

Page 1

Thank you for purchasing a quality VALCO product. Please read and follow the instructions
outlined in this guide carefully. Familiarise yourself with the construction and safety features
and be sure that you understand all the warnings and safety guidelines before use.
Retain this guide in a safe place for future reference.
PRODUCT REFERENCE GUIDE
PRISM STROLLER
valco
baby
© Copyright VE 2007
Due to our policy of continuous product
development, this product is constantly
evolving. It is possible that some features or
procedures outlined here have changed since
this document was written. If you are unsure
of any procedure shown here, please contact
us via the web at info@valco.com.au to obtain
the most up to date information before use.
Include the batch number, which can be
found on a sticker the stroller frame.
All pictures and diagrams herein are provided
for illustration purposes only. Actual product,
colour or fabric may vary. VALCO reserves the
right to modify or alter any specication or
colour without notice or obligation to modify
any product previously purchased
FURTHER INFORMATION
In Australia/New Zealand
www.valco.com.au
www.valco.co.nz
In North America only
www.valcobaby.com
1800 610 7850
Page 2
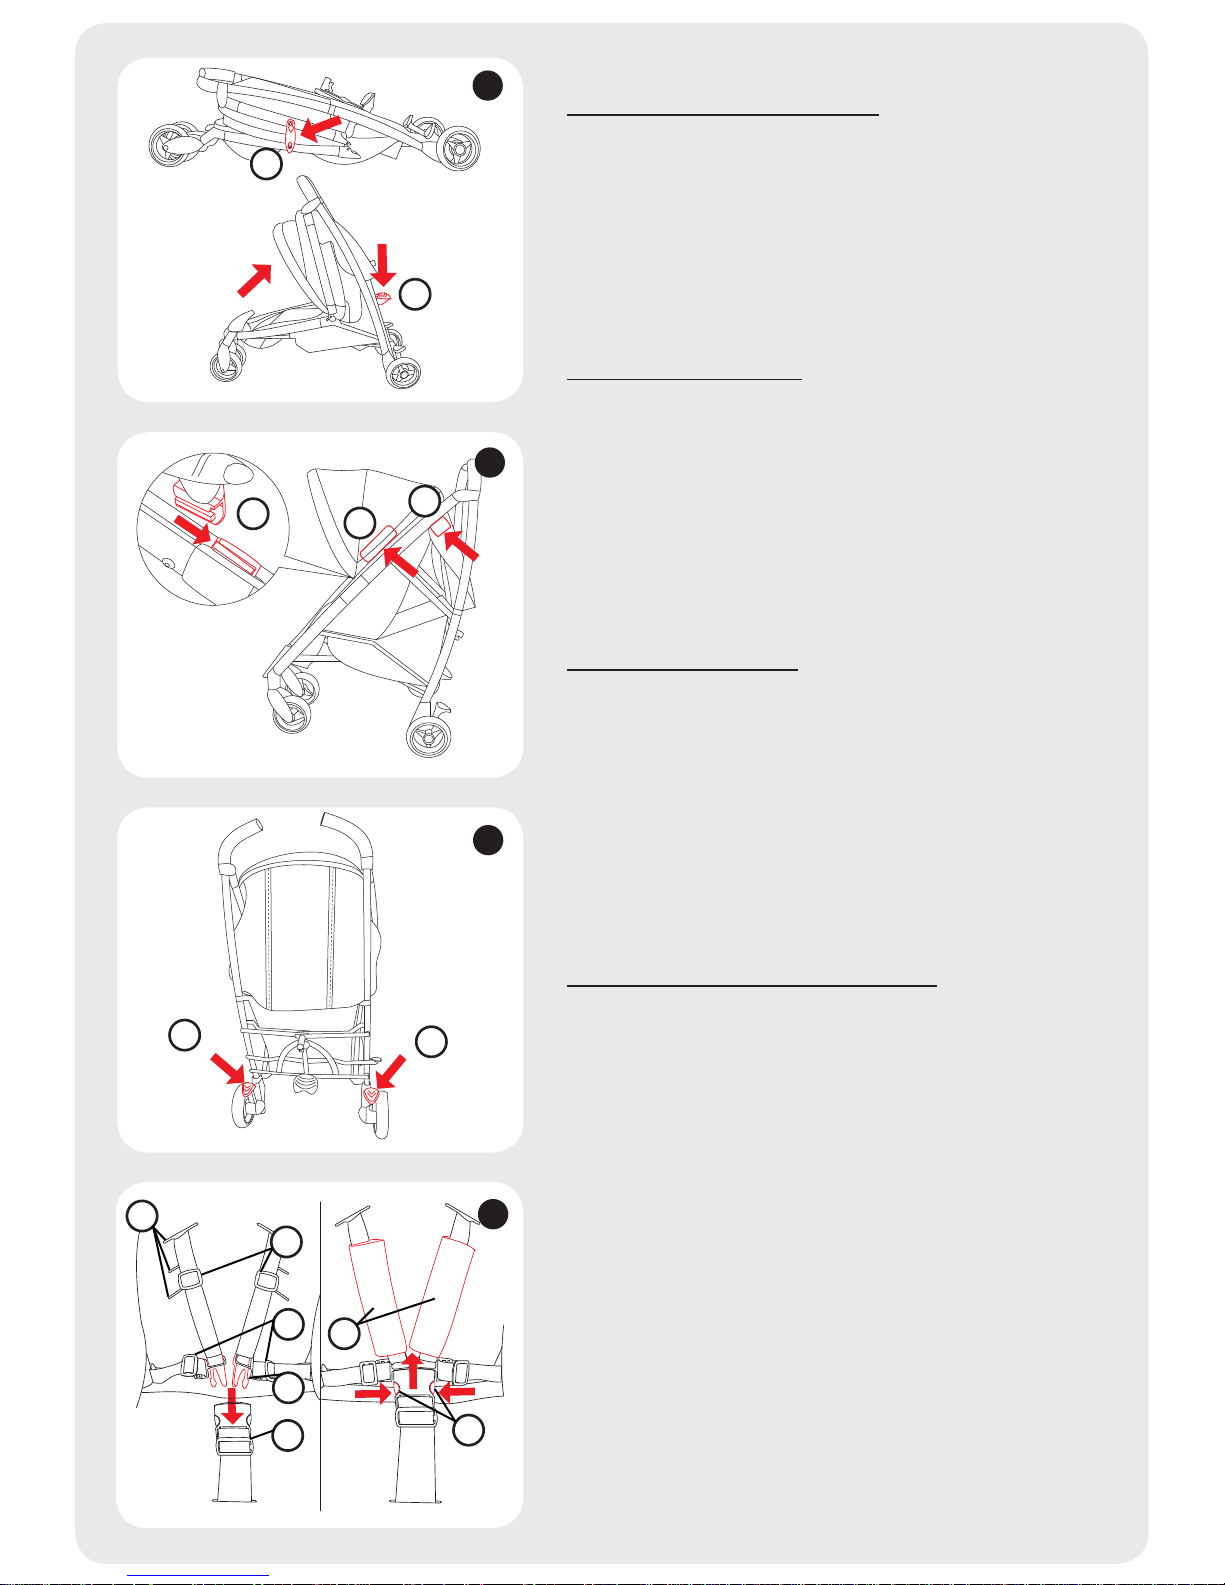
OPENING THE STROLLER
FIGURE A
1. To open the stroller, rst release the catch on the left
hand side (1a) which holds the stroller in the umbrella
position. Holding the stroller by the handles, gently lift
and push down on the primary locking bar (1b) until
fully open. CAUTION: Ensure that all the locking
devices are engaged before use.
FITTING THE HOOD
FIGURE B
2. To t the hood, slide the clips (2) on either side onto
the bracket of the frame and ensure they click rmly
into place.
3. Secure into position using the Velcro strips (3) on
each side of the hood.
4. Complete the tting by securing the Velcro strips on
the back ap of the canopy (4).
USING THE BRAKE
FIGURE C
5. Push down on the brake lever on the right hand side
(5) to engage the brake. It is recommended that you
test the brake before use.
6. Push down on the brake lever on the left hand side
(6) to release the brake. CAUTION: Never leave your
child unattended in the stroller even if the brakes
have been applied. The brakes may not work properly
on a steep incline.
USING THE SAFETY HARNESS
FIGURE D
7. A ve-point harness is provided to secure your child.
Sliding adjusters are tted and should be carefully
adjusted on each side (7a), at the base strap (7b)
and on both shoulder straps (7c) so that the harness
ts your child comfortably.
8. To fasten the harness push the two clips into the
buckle until they click into position (8).
9. To unfasten the harness push the clips in on either
side (9) and remove the two clips from the buckle.
10. To t the harness covers, wrap each one around the
shoulder harness straps and secure using the
Velcro strips (10).
11. There are three slots provided on the backrest to
adjust the height of the shoulder straps (11).
CAUTION: Always use the safety harness.
A
B
C
D
1a
1b
2
3
4
5
6
7a
7b
7c
8
9
10
11
Page 3

FIGURE E
12. The length of the shoulder straps can be adjusted at
the back of the seat. Press down on one red plastic
tab (12a) and rmly pull backwards to lengthen whilst
holding the strap (12b). To shorten hold the edge of
the strap (12c) and pull inwards whilst pressing on
the plastic tab. Repeat for the other side.
ADJUSTING THE BACKREST
13. The backrest can be adjusted to different positions.
Whilst pressing down on the lever located on the
back of the seat with one hand (13a), pull the strap
with the other hand (13b) to raise the backrest to
the desired position.
14. To lower, rmly push down on the lever until the
backrest is lowered to the desired position. Ensure
that the lever is pushed inward after adjusting.
FITTING THE QUICK RELEASE WHEELS
FIGURE F
15. To t the front wheel, simply insert the wheel axle into
the housing until fully engaged. To remove, press the
button above the housing (15) and take the wheel out.
16. To lock the front wheel, when you do not require it to
swivel 360º, ensure the wheel is straight and press
the button upwards (16) until it clicks rmly into
position. To release press the button downwards.
17. To t the rear wheel, simply insert the wheel axle
into the housing until fully engaged. To remove,
press the button beside the brake lever (17) and
take the wheel out.
FOLDING YOUR STROLLER
FIGURE G
18. Before folding, ensure the backrest is in its most
upright position and the hood is fully folded back.
19. To fold the stroller, rst press the secondary locking
button (19a) and pull upwards whilst pushing down
on the right hand side lock (19b).
20. Continue to lift the secondary locking button (19a)
and gently push the handles forward (20a) until the
stroller is completely folded. Use the catch to lock the
stroller in the umbrella position (20b).
FITTING THE BASKET
FIGURE H
21. To t the basket, wrap the basket straps
around the frame tubes where shown (21a, 21b) and
secure using the press studs. Repeat for the other side.
E
F
G
H
12a
12b
12c
13a
13b
15
16
20a
20b
21a
17
21b
19a
19b
Page 4

WARNINGS
Your child’s safety is your responsibility ………
• Be sure to check that all hinges, clamps and buckles are securely xed and in place before use.
• Check all parts for breakage or fatigue before use. Discontinue immediately if any part is found to
be damaged or broken.
• The maximum weight of the child for which this stroller is intended is 15 kg’s (33 lbs).
• Exceeding the recommended load may cause this unit to become unstable.
• Care MUST be taken when folding the stroller to prevent nger entrapments.
• This product can be used for a newborn baby onwards.
• NEVER jog with a newborn baby in any pram or stroller. This stroller is not suitable to be used when
running or roller blading.
• ALWAYS ensure that the child is clear of all moving parts when adjusting the stroller.
• If your child is in the seat, ensure that the child is properly supported before adjusting the backrest.
• ALWAYS engage the brake system when the stroller is at rest.
• NEVER leave any child unattended in the stroller.
• NEVER use on escalators or stairs.
• When in the stroller the child must ALWAYS wear the safety harness, correctly tted and adjusted,
at all times.
• DO NOT hang shopping bags from the handle as this may affect the stroller’s stability.
• Always use the basket provided. The maximum weight in the basket is 2 kg’s (4.4 lbs).
• Do not carry additional children in the stroller. It may be unsafe to use any accessories other than
VALCO approved ones.
• NEVER allow the stroller to be used as a toy.
• NEVER allow your child to stand up in the stroller.
• Although the chassis is strong, it will be weakened when descending steps/curbs with the back wheels only.
• ALWAYS be aware of the risks provided by re and other signicant sources of heat such as radiators etc.
which may be in the immediate vicinity of your stroller.
• This product is intended for domestic use only. It is not intended for commercial use.
CARE & MAINTENANCE
• Clean the frame using a mild detergent and a damp cloth. Dry thoroughly afterwards. Do not use abrasives.
• Gently wipe the hood and seat with a clean damp cloth. Dry thoroughly after cleaning in the shade or in a
well ventilated area until dry.
• Never leave the stroller directly exposed to sunlight for long periods of time as fabric and plastic parts may
become damaged.
• Moving parts may be lubricated with WD-40 or another silicon coating product. DO NOT USE OIL OR GREASE
BASED PRODUCTS. Regular lubrication lengthens the life of the stroller.
• Replace any broken or damaged parts IMMEDIATELY with approved parts only. DO NOT USE the stroller until
it has been repaired.
• When using the stroller in sandy areas, clean thoroughly after use to remove sand and/or salt from the
wheel mechanisms.
In Australia/New Zealand
www.valco.com.au
www.valco.co.nz
In North America only
www.valcobaby.com
1 800 610 7850
valco
baby
 Loading...