

Page 1
valco
baby
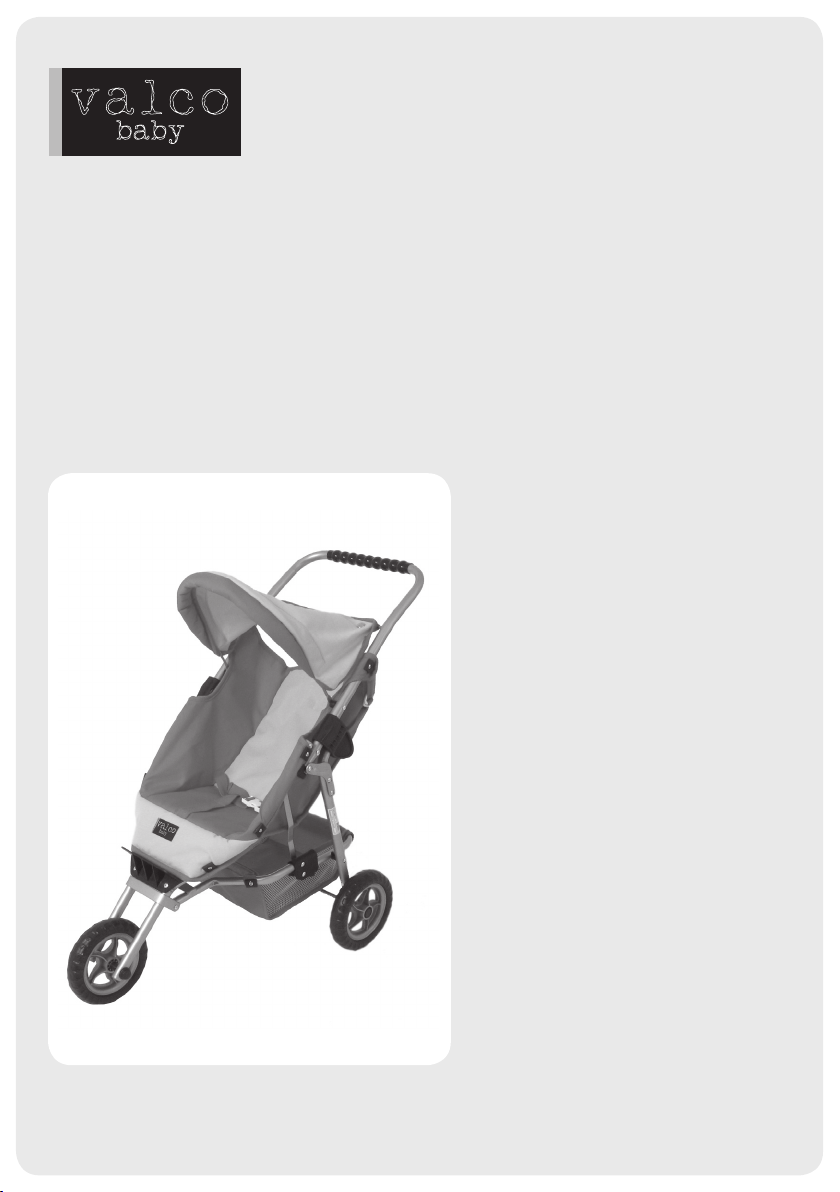
MINI MARATHON
STROLLER
PRODUCT REFERENCE GUIDE
Thank you for purchasing a quality VALCO product. Please read and follow the instructions
outlined in this guide carefully. Familiarise yourself with the construction and safety features
and be sure that you understand all the warnings and safety guidelines before use.
Retain this guide in a safe place for future reference.
Due to our policy of continuous product
development, this product is constantly
evolving. It is possible that some features or
procedures outlined here have changed since
this document was written. If you are unsure
of any procedure shown here, please contact
us via the web at info@valco.com.au to obtain
the most up to date information before use.
Include the batch number, which can be
found on a sticker the stroller frame.
Complies with Australian Standard
AS/NZS ISO 1824.1:2002
© Copyright VE 2008
All pictures and diagrams herein are provided
for illustration purposes only. Actual product,
colour or fabric may vary. VALCO reserves the
right to modify or alter any specication or
colour without notice or obligation to modify
any product previously purchased
FURTHER INFORMATION
In Australia/New Zealand
www.valco.com.au
www.valco.co.nz
In North America only
www.valcobaby.com
1800 610 7850
SUITabLE FOR ChILDREN 3 yEaRS aND UP
Page 2
A
&RONT&ORK4UBES
&RONT7HEEL
!
!
"
"
# #
$
2EAR4UBE
2EAR7HEEL
!
"
PARTS ENCLOSED:
2 X Rear Wheels (as labelled in package)
1 x Front Wheel (as labelled in package)
A - 5pcs round plastic caps (1 unit as spare)
B - 5pcs star plastic ttings (1 unit as spare)
C - 3 pcs plastic spacers (1 unit as spare)
D - 1 x Steel Axle
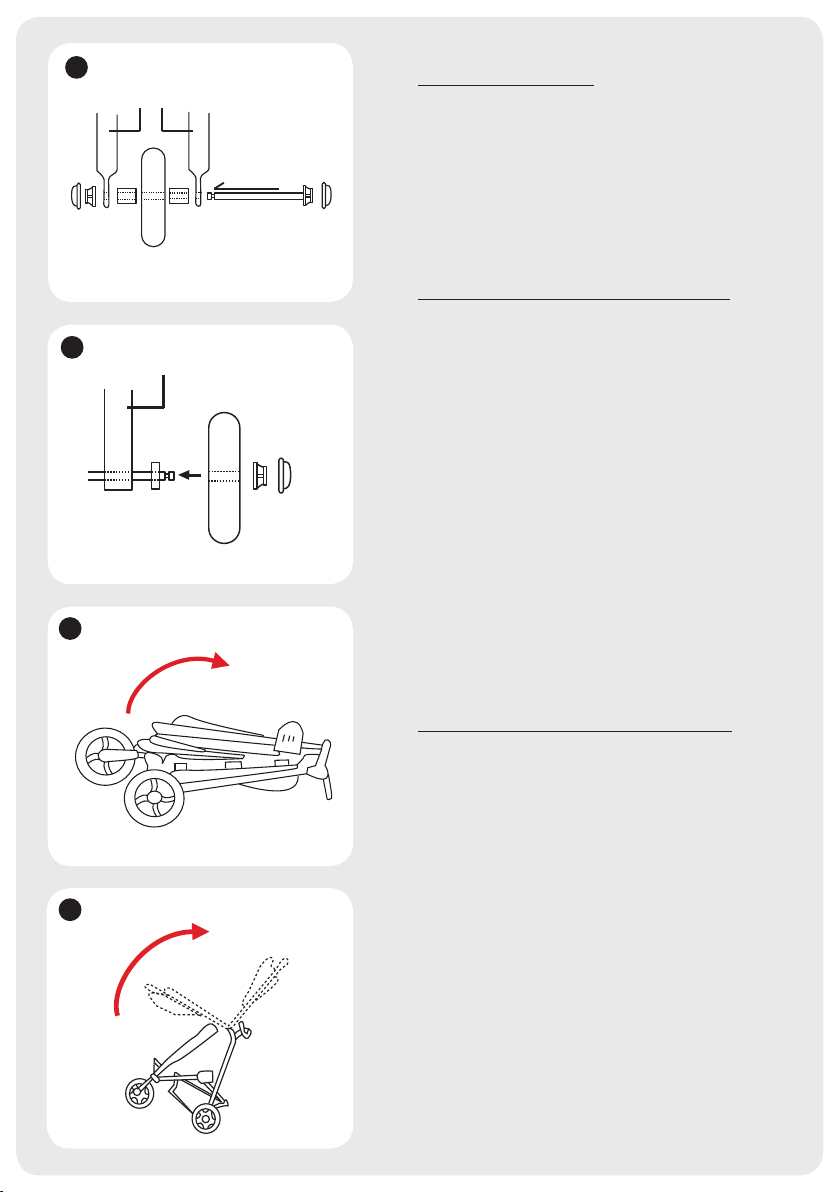
ASSEMBLING THE FRONT WHEEL
B
FIGURE A
1. Fasten a star plastic tting (B) to one
end of the steel axle (D).
2. Slide the steel axle (D) through in the
following order as shown in illustration:
one side of the chassis front fork tube,
a plastic spacer (C), the front wheel,
the second plastic spacer (C), the other
front tube, and fasten with another star
plastic tting (B).
C
3. Lastly fasten both ends with round
plastic caps (A).
ASSEMBLING THE REAR WHEELS
FIGURE B
4. Insert the rear wheel into the rear axle.
5. Fasten the axle end with a star plastic
tting (B).
D
6. Fasten end with round plastic cap (A).
7. Repeat procedure for the other side.
Page 3

E
OPENING YOUR DOLL STROLLER
FIGURE C
8. Unfold the dolls pram by pulling the
handle bar upwards.
FIGURE D
9. Continue pulling the handle bar
outwards as far as it can to fully
F
unfold the chassis.
FIGURE E
10.Secure the chassis by swinging
inwards the nylon ap found on one
side of the chassis.
FOLDING YOUR DOLL STROLLER
11.To fold the doll stroller swing the
nylon ap outwards.
G
FIGURE F
12.Lift the spring loaded lock upwards
located on the other side of the
chassis.
FIGURE G
13.Fold the hood towards the handle
bar.
H
14.Lastly push the handle bar
frontwards and downwards to fully
fold it.
Page 4

WARNINGS
valco
baby
Your child’s safety is your responsibility ………
• Be sure to check that all hinges, clamps and buckles are securely xed and in
place before use.
• Check all parts for breakage or fatigue before use. Discontinue immediately if any
part is found to be damaged or broken.
• Do not leave a child unsupervised with this doll stroller.
• Do not allow a child to climb into the doll stroller.
• Do not place bags or other heavy items in or on the doll stroller.
• This doll stroller is not for carrying children.
• Safe load is a maximum of 5 kg.
• We assume no responsibility where the purchaser tampers with product design
and functions.
• ALWAYS be aware of the risks provided by re and other signicant sources of heat
such as radiators etc. which may be in the immediate vicinity of your stroller.
• This product is intended for domestic use only. It is not intended for commercial use.
• This product is suitable for children 3 years and up.
CARE & MAINTENANCE
• Clean the frame using a mild detergent and a damp cloth. Dry thoroughly afterwards.
Do not use abrasives.
• Gently wipe the hood and seat with a clean damp cloth. Dry thoroughly after cleaning
in the shade or in a well ventilated area until dry.
• Never leave the stroller directly exposed to sunlight for long periods of time as fabric
and plastic parts may become damaged and/or discoloured.
• Moving parts may be lubricated with WD-40 or another silicon coating product. DO
NOT USE OIL OR GREASE BASED PRODUCTS. Regular lubrication lengthens the life of
the doll stroller.
• Replace any broken or damaged parts IMMEDIATELY with approved parts only. DO
NOT USE the doll stroller until it has been repaired.
• When using the stroller in sandy areas, clean thoroughly after use to remove sand
and/or salt from the wheel mechanisms.
In Australia/New Zealand
www.valco.com.au
www.valco.co.nz
In North America only
www.valcobaby.com
1 800 610 7850
 Loading...