

Page 1

Please read and follow the instructions outlin ed in this guide carefully. Retain this guide in a safe place for
future reference!
All pictures and diagrams herein are provided for illustration purposes only . Actual product, colour or fabric
may vary. VALCO reserves the right to modify or alter any specification or colour without notice or obligation
to modify any product previously purchased.
Visit us on the web at www.valco.com.au
i
Page 2
Thank you for purchasing a quality VALCO product. Due to our policy of continuous product
development, this product is constantly evolving. It is possible that some features or
procedures outlined here have changed since this document was written. If you unsure of
any procedure shown here please contact your local store or VALCO direct via the web at
info@valco.com.au to obtain the most up to date information before use.
Before assembling this product, please read the instructions carefully.
Familiarize yourself with the product construction and safety warnings; be
sure that you understand all the warnings and safety guidelines before use.
Your VALCO hitchhiker is designed to fit on many different types, makes and brands of
prams and stroller. While every effort has been made to cover all the different possibilities,
there may be some units that are not compatible with this product.
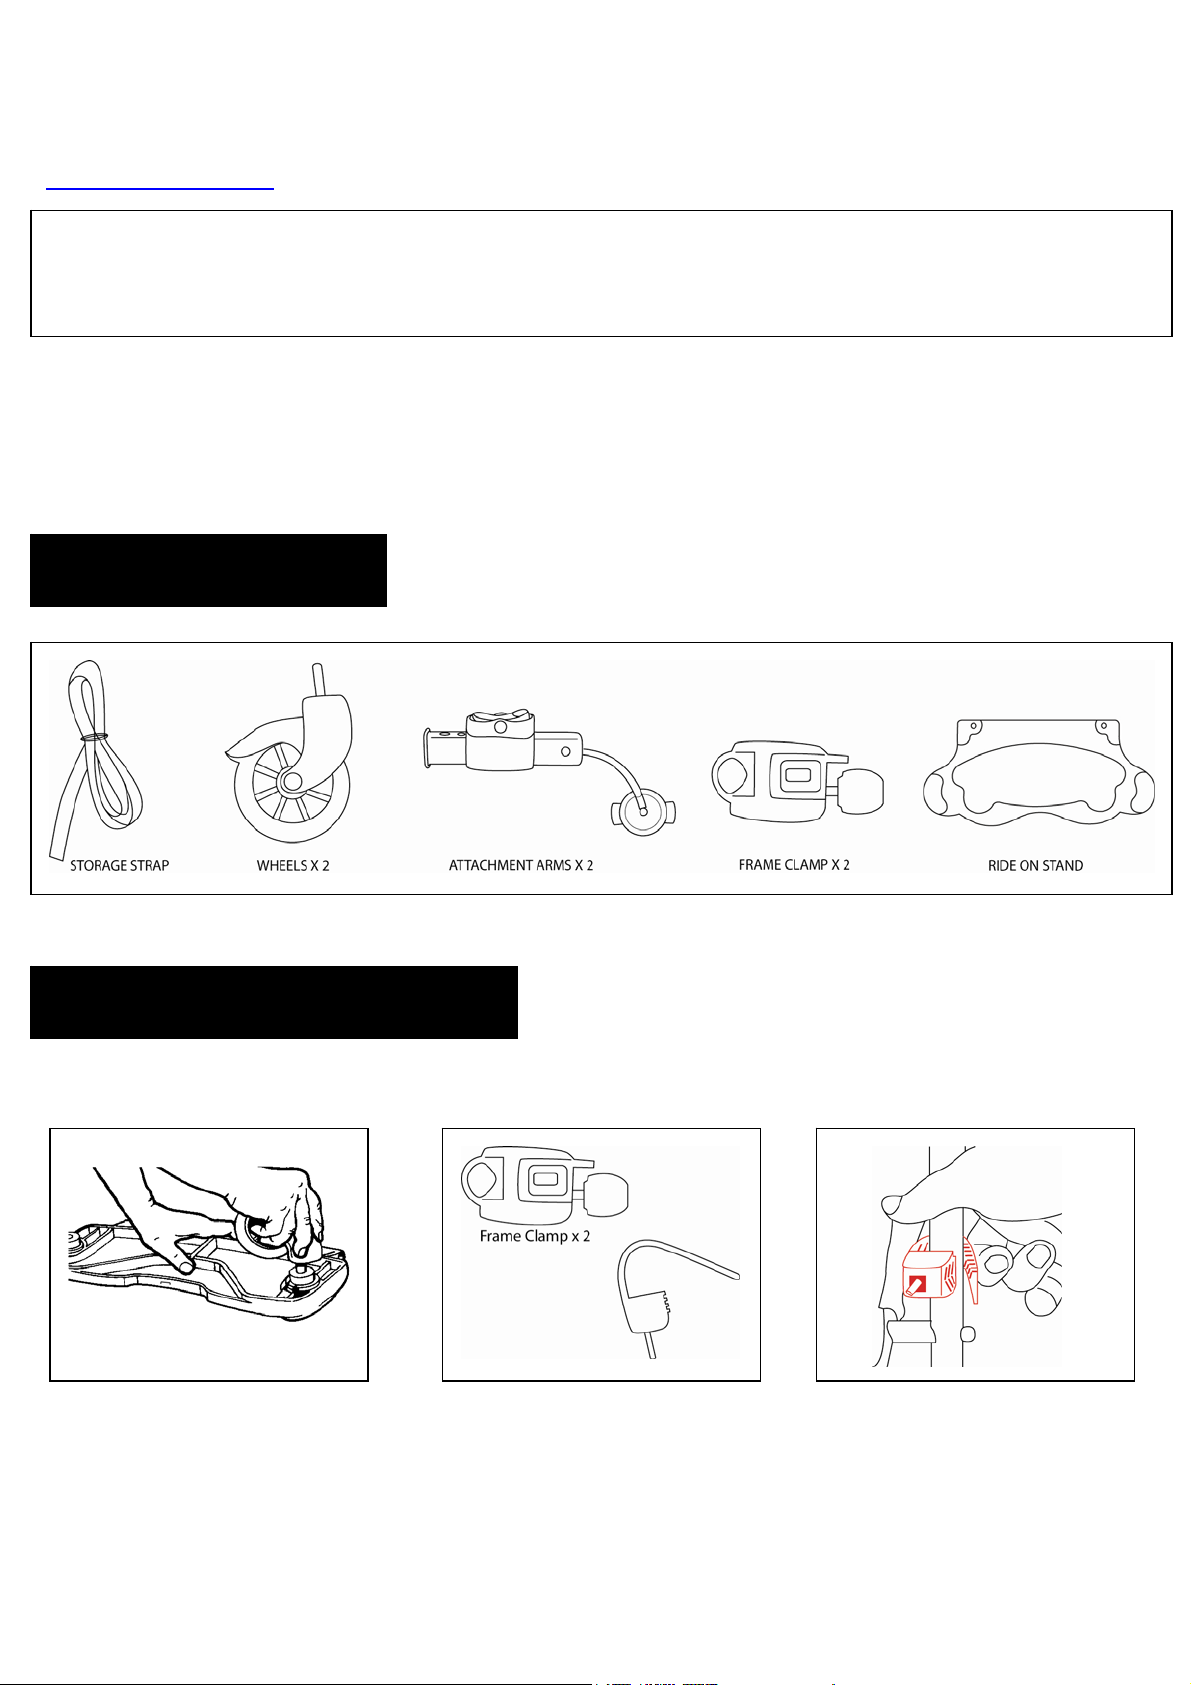
Carton Contents
Assembly and Installation
1. Insert the front swivel wheel into
the housing on the front leg.
2. Firmly press the pin into the
housing until it locks into place.
3. Repeat for the other wheel.
1. Remove the fastening strap
from the frame clamp unit by
turning the screw anticlockwise until it is released
from the lock core.
2. Pull the fastening strap from
the frame clamp unit.
3. Identify the upright leg tubes to
which you will attach the
Hitchhiker Stand.
4. Wrap the fastening strap around
the tube at a height which is
reachable by the fastening arms.
(You will notice that the strap
conforms to the size/shape of
the tube).
5. Lock the flexible tube strap in
the ridges of the screw housing.
Page 3

8. Holding the strap firmly locked
into the housing, slide the
frame clamp over the strap
until the strap exits through
the side slot and the thread
through the exit hole.
11. Insert each of the arms into
the board channel on either
side.
14. Ensure that the board is as
parallel as possible to the
ground by turning the arm
adjusters. To do this,
simultaneously press the
buttons and turn the board
until it is horizontal to the
ground.
6. Secure with the knob and
tighten.
7. Repeat this procedure for the
opposite side.
12. Move the board left or right
until it sits centred behind the
stroller. Lock the position by
tightening the two screws on
the underside of the board.
15. Attach the arms to the
stroller by placing the
securing rivet over the channel
in the frame clamp.
16. Pull the spring loaded cover
back to open the channel.
17. Insert the securing rivet firmly
into the channel and release
the cover.
18. Repeat for the other side.
9. If you need to turn the length
adjuster so the rocker switch
is on the top, press down on
the rocker switch and pull the
adjuster all the way back
toward you.
10. Turn it over and press down on
the rocker switch to re-insert
on the arm housing.
13. Lock the position by tightening
the two screws on the
underside of the board.
19. Adjust the distance of the
board from the stroller by
depressing the rocker switch
and moving the arms in the
desired direction.
Page 4

Examples of the Hitchhiker on different
product types
20. Attach the strap to your
stroller handle by looping it over
the bar and securing by
threading it through the sewn
21. You can conveniently “fold” your
22. Adjust the strap length using
23. To release, press the buckle
loop.
hitchhiker out of the way by
lifting it and securing it to the
strap by inserting the strap
buckle through the slot in the
board.
the slider buckle. Ensure the
strap is tight, lifting the entire
unit as much “out of the way” as
possible.
tongue on the underside of the
stand, ease the buckle out of
the board and gently lower the
unit to the ground.
WARNINGS
Your child’s safety is your responsibility ………
Be sure that all clamps and buckles are securely fixed into place before use.
Moving parts may be lubricated with silicone spray – DO NOT USE OIL.
The maximum weight of the child for which this product is intended is up to 30 kg’s.
AXLES ARE BEST LUBRICATED WITH GREASE OR PETROLEUM JELLY. MOV ING PARTS ARE
BEST LUBRICATED WITH SILICONE BASED PRODUCTS. DO NOT USE OIL BASED
Recommended from approximately 2 years plus.
Your child’s feet should be completely standing on the dimpled/non slip part of the
HITCHHIKER RIDE ON STAND.
Your child should never be left unattended while on the HITCHHIKER RIDE ON STAND.
Your children should never be left unattended. Children in the stroller must always wear a
safety harness, correctly fitted and adjusted, at all times.
Always keep your hand on the pram handle when your child is using the HITCHHIKER RI DE
ON STAND.
The parking brake of your pram or stroller should not be used while a child is on the
HITCHHIKER RIDE ON STAND.
Check all parts before use for breakage or fatigue. Discontinue use immediately if any part is
found to be damaged or broken.
Do not carry additional children.
Make sure that any part of the child’s body is clear of all moving parts before making any
adjustments.
Your VALCO product is intended for domestic use only. It is not intended for commercial use.
Never carry your HITCHHIKER RIDE ON STAND with a child on it.
This product is intended for domestic use only. It is not intended for commercial use.
© Copyright VE 2004
www.valco.com.au
In Australia/NZ
www.valcobaby.com
 Loading...