

Page 1

PRODUCT REFERENCE GUIDE
© Copyright VE 2011
vs300311
Due to our policy of continuous product
development, this product is constantly
evolving. It is possible that some features or
procedures outlined here have changed since
this document was written. If you are unsure
of any procedure shown here, please contact
us via the web at info@valco.com.au to obtain
the most up to date information before use.
Include the batch number, which can be found
on a sticker on the frame.
All pictures and diagrams herein are provided
for illustration purposes only.
Actual product, colour or fabric may vary.
VALCO BABY reserves the right to modify or
alter any specication or colour without notice
or obligation to modify any product previously
purchased
EVO2 for 2
Twin Stroller
FURTHER INFORMATION
In Australia/New Zealand
www.valco.com.au
In North America only
www.valcobaby.com
1800 610 7850
Thank you for purchasing a quality VALCO BABY product. Please read and follow the instructions outlined in
this guide carefully. Familiarise yourself with the construction and safety features; be sure that you understand
all the warnings and safety guidelines before use.
Important: Please read the following instructions carefully before assembling this product.
Retain this guide in a safe place for future reference.
Page 2
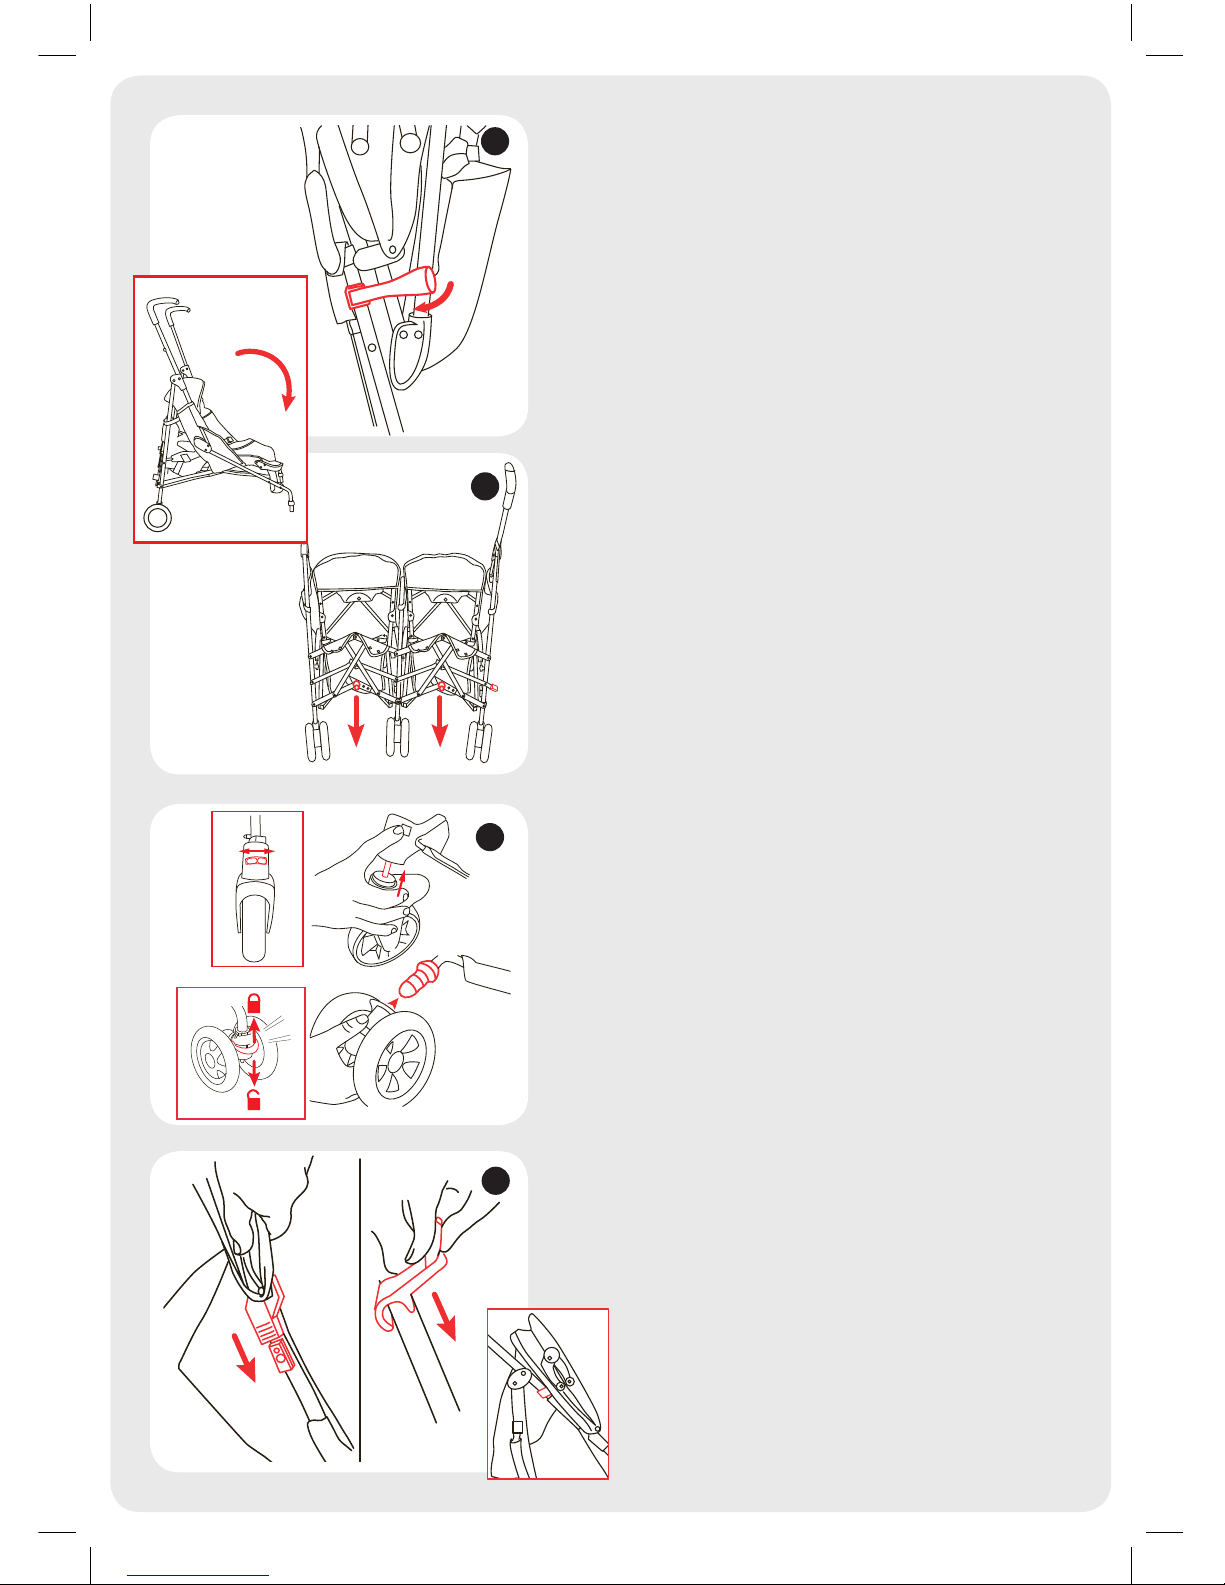
stroller AsseMBlY/oPeNING
FIGURE A - ASSEMBLING YOUR STROLLER
1. Remove the carton contents carefully. Dispose of any
packaging materials thoughtfully.
2. Release the stroller from the locked position by lifting the
locking hinge from over the locking rivet on the stroller
frame. HINT: You may need to squeeze the stroller legs
and handles closer together rst so as to release the
tension on the rivet.
FIGURE B - ASSEMBLING YOUR STROLLER
3. Standing behind the stroller and holding it by the
handles, allow the wheels to fall forward.
4. With your foot, press down on both primary locking
hinges until the entire frame locks into the open position.
IMPortANt WArNING: AlWAYs test tHAt All lAtCHes Are
seCUrelY eNGAGeD BeFore Use.
FIGURE C - CONNECTING THE FRONT WHEELS
Note: tHe reAr WHeels CoMe AttACHeD to YoUr stroller AND
reQUIre No AsseMBlY
5. Single Front Side Wheels: Insert the front swivel wheel
pin into the housing on the front leg and push upward
until you feel it lock into place. Repeat for the other
wheel.
6. To x the front wheels in the non swivel position, slide
the latch on the front of the each wheel housing to the
outside and turn the wheel until it locks into place.
7. To unlock, slide the latch on the front of each wheel
housing to the inside.
8. Double Front Centre Wheel: Insert the centre front
swivel wheel over the housing on the front leg and push
upward until you feel it lock into place. Be sure to insert
wheel (underneath the pram), in the direction of the
arrrow, with the lock at the top.
9. To x the front wheels in the non swivel position, turn the
wheel so that the two notches on both housings line up.
10. Lift the swivel lock until it locks into place. To unlock,
press down rmly on the red swivel lock to release.
FIGURE D - ATTACHING THE HOOD
11. Slide the hood xture into the corresponding housing
on the sides of the stroller frame
11. Snap the center hood connector to the centre bar of the
stroller frame.
12. Secure the rear of each hood to the frame by wrapping
and securing the Velcro strap around the frame.
13. Repeat for the other side.
14. Arrange the rear hood skirt beneath and around
each seat back and secure the snaps to the
corresponding snaps found on the back of each
seat.
A
B
C
D
FRONT
SIDE
WHEELS
FRONT
CENTRE
WHEEL
CLICK
HOOD
SIDES
HOOD
CENTRE
VELCRO
ATTACH
Page 3

FIGURE E - FOLDING YOUR STROLLER
15. Lift the primary safety lock (a) with your foot or hand.
16. Press down on the secondary lock (b) with your foot.
17. Simultaneously push the handles all the way down to meet the
wheels (or bring the wheels up to the handles).
18. When pushed down fully, the frame lock should automatically
engage.
FIGURE F - USING YOUR BRAKES
19. To activate the brake press down on each brake lever until it
engages in the brake cog on the wheel.
20. To release, lift each brake lever in turn.
WARNING: ALWAYS ENGAGE BOTH WHEEL BRAKES WHEN THE STROLLER
IS AT REST.
FIGURE G - ADJUSTING YOUR SEAT
21.To raise the seat, gently lift the seat forward into the desired
position.
22. To recline the seat, simultaneously lift both seat recline levers
and ease the seat back to the desired position.
ALWAYS TEST THAT THE SEAT IS SECURELY FIXED IN POSITION BEFORE USE.
FIGURE G - ADJUSTING YOUR FOOTREST
23. To adjust your footrest downward, press on each adjuster in
turn while simultaneously pressing down lightly on the footrest.
FOR SAFETY, YOUR FOOTREST IS DESIGNED TO COLLAPSE IF EXCESS
WEIGHT IS APPLIED TO IT.
FIGURE O - USING YOUR HARNESS
YOUR STROLLER IS FITTED WITH OUR UNIqUE mULTI POINT SAFETY
HARNESS SYSTEm. ALWAYS USE THE HARNESS, CORRECTLY FITTED AND
ADjUSTED, WITH YOUR CHILD IN THIS SEAT
TO SECURE YOUR CHILD IN THE HARNESS:
FIGURE I
24. Slide the shoulder strap buckle (1) into the housing of the waist
strap buckle (2), forming a complete buckle
25. Repeat for the opposite side.
26. Insert the completed buckle (3) in the buckle housing (4) until it
engages securely in place.
27. Repeat for the opposite side.
28. Carefully adjust the harness straps to snugly t your child by
adjusting the Sliders located on all Shoulder Straps, Waist Straps
and the Crotch Strap (5).
Your harness can be adjusted for even more comfort for smaller or
larger children by threading the harness webbing through the
adjusting ‘sliders’ in either direction, you can change the length
of the webbing thus making them tighter or looser over your
child’s torso.
The harness should be snugly tted to the baby’s body, tight enough
so that the baby cannot wriggle itself free of the straps but loose
enough so as not to cause the baby any discomfort.
TO OPEN YOUR HARNESS
29. Press down rmly on the button in the center of the buckle
housing (4). The waist and shoulder strap sections will spring
free of the buckle housing.
30. If they do not automatically release, slide the shoulder strap
buckles (1) free from the waist strap sections. This is to ensure
that they do not form a potential entrapment area.
31. Your harness will separate into 5 sections
ImPORTANT WARNING: WHEN NOT IN USE DISCONNECT SHOULDER STRAPS
FROm THE WAIST STRAP AND/OR BUCKLE.
F
I
G
H
1
5
2
3
4
E
Page 4

In Australia/New Zealand
www.valco.com.au
In North America only
www.valcobaby.com
1 800 610 7850
WArNING: to AvoID INjUrY or DeAtH
• always apply the brakes whenever the pram/stroller is stationary
• Do not leave ChilDren UnattenDeD.
• seCUre the ChilD in the harness at all times.
• Do not Carry eXtra ChilDren or baGs on this pram/stroller.
• make sUre ChilDren are Clear oF any movinG parts iF yoU aDJUst the pram/stroller. otherwise
THEY mAY BE INjURED.
• warninG: Use this harness at all times.
• warninG: when not in Use DisConneCt shoUlDer straps From the waist strap anD/or bUCkle.
• Follow the manUFaCtUrer’s instrUCtions.
Remember, your child’s safety is your responsibility...
• Never Use oN stAIrs or esCAlAtors.
• AlwAys use the tether strAp when the stroller is in use.
• the CorreCt use AnD MAintenAnCe oF this VehiCle Are essentiAl.
• Be sure thAt All ClAMps AnD BuCkles Are seCurely FixeD AnD in plACe BeFore use
• when in the stroller, ChilDren Must AlwAys weAr the sAFety hArness, CorreCtly FitteD AnD ADjusteD,
At All tIMes.
• AlwAys use the hArness, CorreCtly FitteD AnD ADjusteD, with your ChilD in this seAt.
• the MAxiMuM weight liMit oF eACh seAt is 15 kgs
• the MAxiMuM height oF ChilD For whiCh this stroller wAs intenDeD is 90CM (35inChes).
• the stroller will BeCoMe unstABle iF the MAnuFAturer’s reCoMMenDeD loAD is exCeeDeD.
• CAre Must Be tAken when FolDing AnD unFolDing the proDuCt to preVent Finger entrApMent.
• CAn Be useD FroM A newBorn BABy onwArDs. A CoCoon, speCiAlly DesigneD to Be useD with A
stroller, is reCoMMenDeD when Any Fully reClining stroller is useD with A newBorn.
• neVer run with A newBorn BABy in Any prAM or stroller until the ChilD CAn sit up unAssisteD
(ApproxiMAtely 6 Months).
• CheCk All pArts BeFore use For BreAkAge or FAtigue. DisContinue use iMMeDiAtely iF Any pArt is FounD
to Be DAMAgeD or Broken.
• MAxiMuM loAD oF BAskets: 3.5kgs.
• Do not CArry ADDitionAl ChilDren. tHIs stroller Is MANUFACtUreD For tHe Use WItH tWo CHIlDreN oNlY
• AlwAys Be AwAre oF the risks proViDeD By Fire AnD other signiFiCAnt sourCes oF heAt suCh As
rADiAtors, etC. whiCh MAy Be in the iMMeDiAte ViCinity oF your stroller.
• it MAy Be unsAFe to use Any ACCessories other thAn VAlCo BABy ApproVeD ones.
• this proDuCt is intenDeD For DoMestiC use only. it is not intenDeD For CoMMerCiAl use.
Should the chassis become wet, dry off promptly before storing. If this pram is used near the ocean
or salted roads, spray the chassis and seat frame with water and dry. We recommend a rust inhibiting
product should be used to prevent rust and fatigue on metal parts.
We recommend that you wipe down axles and lubricate the wheels every 3 months. Sand and dirt can
grind down axles, if you live near the beach or in a dusty environment you must wipe down the axles and
wheels then lubricate them monthly.
AXLES ARE BEST LUBRICATED WITH GREASE OR PETROLEUM JELLY. MOVING PARTS ARE BEST
LUBRICATED WITH SILICONE BASED PRODUCTS. DO NOT USE OIL BASED PRODUCTS.
 Loading...