

Page 1
PRODUCT REFERENCE GUIDE
valco
baby
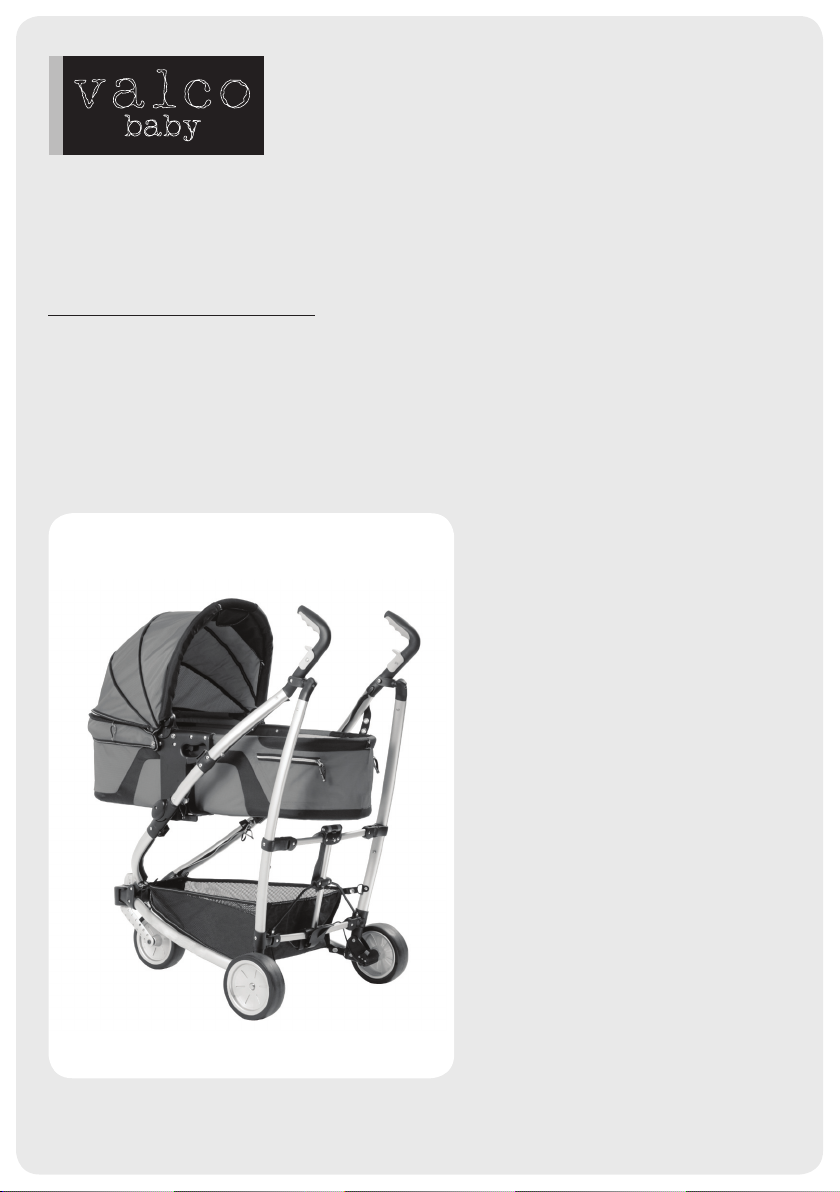
BUGGSTER BASSINET
Thank you for purchasing a quality VALCO product. Please read and follow the instructions outlined in this
guide carefully. Familiarise yourself with the construction and safety features; be sure that you understand all
the warnings and safety guidelines before use.
Retain this guide in a safe place for future reference.
Due to our policy of continuous product
development, this product is constantly
evolving. It is possible that some features
or procedures outlined here have changed
since this document was written. If you are
unsure of any procedure shown here, please
contact us via the web at info@valco.com.
au to obtain the most up to date information
before use. Include the batch number, which
can be found on a sticker on the frame.
All pictures and diagrams herein are provided
for illustration purposes only. Actual product,
colour or fabric may vary. VALCO reserves the
right to modify or alter any specication or
colour without notice or obligation to modify
any product previously purchased
© Copyright VE 2007
FURTHER INFORMATION
In Australia/New Zealand
www.valco.com.au
www.valco.co.nz
In North America only
www.valcobaby.com
1800 610 7850
Page 2
A
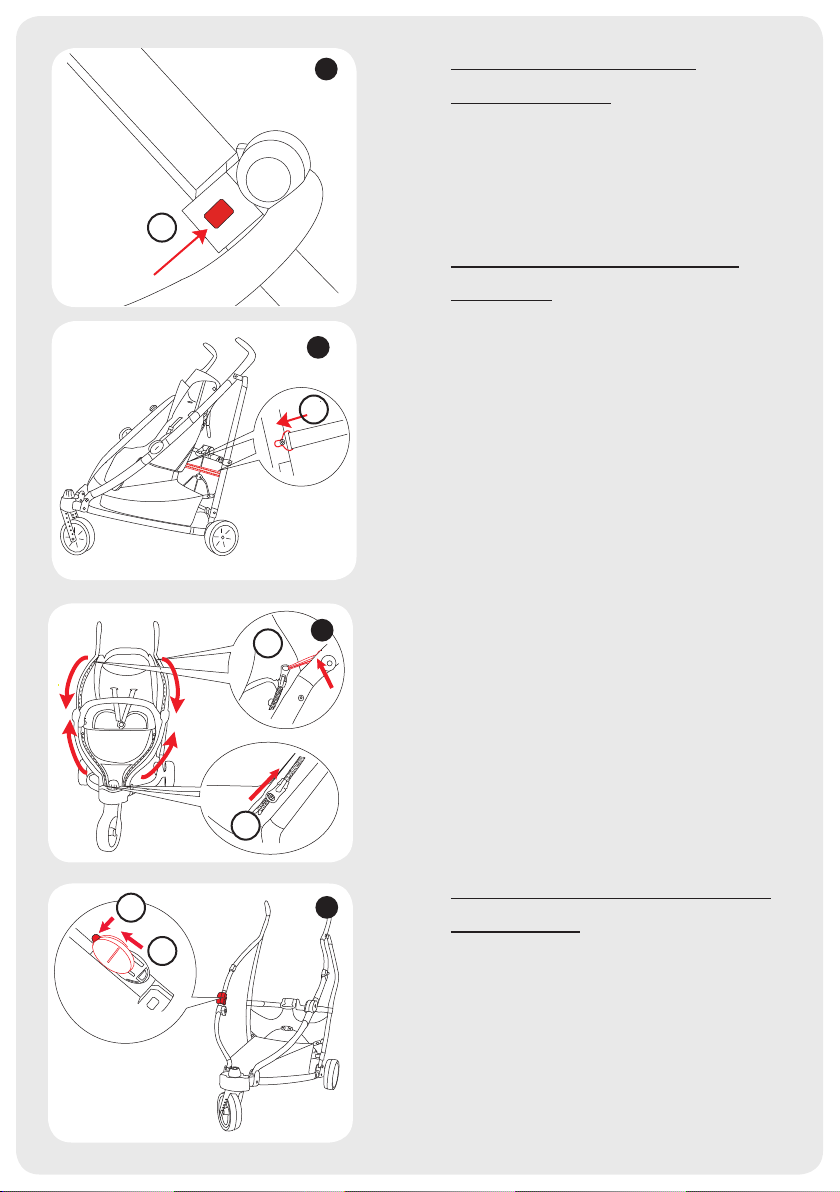
REMOVE THE FRONT
BUMPER BAR
FIGURE A
1. Press the locking button on the inside of
the bumper bar housing (1) and lift it out.
Repeat for the other side.
1
REMOVE THE STROLLER
FABRICS
B
2
C
3
4
5
D
FIGURE B
1. Disconnect the seat tethers at the rear of
the seat from the frame by pushing rmly
on the long side of the clip, forcing the
rivet head through the narrow channel (2).
Repeat for the other strap.
FIGURE C
1. Open each of the four aps which cover
the zippers located along the inside length
of the stroller frame.
2. Lift the elastic ends of the zippers off
the securing rivet heads (3). HINT: Note
the location of each of these rivet heads
for when you will re-install your stroller
fabrics.
3. Unzip the fabrics (3) & (4) from the
stroller frame.
4. Slide the bottom of the fabrics from the
slot in the housing in the rear of the front
wheel swivel system.
BE SURE TO WRAP YOUR FABRICS AND STORE
THEM IN A COOL DRY PLACE.
INSTALLING THE BASSINET
ADAPTORS
6
FIGURE D
1. Pull the locking lever inward (5) and slide
the hinge cover (6) upward, toward you.
Repeat for the other side. Store in a safe
place as you will need to replace them
when you reinstall your stroller fabrics.
Page 3

FIGURE E
E
7
F
8
1. Aligning the tracks at the rear of the
bassinet adaptor with those in the
uncovered hinge, slide the adaptor (7)
downward onto the hinge, until you feel it
secure in place. Repeat for the other side.
FIGURE F
1. Place the adaptor extension over the
bassinet adaptor (8) making sure that
the locking button (9) catches in the
adaptor hole. Repeat for the other side.
Ensure adaptors are locked rmly into
position. IMPORTANT: You may nd these
extensions stored in the housings on each
side of the bassinet.
INSTALLING /REMOVING
YOUR BASSINET
12
11
10
9
G
H
FIGURE G
1. Standing at the side of the chassis, and
holding the bassinet at both sides by
the plastic hand holds, tilt the bassinet
slightly toward you.
2. Gently slide the bassinet into the chassis,
so that it is facing towards the handles.
Align the plastic housing on the side of the
bassinet (10) over the bassinet adaptor
on the chassis (11) that is closest to you.
3. “Line up” the other side of the bassinet
with the corresponding bassinet adaptor.
4. Press down gently on the bassinet and it
should slide into place.
FIGURE H
1. For greater security you can additionally
secure your bassinet to the frame by
sliding the locking strap “keyhole clip”
over the locking rivet head (12) and
pulling it rmly through the narrow
channel, locking it in place.
2. To remove your bassinet: If the locking
strap is engaged, reverse the procedure
outlined in Figure H No. 1.
3. Holding the bassinet by the plastic grips
at either side, simultaneously press the
two triggers located inside each grip.
4. Gently lift the bassinet from the frame.
Page 4

WARNINGS
valco
baby
Your child’s safety is your responsibility ………
•This carrycot must not be used on a stand.
•Never leave your child unattended.
•Please grip the harness of the carrycot in such a way that you keep the
carrycot balanced and the carrycot with the child remains in the horizontal
position.
•This product is only suitable for a child that cannot sit up on its own or roll
onto its side and cannot support itself on its hands and knees.
•Maximum weight of a child: 9kg.
•Only place the carrycot down on a rm, horizontal and dry surface.
•Do not allow other children to play near the carrycot unattended.
•Do not the carrycot if any parts are broken, torn or missing.
•Only use spare parts or accessories that are supplied or approved by the
manufacturer.
•Be aware of hazards caused by open res and other sources of heat, such as
electrical heaters, gas ames, etc,. if they are in the immediate vicinity of the
carrycot.
•If you are using a mattress in the carrycot, please make sure that the
dimension between the child’s reclining surface and the upper edge of the
carrycot is not less than 17cm.
•Please inspect the handles and the base regularly for wear and damage.
In Australia/New Zealand
www.valco.com.au
www.valco.co.nz
In North America only
www.valcobaby.com
1 800 610 7850
 Loading...