

Page 1

VALCam USB with Flash
Introduction
Thank you for purchasing the VALCam USB, the first
image acquisition system designed specifically for photoID and visual database applications. All camera controls
(pan, tilt, zoom and exposure level) are available from the
mouse or keyboard. Manual positioning of the camera is
eliminated for increased operator efficiency.
In addition to hands off control, the VALCam USB
provides a synchronized photoflash for consistent high
quality image acquisition in any environment. Software
controls are provided for flash intensity and flesh tone
adjustments making the acquisition of top quality images a
snap. High quality captures with perfect skin tones and
exposure can be obtained effortlessly in any environment,
even dark rooms!
Video Associates Labs, Inc.
11525A Stonehollow Dr., Suite 130
Austin, TX 78758
1-800-331-0547
www.VAL.com
Page 2

Features Include:
• Complete USB hardware interface
The only connection to the computer is a USB cable
• Mouse control of pan, tilt, zoom and exposure in
Pan/Tilt/Zoom version. Zoom in/out for the Zoom
version.
• Uses optical pan, tilt, zoom for highest resolution.
• Synchronized photoflash with software control of
flash exposure and flesh tones. Perfect captures even
in dark rooms.
• Hassle free integration of photoflash.
• Includes 32 Bit Twain Driver. Optional Software
Developers Kit available.
• Will work in all major Windows photo ID and
imaging applications.
• High-resolution single chip CCD array (796x494).
• Auto Focus, S-video output.
• Available in both NTSC and PAL video standards.
Quick start instructions for hardware and software installation
are provided. A trouble-shooting guide will help resolve any
installation and operational problems. The Imaging Hints and
Tips section will help the end user achieve high quality
captures.
If technical support is needed please contact:
Video Associates Labs, Inc.
Phone: 800-331-0547
Fax: 512-491-7619
Email:
2
Page 3
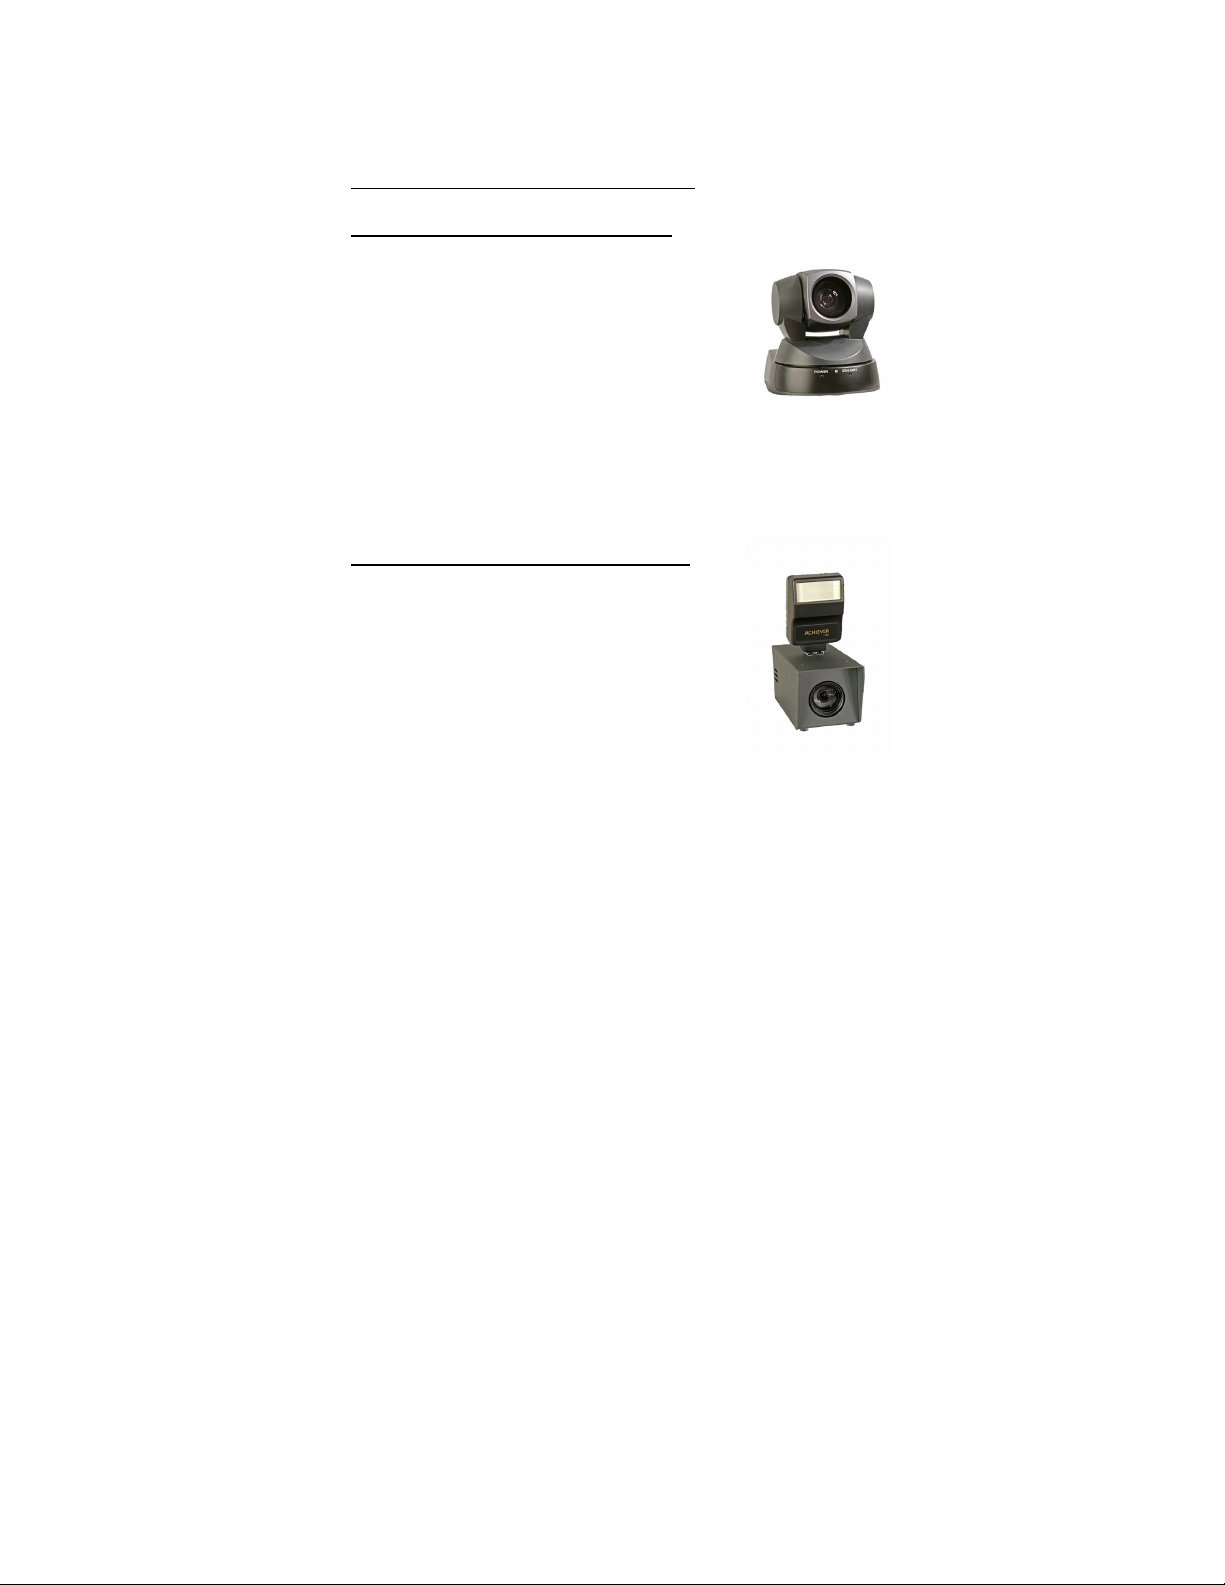
Parts List for available VALCam products:
8000-630 VALCam Pro with Flash
High resolution Pan/Tilt/Zoom Camera
External USB interface box
Multi-cable interconnect
Hi Intensity Photo-Flash
Universal mounting bracket for flash
USB cable
4 Port USB Hub
Brick power supply for USB interface box
Instruction Manual
Installation Disk
8000-628 VALCam Zoom with Flash
High resolution USB Zoom camera
Hi Intensity Photo-Flash
USB cable
4 Port USB Hub
Brick power supply for camera
Instruction Manual
Installation Disk
3
Page 4

Installing the VALCam USB Zoom
1.
Do
not
connect the camera to the computer until after
software installation.
Mount the photo-flash to the hot-shoe connector on top
2.
of the camera.
Connect the flash cable to the matching receptacle on
3.
the back of the camera.
Connect the power adaptor to the matching connector
4.
on the back of the camera. Plug the power adaptor to a
wall socket.
5. Connect the USB cable to the back of the camera.
Do not connect the USB cable to the computer.
Installing the VALCam USB Pan/Tilt/Zoom
1. Do
2.
3. Attach the complete unit to the tripod.
4.
5.
6.
not
connect the camera to the computer until after
software installation.
Attach the flash-mounting bracket to the bottom of the
camera. Use the knob on the bottom of the flash
bracket to secure the attachment.
Attach the photo-flash to the hot-shoe connector on the
flash bracket.
Locate the camera multi-cable.
Connect the
cable to the matching S-Video connector on the
camera. Verify that the connector is properly oriented
and gently insert the connector. Do not force the
connection.
brown
S-video connector on the multi-
4
Page 5

7. Connect the
connector on the camera.
8.
Connect the
yellow
Connect the photo-flash cable to the matching white
9.
connector on the multi-cable.
10.
Connect the 25 pin connector on the multi-connector
to the USB converter box.
Connect the power supply to the USB converter box.
11.
Connect the USB cable to the converter box. Do not
12.
connect the other end of the USB cable to the
computer.
red
Visca connector to the matching
yellow
power connector to the matching
connector on the camera.
Final Installation for Win XP and Win 2000
1. Run
2.
3. Verify that the USB cable from the Zoom camera or
4. The computer will find new hardware and install the
5. The installation process will install 2 devices before
Setup VALCam USB.EXE
installation CD.
Verify that the camera is configured as described
above. Make sure the power supply is connected and
plugged in to a wall outlet.
converter box are attached. Plug the USB cable to your
computer USB port.
device. Answer
during the installation.
the process is completed.
Yes
or
Continue
located on the
if you are queried
red
5
Page 6
6. You can confirm the installation opening Device
Manager and noting the “
listed under “
Imaging Devices
VALCam USB Camera
”
Basic Operation
1. Confirm that the display settings of your computer are
set to 24 or 32 bit color (16 bit is not recommended)
2. Click on
and start the application.
The application will determine if the version of
3.
DirectX
the camera. If the version needs to be upgraded, an
error message will be displayed. The Microsoft
DirectX upgrade is provided on the installation CD. If
necessary run the DirectX upgrade and restart the
camera application.
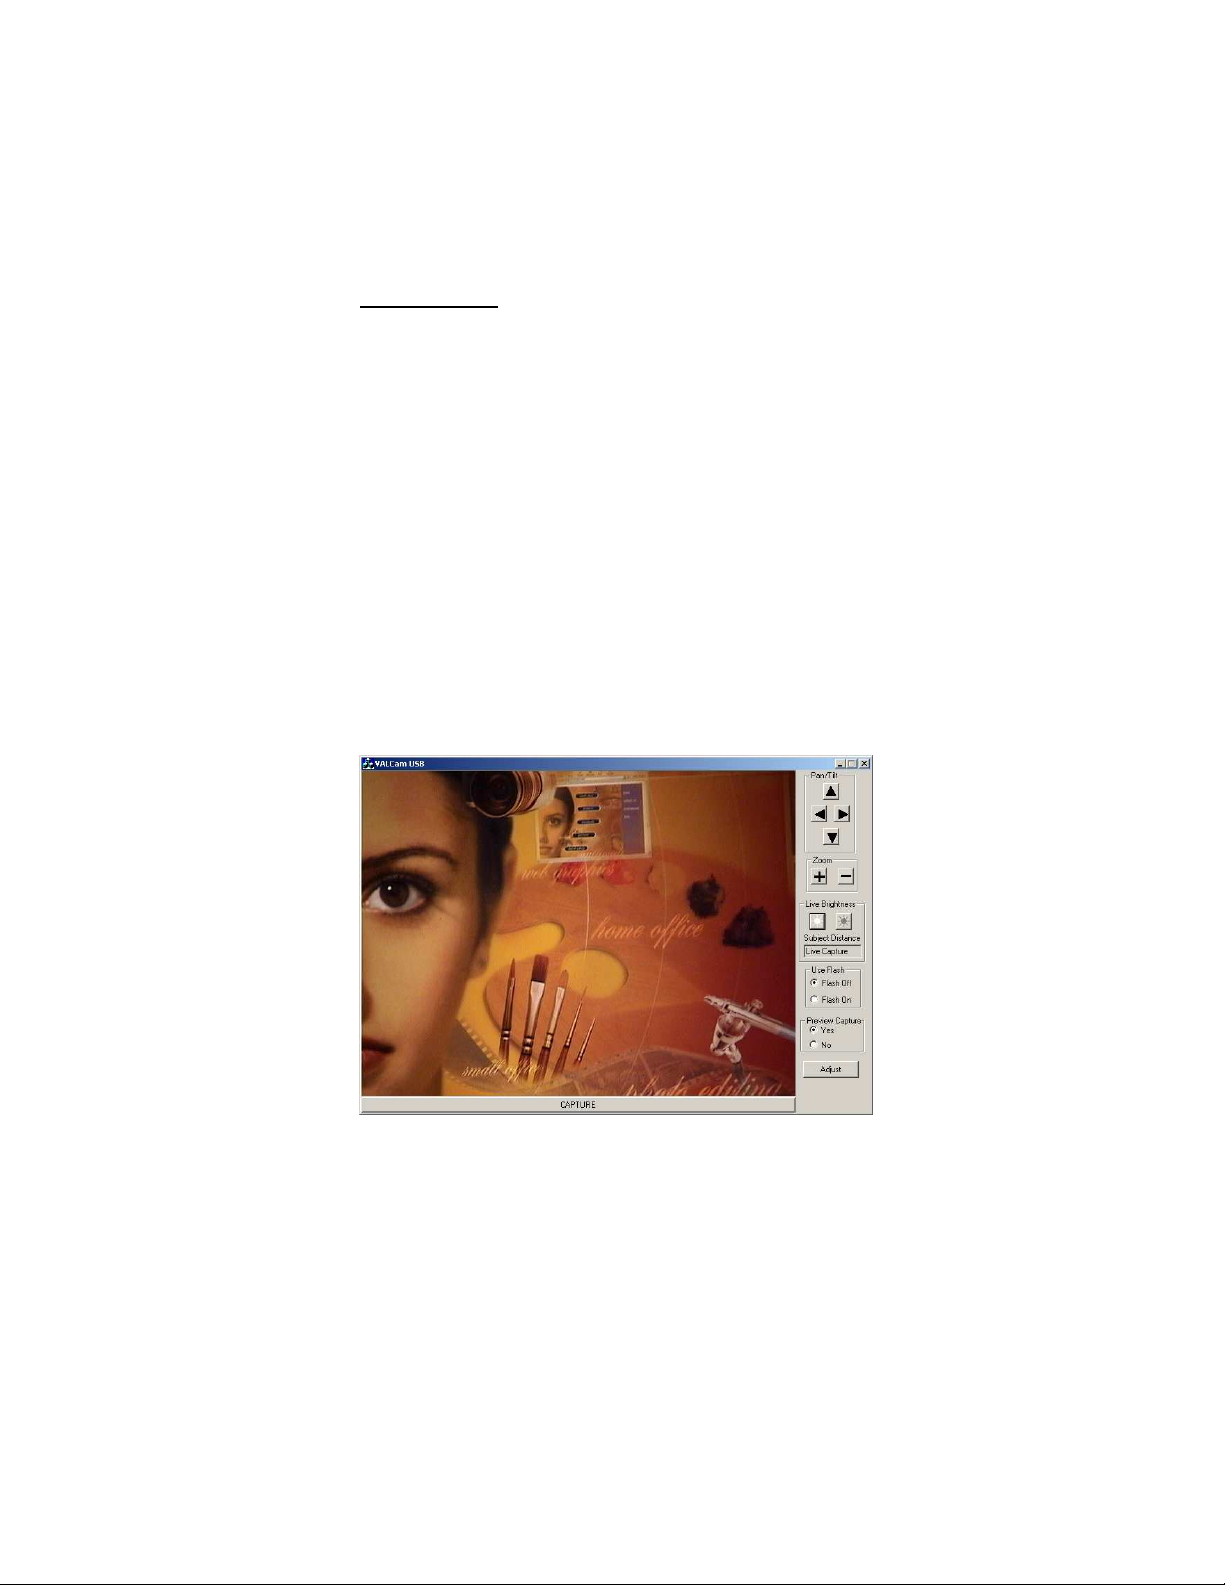
4. The
START->PROGRAMS->VALCam USB
installed on the computer is capable of using
VALCAM ID
capture control box will appear.
you receive an error message or the capture control
box does not appear displaying live video, consult
the troubleshooting guide.
”
.
If
6
Page 7

Camera motion controls
1. Press the + key next to the numeric key pad, the camera
will zoom in. Release the
zooming. To zoom out press the
keypad. Release the
2.
Use the
pan/tilt operation. Hold down keys to initiate action and
release keys to stop action. (Pan/Tilt/Zoom Camera only)
Place the mouse over the button and hold down the left
3.
mouse button. The camera will zoom in. When the mouse
button is released, zooming will stop. The
the same way to zoom out.
Place the mouse over the button and hold down the left
4.
mouse button. The camera will tilt up. When the mouse
button is released, camera motion will stop. The
Camera only)
5.
PTZ
↑↑↑↑, ↓↓↓↓, ←←←←, →→→→
buttons works in a similar fashion. (
speed can be adjusted in the “Adjust Dialog Box”.
+
key and the camera will stop
–
key next to the numeric
–
key to stop the action.
keys on your keyboard to control
button works
, ,
Pan/Tilt/Zoom
7
Page 8
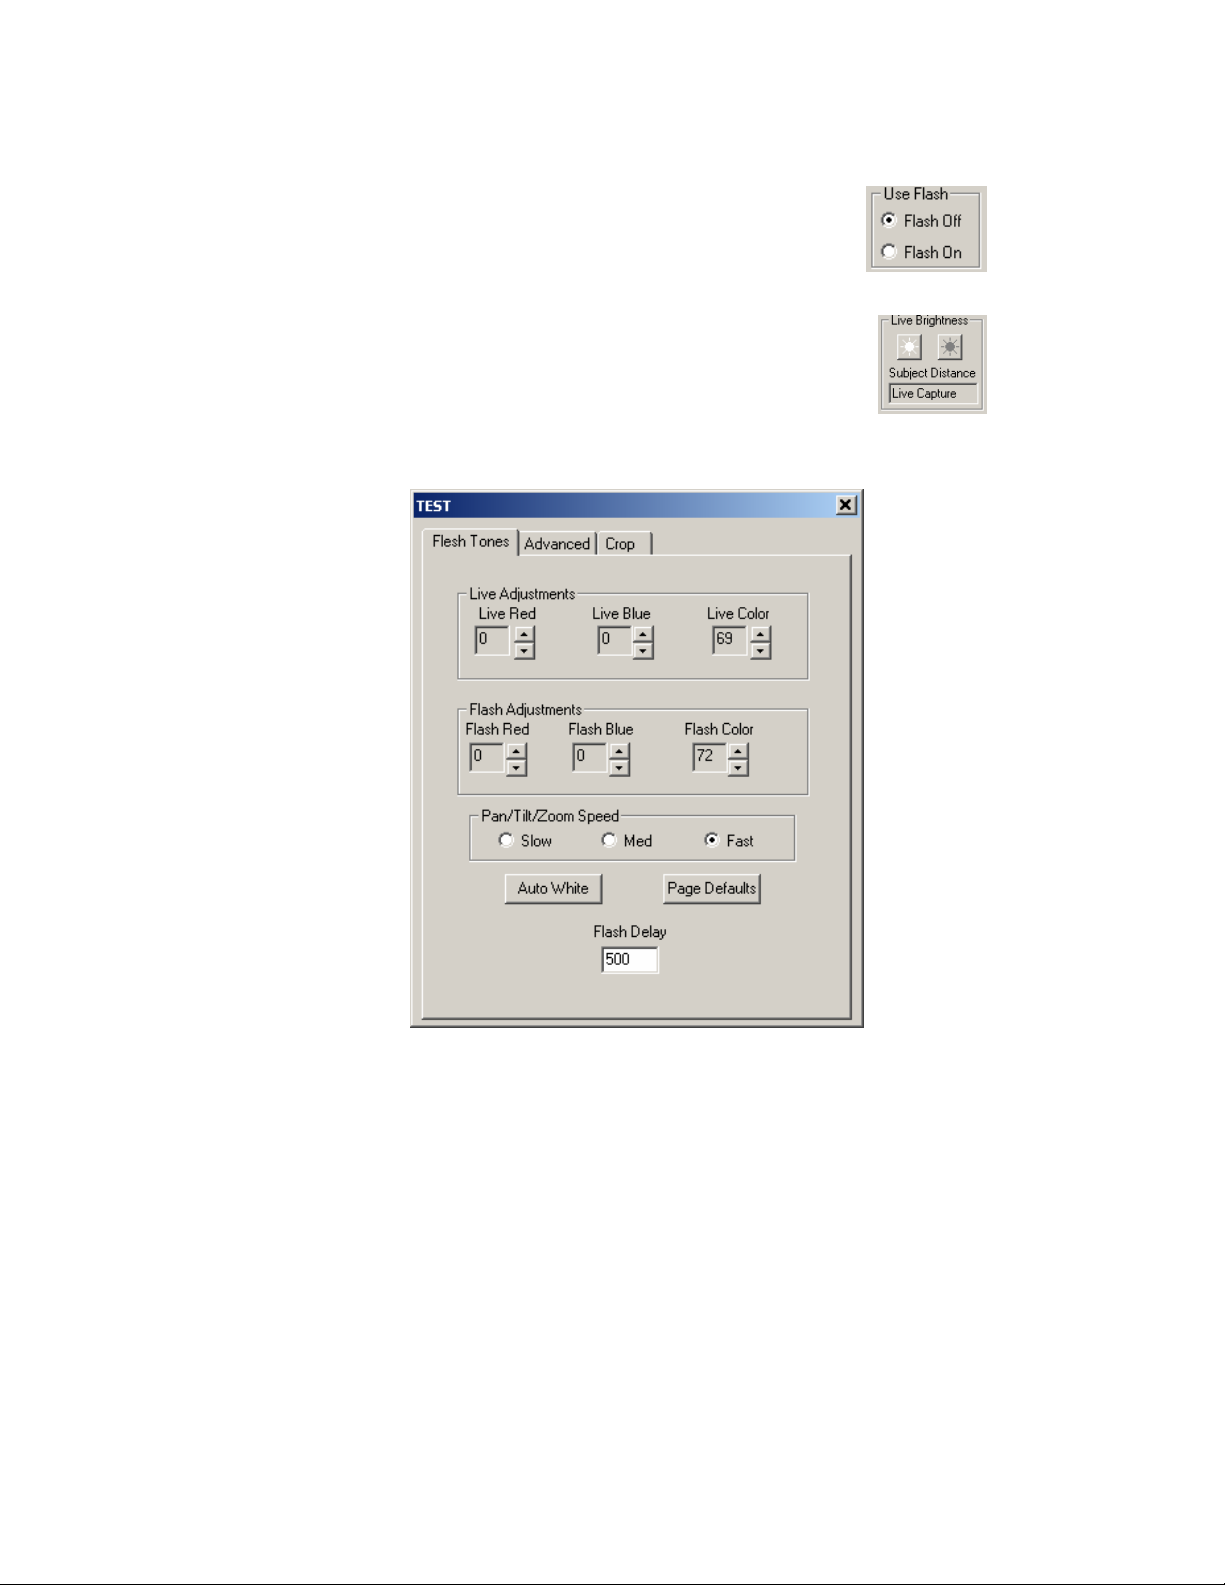
Adjust Live Preview/Capture Parameters
1.
2.
3.
4. Click the
Click the
Adjust the
image illumination. This is the only control used to
adjust image brightness.
The last setting of the
remembered between sessions.
tab.
Flash Off
Brightness
button.
control buttons for proper
Brightness
Adjust
button and click the “
control are
Flesh Tone
”
8
Page 9
4. Adjust the
Note the changes in the image hue. These controls should be used to
fine tune image color for optimal quality.
Adjust the
5.
This control adjust color intensity from pale to very intense.
Click the “Page Defaults” button to reset White Balance and
6.
normalize color settings.
Live Red
and
Live Color
Live Blue
control and note the changes in the image.
scroll controls up and down.
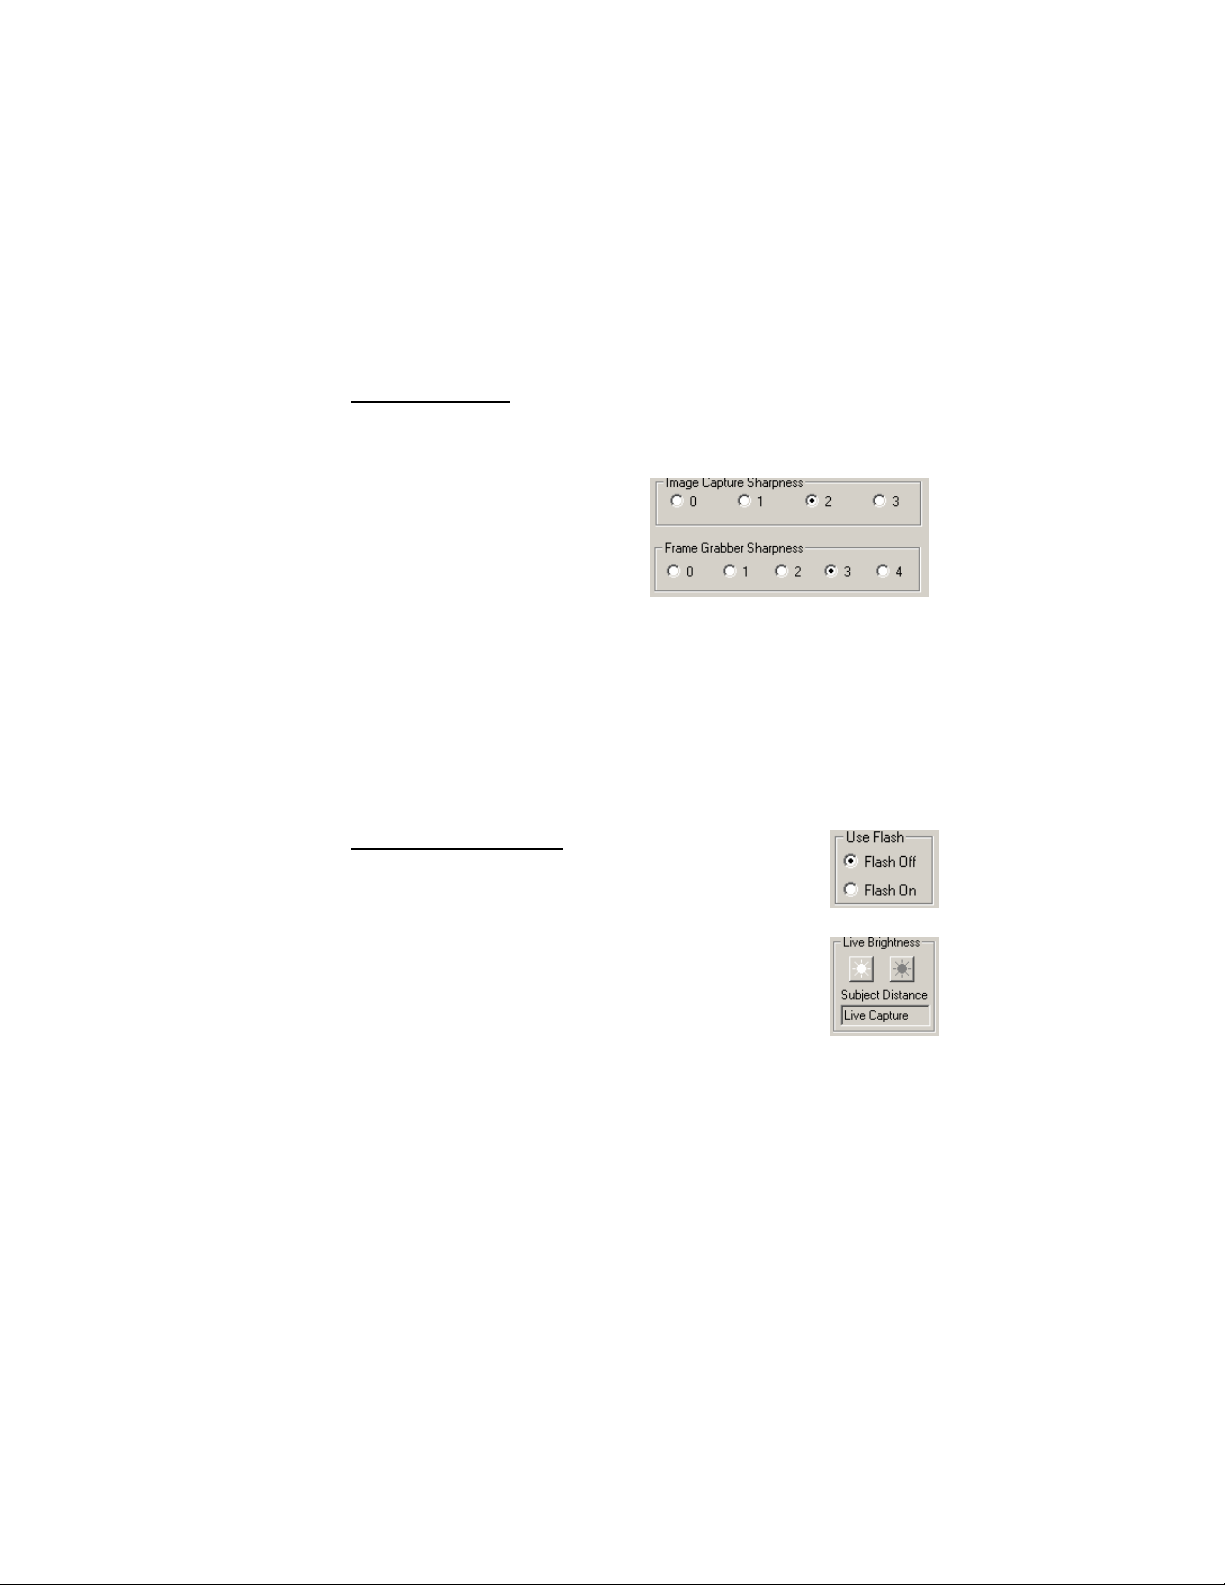
Sharpness Control
1. Click the “
The “
2.
control adjusts post capture
image enhancement. The
effects of this control are not
visible until the capture is
viewed. The default is 2.
3.
The
time out image sharpness. The default is 3.
Higher or lower values might be warranted in different
4.
circumstances. If the values are too high the image will
look edgy and noisy. If the value is too low the image will
look soft or out of focus.
Capturing a Live Images
Verify that the
1.
Flash
Advanced
” tab on the Adjust Dialog box.
Image Sharpness
“Frame Grabber”
Use Preview
is set to
Flash Off.
”
sharpness adjustment affects real
is set to
Yes
and
Use
2. Zoom in as close as necessary to your subject.
NOTE: Always zoom in as tight as the image
composition will allow for best quality images
3.
Adjust
Brightness, Flesh Tone
for best image quality.
, and
Sharpness
.
controls
9
Page 10
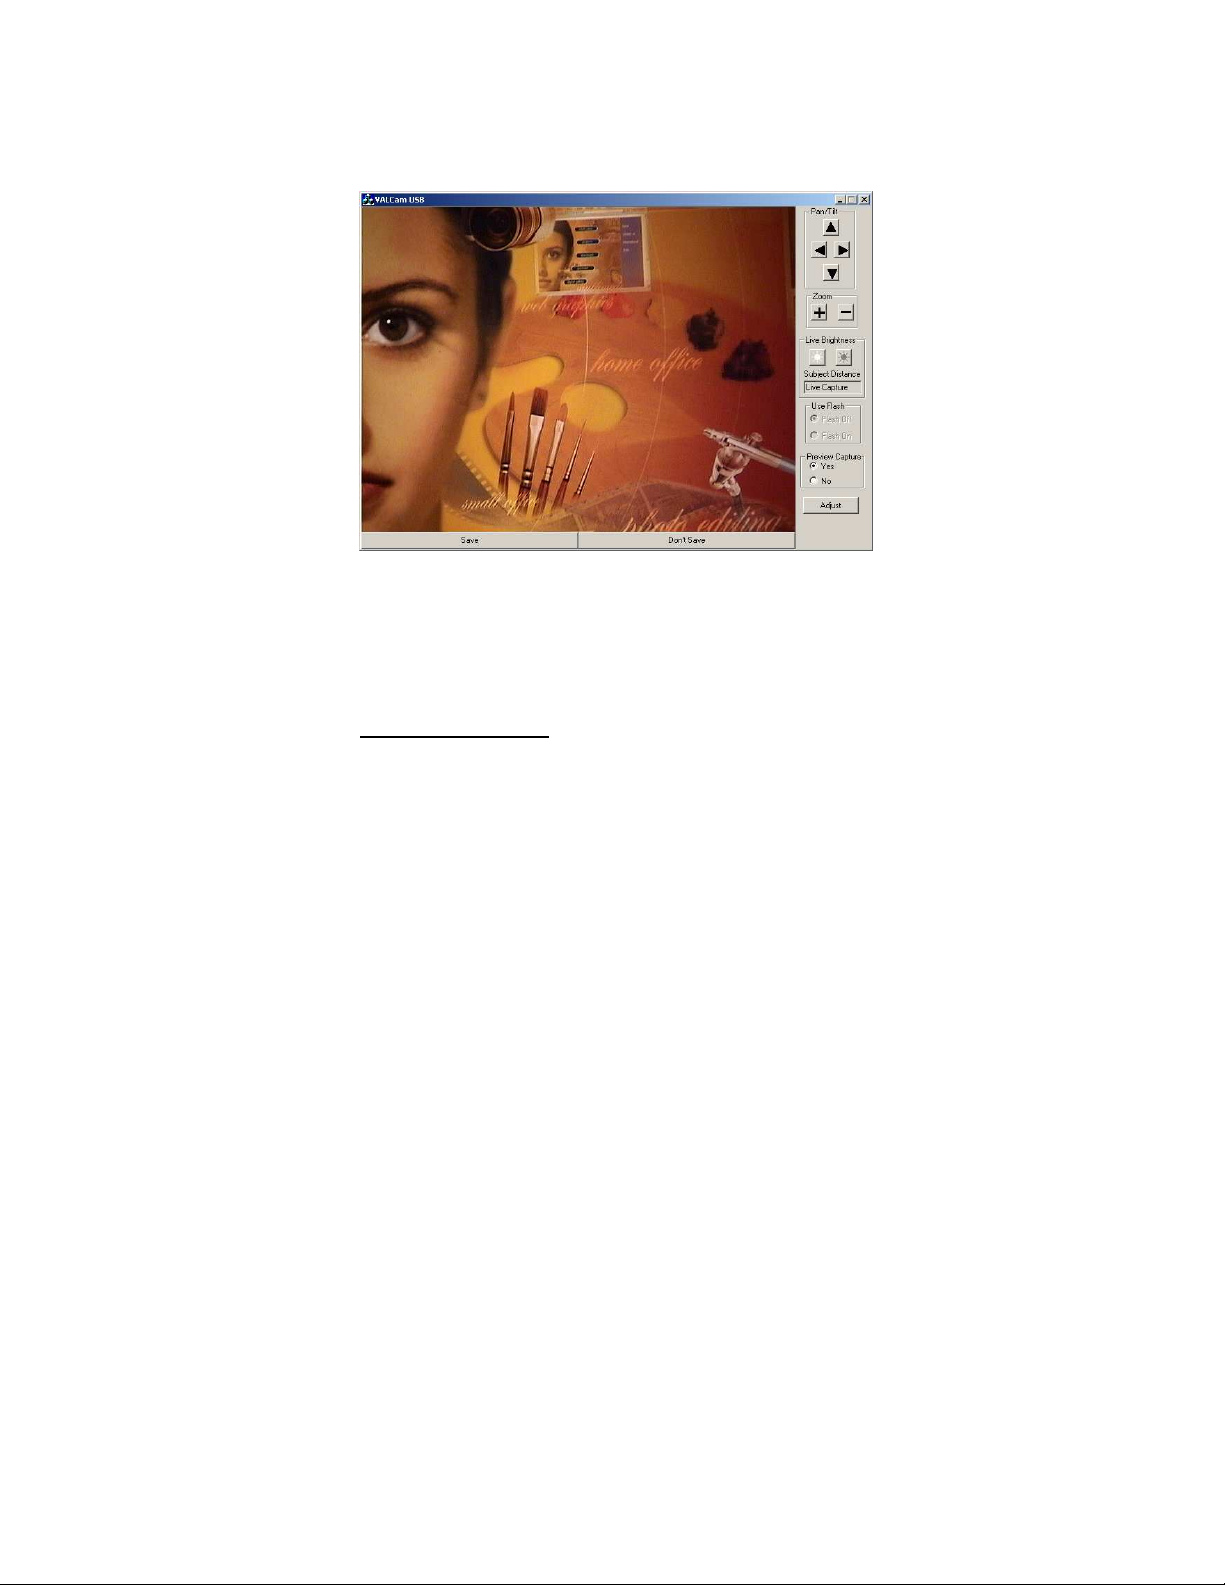
4. Click the Capture Button and the capture will happen
immediately.
Click the “Save” button to send the image to clipboard or
5.
your application. Click the “Don’t Save” button to discard
the image and prepare to take another capture. This is very
useful when using the Twain driver as you can immediately
take another capture without restarting the application.
Using the Photo-Flash
The photo-flash allows optimal captures to be obtained in
any environment with the highest quality. You can even take
captures in a completely dark room and varying subject
distances with no degradation of image quality.
Once the flash intensity is set for a given subject distance,
all captures will be identical even with different amounts of
room light.
The VALCam stores different settings for Flash and non
Flash captures so both live and Flash captures can be
obtained without user intervention.
10
Page 11
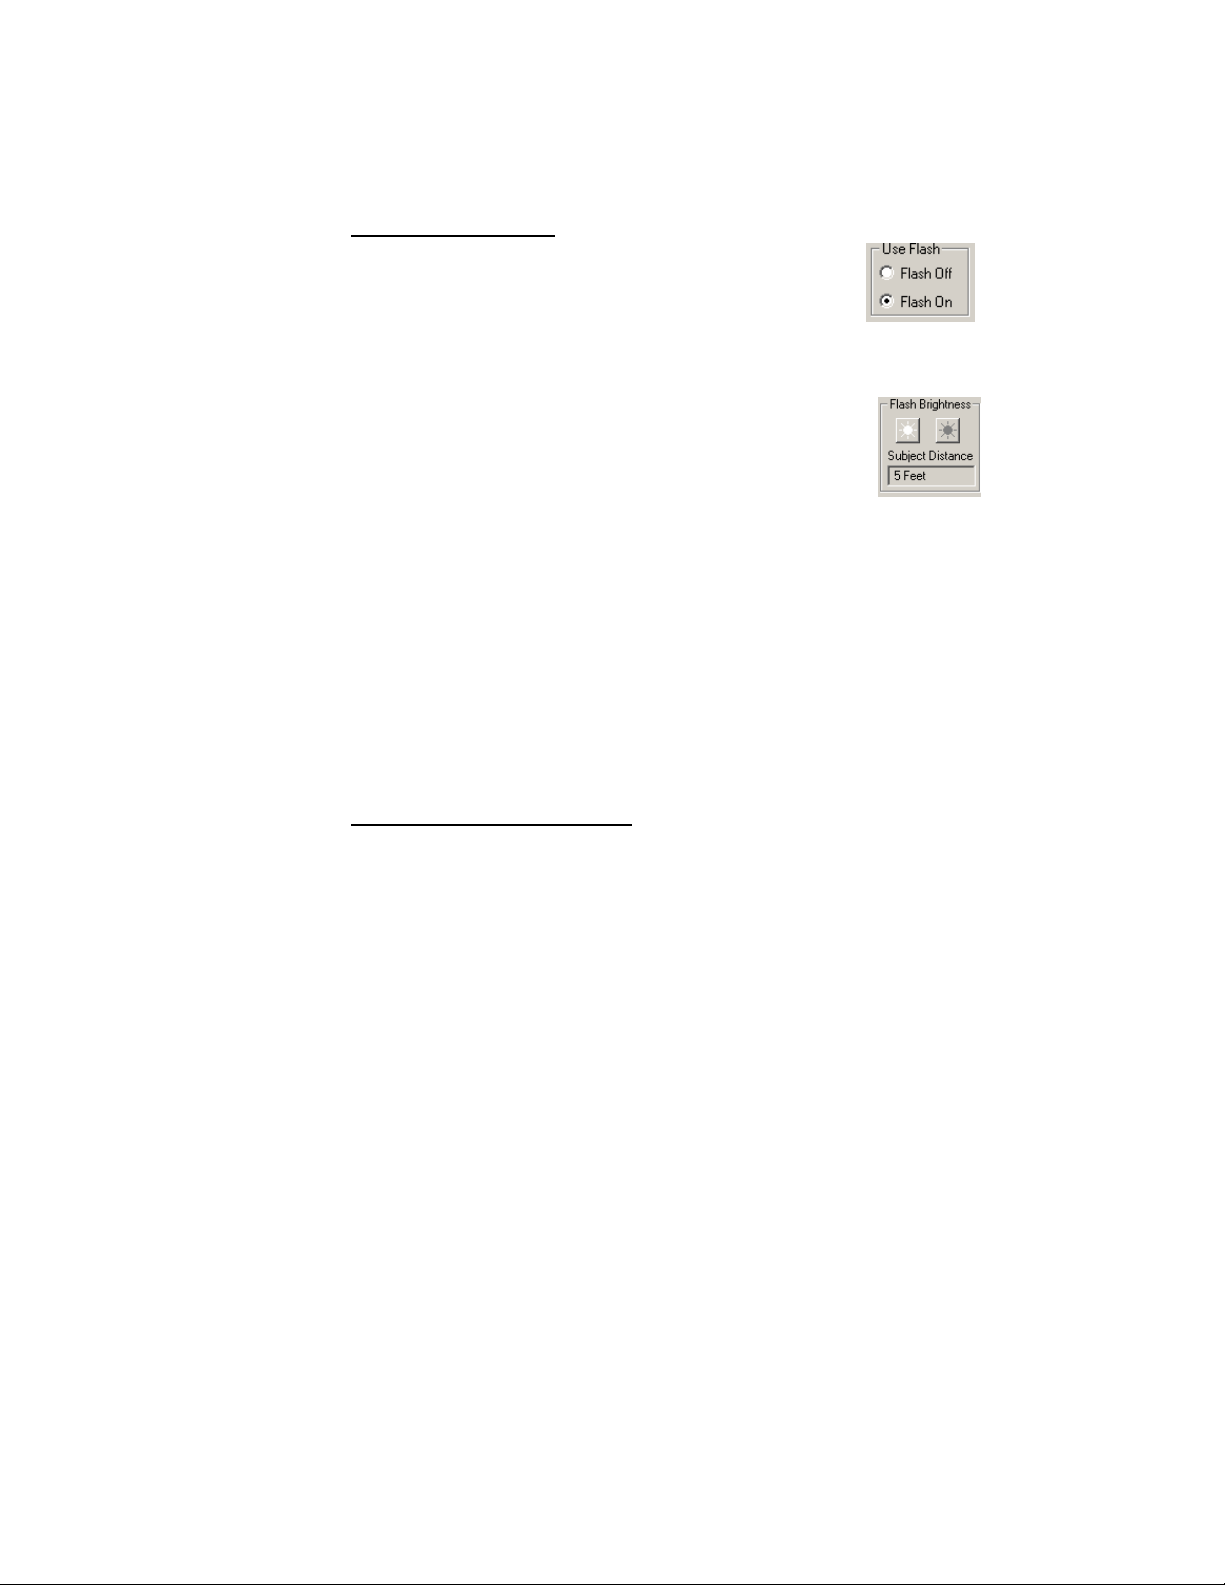
Taking a Flash Capture
1. Click the
The Flash will be triggered the next time the capture
button is clicked.
Frame the subject with the camera controls.
2.
Remember to zoom in as tight as your image
composition will allow.
Adjust the
3.
subject distance from the camera.
4.
Click the Capture Button and after a short delay the
flash will fire and the image will be displayed. (Verify
Use Preview
that
5.
Fine tune the
optimal capture exposure. The live preview will not
change because
6.
Once the proper setting is found, it will not need to be
readjusted again more than 1 or 2 clicks up or down
even if the room light changes.
Use Flash
Brighter
is set to
Brighter
Use Flash
button to
and
and
Adjusting Flash Capture Quality
1.
Click the Adjust button and select Flesh Tone tab on
the Adjust dialog box.
Adjust Flash Red, Flash Blue and Flash Color control.
2.
3.
Take another Flash Capture and note the changes. (Be
sure the
controls work similarly to the live color adjustment
except the changes only appear after a Flash Capture.
Preview Capture
Flash On.
Darker
buttons for the
Yes
)
Darker
is set to
button is set to
adjustments for
Flash On.
Yes
) These
11
Page 12

4. Please note that the Flash color controls only effect
flash captures and have no effect on the live preview.
Cropping Control
The VALCam USB allows the user to set cropping parameters
for both preview and capture. The live preview will display live
video that corresponds to these parameters. The capture image
will also conform to these dimensions.
These parameters can be set to match the picture box of the card
design thereby eliminating the need for software cropping and
speeding up the capture process. The efficiency of the process
will depend on how the photo-id application handles image
captures.
Another advantage of this feature is that the live preview will
correspond to the actual “portrait” design of the card for a more
pleasing a realistic rendition of the image.
Using Cropping Control
12
Page 13
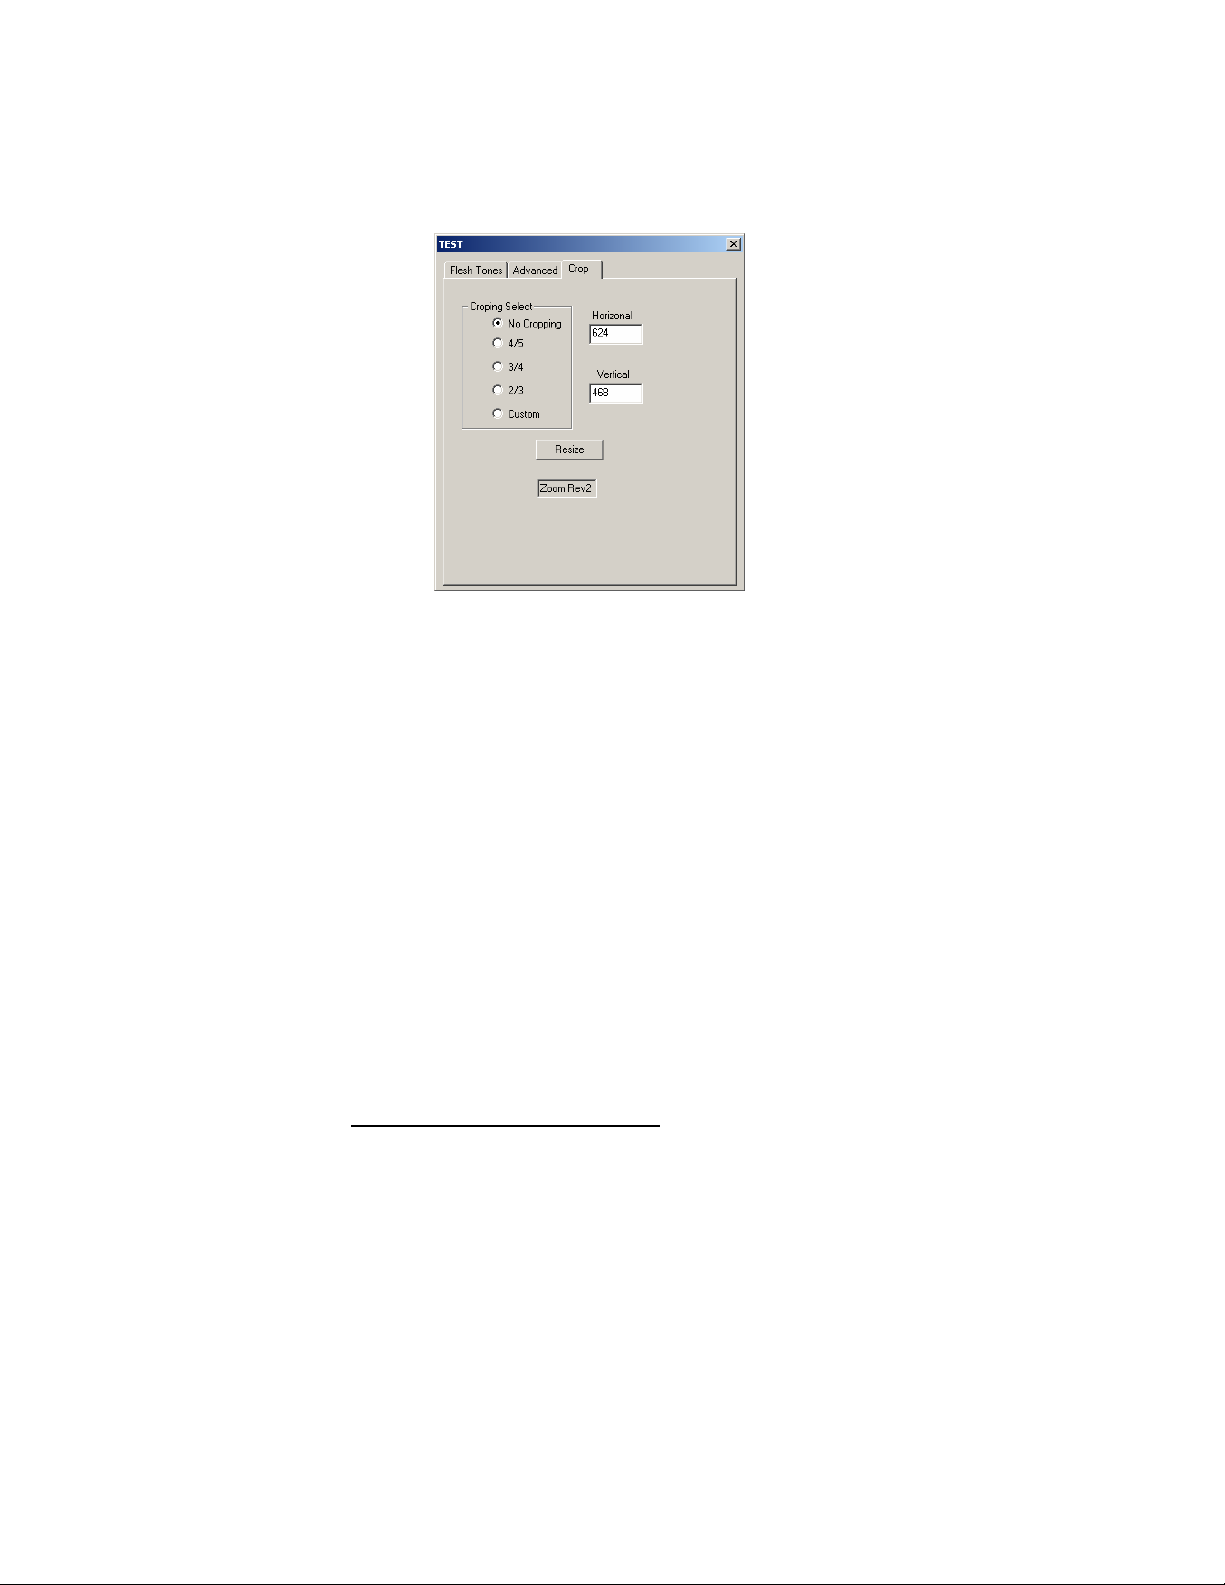
1. Click the Adjust button.
2.
Click the Cropping tab on the adjust dialog box.
3.
Click the various Cropping Select choices and see how
the live display changes to the new aspect ratio.
Take a capture and note how the capture also matches
4.
the new settings.
Select Custom and adjust the Horizontal setting for any
5.
aspect for and custom aspect ratio.
6.
Its recommended to leave the Vertical setting at 468
for maximum resolution.
Typically it’s only necessary to match the
7.
Horizontal/Vertical ratio to your picture box on your
card design. It’s not necessary to match absolute pixel
values.
Setting an Administrators Password
13
Page 14

1. Locate and double click on the
file located in the Windows folder or sub folder.
The file will open in Notepad. Scroll down and locate
2.
the
Password=None
3.
Modify this entry with a password of your choice
Example:
Restart the
4.
button.
5. You will be prompted to enter your password
Enter
Password=007.
VALCam
007
to open the Adjust Dialog box.
entry.
application and click the
VALCam USB.INI
Adjust
Using the VALCam with Photo-ID Applications
Twain drivers for the
software installation procedure. Using your application, select
the
VALCam
Alternatively you can run the
standalone application and capture images directly to the
Window’s clipboard. You can then paste these images into
any applications that will support the Window’s clipboard.
A future version of the application will allow saving images
as JPG files.
system as your Twain source.
VALCam USB
VALCam
are loaded during the
executable as a
Quick Tips for Quality Capture
1. Adjust camera controls to frame subject.
2.
Zoom
3.
in as tight as your image composition will
allow, for highest resolution.
Enable the
Flash On
and
Preview YES
radio buttons.
14
Page 15

4. Take a number of captures adjusting the
for optimal image exposure. Usually a setting between
12 (close up) and 24 (far away) will work.
Fine tune image capture with the
5.
and
Sharpness
controls.
Iris buttons
Red, Blue, Color
Note: When using the Flash, image parameter changes only
occur when the image is captured and will not be displayed
.
on the live preview
When not using the Flash, image
parameter changes are displayed immediately in the
preview window.
6. Click the
your application or to the clipboard.
7.
For highest speed through put
Preview No
immediately be sent to your application.
Send to Twain
radio button, and captures will
button to send the image to
, select the
Use
Trouble Shooting
Trouble starting or running the application:
1. Verify that the power supply is properly connected to the
Zoom camera or converter box if using the
Pan/Tilt/Zoom version.
Verify that the
2.
Manager under
3.
Verify that you are running DirectX 8.1 or above. The
application will test for this before starting and display
a warning message have a DirectX compatible error.
4.
Unplug and Reinsert the USB cable.
Unplug and Reinsert the power cable.
5.
6.
Reboot the computer.
VALCam USB
Imaging Devices
appears in Device
.
15
Page 16

Flash will not fire
Verify that the Flash switch is in the on position.
1.
2.
Verify Flash connector is fully inserted.
Verify that the amber led is on located on the back of the
3.
flash.
:
16
 Loading...