


VAIS
VAIS TTEECC
H
H
N
NOOLLOOGGYY
Automotive Audio Player
with USB 2.0 Host
and optional HDD
Now
with iPod USB Audio and Controls
www.vaistech.com
2010 TOYOTA • LEXUS
Owner’s Manual
Copyright (C) 2003-2009 VAIS Technology
Published February 22, 2010
DO NOT DISASSEMBLE OR ALTER
Doing so may result in an accident, fire or electric shock.
Do not block your view
Do not mount product or any added audio and/or video equipment where it can block your view through the windshield or
your view of dashboard indicators and displays.
Do not block the airbag
Do not mount product or any added audio and/or video equipment where it can obstruct the operation of the safety device
such as the airbag.
Distraction warning
Do not let product or any added audio and/or video equipment to distract you while you are driving.
BEFORE WIRING, DISCONNECT THE CABLE FROM THE NEGATIVE BATTERY TERMINAL
DO NOT SPLICE INTO ELECTRICAL CABLES
Never cut away cable insulation to supply power to other equipment. Doing so will exceed the current carrying capacity of
the wire and result in fire or electric shock .
DO NOT ALLOW CABLES TO BECOME ENTANGLED IN SURROUNDING OBJECTS
Cables or wiring that obstruct or get caught on places such as the steering wheel, shift lever, brake pedals, etc. can be
extremely hazardous.
DO NOT INSTALL IN LOCATIONS WITH HIGH MOISTURE OR DUST
Moisture or dust may result in product failure.
HAVE THE WIRING AND INSTALLATION DONE BY EXPERTS
The wiring and installation of this product requires special technical skills and experience.
USE ONLY SPECIFIED ACCESSORY PARTS
Use of other than specified parts may damage product internally.
FOLLOW THE OPERATIONAL AND INSTALLATION MANUALS.
YOU SHOULD READ AND FAMILIARIZE YOURSELF THOROUGHLY WITH THE FOLLOWING INFORMATION PRIOR
TO INSTALLING AND USING THIS UNIT. IN ADDITION, YOU MUST CAREFULLY READ AND FOLLOW THE
INSTALLATION SCHEMATICS/INSTRUCTIONS FOR THE PRODUCT AND THE VEHICLE IN WHICH IT IS BEING
INSTALLED. FAILURE TO FOLLOW INSTALLATION INSTRUCTIONS MAY DAMAGE THE PRODUCT AND THE
VEHICLE, WILL VOID THE PRODUCT WARRANTY, AND MAY VOID THE VEHICLE WARRANTY
CHECK YOUR LOCAL LAWS
Some States/Provinces or other governmental jurisdictions (such as cities) may have laws that prohibit the operation of a
video screen within the sight of the Driver. If you have purchased such a product, you should use the product only in
locations where it is legal to do so, and if you do use the product, set up the screen so it is only visible to passengers.
TROUBLESHOOTING
Should this product fail to operate properly, please contact your Dealer or our Customer Service Department at
support@vaistech.com.
Before starting any installation work , you must wait 90 seconds after turning the ignition switch to the LOCK position and disconnecting the negative (-) terminal
from the battery. The supplemental restraint system (airbag) is equipped with a backup power source. If installation work is started less 90 seconds after
disconnection of the negative (-)battery terminal, the SRS may deploy. When the negative (-) terminal cable is disconnected from the battery the clock and audio
systems memory will be erased. Before starting installation work make a record of the clock and audio systems memory settings. When installation is complete,
reset the clock and audio systems to their previous settings . Power tilt, power telescopic steering column, front power seats, power mirrors, and power shoulder
belt anchorage are equipped with a memory function .The rear power seat is not equipped with a memory function. e and they can make a record of the memory
contents, rear power seat is not equipped with the memory function. When installation is complete, it is necessary to readjust the features to their previous settings
Never use a backup power supply (such as another battery) during installation work to avoid losing these memory settings.
WARNING
!
CAUTION
!
Before You Start
2
MP3 (MPEG-1 Audio Layer 3) is a digital audio encoding format using a form of lossy data compression.
“MPEG Layer 3 audio coding technology licensed from Fraunhofer IIS and Thomson.”
“Supply of this product only conveys a license for private, non-commercial use and does not convey a license nor imply
any right to use this product in any commercial (i.e. revenue-generating) real time broadcasting (terrestrial, satellite, cable
and/or any other media), broadcasting/streaming via internet, intranets and/or other networks or in other electronic content
distribution systems, such as pay-audio or audio-on-demand applications. An independent license for such use is required.
For details,please visit http://www.mp3licensing.com.”
Before You Start
The VML Audio Player supports playback of MP3 and WAV files from a USB Mass Storage Device or optional automotive
grade internal Hard Drive (see details below).
IMPORTANT
i
What is MP3?
i
3
MP3
! Bit rate: 8 kbps to 320 kbps
! Sampling frequency: 16 kHz to 48 kHz
! Compatible ID3 tag version: 1.0, 1.1, 2.2, 2.3, 2.4 (ID3 tag Version 2.x is given priority over Version 1.x.)
! M3u playlist: Supported
! MP3 PRO: Not supported
WAV
! Compatible format: Linear PCM (LPCM)
! Quantization bits: 8, 16, 24 and 32 (LPCM)
! Sampling frequency: 16 kHz to 48 kHz (LPCM)
FLAC
! Compatible format: FLAC subset format
Audio Format Compatibility
i
! This unit can playback files in USB memory and USB Portable Audio Players that support the USB Mass Storage
Class (MSC) protocol.
! You cannot connect a USB memory or USB Portable Audio Player to this unit via a USB hub.
! Partitioned USB memory is compatible with this unit.(Can not be managed by Windows XP and Windows Vista).
! Depending on the kind of USB memory or USB Portable Audio Player, this unit may not recognize the USB memory or
USB Audio Player and/or audio files may not be played back properly.
! USB memory devices with security functions can not be played (for example Flash drive with Hardware encryption).
! USB memory or USB Audio Player may not function correctly at high or low temperature.
! Do not leave the USB memory or USB Audio Player in direct sunlight for extended amounts of time. It can result in
USB memory or USB Audio Player malfunction.
! USB memory or USB Audio Player may take time to playback. Depending on amount of files and specific file location in
the memory, it may take considerable time before the file is played back.
! Never remove USB memory or USB Audio Player device while playback or file transfers are in progress, to prevent
possible damage to its memory (see “How to eject a USB device”).
! Never insert/remove USB memory or USB Audio Player while vehicle is in motion for safety.
! USB memory or USB Portable Audio Player must be formatted as FAT16 or FAT32. Please do not format USB
device if it is already formatted as FAT16 or FAT32.
! Unit can playback up to 999 playlists and up to 999 files in each playlist (per partition). Large amount of playlists and
files can result in slow navigation and playback.
! For USB memory or USB Portable Audio Player VML player supports MPEG-1 Layer 1 (file extension .MP1), MPEG-1
Layer 2 (file extension .MP2) and the MPEG-2 audio extension to Lower Sampling Frequencies.
! File extensions must be used properly (non-audio data will not be recognized). Playback of non-audio data may
generate a noise that can cause damage of amplifier and/or speakers.
! You must maintain “Free Space” on USB memory or USB Portable Audio Player necessary for unit operation
(approximately 1% of partition capacity).
! Touching the connector terminals may transmit static electricity to the inner circuits of unit or USB memory/USB
Portable Audio Player and may lead to malfunctions. Use precautions to prevent damage to the system by
electrostatic discharge (ESD).
! If iPod connected to VML player, supports USB Audio, VML player will switch to dedicated iPod control mode.
In that case VML player will not use Mass Storage capabilities of the iPod.
USB Memory/Portable Audio Player Handling
i

! This unit can playback files from the optional internal IDE Hard Disc Drive (HDD).
! HDD playback functionality requires additional activation.
! HDD playback functionality will be automatically de-activated after 5 failed attempts to recognize HDD.
! Unit can recognize up to 4 Primary Partitions accessible as separate Discs.
! Depending on amount of files and specific file location, it may take considerable time before the file is played back.
! Never remove or hot-swap HDD while unit is powered to prevent possible damage of HDD and/or VML player itself.
! HDD must be formatted as FAT16 or FAT32.
! Unit can playback up to 999 playlists and up to 999 files in each playlist (per partition). Large amount of playlists and
files can result in slow navigation and playback.
! For HDD VML player supports MPEG-1 Layer 1 (file extension .MP1), MPEG-1 Layer 2 (file extension .MP2) and the
MPEG-2 audio extension to Lower Sampling Frequencies.
! File extensions must be used properly (non-audio data will not be recognized). Playback of non-audio data may
generate a noise that can cause damage of amplifier and/or speakers.
! You must maintain “Free Space” on HDD necessary for unit operation (approximately 1% of partition capacity).
! Be sure HDD has enough free space to complete file transfer.
! Touching the connector terminals may transmit static electricity to the inner circuits of unit or HDD and may lead to
malfunctions. Use precautions to prevent damage to the system by electrostatic discharge (ESD).
! To avoid condensation that can lead to HDD permanent damage do not introduce HDD or unit with HDD inside to
sudden temperature changes. If transferring HDD or unit with HDD inside always allow it some time to adopt to the
surrounding environment.
! Never touch top cover of HDD. Always hold HDD on the sides. Follow the Hard Drive Manufacturer handling
instructions.
! Keep HDD or unit with HDD inside away from magnetic items.
Internal Hard Drive Handling
i
! To prevent the accidental loss of data, we are strongly recommend always backing up important data on your
computer.
! VAIS Technology accepts no responsibility for any loss of data on USB memory/USB Portable Audio Player
and/or HDD, even if data is lost while using this unit.
! This unit does not support connections to a computer.
IMPORTANT
i
Before You Start
4

Connections
5
Audio Wiring Harness
(included)
Connecting MultiMediaLinQ
Connecting the units
Used for
programming
Power and Audio
wiring harness
Service
Port
To the factory
Audio harness
To the
Head Unit
Audio Y-Harness
(included)
USB 2.0 Host

Connections
6
Head Unit (Radio Receiver)
Connection diagram used for most 2009-2010 Toyota/Lexus vehicles
Connecting MultiMediaLinQ to head unit (for Toyota/Lexus vehicles)
AA
Factory Audio
harness
(if present)
Plug into
Head Unit
(connector “B”)
12-pin connector
To Un-plug any connector do NOT pull it by the wires.
WARNING
!
Radio Receiver shown.
Locate connector “B” (12-pin connector) on your Radio.
Connector location on the Radio may be
different from shown above.
To MultiMediaLinQ
Audio Harness (36”)
12 Pin Y-harness
Installation
We strongly recommend that you install the unit in an easily accessible location, so you can later upgrade
the unit or re-program it in case of incorrect programming.
IMPORTANT
i
@Gain access to the back of you vehicle’s Head Unit.
@Find the same port as our Audio Harness (see “Connecting MultiMediaLinQ to head unit”)
@Disconnect the existing connector (if present) and plug in our Audio connector into this port, then plug female end of
Audio Harness to the plug in for your factory connector. Audio harness female connector is not used in some vehicles
(isolate this connector by using sticky foam tape or electrical tape).
@Plug the other end of Audio cable into designated port on MultiMediaLinQ.
@Setup USB Emulation Mode for this unit (see “USB Emulation Mode Selection”)
@Turn the car on and check MultiMediaLinQ functionality before the final assembly.
@Make sure your USB Storage device or iPod has at least two Folders/playlists, in order for this unit to operate
properly.
@Please mount this unit in an easy accessible location for upgrading.
@Do not plug iPod USB cable directly to the MultiMediaLinQ. Use USB 2.0 certified extension cable.
@Secure the Head Unit in its original position.
Installation
7
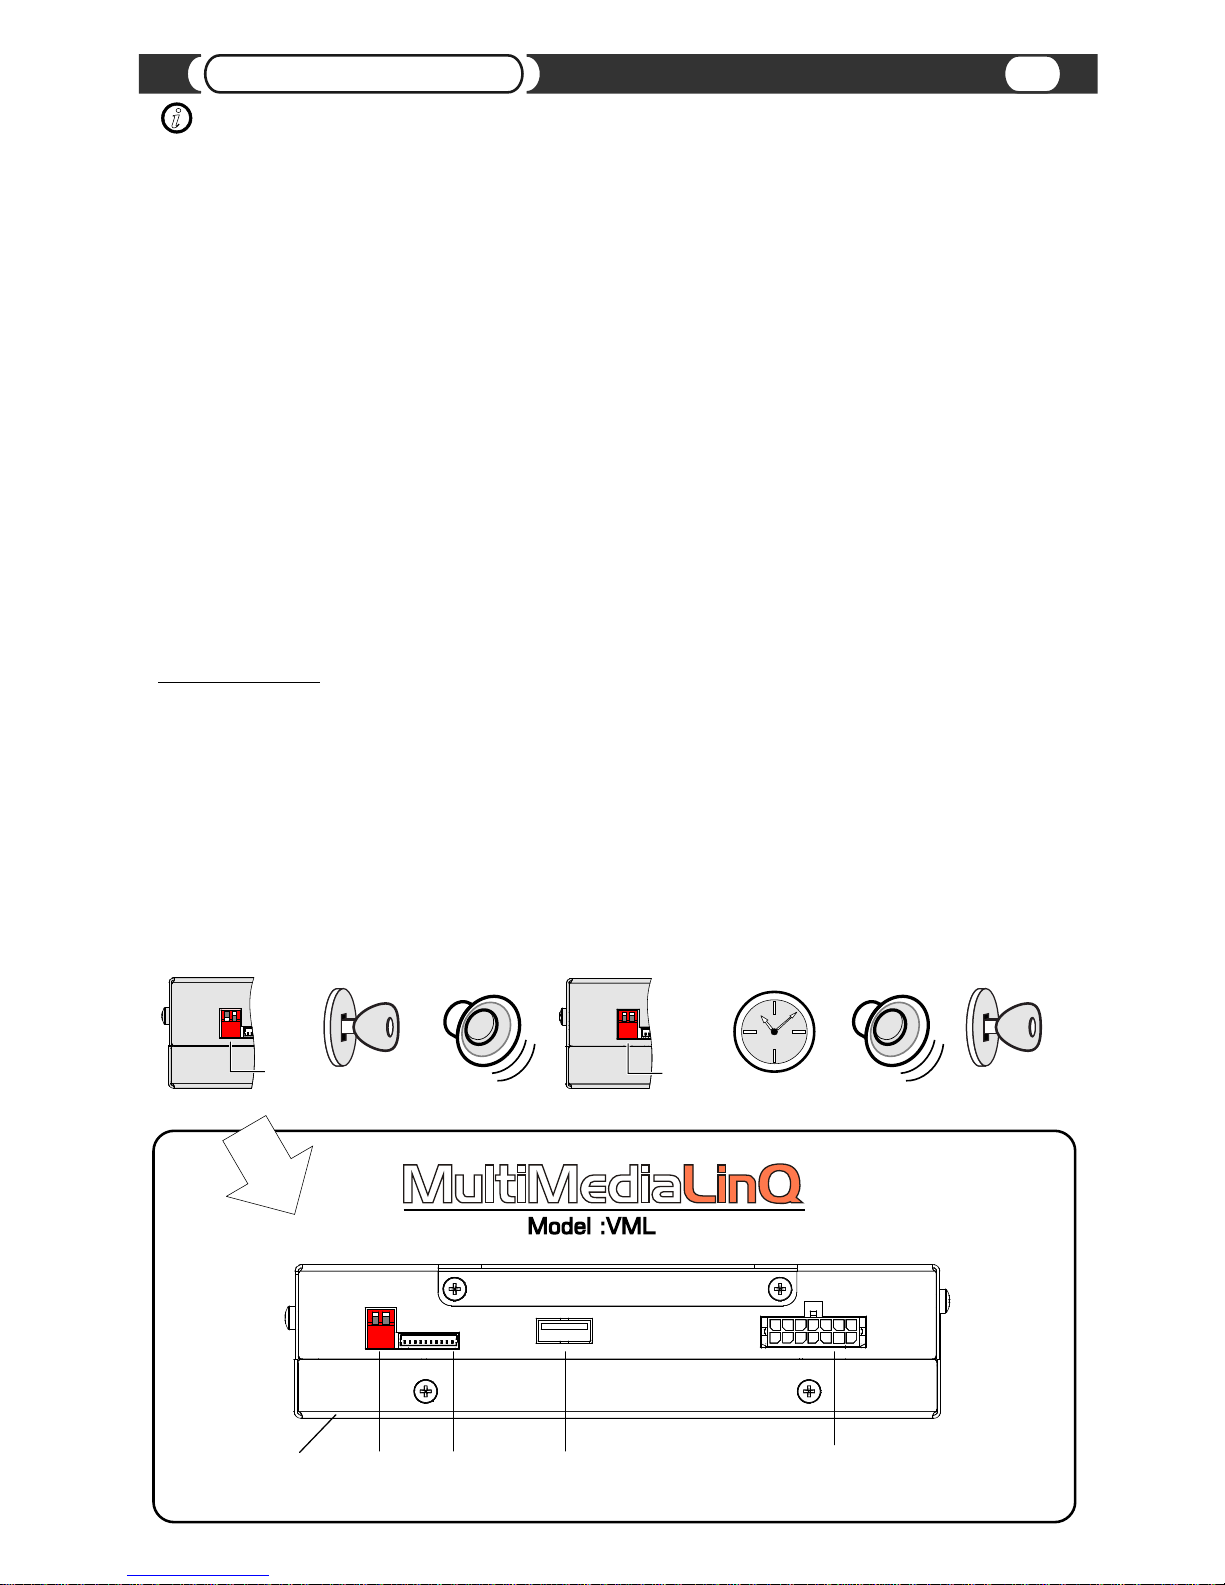
USB Emulation Mode Selection (USB emulation)
USB Emulation Mode programming steps:
@Properly install VML player.
@Put the “Left” programming switch in the “DOWN” position.
@Put ignition switch into the “ACC” position.
@Wait for a long beep followed by a few short beeps. This may take up to one minute.
@Return programming switches to their default position (both switches “UP”).
Wait up to 30 seconds until confirmation beep.
@Put ignition switch into the “OFF” position.
@Wait at least 10 seconds.
@Put ignition switch into “ACC” or “ON” position.
@Check MultiMediaLinQ for functionality.
Ignition into
“ACC” or “ON”
position
Both
switches
“UP”
Ignition into
“OFF” position
up to 30 sec
Confirmation beep
Left
switch
“DOWN”
Used for
programming
Power and Audio
wiring harness
Service
Port
USB 2.0 Host
Top cover with
VAIS Technology
Logo
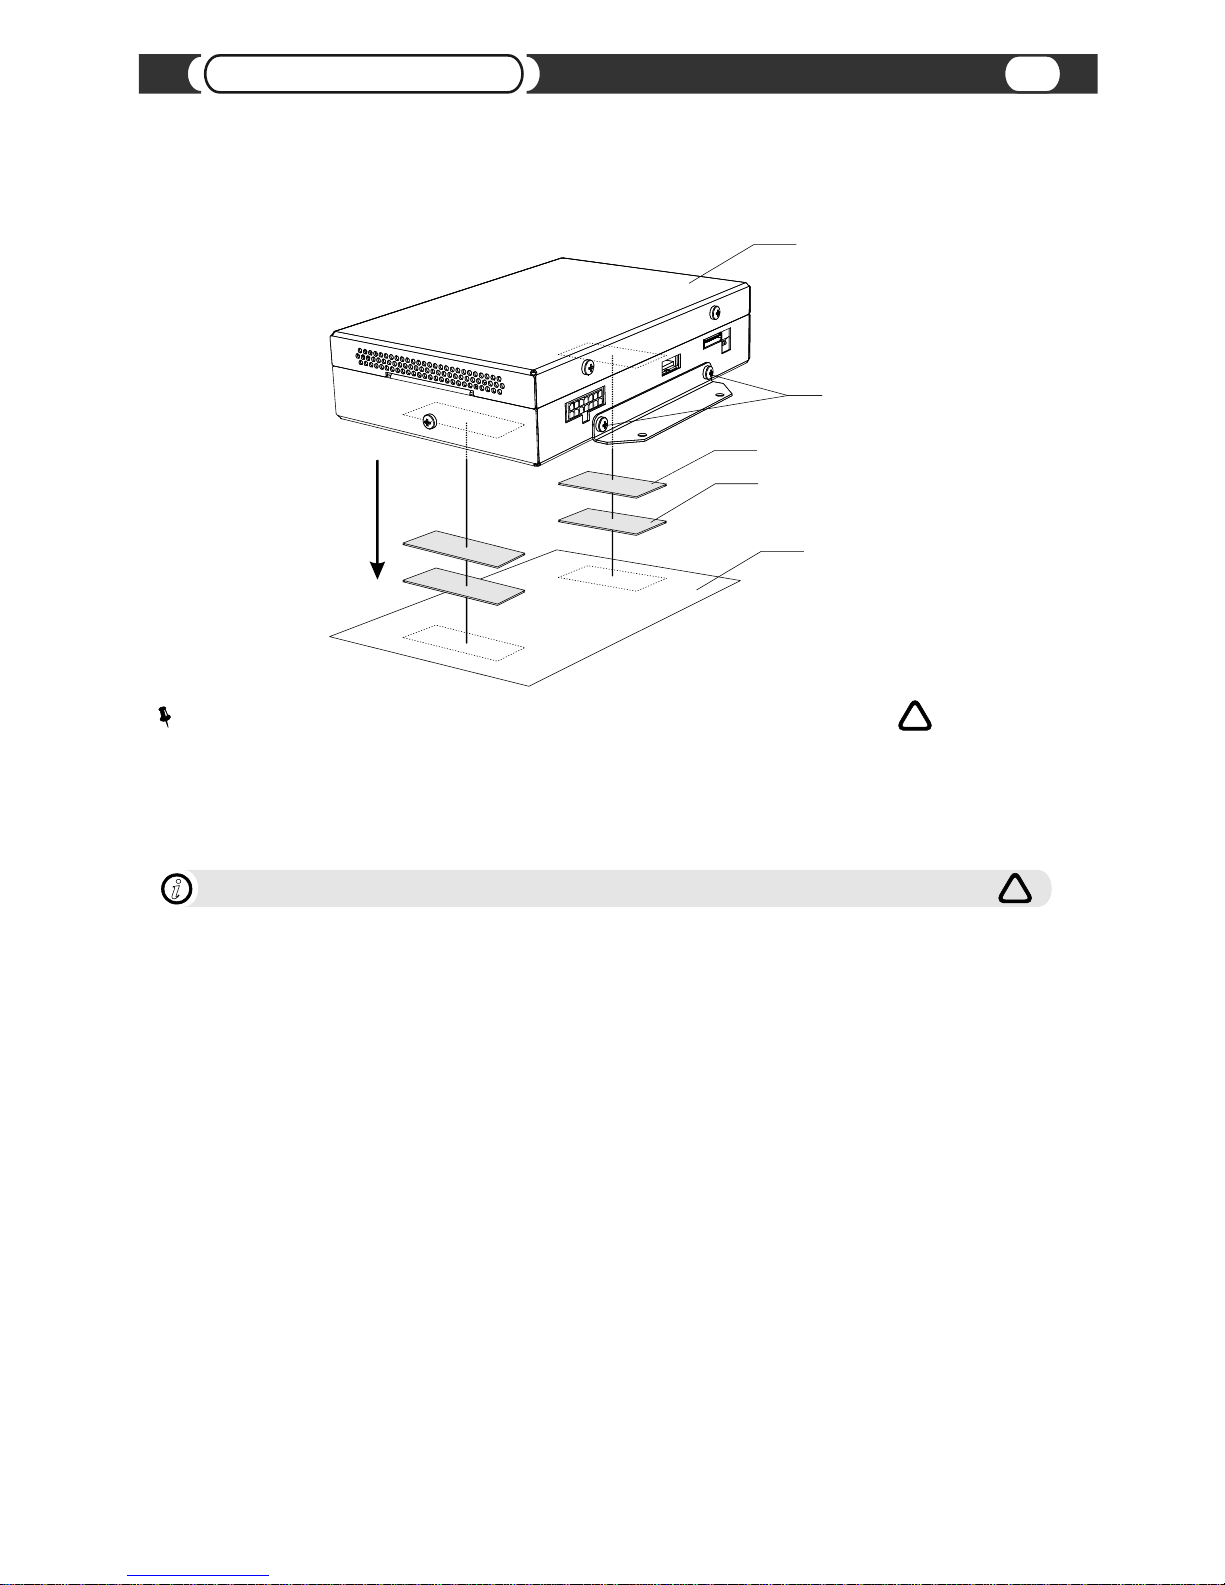
Mounting unit using Velcro fasteners
! Velcro Fasteners are not included
! VAIS Technology strongly recommends grounding the unit to the car chassis for best results.
! Do not use any screws longer than 5mm. Using screws larger then 5mm may damage the PCB board.
NOTE
Carpet or car chassis
“Soft” Velcro Fastener
“Hard” Velcro Fastener
VML (MultiMediaLinQ)
M3 x 5mm*
(see note below)
WARNING
!
We strongly recommend to Ground VML to the vehicle’s chassis
i
!
Installation
8

Installation
9
Hard Drive Installation/Removal
Remove 3 screws
M3 x 5mm*
IDE 2.5” Hard Drive
4 screws
M3 x 5mm*
(included)
! This unit can playback files from the optional internal IDE Hard Disc Drive (HDD).
! HDD playback functionality requires additional activation.
! HDD playback functionality will be automatically de-activated after 5 failed attempts to recognize HDD.
! Unit can recognize up to 4 Primary Partitions accessible as separate Discs.
! Depending on amount of files and specific file location, it may take considerable time before the file is played back.
! Never remove or hot-swap HDD while unit is powered to prevent possible damage of HDD and/or VML player itself.
! HDD must be formatted as FAT16 or FAT32.
! Unit can playback up to 999 playlists and up to 999 files in each playlist (per partition). Large amount of playlists and
files can result in slow navigation and playback.
! For HDD VML player supports MPEG-1 Layer 1 (file extension .MP1), MPEG-1 Layer 2 (file extension .MP2) and the
MPEG-2 audio extension to Lower Sampling Frequencies.
! File extensions must be used properly (non-audio data will not be recognized). Playback of non-audio data may
generate a noise that can cause damage of amplifier and/or speakers.
! You must maintain “Free Space” on HDD necessary for unit operation (approximately 1% of partition capacity).
! Be sure HDD has enough free space to complete file transfer.
! Touching the connector terminals may transmit static electricity to the inner circuits of unit or HDD and may lead to
malfunctions. Use precautions to prevent damage to the system by electrostatic discharge (ESD).
! To avoid condensation that can lead to HDD permanent damage do not introduce HDD or unit with HDD inside to
sudden temperature changes. If transferring HDD or unit with HDD inside always allow it some time to adopt to the
surrounding environment.
! Never touch top cover of HDD. Always hold HDD on the sides. Follow the Hard Drive Manufacturer handling
instructions.
! Keep HDD or unit with HDD inside away from magnetic items.
Internal Hard Drive Handling
i
CAUTION
ELECTROSTATIC
SENSITIVE
DEVICES
Flat ribbon cable
(Pin 1 is marked)
Do not cover
ventilation holes
if you have hard drive
installed
WARNING
!
 Loading...