

Page 1

RLU
R
a
u
m
l
u
f
t
u
n
a
b
h
ä
n
g
i
g
g
e
p
r
ü
f
t
Operating and installation instructions
EN
THE NEW VARIETY OF FIRE
Dated: March 2019
VAIO_7 VAIO_8
Page 2

2
VAIO Operating and installation instructions
1. General information 2 - 3
2. General warranty conditions 3 - 5
3. Drawings 6 - 9
4. Installation manual 10 - 12
5. Installing individual parts 12 - 13
6. Detailed installation instructions 14 - 19
7. Heating instructions – wood 20 - 22
8. General information about lighting the stove 22 - 23
9. Maintenance 24 - 25
10. Operational disruptions 25
11. Declaration of performance 25
12. Commissioning certificate 26
13 Product data sheets in accordance with Regulation EU 2015/1186 27
CONTENTS
Note:
No guarantee claims shall be accepted in the event of failure to observe the installation and operating instructions.
Subject to technical modifications and errors.
CB stone-tec GmbH | Behaimweg 2, D – 87781 Ungerhausen
Visual inspection of the goods in their unpackaged condition
Before unpacking the received goods, you must visually inspect them while still in their packaging to check
for any damage. In the event of claims against the delivering shipping company, it is essential to indicate any
damage on the delivery note and to record this with photos. CB stone-tec must be informed immediately of
any damage.
Basic installation requirements
Your VAIO wood-burning stove must be installed by a skilled technician. Before installing your VAIO
wood-burning stove, you must contact your authorised local chimney sweep to discuss the suitability of
your chimney system, the site of installation and any other questions.
Natural stone is a natural product
In choosing your fireplace, you have opted for a one-of-a-kind product. Your VAIO product is one-of-a-
kind because it is clad with natural stone.
Every natural stone is a natural product that has developed over millions of years. For this reason,
every natural stone is unique and naturally different to all other stones. Every stone has its own grains,
inclusions and structures – and depending on the type of stone, these feature can be almost invisible
or also very prominent.
1. General information
Page 3

3
VAIO Operating and installation instructions
Cleaning the natural stone cladding
The VAIO natural stone elements should only be cleaned using CB stone-tec’s natural stone cleaning and
maintenance materials, which have been specially developed for the purpose. CB care spray should be used
for maintenance care. CB care spray also ensures permanent impregnation of the natural stone surface.
CB deep cleaner can be used for cleaning purposes or to remove stubborn dirt.
Cleaning and care of the stone must only be carried out when the stone surface is cold. Any attempt to clean
or care for the natural stone elements while they are hot can cause irreparable damage or discolouration
of the natural stone surface.
The use of other maintenance and cleaning agents will invalidate the guarantee as these agents have generally not been developed for use on hot surfaces or can react with the CB cleaning agents.
Ä Natural stone can react if it comes into contact with other materials. This can cause discolourati-
on and/or marking. For this reason, it is advisable not to place any decorative or other objects on
the fireplace or to lean them against the fireplace. Any discolouration caused by contact with other
objects is excluded from the guarantee. Objects which themselves react when heated (candles,
plastic objects, etc.) should not be allowed to come into contact with the natural stone surface
under any circumstances.
CB deep cleaner CB care spray
General information
This is a state-of-the-art, high-quality product. The materials used have been carefully selected and, along
with our entire production process, remain under constant surveillance. Special expertise is required to install or remove this product. Therefore, our products may only be installed and put into service by specialist
companies in accordance with the relevant legal provisions.
2. General warranty conditions
Warranty period
The general warranty conditions apply within the European Union. The warranty period and scope of warranty are provided within the framework of these conditions in addition to the statutory warranty period which remains unaffected. CB stone-tec provides a two-year warranty for the basic body of the VAIO
wood-burning stove.
CB stone-tec also provides a two-year warranty for the ceramic components, and a six-month warranty for
the grate, gaskets and glass ceramics.
Page 4

4
VAIO Operating and installation instructions
Warranty exclusions
The warranty does not cover:
Wear and tear of the product
Fireclay/vermiculite: these are natural products which are subject to contraction and expansion du-
ring each heating process. This can lead to cracks. As long as the linings remain in position in the fire
compartment and do not crack, these products are fully functional.
Surfaces: discolouration of the paintwork or galvanised surfaces caused by thermal loads or overload.
Gaskets: loosening of the gaskets due to thermal loads and hardening.
Glass ceramics: soiling by soot or encrusted residues of burnt materials and colour changes or other
visual changes caused by thermal load.
Incorrect transport and/or incorrect storage
Improper handling of fragile parts such as glass
Improper handling and/or use
Insufficient maintenance
Incorrect installation or connection of the device
Failure to observe the operating and installation instructions
Technical changes to the device by parties from outside the company
Increased heat stress due to excessive quantities of wood
Prerequisite for effectiveness of the warranty
The warranty period starts from the date of delivery to the VAIO dealer. Proof of this must be provided by
the certificate or invoice with the VAIO dealer’s proof of delivery. The product’s warranty certificate must be
submitted by the claimant to validate the claim.
Without furnishing this proof, CB stone-tec shall have no warranty obligations.
Repairing defects/maintenance
Irrespective of the statutory warranty which takes priority over the warranty within the statutory warranty
periods, within the scope of this warranty, any defects which have been demonstrably caused by material or
manufacturing defects shall be repaired free of charge, and the remaining conditions of this warranty shall
be met. Within the scope of this warranty, CB stone-tec undertakes to either repair the defect or to replace
the device free of charge. Repairing the defects shall take priority.
This warranty does not explicitly include further compensation for damage which is excluded over and above the statutory warranty.
Ä Discolouration or damage to the natural stone elements due to incorrect heating and/or improper
maintenance is excluded from the guarantee. This includes, in particular, damage due to improper
maintenance and cleaning and/or damage due to incorrect heating, particularly by using excessive
quantities of wood (see Max. quantities of wood).
Page 5

5
VAIO Operating and installation instructions
Extending the warranty period
If a warranty service is claimed, whether this be to repair a defect or to replace a device, the warranty period
for the exchanged device/ components shall be extended.
Replacement parts
If any replacement parts are required, only replacement parts produced or recommended by the manufacturer may be used.
Liability
Damage and claims for damage which do not result from a CB stone-tec device delivered with defects shall
be excluded and are not covered by this warranty. This excludes statutory warranty claims where these exist
on a case-by-case basis.
Final note
Your specialist dealer/contracting party will gladly offer you advice and support about these warranty conditions and promise of warranty. It is strongly recommended to have your chimney system and wood-burning
stove regularly inspected by a stove fitter.
Page 6

6
VAIO Operating and installation instructions
A1)
1
2
3
4
3
4
1
A2)
A.
B.
Page 7

7
VAIO Operating and installation instructions
C.
1
2
3
5
4
6
6
7
8
9
11
12
10
C1)
C2)
4
6
6
7
14
13
3
9
10
E.
F.
Page 8

8
VAIO Operating and installation instructions
G.
G.
Page 9

9
VAIO Operating and installation instructions
H.
Page 10

10
VAIO Operating and installation instructions
4. Installation manual
Legal provisions
When installing the VAIO wood-burning stove, all legal provisions must always be complied with along with
the local building regulations. Please contact your specialist dealer if you have any questions. You must
have your wood-burning stove approved by your authorised local chimney sweep.
Space requirements
If an extractor hood is installed in the interconnecting area in your home, a contact switch must ensure
that it can only be operated when the window is tilted open. When operating the fireplace, the combustion
air outlets must never be closed.
Balanced flue operation
The VAIO_7 and VAIO_8 models feed a controlled supply of external air into the stove for combustion purposes, and have been specially designed for well-insulated living spaces. The combustion air must be fed
into the device from outside via a sealed duct or an air-exhaust chimney system. The design even enables
the fireplace to operate flawlessly in negative pressure of up to 8 Pa at the site of installation. For this reason, the VAIO_7 and VAIO_8 wood-burning stoves are also approved for balanced flue operation.
The combustion air line to the fireplace’s site of installation must be constructed on site.
According to EnEV (the German ordinance on energy saving in buildings), it must be possible to seal off the
combustion air line. The closed/open setting must be clearly visible. This is not necessary for air-exhaust
chimney systems.
DIBt-approved wood-burning stoves, tested for balanced flue operation, also create a connection to the
ambient air when more fuel is added. To prevent this, open the window in this room, or tilt it open before
adding more wood to the fire. The atmospheric pressure will even itself out. You can then add more wood
without the wood-burning stove generating clouds of smoke. When you shut the stove door again, close
the window again.
Load-bearing bases
Before installing your stove, make sure that the base can bear the weight of the stove and flue.
The weight of various wood-burning stove models is as follows:
Model Weigth Height Width Depth
VAIO_7
weight varies depending on the type of stone
approx.
185 kg
112,7 cm 49,4 cm 40,9 cm
VAIO_8
weight varies depending on the type of stone
approx.
210 kg
137,2 cm 49,4 cm 40,9 cm
Heat-storage stone for VAIO_8 approx. 29 kg
Page 11

11
VAIO Operating and installation instructions
Distance to flammable material
Do not place your VAIO wood-burning stove on a non-flammable base. If the wood-burning stove is installed on a wooden floor or similar, (in Germany) the floor must be covered with a non-flammable material,
measuring 50 cm in front, and 30 cm on both sides, of the wood-burning stove (facing towards the stove).
If the wood-burning stove is installed on a base or is hung from the wall, the floor beneath the stove and
up to at least 30 cm on either side of the stove (facing towards the stove) must also be covered with a
non-flammable material.
Minimum distances - uninsulated flue pipe
(figure A)
VAIO_7 | VAIO_8
with stone cladding
1. Non-flammable wall, rear, cm
10
2. Non-flammable wall, side, cm
10
1. Flammable wall, rear, cm
10
2. Flammable wall, side, cm
40
1. Flammable wall, installed in a corner, cm
7
3. Installation distance, front, cm
110
4. Fire-safe distance, cm
92,5
Note that glass surfaces do not necessarily have to be heat-resistant. As a glass surface is categorised
in the “flammable wall” category, you should ask the manufacturer or master chimney sweep about this.
Comply with any existing rules on distances between walls and flue pipes.
Existing rules on distances between walls and flue pipes must be complied with. In order to access the
fresh air automatic system, the specified distance to the wall must be observed.
IMPORTANT
Do not store any flammable materials under the stove.
Chimney requirements
The chimney must be tall enough to ensure a good draught and to prevent smoke from becoming a nuisance. Nominal draught: approx. 12 Pa.
The chimney should have a light opening of at least Ø 150 mm. Another minimum requirement is that the
opening should always correspond to the size of the stove’s exhaust connections. The chimney should also
have an easily accessible cleaning door.
Page 12

12
VAIO Operating and installation instructions
5. Installing individual parts
Before installing the wood-burning stove, make sure that all individual parts have been correctly mounted.
Vertical section of the wood-burning stove (figure B):
1. Baffle plate at the bottom. Should be in contact with the steel rail at the back of the fire compartment.
2. Baffle plate at the top. Should be in contact with the bottom baffle plate.
3. The steel baffle plate comes in two parts. Each of the two parts is suspended from a hook on the top
plate and is fitted with a transportation lock in the form of two split pins (7). These two split pins must
be removed before setting the stove into operation.
4. RSmoke outlet at the rear. Connected to a bolted plate in the factory. This means that the exhaust flue
is hidden behind the rear wall.
5. Removable rear wall concealing the automatic system. Should always be mounted when the stove is
installed next to a flammable wall.
6. Loose thermal shield under the ash pan.
Connection to the chimney
The series is fitted with a rear and a top smoke outlet. The stove can be connected at the top or directly at
the rear to a flue.
Vertical section in the flue (figure C):
C1: Smoke outlet at the top
C2: Smoke outlet at the rear
1. Steel flue.
2. Elbow pipe. Mount inside the flue pipe connection.
3. Brick-lined chimney.
4. Masonry box. Corresponds to the size of the flue.
5. Wall rose. Conceals repairs in the masonry box area.
6. Connecting point. Seal with sealing strip.
7. VAIO wood-burning stove flues.
8. Cover plate on the external rear wall: Removed in the case of a rear smoke outlet.
9. Bolted cover: Bolted on the top cover plate for a rear smoke outlet.
10. Flue pipe plug-in connector: Bolted on the rear side for a rear smoke outlet.
11. Regulating damper in the flue pipe.
12. Cleaning vent.
13. Flue for rear smoke outlet.
14. Loose cover made of cast iron: Placed on the top cover plate for a rear smoke outlet.
Adjustable feet
The wood-burning stove’s scope of delivery includes four adjustable feet. Mount the adjustable feet and
adjust the two setting screws on both sides to the required height according to the instructions enclosed.
Page 13

13
VAIO Operating and installation instructions
Chimney flue
The chimney flue is the wood-burning stove’s engine, and of vital importance to the stove’s general function. The draught in the chimney flue generates negative pressure in the stove. It removes smoke from the
stove and draws in air through the air slider which cleans the glass pane and keeps it free from soot. The
negative pressure also ensures that air for combustion is drawn in through the primary and secondary
sliders.
The chimney draught is generated by the different temperatures inside and outside the chimney. The
higher the temperature in the chimney, the stronger the draught. That’s why it is particularly important
that the chimney is thoroughly heated before pushing the slider forwards and shutting off the air for the
combustion in the stove (a brick-lined chimney takes longer to heat than a steel flue). On days on which
the draught in the chimney is weak due to wind and weather conditions, it is particularly important to heat
up the chimney or flue as quickly as possible. The flames must be generated quickly. Chop the wood up
particularly small and also use kindling wood.
After long periods when the stove has been out of use, it is important to have the flue pipe checked for any
blockages.
It is possible to connect several devices to one chimney. However, the applicable rules for this must first
be looked into.
Malfunctions can occur even in a top-class chimney if it is not operated correctly. Inversely, a chimney of
a lesser quality can operate extremely well if used properly.
Chimney sweeping
To counter the risk of a chimney fire, the chimney should be swept every year. The flue pipe and smoke
chamber above the steel baffle plate should be cleaned at the same time as the chimney. If the chimney is
too tall for it to be cleaned from the top, a cleaning vent should be installed.
In the event of a chimney fire, close all vents and call the fire brigade immediately. Before using the stove
again, have the chimney inspected by a chimney sweep.
Results of a nominal output test in accordance with EN 13240
Nominal heat output 4,9 kW
Flue gas temperature – measuring point in accordance with EN 13240 260ºC
Flue gas temperature – measured in the flue outlet 312ºC
Flue gas mass flow 4,1 g/s
Efficiency 81%
Test results as per NS 3058
Particle emission 2,16 g/kg
Page 14

14
VAIO Operating and installation instructions
6. Detailed installation instructions
When unpacking the goods, make sure that your cutting tools (blades, cutting knives, scissors, etc.) do not
cause any damage.
Heating technology
Door handle including top inlay (natural stone/wood) and front inlay (wood)
Side parts (natural stone)
Top plate (natural stone)
4 adjustable feet
Oven glove
A4 cover with: - fastening material
- other accessories
- guarantee certificate
- stone certificate
- operating and installation instructions
-> fastening material: - 8 countersunk head screws (for the side cladding)
- 2 countersunk head screws (for the door handle)
- 5 wood screws (for the top/front inlay made of wood)
-> other accessories: - 2 silicone points (for the top plate)
Unpacking the goods
Lieferumfang
Transporting the components to the site of installation
When transportng the goods, make sure that your hands/gloves are clean
Never place the ceramic elements near sharp edges or corners.
Never push or pull the ceramic elements along the floor or ground (risk of scratching).
Always carry the ceramic elements to the site of installation, never use carts etc. to transport them.
The heating technology should only be transported in the upright position or slightly tilted on its back; ne-
ver pick it up from the door side.
If using luggage carts as a transport aid, only ever pick up the heating technology from the back, never
from the door side.
Only transport the heating technology with the fire compartment door closed.
Page 15
15
VAIO Operating and installation instructions
Installation process
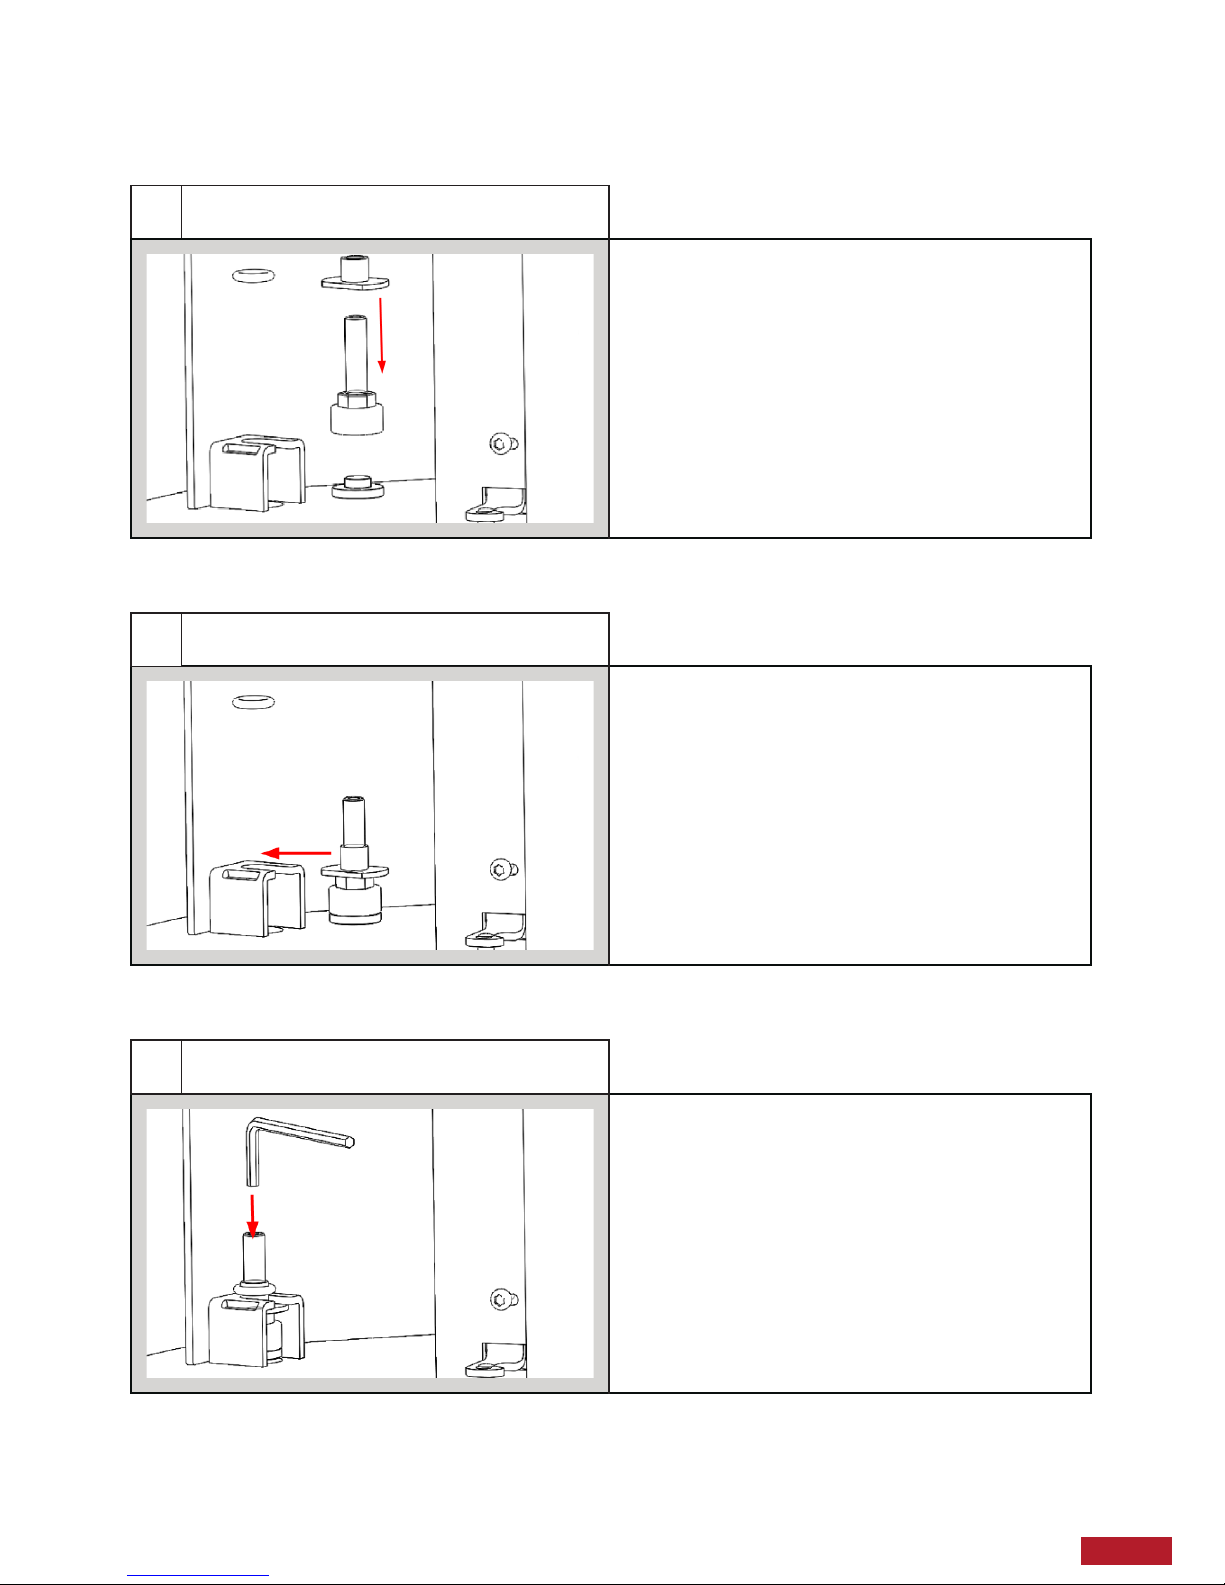
1
Mounting the adjustable feet
The individual parts of the four adjustable
feet can be found inside the heating insert.
Assemble these as illustrated.
Then mount the assembled adjustable feet
in the holders provided on the floor plate.
Now push the gasket over the screw from
above. You can then adjust the individual
adjustable feet with the aid of an Allen key.
3
2
Mounting the adjustable feet
Mounting the adjustable feet
Page 16
16
VAIO Operating and installation instructions
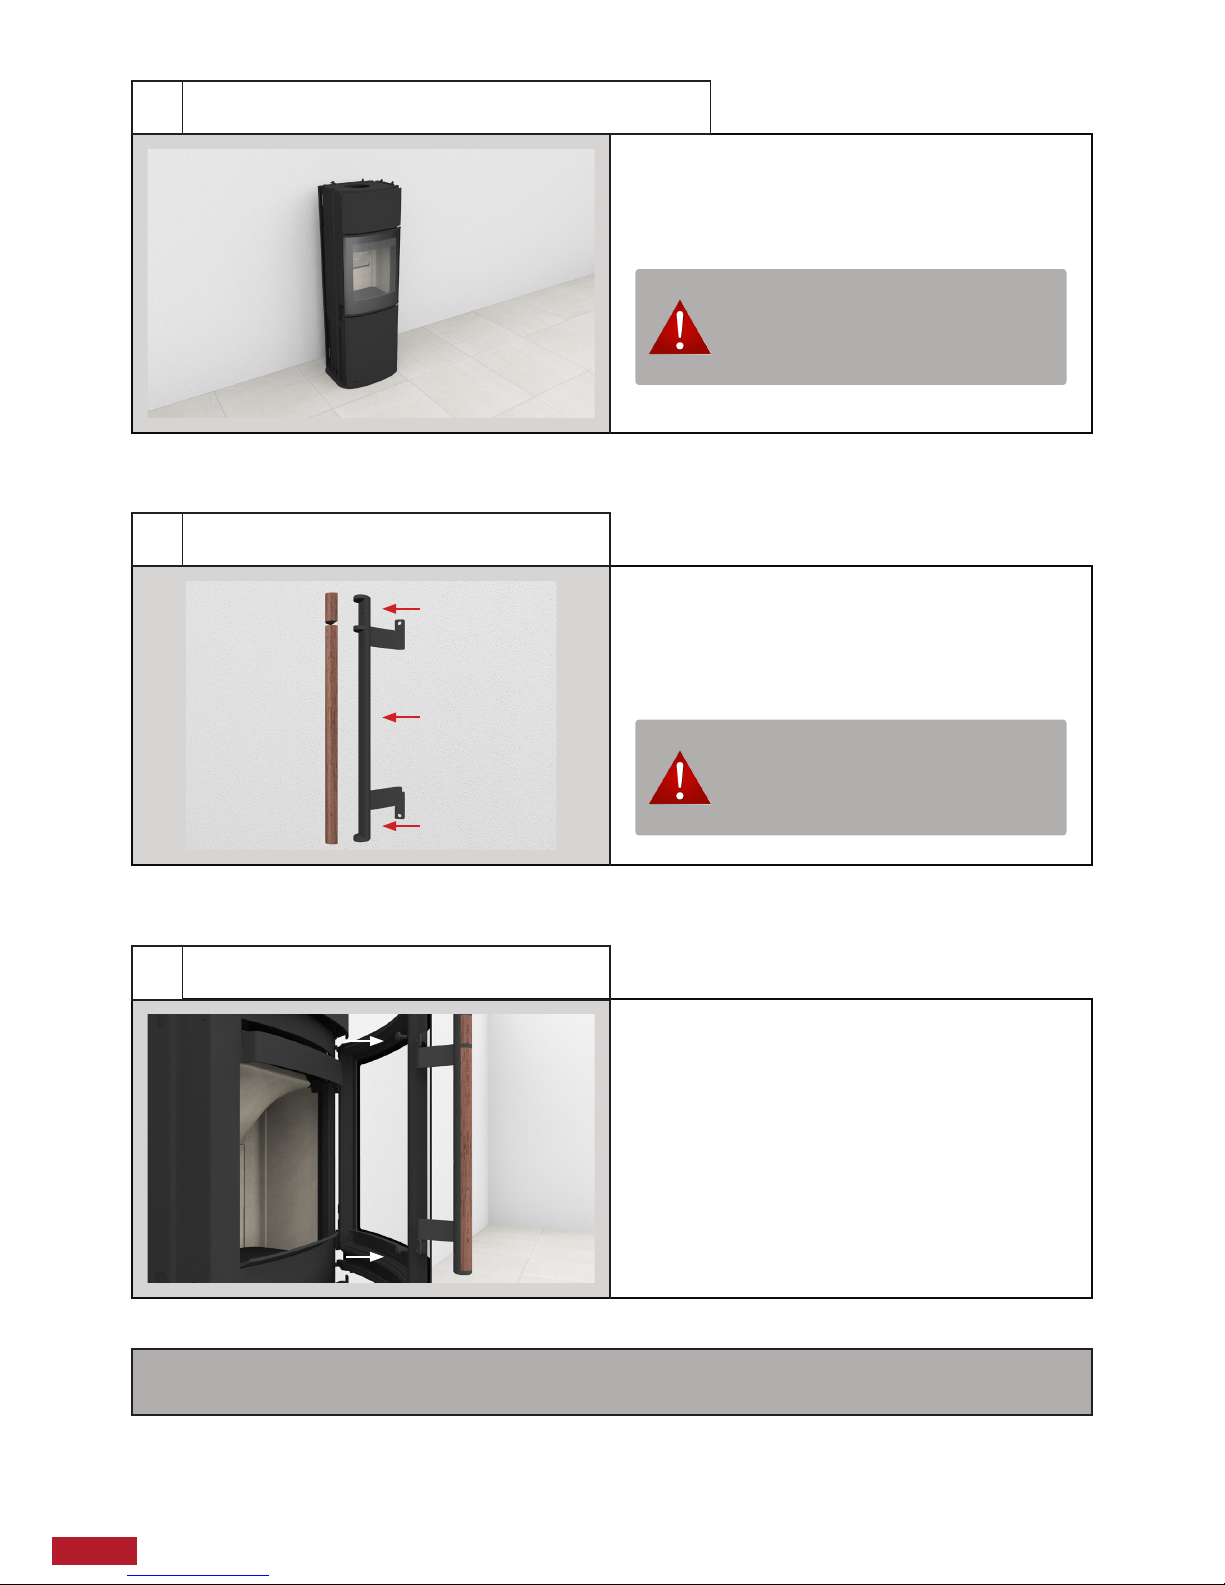
Position the heating technology in the site
of installation and adjust the adjustable
feet to correct any unevenness.
Only mount the top and front inlays on the
door handle using the wood screws supplied. When doing so, lift the wood inlay so
that it sits flush with the metal handle.*
The handle can now be fastened to the fire
compartment door using the raised head
screws supplied.
Observe the correct distance
from the walls.
Fasten the screws into the wood
from behind, through the metal.
4
5
6
Setting up and aligning the heating technology
Mounting the top/front inlay*
Mounting the door handle
* Note: Top inlays made of natural stone are already attached to the door handle in the factory.
Page 17
17
VAIO Operating and installation instructions
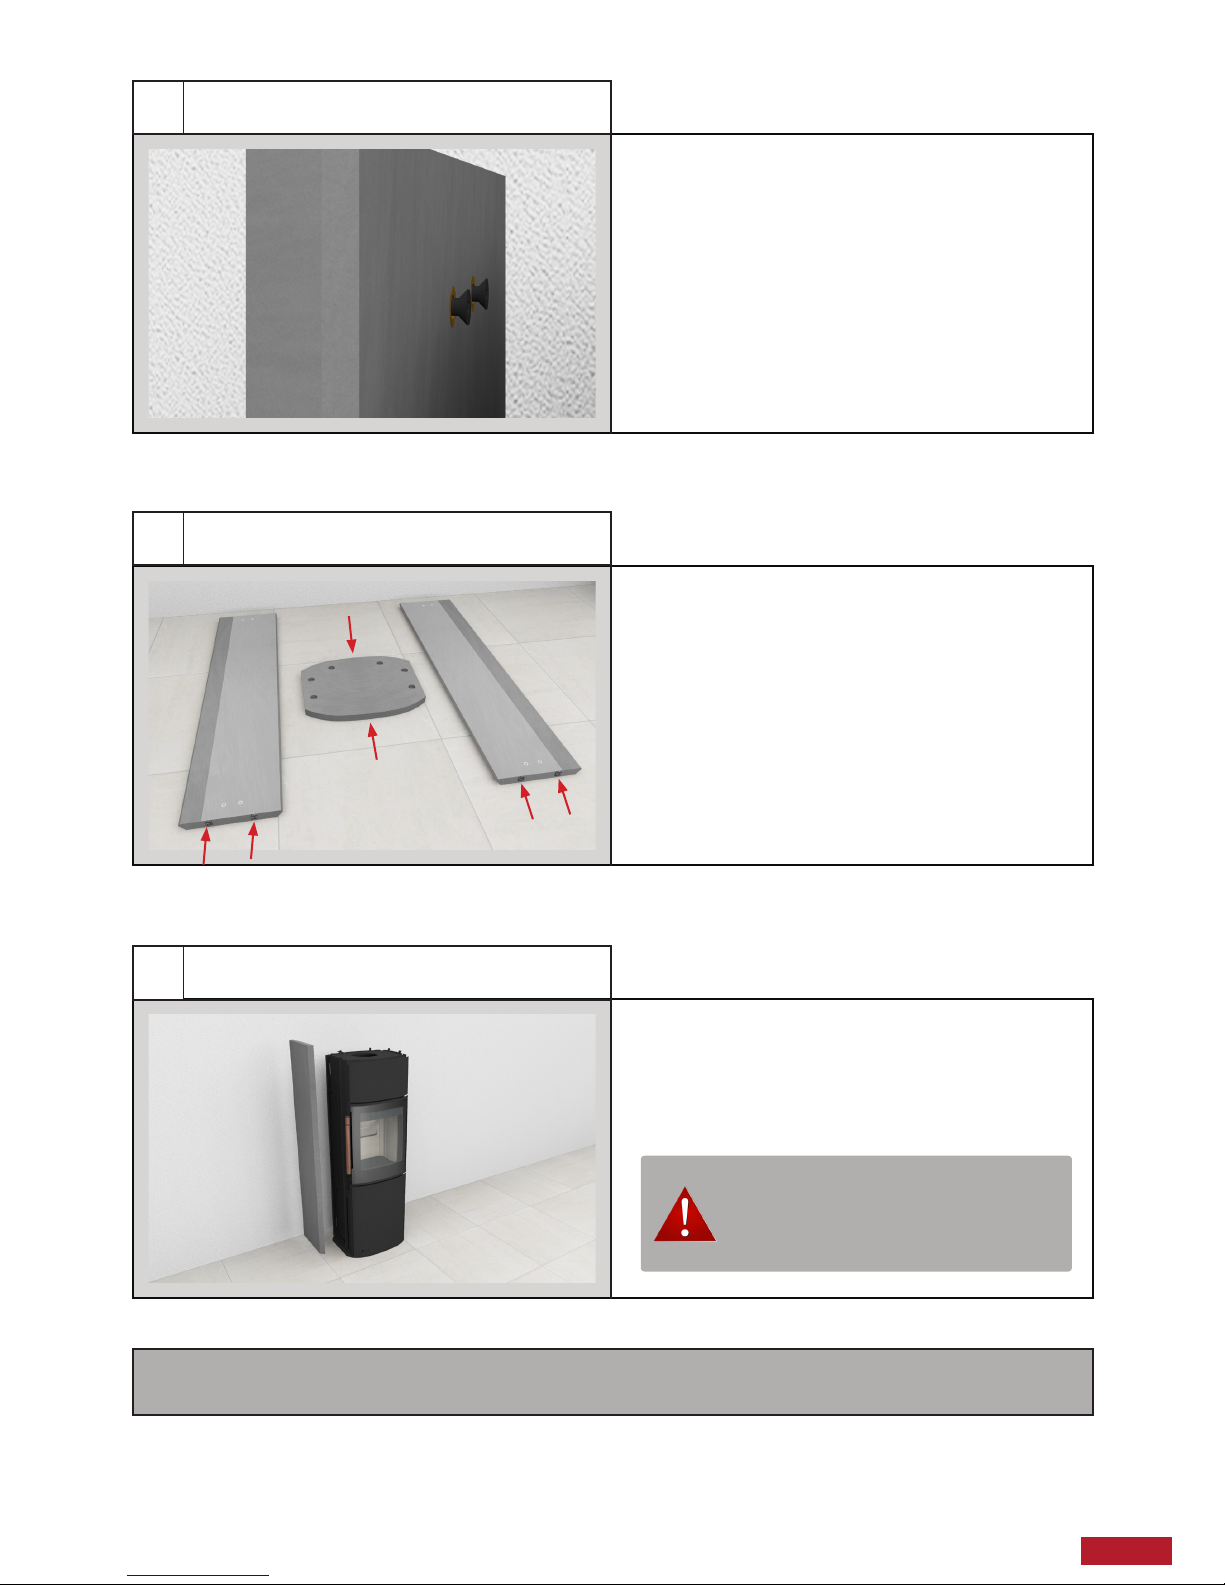
On each side section, screw 4 countersunk
head screws into the pre-mounted dowels.
Turn the screws until you can no longer see
the thread.
Each of the side sections has surface treatment on the inside of one long side. So
there is a left (L) and a right (R) side section. Sealing strips are attached to the undersides of these sections (see arrows) and
must point downwards at a later stage.
There are six recesses on the underside of
the top plate which indicate the rear and
the front (see illustration).
Carefully lift the left side section onto the
wood-burning stove.
Make sure that the element is
parallel to the stove.
7
8
9
Preparing the side cladding
Side sections and top plate explanations
front
behind
Mounting the left side section
* Note: The part with the surface treatment should always point forwards.
(R)
(L)
Page 18
18
VAIO Operating and installation instructions
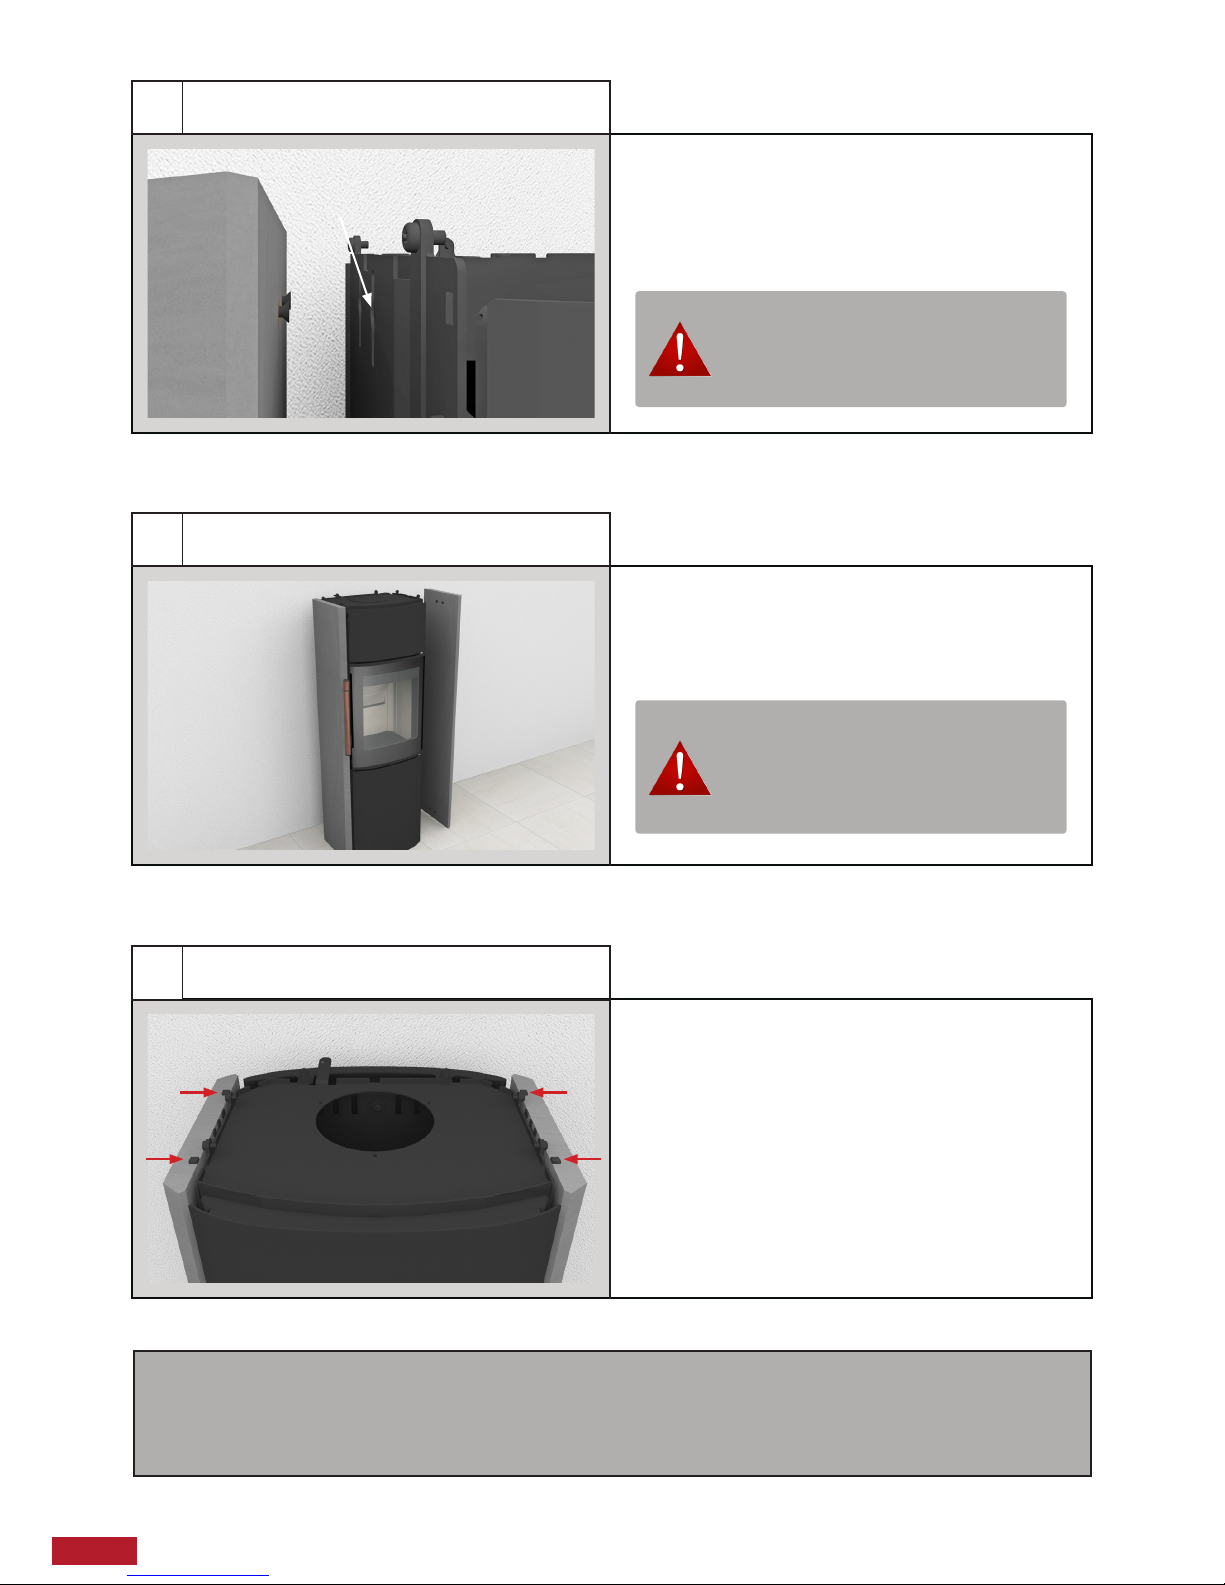
Carefully lift the element towards the stove
so that the screw heads fit through the keyholes. Then carefully slide the side section
downwards.
Mount the right side section in the same
way as the left one.
Four silicone points (2 spare points are
provided in the scope of delivery), have
already been attached to the top of the side
sections in the factory. They are used to
support the top plate.
Make sure that all four screw
heads slide into the keyholes at
the same time.
Make sure that the sealing strips
on the undersides of both side
sections are supported on the
heating technology floor plate.
10
11
12
Mounting the left side section
Mounting the right side section
Information about the silicone points
Note: - If the side section wobbles after being mounted or there is a gap, mount it again and screw the coun-
tersunk head screws further in.
- If the side section is too heavy or cannot be lowered down into the keyholes, mount it again and slightly
unscrew the countersunk head screws.
keyholes.
Page 19
19
VAIO Operating and installation instructions
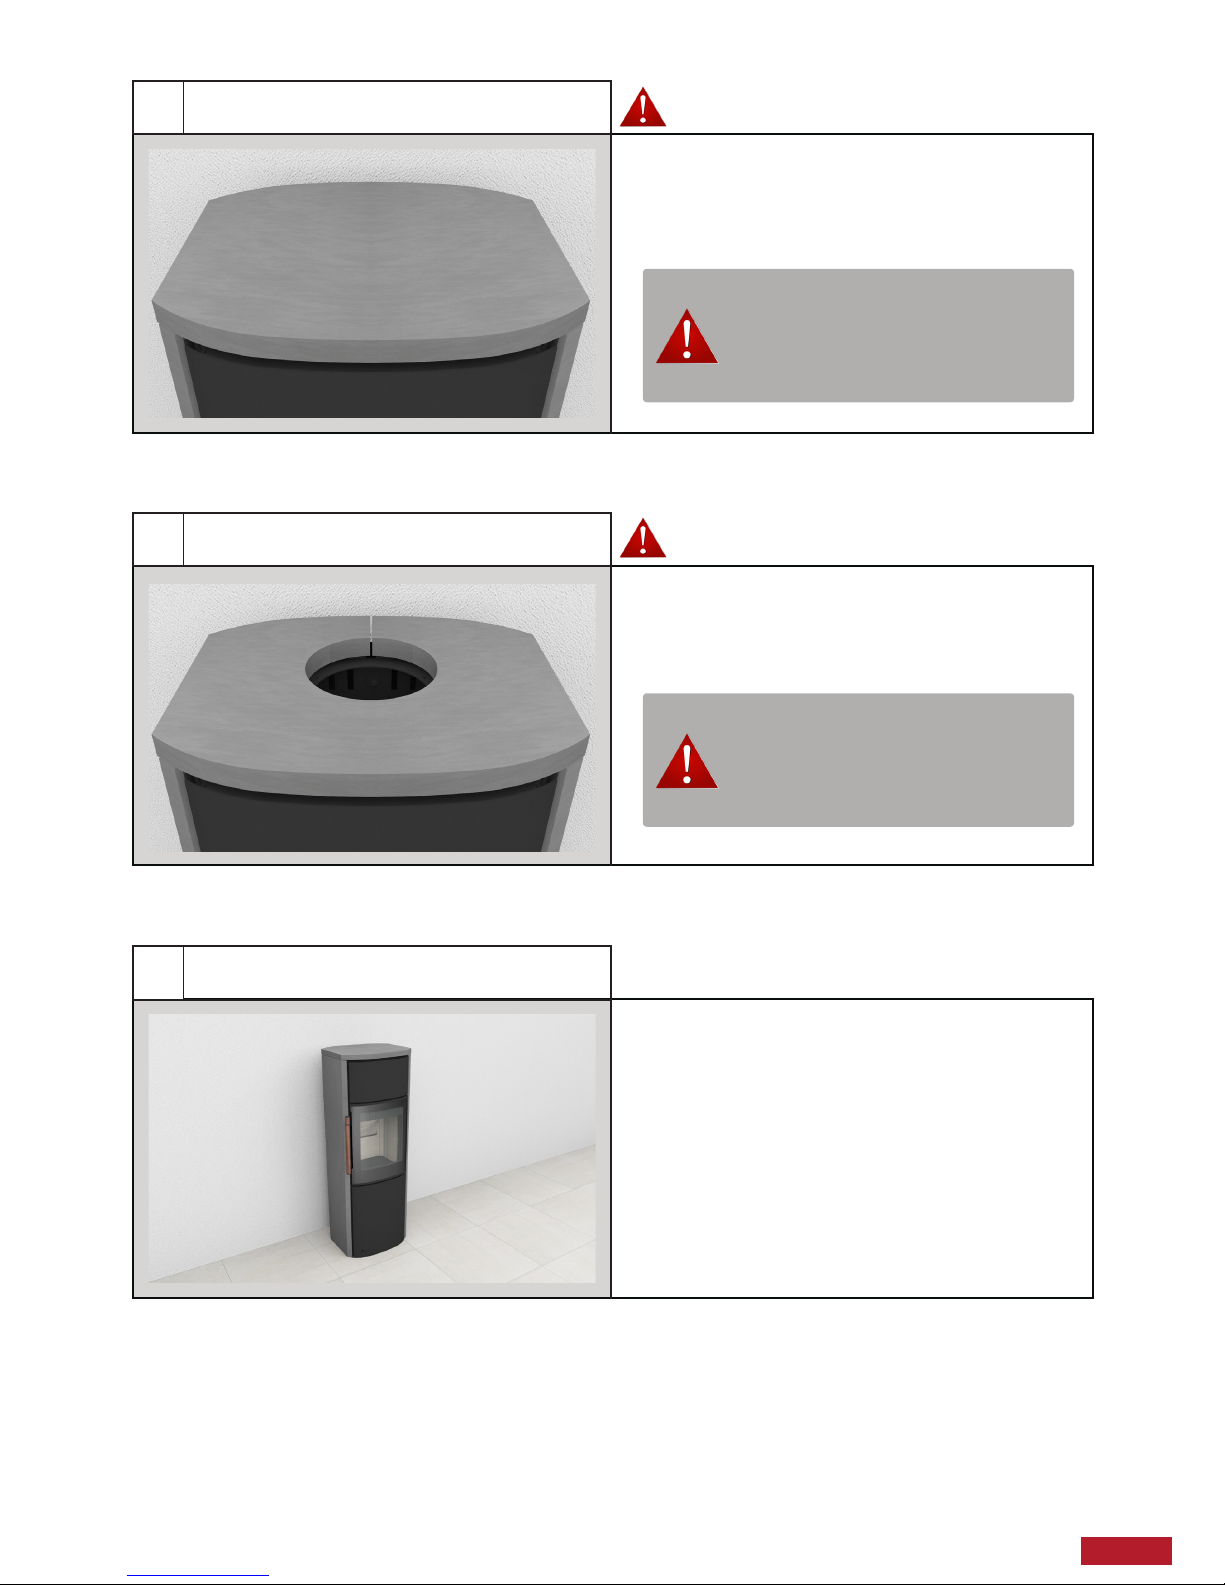
Now carefully place the top plate onto the
silicon points.
Now carefully place the top plate onto the
silicon points.
This completes the installation.
Attention: The holes on the bottom of the top plate indicate the
front of the top plate (see point
8).
Attention: The holes on the bottom of the top plate indicate the
front of the top plate (see point
8).
13
13
14
a) Mounting the top plate - Top smoke outlet -
- Rear smoke outlet -
b) Mounting the top plate
Assembled natural stone casing
Page 20

20
VAIO Operating and installation instructions
7. Heating instructions – wood
When the stove is heated for the first time, the paint on its surface hardens. For this reason, the door and
ash drawer should be opened very carefully to prevent the gaskets from sticking to the paint. The paint
may also give off an unpleasant odour, therefore you must make sure that the room is well ventilated.
On the subject fire safety
Approved fuels
VAIO-wood-burning stoves are EN approved in accordance with standard regulations for burning wood
only. We recommend using dried wood with a maximum residual moisture content of 18%. If wood with
a higher moisture content is used, this can result in the accumulation of soot, harmful emissions and
inefficient fuel economy. We advise purchasing a hygrometer to regularly check that the firewood has the
correct moisture content before burning it.
Recommended types of wood
Types of wood such as birch, beech, oak, elm, ash, conifers, and fruit trees can be used as fuel for this
stove. The difference between the different types of wood is not in the fuel value, but in the weight per unit
volume. Since beech weighs more per cubic metre than the same amount of common spruce, it takes
more common spruce to produce the same amount of heat that would be produced from one cubic metre
of beech.
Banned fuel types
Folgende Brennstoffe dürfen nicht verfeuert werden:
• printed paper • chipboard • plastic • rubber • flammable liquids
• Arubbish such as milk cartons • painted, varnished or waterproof timber.
Burning of these materials is prohibited because during combustion, they develop substances that are
harmful to health and the environment. These substances could also damage your wood-burning stove
and chimney, invalidating the warranty.
Storing the wood
A water content of maximum 18% can be achieved by storing the wood outdoors under cover for at least
one year (or preferably two). Wood stored indoors can become too dry and therefore burn too quickly. However, this does not apply to kindling wood which should be stored indoors for a few days before use.
Recommended dimensions
As the size of the fuel influences the way it burns, the following information must be observed:
Fuel type Length in cm Diameter in cm
Kindling wood 20-31 2-5
Chopped wood 20-31 7-9
Page 21

21
VAIO Operating and installation instructions
To carefully light the wood-burning stove for the first time, please proceed as follows:
1. Lighting for the first time
Turn the regulator knob (fig. E, 1) clockwise to the maximum position. Lay two pieces of wood (5-8 cm
diameter) horizontally on the bottom of the fire compartment (1-1.5 kg). Then lay 6 to 10 pieces of kindling
crosswise and diagonally over them. Add 4 firelighters to the top layer of kindling. Light the firelighters
and shut the door. If there is a problem with condensation in the door, you can leave the door slightly ajar
if necessary before closing it. When the fire has completely gone out, open the door and leave open until
the stove has cooled down to room temperature.
2. Lighting the stove for the second time
Turn the regulator knob (fig. E, 1) clockwise to the maximum position. Lay two pieces of wood (5-8 cm
diameter) horizontally on the bottom of the fire compartment (1-1.5 kg). Then lay 6 to 10 pieces of kindling
crosswise and diagonally over them. Add 4 firelighters to the top layer of kindling. Light the firelighters
and shut the door. If there is a problem with condensation in the door, you can leave the door slightly ajar
if necessary before closing it.
Once there are no more yellow flames and there is an adequate layer of embers, you can add more wood.
An adequate layer of embers is achieved when the floor of the fire compartment is covered with nicely
glowing embers. Add two more pieces of wood (up to 1.2 kg per piece) with a diameter of approx. 7-9 cm.
After lighting the fire, once all pieces of wood are burning, turn the regulator knob (1) to the middle position. The fire should burn out and the stove should be allowed to cool down to room temperature before
lighting it again.
3. Lighting the stove for the third time
The procedure is the same as when lighting the fire for the second time, however, this time, more wood is
required. The fire should burn out and after the fire has gone out, the stove should cool down.
Subsequently lighting the stove:
Follow the normal instructions, see the “Lighting” and “Adding more wood” sections.
Follow the normal instructions, see the “Lighting” and “Adding more wood” sections.
It is very important to heat the stove properly in order to achieve successful combustion. A cold wood-burning stove and a cold chimney constitute a challenge for the combustion process. It is important to achieve
a high flue gas temperature as quickly as possible.
Turn the regulator knob (1) clockwise to the maximum position. Lay two pieces of wood (5-8 cm diameter)
horizontally on the bottom of the fire compartment (0.9-1.2 kg). Then lay 6 to 10 pieces of kindling crosswise and diagonally over them. Place 2-4 firelighters between the top layer of kindling wood. Light the
firelighters and shut the door. If there is a problem with condensation in the door, you can leave the door
slightly ajar if necessary before closing it. Once all pieces of kindling wood are burning, turn the regulator
knob (1) to the middle position. If the fire goes out when you are adjusting it, turn the regulator knob back
to the maximum position until the fire burns better. Then turn the regulator knob to the middle position.
The kindling wood should burn up fully until no more flames are visible. Only then should you add more
wood.
Important!
Do not open the ash pan during the heating phase. It should always remain closed when the stove is in
operation as otherwise the automatic controller for the flow of air could become damaged. Only open the
door when lighting the stove, adding more wood and cleaning the stove.
Page 22

22
VAIO Operating and installation instructions
Adding more wood (figure E)
Once there are no more yellow flames and there is an adequate layer of embers, you can add more wood.
An adequate layer of embers is achieved when the floor of the fire compartment is covered with nicely
glowing embers. Add at least two more pieces of wood of up to 1.2 kg per piece to the stove. The stove no
longer needs to be adjusted, the automatic system will do this. However, you can adjust the temperature
up or down using the regulator knob (1). When turned to the minimum position (in an anti-clockwise direction), the rate of combustion is reduced and the burning time increases. When turned to the maximum
position (in a clockwise direction), the rate of combustion intensifies and the burning time decreases.
Whenever you add more wood, you should always wait until the layer of embers is sufficiently small again.
Heating with charcoal and coal
The wood-burning stove is not suitable for heating with charcoal or coal. However wood briquettes are
permitted and can be placed on the glowing kindling. Turn the regulator knob clockwise into the maximum
position until the wood briquettes thoroughly glow. When using wood briquettes, make sure that they have
an elevated heating capacity (max. 3 kg per hour).
Remember to turn the regulator knob back in an anti-clockwise direction. Bear in mind that the glass
panel will soot during heating if you use fuels other than wood.
Operating the valve in the heat accumulator
There is a valve at the rear of the stove between the cover plate and the heat accumulator which can be
opened to allow the convection air to reach the heat accumulator. When the valve is pushed to the left,
convection air is supplied. When the valve is pushed to the right, convection air is not supplied.
To heat up the stones in the heat accumulator as quickly as possible, it is advisable to keep the convection
valve closed when lighting the fire.
When the convection valve is closed, the heat accumulator keeps the heat stored in the stones for longer.
In contrast, if the valve is opened, the heat from the stones in the heat accumulator will be emitted quickly
out of the heat accumulator and into the room.
8. General information about lighting the stove
Fast or powerful heating
Faster or more powerful heating can be achieved by using many small pieces of wood.
Maximum combustion
For heating purposes, a maximum of:
2.4 kg of wood per hour should be used.
If this amount is exceeded, the standard factory warranty will be invalidated. There is also a risk of causing
damage due to the intensive heat. The stove is approved for intermittent burning.
Typical lighting interval
Typical lighting interval at nominal heat output
Wood: 45 min (1.1 kg of wood)
Long burning time
The longest burning time is achieved by turning the regulator knob in an anti-clockwise direction. Turning
it to the limit stop prevents primary air from being drawn in through the grate. After adding more wood
for the first time, turn the regulator knob clockwise to enable primary air to stream into the stove and the
wood to burn.
After heating up the stove, make sure that the flames are kept alive in the wood. If this is not the case, the
air supply has been reduced too far and you must turn the handle to the right (clockwise), to increase the
supply of air.
Page 23

23
VAIO Operating and installation instructions
Insufficient heating
If the fireproof materials in the fire compartment are blackened after a fire, there is a risk that the stove
will become polluted and the automatic system will not be able to function optimally. Therefore, open the
air supply further by turning the regulator knob clockwise (to the right). In such cases, it can also help if
you burn larger quantities of wood.
Optimal combustion
• Use clean, dry wood.
Wet wood results in inefficient combustion and in the production of soot. In addition, a great deal of energy
is used to dry the wood rather than heat the room.
• Add a little wood at a time.
The best combustion is achieved by adding small quantities of wood. If you use too much wood, it takes too
long to reach an optimum combustion temperature.
• Make sure that there is a sufficient supply of air.
You must also make sure – especially when heating the wood-burning stove at the start – that there is
plenty of air so that the temperature in the wood-burning stove rises quickly. In this way, the fumes and
particles that are also released during combustion will be burned. Otherwise, they will cause soot to build
up in the chimney, leading to the risk of a chimney fire, or will be released into the environment as harmful
emissions. If an incorrect amount of air is supplied, this leads to inefficient combustion and therefore to a
lower level of efficiency.
• You cannot use wood to keep the fireplace heated over night.
Before going to bed at night, you should not add more wood to the stove and then close the air supply in
order to keep the fireplace heated over night. If you do so, large amounts of hazardous smoke will be emitted. In addition, soot may be deposited on the chimney, leading to the risk of a chimney fire.
Cleaning the glass
We recommend wiping the glass pane after heating with a dry paper towel.
Fuel
Heating the stove excessively may cause damage, for example, the glass may turn white. This can be avoided by never igniting the fire with the door open and by taking extra care when igniting the fire with fuel
types that generate high temperatures such as briquettes.
Use birch or beech. Chop up the wood and store for at least one year in the open air under cover before
use. Wood that is stored indoors dries more easily and therefore burns too quickly when heated.
Briquettes emit a great deal of heat. Certain types expand greatly which can lead to uncontrollable burning.
The wood-burning stove is only approved for igniting with EN 13240 wood. Never burn chipboard, painted, varnished or waterproof timber, plastic or rubber.
Page 24

24
VAIO Operating and installation instructions
9. Maintenance
Cleaning
Maintenance work must only be carried out when the wood-burning stove is cold. Your wood-burning stove requires a minimum of daily maintenance. It is best to use a vacuum cleaner with a small mouthpiece
and a soft brush to vacuum the outside of the wood-burning stove or clean it with a soft, dry cloth or soft
duster.
You can also dust the wood-burning wood-burning stove with a soft, dry cloth or a soft hand brush. But
remember only to do so when the wood-burning stove is cold. Do not use water, alcohol or any cleaning
agents as this will damage the paint.
The wood-burning stove should undergo a thorough overhaul once a year. It is particularly important to
clean the fire compartment as that is where ash and soot gather. Hinges and locking hooks must be lubricated with spray-on copper grease (heat-resistant up to 1100°C), see figure H. Lift the door by approx. ½
cm and spray the copper grease into the hinge pins.
Maintenance
The wood-burning stove should undergo a thorough inspection at least every two years. The inspection
includes:
• Thorough cleaning of the wood-burning stove.
• Checking the springs in the automatic system and replacing if necessary.
• Checking the gaskets and replacing them if damaged or no longer soft.
• Checking the insulating material and replacing if necessary.
• Checking the design type (only in certain countries).
• Checking the bottom of the combustion compartment.
• Hinges and locking hooks must be lubricated with copper grease (see figure H).
Maintenance must be carried out by a qualified installer. Only use original replacement parts.
Cleanup
To prevent soot or ash from getting into the automatic system when cleaning the chimney, turn the regulating knob to the MIN position. Remove the top smoke plate and the two-part steel baffle plate from the
stove before cleaning (figure F):
• Lift the smoke plate (1) out of the fire compartment.
• Detach both halves of the baffle plate (2) from the hooks (3) under the top plate.
Ash
Emptying the ash pan is very simple. Place a bin bag over the ash pan, tip the contents into the bag and
gently take the ash pan back out of the bag. The ash can be collected with the household waste. Make sure
that you wait 24 hours after the fire has gone out, as the ashes may still be hot.
Insulation
The effective yet porous insulation of the fire compartment is subject to a certain level of wear and tear,
and can become damaged over time. Initially, this should not have a negative impact on the stove’s efficiency. However, as soon as the insulation is worn down to over half of its original thickness, you should
replace it.
VAIO Automatic (figure G)
Lift the top plate off the stove. Dismantle the rear panel by loosening the two screws. Check the initial
point of the sensor rod when the stove is cold. In the cold condition, the initial point should be approx. 20°
above the horizontal (laser-cut marking).
The rod should move easily and should be slightly springy to the touch in both cold and warm conditions.
When the temperature increases or drops, it should not move more slowly. The sliders should be dry and
clean and should slide easily into each other. The control rods and sliders may be lubricated with WD40
(never use oil).
Page 25

25
VAIO Operating and installation instructions
Door/glass
Only clean the glass when the wood-burning stove has cooled down. To do so, use a damp piece of paper
dipped in ash. This will enable you to remove any soot from the glass panel. Then moisten a clean piece
of paper and wipe the glass panel clean. The manufacturer shall not be held responsible for any damage
caused by the use of aggressive chemical substances.
At regular intervals, make sure that the gaskets on the door are soft and undamaged. If this is not the
case, they must be replaced. Only use original seals.
Surface
The surface does not usually require any subsequent treatment. Any paint damage can be quickly and
easily improved using Senotherm spray.
Guarantee
Failure to carry out maintenance will invalidate the stove manufacturer’s guarantee.
10. Operational disruptions
Sooty glass
• Wood is too damp. Only use wood that has been stored under cover for a minimum of twelve months with
a moisture content of approx. 18%.
• The door gasket may not be properly sealed.
Formation of smoke when opening the front door
• The throttle valve in the chimney may be shut. Open the throttle valve.
• No draft in the chimney. See the section describing the chimney or contact your local chimney sweep.
• The cleaning door is not properly sealed or has fallen out. Replace or re-install.
• Never open the door when there are flames.
It is not possible to regulate the heating
• The door or ash pan gasket is not properly sealed. Replace the gasket.
• If the draft is too strong in the chimney, the regulating rod may need to be closed. If the stove is not in
operation, close the regulating rod.
• If the steel panels are burnt or deformed, the stove is not heating correctly. Stop using the stove and
contact your specialist.
In the event of operational disruptions that you are not able to resolve yourself, please contact the place
of purchase.
11. Declaration of performance
Download the declaration of performance from our website via the following links: www.vaio-fire.com
Page 26
26
VAIO Operating and installation instructions
12. Commissioning certificate
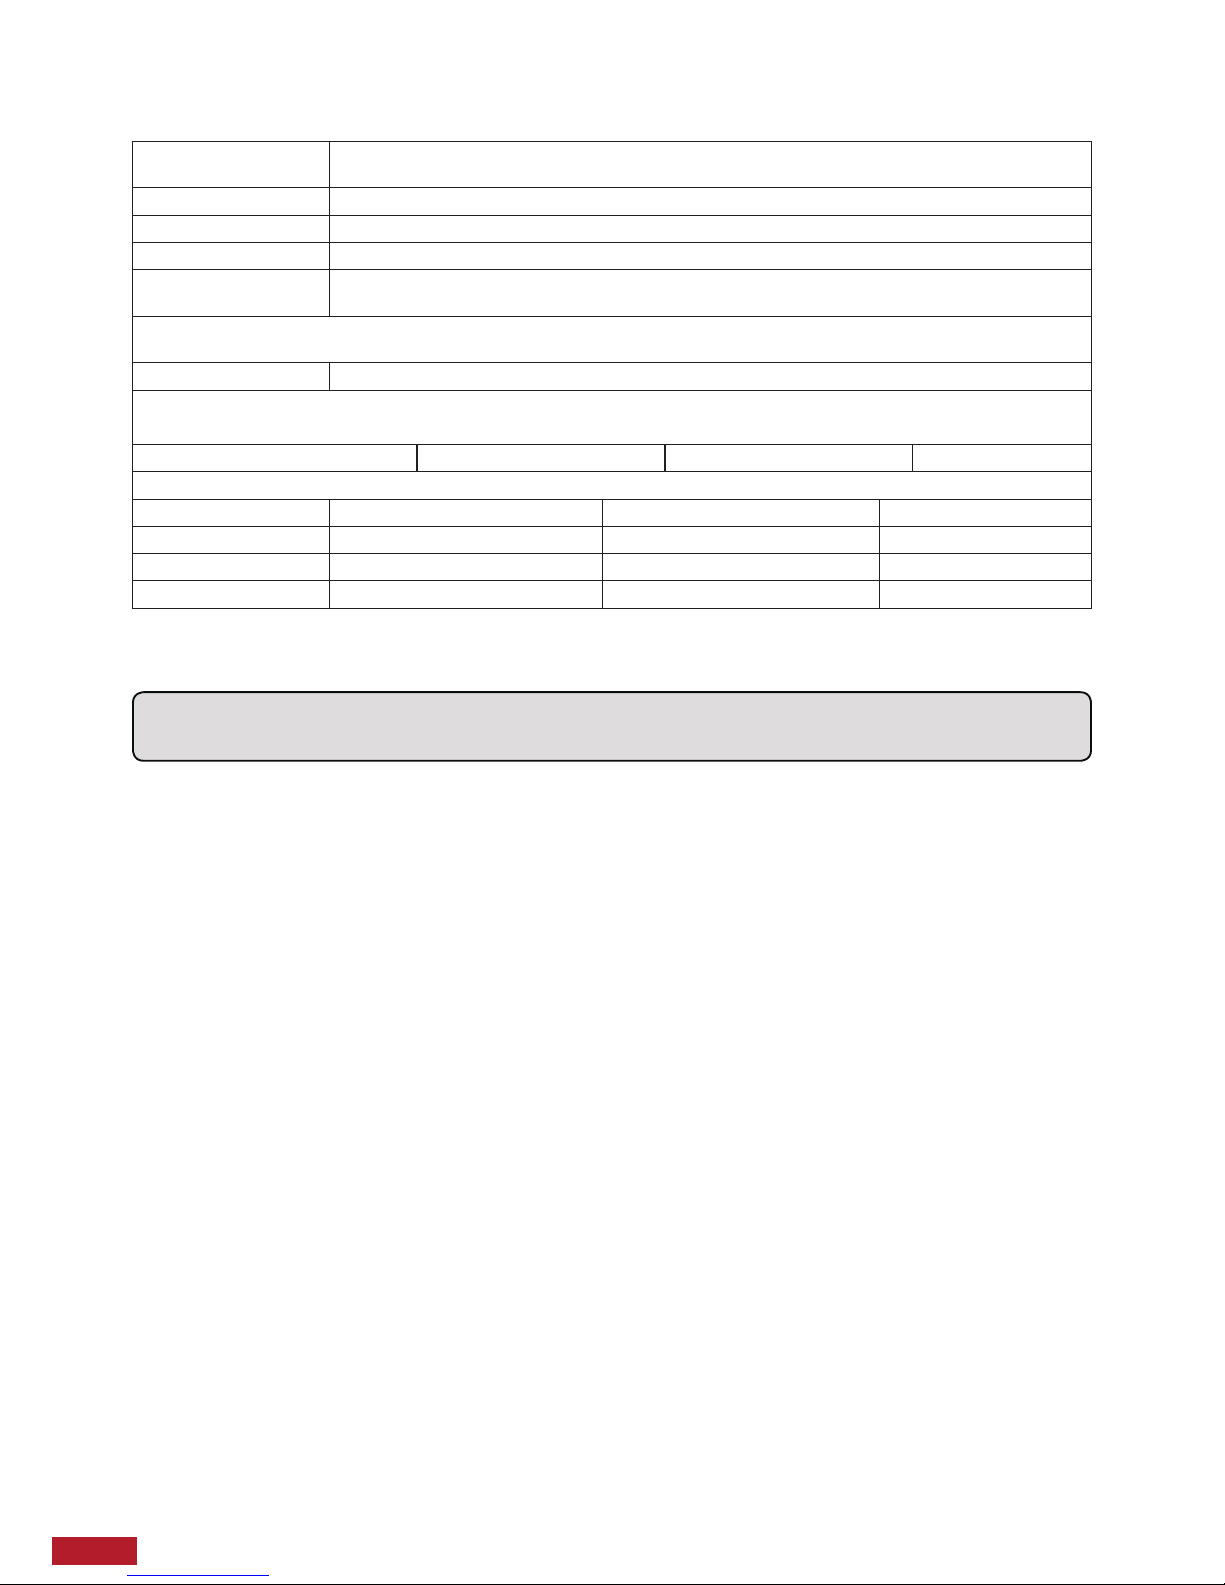
Date: Serial no:
(see type plate)
Installation company:
Has the actual supply
pressure been checked?
Yes No
Negative pressure greater than 20-25 Pa can influence correct operation. This can lead to soiling of the glass or to an increase in
the generation of noise.
Test burning carried out:
Yes No
Wood-burning stove operator trained in operating and installing the stove, and operating instructions handed over:
Signatures:
Installer Stove fitter Operator
Annual maintenance:
Type of work
Name:
Date:
Signature:
Ä Attention: Keep in a safe place. Store the instructions together with their valid and clearly dated proof of
purchase, and keep the documents ready for our installers in the event of any servicing work.
Page 27
27
VAIO Operating and installation instructions
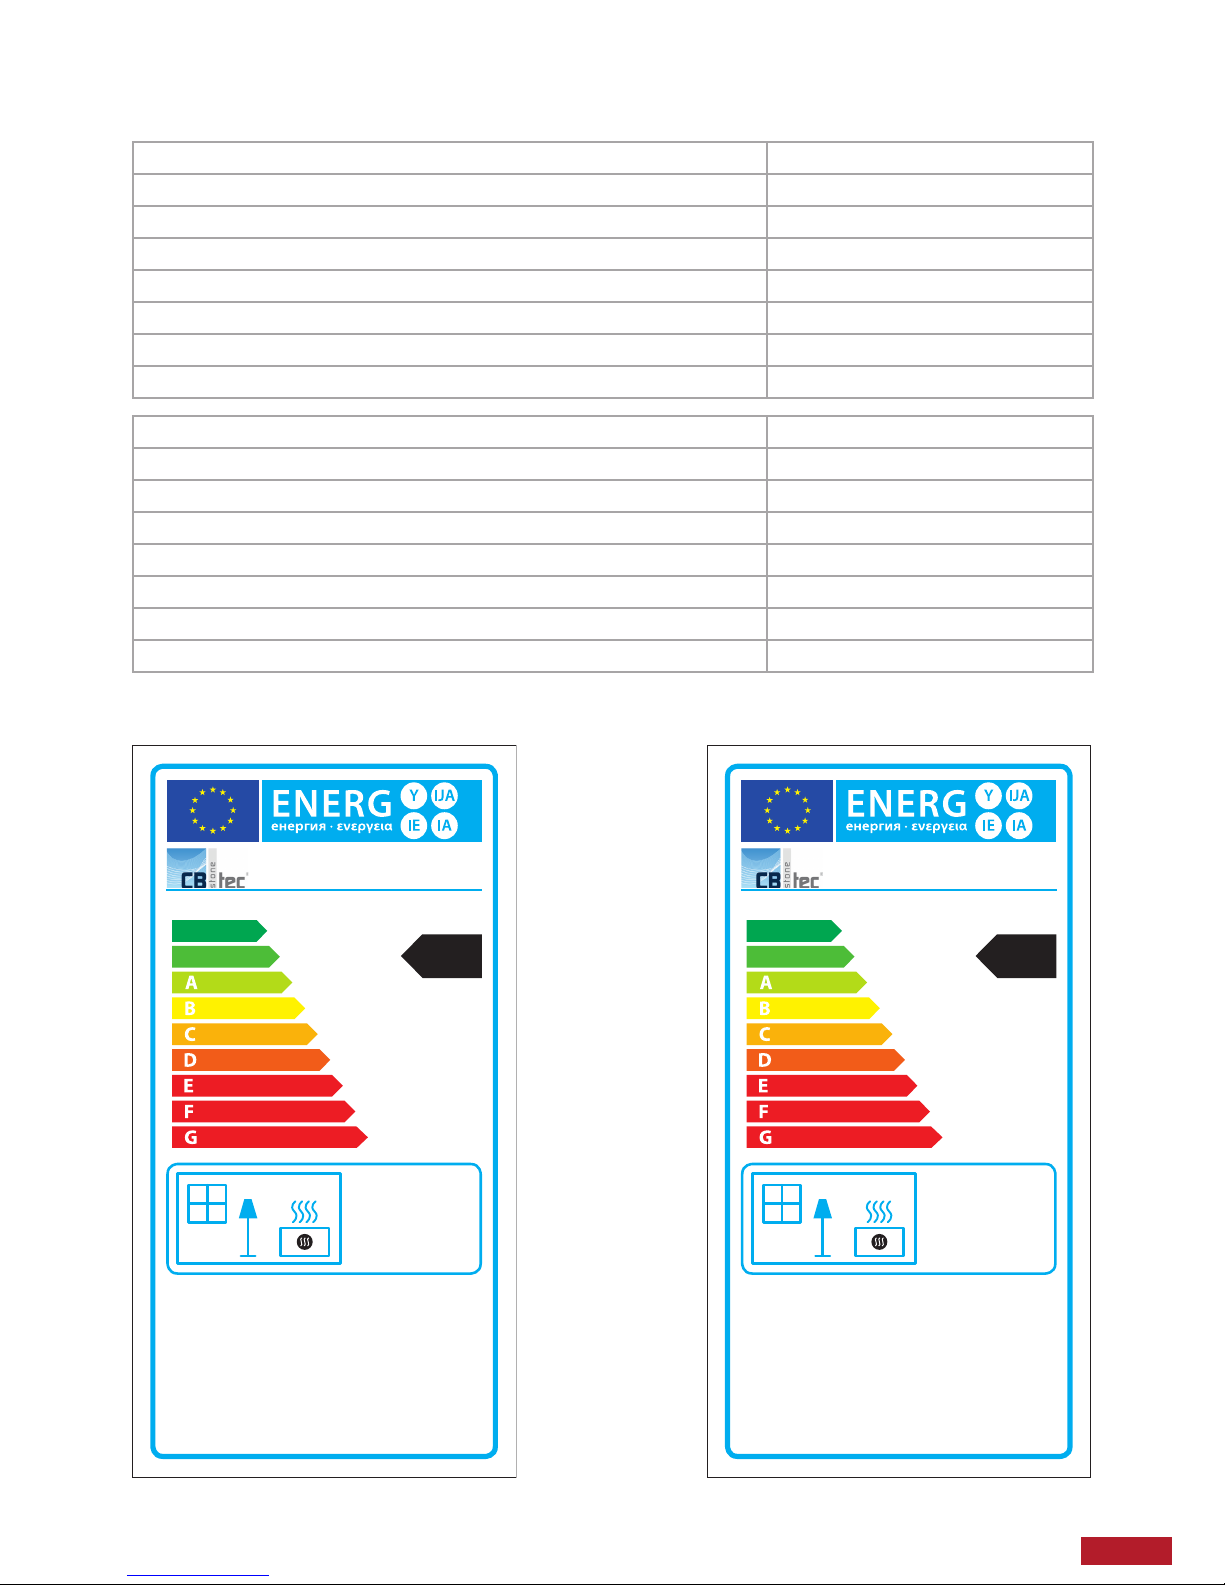
13. Product data sheets in accordance with Regulation EU 2015/1186
Name or tradename of supplier: CB stone-tec GmbH
Supplier model: VAIO_7
Model energy efficiency class: A+
Thermal output [kW]: 4,9
Energy efficiency index EEI: 109,9
Fuel energy efficiency at nominal heat output: 82,0
Fuel energy efficiency at minimal load (if relevant): N. A.
Special precautions (for set-up, maintenance): see instruction
Name or tradename of supplier: CB stone-tec GmbH
Supplier model: VAIO_8
Model energy efficiency class: A+
Thermal output [kW]: 4,9
Energy efficiency index EEI: 109,9
Fuel energy efficiency at nominal heat output: 82,0
Fuel energy efficiency at minimal load (if relevant): N. A.
Special precautions (for set-up, maintenance): see instruction
I II
A
+
A
B
C
D
E
F
G
A
+
2015/1186
4,9
kW
ENERGIA · · ΕΝΕΡΓΕΙΑ · ENERGIJA · ENERGY · ENERGIE ENERGI
A
++
A
+
A
+++
A
++
A
+
A
-80%
A
-60%
A
-40%
A
-20%
VAIO_7
I II
A
+
A
B
C
D
E
F
G
A
+
2015/1186
4,9
kW
ENERGIA · · ΕΝΕΡΓΕΙΑ · ENERGIJA · ENERGY · ENERGIE ENERGI
A
++
A
+
A
+++
A
++
A
+
A
-80%
A
-60%
A
-40%
A
-20%
VAIO_8
Page 28

We wish you a lot of fun and cozy hours with yours
VAIO stove.
CB stone-tec GmbH
Behaimweg 2
DE-87781 Ungerhausen
www.vaio-fire.com
Dated: March 2019
 Loading...