

Page 1
Installation and maintenance instructions
For the competent person
Installation and maintenance instructions
ecoLEVEL
Condensed water pump
GB, IE
Page 2

Table of contents
Table of contents
1 Notes on the documentation .....................................3
1.1 Attaching and storing documents ...............................3
1.2 Applicability of the instructions ...................................3
1.3 CE label ...............................................................................3
1.4 Identification plate ...........................................................3
2 Safety information and regulations ......................... 3
2.1 Intended use ......................................................................3
2.2 General safety information ............................................4
3 Installation .......................................................................6
3.1 Scope of delivery .............................................................6
3.2 Required tools ...................................................................6
3.3 Selecting the installation site .......................................6
3.4 Dimensions and installation clearances .....................7
3.5 Installing the wall bracket ..............................................7
4 Hydraulic connection ....................................................8
4.1 Removing the ecoLEVEL ................................................8
4.2 Install the inlet hose ........................................................9
4.3 Connecting and positioning the drain hose ..............9
4.4 Connecting the drain hose to the
existing discharge pipe ................................................. 10
4.5 Connecting the condensed water pump
to the boiler ......................................................................11
5 Electrical connection ...................................................12
5.1 Overview of the electrical connections .....................12
5.2 Preparing the electrical connection ...........................12
5.3 Connecting the condensed water pump
to the 230 V mains voltage ..........................................12
5.4 Connecting the condensed water pump
to the safety cut-out switch .........................................13
11 Recycling and disposal ................................................19
12 Technical data .............................................................. 20
6 Operation and troubleshooting .................................15
6.1 LED display of operating status or faults .................15
6.2 Faults ..................................................................................15
6.3 Fault diagnostics and elimination ...............................15
7 Handing over to the operator ...................................16
8 Maintenance ....................................................................17
8.1 Cleaning the non-return valve .....................................17
8.2 Cleaning the pump ........................................................ 18
9 Spare parts ..................................................................... 18
10 Guarantee and Customer Service............................19
10.1 Vaillant guarantee ...........................................................19
10.2 Vaillant Service ................................................................19
2 ecoLEVEL installation and maintenance instructions 0020029316_01
Page 3
Notes on the documentation
11
1 Notes on the documentation
The following information is intended to help you throughout the entire documentation.
Further documents apply in combination with these operating, installation and maintenance instructions.
We accept no liability for any damage caused by failure
to observe these instructions.
Other applicable documents
When installing the condensed water pump, you must
observe all the installation instructions for the assemblies
and components of the system. These instructions are
enclosed with the various system parts and supplementary
components.
1.1 Attaching and storing documents
Please pass these operating, installation and maintenance
instructions on to the system operator, who is responsible
for storing the instructions so that they are available whenever required.
1.2 Applicability of the instructions
These installation and maintenance instructions apply
exclusively to units with the following article number:
– 0020030797
The article number of the unit can be found on the identification plate.
1.3 CE label
CE labelling shows that the ecoLEVEL condensed water
pump complies with the basic requirements of the following
applicable directives as stated on the identification plate:
> Permissible voltages (Directive EN 60 335-1 and
EN 60 335-2-41)
> Electromagnetic compatibility (Directive EN 55 014-1 and
EN 55 014-2)
1.4 Identification plate
The identification plate with the serial number, the protection rating classification, the supply voltage, the frequency,
and the CE label is situated on the underside of the
ecoLEVEL condensed water pump.
2 Safety information and regulations
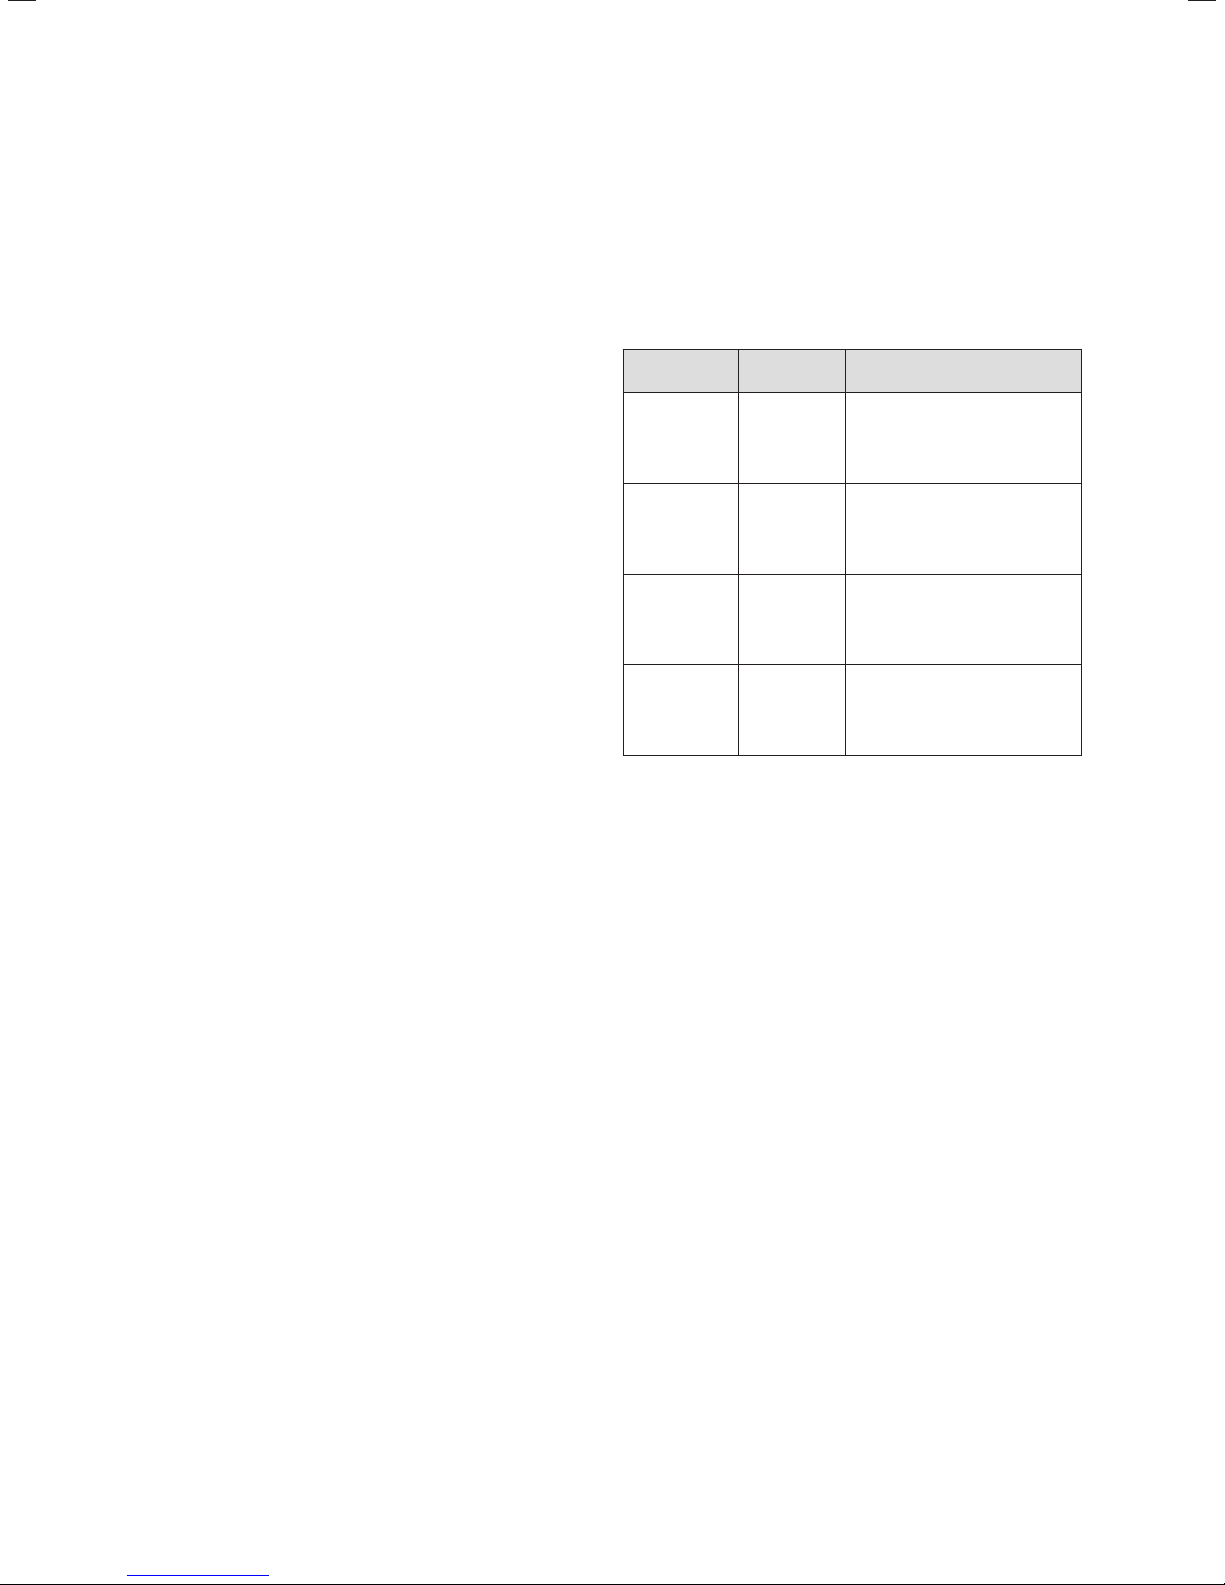
Classification of warnings
The warnings are classified in accordance with the severity
of the possible danger using the following warning signs
and signal words:
Warning
symbol
a
e
Signal word Explanation
Danger!
Danger!
Warning. Risk of minor personal injury
Imminent danger to life or risk
of severe personal injury
Risk of death from electric
shock
a
Caution.
b
2.1 Intended use
The Vaillant condensed water pump is constructed using
state-of-the-art technology in accordance with the recognised safety rules and regulations. Nevertheless, there is
still a risk of injury or death to the user or others or of
damage to the unit and other property in the event of
improper use or use for which it is not intended.
The ecoLEVEL condensed water pump is intended for use
only in conjunction with Vaillant system components in
which the condensed water is produced as a by-product of
operation. This includes all Vaillant condensing boilers.
The ecoLEVEL condensed water pump is only approved for
individual units up to 45 kW. The pump and all of its components are designed for delivering condensed water from
heating installations. The introduction of rainwater into the
system as a result of the flue gas system is taken into
account in terms of the permitted volume, the composition,
and also the content of solids in the condensate.
This unit is not designed to be used by persons (including
children) with limited physical, mental or sensory capabilities or by persons who do not have enough experience and/
or knowledge, unless they are supervised by a person who
is responsible for their safety or have been instructed by
him/her about how to use the unit.
Children must be supervised to ensure that they do not
play with the unit.
Risk of material or environmental damage
ecoLEVEL installation and maintenance instructions 0020029316_01 3
Page 4

Safety information and regulations
2
The condensed water pump is not suitable for the pumping
of other fluids or solid media. In particular, waste water of
all types, chemicals and emulsions that contain oil must not
be fed into the condensed water pump. Using the condensed water pump in vehicles is regarded as improper use.
Units that are not classed as vehicles are those that are
installed in a fixed and permanent location (known as "fixed
installation").
Any other use, or use beyond that specified, shall be considered improper use. Any direct commercial or industrial
use is also deemed to be improper. The manufacturer/supplier is not liable for any claims or damage resulting from
improper use. The user alone bears the risk.
Intended use includes observance of the operating and
installation and maintenance instructions and all other
applicable documents, as well as adherence to the maintenance and inspection conditions.
Caution.
Improper use of any kind is prohibited.
2.2 General safety information
Working on the ecoLEVEL condensed water pump
The ecoLEVEL condensed water pump must only be
installed and started up by a competent person. The existing regulations, rules and guidelines must be observed
when doing so. Inspection/maintenance and repairs must
also be carried out by this skilled tradesman.
Only competent persons who have acquainted themselves
with all the safety information provided in these installation
instructions, and the fitting, operating and maintenance
instructions, may work on this unit.
Risk of electric shock when opening the unit and
carrying out maintenance work.
When operating this unit, certain components must inevitably be under dangerous voltages which can lead to severe
bodily injury or to death.
> Ensure that the unit is only opened by a company oper-
ating a recognised competent persons scheme.
> Only open the bottom cover plate if all electrical connec-
tions to the pump have been isolated.
> Before carrying out any visual inspections and mainte-
nance work, ensure that the power supply is switched off
and secured against being switched back on again.
Risk of electric shock when the unit is switched on.
When operating this unit, certain components must inevitably be under dangerous voltages which can lead to severe
bodily injury or to death.
> If measurements need to be made with the power supply
switched on, never touch the electrical connections.
> Remove all jewellery from wrists and fingers.
> Make sure that the test equipment is in a good, safe
operating condition.
> When working on the unit when it is switched on, ensure
that it is standing on an insulated base, in other words
make sure that there is no earth connection.
Risk of burns and explosion when unsuitable
liquids are used.
Pumping out flammable and explosive liquids such as petrol, heating oil, etc., poses a risk of burns and explosions.
> Do not use the pump to pump out flammable or explo-
sive liquids.
Risk of explosions in explosive atmospheres.
Operating the pump in explosive atmospheres could trigger
an explosion.
> Do not use the pump in an explosive atmosphere.
Risk of injury due to condensate.
The condensate pumped by the pump poses a risk to the
eyes if they come into contact with it.
> Avoid any contact of the condensed water with the eyes.
> Make sure that the ecoLEVEL condensed water pump is
only operated out of the reach of children.
> In case of eye contact with the condensate, rinse the
eyes thoroughly with clean water and seek medical
advice.
Danger of poisoning by flue gas leaks.
If you connect the condensate drain hose of the pump with
the waste water piping, the internal siphon of the boiler
may be completely emptied.
> Do not connect the water condensate hose of the pump
with a sealed connection to the waste water piping ('free
outlet').
Malfunctions and material damage due to
instability.
If the pump is not in a stable position during operation, this
can lead to malfunctions of the pump. This may result in
damage to the pump or boiler.
> During operation, ensure that the pump has a stable
base or is attached to the wall.
Risk of damage due to improper modifications.
Modifications to the ecoLEVEL condensed water pump may
damage the unit and are therefore generally prohibited.
> Under no circumstances should you ever attempt to make
alterations to the pump or other parts of the system.
> Consult an approved heating specialist company to make
such alterations.
Material damage caused by leaking condensed
water
In the event of a defect in the condensed water pump, leaking condensed water may cause material damage or damage to the boiler.
> Connect a current interrupter or an alarm to the safety
cut-out switch.
4 ecoLEVEL installation and maintenance instructions 0020029316_01
Page 5

Material damage caused by unsuitable discharge
pipes
If you use discharge pipes that are not acid-resistant, this
can lead to leaks and damage caused by leaking condensed
water.
> If you need to extend the condensed water discharge
pipe during installation, use only acid-resistant discharge
pipes.
Earthing, conductor dimensioning, short-circuit
protection
> The pump connection has a protective connection. Make
sure that the power supply is earthed in accordance with
legal requirements.
Regulations and standards
IEC 60364-7-712 Electrical installations of buildings Part 7-712
EMC test procedure in accordance with EN 50081-1:1992,
EN 50082-1:1997
Interference emission: EN 55014-1: 1993
Immunity: EN 55014-2: 1997
Safety information and regulations
2
Rules of engineering
The installation must suit the conditions at the site of the
customer and comply with local regulations and engineering rules. In particular, this includes:
– Electrical connection
– VDE 0100 Erection of power installations with rated
voltages below 1000 V,
– VDE 0105, part 100 Operation of electrical systems
DIN 18382 Electrical cable and wiring systems in
buildings
ecoLEVEL installation and maintenance instructions 0020029316_01 5
Page 6
Installation
3
3 Installation
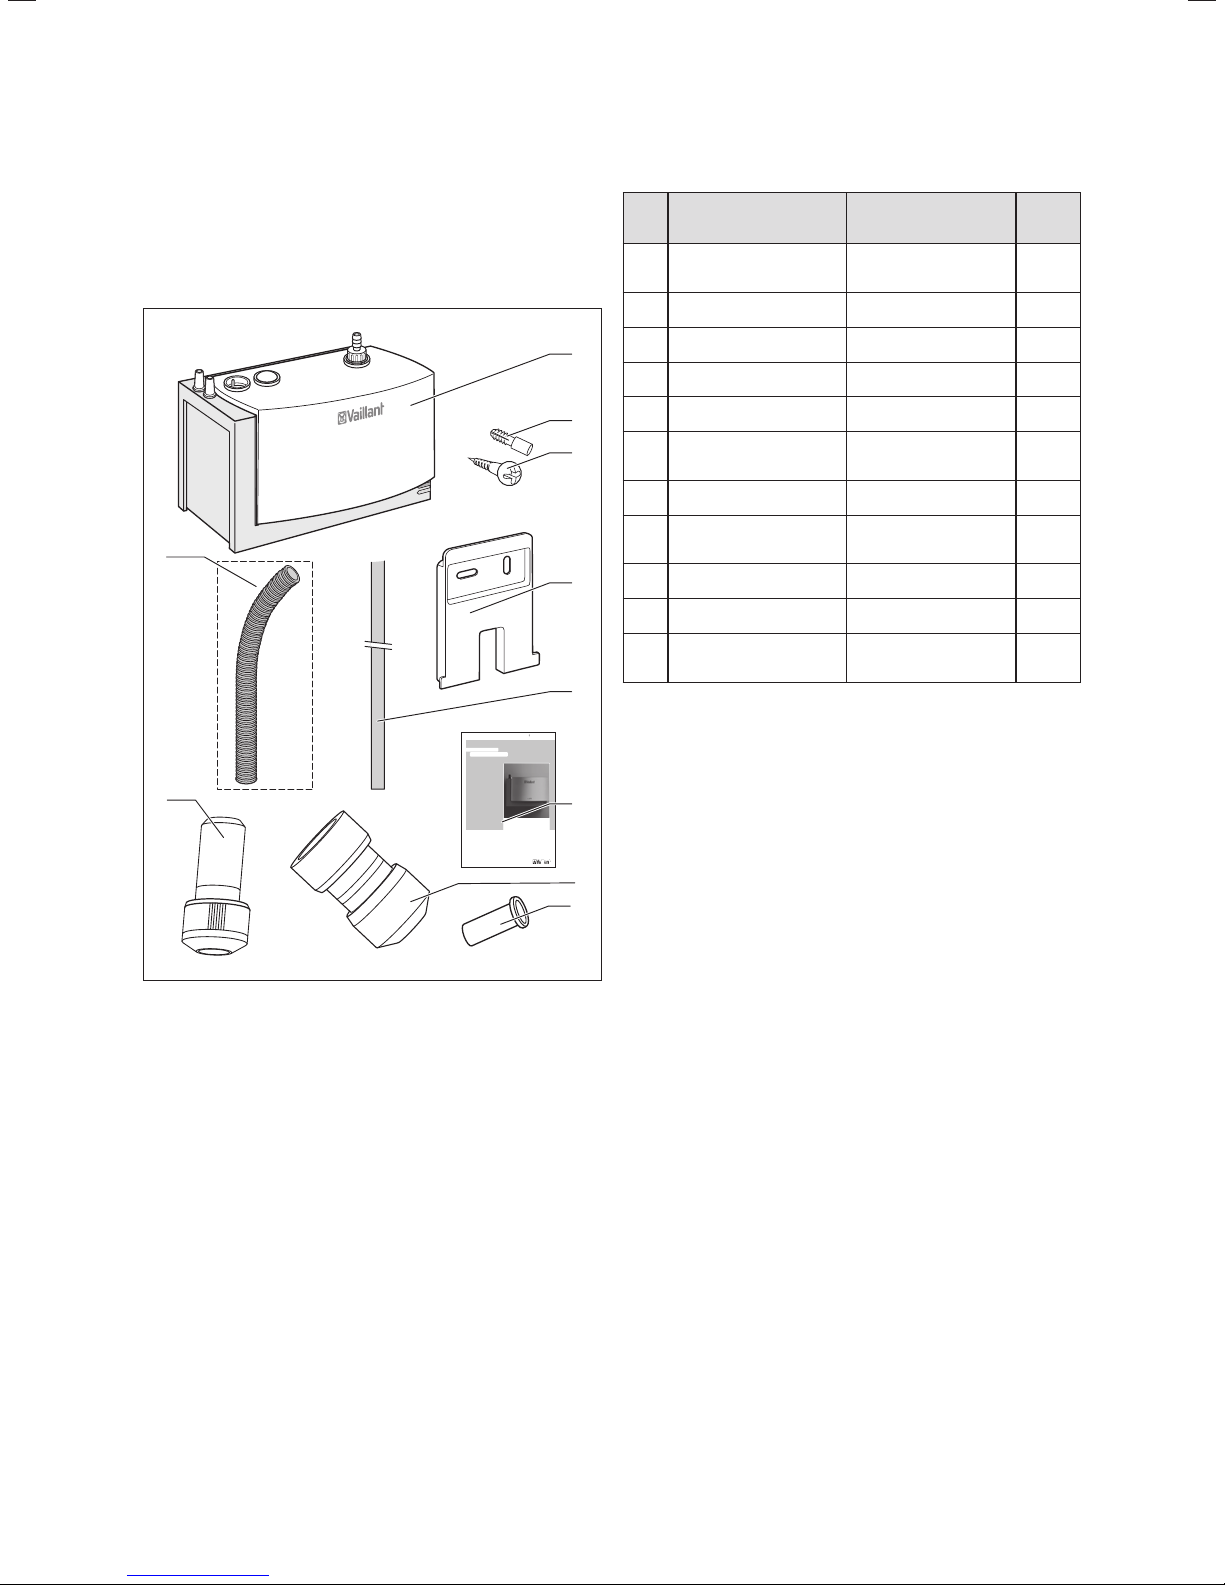
Item Component Dimensions Number
3.1 Scope of delivery
10
9
Für den Betreiber
Betriebs anleitung
ecoLEVEL
Kondenswasserpumpe
Betriebs anleitung
DE, AT, BEDE, CH
1 Condensed water pump
(H x W x L)
150 x 175 x 100 mm
1
2 Fixing plugs 6 mm 2
1
3 Bolts 4 x 35 mm 2
4 Wall bracket - 1
2
3
5 Drain hose dia. 10 mm x 6 m 1
Installation and mainte-
6
nance instructions
-1
7 Socket screw connection 15 x 22 mm 1
Stainless steel pipe
8
insert
4
9 Coupling piece 22 mm x 3/4" imperial 1
-1
10 Inlet hose dia. 24 mm x 1.15 m 1
Wall bracket for drain
hose
5
3.1 Scope of delivery
-6
3.2 Required tools
6
DE
The following tools are required for installation:
– Drill
– Drill bit (6 mm)
7
– Flat blade screwdriver
8
– Spirit level
– Cutting blade
– Tools for electrical connection
3.1 Scope of delivery
6 ecoLEVEL installation and maintenance instructions 0020029316_01
3.3 Selecting the installation site
The ecoLEVEL condensed water pump is designed for
installation in the room housing the boiler.
The ambient temperature must be between 5 °C and 60 °C.
The condition of the walls in the installation room must
allow the connecting elements supplied to be used without
any problems.
> If the walls are not in a suitable condition, a suitable
installation surface must be prepared before starting the
installation.
The ecoLEVEL condensed water pump must not be used as
a storage surface for objects.
Page 7
Installation
3
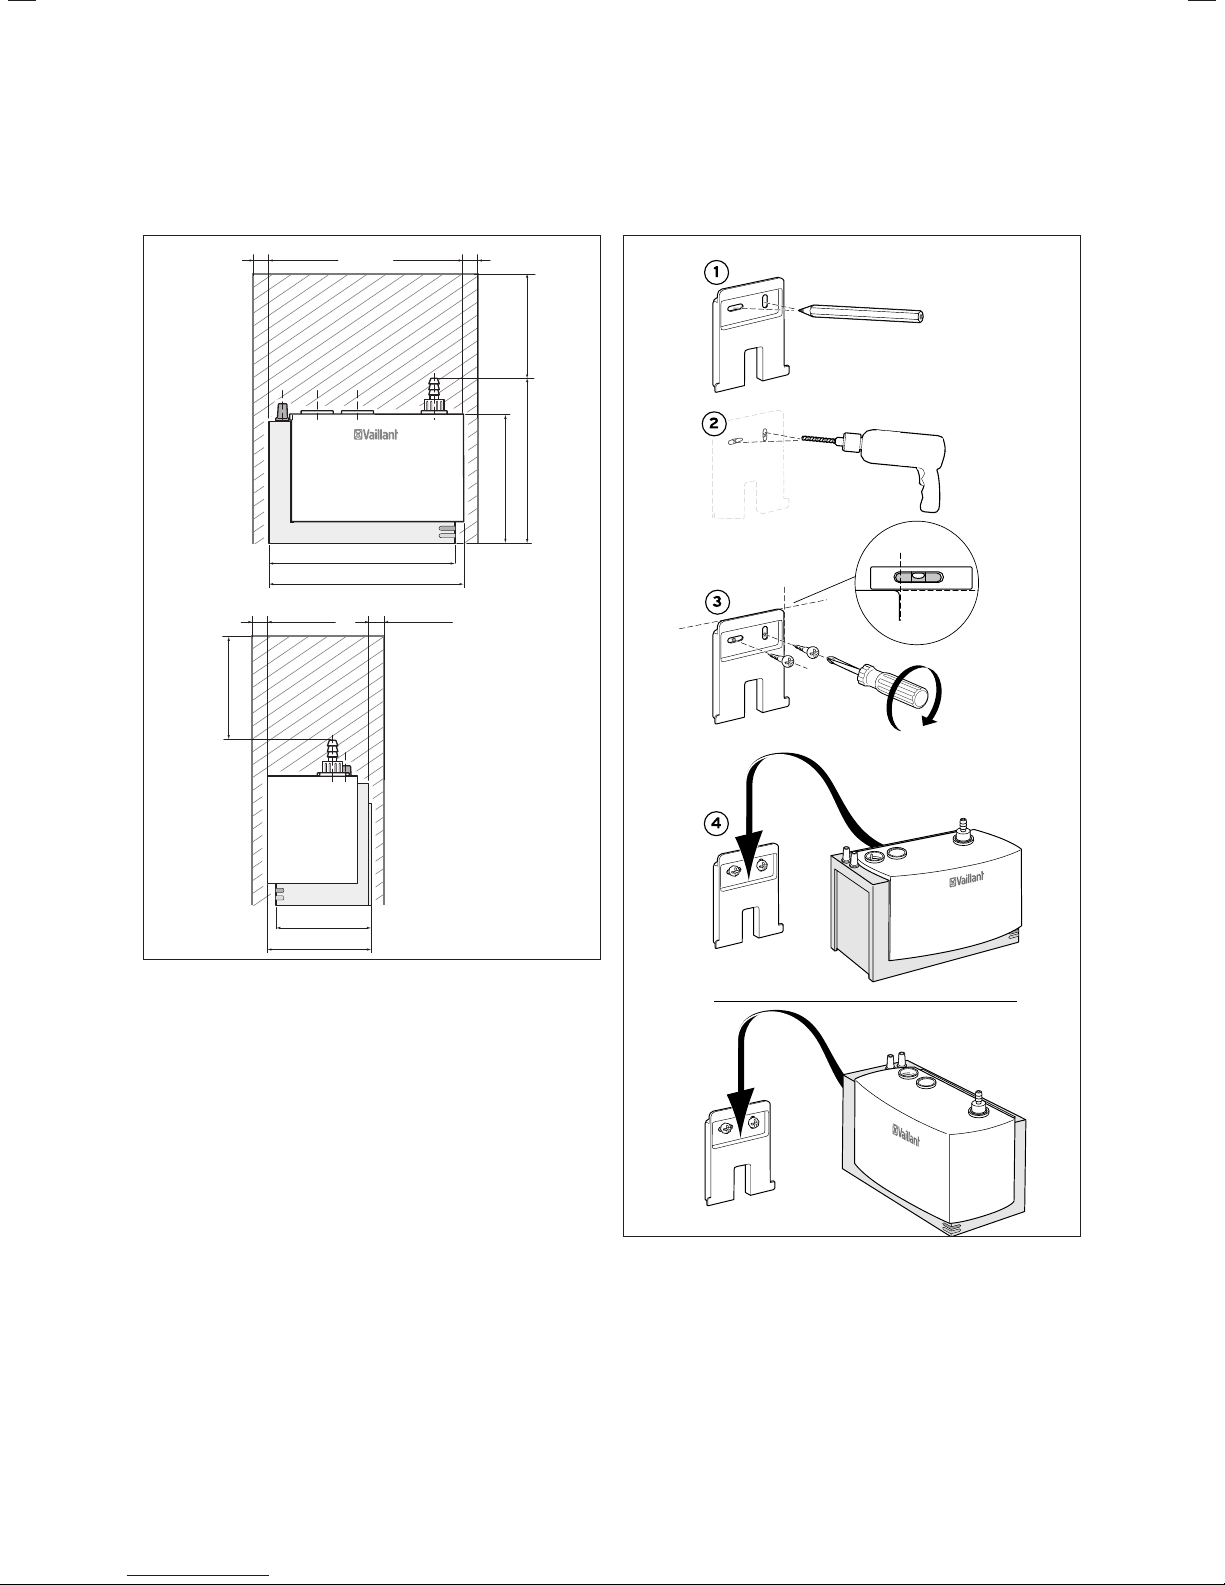
3.4 Dimensions and installation clearances
min. 5 mm min. 5 mm
min. 200 mm
150 mm
115 mm
165 mm
175 mm
min. 5 mm min. 5 mm
min. 200 mm
3.5 Installing the wall bracket
90 mm
100 mm
3.2 Dimensions and installation clearances
> During installation, adhere to the appropriate dimensions
and installation clearances.
A
B
3.3 Installing the wall bracket
> Push the pre-assembled wall bracket downwards out of
the casing for the condensed water pump.
> Install the wall bracket in a suitable position underneath
the condensate drain point of the boiler.
The wall bracket must be installed horizontally. Use a
spirit level.
ecoLEVEL installation and maintenance instructions 0020029316_01 7
Page 8
Hydraulic connection
4
> Push the condensed water pump from above onto the
guide surfaces of the wall bracket.
A small hook retains the pump on the bracket in the lowest position.
The condensed water pump can be secured in
the bracket either on the wide rear surface (A)
i
or on the narrow side (B) (¬ fig. 3.3).
4 Hydraulic connection
Caution.
Material damage.
b
b
The pump and the wall bracket can be damaged during fitting if excessive force is
used.
> Do not connect the hoses until you have
removed the non-return valve and the
cover.
Caution.
Material damage.
If the inlet hose is not connected correctly,
the condensed water cannot flow freely into
the pump.
> Route the inlet hose at a constant down-
ward gradient from the boiler to the
ecoLEVEL condensed water pump.
> Lay the inlet hose as straight as possible,
avoiding any bends or kinks.
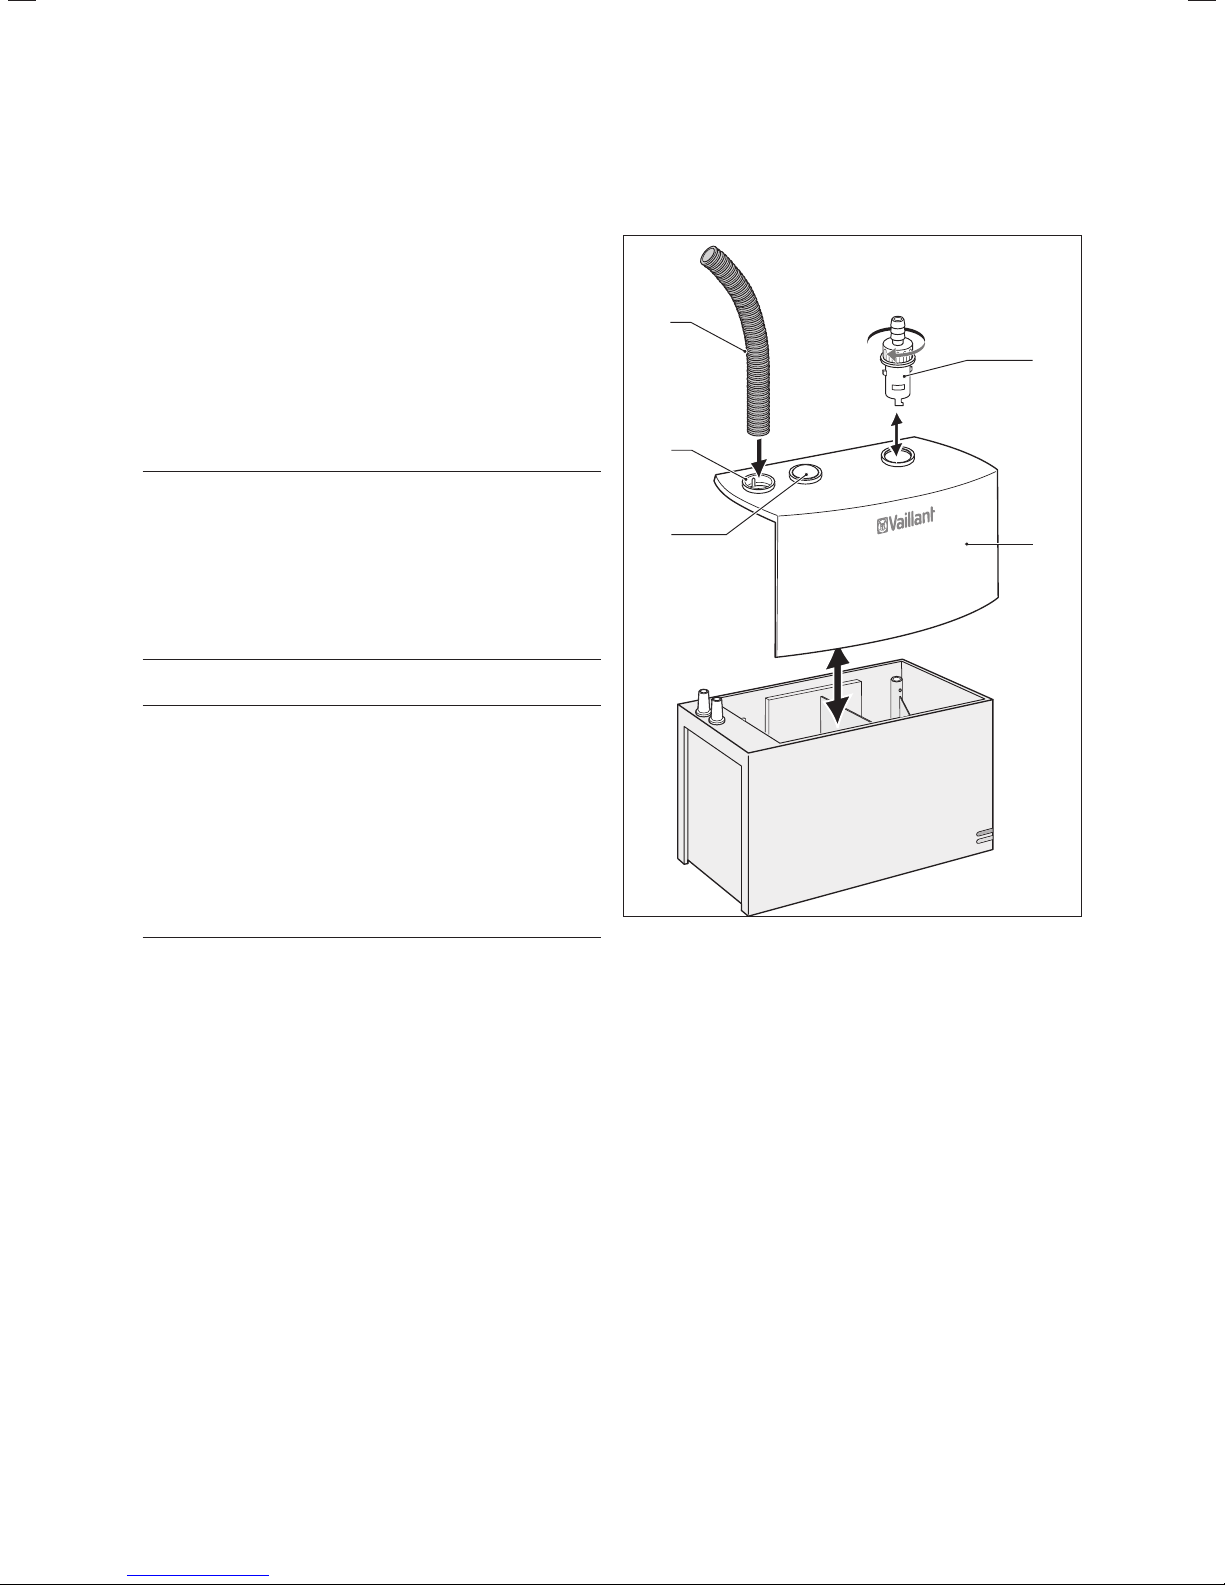
4.1 Removing the ecoLEVEL
5
1
3
4
4.1 Removing the non-return valve and cover, and installing the
inlet hose
2
8 ecoLEVEL installation and maintenance instructions 0020029316_01
Key
1 Non-return valve
2 Cover
3 Opening for the inlet hose
4 Additional opening for the inlet hose
5 Inlet hose
Removing the cover and the non-return valve
> To open the cover of the pump (2), turn the non-return
valve (1) a quarter turn to the left.
Both the cover and the non-return valve are then unlocked.
> Remove the cover (2) and the non-return valve (1) by
pulling upwards.
Page 9

Hydraulic connection
4
4.2 Install the inlet hose
Shortening and plugging in the inlet hose
> Determine the required length of the inlet hose.
> Shorten the hose so that it clicks a maximum of
3 notches into the cover.
> Ensure that the hoses do not protrude into the water
when the pump is at its maximum fill level.
> Push the inlet hose into the inlet opening (3) or (4) of
the removed cover until the inlet hose clicks into position
(max. 3 notches).
Install the second inlet hose
> If you need to connect a second hose, remove the plug
from the second inlet opening (4).
> Shorten the hose so that it clicks a maximum of
3 notches into the cover.
> Ensure that the hoses do not protrude into the water
when the pump is at its maximum fill level.
> Note that the hoses must be pushed no more than
3 notches into the inlet openings (3) and (4).
Replacing the cover
> Place the cover onto the ecoLEVEL condensed water
pump from above.
Positioning the drain hose
ca 3°
max. 4 .0 m
4.3 Connecting and positioning the drain hose
Connecting the drain hose
> Push the drain hose (¬ fig. 3.1), item 5) onto the
removed non-return valve (¬ fig. 3.3), item 1) until it
stops.
> Insert the non-return valve into the cover and lock it into
position by turning a quarter turn to the right.
4.2 Positioning the drain hose
> When routing the drain hose, note the following
(¬ fig. 4.2):
The drain hose of the pump must connect into the wastewater system of the building housing the installation. The
drain hose must lead upwards from the pump,
– in order to compensate for the height difference
between the pump outlet and the drain point
– so that the drain hose can be laid at a gradient to the
drain point after the diversion.
> Lay the drain hose far enough upwards directly from the
pump.
ecoLEVEL installation and maintenance instructions 0020029316_01 9
Page 10

Hydraulic connection
4
Caution:
Material damage caused by unsuitable
a
discharge pipes
If you use discharge pipes that are not acidresistant, this can lead to leaks and damage
caused by leaking condensed water.
> If you need to extend the condensed water
discharge pipe during installation, use only
acid-resistant discharge pipes.
> Note that the maximum feed height of the pump is 4 m.
> Run the drain hose at a steady downward gradient to a
suitable drain location.
> At its highest point, lay the drain hose in a U-shape to
form a non-return device.
4.4 Connecting the drain hose to the existing
discharge pipe
Note!
If a 21.5 mm discharge pipe is already present,
i
you can use the supplied pipe connecting elements.
1
1
4.4 Drain hose and stainless steel pipe insert (installed)
> Hold the cut end of the drain hose (1) in hot water for a
moment. Then insert the stainless steel pipe insert (2)
into the end of the drain hose (¬ fig. 4.4).
1
4.5 Installed drain hose in socket screw connection
2
2
4.3 Drain hose and stainless steel pipe insert (not installed)
> Shorten the end of the drain hose (1). For this, ensure
that the cut on the hose is at a right angle and is free
from burrs (¬ fig. 4.3).
10 ecoLEVEL installation and maintenance instructions 0020029316_01
> Push the drain hose (1) tightly into the socket screw con-
nection (2). Pull on the drain hose to make sure that the
snap-on connection has engaged (¬ fig. 4.5).
> Ensure that the end of your discharge pipe in the build-
ing housing the installation is at a right angle.
Page 11

Hydraulic connection
4
1
4.6 Complete installation at the discharge pipe
> Push the end of the white 3/4" coupling piece (3) tightly
onto the discharge pipe (4).
> Pull on the drain hose (1) to make sure that the snap-on
connections have engaged (¬ fig. 4.6).
> Push the socket screw connection (2) and the coupling
piece (3) together (¬ fig. 4.6).
2
3
4
4.5 Connecting the condensed water pump to
the boiler
The ecoLEVEL condensed water pump can be connected to
the siphon of all Vaillant condensing boilers using the inlet
hose provided.
> If the boiler's condensed water drain hose is long
enough, it can be connected directly to the pump
(¬ fig. 4.1)/(¬ fig. 4.2).
If the boiler hose is too short, replace it with the inlet hose
provided.
> Connect the inlet hose to the condensed water outlet on
the boiler.
> Connect the inlet hose to the ecoLEVEL condensed
water pump.
ecoLEVEL installation and maintenance instructions 0020029316_01 11
Page 12

Electrical connection
5
5 Electrical connection
Before you begin the electrical connection of the unit, the
installation (¬ section 3) and the hydraulic connection
(¬ section 4) for the ecoLEVEL condensed water pump
must be completed.
Danger!
Risk of death from electric shock!
a
5.1 Overview of the electrical connections
a
If the electrical installation is not carried
out properly, there is a risk of electric
shock and damage to the unit.
> Ensure that only competent persons are
permitted to perform the electrical connection.
Caution:
Error functions due to improper use of
the plugs.
Using X40 and Pro-E plugs at the same
time leads to error functions.
> Only use one of the connection types
mentioned here to connect the safety
cut-out switch.
3
Key
1 230 V connection cable (if necessary: plug can be connected)
2 Main line from ecoLEVEL
3 Connection cable for the safety cut-out switch with Pro-E plug
and X-40 plug
The 230 V connection cable (1) with the free cable end provides the power supply to the pump.
The connection cable of the safety cut-out switch (3) is
used for the electrical connection of the safety cut-out
switch to the boiler.
5.2 Preparing the electrical connection
Before you establish the electrical connection to the condensed water pump:
> Switch off the condensed water pump.
> Switch off the boiler.
> Secure the condensed water pump and the boiler against
being switched back on again.
All electrical and water condensate carrying con-
nections to the pump must be routed so that no
i
5.3 Connecting the condensed water pump to
The pump can be connected to the 230 V mains voltage in
two different methods:
> Connect the line (1) to the 230 V mains voltage via the
mains voltage output of the boiler.
Or:
> Install a mains plug on the cable (1) and connect the
pump via a mains socket (the plug is not included in the
scope of delivery).
mechanical tension is present.
the 230 V mains voltage
2
1
5.1 Overview of the electrical connections
12 ecoLEVEL installation and maintenance instructions 0020029316_01
Page 13

Electrical connection
5
5.4 Connecting the condensed water pump to
the safety cut-out switch
The type of connection on the printed circuit board (PCB)
depends upon the individual boiler.
The table (¬ tab. 5.1) shows which boiler must be connected in accordance with connection type C.
Country Boiler
GB/IE ecoMAX pro
5.1 Connection types for different boilers
Connection for safety cut-out
switch
Connection type C:
(Mains voltage of the boiler is
switched via a relay in the
ecoLEVEL condensed water
pump)
All other boilers can be connected using connection type A
or B.
Connection type A
For connection type A, you can connect the safety cut-out
switch to the extra-low voltage circuit of the boiler using
variants I., II. or III.
> Instead, plug the Pro-E plug on the connection cable of
the safety cut-out switch into the blue socket which is
labelled as either "Anl-Therm" (I.) or "Burner off" (B.Off)
(II.)(2).
1
2
BUSRTB. off
5.3 Connecting the safety cut-out switch, connection type A
3
Anl -
Therm
24V
RT
BUS
1
2
Burner
off
24V
RT
BUS
5.2 Connecting the safety cut-out switch, connection type A
Variants I. and II.
> Open the electronics box on the boiler.
> On the boiler PCB, remove the plug from the blue socket
which is labelled as either "Anl-Therm" (I.) or "Burner
off" (B.Off) (II.) (1).
2
Variant III.
> Open the electronics box on the boiler.
> Remove the cable bridge from the plug on the PCB of
the boiler (1).
> Remove the Pro-E plug from the connection cable of the
safety cut-out switch (2).
> Instead, connect the free cable ends of the connection
cable to the "Burner off" (B. off) terminal block (3).
ecoLEVEL installation and maintenance instructions 0020029316_01 13
Page 14

Electrical connection
1
1
X35
X90
Display
X21
5
Connection type B
For connection type B, you can connect the safety cut-out
switch to the extra-low voltage circuit of the boiler using
variants I., or II.
If a flue non-return flap is connected to the multi-functional
module 2 in 7 and you want to use the function of the flue
non-return flap, you must not use the X40B connection:
> In this case, use the connection type A "Anl-Therm"/
"Burner off" (B.off).
Connection type C
Connect the safety cut-out switch to the boiler in the following way:
> Use a suitable tool to cut both plugs from the cable
(¬ fig. 5.1), item 3) and insulate the cable ends.
> Connect the boiler mains voltage line accordingly
(¬ fig. 5.5).
> Connect the 230 V mains voltage for the ecoLEVEL con-
densed water pump in accordance with (¬ section 5.3).
Boiler
PE L1 N
230 V ~
5.4 Connecting the safety cut-out switch, connection type B
Variants I. and II:
> Open the electronics box on the boiler.
> Select variant I. or II., depending on where the X40 plug
is located on the PCB.
> Plug the X-40 plug into the peripheral plug location X40.
Connection type B if connection X40 is occupied
If the boiler has a multi-functional module 2 of 7 (article
number 00 2001 7744) fitted, connection X40 is already
occupied. If this is the case, connect the safety cut-out
switch as follows:
> Insert the plug in the connection X40B of the multi-func-
tional module 2 of 7.
> Also refer to the instructions for the multi-functional
module.
230 V ~
5.5 Connecting the safety cut-out switch, connection type C
14 ecoLEVEL installation and maintenance instructions 0020029316_01
Page 15

Operation and troubleshooting
6
6 Operation and troubleshooting
Once the installation and the hydraulic and electrical connections are completed, the ecoLEVEL condensed water
pump is ready for operation. The green LED lights up. The
operation is self-regulating and does not require any further manual control.
6.1 LED display of operating status or faults
On the front of the ecoLEVEL condensed water pump casing, there are two LEDs (¬ fig. 6.1), items 1 and 2) which
indicate the operating status or faults of the ecoLEVEL
condensed water pump.
1
2
6.1 Display of operating status
Key
1 Top LED
2 Bottom LED
Which operating status or fault is displayed by the light signals of the LEDs can be taken from the following table.
Bottom LED (2)
Lights up
1
green
Lights up
2
green
3 Flashes green Lights up red
4 Flashes green Flashes red
5 Flashes green
6.1 Display of operating status
Top LED (1) Operating status/Fault
The pump is supplied with
-
Flashes green
Flashes red
(> 1 min)
230 V mains voltage. The
pump is ready for operation.
The pump is in operation
and is pumping.
The water level has
exceeded the maximum
permitted value. The
safety cut-out switch is
triggered if this condition
is prolonged.
If a connection between
the safety cut-out switch
and the boiler has been
installed, the boiler is
switched off. Switching off
prevents further condensed water from forming.
The pump is at rest for a
defined time period and
then starts up again on its
own.
> Follow the fault diag-
nostics (¬ section 6.3)
6.2 Faults
The ecoLEVEL condensed water pump can automatically
resolve short-term faults in the normal function sequence.
When the maximum permitted water level is reached, both
LEDs flash. If the water level cannot be reduced by pumping, the red LED flashes. As a consequence, the safety cutout switch is triggered after approx. 10 seconds. A potential-free contact or the current circuit opens to switch off
the boiler.
If a corresponding connection to the boiler has been
installed, the boiler is switched off to prevent any further
condensed water from being formed.
ecoLEVEL installation and maintenance instructions 0020029316_01 15
6.3 Fault diagnostics and elimination
If the red LED flashes or remains lit for longer than
1 minute, there is a fault in the installation or a defect in
the pump.
> To eliminate this fault, check the following points:
Page 16

Handing over to the operator
7
Cause Troubleshooting
Pump not pumping:
Kink in the drain hose
Motor blocked
Motor defective Replace condensed water pump
Pump is not being filled
Auxiliary float blocked Release blocked auxiliary float
6.2 Fault diagnosis and elimination
Remove kink
Visual inspection of the motor inlet:
Check for foreign bodies and remove
if necessary
Check inlet hoses for routing, blockage and seating in the pump, and
resolve the fault, if required
Fault messages on the boiler or system controller
You will also find fault messages on the display of your
boiler or system controller. The messages differ depending
on the country, boiler, and connection type. The following
table shows which message is displayed on your unit.
> To eliminate the fault, refer to the installation instruc-
tions for your boiler or system.
7 Handing over to the operator
The operator must be instructed in the handling and functions of the ecoLEVEL condensed water pump.
> Provide the operator with all relevant instructions and
unit documentation for safe-keeping.
> Go through the operating instructions with the operator
and answer any questions the operator may have.
> Draw special attention to the safety information which
the operator must follow.
> Inform the operator of the necessity to ensure that the
system is regularly inspected/maintained (inspection and
maintenance contract).
> Make the operator aware of the need to keep the instruc-
tions near the ecoLEVEL condensed water pump.
Connection for
safety cut-out
switch
Connection type A Status message on unit display (S.39)
Connection type B
6.3 Fault messages, divided according to the connection type
Message if fault occurs
Status message on unit display (S.42);
approx. 15 min fault message (F.77)
16 ecoLEVEL installation and maintenance instructions 0020029316_01
Page 17

Maintenance
8
8 Maintenance
Danger!
Risk of death from electric shock!
a
> Make sure that the infeeds and drains are free from
blockage.
> Clean the non-return valve, as described in (¬ sec-
tion 8.1).
> Remove the cover from the pump and check the conden-
sate vessel for contamination. If necessary, clean the
condensate vessel with warm water and a mild cleaner
(¬ section 8.2)
> Check the inlet and drain lines and clean these if neces-
sary.
> Check that the lines are not kinked to ensure that the
flow rate is unhindered.
i
8.1 Cleaning the non-return valve
There is a risk of electrical shock from live connections.
> Always switch off the power supply to the
pump and to the boiler before performing
maintenance work.
The maintenance of the pump can be based
upon the maintenance intervals of the boiler.
The pump should be maintained at least once
a year.
Removing the non-return valve
> Remove the drain hose.
In doing so, protect against leaking condensed water. For
more information, see the "Safety" section (¬ section 2)
> Remove the non-return valve (1) from the pump cover by
turning it anti-clockwise.
1
4
2
3
3
8.2 Removing the sealing insert
Removing the sealing insert from the non-return
valve
> Proceed carefully when removing the sealing insert.
Ensure that the sealing insert is not damaged.
> To remove the sealing insert (2) from the casing of the
non-return valve, use a screwdriver to carefully push in
the four protruding burls (3).
The sealing insert becomes loose from the casing.
Cleaning the non-return valve
> Remove the ball (4) from the non-return valve.
> Flush the casing of the non-return valve thoroughly with
warm water.
> Clean the ball from the non-return valve with warm
water.
Reinstalling the non-return valve
> If required, clean the pump first before you reinstall the
1
8.1 Removing the non-return valve
ecoLEVEL installation and maintenance instructions 0020029316_01 17
non-return valve (¬ section 8.2)
> Proceed with the installation carefully. Ensure that the
sealing insert is not damaged.
> Place the ball (¬ fig. 8.2), item 4) into the non-return
valve.
> Position the burls (¬ fig. 8.2), item 3) of the sealing
insert (¬ fig. 8.2), item 2) at the designated position.
> Carefully push the sealing insert into the non-return
valve.
Page 18

Spare parts
9
8.2 Cleaning the pump
2
8.3 Cleaning the pump
1
Removing the internal component
> Remove the cover of the pump.
> Press the clip on the internal component (1) inwards and
hold.
> Remove the internal component (1) from the condensate
vessel.
9 Spare parts
Procuring spare parts
The original components of the unit were also certified as
part of the CE declaration of conformity. If you do not use
certified Vaillant genuine spare parts, this voids the CE conformity of the unit. We therefore strongly recommend that
you fit Vaillant genuine spare parts.
You can find information about available Vaillant genuine
spare parts from the contact address provided on the
reverse of this document.
> If you require spare parts for servicing or repair work,
use only Vaillant genuine spare parts.
Removing the O-ring
> Ensure that the O-ring (2) does not remain in the pump.
> Should the O-ring (2) remain in the nut on the base of
the pump, remove it using tweezers.
Cleaning the pump
> Clean the condensate vessel and the internal component
(1) using a soft brush, warm water and some soap. Do
not use scouring or cleaning agents which could damage
the plastic casing.
Reassemble the unit
> Place the O-ring (2) onto the internal component (1) as
shown.
> Place the internal component (1) back into the conden-
sate vessel.
> Ensure that the clips click into place.
> Replace the pump cover on the unit.
18 ecoLEVEL installation and maintenance instructions 0020029316_01
Page 19

Guarantee and Customer Service
10
10 Guarantee and Customer Service
10.1 Vaillant guarantee
Vaillant provides a full parts and labour guarantee for this
appliance for the duration as shown on the enclosed registration card which must be fully completed and returned
within 30 days of installation. All appliances must be
installed by a suitably competent person fully conversant
and in accordance with all current regulations applicable to
the appliance type installation. In the case of gas appliances
the Gas Safety (Installation and Use) Regulations 1998, and
the manufacturer’s instructions. In the UK competent persons approved at the time by the Health and Safety Executive undertake the work in compliance with safe and satisfactory standards. Installers should also be fully conversant
with and competent with all necessary electrical and building regulations that may apply to the installation.
In addition all unvented domestic hot water cylinders must
be installed by a competent person to the prevailing building regulations at the time of installation (G3).
All appliances shall be fully commissioned in accordance
with our installation manual and Benchmark commissioning
check list (this will be included within the installation manual). These must be signed and given to the user for safe
keeping during the hand over process. Installers should also
at this time advise the user of the annual servicing requirements and advise of appropriate service agreement.
Terms and conditions do apply to the guarantee, details of
which can be found on the registration card included with
this appliance. In order to qualify for guarantee after one
year the appliance must be serviced in accordance with our
installation manual servicing instructions. The benchmark
service history should be completed.
Note - all costs associated with this service are excluded
from this guarantee. Failure to install and commission this
appliance in compliance with the manufacturer’s instructions will invalidate the guarantee (this does not affect the
customer’s statutory rights).
11 Recycling and disposal
Both the pump and its transport packaging are made
mainly of recyclable raw materials.
Unit
Faulty pumps and all the accessories must not be disposed
of in the household waste.
> Make sure that the old unit and any accessories are dis-
posed of properly.
If your Vaillant unit is labelled with this symbol, it
does not belong with your household waste at the
end of its useful life.
> In this case, make sure that the Vaillant unit and any
accessories present are properly disposed of at the end
of their useful life.
As this Vaillant appliance is covered by the law regarding
the marketing, return and environmentally friendly disposal
of electrical and electronic equipment (ElektroG in Germany), the unit can be disposed of at no cost at a municipal
collection point.
Packaging
> Leave the disposal of the transport packaging to the
approved competent person who installed the unit
10.2 Vaillant Service
To ensure regular servicing, it is strongly recommended
that arrangements are made for a Maintenance Agreement.
Please contact Vaillant Service Solutions (0870 6060 777)
for further details.
ecoLEVEL installation and maintenance instructions 0020029316_01 19
Page 20

Technical data
12
12 Technical data
Technical data Units ecoLEVEL
Design Appliance for wall-mounted installation
Nominal capacity l 0.5
Supply voltage V 230
Max. current consumption A 1
Frequency Hz 50
Max. nominal output W 25
Max. feed height m 4
Dimensions Height mm 150
Width mm 175
Depth mm 100
Weight when filled with water kg 1.8
Inlet hose (max. outside diameter) mm 24
Drain hose (min. inner diameter) mm 10
Water inlet temperature °C 1 - 60
Ambient temperature °C 5 - 60
Safety Radio-shielded, non-interacting with the mains supply
Safety cut-out switch 5 mA - 4 A; 230 V
Level of protection in accordance with EN 60529 IP 44
Approved for individual units kW up to 45
12.1 Technical data
20 ecoLEVEL installation and maintenance instructions 0020029316_01
Page 21

Page 22

Page 23

Page 24

Supplier
Manufacturer
0020029316_01 GBIE 102012 – Subject to change
 Loading...