

Page 1
WHERE
INSPIRATION
FLOWS
Digital Shower Controller
User Guide
Keep for future reference
Page 2

Important Information ............................................................................. 3
Digital Controller ..................................................................................... 4
Quick Start ............................................................................................... 5
Shower Operation .................................................................................... 6
- Waking the Shower .......................................................................... 6
- Starting the Shower ......................................................................... 6
- Stopping the Shower ....................................................................... 6
- Cold Setting ..................................................................................... 6
- Adjusting the Showering Temperature .......................................... 7
- Adjusting the Flow Setting .............................................................. 7
- Selecting Outlets ............................................................................. 8
Configuration Mode .. ............................................................................... 9
- Navigating the Configuration Menu ................................................ 9
- Configuration Options .................................................................... 10
Remote Start/Stop Operation .................................................................. 12
Product Care ............................................................................................ 12
Contents
Page 3

3
This booklet contains all the necessary information for you to
operate and enjoy your Digital Mixer Shower. Please read them
carefully, and keep safe for future reference.
NOTE: The temperature setting displayed on the Digital Control
Panel is measured within the Digital Mixer Processor unit.
Depending on your installation this is not necessarily the
temperature of the water delivered at the shower outlet.
NOTE: When selecting the temperature you want your shower
to be, the display shows the desired temperature. The actual
water temperature delivered will take several seconds to stabilise
depending on your plumbing system.
The Digital Mixer Processor unit MUST only be used with the AC
power supply cable provided. If this supply cable is damaged,
it must be replaced by a VADO engineer or similar qualified
persons to avoid a potential hazard.
This product can be used by children aged 8 years and above and
persons with reduced physical, sensory or mental capabilities
providing they have been given supervision or instruction
concerning use of the product in a safe way and understand
the potential hazards. Children may not play with the product.
Cleaning and user maintenance must not be made by children
without supervision.
Important Information
Page 4
4
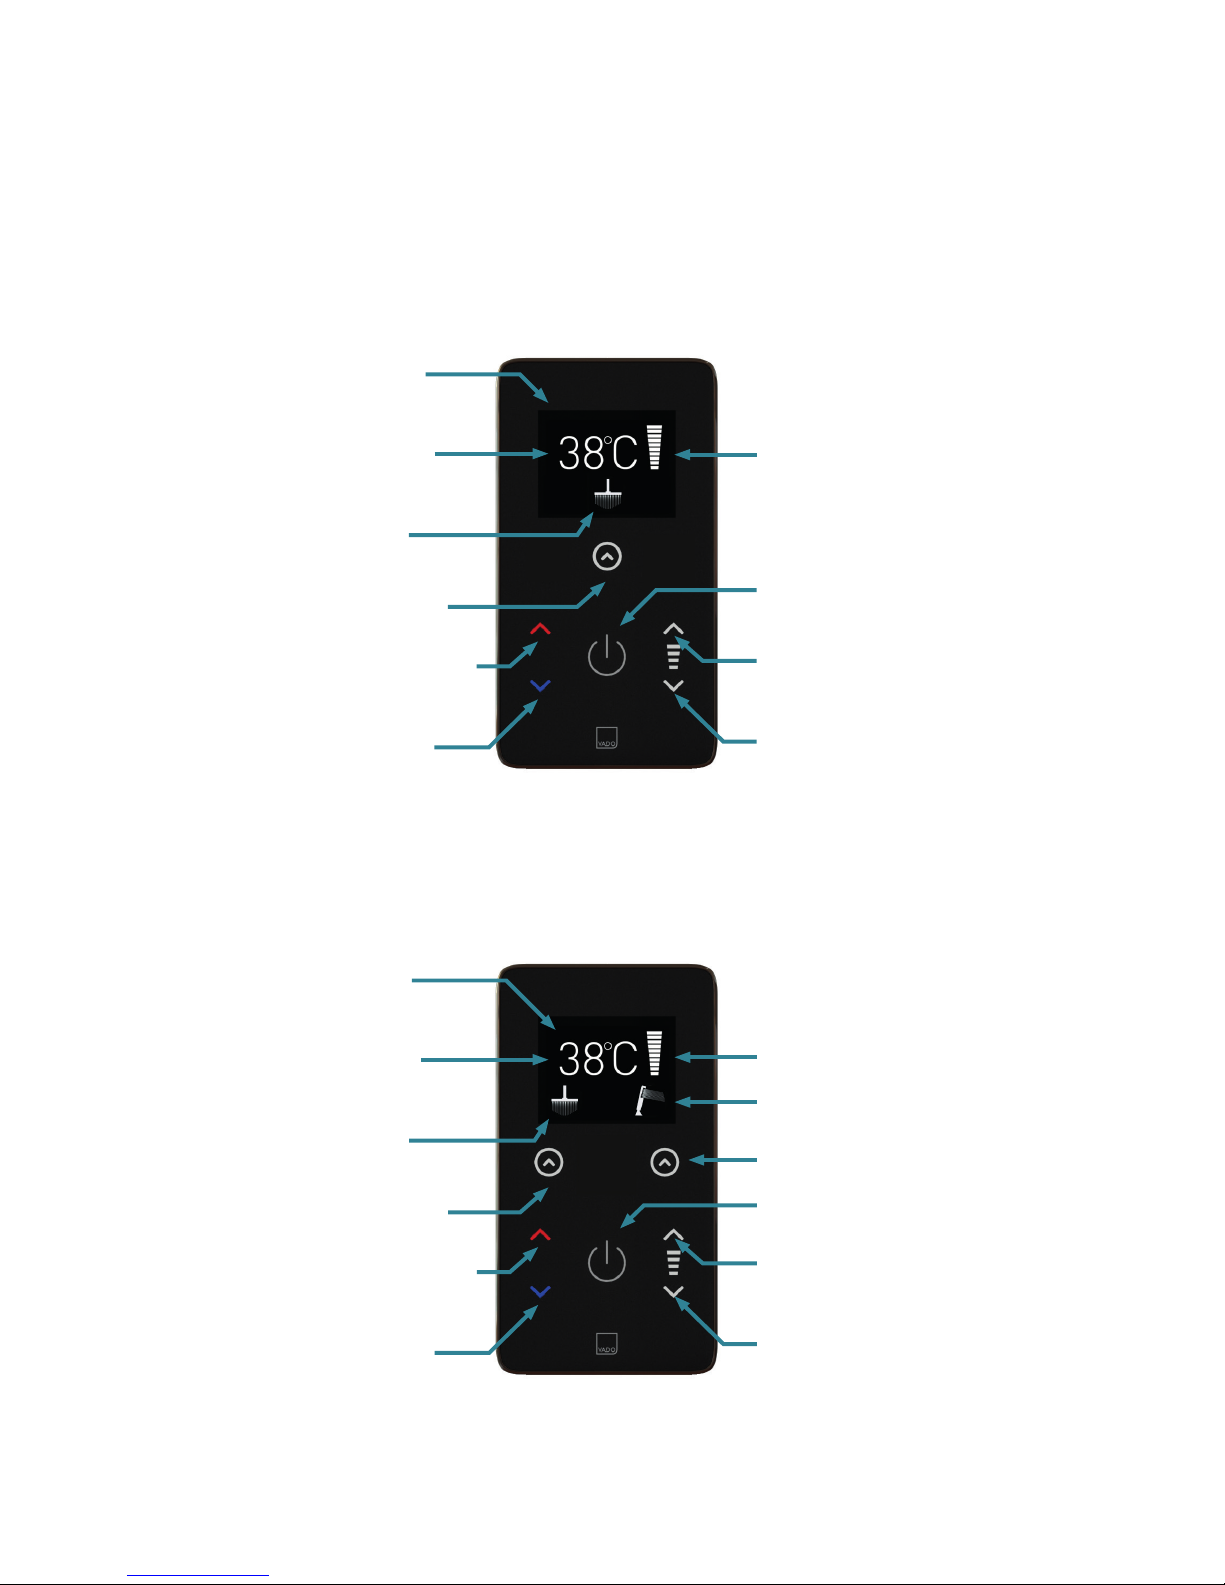
Digital Controller
Temperature
Decrease
Flow Decrease
Temperature
Increase
Flow Increase
Start/Stop
Flow Volume
Outlet
Control
Outlet
Icon
Single Outlet
Product
Display
Screen
Temperature
Setting
Flow Decrease
Temperature
Decrease
Flow Increase
Start/Stop
Outlet Icon 2
Outlet Flow 2
Flow Volume
Temperature
Increase
Outlet
Control 1
Outlet
Icon 1
Dual Outlet
Product
Display
Screen
Temperature
Setting
Page 5
5
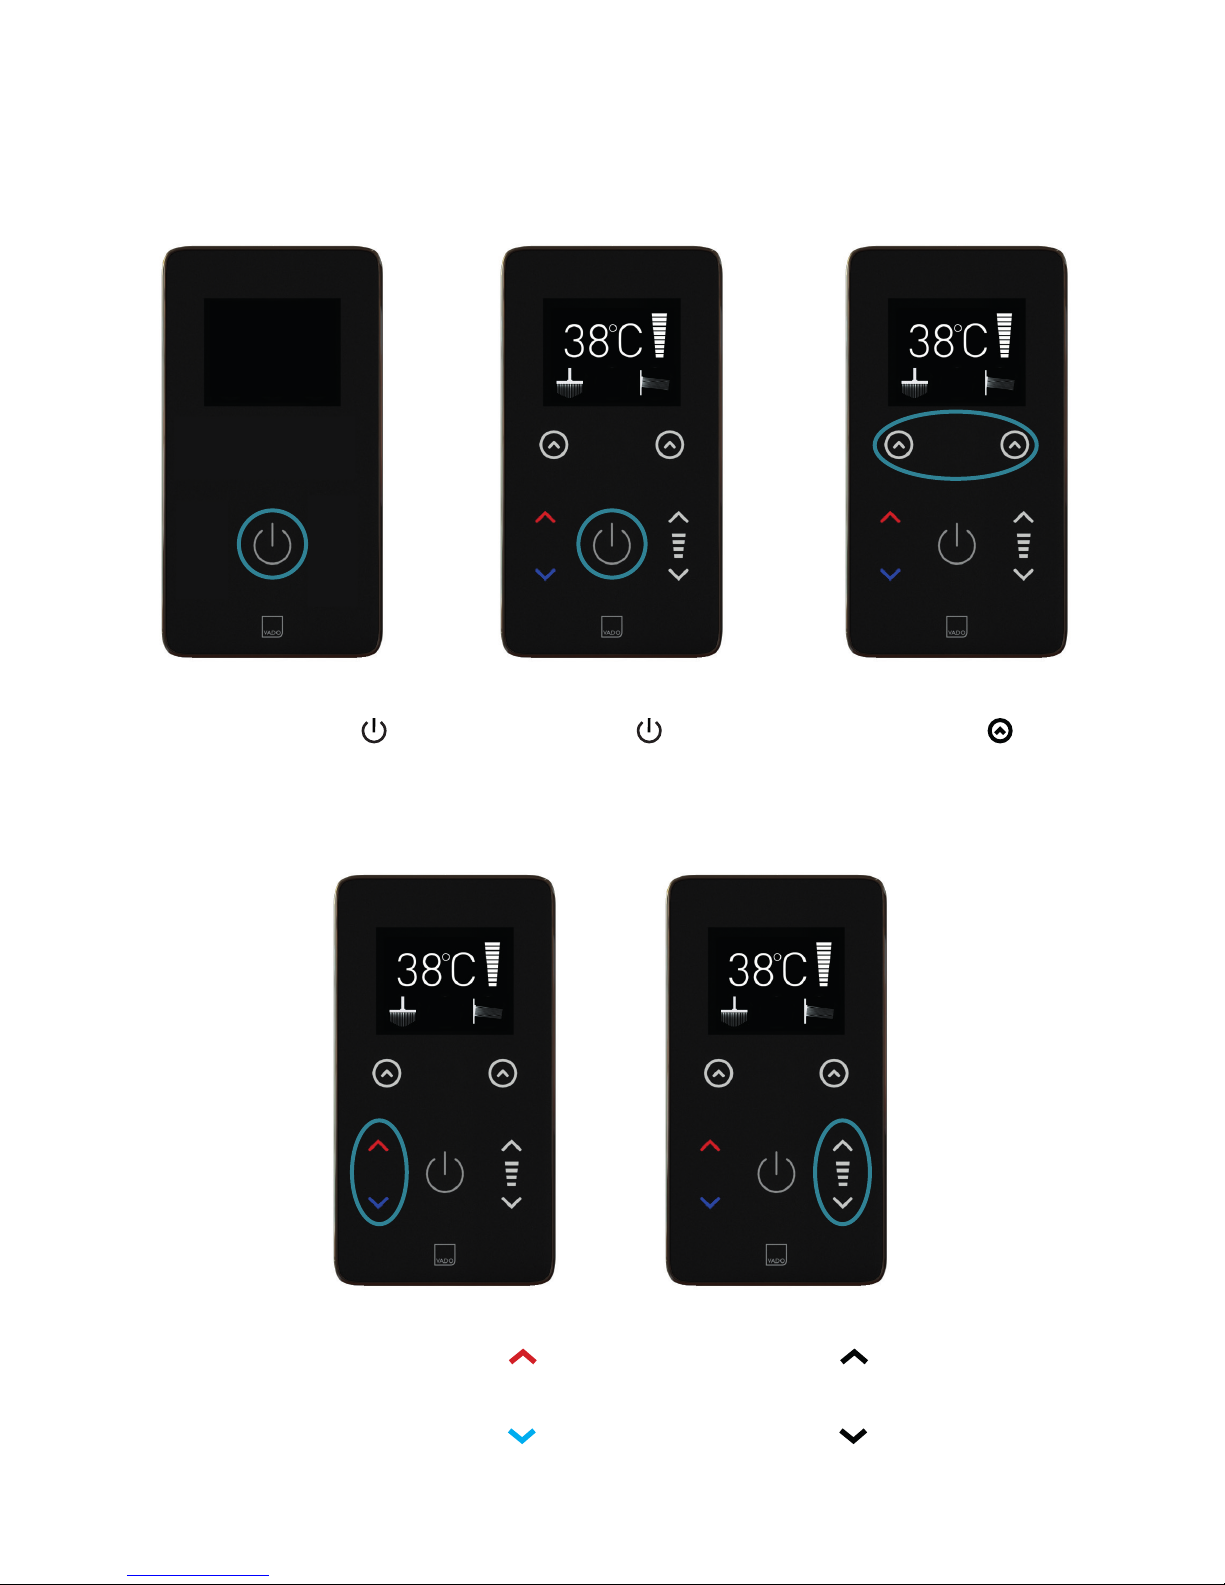
Quick Start
1 2 3
Wake the shower from
Sleep Mode using the
START/STOP control
Change outlets using the
corresponding OUTLET
controls
NOTE: The available
outlets will vary depending on
the product configuration.
Start and stop the shower
using the START/STOP
control
4
Increase the showering
temperature using the
TEMP + control
Decrease the water
temperature using the
TEMP - control
5
Increase the water
flow using the
FLOW + control
Decrease the water
flow using the
FLOW - control
Page 6

6
Shower Operation
WAKING THE SHOWER
If the shower has been inactive for a period of 3 minutes, it will return to Sleep Mode, in
order to conserve electricity.
To wake the shower from Sleep Mode, use the START/STOP control
STARTING THE SHOWER
To activate the shower with the default outlet running, use the START/STOP control
Alternatively, to activate the shower with a specified outlet, use the corresponding
OUTLET control
NOTE: The available outlets will vary depending on product type.
The shower will start and the temperature display will flash for a short period to
indicate the temperature is being adjusted.
NOTE: If the shower is restarted using the START/STOP control
within 3 minutes, it
will restart with the outlet last used.
STOPPING THE SHOWER
To stop the shower, use the START/STOP control
Alternatively, turn all running outlets off using the corresponding OUTLET controls
COLD SETTING
The shower includes a cold setting. When the cold setting is activated, the shower will
stop the hot water supply, allowing only cold water to flow. The cold setting is activated
using the TEMP - control
when the showering temperature is set to 32°C.
To cancel the cold setting, use the TEMP +
and TEMP - controls to select the
desired showering temperature.
When the cold setting is active, the following icon will be displayed in the temperature
display area:
Page 7
7
ADJUSTING THE WATER TEMPERATURE
The water temperature can be adjusted between 32°C and
the maximum showering temperature setting (47°C), in
1°C increments.
The showering temperature is adjusted using the
TEMP +
and TEMP - controls.
The maximum showering temperature is factory set to 47°C,
but it can be restricted using the maximum temperature
setting in the Configuration Mode (See page 9).
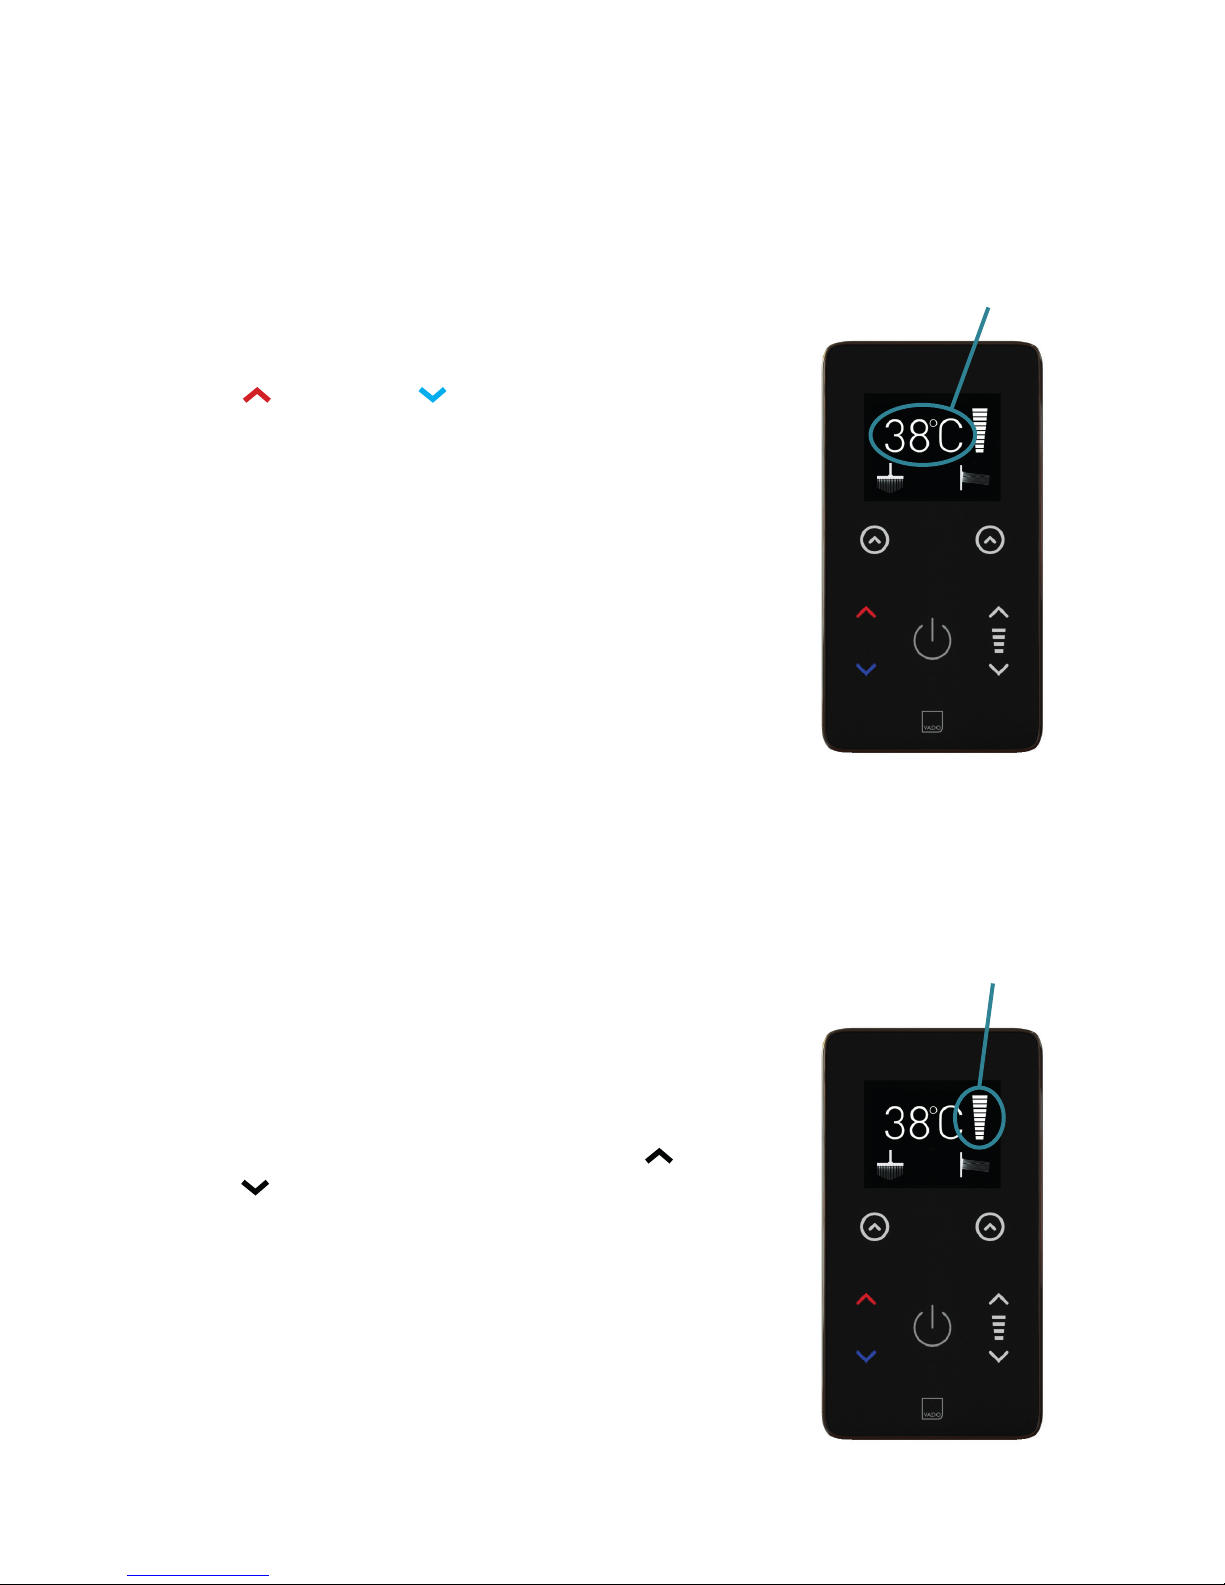
The current temperature setting is shown on the display
screen. When the temperature setting is adjusted,
the display will flash for a short period to indicate the
temperature is being adjusted.
NOTE: When selecting the temperature you want your
shower to be, the display shows the desired temperature.
The actual water temperature delivered will take several
seconds to stabilise depending on your plumbing system.
A default showering temperature can be set in the
Configuration Mode
(See page 9)
. When the default setting
is enabled, the shower will return to that temperature
whenever it wakes from the Sleep Mode. If the default
setting is disabled, the shower will always restart at the
last used temperature setting.
ADJUSTING THE FLOW SETTING
The shower has 10 flow settings.
The flow setting is adjusted using the FLOW +
and
FLOW -
controls.
The current flow setting is shown on the display screen
A default flow setting can be set in the Configuration Mode
(See page 9)
. When the default setting is enabled, the
shower will return to that pre-set flow whenever it wakes
from the Sleep Mode. If the default setting is disabled, the
shower will always restart at the last used flow setting.
Shower Operation
Current
Temperature
Setting
Current Flow
Setting
Page 8
8
Shower Operation
SELECTING OUTLETS
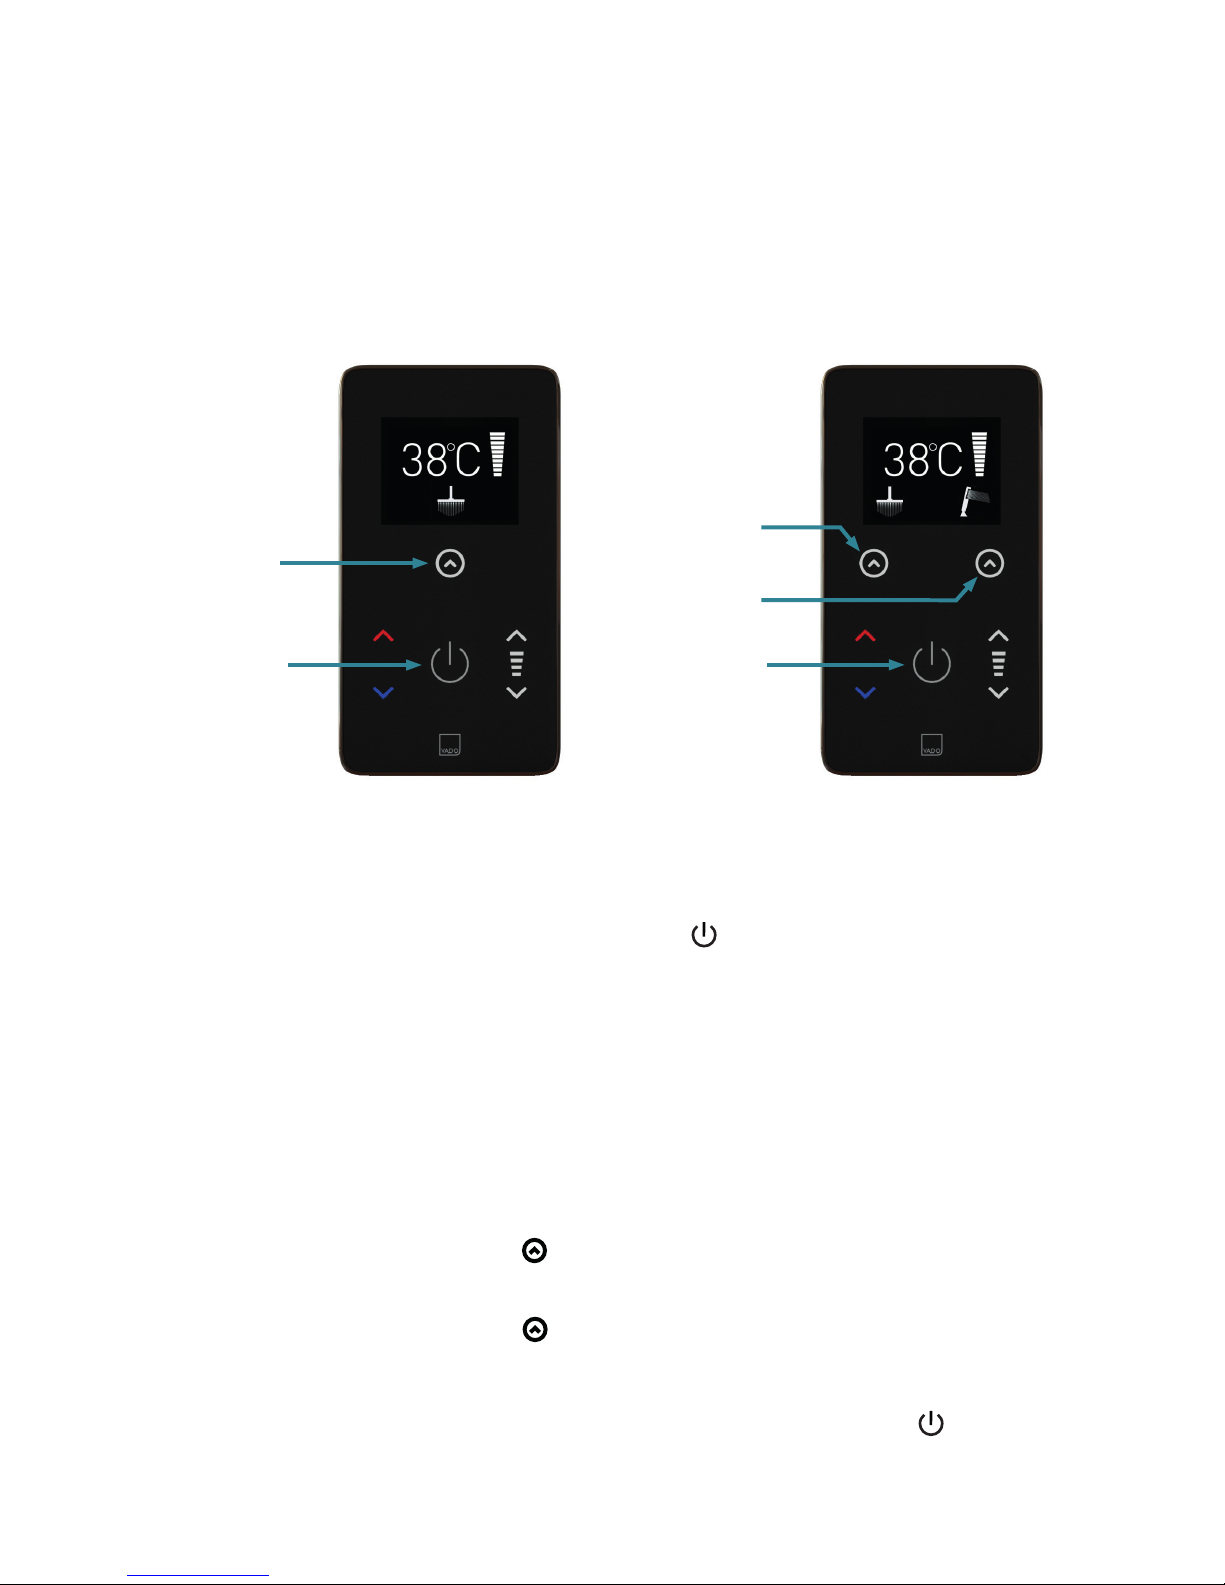
The available shower outlets will vary depending on the product configuration,
as shown below.
When starting from Sleep Mode, you can operate the shower with the default
outlet running using the START/STOP control
On subsequent uses, if the shower is restarted using the START/STOP control
within 3 minutes of being stopped, it will restart with the last used outlet running.
The shower will return to the default outlet setting when it returns to the Sleep
Mode after 3 minutes of activity.
NOTE: If the default outlet option is disabled, the shower will always start with
the last used outlet configuration running.
Alternatively, the shower can be started with a specific outlet running using the
corresponding OUTLET control
When the shower is running, the outlets can be turned On and Off using the
corresponding OUTLET control
If all outlets have been selected to Off, the shower will return to the Sleep Mode.
All outlets can be stopped at once using the START/STOP control
Single Outlet
Product
Dual Outlet
Product
Outlet
Control 1
Outlet
Control 1
Outlet
Control 2
Start/Stop Start/Stop
Page 9
9
Configuration Mode
The Sensori Digital Mixer has many features that can be configured to personalise
your showering experience, using the Configuration Mode.
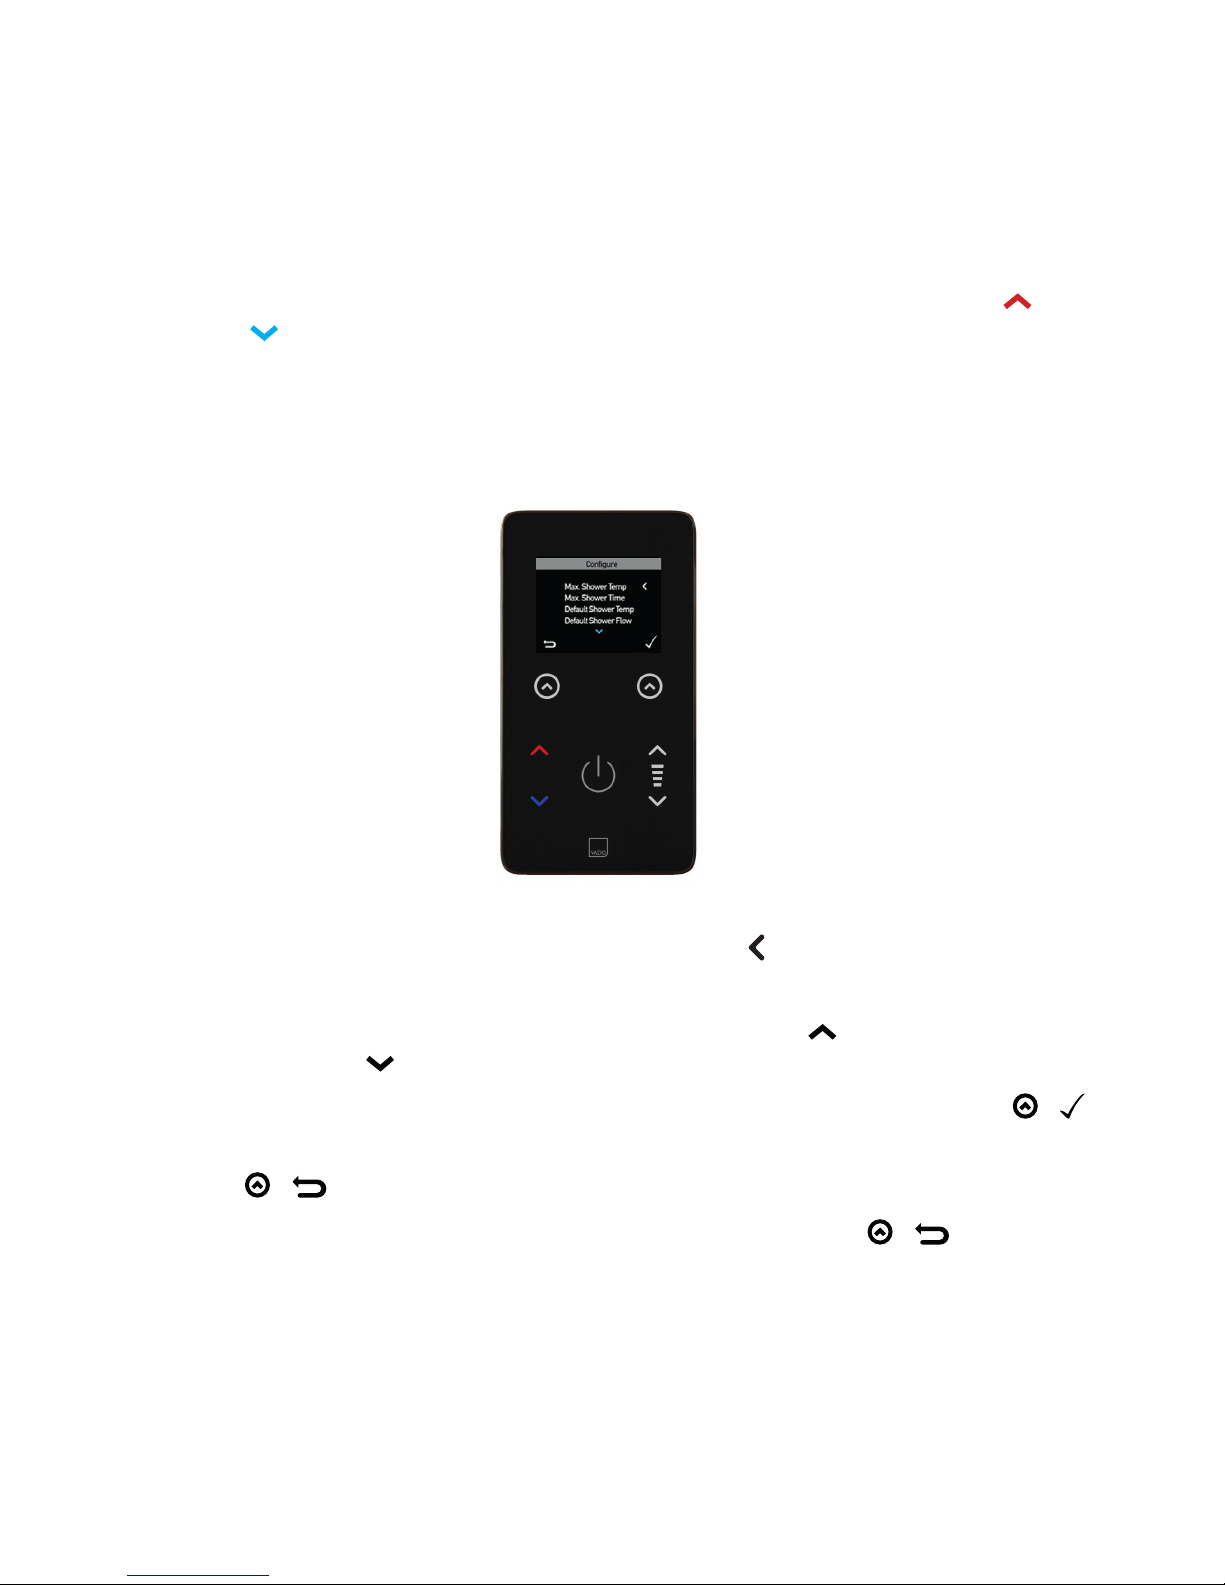
You can enter the Configuration Mode at any time by holding the TEMP +
and
TEMP - controls together for 3 seconds.
NAVIGATE THE CONFIGURATION MENU
When in the configuration mode, a selection arrow
is shown next to the
option currently selected.
The selection arrow can be moved up using the FLOW +
and moved down
using the FLOW - control.
The current selected option can be chosen by pressing the ACCEPT control /
You can return to the previous menu without updating the setting using the BACK
control /
The Configuration Mode can be exited using the back control / on the main
configuration menu screen.
If no controls are operated for a period of 3 minutes, the shower will
automatically return to Sleep Mode.
The available configuration options varies depending on the products installed
with the Sensori Digital Mixer.
Page 10
10
Configuration Mode
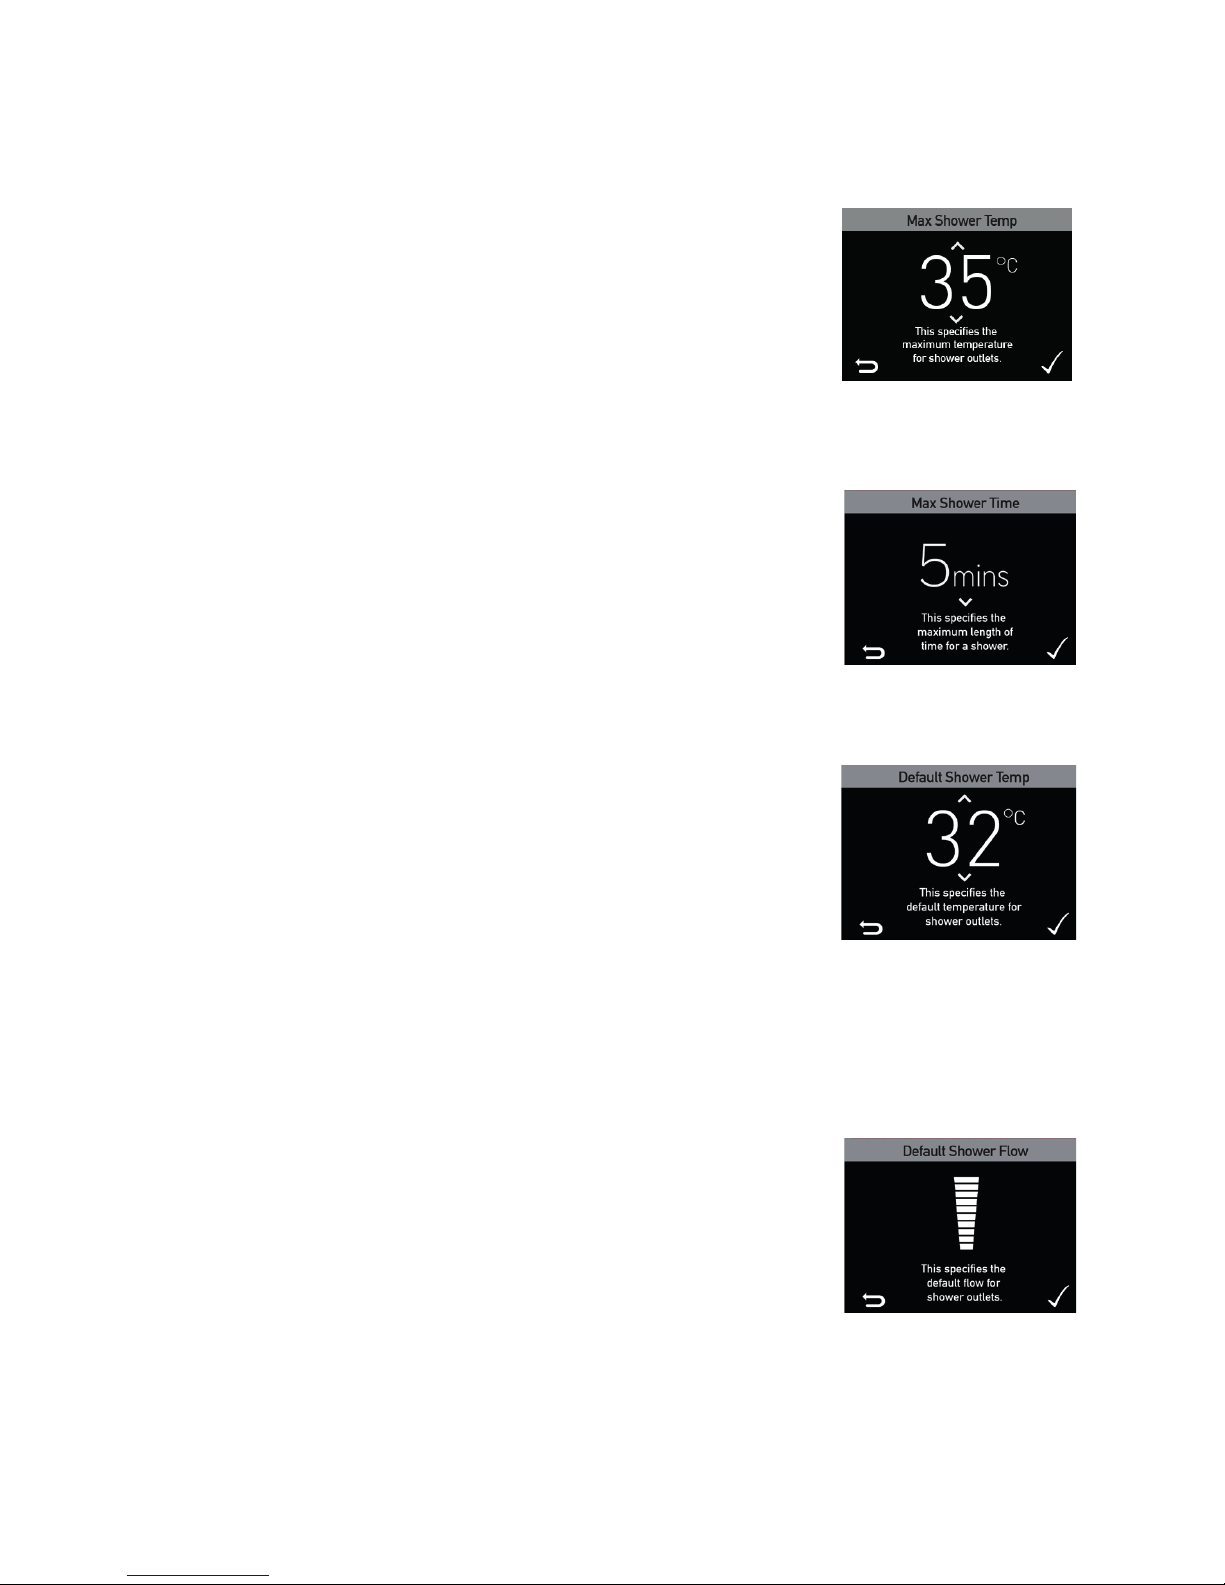
MAXIMUM SHOWER TEMPERATURE
This limits the outlet water temperature delivered to all
outlets.
It can be adjusted between 32°C and 47°C, in 1°C
increments.
Factory set to 47°C maximum.
MAXIMUM SHOWER TIME
When the maximum showering time is reached, the
shower will automatically return to the Sleep Mode.
It can be set to run for a maximum of 5, 10, 15, 20, 25 or
30 minutes.
Factory set to 30 minutes maximum.
DEFAULT SHOWER TEMPERATURE
When the shower is woken from Sleep Mode, the
temperature setting will return to the default.
If this setting is disabled, the temperature will start at
the last used setting.
It can be set to OFF or set between 32°C and 47°C Max
Shower Temp setting, in 1°C increments.
Factory set to 38°C.
DEFAULT SHOWER FLOW
When the shower is woken from Sleep Mode, the flow
will start on the default setting.
If this setting is disabled, the flow will start at the last
setting used.
It can be set to OFF or set to start on any flow setting
between 1 and 10.
Factory set to 10 as standard.
Page 11
11
Configuration Mode
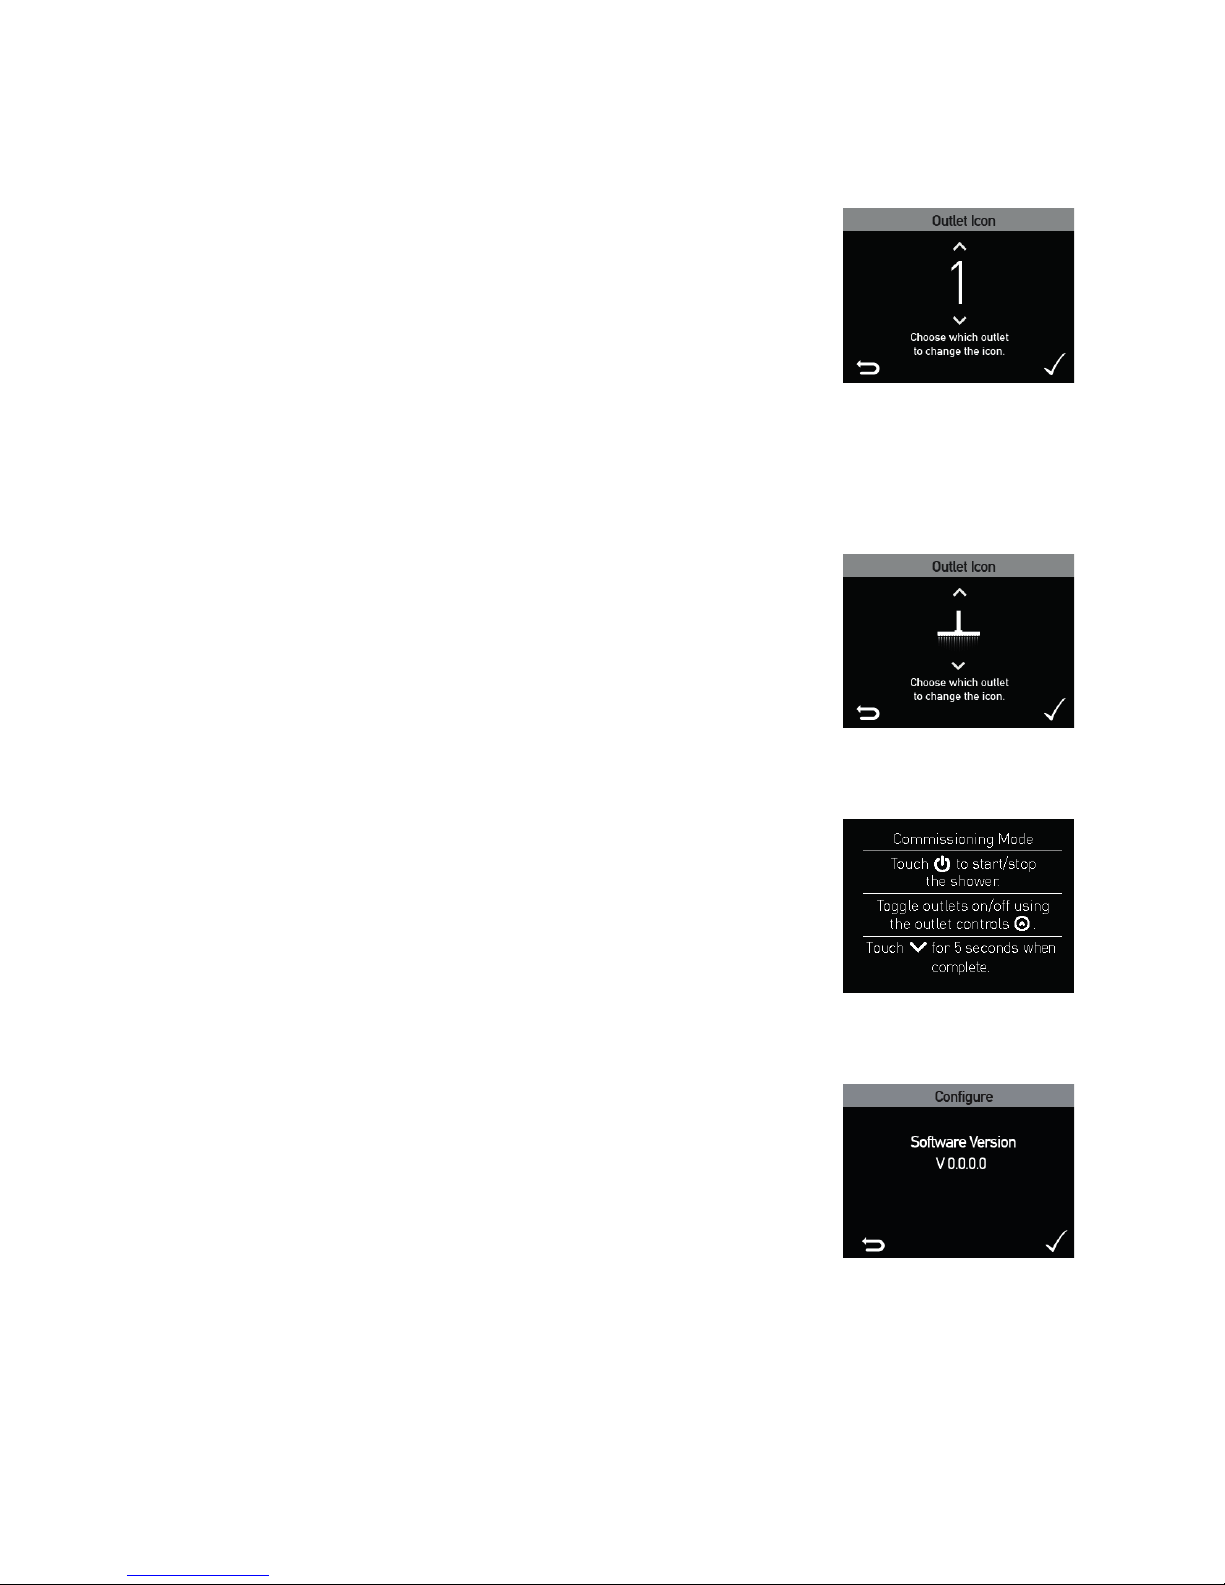
DEFAULT OUTLET
When the shower is woken from Sleep Mode, it will start
on the default outlet setting.
If this setting is disabled, the shower will start at the
last used setting.
It can be set to any outlet of your choice.
Factory set to outlet 1 as standard.
OUTLET ICONS
This allows the outlet control icons to be configured to
coordinate with the other showering products installed.
There are 7 icons to choose from.
COMMISSIONING MODE
This option returns the shower to the Commissioning
Mode. See separate Installation Guide.
SOFTWARE VERSION
This displays the current control panel software version.
Page 12

12
Remote Start/Stop Operation
When the shower is in Sleep/Standby mode:
Press the remote button once to activate outlet 1.
Press the remote button twice to activate outlet 2*.
Once the shower is running:
Press the remote button once to select outlet 1 On/Off.
Press the remote button twice to select outlet 2 On/Off. (*)
Press and hold the remote button for two seconds to
deactivate all outlets.
*Only available on multi-outlet product versions.
Product Care
CLEANING
It is recommended that your Sensori Digital Mixer Shower system is cleaned
regularly with warm, soapy water using a micro fibre cleaning cloth (e.g.
E-cloth) or sponge ONLY.
DO NOT use a general purpose cleaning cloth (e.g. J-cloth) dish cloth or
scourer.
DO NOT use abrasive or aggressive chemical cleaning products as this
may affect the products surface finish and invalidate your guarantee.
CONTROL LOCK
The control panel includes a Control Lock function. This locks all of the touch
controls, to enable the control panel to be cleaned without activating it.
To enable the Control Lock function, hold the START/STOP touch control for 5
seconds whilst the shower is in Sleep Mode.
When the Control Lock function is enabled, a padlock icon will be displayed on
the screen.
To disable the Control Lock function, hold the START/STOP control for
5 seconds.
The Control Lock function will be automatically disabled after a period of 10
minutes and the control panel will return to the Sleep Mode.
Page 13

13
Guarantee
All VADO products come with a 2 year guarantee as standard. Within this guarantee period VADO will provide
replacement parts and any labour [SEE NOTE 1] needed to complete the product repair.
This standard guarantee may be extended by registering your product to give up to a 12 year guarantee period.
Once registered:
VADO chromed brassware and stainless steel products have a 12 year guarantee (2 years parts and labour plus
10 years parts only).
VADO Sensori Smart Touch and Smart Dial products have a 5 year guarantee (parts and labour).
VADO Identity and i-tech products have a 5 year guarantee (2 year parts and labour plus 3 years parts only).
All other VADO products have a 3 year guarantee (2 years parts and labour plus 1 year parts only) [SEE NOTE 2].
VADO electric showers have a 2 years parts and labour guarantee.
Guarantee conditions
Our products are guaranteed against manufacturing defects from the date of purchase until the expiry of the
relevant guarantee period shown above.
The guarantee is only valid if:
• The product has been installed, used and maintained in accordance with VADO’s instructions and subjected to
normal use only.
• The defect is not due to use of an unsuitable or inadequate water or power supply.
• The defect is not due to accident, misuse, neglect or incorrect/inappropriate repair (other than by VADO or
VADO authorised agents) or damage caused by foreign objects or substances.
• The extended guarantee is only available if you have completed the Guarantee Registration Process. This can
be done via the VADO website or via phone to our aftersales team. Registration must be completed within 6
months from date of purchase.
Under the extended guarantee period VADO will, at its option, offer to supply any replacement product (or
component part) assessed to be defective [SEE NOTE 3].
The guarantee (whether standard or extended) is non-transferable to any subsequent owner. All claims under the
guarantee should be notified in the first instance to our Aftersales department, contact details below, this must
be done no later than the last day of the relevant guarantee period. All claims must be accompanied by proof of
purchase (sales receipt or delivery note) from an official VADO dealer.
The guarantee does not extend to any consequential loss or damage.
After repair or replacement, the relevant guarantee period will be calculated from the original date of purchase.
VADO operates a policy of continuous product development and therefore reserves the right to change the
product, packaging and documentation specifications without notice.
NOTES:
[1] Labour via our engineer network is only available in the UK. Attendance by a VADO engineer or sub-contract
engineer will be under our standard terms and conditions.
[2] VADO spare parts and shower hoses are under a parts only guarantee.
[3] VADO reserves the right to charge in advance for a product (or replacement part) pending collection and
investigation (at VADO expense) to confirm a defect is due to a manufacturing issue. If a defect is found the
charge will be refunded or cancelled. This guarantee is in addition to and does not affect your statutory rights as
a consumer.
Page 14
14
Page 15
15
Page 16
MY SHOWER IS NOT
WORKING, WHAT DO I DO?
01934 745163
 Loading...