

Page 1

C-1050 Series
User Manual
Page 2

Notice
The information in this manual is subject to change without notice.
VADEM SHALL NOT BE LIABLE FOR TECHNICAL OR
EDITORIAL ERRORS OR OMMISSIONS CONTAINED HEREIN;
NOR FOR INCIDENTAL OR CONSEQUENTIAL DAMAGES
RESULTING FROM THE FURNISHING, PERFOMANCE OR USE
OF THIS MATERIAL.
This manual contains information protected by copyright. No part of
this manual may be photocopied or reproduced in any form without
prior written consent from Vadem.
© 1999 Vadem.
Vadem, Vadem ViewFinder, CalliGrapher® and ClioTM are trademarks of
Vadem.
Microsoft®, MS, MSN, PowerPoint®, ActiveX, ActiveSync, Outlook,
InkWriter, Windows, Windows NT, Visual Basic, Visual C++, and the
Windows logo are registered trademarks or trademarks of Microsoft
Corporation in the United States and/or other countries. Microsoft
products are licensed to OEMs by Microsoft Licensing, Inc., a wholly
owned subsidiary of Microsoft Corporation.
Product names mentioned herein may be trademarks and/or registered
trademarks of their respective companies.
Clio C-1050 User Manual
Second Edition (September 1999)
Part Number DA-00183
FOR YOUR RECORDS
For your assistance in reporting this product in case of loss or theft, please
record the model number and serial number (located on the bottom of the
device) below. Please retain this information.
Model Number ______________________________________
Serial Number _______________________________________
Date of Purchase _____________________________________
Place of Purchase_____________________________________
Page 3

Contents
About this Manualx
Important Safety Instructionsxii
Operating Precautionsxiii
Where to Find Informationxiv
Conventionsxvi
1 Getting Acquainted with Clio1-1
Attaching to AC Power1-3
Calibrating and Personalizing the Device1-4
Managing Power1-5
Cycling Power1-6
Notification LED/Switch1-7
Power Manager Control Panel1-7
Battery Status Tab1-8
Suspend Options Tab1-10
Backlight Tab1-11
Managing Battery Pack Life1-12
Recharging the Main Batteries1-12
Using Batteries Efficiently1-13
Using Display Modes1-14
Using Clio in Keyboard Mode1-14
Using Clio in Tablet Mode1-15
Adjusting Contrast/Brightness1-15
Using the Stylus1-16
Exploring the Desktop1-17
My Handheld PC1-17
Taskbar1-18
Start Menu1-18
Online Help1-18
Using Windows and Internet Explorer1-19
Clio User Manual iii
Page 4

Windows Explorer1-19
Internet Explorer1-19
Communications and Connectivity1-20
Connecting to the Modem1-20
Using Infrared1-21
Removing or Replacing the Battery Pack1-22
Removing the Battery1-23
Replacing the Battery1-24
Memory1-26
Using Optional Flash Cards1-26
Installing a Compact Flash Card1-28
Installing ROM1-30
Resetting Clio1-32
Clearing Memory1-33
2 Setting up a Partnership
with a Desktop PC2-1
Connecting with the Travel Dock2-2
Setting up Communications2-4
Customizing Synchronization2-7
Synchronizing Files and File Conversion2-9
Drag and Drop2-10
Synchronized Files2-10
Backup and Restore2-11
Remote Synchronization2-11
3 Setting Up Remote Networking3-1
iv Clio User Manual
Connecting to an ISP3-2
Connecting to a Network3-3
Creating a Dial-up Connection to a Network3-4
Creating a Network (Ethernet) Connection3-5
Synchronizing with a Desktop Computer3-6
Creating a Dial-up Connection to a Modem3-9
Page 5

Inbox: Sending and Receiving E-mail Messages3-10
Setting up Inbox for Connecting to a Mail Server3-10
Connecting to a Mail Server3-13
Downloading Messages from a Mail Server3-13
Disconnecting From a Mail Server3-14
Managing Messages and Folders on a Mail Server3-14
Synchronizing E-mail Using ActiveSync3-15
Creating an Email Message3-18
Getting Help on Connectivity3-18
4 A Tour of Windows CE4-1
Programs4-2
Using the Start Menu and Taskbar4-4
Using the Command Bar4-5
Finding Files and Exploring the Web4-5
Printing4-6
Customizing Clio4-7
Communications4-7
Dialing4-7
Display4-8
Keyboard4-8
Network4-8
Owner4-8
Password4-9
Power Manager4-9
Regional Settings4-9
Remove Programs4-10
Stylus4-10
System4-10
Tablet Mode AutoStart4-10
Volume and Sounds4-11
World Clock4-11
Clio User Manual v
Page 6

5 Using the Microsoft Office and Other
Companion Programs5-1
Pocket Word: Creating Documents5-2
Pocket Excel: Creating Workbooks5-4
Pocket Access: Viewing and Creating Data5-6
Pocket PowerPoint: Showing Presentations5-8
Voice Recorder and InkWriter5-10
Voice Recorder: Capturing Ideas and Thoughts5-10
InkWriter: Creating Notes and Drawings5-12
Microsoft Pocket Outlook5-14
Calendar: Scheduling Meetings and Appointments5-15
Contacts: Tracking Friends and Colleagues5-18
Tasks: Keeping a To Do List5-19
6 Using the Bundled Programs6-1
Vadem ViewFinder™6-2
Viewing, Finding and Editing Your Personal Information6-3
Archiving and Restoring Notes6-4
CalliGrapher® 5.3 6-6
Starting CalliGrapher6-6
Recognition Mode6-7
ScreenDraw mode6-9
BSQUARE® bFAX® Pro6-10
Sending a Fax via the Built-In Modem6-11
Receiving a Fax6-11
BSQUARE bUSEFUL
Starting a bUSEFUL Backup6-12
Some Helpful Tips and Tricks about bUSEFUL6-12
BSQUARE Publisher and Viewer6-15
Starting and running BSQUARE bREADY Publisher6-15
Starting and Running the BSQUARE bREADY Viewer on your
Clio6-16
TM
Backup Plus6-12
vi Clio User Manual
Page 7

A Clio Troubleshooting
Guide and TipsA-1
What should I do if…A-1
…the power button won’t turn the device on?A-1
…my screen is dark?A-2
...Clio’s Notify button is not working?A-2
…the system is not responding properly to the stylus taps?A-2
…my Clio will not respond to screen taps or keystrokes?A-3
... my battery is not holding a charge?A-3
...I can’t install the battery?A-4
...my Clio doesn’t open and close properly?A-4
...my Clio’s AC adapter is not charging the unit?A-4
...my Clio is not receiving audio?A-4
...I can’t insert a PC card into the card slot?A-5
…I forget my power-on protection password?A-5
....the LCD on my Clio is flickering?A-5
...my Clio’s battery LED is not working?A-6
...my Clio’s serial port is not working?A-6
How do I…A-6
…minimize an application or window?A-6
…quickly access the desktop?A-6
…create a shortcut to my favorite application or file on the
desktop?A-6
…end an application that is not responding?A-7
…tell if the Caps Lock is active?A-7
…access the context menus (right mouse click in Windows
95)?A-7
…check battery levels?A-7
…find out how much memory I have left for storage and
applications?A-7
…maximize my battery life?A-8
Clio User Manual vii
Page 8

B Hardware SpecificationsB-1
C Regulatory Information for the
C-1050 SeriesC-1
D Supported PC Cards D-1
E Limited WarrantyE-1
F Vadem Software License AgreementF-1
G BSQUARE® EULAG-1
H Software ProgramsH-1
Glossary Glossary-1
Index
viii Clio User Manual
Page 9

Preface
Congratulations on purchasing Clio, the ideal PC Companion
powered by the Microsoft® Windows® CE operating system. The
size and capabilities of this device let you keep your most important business and personal information up-to-date and close at
hand. Windows ActiveSync® with CE Services increases the
power of Clio by letting you synchronize the information on your
desktop or laptop computer with this device. Picture yourself in
the following situations:
• You’re on a business trip, getting important customer
feedback that you want to discuss with your colleagues back
in the office. Using Calendar, Contacts, and Inbox, you
schedule a meeting and send it to your colleagues while still
on the road.
• You are on the road taking customer orders. Using Pocket
Access, you create records for each customer with their order
information. At night, you connect to your network and
update the global database with your new orders. You also
download updates to the product information database you use
when making sales.
• You glance at the time and realize that you are going to be late
for the bus. You grab Clio and catch the bus just in time.
Because ActiveSync keeps the information on your device
always up-to-date, while on the bus, you leisurely read and
respond to the e-mail messages you did not have a chance to
get to during the day. Once at home, you use your device to
dial into the network at your company and send your replies.
Clio User Manual ix
Page 10

• During a few spare minutes in the airport, you check your e-
mail and send a note to your daughter wishing her luck at the
gymnastics meet.
About this Manual
Table P-1 provides a description of each section in this manual.
TABLE P-1 Contents of this Manual
Section Content
Chapter 1:
Getting Acquainted with Clio Essential information about Clio, including its
hardware, software applications, supported PC
cards, and essential set-up tasks you should
perform.
Chapter 2:
Setting up a Partnership with a
Desktop PC
Chapter 3:
Setting Up Remote
Networking
Chapter 4:
A Tour of Windows CE Description of the features of the Windows CE
Chapter 5:
Using Microsoft Office and
Other Companion Programs
Chapter 6:
Using the Bundled Programs Information about using the Vadem applica-
Instructions for setting up a partnership and
synchronizing Clio with a desktop PC.
Instructions for configuring and using dialup
and network connections.Instructions for
sending and receiving email messages with the
Inbox program.
desktop environment.
Information about using the Microsoft applications bundled with Clio.
tions bundled with Clio: ViewFinder, CalliGrapher, BSQUARE bFAX Pro, bUSEFUL
BACKUP Plus and bREADY Publisher and
Viewer.
x Clio User Manual
Page 11

About this Manual
TABLE P-1 Contents of this Manual
Section (Continued) Content
Appendix A:
Clio Troubleshooting Guide
and Tips
Symptom, Cause, and Solution information
for commonly encountered difficulties
Appendix B:
Hardware Specifications System specifications for Clio
Appendix C:
Regulatory Information for the
Regulatory information regarding Clio
C-1050 Series
Appendix D:
Supported PC Cards Listing of PC Cards supported by Windows
CE
Appendix E:
Vadem Limited Warranty Complete text of Vadem limited warranty
Appendix F:
Vadem Software
Complete text of software license agreement
License Agreement
Appendix G:
BSQUARE® End-User
License Agreement (EULA)
BSQUARE® bFAX® Pro, BSQUARE®
bUSEFULTMBACKUP Plus, bREADYTM Publisher and Viewer EULA
Appendix H:
Software Programs Complete listing of software programs
included with C-1050 Series
Glossary Translations of commonly used terms
Clio User Manual xi
Page 12

Important Safety Instructions
Follow basic safety precautions to reduce the risk of fire, electric
shock, or personal injury:
1. Read and understand all instructions.
2. Follow all warnings and instructions marked on the
product.
3. Never install telephone wiring during a lightning storm.
4. Never install telephone jacks in wet locations unless the
jack is specifically designed for wet locations.
5. Never touch uninsulated telephone wires or terminals
unless the telephone line has been disconnected at the
network interface.
6. Use caution when installing or modifying telephone wires.
7. Avoid using a telephone (other than a cordless type) or
modem during an electrical storm. There may be a remote
risk of electric shock from lightning.
8. Use only the power adapter supplied with Clio. If you need
to replace the supplied power adapter, go to the Vadem
web site,
http://www.vadem.com,
for information on how to order a replacement.
9. Do not overload wall outlets and extension cords as this
can result in the risk of fire or electric shock.
10. Never spill liquid of any kind on the product.
11. To reduce the risk of electric shock, do not disassemble the
product. Instead, take it to qualified service personnel
when service or repair work is required. Opening or
removing covers may expose you to dangerous voltage or
other risks. Incorrect reassembly can cause electric shock
when the product is next used.
xii Clio User Manual
Page 13

Operating Precautions
Clio is a precision digital instrument. Be sure to observe the
following important precautions in order to prevent malfunction
that can result in improper operation or corruption of data in
memory.
• Never continue to use the device when battery power is low.
Low battery power can cause corruption or loss of data stored
in memory. Recharge batteries as soon as possible after low
power is indicated. Charge whenever possible.
• Avoid using the device in areas subjected to the conditions
listed below. Such conditions can create the danger of fire or
personal injury, as well as damage to and malfunction of the
device.
• Electrostatic charge
• Extreme heat
• Very high humidity
• Sudden temperature change
• Large amounts of dust
Operating Precautions
Also note the following important precautions. Failure to do so
can create the danger of fire, personal injury, as well as damage to
and malfunction of the device.
• Never drop the device, allow it to be hit by other objects or
otherwise subject it to strong impact.
• Never place heavy objects on top of the device.
• Never disassemble the device.
• Never insert foreign objects into the connectors or slots of the
device.
• Never allow water or other liquids to come into direct contact
with the device.
Clio User Manual xiii
Page 14

• Always use the stylus that comes with the device when
operating its touch screen, and only use the shiny end of the
stylus.
• Never use paint thinner, benzene, or other volatile agents to
clean the device or its display panel. Instead, use a soft cloth
moistened with water. Wring out all excess liquid from the
cloth before wiping the device or display panel.
Where to Find Information
This manual describes your Clio hardware, provides an overview
of the programs included, and describes how to set up
communications between your device and your desktop
computer. Table P-2 is a guide to the different types of
information available to help you use your device. Note that
although this book introduces the programs on your Clio, it does
not describe them completely. For more information, see the
comprehensive online Help for each program.
TABLE P-2 Clio Information
Information Source
Program Documentation This User’s Manual
-orOnline Help on your device.
Select Start > Help.
Synchronizing and exchanging files
with a desktop computer
This User’s Manual.
-orOnline Help on your device.
Select Start > Help.
-orMicrosoft ActiveSync online Help on
your desktop computer. In the ActiveSync window, click
Help > Windows CE Services Help
Topics.
xiv Clio User Manual
Page 15

Where to Find Information
TABLE P-2 Clio Information (Continued)
Information Source
Toolbar buttons Tap and hold on a toolbar button to see
its name. Drag off the toolbar button
before lifting to avoid activating the
button.
Troubleshooting information on
connections
The Communications Troubleshooter
on your desktop computer. In the
ActiveSync window, click Help >
Communications Troubleshooting.
Up-to-date information on Windows
CE-based devices
Information on this release of
Windows CE
The Microsoft Windows CE Home
Page:
http://www.microsoft.com/windowsce
Readme.doc file (located in the
Microsoft ActiveSync folder on your
desktop computer).
Extensive online support for Clio specific tips, troubleshooting and FAQs
The Vadem Home Page:
http://www.vadem.com
(Frequently Asked Questions)
Information about accessories,
software and upgrades for Clio
The Vadem Home Page:
http://www.vadem.com
Vadem Technical Support Email to:
Vadem Technical Support, Service and
1-888-GO-VADEM
Repair
Clio User Manual xv
Page 16

Conventions
This manual uses several conventions to present information of
special importance.
Warning: Warnings are cautions and alerts of things that can interfere
with or damage the function of this device.
Note: Notes highlight helpful and important things to keep in mind
when using this mobile device. These include things like tips
and tricks, shortcuts, and hints.
Lists of items, points to consider, or procedures that do not need
to be performed in a specific order appear in bullet format:
• Item 1
• Item 2
Procedures that must be followed in a specific order appear in
numbered steps:
1. Perform this step first
2. Perform this step second
NOTE: The notation [tap] or [double-tap] may appear in this
document. It signifies a stylus or finger tapping the touch screen.
xvi Clio User Manual
Page 17

Where to Find Information
The following general text conventions are used to denote special
circumstances.
[ENTER]
Specific keyboard keys are shown in
square brackets and are capitalized.
[ALT]+[F4]
Keys with a plus sign (+) between
them must be pressed simultaneously
{POWER}
Buttons and knobs are depicted in
round brackets and are capitalized
and italicized.
\\HKEY\CURRENT_USER
Path names to PC or Windows CE
resources are shown in Courier font.
Start>Settings>Control Panel Clio paths to resources are shown usually
in bold font
cd \letters\business\legal
[ENTER]
http://www.Vadem.com
PC keyboard entries or URLs you are
expected to enter exactly as shown are
indicated in Courier font.
Clio User Manual xvii
Page 18

xviii Clio User Manual
Page 19

1 Getting Acquainted with Clio
Before you start using Clio, you will need to charge the unit until
the orange indicator light on the front turns to green, indicating a
fully charged battery.
This chapter will show you how to:
1. Attach to AC power and charge the batteries.
When attached to AC power, the battery pack and backup
battery charge automatically, even when Clio is in use. Refer
to “Attaching to AC Power” on page 1-3.
Important: The first time you charge Clio, be sure that
your device remains connected to AC power
for twelve hours to fully charge both batteries.
You may use Clio during this time, but do not
remove it from the AC connection. This is only
required the first time you charge Clio.
2. Calibrate and personalize Clio.
Refer to “Calibrating and Personalizing the Device” on page
1-4.
Clio User Manual 1-1
Page 20

Getting Acquainted with Clio
Screen contrast control keys
The names and locations of key components on your Clio are
shown below. Figure 1-1 shows a top view of Clio in Keyboard
Mode, and Figure 1-2 shows a bottom view of Clio.
Display Power Button
External
Power
Port
Serial/
Docking Port
IR Port
Modem Jack
Microphone
Birghtness control keys
Notification LED/Switch
Stylus
FIGURE 1-1 Top view of Clio in Keyboard Mode
Warning: Be careful when opening Clio. The hinge arm may pinch skin
or clothing that is in contact with the back of the device when
it is opened. Always rest Clio on a flat surface before
opening.
1-2 Clio User Manual
Page 21

Battery Pack door
FIGURE 1-2 Bottom View of Clio
Attaching to AC Power
To attach Clio to AC power, plug the mini-connector end of the
AC adaptor cable into Clio and the two-pronged end into a
standard 110V AC power outlet. You can also attach the device to
AC power using the Travel Dock (refer to “Connecting with the
Travel Dock” on page 2-2).
Attaching to AC Power
Compact Flash Slot (internal, not shown)
Memory Module Cover
Speaker
Reset button
PC Card ejector
PC card slot
When you attach Clio to AC power, the batteries automatically
recharge. You can use the device while your batteries are
recharging. In fact, it is recommended that you always use AC
power when you are near an outlet to insure your batteries stay
fully charged for when you travel.
Important: Use only the AC power adapter supplied with Clio.
If you need to replace the adapter, go to the Vadem
web site,
http://www.vadem.com,
for information on how to order replacement.
Clio User Manual 1-3
Page 22

Getting Acquainted with Clio
Calibrating and Personalizing the Device
The first time you power on, the “Welcome to Windows CE for
the Handheld PC” wizard appears on your screen. Just follow the
instructions as they appear.
1. Calibrate the screen:
a. Remove the stylus from its holder.
b. At the center of each cross or target (+) that appears on
the display, tap using the stylus.
c. Press the ENTER key when you are done.
Note: Always use the Clio stylus to touch the Clio screen. Do not
use any stylus or pen other than the Clio stylus. Using a
different pen or stylus may damage your screen. Do not rest
the heel of your hand on the screen, as it is quite sensitive to
contact and will not work accurately when there is more than
one point of contact.
2. Set the world clock.
When the World Clock dialog appears:
a. In the Home tab, select a city in your time zone.
b. Optionally, in the Visiting tab, select another city for
which you would like to track local time, then tap OK.
c. In the Date and Time tab, select the date and specify the
time in your Home and Visiting cities.
d. Tap OK in the upper right of the dialog.
3. Enter your personal information.
When the Owner Properties dialog appears, enter your
personal information, then tap Done in the lower right corner
of the dialog.
1-4 Clio User Manual
Page 23

Managing Power
Clio uses two types of batteries and will maintain memory for at
least two weeks when the device is turned off:
• The rechargeable main battery pack, which comes packaged
with the device. It provides approximately 12 hours of power
under normal use.
• A built-in, rechargeable backup battery. This battery pack
recharges whenever you recharge the device. Its purpose is as
an emergency power source to maintain memory when the
main battery pack is removed for short periods.
Note: The device cannot be turned on using only the
backup battery.
Managing Power
Warning: All data will be lost if the main battery is drained or
removed and the backup battery is also drained.
Replace the main battery as soon as possible after
removing it. Always charge Clio whenever possible
to protect your data.
Clio User Manual 1-5
Page 24

Getting Acquainted with Clio
Cycling Power
Clio is ready to use as soon as you power on. Unlike a PC, Clio
does not need to boot up or shut down.
There are three ways to power on and off:
• Power Button. To power on, press the Power Button (large
button recessed into the frame to the right of the display). To
power off, press this same button.
• Opening and Closing Clio. This is an optional feature you can
set using the Power Manager Control Panel. When this feature
is enabled and you close Clio with the screen facing down, it
powers off. When you open Clio, it powers on.
• Docking with the PC. When you dock Clio to your PC using
the Travel Dock or Serial Cable, your Clio will automatically
power on as part of establishing a partnership with your PC
(refer to Chapter 2, “Setting up a Partnership with a Desktop
PC”).
Note: If the screen does not appear to be on after you power on the
device, you may need to adjust the screen brightness and
contrast (refer to “Adjusting Contrast/Brightness” on page 1-
15). The Clio screen takes a few seconds to reach full
brightness after you turn on the device.
1-6 Clio User Manual
Page 25

Power Manager Control Panel
Notification LED/Switch
Clio features a Notification LED/switch on its lower front edge.
To interpret signals from the LED, refer to Table 1-1.
TABLE 1-1 Notification LED/switch
Indicator Meaning
Steady green light Clio is attached to AC power and the bat-
tery pack is fully charged.
Steady orange light Clio is attached to AC power and the bat-
tery pack is charging.
Red blinking light An alarm or reminder of an important event
or appointment that occurs while Clio is
turned off. Press the LED/switch to turn on
Clio and to turn off the alarm/reminder
after it lights up.
Power Manager Control Panel
If you select the Power Manager icon in the Control Panel, a
dialog box will be displayed that contains information about the
Power status of the device. It contains three tabs that allow you to
check your battery level and customize options to improve
battery life.
Clio User Manual 1-7
Page 26

Getting Acquainted with Clio
Battery Status Tab
Figure 1-3 shows the Power Properties dialog box with the
Battery Status tab displayed.
FIGURE 1-3 Battery Status Tab in the Power Properties Dialog Box
The Battery Status tab displays the battery level as a meter with
green (good), yellow (low) and red (very low) zones. You can
quickly determine whether your battery is empty or full by
looking at the meter. The status of the internal, rechargeable
backup battery is also shown.
An estimated battery life is displayed for the Main Battery is also
shown. The estimated battery life is a continuous calculation
based on current use. It may fluctuate based on various factors
including the brightness setting of the display, whether or not the
modem is being used or even if the user is actively typing or
letting the device sit idle. In some cases you may see “Unknown
Time Remaining” for a short time before the device has time to
calculate estimated battery life. The value should be taken as only
an estimate of remaining battery life, not an exact time.
1-8 Clio User Manual
Page 27

Power Manager Control Panel
Note: To preserve your data stored in RAM memory, Clio will
automatically power off after the battery level enters into the
red zone. If you attempt to turn the device on again, it may
turn on briefly, then turn off again to protect memory. Use the
AC Adapter as soon as possible to recharge the device. In
order to protect your data, you should never leave the device
for long periods of time without recharging the battery. When
power becomes low on the device, dialog boxes appear to
alert you of the problem.
When AC Power is applied, the Main Battery icon changes to the
External Power icon (Figure 1-4), to indicate that the device is
running on AC and the Main Battery is recharging.
FIGURE 1-4 External Power Icon
Clio User Manual 1-9
Page 28

Getting Acquainted with Clio
Suspend Options Tab
The Suspend Options tab (Figure 1-5) allows you to set options
for automatically powering the device on or off. You can choose
to have Clio turn on and off automatically whenever you open or
close the case. In addition, you can set a timeout to automatically
power off the device after an idle period to preserve battery
power.
FIGURE 1-5 Suspend Options Tab in the Power Properties Dialog Box
1-10 Clio User Manual
Page 29

Power Manager Control Panel
Backlight Tab
The Backlight tab (Figure 1-6) allows you to set a timeout to
automatically dim the backlight after an idle period. Enabling this
feature will maximize the battery life of your device under
normal operating conditions. Touching the screen or any key on
the keyboard will automatically brighten the backlight back to its
original setting.
FIGURE 1-6 Backlight Tab in the Power Properties Dialog Box
Clio User Manual 1-11
Page 30

Getting Acquainted with Clio
Managing Battery Pack Life
When fully charged, the main battery pack supports up to 12
hours of use. The backup battery provides an emergency power
source to protect your memory contents if the main battery pack
is removed for short periods of time. When attached to AC power,
both batteries charge automatically, even when Clio is in use.
Recharging the Main Batteries
Warning: Never continue to use Clio when the battery pack is low.
Complete loss of battery pack power will destroy your data.
Recharge the batteries as soon as low power is indicated.
To recharge the main battery pack and built-in rechargeable
backup battery:
• If you have a travel dock that is plugged into a wall outlet,
attach Clio to the travel dock.
• Otherwise, attach the AC Adapter directly to Clio.
Note: The Notification LED/Switch turns orange whenever AC is
applied and the battery is charging. Be sure to check the LED
when you plug Clio into the AC Adapter or dock. The LED
turns green when the battery is fully charged.
The backup battery is provided for use by the system on an
emergency basis, where the main battery pack cannot be
recharged as necessary or when the main battery pack must be
removed. Be sure to replace the main battery pack without delay.
1-12 Clio User Manual
Page 31

Managing Battery Pack Life
Using Batteries Efficiently
Here is a list of things you can do to maximize your battery
pack’s life and charge:
• Charge the battery pack as soon as the first low battery pack
warning appears. Keep the battery fully charged whenever
possible.
• Use AC power as much as possible, especially when you are
using PC cards. These cards consume a lot of power.
• If you are low on power, turn off sounds on the device using
the Volume and Sound Control Panel. These sounds consume
a lot of power.
• If possible, use AC power when using the Clio built-in modem
as it requires more power.
• Turn on the dim backlight feature, described above, to
maximize battery life when the device is idle.
• Choose a lower brightness setting if possible. The backlight
consumes a lot of power.
Clio User Manual 1-13
Page 32

Getting Acquainted with Clio
Using Display Modes
The display screen is designed to make Clio as easy to use, under
as many conditions, as possible.
Using Clio in Keyboard Mode
To open the screen in keyboard mode:
1. Place Clio face up on a flat surface with the Notification
LED/switch facing you.
2. Lift up on the screen and push the top of it away from you,
keeping the screen inline with the screen arms.
3. Pivot the screen to optimize its readability under different
lighting conditions.
Refer to Figure 1-7.
Step 2.
Lift the top away
from you
Step 3.
Pivot the bottom
toward you
FIGURE 1-7 Opening the Display in Keyboard Mode
1-14 Clio User Manual
Page 33

Using Display Modes
To close Clio:
1. Align the screen with the screen arms.
2. Close the screen by pushing it down to meet the body of
Clio.
Using Clio in Tablet Mode
Once the screen is open, you can convert it to tablet mode:
1. Pivot the screen so that it is facing away from the
keyboard and is aligned with the screen arms.
2. Push the screen down to meet the body of Clio (but with
the display facing up), as shown in Figure 1-8.
FIGURE 1-8 Display in Tablet Mode
Adjusting Contrast/Brightness
To adjust display contrast, press ALT+LESSTHAN(<) to decrease
or ALT+GREATERTHAN (>) to increase contrast. To adjust display
Clio User Manual 1-15
Page 34

Getting Acquainted with Clio
brightness, press ALT+PLUS (+) to increase or ALT+ MINUS (-) to
reduce brightness.
Using the Stylus
Clio comes with a stylus, a pencil-shaped device for tapping or
dragging to select or to move displayed items. To reduce the risk
of scratching the Touch Screen, use the grey end of the stylus.
You can use the stylus much as you would a mouse. For example:
• Tap icons on your screen to select them.
• Double-tapping works like double-clicking a mouse.
• Press ALT and tap to access context-sensitive menus
(equivalent to right-button click on a mouse).
• To move something on the display, or to draw lines or curves,
press continuously and drag.
• If the CalliGrapher program is active (refer to “CalliGrapher®
5.3” on page 6-6), you can write on the screen in block or
cursive styles and the system will capture your input, as if you
had used the keyboard.
Note: You may use your finger instead of the stylus, but do not use
any other stylus or pen. Using a different pen or stylus may
damage your screen. Also, do not rest the heel of your hand
on the screen, as it is quite sensitive to contact and will not
work accurately when there is more than one point of contact.
1-16 Clio User Manual
Page 35

Exploring the Desktop
The Clio Windows CE desktop contains shortcuts to programs
and features the standard “My Handheld PC” icon, Start menu
and taskbar.
The following section briefly describes Clio’s desktop features.
For more in-depth information on Windows CE applications, see
Chapter 4, “A Tour of Windows CE”.
My Handheld PC
The “My Handheld PC” folder contains standard Windows
folders, such as the Control Panel, Databases, My Documents,
Program Files, and Windows.
Use these resources to create new folders, create shortcuts to the
desktop, navigate files, add files to the Favorites list (on Start
menu), view files as icons or list, transfer files using infrared, and
switch to the internet.
Exploring the Desktop
For more specific information on the folders contained within the
“My Handheld PC’ folder, see the Clio online help.
Clio User Manual 1-17
Page 36

Getting Acquainted with Clio
Taskbar
The taskbar is displayed along the lower edge of the desktop. It
displays the programs you are currently running, the Desktop
icon, and status tray. When selected, the Desktop icon minimizes
all opened programs to display the desktop.
The taskbar icons display the following information from left to
right:
• your battery status, including whether you are using AC
current or battery.
• your network connection status
• access to Calligrapher resources (For more information on
Calligrapher see “CalliGrapher® 5.3” on page 6-6).
• contrast, brightness, volume and video screen settings, as well
as battery charge information.
• the current time
Start Menu
The Start menu is found on the left-most end of the taskbar.
Tapping the Start icon opens the menu, where you will find
directories containing all software application programs, your
favorite documents, recently used documents, and Clio settings.
The Run facility lets you set up and run software. The Suspend
function lets you save your session settings to return to your
current settings when disconnected.
Online Help
Clio contains an online help system that you can access from
many ways. From the Start Menu, choose the Help icon. From
applications, choose the question mark [?] icon.
1-18 Clio User Manual
Page 37

Using Windows and Internet Explorer
The online help system contains the most up-to-date information
about Clio’s features and functions.
Using Windows and Internet Explorer
Clio uses its own version of Windows Explorer and Internet Explorer.
Windows Explorer
The Windows Explorer program is useful for viewing,
transferring and organizing files. It is also accessed from the “My
Handheld PC” icon.
To open this program, tap Start > Programs > Windows
Explorer.
Internet Explorer
Internet Explorer lets you view HTML files and acts as your
Internet browser.
To open this program, tap Start > Programs > Internet
Explorer. To view an HTML file residing on your Clio, select
File > Open, then choose the file. To connect to the Internet and
use Internet Explorer as your browser, see Connecting to an ISP
on page 3-2.
Clio User Manual 1-19
Page 38

Getting Acquainted with Clio
Communications and Connectivity
Clio provides a modem jack, an IR (infrared) port, a serial/
docking port, a PC Card slot, and a Compact Flash slot. This
section describes the use of each of these features.
Connecting to the Modem
To use the internal modem, plug any analog phone line into the
standard RJ11 jack on the side of Clio (Figure 1-9).
Warning: Only use an analog phone line with the built-in modem on
Clio. Digital phone lines may damage the built-in modem.
Digital phone lines can sometimes be found in hotels or
corporate buildings using PBX systems. Check before using
an unknown phone line.
FIGURE 1-9 Plugging in the Modem Cable
1-20 Clio User Manual
Page 39

Communications and Connectivity
To use the built-in modem, choose “Built-in modem on COM5:”
as the modem type. Refer to Chapter 3, “Setting Up Remote
Networking” for information on creating dial-up connections.
Using Infrared
You can establish an IR (infrared) connection between Clio and
another device that runs Windows CE using the infrared port.
To create an IR connection:
1. Power on both devices.
2. Place Clio and the other Windows CE device so that their
IR ports are directly facing each other (refer to Figure 1-
10).
FIGURE 1-10 Infrared Connection
To send a file, highlight the file then select File > Send To >
Infrared Recipient in the Windows Explorer menu. To receive a
file, select File > Receive in the Windows Explorer menu. Other
programs may support infrared. Check the documentation for
other programs for details.
Clio User Manual 1-21
Page 40

Getting Acquainted with Clio
Note: The IR port and the serial port cannot work simulta-
neously.
Removing or Replacing the Battery Pack
For certain operations, such as installing more memory or installing certain types of PC cards, you will need to remove the battery
pack. Also, if the battery becomes defective, you’ll need to
replace it. Follow the steps in this section to safely handle the battery pack.
Warning: Never open the battery pack door or remove the battery pack
without FIRST shutting off the device. REMOVING THE
BATTERY WHILE THE DEVICE IS ON MAY CAUSE
YOU TO LOSE ALL OF YOUR DATA.
1. Remove the battery pack door.
2. With Clio face down on a flat surface and the back of the
device facing you, grasp the tabs on the back of the battery
pack door and lift away from you (Figure 1-11).
1-22 Clio User Manual
Page 41

Removing or Replacing the Battery Pack
Back of the
device facing
you
Lift the Battery
Pack door up
Device face down
on a flat surface
FIGURE 1-11 Removing the Battery Pack Door
and away from
you
Removing the Battery
3. Rotate the tab of the battery pack away from the battery
contacts and lift the battery pack out of the device. Refer
to Figure 1-12.
.
FIGURE 1-12 Rotating the Battery Pack away from the Battery Contacts
Warning: Never operate Clio with the Battery Pack removed. When
Clio User Manual 1-23
removing the battery pack, replace it as quickly as possible
and be careful not to leave it out of the system for an
extended period of time.
Page 42

Getting Acquainted with Clio
Replacing the Battery
1. Open the battery compartment as described in steps 1-3
above.
2. Insert the battery pack.
Orient the battery pack so the tab is on the side matching the
three battery contacts on Clio (and so that the tab is facing
away from Clio).
Insert the battery pack into Clio. Make sure both ends snap in
securely. (Figure 1-13).
.
Tab
Battery Contacts
FIGURE 1-13 Inserting the Battery Pack
3. Rotate the battery pack so that its tab makes a connection
with the three Battery Contacts on Clio.
Refer to Figure 1-14.
.
FIGURE 1-14 Rotating the Battery Pack toward the Battery Contacts
1-24 Clio User Manual
Page 43

Removing or Replacing the Battery Pack
4. Replace the battery pack cover.
Insert the tabs on the curved side of the door into the body of
Clio (Figure 1-15), then press down on the straight side and
snap into place (Figure 1-16).
Note: If the battery pack door does not close completely, the
device will not power on.
.
FIGURE 1-15 Inserting Door
.
FIGURE 1-16 Closing Door
Clio User Manual 1-25
Page 44

Getting Acquainted with Clio
Memory
Clio uses three types of memory:
• Optional Flash Cards, which can be used to store files.
• ROM, which contains the operating system and built-in
programs.
• RAM, which contains additional programs and data.
This section describes installation and use of each type of
memory.
Using Optional Flash Cards
You can use many kinds of Type I or Type II PC cards with Clio.
Flash memory PC Cards can be used to store files. Modem and
ethernet PC Cards can be used for communications. VGA PC
Cards can be used to give presentations. Windows CE supports
many such cards with its built-in drivers. Other cards come with
their own drivers. A list of supported PC Cards is provided in
Appendix D, “Supported PC Cards.”
Installing a PC Card:
1. Insert your PC card into the PC card slot.
If you have not used a PC card with the device before, you
need to remove the protection card that is in the slot. To do
this, grasp the tab on the end of the card and pull it out.
Insert the PC card connector end first until it is snug and the
eject button pops out. Do not force the card, it will still stick
out slightly from the slot when fully inserted.
Refer to Figure 1-17.
Note: If the card stops and the Eject button has not popped
out, you may have inserted the PC Card upside down.
1-26 Clio User Manual
Page 45

Memory
Remove the PC Card, flip it over and try again.
After removing the
protection card,
insert the PC card
until snug. Do not
force the card, as it
will not fit all the way
into Clio.
FIGURE 1-17 Inserting a PC Card
2. If this is the first time you have inserted this PC Card, you
may be prompted by the device to identify or format the
card.
Follow the instructions on the display.
Flash memory PC Cards will appear as the
Storage Card folder inside the My Handheld PC folder.
Clio User Manual 1-27
Page 46

Getting Acquainted with Clio
Removing a PC Card
Note: Carefully follow these steps when removing a PC Card.
Otherwise, you may lose your data.
To remove a PC card from Clio:
1. Exit all programs that are using files that reside on your
PC card.
2. Power off Clio.
3. Eject the card.
Press the button beside the PC card slot.
4. Replace the protection card.
This prevents dust from entering the slot.
Installing a Compact Flash Card
You can use a compact flash card to store files as you would a PC
card.
Note: The Compact Flash slot is an internal slot. If swapping a
compact flash card back and forth from a digital camera, you
may wish to use a PC card adapter in the external slot.
To insert or change a compact flash card:
1. Follow the steps to remove the battery pack (see
“Removing or Replacing the Battery Pack” on page 1-22).
2. Insert the compact flash card in the available slot.
If there is a compact flash card currently in the slot, remove it
first. Refer to Figure 1-18.
1-28 Clio User Manual
Page 47

Memory
Remove the battery
pack
Insert compact flash
card into available
slot, label side up.
FIGURE 1-18 Inserting a Compact Flash Card
3. Replace the battery pack.
Warning: When removing the battery pack, please replace it as
quickly as possible and be careful not to leave it out
of the system for an extended period of time. The
backup battery provides an emergency power source
for up to two hours, BUT IF IT DRAINS YOU
WILL LOSE ALL OF YOUR DATA.
4. Replace the battery pack cover and snap into place.
Insert the tabs on the curved side of the door into the body of
Clio, then press down on the flat side and snap into place. If
the battery pack door is not completely closed, the device will
not power on.
Compact flash cards will appear as the Storage Card 1 folder
inside the My Handheld PC folder.
Clio User Manual 1-29
Page 48

Getting Acquainted with Clio
Installing ROM
Warning: Never open the battery pack door or remove the battery pack
without FIRST shutting off the device. REMOVING THE
BATTERY WHILE THE DEVICE IS ON MAY CAUSE
YOU TO LOSE ALL OF YOUR DATA.
You can upgrade the ROM module in Clio:
• A new ROM module may be necessary to upgrade to a new
release of the operating system.
To replace the ROM:
1. Synchronize information to your desktop PC.
Backup any files or programs you need. Refer to
“Synchronizing Files and File Conversion” on page 2-9.
2. Disconnect any AC power connection, including the travel
dock.
3. Open the battery pack door and rotate the battery pack
away from contacts.
4. Remove the memory module cover, using a phillips
screwdriver.
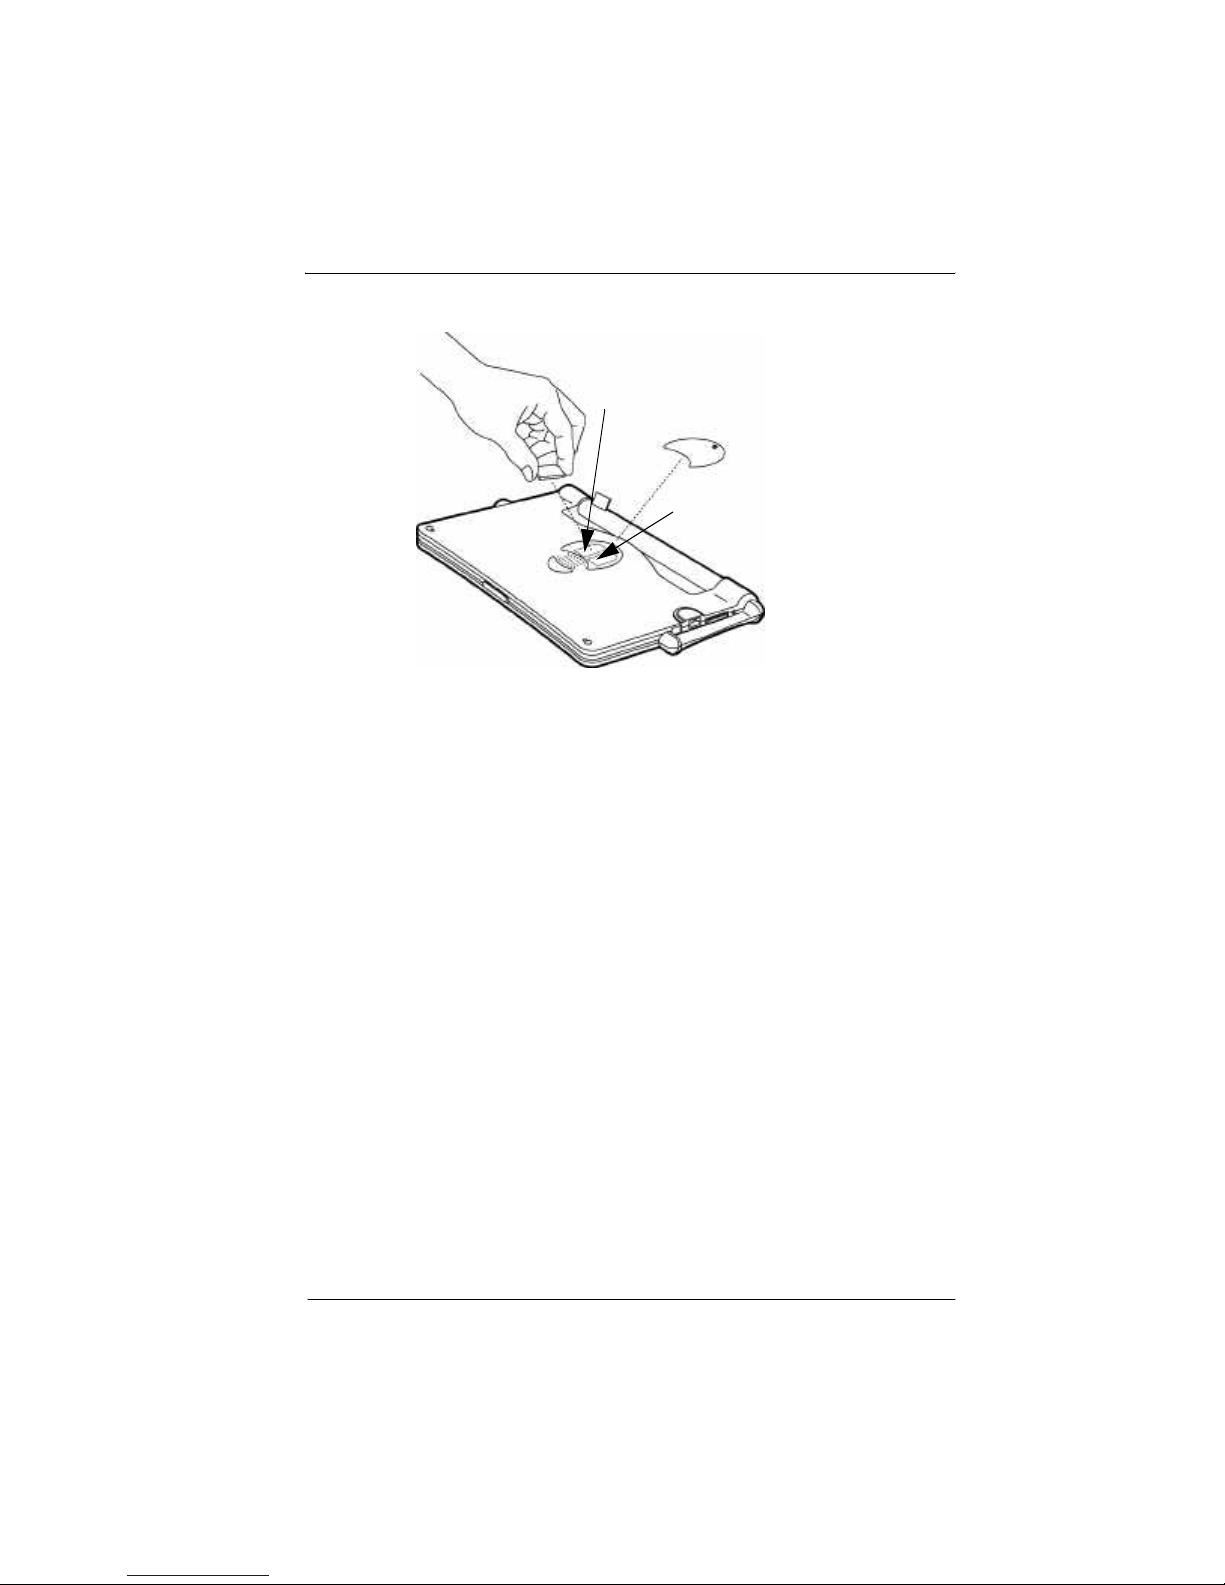
5. Remove the ROM module currently in the device.
Under the memory module cover are two modules. With Clio
face down and its Notification LED/switch light facing you,
the ROM module is on the right and the RAM on the left. Put
your fingers around the ROM module and lift it out.
Refer to Figure 1-19.
1-30 Clio User Manual
Page 49
Memory
RAM
ROM
FIGURE 1-19 Inserting a ROM Module
6. Install the new ROM module.
The ROM and RAM modules have unique connectors that
will not accept the wrong module. Align the connectors on the
module with the connectors in the Clio. Then firmly and
evenly snap into place. Make sure the module is firmly seated
in place. Do not force it.
7. Replace the memory module cover.
Be sure the cover is firmly in place. Clio will not power on if
the cover is not in place. Replace the screw and carefully
tighten. Do not overtighten the screw.
8. Replace the battery pack (see “Removing or Replacing the
Battery Pack” on page 1-22 for instruction).
9. Optionally, reconnect AC power.
10. Power on the device.
11. Synchronize with your desktop PC to restore your data.
Clio User Manual 1-31
Page 50

Getting Acquainted with Clio
Note: Always read and follow the specific instructions that came
with your ROM module. There may be important updated
information.
Resetting Clio
If the device does not turn on after you install the battery pack
and attach the device to AC power, first check if the contrast and
brightness are set correctly (see “Adjusting Contrast/Brightness”
on page 1-15). If the device still does not turn on or appears
frozen, you may need to reset the device.
Warning: You will lose any unsaved changes in files or programs when
you reset Clio. All running applications will exit upon reset.
To reset the device, use the Clio stylus to push the reset switch.
This switch is recessed on the bottom of the device (Figure 1-20),
recessed behind a hole to protect it from accidental triggering. It
is labeled RESET.
1-32 Clio User Manual
Page 51

FIGURE 1-20 Resetting Clio
Clearing Memory
Clearing Memory
Warning: Clearing memory will completely erase all data on the
system. This should only be done as an emergency procedure
or when you wish to completely erase all data; for example,
when assigning your device to a new owner.
To clear memory:
1. Synchronize information to your desktop PC.
Backup any files or programs you need.
Refer to “Synchronizing Files and File Conversion” on page
2-9.
2. Remove the memory module cover.
3. Press the silver and black Memory Erase button (under
the memory module cover), and simultaneously press the
RESET switch with the stylus.
Clio User Manual 1-33
Page 52

Getting Acquainted with Clio
With Clio face down and its Notification LED/switch facing
you, the Memory Erase button can be found adjacent to the
RAM module.
4. Replace the memory module cover.
Be sure the cover is firmly in place.
5. Power on the device.
6. Synchronize with your desktop PC to restore your data.
1-34 Clio User Manual
Page 53

2 Setting up a Partnership
with a Desktop PC
Microsoft ActiveSync® with Windows CE Services enables you
to synchronize the information on your desktop computer with the
information on Clio. Synchronization compares the data on Clio
and your desktop computer, then updates both with the most
recent information. For example:
• Keep Pocket Outlook data up-to-date by synchronizing your
mobile device with your choice of Microsoft Outlook (Inbox
synchronization with Outlook Express is not currently
supported), Microsoft Schedule+, or Microsoft Exchange.
• Synchronize Word and Excel documents, Access and other
ODBC databases and tables, as well as InkWriter files
between Clio and desktop computer. Your files are
automatically converted to the correct format.
With ActiveSync, you can also:
• Back up and restore Clio data.
• Add and remove programs on Clio.
• Copy (rather than synchronize) files between Clio and your
desktop computer.
Clio User Manual 2-1
Page 54

Setting up a Partnership with a Desktop PC
Synchronizing or exchanging files with your PC requires:
• A physical connection with Clio via a Travel Dock or network
connection.
Refer to “Connecting with the Travel Dock” on page 2-2.
• Installation of ActiveSync with Windows CE Services and
setting up a “partnership” between Clio and your Desktop PC.
Refer to “Setting up Communications” on page 2-4.
The travel dock connects Clio to AC power and the serial port
of the PC in one step, helping you to keep your device
synchronized and your battery pack fully charged.
Connecting with the Travel Dock
You can connect the device to your PC with the Travel Dock,
included with Clio.
To connect Clio and a PC and/or recharge the device with the
travel dock:
1. Connect the travel dock to a free serial port on your PC
using the included null modem cable (DB9F-to-DB9F).
2. Connect the mini-plug on the supplied AC Adapter to the
travel dock. Connect the two-prong end of the AC adapter
to a standard wall outlet.
2-2 Clio User Manual
Page 55

Connecting with the Travel Dock
3. Insert the travel dock into the serial/docking port.
AC power is supplied to Clio through the serial/docking port
when using the Travel Dock.
Refer to Figure 2-1.
4. Verify that AC power is correctly supplied to Clio by
checking the Notification LED/switch on the front of the
device.
The LED should be orange when the batteries are charging
and green when fully charged.
To AC
To PC
FIGURE 2-1 Travel Dock Connector
Note: After setting up the travel dock, leave it connected to your PC
and plugged in with the AC adapter, so you can conveniently
charge and synchronize Clio in one step.
Clio User Manual 2-3
Page 56

Setting up a Partnership with a Desktop PC
Setting up Communications
After you have calibrated and personalized Clio (refer to
“Calibrating and Personalizing the Device” on page 1-4), you can
install ActiveSync with Windows CE Services and set up a
partnership between Clio and your computer.
To install ActiveSync and set up a partnership with a desktop PC:
1. Optionally, upgrade to Microsoft Outlook 98, Microsoft
Outlook 2000, or Schedule Plus 7.0A before installing
ActiveSync.
The installation tailors the partnership to the existing system
configuration; therefore, the PIM software you will use should
be installed on your PC before installing ActiveSync.
2. Connect Clio to your desktop computer.
Refer to “Connecting with the Travel Dock” on page 2-2.
3. Launch the ActiveSync setup wizard.
Insert the Desktop Software for Microsoft ActiveSync with
Windows CE Services compact disc into your CD-ROM drive
on your desktop PC. The Setup Wizard (Figure 2-2) starts
automatically and finds the port with the Clio attached.
FIGURE 2-2 Windows ActiveSync Setup Wizard
2-4 Clio User Manual
Page 57

Setting up Communications
Note: If the wizard does not launch automatically, type
d:\setup, where d is your CD-ROM drive.
The Setup Program automatically searches your PCs COM
ports for a device. If it reports no device found, check your
serial cable connection, make sure your Clio is turned on, and
repeat.
4. Follow the directions as they appear on your screen.
For most users, the Typical installation works best.
5. Set up a partnership with your desktop PC.
The wizard guides you through installing ActiveSync, setting
up a partnership (Figure 2-3) and performing your first
synchronization.
FIGURE 2-3 Setting up a Parnership
• Frequency. You can synchronize Manually only when you
Clio User Manual 2-5
tap Synchronize Now, On Connection whenever Clio and
the PC are connected, or Continuously, as information is
updated.
Page 58

Setting up a Partnership with a Desktop PC
• File Type. You can have synchronization apply to
appointments, channel items, contacts, files, messages,
tables, and/or tasks.
6. When you are finalized, your device will synchronize for
the first time.
If you chose manual synchronization during setup, you will
need to choose Synchronize Now in the Tools menu of the
Mobile Devices folder.
2-6 Clio User Manual
Page 59

Customizing Synchronization
The default frequency and file types work well for most users.
To change either setting after you’ve completed the wizard:
1. Select your device icon in the Mobile Devices folder and
then tap Tools > Synchronization Options.
You can tap Tools > Synchronization Options to make new
choices about the synchronization of the partnership (Figure
2-4).
Customizing Synchronization
FIGURE 2-4 Mobile Devices ActiveSync Options
As follows:
• Appointments. All appointments in Outlook or Schedule
• Channel Items. Advanced users may require this new
Clio User Manual 2-7
Plus (or another calendaring program if you have thirdparty software that supports ActiveSync ).
technology.
Page 60
Setting up a Partnership with a Desktop PC
• Contacts. All address book or contact information in
Outlook or Schedule Plus (or another contacts program if
you have third-party software that supports ActiveSync).
• Files. Allows synchronization of desktop and Clio files. If
you do not select this, you can still drag and drop files
between systems.
• Messages. Refers to email in your Inbox.
• Tables. Refers to Access database tables.
• Tasks. All “to do” items in Outlook or Schedule Plus (or
another tasks program if you have third-party software that
supports ActiveSync).
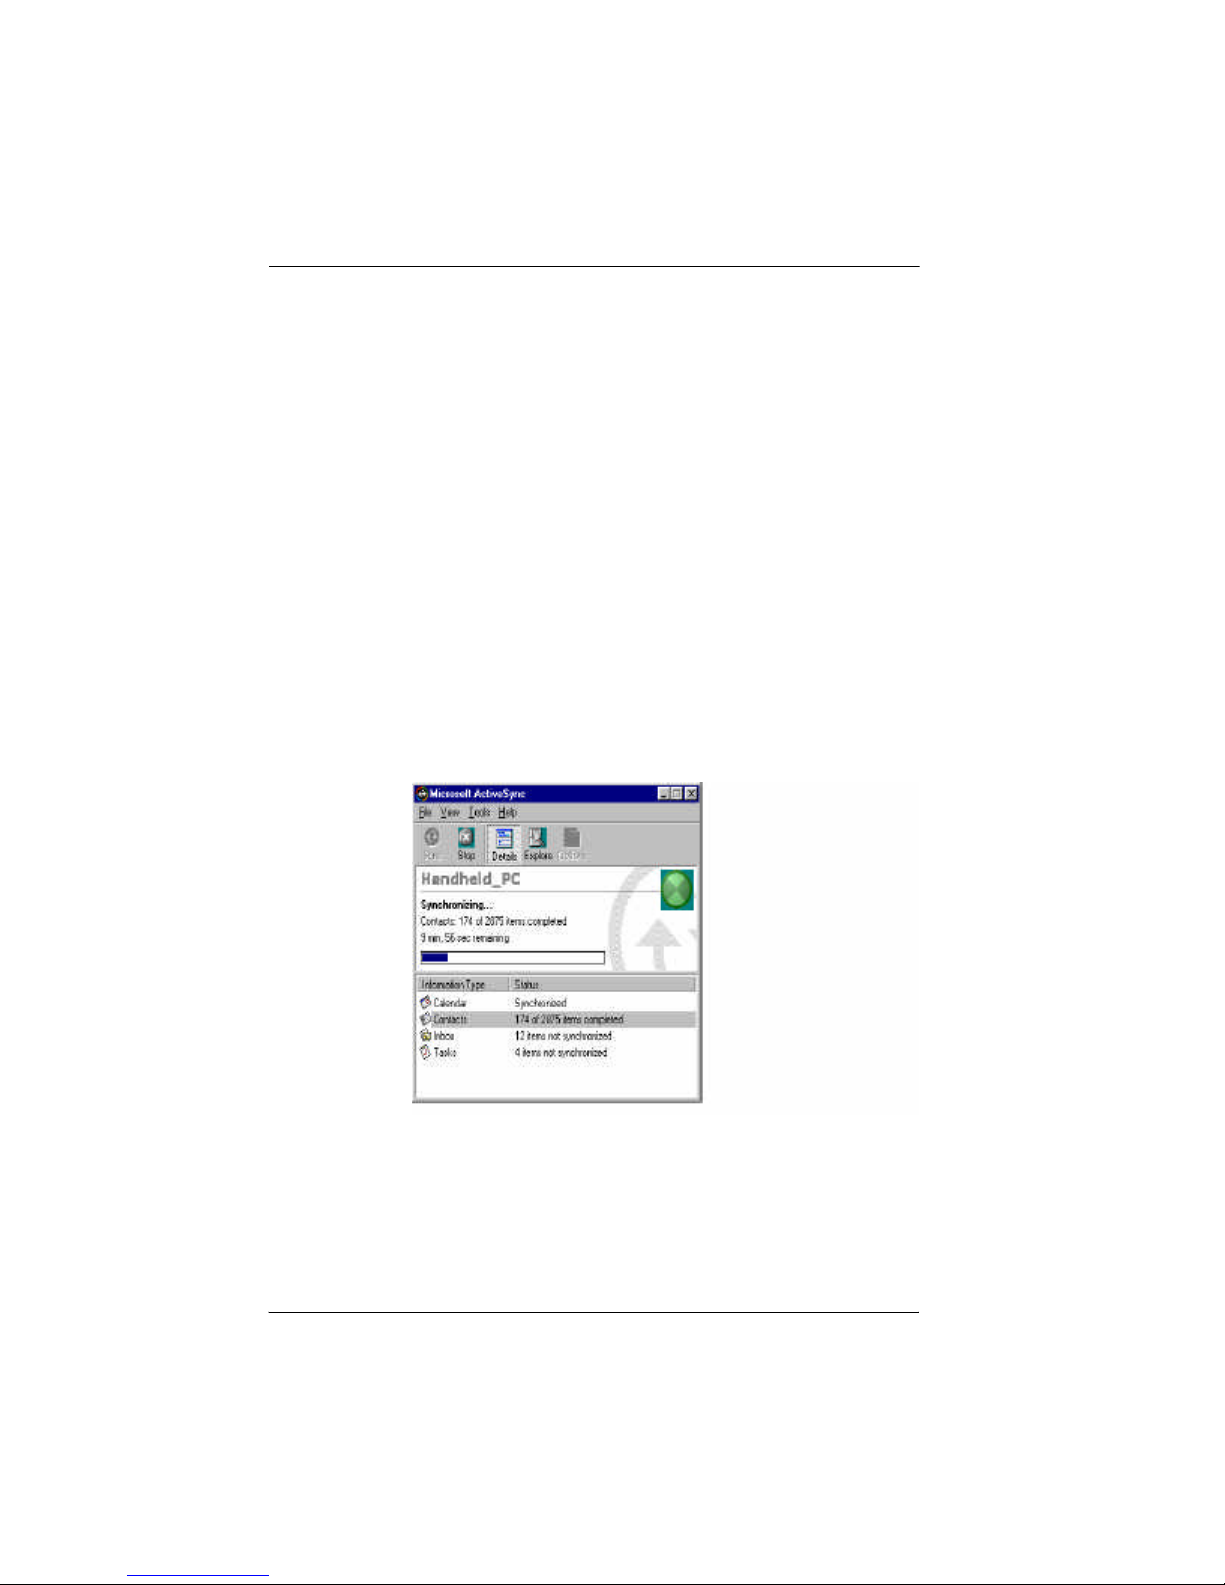
2. Optionally, check synchronization status.
When the Mobile Devices window appears at the end of the
installation, you can tap Tools > Synchronization Status to
display status information about the synchronization of the
partnership (Figure 2-5).
FIGURE 2-5 Mobile Devices ActiveSync Status
2-8 Clio User Manual
Page 61

Synchronizing Files and File Conversion
Synchronizing Files and File Conversion
When you transfer a file from your desktop computer to your
device, the file is converted to a format that the device can read.
During file conversion, some of the file’s attributes may be
changed or removed, and the file extension is changed.
For example, when you transfer a Microsoft Word file to your
device, some of the file’s formatting may be removed or changed,
and the file extension is changed to .pwd (Pocket Word). When
this file is transferred back to the desktop computer, the file
extension is converted back to .doc, but any changed or
removed formatting will still be lost. Therefore, if you are using
the Synchronized Files folder to transfer files and you want to
preserve all formatting in the original document, keep a copy of
the original file in another folder. See ActiveSync Help for
specific information on how file attributes are affected during
conversion.
Note: If you have password protection on an Excel or Word file on
your device, you must first turn off the password protection
before the file is synchronized with the desktop computer. To
do so, open the file, select File> Password, and clear the
Password field.
Clio User Manual 2-9
Page 62

Setting up a Partnership with a Desktop PC
Drag and Drop
Files can be dragged and dropped from Clio to the PC
workstation and vice-versa. To do this, connect Clio and desktop
computer, double-tap the desktop computer’s device icon (in the
Mobile Devices folder), and drag the files between the PC and the
Mobile Devices folder. The files will be converted and copied
onto Clio.
Synchronized Files
Where updates occur frequently on both Clio and desktop
computer, you can synchronize the two instances of a file so that
you always have an up-to-date copy on both computers. To do
this, store such files in the Synchronized Files folder on both
systems. During synchronization, files are updated in both
locations.
Note: On the device, the Synchronized Files folder is in the My
Documents folder. On the desktop computer, the
Synchronized Files folder is called device Synchronized
Files, where device is the name of your device. If you are
using Windows 95 or Windows 98, the folder is located in the
My Documents folder (c:\My Documents\device
Synchronized Files). If you are using Windows NT, the
folder is located in the Personal folder
(c:\Winnt\Profiles\your
username\Personal\device Synchronized Files.
2-10 Clio User Manual
Page 63

Backup and Restore
Backup and Restore
Regularly back up your device data on your desktop computer
using ActiveSync, or use BSQUARE bUSEFUL BACKUP Plus
(see page 6-12), to prevent losing information if your device is
ever corrupted or lost. To do this, connect your systems, then tap
Tools > Backup/Restore in the Microsoft ActiveSync folder on
your desktop computer. Your first backup may take some time,
depending on how much information you have on your device.
Subsequent backups will be faster if you select Incremental
instead of Full.
Note: Check the Automatic backup option to perform incremental
backups each time your Clio is connected to your desktop
PC. The automatic backup minimizes the possibility of data
loss.
Remote Synchronization
You can synchronize with your desktop computer while away
from the office by connecting to your network or directly to your
computer via a modem attached to your computer. For more
information, refer to “Synchronizing with a Desktop Computer”
on page 3-6.
Clio User Manual 2-11
Page 64

Setting up a Partnership with a Desktop PC
2-12 Clio User Manual
Page 65

3 Setting Up Remote Networking
With a dialup connection, you can connect to your desktop
computer, a network, or the Internet while away from your office.
This is called remote networking and Clio provides the following
remote networking options:
• Use the Internet Connection Wizard to connect.
• Connecting to an ISP (Internet Service Provider). Once
connected, you can send and receive e-mail messages and
view Web pages.
If this is the method you want to use, refer to “Connecting to
an ISP” on page 3-2.
• Connecting to a Network. Once connected, you can send and
receive e-mail messages, view intranet Web pages, and access
files on the network.
If this is the method you want to use, refer to “Connecting to a
Network” on page 3-3.
• Synchronizing with a Desktop Computer. Once connected, you
can synchronize information such as your Pocket Outlook
data.
If this is the method you want to use, refer to “Synchronizing
with a Desktop Computer” on page 3-6.
Clio User Manual 3-1
Page 66

Setting Up Remote Networking
Connecting to an ISP
You can connect to your ISP via a dial-up connection. Once
connected, you can send and receive e-mail messages and view
Web pages.
To create a dial-up connection to an ISP:
1. Obtain the following information from your ISP:
• ISP dial-up phone number
• POP3 or IMAP4 server name
• SMTP host name
• User name
• Password
• Domain name (for network connections only)
2. If you use a PCMCIA card, insert it into Clio.
3. Select Start > Programs > Communications, then Remote
Networking.
4. Double-tap the Make New Connection icon.
5. Enter a connection name (e.g., “ISP Dial-Up”), select Dial-
Up Connection, then select Next.
6. Select your modem type.
To use the built-in modem on Clio, select “Built-in modem on
COM 5:”
7. Optionally, select configuration and TCP/IP settings.
You should not need to change any settings in the Configuration or TCP/IP Settings dialog boxes. Most ISPs now use
server-assigned addresses. If the ISP you are connecting to
does not use server-assigned addresses, enter the addresses in
the TCP/IP Settings dialog box. When finished, tap Next.
8. Enter your access phone number and tap Finish.
Once created, the dial-up connection is available anytime. To
use it, double-tap its icon, enter your user name and password,
3-2 Clio User Manual
Page 67

Connecting to a Network
then tap Connect. Once connected, you can use Pocket Internet Explorer to visit Web pages or Inbox to send and receive email.
Note: Before you can use Inbox, you need to provide the
information it needs to communicate with the mail server. For
specific instructions, refer to “Inbox: Sending and Receiving
E-mail Messages” on page 3-10.
Connecting to a Network
If you have access to a network, you can send e-mail, access file
servers, view intranet pages, and possibly access the Internet. You
can connect to your network in one of two ways:
• Create a dial-up connection using a RAS (Remote Access
Service) account. Before you can create this dial-up
connection, your network administrator will need to create a
RAS account for you on the network.
If this is the method you want to use, refer to “Creating a Dialup Connection to a Network” on page 3-4.
• Connect to the network using an Ethernet PC Card.
If this is the method you want to use, refer to “Creating a Network (Ethernet) Connection” on page 3-5.
Clio User Manual 3-3
Page 68

Setting Up Remote Networking
Creating a Dial-up Connection to a Network
To create a dial-up connection to a network:
1. Obtain the following information from your network
administrator:
• Corporate dial-up access telephone number
• User name and Password
• Domain name
2. If you use a PCMCIA modem card, insert the card into
Clio.
3. Tap Start > Programs > Communications, then Remote Net-
working.
4. Double-tap the Make New Connection icon.
5. Enter a connection name (e.g., “Corporate Dial-Up”),
select Dial-Up Connection, then tap Next.
6. Select the Dial-Up Connection.
• Dial-Up Connection: is used for softmodem, wireless
modem, or PCMCIA modem card to send and receive
email or to access the Internet (or shared resource).
• Direct Connection: is used for infrared port, serial cable, or
Ethernet card. The infrared port and serial cable are used to
transfer files (.doc, .pxl, etc.) from Clio to the PC or vice
versa. The Ethernet card is used to network Clio to another
mobile device or to the PC Internet connection.
Note: The serial cable connection provides the same data
3-4 Clio User Manual
transfer rate as the SIR infrared connection. On the
other hand, the infrared connection saves you the hassle of using a wire to connect the devices.
An Ethernet card can connect Clio to the Internet at
extremely fast speeds. It can also network other
Page 69

Connecting to a Network
devices/PCs to Clio.
7. Optionally, select configuration and TCP/IP settings, then
tap Next.
You should not need to change any settings in the Configura-
tion or TCP/IP Settings dialog boxes.
8. Enter your access phone number and tap Finish.
Once created, the dial-up connection is available anytime. To
use it, double-tap its icon, enter your user name and password,
then tap Connect. Once connected, you can use Pocket Internet Explorer to visit Web pages or Inbox to send and receive email.
Creating a Network (Ethernet) Connection
You do not need to create a new connection in Remote
Networking on your device for a network connection. Instead,
you must install and configure an Ethernet card. The drivers for
the card may already exist on your device.
To create a network (Ethernet) connection:
1. Insert the Ethernet card into your device and connect it to
your network cable.
Note: For a list of supported cards, refer to Appendix D,
“Supported PC Cards.”
2. If you have an A/C Adapter, plug it into your device.
Ethernet PC Cards consume a significant amount of power.
3. In the Settings dialog box, enter the information for your
server.
Tap Start > Settings > Control Panel, then double-tap Net-
work:
Clio User Manual 3-5
Page 70

Setting Up Remote Networking
a. Select your Ethernet driver, then tap Properties.
Most networks use DHCP, so you should not have to
change these settings.
b. In the Identification tab, enter your name, password, and
domain.
See your network administrator if you need assistance.
Once connected, you can use Pocket Internet Explorer to visit
intranet Web pages and Inbox to send and receive e-mail.
Note: Before using Inbox, you need to provide the informa-
tion it needs to communicate with the mail server. For
instructions, see “Inbox: Sending and Receiving Email Messages” on page 3-10.
Synchronizing with a Desktop Computer
To synchronize remotely, the following conditions must be met:
• You must first establish a partnership between your device and
desktop computer while at your desktop computer. The
partnership cannot be established remotely.
Refer to “Setting up Communications” on page 2-4.
• The desktop computer must be powered on and you must be
logged in. Schedule+, Exchange, or Outlook must be running
with your user profile.
• In the lower-right corner of the ActiveSync window, the
connection status must display “Waiting for mobile device to
connect.”
• Synchronization must be enabled or set to “Automatically
synchronize if data is out-of-date.”
To verify this, check the ActiveSync Options dialog box.
• Auto Connect must be set to “At all times” in ActiveSync.
3-6 Clio User Manual
Page 71

Synchronizing with a Desktop Computer
• If you are communicating with the desktop computer through
a dial-up or network connection, you must be logged on to the
network on the desktop computer.
Select “Enable a network connection” in the ActiveSync
Properties dialog box.
Note: If your computer must be turned off while you are away from
your office, you cannot synchronize remotely. However,
since your email resides on the network’s mail server, you
can still receive messages by dialing in directly to your
network. Refer to “Connecting to a Network” on page 3-3.
If the above conditions are met, you can synchronize with your
desktop computer while away from the office in one of three
ways:
• Create a dial-up connection using a RAS (Remote Access
Service) account.
If this is the method you want to use, refer to “Creating a Dial-
up Connection to a Network” on page 3-4.
Once the connection has been created and you are connected,
select Start > Programs > Communications > ActiveSync
in the Clio Start menu. In the ActiveSync dialog box, select a
dial-up connection and the name of a computer with which to
connect.
Once connected to the network, your device will find your
desktop computer and initiate synchronization.
• Use an Ethernet card to connect to the network.
If this is the method you want to use, refer to “Creating a Network (Ethernet) Connection” on page 3-5.
Once the connection has been created and you are connected,
select Start > Programs > Communications > ActiveSync.
Clio User Manual 3-7
Page 72

Setting Up Remote Networking
In the ActiveSync dialog box, select Network Connection as
the method to connect and the name of the computer with
which to connect.
Once connected to the network, your device will find your
desktop computer and initiate synchronization.
• Create a dial-up connection to a modem connected directly to
your computer.
The modem must be set up to answer incoming calls.
If this is the method you want to use, refer to “Creating a Dial-
up Connection to a Modem” on page 3-9.
Once the connection has been created and you are connected,
select Start > Programs > Communications > ActiveSync.
In the ActiveSync dialog box, select a dial-up connection the
name of a computer from the Connect to list.
3-8 Clio User Manual
Page 73

Creating a Dial-up Connection to a Modem
Creating a Dial-up Connection to a Modem
To create a dial-up connection to a modem attached to a desktop
computer:
1. Perform any relevant prerequisite steps:
a. If you are a Windows 95 user, install the Dial-Up Net-
working Upgrade 1.2.
b. If User Level Access is enabled in Dial-Up Networking,
create a user account.
c. If you are a Windows 98 user, you will need to add a sec-
ond dial-up adapter.
For more information about any of these prerequisites, see
ActiveSync Help.
2. Follow the modem manufacturer's directions to install a
modem on your desktop computer.
3. Note the telephone number for your desktop computer
modem.
4. On your desktop computer, open the Mobile Device folder.
Tap File > Communications.
5. Under “Device Connections via Serial Port”, tap your
modem in the Ports list.
6. Tap “Enable mobile device connection.”
7. Tap “Enabled” in both “Device Connections via Serial
Port” and “Device Connections via Network.”
8. To create the connection, refer to “Connecting to an ISP”
on page 3-2.
Substitute the phone number you noted in step 3 for the ISP
dial-in number.
Clio User Manual 3-9
Page 74

Setting Up Remote Networking
Inbox: Sending and Receiving E-mail Messages
Use Inbox to send and receive e-mail messages. You can access
your e-mail by connecting to a mail server through an Internet or
network account or by synchronizing with your desktop
computer.
This section shows you how to:
1. Set up your mailbox to use a mail server
Clio connects and synchronizes with third party electronic
mail servers that use the POP and IMAP protocol.
1. Synchronize email with the server
Once connections are set up, follow these procedures to
synchronize transmission of messages between your PC, or
your email server.
2. Send a message
Take a few minutes to familiarize yourself with Clio’s
messaging facility.
Setting up Inbox for Connecting to a Mail Server
Note: Inbox does not currently support connecting with proprietary
mail protocols such as AOL and MSN. However, you can
still gain access to the Internet through these services. There
may be third-party programs available that would enable you
to send and receive mail through proprietary protocols.
1. Obtain the following information from your ISP or net-
work administrator:
• POP3 or IMAP4 server name
• SMTP host name
3-10 Clio User Manual
Page 75

Inbox: Sending and Receiving E-mail Messages
• User name
• Password
• Domain name (for network connections only).
2. Select Start > Programs > Pocket Outlook > Inbox.
3. Select Services > Options.
4. On the Services tab, tap Add.
5. Choose “IMAP4 Mail” or “POP3 Mail”, enter a name for
the connection, and then tap OK.
6. In the Mail Service Definition dialog box, enter the infor-
mation from step 1.
7. In Connection, choose the remote connection you want to
use.
For example, if you are receiving e-mail through a network
connection, select “Network Connection.”
If you have not created a connection, select “Create new connection”, double-tap the Make New Connection icon, then
follow the instructions in the wizard. When finished, tap
Inbox in the taskbar and continue.
8. In the Mail General Preferences dialog box, select desired
options.
9. In the Mail Inbox Preferences dialog box, select desired
options:
• In When Getting Messages, choose how you want
messages downloaded by default:
• “Get full copy of messages” will take up more storage
space on your device.
• “Only synchronize Inbox folder hierarchy” (IMAP4
only) will speed up the time it takes to download your
messages.
Clio User Manual 3-11
Page 76

Setting Up Remote Networking
• In When Getting Full Copy, choose whether you want to
download file attachments and meeting requests with
messages.
This setting applies whether you have chosen to download
full copies of messages by default, or to selectively download full copies of messages (by opening the message and
selecting the Get Full Copy button).
Note: If you want to receive meeting requests, your Exchange
Server administrator must enable support for Rich Text
Format for your account. Ask your administrator if this
feature is enabled for you.
10. Tap Finish.
The service connection appears on the Installed services box in
the Options dialog box.
Creating Another Connection
You can create other mail connection configurations just as you
created your initial ISP or Network Connection.
1. Tap Start > Programs > Pocket Outlook > Inbox.
a. Tap Services > Options.
• From the Connection menu in the POP3 Service
Definition Window, select "Create new connection."
• Double-tap the Make New Connection icon, then
follow the instructions from the Wizard.
• When finished, tap Inbox in the taskbar and continue to
fill in your POP or IMAP information and other options
you prefer.
3-12 Clio User Manual
Page 77

Inbox: Sending and Receiving E-mail Messages
Connecting to a Mail Server
You can send and receive messages by connecting directly to
your mail server. To do this, either:
• Connect to your Internet service provider (ISP) via modem.
• Connect to the local area network that includes your mail
server, via modem or Ethernet PC card.
Downloading Messages from a Mail Server
To send and receive e-mail:
1. Verify that the service you want is selected.
Tap the Services menu and make sure that the service you
want to use has a bullet next to it.
2. Tap Connect.
When you connect to the mail server, the messages on your
device and mail server are synchronized:
• New messages are downloaded to the device Inbox folder
• Messages in the Clio Outbox folder are sent
• Messages that have been deleted on the server are removed
from the Clio Inbox.
These folders are stored under the service you created when
setting up Inbox. Double-tap a message in the message list to
open it. If you read a message and decide that you need the
full copy, tap Get Full Copy.
Clio User Manual 3-13
Page 78

Setting Up Remote Networking
Disconnecting From a Mail Server
To disconnect Inbox from a mail server, tap Services/Disconnect.
You must also disconnect your dial-up connection by doubletapping the icon in the status bar and selecting Disconnect.
Managing Messages and Folders on a Mail Server
By default, messages are displayed in one of four folders in the
service you created: Inbox, Deleted (local), Outbox, and Sent.
The Deleted (local) folder contains messages that have been
deleted on the device. If you are using IMAP4, you may see a
Deleted Items folder. This folder is for deleted messages on the
server. The behavior of the Deleted and Sent folders depends on
the Inbox options you have chosen.
To organize messages into additional folders:
1. Select File > Folder, then New Folder.
2. Name the new folder.
3. Drag messages into the folder you created.
The behavior of the folders you create depends on whether
you are using POP3 or IMAP4. Differences in behavior are
described below.
• If you are using POP3, when you drag messages to a folder
you created, the link is broken between the messages and
their copies on the mail server. The next time you connect,
the mail server will see that the messages are missing from
the device Inbox and delete them from the server. This
prevents you from having duplicate copies of a message,
but it also means that you will no longer have access to the
messages you move to the folders you create (from
anywhere except the device).
• If you are using IMAP4, the folders you create and the
messages you move are mirrored on the server. For
3-14 Clio User Manual
Page 79

Inbox: Sending and Receiving E-mail Messages
example, if you move two messages from the Inbox folder
to a folder called Family, the server will create a copy of
the Family folder and copy the messages into that folder.
Therefore, messages are available to you anytime you
connect to your mail server, whether it is from your device,
laptop computer, or desktop computer. This
synchronization of folders occurs when you create a new
folder, move messages into a folder, exit the Inbox
program, or select Services > Synchronize Folders. If you
want to view the messages in a folder while disconnected
from your mail server, select the folder and then Services >
Offline Folder.
Synchronizing E-mail Using ActiveSync
Another way to access your e-mail is by synchronizing your
device and desktop computer. Using ActiveSync on your desktop
computer, you can send and receive e-mail messages by
exchanging information between Inbox on your device and Inbox
in either Outlook or Exchange on your desktop computer.
Clio User Manual 3-15
Page 80

Setting Up Remote Networking
When you synchronize, any changes made on either computer are
transferred to the other:
• If you have received new messages in Inbox on your desktop
computer, the messages are copied to your device.
• If you delete a message on the device, it is deleted from the
desktop the next time you synchronize.
• If you compose and send new e-mail messages on your
device, the messages are moved to the desktop computer and
sent the next time you synchronize. In addition, changes
you’ve made to Calendar, Contacts, and Tasks are updated.
If you are receiving e-mail by synchronizing with your desktop
computer, the device Inbox is set up by default. However,
because e-mail messages are not synchronized by default, you
will need to set up ActiveSync Services on your desktop
computer to include e-mail messages when synchronizing. To do
so, select your device icon in the ActiveSync folder on the
desktop and then tap Tools > ActiveSync Options. Tap Options
to set options such as how much of a message to download and
whether you want attachments included. You will not be able to
change these settings from the device.
Downloading Messages Using ActiveSync
To send and receive e-mail, connect to your desktop computer
and initiate synchronization. The way you initiate
synchronization depends on how you are connected to your
desktop computer and the settings you have chosen in
ActiveSync.
When you synchronize, the first 100 lines of new messages in
Inbox on the desktop computer are copied to the Inbox folder on
your device, and messages in the device Outbox folder are sent.
Double-tap a message in the message list to open it.
3-16 Clio User Manual
Page 81

Inbox: Sending and Receiving E-mail Messages
Managing Messages and Folders Using ActiveSync
Messages are stored in one of four folders in the ActiveSync
service: Inbox, Deleted (local), Outbox, and Sent. The behavior
of the Deleted and Sent folders depends on the Inbox options you
have chosen.
If you want to store messages in a folder other than Inbox, select
File > Folder > New Folder. Create the folder and then drag
messages into it. Doing so breaks the link between these
messages and their copies on the desktop computer. When you
synchronize next, the messages in the folder you created will not
be synchronized. In addition, the desktop computer will see that
the messages are missing from the device Inbox folder and delete
them from the Inbox folder on the desktop so that both Inbox
folders match. This prevents you from getting duplicate copies of
a message, but it also means that you will no longer have access
to the messages you move out of Inbox except from the device.
Clio User Manual 3-17
Page 82

Setting Up Remote Networking
Creating an Email Message
To create a message:
1. Tap Compose > New Message.
2. In the To field, enter the address of one or more recipients.
You can also tap Address Book to select addresses from the
Contacts list or an address service.
3. In the Subject field, enter a title for the message.
4. Select the message body and type your message.
5. To attach a file, tap Add Attachment.
6. Tap Send.
If you are not connected to your mail server, the message is
moved to the Outbox folder and will be sent the next time you
connect or synchronize.
Getting Help on Connectivity
More information on the procedures described here, as well as
information on additional procedures, can be found in the
following locations:
• Online Help on the device. Select Start > Help, then Inbox,
Remote Connections, or Synchronization.
• Microsoft ActiveSync online Help on the desktop computer.
Open the Microsoft ActiveSync icon, then tap Help Topics on
the Help menu. Troubleshooting information is also contained
there.
3-18 Clio User Manual
Page 83

4 A Tour of Windows CE
Your device comes with a keyboard, touch screen, and stylus.
You use the keyboard just as you do on your desktop computer.
The stylus and touch screen replace the pointing device; you
select and move objects on the screen by tapping and dragging
them with the stylus. The stylus also allows you to write on the
screen just as you do with a pen and paper.
Note: If you have difficulty accurately selecting objects with your
stylus, press CTRL+ALT+PLUS (+) to calibrate the screen.
Clio User Manual 4-1
Page 84

A Tour of Windows CE
Programs
The Windows CE programs that come with your device are stored
in ROM (read-only memory) and cannot be removed or lost. You
can install additional programs that will be placed in RAM
(random access memory). Table 4-1 provides a listing of
programs and descriptions.
TABLE 4-1 Programs Bundled with Clio
Program Description
Calendar Keep track of your appointments
Contacts Keep track of your friends and col-
Inbox Send and receive e-mail.
Tasks Keep track of your tasks.
Microsoft Pocket Access View ODBC databases and create
Microsoft Pocket Excel View and create Excel documents.
Microsoft Pocket PowerPoint Present PowerPoint presentations.
Microsoft Pocket Word View and create Word documents.
ActiveSync Initiate synchronization with your
PC Link Initiate a connection with your
Remote Networking Set up connections with other com-
Terminal View and download files from a
Microsoft Voice Recorder Record your spoken ideas.
Microsoft InkWriter Create handwritten or typed notes
and create meeting requests.
leagues.
Access information.
desktop computer from your device.
desktop computer.
puters or the Internet.
bulletin board or send and receive
e-mail.
and drawings.
4-2 Clio User Manual
Page 85

Programs
TABLE 4-1 Programs Bundled with Clio
Program Description
World Clock Set the date, time, and alarm for
your home city or the city you are
visiting.
Calculator Perform calculations.
Solitaire Entertain yourself while on the
road.
Note: There are many Windows CE programs available, including
freeware and shareware. Visit
http://www.microsoft.com/windowsce/
or try searching the Web on the keyword “Windows CE” to
find additional programs for your device.
Clio User Manual 4-3
Page 86

A Tour of Windows CE
Using the Start Menu and Taskbar
Use the Start menu to open programs, settings, Help, and
recently used documents. Just select Start, and then select the
program or item you want to open. In addition to the Start menu,
the taskbar contains buttons for the programs you have running, a
status area, and a desktop icon
(Figure 4-1).
FIGURE 4-1 Start Menu and Taskbar
4-4 Clio User Manual
Page 87

Using the Command Bar
Each program has a command bar located at the top of the
program window (Figure 4-2). The command bar displays both
menu names and toolbar buttons. Select the slider to switch
between displaying toolbar buttons only or menu names and
toolbar buttons. You can drag the slider to display the buttons and
menu names you want. You can also drag the slider down to
move the toolbar buttons under the menus.
FIGURE 4-2 Command Bar
Finding Files and Exploring the Web
To find files on your device, select Start > Programs >
Windows Explorer. When you create and save a file on your
device, it is stored in a folder called My Documents unless you
select another location. You can copy or move a file from one
location to another by selecting the file and then using the Copy
or Cut and Paste commands on the Edit menu.
Using the Command Bar
To view Web pages, select Start > Programs >Internet
Explorer:
• For pages that are stored on your device, select, File > Open,
then tap Browse and locate the file.
• For pages on the Internet or an intranet, type a URL in the
Address box.
Clio User Manual 4-5
Page 88

A Tour of Windows CE
To access Internet or intranet Web pages, you must first set up a
connection between your device and the Internet or an intranet.
Note: To view the HTML source code of a Web page on your
device, tap File > Save As to save the page on your device.
Then, in Pocket Word, tap File > Open, select “All
Documents” from the Type list, then select the page you
saved.
Printing
Microsoft Pocket Word, Microsoft Pocket Excel, Microsoft
InkWriter and Pocket Outlook support printing. In order to print,
you will need to connect to a PCL 3 printer. Clio can print
directly to IrDA (infrared) capable PCL printers. Choose Print
under the File menu within these programs. Select PCL Laser or
PCL Inkjet, depending on the type of printer. Choose IRDA as the
Port.
To print to a serial printer, use the travel dock and connect the
printer to the DB9 connector on travel dock. You will need
appropriate printer driver support for Windows CE. Contact your
printer manufacturer for printer driver support for Windows CE.
In addition, you can transfer files to your desktop PC and print
them from your desktop.
4-6 Clio User Manual
Page 89

Customizing Clio
Clio uses the standard Microsoft CE Control panel. You can
customize and adjust settings on Clio by using the Control Panel.
To open the Control Panel, tap Start > Settings > Control Panel.
Double tap any icon to bring up properties for that item.
A list of icons and their functions follows. For detailed
information about the properties of any Control Panel item, tap
the “?” in the upper right corner of the dialog box for online Help.
Communications
Assigns a name to Clio for use in communicating
with other computers. You can also specify whether
to allow a connection with a desktop computer and
the port specifications for that connection.
Customizing Clio
Dialing
Specifies dialing settings, including area code,
country code, dial type, and the code to disable call
waiting. You can store multiple dialing patterns
(e.g., “Work”, “Home”, etc.).
Clio User Manual 4-7
Page 90

A Tour of Windows CE
Display
Keyboard
Network
Changes the background (wallpaper) and
appearance (window color scheme) on the
Windows CE desktop. You can add a bitmap by
copying a .bmp file to your the Windows directory
on Clio. Then select this .bmp file in the
Appearance tab.
Toggles character repeat on and off, and specifies
delay and rate for repeated characters.
Selects the network adapter and provides
identification of the device to the network.
Owner
Provides fields in which owner information can be
entered. A notes tab also allows other information
to be entered and to be displayed when powering
on, for example, “Reward for return of this device.”
4-8 Clio User Manual
Page 91

Password
Power Manager
Customizing Clio
Allows you to set a password to restrict access
when Clio emerges from suspend mode. Once set,
password access cannot be circumvented: Clio must
be reset. Thus, if you set a password, write it down
in a retrievable place. Password mode can be
toggled on and off.
Displays battery pack status and provides power
management option selections.
Alternatively, battery status can be viewed from the
status bar.
Regional Settings
Allows you to customize Clio to display text in a
local language, as well as format numbers,
currency, time and date for regional preference.
Clio User Manual 4-9
Page 92
A Tour of Windows CE
Remove Programs
Stylus
System
Lists programs that can be removed. Tap to select a
program from the list, then tap Remove.
Adjusts how Windows CE recognizes your double
taps (as slow or rapid successive taps). You can also
recalibrate your screen.
Displays system and memory properties. You can
allocate memory between storage memory and
program memory.
Tablet Mode AutoStart
Runs programs automatically when Tablet mode is
enabled. By default, CalliGrapher is selected to run
when Clio is opened in Tablet Mode.
4-10 Clio User Manual
Page 93

Volume and Sounds
Lets you adjust volume and select sounds to
accompany programs, notices, and events. Toggles
sound on or off, enables audible clicks and taps (for
keys and screen taps).
You can also add a sound by copying a .wav file to
the Windows directory on Clio. To play the sound,
select the .wav file in the Sound tab.
World Clock
Allows you to specify a Home time zone and
Visiting city (from a list that you can customize),
local time for each, and the date. You can also set
alarms to alert you.
Customizing Clio
Clio User Manual 4-11
Page 94

A Tour of Windows CE
4-12 Clio User Manual
Page 95

5 Using the Microsoft Office and
Other Companion Programs
The Microsoft Office companion programs consist of Microsoft
Pocket Word, Microsoft Pocket Excel, Microsoft Pocket Access,
and Microsoft Pocket PowerPoint. You can access the Office
companion programs by tapping Start > Programs > Office, and
then the program you want to open.
Other Microsoft companion programs include Voice Recorder
and InkWriter. You can access these companion programs by
tapping Start > Programs > Accessories, and then the program
you want to open. To access Microsoft Pocket Outlook, tap Start
> Programs > Pocket Outlook, and then the component
program that you want to open.
Note: More information on the procedures described in this chapter
can be found in online Help on Clio. Tap Start > Help, then
the program name. Because programs work in similar ways
to their counterparts on the desktop computer, online Help
covers basic procedures and the differences between the
companion programs and desktop programs. If you need
more information on using a companion program, refer to the
documentation that came with the desktop version of the
program.
Clio User Manual 5-1
Page 96

Using the Microsoft Office and Other Companion Programs
Pocket Word: Creating Documents
You can use Pocket Word to create documents, such as letters,
meeting minutes, and trip reports. You can also use Pocket Word
to open and edit documents created in the desktop version of
Word. When you are ready to save a document you created or
edited, you can save it in a variety of formats, including Pocket
Word (.pwd) and Word (.doc). If you plan to send the document
through e-mail to someone who will be using Word, not Pocket
Word, be sure to save it in the Word (.doc) format.
To type text in Pocket Word, tap or tap the screen to place the
insertion point and start typing. Use the spelling checker to verify
accuracy. You can quickly format the text, using buttons and
menu commands. You can format as you go or apply formatting
later.
You can type text in either Outline view or Normal view, and you
can easily switch from one view to the other, using the View
menu. Work in Outline view when taking notes in meetings. As
shown in Figure 5-1, use the formatting of the templates to
highlight main points and provide formatting for detail text.
5-2 Clio User Manual
Page 97

Pocket Word: Creating Documents
FIGURE 5-1 Pocket Word: Meeting Minutes Template
To take meeting minutes using Pocket Word:
1. Tap File > New > Document from Template.
2. In the Template dialog box, tap Meeting Notes, then OK.
3. Tap File > Save.
4. Enter a name, choose a storage location, then tap OK.
5. Overtype the text in the template with your agenda items
and notes.
Note: To see more of your document, tap View > Full Screen.
Clio User Manual 5-3
Page 98

Using the Microsoft Office and Other Companion Programs
Pocket Excel: Creating Workbooks
You can use Pocket Excel to create workbooks, such as expense
reports and mileage logs. You can also use Pocket Excel to open
and edit workbooks created in the desktop version of Excel.
When you are ready to save a workbook you created or edited,
you can save it in a variety of formats, including Pocket Excel
(.pxl) and Excel (.xls). If you plan to send the document
through e-mail to someone who will be using Excel, not Pocket
Excel, be sure to save it in the Excel (.xls) format.
Pocket Excel provides fundamental spreadsheet tools, such as
formulas, functions, sorting, and filtering. You can split panes to
easily view different areas of a large worksheet. You can also
“freeze” the top and leftmost panes in a worksheet to keep row
and column labels or other data visible as you scroll through a
sheet.
FIGURE 5-2 Pocket Excel: Expense Report Template
5-4 Clio User Manual
Page 99

Pocket Excel: Creating Workbooks
To log travel expenses using Pocket Excel:
1. Tap File > New > Workbook from Template.
2. In the Template dialog box, tap Expense Report, then OK.
3. Tap File > Save.
4. Enter a name, choose a storage location, and then select
OK.
5. Overtype the text in the template.
Note: If your workbook contains sensitive information, you can
protect it with a password. To do so, open the workbook, tap
File > Password. Every time you open the workbook, you
will need to enter the password, so pick one that is easy for
you to remember but hard for others to guess. Workbooks
with password protection cannot be synchronized.
Clio User Manual 5-5
Page 100

Using the Microsoft Office and Other Companion Programs
Pocket Access: Viewing and Creating Data
Use Pocket Access to view and update data from Microsoft
Access, Microsoft SQL Server, and other ODBC databases on
your desktop computer. Simply create the database on your
desktop computer and then transfer the data to your device. You
can also use Pocket Access to create new databases, tables, and
SQL procedures directly on your device.
Note: Programmers can use Microsoft ActiveX Data Objects for
Windows CE (ADOCE) and Microsoft Visual Basic or
Microsoft Visual C++ to develop custom database
solutions. For more information, see
http://www.microsoft.com/windowsce/.
FIGURE 5-3 Pocket Access: Database Table
5-6 Clio User Manual
 Loading...