

Vacuflo 760, 960, 780, 980 Operating Instructions Manual
FOR MODELS
760/960 & 780/980
OPERATING
INSTRUCTIONS
IMPORTANTES MESURES DE SECURITÉ
En employant un appareil électrique, des précautions
fondamentales devraient toujours être prises, y compris:
AVERTISSEMENT
Pour réduire les dangers de feu, d'électrocution,
ou de blessure:
LISEZ COMPLÈTEMENT LE MODE D'EMPLOI AVANT
D'UTILISER CE SYSTÈME D'ASPIRATEUR.
• Débrancher et couper le courant avant
de le réparer.
• Ne pas utiliser sur des surfaces
mouillées.
• Ne pas utiliser comme jouet et
surtout faire attention quand on
l'emploie prés des enfants.
• Employer seulement tel que décrit dans
ce manuel d'emploi et qu'avec les
accessories du fabricant.
• Ne pas utiliser si la corde ou la prise
électrique est endommagée. Si
l'appareil ne fonctionnne pas, est
endommagé, est tombé par terre, a été
laissé à l'extérieur, ou a été immergé,
dans l'eau, veuillez rapporter l'appareil à
un centre de service.
• Ne pas tirer sur le cordon eléctrique. Ne
pas utiliser le cordon eléctrique comme
poignée, ni le coincer dans une porte
ou l'appuyer sur des coins et boudures
tranchants. Ne pas passer l'aspirateur
sur le cordon électrique. Eloigner le
cordon électrique de la chaleur.
• Ne pas débrancher en tirant sur le
cordon électrique. Pour le débrancher,
saisir la prise de courant, et non le
cordon électrique.
• Ne pas utiliser avec les mains mouillées.
• Ne rien mettre dans les fentes et les
orifices bouchés. Ne pase employer
avec des orifices bouches. Éliminer
poussiére, cheveux et les autres choses
qui peuvent rendre difficile la circulation d'air.
• Gardez cheveux, vêtements amples,
doigts, et toutes autres parties ducorps
loin des orifices et des piéces mobiles.
• Ne pas aspirer queique chose qui brûle
ou fume, comme des cigarettes, des
allumettes, ou des cendres chaudes.
• Brancher à une prise de courant
munie d'une mise à la terre. Voir les
reseignements de mise à la terre.
• Éteindre tous les contrôles avant de
débrancher.
• Faire bien attention en nettoyant les
escaliers.
• Ne pas utiliser pour aspirer des
liquides infammables comme l'essence
et ne pas employer dansdes endroits où
ces choses peuvent se trouver.
• Ne rien placer ou entreposer sur
le dessus de l'appareil - une surchauffe
du moteur pourrait se produire.
®
®
®
®
NRTL /C
ATTENTION:
NE PAS UTILISER
SUR TAPIS OU
PLANCHER
MOUILLE.
INSTRUCTIONS
DE MISE À LA
TERRE
Cet appareil doit avoir une mise à la terre.
Si une défectuosité ou autre survenait, la
mise à la terre offre une voie de moindre
résistance au courant électrique, d'où un
risque moins élevé d électrocution. Cet
appareil est équipé d' un cordon électricque
ayant un conducteur et une fiche de mise à
la terre. Cette fiche doit être branchée dans
une prise appropriée qui a été installée et
mise à la terre convenablement en accord
avec le code électrique de votre région
AVERTISSEMENT
Un branchement incorrect de l'équipement
de mise à la terre peut causer un risque
d'électrocution. Si vous avez un doute
concernant la mise à la terre de votre prise,
veuillez faire vérifier votre installation par
un électricien qualifié ou une personne du
service après-vente. Ne pas modifier la fiche
fournie avec l'appareil - si la fiche ne se
branche pas à la prise, faites installer une
prise adéquate par un électricien qualifié.
Les appareils, modéle 760 & 960 doivent
être employés avec un circuit de 120 volts
et avoir une prise qui ressemble à la prise
illustrée sur I'image A.
Les appareils, modéle 780 & 980 doivent être
employés avec un circuit de 240 volts et
avoir une prise qui ressemble à la prise
illustrée sur I'image B.
Vérifiez que votre appareil est branché sur
une prise ayant la même configuration que
la fiche électrique. Aucun adapteur ne
devrait être utilisé avec cet appareil.
Les logos ci-dessus ne s àppliquent pas au
modèle 780 & 980
G
B
W
MODÉLE A
MÉTHODE DE MISE À LA TERRE
G
MODÉLE B
MÉTHODE DE MISE À LA TERRE
MODELS 760/780 & 960/980
COMMERCIAL
AND OVERSEAS
LIMITED WARRANTY
The manufacturer warrants to the initial purchaser that the VACUFLO Models 760/
780 and 960/980 power units will be free from defects in material and workmanship for one (1) year from the date of first consumer purchase and that hoses,
tools, turbine attachments and other attachments will be free from defects in
material and workmanship for ninety (90) days from the date of first purchase.
Defects, malfunctions, failure, or damage caused by improper, unreasonable,
or negligent use or repair while the warranted parts are in possession of the
purchaser are excluded from the warranty. This warranty does not cover
unauthorized removal or repair of the motor assembly.
THIS WARRANTY IS EXPRESSLY IN LIEU OF ANY OTHER WARRANTIES,
EXPRESS OR IMPLIED, INCLUDING THE IMPLIED WARRANTIES OF MERCHANTABILITY OR FITNESS FOR A PARTICULAR PURPOSE. THIS WARRANTY DOES NOT COVER THE INSTALLATION OF EQUIPMENT. IN NO
EVENT SHALL THE MANUFACTURER BE LIABLE FOR ANY OTHER OBLIGATIONS OR LIABILITIES ESPECIALLY FOR ANY INCIDENTAL OR CONSEQUENTIAL DAMAGES TO ANYONE. THE WARRANTY DOES NOT COVER
UNAUTHORIZED REMOVAL OR REPAIR OF THE MOTOR ASSEMBLY.
Some states/provinces do not allow the exclusion or limitation of incidental or
consequential damages so the above limitation or exclusion may not apply to
you. We neither assume nor authorize any person to assume for us any
liability in connection with the sale or service of the VACUFLO equipment
other than as provided in this warranty. This warranty is only valid under
normal, intermittent use of the product when properly installed and operated
in light commercial application.
™
®
512 West Gorgas Street • P.O. Box 3912
Louisville, OH 44641-3912
1-800-822-8356
www.vacuflo.com
™
®
CONSERVEZ CES INSTRUCITONS
USAGE RESERVÉ POUR LA MAISON OU EMPLOI
COMMERCIAL LÉGER
Ne pas ventiler dans un mur, un plafond, ou un espace
dissimulé d'un bâtiment ou un édifice.
Ne brancher l'appareil qu'à une prise avec mise à la terre.
™
®
READ MANUAL BEFORE OPERATING SYSTEM
Please be sure this manual and warranty
information are left with the power unit or
customer when installation is complete.
P/N 7899
10/01
TO THE OWNER:
Read the owner's manual thoroughly to ensure the most efficient use of your VACUFLO system. To register your VACUFLO
system warranty in the United States and Canada, call 1-800-8229277, register online (www.vacuflo.com) or fill in and mail the
warranty card located with this manual.
IMPORTANT WARRANTY INFORMATION
Proof of Purchase or Registration of the VACUFLO System
is required before any warranty work will be performed by
an Authorized VACUFLO Dealer. Registration ensures a fast
and easy resolution to your warranty requirements.
To register, simply call the 24-hour VACUFLO registration
line at 1-800-822-9277, register online (www.vacuflo.com)
or complete and return the blue warranty postcard located
in this VACUFLO Owner's Manual.

VACUFLO®Built - In Central Vacuum Systems
General Information
Do Not Store Objects on top of the
power unit. This will block the motor
cooling ventilation. Restricting the
cooling airflow may shorten the
motor life.
The central vacuum is designed to
vacuum ordinary household dirt and
dust. The system is designed for dry
pickup. A Wetvac accessory is needed
if the system will be used for liquid
pickup.
The central vacuum system is a
network of inlet valves, 2” PVC tubing,
and low voltage wiring installed in the
walls of your home. To operate the
system, simply plug the hose into an
inlet valve, attach the cleaning tool to
the curved hose end and begin vacuuming. The dirt is transported through
the in-wall tube system back to the dirt
canister (located on the power unit).
Caution: Do not allow the motor
to remain turned on, unless a hose is
connected or an inlet valve is open. If
air is not permitted to pass through the
fan blades, damage may occur to the
motor.
Operating Instructions
Using the Central Vacuum System is
easy. Simply raise the inlet valve lid,
insert the hose end and attach the
desired cleaning tool to the hose wand.
The Power Unit is activated when the
hose is inserted into the valve.
General Power Unit
Maintenance
The simple care and maintenance
instructions included here will help
ensure trouble-free use of the central
vacuum system.
• Do not place objects on top of the
power unit. The motor could
overheat.
• Do not allow the motor to remain
“on” unless a hose is connected or
an inlet valve is open. If airflow is
not permitted to flow through fan
blades, motor damage may occur.
• Empty the dirt canister when it is
3/4 full.
• Remember to clean the motor guard
screen each time the dirt receptacle
is emptied. (refer to Cleaning Guard
Screen instructions).
• The power unit does not require
any lubrication.
• The exterior of the power unit can
be wiped with a clean, dry cloth.
Do not use liquid cleaners or water
as an electrical shock may occur.
• For additional service contact a
qualified service person.
OPERATING INSTRUCTIONS
ILLUS. #1
VACUFLO®True Cyclonic
MODELS: 760/960 & 780/980
Emptying the Dirt
Canister & Cleaning
the Guard Screen
The dirt canister – where the vacuumed dirt is deposited – is the removable lower portion of the power unit.
The canister needs to be removed and
emptied when it is 3/4 full. The Motor
Guard Screen should be cleaned each
time you empty the dirt canister.
The motor guard screen is located
directly above the dirt canister inside
the power unit. The guard screen is
not removable, it is designed to
prevent lightweight fibers from entering the motor impeller blades. A
buildup of material on the guard
screen may result in a loss of vacuum.
Follow these steps to empty
the dirt canister
(refer to illustration #1)
Make sure the Power Unit is OFF.
1) Disengage the canister latches
located on opposite sides of the
power unit.
2) Remove the dirt canister.
3) Dispose of canister contents in trash
receptacle.
4) Clean the guard screen.
Guard
Screen
Gasket
Dirt Receptacle
ILLUS. #2
IMPORTANT SAFETY INSTRUCTIONS
READ ALL INSTRUCTIONS BEFORE USING THIS VACUUM SYSTEM
WARNING
To reduce the risk of fire, electric shock or injury:
When using an electrical appliance, basic precautions should
always be followed, including the following:
• Unplug and disconnect power before
servicing.
• Do not use on wet surfaces.
• Do not allow to be used as a toy. Close
attention is necessary when used by or
near children.
• Use only as described in this
manual. Use only manufacturer's
recommended attachments.
• Do not use with damaged cord or plug.
If appliance is not working as it should,
has been dropped, damaged, left
outdoors, or dropped into water, return
it to a service center.
• Do not pull or carry by cord, use cord
as a handle, close a door on cord, or
pull cord around sharp edges or
corners. Do not run appliance over
cord. Keep cord away from heated
surfaces.
• Do not unplug by pulling on cord. To
unplug, grasp the plug, not the cord.
• Do not handle system or appliance with
wet hands.
• Do not put any object into openings.
Do not use with any opening blocked.
Keep openings free of dust, lint, hair,
and anything that may reduce air flow.
•Keep hair, loose clothing, fingers, and all
parts of body away from openings and
moving parts.
• Do not pick up anything that is burning
or smoking, such as cigarettes, matches,
or hot ashes.
• Connect to a properly grounded outlet.
See grounding instructions.
•Turn off all controls before
unplugging.
• Use extra care when cleaning
on stairs.
• Do not use to pick up flammable or
combustible liquids such as gasoline or
use in areas where they may be present.
• Do not place or store anything on
top of power unit - overheating of
motor could occur.
®
®
®
®
NRTL /C
WARNING:
ELECTRIC SHOCK
COULD OCCUR IF
USED ON WET
SURFACES.
CAUTION:
DO NOT USE ON
WET RUG OR
FLOOR.
GROUNDING
INSTRUCTIONS
This appliance must be grounded. If it
should malfunction or breakdown, grounding provides a path of least resistance for
electric current to reduce the risk of electric shock. This appliance is equipped with
a cord having an equipment grounding conductor and grounding plug. The plug must
be plugged into an appropriate outlet that
is properly installed and grounded in accordance with all local codes and ordinances.
WARNING
Improper connection of the equipmentgrounding conductor can result in a risk of
electric shock. Check with a qualified electrician or service person if you are in doubt
as to whether the outlet is properly
grounded. Do not modify the plug provided
with the appliance - if it will not fit the outlet, have a proper outlet installed by a qualified electrician.
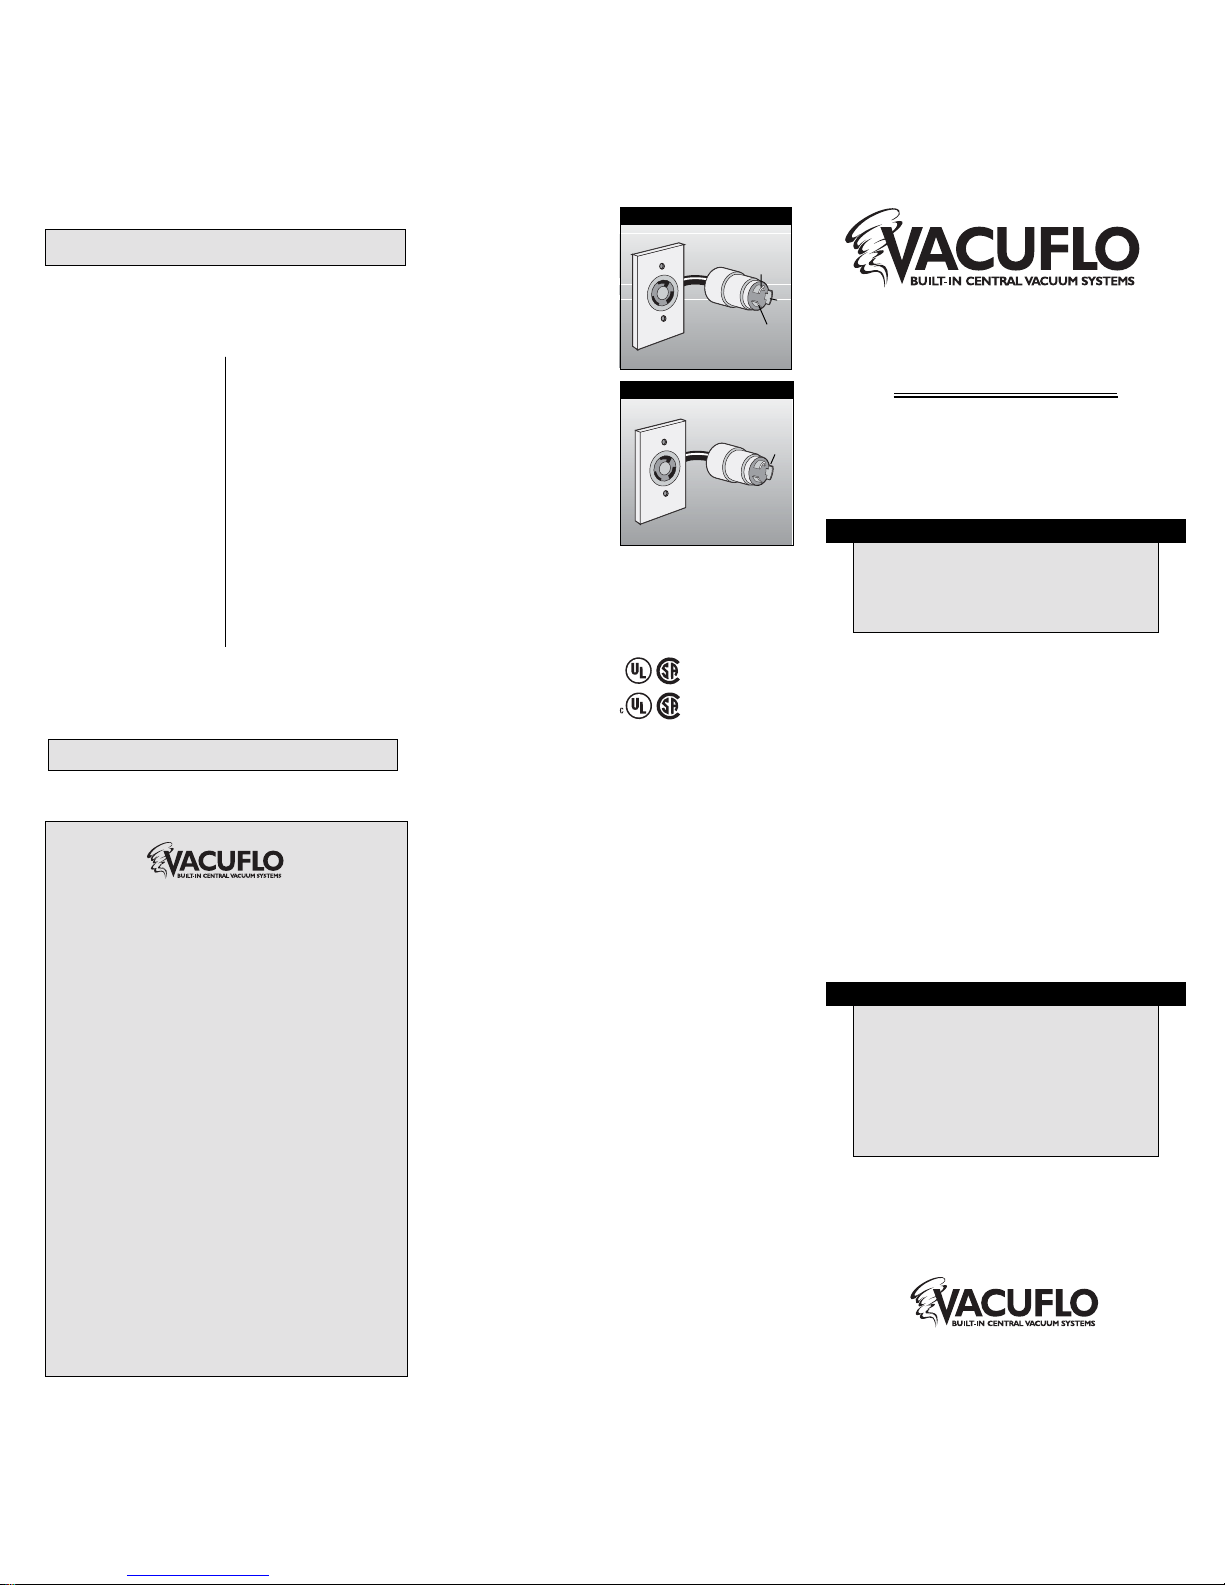
The Models 760 & 960 appliance is for use
on a nominal 120 volt circuit and has a
grounding plug that looks like the plug illustrated in Fig. A.
The Models 780 & 980 appliance is for use
on a nominal 240 Volt circuit and has a
grounding plug that looks like the plug illustrated in Fig. B.
Make sure that the appliance is connected
to an outlet having the same configuration
as the plug. No adapter should be used with
this appliance.
Above logos do not apply to models 780 & 980
G
B
W
FIG. A
GROUNDING METHOD
G
FIG. B
GROUNDING METHOD
™
®
MODELS 760/780 & 960/980
LIFETIME PLUS 3
RESIDENTIAL
LIMITED WARRANTY
All permanently installed components of the VACUFLO Built-In Central
Vacuum System are warranted to be free from defects in material and workmanship under normal use and care as long as the original consumer purchaser owns the home of original installation or until the system is removed
from its' original installation, whichever occurs first.
In the event of a defect in permanently installed components of the VACUFLO
System, an authorized VACUFLO dealer should be contacted. The dealer will
repair or replace (at our option) any defective part or parts at your location at no
labor cost for a period of three (3) years. Thereafter, repaired or replacement (at
our option) part or parts will be provided to you for any items under warranty.
All VACUFLO accessories are warranted to be free from defects in material and
workmanship under normal use and care for three (3) years from date of
original consumer purchase. In the event of a defect in a VACUFLO accessory,
the accessory will be repaired or replaced (at our option) at an authorized
VACUFLO dealer location at no labor costs for three (3) years. There is no
warranty for consumable items such as light bulbs, belts, and beater brushes.
THIS WARRANTY IS A SOLE AND EXCLUSIVE WARRANTY. ALL OTHER
WARRANTIES INCLUDING IMPLIED WARRANTIES OF MERCHANTABILITY
OR FITNESS FOR A PARTICULAR PURPOSE ARE EXCLUDED. THIS WARRANTY COVERS ONLY LIABILITY AND RESPONSIBILITY DESCRIBED
HEREIN AND THERE IS NO LIABILITY FOR ANY CONSEQUENTIAL, INCIDENTAL OR SPECIAL DAMAGES ARISING FROM THE USE OF THIS SYSTEM.
Some states do not allow exclusion or limitation of warranties or limitation of
incidental or consequential damages so the above exclusion may not apply to
you. This warranty gives you specific legal rights and you may have other
rights which vary from state to state.
To register as the original consumer purchaser and verify your coverage
please return the warranty registration located in the owner's manual or in the
United States and Canada, call 1-800-822-9277.
Register online (www.vacuflo.com)
5) Raise the empty dirt canister to the
proper location under the power
unit and engage the latches.
6) Be certain the dirt canister is
“seated” properly to the gasket on
the body of the power unit.
Follow these steps to Clean the
Guard Screen
(refer to Illustration #2)
A long handled stiff brush is recommended for cleaning the screen.
Make sure the Power Unit is OFF.
1) Unlatch and remove the Dirt
Canister. (Hold or place the canister
under the power unit to catch the
debris removed from the guard
screen.)
2) Using a long handled brush, insert
the brush through the bottom of the
dirt cone reaching to the guard
screen. Gently “sweep” the screen
to remove the debris.
3) Dispose of the dirt and debris
captured in the dirt canister.
4) Raise the dirt canister to the proper
location under the power unit and
engage the latches.
5) Be certain the dirt canister is
“seated” properly to the gasket on
the body of the power unit.
Troubleshooting the
system
Motor Fails to Turn On:
• Check the main fuse or circuit
breaker at the main power supply
panel of your home. Reset breaker
or replace fuses if necessary.
• Check the Power unit reset button
located above the power cord.
Pressing the button should restore
operation.
• If the circuit protector continues to
trip off after a short period of time,
the motor brushes may be worn out.
Call a qualified service person for
service.
Loss of Vacuum
If the system shows a loss of vacuum
power, check the following:
• The dirt receptacle and motor guard
screan may need cleaned – follow
instructions in this guide.
• The hose may be clogged – To
check if there is an obstruction,
unplug the hose and insert an
object that is smaller then the
diameter of the hose (A butter knife
works well). Pass the object completely through the hose, if it stops
that will indicate where the obstruc-
tion is located. A dry garden hose
can be inserted into the hose to help
push obstruction through.
• The Dirt Canister may not be properly
seated to the gasket – Follow instructions for replacing the dirt canister.
•Tube lines may be obstructed – First
check the 90 degree elbow located
directly behind the inlet valves, if an
obstruction occurs it will usually not
make it past this elbow. If the
obstruction is not visible at the
elbow, attempt to purge the tubing at
each inlet valve. To do this, connect
the hose and use your hand to stop
airflow at the end of the hose for a
couple seconds, let airflow resume.
Repeat if necessary.
• If necessary call a qualified service
person to perform required maintenance.
Obtaining Service Under Warranty:
To obtain repair on warranted parts
contact the seller of the system with
the power unit serial number.
SAVE THESE INSTRUCTIONS
INTENDED FOR HOUSEHOLD AND LIGHT COMMERCIAL USE.
Connect to a properly grounded outlet only.
Do not vent into a wall, a ceiling, or concealed
space of a building or structure.
 Loading...