

Page 1
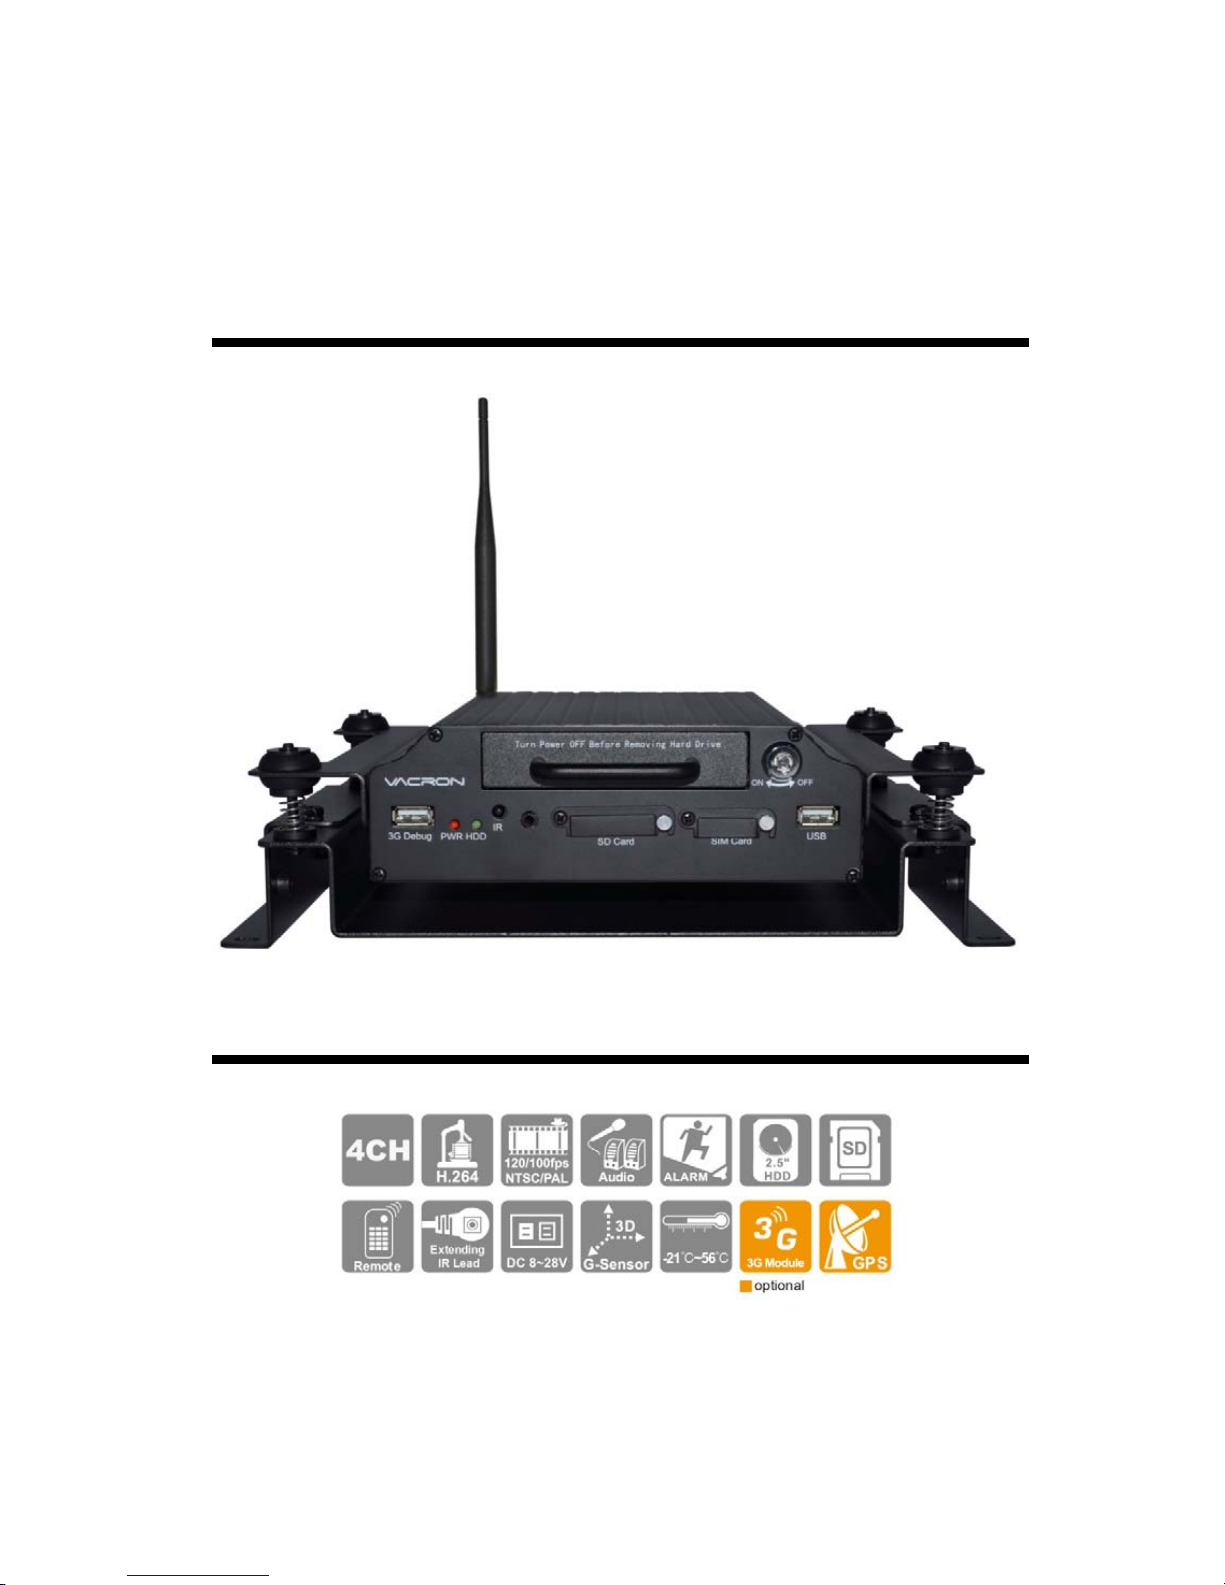
4 CH Vehicle Mobile DVR
User’s Manual
2015 MAY V1.1
Page 2

Safety Notice
Dear Users,
Sincerely thanking you for choosing our products, for any product
inquiry, please contact your local dealer for a prompt and precise
service from the local dealer. We will continuously improving our
product software or hardware design to satisfy your requirement.
Before using this product, please read the following instruction
carefully.
System Installation Precautions
• Please thoroughly understand the wiring layouts of your vehicle
before commencing on installation.
• Please find a professional vehicle infotainment system installer
for installation, the unit should be placed in a ventilated space
inside the vehicle.
• Please choose a storage medium suitable for vehicle
environment and / or recommended by manufacturer for the
continuous re-writing of large volumes of data. Please purchase
from a reputable dealer to ensure its quality.
• If you any enquiry or assistance, please contact your local
dealer, or our distributor and authorized technician.
Mobile DVR System Usage Notifications
• Please do not drop any solid or liquid object onto and into the
DVR unit.
• Please do not attempt to dismantle, repair or changing parts by
yourself. Contact your local dealer or the manufacturer if you
are experiencing any problem related to the product. We will
help you with troubleshooting as soon as possible to avoid
further inconvenience.
• Please remove battery from remote controller if the remote
controller is not in use for an extended period of time, this is to
avoid leakages from battery which might damage the remote.
Page 3

• If any camera or alarm is installed outside of vehicle, please
remember to ground the mobile DVR to main frame of the
vehicle to avoid damages by lightning, surges or electrostatics.
• Mobile DVR system is capable of recording, live streaming and
remote monitoring, live and remote functions need APN Service
provided by ISP or telecommunication provider for free or at a
cost. The free APN may drop connection sometimes, however,
this does not usually happen on service fee based APN, please
choose APN carefully while selecting internet services.
Operating Environment
• Please installed in an environment befitting the recommended
operation environment, please avoid direct sun lit or in close
proximity of heat sources.
• Please do not install the device in a damp environment.
• Please do not install the device in a smoky and dusty
environment.
• Please avoid violent vibration or colliding force, do not drop the
device from height.
• Please install the device in a ventilated environment, please do
not block the onboard air passage or vent.
• Please operate the device at a range ( input/output power
voltage and current) conforming to the our guideline or
recommendation.
• This device is designed to be operated at an extended period of
time. For safety reasons, please do not leave any flammable or
explosive materials close to the device.
Page 4

Index
A. Features .................................................................................................. 1
B. Specification ............................................................................................ 2
C. Product Appearance ............................. ............................................... .... 3
D. 2.5” HDD Installations ............................................................................. 5
E. Record and Stop Recording .................................................................... 6
F. Remote Controller (RC or Remote hereafter) ......................................... 7
G. System UI and Operating Instruction ...................................................... 9
•
OSD (On Screen Display) Menu Operation ................................. 10
•
Main Menu and Encode Parameter Setting ................................. 11
H. Playback Mode ...................................................................................... 18
I. Playback Through PC Software ............................................................ 20
J. Format / Restore Device ....................................................................... 30
•
Format Storage Device ................................................................ 30
•
Restore Storage Device ............................................................... 32
L. 3G Client Remote Monitroing ................................................................ 39
M. Continuous Recording Capacity Evaluation .......................................... 46
Page 5

User Manual Standalone Mobile DVR
1
A. Features
1. Video output for video playback on local device.
2. H.264 compression, D1 and CIF resolution choices.
3. Support 1 channel audio input.
4. User friendly operating and player software, easy to operate.
5. Reliable event log for quick search of events and recordings.
6. Complete build-in date & time, location log and speed information on
display
7. Wide range voltage design for all kinds of vehicles, such as sedan or
truck.
8. Auto recording when powered on for tampering prevention.
9. Removable HDD track compatible with HDD or SSD.
10. 4 sets of alarm I/O, build-in buzzer.
11. Support USB firmware upgrade.
12. Delayed record function, a short length recording after powering off.
13. G-sensor、GPS data。Support recording audio, video, G-sensor and
GPS data at the same time.
14. Optional 3G module for real time monitoring, vehicle status, single &
multiple unit voice broadcast.
Page 6
User Manual Standalone Mobile DVR
2
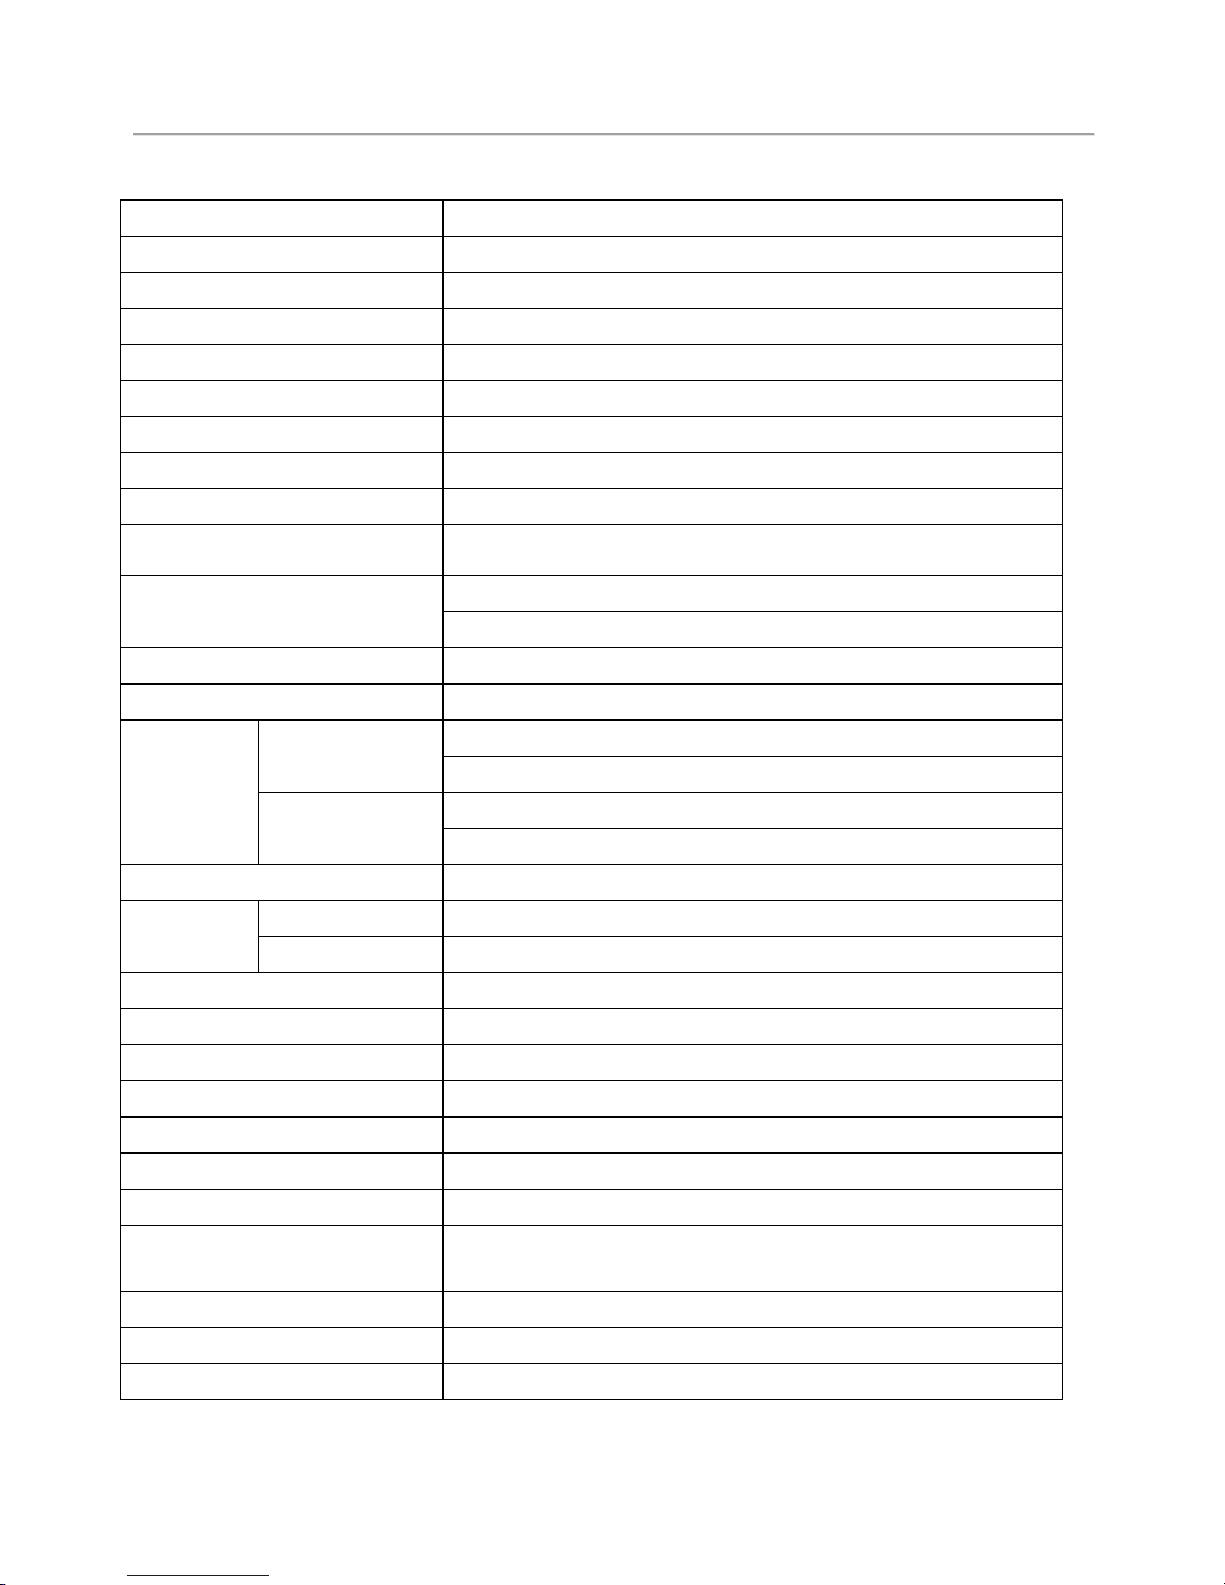
B. Specification
Video Format NTSC / PAL
Operating System Embedded Linux
Video Input Channel 4 channel input via BNC or harness connector
Camera Power Input 4 channel power 12V / 400mA
Video Output 1 channel output via BNC or harness connector
Audio Input 1 channel harness connector
Audio Output 1 channel RCA / harness connector output
Alarm Input 4 sets alarm in
Display Interface Graphical User Interface
Languages
Multiple (English, Traditional Chinese, Simplified Chinese,
expandable)
Recording Frame Rate
NTSC: Max. 120 fps @D1 / Max. 240 fps @CIF
PAL: Max. 100 fps @D1 / Max. 200 fps @CIF
Display Mode Full Screen, 4 Split, Auto-Switch
Simplex Record / Playback / Backup
Resolution
Display
NTSC : 720 x 480
PAL : 720 x 576
Recording
NTSC: 360x240@CIF / 720x480@D1
PAL: 360x288@CIF / 720x576@D1
Backup
SD / USB
Search
Mode Date / Time / Event Log
Full Screen Yes
LED Indicator 3 LED (Recording、GPS、Power)
Signal Loss Notification Yes
Alarm Buzzer Yes
GPS Yes
G-SENSOR Yes
3G Yes
IR Yes
System Monitor
Power on / off auto record (Delayed Record at 15/30/60/120
Minutes)
Power Supply (1) DC 8V~28V (2)ACC (for Delayed Record)
Dimension (m m) 2 1 0x180x58 (WxDxH)
Operating Temperature -21°C~56 °C
Page 7
User Manual Standalone Mobile DVR
3
C. Product Appearance
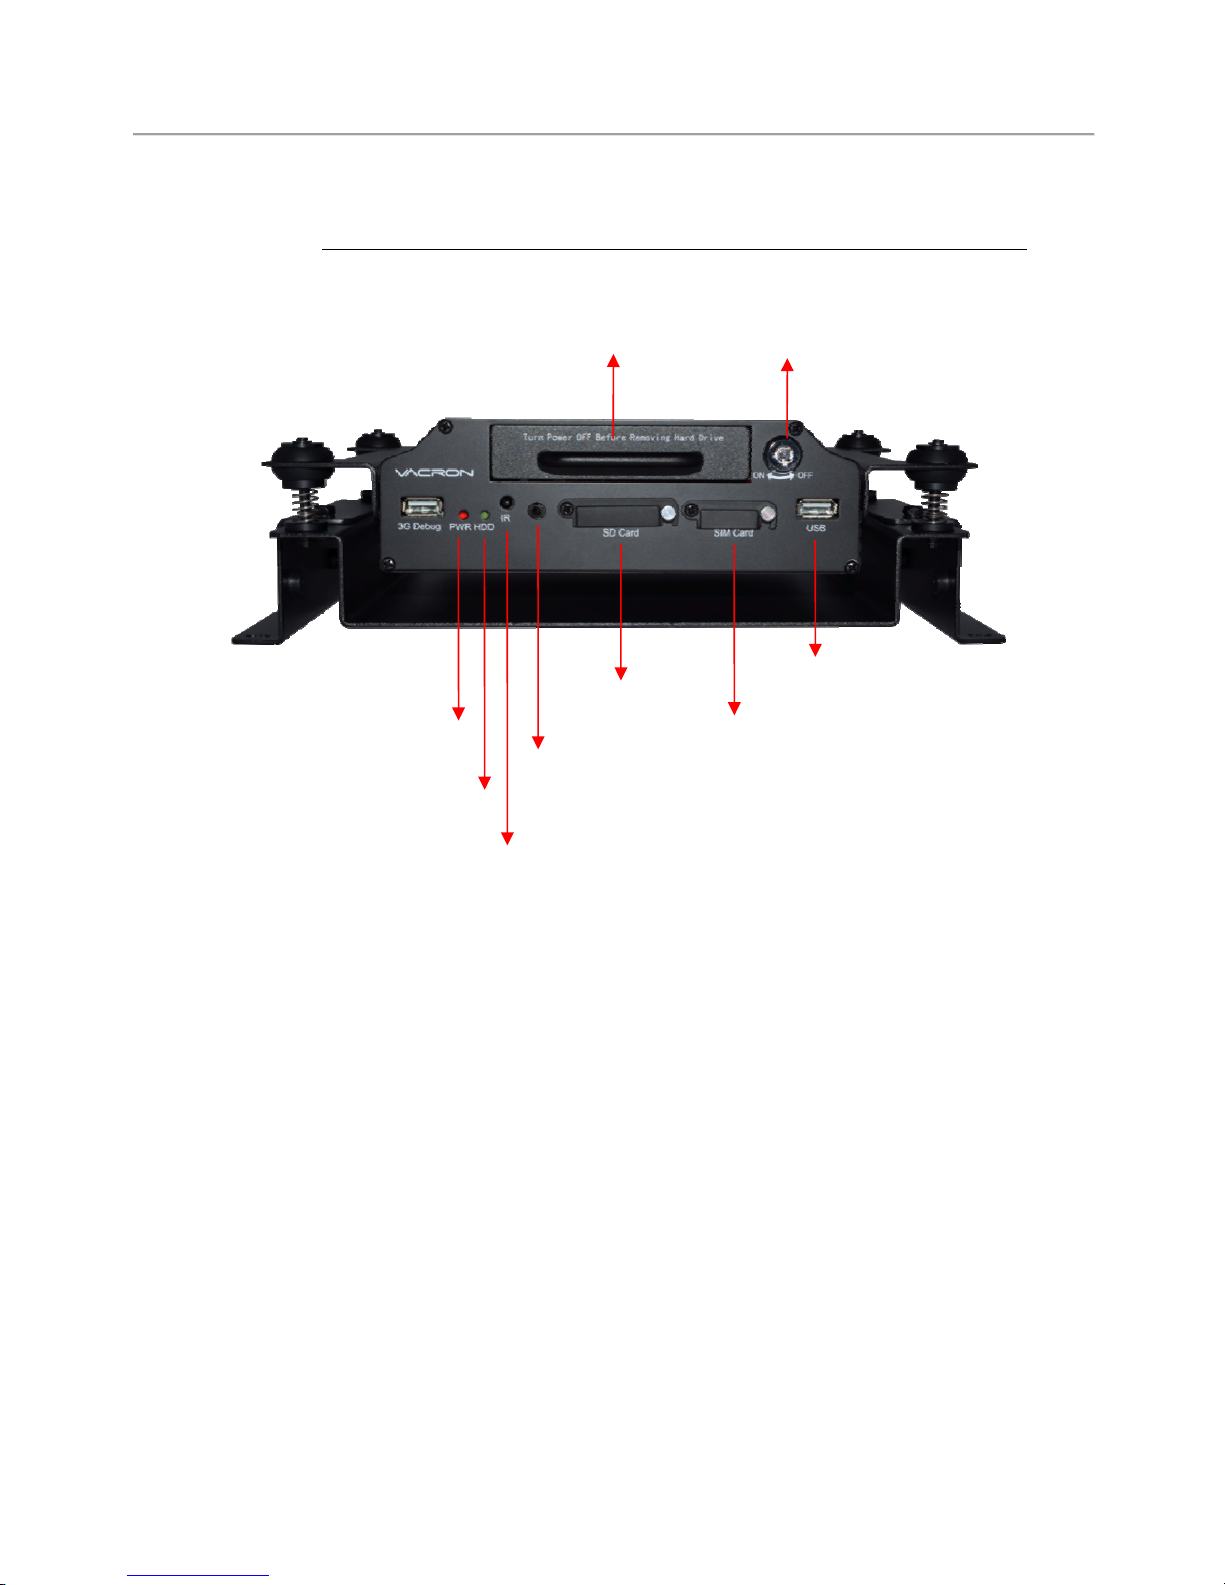
Front Panel
HDD lock
Power indicator
USB
HDD record indicato
r
IR receive
r
2.5” HDD tray
3G SIM
Extended IR jack
SD card
Page 8
User Manual Standalone Mobile DVR
4
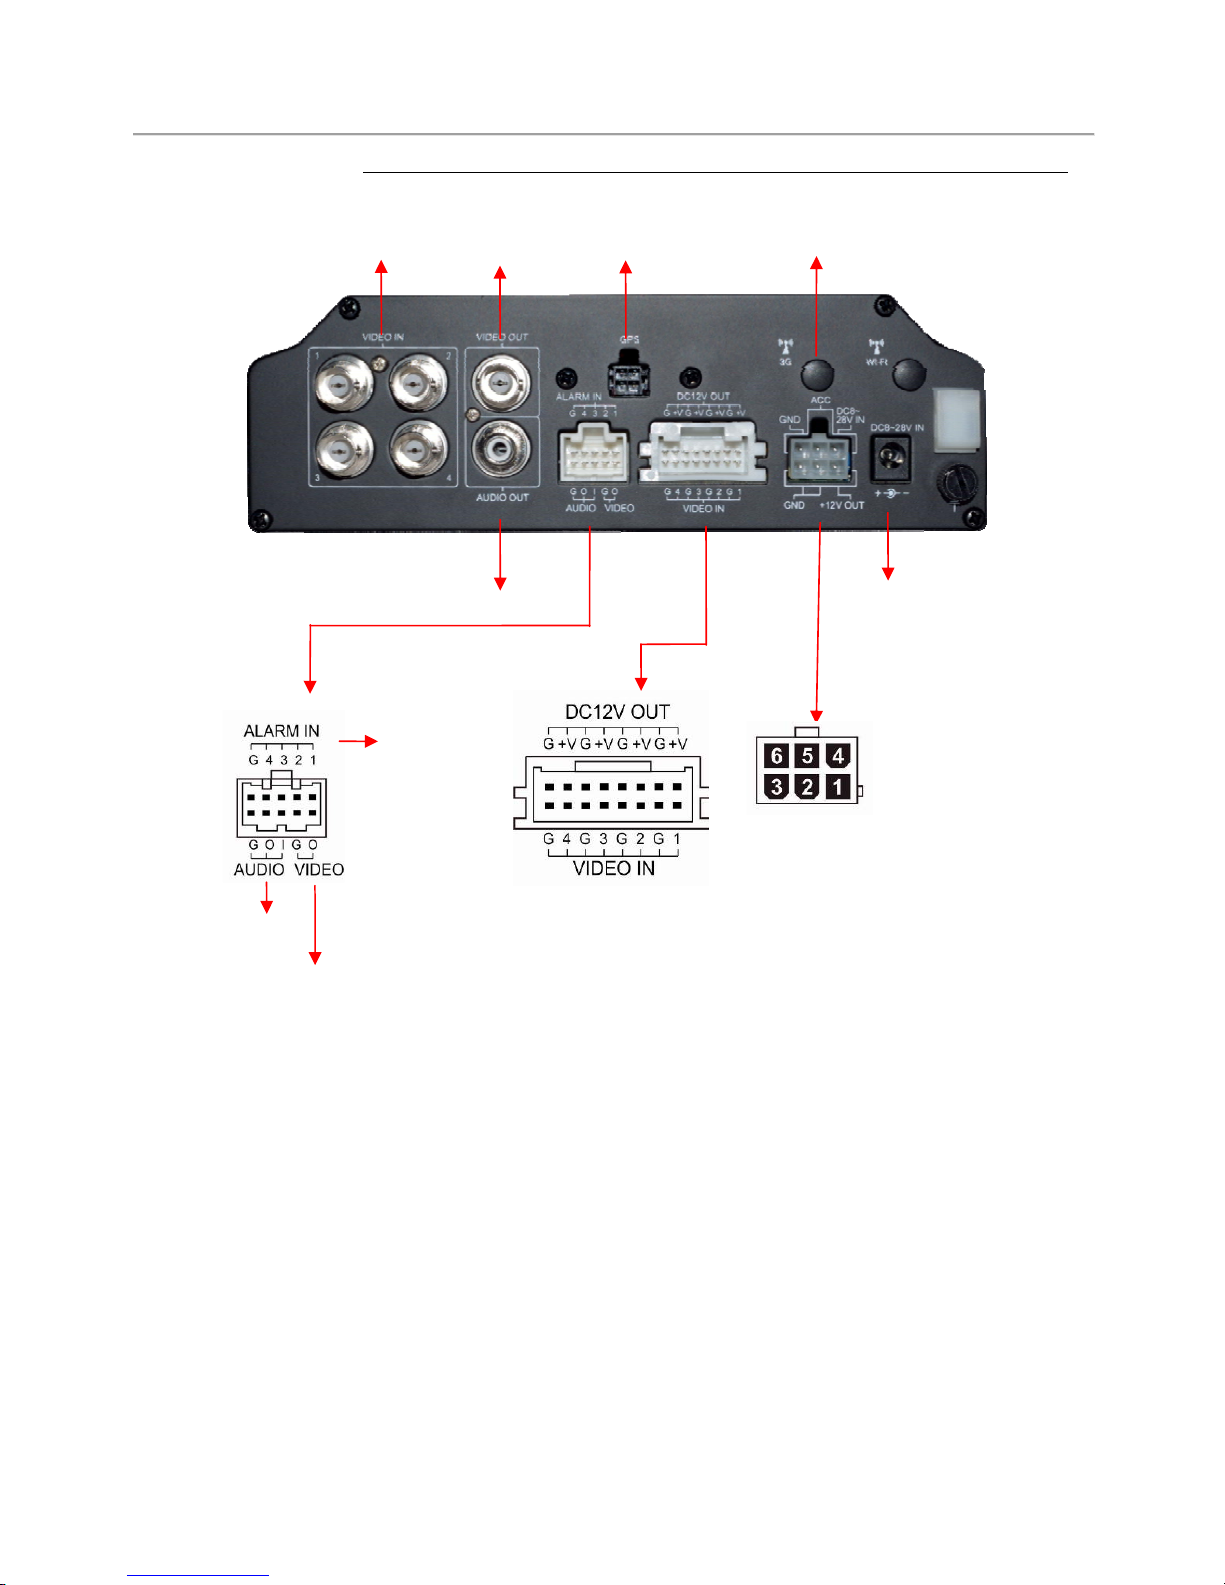
Back Panel
Video in
Video out
Audio out
GPS
Power input DC 8-28V
Harness connector
Alarm in
A
udio in / ou
t
Video out
1. DC+12V output (+)
2. Signal and DC ground
3. Signal and DC ground
4. Vehicle battery DC8~28V
input (+)
5. ACC starter control
6. Vehicle battery Ground (-)
Harness connector :
Provide power and video
input for accompanying
cameras
3G module
Page 9
User Manual Standalone Mobile DVR
5
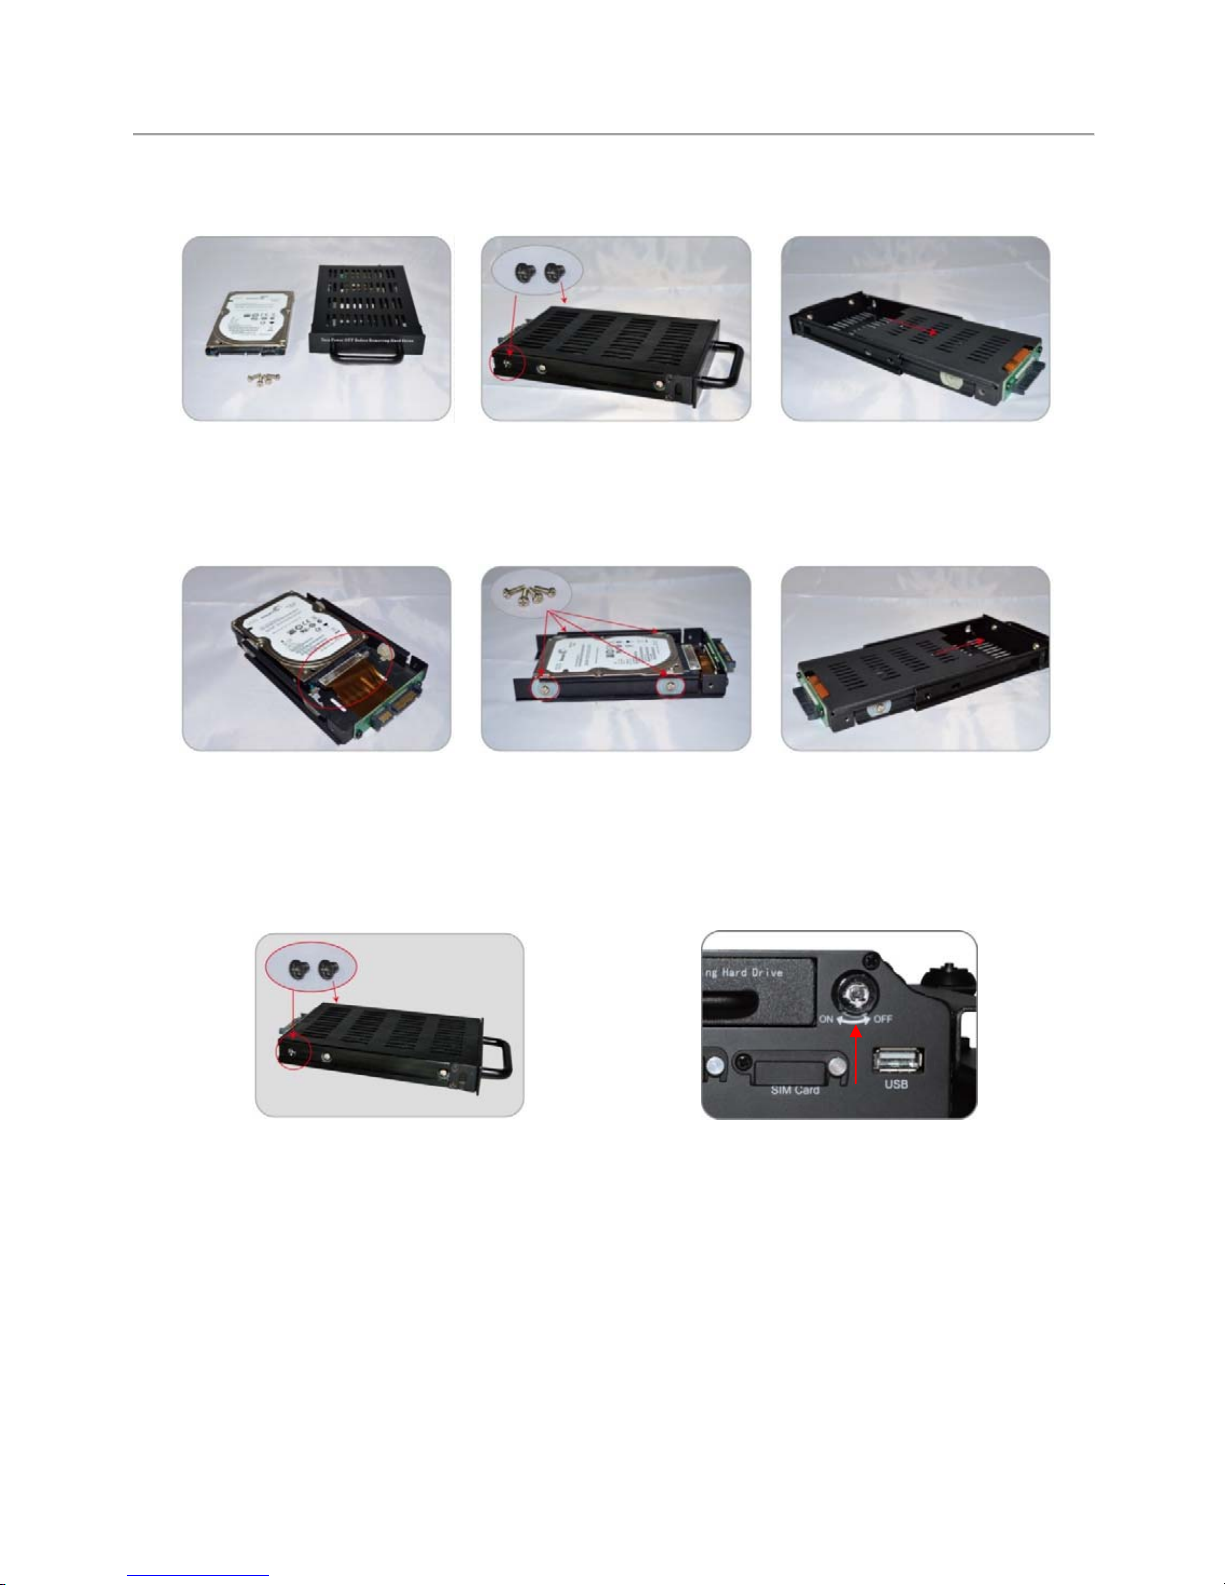
D. 2.5” HDD Installations
Mobile DVR Hard Disk
tray , screws x4, 2.5” Hard
Disk (Purchased Optionally)
1. Remove the side
screws of HDD tray.
2. Push out the HDD tray
parallel.
3. Connect HDD to SATA flat
cable, align HDD with silicon
buckle and slide in.
4. Fasten 4 screws to lock
HDD in place.
5. Gently slide the top lid
back until it level with HDD
tray.
6. Fasten the side screws to complete HDD
installation.
7. Slide the HDD tray back on DVR and lock
the HDD in place (turn to ON).
Page 10
User Manual Standalone Mobile DVR
6
E. Record and Stop Recording
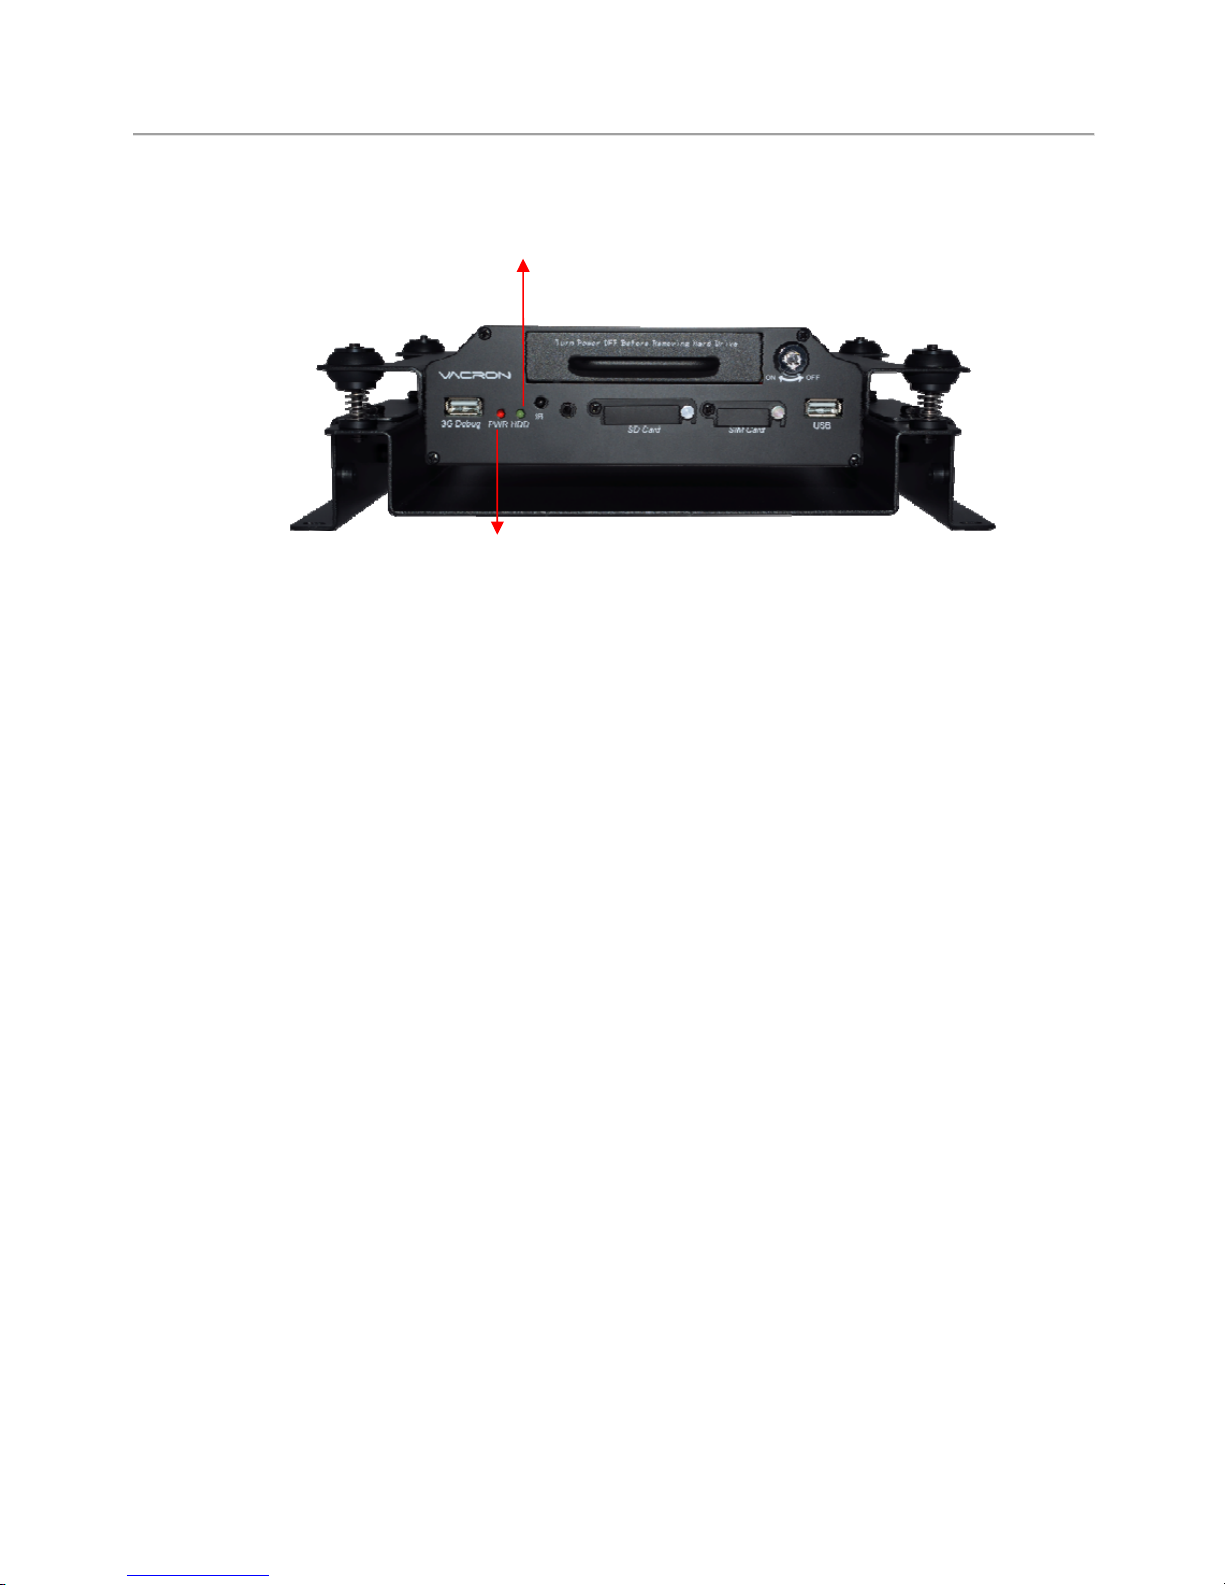
1. Power on / Record
Turn on the power and wait approximately 40 seconds for the device to boot
up. HDD indicator starts blinking once the recording is in progress.
Light Indicator:
●
Red light: constant red power on signify normal power supply, no light
means no power or power off.
●
Green light: Blinking green light signify normal recording, no light means
the device is not currently recording.
Note: The device cannot record when device is playing back the recorded
footage.
2. Power off / Stop recording:
Powering off will stop the recording process, you can safely remove the
HDD without affecting recorded footage.
Power Indicator LED
HDD Indicator LED
Page 11
User Manual Standalone Mobile DVR
7
F. Remote Controller (RC or Remote hereafter)
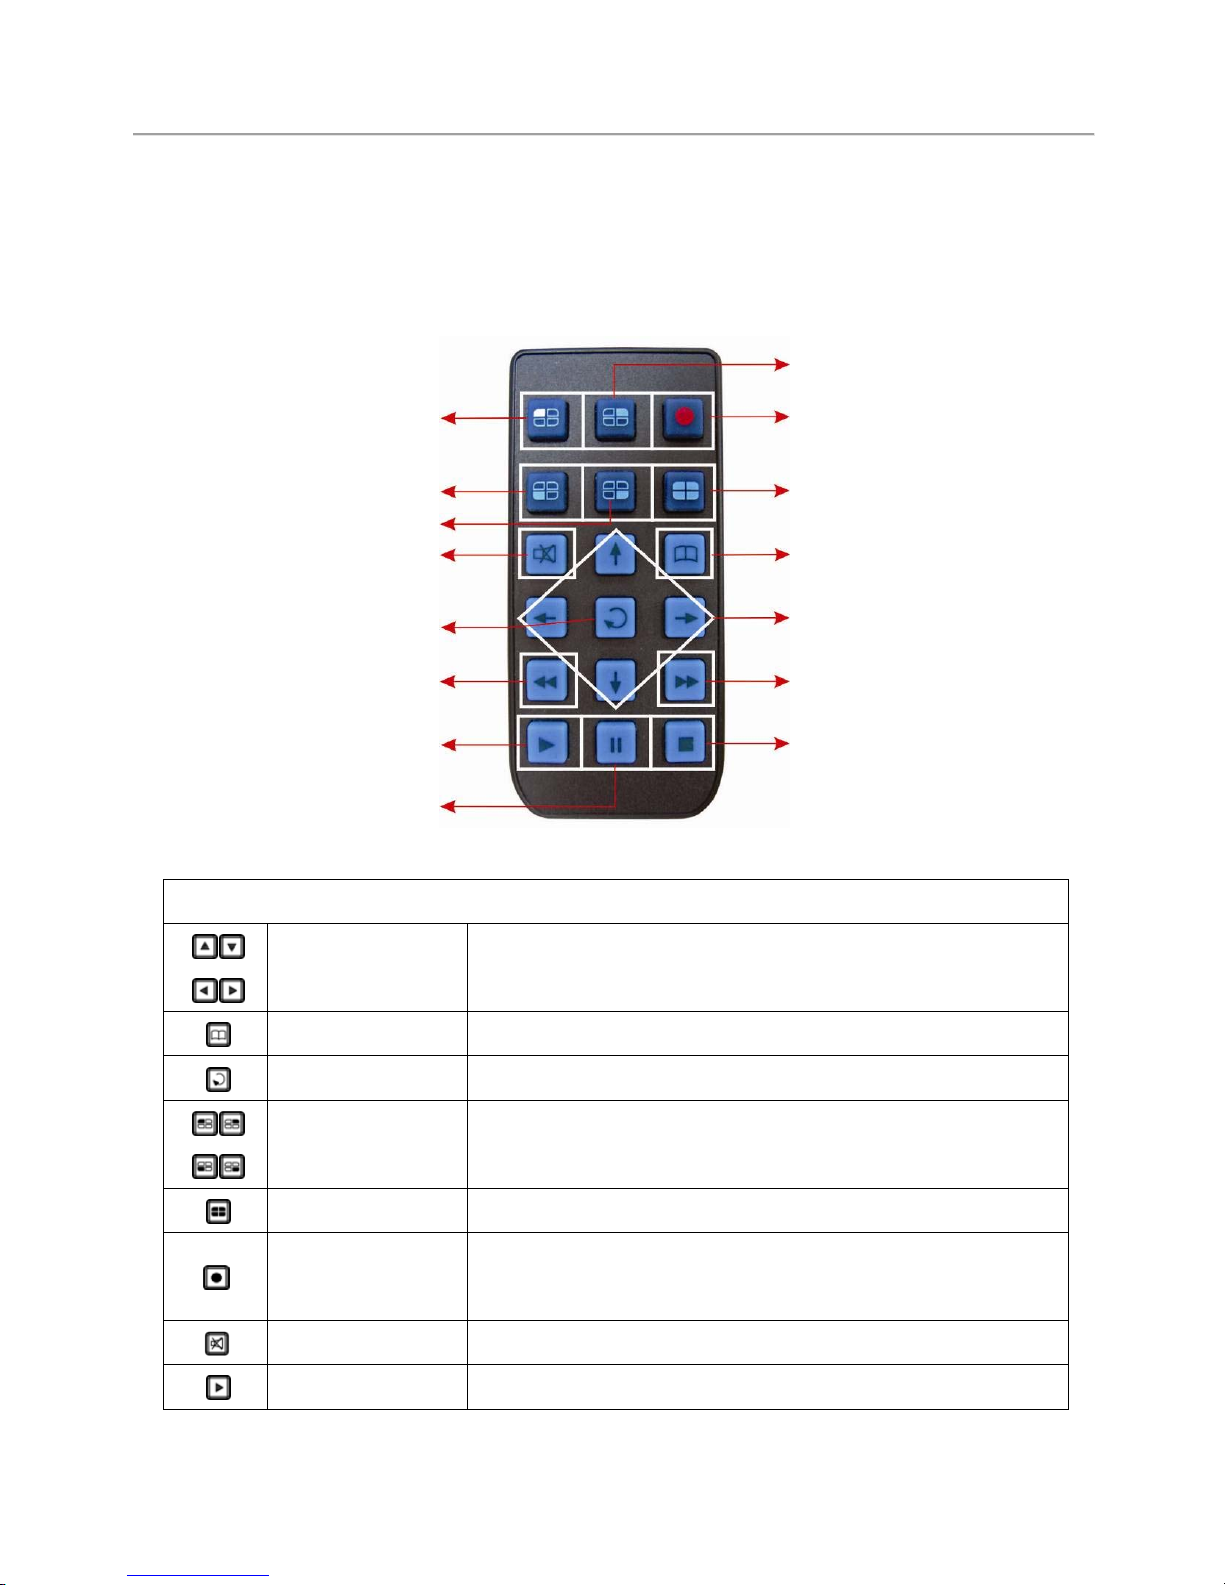
Vehicle DVR can be operated through two methods: IR remote controller and
PC software application.
IR remote controller instruction
(
4 channnel RC in above Example)
Corresponding Functions
Arrow Key Choose next or adjacent selection in menus.
Menu Open main menu or return to previous menu
Confirm Accessing channel view or save applied settings.
Channel 1 ~ 4
Choose between 1 to 4 channel in single channel live view
or playback
Quad Display Display 4 channel simultaneously in live view
Record
Manually start recording when in live view or playback (will
exit playback)
Mute Disable audio during playback
Play Initiate playback function
Channel 2
Record
Quad display
Menu
Up / down / left / right
Fast forward
Stop
Pause
Channel 1
Channel 3
Channel 4
Mute
Confirm
Fast rewind
Play
Page 12
User Manual Standalone Mobile DVR
8
How to check if the
remote controller
is workable?
√ Ch eck the mercury cell is installed in
correct direction. (C he c k the pole)
√ Check if the cell power is exhaust.
√ Check if the sensor is covered.
√ Check if it nears by Fluorescent Lamp.
Stop Stop playback and return to previous page
Pause Pause the video during playback
Fast Forward Fast forward during playback
Fast Rewind Fast rewind during playback
Page 13
User Manual Standalone Mobile DVR
9
G. System UI and Operating Instruction
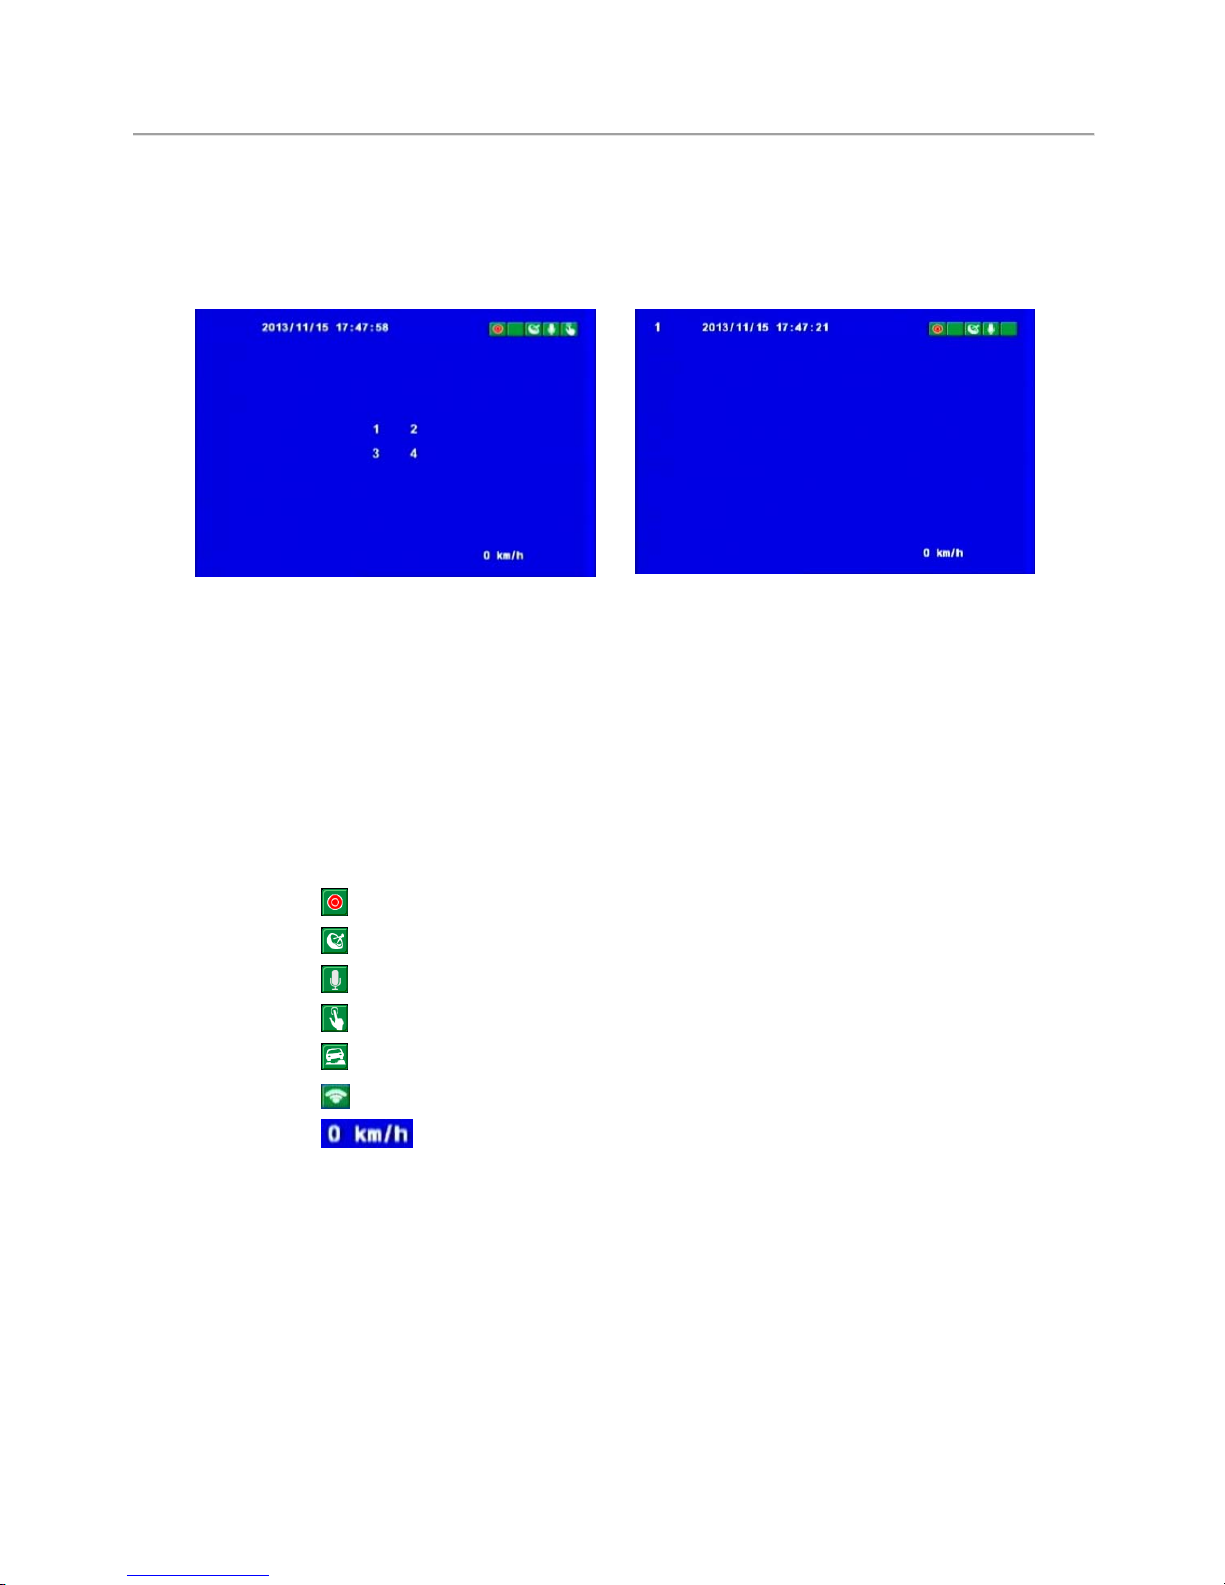
Live Monitoring Display
Live Monitoring – Quad Display Live Monitoring – Single
(1) Screen Display:
• Press channel 1 to 4 to display channel 1 to 4.
• Press quad display to display 4 channels simultaneously.
• Press menu to bring up menu for more option.
• Press playback to playback recorded footage.
(2) Icons:
• : Signifies recording in process.
• : Signifies successful GPS positioning.
• : Signifies microphone is enabled.
• : Signifies forced recording in process.
• : Signifies forced record in process due to G-sensor trigger.
• : Signifies 3G connection established.
• : Signifies traveling speed, related settings can be set via
computer. (Please refer to “storage device format setting”)
Page 14
User Manual Standalone Mobile DVR
10
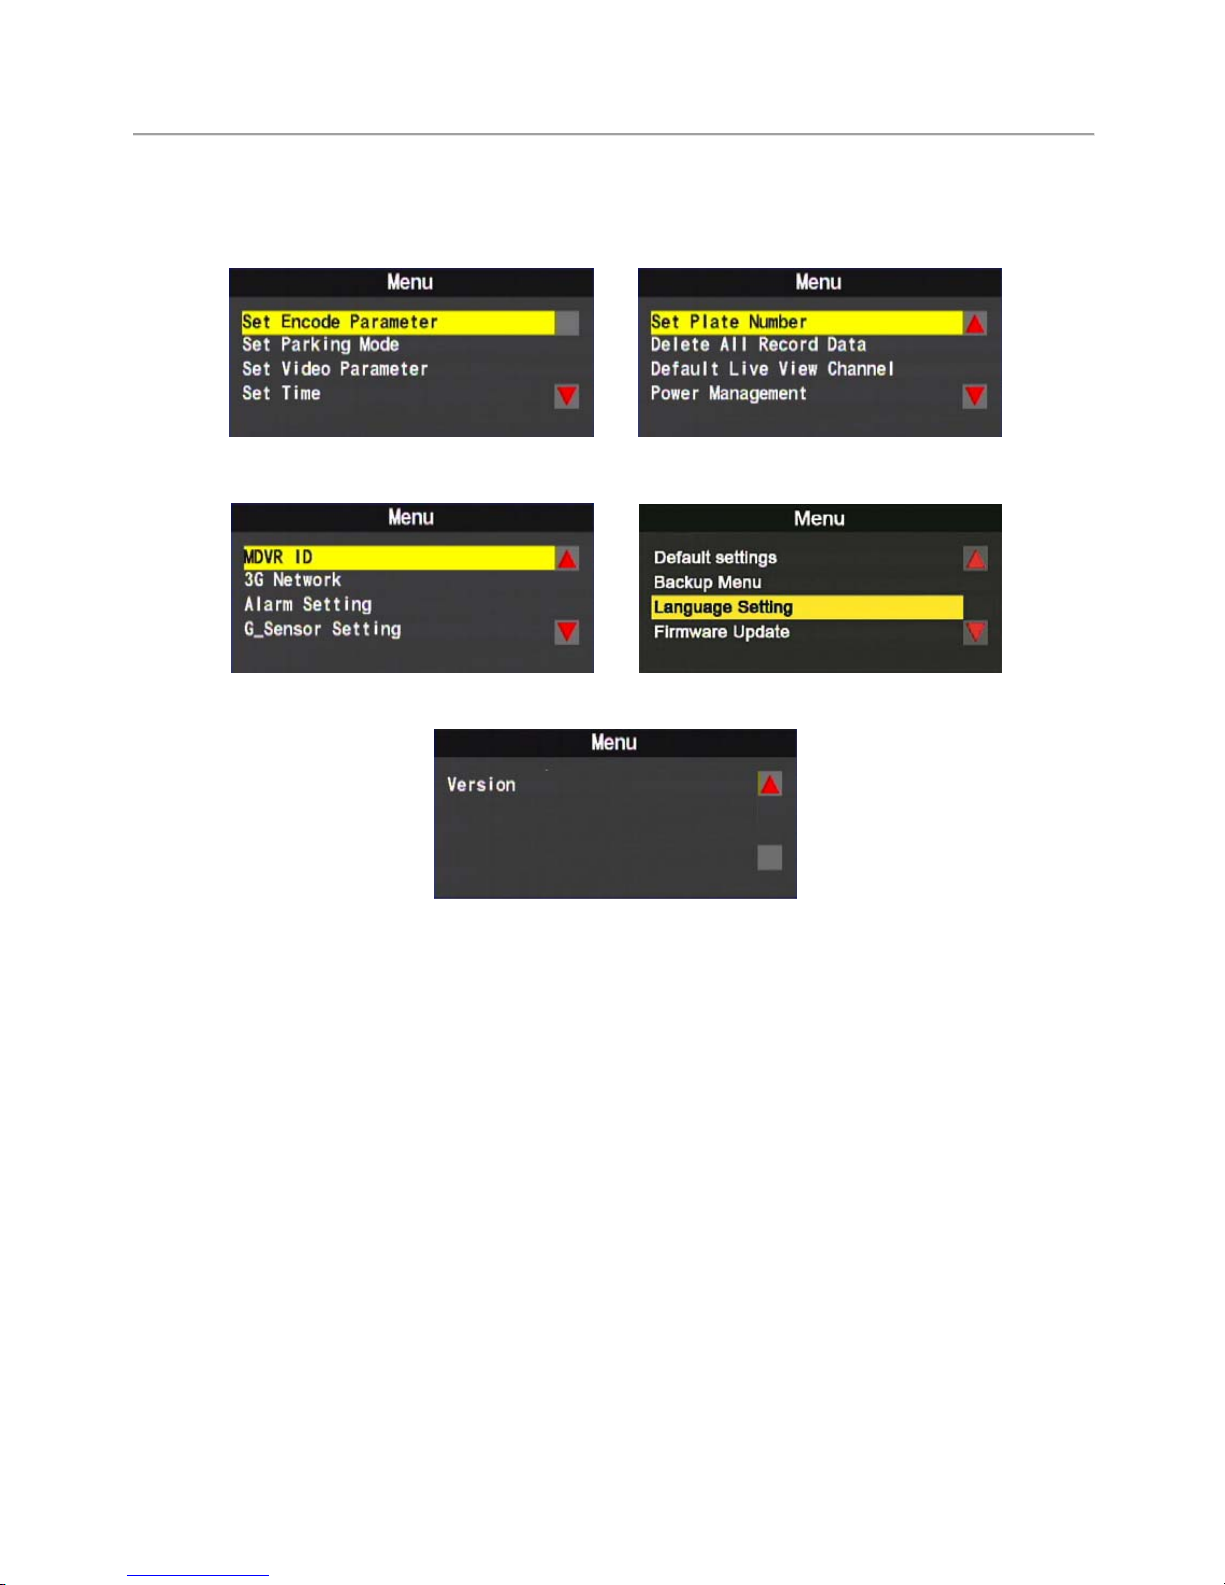
OSD (On Screen Display) Menu Operation
(1) Menu:
Main Menu 1/5
Main Menu 2/5
Main Menu 3/5
Main Menu 4/5
Main Menu 5/5
(2) Remote Controller Operation:
• During live view monitoring, press menu key on RC to
bring up the main menu
• After accessing main menu, use directional keys to select
any settings; once a setting is selected, please press
confirmation to access any specific setting.
• Please press the Menu on remote control to exit the
current settings and return to the main menu.
※ The language selection is only available for
none-3G models.
Page 15
User Manual Standalone Mobile DVR
11
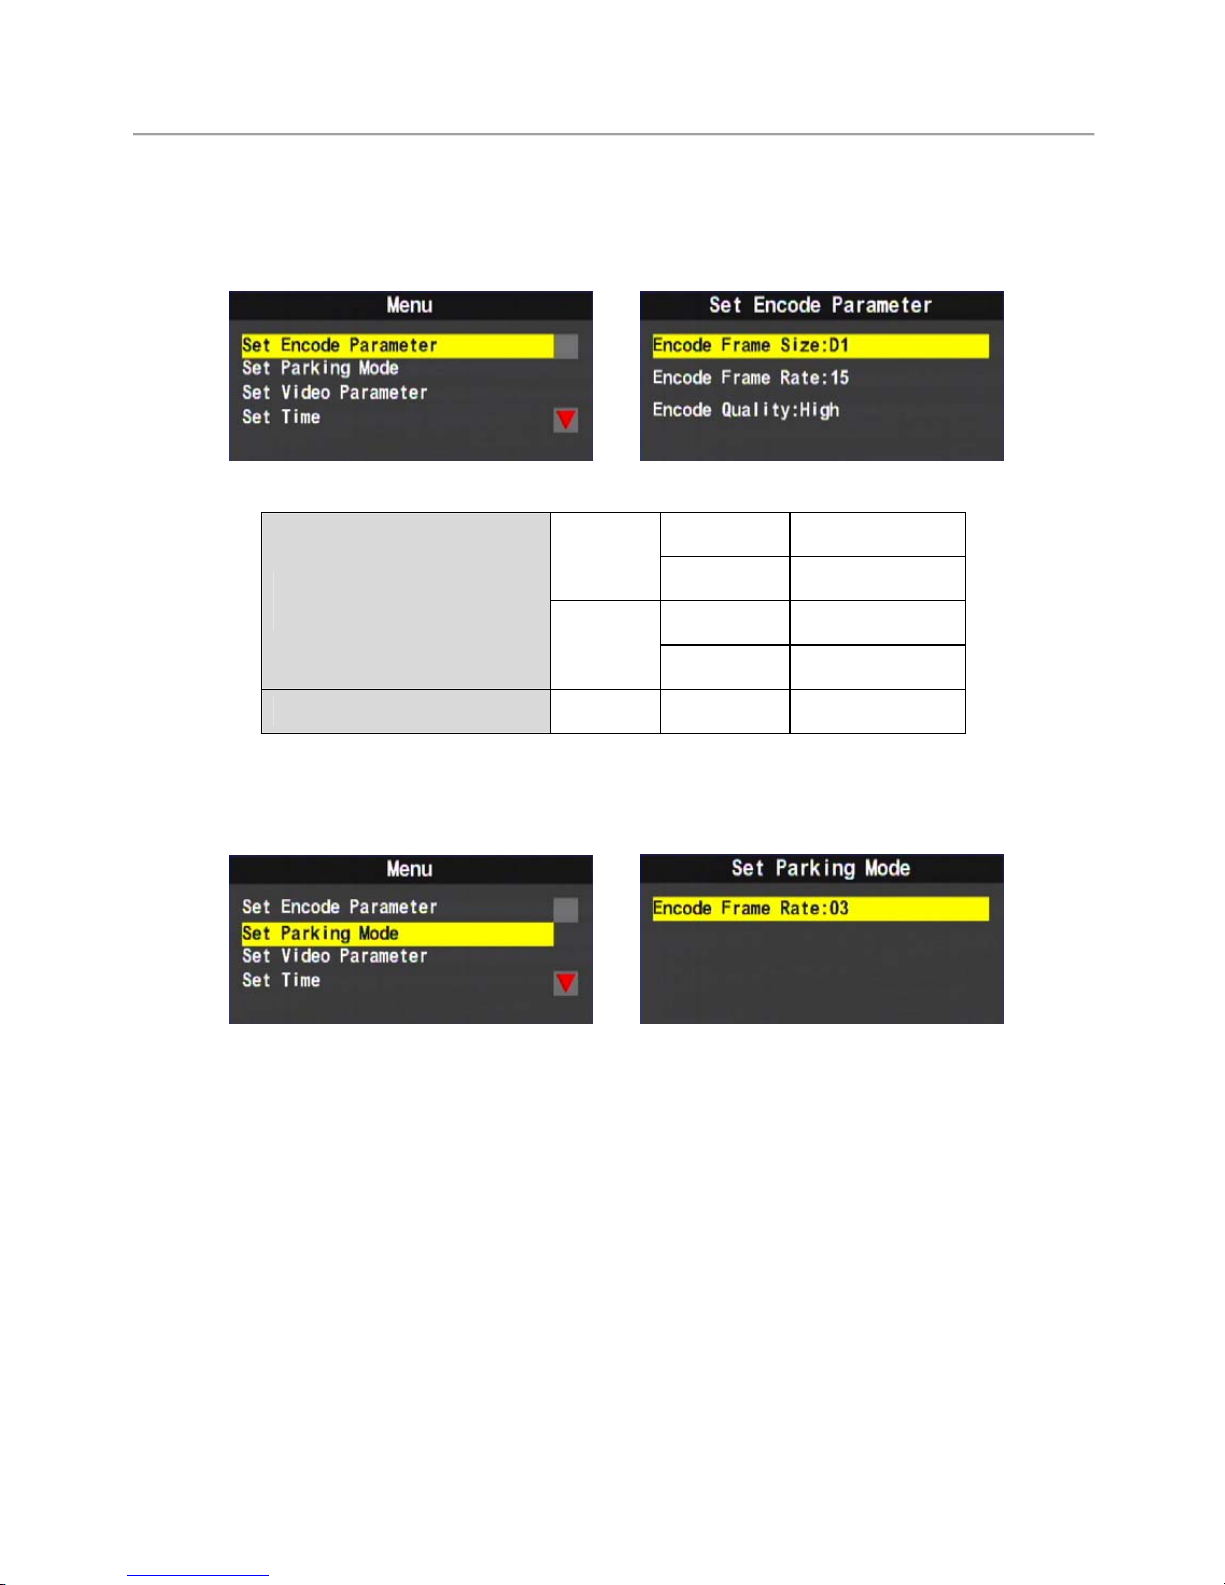
Main Menu and Encode Parameter Setting
(1) Encode Parameter
Recording parameter Setting
Recording Frames
(second)
NTSC
D1 5-15 frames
CIF 5-30 frames
PAL
D1 5-15 frames
CIF 5-25 frames
Image Quality
Normal Good Finest
(2) Stationary Recording Setting
The main function sets the number recording of frames after the
vehicle engine powered off, this is to be used with Power
Management.
The recorded frame rate in stationary mode shall be no higher
than normal recordings.
Frame rate in normal recording circumstance is able to be set at
5, 10 15, 20, 25, 30 frames (the highest frame rate for D1 video is
15 frames, CIF is at 30 frames).
Page 16
User Manual Standalone Mobile DVR
12
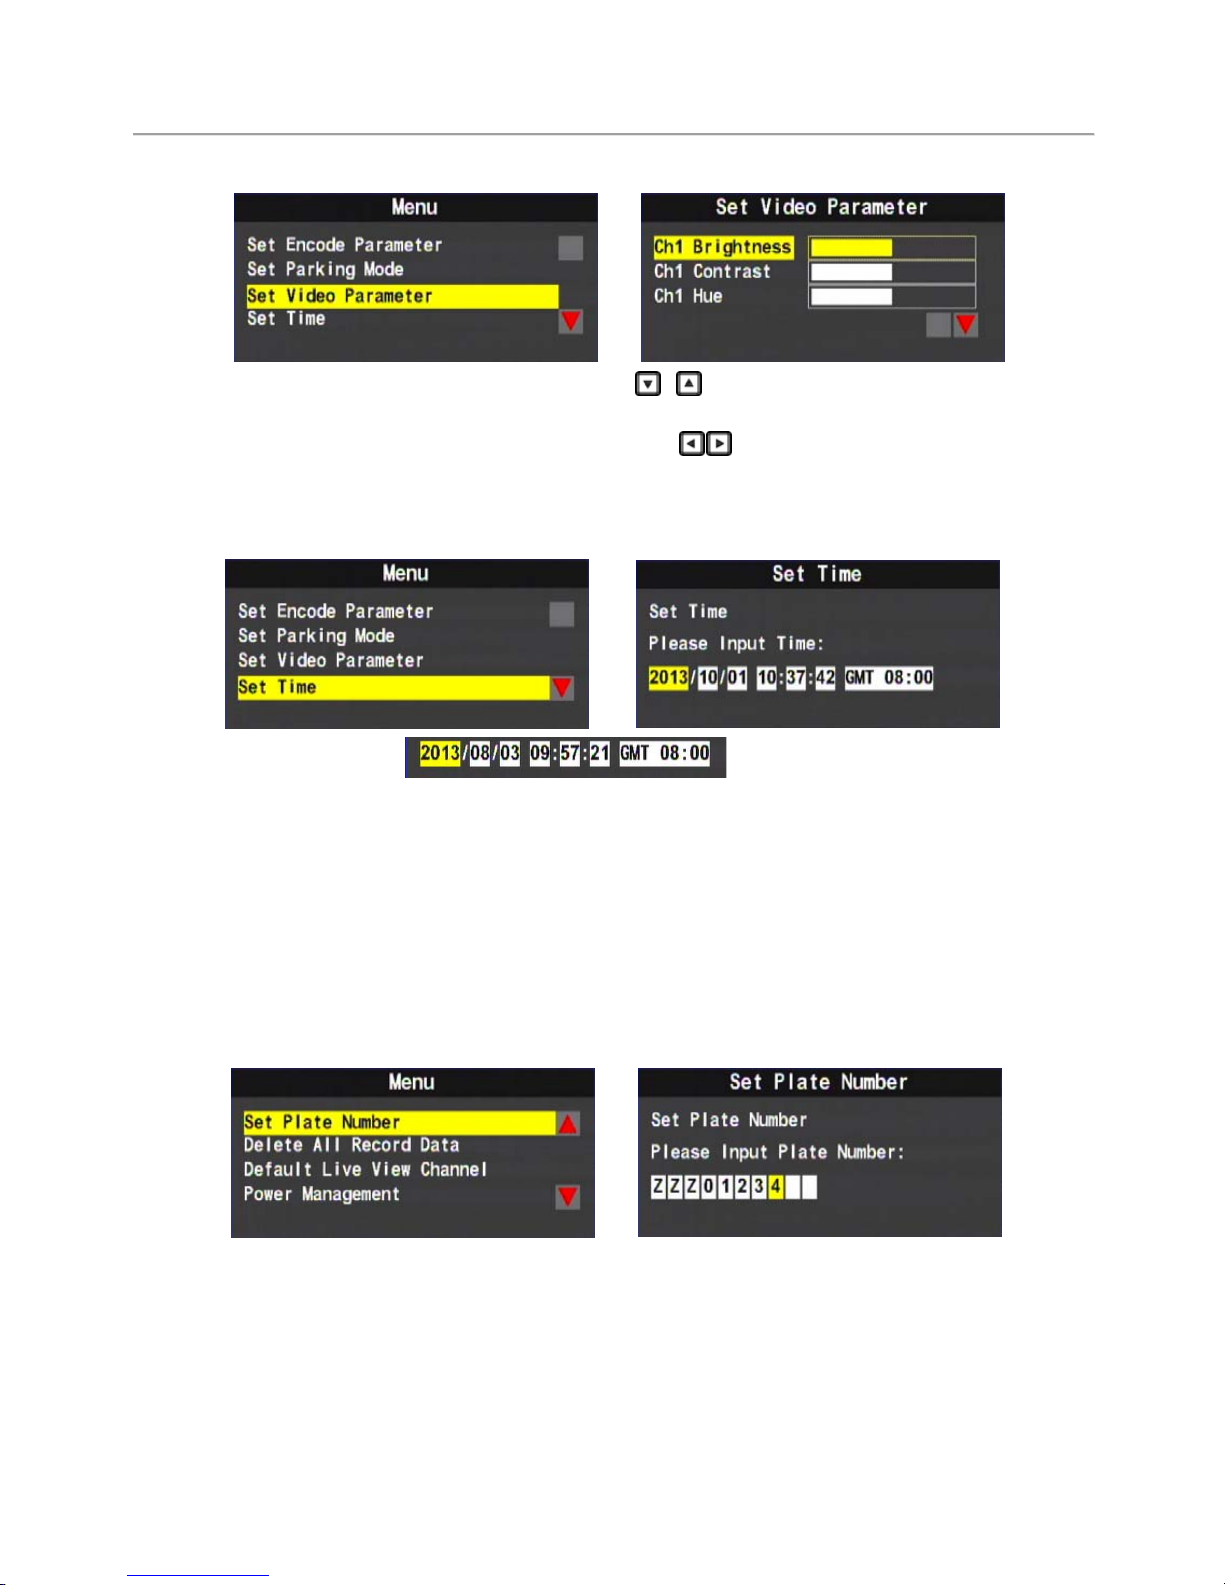
(3) Video Parameter
Selecting Channels: Press on remote control to select
different channel.
Brightness/Contrast/Hue: press on RC to change to the gain
setting, press Confirm to save the setting and exit.
(4) Time Setting
: Signifies
「YYYY/MM/DD/HH/MM/Sec/Time Zone」
Whenever GPS signal is available, the device will use
GPS signal to adjust time according to time zone
automatically.
Use left or right to select next digits, up / down to
increase or decrease the number.
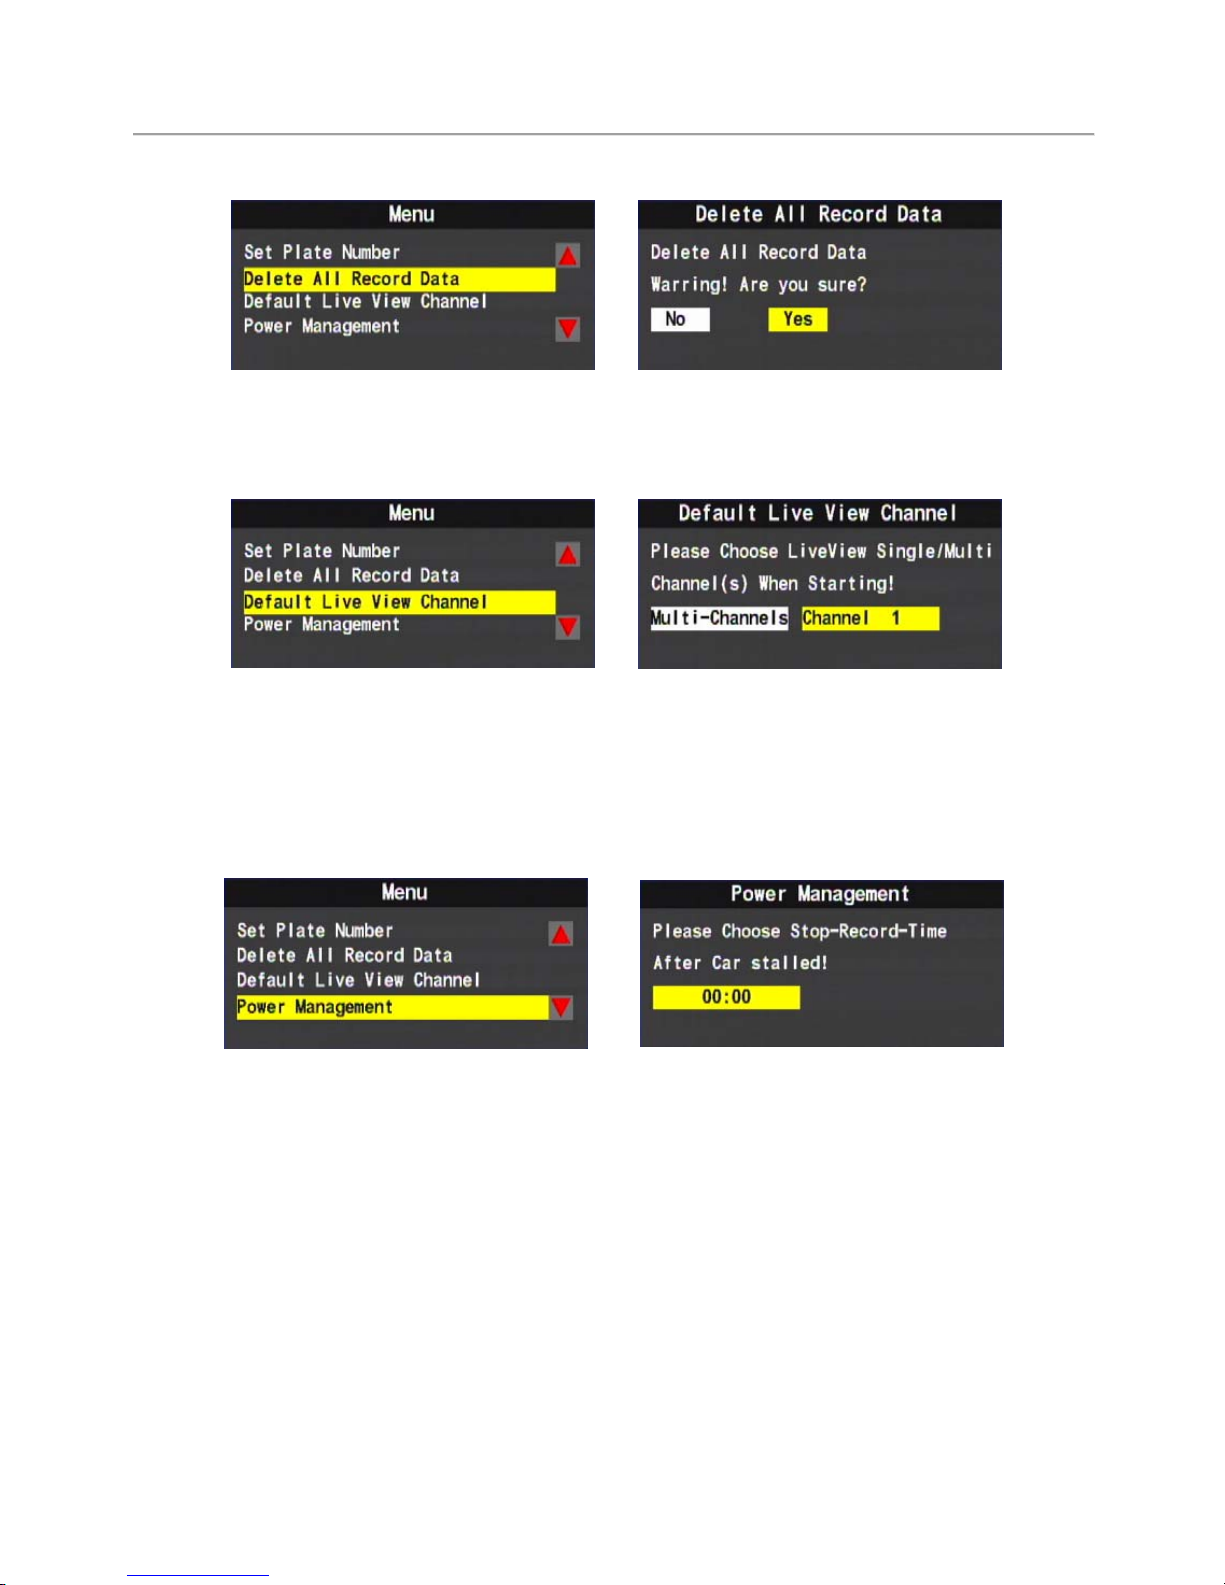
(5) Set Plate Number (Registration Plate)
Validate input characters and digits: A~Z and 0~9.
Page 17
User Manual Standalone Mobile DVR
13
(6) Format HDD
※Caution! A l l data will be deleted when you cl ick “Yes”.
(7) Default Live View Channel Display
Multiple Channels: Displaying live channels in Quad or
checker grid.
Channel 1:Displaying channel 1 in live view.
(8) Power Management
This function sets extended record period after engine
powered off.
Recording Time Setting:It is set in 30 minutes interval,
ranging from 00:00 to 24:00, the maximum is Never
Switch Off. Please set it to never switch off for
continuously recording after engine powered off.
Page 18
User Manual Standalone Mobile DVR
14
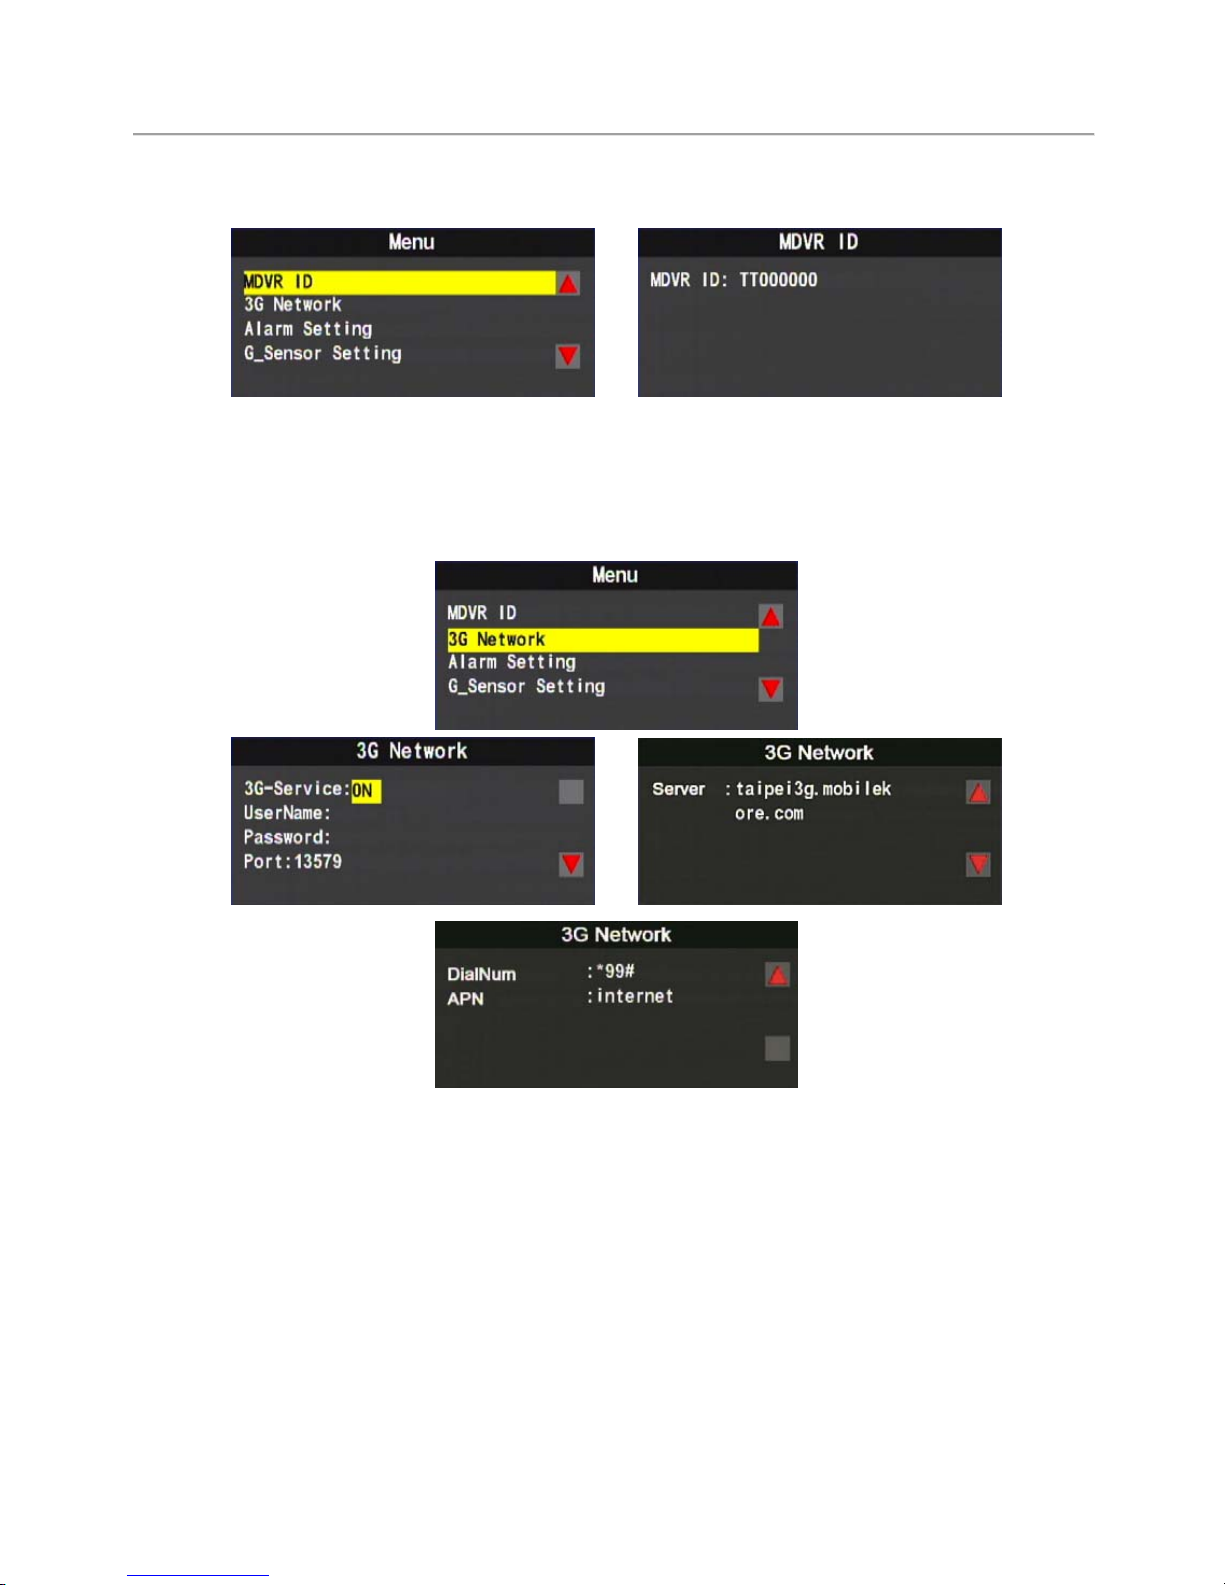
(9) MDVR ID
Display MDVR ID, this is the unique serial code of each
device, it is to be used with 3G Client software for remote
monitoring.
(10) 3G Network
The MDVR ID displayed in previous page is the only
device S/N, and the default number to be used with 3G
Client software.
Use the left / right key on remote control to turn on / off
the 3G network service.
Please press Confirm on RC to save any modified setting.
Please refer to 3G Network Setting for further setting
information.
Page 19
User Manual Standalone Mobile DVR
15
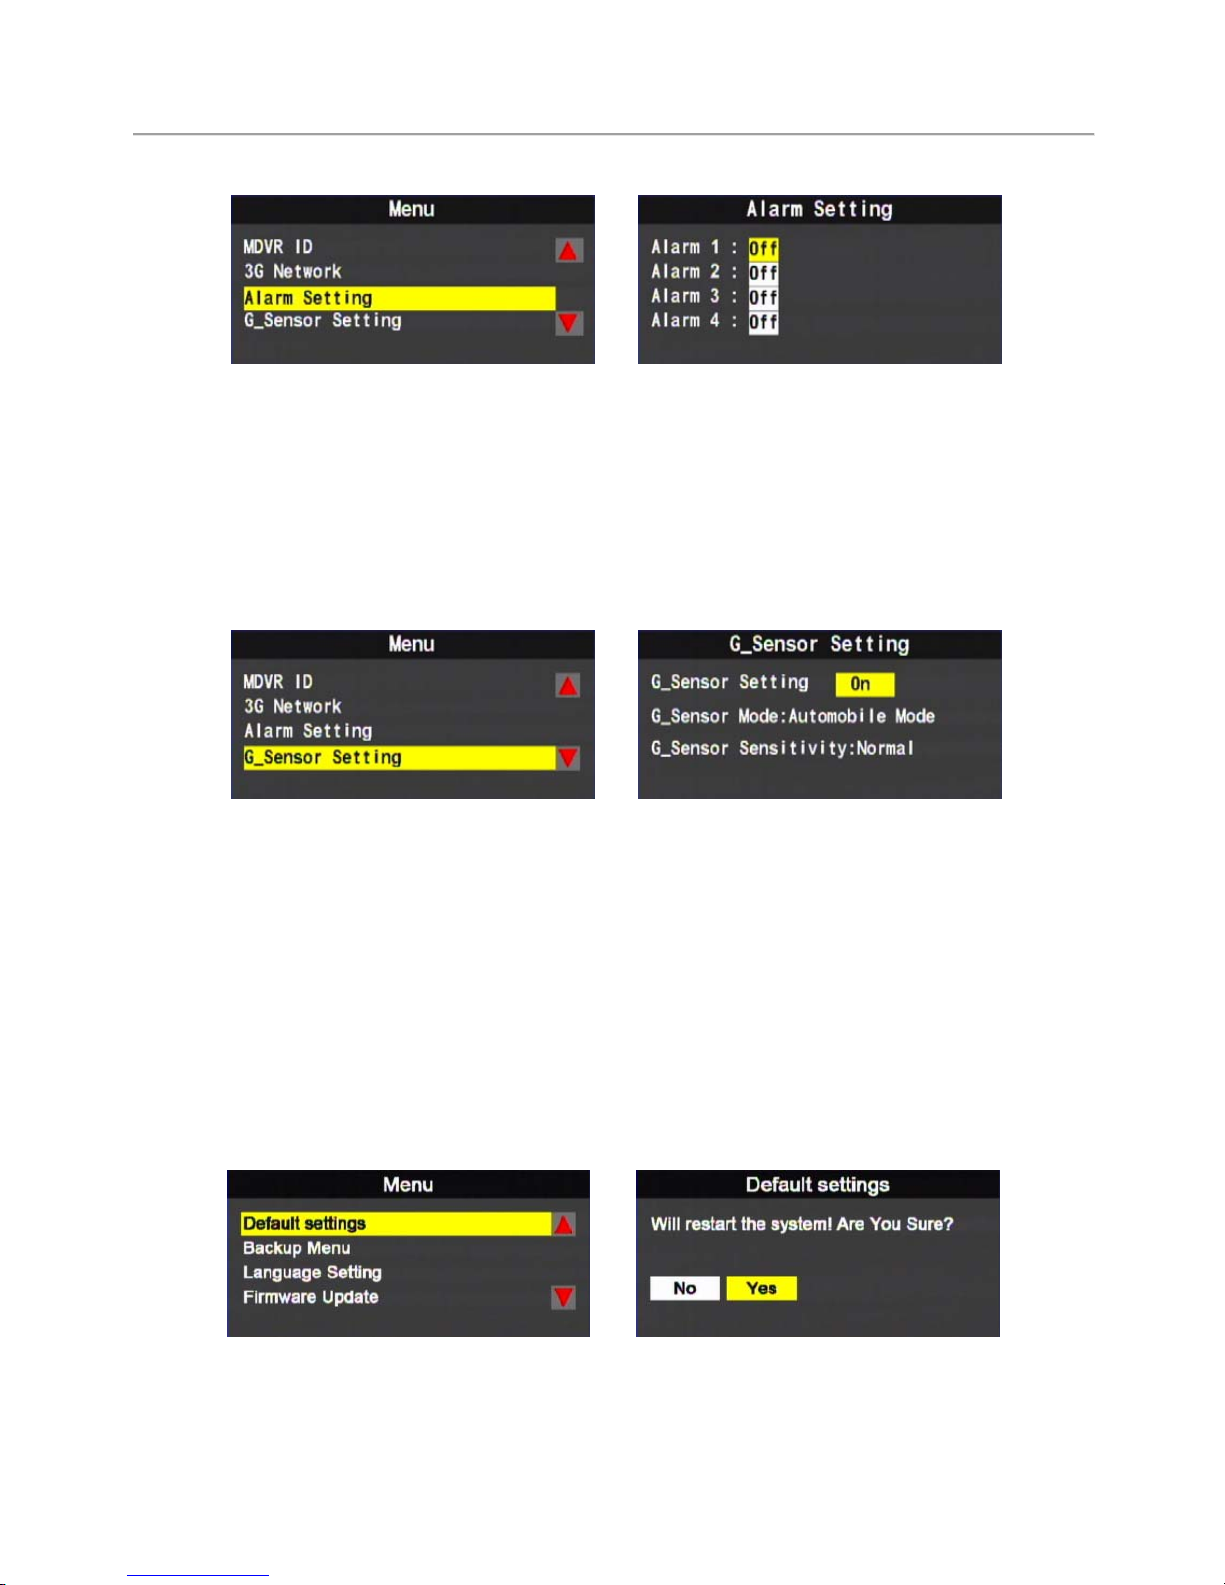
(11) Alarm Setting
Alarm Mode Setting:Each individual channel (1 to 8
depending on model) on / off, and server report.
Alarm On CH1~ CH4(CH8): When an alarm is triggered,
the corresponding channel will pop up in full display.
Server Report: When an alarm is triggered, the device will
notify 3GAppClient and logged as event in the event list.
(12) G_Sensor Setting
G_Sensor Setting:On, off.
G_Sensor Mode Selection:Sedan and Truck selections.
This is to adjust G-Sensor sensitivity accordingly.
G_Sensor Sensitivity:Lowest, low, normal, high and
highest. This further calibrates G-sensor sensitivity.
★Once enabled, this feature will force and save a record when
the vehicle comes in contact or collide with other object or
vehicle.
(13) Default Settings
The restore default setting with reboot, then wipe off all data and
restore to factory default setting.
Page 20
User Manual Standalone Mobile DVR
16
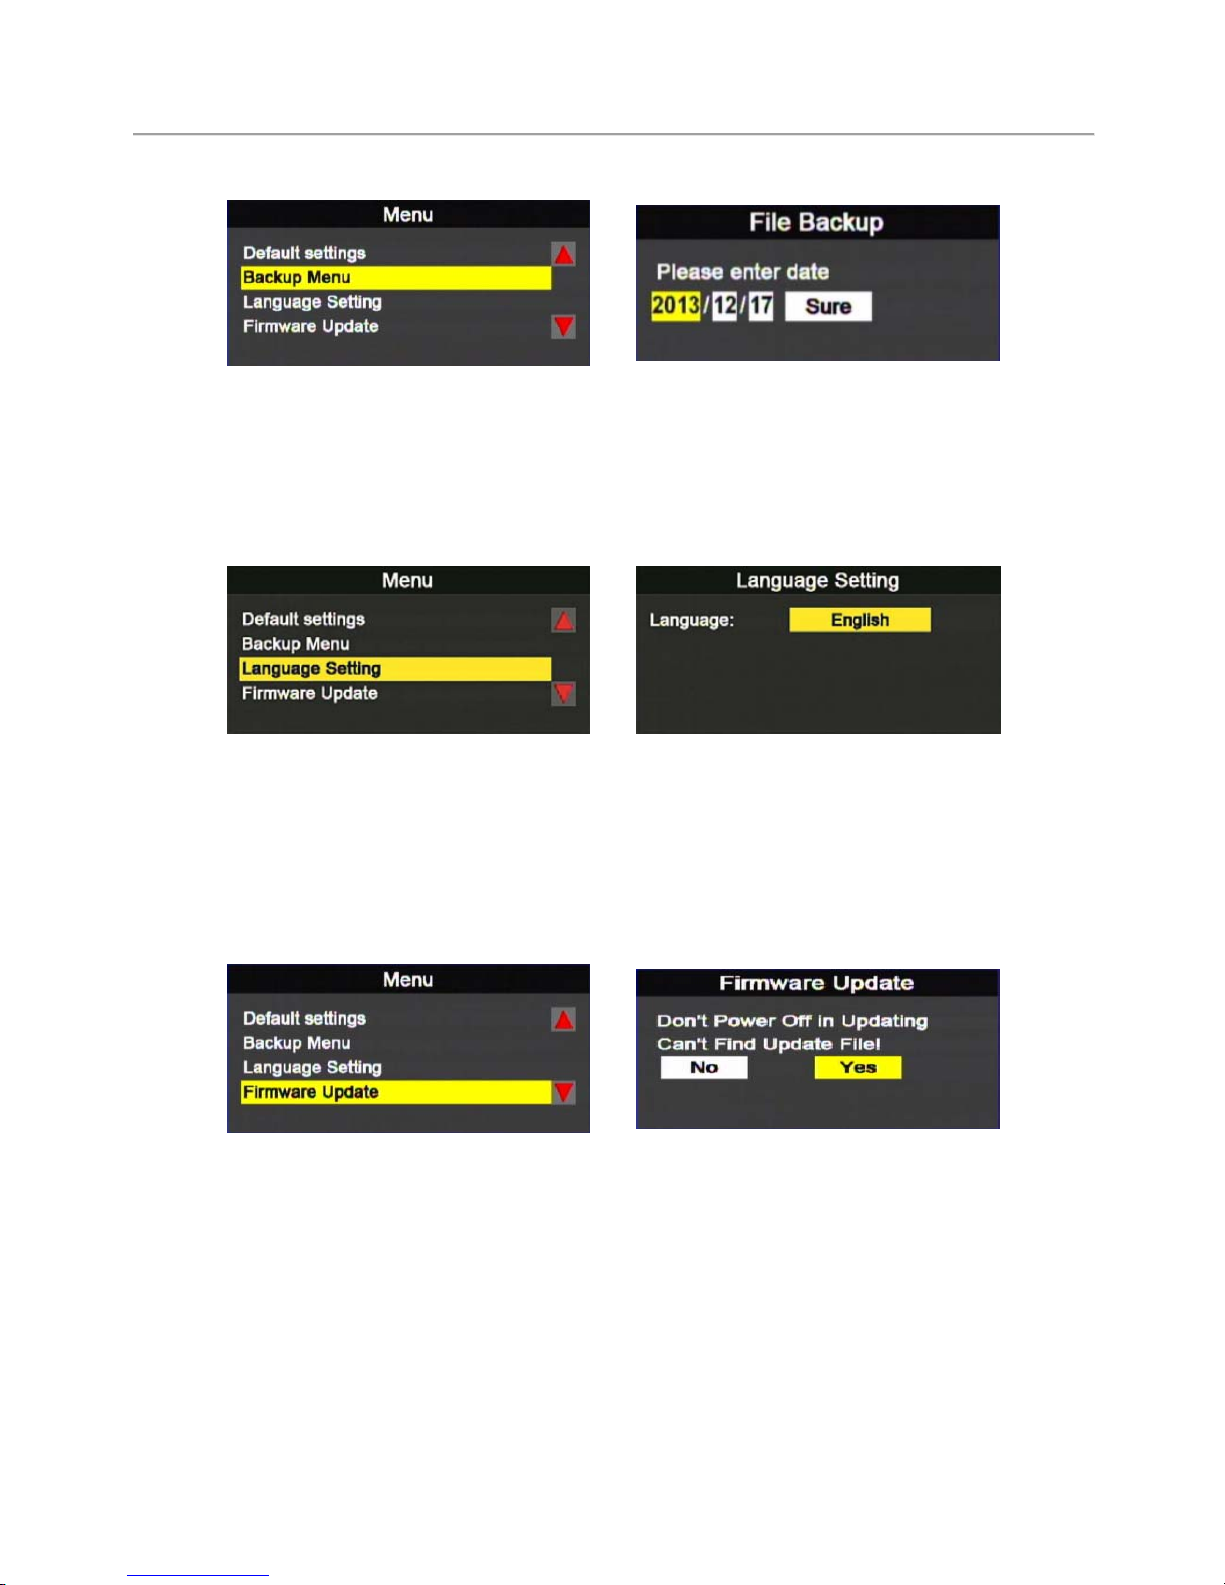
(14) Backup Menu
The user can choose to search or display all recorded
footage for backup; once a file is selected, press Confirm
to access backup selection in playback mode.
(15) Language Settings –Only for non 3G Device
Main Menu-Languages Language Setting (
in non-3G models)
Languages:English / Traditional Chinese / Japanese / Korean /
Russian / Spanish / German available
(16) Firmware Upgrade
To upgrade firmware, please save new firmware on to USB
drive and upgrade via USB drive.
Please do not power off the device during firmware upgrade,
the device will reboot automatically after upgrade is complete.
Page 21
User Manual Standalone Mobile DVR
17
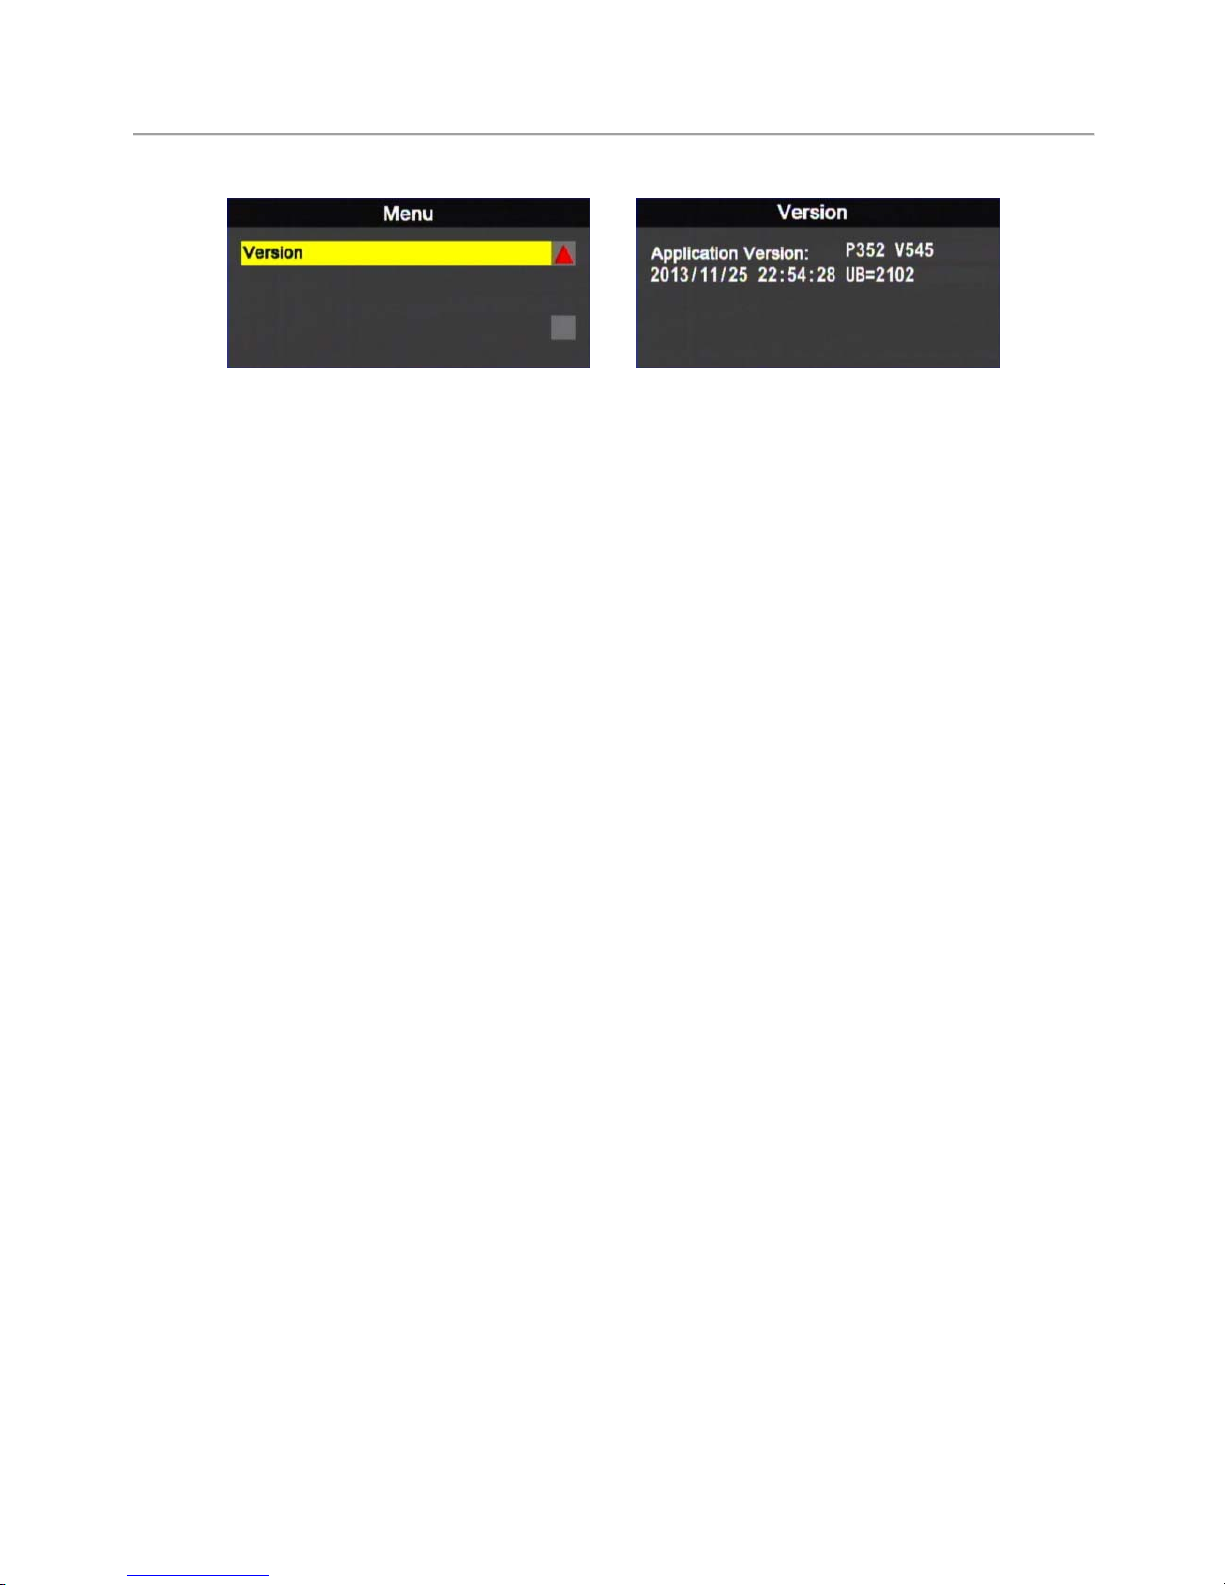
(17) Version (Firmware Version)
Display firmware version and release date. Please
check current firmware before upgrade.
Page 22
User Manual Standalone Mobile DVR
18
H. Playback Mode
At site playback and PC playback are available.
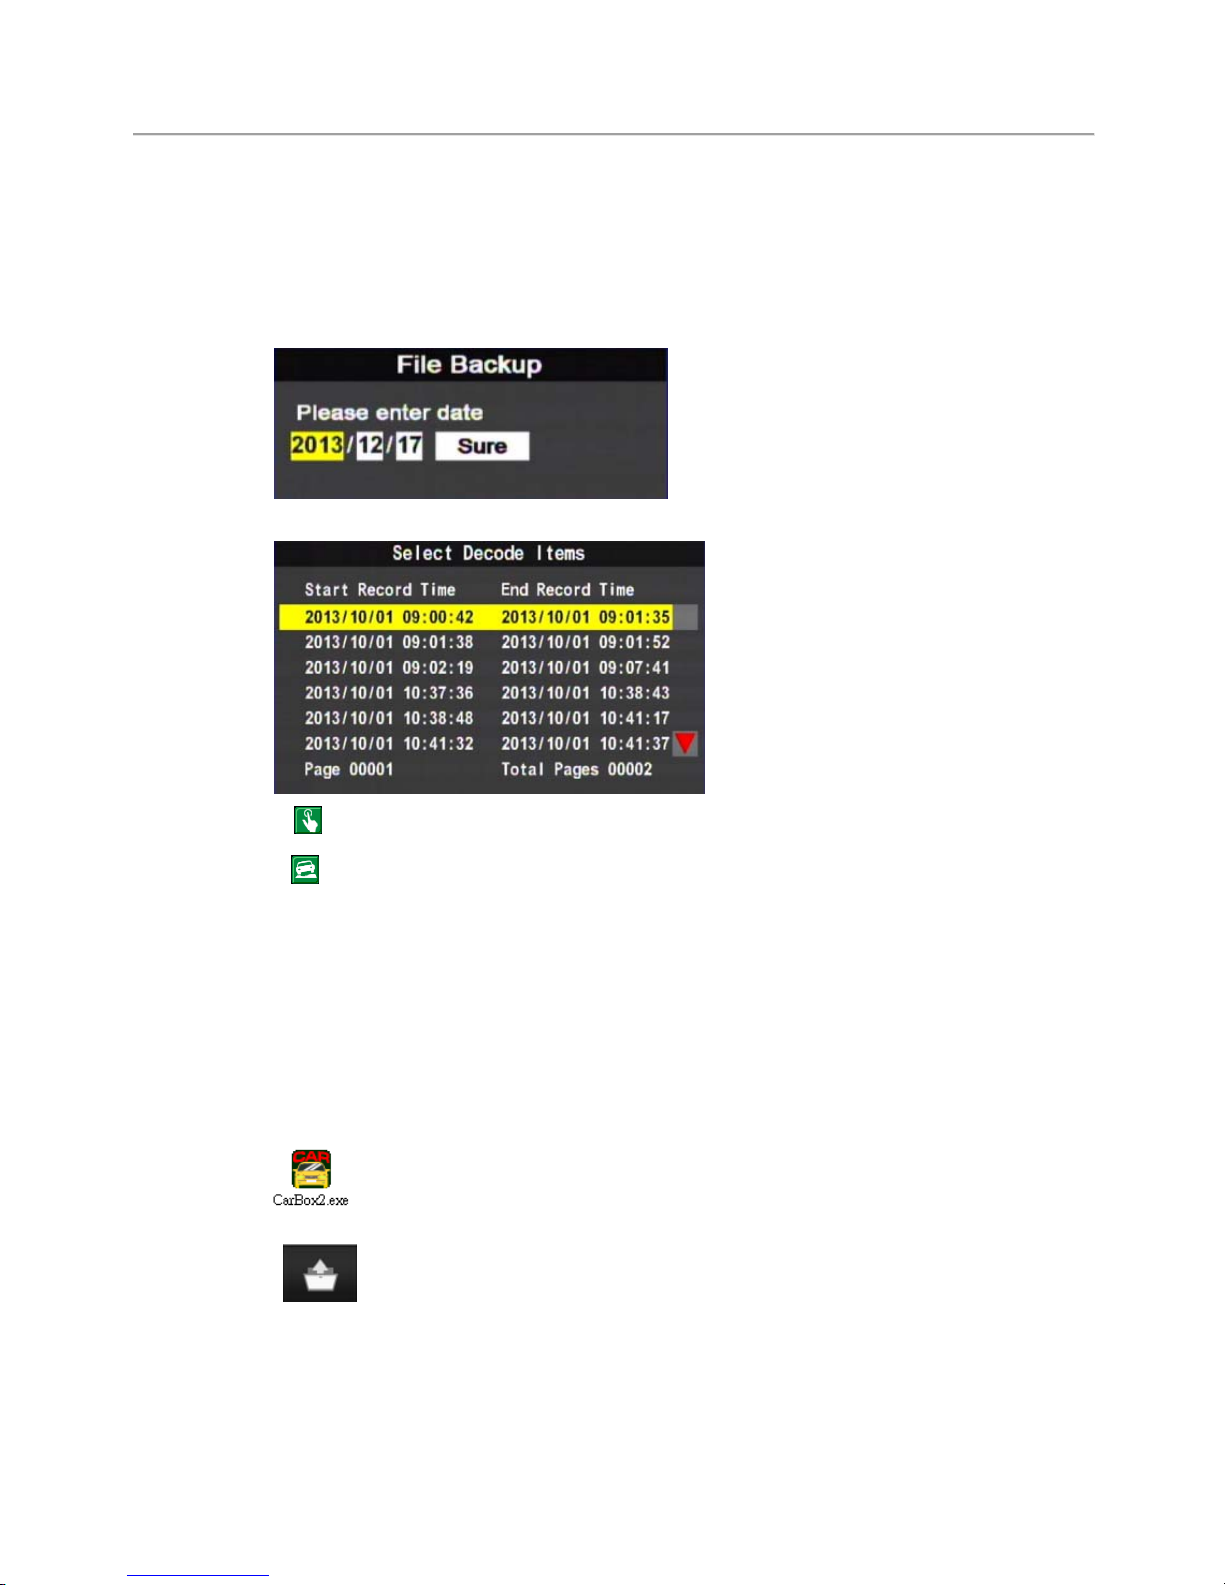
At site playback
(1) Press Play in live mode to enter playback mode.
(2) Press Play to enter option
(3) Select the option and press enter to enter file list.
:Signifies manually forced recording.
:Signifies G-sensor forced recording.
(4) Select a file and press Enter to start playback.
Playback on Computer: Via connected storage device.
(1) Once the computer recognized a storage device has been connected,
use CarBox software to read and play all stored files on storage device.
Device
CarBox2.exe (software icon)
(2)
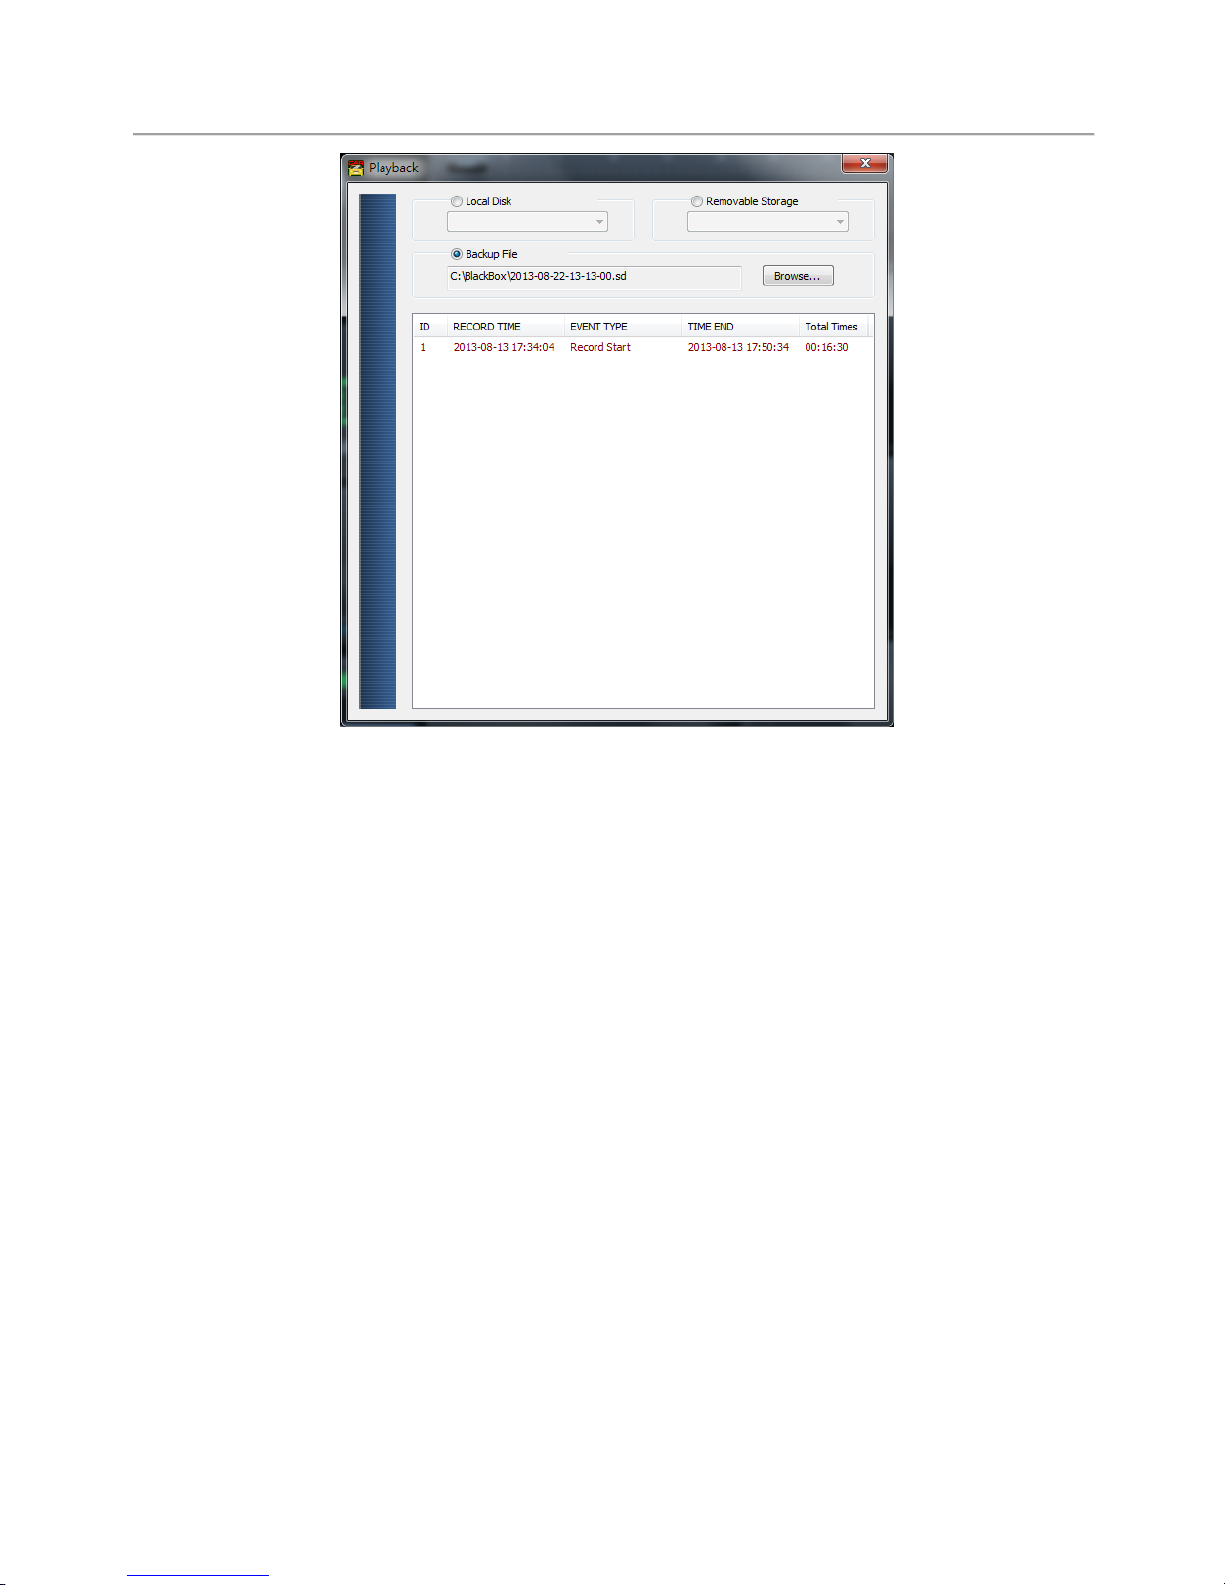
Choose “Playback” to bring up playback selection menu.
(3) Choose a device (Local Disk or Removable Storage) to display all
recorded files. Choose a desired file to begin playback
Page 23
User Manual Standalone Mobile DVR
19
Playback Selection Menu
(Note:If you experience difficulty reading the files on Windows 7 or 8
computer, please right click on CarBox software icon and choose to run it
as Administrator)
Page 24
User Manual Standalone Mobile DVR
20
I. Playback Through PC Software
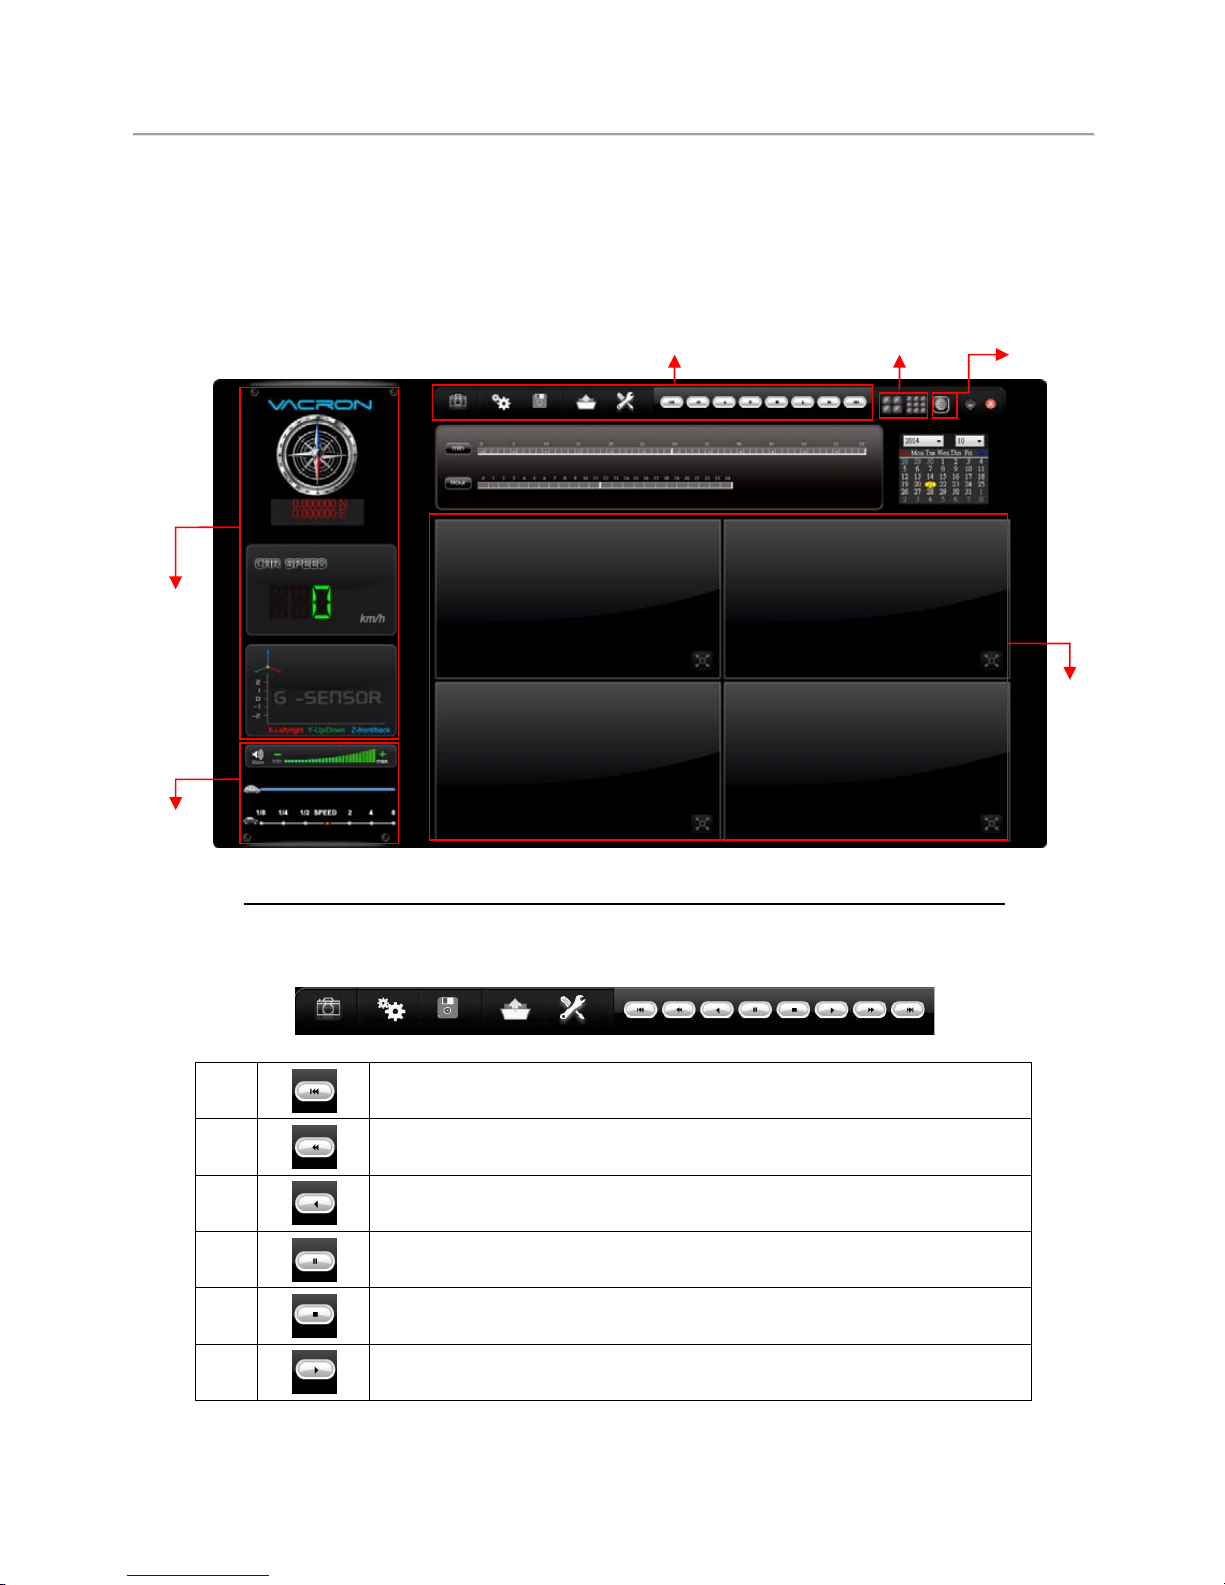
Executing CarBox2.exe software, the interface is as below
★Note: Require DirectX 9.0 or above
Software Interface
GPS Coordinate, Speed and Google Map (select models with 3G modules)
(1). Control Interface
1
Previous File
2
Fast Rewind
3
Rewind
4
Pause
5
Stop
6
Play
Control Interface
Quad & 9CH
Google Map
Playback
Speed
Playback
Screen
Data
Interface
Page 25
User Manual Standalone Mobile DVR
21
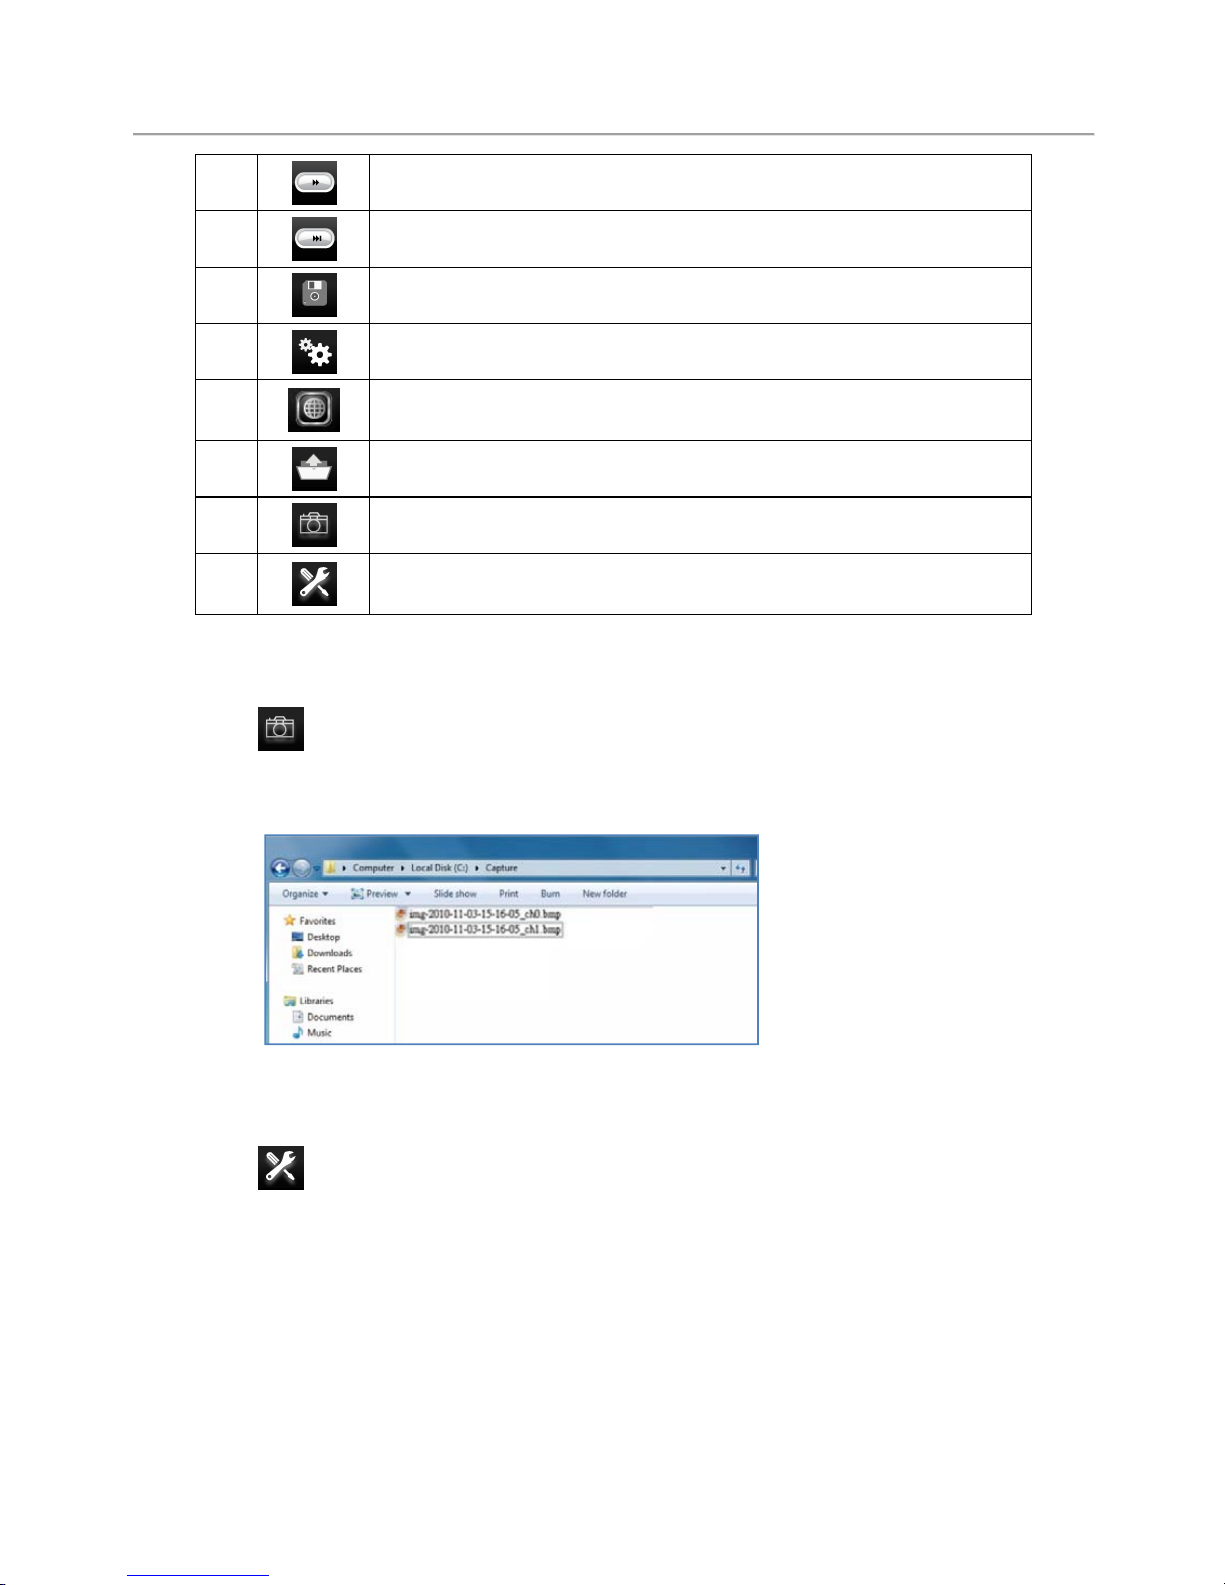
7
Fast Forward
8
Next File
9
Disk backup, choose the desired backup path
10
Setup, setups related to MDVR
11
Google Map, display map location corresponding to
footage
12
Open document folder and choose desired document
13
Snapshot
14
Configuration, Language setting and disk format
selection can be found here
(2). Snapshot
Snapshot: Record the current frame as a picture in bmp file
format.The file is automatically saved in Snapshot folder under CarBox
software.
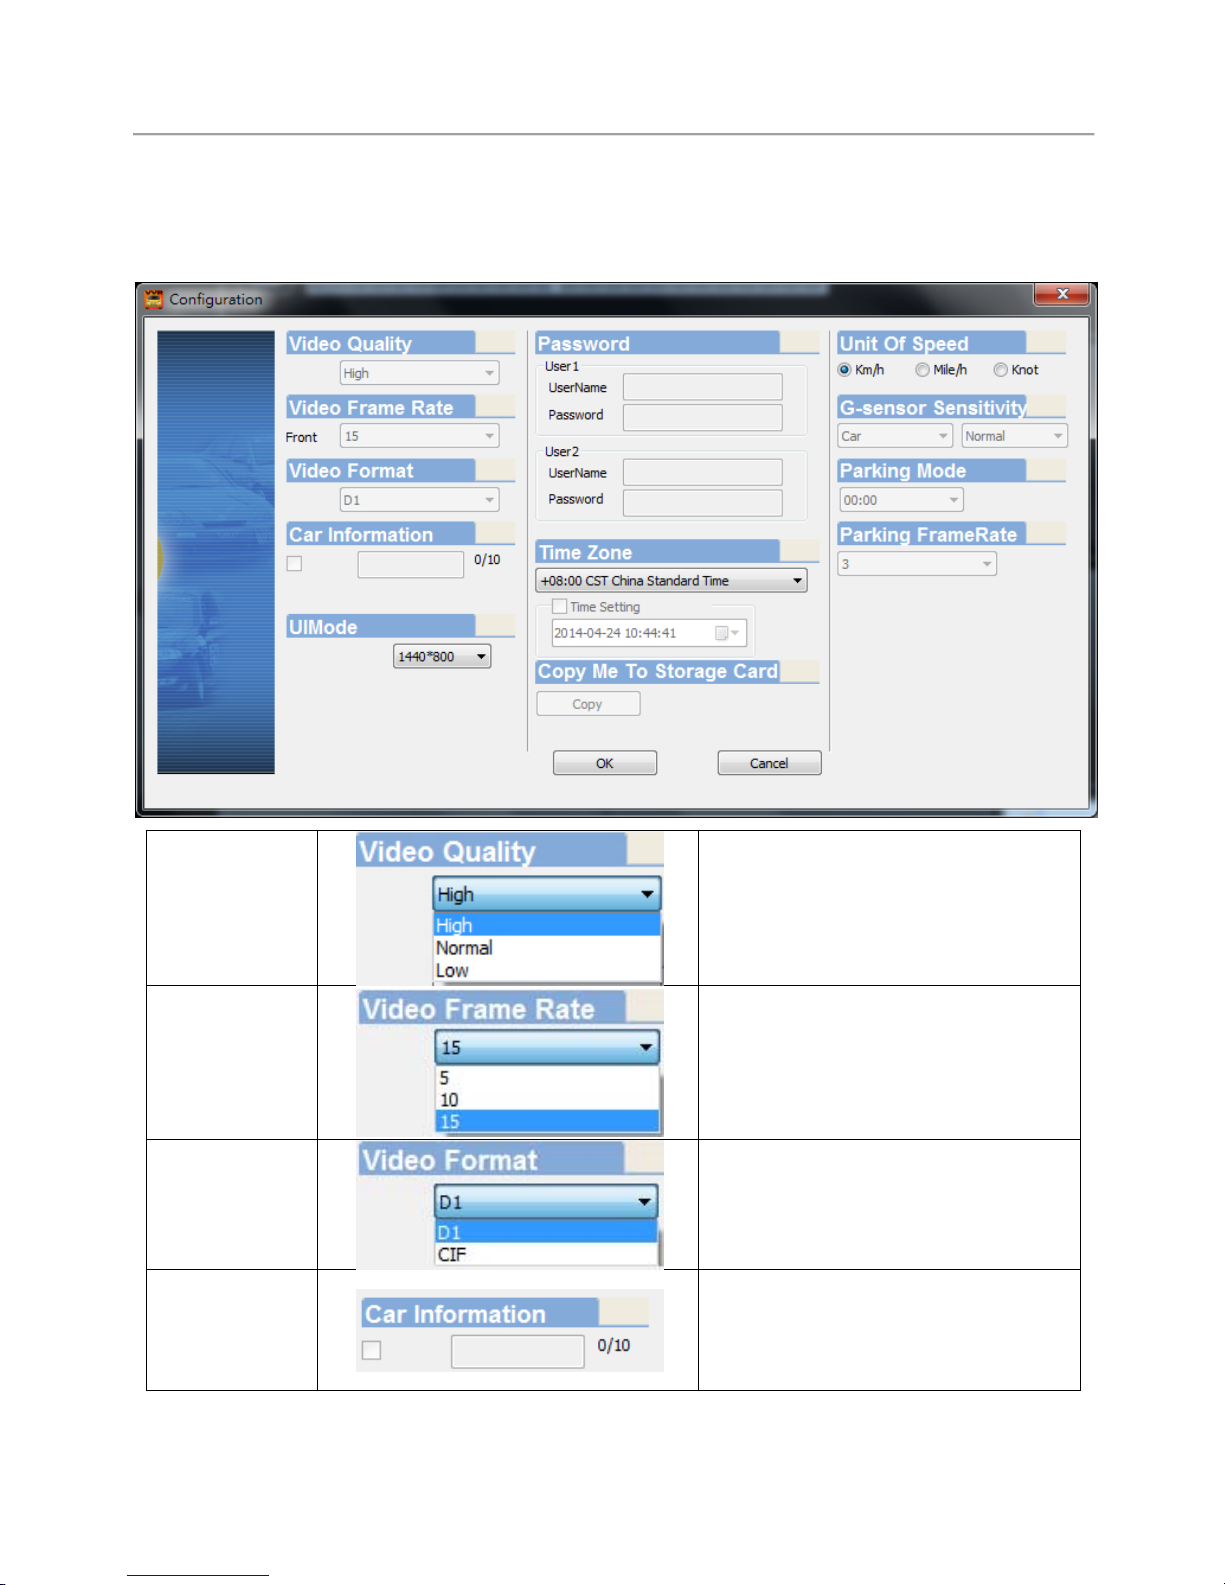
(3). Configuration
: Storage Device Formatting
Before using the storage device on MDVR, please connect it to
computer and configure the storage device via CarBox software to
setup the recording format, speed, time & date and etc.
Once completed, please proceed to install the storage device onto
MDVR.
Page 26
User Manual Standalone Mobile DVR
22
Note:A SATA to USB converter cable can be used for easy access the
storage device (HDD) on computer
Video
Quality
Recording quality in High /
normal / low
Video Frame
Rate
Set recording frame rate per
second
D1 resolution:5~10 frames
CIF resolution frame rate:
ranging between 5~30 frames
Video
Format
Video resolution format in D1 /
CIF
Vehicle
Information
Type in license plate number
or driver’ call sign or name
(suitable for corporate vehicle,
fleet management)
Page 27
User Manual Standalone Mobile DVR
23
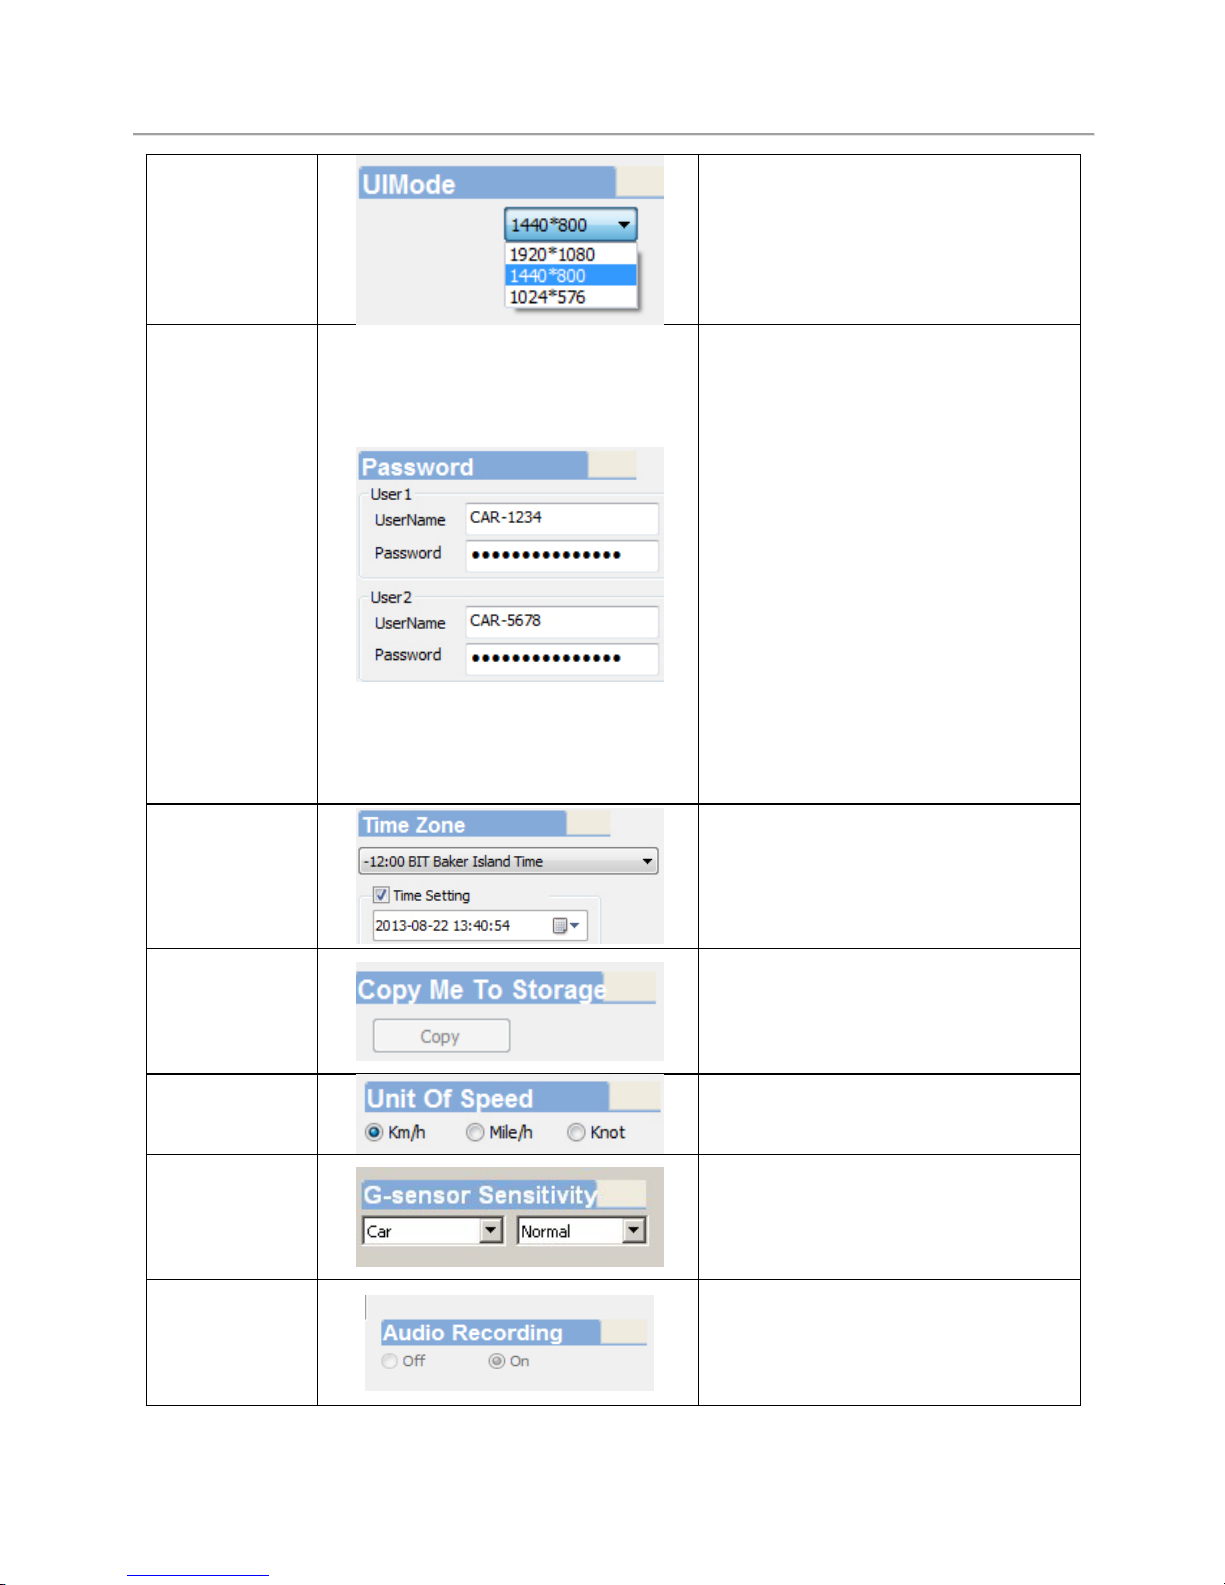
UI Mode
Set the size of software
appearance on computer
Password
This function can encrypt the
data and prevent others from
accessing.
Maximum letters:15 characters
Example: 123456789123456
After setting the password up,
you have to input password
every time for playing the files,
modify the settings, formatting
the HDD etc.
★ Note: Please check if you
have
set capital letters for your
password and save your
password well in other place to
prevent from missing.
Time Zone
Time Zone:
GMT (GPS auto time
correction)
Backup
Software to
Storage
Device
Save a copy of player software
on to disk for ease of use.
Unit of
Speed
Display the desired speed unit
G-sensor
Sensitivity
G-sensor mode and sensitive
Audio
Recording
Audio recording on or off
Page 28
User Manual Standalone Mobile DVR
24
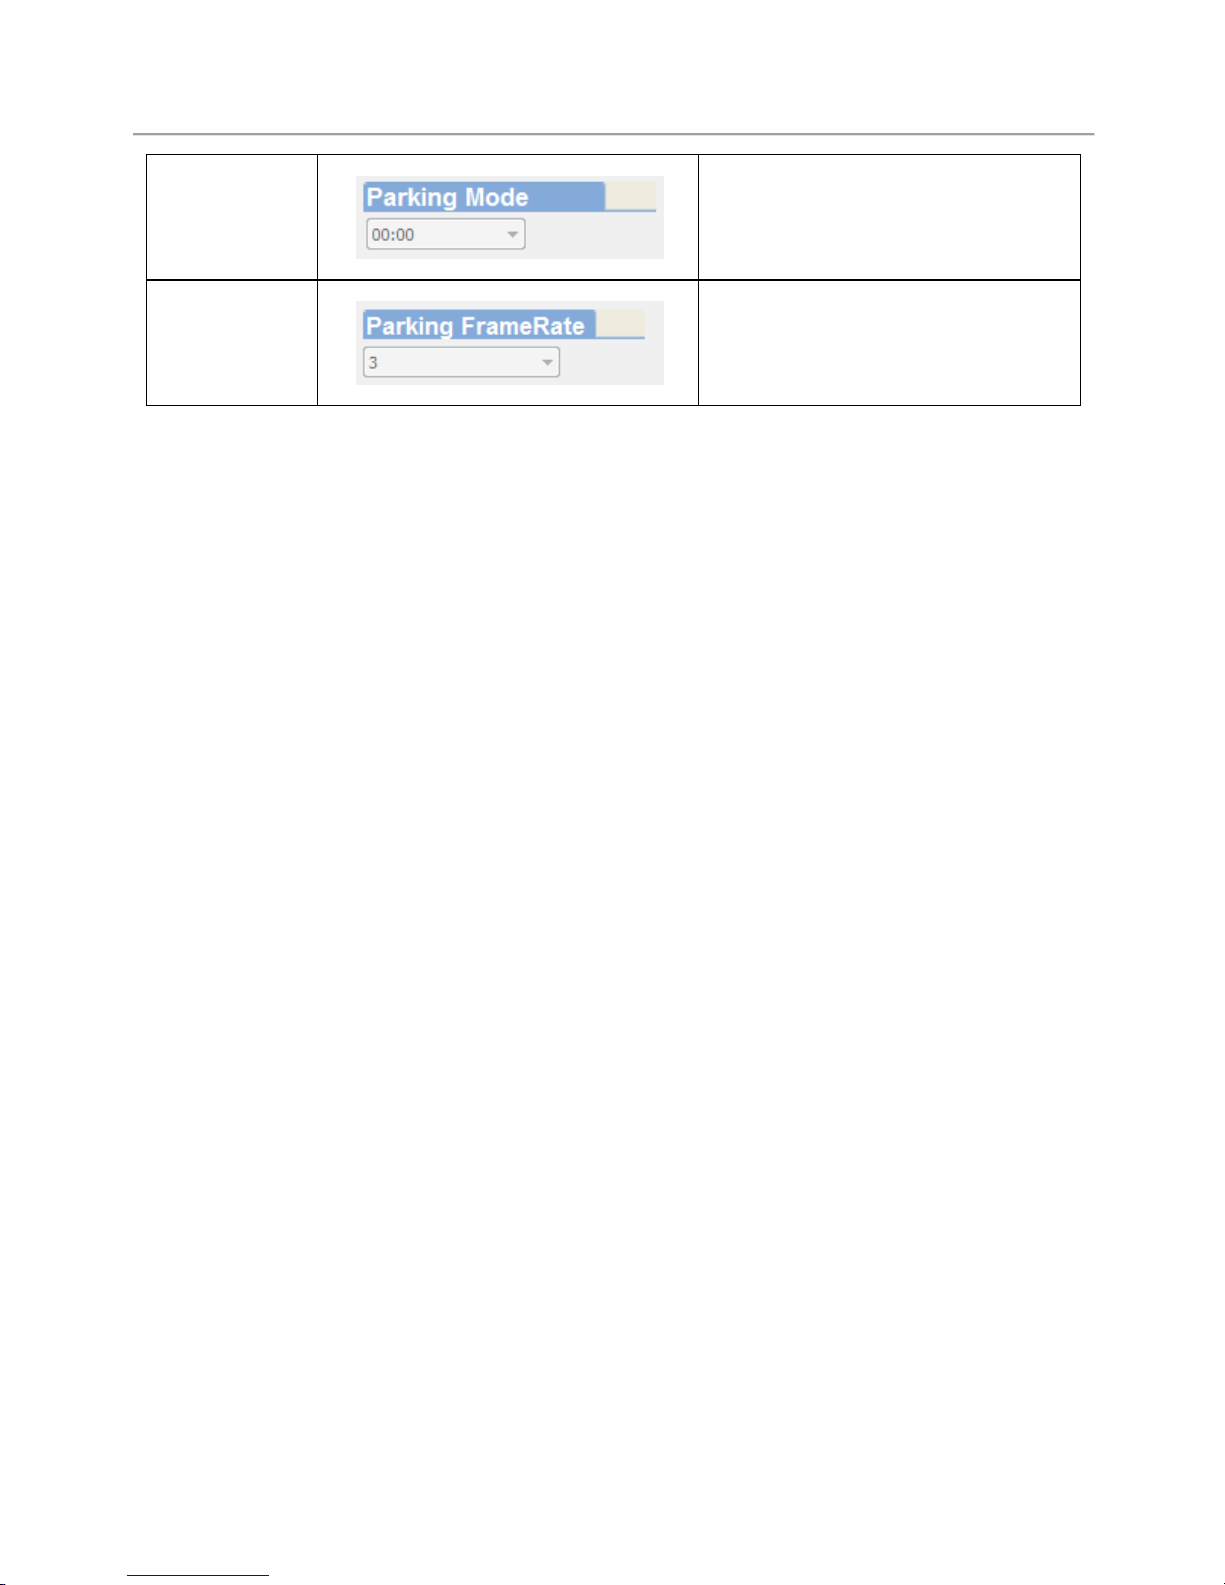
Power
Management
Set extended recording period
after engine powered off
Stationary
Recording
Frame Rate
The extended recording frame
rate after engine powered off
Page 29
User Manual Standalone Mobile DVR
25
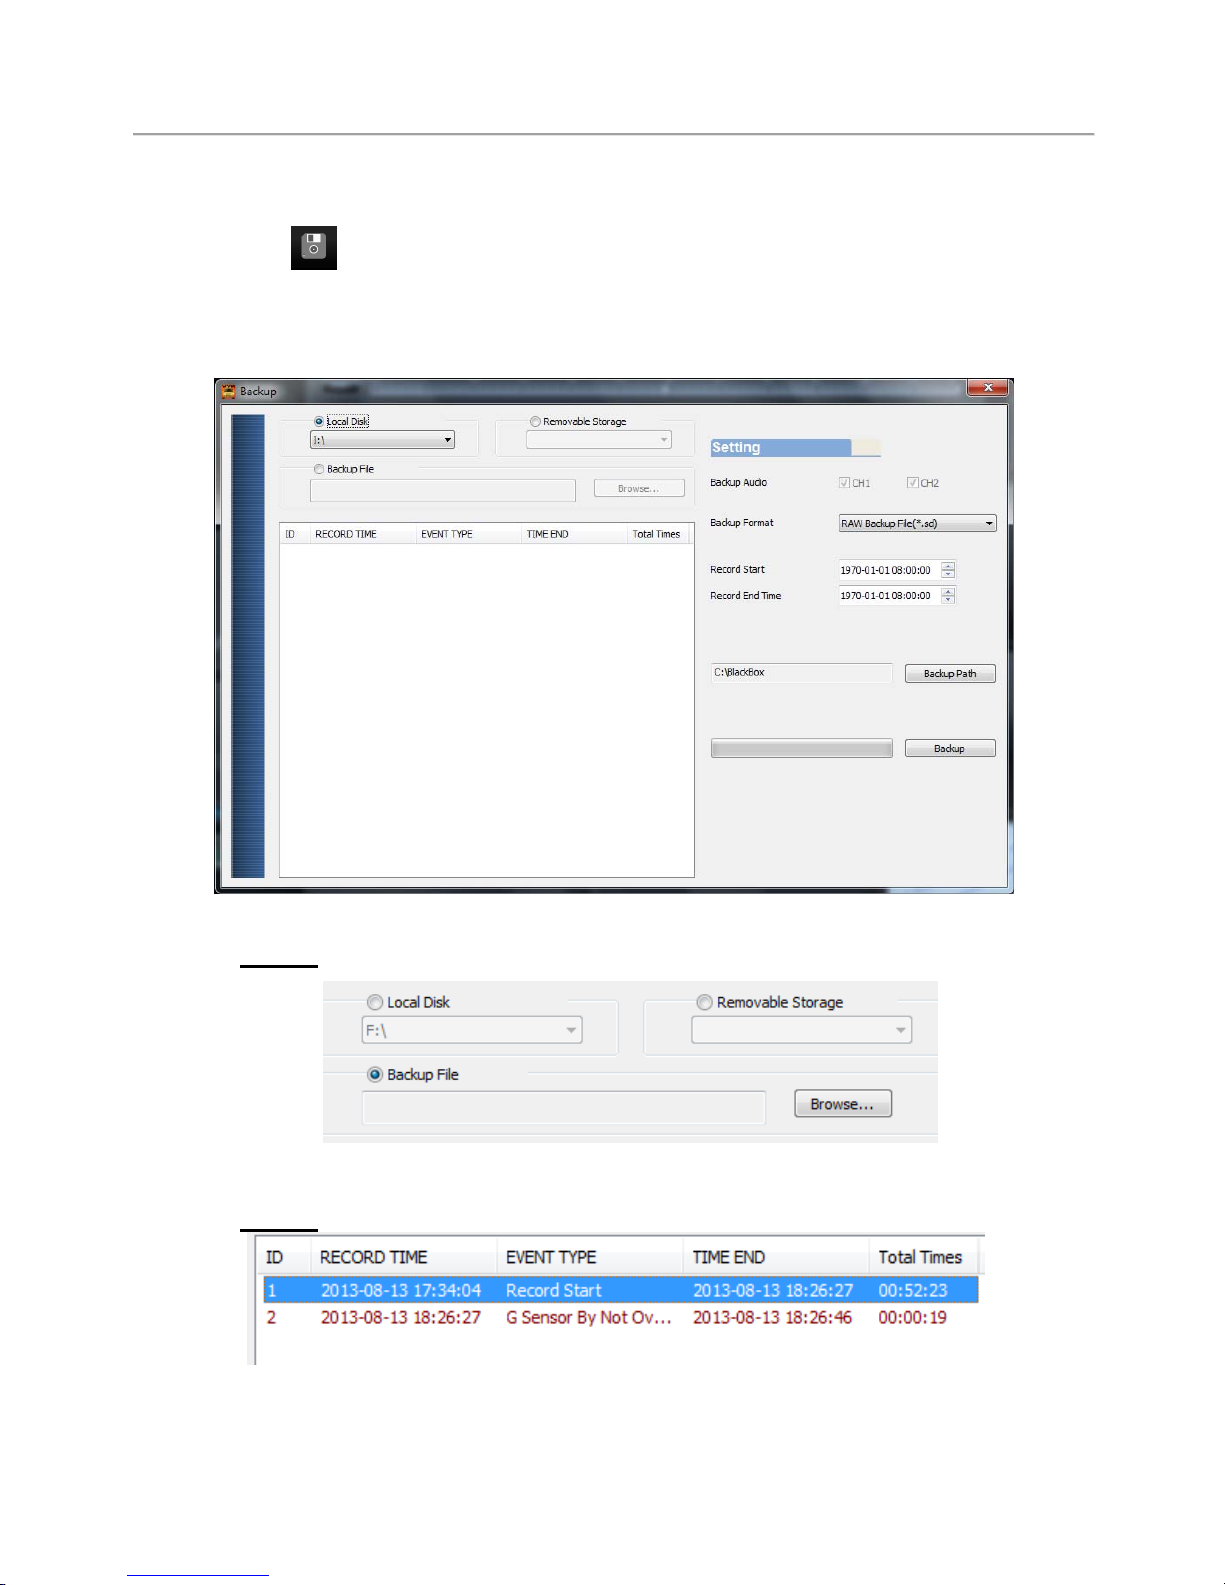
(4). Backup
:Start backup
Press the icon to access backup menu and select the files on storage
device to backup to computer for future playback requirement.
Step 1. Select storage device with recorded footage.
Step 2
. Select desired footage for backup
Page 30
User Manual Standalone Mobile DVR
26
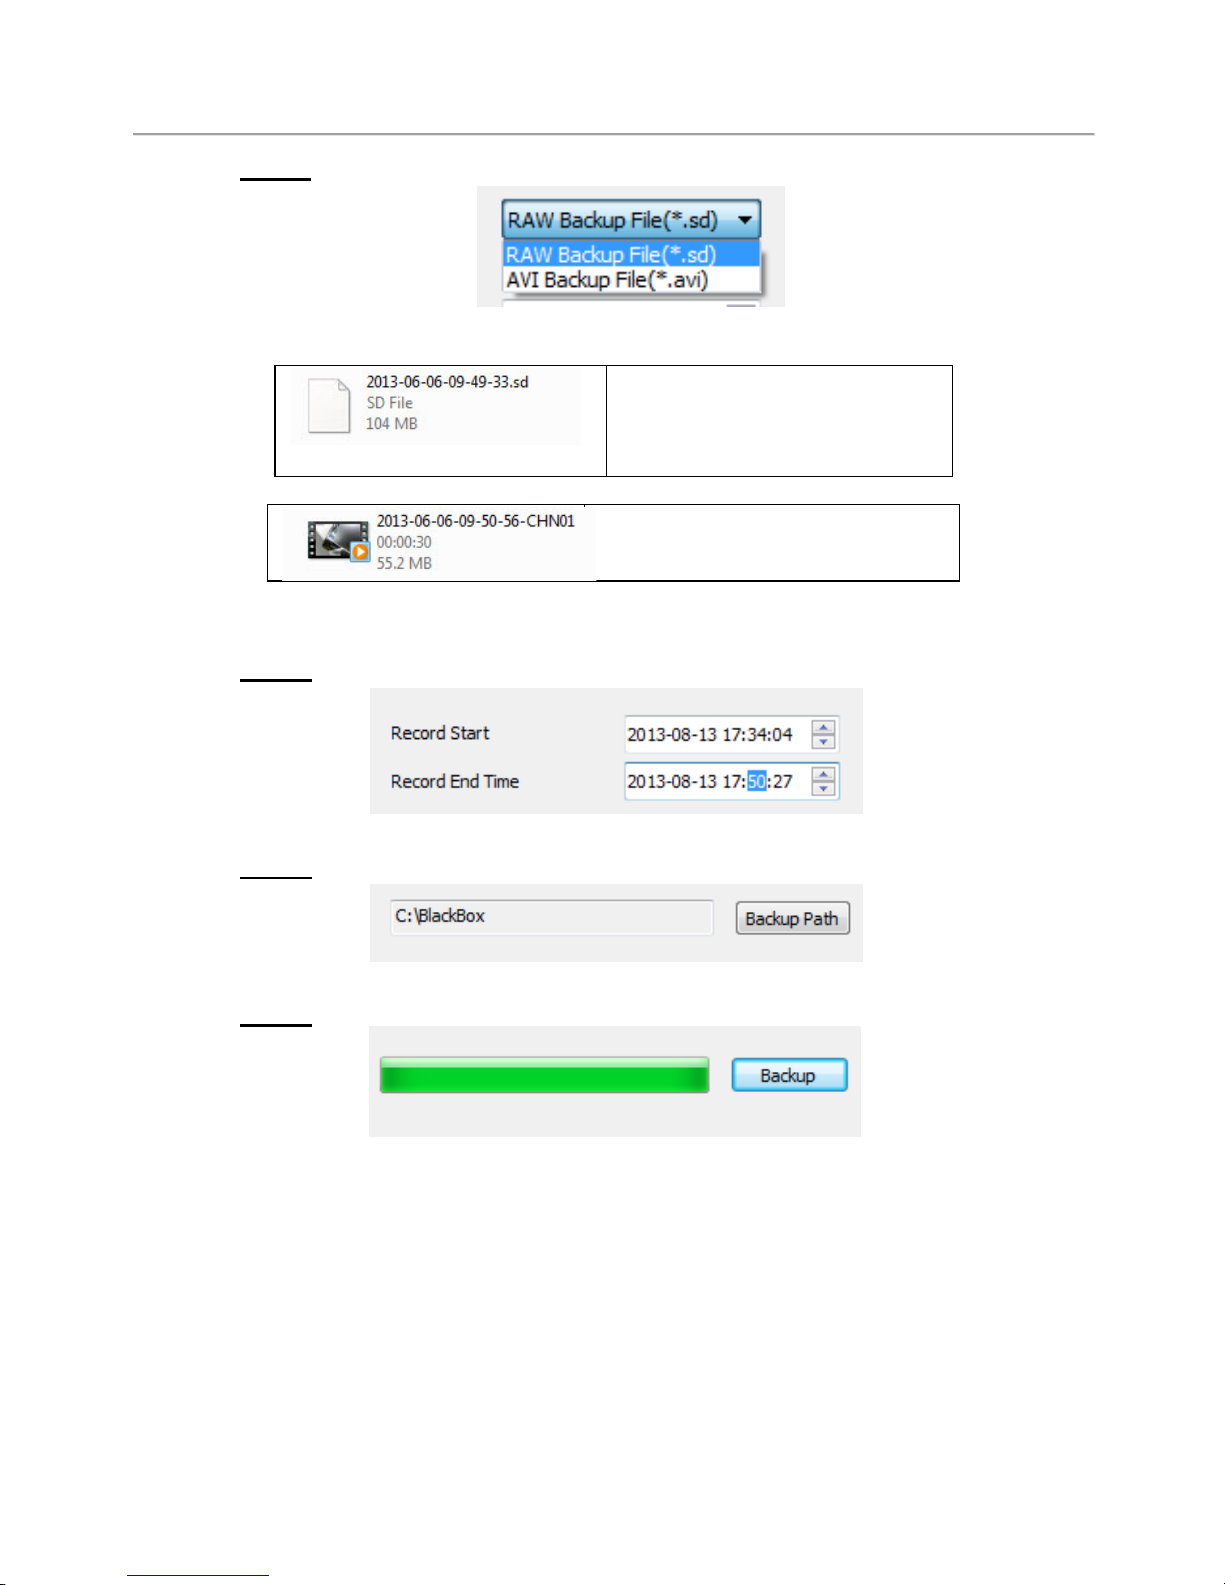
Step 3.Select file format to backup
Fomat available:
● SD Format (RAW data)
SD format also contains
speed, direction, GPS
location and G-sensor data
(recommended format)
● AVI Format
Only video and audio
Step 4
. Choose start and end time to set backup range.
Step 5
. Choose backup backup.
Step 6
. Start backup
Page 31
User Manual Standalone Mobile DVR
27
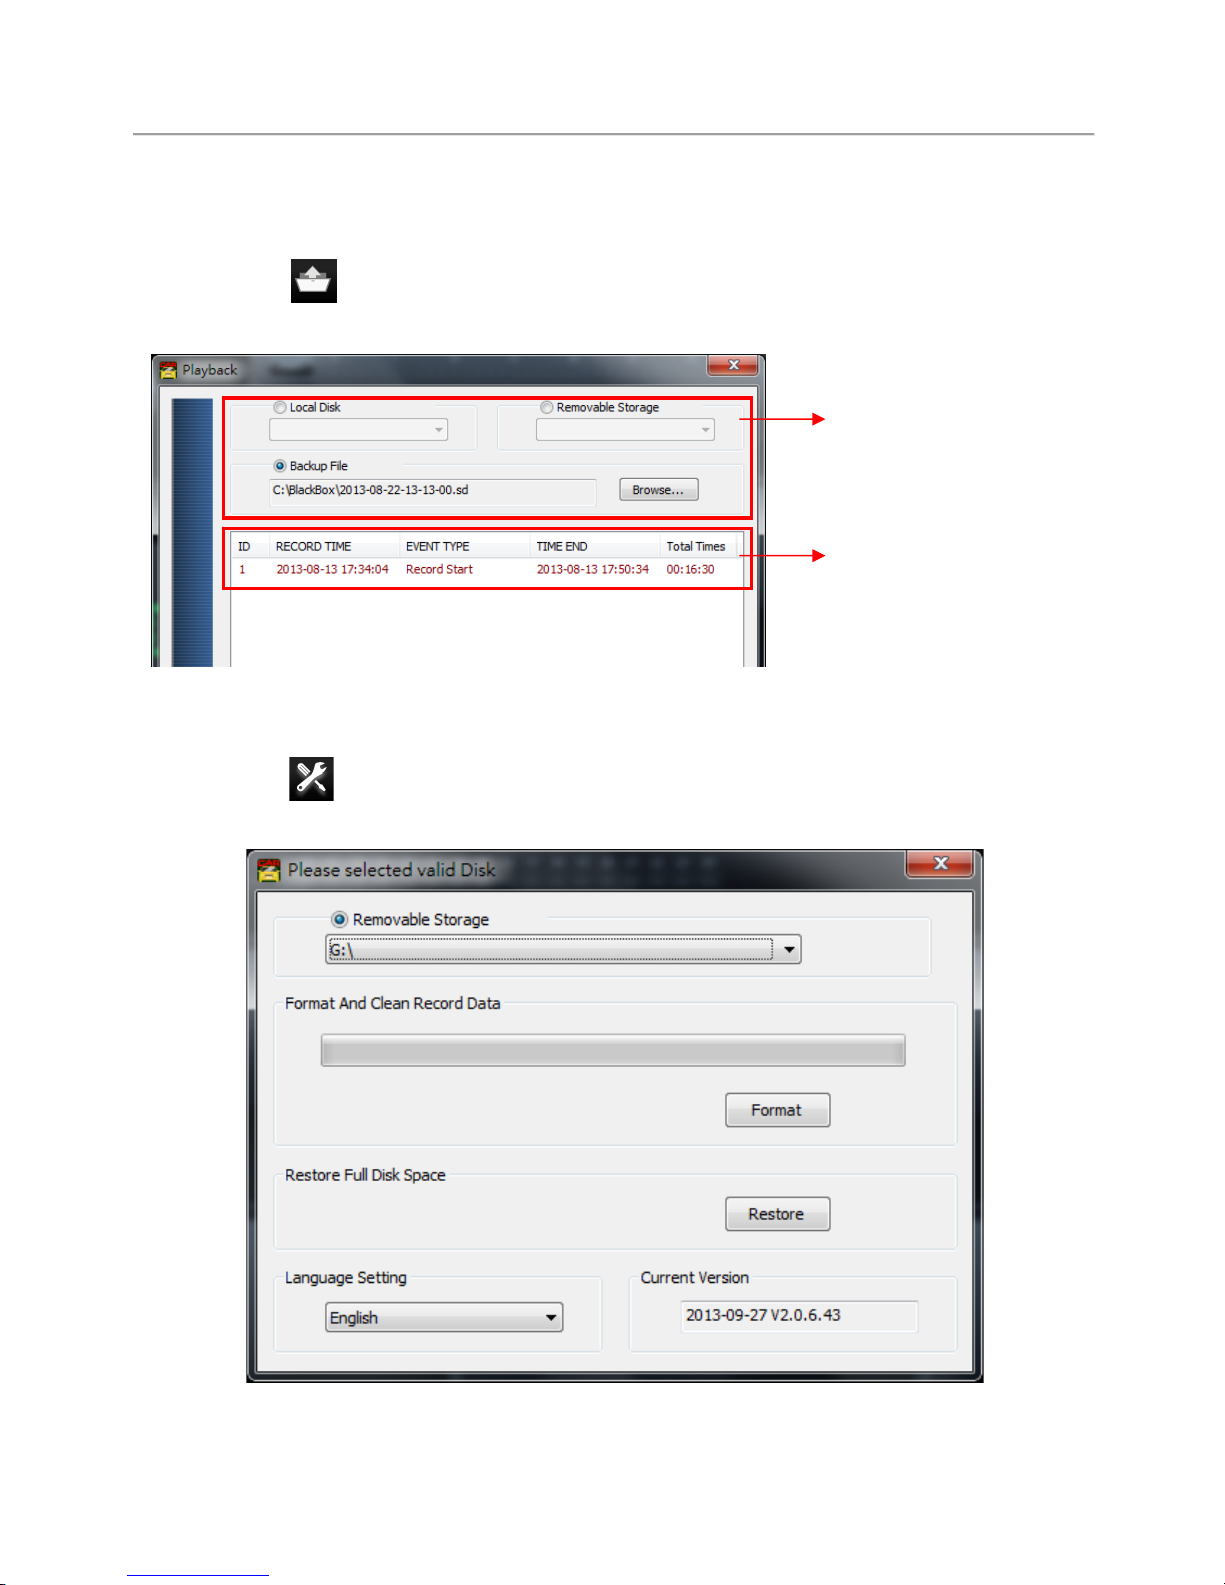
(5). Playback Footage
Playback footage:Select storage device with stored footage to
playback.
(6). Format
:Format storage device, please refer to “Format and Restore
Storage Device) for detailed information.
1. Choose the Local Disk,
Removable Storage or
Backup File
2. Choose the file
Page 32
User Manual Standalone Mobile DVR
28
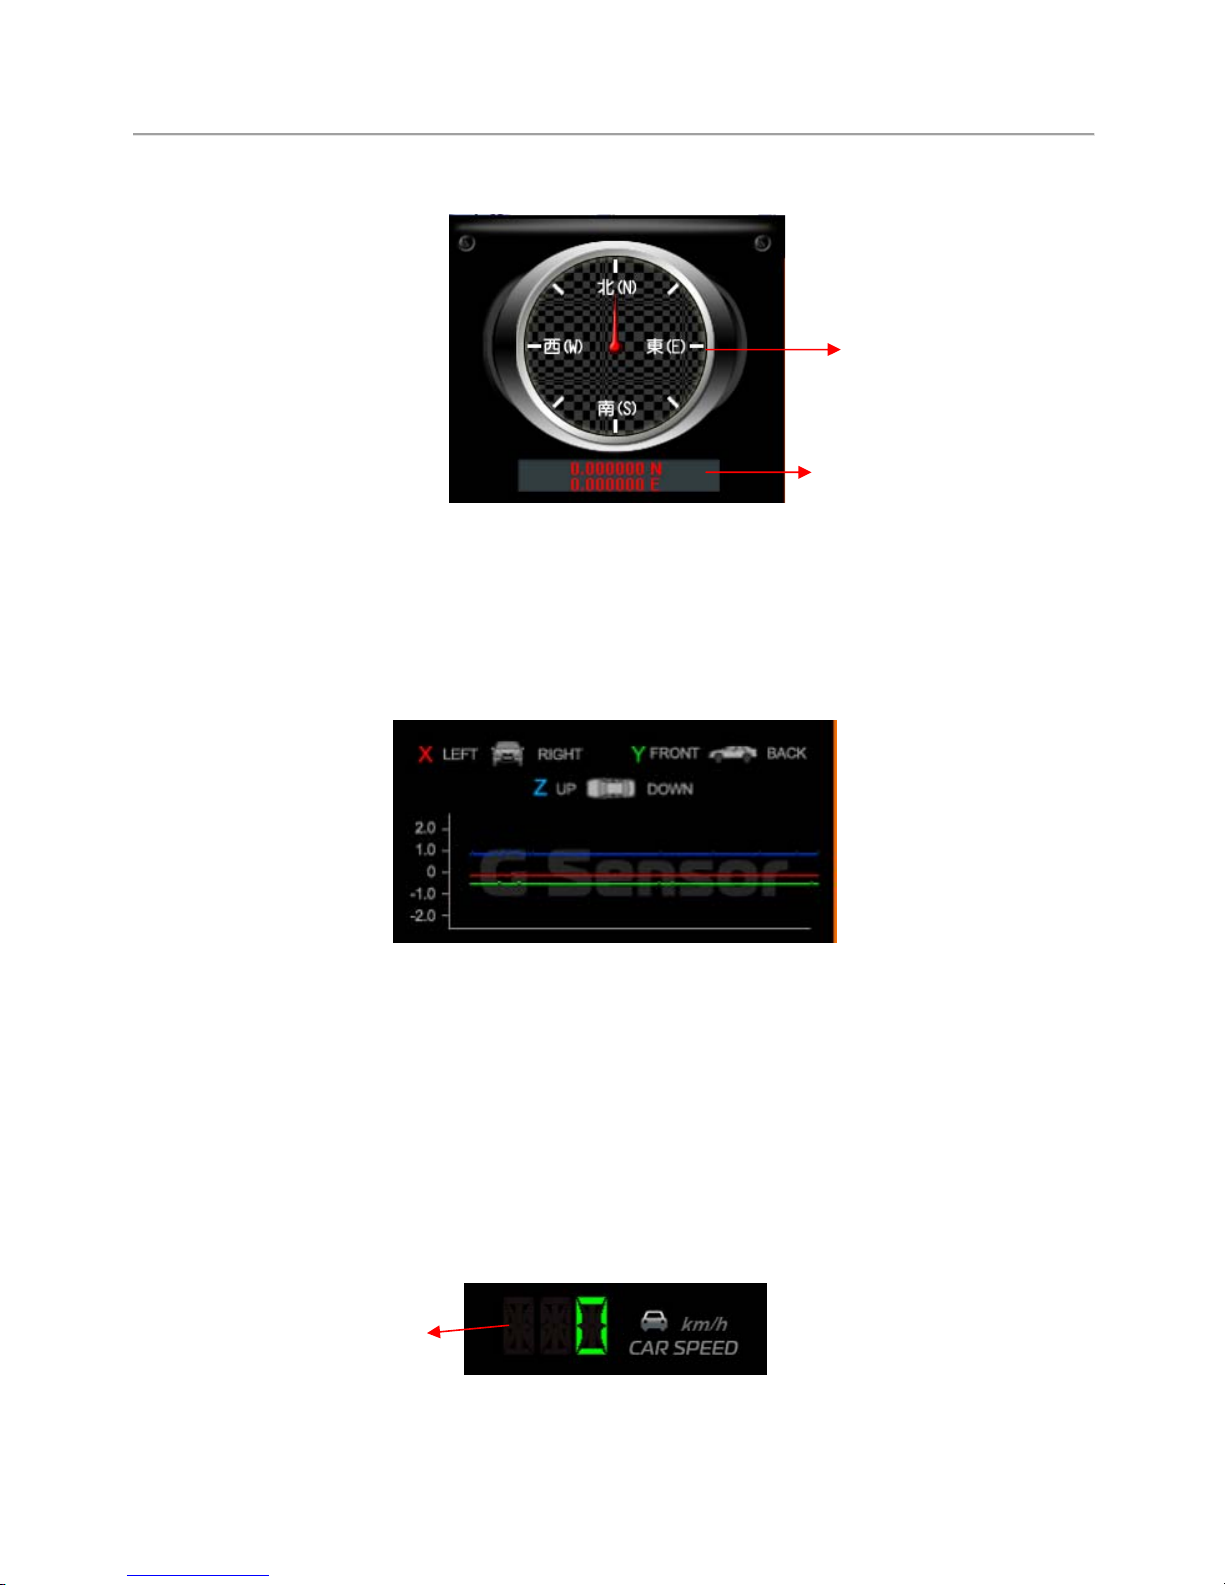
(7). GPS Data
Direction and longitude, latitude Display traveling direction and
location related information. (GPS mouse needed)
(8). G-SENSOR
G-SENSOR:Gravitational analysis, when G-sensor is triggered, this
area displays the force variances of X, Y and Z axis.
X:Related to left and right of vehicle.
Y:Related to front and rear of vehicle.
Z:Related to changes of up and down of vehicle.
(9). Traveling Speed
Display
Direction
Display GPS
location
Current
Speed
Page 33
User Manual Standalone Mobile DVR
29
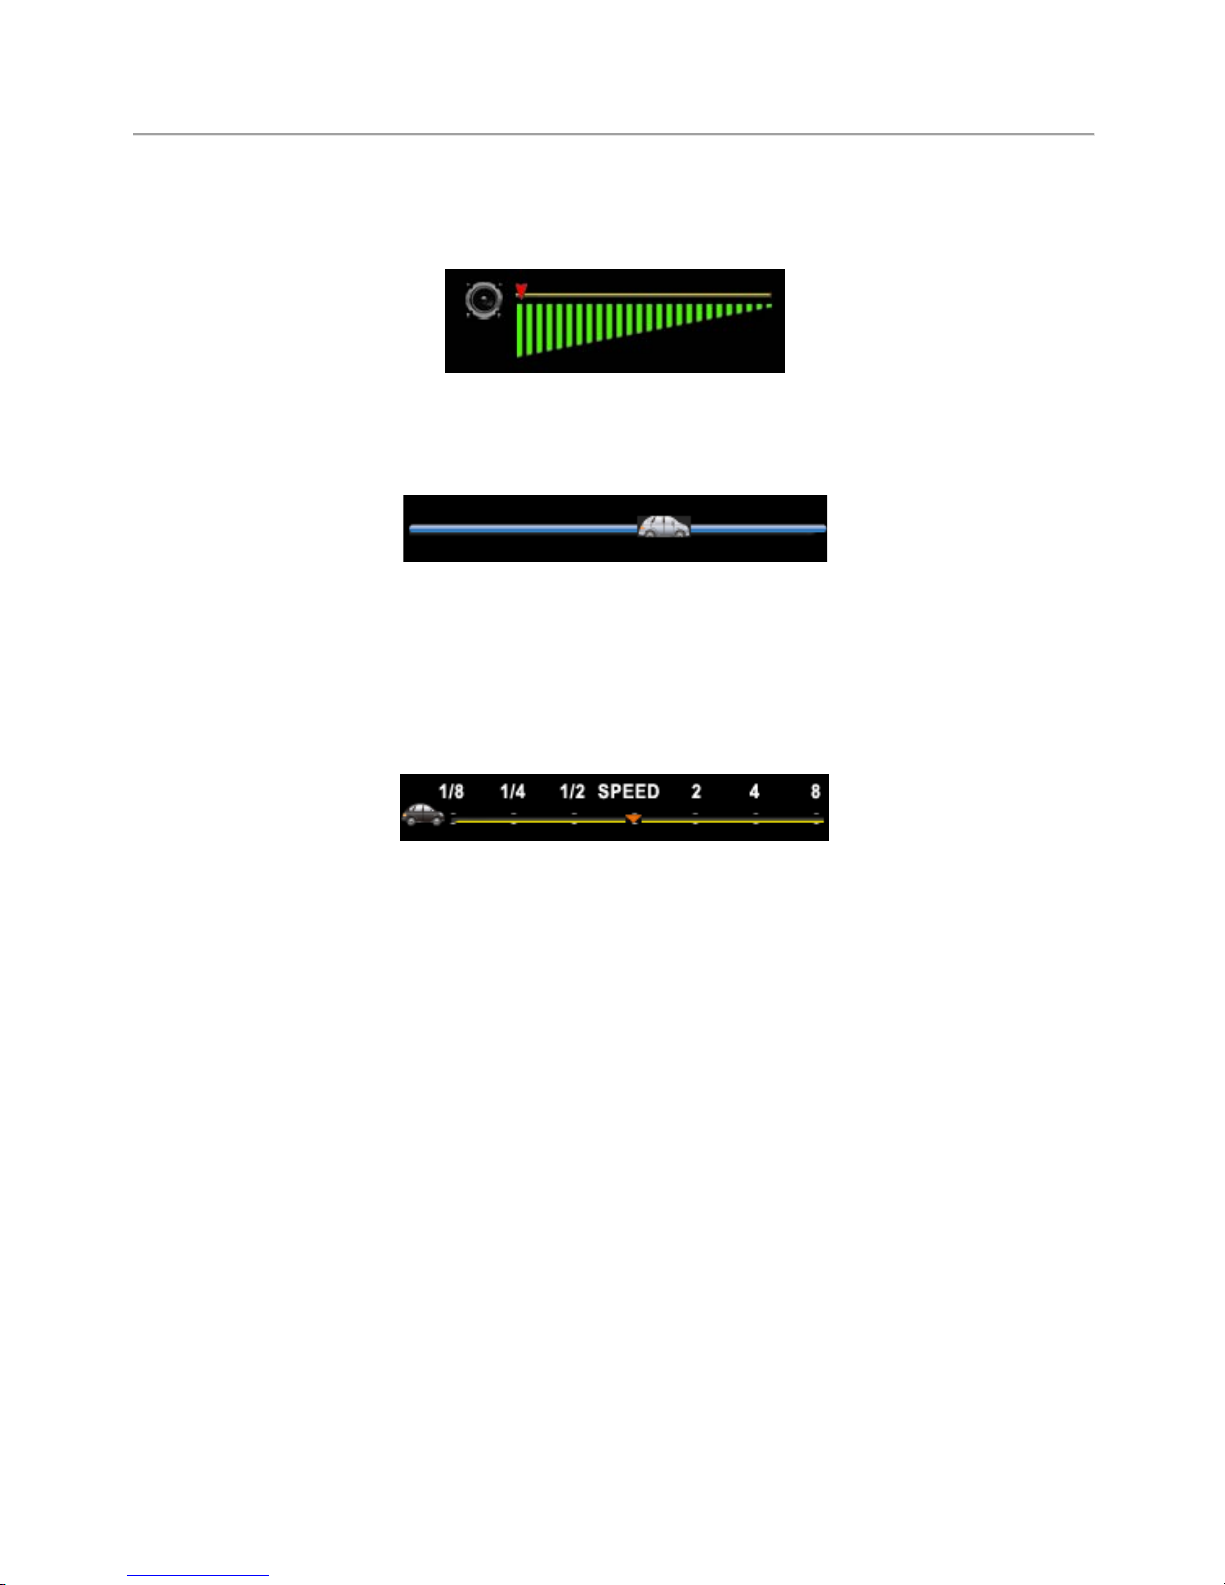
(10). Playback Volume
Volume Control: Left click on + or – to change the volume level.
(11). Playback Search Bar
Playback Search Bar:On the search bar, hold down left click to drag
and place to vehicle icon to jump to the desired time.
(12). Playback Speed
Playback Speed: Drag the vehicle icon to control 2 to 8 times of
playback speed, and 1/2 to 1/8 of slow frame.
Page 34
User Manual Standalone Mobile DVR
30
J. Format / Restore Device
Format Storage Device
When do I need to format storage device?
Please format all new and used storage devices, especially and when the
current format is different from the format MDVR required, before
proceeding to installation.
※ Please make sure to look for any important files has yet to backup, and
make copy to it before formatting.
Formatting storage device can be done via MDVR (locally) or software (on
computer)
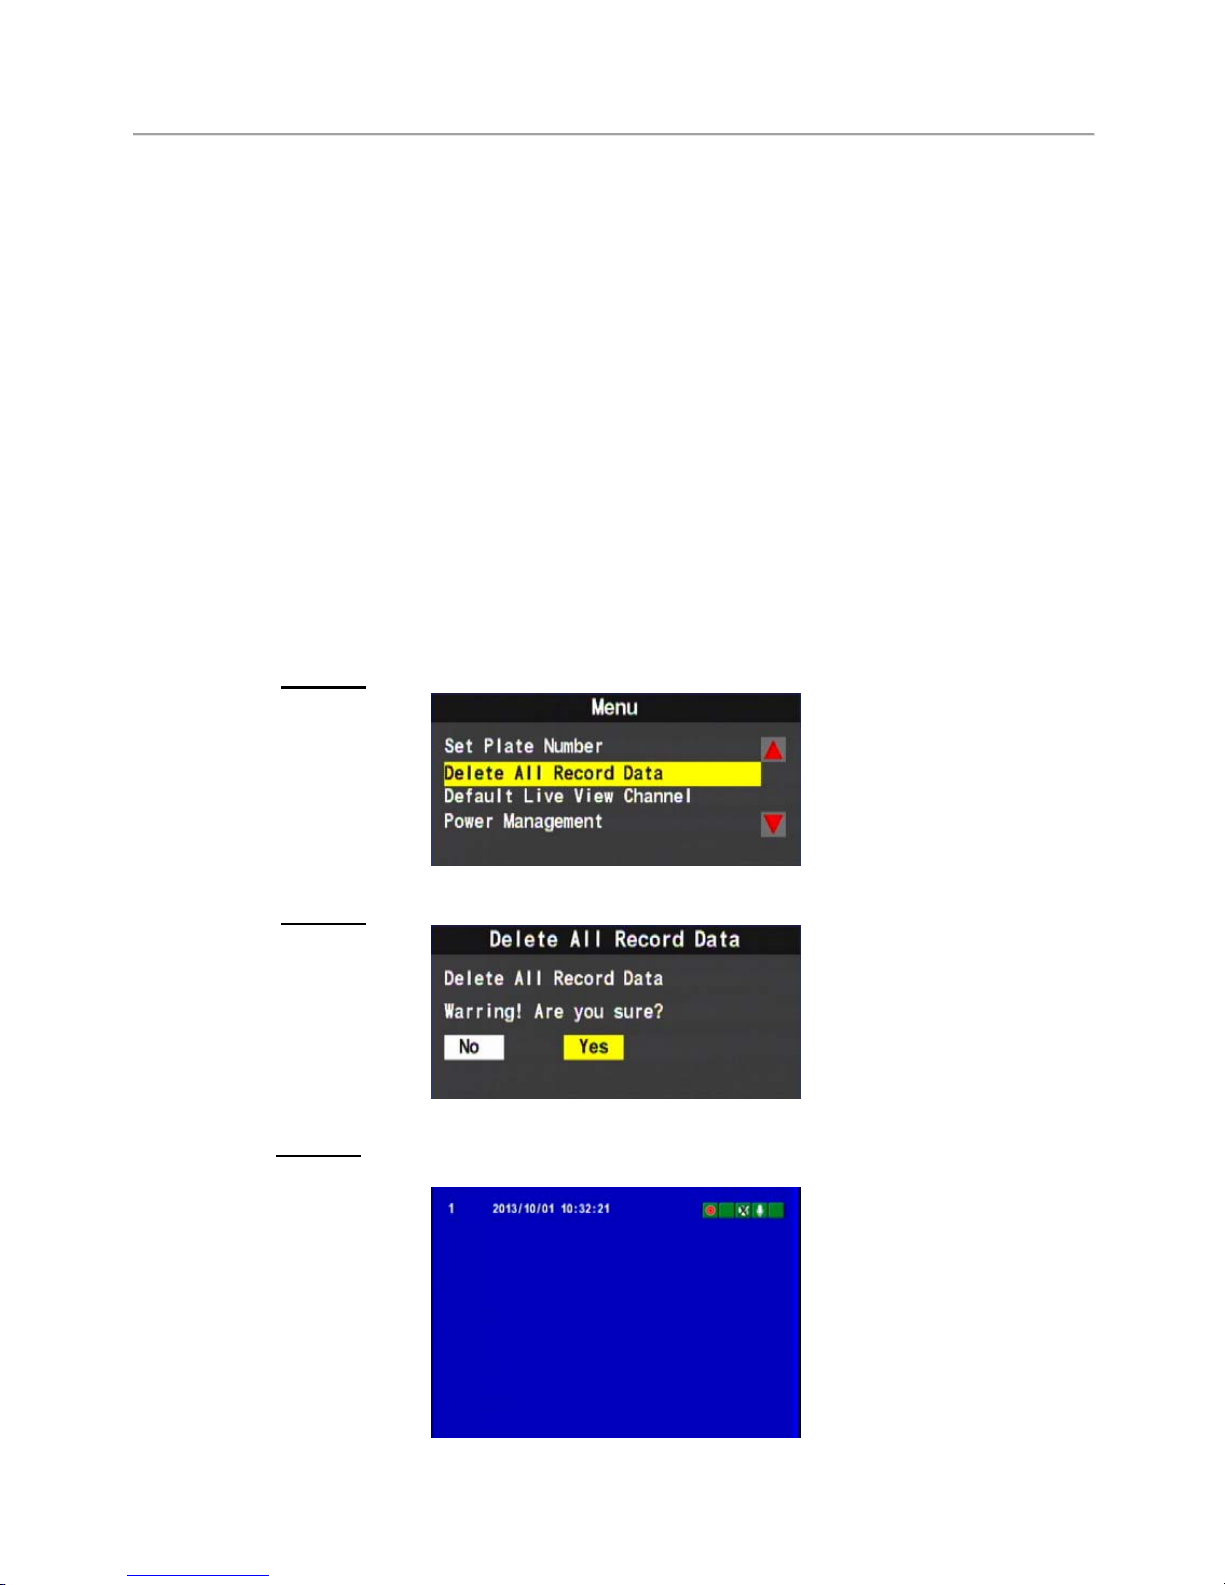
(1) Formatting on MDVR
Using RC to format storage device as below:
Step 1.
Use RC to select “Format HDD” on Main Menu.
Step 2.
Choose Yes to proceed with formatting
Step 3.
The screen will return to live monitoring
when format complete.
Page 35
User Manual Standalone Mobile DVR
31
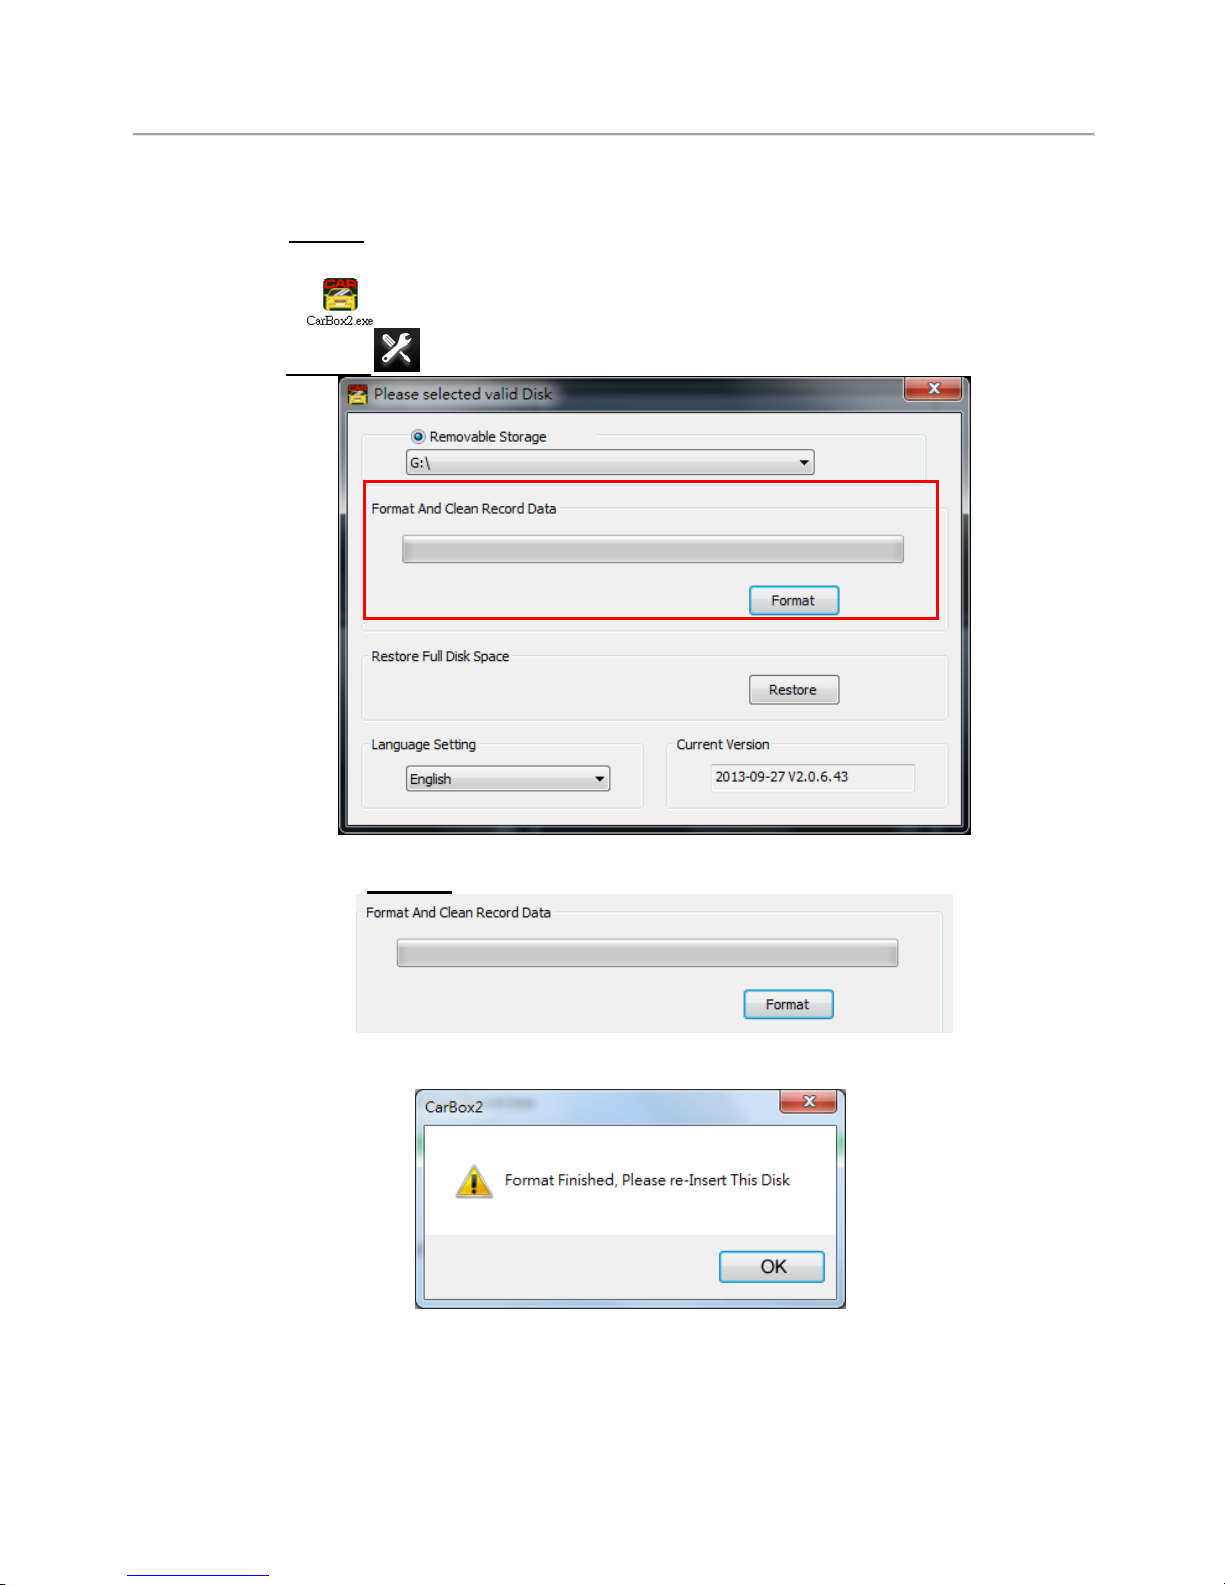
(2) Format on Computer
Steps for formatting on computer is as below:
Step1.
Remove the storage device from MDVR, then connect it to PC
and launch CarBox software.
Step 2. Click on Format to access formatting menu.
Step 3.
Click on Format
Step 4. Choose Yes
(After formatting complete, please re-connect to PC and proceed
to set configuration accordingly. Re-install the storage device
back onto MDVR once the configuration completed.)
Page 36
User Manual Standalone Mobile DVR
32
Restore Storage Device
When do I need to restore my storage device?
When the storage device is to be used for other purposes, please format it
before all else.
※Please make sure to look for any important files has yet to backup, and
make copy to it before formatting.
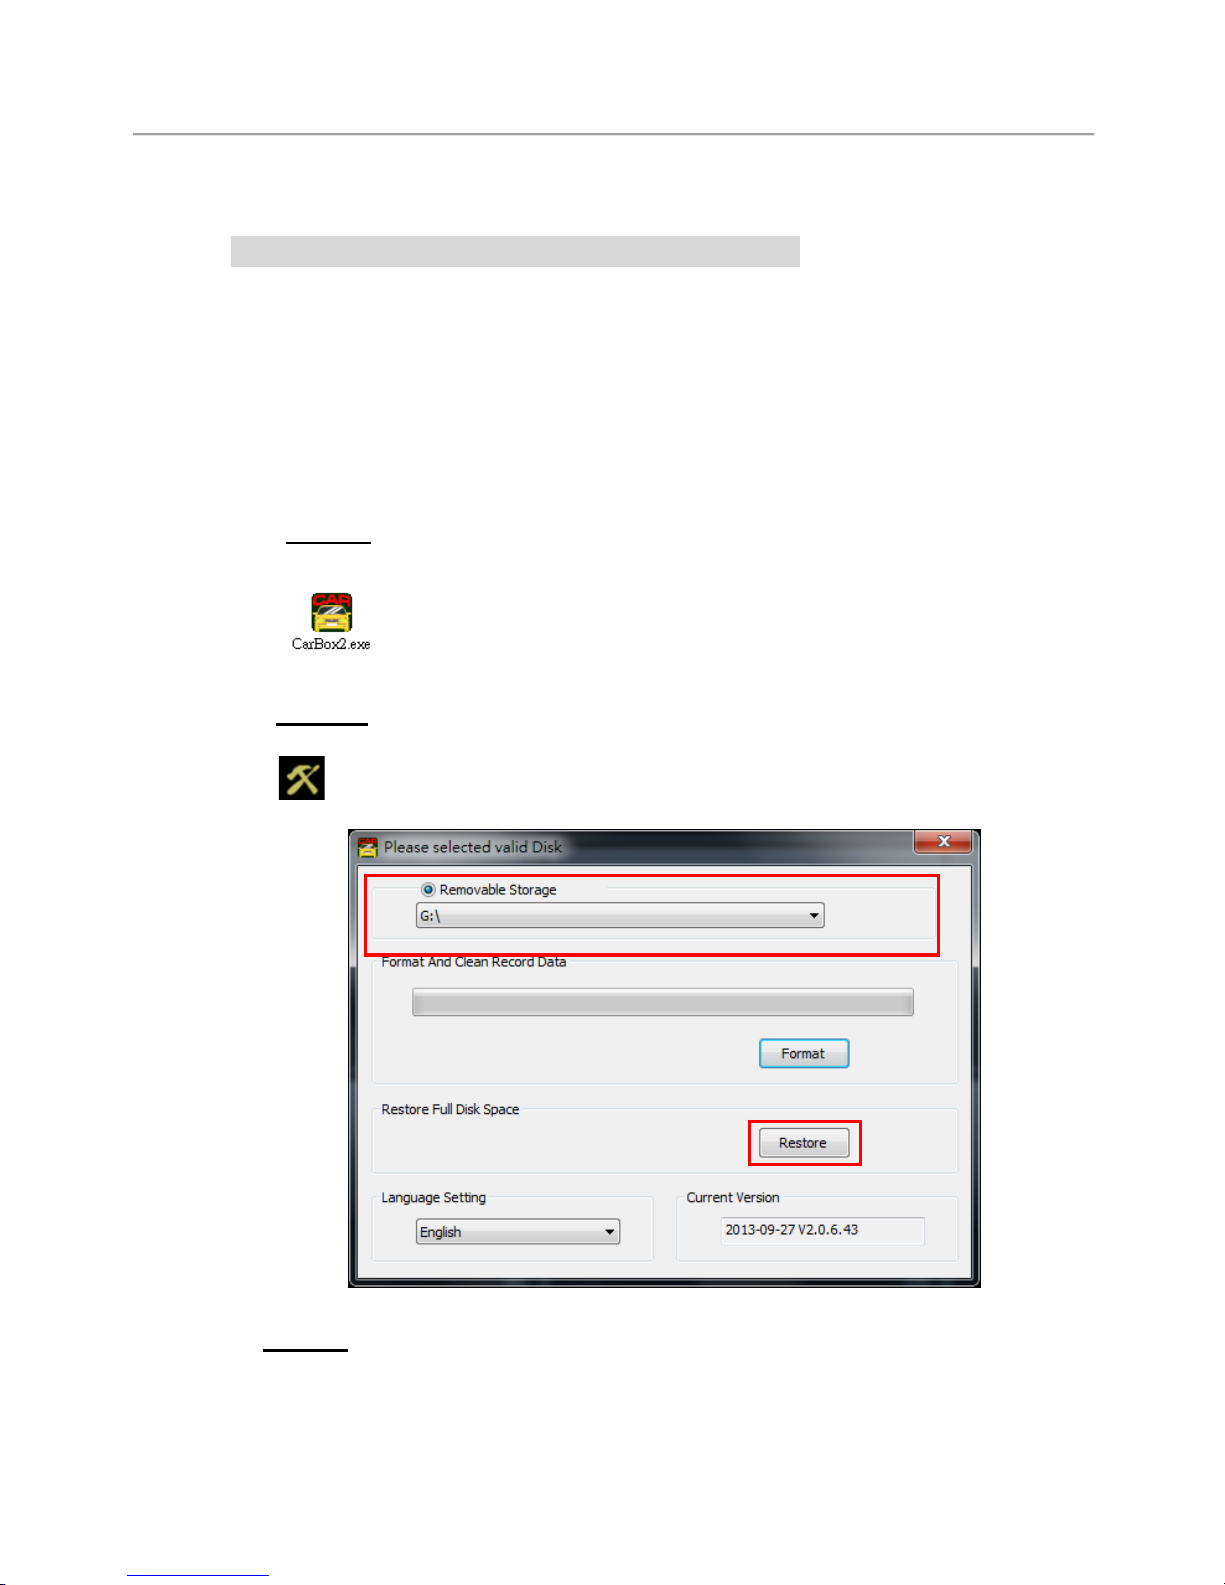
(1) Restore Storage Device on PC
Step as below:
Step 1. Remove the storage device from MDVR and connect it to PC,
then launch CarBox software.
Step 2.
Click on Format then choose the desired storage device. Once
selected, choose Restore.
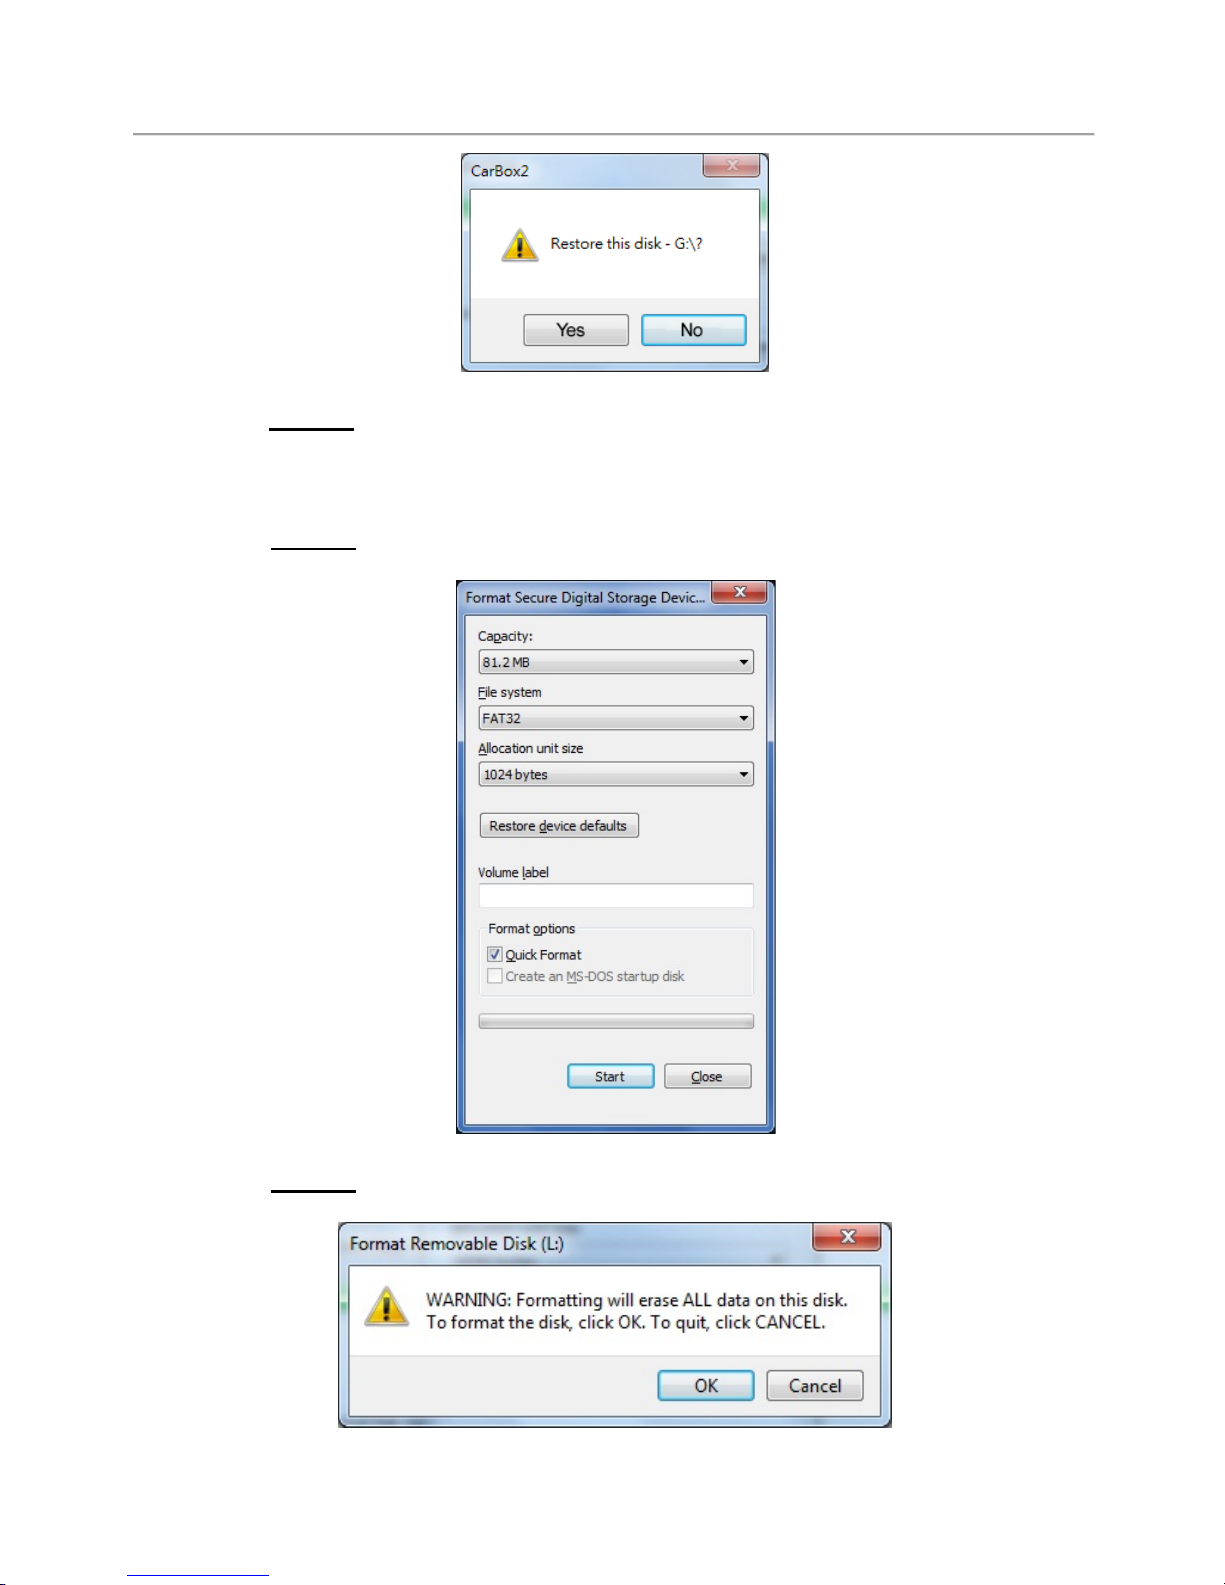
Step 3. A notification box will pop up informing the device information,
choose Yes to proceed.
Page 37
User Manual Standalone Mobile DVR
33
Step 4.
A successful notification box will pop up after format completed,
click Yes to proceed.
Step 5.
The system will then proceed to format the storage device,
please choose Quick Format then hit Start.
Step 6.
A warning notification box will appear, please click on Yes to
proceed.
Page 38
User Manual Standalone Mobile DVR
34
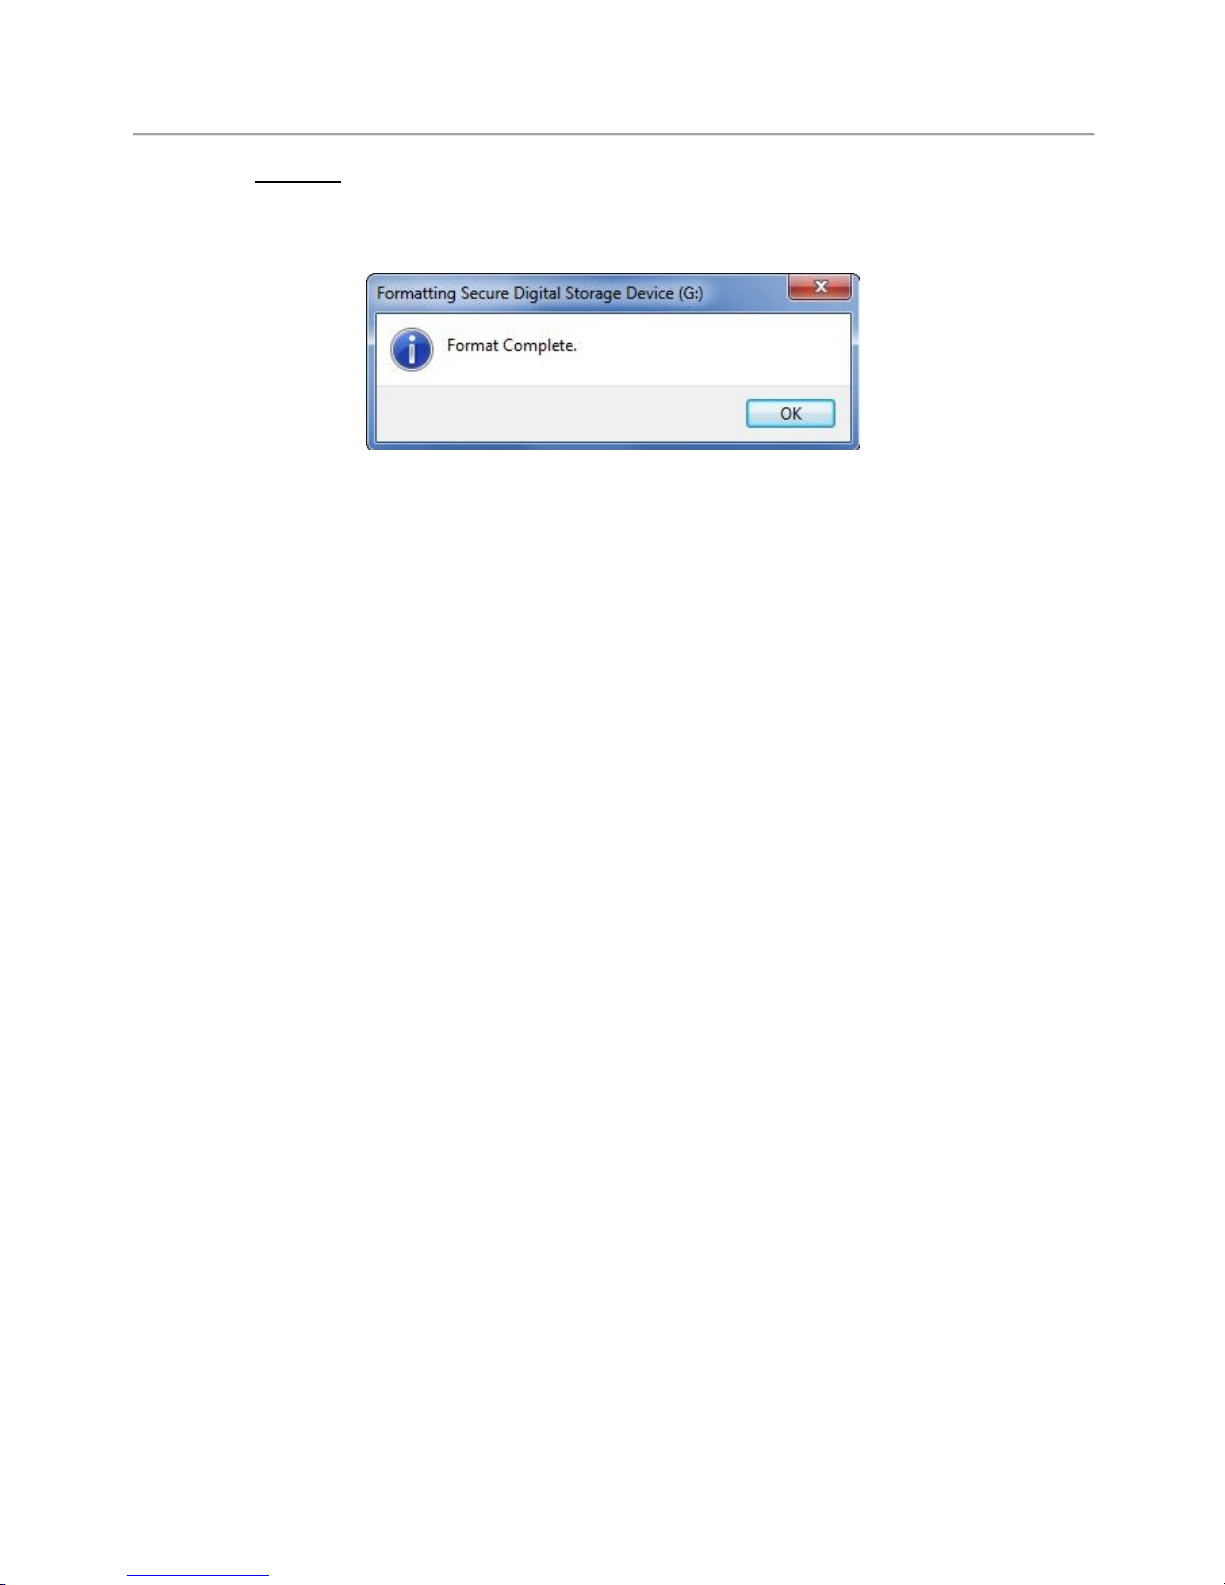
Step 7. The Format Complete notification will notify you when the
formatting is complete. The storage device can now be used for other
purposes.
Page 39
User Manual Standalone Mobile DVR
35
K. 3G Setting
(1) SIM Card Setting
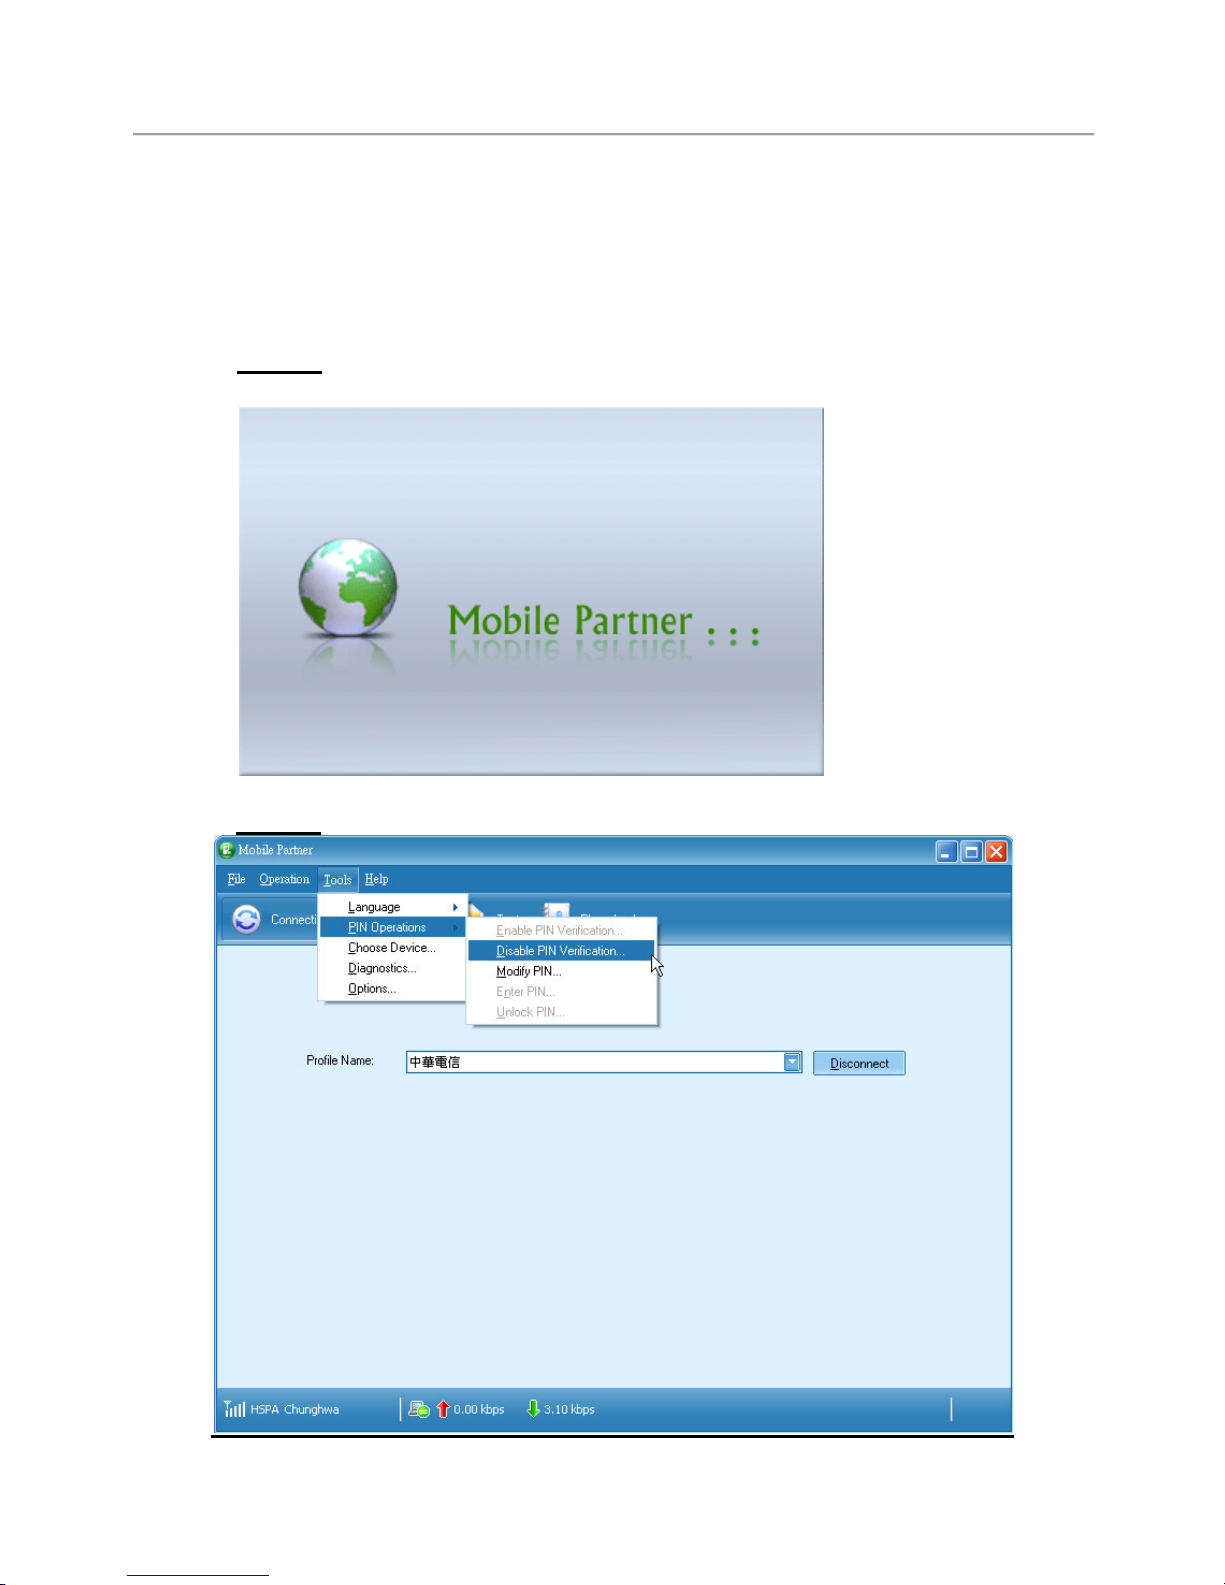
Please switch off PIN protection code on SIM card before using on MDVR,
the step as below:
(Using Huawei CHT-E180 3.5G USB dongle as example)
Step 1.
Connect 3G SIM card with PC via 3G dongle, the system will
launch Mobile Partner.
Step 2.
Please go to Tools PIN setting Stop PIN verification
Page 40
User Manual Standalone Mobile DVR
36
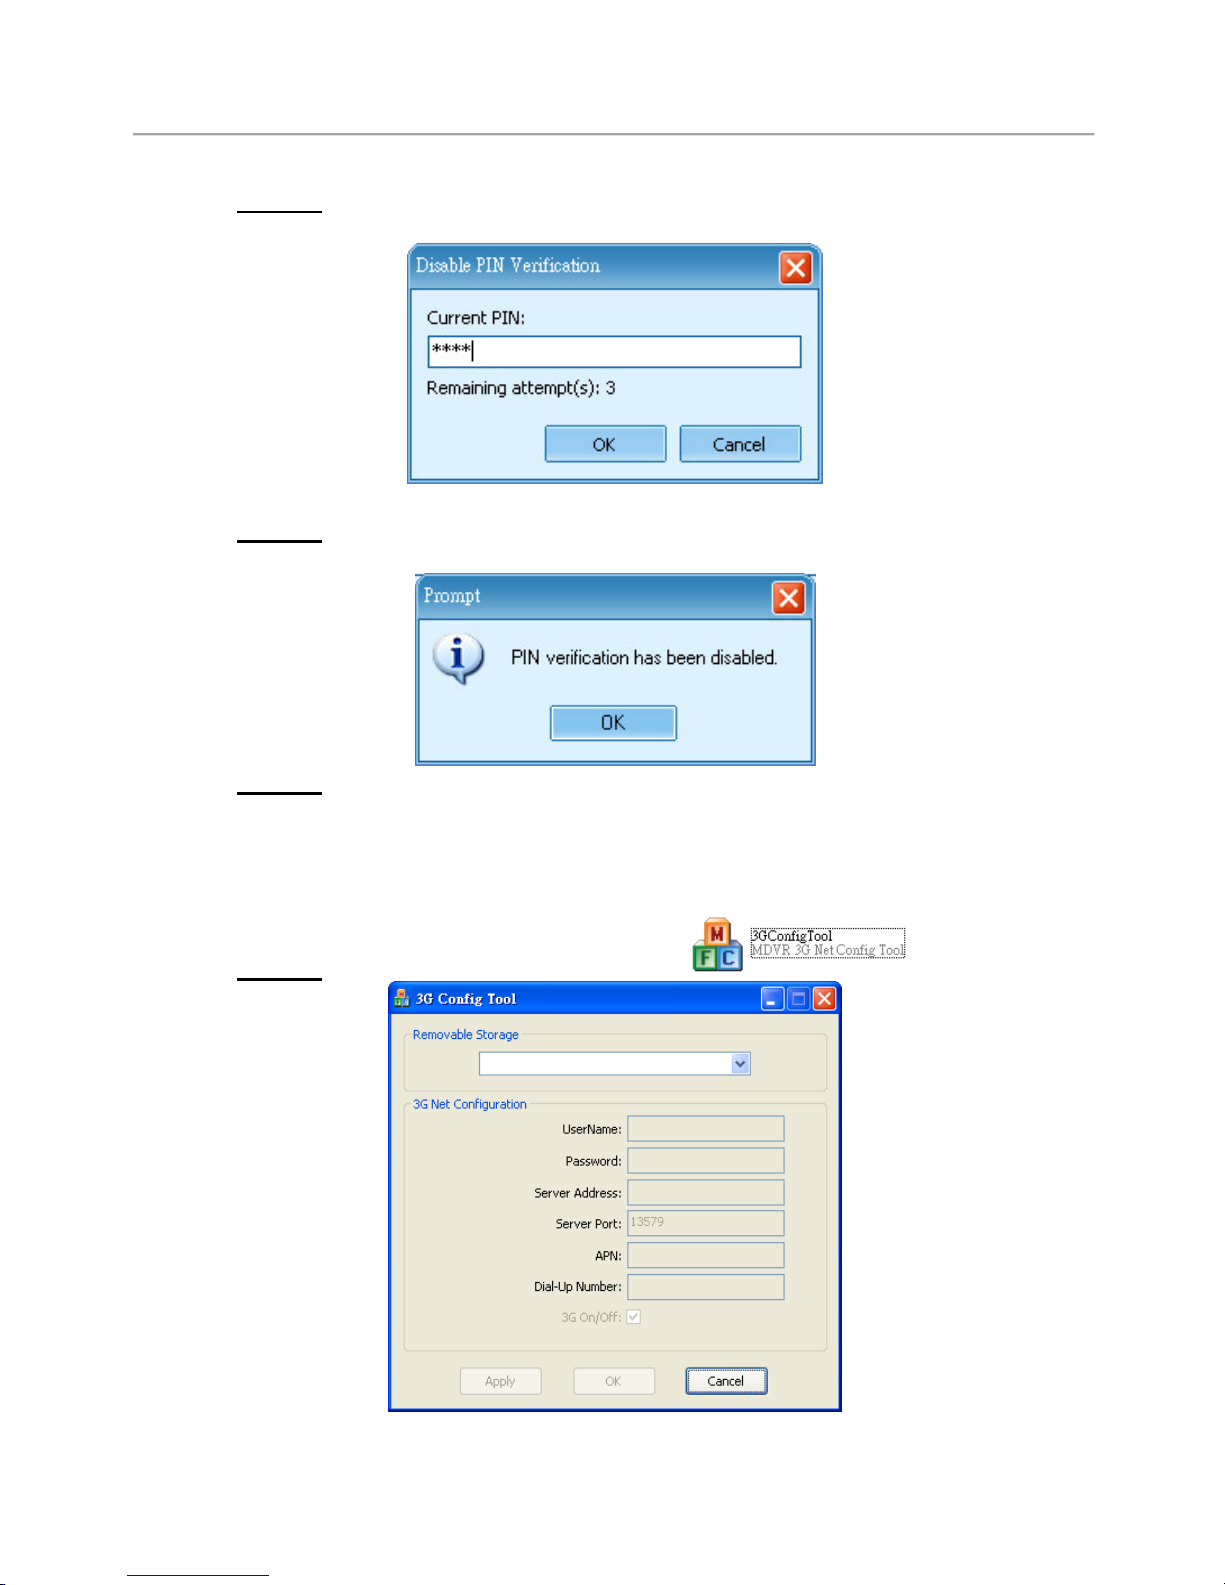
Step 3.
Type in correct PIN code, the default code is 0000 for some ISP.
Please always check this with your ISP telecommunication provider.
Step 4.
After stopping PIN verification successfully, a notification box will
pop up, please check the box to proceed.
Step 5.
After completing the above procedures, please install SIM card to
the MDVR for next procedure.
(2) 3G-Network Setting
Set MDVR 3G Network setting.
Step 1.
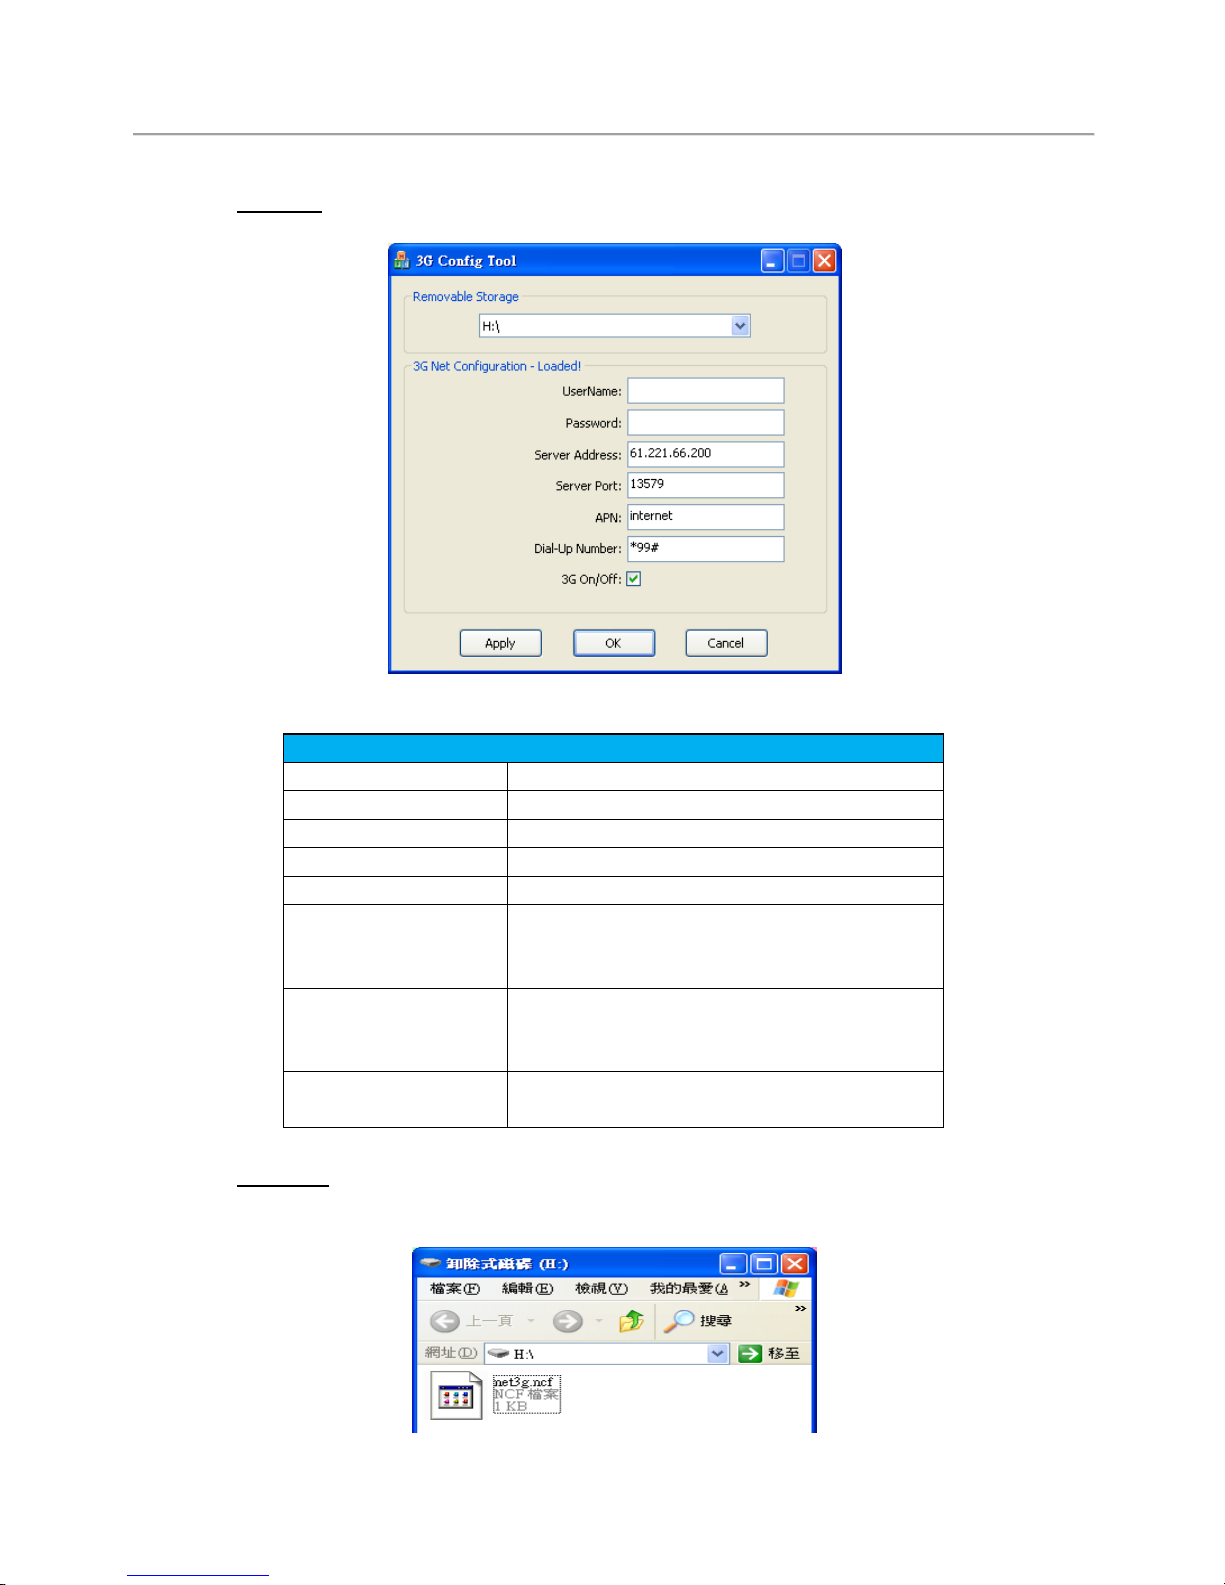
Please launch 3G Config Tool
Page 41
User Manual Standalone Mobile DVR
37
Step 2.
Connect USB disk drive to PC and select USB drive, adjust
related parameter accordingly.
Setting Parameters
Removable Storag Storage device location (path)
UserName User name (blank by default)
Password Password (blank by default)
Server Address Server IP address
Server Port Connecting port (13579 by default)
APN
3G network access point name
(Please consult your local service
provider for APN accordingly)
Dial-Up Number
3G internet dial up setting
(Please consult your local service
provider for dial up prefix)
3G On/Off
3G Connection
(uncheck to switch off)
Step 3.
Click on OK to save 3G parameter setting, please proceed to
check for storage path for network configuration file. (file name is
net3g.ncf)
Page 42
User Manual Standalone Mobile DVR
38
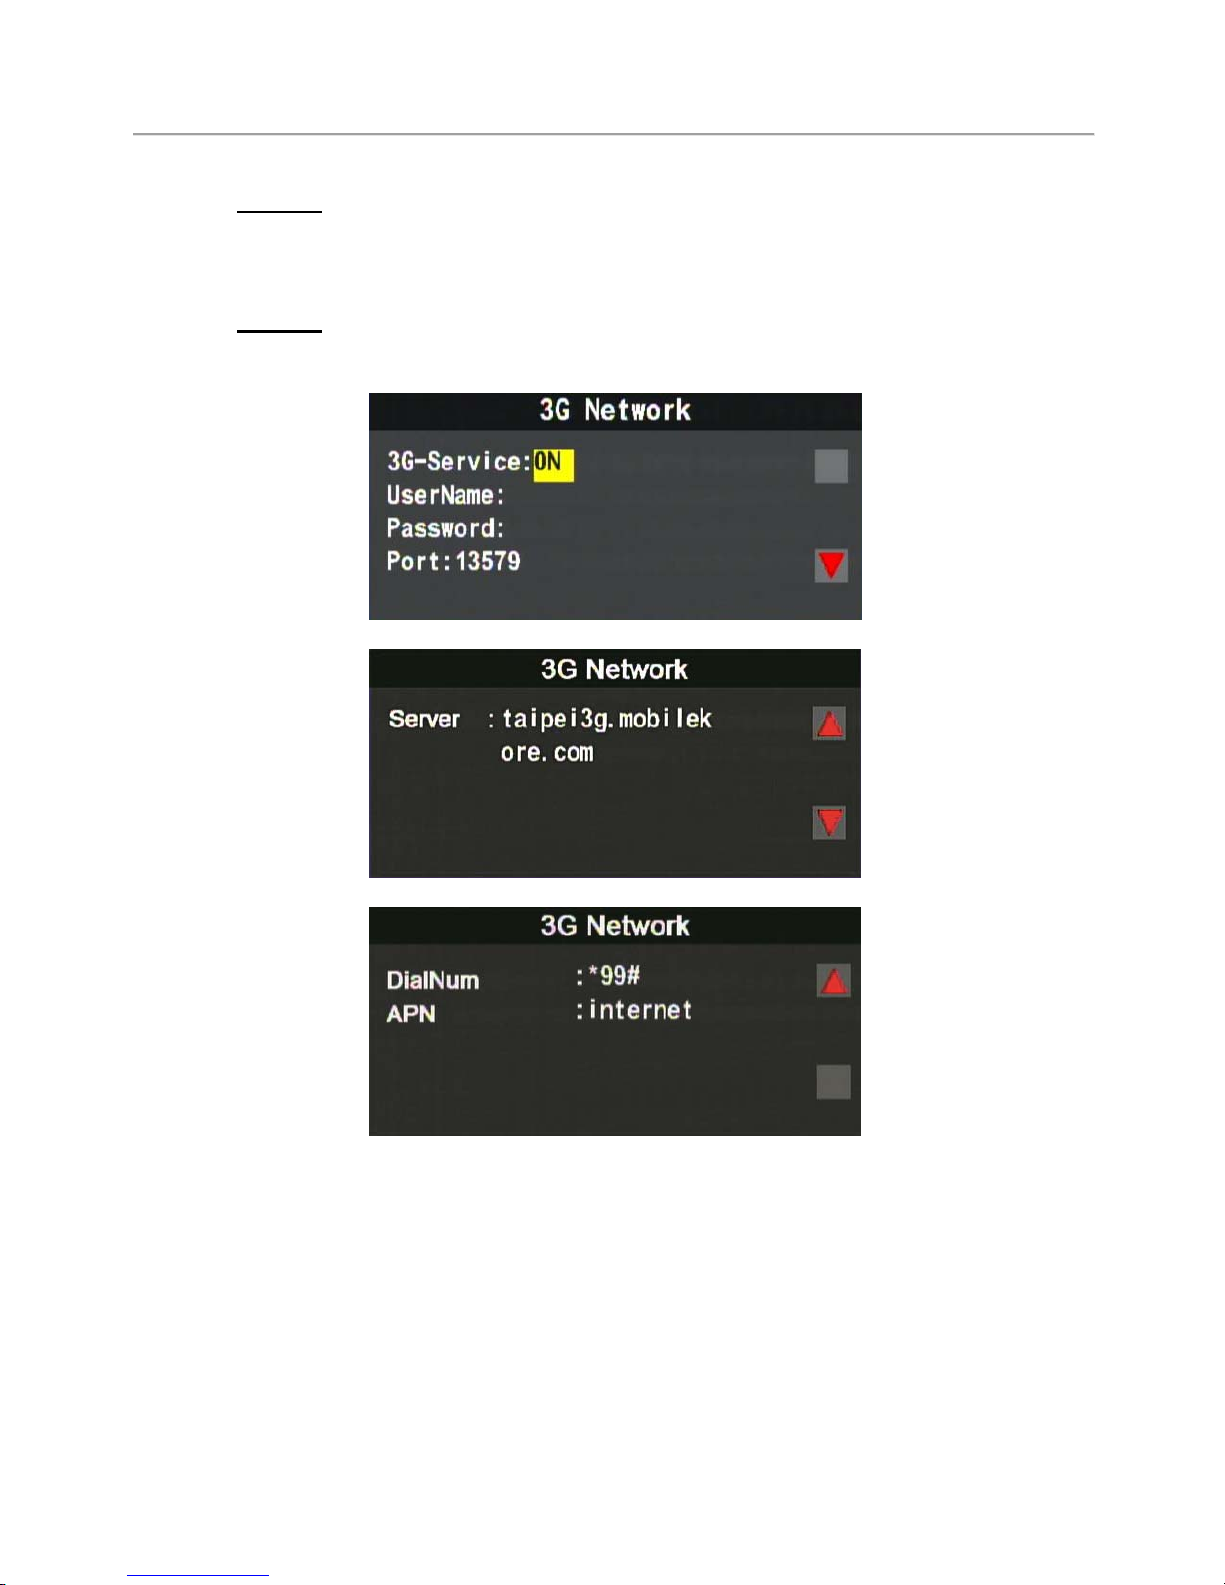
Step 4.
Please connect USB disk drive to MDVR, then reboot / switch on
for automatic network configuration setting. The system will reboot after 10
second.
Step 5.
When reboot complete, please go in to 3G Network to check if all
information has been updated.
(The updated information will be displayed on 3G Network information)
Page 43
User Manual Standalone Mobile DVR
39
L. 3G Client Remote Monitroing
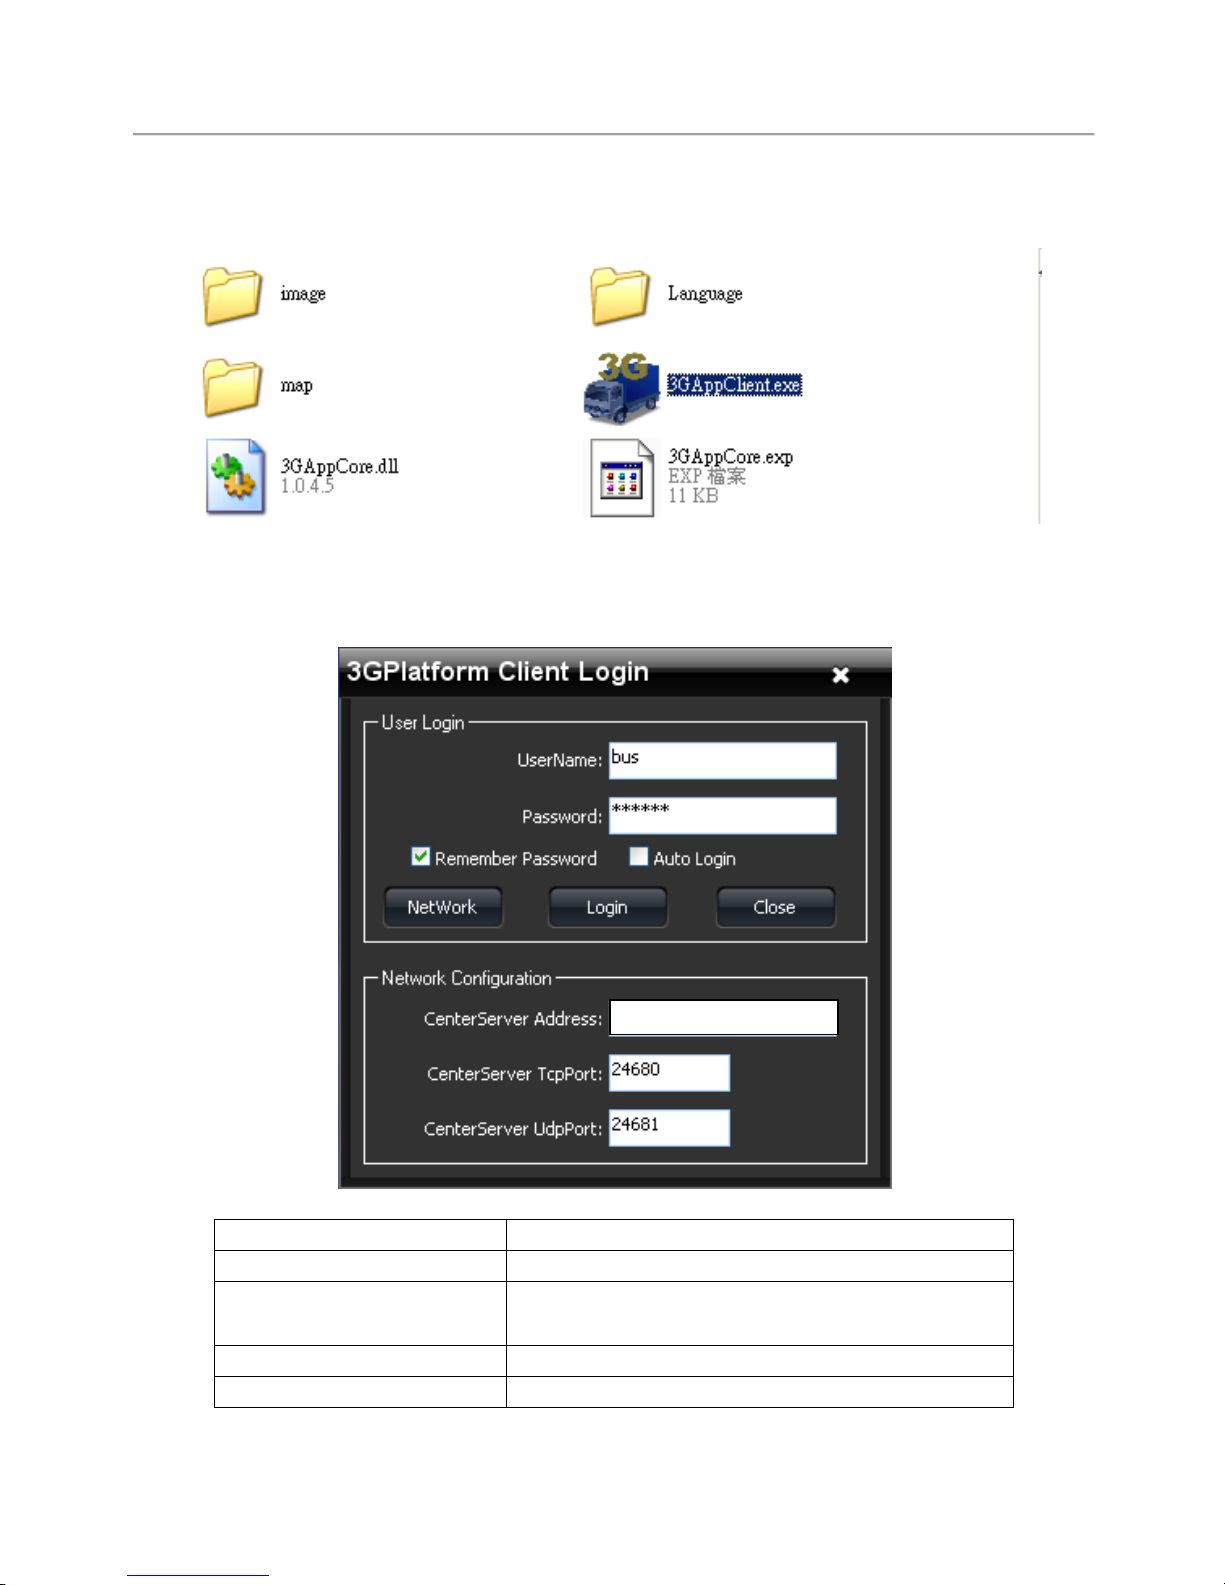
(1) Log In Page
Please launch 3GClientApp.exe and log in with your account.
Log in page as below, click on Log In to log in
Note:Need DirectX 9.0 or above.
User Name User Name
Password password
Central Server IP
Central Server IP (The default is Taipei
server:202.39.134.134)
Central Server TCP Server TCP Port (default 24680)
Central Server UDP Server UDP Port (default 24681)
61.221.66.200
Page 44
User Manual Standalone Mobile DVR
40
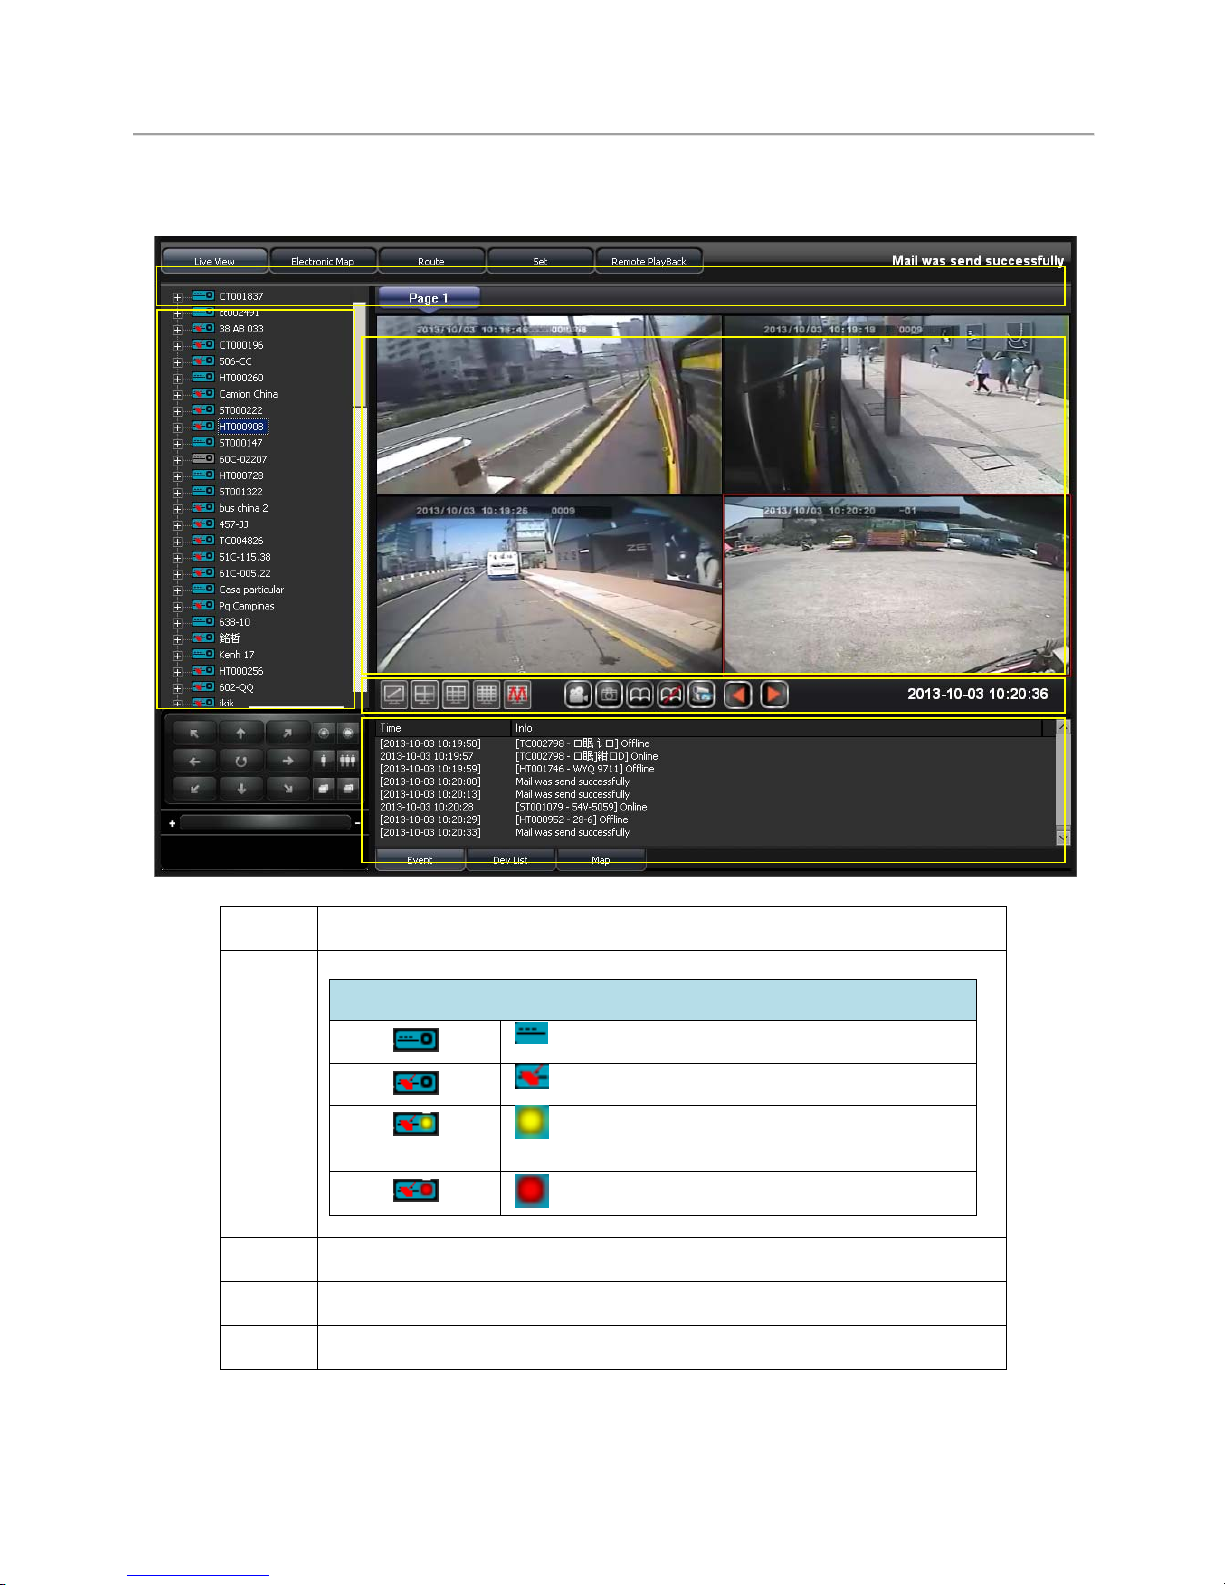
(2) Live Monitoring
1 Display Interface
2
MDVR List
MDVR Tracking Signals
GPS not yet located
GPS located
Yellow light signifies slow speed or
stationary
Red light signifies over speed limit
3 Live Monitoring Screen
4 Display Screen Settings
5 Map/event list/device list
1
2
5
3
4
Page 45
User Manual Standalone Mobile DVR
41
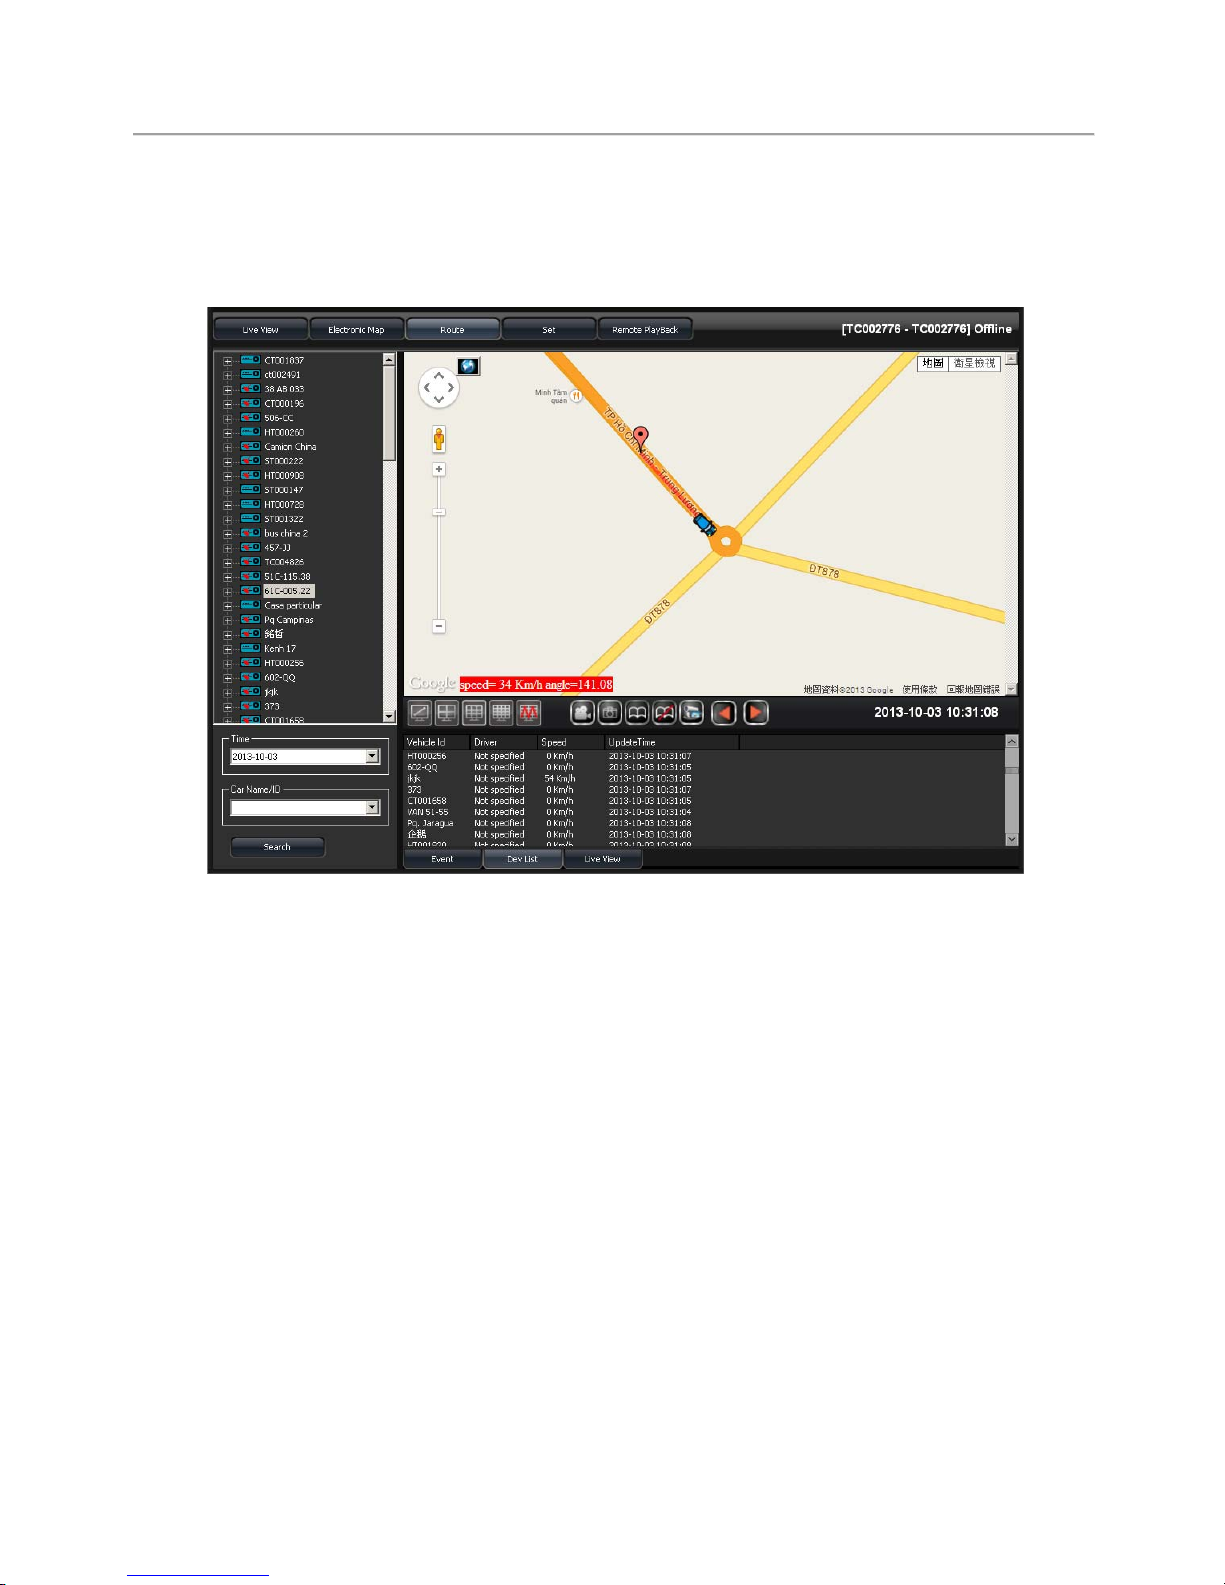
(3) Location Tracking
※G-Mouse,is requried for GPS location tracking
Display MDVR traveling path, historical path of up to 1 month can be
checked by selecting / searching device ID.
Page 46
User Manual Standalone Mobile DVR
42
(4) Setting Page
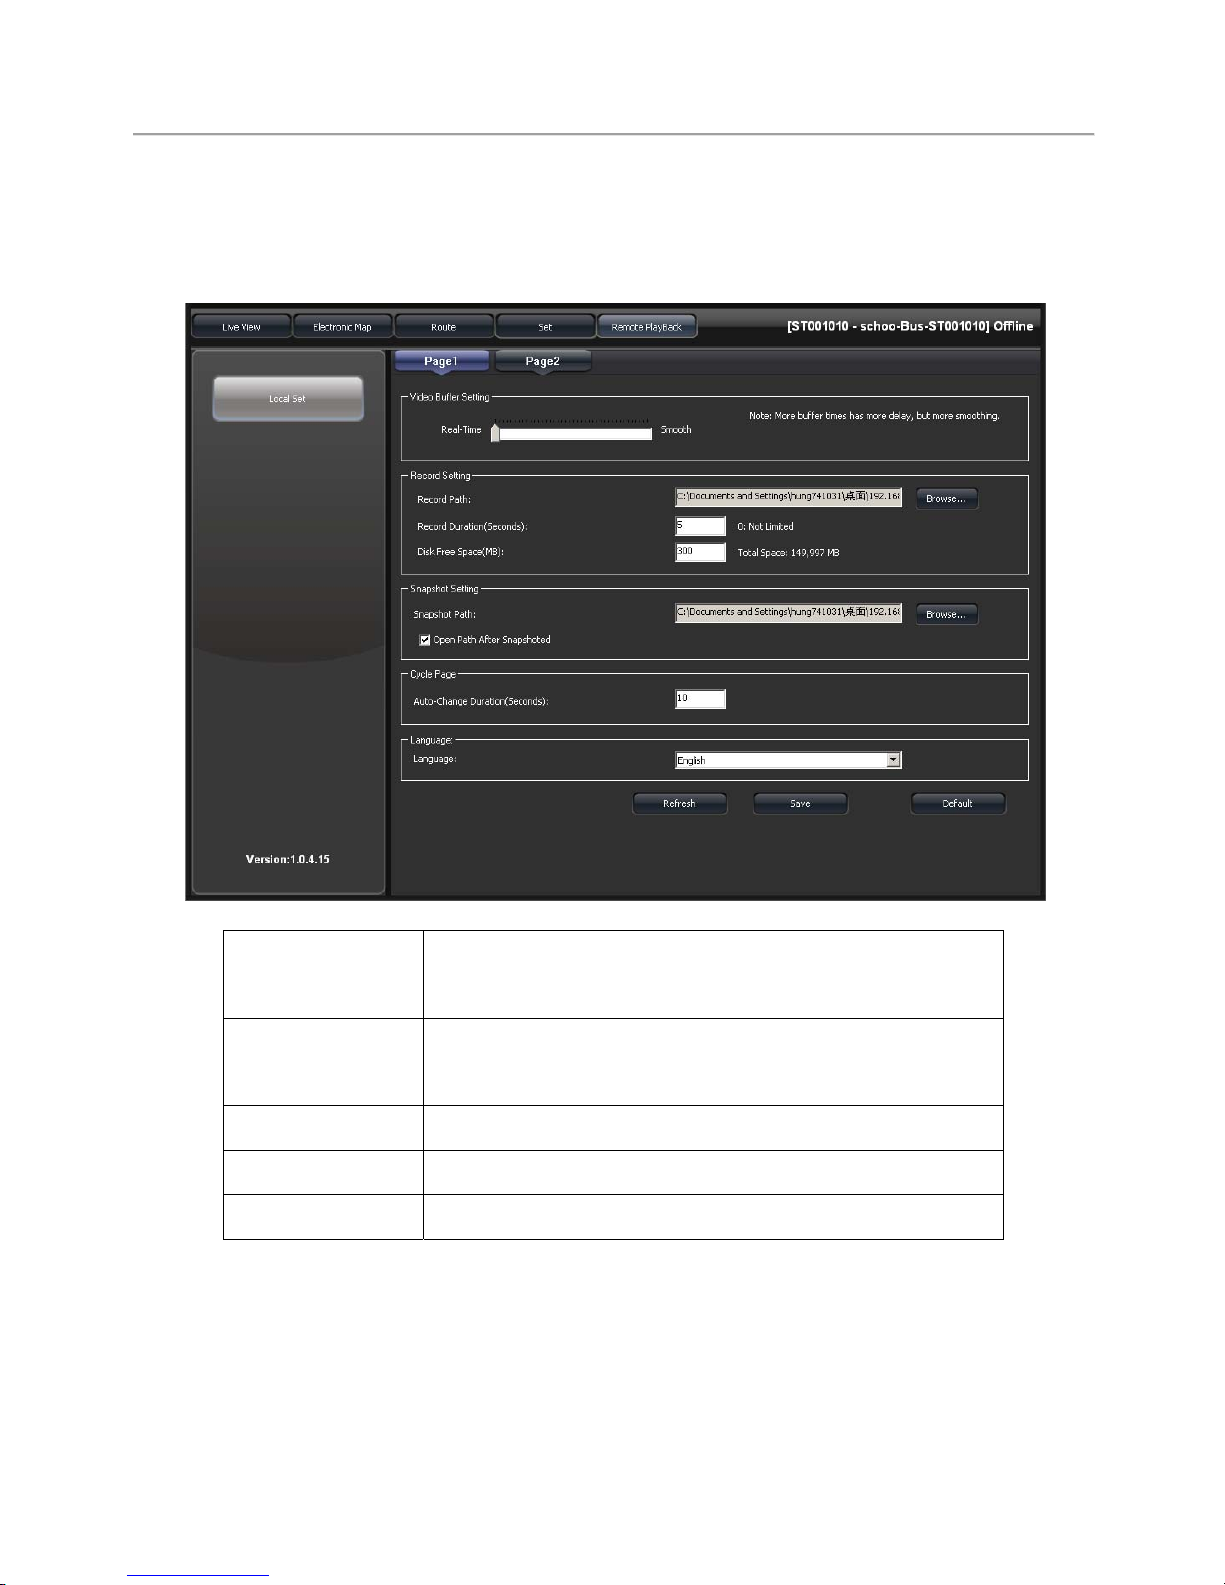
Setting Page - 1
Setting live streaming preferences (real time or smooth),
sanpshot, next page interval and language setting.
Video
Streaming
Real time→ Streaming preference
Smooth→ Quality preference
Recording Set recording path, length, storage device.
Snapshot Set snapshot path
Next Page Page flipping interval (seconds)
Language 3G Client language
Page 47
User Manual Standalone Mobile DVR
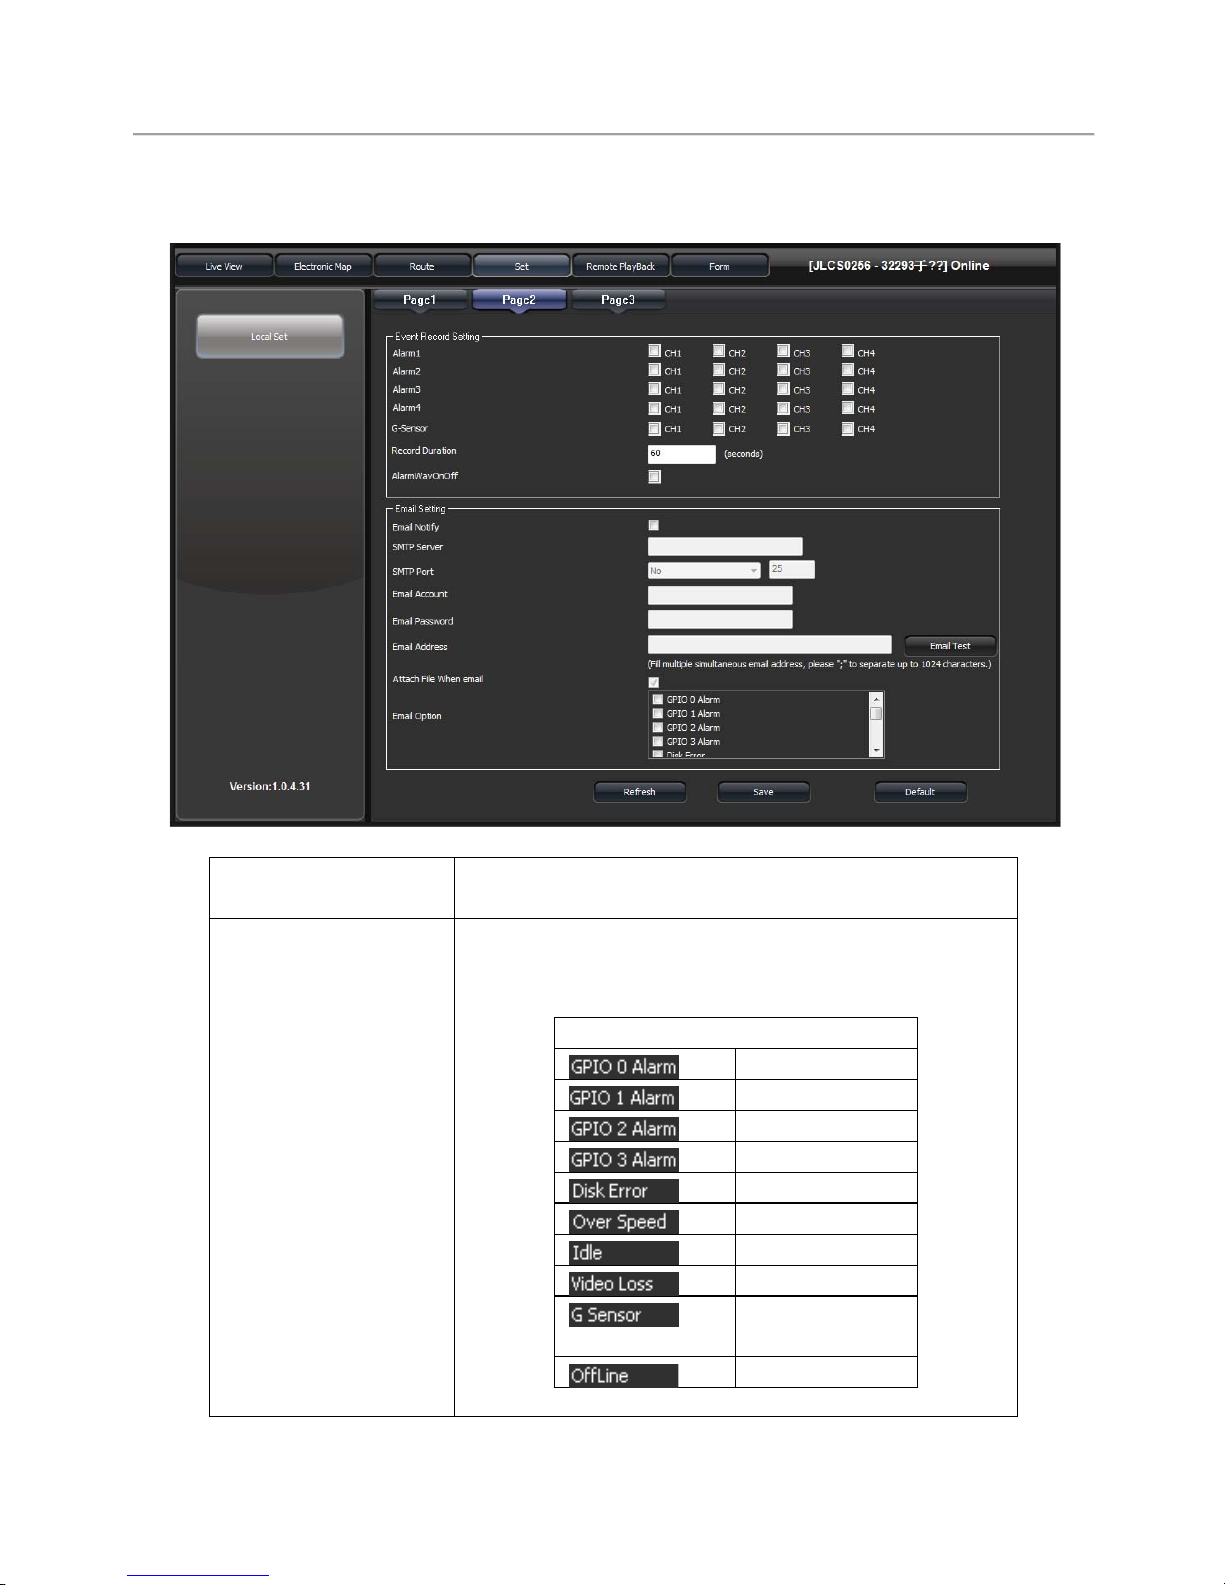
43
Setting Page - 2
Set alarm, event and SMTP mail.
Alarm Setting
Set the recording preference when alarm
triggered.
Email Setting
When alarm is triggered, an email with below
notification will be sent to the desired email.
Mail Dispatch Option
Alarm 1
Alarm 2
Alarm 3
Alarm 4
Disk Error
Speeding
Idle
Video Loss
G sensor
Trigger
Offline
Page 48
User Manual Standalone Mobile DVR
44
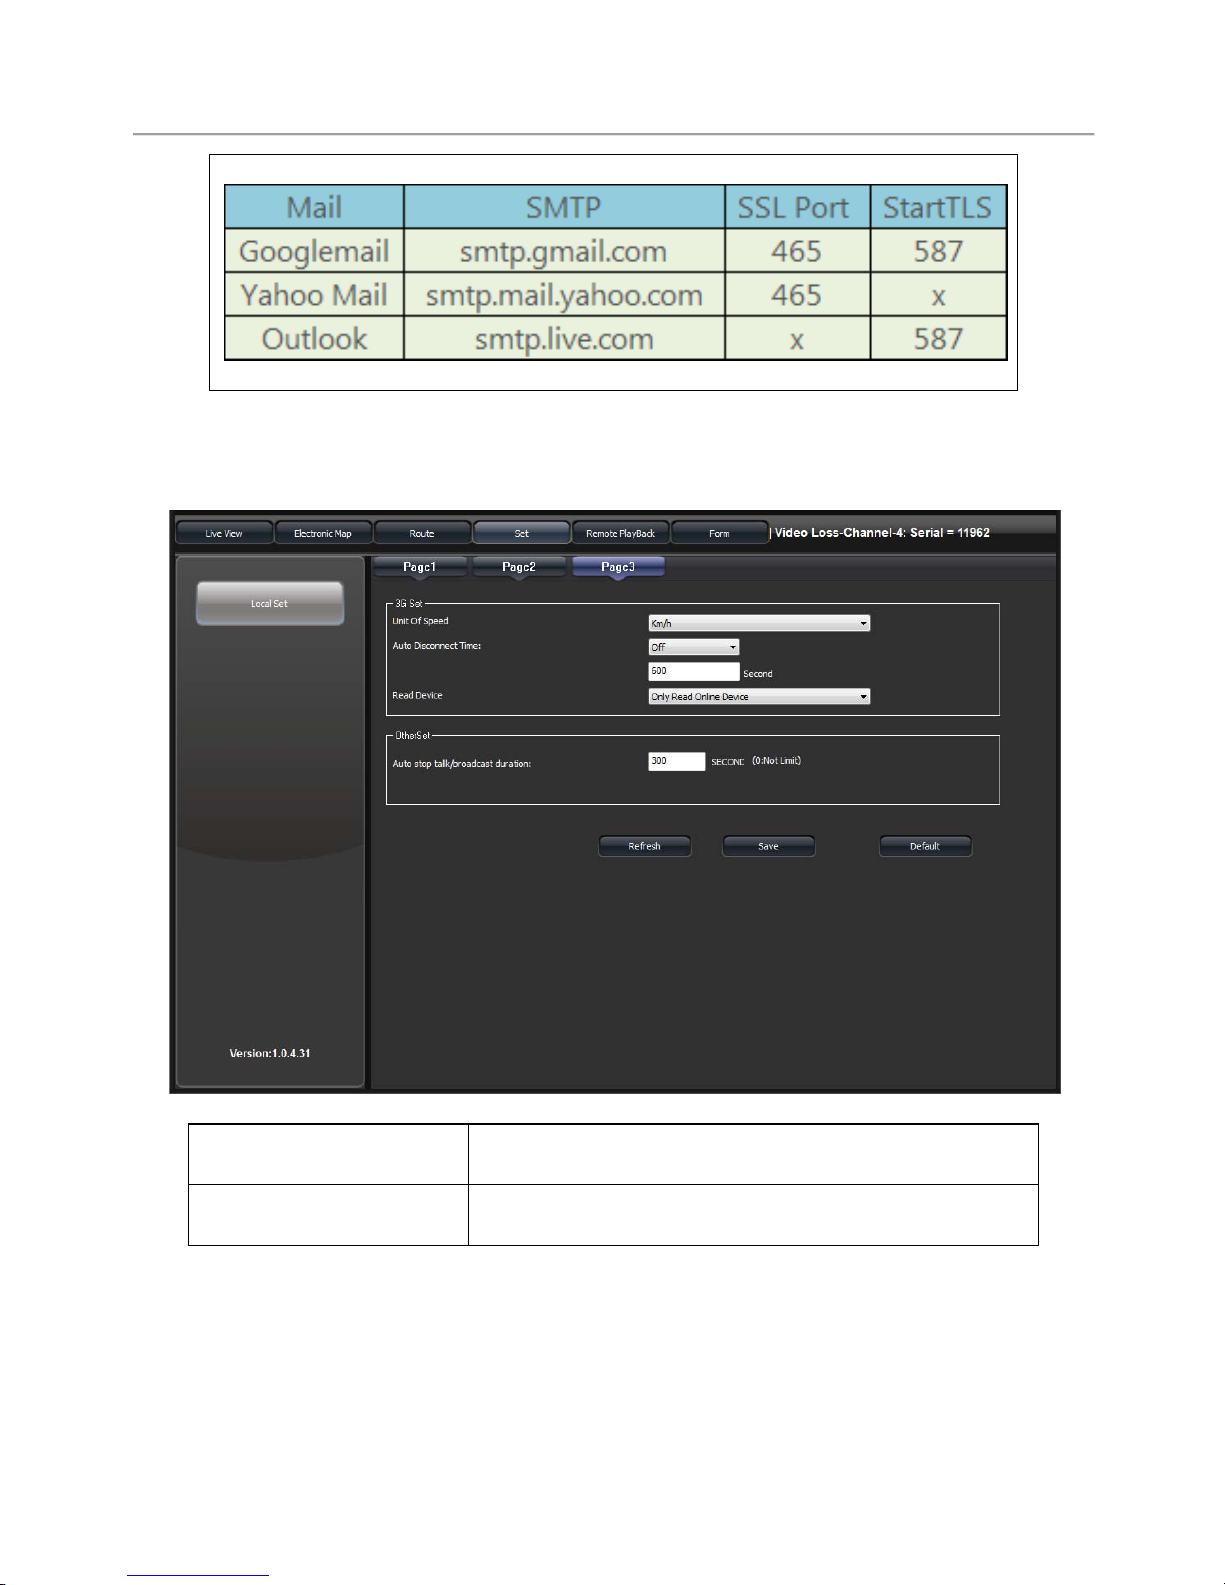
Common SMTP ServerList
Setting Page - 3
For 3G, 3G triangulation and time off setting.
3G Setting
Set speed unit, automatica video off duration,
only communicating with online device.
Other Setting
Set auto stop talk / broadcast during (in case of
voice con left on)
Page 49
User Manual Standalone Mobile DVR
45
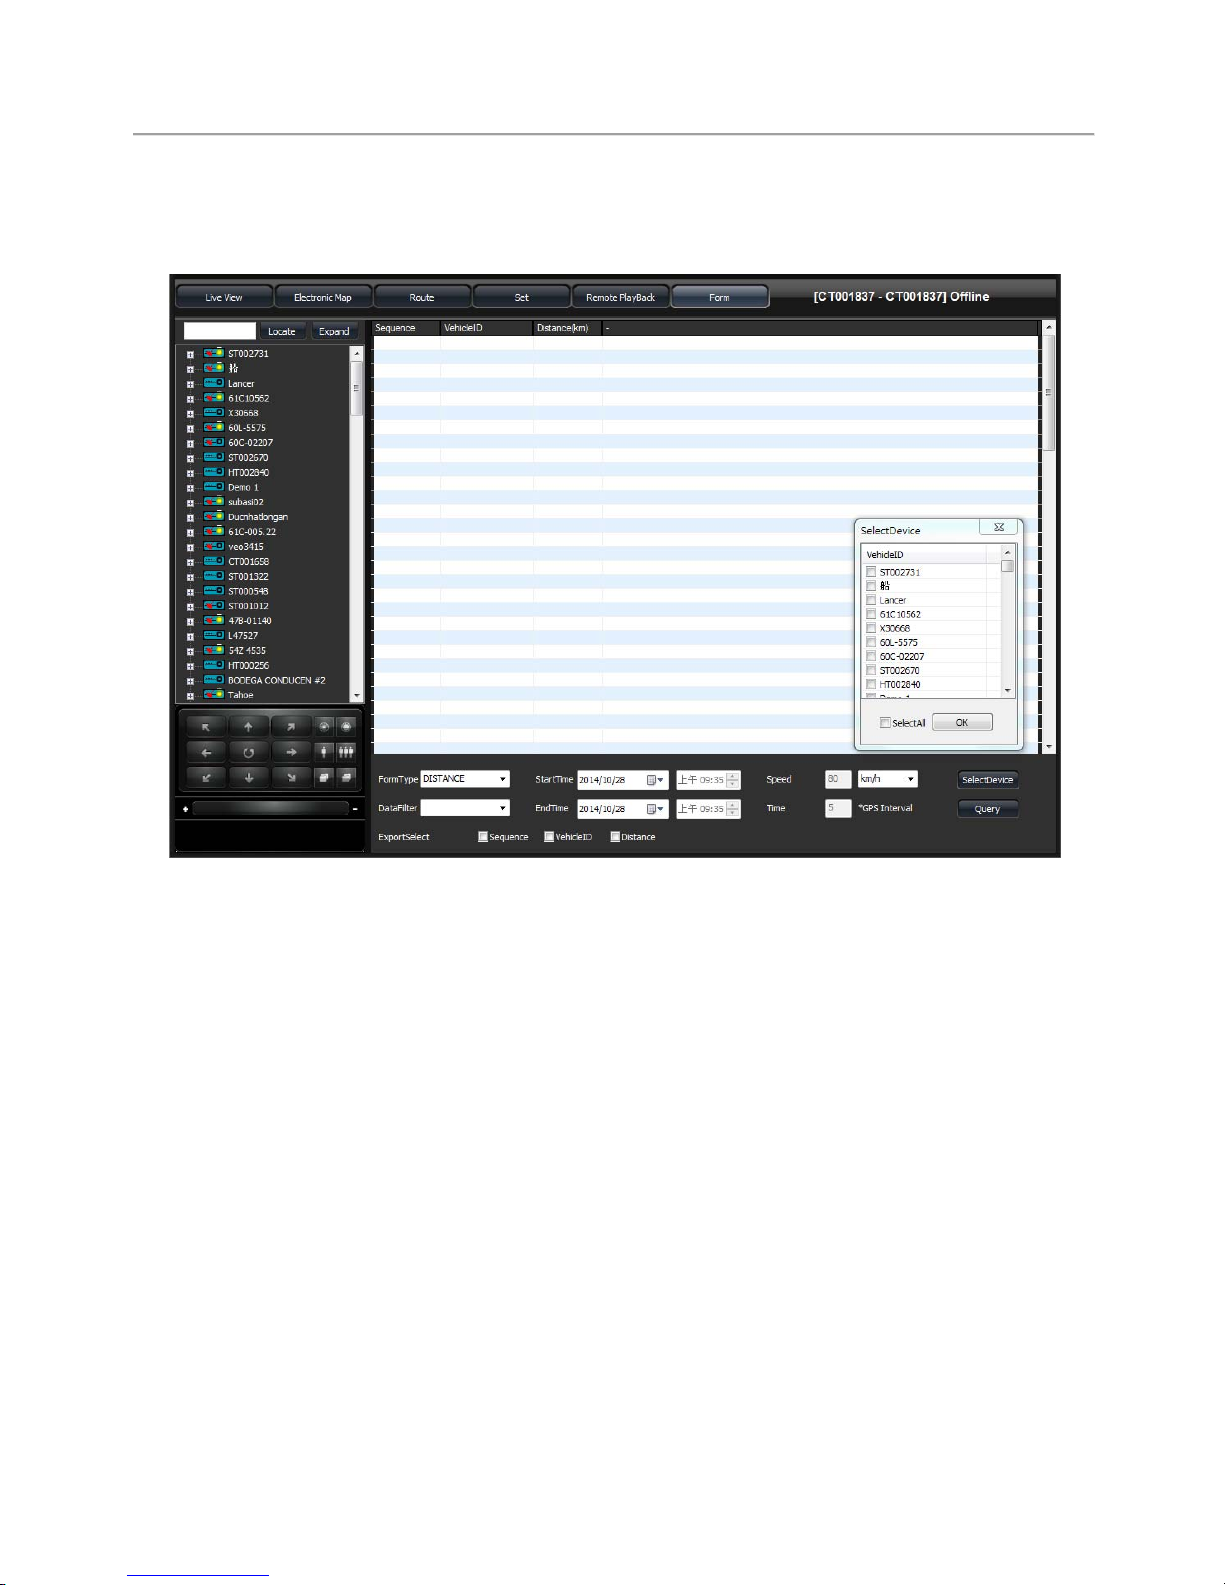
(5) Event Log
Search / Select a specific device to retrieve device information.
Page 50
User Manual Standalone Mobile DVR
46
M. Continuous Recording Capacity Evaluation
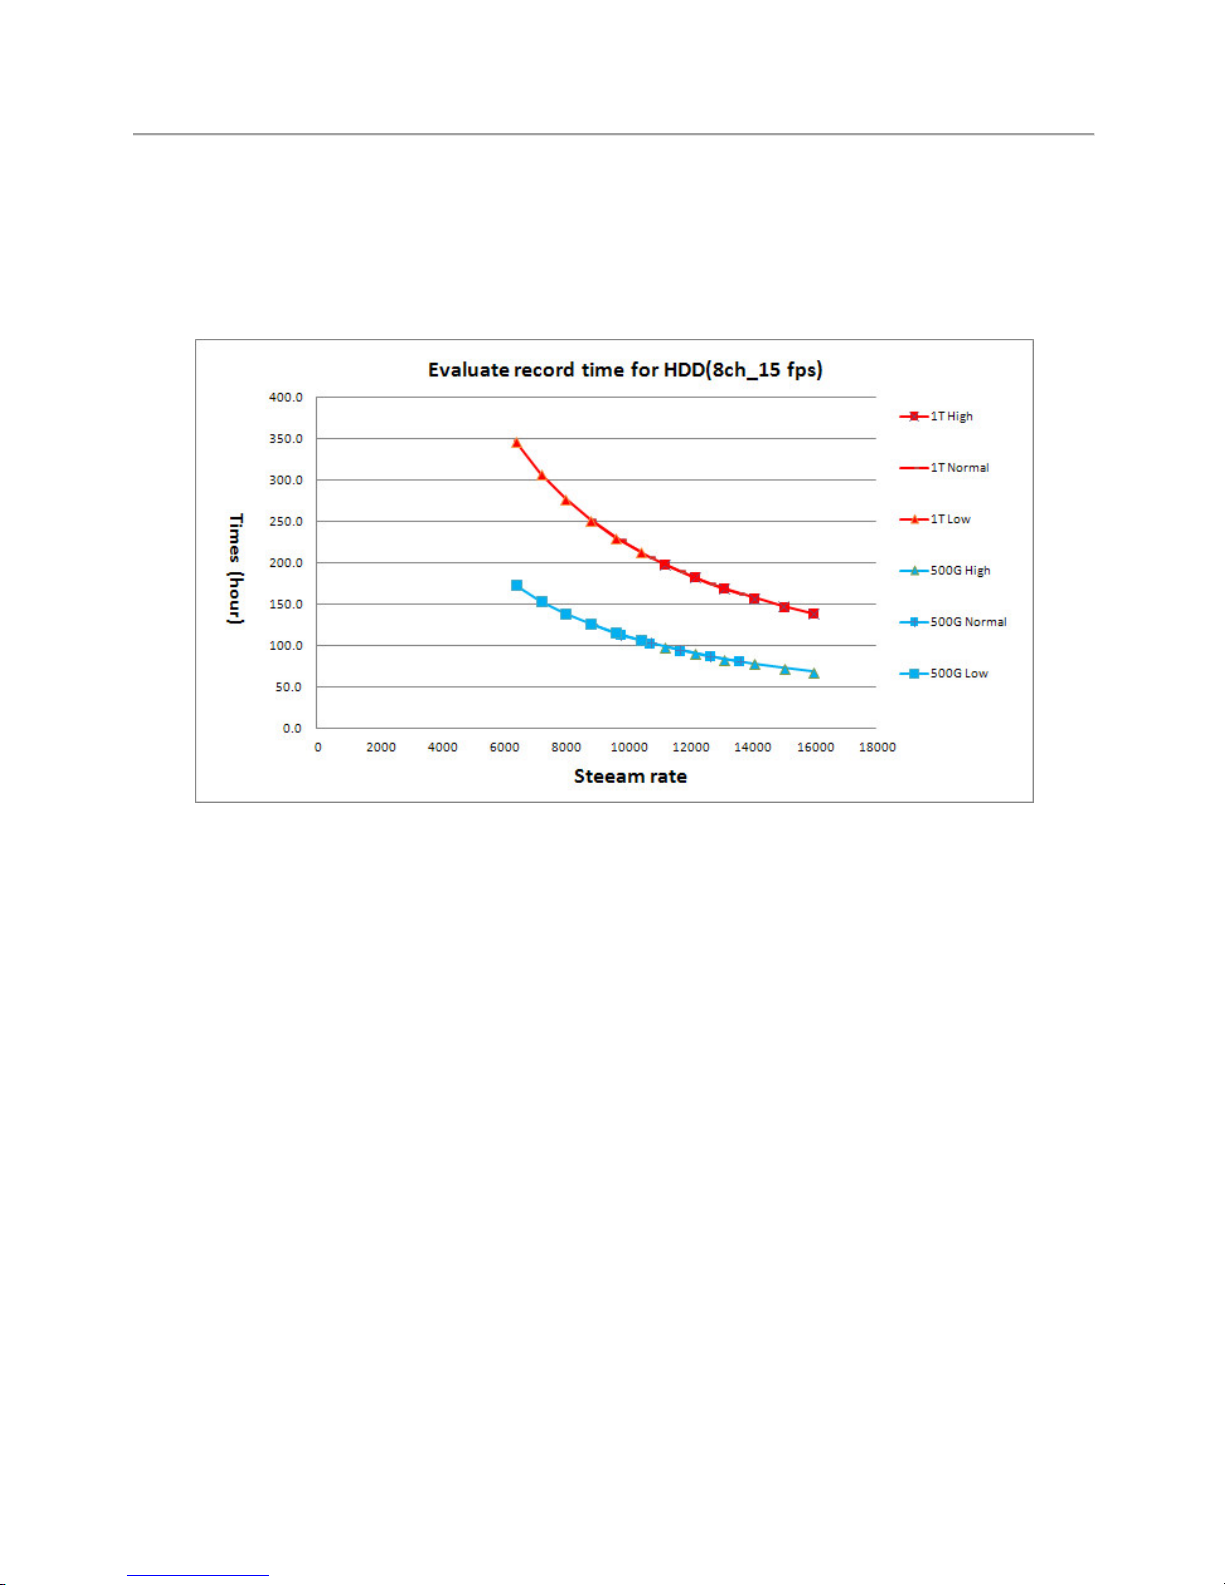
The graph below charts the maximum recording time length under different
resolution. Examples using 1TB and 500 GB HDD.
The above graph is for reference only, the real recording length may vary
according to the actual recording environment.
Page 51

For more information
Please visit VACRON at
http://vvr.vacron.com.tw Made in Taiwan
 Loading...