

Page 1
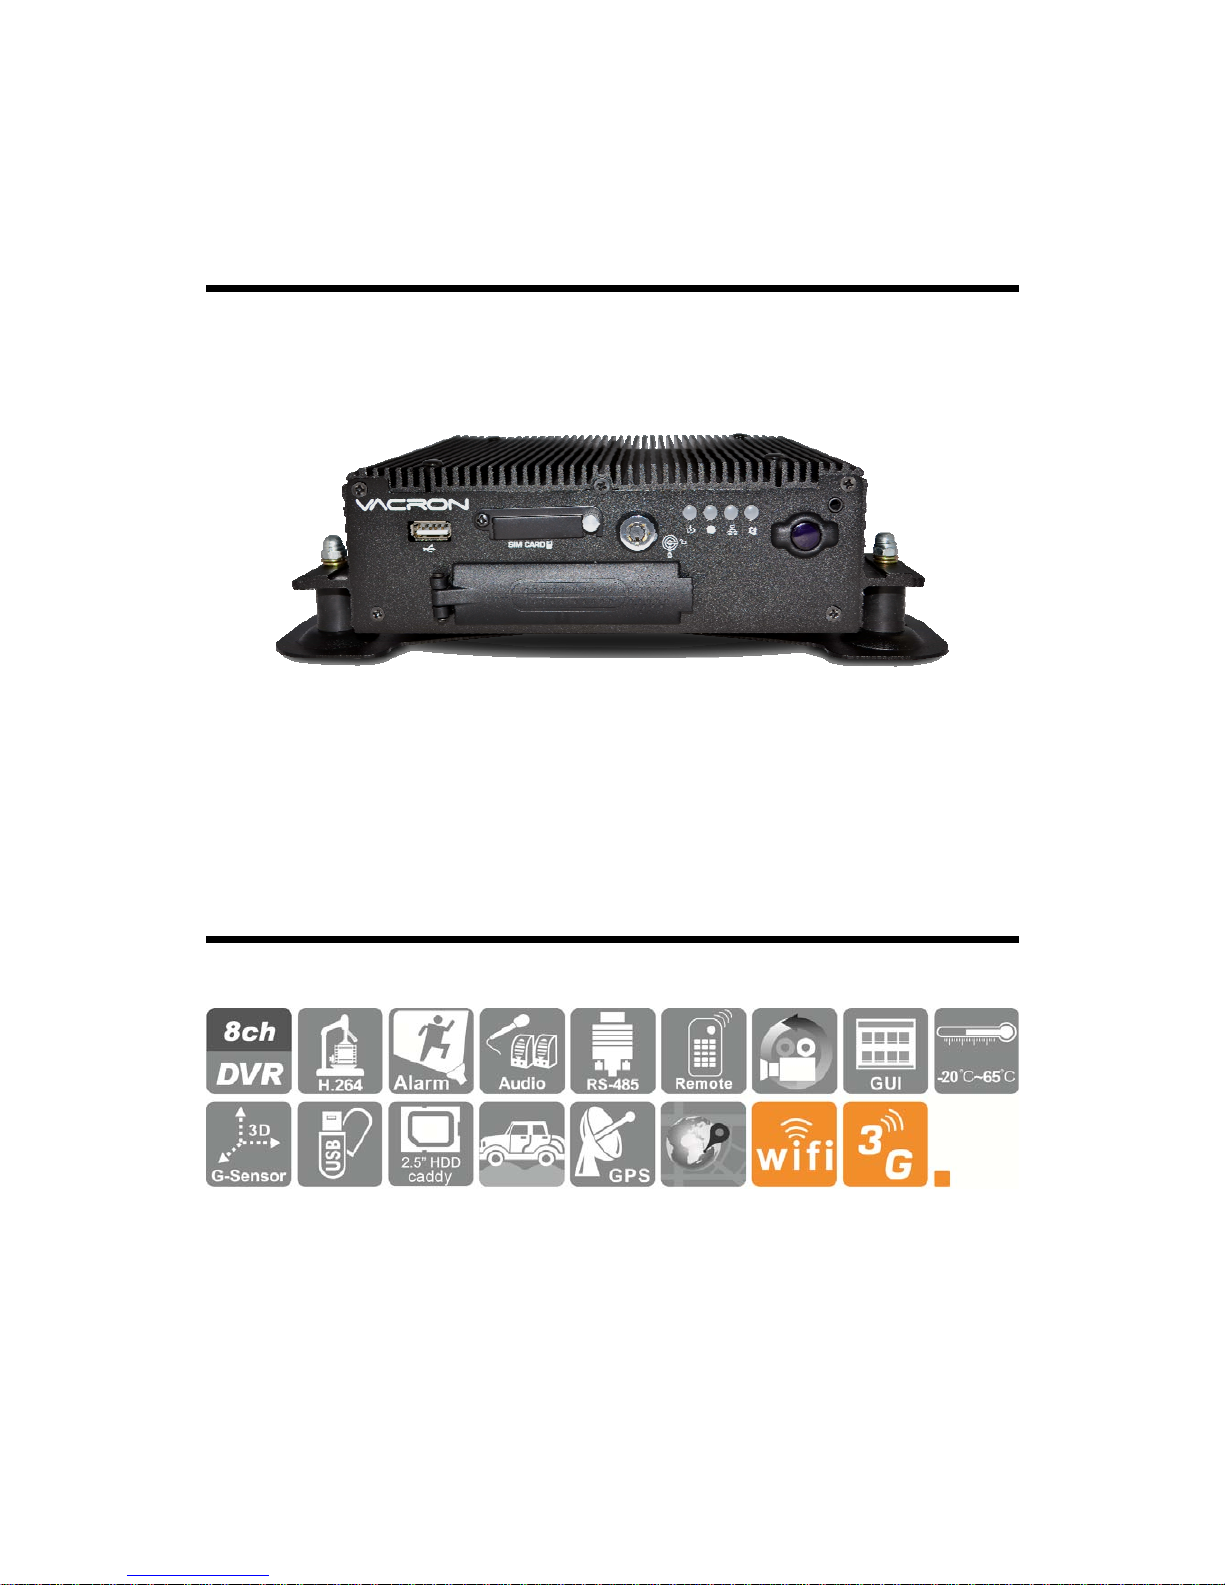
8 CH Vehicle Mobile DVR
2013 OCT V1.0
optional
Page 2

i
Safety Precautions
Take and review some testing video initially to make sure the
images were recorded correctly. Please note that manufacturer,
its subsidiaries and affiliates, and its distributors are not liable for
consequential damages arising from any malfunction of main
device accessory, including memory device that results in the
failure of an image to be recorded or to be recorded in a way that
is machine readable.
Before using the product, please ensure that you read the safety precautions
described below. Always ensure that the product is used correctly.
• Please keep device away from children.
• Use only recommended power sources.
• Do not attempt to disassemble, alter or apply heat to the product.
• Avoid dropping or subjecting the product to severe impacts.
• To avoid the risk of injury, do not touch the interior of the product if it has been
dropped or otherwise damaged.
• Stop using the product immediately if it emits smoke, a strange smell, or otherwise
behaves abnormally.
• Do not use organic solvents such as alcohol, benzene, or thinner to clean the
product.
• Do not let the product come into contact with water (e.g. sea water) or other liquids.
• Do not allow liquids or foreign objects to enter the VVR.
• Do not place the VVR near or in direct flame.
• Do not handle the power cord with wet hands.
• Do not use the equipment in a manner that exceeds the rated capacity of the
electrical outlet or wiring accessories. Do not use if the power cord or plug are
damaged, or not fully plugged into the outlet.
• Do not allow direct or metal objects (such as pins or keys) to contact the terminals
or plug.
• Avoid using, placing or storing the product in the humid or dusty areas.
Page 3

ii
Index
A. Features ............................................................................................................ 1
B. Specification ...................................................................................................... 2
C. Accessories ....................................................................................................... 3
E. Record / Stop-Record........................................................................................ 6
F. System operating instruction ............................................................................. 7
Through IR Remote controller instruction .......................................................... 7
G. System Interface and Operation ........................................................................ 9
Main menu page switch ................................................................................... 11
System Setup instruction ................................................................................. 12
H. Playback ......................................................................................................... 18
I. Carbox Player on PC site ................................................................................ 20
(1). Snapshot ................................................................................................. 21
(2). Configuration ........................................................................................... 22
(3). Backup .................................................................................................... 24
(4). Playback .................................................................................................. 27
(5). Format ..................................................................................................... 27
(6). Playback date selection ........................................................................... 28
J. HDD Format .................................................................................................... 30
(1) Format in your computer .......................................................................... 30
(2) Process to Format the HDD on DVR: ...................................................... 31
K. Restore Storage Device .................................................................................. 32
L. 3G Internet Setting .......................................................................................... 35
M. 3G client software for viewing directly(select models with 3G modules) .......... 40
N. Capacity Evaluation of Continuous Recording Storage Device ....................... 59
Page 4

1
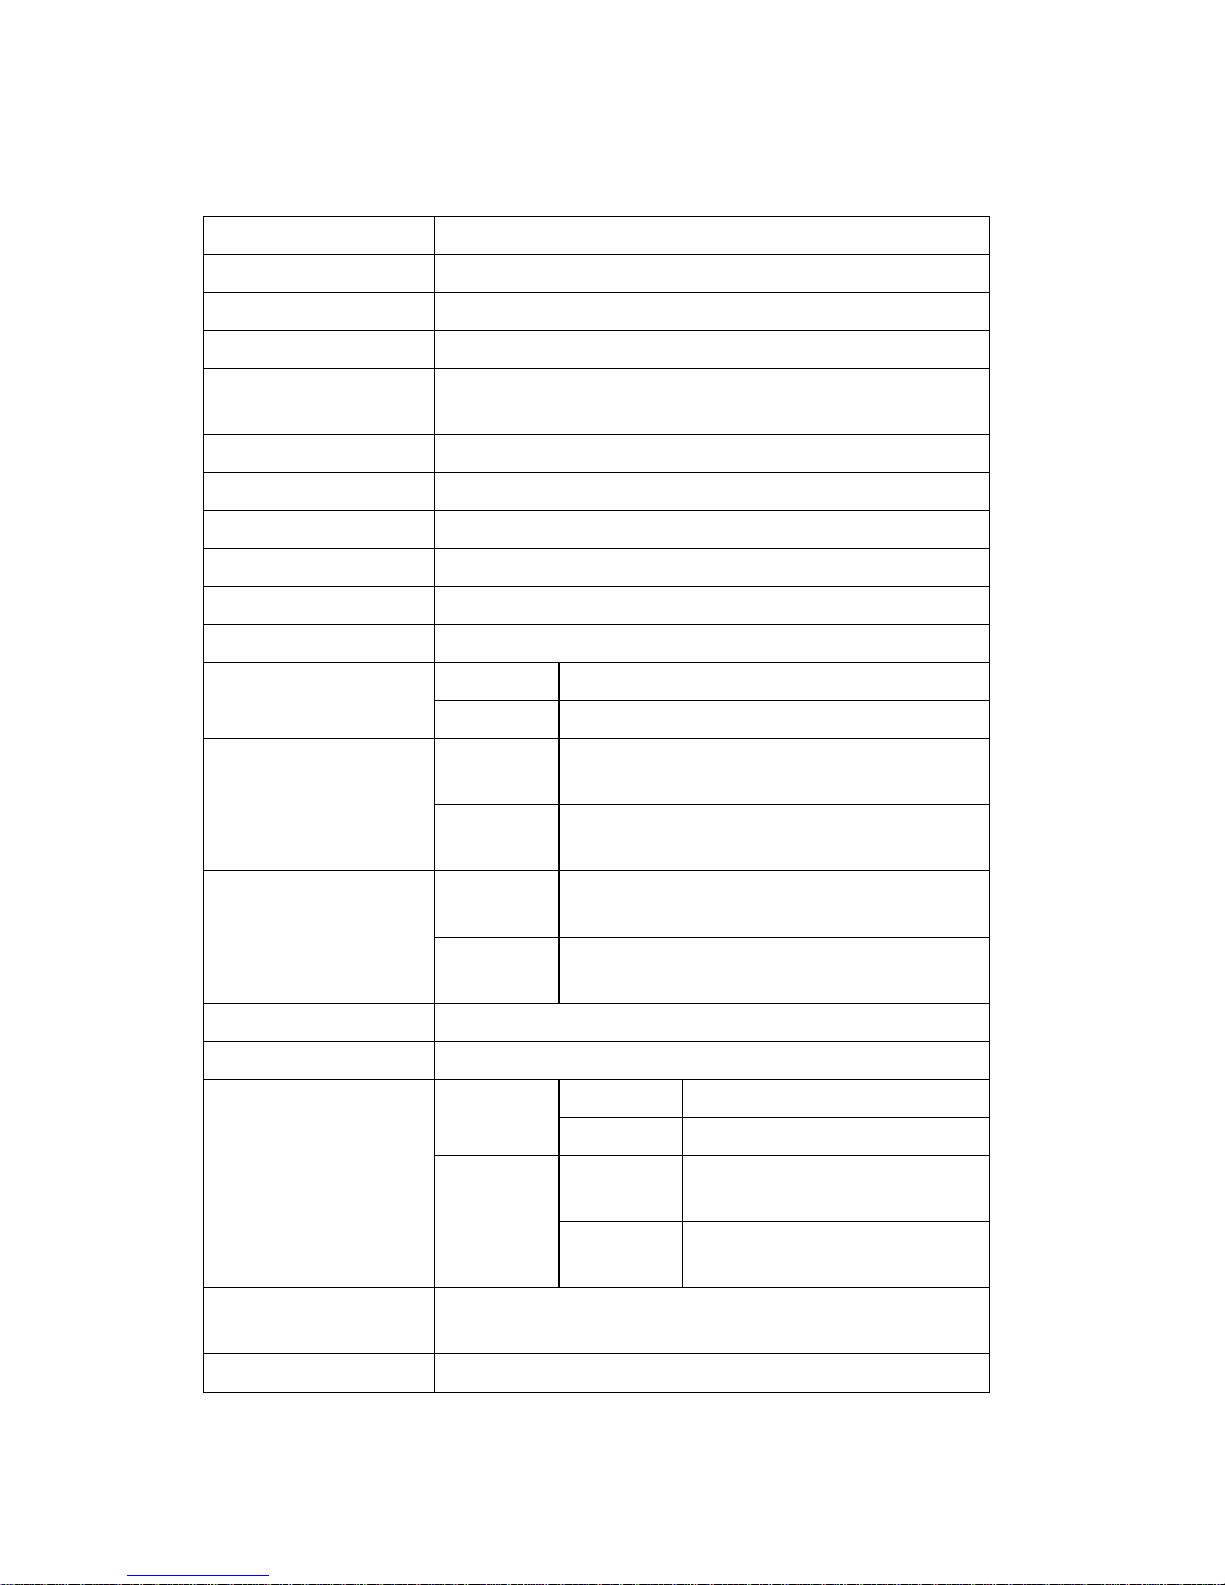
A. Features
‧ Provide Video output for playing-back mode in mainframe.
‧ Recording format: D1 and CIF
‧ User friendly player software, easy to operation.
‧ Overall quick search event log.
‧ The full recording time and date can be showing in the monitor
directly.
‧ Auto recording after power supplied.
‧ Removable HDD Track compatible with 2.5" HDD or SSD.
‧ Firmware can be upgraded via USB port.
‧ Support recording audio, video, G-sensor and GPS data at the
same time.
‧ Optional 3G module, for real time monitoring the driving statue,
or talk to driver.
Page 5
2
B. Specification
Type 8CH Vehicle DVR
Video Format NTSC/PAL
Operating System Embedded Linux
Video Input 8CH Input
Max. Cam Power
supplier
12V/250mA/Each
Video Output 1CH Output
Audio Input 1CH Input
Audio Output 1CH Output
Alarm Input 4 Alarm Input
Control Mode GUI
Multi-Language English / Chinese / Others
Display Resolution
NTSC 240 fields/s (8x30 fields/s)
PAL 200 fields/s (8x25 fields/s)
Recording
Resolution
NTSC
Max. 30fps@CIF (real time
recording)
PAL
Max. 25fps@CIF (real time
recording)
Recording
Resolution
NTSC
Max. 30fps@CIF (real time
playback)
PAL
Max. 25fps@CIF (real time
playback)
Display Mode Full Screen, 4 / 9 Split
Triplex Record / Playback / Network
Resolution
Display
NTSC 720 x 480
PAL 720 x 576
Recording
NTSC
360x240@CIF/
720x480@D1/
PAL
360x288@CIF
720x576@D1/
Compression
Algorithm
H.264(1~ 5)
HDD 2.5”SATA HDD Caddy Max. 1Tb
Page 6

3
Backup Device USB Storage or through Carbox Player
Playback Mode
Search Function: Time / Event
Full Screen
LED Indicator 4 LED (LAN、REC、GPS、Power)
Signal Loss
Detector
Yes
Buzzer Alarm
Output
Yes
RS485 Yes
MOUSE Yes
GPS Yes
G-SENSOR Yes
Network Yes
3G optional
WIFI optional
IR Remote Control Yes
Watchdog Yes
Extended Record
Mode
Yes
Power Supply DC 8V~36V
Dimension 250mm x 174.8mm x 69.5mm
Operation
Temperature
-20℃ ~ +65℃
Weight 1.85kg(with bracket and HDD)
*Version updating is not going to inform, please check the on-going updating information
C. Accessories
(1) Standard
Main Device / Power Cable 6P+5A / Alarm Cable / IR Extension
Cord / 16P Female / Mini-Din*2 Harness Connector / Microphone /
IR Remote Control / Network Cable / Compact Disc / RS-485 Cable
(2-pin)
(2) Optional
3G Module / Wi-fi Antenna / G-Mouse
Page 7
4
D. Product Appearance
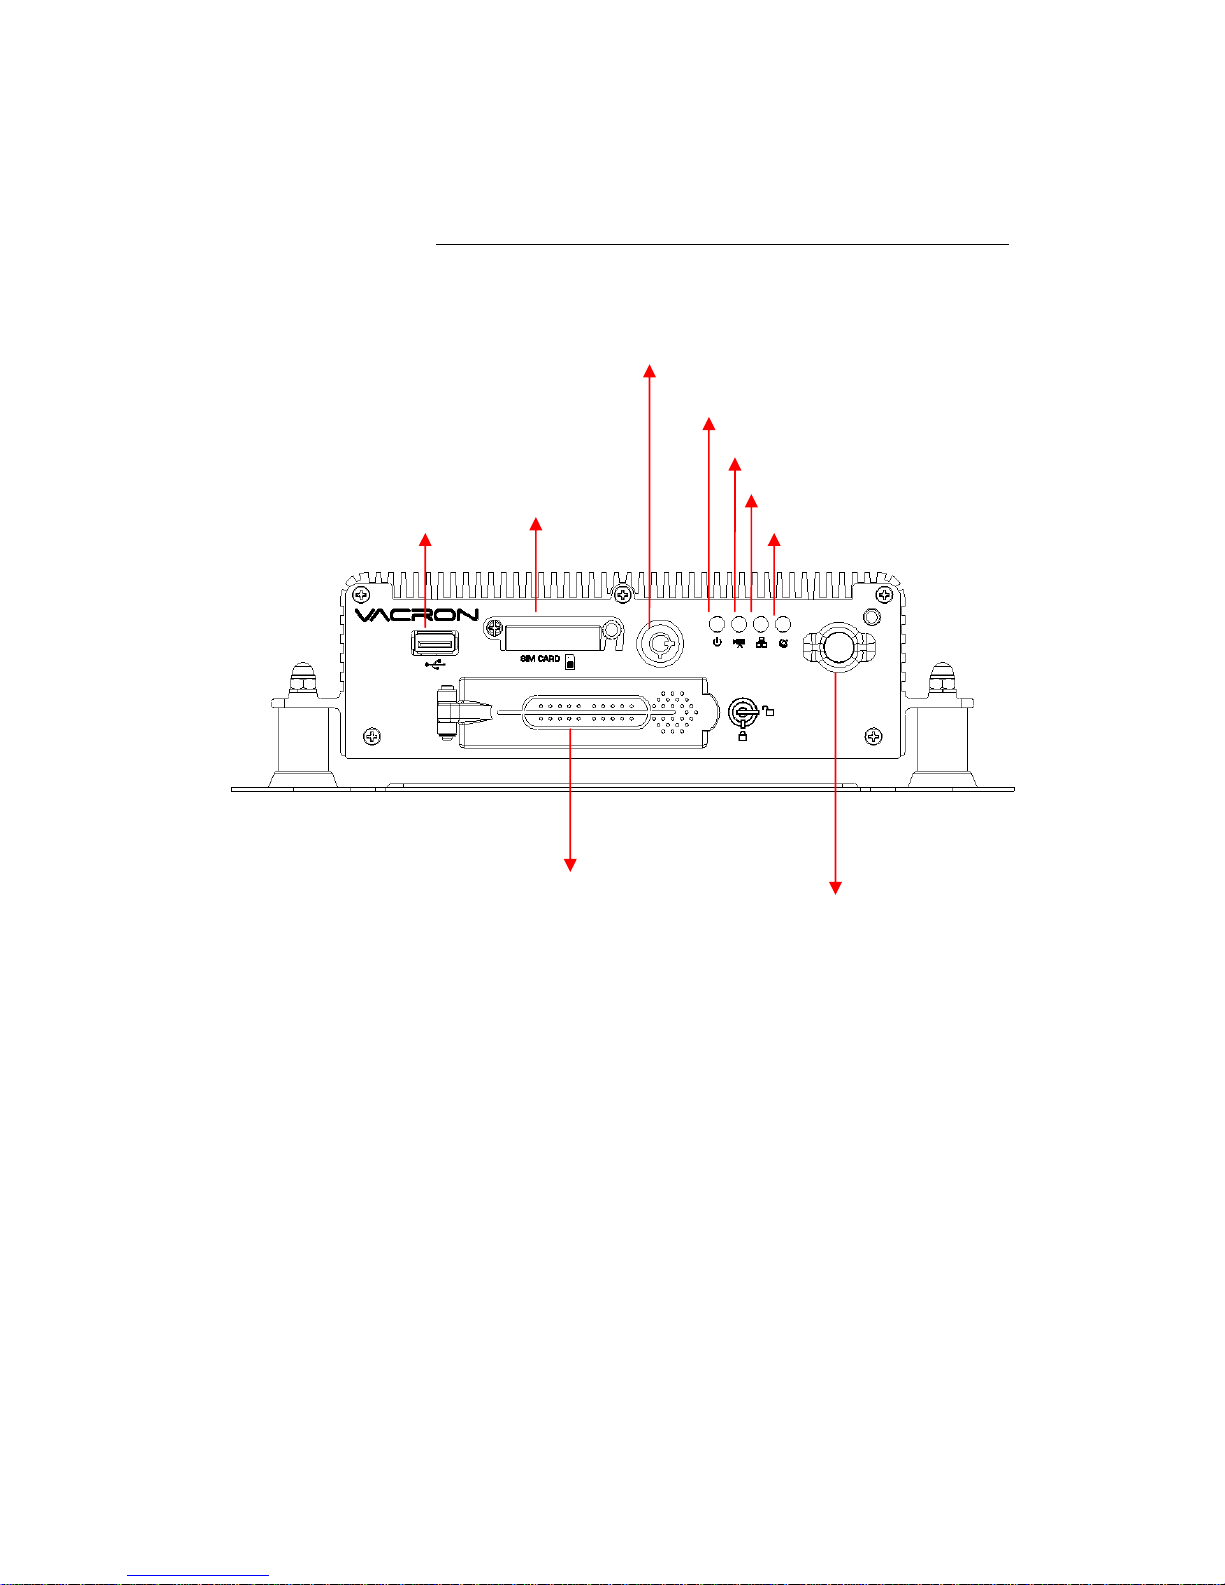
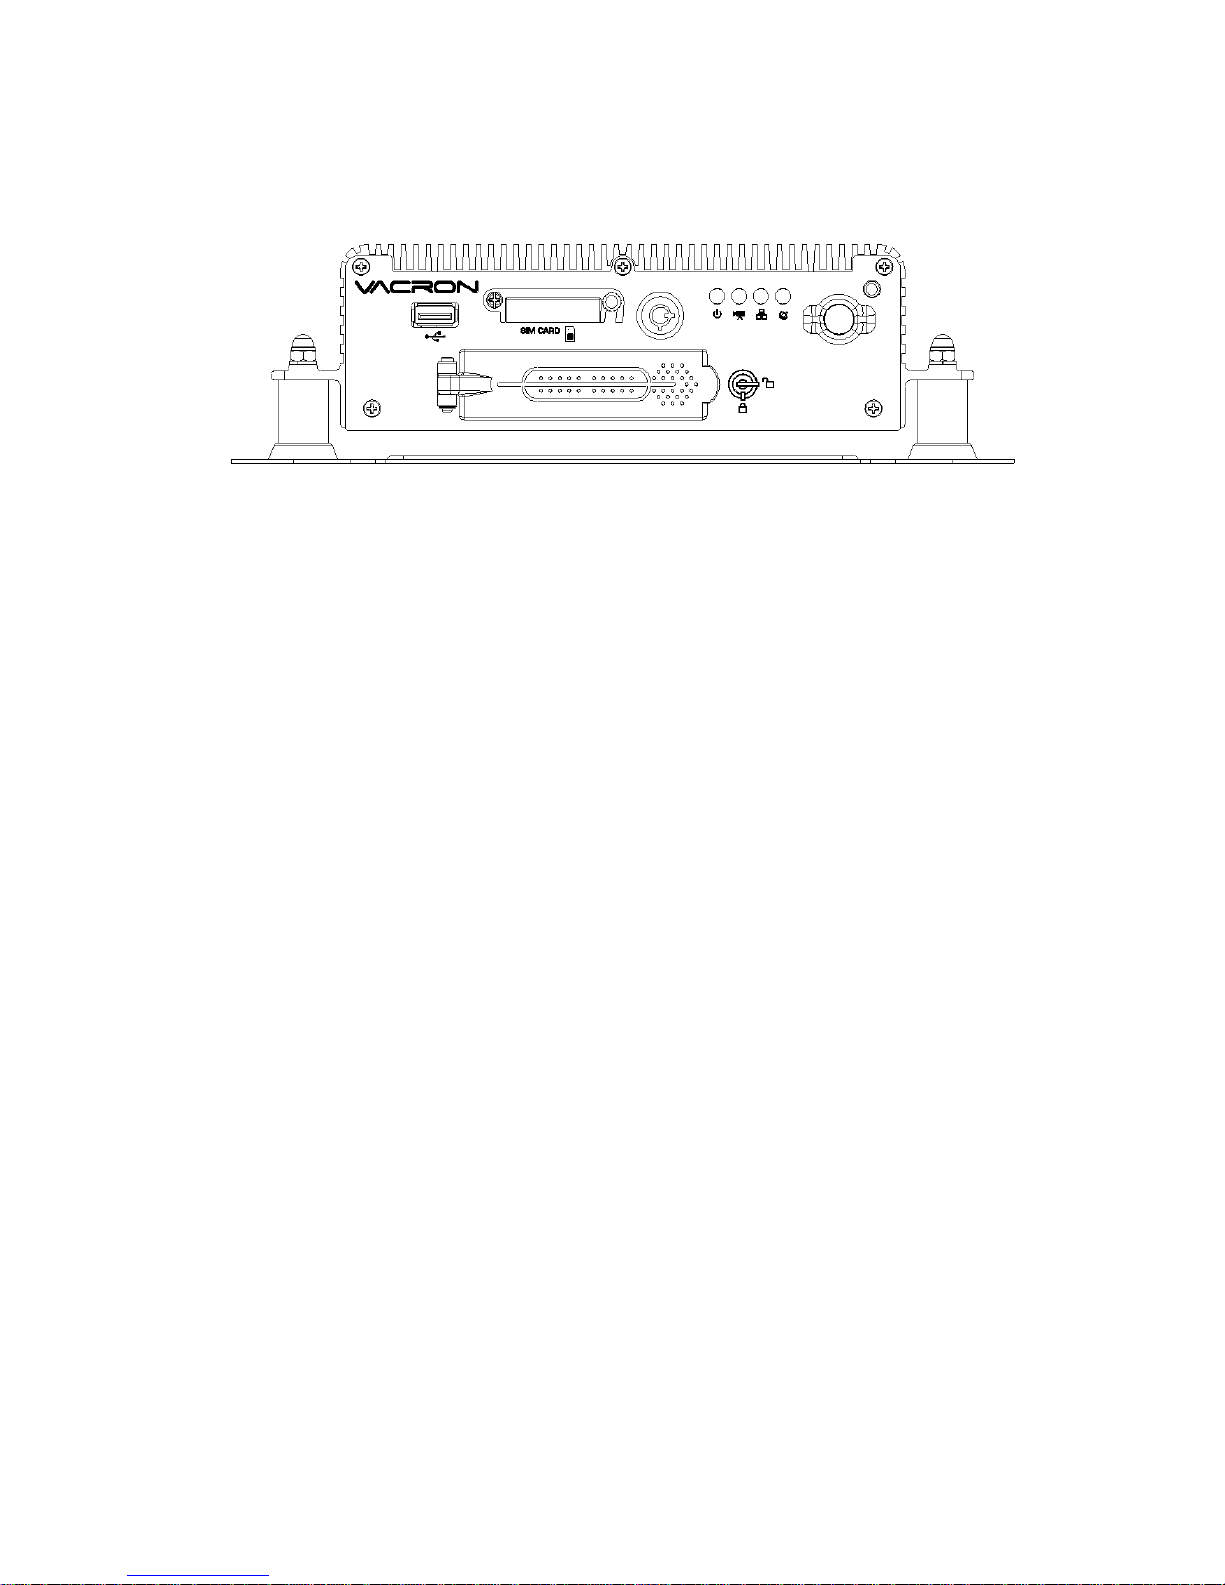
FRONT PANEL
Sim card slot
USB connection
Infrared receiver
Power light
Record light
Network light
GPS light
HD slot
HD slot lock
Page 8
5
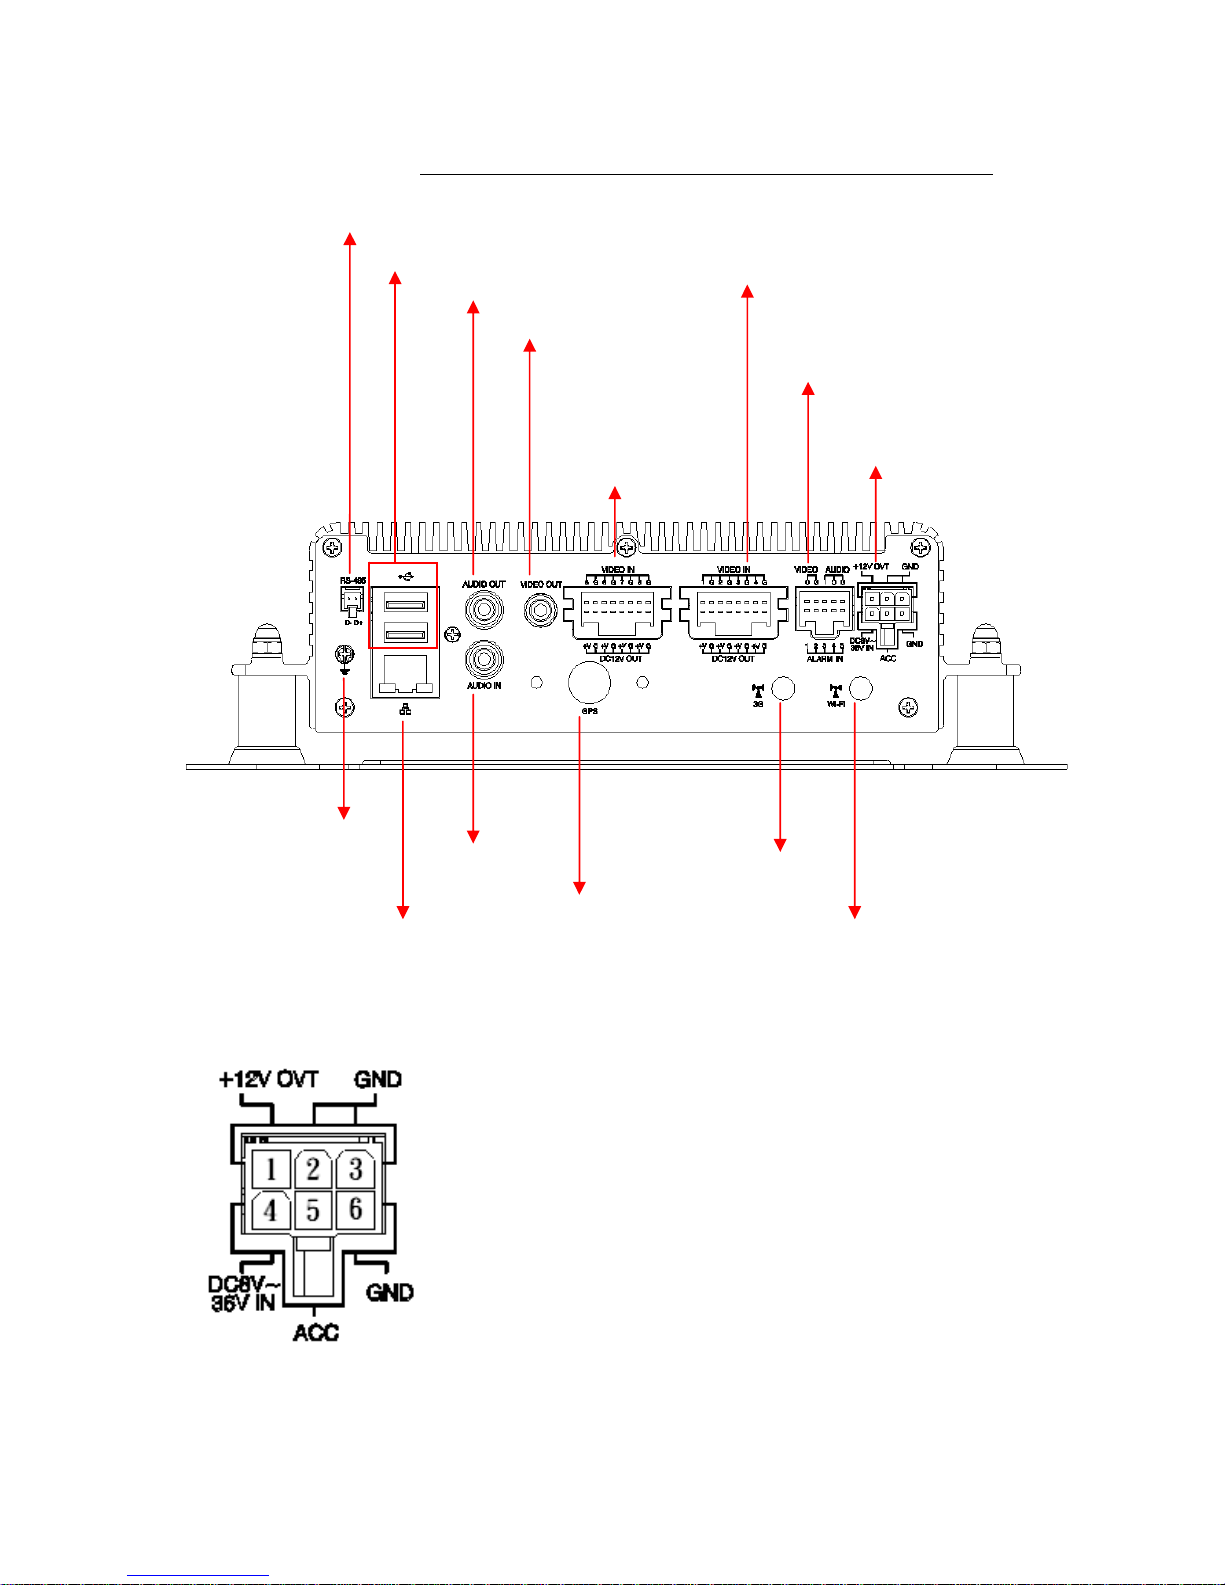
REAR PANEL
Power connection
1. DC12V Out
2/3. Signal & DC grounding
4. DC8~36V vehicle power (+)
5. ACC control
6. GNDP vehicle power (-)
RS-485 Connection
USB Connection
Network Connection
Audio input
G-Mouse
connection
3G antenna
connection
WIFI antenna
connection
Audio output
Video output
Hollow connection
1 set of video/ audio output
4 set of alarm input
Power Connection
GND
Hollow connection
Video recorder
connectino 5-8 CH
Hollow connection
Video recorder
connectino 1-4 CH
Page 9
6
E. Record / Stop-Record
1. Power on / Record
Turn on the power, and it will take approximately 40 seconds to
boot up. During the recorder booting up, the HDD indicator LED
will start flashing as the recording is in progress.
Light indicator:
●
Green
light: light on, means power on; light off, means no
power/power off.
● Red
light: light flashing
, means HDD take recording; light off
means non-recording.
● Orange light: On when internet connection; off when internet
disconnection.
● Blue light: On when GPS positioning is ready; off when GPS is
not ready.
★ Remark: While using playback function in DVR, it cannot
take live recording at that time.
2. Power off/Stop recording:
Power off also stop recording, at then you can take out HDD to
read the recorded files.
Page 10
7
F. System operating instruction
Vehicle DVR can be operated through two methods: IR remote
controller and PC software application.
Through IR Remote controller instruction
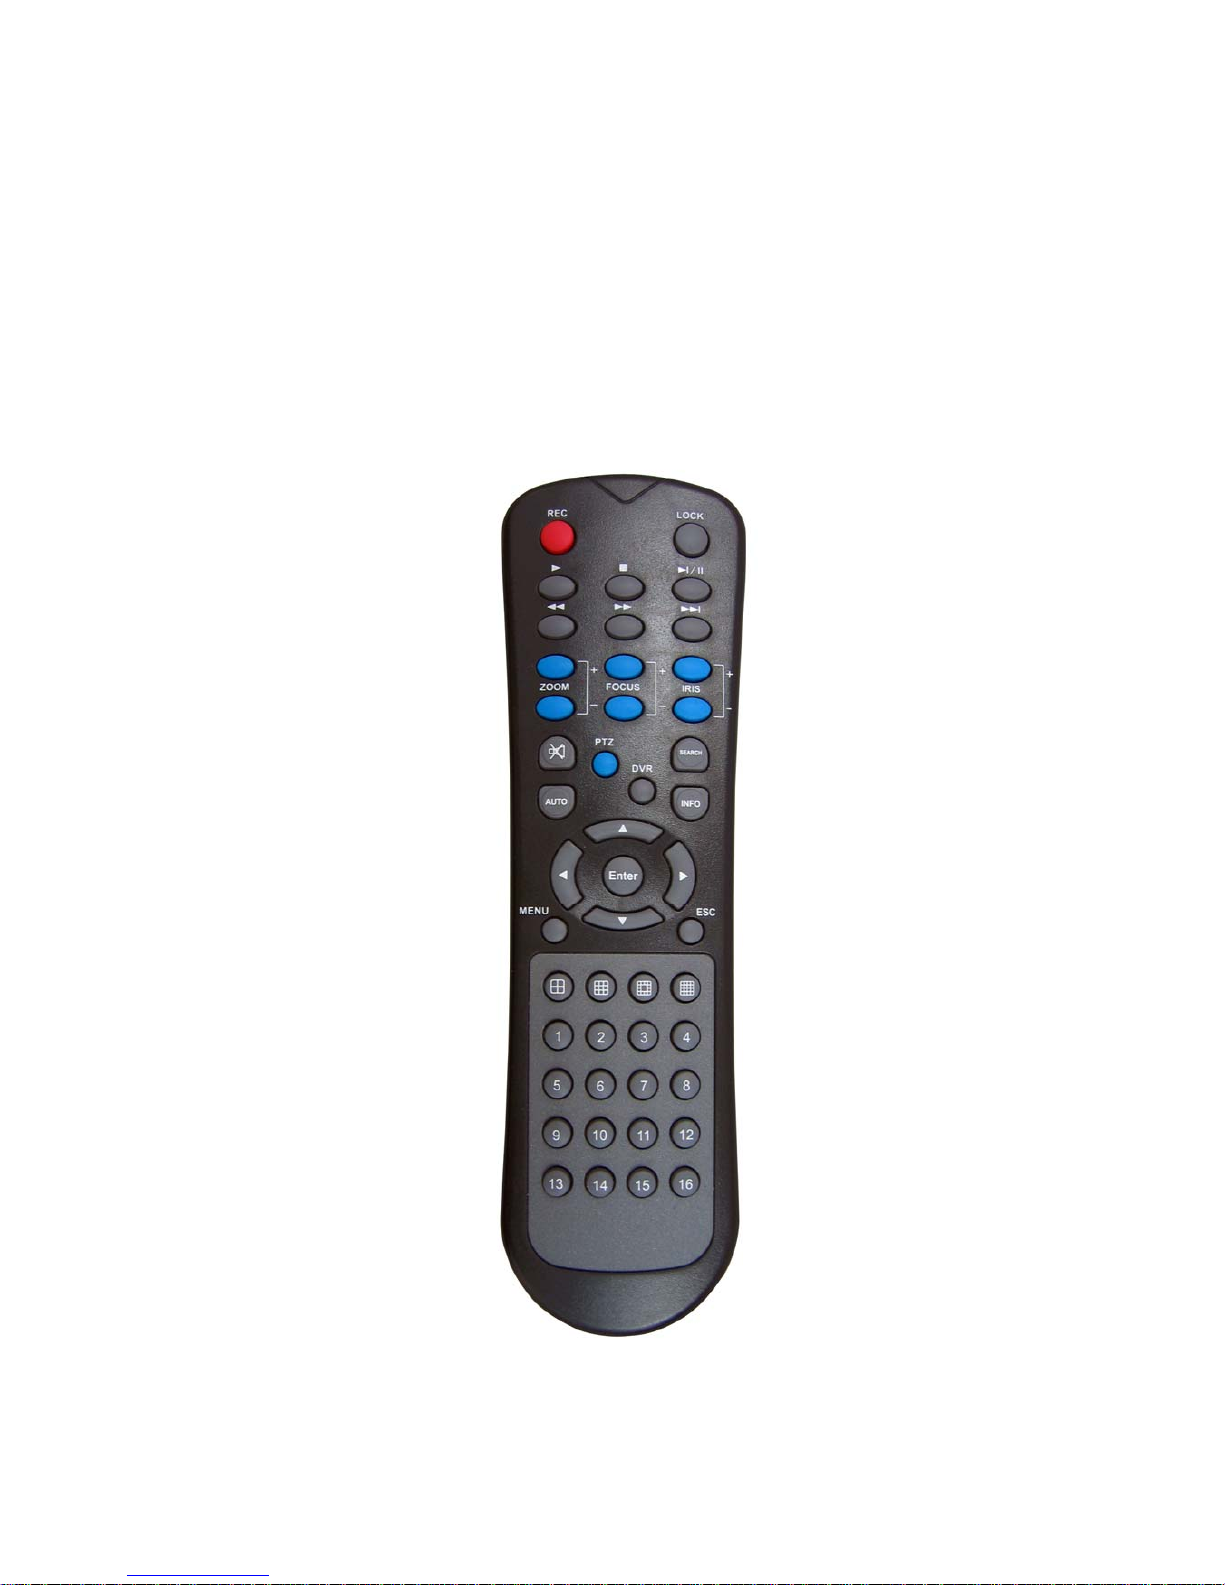
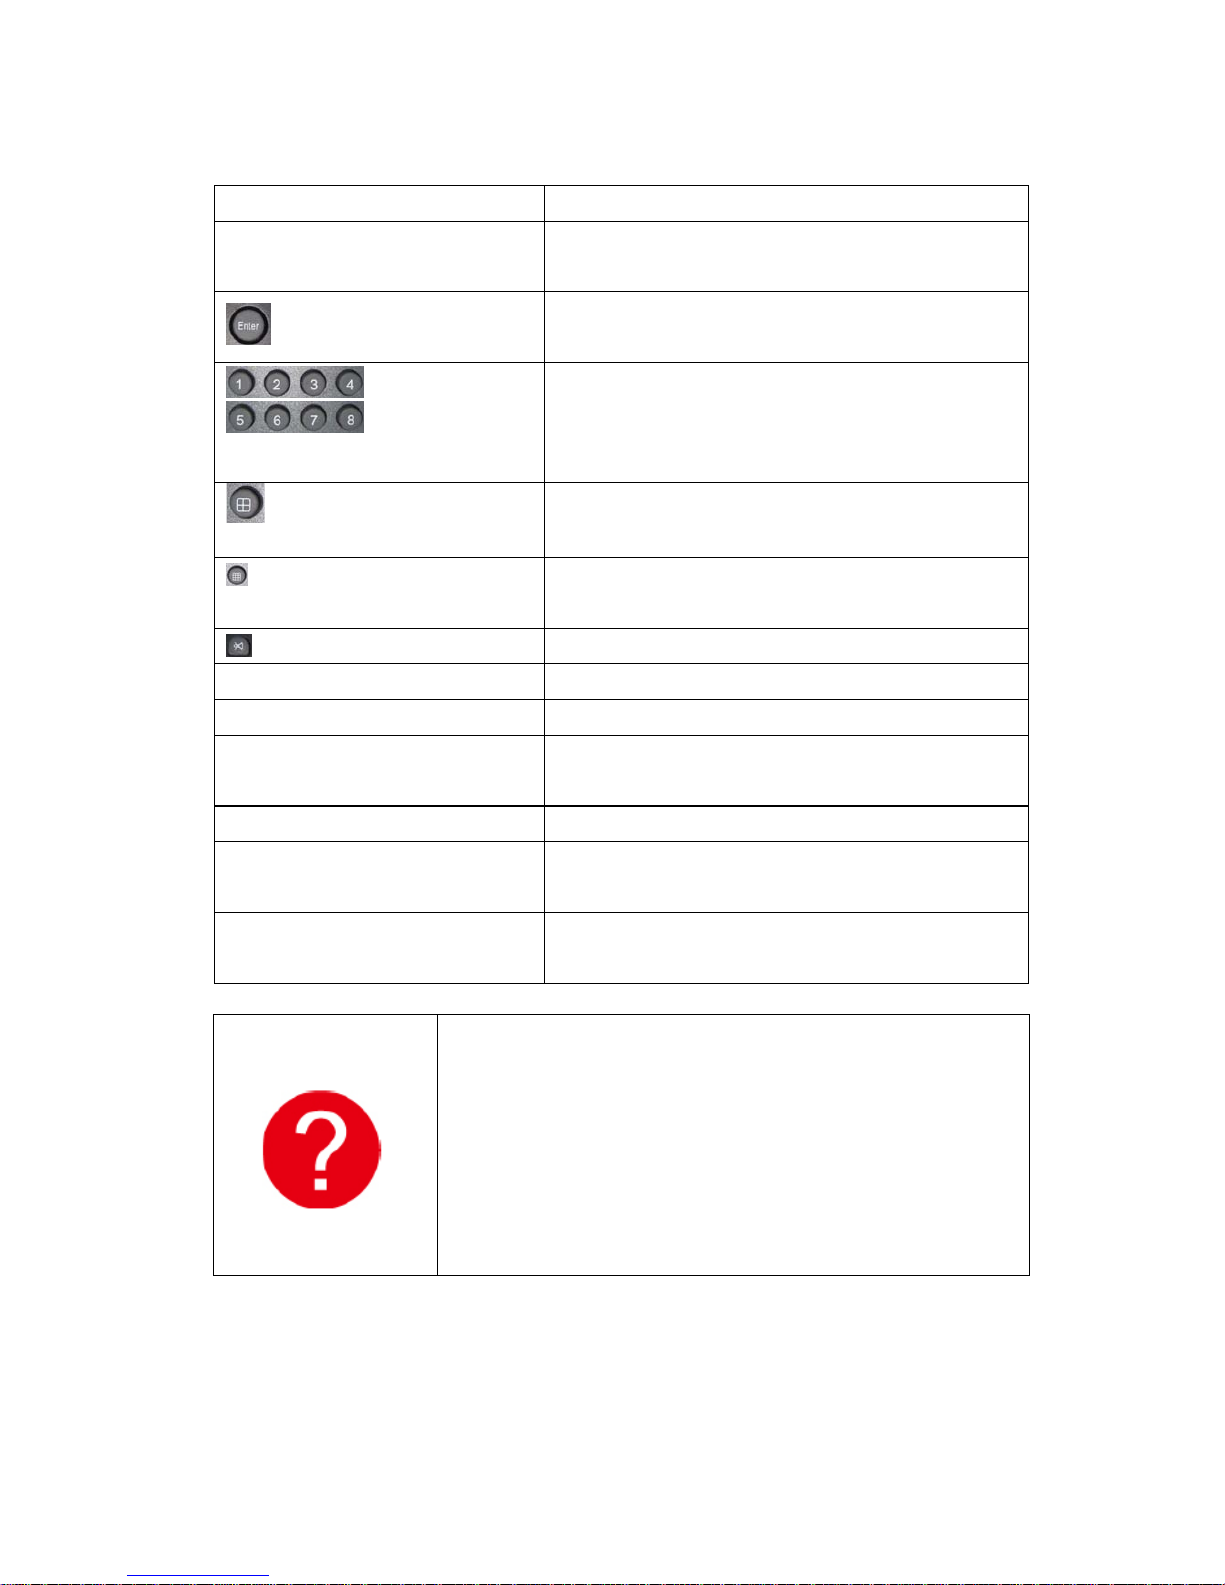
1. As following is the key mapping table for IR Remote controller:
Page 11
8
Arrow Select the options in the menu list.
Menu
Open the main menu or back to
previous page.
Enter
Enter the menu or save the setting
options.
Channel 1-8
Select channel 1-8 under watching or
review mode
Four parts switch
Separate the screen to quad divisions
display
Nine parts
switch
Separate the screen to eight divisions
display
Mute Do not record the audio data
Play Start play under
REC Manual recording under watching mode
Stop
Stop and back to up layer under play
mode
Pause Pause under review mode
Speed
forward
Speed up under review mode
Speed
backward
Speed up backward under review mode
Remote control inspection
Check the battery’s positive and negative
polarity.
Check the battery if run out.
Check the sensor of remote control if be
obscured.
Check if there are fluorescent lamps are
used nearby.
Page 12
9
G. System Interface and Operation
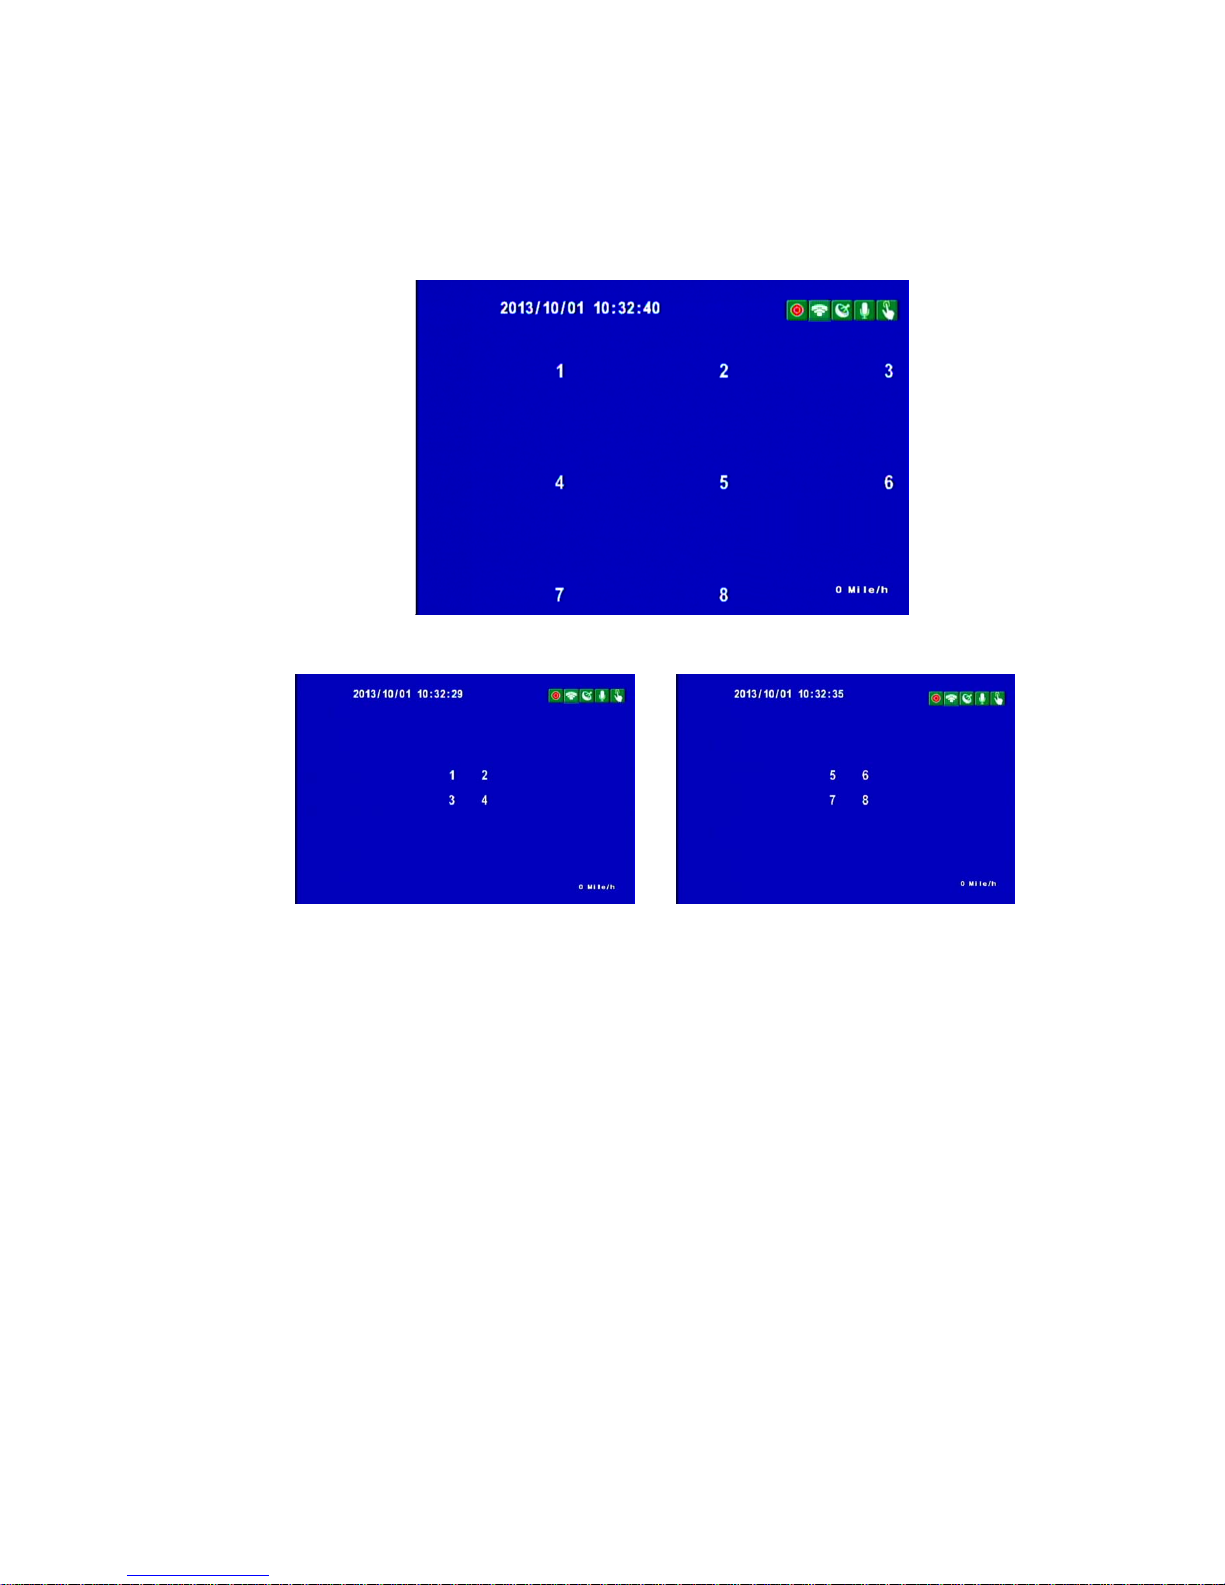
(1) Live Monitoring Mode Display
Live Monitoring Mode - 9 split display
Live Monitoring Mode-
4 Split Display (1~4Ch)
Live Monitoring Mode-
4 Split Display (5~8Ch)
(2) Display Description:
• Press Ch1~Ch8 button for single display.
• Pres quad split screen button for 4Ch display.
• Press quad split screen button repeatedly, to show
Ch1~4 display or Ch5~8 display.
• Press 9-split screen button for 9 split display.
• Press menu button to enter menu option.
• Press play button to enter playback mode.
Page 13
10
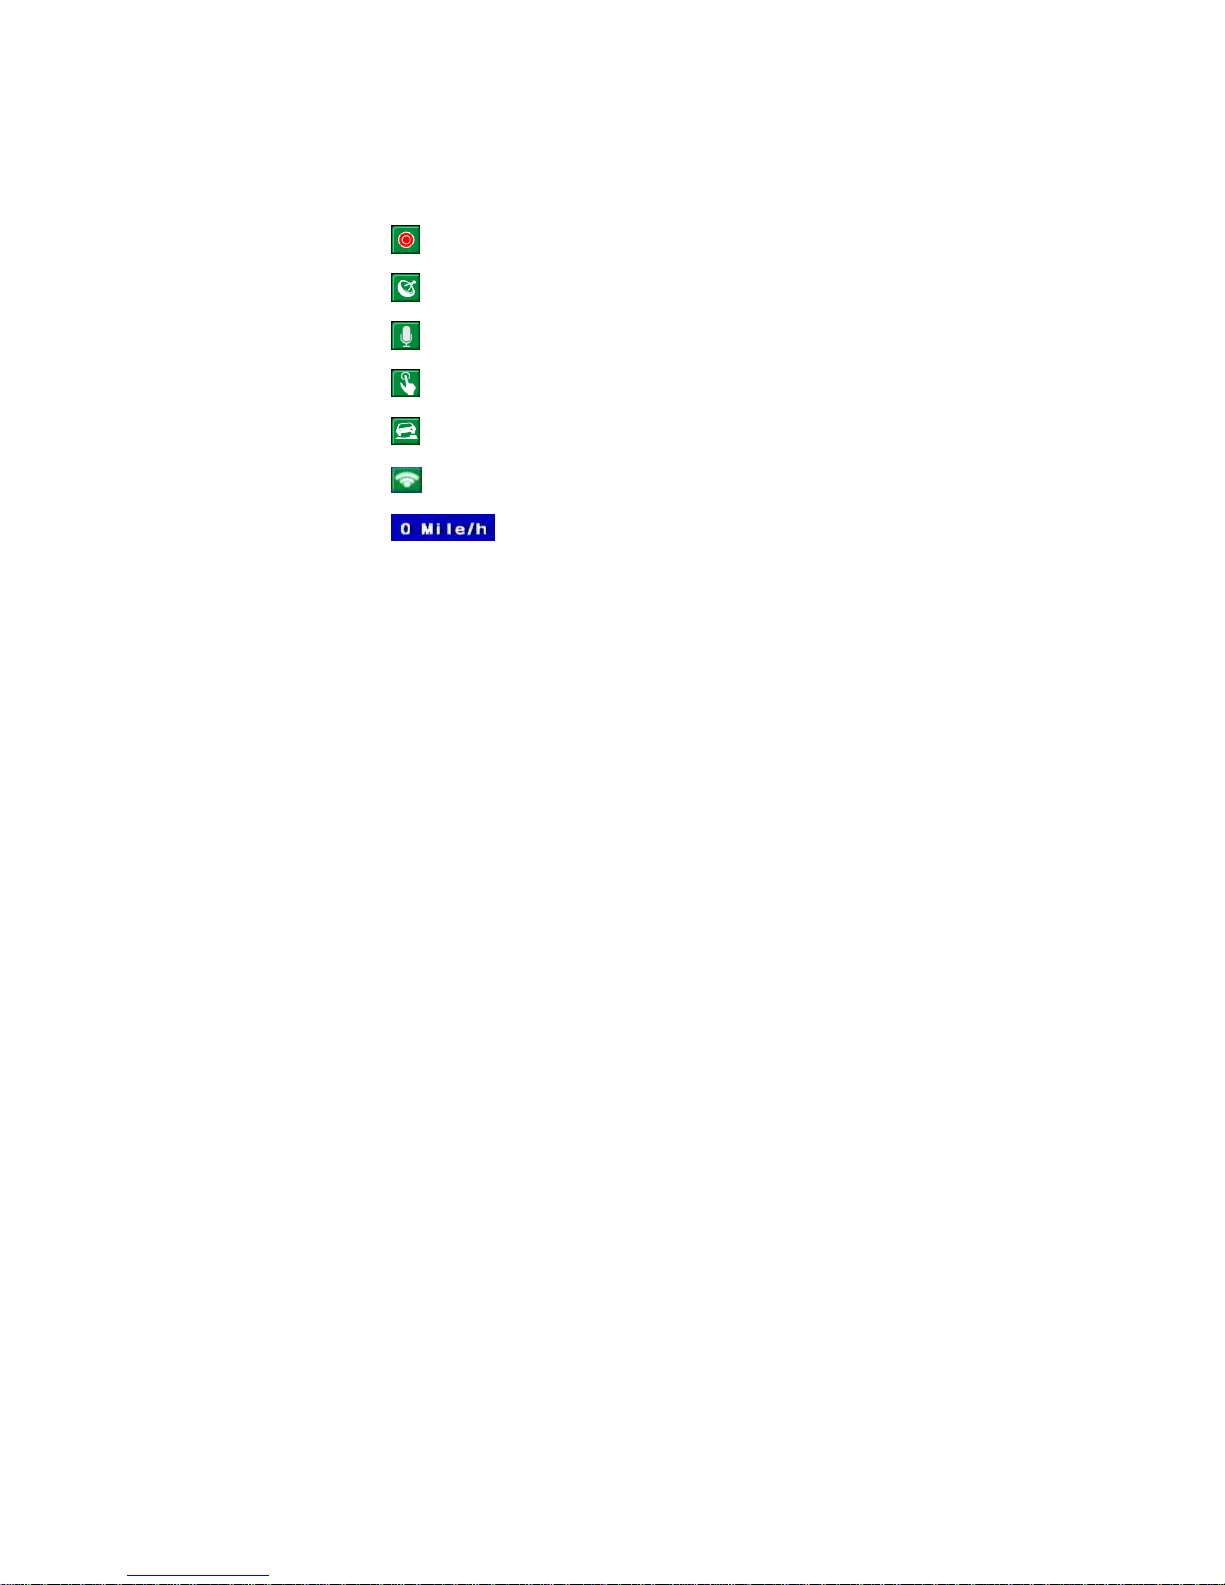
(3) Icon Description:
•
: Recording
•
: GPS Connecting
•
: Voice Recording On
•
: Manually Force Recording On
•
: G-Sensor Recording On
•
: 3G Connection On
: Speed Display, need to be setup on PC
(For complete details, please refer to setup of HDD
format)
Page 14
11
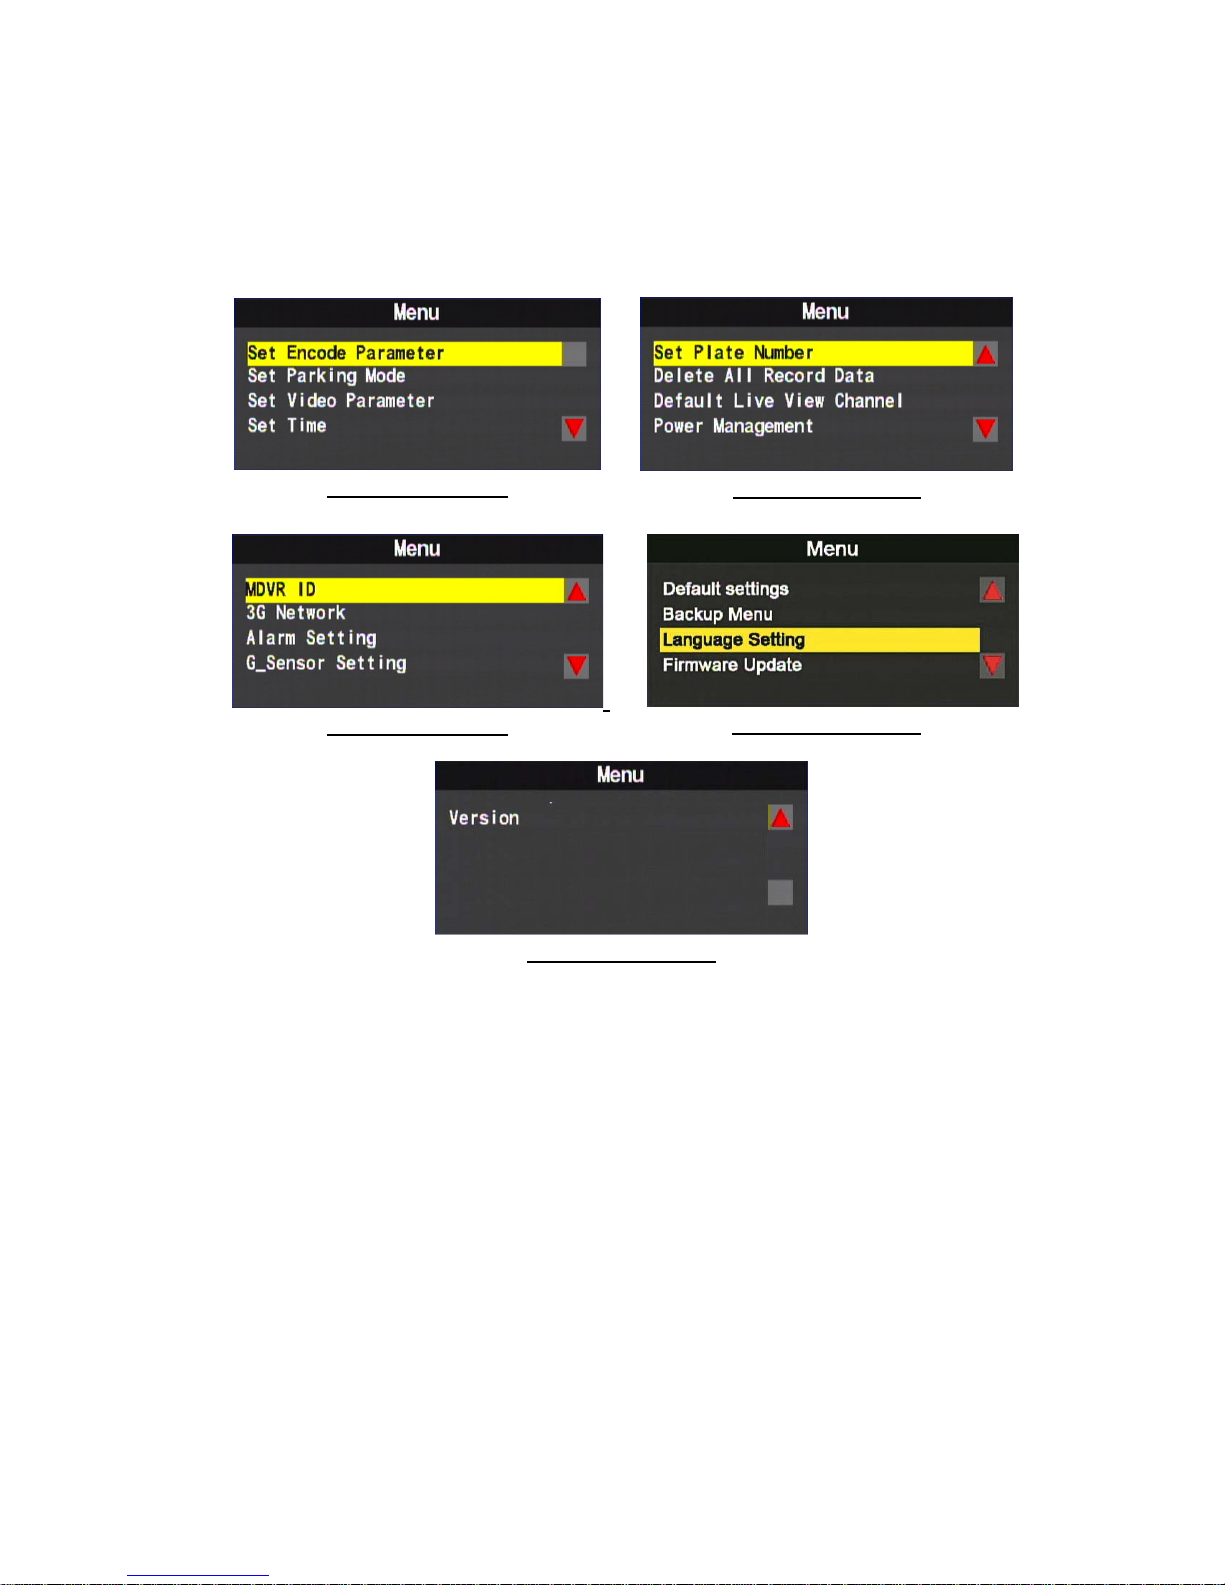
DVR OSD menu operation and IR Remote controller key mapping
chart
Main menu page switch
Page1/5 setting
Page 2/5 setting
Page3/5 setting
Page 4/5 setting
Page 5/5 setting
◆ IR Remote controller Instruction
(1) Select Item: [up/down/left/right]
(2) Change setting for selected item: [up/down/left/right]
(3) Change setting for Bar item:[Enter]
(4) Full Screen display for each CH: [CH1~CH4]
(5) Open OSD menu, back to previous page:[menu]
(6) Quad display:[Quad]
(7) Enter playback mode:[play]
(8) Stop Play/exit playback mode:[Stop]
(9) Suspend recording:[Pause]
Page 15
12
System Setup instruction
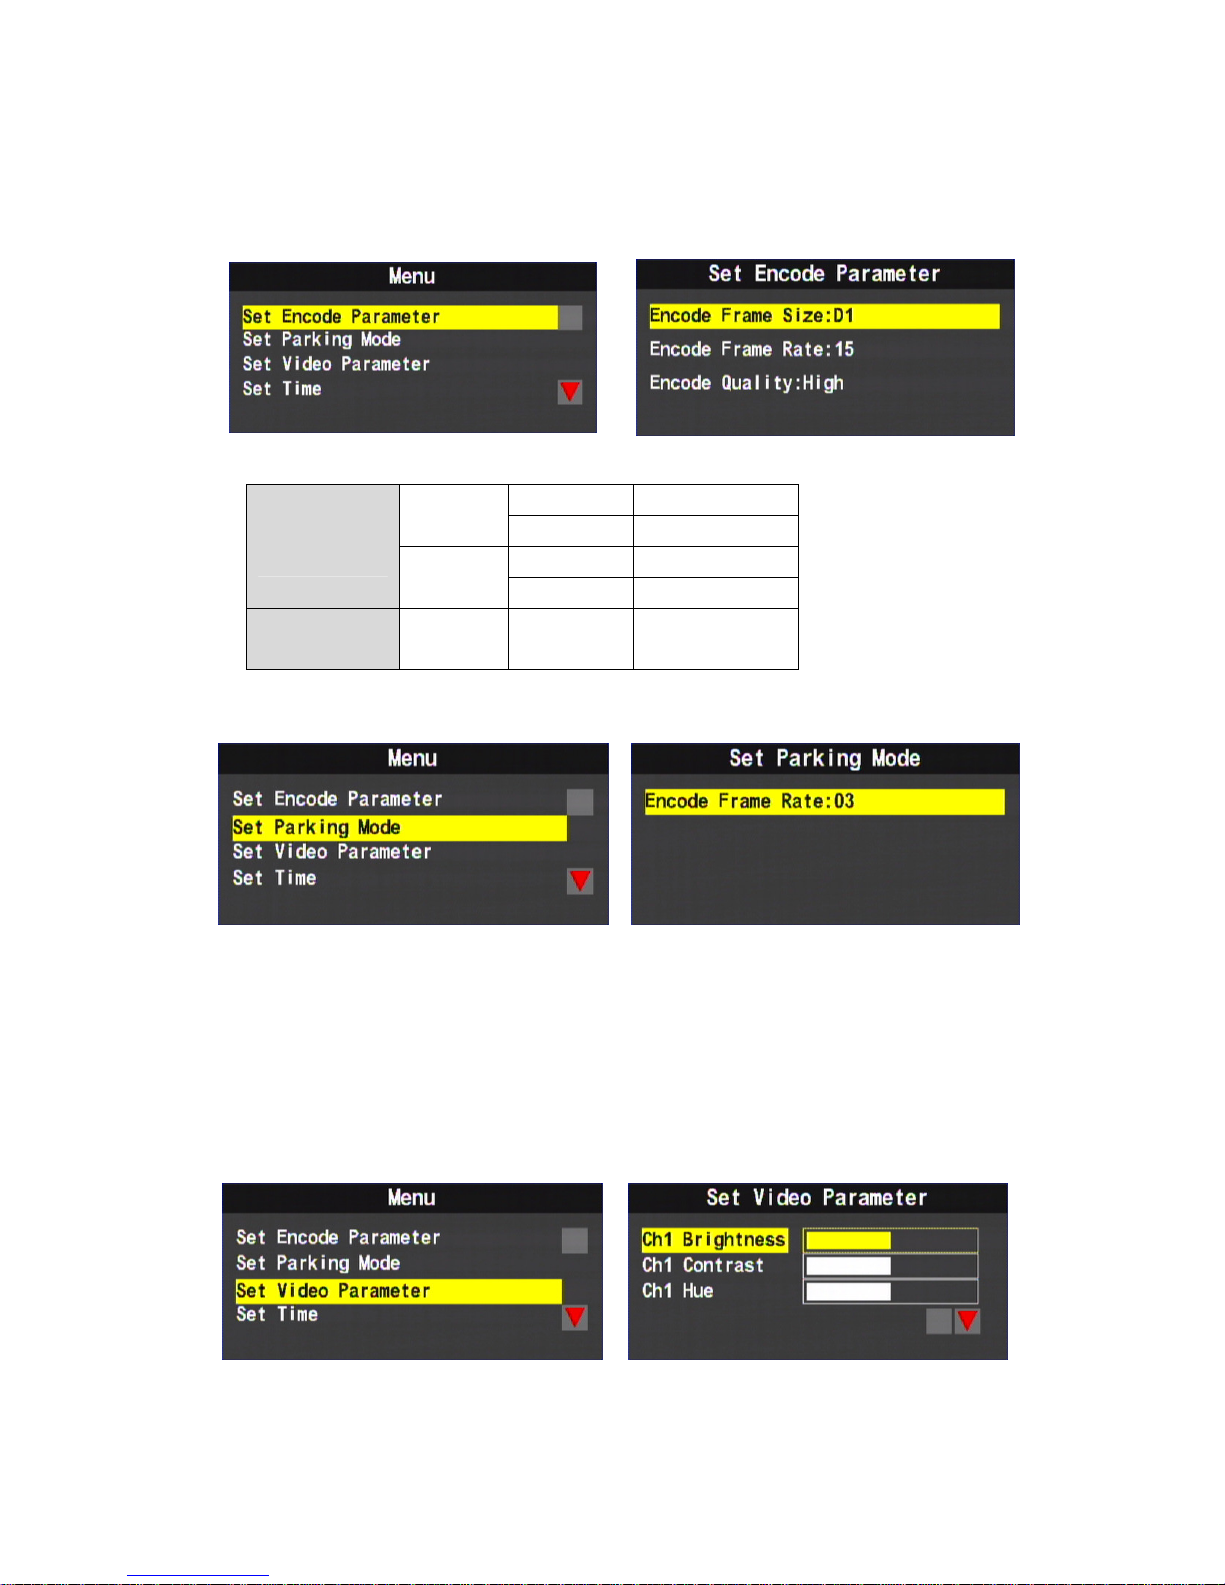
1. Set Encode Parameter
Recording Parameter Setup
Frame
Rate
NTSC
D1 5-10 fps
CIF 5-30 fps
PAL
D1 5-15 fps
CIF 5-25 fps
Recording
Quality
Normal Better High
2. Set Parking Mode
To setup the recording frame rate after the vehicle power off,
power management function must also be setup accordingly
FPS setting, it must be less than “Recording Setup”fps setting.
Setting
Encode frame rate: 3, 5, 10, 15, 20, 25, 30, (D1 Maximum 15,
CIF Maximum 30 and cannot over than original setting)
3. Set Video Parameter
Page 16
13
Item Setting
(1) Brightness: (Left key→ to reduce)/ (Right key→ to increase)
(2) Contrast: (Left key→ to reduce)/ (Right key→ to increase)
(3) Hue: (Left key→ to reduce Hue)/ (Right key→ to increase
Hue)
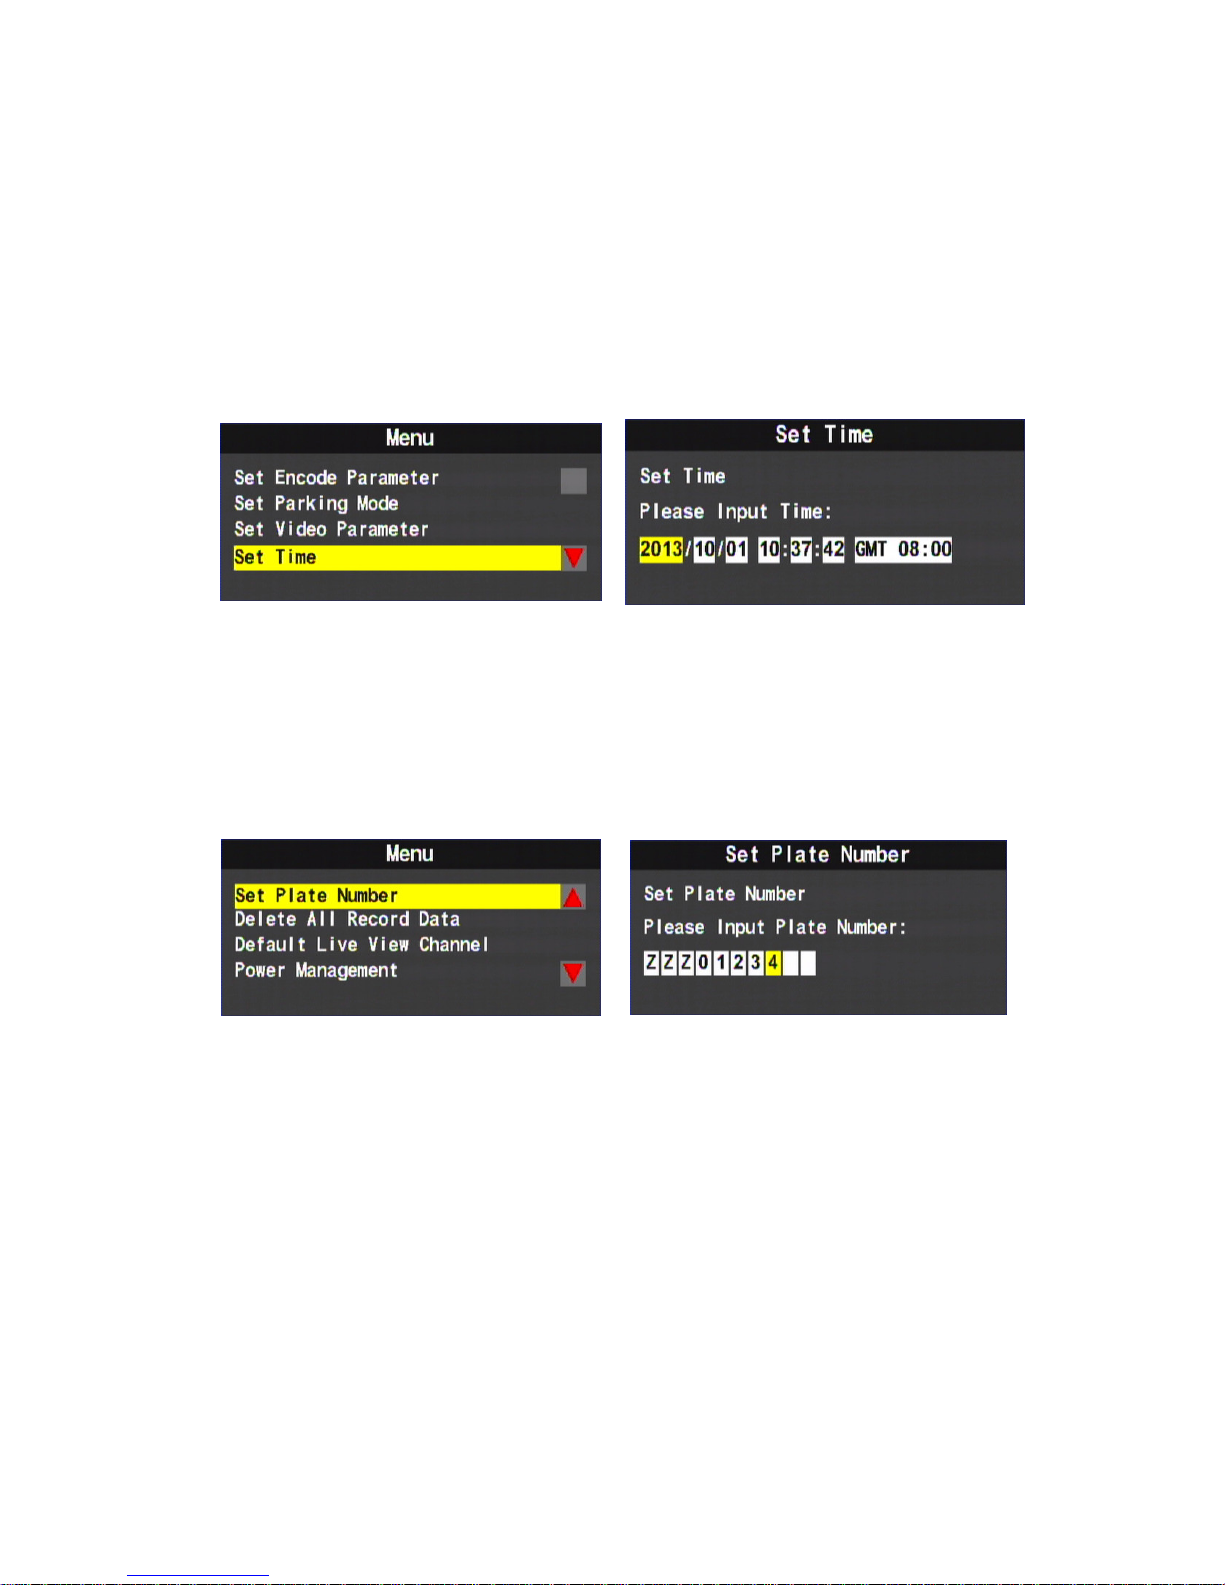
4. Set Time
IR Remote controller operating instruction
(1) Up key→ Plus one, Down key→ Reduce one.
(2) Left key→ Left one space, Right key→ Right one space.
The time setting will be automatically calibrated by GPS
signal.
5. Set Plate Number
Input range:A~Z, 0~9.
Page 17
14
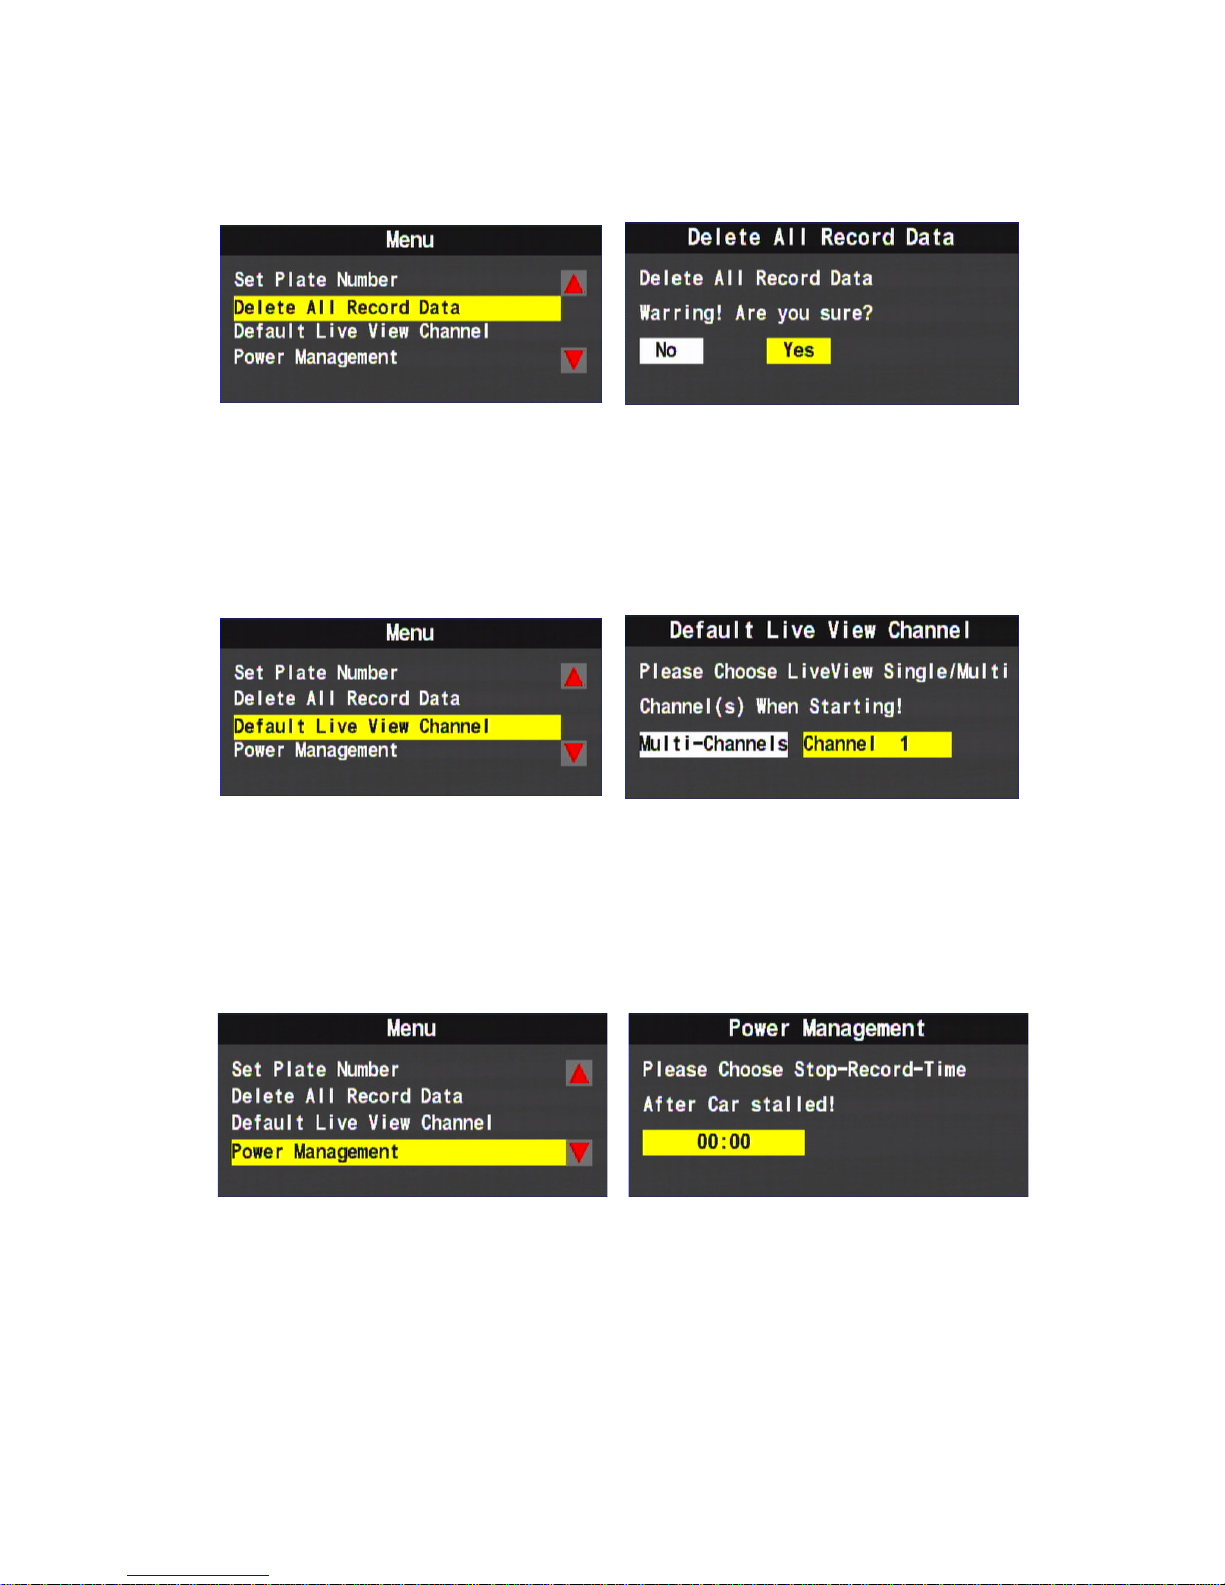
6. Delete All Record Data (Format Disk)
Delete All Record Data
Use right key or left key to select the selection then click “enter”
to confirm.
★ Caution! All data will be deleted when you click “Yes”.
7. Default Live View Channel
Select the default live view CH after startup: Item selected will be
default live view display mode after DVR booting completed.
On this page, Use left key or right key to select Quad display
(Multi-CH) or CH 1 Display, then press “enter” to confirm.
8. Power Management
Power Management: Setup Extended Record period after Engine
shutdown.
Use IR Remote controller for setting, Click Left key to move one
space for selecting time for delay-recording, then press enter key
to confirm.(The delay-recording period can be 0,5,10,15,20
minutes)
Page 18
15
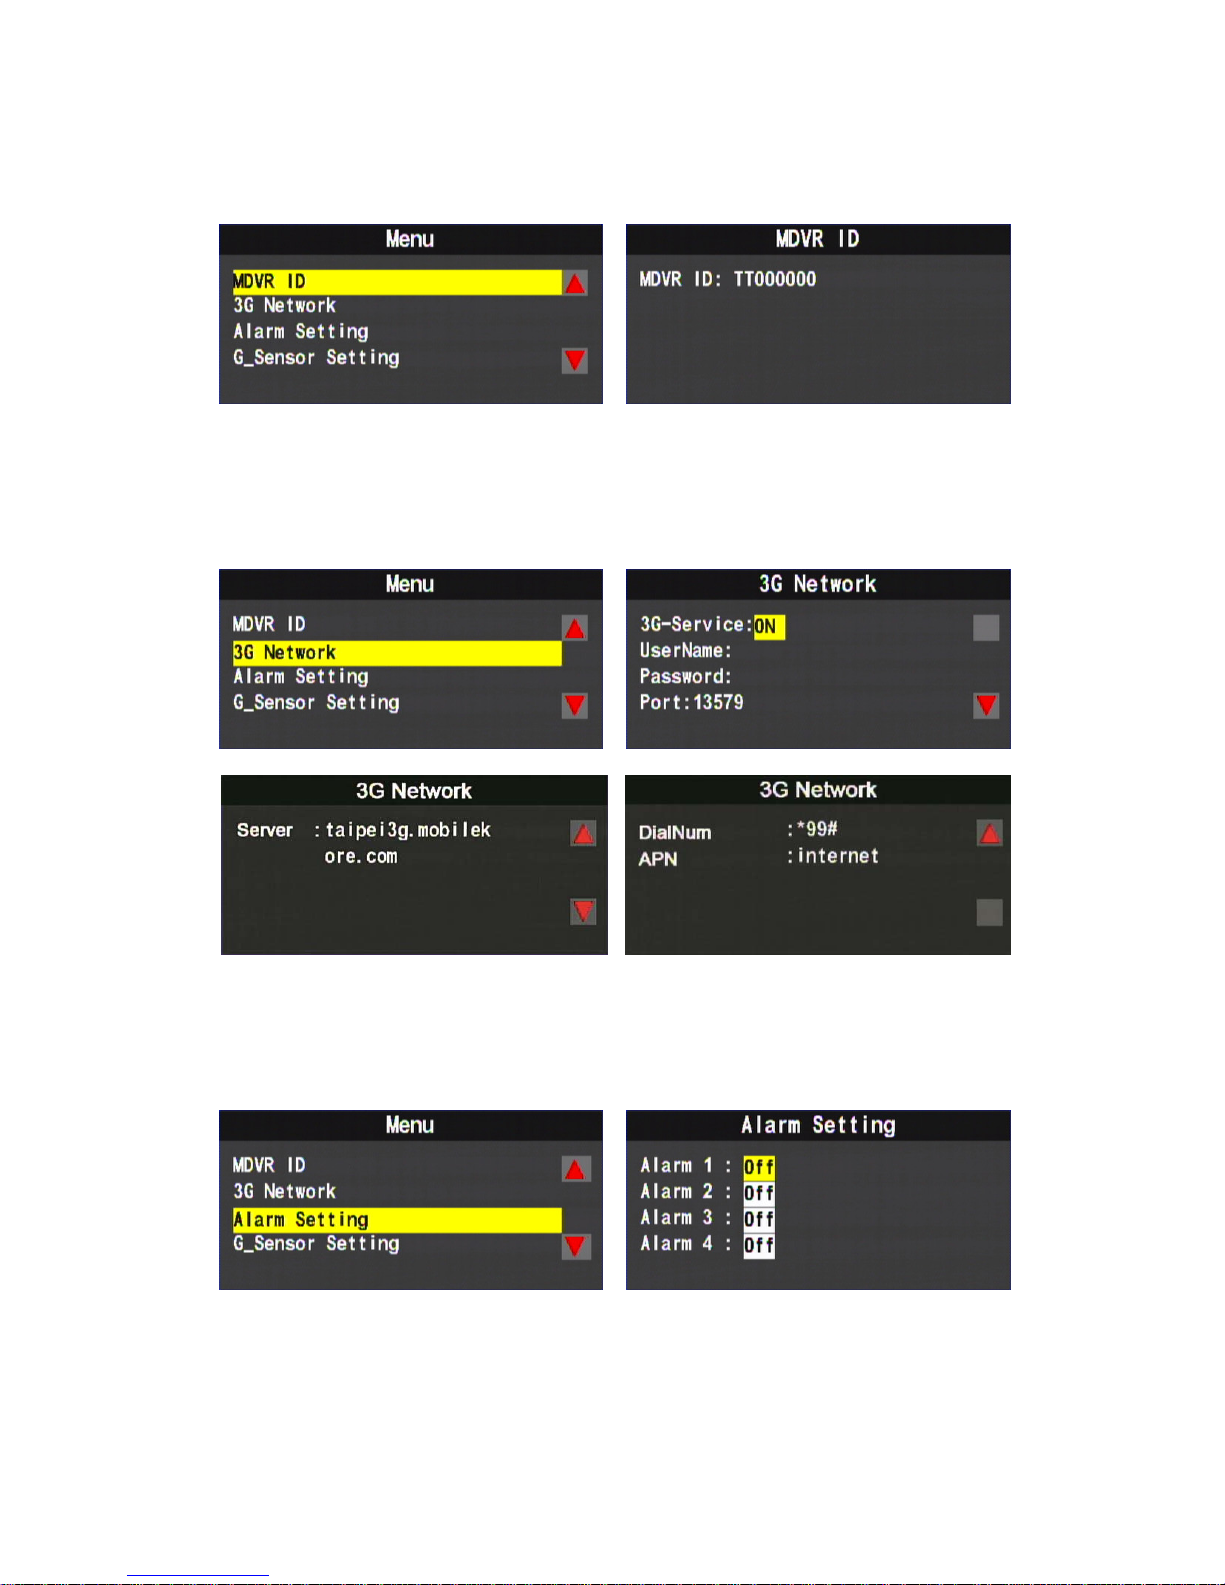
9. Check MDVR ID Information (Only available when DVR with
specific 3G module)
If you need to check current MDVR ID information, please click
MDVR ID and press enter key on remote controller.
10. 3G Network
Press the right or left button, to select 3G Network on or off.
After finishing the setting, press enter button to save the setting.
Please refer to 3G network parameter setting for any further setting.
11. Alarm Setting
When the alarm is triggered, the screen should display which CH is
triggered. Press the right/left button on remote controller to select
channel, then press the “confirm” key set the channel.
Page 19
16
★ Check the explanation of back panel, in order to facilitate
triggering alarm information setting.
★ Alarm system works only after finishing both hardware and
software setting.
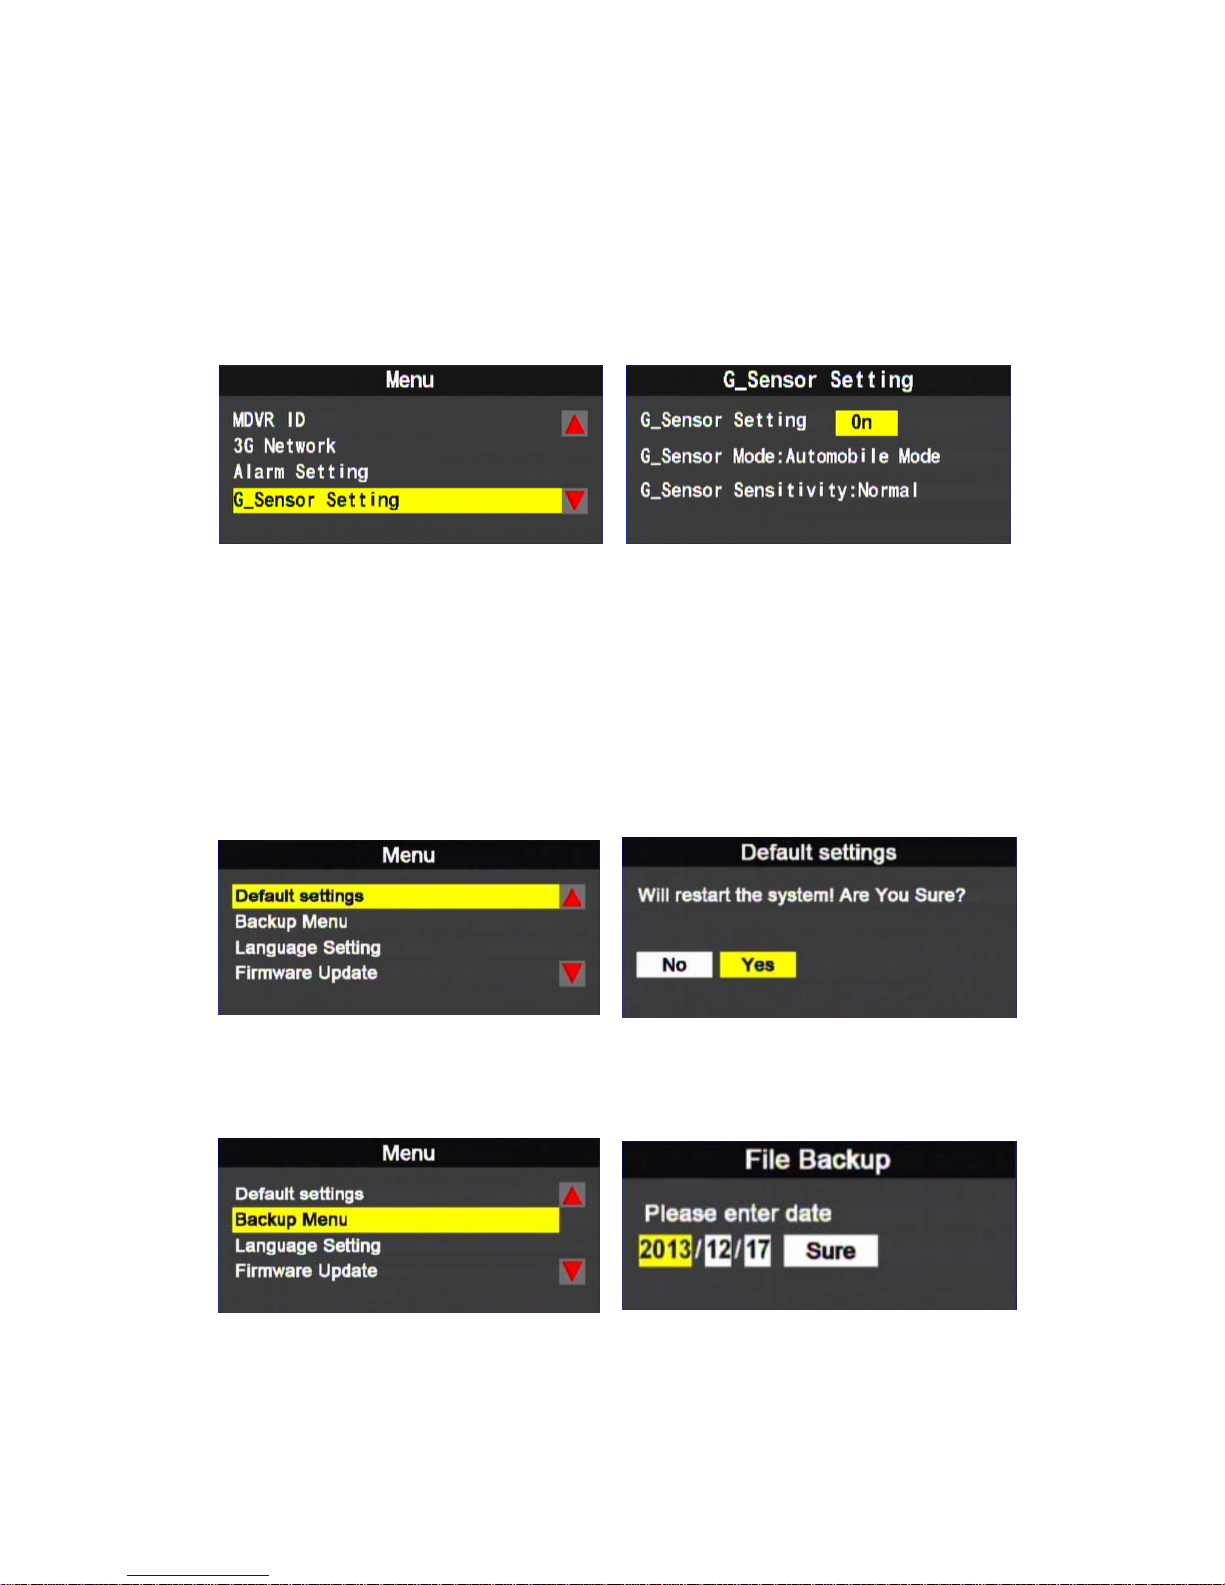
12. G-Sensor Setting
G_Sensor options:On、OFF.
G_Sensor Mode:Sedan mode、Truck mode.
G_Sensor sensitivity options:Min、Low、medium、High、Max.
★ Once the function is activated, when the car collision happened,
『Force Recording』mode will be automatically triggered, to
prevent complete recording event not be overwritten.
13. Default Settings
Make sure if update complete through using controller.
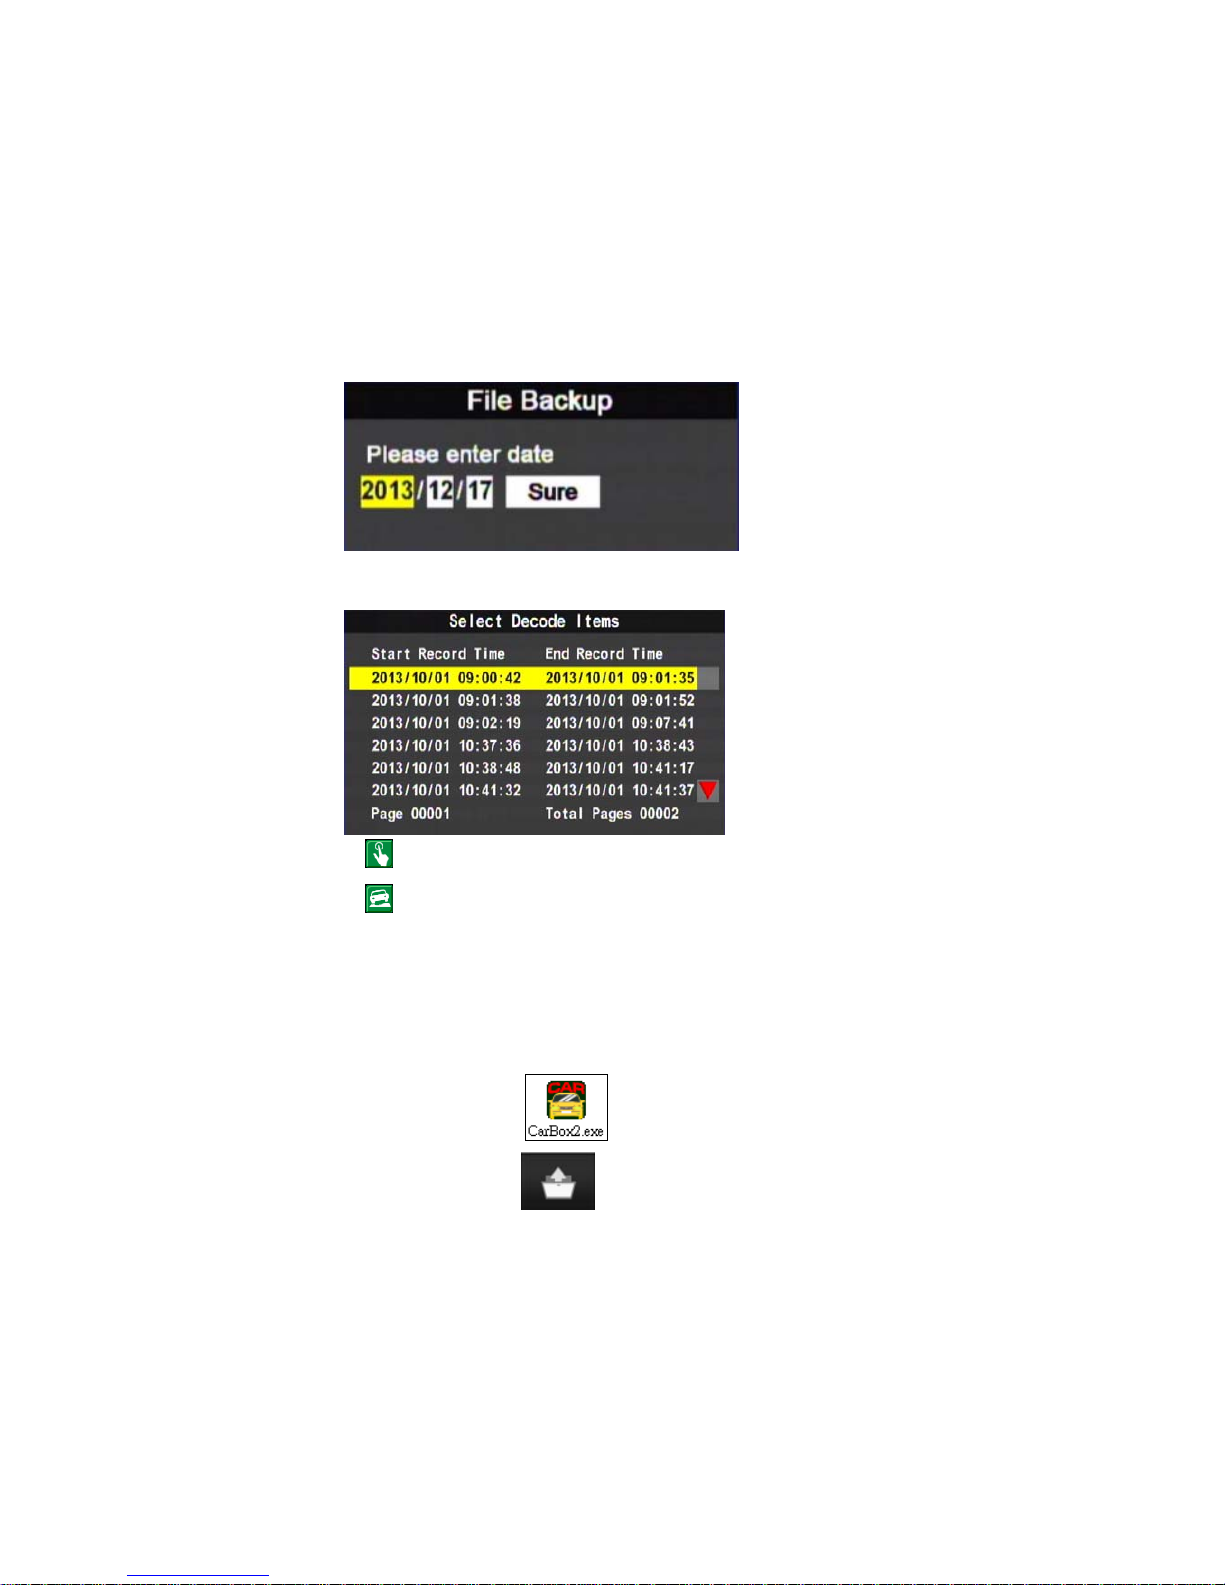
14. Backup Menu
To backup files by select the playback file in the playlist or by date;
to enter “Sure” button, to backup by entering playback mode.
Page 20
17
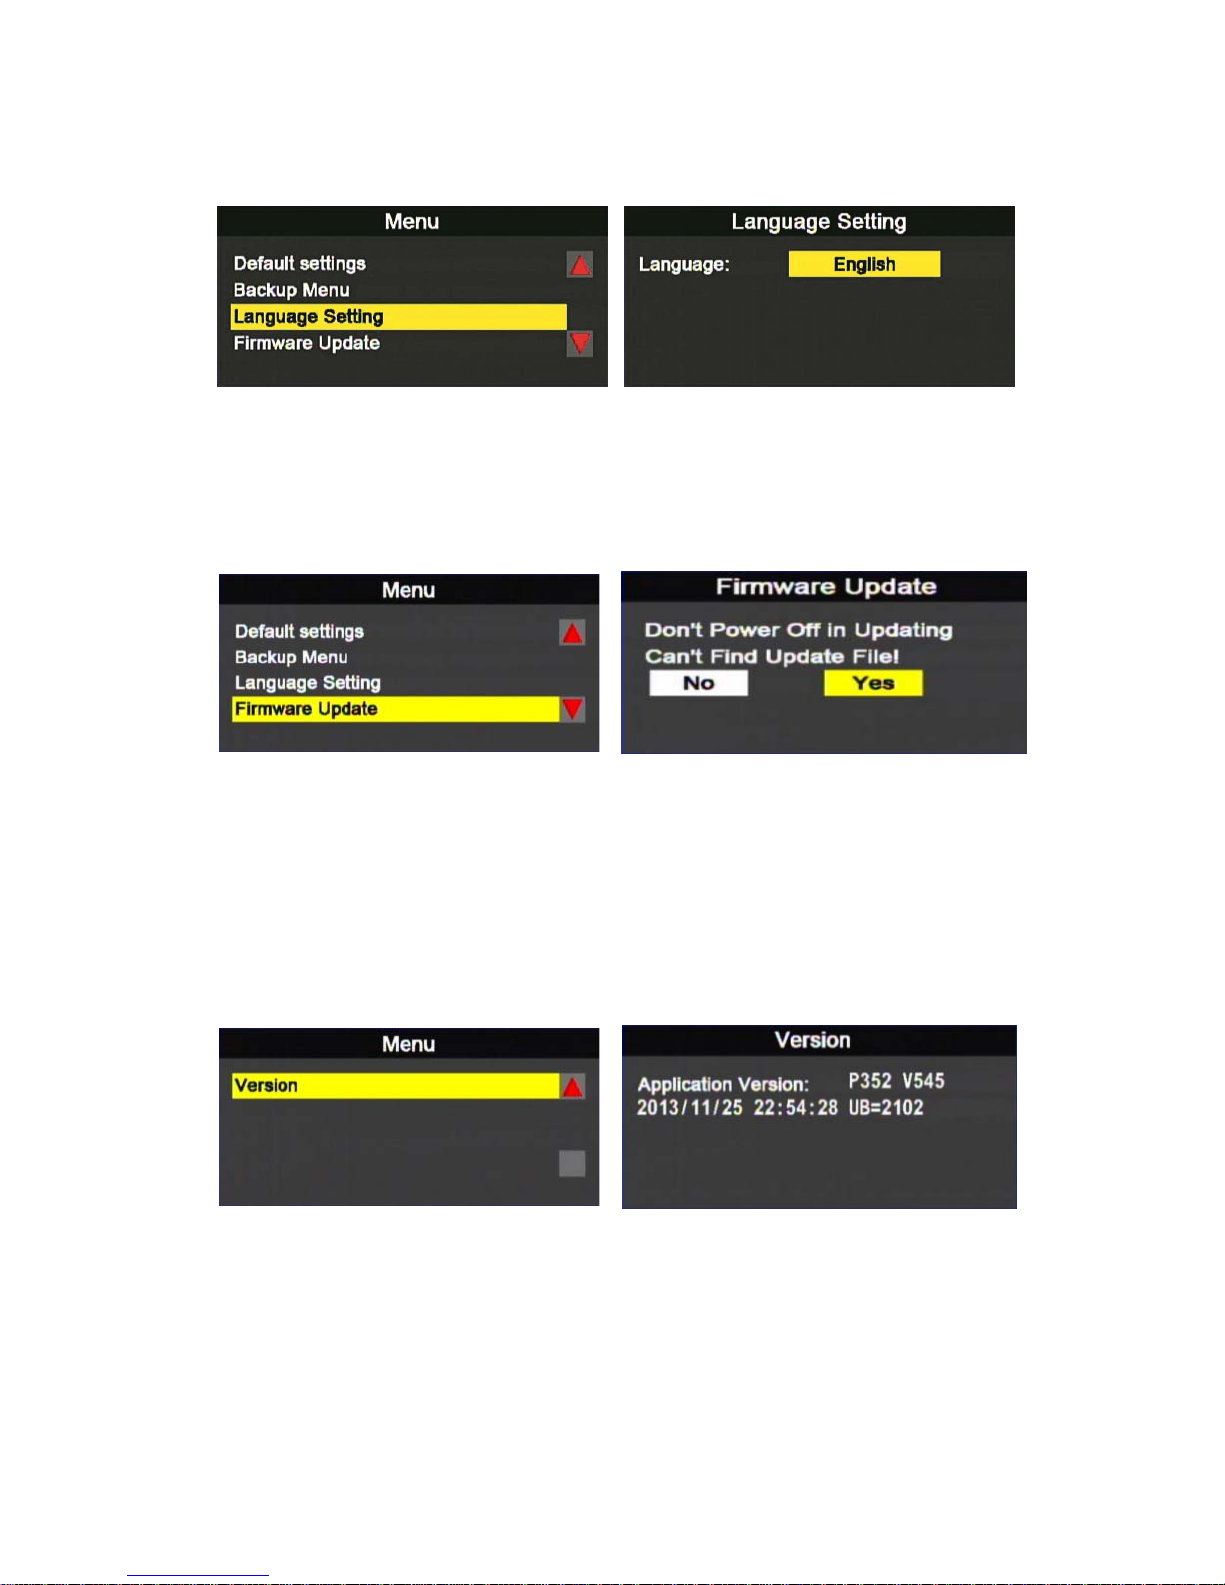
16. Language Setting
Only for the model without 3G function
Language Setting: English/ Traditional Chinese / Japanese/
Korean / Russian /Spanish / German
17. Firmware Update
Before execute, please save the firmware files to the USB device,
and insert the USB device into DVR
DVR can not interrupt power source when updating the
firmware. After firmware update, the DVR system will reboot
automatically.
18. Version
You can check the firmware version here to make sure if you
need to update the firmware
Page 21
18
H. Playback
Playback Method: Live screen on the device or on PC
On the device
(1) Click play button on the remote control during live
monitoring mode, to enter playback page.
(2) Click play button on the remote control, to enter playback
page.
(3) To select search type then click enter button, to enter
playback list
:Manually Forced Recording
:G-Sensor Forced Recording
(4) To select the playback file, then click enter button to enter
the playback video file.
Playback on PC: To enter playback by unplug and read HDD
(1) To read the HDD with saving data on PC, then run the
player software
CarBox2.exe。
(2) Click “Playback” ,to enter playlist menu
(3) To select HDD, the video files will be shown in the playlist,
Click the video file to play.
Page 22
19
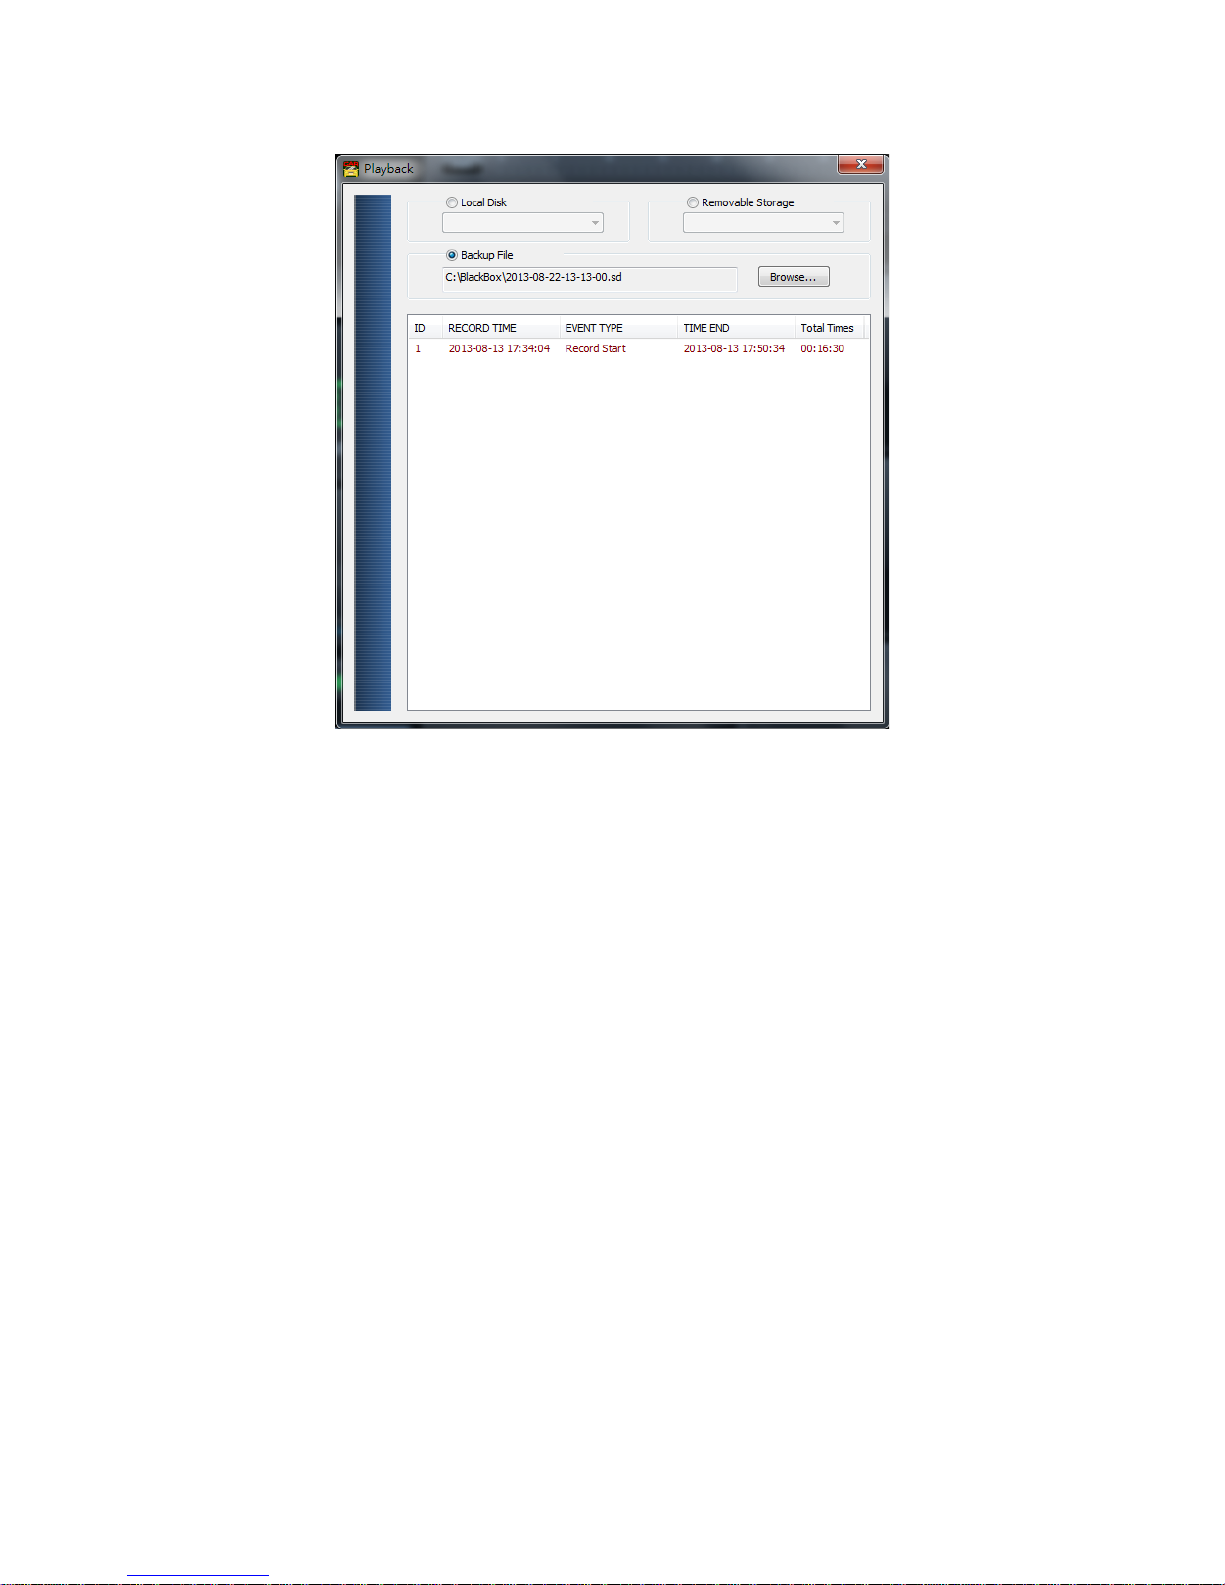
Playback List Display
Page 23
20
I. Carbox Player on PC site
1. Through Carbox Player on PC site
(1) Use HDD to playback directly
Execute the CarBox2.exe
from CD-ROM , the display as
showing below. Click
Play button to select HDD; or click
open file
to choose the files from hard disk, and then
double-click the file you want to play. Under playing mode
the
play key will switch to pause key.
★ Caution: It needs to install DirectX 9.0 or above before
running CarBox2 software.
2. Operating instruction
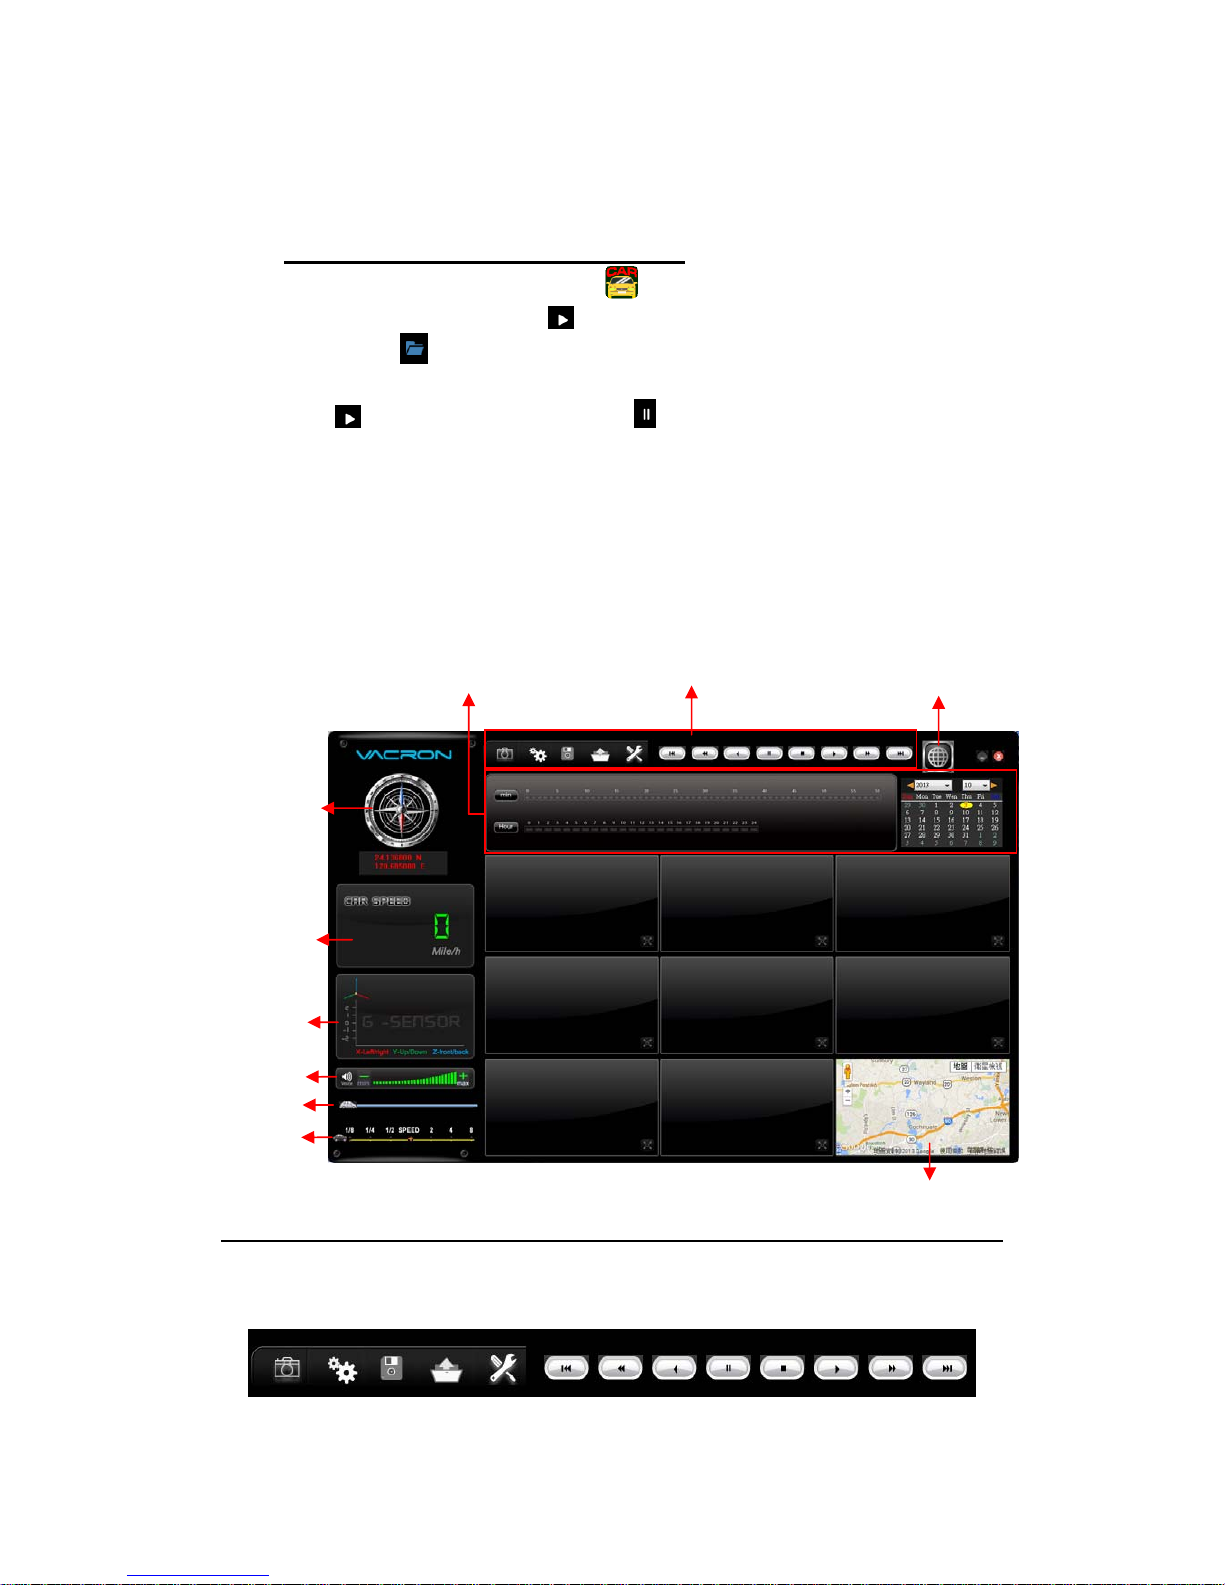
Viewer interface schematic
GPS Coordinate, Speed and Google Map (select models with 3G modules)
(1). Control interface description
GOOGLE Ma
p
Control Interface
G-Senso
r
Play speed
Play BAR
V
olume
GPS Coordinate
Speed
GOOGLE Ma
p
Playback date selection
Page 24
21
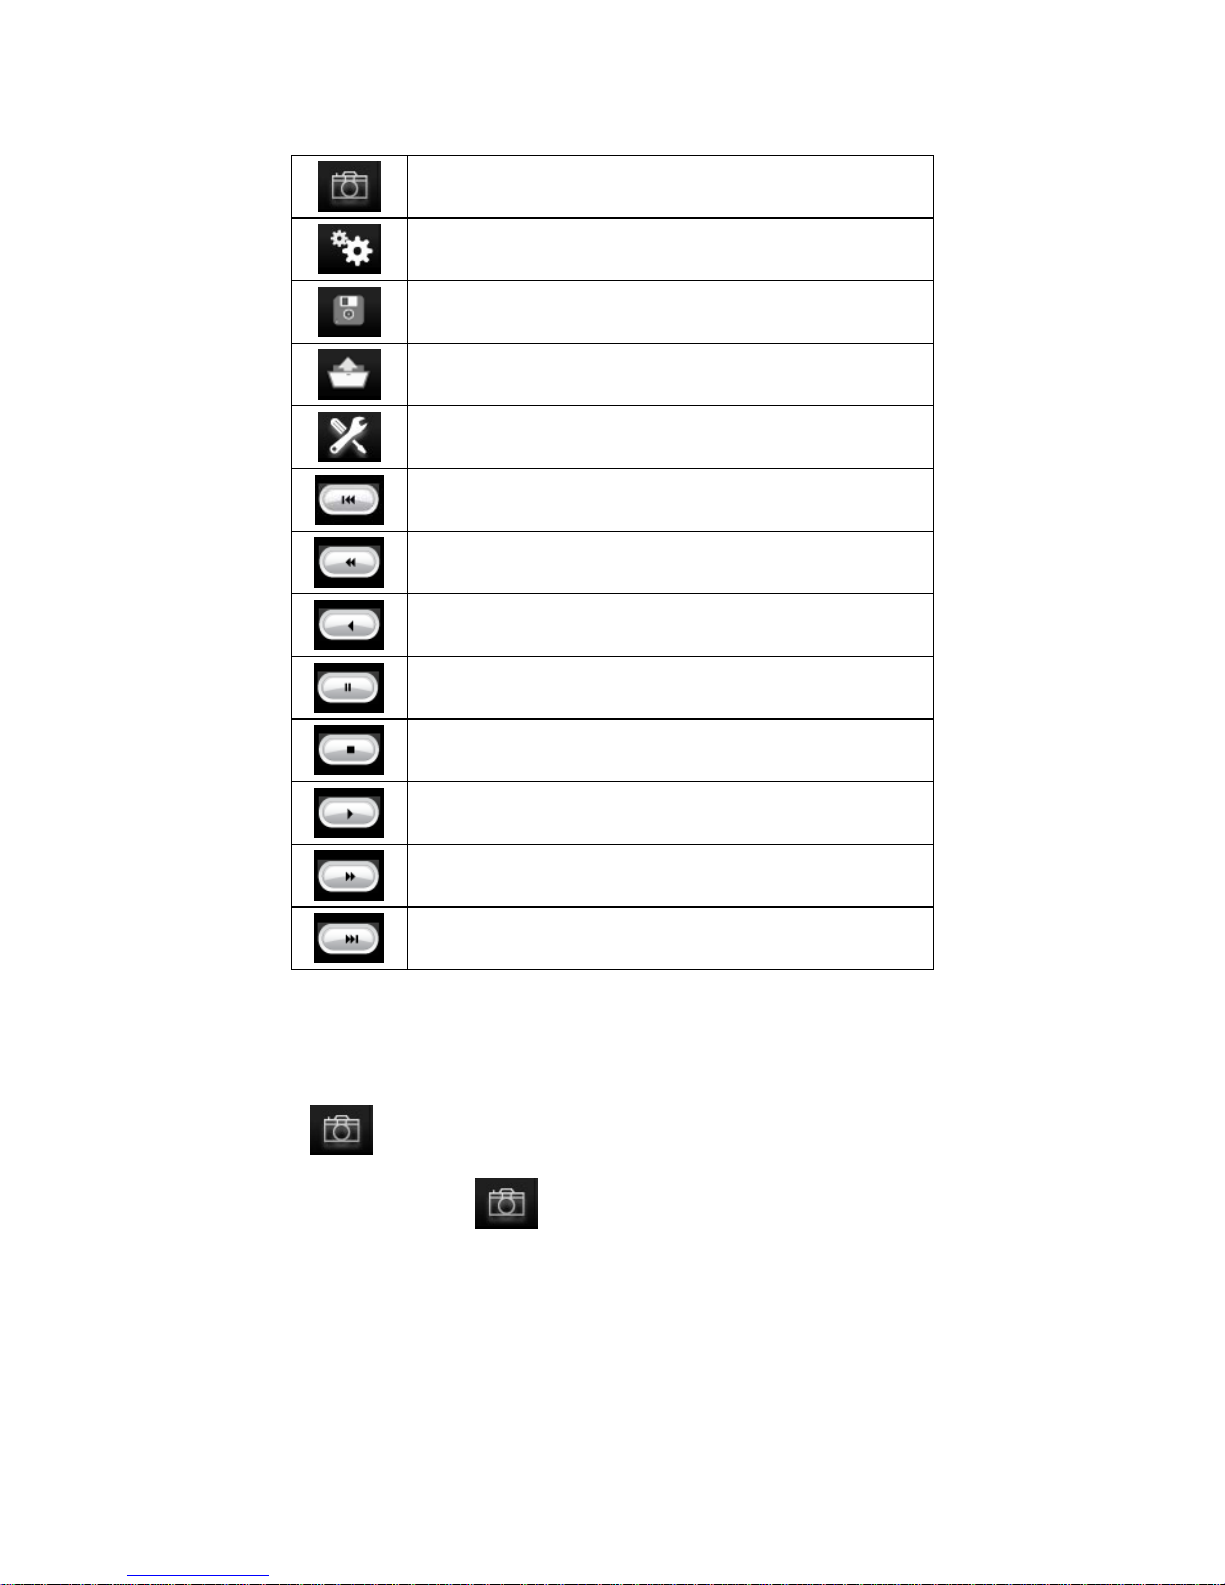
Snapshot
Configuration
Disk backup
Playback
Tool, HDD format, language setting.
Previous File
Previous Frame
Backward Play
Pause
Stop
Play
Next Frame
Next file
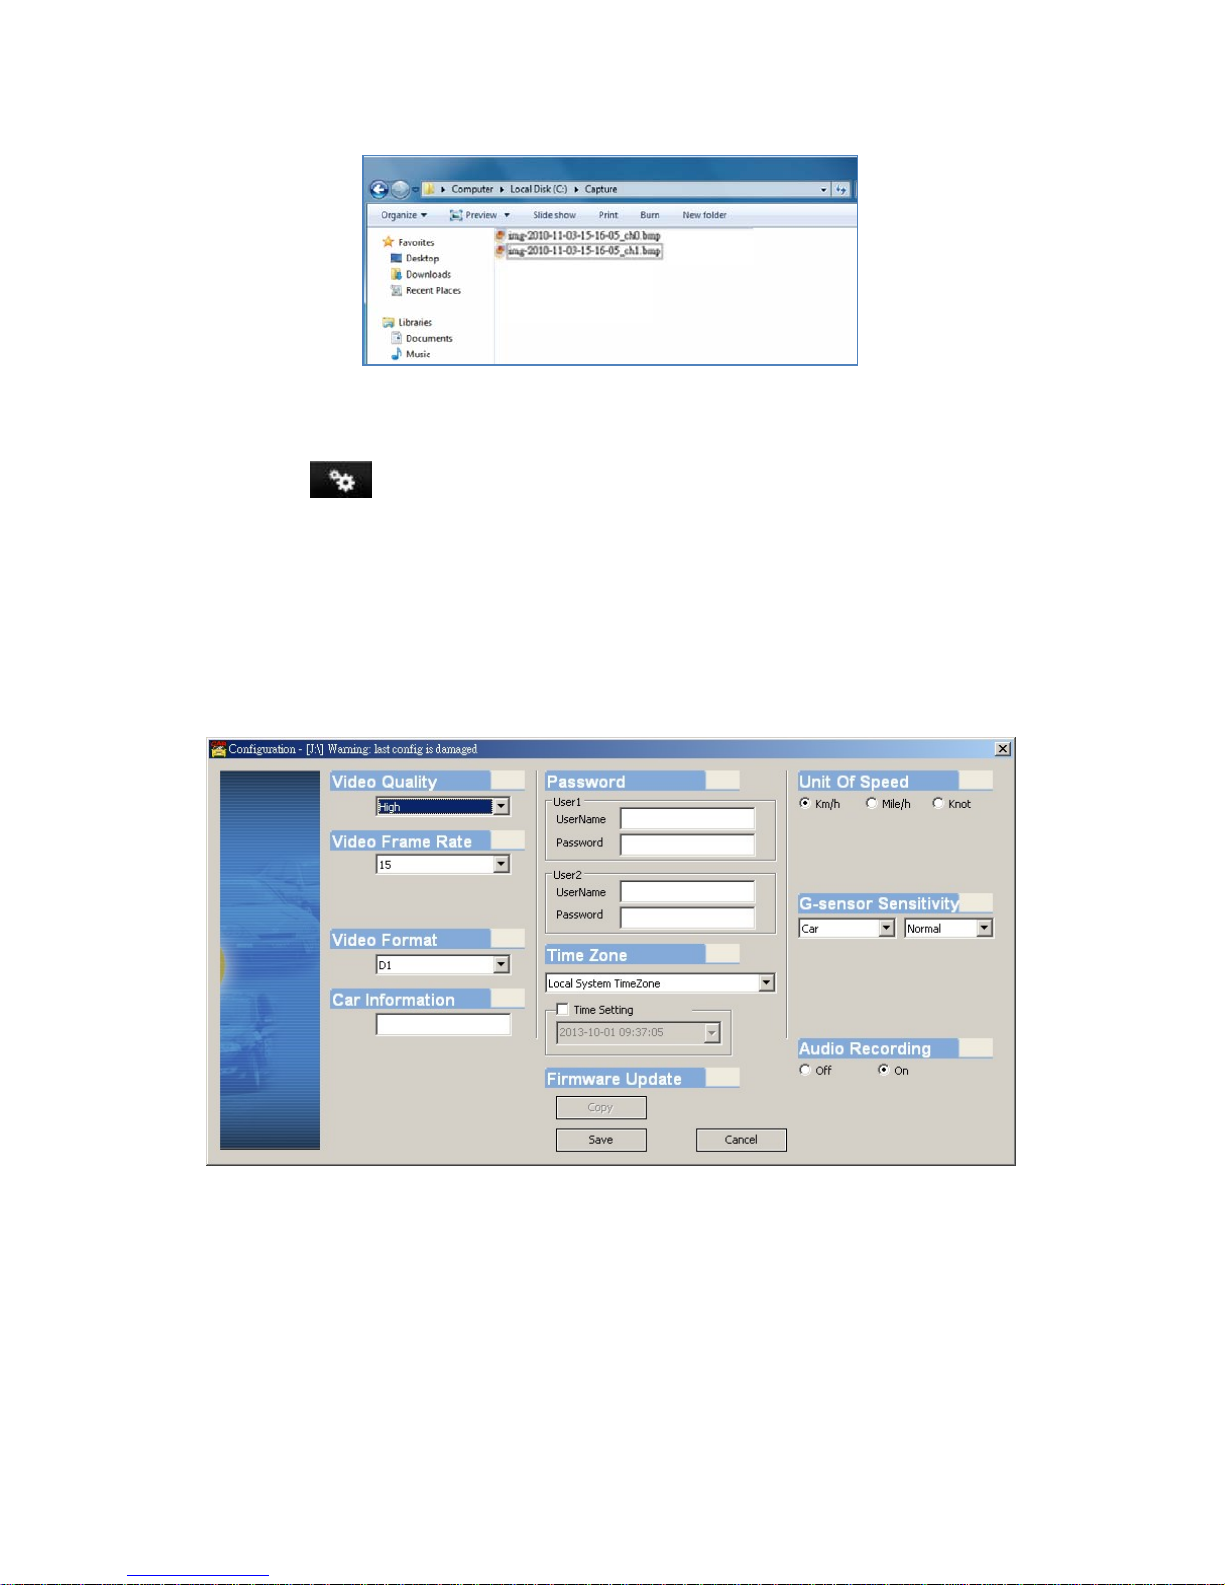
(1). Snapshot
Capture:Screen shoot
Click the
icon to capture the footage screen. The
Image will be save as .bmpfile format.
Player will show the backup folder automatically. The
default directory is the Snapshot folder. (Under the
Player installation folder)
Page 25
22
(2). Configuration
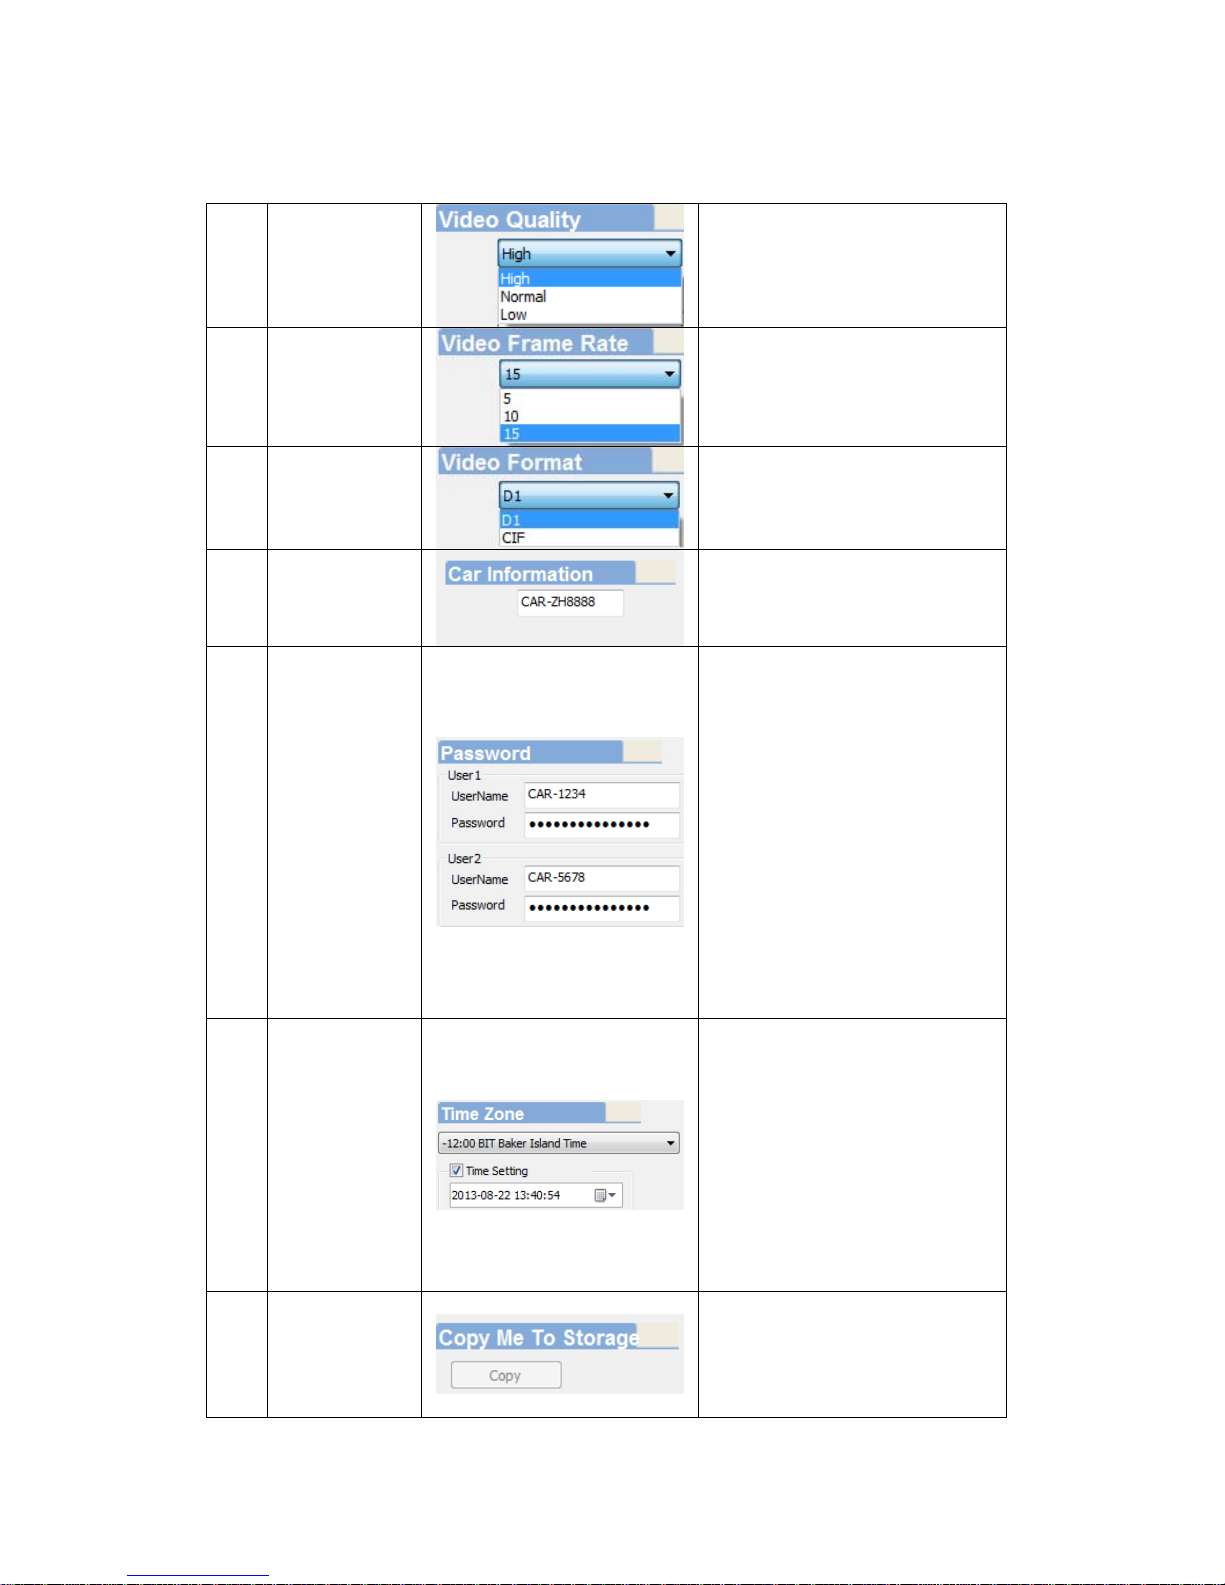
Configuration: Setup the general setting.
Before execute this function, please insert the HDD device
into your computer. When finish all setting and click
『Save』, all the setting will save to the HDD device. When
you insert the HDD device into your DVR, the DVR will read
the setting and follow the setting to start recording.
Page 26
23
1
Image
Quality
Choose the resolution:
High / Normal / Low
2 fps
Set the fps
D1 resolution:5~15
CIF resolution:5~30
3
Image
Format
Two format: D1 / CIF
4
Car
Information
Car License, Driver (For
Company car, Taxi, or
fleet)
5 Password
Encrypt the HDD device to
prevent others who not
permitted to access the
HDD device. String length:
15 character. After setting
the password, all actions,
like Playback footage,
setting, format HDD
device, need the
password.
★ Note: Upper
character and lower is
different.
6 Time Zone
GMT setting, to adjust the
time zone. ( need GPS
signal to adjust the
accurate time zone
automatically)
If choose 「Time
setting」, you need to set
the time by yourself.
7
Copy Player
to Storage
Copy all Player’ related
files to Storage
Page 27
24
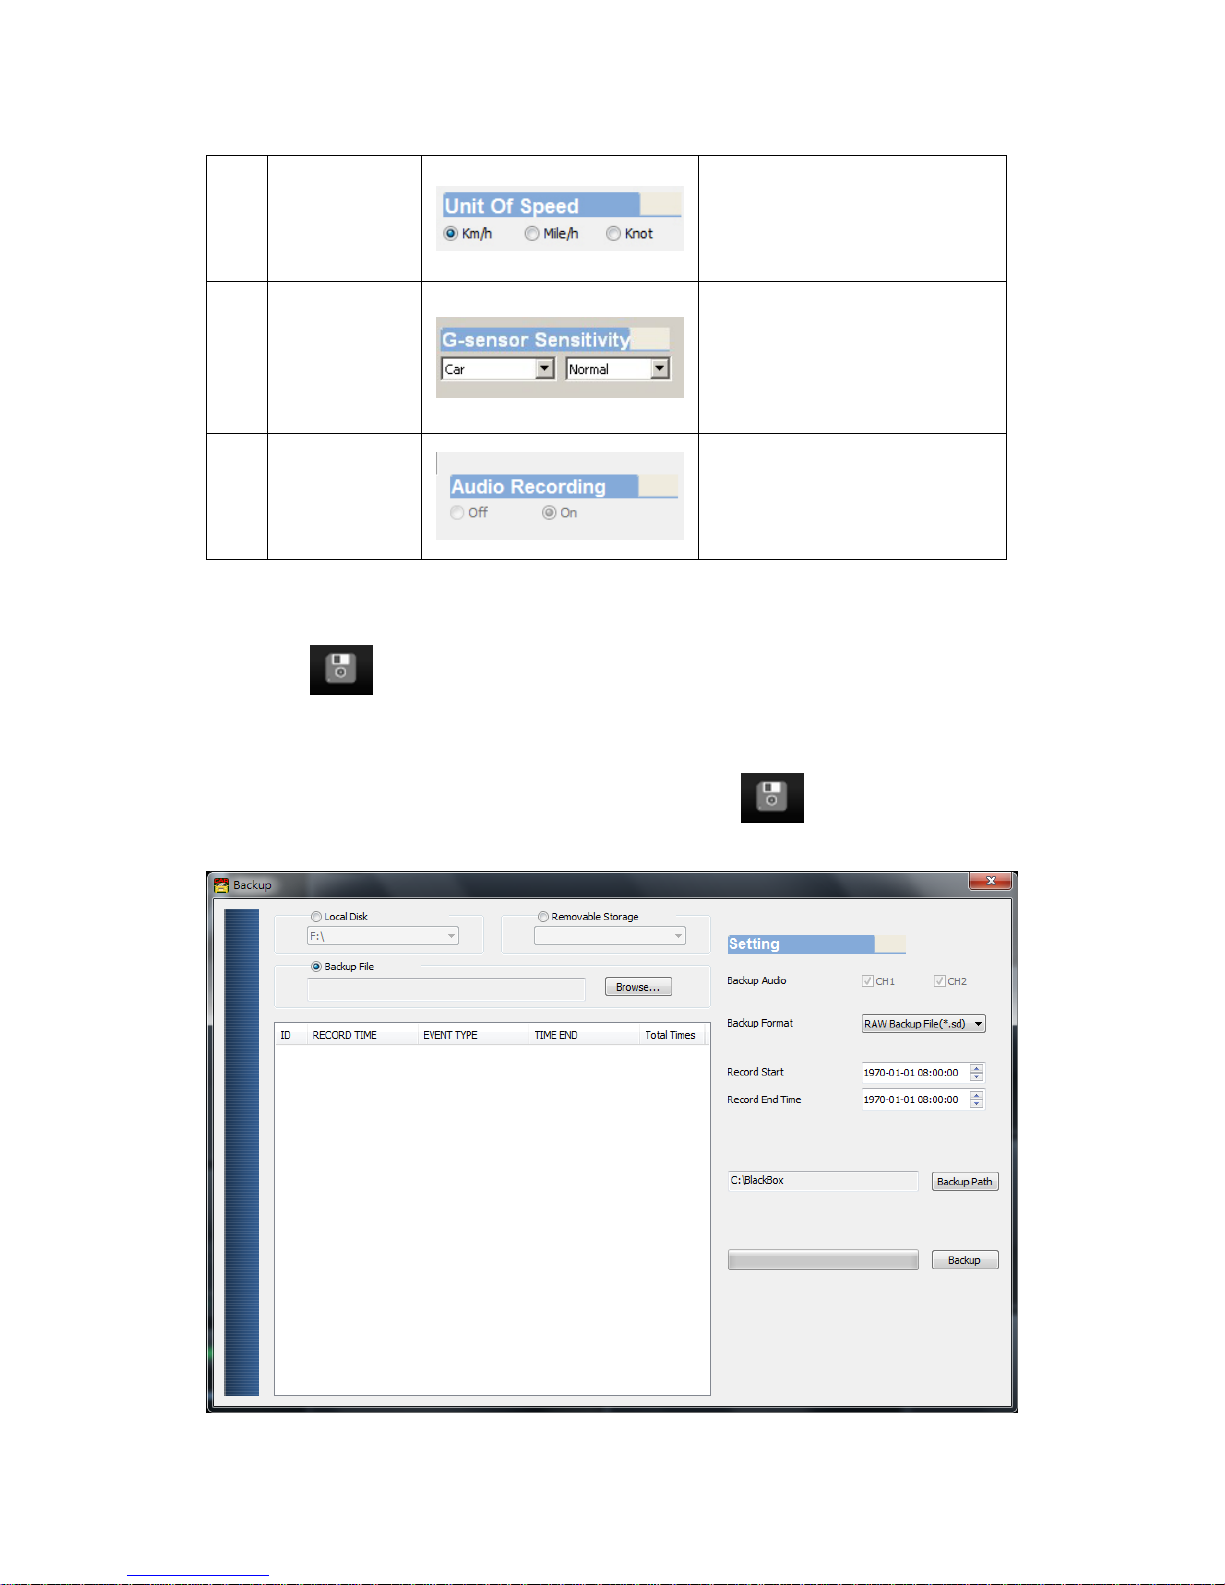
9 Speed Unit
Set the speed unit
Km/hr Mile/hr Knot
10
G-sensor
Sensitivity
G-sensor sensitivity
setting mode
Sensitivity setting:
(Min/Low/Normal/High/Ma
x)
11
Audio
Recording
Set Audio Recording off or
on.
(3). Backup
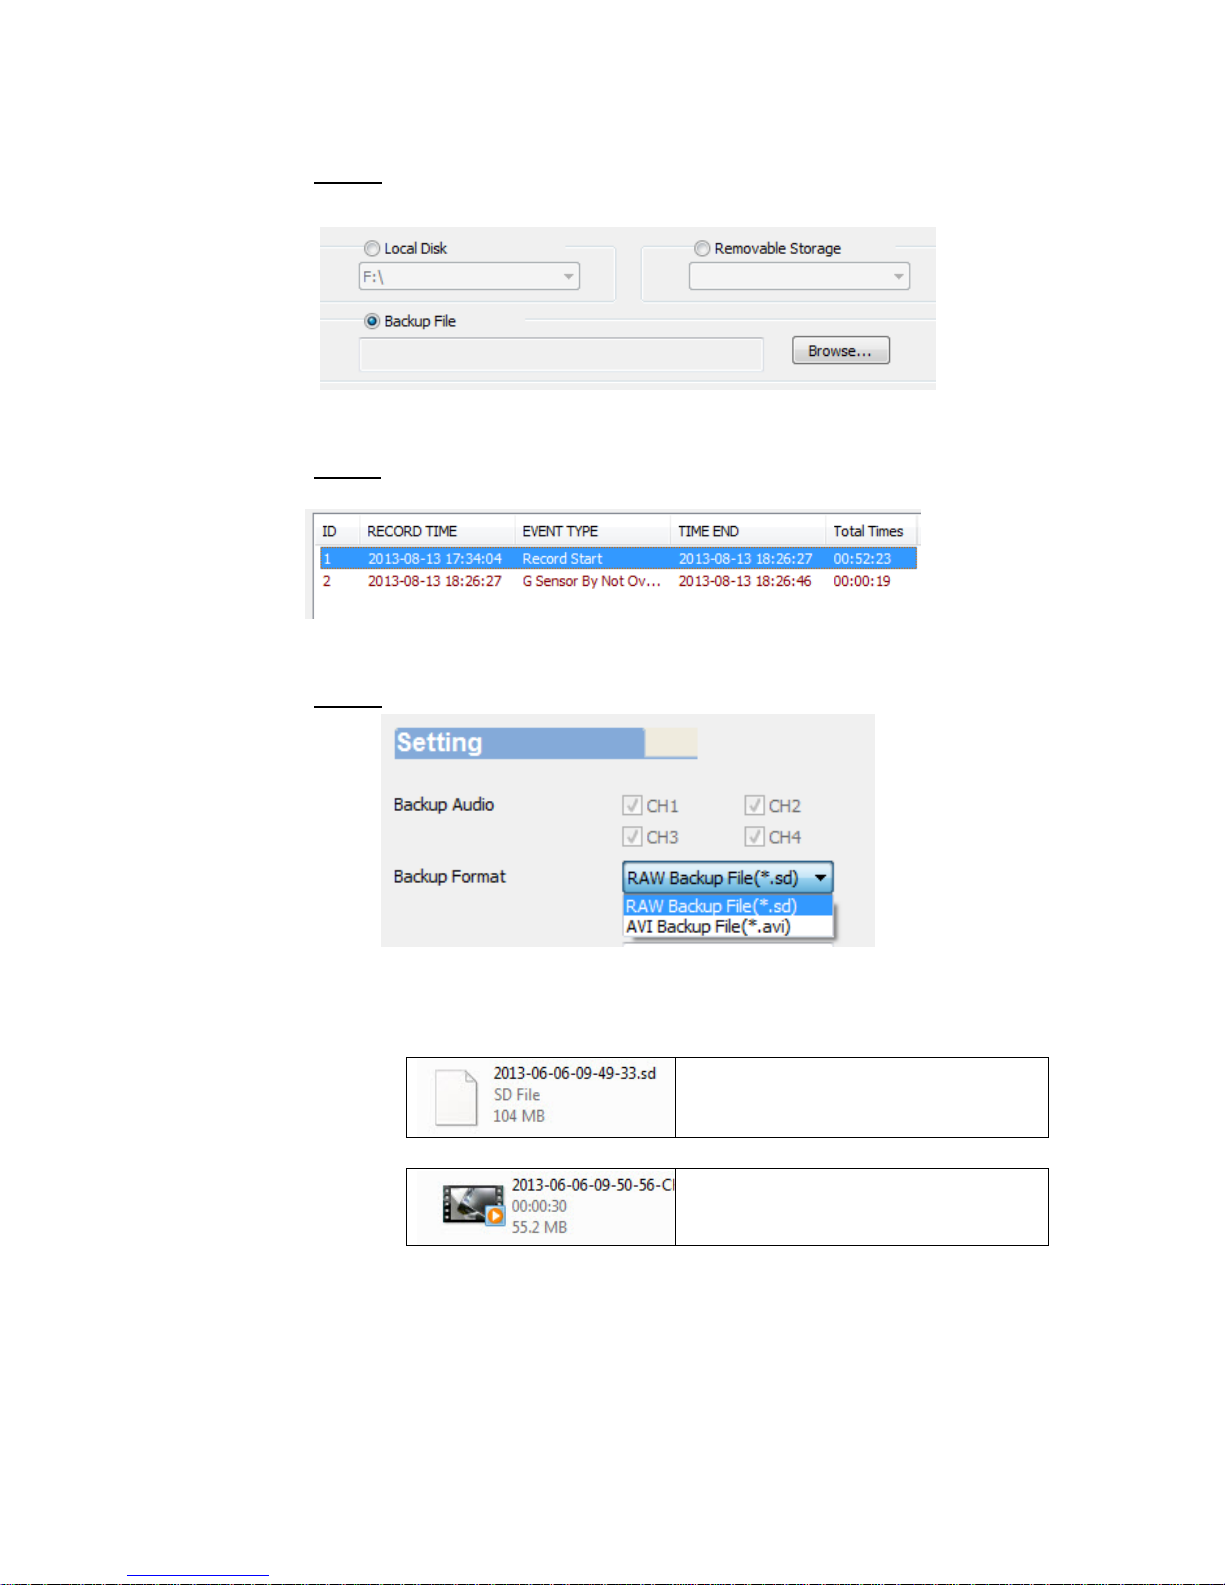
Backup folder: Choose the folder that backup file will
save.
You can backup the footage on the
HDD device to your
computer for data backup. Choose
icon to start the
backup function as the following :
Page 28
25
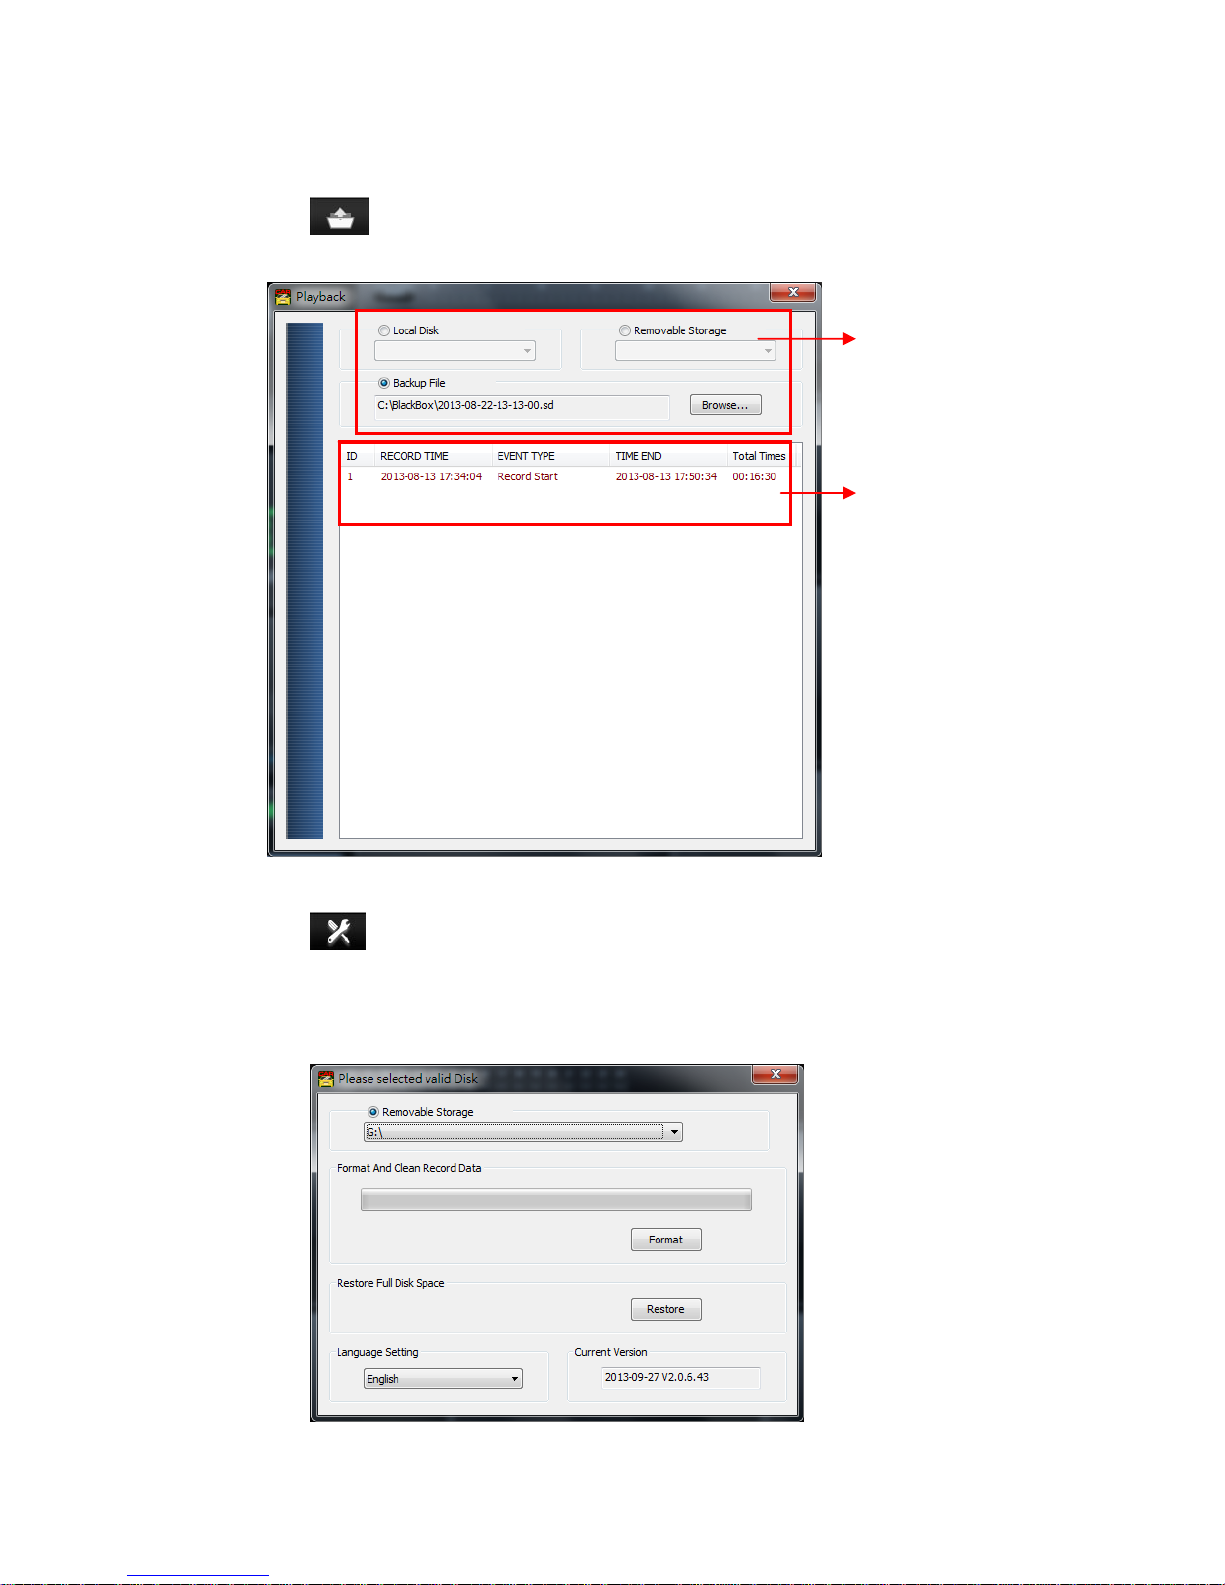
Step1.Choose the Local Disk, Removable Storage or
Backup File.
Step2
.Choose the file you want to backup on the
HDD device.
Step3
.Choose backup file audio and format
Backup format:
● SD format
*.sd
● AVI format
.avi
Note:*.sd format file contain image/ speed/ location
and G-SENSOR data. *.avi format only can backup
the video and audio. We recommend you backup as
*.sd format.
Page 29
26
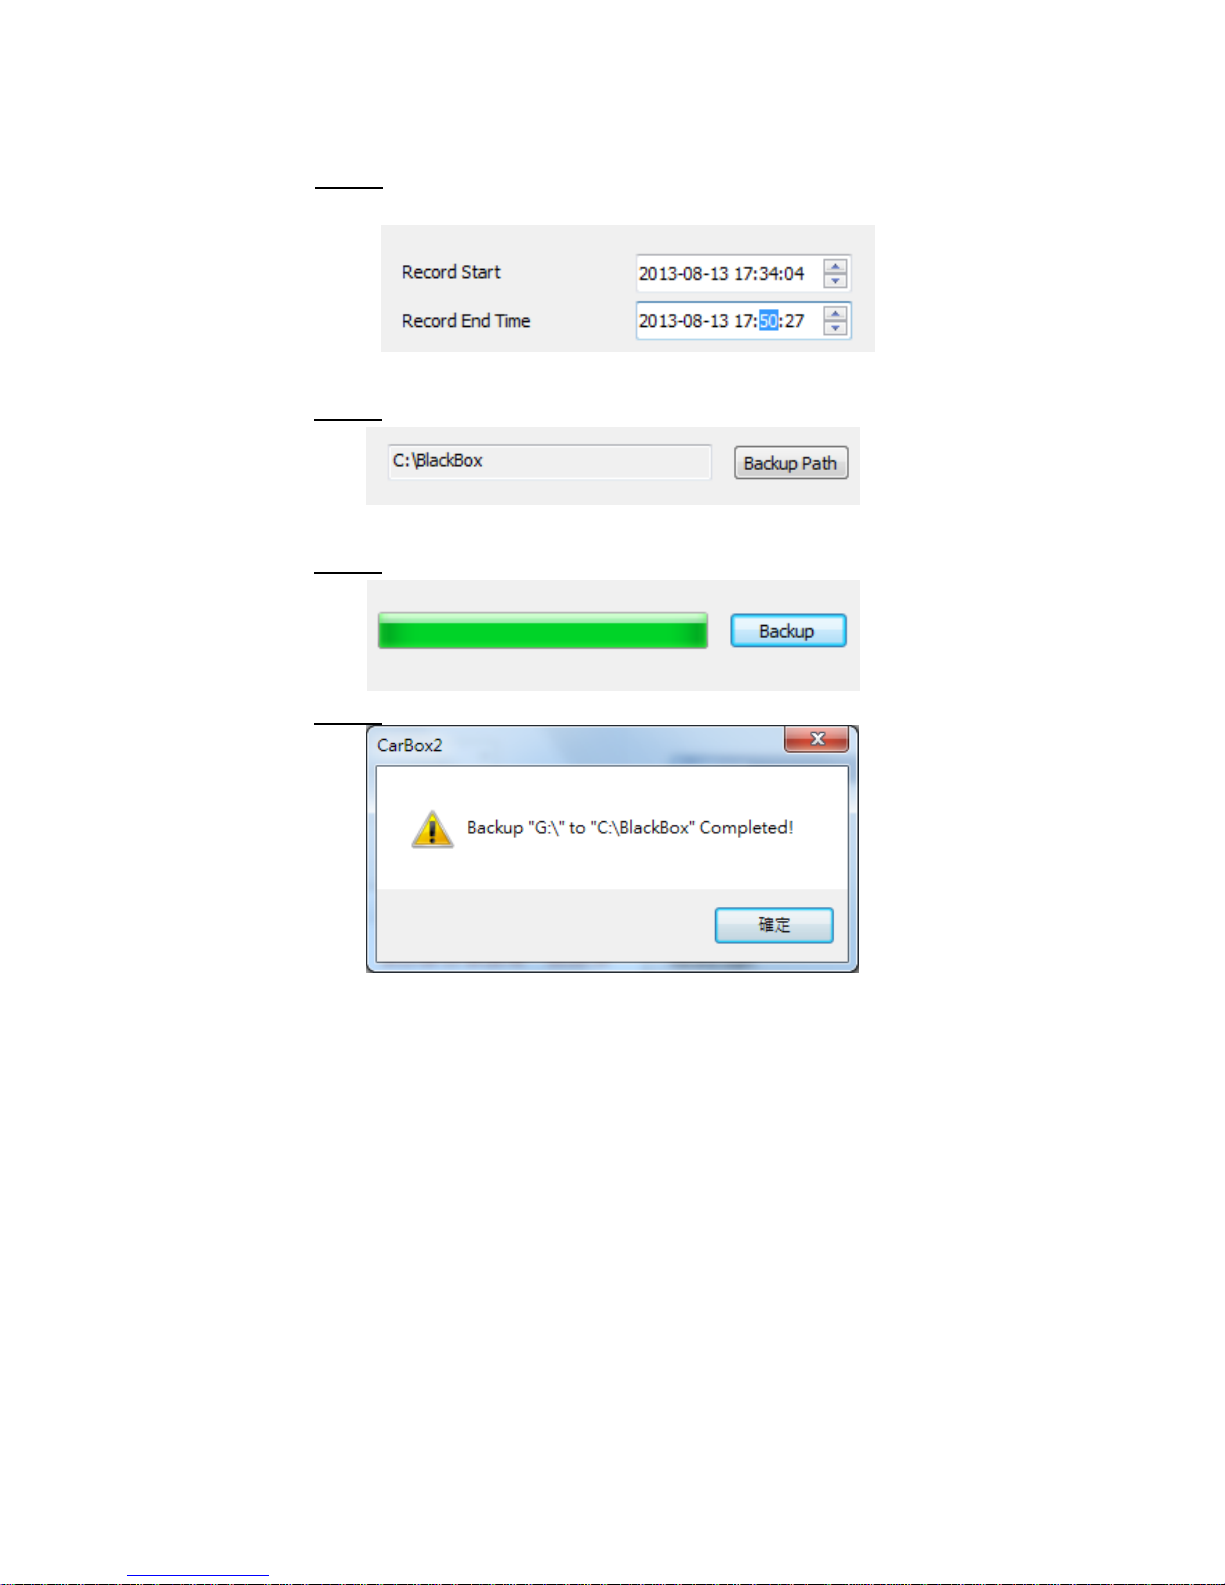
Step4.You also can choose a period to backup the footage
during the period.
Step5
.Choose the backup folder.
Step6
.Start to backup.
Step7. Backup Completed.
Page 30
27
(4). Playback
Playback the footage: Choose the file in HDD device or
in the computer to playback.
(5). Format
Format:Format the storage and Restore the storage
format to windows format. Language setting, Firmware
version. For Format and restore storage, please reference
the next item.
1. Choose the Local
Disk, Removable
Storage or Backup
2. Choose the
file
Page 31
28
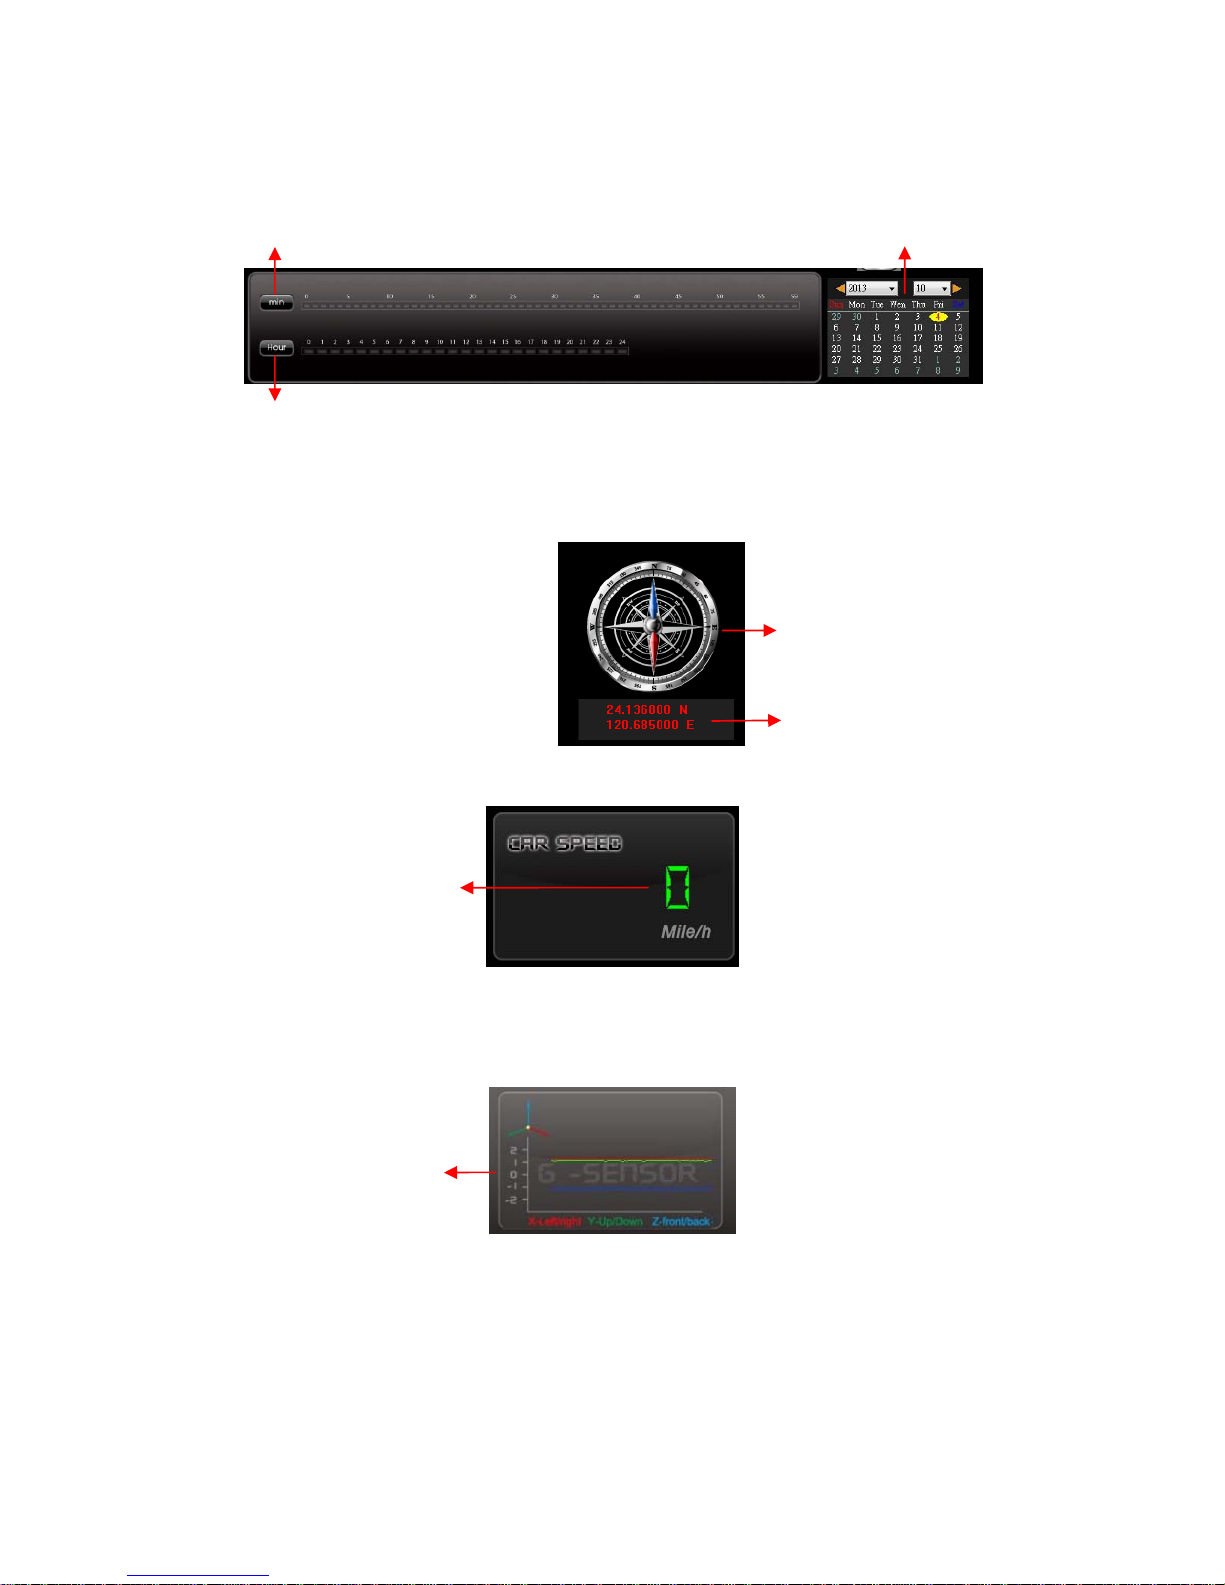
(6). Playback date selection
(7). Latitude & Longitude Coordinates
(8). Speed meter
(9). G SENSOR
G-sensor: Detect & record G-force data.
(1)
X: The G-force from left & right of the car.
(2)
Y: The G-force from front & back of the car.
(3) Z: The G-force from upside & downside of the car
Position
Latitude & Longitude
G SENSOR
Quick switching by minutes
Selecting by Hours/Minutes (24-hours)
Selecting by date
Speed
Page 32
29
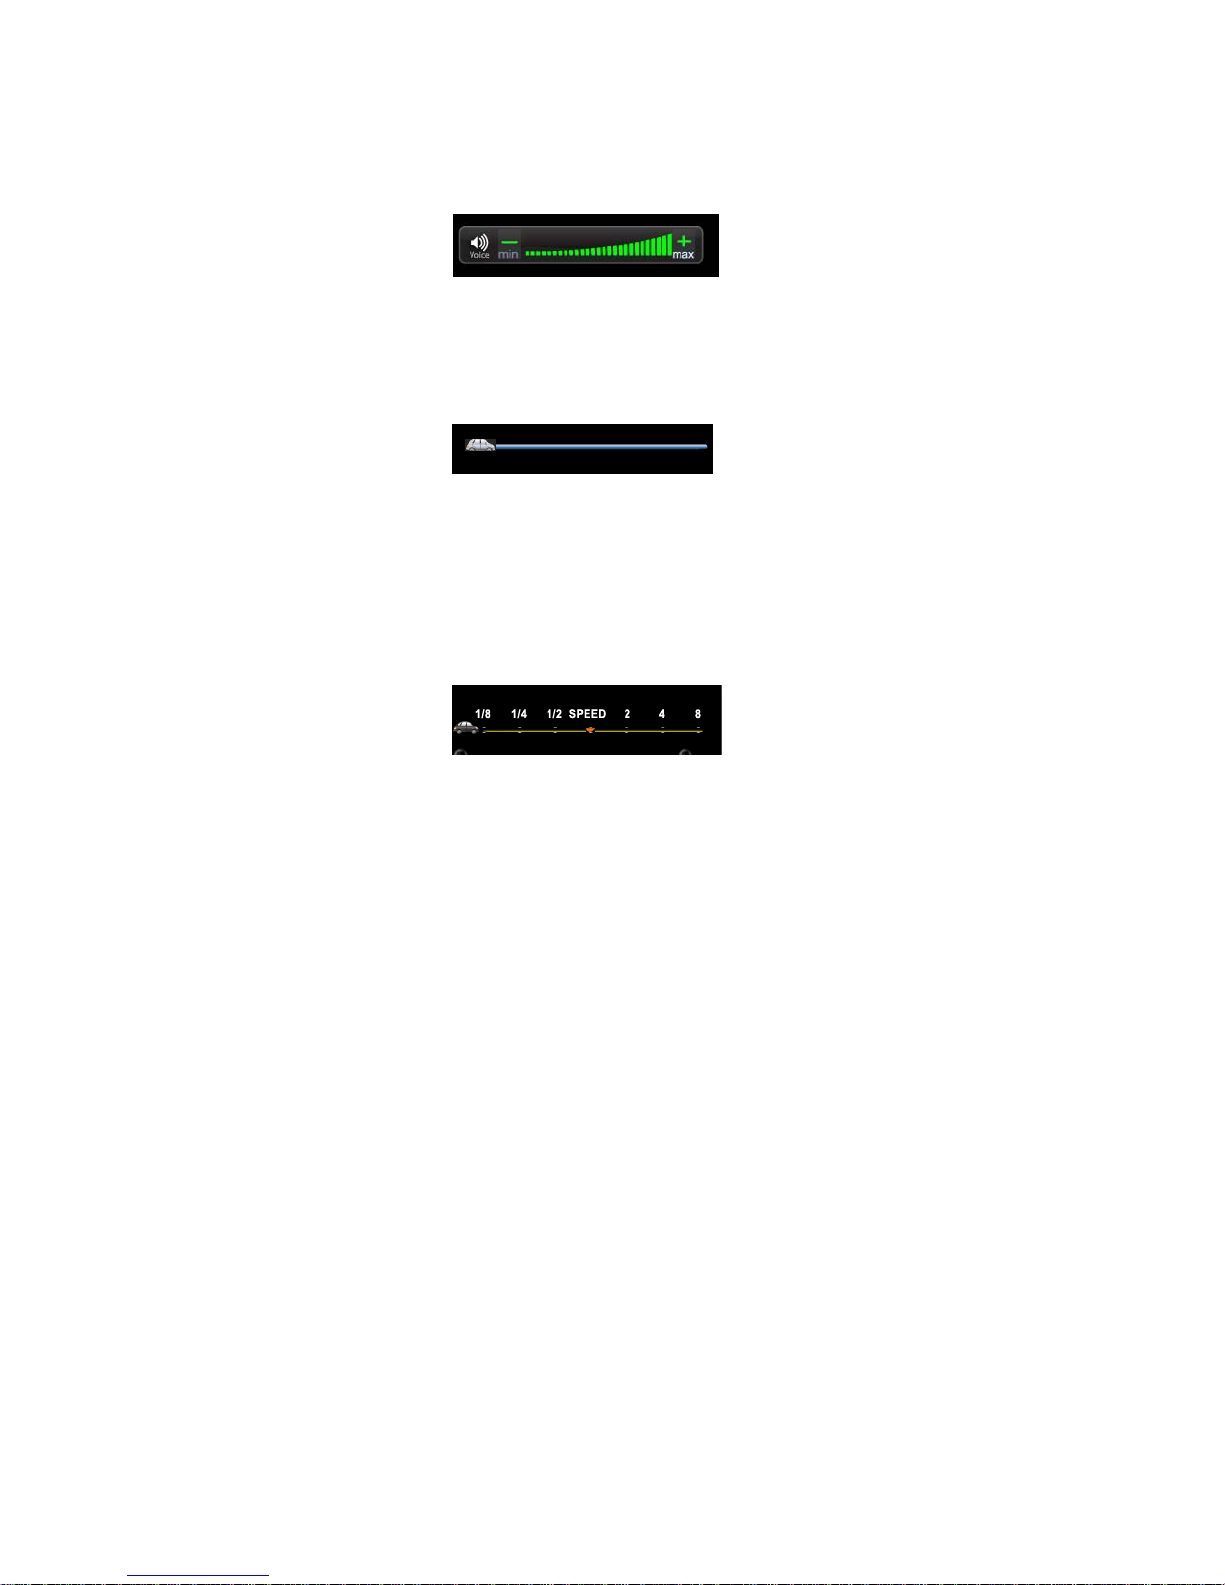
(10). Volume control
Volume BAR: Click the left button of mouse control to
adjust the volume degree.
(11). Video Search
Video Searching:You can use the mouse to drag the bar to
search the video quickly.
(12). Video Search & Play Speed
Play Speed: Support 2x, 4x 8x fast forwarding and -1/2x, -1/4x 1/8x slow play mode.
Page 33
30
J. HDD Format
When should you format the HDD?
For brand new HDD or an used HDD which is used in other
equipment before, it should be formatted before using.
(1) Format in your computer
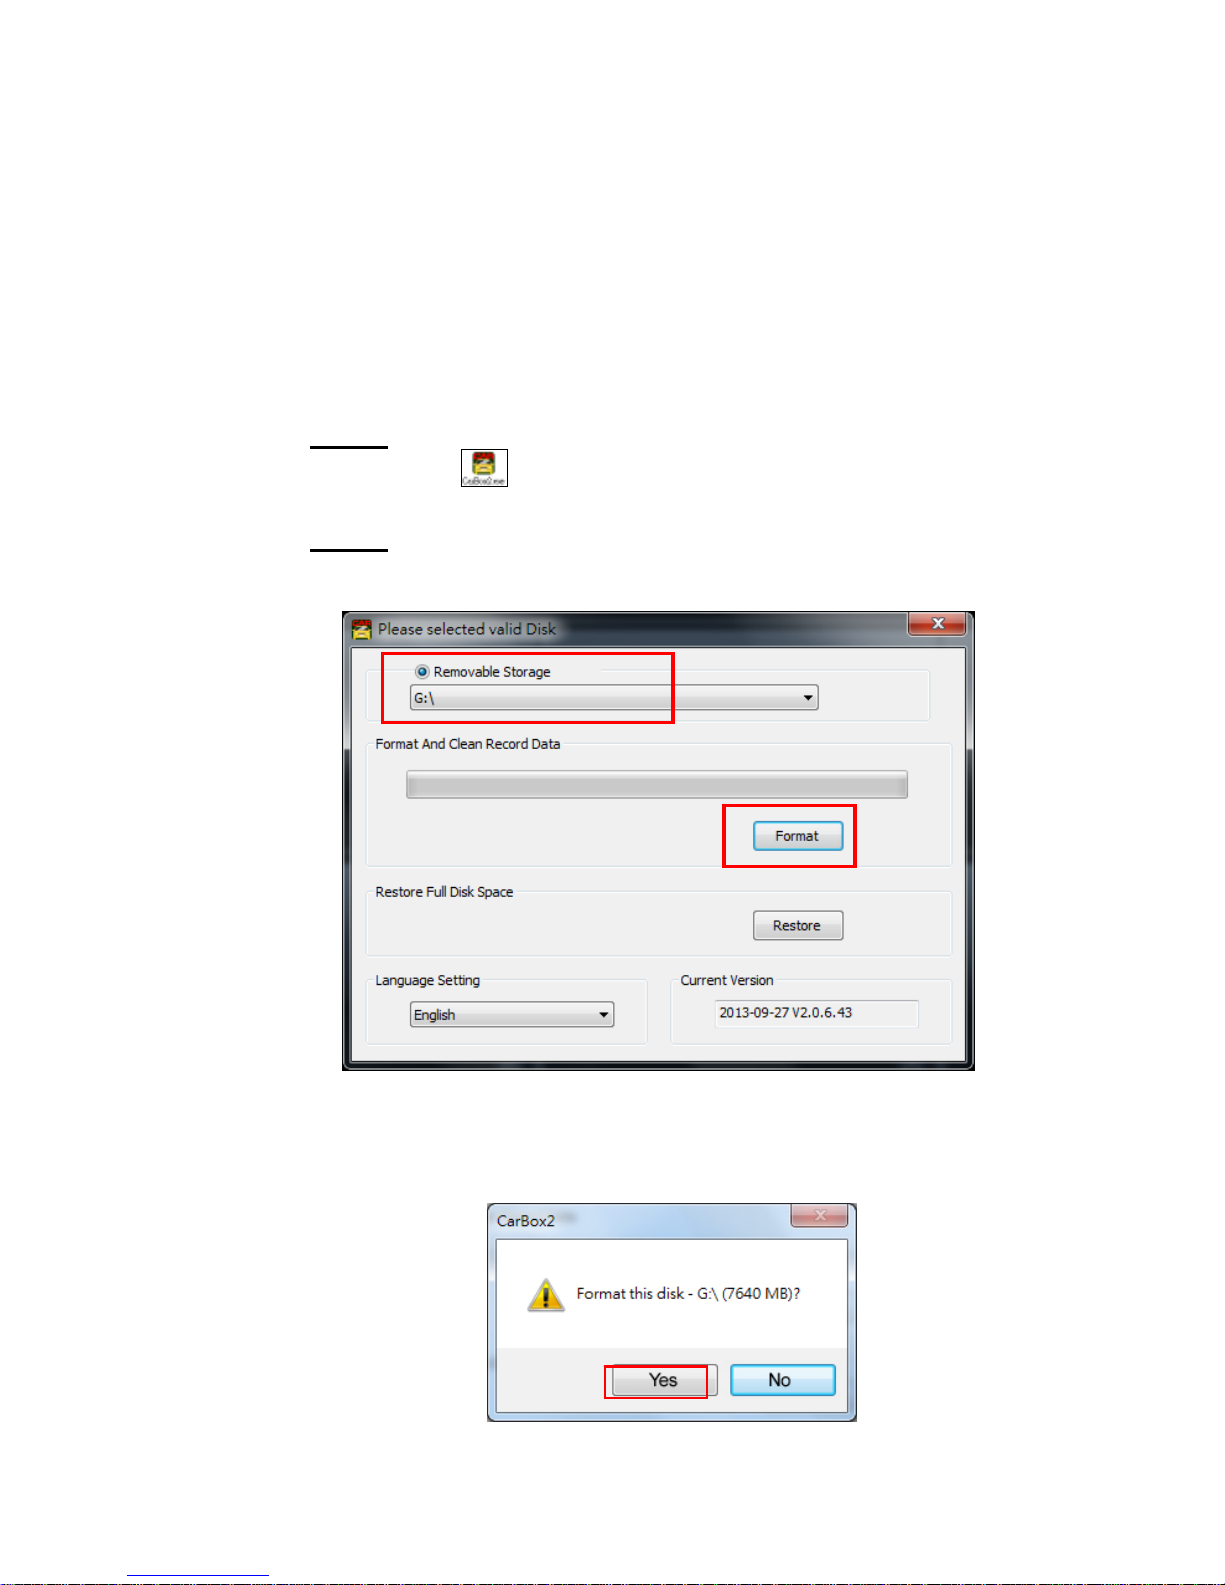
Step1. Connect the storage device / hard disk to PC.
Execute the
CarBox2.exe software (bundle in our
product CD)
Step2.
Select the path of HDD, and click “Format” to start
formatting.
Step4. Windows pop up the menu as follows and ask you to
answer 『Start to Format this device?』, Please make sure
the disk drive is right, then press 『Yes』.
a.
b.
Page 34
31
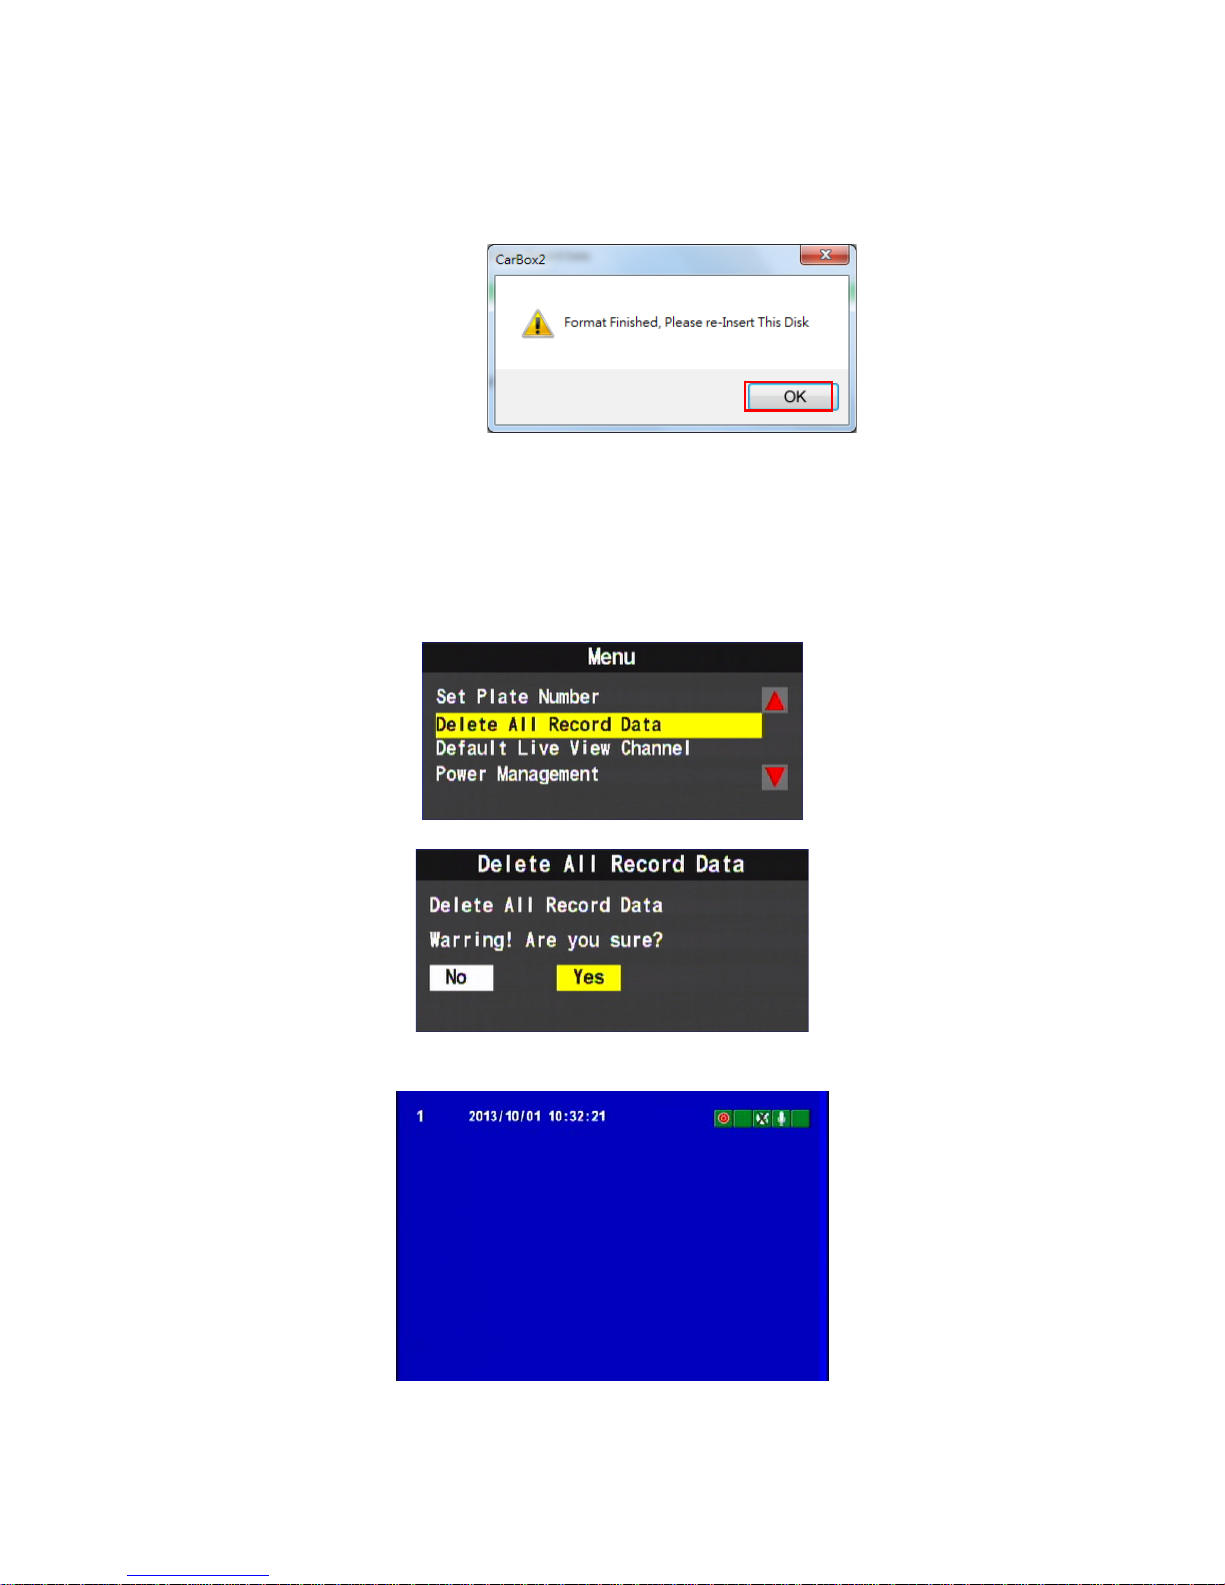
Step 5. When the format procedure finish, the following pop
window will show on your screen.
(After format, re-plug the storage device, then you can set up
related parameters and save. After setting, Install the HDD
into the DVR and it can start to work. )
(2) Process to Format the HDD on DVR:
1. Use remote controller to enter DVR menu and choose
Delete All the Record Data(format disk).
2. Select “Yes” and Click “Enter’’ to start formatting.
3. When the screen back to LIVE mode ,the formatting is
completed.
Page 35
32
K. Restore Storage Device
Q. When you need to restore the Storage?
A. If the storage device(HDD) will be used in other purpose.,
please back-up record footages to PC firstly and then restore it.
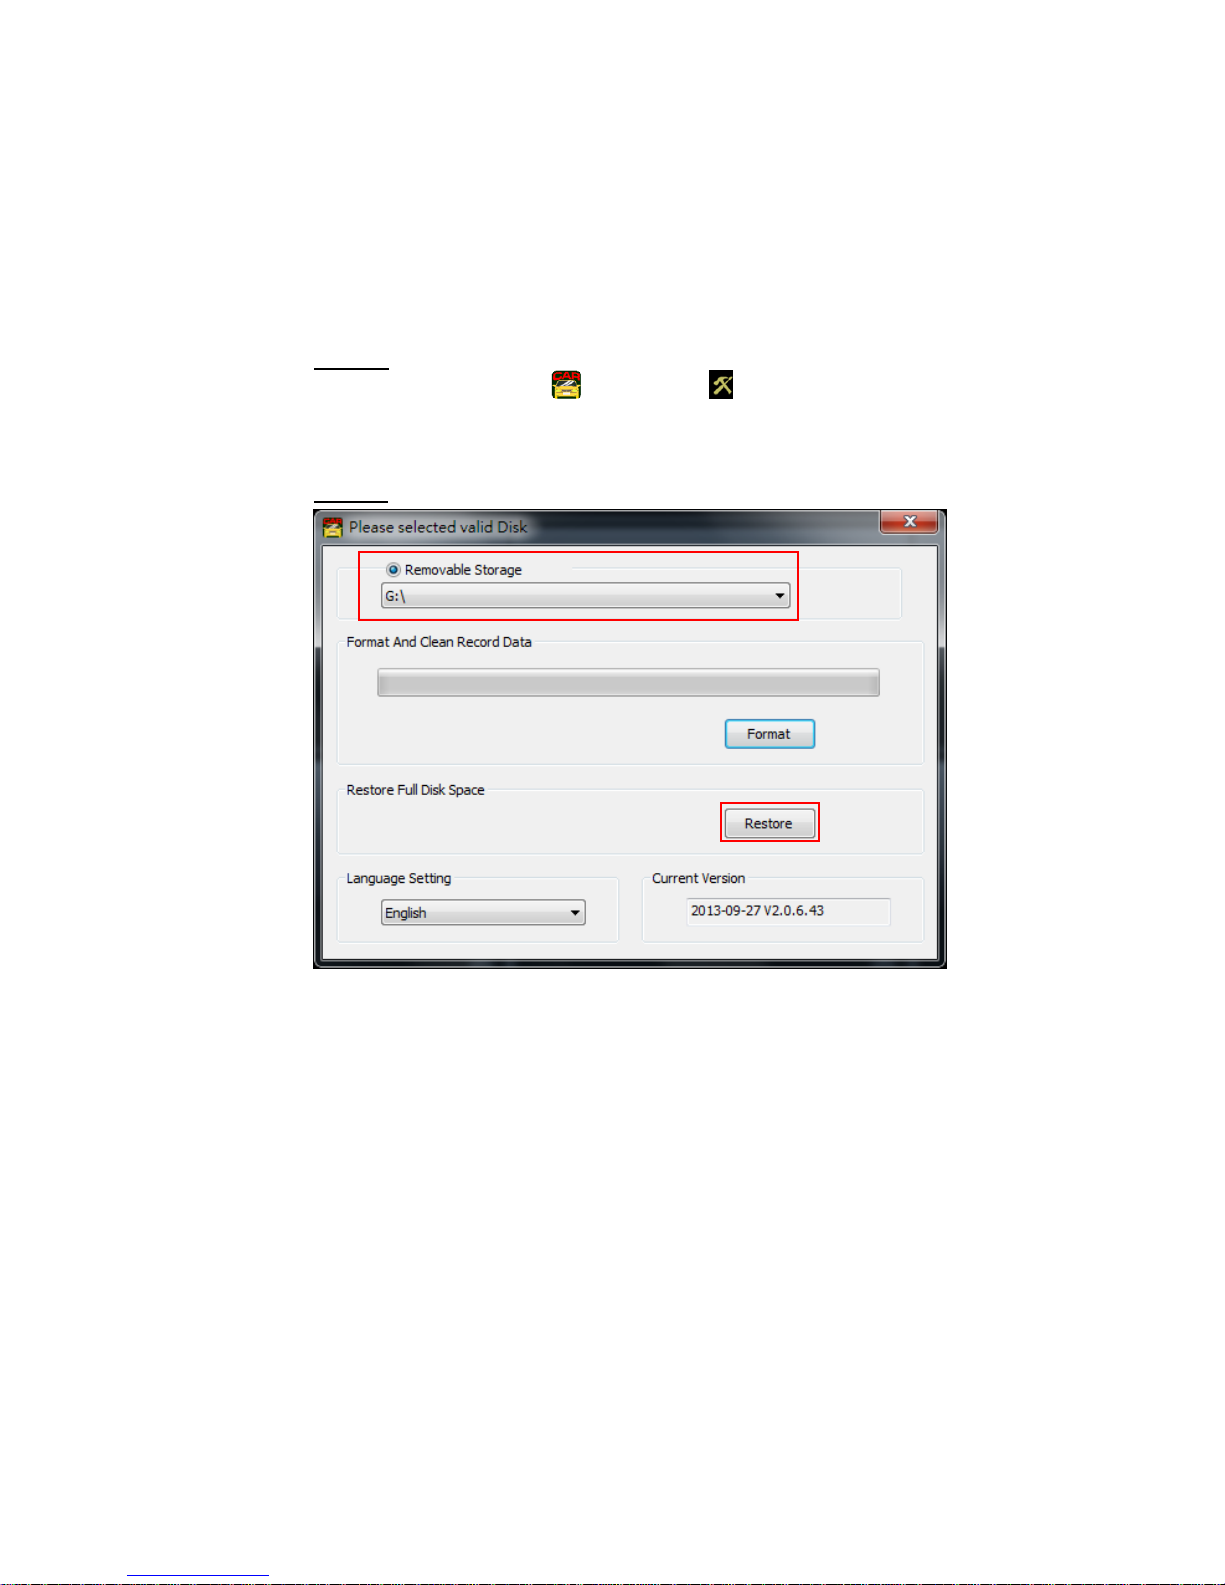
Step1.
Connect the storage device (hard disk) to PC.
Execute CarBox.exe
, one click to enter the following
page.
Step2.
Choose the Storage, then press 『Restore』
Page 36
33
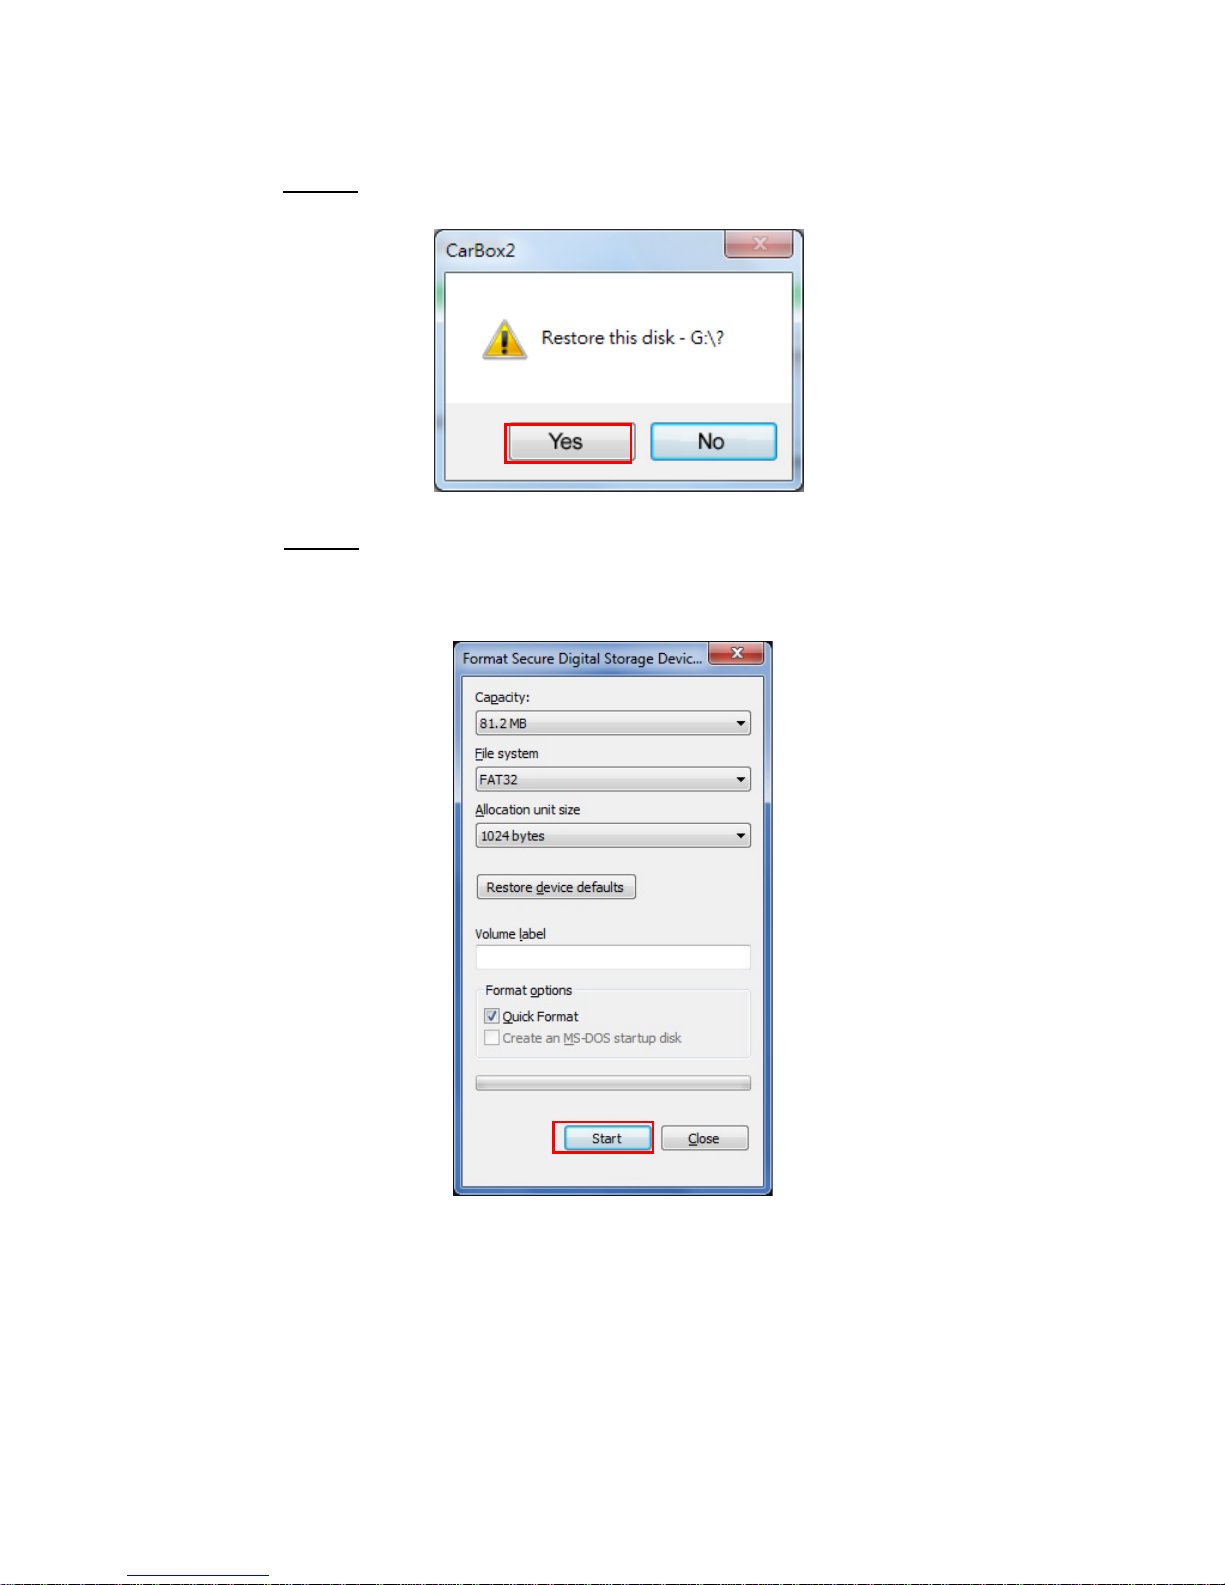
Step3.The following window will pop up, Click 『Yes』to start
restore the Storage.
Step4.
Now system will pop up the window to proceed the
format procedure, please choose 『Quick format』,
then click 『Start』.
Page 37
34
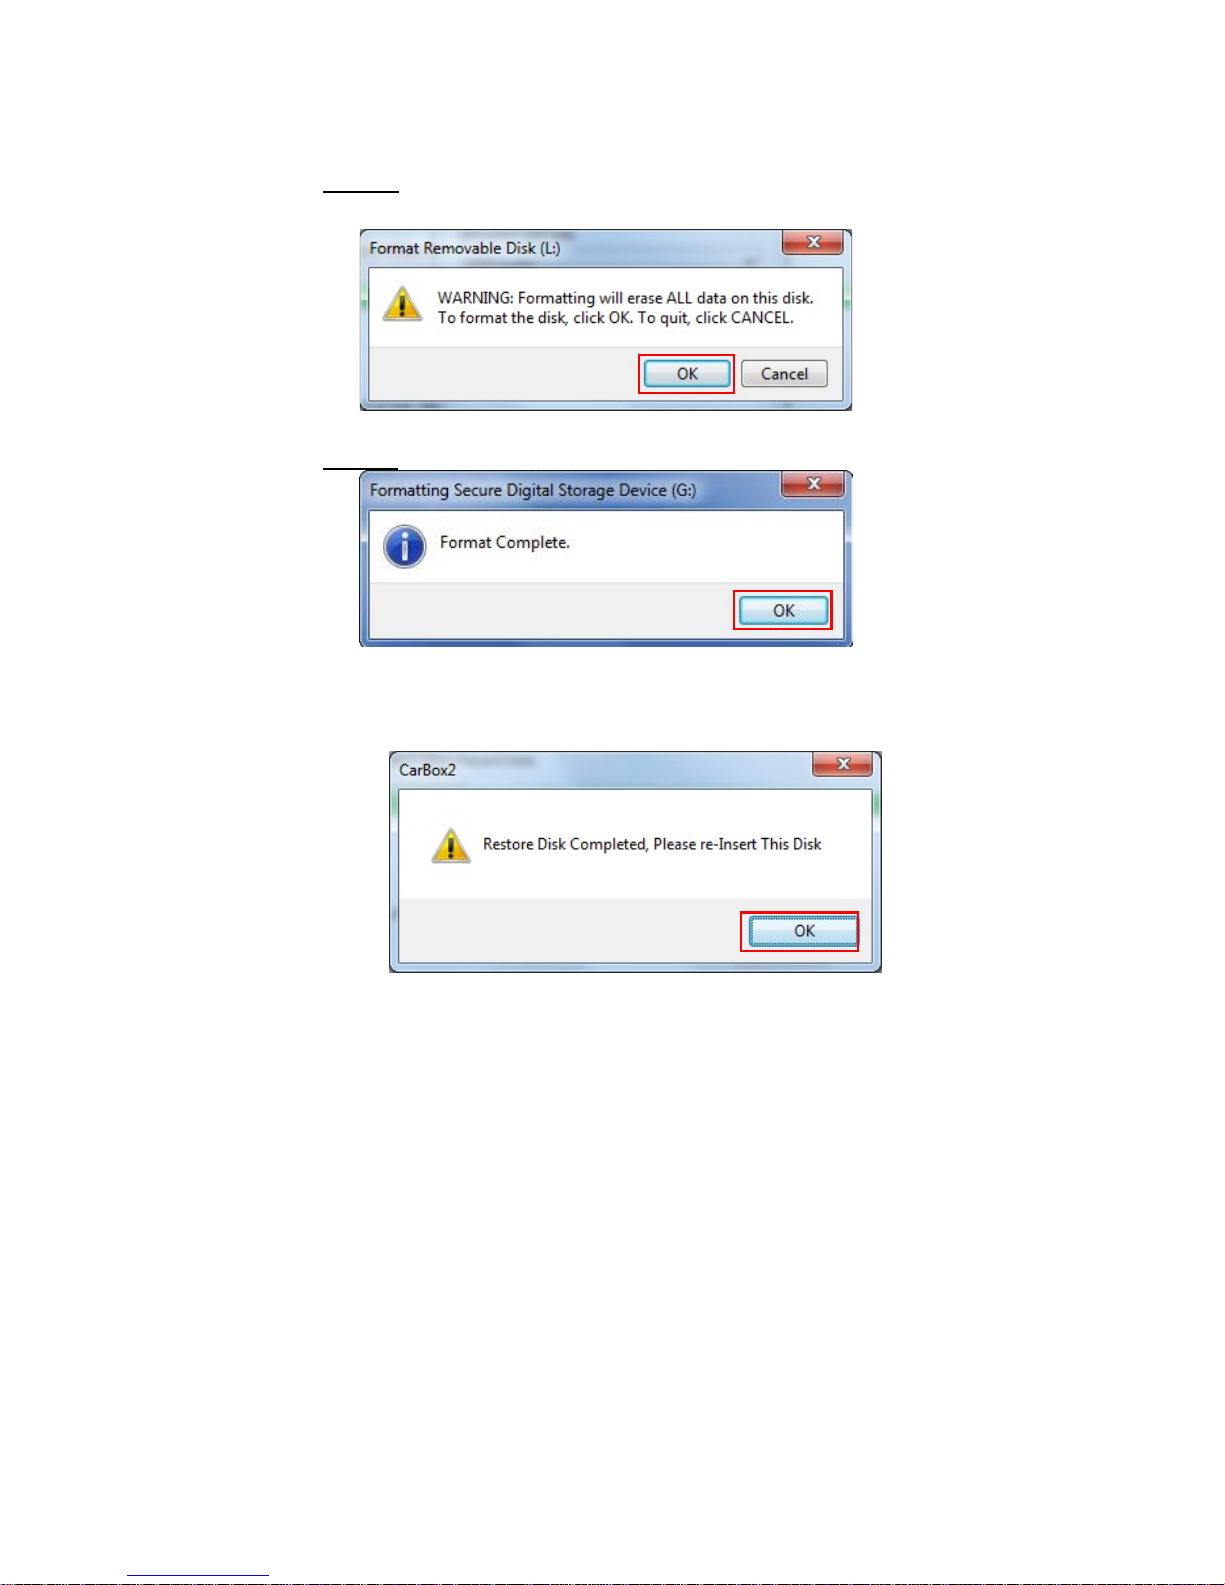
Step5. Click 「Yes」 to start formatting the Storage
Step6.
Click "OK" to finish restore HDD device.
Step7.After finished, press 『OK』。Then the Storage format
is normal windows format.
Page 38

35
L. 3G Internet Setting
(1) SIM card setting
During using SIM card, the protected pin code must be
turned off, please refer to the following steps.
(For example like HUWEI CHT-E180 model, 3.5G USB
wireless adaptor)
Step1.
Plug in SIM card into 3G dongle then connect 3G
dongle to PC, the system will automatically execute Mobile
Partner
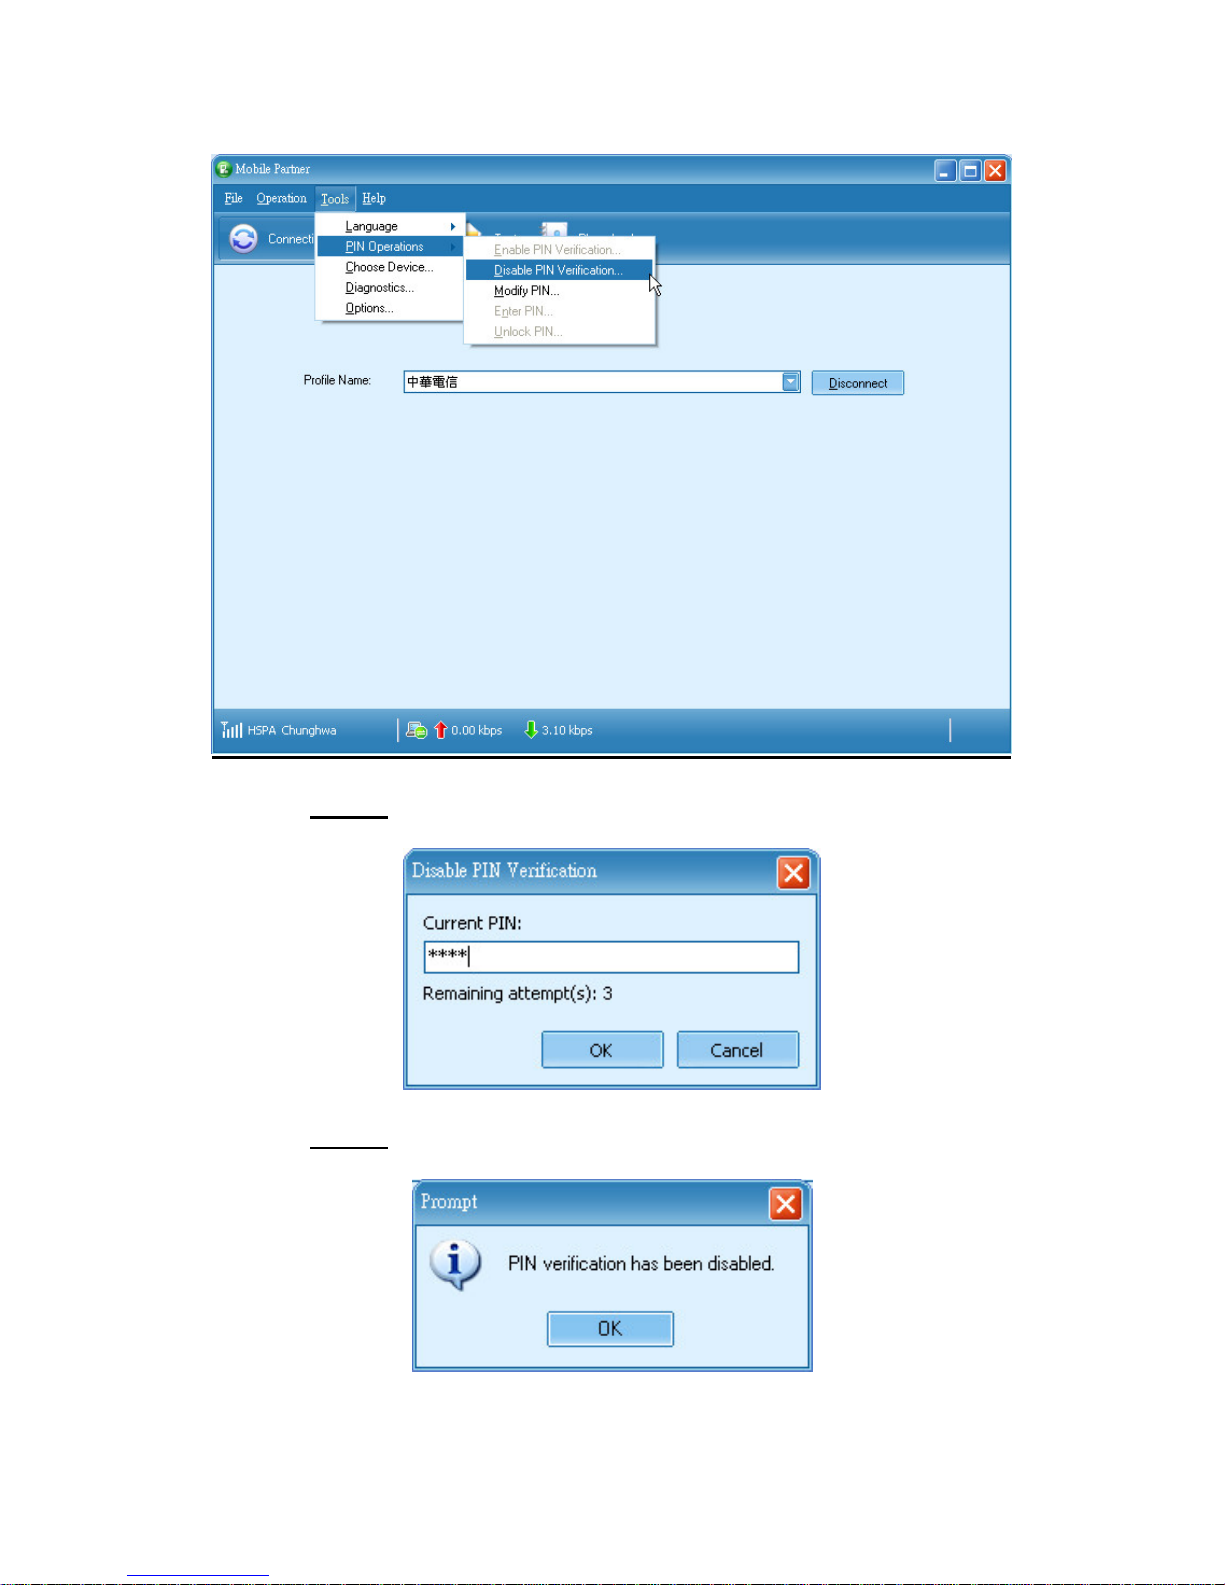
Step2.
Once enter the system, go to Tool-> PIN
operations-> Disable PIN Verification
Page 39
36
Step3.
Input the correct PIN numbers,
Default Setting: 0000
Step4.
After input PIN numbers, it will have a pop-up
message to complete disable PIN numbers
Page 40
37
Step5. After complete these steps, reinsert SIM card to the
socket on the device to activate.
(2) 3G-Network Setting
Setup the relative parameter of 3G-Network.
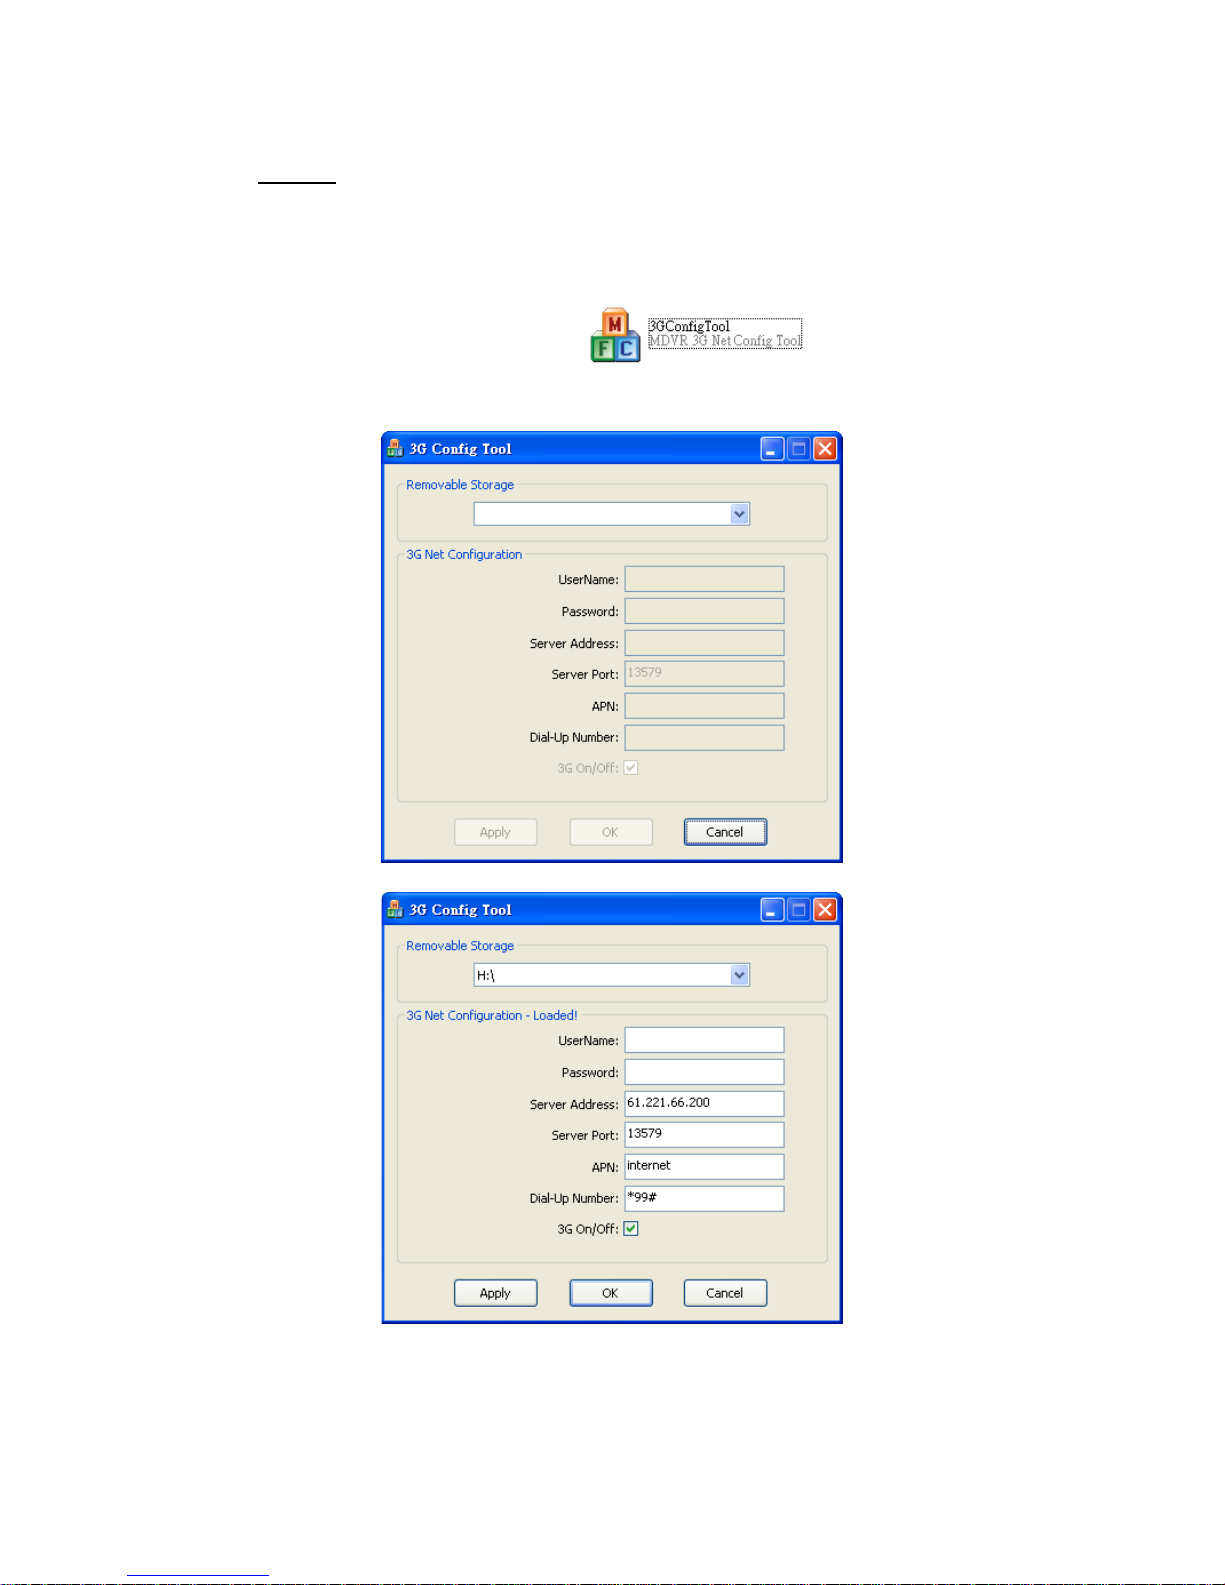
1.1 Please double click
and open the
setting page as below:
2.2 The explanation for setting up:
Page 41
38
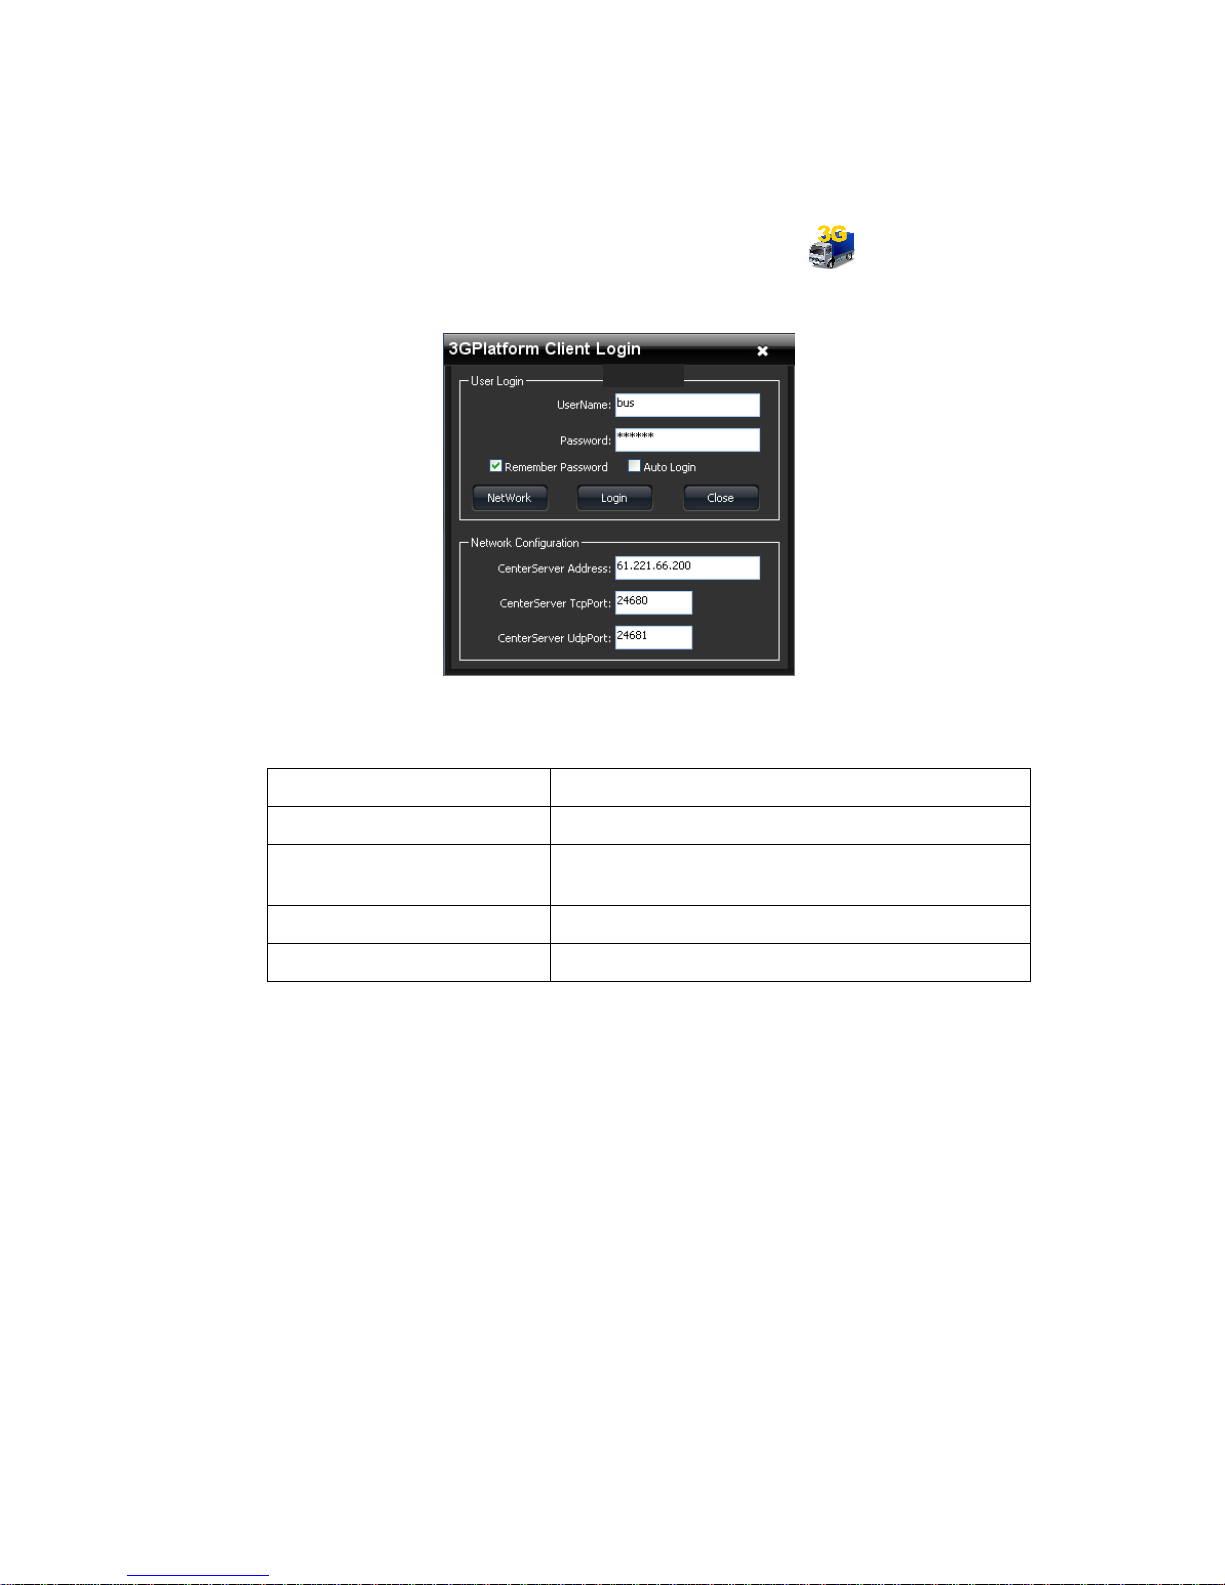
UserName: No need in common
Password: No need in common
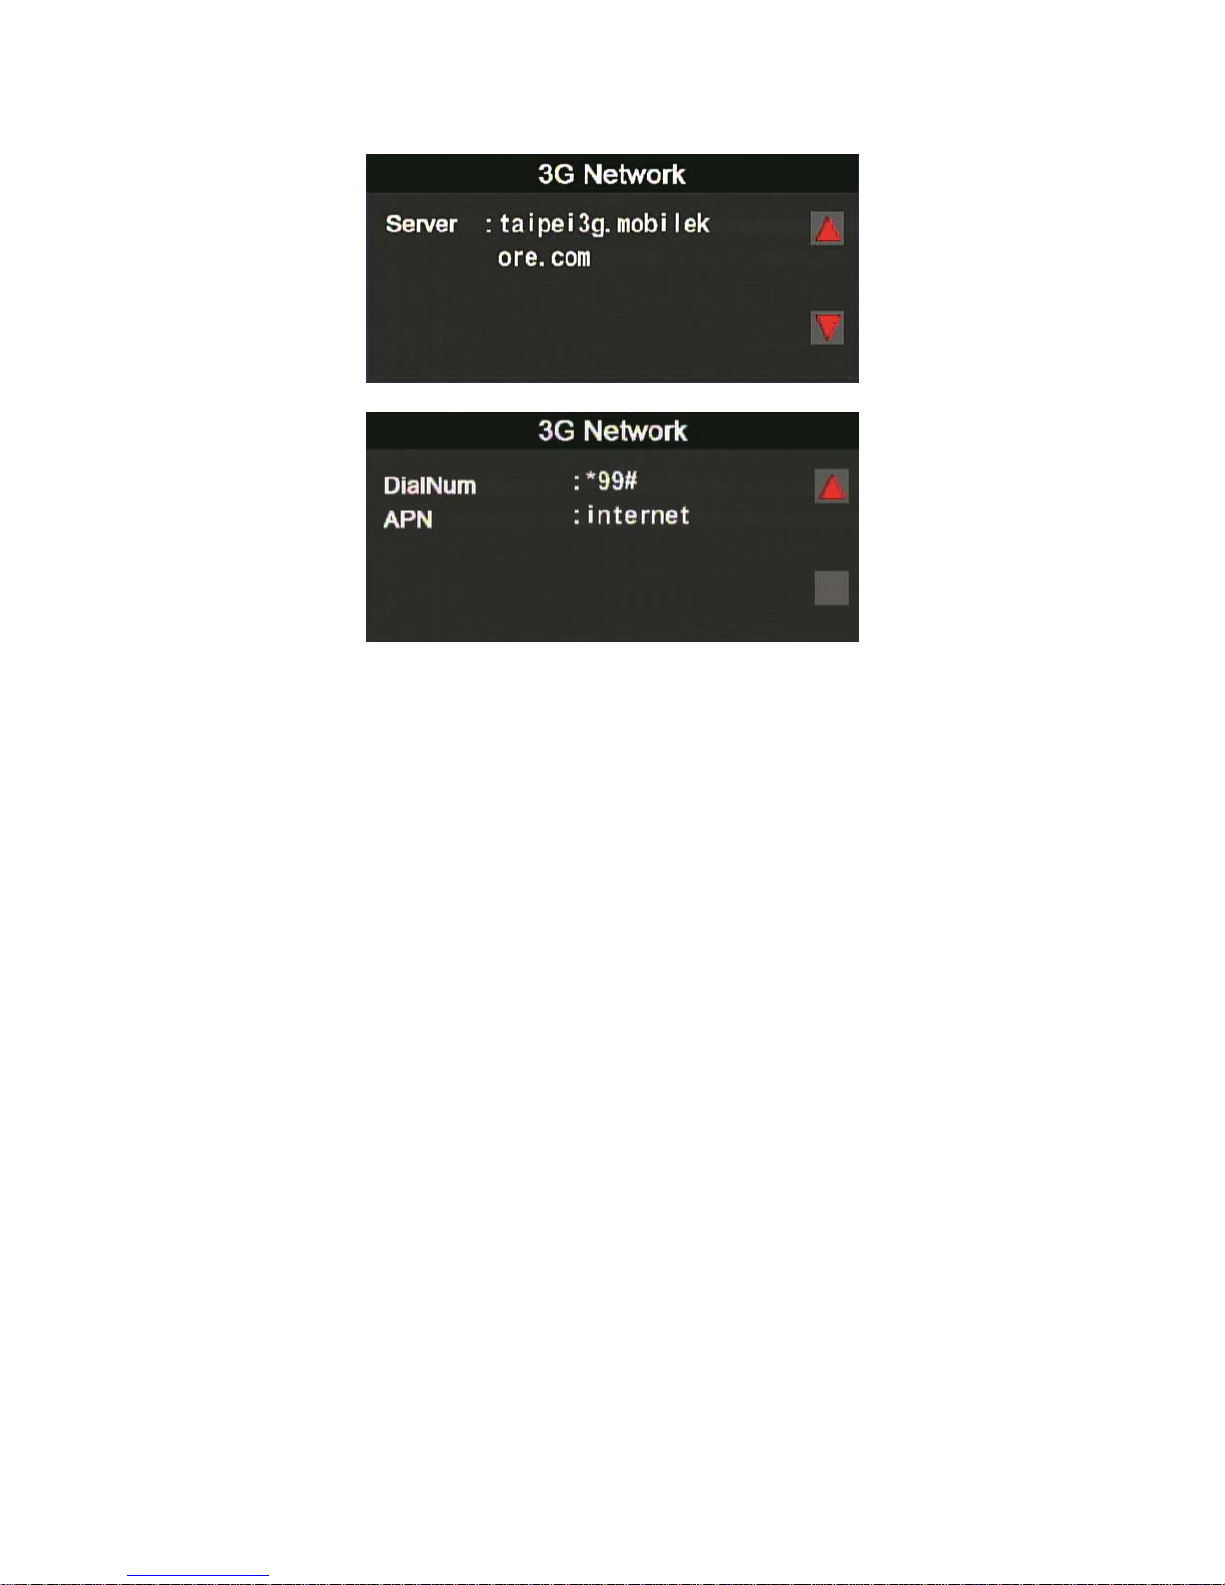
Server Address: Enter Server IP address setting----Default Server
IP Address is 61.221.66.200
Server Port: Default Sever Port is 13579, Not recommend to
change the original setting).
APN: 3G APN, generally preset to be Taiwan Telecommunication
providers, if in other area, Please check local Telecommunication
providers offered APN setting name.)
Dial-Up Number: 3G Dial-Up Number, generally preset to be *99#,
if in other area, Please check local Telecommunication providers
offered 3G Dial-Up SETTING Numbers.
3G On/Off: To choice whether star the 3G tele-connecting function
or not. “Pick” (V) mean “Star” commonly, if not willing to use teleconnecting function, please directly neglect it.
2.3 After finishing all the input information, click “OK” to save
the information into USB drive. Click USB drive to check if
the file already exists. (File name is net3g.ncf)
2.4 Insert USB drive into DVR USB port then restart; after
restart, if the parameter is successfully configured, the
system will automatically restart in 10 seconds.
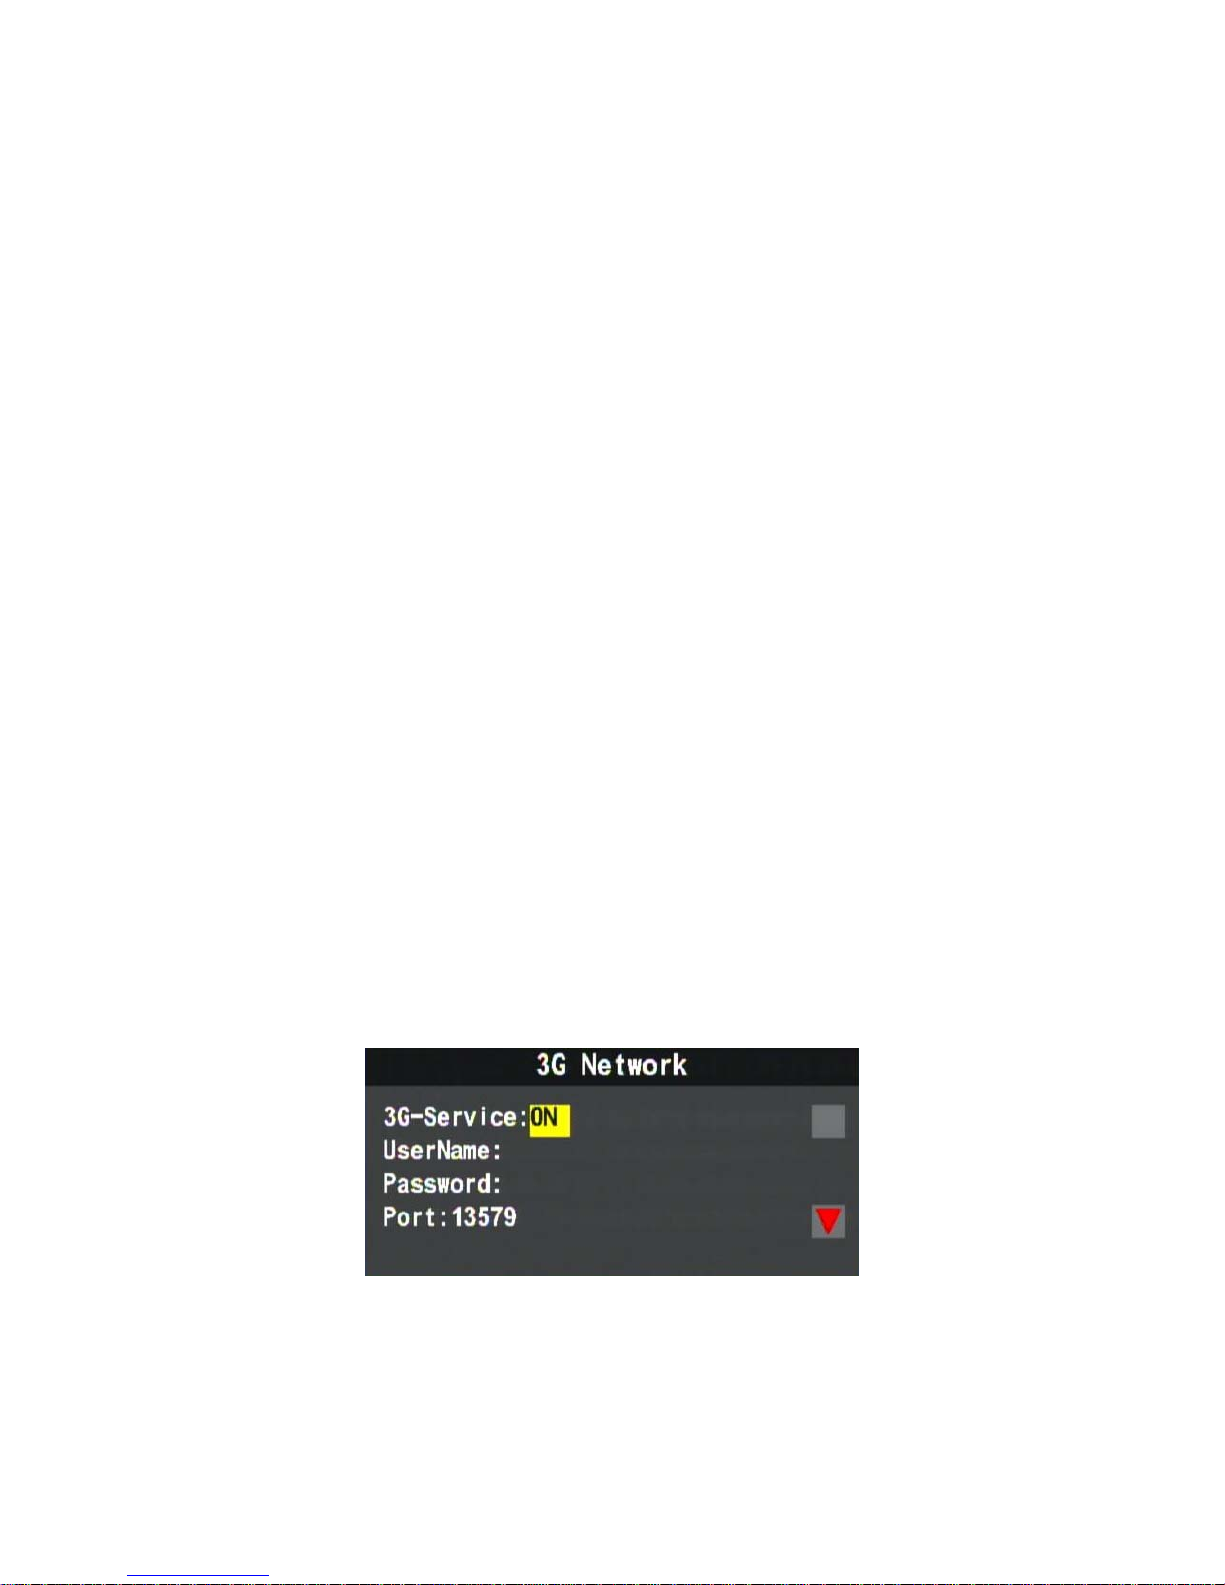
2.5 After the system restart, please go into 3G Network in the
main menu to check if the parameter is successfully
configured.
Page 42
39
(Once the configuration is done, it will show the information on the screen)
Page 43
40
M. 3G client software for viewing directly(select models
with 3G modules)
Executive Playback software “3G ClientApp.exe ” , the
playback screen shown as below. Enter the username and
password and then press “Login” button to login screen.
★ Note: To perform this software will require DirectX 9.0 or more.
User Name User Account Name
Password User Account Password
CenterServer Address
3G Server IP Address
(Default: 61.221.66.200
CenterServer TcpPort Server TCP Port (Default: 24680)
CenterServer UdpPort Server UDP Port (Default: 24681)
Page 44
41
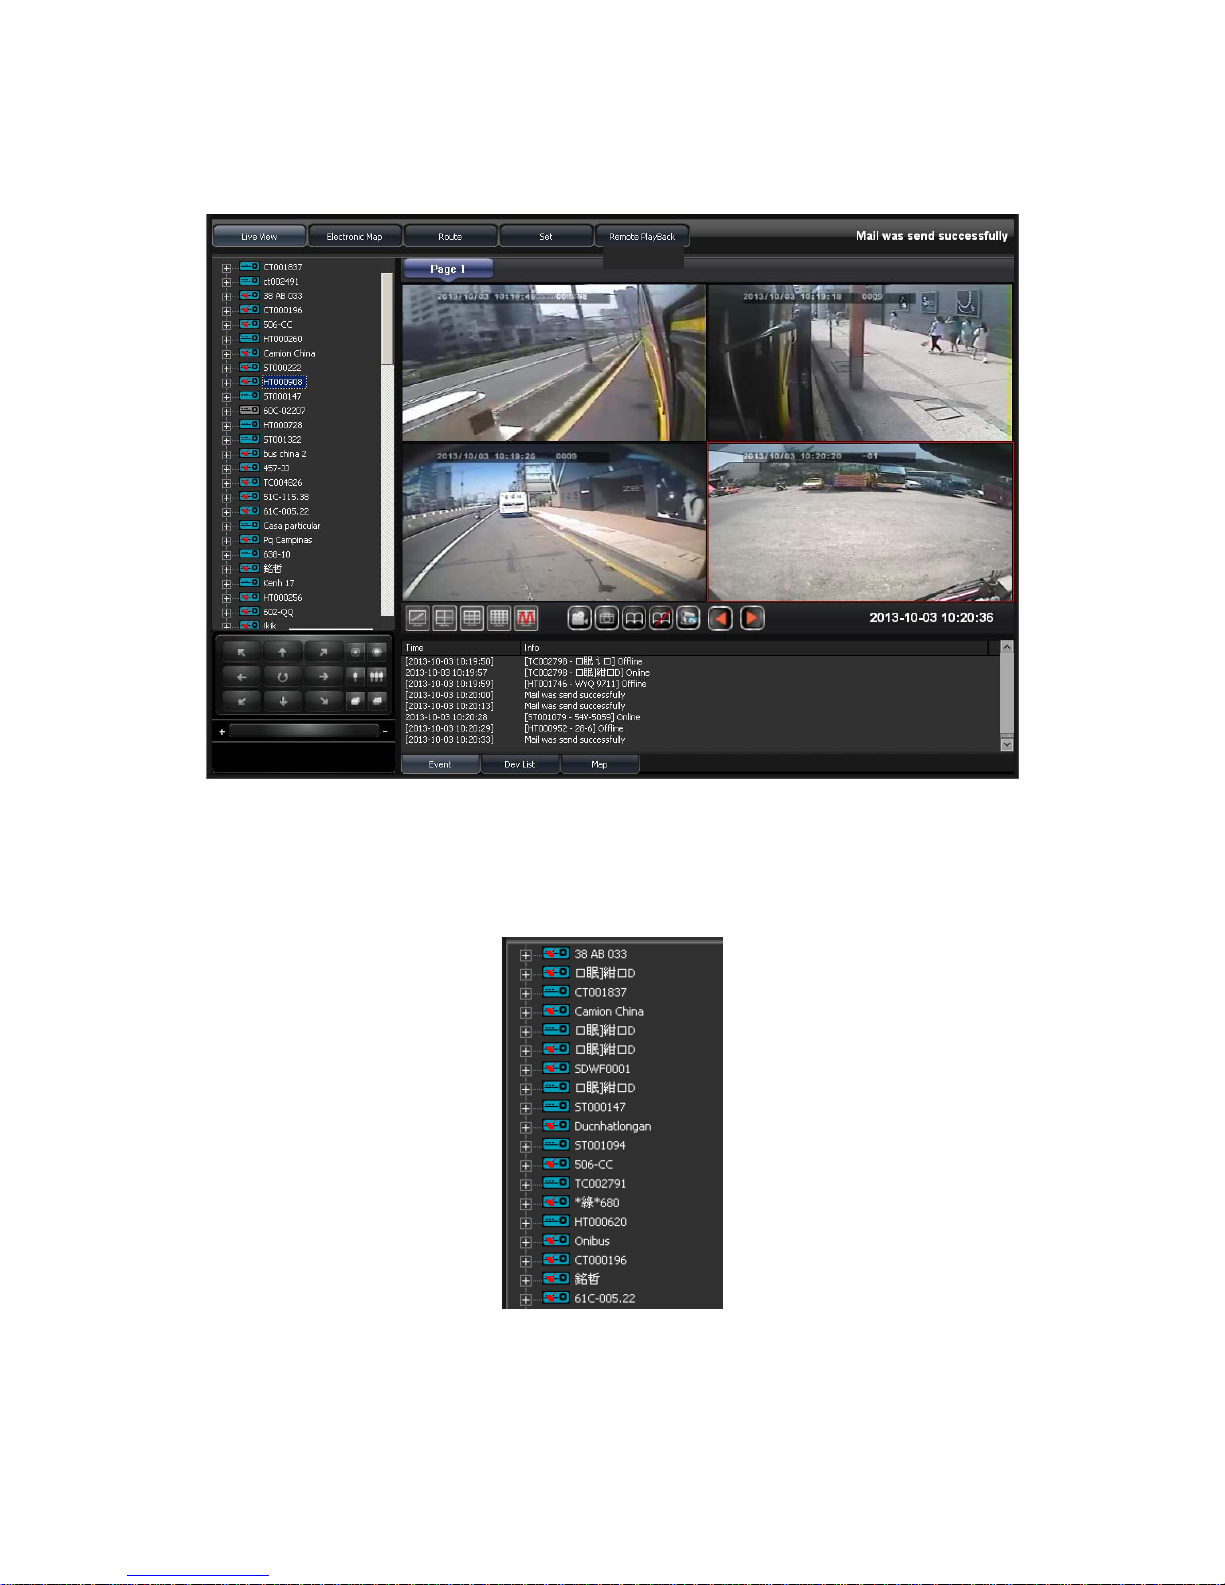
(1) Live view
Equipments list display all the connecting equipments.
Be able to play real-time image form all channels. Lift
click mouse to open equipment channel than click on
chennel to view the real-time image.
Device List
Page 45
42
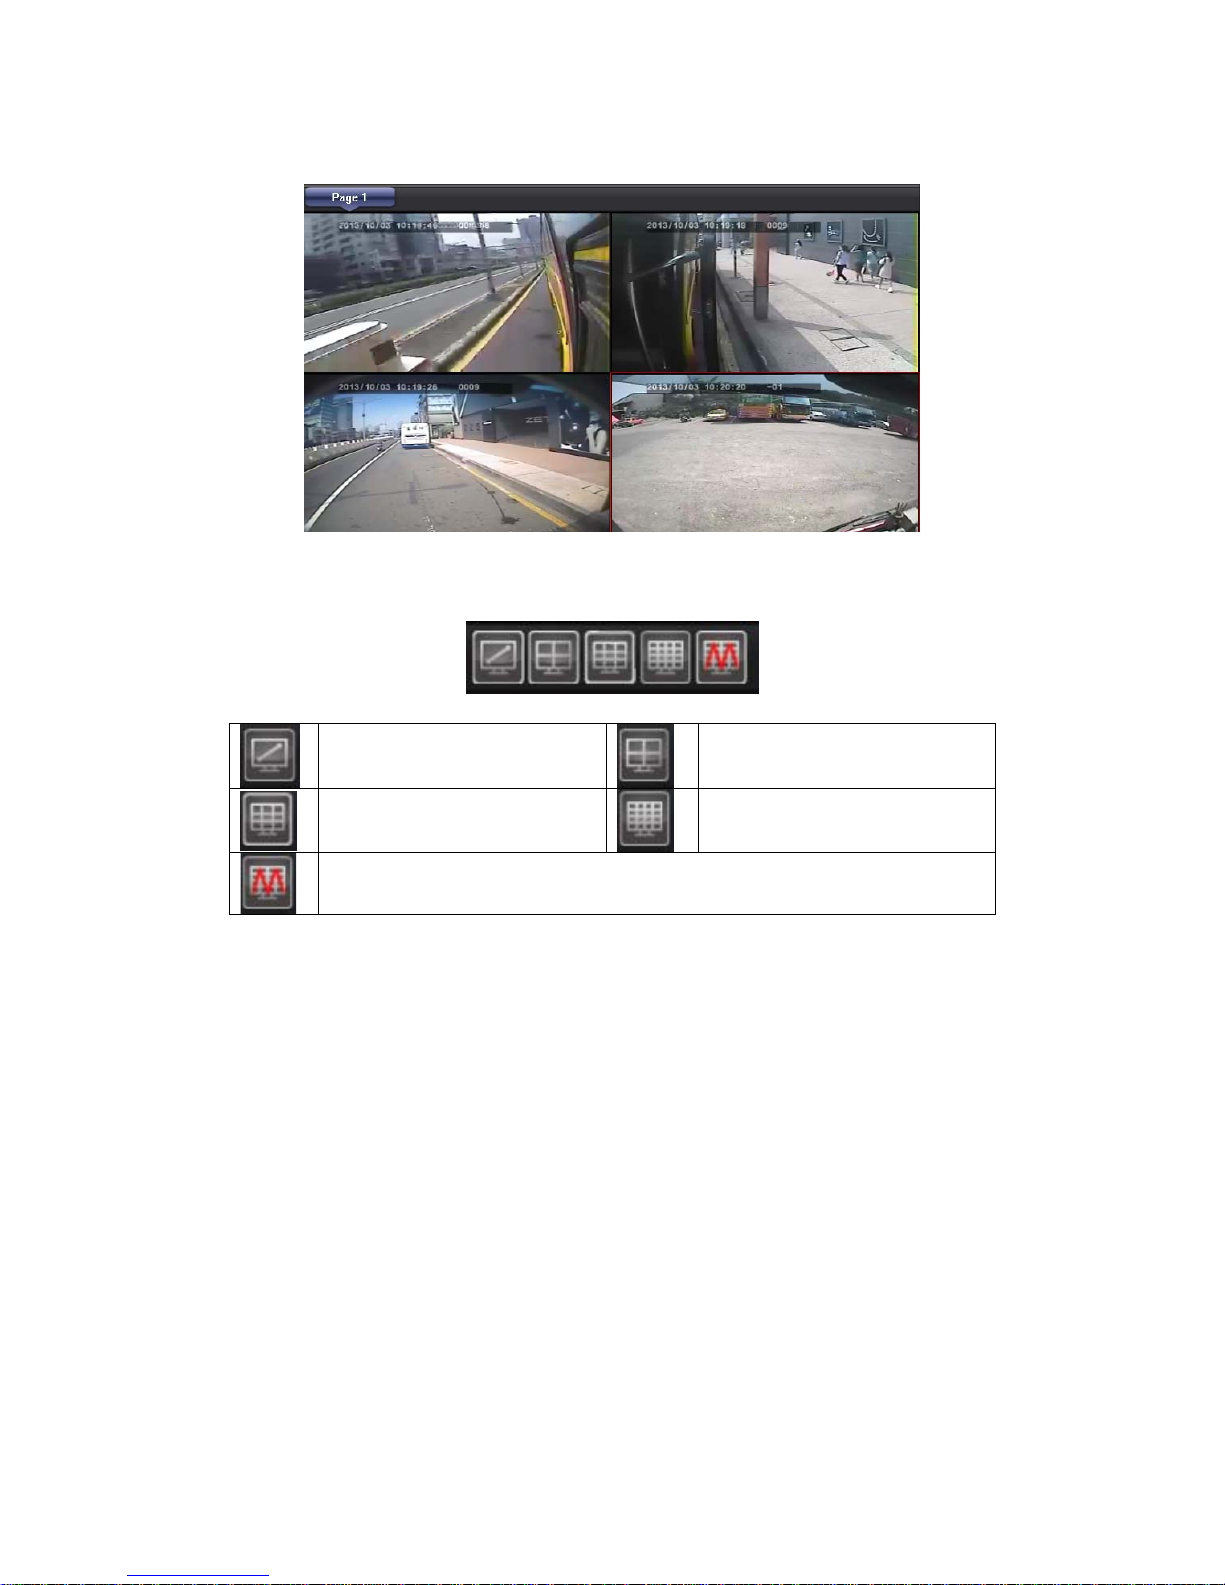
Live View
Split screen display mode button
Single display
Quad display
9 divisions display
16 disvisions display
Muti-divisions display,25/36/49/64
Page 46
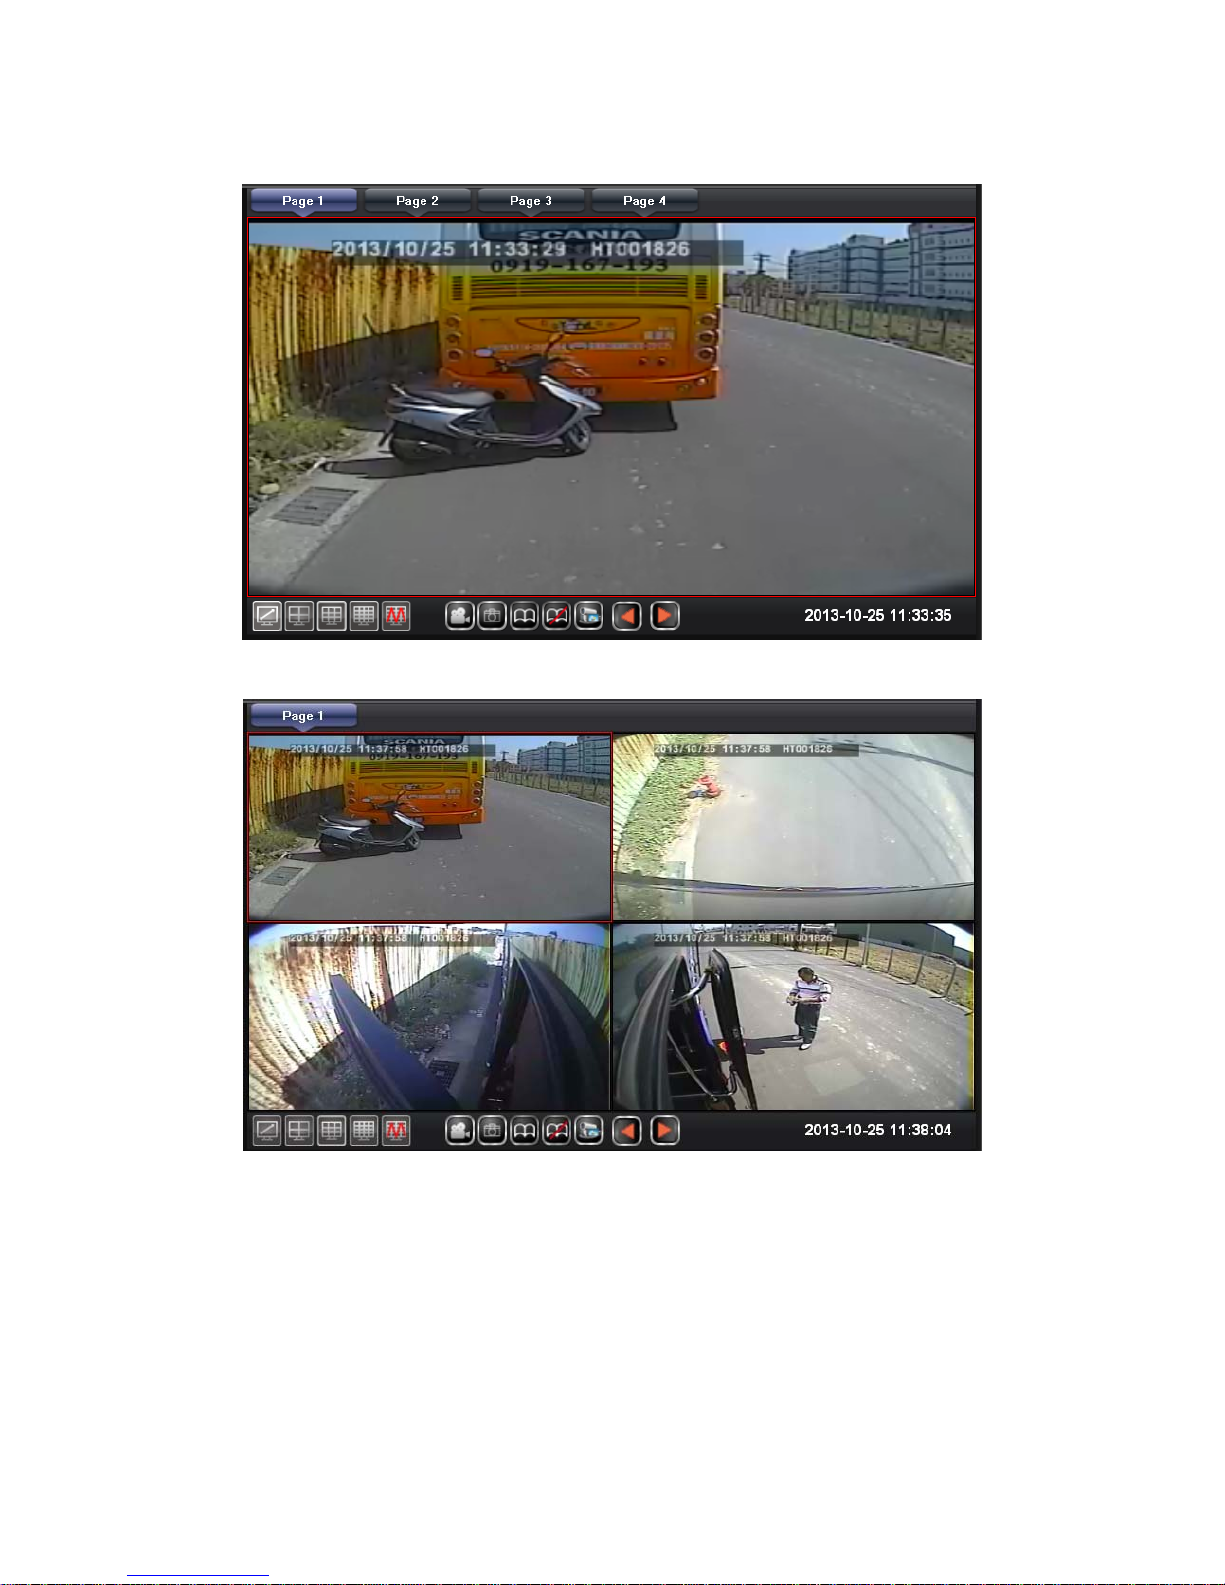
43
Live View-Single Channel Display
Live View- Quad Channels Display
Page 47
44
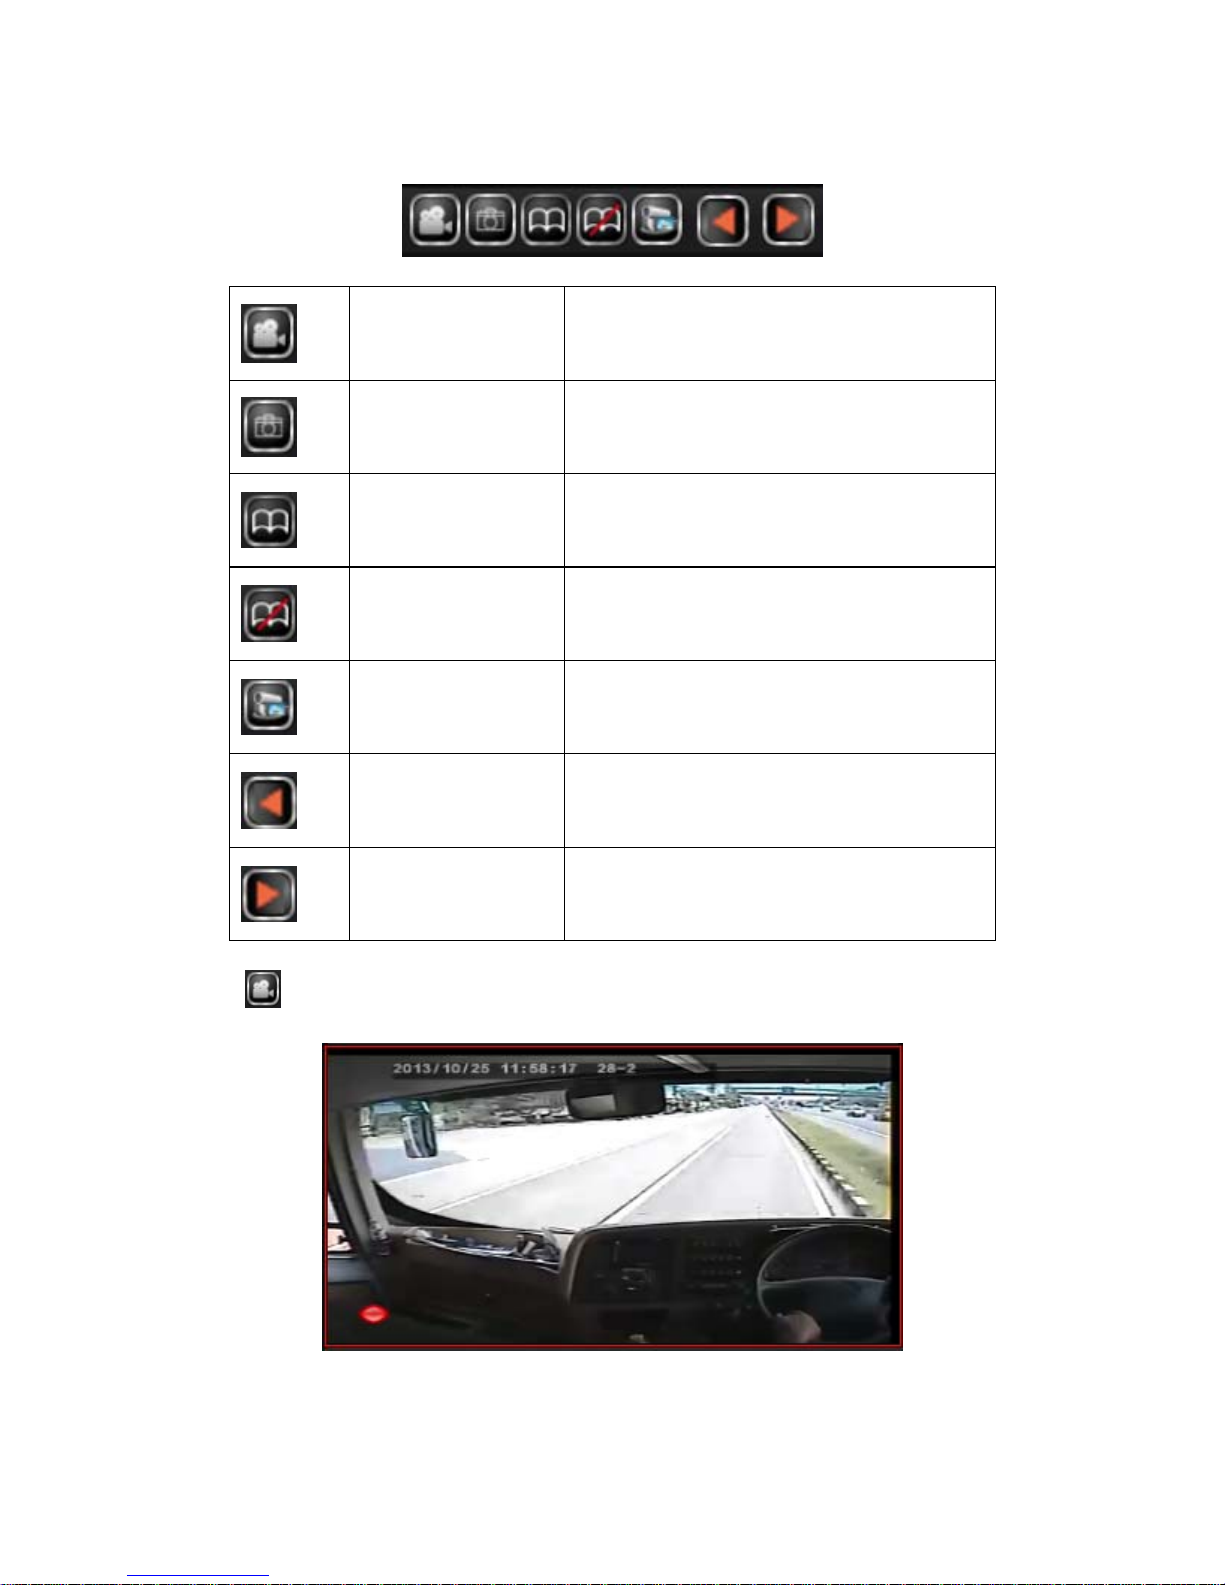
Live View Function buttons
Recording Signle snapshot as AVI file
Snapshot Snapshot
Auto-flip Auto flip to next page
Stop auto-flip Stop auto-flip to next page
Monitoring
Status
Save the current live viewing
channels to be able to retrieve it
next time
Go to
previous page
Manually go to previous page
Go to
next page
Manually go to next page
1.
Recording: To record the selected channel, the red recording
signal will show up at the bottom of the screen.
Page 48
45
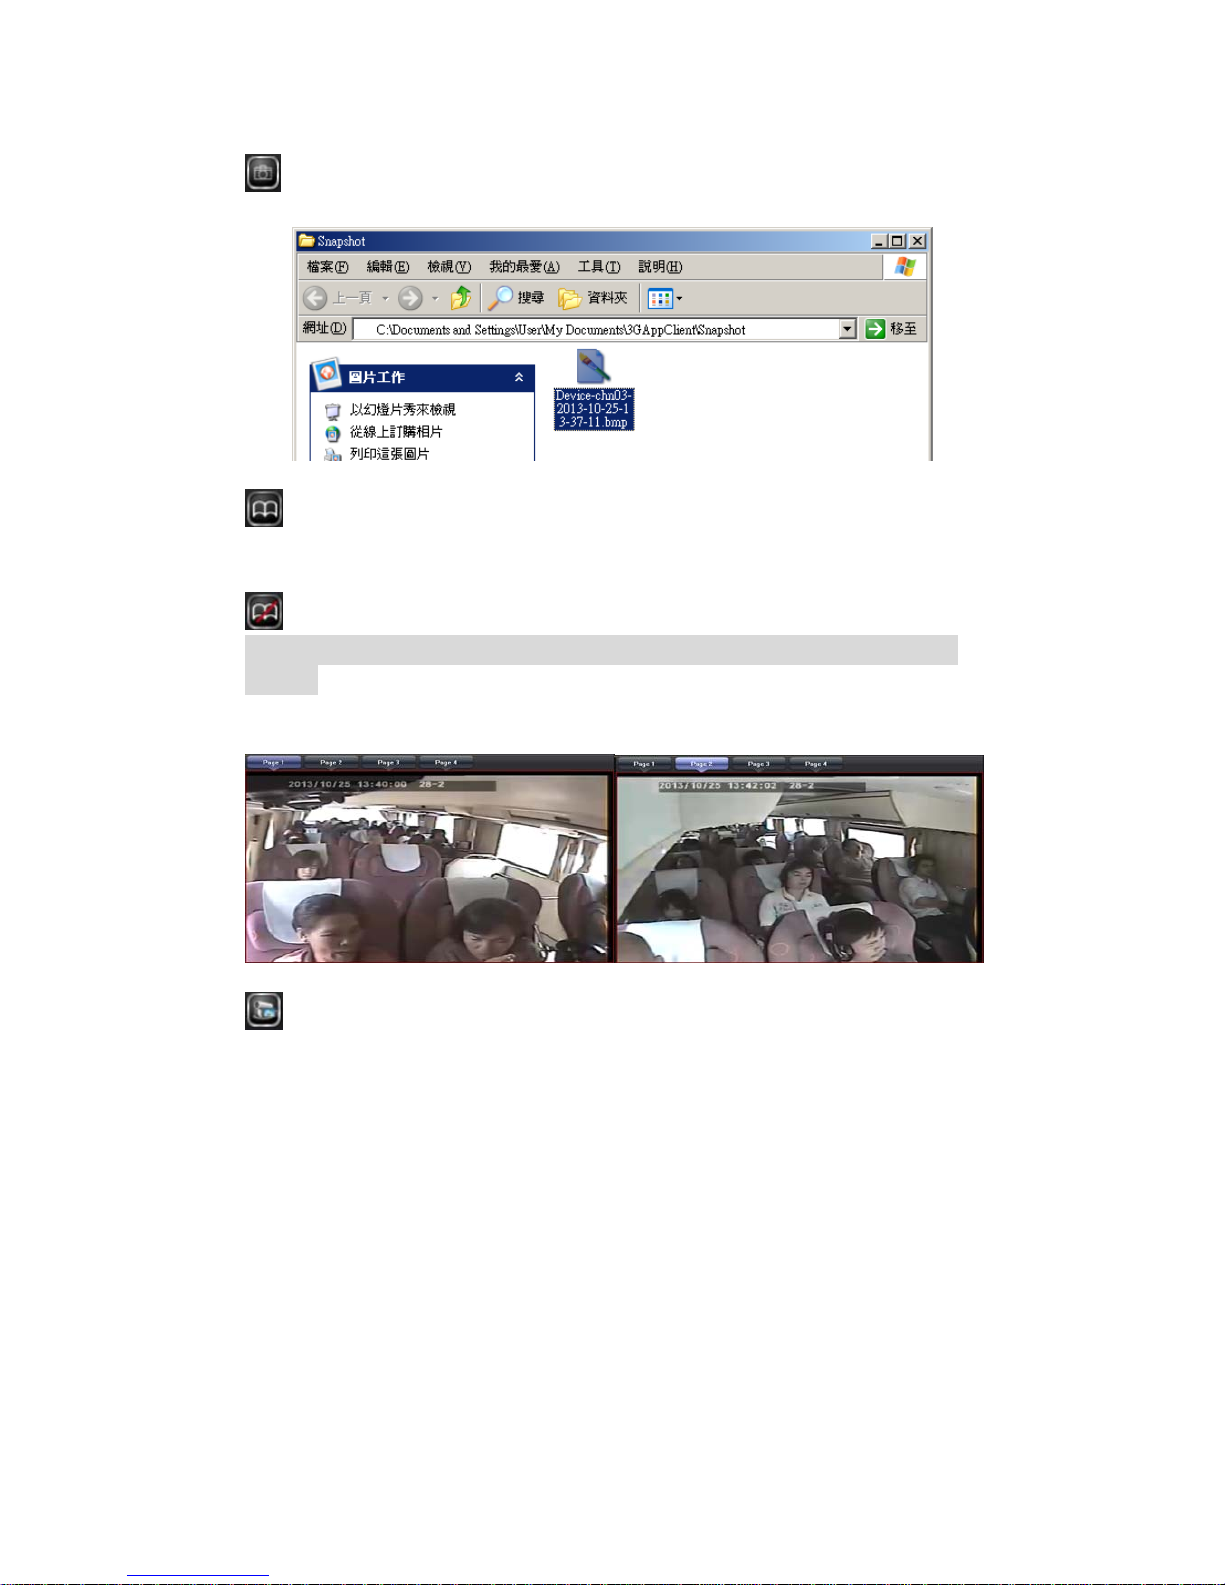
2. Snaptshot: To take the snapshot of the selected channel, it will
automatically go to the saving directory.
3.
Start Auto-flip: Once auto-flip is triggered, it will go to next
page in a period of time.
4.
Stop Auto-flip: Auto-flip function will stop.
Auto-flip time setting, please go to Setting->Page 1->Auto flip
period
Page-Once the time is up, it will automatically go to next page
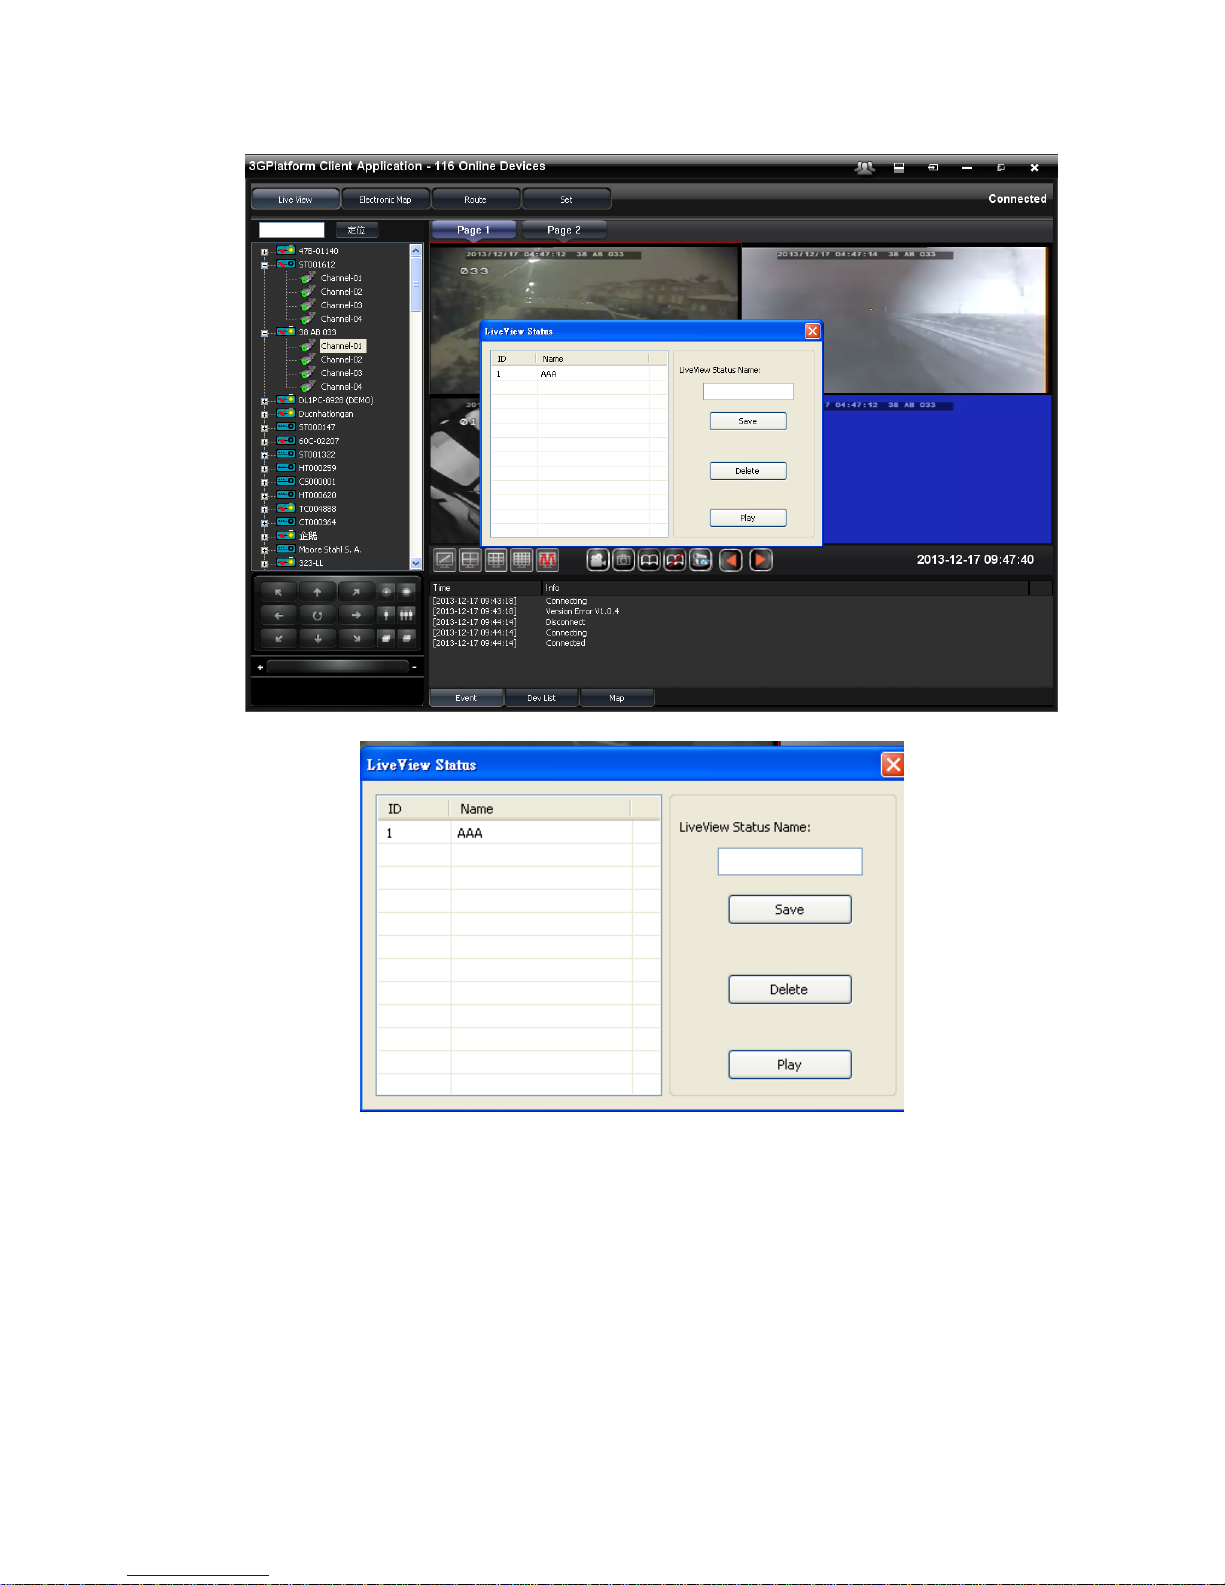
5.
Monitoring Status: To save the current live channels, input the
status name then save it; next time when you log into 3G client
software, you could click the saved status name to watch.
Page 49
46
Page 50
47
6.
Manually select page: Manually select the previous or
next page
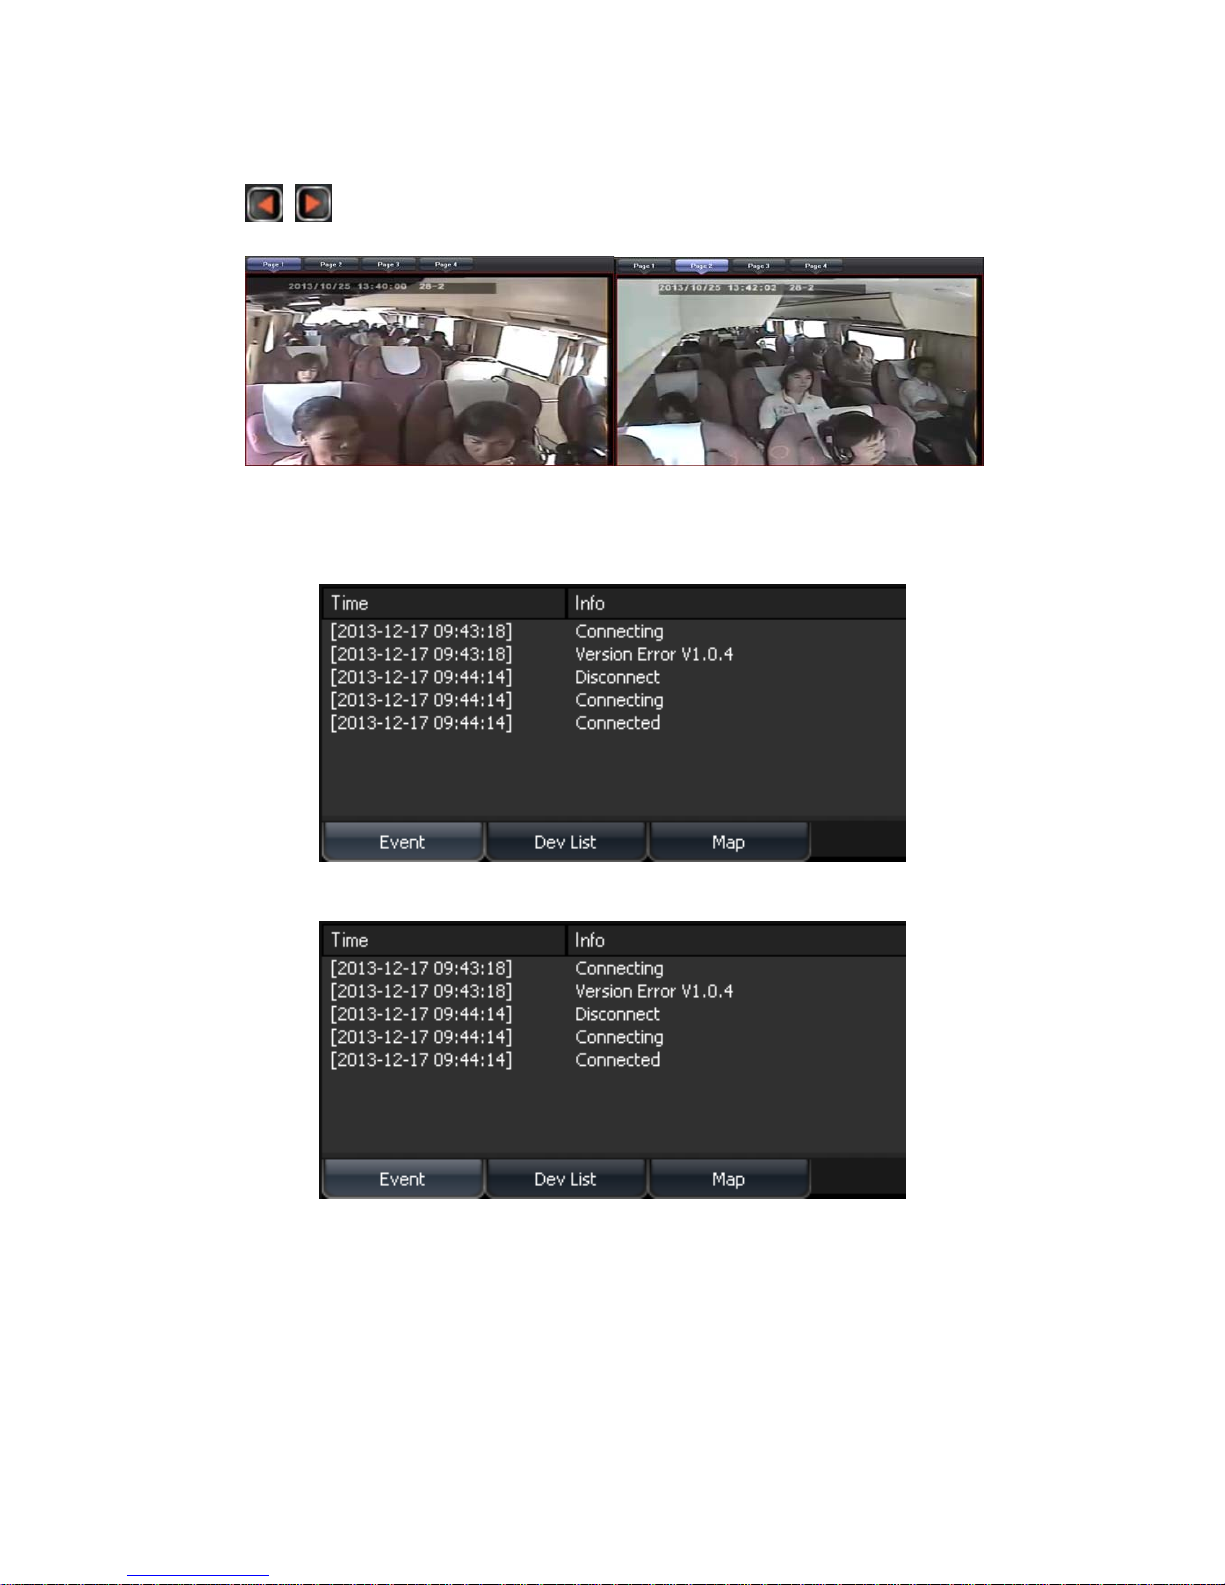
Live View Interface
To select different display mode: Event/Dev List/Map to
show different status.
1. Event
2. Dev List
Page 51
48
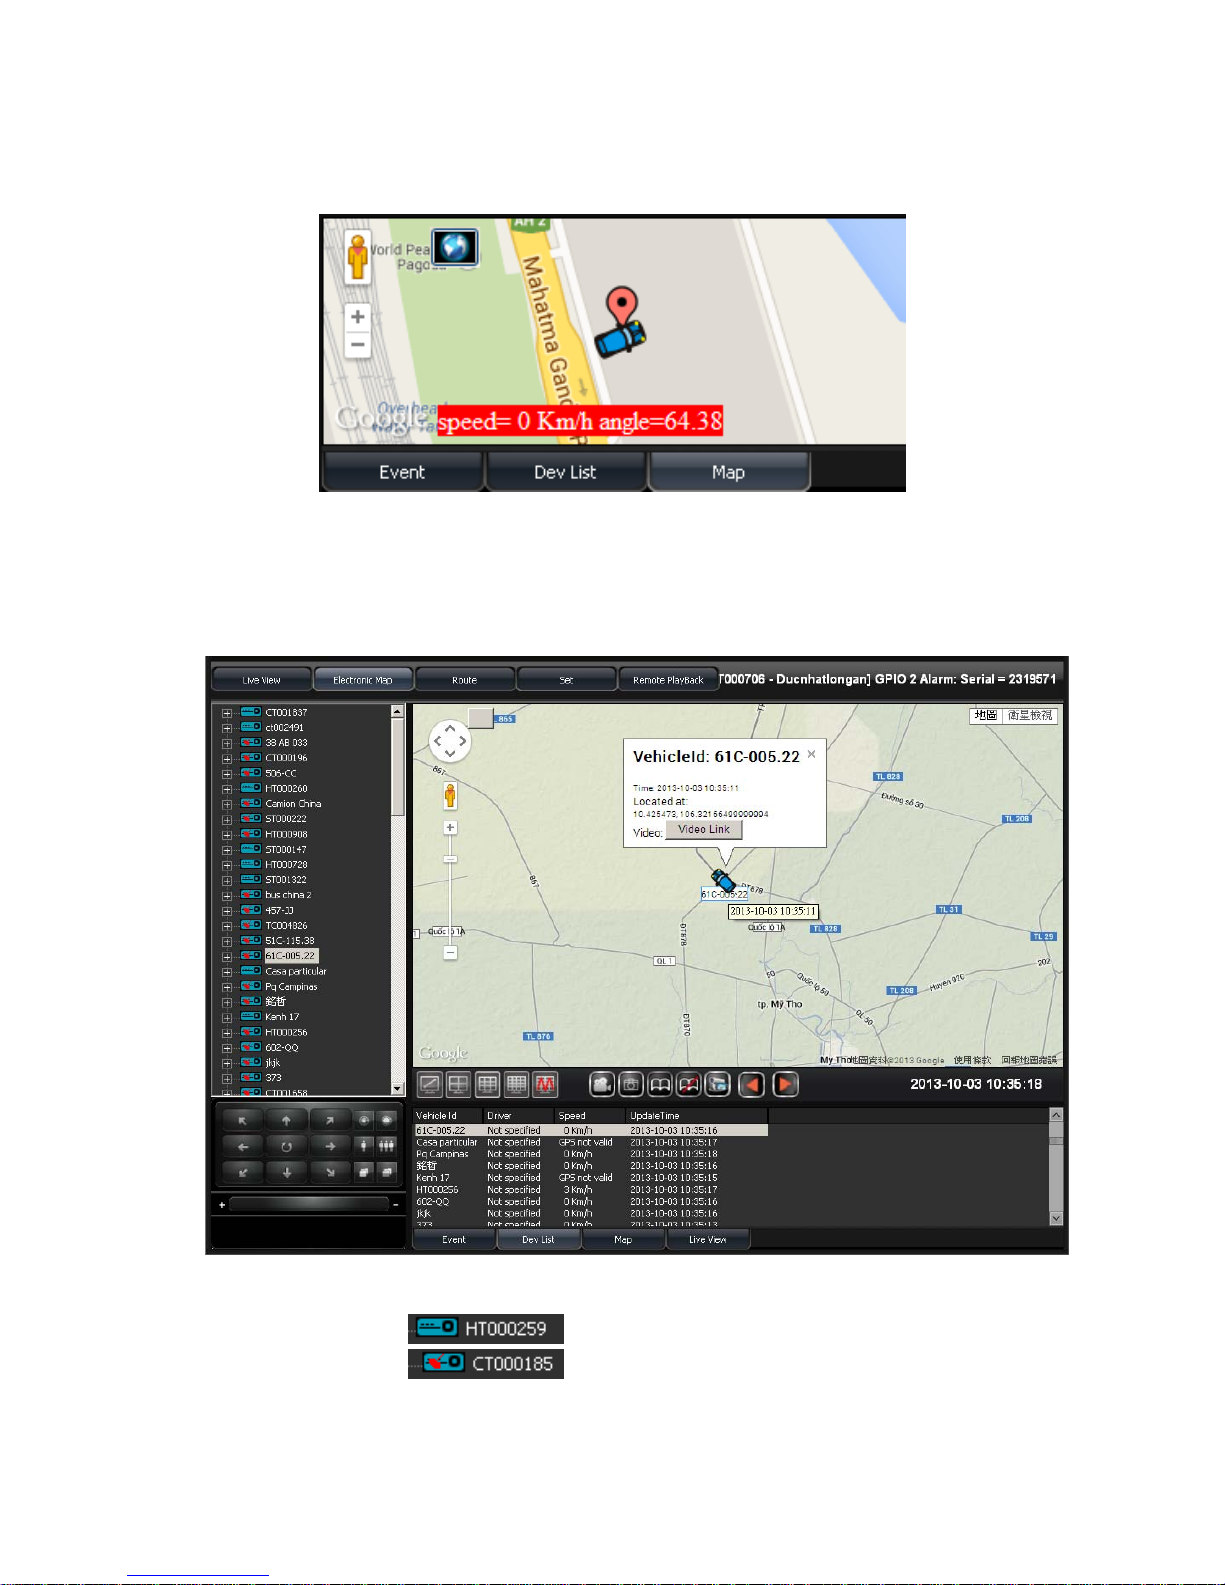
3. MAP
(2) Electronic Map
※ G-Mouse must equiped with Device to have GPS
function to provide positioning information
Once positioning is done, you could use the mouse to
click the device for current position.
Device Positioning
Without GPS function.
With GPS function Device Positioning.
Page 52
49
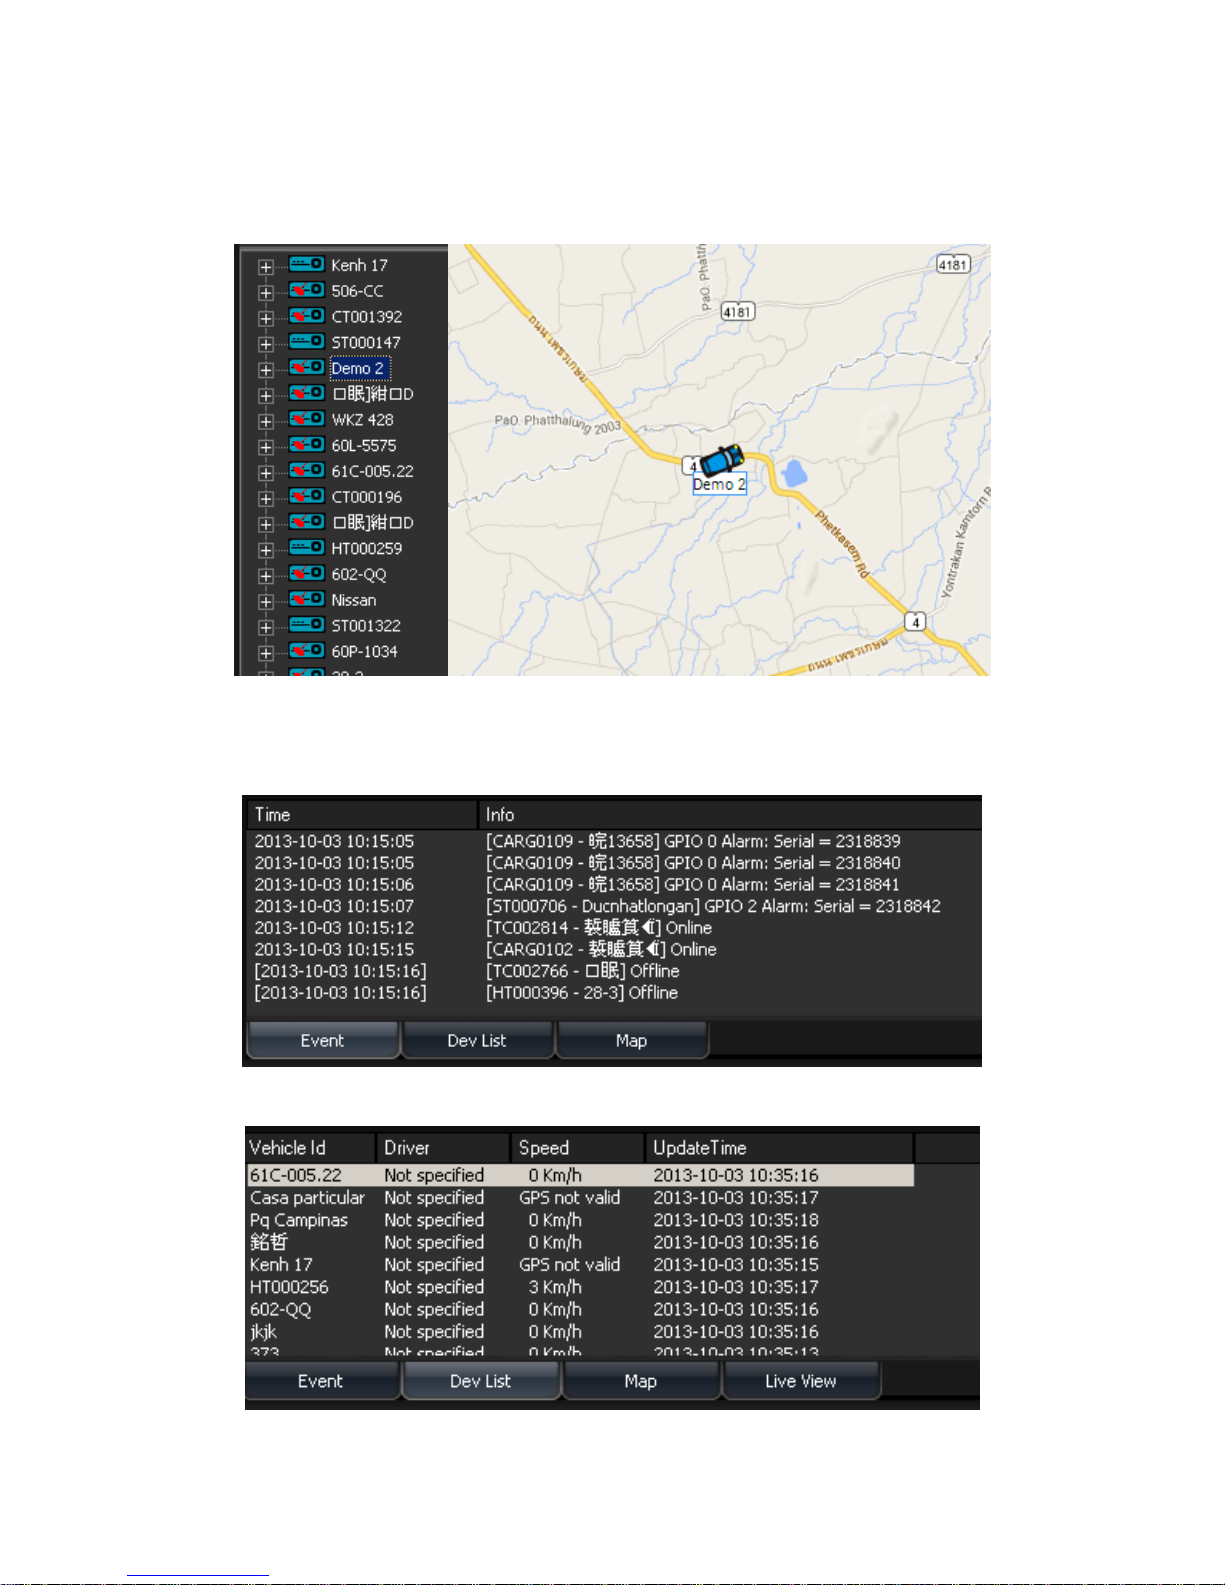
Electronic Map
Select the positioned device on the list, then it will
show its position on the map.
Live View Interface
To select different display mode: Event/Dev List/Map
to show different status.
1. Event
2. Dev List
Page 53
50
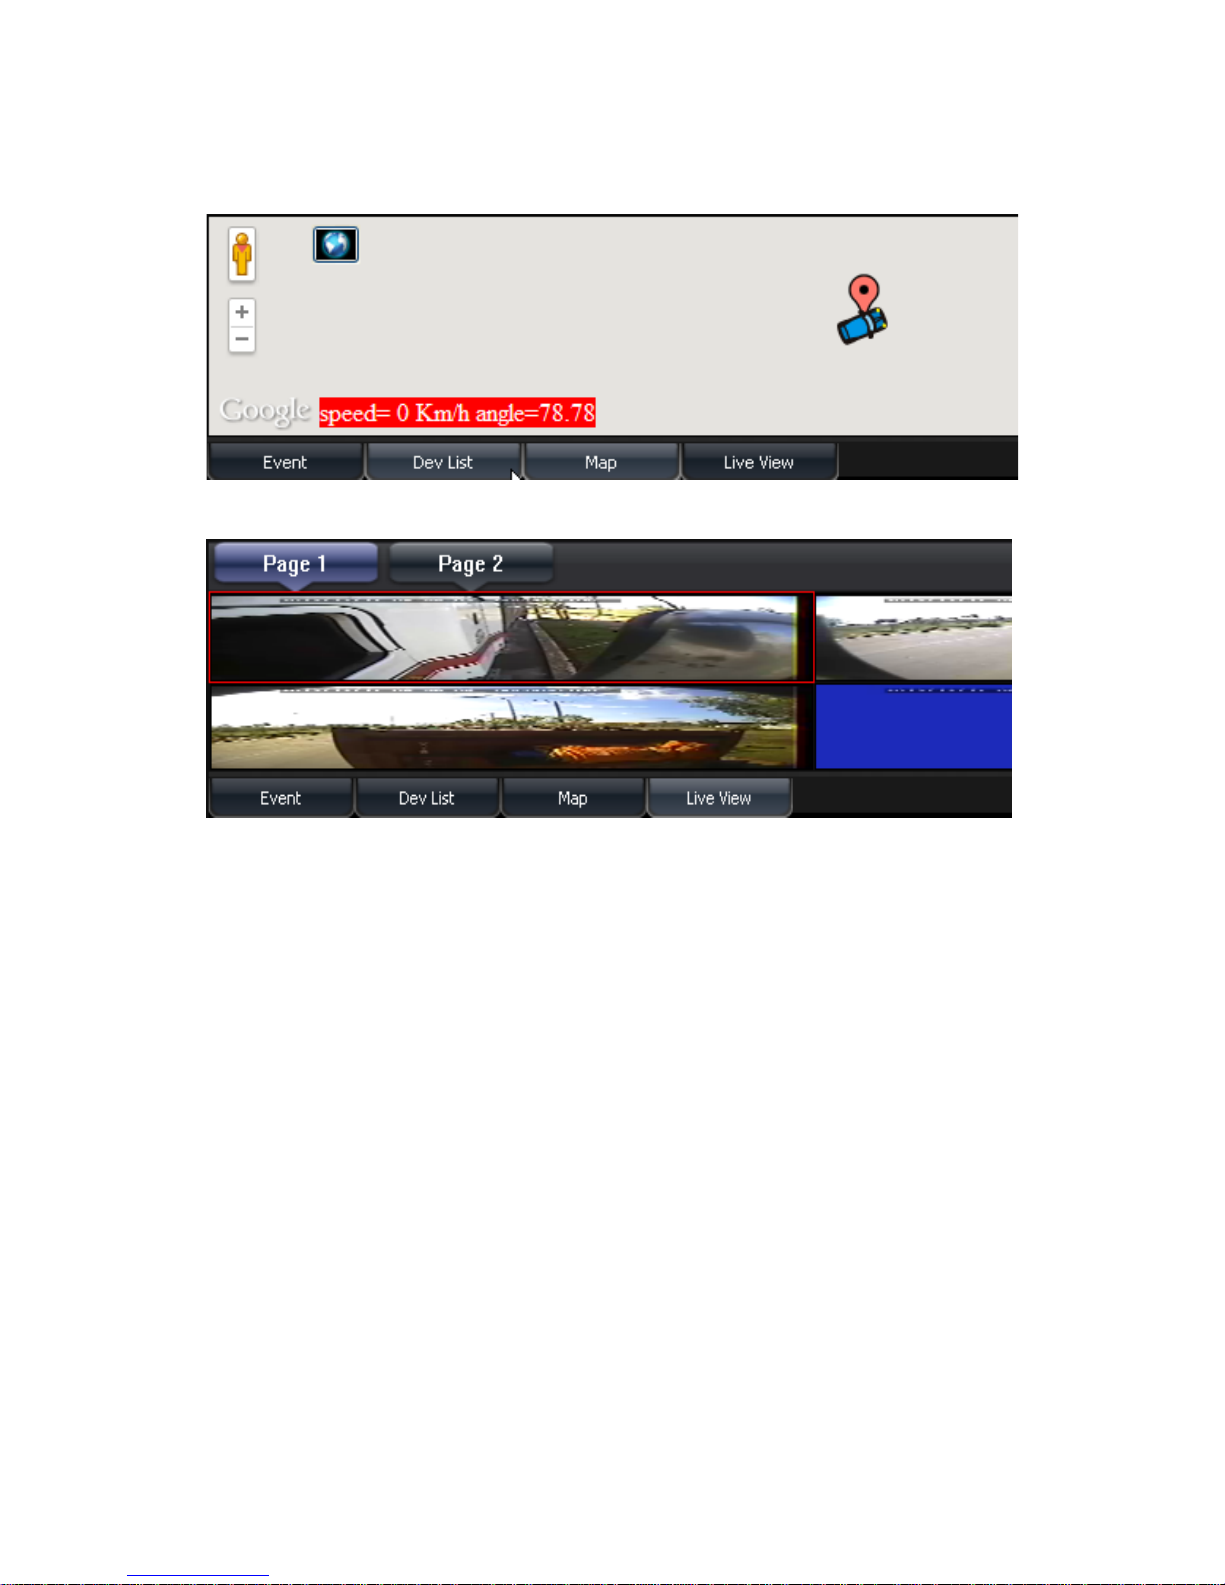
3. Map
4. Live View
Page 54
51
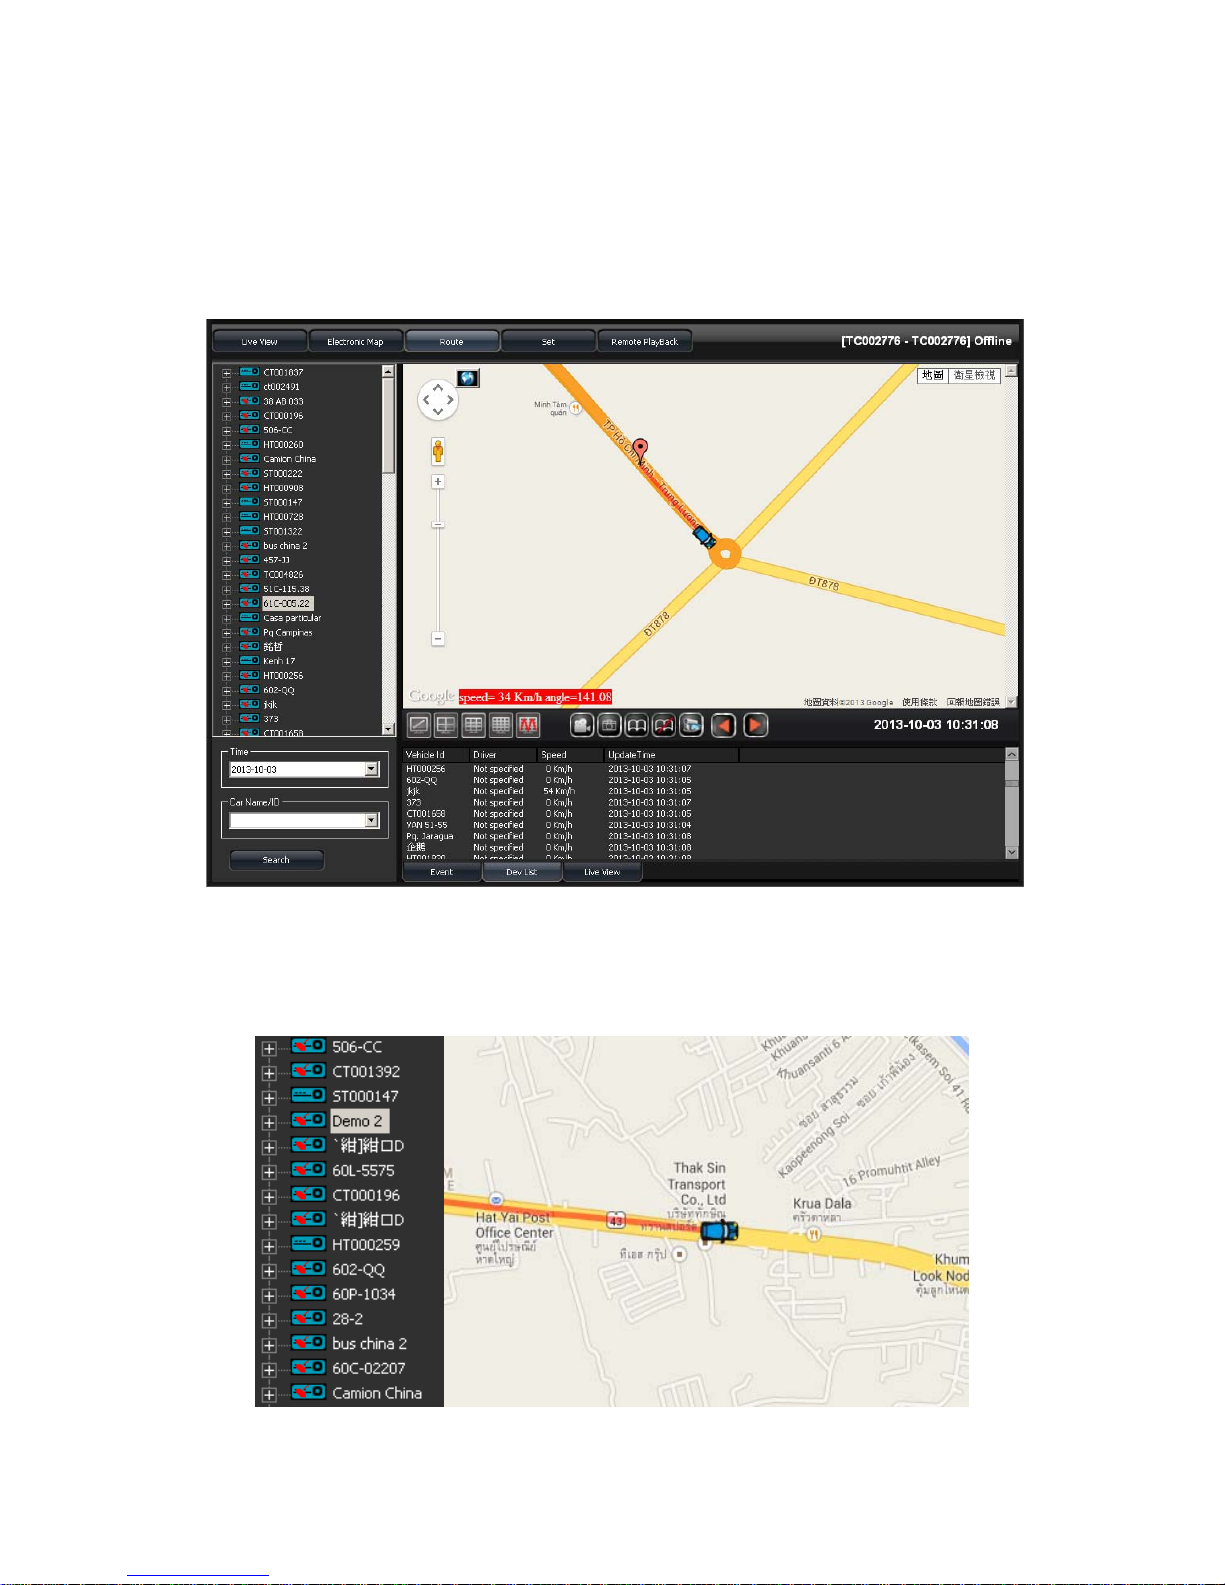
(3) Route
※ G-Mouse must equiped with Device to have GPS
function to provide positioning information
To display the positioned device at the track, you can notice
the traveling route of the vehicle.
Device Positioning Information
Select the positioned device on the list, then it will
show its current position and traveling route on the
map.
Page 55
52
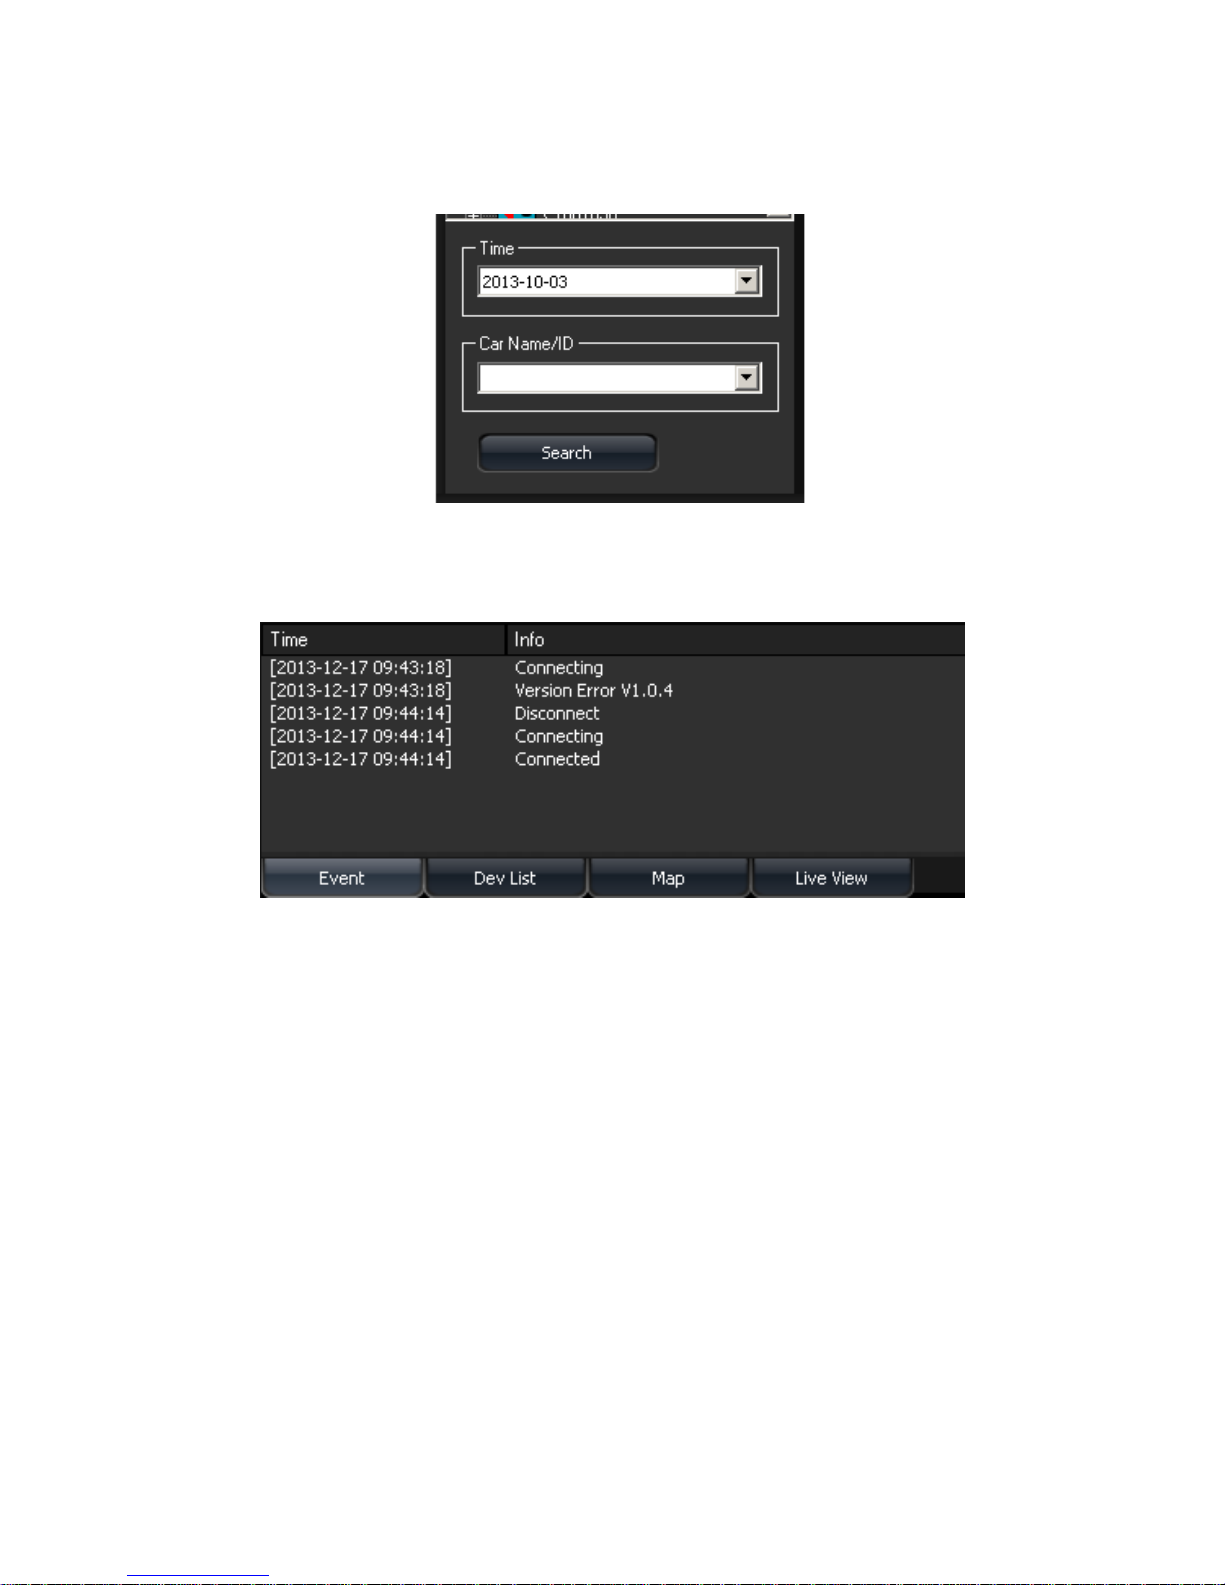
Tracking Route Search
Choose Date and Car Name/ID to search the data
Remote Live View Message Interface
Mode: Event/Dev List/Map/Live View
1. Event
Page 56
53
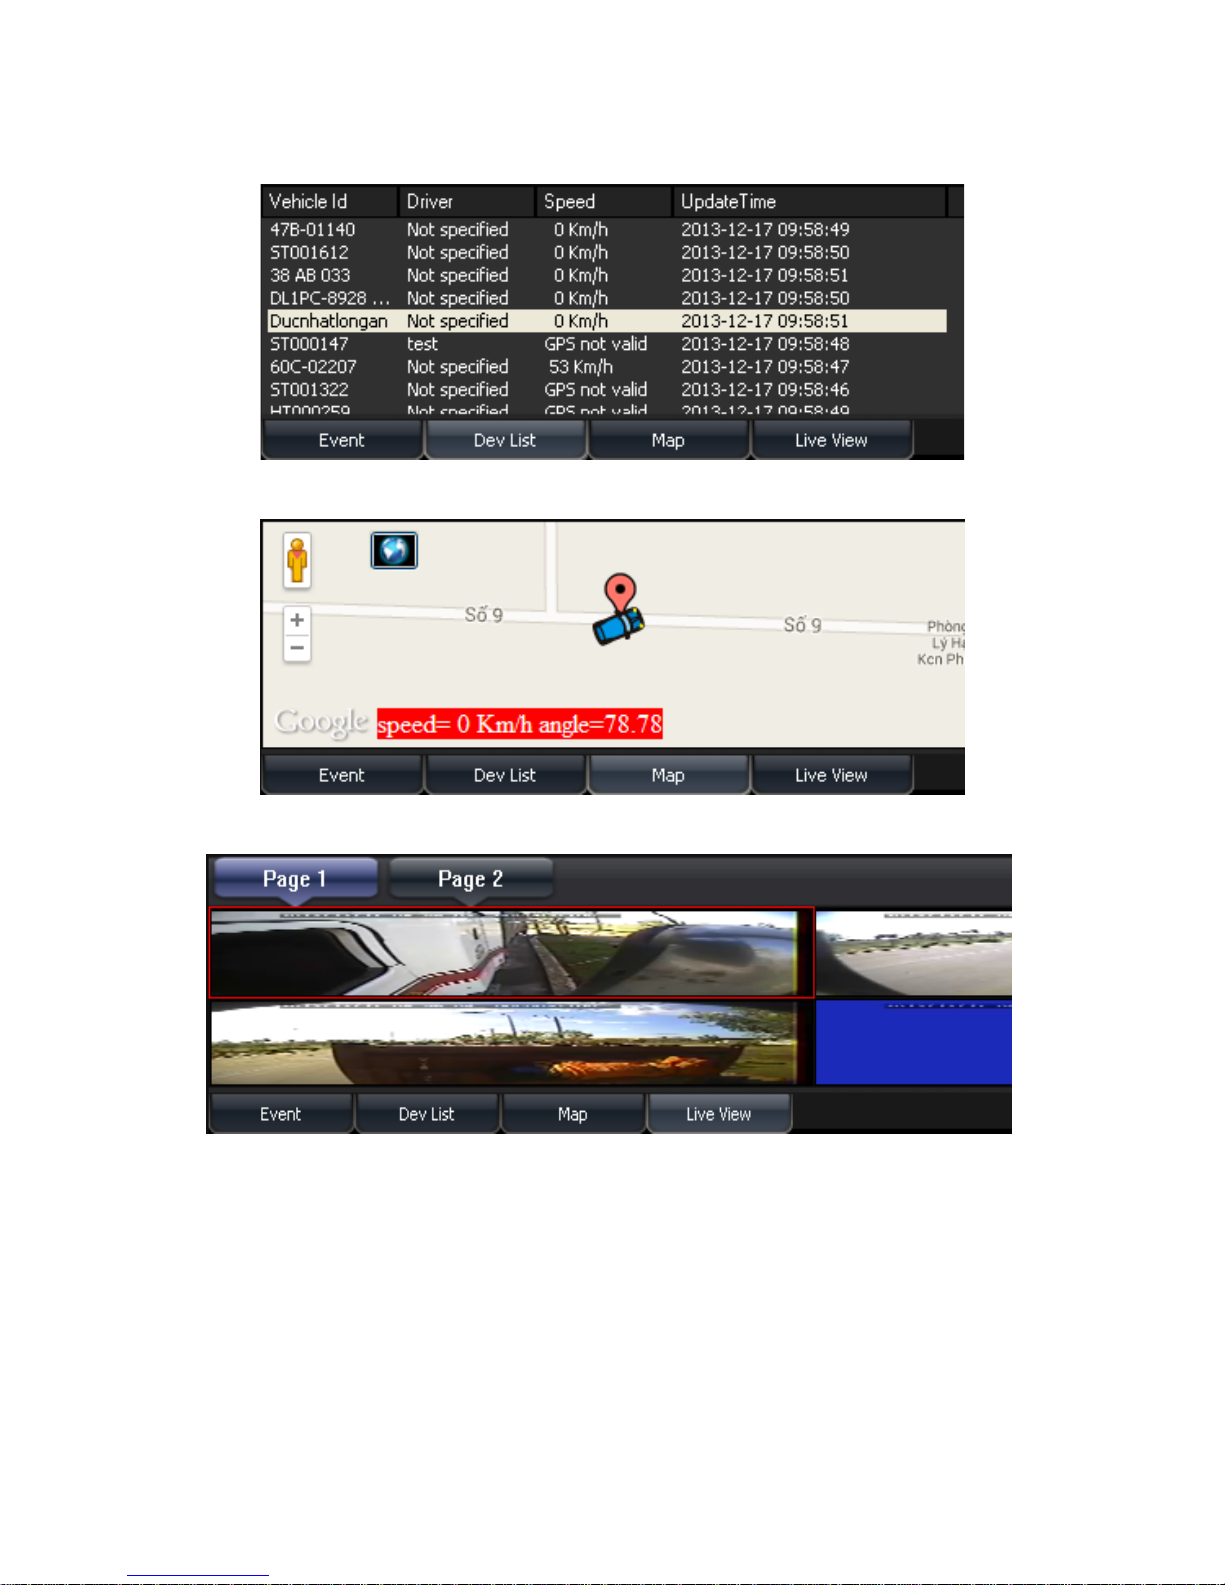
2. Device List
3. Map
4. Live View
Page 57
54
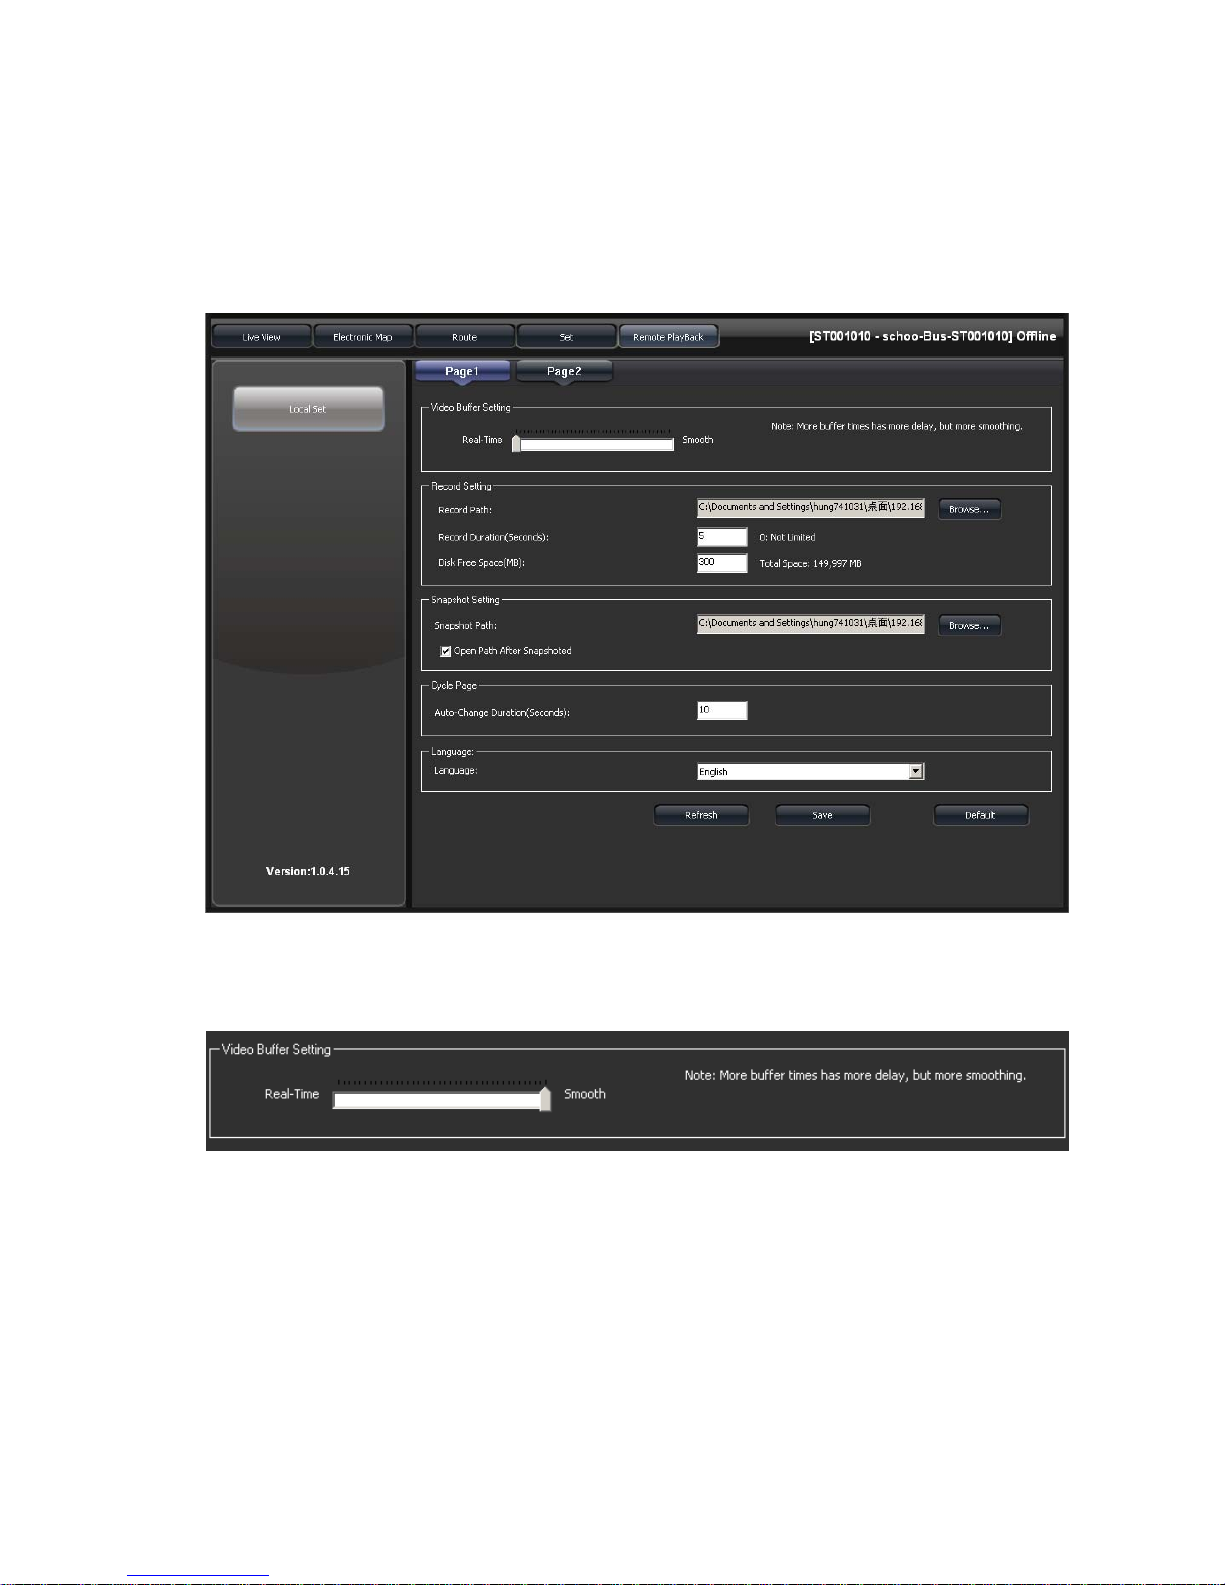
(4) Set
Page 1
Setting the FPS, recording function, auto turn over
page, and language.
1. Video Buffer Setting
Real-Time-> Higher frame rate
Smooth-> Higher video resolution
Page 58
55
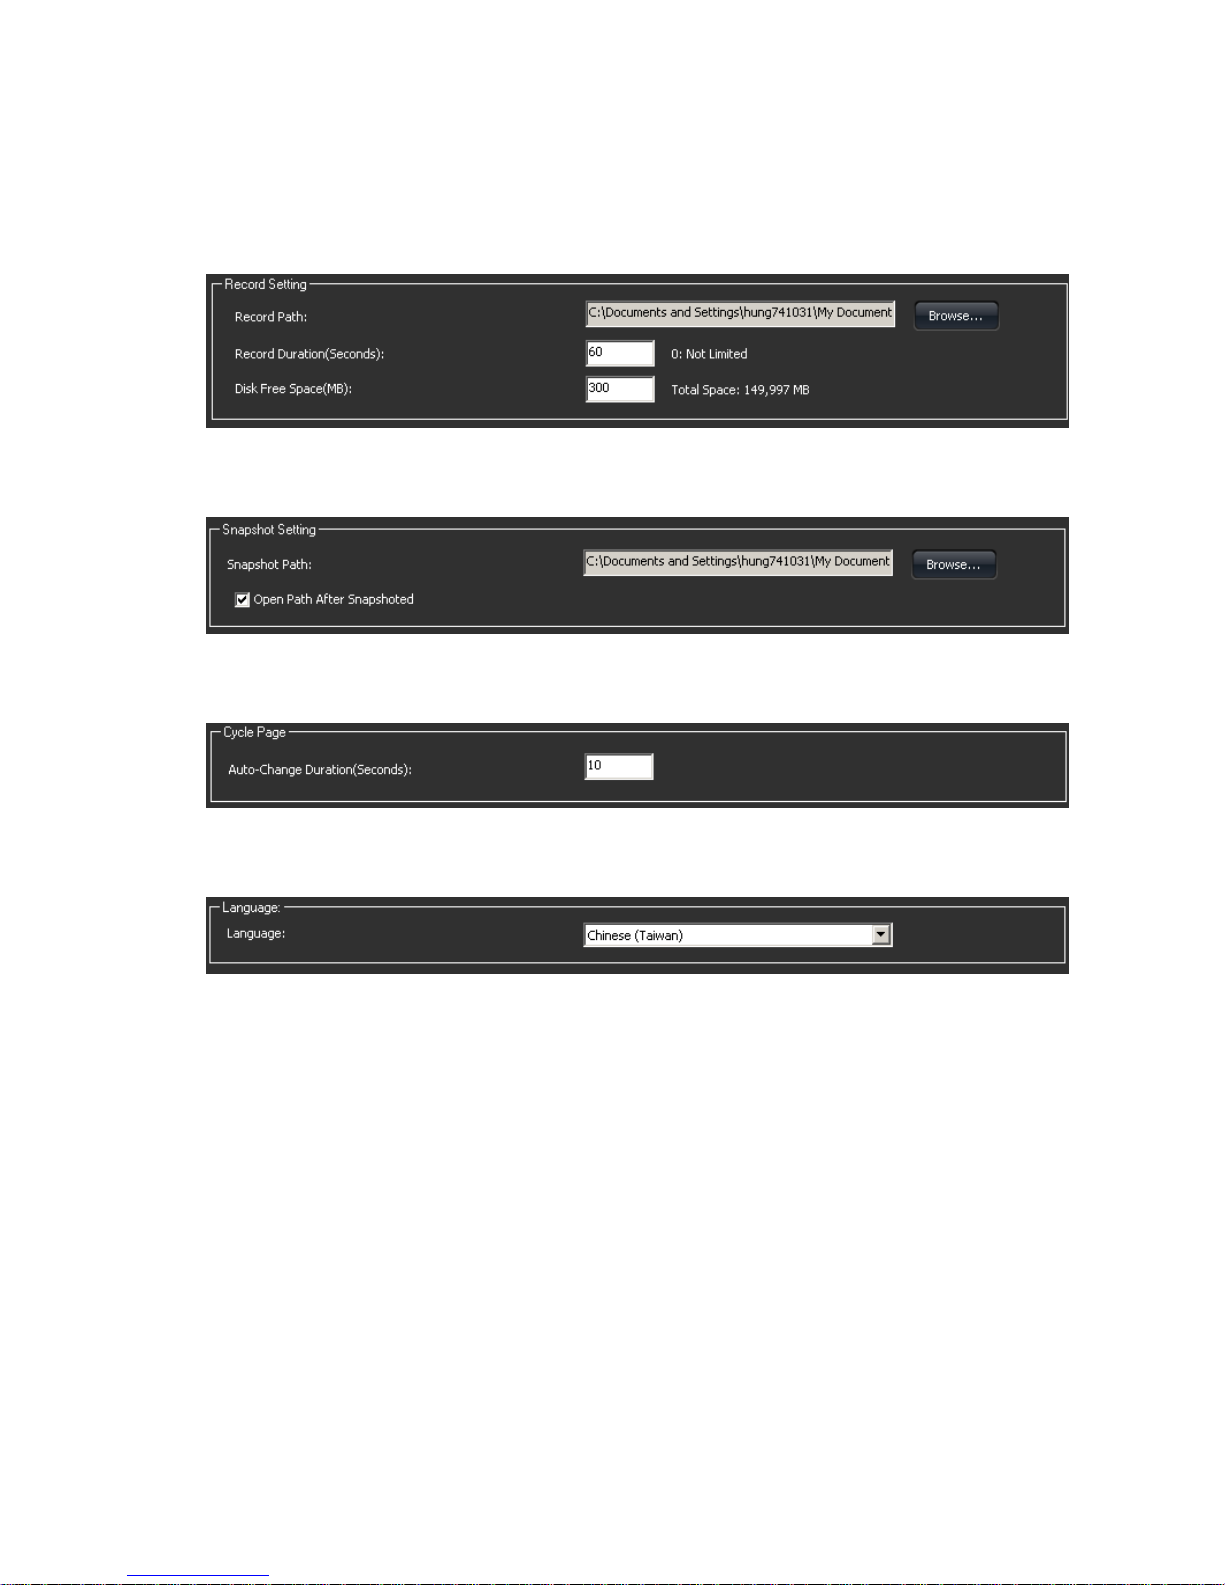
2. Recording Setting
Record Path, Record Duration (Seconds), and Disk
Free Space(MB) are the relative options.
3. Snapshot Path
Set the path after snapshot
4. Auto-Change Duration (Seconds)
Set the duration in seconds of auto-change page.
5. Language
Set language display
Page 59
56
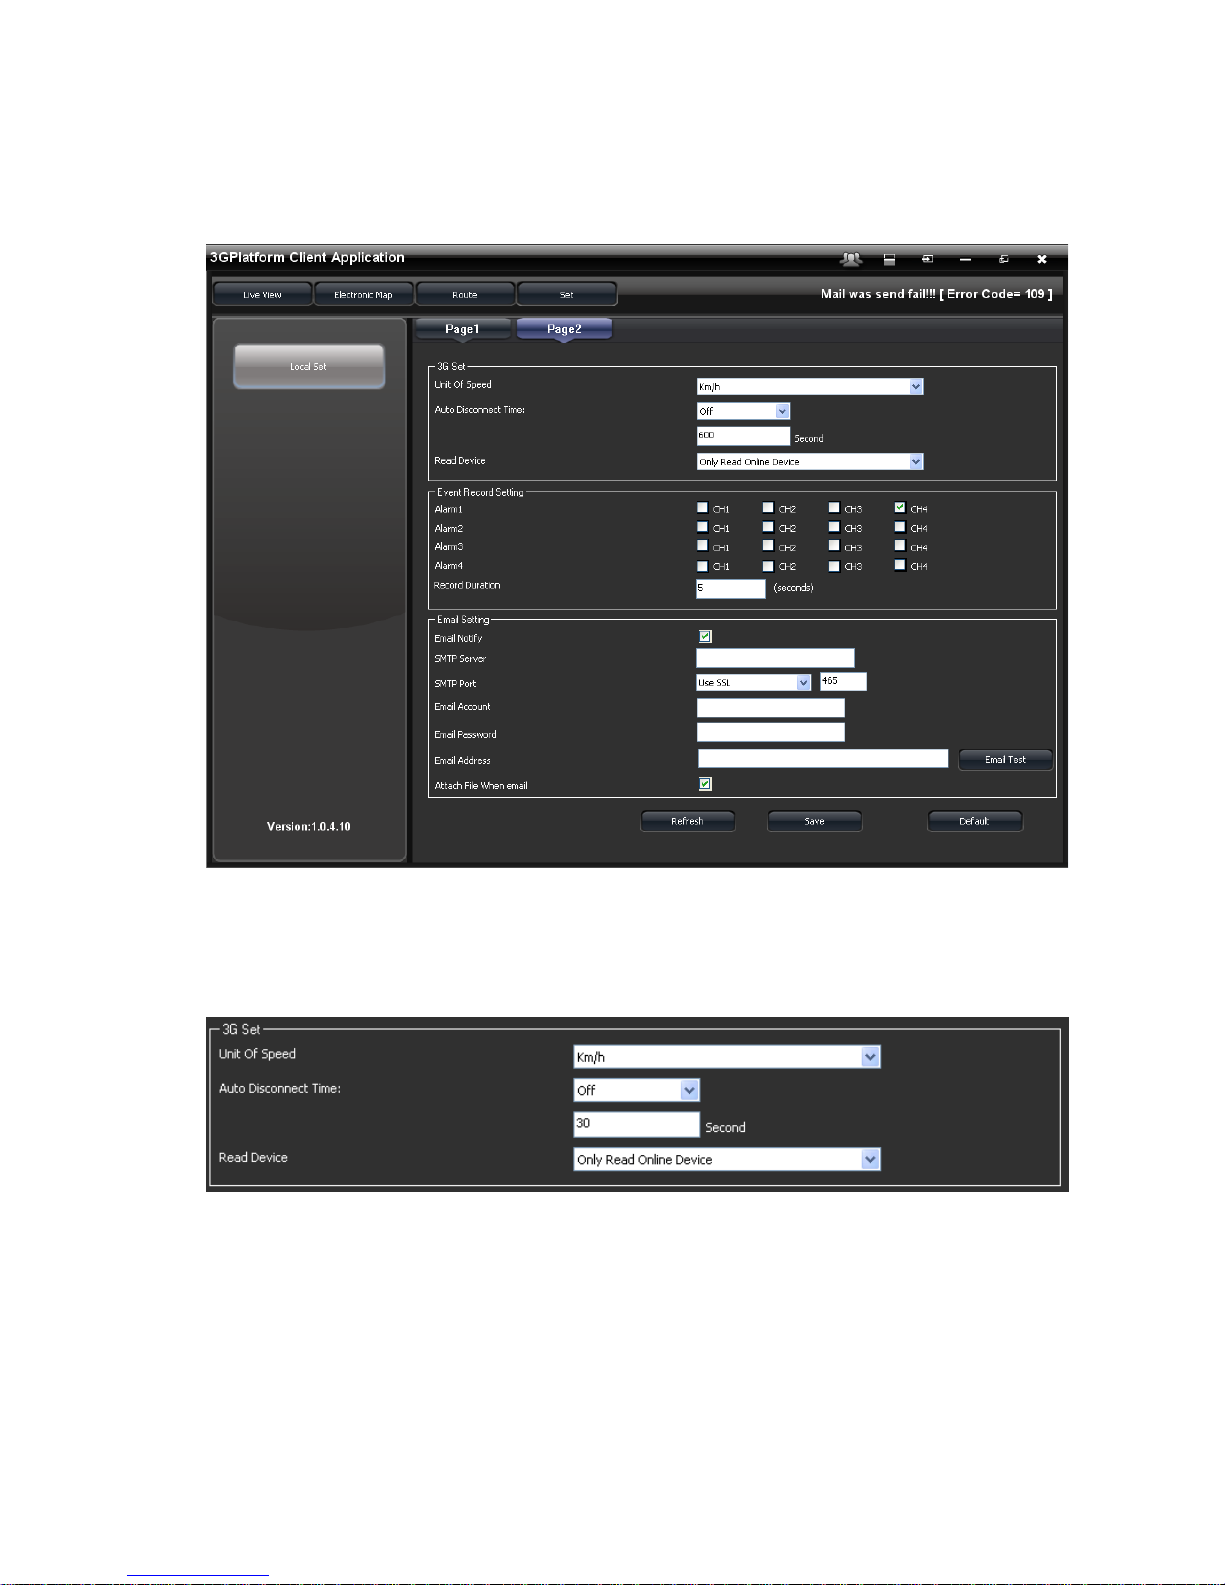
Page 2
Setting 3G function, recording, and e-mail.
1. 3G Setting
Unit of Speed, Auto Disconnect Time, Read Device
functions are available.
• Speed Unit: Speed unit of E-map and tracking
route display
• Auto Disconnect Time: During live video playing,
once it is set, the video image will be Close at
the setup time.
Page 60
57
• Read Device: To read all the devices or all
available online devices. (If too many devices in
this server, we recommend to select “only read
online device”to have better PC performance.)
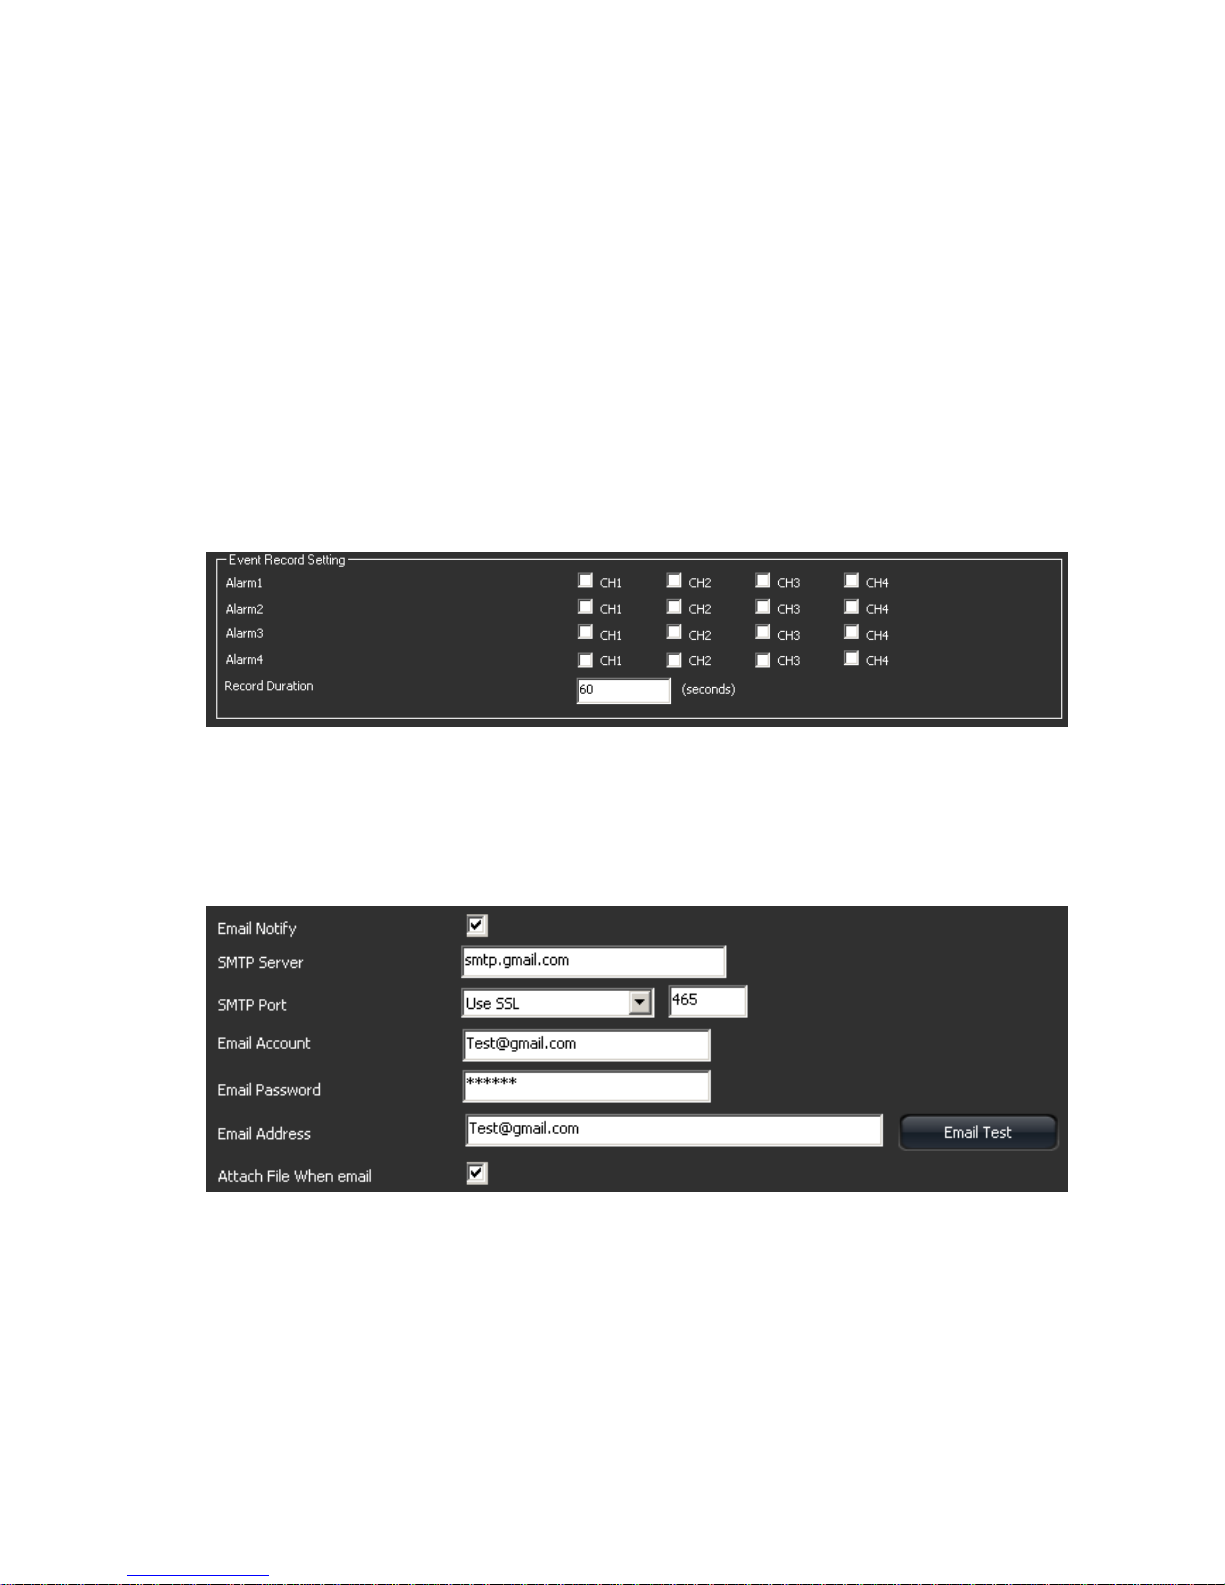
2. Event Record Setting
To set the video recording channel and duration,
once the alarm is triggered. (Remark: Once this
function is set, all of online device video will be
recorded; hence, if there are too many devices in
this server, we recommend to close this functio to
have better PC performance.)
3. E-mail setting
When the alarm is triggered, the server will send a email to the specific account, please refer to the
following figure.
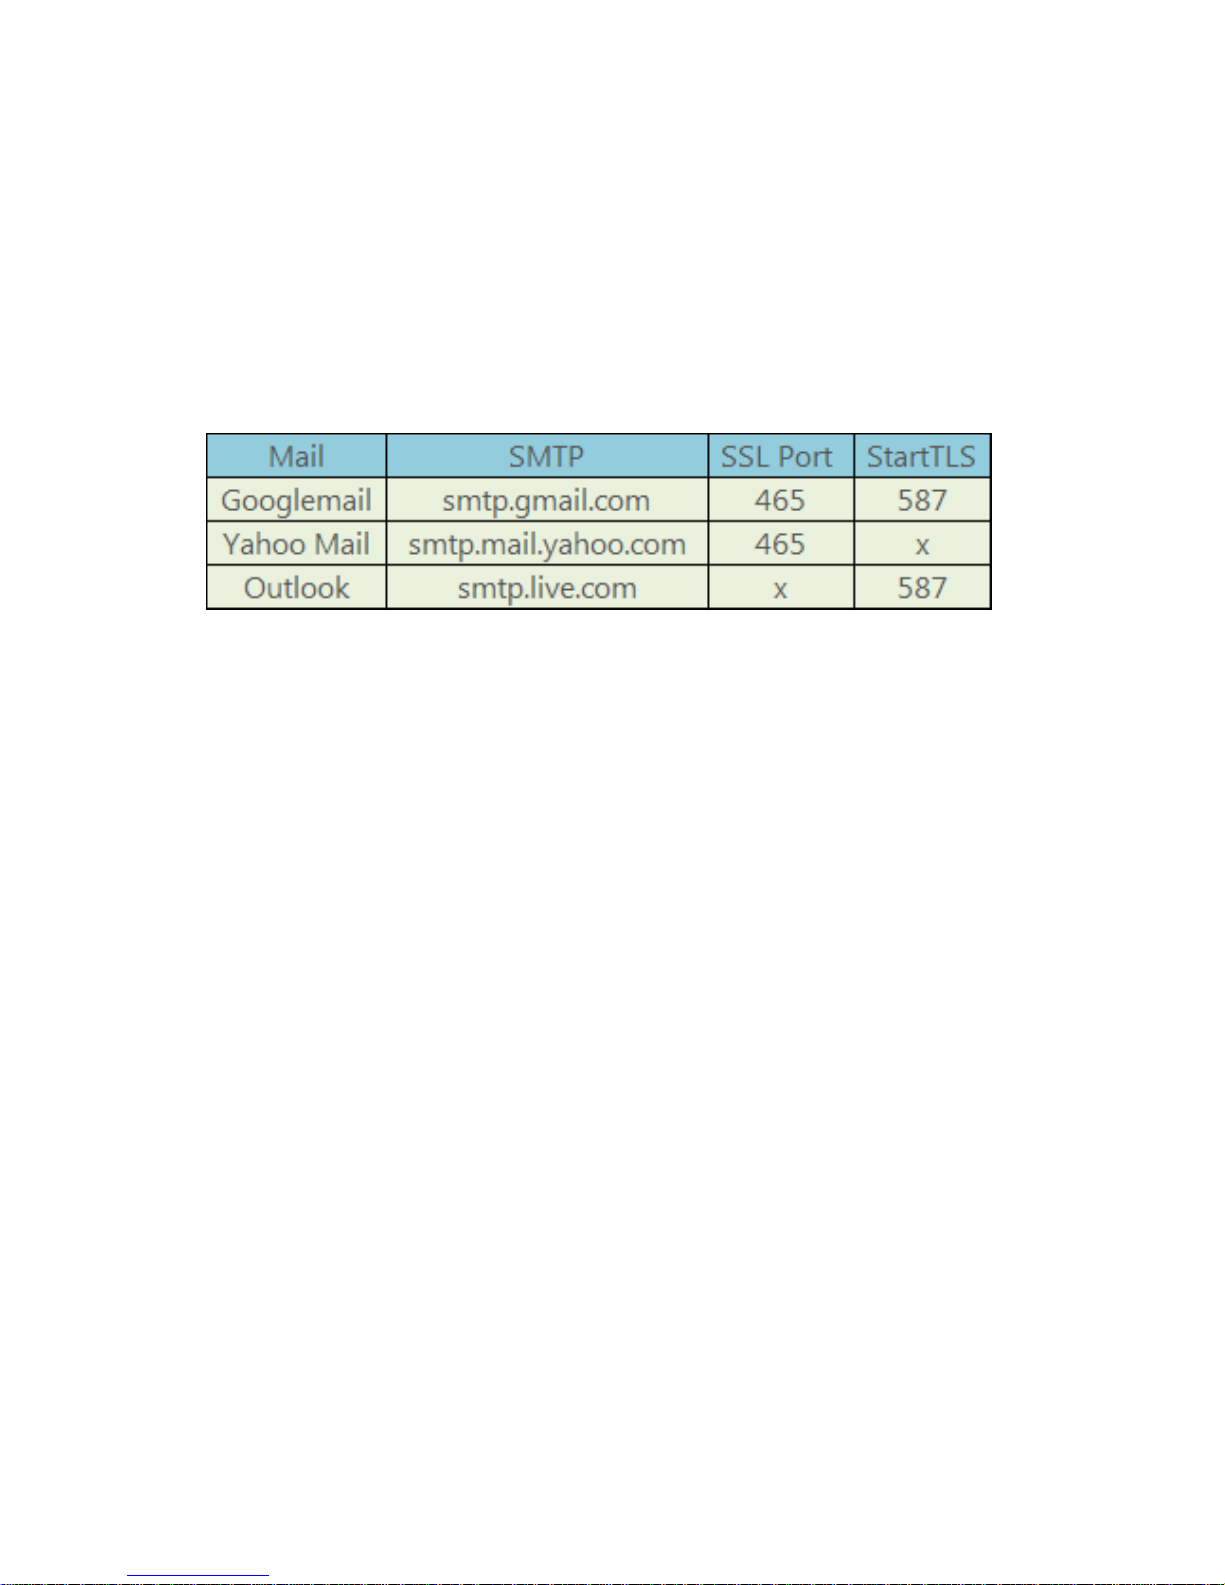
• SMTP Servr:SMTP Sever addres.
• SMTP Port:SMTP port.
• Email Account
• Email Password
• Email Address
Page 61
58
• Attach File when email
(Remark: E-mail setting: Once the alarm is triggered,
the e-mail will be sent to all of online device; hence,
if there are too many devices in this server, we
recommend to close this functio to occupy
unnecessarily the space of the e-mail account.)
SMTP list table
Page 62
59
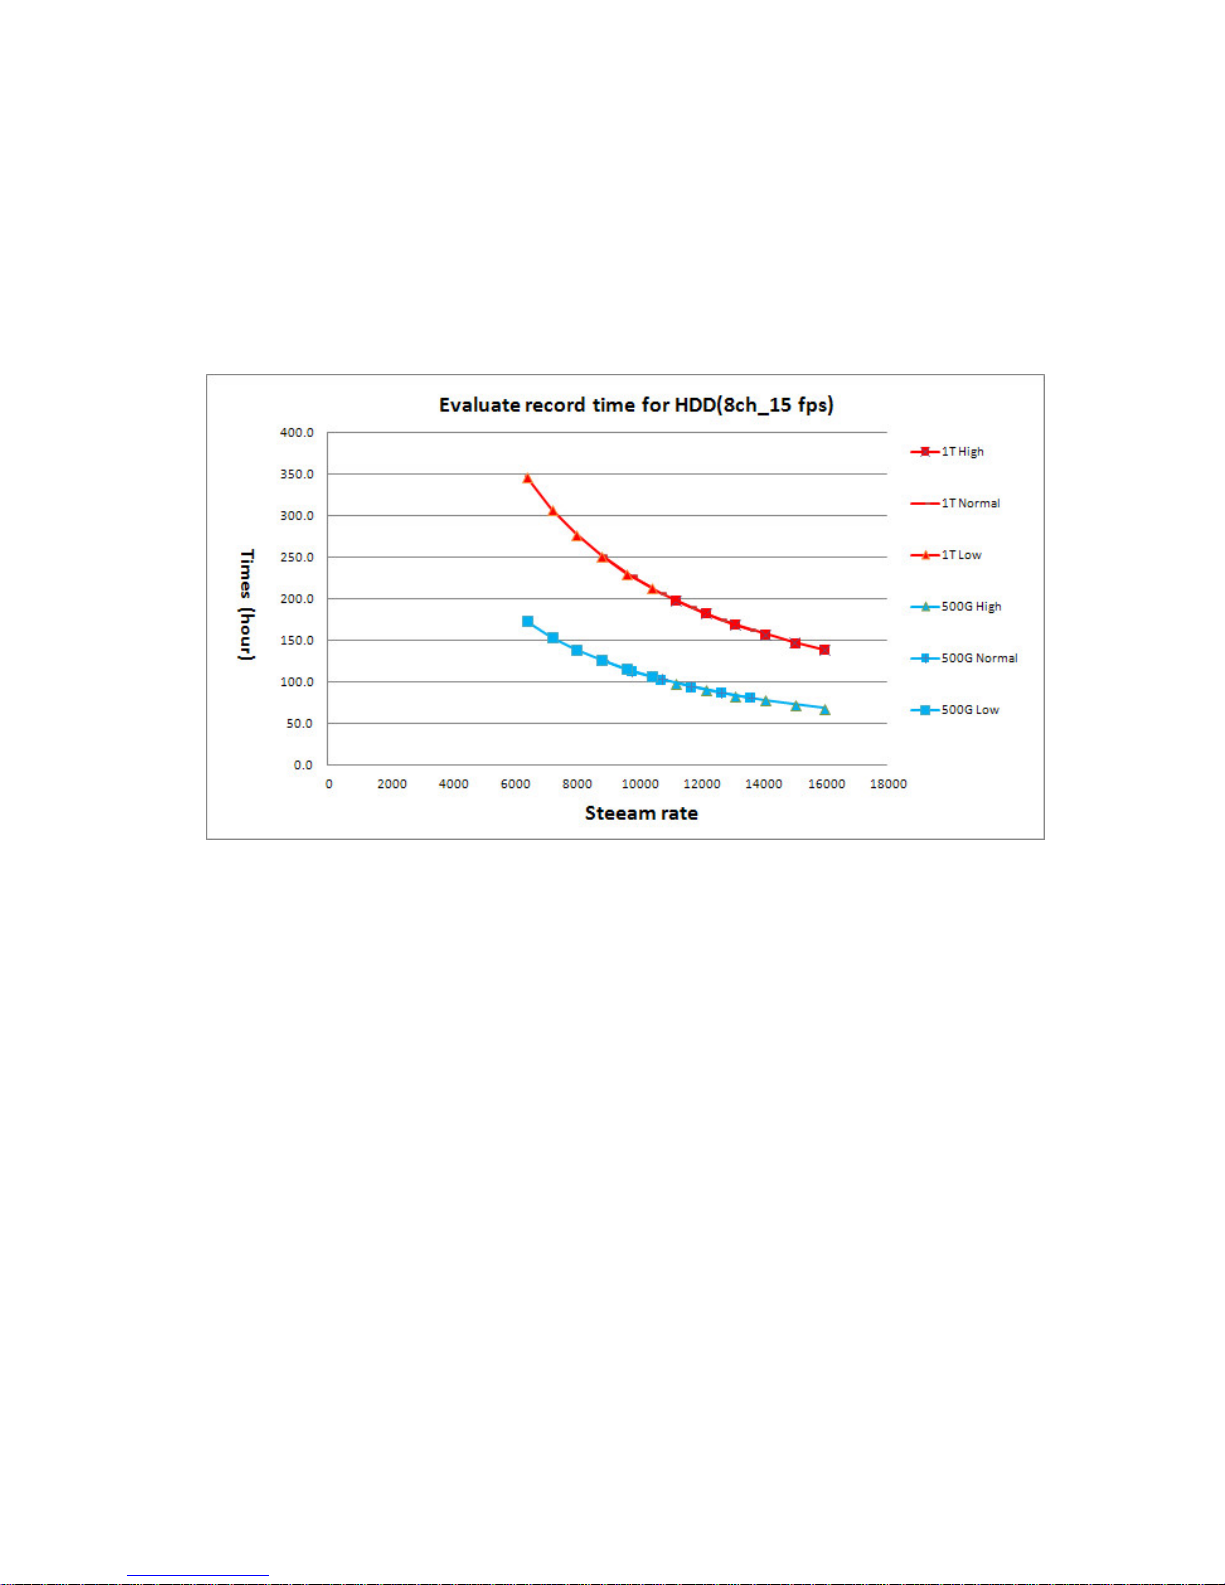
N. Capacity Evaluation of Continuous Recording
Storage Device
Assumption of the minimum record time for Mobile DVR:
8Ch/15FPS , Statics Recording and different capacity of Hard Disk.
The following recording table is evaluated by 1TB.
Page 63

More product information
Please visit VACRON web-site
http://www.vacron.com Made in Taiwan
 Loading...