

Page 1
i
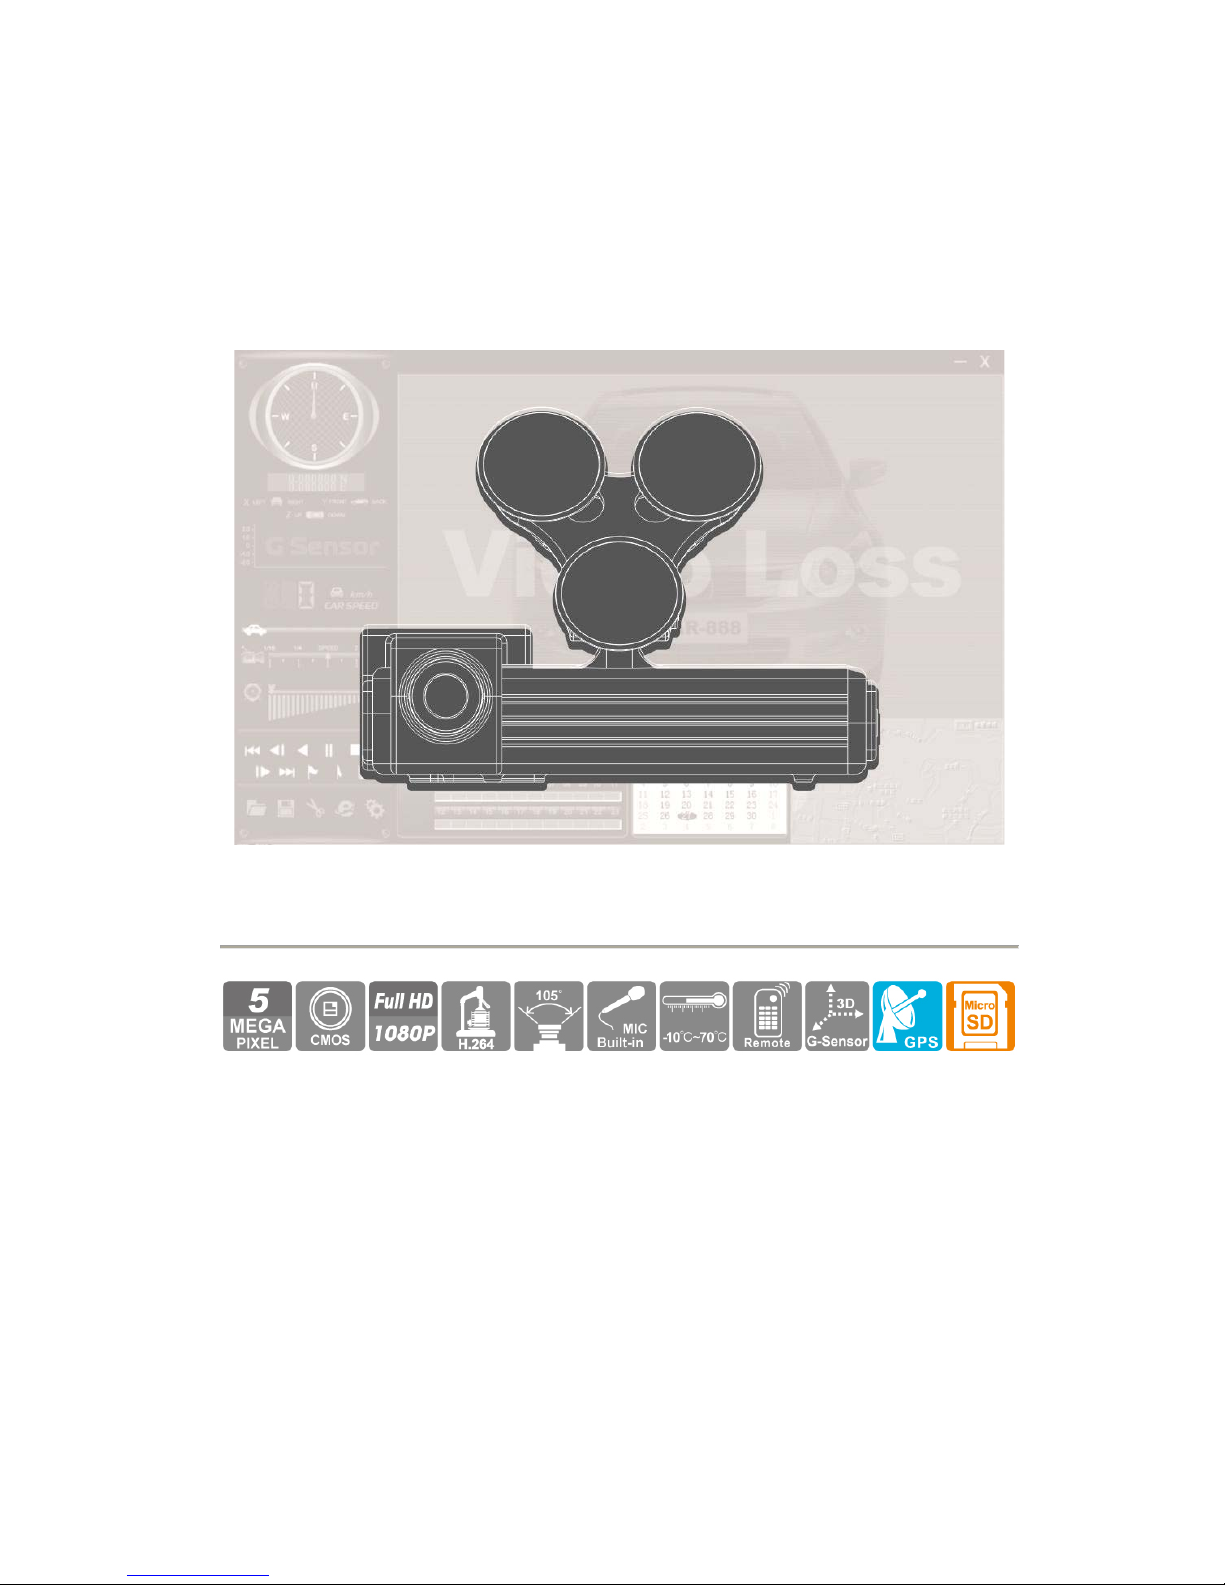
FULL HD 5 Megapixel
Vehicle Video Recorder
User Manual
2012 NOV V1.1
Two types for this Model:
Type A W/O GPS / Type B Built-in GPS
CAUTION BEFORE USE:
1. When you use the Micro SD card at the first time, please format it firstly.
2. The Micro SD card can be formatted by remote controller after connecting TV out
cable to TV. Or you can format the memory card by operating the player software
on PC.
3. Please don’t take out the Micro SD card suddenly when connecting with power. It
should be switch off first or it might are likely to cause the destruction of data.
TYPE B OPTIONAL
Page 2

i
Index
A. Feature Description ..................................................................... 1
B.
Schematic Diagram of The Installation Steps ............................... 2
C.
Specification ................................................................................. 3
D. Product Dimensions ..................................................................... 5
E. Remote Controller Description ...................................................... 6
F. Main Menu Operating Description ................................................ 7
G. Play The Recorded File .............................................................. 24
H. Software Operating Instruction ................................................... 29
I. Formatting the Memory Card ...................................................... 37
J. Installation of Micro SD Card ...................................................... 40
K. Record Time Estimation (based on constant record mode
with 8GB card) ............................................................................ 40
L. Operation for Saving Records as AVI Files ................................ 40
Page 3

1
A. Feature
Built-in Full HD 5M CMOS Sensor. Viewing angle approx. 105
degrees.
Easy installation. Suitable for all types of vehicles use.
Video record outside driving conditions and audio record inside
the vehicle simultaneously.
G-sensor, GPS and Image data are recorded and playable on
client software. (GPS only for Type B model)
Image data is securely stored on Micro SD Card (read/write
speed 15MB/s), support Max. 32 GB and sudden disconnection
from unexpected shock is completely prevented.
G-sensor sensitivity can be adjusted according to vehicles and
road situations. When detect a strong shock, system will start
emergency recording and keep the files without being
overwritten.
The most user-friendly player software, easy to operate.
With full time/date record, can be displayed in screen directly.
Provides complete event log table, easy to search recorded files.
Provides a variety of recording video formats and number of
frames to select.
Built-in Dual High Sensitivity Microphone.
Page 4
2
B.
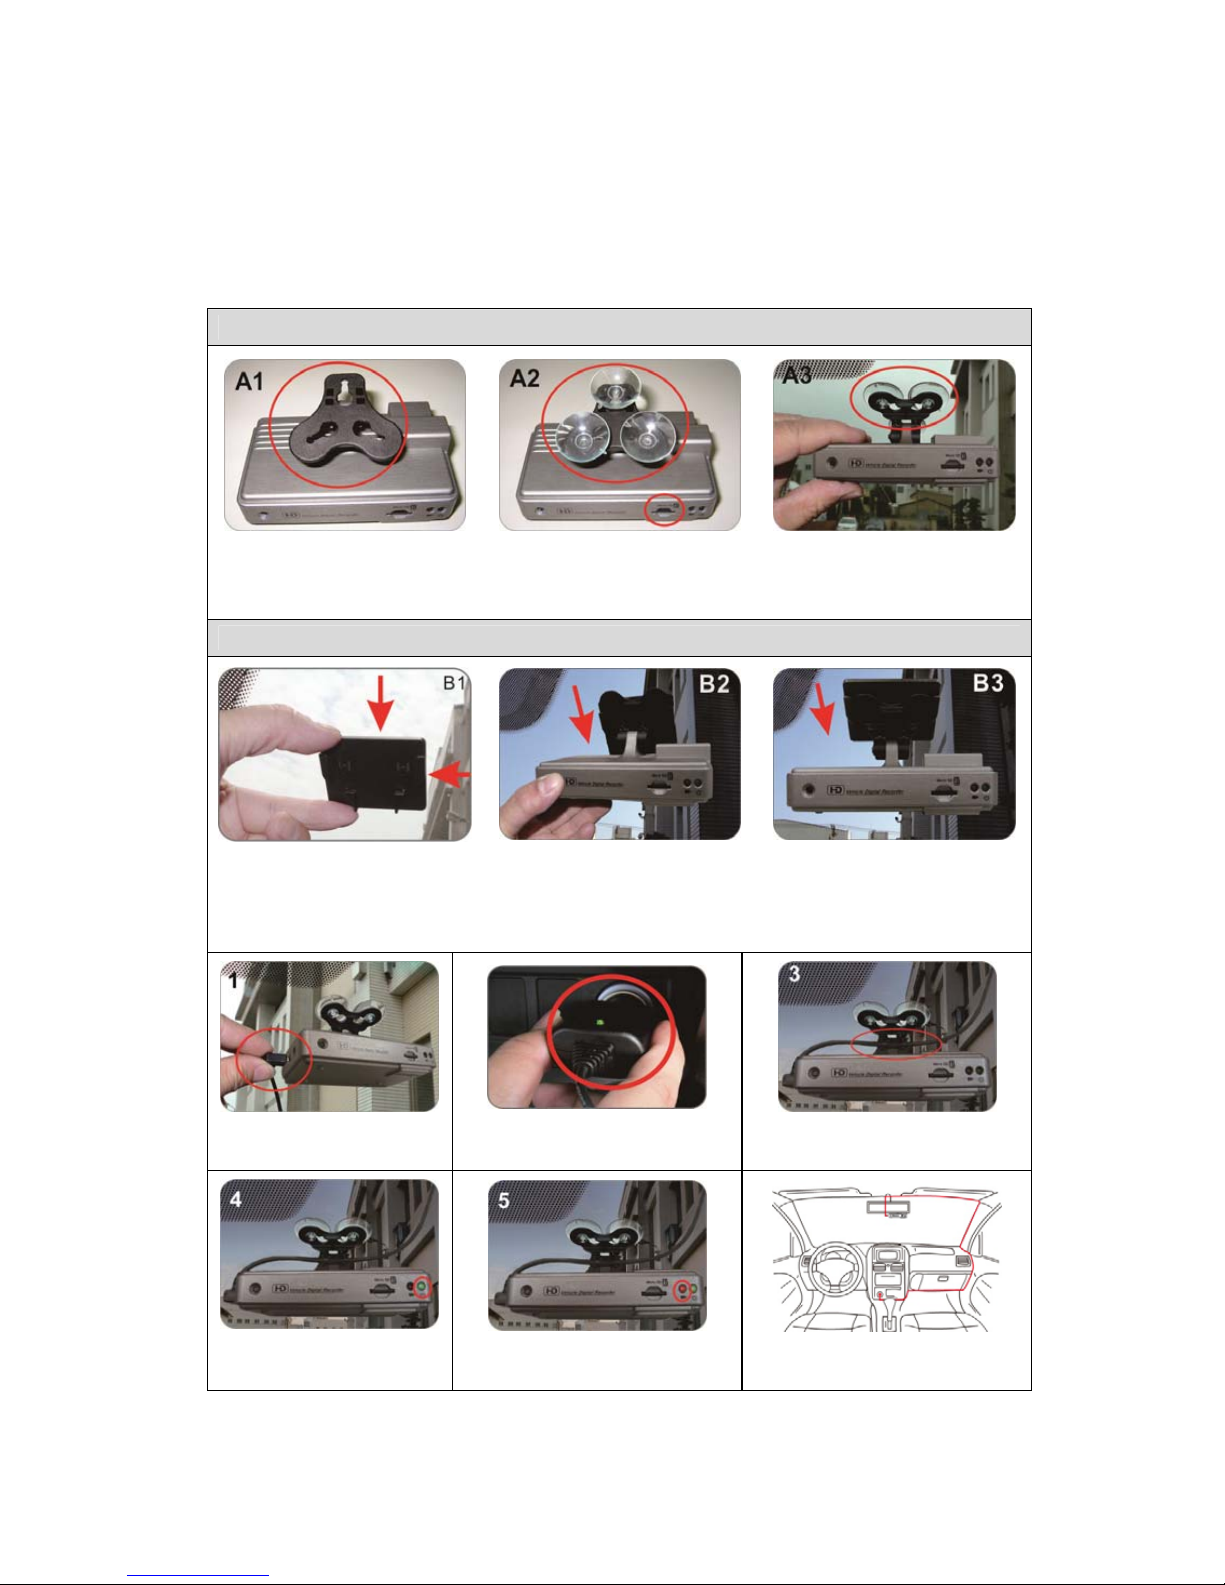
Schematic Diagram of The Installation St eps
Two types of brackets installation for selection, suction-cups type and
stick-holder type.
Suction-cups Type
A1. Make the bracket
facing upward
A2.Assemble the suction
cups, and insert the Micro
SD card.
A3. Set up appropriate
position by suction cups.
Stick-holder Type
B1. Remove 3M sticker
and adjust the best
position to posted closely.
B2+B3. Stuck bracket into latch.
Power line installs into
USB port.
Plug in the cigarette
adapter.
Set up appropriate position
and fix power line.
Green light on:
Power.
Red light flashing:
Recording.
Schematic diagram of the
wire installation.
Page 5
3
C.
Specification
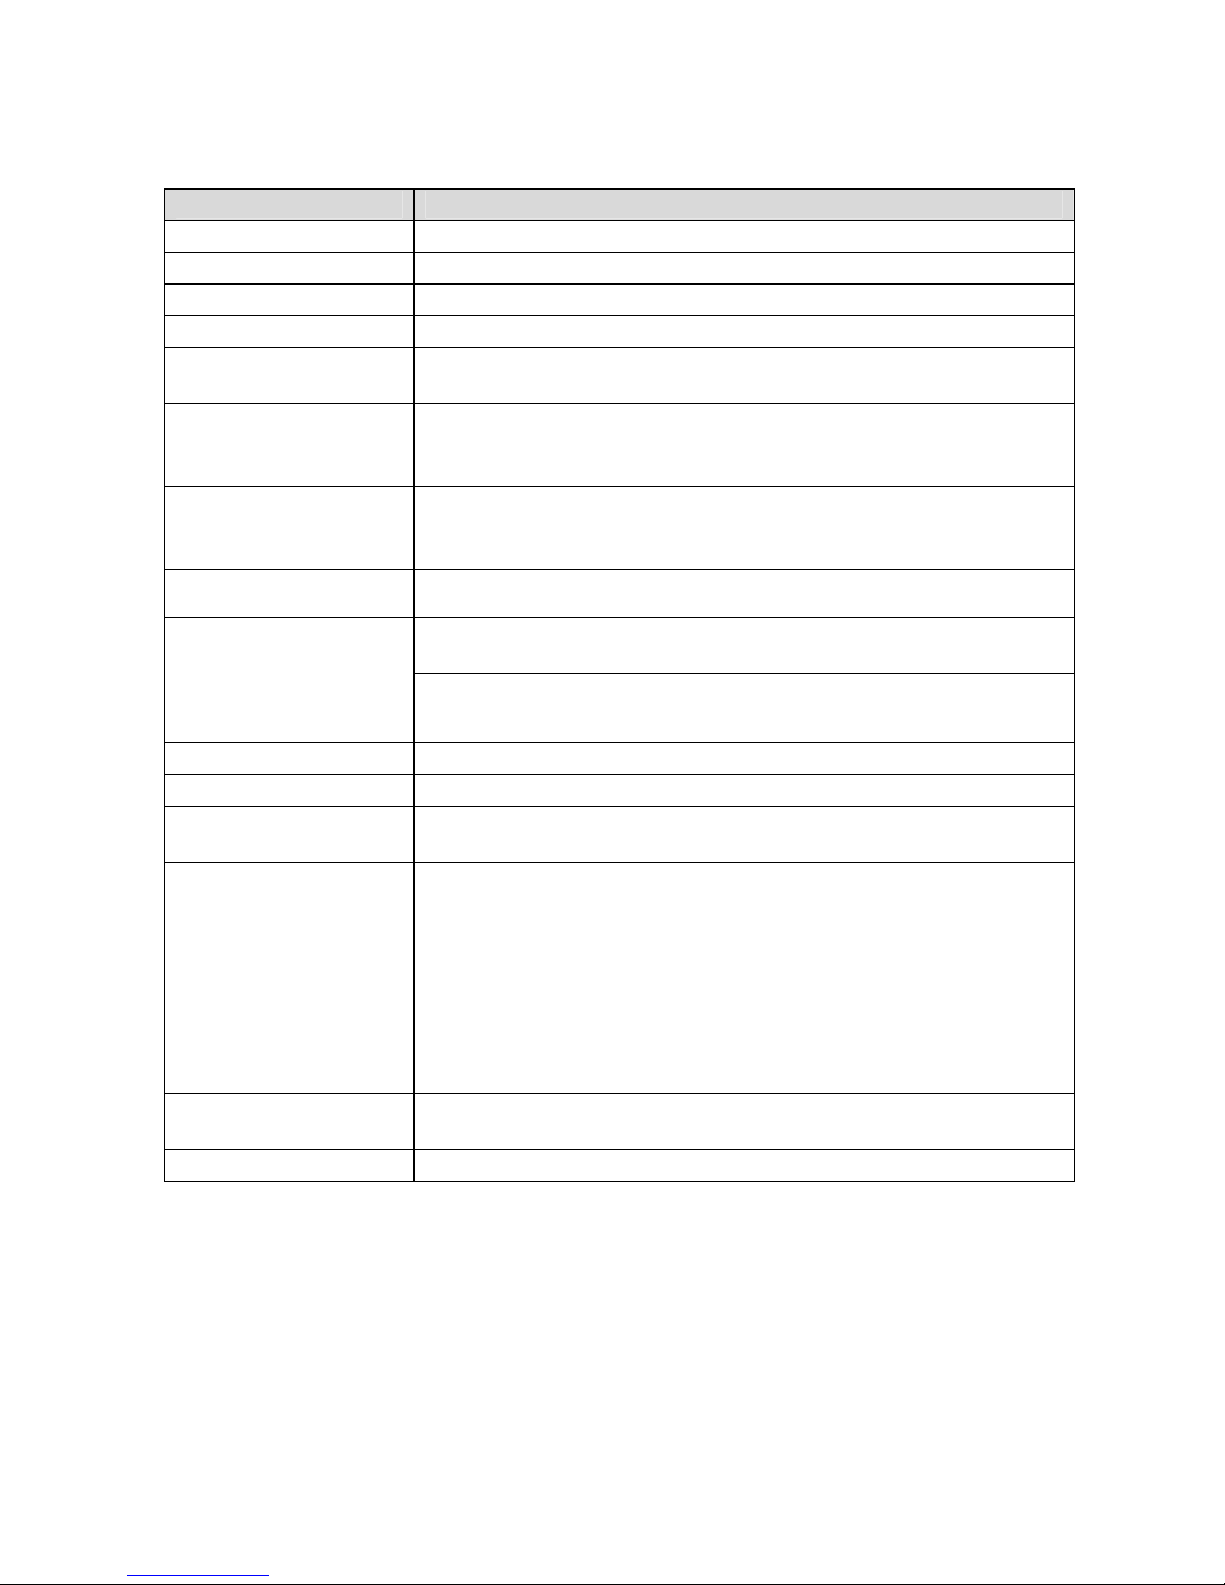
Items Description
Chipset Ambarella H.264 image compression chip
Sensor Device Full HD 5M CMOS Sensor
View Angle View angle approx. 105 degrees.
Voltage 5V± 5%; 650mA,
Operating
Temperature
-10℃~ +70℃ (Inside vehicle)
Storage Device
For the performance issue, use Micro SD card Class 10 or
above read / write speed 15MB/s recommend. (min capacity
4G, Max 32G)
Recording Frame
and Content
1920x1080 (Full HD1080P/ 30F) 1280x720(HD720P/ 60F
and HD720P/ 30F). Auto record when power up system.
Recording frame: 30fps/60fps (NTSC/PAL) only select one.
Camera Mode Resolution 3M, 5M, 8M( manual/ G-sensor/Timer)
Recording Content
TYPE A:
Date, time, image, sound, G-Sensor data
TYPE B:
Date, time, image, sound, G-Sensor data , GPS data
Recording Format Specific format for player software (recording mode).
Microphone Built-in Dual High Sensitivity Microphone.
Input Device
(a) Enforced recording button, Remote controller.
(b) GPS Mouse external extension hole.
Out Device
(a) TV-Out (1 Vp-p composite video output, 75 ohms), two
kind of system: NTSC/PAL
(b) Green light: Power/GPS signals. When power up to
system, green light on(Type A). When GPS are
positioning, green light will flash, and turn to light when
complete positioning (Type B).
(c) Red light: Recording
Time Setup
Auto-calibrating by GPS signals. If GPS is not available, the
built in clock will be used.
G-Sensor Built in Internal 3D G-Sensor
Page 6

4
Accessories
(a) 5V cigarette Power adapter
(b) RCA output cable
(c) Remote controller
(d) Product CD
(e) Suction cup bracket
(f) Bracket holder
(g) Quick user guide
(h) USB card reader
(i) Micro SD Card (optional)
(j) RCA AV cable (optional)
Important
Notice
(a) GPS positioning speed will be affected by weather,
window films, etc. Windows film may contain metal
substances and have impact on GPS positioning. (TYPE B)
(b) The light indicator distinguish between day and night
mode, When power-on it will enter night mode first.
(c) Machine must be installed in the area that wipe can be
reached.
(d) Micro SD card must be formatted by machine or client
software first to be used properly.
(e) After Micro
SD card formatted, user needs to set up time
zone data from OSD. Or Auto-calibrating by GPS signals
directly, then the video file can be recorded the right time
data.
(f) Due to power consumption is over standard USB (signal
output 500mA), when connected to the computer power
supply, please use other power line.
(h) For power cable installing, try not to bypass above the
machine (GPS patch), Set the cable to bracket latch then
wiring to the car ceiling, it can receive the GPS signal better.
(i) The machine reserved for the RTC battery cover for easy
changing battery (CR1220).
Page 7
5
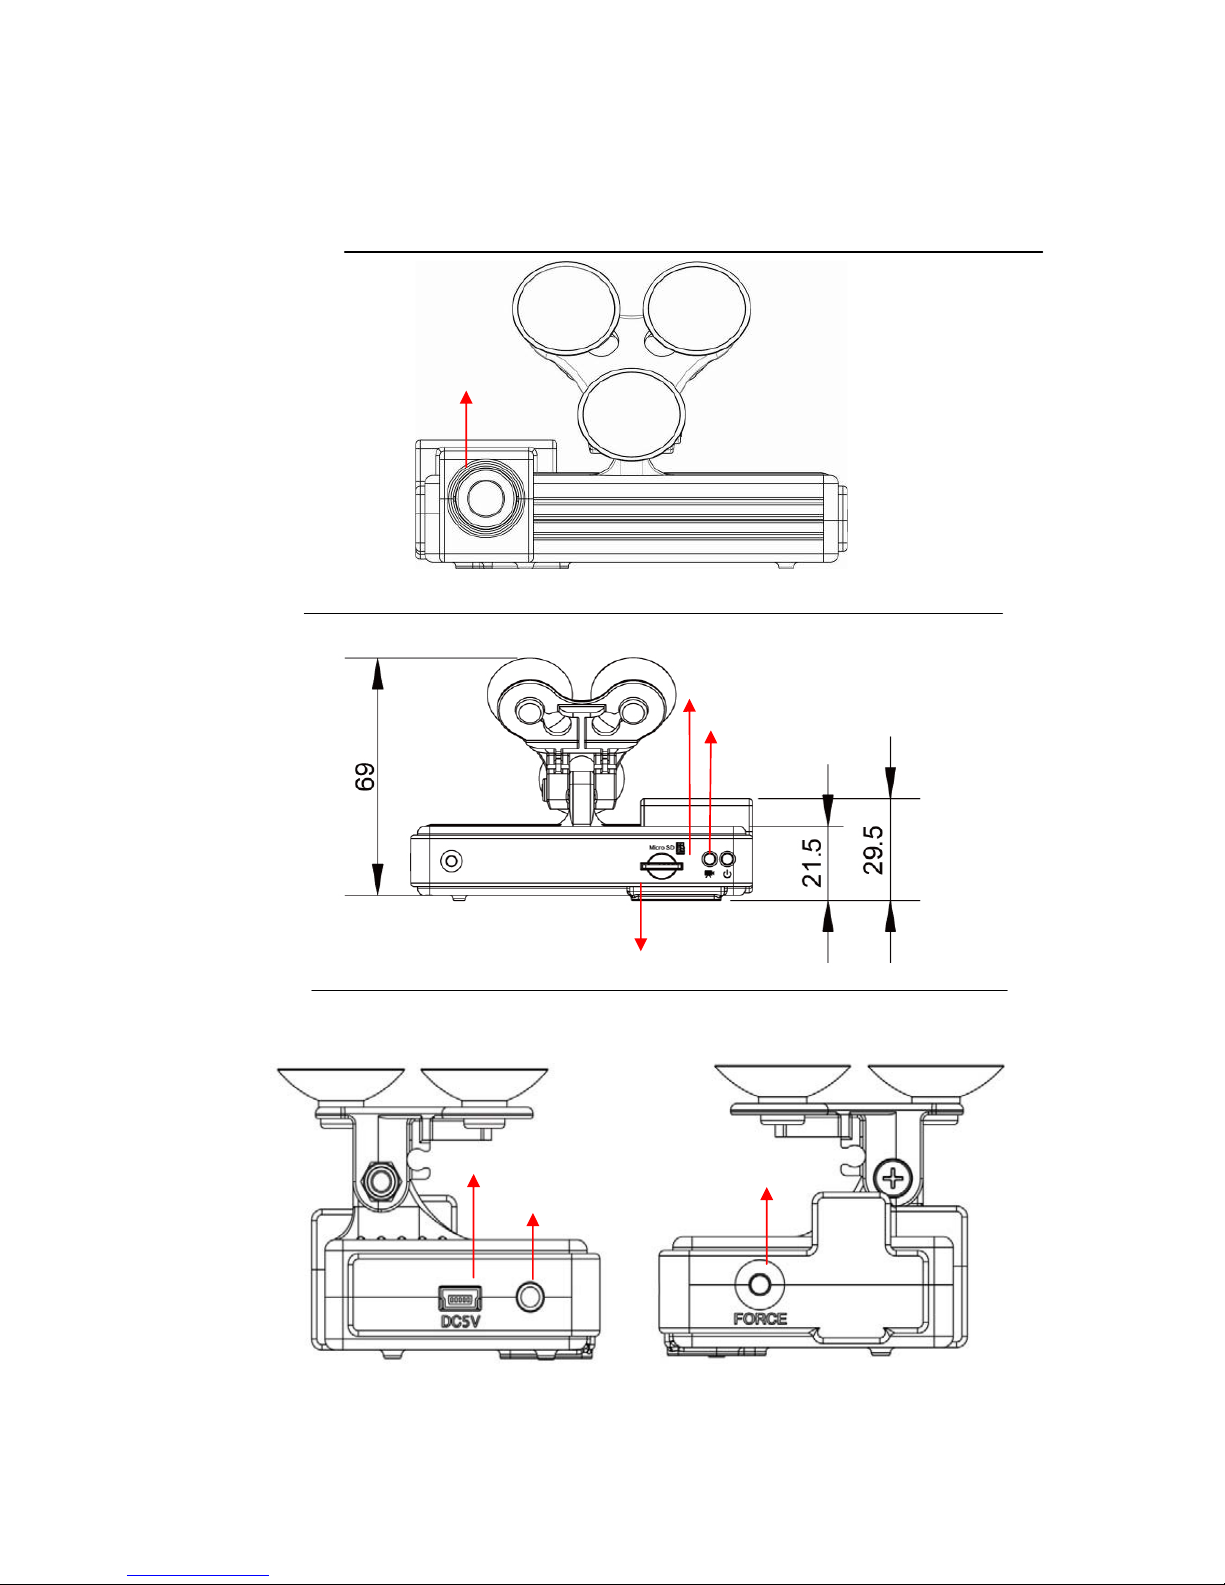
D. Product Dimensions
Front Panel
Rear Panel
Side Panel
Lens
Enforced Recording
UNIT:mm
Micro SD Card
Recording Indicator
Power
DC5V Power Input
Video Out
Page 8
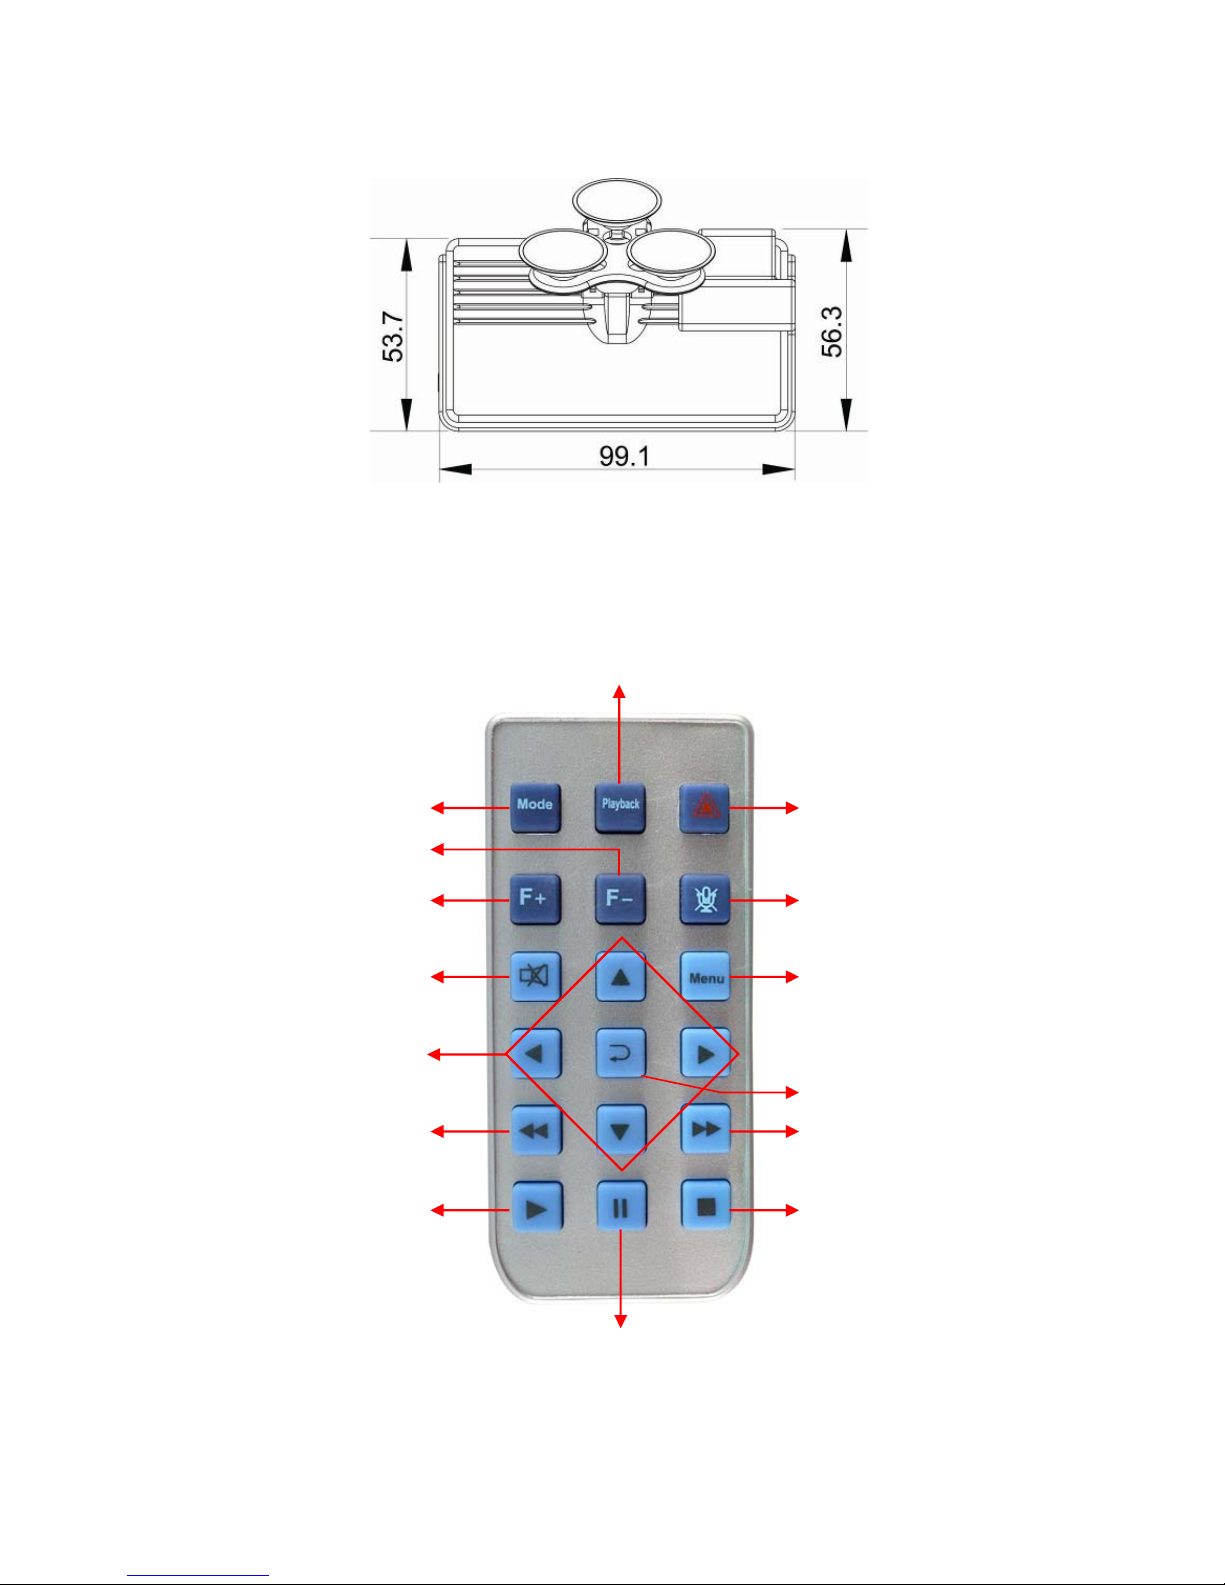
6
E. Remote Controller Description
Key mapping table for remote controller:
Playback
Manual Force Recording
Volume down
Stop voice
Menu
Confirm
Fast Forward
Stop
Play
Pause / Step
Fast Rewind
Up / Down
/
Left / Right
Mute
Volume up
Camcorder/camera
mode switch
Page 9
7
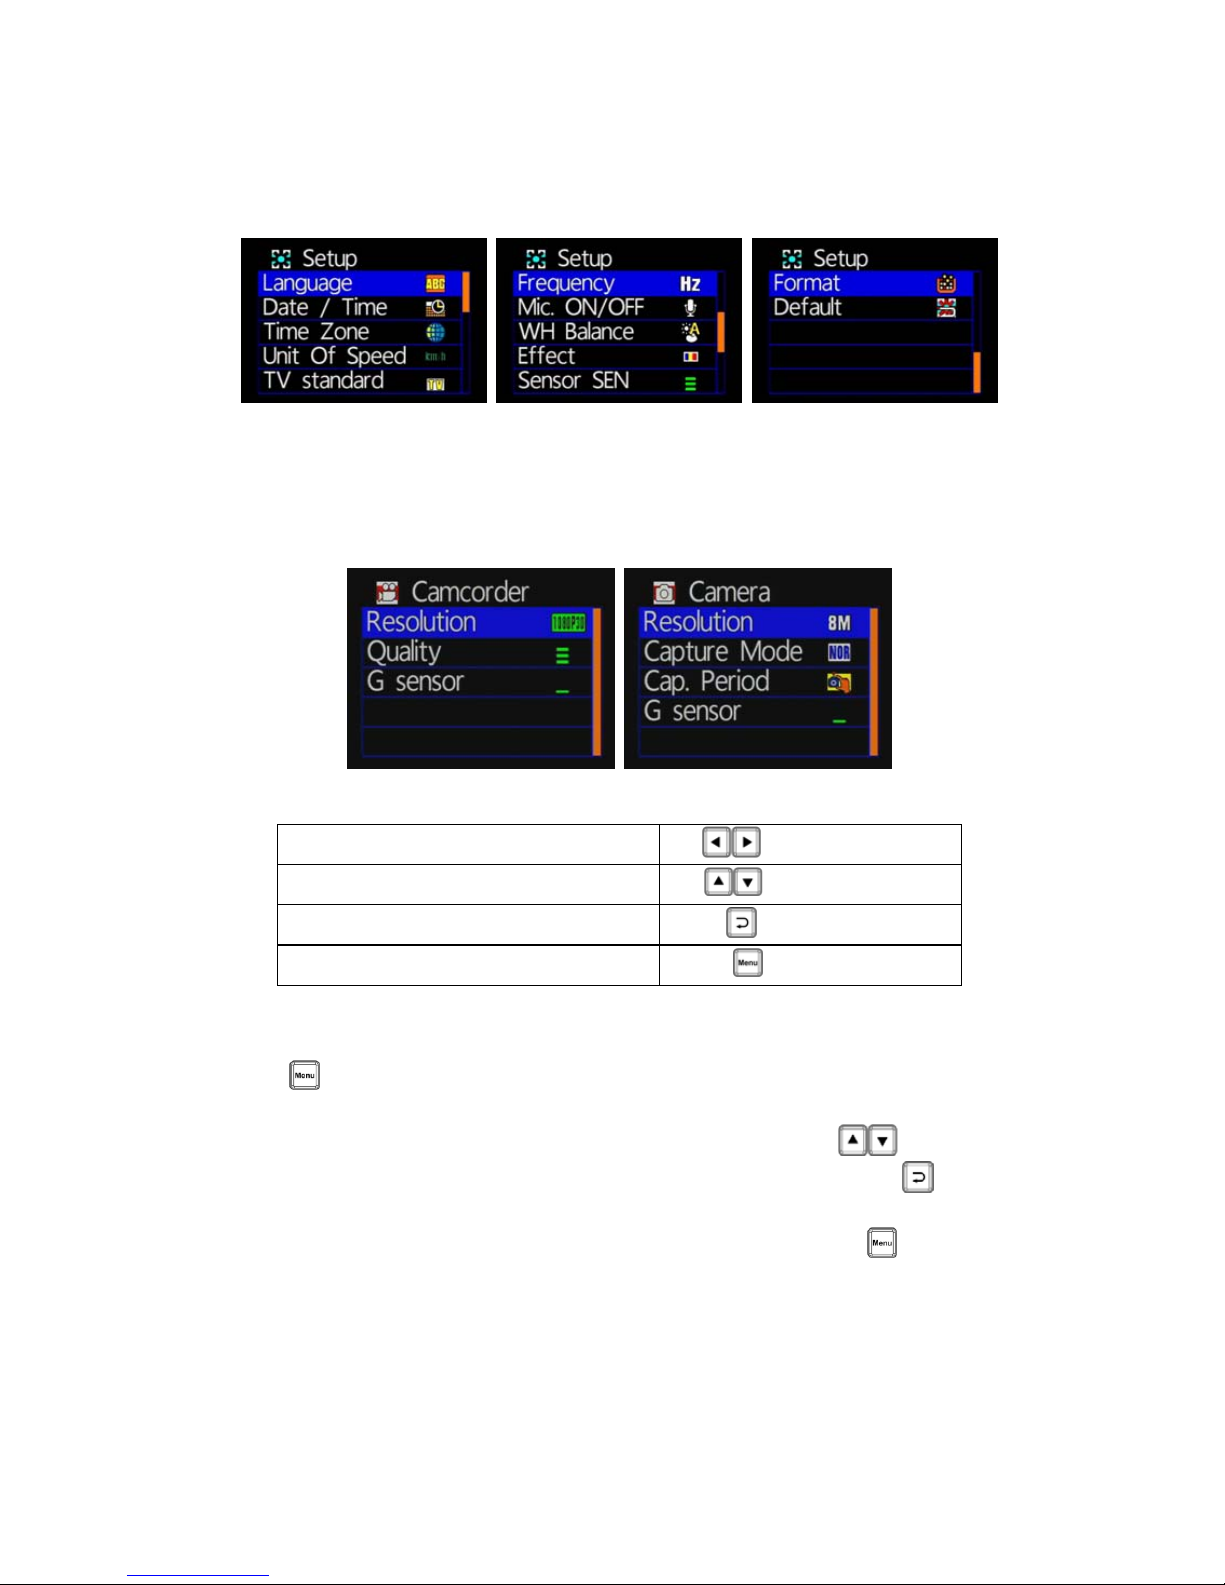
F. Main Menu Operating Description
Main menu table switch
Set 1/3 Set 2/3 Set 3/3
★
Total three setting pages; click on the settings page, you can
conduct more detailed and related setting (For detailed setting,
please refer to the settings page instructions).
First stage Remote controller keys description
Moving menu options
[Left/Right Key]
Selecting items
[Up/Down Key]
Selected the item, confirm setting
[Confirm key]
Enter index, back to previous menu
[MENU key]
Main Menu Settings
Click
button on the remote controller to enter the main menu
setting page.
After entering the main menu settings page, press the
button on
the remote controller, choose the Settings page; then click
on the
remote controller to enter the settings page.
To exit the Settings page, click on the remote controller
you can
choose to leave and return to the settings page.
Page 10
8
◆
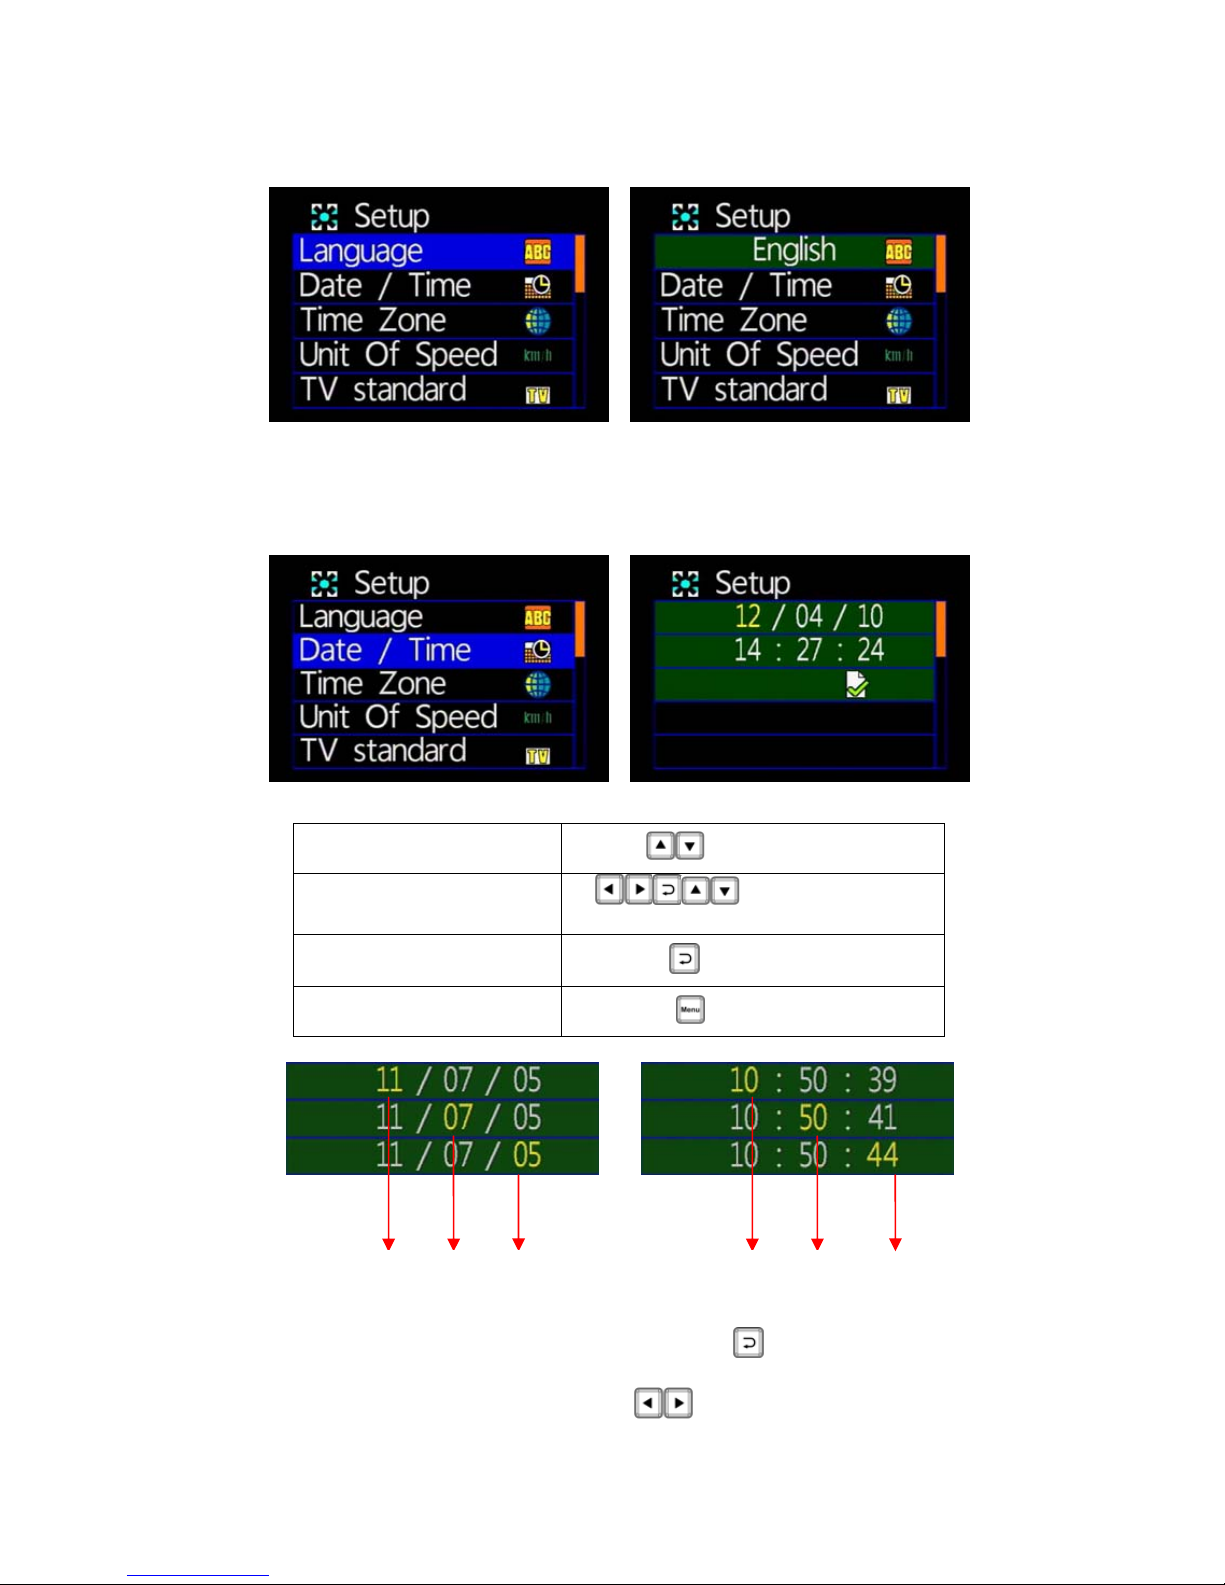
Language Setting
★Support 13 languages: English / French / German / Italian /Japanese / Korean /
Portuguese / Russian /Simplified Chinese /Spanish / Traditional Chinese /
Turkish / Dutch
◆
Date / Time
Menu Options
[Up/Down Key]
Selecting Options
[Left/Right Key]+
[Confirm key]+ [Up/Down Key]
Selected the item
Confirm setting
[Confirm key]
back to previous menu
[MENU key]
Date / time: Press the remote control button, enter the
date / time setting
Press the remote control
key, move to the year /
Mont
DateYear Hour Minute
Second
Page 11
9
month / day / hour / minutes / seconds
Press the remote control
button, can change the set
of year / month / day / hour / minutes / seconds
After setting and then press remote control
key to
the Select
button and then press to confirm saving.
★Year Setting: to set behind 2 digits of AD year, to set hour for
the 24-hour.
◆
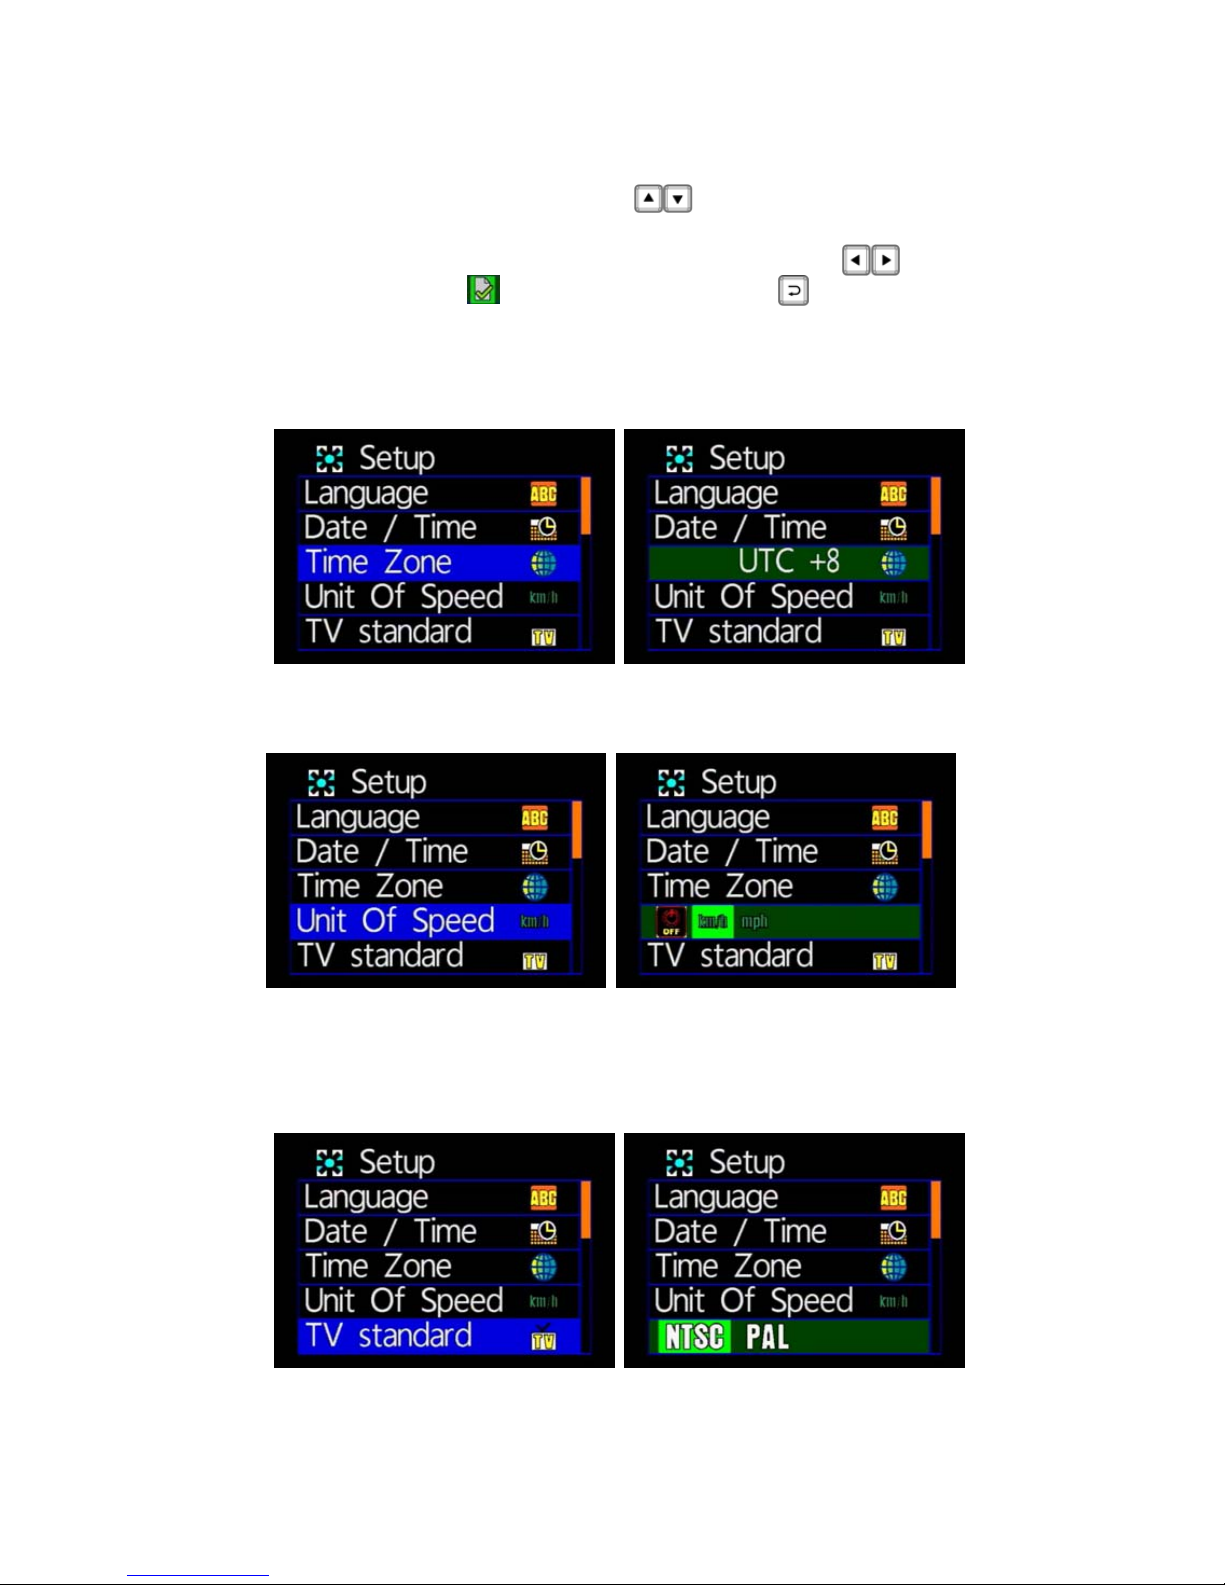
Time Zone
★selecting the proper time zone for your position
◆ Unit Of Speed
★Off / km/h /mph, three choices.
★This function works in TYPE B only(with GPS).
It works when GPS positioning successfully.
◆
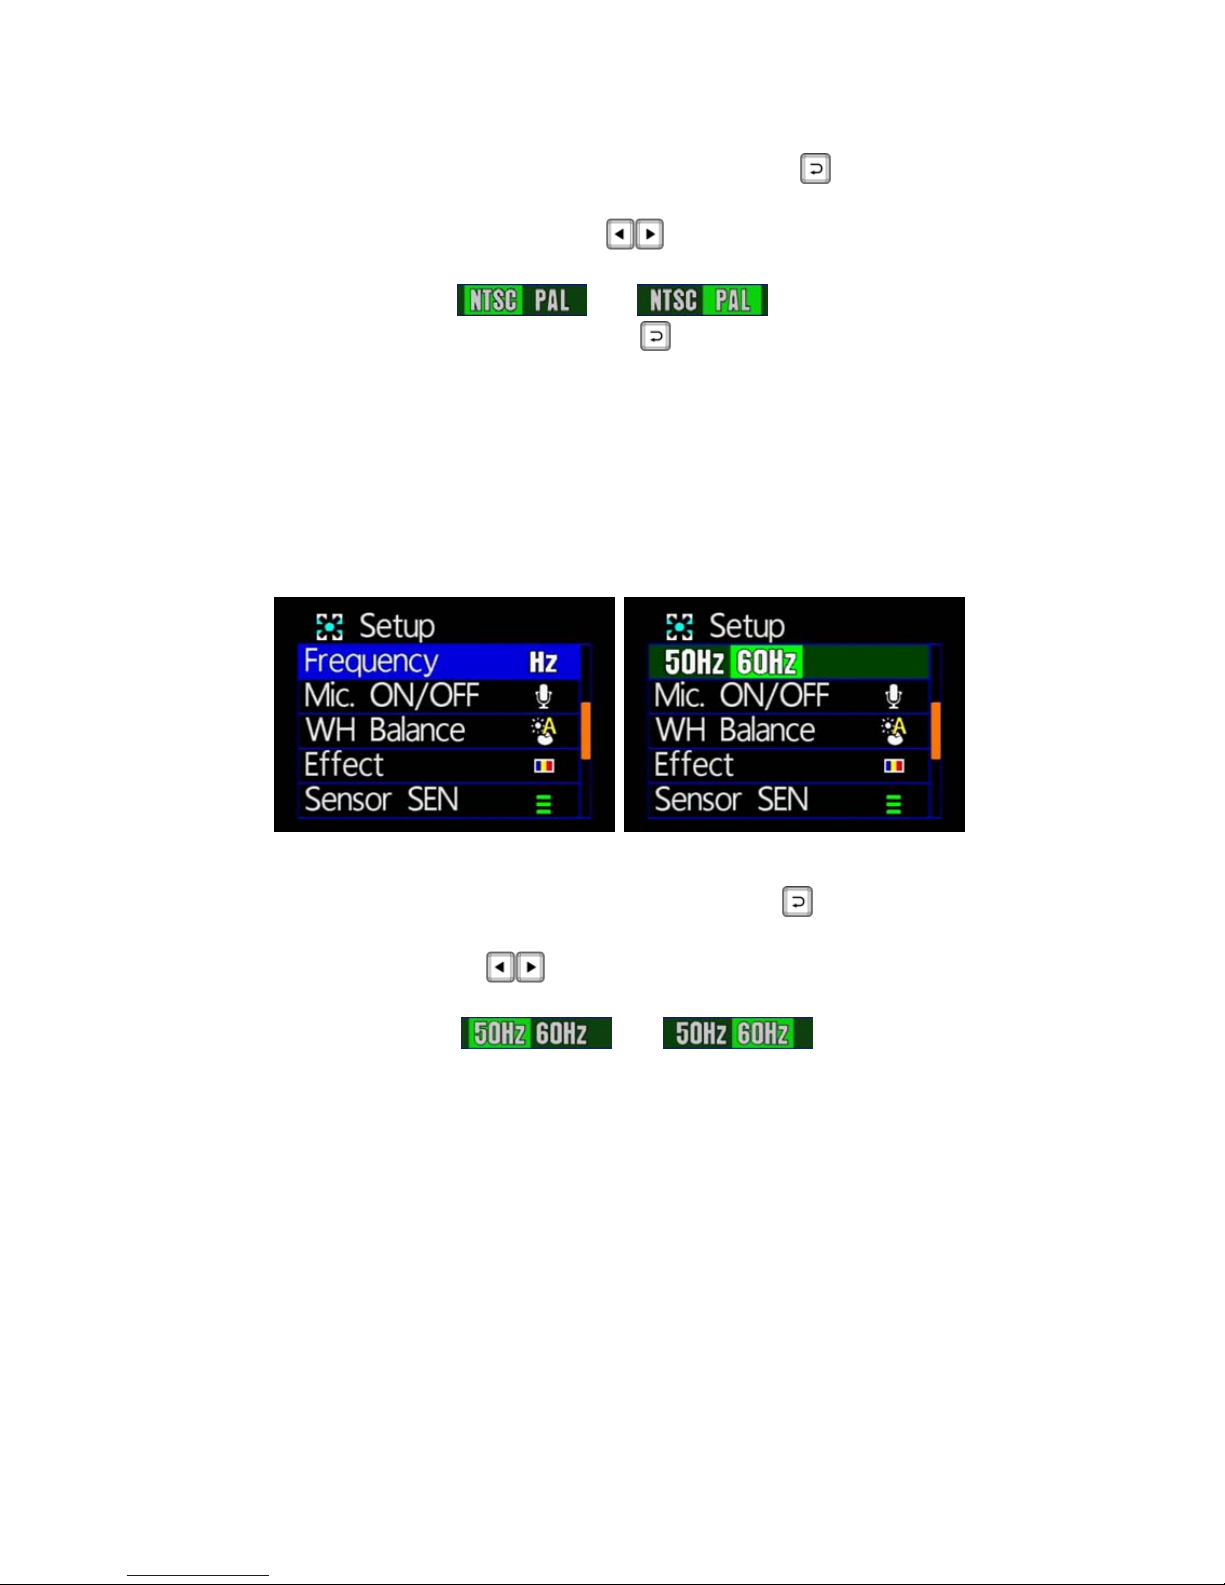
TV Standard
★NTSC/ PAL for selecting
Page 12
10
TV output format: click the remote control button to enter
the TV output format settings page.
Press the remote control
key, select the video output
format of driving recorder.
For example:
→
, after setting up and
then press the remote control
button to save the settings.
★TV output format, according to different national systems using
the input format for the TV set, the system is preset to NTSC
(Taiwan TV image is NTSC). When input the image causing TV
screen which appears black and white, beat, we can switch to
PAL TV screen to check returning to normal status.
◆
Light Frequency Setting
★ 50Hz/ 60Hz for selecting
Light frequency: press the remote control button, enter the
light frequency page to do the setting.
Remote control
button, can change the light frequency
setting.
For example:
→
, after setting
finished, press the selected remote control key to save the
settings.
★Light frequency: according to different power frequency flicker
and, thus, the wavelength, the wavelength is caused by the
human eye brightness of the most important factor; general, the
higher the frequency of light, the brighter the ambient feel. As the
use of Taiwan's general power frequency 60HZ, 60HZ
recommended to set the frequency for the light source is more
suitable environment in Taiwan.
Page 13
11
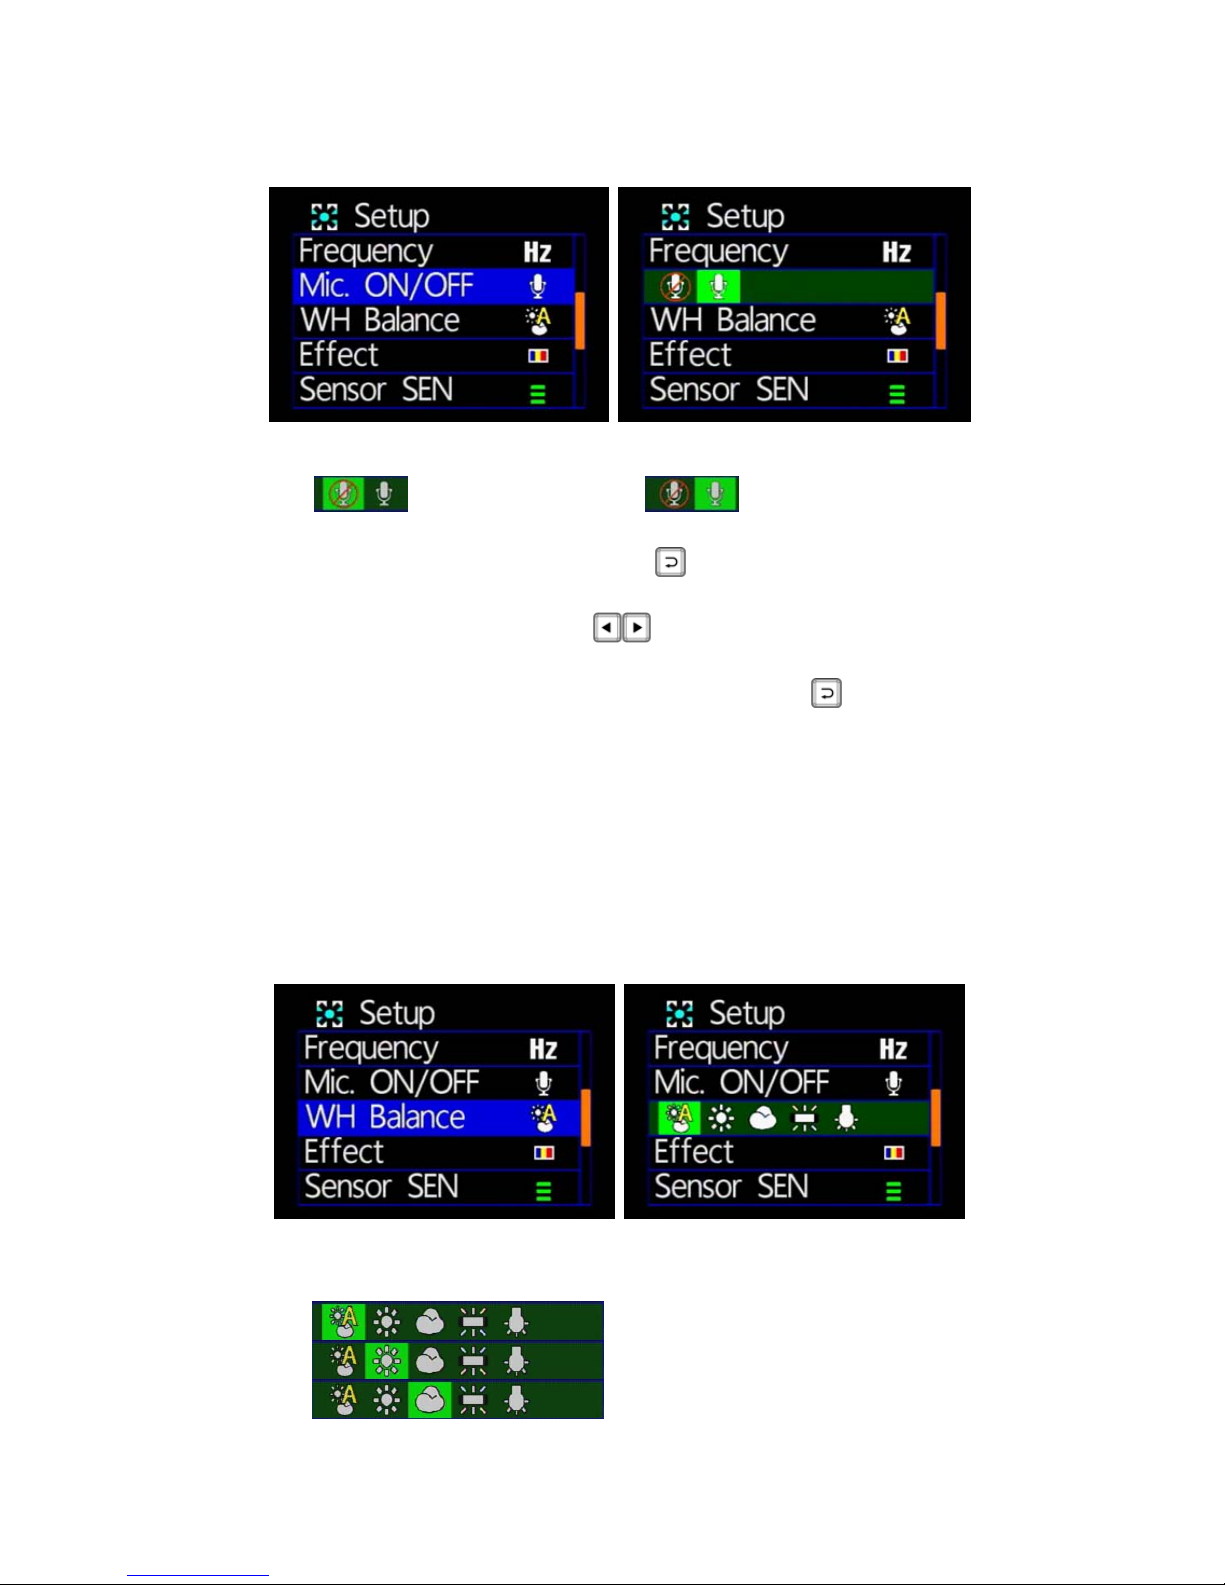
◆
Microphone Switch
★ OFF/ON
: Microphone off : microphone on
Microphone: press the remote
button, into the microphone
switch pages.
Press the remote control
key can be turned on or off the
microphone.
Setup is complete, press the remote control
key to store
settings.
★Microphone to record the sound of inside vehicle information,
if concern about personal privacy information, proposed close
microphone function (off microphone function, converting the
image files to video without sound state).
◆
White Balance
★Five ambient light option for selecting Auto / Daylight /
Cloudy / Fluorescent / incandescent light
: Automatic mode
: Daylight mode
: Cloudy mode
Page 14
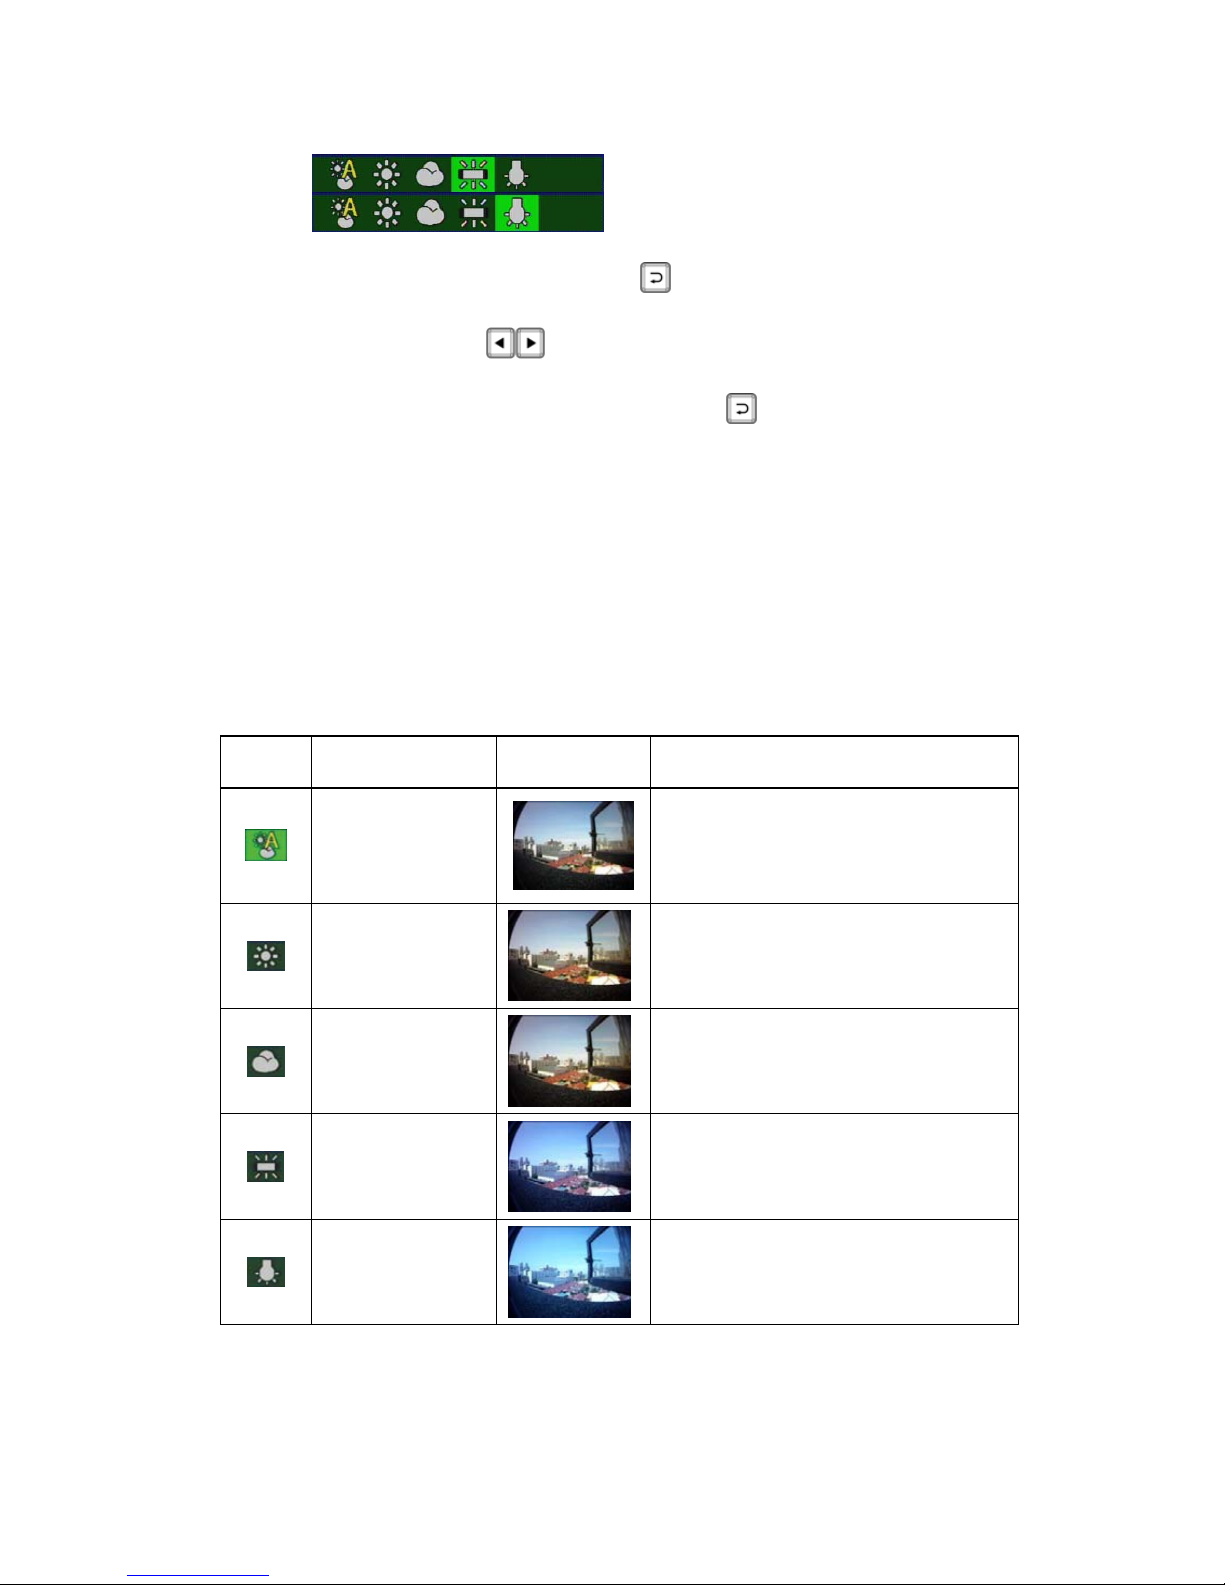
12
: Fluorescent mode
: Incandescent mode
White balance, press remote button, into white balance
settings page.
Remote control
key to select different white balance
mode.
Setup is complete, press the remote
button to save the
setting.
★White balance mode is set, regardless of the state in the
camera or photography will open automatically.
★When take recording; suggest white balance set to automatic
mode in order to open the white balance automatically to avoid
the screen unclear.
The following table shows picture taken in various white balance
mode.
Icon Description Picture Application instructions
Auto
The machine set automatically
Sunlight
For fine weather
Cloudy day
For cloudy, dark or twilight
Fluorescent
For warm white, cool white
(3-wavelength) fluorescent lighting
Incandescent
For incandescent lamps and bulbtype 3-wavelength fluorescent
Page 15
13
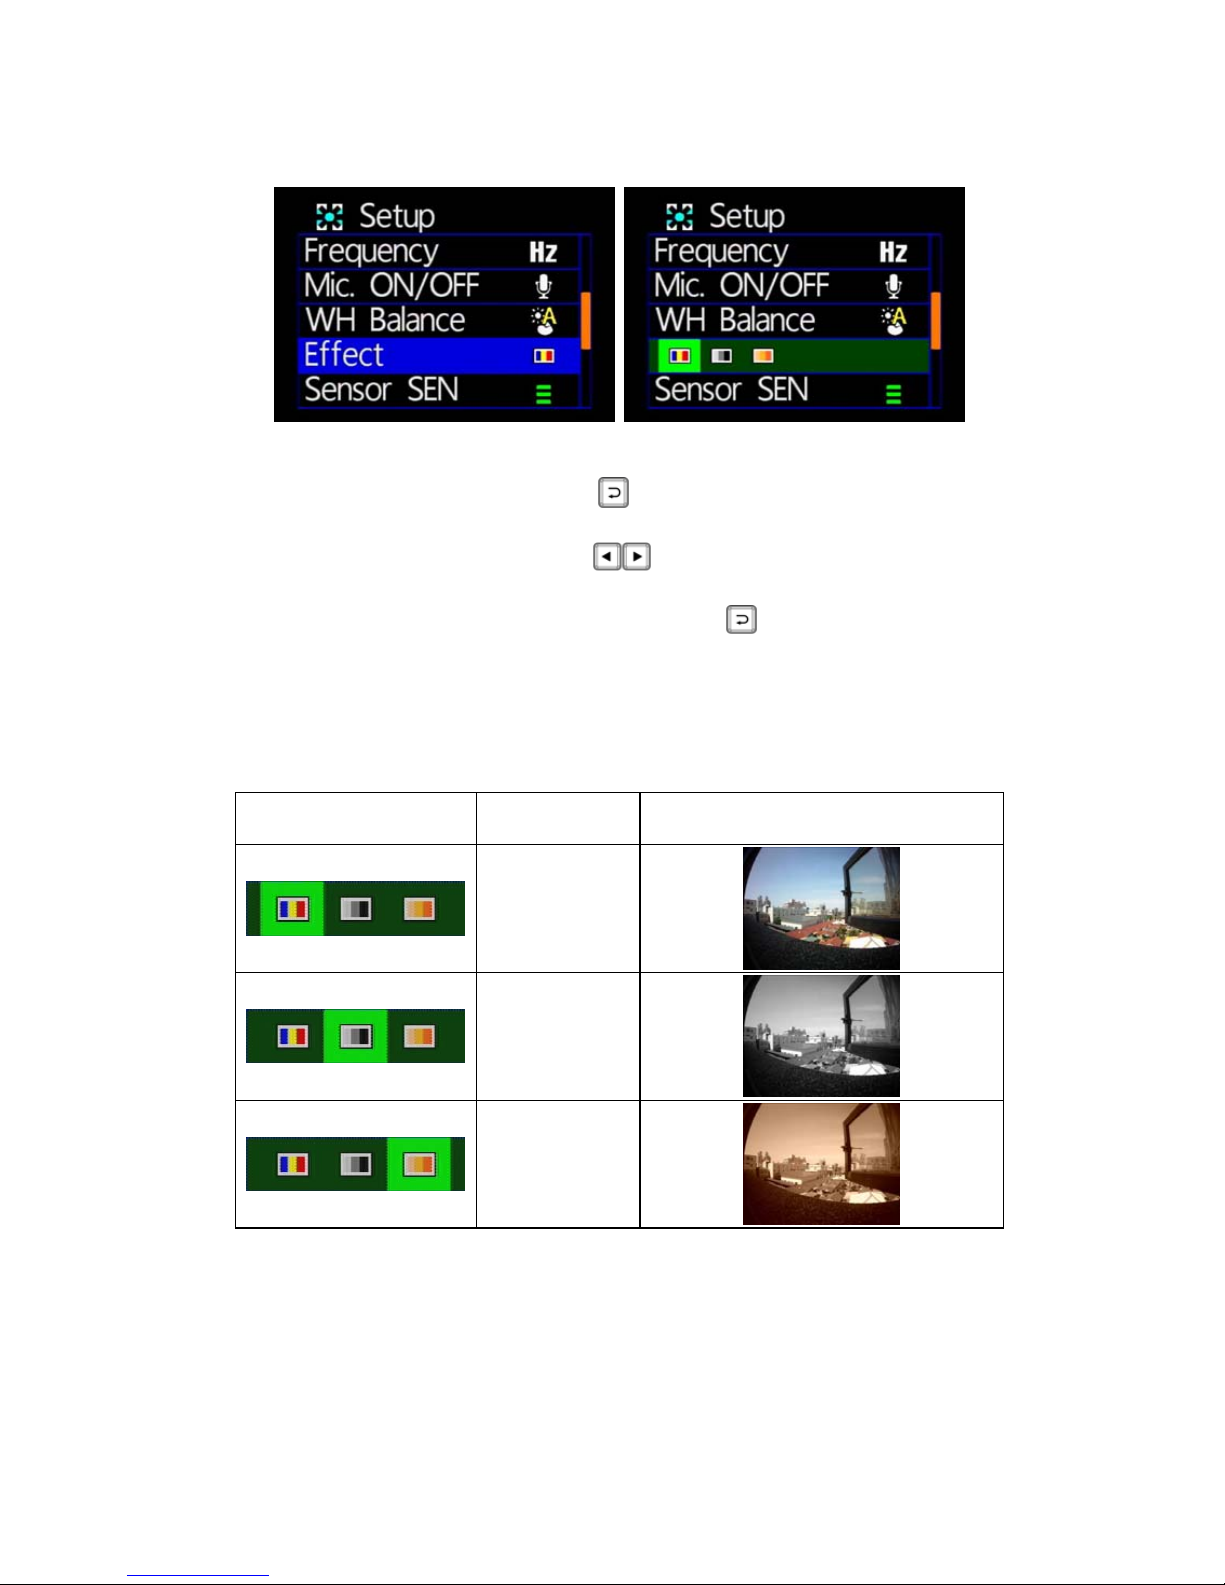
◆
Effects
★Color / B & W / Retro color
Effects: press the remote button, enter the effects settings
page.
Press the remote control
button to select the effect
model.
Setup is complete, press the remote
button to save the
settings.
★Effects model setting, whether in photography or video mode it
will automatically open.
The following table shows picture taken in various effect mode.
Icon Description Picture
Color mode
Black mode
Retro mode
Page 16
14
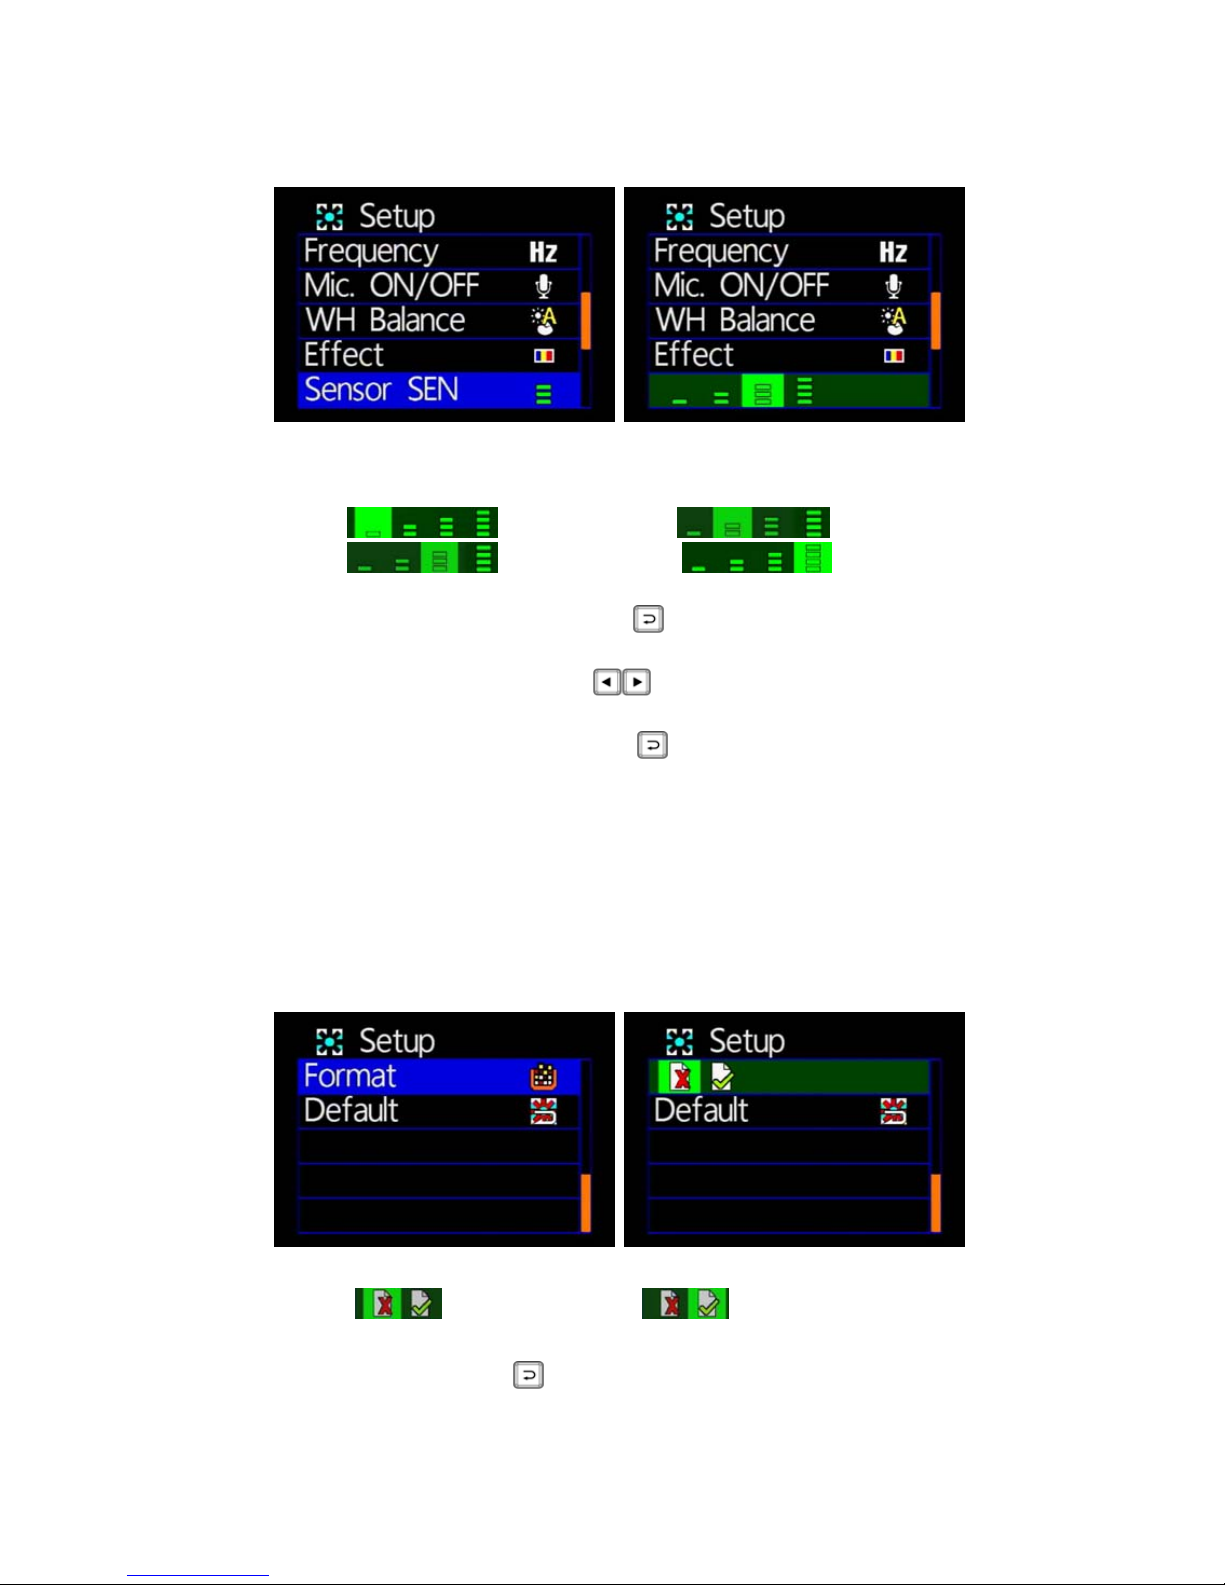
◆
Sensing sensitivity
★Caution: You can adjust the sensitivity level (more number of
green bars stands for higher sensitivity)
:Low
:Normal
:High :Highest
Sensor sensitivity: press the button, enter the sensor
sensitivity settings page.
Press the remote control
key, select the sensor
sensitivity level.
Setup is complete, press the
button to save the settings
★Sensor sensitivity means the sensitivity of the reaction: when
passing through a dark place, the vehicle turned on the white
balance mode; when the higher sensitivity settings, after passing a
little dark as long as it will open automatically, more likely to cause
excessive light up the screen.
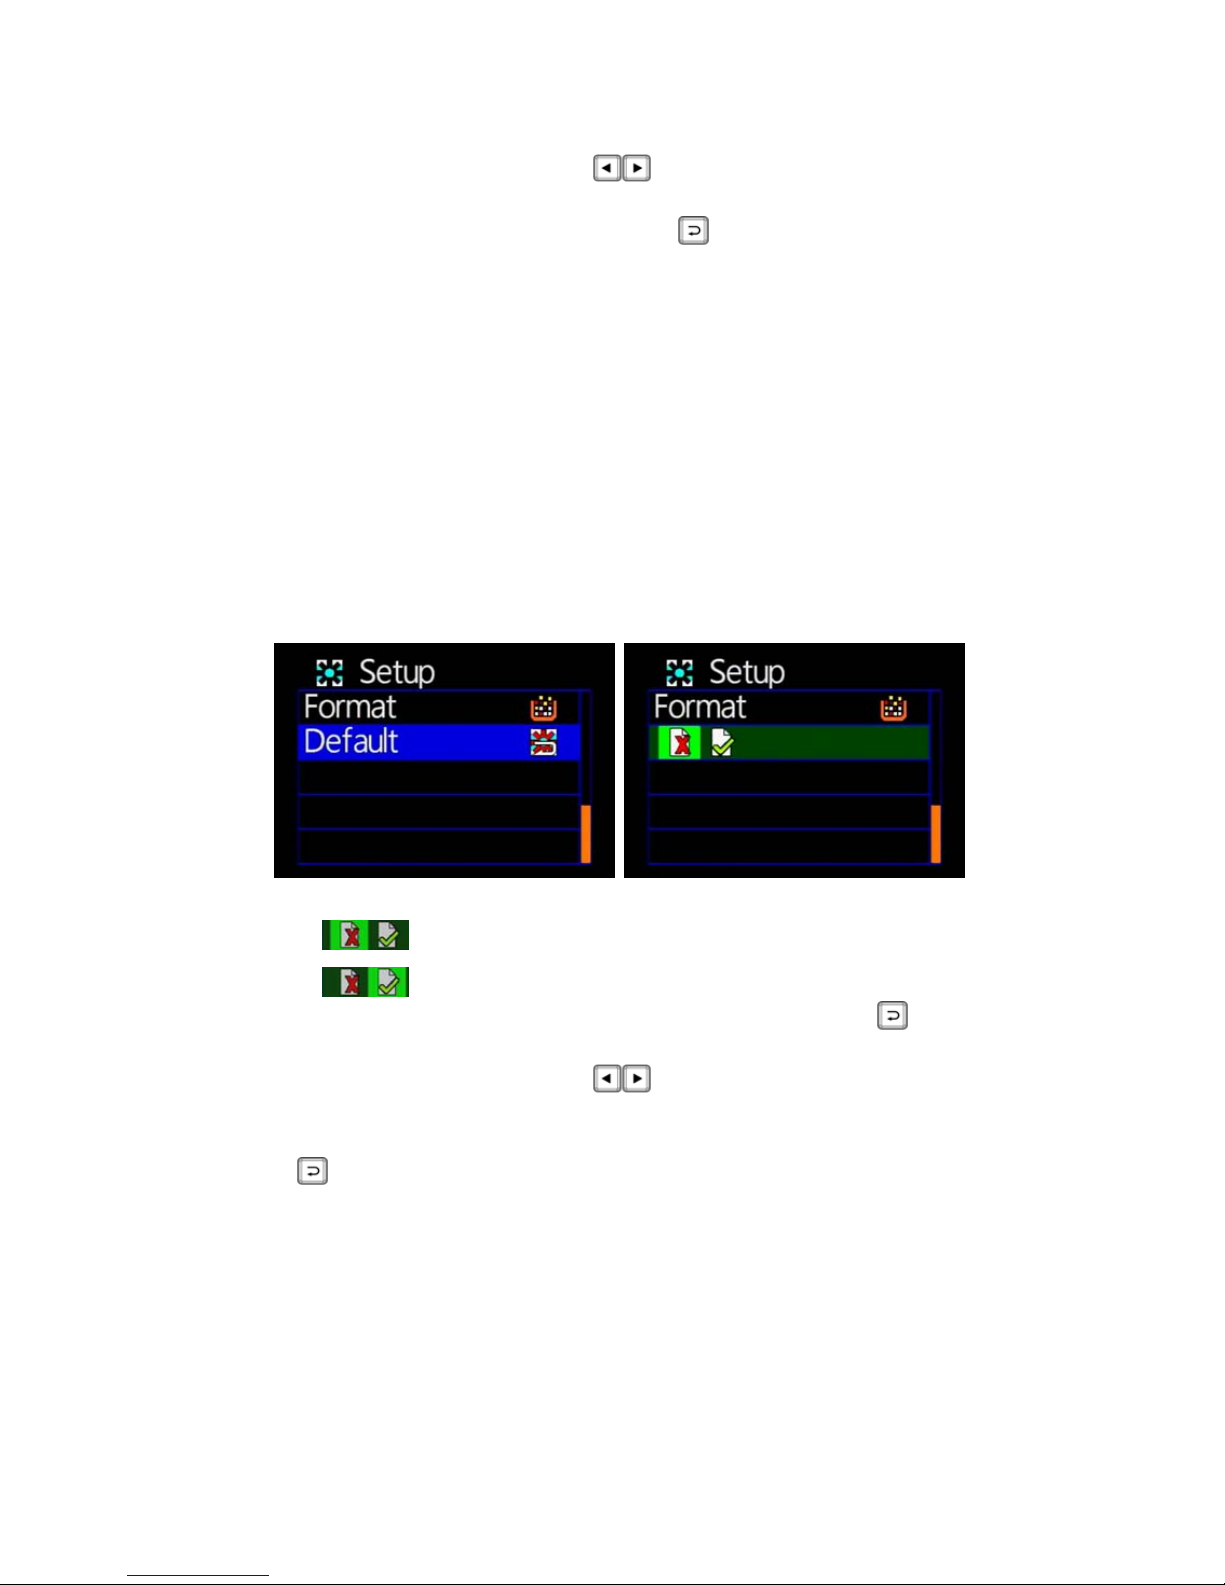
◆ Format
★cancel format / confirm format
: Cancel format
: Confirm format
Format: press the button, enter the format settings page.
Page 17
15
Press the remote control button, choose whether to
format.
To confirm the format, press the
button to do the Micro SD
card format.
★When you click “cancel the format:, it will return to the main
Settings page.
★When determining to format the Micro SD card, all data in the
Micro SD card will be erased, please back up any old data in
advance to avoid old data be erased.
★A new Micro SD card must do the formatting operation first and
then start the recording.
◆
Restore factory settings
★cancel default setting / confirm default setting
: Cancel to restore factory settings
: confirm to restore factory settings
Restore factory settings: press the remote control button,
enter the restore factory settings page.
Press the remote control
key, whether you want to
restore to factory settings.
Confirm to restore factory settings, press the remote control
button, to return to the original setting
★When click “cancel to restore factory settings”, it will return to
the main Settings page.
★When confirm “confirm to restore factory settings”, it will return
to the factory value settings; when return to factory value, you
could enter main menu to configure the related settings again.
Page 18
16
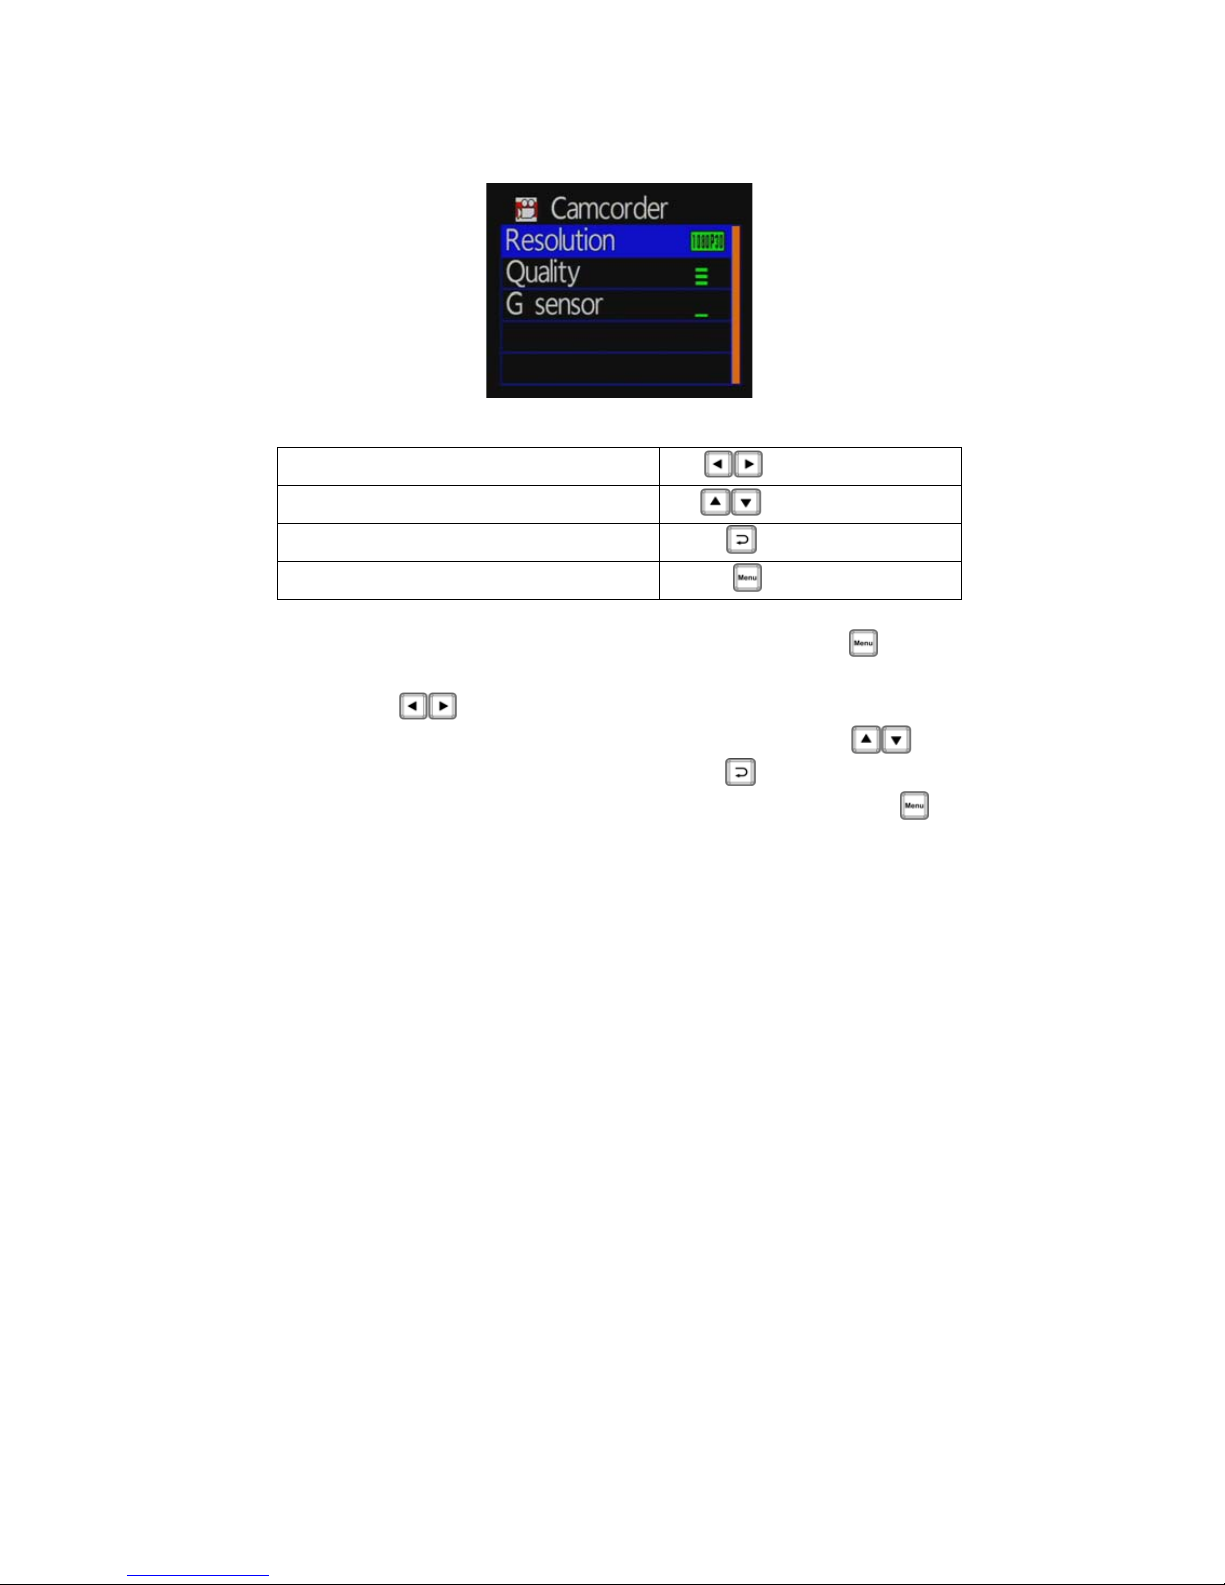
Camcorder mode setting
Remote control keys description
Moving menu options
[Up/Down Key]
Selecting items
[Left/Right Key]
Selected the item, confirm setting
[Confirm key]
Enter index, back to previous menu
[MENU key]
Camcorder mode settings: press the remote control
key to
enter the camcorder settings page. Enter the main page, press the
remote control
key to select the camera or camcorder. Enter
camcorder mode main page, press the remote control
key to
select the setting. Press the remote control
key to enter the
settings page. If leaves the settings page, press the select
button
on the remote control, you can leave and return to the camcorder or
the main page.
★Camera mode setting is total one page; Click the Settings
page to enter more detail setting related (set for details, see the
description of the settings page)
Page 19
17
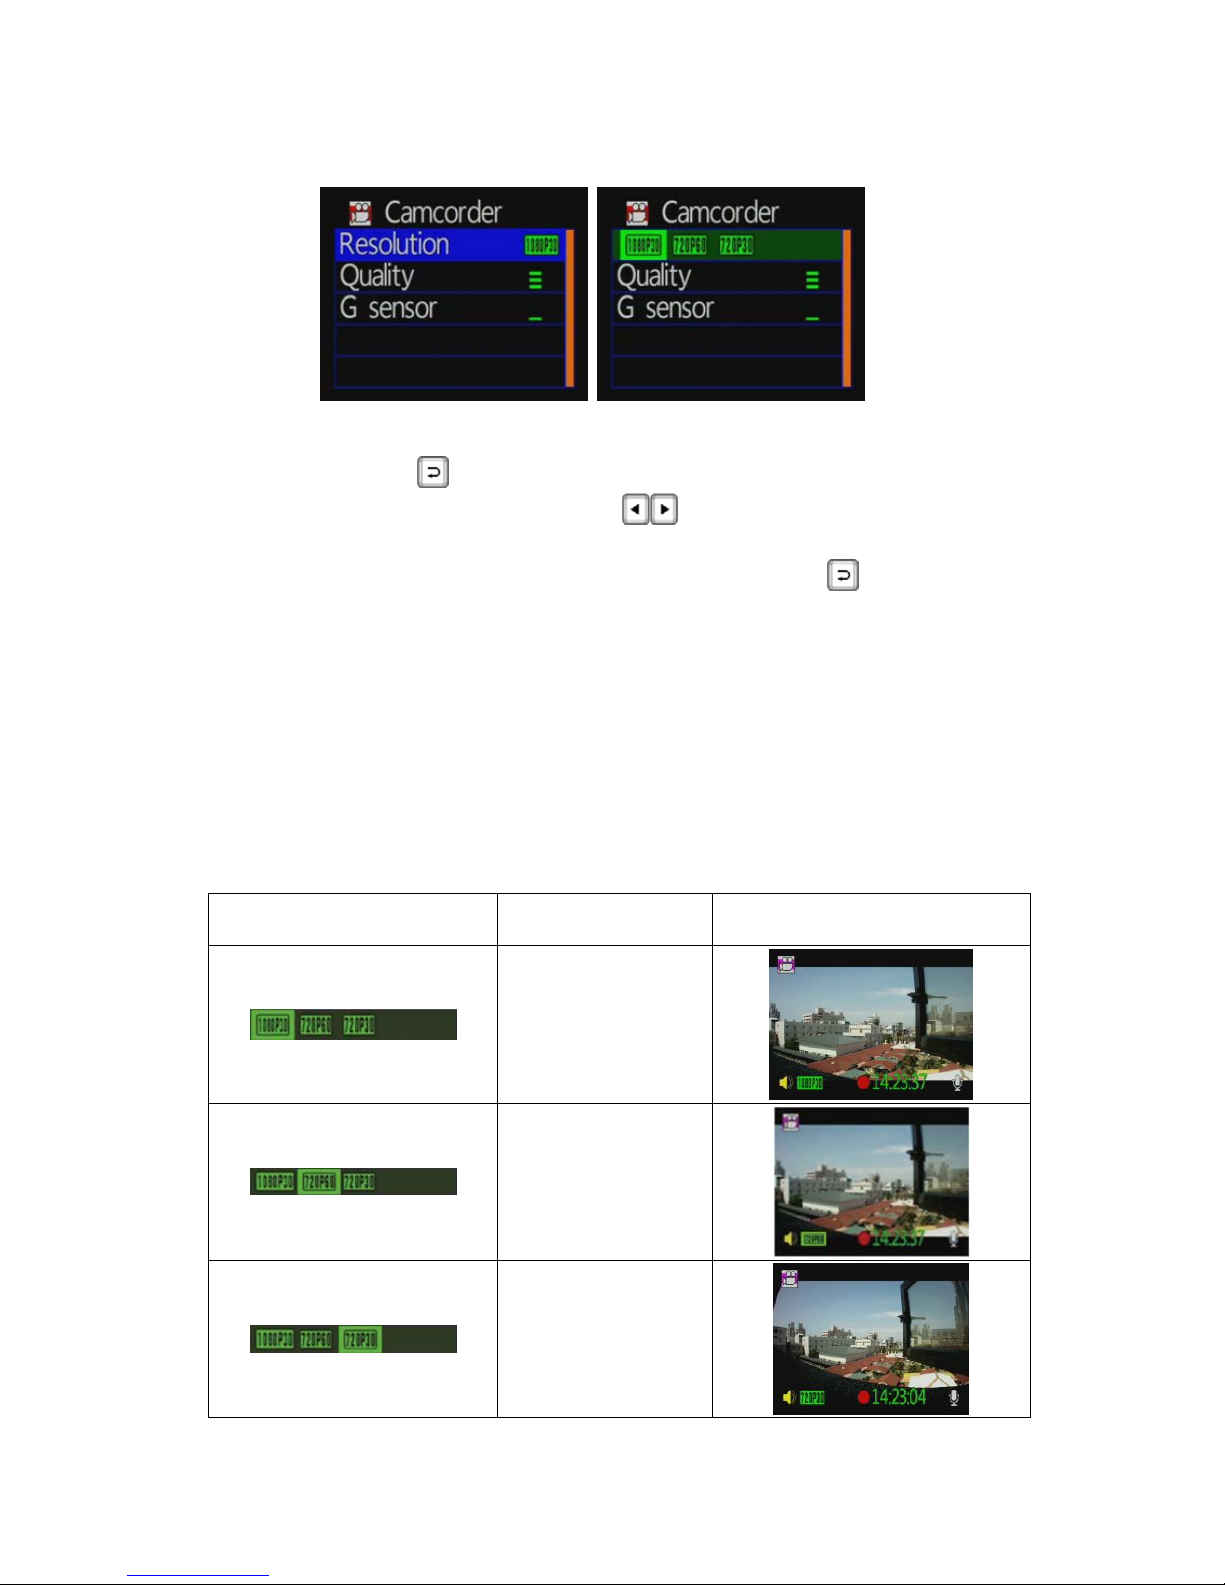
Video Resolution Setting
Camcorder mode settings / image resolution, press remote
controller
button to enter image resolution setting page.
Press the remote controller
key to choose variety of
image resolution.
Setup is complete, press the remote controller
button to
save the settings.
Three video resolution modes for selecting:
1920 * 1080P (30): 1920 * 1080 screen resolution, 30 frames per
second.
1280 * 720P (60): 1280 * 720 screen resolution, 60 frames per
second.
1280 * 720P (30): 1280 * 720 screen resolution, 30 frames per
second.
Icon Description Picture
1920x1080P(30)
1280x720P(60)
1280x720P(30)
Page 20
18
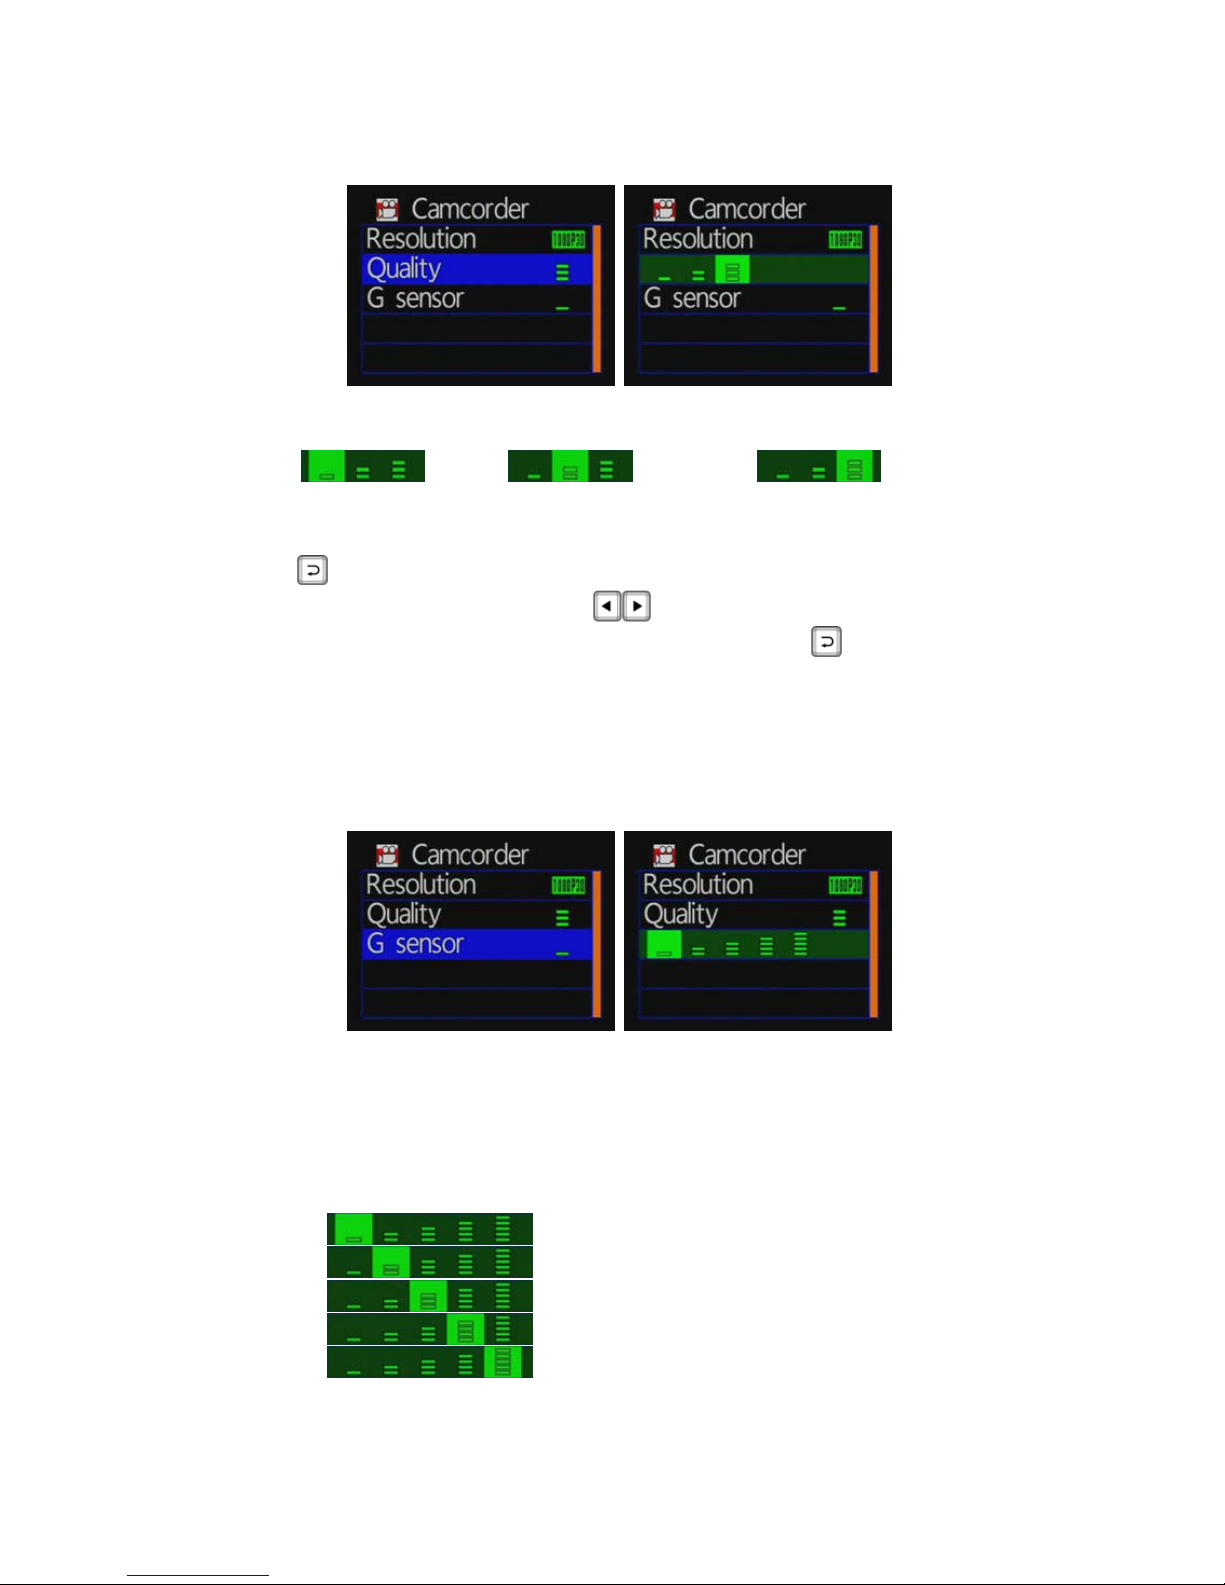
◆ Quality Settings
★ more number of green bars stands for higher quality
: Low
: Normal
: High
Set the camcorder mode / quality: press the remote control
button to enter the quality settings.
Press the remote control
key to select the video quality.
Setup is complete, press the remote control
button to save
the settings.
★Video quality setting higher, the better image quality.
◆
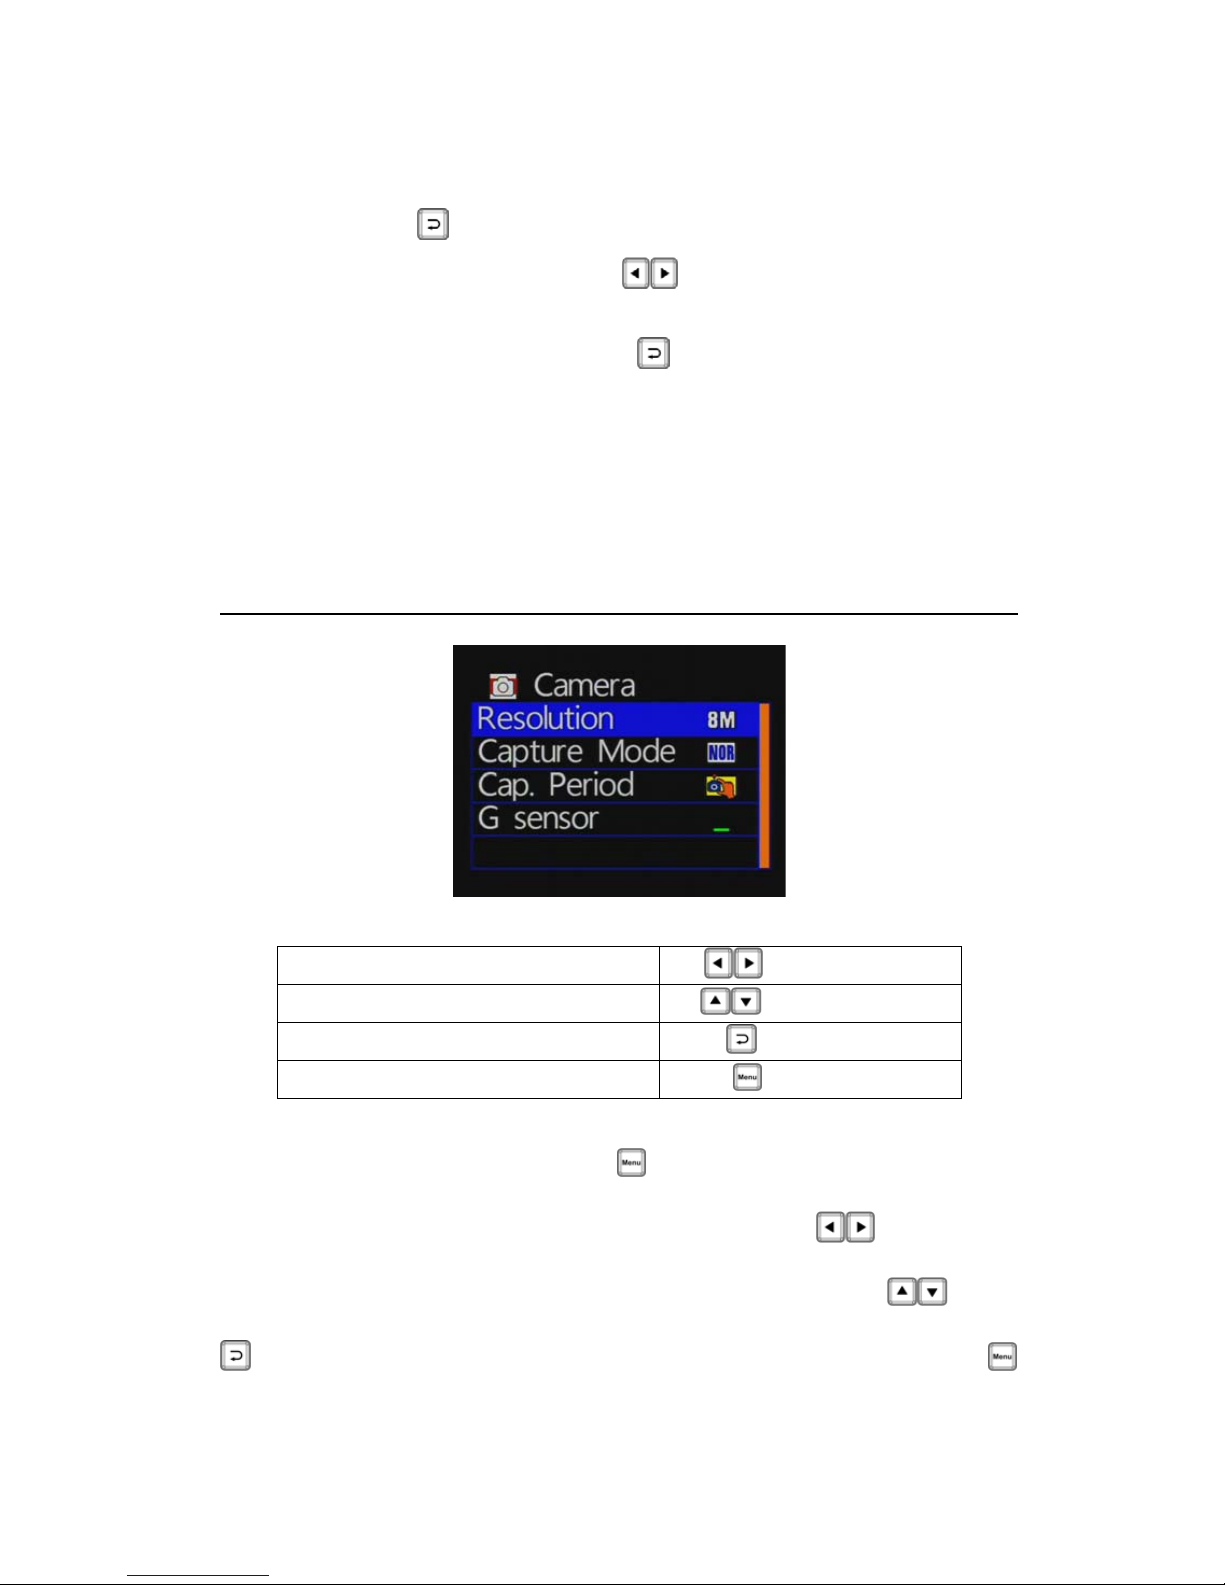
G-sensor Setting
★Caution: You can adjust the G-sensor sensitivity level
(more number of green bars stands for higher sensitivity)
★When emergency record is triggered, it will keep around 3
minutes emergency recording and keep the files without
being overwritten
: Very low
: Low
: Normal
: High
: Very high
Page 21
19
Camcorder mode settings / G-sensor: press the remote
controller
button to enter the G-sensor settings.
Press the remote controller button to select the
sensitivity of G-sensor.
Setup is complete, press the
button to save the settings.
★Note: the higher the sensitivity on behalf of gravity (G) the more
sensitive the sensor, the more likely trigger mandatory recording;
every trigger mandatory recording, before and after the accident will
force to save 3 minute video and not be covered (when G-sensor
trigger recording, all the lights will become darker).
Camera Mode Setting
Remote control keys description
Moving menu options
[Up/Down Key]
Selecting items
[Left/Right Key]
Selected the item, confirm setting
[Confirm key]
Enter index, back to previous menu
[MENU key]
Set the camera mode: press the button on the remote control to
enter the camera settings page.
To set directory on the main page, press the select
buttonon
the remote control to select the camera or photograph; Into the
camera mode of the main page, press the remote control
key
selected to choose the Settings page and press the remote control
to enter the setting page; to leave the settings page, press the
Page 22
20
button on the remote control, you can leave and return to the camera
or main setting page.
★Camera mode is total one page; Click Settings page to more detail
settings (the detailed settings, see the setting instructions on the
settings page).
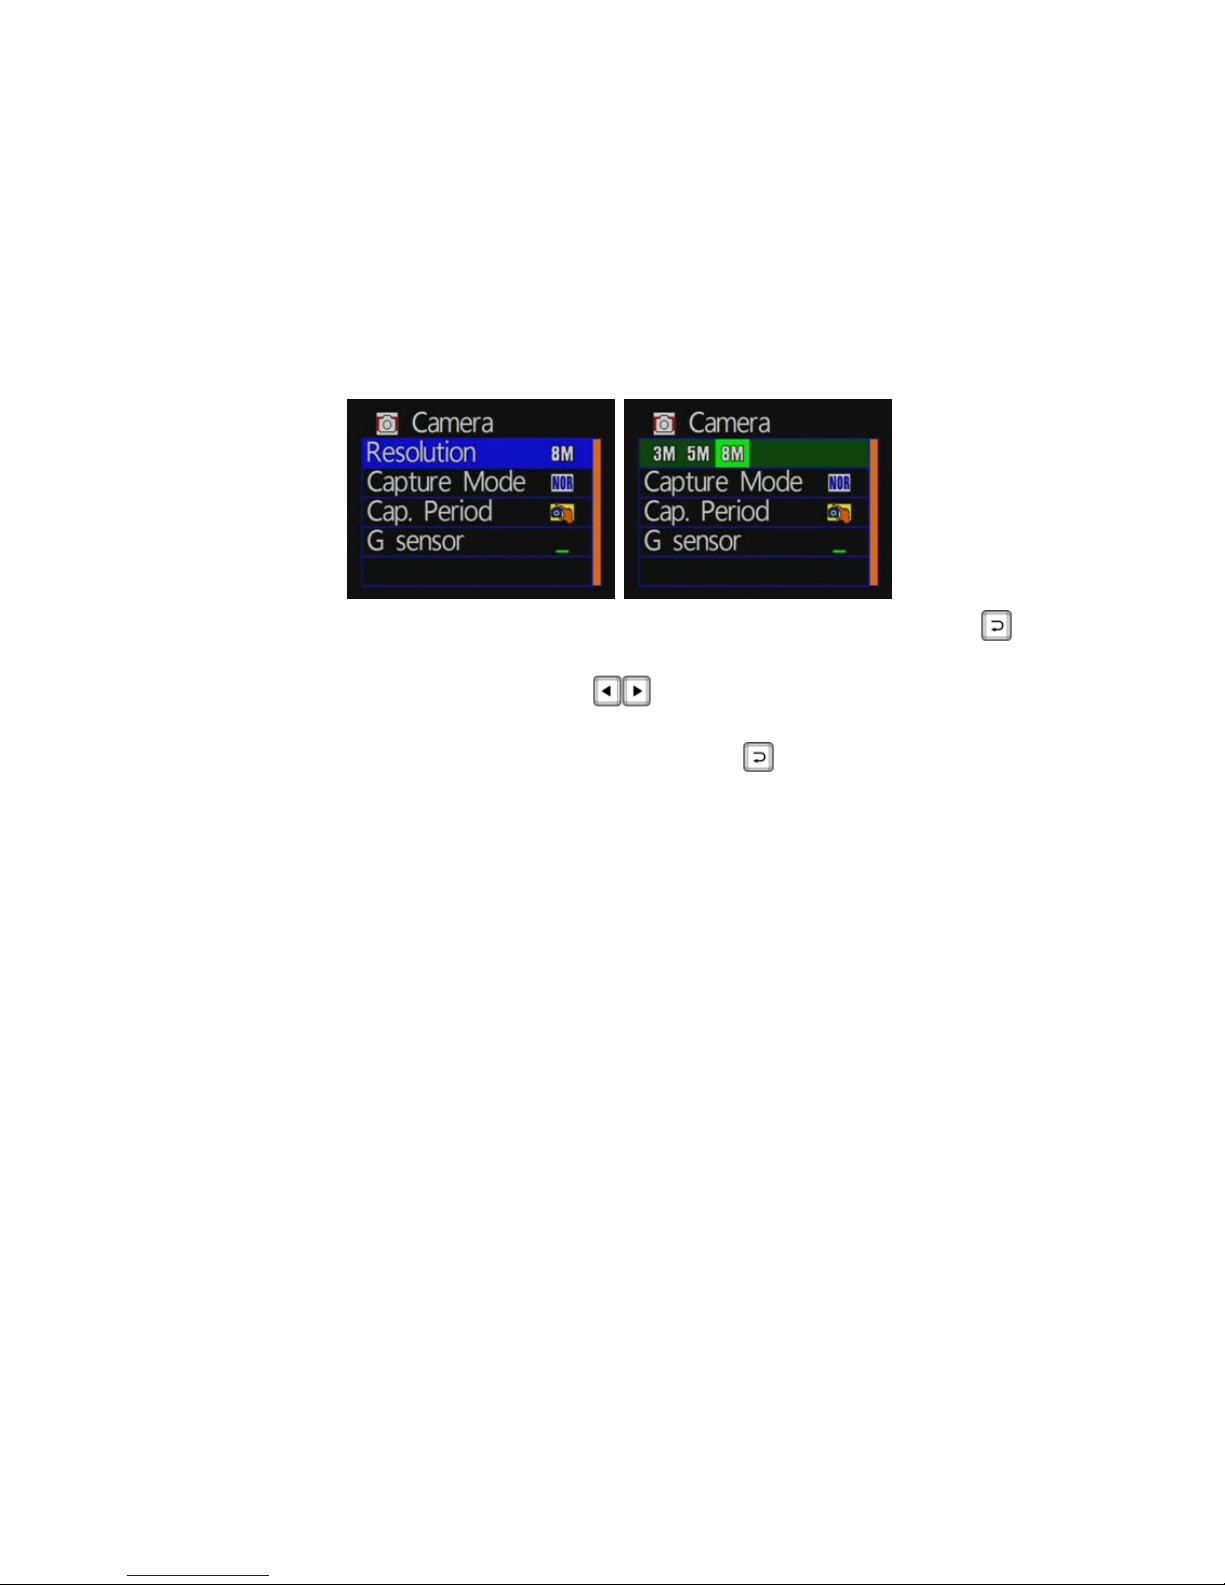
◆ Image resolution setting:
Camera mode / image resolution: press the remote control
button to enter the setting page of image resolution.
Press the remote control
button to select different
image resolution.
After setting, press the remote control
key, to store
settings.
★There are three image resolution modes selectable:
8M: 3200 * 2400 screen resolution, picture quality is 800
million pixels.
5M: 2592 * 1944 screen resolution, picture quality is 500
million pixels.
3M: 2048 * 1536 screen resolution, picture quality is 300
million pixels.
Page 23
21
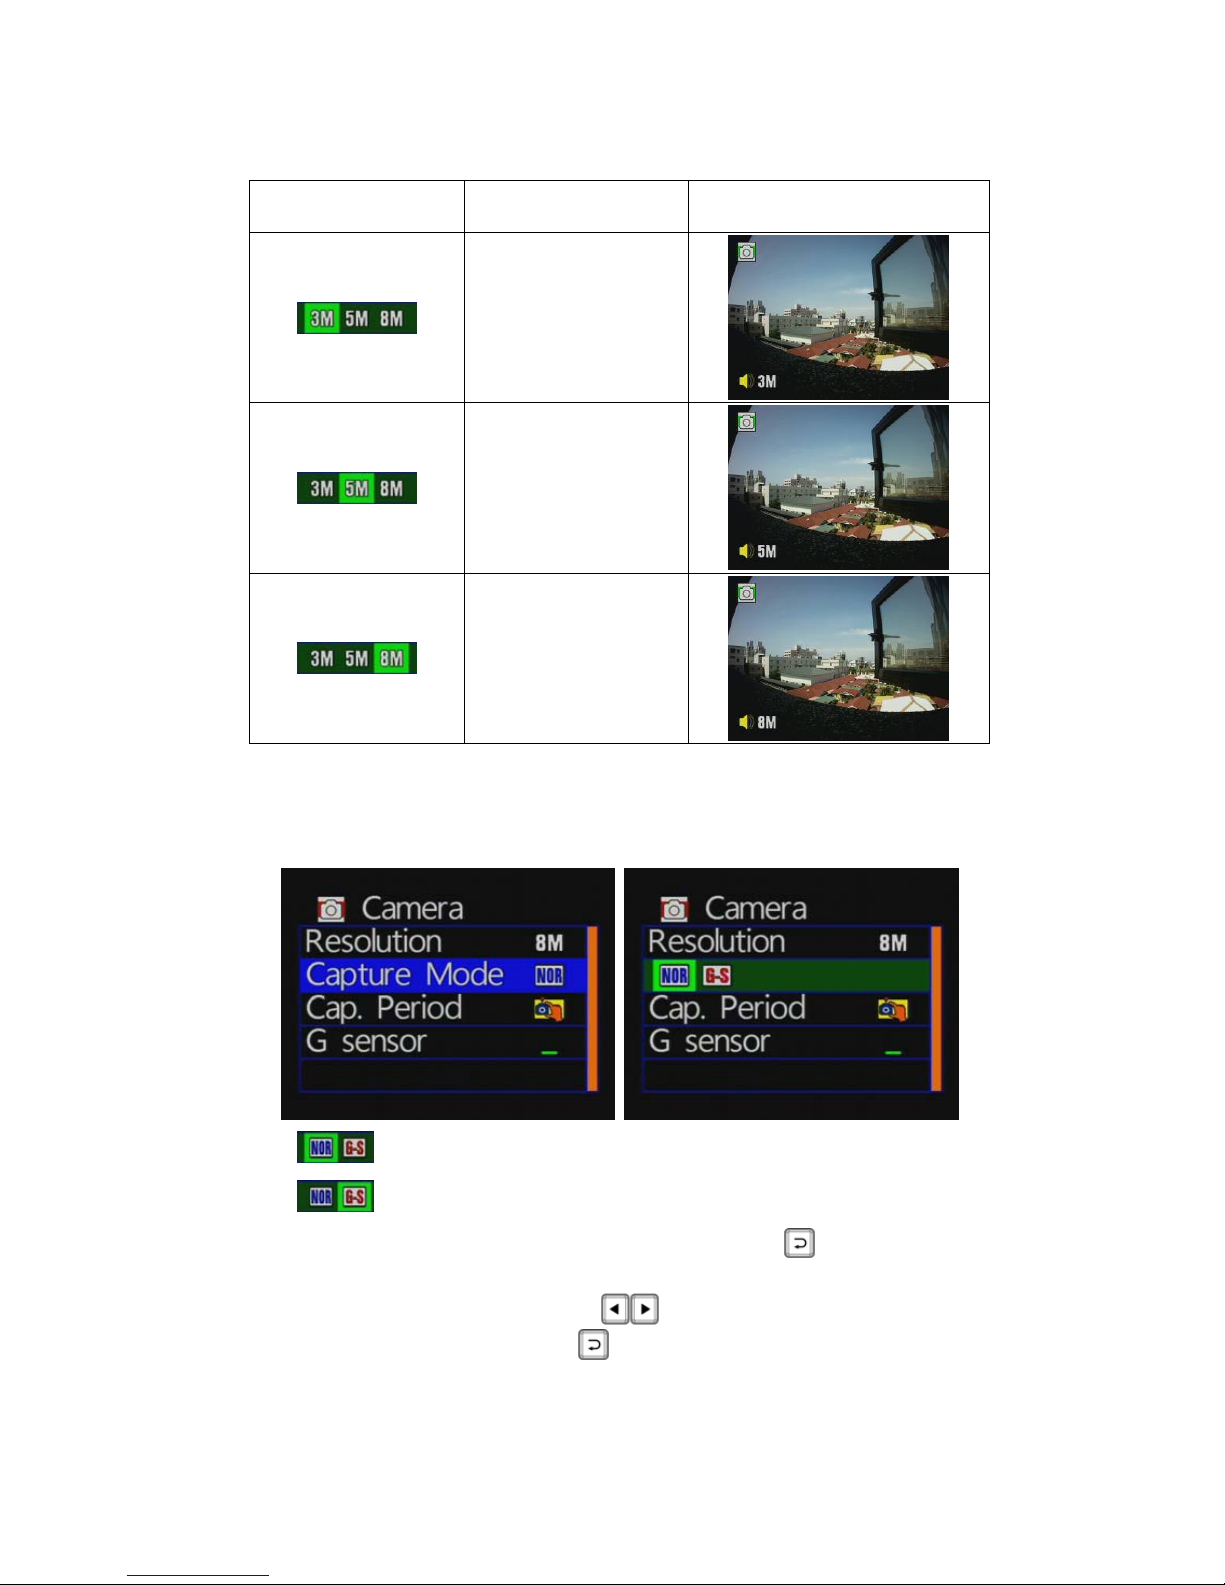
Icon Description Picture
3M: 300 million
pixels
5M: 500 million
pixels
8M: 800 million
pixels
★When the higher image resolution, the greater the amount of data stored in
the file.
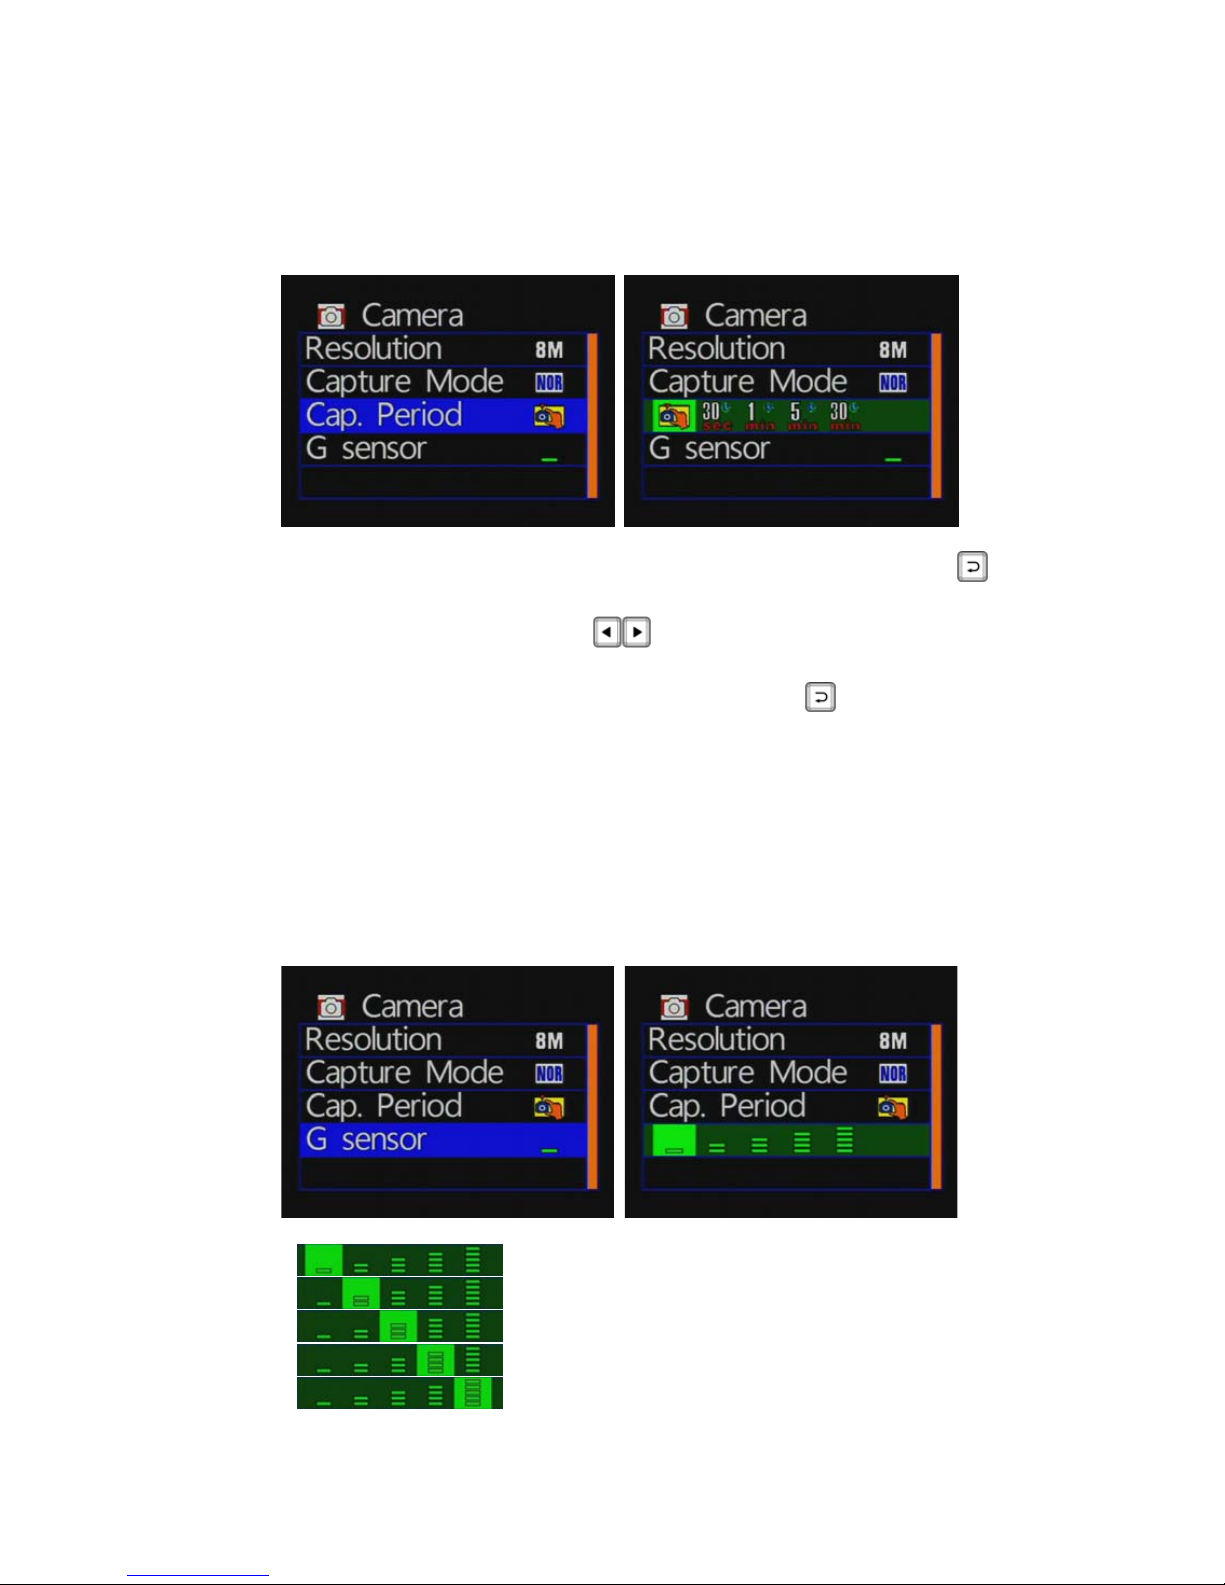
◆ Capture mode setting
NOR: Normal mode
G-S: G-Sensor mode with three pictures once
Camera mode / capture mode: press the button to enter
the capture mode setting page.
Press the remote control
keyto select the capture mode.
After setting, press the
button to save the settings.
Page 24
22
★When the capture mode NOR selected, to set capture picture
time from the camera cycle option.
Camera Period Setting
Camera mode / capture period: press the remote control
buttonto enter the settings page to set the period setting.
Press the remote control
buttonto select period of time
to capture.
Setup is complete, press the remote button
to save the
settings
★ When the capture mode NOR selected, the option to set the
camera period setting.
★ Photographic period: 30 seconds / 1 minute / 5 minutes / 30
minutes, fixed shot once.
◆ G-sensor Setting
: Very low
: Low
: Normal
: High
: Very high
Page 25

23
Camera mode / G-sensor, press the remote control button
to enter the page to set the G-sensor.
Press the remote control
button to set the sensitivity of
G-sensor.
Setup is complete, press the remote
button to save the
settings.
★Note: the higher the sensitivity on behalf of gravity (G) the more
sensitive the sensor, the more likely trigger mandatory
photography;
Each time the force shooting is triggered, it will shoot three
images once.
Page 26
24
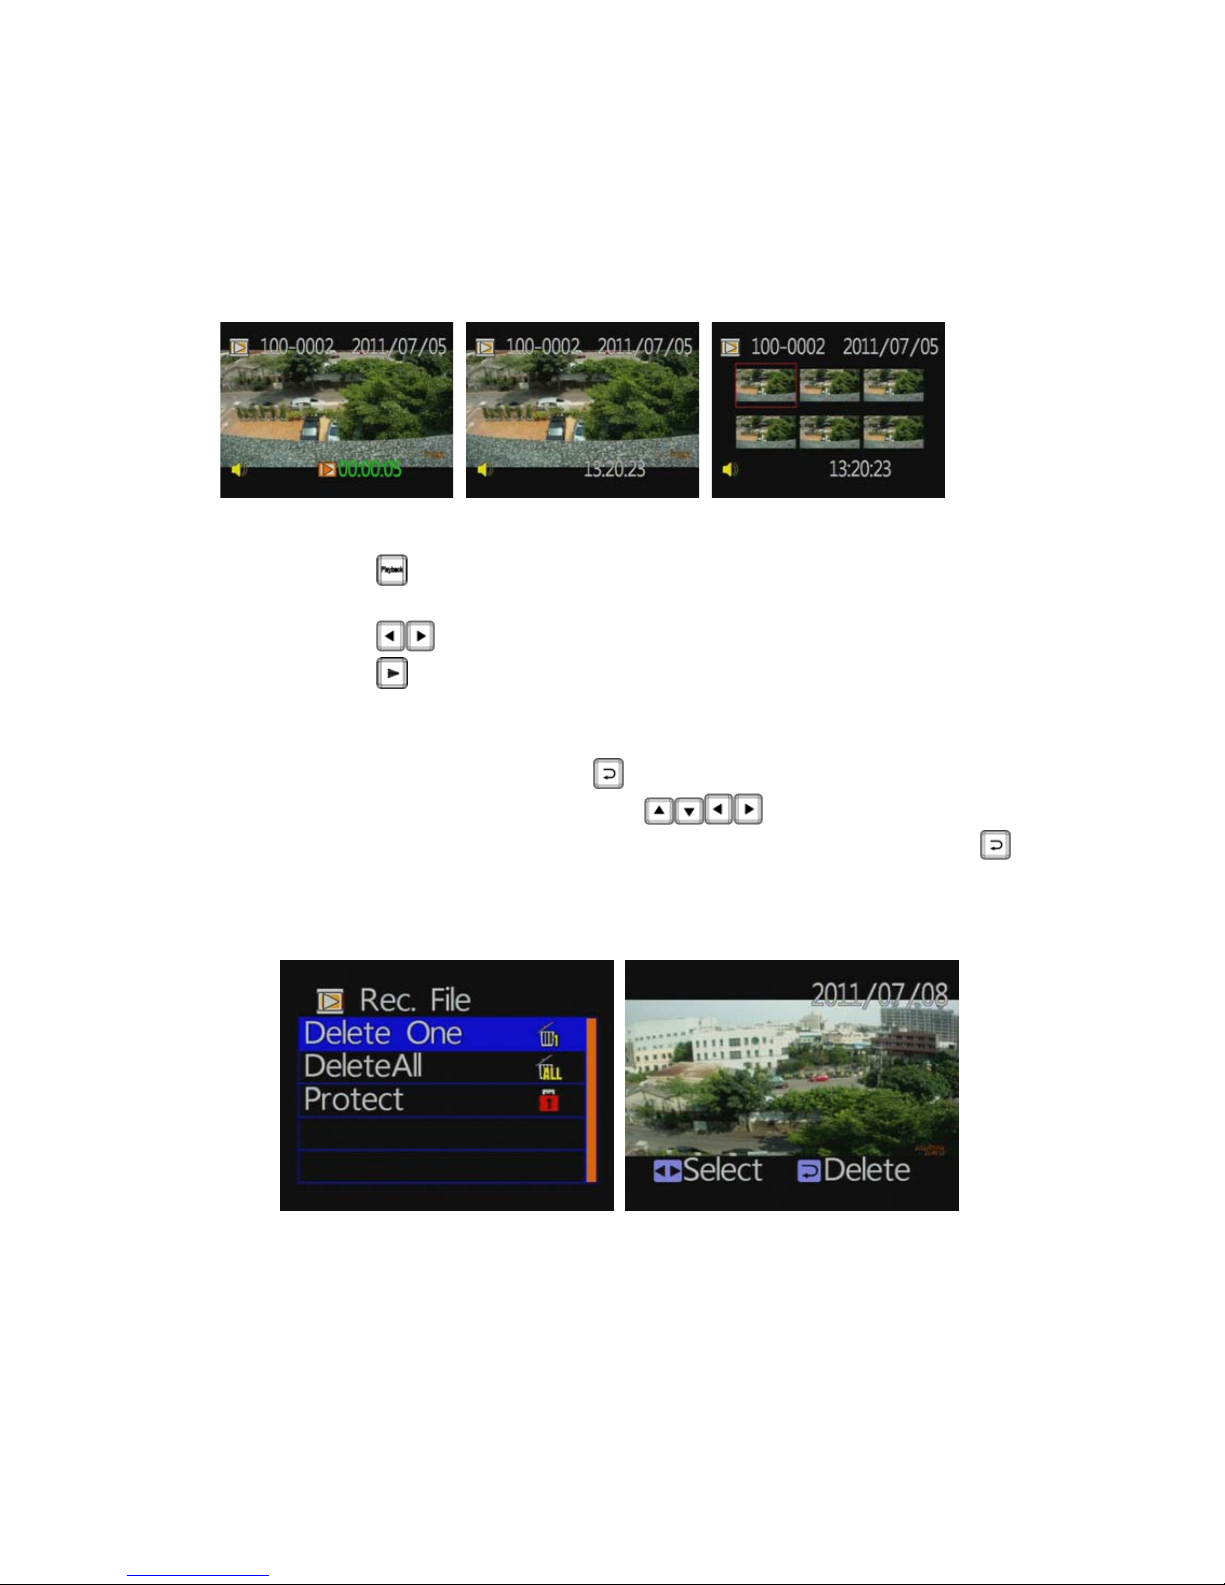
G. Play The Recorded File
Direct playback on machine side
Camcorder mode
Play back file screen File selecting screen Multi-files selecting screen
Press
button on remote controller under LIVE recording
mode to enter file playback menu.
Press
button to adjust before and after clips.
Press
button to play file.
★When in the playback file page, default is as single file mode.
However, you can press the
button to enter into six separate
screen page, and then press the
button to select the
file you want to play. When you select OK, and then press the
button to return to a single file for playback page.
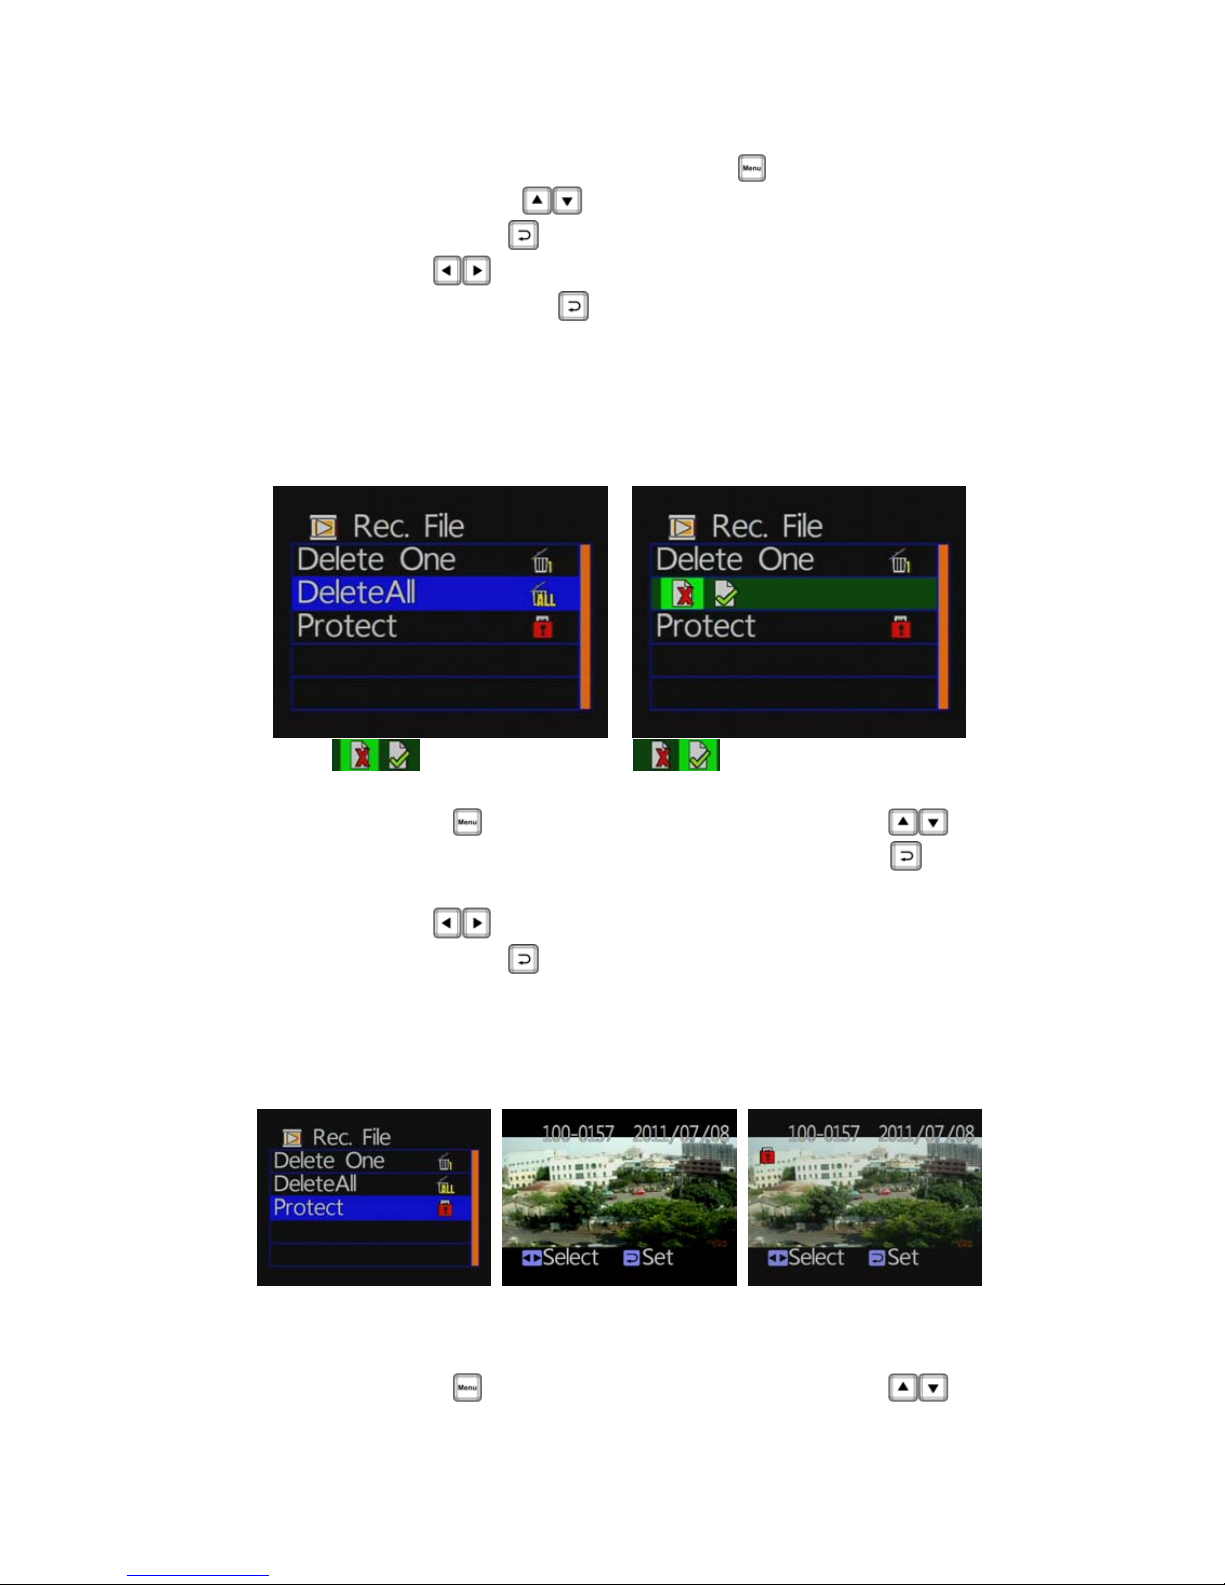
◆ Playback settings - Deleting a single file
Page 27
25
For playback file setting, press button to enter setup
page, press
button to move to delete one item,
then press
enter into deleting page.
Use
button moving to the file you want to delete,
and then press
to start deleting.
★You must disable the protection function first in order to
process the deleting procedures.
◆ Playback settings- Delete All
: Cancel delete all : Confirm Delete All
Press
button to enter setup page, press
button to move to delete all item, then press
enter
into deleting all page.
Use
button moving to you want to delete all files,
then press
to start deleting.
★You must disable the protection function first in order to
process the deleting procedures.
◆ Playback file setting-protect
★Caution: When the picture has a lock-shaped icon indicates that the data in
protection mode
Press
button to enter setup page, press
Page 28
26
button to move to protect item, then press enter into
protect setting page.
Use
button moving to you want to protect file,
then press
to start protect setting.
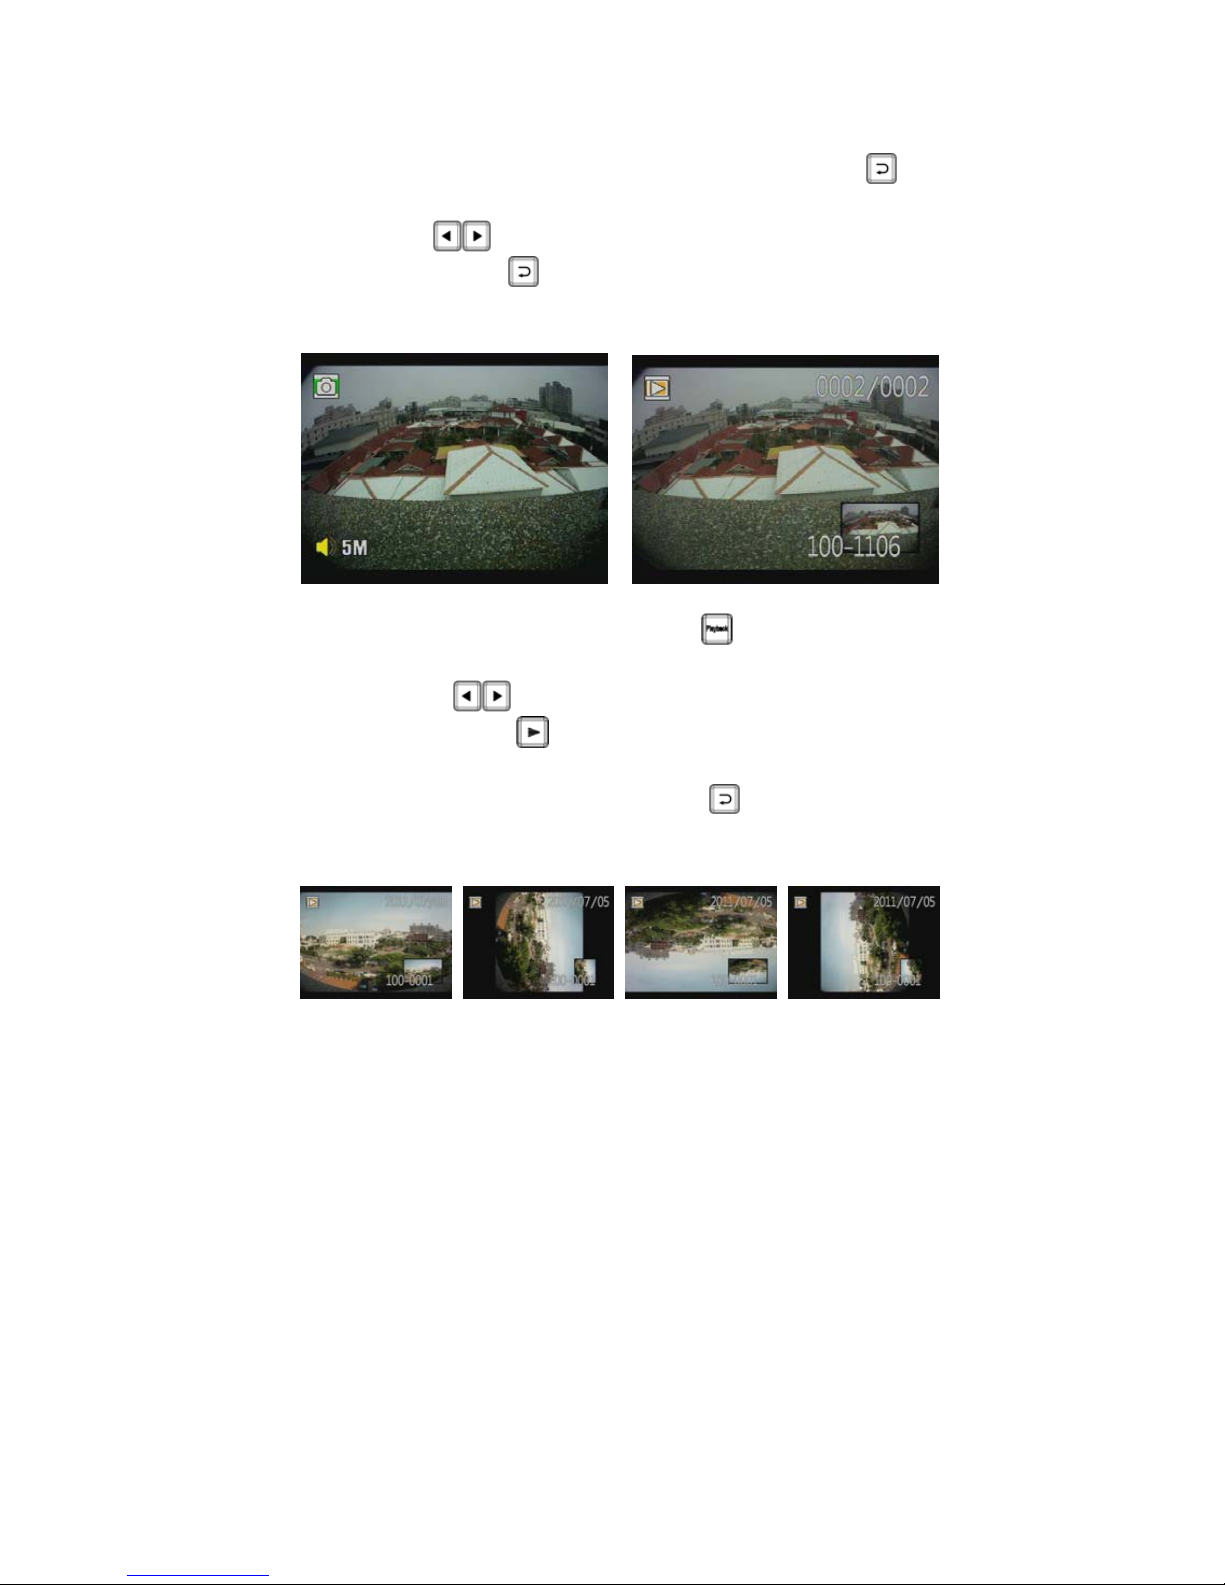
Camera Mode
Under camera mode, press
button entering into
photo playback page.
Press
button to select the file you want to play.
Then press
button to play.
★When in playback page, press
button to do Clockwise
rotation of photo.
Page 29
27
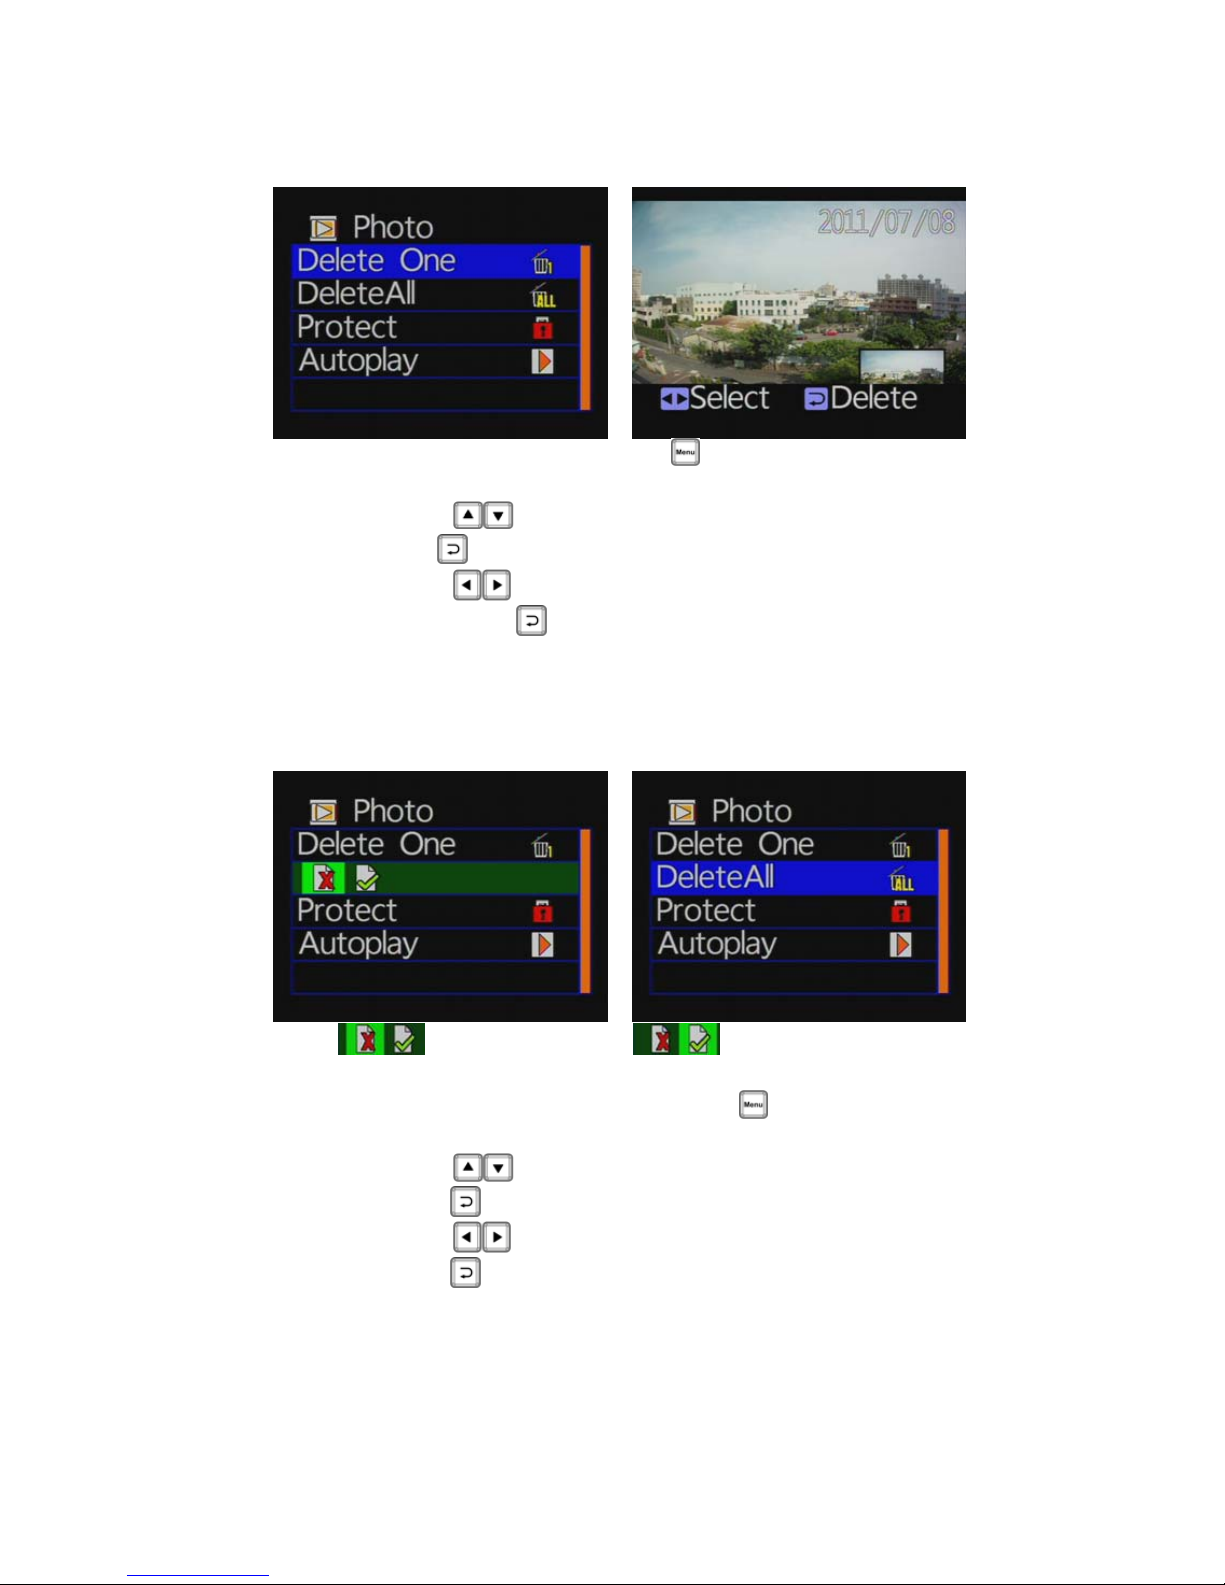
◆ Photo playback settings-Delete one
Photo play setting, press
button entering into setting
page.
Press
button moving to delete one item. Then
press
button to enter delete page.
Press
button to select the file you want to delete.
Then press
button to start deleting.
★ You must disable the protection function first in order to
process the deleting procedures.
◆ Photo playback settings-Delete All
:Cancel delete all : Confirm delete all
Photo playback settings, press
button enter setup
page.
Press
button moving to delete all item. Then
press
button to enter delete all page.
Press
button to confirm delete all files. Then
press
button to start deleting all files.
★You must disable the protection function first in order to
process the deleting procedures.
Page 30
28
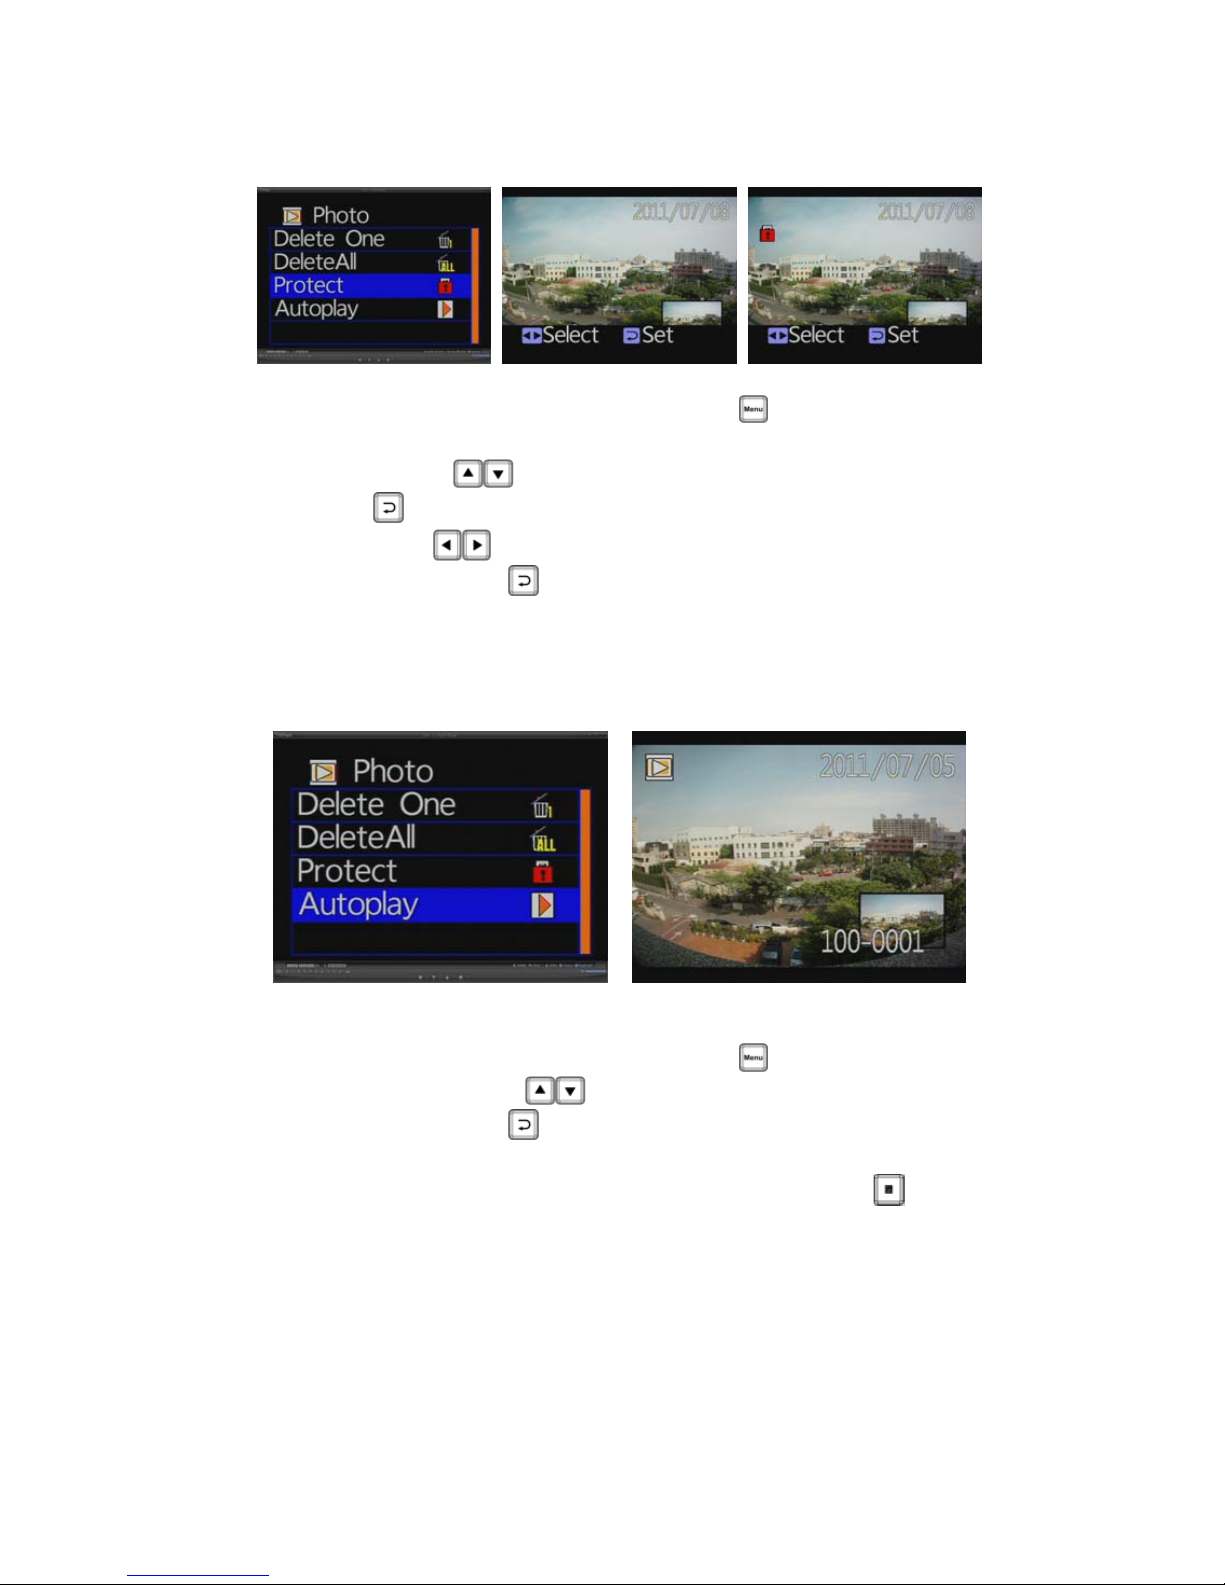
◆ Photo playback settings-protect
Photo playback settings, press
button enter setup
page.
Press
button to move to protect item, then press
enter into protect setting page.
Use
button moving to you want to protect file,
then press
to start protect setting.
★Caution: When the picture has a lock-shaped icon
indicates that the data in protection mode.
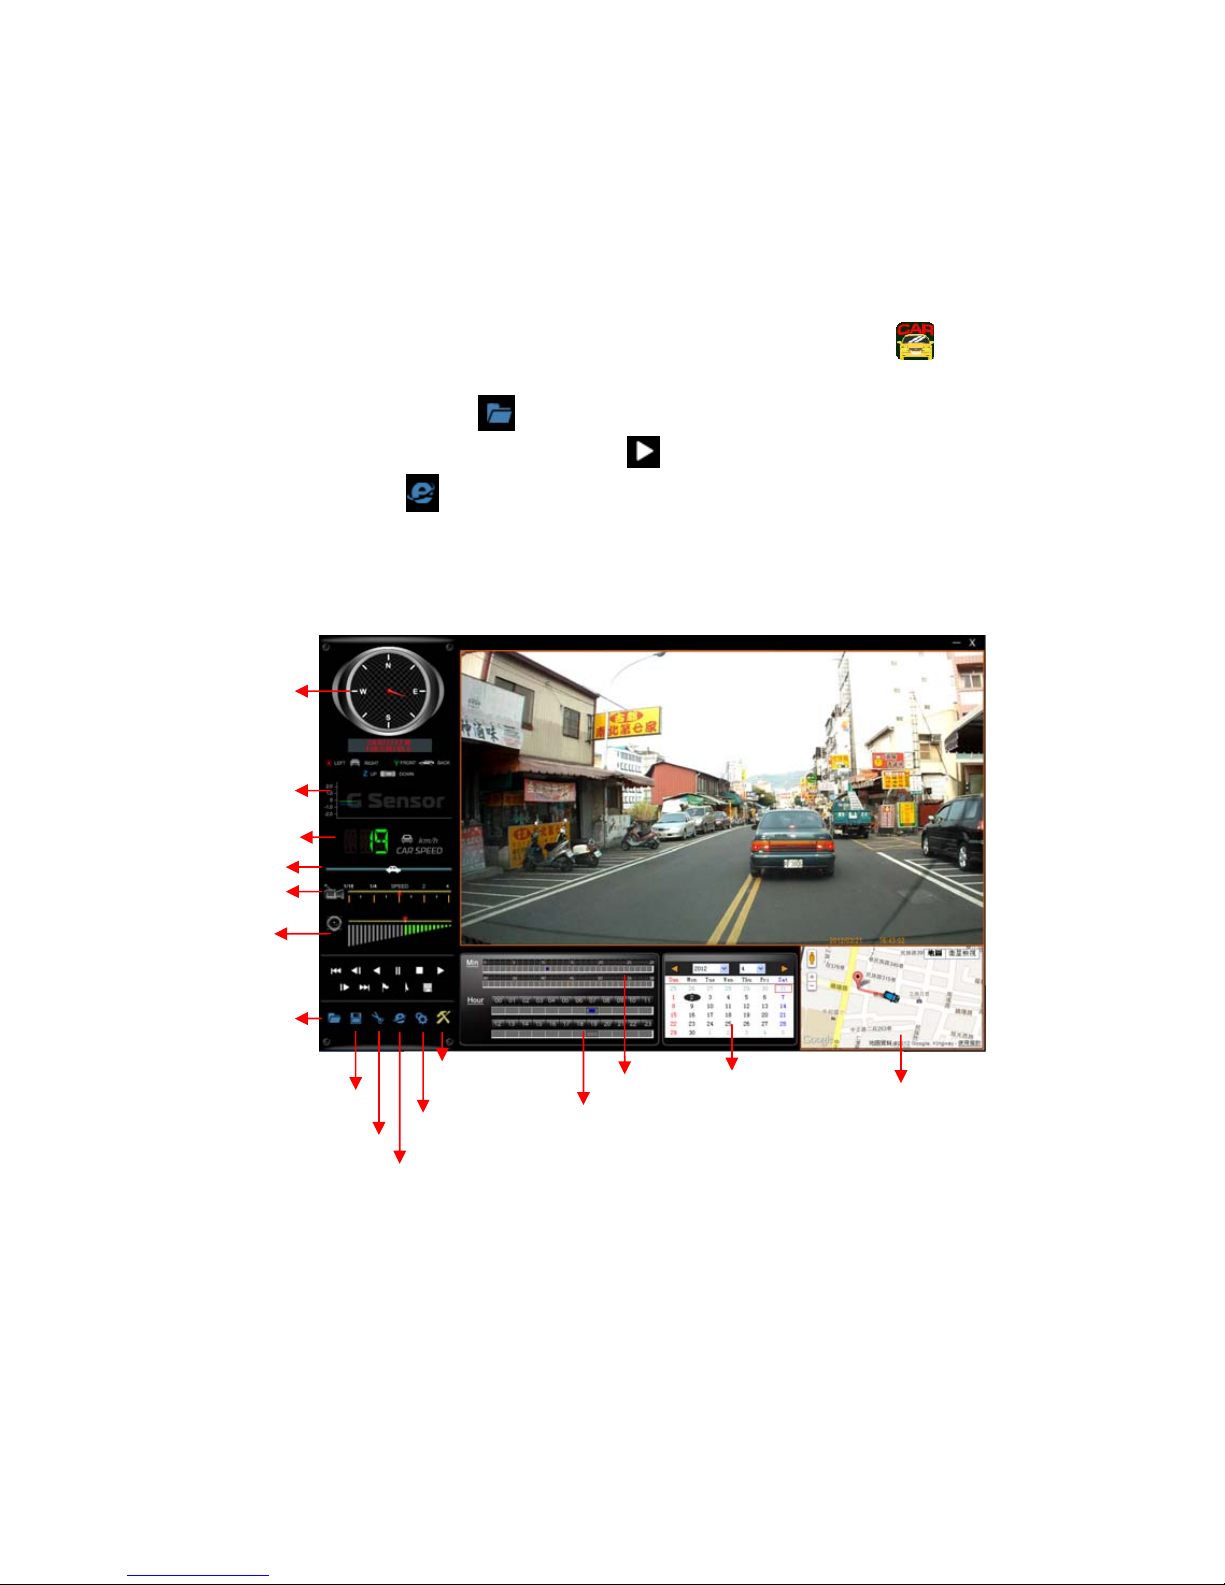
◆ Photo Payback Settings-Autoplay
★ 5 Sec duration per image / click menu to stop.
Photo playback settings, press
button enter setup
page. Press
button to move to auto play item,
then press
enter into auto play setting page.
When under Auto Play mode, about every 5 seconds to
play the next photo. You can click the stop
button
to return to photo playback page.
Page 31
29
H. Software Operating Instruction
1. Remove Micro SD card from card slot of host side
2. Put the Micro SD card to the card reader
3. Connect card reader to the USB port of PC side
4. Choose the file to play: Execute “TransportStream.exe”
, which
is located in the product CD folder, Screen shown as below. Choose
“Open the document”
, and choose the file of memory card or
hard disc and then click “Play key”
to do playback;when using
playback. Click
key to show the historical routing from Google
map.
◎Note: To perform this software, please install Direct X 9.0 or above.
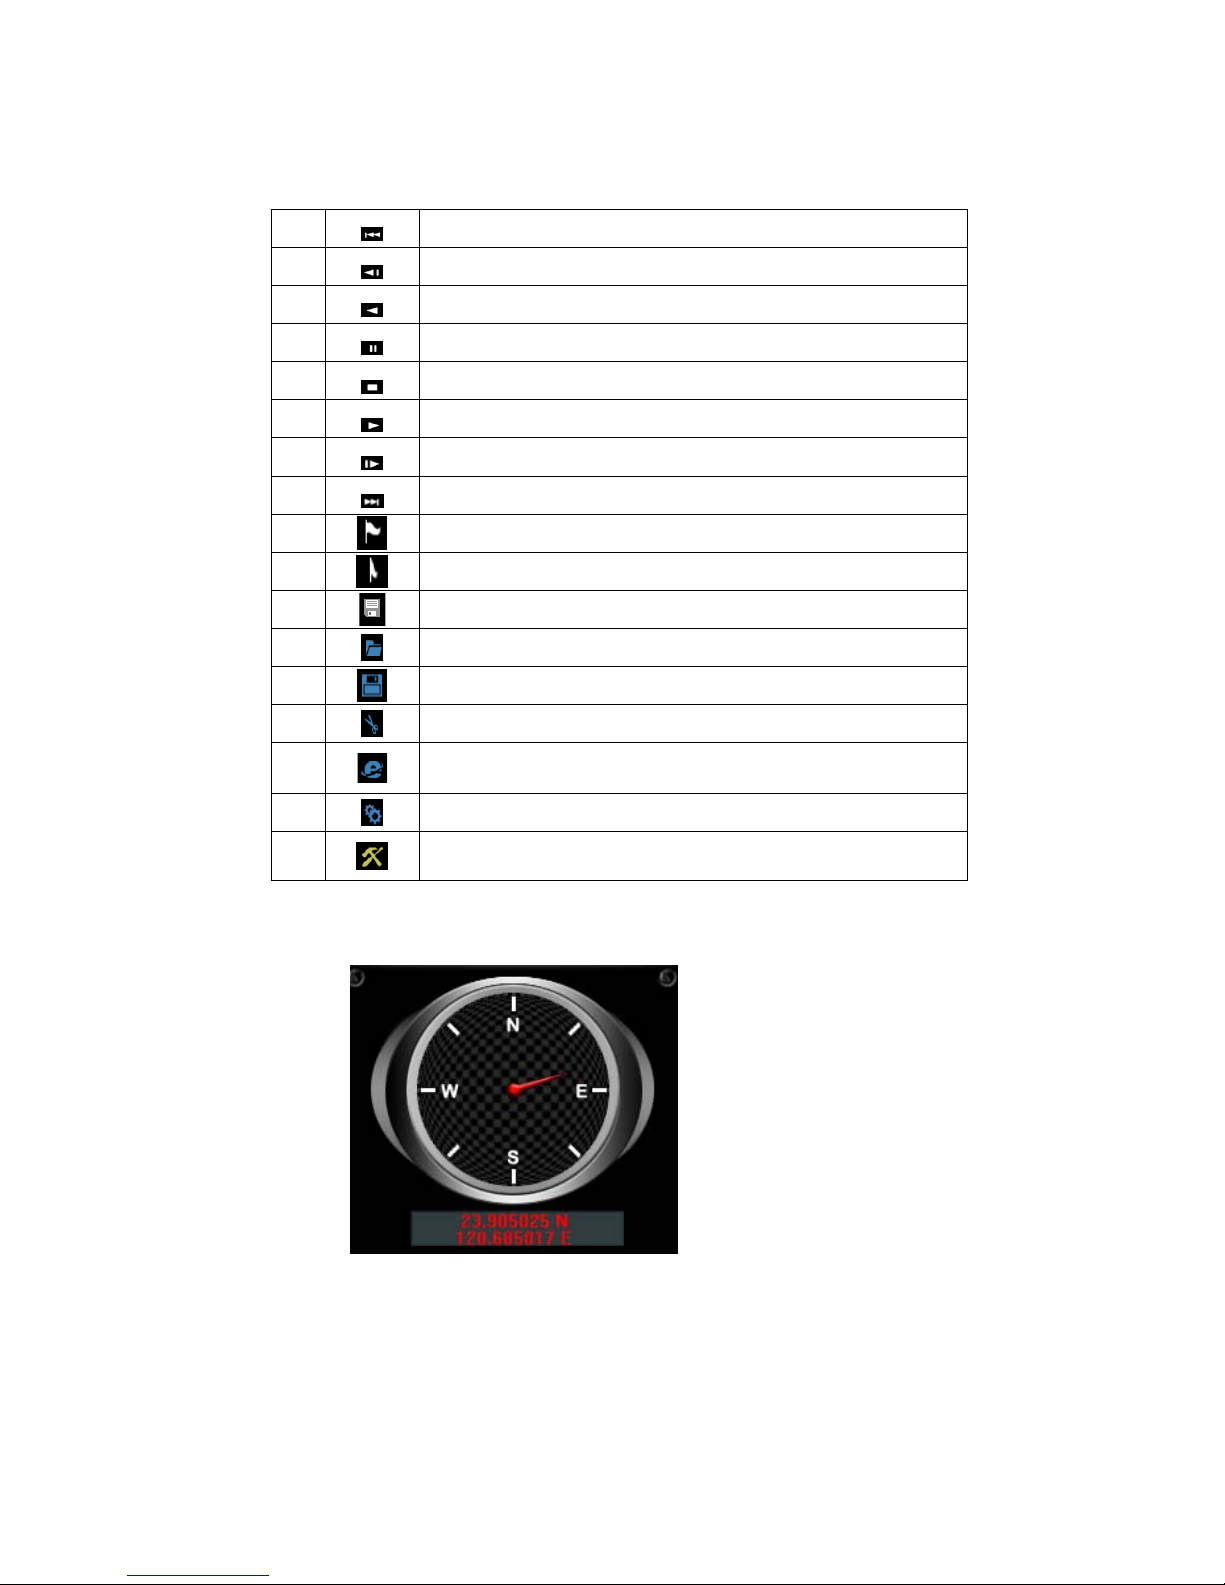
Viewer interface description
★ Direction, Latitude, Longitude, Speed Meter and Google Map are available for
GPS function of TYPE B.
Voice Volume
Play Speed
Open File
SnapSho
t
SD Card Setup
G-Senso
r
Latitude and
Longitude
Google Map
Google Map
Hour
Minute
Year, Month,
Date Selected
Speed Mete
r
Play Ba
r
Save The Playing File
Config
Page 32
30
1. Operating Interface Description
1
Return to previous function
2
Forward Playback
3
Playback Key
4
Pause Key
5
Stop Key
6
Play Key
7
Backward Playback
8
Go To Next File
9 Flag to mark starting point of backup file
10 Flag to mark ending point of back up file
11 Back up the marking file
12
Playback, Open file, select files to play
13 Back up the current file
14
Snapshot Tool
15
Google Map, LIVE location display
(TYPE B – GPS model only)
16
Configuration & Machine related settings.
17
Micro SD Card Setting
2. Player Interface Description:
Show latitude and longitude position
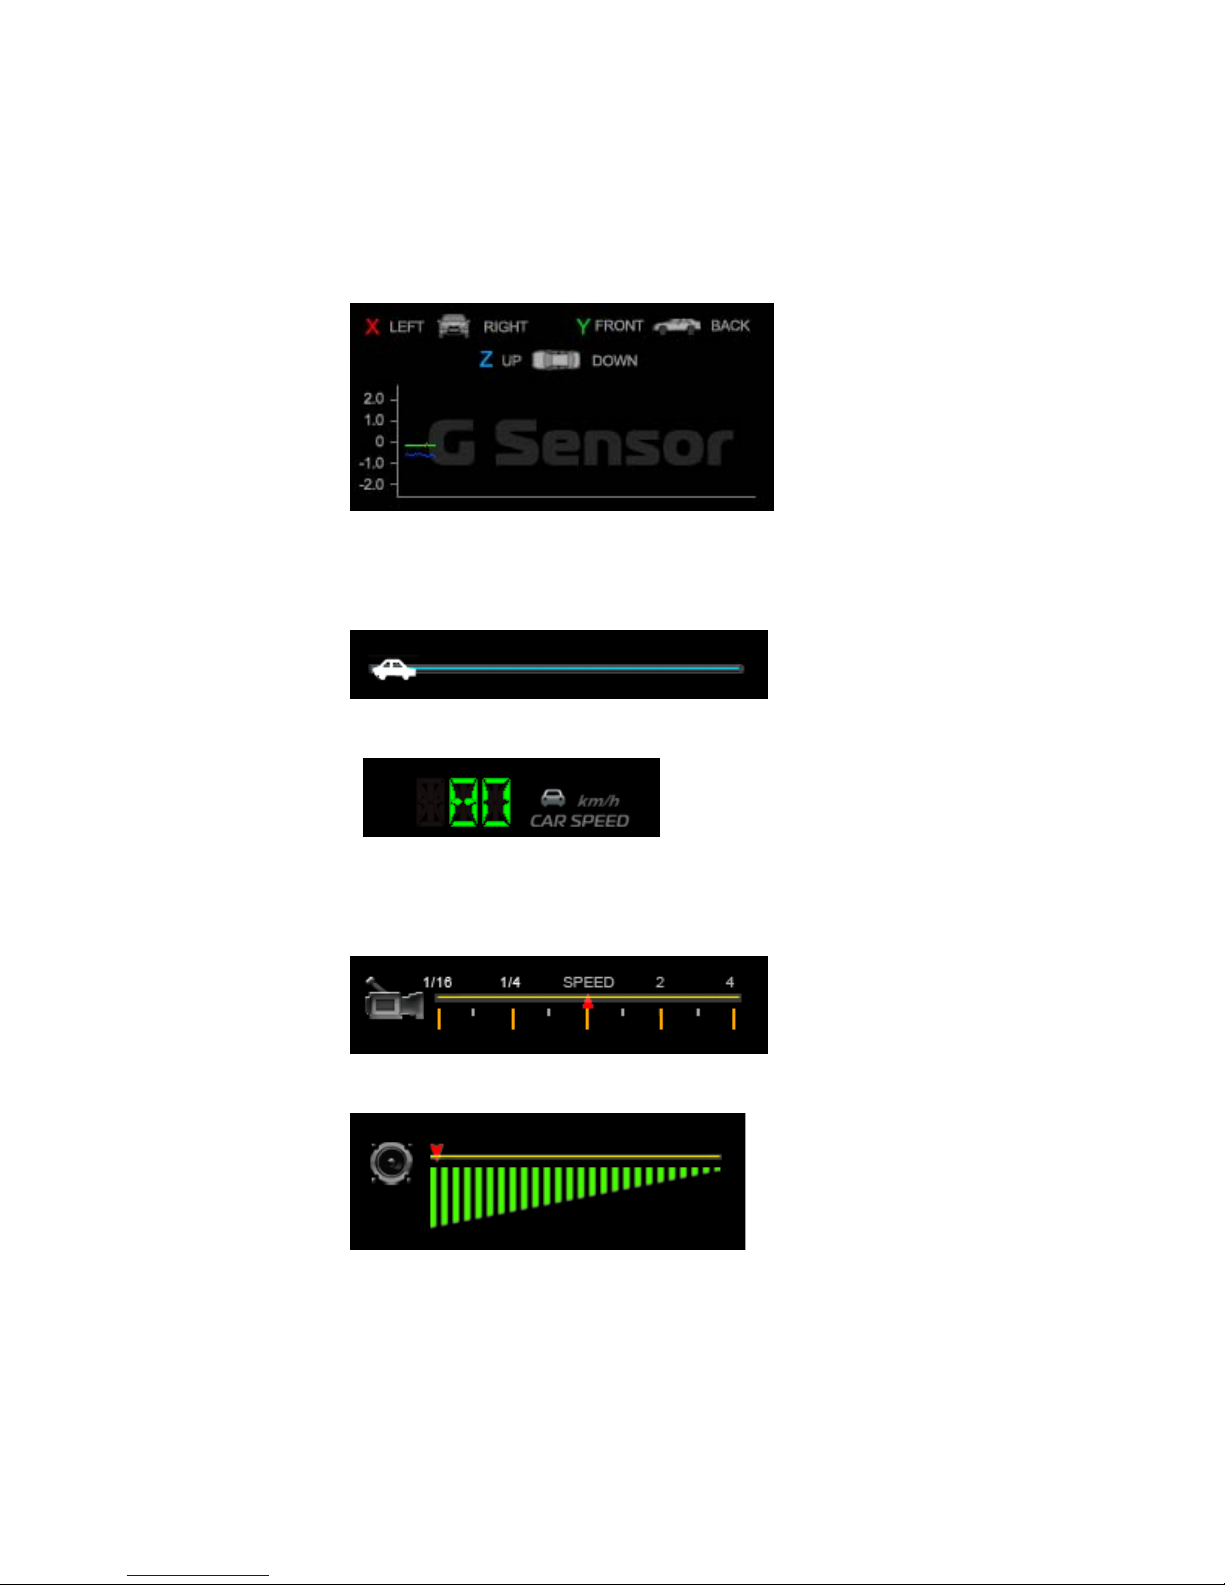
G-sensor : Impact sensor analyzer, forced saving the
accident video before and after 1 to 3 minutes, not
covered by other new files, protect the integrity of the
incident video.
Page 33
31
X: Induct about level of vehicles moving
Y: Induct around level of vehicles moving
Z: Induct Height fluctuation around level of vehicles
moving
Play BAR
Press left button of mouse and move around to pull BAR
with fast-moving.
Driving Speed
Playback speed
Fast forward with 2 times or 4 times, and playback with
0.25 times, 0.0625 times.
Volume control
Page 34
32
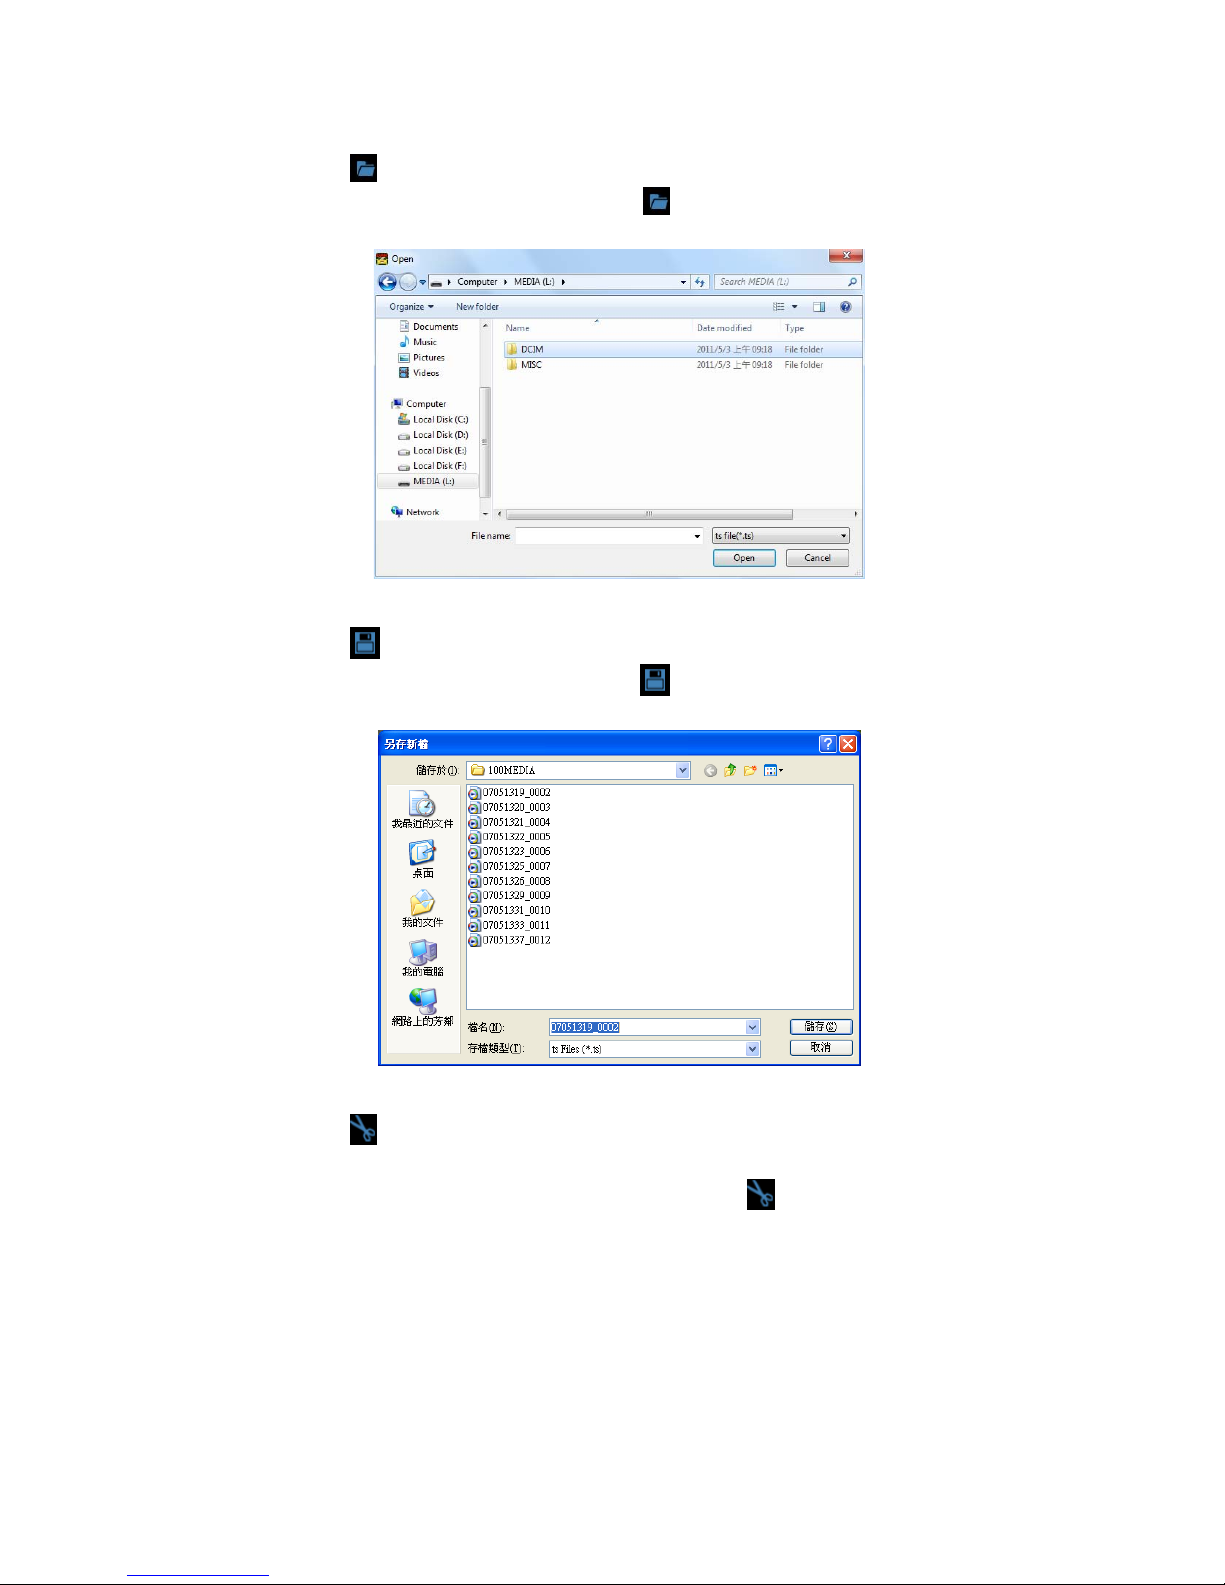
Select the file to playback
Select “ Open the document”
, and then choose the file of
memory card or hard disc. (The file format is *.ts)
Save the playing file
Select “Save the playing file”
, and then choose the file of
memory card or hard disc. (The file format is *.ts)
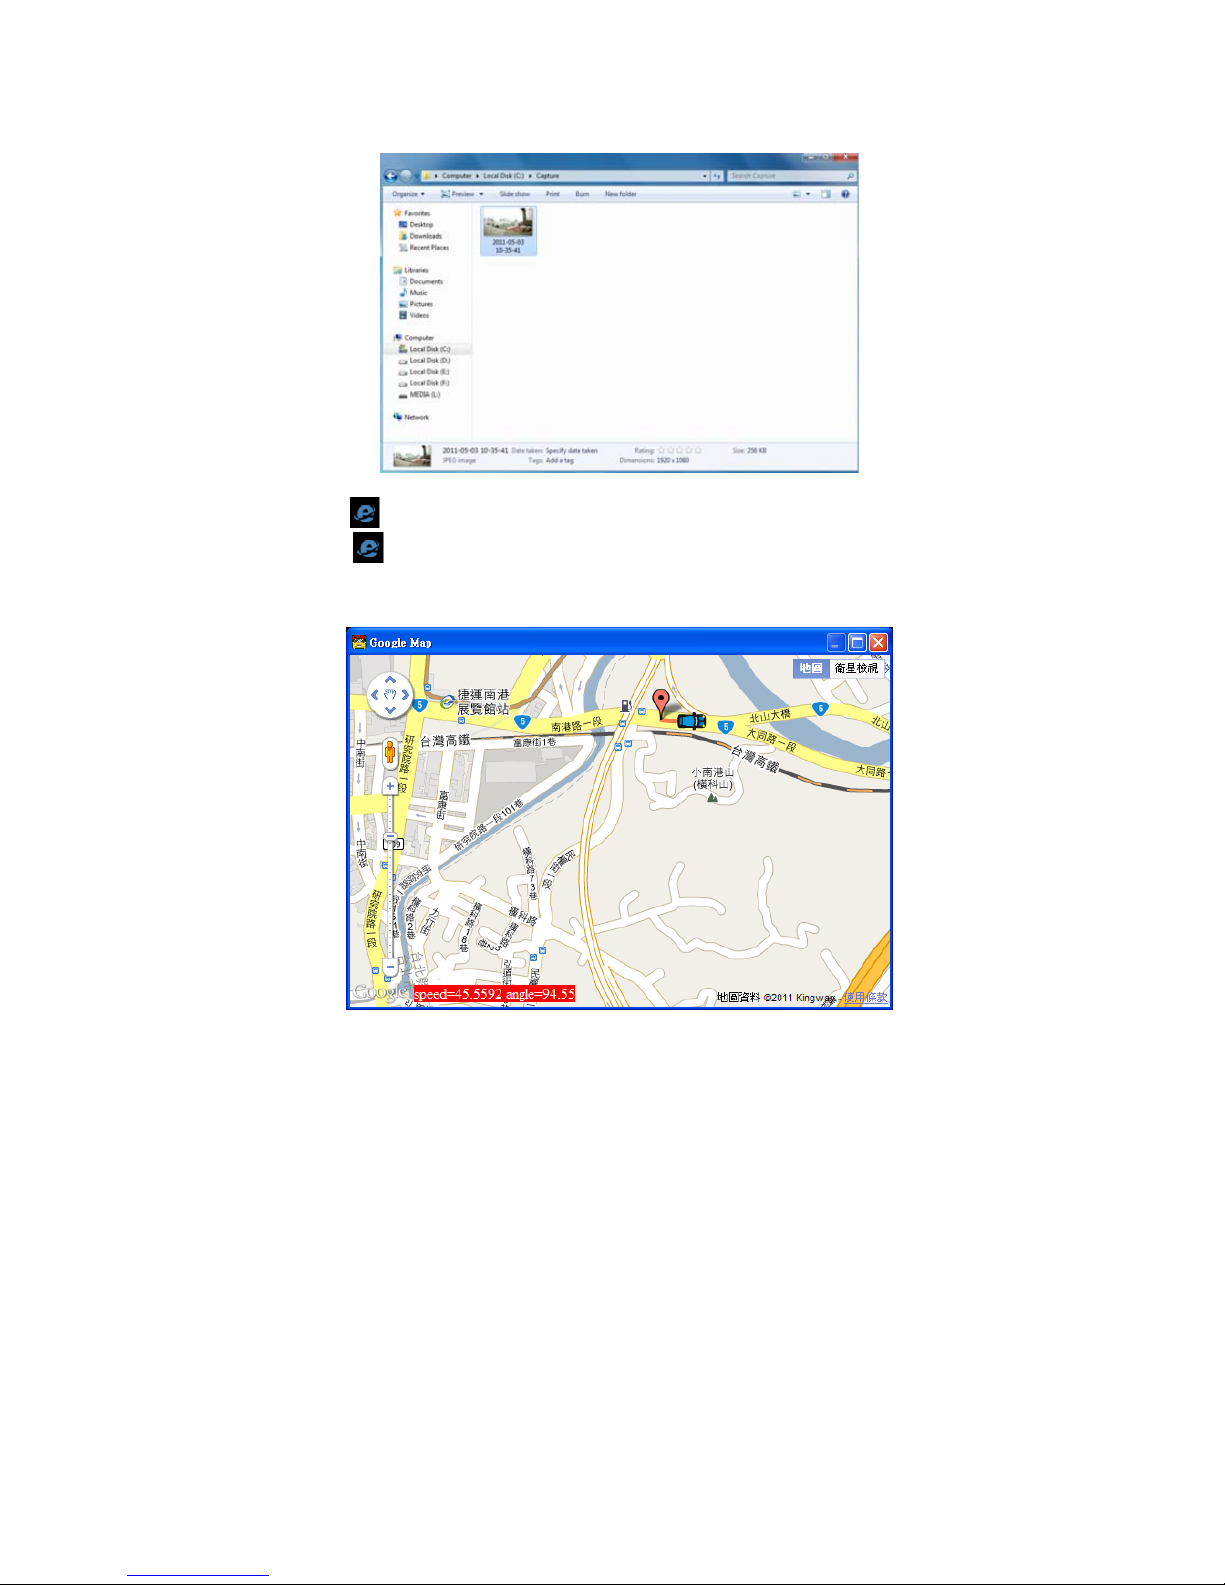
Snapshot Tool
Play record from Micro SD card first and then use Snapshoot
tool to capture the screen. When select
Snapshoot tool, it
will appear the following window. (The picture of display screen
will save in capture storage folder path.)
Page 35
33
Google Map
Click
and then appear the window of Google Map to view
the tracking of Vehicle. (This function needs to connect Internet.)
Page 36
34
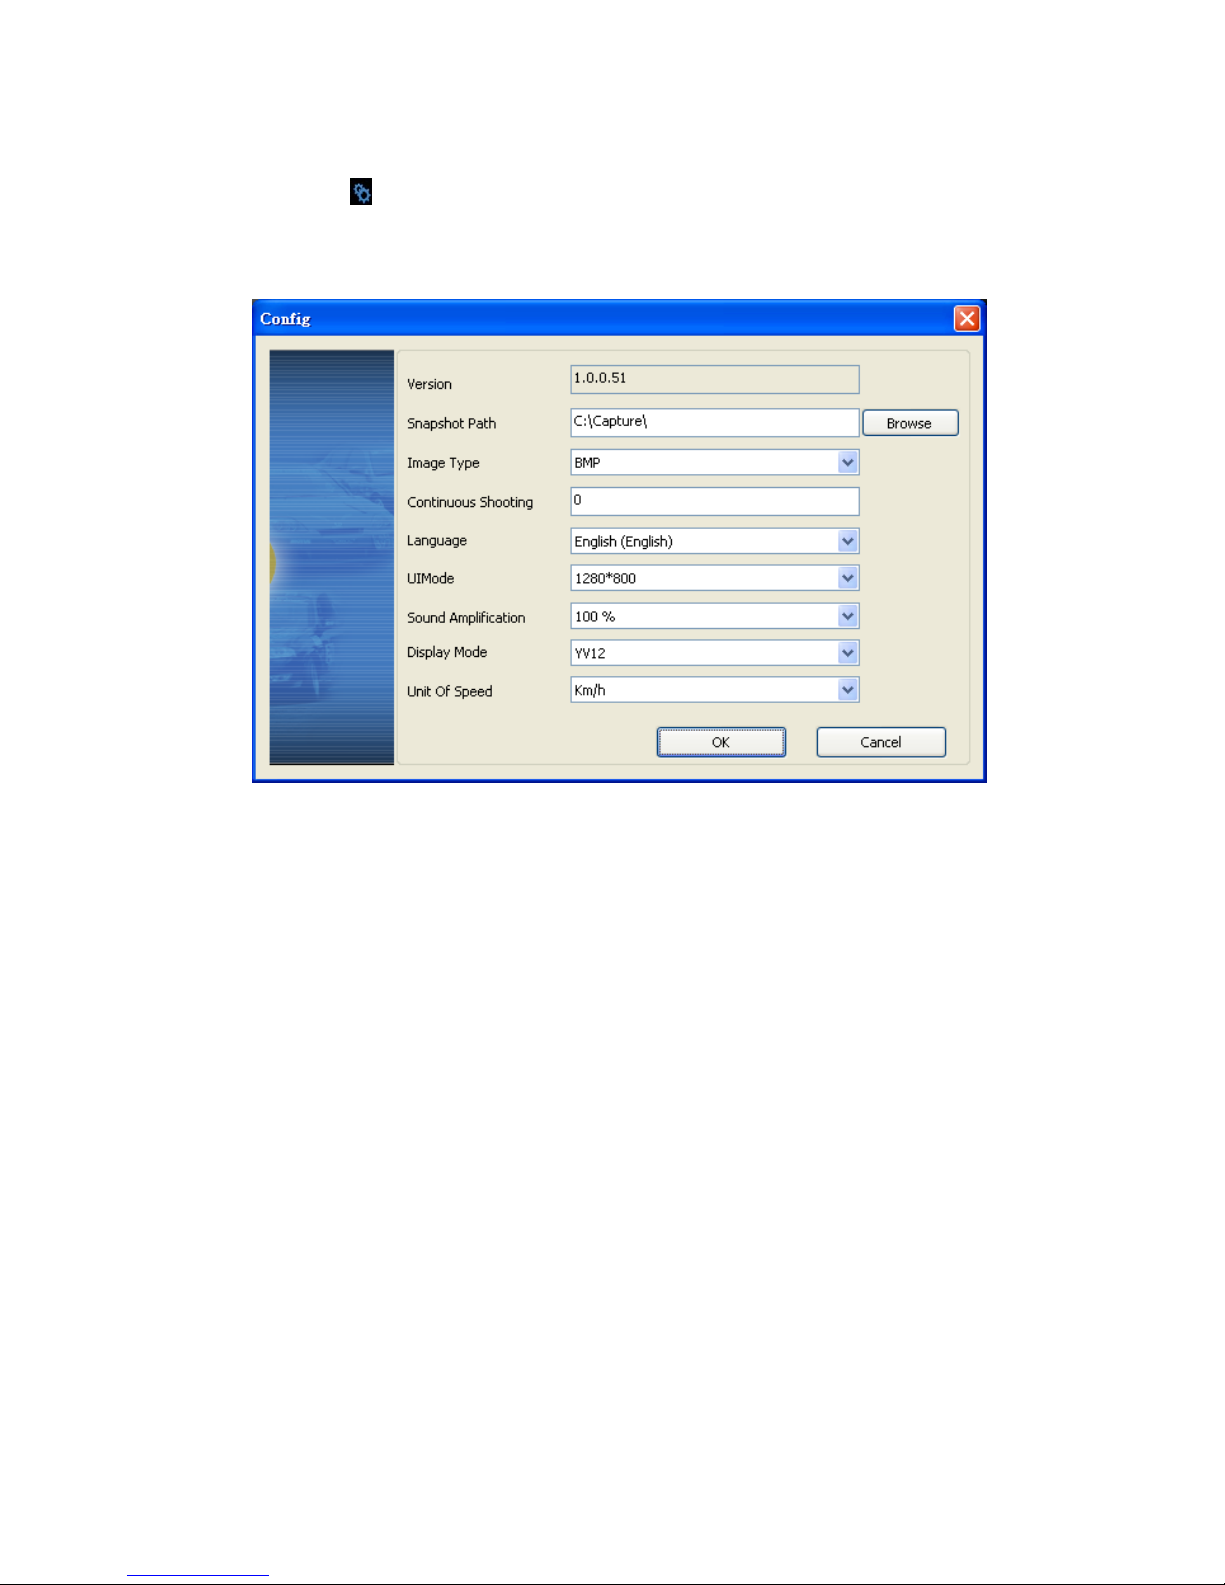
Configuration Setting
Announce related information of software version and data
storage setting of Micro SD card
(a) Version: Current Display Version
(b) Path of snapshoot: store location of PC client
(c) Picture Type: save picture type as bmp or jpg format
(d) Continuous snapshoot: Default value is zero, can set continuous
screen images capturing.
(e) Language: Select a specific language system; please restart
player software after setting up completed.
(f) UI mode: Set up store type for different resolution, including
960x600, 1280x800, 1920x1080. Please insert Micro SD card
before set up the resolution.
(g) Volume Loud: Adjustment of voice volume loudly by percentage.
(h) Display Mode: Default value YV12, two color modes can be
selected: YV12 and RGB.
(i) Speed unit: Km/h, Mile/h and Knot available
Page 37
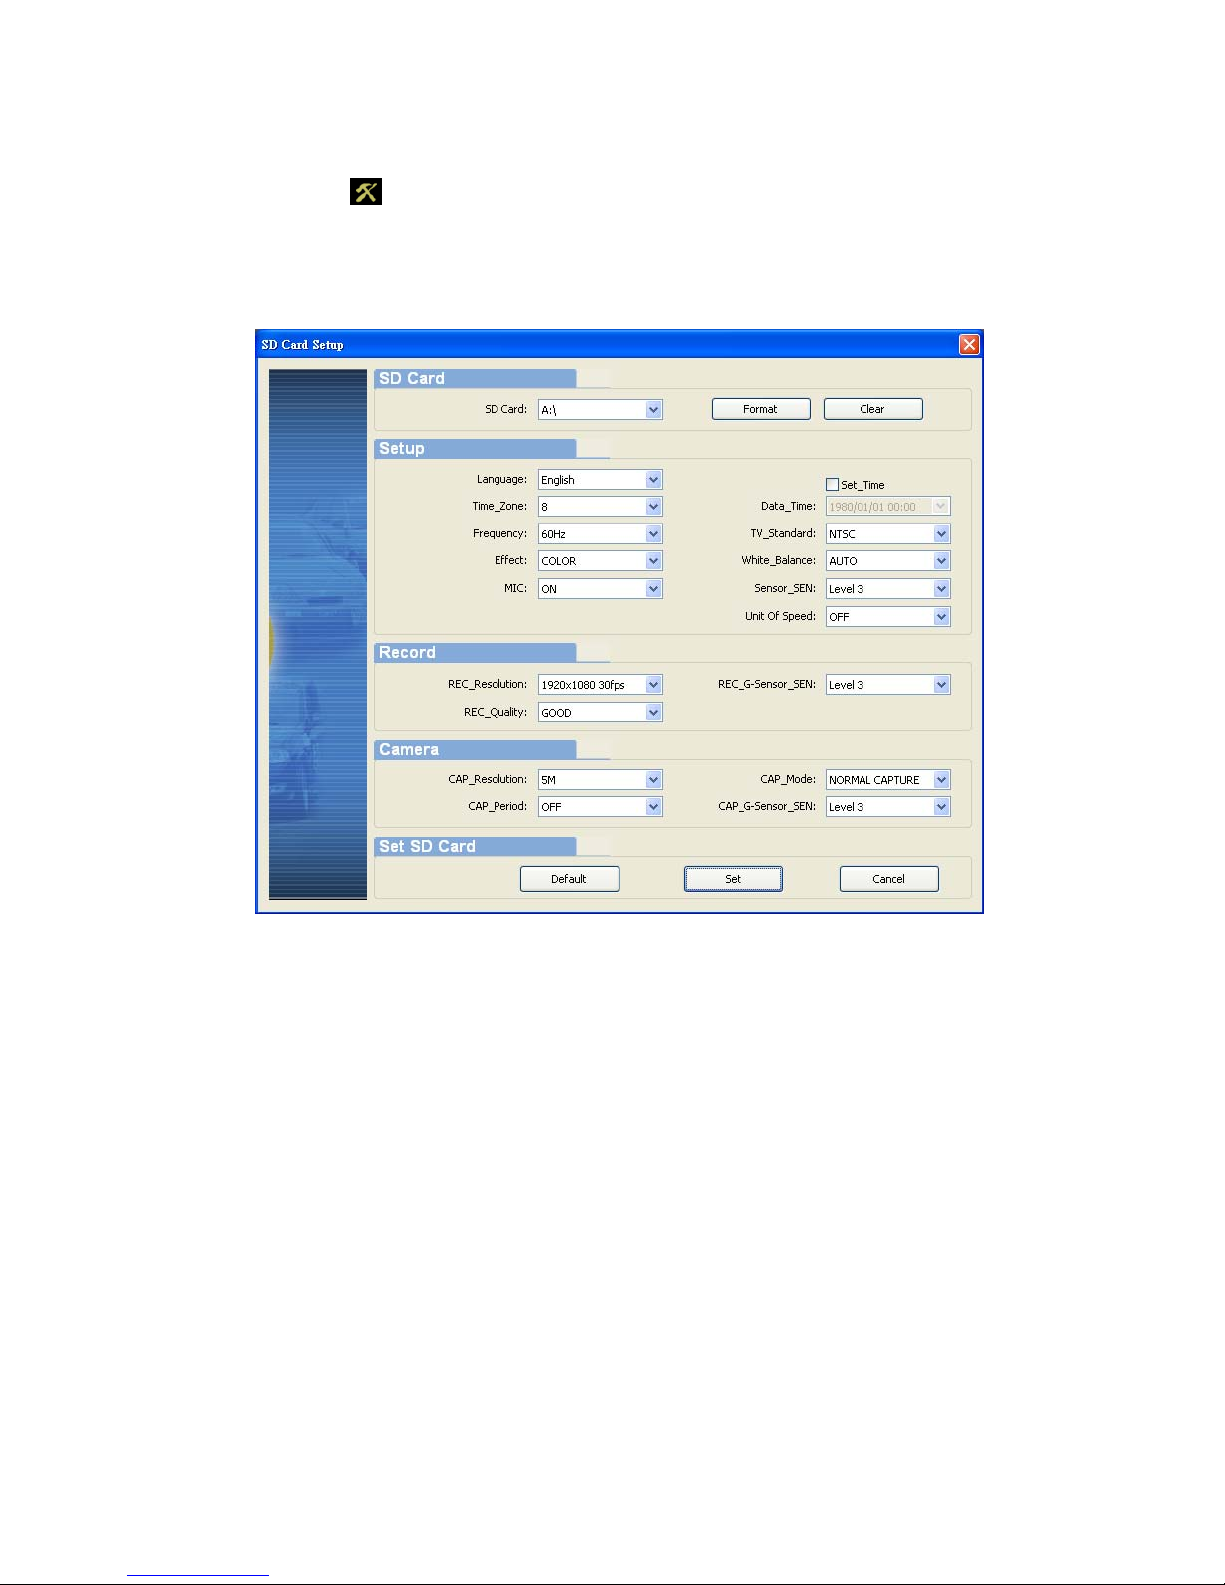
35
Micro SD card Setting
There will have default value before the device complete.
Setting up Micro SD card or external monitor connecting can
revise default value of this device.
(a) Micro SD card: Select the slot of Micro SD card
Format: Micro SD card formatted
Clear: Clear all recording data of Micro SD card to
empty status.
(b) Setup: Set up functions of this device
Language: Multi-languages available
Time_Zone: Default UCT+8
Date_Time: Tick time setting and select it.
Frequency: 50Hz for PAL system, 60Hz for NTSC
system
TV_Standard: NTSC / PAL for different countries
Effect: Color (Default), Grayscale, Classic
White_Balance: Auto (Default), Sunlight, Cloudy,
Fluorescent , Tungsten
MIC : ON (Default) / Off the microphone
Page 38
36
REC_G-Sensor_SEN: Default as “Level 3”
Speed Unit: Default as “Km/h”
(c) Record: Set up record items of the device
Resolution: 1920x1080P@ 30 fps (Default),
1280x720P@60/30 fps
G-Sensor: Default as “the third level”
Record Quality: Good (Default) , Normal, Best
(d) Camera: Setting snapshoot items
CAP_Resolution: 3M, 5M (Default), 8M
Cap_ Mode: Manual, Auto by G-Sensor detecting
Cap_Period: Off, 30 sec, 1 min, 5 min, 30 min
CAP_G-Sensor: Default as “Level 3”
(e) Micro SD card setting: Restore, Store, And Cancel
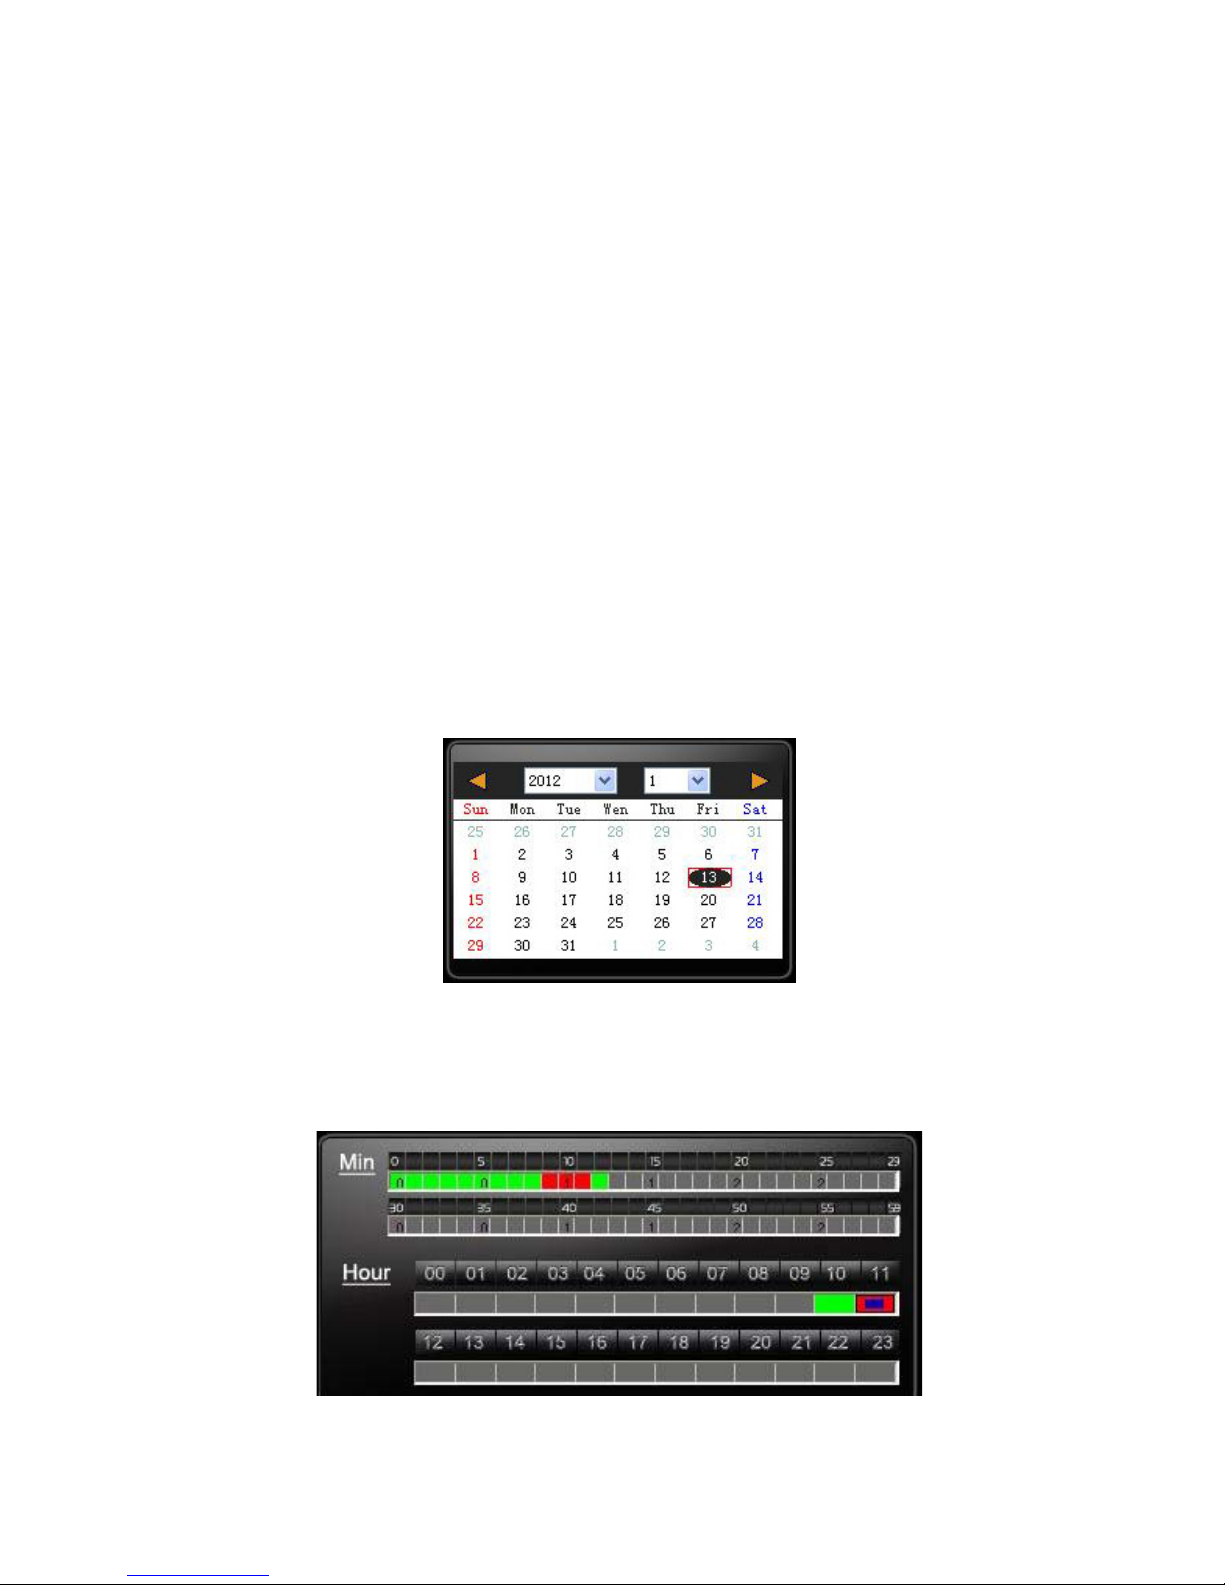
Playback date selection
1. Selecting by date
Launch the Player, click the "open" to select the file or path of
storage. Then on date table with Gray-brown color means
having recording footage.
2.Selecting by Hours/Minutes (24-hours)
Page 39
37
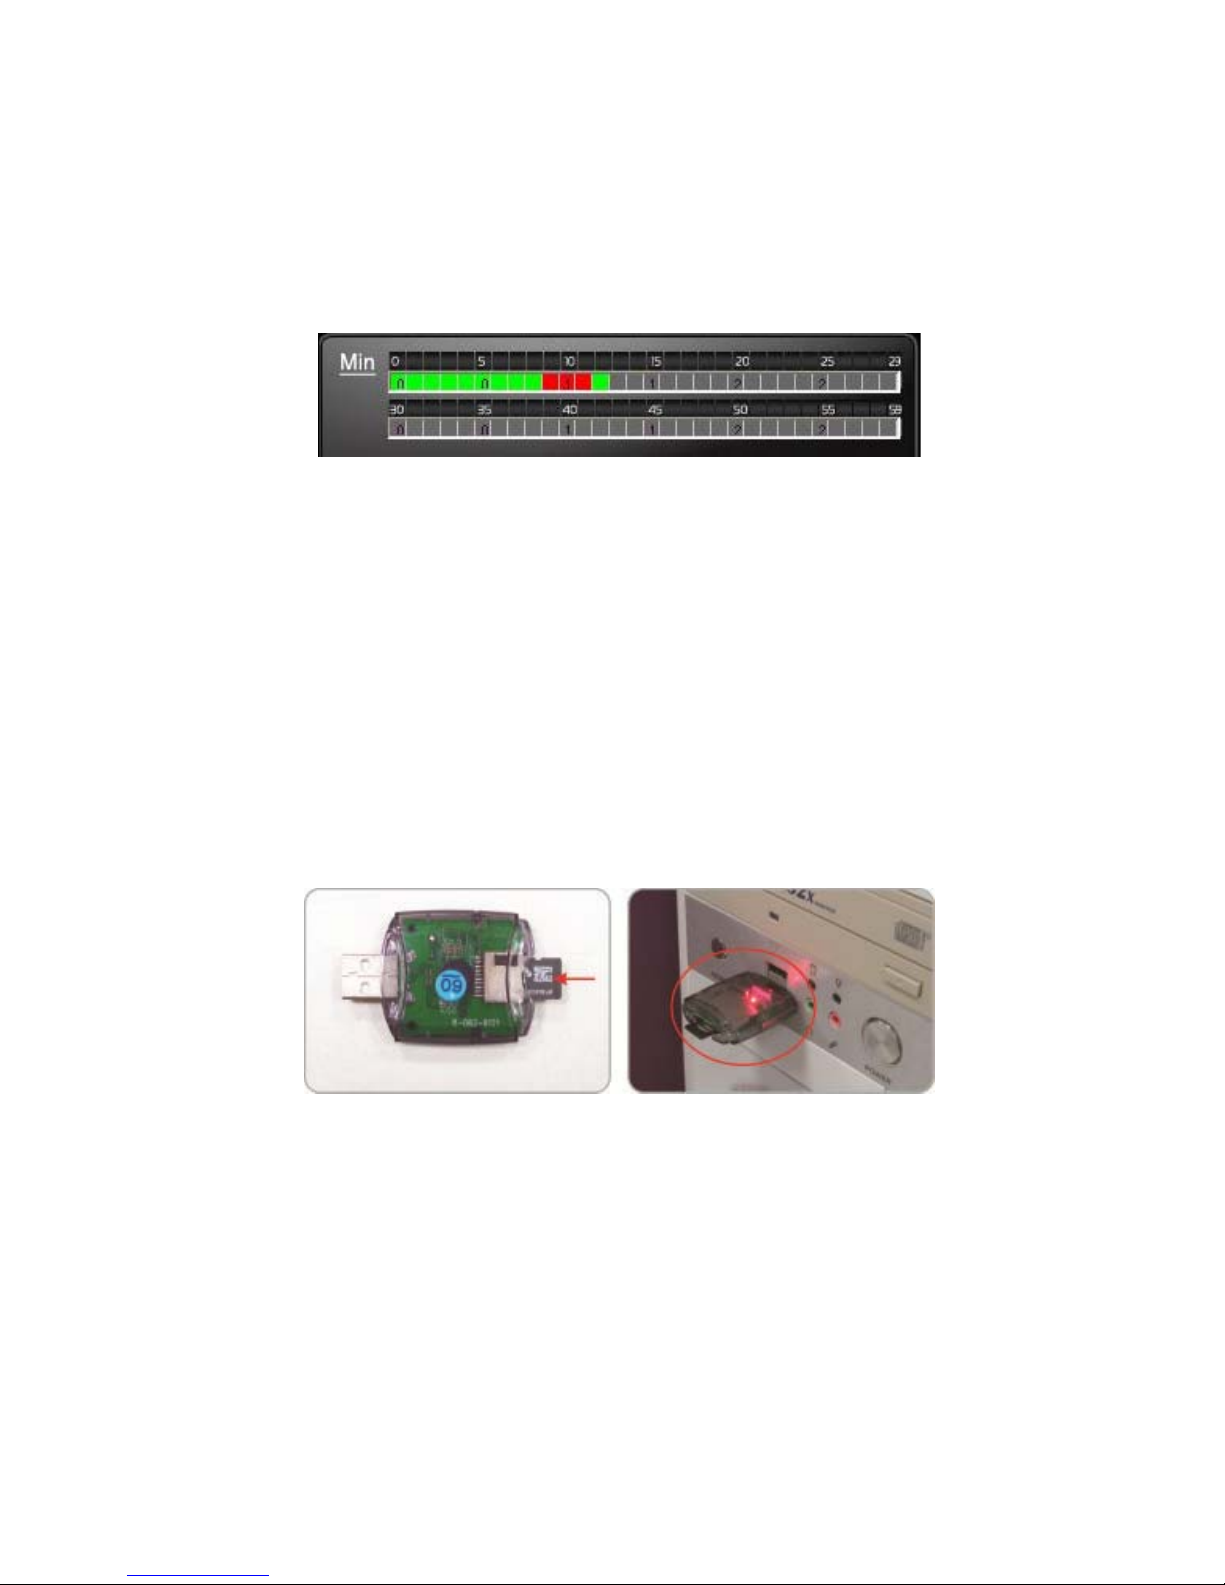
After select the "Date" with Gray-brown color, on Hour/Minutes
table will display Red/Green color.
Green: normal record
Red: force record
3.Quick switching by minutes
Click the minutes table to change the recording footage
immediately.
I. Formatting the Memory Card
Q. When will you need to format the Micro SD card?
Ans: Please format a new Micro SD card and start to record
after installation into the video recorder.
Procedures of a new Micro SD card formatted as below:
Way 1. Format the Micro SD card by PC
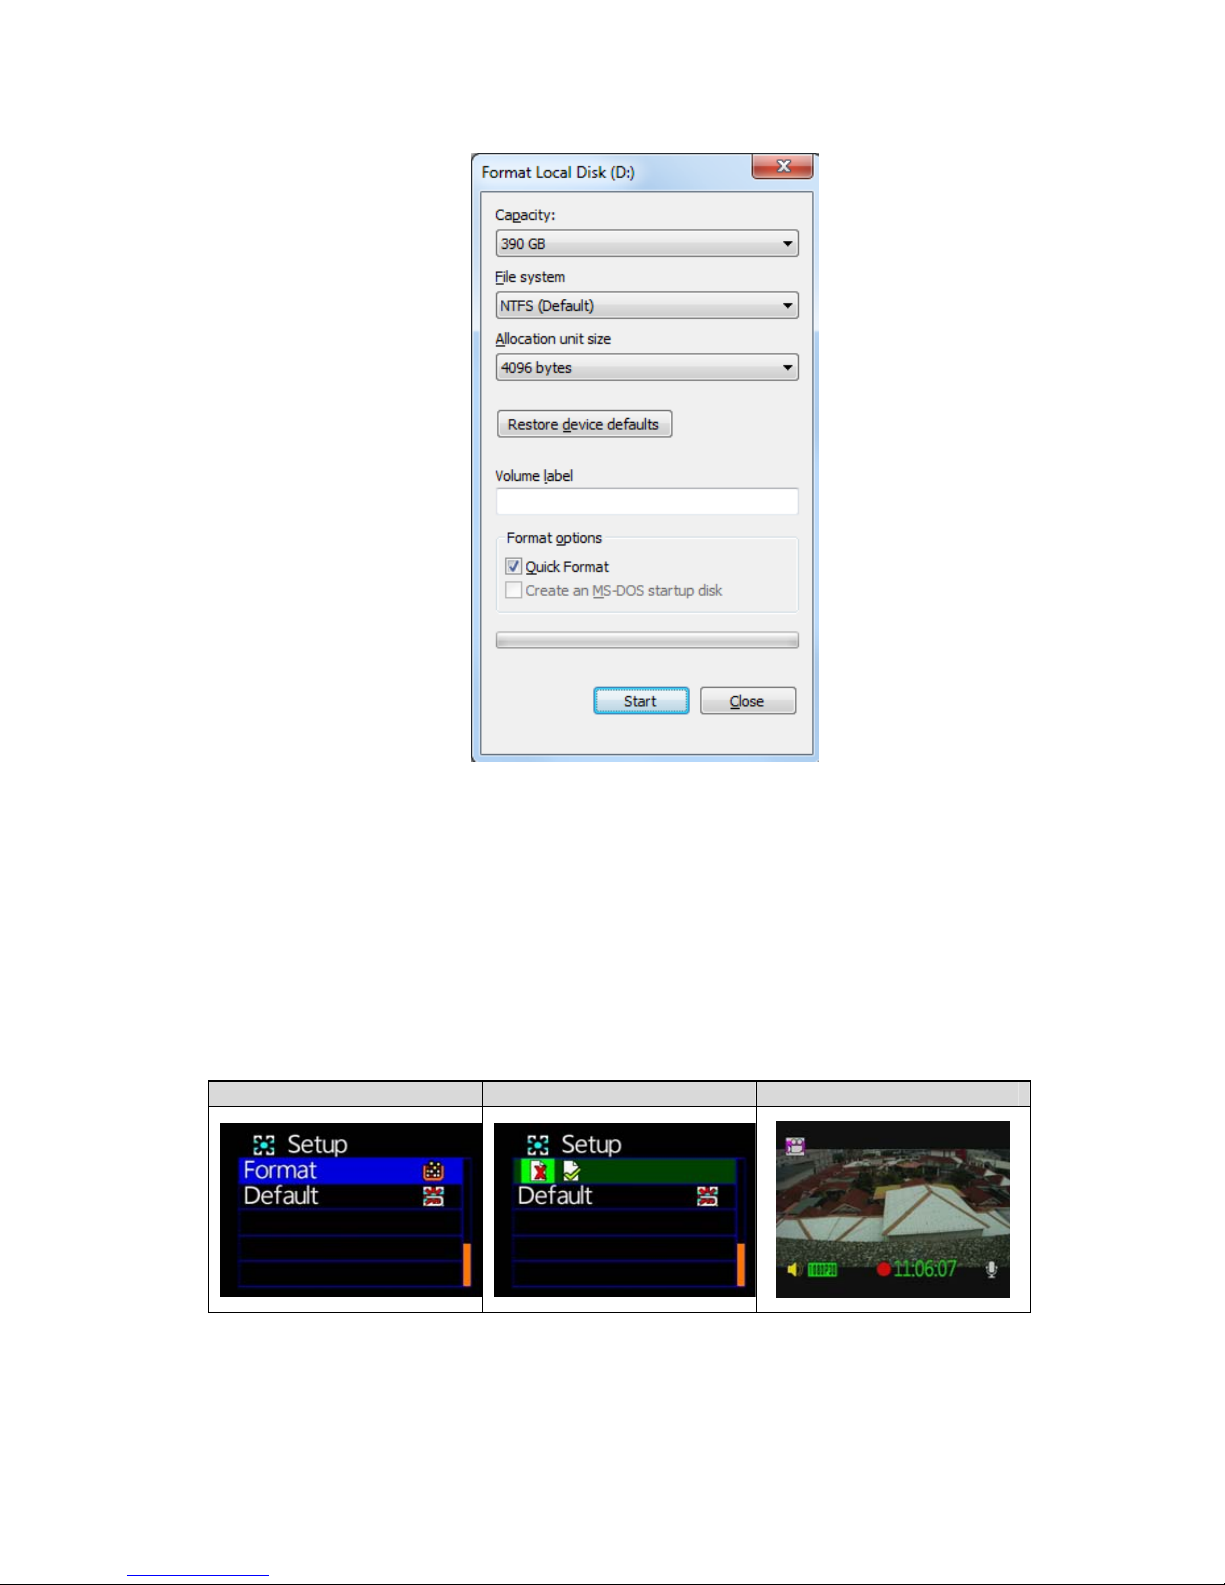
Insert the Micro SD card into card reader and plug into USB
port of PC.
Page 40
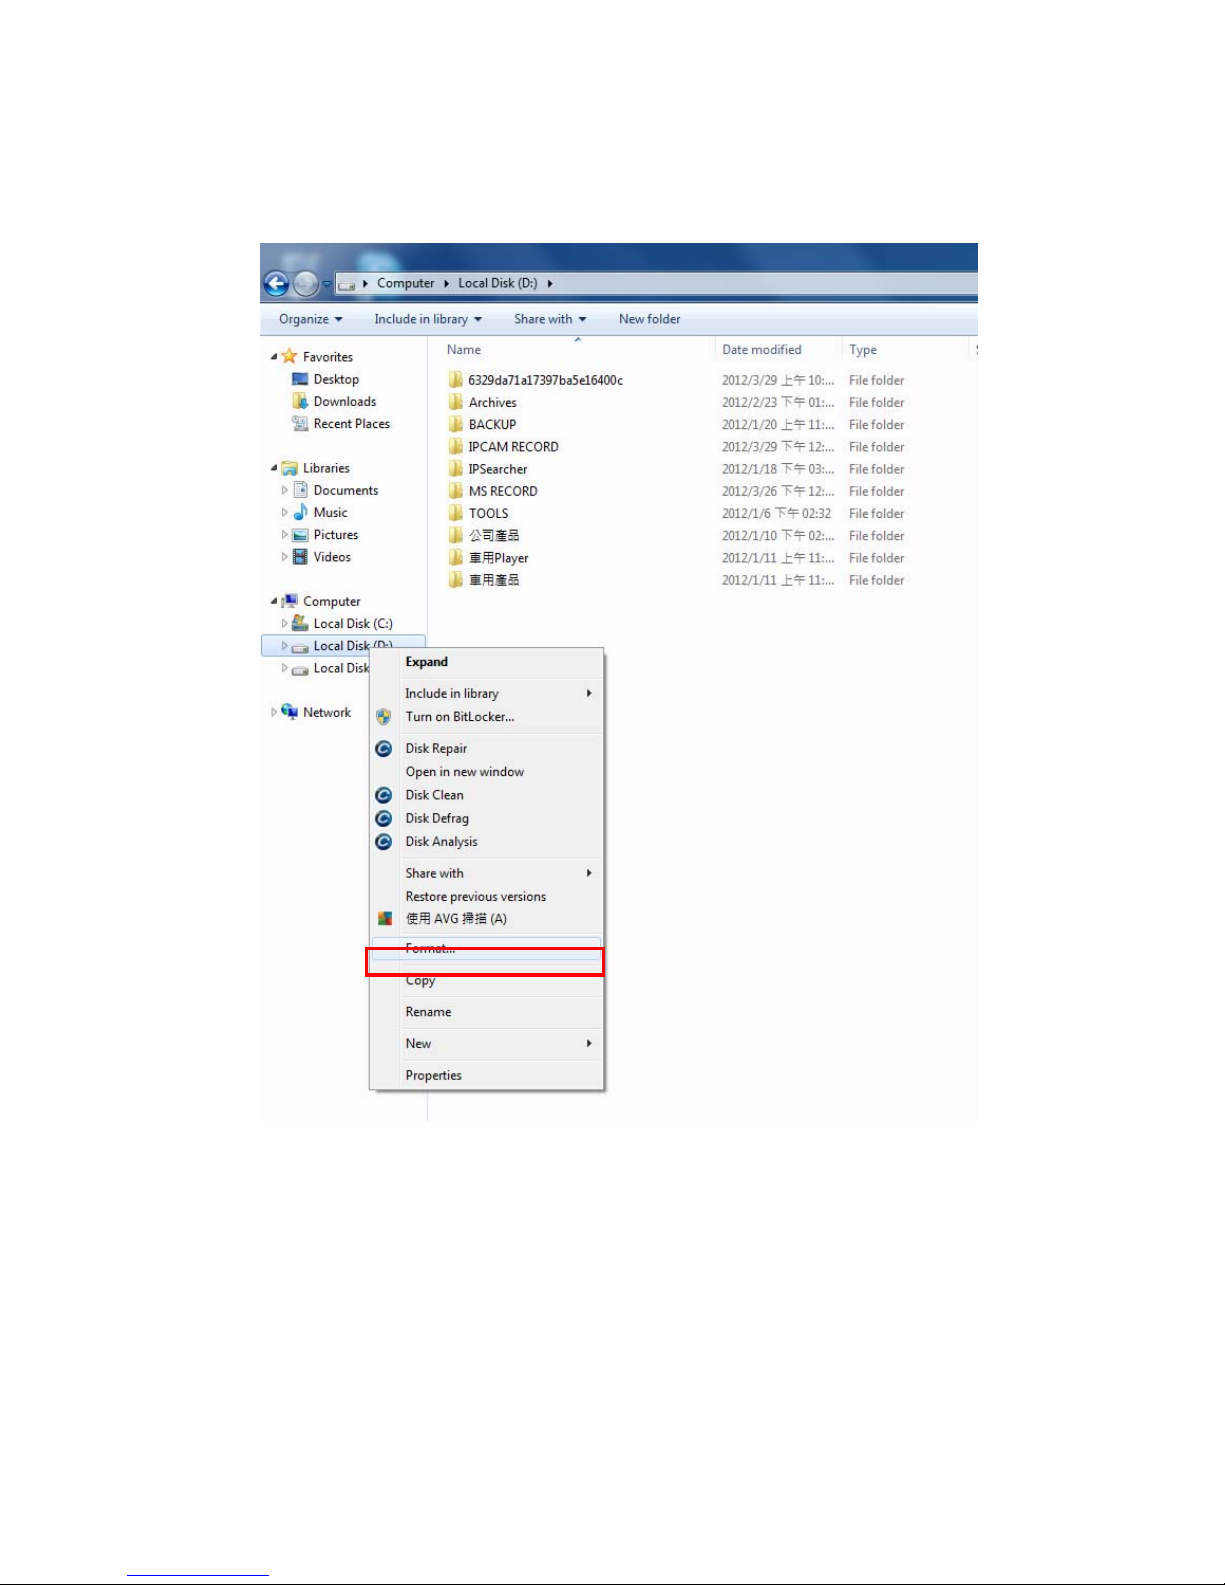
38
1. Select the Disc from “My Computer” and mouse click right side
for memory card format.
2. Please mind the file system as “FAT32” while formatted.
Page 41
39
3. After format process, the Micro SD card can be used to record
in vehicle video recorder directly.
Way 2. Format the Micro SD card by OSD screen of this
device
1. Connect power cable to the device, insert the Micro SD card
into the slot and select format item from OSD screen by
remote controller.
Format Process:
Process A Process B Process C
2. After the Micro SD card formatted, quit Menu page and back
to LIVE view.
Page 42
40
J. Installation of Micro SD Card
Install the Micro SD card into the device before record started.
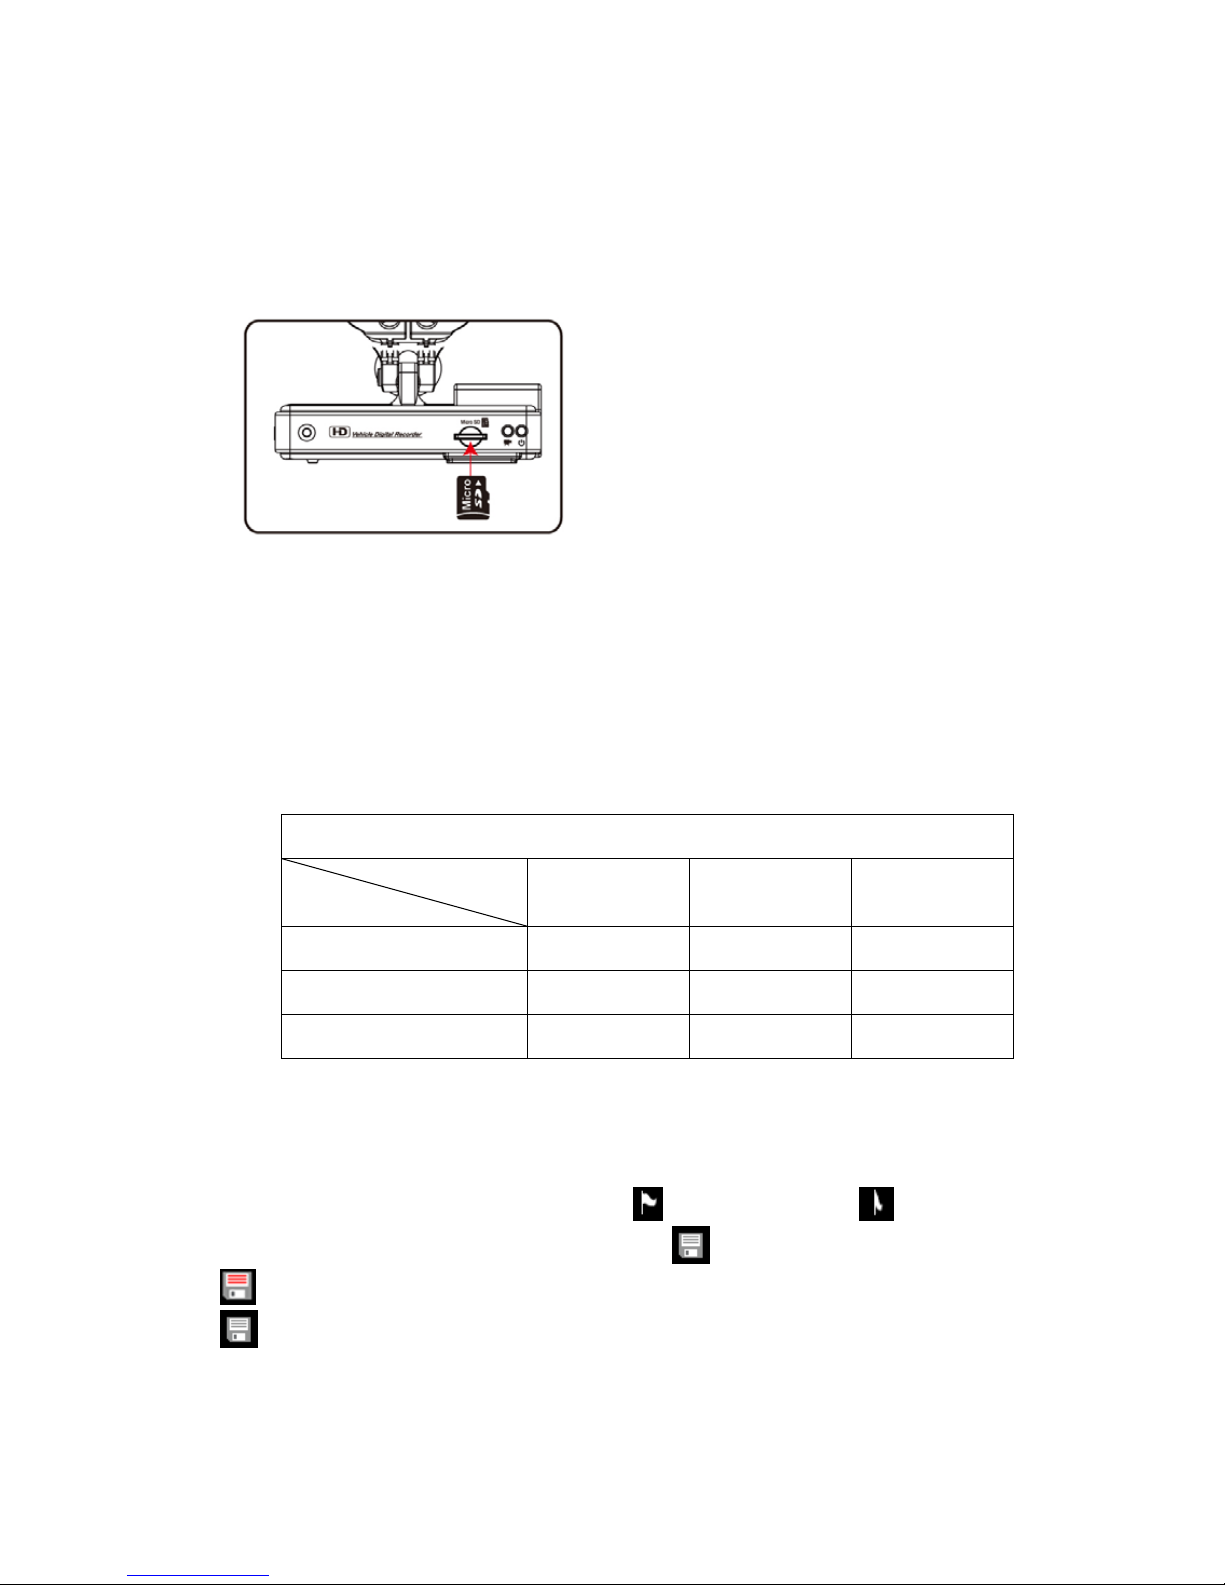
Procedures for installation of Micro SD card as below:
1. Insert the Micro SD card into the slot,
please mind the install direction.
2. Push the Micro SD card into the slot
flatly.
3. Installation completed after pushing
the Micro SD card
K. Record Time Estimation (based on constant record
mode with 8GB card)
*The chart of estimated record time listed below is for reference
only. The length of time recorded can be varied due to variation in
image size may be somewhat different.
Video Format (NTSC / PAL)
Resolution
Video Quality
1080P30 720P60 720P30
High 110 Min 105 Min 115 Min
Normal 115 Min 110 Min 135 Min
Low 135 Min 130 Min 155 Min
L. Operation for Saving Records as AVI Files
Play records from Micro SD card, select a time period to transfer to
AVI file, decide the beginning point
and end point and mark
them respectively. Press backup mark
to transfer file as AVI file.
: On transferring file to AVI file now
: File transfer completed
 Loading...