

Page 1
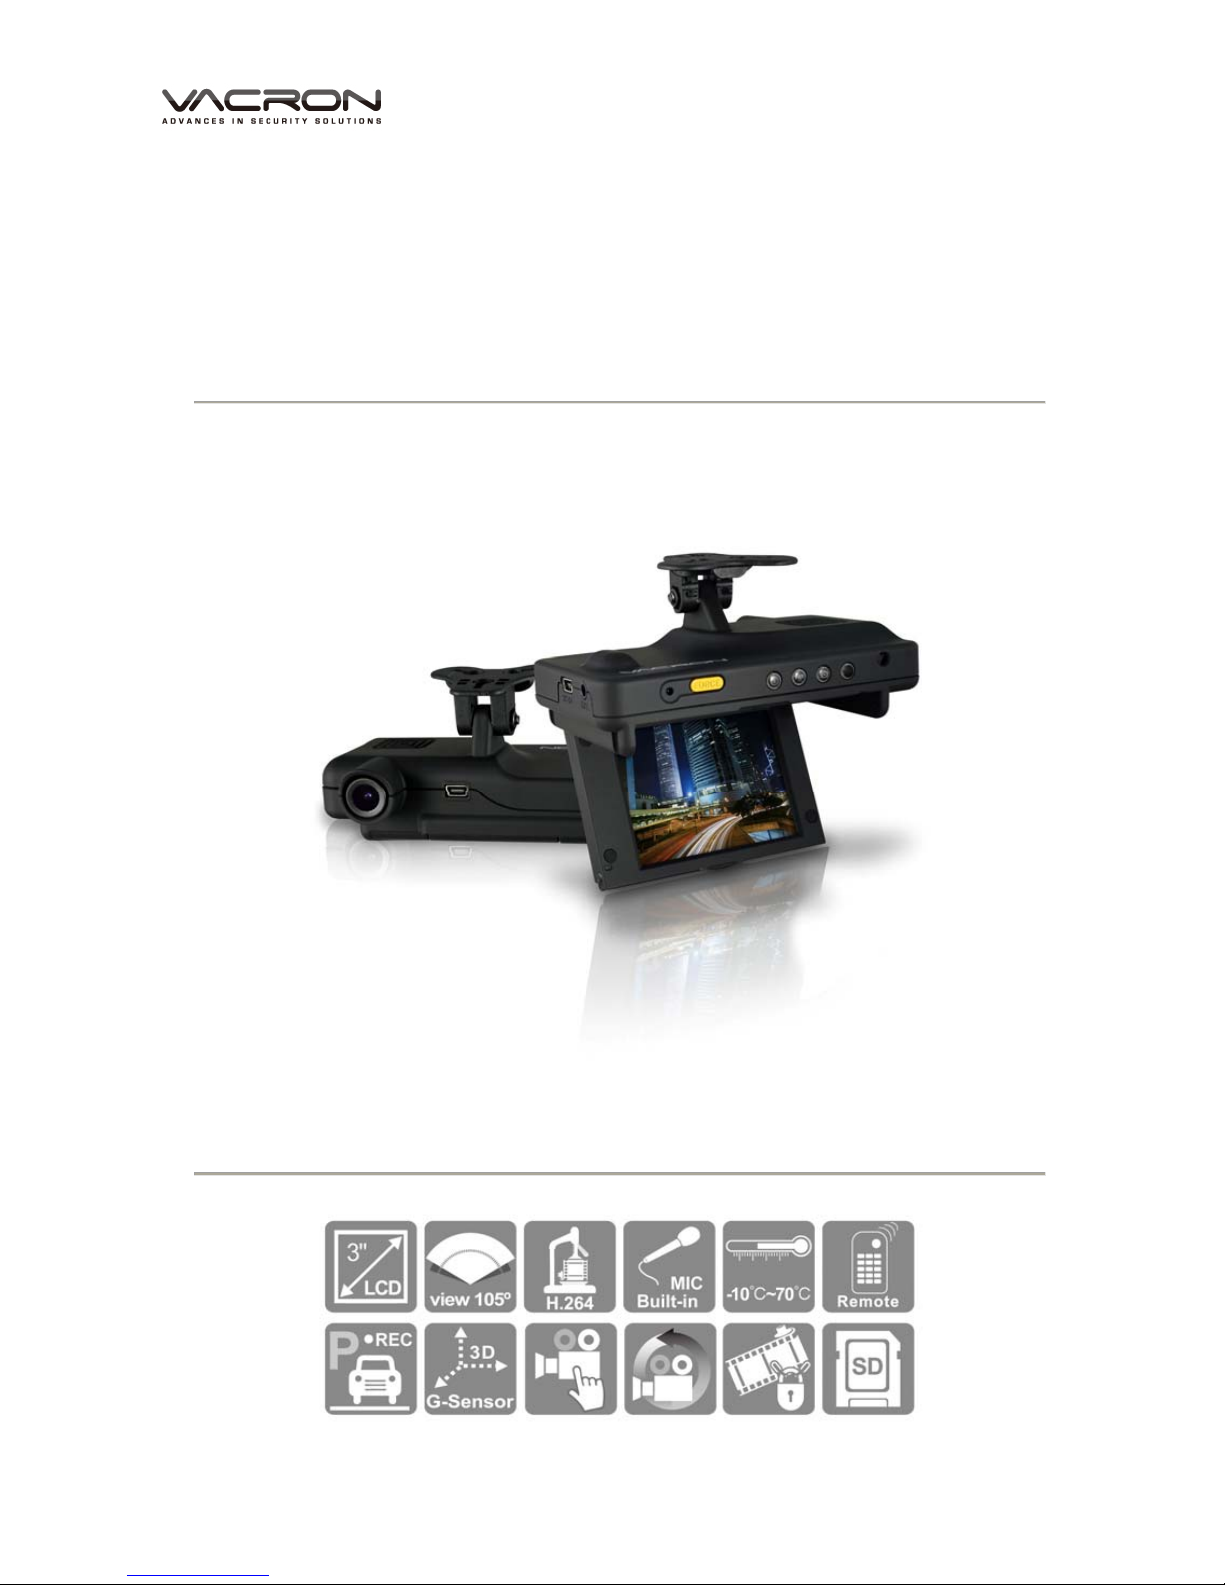
Full HD 1080P
Vehicle Video Recorder
User Manual
2013 FEB V1.0
Page 2

Vehicle Video Recorder User Manual
i
Index
A. Feature Description ....................................................................... 1
B. Specification
.................................................................................. 2
C.
Accessories ................................................................................... 2
D. Schematic Diagram of The Installation Steps
................................ 3
E. Product Function Introduction ........................................................ 5
F. SD Card Installation ....................................................................... 6
G. Remote Controller Description ....................................................... 7
H. Operation Setting ........................................................................... 8
1. OSD List Menu ...................................................................... 8
2. Setup Menu ........................................................................... 9
3. Camcorder Menu ................................................................. 14
4. Camera Menu ...................................................................... 16
5. Motion Menu ........................................................................ 17
I. Playback ...................................................................................... 18
1. Direct playback on machine side ......................................... 18
2. Video modes ....................................................................... 18
3. Snapshot playback .............................................................. 20
J. Software operating instruction ..................................................... 22
K. Formatting memory card .............................................................. 28
L. Record Time Estimation (based on constant record mode
with 8GB card) ................................................................................... 29
M. Appendix: The Indication of Bright and Dark Spot of LCD ........... 30
Page 3

Vehicle Video Recorder User Manual
1
A. Feature Description
Built-in Full HD 5M CMOS Sensor. Viewing angle approx. 105
degrees.
Suitable for all types of vehicles use. Small Design, Easy
Installation。
Equipped with 3 inch TFT LCD screen to make the adjustment of
recording angle easily; also providing photo shooting manually.
During playback of video footage and photo, the built-in screen
direction sensor will detect screen side.
Video record outside driving conditions and audio record inside the
vehicle simultaneously.
SD card Class 10 or above recommend. MAX to 32GB
G-sensor sensitivity can be adjusted according to vehicles and
road situations. When detecting a strong shock, system will start
emergency recording and keep the files without being overwritten.
Motion detection recording function during car stopping (External
power source is needed)
Page 4
Vehicle Video Recorder User Manual
2
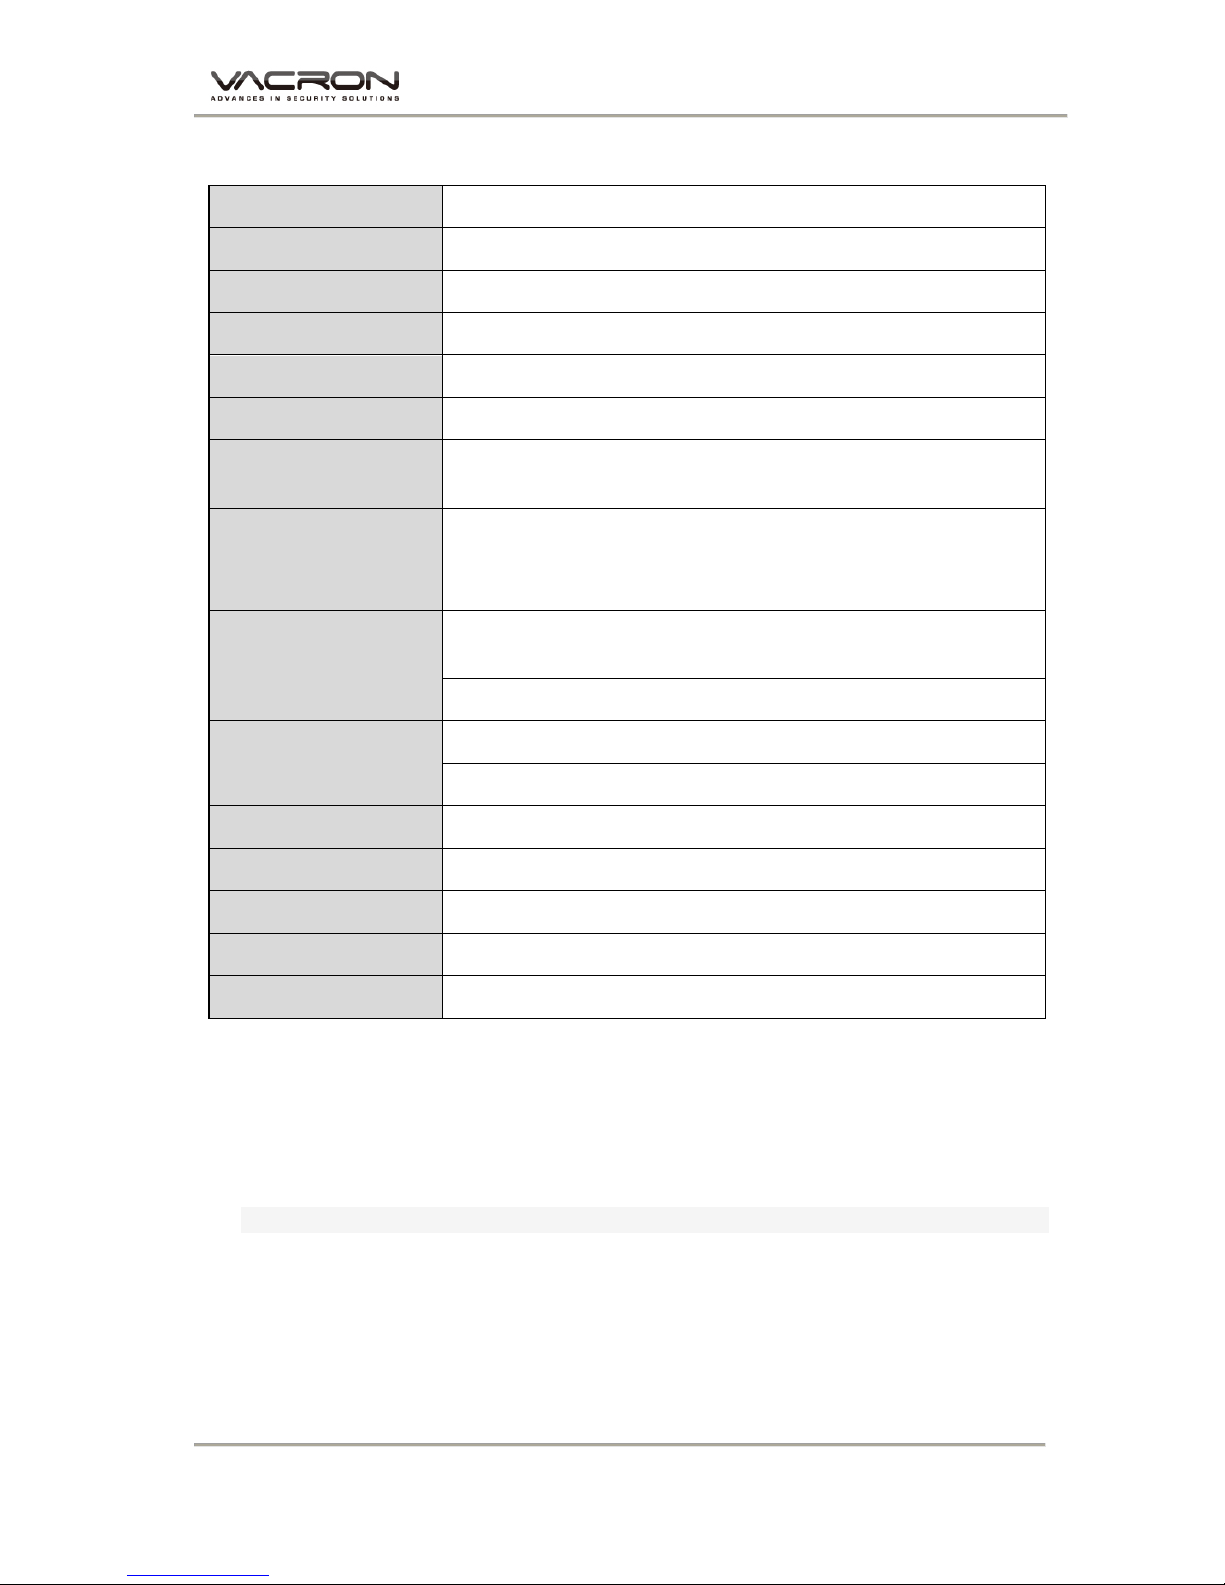
B. Specification
Items Description
Chipset Ambarella H.264 image compression chip
Sensor Device Full HD 5M CMOS Sensor
View Angle Approx. 105 degrees
Display LCD 3 inch 4:3 monitor
Voltage Start at 5V±5%;650mA (5V/1A Power Adaptor)
Operating
Temperature
-10℃~ +70℃
Storage Devi ce
For the performance issue, use SanDisk SD card Class
10 or above read/write speed 15MB/s recommend. (min
capacity 4G, Max 32G)
Recording Frame
and Content
1920x1080(Full HD1080P / 30F); 1280x720 (HD720P /
30F). Auto recording when power up system.
Maximum Recording frame: 30fps (NTSC/PAL)
Camera Mode
Resolution 3M, 5M, 8M
Photo Shooting by Manually/ G-Sensor/ Timer
Recording Content Date, Time, Image, Soun d, G-Sensor data
Recording Format Specific format for exclusive player (Recording Mode)
Microphone Built-in Dual High Sensitivity Microphone.
Time Setup Built-in clock will be used.
G-Sensor Built in Internal 3D G-Sensor
C.
Accessories
Standard:
1. 5V cigarette Power adapter 2. Remote controller
3. Product Disc 4. Suction cup bracket
5. Bracket holder 6. Quick user guide
Optional:
1. 16G _Class 10 SD card
2. 5M RCA Video output cable
Page 5
Vehicle Video Recorder User Manual
3
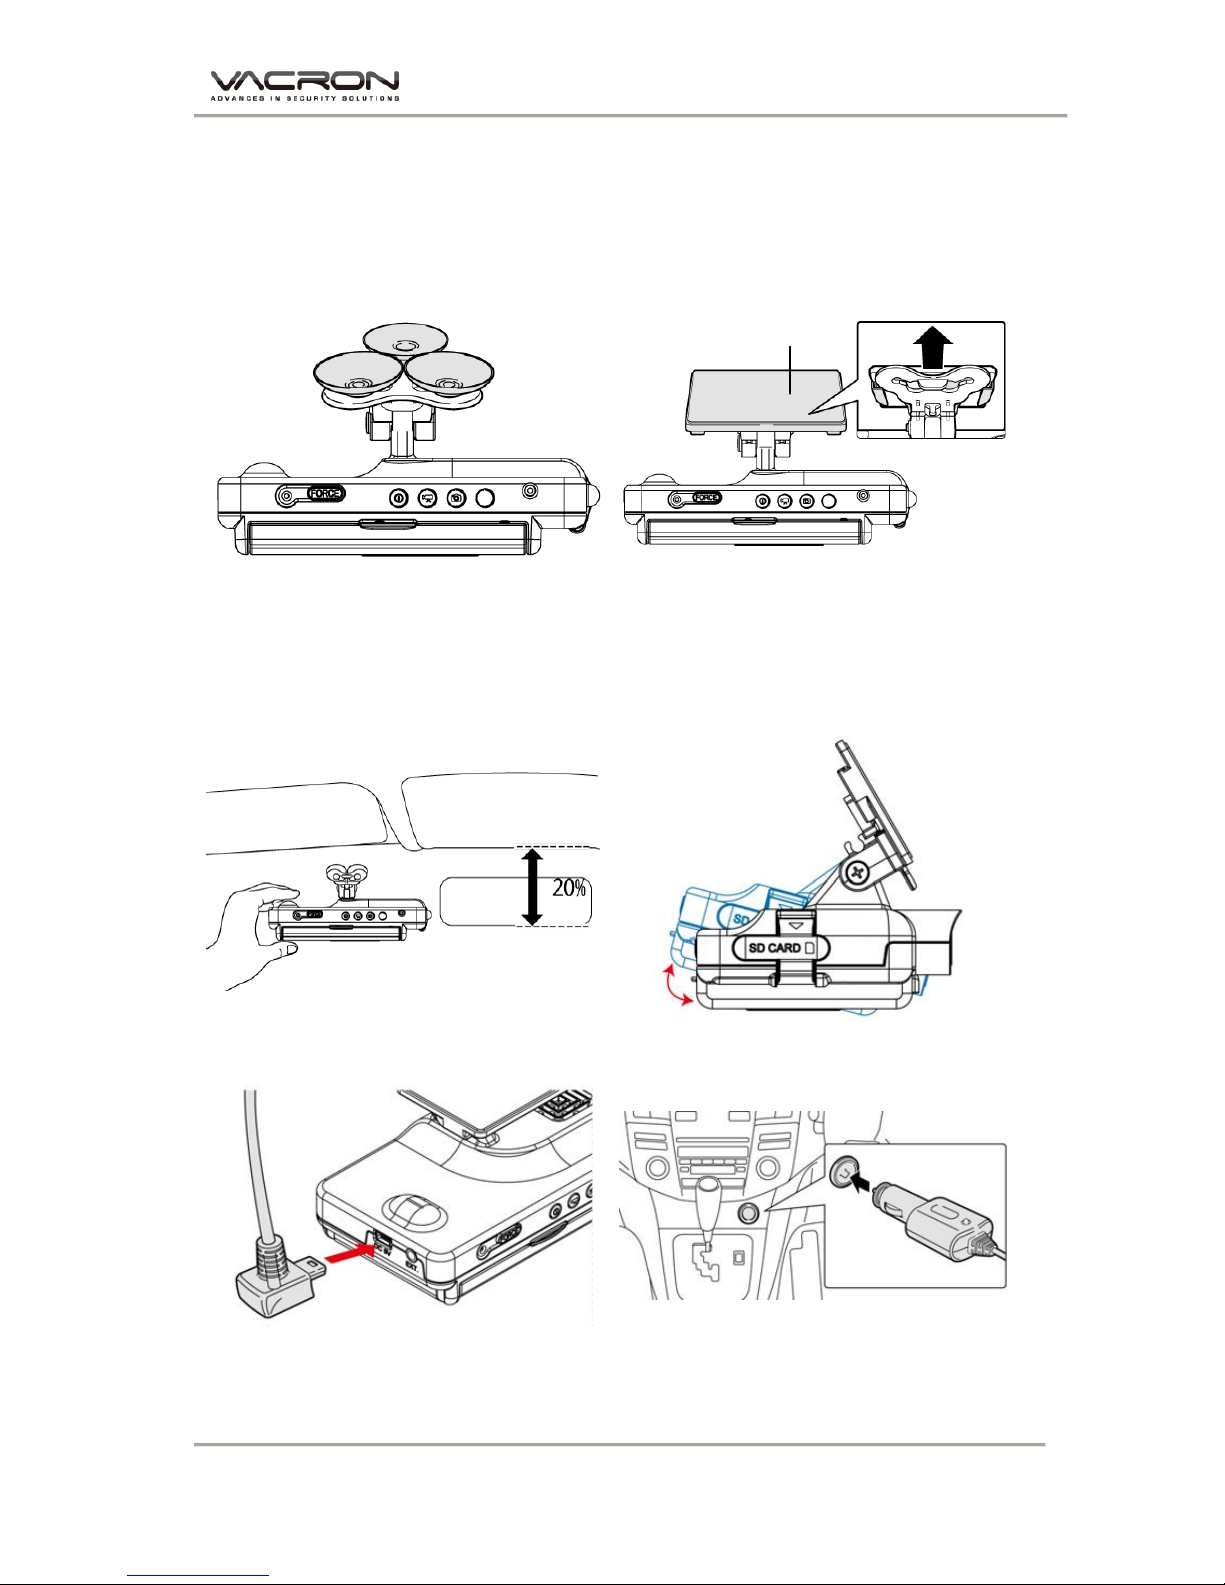
D. Schematic Diagram of The Installation Steps
1. To install the device on the windshield by “Suction Cups” or
“S tick-Holder” Type
Suction Cups T ype Stick-Hol der Type
2. The best position to install
the device on the windshield
3. To adjust the recording angle
properly
4. Plug in DC5V Power Supply 5. Plug in the Cigarette Charger
Sticker Adhe sive Spot
Page 6
Vehicle Video Recorder User Manual
4
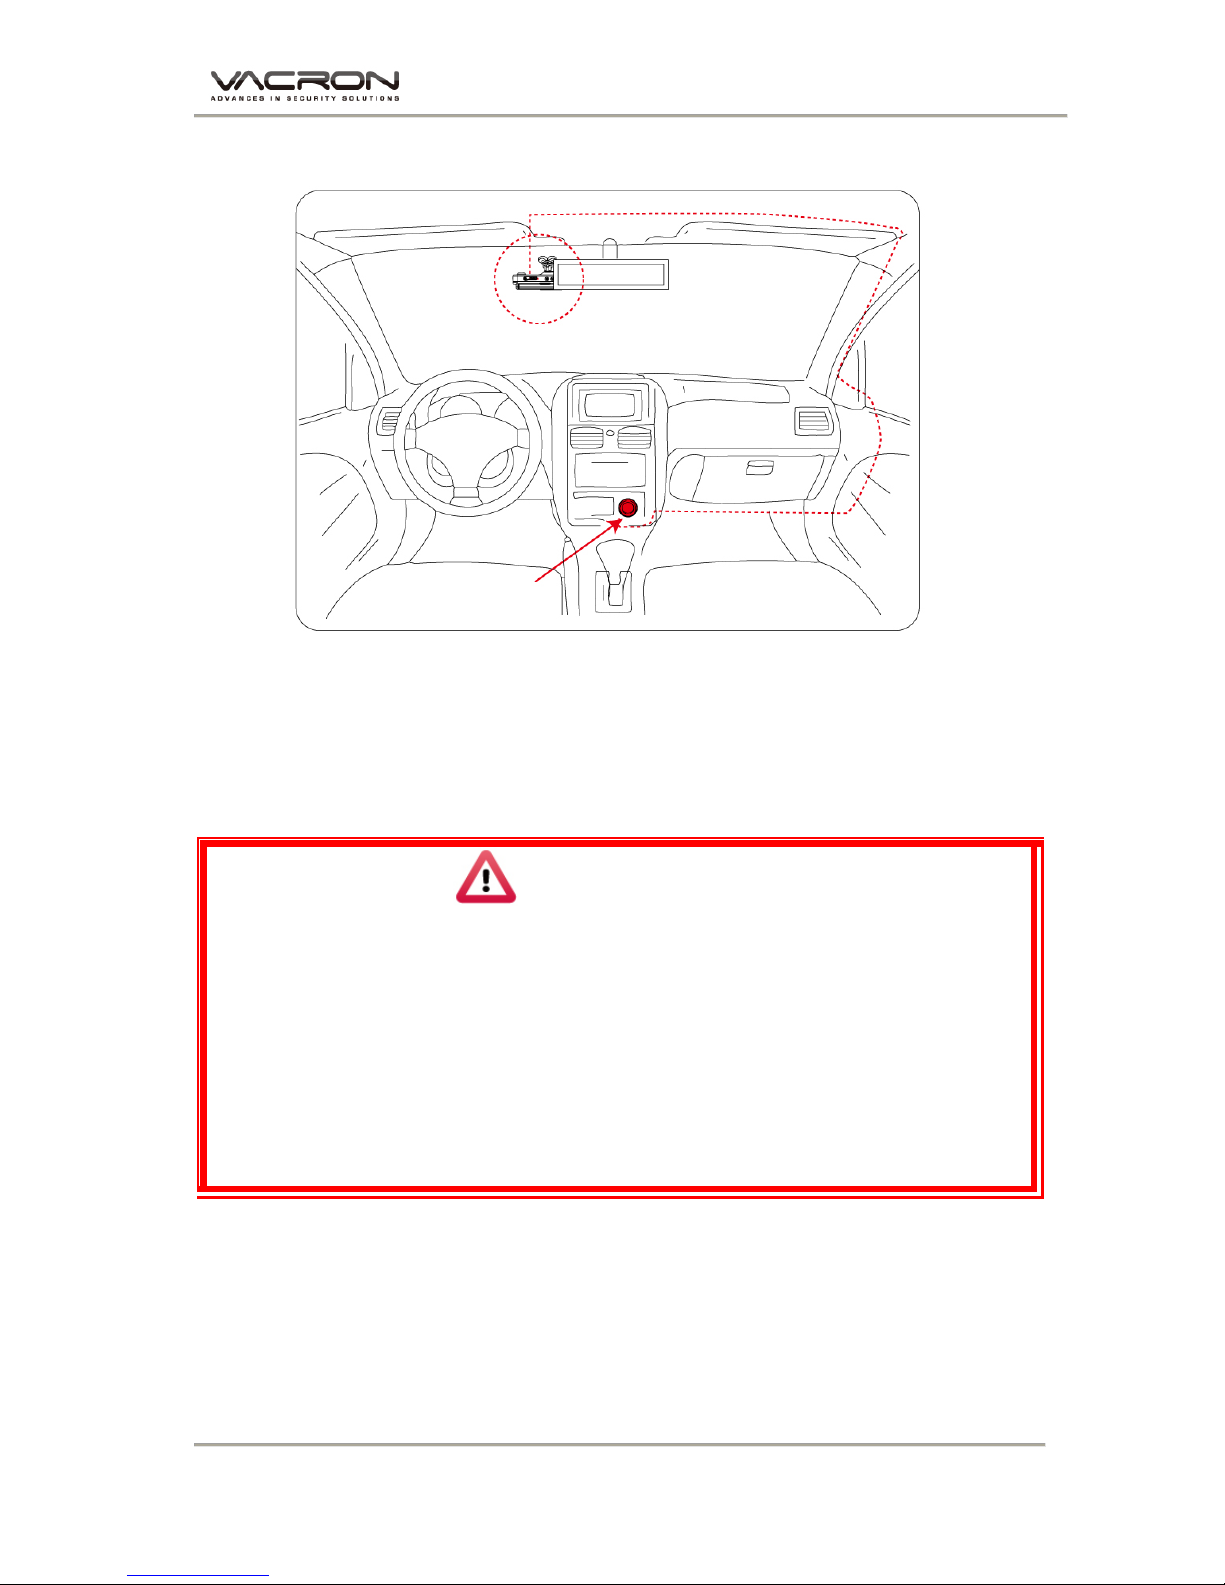
6. VVR installation
Description:
(a) Indicator Lighting Mode- Day and Night mode/Auto Detection.
(b) Mini-USB Port reserved for USB PC Link.
Notice
(1). This device should be installed in the area wh ere the windshield will be
able to be cleaned.
(2). Formatting SD card on the device before beginning to use.
(3). NTSC or PAL setting through OSD.
(4). Electricity consumption: 650mA. If power supplied by PC, please use Y
Type USB Cable.
Best location
Cigarette adapter
Page 7
Vehicle Video Recorder User Manual
5
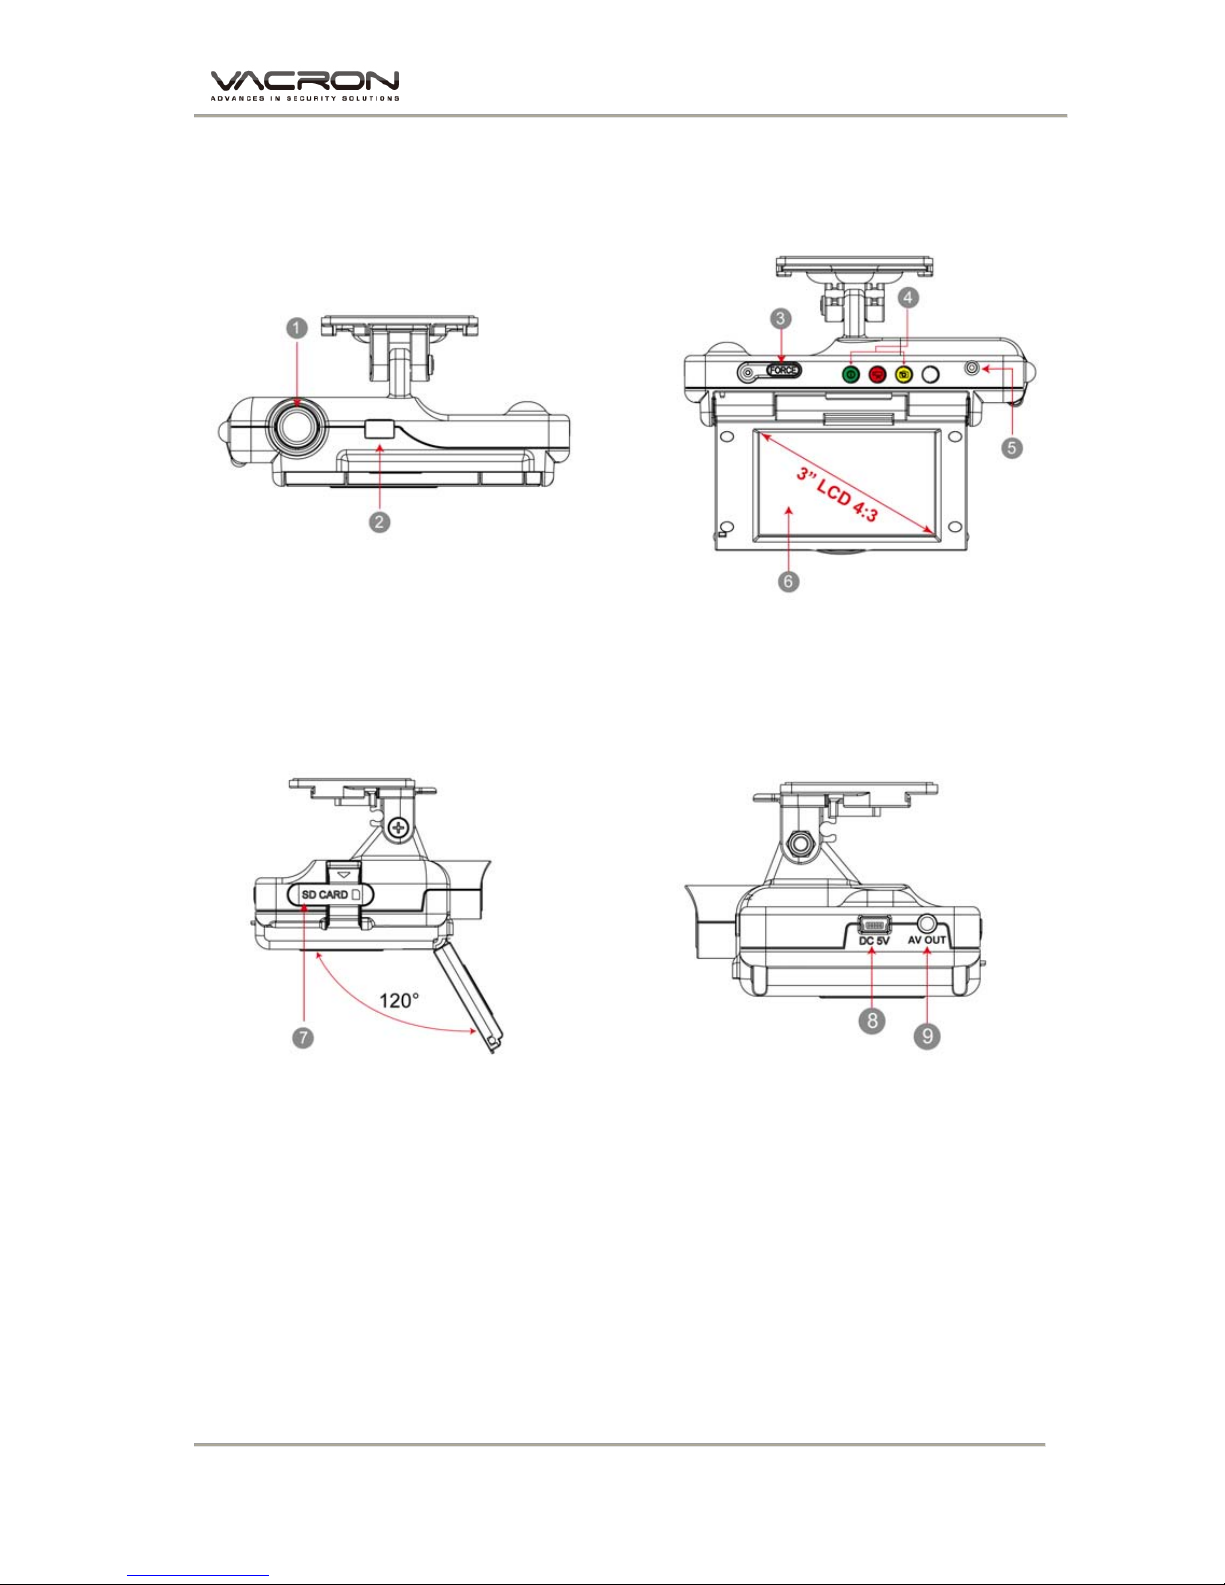
E. Product Function Introduction
Light Indicator
Green light:Power
Red light:Recording
Yellow Light:Playback
1. Lens
2. USB cover / Reserved for USB PC Link
3. Force recording
4. Indicator
5. IR Receiver
6. Screen
7. SD card Slot
8. DC5V
9. A V OUT
Page 8
Vehicle Video Recorder User Manual
6
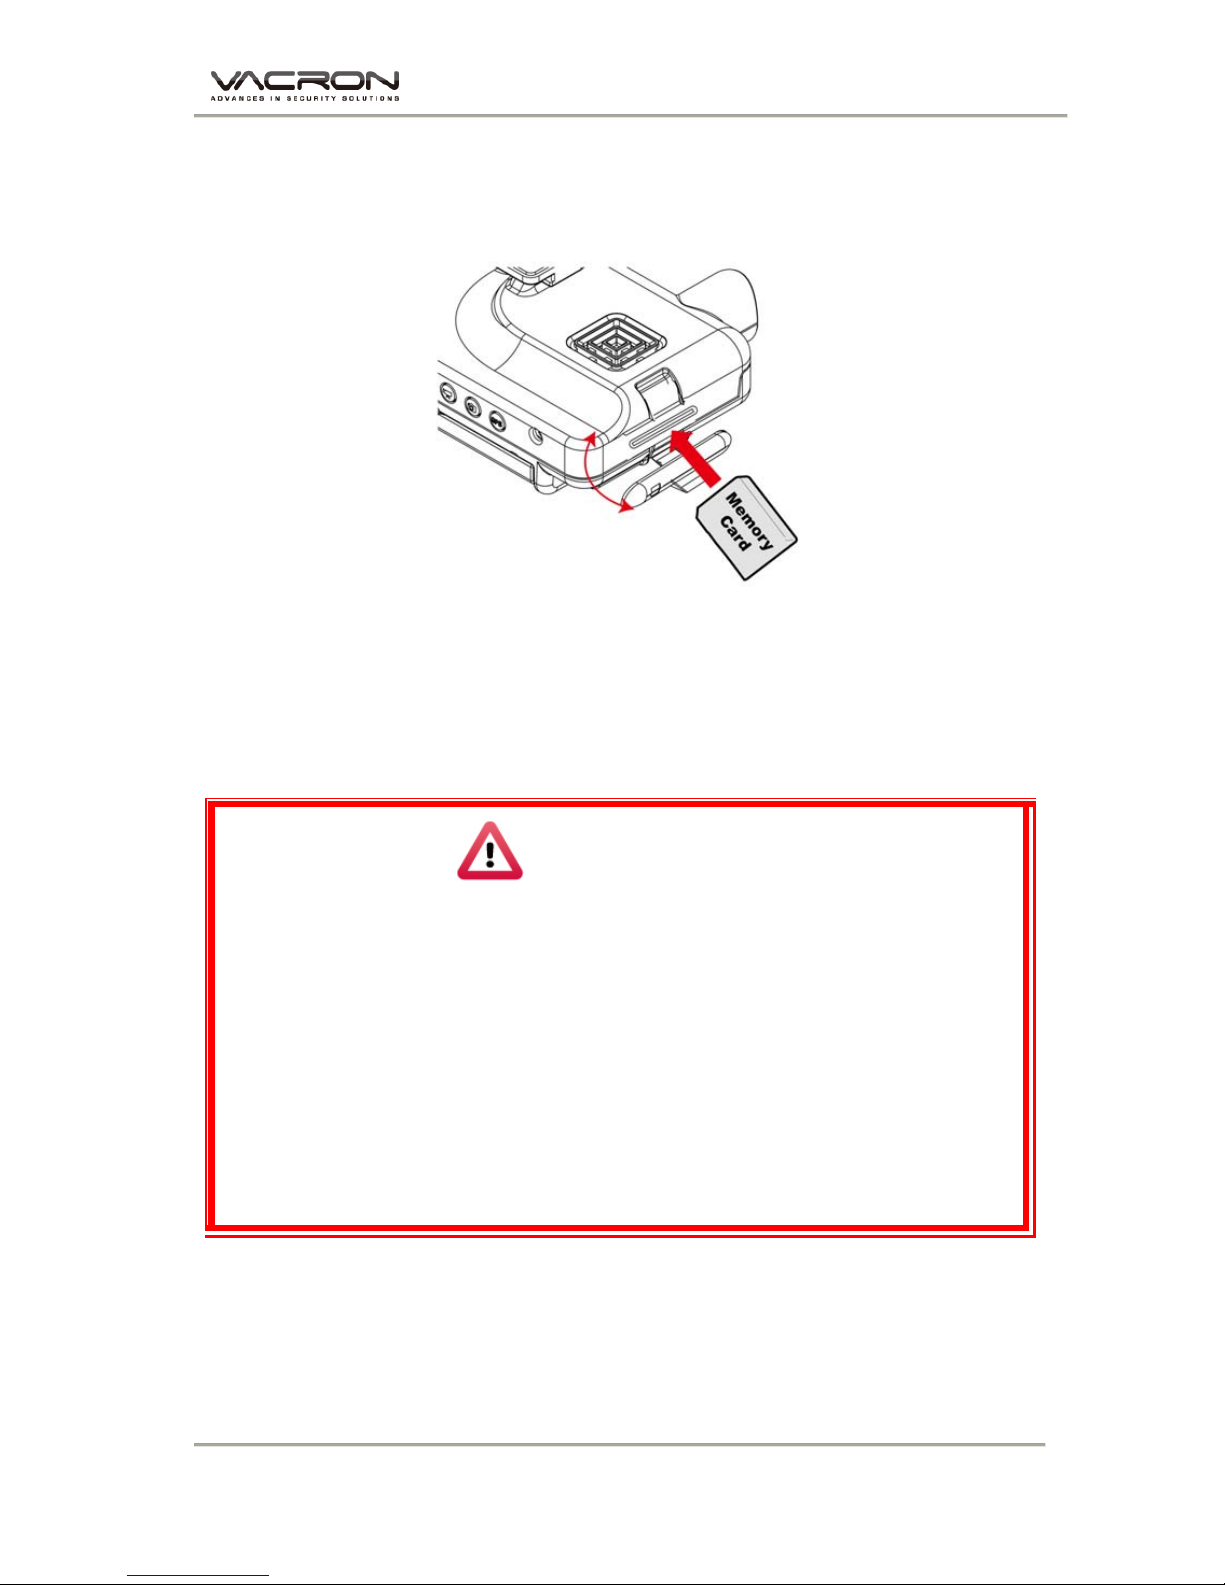
F. SD Card Installation
(1). Open SD card cover on the device to insert of remove SD
card.
(2). Format memory card; please refer to the other chapter
“Formatting memory card” for more detail.
Remark: Memory Card is optional
Warning
(1). Recommend Memory Card “SanDisk” or “Transcend” Cla ss 10 or
above. (Minimum of 4GB)
(2). If the memory card is not formatted by our exclusive player, the device
will automatically erase all the data inside of the memory card after
inserting it, start recording at default setting.
(3). Please don’t convert Micro SD to SD card to begin recording, to avoid
the damage during recording.
(4). Since memory cards have the writing endurance situation, we
recommend to inspect the memory card and use pc for playback
regularly, to ensure that the memory card can read and write
Page 9
Vehicle Video Recorder User Manual
7
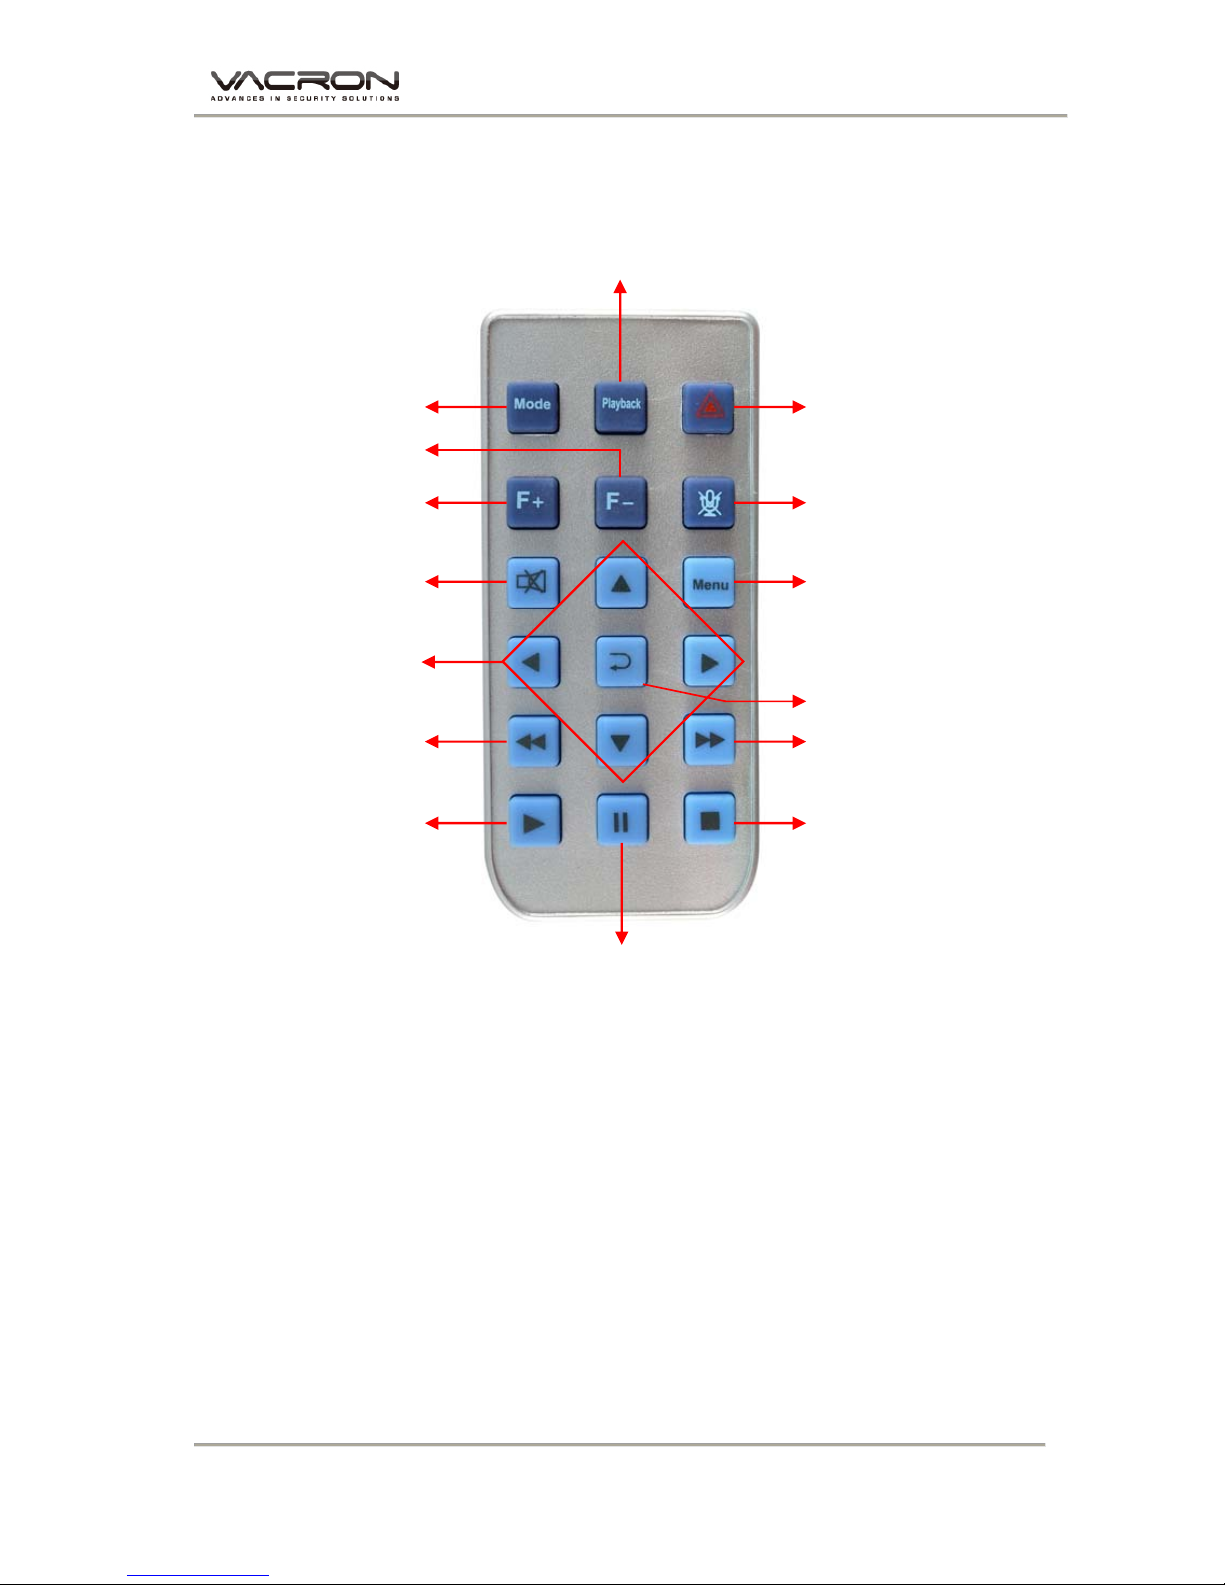
G. Remote Controller Description
Playback
Manual Force Recording
Volume Down
Stop Voice Recording
Menu
Confirm
Fast Forward
Stop Play
Pause
Fast Rewind
Up / Down /
Left / Right
Speaker On/Of
f
Volume Up
Camera/ Camcorder
/
Motion Mode Switch
Page 10
Vehicle Video Recorder User Manual
8
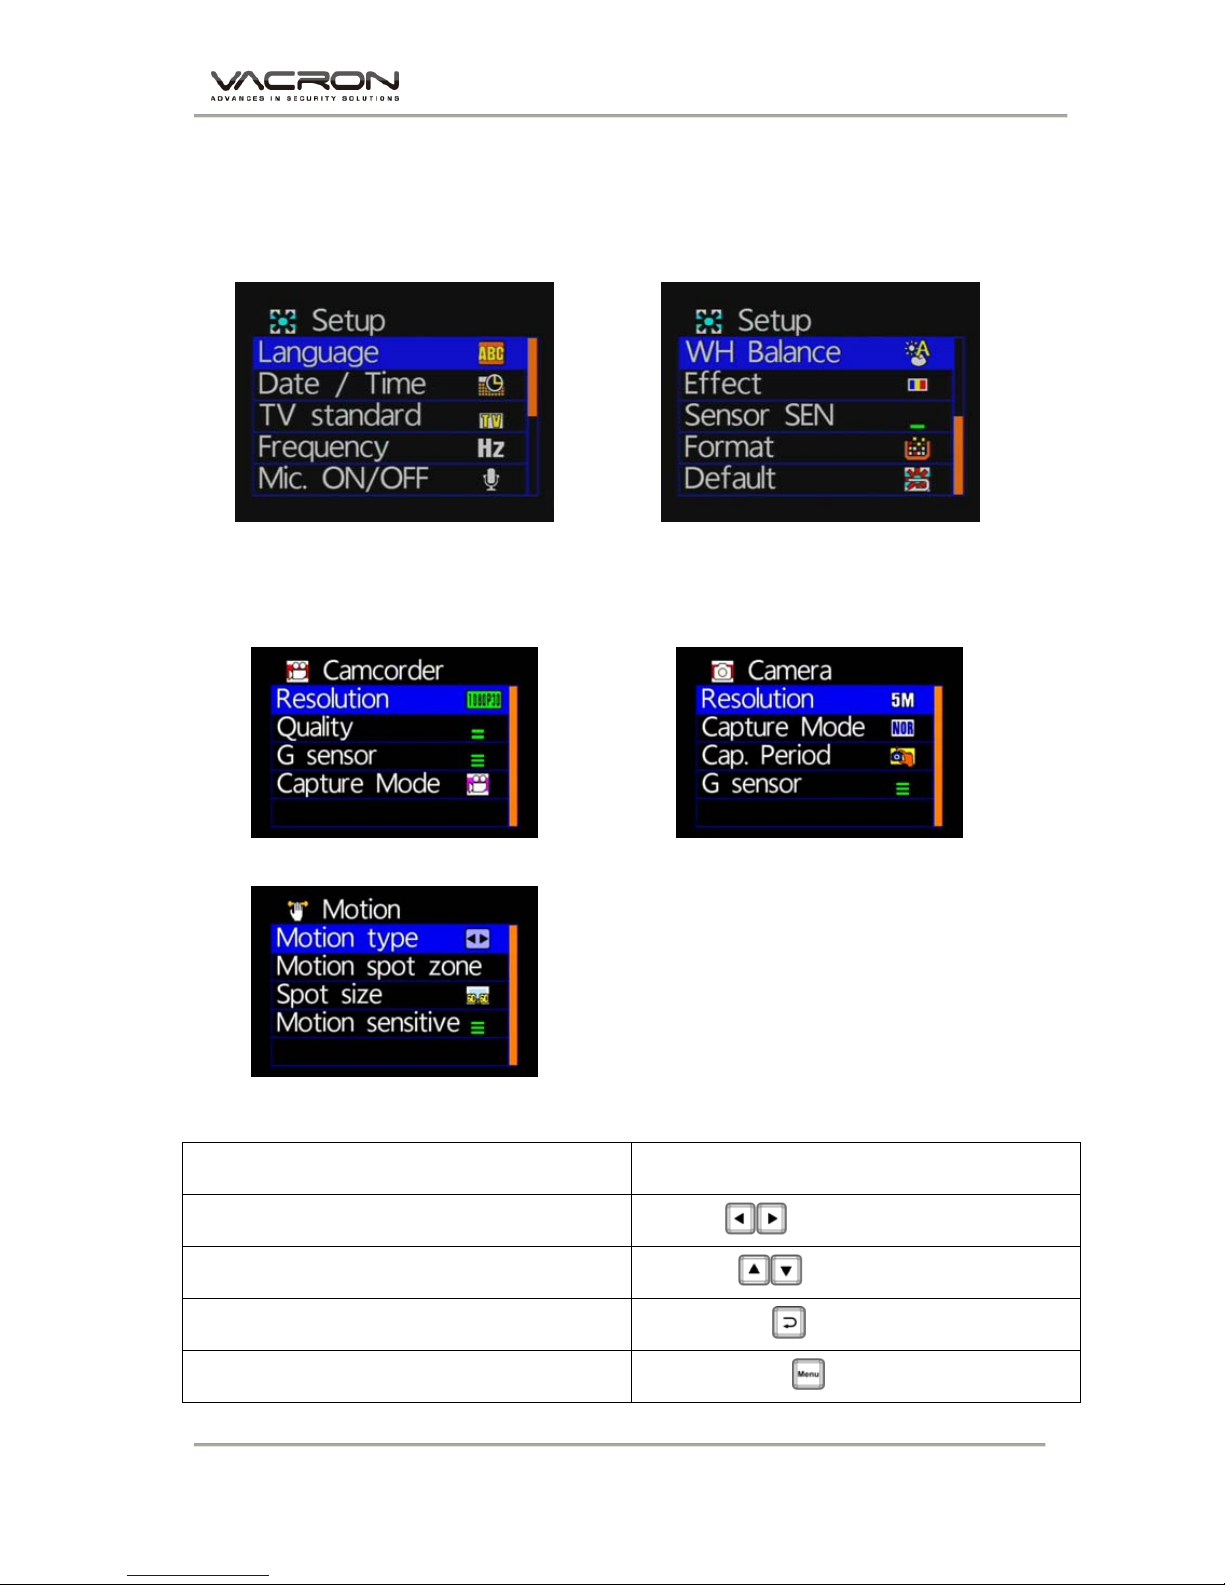
H. Operation Setting
1. OSD List Menu
Setup Menu
1/2 2/2
Camcorder Menu Camera Menu
Motion Menu
Please use IR controller to select function
List Function Key on IR Controller
List Moving
[LEFT OR RIGHT ]
Bar Moving
[UP OR DOWN]
Confirmation
[CONFIRM ]
Go to Previous Menu or Main Menu
[MENU ]
Page 11
Vehicle Video Recorder User Manual
9
2. Setup Menu
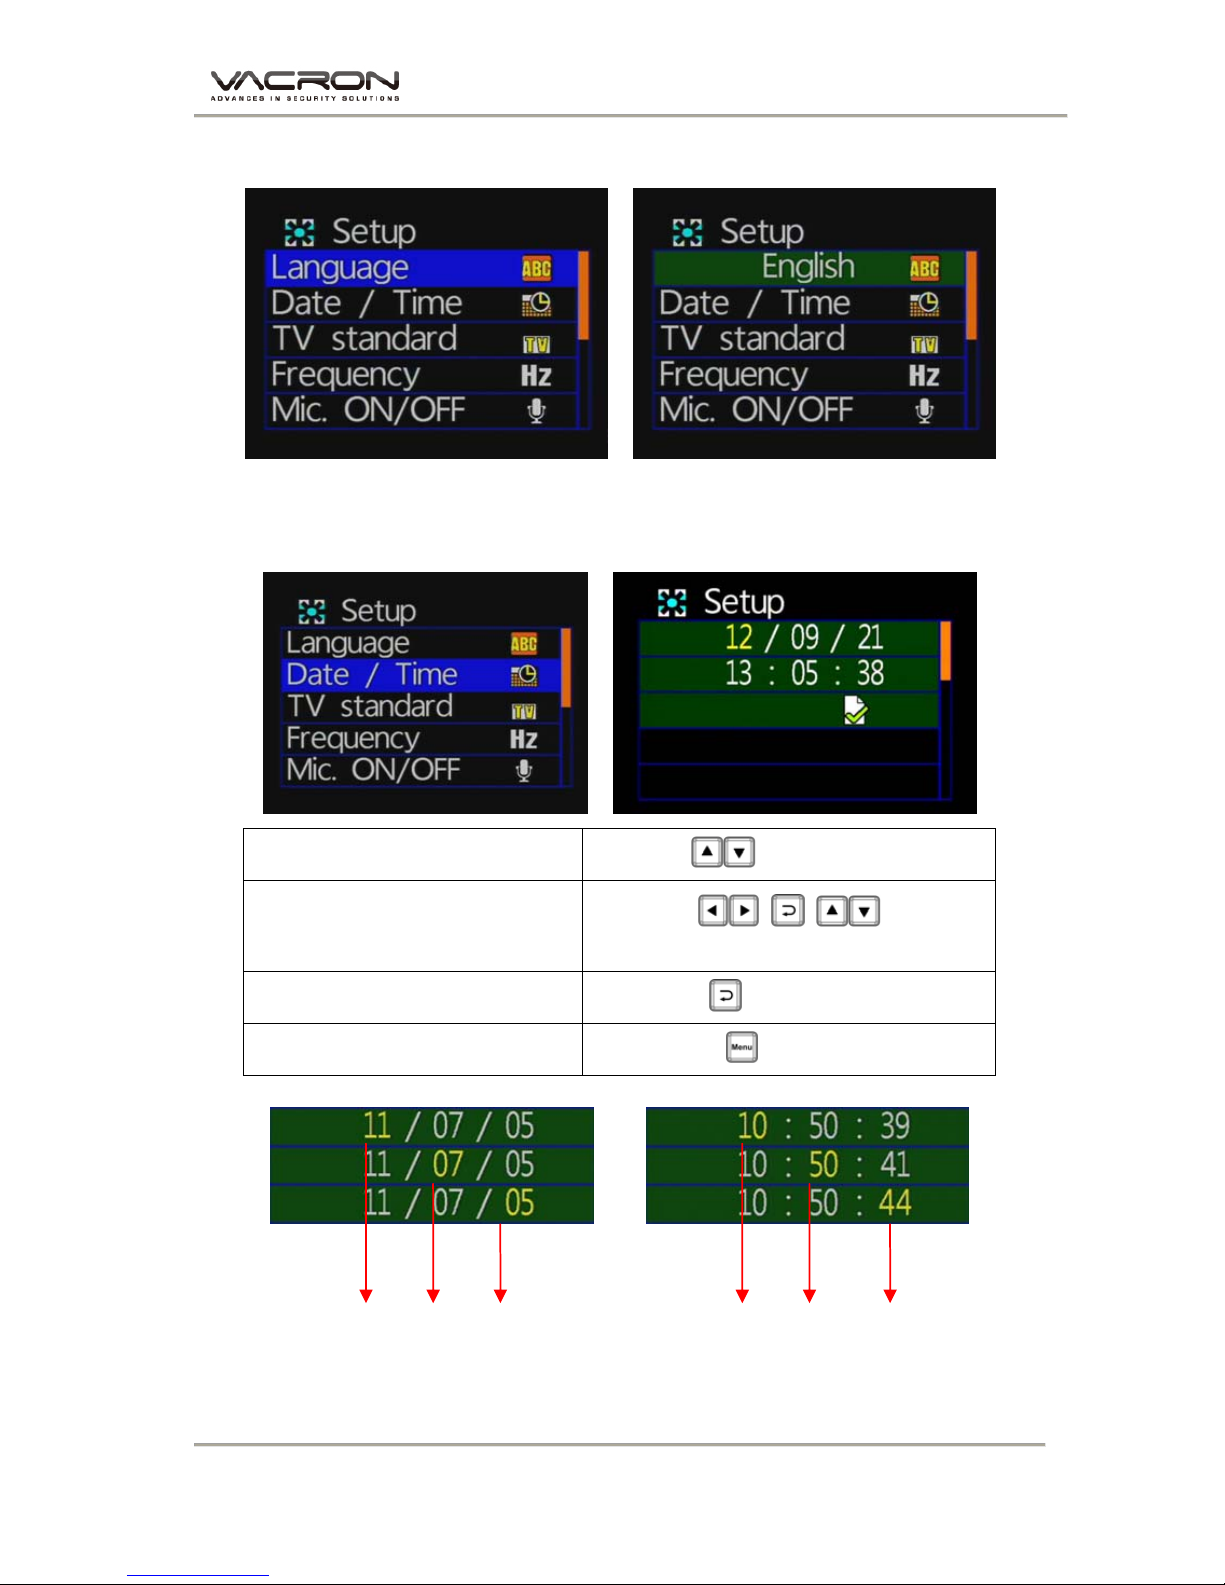
◆ Language Setting
★
English / French / German / Italian / Japanese / Korean / Portuguese / Russian /
Traditional Chinese / Spanish / Simplified Chinese / Turkish / Dutch…etc
◆ Date/Time Setting
LIST FUNCTION
[UP/DOWN]
LIST MOVING
+ +
[R/L]+[CONFIRMATION]+[UP/DOWN]
CONFIRMATION
[CONFIRM]
Go to Previous Menu
[MENU ]
★
Year: Last digits of year (11 means 2011).
Hour: 24 hour.
M D
Y H M S
Page 12
Vehicle Video Recorder User Manual
10
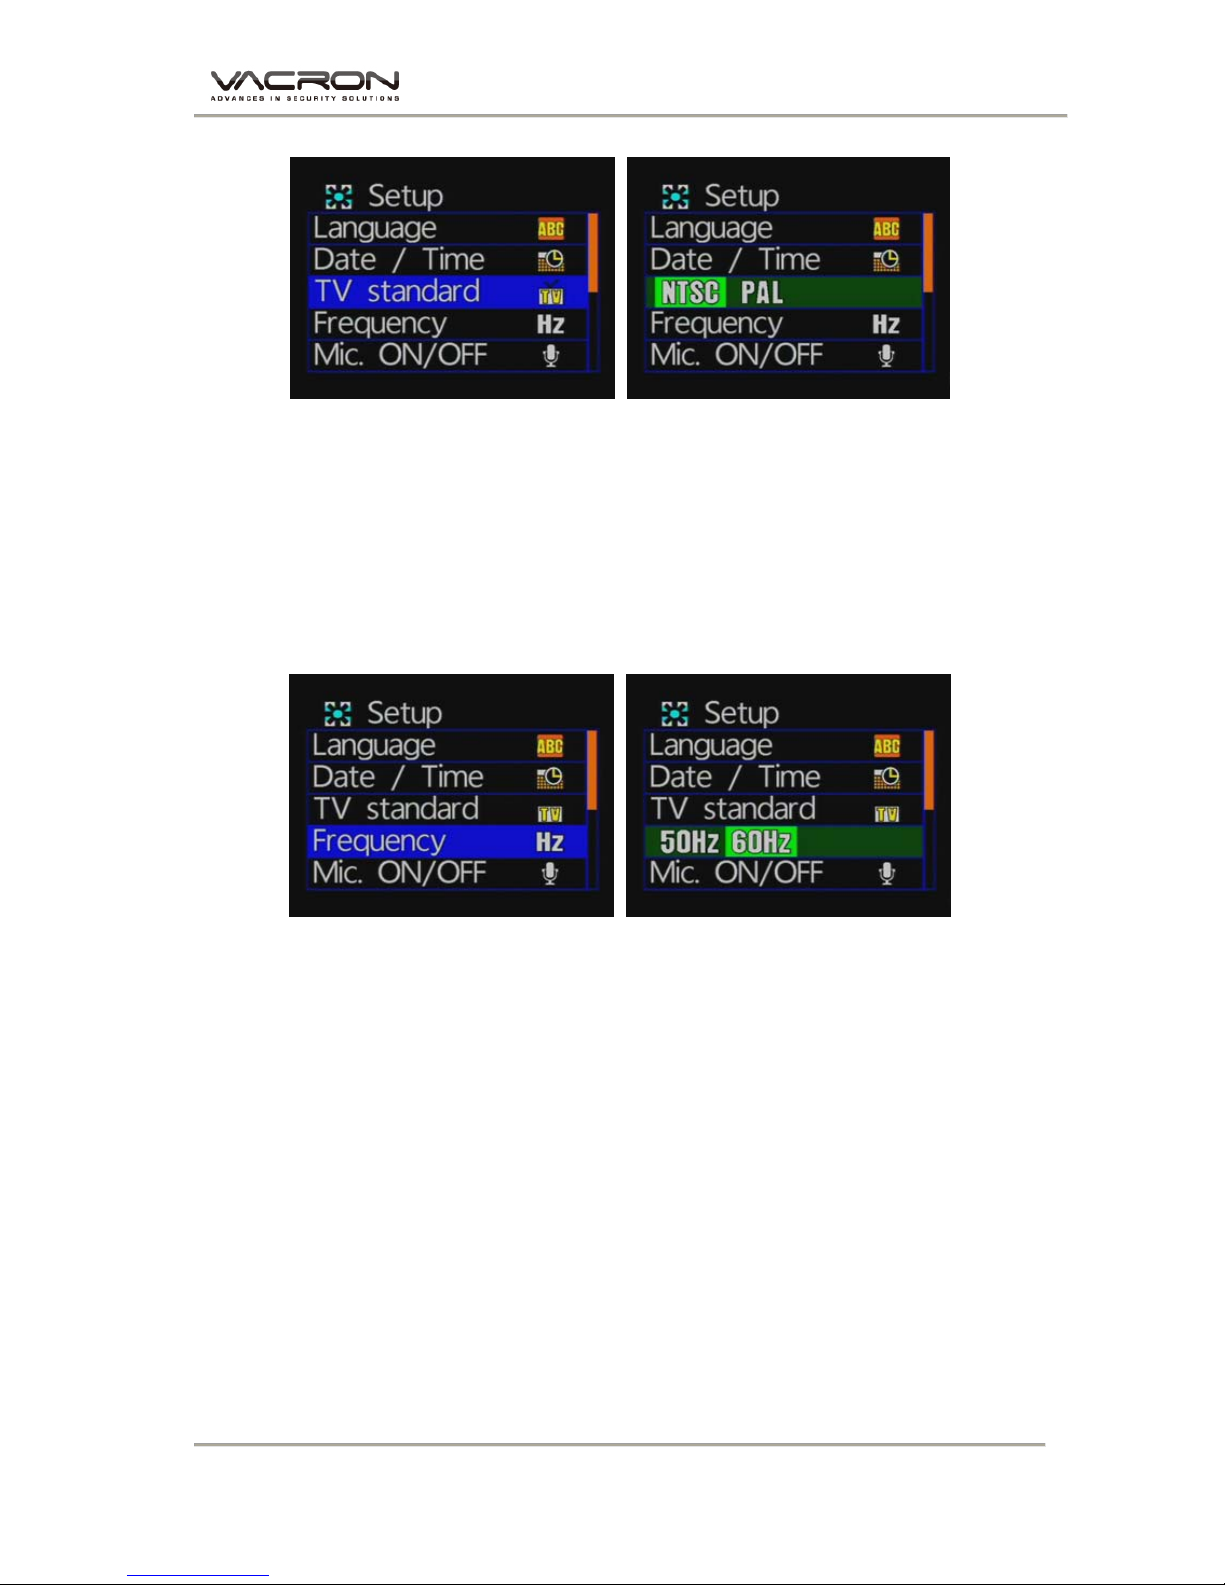
◆ TV Standard Setting
★
NTSC/ PAL for selecting
★
TV output format, according to different national systems using
the input format for the TV set, the system is preset to NTSC
(Taiwan TV image is NTSC). When input the image causing TV
screen which appears black and white, beat, we can switch to
PAL TV screen to check returning to normal status.
◆ Frequency Setting
★km/h(kilometer) or mph(knot)
★
Light frequency: according to different power frequency flicker
and, thus, the wavelength, the wavelength is caused by the
human eye brightness of the most important factor; general, the
higher the frequency of light, the brighter the ambient feel. As the
use of Taiwan's general power frequency 60HZ, 60HZ
recommended to set the frequency for the light source is more
suitable environment in Taiwan.
Page 13
Vehicle Video Recorder User Manual
11
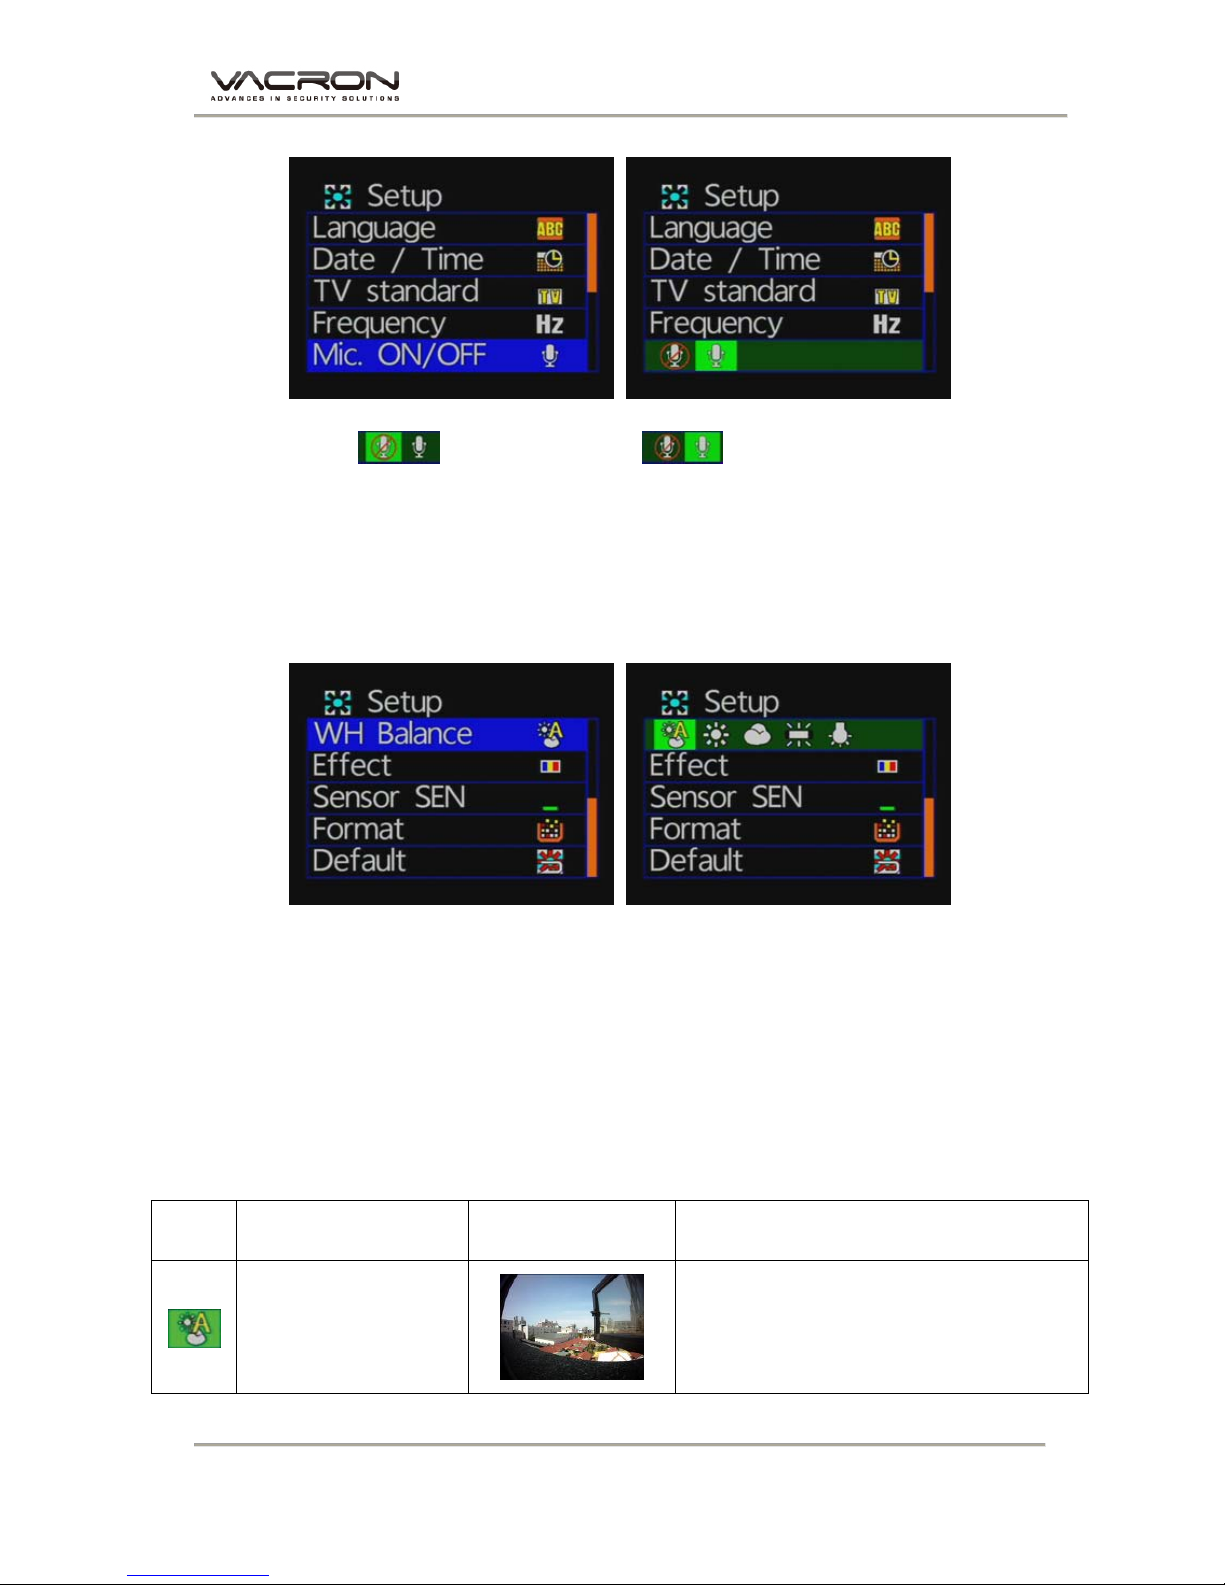
◆ Mic ON/OFF Setting
: Microphone off : Microphone on
★
Microphone to record the sound of inside vehicle information, if
concern about personal privacy information, proposed close
microphone function (off microphone function, converting the
image files to video without sound state).
◆ WH Balance Setting
★
Five ambient light option for selecting Auto / Daylight /
Cloudy / Fluorescent / incandescent light
★
White balance mode is set, regardless of the state in the camera or
photography will open automatically.
★
When take recording, suggest white balance set to automatic mode
in order to open the white balance automatically to avoid the screen
unclear.
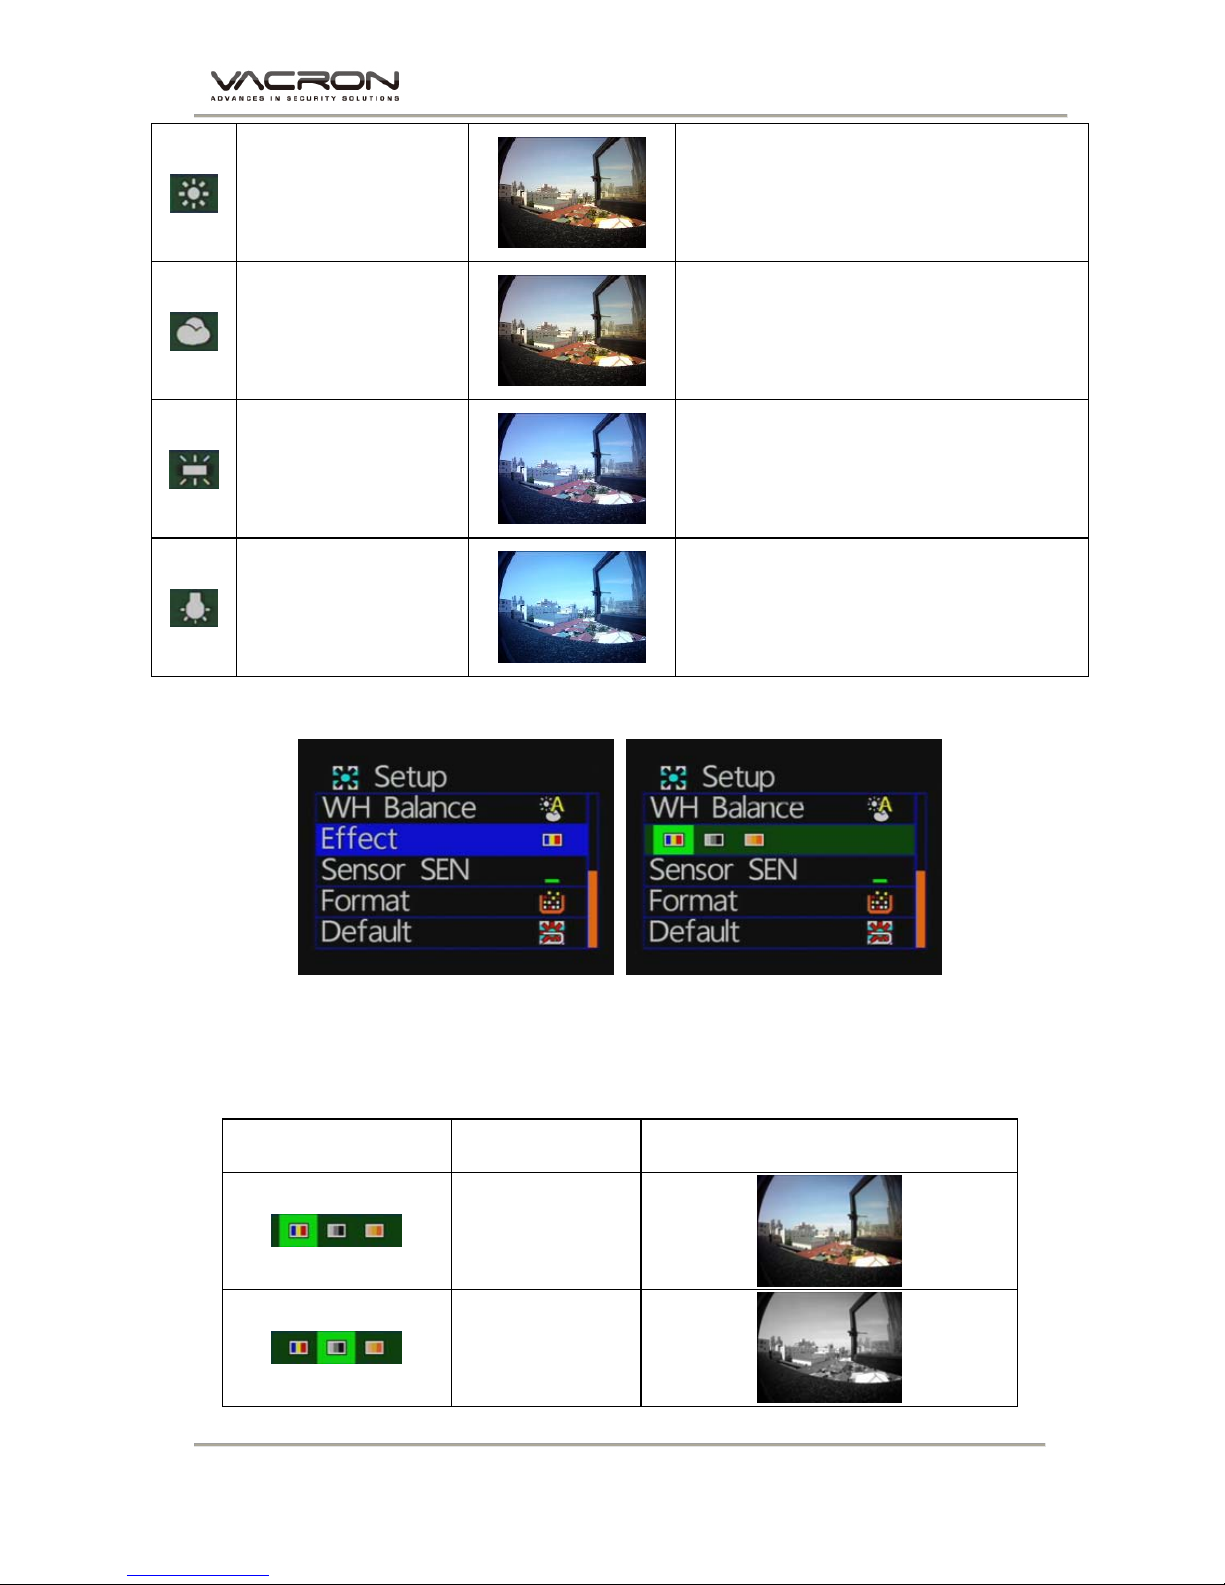
The following table shows picture taken in various white balance mode.
Icon Description Picture Application instructions
Automatic mode
The machine set automatically.
Page 14
Vehicle Video Recorder User Manual
12
Daylight mode
For fine weather.
Cloudy mode
For cloudy, dark or twilight.
Fluorescent mode
For warm white, cool white (3wavelength) fluorescent lighting
Incandescent mode
For incandescent lamps and bulb-type
3-wavelength fluorescent
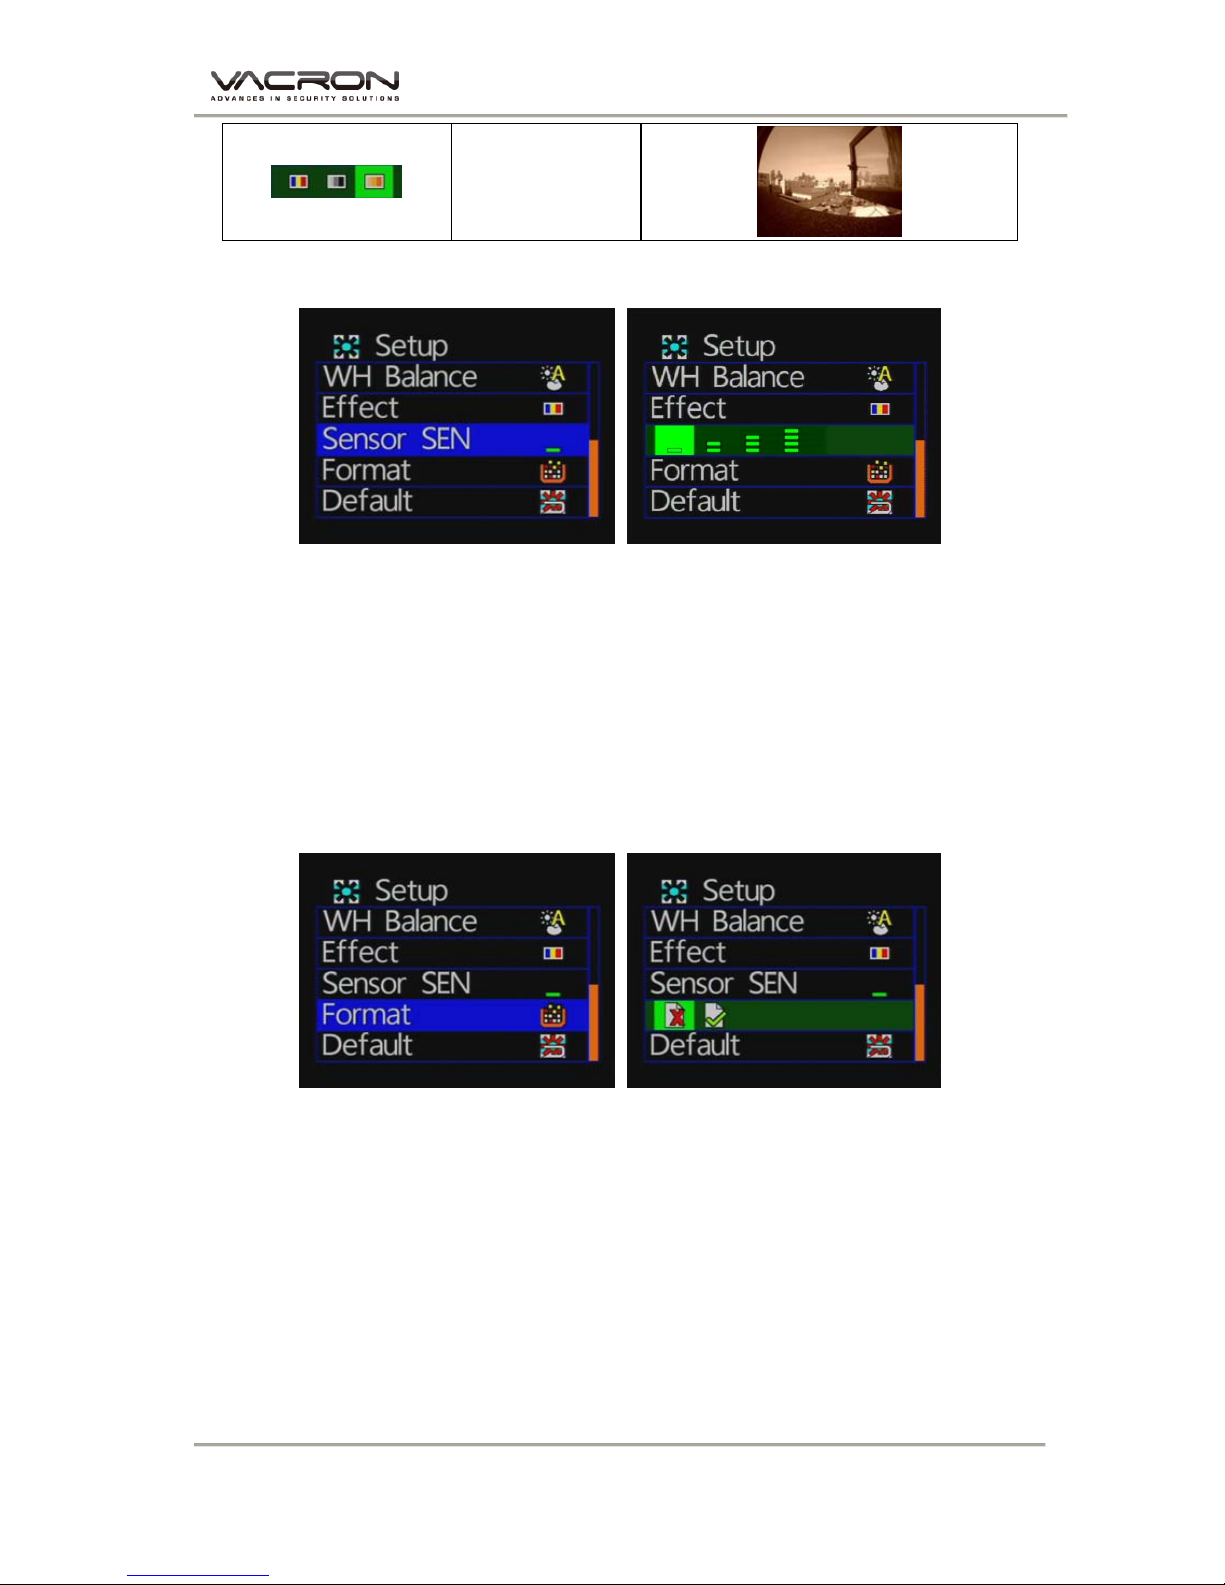
◆ Effect Setting
★
Color / B & W / Retro color
★
Effects model setting, whether in photography or video mode it
will automatically open.
Icon Description Picture
Color mode
Black mode
Page 15
Vehicle Video Recorder User Manual
13
Retro mode
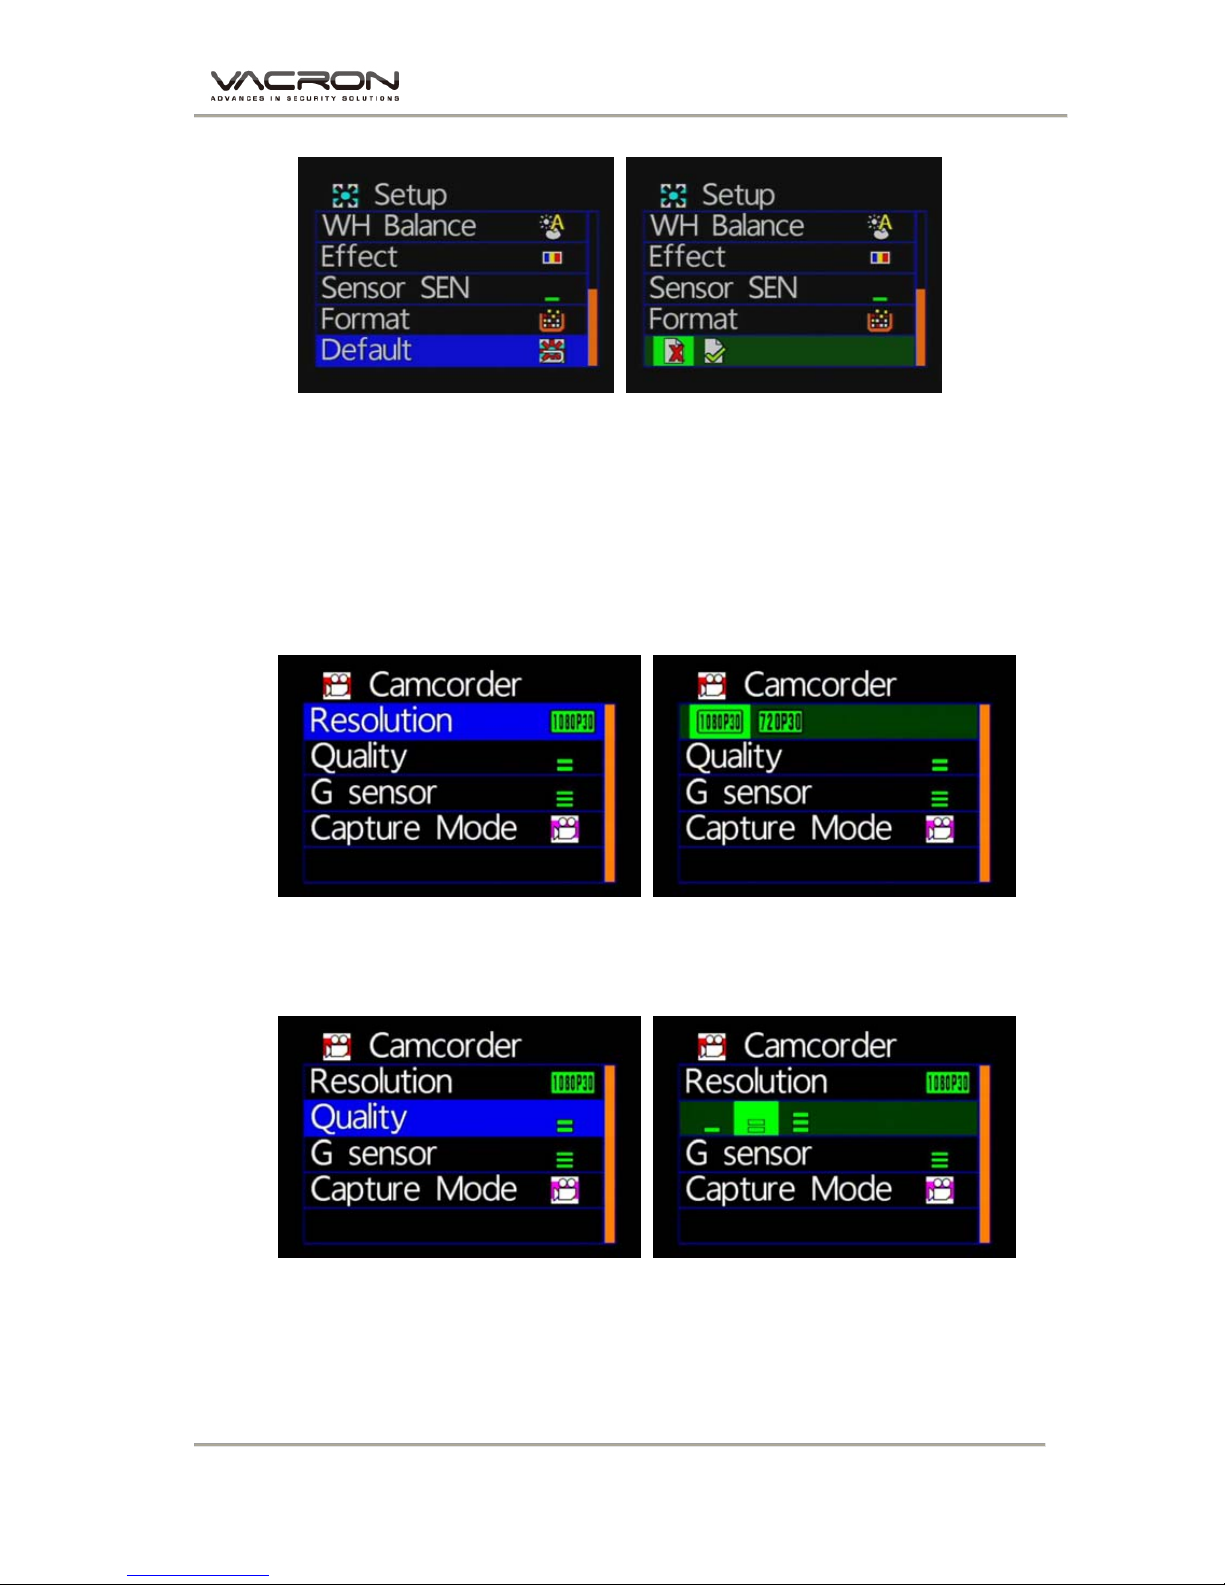
◆ Sensor SEN Setting
★Caution: You can adjust the sensitivity level (more number
of green bars stands for higher sensitivity)
★
When vehicle drives through darker areas, “sensitivity” decides
whether “white balance” is going to be functioned or not. If
“sensitivity “ is set more sensitive, as vehicle drives into darker
areas, “ white balance” will automatically be on, and under the
situation, it may cause the video image too bright.
◆ Format Setting
★
Cancel / Confirm Formatting
★
When selecting “Cancel Formatting”, it goes to “Main Menu.”
★
During formatting, existed data will be erased. Please backup the
needed data before the process
★
Brand-new SD cards must be formatted before using.
Page 16
Vehicle Video Recorder User Manual
14
◆ Default Setting
★
Cancel Factory Default Setting / Confirm Factory Default Setting
★
When selecting “Default”, it goes to “Main Menu”.
★
When going to “Default”, it will automatically go to factory default
setting. For changing further setting, please go to main menu.
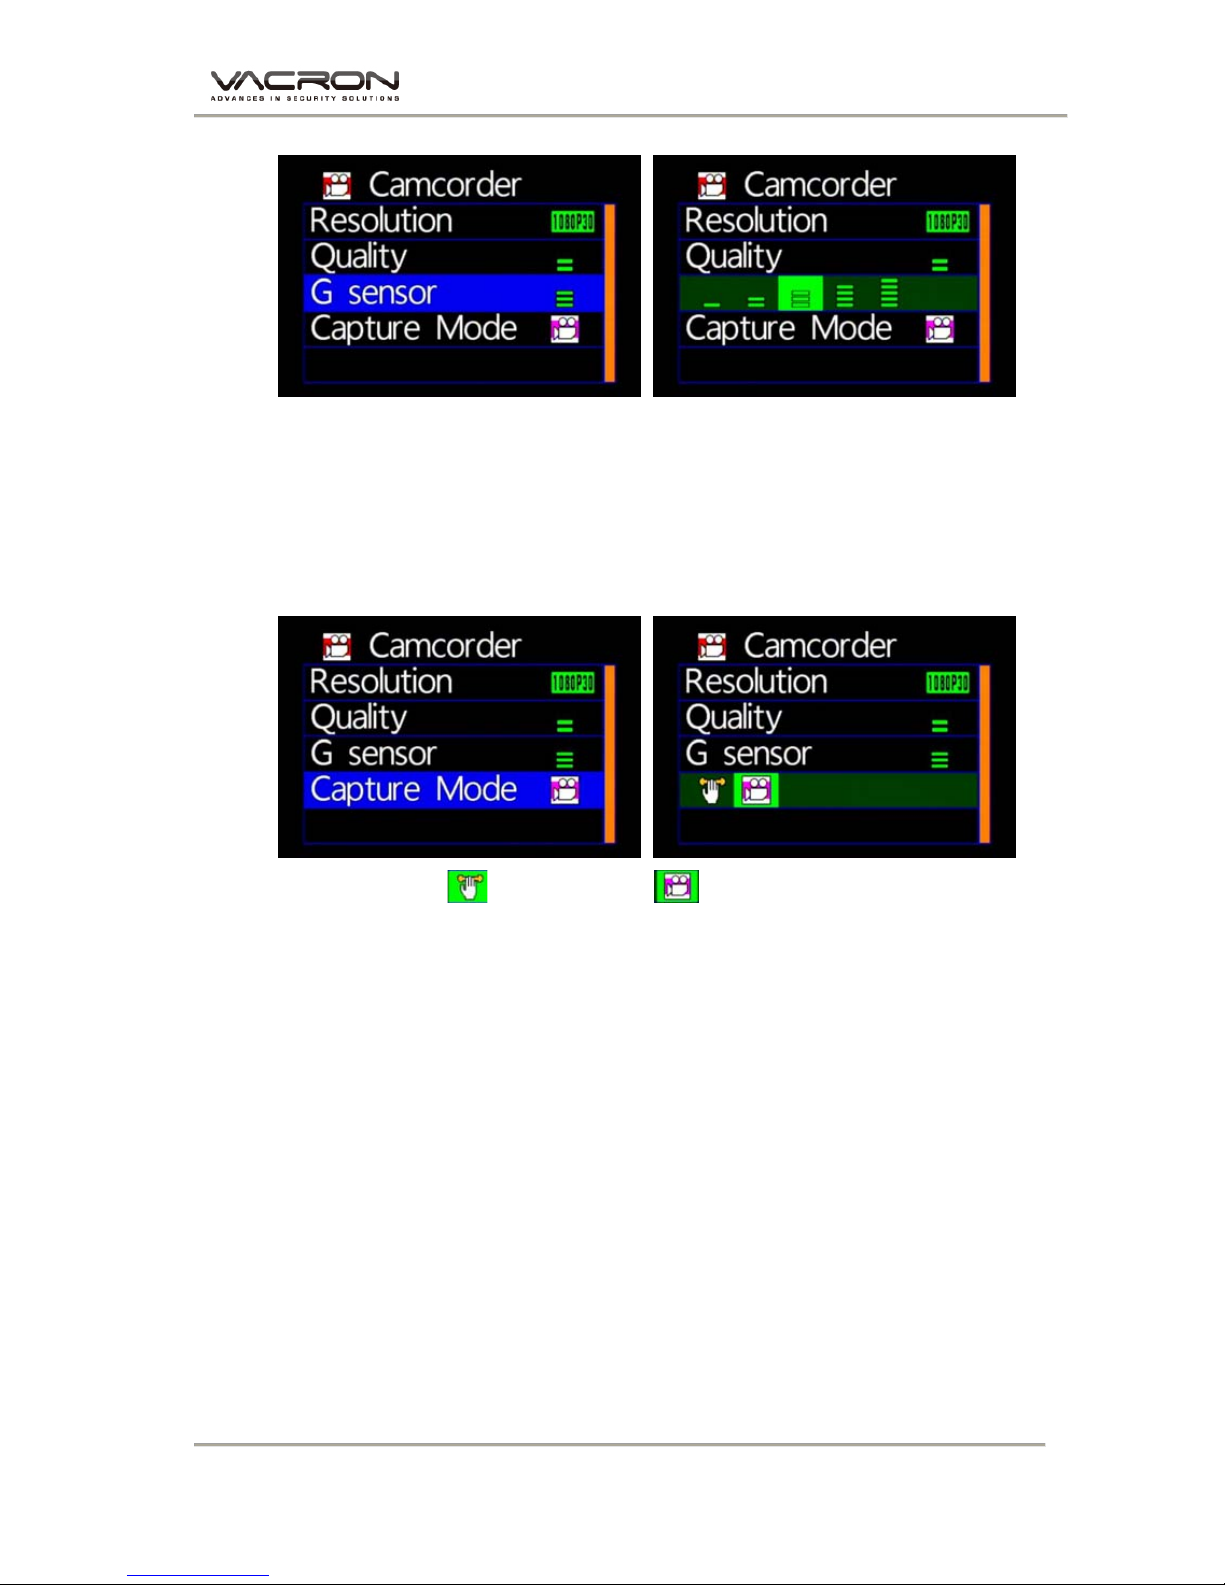
3. Camcorder Menu
Resolution Setting
★2 resolution: 1080P(30) / 720P(30)
Quality Setting
★Notice: More stripes appear; more video resolution does
Page 17
Vehicle Video Recorder User Manual
15
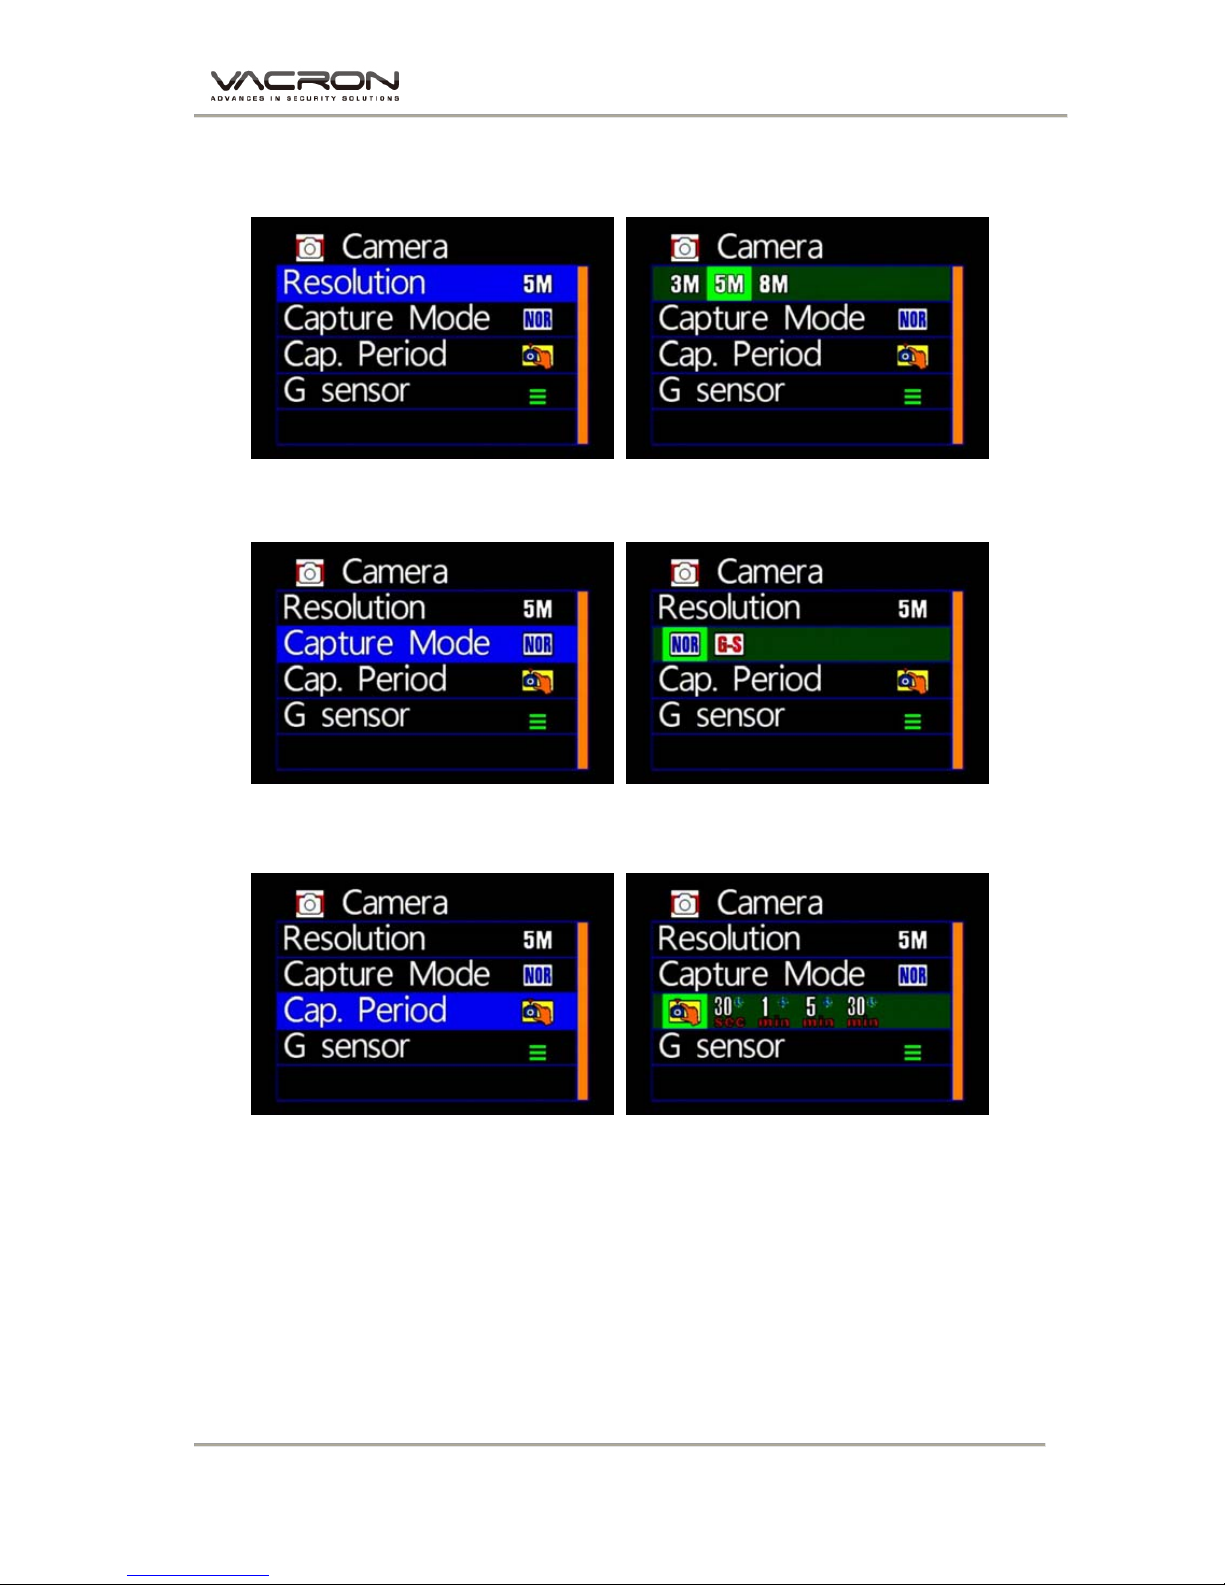
G-Sensor Setting
★
NOTICE: More Stripes; More Sensitivity to trigger G-sensor easily for
forced recording.
★
Each time for triggering force recording, it will be automatically
saving 3 more minutes before and after the accident.
Capture Mode Setting
: Motion mode / : Normal mode
★
During Motion mode, it will be switched to normal recording
mode after restart
★
To start the function of motion and LDWS recording, please
turn on this.
Page 18
Vehicle Video Recorder User Manual
16
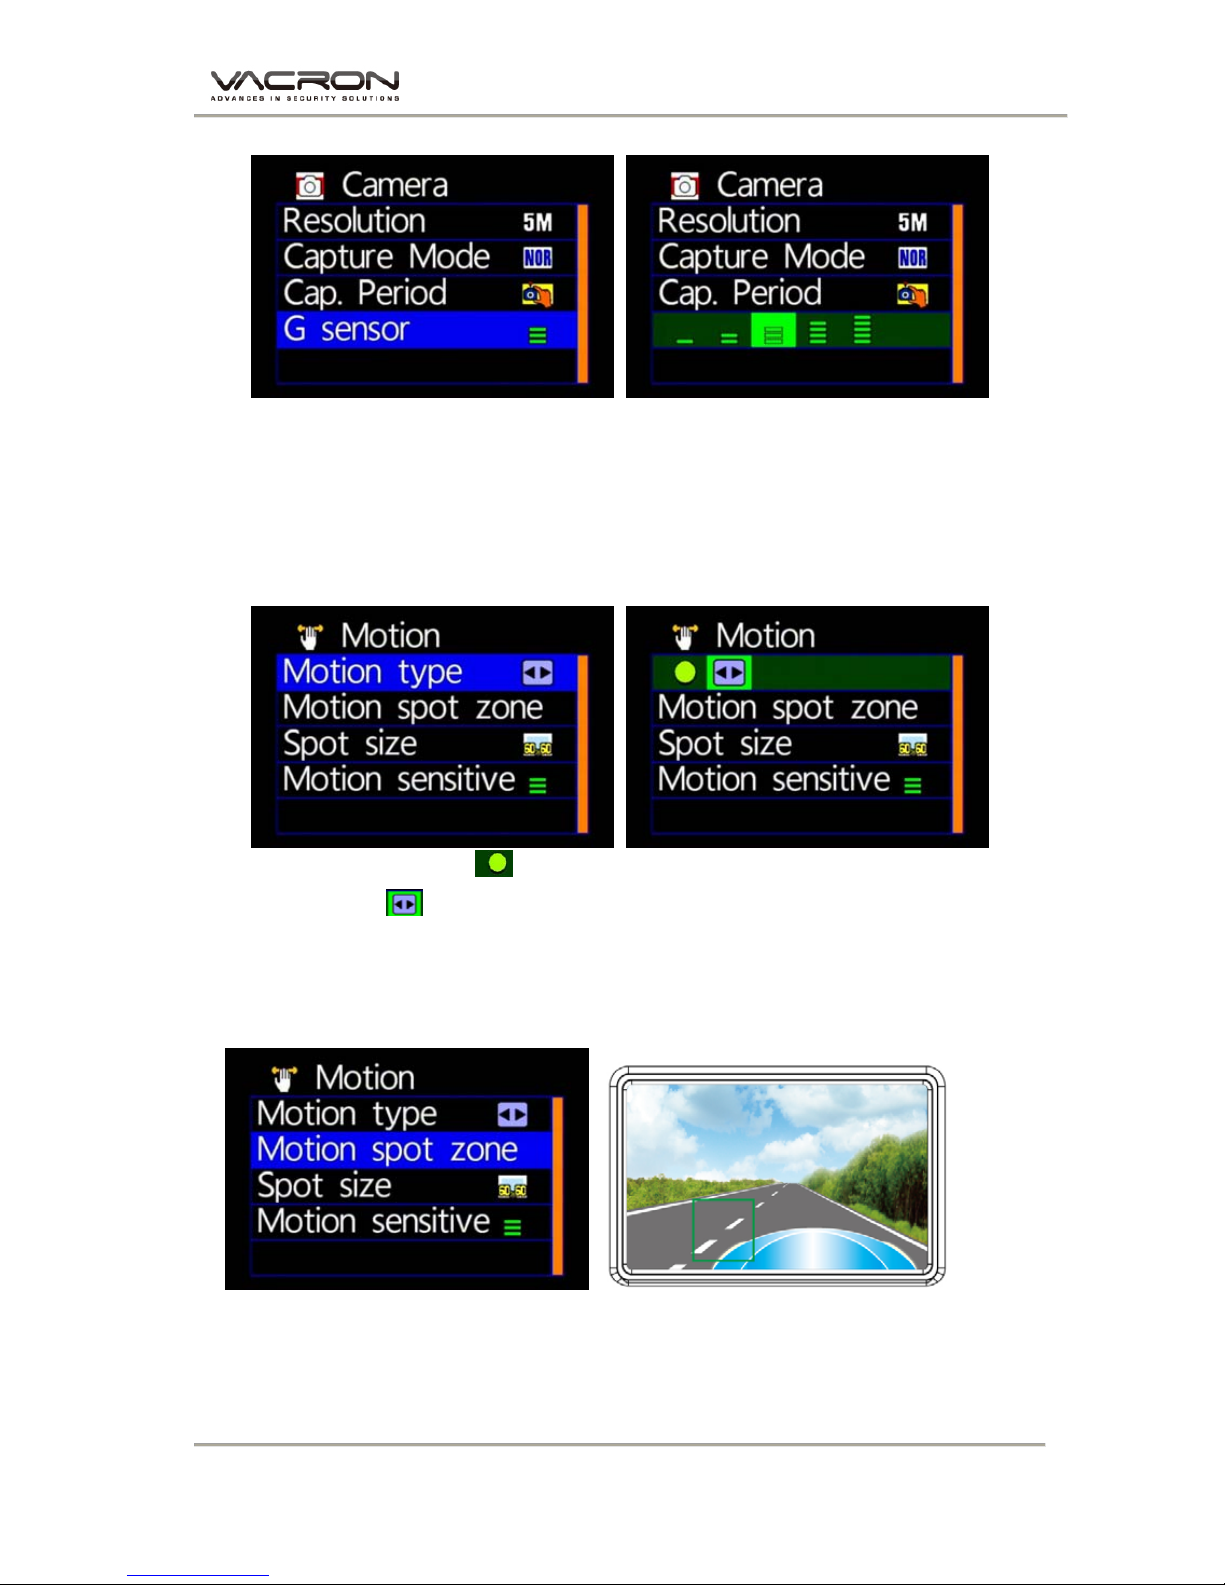
4. Camera Menu
Resolution Setting
★
3 Resolution modes: 3M/ 5M/ 8M
Capture Mode Setting
★
NOR: Normal, G-S: G Sensor mode, three continuous snapshots
Capture Frequency Setting
★
Normal / 30sec /1 minute/5 minutes /30minutes
Page 19
Vehicle Video Recorder User Manual
17
◆ G-sensor Setting
★
Notice: Higher sensitive of G-sensor, Easier to trigger forcing video recording.
After force recording is triggered, 3 consecutive pictures will be taken
automatically.
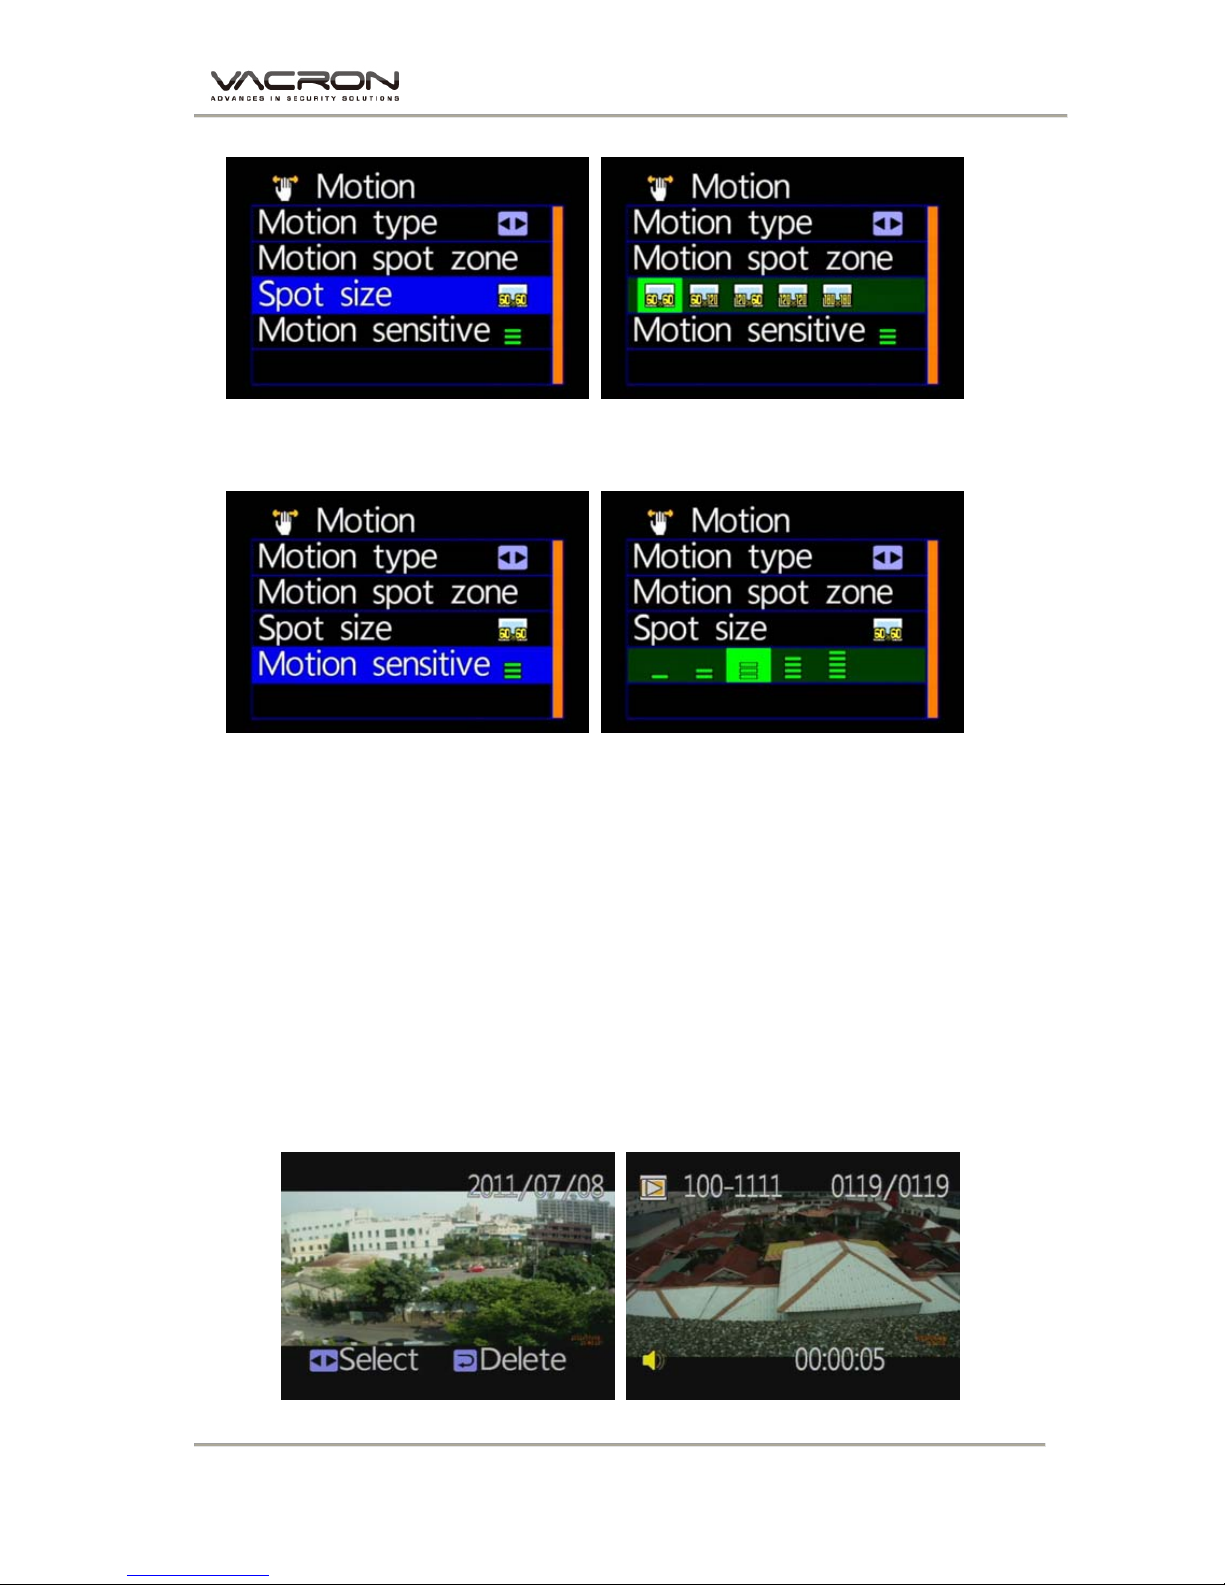
5. Motion Menu
Motion Type Setting
★
: Constant Motion Recording.
★
:Full Screen Motion Recording. (For this setting,
it is not necessary to setup the motion detection areas)
Motion Sport Zone Setting
★
Use remote controller to sense the movement location
★When setup for constant motion recording mode,
please select the designated areas for motion detection.
Page 20
Vehicle Video Recorder User Manual
18
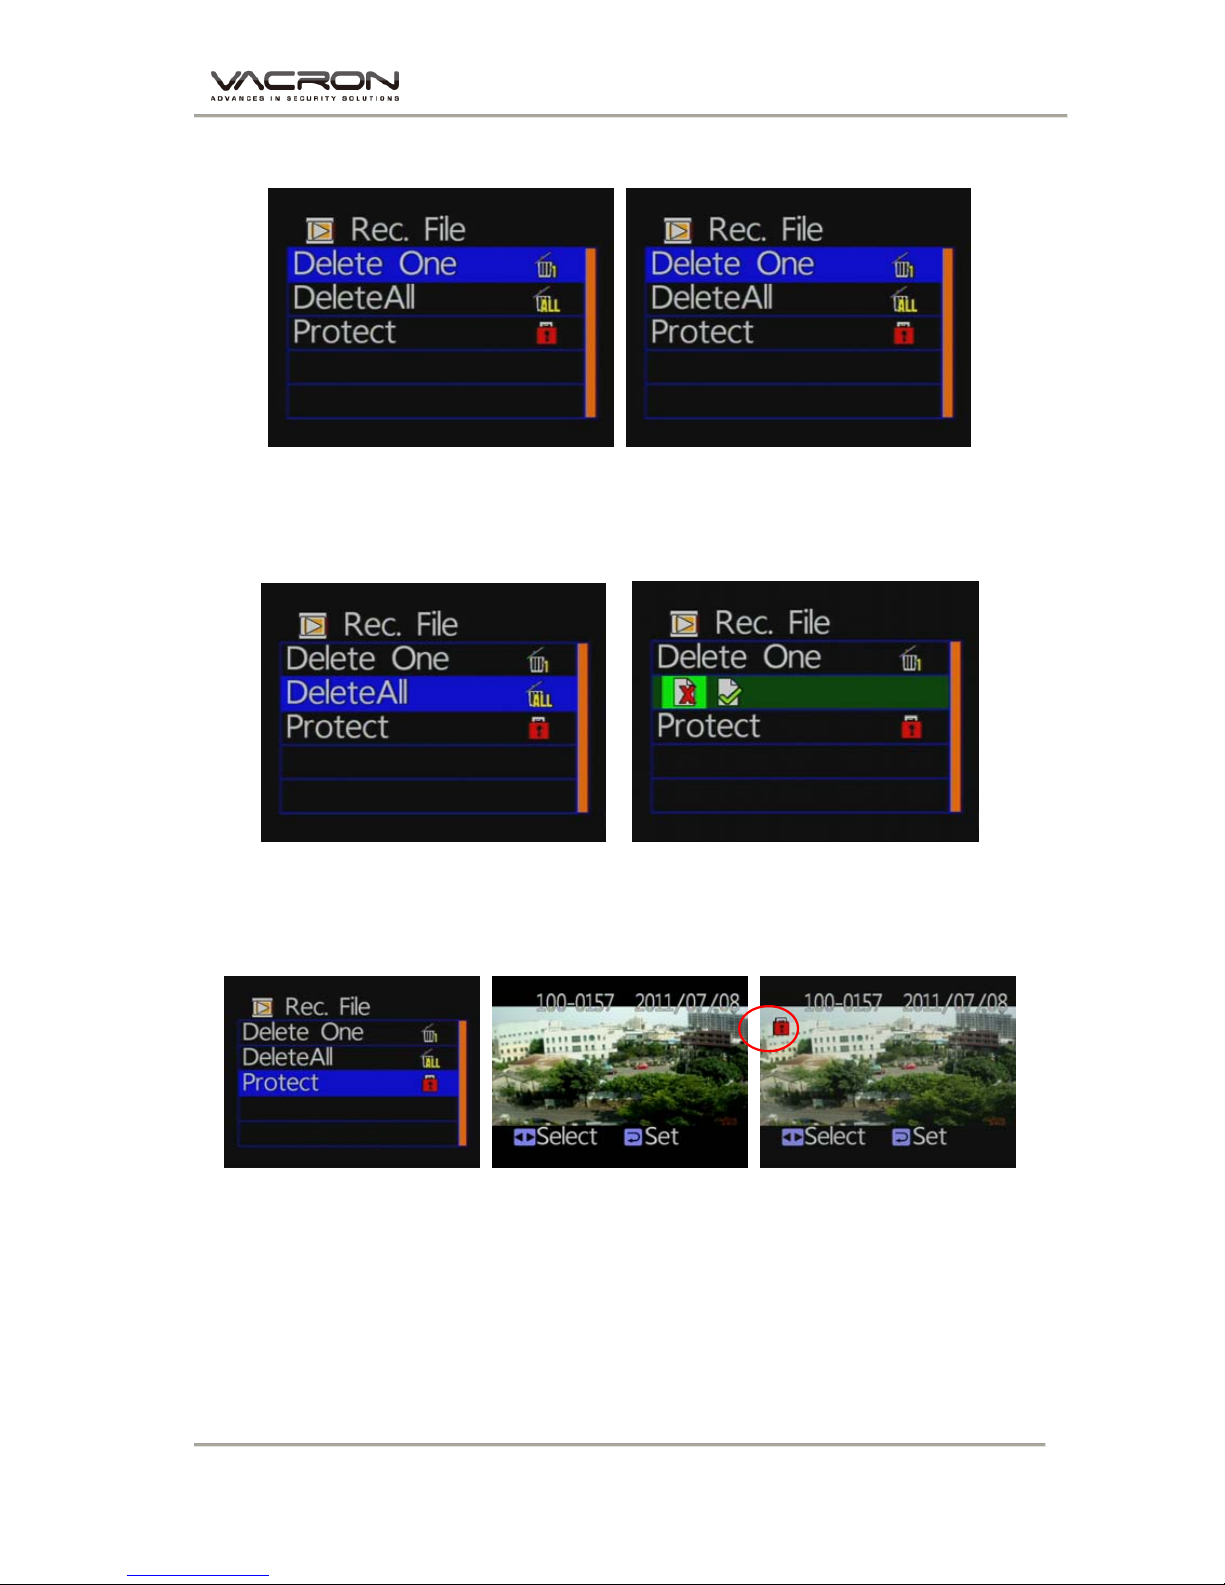
Spot Size Setting
★
Sizes: 60x60 / 60x120 / 120x60 / 120x120 / 180x180
Motion Sensitivity Setting
★
More Stripes, More Sensitivity
I. Playback
1. Direct playback on machine side
Build-in accelerometer, the system automatically determine the level
of the screen visualization, and make the screen self-rotated to
normal position.
2. Video modes
Press “ Playback” on remote controller into Playback modes. Select
the timing of the video by pressing “Play”
Page 21
Vehicle Video Recorder User Manual
19
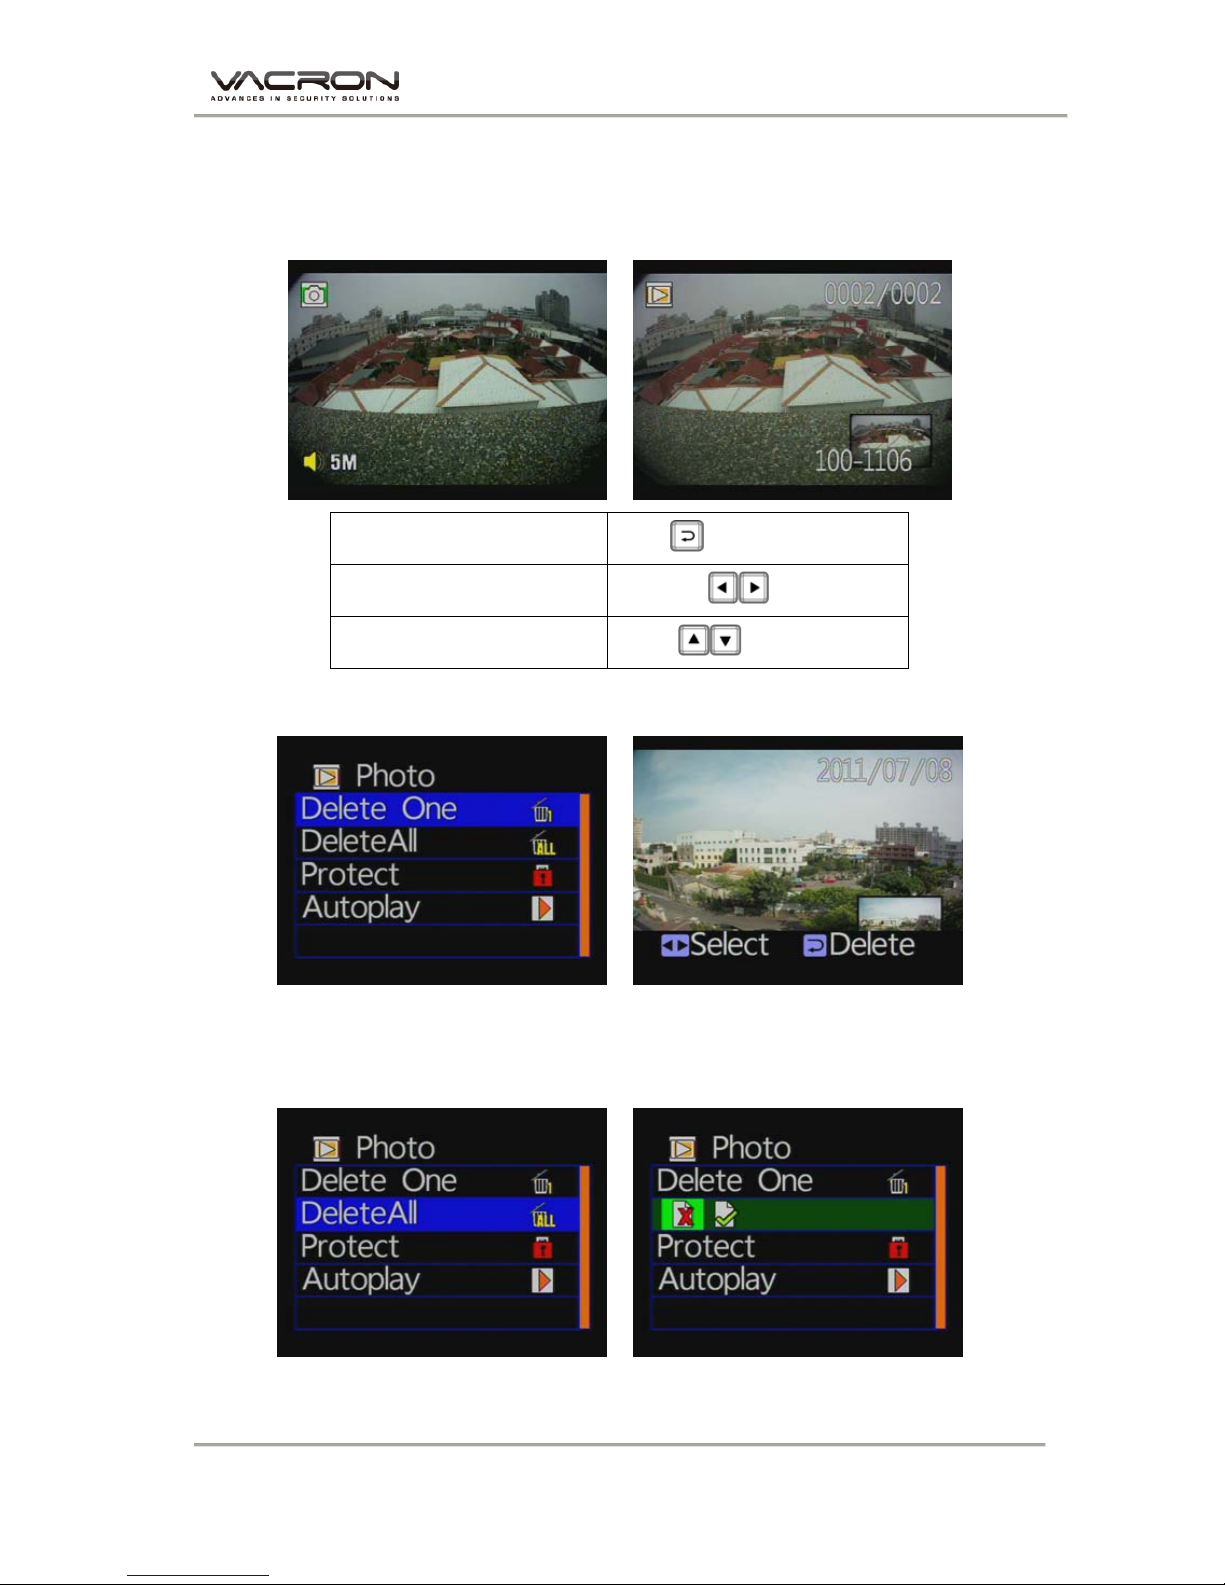
◆ Playback settings - Deleting a single file
★ You must disable the protection function first in order to
process the deleting procedures.
◆ Playback settings- Delete All
★ You must disable the protection function first in order to process
the deleting procedures.
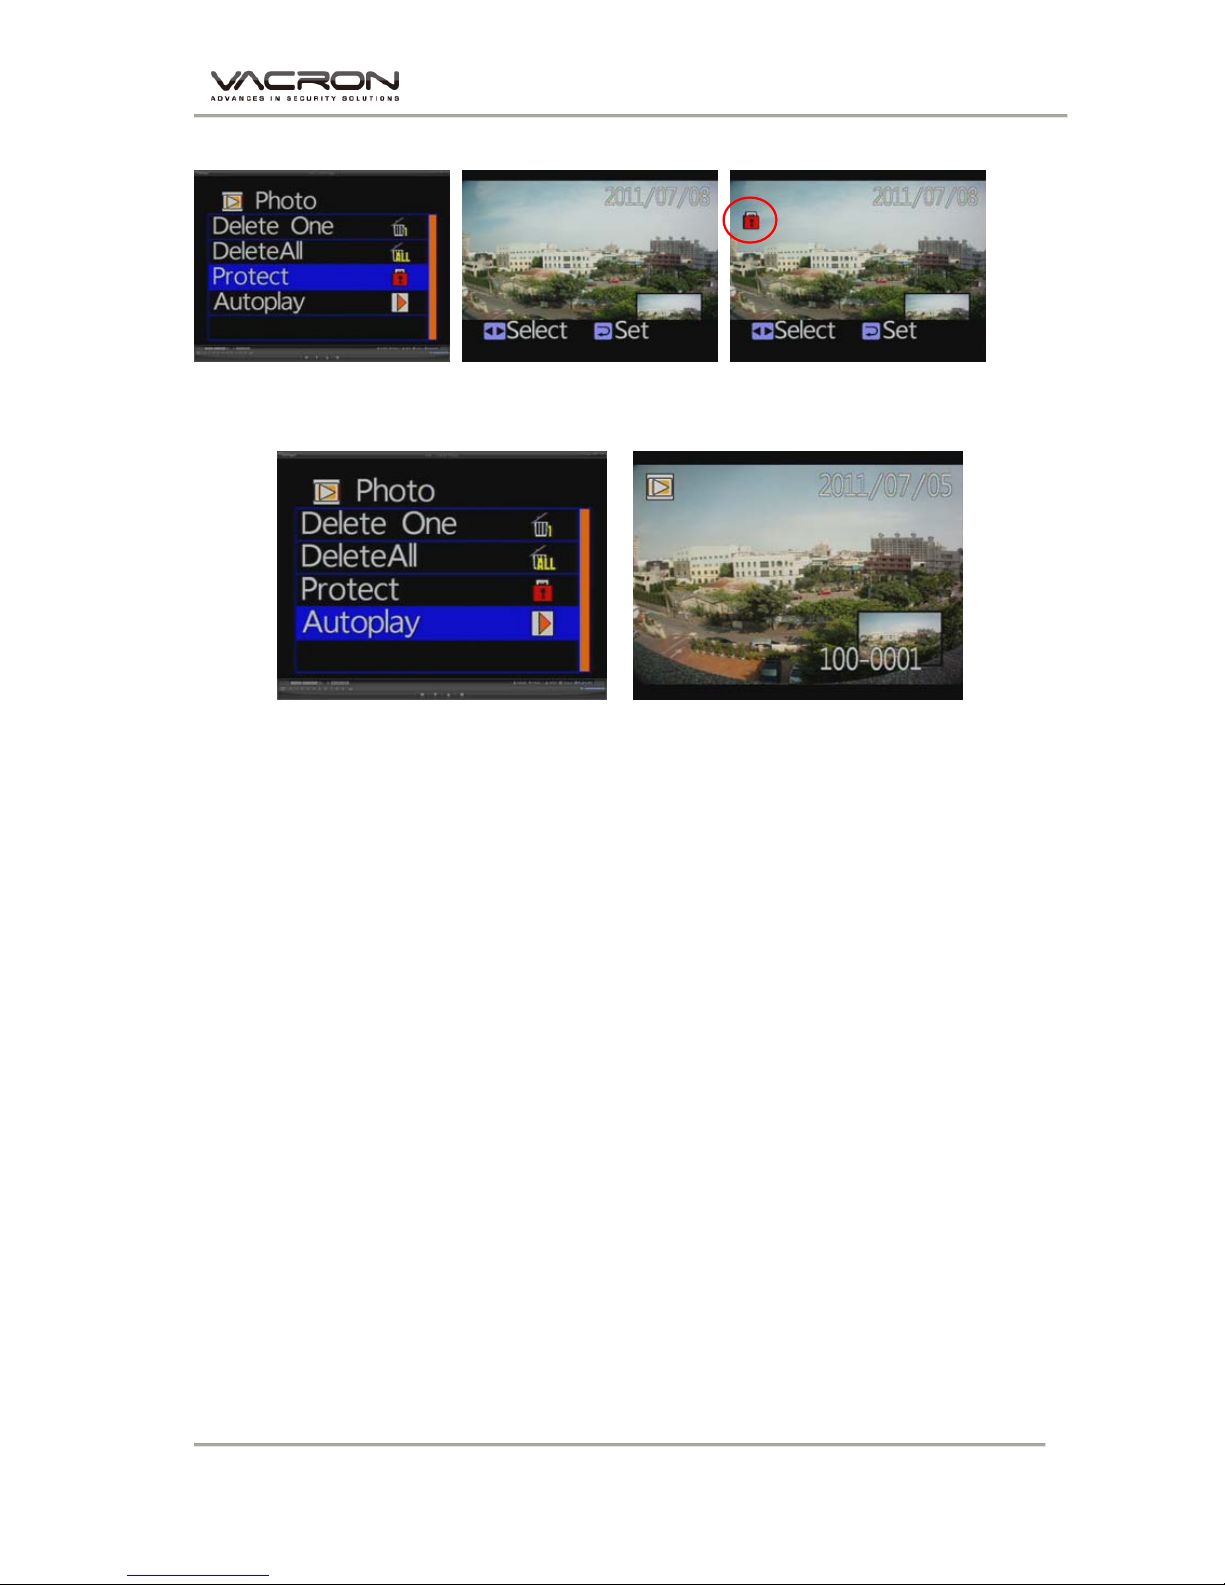
◆ Playback file setting-protect
Notice: When an icon of lock is appear, this specific video data is
protected.
Page 22
Vehicle Video Recorder User Manual
20
3. Snapshot playback
Press “ Playback” on remote controller under Snapshot mode.
Select the timing of snapshot pictures.
Rotation
[Confirm] key
Next
[R/L]key
Zoom
[U/D]key
◆ Photo playback settings-Delete one
★ You must disable the protection function first in order to process the deleting
procedures.
◆ Photo playback settings-Delete All
★You must disable the protection function first in order to process the deleting
procedures.
Page 23
Vehicle Video Recorder User Manual
21
◆ Photo playback settings-protect
Notice: When an icon of lock is appear, this specific video data is protected.
◆ Photo playback settings-Autoplay
Each Snapshot will display in every 5 seconds. Press “Menu” for stop.
Page 24
Vehicle Video Recorder User Manual
22
J. Software operating instruction
1. Remove SD card from card slot of host side
2. Put the SD card to the card reader
3. Connect card reader to the USB port of PC side
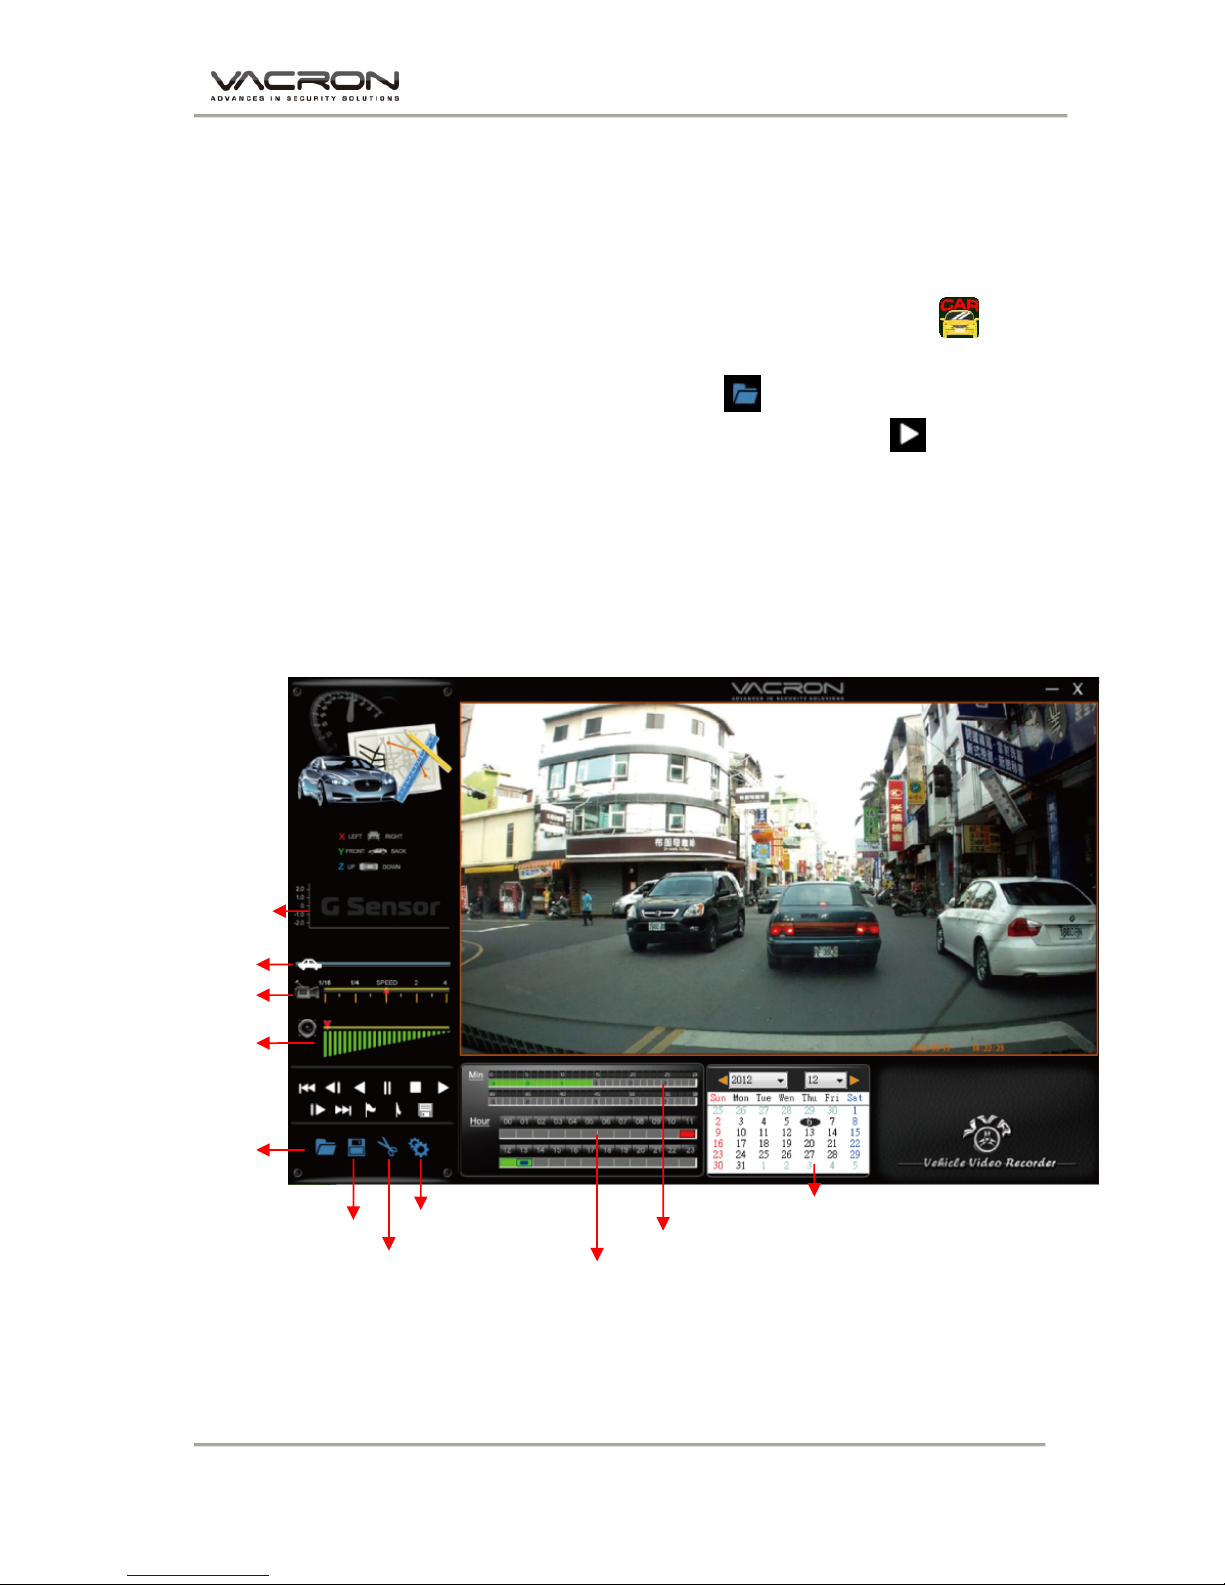
4. Choose the file to play: Execute “TransportStream.exe” ,
which is located in the product CD folder, Screen shown as
below. Choose “Open the document”
,and choose the file of
memory card or hard disc and then click “Play key” for
playback.
◎Note: To perform this software, please install Direct X 9.0 or
above.
Viewer interface description
Play Speed
Open File
Snapshoo
t
Setting
Voice Volume
G-Sensor
Save the Playing File
Playback by Hour
Playback by Minutes
Playback by Date
Play Ba
r
Page 25
Vehicle Video Recorder User Manual
23
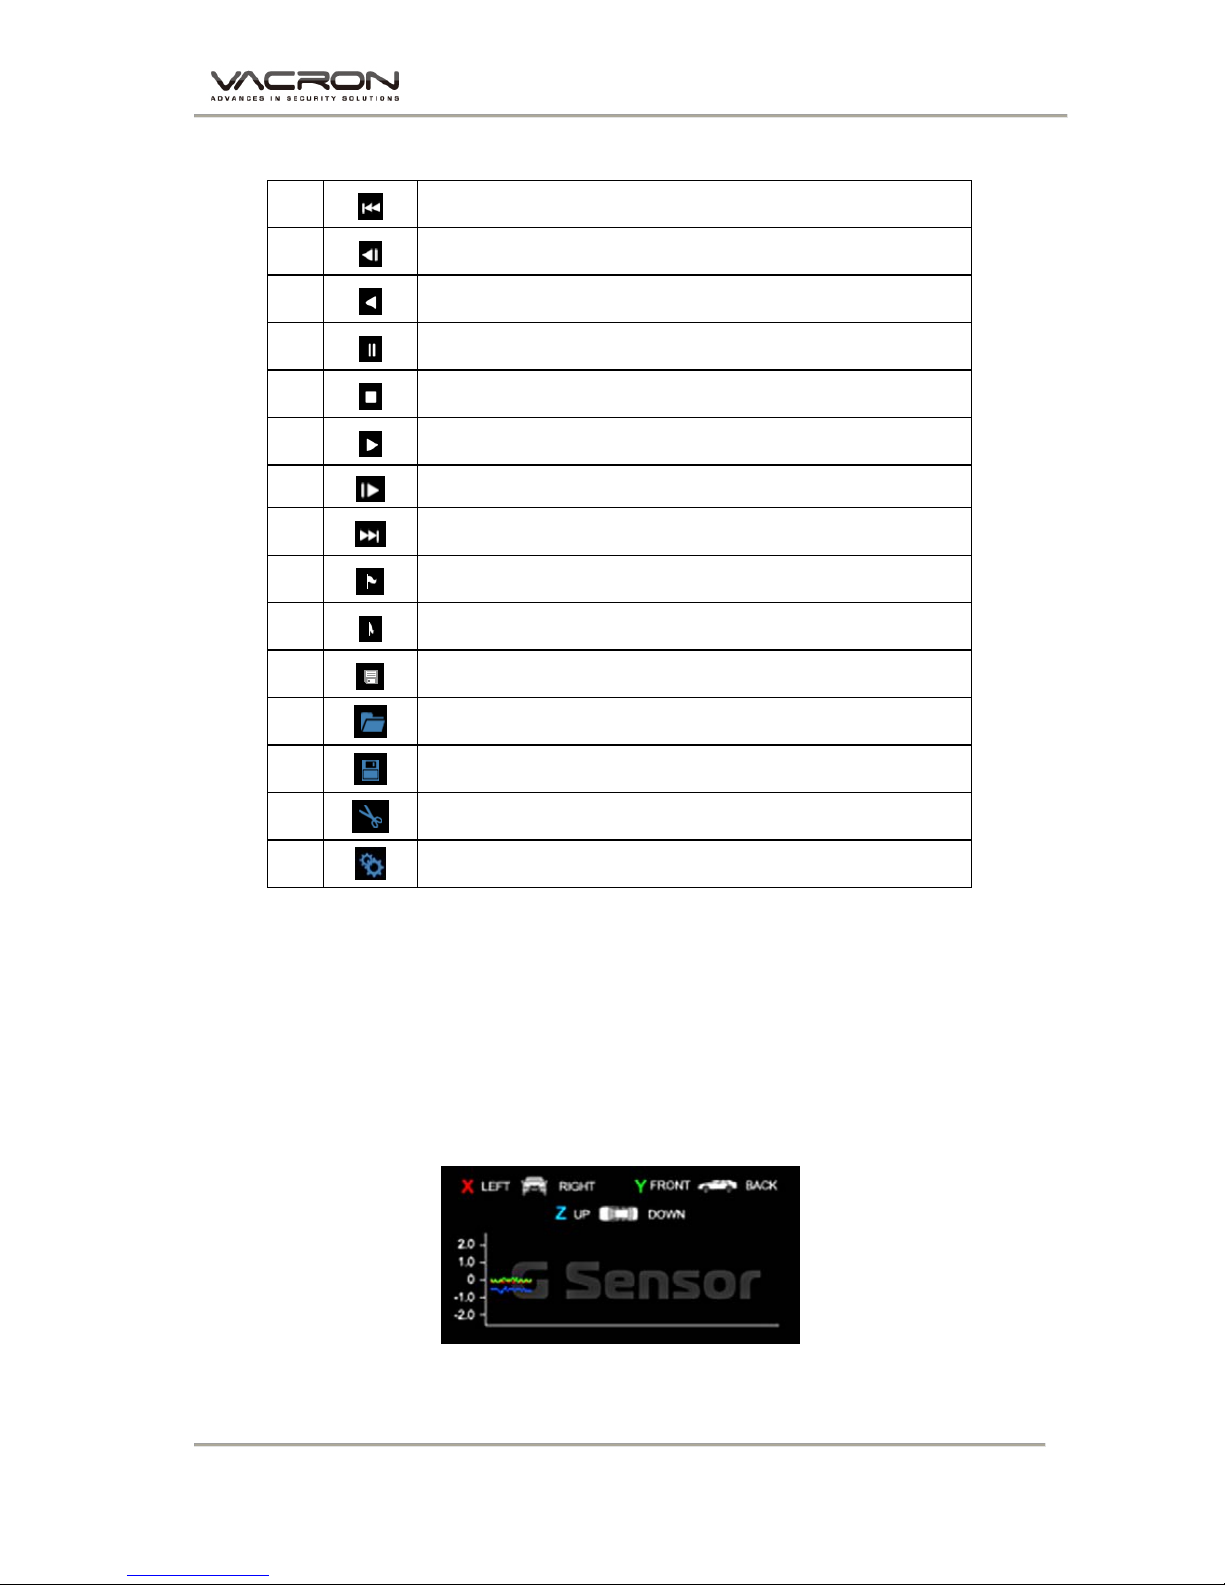
2. Operating Interface Description:
1
Return to last file key
2
Forward playback
3
Playback key
4
Pause key
5
Stop key
6
Play key
7
Forward playback
8
Go to next file key
9
Mark starting point of back up file
10
Mark ending point of back up file
11
Backup the marking file
12
Open document, select the file to play
13
Backup the current playing file
14
Snapshoot tool
15
Configuration, Set machine-related settings
3. Player Interface Description:
G-sensor: Impact sensor analyzer, forced saving the accident
video before and after 1 to 3 minutes, not covered by other new
files, protect the integrity of the incident video.
X: Induct about level of vehicles moving
Y: Induct around level of vehicles moving
Z: Induct Height fluctuation around level of vehicles moving
Page 26
Vehicle Video Recorder User Manual
24
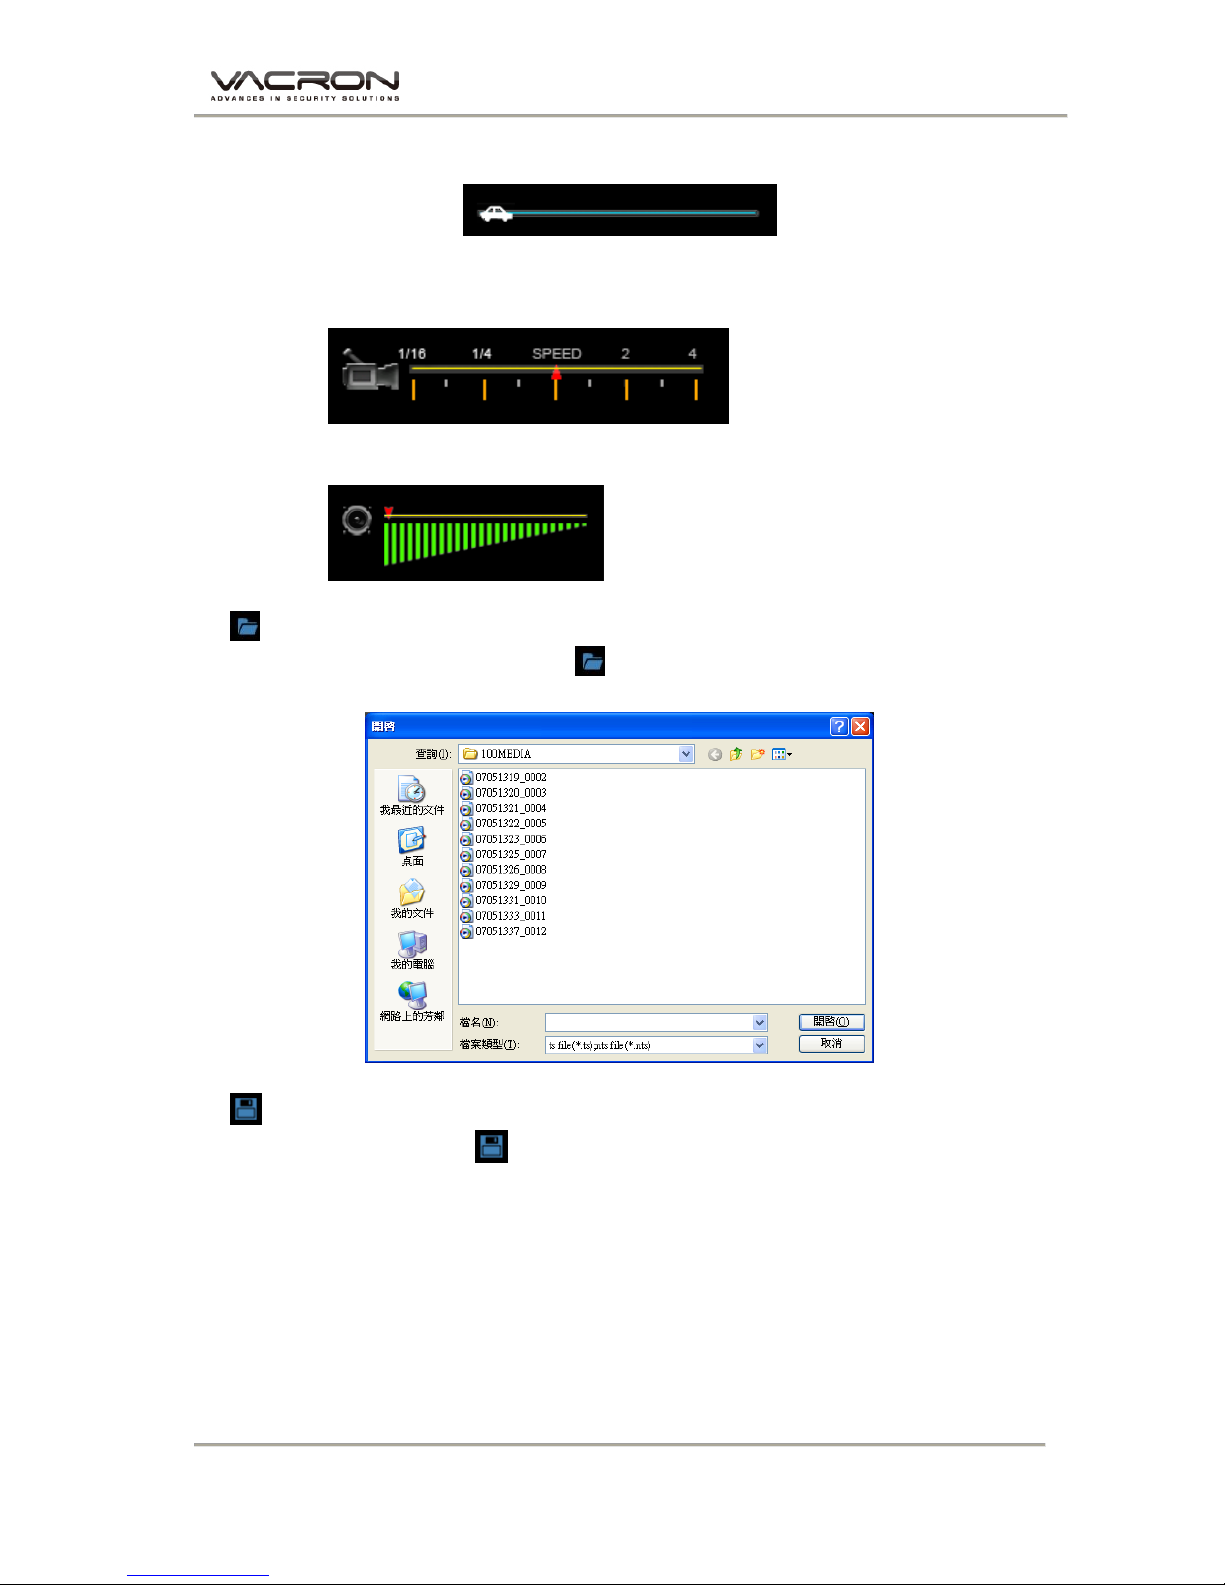
Play BAR: Press left button of mouse and move around to pull
BAR with fast-moving.
Playback speed
Fast forward with 2 times or 4 times, and playback with 0.25
times, 0.0625 times
Volume control
4. Select the file to playback
Select “Open the document” , and then choose the file of memory
card or hard disc. (The file format is *.ts)
5.
File backup
Select “ file backup” ,and then choose the file of memory card or
hard disc to start backup procedures.
Page 27
Vehicle Video Recorder User Manual
25
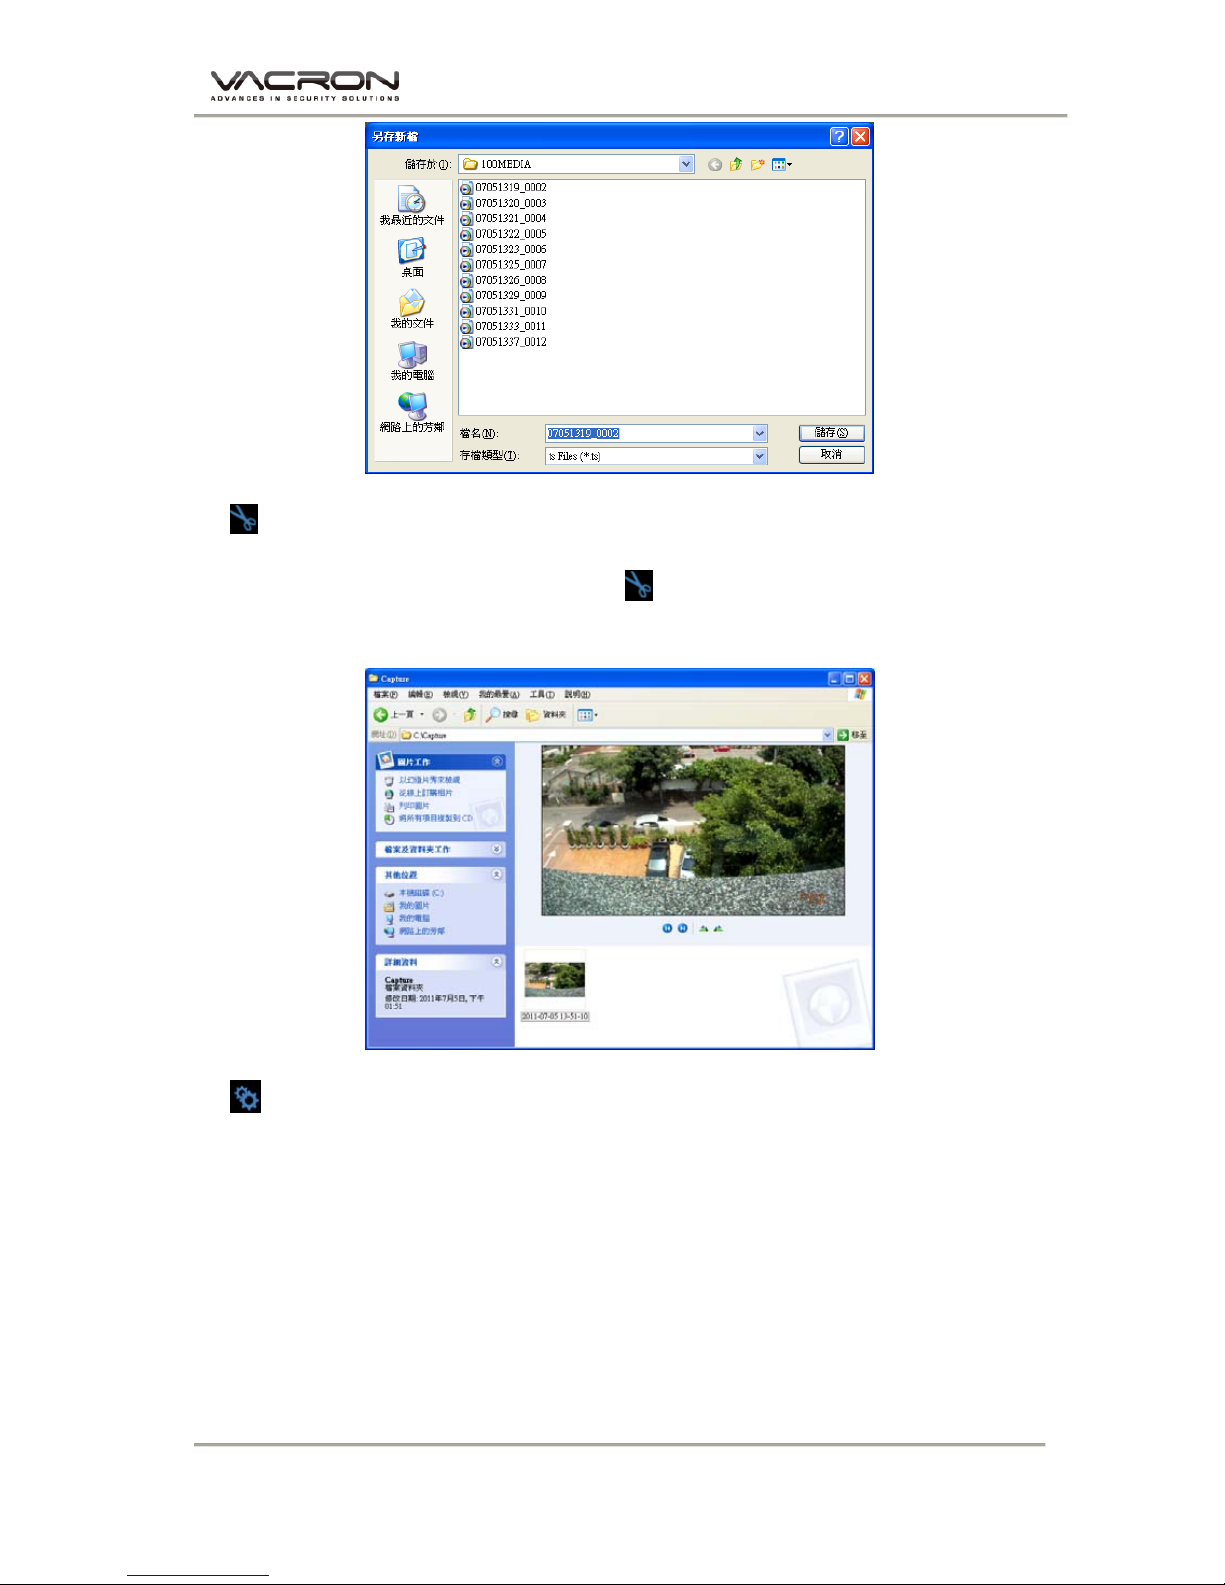
6. Snapshoot Tool
Play record from SD card first and then use Snapshoot tool to
capture the screen. When select Snapshoot tool, it will appear
the following window. (The picture of display screen will save in
capture storage folder path.)
7.
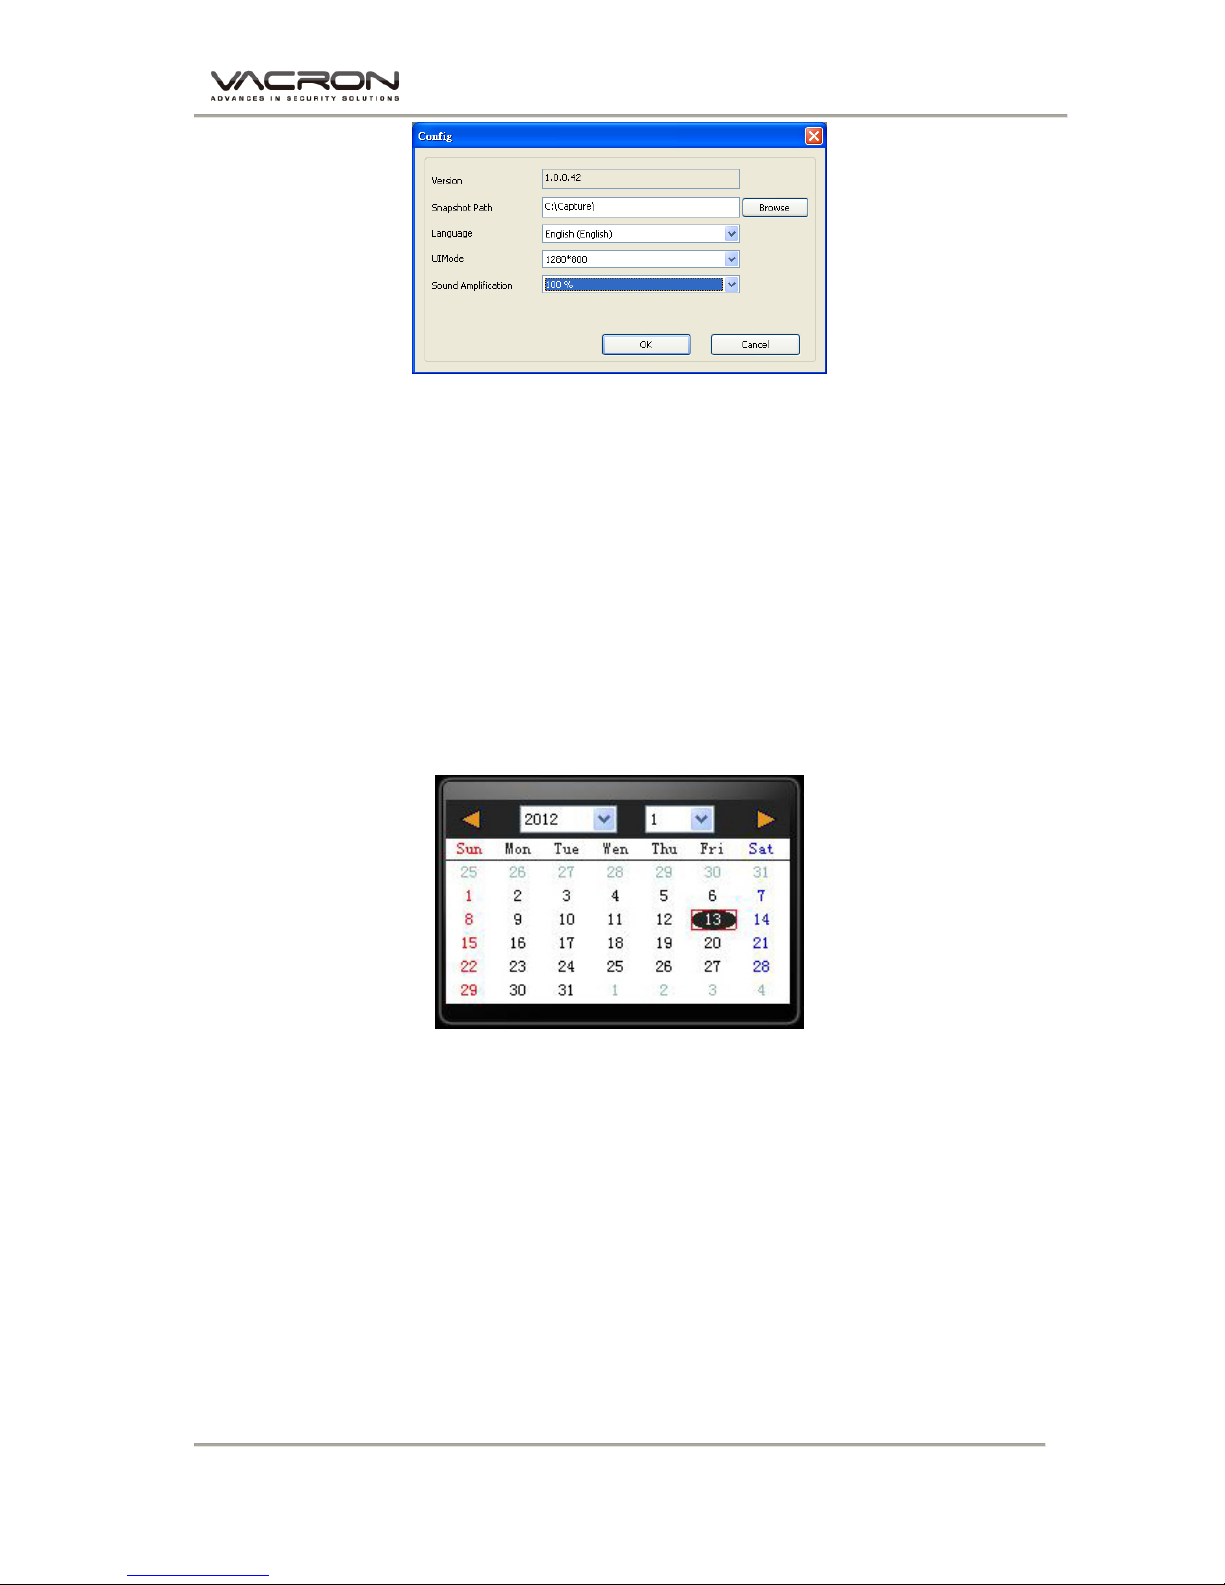
Related settings
Software version related information and SD card data storage
settings
Page 28
Vehicle Video Recorder User Manual
26
(a) Storage path of Snapshot: the location to save images in the
computer
(b) Language: select language settings of playback software. (The
settings will work after re-open the software)
(c) The mode of User Interface: Set the display mode of host. (To
change the configuration option, it must insert SD card into the
Vehicle Video Recorder). It provides 3 different resolutions for
selecting: 960x600, 1280x800 and 1920x1080
(d)
Sound Amplification: max. 10 times
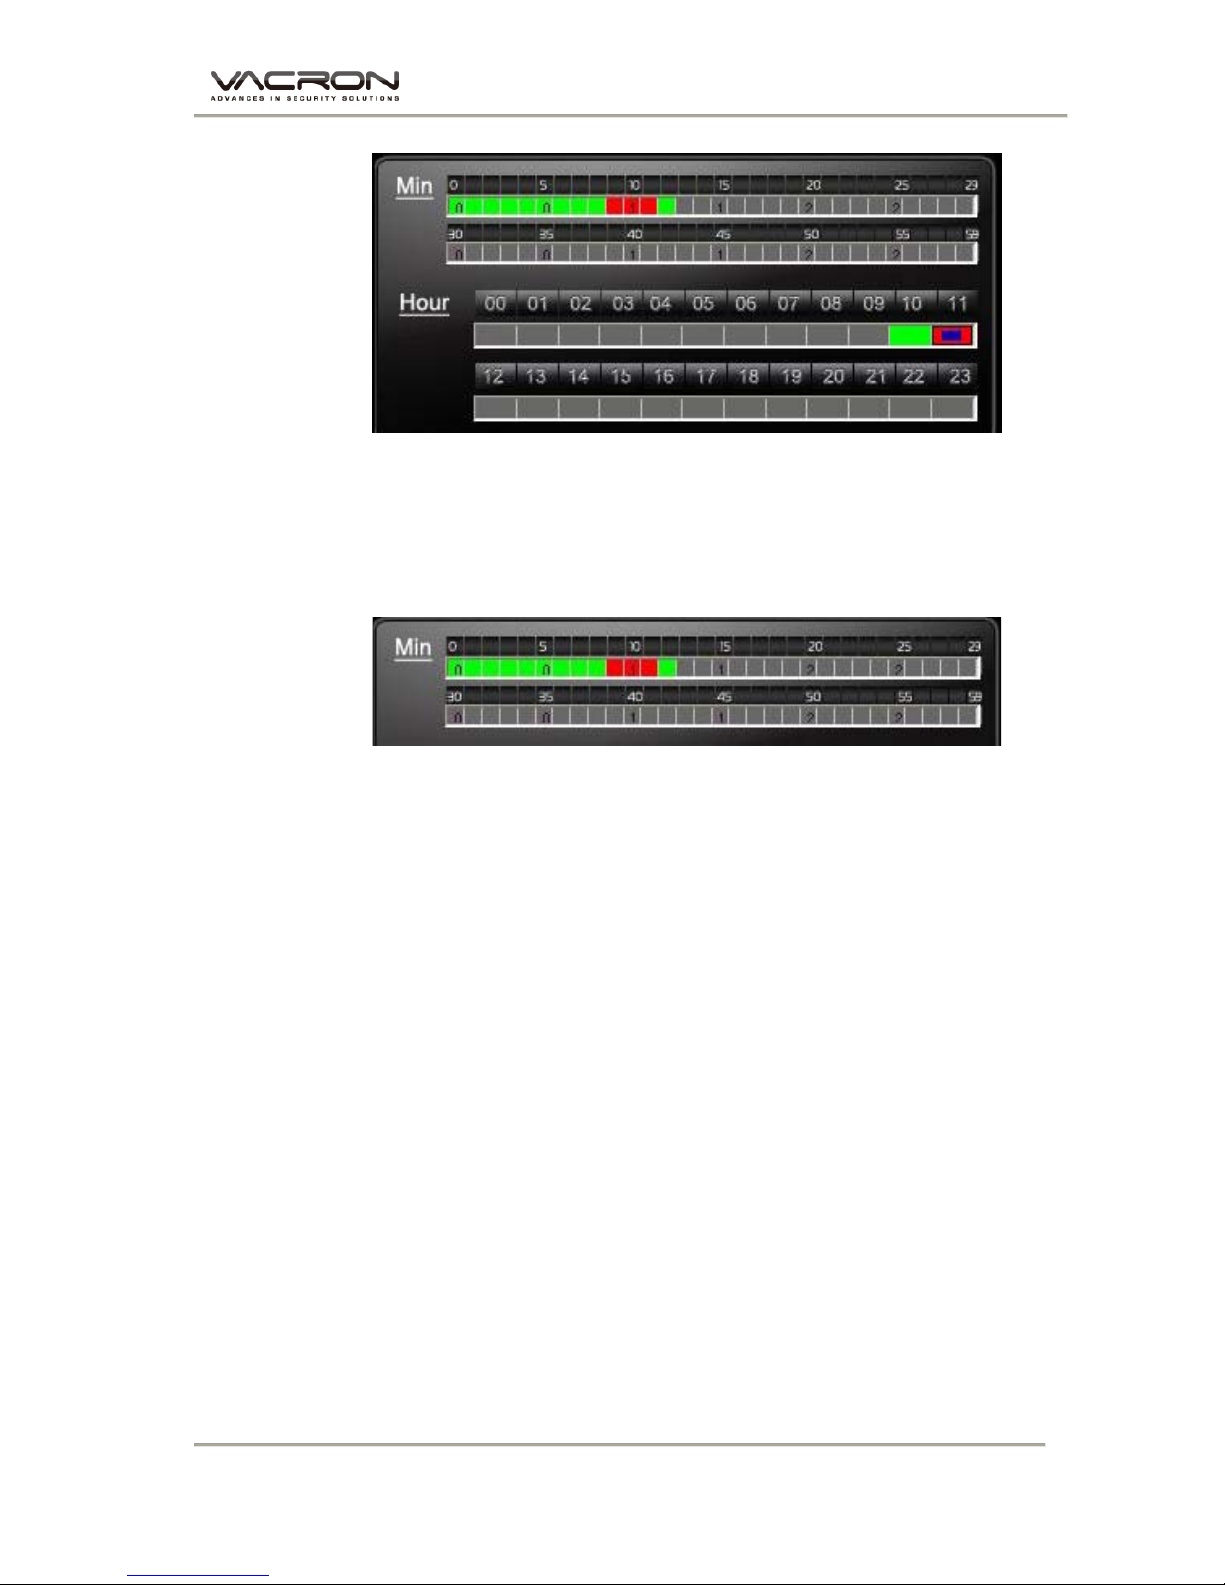
8. Playback date selection
Playback selecting by date
Open the player, the "date table" will show date today with graybrown display. When you click on the file for playback, if the SD
card has recorded file, then S the date will display with a red box,
that means it has the data to play back.
Page 29
Vehicle Video Recorder User Manual
27
Playback selecting by Hours (24-hours)
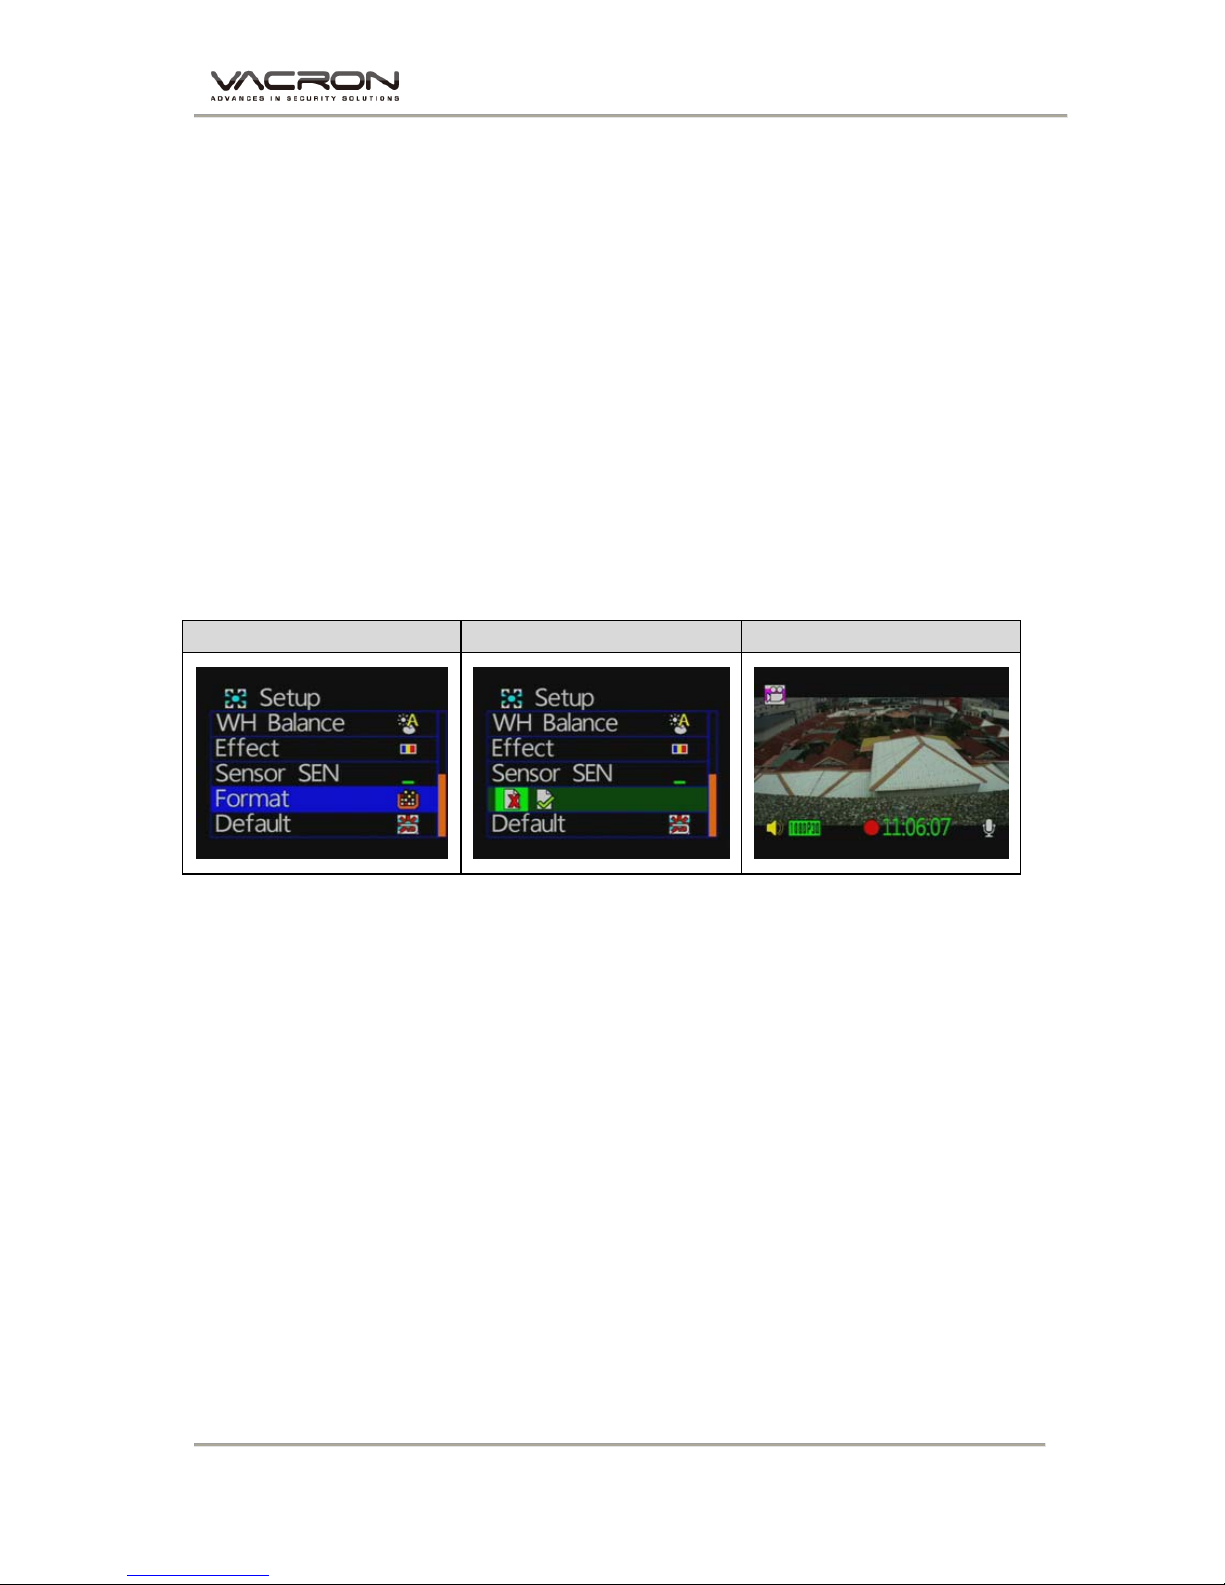
After select the "Date" with Gray-brown color, on
Hour/Minutes table will display Red/Green color.
Green: normal record
Red: force record
Playback selecting by minutes
Click the minutes table to change the recording footage
immediately.
Page 30
Vehicle Video Recorder User Manual
28
K. Formatting memory card
When should you need to format the SD card?
When you purchase a new SD card, you have to format it for
vehicle video recorder to record properly.
Procedures for new SD card formatted as follows:
1. Insert SD card into the SD slot of Vehicle Video Recorder and
then open the menu. Find the format option and then begin to
format SD card.
2. Connect power cable to machine, use remote controller to enter
index menu and select format operation.
Formatting S teps:
Step 1 Step 2 Step 3
3. After formatting is completed, leave the index menu and back to
live screen. Then the SD card formatting is done and ready to
use.
Page 31
Vehicle Video Recorder User Manual
29
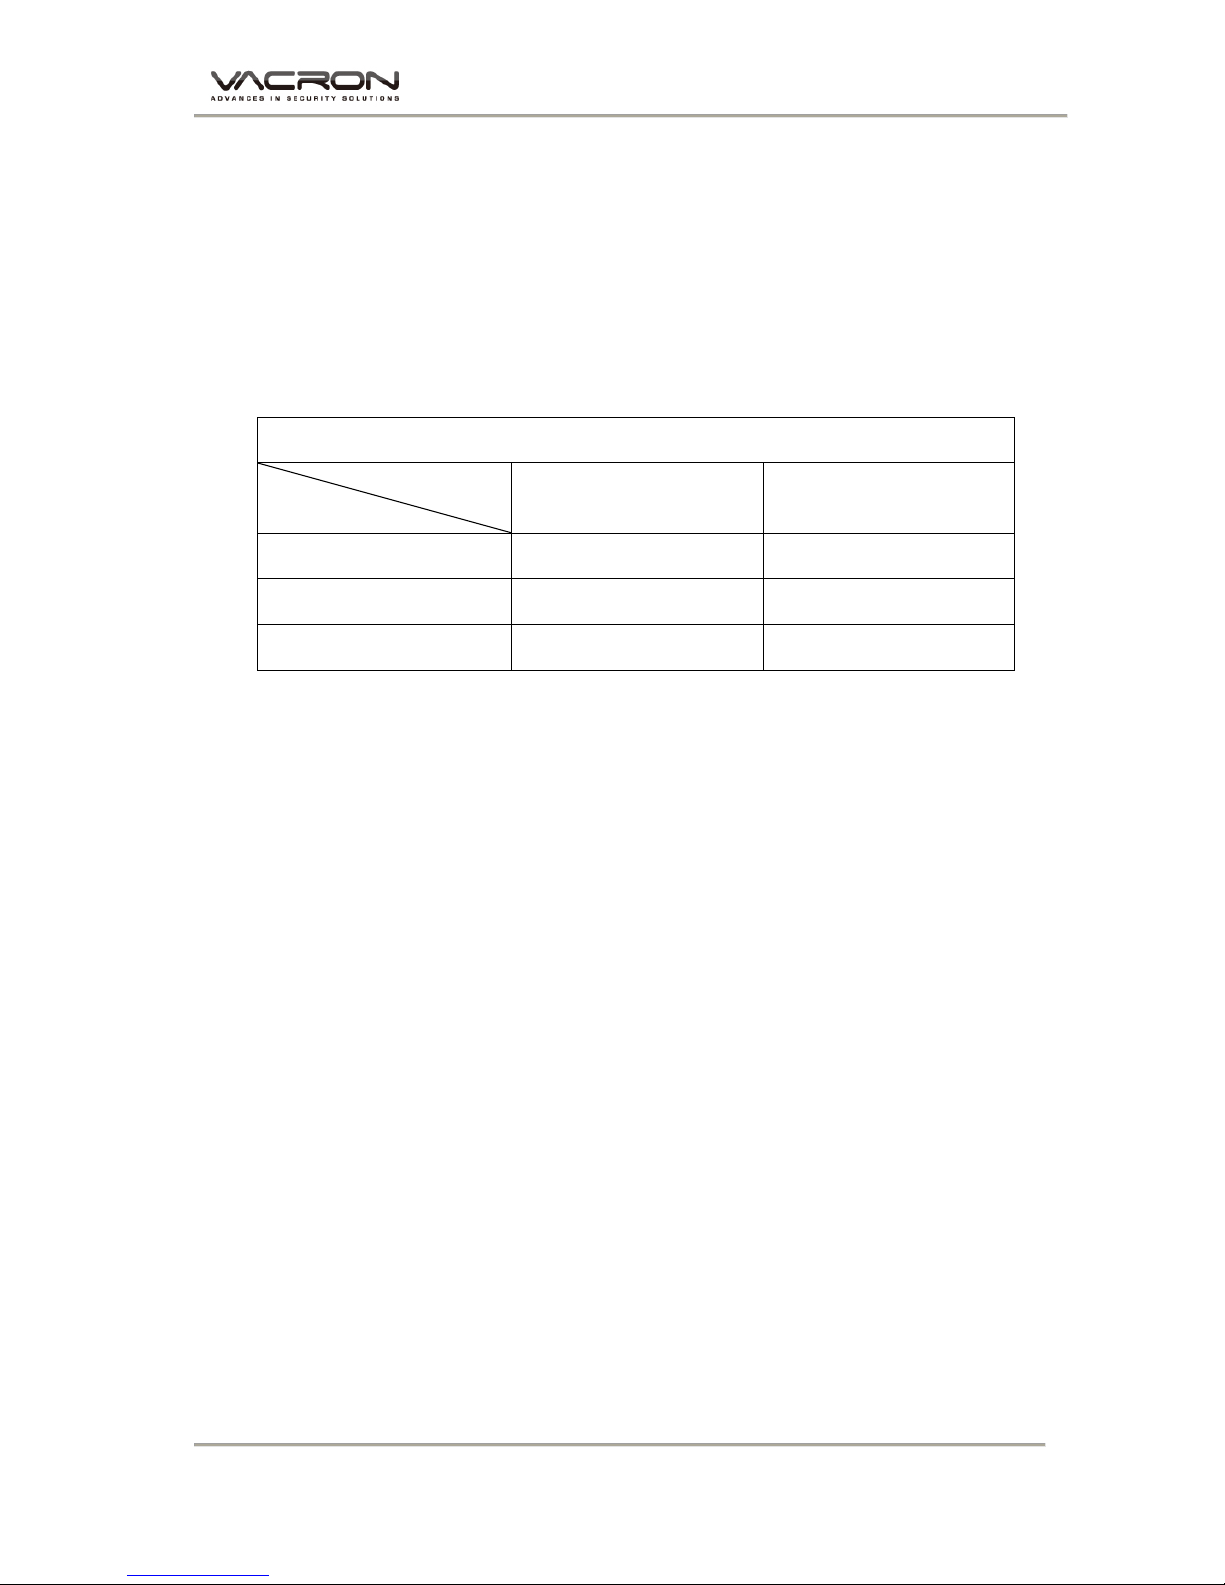
L. Record Time Estimation (based on constant record
mode with 8GB card)
*The chart of estimated record time listed below is for reference
only.
The length of time recorded can be varied due to variation in
image size may be somewhat different.
Video Format (NTSC / PAL)
Resolution
Video Quality
1080P30 720P30
High 110 Min 115 Min
Normal 115 Min 135 Min
Low 135 Min 155 Min
Page 32
Vehicle Video Recorder User Manual
30
M. Appendix: The Indication of Bright and Dark Spot of
LCD
Q: What is Bright/Dark Spot?
A : Bright Spot: At dark background, we found the abnormal bright
spots, we called those spot are “Bright Spot”
Dark Spot: At multiple color background (excluded dark
background), we found the abnormal dark spot, we called those
spot are “Dark Spot”
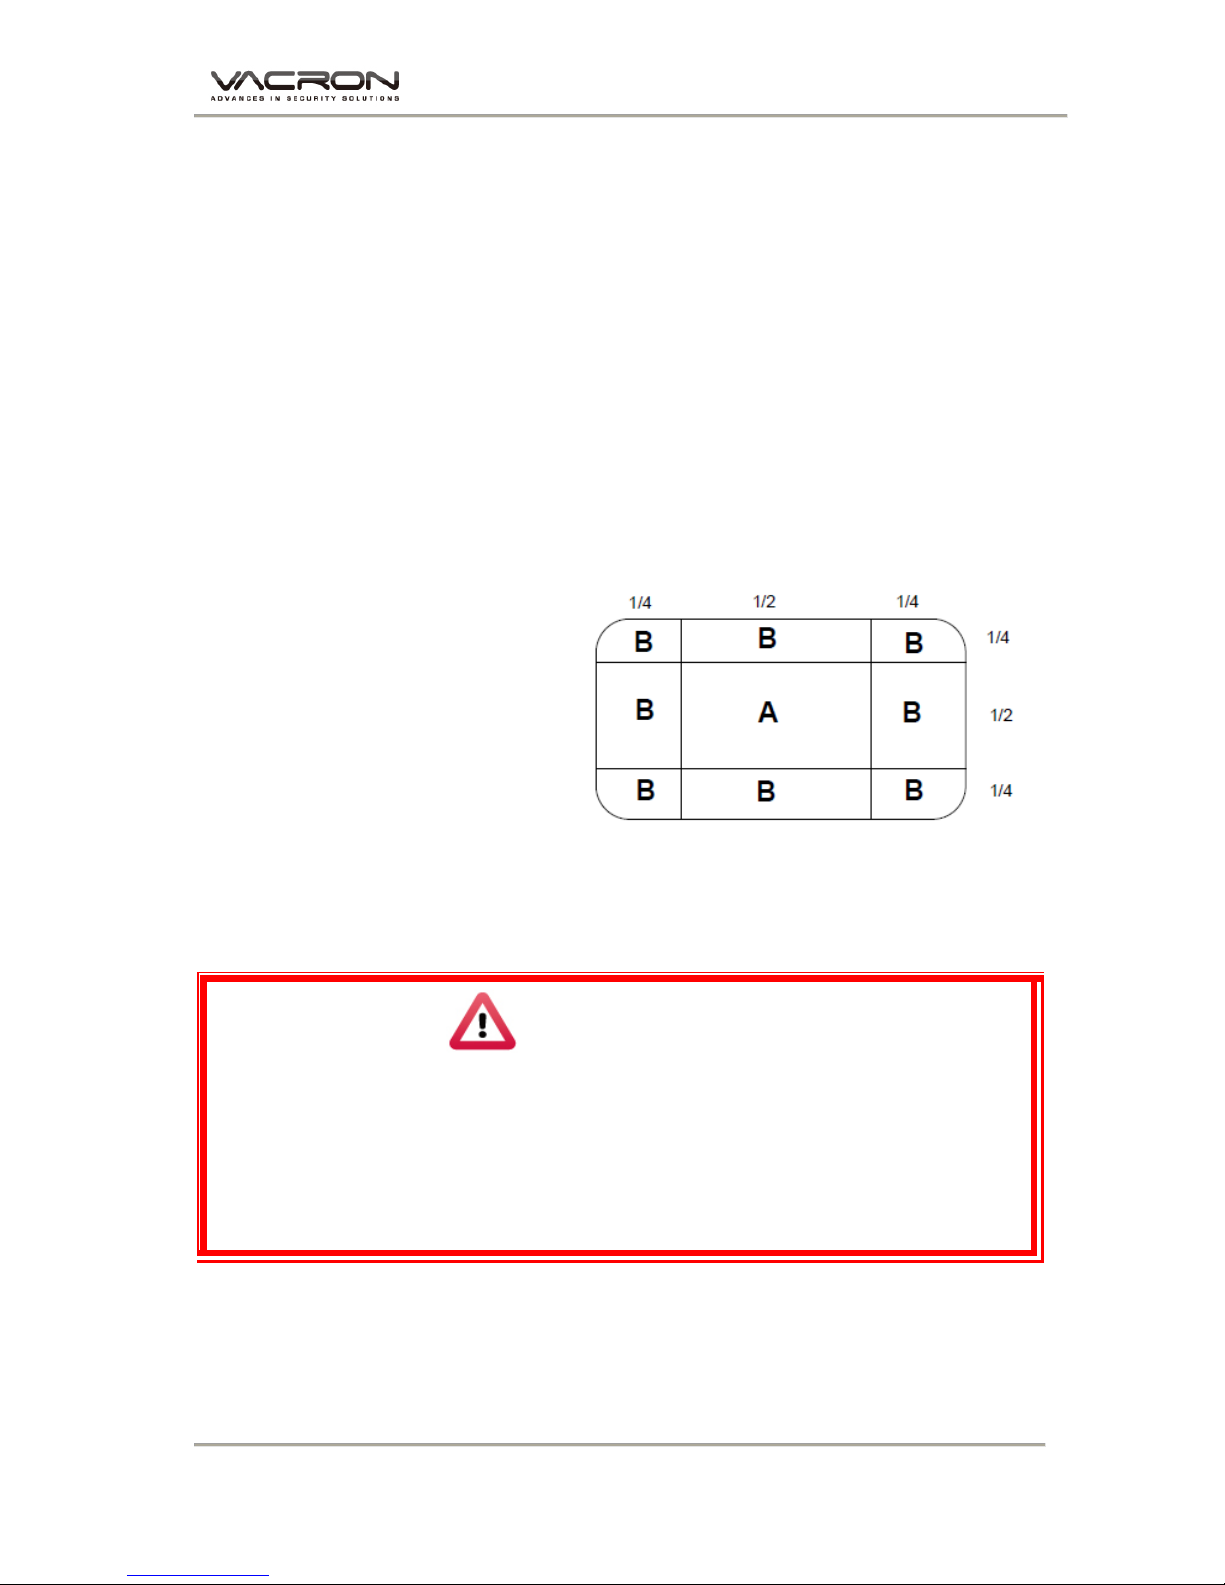
Q: The indication of Bright and Dark Spot
(a) There is no bright spot
allowed in Area A, only
single dark spot or none
is allowed.
(b) The maximum amount of
bright spots and dark
spots allowed in Area B
are two of each.
(c) The max total amount of
bright and dark spots in
Area A and B are three or
under
The Diagram of Area A and B
Notcie
(1). There is 30 days exchanges refer to the indication of bright and dark.
(2). Please keep the receipt and contact your local dealer for exchanging
merchandise.
(3). The maximum valid date is 30 days.
Page 33

For More Information
Please check VACRON Website
http://www.vacron.com
Made in Taiwan
 Loading...