

Page 1
USER MANUAL
Vacuum and Floor Mopping Robot myVacBot S200
Page 2

Page 3

CONTENTS
01 FEATURES ...............................................................................................................
02 SAFETY INSTRUCTIONS .........................................................................................
03 PARTS ......................................................................................................................
04 ASSEMBLY ..............................................................................................................
05 FUNCTIONS ...........................................................................................................
06 FEATURES & CLEANING MODE ............................................................................
07 CLEANING FEATURES ............................................................................................
08 CLEANING MODES ................................................................................................
09 BATTERY INSTALLATION ........................................................................................
10 BATTERY REMOVAL ...............................................................................................
11 CHARGING .............................................................................................................
12 DOCK ......................................................................................................................
13 DOCKING TEST ......................................................................................................
14 ROBOT BATTERY RECHARGE ................................................................................
15 ROBOT BATTERY CARE .........................................................................................
16 ROOM LIMITER (SONIC WALL) ..............................................................................
17 SPINNING SIDE BRUSHES ......................................................................................
18 CONTROL PANEL ...................................................................................................
19 REMOTE CONTROL ...............................................................................................
20 SCHEDULING THE VACUUM AND FLOOR MOPPING ROBOT ............................
21 SETTING YOUR LOCAL TIME .................................................................................
22 SCHEDULING THE VACUUM AND FLOOR MOPPING ROBOT ............................
23 AUTO START ...........................................................................................................
24 CLEANING & MAINTENANCE ...............................................................................
25 DUST BIN & FILTER CLEANING .............................................................................
26 WET MOPPING BASE INSTRUCTIONS ..................................................................
27 SETTING ID WITH MAIN UNIT ...............................................................................
28 APP INSTRUCTION .................................................................................................
29 USEFUL TIPS ...........................................................................................................
30 TROUBLESHOOTING .............................................................................................
31 PRODUCT SPECIFICATIONS ..................................................................................
4
5
6
6
7
8
8
8
9
9
10
10
10
11
11
12
13
14
15
16
16
17
17
18
18
20
21
23
25
27
28
Page 4

4
01 FEATURES
We bring you an easy to use vacuum and oor mopping robot that works both on hard oor surfaces and
carpets and also can be used for wet mopping operations.
This is not just sweeper but a real vacuum cleaner with powerful suction, side brushes and a main brush.
You can now enjoy your personal time while the vacuum and oor mopping robot will clean for you.
Slim prole at only 8.0cm height and 33cm diameter this time saving device will get in hard to reach places,
including under furniture where other vacuum and oor mopping robots will fail to operate.
Simple operation with touch controls and adjustable cleaning timer also features and advanced remote
control.
Easy to use to automated cleaning pattern, your robot benets from an advanced cleaning algorithm that
ensures that maximum effective cleaning is achieved with minimum iterations. There are ve advanced
programs in operation that will advance from spot cleaning, around the wall cleaning and pattern cleaning.
According to the set timer the programs will be intelligently combined for maximum cleaning efciency.
Two extra-long side brushes around the outer edges ensure that dirt is gathered even from corners and
borders. The middle suction vacuum will ensure dirt and debris are efciently collected.
This vacuum and oor mopping robot features smart ultrasonic navigation sensors. There are also cliff
sensors that will stop the vacuum and oor mopping robot from falling of any steps. *
Great on hard oor and low and medium pole carpet. Easy to empty bagless side loading sealed dust
container. This antibacterial vacuum and oor mopping robot features an easy to clean HEPA type lter that
will improve air quality in your household during the cleaning operation.
* In difcult lighting or dirty bottom sensors, errors could happen. Please clean the bottom sensors regularly and put an obstacle in
front of high abysses or use the sonic wall (f.ex. stairs).
Page 5

5
Important
• Carefully read the instructions before operating the unit. Please retain the manual for future reference.
• This appliance is for indoor use only.
• Rating: this unit must be only connected to a 220-240V / 50Hz earthed outlet. Always check the ratting
label against your electrical supply.
• If you are in any doubt about the suitability of your electrical supply have it checked and, if necessary,
retested by a qualied electrician.
• This vacuum and oor mopping robot has been tested and is safe to use. However, as with any
electrical appliances – use it with care.
• Disconnect the power plug from unit before dismantling, assembling or cleaning.
• Do not clean the unit by spraying it or immersing it in water. The device is not waterproof.
• Never operate this appliance if the cord or power supply is damaged. Ensure the power cord is not
stretched or exposed to sharp object/edges.
• Do not use the appliance if any part or any accessory is damaged or defective.
• A damaged power supply should be replaced only with original parts from the manufacturer. Otherwise
warranty is lost.
• Avoid touching any moving parts of the appliance.
• Never insert ngers, or any other objects while machine is in operation.
• This appliance is not intended for use by persons (including children) with reduced physical, sensory or
mental capabilities. It is also not intended for use by those with a lack of experience and knowledge,
unless they have been given supervision or instruction concerning the use of the appliance by a person
responsible for their safety.
• Do not leave children or animals unsupervised with this appliance.
• Only use original battery or charger form manufacturer, any third party components may damage the unit.
• Any service other than regular cleaning should be only performed by an authorized service
representative. Failure to comply could result in a voided warranty.
• Do not use the appliance for any other purposes than its intended use.
• Do not use the appliance in places with high humidity (>80% Relative Humidity)
• Do not immerse the robot in water or other liquids. If the robot is immersed in water or other liquids by
mistake, do not touch it with your hands. If the appliance is immersed in water or other liquids, discard
it. Do not use if you spilled liquids on the oor.
• Do not use to clean printer tonner spilled on the oor as this could cause re.
• Before using the vacuum and oor mopping robot, remove any fragile objects from the oor e.g. glass
pieces or any other objects that could block or damage the robot.
• Do not place any object on the top of the vacuum and oor mopping robot.
• Do not leave any fragile objects on the side of the tables, cabinets etc. where the vacuum and oor
mopping robot could bump into and cause them to fall.
• Secure stairs with the Sonic Wall or an obstacle.
Unit Safety Protection and Performance Tips
• Make sure unit is assembled correctly before use.
• Charge for 24 hours before operating for the rst time. If not using the vacuum and oor mopping
robot for a long time, please fully charge and remove the battery.
• Clean vacuum and oor mopping robot and brushes regularly. Empty and vacuum the dust container.
• If the vacuum and oor mopping robot becomes entangled, remove brushes, clean the debris and
reassemble.
02 SAFETY INSTRUCTIONS
Page 6
6
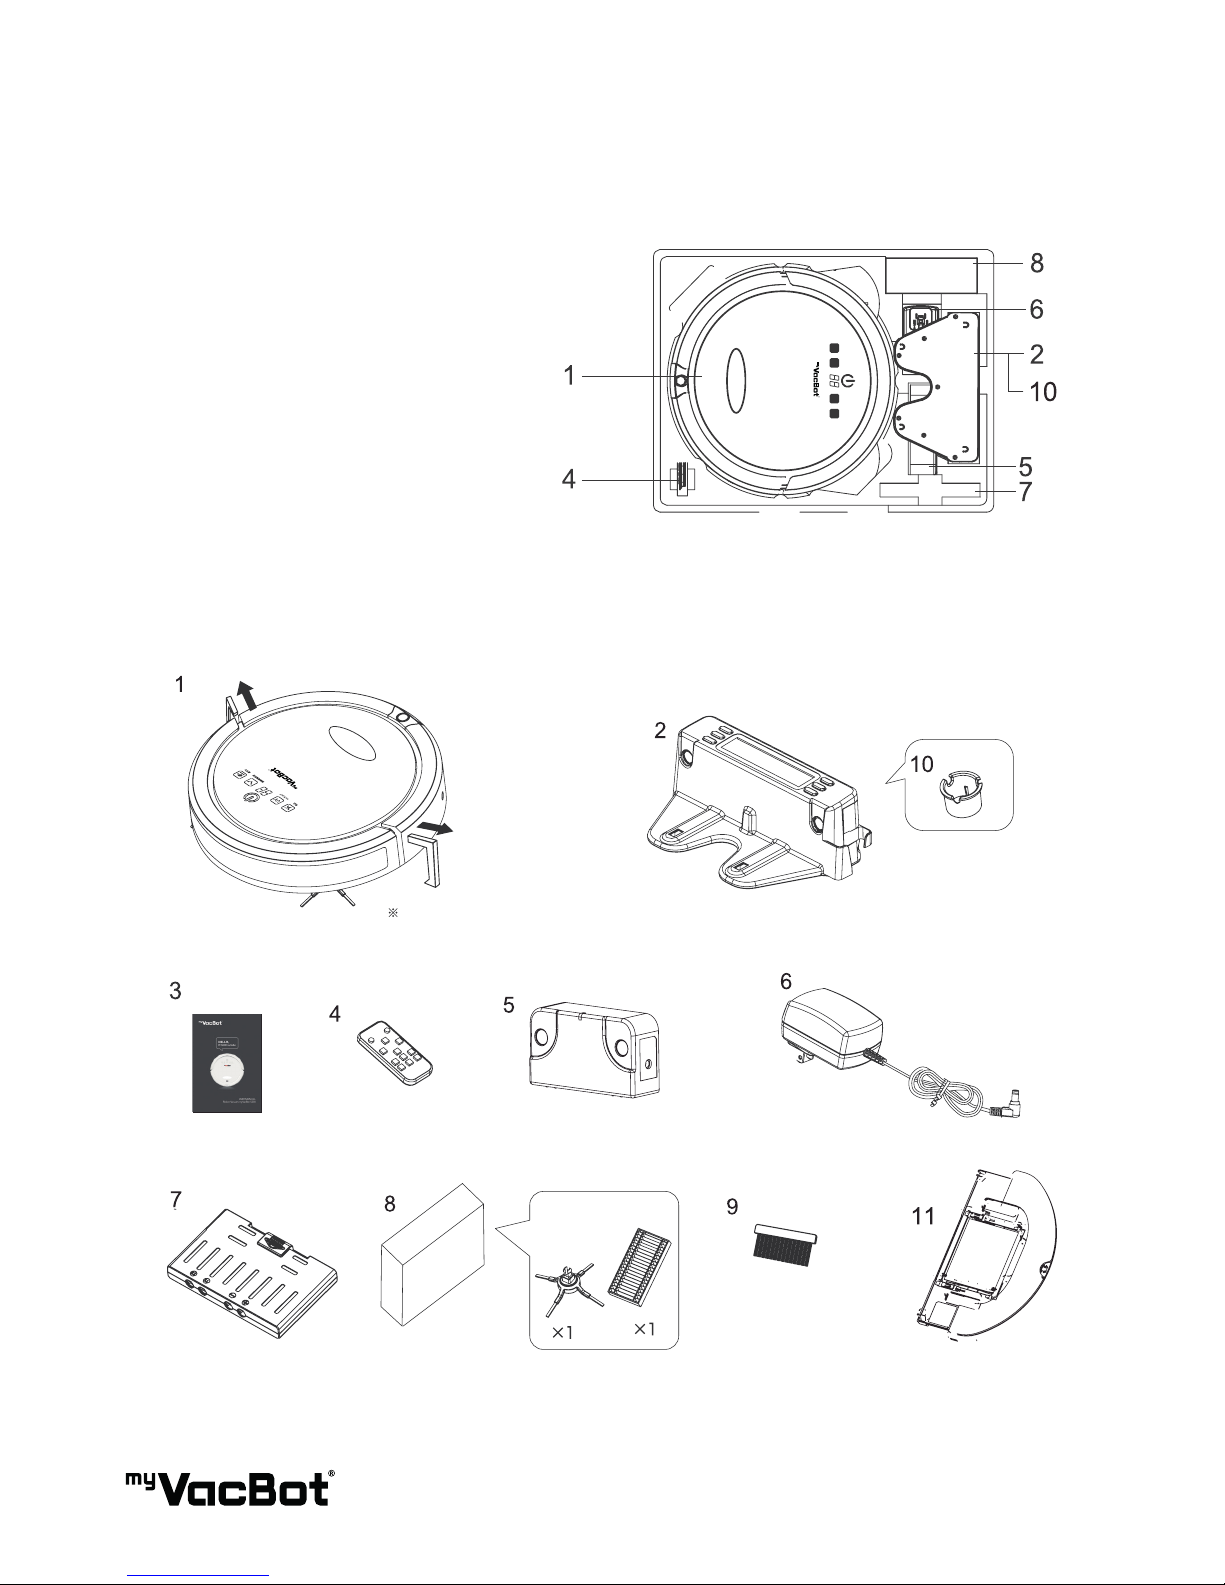
1. Vacuum and oor mopping robot
2. Home Base
3. User Manual
4. Remote Control
5. Room Limiter (Sonic Wall)
6. Power Supply Adaptor
7. Battery
8. Spare Parts Box
9. Cleaning Brush
10. Hair Removal Tool (inside the Home Base)
11. Wet Mopping Base
03 PARTS
04 ASSEMBLY
Page 7
7
05 FUNCTIONS
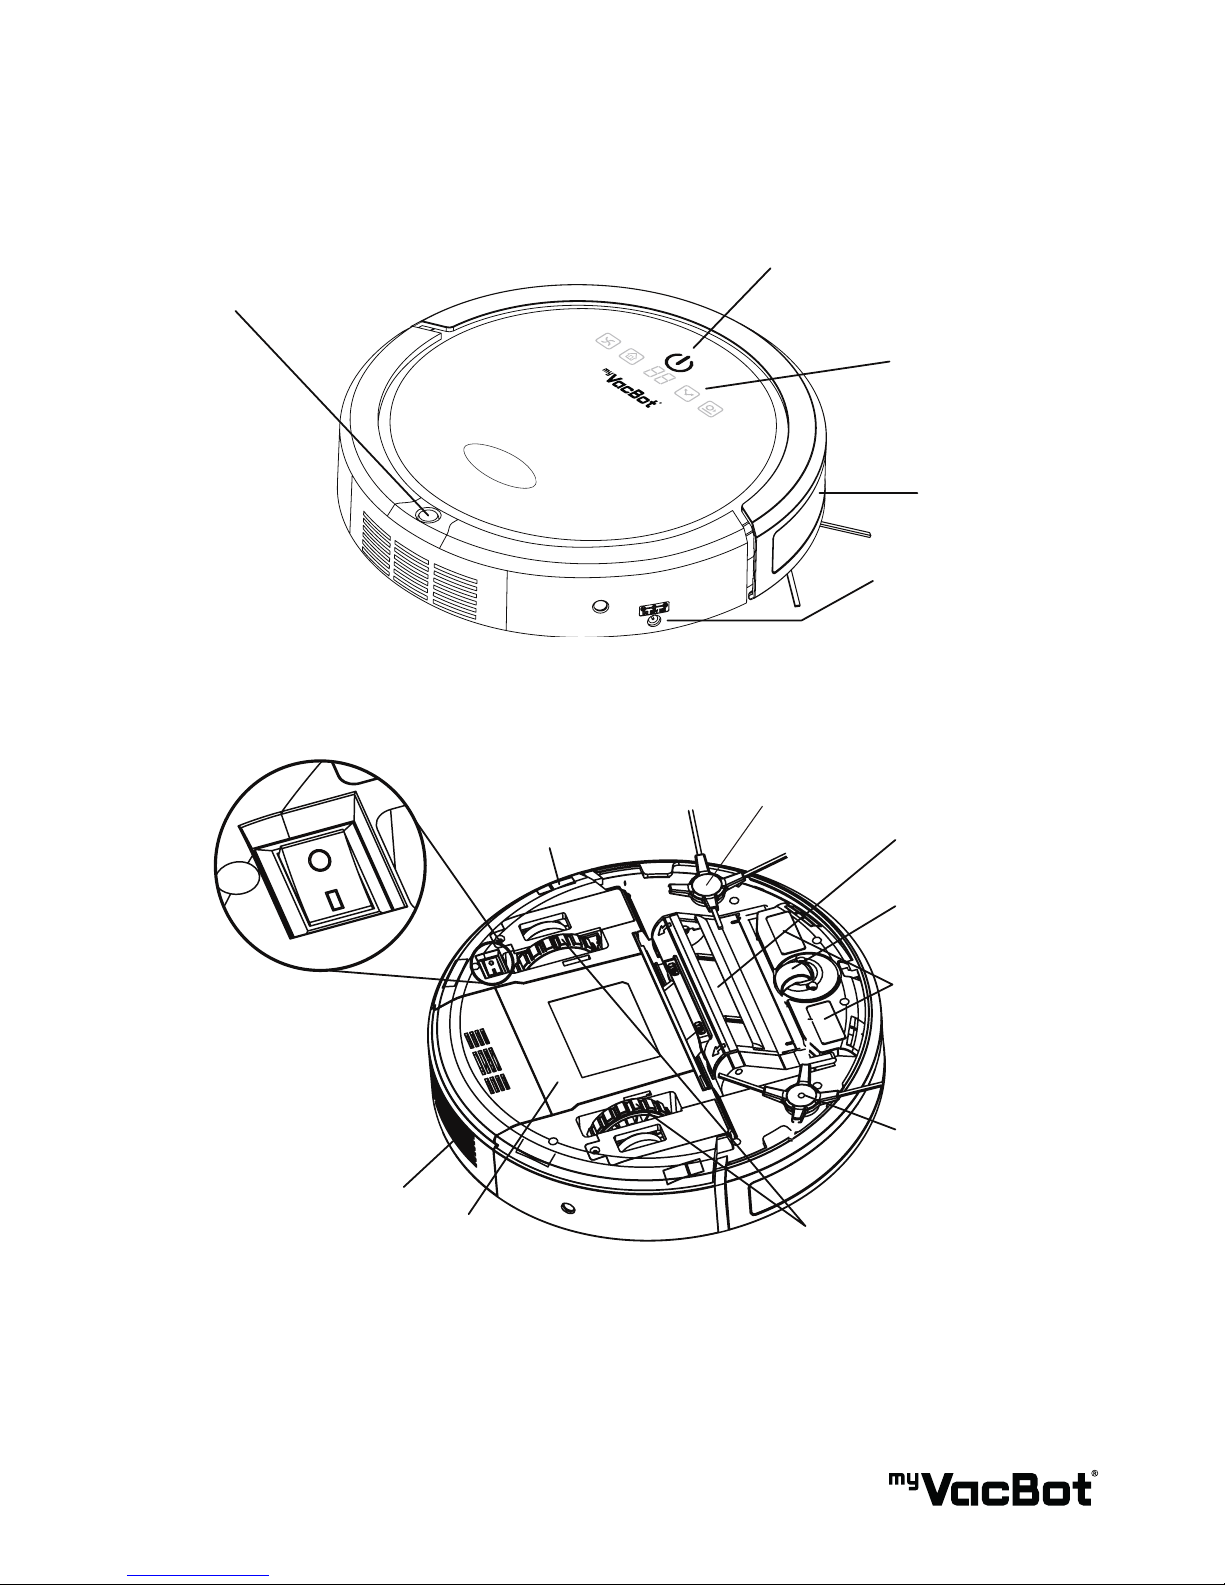
Dust-bin button
Function display
Bumper
Charger Inlet
Power switch
Start / Stop switch
Drop-Sensor (*4)
Side-Brush
Main-Brush
Universal Wheel
Charging-Pad
Side-Brush
Wheel set
Dust-bin unit
Air-outlet
Power switch
– : ON
o : OFF
Page 8
8
06 FEATURES & CLEANING MODE
07 CLEANING FEATURES
08 CLEANING MODES
Robotic Features
1. Scheduler/Recharging Home Base – Auto cleaning with scheduler & auto recharge when low on
battery
2. Ultrasonic Obstacle Detection
3. Ultrasonic Collision Obstacle Detection
4. Anti-Falling Cliff Detection Sensor
5. Ultrasonic Dust Sensors
6. Ultrasonic Room Limiter (Sonic Wall): can be used if needed to limit the access of the vacuum and oor
mopping robot in certain areas
7. Remote Control
1. Side brushes and powerful suction inlet – powerful suction and full coverage of cleaning.
2. Floating Roller Brush – allows the roller brush and suction to stay close to the ground, covers all the
dead spot while having full suction power.
3. Dust Filter & HEPA type Filter – Dust Filter holds normal debris and extends HEPA Filter’s life span. High
efciency particulate air lter traps the ne particles which trigger allergy and asthma symptoms.
4. Wet Mopping Base: uses wet mop with reservoir
5. Mop Track: to fully use every part of the mop
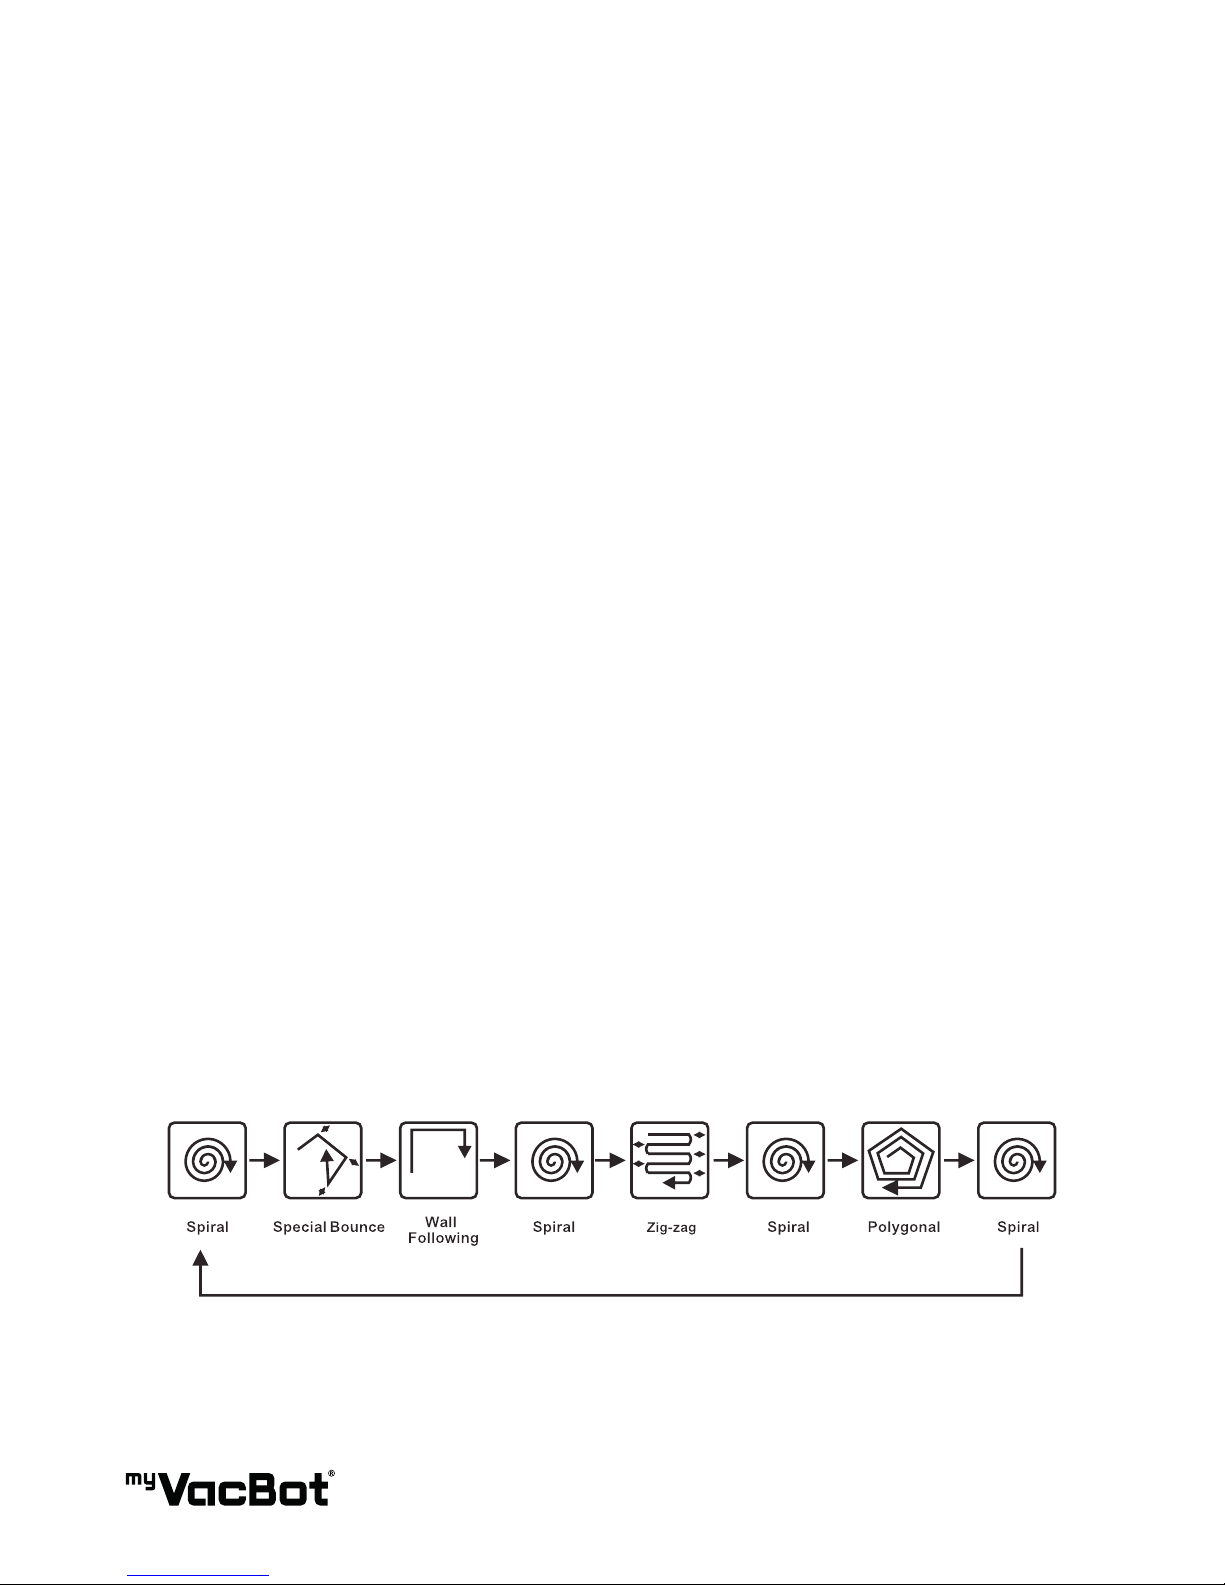
1. Auto Mode
Once the vacuum and oor mopping robot is activated without specic cleaning instructions, it will
automatically execute the auto function by repeating the ve different modes. The combination of different
cleaning patters will ensure the vacuum and oor mopping robot nishes the cleaning of any given space or
area.
2. Manual Mode
User can manually instruct the vacuum and oor mopping robot to perform any specic cleaning patterns
depending on different spaces to be cleaned.
Page 9
9
NOTES
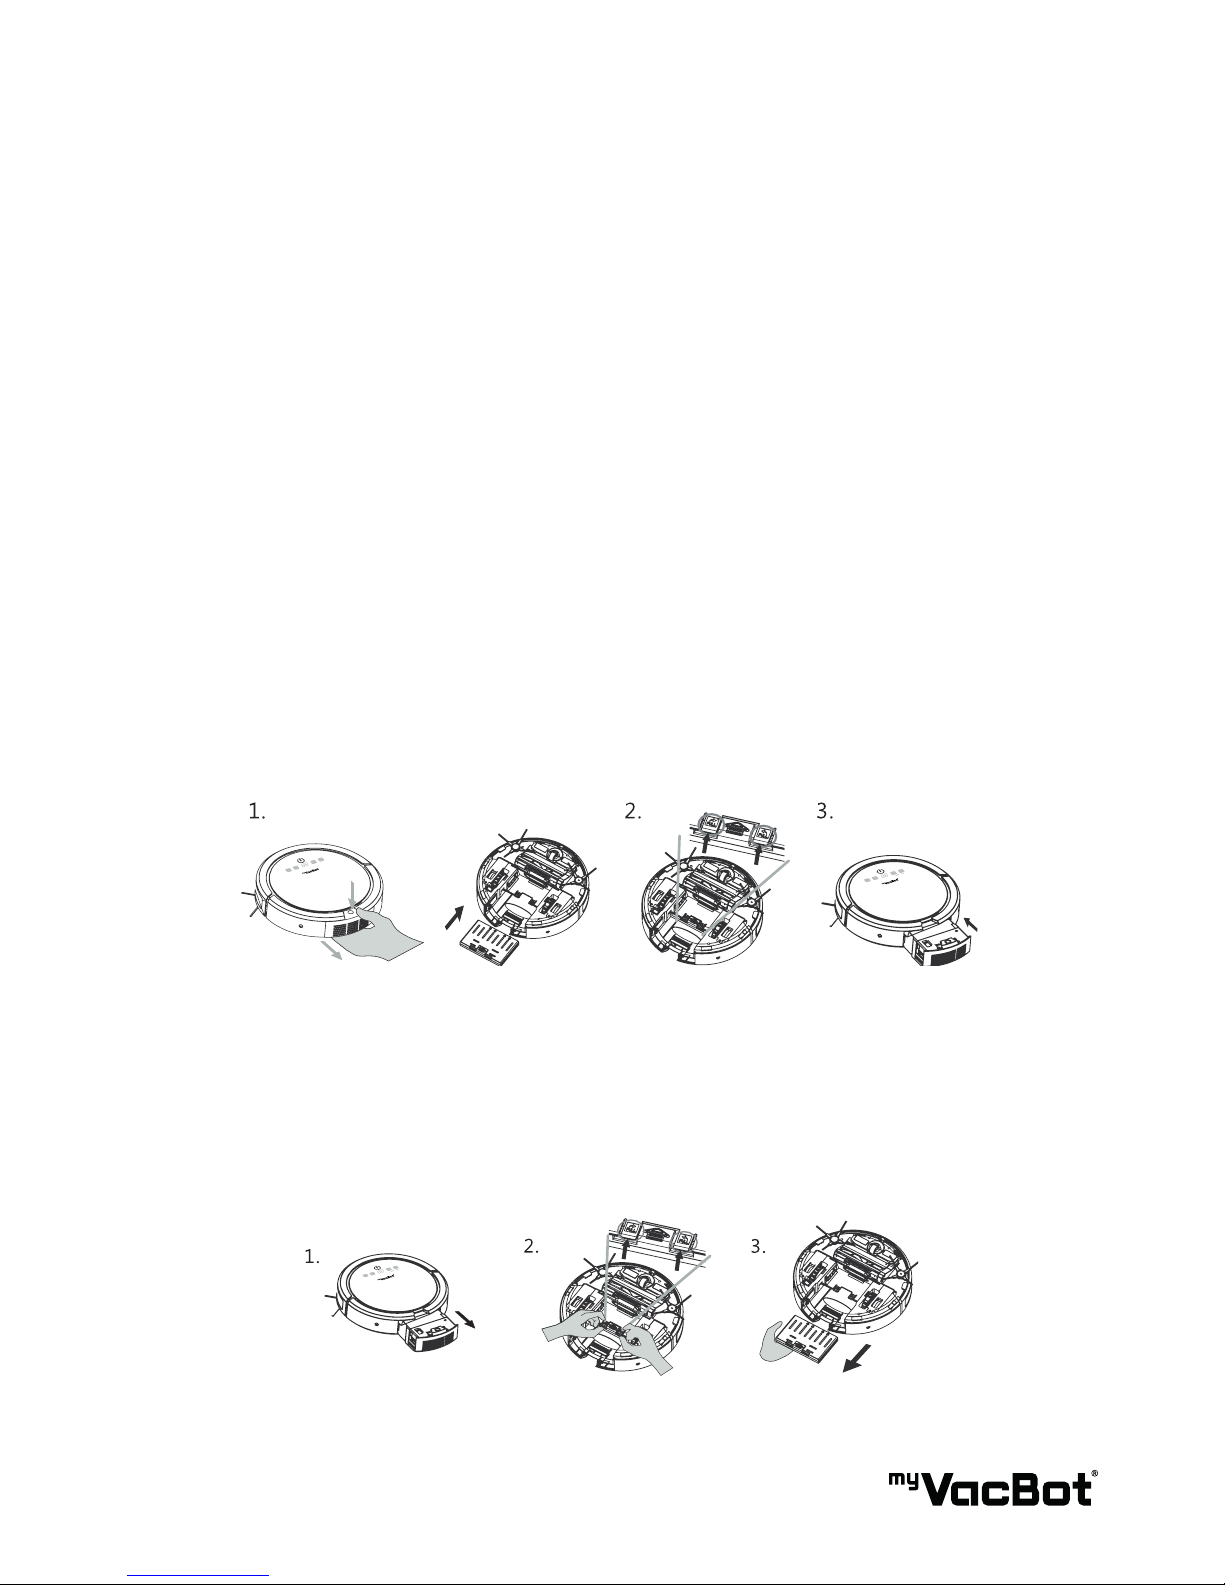
09 BATTERY INSTALLATION
10 BATTERY REMOVAL
1. The vacuum and oor mopping robot is suitable for hard oors and low to medium pile carpets.
2. This vacuum and oor mopping robot is not suitable for very uneven surfaces. Do not use in long pile/
tick carpet. Fold carpet fringes under the carpet before starting operation.
3. Please note that this robot will collect dust and small particles. It will not clean paper, plastic bags and
other large debris. It will get entangled in wires, so please declutter oor surfaces before using.
4. Do not leave bottles, lamps or other breakables on the oor.
5. Do not use in tight spaces less than 38cm wide as the vacuum and oor mopping robot may get blocked.
6. Do not use on wet or greasy dust.
The vacuum and oor mopping robot battery is user replaceable. If the battery stops keeping its hold,
please re-order replacement form the manufacturer or service centre.
1. Push the dust bin release button and pull out the dust-bin. Flip the robot over and push the battery into
the slot.
2. Push the battery until it clicks in.
3. Flip the vacuum and oor mopping robot over again and insert the dust bin back into the body.
1. Remove the dust bin rst and ip the vacuum and oor mopping robot over.
2. Push the two battery hook buttons simultaneously. The battery will pop out automatically.
3. Remove the battery.
Page 10
10
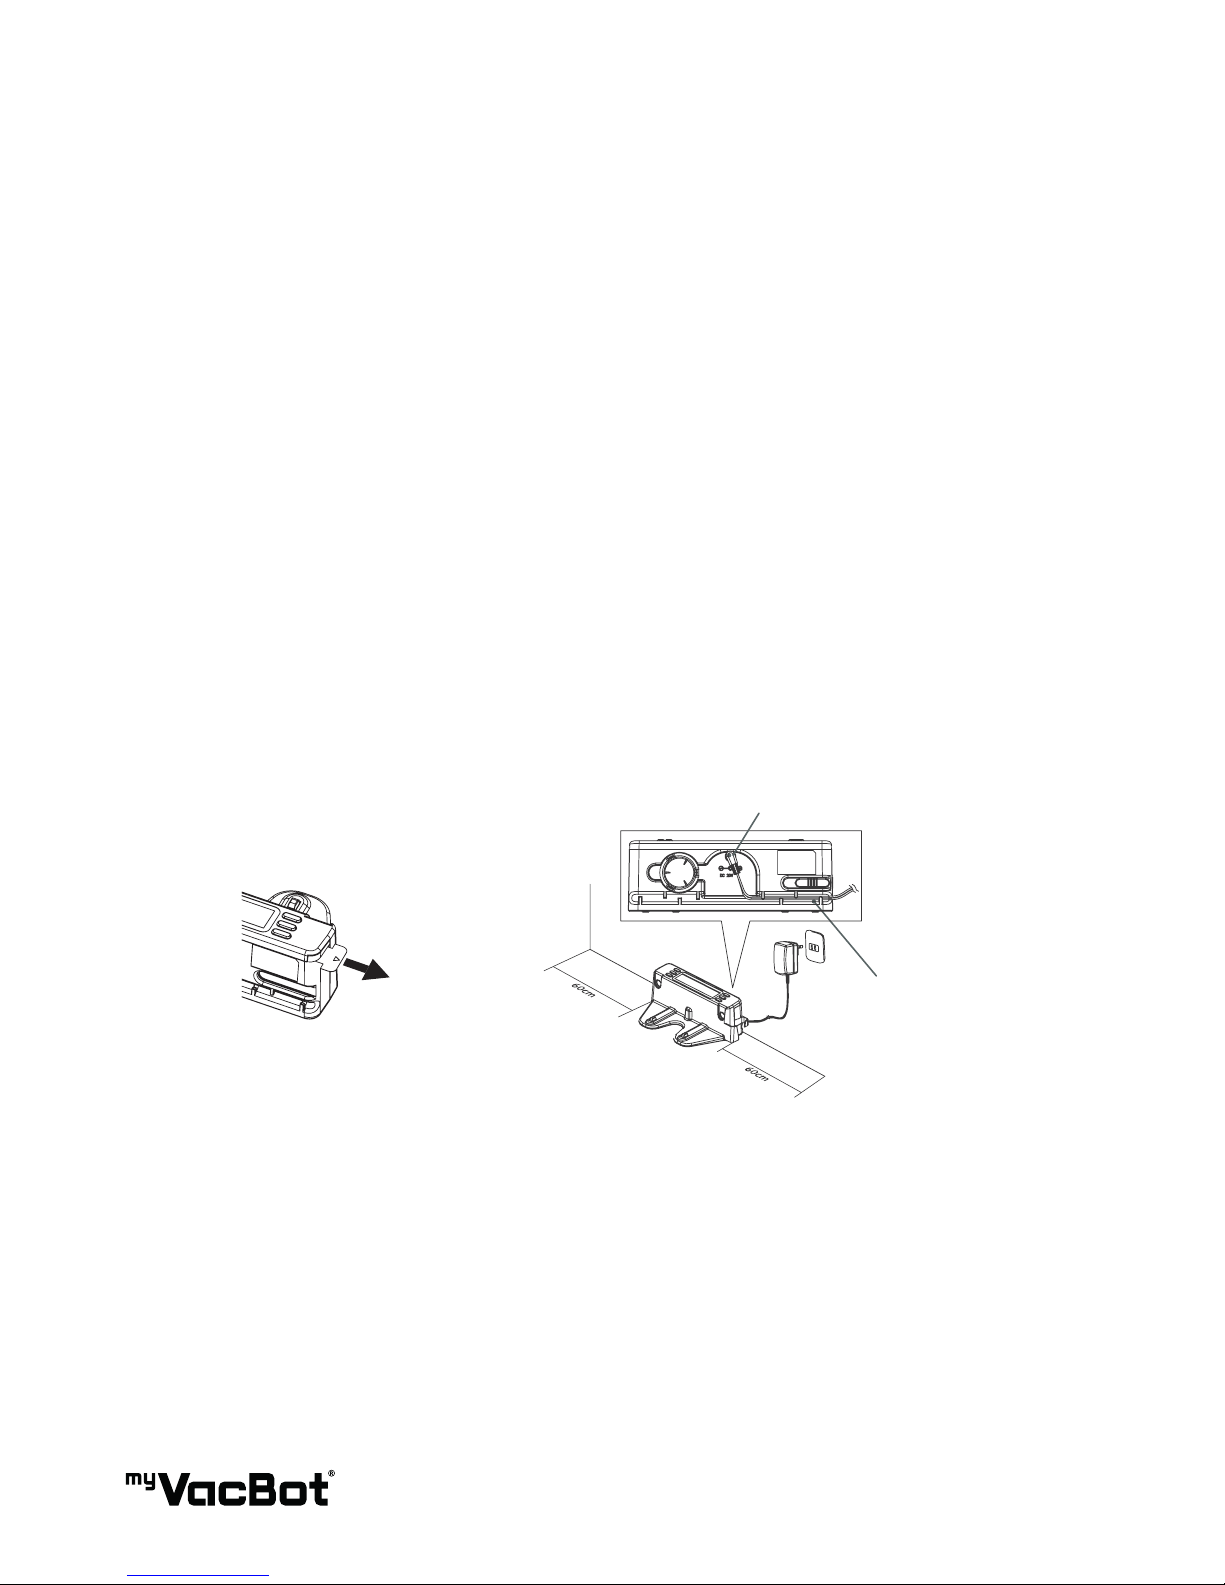
11 CHARGING
12 DOCK
13 DOCKING TEST
If the vacuum and oor mopping robot shuts down while working or the battery indicator ashes, please
charge the vacuum and oor mopping robot immediately. When the vacuum and oor mopping robot
completes its cleaning cycle or the battery level is low, the vacuum and oor mopping robot will return to its
Home Base automatically if there is enough power left to do so.
1. Plug the charger in the power outlet. Insert the power cable into the Home Base and
place the robot to charge.
2. The power plug can be inserted in the side of the vacuum and oor mopping robot. If the battery
indicator ashes, it means the vacuum and oor mopping robot is charging normally.
• The Home Base must be positioned on an even oor surface against a wall with at least a 60cm (2ft)
clearance around.
• Connect the AC adaptor to the power socket on the rear side of the dock or robot.
• Only use the AC adaptor provided by the manufacturer. The LCD display on the charging dock will turn
on when it is plugged in.
• Always keep the dock plugged in.
• Leave the vacuum and oor mopping robot on the oor somewhere near the dock.
• Press the “HOME” button on the remote control.
• The vacuum and oor mopping robot will return to the Home Base automatically. If the vacuum and
oor mopping robot fails to dock, check the installation process to make the necessary adjustments to
the docking station until the robot can dock properly.
Pull out
Remove the insulation sheet
Charger socket
Wire slot
Please sattle down the cable of
charger into the back side slot
of base.
Page 11

11
14 ROBOT BATTERY RECHARGE
15 ROBOT BATTERY CARE
NOTES
• When the Power Button on the vacuum and oor mopping robot blinks red, this indicates that the
battery level is low.
• The robot will shut down the vacuum engine and go back to the recharging Home Base.
• The AC adaptor can be plugged into the vacuum and oor mopping robot directly to recharge
the battery.
• When the battery is fully recharged, the Power Button will light up a solid blue. The recharging process
is about 3.5 hours.
• High capacity rechargeable batteries are used in this robot.
• The batteries can last for hundreds of recharging cycles if it is properly cared for.
• Recharge the battery as soon as the vacuum and oor mopping robot is used. Keep the robot charged
when not in use.
• If the vacuum and oor mopping robot will not be used for a longer period of time, remove the battery
from the robot and store it in a cool and dry place.
1. Charge the vacuum and oor mopping robot for at least 24 hours before the rst use.
2. Each time the vacuum and oor mopping robot is fully depleted charge for at least 3.5 hours.
3. Never use the vacuum and oor mopping robot in temperatures less than 0°C or over 40°C as this will
reduce the battery life and performance.
4. It is normal for the temperatures of the charger to increase during the charging process.
Note: All the settings are disabled while battery is charging. LCD screen will be on and the timer and the
battery icon is ashing and the charged percentage is showing.
Page 12
12
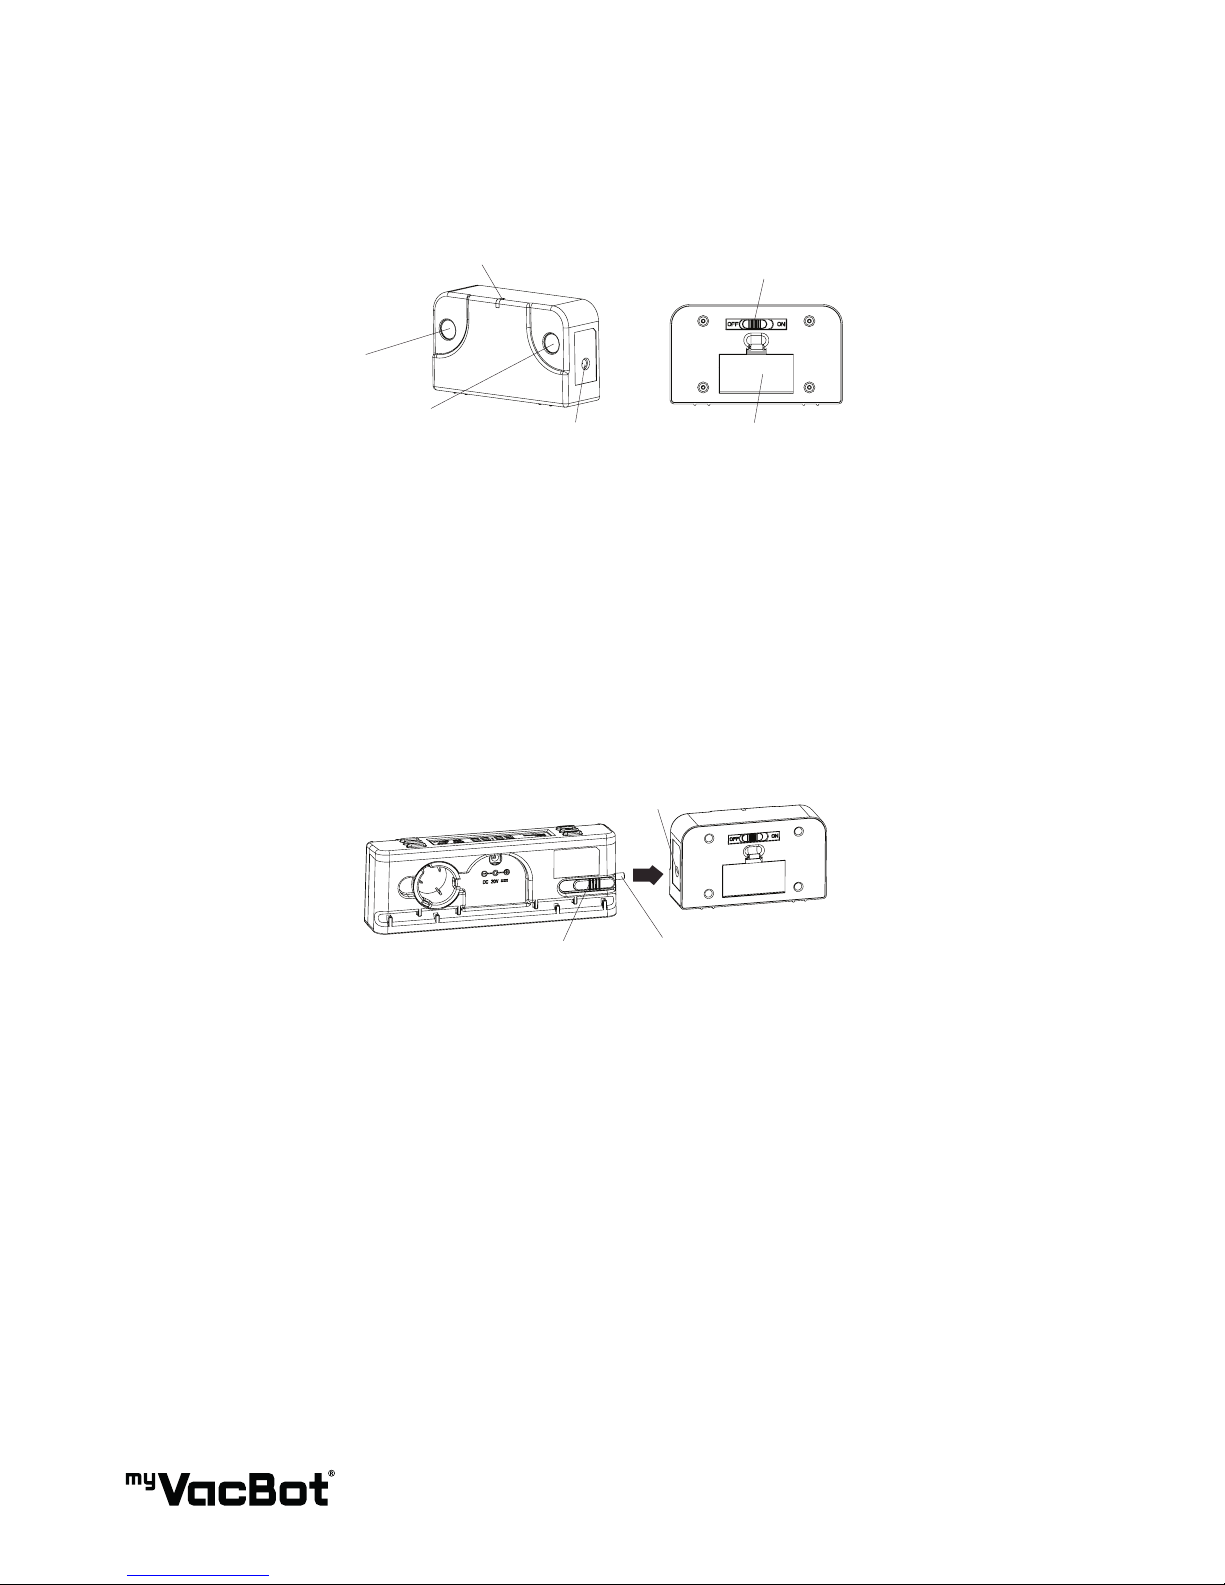
16 ROOM LIMITER (SONIC WALL)
The Room Limiter creates an invisible ultrasonic barrier that myVacBot S200 will not cross.
Instructions
1. The Sonic Wall is powered by 2 AA batteries. Make sure to install the AA batteries with correct polarity.
2. To turn on the Sonic Wall, slide the power switch on “ON” position.
3. When turned on, the blue LED light blinks for 70 seconds, then turns into standby mode. When
myVacBot S200 starts working, the Room Limiter will turn on and show blue LED light.
4. The best effective distance of Sonic Wall barrier is about 2M (10ft).
5. The LED light will blink when the Sonic Wall is low in battery.
If you use 2 rechargeable batteries, you could charge the Sonic Wall by plugging the zone divider into the
Home Base.
Step 1: The power switch of the Sonic Wall must set to “ON” position.
Step 2: Press and slide out the DC Plug from charging dock.
Step 3: lug the DC Plug into DC inlet, the LED light will blink.
Step 4: When recharge is complete, LED will glow continuously.
Power indicator LED
Sonic receiver
Power switch
Battery coverCharging Inlet
Sonic receiver
Charging-base
DC Inlet
Slide switch
DC Plug
Room Limiter
Page 13
13
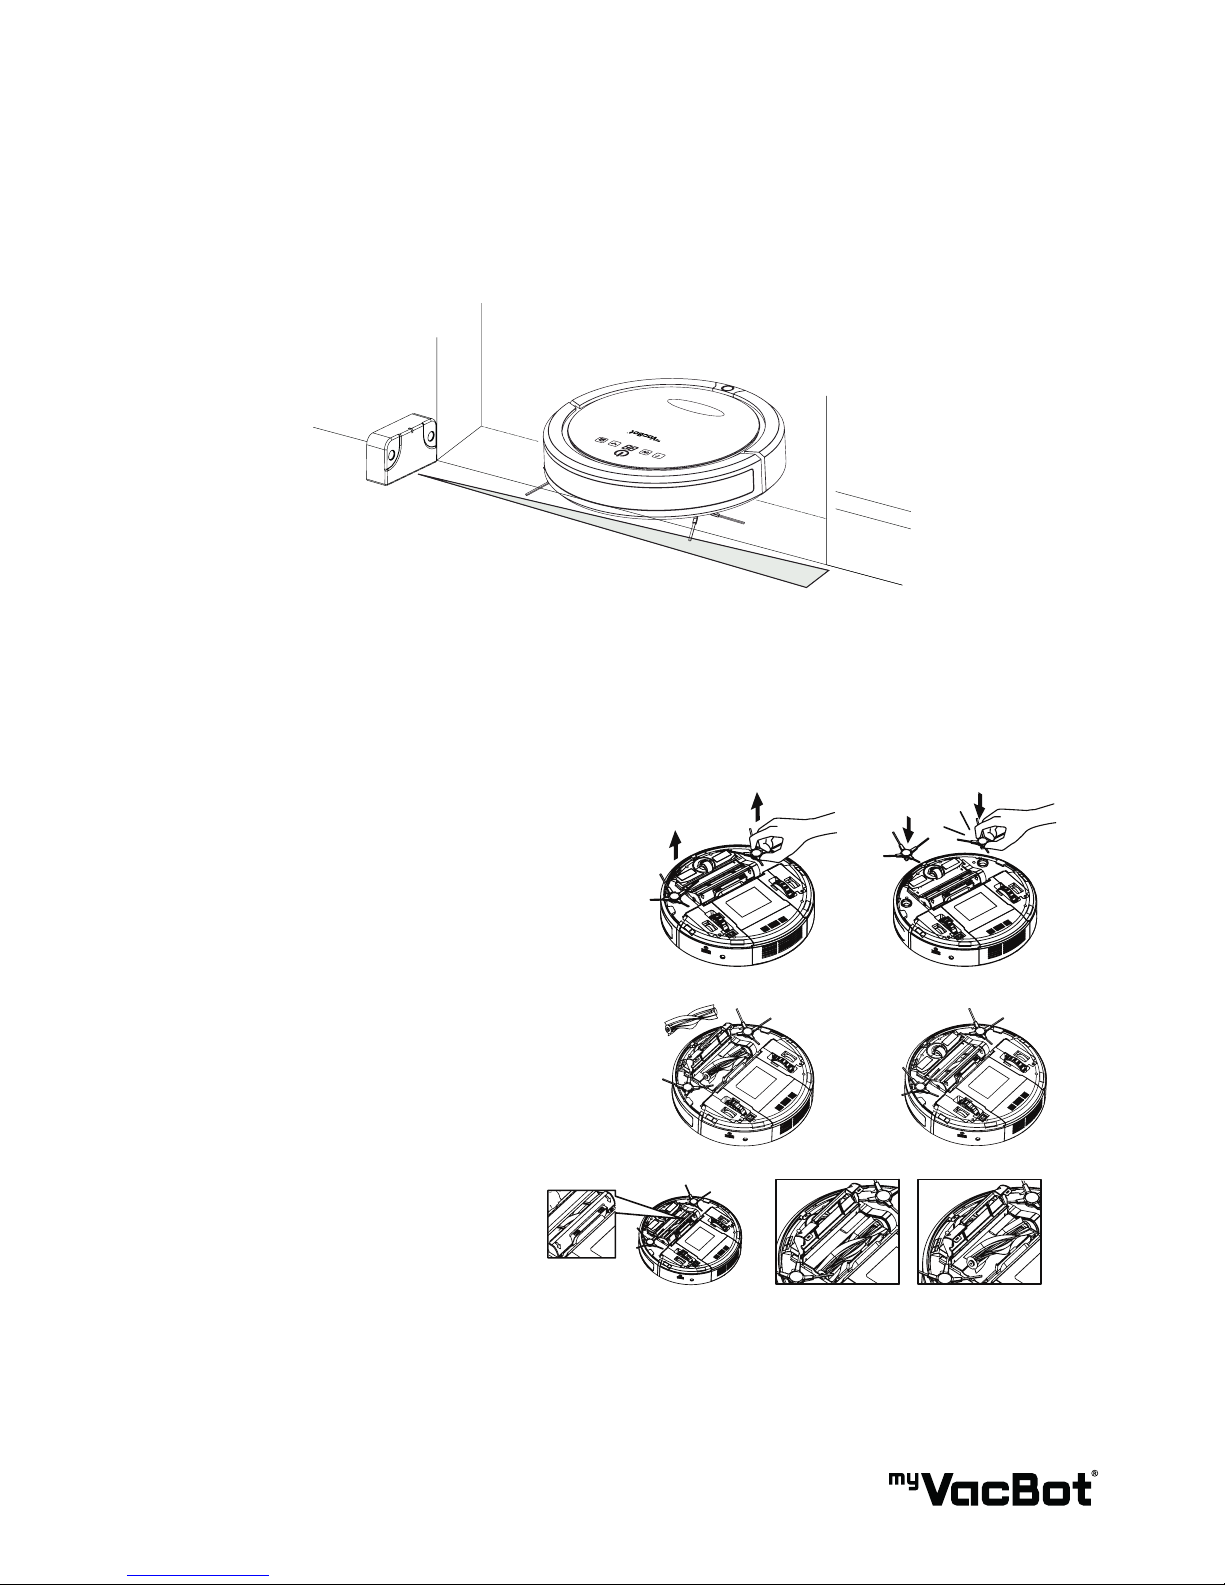
6. When myVacBot S200 is cleaning, the Sonic Wall must be positioned at least 1m (3ft) away from the
Home Base and should avoid facing towards it.
7. When the vacuum and oor mopping robot completes the cleaning cycle you can power off the Sonic
Wall by sliding the power switch to “OFF” position. When the vacuum and oor mopping robot detects
the invisible barrier, it will turn around and move to another direction.
17 SIDE BRUSHES & MAIN BRUSH
Side Brushes
Installation:
Insert each side brush into the socket.
Press it rmly until it is properly locked.
Removal:
Pull the side brush from the bottom.
Main (Rolling) Brush
Installation:
Insert the main brush, then press the “Push”
button and close the cover.
Removal:
Press the “Pull” button,
then pull out the main brush.
Page 14
14
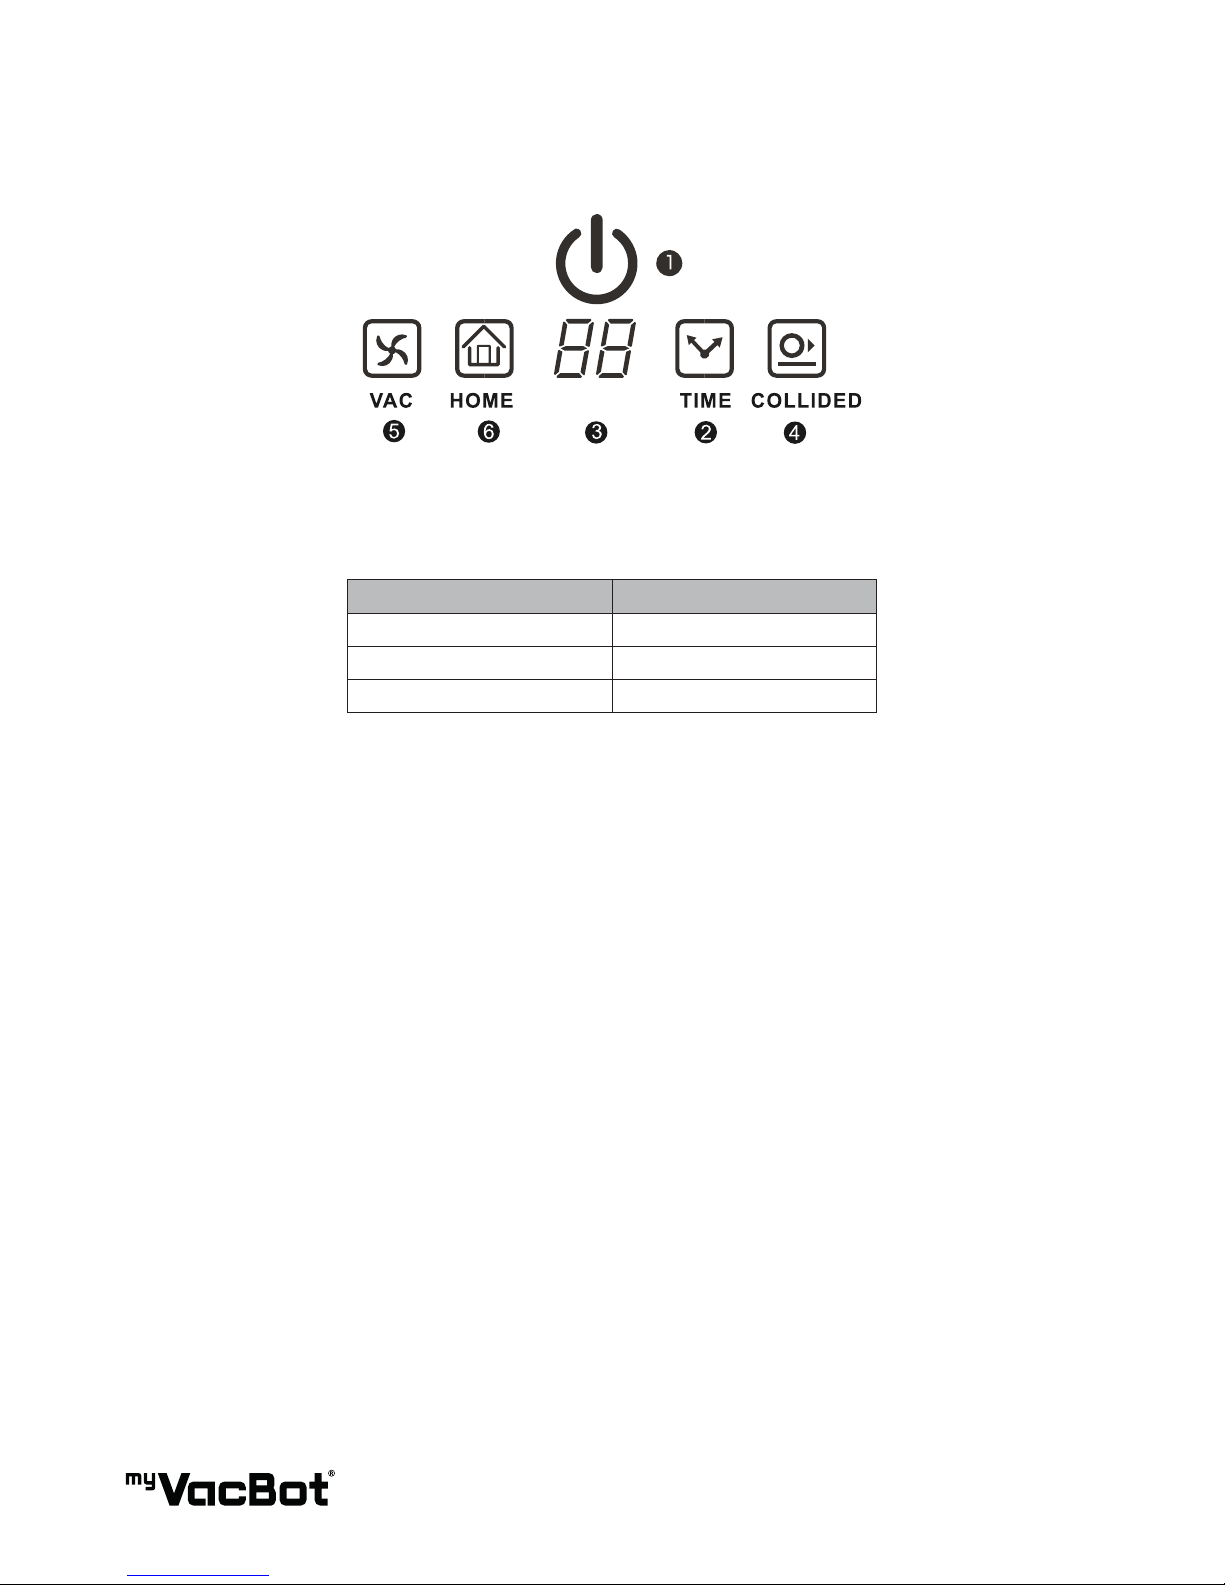
Power Button:
Press the Power Button to activate the vacuum and oor mopping robot. The button will light up blue. The
power button light indicates the status of the robot and its system.
Power Button Light System Status
Red LED Blinking Battery Level is low
Blue LED Blinking Battery is recharging.
Solid Blue Battery is fully charged
1. Start/Stop Button:
Press this button and it will light up blue. The vacuum and oor mopping robot is activated to perform the
cleaning cycle. Press the button again to stop the cleaning cycle.
2. Timer:
There are different cleaning time settings available. Users may use the remote control to enter specic
cleaning time settings (e.g. 10 mins, 20 mins, … 80 mins). The selected setting will be shown on the display.
When the vacuum and oor mopping robot is activated the default cleaning time setting is the last previous
time set.
3. Display of Timer / Cleaning Mode
The vacuum and oor mopping robot uses several patterns during the cleaning process.
1. Spot Spiral
2. Ultrasonic Collision Obstacle Detection
3. Wall Following
4. Zig-Zag
5. Polygonal Spiral
A. Automatic (the combination of patterns 1-5)
The user may use the remote control to select a specic cleaning pattern. The number or letter “A” will be
shown on the display.
When the vacuum and oor mopping robot starts to return to the Home Base, showing the letter “H” on
the display. Users may also interrupt the cleaning cycle by pressing the “Home” button on the remote
control. When the command is entered, the robot will stop cleaning and go back to the dock.
18 CONTROL PANEL
Page 15

15
4. Collided
When this function is activated, the robot will slow down its moving speed in order not to collide with any
objects when cleaning. This function is ideal on cluttered space.
5. Vacuum Motor
The robot cannot perform the cleaning process without the activation of the vacuum motor function.
6. Home
When this function is activated, the robot will start searching for the Home Base to charge itself.
All function buttons on the vacuum and oor mopping robot’s panel are available on the remote control.
There are some additional unique buttons on the remote control shown below.
Power Button:
Press this button to activate or to shut down the robot.
Start/Stop Button:
Press this button to activate the vacuum and oor mopping robot to perform or to stop the cleaning
process.
Direction Buttons:
Left/Right/Reverse/Forward buttons for users to control the robot movement manually.
Home Button:
This function interrupts the leaning cycle and commands the robot to go back to the Home Base.
Mode Button:
Manually sets up the cleaning mode of the vacuum and oor mopping robot. Each press will command the
vacuum and oor mopping robot to change its cleaning mode in the sequence of the following patterns.
Users may also nd the current pattern code on the vacuum and oor mopping robot’s display panel.
1. Spot Spiral
2. Ultrasonic Collision Obstacle Detection
3. Wall Following
4. Zig-Zag
5. Polygonal Spiral
6. Automatic
19 REMOTE CONTROL
Page 16
16
Collided Button:
1. Press this button to activate or to shut down the function.
2. Before the vacuum and oor mopping robot starts cleaning, it is suggested to clean up small items, like
clothing, power cords, cables and loose fringes of rugs.
3. Check if the dust-bin is full and empty it out before starting the cleaning cycle.
4. Press the Power Button to activate the vacuum and oor mopping robot.
5. Use the remote control to set up the preferred cleaning time or cleaning cycle. The vacuum and
oor mopping robot can clean a 6 to 8 square meters area in 10 minutes. However this ration varies
depending on types of oors and the complexity of the space.
6. Users may interrupt the robot’s cleaning cycle at any time by pressing the Start/Stop button either on
the robot panel or the remote control. By pressing the button again, the vacuum and oor mopping
robot will resume the previous cleaning cycle.
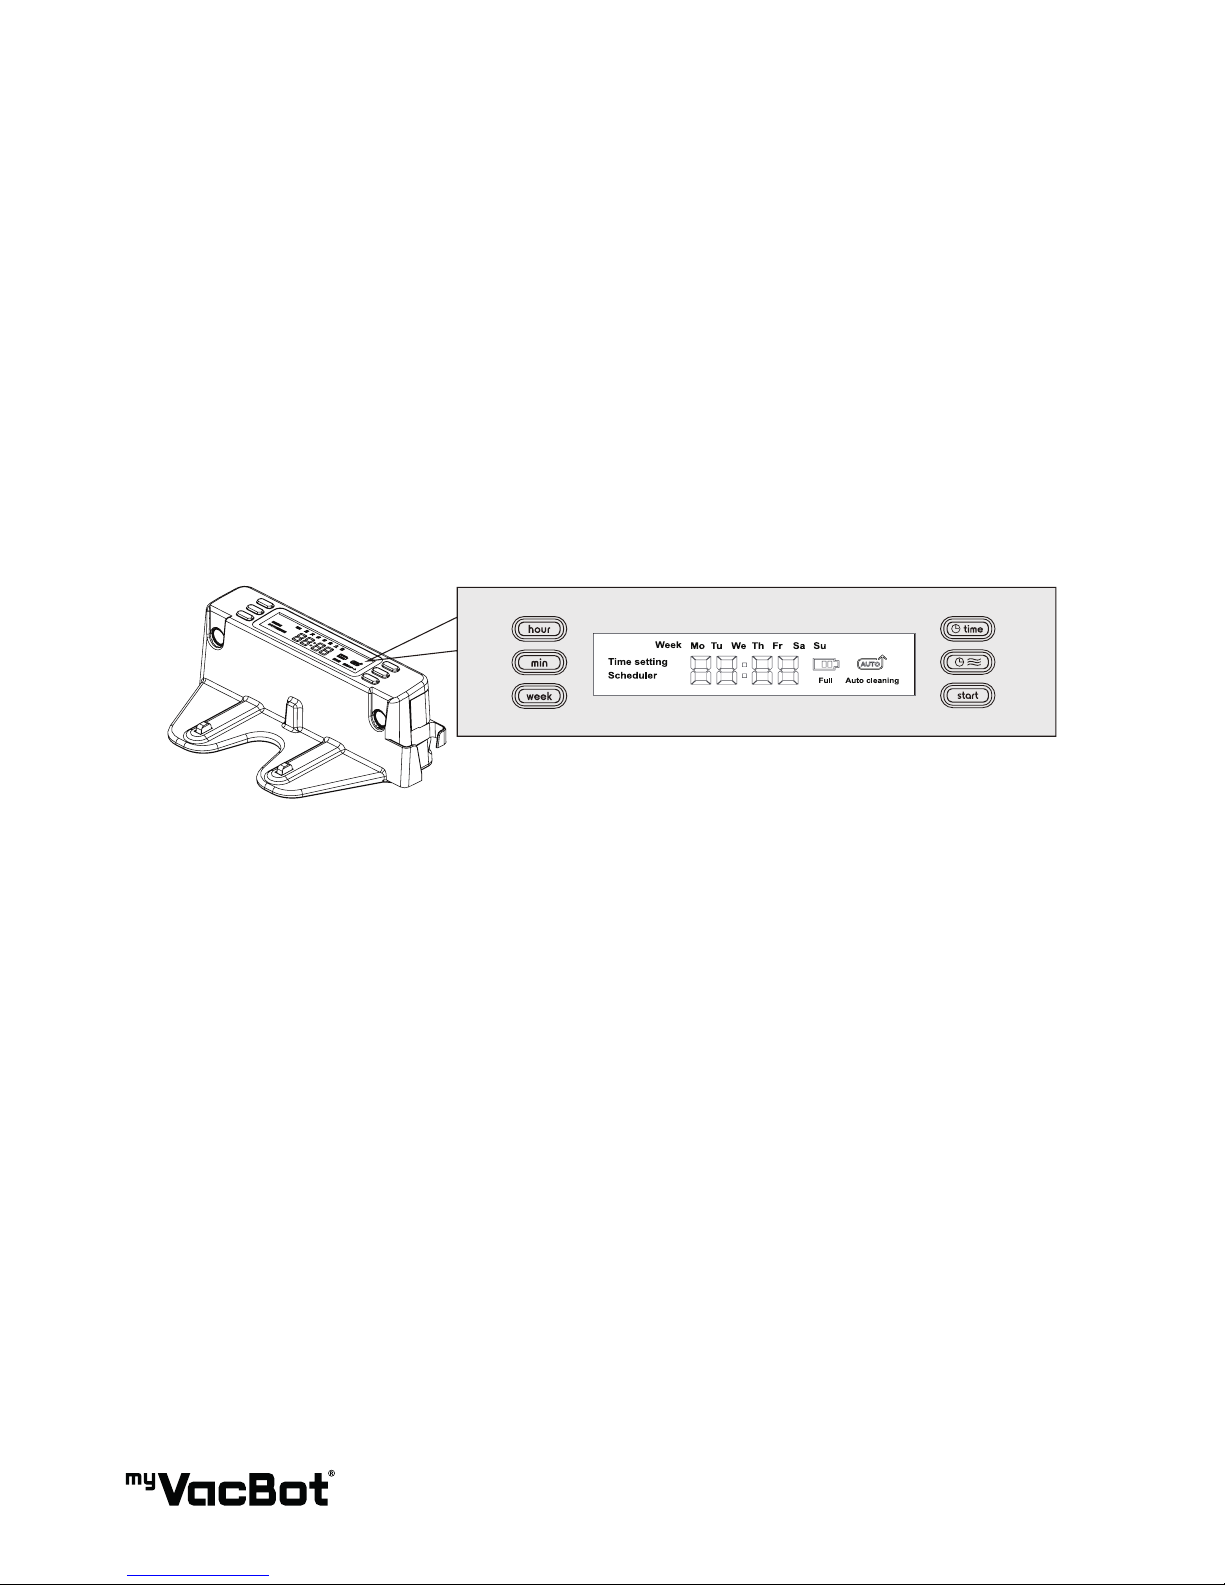
1. First, press the button “Time”. The LCD display will show “Time Setting”.
2. Press the “Week” button to choose the correct weekday.
3. Once the chosen weekday appears on the display, press the button again.
4. Follow the previous steps to complete the settings of “Hour” and “Min”.
Users may program the vacuum and oor mopping robot to perform the cleaning cycle on any preferred
day and time. This scheduling function is built into the Home Base with the LCD display and several setting
buttons. In order to perform this function, the Home Base needs to be plugged in at all times.
20 SCHEDULING
21 SETTING YOUR LOCAL TIME
Page 17

17
1. Press the “Schedule” button rst. The LCD display will show “Scheduler”.
2. Press the “Week” button. The LCD display will show “Mo (Monday)” blinking.
3. If Monday is the chosen day, press the “Week” button again. Then Monday will be programmed in.
4. The setting function will automatically change to the next following weekday every 8 Seconds. Press
“Week” when the chosen day appears on the LCD display to complete the settings.
5. Follow the previous steps until you have nished all cleaning day settings.
6. Press the “Hour” button to complete the hour settings.
7. Press the “Min” button to complete the minute setting.
8. The schedule setting function will automatically quit if there is no input for more than 60 Seconds.
9. When all settings are nished, the selected cleaning date and time will be shown on the LCD display.
10. After 10 Seconds the LCD display will go back to the clock display mode. Local current time will be
shown on the display.
11. The selected cleaning date will remain on the LCD display while the selected time is NOT.
12. To check the programmed cleaning time, press and hold the “schedule” button.
13. For changing or deleting the set schedule, repeat the precious setting process.
When the vacuum and oor mopping robot is docked and recharging:
1. Press the “Start” button. The LCD display will show “AUTO”. The vacuum and oor mopping robot will
start one cleaning cycle as soon as the battery is fully charged.
2. Press the “Start” button and hold it for 3 Seconds. The vacuum and oor mopping robot will its
recharging process and leave the Home Base immediately for one cleaning cycle.
22 SCHEDULING
23 AUTO START
Page 18
18
In order to keep the robot in the best condition and for the best cleaning performance, perform the
following maintenance.
1. Make sure the unit is unplugged before performing any cleaning operation.
2. Before rst use and continuing after each use, wipe of unit with a damp cloth and dry thoroughly.
3. Clean all the brushes and empty the rubbish container. Vacuum or wipe with a cleaning pad the inside
of the container.
4. DO NOT immerse the vacuum and oor mopping robot or the power supply in any liquid.
5. Reassemble the unit following the instructions and charge it before the next use.
6. Store the vacuum and oor mopping robot in a cool and dry place.
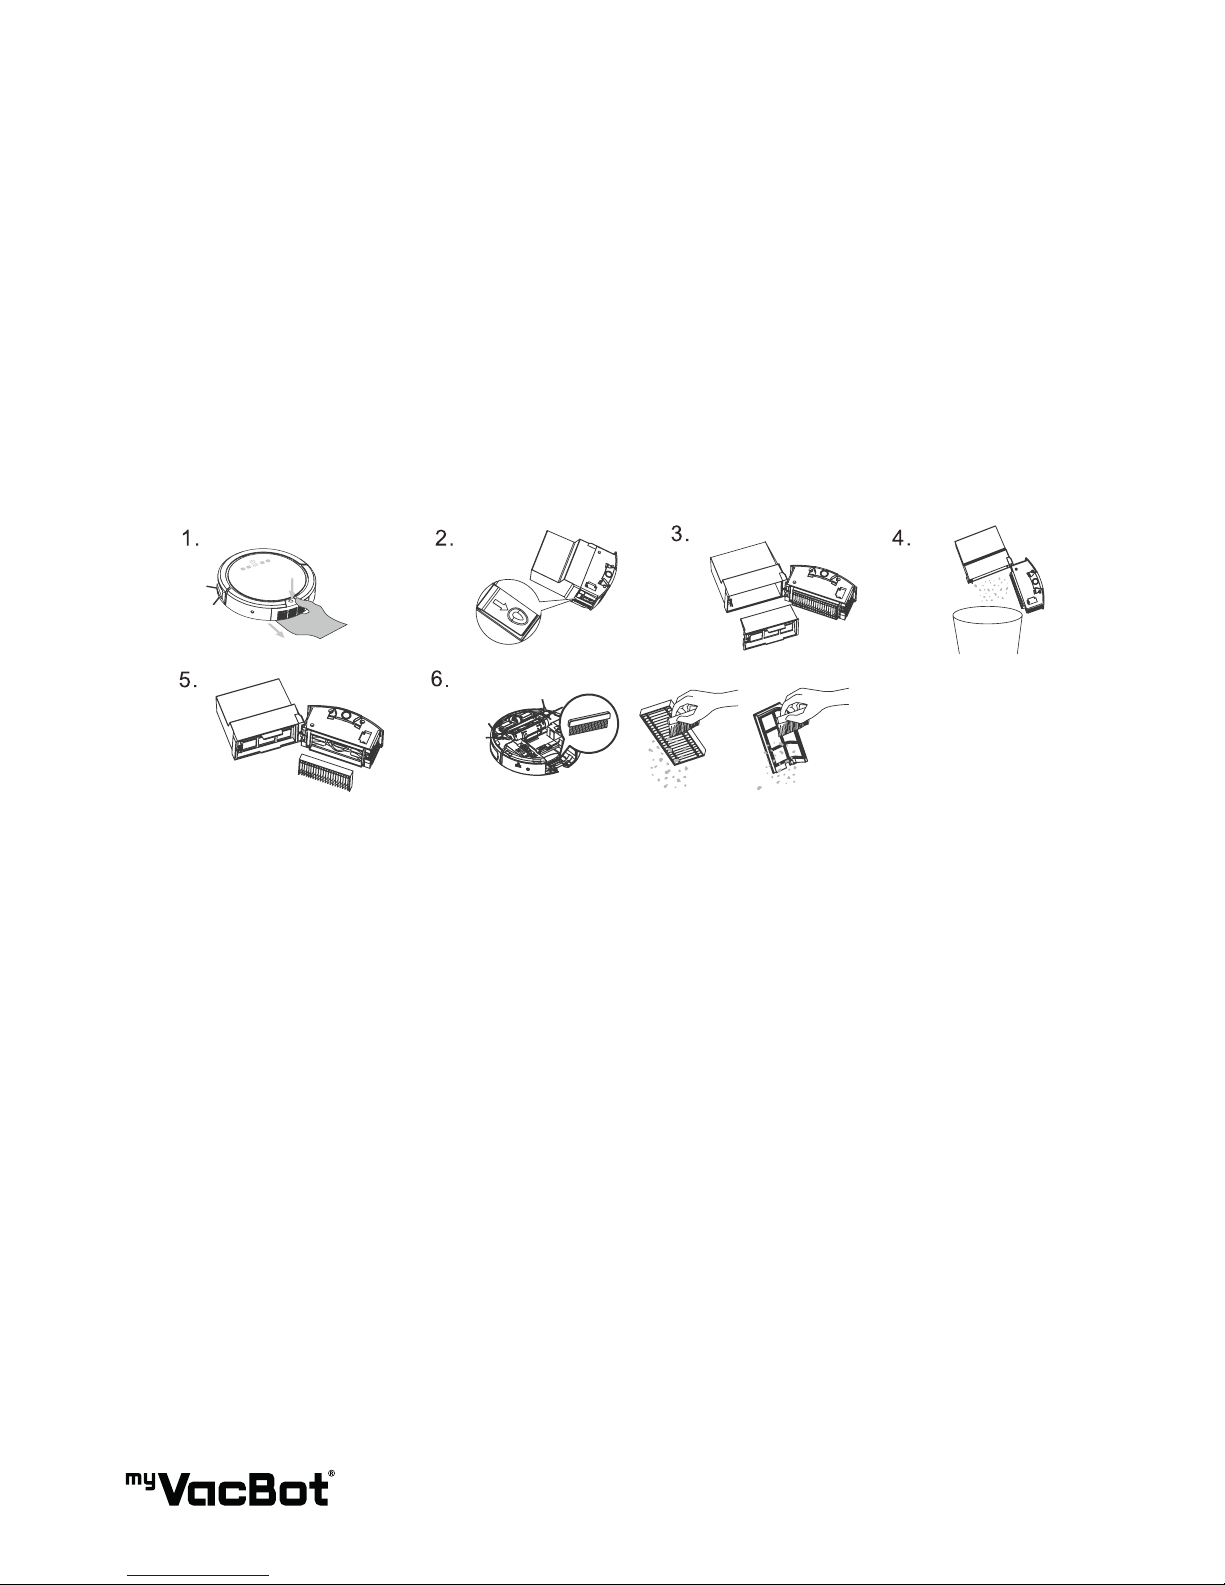
Basic Cleaning
1. Press the Dust Bin Release Button to remove the dust bin.
2. Press the side button to release the dust compartment.
3. Remove the debris lter.
4. Empty all dust and shake off all debris.
5. Remove the dust lter.
6. Use the included brush to wipe out the dust lter and debris lter.
Deep Cleaning
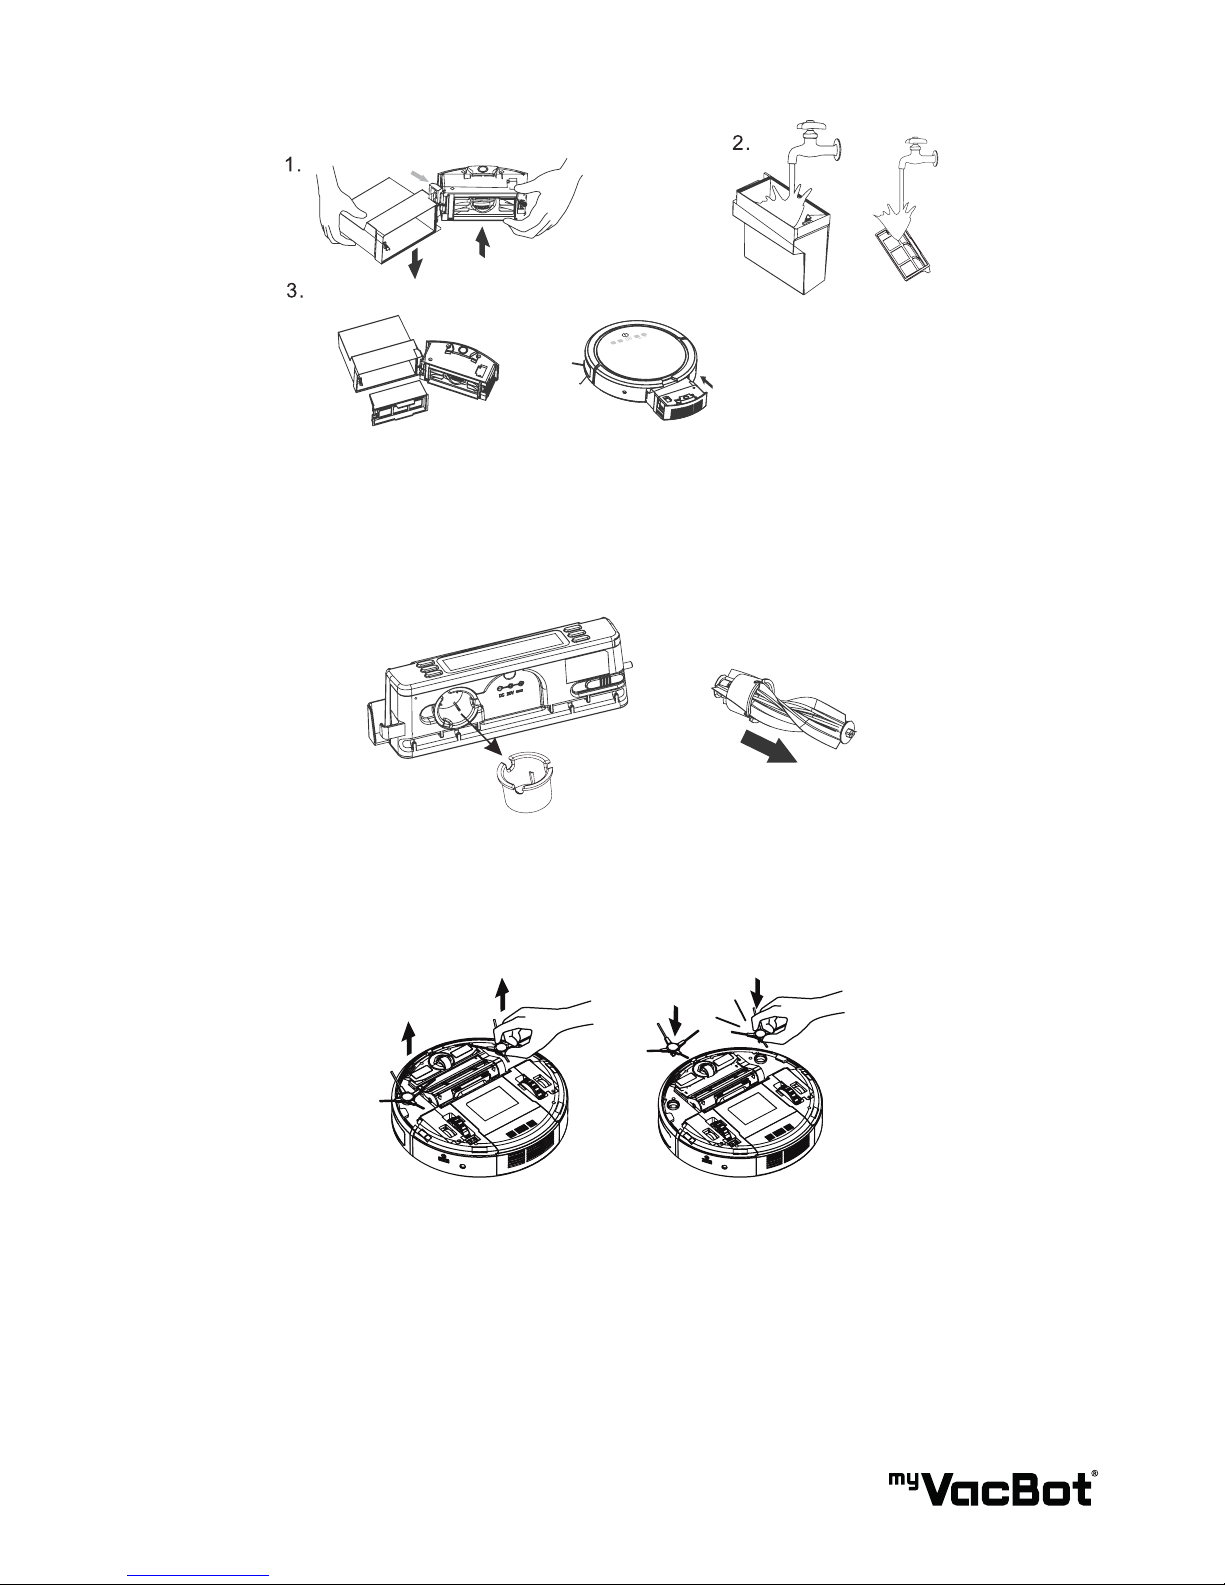
1. Carefully separate the dust compartment from the vacuum and oor mopping robot body.
2. Gently wash the dust compartment and debris lter.
3. Wipe them thoroughly with a cloth and let it rest until completely dry.
24 CLEANING & MAINTENANCE
25 DUST BIN & FILTER CLEANING
Page 19
19
Main Brush
1. Remove the Main Brush from its holder.
2. Take out the cleaning tool included on the rear side of the dock.
3. Slide the cleaning tool through the rolling brush.
Side Brushes
1. Remove the side brushes from their holders.
2. Clean the side brush and install them back.
Wheels and Sensors
1. Check and remove all debris and dirt.
2. The myVacBot S200 is equipped with four ground sensors. Please clean them gently using a wet cloth
or tissue. Do not use any solvents as they may damage the sensors.
3. Please check the side brushes for damages and debris. If hair or other debris are trapped please
unclick the brushes and remove them. Please change the side brushes if they are damaged. Only use
the parts provided by the manufacturer.
Page 20
20
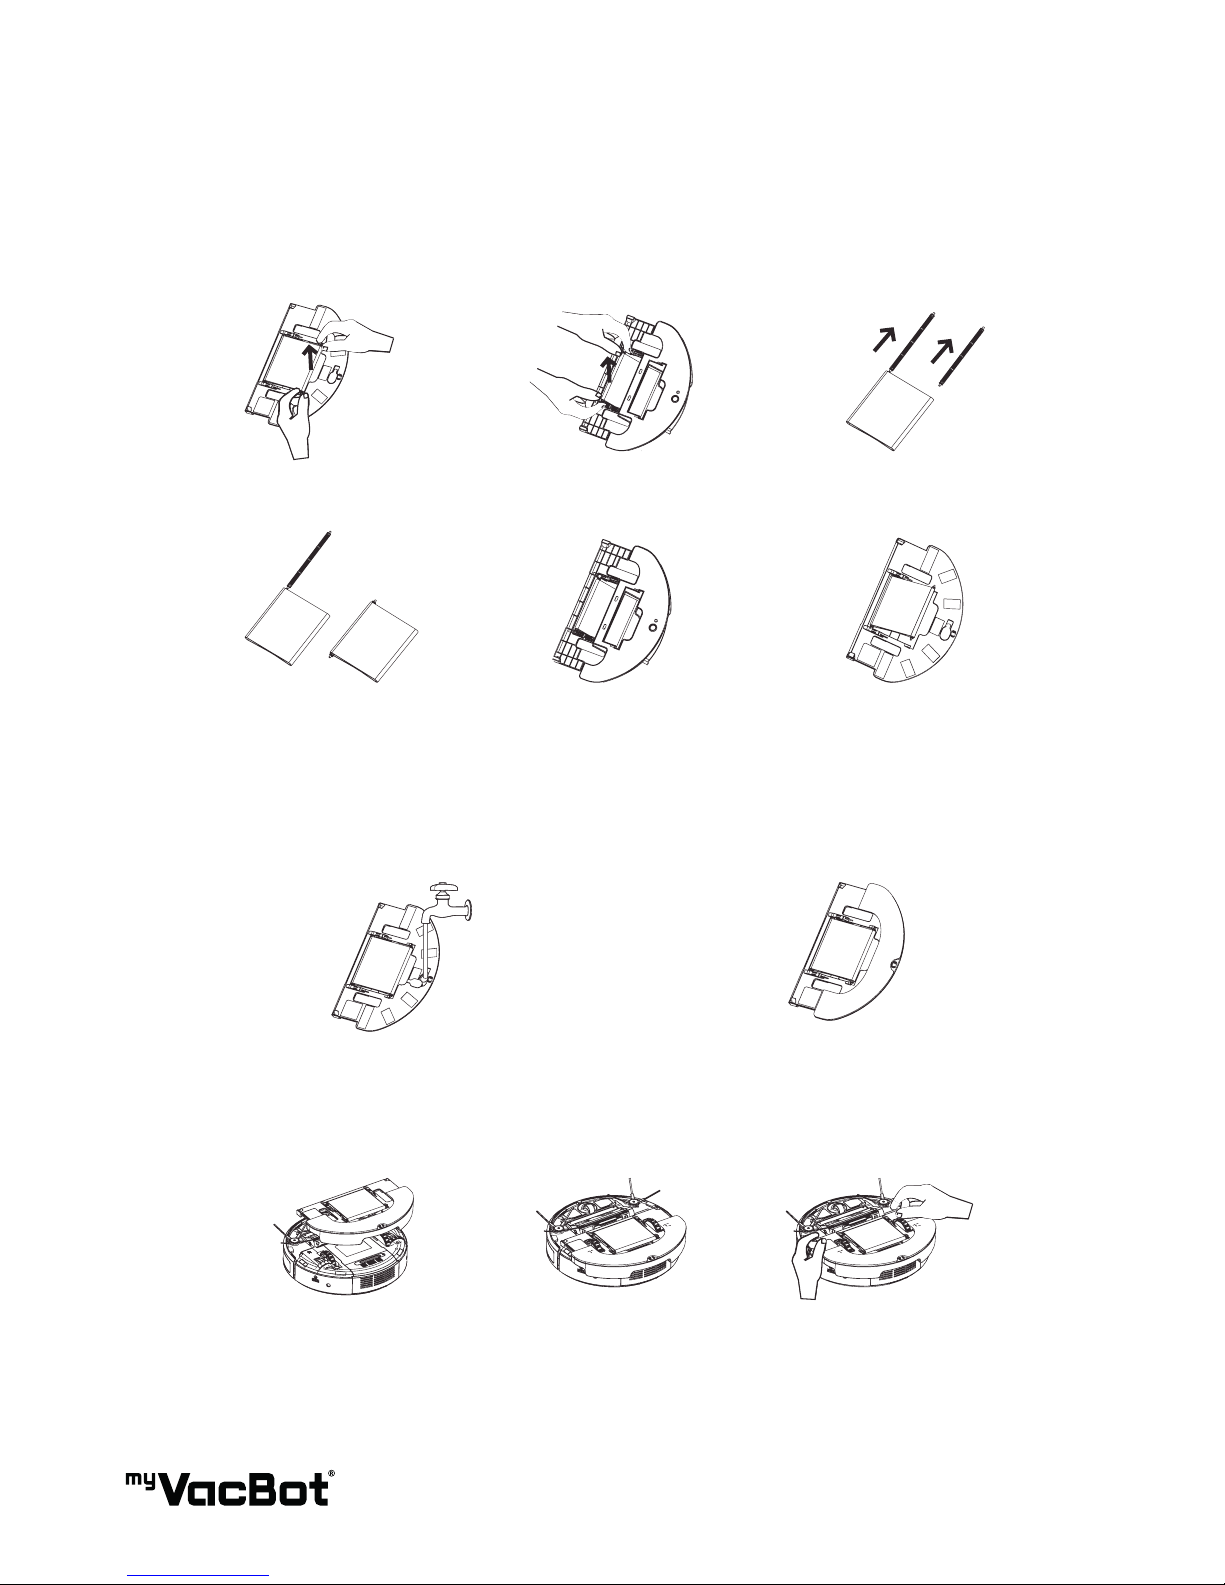
26 WET MOPPING BASE INSTRUCTIONS
Reminder: Wet Mopping Base needs to be taken off before cleaning on carpets.
Install New Mop:
Install Wet Mopping Base:
Remove their inner roller rst.
New Mop
Insert the roller from one end
of new mop.
Make sure that there is no leak and
dripping water. Then, align the
mopping base with the machine.
Open the ll cap and ll the reservoir with water. If
needed, add small amount of mild cleaning solution
to improve cleaning performance. Close the ll cap.
Place the dry mop along the Velcro
and the edge of the base.
Remove the second roller.
Top Side
Place the wet mop through
the base and toggle the roller
into the slots.
Press the mopping base rmly, the
wheels would go through the mop-
ping base.
Take rollers out.
Bottom Side
Insert the other roller
through the mop. Toggle the
roller into the slots.
To remove the wet mopping base,
lift from the “Pull” area.
Page 21
21
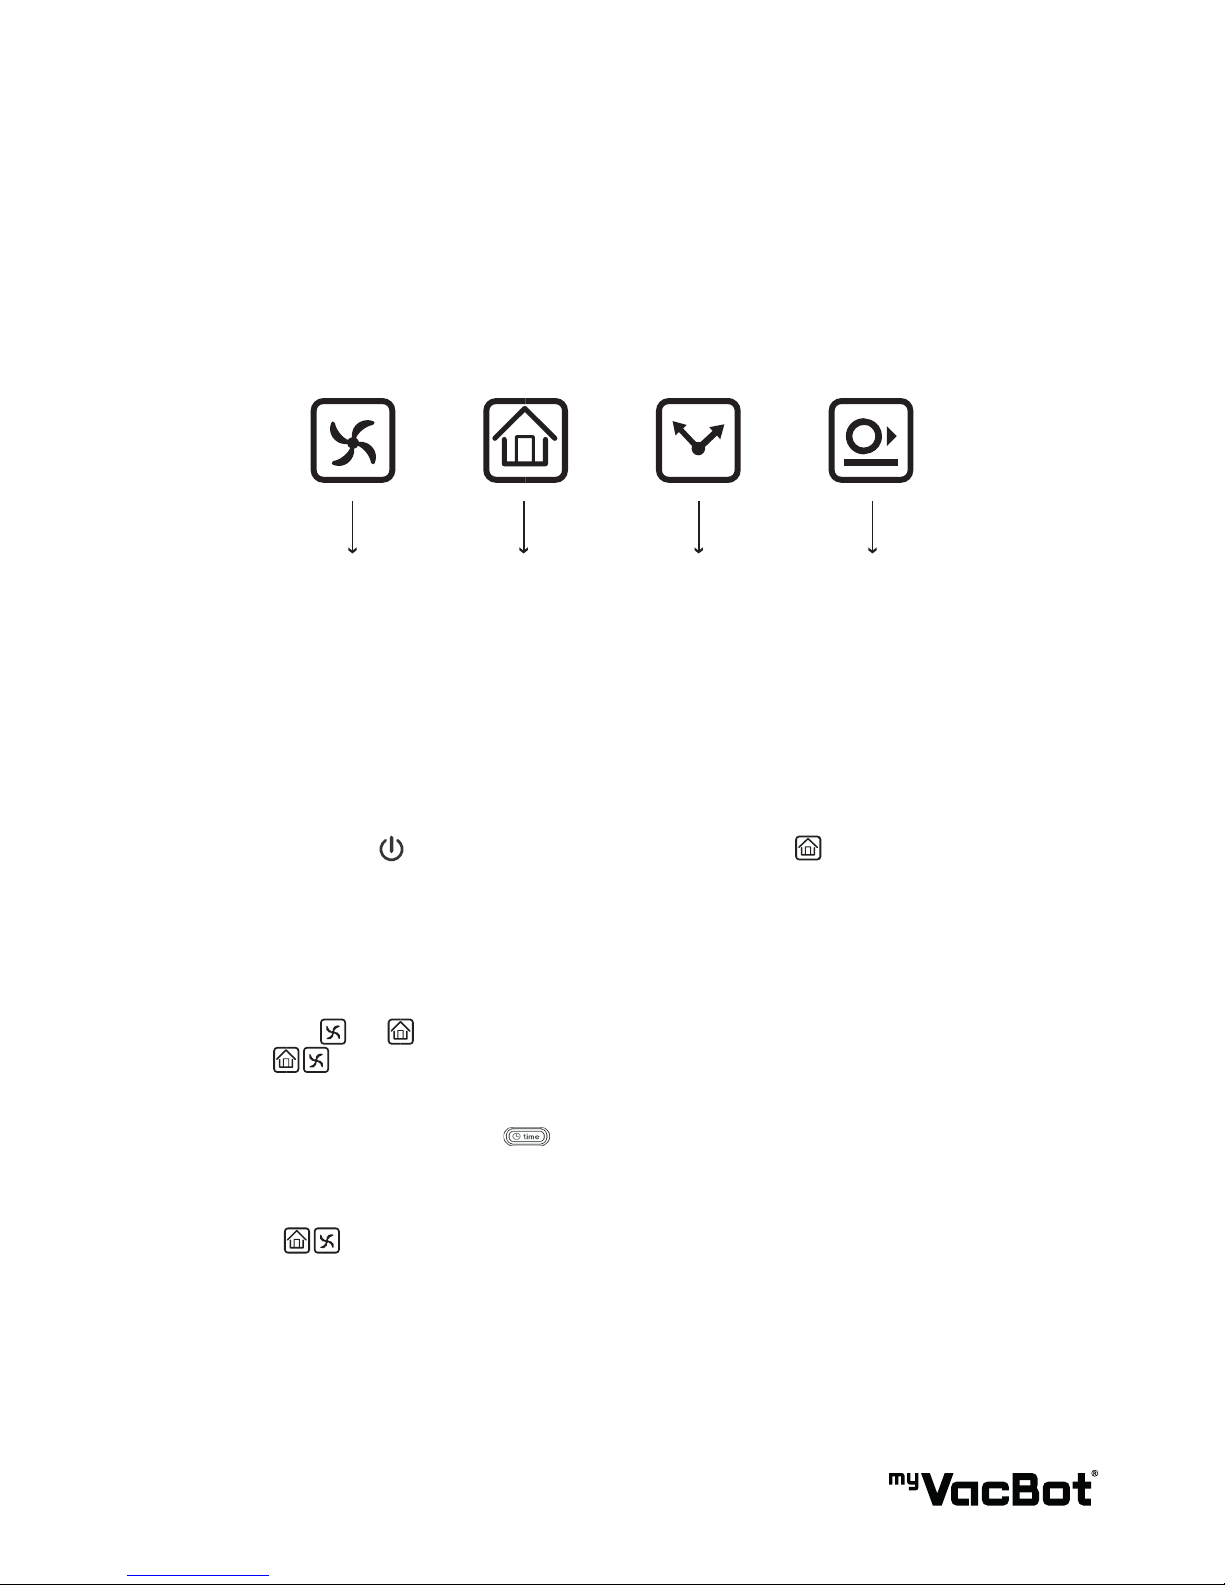
27 SETTING ID WITH MAIN UNIT
Purpose:
If you have lost or buy a new one of Home Base or Sonic Wall.
You are in need of a setting your ID into the new unit form communication with myVacBot S200.
How to set up an ID (Status of main unit indicator lamps when studying):
Light up --> means the ID has been used already
Light off --> means the ID has not been used yet
Steps:
1. Let the Main Unit Into Studying Mode
Push the start Button on the main unit. Then press the Home button all the time, until heard
“DI-DI” sounds and the display panel shows Cd .
This means the main unit has turned into study mode already.
2. Let the Charging Station Start to Study
There are two and display symbols to locate two charging stations.
If any of these symbols does not light up, please follow the steps to set up your ID.
Step 1: Power on the Home Base.
Step 2: Press the time setting button all the time until you hear “DI-DI” sounds and one of the two
buttons light up (symbol must light off before). It means the Home Base has complete the study.
Note:
If the two symbols are all light up (before you start setting), please clear previous ID of the Main
Unit.
Sonic Wall 2Sonic Wall 1Home Base 2Home Base 1
【
【
Page 22

22
3. Let the Sonic Wall Start to Study
If the two symbols are all light up, please clear previous ID from the main unit. If any of the two
symbols is not light up, please follow the steps below.
Step 1: Power on the Sonic Wall so the power LED lights up.
Step 2: Use one of toothpick to insert the hole at the back of the Sonic Wall and press down when you
hear “BI” sounds. One of the two symbols will light up what means the Sonic Wall has
completed the study.
Note: If there are more sonic walls need to study, please operate above steps again, and at most you
can play three sonic walls at the same time.
4. Let the Main Unit Exit Study Mode
Push the power button to exit the study mode and the main unit will complete the study.
5. Clear Previous Information of Main Unit
Let the unit into study mode (see step a) and press the Home button all the time until you hear
“DI-DI” sounds. When all of the four indicator lamps symbols are light off it means that previous IDs or
the main unit are already cleared. Now you must reset all ID from the new Home Base, Sonic Wall or
Remote Control.
Page 23
23
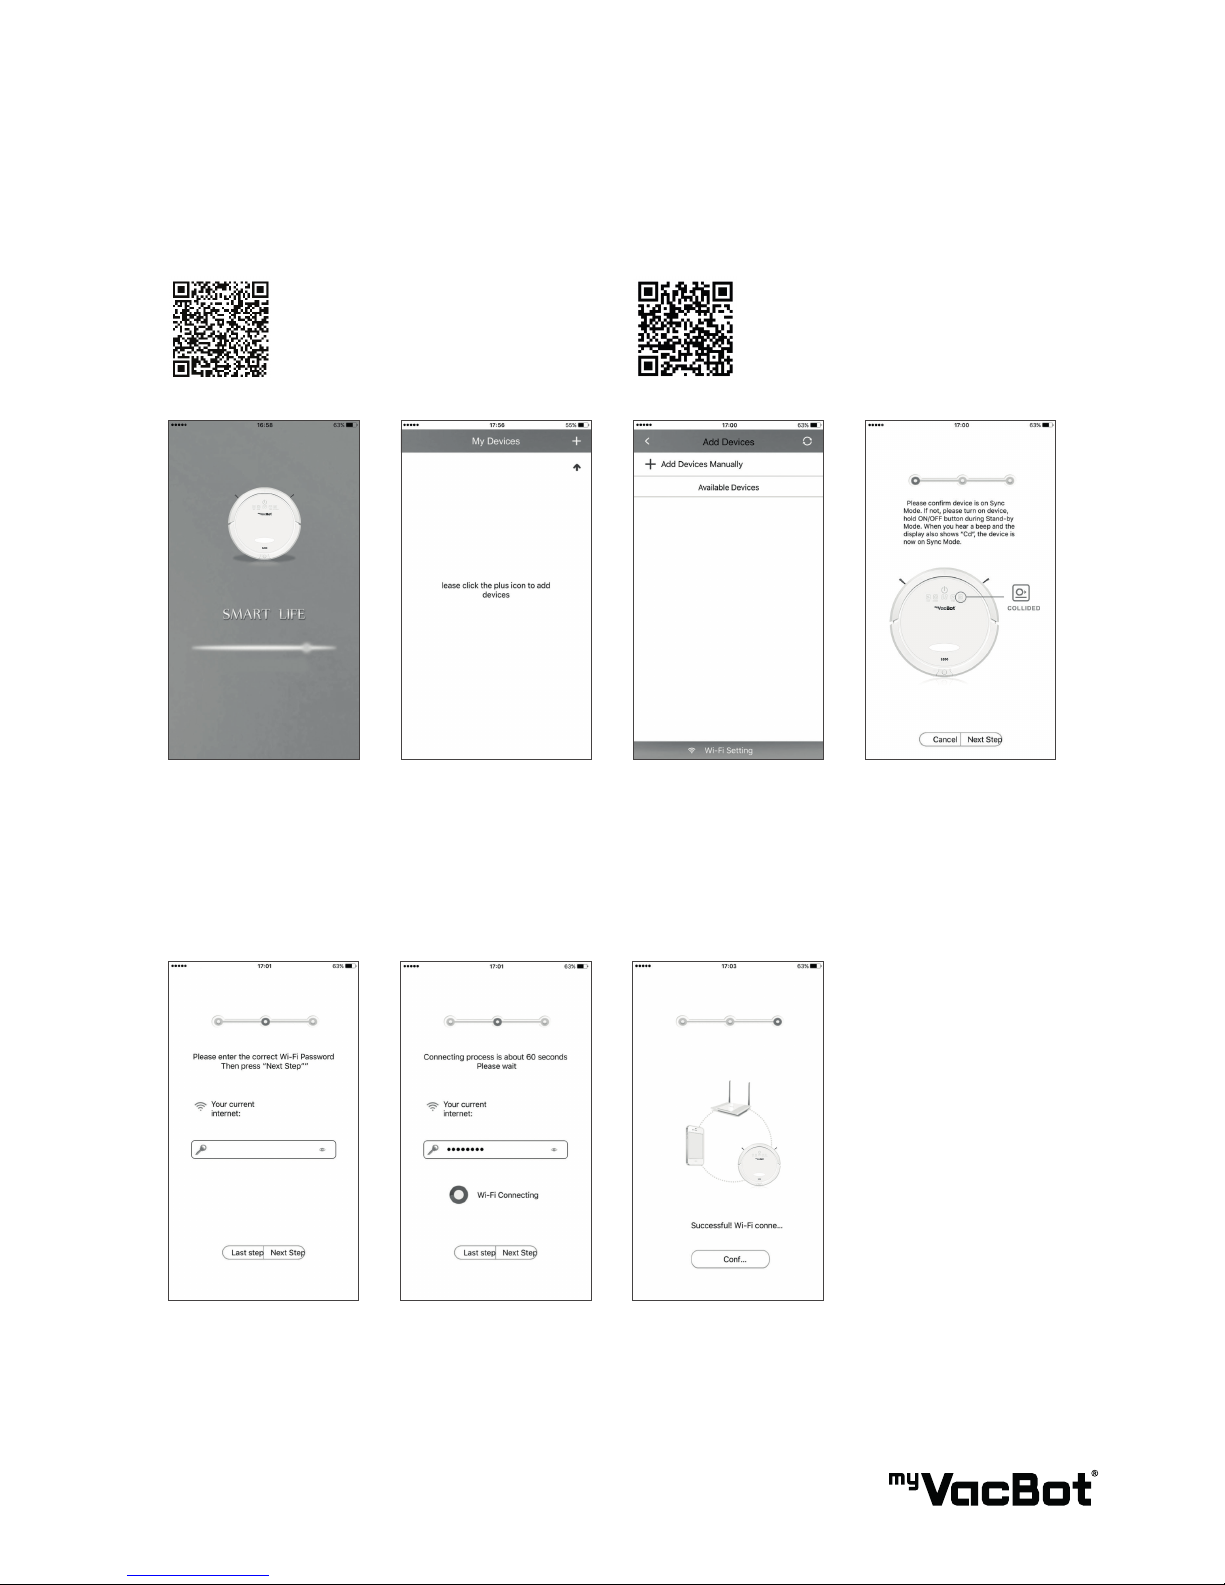
28 APP INSTRUCTION
4. Click Wi-Fi Setting in
the bottom
2. App starting 5. Conrm host into
networking stat
3. Click „+“ in the
upper light corner
6. Enter WIFI password
and click „Next Step“
7. Connecting ... 8. Successfull Wi-Fi
Connection
1. Scan QR-Code to download the app, install App and open it
Apple IOS Android
Page 24
24
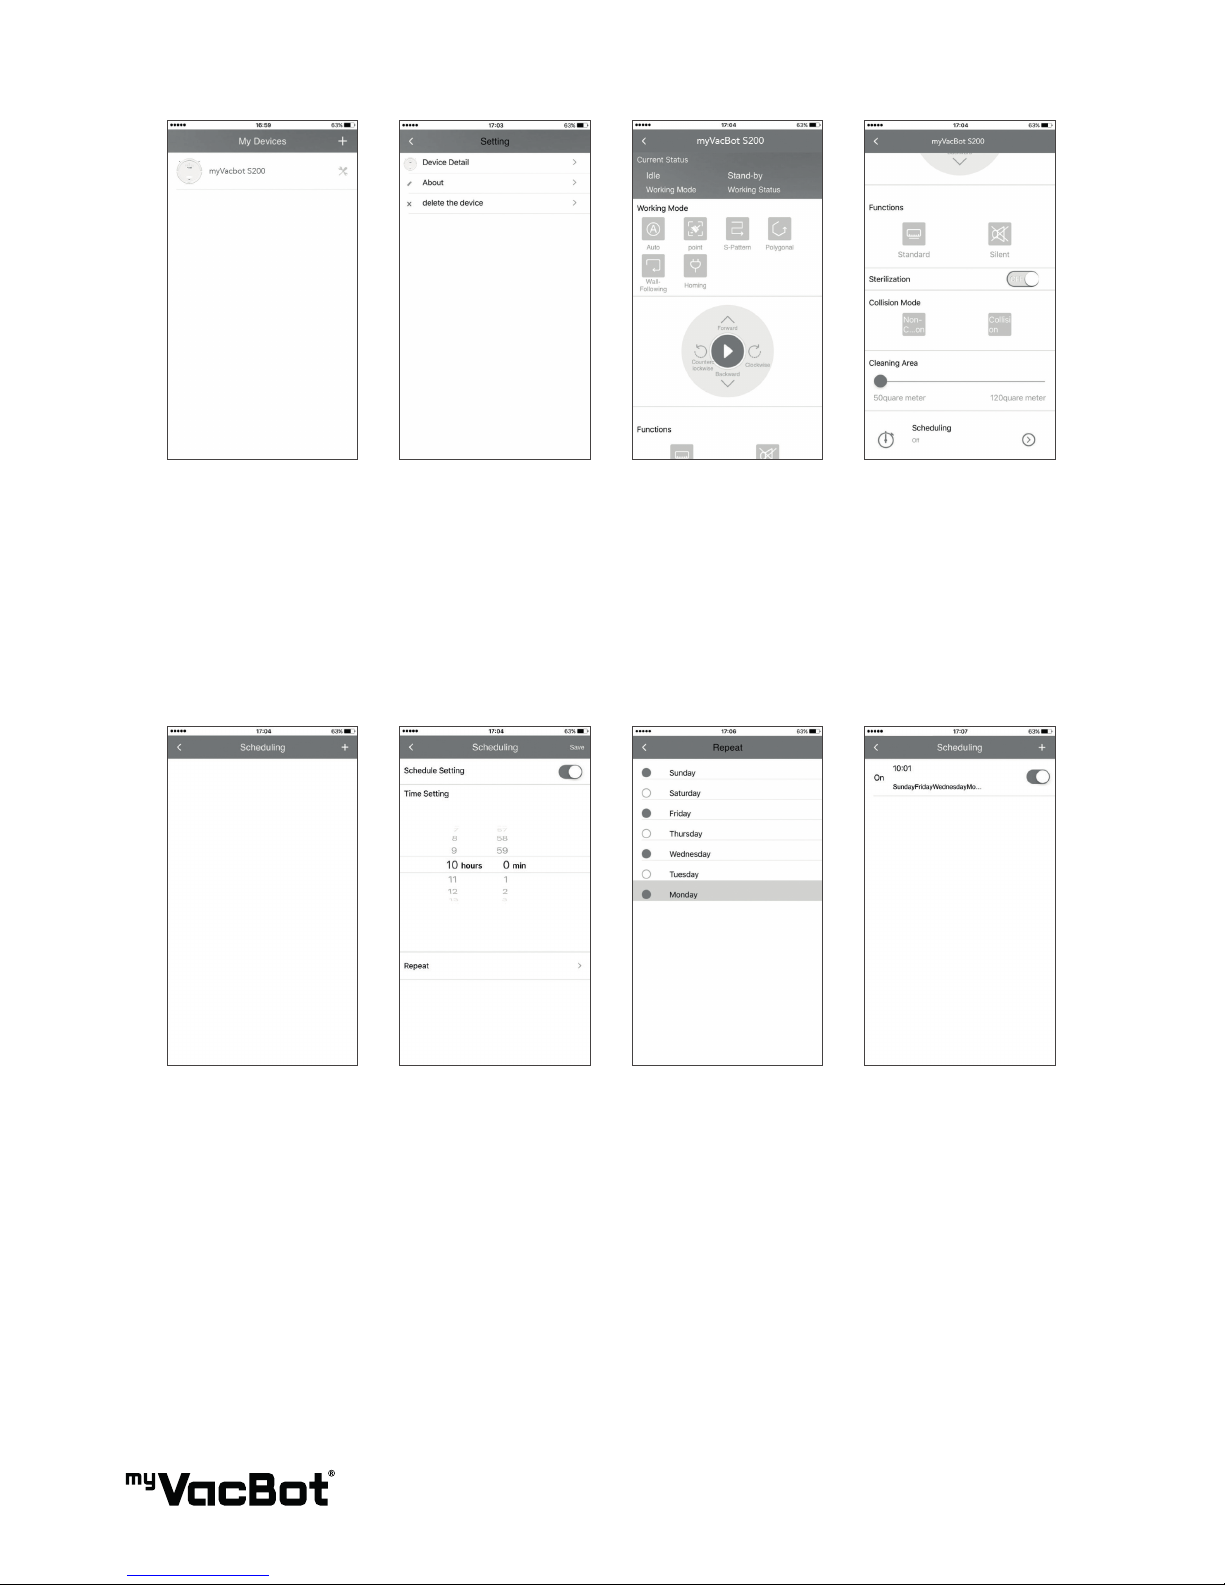
10. Enter into remote
control inferface. In
Standby mode, press
arrow keys to default
start cleaning
14a. Timer on/off
14b. Set minutes and
hours
14c. Set the weekly
work
11. Drag up to show
more menus
15. Select the working
day then click the
arrow to conrm and
return
9a. Choose the
connected device then
jump to Step 10.
9b. Click to view
rmware version
and delete online
information
13. Click „+“ in the
upper light corner
If you need to add more phone control, repeat the above operation,
note that it must be operated under the same WIFI.
12. Click the arrow
into timer reservation
setting
16. Click save and
return to the list of
time settings
Page 25
25
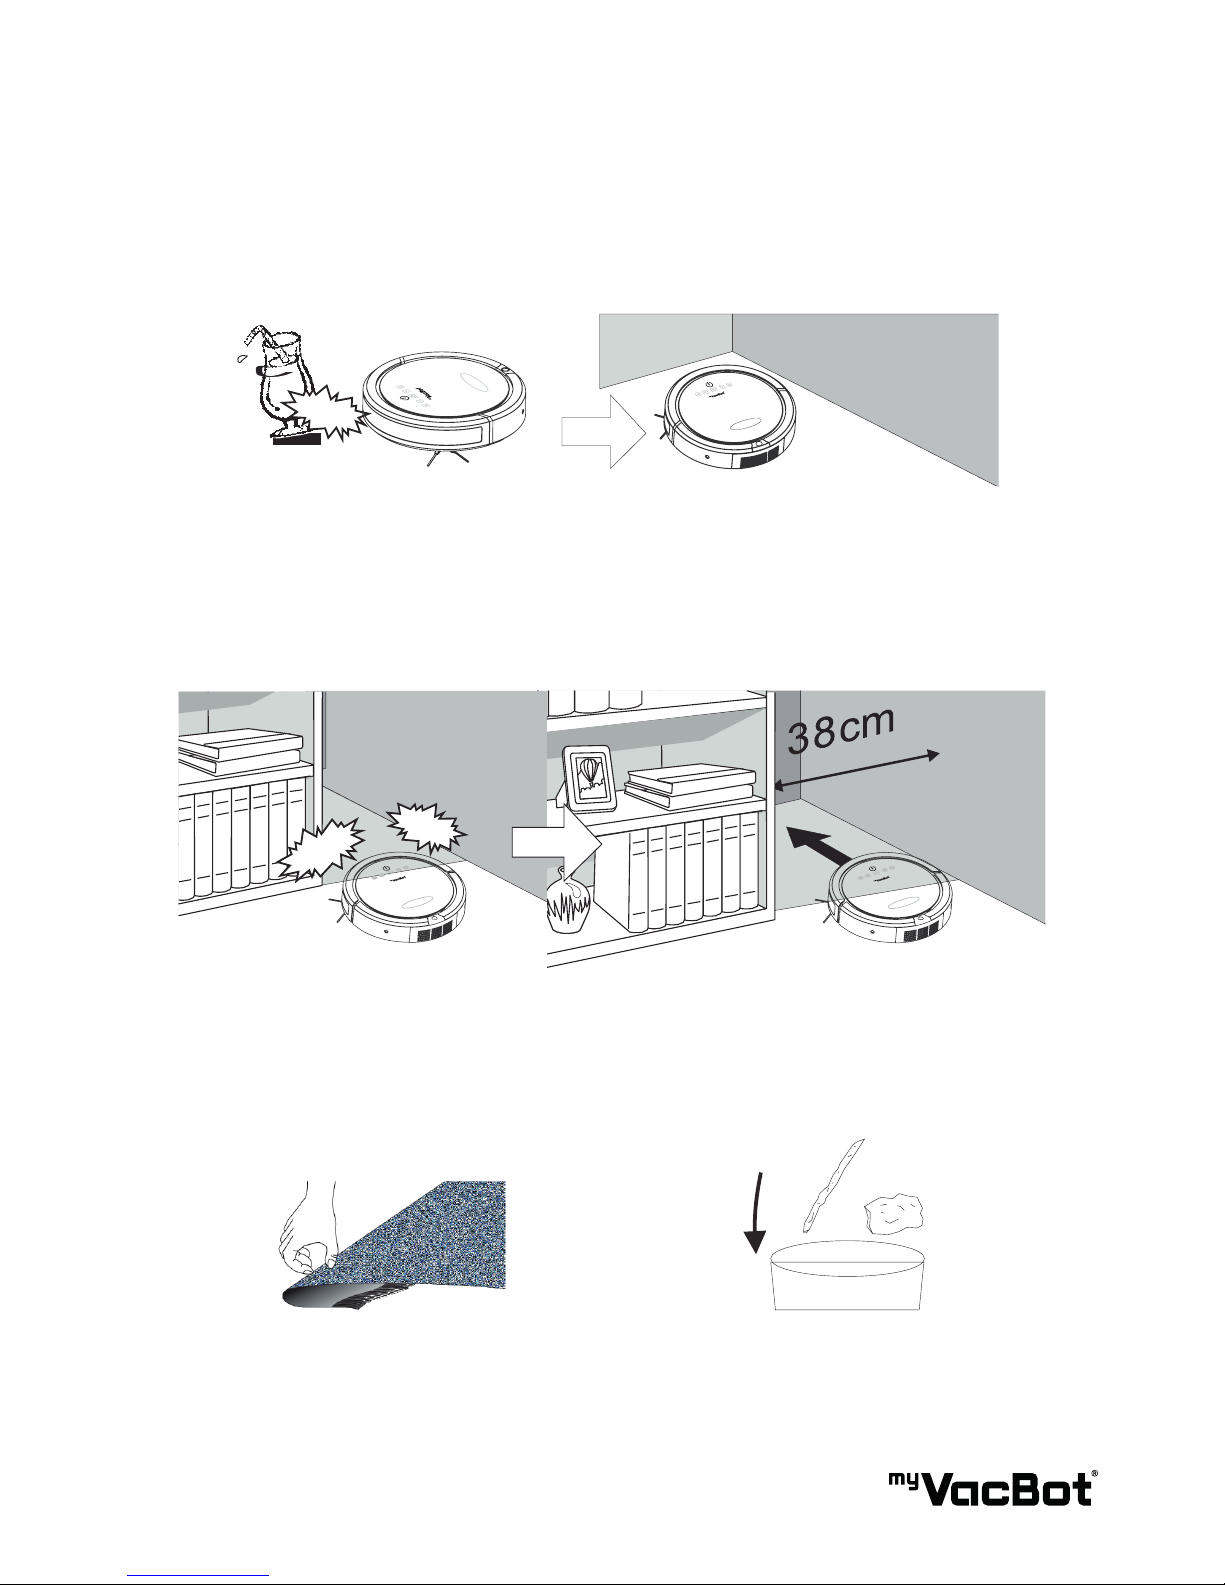
29 USEFUL TIPS
Tip #1
Prepare the cleaning area and remove large debris, loose cables, wires and items that can be easily tangled
with the brushes or knocked over.
Tip #2
Leave enough space (15“ or more) for myVacBot S200 to operate
Tip #3
Do not let loose edges of rugs, drapes, table cloths, etc. to get caught by myVacBot S200 brushes. Roll the
loose edges of rugs underneath.
Remove vases, glasses or small lampts
Fold the rug edges that have loose ends under it.
Remove small items that might obstruct operation for
faster and better cleaning.
Remove plastic bags and long string or loose wires
from the oor.
Page 26
26
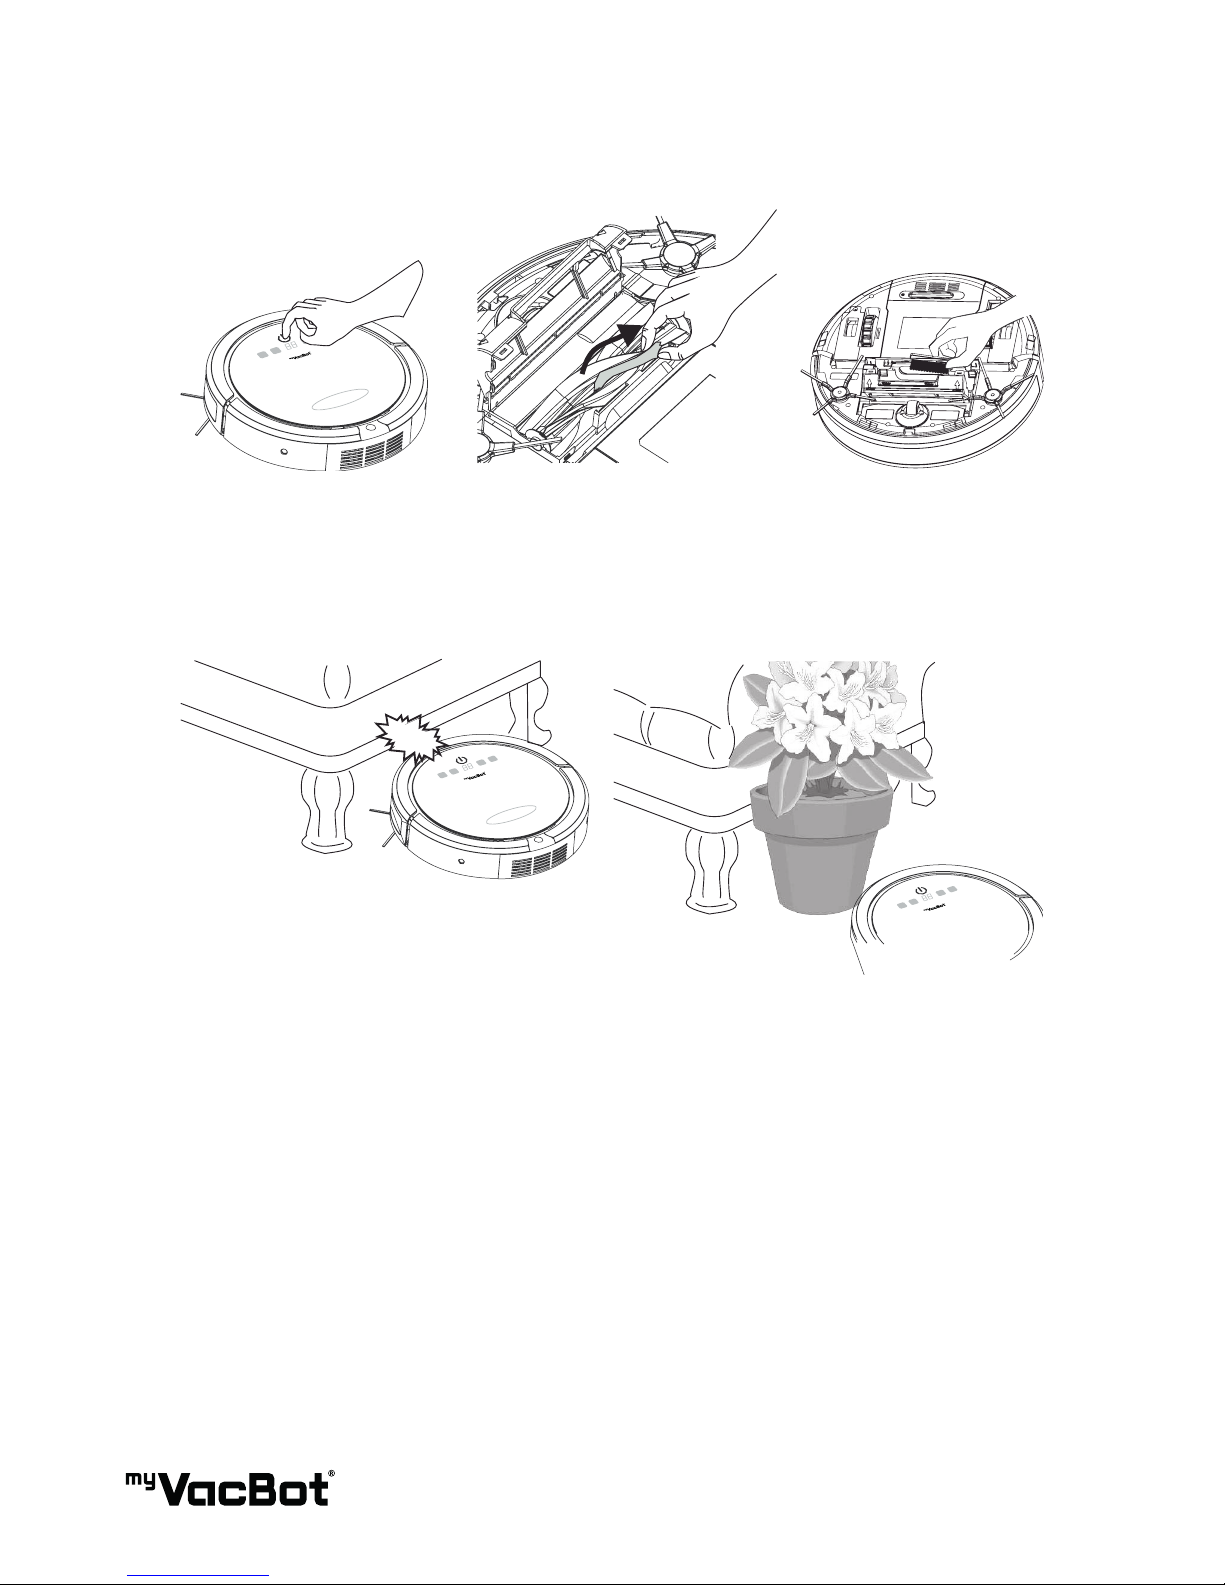
Tip #4
Fixing jams: If some object gets caught with the roller or side brush, turn the myVacBot S200 off
immediately. Remove anything that caused the jam before using the cleaner again.
Tip #5
Block off certain areas with Sonic Walls (or other objects) to get better cleaning results.
The space under some furniture may not be high
enough for the myVacBot S200 to get underneath.
myVacBot S200 will make a
beeping sound when jammed.
Power-off the unit.
Use potted plants to block the myVacBot S200 and
prevent it from going these places.
Turn it upside down and remove the
objects.
Clean the vacuum entry.
Page 27
27
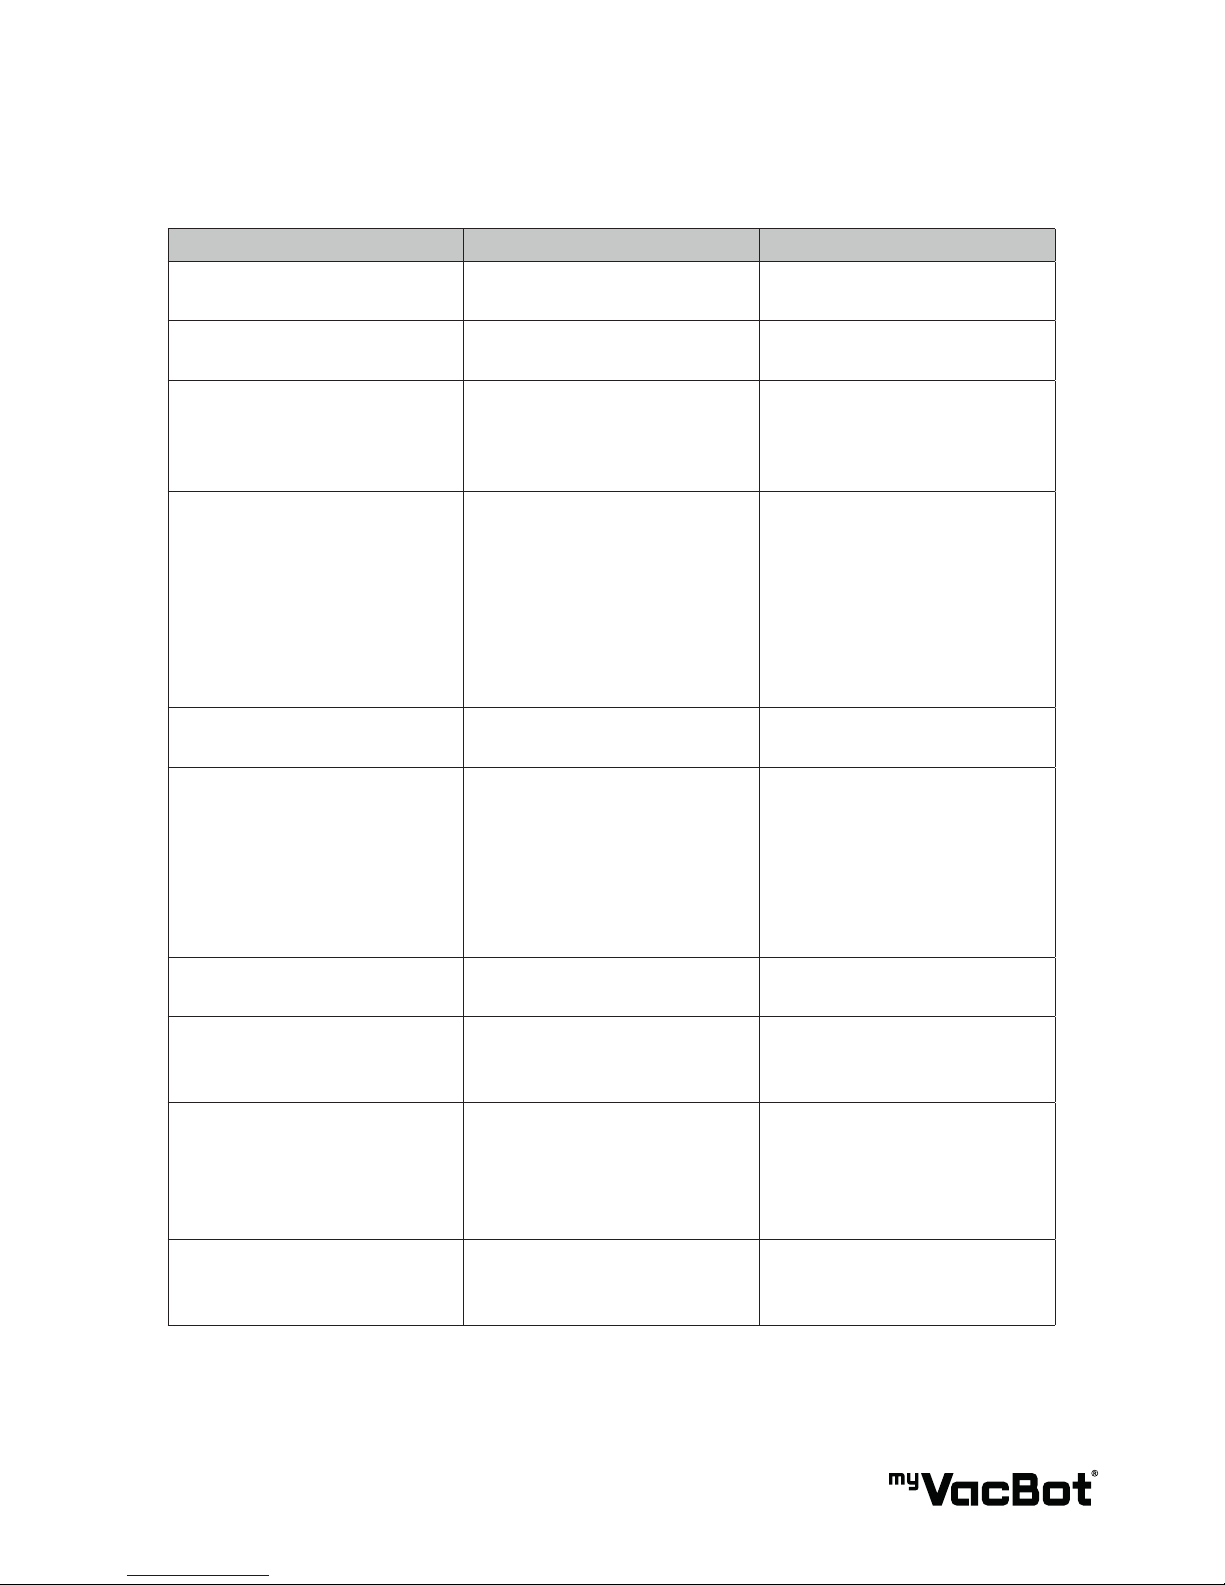
30 TROUBLESHOOTING
Problem Cause Solution
Error message Sensor malfunction or system
jammed.
Check the error messages on the
next page for correct action.
The vacuum and oor mopping
robot cannot power on.
Battery is not installed or installed
incorrectly.
Check if the battery is still in good
condition and installed correctly.
Remote Control malfunction The transparent lm is not taken
off. The battery is not correctly
installed or the battery strength is
too low.
Tear off the transparent lm.
Check the installation of the
battery or replace the battery.
Vacuum and oor mopping robot
fails to return to its Home Base
Home Base is not properly
placed; there are obstacles
between the Home Base and the
vacuum and oor mopping robot;
or the vacuum and oor mopping
robot is stuck or jammed
Place the Home Base in a proper
location and leave sufcient
clearance space for the vacuum
and oor mopping robot to
return it. Remove any obstacles
in front of the Home Base. Check
and clean the vacuum and oor
mopping robot’s wheels.
The vacuum and oor mopping
robot does not charge
AC power is not plugged in.
Vacuum and oor mopping robot
is not docked correctly.
Plug the AC jacket onto the dock
rmly. When the vacuum and
oor mopping robot is docked,
please make sure it is properly
placed. Do recharge for at least
60 minutes until battery cooled
down.
Main brush or side brushes do
not work
Brushes are stuck by debris or
hair.
Clean the brushes.
Vacuum and oor mopping robot
does not start cleaning after it is
fully recharged.
The “Auto” function is not set
correctly.
The battery is over-heating. Check the schedule setting
section and reset the “Auto-Function”. Do recharge for at least
60 minutes until battery cooled
down.
Vacuum and oor mopping robot
keeps moving backwards or tur-
ning around
Cliff sensors are blocked or cover-
ed by dust.
Wipe all sensors with a dry clean
cloth.
Page 28
28
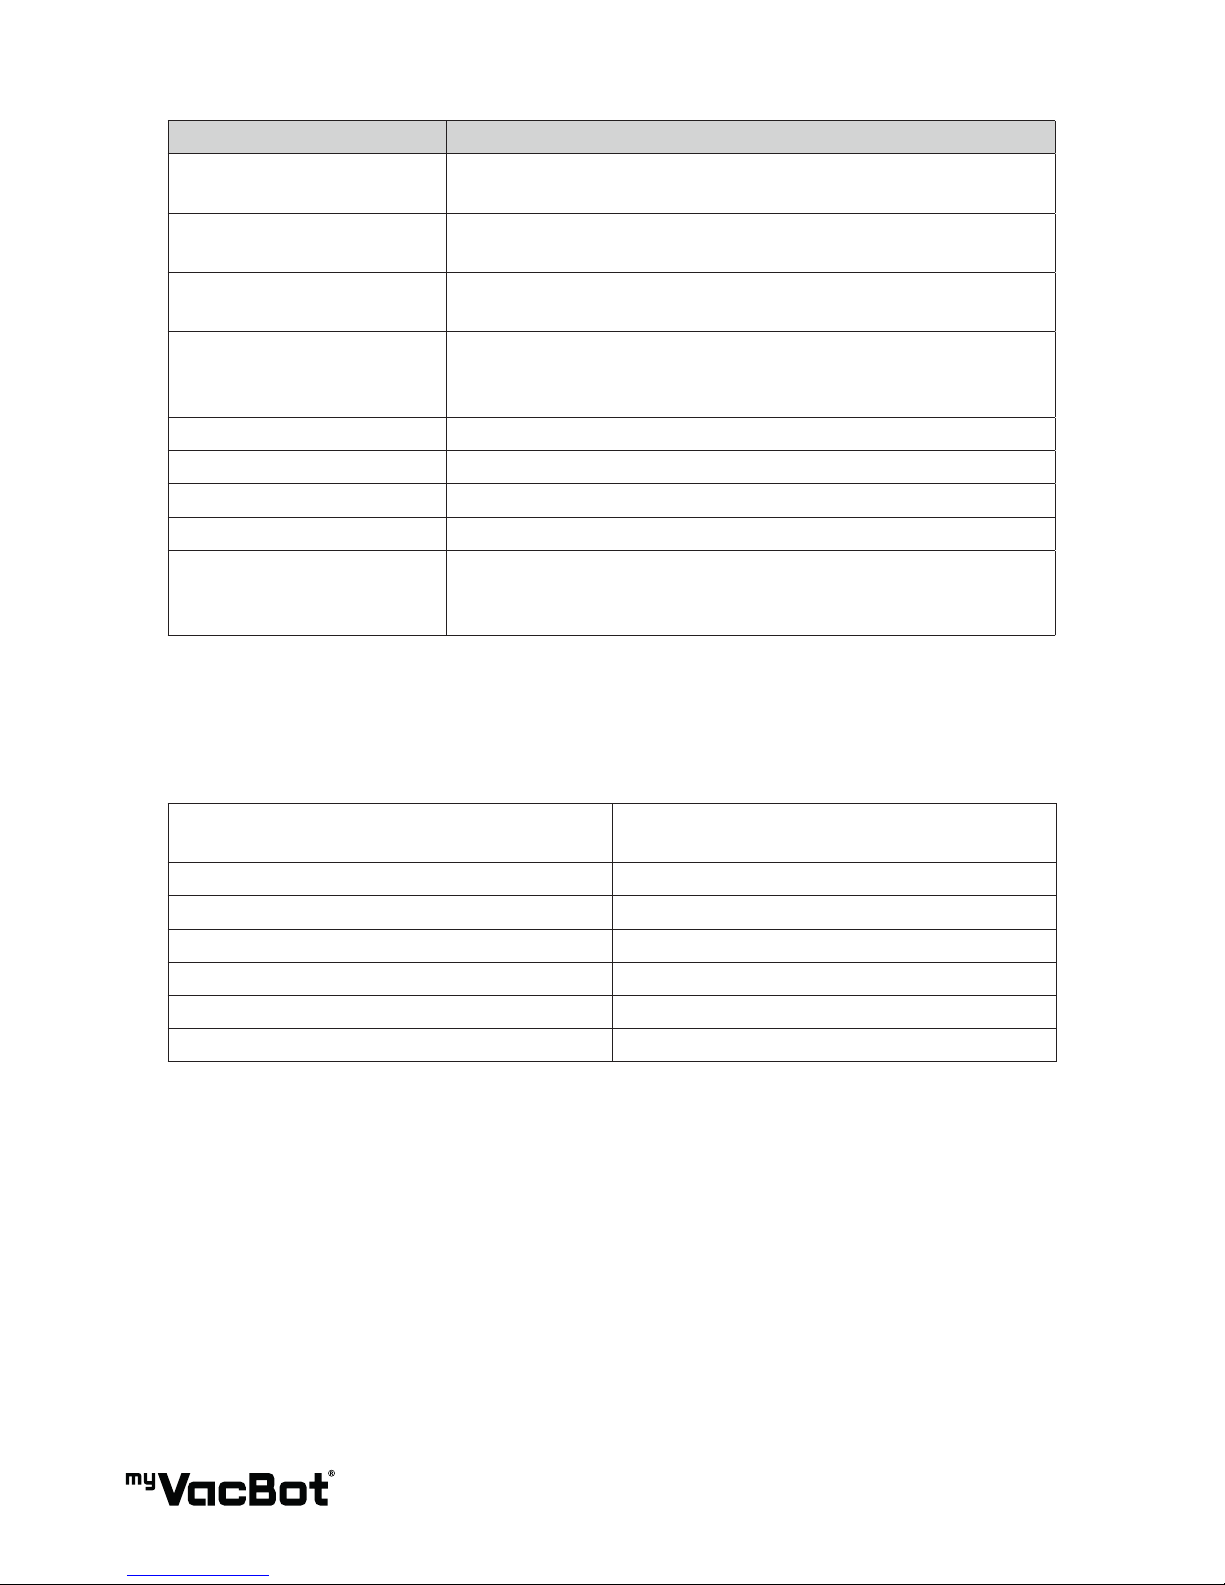
31 PRODUCT SPECIFICATIONS
Error Message Suggested Actions
E1 Front Cliff Sensor The vacuum and oor mopping robot might be trapped in a specic
area where there are stairs or oor edge.
E2 Charging Error Please refer to the correct installation process of the charging dock and
try again.
E3 Front Bumper Error The vacuum and oor mopping robot’s front bumper is stuck. Check the
front bumper.
E4 Battery Over-Heating Stop using the robot for at least 60 min and then restart it again. If
this message still shows up, please contact your local warranty service
provider.
E5 Left Wheel Overloaded Check the left wheel and remove any objects stuck.
E6 Right Wheel Overloaded Check the right wheel and remove any objects stuck.
E7 Side Brushes Overloaded Check both side brushes to remove any jammed objects or debris.
E8 Main Brush Overloaded Check the rolling brush to remove any jammed objects or debris.
E9 Vacuum Motor Overloaded Stop using the robot for at least 60 mins and then restart it again. If
this message still shows up, please contact your local warranty centre
provider.
Power Supply Input: AC 100¬-240VC 50-60 Hz
Output: DC 20V 1000 mA
Rechargeable Battery Li-Ion 3350 mAh
Charging Time approx. 3.5h
Operating Time approx. 120 Minutes
Dustbin Capacity 0.5l
Dimension 330x330x80 mm
Weight 3.7 kg
Page 29

29
Page 30

30
Page 31

31
Page 32

Disposal: Do not dispose this product as unsorted waste. Collection of such waste
must be handled separately as special treatment is necessary.
Recycling facilities are now available for all customers at which you can deposit your old electrical products.
Customers will be able to take any old electrical equipment to participating civic amenity sites run by their
local councils. Please remember that this equipment will be further handled during the recycling process, so
please be considerate when depositing your equipment. Please contact the local council for details
of your local household waste recycling centres.
 Loading...