

Page 1

UNIVERSAL
DOCKING
STATION
UDDS1
Page 2

1 INTRODUCTION
Features 1
Package Contents 1
System Requirements 1
5 AUDIO CONFIGURATION 15
6 UNINSTALL THE DRIVER 16
7 SPECIFICATION 18
2 PRODUCT OVERVIEW
Front 2
Rear 2
3 INSTALLATION
Windows 7/8 3
Mac OS 4
Verifying the Installation 6
4 DISPLAY CONFIGURATION
Utility Settings 9
Description of the Settings 10
Multi-Monitor Conguration 11
Extended Mode 13
Mirror Mode 13
Be the Primary Monitor 13
Windows Shortcut 14
8 LEGAL
Safety Instructions 19
Copyright 19
Trademarks 19
9 REGULATORY COMPLIANCE
FCC Conditions 20
CE 20
WEEE Information 20
TABLE OF CONTENTS
www.V7-world.com
i
Page 3

1
The V7 UDDS docking station is designed for extra connectivity demands. With the docking station, you can extend the connection
of your computer with more USB peripherals, Ethernet connection, speaker, and the microphone through one single USB cable.
With the built-in USB 3.0 ports, the docking station enables you to enjoy the super speed data transmission between USB
peripherals. Aside from USB 3.0, this product is compliant with USB 1.1/2.0 standard.
In addition, the docking station is equipped with video output. You can mirror your primary screen or extend the desktop allowing
visibility of more applications at the same time. Enhanced expansion capability plus the stylish appearance, this docking station with
video is the most versatile accessory that also complements your home or oce space.
Features
• Compatible with USB 2.0/3.0 specication
• Resolution up to 2048x1152
• 2.1 audio channel connection
• Gigabit Ethernet connection
• HDMI/DVI/VGA connection
• BC 1.2 charging
Package contents
• Docking Station
• USB 3.0 Cable
• Power Adapter
INTRODUCTION
• CD (Driver and User’s Manual)
• Quick Installation Guide
System Requirements
The Minimum Requirements
• CPU: 1.6GHz single core or higher processor clock.
Intel Pentium/Celeron family
AMD K6/Athlon/Duron family or compatible processor
• RAM: 1GB or above
• USB port: 2.0/3.0
• 30MB of available disk space
• Operating Systems:
Microsoft: Windows® 7 SP1 or later/ Windows® 8
Apple: Mac OS X® 10.9
1
Page 4

Front Rear
2
1
2
3
4
Item Description
5
6
7
8
9
10
Item Description
1
2
3
PRODUCT OVERVIEW
4
USB 3.0 Port Connect to USB 3.0 Devices
USB 3.0 Port
Speaker Jack Connect to Speaker or Earphone
MIC Jack Connect to Microphone
Connect to USB 3.0 Devices With BC 1.2
Charging
USB 2.0 Ports Connect to USB 2.0 Devices
5
RJ45 Port Connect to Ethernet
6
DVI Connector Connect to a DVI Monitor or Projector
7
HDMI Connector Connect to a HDMI monitor or projector
8
USB 3.0 Port (Type B) Connect to Computer
9
Power Jack Connect to Power Adapter
10
2
Page 5

Note: Make sure the drivers are installed before connecting the V7 UDDS to your
computer for best experience. Visit www.displaylink.com for software
3
Windows® 7/8
INSTALLATION
• Insert the supplied driver CD into the CD/DVD- ROM.
• Click Run Setup.exe to start the installation.
If the AutoPlay does not appear automatically, locate and double-click on the
Setup.exe le in the driver folder to launch the setup.
• Click I Accept to continue driver setup
• Please wait while the installation is in process
• Connect the Docking Station to a computer after the driver installation to
complete installation
3
Page 6

Mac OS X®
INSTALLATION
• Insert the supplied driver CD into the CD/DVD ROM
• Click Run Driver.dmg to start the installation, and click Continue
• Click Continue in Software License Agreement
• Click Agree > Install > Continue Installation
4
Page 7

• Please wait while the installation is in process.
• Installation was successful.
INSTALLATION
5
Page 8

Verifying the Installation
To verify the driver of the adapter, follow the step below
•
Follow the path to open the device manager
Windows® 7
Control Panel\ System and Security\ Systems\ Device Manager
Windows® 8 / Windows® 8.1
Settings\ Control Panel \ System and Security\ System\ Device Manager
• You will nd Displaylink Adapter device list.
Note: If you cannot nd the driver, it may not be properly installed.
INSTALLATION
Please unplug the device and repeat the installation steps.
6
Page 9

Mac OS X®
INSTALLATION
• Click on the Apple Icon on the top left corner of the screen to open About This Mac
• Click More Info...
• Click System Report...
7
Page 10

• You will nd Displaylink Adapter in the device list.
INSTALLATION
8
Page 11

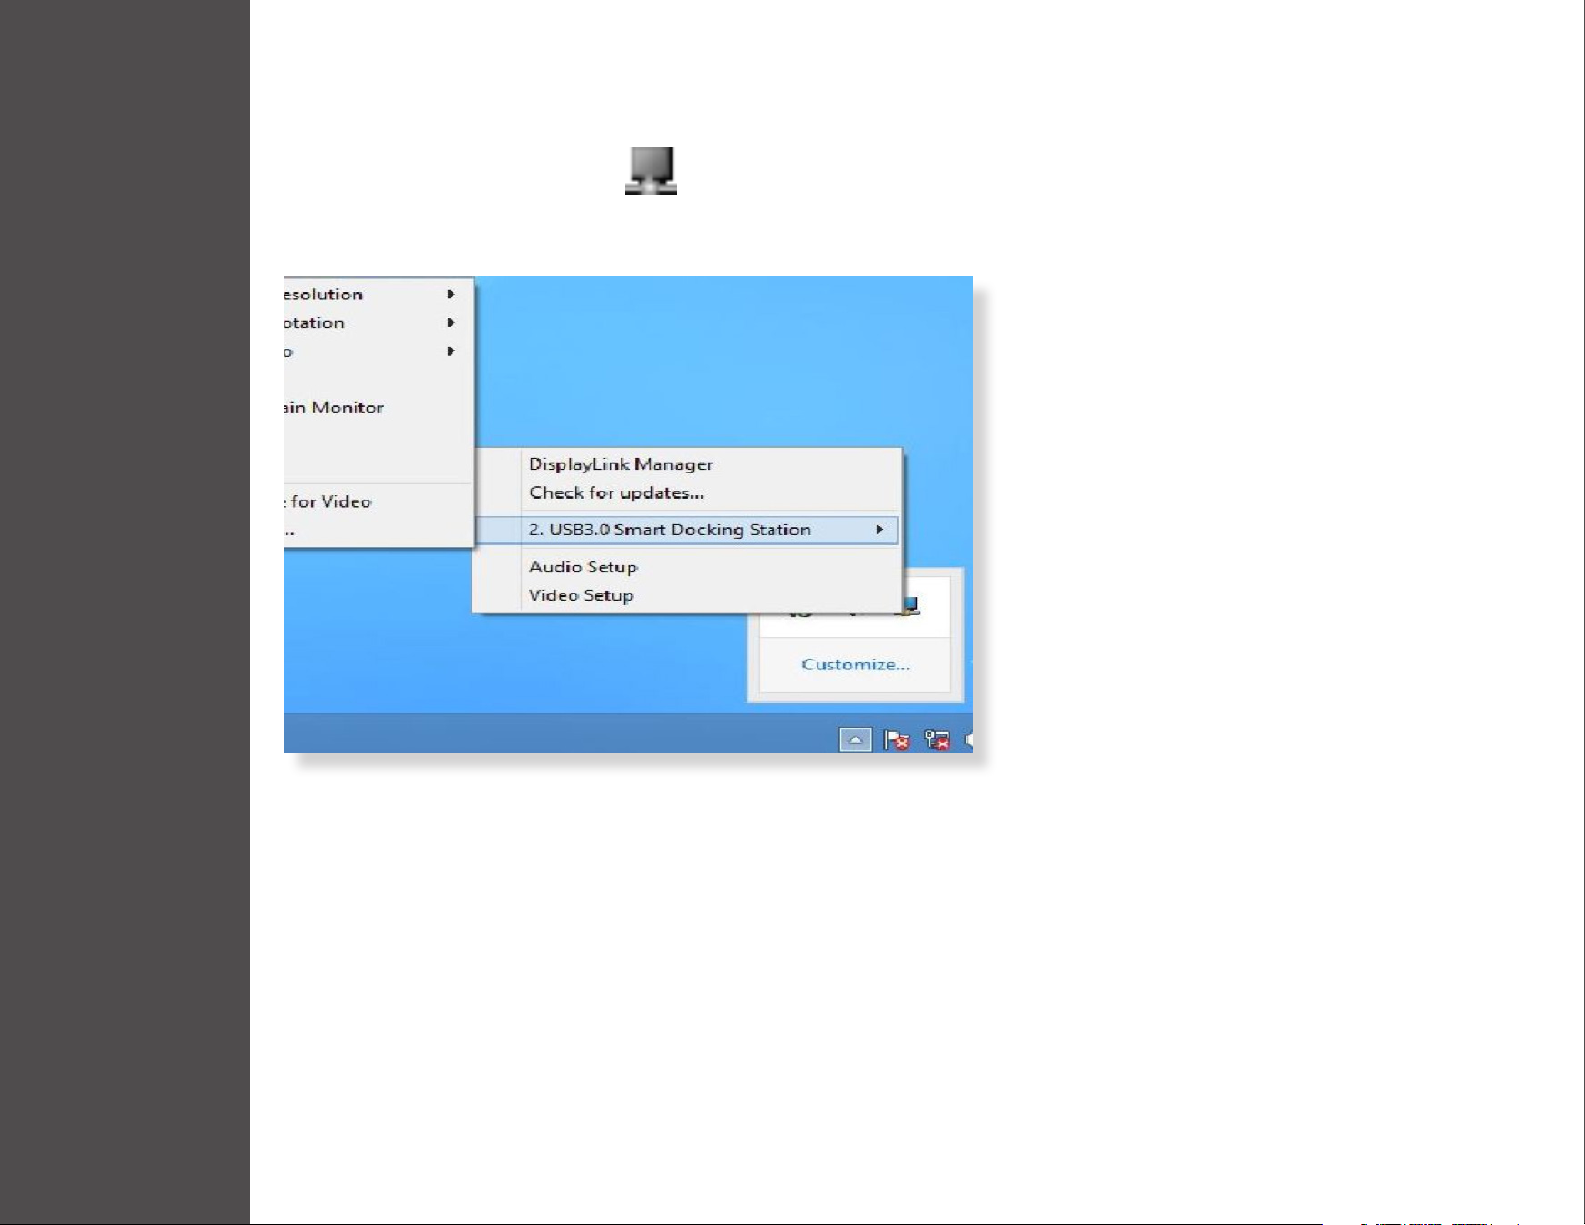
Utility Settings
The supplied utility allows conguring the display mode, screen rotation, screen resolution, and physical arrangement of your monitors.
4
1. Click utility icon in Windows System Tray.
2. Choose the Monitor preference you would like to display.
DISPLAY CONFIGURATION
9
Page 12

Description of Settings
Options Description
DisplayLink Manager Enable the Windows screen resolution
Check for Updates Check the latest driver and download if available
USB 3.0 Video Dock Video Dock Preference
Screen Resolution
Screen Rotation Rotate the screen according to the desired orientation
Extend Extend the main screen
Extend To The cursor can extend to desired screen via left/right/above/below
Set as Main Monitor Set this screen to the main screen
Notebook Monitor OFF
Mirror Duplicate computer screen
O Turn o monitor
Optimize for Video Optimize the video quality when playing back. Text may appear less clear when enabled
Fit to TV
Click to select an available resolution. Note that this function is invalid in mirror mode, as the resolution is dened as the resolution of the
primary monitor
Switch the monitor to the main display and turn o the screen of the laptop.
NOTE: This function may not appear
Adjust the size of Windows Desktop
NOTE: This function will only work only when at least one monitor is connected.
Audio Setup Enable the Windows audio conguration page.
Video Setup Enable the Windows screen resolution page.
DISPLAY CONFIGURATION
10
Page 13

Multi-Monitor Conguration
The docking station is able to support 2 monitors simultaneously. Once the monitors are connected, it can be congured to use in
either “Mirror Mode”, “Extended Mode” or be the primary display.
Windows® 7/8
Position the mouse anywhere on the desktop, right-click and select Screen Resolution.
Single Display Dual Display
Alternatively, click utility icon in the Windows System Tray, and then select DisplayLink Manager.
DISPLAY CONFIGURATION
11
Page 14

Mac OS X®
1. Click the Apple Icon of the upper left icon in screen and select System Preferences… on the drop-down list.
2. Click Displays turn enable Multi-Monitor mode and the extended monitor will be shown in the Desktop.
Single Display Dual Display
DISPLAY CONFIGURATION
NOTE: Check the Mirror Displays box to enable Mirror Mode.
12
Page 15

Extended Mode
1. In the Display drop-down menu, select the preferred monitor.
2. Check the Multiple Displays > Extend these Displays on Window® 7/8
3. Click OK to conrm and close the settings screen.
4. Once the setting is completed, simply drag and drop the application icons or the opened windows to the add-on monitor.
However, some applications may not support to display on the extended desktop.
Cursor Disappeared
If the status remains in the extended mode but the adapter is disconnected, the desktop will still be panned to the add-on monitor. The
cursor may not be found on the primary monitor in such a case. If it happens, connect the add-on monitor through the adapter again
or keep moving the mouse.
Mirror Mode
1. In the Display drop-down menu, select the preferred monitor.
2. Check the Multiple Displays > Duplicate these Displays on Window® 7/8
3. Click OK to conrm and close the settings screen.
Be the Primary Monitor
1. In the Display drop-down menu, select the preferred monitor.
2. Check the Make this my main display box on Window® 7, Set as Main Monitor on Window® 8
NOTE: Some PCs and laptops may need to disable the main display (i.e. uncheck the Extend the desktop onto this monitor or
Extend my Windows desktop onto this monitor box for the main display) as part of the same settings change.
3. Click OK to conrm and close the settings screen.
DISPLAY CONFIGURATION
13
Page 16

Windows Shortcut
Press (Windows button) + P to bring up the menu and select a desired option. .
This function is available for Windows® 7 and above only.
Supported Resolution
Options Description
640 x 480 VGA 60 72 75 78 60 72 75 85
800 x 600 SVGA 56 60 72 75 56 60 72 75 85
1024 x 768 XGA 60 70 75 85 60 70 75 85
1280 x 720 720P 60 60
1280 x 768 WXGA+ 60 70 75 85 60 70 75 85
1280 x 800 WXGA 60 60
1280 x 1024 SXGA 60 75 85 60 75
1366 x 768 WXGA+ 60 60
1400 x 1050 SXGA+ 60 75 85 60 75 85
1600 x 1200 UXGA 60 60
1680 x 1050 WSXGA+ 60 60
1920 x 1080 1080p 60 60
1920 x 1200 WUXGA 60 60
DISPLAY CONFIGURATION
2048 X 1152 QXGA 60 60
Refresh Rate Refresh Rate
16 bit 32 bit
14
Page 17

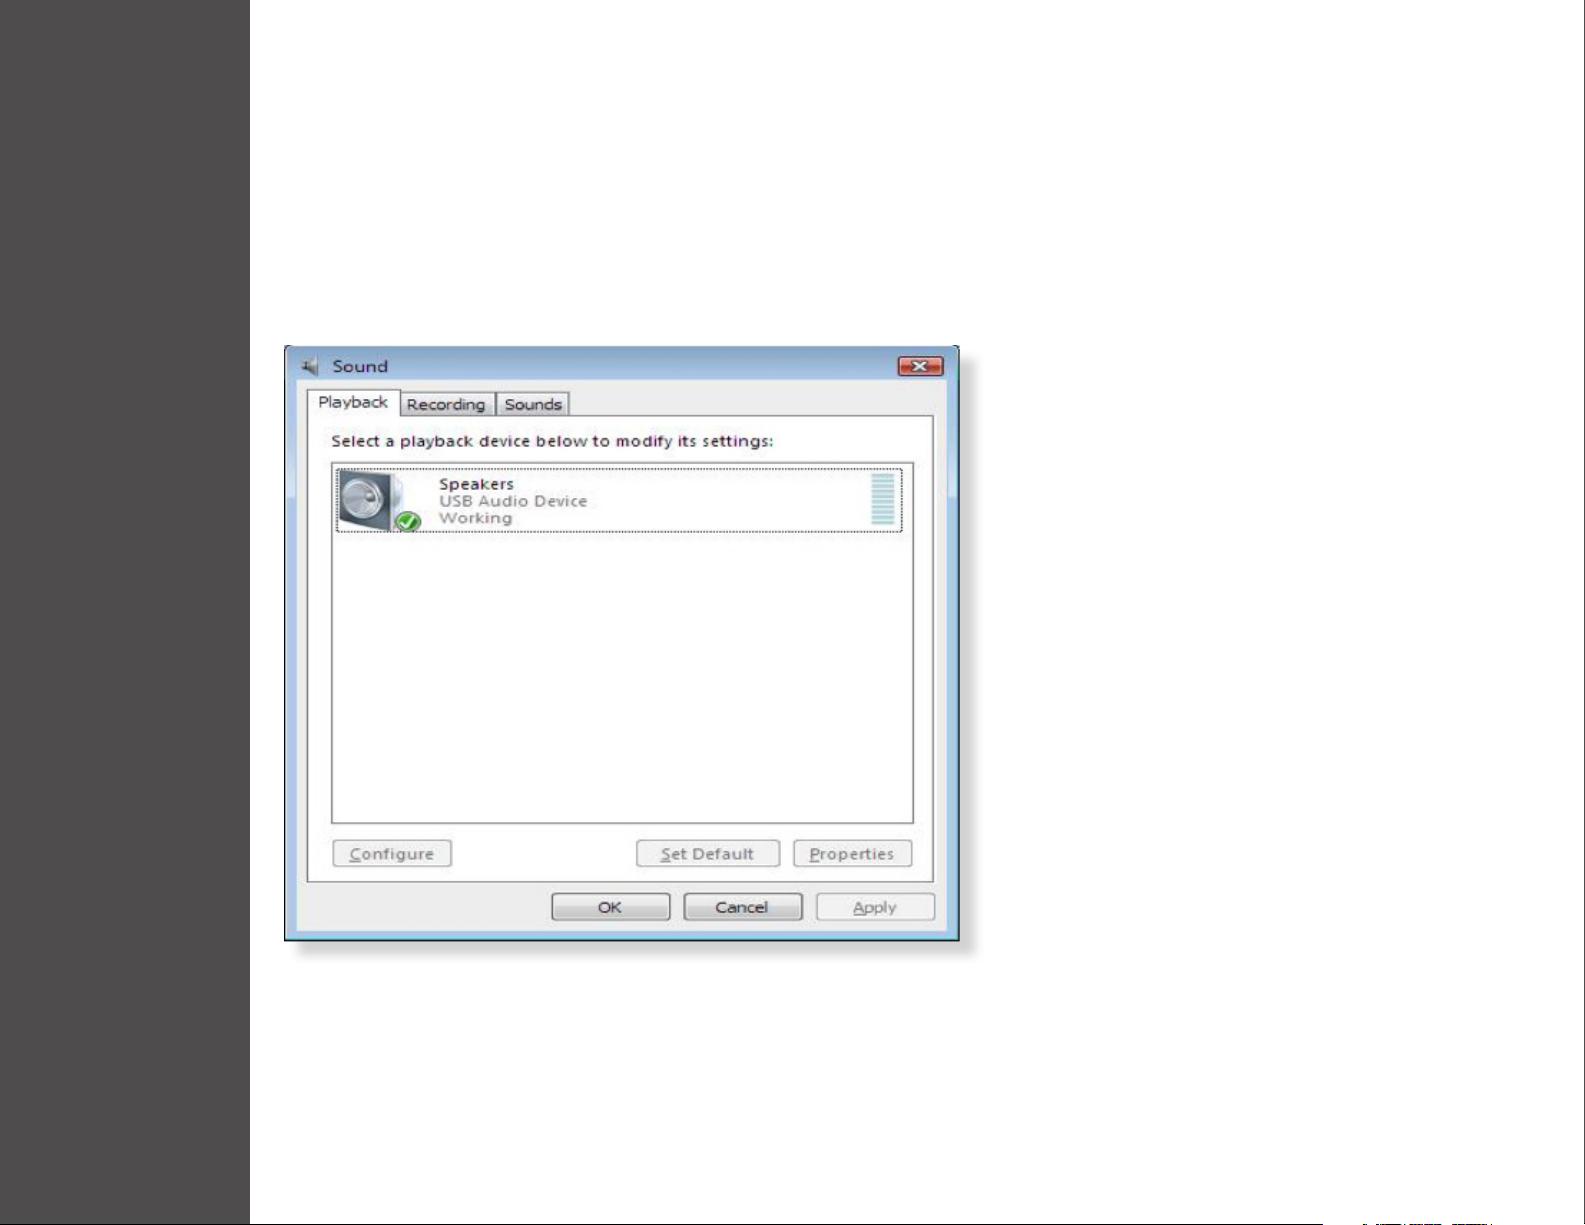
By default, when the docking station is connected to a computer, the audio conguration may be changed to USB (Multimedia)
Audio Device automatically (this setting depends on models). If it does not work, follow the steps below to setup.
Windows 7/8
5
1. Open Control Panel and then select the hardware and sound icon.
2. Click Sound > Manage audio devices and then select USB Audio Device or Displaylink Audio
AUDIO CONFIGURATION
15
Page 18

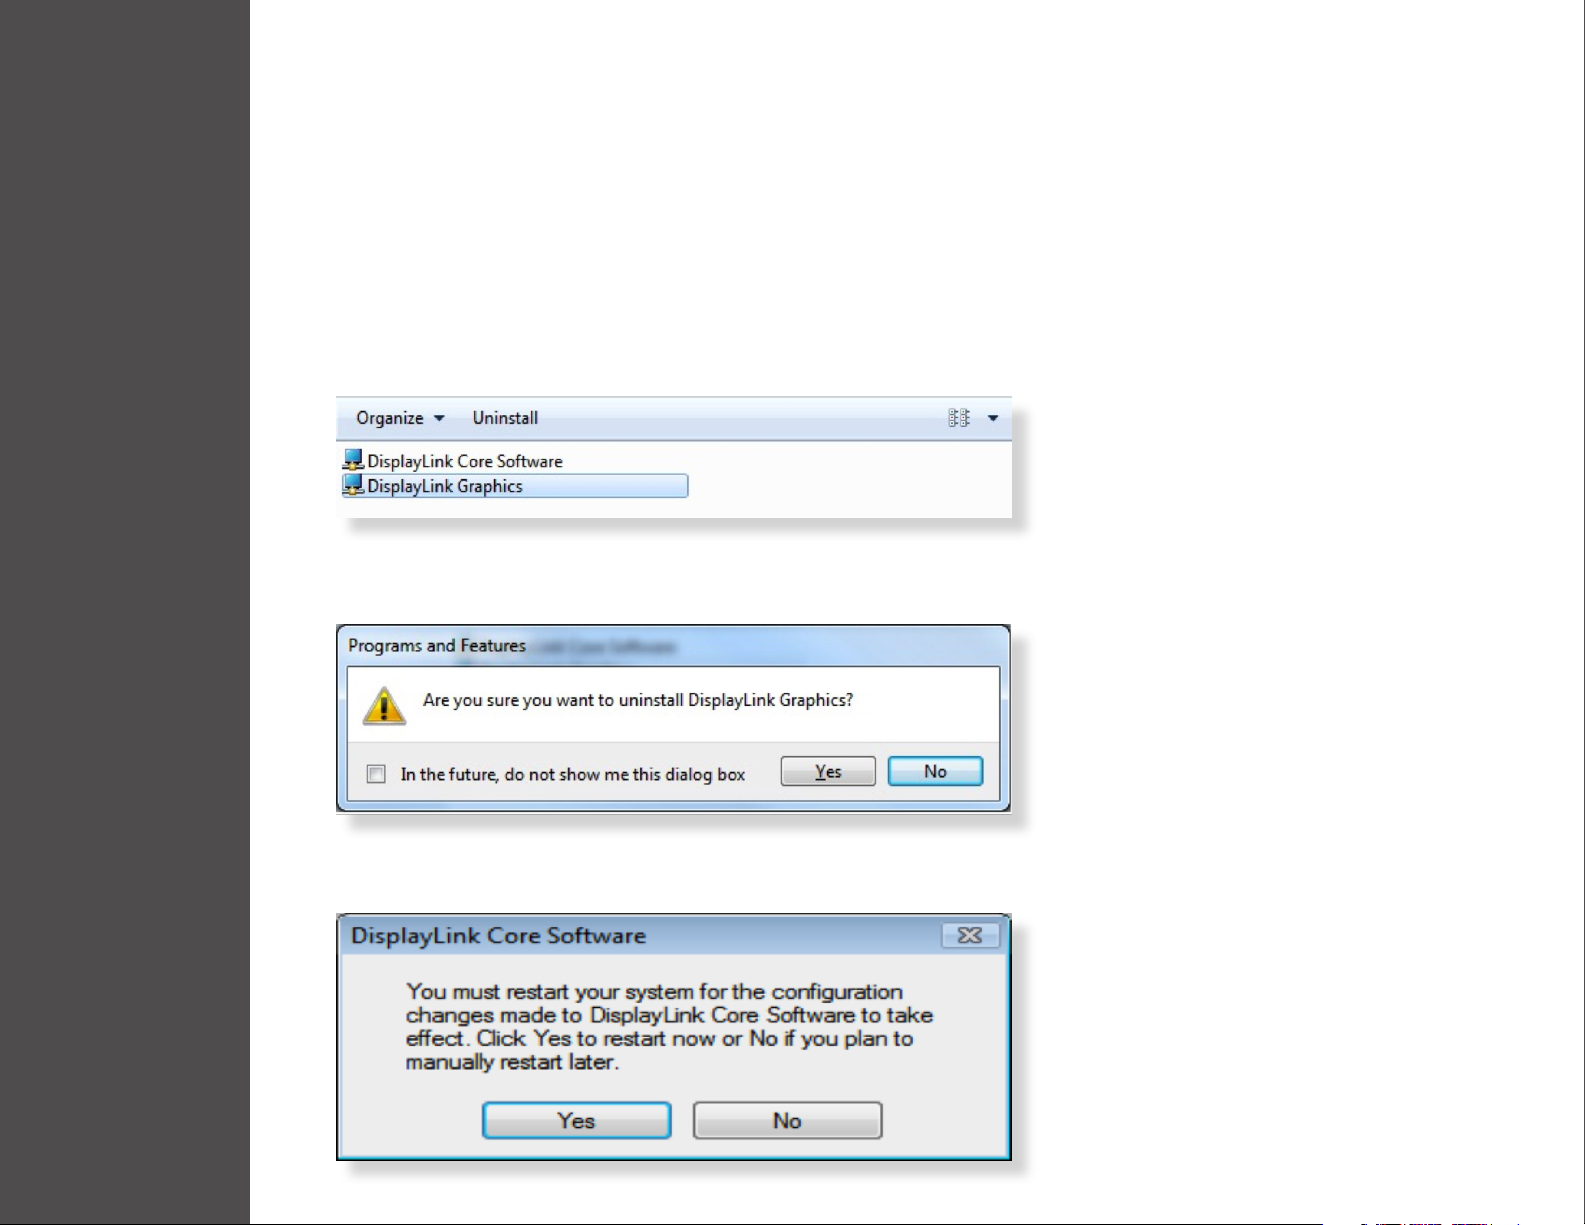
1. Follow the instructions to nd the driver path, and then right-click on DisplayLink Graphics to uninstall the driver.
Windows 7
6
Control Panel > Programs > Programs and Features > Uninstall or change the program
Windows 8
Settings > Control Panel > Programs > Uninstall a program
2. Click Yes to conrm the uninstallation.
3. Click Yes to restart your computer. You may also disconnect the device now.
UNINSTALL DRIVERS
16
Page 19

Mac OS X
1. Open driver and click DisplayLink Software Uninstaller.
UNINSTALL DRIVERS
17
Page 20

Host Interface USB 3.0
Connector HDMI 30 pin Female Connector
DVI-D 30 pin Female Connector
7
USB B Connector
USB A Connector
3.5mm Stereo Mini-Jack
RJ45 Connector
DC Power Jack
Video Resolution HDMI = 2048 x 1152
DVI = 2048 x 1152
Supported Colors 16 Bits and 32 Bits
Audio 2.1 CH
Ethernet 10/100/1000
Power Input: AC 100-240V
Output: DC 5V 4A
Power Consumption Operating Power: 14.43W
SPECIFICATIONS
Suspend Mode POwer: 1.95W
Plastic ABS
Weight 599 g
Dimensions 187.85(L) x 76.9(W) x 31.08(H) mm
Operation Temperature 0~40 Degree
Storage Temperature -20~70 Degree
Compliance CE, FCC, RCM
18
Page 21

8
Safety Instructions
Always read the safety instructions carefully
• Keep equipment away from humidity
• If any of the following situation arises, get the equipment checked by a service technician:
The equipment has been exposed to moisture.
The equipment has been dropped and damaged.
The equipment has obvious sign of breakage.
LEGAL
The equipment has not been working well or cannot get it to work according to the User’s Manual.
Use only with provided adapter.
Copyright
This document contains proprietary information protected by copyright. All right are reserved.
No part of this manual may be reproduced by any mechanical, electronic or other means, in any
form, without prior written permission of the manufacturer.
Trademarks
All trademarks and registered trademarks are the property of their respective owners or companies.
19
Page 22

9
V1.0
FCC Conditions
This equipment has been tested and found to comply with Part 15 Class B of the FCC Rules. Operation is subject to the following
two conditions: (1) This device may not cause harmful interference. (2) This device must accept any interference received and
include interference that may cause undesired operation.
CE
This equipment is in compliance with the requirements of the following regulations: EN 55 022: CLASS B
WEEE Information
For EU (European Union) member users: According to the WEEE (Waste electrical and electronic equipment) Directive, do not
dispose of this product as household waste or commercial waste. Waste electrical and electronic equipment should be appropriately
collected and recycled as required by practices established for your country. For information on recycling of this product, please
contact your local authorities, your household waste disposal service or the shop where you purchased the product.
USB 3.0 Single/Dual Display Docking Station
REGULATORY COMPLIANCE
User’s Manual
www.V7-world.com
20
Page 23

UNIVERSELLE
DOCKINGSTATION
UDDS1
Page 24

1 EINFÜHRUNG
Eigenschaften 1
Eigenschaften 1
Systemanforderungen 1
5 AUDIO-KONFIGURATION 15
6 TREIBER DEINSTALLIEREN 16
7 TECHNISCHE DATEN 18
2 PRODUKTÜBERSICHT
Vordeseite 2
Hinterseite 2
3 INSTALLATION
Windows 7/8 3
Mac OS 4
Überprüfen der Installation 6
4 BILDSCHIRM KONFIGURIEREN
Utility-Einstellungen 9
Beschreibung von Einstellungen 10
Multi-Monitor-Konguration 11
Erweiterungsmodus 12
Spiegel-Modus (Mirror Mode) 13
Als Hauptbildschirm 13
Zugristasten von Windows 14
8 JURISTISCH
Sicherheitsanweisungen 19
Copyright 19
Marken 19
9 GESETZLICHE BESTIMMUNGEN
FCC-Bedingungen 20
CE 20
WEEE Information 20
INHALTSVERZEICHNIS
www.V7-world.com
i
Page 25

1
Die V7 UDDS Dockingstation ist für zusätzliche Konnektivitätsanforderungen konzipiert. Mit der Dockingstation können Sie die
Verbindung Ihres Computers mit mehr USB-Peripheriegeräten, Ethernetverbindung, Lautsprecher und dem Mikrofon über ein
einziges USB-Kabel erweitern.
Die eingebauten USB 3.0-Anschlüsse der Dockingstation ermöglichen es Ihnen, die Hochgeschwindigkeits-Datenübertragung
zwischen USB-Peripheriegeräten zu nutzen. Neben USB 3.0 erfüllt dieses Gerät den USB 1.1/2.0-Standard.
Außerdem ist die Dockingstation mit einem Videoausgang ausgestattet. Sie können Ihren Primärbildschirm spiegeln oder den
Desktop erweitern und so mehr Anwendungen gleichzeitig sichtbar machen. Mit der verbesserten Erweiterungsfähigkeit und dem
stilvollen Aussehen ist diese Dockingstation mit Video ein vielseitiges Zubehör, das auch Ihren Raum zuhause oder im Büro ergänzt.
Features
• Kompatibel mit der USB 2.0/3.0-Spezikation
• Auösung bis zu 2048x1152
• 2.1 Audiokanalverbindung
• Gigabit Ethernetverbindung
• HDMI-/DVI-/VGA-Anschluss
• BC 1.2-Ladeport
Package contents
EINFÜHRUNG
• Dockingstation
• USB 3.0-Kabel
• Netzadapter
• CD (Treiber und Benutzerhandbuch)
• Schnellinstallationsanleitung
Systemanforderungen
Mindestanforderungen:
• CPU: Prozessoruhr mit 1,6 GHz oder höher mit einzelnem Kern.
Intel Pentium-/Celeron-Familie
AMD K6-/Athlon-/Duron-Familie oder kompatibler Prozessor
• RAM: 1GB oder höher
• USB-Anschluss: 2.0/3.0
• 30MB vom verfügbaren Festplattenspeicher
• Betriebssysteme:
Microsoft: Windows® 7 SP1 oder neuer/ Windows® 8
Apple: Mac OS X® 10.9
1
Page 26

Front Rear
2
1
2
3
4
Element Beschreibung
5
6
7
8
9
10
Item Description
USB 3.0-Anschluss Anschluss an USB 3.0-Geräte
1
Anschluss an USB 3.0-Geräte
USB 3.0-Anschluss
2
Lautsprecheranschluss Lautsprecher- oder Kopfhöreranschluss
3
PRODUKTÜBERSICHT
Mikrofonstecker Mikrofonanschluss
4
Mit BC 1.2 Ladeport
USB 2.0-Anschluss Anschluss an USB 2.0-Geräte
5
RJ45-Anschluss Ethernetanschluss
6
DVI-Anschluss
7
HDMI-Anschluss
8
USB 3.0-Anschluss
(Typ B) Anschluss an einen Computer
9
Steckdose Anschluss an den Netzadapter
10
Anschluss an einen DVI-Bildschirm oder
Projektor
Anschluss an einen HDMI-Bildschirm oder
Projektor
2
Page 27

Hinweis: Für die beste Erfahrung stellen Sie sicher, dass der Treiber installiert ist, bevor Sie
den V7 UDDS an Ihren Computer anschließen besuchen. www.displaylink.com für Software
3
Windows® 7/8
INSTALLATION
• Stecken Sie die mitgelieferte Treiber-CD in das CD-/DVD-ROM-Laufwerk.
• Klicken Sie auf Run Setup.exe (Setup.exe ausführen), um die Installation zu starten.
Wenn AutoPlay (Automatische Wiedergabe) nicht automatisch erscheint, lokalisieren
Sie die Datei Setup.exe (Setup.exe) im Treiberordner und doppelklicken Sie darauf, um
die Installation zu starten.
• Klicken Sie auf I accept (Ich akzeptiere), um die Treiberinstallation fortzusetzen.
• Bitte warten Sie, während die Installation im Gange ist.
• Schließen Sie die Dockingstation nach der Treiberinstallation an einen
Computer an, um die Installation abzuschließen.
3
Page 28

Mac OS X®
INSTALLATION
• Stecken Sie die mitgelieferte Treiber-CD in das CD-/DVD-ROM-Laufwerk
• Klicken Sie auf Run Driver.dmg (Treiber.dmg ausführen), um die Installa-
tion zu starten und klicken Sie auf Continue (Weiter).
• Klicken Sie im Softwarelizenzvertrag auf Continue (Weiter).
• Klicken Sie auf Agree (Akzeptieren) > Install (Installieren) > Continue Installation
(Installation fortsetzen).
4
Page 29

• Bitte warten Sie, während die Installation im Gange ist.
• Die Installation war erfolgreich.
INSTALLATION
5
Page 30

Installation wird überprüft
Um den Treiber des Adapters zu überprüfen, befolgen Sie die Schritte unten.
•
Der Pfad für das Önen des Gerätemanagers wird befolgt.
Windows® 7
Control Panel (Systemsteuerung)\ System and Security (System und Sicherheit)\ Systems (Systeme)\
Device manager (Geräte-Manager)
Windows® 8 / Windows® 8.1
Settings (Einstellungen)\ Control Panel (Systemsteuerung)\ System and Security (System und Sicherheit)\
System (System)\ Device manager (Geräte-Manager)
Sie sehen die DisplayLink Adapter (DisplayLink Adapter)-Geräteliste.
Hinweis: Wenn Sie den Treiber nicht nden können, ist er möglicherweise nicht ordnun
gemäß installiert. Trennen Sie das Gerät und wiederholen Sie die Installationsschritte.
INSTALLATION
6
Page 31

Mac OS X®
INSTALLATION
• Klicken Sie auf das Apple-Symbol in der linken oberen Ecke, um About This Mac (Über diesen
Mac) zu önen.
• Klicken Sie auf More Info… (Weitere Informationen…)
• Klicken Sie auf System Report… (Systembericht…)
7
Page 32

• Sie nden den DisplayLink-Adapter in der Geräteliste.
INSTALLATION
8
Page 33

Hilfsprogramm-Einstellungen
Das bereitgestellte Hilfsprogramm ermöglicht die Konguration von Anzeigemodus, Bildschirmdrehung, Bildschirmauösung und der
tatsächlichen Anordnung Ihrer Bildschirme.
4
1. Klicken Sie auf das Symbol Utility (Hilfsprogramm) in Windows System Tray (Windows Taskleiste).
2. Wählen Sie die Bildschirmpräferenz, die Sie anzeigen möchten.
BILDSCHIRM KONFIGURIEREN
9
Page 34

Beschreibung von Einstellungen
Options Description
DisplayLink Manager Aktivieren Sie die Windows Bildschirmauösung
Nach Updates suchen Wenn verfügbar, nach dem neuesten Treiber und Download suchen
USB 3.0 VideoDockingstation
Bildschirmauösung
Bildschirmdrehung Drehen Sie den Bildschirm in die gewünschte Richtung.
Erweitern Hauptbildschirm erweitern
Erweitern auf Der Cursor kann über left (links)/right (rechts)/above (oben)/below (unten) auf den gewünschten Bildschirm erweitert werden
Als Hauptbildschirm
einstellen
Notebook-Bildschirm aus
Spiegeln Den Computerbildschirm duplizieren
Aus Bildschirm ausschalten
Für Video optimieren Die Videoqualität bei der Wiedergabe optimieren. Text wird bei Aktivierung dieser Funktion möglicherweise weniger deutlich angezeigt
Video-Docking-Präferenz
Klicken Sie, um eine verfügbare Auösung auszuwählen. Beachten Sie, dass diese Funktion im Spiegel-Modus ungültig ist, da die Auösung als
Auösung des Primärbildschirms deniert ist
Diesen Bildschirm auf den Hauptbildschirm einstellen
Den Bildschirm auf die Haupt-Anzeige umschalten und den Bildschirm des Laptops ausschalten.
HINWEIS: Diese Funktion wird möglicherweise nicht angezeigt
An TV anpassen
Audio-einrichten Die Windows Audio-Kongurations-Seite aktivieren.
Video einrichten Die Windows Bildschirmauösungsseite aktivieren.
Die Größe des Windows Desktops anpassen anpassen
HINWEIS: Diese Funktion ist nur aktiv, wenn mindestens ein Bildschirm angeschlossen ist.
BILDSCHIRM KONFIGURIEREN
10
Page 35

Mehrfachbildschirm-Konguration
Die Dockingstation kann 2 Bildschirme gleichzeitig unterstützen. Sobald die Bildschirme angeschlossen sind, kann sie entweder für die
Verwendung im „Spiegelmodus“, im „Erweiterungsmodus“ oder als Primäranzeige konguriert werden.
Windows® 7/8
Positionieren Sie die Maus an einer beliebigen Stelle des Desktops, klicken Sie mit der rechten Maustaste und wählen Sie Screen
Resolution (Bildschirmauösung).
Einzelanzeige Duale Anzeige
Klicken Sie alternativ auf das Symbol utility (Hilfsprogramm) in Windows System Tray (Windows Taskleiste) und wählen Sie dann
DisplayLink Manager (DisplayLink Manager).
BILDSCHIRM KONFIGURIEREN
11
Page 36

Mac OS X®
1. Klicken Sie auf das Apple Icon (Apple-Symbol) des Symbols links oben auf dem Bildschirm und wählen Sie in der Dropdownliste
System Preferences… (Systemeinstellungen…).
2. Klicken Sie auf Displays (Anzeigen), um Sie den Mehrfachbildschirm-Modus zu aktivieren und der erweiterte Bildschirm wird auf
dem Desktop angezeigt.
Single Display Dual Display
HINWEIS: Markieren Sie das Kästchen Mirror Displays (Anzeigen spiegeln), um den Spiegel-Modus zu aktivieren.
BILDSCHIRM KONFIGURIEREN
12
Page 37

Erweiterungsmodus
1. Wählen Sie im Dropdown-Menü Display (Anzeige) den bevorzugten Bildschirm.
2. Klicken Sie auf Multiple Displays (Mehrere Anzeigen) > Extend these Displays (Diese Anzeigen erweitern) in Windows® 7/8.
3. Klicken Sie zur Bestätigung auf OK (OK) und schließen Sie den Einstellungsbildschirm.
4. Sobald die Einstellung abgeschlossen ist, ziehen Sie die Anwendungssymbole oder die geöneten Fenster einfach zum
hinzugefügten Bildschirm. Einige Anwendungen unterstützen jedoch möglicherweise nicht die Anzeige auf einem erweiterten
Desktop.
Cursor verschwunden (Cursor Disappeared)
Wenn der Status im Erweiterungsmodus bleibt, aber der Adapter getrennt wird, bleibt der Desktop auf den hinzugefügten Bildschirm
geschwenkt. Der Cursor erscheint in diesem Fall möglicherweise nicht auf dem Hauptbildschirm. Wenn dies geschieht, schließen Sie
den hinzugefügten Bildschirm erneut über den Adapter an oder bewegen Sie die Maus weiterhin.
Spiegel-Modus (Mirror mode)
1. Wählen Sie im Dropdown-Menü Display (Anzeige) den bevorzugten Bildschirm.
2. Klicken Sie auf Multiple Displays (mehrere Anzeigen) > Duplicate these Displays (diese Anzeigen duplizieren) in Windows® 7/8
3. 3. Klicken Sie zur Bestätigung auf OK (OK) und schließen Sie den Einstellungsbildschirm.
Als Hauptbildschirm einrichten
1. Wählen Sie im Dropdown-Menü Display (Anzeige) den bevorzugten Bildschirm.
2. Markieren Sie das Kästchen Make this my main display (Diesen Bildschirm als Hauptbildschirm verwenden) in Windows® 7, Set as
Main Monitor (Als Hauptbildschirm einstellen) in Windows® 8
HINWEIS: Bei einigen PCs und Laptops muss möglicherweise im Zuge derselben Einstellungsänderung der Hauptbildschirm
deaktiviert werden (deaktivieren Sie z. B. das Kästchen Extend the desktop onto this monitor (Desktop auf diesen Monitor
erweitern) oder Extend my Windows desktop onto this monitor (Windows-Desktop auf diesen Monitor erweitern) für den
Hauptbildschirm).
3. Klicken Sie zur Bestätigung auf OK (OK) und schließen Sie den Einstellungsbildschirm.
BILDSCHIRM KONFIGURIEREN
13
Page 38

Zugristasten von Windows
Drücken Sie (Windows-Taste) (Windows button) + P, um das Menü anzuzeigen und wählen Sie eine gewünschte Option.
Diese Funktion ist nur für Windows® 7 und höher verfügbar.
Unterstützte Auösung
Options Description
640 x 480 VGA 60 72 75 78 60 72 75 85
800 x 600 SVGA 56 60 72 75 56 60 72 75 85
1024 x 768 XGA 60 70 75 85 60 70 75 85
1280 x 720 720P 60 60
1280 x 768 WXGA+ 60 70 75 85 60 70 75 85
1280 x 800 WXGA 60 60
1280 x 1024 SXGA 60 75 85 60 75
1366 x 768 WXGA+ 60 60
1400 x 1050 SXGA+ 60 75 85 60 75 85
1600 x 1200 UXGA 60 60
1680 x 1050 WSXGA+ 60 60
1920 x 1080 1080p 60 60
1920 x 1200 WUXGA 60 60
Refresh Rate Refresh Rate
16 bit 32 bit
2048 X 1152 QXGA 60 60
BILDSCHIRM KONFIGURIEREN
14
Page 39

Wenn die Dockingstation an einen Computer angeschlossen ist, kann die Audio-Konguration automatisch standardmäßig auf USB
(Multimedia) Audiogerät (USB (Multimedia) Audio Device) geändert werden (diese Einstellung hängt vom Modell ab). Wenn das
nicht funktioniert, befolgen Sie für die Einrichtung die Schritte unten.
5
Windows 7/8
1. Önen Sie Control Panel (Systemsteuerung) und wählen Sie dann das Symbol Hardware und Sound.
2. Klicken Sie auf Sound (Sound) > Manage audio devices (Audiogeräte verwalten) und wählen Sie dann USB Audio Device
(USB Audiogerät) oder Displaylink Audio (Displaylink Audio).
AUDIO-KONFIGURATION
15
Page 40

1. Folgen Sie den Anweisungen, um den Treiberpfad zu nden und klicken Sie dann mit der rechten Maustaste auf DisplayLink
Graphics (DisplayLink-Graken), um den Treiber zu deinstallieren.
Windows 7
6
Control Panel (Systemsteuerung) > Programs (Programme) > Programs and Features (Programme und Funktionen) >
Uninstall or change the program (Programm deinstallieren oder ändern)
Windows 8
Settings (Einstellungen) > Control Panel (Systemsteuerung) > Programs (Programme) > Uninstall a program (Programm
deinstallieren)
2. Klicken Sie auf Yes (Ja), um die Deinstallation zu bestätigen.
3. Klicken Sie auf Yes (Ja), um Ihren Computer neu zu starten. Sie können das Gerät jetzt auch trennen.
TREIBER DEINSTALLIEREN
16
Page 41

Mac OS X
1. Önen Sie den Treiber und klicken Sie auf DisplayLink Software Uninstaller (DisplayLink Software Deinstallationsprogramm).
TREIBER DEINSTALLIEREN
17
Page 42

Host-Schnittstelle USB 3.0
Anschluss 30-poliger HDMI-Buchsenanschluss
30-poliger DVI-D-Buchsenanschluss
7
USB B-Anschluss
USB A-Anschluss
3,5-mm-Stereo-Minibuchse
RJ45-Anschluss
Gleichstrombuchse
Videoauösung HDMI = 2048 x 1152
DVI = 2048 x 1152
Unterstützte Farben 16 Bit und 32 Bit
Audio 2.1 CH
Ethernet 10/100/1000
Strom Eingang: AC 100-240V
Ausgang: DC 5V 4A
Stromverbrauch Betriebsleistung: 14,43 W
Leistung im Ruhezustand: 1,95 W
Kunststo ABS
Gewicht 599 g
TECHNISCHE DATEN
Maße 187.85(L) x 76.9(W) x 31.08(H) mm
Betriebstemperatur 0~40 Grad
Lagertemperatur -20~70 Grad
Konformität CE, FCC, RCM
18
Page 43

8
Sicherheitsanweisungen
Lesen Sie die Sicherheitsanweisungen immer genau:
• Schützen Sie das Gerät vor Feuchtigkeit
• Wenn eine der folgenden Situationen eintritt, lassen Sie das Gerät von einem Servicetechniker überprüfen:
Das Gerät war Feuchtigkeit ausgesetzt.
Das Gerät wurde fallengelassen und beschädigt.
Das Gerät weist offensichtliche Anzeichen einer Bruchstelle auf.
Das Gerät arbeitet nicht gut oder kann nicht gemäß dem Benutzerhandbuch in Betrieb genommen werden.
Ausschließlich mit beiliegendem Netzteil zu verwenden.
Copyright
Dieses Dokument enthält rmeneigene, urheberrechtlich geschützte Informationen. Alle Rechte
vorbehalten. Kein Teil dieses Handbuchs darf ohne vorherige schriftliche Genehmigung des
Herstellers mechanisch, elektronisch oder durch andere Mittel in irgendeiner Form reproduziert
werden.
JURISTISCH
Marken
Alle Marken und eingetragenen Marken sind Eigentum ihrer jeweiligen Besitzer oder Unternehmen.
19
Page 44

V1.0
9
FCC Conditions
Dieses Gerät wurde getestet und erfüllt Teil 15 Klasse B der FCC-Bestimmungen. Für den Betrieb gelten folgende zwei Bedingungen:
(1) Das Gerät darf keine schädlichen Störungen verursachen. (2) Das Gerät muss den Empfang von Interferenzen zulassen,
einschließlich von Interferenzen, die einen ungewünschten Betrieb verursachen können.
CE
Dieses Gerät erfüllt die Anforderungen folgender Bestimmungen: EN 55 022: KLASSE B
WEEE Information
Für Anwender aus EU-Mitgliedsländern (Mitglieder der Europäischen Union): Gemäß der Richtlinie für die Entsorgung elektrischer
und elektronischer Altgeräte (WEEE) darf dieses Produkt nicht als Hausmüll oder Gewerbeabfall entsorgt werden. Elektrische
und elektronische Altgeräte müssen ordnungsgemäß gesammelt und entsprechend den für Ihr Land geltenden Verfahren und
recycelt werden. Weitere Informationen über das Recycling dieses Produkts erhalten Sie bei Ihren örtlichen Behörden, beim
Entsorgungsdienst für Haushaltsabfälle oder bei der Verkaufsstelle, bei der Sie das Produkt gekauft haben.
USB 3.0 Dockingstation mit Einzel-/Doppelanzeige
Benutzerhandbuch
GESETZLICHE BESTIMMUNGEN
www.V7-world.com
20
Page 45

STATION
D’ACCUEIL
UNIVERSELLE
UDDS1
Page 46

1 INTRODUCTION
Caracteristiques 1
Contenu Du Package 1
Conguration Systeme Requise 1
5 CONFIGURATION AUDIO 15
6 DESINSTALLER LE PILOTE 16
7 SPECIFICATIONS 18
2 APERÇU DU PRODUIT
Avant 2
Arriere 2
3 INSTALLATION
Windows 7/8 3
Mac OS 4
Vérication de l’installation 6
4 CONFIGURATION DE L’AFFICHAGE
Paramètres de l’utilitaire 9
Description Des Parametres 10
Conguration multi-écrans 11
Mode Etendu 13
Mode Miroir 13
Congurer En Montiteur Principal 13
Raccourci Windows 14
8 LÉGAL
Consignes De Securite 19
Droit D’Auteur 19
Marques 19
9 CONFORMITE AUX NORMES
Conditions FCC 20
CE 20
Informations DEEE 20
TABLE DES MATIÈRES
www.V7-world.com
i
Page 47

1
La station d’accueil V7 UDDS est conçue pour des exigences de connectivité accrues. Avec la station d’accueil, vous pouvez prolonger la
connexion de votre ordinateur avec davantage de périphériques USB, une connexion Ethernet, le haut-parleur et le micro, par le biais d’un
seul câble USB.
Avec les ports USB 3.0 intégrés, la station d’accueil vous permet de proter d’une transmission de données ultrarapide entre les
périphériques USB. En plus de la norme USB 3.0, ce produit est conforme aux normes USB 1.1/2.0.
De plus, la station d’accueil est équipée d’une sortie vidéo. Vous pouvez reéter l’image de votre écran principal, ou accroître la visibilité
du bureau et ainsi acher plus d’applications en même temps. Avec sa possibilité d’extension améliorée et son apparence élégante, cette
station d’accueil avec vidéo est l’accessoire le plus polyvalent qui soit et constitue le complément idéal de votre domicile ou bureau.
Caractéristiques
• Compatible avec les spécications USB 2.0/3.0
• Résolution jusqu’à 2 048 x 1 152
• Connexion canal audio 2.1
• Connexion Gigabit Ethernet
• HDMI/DVI/VGA connection
• Chargement BC 1.2
Contenu du package
• Station d’accueil
• Câble USB 3.0
• Adaptateur d’alimentation
INTRODUCTION
• CD (pilote et manuel de l’utilisateur)
• Guide d’installation rapide
Conguration système requise
Conguration minimale requise :
• Processeur : Simple cœur 1,6 GHz ou horloge du processeur plus élevée.
Famille Intel Pentium/Celeron
Famille AMD-K6/Athlon/Duron ou processeur compatible
• RAM: 1 Go ou plus
• Port USB : 2.0/3.0
• 30 Mo de disque dur disponible
• Systèmes d’exploitation :
Microsoft : Windows® 7 SP1 ou version ultérieure/Windows® 8
Apple : Mac OS X® 10.9
1
Page 48

Avant Arrière
2
1
2
3
4
Objet Description
5
6
7
8
9
10
Item Description
1 Port USB 3.0 Connexion aux périphériques USB 3.0
1
2 Port USB 3.0
2
Prise pour haut-
3
parleur
Prise micro Connexion à un micro
4
APERÇU DU PRODUIT AVANT
Connexion aux périphériques USB 3.0
Avec chargement BC 1.2
Connexion à un haut-parleur ou un casque
Ports USB 2.0 Connexion aux périphériques USB 2.0
5
Port RJ45 Connexion à une prise Ethernet
6
Connecteur DVI
7
Connecteur HDMI
8
Port USB 3.0
9
(Type B)
Jack d’alimentation Connexion à un adaptateur d’alimentation
10
Connexion à un moniteur DVI ou un projecteur
Connexion à un moniteur HDMI ou un
projecteur
Connexion à un ordinateur
2
Page 49

Remarque : veillez à ce que le pilote soit installé avant de connecter le V7 UDDS à
votre ordinateur pour une. visitez www.displaylink.com pour les logiciels.
3
Windows® 7/8
INSTALLATION
• Insérez le CD de pilote fourni dans le lecteur de CD/DVD-ROM.
• Cliquez sur Run Setup.exe (Exécuter Setup.exe) pour démarrer l’installation.
Si AutoPlay (Lecture automatique) n’apparaît pas automatiquement, recherchez et double-cliquez sur le chier Setup.exe dans le dossier du pilote an
de démarrer l’installation.
• Cliquez sur I Accept (J’accepte) pour continuer l’installation du pilote.
• Veuillez patienter pendant l’installation
• Connectez la station d’accueil à un ordinateur après l’installation du pilote
pour terminer l’installation.
3
Page 50

Mac OS X®
INSTALLATION
• Insérez le CD de pilote fourni dans le lecteur de CD/DVD-ROM.
• Cliquez sur Run Driver.dmg (Exécuter Driver.dmg) pour lancer l’installation, et cliquez sur Continue (Continuer).
• Cliquez sur Continue (Continuer) dans le Contrat de licence du logiciel.
• Cliquez sur Agree (J’accepte) > Install (Installer) > Continue Installation
(Continuer l’installation).
4
Page 51

• Veuillez patienter pendant l’installation.
• L’installation a bien été eectuée.
INSTALLATION
5
Page 52

Vérier l’installation
Pour vérier le pilote de l’adaptateur, veuillez suivre les étapes ci-dessous.
•
Suivez le chemin pour ouvrir le gestionnaire du périphérique.
Windows® 7
Panneau de conguration\ Système et sécurité\ Systèmes\ Gestionnaire du périphérique
Windows® 8 / Windows® 8.1
Paramètres\Panneau de conguration\Système et sécurité\Système\Gestionnaire du périphérique
• Vous trouverez la liste de périphérique DisplayLink Adapter (Adaptateur DisplayLink).
Remarque : si vous ne trouvez pas le pilote, il se peut que celui-ci n’ait
pas été installé correctement. Veuillez débrancher le périphérique et
INSTALLATION
répéter les étapes de l’installation.
6
Page 53

Mac OS X®
INSTALLATION
• Cliquez sur l’icône Apple dans le coin en haut à gauche de l’écran pour ouvrir About This Mac
(À propos de ce Mac).
• Cliquez sur More Info… (Plus d’informations…)
• Cliquez sur System Report… (Rapport système...)
7
Page 54

• Vous trouverez l’adaptateur DisplayLink dans la liste de périphériques.
INSTALLATION
8
Page 55
Paramètres de l’utilitaire
L’utilitaire fourni permet de congurer le mode d’achage, la rotation de l’écran, la résolution de l’écran, et l’agencement physique de vos moniteurs.
4
1. Cliquez sur l’icône de l’utilitaire dans Windows System Tray (Barre d’état système de Windows).
2. Choisissez les préférences du moniteur que vous souhaitez acher.
CONFIGURATION DE L’AFFICHAGE
9
Page 56

Description des peramètres
Options Description
Gestionnaire DisplayLink Activer la résolution d’écran Windows
Chercher des mises à jour Chercher le dernier pilote et le télécharger s’il est disponible
Accueil vidéo USB 3.0 Préférences de l’accueil vidéo
Résolution de l’écran
Rotation de l’écran Faites pivoter l’écran dans le sens souhaité
Agrandir Agrandir l’écran principal
Étendre vers Le curseur peut accéder à l’écran souhaité, via gauche/droite/haut/bas
Congurer en tant que
moniteur principal
Moniteur du bloc-notes
désactivé
Miroir Reéter l’écran de l’ordinateur
Désactivé Éteindre le moniteur
Optimiser pour la vidéo Optimiser la qualité de la vidéo lors de la lecture. Le texte peut être moins lisible si cette option est activée
Adapter à la TV
Cliquez pour sélectionner une résolution disponible. Veuillez noter que cette fonction n’est pas valide en mode miroir, car la résolution est dénie
en tant que résolution pour le moniteur principal
Congurer cet écran en tant qu’écran principal
Faites passer le moniteur sur l’écran principal et éteignez l’écran de l’ordinateur portable.
REMARQUE : il se peut que cette fonctionnalité n’apparaisse pas
Ajuster la taille de Windows Desktop
REMARQUE : cette fonctionnalité marchera uniquement si au moins un moniteur est connecté.
Conguration audio Activer la page de conguration audio de Windows
CONFIGURATION DE L’AFFICHAGE
Conguration vidéo Activer la page de résolution d’écran de Windows
10
Page 57

Conguration multimoniteur
La station d’accueil peut prendre en charge 2 moniteurs simultanément. Une fois les moniteurs connectés, vous pouvez congurer
pour une utilisation en « Mode miroir », « Mode étendu » ou pour un achage principal.
Windows® 7/8
Positionnez la souris n’importe où sur le bureau, cliquez avec le bouton droit et sélectionnez Screen Resolution (résolution de l’écran).
Achage unique Achage double
Sinon, cliquez sur l’icône de l’utilitaire dans la Windows System Tray (Barre d’état système de Windows), puis sélectionnez
DisplayLink Manager (gestionnaire DisplayLink).
CONFIGURATION DE L’AFFICHAGE
11
Page 58

Mac OS X®
1. Cliquez sur Apple Icon (l’icône Apple) en haut à gauche parmi les icônes à l’écran et sélectionnez System Preferences…
(Préférences système...) dans la liste déroulante.
2. Cliquez sur Displays (Achages) pour activer le mode multimoniteur et voir le mode étendu aché sur le bureau.
Achage unique Achage double
CONFIGURATION DE L’AFFICHAGE
REMARQUE : cochez la case Mirror Displays (Achages miroir) pour activer le mode miroir.
12
Page 59

Mode étendu
1. Dans le menu déroulant Display (Achage), sélectionnez le moniteur préféré.
2. Sélectionnez Multiple Displays (Achages multiples) > Extend these Displays (Étendre ces achages) sur Windows® 7/8
3. Cliquez sur OK pour conrmer et fermer l’écran de paramètres.
4. Après avoir complété les paramètres, faites glisser-déplacer les icônes d’application ou les fenêtres ouvertes sur le moniteur
additionnel. Cependant, il se peut que certaines applications ne puissent s’acher sur le bureau étendu.
Disparition du curseur
Si le statut reste en mode étendu, mais que l’adaptateur est déconnecté, le bureau sera toujours lié au moniteur additionnel. Dans ce
cas, il se peut que le curseur soit introuvable sur le moniteur principal. Si cette situation se présente, connectez le moniteur additionnel
à nouveau par le biais de l’adaptateur ou continuez à déplacer la souris.
Mode miroir
1. Dans le menu déroulant Display (Achage), sélectionnez le moniteur préféré.
2. Sélectionnez Multiple Displays (Achages multiples) > Duplicate these Displays (Reéter ces achages) sur Windows® 7/8
3. Cliquez sur OK pour conrmer et fermer l’écran de paramètres.
Congurer en moniteur principal
1. Dans le menu déroulant Display (Achage), sélectionnez le moniteur préféré.
2. Cochez la case Make this my main display (Faire de cet achage l’achage principal) sur Windows® 7, Set as Main Monitor
(Congurer en tant que moniteur principal) sur Windows® 8
REMARQUE : il se peut que certains PC et ordinateurs portables nécessitent de désactiver l’achage principal (c.-à-d. décocher la case
Extend the desktop onto this monitor [Étendre le Bureau à ce moniteur] ou Extend my Windows desktop onto this monitor
[Étendre le Bureau Windows à ce moniteur] pour l’achage principal) pour des changements de paramètres similaires.
CONFIGURATION DE L’AFFICHAGE
3. Cliquez sur OK pour conrmer et fermer l’écran de paramètres.
13
Page 60

Raccourci Windows
Appuyez sur (bouton Windows) + P pour acher le menu et sélectionner l’option souhaitée.
Cette fonctionnalité est disponible sur Windows® 7 et version ultérieure uniquement.
Supported Resolution
Fréquence
Résolution Nom
640 x 480 VGA 60 72 75 78 60 72 75 85
800 x 600 SVGA 56 60 72 75 56 60 72 75 85
1024 x 768 XGA 60 70 75 85 60 70 75 85
1280 x 720 720P 60 60
1280 x 768 WXGA+ 60 70 75 85 60 70 75 85
1280 x 800 WXGA 60 60
1280 x 1024 SXGA 60 75 85 60 75
1366 x 768 WXGA+ 60 60
1400 x 1050 SXGA+ 60 75 85 60 75 85
1600 x 1200 UXGA 60 60
1680 x 1050 WSXGA+ 60 60
CONFIGURATION DE L’AFFICHAGE
1920 x 1080 1080p 60 60
d’actualisation
16 bit 32 bit
Fréquence
d’actualisation
1920 x 1200 WUXGA 60 60
2048 X 1152 QXGA 60 60
14
Page 61

Par défaut, lorsque la station d’accueil est connectée à un ordinateur, la conguration audio peut être changée automatiquement
pour USB (Multimedia) Audio Device (Périphérique audio (Multimédia) USB (ce paramètre dépend des modèles). Si cela ne
fonctionne pas correctement, suivez la procédure de conguration ci-dessous.
5
Windows 7/8
1. Ouvrez le Control Panel (Panneau de conguration) puis sélectionnez l’icône de matériel et audio.
2. Cliquez sur Sound > Manage audio devices (Audio > Gérer les périphériques audio) puis sélectionnez USB Audio Device
(Périphérique audio USB) ou Displaylink Audio (Audio Displaylink).
CONFIGURATION AUDIO
15
Page 62
1. Suivez les instructions pour trouver le chemin du pilote, puis cliquez avec le bouton droit sur DisplayLink Graphics (Graphiques
DisplayLink) pour désinstaller le pilote.
Windows 7
6
Panneau de conguration > Programmes > Programmes et fonctionnalités > Désinstaller ou modier ce programme
Windows 8
Paramètres > Panneau de conguration > Programmes > Désinstaller un programme
2. Cliquez sur Yes (Oui) pour conrmer la désinstallation.
3. Cliquez sur Yes (Oui) pour redémarrer votre ordinateur. Vous pouvez désormais également déconnecter le périphérique.
DÉSINTALLER LE PILOTE
16
Page 63

Mac OS X
1. Ouvrez le pilote et cliquez sur DisplayLink Software Uninstaller (Programme de désinstallation de DisplayLink).
UNINSTALL DRIVERS
17
Page 64

Interface hôte USB 3.0
Connexion Connecteur femelle HDMI 30 broches
Connecteur femelle DVI-D 30 broches
7
Connecteur USB B
Connecteur USB A
Mini-Jack Stéréo 3,5 mm
Connecteur RJ45
Jack d’alimentation Courant continu
Résolution vidéo HDMI = 2 048 x 1 152
DVI = 2 048 x 1 152
Couleurs prises en charge 16 bits et 32 bits
Audio 2.1 canaux
Ethernet 10/100/1000
Alimentation Puissance opérationnelle : 14.43 W
Sortie : CC 5 V, 4 A
Consommation électrique Operating Power: 14.43W
SPÉCIFICATIONS
Puissance en mode veille : 1.95 W
Plastique ABS
Poids 599 g
Dimensions 187.85(L) x 76.9(W) x 31.08(H) mm
Température de fonctionnement 0~40 degrés
Température de conservation -20~70 degrés
Conformité CE, FCC, RCM
18
Page 65

8
Consignes de sécurité
Veuillez lire attentivement les consignes de sécurité :
• Conservez l’équipement à l’abri de l’humidité
• Si l’une des situations suivantes se présente, faites vérier l’équipement par un technicien de service
l’équipement a été exposé à l’humidité ;
l’équipement est tombé et a été endommagé ;
l’équipement présente des signes évidents de casse ;
LÉGAL
l’équipement ne fonctionne pas correctement ou je n’arrive pas à le faire fonctionner en suivant le manuel d’utilisateur.
Utilisez uniquement l’adaptateur fourni.
Droit d’auteur
Ce document contient des informations protégées par le droit d’auteur. Tous les droits sont réservés. Aucune partie de ce manuel ne
peut être reproduite par quelque moyen mécanique ou électronique ou quelque autre forme que ce soit, sans l’autorisation écrite
au préalable du fabricant.
Marques
Toutes les marques et les marques déposées sont détenues par leurs entreprises ou propriétaires respectifs.
19
Page 66

V1.0
9
Conformité aux normes Conditions FCC
Cet équipement a été testé et déclaré conforme à la section 15, classe B des règlements de la FCC. Son fonctionnement est soumis
aux deux conditions suivantes : (1) Cet appareil ne doit pas provoquer d’interférences nuisibles. (2) Cet appareil doit accepter toute
interférence reçue, y compris des interférences qui peuvent provoquer un fonctionnement non désiré.
CE
Cet équipement est conforme aux exigences des réglementations suivantes : EN 55 022 : Classe B
WEEE Information
Pour les utilisateurs membres de l’UE (Union européenne) : Conformément à la directive sur les déchets d’équipements électriques
et électroniques (DEEE), ne jetez pas ce produit avec les déchets ménagers ou commerciaux. Les déchets d’équipements électriques
et électroniques doivent être ramassés de manière appropriée et recyclés si nécessaire en fonction des pratiques établies dans votre
pays. Pour des informations sur le recyclage de ce produit, veuillez contacter les autorités locales, votre centre de traitement des
déchets ménagers ou le magasin où le produit a été acheté.
CONFORMITE AUX NORMES
Station d’accueil avec achage double/unique USB 3.0
Manuel de l’utilisateur
www.V7-world.com
20
Page 67

BASE DE
CONEXIÓN
UNIVERSAL
UDDS1
Page 68

1 INTRODUCCIÓN
Características 1
Contenido del Paquete 1
Requistos del Sistema 1
DESCRIPCION GENERAL
2
DEL PRODUCTO
Parte Delantera 2
ÍNDICE
Parte Trasera 2
3 INSTALLACIÓN
Windows 7/8 3
Mac OS 4
La Vericación de la Instalación 6
4 CONFIGURACIÓN DE LA PANTALLA
Conguración de la Utilidad 9
Descripción de los Ajustes 10
Conguración de Varios Monitores 11
Modo Extendido 13
Modo Duplicado 13
Convertir en Monitor Principal 13
Acceso Directo De Windows 14
5 CONFIGURACION DE AUDIO 15
6 DESINSTALAR EL CONTROLADOR 17
7 ESPECIFICACIONES 18
8 LEGAL
Instrucciones de Seguridad 19
Copyright 19
Marcas Comerciales 19
9 CUMPLIMIENTO DE LA NORMATIVA
Condiciones de la FCC 20
CE 20
Información Sobre la Directiva RAEE 20
www.V7-world.com
i
Page 69

1
La base de conexión universal V7 UDDS se ha diseñado para aquellos usuarios que exigen una mayor conectividad. Con la base de
conexión podrá extender la conexión de su ordenador con más periféricos USB, conexión Ethernet, altavoz y micrófono a través de
un solo cable USB.
Con los puertos USB 3.0 integrados, la base de conexión le permite disfrutar de una elevadísima velocidad de transmisión de datos
entre los periféricos USB. Además de la conexión USB 3.0, este producto cumple la norma USB 1. 1/2.0.
Asimismo, la base de conexión cuenta con salida de vídeo. Podrá duplicar su pantalla principal o extender el escritorio para poder
ver más aplicaciones al mismo tiempo. Esta base de conexión con vídeo, que cuenta con una mayor capacidad de expansión y un
elegante diseño, es el accesorio más versátil que mejor combina con su hogar o su ocina.
Características
• Compatible con la especicación USB 2.0/3.0
• Una resolución de hasta 2048 x 1152
• Conexión de canales de audio 2.1
• Conexión Gigabit Ethernet
• Conexión HDMI/DVI/VGA
• Carga BC 1.2
Contenido del paquete
• Base de conexión
• Cable USB 3.0
• Adaptador de corriente
INTRODUCCIÓN
• CD (Controlador y Manual del usuario)
• Guía de instalación rápida
Requisitos del sistema
Requisitos mínimos:
• CPU: reloj del procesador de un solo núcleo a 1,6 GHz o superior.
Familia Intel Pentium/Celeron
Familia AMD K6/Athlon/Duron o procesador compatible
• RAM: 1 GB o superior
• Puerto USB: 2.0/3.0
• 30 MB de espacio en disco disponible
• Sistemas operativos:
Microsoft: Windows® 7 SP1 o posterior/Windows® 8
Apple: Mac OS X® 10.9
1
Page 70

Parte Delantera Parte Trasera
2
1
2
3
4
Elemento Descripción
5
6
7
8
9
10
Elemento Descripción
DESCRIPCIÓN GENERAL DEL PRODUCTO
Puerto USB 3.0 Conexión a dispositivos USB 3.0
1
Puerto USB 3.0
2
Conector de
3
altavoz
Conector de
4
micrófono
Conexión a dispositivos USB 3.0
Con carga BC 1.2
Conexión a altavoz o auriculares
Conexión a micrófono
Puertos USB 2.0 Conexión a dispositivos USB 2.0
5
Puerto RJ45 Conexión a Ethernet
6
Conector DVI Conexión a un proyector o monitor DVI
7
Conector HDMI Conexión a un proyector o monitor HDMI
8
9
10
Puerto USB 3.0
(Tipo B)
Conector de
alimentación
Conexión a un ordenador
Conexión al adaptador de corriente
2
Page 71

3
Nota: Asegúrese de instalar el controlador antes de conectar la V7 UDDS a su
ordenador para mejorar su experiencia. visitar www.displaylink.com para el software
Windows® 7/8
INSTALACIÓN
• Inserte el CD del controlador suministrado en el CD/DVD ROM.
• Haga clic en Run Setup.exe (Ejecutar Setup.exe) para iniciar la instalación.
Si AutoPlay (Reproducción automática) no aparece automáticamente, localice y
haga doble clic en el archivo Setup.exe en la carpeta del controlador para iniciar la
instalación.
• Haga clic en I Accept (Acepto) para continuar con la instalación del controlador.
• Espere mientras se lleva a cabo la instalación.
• Conecte la base de conexión a un ordenador después de haber instalado el
controlador para nalizar el proceso de instalación.
3
Page 72

Mac OS X®
INSTALACIÓN
• Inserte el CD del controlador suministrado en el CD/DVD ROM.
• Haga clic en Run Driver.dmg (Ejecutar Driver.dmg) para iniciar la instalación y
haga clic en Continue (Continuar).
• Haga clic en Continue (Continuar) en el Contrato de licencia de software.
• Haga clic en Agree (Aceptar) > Install (Instalar) > Continue Installation
(Continuar instalación).
4
Page 73

INSTALACIÓN
• Espere mientras se lleva a cabo la instalación.
• La instalación se realizó correctamente.
5
Page 74

Comprobación de la instalación
Para comprobar el controlador del adaptador, siga el paso que se indica a continuación.
•
Siga la ruta para abrir el administrador de dispositivos.
Windows® 7
Control Panel (Panel de control)\System and Security (Sistema y seguridad)\Systems (Sistemas)\Device manager
(Administrador de dispositivos)
Windows® 8 / Windows® 8.1
Settings (Conguración)\Control Panel (Panel de control)\System and Security (Sistema y seguridad)\
System (Sistema)\Device manager (Administrador de dispositivos)
• Encontrará DisplayLink Adapter (Adaptador DisplayLink) en la lista de dispositivos
INSTALACIÓN
Nota: Si no encuentra el controlador, es posible que no esté correctamente
instalado. Desenchufe el dispositivo y vuelva a realizar los pasos de instalación.
6
Page 75

Mac OS X®
INSTALACIÓN
• Haga clic en el símbolo de Apple situado en la esquina superior izquierda de la pantalla para
abrir About This Mac (Acerca de este Mac)
• Haga clic en More Info… (Más información…)
• Haga clic en System Report… (Informe del sistema...)
7
Page 76

• Encontrará DisplayLink Adapter (Adaptador DisplayLink) en la lista de dispositivos.
INSTALACIÓN
8
Page 77

Ajustes de la utilidad
La utilidad suministrada permite congurar el modo de visualización, la rotación de la pantalla, la resolución de la pantalla y la
disposición física de sus monitores.
4
1. Haga clic en el icono de la utilidad en Windows System Tray (Bandeja del sistema de Windows).
2. Seleccione la preferencia del monitor que desee mostrar.
CONFIGURACIÓN DE LA PANTALLA
9
Page 78

Descripción de los ajustes
Opciones Descripción
DisplayLink manager
(Administrador de DisplayLink)
Check for Updates
(Buscar actualizaciones)
USB 3.0 Video Dock
(Conexión de vídeo USB 3.0)
Screen Resolution
(Resolución de pantalla)
Screen Rotation
(Rotación de la pantalla)
Extend (Extender) Extienda la pantalla principal
Extend To (Extender a) El cursor puede extenderse hasta la pantalla que desee por la parte izquierda/derecha/superior/inferior
Set as Main Monitor (Establecer
como monitor principal)
Notebook Monitor O
(Monitor del portátil apagado)
Mirror (Duplicar) Duplique la pantalla del ordenador
Habilite la resolución de pantalla de Windows
Busque el último controlador y descárguelo si está disponible
Preferencia de conexión de vídeo
Haga clic para seleccionar una resolución disponible. Tenga en cuenta que esta función no es válida en el Modo duplicado, ya que la resolución
se ha denido como la resolución del monitor principal
Gire la pantalla según la orientación deseada
Establezca esta pantalla como la pantalla principal
Cambie el monitor a la pantalla principal y apague la pantalla del portátil.
NOTA: Es posible que esta función no aparezca
O (Apagar) Apague el monitor
Optimize for Video
(Optimizar para vídeo)
Fit to TV (Ajustar a la TV)
Audio Setup
(Conguración de audio)
Video Setup
(Conguración de vídeo)
Optimice la calidad de vídeo durante la reproducción. El texto podría perder nitidez si esta opción está habilitada
Ajuste el tamaño del escritorio de Windows
NOTA: Esta función solo funcionará si hay al menos un monitor conectado.
Habilite la página de conguración de audio de Windows.
Habilite la página de resolución de pantalla de Windows.
CONFIGURACIÓN DE LA PANTALLA
10
Page 79

Conguración de varios monitores
La base de conexión es capaz de admitir 2 monitores de forma simultánea. Cuando se hayan conectado los monitores, podrá
congurarse para utilizarlos en el “Modo duplicado” o en el “Modo extendido”, o para convertirse en la pantalla principal.
Windows® 7/8
Coloque el ratón en cualquier parte del escritorio, haga clic con el botón derecho y seleccione Screen Resolution (Resolución de pantalla).
Visualización simple Visualización doble
Asimismo, puede hacer clic en el icono de la utilidad en Windows System Tray (Bandeja del sistema de Windows) y, a
continuación, seleccionar DisplayLink Manager (Administrador de DisplayLink).
CONFIGURACIÓN DE LA PANTALLA
11
Page 80

Mac OS X®
1. Haga clic en el icono de Apple situado en la parte superior izquierda de la pantalla y seleccione System Preferences…
(Preferencias del Sistema...) en la lista desplegable.
1. Haga clic en Displays (Pantallas), habilite el Modo de varios monitores y el monitor extendido se mostrará en el escritorio.
Visualización simple Visualización doble
NOTA: Marque la casilla Mirror Displays (Duplicar pantallas) para habilitar el Modo duplicado.
CONFIGURACIÓN DE LA PANTALLA
12
Page 81

Modo extendido
1. En el menú desplegable Display (Pantalla), seleccione el monitor que preera.
2. Marque Multiple Displays (Varias pantallas) > Extend these Displays (Extender estas pantallas) en Windows® 7/8
3. Haga clic en OK (Aceptar) para conrmar y cerrar la pantalla de conguración.
4. Una vez realizada la conguración, simplemente arrastre y coloque los iconos de las aplicaciones o las ventanas abiertas en el
monitor complementario. Sin embargo, es posible que algunas aplicaciones no admitan la visualización en el escritorio extendido.
Cursor desaparecido
Si el estado continúa en el modo extendido pero el adaptador está desconectado, el escritorio seguirá desplazándose al monitor
complementario. En dicho caso, es posible que el cursor no se encuentre en el monitor principal. Si esto sucede, vuelva a conectar el
monitor complementario a través del adaptador o siga moviendo el ratón.
Modo duplicado
1. En el menú desplegable Display (Pantalla), seleccione el monitor que preera.
2. Marque Multiple Displays (Varias pantallas) > Duplicate these Displays (Duplicar estas pantallas) en Windows® 7/8
3. Haga clic en OK (Aceptar) para conrmar y cerrar la pantalla de conguración.
Convertir en monitor principal
1. En el menú desplegable Display (Pantalla), seleccione el monitor que preera.
2. Marque la casilla Make this my main display (Convertir esta pantalla en la principal) en Windows® 7, Set as Main Monitor
(Congurar como monitor principal) en Windows® 8
NOTA: Es posible que algunos PC y portátiles deban deshabilitar la pantalla principal (es decir, desmarcar la casilla Extend the desktop
onto this monitor [Extender el escritorio a este monitor] o Extend my Windows desktop onto this monitor [Extender mi
escritorio de Windows a este monitor] de la pantalla principal) para realizar el mismo cambio en la conguración.
3. Haga clic en OK (Aceptar) para conrmar y cerrar la pantalla de conguración.
CONFIGURACIÓN DE LA PANTALLA
13
Page 82

Acceso directo de Windows
Pulse (botón de Windows) + P para mostrar el menú y seleccionar la opción que desee.
Esta función solo está disponible en Windows® 7 y superiores.
Resolución compatible
Options Description
640 x 480 VGA 60 72 75 78 60 72 75 85
800 x 600 SVGA 56 60 72 75 56 60 72 75 85
1024 x 768 XGA 60 70 75 85 60 70 75 85
1280 x 720 720P 60 60
1280 x 768 WXGA+ 60 70 75 85 60 70 75 85
1280 x 800 WXGA 60 60
1280 x 1024 SXGA 60 75 85 60 75
1366 x 768 WXGA+ 60 60
1400 x 1050 SXGA+ 60 75 85 60 75 85
1600 x 1200 UXGA 60 60
1680 x 1050 WSXGA+ 60 60
1920 x 1080 1080p 60 60
1920 x 1200 WUXGA 60 60
Refresh Rate Refresh Rate
16 bit 32 bit
2048 X 1152 QXGA 60 60
CONFIGURACIÓN DE LA PANTALLA
14
Page 83
De forma predeterminada, cuando la base de conexión está conectada a un ordenador, la conguración de audio puede cambiarse
a USB (Multimedia) Audio Device (Dispositivo de audio USB [Multimedia]) automáticamente (este ajuste dependerá del
modelo). Si esto no funciona, siga los pasos que se indican a continuación para realizar la conguración.
Windows 7/8
5
1. Abra Control Panel (Panel de control) y, a continuación, seleccione el icono de Hardware y sonido.
2. Haga clic en Sound (Sonido) > Manage audio devices (Administrar dispositivos de audio) y, a continuación, seleccione USB
Audio Device (Dispositivo de audio USB) o DisplayLink Audio (Audio de DisplayLink).
CONFIGURACIÓN DE AUDIO
15
Page 84

1. Siga las instrucciones para encontrar la ruta del controlador y, a continuación, haga clic con el botón derecho en DisplayLink
Graphics (Grácos de DisplayLink) para desinstalar el controlador.
Windows 7
6
Control Panel (Panel de control) > Programs (Programas) > Programs and Features (Programas y características) > Uninstall or
change the program (Desinstalar o cambiar un programa)
Windows 8
Settings (Conguración) > Control Panel (Panel de control) > Programs (Programas) > Uninstall a program (Desinstalar un
programa)
2. Haga clic en Yes (Sí) para conrmar la desinstalación.
3. Haga clic en Yes (Sí) para reiniciar el ordenador. Ahora también puede desconectar el dispositivo.
DESINSTALAR EL CONTROLADOR
16
Page 85

Mac OS X
1. Abra el controlador y haga clic en DisplayLink Software Uninstaller (Desinstalador de software DisplayLink).
DESINSTALAR EL CONTROLADOR
17
Page 86

Interfaz host USB 3.0
Conector Conector hembra de 30 contactos HDMI
Conector hembra de 30 contactos DVI-D
7
Conector USB B
Conector USB A
Miniconector estéreo de 3,5 mm
Conector RJ45
Conector de alimentación CC
Resolución de vídeo HDMI = 2048 x 1152
DVI = 2048 x 1152
Colores compatibles 16 bits y 32 bits
Audio 2.1 canales
Ethernet 10/100/1000
Alimentación Entrada: 100-240 V CA
Salida: 5 V CC 4 A
Consumo de energía Potencia de servicio: 14,43 W
Potencia del modo de suspensión: 1,95 W
Plastic ABS
Peso 599 g
ESPECIFICACIONES
Dimensiones 187,85 (largo) x 76,9 (ancho) x 31,08 (alto) mm
Temperatura de funcionamiento 0~40 grados
Temperatura de almacenamiento -20~70 grados
Cumplimiento CE, FCC, RCM
18
Page 87

8
Instrucciones de seguridad
Lea siempre las instrucciones de seguridad detenidamente:
• Mantenga el equipo alejado de la humedad
• Si se produce alguna de las siguientes situaciones, llame a un técnico de servicio para que revise el equipo:
El equipo se ha expuesto a la humedad.
El equipo se ha caído y ha sufrido daños.
El equipo presenta claros signos de rotura.
LEGAL
El equipo no ha estado funcionando correctamente o no funciona según el Manual del usuario.
Solamente utiliza el adaptador incluido.
Copyright
Este documento contiene información condencial protegida por copyright. Todos los derechos
están reservados. Ninguna parte de este manual podrá reproducirse de forma mecánica, electrónica o de cualquier otro modo sin la previa autorización por escrito del fabricante.
Marcas comerciales
Todas las marcas comerciales y marcas comerciales registradas pertenecen a sus respectivos propietarios o empresas.
19
Page 88

V1.0
9
Condiciones de la FCC
Este equipo se ha sometido a pruebas y ha demostrado que cumple la Parte 15, Clase B, de las Reglas de la FCC. Su funcionamiento
está sujeto a las dos condiciones siguientes: (1) Este dispositivo no podrá provocar interferencias perjudiciales. (2) Este dispositivo
deberá aceptar las interferencias recibidas e incluir las interferencias que puedan provocar un funcionamiento no deseado.
CE
Este equipo cumple los requisitos de las siguientes normativas: EN 55 022: CLASE B
Información sobre la Directiva RAEE
Para los usuarios miembro de la UE (Unión Europea): Según la Directiva RAEE (Residuos de aparatos eléctricos y electrónicos), no
deberá eliminar este producto como residuo doméstico o comercial. Los residuos de aparatos eléctricos y electrónicos deben
recogerse y reciclarse según las prácticas establecidas en su país. Si desea más información sobre cómo reciclar este producto,
póngase en contacto con sus autoridades locales, el servicio de eliminación de residuos domésticos o el establecimiento en el que
compró el producto.
CUMPLIMIENTO DE LA NORMATIVA
Base de conexión de visualización simple/doble USB 3.0
Manual del usuario
www.V7-world.com
20
Page 89

ALLOGGIAMENTO
DI ESPANSIONE
UNIVERSALE
UDDS1
Page 90

1 INTRODUZIONE
Caratteristiche 1
Contenuto Della Confezione 1
Requisti di Sistema 1
5 CONFIGURAZIONE AUDIO 15
6 DISINSTALLAZIONE DEL DRIVER 16
7 SPECIFICHE TECNICHE 18
INDICE
2 PANORAMICA DEL PRODOTTO
Fronte 2
Retro 2
3 INSTALLAZIONE
Windows 7/8 3
Mac OS 4
Verica dell’installazione 6
4 CONFIGURAZIONE SCHERRMO
Impostazioni di Utilità 9
Descrizinoe delle Impostazioni 10
Congurazione per più monitor 11
Madalità Estesa 13
Modalita di Mirroring 13
Impostazione del Monitor Principale 13
Tasti di Scelta Rapida di Windows 14
8 LEGALE
Istruzioni di Sicurezza 19
Copyright 19
Marchi 19
9 CONFORMITÀ ALLE NORMATIVE
Condizinoi FCC 20
CE 20
Informativa RAEE 20
www.V7-world.com
i
Page 91

1
L’alloggiamento di espansione V7 UDDS è progettato per rispondere a esigenze di maggiore connettività. L’alloggiamento di
espansione consente di ampliare i collegamenti del proprio computer con più periferiche USB, un collegamento Ethernet,
altoparlanti e microfono tramite un singolo cavo USB.
Con le porte USB 3.0 integrate, l’alloggiamento di espansione permette all’utente di sfruttare la trasmissione di dati a velocità elevate
tra le periferiche USB. Oltre alle porte USB 3.0, questo prodotto è compatibile con lo standard USB 1.1/2.0.
Inoltre, l’alloggiamento di espansione è dotato di output video. È possibile duplicare lo schermo principale o estendere il desktop
per visualizzare più applicazioni contemporaneamente. Con le funzionalità di espansione ottimizzate e un design elegante,
l’alloggiamento di espansione con video rappresenta l’accessorio più versatile che si adatta inoltre a casa e ucio.
Caratteristiche
• Compatibile con speciche USB 2.0/3.0
• Risoluzione no a 2048x1152
• Collegamento canale audio 2.1
• Connessione Gigabit Ethernet
• Collegamento HDMI/DVI/VGA
• Conforme alla ricarica BC 1.2
Contenuto della confezione
• Alloggiamento di espansione
• Cavo USB 3.0
• Alimentatore
INTRODUZIONE
• CD (driver e Manuale utente)
• Guida all’installazione rapida
Requisiti di sistema
Requisiti minimi:
• CPU: single-core da 1,6 GHz o clock del processore superiore.
Famiglia Intel Pentium/Celeron
Famiglia AMD K6/Athlon/Duron o processori compatibili
• RAM: 1 GB o superiore
• Porta USB: 2.0/3.0
• 30 MB di spazio disponibile su disco
• Sistemi operativi:
Microsoft: Windows® 7 SP1 o versioni successive/Windows® 8
Apple: Mac OS X® 10.9
1
Page 92

Fronte Retro
2
1
2
3
4
Elemento Descrizione
5
6
7
8
9
10
Elemento Descrizione
PANORAMICA DEL PRODOTTO
Porta USB 3.0 Collegamento a dispositivi USB 3.0
1
Porta USB 3.0
2
Jack per
3
altoparlanti
Jack per
4
microfono
Collegamento a dispositivi USB 3.0
Con ricarica BC 1.2
Collegamento ad altoparlanti e cue
Collegamento a microfono
Porte USB 2.0 Collegamento a dispositivi USB 2.0
5
Porta RJ45 Collegamento a Ethernet
6
Connettore DVI Collegamento a un monitor o proiettore DVI
7
Connettore HDMI
8
Porta USB 3.0
9
(Tipo B)
Jack dell’alimentazione Collegamento all’alimentazione
10
Collegamento a un monitor
o proiettore HDMI
Collegamento al computer
2
Page 93

Nota: per una migliore esperienza, vericare che siano installati i driver prima di
collegare V7 UDDS al computer. Visitare www.displaylink.com per il software
3
Windows® 7/8
• Inserire il CD del driver in dotazione nell’unità CD/DVD- ROM.
• Per avviare l’installazione, fare clic su Run Setup.exe.
Se l’AutoPlay non viene visualizzato automaticamente, individuare il le
Setup.exe nella cartella dei driver e farvi doppio clic per avviare l’installazione.
• Fare clic su I Accept (Accetto) per continuare l’installazione del driver.
INSTALLAZIONE
• Attendere durante il processo di installazione.
• Per completare l’installazione, collegare l’alloggiamento di espansione a un
computer dopo aver installato il driver.
3
Page 94

Mac OS X®
• Inserire il CD del driver in dotazione nell’unità CD/DVD ROM.
• Per avviare l’installazione, fare clic su Run Driver.dmg e poi su Continue (Continua).
• Quando appare il contratto di licenza software, fare clic su Continue (Continua).
INSTALLAZIONE
• Fare clic su Agree (Accetto) > Install (Installa) > Continue Installation
(Continua l’installazione)
4
Page 95

• Attendere durante il processo di installazione.
• Installazione completata.
INSTALLAZIONE
5
Page 96

Verica dell’installazione
Per vericare il driver dell’adattatore, seguire la procedura indicata.
•
Seguire il percorso per aprire Gestione dispositivi.
Windows® 7
Control Panel\System and Security\Systems\Device manager (Pannello di controllo\Sistema e sicurezza\Sistemi\Gestione dispositivi)
Windows® 8 / Windows® 8.1
Settings\Control Panel\System and Security\System\ Device manager (Impostazioni\Pannello di controllo\Sistema e sicurezza\Sistema\
Gestione dispositivi)
• L’adattatore DisplayLink sarà visibile nell’elenco dei dispositivi
Nota: qualora il driver non sia presente, potrebbe non essere installato
correttamente. Scollegare il dispositivo e ripetere la procedura di installazione.
INSTALLAZIONE
6
Page 97

Mac OS X®
• Fare clic sul simbolo Apple nell’angolo superiore sinistro della schermata per aprire About This
Mac (Informazioni su questo Mac)
• Fare clic su More Info… (Ulteriori informazioni...)
INSTALLAZIONE
• Click System Report...
7
Page 98

• L’adattatore DisplayLink sarà visibile nell’elenco dei dispositivi.
INSTALLATION
8
Page 99

Impostazioni dell’utilità
L’utilità fornita in dotazione consente la congurazione della modalità di visualizzazione, della rotazione dello schermo, della risoluzione
dello schermo e della disposizione sica dei monitor.
4
1. Fare clic sull’icona dell’utilità sulla barra delle applicazioni di Windows.
2. Scegliere le preferenze del monitor che si desidera visualizzare.
CONFIGURACIONE SCHERRMO
9
Page 100

Descrizione delle impostazioni
Opzioni Descrizione
DisplayLink manager
(Gestione DisplayLink)
Check for Updates
(Verica disponibilità
aggiornamenti)
USB 3.0 Video Dock
(Espansione video USB 3.0)
Screen Resolution
(Risoluzione dello schermo)
Screen Rotation
(Rotazione dello schermo)
Extend
(Estensione)
Extend to
(Estensione a)
Set as Main Monitor
(Imposta come monitor
principale)
Notebook Monitor O
(Monitor notebook spento)
Abilita la risoluzione dello schermo di Windows
Controlla il driver più recente e lo scarica, se disponibile
Preferenza per espansione video
Fare clic per selezionare una risoluzione disponibile. Tenere presente che questa funzione non è valida in modalità di mirroring poiché la
risoluzione viene denita direttamente dal monitor principale
Ruota lo schermo in base all’orientamento desiderato
Estende lo schermo principale
Il cursore può spostarsi sullo schermo desiderato verso destra/sinistra/in alto/in basso
Imposta questo schermo come quello principale
Passa il monitor allo schermo principale e spegne lo schermo del portatile.
NOTA: questa funzione potrebbe non essere visibile
Mirror
(Duplica)
O
(Spento)
Optimize for Video
(Ottimizza per video)
Fit to TV
(Adatta al televisore)
Audio Setup
(Impostazioni audio)
Video Setup
(Impostazioni video)
Consente di duplicare lo schermo del computer
Spegne il monitor
Ottimizza la qualità del video durante la riproduzione. Quando la funzione è abilitata, il testo potrebbe apparire meno nitido
Regola le dimensioni del desktop di Windows in funzione del televisore
NOTA: questa funzione è disponibile solo quando è collegato almeno un monitor.
Abilita la pagina di congurazione audio di Windows.
Abilita la pagina di risoluzione dello schermo di Windows.
CONFIGURACIONE SCHERRMO
10
 Loading...