

Page 1
LT V46DA
User's Manual
Page 2

Page 3
Content
■ Conformity............................................................................................................................................... 3
Disposal ..................................................................................................................................................... 3
■ Unpacking and Setup ......................................................................................................................... 4
Scope of Supply ...................................................................................................................................... 4
Safety ......................................................................................................................................................... 4
Location .................................................................................................................................................... 6
Intended purpose ................................................................................................................................... 6
■ Viewing the Control Panels ............................................................................................................. 7
Front View ................................................................................................................................................. 7
Rear View .................................................................................................................................................. 7
■ Remote Control ..................................................................................................................................... 8
Content
English
■ Connections and Start of Operation .............................................................................................. 9
Connections for TV Reception .............................................................................................................. 9
Connecting a Satellite Receiver, a Set Top Box or a Video Recorder ............................................. 9
Connecting to the Roof Aerial ............................................................................................................. 10
Connecting to Cable Reception ............................................................................................................11
Connecting to Headphones .................................................................................................................. 11
Connecting Camcorders and Video Games ...................................................................................... 11
Connecting to a Computer ................................................................................................................... 13
Connecting to External Devices with Component Input ................................................................. 13
Connecting the Digital Audio Output ................................................................................................. 14
Connecting Several Devices ................................................................................................................ 14
Connecting Mains Cable ...................................................................................................................... 14
Connecting to the HDMI Connection .................................................................................................. 14
Inserting the Batteries ........................................................................................................................... 15
■ Settings ................................................................................................................................................. 16
Switching On .......................................................................................................................................... 16
Switching Off .......................................................................................................................................... 16
Setting up for Operation ....................................................................................................................... 16
Open, Select and Close Menus ............................................................................................................ 17
Tuning ...................................................................................................................................................... 17
Change channel ..................................................................................................................................... 18
Set Colour System ................................................................................................................................. 19
Set System .............................................................................................................................................. 19
Manual Tuning ........................................................................................................................................ 20
Fine Tuning ............................................................................................................................................. 20
Change Channel Name .......................................................................................................................... 21
Sound Settings ....................................................................................................................................... 21
Improve Signal Quality .......................................................................................................................... 22
Set Channel ............................................................................................................................................. 22
1
Page 4
Content
Reduce Noise ......................................................................................................................................... 23
Channel Groups ..................................................................................................................................... 23
Set Screen Language ............................................................................................................................ 24
Set Aspect Ratio .................................................................................................................................... 24
Set Picture Mode ................................................................................................................................... 25
Audio Settings ....................................................................................................................................... 27
Adjust Individual Audio Frequencies ................................................................................................. 27
Adjust Medium and Low Frequencies ................................................................................................ 28
Set the Audio Input (HDMI or PC) ...................................................................................................... 28
Set Sound Source ................................................................................................................................29
Set Time .................................................................................................................................................. 29
Set Switch on Time ............................................................................................................................... 30
Set Switch off Time ............................................................................................................................... 31
Automatic Switch off ............................................................................................................................. 31
Set On-Screen Display .......................................................................................................................... 32
Child Lock .............................................................................................................................................. 33
Set Characters for Teletext ................................................................................................................... 34
Restore Default ...................................................................................................................................... 34
Settings for the Computer .................................................................................................................... 34
■ Watching ............................................................................................................................................... 35
Watch Current Television Program ..................................................................................................... 35
Set Volume .............................................................................................................................................. 35
Change Channel ..................................................................................................................................... 35
Recall a Favourite Channel .................................................................................................................. 36
Select Source ......................................................................................................................................... 36
Watch Two Programs at the Same Time (PIP ) .................................................................................. 37
Set Picture-in-Picture Size .................................................................................................................... 38
Set Picture-in-Picture Position ............................................................................................................. 38
Teletext .................................................................................................................................................... 38
Still Picture ............................................................................................................................................. 39
Show Time .............................................................................................................................................. 39
Set Sleep Time ....................................................................................................................................... 39
Set Picture Mode while Watching ....................................................................................................... 39
Adjust Picture Size while Watching .................................................................................................... 39
Set Sound Effect while Watching ....................................................................................................... 40
Set Sound while Watching ................................................................................................................... 40
Set Stereo/Mono while Watching ........................................................................................................ 40
Select a Different Audio Language while Watching ......................................................................... 40
■ Cleaning and Troubleshooting ....................................................................................................... 41
Cleaning .................................................................................................................................................. 41
Troubleshooting ..................................................................................................................................... 41
■ Technical specifications .................................................................................................................. 43
22
Page 5

Conformity
Disposal
Conformity
This product fulfills the EC guidelines 89/336/EEC (EMC guideline) with amendments
93/68 EEC and 92/31 EEC and the EC guideline 73/23/EEC (low voltage guideline) with
amendments 93/68/EEC.
English
This product is subject to the European guideline 2002/96/EC.
All electric and electronic devices must be disposed of separately from household waste
at publicly established facilities.
Avoid hazard to the environment and dangers to your personal health by disposing the
device properly.
For further information about the proper disposal, contact the relevant local government
department, the disposal facility or the shop where you bought the device.
33
Page 6
Unpacking and Setup
Unpacking and Setup
Scope of Supply
Please check, that the delivery is complete.
1 Unit
2 Remote control
3 Batteries
4 Mains cable
Safety
• Read the following instructions carefully.
• Keep this manual at hand.
• Closely follow the instructions given.
• Proceed exactly as described in the instructions.
• Do not use the unit near water.
• Clean the unit with a dry cloth only.
• Ensure that the ventilation openings are not covered.
• Do not install the unit close to heat sources such as radiators, stoves or other devices (including amplifiers)
radiating heat.
• Use grounded plugs (shock-proof plugs) and wall outlets only. If the provided plug does not fit your outlet,
consult an electrician to replace the outdated outlet.
• Lay the power cable in a manner that does not obstruct anyone. Make sure the power cable is not damaged or
stepped on, particularly at the plug and at the exit of the unit.
• In case you have to disconnect the unit quickly from the mains, make sure the wall socket is easily accessible.
Connect the unit as described in the instructions by the manufacturer.
• To completely disconnect the unit from the electric power, unplug the power cable.
• Do not use any extension cables.
• Use the accessories specified by the manufacturer only.
4
Page 7

Unpacking and Setup
• Only use suitable stands, supports, carts or tables that ensure the unit does not tip over.
If you place the unit on a cart, move it with caution to prevent injuries or damage resulting from tip-over.
• Unplug the unit during lightning storms or if you will not use it for a longer period of time.
• Refer all servicing to qualified service personnel only. Servicing is required if the unit has been damaged, e.g. if
the power cable or power plug are damaged, if liquid or objects entered the unit, it it was subject to rain or any
other kind of humidity, if it has been dropped or if it does not operate properly.
• Safety instructions to handle the battery - to prevent leakage of the batteries and related health hazards or
damage to material follow the instructions below:
-
Mind the polarity of the batteries (+/-) when inserting. Use only similar batteries (manufacturer, carbon, alkaline
old, new) together.
- Remove the batteries, if you will not use the unit for a longer period.
• To avoid electric shock or fire, do not expose the unit to rain or humidity.
• Do not expose the unit to dripping or splashing water. Do not place any container with liquids (beverages, vases
etc.) on the unit.
• Do not place any open fire (candles etc.) on the unit.
• If you use an outdoor antenna, make sure to ground the antenna to provide protection against voltage surges
and build up of static charges.
• If you do not operate the unit in the Federal Republic of Germany, make sure to observe the local laws and
regulations applicable in your country.
,
English
This symbol indicates additional safety instructions in the text.
This symbol indicates instructions to facilitate the operation.
5
Page 8
Unpacking and Setup
Location
➣
The Best Distance
The distance when watching programs on a television of this size should be
approximately 2.2 to 2.7 metres. If the distance is too large or too small, this may
lead to strain of your eyes. This may impair your health.
➣
Background Light/Reflections
When watching television at night, the television should not be the only source of light in the room. The big
difference of brightness between the screen and the background causes continuous dark-light adaptation of
the eyes. This leads to strain of the eyes and may cause headaches. It is better, if a dim, indirect light lights-up
the environment of the television.
For the same reasons, make sure that no reflections on the screen impair the picture.
➣
The Best Alignment
Choose a location that allows you to sit in a relaxed position. Otherwise, tension
and further impairments to your health may be the consequence.
➣
Additional Information on the Location
• Do not expose the unit to direct sunlight.
• Avoid humid and/or dusty environments.
• Place the unit on level, non-vibrating surfaces.
• Do not place the unit close to the outlets of air conditioners or heaters.
• Make sure the unit is easily accessible from all sides.
• Make sure that no liquids can enter the unit.
• Avoid extreme changes of temperature to prevent humidity condensing in the unit.
Intended purpose
This is a unit for consumer electronics. It may only be used for private, non-industrial purposes. Furthermore the
unit may only be operated indoors and not for commercial purposes.
Keep this user guide carefully.
6
Page 9
Viewing the Control Panels
Front View
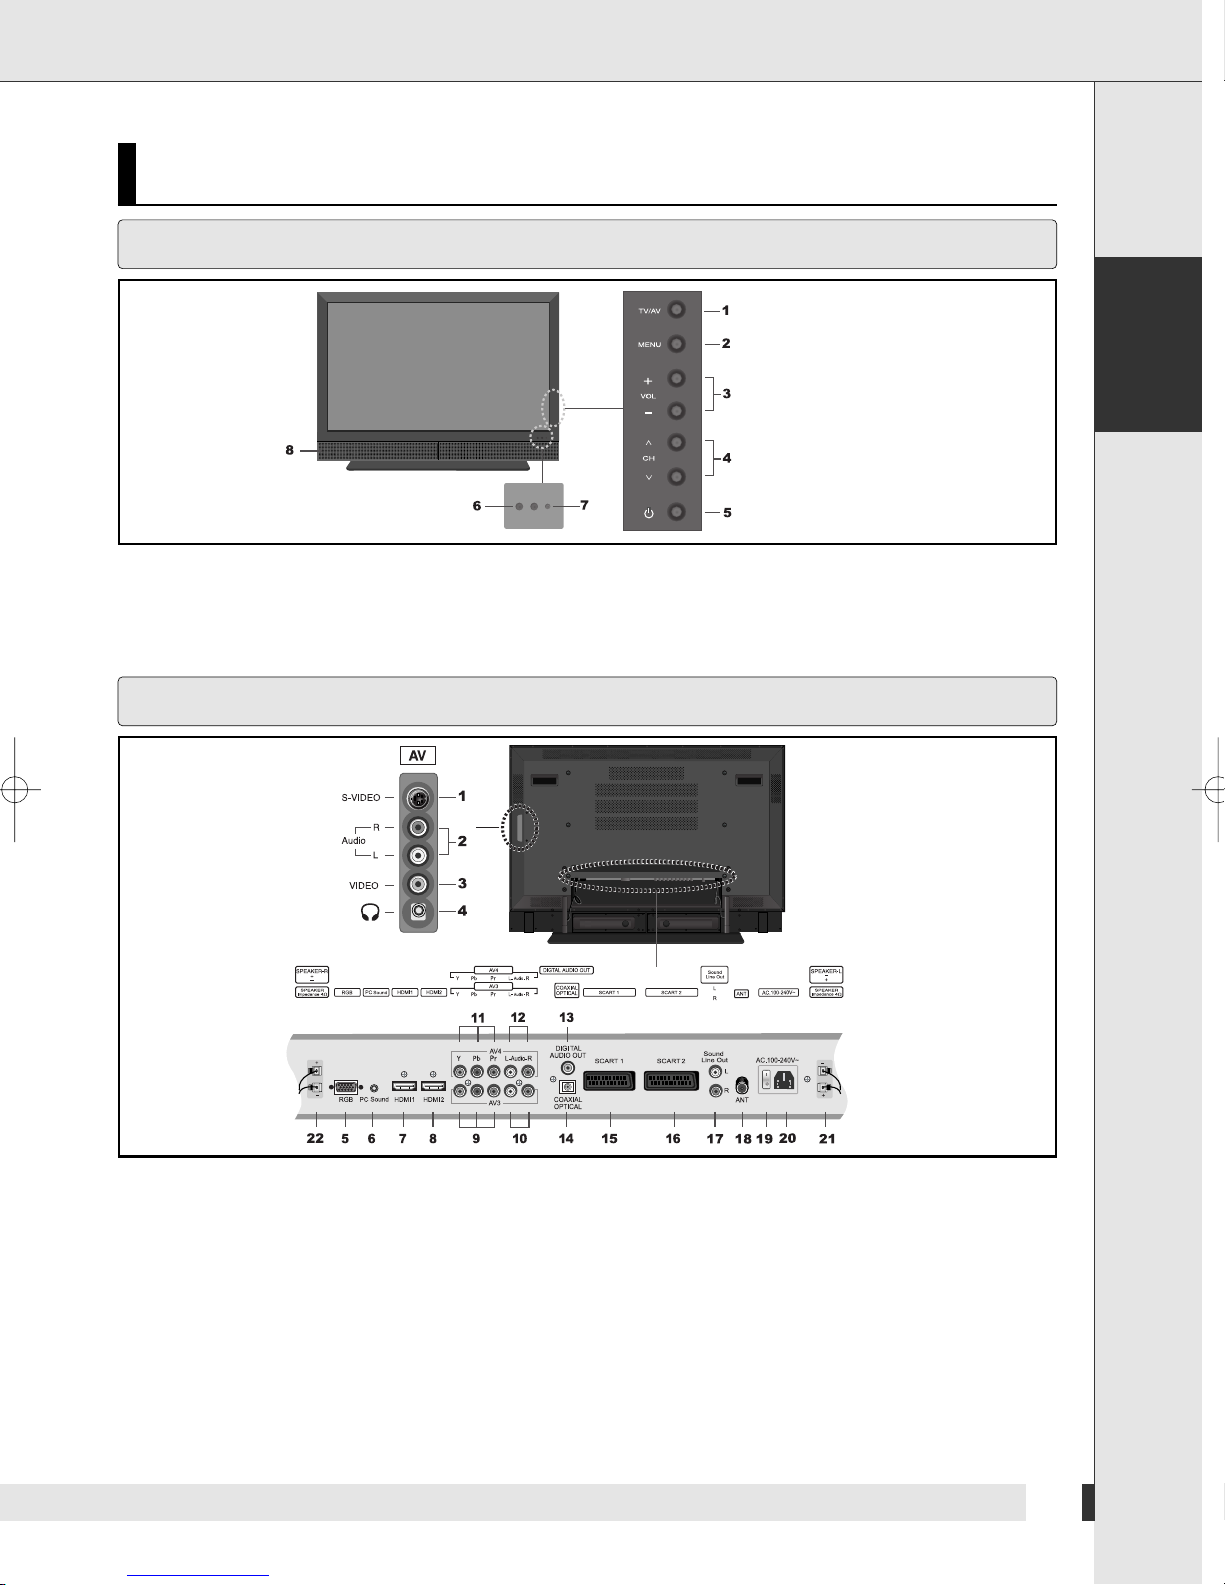
1
Input source selection button
2
MENU selection button
3
Volume adjustment button
4
Channel selection button
Viewing the Control Panels
5
Power button
6
Remote control sensor
7
Power Indicator
8
Speaker
English
Rear View
1
AV S-VIDEO Input
2
AV AUDIO Input
3
AV VIDEO Input
4
Headphone Jack
5
Analog RGB Input (PC)
6
Audio Input (PC)
7
HDMI Input (HDMI1)
8
HDMI Input (HDMI2)
9
DTV/DVD Video (Y/Pb/Pr) Input (AV3)
10
DTV/DVD Audio Input
11
DVD Video (Y/Pb/Pr) Input
12
DVD Audio Input
13
Digital Audio Out (Coaxial)
(AV3)
(AV4)
(AV4)
- 5.1 channel sound output for Home-theater system
through the coaxial cable
14
Digital Audio Out (Optical)
- 5.1 channel sound output for Home-theater system
through the optical cable
15
Euro-scart Jack (SCART1)
16
Euro-scart Jack (SCART2)
17
Sound Line Out
18
Antenna Input Jack
19
Power Switch (Main)
20
Power Inlet
21
Speaker Out (Left)
22
Speaker Out (Right)
7
Page 10
Remote Control
Remote Control
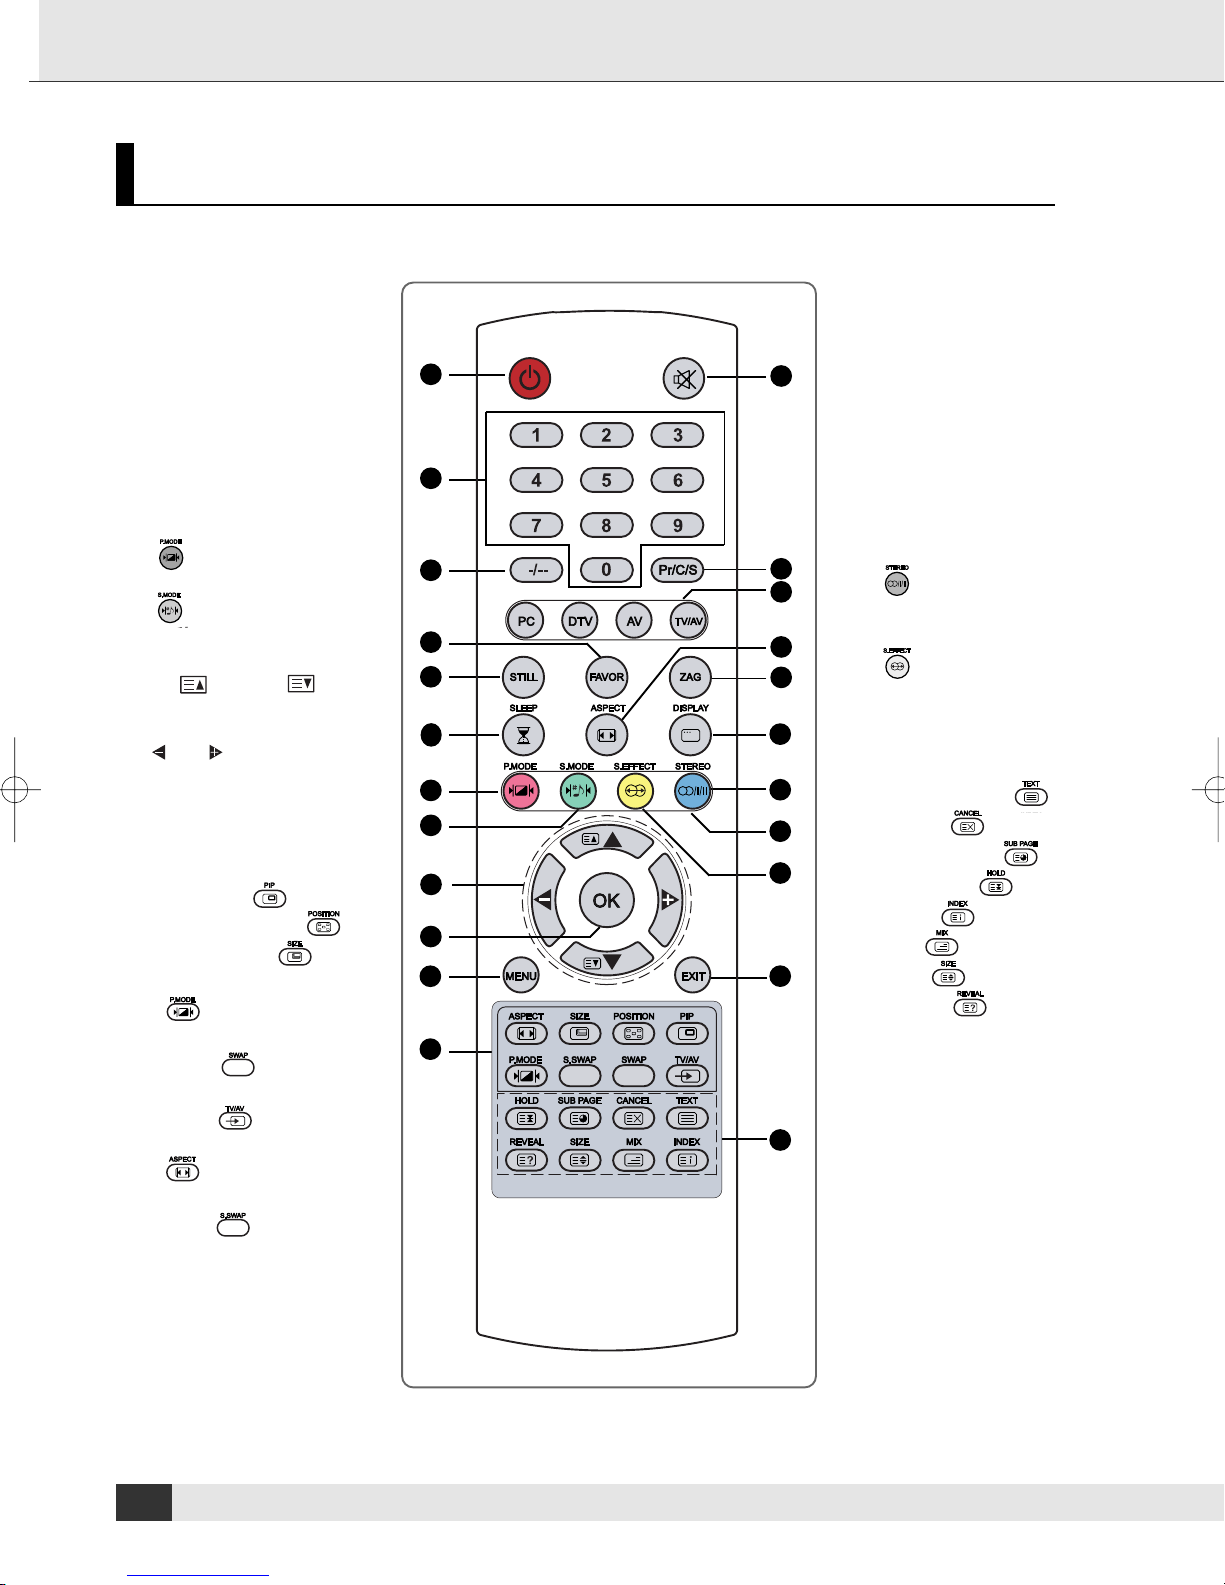
1 Power On/Off button
2 Numeric buttons
3 One/Two-Digit Channel
Selection
4 Favorite Channel Selection
5 Picture Still
6 Sleep Timer
7 Picture Mode Selection
( )
8 Sound Mode Selection
( )
9 Control the Cursor in the
OSD Menu
( ) and ( )
(Channel Up / Down)
(Teletext Page Up / Down)
and
(Volume Up / Down)
10 MENU Confirmation
11 Display OSD Menu
12 PIP Functions:
- PIP On/Off ( )
- Position Selection ( )
- Size Selection ( )
- Picture Mode Selection
( )
- Swapping main and sub
picture ( )
- Selecting the Input
TV/AV ( )
- PIP Picture Size Selection
( )
- Swapping main and sub
Sound( )
1
2
3
4
5
6
7
8
9
10
11
12
13
14
15
16
17
18
19
20
21
22
23
13
Temporary Sound Mute
14
TV Input Source Selection
15
External Source Input
Selection
16
Picture Size Selection
17
Previous Channel
18
TV Information Display
19
Sound Selection :
Mono/Stereo Dual Select
( )
20
Fastext Functions
21
Sound Effect Selection
( )
22
- Exit from the OSD
- Display the current time
when the OSD is off
23
Teletext Functions:
- Teletext On/Off ( )
- Cancel ( )
- Sub Page On ( )
- Page Hold ( )
- Index ( )
- Mix ( )
- Size ( )
- Reveal ( )
8
Page 11
Connections and Start of Operation
Connections and Start of Operation
Connections for TV Reception
You can connect roof aerial, cable reception, a satellite receiver, set top boxes (DVB-T) or video recorders etc. to
the unit.
Connecting a Satellite Receiver, a Set Top Box or a Video Recorder
➣
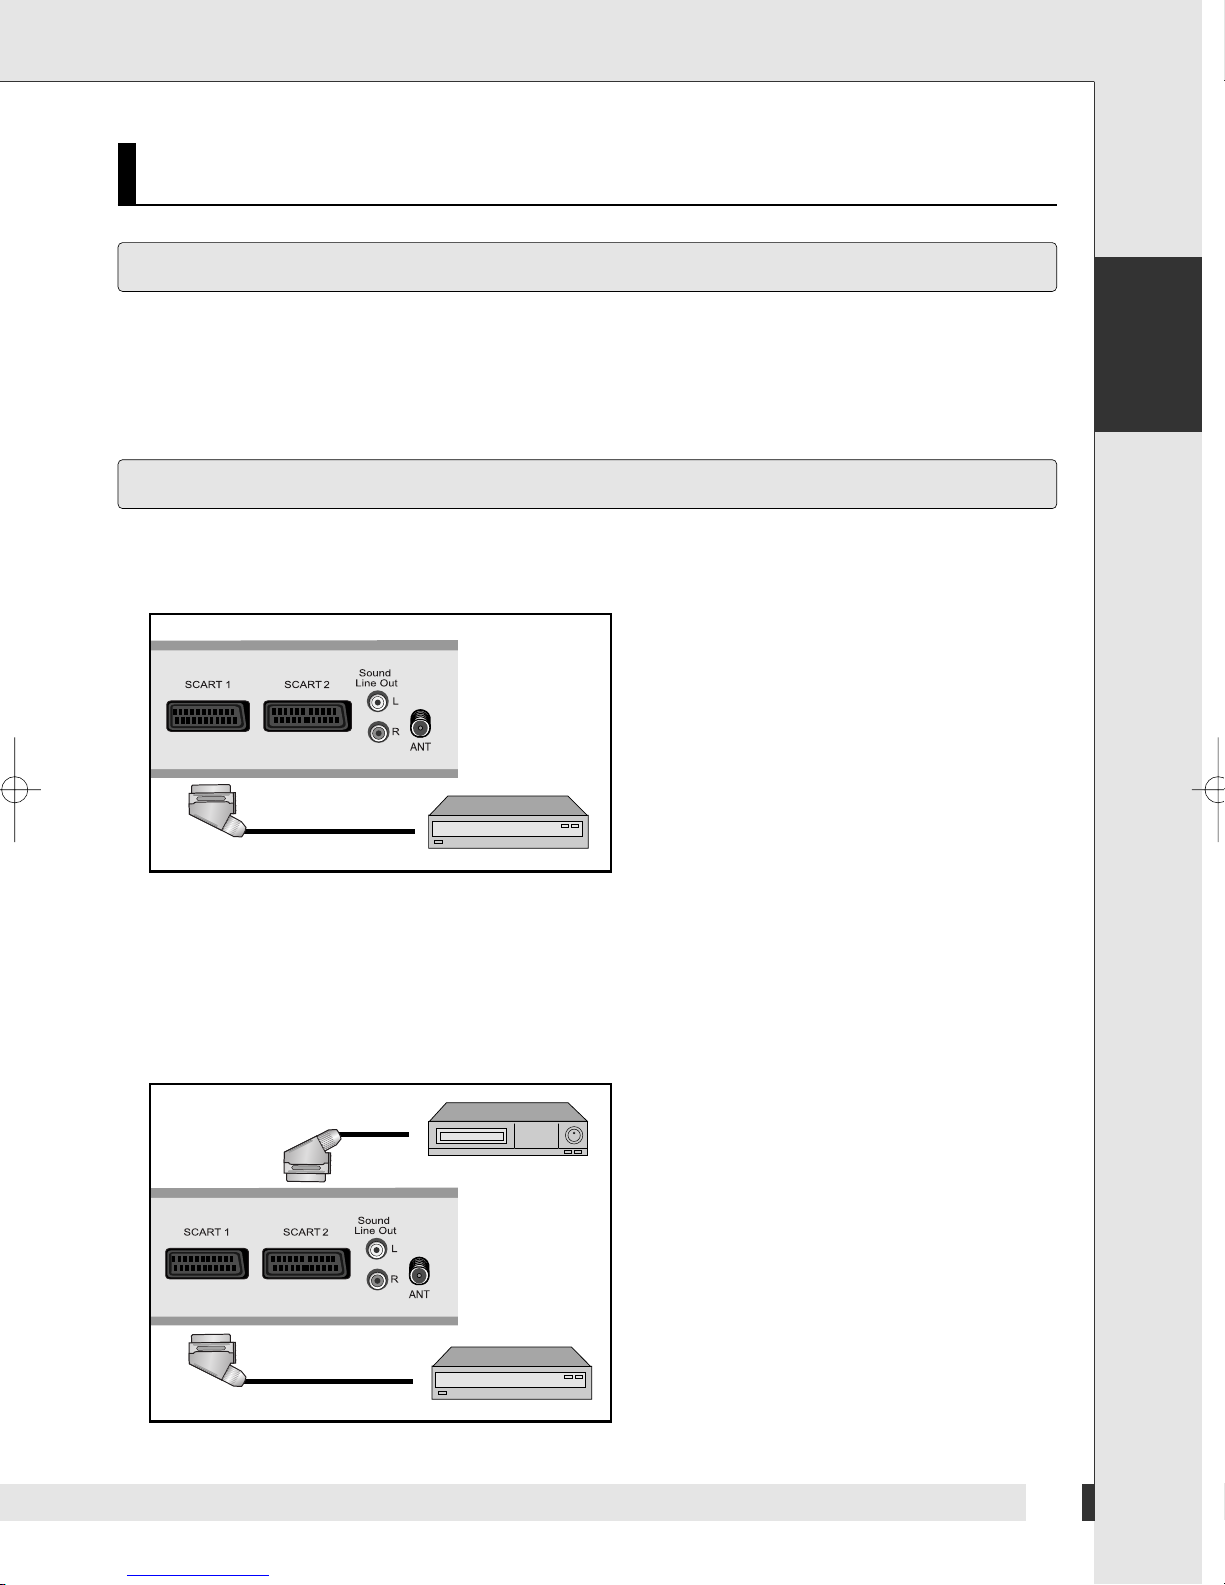
Connecting to a Device with SCART Socket
Use a SCART cable to connect the units.
1 Plug the SCART cable into the socket [SCART1]
on the television set.
2 Plug the other end of the SCART cable into the
output socket on the receiver.
English
➣
Connecting to two Devices with SCART Socket
The unit has two SCART sockets. You can connect two devices by the SCART sockets at the same time.
On how to select one device for display on the screen, see “Select Source” on Page 36.
1 Connect the first device as described above.
2 Plug the SCART cable of the second device
into the socket [SCART2] on the television set.
3 Plug the other end of the SCART cable into the
output socket on the receiver.
9
Page 12
Connections and Start of Operation
➣
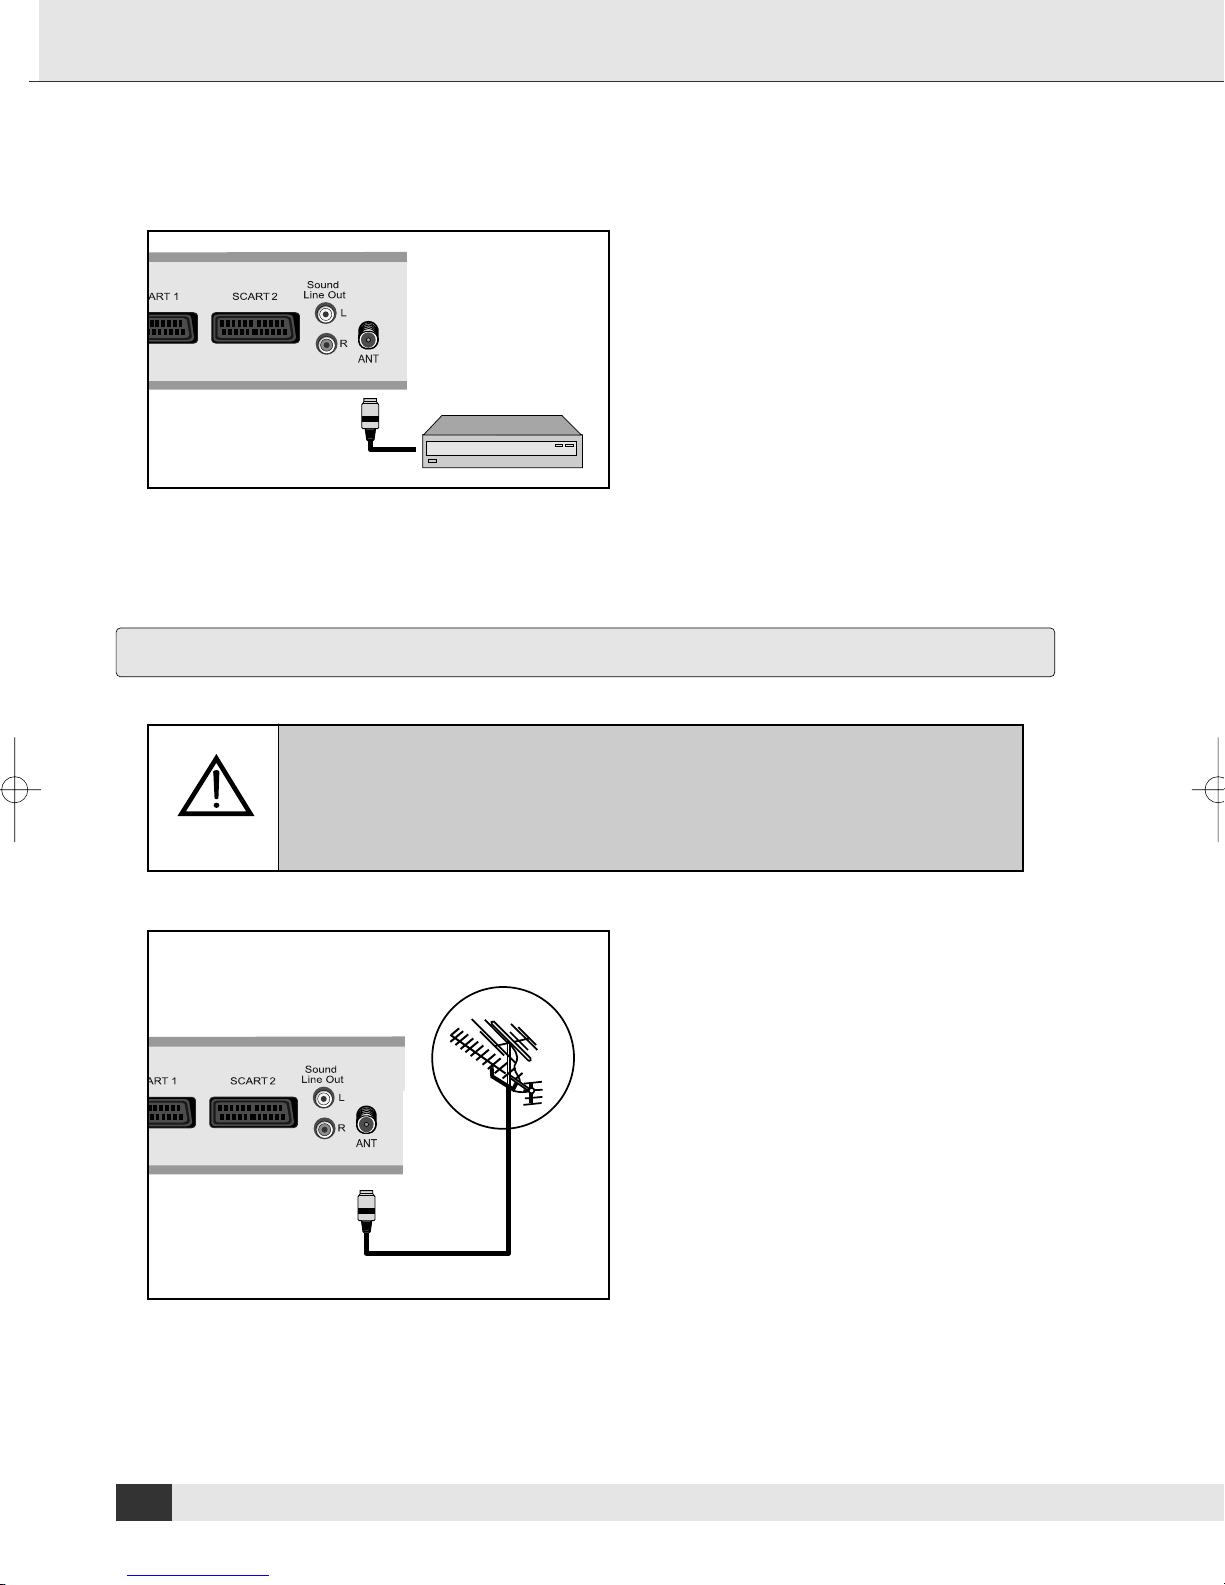
Connecting to a Device without SCART Socket
Use a coaxial cable to connect the units.
1 Plug the coaxial cable into the socket [ANT] on
the television set.
2 Plug the other end of the coaxial cable into the
output socket on the receiver.
Connecting to the Roof Aerial
Ensure that the roof aerial is properly installed and grounded.
If the roof aerial is not properly grounded, voltage may damage the unit and
static charges may build up.
1 Plug the coaxial cable of the roof aerial into
the socket [ANT].
10
Page 13

Connecting to Cable Reception
Connecting to Headphones
Connections and Start of Operation
1 Plug the coaxial cable of the cable reception
into the socket [ANT].
English
The output for the headphone is on the right rear side of the unit. If you connect a headset to the unit, the main
speaker will be switched off.
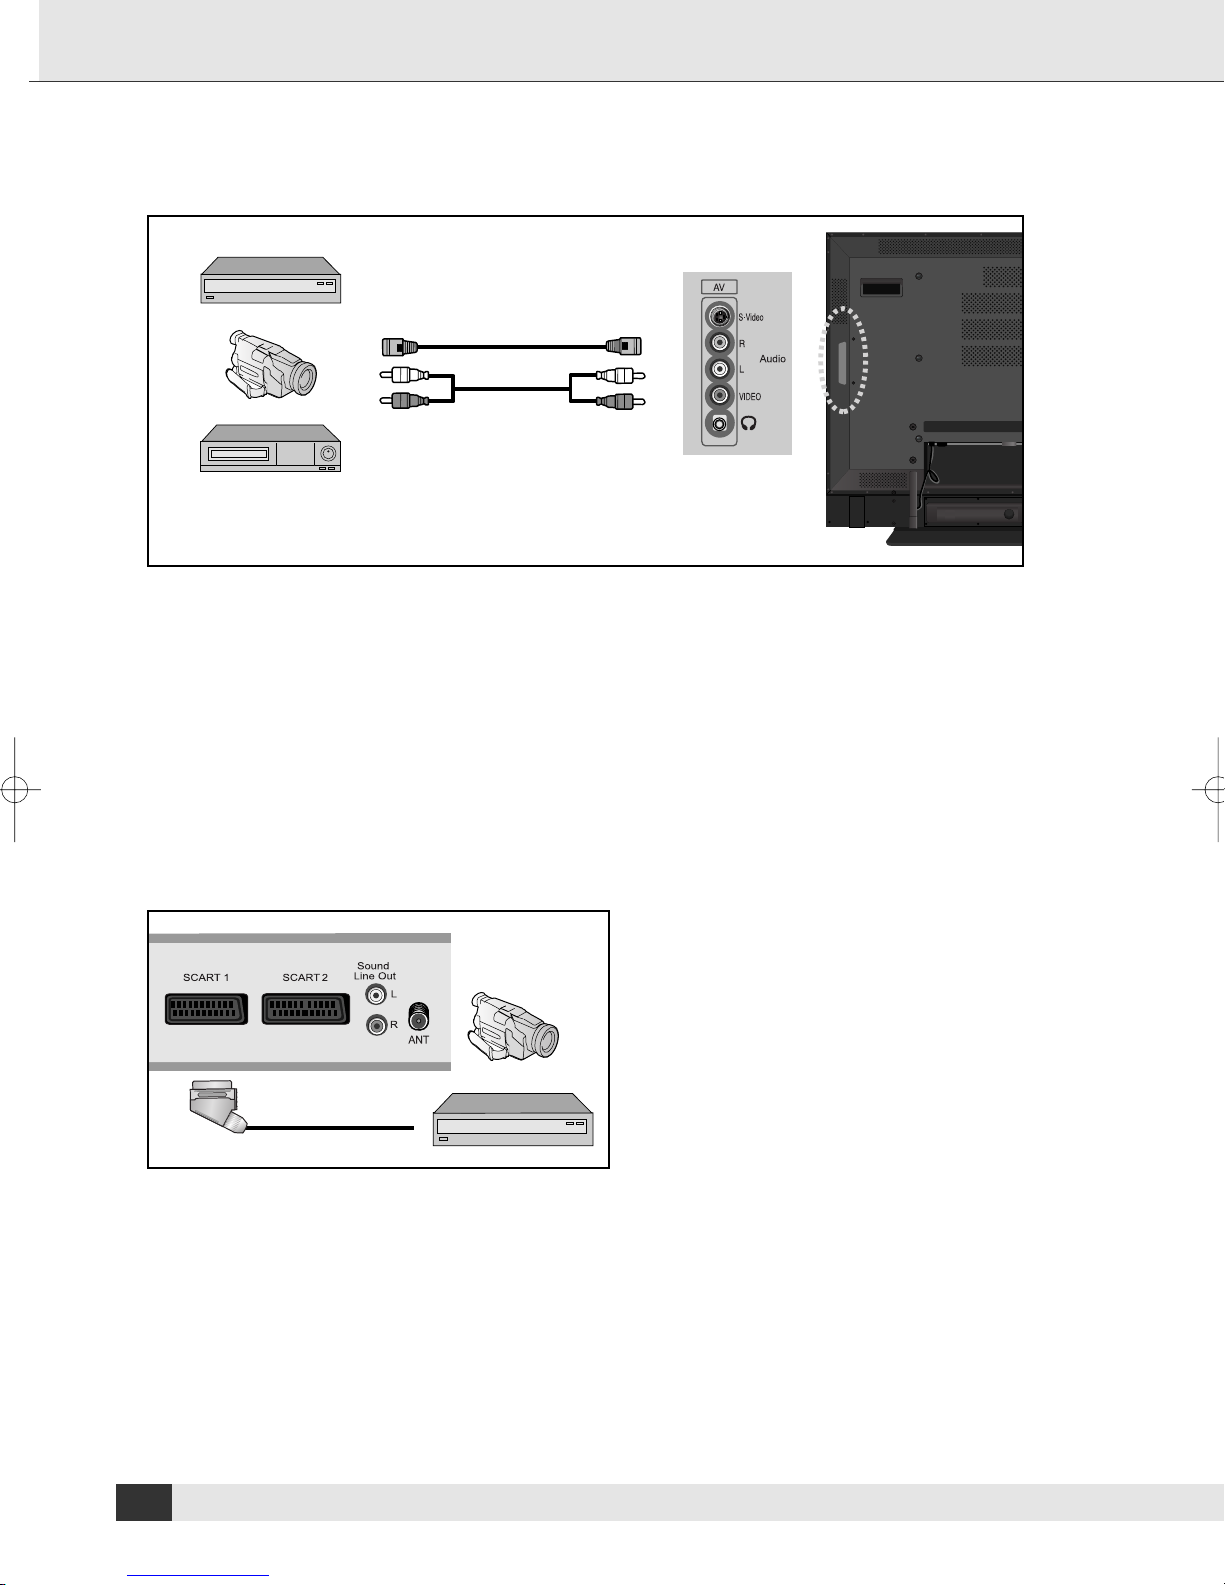
Connecting Camcorders and Video Games
You can use the television set to connect camcorder and video games. Use either the cinch sockets or one of the
SCART sockets.
➣
Connecting Camcorders and Video Games by AV Cable
1 Connect the AV cables according to the colours (red/white/yellow) to the sockets [VIDEO/AUDIO IN] and
the output sockets of the external devices.
11
Page 14
Connections and Start of Operation
➣
Connecting Camcorders and Video Games by S-Video Cable
1 Connect the S-Video cable to the socket [S-VIDEO] and the output sockets of the external devices.
2 Plug the audio cable into the socket [AUDIO IN] on the television set and connect the cable to the output
socket of the external device.
➣
Connecting Camcorders and Video Games by SCART Cable
Use a SCART cable with a SCART plug on one end and AV plugs on the other end.
Plug the SCART cable into the socket [SCART1]
1
on the television set and connect the other end
with the output sockets of the external devices.
12
Page 15

Connections and Start of Operation
Connecting to a Computer
You can use the television set as a monitor for the computer. This is possible parallel to television operation.
Use a 15-pin D-Sub cable to connect the television set to the computer.
1 Plug the cable into the output socket of the
graphic board.
2 Plug the other end of the cable into the socket
[RGB].
3 Connect the audio cable according to the
colours to the socket [PC Sound] on the
television set and the output sockets of the
graphic board.
Adjust the settings of the television picture
corresponding to the settings for television
operation. See “Settings” on Page 16.
If the television set does not receive any signal, adjust the output of the computer.
For information on how to setup the computer, refer to the corresponding manual
of the computer.
English
Connecting to External Devices with Component Input
You can use the television set to connect DVD recorder/player and set-top-box. Connect the audio and video cables
from the external equipment's output jacks to the TV input jacks, as shown in the figure. When connecting the TV to
external equipment, match the jack colors.
➣
Connecting to External Devices
1 Plug the video cable according into the colours to
the output sockets of the external devices.
2 Plug the other end of the video cable according to
the colours into the Y, Pb, Pr sockets
[AV 3 or AV 4] on the television set.
3 Plug the audio cable according to the colours to
the audio output sockets of the external devices.
4 Plug the other of the audio cable according to the
colours into the audio input socket on the
television set.
If the external equipment has mono audio output, connect it only to left socket of
the audio input/output.
13
Page 16
Connections and Start of Operation
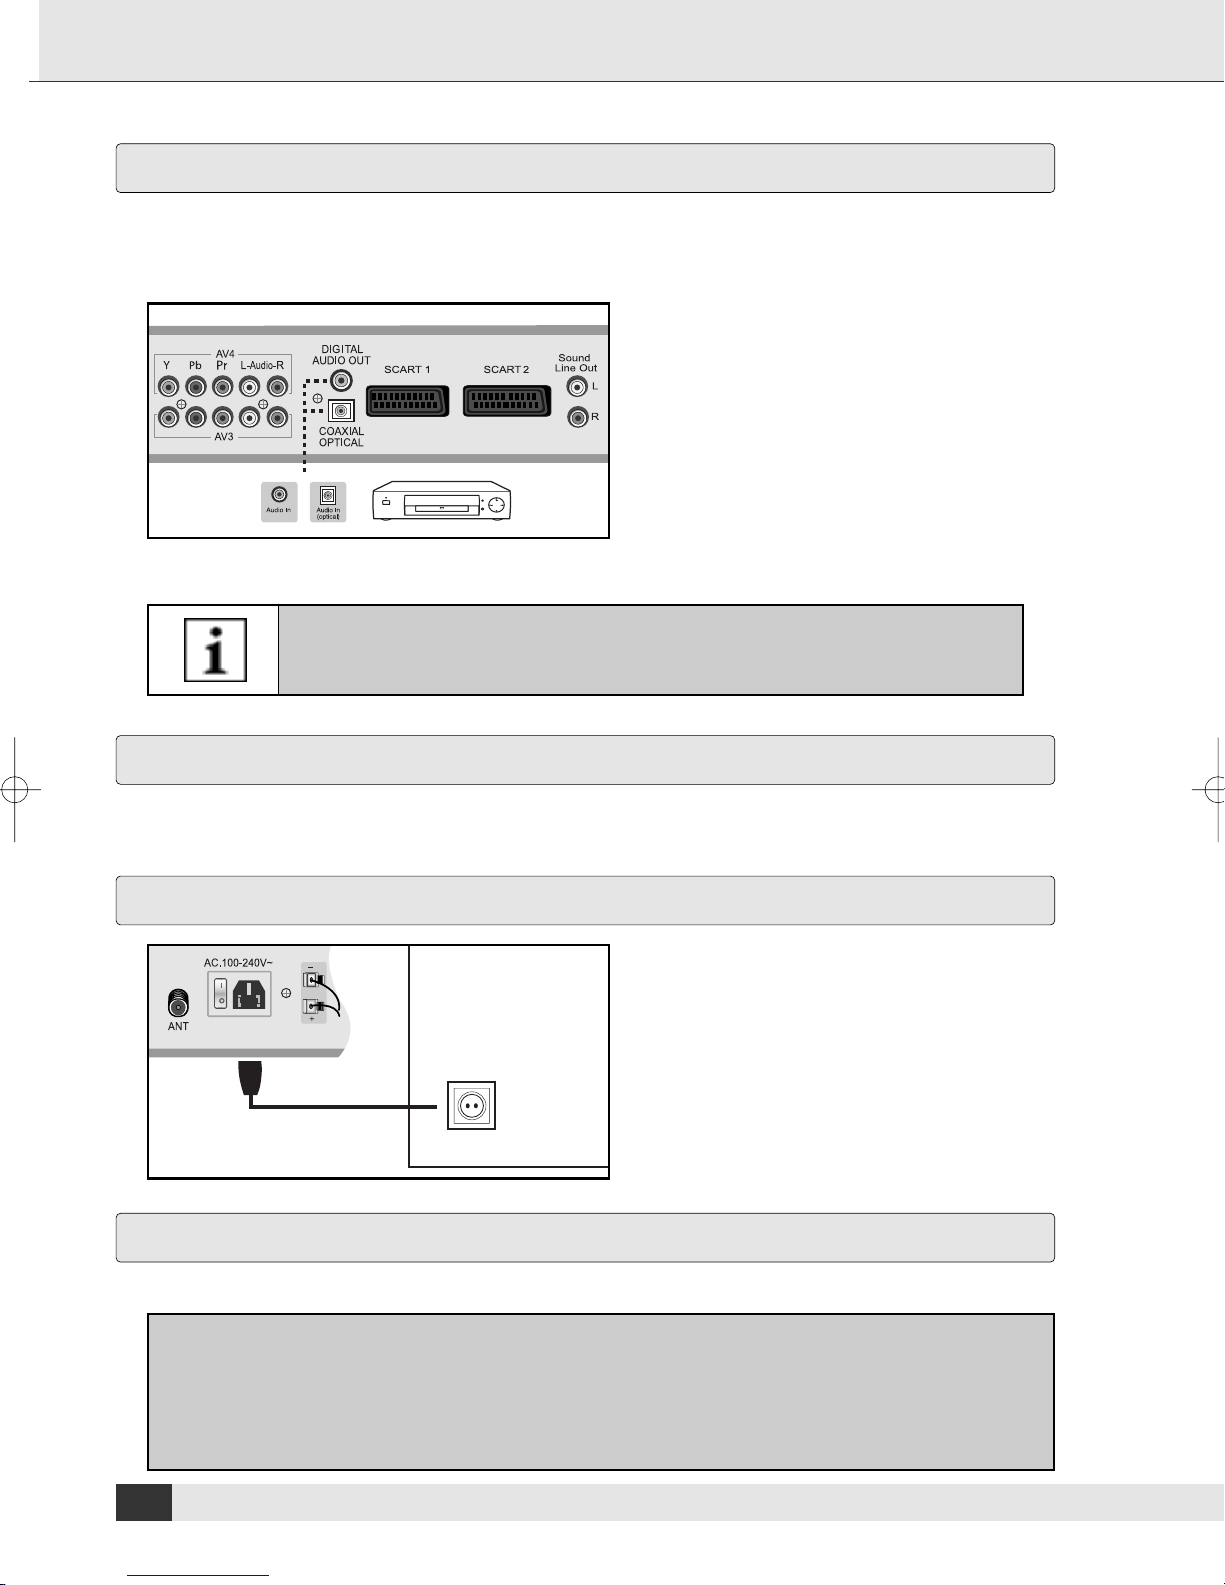
Connecting the Digital Audio Output
You can Connect optical digital audio cable to "DIGITAL AUDIO OUT" on the rear of the TV and the other end to
"DIGITAL AUDIO IN" of the equipment with a digital output to enjoy digital sound (Multi-Channel Surround
Sound, Stereo, Dolby Sound).
1 Connecting the OPTICAL Port
Connect the OPTICAL port of the DIGITAL
AUDIO OUT on the rear of the TV to the optical
audio input of the DVD Home Theater System (or
AV Receiver Amplifier) using the optical cable.
2 Connecting the COAXICAL Port
Connect the COAXIAL port of the DIGITAL
AUDIO OUT on the rear of the TV to the coaxial
audio input of the DVD Home Theater System(or
AV Receiver Amplifier)using the coaxial cable.
Decrease the TV volume to enjoy the more clear and grand sound through separate speakers.
Refer to corresponding user's manual from the manufacturer for connecting the
speaker to the DVD Home Theater System or AV Receiver Amplifier.
Connecting Several Devices
You can use the connections described parallel . On how to select the desired source see “Select Source” on
Page 36 and “Select Signal Source for PIP” on Page 37.
Connecting Mains Cable
1 Connect the mains cable.
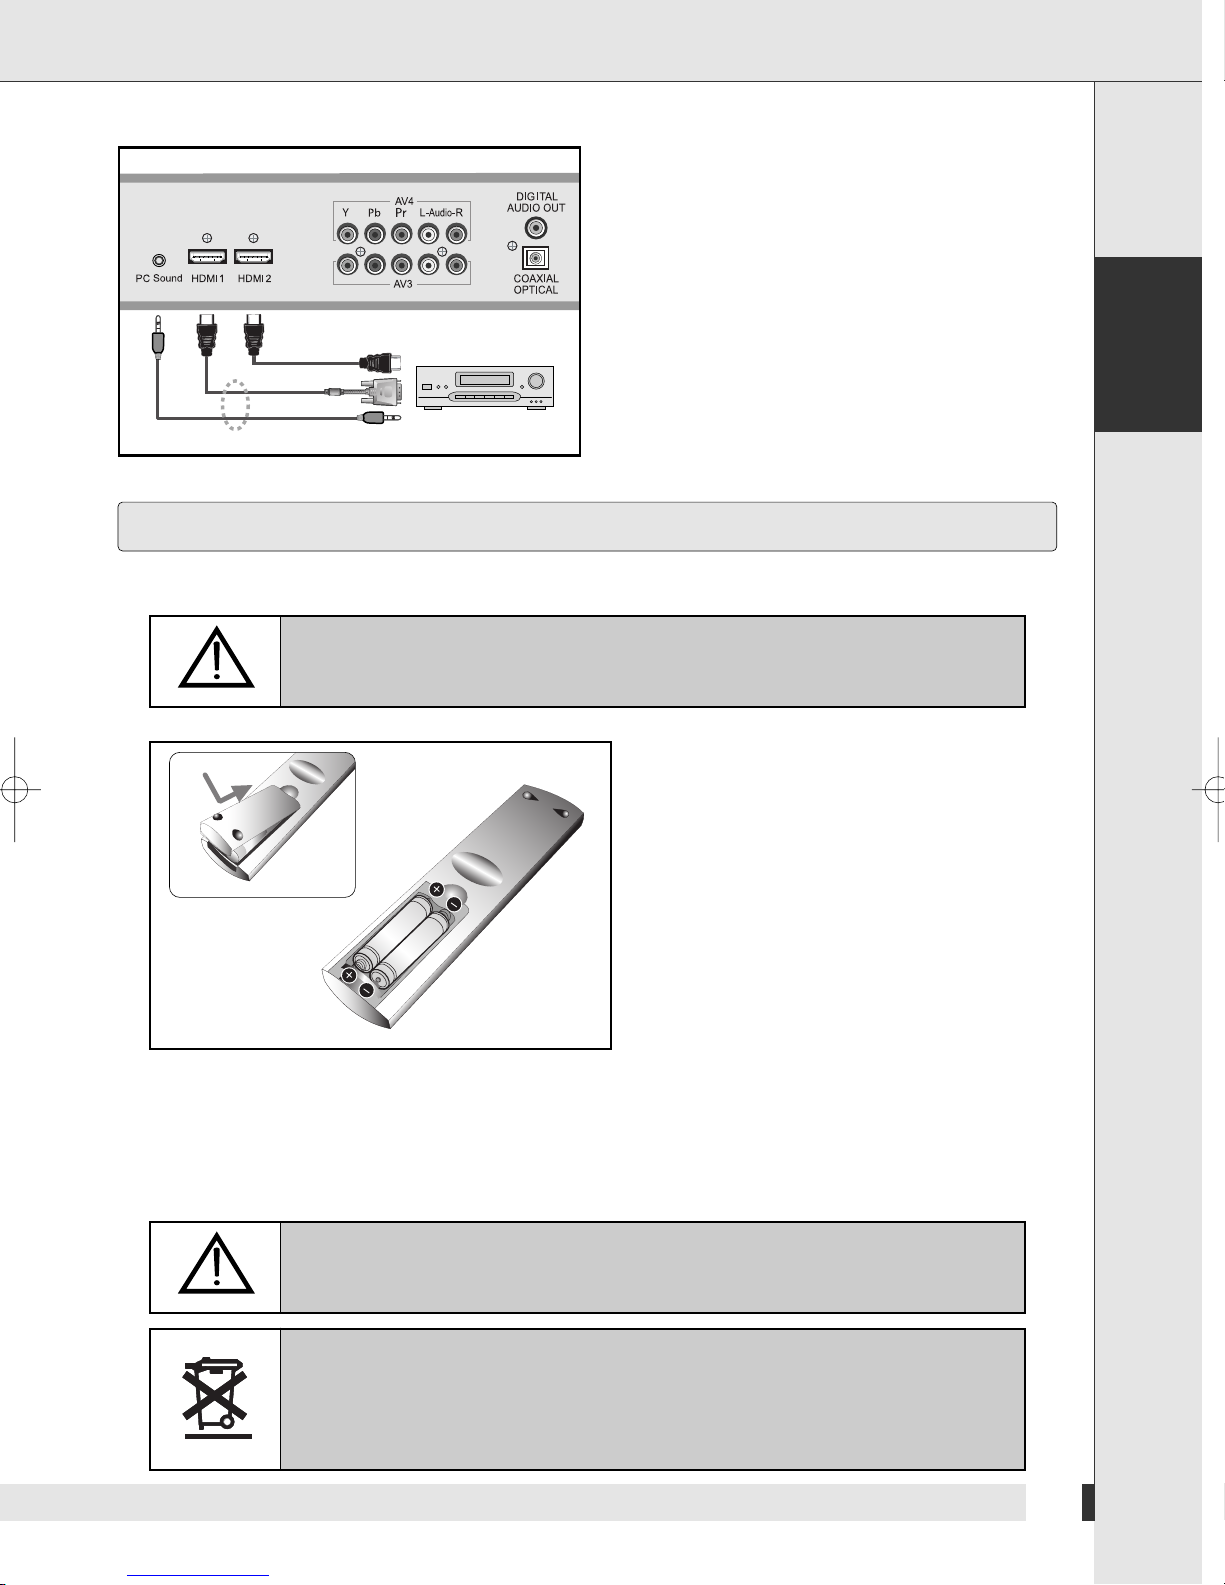
Connecting to the HDMI Connection
This can be applied if there is the HDMI Output connector on the external device.
What is HDMI (High-Definition Multimedia Interface)?
HDMI is a next generation interface that connects the digital audio and video signals using only one
cable without compression. The sound signal supports multi-channel (5.1 Channel). So it is called a
multimedia interface rather than a video terminal. The difference between HDMI and DVI is that the
HDMI device is smaller in size, has the HDCP (High Bandwidth Digital Copy Protection) and
supports multi channel audio.
14
Page 17
Connections and Start of Operation
1 Connecting HDMI/DVI Cable
Connect the HDMI/DVI cable and audio cable
from the output jacks on the DVD player or
Set-top box to the [HDMI 1] or [HDMI 2] input jack
and PC Audio input jacks on the TV.
2 Connecting HDMI Cable
Connect the HDMI cable from the output jack on
the DVD player or Set-top box to the [HDMI 1] or
[HDMI 2] input jack on the TV.
or
Inserting the Batteries
For the operation of the remote control 2 type R03 1.5V Size AAA batteries are included in the delivery.
English
When inserting the batteries, ensure the polarity is matched correctly (+ and marking on the battery and on the unit).
1 Remove the cover on the back of the
remote control and insert the batteries.
➣
Notes on Handling Batteries
When used properly batteries are a safe and reliable source of energy. However, when misused or not
used according to the intention, they may leak. In extreme cases there is a danger of explosion or fire.
Therefore please understand that the manufacturer will not be liable in case of misuse or improper use.
For detailed information on how to handle the batteries, please contact the respective manufacturer.
Never try to recharge non-rechargeable batteries.
Disposal of batteries is clearly regulated by legal acts. Consumer quantities of
batteries must be taken back by the dealer or by local public collectors. Never
discharge batteries together with common waste. Make use of the free public
collection system! Protect your environment. Return used batteries.
15
Page 18
Settings
Settings
Switching On
1 Press the mains switch on the back of the unit.
2 Press the remote control. This switches the unit on and it can be operated using the remote control.
If it is not explicitly stated otherwise, it will be assumed that the unit and the
TV set are switched on and will be operated by the remote control.
By default, the unit is set to the English language. For information on how to
change the on-screen language later, refer to: “Set Screen Language” on page 24.
Switching Off
➣
Stand by
1 Press on the remote control.
Please note that the unit also consumes a little power when in stand by mode.
➣
Switch Stand by Off
1 Press the mains switch on the back of the unit..
Now the unit is switched off completely and does not consume any power.
Setting up for Operation
You can adjust various settings of the unit to adapt it to your requirements.
16
Page 19
Open, Select and Close Menus
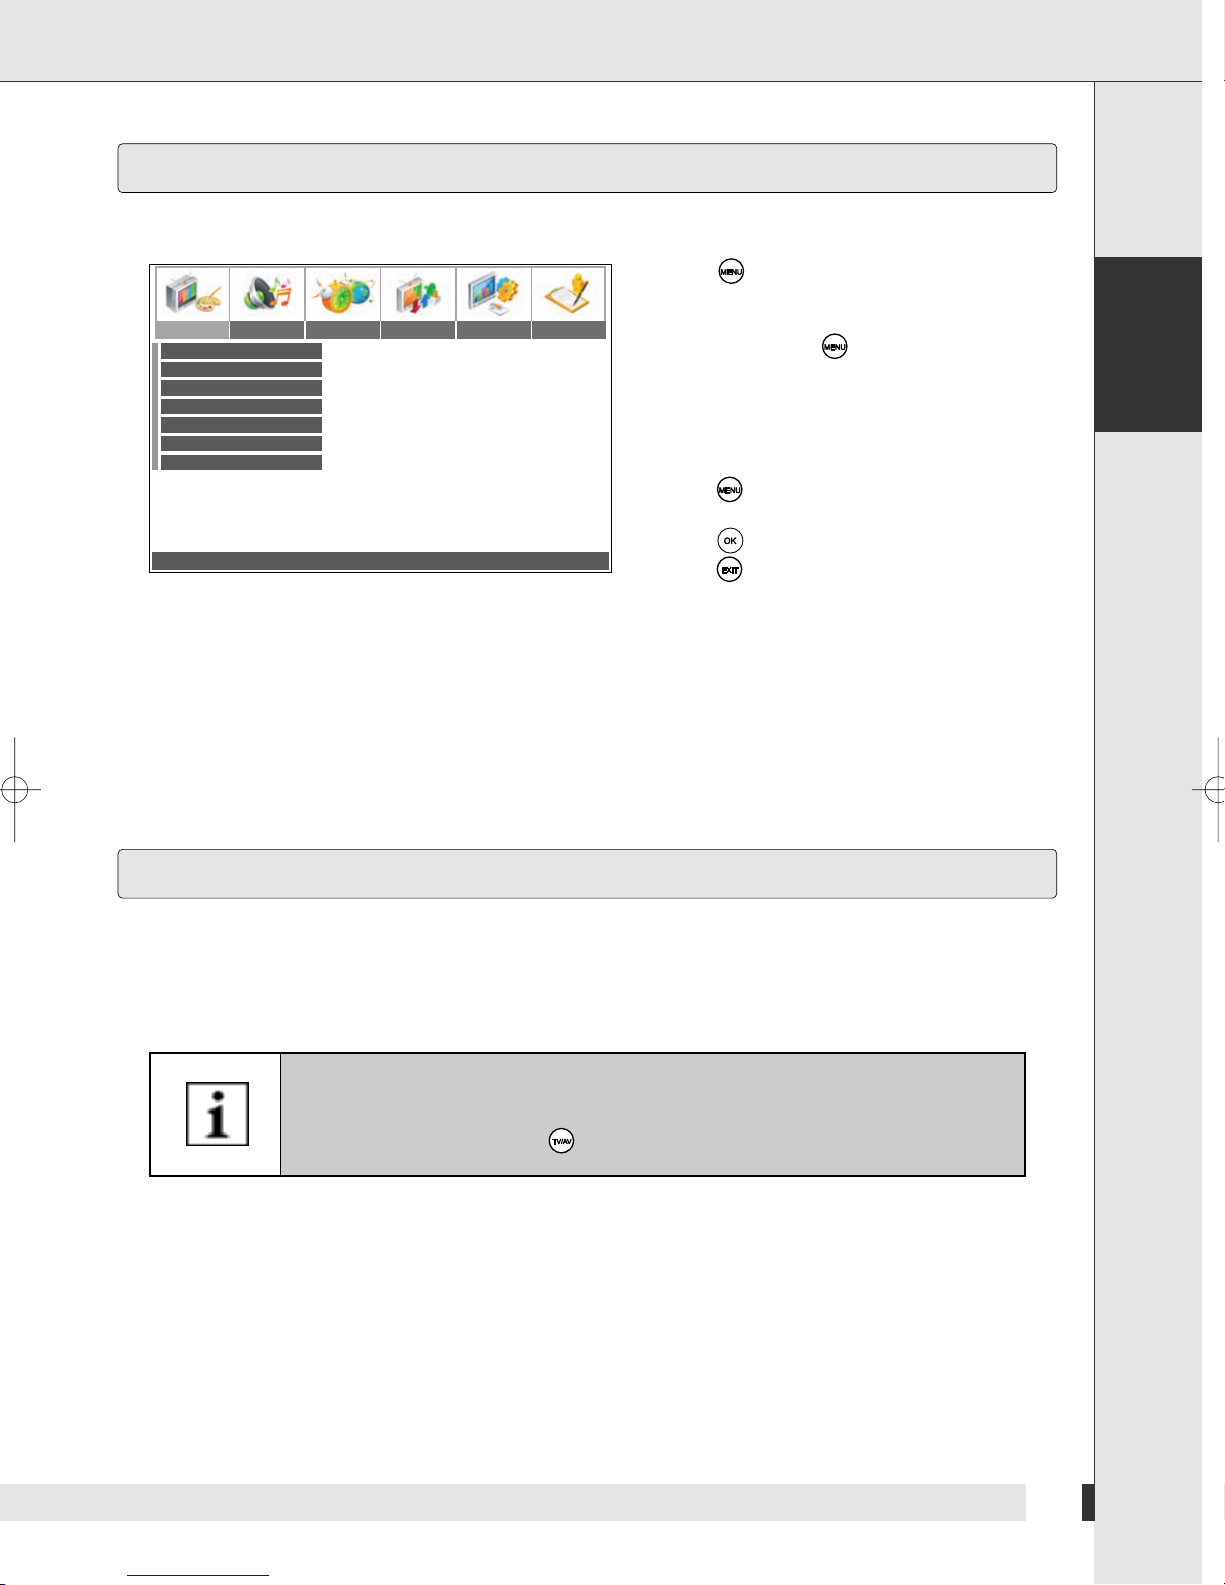
The settings of the unit are accessible via menus. To navigate in the menus proceed as follows:
1 Press .
The main menu opens. The submenu
Picture Audio Timer Install Setup Option
Mode
Brightness
Contrast
Sharpness
Colour
Tint
Colour Temperature
¥
Position OK: Select MENU/EXIT: Exit
Standard
050
050
050
050
050
selected last will be displayed.
2 If necessary, press to return to the
main menu.
3 Press ¥ or to select the desired menu.
Or
4 Press or to select the desired sub menu.
5 Press ¥ or to set the desired sub menu.
6 Press to move one menu level up.
7 Press or to select the desired setting.
8 Press to activate the desired setting.
9 Press to save the settings.
Settings
English
Tuning
➣
Starting Automatic Tuning TV Stations
Use this feature to start automatic tuning. The TV channels will be tuned and stored. Later you can
rearrange the sorting of the TV channels as you wish.
You only need to tune the TV channels, if the device is connected to a roof aerial.
If you use a satellite receiver, a decoder or a similar device, the signal of this
device will be shown. Press and select the desired device.
17
Page 20
Settings
Picture Audio Timer Install Setup Option
Auto Tuning
Austria
Belgium
Belgium-Dutch
Croatia
Czech
Denmark
Finland
France
Germany
Move OK: Select MENU: Previous EXIT: Exit
¥
You can also make the settings later. Note that TV must be selected as a signal
source for this menu to be active.
Auto Tuning
Programme
Colour
System
Manual Tuning
Fine Tuning
Name
Sound
Weak Signal Boost
Programme Edit
Stereo / Dual 1
Italy
PAL
BG
S23
217.25
S23
Off
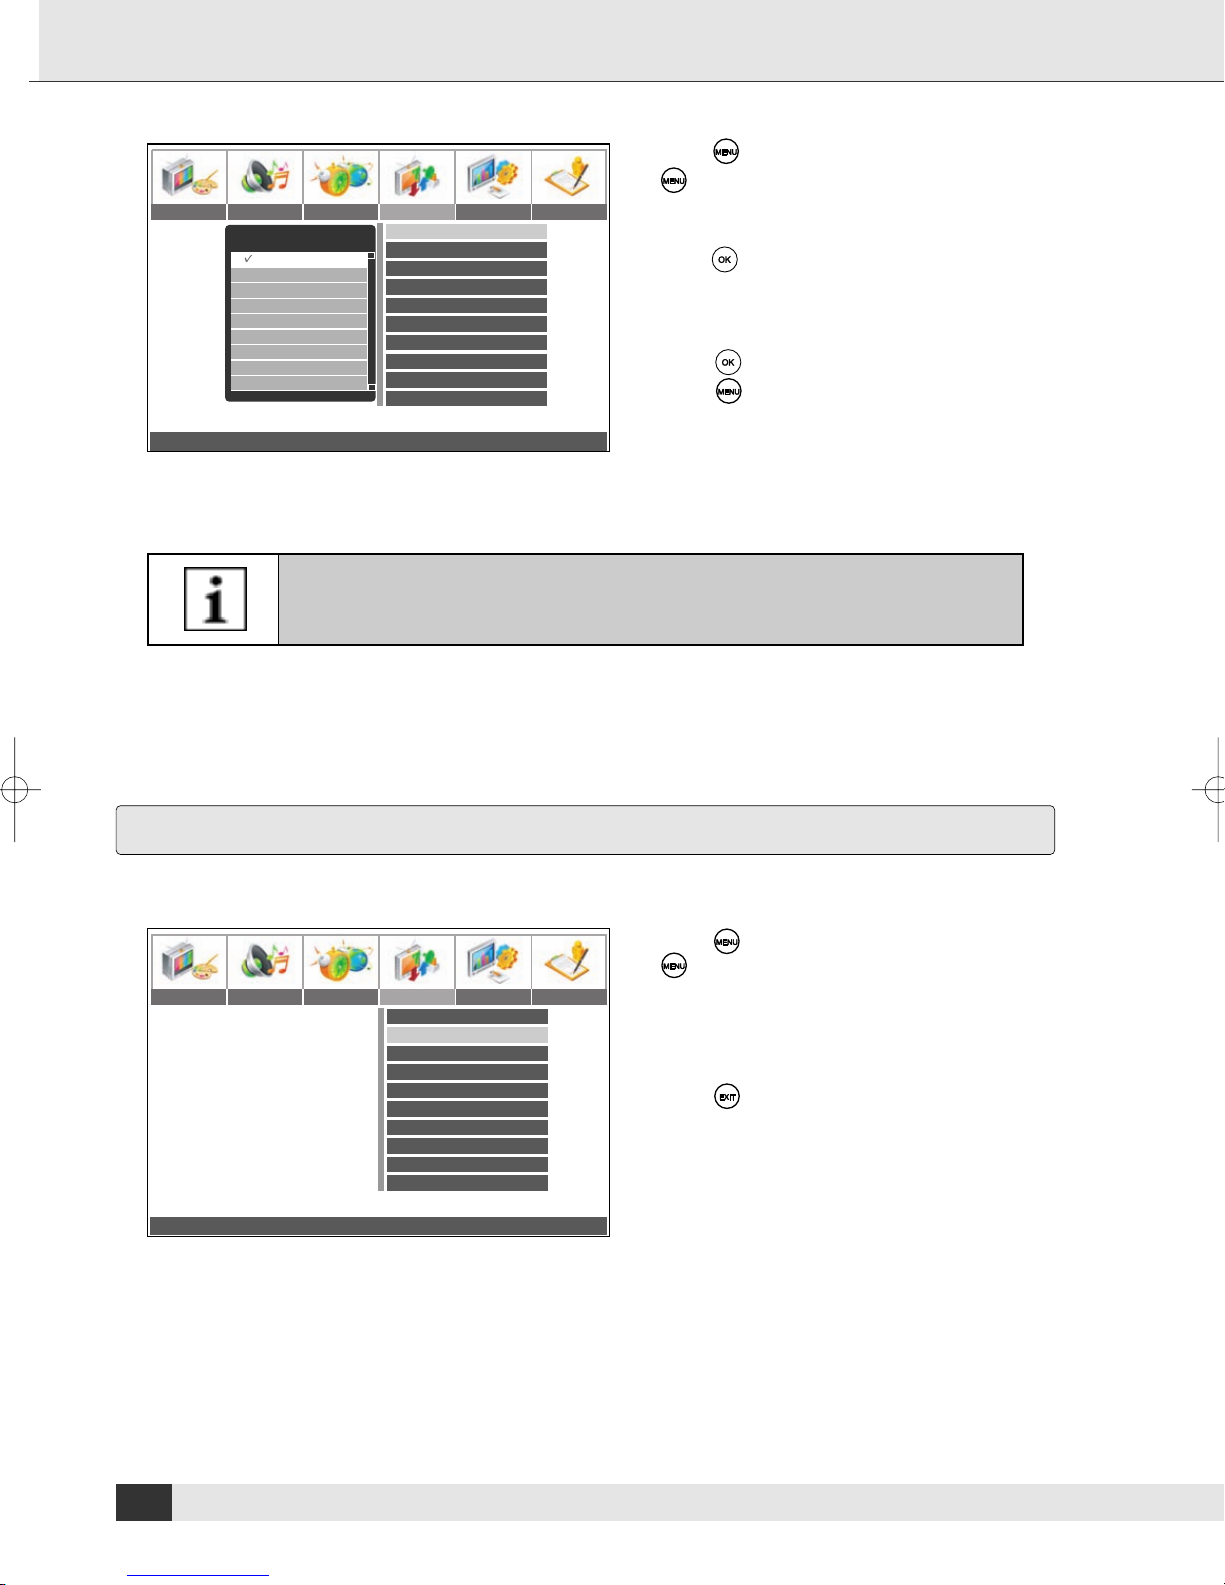
1 Press . To return to the main menu, press
several times.
2 Press ¥ or and select INSTALL.
12
3 Press or and select AUTO TUNING.
4 Press .
5 Select the country where you want to operate
the unit.
6 Press or to select the desired setting.
7 Press to start tuning.
Press to interrupt tuning.
The tuning starts and the TV channels are listed.
8 After tuning is completed a menu in which you
can make the settings opens.
Change channel
Use this function to set the channel for individual stations.
1 Press . To return to the main menu, press
Picture Audio Timer Install Setup Option
Move
¥
Auto Tuning
Programme
Colour
System
Manual Tuning
Fine Tuning
Name
Sound
Weak Signal Boost
Programme Edit
¥
0~9 Adjust MENU: Previous EXIT: Exit
Italy
12
PAL
BG
S23
217.25
S23
Stereo / Dual 1
Off
2 Press ¥ or and select INSTALL.
3 Press or and select PROGRAMME.
4 Press ¥ or and select the desired channel.
5 Adjust the settings in the other menus.
6 Press to save the settings.
several times.
18
Page 21
0
Set Colour System
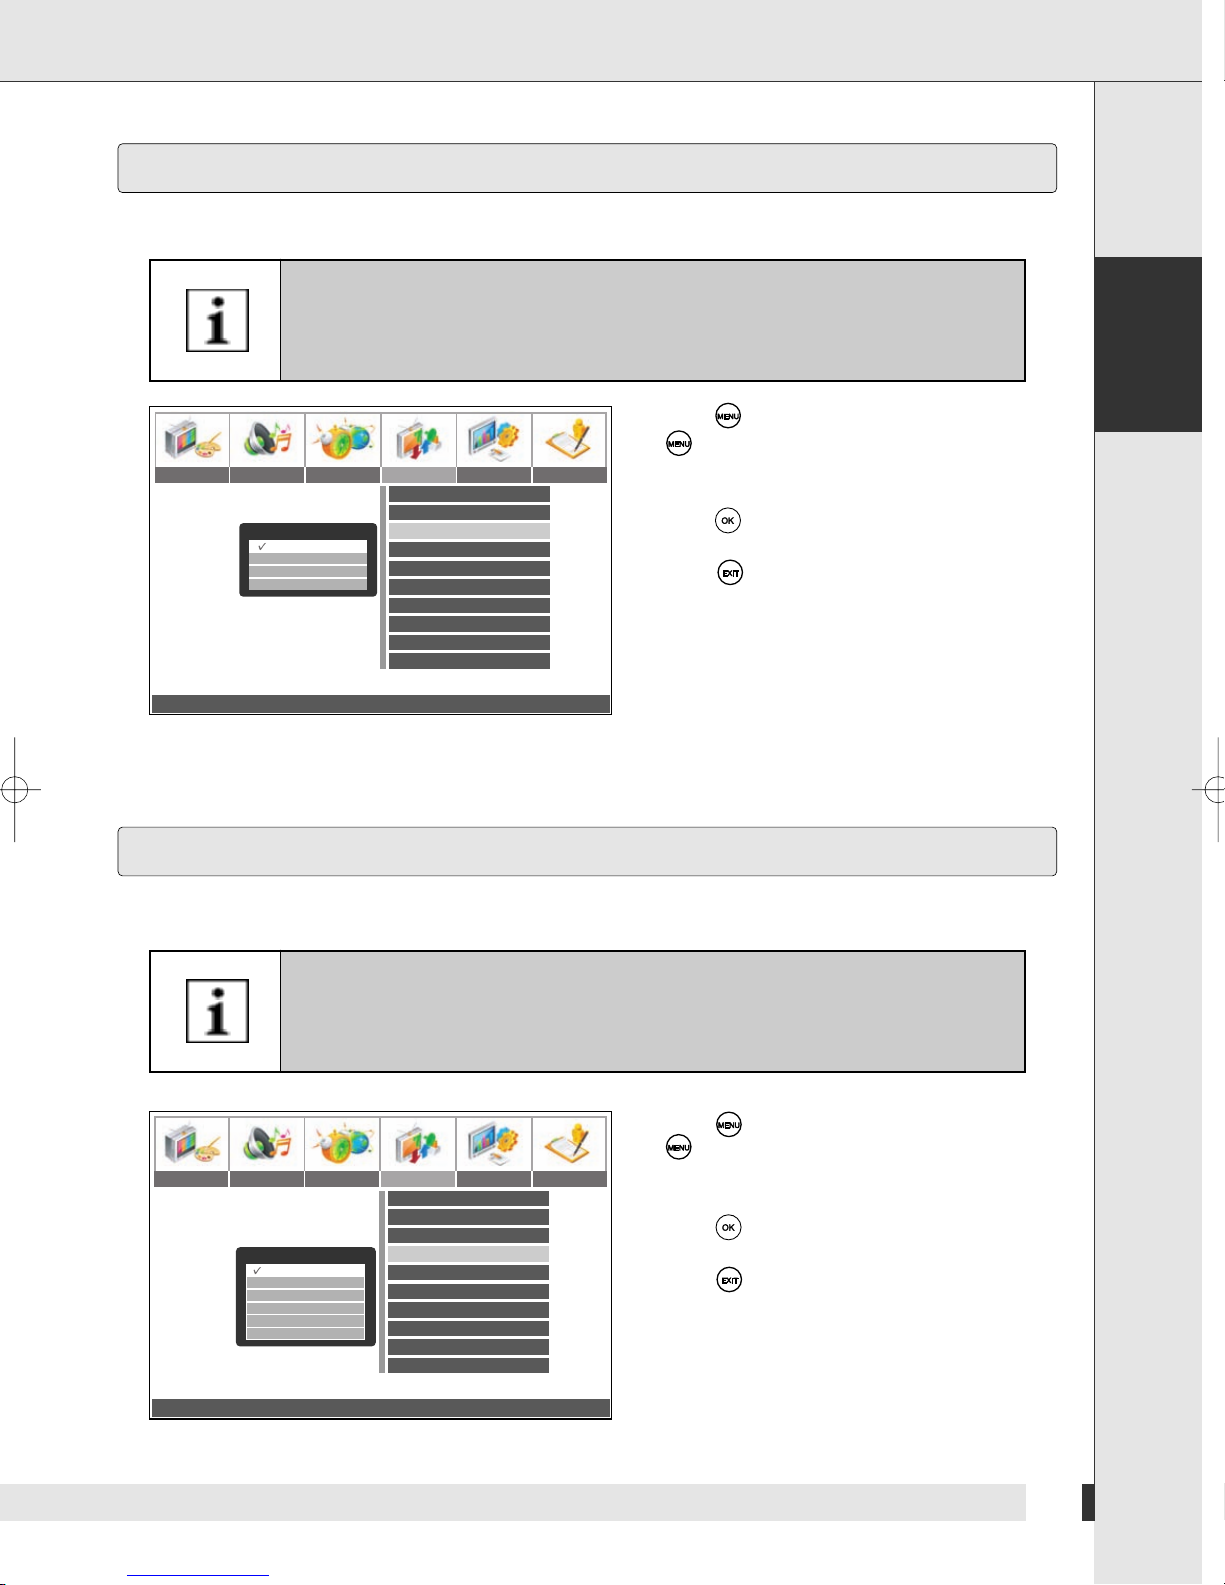
Use this function to set the television signal to your national television standard.
These settings are made automatically by the automatic tuning function.
You should only change the settings described in this section, if you are familiar
with the reception of television signals.
1 Press . To return to the main menu, press
several times.
Picture Audio Timer Install Setup Option
Colour
Auto
PAL
SECAM
NTSC
Move OK: Select MENU: Previous EXIT: Exit
¥
Auto Tuning
Programme
Colour
System
Manual Tuning
Fine Tuning
Name
Sound
Weak Signal Boost
Programme Edit
Stereo / Dual 1
Italy
12
PAL
BG
S23
217.25
S23
Off
2 Press ¥ or and select INSTALL.
3 Press or and select COLOUR.
4 Press .
5 Press or to select the desired setting.
6 Press to save the settings.
The following settings are available:
Auto, PAL, SECAM, NTSC
The automatic tuning function sets the unit
automatically to the received signal. This is
why the menu item AUTO cannot be selected.
Settings
English
Set System
Use this function to set the sound signal to your national television standard.
These settings are made automatically by the automatic tuning function.
You should only change the settings described in this section, if you are familiar
with the reception of television signals.
1 Press . To return to the main menu, press
several times.
Picture Audio Timer Install Setup Option
System
BG
DK
i
L
L’
M
Move OK: Select MENU: Previous EXIT: Exit
¥
Auto Tuning
Programme
Colour
System
Manual Tuning
Fine Tuning
Name
Sound
Weak Signal Boost
Programme Edit
Stereo / Dual 1
Italy
12
PAL
BG
S23
217.25
S23
Off
2 Press ¥ or and select INSTALL.
3 Press or and select SYSTEM.
4 Press .
5 Press or to select the desired setting.
6 Press to save the settings.
The following settings are available:
BG, DK, I, L, L’, M
19
Page 22
Settings
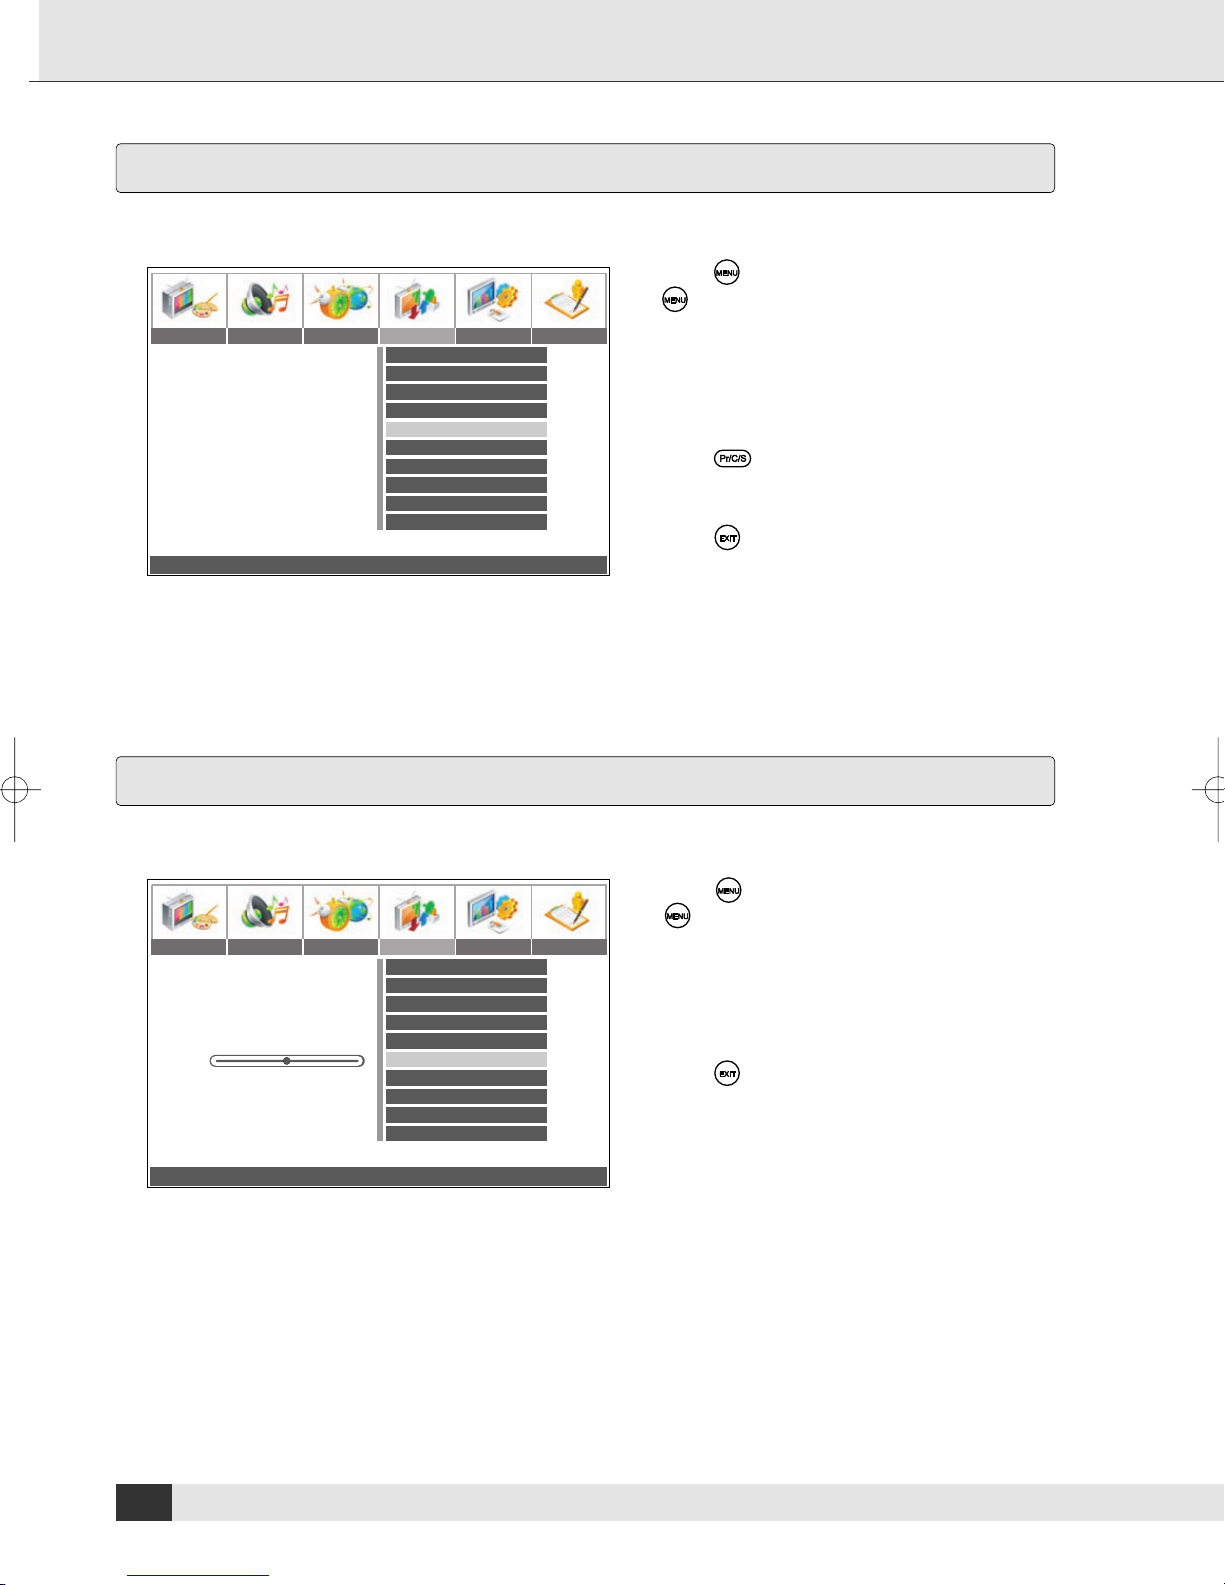
Manual Tuning
Use this function to tune the channels manually.
Picture Audio Timer Install Setup Option
Move
¥
¥
Pr/C/S
Adjust MENU: Previous EXIT: Exit
Auto Tuning
Programme
Colour
System
Manual Tuning
Fine Tuning
Name
Sound
Weak Signal Boost
Programme Edit
Stereo / Dual 1
Italy
PAL
BG
S23
217.25
S23
Off
1 Press . To return to the main menu, press
several times.
2 Press ¥ or and select INSTALL.
3 Press or and select PROGRAMME.
12
4 Press ¥ or and select the desired channel.
5 Press or and select MANUAL TUNING.
6 Press ¥ or and select the desired channel.
7 Press to select C for standard channels or
S for cable channels.
8 Adjust the settings in the other menus.
9 Press to save the settings.
Fine Tuning
Use this function to adjust the tuning of the individual channels for a clearer picture.
1 Press . To return to the main menu, press
several times.
Picture Audio Timer Install Setup Option
¥
Adjust MENU: Previous EXIT: Exit
Auto Tuning
Programme
Colour
System
Manual Tuning
Fine Tuning
Name
Sound
Weak Signal Boost
Programme Edit
Stereo / Dual 1
Italy
12
PAL
BG
S23
217.25
S23
Off
2 Press ¥ or and select INSTALL.
3 Press or and select PROGRAMME.
4 Press ¥ or and select the desired channel.
5 Press or and select FINE TUNING.
6 Press ¥ or and adjust the fine tuning.
7 Press to save the settings.
20
Page 23
Change Channel Name
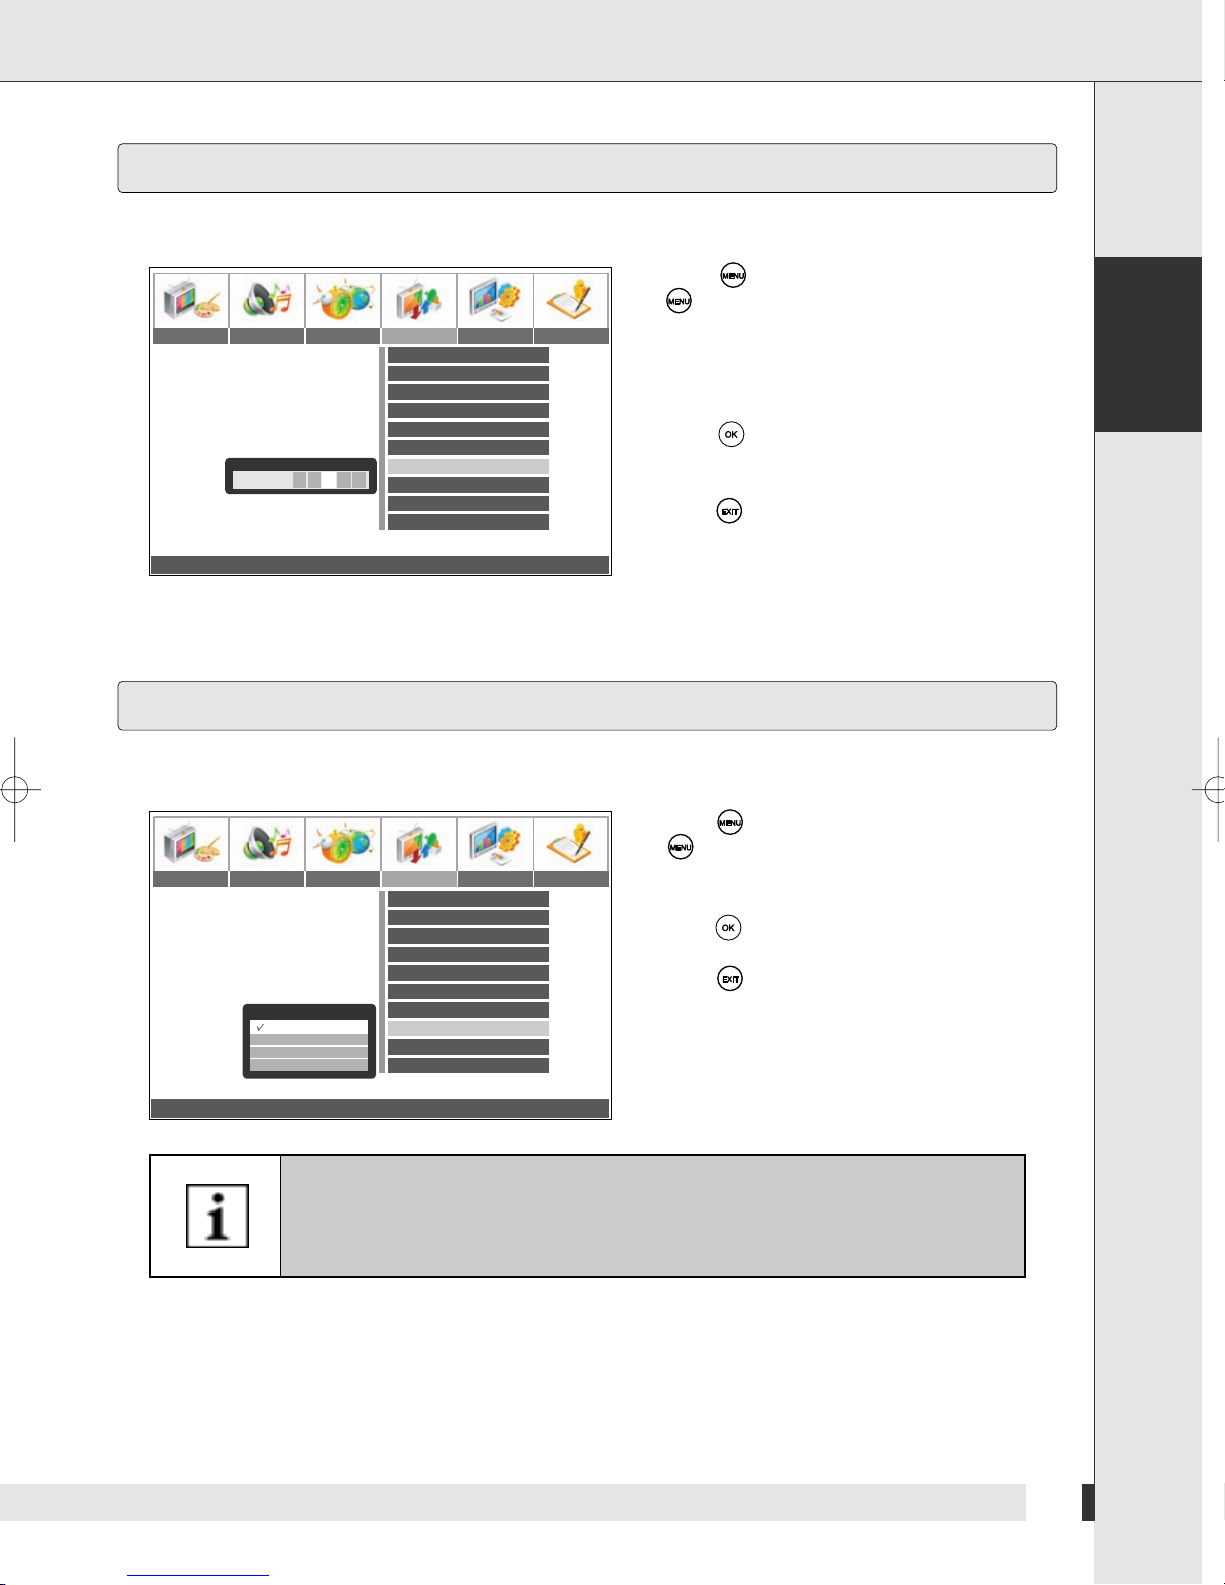
The names of the channels are programmed into the receiver. You can change these names manually.
1 Press . To return to the main menu, press
several times.
Picture Audio Timer Install Setup Option
Name
Name S 2 3
¥
Move 0~9 Adjust OK: Clear MENU: Previous EXIT: Exit
¥
Auto Tuning
Programme
Colour
System
Manual Tuning
Fine Tuning
Name
Sound
Weak Signal Boost
Programme Edit
Stereo / Dual 1
Italy
12
PAL
BG
S23
217.25
S23
Off
2 Press ¥ or and select INSTALL.
3 Press or and select PROGRAMME.
4 Press ¥ or and select the desired channel.
5 Press or and select NAME.
6 Press .
7 Press or to select the desired letter.
8 Press ¥ or to move to the next letter.
9 Press to save the settings.
Settings
English
Sound Settings
The unit can record and play back stereo sounds.
Picture Audio Timer Install Setup Option
Sound
Stereo / Dual 1
Mono / Dual 1
Stereo / Dual 2
Mono / Dual 12
¥
Move OK: Select MENU: Previous EXIT: Exit
¥
This setting is only available if the tuner is receiving a signal from the roof
aerial or the cable. If you have connected an external device, set the language
on this device.
Auto Tuning
Programme
Colour
System
Manual Tuning
Fine Tuning
Name
Sound
Weak Signal Boost
Programme Edit
Stereo / Dual 1
Italy
12
PAL
BG
S23
217.25
S23
Off
1 Press . To return to the main menu, press
several times.
2 Press ¥ or and select INSTALL.
Press or and select SOUND.
3 Press .
4 Press or to select the desired setting.
5 Press to save the settings.
The following settings are available:
Stereo/Dual 1: National language stereo
Mono/Dual 1: National language mono
Stereo/Dual 2: Foreign language of the program
Stereo/Dual 12: Both languages at the same time
21
Page 24
Settings
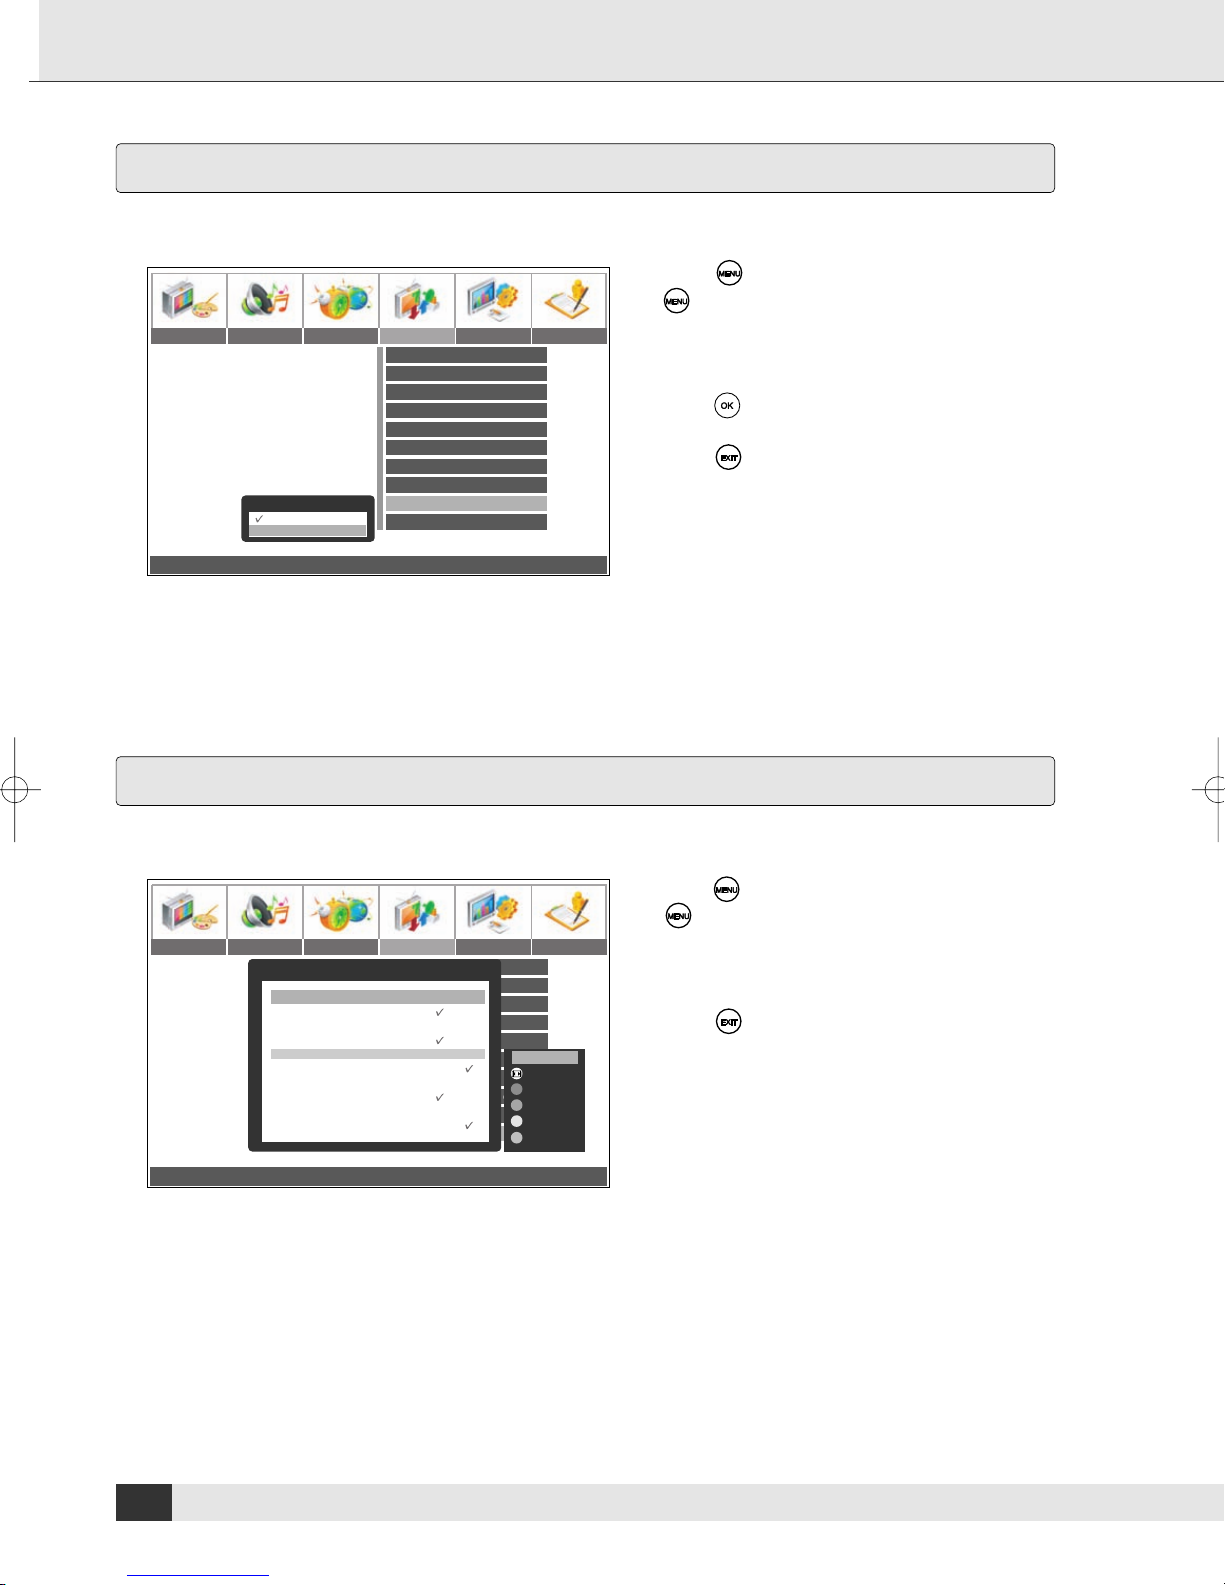
Improve Signal Quality
Use this function to improve poor signal quality.
Picture Audio Timer Install Setup Option
Weak Signal Boost
On
Off
¥
Move OK: Select MENU: Previous EXIT: Exit
¥
Auto Tuning
Programme
Colour
System
Manual Tuning
Fine Tuning
Name
Sound
Weak Signal Boost
Programme Edit
Stereo / Dual 1
Italy
PAL
BG
S23
217.25
S23
Off
1 Press . To return to the main menu, press
several times.
2 Press ¥ or and select INSTALL.
3 Press or and select WEAK SIGNAL
12
BOOST.
4 Press .
5 Press or to select the desired setting.
6 Press to save the settings.
The following settings are available :
On/Off
Set Channel
Use this function to set the settings for individual channels.
Picture Audio Timer Install Setup Option
Programme Edit
Freq.
CH.
471.25
S12
01
471.25
S13
02
471.25
S14
03
471.25
S15
04
471.25
S16
05
471.25
S17
06
471.25
S18
07
471.25
S19
08
471.25
S20
09
Move MENU: Previous EXIT: Exit
¥
Auto Tuning
Programme
Name
Lock SkipPr.
Colour
S12
System
S13
S14
Manual Tuning
S15
Fine Tuning
S16
Name
S17
S18
Sound
S19
Weak Signal Boost
S20
Programme Edit
Italy
PAL
BG
S23
217.25
S23
Stereo /Dual
12
Edit
Delete
Move
Swap
1
Lock
Skip
1 Press . To return to the main menu, press
several times.
2 Press ¥ or and select INSTALL.
3 Press or and select PROGRAMME EDIT.
4 Adjust the settings.
5 Press to save the settings.
The following settings are available:
Delete: Delete a channel.
Move: Move a channel up or down in the list of
channels.
Swap: Swap selected channels.
Lock: Lock channel
Skip: Skip channels when scrolling
22
Page 25
Reduce Noise
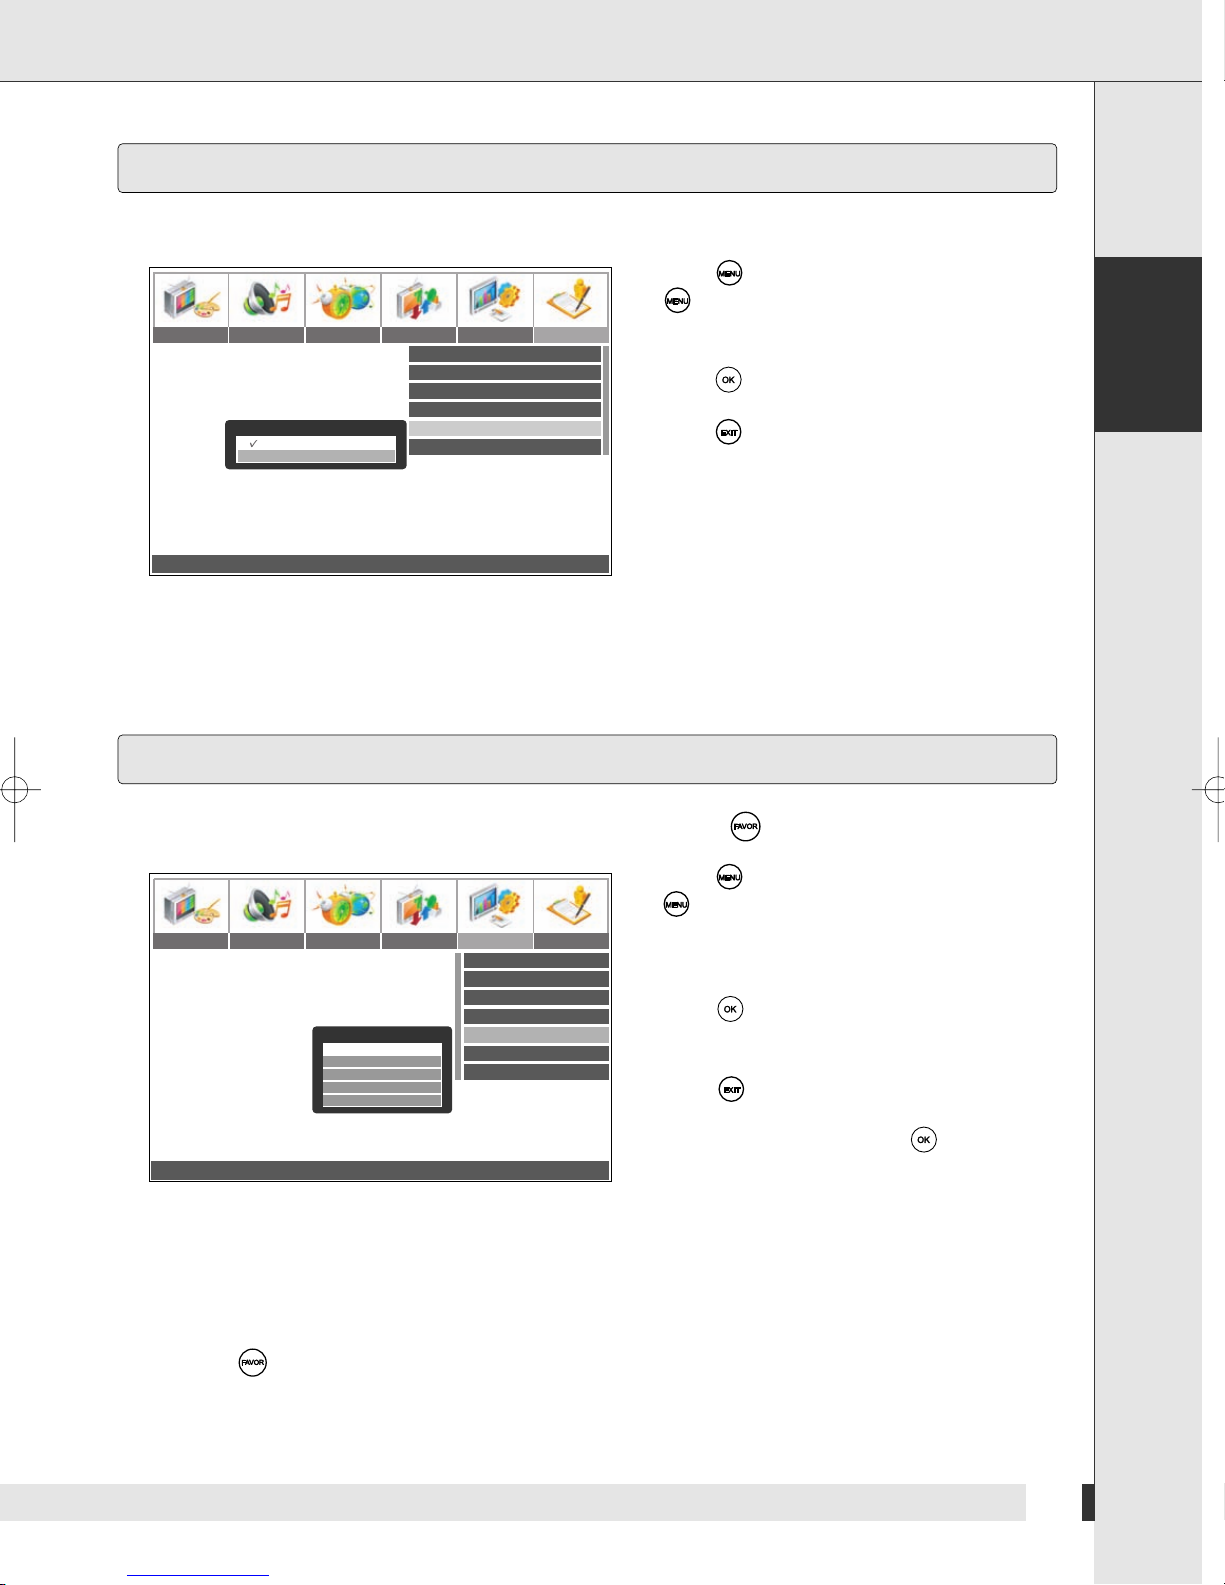
Use this function to reduce picture noise.
Picture Audio Timer Install Setup Option
Noise Reduction
On
Off
Move OK: Select MENU: Previous EXIT: Exit
¥
Local Lock
OSD Setting
No Signal Power Off
No Operation Power Off
Noise Reduction
Teletext Character Group
West Europe
1 Press . To return to the main menu, press
several times.
2 Press ¥ or and select OPTION.
Off
3 Press or and select NOISE REDUCTION.
4 Press .
20
5 Press or to select the desired setting.
180
On
6 Press to save the settings.
The following settings are available:
On/Off
Settings
English
Channel Groups
Use this function to store channels in the list of favourites with access by .
1 Press . To return to the main menu, press
several times.
Picture Audio Timer Install Setup Option
Favourite Channel
1: Pr 01
2: Pr 17
3: Pr 12
4: Pr 13
5: Pr 06
¥
0~9 Adjust OK: Clear MENU: Previous EXIT: Exit
Watch Favourite Channel
➣
Move
¥
Language
Geometry
Aspect
No WSS
Favourite Channel
PIP Adjustment
Factory Preset
Press to scroll through your favourite channels.
English
2 Press ¥ or and select SETUP.
3 Press or and select FAVOURITE
Auto
Full
CHANNEL.
4 Press .
5 Press or to select the desired line.
6 Press ¥ or to select the desired channel.
7 Press to save the settings.
To delete a wrong entry press .
23
Page 26
Settings
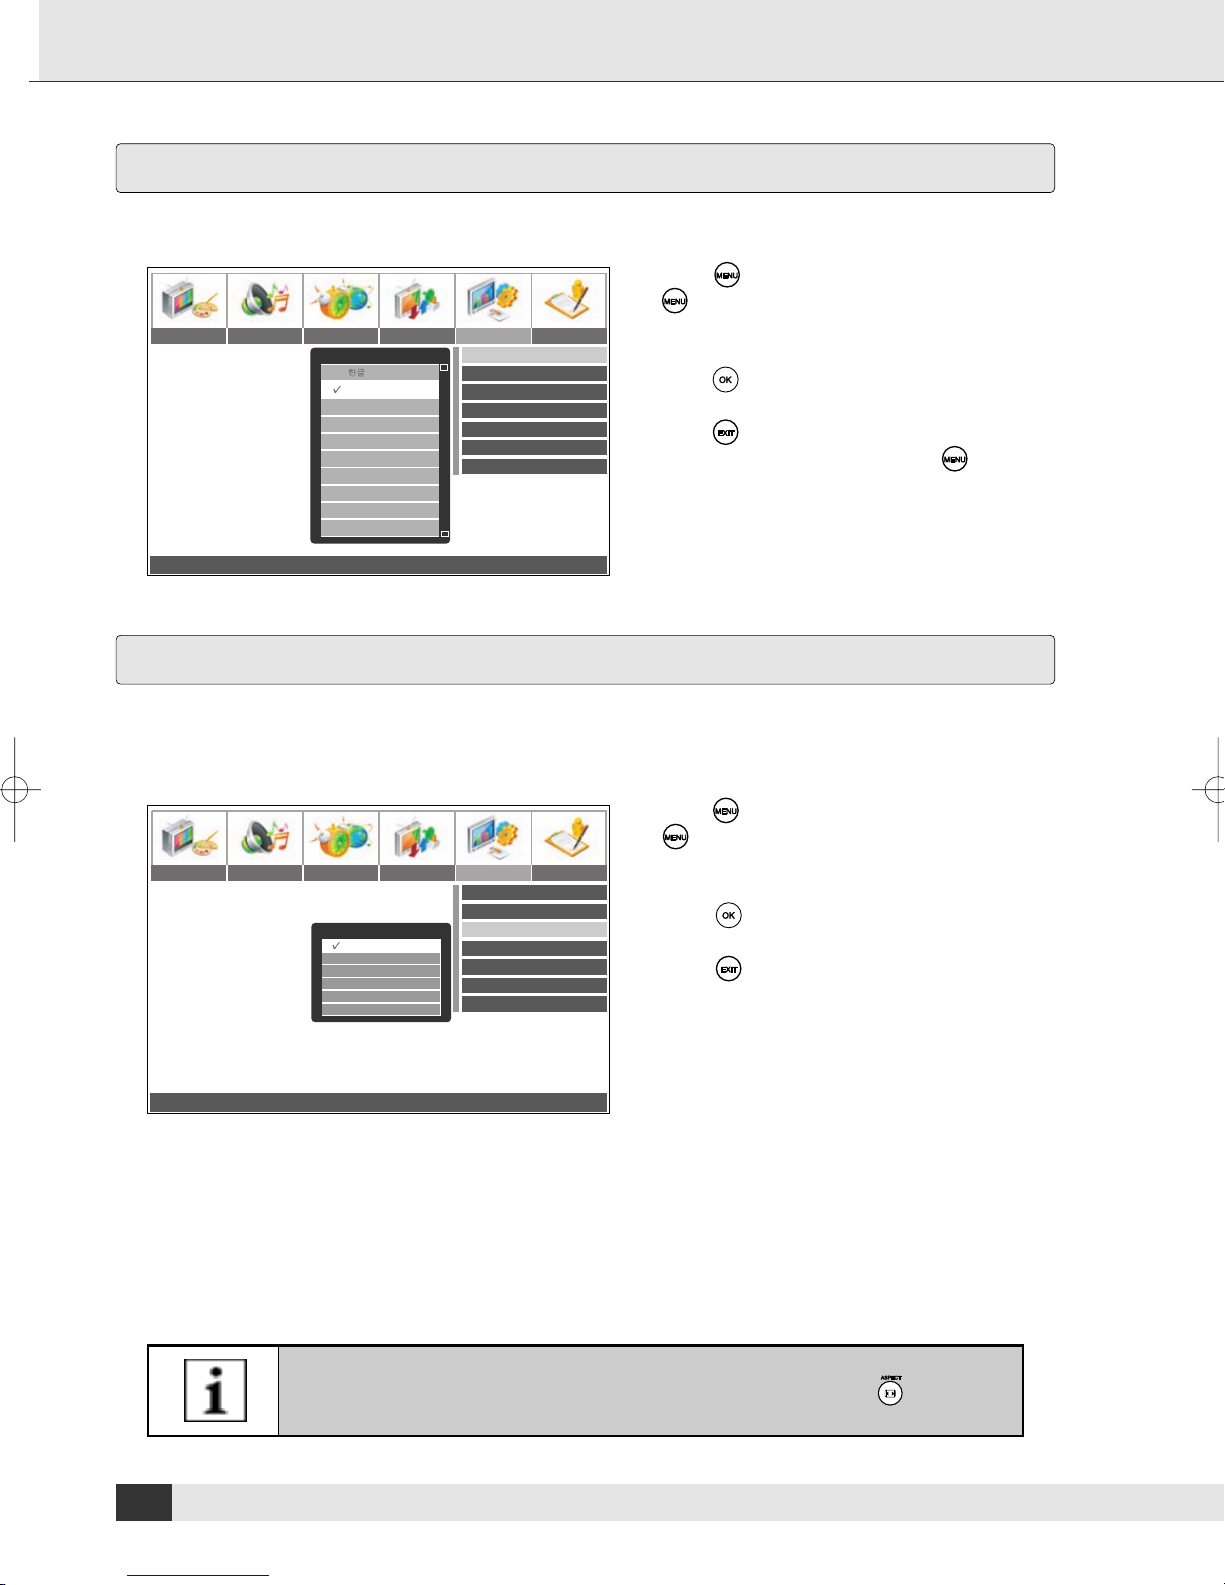
Set Screen Language
By default, the unit is set to the English language. The screen display text can be displayed in several languages.
1 Press . To return to the main menu, press
several times.
Picture Audio Timer Install Setup Option
Language
English
Français
Deutsch
Italiano
Español
Dutch
Portuguese
Norsk
Dansk
Move OK: Select MENU: Previous EXIT: Exit
¥
Language
Geometry
Aspect
No WSS
Favourite Channel
PIP Adjustment
Factory Preset
English
2 Press ¥ or and select SETUP.
3 Press or and select LANGUAGE.
4 Press .
Auto
5 Press or to select the desired setting.
Full
6 Press to save the settings.
7 To return to the main menu, press several
times.
Set Aspect Ratio
➣
Set Wide Screen Format
Use this function to display programms broadcast in wide screen format.
1 Press . To return to the main menu, press
several times.
Picture Audio Timer Install Setup Option
Aspect
Auto
Normal
Full
Zoom1
Zoom2
Panorama
Move OK: Select MENU: Previous EXIT: Exit
¥
Language
Geometry
Aspect
No WSS
Favourite Channel
PIP Adjustment
Factory Preset
English
The following settings are available:
Auto: Sets the display automatically to the broadcast format.
Normal:
The format 16:9 is suppressed. The format 4:3 is not adapted a black area is displayed on the left and the right.
Full: The format 16:9 is displayed as broadcast. The format 4:3 is horizontally spread.
Zoom1: The format 4:3 is vertically spread.
Zoom2:
Like zoom1 but the whole picture is moved upwards so that text at the bottom of the display becomes visible.
Panorama: The format 16:9 is displayed as broadcast. The format 4:3 is horizontally spread. In this the outer areas of
the picture are modified more than the centre of the picture.
2 Press ¥ or and select SETUP.
3 Press or and select ASPECT.
4 Press .
Auto
5 Press or to select the desired setting.
Full
6 Press to save the settings.
You can scroll through the settings while watching. For this, press .
24
Page 27
Settings
➣
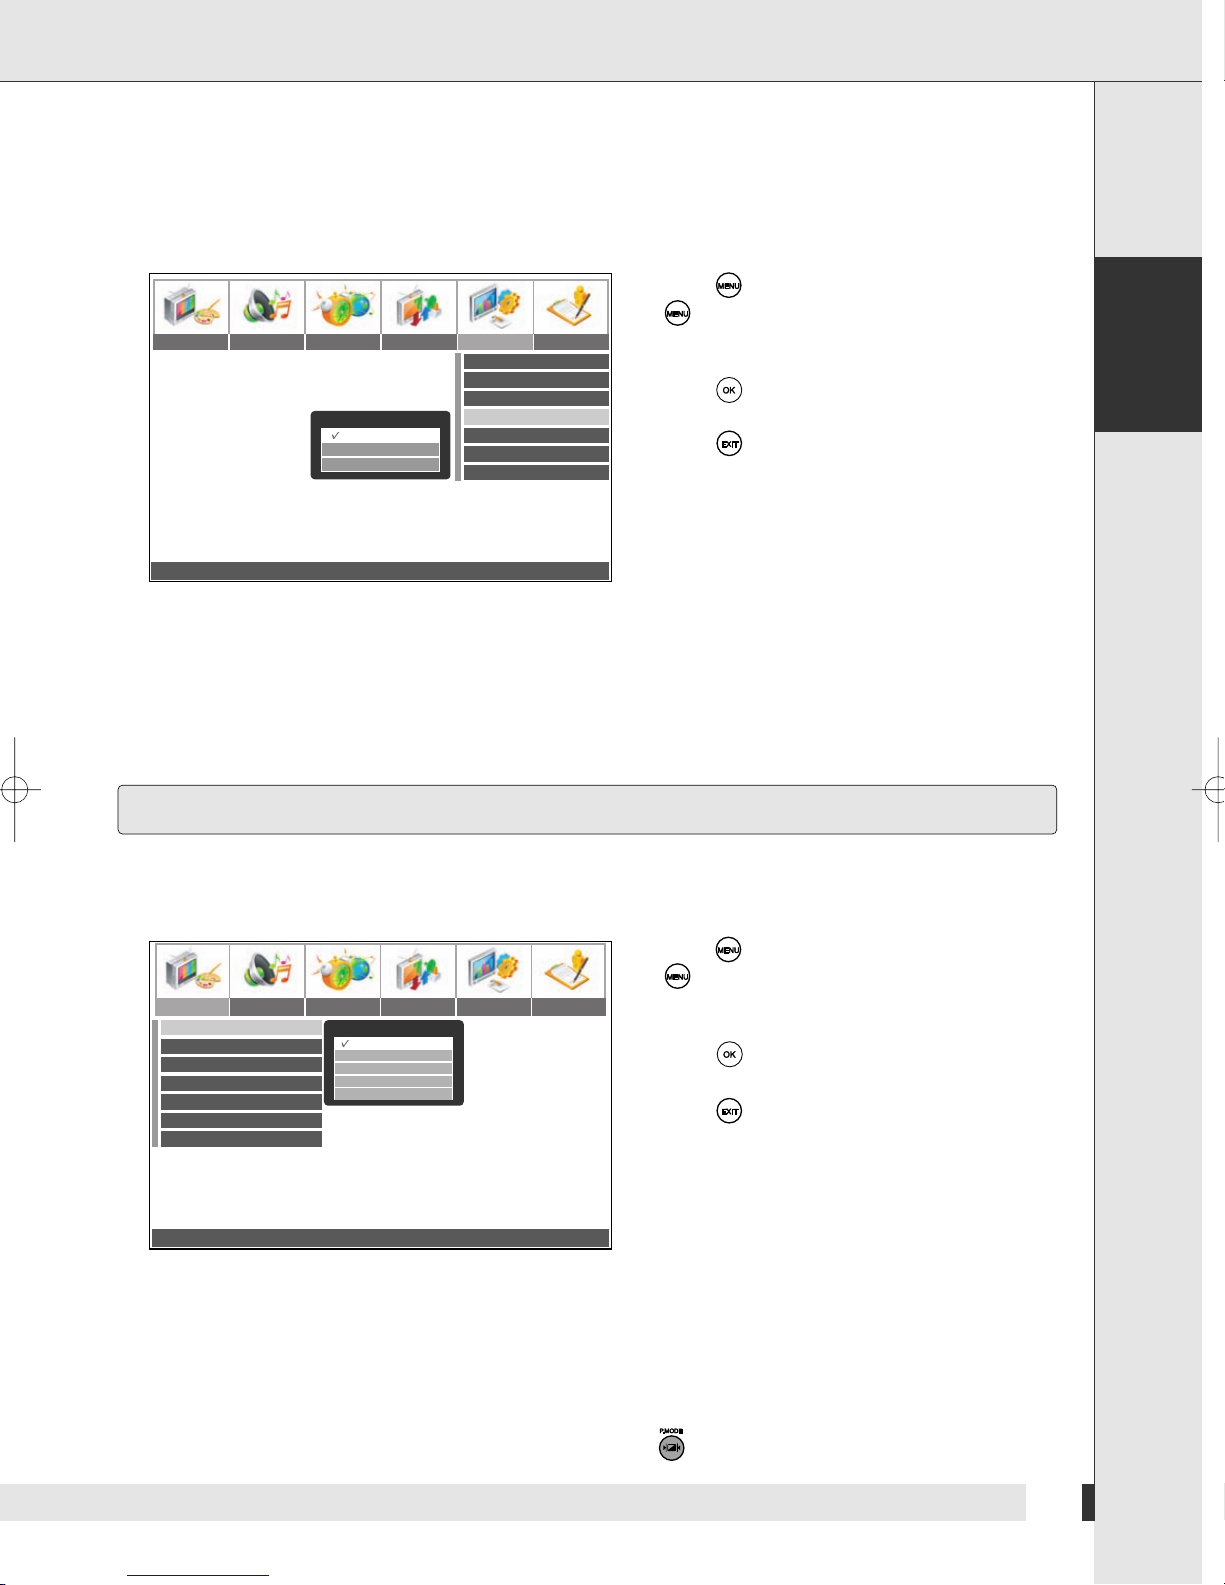
Display if no Wide Screen Signal is Received
Most programs are broadcast together with a signal describing the format of the picture.
With this function you can set the way the picture is displayed, if no such signal is received.
This function is only available, if you have set the picture format to AUTO.
1 Press . To return to the main menu, press
several times.
Picture Audio Timer Install Setup Option
No WSS
Full
Normal
Panorama
Move OK: Select MENU: Previous EXIT: Exit
¥
Language
Geometry
Aspect
No WSS
Favourite Channel
PIP Adjustment
Factory Preset
English
The following settings are available :
Normal: The format 16:9 is suppressed. The format 4:3 is not adapted a black area is displayed on the left
and the right.
Full: The format 16:9 is displayed as broadcast. The format 4:3 is horizontally spread.
Panorama: The format 16:9 is displayed as broadcast. The format 4:3 is horizontally spread.
In this the outer areas of the picture are modified more than the centre of the picture.
2 Press ¥ or and select SETUP.
3 Press or and select NO WSS.
4 Press .
Auto
Full
5 Press or to select the desired setting.
6 Press to save the settings.
English
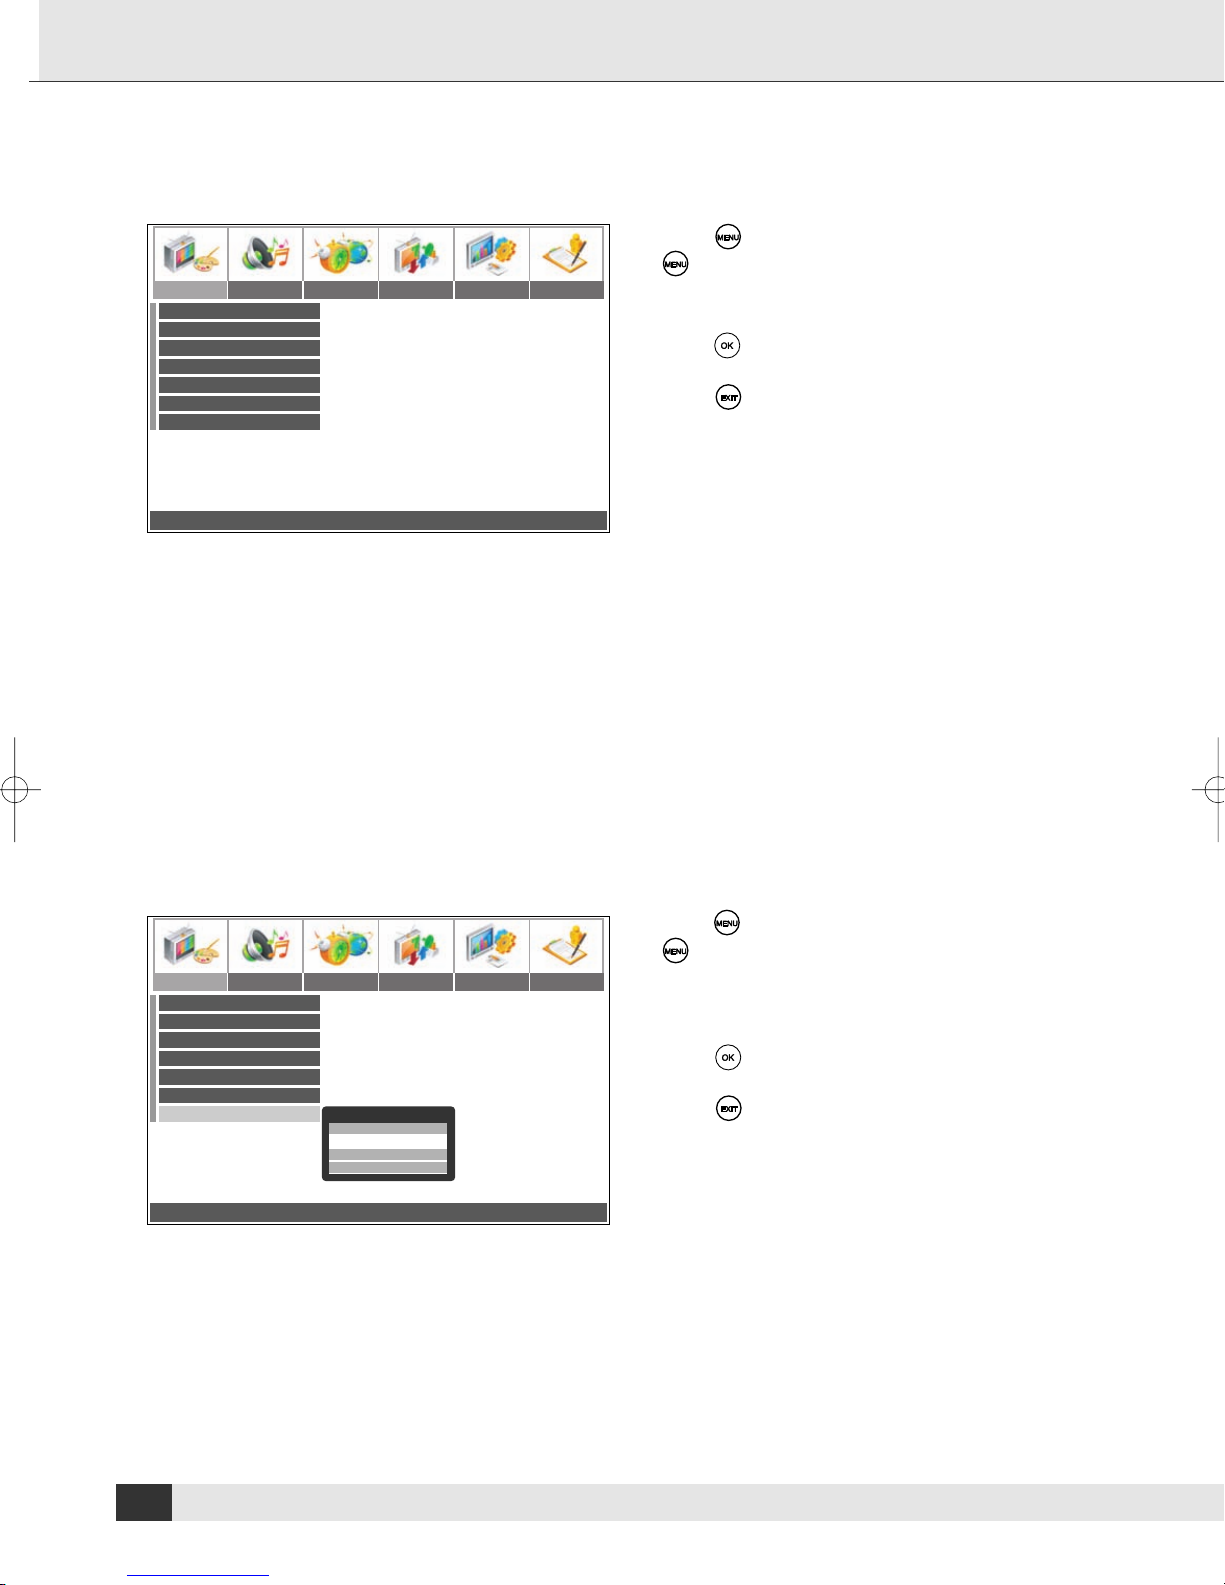
Set Picture Mode
Use this function to adapt the picture optimally to the content. You can also adapt the sound modes for these
settings. See “Adjust Individual Audio Frequencies” on page 28.
1 Press . To return to the main menu, press
several times.
Picture Audio Timer Install Setup Option
Mode
Brightness
Contrast
Sharpness
Colour
Tint
Colour Temperature
Move OK: Select MENU: Previous EXIT: Exit
¥
Standard
050
050
050
050
050
Standard
Sport
Natural
Mild
Custom
Mode
The following settings are available :
Standard: Setting for a bright background of the television set.
Sport: Setting for a clearer picture.
Natural: Setting for films and music.
Mild: Setting for a dark background of the television set.
Custom: Select this mode if you want to adjust the settings individually. See “Additional Picture Settings”
on page 26.
2 Press ¥ or , and select PICTURE.
3 Press or , and select MODE.
4 Press .
5 Press or to select the desired setting.
6 Press to save the settings.
You can also select the picture mode manually. For this, press .
25
Page 28
Settings
➣
Additional Picture Settings
Use this functions to adjust the picture settings individually, if you have selected the picture mode Custom.
Picture Audio Timer Install Setup Option
Mode
Brightness
Contrast
Sharpness
Colour
Tint
Colour Temperature
¥
Position OK: Select MENU/EXIT: Exit
The following settings are available:
Brightness: Brightness of the picture
Contrast: Contrast of the picture
Sharpness: Sharpens the edges of the objects
Colour: Adjusts the intensity of the colours
Tint: Sets the hue
Standard
050
050
050
050
050
1 Press . To return to the main menu, press
several times.
2 Press ¥ or and select PICTURE.
3 Press or to select the desired menu.
4 Press to open the desired menu.
5 Press ¥ or to select the desired setting.
6 Press to save the settings. The settings will
be saved in the picture mode Custom.
➣
Set Individual Colour Channels
Use this function to adjust the intensity of the individual colour channels.
1 Press . To return to the main menu, press
several times.
Picture Audio Timer Install Setup Option
Mode
Brightness
Contrast
Sharpness
Colour
Tint
Colour Temperature
Move
¥
Standard
050
050
050
050
050
Colour Temperature
Temperature
Red 50
Green 50
Blue 50
¥
Adjust MENU: Previous EXIT: Exit
2 Press ¥ or and select PICTURE.
3 Press or and select COLOUR
TEMPERATURE.
4 Press .
5 Press or to select the desired setting.
6 Press to save the settings.
The following settings are available:
Red/Green/Blue
26
Page 29
Audio Settings
➣
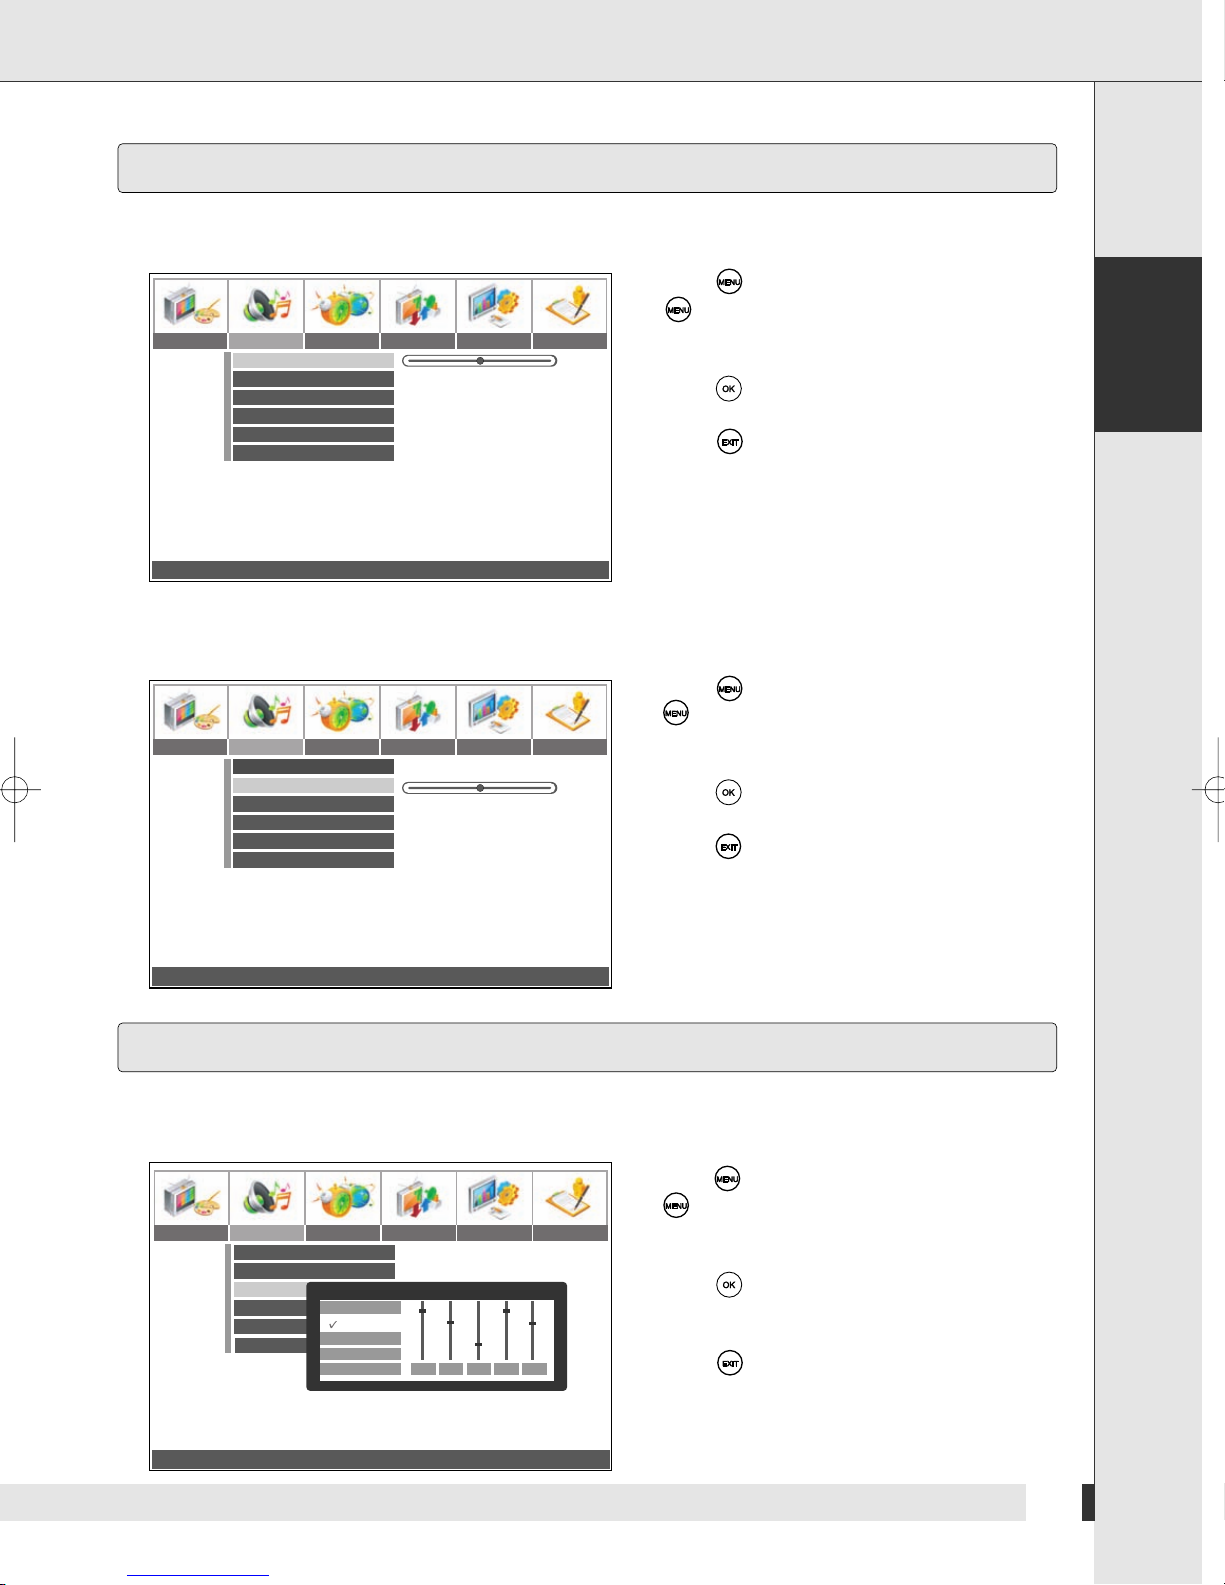
Set Balance
Picture Audio Timer Install Setup Option
¥
Adjust MENU: Previous EXIT: Exit
➣
Balance
Volume
Equalizer
SRS WOW
Audio Selection
HDMI Audio
Set volume
050
019
Music
Off
Sub
HDMI
Settings
1 Press . To return to the main menu, press
several times.
2 Press ¥ or and select AUDIO.
3 Press or and select BALANCE.
4 Press .
5 Press ¥ or to select the desired setting.
6 Press to save the settings.
English
1 Press . To return to the main menu, press
several times.
Picture Audio Timer Install Setup Option
¥
Adjust MENU: Previous EXIT: Exit
Balance
Volume
Equalizer
SRS WOW
Audio Selection
HDMI Audio
050
019
Music
Off
Sub
HDMI
2 Press ¥ or and select AUDIO.
3 Press or and select VOLUME.
4 Press .
5 Press ¥ or to select the desired setting.
6 Press to save the settings.
Adjust Individual Audio Frequencies
Use this function to adjust the individual frequency ranges. The settings are allocated to the different picture
modes. You can only adjust these settings, if the SRS function is turned off.
1 Press . To return to the main menu, press
several times.
Picture Audio Timer Install Setup Option
Balance
Volume
Equalizer
SRS WOW
Audio Selection
HDMI Audio
Music
Standard
Music
Film
Speech
Custom
050
019
Equalizer
Off
Sub
100 300 1K 10K 3K
2 Press ¥ or and select AUDIO.
3 Press or and select EQUALIZER.
4 Press .
5 Press ¥ or to select the desired frequency.
6 Press or to select the desired setting.
7 Press to save the settings.
Move OK: Select MENU: Previous EXIT: Exit
¥
27
Page 30
Settings
Adjust Medium and Low Frequencies
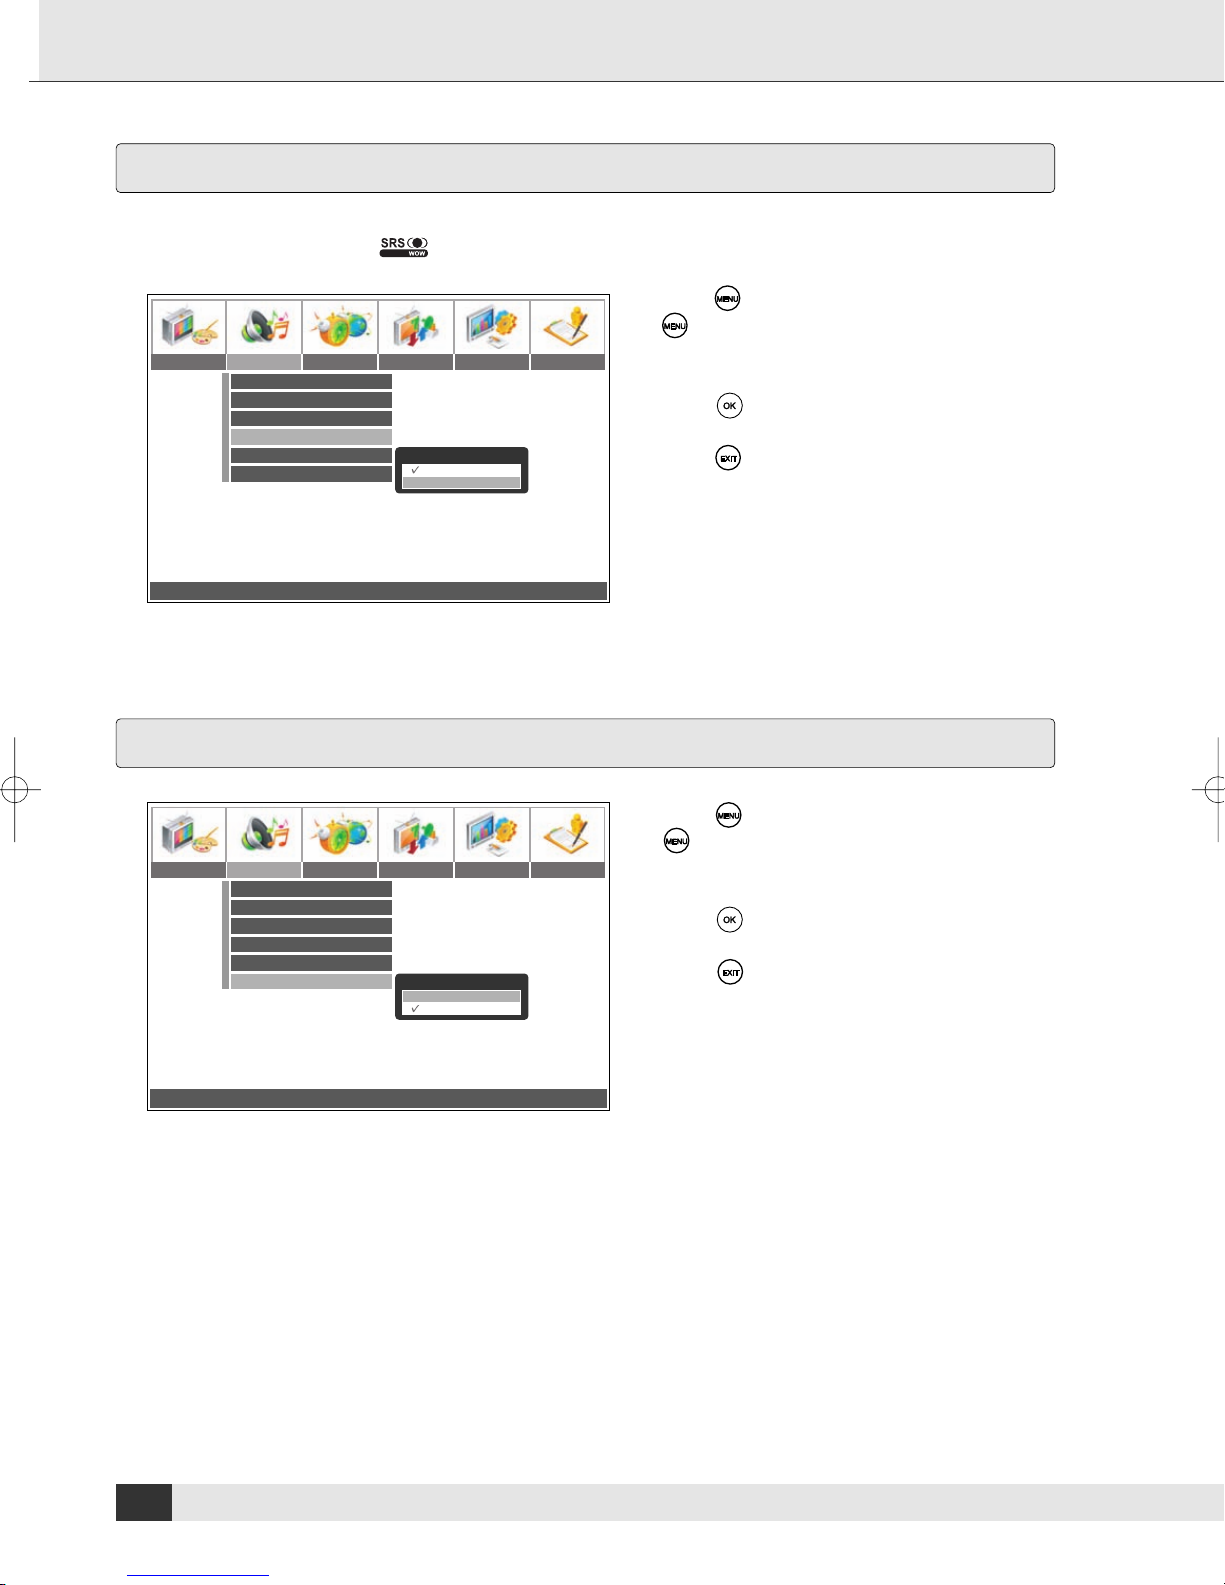
Use this function to boots the medium and low frequencies to create a better surround sound. For this the SRS
WOW®technology is used. is a registered trademark.
1 Press . To return to the main menu, press
several times.
Picture Audio Timer Install Setup Option
Move OK: Select MENU: Previous EXIT: Exit
¥
Balance
Volume
Equalizer
SRS WOW
Audio Selection
HDMI Audio
050
019
Music
Off
Main
HDMI
SRS WOW
On
Off
2 Press ¥ or and select AUDIO.
3 Press or and select SRS WOW.
4 Press .
5 Press or to select the desired setting.
6 Press to save the settings.
The following settings are available:
On/Off
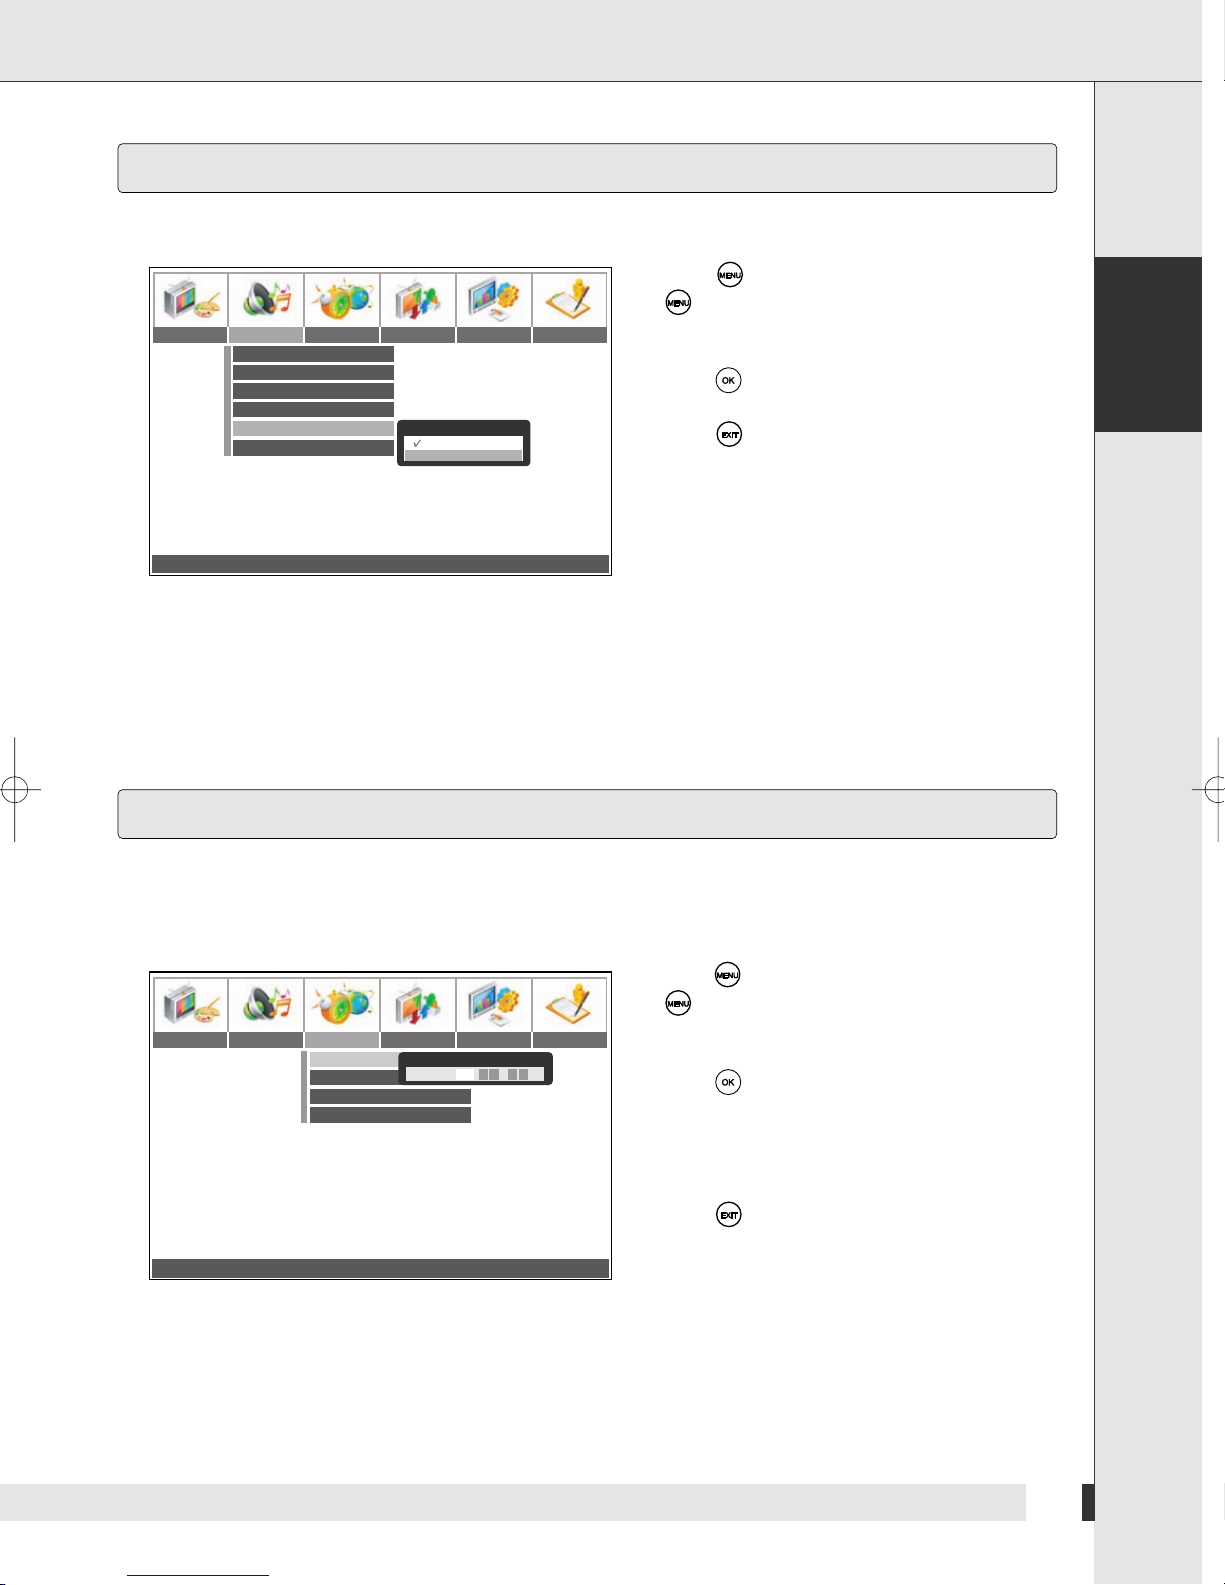
Set the Audio Input (HDMI or PC)
Picture Audio Timer Install Setup Option
Move OK: Select MENU: Previous EXIT: Exit
¥
Balance
Volume
Equalizer
SRS WOW
Audio Selection
HDMI Audio
050
019
Music
Off
Main
HDMI
HDMI Audio
HDMI
PC
1 Press . To return to the main menu, press
several times.
2 Press ¥ or and select AUDIO.
3 Press or and select HDMI AUDIO.
4 Press .
5 Press or to select the desired settings.
6 Press to save the settings.
The following settings are available:
HDMI/PC
When connecting the PC to your TV with the
HDMI/DVI cable, you should select PC.
28
Page 31
Set Sound Source
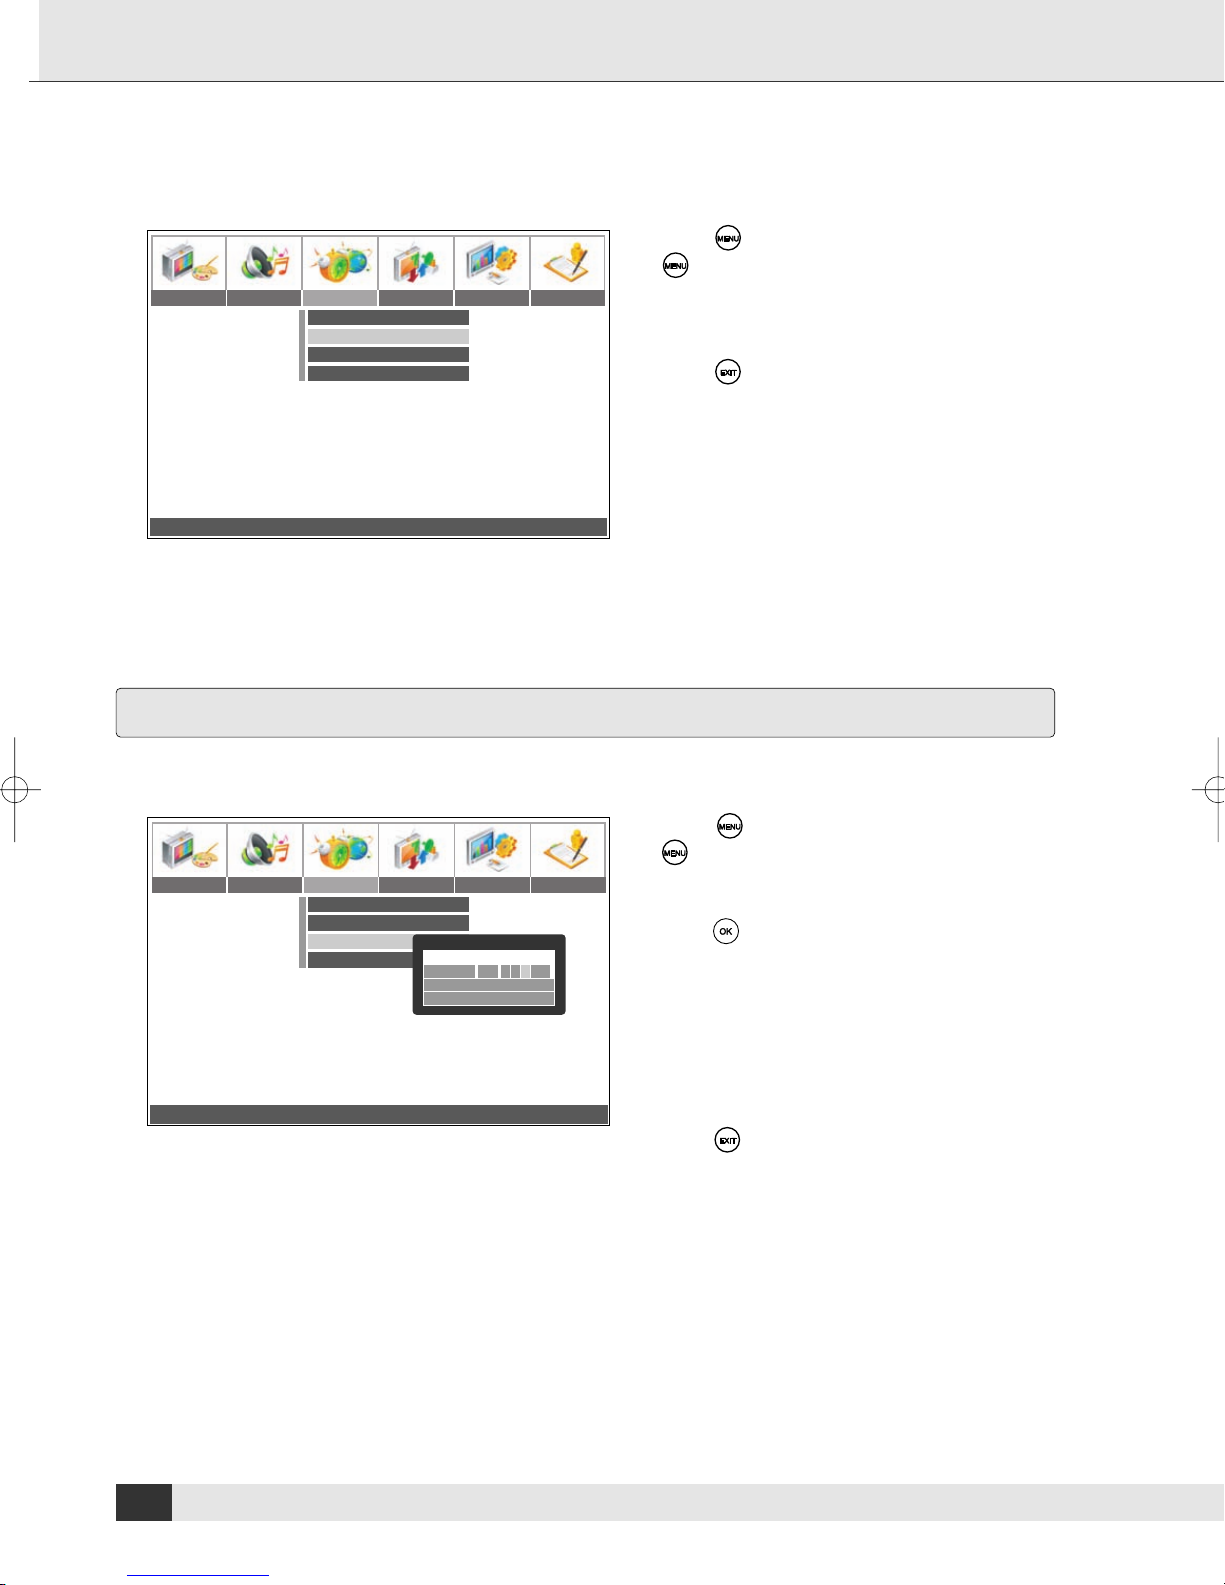
Use this function to set which sound you will hear when watching picture-in-picture mode.
1 Press . To return to the main menu, press
several times.
Picture Audio Timer Install Setup Option
Move OK: Select MENU: Previous EXIT: Exit
¥
Balance
Volume
Equalizer
SRS WOW
Audio Selection
HDMI Audio
050
019
Music
Off
Main
HDMI
Audio Selection
Main
Sub
The following settings are available :
Main: You will hear the sound of the main screen
Sub: You will hear the sound of the small screen
2 Press ¥ or and select AUDIO.
3 Press or and select AUDIO SELECTION.
4 Press .
5 Press or to select the desired setting.
6 Press to save the settings.
Settings
English
Set Time
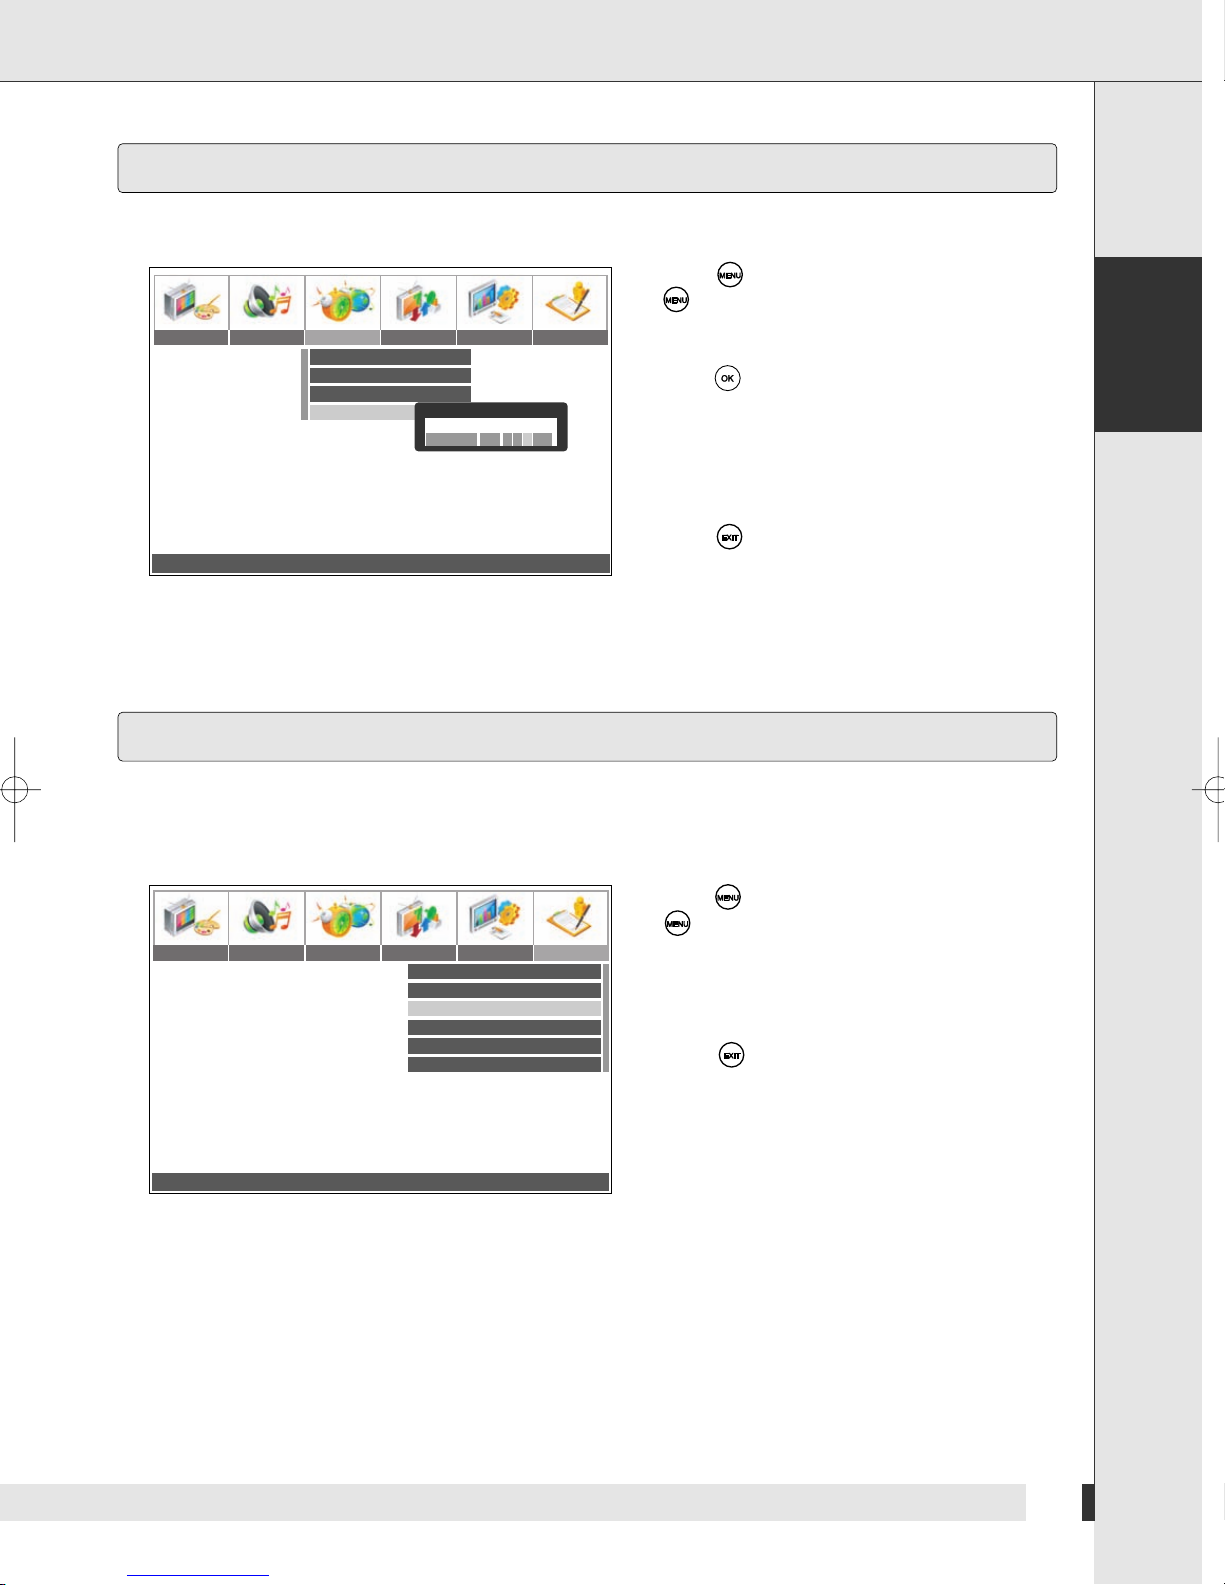
In order to set the correct times for switching on and off automatically, the clock in the receiver must be set
correctly. By default, the unit receives the current time from the selected station. You can enter the time manually
as well. Enter the time in 12-hour format.
1 Press . To return to the main menu, press
several times.
Picture Audio Timer Install Setup Option
¥
Move 0~9 Adjust OK: Clear MENU: Previous EXIT: Exit
¥
Clock
Update Pr.
On Timer
Off Timer
Audio Selection
- -:- -
Clock
Clock AM1 1 : 34
Off
AM 12:00
Off
Main
2 Press ¥ or and select TIMER.
3 Press or and select CLOCK.
4 Press .
5 Press or and select AM for times between
0:00 hours and 12:00 hours or PM for the times
between 12:00 hours and 24:00 hours.
6 Enter the time using the key pad.
7 Press to save the settings.
29
Page 32
Settings
➣
Set Time by Station
Use this function to set the time of the unit to the time broadcast by the station.
Picture Audio Timer Install Setup Option
Clock
Update Pr.
On Timer
Off Timer
Audio Selection
- -:- -
Off
AM 12:00
Off
Main
1 Press . To return to the main menu, press
several times.
2 Press ¥ or and select TIMER.
3 Press or and select UPDATE PR.
4 Press ¥ or and select the desired channel.
5 Press to save the settings.
Move
¥
¥
0~9 Adjust OK: Clear MENU: Previous EXIT: Exit
Set Switch on Time
Use this function to set a time when the unit turns on.
Picture Audio Timer Install Setup Option
Move
¥
¥
Select MENU: Previous EXIT: Exit
Clock
Update Pr.
On Timer
Off Timer
Audio Selection
- -:- -
Off
AM 12:00
On Timer
Enable On
Off
On Time AM 1 1 : 3 4
Main
Programme 01
Volume 020
1 Press . To return to the main menu, press
several times.
2 Press ¥ or and select TIMER.
3 Press or and select ON TIMER.
4 Press .
5 Press ¥ or and select ON or OFF.
6 Press or and select AM for times between
00:00 hours and 12:00 hours or PM for the
times between 12:00 hours and 24:00 hours.
7 Enter the time using the key pad.
8 Select the channel.
9 Set the volume.
10 Press to save the settings.
30
Page 33
Set Switch off Time
Use this function to set a time when the unit turns off.
Picture Audio Timer Install Setup Option
Move
¥
¥
Select MENU: Previous EXIT: Exit
Clock
Update Pr.
On Timer
Off Timer
Audio Selection
- -:- -
Off
AM 12:00
Off Timer
Off
Enable On
Main
Off Time AM - - : 3 4
Settings
1 Press . To return to the main menu, press
several times.
2 Press ¥ or and select TIMER.
3 Press or and select OFF TIMER.
4 Press .
5 Press ¥ or and select ON or OFF.
6 Press or and select AM for times between
00:00 hours and 12:00 hours or PM for the
times between 12:00 hours and 24:00 hours.
7 Enter the time using the key pad.
8 Press to save the settings.
English
Automatic Switch off
➣
Automatic Switch off if no Signal is Received
This function switches the unit automatically off, if no signal is received. (E.g. when a video tape was
played completely and the video recorder turns off).
1 Press . To return to the main menu, press
several times.
Picture Audio Timer Install Setup Option
Move
¥
¥
Adjust MENU: Previous EXIT: Exit
Local Lock
OSD Setting
No Signal Power Off
No Operation Power Off
Noise Reduction
Teletext Character Group
West Europe
2 Press ¥ or and select OPTION.
Off
3 Press or and select NO SIGNAL POWER
20
180
On
OFF.
4 Press ¥ or and select the time.
5 Press to save the settings.
31
Page 34
Settings
➣
Switch Off if no Key is Pressed
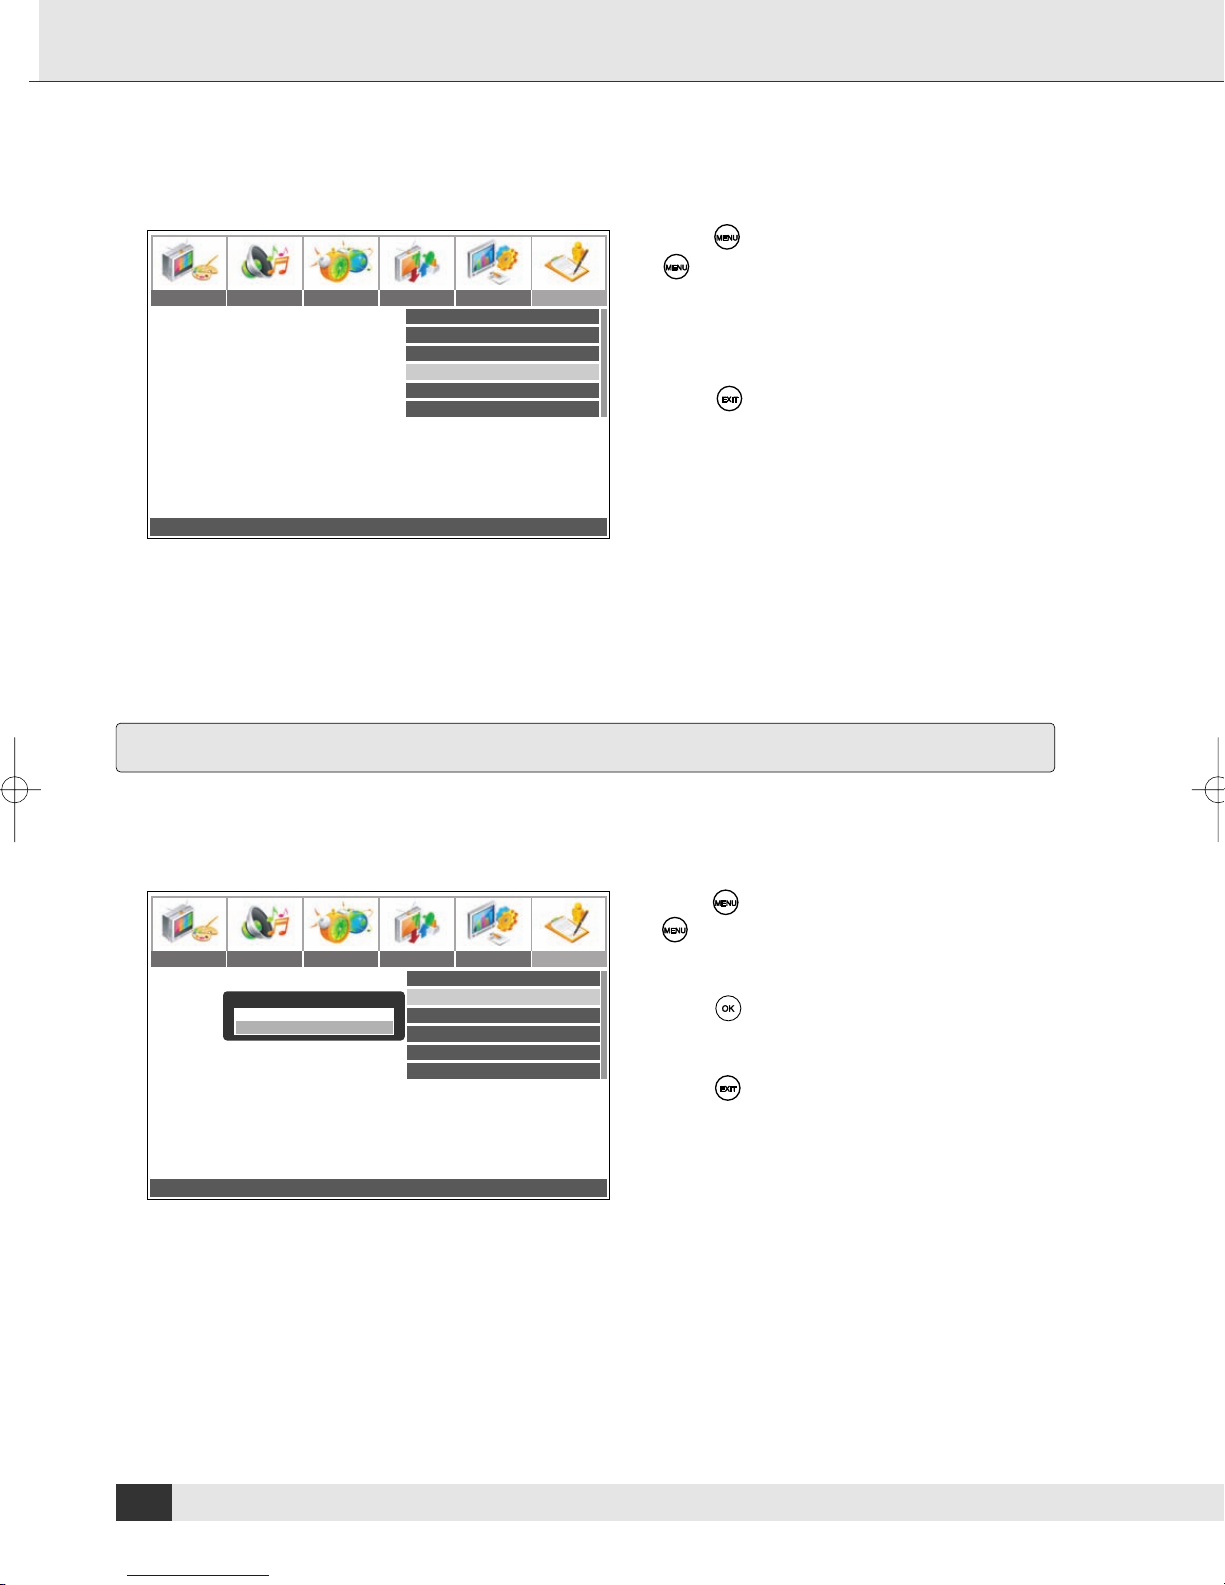
This function switches the unit automatically off, if no key is pressed for a longer time.
Picture Audio Timer Install Setup Option
Local Lock
OSD Setting
No Signal Power Off
No Operation Power Off
Noise Reduction
Teletext Character Group
Off
20
180
On
West Europe
1 Press . To return to the main menu, press
several times.
2 Press ¥ or and select OPTION.
3 Press or and select NO OPERATION
POWER OFF.
4 Press ¥ or and select the time.
5 Press to save the settings.
Move
¥
¥
Adjust MENU: Previous EXIT: Exit
Set On-Screen Display
➣
Set Duration
Use this function to set the time span for which the on-screen display will be shown.
1 Press . To return to the main menu, press
several times.
Picture Audio Timer Install Setup Option
OSD Setting
OSD Timeout 30
OSD Transparency 0
Local Lock
OSD Setting
No Signal Power Off
No Operation Power Off
Noise Reduction
Teletext Character Group
West Europe
2 Press ¥ or and select OPTION.
Off
3 Press or and select OSD SETTING.
4 Press .
20
180
5 Press or and select OSD TIMEOUT.
On
6 Press ¥ or to select the desired setting.
7 Press to save the settings.
Move
¥
¥
Adjust MENU: Previous EXIT: Exit
32
Page 35
➣
Set Transparency
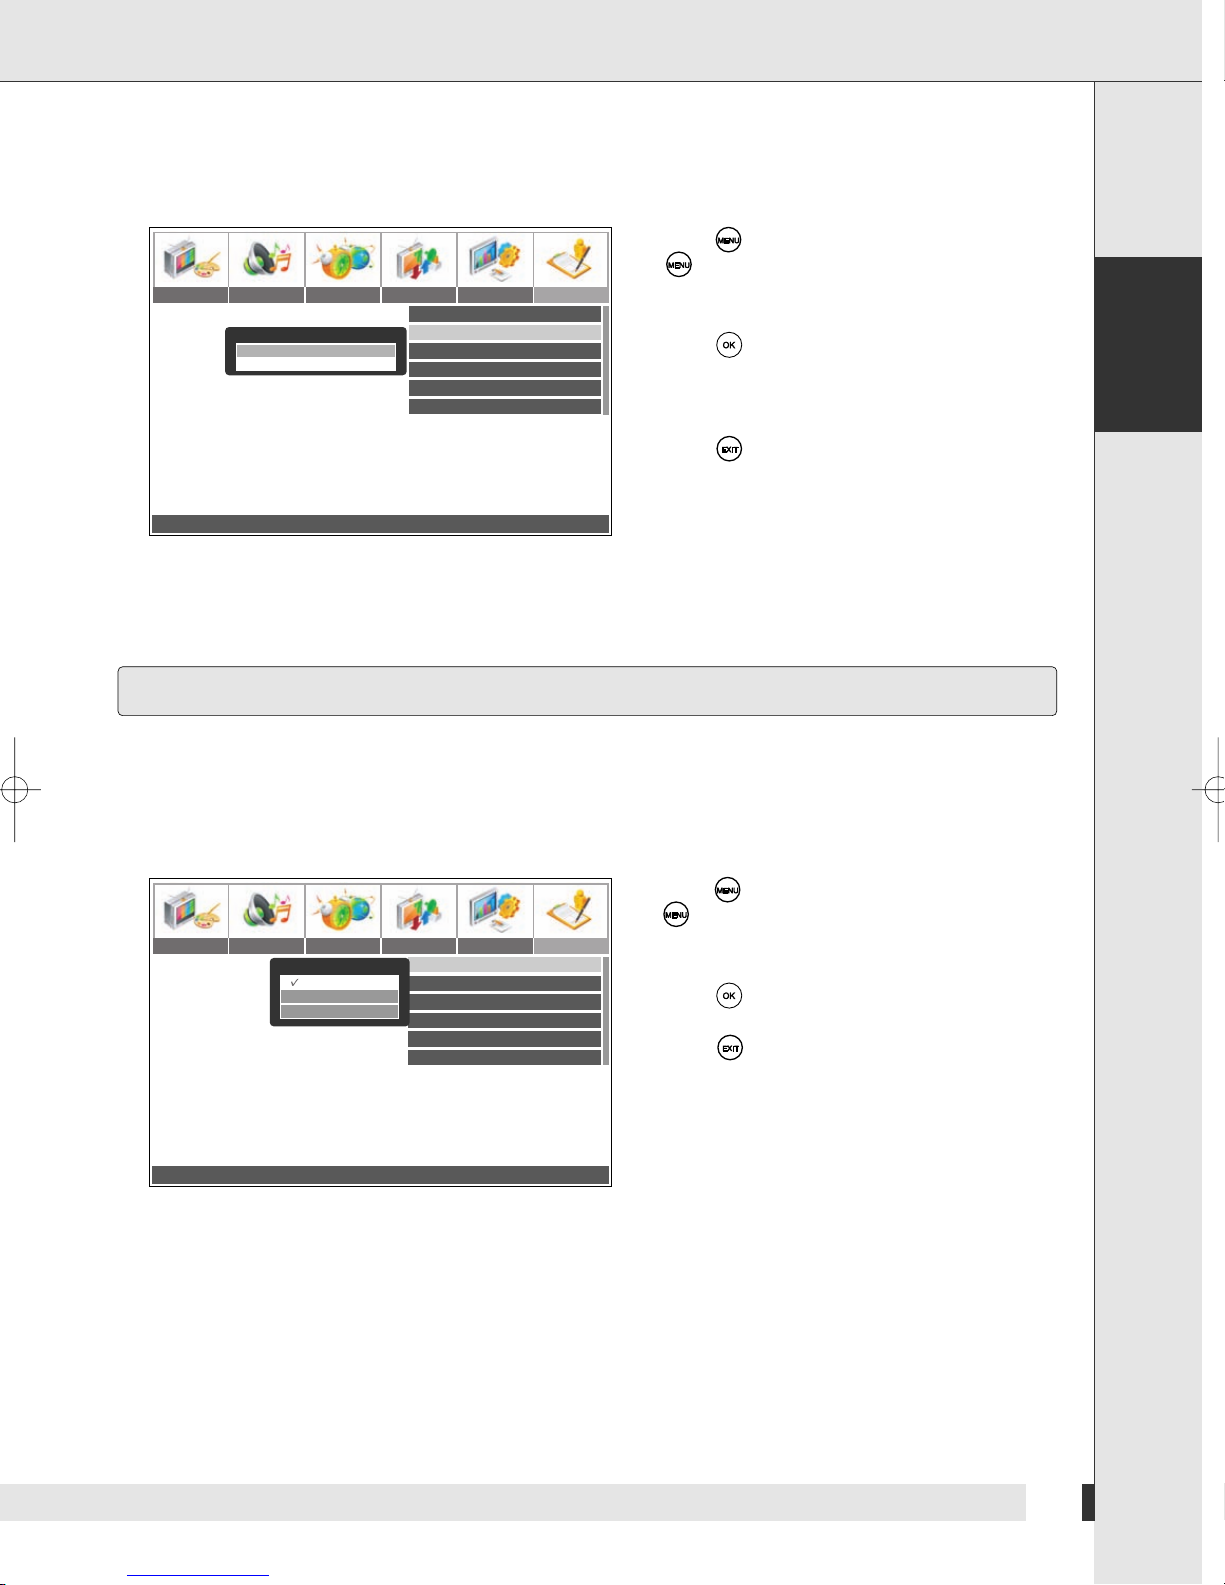
Use this function to set the transparency of the on-screen display.
Picture Audio Timer Install Setup Option
OSD Setting
OSD Timeout 30
OSD Transparency 0
Local Lock
OSD Setting
No Signal Power Off
No Operation Power Off
Noise Reduction
Teletext Character Group
Off
20
180
On
West Europe
Settings
1 Press . To return to the main menu, press
several times.
2 Press ¥ or and select OPTION.
3 Press or and select OSD SETTING.
4 Press .
5 Press or and select OSD
TRANSPARENCY.
6 Press ¥ or to select the desired setting.
7 Press to save the settings.
English
Move
¥
¥
Adjust MENU: Previous EXIT: Exit
Child Lock
You can lock the keys on the front panel of the unit. Then the operation is only possible by the remote control. In
this case keep the remote control out of the reach of children.
➣
Activate Child Lock
1 Press . To return to the main menu, press
several times.
Picture Audio Timer Install Setup Option
Local Lock
Off
Once
Always
Local Lock
OSD Setting
No Signal Power Off
No Operation Power Off
Noise Reduction
Teletext Character Group
West Europe
2 Press ¥ or and select OPTION.
Off
3 Press or and select LOCAL LOCK.
4 Press .
20
180
5 Press or to select the desired setting.
On
6 Press to save the settings.
If a deactivated key is pressed the message
TV Key will appear
Move OK: Select MENU: Previous EXIT: Exit
¥
The following settings are available:
Off: No key lock.
Once: The key lock is active until the unit is turned on using the remote control.
Always: The key lock is permanently active.
33
Page 36
Settings
➣
Deactivate Child Lock
To deactivate child lock, proceed as described in chapter “Activate Child Lock” on page33 and select OFF.
Set Characters for Teletext
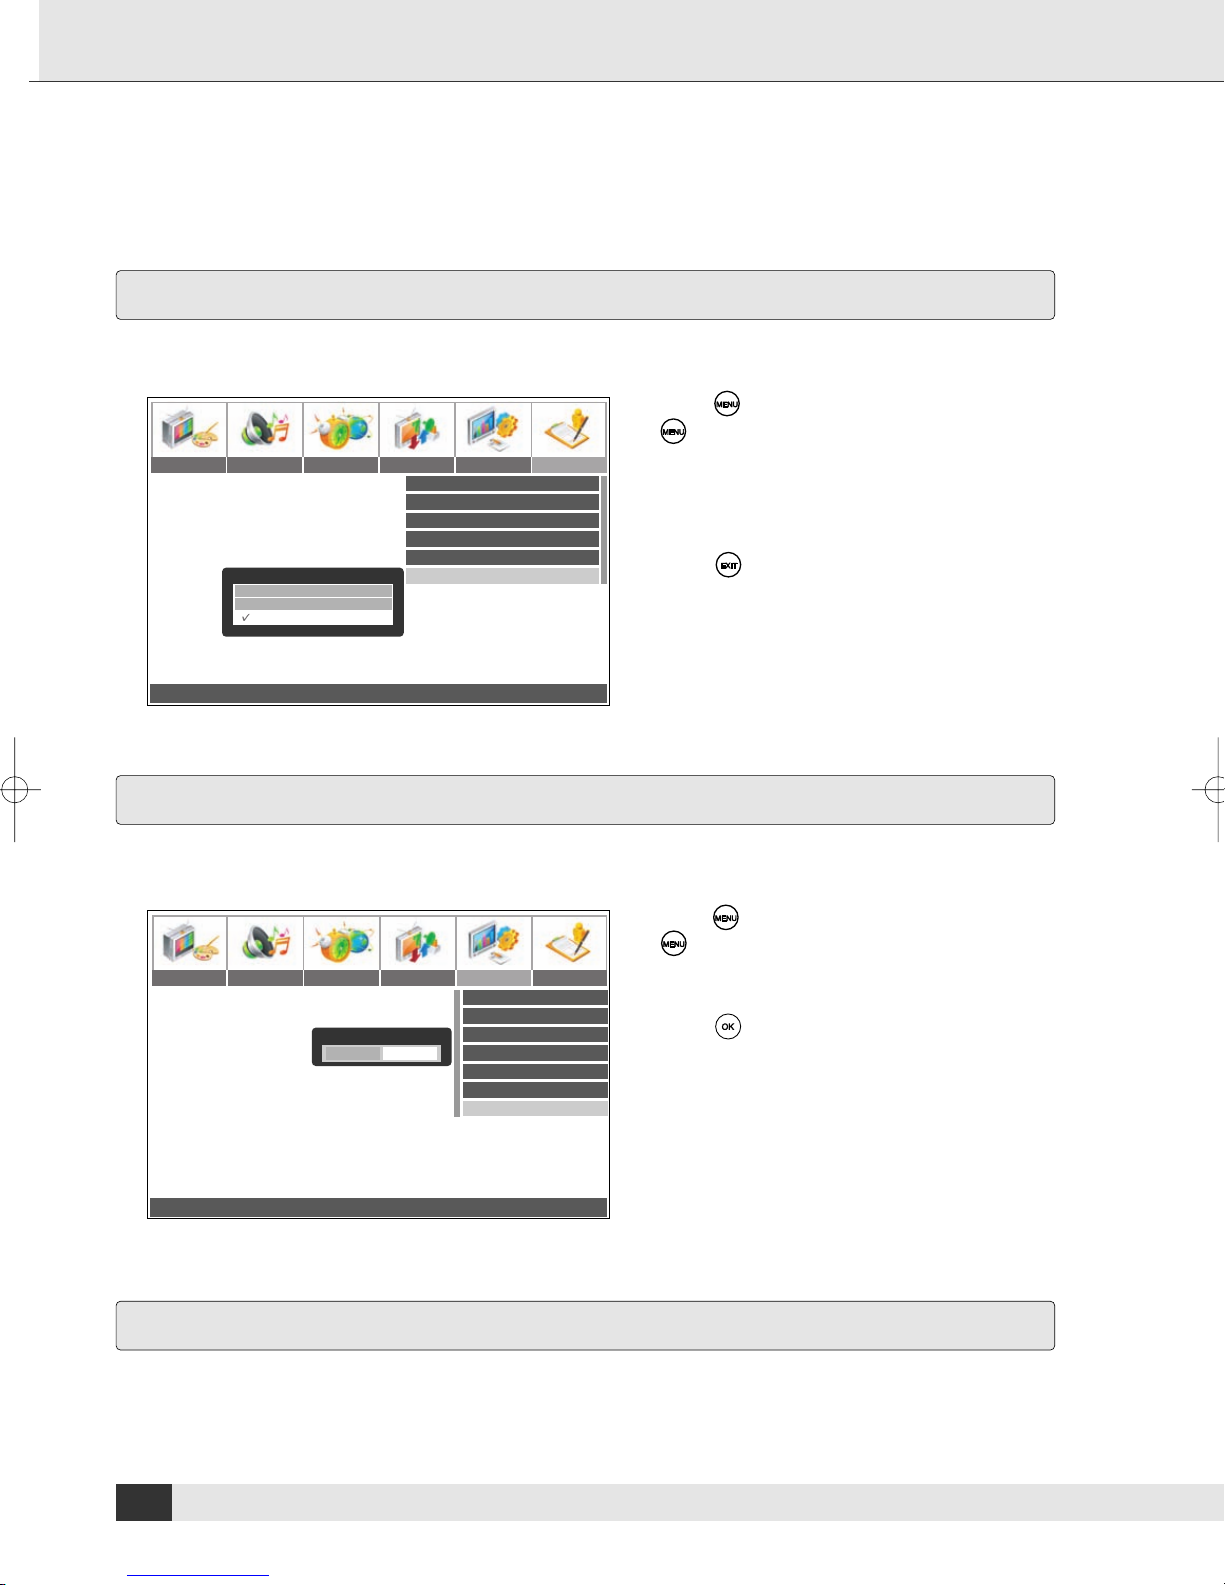
Use this function to set the character set for teletext to your region.
Picture Audio Timer Install Setup Option
Teletext Character Group
West Europe
East Europe
Cyrillic
Local Lock
OSD Setting
No Signal Power Off
No Operation Power Off
Noise Reduction
Teletext Character Group
Off
20
180
On
West Europe
1 Press . To return to the main menu, press
several times.
2 Press ¥ or and select OPTION.
3 Press or and select TELETEXT
CHARACTER GROUP.
4 Press or and select the character set.
5 Press to save the settings.
The following settings are available :
Western Europe, Eastern Europe, Cyrillic
Move OK: Select MENU: Previous EXIT: Exit
¥
Restore Default
Use this function to set all settings you have made back to the default factory setting.
1 Press . To return to the main menu, press
several times.
Picture Audio Timer Install Setup Option
! Warning
Yes No
Position OK: Select MENU: Previous EXIT: Exit
¥
Language
Geometry
Aspect
No WSS
Favourite Channel
PIP Adjustment
Factory Preset
English
2 Press ¥ or and select SETUP.
3 Press or and select FACTORY PRESET.
4 Press .
Auto
5 Press the mains switch on the back of the unit.
Full
Settings for the Computer
If you are using the unit as a monitor for your computer make the applicable settings accordingly. Set the
resolution to 1024 X 768 and the frequency to 60 Hz.
34
Page 37
Watching
Watch Current Television Program
When you switch the unit on, the current television program will be displayed.
Set Volume
1 Press ¥ or to set the desired volume.
➣
Mute
1 Press to switch the sound temporarily off.
3 Press to switch the sound on again.
Watching
English
Change Channel
Press or to scroll through the channels.
➣
Switch to Last Channel
Use this function to toggle between the last two channels you have watched.
1 Press .
➣
Show Channel Information
Use this function to display the current station name and the channel.
1 Press .
2 Press again to hide the information.
35
Page 38
Watching
Recall a Favourite Channel
Use this function to scroll through the channels or sources you have stored as your favourite stations. This way
you do not need to scroll through all the stations, if you only want to watch specific subjects. On how to store
channels as your favourites see: “Channel Groups” on page 23.
1 Press .
2 Press repeatedly until you select the desired channel.
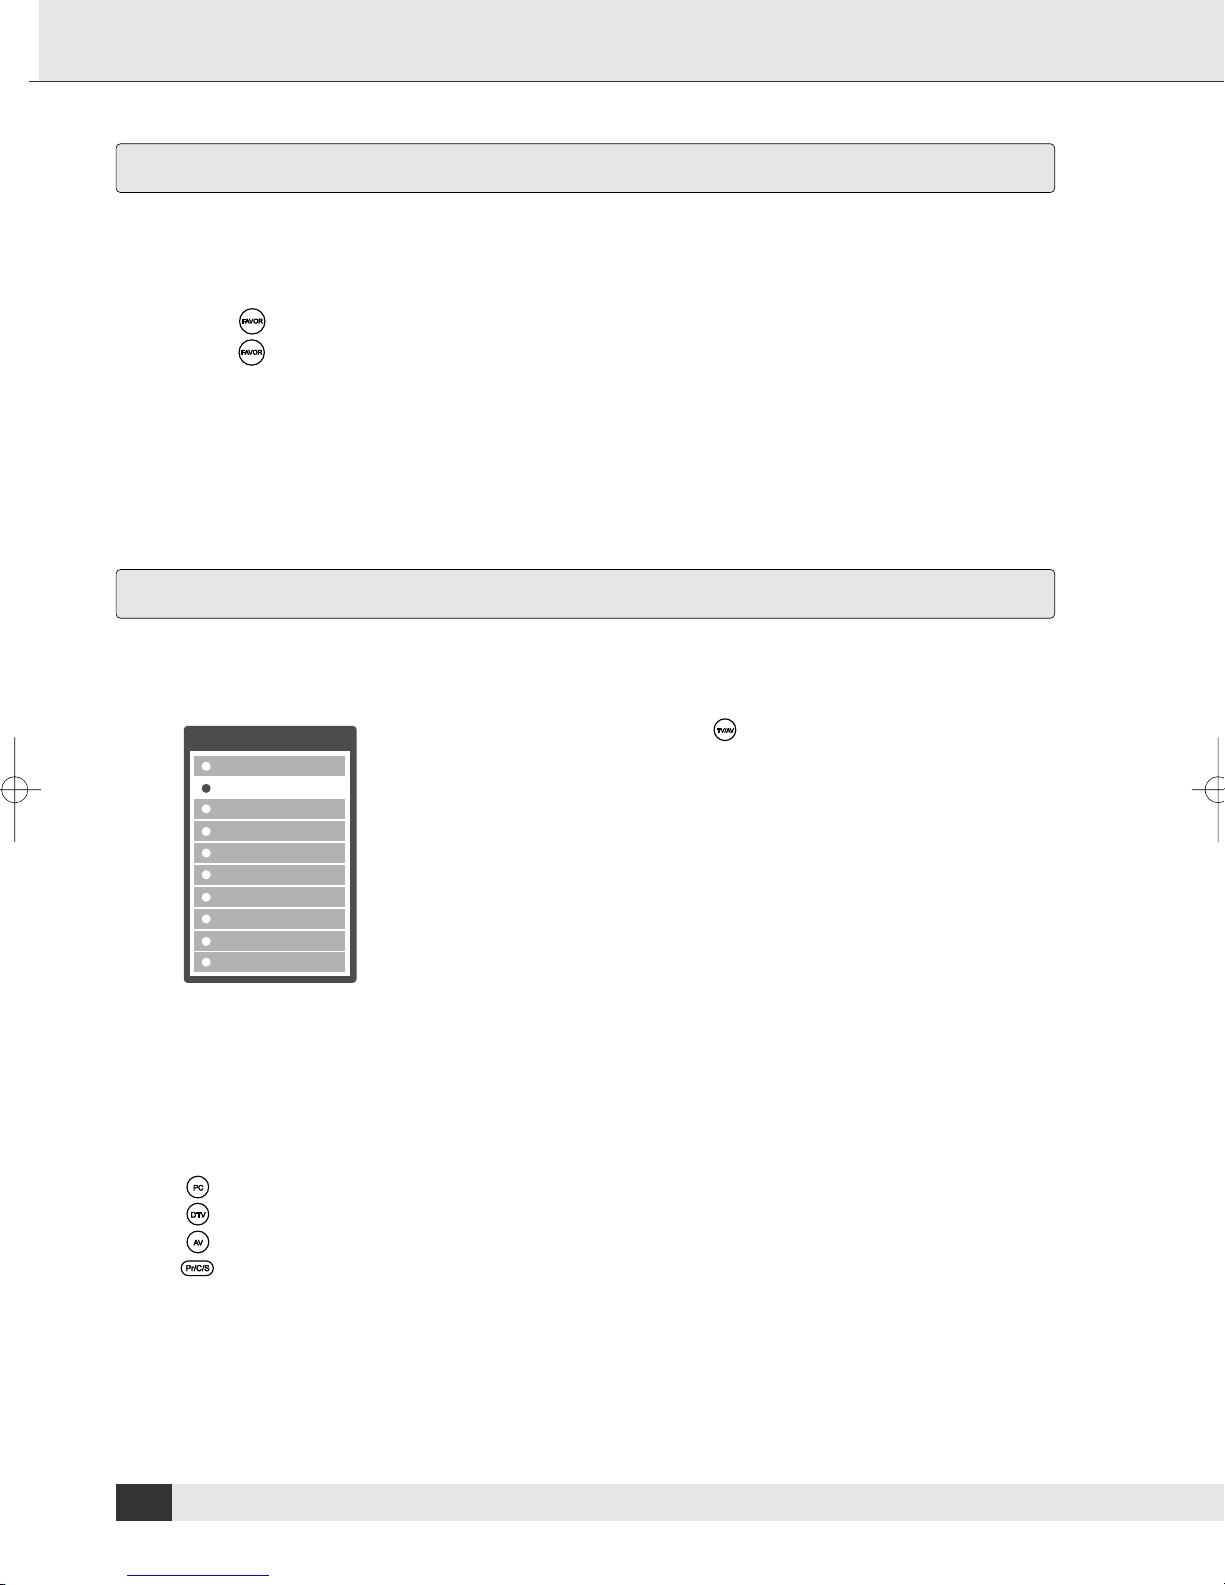
Select Source
Use this function to select which signal will be displayed on the main screen, if you have connected several
sources (e.g. a decoder and a roof aerial).
Input Selection
1. TV
2. SCART1 VIDEO
3. SCART2 VIDEO
4. Video
5. S-Video
6. Component1
7. Component2
8. RGB
9. HDMI
0. HDMI2
➣
Select Input
Use this function to switch directly between the different input channels. For this, press the keys below.
: Selects a RGB, HDMI or HDMI2 input .
: Selects a component input.
: Selects a SCART or AV input.
: Selects a TV.
1 Press .
36
Page 39
Watching
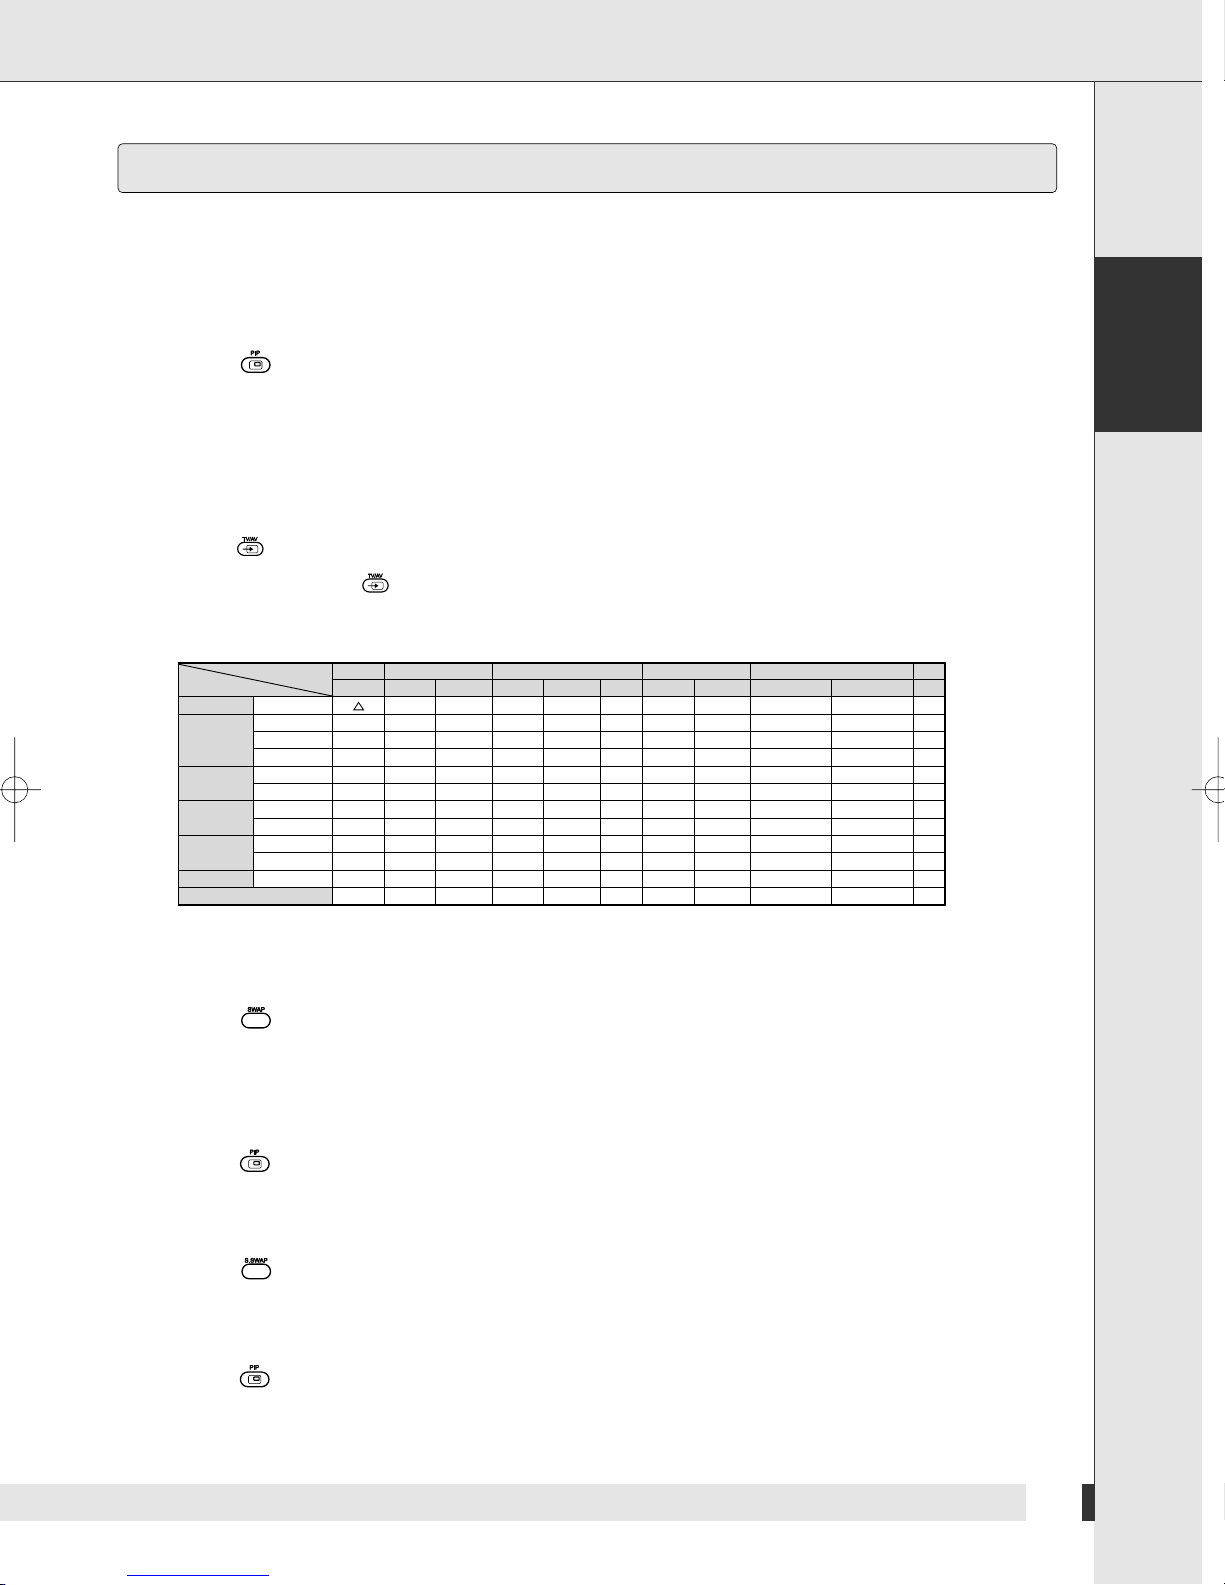
Watch Two Programs at the Same Time (PIP )
Use this function to display a second picture. This way you can watch two programs you are receiving by antenna
or by the other inputs at the same time. You can display on large and one small picture or two pictures of the same
size. You can adapt the size and the position of the small picture.
➣
Display Second Picture
1 Press .
➣
Select Signal Source for PIP
Use this function to select which signal to display on the sub screen, if you have connected several
sources.
1 Press .
Whenever you press , you can choose the external signal source excluding the chosen signal source
on the main picture.
English
PIP
TUNER SCART1 Input SCART2 Input AV2 Input Component Input
Main
TUNER
SCART1
Input
SCART2
Input
AV2
Input
Component
Input
PC
HDMI
PIP
Main
VIDEO
S-VIDEO
RGB
VIDEO
S-VIDEO
VIDEO
S-VIDEO
Component1
Component2
RGB
SUB VIDEO S-VIDEO VIDEO S-VIDEO VIDEO S-VIDEO Component1 Component2RGB
*1
O
O
O
O
X
X
O
X
O
X
O
O
O
O
O
O
O
O
O
O
O
O
O
O
O
O
O
O
X
O
X
O
O
X
O
X
O
O
O
O
O
O
O
O
O
O
O
O
O
O
O
O
O
O
O
X
X
X
X
O
O
O
O
O
O
O
O
O
O
O
O
O
O
O
O
O
O
O
O
O
O
O
O
X
O
O
X
O
O
O
O
O
O
O
O
O
O
O
O
O
O
O
O
X
O
O
O
( *1 : 2 Tuner model only )
➣
Toggle between Two Pictures
1 Press .
This function is only available if you have selected a signal source for the main screen and the sub screen.
➣
Switch Second Picture Off
1 Press several times.
PC
RGB
O
O
O
O
O
O
O
O
O
O
O
O
O
O
O
O
O
O
X
O
O
X
O
O
➣
Toggle Sound between Main Screen and Sub Screen
1 Press .
➣
Display Two Pictures at the same Time
1 Press several times.
This function is only available if you have selected a signal source for the main screen and the sub screen.
37
Page 40
Watching
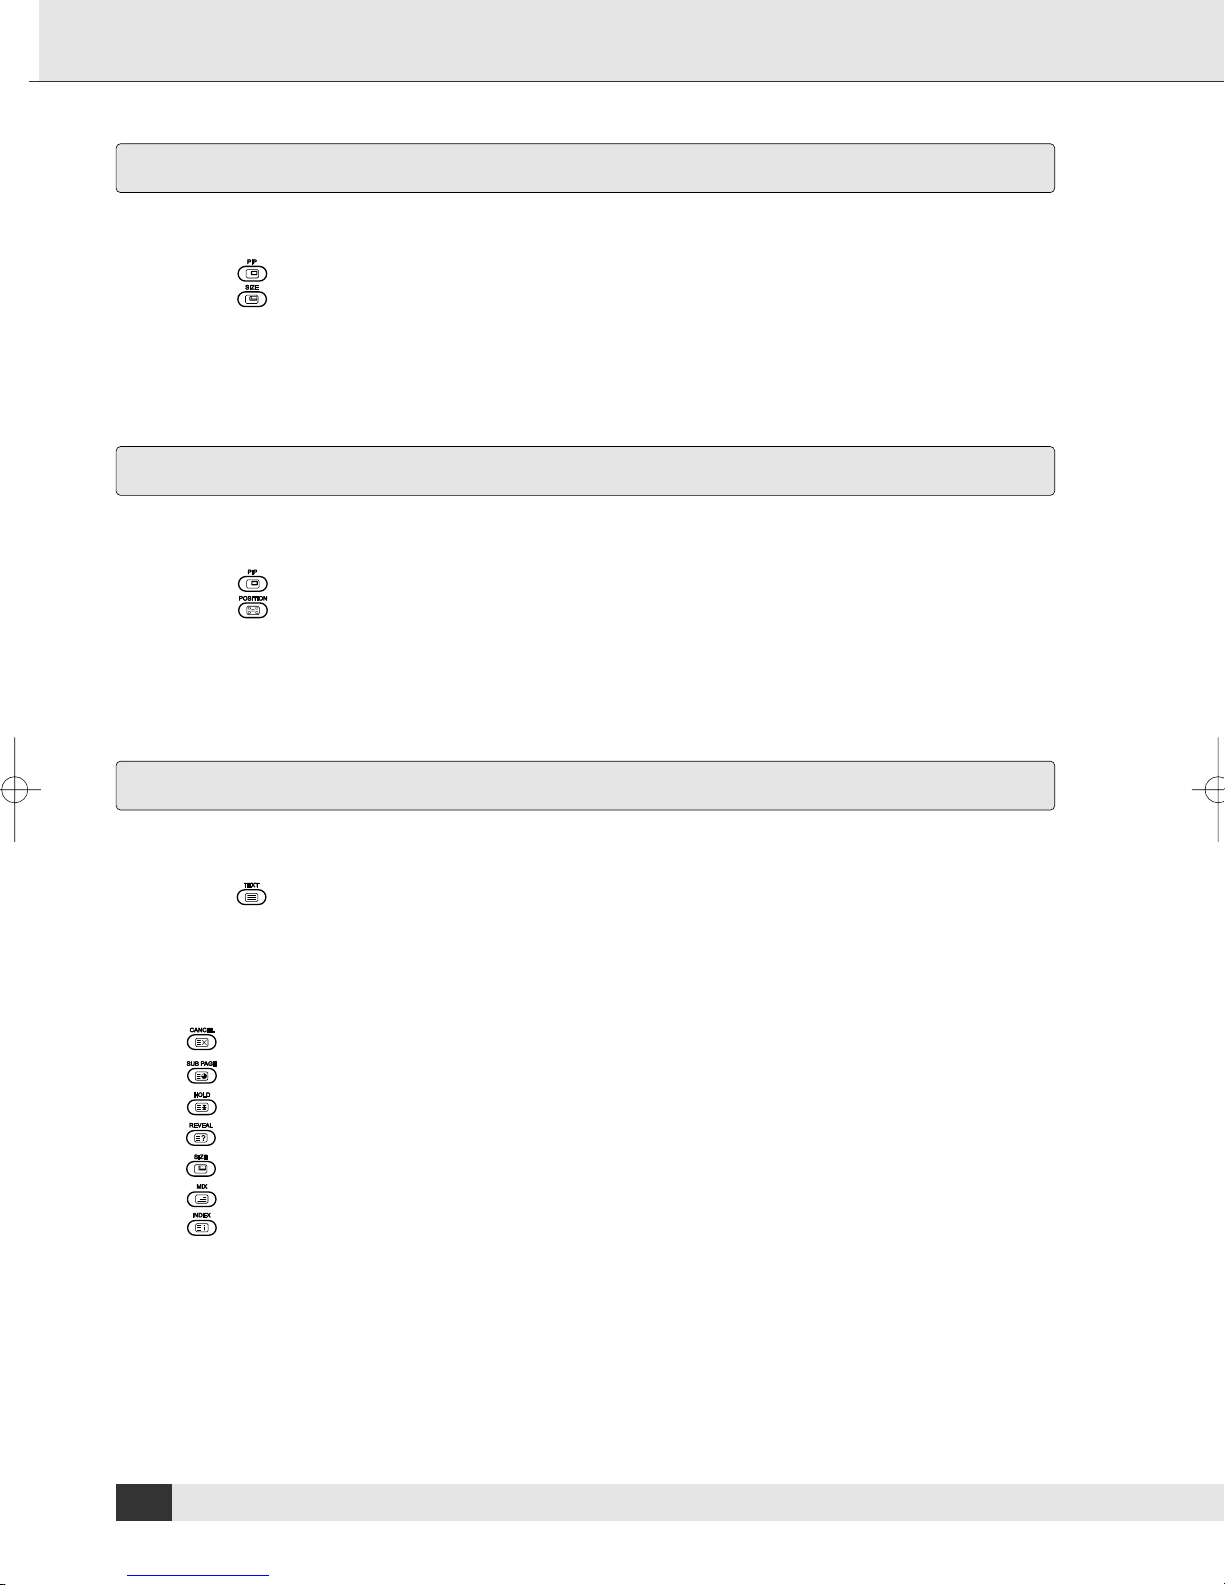
Set Picture-in-Picture Size
Use this function to set the size of the small picture.
1 Press .
2 Press .
3 Press or ¥ or or and select the desired size.
You can also adjust this setting in the menu OPTIONS.
Set Picture-in-Picture Position
Use this function to set where the sub screen will be displayed.
1 Press .
2 Press .
3 Press or ¥ or or and select the desired size.
You can also adjust this setting in the menu OPTIONS.
Teletext
This function is only available if the current station broadcasts teletext.
1 Press to display teletext.
Teletext is not available for PIP.
The following settings are available:
: Cancels the current function.
: Opens a sub page (if available). Enter the number of the sub page using the key pad.
: Interrupts the display of several sequential pages. To continue the display, press the key again.
: Shows hidden text (e.g. solutions in quiz shows).
: Increases/decreases the display. Press the key several times to scroll thorough the different sizes.
: Shows teletext on a transparent background.
: Shows the index page of teletext.
38
Page 41
Still Picture
Use this function to hold the picture.
1 Press .
During the display of the still picture the sound will continue to play.
2 Press again to continue watching.
Show Time
Use this function to display the time. If teletext is displayed, the time will not be shown.
1 Press .
2 Press again to hide the time.
Watching
English
Set Sleep Time
Use this function to set after how many minutes the unit will switch off.
1 Press until the desired number of minutes is displayed.
Set Picture Mode while Watching.
Use this function to adjust the picture optimally to the content.
1 Press until the desired mode is displayed.
For further information on the settings refer to: “Set Picture Mode” on page 25.
Adjust Picture Size while Watching
Use this function to set the picture size.
1 Press until the desired size is displayed.
For further information on the settings refer to: “Set Aspect Ratio” on page 24.
39
Page 42
Watching
Set Sound Effect while Watching
Use this function to set the sound effects.
1 Press .
2 Press again to switch the sound effect off.
For further information on the settings refer to: “Adjust Medium and Low Frequencies” on page 28.
Set Sound while Watching
Use this function to adjust the sound optimally to the content.
1 Press until the desired mode is displayed.
For further information on the settings refer to: “Adjust Individual Audio Frequencies” on page 28.
Set Stereo/Mono while Watching
Use this function to turn the stereo sound on or off.
1 Press .
The displays/controls the processing and output of the audio signal. When power is switched on, the
mode is automatically preset to stereo or dual, depending on the current transmission.
For further information on the settings refer to: “Sound Settings” on page 21.
40
Page 43
Cleaning and Troubleshooting
Cleaning and Troubleshooting
Cleaning
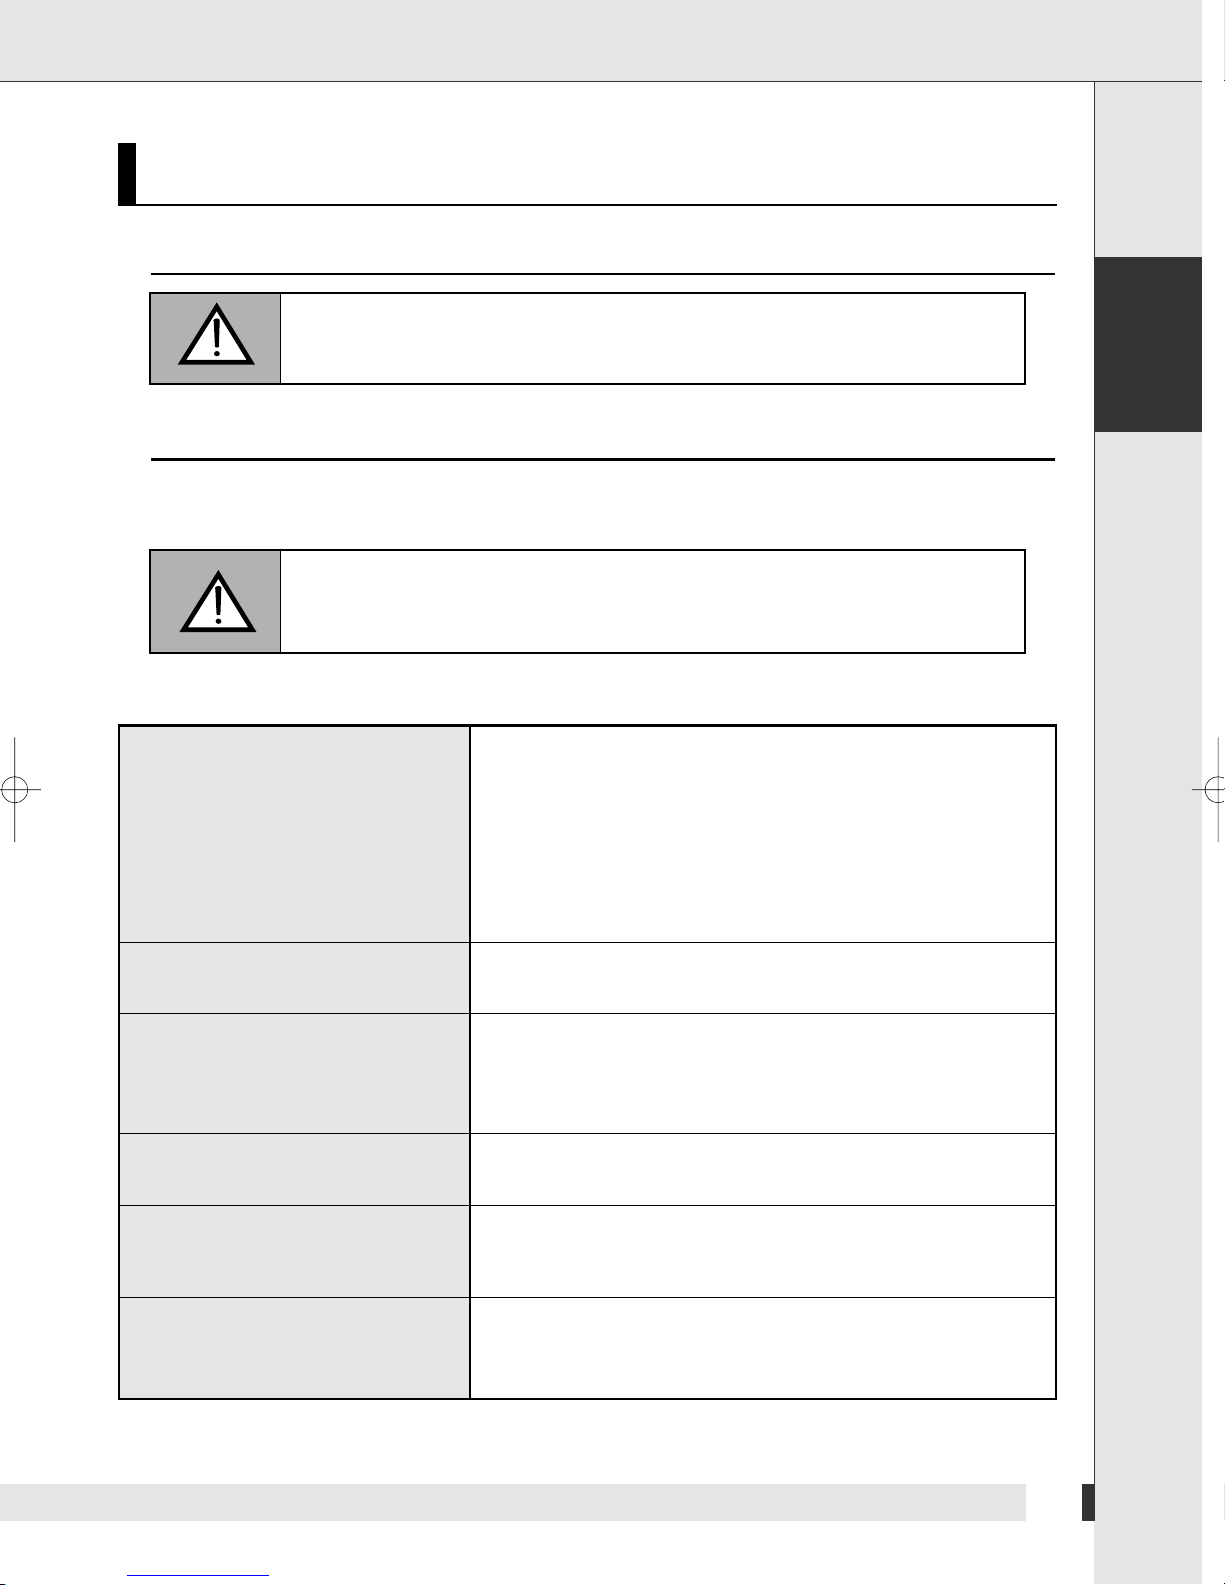
Use a dry cloth to clean the unit. Never use water, cleaning detergents or
spray cleaners.
Troubleshooting
If there are problems with the unit, please check the following points before contacting the technical service.
Never open the unit. This may lead to electric shocks and will void the warranty.
English
No Picture or Sound
Black Screen
Picture OK but no Sound
Poor Sound
No Picture on Some Channels
Unstable, Poor Picture
Make sure the receiver and the TV set are both connected to the
mains and switched on.
Check whether the antenna cable is in proper condition and if it is
connected to the respective sockets. See chapter “Connecting a
Satellite Receiver, a Set Top Box or a Video Recorder” on page 9,
“Connecting to Cable Reception” on page 11 or “Connecting to
the Roof Aerial” on page 10. If you are using a SCART cable, check
whether it is properly connected.
Check whether a signal source is selected. See chapter “Select
Source” on page 36 and “Select Input” on page 36.
Check wether the sound is set to mute or if it is turned down.
See chapter “Set Volume” on page 35.
Check if the sound is ok on another channel. If this is the case, the
program is broadcast improperly.
Switch between stereo and mono sound.
See chapter “Set Stereo/Mono while Watching” on page 40.
Check if the channel has been tuned to a station.
See chapter “Tuning” on page 17.
Adjust the fine tuning. See chapter “Fine Tuning” on page 20.
Adjust the fine tuning. See chapter “Fine Tuning” on page 20.
Check if strong electromagnetic fields, e.g. caused by electric devices
nearby cause the impairments.
41
Page 44
Cleaning and Troubleshooting
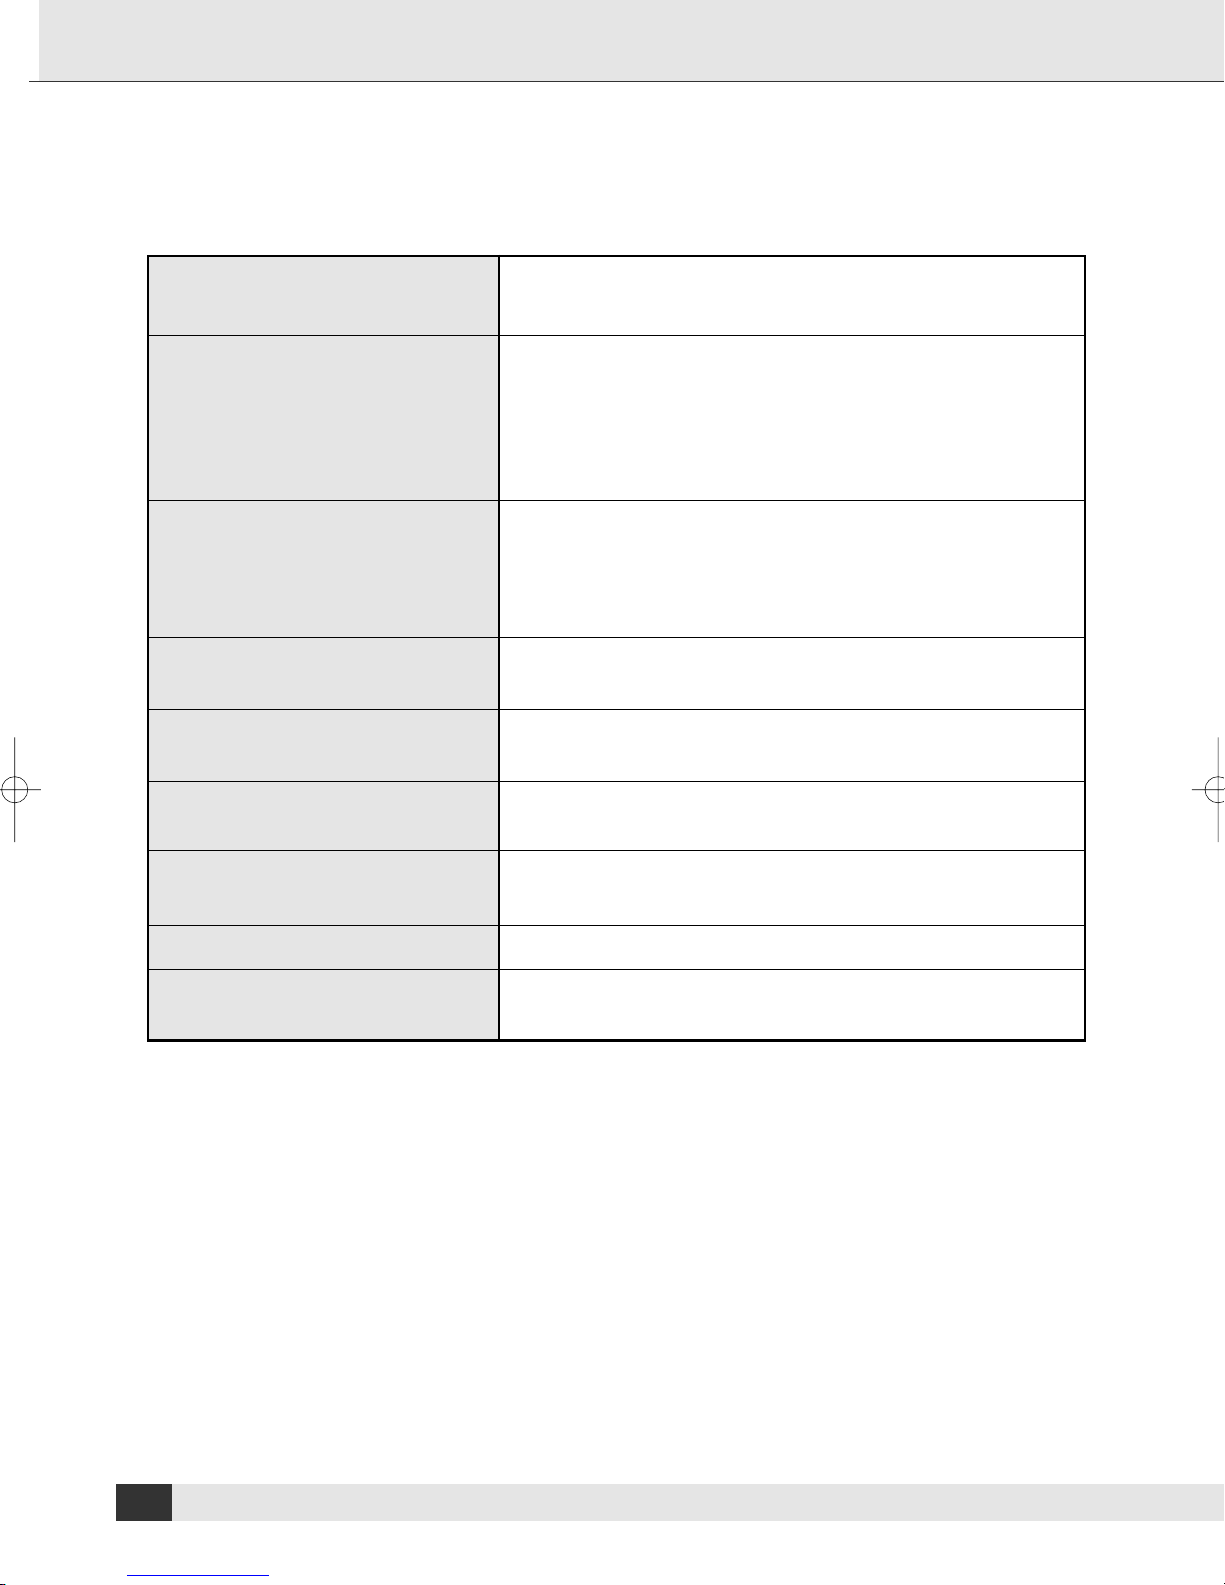
Some Channels Display Black and
White
Snow on one or Several Channels
Remote Control Does Not Work
Message "No Signal "
Message "Video not Supported"
Picture Scrolls Vertically
Check if other channels display colours. If yes, the program is broadcast in black and white. Adjust the colour settings.
Check whether the antenna cable is in proper condition and if it is
connected to the respective sockets. See chapter “Connecting a
Satellite Receiver, a Set Top Box or a Video Recorder” on page 9,
“Connecting to Cable Reception” on page 11 or “Connecting to the
Roof Aerial” on page 10.
Adjust the fine tuning. See chapter “Fine Tuning” on page 20.
Make sure the unit is connected to the mains.
Check whether the batteries are inserted correctly and whether they
are sufficiently charged. To do this, insert new batteries for testing.
Check whether a function key for another device has been activated.
See chapter “Restore Default” on page 34.
Check wether the connecting cable is properly connected to the
computer and the respective sockets.
The resolution or the frequency of the graphic board in the computer
cannot be displayed. Change the settings in the computer.
Check wether the connecting cable is properly connected to the
computer and the respective sockets.
Parts of the Picture are not
Displayed
Picture Too Small or Too Large
Horizontal or Vertical Bars
Check the resolution and the frequency of the graphic board in the
computer. Adjust the settings. See chapter “Settings” on page 16.
Adjust the settings. See chapter “Settings” on page 16.
Adjust the settings of the computer. See chapter “Settings for the
Computer” on page 34.
42
Page 45
Technical specifications
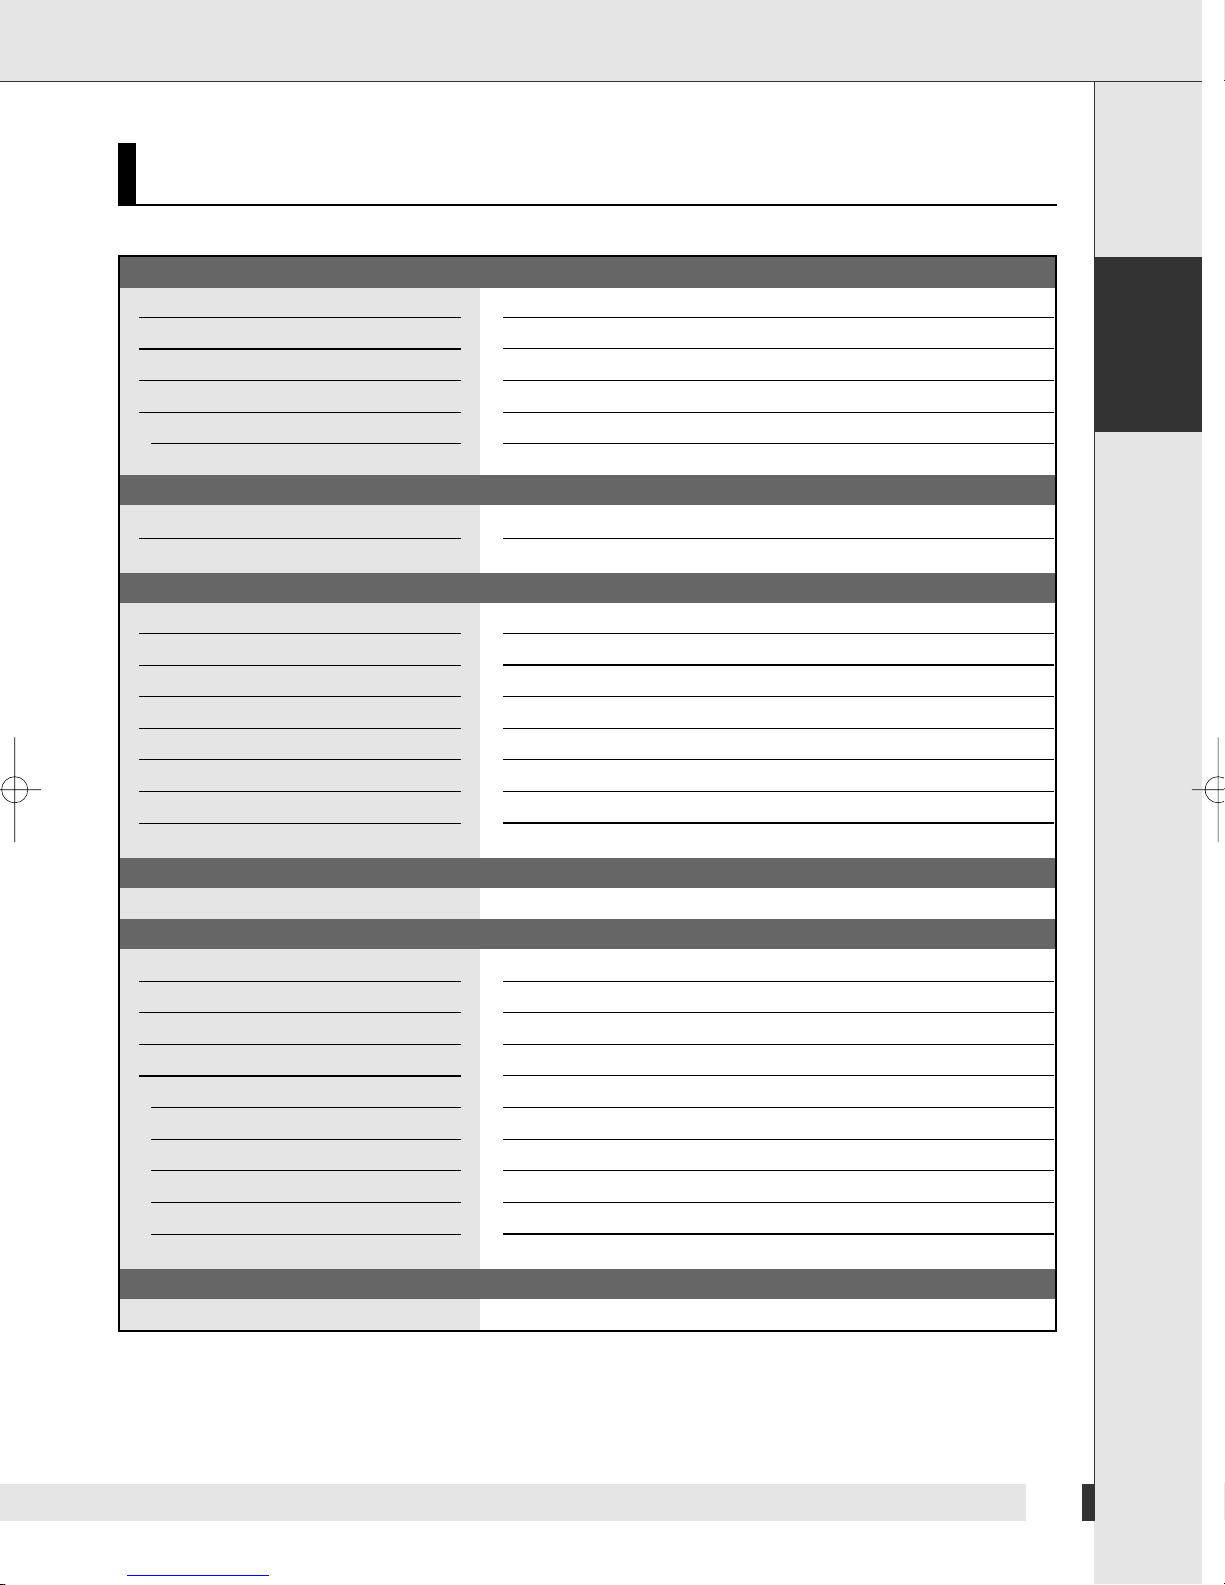
General
Input voltage
Operating temperature
Environment temperature
Remote control
Type
Battery
LCD
Pixel
Type
Video
Frequency
Colour system
Sound system
Video system
Teletext
DiR Engine
3D Auto DNR
Comb Filter
Component Input
Y/Pb/Pr
SCART
Video input
Audio input
RGB input
PC
Synchronization
Colour display
Resolution Max.
Input signal
Synchronization H/V separated
AC 220-240 V~, 50 Hz
5 C° to 40 C°
-20 C° to +60 C°
Infrared
Type R03 1.5 V Size AAA
1366 x RGB x 768
a-Si TFT active matrix
UHF/VHF 75 ohm
PAL/SECAM/AV/NTSC
BG, D/K, I, L, L’, M
CVBS, S-Video
4000 pages
Optional
Yes
3D digital
Component 1/2; 480i/p, 576i/p, 720p, 1080i
1,0 Vp-p @ 75 ohm
500 mV RMS
0,7 Vp-p @ 75 ohm
30~61 kHz horizontal
56~75 Hz vertical
16,7 M (true)
1360 x 768
RGB
Positive or negative
Technical specifications
English
HDMI
HDMI
Ver. 1. 1
43
Page 46
Memo
44
Page 47
Memo
English
45
Page 48
Memo
46
 Loading...