

UView Combustion Leak Tester User Manual

COMBUSTION LEAK TESTER INSTRUCTIONS
COMBUSTION LEAK TESTER INSTRUCTIONS
Designed to check for leaks between Combustion Chamber and
Cooling System of water-cooled engines.
•
WARNING!
Hot coolant can cause severe burns.
• Pressurized system can leak.
Wear safety goggles (user and bystanders).
Use in well ventilated area.
Do not breathe coolant vapors.
Read and follow instructions.
Pressurized leaks and breathing vapors can cause injury.
HOW THE LEAK TESTER WORKS
Combustion gas, when it enters the cooling system through any leak, accumulates in the air
cushion above the radiator coolant level (in sealed coolant systems, this air cushion must be
created by lowering the coolant level about an inch and a half). The Leak Tester analyzes
this air: The blue fluid turns yellow when CO
diesel engines. The double-chamber feature of the Leak Tester assures a high level of accuracy.
Conventional detection methods often give incorrect readings because alkaline particles present in the
air cushion can cause false indications of a combustion leak. Alkaline particles are absorbed by the
Leak Tester's first chamber, which acts as a filter, allowing only air and CO2 to reach the second,
upper chamber. If the blue fluid in this upper chamber turns yellow or green, it is proof positive that
there is a combustion gas (CO2) leak into the coolant.
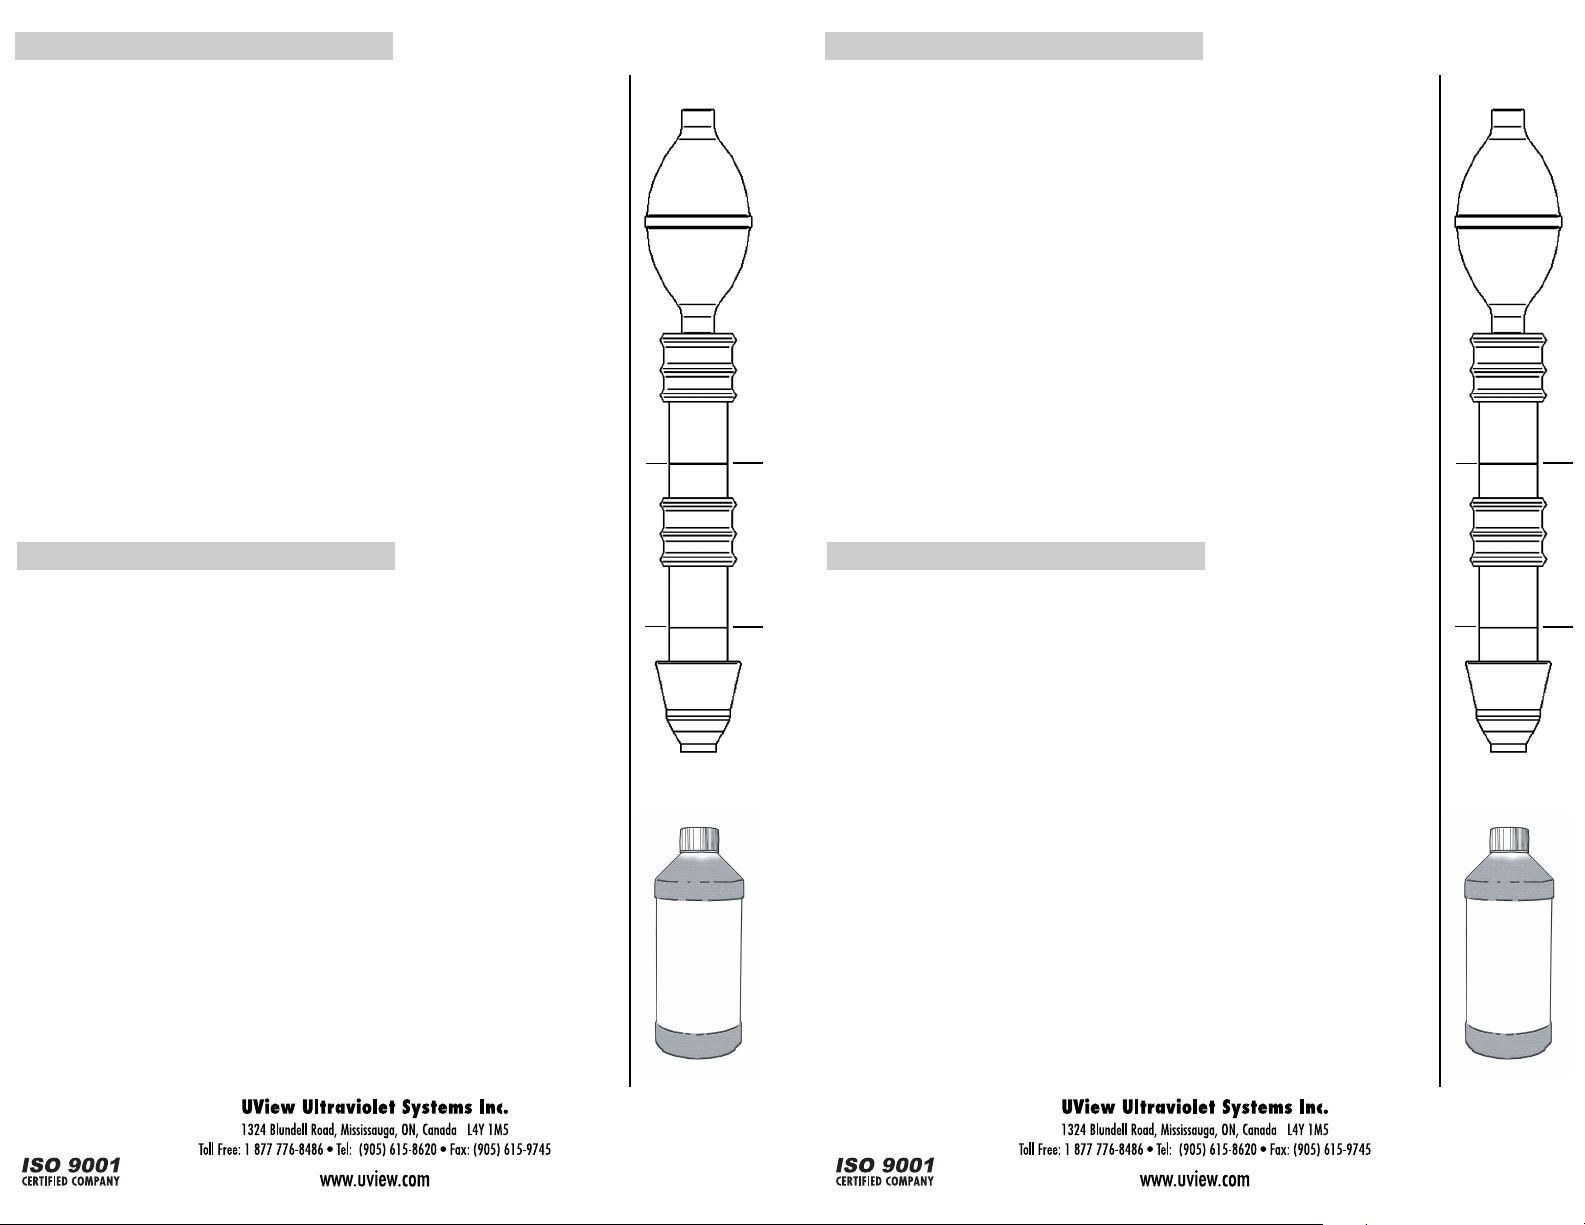
PREPARE THE LEAK TESTER FOR USE
Pull the three segments apart using a firm, twisting motion. Fill each of the two chambers up to the
fill line (1/2 oz.) with fresh blue Leak Tester fluid and reassemble, while keeping the hole in the rubber
intake end plugged with a finger. The fluid is not hazardous: it is non-toxic, non-flammable and
contains no acid. It will stain clothes. Stains should be washed immediately and not allowed to dry.
(CAUTION: The fluid may irritate skin and eyes; affected areas should be washed thoroughly with tap
water immediately after contact).
TO TEST THE LEAK TESTER FLUID
Test the tool and fluid by exhaling into a cupped hand and sucking the exhaled air through the intake
hole into the two chambers by squeezing the rubber bulb two or three times, holding the Leak Tester
in a vertical position. (CAUTION: Do not put the rubber intake end in your mouth).
Do not use exhaust gasses or smoke from cigarettes or matches, etc... for this test, as this could
contaminate the test fluid. If the fluid fails to turn yellow or green it should be replaced and the
chambers washed thoroughly with clean water.
IMPORTANT: Do not wipe dry. Do not use soap or detergent, as these can contaminate the fluid.
TO USE THE LEAK TESTER
There are two basic types of tests that can be performed: The “routine maintenance” test and the
“major leak” test. Always start with the “routine maintenance” procedure. The “major leak” test is
required only when a leak is detected. Because of the high sensitivity of the Leak Tester fluid, even
the smallest leak can be detected, even hours after it has occurred. The “routine maintenance” test
can be performed with the engine running or just after it has been turned off.
STORAGE
Store the Leak Tester fluid at room temperature. Both fluid and chambers must be kept clean.
If the fluid becomes contaminated or fails the sensitivity test (see above) it must be discarded
and replaced with fresh fluid after the chambers have been thoroughly cleaned with fresh water.
gas is detected in gasoline engines and green in
2
Hot antifreeze/coolant under pressure.
Wear safety shield and protective
clothing (user and bystanders).
Do not open system when hot.
Hot, pressurized antifreeze/coolant
can cause injury.
Keep self and tools clear of
moving parts.
Moving components can cause injury.
Designed to check for leaks between Combustion Chamber and
Cooling System of water-cooled engines.
WARNING!
Hot coolant can cause severe burns.
• Pressurized system can leak.
Wear safety goggles (user and bystanders).
Use in well ventilated area.
Do not breathe coolant vapors.
Read and follow instructions.
Pressurized leaks and breathing vapors can cause injury.
HOW THE LEAK TESTER WORKS
Combustion gas, when it enters the cooling system through any leak, accumulates in the air
cushion above the radiator coolant level (in sealed coolant systems, this air cushion must be
created by lowering the coolant level about an inch and a half). The Leak Tester analyzes
this air: The blue fluid turns yellow when CO
diesel engines. The double-chamber feature of the Leak Tester assures a high level of accuracy.
Conventional detection methods often give incorrect readings because alkaline particles present in the
air cushion can cause false indications of a combustion leak. Alkaline particles are absorbed by the
Leak Tester's first chamber, which acts as a filter, allowing only air and CO2 to reach the second,
upper chamber. If the blue fluid in this upper chamber turns yellow or green, it is proof positive that
there is a combustion gas (CO2) leak into the coolant.
PREPARE THE LEAK TESTER FOR USE
Pull the three segments apart using a firm, twisting motion. Fill each of the two chambers up to the
fill line (1/2 oz.) with fresh blue Leak Tester fluid and reassemble, while keeping the hole in the rubber
intake end plugged with a finger. The fluid is not hazardous: it is non-toxic, non-flammable and
contains no acid. It will stain clothes. Stains should be washed immediately and not allowed to dry.
(CAUTION: The fluid may irritate skin and eyes; affected areas should be washed thoroughly with tap
water immediately after contact).
TO TEST THE LEAK TESTER FLUID
Test the tool and fluid by exhaling into a cupped hand and sucking the exhaled air through the intake
hole into the two chambers by squeezing the rubber bulb two or three times, holding the Leak Tester
in a vertical position. (CAUTION: Do not put the rubber intake end in your mouth).
Do not use exhaust gasses or smoke from cigarettes or matches, etc... for this test, as this could
contaminate the test fluid. If the fluid fails to turn yellow or green it should be replaced and the
chambers washed thoroughly with clean water.
IMPORTANT: Do not wipe dry. Do not use soap or detergent, as these can contaminate the fluid.
TO USE THE LEAK TESTER
There are two basic types of tests that can be performed: The “routine maintenance” test and the
“major leak” test. Always start with the “routine maintenance” procedure. The “major leak” test is
required only when a leak is detected. Because of the high sensitivity of the Leak Tester fluid, even
the smallest leak can be detected, even hours after it has occurred. The “routine maintenance” test
can be performed with the engine running or just after it has been turned off.
STORAGE
Store the Leak Tester fluid at room temperature. Both fluid and chambers must be kept clean.
If the fluid becomes contaminated or fails the sensitivity test (see above) it must be discarded
and replaced with fresh fluid after the chambers have been thoroughly cleaned with fresh water.
gas is detected in gasoline engines and green in
2
•
Hot antifreeze/coolant under pressure.
Wear safety shield and protective
clothing (user and bystanders).
Do not open system when hot.
Hot, pressurized antifreeze/coolant
can cause injury.
Keep self and tools clear of
moving parts.
Moving components can cause injury.
“ROUTINE MAINTENANCE” TEST
1. Open the radiator cap (CAUTION: Be extremely careful
if engine is hot, let it cool sufficiently to avoid burns).
Determine whether there is sufficient air in the top of the
radiator (approximately 1.5 inches) so that the rubber intake end can seat
against the inside of the radiator filler neck without touching the coolant.
If it is necessary to drain some coolant from the radiator, run the engine for
a few minutes before proceeding with the test.
IMPORTANT: Avoid sucking coolant into the Leak Tester – it will contaminate
the fluid.
2. After opening the radiator cap and checking (and correcting) the coolant level,
insert the rubber intake end of the Leak Tester into the radiator filler neck.
3. Squeeze the rubber bulb completely and slowly about 3-5 times for gasoline
(5-10 times for diesel), sucking the air up through the two fluid-filled chambers.
As the air bubbles up through the fluid, it will cause a chemical reaction if
combustion gas is present which will change the color of the blue fluid to yellow
for gasoline (green for diesel).
IMPORTANT: It is the upper fluid chamber which will give the correct reading.
If the fluid in the upper chamber remains blue, no combustion gas has escaped
into the coolant and there is no leak. Since this “routine maintenance” procedure
will reveal even small leaks which may not require immediately attention, it is
suggested that a second, “major leak” test be made if the first test is positive.
“MAJOR LEAK” TEST
1. With the engine off and the radiator cap open, fill the radiator with coolant to
the top of the filler neck.
2. The new coolant will displace the stale air which has already given a positive
reading. Now remove the excess coolant to restore the air cushion as described
in step 1 of the “routine maintenance” test.
3. You are now ready to take the reading for the “major leak” test. While you hold
the Leak Tester in position in the radiator filler neck, have an assistant start the
engine and accelerate approximately 15 times. After each acceleration, allow
the engine to slow to idle for a few seconds before speeding up again. This
procedure creates high combustion pressure in the engine by simulating an
actual driving cycle. During this procedure, squeeze the rubber bulb about
15 times.
Fill
Line
Fill
Line
Top
Chamber
Bottom
Chamber
1/2 oz.
1/2 oz.
4. Watch the fluid in the upper chamber of the Leak Tester as you perform the
above test. If it turns yellow for gasoline (green for diesel), you have confirmed
that combustion gas has leaked into the coolant within a very short time, meaning
there is a serious leak that requires immediate attention.
Note: Although in most cases the leak will be caused by a faulty head gasket,
it may be the result of a cracked, warped and corroded head and/or block, or another
problem. The cause must be determined by a competent professional mechanic.
Contact your distributor to order additional Tester Fluid, Parts and/or additional Tools
Replacement
Tester Fluid
16 oz./480 ml
bottle
560500
#99081870 Rev.0-0
Made in Canada
 Loading...