

Page 1

TABLE OF CONTENTS
CHAPTER 1. GETTING STARTED
FINDING YOUR PHONE’S SERIAL NUMBER.....................................................................................................6
INSTALLING THE BATTERY..............................................................................................................................7
CHARGING THE BATTERY...............................................................................................................................8
POWER CONNECTION..........................................................................................................................................................8
ACTIVATING YOUR VIRGIN MOBILE ACCOUNT..............................................................................................9
PROGRAMMING YOUR PHONE ....................................................................................................................10
GETTING TO KNOW YOUR PHONE................................................................................................................11
TURNING THE PHONE ON..................................................................................................................................................15
TURNING THE PHONE OFF.................................................................................................................................................15
MY PHONE #......................................................................................................................................................................16
TTY.....................................................................................................................................................................................16
PHONE INFO.......................................................................................................................................................................17
NAVIGATING THROUGH MENUS..................................................................................................................19
CHAPTER 2. MY ACCOUNT
MY ACCOUNT...............................................................................................................................................22
CHECKING YOUR ACCOUNT BALANCE..............................................................................................................................22
TOP-UP YOUR ACCOUNT...................................................................................................................................................22
TOP-UP WITH A TOP-UP CARD ..........................................................................................................................................23
TOP-UP WITH A DEBIT CARD, CREDIT CARD, OR PAYPAL ACCOUNT................................................................................23
FOR MORE INFORMATION.................................................................................................................................................24
CHAPTER 3. MAKING AND RECEIVING CALLS
MAKING AND RECEIVING CALLS..................................................................................................................26
MAKING A CALL.................................................................................................................................................................26
ANSWERING CALLS............................................................................................................................................................26
SPEAKERPHONE.................................................................................................................................................................27
HARD/2.SEC PAUSE FEATURE............................................................................................................................................27
CALLER ID FUNCTION........................................................................................................................................................27
CALL WAITING FUNCTION.................................................................................................................................................28
ADJUSTING VOLUME.........................................................................................................................................................28
KEYGUARD.........................................................................................................................................................................28
1
Page 2

TABLE OF CONTENTS
ONE-TOUCH/TWO-TOUCH DIALING...................................................................................................................................29
RECENT CALLS LIST-INCOMING CALLS..............................................................................................................................29
RECENT CALLS LIST-OUTGOING CALLS..............................................................................................................................30
RECENT CALLS LIST-MISSED CALLS....................................................................................................................................31
RECENT CALLS LIST-ALL CALLS..........................................................................................................................................31
VOICEMAIL.........................................................................................................................................................................32
CALL TIMER........................................................................................................................................................................32
911 IN LOCK MODE............................................................................................................................................................33
911 USING ANY AVAILABLE SYSTEM.................................................................................................................................33
DURING A CALL............................................................................................................................................34
MUTE.................................................................................................................................................................................34
RECENT CALLS...................................................................................................................................................................34
CONTACTS.........................................................................................................................................................................34
MESSAGING.......................................................................................................................................................................34
LOCATION..........................................................................................................................................................................34
CHAPTER 4. ENTERING LETTERS, NUMBERS, SYMBOLS
ENTERING LETTERS, NUMBERS, SYMBOLS...................................................................................................36
ALPHABET INPUT MODE....................................................................................................................................................36
T9 INPUT MODE.................................................................................................................................................................37
NUMBER MODE.................................................................................................................................................................38
SYMBOL MODE..................................................................................................................................................................38
AUTO TEXT.........................................................................................................................................................................38
EMOTICON.........................................................................................................................................................................38
CHAPTER 5. STORING CONTACTS
STORING CONTACTS.....................................................................................................................................40
ADD NEW...........................................................................................................................................................................41
FIND NAME........................................................................................................................................................................41
GROUPS.............................................................................................................................................................................42
SPEED DIAL........................................................................................................................................................................43
2
Page 3

TABLE OF CONTENTS
CHAPTER 6. MESSAGING
MESSAGING..................................................................................................................................................46
SEND A TEXT MESSAGE.....................................................................................................................................................46
INBOX................................................................................................................................................................................47
SENT...................................................................................................................................................................................47
SAVED................................................................................................................................................................................48
ERASE MSGS......................................................................................................................................................................48
MSG SETTINGS...................................................................................................................................................................49
VIRGIN ALERTS ..................................................................................................................................................................52
CHAPTER 7. VIRGINXL
VIRGINXL......................................................................................................................................................54
CHAPTER 8. MY STUFF
MY STUFF .....................................................................................................................................................56
MY RINGTONES .................................................................................................................................................................56
MY GAMES ........................................................................................................................................................................56
MY OTHER STUFF...............................................................................................................................................................57
MY GRAPHICS....................................................................................................................................................................58
CHAPTER 9. CUSTOMIZING YOUR PHONE
CUSTOMIZING YOUR PHONE........................................................................................................................60
SOUNDS.............................................................................................................................................................................60
DISPLAY.............................................................................................................................................................................71
MESSAGING.......................................................................................................................................................................75
CALL OPTIONS ...................................................................................................................................................................79
GAME SETTINGS................................................................................................................................................................80
SECURITY...........................................................................................................................................................................81
OTHER................................................................................................................................................................................83
CHAPTER 10. USING TOOLS
USING TOOLS................................................................................................................................................86
CALCULATOR.....................................................................................................................................................................86
3
Page 4

TABLE OF CONTENTS
ALARM CLOCK...................................................................................................................................................................87
SCHEDULER........................................................................................................................................................................88
STOPWATCH ......................................................................................................................................................................89
WORLD TIME......................................................................................................................................................................89
CHAPTER 11. GETTING HELP
GETTING HELP..............................................................................................................................................92
CUSTOMER SUPPORT.........................................................................................................................................................92
CHAPTER 12. WARRANTY
WARRANTY...................................................................................................................................................94
MANUFACTURER’S WARRANTY ........................................................................................................................................94
CHAPTER 13. SAFETY
SAFETY..........................................................................................................................................................98
SAFETY INFORMATION FOR WIRELESS HANDHELD PHONES.............................................................................................98
SAFETY INFORMATION FOR FCC RF EXPOSURE ..............................................................................................................100
SAR INFORMATION..........................................................................................................................................................101
FDA CONSUMER UPDATE................................................................................................................................................102
EMERGENCY CALLS....................................................................................................................................................... 108
COMPLIANCE WITH OTHER FCC REGULATIONS..............................................................................................................109
GENERAL SAFETY.............................................................................................................................................................110
ANTENNA.........................................................................................................................................................................110
BATTERY..........................................................................................................................................................................111
ADAPTER/CHARGER.........................................................................................................................................................112
RECYCLE YOUR CELL PHONE!..........................................................................................................................................113
4
Page 5

CHAPTER 1 GETTING STARTED
CHAPTER 1
GETTING STARTED
This chapter provides important information about
using your phone including:
Finding Your Phone’s Serial Number
Installing the Battery
Charging the Battery
Activating Your Virgin Mobile Account
Programming Your Phone
Getting to Know Your Phone
Navigating through Menus
Caring for the Battery
5
Page 6
FINDING YOUR PHONE’S SERIAL NUMBER
To activate your Virgin Mobile account, you need your phone’s serial number. To locate the
number:
1.
Make sure your phone is turned off.
2.
Hold the phone face down.
3.
Using your thumb, press down on the battery cover and push it off the phone.
4.
If necessary, remove the battery by pulling up on the bottom edge of the battery.
5.
The ESN is located just below the second barcode inside the back of the phone .
6.
Write down the ESN.
7.
Replace the battery.
6
Page 7

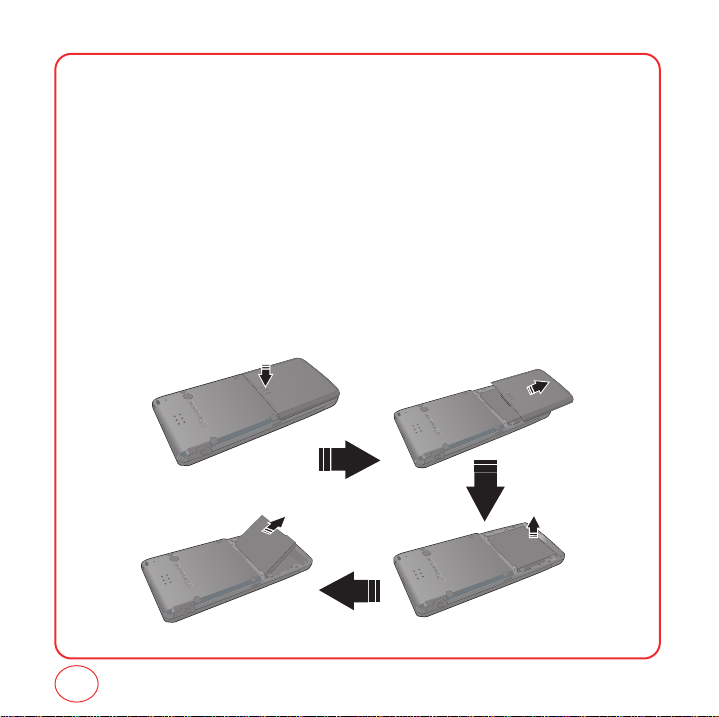
INSTALLING THE BATTERY
1.
Place the battery (label side up) on the back of the phone so the metal contacts match up on
the battery and in the battery cavity.
2.
Push the battery down into the battery cavity until it locks into place.
3.
Place the battery cover over the battery and slide up into place.
Battery
900 mAh Lithium Ion
Talk Time Standby Time
Up to 270 min Up to 230 hours
7
Page 8
CHARGING THE BATTERY
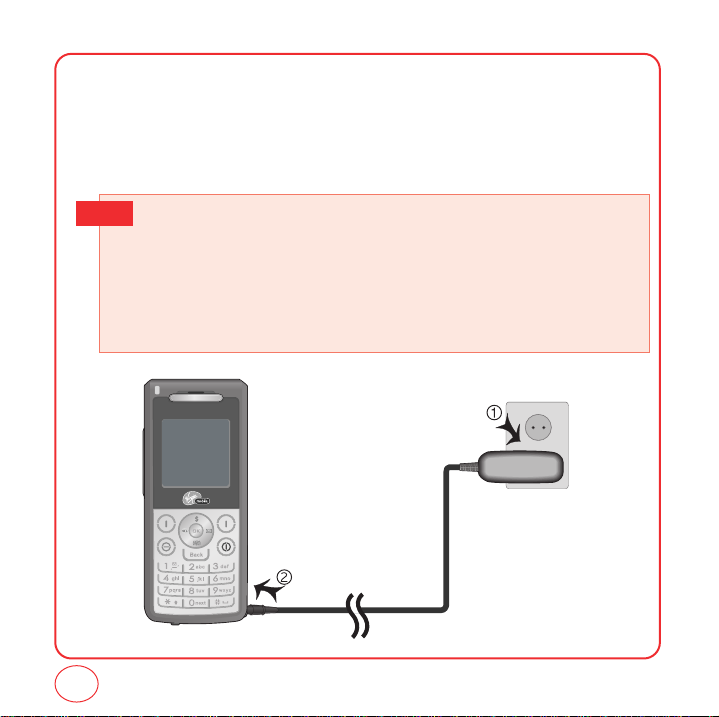
POWER CONNECTION
1.
Plug the AC Charger into a standard outlet.
2.
Plug the other end of the AC Charger into your phone. Make sure the battery is securely in
place.
• When you charge the battery with the phone power off, youwill see a charging status screen.
Tip
You cannot operate the phone until it is powered on.
• The battery is not charged at the time of purchase.
• Fully charge the battery before use.
• It is more efficient to charge the battery with the handset powered off.
• The battery must be connected to the phone in order to charge it.
• Battery operating time gradually decreases over time.
• If the battery fails to perform normally, you may need to replace the battery.
8
Page 9

ACTIVATING YOUR VIRGIN MOBILE ACCOUNT
Before you can start talking, messaging, or downloading, you need to activate service with Virgin
Mobile. You need your phone’s ESN to activate your Virgin Mobile account (see “Finding Your
Phone’s Serial Number on Page 6). Activate your account online by going to
www.virginmobileusa.com and clicking on Activate. Or call Virgin Mobile at 1-888-322-1122.
9
Page 10
PROGRAMMING YOUR PHONE
Once your account is activated, you will receive MDN (your Virgin Mobile phone number) and MSID
(your network ID) numbers. These are used to program your phone. When you are ready, follow
these steps to program your phone:
1.
Turn on your phone and wait for it to power up.
2.
Using the keypad, dial ##VIRGIN (that's #-#-8-4-7-4-4-6) and press .
3.
Select Edit by highlighting that option with the and pressing [OK].
4.
Enter your 10-digit MDN. Any numbers that are initially on the screen will automatically be
overwritten when you begin to enter your MDN.
5.
Use the to select Done.
6.
Enter your 10-digit MSID (you can leave off any extra zeros at the beginning). Any numbers
that are initially on the screen will automatically be overwritten when you begin to enter your
MSID.
7.
Select Done via the .
8.
Select Done by highlighting that option with the and pressing [OK].
9.
The phone will display a message saying that your programming is complete. The phone will
turn off and back on by itself.
• That’s it – You're done!. It might take a couple of hours to get you set up on our network, but we
will send a text message to your phone to let you know you can start talking. Also, it may
take up to 4 hours for VirginXL, voicemail, and Top-Up features to come online.
10
Page 11
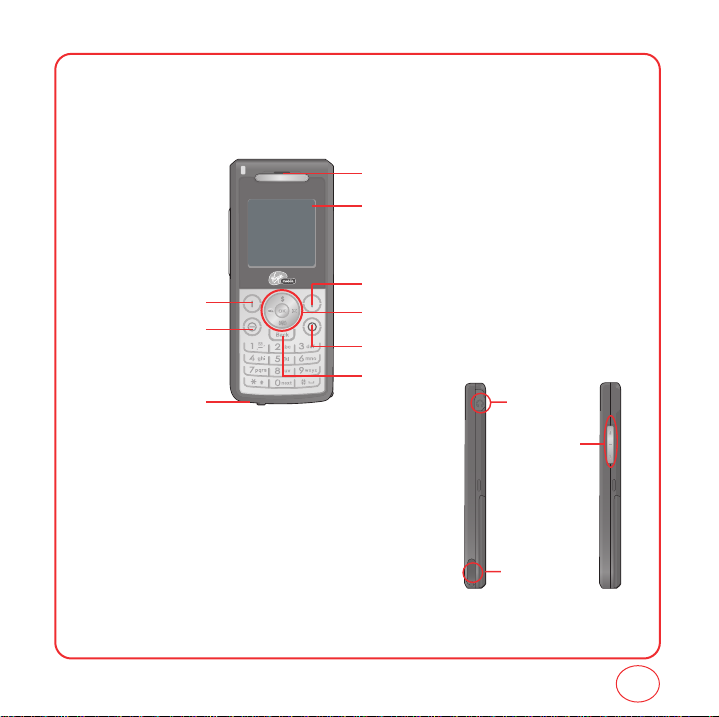
GETTING TO KNOW YOUR PHONE
Your Slice weighs 3.2 ounces. The dimensions are 3.5"x 1.9"x .8".
Earpiece
Color STN Display
Left Option Button
SEND Key
Microphone
Right Option Button
Navigation and OK Key
END/POWER Key
Clear Key
Earjack
Volume Keys
Charging
port
11
Page 12
GETTING TO KNOW YOUR PHONE
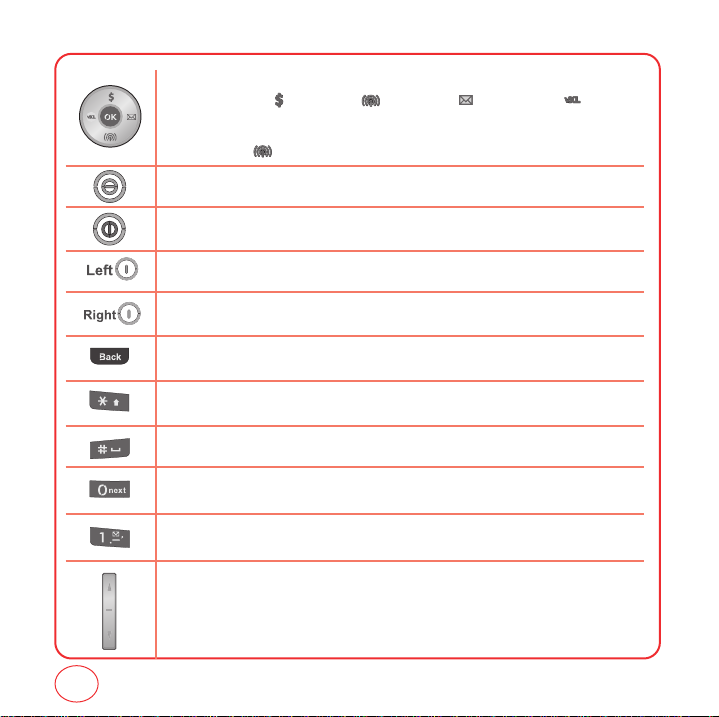
NAVIGATION KEY
In Idle Mode :
Within a Menu :
On a Call :
Send Key
Press to make or receive a call or in idle mode, press to access the Recent Calls list.
End Key
Press to terminate a call or to return to idle mode. Press and hold to turn the phone on/off.
Left Option Button
Press to access the Menu or function displayed at the bottom of the screen.
Right Option Button
Press to access Contacts menu or function displayed at the bottom of the screen.
BACK Key
Press to clear a digit or press and hold to clear all digits from the display. Press to return to the previous page.
Shift Key
Enters the asterisk [*] character for calling features. Press and hold to enter Keyguard mode.
Space Key
In text entry mode, press to accept the word and add a space.
0 Key
In T9 Mode, press to see other word choices.
1 Key
Press and hold to access voicemail.
Side Volume Key
Allows you to adjust the ringtone volume in standby mode or adjust the voice volume during a call.
The volume key can also be used to scroll up or down to navigate through the different menu options.
Press to ignore an incoming call and mute the ringtone.
Press for My Account, for Recent Calls, for Messaging and for VirginXL.
Within a menu, use to scroll through menu options, or to select a function displayed on
the screen.
Press to activate speakerphone mode.
12
Page 13
GETTING TO KNOW YOUR PHONE
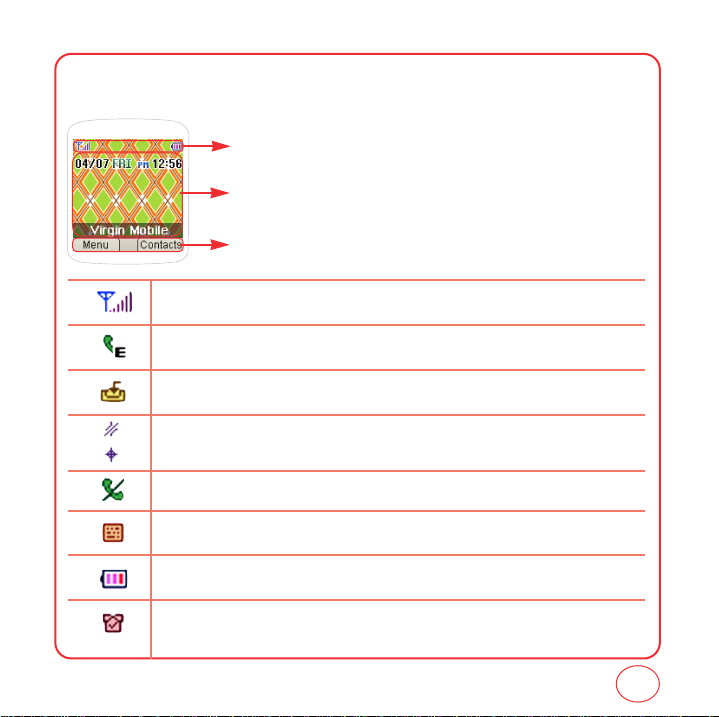
The idle mode display appears when you are not on a call or using the menu. You must be in the
idle mode display to dial a phone number.
Display Indicators
Display various icons.
Text & Graphic area
Option Button Indicators
Shows the functions currently assigned to each Option Button and displays some icons.
Signal Strength
Current signal strength: the more lines, the stronger the signal.
Emergency Call
Blinks when an emergency call is in progress.
Download
Downloading is in progress.
GPS Icon
Indicates the Location Service of your phone is disabled/enabled.
No Service
Indicates the phone cannot receive a signal from the system.
TTY
Indicates your phone is in TTY mode.
Battery
Battery charging level — the more bars, the fuller the charge.
Alarm
Appears when either a calendar or an alarm is set.
13
Page 14
GETTING TO KNOW YOUR PHONE
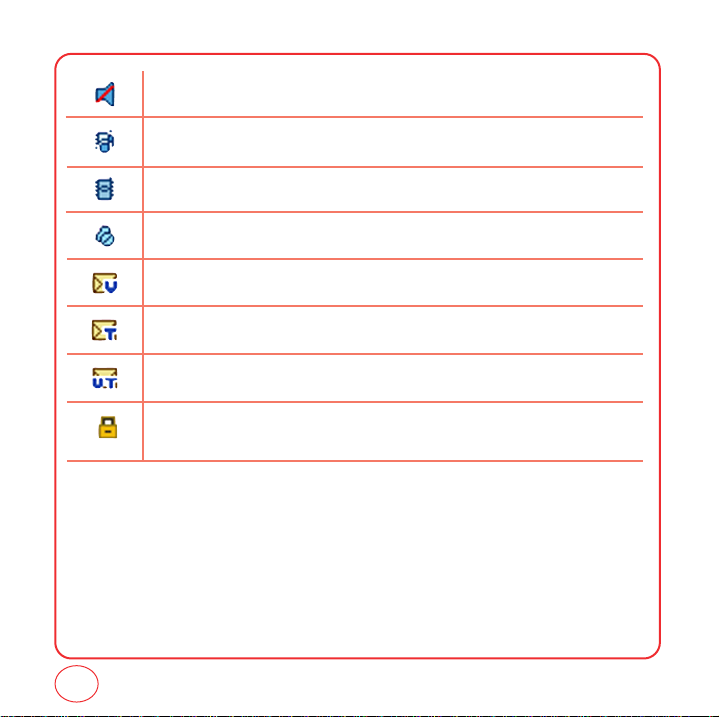
Off
Indicates the ringtone volume is set to off.
Vibrate+Bell Mode
Phone will vibrate and ring to notify you of an incoming call.
Vibrate Only
Phone will vibrate to notify you of an incoming call.
Silence All
All sounds, including ringtone volume, are set to off.
Voicemail
Indicates you have voicemail messages.
New Text Messages
Indicates you have text messages.
New Voice Messages
Indicates you have both text and voicemail messages.
Lock
Phone is locked.
14
Page 15
GETTING TO KNOW YOUR PHONE
TURNING THE PHONE ON
1.
Press and hold until the Virgin Mobile logo appears and the tone sounds.
• If “Password” appears on the display enter your 4-digit password to unlock your phone.
Tip
• The default password is the last 4 digits of your phone number.
TURNING THE PHONE OFF
1.
Press and hold until the phone powers off.
• Immediately change or recharge the battery when “LOW BATTERY!! PHONE IS TURNING OFF!”
Tip
appears on thedisplay. Memory may possibly be damaged if the phone turns offdue to the
battery completely draining.
• Turn the phone off before removing or replacing the battery. If the phone is on, unsaved data
may be lost.
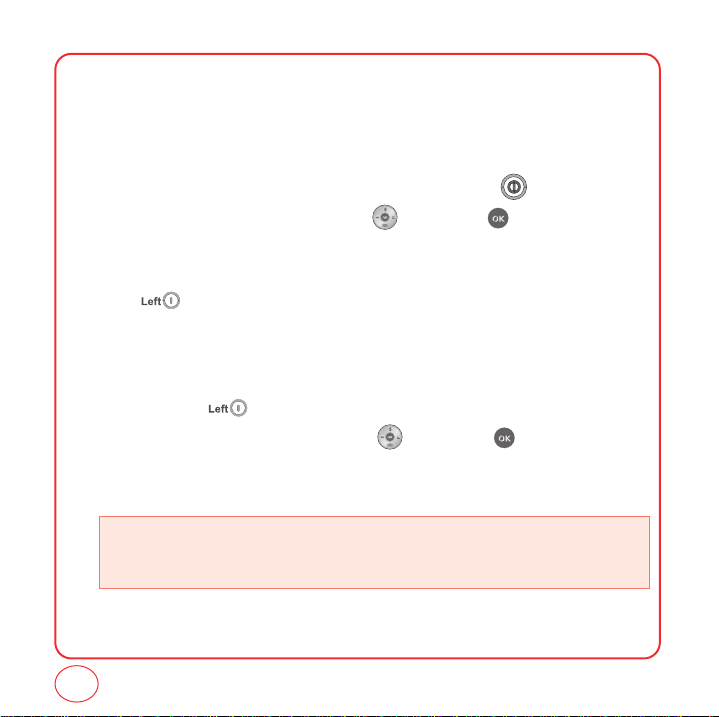
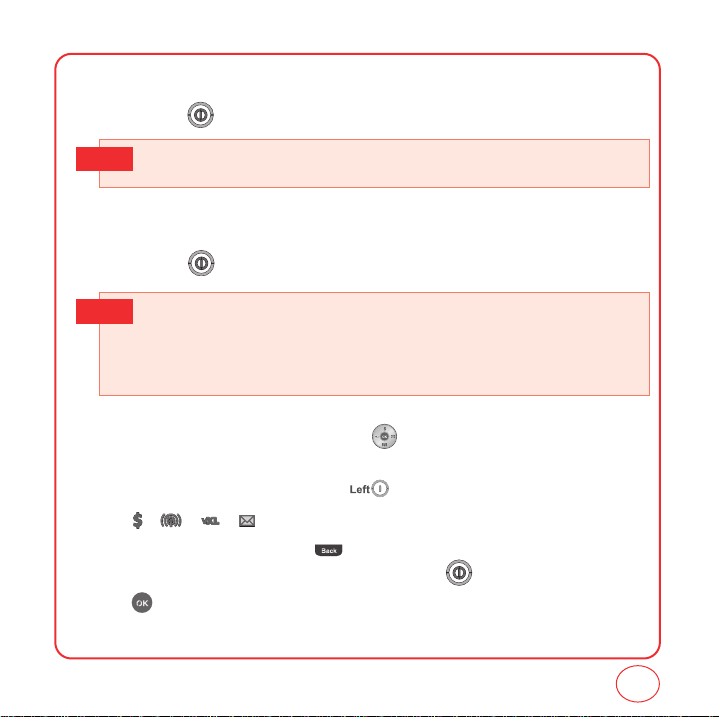
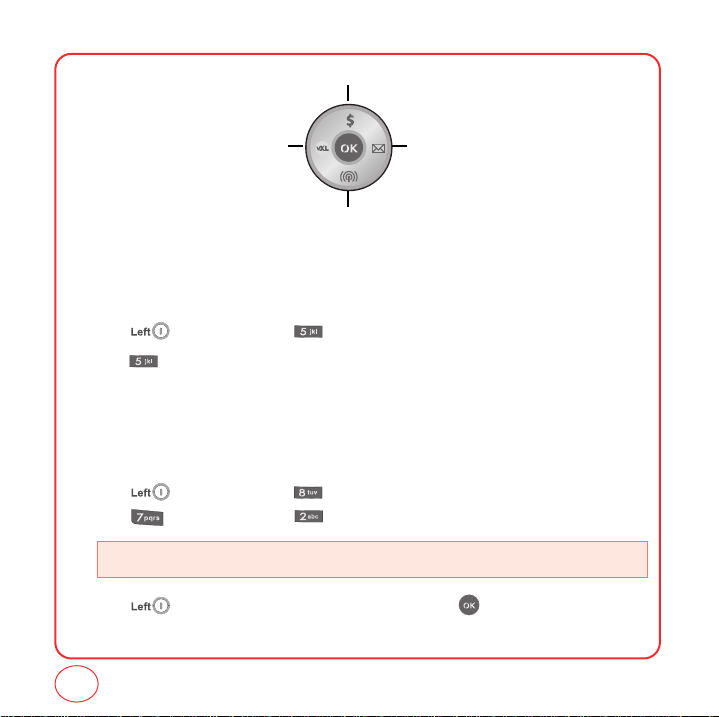
Each function can be accessed by scrolling with the or by pressing the number that
corresponds with the menu item.
1.
To access the menu in the idle mode, press [Menu].
2.
Press / / / to scroll through the 8 menu items.
3.
To return to the previous page, press .
To exit the current menu and return to the idle mode, press .
4.
Press to enter a function when its main page is displayed or press its assigned number to
have direct access to the function.
15
Page 16
GETTING TO KNOW YOUR PHONE
My Account
MessagingVirginXL
Recent Calls
MY PHONE #
Displays your phone number.
1.
Press [Menu], then press "Contacts".
2.
Press "My Phone #". Your phone number will be displayed.
TTY
Your phone is able to operate with a TTY(Teletypewriter) device. This feature is system dependent
and may not be available in all areas.
1.
Press [Menu], then press "Settings".
Press “Other”, then press "TTY".
• Enabling TTY may impair headset use and non- TTY accessory performance.
2.
Press [Next]. Highlight Disable or Enable, then press [Done] to save the setting.
16
Page 17
GETTING TO KNOW YOUR PHONE
PHONE INFO
Displays your phone’s information:
MY MOBILE NUMBER
Displays your phone number.
1.
Press [Menu], then press "Settings".
Press "Phone info", then press "My Mobile Number".
2.
Your phone number is displayed.
S/W VERSION
Displays your phone's software version.
1.
Press [Menu], then press "Settings".
Press "Phone info", then press "S/W version".
2.
Your phone's software version is displayed.
PRL VERSION
Displays your phone's PRL version.
1.
Press [Menu], then press "Settings".
Press "Phone info", then press "PRL version".
2.
Your phone's PRL version is displayed.
17
Page 18
GETTING TO KNOW YOUR PHONE
BROWSER NAME AND VERSION
Displays your phone's Browser Name and version.
1.
Press [Menu], then press "Settings".
Press "Phone info", then press "Browser name and version".
2.
Your phone's Browser Name and version is displayed.
ICON KEY
Displays some of the indicator icons of your phone.
1.
Press [Menu], then press "Settings".
Press "Phone info", then press "Icon key".
2.
Your phone's indicator icons is displayed.
18
Page 19

NAVIGATING THROUGH MENUS
MY ACCOUNT
MESSAGING
1. Send text msg
2. Inbox
3. Virgin Alerts
4. Sent
5. Saved
6. Voicemail
7. Erase msgs
7.1. Inbox
7.2. Sent
7.3. Saved
8. Msg settings
8.1. Sounds
8.2. Groups
8.3. Auto text
8.4. Text entry
8.5. Signature
8.6. Save to Sent folder
8.7. Auto erase
8.7.1. Inbox
8.7.2. Sent
8.8. Notification
8.9. Callback number
VIRGINXL
MY STUFF
1. My ringtones
2. My games
3. My other stuff
3.1. Get more stuff
4. My graphics
CONTACTS
1. Find name
2. Add new
3. Groups
4. Speed dial
5. My phone #
RECENT CALLS
1. Incoming calls
2. Outgoing calls
3. Missed calls
4. Recent calls
5. Call timer
TOOLS
1. Calculator
1.1. Std calculator
1.2. Tip calculator
2. Alarm clock
3. Scheduler
4. Stopwatch
5. World time
SETTINGS
1. Sounds
1.1. Ringtones
1.1.1. Voice call
1.1.2. Messaging
1.1.3. Voicemail
1.1.4. Alarms
19
Page 20

NAVIGATING THROUGH MENUS
1.2. Volume
1.2.1. Ringtone
1.2.2. Speakerphone
1.2.3. Headset
1.2.4. Advanced
1.3. Alert sounds
1.3.1. One minute
1.3.2. Connect tone
1.4. Key beeps
1.5. Tone length
2.Display
2.1. Graphics
2.1.1. Wallpaper
2.1.2. Time set
2.1.3. Screensaver
2.2. Menu style
2.3. Greeting banner
2.4. Contrast
2.5. Backlight
2.5.1. LCD
2.5.2. Keypad
3. Messaging
3.1. Sounds
3.2. Groups
3.3. Auto text
3.4. Text entry
3.5. Signature
1.2.4.1. Messaging
1.2.4.2. Voicemail
1.2.4.3. Alarms
1.2.4.4. Applications
1.2.4.5. Power up/down
3.6. Save to Sent folder
3.7. Auto erase
3.7.1. Inbox
3.7.2. Sent
3.8. Notification
3.9. Callback number
4. Call options
4.1. Call answer
4.2. Auto answer
5. Game settings
5.1. Backlight
5.2. Volume
6. Security
6.1. Lock phone
6.2. Change lock code
6.3. Special numbers
6.4. Erase contacts
6.5. Erase downloads
7. Other
7.1. Location
7.2. TTY
8. Phone Info
8.1. My Mobile Number
8.2. S/W version
8.3. PRL version
8.4. Browser name and version
8.5. Icon key
20
Page 21

CHAPTER 2 MY ACCOUNT
CHAPTER 2
MY ACCOUNT
21
Page 22
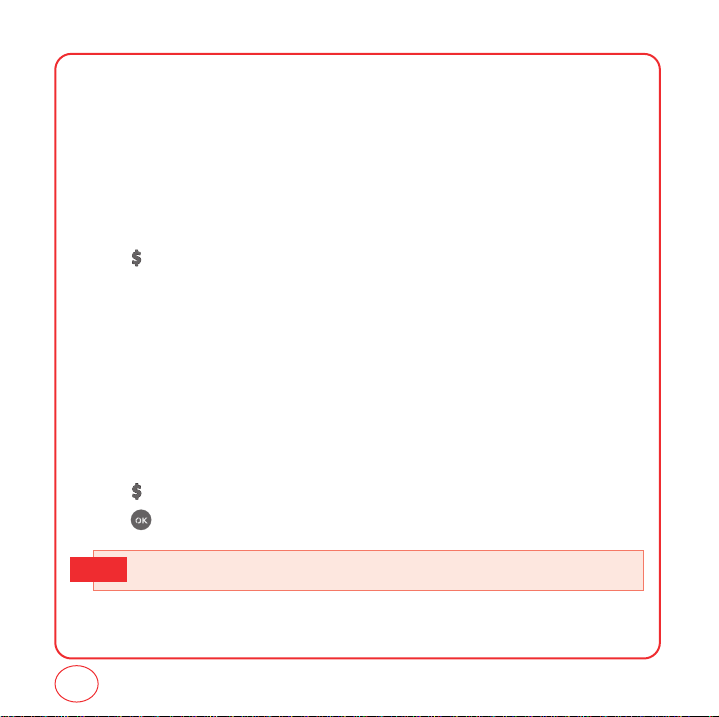
MY ACCOUNT
You can manage your Virgin Mobile account directly from your phone. The basic tasks are
summarized in this chapter. For more information about your account, go to
www.virginmobileusa.com.
CHECKING YOUR ACCOUNT BALANCE
You can check the amount of airtime remaining in your Virgin Mobile account right from your
phone.
1.
Press "My account".
2.
Your account information will be shown.
TOP-UP YOUR ACCOUNT
Top-Up is how you add money to your Virgin Mobile account so you can keep talking and texting.
You can Top Up your Virgin Mobile account right from your phone. First, buy a Top-Up card at the
thousands of retailers that carry them, or register your debit card, credit card, or PayPal account at
www.virginmobileusa.com.
When your balance is low, you can Top up your account from your phone
1.
Press "My account".
2.
Press to proceed.
• See www.virginmobileusa.com for more information about Top-Up.
Tip
22
Page 23
MY ACCOUNT
TOP-UP WITH A TOP-UP CARD
1.
Press "My account".
2.
Use the to scroll down to the Top-Up link and press .
3.
Scroll down and select Top-Up Card.
4.
Enter your vKey and press .
5.
Scroll down to select Login and press .
6.
Enter your Top-UP card’s PIN number and press .
7.
Scroll down to select Top-Up Now and press .
8.
At the confirmation screen, select Yes by press .
9.
Press to exit. You’re topped up !
To find a store near to you that sells Top Up cards, select Find a Store from the Top Up menu.
TOP-UP WITH A DEBIT CARD, CREDIT CARD, OR PAYPAL
ACCOUNT
Before you can Top-Up from your phone with a debit card, credit card, or PayPal account, you need
to register the card or PayPal account at www.virginmobileusa.com.
1.
Press "My account".
2.
Use the to scroll down to the Top-Up link and press .
3.
Scroll down and select Credit Card or PayPal.
4.
Enter your vKey and press .
23
Page 24
MY ACCOUNT
5.
Scroll down to select Login and press .
6.
Enter the amount you want to Top-Up and press . You can Top-Up in amounts of $20,
$30, $50, or $90.
7.
Scroll down to select Top-Up Now and press .
8.
Your phone will validate the amount you want to Top-Up. Scroll down to select Yes and
press .
9.
That’s it. You’ll receive a confirmation that you’ve Topped-Up. Press .
10.
Press to exit.
FOR MORE INFORMATION
For more information about your Virgin Mobile account or Virgin Mobile service, visit
www.virginmobileusa.com.
24
Page 25

CHAPTER 3 MAKING AND RECEIVING CALLS
CHAPTER 3
MAKING AND
RECEIVING CALLS
MAKING AND RECEIVING CALLS
DURING A CALL
25
Page 26
MAKING AND RECEIVING CALLS
MAKING A CALL
1.
Enter a phone number.
To modify the phone number you have entered :
Tip
• To erase one digit at a time, press .
• To erase the entire number, press and hold
2.
Press .
• If “CALL FAILED” appears on the display or the line is busy, press or .
Tip
• If you activate the
of times you have selected.
• When you place or receive a call from stored phone numbers, only the name will be displayed.
• If “Enter lock code” appears on the display enter your 4-digit password to unlock your phone.
3.
To end a call, press .
"
AUTO RETRY"function, the phone will automatically retry for the number
.
ANSWERING CALLS
1.
When your phone rings or vibrates, press to answer the incoming call. (Depending on
your phone’s settings, you may also answer incoming calls by pressing any digit key.)
• To ignore incoming calls, press [Ignore].
2.
To end a call, press .
26
• In Auto answer mode, a call is automatically answered after five seconds.
Tip
Page 27
MAKING AND RECEIVING CALLS
SPEAKERPHONE
The speakerphone feature lets you hear audio through the speaker and talk without holding the
phone.
1.
To activate the speakerphone while on a call, press .
2.
The phone returns to normal (Speakerphone Off) after ending a call or when the phone is
turned off and back on.
HARD/2.SEC PAUSE FEATURE
Pauses are used for automated systems (i.e., voicemail, calling cards). Insert a pause after a phone
number then enter another group of numbers. The second set of numbers is dialed automatically
after the pause. This feature is useful for dialing into systems that require a code.
1.
To insert a Hard Pause/2-sec Pause, enter a phone number then press [Options].
Select either a P Hard Pause ("P" appears) or a T 2.Sec Pause ("T" appears).
2.
Press to dial or press [Save] to save phone number.
CALLER ID FUNCTION
Identifies caller by displaying their phone number. If the caller’s name and number are already
stored in your phone book, their name will appear. This is a system dependent feature. Please
contact your service provider for details.
27
Page 28
MAKING AND RECEIVING CALLS
CALL WAITING FUNCTION
Notifies you of an incoming call when you are already on a call by sounding a beep tone and
displaying the caller’s phone number.
1.
To answer another call while on the phone, press .
This places the first call on hold. To switch back to the first caller, press again.
• Call waiting is a system dependent feature. Please contact your service provider for details.
Tip
ADJUSTING VOLUME
To adjust the ringtone volume:
1.
In idle mode, press up or down. Choose from Low, Medium or High. If you choose High,
you can also choose to have the phone vibrate as well when the the phone rings. Press
to check the box on/off for Vibrate.
2.
Press [Done] to save the setting.
KEYGUARD
The keyguard feature of your phone locks the keypad to protect against accidental key presses
when the phone is turned on. You can still answer or silence an incoming call.
1.
To activate keyguard, press and hold . Keyguard activated! will be displayed.
2.
To deactivate keyguard, press and hold . Highlight Yes and press .
• Lock feature will deactivate when the phone is powered off. Upon next power up, you will need to
press and hold to lock phone again.
28
Page 29
MAKING AND RECEIVING CALLS
ONE-TOUCH/TWO-TOUCH DIALING
Ideal for frequently dialed numbers, this feature allows entries in your contact list to be dialed via the
keypad with only one or two key presses.
ONE-TOUCH DIALING
2-9 : Press and hold the corresponding memory number for more than 1 second.
TWO-TOUCH DIALING
10-99 : Press and release the first digit, then press and hold the second digit for more than 1 second.
• If no phone number is stored in the location entered, "Speed dial# X Empty" will appear on
Tip
the screen.
• Location 1 is reserved for voicemail. Locations 2-99 are unassigned. To assign a speed dial
location, please see page 43.
RECENT CALLS LIST-INCOMING CALLS
Displays information about the 20 most recent incoming calls. Place a call to a selected number by
pressing .
1.
Press [Menu], then press "Recent calls". Press for Incoming calls.
If the number is already stored in your contact list, only the name appears. If the number is not
stored, the number appears.
2.
To view incoming call details, press .
• Call details include date, time and phone number.
Tip
3.
Press [Options] to Send msg, Save, Prepend, Erase, or Erase all.
29
Page 30
MAKING AND RECEIVING CALLS
• Send msg: Save the message.
• Save: Save the phone number in your phonebook.
• Prepend: Adds numbers to the beginning of the phone number.
• Erase: To erase incoming call list.
• Erase all: To erase all incoming calls list.
RECENT CALLS LIST-OUTGOING CALLS
Displays information about the 20 most recent outgoing calls. Place a call to a selected number by
pressing .
1.
Press [Menu], then press "Recent calls". Press for Outgoing calls.
If the number is already stored in your contact list, only the name appears. If the number is
not stored, the number appears.
2.
To view incoming call details, press .
• Call details include date, time and phone number.
Tip
3.
Press [Options] to Send msg, Save, Prepend, Erase, or Erase all.
• Send msg: Save the message.
• Save: Save the phone number in your phonebook.
• Prepend: Adds numbers to the beginning of the phone number.
• Erase: To erase outgoing call list
• Erase all: To erase all outgoing calls list.
30
Page 31

MAKING AND RECEIVING CALLS
RECENT CALLS LIST-MISSED CALLS
Displays information about the 20 most recently missed calls. Place a call to a selected number by
pressing .
1.
Press [Menu], then press "Recent calls". Press for Missed calls.
If the number is already stored in your contact list, only the name appears. If the number is not
stored, the number appears.
2.
To view incoming call details, press .
Call details include date, time and phone number.
Tip
3.
Press [Options] to Send msg, Save, Prepend, Erase, or Erase all.
• Send msg: Save the message.
• Save: Save the phone number in your phonebook.
• Prepend: Adds numbers to the beginning of the phone number.
• Erase: To erase missed call list
• Erase all: To erase all missed calls list.
RECENT CALLS LIST-ALL CALLS
Displays information about the 60 most recent incoming, outgoing or missed calls.
1.
Press [Menu], then press "Recent calls". Press for Recent calls.
2.
If the number is already stored in your phone book, only the name appears. If the number is
not stored, only the phone number appears.
31
Page 32

MAKING AND RECEIVING CALLS
3.
To view call detail, press .
Call details include date, time, and phone number.
Tip
4.
Press [Options] to 1. Send msg, 2. Save, 3. Prepend, 4. Erase, or 5. Erase all.
After 60 incoming, outgoing or missed calls, the oldest call will automatcally be erased from the
Tip
history.
• Send msg: Save the message.
• Save: Save the phone number in your phonebook.
• Prepend: Adds numbers to the beginning of the phone number.
• Erase: To erase all call list.
• Erase all: To erase all all calls list.
VOICEMAIL
CALL INTO YOUR VOICEMAIL
1.
Press [Menu], then press "Messaging". Press "Voicemail".
2.
Press "Call voicemail".
CALL TIMER
Check the talk time and manages your calls within the limit you set. The four call timers include:
Last call, Recent call, Incoming calls, and Outgoing calls.
32
Page 33

MAKING AND RECEIVING CALLS
1.
Press [Menu], then press "Recent calls". Press for Call timer.
2.
Press / to view the different timers.
Press [Options] to 1.Reset, 2.Reset all.
3.
To return to the previous page, press .
The 911 feature puts the phone in the Emergency Call Mode when you dial the preprogrammed
emergency number, 911. It also operates in the lock mode and out of the service area.
911 IN LOCK MODE
The 911 call service is available even in the lock mode.
1.
Enter "911", then press .
2.
The call connects.
3.
When the call ends, the phone returns to the Lock Mode.
The 911 call is not recorded in the recent call list.
Tip
911 USING ANY AVAILABLE SYSTEM
1.
Enter "911", then press .
2.
The call connects.
3.
The phone maintains the Emergency Mode and the phone can receive an incoming call from
any available system. However, it can’t make a call.
33
Page 34

DURING A CALL
MUTE
The caller cannot hear you or any sounds from your side but you can still hear them.
1.
Press [Mute].
• To deactivate, press [Remove].
• The phone will automatically unmute in Emergency Call or Callback mode.
RECENT CALLS
To display the Recent Call menu.
1.
Press [Options], then press .
CONTACTS
To select the phone number in your internal Contact List.
1.
Press [Options], then press .
MESSAGING
To send a text message during a call:
1.
Press [Options], then press .
LOCATION
To enable the network to locate your current location through Global Positioning System (GPS).
1.
Press [Options], then press .
34
Page 35

CHAPTER 4 ENTERING LETTERS, NUMBERS, SYMBOLS
CHAPTER 4
ENTERING
LETTERS,
NUMBERS,
SYMBOLS
35
Page 36

ENTERING LETTERS, NUMBERS, SYMBOLS
You can enter letters, numbers, and symbols using several entry modes: Alphabet, Number, T9,
Symbol, Auto Text, and Emoticon. Not all options are available for every text entry screen.
An indicator for the current entry mode will appear in the middle of the bottom row on the display
when you are entering letters and numbers. To select an entry mode, press the right
[Options], then choose from the list onscreen.
ALPHABET INPUT MODE
Use the number keys to enter letter, numbers and symbols.
1.
Enter letters using the keypad. Press each key until the letter you want appears on screen.
2.
To enter a space, press . The cursor will automatically move to the next column.
3.
To delete one digit, press .
To delete one letter, press and hold .
Select Alphabet mode by pressing [Options], then select "Alphabet".
Tip
When you select this mode, the Alphabet icon [Abc] appears as a visual confirmation.
- Find the key that corresponds to the letter you want to enter.
- Press it as many times as needed for the letter to appear on the screen.
- To enter the name “John”:
Press [ ] J
Press [,,] o
Press [ , ] h
Press [ , ] n
36
Page 37

ENTERING LETTERS, NUMBERS, SYMBOLS
T9 INPUT MODE
T9 mode uses a built-in dictionary to select a word based on the letters you've entered. A word can
be entered more quickly by pressing each key once per character.
with Instead of typing out the entire word, scroll through the list of words provided and select the
one you want.
1.
Press [Options], then select T9 Word from the list.
2.
For each letter of the word you want, press the corresponding number key once. For example,
to enter the word "any", press -> -> .
3.
If the word doesn't match what you want, press to look at other word matches.
4.
When you see the word you want, press to accept the word and enter a space.
To enter a compound word:
Tip
• Enter the first part of the word then press to accept it without adding a space after it.
• Enter the last part of the word then press to accept the word.
Tip
To enter "Sweetcakes"in T9 mode:
- Press [Options] to select and select T9 Word mode.
- Press , , , , and you will see the word "Sweet".
- Press to keep Sweet selected and to complete the compound word entry.
- Press , , , , and you will see "baker". Press until you
see "cakes".
37
Page 38

ENTERING LETTERS, NUMBERS, SYMBOLS
NUMBER MODE
Number mode allows you to enter numbers.
1.
Press [Options] then select Number from the list.
2.
To enter a number, press a digit key.
SYMBOL MODE
Symbol mode allows you to enter symbols.
1.
Press [Options] then select Symbols from the list.
2.
Select the symbol you want to enter by pressing / / / . Then press .
AUTO TEXT
Auto Text allows you to use preloaded messages.
1.
Press [Options] then select Auto Text from the list.
2.
Highlight a message from the list and press [Select].
EMOTICON
Emoticon mode allows you to enter emoticons.
1.
Press [Options] then select Symbol.
Press [Emoticon].
2.
Select the emoticon from the list by pressing / / / . Then press .
38
Page 39

CHAPTER 5 STORING CONTACTS
CHAPTER 5
STORING
CONTACTS
39
Page 40

STORING CONTACTS
1.
Enter phone number then press [Options] and then press [Save].
2.
Highlight "New entry" or "Existing entry". Press to select.
If "Existing entry" is selected, your contact list is displayed. Choose the entry to add the
number to, then press [Next]. You will then see the phone number listed above the
number type list. Select the type then press .
• If you are trying to add a phone number to an existing contact and that type of number already exists,
you will see "Overwrite?". Select Yes to save the new number to that type of number.
3.
If "New entry" is selected, the list of phone number types will be shown.
Press / to choose the type of number you are adding. Press to select. Enter a
name. To change the input mode, press [Options]. Press to enter information
in other fields for the contact. Fields include Name, Mobile, Home, Work, etc, IM, Email,
Group, Ringtone, Notes.
• Group: To set a group for the contact, highlight the Group field and press . The Group screen
will appear. Highlight the group name and press [Select].
• Ringtone: To set a ringtone for the contact, highlight the Ringtone field and press . The Ring
• Notes: To add a note for a contact, highlight the Notes field and press . The Notes screen will
4.
To store the entry in your contact list, press [Save].
type screen will appear. Highlight a ringtone and press [Select].
appear. Enter your note and press [Done].
40
Page 41

STORING CONTACTS
ADD NEW
Adds a new entry to your phone's contact list.
1.
Press [Menu], then press "Contacts".
2.
Press "Add new".
3.
Fill in the fields as they are selected.
Press / to highlight a field, then press to select it.
• Phone book fields : Name/Mobile/Home/Work/etc/IM/Email/Group/Ringtone/Notes.
4.
To save the entry, press [Save]. To return to the previous page, press .
FIND NAME
Retrieves an entry by name and calls the primary number by simply pressing .
1.
Press [Menu], then press "Contacts".
2.
Press "Find name".
3.
The list of names in your contacts is displayed alphabetically.
4.
Enter a name or scroll through the list. If more than one contact is listed, highlight the contact
you want.
5.
To select the contact, highlight it and press . The contact information is displayed.
6.
To edit the contact information, press [Edit]. The Edit Contact screen will appear with
the selected contact information shown. See page 40 for Storing a Phone Number.
7.
To save the entry, press [Save]. To return to the previous page, press .
41
Page 42

STORING CONTACTS
7.
Highlight a field in the contact and press [Options] for various functions for the fields.
8.
To call the selected number, press .
GROUPS
Organize your contact list into groups for better management, like "Family", "Business", etc.
CHANGE GROUP NAME
1.
Press [Menu], then press "Contacts".
2.
Press "Groups".
3.
Scroll to Group 1, Group 2, Group 3 or Group 4. Press [Options], then select Rename
from the list.
4.
Input a new group name.
5.
Press [Done] to save the setting.
RINGTONE
1.
Press [Menu], then press "Contacts".
2.
Press "Groups".
3.
Select an existing group name.
4.
Press [Options], then select Ringtone from the list.
5.
Select ringtone and press [Select].
42
Page 43

STORING CONTACTS
ERASE GROUP
1.
Press [Menu], then press "Contacts".
2.
Press "Groups".
3.
Select Group 1, Group 2, Group 3 or Group 4.
4.
Press [Options], then select Erase from the list.
5.
“Erase?” will be displayed. Select Yes and press to erase the group.
SPEED DIAL
In idle mode, calls can be placed to numbers stored in speed dial by pressing & holding the location
number on the key pad. For a 2-digit location number, press the first number, then press and hold
the second number.
1.
Press [Menu], then press "Contacts".
2.
Press "Speed dial".
3.
To assign a phone number to a location, select the location then press [Assign].
"
Unassigned"appears if the location is available.
Tip
4.
Highlight a name from your contact list. If the contact has more than 1 number saved, press
/ until the correct number for the speed dial location is shown.
5.
Press [Done] to save the number to the speed dial location. You will see the contact
name next to the speed dial location number in the speed dial list.
43
Page 44

MEMO
44
Page 45

CHAPTER 6 MESSAGING
CHAPTER 6
MESSAGING
Charges apply for the use of these features. see
www.virginmobileusa.com for pricing.
45
Page 46

MESSAGING
SEND A TEXT MESSAGE
To send a new text message:
1.
Press .
2.
Under "Send to", input the phone number then press [Next].
Press [Options] to choose from:
• Alphabet
• Number
• Symbol
• Find: Look up a phone number from your contact list.
• Recent msgs: Look up a number from your recent message list.
• Groups: Look up a group of numbers by the name of the group you saved them under.
• Erase: Erase to phone number.
3.
Under "Input msg", input your message, then press [Next].
Press [Options] to choose from:
• Alphabet
• Number
• T9 word
• Symbol
• Auto text: inserts pre-saved text into your message.
4.
From the Preview screen, press to edit the callback number. You can press
[Options] to 1.Edit or 2.Save.
5.
To send the message, press [Send].
46
Page 47

MESSAGING
INBOX
The Inbox manages text messages you've received.
1.
Press [Menu], then press "Messaging". Press "Inbox".
2.
Select a message, then press . The message is displayed.
3.
Press [Option], then select one of the following options:
• Resend: To resend to a received message.
• Edit: Edit the message.
• Lock: To lock or unlock the message.
• Compose new: Create a new message.
• Erase: Delete the message.
• Erase all: Delete all the messages in your Inbox.
SENT
The Sent folder manages the text messages you've sent.
1.
Press [Menu], then press "Messaging". Press "Sent".
2.
Select a message, then press . The message is displayed.
3.
Press [Options], then select one of the following options:
• Call: Place a call to the number the message was sent to.
• Save: Saves the message in the Saved folder.
• Erase: Delete the message.
• Edit: Edit the message and resend.
• Send: Sends the message again.
• Forward: Send the message to another person.
• Save contact: Save the phone number in the contacts.
47
Page 48

MESSAGING
SAVED
The Saved folder contains any draft or saved messages. If you receive a voice call or other
interruption while you're composing a text message, a draft of your text message will be saved
automatically in the Saved folder.
1.
Press [Menu], then press "Messaging". Press "Saved".
2.
Select a message, press [Erase] then Select Yes and press to delete the
messages from the saved folder.
3.
Select a message, then press . The message is displayed.
4.
Press [Options], then select one of the following options:
• Edit: Edit the message.
• Save: Save the message.
ERASE MSGS
This feature allows you to erase text messages.
1.
Press [Menu], then press "Messaging". Press "Erase msgs".
2.
Select:
1. Inbox
2. Sent
3. Saved
3.
Select Yes and press to delete the messages from the selected folder.
48
Page 49

MESSAGING
MSG SETTINGS
This feature enables you to manage your text message settings.
SOUNDS
1.
Press [Menu], then press "Messaging". Press "Msg settings".
2.
Press "Sounds".
3.
Highlight "Beep", "Msg Tone", "Vibrate", "Silent", "Ring & Remind", “Vibrate & Remind”,
then press .
4.
Press [Done] to save the setting.
GROUPS
1.
Press [Menu], then press "Messaging". Press "Msg settings".
2.
Press "Groups".
AUTO TEXT
To edit the Auto Text message you have saved.
1.
Press [Menu], then press "Messaging". Press "Msg settings".
2.
Press "Auto Text".
3.
Highlight a message from the list. To add a new Quick Text message, press [Options],
then press "Add New". To edit the Quick Text message you have selected, press .
Press to delete any characters you don't want then enter your text. Press
[Done] to save the text and return to the Auto Text list.
49
Page 50

MESSAGING
4.
From the Auto Text list, press [Options] to select one of the following:
•Add new
• Edit
• Send text msg
• Erase
• Erase all
TEXT ENTRY
1.
Press [Menu], then press "Messaging". Press "Msg settings".
2.
Press "Text Entry".
3.
Highlight "Alphabet", "Number", or "T9 Word" then press . Press [Done] to
save the setting.
SIGNATURE
Create a signature that can be automatically inserted at the end of a text message.
1.
Press [Menu], then press "Messaging". Press “Msg settings”.
2.
Press "Signature".
3.
Highlight “On” or “Off” then press . Press [Done] to save the setting.
50
Page 51

MESSAGING
SAVE TO SENT FOLDER
1.
Press [Menu], then press "Messaging". Press "Msg settings".
2.
Press "Save To Sent Folder".
3.
Highlight “On” or “Off” then press . Press [Done] to save the setting.
• On: All sent messages saved in the Sent box.
• Off: All sent messages not saved in the Sent box.
AUTO ERASE
Automatically erases inbox messages when new messages arrived.
Inbox
1.
Press [Menu], then press "Messaging". Press "Msg settings".
2.
Press "Auto Erase". Press "Inbox".
3.
Highlight “On” or “Off” then press . Press [Done] to save the setting.
• On: Oldest message erased from inbox automatically when message is full.
• Off: Oldest message not erased from inbox automatically when message is full.
Sent
1.
Press [Menu], then press "Messaging". Press "Msg settings".
2.
Press "Auto Erase". Press "Sent”
3.
Highlight “On” or “Off” then press . Press [Done] to save the setting.
• On: Oldest message erased from inbox automatically when message is full.
• Off: Oldest message not erased from inbox automatically when message is full.
51
Page 52

MESSAGING
NOTIFICATION
1.
Press [Menu], then press "Messaging". Press “Msg settings”.
2.
Press "Notification".
3.
Highlight “Only Icon” or “Msg & Icon”, then press to select it.
4.
Press [Done] to save the setting.
CALLBACK NUMBER
Allows you to input a specific call back number. Call back numbers are used in text messaging so
the other party knows how to get back to you.
1.
Press [Menu], then press "Messaging". Press “Msg settings”.
2.
Press "Callback number".
3.
Highlight one of the following options then press to select it:
•
None: No callback number will be sent.
•
My Mobile Number: Your phone's number will be sent.
•
Other: Input another phone number to be sent.
4.
Press [Done] to save the setting.
VIRGIN ALERTS
To view Virgin Alerts stored on your phone:
1.
Press [Menu], then press "Messaging". Press "Virgin alerts".
2.
To select "GoTo", press . To select "Erase Message", press .
52
Page 53

CHAPTER 7
VIRGINXL
CHAPTER 7 VIRGINXL
53
Page 54

VIRGINXL
VirginXL is a fun collection of features which you can access directly from your phone - download
ringtones, games, graphics, and more. Charges apply. Visit www.virginmobileusa.com for details.
1.
To access VirginXL, press .
2.
To scroll down the page or through the menus, press / .
3.
To return to the previous page, press .
4.
To exit VirginXL, press .
When you select VirginXL, a session is initiated.
Tip
You cannot receive incoming calls when a VirginXL session is in progress. All incoming calls will
be automatically forwarded to voicemail.
54
Page 55

CHAPTER 8
MY STUFF
CHAPTER 8 MY STUFF
55
Page 56

MY STUFF
Anything you download from VirginXL - games, ringtones, graphics, and applications - will be
stored in the My Stuff folder. You can access these files from My Stuff.
MY RINGTONES
You can download the latest ringtones right to your phone. Charges apply. Visit
www.virginmobileusa.com for details.
1.
Press [Menu], then press "My stuff".
2.
Press "My ringtones".
3.
Your list of ringtones is shown. Select 1. Get more ringtones to download any additional
ringtones to your phone. Your browser will launch and you will be taken to the download
menu.
4.
Download your ringtone. From the information page select "Buy".
5.
A confirmation page will notify you that the ringtone has been purchased. To download the
ringtone, select "Download".
MY GAMES
You can download the latest games and play them right on your phone. Charges apply. Visit
www.virginmobileusa.com for details.
1.
Press [Menu], then press "My stuff".
2.
Press "My games".
3.
Your games list will be shown. Select 1. Get more games to download additional games to
your phone. Your browser will launch and you will be taken to the download menu.
56
Page 57

MY STUFF
4.
Download your game. From the information page select "Buy".
5.
A confirmation page will notify you that the game has been purchased. To download the
game, select "Download".
MY OTHER STUFF
You can download and access other VirginXL applications right on your phone. Charges apply. Visit
www.virginmobileusa.com for details.
1.
Press [Menu], then press "My stuff".
2.
Press "My other stuff".
3.
Your other stuff list will be shown. Select 1. Get more stuff to download additional
applications to your phone. Your browser will launch and you will be taken to the download
menu.
4.
Download your application. From the information page select "Buy".
5.
A confirmation page will notify you that the application has been purchased. To download the
application, select "Download".
57
Page 58

MY STUFF
MY GRAPHICS
You can download graphics right on your phone. Charges apply. Visit www.virginmobileusa.com
for details.
1.
Press [Menu], then press "My stuff".
2.
Press "My graphics".
3.
Your graphics list will be shown. Select 1. Get more graphics to download additional images
to your phone. Your browser will launch and you will be taken to the download menu.
4.
Download your graphic. From the information page select "Buy".
5.
A confirmation page will notify you that the graphic has been purchased. To download the
graphic, select "Download".
58
Page 59

CHAPTER 9 CUSTOMIZING YOUR PHONE
CHAPTER 9
CUSTOMIZING
YOUR PHONE
59
Page 60

CUSTOMIZING YOUR PHONE
Customizes your phone and optimizes performance through a variety of settings.
SOUNDS
RINGTONES
To select a ringtone type for:
Voice call
1.
Press [Menu], then press "Settings".
Press "Sounds", then press Ringtones".
2.
Press "Voice call".
3.
Select "Caller ID" or "Incoming call" then press .
• Caller ID: Set ringtone for any incoming call from a saved contact phone number, unless the contact
• Incoming call: Set ringtone for any incoming call from someone not saved to your contact list.
4.
Select your desired ringtone from the list by pressing the / . To hear a ringtone that
is highlighted, press [Play].
5.
To save the selected ringtone, press [Select].
was saved with a specific ringtone.
Messaging
1.
Press [Menu], then press "Settings".
Press "Sounds", then press “Ringtones”.
2.
Press "Messaging".
60
Page 61

CUSTOMIZING YOUR PHONE
3.
Select your desired ringtone from the list by pressing the / . To hear a ringtone that
is highlighted, press [Play].
4.
To save the selected ringtone, press [Select].
Voicemail
1.
Press [Menu], then press "Settings".
Press "Sounds", then press “Ringtones”.
2.
Press "Voicemail".
3.
Select your desired ringtone from the list by pressing the / . To hear a ringtone that
is highlighted, press [Play].
4.
To save the selected ringtone, press [Select].
Alarms
1.
Press [Menu], then press "Settings".
Press "Sounds", then press "Ringtones".
2.
Press "Alarms".
3.
Select your desired ringtone from the list by pressing the / . To hear a ringtone that
is highlighted, press [Play].
4.
To save the selected ringtone, press [Select].
VOLUME
Control the volume for Ringtone, Speakerphone, Headset, and Advanced settings.
61
Page 62

CUSTOMIZING YOUR PHONE
Ringtone
Set ringtone volume and incoming call alert options:
1.
Press [Menu], then press "Settings".
Press "Sounds", then press "Volume".
2.
Press "Ringtone".
3.
Press / to adjust the volume level. Press to select Vibrate when High is the
volume level.
The volume settings available are:
• Silence all: All sounds are off.
• Vibrate : Phone will vibrate to alert you of incoming call or message.
• Off: Only the ringtone is muted.
• Ringtone mode: Low, Medium, High.
• You can adjust the ringtone volume with the side keys.
Tip
62
Page 63

CUSTOMIZING YOUR PHONE
Speakerphone
Adjust the speakerphone volume:
1.
Press [Menu], then press "Settings".
Press "Sounds", then press "Volume".
2.
Press "Speakerphone".
3.
Adjust the Speakerphone volume by pressing / . Press [Done].
Headset
Adjust the headset volume:
1.
Press [Menu], then press "Settings".
Press "Sounds", then press "Volume".
2.
Press "Headset".
3.
Adjust the Headset volume by pressing / . Press [Done].
63
Page 64

CUSTOMIZING YOUR PHONE
Advanced
Messaging
Adjust the message alert volume:
1.
Press [Menu], then press "Settings".
Press “Sounds”, then press “Volume”.
2.
Press “Advanced”, then press “Messaging”.
3.
Highlight "Use Ringtone" or "Separate" and press to select. If Separate is selected,
press to highlight the volume level. Press / to adjust the volume level.
4.
Press [Done] to save the setting.
5.
Press [Help].
This setting controls the volume of new text message alerts.
Use ringtone vol.: Plays the text message alerts at the same volume as the voice ringtone and allows
Use separate vol.: Plays the text message alerts at the selected volume level. Alerts will always play at
Use vibrate: Selecting this causes the application to add vibration to any sound. Only works with
the side volume keys to change the text message alert volume at the same time as
the voice ringtone.
this level unless the ringtone volume is set to “Silence all” or “Vibrate”.
“Separate”.
64
Page 65

CUSTOMIZING YOUR PHONE
Voicemail
Adjust the voicemail alert volume:
1.
Press [Menu], then press "Settings".
Press “Sounds”, then press “Volume”.
2.
Press "Advanced", then press "Voicemail".
3.
Highlight "Use Ringtone" or "Separate" and press to select. If Separate is selected,
press to highlight the volume level area. Press / to adjust the volume level. If
High is selected, you can press to select Vibrate as well.
4.
Press [Done] to save the setting.
5.
Press [Help].
This setting controls the volume of new voicemail alerts.
Use ringtone vol.: Plays the voicemail alerts at the same volume as the voice ringtone and allows the
Use separate vol.: Plays the voicemail alerts at the selected volume level. Alerts will always play at
Use vibrate: Selecting this causes the application to add vibration to any sound. Only works with
side volume keys to change the voicemail alert volume at the same time as the
voice ringtone.
this level unless the ringtone volume is set to “Silence all” or “Vibrate”.
“Separate”.
65
Page 66

CUSTOMIZING YOUR PHONE
Alarms
Adjust the alarms volume:
1.
Press [Menu], then press "Settings".
Press "Sounds", then press "Volume".
2.
Press "Advanced", then press "Alarms".
3.
Highlight "Use Ringtone" or "Separate" and press to select. If Separate is selected,
press to highlight the volume level area. Press / to adjust the volume level. If
High is selected, you can press to select Vibrate as well.
4.
Press [Done] to save the setting.
5.
Press [Help].
This setting controls the volume of new alarm alerts.
Use ringtone vol.: Plays the alarms alerts at the same volume as the voice ringtone and allows the
Use separate vol.: Plays the alarms alerts at the selected volume level. Alerts will always play at this
Use vibrate: Selecting this causes the application to add vibration to any sound. Only works with
side volume keys to change the alarms alert volume at the same time as the voice
ringtone.
level unless the ringtone volume is set to “Silence all” or “Vibrate”.
“Separate”.
66
Page 67

CUSTOMIZING YOUR PHONE
Applications
Adjust the Applications volume:
1.
Press [Menu], then press "Settings".
Press "Sounds", then press "Volume".
2.
Press "Advanced", then press "Applications".
3.
Highlight "Use Ringtone" or "Separate" and press to select. If Separate is selected,
press to highlight the volume level area. Press / to adjust the volume level. If
High is selected, you can press to select Vibrate as well.
4.
Press [Done] to save the setting.
5.
Press [Help].
This setting controls the volume of new Applications alerts.
Use ringtone vol.: Plays the applications alerts at the same volume as the voice ringtone and allows
Use separate vol.: Plays the applications alerts at the selected volume level. Alerts will always play at
Use vibrate: Selecting this causes the application to add vibration to any sound. Only works with
the side volume keys to change the alarms alert volume at the same time as the
voice ringtone.
this level unless the ringtone volume is set to “Silence all” or “Vibrate”.
“Separate”.
67
Page 68

CUSTOMIZING YOUR PHONE
Power Up/Down
Adjust the Power On/Off volume:
1.
Press [Menu], then press "Settings".
Press "Sounds", then press "Volume".
2.
Press "Advanced", then press “Power up/down”.
3.
Highlight "Use ringtone" or "Separate" and press to select. If Separate is selected,
press to highlight the volume level area. Press / to adjust the volume level. If
High is selected, you can press to select Vibrate as well.
4.
Press [Done] to save the setting.
5.
Press [Help].
This setting controls the volume of power up/ down.
Use ringtone vol.: Plays the power up/ down at the same volume as the voice ringtone.
Use separate vol.: Plays the power up/ down at the selected volume level. Power up/ down will
Use vibrate: Selecting this causes the application to add vibration to any sound. Only works with
always play at this level unless the ringtone volume is set to “Silence all” or
“Vibrate”.
“Separate”.
68
Page 69

CUSTOMIZING YOUR PHONE
ALERT SOUNDS
This feature allows you to set additional phone alerts.
One minute
This alert notifies you every minute that you have been on a call.
1.
Press [Menu], then press "Settings".
Press "Sounds", then press "Alert sounds".
2.
Press "One minute".
3.
Highlight “On” or “Off” then press to select it.
4.
Press [Done] to save the setting.
Connect tone
This alert notifies you that a call has been successfully placed.
1.
Press [Menu], then press "Settings".
Press "Sounds", then press "Alert sounds".
2.
Press "Connect tone".
3.
Highlight “On” or “Off” then press to select it.
4.
Press [Done] to save the setting.
69
Page 70

CUSTOMIZING YOUR PHONE
KEY BEEPS
Adjust key pad tone volume.
1.
Press [Menu], then press "Settings".
Press "Sounds", then press "Key beeps".
2.
Adjust the volume by pressing / . Press [Done] to save the setting.
TONE LENGTH
Adjust key pad tone length.
1.
Press [Menu], then press "Settings".
Press "Sounds", then press "Tone length".
2.
Highlight “Normal” or “Long” then press to select it.
3.
Press [Done] to save the setting.
70
Page 71

CUSTOMIZING YOUR PHONE
DISPLAY
This set of features allows you to customize your display.
GRAPHICS
Select an image for your idle display.
Wallpaper
1.
Press [Menu], then press "Settings".
Press "Display", then press "Graphics".
2.
Press "Wallpaper".
3.
Press / to scroll through the images.
4.
Press [Select] to save the image as your wallpaper.
Time set
Select a clock type for your idle display. (Clocks can only be displayed when your wallpaper is a
preloaded image.)
1.
Press [Menu], then press "Settings".
Press "Display", then press "Graphics".
2.
Press "Time set".
3.
Press / to choose a clock type.
71
Page 72

CUSTOMIZING YOUR PHONE
Clock types:
• Analog: Shows time in a standard clock format.
• Digital: Shows date and time in written format.
• Calendar: Shows the current month's calendar.
• Dual time: Shows Digital at top of display and selected city with its Digital date and time at bottom
4.
Press [Select] to save the setting.
Screensaver
1.
Press [Menu], then press "Settings".
Press "Display", then press "Graphics".
2.
Press "Screensaver".
3.
Select 1. "Time setting" or 2. "Image setting".
• Time setting: Select Screensaver off, 8 sec or 15 sec. Press [Done] to save the setting.
• Image setting: Press / to scroll through the images. Press [Select] to save the
MENU STYLE
Select how the phone menu will display.
1.
Press [Menu], then press "Settings".
Press "Display", then press "Menu style".
2.
Highlight “Grid” or “List” then press to select it.
3.
Press [Done] to save the setting.
of display. Press [City] to select a city.
setting.
72
Page 73

CUSTOMIZING YOUR PHONE
GREETING BANNER
The greeting banner is your personal label for your phone. It appears on the main screen along the
bottom of the display.
1.
Press [Menu], then press "Settings".
Press "Display", then press "Greeting banner".
2.
The current banner text is displayed. Press to delete the banner, then enter your new
banner. Press [Options] to change the input mode.
3.
Press [Save] to save the banner.
CONTRAST
Adjust the display contrast:
1.
Press [Menu], then press "Settings".
Press "Display", then press "Contrast".
2.
To adjust the display contrast, press / . Press [Save] to save the setting.
BACKLIGHT
Turn on the backlight on the display and keypad for easy viewing in dark places.
LCD
1.
Press [Menu], then press "Settings".
Press "Display", then press "Backlight".
2.
Press "LCD".
3.
Highlight one of the following options by pressing / .
73
Page 74

CUSTOMIZING YOUR PHONE
• 5 seconds, 10 seconds, 20 seconds, Always On, Always Off.
4.
Press to select the time.
5.
Press [Done] to save the setting.
Keypad
1.
Press [Menu], then press "Settings".
Press "Display", then press "Backlight".
2.
Press "Keypad".
3.
Highlight one of the following options by pressing / .
• 5 seconds, 10 seconds, 20 seconds, Always On, Always Off.
4.
Press to select the time.
5.
Press [Done] to save the setting.
74
Page 75

CUSTOMIZING YOUR PHONE
MESSAGING
This feature enables you to manage your text message settings.
SOUNDS
1.
Press [Menu], then press "Settings". Press "Messaging".
2.
Press "Sounds".
3.
Highlight "Beep", "Msg Tone", "Vibrate", "Silent", "Ring & Remind", “Vibrate & Remind”,
then press .
4.
Press [Done] to save the setting.
GROUPS
1.
Press [Menu], then press "Settings". Press "Messaging".
2.
Press "Groups".
AUTO TEXT
To edit the Auto Text message you have saved.
1.
Press [Menu], then press "Settings". Press "Messaging".
2.
Press "Auto Text".
3.
Highlight a message from the list. To add a new Quick Text message, press [Options],
then press "Add New". To edit the Quick Text message you have selected, press .
Press to delete any characters you don't want then enter your text. Press
[Done] to save the text and return to the Auto Text list.
75
Page 76

CUSTOMIZING YOUR PHONE
4.
From the Auto Text list, press [Options] to select one of the following:
•Add new
• Edit
• Send text msg
• Erase
• Erase all
TEXT ENTRY
1.
Press [Menu], then press "Settings". Press "Messaging".
2.
Press "Text Entry".
3.
Highlight "Alphabet", "Number", or "T9 Word" then press . Press [Done] to
save the setting.
SIGNATURE
Create a signature that can be automatically inserted at the end of a text message.
1.
Press [Menu], then press "Settings". Press "Messaging".
2.
Press "Signature".
3.
Highlight “On” or “Off” then press . Press [Done] to save the setting.
76
Page 77

CUSTOMIZING YOUR PHONE
SAVE TO SENT FOLDER
1.
Press [Menu], then press "Settings". Press "Messaging".
2.
Press "Save To Sent Folder".
3.
Highlight “On” or “Off” then press . Press [Done] to save the setting.
• On: All sent messages saved in the Sent box.
• Off: All sent messages not saved in the Sent box.
AUTO ERASE
Automatically erases inbox messages when new messages arrived.
Inbox
1.
Press [Menu], then press "Settings". Press "Messaging".
2.
Press "Auto Erase".Press "Inbox".
3.
Highlight “On” or “Off” then press . Press [Done] to save the setting.
• On: Oldest message erased from inbox automatically when message is full.
• Off: Oldest message not erased from inbox automatically when message is full.
Sent
1.
Press [Menu], then press "Settings". Press "Messaging".
2.
Press "Auto Erase". Press "Sent”
3.
Highlight “On” or “Off” then press . Press [Done] to save the setting.
• On: Oldest message erased from inbox automatically when message is full.
• Off: Oldest message not erased from inbox automatically when message is full.
77
Page 78
CUSTOMIZING YOUR PHONE
NOTIFICATION
1.
Press [Menu], then press "Settings". Press "Messaging".
2.
Press "Notification".
3.
Highlight “Only Icon” or “Msg & Icon”, then press to select it.
4.
Press [Done] to save the setting.
CALLBACK NUMBER
Allows you to input a specific call back number. Call back numbers are used in text messaging so
the other party knows how to get back to you.
1.
Press [Menu], then press "Settings". Press "Messaging".
2.
Press "Callback number".
3.
Highlight one of the following options then press to select it:
•
None: No callback number will be sent.
•
My Mobile Number: Your phone's number will be sent.
•
Other: Input another phone number to be sent.
4.
Press [Done] to save the setting.
78
Page 79

CUSTOMIZING YOUR PHONE
CALL OPTIONS
CALL ANSWER
This feature allows you to select the answer mode.
1.
Press [Menu], then press "Settings".
Press "Call options", then press "Call answer".
2.
Highlight “Send key” or “Any Key”, then press to select it.
3.
Press [Done] to save the setting.
• Send key:
• Any key:
Press only to answer a call.
Press any key to answer an incoming call except , , , and .
AUTO ANSWER
This features allows you to set the phone to answer automatically when you're using a hands-free
headset.
1.
Press [Menu], then press "Settings".
Press "Call options", then press "Auto answer".
2.
Highlight “Off”, “5 sec”, “10 sec” or “15 sec”, then press to select it.
3.
Press [Done] to save the setting.
79
Page 80

CUSTOMIZING YOUR PHONE
GAME SETTINGS
BACKLIGHT
Select a Backlight mode to be used when you're playing games.
1.
Press [Menu], then press "Settings".
Press "Game settings", then press "Backlight".
2.
Select “5 sec”, “10 sec”, “20 sec”, “Always On”, or “Always Off” then press to select it.
3.
Press [Done] to save the setting.
VOLUME
Select the volume setting to be used when you're playing games.
1.
Press [Menu], then press "Settings".
Press "Game settings", then press "Volume".
2.
Adjust the volume by pressing / . Press [Done] to save the setting.
80
Page 81

CUSTOMIZING YOUR PHONE
SECURITY
The security settings allow you to prevent unauthorized use of your phone. The following settings
can be restricted.
LOCK PHONE
Turn on the lock to prevent the phone from being used without entering the password first.
1.
Press [Menu], then press "Settings".
Press "Security". Enter your password.
• The default password is the last 4 digits of your phone number.
2.
Press "Lock Phone".
3.
Highlight “Lock now”, “Power up” or “Unlock” then press to select it.
4.
Press [Done] to save the setting.
CHANGE LOCK CODE
You can change the 4-digit password to lock and unlock your phone.
1.
Press [Menu], then press "Settings".
Press "Security". Enter your password.
• The default password is the last 4 digits of your phone number.
2.
Press "Change lock code".
3.
Enter your lock code then enter your new lock code. Enter your new lock code again.
• IMPORTANT: Be sure to write down your lock code if you change it. Virgin Mobile cannot unlock
your phone for you if you forget your password.
81
Page 82
CUSTOMIZING YOUR PHONE
SPECIAL NUMBERS
This features allows you to set 3 phone numbers that can be called even when the phone is locked.
1.
Press [Menu], then press "Settings".
Press "Security". Enter your password.
• The default password is the last 4 digits of your phone number.
2.
Press "Special Numbers".
3.
Select a location and press [Add].
4.
Enter the phone number and press [Save] to save it to that location.
• When selecting a location, press [Erase] to erase the location entry or all location entries.
ERASE CONTACTS
Erase all the names and phone numbers in your contact list:
1.
Press [Menu], then press "Settings".
Press "Security". Enter your password.
• The default password is the last 4 digits of your phone number.
2.
Press "Erase contacts". A warning message stating that this function will delete all
contacts in your contact list is displayed.
3.
"Erase all contacts?" will be displayed. Select "Yes" then press to erase all contacts in
your phone.
82
Page 83

CUSTOMIZING YOUR PHONE
ERASE DOWNLOADS
1.
Press [Menu], then press "Settings".
Press "Security". Enter your password.
• The default password is the last 4 digits of your phone number.
2.
Press "Erase downloads".
3.
"Erase all downloads?" will be displayed. Select "Yes" then press to erase all
downloads saved to your phone.
OTHER
LOCATION
Your telephone is equipped with a Location feature for use in connection with location-based
services that may be available in the future. The Location Feature allows the network to detect
your position. Turning Location Off will hide your location from everyone except 911.
1.
Press [Menu], then press "Settings".
Press "Other", then press "Location".
• Turning location on will allow the network to detect your position using GPS technology, making
some Virgin Mobile applications and services easier to use. Turning location off will disable the GPS
location function for all purposes except 911, but will not hide your general location based on the cell
site serving your call. No application or services may use your location without your express
permission. GPS enhanced 911 is not available in all areas.
2.
Press [Next]. Highlight “On” or “Off”, then press to select it.
83
Page 84

CUSTOMIZING YOUR PHONE
3.
Press [Done] to save the setting.
• On:
Turning location “On” lets the network detect your where abouts using GPS.
• Off:
Turning location "Off" disables GPS- except for 911- but cell tower technology may still used to detect
your whereabouts for some features and basic telephone service.
84
Page 85

CHAPTER 10 USING TOOLS
CHAPTER 10
USING TOOLS
This section shows you how to use features that can help
you keep up with your contacts, schedules and
appointments.
85
Page 86

USING TOOLS
CALCULATOR
Your phone comes with two calculators: a standard calculator and a tip calculator.
STD CALCULATOR
Access the standard calculator:
1.
Press [Menu], then press "Tools".
Press "Calculator", then press "Std calculator".
2.
Enter numbers using your keypad, and use the following keys to enter mathematical functions:
• Press for Multiplication (x). Press for Division (÷). Press for Subtraction (-).
• Press for Addition (+). Press for a decimal point. Press [AC] to clear all numbers.
• Press to change a number from positive (+) to negative (-).
3.
Press to calculate the result.
For example, to calculate 5x2, enter 5 , press , enter 2 , then press to calculate the
result of 10.
TIP CALCULATOR
Access the Tip calculator:
1.
Press [Menu], then press "Tools".
Press "Calculator", then press "Tip calculator".
2.
Enter numbers using your keypad, and use the following keys to enter mathemetical functions:
• Press for Multiplication (x). Press for Division (÷). Press for Subtraction (-).
• Press for Addition (+). Press for a decimal point. Press to clear all numbers.
• Press for change the displayed number from positive (+) to negative (-) and vice versa.
86
Page 87

USING TOOLS
3.
Press to calculate the result.
For example, to calculate a 15% tip on a bill of $21.50, enter 21, press for the decimal
point, enter 50, then press , enter 15, then press to calculate a tip of $3.15.
ALARM CLOCK
1.
Press [Menu], then press "Tools".
Press "Alarm clock".
2.
Select Alarm 1, 2 or 3 to set a new alarm. To edit an existing alarm, select the alarm name.
Press [Set].
3.
The setting field will be highlighted. Press to select alarm options.
• Set: Press / to select alarm on or off.
• Time: Use the keypad to set a time for the alarm and to select “AM” or “PM”.
• Repeat: Press / to select Daily/Once/Mon to Fri/Sat to Sun.
• Snooze: Press / to select 5Min/10Min/15Min/20Min.
• Ring type: Press [Change] to select a ringtone for the alarm sound.
4.
To save an alarm setting press [Save].
87
Page 88

USING TOOLS
SCHEDULER
ADD NEW EVENT
1.
Press [Menu], then press "Tools".
Press "Scheduler".
2.
Press / / or to choose a date in the calendar.
Press [Add] to add an event to the calendar.
3.
The Schedule screen will be displayed. When the Title field is highlighted, enter the event title.
Then press [Save]. Press to move to the next fields. In the From field and To
field, edit the date and time by pressing / to the number and press the digit key you
want. Press for AM or PM.
In the Contents field, enter any notes or message for the event, then press [Done] to
go back to the Scheduler screen. In the Notice field, press / to select On Time,
Before 10 min, Before 20min, Before 30min. In the Snooze field, press / to select
5Min, 10Min, 15Min, or 20Min. In the Ring Type field, press to get the list of ringtones.
Highlight the ringtone you want and press [Select].
4.
Press [Save] to save the event or to return to the calendar.
5.
The date of the event will be marked on your calendar.
88
Page 89

STOPWATCH
You can simultaneously time up to 10 different events.
1.
Press [Menu], then press "Tools".
Press "Stopwatch".
2.
To measure a time period:
• To start, press [Start].
• To stop the timing, press [Stop]. To continue timing, press [Continue].
• Press [Lap] to save the time at one instance. You can show up to 10 times.
• To reset it, press [Reset].
WORLD TIME
1.
Press [Menu], then press "Tools".
Press "World time".
2.
Press / to scroll through the different cities.
3.
Press [Options] to select World time options:
USING TOOLS
• Set /Unset DST: Specifies whether the current time of the selected place is adjusted to daylight
• Set dual time: To set dual time.
4.
To return to the previous page and save current view city’s time information, press
[Close] to save the setting.
saving time.
89
Page 90

MEMO
90
Page 91

CHAPTER 11 GETTING HELP
CHAPTER 11
GETTING HELP
91
Page 92

GETTING HELP
CUSTOMER SUPPORT
To contact Virgin Mobile for information about your phone, account history, coverage area, and specific
features and services available to you:
• Go to www.virginmobileusa.com
• Dial *VM from your Virgin Mobile phone
• Dial 1-888-322-1122 from any phone
For questions about the phone features, refer to the materials provided with your phone, or visit
www.virginmobileusa.com.
92
Page 93

CHAPTER 12
WARRANTY
CHAPTER 12 WARRANTY
93
Page 94

WARRANTY
MANUFACTURER’S WARRANTY
12 MONTH LIMITED WARRANTY
UTStarcom Personal Communications (the Company) warrants to the original retail purchaser of this UTStarcom
handheld portable cellular telephone, that should this product or any part thereof during normal consumer
usage and conditions, be proven defective in material or workmanship that results in product failure within the
first twelve (12) month period from the date of purchase, such defect(s) will be repaired or replaced (with new
or rebuilt parts) at the Company’s option, without charge for parts or labor directly related to the defect(s).
The antenna, keypad, display, rechargeable battery and battery charger, if included, are similarly warranted for
twelve (12) months from date of purchase.
This Warranty extends only to consumers who purchase the product in the United States or Canada and it is not
transferable or assignable.
This Warranty does not apply to:
(a) Product subjected to abnormal use or conditions, accident, mishandling, neglect, unauthorized alteration,
misuse, improper installation or repair or improper storage;
(b) Product whose mechanical serial number or electronic serial number has been removed, altered or defaced.
(c) Damage from exposure to moisture, humidity, excessive temperatures or extreme environmental conditions;
(d) Damage resulting from connection to, or use of any accessory or other product not approved or authorized
by the Company;
(e) Defects in appearance, cosmetic, decorative or structural items such as framing and non-operative parts;
(f) Product damaged from external causes such as fire, flooding, dirt, sand, weather conditions, battery leakage,
blown fuse, theft or improper usage of any electrical source.
The Company disclaims liability for removal or reinstallation of the product, for geographic coverage, for
inadequate signal reception by the antenna or for communications range or operation of the cellular system as
a whole.
94
Page 95

WARRANTY
When sending your wireless device to UTStarcom Personal Communications for repair or service, please note
that any personal data or software stored on the device may be inadvertently erased or altered. Therefore, we
strongly recommend you make a back up copy of all data and software contained on your device before
submitting it for repair or service. This includes all contact lists, downloads (i.e. third-party software
applications, ringtones, games and graphics) and any other data added to your device. In addition, if your
wireless device utilizes a SIM or Multimedia card, please remove the card before submitting the device and store
for later use when your device is returned, UTStarcom Personal Communications is not responsible for and does
not guarantee restoration of any third-party software, personal information or memory data contained in, stored
on, or integrated with any wireless device, whether under warranty or not, returned to UTStarcom Personal
Communications for repair or service.
To obtain repairs or replacement within the terms of this Warranty, the product should be delivered with proof
of Warranty coverage (e.g. dated bill of sale), the consumer’s return address, daytime phone number and/or
fax number and complete description of the problem, transportation prepaid, to the Company at the address
shown below or to the place of purchase for repair or replacement processing.
In addition, for reference to an authorized Warranty station in your area, you may telephone in the United States
(800) 229-1235, and in Canada (800) 465-9672 (in Ontario call 416-695-3060).
THE EXTENT OF THE COMPANY’S LIABILITY UNDER THIS WARRANTY IS LIMITED TO THE REPAIR OR
REPLACEMENT PROVIDED ABOVE AND, IN NO EVENT, SHALL THE COMPANY’S LAIBILITY EXCEED THE
PURCHASE PRICE PAID BY PURCHASER FOR THE PRODUCT.
ANY IMPLIED WARRANTIES, INCLUDING ANY IMPLIED WARRANTY OF MERCHANTABILITY OR FITNESS FOR A
PARTICULAR PURPOSE, SHALL BE LIMITED TO THE DURATION OF THIS WRITTEN WARRANTY. ANY ACTION
FOR BREACH OF ANY WARRANTY MUST BE BROUGHT WITHIN A PERIOD OF 18 MONTHS FROM DATE OF
ORIGINAL PURCHASE. IN NO CASE SHALL THE COMPANY BE LIABLE FOR AN SPECIAL CONSEQUENTIAL OR
INCIDENTAL DAMAGES FOR BREACH OF THIS OR ANY OTHER WARRANTY, EXPRESS OR IMPLIED,
WHATSOEVER. THE COMPANY SHALL NOT BE LIABLE FOR THE DELAY IN RENDERING SERVICE UNDER THIS
WARRANTY OR LOSS OF USE DURING THE TIME THE PRODUCT IS BEING REPAIRED OR REPLACED.
95
Page 96

WARRANTY
No person or representative is authorized to assume for the Company any liability other than expressed herein
in connection with the sale of this product.
Some states or provinces do not allow limitations on how long an implied warranty lasts or the exclusion or
limitation of incidental or consequential damage so the above limitation or exclusions may not apply to you.
This Warranty gives you specific legal rights, and you may also have other rights, which vary from state to state
or province to province.
IN USA: UTStarcom Personal Communications 555 Wireless Blvd.
IN CANADA: UTStarcom Canada Company
Hauppauge, NY 11788
(800) 229-1235
5535 Eglinton Avenue West
Suite# 234
Toronto, ON M9C 5K5
(800) 465-9675
96
Page 97

CHAPTER 13 SAFETY
CHAPTER 13
SAFETY
Read this important safety information before using your
phone.
97
Page 98

SAFETY
SAFETY INFORMATION FOR WIRELESS HANDHELD PHONES
Read This Information Before Using Your Handheld Portable Cellular Telephone
DRIVING SAFETY
Talking on the phone while driving is extremely dangerous and is illegal in some states. Remember, safety
comes first. Check the laws and regulations on the use of phones in the areas where you drive. Always obey
them. If you must use your phone while driving, please:
•
Give full attention to driving. Driving safely is your first responsibility.
•
Use hands-free operation and/or one-touch, speed dialing, and auto answer modes.
•
Pull off the road and park before making or answering a call.
An air bag inflates with great force. DO NOT place objects, including either installed or portable wireless
equipment, in the area over the air bag or in the air bag deployment area. If in-vehicle wireless equipment is
improperly installed and the air bag inflates, serious injury could result.
WARNING!:
ELECTRONIC DEVICES
Your wireless handheld portable telephone is a low power radio transmitter and receiver. When it is ON, it
receives and also sends out radio frequency (RF) signals.
Most modern electronic equipment is shielded from RF energy. However, certain electronic equipment may not
be shielded against the RF signals from your wireless phone. Therefore, use of your phone must be restricted in
certain situations.
PACEMAKERS
The Health Industry Manufacturers Association recommends that a minimum separation of six (6”) inches be
maintained between a handheld wireless phone and a pacemaker to avoid potential interference with the
pacemaker. These recommendations are consistent with the independent research by and recommendations of
Wireless Technology Research.
Failure to follow these instructions could lead to serious personal injury and possible property
damage.
98
Page 99

SAFETY
Never come closer than six (6) inches to a person with a heart pacemaker implant when using your phone.
Doing so could result in interference with the function of the pacemaker.
Persons with pacemakers :
•
ALWAYS keep the phone more than six inches from your pacemaker when the phone is turned on.
•
Do not carry the phone in a breast pocket.
•
Use the ear opposite the pacemaker to minimize the potential for interference.
•
If you have any reason to suspect that interference is taking place, turn your phone OFF immediately.
HEARING AIDS
Some digital wireless phones may interfere with some hearing aids. In the event of such interference, you may
want to consult your service provider (or call the customer service line to discuss alternatives).
OTHER MEDICAL DEVICES
If you use any other personal medical device, consult the manufacturer of your device to determine if they are
adequately shielded from external RF energy. Your physician may be able to assist you in obtaining this
information.
HOSPITALS AND HEALTH CARE FACILITIES
Turn your phone OFF in health care facilities when any regulations posted in these areas instruct you to do so.
Hospitals or healthcare facilities may be using equipment that could be sensitive to external RF energy.
VEHICLES
RF signals may affect improperly installed or inadequately shielded electronic systems in motor vehicles. Check
with the manufacturer or its representative regarding your vehicle. You should also consult the manufacturer of
any equipment that has been added to your vehicle.
POSTED FACILITIES
Turn your phone OFF where posted notices so require.
99
Page 100

SAFETY
AIRCRAFT
FCC regulations prohibit using your phone while in the air. Turn your phone OFF before boarding an aircraft.
Always request and obtain prior consent and approval of an authorized airline representative before using your
phone aboard an aircraft. Always follow the instructions of the airline representative whenever using your
phone aboard an aircraft, to prevent any possible interference with airborne electronic equipment.
BLASTING AREAS
To avoid interfering with blasting operations, turn your phone OFF when in a “blasting area” or in areas posted
“Turn off two-way radio”. Obey all signs and instructions.
POTENTIALLY EXPLOSIVE ATMOSPHERES
Turn your phone OFF when in any area with a potentially explosive atmosphere and obey all signs and
instructions. Sparks in such areas could cause an explosion or fire resulting in bodily injury or even death.
Areas with a potentially explosive atmosphere are often, but not always, clearly marked. They include fueling
areas such as gas stations; below deck on boats; fuel or chemical transfer or storage facilities; vehicles using
liquefied petroleum gas (such as propane or butane); areas where the air contains chemicals or particles, such
as grain, dust, or metal powders; and any other area where you would normally be advised to turn off your
vehicle’s engine.
SAFETY INFORMATION FOR FCC RF EXPOSURE
Warning! Read this information before using your phone.
In August 1996 the Federal Communications Commission (FCC) of the United States with its action in Report
and Order FCC 96-326 adopted an updated safety standard for human exposure to radio frequency
electromagnetic energy emitted by FCC regulated transmitters. Those guidelines are consistent with the safety
standard previously set by both U.S. and international standards bodies. The design of this phone complies with
the FCC guidelines and these international standards.
BODY-WORN OPERATION
This device was tested for typical body-worn operations with the back of the phone kept 15 mm from the body.
100
 Loading...