

Page 1

TABLE OF CONTENTS
CHAPTER 1. BEFORE USING YOUR PHONE
PACKAGE CONTENTS ............................................................................................ 6
HANDSET DESCRIPTION ........................................................................................ 7
THE FUNCTION KEYS .......................................................................................................... 8
DISPLAY INDICATORS .......................................................................................................... 9
BATTERY USAGE .................................................................................................12
BATTERY INSTALLATION.................................................................................................... 12
BATTERY REMOVAL ........................................................................................................... 12
BATTERY CHARGING ......................................................................................................... 13
USING SIM CARD ................................................................................................ 14
INSERTING THE SIM CARD ................................................................................................ 14
USING microSD CARD .........................................................................................15
INSERTING THE microSD CARD ......................................................................................... 15
REMOVING THE microSD CARD ........................................................................................ 15
USING QWERTY KEYPAD .................................................................................... 16
BLOCKING ANTENNA WHILE MAKING A CALL ...................................................18
BATTERY HANDLING INFORMATION...................................................................19
IEEE STANDARD FOR RECHARGEABLE BATTERIES FOR CELLULAR TELEPHONES .............. 19
CTIA BATTERY CERTIFICATION REQUIREMENTS ............................................................... 20
CHAPTER 2. BASIC OPERATION
TURNING THE PHONE ON/OFF ............................................................................ 22
SWITCHING TO LOCK MODE ............................................................................... 22
USING SHORTCUT BUTTON ................................................................................. 22
USING IDLE SCREEN ITEM ..................................................................................23
USING THE TOUCHSCREEN .................................................................................24
MENU SUMMARY ............................................................................................... 26
12-UP MAIN MENU........................................................................................................... 26
LANDSCAPE MODE MENU ................................................................................................ 27
MAKING A CALL................................................................................................................ 29
ANSWERING CALLS .......................................................................................................... 30
WAIT/PAUSE FEATURE ...................................................................................................... 30
3-WAY CALLING ................................................................................................................ 31
CALLER ID FUNCTION ....................................................................................................... 31
CALL WAITING FUNCTION ................................................................................................ 31
ADJUSTING VOLUME ........................................................................................................ 32
1
Page 2

TABLE OF CONTENTS
MAKE AN INTERNATIONAL CALL ...................................................................................... 32
DURING A CALL ..................................................................................................33
MUTE (UNMUTE) .............................................................................................................. 33
SPEAKERPHONE ................................................................................................................ 33
3-WAY CALLS .................................................................................................................... 33
VOICE MEMO .................................................................................................................... 34
CALL HISTORY ................................................................................................................... 34
FIND NAME ....................................................................................................................... 34
MESSAGING ...................................................................................................................... 34
BLUETOOTH....................................................................................................................... 34
MAKING AN EMERGENCY CALL .........................................................................35
911 IN LOCK MODE .......................................................................................................... 35
911 USING ANY AVAILABLE SYSTEM ................................................................................ 35
CHAPTER 3. MEMORY FUNCTION
STORING A PHONE NUMBER ..............................................................................38
ENTERING LETTERS, NUMBERS & SYMBOLS ....................................................... 39
STANDARD INPUT MODE .................................................................................................. 41
NUMERIC MODE ............................................................................................................... 42
SYMBOL MODE ................................................................................................................. 42
EMOTICON MODE ............................................................................................................. 42
MAKING A CALL THROUGH THE CONTACT LIST .................................................. 43
ONE-TOUCH DIALING ....................................................................................................... 43
CHAPTER 4. MENU FUNCTION
AT&T MUSIC ....................................................................................................... 46
MUSIC PLAYER .................................................................................................................. 46
SHOP MUSIC ..................................................................................................................... 47
MUSIC ID .......................................................................................................................... 48
XM RADIO ......................................................................................................................... 48
MUSIC VIDEOS .................................................................................................................. 48
THE BUZZ .......................................................................................................................... 49
COMMUNITY .................................................................................................................... 49
MUSIC APPS ...................................................................................................................... 49
MESSAGING ........................................................................................................ 50
CREATE NEW MESSAGE .................................................................................................... 50
2
Page 3

TABLE OF CONTENTS
INBOX ............................................................................................................................... 51
OUTBOX ............................................................................................................................ 51
SENT ................................................................................................................................. 52
DRAFTS .............................................................................................................................52
EMAIL ............................................................................................................................... 53
IM ..................................................................................................................................... 53
VOICE MAIL ...................................................................................................................... 53
YELLOWPAGES ....................................................................................................54
MEDIA NET .........................................................................................................55
MEDIA NET HOME ............................................................................................................ 55
FAVORITES ........................................................................................................................ 55
ENTER URL ........................................................................................................................ 56
HISTORY ............................................................................................................................ 56
SETTINGS .......................................................................................................................... 57
MEDIA MALL ....................................................................................................... 58
SHOP RINGTONES ............................................................................................................. 58
SHOP GAMES .................................................................................................................... 58
SHOP GRAPHICS ............................................................................................................... 58
SHOP MULTIMEDIA ........................................................................................................... 58
SHOP APPLICATIONS ......................................................................................................... 59
SHOP THEMES ................................................................................................................... 59
SHOP VIDEO ...................................................................................................................... 59
MEDIA NET HOMEPAGE .................................................................................................... 59
CELLUAR VIDEO ..................................................................................................60
MY STUFF ...........................................................................................................61
RINGTONES&AUDIO .......................................................................................................... 61
IMAGES ............................................................................................................................. 62
VIDEOS .............................................................................................................................. 63
ADDRESS BOOK .................................................................................................. 64
FIND NAME ....................................................................................................................... 64
ADD NEW .......................................................................................................................... 69
GAMES&APPS ..................................................................................................... 70
GAMES .............................................................................................................................. 70
APPS ................................................................................................................................. 70
AT&T GPS ............................................................................................................ 71
ORGANIZER&TOOLS ...........................................................................................72
3
Page 4

TABLE OF CONTENTS
SCHEDULER ..................................................................................................... 72
ALARM ............................................................................................................ 73
CALCULATOR ...................................................................................................74
TIP CALCULATOR ............................................................................................. 74
TO DO .............................................................................................................. 74
WORLD TIME ...................................................................................................75
NOTEPAD .........................................................................................................75
UNIT CONVERTER ............................................................................................ 76
VOICE MEMO .................................................................................................. 77
STOPWATCH .................................................................................................... 78
SETTINGS ............................................................................................................ 79
PROFILE ............................................................................................................................ 79
DISPLAY ............................................................................................................................ 80
BLUETOOTH....................................................................................................................... 82
DATE & TIME ..................................................................................................................... 83
PHONE ..............................................................................................................................84
CALL .................................................................................................................................. 86
SECURITY .......................................................................................................................... 89
APPLICATIONS .................................................................................................................. 91
SOFTWARE UPDATE .......................................................................................................... 93
VOICE COMMANDS ............................................................................................ 94
CAMERA ............................................................................................................. 95
CHAPTER 5. SAFETY INFORMATION
SAFETY ................................................................................................................ 98
WARRANTY ....................................................................................................... 126
4
Page 5

CHAPTER 1
BEFORE USING YOUR PHONE
CHAPTER 1
BEFORE
USING
YOUR PHONE
This chapter provides important information about your
UTStarcom handset including:
Package Contents
Handset Description
Battery Usage
Usage SIM Card
Usage microSD Card
Usage Qwerty Keypad
Blocking Antenna while Making a Call
Battery Handling Information
5
Page 6
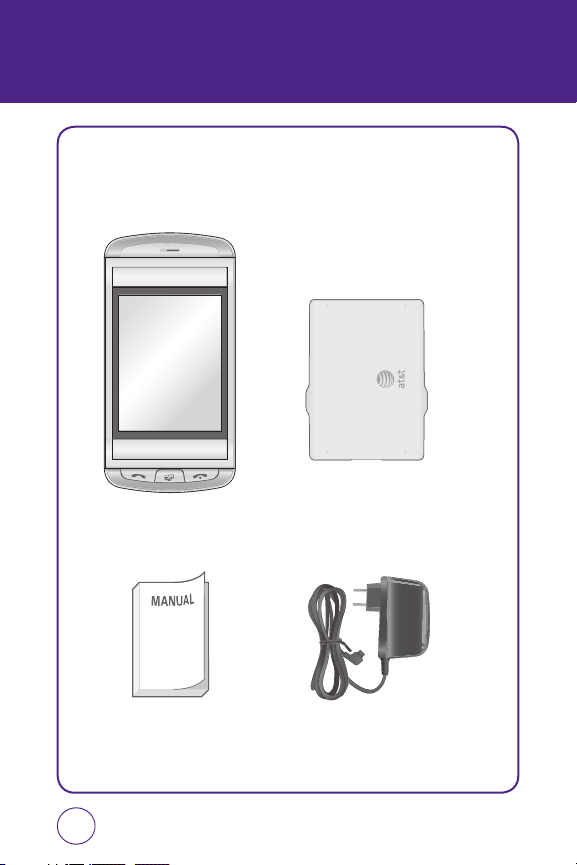
PACKAGE CONTENTS
This package should include all items pictured below.
If any are missing or different, immediately contact the retailer where
you purchased the phone.
Handset Standard Battery
Manual AC Charger
6
Page 7
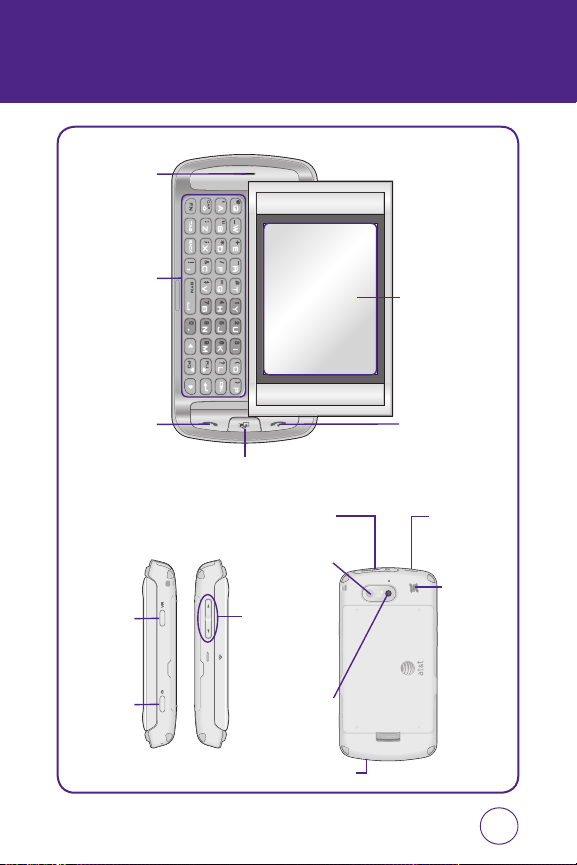
HANDSET DESCRIPTION
Earpiece
QWERTY
Keypad
SEND Key END Key
Shortcuts Key
Main Display
with Touch
Screen
AVR Key
Camera
Key
microSD/Ear Jack
or Charger slot
Camera
Lens
Volume
Up/Down
Keys
Mirror
Microphone
Power and
Hold Key
External
Speaker
7
Page 8
HANDSET DESCRIPTION
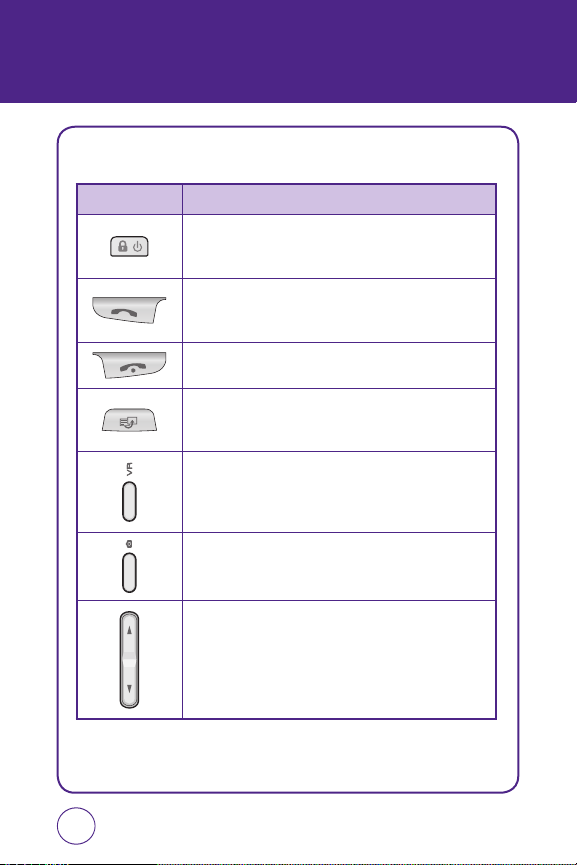
THE FUNCTION KEYS
KEY Discriptions
End Key
Press and hold to turn the phone on/off. Press to lock the
phone.
Send Key
Press to make or receive a call or in idle mode, press to
access the All calls list.
End Key
Press to terminate a call or to return to idle mode.
Shortcut Key
Press to launch the Quick List such as Main Menu, Call,
Messaging, Browser, Music Player.
Voice Command Key
Activates Voice Command. Press enters voice command state
as default.
Camera Key
Press to launch the camera application.
Side Volume Key
Allows you to adjust the ringer volume in standby mode or
adjust the voice volume during a call. The volume key can
also be used to scroll up or down to navigate through the
different menu options. Press to ignore an incoming call and
mute the ringer.
8
Page 9
HANDSET DESCRIPTION
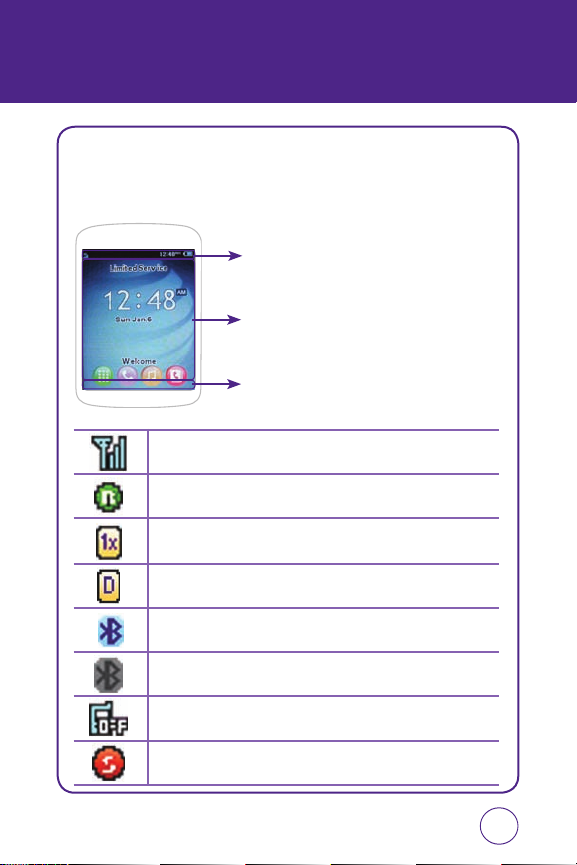
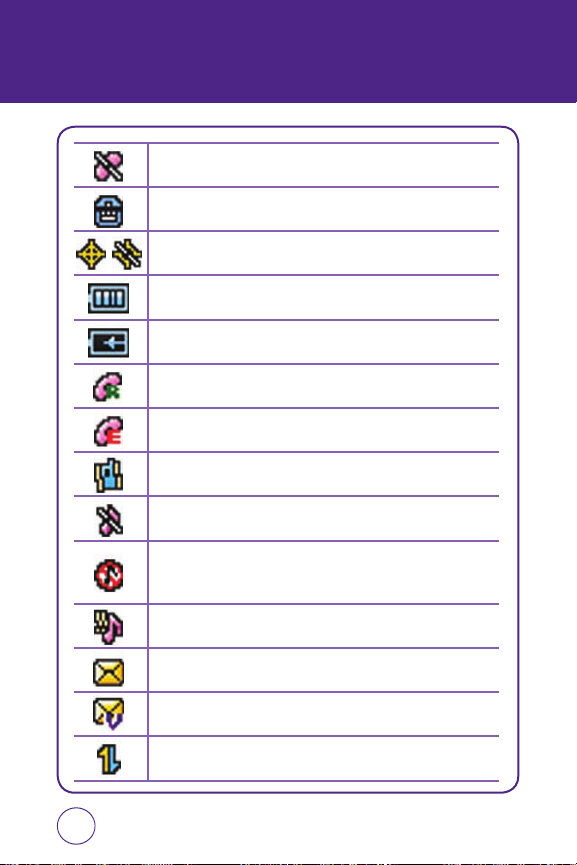
DISPLAY INDICATORS
The idle mode display appears when you are not on a call or using the
menu. You must be in idle mode to dial a phone number.
Display Indicators
Display various icons.
Text & Graphic Area
Soft Key Indicators
Shows the functions currently assigned to each Option
Button and displays some icons.
Signal Strength
Current signal strength: the more lines, the stronger the signal.
Roaming
Phone is out of home area.
1x mode
Phone is in the 1x service area.
Digital mode
Phone is in the digital service area.
Bluetooth connected
Indicates Bluetooth Connected.
Bluetooth on
Indicates Bluetooth mode.
Airplane mode
Transmitting and receiving information is restricted.
Data securtiy
Appears when the phone is accesing a secure Web Site.
9
Page 10
HANDSET DESCRIPTION
No service
Indicates the phone cannot receive a signal from the system.
TTY mode
Indicates your phone is active in TTY mode.
GPS icon
Indicates the Location Service of your phone is disabled/enabled.
Battery
Battery charging level — the more blocks, the stronger the charge.
Battery charging
Indicates the battery is charging.
Roaming call
Blinks when an roaming call is in progress.
Emergency call
Blinks when an emergency call is in progress.
Vibrate
Phone will vibrate to notify you of an incoming call.
Ringer off
Indicates the ringer volume is set to off.
Silence all
Phone is set to Silent - no sound will be made to notify you of incoming
calls or messages.
Level 5 or 1 & vibrate
Phone is set to ring and vibrate.
New text message
Indicates you have new text messages.
New voice messages
Indicates you have both text and voicemail messages.
Data service
Downloading is in progress.
10
Page 11
HANDSET DESCRIPTION
1x mode
Phone is in the 1x service area.
Digital mode
Phone is in the digital service area.
Bluetooth connected
Indicates Bluetooth Connected.
Bluetooth on
Indicates Bluetooth mode.
Airplane mode
Transmitting and receiving information is restricted.
Data securtiy
Appears when the phone is accesing a secure Web Site.
Voice privacy
Indicates Voice Privacy mode.
Alarm & Schedule
Appears when either a calendar or an alarm is set.
Lock
Indicates your phone is locked.
11
Page 12
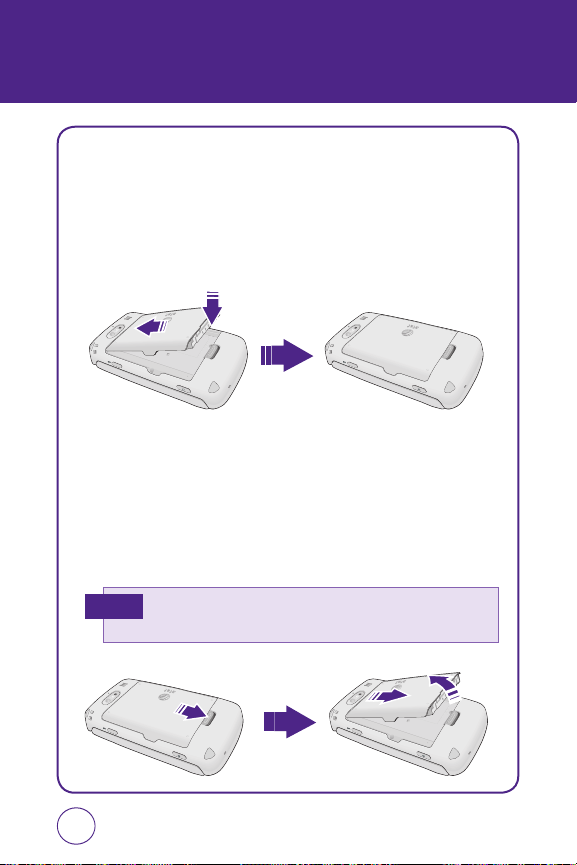
BATTERY USAGE
BATTERY INSTALLATION
1.
Place the battery (label side up) on the back of the phone so the
metal contacts match up on the battery and in the battery cavity.
2.
Slide the battery down into the battery cavity until it locks into
place.
BATTERY REMOVAL
1.
Push up the release latch button, then slide the battery off the
phone.
2.
Lift the battery up and out of the battery cavity from the top of the
battery.
If the battery is not correctly placed in the compartment, the handset
Note
will not turn on and/or the battery may detach during use.
12
Page 13
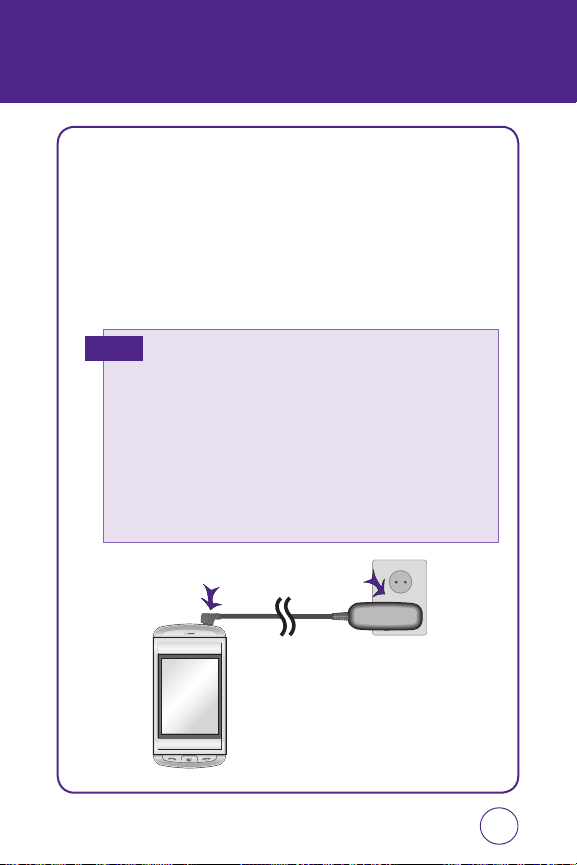
BATTERY USAGE
BATTERY CHARGING
POWER CONNECTION
1.
Plug the AC Charger into a standard outlet.
2.
Plug the other end of the AC Charger into the charging port on your
the upper side of your phone. The battery must be installed onto the
phone to work properly.
• When you charge the battery with the phone powered off, you will
Hot Key
see a charging status screen. You cannot operate the phone until it is
powered on.
• The battery is not charged at the time of purchase.
• Fully charge the battery before use.
• It is more efficient to charge the battery with the handset powered
off.
• The battery must be connected to the phone in order to charge it.
• Battery operating time gradually decreases over time.
• If the battery fails to perform normally, you may need to replace the
battery.
13
Page 14
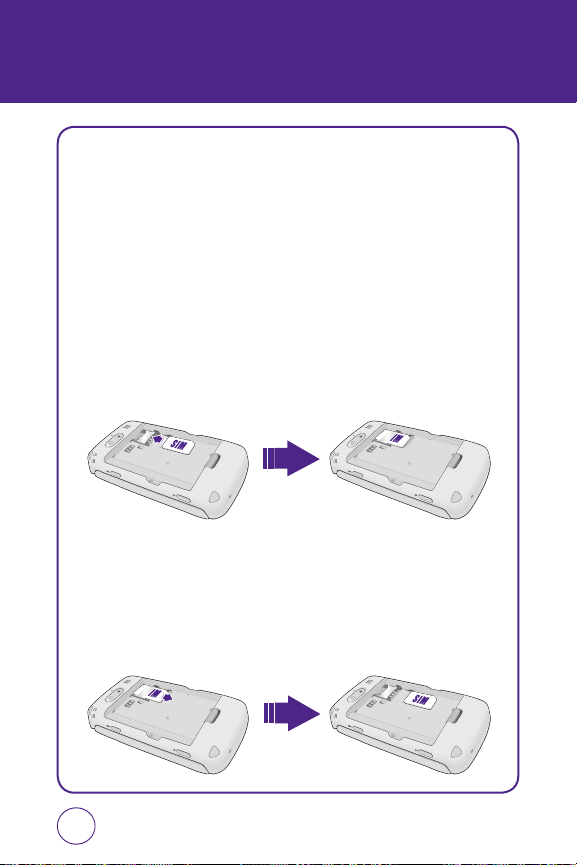
USING SIM CARD
INSERTING THE SIM CARD
You’ll always need a SIM card to use your mobile. This contains important
information about your mobile and network. The message “Insert SIM”
appears when the SIM card is not installed. Please take care of your SIM
card and don’t keep it near magnetic and electronic devices as this can
interfere with data storage and network operations.
1.
Lift the battery out of the mobile.
2.
Slide the SIM card in under the metal grooves in the SIM card slot.
Make sure the SIM card’s metal contacts are facing down and the cut
corner is at the upper left.
REMOVING THE SIM CARD
1.
Lift the battery out of the mobile.
2.
To remove the SIM card, slide it away from socket.
14
Page 15
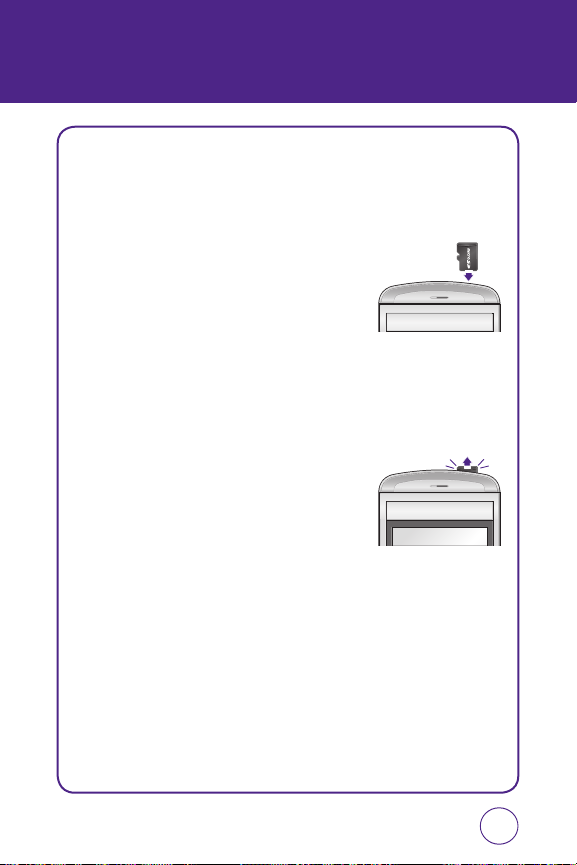
USING microSD CARD
INSERTING THE microSD CARD
The microSD card stores sounds, images, photos and videos, music, and
other files. To install your microSD card, use the following steps:
1.
With the microSD card slot opened, and
the gold contacts facing down, insert the
microSD card into the slot.
2.
Push the card in until it it clicks into place.
Close the microSD card slot.
REMOVING THE microSD CARD
To remove the microSD card, use the following steps:
1.
Open the microSD card slot. Use your
thumb to press and release the microSD
card. It will pop-out to allow you to remove
the card.
2.
Remove the card and close the microSD
card slot.
15
Page 16
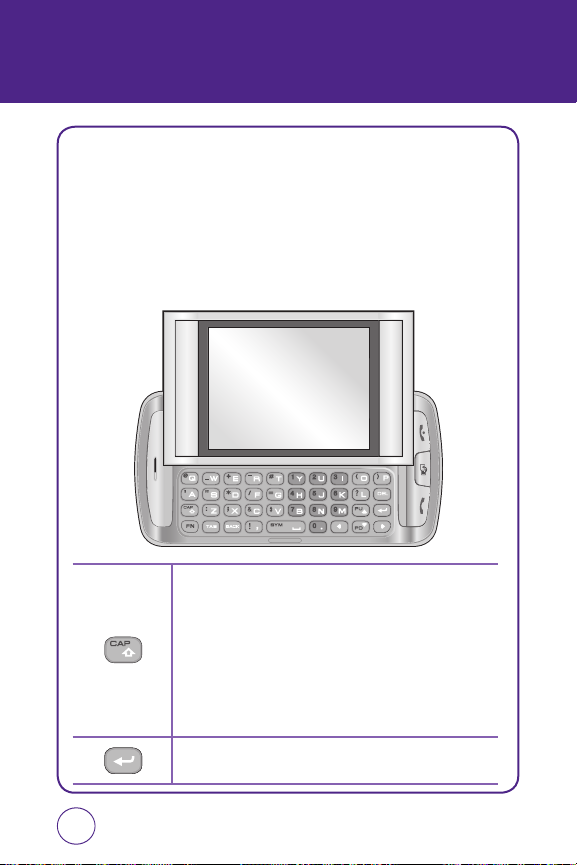
USING QWERTY KEYPAD
Your phone, with a specifically designed QWERTY keyboard, that
provides a superior typing experience on a small handheld for easy and
comfortable text writing. You can use all of the phone functions with the
keyboard either closed or open. When you open the keyboard you have
the extra benefit of a full messaging keyboard. The handheld includes
a fully-functional QWERTY keyboard you can use to compose text for
e-mail messages, notes, and so on.
Caps/Shift Key
To type upper-case letters, hold down the Shift key and then press
one or more letter keys. To type upper-case letters continuously,
use the CAPS-LOCK mode. To change to the CAPS-LOCK mode,
double-tap the Shift key. Once the CAPS-LOCK mode is set, you
can type upper-case letters only. To deactivate, double-tap the
Shift key again. To type an upper-case letter for the first letter of
a word only, simply press the Shift key once. Then, the first letter
you type will be upper case while the rest will be lower-case.
Enter Key
Press the Enter key to insert a line break.
16
Page 17
USING QWERTY KEYPAD
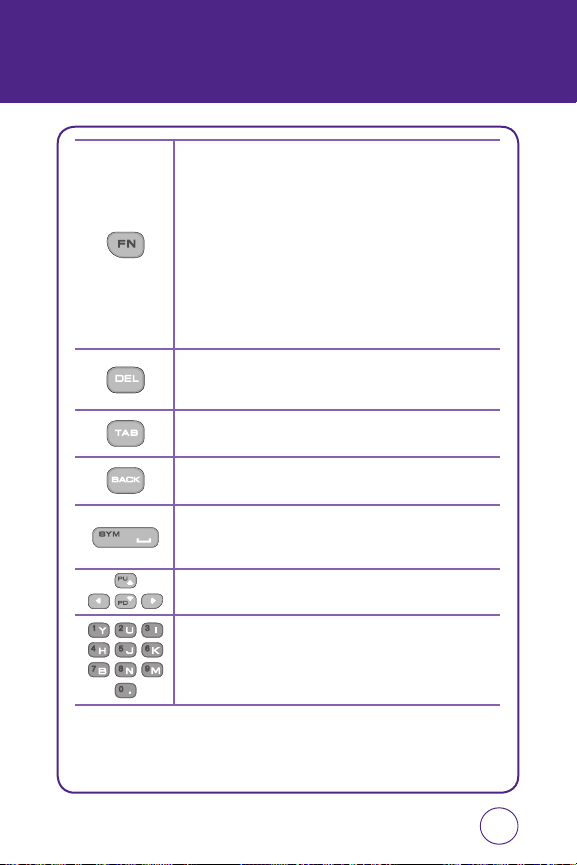
FN Key
To type a special character or numbers, press the applicable key
while holding down the FN key. To type special characters or
numbers consecutively, use the FN-LOCK mode. To change to the
FN-LOCK mode, double-tap the FN key. You can type special
characters or numbers only in this mode. To deactivate, double-tap
the FN key again. To type a special character or number for the
first letter of a word only, simply press the FN key once. Then, the
first letter you type will be a special character or number while
the rest will be normal letters. To type a special character that is
not placed on the keyboard, press FN + Space.
DEL Key
Press the Delete key to delete a character to the left of the text
cursor.
TAB Key
Press to return to the Home screen.
Back Key
Press to return to the previous page.
Sym/Space Key
Press the Space key to type a blank space.
Press FN Key + Space Key, to open the Symbol Pad.
Arrow Key
Press the arrow keys for directional movement.
Numeric Key
Press FN Key + Corresponding Key, to enter number.
17
Page 18
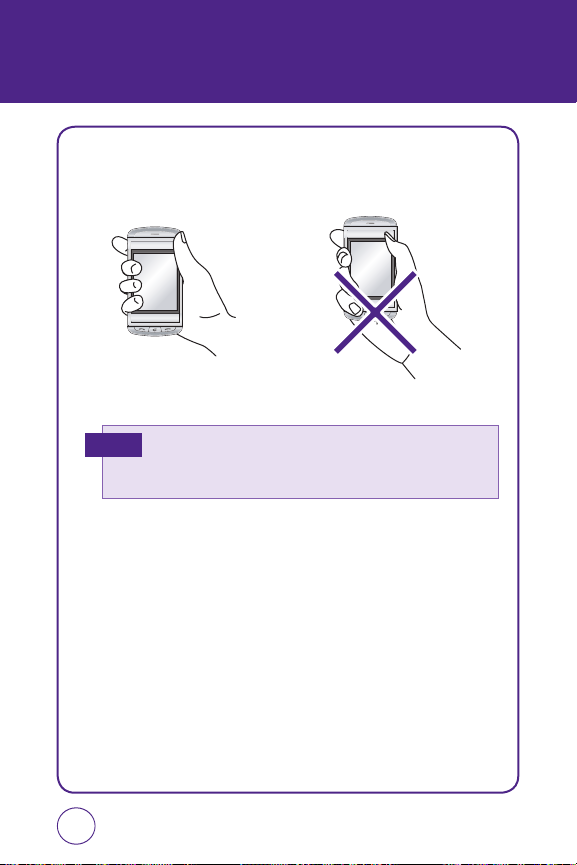
BLOCKING ANTENNA WHILE
MAKING A CALL
CORRECT/INCORRECT FINGER
POSITION
CORRECT FINGER POSITION INCORRECT FINGER POSITION
Your phone is equipped with an intenna. For optimal call quality, hold
Note
the phone by the gripped edges on the side and avoid touching the top
and bottom of the phone.
18
Page 19

BATTERY HANDLING INFORMATION
IEEE STANDARD FOR RECHARGEABLE
BATTERIES FOR CELLULAR
TELEPHONES
• Do not disassemble or open, crush, bend or deform, puncture, or shred.
• Do not modify or remanufacture, attempt to insert foreign objects into
the battery, immerse or expose to water or other liquids, or expose to
fire, explosion, or other hazard.
• Only use the battery for the system for which it was specified.
• Only use the battery with a charging system that has been qualified
with the system per this standard. Use of an unqualified battery or
charger may present a risk of fire, explosion, leakage, or other hazard.
• Do not short circuit a battery or allow metallic or conductive objects to
contact the battery terminals.
• Replace the battery only with another battery that has been qualified
with the system per this standard. Use of an unqualified battery may
present a risk of fire, explosion, leakage, or other hazard.
• Promptly dispose of used batteries in accordance with local
regulations.
• Battery usage by children should be supervised.
• Provide an explanation of security implementation, per 10.2.1.
• Avoid dropping the phone or battery. If the phone or battery is
dropped, especially on a hard surface, and the user suspects damage,
take it to a service center for inspection.
• Improper battery use may result in a fire, explosion, or other hazard.
Foreign Objects
Ensure precautions were taken to minimize the potential for
foreign objects and / or liquids to enter the host device and
cause a short circuit either during the manufacturing process
or end-user operation.
19
Page 20

BATTERY HANDLING INFORMATION
CTIA BATTERY CERTIFICATION
REQUIREMENTS
• Do not disassemble or open crush, bend or deform, puncture or shred
• Do not modify or remanufacture, attempt to insert foreign objects into
the battery, immerse or expose to water or other liquids, expose to fire,
explosion or other hazard.
• Only use the battery for the system for which it is specified
• Only use the battery with a charging system that has been qualified
with the system per this standard. Use of an unqualified battery or
charger may present a risk of fire, explosion, leakage, or other hazard.
• Do not short circuit a battery or allow metallic conductive objects to
contact battery terminals.
• Replace the battery only with another battery that has been qualified
with the system per this standard, IEEE-Std-1725-200x. Use of an
unqualified battery may present a risk of fire, explosion, leakage or
other hazard.
• Promptly dispose of used batteries in accordance with local
regulations
• Battery usage by children should be supervised.
• Avoid dropping the phone or battery. If the phone or battery is
dropped, especially on a hard surface, and the user suspects damage,
take it to a service center for inspection.
• Improper battery use may result in a fire, explosion or other hazard.
• For those host devices that utilize a USB port as a charging source, the
host device’s user manual shall include a statement that the phone
shall only be connected to products that bear the USB-IF logo or have
completed the USB-IF compliance program.
20
Page 21

CHAPTER 2
BASIC OPERATION
CHAPTER 2
BASIC
OPERATION
This chapter addresses and explains the basic features of your
phone including:
Basic Operation
Menu Summary
Basic Functions
During a Call
Making an Emergency Call
21
Page 22
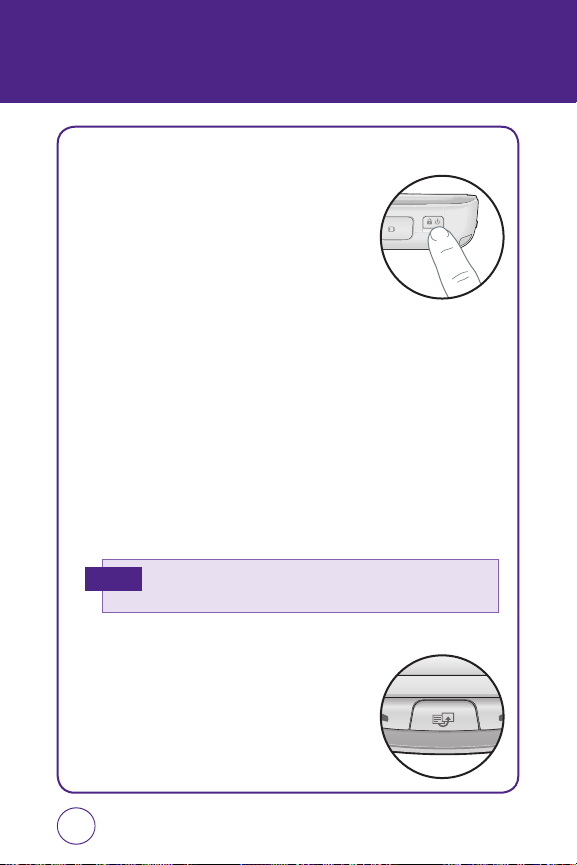
BASIC OPERATION
TURNING THE PHONE ON/OFF
1.
To turn on the power, press and hold the POWER
button for a few seconds until power on AT&T
animation appears and the melody begins to
play at same time.
2.
To turn off the power, press and hold the
POWER button for a few seconds, then tap Yes icon.
3.
Power off AT&T animation appears and the melody begins to play
at same time.
SWITCHING TO LOCK MODE
Press the POWER button turns off the display temporarily and blinking
Lock Icon. You will still be able to receive messages and calls while your
device is in Lock Mode. Press the Lock Icon and Touch the Falling Key
or open QWERTY keyboard or press Shortcuts button will wake up your
device.
Your device also automatically goes into sleep mode when you leave
Note
the device idle after a certain amount of time.
USING SHORTCUT BUTTON
You can quickly access a few shortcut programs are
added by default between running programs and
stop programs when you do not need to use them.
(Main Menu, Call, Messaging, Browser, Music
Player).
22
Page 23
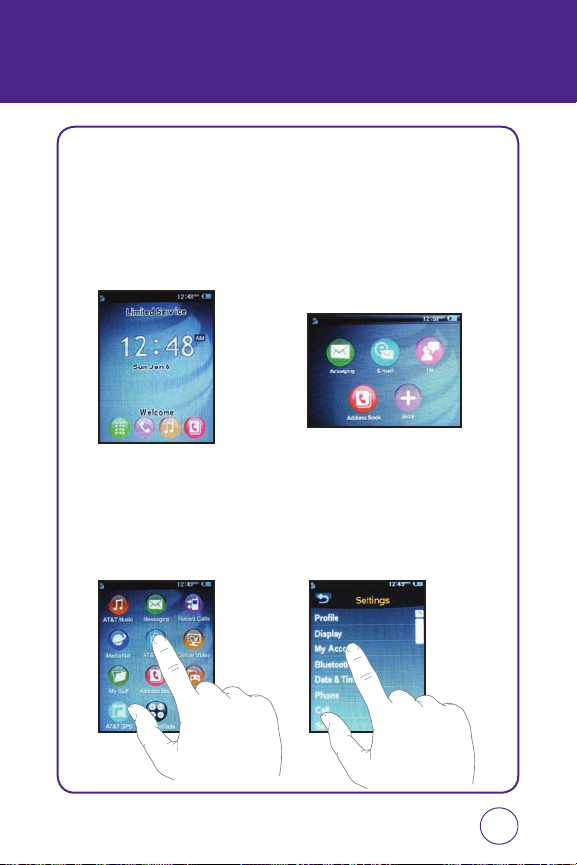
BASIC OPERATION
USING IDLE SCREEN ITEM
From the Idle screen, you can access Main Menu, Call, AT&T Music and
Address Book.
From the Landscape mode screen, you can access Messaging, E-mail, IM,
Address Book and More.
USING THE TOUCHSCREEN
TO SELECT SCREEN MENU ITEM
1.
Tap any application or sub menu items to open it.
23
Page 24
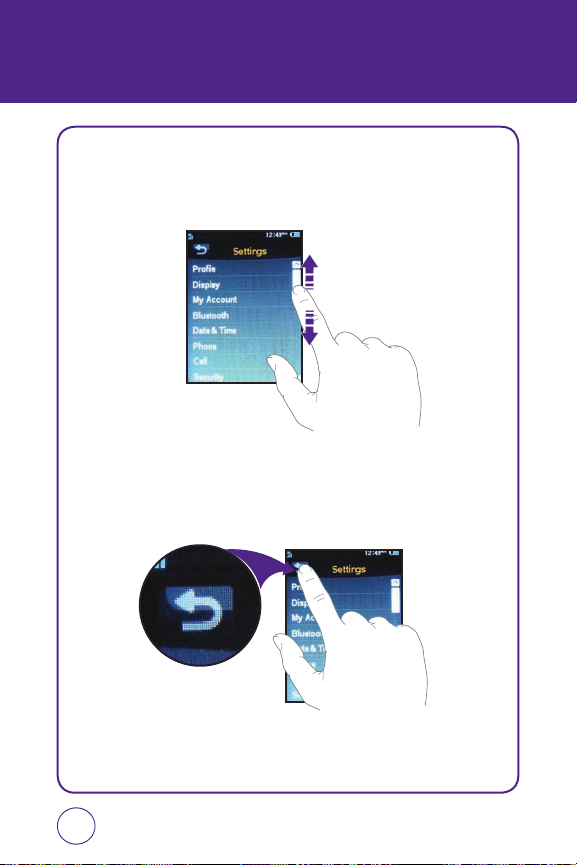
BASIC OPERATION
TO USING SCROLL BAR
1.
Tap and hold scroll bar and drag up or down. On some screens such
as webpages, you can also scroll side to side.
TO RETURN TO THE PREVIOUS SCREEN
1.
Tap return button.
24
Page 25
BASIC OPERATION
MAKING A CALL WITH SCREEN DIAL BUTTON
1.
Simply touch the screen dial button with your finger to enter the
phone number.
TO RETURN TO THE IDLE SCREEN
1.
Press the END key below the display at any time
to return to the IDLE screen.
25
Page 26

MENU SUMMARY
12-UP MAIN MENU
1. AT&T Music
1.1. Music Player
1.1.1. Now Playing
1.1.2. All Music
1.1.3. Albums
1.1.4. Artists
1.1.5. Play List
1.1.6. Genres
1.1.7. Settings
1.2. Shop Music
1.3. Music ID
1.4. XM Radio
1.5. Music Videos
1.6. The Buzz
1.7. Community
1.8. Music Apps
2. Messaging
2.1. Create New Message
2.2. Inbox
2.3. Outbox
2.4. Sent
2.5. Drafts
3. Yellowpages
4. MEdia Net
4.1. MEdia Net Home
4.2. Favorites
4.3. Enter URL
4.4. History
4.5. Settings
5. MEdia Mall
5.1. Shop Ringtones
5.2. Shop Games
5.3. Shop Graphics
5.4. Shop Multimedia
5.5. Shop Applications
5.6. Shop Video
5.7. MEdia Net Homepage
6. Celluar Video
7. My Stuff
7.1. Ringtones&Audio
7.2. Images
7.3. Videos
8. Address Book
9. Games&Apps
9.1. Games
9.2. Apps
10. AT&T GPS
11. Organizer&Tools
11.1. Scheduler
11.2. Alarm
11.3. Calculator
11.4. Tip Calculator
11.5. To Do
11.6. World Time
11.7. Notepad
11.8. Unit Converter
11.9. Voice Memo
11.10. Stopwatch
12. Settings
12.1. Profile
12.1.1. General
12.1.2. Outdoor
12.1.3. Meeting
26
Page 27

MENU SUMMARY
12.1.4. Headset
12.1.5. Flight
12.2. Display
12.2.1. Wallpaper
12.2.2. Style
12.2.3. Greeting Banner
12.2.4. Backlight
12.2.5. Theme
12.3. Bluetooth
12.3.1. Bluetooth
12.3.2. Search Device
12.3.3. Paired Device List
12.3.4. My Phone’s Visibility
12.3.5. My Phone’s Name
12.3.6. Supported Services
12.4. Date&Time
12.4.1. Time Zone Update
12.4.2. Date Format
12.4.3. Time Format
12.5. Phone
12.5.1. Language
12.5.2. Network Selecting
12.5.3. Network Profile
12.5.4. USB Connection Mode
12.5.5. Memory Meter
12.5.6. Phone Information
12.6. Call
12.6.1. Answer Mode
12.6.2. Auto Redial
12.6.3. Minute Minder
12.6.4. Call Forwarding
12.6.5. Call Waiting
12.6.6. Caller ID
12.6.7. Call Barring
12.6.8. TTY
12.7. Security
12.7.1. Phone Lock
12.7.2. PIN Code Request
12.7.3. Change Phone Password
12.7.4. Change PIN Code
12.7.5. FDN
12.7.6. Master Reset
12.7.7. Master Clear
12.8. Applications
12.8.1. Messaging Settings
12.8.2. Browser Settings
12.8.3. Address Book Settings
12.8.4. Camera Settings
12.9. Software Update
12.9.1. Continue Update
12.9.2. Check for Update
27
Page 28

MENU SUMMARY
LANDSCAPE MODE
MENU
1. Messaging
1.1. Create New Message
1.2. Inbox
1.3. Outbox
1.4. Sent
1.5. Drafts
2. E-mail
3. IM
4. Address Book
5. More
5.1. Call
5.2. AT&T Music
5.3. Recent Calls
5.4. YELLOWPAGES.COM
5.5. MEdia Net
5.6. MEdia Mall
5.7. Cellular Video
5.8. My Stuff
5.9. Games&Apps
5.10. AT&T GPS
5.11. Organizer&Tools
5.12. Settings
28
Page 29

BASIC FUNCTIONS
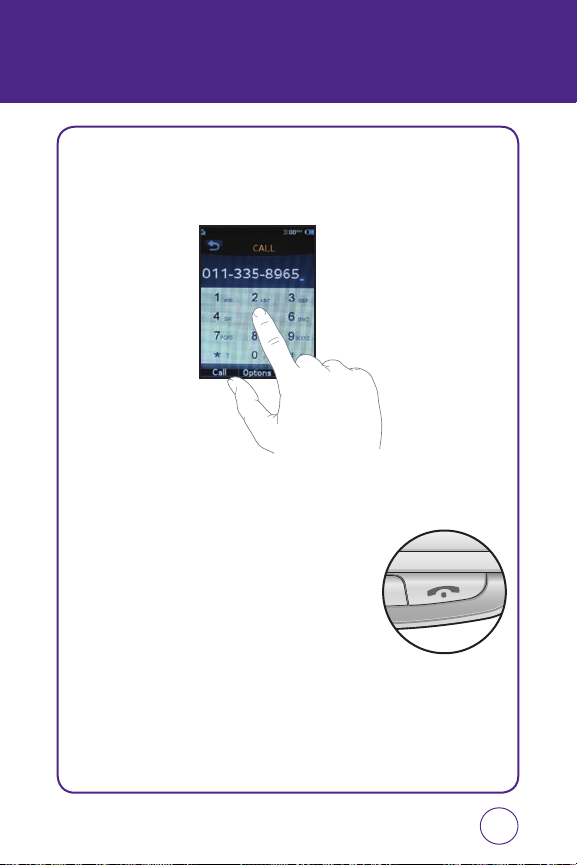
MAKING A CALL
MAKE A CALL FROM PHONE
1.
Tap Call icon.
2.
On the Phone keypad, simply touch the keys with your finger to
enter the phone number. If you tap a wrong number, tap
erase a number. To erase the entire number, tap and hold
3.
Tap the
Call
on your device to place the call.
MAKE A CALL FROM PHONE BOOK
1.
Tap Phone Book icon. Phone Book list displayed.
2.
Tap and hold scroll bar and drag up or down with your finger.
3.
Tap the desired contact in the Phone Book list, and tap the phone
number that you want to call.
4.
Tap the
Call
on your device to place the call.
MAKE A CALL FROM CALL HISTORY
1.
On the Phone screen, press SEND key.
2.
You can select through all calls in Call History select from a category
of Call History types (All Calls, Received Calls, Dialed Calls, Missed
Calls).
Clear
Clear
to
.
3.
Select the desired contact or phone number, and tap
Call
.
29
Page 30
BASIC FUNCTIONS
ANSWERING CALLS
1.
When your phone rings or vibrates, tap the Send Key to answer the
incoming call. (Depending on your phone’s settings, you may also
answer incoming calls by opening the phone or by pressing any digit
key.)
To ignore incoming calls, tap
2.
To end a call, press the End Key.
In “Auto Answer Mode“, a call is automatically answered after five
Note
seconds of ring tones.
Ignore
.
WAIT/PAUSE FEATURE
Pauses are used for automated systems (i.e., Voicemail, calling cards).
Insert a pause after a phone number then enter another group of
numbers. The second set of numbers is dialed automatically after the
pause. This feature is useful for dialing into systems that require a code.
1.
To insert a wait/pause, enter a phone number then press and hold the
* Type button for a few seconds until “T“(“T“ appears) or press and
hold the # Type button for a few seconds until “P“(“P” apperas).
2.
30
•
Type “P“
Type “T“
•
Tap the
: A hard pause stops the calling sequence until further input from
you.
: A two second pause stops the calling sequence for two seconds
and then automatically send the remaining digits.
Call
to dial.
Page 31

BASIC FUNCTIONS
3-WAY CALLING
With 3-Way Calling, you can talk to two people at the same time. When
using this feature, the normal airtime rates will be applied for each of
the two calls.
1.
Enter a number you wish to call then tap
2.
Once you have established the connection, enter the second number
you wish to call then tap
3.
When you’re connected to the second party, tap
your 3-Way call.
Call
.
Call
.
Call
again to begin
CALLER ID FUNCTION
Identifies caller by displaying their phone number. If the caller’s name
and number are already stored in your phone book, their name will
appear. This is a system dependent feature. Please contact your service
provider for details.
CALL WAITING FUNCTION
Notifies you of an incoming call when you are already on a call by
sounding a beep tone and displaying the caller’s phone number.
1.
To answer another call while on the phone, press the Send Key. This
places the first call on hold. To switch back to the first caller, press
the Send Key again.
Call Waiting is a system dependent feature. Please contact your service
Note
provider for details.
31
Page 32

BASIC FUNCTIONS
ADJUSTING VOLUME
Adjusts the volume of the ringer, key beep and earpiece.
1.
In idle mode, press the Side Volume Key up or down. Choose
from “General“, “Outdoor“, “Meeting“, “Vibrate“, “Silent“, “OFF“
or “Level 1 ~ Level 7“.
• To adjust the conversation phone volume, you must do it during a call.
Note
Adjusting the volume at another time will affect the ring, notification,
and Music sound levels.
• When you activate Vibrate mode, sound will automatically be muted
and your device will vibrate when an incoming call is received.
MAKE AN INTERNATIONAL CALL
1.
Tap and hold the number 0 key on the Phone keypad until the + sign
appears. The + replaces the international prefix of the country that
you are calling.
2.
Enter the full phone number you want to dial, and press the Call
button on your device.
32
Page 33

DURING A CALL
MUTE (UNMUTE)
If you press Mute during a call, the person you are speaking with cannot
hear you or any sounds from your side of the conversation. However, you
can still hear them. To activate Mute during a call, tap
Mute
.
• To deactivate, tap
• The phone will automatically unmute in “Emergency Call“ or “Callback
Mode“.
Unmute
.
SPEAKERPHONE
To activate speakerphone during a call:
1.
To activate the speakerphone while in answering or calling modes,
tap
Speaker On
(Speakerphone On/Off).
3-WAY CALLS
To call a second party during a call, dial the number or select it from the
directory by accessing the menu during a call.
1.
Tap
Options
, then tap
3-Way Calls
.
33
Page 34

DURING A CALL
VOICE MEMO
To record a voice memo during a call:
1.
Tap
Options
, then tap
Voice Memo
.
CALL HISTORY
Displays call information:
1.
Tap
Options
, then tap
Call History
.
FIND NAME
To select a phone number in your internal Contact List:
1.
Tap
Options
, then tap
Find Name
.
MESSAGING
To send a text message during a call:
1.
Tap
Options
, then tap
Voice Messaging
.
BLUETOOTH
To connect to a Bluetooth-enabled device, such as a wireless headset
(sold separately):
34
1.
Tap
Options
, then tap
Bluetooth
.
Page 35

MAKING AN EMERGENCY CALL
The 911 feature puts the phone in the Emergency Call Mode when you
dial the preprogrammed emergency number 911. It also operates in Lock
Mode and outside the service area.
911 IN LOCK MODE
The 911 call service is available even in Lock Mode.
1.
Enter “911”, then tap
2.
The call connects.
3.
When the call ends, the phone returns to Lock Mode.
Call
.
911 USING ANY AVAILABLE SYSTEM
1.
Enter “911”, then tap
2.
The call connects.
3.
The phone maintains Emergency Mode and the phone can receive
an incoming call from any available system.
However, it can’t make a call.
The 911 call does not appear in the recent call list.
Note
Call
.
35
Page 36

MEMO
36
Page 37

CHAPTER 3
MEMORY FUNCTION
CHAPTER 3
MEMORY
FUNCTION
This chapter addresses memory functions including:
Storing a Phone Number
Entering Letters, Numbers & Symbols
Making a Call Through the Contact List
37
Page 38

STORING A PHONE NUMBER
The phone book stores up to 500 entries.
1.
Enter the phone number, tap
2.
Tap “New entry“ or “Existing entry“. If “Existing entry” is selected,
your contact list is displayed. Choose the entry to add the number,
then tap
Done
. Select the type of number you are adding from the
icon list, tap
then tap
3.
If “New entry“ is selected, the New entry icon list appears. Tap to
Type of phone
Select
to save contact.
choose the type of number you are adding. Tap to select. Enter a
name(First Name and Last Name). To change the input mode, tap
Options
. Tap to enter information in other fields for the contact.
Fields include “First Name”, “Last Name”, “Mobile”, “No Group”,
“Ringtone”.
•
Phone number:
•
Group:
•
Ringtone:
To insert a other phone number for the contact, enter the
phone number. Tap to select type (Mobile, Office, Home,
Pager, Other) of phone number.
To set a group for the contact, highlight the Group Name. Tap to
select “No Group“, “Business“, “Family“ or “Friends“.
To set a ringtone for the contact, highlight a Ringtone. Tap to
select “voice_#.amr“, “AT&T Ringtone“, “Basic Ringtone 1
~ Basic Ringtone 3“, “Sky lounge”, “Rainforest”, “Fighters”,
“Love”, “Funny guy” or “Happiness”.
Options
>
Save Contact
. Tap
Save
. Tap primary phone number,
.
38
Page 39

STORING A PHONE NUMBER
Tap
Options
to access the following options:
•
Home FAX
•
Office FAX
•
E-mail
•
URL
•
Instant Message
•
Picture
•
Birthday
•
Company
•
Job Title
•
Address
•
Memo
4.
To store the entry in your contact list, tap
Save
to save contact.
39
Page 40

ENTERING LETTERS,
NUMBERS & SYMBOLS
The input mode will automatically be activated when it is necessary to
enter letters and numbers. There are 4 available modes: Alphabet mode
(Abc/ABC), Numeric mode (123), Symbol mode (Symbols) and Emoticon
mode (Emoticon). The input mode indicator appears on the lower
portion of the display when letters and numbers are entered.
40
Key
Key
Key
Tap
Options
To change the entry mode -
[Symbols] [Emoticon] [Add
Media] [Add Contacts]
[Sending Settings] [Add
Format] [Save Drafts] [Add
Slide].
Press
Press to delete a character
to “Del” key.
Press
To enter a number or
symbol: [123] [1bc].
Del Key
FN Key
Press
SYM Key
Press to accept a word and
add a space.
Press
CAP Key
Press to select the letter
case: [Abc] [ABC].
Press
FN
and
CAP Key
To enter a number or
symbol: [1BC].
Page 41

ENTERING LETTERS,
NUMBERS & SYMBOLS
STANDARD INPUT MODE
Use the digit keys to enter letters, numbers and characters.
1.
Enter letters using the keypad. To change the input mode,
tap
CAP Key
>
Abc
.
2.
To enter a space, tap “SYM“ Key. The cursor will automatically move
to the next column.
3.
Repeat until letters are entered.
4.
To delete one letter, tap
To delete the entire entry, tap and hold
Del Key
.
Del Key
.
Select Abc mode, tap
E.G.
the C icon appears as a visual confirmation.
- Find the key that corresponds to the letter you want to enter.
- Press it as many times as needed for the letter to appear on the
screen.
CAP Key > Abc
. When you select this mode,
41
Page 42

ENTERING LETTERS,
NUMBERS & SYMBOLS
NUMERIC MODE
Allows you to enter numbers.
1.
Tap
FN Key
>
123
.
2.
To enter a number, press its corresponding digit key.
SYMBOL MODE
Allows you to enter symbols.
1.
Tap
Options
>
Symbols
.
2.
Tap the /, symbol you want to enter >
Done
EMOTICON MODE
Allows you to enter Emoticons.
1.
Tap
Options
>
Emoticon
.
2.
Tap the /, emoticon you want to enter >
.
Done
.
42
Page 43

MAKING A CALL THROUGH
THE CONTACT LIST
ONE-TOUCH DIALING
Ideal for frequently dialed numbers, this feature allows entries in your
contact list to be dialed via the keypad with only one or two key presses.
In order for One-Touch Dialing to properly work, it must be enabled.
ONE-TOUCH DIALING
2-9: Press and hold the corresponding memory number for more than
1 second.
• If no phone number is stored in the location entered, “Empty” will
Note
appear on the screen.
• If One Touch Dial is set to Off: Enter the speed dial location number
then press the Send Key.
• Location 1 is reserved for voicemail. Location 2-9 are unassigned.
To assign a speed dial location, please see page 66.
43
Page 44

45
NOTE
44
Page 45

45
CHAPTER 4
MENU FUNCTION
CHAPTER 4
MENU
FUNCTION
This chapter addresses accessing the menu and using its
functions and features to customize your phone.
AT&T Music
Messaging
Yellowpages
MEdia Net
MEdia Mall
Celluar Video
My Stuff
Address Book
Games&Apps
AT&T GPS
Organizer&Tools
Settings
Voice Commands
Camera
45
Page 46

AT&T MUSIC
MUSIC PLAYER
The built in Media Player is an application that can play music files. The
music player supports files with extensions AAC, AAC+, eAAC+, MP3,
WMA, 3GP, MPEG, MP4, and M4A. Launching the Media Player allows
you to navigate within your Media Player folders and select playback
material.
1.
In Idle mode, tap
•
Now Playing:
•
All Music
•
Albums
•
Artist:
•
Play List
•
Genres:
•
Settings
- Play Via:
- Shuffle:
- Repeat:
- Equalizer:
Manu icon
and select
Opens the current play list >
: View entire playlist in theinternal/external memory
>
All Music
: View Plays music files information >
View Plays music files information >
: Create user own playlists bychoosing songs from the All Songs
menu list >
View Plays music files information >
Tap “All” or “Bluetooth”.
.
Play List
.
Tap “Phone” or “Bluetooth”.
Tap “On” or “Off”.
Tap “Normal”, “Rock”, “Pop”, “Classical”, “Jazz” or “Bass”.
AT&T Music
Now Playing
Albums
.
Artist
.
Genres
.
>
Music Player
.
.
46
Page 47

AT&T MUSIC
SHOP MUSIC
AT&T MusicTM can be used to shop for ringtones, Answer TonesTM and
songs from some of your favorite music stores.
1.
In Idle mode, tap
•
History:
•
Display:
•
Search:
•
Tool
- Send URL:
- Page Info:
- Save Item:
•
Settings
- Help:
- Certificates:
- Preferences:
- Clear Cache:
- Clear Cookies:
- Clear History:
- Clear Auto-complete:
Manu icon
and select
Display the site that user visited.
Select “Page Map” or “Page Layout”.
Enter the text >
User to help information.
Search
Send a URL to message.
Display to site information.
Save a item to “Phone” or “SD Card”.
Display the site information.
User Cheacked site preferances. Tap “Yes” or “No”.
Tap “Yes” or “No”.
Tap “Yes” or “No”.
Tap “Yes” or “No”.
Tap “Yes” or “No”.
AT&T Music
.
>
Shop Music
.
47
Page 48

49
AT&T MUSIC
MUSIC ID
Music ID is an application which uses the onboard microphone to
analyze a song sample and then compare it to a remote database of
songs. Once the application completes the analysis of the song sample,
it then provides you with the name of the song, artist and album art as
well as opportunities to buy related content.
1.
In Idle mode, tap
Manu icon
and select
AT&T Music
>
Music ID
.
XM RADIO
This service allows you to stream over 40 channels of commercial-free
music through your handset.
1.
In Idle mode, tap
Manu icon
and select
AT&T Music
>
XM Radio
.
MUSIC VIDEOS
The Music Videos homepage is a component of the AT&T Video
service. This page provides you with links to some of the most popular
multimedia content.
1.
In Idle mode, tap
Manu icon
and select
AT&T Music
>
Music Videos
.
48
Page 49

49
AT&T MUSIC
THE BUZZ
This service allows you to navigate through Top 20 chart songs (in a
variety of categories). Other features of this service include streaming
entertainment news about your favorite music artists, access to an
artists main page (containing discographies, ringtones, concert dates,
etc.), concert information, games, and setup options for your own
personal billboard notifications.
1.
In Idle mode, tap
Manu icon
and select
AT&T Music
>
The Buzz
.
COMMUNITY
This Community is a place where you can find a listing of various fan
sites that provide sound clips, wallpapers, bios, discographies, and other
information about an artist.
1.
In Idle mode, tap
Manu icon
and select
AT&T Music
>
Community
.
MUSIC APPS
Music Apps is a group of internet-based music applications, including
MySpace,Billboard Mobile Channel, Hip Hoptionary, Hip Hop Official by
GoTV, and a search option for other features. All of these applications
are by subscription only, and require a large amount of data streaming.
AT&T strongly recommends that if you subscribe to one of these
subscription services that you also subscribe to an appropriate unlimited
Data rate plan for your handset.
1.
In Idle mode, tap
Manu icon
and select
AT&T Music
>
Music Apps
.
49
Page 50

MESSAGING
CREATE NEW MESSAGE
To send a new message:
1.
In Idle mode, tap
Message
2.
Tap To, input the phone number then tap
From the To screen, tap
•
Recent message:
•
Recent Calls:
•
Contacts:
•
Change to To:
•
Change to CC:
•
Change to BCC:
3.
Tap
Message
From the
•
Symbols:
•
Emoticon:
•
Add Media:
•
Add Contacts:
•
Add Format:
•
Add slide:
4.
To send message, tap
Manu icon
and select
.
Options
to choose from:
Look up a number from your recent message list.
Look up a number from your recent call list.
Look up a phone number from your Contact list.
Change to input mode.
Change to input mode, tap To.
Change to input mode, tap CC.
, input your message.
Message
screen, tap
Options
Allows you to enter symbols.
Allows you to enter emoticon.
Allows you to add this contact to your media.
Allows you to add this contact to your contacts.
Allows you to add this contact to your format.
Allows you to add this contact to your slide.
Send
to choose from:
.
Messaging
Message
>
Create New
.
50
Page 51

MESSAGING
INBOX
The Inbox manages messages you’ve received.
1.
In Idle mode, tap
2.
Tap a message. The message is displayed.
From the
•
Call:
Place a call to the number the message was sent from.
•
Forward:
•
Save:
•
Save contact:
•
Erase:
•
Cancel:
Manu icon
and select
Inbox
screen, tap
Options
Send the message to another person.
Saves the message in the Saved folder.
Save the phone number in contacts.
Delete the messages
Cancel the message.
Messaging
to choose from:
OUTBOX
To manage Outbox messages:
1.
In Idle mode, tap
2.
To delete a message, tap
>
Yes/No
2.
Tap a message. The message is displayed.
From the
•
Send:
•
Save:
•
Save contact:
•
Erase:
•
Edit:
Change the recipient’s number and send a message.
Manu icon
and select
Options
Messaging
. Tap
Select & Delete
.
Outbox
screen, tap
Options
Resend the selected message to the original recipient.
Saves the message in the Saved folder.
Save the phone number in contacts.
Delete the message.
to choose from:
>
Inbox
>
Outbox
.
or
Delete All
.
51
Page 52

MESSAGING
SENT
To manage Sent messages:
1.
In Idle mode, tap
2.
To delete a message, tap
>
Yes/No
2.
Tap a message. The message is displayed.
From the
•
Send:
•
Save:
•
Save contact:
•
Erase:
•
Edit:
Change the recipient’s number and send a message.
Manu icon
and select
Options
.
Sent
screen, tap
Options
Resend the selected message to the original recipient.
Saves the message in the Saved folder.
Save the phone number in contacts.
Delete the message.
to choose from:
DRAFTS
To manage Drafts messages:
1.
In Idle mode, tap
2.
To delete a message, tap
>
Yes/No
3.
Tap a message. The message is displayed.
From the
•
Symbols:
•
Emoticon:
•
Add Media:
•
Add Contacts:
•
Add Settings:
•
Add Format:
•
Add slide:
Manu icon
and select
Options
.
Sent
screen, tap
Options
Allows you to enter symbols.
Allows you to enter emoticon.
Allows you to add this contact to your media.
Allows you to add this contact to your contacts.
Allows you to add this contact to your settings.
Allows you to add this contact to your format.
Allows you to add this contact to your slide.
to choose from:
Messaging
. Tap
Select & Delete
Messaging
. Tap
Select & Delete
>
>
Sent
.
or
Delete All
Drafts
or
Delete All
.
52
Page 53

MESSAGING
4.
To send message, tap
Send
.
EMAIL
You need to create a new account to use for retrieving and sending
email messages.
1.
In Idle mode, tap
Manu icon
and select
Messaging
>
Email
.
IM
Your handset comes with the ability to sign onto Instant Messaging.
You must first create an active account using your PC, and then you can
connect and chat using the following applications:
•
AOL Instant Messenger
•
Windows Live Messenger
•
Yahoo! Messenger
1.
In Idle mode, tap
Manu icon
and select
Messaging
> IM.
VOICE MAIL
Voicemail allows callers to leave voice messages in your voice mailbox,
and lets you review, play, and delete your voice messages any time you
are in your Carrier’s network coverage area.
1.
In Idle mode, tap
•
Call voicemail: Call your voicemail.
• Last voicemail detail: View last voicemail information.
• Clear voicemail icon: Delete the voice mail icon.
Manu icon
and select
Messaging
>
Voice Mail
.
53
Page 54

YELLOWPAGES
1.
In Idle mode, tap
Manu icon
and select
Yellowpages
.
54
Page 55

MEDIA NET
MEDIA NET HOME
Your phone is connected to the network and loads the MEdia Net
homepage.
1.
In Idle mode, tap
Home
.
Manu icon
and select
MEdia Net
>
MEdia Net
FAVORITES
While navigating through either the Internet or the MEdia Net pages,
you can bookmark a site to quickly and easily access it at a future time.
The URL addresses of the bookmarked sites are stored in the Favorites
folder, wherein you can either use the 6-preset URL addresses or store
your own favorite URL addresses.
1.
In Idle mode, tap
2.
Tap a bookmark item on the Favorite list. The preset URLs consist of:
•
My Account
•
Chat
•
News
•
Sports
•
Weather
•
Cellular Video
Tap
Options
•
Add Folder:
•
Add Favorite:
•
Delete All:
Manu icon
and select
to access the following options:
Allows you to add this contact to your folder.
Allows you to add this contact to your favorite.
“Delete all Items?“will be display >
Messaging
Yes/No.
>
Drafts
.
55
Page 56

MEDIA NET
3.
Tap Go to launch the website.
Tap
Options
to access the following options:
•
Send:
Resend the selected message to the original recipient.
ENTER URL
When you are prompted to enter text, the currently active text input
mode is indicated on the screen. To change the text input mode,
press the key one or more times.
1.
In Idle mode, tap
2.
Tap a bookmark item on the Favorite list. The preset URLs consist of:
The following modes are available:
•
T9Word:
•
Abc:
Allows you to enter alphabet characters.
•
123:
Allows you to enter numbers.
•
Symbols:
•
Cancel:
3.
Tap Go to go there directly.
Manu icon
and select
Allows you to enter characters by pressing one key per letter. In
this mode, you can use only the tap “T9” to display alternative
words.
Allows you to enter symbols.
Cancel the enter URL.
Messaging
>
Enter URL
.
HISTORY
The History list provides you with a list of the most recently visited web
sites. These entries can be used to return to previously unmarked web
pages.
1.
In Idle mode, tap
2.
Tap a bookmark item on the History list.
Manu icon
and select
56
Messaging
>
History
.
Page 57

3.
Tap
Delete All
, “All Items will be deleted. Delete all?“ will be display
>
Yes/No
.
SETTINGS
1.
In Idle mode, tap
•
Help
•
Certificates
•
Preferences
•
Clear Cache
•
Clear Cookies
•
Clear History
•
Clear Auto-complete
Manu icon
and select
MEDIA NET
Messaging
>
Settings
.
57
Page 58

MEDIA MALL
The Media Mall topics covered in this section are shopping for
Ringtones, Games, Graphics, Multimedia, Applications, Themes, Videos
and MEdia Net Home the MEdia Home site.
SHOP RINGTONES
1.
In Idle mode, tap
>
Shop Ringtones
Manu icon
.
and select
MEdia Mall
SHOP GAMES
The Shop Games menu option allows you to shop for games using the
built-in browser. You can download new games to your Games folder.
1.
In Idle mode, tap
Manu icon
and select
MEdia Mall
>
Shop Games
.
SHOP GRAPHICS
The Shop Graphics menu option allows you to shop for graphic images
using the built-in browser. You can download new images to your
Graphics folder.
1.
In Idle mode, tap
Manu icon
and select
MEdia Mall
>
Shop Graphics
.
SHOP MULTIMEDIA
The Shop Multimedia menu option allows you to shop for multimedia
files (videos) using the built-in browser. You can download new videos
to your Videos folder.
1.
In Idle mode, tap
>
Shop Multimedia
58
Manu icon
.
and select
MEdia Mall
Page 59

MEDIA MALL
SHOP APPLICATIONS
The Shop Applications menu option allows you to shop for application
files using the built-in browser. You can download the new applications
to your Applications folder.
1.
In Idle mode, tap
Shop Applications
>
Manu icon
.
and select
MEdia Mall
SHOP VIDEO
The Shop Video menu option allows you to shop for videos online. You
can download the new applications to your My Stuff folder. To access
this menu option, use the following steps:
1.
In Idle mode, tap
Manu icon
and select
MEdia Mall
>
Shop Video
.
MEDIA NET HOMEPAGE
The MEdia Net Home menu option allows you to quickly access your
Cingular MEdia Net homepage using the built-in browser. This page
gives you quick access to information such as local weather, sports
scores, horoscope information and quick links to the previously
mentioned shopping sites.
1.
In Idle mode, tap
>
MEdia Net Homepage
Manu icon
.
and select
MEdia Mall
59
Page 60

CELLUAR VIDEO
CELLUAR VIDEO
1.
In Idle mode, tap
Manu icon
and select
MEdia Mall
>
Celluar Video
.
60
Page 61

MY STUFF
Content (graphics and ringtones) downloaded from “MetroWEB“
- will be stored in the “My Stuff” folder of the device.
RINGTONES & AUDIO
1.
In Idle mode, tap
>
Ringtones & Audio
2.
Tap
Phone
Tap
Options
•
Copy to SD Card
•
Delete Multimedia
3.
Tap
voice_#.amr, AT&T Ringtone, Basic Ringtone 1~3, Sky lounge
Rainforest, Fighters, Love, Funny guy
Tap
Options
•
Send Message
•
Assign
•
Rename
4.
Tap
Play
5.
Tap
Delete
Manu icon
and select
.
or
SD Card
.
to access the following options:
to access the following options:
, to play.
, “Delete item?“ will be display >
My Stuff
and
Happiness
Yes/No
.
.
,
61
Page 62

MY STUFF
IMAGES
You can download graphics directly to your phone when browsing
MetroWEB! Here is how to download graphics.
1.
In Idle mode, tap
2.
Tap
Phone
Tap
Options
•
Copy to SD Card
•
Delete Multimedia
3.
Tap
Pic#.jpg, Wallpaper_01
4.
Tap
Preview
Tap
Options
•
Send Message
•
Assign to Wallpaper
•
Rename
5.
Tap
Delete
Manu icon
and select
or
SD Card
.
to access the following options:
~
, to preview a image.
to access the following options:
, “Delete item?“ will be display >
My Stuff
Wallpaper_10
.
Yes/No
>
Images
.
.
62
Page 63

MY STUFF
VIDEOS
The Shop Video menu option allows you to shop for videos online. You
can download the new applications to your My Stuff folder. To access
this menu option, use the following steps:
1.
In Idle mode, tap
2.
Tap
Phone
Tap
Options
•
Copy to SD Card
•
Delete Multimedia
3.
Tap
Video#.3gp
4.
Tap
Play
Tap
Options
•
Send Message
•
Rename
5.
Tap
Delete
Manu icon
and select
or
SD Card
.
to access the following options:
.
, to play a video.
to access the following options:
, “Delete item?“ will be display >
My Stuff
>
Yes/No
Images
.
.
63
Page 64

ADDRESS BOOK
Stores up to 500 entries, each of which can be assigned to a group.
Entries can be retrieved by name or group.
1.
In Idle mode, tap
Manu icon
and select
Address Book
.
FIND NAME
Retrieves an entry by name and calls the primary number by simply
pressing the Send Key . You can review all the entries stored in your
contacts list or quickly find an entry by entering a name or its character
string.
1.
The list of names in your contacts is displayed alphabetically.
2.
Enter a name or scroll through the list. If more than one contact is
listed, highlight the contact you want.
3.
Tap the contact. The contact information is displayed.
4.
To edit the contact information, tap
appear with the selected contact information shown.
See page 38 for “Storing a Phone Number“.
5.
To save the entry, tap
To return to the previous page, tap
6.
Tap
Options
• Group List
• Speed Dial List
• Copy to
• Delete Contat
• Service Dial Number
• My Number
• Address Settings
Save
to access the following options:
Edit
. The Edit Contact screen will
.
BACK
.
64
Page 65

ADDRESS BOOK
GROUP LIST
Allows you to classify phone entries into groups. Existing groups
include “No Group“, “Business“, “Family“, “Friends“. A maximum of
30 groups is allowed.
1.
In Idle mode, tap
>
Group List
Add new group
1.
Tap
Add New
2.
Input a new group name.
3.
To save a new group, tap
Setting a ringer type for a group
1.
Select an existing group name.
2.
Tap
Options > Set Group Ringtone
3.
Tap “voice_#.amr“, “AT&T Ringtone”, Basic Ringtone 1 ~ Basic
Ringtone 3”, “Sky lounge”, “Rainforest”, “Fighters”, “Love”,
“Funny guy” or “Happiness”.
4.
Tap
Save
Manu icon
.
to add a new group name.
.
and select
Save
.
.
Address Book
>
Options
65
Page 66

ADDRESS BOOK
Change group name
1.
Select the group you want to rename. Only new groups you added
can be changed. The default groups “Business“, “Family“ and
“Friends“ cannot be renamed.
2.
Tap
Options > Rename Group
3.
Input a new group name.
4.
To change the name, tap
Delete group
1.
Select an existing group name. Only new groups you added can be
changed. The default groups “Business“, “Family“ and “Friends“
cannot be deleted.
2.
Tap
Options > Delete Group
3.
“Delete Group“ will be display >
SPEED DIAL LIST
In idle mode, calls can be placed to numbers stored in Speed Dial by
pressing & holding the location number on the key pad.
Speed Dial must be activated.
Note
Save
.
.
.
Yes/No
.
1.
In Idle mode, tap
>
66
Group List
.
Manu icon
and select
Address Book
>
Options
Page 67

ADDRESS BOOK
2.
To assign a phone number to a location, select the location then
tap
Assign
.
“Empty” appears if the location is available.
Note
3.
Tap a name from your contact list. If the contact has more than
1 number saved, tap the correct number for the Speed Dial
location is shown.
4.
Tap
Done
to save the number to the Speed Dial location. You will
see the contact name next to the Speed Dial location number in
the Speed Dial lists.
5.
Tap
Reset All
, “Reset all speed dial?” will be display >
COPY TO
1.
Tap
Options > Copy to
2.
Tap “Phone -> SIM“ or “SIM -> Phone”.
3.
Tap the contact you want to remove, tap check or uncheck.
Or, Tap
All
.
4.
To remove all phone number, tap
.
Done
.
Yes/No
.
5.
“Copy to selected contacts?” will be display >
Yes/No
.
67
Page 68

ADDRESS BOOK
DELETE CONTACT
To delete the selected entry.
1.
Tap
Options > Delete Contact
2.
Tap the contact you want to delete, tap check or uncheck.
Or, Tap
All
.
3.
To delete all phone number, tap
4.
“Delete selected contacts?” will be display >
SERVICE DIAL NUMBER
1.
Tap
Options > Service Dial Number
MY NUMBER
Displays your phone number.
1.
Tap
Options > My Number
2.
Your phone number will be displayed.
3.
To return to the previous page,
ADDRESS SETTINGS
1.
Tap
Options > Address Settings
Tap
Options
to access the following options:
•
Save Location:
•
View:
•
Memory Status:
Tap “Always Ask“, “Phone” or “SIM” >
Tap “All“, “Phone” or “SIM” >
Check the current status of the external memory card in
this menu.
.
Done
.
.
.
BACK
.
.
Save
.
Yes/No
Save
.
.
68
Page 69

•
SIM Number Type:
•
Change hidden key:
7.
To call the selected number, tap Send icon.
Tap “Rename”, “Delete” >
Input the new hidden key.
ADD NEW
Adds a new entry.
1.
Tap
Add New
.
2.
Fill in the fields as they are selected.
Phone Book fields:
•
First Name:
•
Last Name:
•
Number Type:
•
No Group:
•
Ringtone:
3.
To save the entry, Tap
Tap
BACK
Note
Enter first name >
Enter last name >
Tap “Mobile”, “Home”, “Office”, “Pager”, “Home FAX”,
“Office FAX” or “Etc Number”.
Tap “No Group”, “Business”, “Family” or Friends”
Tap “voice_#.amr“, “AT&T Ringtone”, Basic Ringtone 1 ~ Basic
Ringtone 3”, “Sky lounge”, “Rainforest”, “Fighters”, “Love”,
“Funny guy” or “Happiness”
Save
.
Save
.
Save
. To return to the previous page,
.
See page 38 for more detailed information about storing a number.
ADDRESS BOOK
Save
.
>
Done
.
>
Save
.
69
Page 70

GAMES&APPS
GAMES
1.
In Idle mode, tap
Manu icon
APPS
1.
In Idle mode, tap
Manu icon
and select
and select
Games&Apps
Games&Apps
>
>
Games
Apps
.
.
70
Page 71

AT&T GPS
1.
In Idle mode, tap
2.
Tap
AT&T Navigator
Manu icon
.
and select
AT&T GPS
Games&Apps
>
AT&T GPS
.
71
Page 72

ORGANIZER&TOOLS
SCHEDULER
Sets an event and reminds you of that event.
1.
In Idle mode, tap
>
Scheduler
ADD NEW EVENT
1.
Tap to choose a date in the calendar. Tap
calendar.
•
Title:
•
Date:
•
Time:
•
Date:
•
Time:
•
Summary:
•
Location:
•
Alarm:
•
Repeat:
2.
Tap
Save
3.
The date of the event will be marked on your calendar.
Manu icon
and select
Organizer&Tools
.
Enter the event title.
Enter the date >
Enter the time. Tap AM/
Enter the date >
Enter the time. Tap AM/
Enter the summary >
Enter the location >
Tap “Off”, “On Time”, “15 Min before.”, “1Hour before.”, “1Day
before.”, “2Days before.”, “1 Week before.” >
Tap “Once”, “Daily”, “Mon to Fri”, Mon to Sat”, “Weekly”,
“Monthly”, “Annually” >
Done
Done
.
PM > Done
.
PM > Done
Save
Save
.
Save
.
.
.
.
.
Add
to add an event to the
Save
.
VIEW ADDED CALENDAR
1.
Tap / to a date in the calendar, then tap to view the event for
that day.
4.
Tap
Add
to add an event to the calendar.
72
Page 73

ORGANIZER&TOOLS
Tap
Options
to access the following options:
•
Select & Delete:
•
Delete All:
2.
Tap event to see the details for the event.
3.
Tap
Edit
4.
Tap
Delete
will be displayed >
“Delete Selected Items?“ >
“Delete all Items?“will be display >
to edit the event, then tap
Save
to delete event in the calendar. “Delete Schedule?”
Yes/No
.
TODAY CALENDAR
1.
Tap
Today
.
ALARM
1.
In Idle mode, tap
2.
Tap
Add
•
Set:
Tap “On“ or “Off“ >
•
Time:
•
Repeat:
•
Snooze:
•
Ring type:
Manu icon
and select
Organizer&Tools
to set a new alarm.
Done
Enter the time. Tap AM/
Tap “Once”, “Mon to Fri”, Mon to Sat”, “Set to Sun” or “Daily”
>
Done
.
Tap “5 min“, “10 min“, “15 min“ or “20 min“ >
Tap select a ringtone for the alarm sound.
.
PM > Done
.
Yes/No
.
Yes/No
.
to save the event.
>
Alarm
Done
.
.
3.
Tap
Save
.
4.
Tap
Delete All
will be displayed >
to delete event in the calendar. “Delete all Items?”
Yes/No
.
73
Page 74

ORGANIZER&TOOLS
CALCULATOR
The calculator allows you to perform general mathematical functions,
such as addition, subtraction, multiplication, and division.
1.
In Idle mode, tap
>
Calculator
2.
Enter the numbers to get the value you want. To cancel a
.
Manu icon
and select
Organizer&Tools
calculation, tap C .
TIP CALCULATOR
1.
In Idle mode, tap
Tip Calculator
>
Manu icon
.
and select
Organizer&Tools
TO DO
In to do list, you can add events to remember the special days or event .
1.
In Idle mode, tap
2.
Tap
Add
•
Title:
•
Date:
•
Summary:
•
Priority:
•
Status: Tap
Manu icon
and select
to set a new to do.
Enter the title >
Tap to choose a date in the calendar.
Tap “High”, “Normal”, “Low” >
Save
.
Enter the summary >
“In Progress”, “Completed” >
Save
.
Organizer&Tools
Save
.
Save
.
>
To Do
.
3.
Tap
Tap
•
Select & Delete:
•
Delete All:
74
Save
.
Options
to access the following options:
“Delete Selected Items?“ >
“Delete all ToDo?“will be display >
Yes/No
Yes/No
.
.
Page 75

WORLD TIME
1.
In Idle mode, tap
Time
.
2.
Tap
Set
, then tap / to choose a city.
•
DST:
Specifies whether the current time of the selected place is adjusted to
3.
Tap
Done
4.
Tap
Delete All
displayed >
Manu icon
Daylight Savings Time.
.
to delete world time. “Delete all Items?” will be
Yes/No
.
NOTEPAD
To access the notepad:
1.
In Idle mode, tap
ADD MEMO
1.
Tap
Add
2.
To input a memo >
3.
Tap
Del. All
>
Yes/No
Manu icon
to add a new memo.
Save
to delete world time. “Erase all?” will be displayed
.
ORGANIZER&TOOLS
and select
and select
.
Organizer&Tools
Organizer&Tools
>
World
>
Notepad
.
VIEW MEMO
1.
The list of all memos, in saved order is displayed.
2.
Tap a memo.
75
Page 76

ORGANIZER&TOOLS
EDIT MEMO
1.
The list of all memos, in saved order is displayed.
2.
Tap a memo.
3.
Tap
Edit
to edit the memo >
Save
.
DELETE MEMO
1.
The list of all memos, in saved order is displayed.
2.
Tap a memo.
3.
Tap
Delete
. “Erase this memo?” will appear on the display >
UNIT CONVERTER
In unit converter, you can get a weight and length in converted value.
1.
In Idle mode, tap
>
Unit Converter
•
Unit:
•
Input:
•
Output:
2.
Tap
Reset
Manu icon
.
Tap “Distance”, “Area”, “Volume”, “Mass” or “Temperature” >
Tap “mm”, “cm”, “m”, “km”, “in”, “ft”, “yd” or “mi” >
Tap “mm”, “cm”, “m”, “km”, “in”, “ft”, “yd” or “mi” >
.
and select
Organizer&Tools
Done
Done
Yes/No
Done
.
.
.
.
76
Page 77

ORGANIZER&TOOLS
VOICE MEMO
Voice Memo allows you to record a reminder message that can be up to
4 minutes. To record a memo:
1.
In Idle mode, tap
>
Voice Memo
2.
To record a voice memo, Tap
To pause/resume a voice memo, Tap
3.
To stop recording a voice memo, Tap
•
Save:
•
Save & Send Msg:
•
Cancel:
Manu icon
and select
.
Start
Saving voice_# in my stuff.
(
Manu icon > My Stuff
To cancel voice memo.
>
To save and send message.
Organizer&Tools
.
Pause/Resume
Stop
.
Ringtones&Audio
)
.
77
Page 78

ORGANIZER&TOOLS
STOPWATCH
You can simultaneously time up to 10 different events.
1.
In Idle mode, tap
>
Stopwatch
2.
To measure a time period:
• To start, tap
• To stop the timing, tap
To continue timing, tap
Lap
• Tap
• To stop the stopwatch, tap
• To review the results, Scroll through.
• To reset it, tap
Manu icon
and select
Organizer&Tools
.
Start
.
Stop
.
Cont.
to save the time at one instance. You can show up to 10 times.
Reset
.
Stop
.
.
78
Page 79

SETTINGS
Customizes your phone and optimizes performance through a variety of
settings.
PROFILE
1.
In Idle mode, tap
2.
Tap
General, Outdoor, Meeting
•
Call Alert Type:
•
Ring Tone:
•
Ring Volume:
•
Message Alert Type:
•
Message Tone:
•
Keypad Volume:
•
Multimedia Volume:
3.
Tap
Flight
Tap On or Off >
Manu icon
Tap Phone or SD Card.
Tap AT&T Ringtone, Basic Ringtone 1 ~ Basic Ringtone 3, Sky
lounge, Rainforest, Fighters, Love, Funny guy, Happiness >
Tap Off or Volume 1 ~ Volume 7 >
Tap Tone 1, Tone 2 or Off >
and select
Tap Ring, Vibrate, Ring & Vibrate, Ring After Vibrate or
Save
Silence >
Tap Ring Once, Ring Periodically, Ring &Vibrate or
Silent >
Tap Off or Volume 1 ~ Volume 7 >
Tap Off or Volume 1 ~ Volume 7 >
or
.
Save
Settings
Headset
.
Save
>
Profile
.
Save
.
.
Save
.
Save
.
Save
.
.
Save
.
.
79
Page 80

SETTINGS
DISPLAY
WALLPAPER
Allows you to choose the kind of background to be displayed on the
phone.
1.
In Idle mode, tap
2.
Tap “Pic#” or “Wallpaper_01 ~ Wallpaper_10”.
3.
Tap
Save
STYLE
1.
In Idle mode, tap
2.
Tap “Digital clock”, “Digital clock”, “Analog clock”, “Dual clock”,
“Calendar” or “Idle screen”.
3.
Tap OK.
GREETING BANNER
The greeting is your personal label for your phone. It appears on the
main screen along the top of the display.
1.
In Idle mode, tap
.
Manu icon
Manu icon
Manu icon
and select
and select
and select
Settings
Settings
Settings
>
Wallpaper
.
>
Style
.
>
Greeting Banner
.
2.
Tap “On” or “Off”.
80
Page 81

SETTINGS
3.
If you select “On”, the current greeting text is displayed.
Tap
Del
to delete the greeting, then enter your new greeting.
Tap
Options
to change the input mode.
4.
Tap
Save
.
BACKLIGHT
Turn on the backlight on the display and keypad for easy viewing in dark
places.
DISPLAY
1.
In Idle mode, tap
>
Display
2.
Tap “5 secs“, “10 secs“, “20 secs“, “1 min“ or “3mins“.
3.
Tap
Save
KEYPAD
1.
In Idle mode, tap
>
Keypad
2.
Tap “5 secs“, “10 secs“, “20 secs“ or “Always off“.
3.
Tap
Save
.
.
.
.
Manu icon
Manu icon
and select
and select
Settings
Settings
>
Backlight
>
Backlight
THEME
1.
In Idle mode, tap
2.
Tap “Gray“ or “Blue“.
3.
Tap
Save
.
Manu icon
and select
Settings
>
Theme
.
81
Page 82

SETTINGS
BLUETOOTH
BLUETOOTH
1.
In Idle mode, tap
>
Bluetooth
2.
Tap “On” or “Off”.
SEARCH DEVICE
Searches for Bluetooth devices in possible range.
1.
In Idle mode, tap
>
Search Device
PAIRED DEVICE LIST
1.
In Idle mode, tap
>
Paired Device List
MY DEVICE VISIBILITY
1.
In Idle mode, tap
>
My Device Visibility
2.
Tap “On” or “Off”.
.
Manu icon
Manu icon
.
Manu icon
.
Manu icon
.
and select
and select
and select
and select
Settings
Settings
Settings
Settings
>
Bluetooth
>
Bluetooth
>
Bluetooth
>
Bluetooth
MY DEVICE NAME
To assign my device name.
1.
In Idle mode, tap
>
My Device Name
82
Manu icon
.
and select
Settings
>
Bluetooth
Page 83

2.
Input your device name.
3.
Tap
Save
.
SUPPORTED SERVICES
1.
In Idle mode, tap
>
Supported Services
2.
Tap “Headset”, ”Stereo Headset”, ”Handsfree”, ”Dial up
Networking”, ”A/V Remote Control” or “Serial Port”.
Manu icon
.
and select
Settings
>
DATE & TIME
Allows you to change the date and time settings.
TIME ZONE UPDATE
1.
In Idle mode, tap
Time Zone Update
>
2.
Tap “Auto Update” or “Manually”.
3.
Tap
Save
DATE FORMAT
1.
In Idle mode, tap
>
Date Format
.
Manu icon
.
Manu icon
.
and select
and select
Settings
Settings
>
>
SETTINGS
Bluetooth
Date & Time
Date & Time
2.
Tap “Sun Jan 06”, ”Jan 06 Sun”, ”Sun Jan.06.1980” or “1980.
Jan.06 Sun”.
3.
Tap
Save
.
83
Page 84

SETTINGS
TIME FORMAT
1.
In Idle mode, tap
Time Format
>
2.
Tap “12 Hour” or “24 Hour”.
3.
Tap
Save
.
Manu icon
.
and select
Settings
>
Date & Time
PHONE
LANGUAGE
Selects the language in which letters are displayed on the screen.
1.
In Idle mode, tap
>
Language
2.
Tap “English” or “Spanish”.
3.
Tap
Save
NETWORK SELECTINGS
1.
In Idle mode, tap
Network Selectings
>
2.
Tap “Automatic” or “Manually”.
.
.
Manu icon
Manu icon
.
and select
and select
Settings
Settings
>
>
Phone
Phone
3.
Tap
Save
.
NETWORK PROFILE
1.
In Idle mode, tap
>
Network Profile
Manu icon
.
84
and select
Settings
>
Phone
Page 85

SETTINGS
USB CONNECTION MODE
1.
In Idle mode, tap
USB Connection Mode
>
2.
Tap “Music Sync”, ”Mass Storage” or “Data Service”.
3.
Tap
Save
MEMORY METER
1.
In Idle mode, tap
Memory Meter
>
2.
Tap “Phone” or “SD Card”.
3.
Your phone’s Games & Apps, Music & Ringtones, Graphics & Videos
and MMS information are displayed.
PHONE INFORMATION
Displays your phone’s information:
1.
In Idle mode, tap
>
Phone Information
2.
Your phone’s My mobile number, IMEI, S/W ver, H/W ver, Config
Version, Network band, Manufacturer and Model information are
displayed.
.
Manu icon
.
Manu icon
.
Manu icon
.
and select
and select
and select
Settings
Settings
Settings
>
>
>
Phone
Phone
Phone
85
Page 86

SETTINGS
CALL
ANSWER MODE
This feature allows you to select the answer mode.
1.
In Idle mode, tap
>
Answer Mode
2.
Tap “Any Key” or “Talk Key”.
•
Any Key:
•
Talk Key:
3.
Tap
Save
AUTO REDIAL
Automatically redials a phone number after a set time interval.
1.
In Idle mode, tap
>
Auto Redial
2.
Tap “On” or “Off”.
3.
Tap
Save
MINUTE MINDER
1.
In Idle mode, tap
Minute Minder
>
Manu icon
.
Press any key to answer an incoming call.
Press talk key to answer a call.
.
Manu icon
.
.
Manu icon
.
and select
and select
and select
Settings
Settings
Settings
>
>
>
Call
Call
Call
2.
Tap “On” or “Off”.
3.
Tap
Save
86
.
Page 87

CALL FORWARDING
1.
In Idle mode, tap
Call Forwarding
>
2.
Tap
Unconditional, Busy, No Reply
•
Activate:
•
Deactivate:
•
Check Status:
3.
Tap
Deactivate All
Manu icon
and select
.
To request the network to activate call waiting.
To request the network to deactivate call waiting.
To check if the function is active or not.
.
CALL WAITING
1.
In Idle mode, tap
Call Waiting
>
2.
Tap
All Call, Voice Call
•
Activate:
•
Deactivate:
•
Check Status:
Manu icon
and select
.
or
Data Call
To request the network to activate call waiting.
To request the network to deactivate call waiting.
To check if the function is active or not.
CALLER ID
1.
In Idle mode, tap
2.
Tap
Show My Number, Hide My Number, Network
•
Show My Number:
•
Hide My Number:
•
Network:
•
Check Status:
Manu icon
Caller ID is Network.
To check the status.
and select
Caller ID is show.
Caller ID is Hide.
Settings
or
Not Reachable
Settings
.
Settings
SETTINGS
>
Call
.
>
Call
>
Call
>
Caller ID
or
Check Status
.
.
87
Page 88

SETTINGS
CALL BARRING
1.
In Idle mode, tap
Call Barring
>
2.
Tap
All Outgoing, Outgoing Int’l, Except Home, All Incoming
Incoming Roaming
•
Activate:
•
Deactivate:
•
Check Status:
Tap
Deactivate All
TTY
Your phone is able to operate with a TTY(Teletypewriter) device. This
feature is system dependent and may not be available in all areas.
1.
In Idle mode, tap
2.
Tap
TTY Full, TTY + Talk, TTY + Hear
3.
Tap
Save
Manu icon
.
To request the network to activate call waiting.
To request the network to deactivate call waiting.
To check if the function is active or not.
Manu icon
.
and select
.
or
Change Password
and select
Settings
.
Settings
or
TTY Off
.
>
>
Call
Call
>
TTY
,
.
88
Page 89

SETTINGS
SECURITY
Prevents others from using the phone without permission and allows
access to security features only after inputting a password.
PHONE LOCK
Turn on the lock to prevent the phone from being used without entering
the password first.
1.
In Idle mode, tap
Phone Lock
>
2.
Tap “On” or “Off”.
3.
Tap
Save
PIN CODE REQUEST
1.
In Idle mode, tap
>
PIN Code Request
2.
Tap “On” or “Off”.
3.
Tap
Save
CHANGE PHONE PASSWORD
1.
In Idle mode, tap
>
Change Phone Password
.
.
Manu icon
.
Manu icon
Manu icon
.
and select
and select
and select
.
Settings
Settings
Settings
>
Security
>
Security
>
Security
2.
Enter your New Password >
>
Done
. Enter your Current Password >
Done
, then enter your Verify Password
Done
.
89
Page 90

SETTINGS
CHANGE PIN CODE
1.
In Idle mode, tap
Change PIN Code
>
2.
Tap
PIN1
FDN
1.
In Idle mode, tap
2.
Tap
FDN
•
FDN:
•
FDN List:
MASTER RESET
1.
In Idle mode, tap
Master Reset
>
2.
“Intialize all settings to default value. Proceed?“ will be display.
Tap
Yes
MASTER CLEAR
1.
In Idle mode, tap
Master Clear
>
Manu icon
.
or
PIN2
.
Manu icon
or
FDN List
.
Tap “On” or “Off” >
Tap
Add New
Manu icon
.
or No.
Manu icon
.
and select
and select
Save
. Enter a “Name” and “Phone number“ >
and select
and select
Settings
>
Settings
>
.
Settings
>
Settings
>
Security
Security
Security
Security
>
Save
FDN
.
.
2.
“Master Clear erases all data and contents. Proceed?“ will be
Yes
display. Tap
or No.
90
Page 91

APPLICATIONS
MESSAGING SETTINGS
1.
In Idle mode, tap
>
Messaging Settings
•
Text Message
- Message Center Number :
- Email Gateway:
- Text Templates:
•
Multimedia Message
- Default Slide Duration:
- Priority:
- Validity Period:
- Request Delivery Receipt:
- Request Read Receipt:
- Automatic Download:
- Send Delivery Receipt:
- Send Read Receipt:
- Message Center:
•
Voicemail:
•
Auto Erase:
Manu icon
and select
.
Send the text message to an Email Address via this
gateway.
View and edit the template messages or create new
messages.
Tap “High”, “Normal” or “Low” >
To change user voice mail number.
Tap “On” or “Off” >
Tap “2 sec.”, “5 sec.” or “10 sec.” >
Tap “1 Hour”, “2 Hours”, “1 Day”, “1 Week” or
“Maxinum” >
Tap “On” or “Off” >
Tap “On” or “Off” >
Tap “On” or “Off” >
Tap “On” or “Off” >
Tap “Name” or “MMSC URL”. Enter a text >
SETTINGS
Settings
>
Applications
Send a text message, you can get the address
of the SMS center by using this menu.
Save
.
Save
.
Tap “On” or “Off” >
Save
.
Save
Save
Save
Save
.
Save
.
.
.
.
Save
Save
.
.
91
Page 92

SETTINGS
BROWSER SETTINGS
1.
In Idle mode, tap
Browser Settings
>
2.
Tap
Add
3.
Enter the browser settings >
ADDRESS BOOK SETTINGS
1.
In Idle mode, tap
Address Book Settings
>
•
Save Location:
•
View:
•
Memory Status:
•
SIM Number Type:
•
Change hidden key:
CAMERA SETTINGS
1.
In Idle mode, tap
>
Camera Settings
•
Camera
- Resolution:
- Quality:
- Save To:
•
Camcorder
- Resolution:
- Quality:
- Save To:
Manu icon
and select
.
.
Manu icon
and select
.
Tap “Always Ask”, “Phone” or “SIM” >
Tap “All”, “Phone” or “SIM” >
Check the current status of the external memory card in
this menu.
Tap “Rename”, “Delete” >
Input the new hidden key.
Manu icon
and select
.
Tap “1280x960”, “640x480” or “320x240” >
Tap “Economy”, “Normal” or “Fine” >
Tap “Phone Memory” or “SD Card” >
Tap “320x240” or “176x144” >
Tap “Economy”, “Normal” or “Fine” >
Tap “Phone Memory” or “SD Card” >
Save
.
Save
Settings
Settings
.
Save
Settings
Save
Save
Save
Save
Save
>
Applications
>
Applications
Save
.
.
>
Applications
Save
.
.
.
.
.
.
92
Page 93

SOFTWARE UPDATE
MESSAGING SETTINGS
1.
In Idle mode, tap
>
Messaging Settings
•
Continue Update:
•
Check for Update:
Manu icon
and select
.
This menu is used to resume a postponed software
update.
“Check the Cingular server for a new software update?
The software update process will not delete any
personal data on your phone.” will be display.
OK
or No.
Tap
Settings
SETTINGS
>
Software Update
93
Page 94

VOICE COMMANDS
Your phone is equipped with an AVR (Advanced Voice Recognition)
feature. This feature allows you to make calls or use the phone’s
functions by simply using your voice. All you have to do is talk into the
phone, and the phone will recognize your voice and complete tasks by
itself.
1.
In Idle mode, press Side VR Key(Advanced Voice Recognition).
2.
When prompted, say one of the following commands:
•
Call
•
Digit Dial
•
Voicemail
•
My Phone Number
•
Status
•
Help
3.
To setup the voice command, tap
•
VR results:
•
Voice Calibration:
•
Prompts:
•
Number format:
4.
To return to the previous page, tap
Tap “One” or “Three best”.
Tap “Words calibration” or ”Digits calibration”.
Tap “Mode” or “Timeout”.
Tap “Accept any” or “North America”.
Set
.
BACK
.
94
Page 95

CAMERA
TAKE A PICTURE
Taking pictures with your phone's built-in camera is as simple as
choosing a subject, pointing the lens,and pressing a button.
1.
In Idle mode, press Side Camera Key >
2.
Using the phone ’s Main LCD as a viewfinder, aim the camera lens
at your subject.
Tap
Options
to choose from:
• View Photo: The list of the photos in the currently selected memory appears.
• Self timer: To select self timer 0ff, 5 sec or 10 sec.
• White Balance: Allows you to select the white balance mode to adjust the
• Image effect: To select image effect Normal, Gray, Negative, Sepia, Emboss,
• Fun frame: Highlight a fun frame from the list.
• Resolution: To select resolution 1280x960, 640x480, 320x240.
• Quality: To select Quality Economy, Normal or Fine.
• Save To: To select save to
3.
Tap
Done
color balance of photos.
Sketch.
“Phone Memory”, “SD Card”
, until the shutter sounds.
Take a Picture
.
.
95
Page 96

MEMO
96
Page 97

CHAPTER 5
SAFETY INFORMATION
CHAPTER 5
SAFETY
INFORMATION
Read this information before using your handheld portable
Cellular Telephone.
Safety
Warranty
97
Page 98

SAFETY
SAFETY INFORMATION FOR WIRELESS
HANDHELD PHONES
Read This Information Before Using Your Handheld
Portable Cellular Telephone
DRIVING SAFETY
Talking on the phone while driving is extremely dangerous and is illegal
in some states. Remember, safety comes first. Check the laws and
regulations on the use of phones in the areas where you drive. Always
obey them.If you must use your phone while driving, please:
• Give full attention to driving. Driving safely is your first responsibility.
• Use hands-free operation and/or one-touch, speed dialing, and auto
answer modes.
• Pull off the road and park before making or answering a call.
An air bag inflates with great force. DO NOT place objects, including
either installed or portable wireless equipment, in the area over the air
bag or in the air bag deployment area. If in-vehicle wireless equipment
is improperly installed and the air bag inflates, serious injury could
result.
WARNING!:
Failure to follow these instructions could lead to serious
personal injury and possible property damage.
98
Page 99

SAFETY
ELECTRONIC DEVICES
Your wireless handheld portable telephone is a low power radio
transmitter and receiver. When it is ON, it receives and also sends out
radio frequency (RF) signals.
Most modern electronic equipment is shielded from RF energy.
However, certain electronic equipment may not be shielded against the
RF signals from your wireless phone. Therefore, use of your phone must
be restricted in certain situations.
PACEMAKERS
The Health Industry Manufacturers Association recommends that
a minimum separation of six (6”) inches be maintained between
a handheld wireless phone and a pacemaker to avoid potential
interference with the pacemaker. These recommendations are consistent
with the independent research byand recommendations of Wireless
Technology Research.
Never come closer than six (6) inches to a person with a heart
pacemaker implant when using your phone. Doing so could result in
interference with the function of the pacemaker.
Persons with pacemakers:
• ALWAYS keep the phone more than six inches from your pacemaker
when the phone is turned on.
• Do not carry the phone in a breast pocket.
• Use the ear opposite the pacemaker to minimize the potential for
interference.
• If you have any reason to suspect that interference is taking place,
turn your phone OFF immediately.
99
Page 100

SAFETY
HEARING AIDS
Some digital wireless phones may interfere with some hearing aids. In
the event of such interference, you may want to consult your service
provider (or call the customer service line to discuss alternatives).
OTHER MEDICAL DEVICES
If you use any other personal medical device, consult the manufacturer
of your device to determine if they are adequately shielded from
external RF energy. Your physician may be able to assist you in
obtaining this information.
HOSPITALS AND HEALTH CARE FACILITIES
Turn your phone OFF in health care facilities when any regulations
posted in these areas instruct you to do so. Hospitals or healthcare
facilities may be using equipment that could be sensitive to external RF
energy.
VEHICLES
RF signals may affect improperly installed or inadequately shielded
electronic systems in motor vehicles. Check with the manufacturer or
its representative regarding your vehicle. You should also consult the
manufacturer of any equipment that has been added to your vehicle.
POSTED FACILITIES
Turn your phone OFF where posted notices so require.
100
 Loading...