

Page 1

_______________________________________
Copyright Statement: “© 2005 UTStarcom, Inc. All rights reserved. No
part of this publication may be repro duced in any form or by any means
without the prior written permission of UTStarcom, Inc.”
Warranty Language: “The contents of this m anual, w hether in w hole o r in
part, do not constitute a ny express or implied warranty w ith respect to any
products of UTStarcom, Inc., or its affiliates.”
i
Page 2

Table of Contents
HANDLING THE PHONE, BATTER Y A ND CHARGER ..................................1
HANDLING THE PHONE ........................................................................2
HANDLING THE BATTERY......................................................................4
HANDLING THE CHARGER ....................................................................5
1. GETTING STARTED ....................................................... 6
1.1 PACKAGE CONTENTS.....................................................................6
1.2 PHONE SPECIFICATIONS ................................................................7
1.3 HANDSET DESCRIPTION.................................................................8
1.4 DISPLAY INDICATORS...................................................................10
1.5 CHARGE THE BATTERY ................................................................11
1.6 REPLACE THE BATTERY ...............................................................12
1.7 CONVENTIONS USED IN THIS MANUAL ..........................................14
1.8 ACCESS MENU/LIST OPTIONS ......................................................15
2. BASIC OPERATIONS ................................................... 16
2.1 SWITCH THE PHONE ON/OFF .......................................................16
2.2 MAKE A CALL...............................................................................16
2.3 USE SPEED DIAL .........................................................................16
2.4 ANSWER A CALL ..........................................................................17
2.5 REJECT A CALL............................................................................17
2.6 IN CALL OPERATIONS...................................................................18
2.6.1 Hold a Call.....................................................................................18
2.6.2 Call Waiting....................................................................................18
2.6.3 Make a New Call............................................................................19
2.6.4 Conference Call.............................................................................20
2.6.5 Transfer a Call...............................................................................20
2.6.6 Mute the Microphone Volume ........................................................21
2.6.7 Access the Phonebook ..................................................................21
2.6.8 Adjust the Earpiece Volume...........................................................21
2.7 STORE A PHONE NUMBER............................................................22
2.8 CALL LOG SHORTCUT..................................................................22
2.9 CUSTOM FUNCTIONS SHORTCUT..................................................23
ii
Page 3

2.10 CURRENT PROFILE SHORTCUT...................................................23
2.11 VIBRATION SHORTCUT ...............................................................23
2.12 KEYPAD LOCK ...........................................................................24
3. PHONEBOOK (NAMES)............................................... 25
3.1 SEARCH......................................................................................25
3.1.1 Edit................................................................................................26
3.1.2 Delete Entry...................................................................................26
3.2 ADD ENTRY.................................................................................26
3.3 DELETE ENTRY............................................................................28
3.3.1 One by One...................................................................................28
3.3.2 All...................................................................................................28
3.4 GROUP INFO ...............................................................................28
3.4.1 Ring Tone.......................................................................................29
3.4.2 Browse...........................................................................................29
3.5 SPEED DIAL ................................................................................29
3.6 MEMORY.....................................................................................30
4. MENU ............................................................................ 31
4.1 CALL LOG ...................................................................................31
4.1.1 Missed Log....................................................................................31
4.1.2 Received Log.................................................................................33
4.1.3 Dialed log.......................................................................................34
4.1.4 Delete Log.....................................................................................35
4.1.5 Duration.........................................................................................36
4.2 PROFILES....................................................................................37
4.2.1 Standard........................................................................................37
4.2.2 Meeting..........................................................................................39
4.2.3 Outdoor..........................................................................................39
4.2.4 User Define....................................................................................39
4.3 SETTINGS ...................................................................................40
4.3.1 Scheme .........................................................................................40
4.3.2 Date/Time......................................................................................41
4.3.3 Answer Mode.................................................................................42
4.3.4 Language.......................................................................................42
4.3.5 Display...........................................................................................43
iii
Page 4

4.3.6 Set Security...................................................................................45
4.3.7 Input Method..................................................................................47
4.4 TOOLS ........................................................................................48
4.4.1 Calculator ......................................................................................48
4.4.2 Calendar........................................................................................49
4.4.3 Alarm.............................................................................................49
4.4.4 Time Zone......................................................................................50
4.4.5 DST Setting...................................................................................51
4.4.6 Time Format...................................................................................51
4.5 WIFI-SETTINGS...........................................................................52
4.5.1 Net Search.....................................................................................52
4.5.2 WiFi Config....................................................................................52
4.5.3 Network Parameter........................................................................55
4.5.4 Signal Protocol...............................................................................57
4.6 NETWORK SERVICE .....................................................................62
4.6.1 Call Waiting....................................................................................62
4.6.2 Call Transfer..................................................................................62
4.6.3 Three Way Call..............................................................................63
4.6.4 Register Interval Time ....................................................................63
4.6.5 Caller-ID Block...............................................................................64
4.6.6 Repeat Dial on Busy......................................................................64
4.6.7 Reject Anonymous Incoming Call ..................................................64
4.6.8 Personal Information......................................................................64
4.7 MISC..........................................................................................65
4.7.1 Vendor Information.........................................................................65
4.7.2 PC Config......................................................................................65
4.7.3 Remote TFTP Update....................................................................65
4.7.4 Local TFTP Update........................................................................66
4.7.5 Local Log.......................................................................................66
5. INPUT METHOD............................................................ 67
5.1 SWITCH INPUT METHOD...............................................................67
5.2 PINYIN AND SIM STROKE .............................................................67
5.3 ENGLISH .....................................................................................67
5.4 LETTER.......................................................................................69
5.5 DIGIT ..........................................................................................70
iv
Page 5

6. TROUBLESHOOTING................................................... 71
v
Page 6

Page 7
Safety Precautions
Handling the Phone, Battery and Charger
DANGER
Only use the battery and charger specified for the
phone. Failure to do so can result in damage to the
phone, electric shock or fire
CAUTION
Do not store or operate the phone or charger in hot,
damp, or dusty areas, which can damage electrical and
mechanical components. Avoid prolonged exposure to
temperatures below 5°C or in excess of 35°C
DANGER
Do not drop, shake or throw the phone or charger.
Rough handling can damage interna l circ uit board s and
the battery pack
Do not use the phone in the vicini ty of volatile gases.
Leave the area before using the phone. Failure to leave
the area can result in the risk of fire or an explosion
Do not disassemble or modify the phone, charger, or
battery. Incorrect modifications, reassembly, or
tampering may result in malfunction or personal injury
1
Page 8
Safety Precautions
Handling the Phone
This device complies with Part 15 of the FCC Rules. Operation is subject
to the following two conditions:
z This device may not cause har mful interference
z This device must accept any interference received, including
interference that may cause undesired operation
DANGER
This phone has been tested and found to comply with
the limits for a Class B digital de vice, pursuant to Part
15 of the FCC Rules. These limits are designed to
provide reasonable protection against harmful
interference in a residential installation. This phone
generates, uses and can radiat e ra dio fr eque ncy en ergy
and, if not installed and used in accordance with the
instructions, may cause harmful interference to radio
communications. However, there is no guarantee that
interference will not occur in a particular installation. If
this phone does cause harmful interference to radio or
television reception, which can be determined by
turning the phone off and on, the user is encouraged to
try to correct the interference by one or more of the
following measures:
Reorient or relocate the receiving antenna
Increase the separation between the phone and
receiver
Connect the phone into an outlet on a circuit different
from that to which the receiver is connected
Consult the dealer or an experienced radio/TV
technician for help
Observe local regulations for specialized areas
(hospital, aircraft, etc) when using the phone
2
Page 9
CAUTION
Safety Precautions
Do not use the phone while operating a vehicle
Changes or modifications not expressly approved by
UTStarcom, Inc. could void the user’s authority to
operate the phone
Keep all storage media (magnetic cards, floppy disks,
credit cards, etc.) away from the phone. Close
encounters or contact can erase or damage the storage
media
Keep all sharp metal objects (pins, nails, hairpins etc.)
away from the phone handset. The handset earpiece
contains a strong magnet that can attract and hold
metal objects. Remove any objects from the handset
earpiece before using, to avoid personal injury
In case of emergency, key in the emergency number
(911 for example in US), then press the Tal k key and let
the operator know your specific location. Don’t hang up
until you are told to do so
3
Page 10
Safety Precautions
Handling the Battery
DANGER
Do not dispose of the battery pack in a fire. It may
explode. Check with local waste management codes for
disposal instructions
Do not force the battery pack into the phone. Improper
installation can cause malfunctions or damage the
battery pack. This may result in fire or personal injury
Use caution in handling batteries in order not to short
the battery on conductive materials such as rings,
bracelets, and keys. The battery and/or conductor may
overheat and cause burns
If the battery becomes too hot while recharging, it
should be removed immediate ly from the charger
When clothes or skin are exposed to battery leakage,
rinse with clean water at once to prevent skin irritation
Do not use a cracked, leaking or odor -emitting battery
pack near an open flame or high temperatures
CAUTION
4
If a fully discharged bat tery is stor ed for a lo ng pe riod of
time, it may not be possible to recharge the battery
Observe local waste management codes for proper
battery disposal instructions
Page 11
Handling the Charger
DANGER
Only use a power source that provides the appropriate
voltage (AC100~240 V) for the charger. An unsuitable
power source can result in damage to the charger,
electric shock or fire
Do not use the charger if the power supply cord or plug
is damaged or frayed (exposed or broken wires, etc).
This can result in the risk of fire or electric shock
Do not short circuit the char ger c onnect or jack. This m ay
result in fire or electric shock
Immediately unplug the charger from the wall outlet in
the event that liquid is spilled into the unit to prevent fire
or electric shock
CAUTION
Always unplug the charger from the wall outlet before
cleaning to avoid the risk of electric shock
Do not place heavy objects on t he c ord t o av oid dama ge
Always grip the power plug when removing the charger
from the wall outlet. Do not pull on the power supply
cord to avoid damage and the risk of electric shock
Safety Precautions
5
Page 12
Getting Started
1. GETTING STARTED
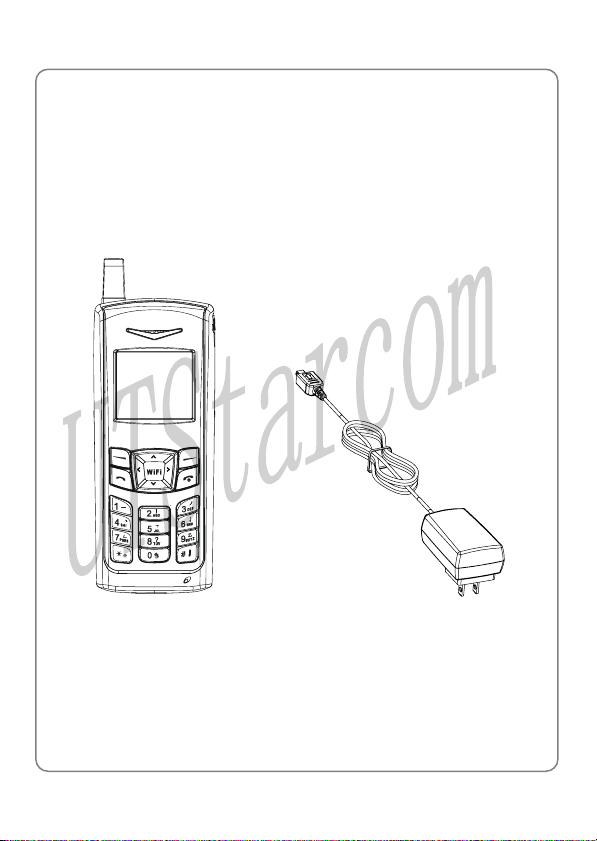
1.1 Package Contents
Please check the package contents by comparing them with the following
list. If you find anything missing or if the documentation set is incomplete,
contact your local phone dealer immediately
z Model F1000G (with one battery)
z Charger (one)
z User manual (one)
z Certificate of quality
6
Page 13

Getting Started
1.2 Phone Specifications
Dimensions
Weight Approximately 100g
Battery DC 3.6V 1500mAh Li-ion battery
Charger
Charger Weight Approximately 80g
Charging Time 3~4 hours
Standby Time 50~100 hours
Talking Time Approximately 5 hours
z Standby time refers to the state in which the phone is on continuously
without being used for calls, or moved to different service areas
z The standby time depends on the network conditions, phone usage
and surrounding area. The phone consumes more battery power
under the following conditions:
- In areas with weak signals, with high or low temperatures, or when
used outside the service coverage area
- When the phone frequently searches for network signal due to
location changes
- When you talk on the phone for long periods of time
- The Alarm, Backlight or Vibration function is active
- Ring or earpiece volume is set to maximum
About 107.8 x 44 x 23.5 (L×W×H) mm
Input: 100~240V AC, 50~60Hz
Output: 5.2V DC, 600mA
7
Page 14

Getting Started
1.3 Handset Description
1. Fixed antenna
2. Earpiece
3. LCD Screen
Navigation Key:
4.
This key is used to scroll up and down through menu lists
Left Soft Key:
5.
This key is used to perform the func tion indicated on the screen above
it
8
Page 15

Getting Started
6. Talk Key:
This key is used to make or receive a call. It can also be used to
access outgoing call logs in standby mode
7. ~ Number Keypad:
These keys are used to enter numbers and characters
* Key/Switch Key:
8.
This key is used to key in “*” or change the text input method
9. Charging Socket
10. Earphone Socket
Right Soft Key:
11.
This key is used to perform the func tion indicated on the screen above
it
12.
Power Key:
This key is used to switch the phone on and off, to end a call, or to
return to standby mode
# Key/Lock Key:
13.
This key is used to key in “#” or paus e symbol “P” (by pressing and
holding the key), or to lock the keypad
14. Microphone
15. Battery Cover Release Button
16. Battery Cover
~ Note: This is only a brief introduction to the keypad functions.
Please refer to the contents of this user manual for detailed
descriptions and operations
9
Page 16
Getting Started
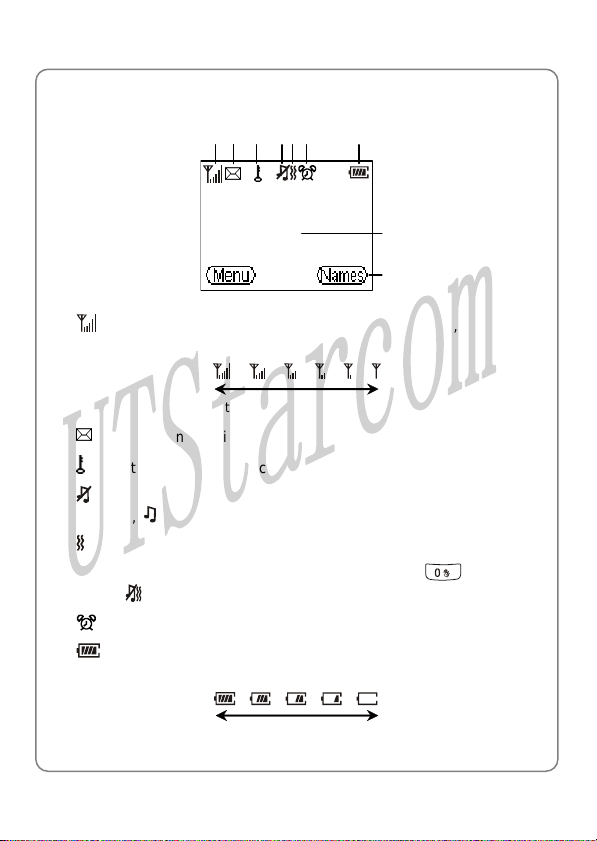
1.4 Display Indicators
1 2 3 4 5 6 7
8
9
Shows the current signal strength. The h igher th e bar, the stron ger
1.
the signal
Strong Weak
Indicates a new voice mail has been received
2.
3.
Indicates the keypad is locked
Means the Ring Mode is set to Mute; if the Ring Mode is set to
4.
Ringing,
Means the Ring Mode is set to Vibration
5.
will be displayed
If you press and hold the vibration shortcut key in standby
mode, will be displayed (refer to page 23 “Vibration Shortcut”)
6.
Indicates the Alarm function is active
7.
Indicates the battery charge level. The higher the bar, the greater
the battery power
High Low
10
Page 17
Getting Started
8. Content Display Area: Shows phone numbers, characters, etc.
9. Soft key function display area: Shows the functions of the left soft key
and the right soft key
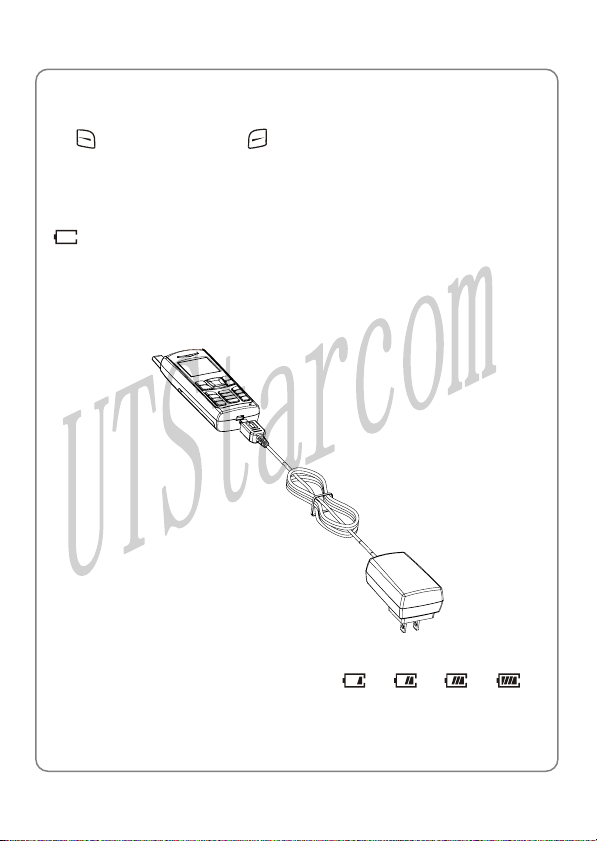
1.5 Charge the Battery
the battery power is lowWhen and needs recharging, the batt ery indi cat or
will flash continuously, and the phone will sound a low battery alarm
(if the alert tone is set to On), remin
and the phone will be switched off
follow the steps below:
1. Connect the charger to an AC wall outlet (100~240V)
ding you that the battery is runnin g lo w
automatically. To charge the battery,
2. Connect the lead from the charger to the char ging sock et of the pho ne.
The battery indicator bar starts to scr oll (
the phone is off, the text “Charging…” is also display on the LCD
screen
Æ Æ Æ ). If
ed
11
Page 18

Getting Started
3. When the battery indicator bar stops scrolling, charging is complete.
The text “Fully Charged!” is also display d on th LCD creen, the
phone is off
The pho
z ne takes about 3~4 hours to charge and the exact time may
vary depending on the circumstances
z
With your phone turned off, charge your new battery for 4 hou rs befor e
its first use
z When the battery is being charged, it is normal that your charger and
phone become warm to the touch
z If the phone is turned on while charging, you can still make and
receive calls
extending the charging time
1.
6 Replace the Battery
Sin
ce battery power is easily consumed, if you find the battery power
dim rging, please replace your battery. After
inishes quickly after full cha
replacing the battery, you will need to
as usual, but this will consume battery power, thus
e e s if
reset the date and time
1. In standby mode, switch the phone off by pressing and holding
(Otherwise, some user settings will be lost.)
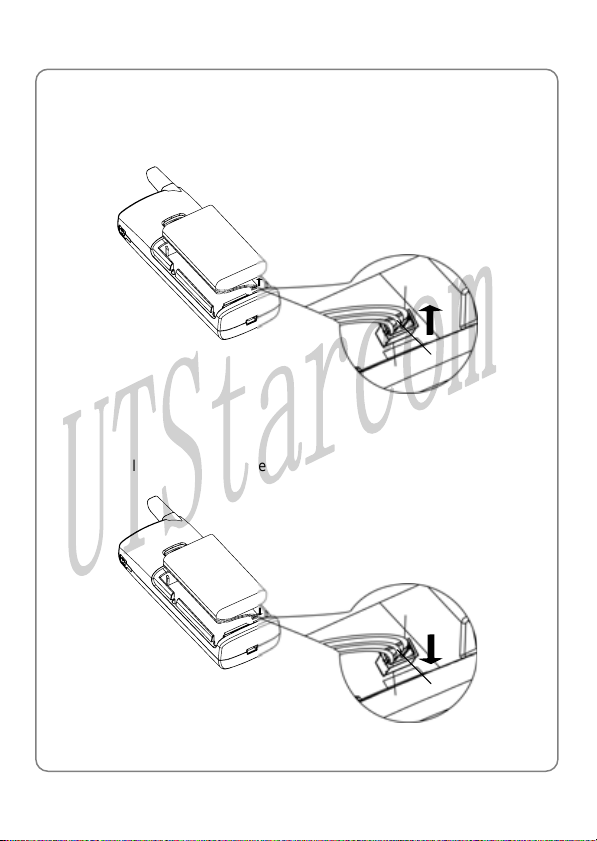
2. Remove the battery cover
With the back of the phone facing you, press th e bat tery cover release
button and lift the cover off in the direction of the arrow
12
.
Page 19
Getting Started
3. Remove the old battery
Disconnect the cord by firmly gripping the connector (not the battery
connection wire) and pulling gently as illustr ate d
Black
Yellow
Red
4. Install the new battery
Connect the cord of the new battery by firmly inserting the connector
into its place. Do not reverse the connector
Black
Red
Yellow
13
Page 20
Getting Started
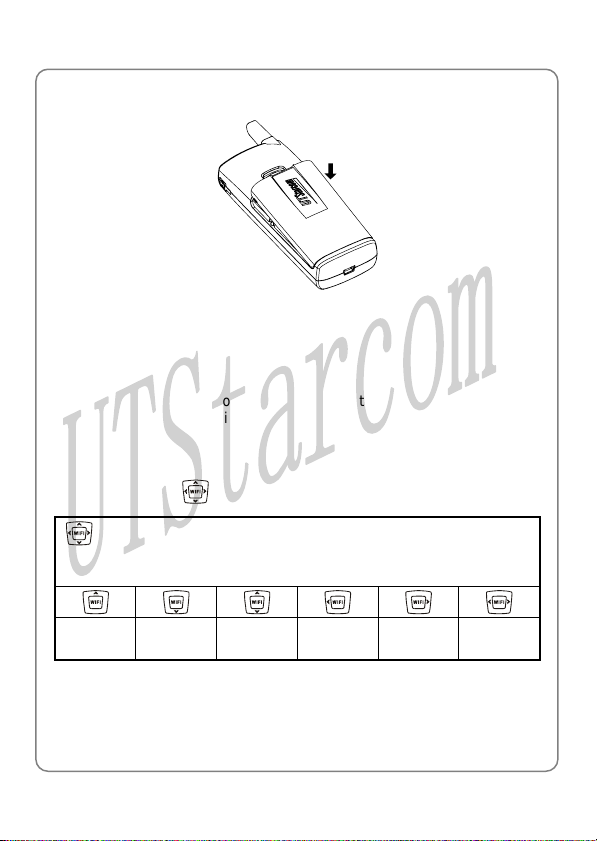
5. Replace the battery cover until it clicks into place
1.7 Conventions Used in this Manual
z In this manual, “press the key” means to release the key after you
press it; “press and hold the key” means to press the key for over 2
seconds before releasing it
z The text displayed on the s cr ee n is indicated in bold in this man ual, for
example Menu
z Navigation key
Press the “Up”, “Down”, “Left”, and “Right” directions on the
Navigation key to execute operations such browsing, selecting,
adjusting and setup; key directions are as foll ows:
Up Down
operations follow:
Up or
Down
as
Left Right
Left or
Right
14
Page 21

Getting Started
1.8 Access M u/List Optionsen
A variety
of options are available for the menus and lists, such as: Menu
and
Names
F
or example, to access ÆSettingsÆAnswer Mode, follow the
steps below:
1. In standby mode, press oft key the left s
(Menu)
2. Press
3. Press
(OK)
to highlight Answer Mode, and then press the left soft key
( to reach Set nd then press the left soft k ey tings, a OK)
~ Note: To return to the previous menu level, pres s the right so ft key
(Exit). To return to standby mode without changing the menu
settings, press .
If you stop operating the phone for two minutes, the phone will
ng settingsreturn to standby mode without changi the menu
15
Page 22

Basic Operations
2. BASIC OPERATIONS
2.1 Switch the Phone On/Off
Press and hold the power key . The phone will display the
power-on/off animation
If the PowerOn Code function is active, after switching on the phone,
enter the security code (with each input displayed as *) and press the left
soft key (Ok). If correct, the power-on animation will be displayed;
otherwise Code Error will be displayed
2.2 Make a Call
1. Key in the phone number
Press
delete the character or digit to the left of the cursor. To delete all the
numbers or characters, press and hold the right soft key
2. Press
To cancel the call attemp t, press the right soft key
time display of 00:00:00 will appear. You can also press the
to cancel the call; the phone will return to standby mode
3. When the call is connected, the call timer is displayed
4. To end the call, press the right soft key (Hangup) or the key
to move the cursor. Press the right soft key (Clear) to
(Clear)
to call the number. “Connecting..” will be displayed
(Cancel). A
key
2.3 Use Speed Dial
If you have assigned a phone nu mber to one of th e speed dial keys
16
Page 23

Basic Operations
~ , you can quickly call that phone number:
1. In standby mode, press and hold the corresponding speed dial key to
automatically display the phone number
2. Press to call the number
z For details of speed dial settings, refer to page 29 “Speed Dial”
2.4 Answer a Call
z If the Answer Mode is set to Talk Key, press the left soft key
(Answer) or the
z If the Answer Mode is set to Any Key , press any key to answer an
incoming call except the right soft key
key to answer an incoming call
, the key or the
key
z When there is an incoming call, you may press to stop the
vibration or ring alert without picking up the call
z To end an ongoing call, press the right soft key (Hangup) or the
key
2.5 Reject a Call
z When there is an inc o mi ng c al l , pr ess t he r igh t so f t ke y (Hangup)
or the
z If you press the right soft key (Hangup) to reject an incoming call,
key to reject the call
the call duration 00:00:00 will be displayed
z When there are missed calls (excluding rej ected calls) , the number of
missed calls will be displayed, fo r exampl e Missed Log 3. In this case,
press the left soft key
(View) to enter the missed call log (Missed
Log)
17
Page 24

Basic Operations
2. o
6 In Call Operati ns
While on a call, you can perform t
2.6.1 Hold a Call
You can place an ong
During a call, press th
(Ok) to select Hold. “Holding…” will bsoft key e displayed
press e left soft key
th
oing call temporarily on hold
e left soft key
(Ok) to select Unhold
he following operations:
(Option), and then press the left
ez To take the call off hold, press the l ft soft key (Option), and t he n
key
(Hangup) or the z To end the held call, press the r ight soft key
2.6.2 Call Waiting
If the Call Waiting funct
when another call come
tone
z To reject the incoming third party call and continue the current call,
ss the right soft key
pre
z To hold the current call and answer the incoming third party call, pr e ss
the left soft key
After answering the third party call, you can perform the following
ope
rations:
z Press the left soft key (Option). Press to highlight Swap
and press the left soft key
and the held call
ion is activated (refer to page 62 “Call Waiting”),
s in during a call, the ear piec e w ill sou nd a w aitin g
(Hangup)
(Ans er) w
(Ok) to switch between the current call
18
Page 25

Basic Operations
z Press the left soft key (Option). Press to highlight End Held
Call and press the left soft key
z Press the right soft key (Hangup) to end the cu rrent call. Then,
you can press the left soft key
(Ok) to end the held call
(Option) and select Unhold to take
the held call off hold
z Press the key to end both calls
2.6.3 Make a New Call
While on a call, if you need to connect to a third party, press the left soft
key
(Option). Press to highlight New Call and press the left soft
(Ok). Key in the third party’s phone number, and then press the
key
left soft key
can start the call with the third party. The original call will be placed on
hold
The following operations are available:
z Press the left soft key (Option). Press to highlight Swap
and press the left soft key
and the held call
z Press the left soft key (Option). Press to highlight End Held
Call and press the left soft key
z Press the right soft key (Hangup) to end the cu rrent call. Then,
you can press the left soft key
the held call off hold
(Ok) or the key. When the connection s ucc eeds, you
(Ok) to switch between the current call
(Ok) to end the held call
(Option) and select Unhold to take
z Press the key to end both calls
19
Page 26

Basic Operations
2.6.4 Conference Call
If the Three Way Call function is active, after making a new call with the
original call on hold (refer to page 19 “Make a New Call”), you can make a
conference call with both parties. Press the left soft key
Press to highlight Conference and press the left soft key (Ok)
to initiate the conference call
z During the conference call, pr ess the left so ft ke y (Option). Press
to highlight Drop and press the left soft key (Ok). Press
to highlight the desired party, and press the left soft key
end the call with the selected party
z During the conference call, pressing the right soft key (Hangup)
or the
key will end both calls
(Option).
(Ok) to
2.6.5 Transfer a Call
If the Call Transfer function is acti vated (refe r to page 62 “Call Transfer”),
you can transfer an ongoing received call to another phone number:
After answering a call, press the left soft key
highlight Call Transfer and press the left soft key
transfer number and press the left soft key
z If the Call Transfer function is set to Blind, the call will be directly
transferred to the dialed phone number after the connection succeeds
z If the Call Transfer function is set to Consult, after the transferred-to
party answers the call, announce the transfer. Then, press the left soft
key
(Transfer) to transfer the intended call
(Option). Press to
(Ok). Key in the
(Ok)
20
Page 27

Basic Operations
2.6.6 Mute the Microphone Volume
During a call, press the left soft key (Option). Press to highlight
Mute and press the left sof t k ey
set to mute
z To resume the volume, press the left soft key (Option). Press
to highlight Unmute and press the left soft key (Ok)
(Ok). The microphone volume will be
2.6.7 Access the Phonebook
While on a call, press to acc ess the phonebook entry list
z When you press to access the phonebook, the last phonebook
entry will be highlighted; when you press
phonebook, the first entry will be highlighted
z After entering the phonebook, press to scroll through the entries.
Press the left soft key
number and group) for the highlighted entry
z In the phonebook entry list, Press ~ to enter the first
letter(s)/digit(s) of the desired entry (name). All names starting with
these letter(s)/digit(s) will be displayed (refer to page 25 “Search”
under the Phonebook menu for details)
(Details) to check the details (name, phone
~ Note: If there are no entries in the phonebook, when you press ,
the error tone will sound
to access the
2.6.8 Adjust the Earpiece Volume
1. During a call, press to access the earpiece volume adjustment
screen
21
Page 28

Basic Operations
2. There are six volume levels. Press to increase or to
decrease the volume
If the volume is at the highest level, the volume level will not change
when
level will not change when is pressed
3. After completing the volume selection, press the right soft key
(Exit) or wait for two seconds to return to the call timer mode. The
phone will save the adjusted volume level
is pressed; if the volume is at the lowest level, the volume
2.7 Store a Phone Number
In standby mode, new entries can be added to the phonebook
1. Enter the desired phone number and p ress the l eft sof t key
2. Enter the name according to the prompts and press t he left s oft key
(Ok)
(Save)
3. Press
press the left soft key (Ok) to complete the operation
to highl ight the desired group for this pho ne number and
~ Note: The phone number and name of the newly added record
cannot be identical to those of an existing record. Otherwise, the
text Exists will be displayed after you enter the name and press the
left soft key
2.8 Call Log Shortcut
In standby mode, you can quickly view the call logs: outgoing call log
(Dialed Log), received call l og (Re ceiv ed Log) and miss ed call log (Missed
Log)
z Press to display the latest outgoing call. Press to scroll
through other outgoing call records
22
(Ok)
Page 29

Basic Operations
z Press to display the latest received call. Press to scroll
through other received call records
z Press to display the latest missed call. Press to scroll
through other missed call records
After the intended record is displayed, you can press
number
To perform other operations with the record, press the left soft key
(Option). (Refer to page 31 “Call Log” for details)
to call the
2.9 Custom Functions Shortcut
1. In standby mode, press to access the custom functions menu
2. Press
Scheme (3), Calculator (4), Calendar (5) or Voice Mail (6), and then
press the left soft key
You can also access an option by pressing its corresponding number
key
to highlight the desired option: WiFi (1), Network (2),
(Ok) to access the opti on
2.10 Current Profile Shortcut
In standby mode, press to access the menu of the current profile.
Press
For details of profile setup, refer to page 37 “Profiles”
to highlight the desired option, and then press the left soft key
(Ok) to access the option
2.11 Vibration Shortcut
In standby mode, press and hold to se t the ri ng mo de fo r in comi ng
calls and alarms to vibration, and set the keypad tone and alert tone to
23
Page 30

Basic Operations
“Off”. will be displayed
z Press and hold again to resume ring mode, keypad tone and
alert tone in the curre nt profile
z For detailed operations , refer to page 38 “Ring Mode”
2.12 Keypad Lock
The keypad lock prevents the keys from being accidentally pressed,
resulting in unintentional operations
z In standby mode, press and hold to lock the keypad. The
indicator will be displayed
z To unlock the keypad, press and hold again in standby mode
z When the keypad is locked, y ou can answ er a c all as usual. Du ring t he
call, you can operate the phone normally. However, the keypad will
automatically lock when the call ends, or if the call is rejected
z When the keypad is locked, even if the Backlight is not set to Off, the
LCD screen and keypad will not light when keys are pressed
24
Page 31

Phonebook (Names)
3. PHONEBOOK (NAMES)
You can store frequently used phone numbers and names in the phone
memory (phonebook). The phonebook can store up to 200 entries. Each
entry may contain a name, phone num
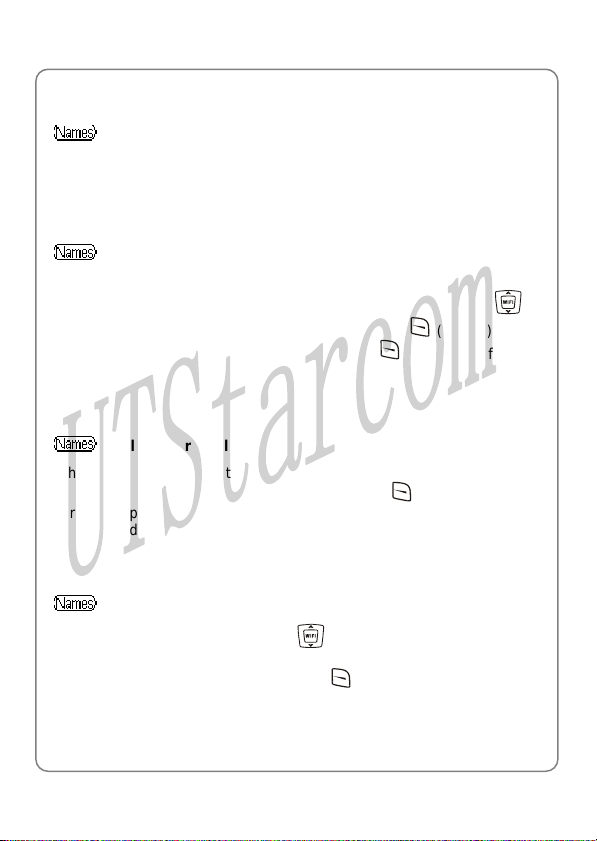
You can enter the phonebook in either of the following ways:
z In standby mode, press the right soft key (Names)
z In standby mode, press the left soft key (Menu), press to
scroll to Phonebook and press the left soft key (Ok)
From the phonebook menu, you can select from the following options:
3.1 Search
ÆSearch
After you access this option, the phonebook entry list will be displayed.
Key in the first letter(s) or digit(s) of the name you are searching for. A
maximum of six letters/digits can be ent ered. All names starting w ith these
letter(s)/digit(s) will be displayed, including Chinese names starting with
corresponding PinYin letters
Enter letters or digits as follows:
ber and group information
1. Press
the respective key. For keys
key repeatedly until the intended letter/digit appears. For example: if
you press
turn:
~ to enter the corresponding letter or digit labeled on
~ , p the cress orresponding
repeatedl e following letters and digit appear in
y, th
a → b → c → 2
25
Page 32

Phonebook (Names)
2. The letter/digit just entered will be underlined. After you have entered
the intended letter/digit, press the appropriate number key to input the
next letter/digit. If the next letter/digit and current letter/digit share the
same key, wait for one second to input the letter/digit again
To delete the last entered letter/digit, press the right soft key
(Clear); to delete all letters/digits, press and hold the right soft key
(Clear)
z When a matched name is highlighted, you can press to call the
corresponding phone number
z When an entry (name) is highlighted, press the left soft key
(Details) to see the detailed information: name, phone number and
group category. Press
When the entry details are displayed, you can press to call the
phone number
When the entry details are displayed, you can press the left soft key
(Option) to select from the following options:
to browse through the text
3.1.1 Edit
Change names, numbers and group categories by following the screen
prompts
3.1.2 Delete Entry
After this option is selected, “Delete?” will be displayed. Press the left s oft
key
(Ok) to confirm the deletion
3.2 Add Entry
ÆAdd Entry
Select this option to add new entries into the phonebook
26
Page 33

Phonebook (Names)
1. Key in the name, and press the left soft key (Ok)
You can enter a maximum of 20 English letters or 10 Chinese
characters (refer to page 67 “Input Method”)
2. Enter the phone number (24 digits maximum), and press the left soft
key
(Ok)
The phone number cannot be lef t blank; ot herwise Number Error will
be displayed
3. Press
to highlight the desired group category: Family, Friend,
Colleague, Classmate, VIP, Partner, Others or Blacklist. Press the
left soft key
z If the name is not filled in, th e phone will use the first 12 digits from the
(Ok) to complete the operati on
phone number as the name
z The phone number and name of the newly added record cannot be
identical to those of an existing record. Otherwise, the text Exists will
be displayed after you enter the phone number and press the left soft
key
(Ok)
z The phone will automatically reject any incoming caller whose number
is on the Blacklist. No response will be displayed. (Caller ID service
needs to be activated)
z No more entries can be added if the phon ebook memo ry is fu ll. When
Add Ent ry is selected, the phone will remind you that the phonebook
memory is full
z In standby mode, you can add a new entry by entering the phone
number and pressing the left soft key
name and press the left soft key
(Save). Then, enter the
(Ok); press to highlight the
desired group category and press the left soft key
(Ok) to
complete the operation
27
Page 34
Phonebook (Names)
3.3 Delete Entry
ÆDelete Entry
You can select from the following options to delete entries one by one or
all at once
3.3.1 One by One
ÆDelete EntryÆOne by one When you access this option, the phonebook entry list will be displayed. Enter the first letter(s)/digit(s) of the intended entry (name). Press
highlight the entry, and then press the left soft key
“Delete?” is displayed, press the left soft key
deletion
(Delete). When
(Ok) to confirm the
3.3.2 All
ÆDelete EntryÆAll
When you access this option, the prompt Enter Code will be displayed.
Enter the security code, and pr ess the left soft k ey
correct, all phonebook entries will be deleted; otherwise Code Error will
be displayed
(Ok). If the code is
to
3.4 Group Info
ÆGroup Info After accessing this option, press
category: Family, Friend, Colleague, Classmate, VIP, Partner, Others
or Blacklist, and press the left soft key
from the following options:
to highlight the desired group
(Ok). Then, you can sele ct
28
Page 35

Phonebook (Names)
3.4.1 Ring Tone
Select this option to specify a ring tone for the particular group category
Press
left soft key
to highlight and sample the ring tone options. Then press the
(Ok) to complete your selection
~ Note: The Blacklist only has a Browse function because the
phone will automatically reject any call from this group. Thus, it is
not necessary to set a ring tone for the Blacklist group
3.4.2 Browse
When you access this option, the list of entries in the selected group
category will be displayed
Enter the first letter(s)/digit(s) of the desired entry (name). Press
highlight the entry, and press the left soft key
details for the entry. Press the left soft key
or Delete Entry to edit or delete this entry
(Details) to view the
(Option), and select Edit
3.5 Speed Dial
ÆSpeed Dial
Select this option to assign a phone number in the phonebook to one of
the speed dial k e y s
(refer to page 16 “Use Speed Dial”)
After you access this option, the setting status for key #1 (
displayed. Press
z If no phone number is assign ed to the key, Unset will be displayed.
Press the left soft key
displayed (if there are no entries in the phonebook, No Record will be
displayed). Enter the first letter(s)/digit(s) of the desired entry (name).
~ for greater convenience when dialing
to browse through the speed dial key settings
(Set); the phonebook entry list will be
to
) will be
29
Page 36

Phonebook (Names)
Press to highlight the entry, and press the left soft key (Ok)
to assign the number to the key
z If a phone number has been assigned to the key, the corresponding
name will be displayed. To change or cancel the setting for this key,
press the left soft key
(Option), and then select Edit or Cancel
~ Note: If the record for a speed dial key is modified in t he phon eboo k,
it will automatically be updated for the speed dial key function
~ If the record for a speed dial key is deleted from the phonebook, it
will also be cancelled for the speed dial key function
3.6 Memory
ÆMemory Select this option to view the number of records in each group category,
totally stored records (Used) and available records (Unused)
30
Page 37

Menu
4. MENU
In standby mode, press the left soft key (Menu) to access the menu.
Press
(Ok) to access the submenu
4.1 Call Log
Your phone records missed, received and dialed calls as well as their call
durations
to reach the desired submenu, and press the left soft key
ÆCall Log
In standby mode, you can press Missed Log, Received Log or Dialed Log (refer to page 22 “Call Log Shortcut”)
, or to quickly access
4.1.1 Missed Log
ÆCall LogÆMissed Log
This option enables you to view the last 20 missed calls
After you access this option, the phone will display the information of the
most recent missed call Missed 1: the caller’s phone number or name (if
the number is stored in the phonebook). Press
calls
to view other missed
~ Note: This function only works in netwo rks that support the Caller
ID service; otherwise No Caller ID will be displayed in the missed
log. If the caller’s phone is set to block the caller’s number, No
Caller ID will also be displayed
When viewing a log, you can dial the caller’s phone number by pressing
.
31
Page 38

Menu
When a call log is displayed, press the left soft key (Option). The
following options will be available:
4.1.1.1 Edit
After you access this option, the caller’s phone number will be displayed.
You can edit the phone number, and then save or dial the edited number:
Save Number
After editing the number, press the left soft key
name and press the left soft key
desired group category, and then press the left soft key (Ok) to
complete the operation
Dial Number
After editing the number, press
(Ok). Press to highlight the
to call the displayed number
(Save). Key in the
~ Note: If No Caller ID is shown in the log, when you select Edit,
Number Error will be displayed
When you are saving the number, the phone number and name
cannot be identical to those of an existing phone book entry.
Otherwise, the text Exists will be displayed after you enter the
name and press the left soft key
4.1.1.2 Time
Select this option to view the time the call came in
4.1.1.3 Delete
When you access this option, “Delete?” will be displayed. Press the left
soft key
(Ok) to co mplete the deletion
32
(Ok)
Page 39

Menu
4.1.2 Received Log
ÆCall LogÆReceived Log This option enables you to view the last 20 received calls After you access this option, the phone will display the information of the
most recently received call Received 1: the caller’s phone number or
name (if the number is stored i n the phone book). P ress
received calls
to view other
~ Note: This function only works in networks that support Caller ID
service; otherwise No Caller ID will be displayed in the received log.
If the caller’s phone is set to block the caller’s number, No Caller ID
will also be displayed
When viewing a log, you can dial the caller’s phone number by pressing
.
When a call log is displayed, press the left soft key
following options will be available:
4.1.2.1 Edit
After you access this option, the caller’s phone number will be displayed.
You can edit the phone number, and then save or dial the edited number.
Refer to page 32 “Edit” under the Missed Log option for details
(Option). The
4.1.2.2 Time
Select this option to view the time the call came in
4.1.2.3 Delete
When you access this option, “Delete?” will be displayed. Press the left
soft key
(Ok) to co mplete the deletion
33
Page 40

Menu
4.1.2.4 Duration
Select this option to view the duration of the received call.
4.1.3 Dialed log
ÆCall LogÆDialed Log
This option enables you to view the last 20 dialed calls
After you access this option, the phone will display the information of the
most recent outgoing call Dialed 1: the dialed phone number or name (if
the number is stored in the phonebook). Press to view other
outgoing calls
~ Note: If you dia l a numb er that has b een r ecorded i n th e Diale d Log ,
the phone will update the log after the call ends
When viewing a log, you can call the dialed phone number by pressing
.
When a call log is displayed, press the left soft key
following options will be available:
4.1.3.1 Edit
After you access this option, the dialed phone number will be displayed.
You can edit the phone number, and then save or dial the edited number:
Save Number
(Option). The
After editing the number, press the left soft key
name and press the left soft key
desired group category, and then press the left soft key
complete the operation.
(Ok). Press to highlight the
(Save). Key in the
34
(Ok) to
Page 41

Menu
~ Note: The phone number and name cannot be identical to those of
an existing phone book entry. Otherwise, the text Exists will be
displayed after you enter the name and press the left soft key
(Ok).
Dial Number
After editing the number, press
4.1.3.2 Time
Select this option to view the time the call was dialed
4.1.3.3 Delete
When you access this option, “Delete?” will be displayed. Press the left
soft key
4.1.3.4 Duration
Select this option to view the duration of the dialed call
(Ok) to co mplete the deletion
to call the displayed number
4.1.4 Delete Log
ÆCall LogÆDelete Log
This option enables you to delete all missed calls, received calls, dialed
calls, or to delete all
z If you select Missed Log, Received Log or Dialed Log, the text
“Delete?” will be displayed. Press the left soft key
complete the deletion
z If Delete All is selected, follow the prompts to enter the security code
and press the left soft key
security code is incorrect, Code Error will be displayed
(Ok) to delete all the call logs. If the
(Ok) to
35
Page 42

Menu
4.1.5 Duration
ÆCall LogÆDuration This option enables you to view the approx imate dura tion of re ceiv ed call s,
dialed calls, or the duration of all calls
After accessing this option, press
calls (Received), dialed calls (Dialed), as well as the duratio n of all calls
(Total Time). The time will be displayed in “h:mm:ss” format
To clear the timer, press the left soft key
will be displayed. Press the left soft key
operation
to view the duration of received
(Reset). The text “Reset?”
(Ok) to complete the
36
Page 43

Menu
4.2 Profiles
ÆProfiles This submenu enables you to customize the phone alert settings to suit a
variety of environments
When you access this submenu, the profile list will be displayed; the
current profile will be highlighted. You can customize each profile, and
activate the one that suits your environment. The phone will utilize all the
current profile’s settings
Standard is the factory-preset profile
4.2.1 Standard
ÆProfilesÆStandard
4.2.1.1 Enable
ÆProfilesÆStandardÆEnable Select this option to activate the selected profile
4.2.1.2 Set
ÆProfilesÆStandardÆSet
This option enables you to change the selected profile’s settings
When you press
highlighted option will be displayed in the adjacent bubble. Press the left
soft key
(Ok) to access the highlighted option
to browse though the options, the setting of the
Ring Volume
Select this option to adjust the ring volume level for incoming calls and the
alarm clock
37
Page 44

Menu
There are two volume levels: High and Low. Press to reach the
desired volume level, and press the left soft key
operation
Ring Mode
This function enables you to define how the phone will notify you of
incoming calls
(Ok) to complet e the
The available options include: Ringing, Vibration and Mute. Press
to reach the desired ring mode, and press the left soft key
complete the operation
Ring Tone
This option enables you to select a special ring tone for incoming calls
Press
After highlighting the desired ring tone, press the left soft key
complete the operation
Alar m Tone
This option enables you to select an alarm tone for the alarm clock
Press
each. After highlighting the desired alarm tone, press the left soft key
(Ok) to complete the operation
Keypad Tone
If this function is activated, when you press any key, the phone will sound
a tone. When an operation on the phone is completed or fails, the
respective success/failure tone will sound
Select On or Off to activate or deactivate this function
to scroll thr ough the ring tones and listen to a sample of each.
to scroll through the alarm tones and listen to a sample of
(Ok) to
(Ok) to
38
Page 45

Menu
Aler t Tone
If this function is activated, a warning tone will sound when the battery
power is low
Select On or Off to activate or deactivate this function
4.2.2 Meeting
ÆProfilesÆMeeting
This profile is suitable for meeting environments. You can preset this
option to meet your needs by following the same steps specified in
“Standard”
4.2.3 Outdoor
ÆProfilesÆOutdoor
This profile is suitable for outdoor environments. You can preset this
option to meet your needs by following the same steps specified in
“Standard”
4.2.4 User Define
ÆProfilesÆUser Define
This profile can be tailored fo r other environments. You can preset this
option to meet your needs by following the same steps specified in
“Standard”
39
Page 46

Menu
4.3 Settings
ÆSettings From this submenu, you can perform various phone settings
4.3.1 Scheme
ÆSettingsÆScheme
When this option is highlighted, the current setting will be displayed in the
adjacent bubble. After accessing this option, you can select from the
following options:
4.3.1.1 Static Picture
The standby display will become static after you set this option
After this option is selected, its current setting will be highlighted. To
customize a text and display it in standby mode, select User-defined; to
select and display a picture in standby mode, select from the options
Photograph1~Photograph24
z If User-defined is selected, enter up to 6 Chinese characters or 12
English letters (refer to page 67 “Input Method”), and then press the
left soft key
z If one of the options Photograph1~Photograph24 is selected, the
corresponding picture will be displ ayed. Y ou can p ress
through other pictures. When the desired picture is displayed, press
the left soft key (Ok) to complete the operation
(Ok) to complete the operation
to browse
4.3.1.2 Every Hour
The standby display will change every hour in a 24-hour cycle after you
set this option. When this option is accessed, these options will be
available:
40
Page 47

Menu
Default The standby display will change every hour in the default picture
sequence after you select this option
User Edit
This option enables you to specify the picture or text for each hour
(Picture1~Picture24)
Select from the options Picture1~Picture24, and then edit text or s elect a
picture by following the same operations specified in “Static Picture”.
Default pictures will remain for unedited options
Change Preview
Select this option to preview the current setting for Every Hour. You can
press the left soft key
4.3.1.3 Every 3 Hours
The standby display will cha ng e every three hours in a 24-hour cycle after
you set this option. Follow the same operations specified in “Every Hour”
4.3.1.4 Every Day
The standby display will change every day in a 7-day cycle after you set
this option. Follow the same operations specified in “Every Hour”
(Replay) to re-preview the pictures or text
4.3.2 Date/Time
ÆSettingsÆDate/Time This option enables you to set the phone’s date and time. When you
highlight this option, the current date and time will be displayed in the
adjacent bubble
41
Page 48

Menu
After accessing the option, enter a date from 2004-01-01 to 2019-12-31,
and then enter the time in the corresponding time format. Press the left
soft key
z When you key in the date or time, you can press to move the
(Ok) to complete the operation
cursor and modify the number
4.3.3 Answer Mode
ÆSettingsÆAnswer Mode This option enables you to select how to answer an incoming call When you highlight this option, its current setting will be displayed in the
adjacent bubble
After you access this option, the following will be available:
4.3.3.1 Any Key
Press any key to answer an incoming call except the right soft key ,
the
key and the key
4.3.3.2 Talk Key
Press the left soft key
incoming call
4.3.4 Language
ÆSettingsÆLanguage This option enables you to select the language of the phone’s text display When you highlight this option, the current language setting will be
displayed in the adjacent bubble
You can select 简体中文 (Simplified Chinese) or English
(Answer) or the key to answer an
42
Page 49

Menu
4.3.5 Display
ÆSettingsÆDisplay You may set the display for the LCD screen as follows:
4.3.5.1 Backlight
ÆSettingsÆDisplayÆBacklight When you highlight this option, the current setting will be displayed in the
adjacent bubble
If the Backlight is not set to Off, the LCD screen and keypad will light
when you press keys or the phone receives a call
The following options are available:
Off
Select this option to deactivate the backlight
Battery Saving
In this mode, the backlight will last for 5 seconds after the last keystroke
Normal
In this mode, the backlight will last for 15 seconds after the last keystroke
4.3.5.2 Contrast
ÆSettingsÆDisplayÆContrast
This option enables you to specify the contrast level for the LCD screen.
When you highlight this option, the current setting will be displayed in the
adjacent bubble
There are six contrast levels. Press
the contrast. The screen display will reflect the contrast setting. After
to increase or to decrease
43
Page 50

Menu
reaching the desired contrast level, press the left soft key (Ok) to
complete the operation
4.3.5.3 Screen Saver
ÆSettingsÆDisplayÆScreen Saver
When you highlight this option, the current setting will be displayed in the
adjacent bubble
If the Screen Saver is not set to Off, the clock screen saver will be
displayed after the phone has been in standby mode for one minute. The
screen saver will disappear when you press keys
The following options are available:
Digital Mode
In this mode, the screen saver will display a digital clock
Analog Mode
In this mode, the screen saver will display an analog clock
Off
Select this option to deactivate the Screen Saver function
4.3.5.4 On/Off Animation
ÆSettingsÆDisplayÆOn/Off Animation
This option enables you to selec t the power-on/off animation. W hen this
option is highlighted, its current setting will be displayed in the adjacent
bubble
Select one of the options Animation 1 ~ Animation 4; the corresponding
animation will be displayed. Press the left soft key
the operation
(Ok) to complete
44
Page 51

Menu
4.3.6 Set Security
ÆSettingsÆSet Security This option enables you to set the security level to protect your phone After accessing this option, you will be prompted to enter the security
code. Key in the security code and press the left soft key
correct, the following options will be available (otherwise Code Error will
be displayed)
4.3.6.1 PowerOn Code
If this function is active, the security code will need to be entered each
time you switch on the phone. When this option is highlighted, its current
setting will be displayed in the adjacent bubble
After accessing this option, select On or Off to activate or deactivate
4.3.6.2 Change Code
Select this option to change the security code. Observe the following
steps:
1. When New Code is displayed, enter a new security code (0~6 digits
long, using numbers 0~9), and then press the left soft key
Confirm Code will be displayed
2. Enter the new security code again and press the left soft key (Ok)
to complete the operation
z The security code is “888888” by default
z If the new security code entered in step 2 is different from that entered
in step 1, when you press the left soft key
be displayed
z To avoid any inconvenience, please remember the new security code
(Ok), Not Matched will
(Ok). If
(Ok).
45
Page 52

Menu
4.3.6.3 Reset All
Select this option to restore your phone’s default settings
When you access this option, “Reset All?” will be displayed. Press the
left soft key
This operation will not delete the phonebook entries or call logs. It cannot
change the phone’s date and time either
Phone Default Settings
Functions Default Settings
Profiles Standard
Earpiece Volume 3
Call Log (Duration) 0:00:00
Speed Dial Setting No
Phonebook Group (Ring Tone) Ring 5
Security Code 888888
PowerOn Code Off
Scheme Static Picture
Scheme (Static Picture) Photograph1
Scheme (User-defined) (Blank)
Answer Mode Talk Key
Language English
Backlight Battery Saving
Contrast 3
Screen Saver Digital Mode
On/Off Animation Animation 3
Input Method (PinYin, Sim Stroke) Off (Deactivated)
Input Method (English, Letter) On (Activated)
(Ok) to complete the operation
46
Page 53

Menu
Functions Default Settings
Alarm (On/Off) Off
Alarm (Set Time)
Alarm (Snooze)
Current Time Zone
Time Format 24 Hour
Profiles Default Settings
Profile
Options
Ring Volume High Low High High
Ring Mode Ringing Vibration Ringing Ringing
Ring Tone Ring 6 Ring 6 Ring 6 Ring 6
Alarm Tone Ring 3 Ring 3 Ring 3 Ring 3
Keypad Tone Off Off Off Off
Alert Tone On Off On On
Standard Meeting Outdoor
08:00
Off
New York
User
Define
4.3.7 Input Method
ÆSettingsÆInput Method In addition to digit input method, the phone supports four kinds of input
methods including PinYin, Sim Stroke, English and Letter. You can
choose to activate or deact ivate these four methods. Consequently, on
the character input interface (such as inputting phonebook entry names),
you can switch between the activated input methods and digit input
method
After you access this option, press
method option. The current setting will be displayed in the adjacent
bubble. Press the left soft key
and then select On or Off to activate or deactivate
to highl ight the intended input
(Ok) to access this input method option,
47
Page 54

Menu
4.4 Tools
ÆTools From this submenu, you can use the Calculator, view the Calendar, set
the Alarm, change the current Time Zone, enable DST (Daylight Saving
Time) or set Time Format
4.4.1 Calculator
ÆToolsÆCalculator
This function enables you to add, subtract, multiply and divide
1. The screen will initially display the number “0”. Enter the fir st number to
be calculated
- To enter a minus sign, press
made negative); to enter a decimal point, press
2. Press
or division signs respectively
3. Enter the second number
- To enter “0”, press
4. Press
- To conduct further calculations from this result, repeat steps 2~4
5. When starting a new calculation, if the result from the l ast calculat ion is
not “0”, press the right soft key
z To delete the character you just entered, press the right soft key
(Clear); to erase all entered char acters, press and hold the right soft
key
, , or to enter the plus, minus, multiplication
and ; “0.0” will be displayed
to display the calculation result
(Clear)
(only the first number can be
(Clear) to initialize
48
Page 55

Menu
z A maximum of 9 digits (including minus si gn a nd deci mal poi nt) ca n be
entered at one time
z If the formula violates mathematical principles (for example, 5/0),
Error will be displayed
z If the absolute value of the ca lculation result exceeds 999,999,999,
Overflow will be displayed
4.4.2 Calendar
ÆToolsÆCalendar
This function enables you to view the calendar from January 1, 2000 to
December 31, 2049
After accessing this option, you can press to highlight the desired
date
4.4.3 Alarm
ÆToolsÆAlarm
This function enables you to set the alarm for a specified time. Once
activated, the alarm indicator
z When the preset alarm time expires, the phone will sound the alarm;
an alarm icon and the current time will be displayed. The alarm will
sound for 30 seconds unless dismissed
z To dismiss the alarm and return to standby mode, press any key
z If the alarm time expires during a call, the alarm will not sound
When you highlight one of the following options, its current setting will be
displayed in the adjacent bubble. You can set the alarm function by
observing the following operations:
4.4.3.1 On/Off
will be displayed
ÆToolsÆAlarmÆOn/Off
49
Page 56

Menu
After accessing this option, select On or Off to activate or deactivate the
alarm function
4.4.3.2 Set Time
ÆToolsÆAlarmÆSet Time
Select this option to set the alarm time. Enter the time in the
corresponding time fo rmat, and then press the left soft key
complete the operation
z When you key in the time, you ca n pr es s to move the cursor and
modify the number
z The cursor will advance if the number entered is valid; otherwise, the
phone will sound an error tone (if the Keypad Tone is set to On)
4.4.3.3 Snooze
ÆToolsÆAlarmÆSnooze
If this function is activated, the alarm will repeat 3 times at 5-minute
intervals after the original alarm time expires
You can select On or Off to activate or deactivate this function
(Ok) to
4.4.4 Time Zone
ÆToolsÆTime Zone
This function enables you to change the current time zone
After you access this option, some cities (time zones) and their time
differences will be displayed; the current time zone will be highlighted
Press
key
change accordingly
to highlight the desired time zone, and then press the left soft
(Ok) to set it as the current time zone. The phone’s time will
50
Page 57

Menu
4.4.5 DST Setting
ÆToolsÆDST Setting
This function enables you to activate or deactivate Daylight Saving Time
(DST). When you highlight this option, the current DST setting will be
displayed in the adjacent bubble
After accessing this option, select On or Off to activate or deactivate the
DST function
4.4.6 Time Format
ÆToolsÆTime Format
This option enables you to set the time format. When you highlight this
option, the current time format will be displayed in the adjacent bubble
After accessing this option, select 12 Hour or 24 Hour
51
Page 58

Menu
4.5 WiFi-Settings
ÆWiFi-Settings
From this submenu, you can perform the following WiFi settings
~ Note: After completing WiFi settings, switch off the phone and then
switch it on, in order that the changed WiFi settings can take effect
4.5.1 Net Search
ÆWiFi-SettingsÆNet Search
This option enables you to search available APs (10 maximum) for the
phone. After selecting this option, the phone will start to search for APs.
Available APs will be listed ac cordi n g to the signa l str engt h. The strong est
AP’s SSID will be highlighted at the top of the list
Press
(Save). Press
the left soft key (Save) to save the SSID to the connecti on profil e. You can
then follow the prompt to set the WEP key. After the WEP key setting, the
phone will start the connection to the AP. If the connection fails, the phone
will connect to other APs specified in “SSID & WEP KEY”. If the phone
fails to connect to all these APs and the Auto Scan function is active, the
phone will try to search and connect to another available AP
to highlight the desired SSID, and press the left soft key
to highlight the desired connection profile, and press
~ Note: When the phone is connecting to an AP, you can press the
right soft key
4.5.2 WiFi Config
ÆWiFi-SettingsÆWiFi Config
From this option, you can perform the following WiFi config ur ati on:
52
(Search) to start the search for available APs
Page 59

Menu
4.5.2.1 Authentication
ÆWiFi-SettingsÆWiFi ConfigÆAuthentication
This option enables you to se t the WiFi authentication mo de. When you
highlight this option, the current setting will be displayed in the adjacent
bubble
After accessing this option, you can select Null or Shared Key
4.5.2.2 SSID & WEP KEY
ÆWiFi-SettingsÆWiFi ConfigÆSSID & WEP KEY
This option enables you to set SSIDs and WEP keys for connection
profiles. Each time you switch on the phone, the phone will try to connect
to one of the corresponding APs (Access Points)
After you select this option, the co nnection profil e list w ill be displ ayed. If a
connection profile has been se t with a 64/128 bit WEP key, a lock icon will
be displayed in front of the connection profile
Press
left soft key
SSID
This option enables you to save an AP’s SSID to the connection profile
After accessing this option, enter the SSID (32 alphanumeric characters
maximum), and then press the left soft key
operation
WEP Key
This option enables you to save the WEP key utilized by the AP to the
connection profile:
to highlight the desir ed conne ctio n profil e, and t hen pres s the
(Ok). The following options will be available:
(Ok) to complete the
53
Page 60

Menu
Null
Select this option to set the WEP key to null
64bit
Select this option to enter a 64bit WEP key. Edit the WEP key and press
the left soft key
Ensure that the WEP key consists of five ASCII characters or ten
hexadecimal characters
128bit
Select this option to enter a 128bit WEP key. Edit the WEP key and press
the left soft key
Ensure that the WEP key consists of 13 ASCII characters or 26
hexadecimal characters
(Ok) to complete the operation
(Ok) to complete the operation
~ Note: The corresponding AP need to select WEP Key 1 as the
default transmit key. Enter WEP Key 1 in the phone
The WEP key setting may be different due to AP settings
For a Linksys AP, a passphrase is used to generate four WEP keys
and WEP Key 1 need to be sele ct ed. In the p hone, yo u s hould ente r
WEP Key 1
If an AP supports only a fixed hexadecimal WEP key, you should
enter the same WEP key in the phone
If an AP supports both ASCII and hexadecimal WEP keys, you can
enter either the ACSII WEP key or the hexadecimal WEP key in the
phone
WEP Key Index
This option enables you to set the WEP key index for the connection
profile
After accessing this option, enter the WEP key index (0~3), and then
press the left soft key
(Ok) to complete the operation
54
Page 61

Menu
Activate
Select this option to connect to the AP according to the connection pr ofile.
If the connection fails, the phone will try to connect to other connection
profiles’ APs. If the phone fails to connect to all these APs and the Auto
Scan function is active, the phone will try to search and connect to
another available AP (Refer to page 55 “Auto Scan”)
4.5.2.3 Auto Scan
ÆWiFi-SettingsÆWiFi ConfigÆAuto Scan
If the Auto Scan function is active, when the phone is switched on and
fails to connect to the APs specified in “SSID & WEP KEY”, the phone will
do a scan for available APs and try to connect to one of these APs
After accessing this option, select Enable or Disable to activate or
deactivate the Auto Scan function
~ Note: If the phone fails to connect to all the specified and sc anned
APs, the phone will periodically retry AP connections
4.5.3 Network Parameter
ÆWiFi-SettingsÆNetwork Parameter
This option enables you to set network parameters:
4.5.3.1 DHCP
ÆWiFi-SettingsÆNetwork ParameterÆDHCP
When you highlight this option, the current setting will be displayed in the
adjacent bubble
After accessing this option, select Disable or Enable to disable or enable
DHCP
55
Page 62

Menu
4.5.3.2 IP
ÆWiFi-SettingsÆNetwork ParameterÆIP
This option enables you to perform IP settings
When you highlight one of the following options, its current setting will be
displayed in the adjacent bubble
~ Note: Only when DHCP is disabled, can the IP option be available.
Otherwise, when you select this option, Please disable DHCP will
be displayed
IP Address
Select this option to set the phone’s IP address
After accessing this option, key in the IP address, and press the left soft
(Ok) to complete the operation
key
Subnet Mask
Select this option to set the subnet mask
After accessing this optio n, key in the subnet mask, and press the left soft
(Ok) to complete the operation
key
Gateway IP Address
Select this option to set the gateway IP address
After accessing this option, key in the gateway IP address, and press the
left soft key
(Ok) to complete the operation
4.5.3.3 DNS
ÆWiFi-SettingsÆNetwork ParameterÆDNS
This option enables you to perform DNS settings. When you highlight one
56
Page 63

Menu
of the following options, its cur rent s etting w ill b e disp l ay ed in the a djac ent
bubble
Primary DNS Server IP Address
Select this option to set the IP address of the local primary DNS server
After accessing this option, key in the IP address, and press the left soft
(Ok) to complete the operation
key
Secondary DNS Server IP Address
Select this option to set the IP address of the local secondary DNS server
After accessing this option, key in the IP address, and press the left soft
(Ok) to complete the operation
key
Priority
Select this option to set the priority
You can select DHCP First or Local First
4.5.3.4 Network Information
ÆWiFi-SettingsÆNetwork ParameterÆNetwork Information
Select this option to view the network information
4.5.4 Signal Protocol
ÆWiFi-SettingsÆSignal Protocol
From this option, you can set signal protocols:
57
Page 64

Menu
4.5.4.1 SIP
ÆWiFi-SettingsÆSignal ProtocolÆSIP
This option enables you to set the SIP protocol. The following options are
available
When you highlight one of these options, its current setting will be
displayed in the adjacent bubble
SIP Register Server Mode
Select this option to set the SIP register server mode
After accessing this option, you can select IP or DNS
SIP Register Server Domain Name
Select this option to set the SIP register server domain name
After accessing this option, en ter the domain name, and press the left soft
(Ok) to complete the operation
key
SIP Register Server IP Address
Select this option to set the SIP register server IP address
After accessing this option, key in the IP address, and press the left soft
(Ok) to complete the operation
key
SIP Register Server Port
Select this option to set the SIP register server port
After accessing this option, key in the port number, and press the left soft
(Ok) to complete the operation
key
58
Page 65

Menu
SIP Outbound Proxy
Select this option to set the SIP outbound proxy
After accessing this option, you can select IP or DNS
SIP Outbound Server Domain Name
Select this option to set the SIP outbound server domain name
After accessing this option, en ter the domain name, and press the left soft
(Ok) to complete the operation
key
SIP Outbound Server IP Address
Select this option to set the SIP outbound server IP address
After accessing this option, key in the IP address, and press the left soft
key
(Ok) to complete the operation
SIP Outbound Server Port
Select this option to set the SIP outbound server port
After accessing this option, key in the port number, and press the left soft
(Ok) to complete the operation
key
SIP User Name
Select this option to set the SIP user name
After accessing this option, enter the user name (1~32 alphanumeric
characters), and press the left soft key
(Ok) to complete the operation
SIP Authentication String
Select this option to set the SIP authentication string
After accessing this option, enter the authentication string, and press the
59
Page 66

Menu
left soft key (Ok) to complete the operation
SIP Password
Select this option to set the SIP password
After accessing this option, follow the prompt to enter the security code
and press the left soft key
alphanumeric characters), and press the left soft key
complete the operation
4.5.4.2 RTP
ÆWiFi-SettingsÆSignal ProtocolÆRTP
Select this option to set the RTP protocol
After you access this option, the RTP Port option will be displayed. Its
current setting will be displayed in the adjacent bubble
RTP Port
This option enables you to set the RTP port
After accessing this option, key in the RTP port number (10000~20000),
and press the left soft key
z The port number should range from 10000 to 20000; otherwise Illegal
input will be displayed
(Ok). Enter the SIP password (0~32
(Ok) to
(Ok) to complete the operation
4.5.4.3 Voice Mail
ÆWiFi-SettingsÆSignal ProtocolÆVoice Mail
This option enables you to perform voice mail settings
After you access this option, the Voice Mail Access Number option will
be displayed. Its current setting will be displayed in the adjacent bubble
60
Page 67

Menu
Voice Mail Access Number
Select this option to set the voice mail access number
After accessing this option , key in the access nu mber, and press the left
soft key
z The default voice mail access number is “*123”
(Ok) to complete the operation
61
Page 68

Menu
4.6 Network Service
ÆNetwork Service
From this submenu, you can set the following network services:
4.6.1 Call Waiting
ÆNetwork ServiceÆCall Waiting
This option enables you to set the Call Waiting function
4.6.1.1 Per Call Basis
ÆNetwork ServiceÆCall WaitingÆPer Call Basis
Select Enable or Disable to activate or deactivate the per call basis Call
Waiting function
4.6.2 Call Transfer
ÆNetwork ServiceÆCall Transfer
If the call transfer function is active, you can transfer an ongoing received
call to another phone numb er. When this option is high l igh te d, t he cu rren t
setting will be displayed in the adjacent bubble
After you access this option, the following will be available:
4.6.2.1 Disable
ÆNetwork ServiceÆCall TransferÆDisable
Select this option to disable the call transfer function
4.6.2.2 Blind
ÆNetwork ServiceÆCall TransferÆBlind
If this option is selected, you can directly tran sfer an ongoin g receiv ed c all
to another phone number after the connectio n su cceeds
62
Page 69

Menu
4.6.2.3 Consult
ÆNetwork ServiceÆCall TransferÆConsult
If this e transfer after the option is selected, you need to announce th
transferred-to party answers your call. Then, press the left soft key
(Transfer) to transfer the intended call
4.6.2.4 Blind & Consult
ÆNetwork ServiceÆCall TransferÆBlind & Consult
Selec ll Transfer
t this option to activate both Blind and Consult Ca
functions
4.6.3 Thr
If the an make a conference call
with two parties (refer to page 20 “Confer ence Call”) . When this option is
highlighted, the current setting will be displayed in the adjacent bubble
After accessing this option, select Enable or Disable to activate or
deactivate the Three Way Call function
ee Way Call
ÆNetwork ServiceÆThree Way Call
Three Way Call function is active, you c
4.6.4 Register Interval Time
ÆNetwork ServiceÆRegister Interval Time
This o e. When this option ption enables you to set the register interval tim
is highlighted, the current setting will be displayed in the adjacent bubble
After accessing this option, enter the interval time (0~86400 seconds),
and then press the left soft key (Ok) to complete the operation
63
Page 70

Menu
4.6.5 Caller-ID Block
ÆNetwork ServiceÆCaller-ID Block
If this function is active, when you dial a call, your phone number will not
be displayed on the called party’s phone. When this option is highlighted,
the current setting will be displayed in the adjacent bubble
After accessing this option, select On or Off to activate or deactivate this
function
4.6.6 Repeat Dial on Busy
ÆNetwork ServiceÆRepeat Dial on Busy
If this function is active, the phone will enable you to select to redial the
last busy number that you tried to dia l. When this optio n is hi ghlig hted, th e
current setting will be displayed in the adjacent bubble
After accessing this option, select On or Off to activate or deactivate this
function
4.6.7 Reject Anonymous Incoming Call
ÆNetwork ServiceÆ Reject Anonymous Incoming Call
If this function is active, the phone will automatically reject anonymous
incoming calls. When this option is highlighted, the current setting will be
displayed in the adjacent bubble
After accessing this option, elect On or Off to activate or deactivate this
function
4.6.8 Personal Information
ÆNetwork ServiceÆPersonal Information
To set a caller ID name for the phone. After accessing this option, enter
the caller ID and press the left s of t key
(Ok) to complete the operation
64
Page 71

Menu
4.7 MISC
ÆMISC
From this submenu, you can perform the following operations:
4.7.1 Vendor Information
ÆMISCÆVendor Information
Select this option to view the vendor information. Press to highlight
the desired option: Vendor Name, Enterprise Code, Model Name and
Version, and then press the left soft key
corresponding information
(Ok) to view the
4.7.2 PC Config
ÆMISCÆPC Config
This option enables you to download WiFi setting parameters from a PC
to the phone via a serial ca ble
z When the operation is complete, restart the phone
4.7.3 Remote TFTP Update
ÆMISCÆRemote TFTP Update
This option enables you to perform remote TFTP update
After you select this option, the phone will display a notice for the remote
TFTP update. Press
left soft key
(Update) to initiate the remote TFTP update process
to browse through the information. Press the
~ Note: The phone will spend a long time completing the remote
TFTP update. Please do not unplug the battery. When the update
operation is complete, restart the phone
65
Page 72

Menu
4.7.4 Local TFTP Update
ÆMISCÆLocal TFTP Updat e
This option enables you to perform local TFTP update
After you select this option, the phone will display a notice for the local
TFTP update. Press
left soft key
(Update) to initiate the local TFTP update process
to browse through the information. Press the
~ Note: The phone will spend a long time completing the local TFTP
update. Please do not unplug the battery. When the update
operation is complete, restart the phone
4.7.5 Local Log
ÆMISCÆLocal Log
Select this option to view the local log. Press the right soft key (Next)
to browse through items
66
Page 73

Input Method
5. INPUT METHOD
This phone supports five input methods, including PinYin, Sim Stroke,
English, Letter and Digit in order to provide e asy inp ut for l etters an d digi ts
in text editing mode
5.1 Switch Input Method
When you enter text-editing mode, the last active input method is
displayed. Press
(refer to page 67 “Input Method” under the Settings submenu for details)
and digit input method. The current input method indicator will be
displayed at the lower left side of the screen and include:
Input Method Indicator
PinYin
Sim Stroke
English
Letter
Digit
to switch between the activated input methods
5.2 PinYin and Sim Stroke
These two input methods are only used for inputting Chinese characters
5.3 English
The phone supports intelligent English input and word association,
speeding up the input process
Switch the input method to English;
left corner of the screen
will be displayed at the lower
67
Page 74

Input Method
1. To enter letters, press ~ one time for the letters labeled
on the respective key; a word matching the input letters will be
displayed automatically
- When you enter the first letter of any English word, “*” will be
displayed (except
will automatically associate the matched English words
- If the letter input does not correspond with any English word in the
phone’s dictionary, this key press will have no response
- Press the right soft key
right to left
2. Select a word and change upper/lower case: If the word displayed is
not desired, press
to switch between upper and lower cases; press once to capitalize
the initial letter; press twice to capit alize al l lett ers; p ress t hree times t o
return letters to lower case
and ). As you input letters, the phone
(Clear) repeatedly to delete letters from
to scroll through other word alter natives. Press
3. Enter the selected word: Press the left soft key
confirm the selected word and to re mov e the unde rli ne; o r pres s
to confirm the word and to add a space
- When no word is underlined, press
to switch input methods; press to move the cursor; press
the right soft key
the cursor; press and hold the r ight sof t key
characters
4. Enter symbols: When no word is underlined, press
symbol list. Press
soft key
to enter the selected symbol
(Clear) to delete the character to the left of
to highlight the intended symbol. Press the left
(Ok) or to
to enter a space; press
(Clear) to delete all
68
to display the
Page 75

Input Method
5.4 Letter
Switch to Letter input method; will be displayed at the lower left
corner of the screen
1. Press
respective key. To input a letter, press the corresponding key
repeatedly until the letter appears
For example: if you press
appear in turn:
- The letter just entered will be underlined. When the letter is
underlined, press
press the right soft y ke
keypad to input the next letter. If the nex t lett er an d cu rrent l ett er sh are
the same key, press the left soft key
underline, and then enter the next letter or simply w t for one second
to input again. Press
a space
3. Ente r symbols and spac es: After the un derline disa ppears, pres s
to display the symbol list. Press
and then press the left soft key
4. When no letter is underlined, press
right soft key
press and hold the right soft key
press
~ to enter the corresponding letter labeled on the
repeatedly, the following letters
to switch between upper and lower cases;
(Clear) to delete the letter
you have entered the intended letter, press any othe2. After r key on the
(Ok) or to remove the
to confirm the current letter input and enter
to enter a space
(Clear) to delete th haracter to the left of the cursor;
to switch input methods
; ai
to highlight the intended symbol,
to enter the selected symbol. Press
to move the cursor; press the
e c
(Clear) to delete all characters;
69
Page 76

Input Method
5.
5 Digit
Sw ig
itch to d it input me thod; will be displayed in the lower left corner
of the screen
To enter digits, press the co esponding number keys
Press
to switch input methods
rr
~ .
70
Page 77

Troubleshooting
6. TROUBLESHOOTING
When using this phone, if you run into malfunctions, please refer to the
following troubleshooting techniques before requesting help:
Symptom Diagnosis Solution
Press and hold
for more than 2
seconds
Insert the connector
correctly
Move to an area
with stronger signal
number to make the
call
Select different ring
mode or different
profile
In standby mode,
press and hold
again
Move to another
area
Slow down or stop
moving during call
The phone
cannot be
switched on
Cannot
make calls
No ring
Strong
interference
noise during
call; or call
interrupted
Have you pressed and
held it for more than 2
seconds?
Is the battery connector
reversed?
Is the battery low? Charge the battery
Is the phone outside of ser vice
area range? Is there suf ficient
signal strength?
Is the keypad locked? Unlock the keypad
Is the phone number correct? Enter the correct
Is the ring mode of the current
profile set to Vibration or
Mute?
Have you pressed and held
in standby mode,
displaying
Is there an obstacle nearby
that is preventing signals from
passing?
Are you using the phone while
moving at high speed?
?
71
Page 78

Troubleshooting
Symptom Diagnosis Solution
The battery
cannot be
charged
(The battery
indicator
bar does
not scroll)
If the malfunction symptoms are not listed in the above table, or the
corresponding solution is invalid, please contact your local service
provider
For Technical Support and Assistance please visit the website at:
http://www.utstar.com
Is the charger properly
connected to the phone?
Is the charger connected to a
100~240V AC wall outlet?
Connect the charger
and phone correctly
Connect the charger
to a 100~240V AC
wall outlet correctly
72
 Loading...