

Page 1

®
Sprint PCS
®
Phone Guide
CDM220SP by UTStarcom
www.sprint.com
© 2006 Sprin
partwithoutprior written approval. Sprint, the
the NEXTEL name and logo, and other trademarks are trademark s of
SprintNe
Printed in the U.S.A.
tNextel. All righ
xtel.
ts reserved. No reproduction in whole or in
"
Going Forward"logo,
Page 2

Table of Contents
Welcome to Sprint . . . . . . . . . . . . . . . . . . . . . . . . . . . . . . . . .i
Introduction . . . . . . . . . . . . . . . . . . . . . . . . . . . . . . . . . . . . . .ii
Your Phone’s Menu . . . . . . . . . . . . . . . . . . . . . . . . . . . . . . .iii
Section 1: Getting Started . . . . . . . . . . . . . . . . . . . . . . . . . .1
1A. Setting Up Service . . . . . . . . . . . . . . . . . . . . . . . . . . . . . . . . .2
Getting Started With SprintPCS Service . . . . . . . . . . . . . . . . . . . . . .3
Setting Up Your Voicemail . . . . . . . . . . . . . . . . . . . . . . . . . . . . . . . . . . . .4
SprintPCS AccountPasswords . . . . . . . . . . . . . . . . . . . . . . . . . . . . . . .5
Getting Help . . . . . . . . . . . . . . . . . . . . . . . . . . . . . . . . . . . . . . . . . . . . . . . .6
Section 2: Your SprintPCS Phone . . . . . . . . . . . . . . . . . . . .9
2A. Your SprintPCS Phone: The Basics . . . . . . . . . . . . . . . . . .10
FrontView of Your Phone . . . . . . . . . . . . . . . . . . . . . . . . . . . . . . . . . . .11
Viewing the Display Screen . . . . . . . . . . . . . . . . . . . . . . . . . . . . . . . . .14
Features of Your SprintPCS Phone . . . . . . . . . . . . . . . . . . . . . . . . . . .15
Turning Your Phone On and Of f . . . . . . . . . . . . . . . . . . . . . . . . . . . . . .17
Using Your Phone’s Battery and Charger . . . . . . . . . . . . . . . . . . . . .18
Navigating Through Phone Menus . . . . . . . . . . . . . . . . . . . . . . . . . .21
Displaying Your Phone Number . . . . . . . . . . . . . . . . . . . . . . . . . . . . .22
Making and Answering Calls . . . . . . . . . . . . . . . . . . . . . . . . . . . . . . . .22
Entering T ext . . . . . . . . . . . . . . . . . . . . . . . . . . . . . . . . . . . . . . . . . . . . . .34
2B. Controlling Your Phone’ s Settings . . . . . . . . . . . . . . . . . .39
Sound Settings . . . . . . . . . . . . . . . . . . . . . . . . . . . . . . . . . . . . . . . . . . . .40
Display Settings . . . . . . . . . . . . . . . . . . . . . . . . . . . . . . . . . . . . . . . . . . . .44
Location Settings . . . . . . . . . . . . . . . . . . . . . . . . . . . . . . . . . . . . . . . . . .47
Messaging Settings . . . . . . . . . . . . . . . . . . . . . . . . . . . . . . . . . . . . . . . .48
Airplane Mode . . . . . . . . . . . . . . . . . . . . . . . . . . . . . . . . . . . . . . . . . . . . .51
TTY Use With SprintPCS Service . . . . . . . . . . . . . . . . . . . . . . . . . . . . .52
Phone Inf o . . . . . . . . . . . . . . . . . . . . . . . . . . . . . . . . . . . . . . . . . . . . . . . . .53
T extEntry . . . . . . . . . . . . . . . . . . . . . . . . . . . . . . . . . . . . . . . . . . . . . . . . .54
Phone Setup Options . . . . . . . . . . . . . . . . . . . . . . . . . . . . . . . . . . . . . . .56
My Menu . . . . . . . . . . . . . . . . . . . . . . . . . . . . . . . . . . . . . . . . . . . . . . . . . .58
Page 3

2C. Setting Your P hon e’s Security . . . . . . . . . . . . . . . . . . . . . .59
Accessing the Security Menu . . . . . . . . . . . . . . . . . . . . . . . . . . . . . . . .60
Using Your Phone’s Lock Feature . . . . . . . . . . . . . . . . . . . . . . . . . . . . .60
Using Special Numbers . . . . . . . . . . . . . . . . . . . . . . . . . . . . . . . . . . . . .62
Restricting Calls . . . . . . . . . . . . . . . . . . . . . . . . . . . . . . . . . . . . . . . . . . . .63
Picture Mail . . . . . . . . . . . . . . . . . . . . . . . . . . . . . . . . . . . . . . . . . . . . . . . .63
Erasing the Contacts List . . . . . . . . . . . . . . . . . . . . . . . . . . . . . . . . . . . .64
Erasing the Message List . . . . . . . . . . . . . . . . . . . . . . . . . . . . . . . . . . . .65
Erasing the Voice Mail List . . . . . . . . . . . . . . . . . . . . . . . . . . . . . . . . . .65
DefaultSettings . . . . . . . . . . . . . . . . . . . . . . . . . . . . . . . . . . . . . . . . . . .66
Resetting Your Phone . . . . . . . . . . . . . . . . . . . . . . . . . . . . . . . . . . . . . . .66
Security Features for SprintPCS Vision
SM
. . . . . . . . . . . . . . . . . . . . . .67
2D. Controlling Your Roaming Experience . . . . . . . . . . . . . . .68
Understanding Roaming . . . . . . . . . . . . . . . . . . . . . . . . . . . . . . . . . . .69
Setting Your Phone’s Roam Mode . . . . . . . . . . . . . . . . . . . . . . . . . . .72
Using Call Guard . . . . . . . . . . . . . . . . . . . . . . . . . . . . . . . . . . . . . . . . . . .73
Using Data Guard . . . . . . . . . . . . . . . . . . . . . . . . . . . . . . . . . . . . . . . . . .74
Roaming Help . . . . . . . . . . . . . . . . . . . . . . . . . . . . . . . . . . . . . . . . . . . . .74
2E. Managing C all History . . . . . . . . . . . . . . . . . . . . . . . . . . . .75
Viewing History . . . . . . . . . . . . . . . . . . . . . . . . . . . . . . . . . . . . . . . . . . .76
Call History Options . . . . . . . . . . . . . . . . . . . . . . . . . . . . . . . . . . . . . . . .77
Making a Call From Call History . . . . . . . . . . . . . . . . . . . . . . . . . . . . .77
Saving a Phone Number F r om Call History . . . . . . . . . . . . . . . . . . .78
Prepending a Phone Number From Call History . . . . . . . . . . . . . . .79
Erasing Call History . . . . . . . . . . . . . . . . . . . . . . . . . . . . . . . . . . . . . . . . .79
2F . Using Contacts . . . . . . . . . . . . . . . . . . . . . . . . . . . . . . . . . . .80
Adding a New Contacts En try . . . . . . . . . . . . . . . . . . . . . . . . . . . . . . .81
Finding Contacts Entries . . . . . . . . . . . . . . . . . . . . . . . . . . . . . . . . . . . .82
Contacts Entry Options . . . . . . . . . . . . . . . . . . . . . . . . . . . . . . . . . . . . .84
Adding a Phone Number to a Contacts Entry . . . . . . . . . . . . . . . . .84
Editing a Contacts Entry’s Phone Num be r . . . . . . . . . . . . . . . . . . . .85
Selecting a Ringer T ype for an Entry . . . . . . . . . . . . . . . . . . . . . . . . . .86
Assigning Speed Dial Numbers . . . . . . . . . . . . . . . . . . . . . . . . . . . . . .87
Page 4

Group Setting . . . . . . . . . . . . . . . . . . . . . . . . . . . . . . . . . . . . . . . . . . . . . .88
My Phone # . . . . . . . . . . . . . . . . . . . . . . . . . . . . . . . . . . . . . . . . . . . . . . . .89
Dialing SprintPCS Services . . . . . . . . . . . . . . . . . . . . . . . . . . . . . . . . . .90
2G. Using the Phone’s Tools . . . . . . . . . . . . . . . . . . . . . . . . . . .91
Using Your Phone’s Alarm Cl ock . . . . . . . . . . . . . . . . . . . . . . . . . . . . .92
Using Your Phone’s Schedule . . . . . . . . . . . . . . . . . . . . . . . . . . . . . . . .93
Using Your Phone’s Memo Pad . . . . . . . . . . . . . . . . . . . . . . . . . . . . . .95
Using Your Phone’s World Time . . . . . . . . . . . . . . . . . . . . . . . . . . . . .96
Using Your Phone’s Countdown . . . . . . . . . . . . . . . . . . . . . . . . . . . . .97
Using Your Phone’s Stop Watch . . . . . . . . . . . . . . . . . . . . . . . . . . . . .98
Using Your Phone’s Calculator . . . . . . . . . . . . . . . . . . . . . . . . . . . . . . .99
Using Your Phone’s ConvertUnit . . . . . . . . . . . . . . . . . . . . . . . . . . .100
2H. Using Your Phone’s Voice Services . . . . . . . . . . . . . . . . .101
Using Voice-Activated Dialing . . . . . . . . . . . . . . . . . . . . . . . . . . . . .102
Managing Voice Memos . . . . . . . . . . . . . . . . . . . . . . . . . . . . . . . . . . .104
2I. Using Your Phone s Built-in Camera . . . . . . . . . . . . . . . .106
Taking Pictures . . . . . . . . . . . . . . . . . . . . . . . . . . . . . . . . . . . . . . . . . . .107
My P ictures . . . . . . . . . . . . . . . . . . . . . . . . . . . . . . . . . . . . . . . . . . . . . . .111
Online Albums . . . . . . . . . . . . . . . . . . . . . . . . . . . . . . . . . . . . . . . . . . .113
Managing SprintPCS Picture Mail . . . . . . . . . . . . . . . . . . . . . . . . . .115
AccountInformation . . . . . . . . . . . . . . . . . . . . . . . . . . . . . . . . . . . . . .121
Section 3: SprintPCS Service Features . . . . . . . . . . . . .123
3A. SprintPCS Service Features: The Basics . . . . . . . . . . . . .124
Using Voicemail . . . . . . . . . . . . . . . . . . . . . . . . . . . . . . . . . . . . . . . . . .125
Using Te xtSMS Messaging . . . . . . . . . . . . . . . . . . . . . . . . . . . . . . . .133
Using Caller ID . . . . . . . . . . . . . . . . . . . . . . . . . . . . . . . . . . . . . . . . . . . .138
Responding to Call W aiting . . . . . . . . . . . . . . . . . . . . . . . . . . . . . . . .138
Making a Three-Way Call . . . . . . . . . . . . . . . . . . . . . . . . . . . . . . . . . .139
Using Call Forwarding . . . . . . . . . . . . . . . . . . . . . . . . . . . . . . . . . . . . .140
3B. SprintPCS VisionSM . . . . . . . . . . . . . . . . . . . . . . . . . . . . . . .141
Getting Started With SprintPCS Vision . . . . . . . . . . . . . . . . . . . . .142
Page 5

Accessing Messaging . . . . . . . . . . . . . . . . . . . . . . . . . . . . . . . . . . . . .148
Downloading Premium Services Content . . . . . . . . . . . . . . . . . . .152
Exploring the Web . . . . . . . . . . . . . . . . . . . . . . . . . . . . . . . . . . . . . . . .156
SprintPCS Vision FAQs . . . . . . . . . . . . . . . . . . . . . . . . . . . . . . . . . . . .162
3C. Sprint PCS Voice CommandSM . . . . . . . . . . . . . . . . . . . . . .164
Getting Started With SprintPCS Voice Command . . . . . . . . . . .165
Creating Your Own Address Book . . . . . . . . . . . . . . . . . . . . . . . . . .166
Making a Call With Sprin tPCS Voice Command . . . . . . . . . . . . .167
Accessing Information Using SprintPCS Voice C ommand . . . .168
Section 4: Safety and Warranty Information . . . . . . . .169
4A. ImportantSafety Information . . . . . . . . . . . . . . . . . . . .170
General Precautions . . . . . . . . . . . . . . . . . . . . . . . . . . . . . . . . . . . . . .171
Maintaining Safe Use of and Access to Your Phone . . . . . . . . . .171
Using Your Phone With a Hearing Aid Device . . . . . . . . . . . . . . . .174
Caring for the Battery . . . . . . . . . . . . . . . . . . . . . . . . . . . . . . . . . . . . .175
Radiofrequency (RF) Energy . . . . . . . . . . . . . . . . . . . . . . . . . . . . . . .176
Owner’s Record . . . . . . . . . . . . . . . . . . . . . . . . . . . . . . . . . . . . . . . . . . .178
Phone Guide Proprietary Notice . . . . . . . . . . . . . . . . . . . . . . . . . . .178
4B. Manufacturer’s Warr an ty . . . . . . . . . . . . . . . . . . . . . . . .179
Manufacturer’s Warranty . . . . . . . . . . . . . . . . . . . . . . . . . . . . . . . . .180
x . . . . . . . . . . . . . . . . . . . . . . . . . . . . . . . . . . . . . . . . . .183
Inde
Page 6

Page 7

Welcome to Sprint
Sprintis committed to bringing you the bestwireless
technology available.
network from the ground up, so all your services
it’s V oicemail or C aller ID
go on the Nationwide SprintPCS Network.
This guide will familiarize you with our technology and your
new SprintPCS Phone through simple, easy-to-follow
instructions. It’s all righthere
passwords.
We builtour complete, nationwide
-
whether
-
will work the same wherever you
-
from setting up your account
Welcome and thank y ou for choosing Sprint.
i
Page 8

Introduction
This Phone Guideintroduces you to SprintPCS Service and
all the features of your new phone. It’ s divided into four
sections:
l Section 1: Getting Started
l Section 2: Your SprintPCS Phone
l Section 3: SprintPCS Service Features
l Section 4: Safety and W arranty Information
Throughoutthis guide, you’ll find tips thathighlightspecial
shortcuts and timely reminders to help you make the most
of your new phone and service. The T able of C ontents and
Index will also help you quickly locate specific information.
Y ou’ll getthe most outof your phone if you read each section.
However, if you’d like to getrightto a specific feature, simply
locate thatsection in the T able of Contents and go directly to
thatpage. Follow the instructions in thatsection, and you’ ll
be ready to use your phone in no time.
Phone Guide Note: Due to updates in phone software, this printed guide
may notbe the mostcurrentversion for your phone. Visitwww.sprint.com
and sign on to My PCSto access the mostrecentversion of the phone guide.
WARNING: Please r efer to the ImportantSafety Informationsection on
page 122 to learn aboutinformation thatwill help you safely use your
phone. Failure to read and follow the ImportantSafety Information in
this phone guide may resultin serious bodily injury, death, or property
damage.
ii
Page 9

Your Phone’s Menu
The following listoutlines your phone’s menu structure. For
more information aboutusing your phone’s menus, see
"Navigating Through Phone Menus" on page 21.
1. Call History
1. Outgoing Calls
2. Incoming Calls
3. Missed Calls
4. Recent Calls
5. Erase Calls 1. Outgoing/2. Incoming/3. Missed/4. All
2. Contacts
1. Find
2. Add New Entry
3. Speed Dial #’s
4. Group Setting
5. My Phone #
6. Services 1. Customer Care/2. Directory/
3. Messaging
1. Send message
2. Inbox
3. Outbox
4. Drafts
5. Voicemail
4. Pictures
1. Camera
2. My Pictures 1. In Camera/2. Save to Phone
3. Online Albums 1. View Albums/2. Upload Pictures
4. Account Info
5. My Contents
1. Games
2. Ringers
3. Screen Savers
4. Applications
5. Email & IM
6. Call Tones
3. AccountInfo/ 4. SprintOper./
5. Voice Command
iii
Page 10

6. WEB
1. Lunch
7. Tools
1. Voice
2. Alarm Clock
3. Schedule
4. Memo Pad
5. World Time
6. Others 1. Countdown/2. StopWatch/3. Calculator/
4. ConvertUnit
8. Settings
1. Sounds
1. Ringer Type 1. Voice Calls/2. Messaging/3. Voicemail/
2. Volume 1. Ringer/2. Speakerphone/3. Key Beep/
3. Alerts 1. Minute Beep/2. Connect Tone/3. Service Tone/
4. Tone Length
2. Display
1. Screensaver
2. Backlight 1. LCD/2. Keypad
3. Greeting
4. Incoming Calls 1. Preset Image/2. Download/3. My Pictures
5. Contrast
6. Menu Style
3. PCS Vision
1. Enable Vision
Net Guard
2.
Update Profile
3.
4. Roaming
1. Set Mode
2. Call Guard
3. Data Guard
4. Help
5. Location
6. Messaging
1. Notification
2. Priority
3. Callback #
4. Alarms/5. Roaming Ringer/6. DiscreetMode
4. Advanced
4. Fade Tone
iv
Page 11

4. Preset Msg.
5. Signature
6. Auto Erase
7. Security
1. Lock Phone
2. Change Lock
3. Special #’s
4. Limit Use
5. Picture Mail 1. Lock Camera/2. Update Profile
6. Erase Contact
7. Erase Message
8. Erase Voice Mail
9. Default Setting
0. Reset Phone
8. Phone Info
1. Phone Number
2. Help
3. Version
4. Advanced
8. Text Entry
1. Auto-Capital
2. Auto-Space
3. My Words
4. Input Language
5. T9 Settings
6. Help
9. Others
1. Abbrev. Dial
2. Contacts Match
3. Answer Mode
4. Auto Answer
5. Language
6. TTY
7. Airplane Mode
v
Page 12

Page 13

Section 1
Getting Started
Page 14

Section 1A
Setting Up Service
In This Section
l Getting Started With SprintPCS Service (page 3)
l Setting Up Y our V oicemail(page 4)
l SprintPCS AccountPasswords(page 5)
l Getting Help(page 6)
Setting up service on your new SprintPCS Phone is quick and
easy .This section walks you through the necessary steps to
unlock your phone, setup your voicemail, establish
passwords, and contactSprintfor assistance with your
SprintPCS Service.
2 Section 1A: Setting Up Service
Page 15

Getting Started With SprintPCS Service
Determining if Y our Phone is Already Activated
If you purchased your phone ata SprintStore, itis probably
activated, unlocked, and ready to use. If you r eceived your
phone in the mail, itprobably has been activated; all you need
to do is unlock it.
If your phone is notactivated, please refer to the activation
card included with your phone.
Unlocking Your Phone
To unlock y our phone, follow these easy steps:
1. Press and hold to turn the phone on.
2. Press Unlock().
Note: T o selecta softkey, press the softk ey button directly below the softkey
textthatappears atthe bottom left and bottom rightof your phone's
display screen. Softkey actions change accor ding to the screen you're
viewing and will notappear if there is no corresponding action available.
3. Enter your four-digitlock code. (For security purposes,
the code is notvisible as you type.)
Tip:If you can'trecall your lock code, try using the lastfour digits
of either your Social Security number or SprintPCS Phone number or try
0000 or NATL (6285). If none of these work, call Sprin tCustomer Service at
1-888-211-4PCS (4727).
Setting Up Service
Section 1A: Setting Up Service 3
Page 16

Setting UpY our V oicemail
All unanswered calls to your SprintPCS Phone are automatically
transferred to your v oicemail, even if your phone is in use or
turned off. Therefore, y ou will wantto setup your voicemail
and personal greeting as soon as your SprintPCS Phone is
activated.
To setup your voicemail:
1. From standby mode, press and hold .
2. Follow the system prompts to:
n
Create your passcode
n
Record your name announcement
n
Record your greeting
n
Choose whether or notto activate One-T ouch
Message Access (a feature thatlets you access
messages simply by pressing and holding ,
bypassing the need for you to enter your passcode)
V oicemail Passcode
If you are concerned aboutunauthorized access to your voicemail account,
Sprintrecommends you enable your voicemail passcode.
For more information aboutusing your voicemail, see "Using
Voicemail" on page 125.
4 Section 1A: Setting Up Service
Page 17

SprintPCS AccountPassw ords
As a SprintPCS customer, you enjoy unlimited access to your
personal accountinformation, your voicemail account, and
your SprintPCS Vision account. T o ensure thatno one else has
access to your information, you will need to crea te passwords
to protectyour privacy.
AccountPassword
If you are the accountowner, you’ ll have an acc ountpassword
to sign on to
Customer Service. Y our defaultaccountpassword is the last
four digits of your Social Security number . If you are notthe
accountowner (if someone else receives the bill for your
SprintPCS Service), you can geta sub-accountpassword at
www .sprint.com.
Voicemail P assword
Y ou’ll create your voicemail password (or passcode) when you
setup your voicemail. See "Setting Up Your V oicemail" on page
103 for more information on your v oicemail password.
www .sprint.comand to use when calling Sprint
Setting Up Service
Section 1A: Setting Up Service 5
Page 18

Getting Help
Visitwww.sprint.com
Y ou can go online to:
v
Access your accountinformation
v
Check your minutes used (depending on your
SprintPCS Service Plan)
v
View and pay your bill
v
Make your life easier by enrolling in SprintPCS Online
Billing and Automatic Payment
v
Purchase accessories
v
Shop for the latestSprintPCS Phones
v
View available SprintPCS Service Plans and options
v
Learn more aboutSprintPCS Vision and other great
products like games, ringers, screen sa vers, and more
Reaching SprintCustomer Service
Y ou can reach SprintCustomer Service many differentways:
v
Dial on your SprintPCS Phone
v
Sign on to your accountatwww .sprin t.c om
v
Call us toll-free at1-888-211-4727(C onsumer customers)
or 1-888-788-4727(Business customers)
v
Write to us atSprintCustomer Service, P. O. Bo x 8077,
London, KY 40742
6 Section 1A: Setting Up Service
Page 19

Receiving Automated Billing Information
For your conv enience, your phone gives you access to billing
information on your SprintPCS Account. This information
includes balance due, paymentreceived, invoicing cycle, and
an estimate of the number of minutes used since your last
invoicing cycle.
To ac cess automated invoicing information:
©
Press .
Note: This service may notbe available in all Affiliate areas.
SprintPCS Directory Assistance
Call from your SprintPCS Phone
and you’ll hav e access to a variety of services and information
through SprintPCS Directory Assistance, including
residential, business, and governmentlistings; movie listings
or show times; driving directions, restaurantreservations, and
major local eventinformation. Y ou can getup to three pieces
of information per call, and the operator can automatically
connectyour call atno additional charge.
There is a per-call charge to use SprintPCS Directory
Assistance and you will be billed for airtime.
To call Sprin tPCS Directory Assistance:
©
Press .
Setting Up Service
Section 1A: Setting Up Service 7
Page 20

SprintPCS Operator Services
SprintPCS Operator Services provides assistance when
placing collectcalls or when placing calls billed to a local
telephone calling card or third party .
To ac cess SprintPCS Operator Services:
©
Press .
For more information or to see the la testin products and
services, visitus online at
www .sprint.com.
8 Section 1A: Setting Up Service
Page 21

Section 2
Your Sprint PCS Phone
Page 22

Section 2A
Your Sprint PCS Phone: The Basics
In This Section
l FrontView of Y our Phone (page 11)
l Viewing the Display Screen (page 14)
l Features of Y our SprintPCS Phone (page 15)
l Turning Y ourPhone On and Off (page 17)
l Using Y our Phone’s Battery and Charger (page 18)
l Navigating Through Phone Menus (page 21)
l Displaying Your Phone Number (page 22)
l Making and Answering Calls (page 22)
l Entering T ext(page 34)
Your SprintPCS Phone is packed with features thatsimplify
your life and expand y our ability to stay connected to the
people and information thatare importantto you.
section will guide you through the basic functions and
calling features of your phone.
This
10 Section 2A: Y our SprintPCS Phone
-
The Basics
Page 23

FrontView of Y our Phone
1. Softkey Buttons
2. Headset Jack
3. Volume Control
4. Talk
5. Back
12. Earpiece
11. Display Screen
10. OK
9. End (Power)
8. Navigation Key
7. Charger Jack
Phone Basics
6. Accessory Jack
Section 2A: Y our SprintPCS Phone
-
The Basics 11
Page 24

Key Functions
1. Softkey Buttons letyou select softkey actions or menu
items corresponding to the bottom leftand rightlines on
the display screen.
2. Headset Jack allow s you to plug in an optional headsetfor
convenient, hands-free con versations.
CAUTION!Inserting an accessory into the incorrectjack
may damage the phone.
3. Volume Control allows you to adjustthe ringer volume in
standby mode (with the flip open) or adjustthe voice
volume during a call. The volume k ey can also be used to
scroll up or down to navigate through the diff erentmenu
options. T o mute the ringer during an incoming call, press
the volume key up or down.
4. Talk allow s you to place or receive calls, answ er Call
Waiting, use Three- Way C alling, or activate V oice Dial.
5. Back deletes characters from the display in te xtentry
mode. When in a menu, press the Back key to return to the
previous menu. This key also allow s you to return to the
previous screen in a SprintPCS Vision session.
6. Accessory Jackallows you to c onnectoptional accessories,
such as a USB cable.
CAUTION!Inserting an accessory into the incorrectjack
may damage the phone.
7. Charger Jack connects the phone to the battery charger.
12 Section 2A: Y our SprintPCS Phone
-
The Basics
Page 25

8. Navigation Key scrolls through the phone’ s menu options
and acts as a shortcutkey fr om standby mode.
n
Press Upto access Messagi ng.
n
Press Downto view your My Co nte nts .
n
Press Rightto access Contac ts.
n
Press Leftto access Pictur e me nu.
9. End (Power) ends a call. Press and hold this key for two
seconds to turn your phone on or off . While in the main
menu, itreturns the phone to standby mode and cancels
your input. When you receive an incoming call, pr ess to
enter silentmode and mute the ringer.
10. OK selects the highlighted choice when navigating
through a menu.
11. Display Screen displays all the information needed to
operate your phone, such as the call status, the C ontacts
list, the date and time, the signal and battery strength, etc.
12. Earpiece
lets you hear the caller and automated prompts.
Phone Basics
Section 2A: Y our SprintPCS Phone
-
The Basics 13
Page 26
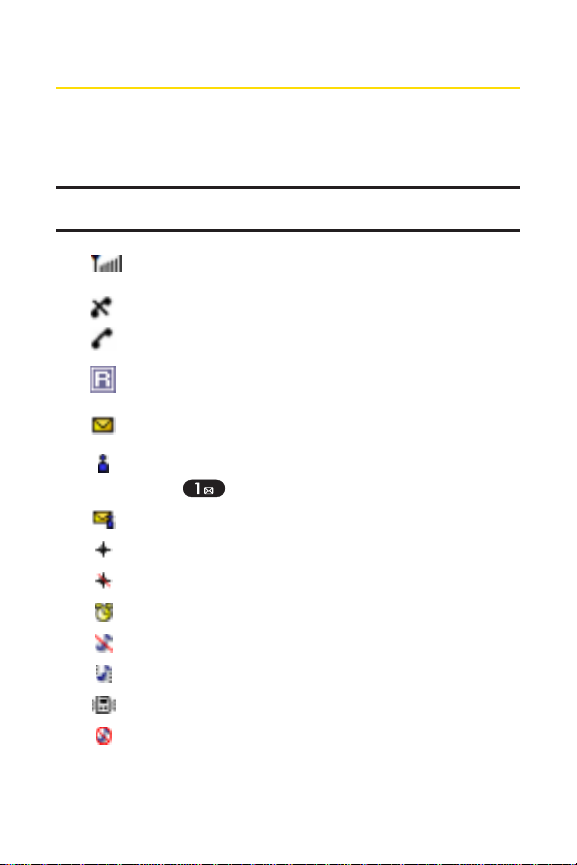
Viewing the Display Screen
Y our phone’s display screen provides a wealth of inf ormation
aboutyour phone’s status and options. This listidentifies the
symbols you’ll see on your phone’ s display screen:
Note: T o view a listof your phone's icons and descriptions, from the main
menu selectSettings > Phone Info > Help.
shows your currentsignal strength. (The more lines
you have, the stronger your signal.)
means your phone cannotfind a signal.
tells you a call is in progress.
indicates you are "roaming" off the Na tionwide
SprintPCS Network.
indicates you have new te xtmessages.
indicates you have v oicemail messages. (Press and
hold to call your voicemail bo x.)
indicates you have new textand voice messages.
indicates your phone’s loca tion feature is on.
indicates your phone’s loca tion feature is off .
indicates Alarm or Scheduler mode is set.
indicates ringer volume is setto Sound Off.
indicates ringer volume is setto Always Vibrate.
indicates ringer volume is setto vibrate.
indicates Silence mode is set.
14 Section 2A: Y our SprintPCS Phone
-
The Basics
Page 27

indicates your phone is operating in TTY mode.
indicates battery charge level (icon shown is full).
Note: Displa y indicators help you manage your roaming charges by letting
you know when you're off the SprintNationwide PCS Network and whether
you're operating in digital or analog mode. (For mor e information, see
Section 2D: Controlling Y our Roaming E xperience on page 68.)
Features of Your SprintPCS Phone
Congratulations on the purchase of y our SprintPCS Phone.
The CDM220SP by UTStarcom is lightweigh t, easy-to-use, and
reliable, and italso offers many significantfeatures and
service options. The following listpreviews some of those
features and provides page numbers wher e you can find
outmore:
v Digital dual-bandcapability allows you to mak e and
receive calls while on the Nationwide SprintPCS Network
and to roam on other 1900 and 800 MHz digital networks
where Sprinthas implemented roaming agreements
(page 68).
v TextSMS Messaging (page 133) provide quick and
convenientmessaging capabilities.
v SprintPCS V oice Command
by speaking someone’s name or the digits of their phone
number (page 164).
v Your Contacts listallows you to store up to 500 entries,
with up to five phone numbers per entry (page 80).
v The built-in Calendar offers several personal inf ormation
managementfeatures to help you manage your busy
lifestyle (page 93).
SM
lets you dial phone numbers
Phone Basics
Section 2A: Y our SprintPCS Phone
-
The Basics 15
Page 28

v Your SprintPCS Phone is equipped with a Location feature
for use in connection with location-based services that
may be available in the future (page 47).
v T9 T extInputlets you quickly type messages with one key
press per letter (see page 35).
v Speed dial lets you dial phone numbers with one or two
key presses (see page 87).
16 Section 2A: Y our SprintPCS Phone
-
The Basics
Page 29

Turning Your Phone On and Of f
Turning Your Phone On
To turn y our phone on:
©
Press and hold for appro ximately two seconds.
Once your phone is on, itmay display "Searching for Service,"
which indicates thatyour phone is searching for a signal.
When your phone finds a signal, itautomatically enters
standby mode. Atthis point, you are ready to begin making
and receiving calls.
If your phone is unable to find a signal after 15 minutes of
searching, a Power Save featur e is automatically activated.
When a signal is found, your phone automatically returns to
standby mode.
In Power Save mode, your phone sear ches for a signal
periodically withoutyour intervention. Y ou can also initiate a
search for SprintPCS Service by pressing any key (when your
phone is turned on).
Tip: The Power Sav e feature helps to conserve y our battery power when you
are in an area where there is no signal.
Turning Your Phone Off
To turn y our phone off:
©
Press and hold for two sec onds until you see the
powering down animation on the display screen.
Y our screen remains blank while your phone is off (unless the
battery is charging).
Phone Basics
Section 2A: Y our SprintPCS Phone
-
The Basics 17
Page 30

Using Y our Phone’s Ba tteryand Charger
WARNING: Use only Sprin tapproved or manufacturer approved
batteries and chargers with your SprintPCS Phone. The failure to use a
Sprintapproved or manufacturer approved battery and charger may
increase the risk thatyour SprintPCS Phone will overheat, catch fire, or
explode, resulting in serious bodily injury , death, or property damage.
Sprintor manufacturer approved batteries and accessories
can be found atSprintStores or through you r phone’s
manufacturer , or call 1-866-343-1114 to order . They ’re also
available at
top, then look under Phones & Accessories.
Battery Capacity
Y our SprintPCS Phone is equipped with a Lithium Ion (LiIon)
battery . Itallows you to recharge your battery before itis fully
drained. The battery provides up to 4.1 hours of c ontinuous
digital talk time (up to 1.5 hours in analog).
When the battery reaches 5% of its capacity , the battery icon
blinks. When there are appro ximately two minutes of talk
time left, the phone sounds an audible alertand then powers
down.
Note: Long backlightsettings, searching for service, vibrate mode, and
browser use affectthe battery's talk and standby times.
Tip: Be sure to watch y our phone's battery level indicator and charge the
battery before itruns outof power.
www .sprint.com
-
click on the Shoppingtab atthe
18 Section 2A: Y our SprintPCS Phone
-
The Basics
Page 31

Installingthe Battery
To install the LiIon ba ttery:
©
T o install, insertthe battery into the opening on the back of
the phone and gently press down until the latch snaps
into place.
Removing the Battery
WARNING: Do nothandle a damaged or leaking LiIon battery as you can
be burned.
emove your battery:
T o r
1. Make sure the power is off so thatyou don’tlose any
stored numbers or messages.
2. Press the battery release latch up and remov e the
battery from the phone ata 45-degree angle.
Phone Basics
Section 2A: Y our SprintPCS Phone
-
The Basics 19
Page 32

Chargingthe Battery
Y our SprintPCS Phone’s LiIon battery is rechargeable and
should be charged as soon as possible so you can begin using
your phone.
Keeping track of your ba ttery’s charge is important. If your
battery level becomes too low , your phone automatically turns
off and you will lose all the information y ou were justworking
on. For a quick check of your phone’s b attery level, glance at
the battery charge indicator located in the upper-righ tcorner
of your phone’s display screen. If the ba ttery charge is getting
too low, the battery ic on blinks and the phone sounds a
warning tone.
Always use a Sprintor manufacturer approved desktop
charger, tr avel charger , or v ehicle power adapter to charge
your battery .
Using the Charger
To use the tr avel charger provided with y our phone:
Ittakes approximately 2.5 hours to fully recharge a
completely rundown battery . With the Sprint-appro ved LiIon
battery, y ou can recharge the battery befor e itbecomes
completely run down.
20 Section 2A: Y our SprintPCS Phone
-
The Basics
Page 33

Navigating Through Phone Menus
The navigation key on your Sprin tPCS Phone allows you to
scroll through menus quickly and easily . The scroll bar a tthe
rightof the menu keeps track of your position in the menu at
all times.
T o navigate through a menu, simply press the na vigation key
up or down. If you are in a first-level menu, such as Settings,
you may also navigate to the nextor previous first-level menu
by pressing the navigation key rightor left.
For a diagram of your phone’s menu, please see "Y our Phone’s
Menu" on page iii.
Selecting Menu Items
As you navigate through the menu, menu options are
highlighted. Selectany numbered option by simply pressing
the corresponding number on the phone’s keypad. You may
also selectany item by highlighting itand pressing
For example, if you wan tto view your lastincoming call:
1. SelectMenu( ) to access the main menu.
2. SelectCall Historyby highlighting itand pressing .
(Itmay already be highlighted.)
3. SelectIncoming Callsby pressing or by
highlighting itand pressing . (If you have receiv ed
any calls, they are display ed on the screen.)
Note: F or the purposes of this guide, the above steps condense into
"SelectMenu > Call History > Incoming Calls."
Phone Basics
.
Section 2A: Y our SprintPCS Phone
-
The Basics 21
Page 34

Backing Up Within a Menu
To g o to the previous menu:
©
Press .
To r eturn to standby mode:
©
Press .
DisplayingYour Phone Number
Justin case you forgetyour phone number , your SprintPCS
Phone can remind you.
To displa y your phone number:
©
SelectMenu > Settings > Phone Info > Phone Number.
(Your phone number and other inf ormation aboutyour
phone and accountwill be displayed.)
Note: To selectMenu, press . To selectmenu options (such as Settings,
above), highlightthe option and press . (If the menu options are
numbered, you may also selectan option simply by pressing the
corresponding number key .)
Making and Answering Calls
Making Calls
Placing a call from your SprintPCS Phone is as easy as making
a call from any land line phone. Justenter the number and
press , and you’re on your w ay to clear calls.
To mak e a call using your keypad:
1. Make sure your phone is on.
22 Section 2A: Y our SprintPCS Phone
-
The Basics
Page 35

2. Enter a phone number from standby mode. (If you make
a mistake while dialing, press to erase one digitat
a time. Press and hold to er ase the entire
number.)
3. Press . (To make a call when y ou are roaming and
Call Guard is enabled, highlightRoam Calland press
. See "Call Guard" on page 73.)
4. Press or close the phone when y ou are finished.
Tip: T o redial your lastoutgoing call, press twice.
Tip: When making calls off the Nationwide Sprin tPCS Network, always dial
using 11 digits (1 + area code + phone number).
Y ou can also place calls from your SprintPCS Phone by using
SprintPCS Voice Command
SM
(page 164), Speed Dialing
numbers from your Contacts (page 87), and using your C all
History listings (page 75).
Dialing Options
When you enter numbers in standby mode, you will see a
variety of dialing options appear as softkeys on the phone’s
display screen.
T o initiate an option, press the corresponding sof tkey button.
v
Speed Dial:Enter a number (1-99) to display the entry
contained in the speed dial location you entered (if
applicable). Press to dial the speed dial number.
Tip: T o speed dial a phone number from standby mode, press and hold the
speed dial number. If the speed dial number is two digits , enter the first
digit, then press and hold the second digit. (For information on setting up
speed dial numbers, see "Assigning Speed Dial Numbers" on page 80.)
(This feature will notwork when you are roaming off the Nationwide
SprintPCS Network; when roaming you mustdial using eleven digits [1 +
the area code + the seven-digitphone number.])
Phone Basics
Section 2A: Y our SprintPCS Phone
-
The Basics 23
Page 36

v
Call: To dial the phone number .
v
Call Speaker On: T o dial the phone number in
speakerphone mode.
v
Save Msg: T o send a textmessage.
v
Save: Enter a seven or ten digitnumber (phone number
and area code) and press Options( ). SelectSav e
( ) to save the phone number in your Contacts.
(See "Saving a Phone Number" on page 29.)
v
Hard Pause: T o inserta hard pause.
v
2-Sec. Pause: T o inserta 2-second pause.
v
Find:Enter a digitor string of digits and press Find()
to display Contacts entries thatcontain the entered
numbers. (See "Finding a Phone Number" on page 30.)
v
4-DigitDial:Enter four digits and press to dial the
phone number in your Contacts thatends with the four
digits you enter. (See "4-DigitCalling" on page 31.)
Answering Calls
To ans wer an incoming call:
1. Make sure your phone is on. (If your phone is of f,
incoming calls go to voicemail.)
2. Press to ans wer an incoming call.(Depending on
your phone’s settings, y ou may also answer incoming
calls by opening the phone or by pressing any number
key . See "Call Answer Mode" on page 56 for mor e
information.)
Y our SprintPCS Phone notifies you of incoming calls in the
following ways:
v The phone rings or vibrates.
v The indicator lightflashes.
24 Section 2A: Y our SprintPCS Phone
-
The Basics
Page 37

v The backlightilluminates.
v The screen displays an incoming call message.
If the incoming call is from a number stored in your Con tacts,
the entry’s name is displayed. The caller’s phone number may
also be displayed, if available.
If Call Answer is setto , the following options are also
displayed. T o selectan option, press the corresponding softke y
button.
v Press Mute( ) to mute the ringer.
v Twice pressed to send the call to your voicemail box.
Note: When y our phone is off, inc oming calls go directly to voicemail.
Answering a Roam C all With Call Guard Enabled
Call Guard is an option thathelps you manage your roaming
charges when making or receiving calls while outside the
Nationwide SprintPCS Network. Please see Section 2D:
Controlling Y our R oaming Experience for mor e information
aboutroaming.
To answer a call when you are roaming and Call Guard is enabled:
©
SelectAnswerto answer the call. (See "Call Guard" on
page 73 for additional information.)
Ending a Call
T o disconnecta call when you are finished:
©
Close the phone or press .
Phone Basics
Section 2A: Y our SprintPCS Phone
-
The Basics 25
Page 38

Missed Call Notification
When an incoming call is notanswered, the Missed Call log is
displayed on your screen.
To displa y the Missed Call entry from the notification screen:
©
Highlightthe entry and press View ( ) or .
(T o dial the phone number, pr ess Call[ ] or ).
To displa y a Missed Call entry from standby mode:
1. SelectMenu > Call History > Missed Calls.
2. Highlightthe entry you wish to view and press .
Calling Emergency Numbers
Y ou can place calls to 911 (dial ), even
if your phone is locked or your accountis restricted.
Note: When y ou place an emergency call, your phone automatically enters
Emergency mode.
During the call press Options( ) to display your options.
T o selectan option, highlight itand press .
v
Speaker Onto activate speakerphone mode. (If you are in
speakerphone mode, the option will appear as Speaker Off
to deactivate.)
v
Unlock Phoneto unlock your phone (appears only if the
phone is locked).
v
Close Menuto close the pop-up menu (appears only if the
phone is unlocked).
Tip: Press My Phone( ) to display your phone number during an
emergency call.
26 Section 2A: Y our SprintPCS Phone
-
The Basics
Page 39

To e xitEmergency mode:
1. Press to end a 911 call.
2. Press Options( ) to display the options menu.
3. HighlightExitEmergencyand press .
Note: When y ou are in Emergency mode, you can only exitfrom the
options menu.
To selectEmergency mode options:
1. Press to end a 911 call.
2. Press Options[].
n
Call 911to call 911.
n
Call 911: Speakerto call 911 in speakerphone mode.
n
ExitEmergencyto exitEmergency mode.
3. Highlightan option and press .
Phone Basics
Section 2A: Y our SprintPCS Phone
-
The Basics 27
Page 40

In-Call Options
Pressing Options( ) during a call displays a list of features
you may use during the course of a call. To selectan option,
press the corresponding keypad number or highlightthe
option and press . The following options are a vailable
through the Options menu:
v
Speaker On( ) to activate or deactivate speakerphone
mode.
v
3-Way C all( ) to initiate a 3-Way Call.
v
Contacts( )to access the Contacts menu.
v
Call History( ) to access the Call History menu.
v
Messaging( )to access the Messaging menu.
v
Phone Info( )to access the Phone Info menu.
During a call, the leftsoftkey button functions as the Mute
button. Press itto mute the phone’s microphone for privacy.
Press itagain to Unmutethe phone.
28 Section 2A: Y our SprintPCS Phone
-
The Basics
Page 41

End-of-Call Options
After receiving a call from or making a call to a phone number
thatis notin your Con tacts, the phone number and the duration
of the call are displayed. The righ tsoftkey displays the Save
option. Selectthis option if you wish to add the new number to
your Contacts. (See "Saving a Phone Number" below .)
After receiving a call from or making a call to a phone number
thatis already in your Contacts, the entry name and phone
number and the duration of the call are displayed. The right
softkey displays the option View. Selectthis option if you wish
to view the Contacts listing for the number .
Note: The End-of -Call options are notdisplayed for calls identified as No ID
or Restricted.
Savinga Phone Number
Y our SprintPCS Phone can store up to five phone numbers in
each of 500 Contacts entries. Each entry’s name can contain 16
characters. Y our phone automatically sorts the Contacts
entries alphabetically . (For more informa tion, see Section 2F:
Using Contacts on page80.)
T o save a number from standby mode:
1. Enter a phone number and press Options( ).
SelectSav e().
2. SelectNew Entry or Existing Entry and press .
3. Selecta label and press .
4. Use the numeric keypad to enter the new contactname
and press Done( ) to save the new entry.
or
Search for an existing contactname and press
( ) to save the new number .
Done
Phone Basics
Section 2A: Y our SprintPCS Phone
-
The Basics 29
Page 42

Findinga Phone Number
Y ou can search Contacts entries for phone numbers that
contain a specific string of numbers.
To find a phone number :
1. Enter one or more digits in standby mode. (The more
numbers you enter , the more specific the search
becomes.)
2. SelectFind( ). (All Contacts entries matching the
entered numbers will display .)
3. T o display the Contacts entry thatcontains the phone
number you entered, highlightthe entry and press
. T o dial the number , press .
Dialing and Saving Phone Numbers With Pauses
Y ou can dial or save phone numbers with pauses for use with
automated systems, such as voicemail or creditcard billing
numbers.
There are two types of pauses available on y our phone:
v
Hard Pause sends the nextsetof numbers when you
press .
v
2-sec Pauseautomatically sends the nextsetof numbers
after two seconds.
Note: You can have multiple pauses in a phone number and c ombine
2-second and hard pauses.
30 Section 2A: Y our SprintPCS Phone
-
The Basics
Page 43

To dial or sa ve phone numbers with pauses:
1. Enter the phone number.
2. Press Options( ) and selecteither Hard Pause
( ) or 2-sec Pause( ). (Hard pauses are
displayed as a "P" and 2-second pauses as a "T".)
3. Enter additional numbers.
4. Press to dial the number .
or
Press Options( ). SelectSave( ) to save the
number in your Contacts.
Note: When dialing a number with a har d pause, press Release( ) to
send the nextsetof numbers.
4-DigitCalling
When you enter four digits of a phone number , the screen
displays "4-DigitDial," indicating thatthe 4-DigitCalling
option is active.
To mak e a call using 4-DigitCalling:
1. Dial the lastfour digits of a Contacts entry’s phone
number.
2. Press . (The matching Contacts entry/ entries will
display.)
3. Highlightthe correctentry and press .
Shortcut: Dial the lastfour digits of a Contacts entry's phone number and
press to place the call. If the digits match mor e than one entry, a listwill
appear; selectthe correctentry and press again.
Phone Basics
Section 2A: Y our SprintPCS Phone
-
The Basics 31
Page 44

Plus (+) Code Dialing
When placing international calls, you can use Plus Code
Dialing to automatically enter the international access code
for your location (for ex ample, 011 for international calls
made from the United States).
To mak e a call using Plus Code Dialing:
1. Press and hold until a "+" appears on your phone
display.
2. Dial the country code and phone number you’ re calling
and press . (The access code for international
dialing will automatically be dialed, followed by the
country code and phone number .)
Dialing Fromthe ContactsList
To dial directly from a Contacts entry:
1. Press Menu > Contacts > Find
Shortcut: Press Find( ) to listentries.
2. Highlightthe entry you wantto call and press to
dial the entry’s defaultphone number.
or
T o dial another number from the entry , highlightthe
name and press , then highlightthe number you
wish to call and press .
.
32 Section 2A: Y our SprintPCS Phone
-
The Basics
Page 45

Using Speed Dialing
Y ou can store up to ninety-nine numbers in your pho ne’s
speed dial memory to make contacting friends and family as
easy as pressing a button or two. With this fea ture, you can
dial Speed Dial entries using one key press for loca tions 1-9 or
two key presses for locations 10-99.
To use One- T ouch Dialing for Speed Dial locations 1-9:
©
Press and hold the appropriate key f or approximately
two seconds. The display confirms tha tthe number has
been dialed when itshows "Calling...".
To use Two- T ouch Dialing for Speed Dial locations 10-99:
1. Press the firstdigit.
2. Press and hold the second digitfor approximately two
seconds. The display confirms thatthe number has been
dialed when itshows "Calling...".
Note: Speed dialing is notavailable when you are roaming; when you are
roaming off the Nationwide SprintPCS Network, you mustalways dial using
eleven digits (1 + area code + number).
Phone Basics
Section 2A: Y our SprintPCS Phone
-
The Basics 33
Page 46

Entering T ext
Selectinga Character InputMode
Y our SprintPCS Phone provides convenientways to enter
words, letters, punctuation, and numbers whenever y ou are
prompted to enter text(for example, when adding a Contacts
entry or when using T extSMS Messaging).
To chang e the character inputmode:
1. When you display a screen where you can enter text,
press the rightsoftkey to change the character input
mode.
2. Selectone of the following options:
n
T9Wordto enter textusing a predictive textentering
system thatreduces the amountof keys thatneed to
be pressed while entering a word (see page 35).
n
Alphabetto cycle through the alpha characters
associated with the letters on the keypad (see page
37).
n
Numberto enter numbers by pressing the numbers
on the keypad (see page 38).
n
Symbolto enter symbols (see page 38).
n
Emoticonto enter "emoticons" (see page 38).
n
PresetMsg. to enter pre-programmed messages
(see page 38).
Tip: When entering text, press to change letter capitalization (ABC >
Abc > abc).
34 Section 2A: Y our SprintPCS Phone
-
The Basics
Page 47

Entering Characters Using T9 T extInput
T9 T extInputlets you enter textin your SprintPCS Phone by
pressing keys justonce per letter. (T o selectthe T9 Wordmode
when entering text, see "Selecting a Character InputMode"
on page 34.)
T9 T extInputanalyzes the letters y ou enter using an intuitive
word database and creates a suitable word. (The word ma y
change as you type.)
To en ter a word using T9 T extInput:
1. Selectthe T9Wordcharacter input mode. (See "Selecting
a Character InputMode" on page 34.)
2. Press the corresponding keys once per letter to en ter
a word (for example, to enter the word "Bill," pr ess
). (If you make a mistake, press
to erase a single character. Press and hold
to delete an entire entry .)
If the word you wantdoes notdisplay af ter you have entered
all the letters, press to scroll through additional wor d
selections. T o accepta word and inserta space, press .
Phone Basics
Section 2A: Y our SprintPCS Phone
-
The Basics 35
Page 48

Adding a Wor d to the T9 Database
If a word you wantto enter does notdisplay as an option
when you are using T9 T extInput, you can add itto the
database.
To add a w ord to the T9 T extInputdatabase:
1. Selectthe Numbercharacter inputmode. (See "Selecting
a Character InputMode" on page 34.)
2. Enter the word using multi-tap textentry. (See "Entering
Characters by T apping the K eypad" on page 37.) The
word will appear as an option the nexttime you scroll
through options during T9 TextInput.
For more information aboutT9 TextInput, visitthe Tegic W eb
www . T9.com.
site at
36 Section 2A: Y our SprintPCS Phone
-
The Basics
Page 49

EnteringCharacters by Tapping the K eypad
To en ter characters by tapping the keypad:
1. Selectthe Alphabetmode (see "Selecting a Character
InputMode" on page 34).
2. Press the corresponding keys r epeatedly until the desired
letter appears (for e xample, to enter the word "Bill,"
press twice, three times, three times,
and three times again). (If you make a mistake,
press to erase a single character . Press and hold
to delete an entire entry .)
By default, the firstletter of an entry is capitalized and the
following letters are lowercase. After a char acter is entered, the
cursor automatically advances to the nextspace after two
seconds or when you enter a character on a diff erentkey .
Characters scroll in the following order:
. , @ 1 ? ! * # /
A B C 2
D E F 3
G H I 4
J K L 5
M N O 6
P Q R S 7
T U V 8
W X Y Z 9
0
Space
Shift
Phone Basics
Section 2A: Y our SprintPCS Phone
-
The Basics 37
Page 50

Entering Numbers, Symbol, Smileys and Preset
Messages
To en ter numbers:
©
Selectthe Numbermode and press the appropriate key .
(See "Selecting a Character InputMode" on page 34).
To en ter symbols:
©
Selectthe Symbolmode. (See "Selecting a Character
InputMode" on page 34.) To enter a symbol, press the
appropriate key indicated on the display.
To en ter "emoticons" (smileys):
©
Selectthe Emoticonmode and press the appropriate key .
(See "Selecting a Character InputMode" on page 34.)
To en ter presetmessages:
1. Selectthe PresetMsg. mode. (See "Selecting a Character
InputMode" on page 34.)
2. Scroll to the desired pre-programmed message and
press .
Note: Pr esetmessages make composing textmessages even easier by
allowing you to enter presetmessages, such as "Meetme at," "Let's get
lunch," or a customized message of your own. (For more inf ormation on
presetmessages, please see "Managing PresetMessages" on page 49.)
38 Section 2A: Y our SprintPCS Phone
-
The Basics
Page 51

Section 2B
Controlling Yo ur Phone’s Settings
In This Section
l Sound Settings(page 40)
l Display Settings(page 44)
l Location Settings(page 47)
l Messaging Settings(page 48)
l Airplane Mode(page 51)
l TTY Use With SprintPCS Service(page 52)
l Phone Info(page 53)
l T extEntry(page 54)
l Phone Setup Options(page 56)
l My Menu(page 58)
Using the menu options available on your SprintPCS Phone,
you can customize your phone to sound, look, and operate just
the way you wantit to. This section describes how you can
change your phone’s settings to bestsuit your needs. T ake a
few moments to review these options and to adjustor add
settings thatare rightfor you.
Your Phone’s Settings
Section 2B: Controlling Your Phone’s Settings 39
Page 52

Sound Settings
Ringer T ypes
Ringer types help you identify incoming calls and messages.
Y ou can assign ringer types to individual Contacts entries,
types of calls, and types of messages or others.
v
Preprogrammed Ringersinclude a variety of standard
ringer types and familiar music.
v
Vibrating Ringeralerts you to calls or messages without
disturbing others.
Selecting Ringer T ypes for V oice Calls
Y our SprintPCS Phone provides a variety of ringer options that
allow you to customize your ring and volume settings. These
options allow you to identify incoming calls by the ring.
To selecta ringer type for voice calls:
1. SelectMenu > Settings > Sounds > Ringer Type >
Voice Calls.
2. SelectWith Caller IDor No Caller ID. (The listof
preprogrammed ringers displays ).
3. Use your navigation key to scr oll through the available
ringers. Press Play( ) to play sound.
4. Press Done( ) to assign the desired ringer.
Selecting Ringer T ypes for Messaging
To selecta ringer type for messaging:
1. SelectMenu > Settings > Sounds > Ringer T ype >
Messaging.
2. Use your navigation key to scr oll through the available
ringers. Press Play( ) to play sound.
40 Section 2B: Controlling Your Phone’s Settings
Page 53

3. Press Done( ) to assign the desired ringer.
Selecting Ringer T ypes for V oicemail
To selecta ringer type for Voicemail:
1. SelectMenu > Settings > Sounds > Ringer Type > Voicemail.
2. Use your navigation key to scr oll through the available
ringers. Press Play( ) to play sound.
3. Press Done( ) to assign the desired ringer.
Selecting Ringer T ypes for Alarms
To selecta ringer type for Alarms:
1. SelectMenu > Settings > Sounds > Ringer Type > Alarms.
2. Use your navigation key to scr oll through the available
ringers. Press Play( ) to play sound.
3. Press Done( ) to assign the desired ringer.
Selecting Ringer Types for Roaming Ringer
To selecta ringer type for Roaming Ringer:
1. SelectMenu > Settings > Sounds > Ringer Type > Roaming
Ringer.
2. SelectNormal or Distinctive and press Done().
Selecting Ringer T ypes for DiscreetMode
T o selecta ringer type for DiscreetMode:
1. SelectMenu > Settings > Sounds > Ringer Type > Discreet
Mode.
2. SelectNormal or Discreet and press Done().
Your Phone’s Settings
Section 2B: Controlling Your Phone’s Settings 41
Page 54

Adjusting the Phone’s VolumeSettings
Y ou can adjustyour phone’s volume settings to suityour
needs and your environment.
To adjustyour phone’s volume settings:
1. SelectMenu > Settings > Sounds > Volume.
2. SelectRinger, Speakerphone, Key Beepor Adv anced.
n
Ringerto select a volume level. (Silence All, Ringer
Off, Vibrate All, Lev el 1 ~ Level 5 or press to
"Always Vibrates").
n
Speakerphoneor Ke y Beepto select a volume level.
(Ringer Off, L evel 1 ~ Level 5).
n
Advancedto selectMessaging, Voicemail, Alarms, or
Power On/Offand selectUse Ringer or Separate
with using the navigation key or press to
"Always Vibrates".
Tip:
UUssee RRiinnggeerr :
ringer and allows the side volume keys to change the textmessage alert
volume atthe same time as the voice ringer.
SSeeppaarraattee :
Alerts will always play atthis level unless the ringer volume is setto
"Vibrate All" or "Silence All".
AAllwwaayyss VViibbrraattee :
any sound. Only works with "Separate Volume".
Tip: Y ou can adjustthe ringer volume in standby mode (or the earpiece
volume during a call) by using the volume key on the leftside of your
phone.
:
Plays the textmessage alertatthe same volume as the voice
:
Plays the textmessage alerts atthe selected volume level.
:
Selecting this cause the application to add vibration to
3. Using the navigation key , choose a volume le vel and
press Done().
42 Section 2B: Controlling Your Phone’s Settings
Page 55

AlertNotification
Y our SprintPCS Phone can alert you with an audible tone
when you change service areas, once a minute during a voice
call, or when a call has been connected.
To enable or disable alertsounds:
1. SelectMenu > Settings > Sounds > Alerts.
2. SelectMinute Beep, ConnectTone, Service Toneor
Fade T one and press .
3. SelectOn or Off and press Done().
Selecting a Key Tone Length
Y our phone offers a number of options for selecting the
audible tones accompanying a key press. (Longer tone lengths
may be better for tone recognition when dialing v oicemail or
other automated systems.)
To selecta key tone:
1. SelectMenu > Settings > Sounds > Tone Length.
2. SelectNormal or Long and pr ess Done().
Silence All
e may be times when you need to silence your phone
Ther
tirely . The phone’s Silence All option allows you to mute all
en
sounds withoutturning your phone off.
To activ ate Silence All:
©
With the phone open, press and hold the volume key down
in standby mode. (The screen will display "Silence All.")
To deactiv ate Silence All:
©
Press the volume key up repea tedly to selecta desired
volume level.
Section 2B: Controlling Your Phone’s Settings 43
Your Phone’s Settings
Page 56

Display Settings
Changing the Screensaver
Choose whether you wantyour phone’s Screensaver .
To chang e the Screensaver on the standby screen:
1. SelectMenu > Settings > Display > Screensa ver.
2. SelectImageor Decoration and press .
n
Image to select a PresetImage, Download or My
Picture , then selectScreensaver image.
n
Time Setto selecta Digital Clock, Analog Clock,
Calendar, or Dual Time (Press City[ ] to select
another city with using navigation key).
3. Press Done( ) to apply the Screensaver setting.
Changing the BacklightTime Length
The backlightsetting lets you select how long the display
screen and keypad are backlitafter any key press is made.
o change the backlightsetting:
T
1. SelectMenu > Settings > Display > Backlight.
2. Selec
tLCD
3. Selecta time setting and press Done().
n
Time Setting :10 seconds, 20 seconds, 30 seconds,
Always On, Always Of f
Note: L ong backlightsettings affectthe battery's talk and standby times.
or K
eypad
.
44 Section 2B: Controlling Your Phone’s Settings
Page 57

Changing the T extGreeting
The textgreeting can be up to sixteen characters and is
displayed on your phone’s screen in standby mode. Y ou may
choose to keep the phone’s def aultgreeting ("Sprint"), or you
may enter your own custom greeting.
To displa y or change your greeting:
1. SelectMenu > Settings > Display > Greeting .
2. T o display the defaultgreeting. ("Sprint")
3. Editthe defaultgreeting, press Edit( ). (See
"Entering T ext" on page 34.)
4. Enter a custom greeting using your keypad and pr ess
Done( ) to save it. (To erase the existing greeting
one character ata time, press . T o erase the entire
greeting, press and hold .)
Changing the Incoming Calls
You can setthe color or downloaded image to be shown on
the Incoming Calls display .
To chang e the incoming calls display:
1. SelectMenu > Settings > Display > Inc oming Calls.
2. SelectPresetImage, Download or M y Pictures.
3. Press your navigation ke y leftor rightto selecta display
from the Graphic list. Press Done( ).
Tip:
PPrreesseett IImmaaggee :
DDoowwnnllooaadd :
MMyy PPiiccttuurreess :
stored in the Saved to Phone folder .
:
Standard LCD display image.
:
Downloaded LCD display image.
:
Select“In Camera”or “Saved to Phone” , then selectpictures
Your Phone’s Settings
Section 2B: Controlling Your Phone’s Settings 45
Page 58

Changing the Contrast
Y ou can adjustyour screen’s contrast(brightness) to suityour
surroundings.
To adjustthe display’s contrast:
1. SelectMenu > Settings > Display > C ontrast.
2. SelectMain L CEor Sub LCD.
3. Press your navigation ke y leftor rightto adjustthe
screen contrastand press Done().
Changing the Phone’s Menu Style
Y our SprintPCS Phone allows you to choose how the menu
appears on your display screen.
To selectthe display’s menu style:
1. SelectMenu > Settings > Display > Menu Style.
2. SelectListto view the main menu as a listor Graphic to
view each main menu item as an animated, single
screen icon and press Done( ).
46 Section 2B: Controlling Your Phone’s Settings
Page 59

Location Settings
Y our SprintPCS Phone is equipped with a Location feature for
use in connection with location-based services thatmay be
available in the future.
The Location feature allow s the network to detectyour
position. T urning Location off will hide y our location from
everyone except911.
Note: T urning Loca tion on will allow the network to detectyour position
using GPS technology, making some SprintPCS applications and services
easier to use. T urning Location off will disable the GPS loca tion function for
all purposes except911, butwill nothide your general loca tion based on the
cell site serving your call. No application or service may use your location
withoutyour requestor permission. GPS enhanced 911 is notavailable in all
areas.
To enable your phone’s Location feature:
1. SelectMenu > Settings > Location.
2. Read the message and press
3. Selec
When the Location feature is on, y our phone’s standby screen
will display the icon. When Location is turned of f, the
icon will display .
tOn or O
ff and pr
Next( ).
ess Done(
).
Your Phone’s Settings
Section 2B: Controlling Your Phone’s Settings 47
Page 60

Messaging Settings
Staying connected to your friends and family has nev er been
easier. With your phone’s adv anced messaging capabilities,
you can send and receive many diff erentkinds of text
messages withoutplacing a voice call.
Y our phone’s messaging settings make textmessaging even
faster and easier by letting you decide how you would like to
be notified of new messages, create a signature with each
sentmessage,and create your own presetmessages, to name
justa few.
Displaying Pop-up Messages
When you receive a textmessage, your phone notifies you by
displaying an icon on your display screen. Y ou can also choose
to be notified with a larger pop-up message on your display
screen.
To displa y pop-up messages:
1. SelectMenu > Settings > Messaging > Notification.
2. SelectOnly Icon or Msg. & Iconand press Done().
Setting Message Priority
1. SelectMenu > Settings > Messaging > Priority.
2. SelectUrgentor Normaland press Done().
Setting Message Callback #
1. SelectMenu > Settings > Messaging > Callback #.
2. SelectNone, My Phone #, or Othersand
press Done().
48 Section 2B: Controlling Your Phone’s Settings
Page 61

Tip:
:
NNoonnee :
T o send no callback number .
MMyy PPhhoonnee ## :
OOtthheerrss :
number.
:
T o send your phone number .
:
T o send a specific callback number . T o seta number, enter a phone
Managing PresetMessages
Y our phone is loaded with twenty presetmessages to help make
sending textmessages faster and easier. These messages, such
as "Where are you?," "Let’s getlunch," and "Meetme at," can be
customized or deleted to suityour needs. You can e ven add your
own presetmessages to the list.
To edita presetmessage:
1. SelectMenu > Settings > Messaging > PresetMsg..
(The listof presetmessages displays.)
2. T o edita presetmessage, highlightitand press Edit
( ).
3. Editthe selected message (see "Entering Te xt" on page
34), and press Done( ) to save it.
o erase presetmessage:
T
1. SelectMenu > Settings > Messaging > PresetMsg..
(The listof presetmessages displays.)
2. T o erase presetmessage, highlightit and press Options
( ) then selectErase or Erase All.
3. SelectYes or No and press to delete message.
Your Phone’s Settings
Section 2B: Controlling Your Phone’s Settings 49
Page 62

To add a ne w presetmessage:
1. SelectMenu > Settings > Messaging > PresetMsg..
(The listof presetmessages displays.)
2. T o add a new presetmessage, press Options( ) then
selectAdd New.
3. Enter your message (see "Entering Text" on page 34), and
press Done( ). (Y our new message will be added to
the beginning of the list.)
To sending pr esetmessage:
1. SelectMenu > Settings > Messaging > PresetMsg..
(The listof presetmessages displays.)
2. T o sending a presetmessage, press Options( ) then
selectSend T o.
3. T o access the Send Message editor (see "Using TextSMS
Messaging" on page 133).
Adding a Customized Signature
Each message you send can have a customized signa ture to
reflectyour personality.
T o add a customized signature to each sentmessage:
1. SelectMenu > Settings > Messaging > Signature.
2. SelectOnor Off and press Done( ).
(If you do notwish to attach a signature to your outgoing
messages, selectOff.)
3. To edityour signa ture, press Edit( ) and press
Done( ). (See "Entering Te xt" on page 34.)
50 Section 2B: Controlling Your Phone’s Settings
Page 63

Deleting Old Messages
Y ou can delete messages thatyou’ve already read whenev er
you like, or you can hav e your phone delete them
automatically for you.
To aut omatically erase read messages:
1. SelectMenu > Settings > Messaging > Auto Er ase.
2. SelectOn or Offand press Done().
Airplane Mode
Airplane Modeallows you to use many of your phone’s
features, such as Games , Notepad, V oice Memos, etc., when
you are in an airplane or in any other area where making or
receiving calls or data is prohibited. When your phone is in
Airplane Mode, itcannot send or receive any calls or access
online information.
To setyour phone to Airplane Mode:
1. Selec
2. SelectOn, Off or Pow er Up and press Done( ).
While in Airplane Mode, your phone’s standby screen will
display "Phone off ."
tMenu > Settings > Others > Airplane Mode.
Your Phone’s Settings
Section 2B: Controlling Your Phone’s Settings 51
Page 64

TTY UseWith SprintPCS Service
A TTY(also known as a TDD or T extTelephone) is a
tele co mmu nic at ion s device tha tallows people who are
deaf, hard of hearing, or who have speech or language
disabilities, to communicate by telephone.
Y our phone is compatible with selectTTY devices. Please check
with the manufacturer of your TTY device to ensur e thatit
supports digital wireless transmission. Y our phone and TTY
device will connectvia a special cable thatplugs into your
phone’s headsetjack. If this cable was notprovided with y our
TTY device, contactyour TTY device manufacturer to purchase
the connector cable.
When establishing your SprintPCS Service, please call Sprint
Customer Service via the state T elecommunications R elay
Service (TRS) by firstdialing . Then
provide the state TRS with this number : 866-727-4889.
To turn TTY Mode on or off:
1. SelectMenu > Settings > Others > TTY.
2. Read the message and press Next().
3. SelectDisable or Enable and pr ess Done().
4. SelectEnable to turn TTY mode on.
or
SelectDisable to turn TTY mode of f.
52 Section 2B: Controlling Your Phone’s Settings
Page 65

Note:In TTY Mode, your phone will display the TTY access icon.
Note:If TTY mode is enabled, the audio quality of non-TTY devices
connected to the headsetjack may be impaired.
WARNING: 911 Emergency Calling
Sprintrecommends thatTTY users make emergency calls by other means,
including T elecommunications R elay Services (TRS), analog cellular, and
landline communications. Wireless TTY calls to 911 may be corrupted when
received by public safety answering points (PS APs) rendering some
communications unintelligible. The problem encoun tered appears related
to TTY equipmentor software used by PSAPs. This matter has been brought
to the attention of the FCC, and the wireless industry and PSAP c ommunity
are currently working to resolve this.
Phone Info
Displays the information of your phone:
1. SelectMenu > Settings > Phone Info .
2. SelectPhone Number, Help, V ersion or Advanced and
press .
3. Y ou are to see the phone information.
4. T o return to the previous page, press Done( ).
Your Phone’s Settings
Section 2B: Controlling Your Phone’s Settings 53
Page 66

TextEntry
To setthe textentry:
Auto-Capital
1. SelectMenu > Settings > TextEntry > Auto-Capital.
2. SelectOn or Off and press Done( ).
Auto-Space
1. SelectMenu > Settings > TextEntry > Auto-Space.
2. SelectOn or Off and press Done( ).
My Words
1. SelectMenu > Settings > T extEntry > My Wor ds.
2. To add a new My Word, press
keypad to enter a new My Word then press
3. To editthe selected My W ord, press Option( ) then
selectEdit. and use your k eypad to editthe message,
press Save( ).
or
T o erase or erase all the My Word, pr ess Option()
then selectErase or Erase All and the selectYes or No and
press .
Add( ) and use your
Save( ).
InputLanguage
1. SelectMenu > Settings > Te xtEntry > Input Language.
2. SelectEnglish or Spanish and pr ess Done( ).
54 Section 2B: Controlling Your Phone’s Settings
Page 67

T9 Settings
1. SelectMenu > Settings > TextEntry > T9 Settings.
2. SelectPrediction Length,NextW ord Predict., Word
Completion, or Word Choice Listand press .
Tip:
PPrreeddiiccttiioonn LLeennggtthh :
NNeexxtt WWoorrdd PPrreeddiicctt.. :
WWoorrdd CCoommpplleettiioonn :
WWoorrdd CChhooiiccee LLiisstt :
:
:
T o Select
s
wwoorrdds
:
T o Select
:
T o Select
T o Select
33++lleetttteerr wwoorrdds
66++lleetttteerr wwoorrdds
, or
n
OOn
n
OOn
or
n
OOn
or
or
OOfff
OOfff
OOfff
f
s
44++lleetttteerr wwoorrdds
,
s
and press
f
and press
f
and press
and press
DDoonnee
DDoonnee
DDoonnee
s
55++lleetttteerr
,
DDoonnee
().
().
().
().
Help
1. SelectMenu > Settings > TextEntry > Help.
2. SelectAuto-Capital
Words, NextWord Predict., W ord Completion, Word
Choice List, or InputLanguage and press .
3. Y ou will see the help message. T o return to the pr evious
page, press Done( ).
,Auto-Space
, Pr ediction Length
Your Phone’s Settings
, My
Section 2B: Controlling Your Phone’s Settings 55
Page 68

Phone Setup Options
Setting Abbreviated Dialing
Abbreviated Dialing is another form of speed dialing. Itallows
you to dial a number by entering 3-6 digits of any number in
your Contacts Directory . If the digits you enter do notma tch
any stored Contacts entry , your phone will automatically
prepend the digits you specify .
To activ ate this feature:
1. SelectMenu > Settings > Others > Abbrev . Dial.
2. SelectDisable or Enable and pr ess Done().
3. If you selectEnable, enter a five- or six-digitprepend
number and press Done().
Setting Contacts Match
To activate this featur e:
1. SelectMenu > Settings > Others > Con tacts Match.
2. SelectDisable or Enable and pr ess Done( ).
Call Answer Mode
Y ou can determine how to answer incoming calls on your
phone, whether you wantto be required to press ,
to press any number key , or simply to open the phone.
To setcall answer mode:
1. SelectMenu > Settings > Others > Answ er Mode
2. T o selectan option, highlight itand press Done().
n
SEND Key
incoming calls.
to require to be pressed to answer all
.
56 Section 2B: Controlling Your Phone’s Settings
Page 69

n
Any Key to allow an incoming call to be answ ered by
pressing any key .
n
Folder Opento allow an incoming call to be
answered by opening the phone.
Auto-Answer Mode
Y ou may setyour phone to automatically pick up incoming
calls when connected to an optional hands-free car kit.
To setAuto-Answer mode:
1. SelectMenu > Settings > Others > Auto-Answ er.
2. SelectOn or Off and press Done().
Display Language
Y ou can choose to display your SprintPCS Phone’s onscreen
menus in English or in Spanish.
T o assign a language for the phone’s display:
1. SelectMenu > Settings > Others > Language .
2. SelectEnglish or Spanish and pr ess Done().
Your Phone’s Settings
Section 2B: Controlling Your Phone’s Settings
57
Page 70

My Menu
Y ou can assign frequently used functions (Call History ,
Contacts, Messaging, T ools, Settings , etc.) to My Menu; this
allows you to quickly access these functions.
My Menu Set
1. T o access My Menu, press My Menu().
2. Press your navigation ke y up or down to highlightthe
desired position, then press Add().
3. Selectthe desired menu option.
4. T o complete the setting, press Done().
My Menu Change or Delete
1. T o access My Menu, press My Menu().
2. Press your navigation ke y up or down to highlightthe
desired item, then press Add().
3. T o change the setting, selectthe desired menu then
press Done().
4. T o delete the setting, press .
58 Section 2B: Controlling Your Phone’s Settings
Page 71

Section 2C
Setting Your Phone’s Security
In This Section
l Accessing the Security Menu(page 60)
l Using Y our Phone’s Lock Feature(page 60)
l Using Special Numbers(page 62)
l Restricting Calls(page 63)
l Picture Mail(page 63)
l Erasing the Contacts List(page 64)
l Erasing the Message List(page 65)
l Erasing the V oice Mail List(page 65)
l DefaultSet(page 66)
l Resetting Your Phone(page 66)
l Security Features for SprintPCS Vision
SM
(page 67)
Your Phone’s Security
By using the security settings on your SprintPCS Phone, you
receive peace of mind withoutsacrificing flexibility.This
section will familiarize you with your phone’s s ecurity
settings. With several options av ailable, you can customize
your phone to meetyour personal needs.
Section 2C: Setting Y our Phone’s Security
59
Page 72

Accessing the Security Menu
All of your phone’s security settings are available through the
Security menu. Y ou mustenter your lock code to view the
Security menu.
To ac cess the Security menu:
1. SelectMenu > Settings > Security.
2. Enter your lock code to display the Security menu.
Tip: If you can'trecall your lock code, try using the lastfour digits of
either your Social Security number or SprintPCS Phone number or try
0000 or NA TL (6285). If none of these work, call SprintCustomer Service at
1-888-211-4PCS (4727).
Using Your Phone’s Lock Fea ture
Locking Y our Phone
When your phone is locked, you can only receive inc oming
calls or make calls to 911, SprintCustomer Service, or special
numbers. (See "Using Special Numbers" on page 62.)
To lock y our phone:
©
From the Security menu, selectLock Phone > Lock Now.
(T o setyour phone to lock the nexttime itis turned on,
selectPow er Up.)
Unlocking Y our Phone
T o unlock your phone:
1. From standby mode, press Unlock().
2. Enter your lock code.
60 Section 2C: Setting Y our Phone’s Security
Page 73

Changingthe Lock Code
To chang e your lock code:
1. SelectMenu > Settings > Security, then enter y our lock
code. (The Security menu is displayed.)
2. SelectChange Lock.
3. Enter currentlock code.
4. Enter new lock code.
5. Enter new lock code again.
Calling in Lock Mode
Y ou can place calls to 911 and to your special numbers when in
lock mode. (For information on special numbers, see "Using
Special Numbers" on page 62.)
To place an outg oing call in lock mode:
©
T o call an emergency number , special number , or
SprintCustomer Service, enter the phone number
and press .
Section 2C: Setting Y our Phone’s Security
Your Phone’s Security
61
Page 74

Using Special Numbers
Special numbers are importantnumbers that you have
designated as being "always av ailable." Y ou can call and
receive calls from special numbers even if y our phone is
locked.
Y ou can save up to ten special numbers in addition to your
Contacts entries (the same number may be in both
directories).
To add or r eplace a special number:
1. SelectMenu > Settings > Security, then enter y our lock
code. (The Security menu is displayed.)
2. SelectSpecial #’s.
3. Selecta location for your entry and press Add ().
4. Enter the number and press Done( ) to save it.
To er ase a special number:
1. SelectMenu > Settings > Security, then enter y our lock
code. (The Security menu is displayed.)
2. SelectSpecial #’s.
3. Selecta location to erase a Special #.
4. Press Erase( ) and select Y esor Nowith the
Navigation Key then pr ess to erase it.
Note: Ther e are no Speed Dial options associated with special numbers.
62 Section 2C: Setting Y our Phone’s Security
Page 75

Restricting Calls
There may be occasions when you wantto limitthe numbers
your phone can call or from which itcan receive calls. Y ou can
use the RestrictCalls setting to do justthat. (The RestrictCalls
setting does notapply to 911 or Sprint Customer Service.)
To r estrictcalls:
1. Press Menu > Settings > Security, then enter your lock
code. (The Security menu is displayed.)
2. SelectLimit Use.
3. SelectIncoming Callsor Outgoing Calls.
4. SelectAllow or Restrictedand press Done().
Picture Mail
With this feature, you mustenter your lock code when you
access the Pictures menu and Update Profile.
T o lock the Pictures menu:
1. Press Menu > Settings > Security, then enter your lock
code. (The Security menu is displayed.)
2. SelectPicture Mail.
3. SelectLock Camera.
4. SelectLock or Unlockand press .
Your Phone’s Security
Section 2C: Setting Y our Phone’s Security
63
Page 76

To upda te profile:
1. Press Menu > Settings > Security, then enter your lock
code. (The Security menu is displayed.)
2. SelectPicture Mail.
3. SelectUpdate Profile.
Erasingthe Con tactList
Y ou can quickly and easily erase all of the contents of your
Contacts.
To er ase all the names and phone numbers in your Contacts:
1. Press Menu > Settings > Security, then enter your lock
code. (The Security menu is displayed.)
2. SelectErase Contact.
3. SelectYes or Nowith the Navigation Key .
4. If you are certain you would like to er ase all of your
Contacts entries, selectYes to erase it.
64 Section 2C: Setting Y our Phone’s Security
Page 77

Erasing the Message List
Y ou can quickly and easily erase all of the messages of your
messages.
To er ase all the Messages:
1. Press Menu > Settings > Security, then enter your lock
code. (The Security menu is displayed.)
2. SelectErase Message.
3. SelectYes or Nowith the Navigation Key .
4. If you are certain you would like to er ase all of your
messages, selectYes to er ase it.
Erasing the V oice Mail List
Y ou can quickly and easily erase all of the voice mails of your
voice mails.
T o erase all the V oice Mail:
1. Press Menu > Settings > Security, then enter your lock
code. (The Security menu is displayed.)
2. SelectErase Voice Mail.
3. SelectYes or Nowith the Navigation Key .
4. If you are certain you would like to er ase all of your voice
mails, selectYes to er ase it.
Your Phone’s Security
Section 2C: Setting Y our Phone’s Security
65
Page 78

DefaultSetting
Resetting the phone restores all the factory defaults ,
including the ringer types and display settings. The Contacts ,
Call History, Scheduler , and Messaging ar e notaffected.
To def aultresetyour phone:
1. SelectMenu > Settings > Security, then enter y our lock
code. (The Security menu is displayed.)
2. SelectDefaultSetting. (Display the warning message)
3. SelectYes or Nowith the Navigation Key .
4. If you are certain thatyou would like to defaultsetting
to your phone, selectYes.
Resetting Your Phone
Resetting the phone restores all the factory defaults.
To r esetyour phone:
1. Selec
2. SelectResetPhone. (Display the warning message)
3. SelectYes or Nowith the Navigation Key .
4. If you are certain thatyou would like to restore all of the
tMenu > Settings > Security, then en
code. (The Security menu is displayed.)
factory settings, select
Y es to resetit.
ter your lock
66 Section 2C: Setting Y our Phone’s Security
Page 79

Security Features f or SprintPCS Vision
Enabling and Disabling SprintPCS V ision Services
Y ou can disable SprintPCS Vision services withoutturning off
your phone; however , you will nothave access to all
SprintPCS Vision services, including Web and messaging.
Disabling SprintPCS Vision will avoid any charges associated
with SprintPCS Vision services. While signed out, you can still
place or receive phone calls, check voicemail, and use other
voice services. Y ou may enable SprintPCS Vision services
again atany time.
To disable Sprin tPCS Vision services:
1. SelectMenu > Settings > PCS Vision > Disable Vision.
(A message will appear.)
2. SelectDisable Vision to confirm thatyou wantto
sign out.
To enable Sprin tPCS Vision services:
1. SelectMenu > Settings > PCS Vision > Enable PCS Vision.
(A message will appear.)
2. Press OK to enable Vision service
SM
Your Phone’s Security
Section 2C: Setting Y our Phone’s Security
67
Page 80

Section 2D
Controlling Your Roaming Experience
In This Section
l Understanding Roaming(page 69)
l Setting Y our Phone’s Roam Mode(page 72)
l Using Call Guard(page 73)
l Using Data Guard(page 74)
l Roaming Help(page 74)
Roaming is the ability to make or rec eive calls when y ou’re of f
the Nationwide SprintPCS Network.Your new tri mode
CDM220SP by UTStarcomworks anywhere on the
tionwide SprintPCS Network and allows you to roam on
Na
other analog and 1900MHz digital netw
implemen
This section explains how roaming works as well as special
features thatletyou manage your roaming experience.
ted roaming agreements with other carriers.
orks where we’v e
68 Section 2D: Controlling Your Roaming Experience
Page 81

Understanding Roaming
Recognizing the Roaming Icon on the Displa y Screen
Y our phone’s display scr een always lets you know when y ou’re
off the Nationwide SprintPCS Network. Any time you are
roaming, the phone displays the roaming icon ( ). If you are
roaming on a digital system, the roaming icon will display
along with the text- Digital Roam -. If you are roaming on an
analog system, the roaming icon will display along with the
text- Analog Roam -.
Tip: Remember , when you are using y our phone off the Nationwide
SprintPCS Network, always dial numbers using 11 digits (1 + area code +
number).
Note: Unless your Sprin tPCS Service Plan includes roaming, you will pay a
higher per-minute rate f or roaming calls.
Roaming on Other Digital Networks
When you’re r oaming on digital networks, your call quality
and security will be similar to the quality you receive when
making calls on the Nationwide SprintPCS Network.
However , you may notbe able to access certain features,
such as SprintPCS Vision.
Note:If you're on a call when you leave the Nationwide SprintPCS Network
and enter an area where roaming is av ailable , your call is dropped. If your call
is dropped in an area where you think SprintPCS Service is available, turn
your phone off and on again to reconnectto the Nationwide SprintPCS
Network.
Roaming
Section 2D: Controlling Your Roaming Experience 69
Page 82

Roaming on Analog Networks
When you roam on analog networks, y ou will experience a
similar quality provided by other analog carriers today .
Although some features, such as SprintPCS Vision and
SprintPCS Voice Command, will be unav ailable, you can
still make and receive calls and access voicemail. If y ou are
accustomed to SprintPCS Service, you may notice some of
the following differences when using analog service:
v
Y ou are more likely to experience static, cr oss-talk,
fade-out, and dropped calls.
v
Some features which are standard on the Na tionwide
SprintPCS Network, such as call waiting, Sprint PCS
Vision, and directinternational dialing, may be
unavailable.
v
Though callers can leave voicemail messages while you
are roaming, you will notreceive notification until you
return to the Nationwide SprintPCS Network. (See
"Checking for Voicemail Messages While Roaming" on
page 71.)
v
There are security and privacy risks (eav esdropping and
cloning) tha
today.
v
Y our battery’s charge will deplete mor e quickly and you
will need to recharge itmore often when you use your
phone for analog roaming.
Note: When using y our phone in analog mode, the phone may feel warm.
This is normal for analog operation.
texist with conventional analog services
70 Section 2D: Controlling Your Roaming Experience
Page 83

Checking for V oicemail Messages While Roaming
When you are roaming off the Nation wide SprintPCS
Network, you will notreceive on-phone notification of new
voicemail messages. Callers can still leave messages , butyou
will need to periodically check your voicemail for new
messages if you are in a roaming service area for an extended
period of time.
To check y our voicemail while roaming:
1. Dial 1+area code+your SprintPCS Phone number.
2. When you hear your voicemail greeting, press .
3. Enter your passcode atthe promptand follow the voice
prompts.
When you return to the Nationwide SprintPCS Network,
voicemail notification will resume as normal.
Roaming
Section 2D: Controlling Your Roaming Experience 71
Page 84

SettingY our Phone’s R oam Mode
Y our SprintPCS Phone allows you to control your roaming
capabilities. By using the Roamingmenu option, you can
determine which signals your phone accepts.
SetMode
Choose from three differ entsettings on your tri mode phone
to control your roaming experience.
To setyour phone’s roam mode:
1. SelectMenu > Settings > Roaming > SetMode.
2. T o selectan option, highlight itand press Done().
n
SprintOnly
SprintPCS Network only and prevents roaming on
other networks.
n
Automaticseeks SprintPCS Service. When SprintPCS
Service is unavailable, the phone searches for an
alternate system.
n
Roaming Onlyforces the phone to seek a roaming
system. The previous setting (SprintOnly or
Automatic) is restored the nexttime the phone is
turned on.
allows you to access the Nationwide
72 Section 2D: Controlling Your Roaming Experience
Page 85

Using Call Guard
Y our phone has two ways of alerting you when you are
roaming off the Nationwide SprintPCS Network: the onscreen
roaming icon and Call Guard. Call Guard mak es iteasy to
manage your roaming charges by requiring an extr a step
before you can place or answer a roaming call. (This additional
step is notrequired when you make or receive calls while on
the Nationwide SprintPCS Network.)
To turn C all Guard on or off:
1. SelectMenu > Settings > Roaming > C all Guard.
2. HighlightOn or Offand press Done().
Note: V oice Dialing and Speed Dialing are notavailable when you are
roaming with Call Guard enabled.
To place r oaming calls with Call Guard on:
1. From standby mode, dial 1 + area code + the seven-digit
number and press . (Y ou can also initiate a call
from the Contacts, Call History , or Messaging.)
2. SelectRoam C all.
To ans wer incoming roaming calls with Call Guard on:
1. Press . (A message will display notifying you that
roaming charges will apply .)
2. SelectAnswer
Note: If the C all Guard feature is setto On, you need to take extra steps to
make and receive roaming calls.
Section 2D: Controlling Your Roaming Experience 73
.
Roaming
Page 86

Using Data Guard
1. SelectMenu > Settings > Roaming > Da ta Guard.
2. HighlightAlways Askor Never Askand
press Done().
Roaming Help
1. SelectMenu > Settings > Roaming > Help.
2. Y ou will see the help message. T o return to the pr evious
page, press Done( ).
74 Section 2D: Controlling Your Roaming Experience
Page 87

Section 2E
Managing Call History
In This Section
l Viewing History(page 76)
l Call History Options(page 77)
l Making a Call From Call History(page 77)
l Saving a Phone Number From Call History(page 78)
l Prepending a Phone Number From Call History(page 79)
l Erasing Call History(page 79)
The Call History keeps track of incoming calls, calls made
from your SprintPCS Phone, and missed calls.This section
guides you through accessing and making the mostof
your Call History .
Section 2E: Managing Call History 75
Call History
Page 88

Viewing History
Y ou’ll find the Call History f eature very helpful. Itis a listof the
last20 phone numbers (or Contacts entries) for calls you
placed, accepted, or missed. Call History makes redialing a
number fastand easy. Itis continually updated as new
numbers are added to the beginning of the listand the oldest
entries are removed from the bottom of the list.
Each entry contains the phone number (if itis available) and
Contacts entry name (if the phone number is in your
Contacts). Duplicate calls (same number and type of call) may
only appear once on the list.
To vie w a Call History entry:
1. Press Menu> Call History, then select Outgoing Calls,
Incoming Calls, Missed Calls, or RecentCalls.
2. Highlightthe entry you wish to view and press .
Note: C all History only records call thatoccur while the phone is turned on.
If a call is received while your phone is turned off , itwill notappear in the
phones Incoming or Missed call logs.
Note:If you return a call from the voicemail menu, itwill notappear in your
phone's Outgoing call log.
76 Section 2E: Managing Call History
Page 89

Call History Options
For additional information and options on a particular call,
highlighta Call History entry and press
.This feature
displays the date and time of the call, the phone number (if
available), and the caller’s name (if the number is already in
your Contacts). By pressing Options ( ), you can select
from the following options:
v
Send T o/Send Pictureto send a textor picture message.
v
Edit(With Caller ID) to edita contacts file.
v
Save (No Caller ID) to save the phone number.
v
Prependto add numbers to the beginning of the selected
number. (See "Pr epending a Phone Number From Call
History" on page 79.)
v
Eraseto delete the entry.
v
Erase Allto delete all Call History entries.
Tip: You can also view the next Call History entry by pressing the naviga tion
key rightor view the previous entry by pressing the navigation k ey left.
Making a Call FromCall History
To place a call fr om Call History:
1. Press Menu> Call History, then select Outgoing Calls,
Incoming Calls, Missed Calls, or RecentCalls.
2. Use your navigation key to selecta Call History entry and
press Call ( ) or .
Note: Y ou cannotmake calls from Call History to entries identified as No ID
or Restricted.
Call History
Section 2E: Managing Call History 77
Page 90

Saving a Phone Number FromCall History
Y our SprintPCS Phone can store up to 500Contacts entries.
Contacts entries can store up to a total of 5 phone numbers,
and each entry’s name can con tain sixteen characters.
To sa ve a phone number from Call History:
1. Use your navigation key to selecta Call History entry and
press Options ().
2. SelectSav e ().
3. SelectNew Entryto create a new Contacts entry for the
number or Existing Entryto save the number to an
existing entry and press .
4. Selecta label and press .
5. Use the keypad to type in the new entry name and
press Save ( ).
or
Use your navigation key to scroll thr ough your existing
Contacts entries, highlighta name, and press
Save ().
After you hav e saved the number , the new Contacts entry is
displayed. (See "Contacts Entry Options" on page 84.)
Note: Y ou cannotsave phone numbers already in your Contacts or from
calls identified as No IDor Restricted.
78 Section 2E: Managing Call History
Page 91

Prepending a Phone NumberFrom
Call History
If you need to make a call from Call History and you happen to
be outside your local area code, you can add the appropria te
prefix by prepending the number .
To pr epend a phone number from Call History:
1. Selecta Call History entry and press Options ().
2. SelectPrepend ().
3. Enter the prefix and press or Call ( )to call the
number.
- or Press Options ( ) and selectSave to sa ve the
amended number in your Contacts.
ErasingCall History
T o erase individual Call History entries, see "C all History
Options" on page 77.
To er ase Call History:
1. SelectMenu > Call History > Er ase Calls.
2. SelectOutgoing, Incoming, Missed, or All. (A confirmation
dialog will appear.)
3. If you are certain you wantto erase the call history, Press
Options ( ) then select
press
- or Press( )to return to the previous menu.
.
Section 2E: Managing Call History 79
Save
, and then selectYes,
Call History
Page 92

Section 2F
Using Contacts
In This Section
l Adding a New Contacts Entry(page 81)
l Finding Contacts Entries(page 82)
l Contacts Entry Options(page 84)
l Adding a Phone Number to a Contacts Entry(page 84)
l Editing a Contacts Entry’s Phone Numbe r(page 85)
l Selecting a Ringer Type for an Entry
l Assigning Speed Dial Numbers(page 87)
l Group Setting(page 88)
y Phone #
l M
l Dialing SprintPCS Services(page 90)
Now thatyou know the basics thatmake iteasier to stay in
touch with people and information, you ’re ready to explore
your phone’s more advanced features.This section explains
how to use your phone’s C ontacts listand helps you make the
mostof your contacts and time when you are trying to
connectwith the importantpeople in your life.
80 Section 2F: Using Contacts
(pag
e 89)
(page 86)
Page 93

Addinga New Contacts Entry
Y our SprintPCS Phone can store up to 500Contacts entries.
Contacts entries can store up to a total of five phone numbers,
and each entry’s name can con tain sixteen characters.
To add a ne w entry:
1. SelectMenu > Contacts > Add New Entry.
2. Enter a name for the new entry and press .
(See "Entering T ext" on page 34.)
3. Enter the phone number for the entry and press .
Shortcut: Enter the phone number in standby mode and press Options
( ). SelectSave( )Proceed with steps 5-7.
4. Selecta label for the other en try (Phone Number slot(5),
e-Mail,Group,Ringer,orMemo).
5. To save the entry, press
T o return to the previous page, press .
After you hav e saved the number , the new Contacts entry is
displayed. (See "Contacts Entry Options" on page 84.)
Note: If user notinputatleastone field among number, e-mail then display
"No Data! Enter Phone number . " in dialogue box.
If name field is empty in editcontactbut one of phone number field inserted
then saved so display phone number in contacts list.
Save( ).
Contacts
Section 2F: Using Contacts 81
Page 94

FindingContacts Entries
There are several w ays to display your C ontacts entries: by
name, by speed dial number, by group , and by voice dial tags.
Follow the steps outlined in the sections below to display
entries from the Contacts menu.
Finding Names
To find C ontacts entries by name:
1. SelectMenu > Contacts > Find .
2. Scroll through all the entries using your navigation k ey .
3. Enter the firstletter of a name or part of a name (such as
"ave" for "Dave"). (The mor e letters you enter , the more
your search narrows.)
4. T o display an entry , highlightitand press .
5. T o dial the entry’s def aultphone number, press or
press Options( ). SelectCall( ).
or
T o display additional Contacts entries , press the
navigation key leftor right.
Shortcut: Fr om standby mode, press Find( ) to display the Search
feature.
82 Section 2F: Using Contacts
Page 95

Finding Speed Dial Numbers
To find phone numbers y ou have stored in speed dial locations:
1. SelectMenu > Contacts > Speed Dial #’s.
2. Scroll through speed dial entries using your navigation
key . Speed dial numbers are display ed in numeric order .
- or Enter the number of a speed dial location using your
keypad.
3. T o display an entry , highlightitand press .
4. T o dial the entrys def aultphone number, press .
- or T o display additional Contacts entries , press the
navigation key leftor right.
Finding Group Entries
To find en tries designated as partof a group:
1. SelectMenu > Contacts > Gr oup Setting.
2. Scroll through the group titles using your navigation k ey .
T o display entries belonging to a group , highlightthe
group and press .
3. T o display an entry within the group, highligh tit and
press .
4. To dial the entry s defaultphone number, press or
press Options( ). SelectCall ( ).
- or T o display additional Contacts entries , press the
navigation key leftor right.
Contacts
Section 2F: Using Contacts 83
Page 96

Contacts Entry Options
T o access a Contacts entry’s opt ions, display the entry and
press Options( ), then selectEdit ( ). T o selectan
option, highlightit and press .
v
Add number to add a phone number to the entry . (See
"Adding a Phone Number to a Contacts Entry" on page 84.)
v
Email to add an email addr ess to the entry .
v
Groupto assign the entry to a group.
v
Ringer to assign a prepr ogrammed or downloaded ringer .
v
Memo to add a note, str eetaddress, or other information.
Tip: Y ou can view the nextentry by pressing the navigation key rightor view
the previous entry by pressing the navigation ke y left.
Adding a Phone Numberto a Contacts Entry
To add a phone number t o an entry:
1. Display a Contacts entry (see "Finding Con tacts Entries"
on page 82).
2. SelectEdit> Add Number.
3. Enter the new phone number and press the navigation
key leftor right.
4. Selecta label for the number and pr ess .
5. Press Save
- orPress to return to standby mode.
( ) to save the new number .
84 Section 2F: Using Contacts
Page 97

Editing a ContactsEntry’s Ph one Number
To editan entry’s phone number:
1. Display a Contacts entry .
2. Press Options( ), then selectEdit ().
3. Highlightthe number you wish to editand press .
4. Press again to edit the number.
5. Press to clear one digit ata time, or press and hold
to erase the entire number .
6. Re-enter or editthe number and press .
7. Selecta label for the number and pr ess .
8. Press Save( ) to save the new number .
- or Press to return to standby mode.
Contacts
Section 2F: Using Contacts 85
Page 98

Selecting a Ringer Type for an Entry
Y ou can assign a ringer type to a Contacts entry so you can
identify the caller by the ringer type. (See "Ringer T ypes" on
page 40.)
To selecta ringer type for an entry:
1. Display a Contacts entry .
2. Press Options( ), then selectEdit ().
3. Highlightthe currentring type and press Change
( ) to display the Ringer T ype menu.
4. Use your navigation key to scr oll through available
ringers. (When you highlighta ringer type, a sample
ringer will sound.)
5. Highlightyour desired ringer and press
( ).
6. Press Done( ) to save the new ringer type.
or
1. Display a Contacts entry and press Options( ),
then selec
tEdit( ).
2. Highlightthe currentring type and press the navigation
key rightor leftto display av ailable ringer types. (T o h ear
a preview , selecta ringer and press Play( ); press
Stop( ) again to return to the Editmenu.)
3. When you’ve selected y our desired ringer , press Done
( ) to save the new ringer type.
Play/Stop
86 Section 2F: Using Contacts
Page 99

AssigningSpeed Dial Numbers
Y our phone can store up to 99 phone numbers in speed dial
locations. For details on how to make calls using speed dial
numbers.
Speed dial numbers can be assigned when you add a new
Contacts entry , when you add a new phone number to an
existing entry , or when you editan existing number.
1. SelectMenu > Contacts > Speed Dial #’s.
2. T o assign a phone number to a location, selectthe
location thenpress Assign()
3. Selectthe contactwith the Navigation Key.
4. T o save it, press Done( ).
5. To unassigned a location, press
select"Unassigned"or "Unassigned All".
Note: If y ou attemptto assign an already in-use speed dial location to a new
phone number, a dialog will appear asking if you wish to r eplace the existing
speed dial assignment. Select
number and delete the previous speed dial assignment.
Yes to assign the location to the new phone
.
Options( ) then
Contacts
Section 2F: Using Contacts 87
Page 100

Group Setting
Allows you to classify phone entries into groups.
Existing groups include Unassigned, Family , F riend, Work.
Allows the user to add group up to10 phone number .
The user can change, anderase Group.
1. SelectMenu > Contacts > Gr oup Setting.
2. Selectan existing group name with the Na vigation Ke y,
press .
3. T o display an group entry
4. Press Options( ) then select"Call"or "Send Msg".
Add New Group
1. SelectMenu > Contacts > Gr oup Setting.
2. Press Add()
3. Inputa new group name.
4. T o save it, press Done().
5. "Group namesaved!" will be displayed.
Change Group Name
1. SelectMenu > Con tacts > Group Setting.
2. Selectan existing group name tha tyou have added with
the Navigation Key.
3. Press Options( ). SelectRename( ).
4. Inputa new group name.
5. T o save it, press Done().
6. "Group namechanged!" will be displayed.
88 Section 2F: Using Contacts
 Loading...