

Page 1

1
CDM9945 User Guide
CONTENTS .................................... 1
WELCOME ..................................... 4
Welcome and thank you for choosing
verizon wireless............................................... 4
Welcome CD-ROM .......................................... 4
Worry-Free Guarantee .................................... 5
Phone Overview ........................... 6
CDM9945 Closed View .................................... 6
CDM9945 Open View ....................................... 7
Menu Overview ............................ 8
Getting Started with Your Phone ..
10
The Battery ..................................................... 10
Installing the Battery................................. 10
Removing the Battery................................ 10
Charging the Battery...................................... 10
Battery Charge Level ..................................... 10
Turning the Phone On and Off...................... 11
Signal Strength............................................... 11
Screen Icons .............................................. 12
Making Calls................................................... 13
Redialing Calls .............................................. 13
Receiving Calls............................................... 13
Quick Access to Convenient
Features...................................... 14
Manner Mode ................................................. 14
Lock Mode....................................................... 14
Mute Function ................................................ 15
Volume Quick Adjustment ........................... 15
Call Waiting ................................................... 16
Caller ID .......................................................... 16
Speed Dialing ................................................ 16
Contacts in Your Phone’s
Memory ...................................... 18
Options to Customize Your Contacts .......... 18
Editing Contacts Entries................................ 20
Editing Labels for Contacts .......................... 21
Deleting............................................................ 22
Using Phone Menus ................... 24
GET IT NOW .................................................... 24
1. Get Tunes & Tones ................................ 25
1.1 Get V CAST Music............................26
CONTENTS
Page 2

2
CDM9945 User Guide
3
CDM9945 User Guide
1.2 Get New Ringtones......................... 26
1.3 My Ringtones .................................. 26
1.4 My Music.......................................... 27
1.5 My Sounds ....................................... 27
1.6 Sync Music ...................................... 27
2. Get PIX & FLIX ........................................ 28
2.1 Get V CAST Video............................ 29
2.2 Get New PIX..................................... 31
2.3 My PIX .............................................. 31
2.4 My FLIX ............................................ 32
2.5 PIX Place.......................................... 33
2.6 Take PIX............................................ 33
2.7 Record FLIX...................................... 34
3. Get Fun & Games .................................. 35
4. Get News & Info .................................... 35
5. Get Going ................................................ 38
6. Get Extra ................................................. 38
MESSAGING.................................................... 39
1. New MSG................................................ 40
1.1 TXT Msg............................................ 40
1.2 PIX Msg ............................................ 42
1.3 FLIX Msg............................................44
2. Inbox ........................................................ 45
3. Sent ......................................................... 47
4. Drafts ....................................................... 48
5. Voicemail ................................................ 48
6. E-mail ....................................................... 49
7. Mobile Instant Messaging ................... 49
8. Chat ......................................................... 49
CONTACTS....................................................... 50
1. New Contact........................................... 50
2. Contact List ............................................. 51
3. Groups ..................................................... 51
4. Speed Dials............................................. 52
RECENT CALLS ............................................... 53
1. Missed ..................................................... 53
2. Received.................................................. 54
3. Dialed ...................................................... 54
4. All.............................................................. 55
5. View Timer .............................................. 55
SETTINGS & TOOLS ...................................... 56
1. My Account ............................................ 56
2. Tools ........................................................ 57
2.1 Calendar .......................................... 57
2.2 Alarm Clock...................................... 58
2.3 World Clock ..................................... 59
2.4 Notepad ........................................... 60
2.5 Calculator......................................... 60
3. Sound Settings ...................................... 60
3.1 Master Volume ............................... 61
3.2 Call Sounds ...................................... 61
3.3 Alert Sounds ................................... 62
3.4 Keypad Volume................................ 62
3.5 Earpiece Volume ............................ 62
3.6 Service Alerts ................................. 62
3.7 Power On/Off .................................. 63
3.8 Alarm Sounds .................................. 63
4. Display Settings ..................................... 64
4.1 Banner ............................................. 64
4.2 Backlight........................................... 65
4.3 Contrast ............................................ 66
4.4 Wallpaper......................................... 66
4.5 Screensaver..................................... 66
4.6 Display Themes............................... 67
4.7 Fonts.................................................. 67
4.8 Clock Format.................................... 67
5. Phone Setting ........................................ 68
5.1 Standalone Mode............................ 68
5.2 Shortcut Key .................................... 68
5.3 Language.......................................... 68
5.4 Location............................................ 69
5.5 Security............................................. 69
5.6 System Select.................................. 70
5.7 NAM Select...................................... 71
6. Call Settings ........................................... 71
6.1 Answer Options............................... 71
6.2 Auto Retry......................................... 72
6.3 TTY Mode ........................................ 72
6.4 One-Touch Dial ............................... 72
6.5 Voice Privacy .................................. 73
6.6 Call Restrictions ............................. 73
6.7 Data Settings ................................... 73
6.8 DTMF Tone....................................... 74
6.9 Ringer ID........................................... 74
6.0 Picture ID.......................................... 74
7. Bluetooth ................................................ 75
7.1 Add New Devices ........................... 75
8. Memory .................................................. 75
8.1 Save Options.................................... 75
8.2 Phone Memory................................ 76
8.3 Card Memory................................... 76
9. Phone Info............................................... 76
9.1 My Number ...................................... 77
9.2 Software Version ............................ 77
9.3 Icon Glossary................................... 77
9.4 Software Update............................. 78
Accessories ................................ 81
Three ways to accessorize........................... 82
may we help you............................................. 83
STANDARD LIMITED WARRANTY
...... 85
CONTENTS
Page 3

4
CDM9945 User Guide
5
CDM9945 User Guide
You’re now connected to the power of America’s best, most reliable wireless network.*
This guide will help you understand your new wireless phone and all the things you
can do with it.
For more details, please refer to the User Guide. If you ever have any questions and
would like to access an online Q&A, please visit us online at www.verizonwireless.com and
check out How to Use Your Phone.
Don’t forget to give the enclosed CD a whirl to see all the great things your new device and
service can do. You’ll also get a glimpse of all the benefits that come with using Verizon
Wireless.
Getting the most out of your wireless device couldn’t be any easier than with the enclosed CDROM. You’ll learn everything you need to know about setup, Get It Now®, available features
and more.
*Network details at www.verizonwireless.com.
1. You’ll enjoy the America’s best, most reliable wireless network* in the palm of your hands.
2. You’ll have a plan that changes to fit your life. Your plan comes with the option to change to
any qualifying Calling Plan or airtime promotion, anytime you want.
•
You won’t pay any additional fees to change plans. Some Calling Plans require specific equipment. You
become eligible to take advantage of equipment upgrades at promotional pricing during the last two months
of your contract period. If you’re upgrading equipment before the final two months of your contract, you may
have to pay full retail price. Promotional offers will require an extension of your Customer Agreement.
3. If you ever have a problem, it becomes our problem the first time you call.
No runarounds, no hassles. If your issue can’t be resolved during the course of
your first call, we’ll take the responsibility of getting back to you with an answer.
4. Why pay for a new phone when you can get one for free every two years with New Every
Two®? Just sign up for and maintain two years of service on a digital plan of $34.99 or
higher, and you’ll be qualified for a free phone (up to a $100 value), or $100 toward the
purchase of a more expensive phone with a two-year renewal.
5. Try out your plan for 15 days. We guarantee that you’ll be happy. If for any reason you’re
not, you have 15 days to return or cancel any product or plan you get from Verizon Wireless.
You pay only for the service you use.†
† 30-day satisfaction guarantee in California.
* Network details at www.verizonwireless.com. Also see the Worry-Free Guarantee brochure and our
Return/Exchange Policy for details.
• Certain conditions and restrictions apply. See store for details. Annual Customer Agreement required.
WELCOME
WELCOME AND THANK YOU FOR CHOOSING VERIZON WIRELESS
WORRY-FREE GUARANTEE®
WELCOME CD-ROM
Page 4
6
CDM9945 User Guide
7
CDM9945 User Guide
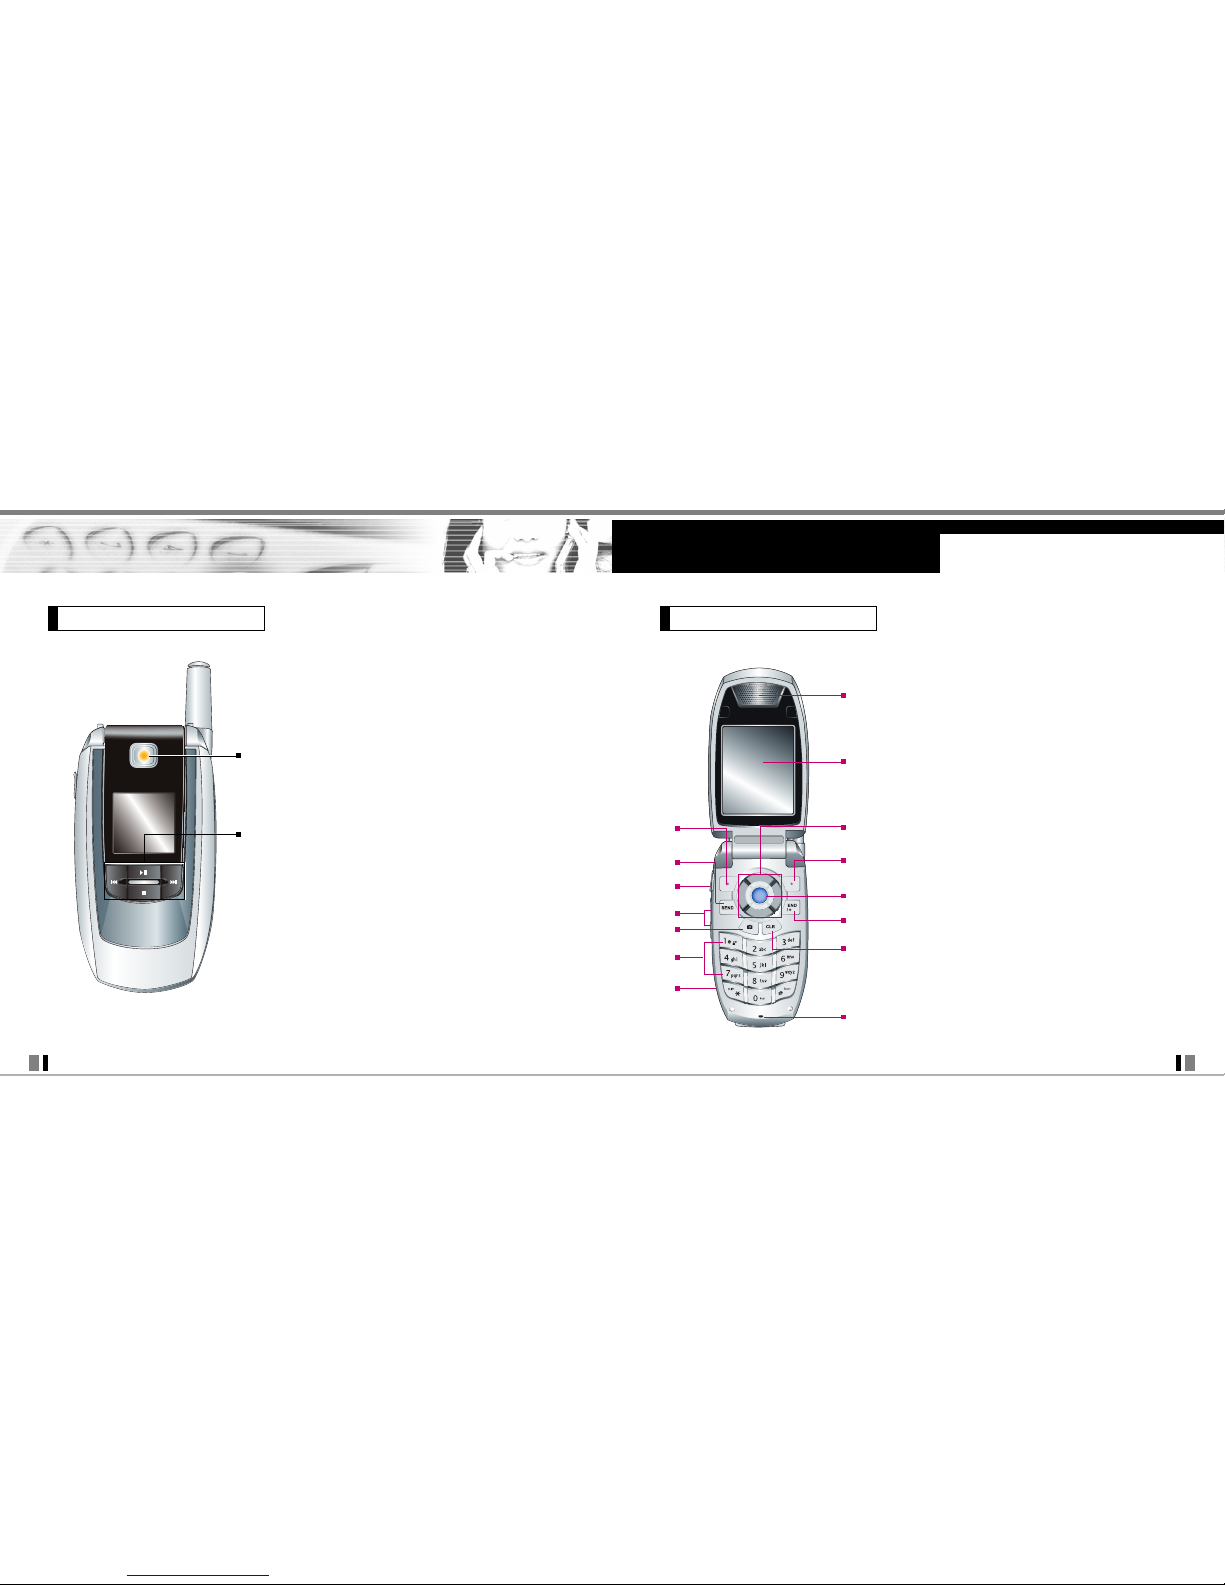
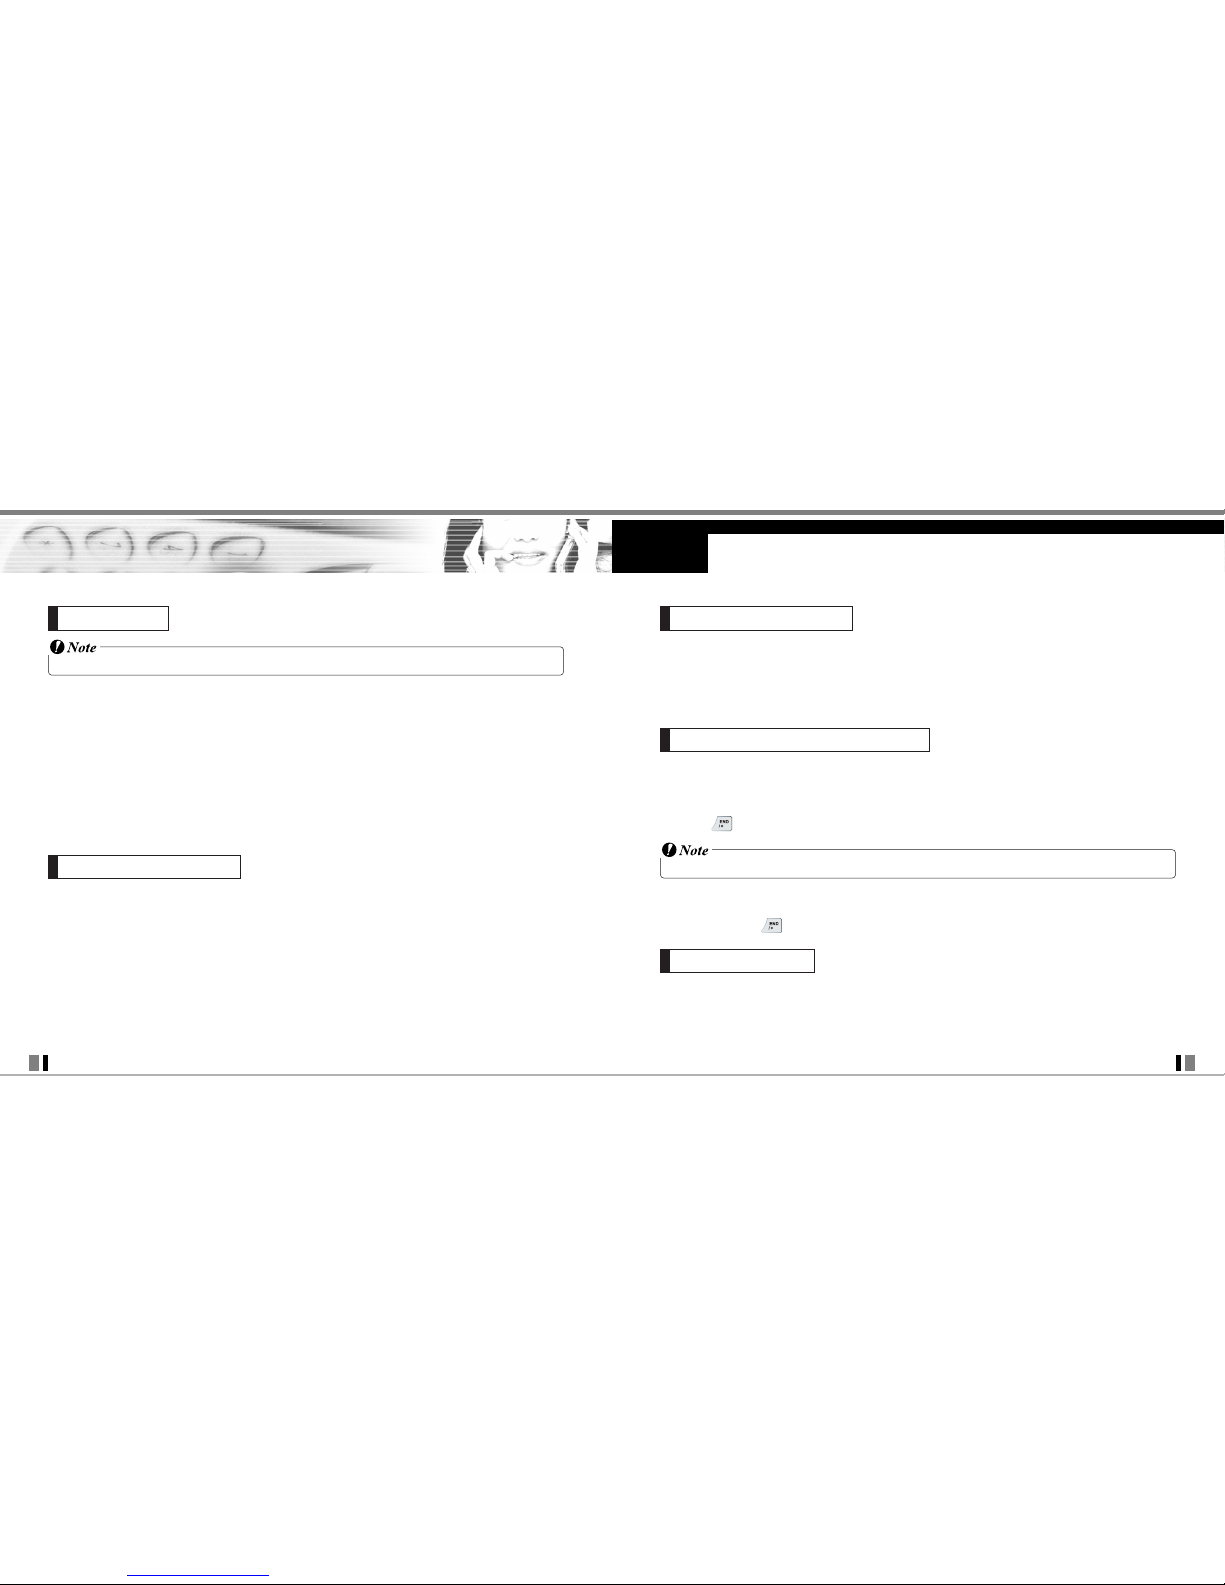
PHONE OVERVIEW
Flash
Used for photographing.
Music Keys
Press for quick access to Get Pix, Schedule, Web Browser,
1. Earpiece
2. LCD Screen : Display messages and indicator icons.
3. Left Soft Key : Press to display the function Message menu.
4. Navigation Keys : Press for quick access to Get PIX,
Schedule, Web Browser, Get It Now.
5. SEND Key : Press to place or answer calls.
6. Right Soft Key : Press for quick access to Contacts.
7. Headset Jack
8. OK Key : Press to accept entered or highlighted information.
9. Volume Keys : Press to adjust the ringer volume in standby
mode and the earpiece volume during a call.
10. END/PWR Key : Press to turn the power on/off and to end a
call. Also use to return to the main menu
display screen.
11. Camera Key : Press for quick access to Camera function
(Long press in Idle Mode).
12. CLR Key : Press to delete a single space or character.
Press and hold to delete entire words. Press this
key once in a menu to go back one level.
13. Alphanumeric Keypad : Press to enter numbers and
characters and select menu items.
14. T-Flash Card Slot : Accommodate optional T-Flash
memory cards.
15. Microphone
1
2
4
6
8
10
12
15
3
5
7
9
11
13
14
OK
CDM9945 Closed View CDM9945 Open View
Page 5

8
CDM9945 User Guide
9
CDM9945 User Guide
GET IT NOW
1. Get Tunes & Tones
1. Get V CAST Music
2. Get New Ringtons
3. My Ringtones
4. My Music
5. My Sounds
6. Sync Music
2. Get PIX & FLIX
1. Get V CAST Video
2. Get New PIX
3. My PIX
4. My FLIX
5. PIX Place
6. Take PIX
7. Record FLIX
3. Get Fun & Games*
4. Get News & Info*
5. Get Going*
6. Get Extra*
MESSAGING
1. New Msg
1. TXT Msg
2. PIX Msg
3. FLIX Msg
2. Inbox
3. Sent
4. Drafts
5. Voicemail
6. E-mail
7. Mobile IM
8. Chat
CONTACTS
1. New Contact
2. Contact List
3. Groups
4. Speed Dials
RECENT CALLS
1. Missed
2. Received
3. Dialed
4. All
5. View Timer
SETTINGS & TOOLS
1. My Account
2. Tools
1. Calendar
2. Alarm Clock
2.1. Alarm1
2.2. Alarm2
2.3. Alarm3
3. World Clock
4. Notepad
5. Calculator
3. Sound Settings
1. Master Volume
2. Call Sounds
2.1. Call Ringtone
2.2. Call Vibrate
3. Alert Sounds
3.1. Txt Message
3.2. PIX-FLIX Msg
3.3. Voicemail Msg
4. Keypad Volume
5. Earpiece Volume
6. Service Alerts
6.1. ERI
6.2. Minute Beep
6.3. Call Connect
7. Power On/Off
8. Alarm Sounds
8.1. Tone
8.2. Vibrate
4. Display Settings
1. Banner
1.1. Personal
1.2. ERI Banner
2. Backlight
2.1. Display
2.2. Keypad
3. Contrast
3.1. Main Screen
3.2. Front Screen
4. Wallpaper
4.1. Main Screen
4.2. Front Screen
5. Screensaver
5.1. Main Screen
5.2. Front Screen
6. Display Themes
7. Fonts
8. Clock Format
8.1. Main Clock
8.2. Front Clock
5. Phone Settings
1. Standalone Mode
2. Shortcut Key
3. Language
4. Location
5. Security
5.1. Lock Mode
5.2. Edit Code
6. System Select
7. NAM Select
6. Call Settings
1. Answer Options
2. Auto Retry
3. TTY Mode
4. One-Touch Dial
5. Voice Privacy
6. Call Restriction
7. Data Settings
7.1. Data Fax
7.2. Select Port
8. DTMF Tones
9. Ringer ID
0. Pictre ID
7. Bluetooth
1. Add New Device
8. Memory
1. Save Options
1.1. PIX
1.2. FLIX
1.3. Sounds
2. Phone Memory
2.1. Memory Usage
2.2. My PIX
2.3. My FLIX
2.4. My Music
2.5. My Sounds
3. Card Memory
3.1. Memory Usage
3.2. My PIX
3.3. My FLIX
3.4. My Music
3.5. My Sounds
9. Phone Info
1. My Number
2. Software Version
3. Icon Glossary
4. Software Update
MENUS OVERVIEW
Page 6
10
CDM9945 User Guide
11
CDM9945 User Guide
The battery charge level is shown at the top right of the LCD screen. When the battery charge
level becomes low, the low battery sensor alerts you in three ways: sounding an audible
tone, blinking the battery icon, and displaying LOW BATTERY WARNING! If the battery
charge level becomes exceedingly low, the phone automatically switches off and any
function in progress is not saved.
Turning the Phone On
1. Install a charged battery or connect the phone to an external power source such as a
cigarette lighter charger or hands-free car kit.
2. Press for a few seconds until the LCD screen lights up.
• Like any other radio device, avoid any unnecessary contact with the antenna while your phone is on.
Turning the Phone Off
1. Press and hold until the display turns off.
Call quality depends on the signal strength in your area. The signal strength is indicated on
the screen as the number of bars next to the signal strength icon: The more bars, the better
the signal strength. If the signal quality is poor, move to an open area. If you are in a
building, the reception may be better near a window.
GETTING STARTED WITH YOUR PHONE
• It is important to fully charge the battery before initial use of the phone.
The phone comes with a rechargeable battery. Keep the battery charged while not in use in
order to maximize talk and standby time. The battery charge level is shown at the top of the
LCD screen.
Installing the Battery
To install the battery, insert the bottom of the battery into the opening on the back of the
phone. Push the battery down until the latch clicks.
Removing the Battery
Turn the power off. Pull the release latch up, hold both ends of the battery and remove it.
To use the charger provided with your phone:
Warning! Use only the charger provided with the phone. Using any charger other than the one included with
the CDM9945 may damage your phone or battery.
1. Plug the end of the adapter into the phone’s charger jack and the other end into an
electrical outlet.
2. The charge time varies depending upon the battery level. The maximum charge time for a
fully discharged standard battery is 5 hours.
The Battery Battery Charge Level
Turning the Phone On and Off
Signal Strength
Charging the Battery
Page 7

12
CDM9945 User Guide
13
CDM9945 User Guide
1. Make sure the phone is turned on. If not, press for about 3 seconds.
2. Enter the phone number (include the area code if needed).
3. Press .
lf the phone is locked, enter the lock code. Call Failed - indicates the call did not go through.
4. Press to end the call.
Correcting Dialing Mistakes
If you make a mistake while dialing a number, press once to erase the last digit entered,
or hold down for at least 2 seconds to delete all digits.
1. Press twice to redial the last number you dialed. The last 270 numbers are stored in the
call history list and you can also select one of these to redial.
1. When the phone rings or vibrates, press to answer.
2. Press to end the call.
•
If you press [Quiet] while the phone is ringing, the ringing or vibration is muted for that call.
• If you press [Ignore] while the phone is ringing, the call will end.
•
Speed dial: 1000 sec (CDM9200:100 sec).
GETTING STARTED WITH YOUR PHONE
Screen Icons
When the phone is powered on, the top line of the LCD screen displays icons indicating the
status of the phone.
Signal strength indicator. The
strength of the signal received by the
phone is indicated by the number of
bars displayed.
In use indicator. A call is in progress.
* No icon indicates that the phone is
in standby mode.
No service indicator. The phone is
not receiving a system signal.
Roaming indicator. The phone is
outside of the home service area.
Digital indicator. Digital service is
available.
Battery indicator. Indicates battery
charge level.
New text/PIX message indicator or
Browser message.
Location on mode.
New voice mail indicator.
Voice Privacy.
Vibrate mode.
Alarm Only.
Sounds Off.
Alarm On.
Bluetooth Audio Device Connected.
Standalone mode.
Missed Calls. Schedule.
Bluetooth On.
Announce Alert.
Shown To All.
Making Calls
Redialing Calls
Receiving Calls
Page 8

14
CDM9945 User Guide
15
CDM9945 User Guide
Use Key Guard Mode to prevent others from using your phone. When Key Guard Mode is
set.
• The lock code/password is 0000 by default.
Lock Mode Quick Activation
1. From standby mode, press for 3 seconds.
Lock Mode Quick Cancellation
1. Press twice [Unlock] then enter your 4-digit password.
The Mute function prevents the other party from hearing your voice, but allows you to hear
the other party.
Mute Quick Activation
1. Press Left Soft Key [Mute] during a call.
Mute Quick Cancellation
1. Press Left Soft Key again.
Use the side keys to adjust the earpiece and master volumes. The upper key increases the
volume and the lower key decreases the volume.
• Earpiece volume can be adjusted during a call.
• Key beep volume is adjusted through the Menu.
• When the flip is open, you can press (lower side key) for 3 seconds to set Sounds Off Mode. Press
(upper side key) to switch to Normal Mode.
Your cellular service may offer call waiting. While a call is in progress, two beeps indicate
another incoming call. When call waiting is enabled, you may put the active call on hold
while you answer the other incoming call. Check with your cellular service provider for
information about this function.
1. Press to receive a waiting call.
2. Press again to switch between calls.
QUICK ACCESS TO CONVENIENT FEATURES
Lock Mode
Lock Mode Volume Quick Adjustment
Call Waiting
Page 9
17
CDM9945 User Guide
CONTACTS IN YOUR PHONE’S MEMORY
Once the basic phone number and name information is stored in your Contacts, you can edit
and/or customize the entries.
Adding or Changing the Group
Allows you to manage your Contacts entries by organizing them into groups.
1. Press [Contacts] and use , to highlight an entry.
2. Press [Edit].
3. Use , to highlight Group and press [Set].
4. Use to select the Group and press .
No Group / Family / Friends / Jazz Club / Work
5. Press to save.
• You can change the name of the group, add groups, and delete groups(see page 44).
Changing the Call Ringer
Allows you to identify who is calling by setting different ringers for different phone numbers in
your Contacts. It is automatically set to the default ringer when the Contact is saved.
1. Press [Contacts] and use , to highlight an entry.
2. Press [Edit].
3. Use , to highlight Ringtone and press [Set].
4. Use to select the Ringer Type and press .
5. Press to save.
OKOKOK
OK
Options to Customize Your Contacts
16
CDM9945 User Guide
Caller ID displays the number of the person calling when your phone rings. If the caller’s
identity is stored in Contacts, the name appears on the screen. Check with your service
provider to ensure they offer this feature.
Speed dialing is a convenient feature that allows you to make phone calls quickly and easily
with a few keystrokes. Your phone recalls the number from your Contacts, displays it briefly,
and then dials it. Speed Dial number 1 is for Voice mail.
Dialing Single Digit Speed Dials (from 1 to 9)
Press and hold the Speed Dial number.
OR
Enter the speed dial number and press .
Dialing Double Digit Speed Dials (from 10 to 99)
Press the first digit and then press and hold the key of the last digit.
OR
Enter the first and second digits and press .
• To set Speed Dials, see “Adding Speed Dial” on page32.
Speed Dialing
Caller ID
Page 10
19
CDM9945 User Guide
CONTACTS IN YOUR PHONE’S MEMORY
18
CDM9945 User Guide
4. Enter an Email address and press to save.
Adding Speed Dial
Allows you to set Speed Dial designations for phone numbers in your Contacts.
1. Press [Contacts] and use to highlight an entry.
2. Press [Edit].
3. Use , to highlight the phone number you want to set with a Speed Dial and press
[Options].
4. Press , select Set Speed Dial and press .
5. Enter a Speed Dial digit.
Use the Keypad and press , or use , to highlight the Speed Dial digit and press .
6. Press to save.
Adding Another Phone Number From the Main Menu Screen
1. From standby mode, enter the phone number you want to save (up to 48 digits).
2. Press [Save].
3. Use , to highlight Update Existing Contact and press .
4. Use , to highlight the existing Contact entry and press .
5. Use , to highlight a Label and press .
Mobile 1 / Home / Work / E mail 1 / Mobile2 / E mail 2 / Fax
6. Press to save.
A confirmation message is displayed.
OK
OK
OK
OK
OK
OKOKOK
Editing Contacts Entries
Changing the Message Ringer
Allows you to identify who is sending you a message by setting different ringers for different
phone numbers in your Contacts. It is automatically set to the default ringer when the Contact
is saved.
1. Press [Contacts] and use , to highlight an entry.
2. Press [Edit].
3. Use , to highlight Msg Tone and press [Set].
4. Use , to select the Ringer Type and press .
5. Press to save.
Adding or Changing the Picture ID
Allows the phone to display a picture to identify the caller.
1. Press [Contacts] and use to highlight an entry.
2. Press [Edit].
3. Use , to highlight Picture and press [Set].
4. Use , to select a graphic and press .
5. Press to save.
Adding or Changing the Email
Allows you to enter an Email address associated with the Contact entry.
1. Press [Contacts] and use to highlight an entry.
2. Press [Edit].
3. Use , to highlight Email 1 or Email 2.
OKOKOK
OK
Page 11

21
CDM9945 User Guide
CONTACTS IN YOUR PHONE’S MEMORY
20
CDM9945 User Guide
5. Press to Set the new number as the Default Number.
Editing Stored Phone Numbers
1. From standby mode, press [Contacts].
Your Contacts display alphabetically.
2. Use , to highlight the Contact entry you want to edit, then press [Edit].
3. Use , to highlight the phone number.
4. Edit the phone number as necessary and press .
Editing Stored Names
1. From standby mode, press [Contacts].
Your Contacts display alphabetically.
2. Use , to highlight the Contact entry you want to edit, then press [Edit].
3. Edit the name as necessary and press .
Deleting a Phone Number from a Contact
1. Press [Contacts].
2. Use , to highlight the Contact entry, then press [Edit].
3. Use , to highlight the phone number to be deleted.
4. Press and hold to delete number.
5. Press .
A confirmation message is displayed.
OK
OKOKOK
Deleting
From the Contacts Screen
1. From standby mode, press [Contacts].
Your Contacts display alphabetically.
2. Use , to highlight the Contact entry you want to edit, then press [Edit].
3. Use , to highlight a Label, then enter the number and press to save.
A confirmation message is displayed.
Default Numbers
The phone number saved when a Contact is created is the Default Number. If more than one
number is saved in a Contact entry, another number can be designated as the Default
Number.
• The Default Number cannot be deleted by itself. The entire Contact entry can be deleted or another
number can be set as the Default Number allowing you to delete the original saved number and keep
the Contact entry.
Changing the Default Number
1. From standby mode, press [Contacts].
Your Contacts display alphabetically.
2. Use , to highlight the Contact entry you want to edit, then press [Edit].
3. Use , to highlight the phone number you want to set as the Default Number and
press [Options].
4. Use , to highlight Set As Default .
OK
Editing Labels for Contacts
Page 12
23
CDM9945 User Guide
USING PHONE MENUS
22
CDM9945 User Guide
Get It Now allows you to do more than just talk on your phone. Get It Now is a technology
and service that allows you to download and use applications on your phone. With Get It
Now, it is quick and easy to personalize your phone to your lifestyle and tastes. Just
download the applications that appeal to you. With a wide range of software available, from
ringtones to games to productivity tools, you can be assured that you can find something
useful, practical, or entertaining.
Downloading Applications
You can download applications and use Get It Now anywhere on the Verizon Wireless
network, as long as your handset has a digital signal available. Most applications do not use a
network connection while in use.
Incoming Calls
While downloading an application, incoming calls will automatically be sent to your voice
mail, if available. If you do not have voice mail, downloading will not be interrupted by an
incoming call, and the caller will receive a busy signal.
• In case of EVDO, downloading will be interrupted when there is an incoming call.
When using applications, an incoming call will automatically pause the application and allow
you to answer the call. When you complete your call, you can resume using the application.
GET IT NOW
Deleting a Contact Entry
1. Press [Contacts].
2. Use , to highlight the Contact entry to be deleted.
3. Press [Options].
4. Press Erase.
5. Use to highlight Yes.
6. Press .
A confirmation message is displayed.
Deleting a Speed Dial
1. From standby mode, press [Menu].
2. Use , to highlight Speed Dials, then press .
3. Use , to highlight the Speed Dial number.
4. Press [Remove].
5. Use , to highlight Yes.
6. Press .
A confirmation message is displayed.
OK
OK
OK
OK
Page 13
25
CDM9945 User Guide
USING PHONE MENUS
24
CDM9945 User Guide
Access and Options
1. Press [MENU].
2. Press 2 times.
3. Press Get Tunes & Tones.
4. Select a sub-menu.
1. Get V CAST Music
2. Get New Ringtones
3. My Ringtones
4. My Music
5. My Sounds
6. Sync Music
1.1 Get V CAST Music
Allows you to connect to Get It Now and download various music.
1. Press [MENU], 2 times , .
2. Press .
1.2 Get New Ringtones
You can download various ringtones files and listen to them in 3D Sound.
1. Press [MENU], 2 times , .
2. Press .
OK
OK
OK
OK
OK
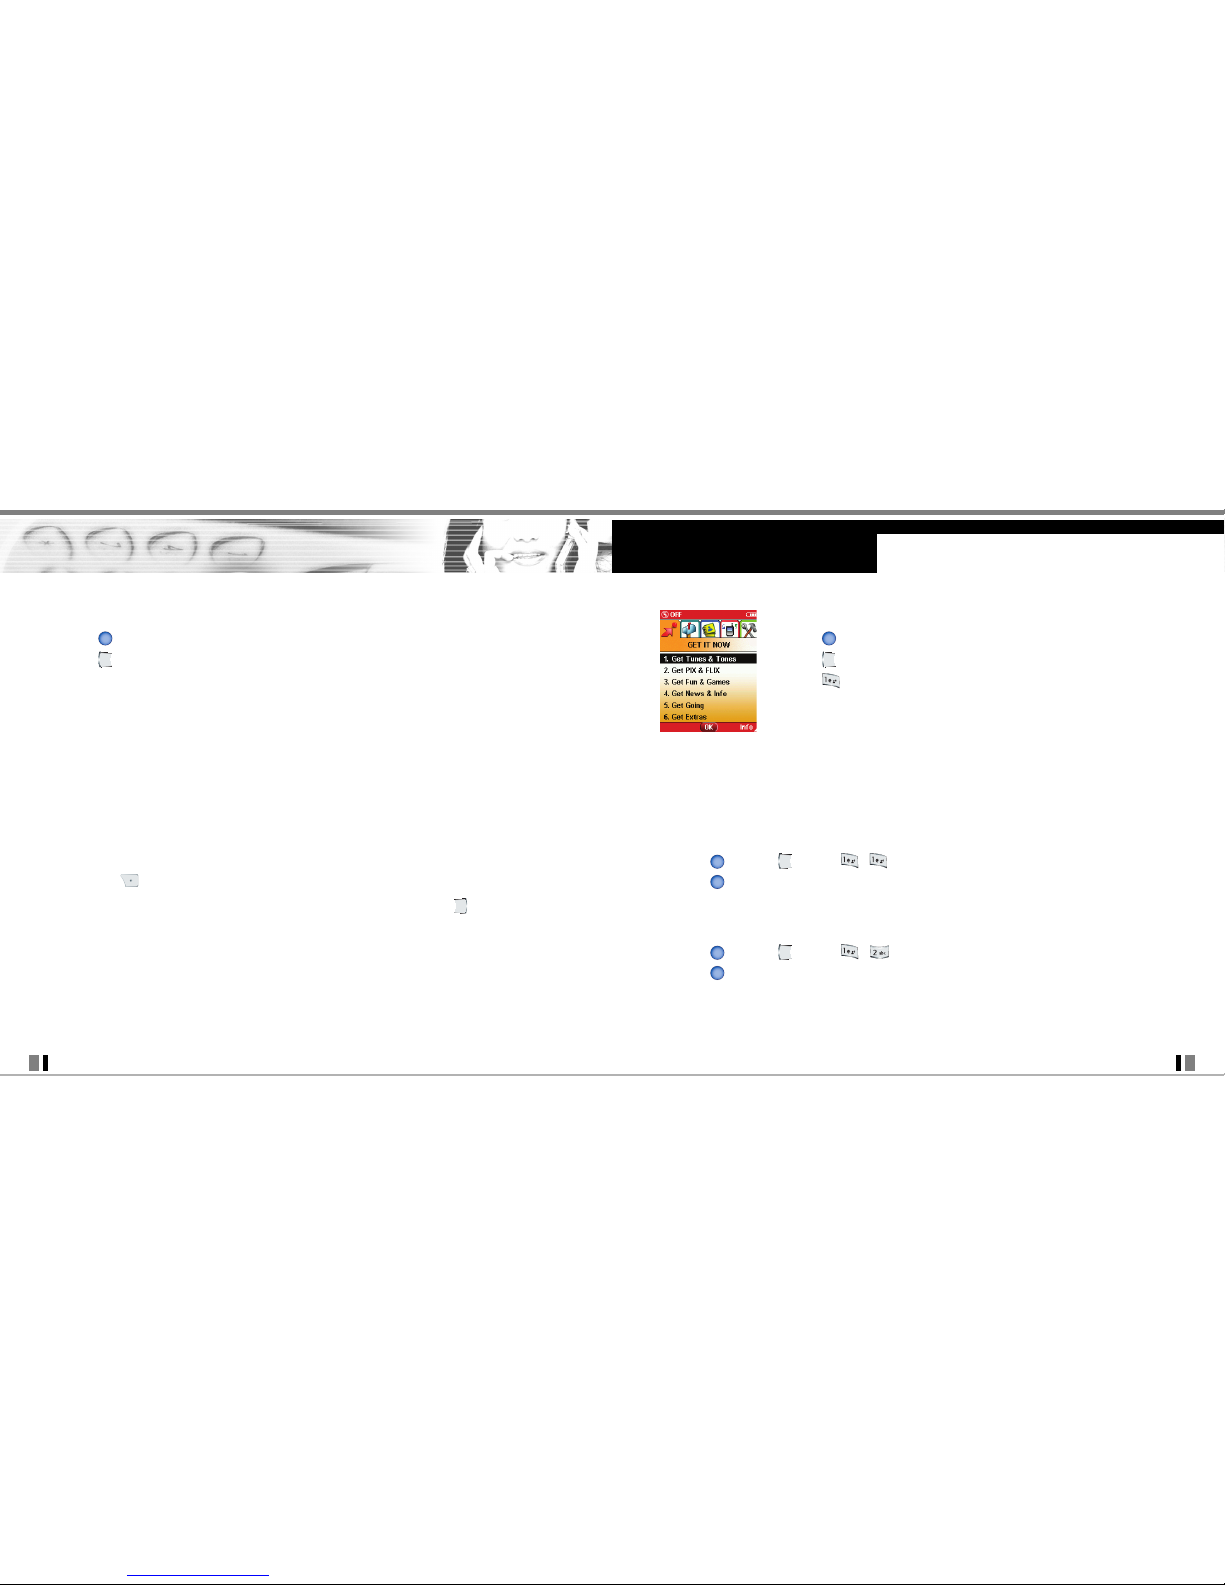
Access and Options
1. Press [MENU].
2. Press 2 times.
3. Options from here:
1. Get Tunes & Tones: Download and play various music and ring tones at anytime.
2. Get PIX & FLIX: View your digital pictures and video right on your wireless phone. Take
and trade pictures with your friends instantly.
3. Get Fun & Games: Turn your phone into a handheld arcade with exciting and challenging
games like Tetris, EverQuest®, and EA SPORTSTM Tiger Woods PGA
TOUR® Golf.
4. Get News & Info: Get the latest news, stock quotes, and movie listings on the internet. To
start, just launch your phone’s Web browser.
5. Get Going: Everything you need to know while you are on the go. Look for a great
restaurant, the nearest ATM, etc.
6. Get Extras
• Press [Info] App / Memory / Content Memory / View Log / Help.
Shortcut You can access the GET IT NOW feature directly by pressing .
1. Get Tunes & Tones
Personalize your phone with ringtones. A large variety of choices are available to choose from
current hits, pop, hiphop, and more.
OK
Page 14

27
CDM9945 User Guide
USING PHONE MENUS
26
CDM9945 User Guide
1.6 Sync Music
Allows you to transter downloaded music from PC togeur phone with usb cable connection.
1. Press [MENU], 2 times , .
2. Get PIX & FLIX
Quick Access to Get PIX & FLIX Feature
Take, view, and trade your digital pictures and video right from your wireless phone.
Access and Options
1. Press [MENU].
2. Press 2 times.
3. Press Get PIX & FLIX.
Short Cut Pressing is a hot key to Get PIX & FLIX.
4. Select a sub-menu.
1. Get V CAST Video
2. Get New PIX
3. My PIX
4. My FLIX
5. PIX Place
6. Take PIX
7. Record FLIX
OK
OK
1.3 My Ringtones
Allows you to select a desired ring tone, download a new ringtone or record a new ringtone.
1. Press [MENU], 2 times , .
2. Use , to highlight Ringtone and press [Options].
• Erase / Rename / Ringtone Info
• Set As Ringtone: Press the corresponding number key to set the ringtone for one of
the following: [1] Ringtone / [2] Contact ID / [3] ALERT TONE
• Set As Contact ID: Press the corresponding number key to set the ringtone for one of
the following: [1] Ringtone / [2] Msg
• Set As Alert Tones: Press the corresponding number key to set the ringtone for one of
the following: [1] PIX / [2] TXT / [3] Voice / [4] Email / [5] Page
1.4 My Music
Allows you to play and download musics.
1. Press [MENU], 2 times , .
2. Press .
1.5 My Sounds
Allows you to select a desired sound or record a new sound.
1. Press [MENU], 2 times , .
2. Use to highlight sound and press Right Soft Key [Options].
• Send / To PIX place / Rename / Move / Lock / Erase / Erase Al / Sound Info
• Record New: You can record and save desired sound.
OK
OK
OK
OK
Page 15
29
CDM9945 User Guide
USING PHONE MENUS
28
CDM9945 User Guide
2. Select Yes to accept charges, press and the Video Clip will initiate transfer.
3. The video clip will begin playback shortly after being selected.
• To download a Video Clip, if applicable
1. Read the description of the video clip and press [Options].
2. Press for Save Video, and press .
3. Select Yes to accept charges, press and the Video Clip will initiate download of video.
4. Once video is downloaded a message will appear on your phone, “Download Complete.
Play video now?”
5. Select Yes and press to view video.
6. The Video clip will be automatically saved in My Fliy and the FLIX Gallery.
• All videos are not downloadable. Only videos that have the option to save can be downloaded.
• Additional charges for each video clip viewed may apply. Video Clips service is not available in all areas.
Check www.verizonwireless.com/getitnow website for details.
Deleting Video Clips
1. Press for GET PIX & FLIX.
2. Select My FLIX and press .
3. Select Video to delete.
4. Press Options.
5. Press to Erase Video.
6. Select Yes and press to erase Video.
OK
OK
OKOKOK
OK
• From standby mode, you can take a picture directly by pressing Camera Key ( ).
• Also, you can take a video in the Camcorder mode by pressing Camera Key ( ) for about 3 sceconds
in the Camera mode.
V CAST Video brings the world to your mobile phone with full-motion video and sound. Catch
up with what’s happening with Video Clips from news, entertainment, sports, or weather.
2.1 Get V CAST Video
1. Press [MENU], 2 times , .
2. Press , to view Video Clip categories including News, Entertainment, Sports and
Weather.
3. Select brand and Video Clip you want to view.
Browsing, Selecting, and Playing Video Clips
1. Press for GET PIX & FLIX.
2. Press for Get V CAST Video to open Video Clips Catalog.
3. Press , to view Video Clip categories including News, Entertainment, Sports, and
Weather.
4. Select content provider, then press .
5. If applicable, select sub-category, then press .
• To view a Streaming Video
1. Read the description of the video clip, and press to view.
OKOKOK
OK
Page 16

31
CDM9945 User Guide
USING PHONE MENUS
30
CDM9945 User Guide
6. Move
7. Lock/Unlock Lock / Unlock
8. Erase Yes / No
9. Erase All
0. PIX Info
2.4 My FLIX
Allows you to view Videos that are stored in the phone.
1. Press [MENU], 2 Times , .
2. Select your desired Video with and press to play.
• : Adjusts the volume.
• : Mute / Unmute.
• : Pause / Play.
• : Changes to Full Screen : Stop
• : Rewind : FF
3. Select the options to customize.
1. Send Sends the FLIX message to an email address
2. To PIX Place Accesses the Online Album, PIX Place
3. Rename Renames the selected FLIX
4. Move
5. Lock/Unlock Lock / Unlock
6. Erase Yes / No
7. Erase All
8. FLIX Info
OK
OK
Configure Alerts for New Video Clips
1. From Video Clips Catalog, select category of content desired.
2. Select Content Provider.
3. Press Options .
4. Select Alerts.
5. Select Configure Alerts and select .
6. Select content for alerts desired and press to save.
2.2 Get New PIX
Allows you to connect to Get It Now and download various PIX.
1. Press [MENU], 2 times , .
2. Press .
2.3 My PIX
Allows you to view photos that are stored in the phone.
1. Press [MENU], 2 times , .
2. Select your desired picture with and press [Options].
3. Select the options to customize.
1. Send Sends the PIX message
2. To PIX Place Accesses the Online Album, PIX Place
3. Get New Wallpaper / Screen saver
4. Set As Wallpaper / Screen saver / Picture ID
5. Rename Renames the selected PIX
OK
OK
OK
OK
OK
Page 17

33
CDM9945 User Guide
USING PHONE MENUS
32
CDM9945 User Guide
2. Set the brightness , zoom , flash , and press [Options] to change
other settings.
• Select the option(s) to customize.
1. Resolution 1280X960 / 640X480 / 320X240 / 160X120
2. Self Time Off / 3 seconds / 5 seconds / 10 seconds
3. Flash Off / On / Auto Flash / Only This Shot
4. Brightness -2 / -1 / 0 / +1 / +2
5. White Balance Auto / Sunny / Cloudy / Tungsten / Fluorescent / Darkness
6. Shutter Sound Shutter / Silent / Say Cheez / Ready! 321
7. Color Effects Normal / Antique / Black&White / Negative
8. Capture Mode Landscape / Portrait
3. Take a picture by pressing .
4. Press [Save]. The picture is stored in the Gallery.
2.7 Record FLIX
Lets you record a video message with sound.
1. Press [MENU], 2 times , .
2. Set the brightness , zoom or press [Options] to change other settings.
• Select the option(s) to customize.
1. Brightness -2 / -1 / 0 / +1 / +2
2. White Balance Auto / Sunny / Cloudy / Tungsten / Fluorescent / Darkness
3. Press to begin recording, then press again to stop.
OK
OK
OK
• To play Video Messages sent to email, please download Apple's QuickTime 6.5. Go to
www.apple.com/quicktime/download to download the free player or upgrade your existing QuickTime
Player. During the download process, when asked to choose an installation type (Minimum,
Recommended or Custom) select Minimum for a quicker download.
2.5 PIX Place
Accesses the Online Album, PIX Place.
1. Press [MENU], 2 times , .
2.6 Take PIX
Lets you to take digital pictures.
• Using the camera feature can rapidly deplete a mobile phone battery. If the battery icon shows,
recharge the battery.
• To take a clear picture, set the proper brightness level, zoom, and flash before taking the picture.
• Avoid jolting the camera.
• Wipe the camera lens with a soft cloth.
• Neither disassemble nor try to reassemble the product. It may cause a fire, electric shock or breakdown.
• Refrain from using the camera flash as much as possible when the battery is low.
• Keep in mind that a stored file can be deleted or initialized if the camera phone powers off due to low
battery while taking a picture.
1. Press [MENU], 2 times , .
OK
OK
Page 18

35
CDM9945 User Guide
USING PHONE MENUS
34
CDM9945 User Guide
Navigating Through the Browser
On-screen items may be presented in one of the following ways:
• Numbered options
You can use your numeric keypad or you can select the items by moving the cursor and
pressing the appropriate Soft Keys.
•
Links embedded in content
You can act on the options or the links by using the Soft Keys just below the display screen.
• Text or numbers
You can select the items by moving the cursor and pressing the appropriate Soft Keys.
Scrolling
Use , to scroll through the content if the current page does not fit on the screen. The
currently selected item is indicated by a cursor on the screen.
Fast Scrolling
Press and hold , to quickly move the cursor up and down on the current screen.
Scrolling by Page
Press the Side Keys to move up and down a page at a time.
Home Page
To go to the Home Page, press and hold or .
View Browser Menu
Press and hold Voice Dial key ( ) to use the Browser menu.
4. Press [Save]. The recorded video is stored in My FLIX.
• Recording time can depend on resolution, definition, and other factors.
3. Get Fun & Games
Allows you to download games and applications from the Get It Now server. Choose the
software you want from the list displayed on the screen.
1. Press [MENU], 2 times, .
2. Press Get Fun & Games.
4. Get News & Info
Allows you to access news, sports, weather, and email from your Verizon Wireless device.
Access and selections within this feature are dependent upon your service provider. For
specific information on Get News & Info access through your phone, contact your service
provider.
Quick Access to News & Info Feature
Get the latest news, stock quotes, and movie listings. With TXT Alerts, you’ll always know
what you need to know.
1. Press [MENU], 2 times, .
Ending a Browser Session
End a Browser session by pressing .
OK
OK
OK
Page 19

37
CDM9945 User Guide
USING PHONE MENUS
36
CDM9945 User Guide
Deleting Text/Number Entered
When entering text or numbers, press to clear the last number, letter, or symbol. Press
and hold to clear the input field completely.
Initiating a Phone Call From the Browser
You can make a phone call from the Browser if the site you are using supports the feature
(The phone number may be highlighted and Left Soft Key appears as Call). The browser
connection is terminated when you initiate the call. After you end the call, your phone returns
to the
screen from which you initiated the call.
5. Get Going
Everything you need to know while you’re on the go.
1. Press [MENU], 2 times, .
2. Press Get Going.
6. Get Extra
1. Press [MENU], 2 times, .
2. Press Get Extras.
OK
OK
OK
OK
View Browser Inbox
If there are any browser messages, the list is displayed from newest to oldest.
Your list of Web messages are displayed.
• Press and hold key to view Browser Inbox.
Soft Keys
To navigate to different screens or select special functions, use the Soft Keys. The function
associated with the Soft Keys can change for each page and depends on each highlighted
item.
Left Soft Key
is used primarily for first options or selecting an item but its function may change,
depending on the content displayed.
Right Soft Key
is used primarily for secondary options or a menu of secondary options.
Entering Text, Numbers, or Symbols
When prompted to enter text, the current text entry method appears above the Right Soft Key
as Alpha, Symbol, Number, or Word.
To change the input mode, press the . To create an upper case character, use .
The current text method appears above the as ALPHA , ABC, or abc and allows you to
shift input case sensitivity.
Page 20

39
CDM9945 User Guide
USING PHONE MENUS
38
CDM9945 User Guide
• Make a call to the callback number by pressing during a message check .
The phone can store up to 386 messages (1 voice message, 100 inbox messages, 50 sent
messages, 30 draft messages, 20 draft PIX/FLIX messages). The information stored in the
message is determined by phone mode and service capability. Other limits to available
characters per message may exist. Please check with your service provider for system
features and capabilities.
New Message Alert
There are two ways your phone alerts you to new messages.
1. The phone displays a message on the screen.
2. The message icon ( ) is displayed on the display screen. In the case of an urgent
message, the icon will flash and NEW TEXT, PIX, FLIX MESSAGE is displayed.
• If you receive the same message twice, your phone deletes the older one and the new one is stored as a
DUPLICATE.
1. New MSG
Allows you to send text messages, pages, and e-mail. Each message has a destination
(Address 1) and information (Message). These are dependent upon the type of message you
want to send.
1.1 TXT Msg
The Basics of Sending a Message
1. Press , press , .
Access and Options
1. Press [MENU].
2. Press [MESSAGING].
3. Select a sub-menu.
Short Cut Pressing is a hot key to Message.
1. New MSG: Sends a TXT message,PIX message, FLIX message.
2. Inbox: Shows the list of received messages.
3. Sent: Shows the list of sent messages.
4. Drafts: Shows the list of draft messages.
5. Voicemail: Shows the number of messages in the voicemail box.
6. E-mail: Read and send e-mails from your e-mail accounts.
7. Mobile Instant Messaging: Instant message your friends with MSN
®
Messenger and
Yahoo®Messenger.
8. Chat: Chat with Internet Messenger users.
Text messages, PIX messages, and the voicemail box become available as soon as the phone
is powered on.
• Check types of messages by pressing the message key .
OK
MESSAGING
Page 21

41
CDM9945 User Guide
USING PHONE MENUS
40
CDM9945 User Guide
Using Contacts to Send a Message
You can designate an entry saved in your Contacts as Address 1 instead of manually entering
the destination.
1. Press , press New MSG.
2. Press [Add].
3. Use , to highlight Contacts and press .
4. Use , to highlight the Contact entry containing the destination and press .
5. Press [Done].
• The Address 1 feature allows multi-sending of up to 10 total addresses.
6. Complete the message as necessary.
1.2 PIX Msg
The Basics of Sending a Message
1. Press , press , .
2. Enter the cellular phone number or e-mail address of the recipient.
• Picture phone number for a PIX message.
• Email address for an e-mail message.
3. Press .
• To send a page, press [Send now].
OK
OK
OK
2. Enter the phone number of the recipient or the e-mail address for an e-mail message.
3. Press .
• To send a page, press [SEND now].
4. Type your message (text or e-mail).
5. Press [SEND].
A sending screen is displayed.
• If you send an SMS message to a phone without SMS, you will still be notified that the message was
sent, however the message will not be received.
Customizing the Message Using Options
1. Create a new message.
2. Press [Options].
3. Select the option(s) to customize.
Add Allows you to add a Contacts, Groups, Recent Calls, Graphics, Sound or Quick
Text.
Save As Draft Saves the message into the Draft folder.
Priority Level Gives priority to the message.
High / Normal.
4. Complete and then send or save the message.
OK
OK
Page 22

43
CDM9945 User Guide
USING PHONE MENUS
42
CDM9945 User Guide
1.3 FLIX Msg
The Basics of Sending a Message
1. Press , press , .
2. Enter the cellular phone number or e-mail address of the recipient.
• Picture phone number for a FLIX message.
• Email address for an e-mail message.
3. Press .
• To send a page, press [Send now].
4. Type your message (text or e-mail).
5. Use , to highlight the FLIX and press [Gallery].
Use , to select My FLIX.
Select My FLIX and press .
6. Use , to highlight the Subject and enter the subject.
7. Press [SEND].
A confirmation message is displayed.
Customizing the Message Using Options
1. Create a new message.
2. Press [Options].
3. Select the option(s) to customize.
Preview Displays the PIX message as it would be seen by the recipient.
Add Quick Text Text Inserts predefined phrases.
OK
OK
OK
4. Type your message (text or e-mail).
5. Use , to highlight the PIX and [Gallery].
Use , to select the My PIX .
Use , to select the image you want to send, then press .
6. Use , to highlight the Sounds,then press [Sounds].
Use , to select the audio file you want to send then press .
7. Use , to highlight Subject and enter the subject.
8. Press [SEND].
A confirmation message is displayed.
Customizing the Message Using Options
1. Create a new message.
2. Press [Options].
3. Select the option(s) to customize.
Preview Displays the PIX message as it would be seen by the recipient.
Add Quick Text Text laserts predefined phrases.
Save As Draft Saves the message into the Drafts folder.
Priority Level Gives priority to the message.
High / Normal
Remove PIX Removes a PIX from your message.
Remove Sound Removes a Sound from your message.
Removes a Slide from your message.
4. Complete and then send or save the message.
OK
OK
OK
Page 23

45
CDM9945 User Guide
USING PHONE MENUS
44
CDM9945 User Guide
Viewing Your Inbox
1. Press [MENU], , .
2. Options from here:
• [Erase].
• [Options].
Reply Replies to the text or picture with the original message attached.
Forward Forwards a received message to other destination address(es).
Lock/Unlock Locks or unlocks the selected message.
Locked messages can not be deleted by the Erase Inbox and Erase All
functions.
Add to Contacts Stores the callback number, e-mail address, and numbers from the address
included in the received message into your Contacts.
Erase Inbox Erase the selected message.
Message Info Checks the received message information.
Message Icon Reference
New/Unread Text Messages
Opened/Read Text Messages
Downloaded PIX/FLIX Messages
New/Unread PIX Notifications
Opened/Read PIX Notifications
Priority
OK
Save As Draft Saves the message into the Drafts folder.
Priority Level Gives priority to the message.
High / Normal
Remove FLIX Removes a FLIX from your message.
4. Complete and then send or save the message.
2. Inbox
The phone alerts you in 3 ways when you receive a new message:
• By displaying a message notification on the screen.
• By sounding a beep or vibrating, if set.
• By blinking . (only when you get an urgent message)
Received text messages, picture messages, and e-mail lists may be searched and the
contents viewed.
Received messages are displayed from newest to oldest.
Out of Memory Warning
If the memory is full, no more messages can be received until enough memory space becomes
available. The message NOT ENOUGH MEMORY is displayed and new messages are not
accepted.
Page 24

47
CDM9945 User Guide
USING PHONE MENUS
46
CDM9945 User Guide
4. Drafts
Displays draft messages.
1. Press [MENU], , .
2. Press [Erase].
Press [Options].
Send Allows you to send the selected message.
Lock/Unlock Locks or unlocks the selected message. Locked messages cannot be deleted
by the Erase Drafts and Erase All functions.
Add to Contacts Stores the callback number, e-mail address, and numbers from the address
included in the draft message into your Contacts.
Erase Draft Erase the selected sent message.
Message Icon Reference
Draft Text
Draft PIX / FLIX
5. Voicemail
Allows you to view new voice messages recorded in the voicemail box. Once you exceed the
storage limit, old messages are overwritten. When you have a new voice message, your
phone will alert you.
Checking Your Voicemail Box
1. Press [MENU], , .
OK
OK
3. Sent
Your phone can save up to 50 sent messages. Access the Sent message list to view contents
of sent messages and verify whether the transmission was successful or not.
1. Press [MENU], , .
2. Press [Erase].
Press [Options].
Forward Forwards a sent message to other destination address(es).
Resend Allows you to retransmit the selected message.
Lock/Unlock Locks or unlocks the selected message. Locked messages can not be
deleted by the Erase Sent and Erase All functions.
Add to Contacts Stores the callback number, e-mail address, and numbers from the address
included in the sent message into your Contacts.
Erase Sent Erase the selected sent message.
Message Info Checks the sent message information.
Message Icon Reference
Sent PIX/Text Messages
Message delivered
Sent Failed PIX/Text Messagess
Incomplete delivery/Pending
Priority
OK
Page 25

49
CDM9945 User Guide
USING PHONE MENUS
48
CDM9945 User Guide
The Contacts Menu allows you to store names, phone numbers, and other information in
your phone’s memory.
When you access your Contacts, the number in parentheses represents the number of entries
you have stored (500 sec).
Access and Options
1. Press [MENU].
2. Select a sub-menu.
1. New Contact
2. Contact List
3. Groups
4. Speed Dials
Short Cut Pressing is a hot key to Contacts List.
1. New Contact
Allows you to add a new number.
• Using this sub-menu, the number is saved as a new Contact. To save the number into an existing
Contact, edit the Contact entry.
1. Press [MENU], .
OK
OK
CONTACTS
2. Options from here:
• Press [Clear] to delete information, and then select Clear count.
• Press [Open]to listen to the message(s).
6. E-mail
Allows you to send an Email.
1. Press [MENU], , .
• Launch Brew application.
7. Mobile Instant Messaging
Allows you to add new applications, as well as send andreceive an Instant Message at any
time.
1. Press [MENU], , .
• Start GET IT NOW.
8. Chat
Allows you to chat with Internet Messenger users.
1. Press [MENU], , .
• Launch Browser.
OKOKOK
OK
Page 26

51
CDM9945 User Guide
USING PHONE MENUS
50
CDM9945 User Guide
• Press [VIEW] to view the contact information.
4. Speed Dials
Allows you to view your list of Speed Dials or designate Speed Dials for numbers entered in
your Contacts.
1. Press [MENU], .
2. Use , to highlight the Speed Dial position, or enter the Speed Dial digit and press .
3. Use , to highlight the Contact and press .
4. Use , to highlight the number and press .
A confirmation message is displayed.
OK
OK
OKOKOK
2. Enter the name and press .
3. Enter the number and press .
• For more detailed information, see page 28.
2. Contact List
Allows you to view your Contacts list.
1. Press [MENU], .
2. Press , to scroll through your Contacts alphabetically.
• Press [Options] to select one of the following
New Contact / Erase / Send TXT Msg / Send PIX Msg / Send FLIX Msg / Call
• Press [Edit] to edit.
• Press [VIEW] to view the contact information.
3. Groups
Allows you to view your grouped Contacts, add a new group, change the name of a group,
or delete a group.
1. Press [MENU], .
2. Use , to highlight a group to view and press .
• Press [New] to add a new group to the list.
• Use , to highlight a group and press [Options] to change the name of the group or
delete the group.
Send Message / Rename / Erase / Add
OKOKOK
OK
Page 27

53
CDM9945 User Guide
USING PHONE MENUS
52
CDM9945 User Guide
2. Use , to highlight an entry, then
• Press to view the entry.
• Press to place a call to the number.
• Press [Options] to select: Save / Details / Erase / Lock / Erase All / View Timers
• Press [Message] to select: TXT MSG / PIX MSG / FLIX MSG
2. Received
Allows you to view the list of incoming calls; up to 30 entries.
1. Press [MENU], , .
2. Use , to highlight an entry, then
• Press to view the entry.
• Press to place a call to the number.
• Press [Options] to select: Save / Details / Erase / Lock / Erase All / View Timers
• Press [Message] to select: TXT MSG / PIX MSG / FLIX MSG
3. Dialed
Allows you to view the list of outgoing calls; up to 30 entries.
1. Press [MENU], , .
2. Use , to highlight an entry, then
• Press to view the entry.
• Press to place a call to the number.
OK
OK
OK
OK
OK
The Recent Calls Menu is a list of the last phone numbers or Contact entries for calls you
placed, accepted, or missed. It is continually updated as new numbers are added to the
beginning of the list and the oldest entries are removed from the bottom of the list.
• To view a quick list of all your recent calls, press from standby mode.
• indicates a dialed call.
• indicates a received call.
• indicates a missed call.
Access and Options
1. Press [MENU].
2. Press [RECENT CALLS].
3. Select a sub-menu.
1. Missed
2. Received
3. Dialed
4. All
5. View Timers
1. Missed
Allows you to view the list of missed calls; up to 30 entries.
1. Press [MENU], , .
OK
RECENT CALLS
Page 28

55
CDM9945 User Guide
USING PHONE MENUS
54
CDM9945 User Guide
The SETTINGS & TOOLS menu has options to customize your phone.
Access and Options
1. Press [MENU].
2. Press 2 times [SETTINGS & TOOLS].
3. Select a sub-menu.
1. My Account
2. Tools
3. Sounds Settings
4. Display Settings
5. Phone Settings
6. Call Settings
7. Bluetooth
8. Memory
9. Phone Info
* Shown only on the inner LCD Screen.
1. My Account
Supported by only inner LCD Screen and this function is provided by the operator.
OK
SETTING & TOOLS
• Press [Options] to select: Save / Details / Erase / Lock / Erase All / View Timers
• Press [Message] to select: TXT MSG / PIX MSG / FLIX MSG
4. All
Allows you to view the list of all calls; up to 90 entries.
1. Press [MENU], , .
2. Use , to highlight an entry, then
• Press to view the entry.
• Press to place a call to the number.
• Press [Options] to select: Save / Details / Erase / Lock / Erase All / View Timers
• Press [Message] to select: TXT MSG / PIX MSG / FLIX MSG
• To view a quick list of all your recent calls, press from standby mode.
5. View Timers
Allows you to view the duration of selected calls.
1. Press [MENU], , .
2. Use , to highlight a call list.
Last Call / All Calls / Received Calls / Dialed Calls / Roaming Calls / KB Counter / Last Reset / Life
time Calls / Life time Data Connter
OKOKOK
Page 29

57
CDM9945 User Guide
USING PHONE MENUS
56
CDM9945 User Guide
• Date
• Time
• Recurrence
• Alert
5. Press [SAVE].
• Scheduler will not alert you when transmitting SMS, or when connecting up. After exiting, it will sound
the reminder.
2.2 Alarm Clock
Allows you to set one of 3 alarms. The current time is displayed below the alarm time to be set.
At the alarm time, Alarm 1 (or 2 or 3, as applicable) will be displayed on the LCD screen and
the alarm will sound.
1. Press [MENU], 2 times, , .
2. Select the alarm you want to edit and press .
[1] Alarm 1 / [2] Alarm 2 / [3] Alarm 3
3. Set the Alarm time.
• Press [Set].
• Use
, to change the hour .
• Use
, to move to minutes, then use , to change the minute.
• Use
, to move to AM/PM, then use , to toggle between the settings.
• Press .
OK
OK
OK
OK
2. Tools
Your phone tools include a Calendar, Alarm Clock, World Clock, Notepad and Calculator.
Access and Options
1. Press [MENU].
2. Press 2 times [SETTINGS & TOOLS].
3. Press Tools.
4. Select a sub-menu.
Calendar / Alarm Clock / World Clock / Notepad / Calculator
2.1 Calendar
Allows you to keep your agenda convenient and easy to access. Simply store your
appointments and your phone will alert you with a reminder of your appointments.
1. Press [MENU], 2 times, , .
2. Use to highlight the scheduled day.
Moves cursor to the left.
Moves cursor to the right.
Moves to the previous week.
Moves to the next week.
3. Press [Add].
4. Enter your schedule information including:
• Appointment Name
OK
OK
Page 30

59
CDM9945 User Guide
USING PHONE MENUS
58
CDM9945 User Guide
• Press [Cities] to select a specific city. Highlight a city and press .
2.4 Notepad
Allows you to read, add, edit, and erase notes to yourself.
1. Press [MENU], 2 times, , .
2. Press [Add] to write a new note.
3. Enter the text, then press [Save].
• Once you have saved multiple notes, use the search feature to quickly access a specific note.
2.5 Calculator
Allows you to perform simple mathematical calculations.
You can enter numbers up to the second decimal place.
1. Press [MENU], 2 times, , .
3. Sound Settings
Options to customize the phone’s sounds.
Access and Options
1. Press [MENU].
2. Press 2 times [SETTINGS & TOOLS].
3. Press Sounds.
OK
OKOKOK
OK
4. Set the Repeat occurance.
• Press [Set].
• Use
, to select Once / Daily / Mon-Fri / Weekends.
• Press .
5. Set the Ringtone.
• Press [Set].
• Use
, to select a ringtone or press to download a new ringtone.
• when a ringtone is highlighted, press [Play] to hear it before selecting it.
• Press .
6. Press [Set] to save the alarm settings.
2.3 World Clock
Allows you to determine the current time in another time zone or country.
1. Press [MENU], 2 times, , .
• Press Left Soft Key [Set DST], to set the World Clock to daylight saving time.
2. The top of the screen displays the current crossline location as well as the date and time.
Select a new location.
• Use , to move the crossline across the world map and the location, date, and time
change accordingly.
OK
OK
OK
OK
Page 31

61
CDM9945 User Guide
USING PHONE MENUS
60
CDM9945 User Guide
3.3 Alert Sounds
Allows you to select the alert type for a new message.
1. Press [MENU], 2 times, , .
2. Select Txt Message / PIX-FLIX Msg / Voicemail Msg.
• Use , to select then press to save the sound.
3.4 Keypad Volume
Allows you to set the keypad volume.
1. Press [MENU], 2 times, , .
2. Adjust the volume with , then press to save the setting.
3.5 Earpiece Volume
Allows you to set the earpiece volume.
1. Press [MENU], 2 times, , .
2. Adjust the volume with , then press to save the setting.
3.6 Service Alerts
Allows you to set any of the five Alert options to either On or Off.
1. Press [MENU], 2 times, , .
3.6.1 ERI Sounds
Alerts you when service changes. Displays Entering
Service Area or Leaving Service Area message.
OK
OK
OK
OKOKOK
OK
4. Select a sub-menu.
Master Volume / Call Sounds / Alert Sounds / Keypad Volume / Earpiece Volume / Service Alerts /
Power On/Off / Alarm Sounds.
3.1 Master Volume
Allows you to set volume settings.
1. Press [MENU], 2 times, , .
2. Adjust the volume with , then press to save the setting.
3.2 Call Sounds
Allows you to set ringtones for types of incoming calls.
1. Press [MENU], 2 times, , .
3.2.1 Call Ringtone
1. Press [MENU], 2 times, , , .
2. Select Ringtone1 / Ringtone2 / Beep Once / No Ring.
3. Use , to select a ringer then press to save the sound.
3.2.2 Call Vibrate
Allows you to set the phone to vibrate for incoming calls.
1. Press [MENU], 2 times, , , .
2. Use , to select On / Off then press to save.
OKOKOK
OK
OK
OK
OK
Page 32

63
CDM9945 User Guide
USING PHONE MENUS
62
CDM9945 User Guide
3.8.2 Vibrate
Allows you to set the phone to vibrate for incoming calls.
1. Press [MENU], 2 times, , , .
2. Use , to select On / Off then press to save.
4. Display Setting
Options to customize the phone’s display screen.
Access and Options
1. Press [MENU].
2. Press 2 times [SETTINGS & TOOLS].
3. Press Display Setting.
4. Select a sub-menu.
Banner / Backlight / Contrast / Wallpaper / Screensaver / Display Themes / Fonts / Clock Format
4.1 Banner
Allows you to enter a string of up to 23 characters which displays on the LCD screen.
1. Press [MENU], 2 times, , .
4.1.1 Personal Banner
1. Press [MENU], 2 times, , , .
2. Choose a Banner sub-menu and press .
3. Enter your banner text then press .
OKOKOK
OK
OKOKOK
3.6.2 Minute Beep
Alerts you 10 seconds before the end of every minute during a call.
3.6.3 Call Connect
Alerts you when the call is connected.
2. Set On / Off with , then press .
3.7 Power On/Off
Allows you to set the phone to sound a tone when the phone is powered on/off.
1. Press [MENU], 2 times, , .
2. Set On / Off with then press .
3.8 Alarm Sounds
Allows you to set the Alarm Sounds.
1. Press [MENU], 2 times, , .
3.8.1 Tone
1. Press [MENU], 2 times, , , .
2. Select Ringtone1 / Ringtone2 / Beep Once / No Ring.
3. Use , to select a ringer then press to save the sound.
OK
OK
OK
OK
OK
OK
Page 33

65
CDM9945 User Guide
USING PHONE MENUS
64
CDM9945 User Guide
• Always Off means that the backlight is never on.
4.3 Contrast
Allows you to set the illuminating the Contrast.
1. Press [MENU], 2 times, , .
2. Choose a Backlight sub-menu and press .
Main Screen / Front Screen
4.4 Wallpaper
Allows you to choose the kind of background to be displayed on the phone.
1. Press [MENU], 2 times, , .
2. Choose a Wallpaper sub-menu and press .
Main Screen / Front Screen
3. Select from different screens then press .
4.5 Screensaver
일정시간동안 핸드폰의 사용이 없을경우 화면 보호를 위해 사용자가 화면을 설정하는 기능입니다.
1. Press [MENU], 2 times, , .
2. Choose a Screensaver sub-menu and press .
3. Select from different screens then press .
4.6 Display Themes
Allows you to choose the color of the background screen.
OK
OK
OKOKOK
OK
OK
OK
4.1.2 ERI Banner
1. Press [MENU], 2 times, , , .
2. Select On / Off with , then press .
If you use ERI service, ERI text is Shown on the sub banner.
4.2 Backlight
Allows you to set the duration for illuminating the backlight.
Dispaly and Keypad are set separately.
1. Press [MENU], 2 times, , .
2. Choose a Backlight sub-menu and press .
Display / Keypad
4.2.1 Display
• 7 Seconds
• 15 Seconds
• 30 Seconds
• Always On means that the backlight is always on.
• Always Off means that the backlight is never on.
4.2.2 Keypad
• 7 Seconds
• 15 Seconds
• 30 Seconds
• Always On means that the backlight is always on.
OK
OK
OK
OK
Page 34

67
CDM9945 User Guide
USING PHONE MENUS
66
CDM9945 User Guide
5. Phone Setting
The Phone menu allows you to designate specific system network settings.
Access and Options
1. Press [MENU].
2. Press 2 times [SETTINGS & TOOLS].
3. Press Phone Settting.
4. Select a sub-menu.
Standalone Mode / Shortcut Key / Language / Location / Security / System Select / NAM Select.
5.1 Standalone Mode
1. Press [MENU], 2 times, , .
2. Set On / Off with then press .
5.2 Shortcut Key
1. Press [MENU], 2 times, , .
2. Set Tunes & Tones / PIX & FLIX / Fun & Games / News & Info / My PIX / My FLIX / My
Ringtones / My Music / My Sounds / Inbox / Email / Chat / Mobie IM / Settings & Tools /
Alarm Clock / Calculator / Calendar with then press .
5.3 Language
Allows you to set the bilingual feature according to your preference. Choose between English
and Spanish.
OK
OK
OKOKOK
1. Press [MENU], 2 times, , .
2. Select Default / Business / Tropical / Blue / Green / Red then press .
4.7 Fonts
Allows you to set the font size.
1. Press [MENU], 2 times, , .
2. Select Normal / Large then press .
4.8 Clock Format
Allows you to choose the kind of clock to be displayed on the LCD screen.
1. Press [MENU], 2 times, , .
2. Press Main Clock or Front Clock.
3. Select Digital / Analog / Off then press .
OK
OK
OK
OK
OK
OK
Page 35

69
CDM9945 User Guide
USING PHONE MENUS
68
CDM9945 User Guide
3. Press Lock Mode.
4. Select an option then press .
Lock The phone is always locked. When locked, you can receive incoming calls
and only make emergency calls.
Unlock The phone is never locked (Lock mode can be used).
On Power Up The phone is locked when it is turned on.
5.5.2 Edit Code
Keeps your phone from unauthorized use. Once the phone is locked, it is in restricted mode
until the lock code is entered. You can receive phone calls and still make emergency calls.
You can modify the lock code using the New Lock code within the Security menu.
1. Press [MENU], 2 times, , .
2. Enter the four-digit lock code.
3. Press Edit Code.
4. Select an option then press .
5.6 System Select
Allows you to set up the phone producer’s management environment. Leave this setting as the
default unless you want to alter system selection as instructed by your service provider.
1. Press [MENU], 2 times, , .
2. Select Home Only / Automatic then press .
OKOKOK
OK
1. Press [MENU], 2 times, , .
2. Select English / Spanish with then press .
5.4 Location
Menu for GPS (Global Positioning System: Satellite assisted location information system)
mode.
1. Press [MENU], 2 times, , .
2. Select Location On / E911 Only then press .
• GPS satellite signals are not always transmitted, especially under bad atmospheric and environmental
conditions, indoors etc.
5.5 Security
The Security menu allows you to secure the phone electronically.
1. Press [MENU], 2 times, , .
5.5.1 Lock Mode
Keeps your phone from unauthorized use. Once the phone is locked, it is in restricted mode
until the lock code is entered. You can receive phone calls and still make emergency calls.
You can modify the lock code using the New Lock code within the Security menu.
1. Press [MENU], 2 times, , .
2. Enter the four-digit lock code.
The lock code is 0000 by default.
OK
OK
OK
OK
OK
OK
Page 36

71
CDM9945 User Guide
USING PHONE MENUS
70
CDM9945 User Guide
• If the flip is closed, the Auto Answer Mode is not operated, except when connected to headset or
hands-free car kit If the flip is opened, it operates when the Speaker mode is On. Auto Answer function
operates in about 5 seconds.
6.2 Auto Retry
Allows you to set the length of time the phone waits before automatically redialing a number
when the attempted call fails.
1. Press [MENU], 2 times, , .
2. Select Off / Every 10 seconds / Every 20 seconds / Every 30 seconds then press .
6.3 TTY Mode
Allows you to attach a TTY device enabling you to communicate with parties also using a TTY
device. A phone with TTY support is able to translate typed characters to voice. Voice can
also be translated into characters and then displayed on the TTY.
1. Press [MENU], 2 times, , .
An explanation message is displayed.
2. Press to continue.
3. Select TTY Full / TTY + Talk / TTY + Hear / TTY Off then press .
6.4 One-Touch Dial
Allows you to initiate a speed dial call by pressing and holding the speed dial digit. If set to
Disable, Speed Dial numbers designated in your Contacts will not function.
1. Press [MENU], 2 times, , .
OK
OK
OK
OK
OK
OK
5.7 NAM Select
Allows you to select the phone’s NAM (Number Assignment Module) if the phone is registered
with multiple service providers.
1. Press [MENU], 2 times, , .
2. Select NAM1 / NAM2 then press .
6. Call Settings
Allows you to designate how the phone handles bothincoming and outgoing calls.
Access and Options
1. Press [MENU].
2. Press 2 times [SETTINGS & TOOLS].
3. Press Call Settings.
4. Select a sub-menu.
Answer Options / Auto Retry / TTY Mode / One-Touch Dial / Voice Privacy / Call Restrictions /
Data Settings / DIMF Settings / Ringer ID / Picture ID.
6.1 Answer Options
Allows you to determine how to handle an answered call.
1. Press [MENU], 2 times, , .
2. Select Flip Open / Any Key / Send Only / Auto Answer then press .
OK
OKOKOK
OK
Page 37

73
CDM9945 User Guide
USING PHONE MENUS
72
CDM9945 User Guide
6.7.2 Select Port
1. Press [MENU], 2 times, , , .
2. Enter your Select Port then press .
6.8 DTMF Tone
Alerts you with the designated ringer ID, when the phone rings.
1. Press [MENU], 2 times, , .
2. Select Normal / Long then press .
6.9 Ringer ID
Alerts you with the designated ringer ID, when the phone rings.
1. Press [MENU], 2 times, , .
2. Select On / Off then press .
6.0 Picture ID
Shows you the designated picture ID when the phone rings.
1. Press [MENU], 2 times, , .
2. Select On / Off then press .
OK
OK
OK
OK
OK
OK
OK
OK
2. Select On / Off then press .
6.5 Voice Privacy
Allows you to set the voice privacy feature for CDMA calls as Enhanced or Standard. CDMA
offers inherent voice privacy. Check with your service provider for availability.
1. Press [MENU], 2 times, , .
2. Select On / Off then press .
6.6 Call Restrictions
Provides a better audio experience by enabling the Auto Volume feature to control the
dynamic range and volume of the sending and receiving voice across different levels of
speaker and environments.
1. Press [MENU], 2 times, , .
2. Select On / Off then press .
6.7 Data Settings
Alerts you with the designated ringer ID, when the phone rings.
1. Press [MENU], 2 times, , .
6.7.1 Data Fax
1. Press [MENU], 2 times, , , .
2. Enter your Data Fax then press .
OK
OK
OK
OK
OK
OK
OK
OK
Page 38

75
CDM9945 User Guide
USING PHONE MENUS
74
CDM9945 User Guide
• The Bluetooth icon shall display on the Status display area when the Bluetooth is set to ON or OFF.
• The CDM9945 will display all devices found within 30 seconds. If Search is pressed within the 30
second duration, the phone will stop searching and display only those devices found up to that time.
• Devices on the list are sorted in alphabetical order.
• If the device has an alias already defined, it will be displayed on the list.
• Add up to 20 alias names to the list.
• The device performing the search does not appear in the list.
• For more information regarding the Passkey, refer to the device manual.
7.1.1 Setting
Allows you to view the your Bluetooth Name, Power, and Address.
1. Press .
• My Phone Name Sound comes from phone now. When selecting this menu, sound comes
from bluetooth headset.
• Discovery Mode Sound comes from Bluetooth device now. When selecting this menu, sound
comes from phone.
7.2 Pairing Start.
If “Pairing Start” task is highlighted, soft key available on the BLUETOOTH screen shall be On
or off / OK / Settings
1. Press [MENU], 2 times, , .
Set the desired device to pairing.
2. Select the ON / OFF then press .
OK
7. Bluetooth
The CDM9945 features built-in Bluetooth technology, allowing you to share information
easier than ever before. Bluetooth is a short-range communications technology that allows
you to connect wirelessly to a number of Bluetooth devices, such as headsets, hands-free car
kits, and Bluetooth enabled handhelds and PCs. The Bluetooth communication range is
usually up to approximately 10 meters (30 feet).
Access and Options
1. Press [MENU].
2. Press 2 times [SETTINGS & TOOLS].
3. Press Bluetooth.
4. Select a sub-menu.
Add New Device / Pairing Start.. / ACL Connect Start / Ring Start / Disconnect Start / Test
mode Start / Headset / Phone
7.1 Add New Devices
If “Add New Device” task is highlighted, soft key available on the BLUETOOTH screen shall be
On or off / OK / Settings
1. Press [MENU], 2 times, , .
Set the desired device to pairing.
2. Select the ON / OFF then press .
OK
OK
Page 39

77
CDM9945 User Guide
USING PHONE MENUS
76
CDM9945 User Guide
1. Press [MENU], 2 times, , .
Set the desired device to pairing.
2. Select the ON / OFF then press .
7.7 Headset
If “Headset ” task is highlighted, soft key available on the BLUETOOTH screen shall be On or
off / OK / Settings
1. Press [MENU], 2 times, , .
Set the desired device to pairing.
2. Select the ON / OFF then press .
7.8 Phone
If “Phone” task is highlighted, soft key available on the BLUETOOTH screen shall be On or off /
OK / Settings
1. Press [MENU], 2 times, , .
Set the desired device to pairing.
2. Select the ON / OFF then press .
8. Memory
Access and Options
1. Press [MENU].
OK
OK
OK
OK
7.3 ACL Connect Start
If “ACL Connect Start” task is highlighted, soft key available on the BLUETOOTH screen shall
be On or off / OK / Settings
1. Press [MENU], 2 times, , .
Set the desired device to pairing.
2. Select the ON / OFF then press .
7.4 Ring Start
If “Ring Start” task is highlighted, soft key available on the BLUETOOTH screen shall be On or
off / OK / Settings
1. Press [MENU], 2 times, , .
Set the desired device to pairing.
2. Select the ON / OFF then press .
7.5 Disconnect Start
If “Disconnect Start” task is highlighted, soft key available on the BLUETOOTH screen shall be
On or off / OK / Settings
1. Press [MENU], 2 times, , .
Set the desired device to pairing.
2. Select the ON / OFF then press .
7.6 Test mode Start
If “Test mode Start” task is highlighted, soft key available on the BLUETOOTH screen shall be
On or off / OK / Settings
OKOKOK
Page 40

79
CDM9945 User Guide
USING PHONE MENUS
78
CDM9945 User Guide
8.2 Phone Memory
Shows the memory information saved in your phone.
1. Press [MENU], 2 times, , .
2. Use , to select a setting, then press .
Memory Usage / My PIX / My FLIX / My Music / My Sounds.
3. If you select one of My PIX / My FLIX / My Music / My Sounds, you can erase or move the
file. Press [Options].
4. Select Erase / Move, then press .
5. Select the file using , or press Mark All, then press Done.
6. press to select Yes.
8.3 Card Memory
Shows the memory information save the Card.
1. Press [MENU], 2 times, , .
2. Use , to select a setting, then press .
Memory Usage / My PIX / My FLIX / My Music / My Sounds.
3. If you select one of My PIX / My FLIX / My Music / My Sounds, you can erase or move the
file. Press [Options].
4. Select Erase / Move, then press .
5. Select the file using , or press Mark All, then press Done.
6. press to select Yes.
OKOKOKOKOKOKOK
OK
2. Press 2 times [SETTINGS & TOOLS].
3. Press Memory.
4. Select a sub-menu.
Save Options / Phone Memory / Card Memory
• Do not install or remove the miniSD card while playing, deleting, moving, recording or downloading PIX
/ FLIX / Sound.
• Up to 512 Mbytes can be saved in the miniSD card.
• Up to 1500 par My PIX / My FLIX / My Sounds folder. When the maximum of 1500 files is reached, files
cannot be tranferred to card regardless of remaining available capacity.
• Up to 54 characters, inclufinh gofrt nsmes, are supported as file names in the miniSD card.
8.1 Save Options
Youn can choose to save a photo, video, or sounds into the phone or the card. If the capacity
of default memory is full, it is saved to another memorly.
1. Press [MENU], 2 times, , .
2. Use , to select a setting, then press .
PIX / FLIX / Sounds.
3. Use , to select then press .
Phone Memory / Card Memory
OK
OK
OK
Page 41

81
CDM9945 User Guide
USING PHONE MENUS
When it comes to keeping in touch, your new phone with Verizon Wireless
service is all you’ll ever need. Nonetheless, here are some great ways to
accessorize your phone.
HANDS-FREE VEHICLE KITS AND HEADSETS
Headsets plug directly into your phone and include a microphone
and earpiece. Just plug in and let your hands enjoy their newfound
freedom.
VEHICLE POWER CHARGERS AND HOME/OFFICE CHARGERS
You’ll never run out of battery pawer when you can use your car’s
battery to power your phone. You can also use other home/office
chargers to charge two batteries at the same time with hands-free
ability.
ADDITIONAL BATTERIES
Keep an extra battery on hand for those times when you just can’t
charge up your phone.
80
CDM9945 User Guide
9. Phone Info
Access and Options
1. Press [MENU].
2. Press 2 times [SETTINGS & TOOLS].
3. Press Phone Info.
4. Select a sub-menu.
My Number / Software Version / Icon Glossary
9.1 My Number
Allows you to view your phone number.
1. Press [MENU], 2 times, , .
9.2 Software Version
Allows you to view the software, PRL, ERI, browser and Get It Now version.
1. Press [MENU], 2 times, , .
9.3 Icon Glossary
Allows you to view all the icons and their meanings.
1. Press [MENU], 2 times, , .
OKOKOK
OK
Page 42

83
CDM9945 User Guide
STANDARD LIMITED WARRANTY
82
CDM9945 User Guide
Manage Your Account Online
The key word here is “ease.” When you manage your account online, everything
you need to do can be done with ease. No more phone calls. No more checks to
write. No more waiting for statements.
Check balances. Make payments. Add or remove features. Do whatever you want
to do, 24 hours a day, 7 days a week – with ease. So register today at
www.verizonwireless.com. It’s fast and free.
Not available in all areas.
www.verizonwireless.com is open 24 hours a day for customer service, general
information, even shopping. But just in case, be sure to keep these numbers handy:
Customer Service (6am-11pm): *611 SEND
24-Hour Technical Support: *611 SEND
411 ConnectSM Directory Assistance: 411 SEND (charges apply)
Emergency Assistance: 911 SEND
©2005 Verizon Wireless. All Rights Reserved.
MAY WE HELP YOU?
Adding accessories is as easy as 1, 2, 3 with three simple ways to expand
your phone.
1. Visit our Communications Stores in person.
2. Go to WWW.VERIZONWIRELESS.COM and click on Accessories.
3. Try our Accessories Hotline at
1.866.VZ GOT IT
THREE WAYS TO ACCESSORIZE
Page 43

85
CDM9945 User Guide
STANDARD LIMITED WARRANTY
84
CDM9945 User Guide
operation of the cellular system as a whole.
When sending your wireless device to UTStarcom Personal Communications for repair or
service, please note that any personal data or software stored on the device may be
inadvertently erased or altered. Therefore, we strongly recommend you make a back up copy
of all data and software contained on your device before submitting it for repair or service.
This includes all contact lists, downloads (i.e. third-party software applications, ringtones,
games and graphics) and any other data added to your device. In addition, if your wireless
device utilizes a SIM or Multimedia card, please remove the card before submitting the device
and store for later use when your device is returned, UTStarcom Personal Communications is
not responsible for and does not guarantee restoration of any third-party software, personal
information or memory data contained in, stored on, or integrated with any wireless device,
whether under warranty or not, returned to UTStarcom Personal Communications for repair or
service.
To obtain repairs or replacement within the terms of this Warranty, the product should be
delivered with proof of Warranty coverage (e.g. dated bill of sale), the consumer’s return
address, daytime phone number and/or fax number and complete description of the problem,
transportation prepaid, to the Company at the address shown below or to the place of
purchase for repair or replacement processing. In addition, for reference to an authorized
Warranty station in your area, you may telephone in the United States (800) 229-1235, and in
Canada (800) 465-9672 (in Ontario call 905-712-9299).
THE EXTENT OF THE COMPANY’S LIABILITY UNDER THIS WARRANTY IS LIMITED TO THE
REPAIR OR REPLACEMENT PROVIDED ABOVE AND, IN NO EVENT, SHALL THE COMPANY°ØS
LAIBILITY EXCEED THE PURCHASE PRICE PAID BY PURCHASER FOR THE PRODUCT.
ANY IMPLIED WARRANTIES, INCLUDING ANY IMPLIED WARRANTY OF MERCHANTABILITY
OR FITNESS FOR A PARTICULAR PURPOSE, SHALL BE LIMITED TO THE DURATION OF THIS
UTStarcom Personal Communications (the Company) warrants to the original retail purchaser
of this Audiovox handheld portable cellular telephone, that should this product or any part
thereof during normal consumer usage and conditions, be proven defective in material or
workmanship that results in product failure within the first twelve (12) month period from the
date of purchase, such defect(s) will be repaired or replaced (with new or rebuilt parts) at the
Company’s option, without charge for parts or labor directly related to the defect(s).
The antenna, keypad, display, rechargeable battery and battery charger, if included, are
similarly warranted for twelve (12) months from date of purchase.
This Warranty extends only to consumers who purchase the product in the United States or
Canada and it is not transferable or assignable.
This Warranty does not apply to:
(a) Product subjected to abnormal use or conditions, accident, mishandling, neglect,
unauthorized alteration, misuse, improper installation or repair or improper storage;
(b) Product whose mechanical serial number or electronic serial number has been
removed, altered or defaced.
(c) Damage from exposure to moisture, humidity, excessive temperatures or extreme
environmental conditions;
(d) Damage resulting from connection to, or use of any accessory or other product not
approved or authorized by the Company;
(e) Defects in appearance, cosmetic, decorative or structural items such as framing and
non-operative parts;
(f) Product damaged from external causes such as fire, flooding, dirt, sand, weather
conditions, battery leakage, blown fuse, theft or improper usage of any electrical
source.
The Company disclaims liability for removal or reinstallation of the product, for geographic
coverage, for inadequate signal reception by the antenna or for communications range or
Page 44

86
CDM9945 User Guide
WRITTEN WARRANTY. ANY ACTION FOR BREACH OF ANY WARRANTY MUST BE BROUGHT
WITHIN A PERIOD OF 18 MONTHS FROM DATE OF ORIGINAL PURCHASE. IN NO CASE SHALL
THE COMPANY BE LIABLE FOR AN SPECIAL CONSEQUENTIAL OR INCIDENTAL DAMAGES
FOR BREACH OF THIS OR ANY OTHER WARRANTY, EXPRESS OR IMPLIED, WHATSOEVER.
THE COMPANY SHALL NOT BE LIABLE FOR THE DELAY IN RENDERING SERVICE UNDER THIS
WARRANTY OR LOSS OF USE DURING THE TIME THE PRODUCT IS BEING REPAIRED OR
REPLACED.
No person or representative is authorized to assume for the Company any liability other than
expressed herein in connection with the sale of this product.
Some states or provinces do not allow limitations on how long an implied warranty lasts or the
exclusion or limitation of incidental or consequential damage so the above limitation or
exclusions may not apply to you. This Warranty gives you specific legal rights, and you may
also have other rights which vary from state to state or province to province.
IN USA: UTStarcom/Audiovox Communications
555 Wireless Blvd.
Hauppauge, NY 11788
(800) 229-1235
IN CANADA: UTStarcom Canada Company
5535 Eglinton Avenue West
Suite# 234
Toronto, ON M9C 5K5
(800) 465-9672
Page 45

Safety Information
1 . SAFETY INFORMATION FOR FIXED WIRELESS TERMINALS
.POTE NTIALLY EXPLOSIVE ATMOSPHERES
Turn your phone OFF when in any area with a potentially explosive atmosphere and obey all signs and instructions.
Sparks in such areas could cauls e an explosion or fire resulting in bodily injury or even death.
INTERFERENCE TO MEDICAL DIVICES
Certain electronic equipment may be shielded against RF signal from you wireless phone. (pacemakers, Hearing Aids,
and so on) Turn your phone OFF in health c are
facilities when any regulations posted in these areas instruct you to do so. RF signals may affect improperly installed or
inadequately shielded electronic system in motor vehicles.
.EXPOSURE TO RF ENERGY
Use only the supplied or an approved replacement antenna. Do not touch the antenna unnecessarily when the phone is
in use. Do not move the antenna close to, or couching any exposed part of the body when making a call.
Page 46

U.S.A.
U.S.FEDERAL COMMUNICATIONS COMMISSION
RADIO FREQUENCY INTERFERENCE STATEMENT
INFORMATION TO THE USER
NOTE : This equipment has been tested and found to comply with the limits for a Class B digital device pursuant to Part 15 of the
FCC Rules. These limits are designed to provide reasonable protection against harmful Interference in a residential installation
This equipment generates, uses, and can radiate radio frequency energy and, if Not installed and used in accordance with the
instructions, may cause harmful Interference to radio communications. However, there is no guarantee that interference will not
occur in a particular Installation. If this equipment does cause harmful interference to radio or television reception, which can be
determined by turning the equipment off and on, the user is encouraged to try to correct the interference by one or more of the
following measures:
*- Reorient or relocate the receiving antenna.
Increase the separation between the equipment and receiver.
*- Connect the equipment into an outlet of a circuit different from that to which the receiver is
connected.
*- Consult the dealer or an experienced radio/TV technician for assistance.
Changes or modification not expressly approved by the party responsible for Compliance could void the user’s authority to
operate the equipment. Connecting of peripherals requires the use of grounded shielded signal cables.
Page 47

FCC Compliance Information
This device complies with Part 15 of FCC Rules.
Operation is subject to the following two conditions:
(1) This device may not cause harmful interference, and
(2) This device must accept any interference received.
Including interference that may cause undesired operation.
SAFETY INFORMATION FOR RF EXPOSURE
Body worn operation
This device was tested for typical body-worn operations with the back of the phone kept 15 mm. from the body. To
maintain compliance with FCC RF exposure requirements, use only belt-clips, holsters or similar accessories that
maintain a 15 mm. separation distance between the user’s body and the back of the phone, including the antenna. The
use of belt-clips, holsters and similar accessories should not contain metallic components in its assembly. The use of
accessories that do not satisfy these requirements may not comply with FCC RF exposure requirements, and should
be avoided.
Page 48

SAR INFORMATION
THIS MODEL PHONE MEETS THE GOVERNMENT’S
REQUIREMENTS FOR EXPOSURE TO RADIO WAVES.
Your wireless phone is a radio transmitter and receiver. It is designed and manufactured not to exceed the emission limits for exposure to
radiofrequency (RF) energy set by the Federal Communications Commission of the U.S. Government. These limits are part of
comprehensive guidelines and establish permitted levels of RF energy for the general population. The guidelines are based on standards
that were developed by independent scientific organizations through periodic and thorough evaluation of scientific studies. The standards
include a substantial safety margin designed to assure the safety of all persons, regardless of age and health. The exposure standard for
wireless mobile phones employs a unit of measurement known as the Specific Absorption Rate, or SAR. The SAR limit set by the FCC is
1.6 W/kg. *
Tests for SAR are conducted with the phone transmitting at its highest certified power level in all tested frequency bands. Although the
SAR is determined at the highest certified power level, the actual SAR level of the phone while operating can be well below the maximum
value. This is because the phone is designed to operate at multiple power levels so as to use only the power required to reach the
network. In general, the closer you are to a wireless base station antenna, the lower the power output. Before a phone model is available
for sale to the public, it must be tested and certified to the FCC that it does not exceed the limit established by the government adopted
requirement for safe exposure. The tests are performed in positions and locations (e.g., at the ear and worn on the body) as required by
the FCC for each model. The highest SAR value for this model phone when tested for use at the ear is 1.32 W/Kg
and when worn on the
body , as described in this user guide, is 1.17 W/Kg
. (Body-worn measurements differ among phone models, depending upon available
accessories and FCC requirements). While there may be differences between the SAR levels of various phones and at various positions,
they all meet the government requirement for safe exposure. The FCC has granted an Equipment Authorization for this model phone with
all reported SAR levels evaluated as in compliance with the FCC RF exposure guidelines. SAR information on this model phone is on file
with the FCC and can be found under the Display Grant section of http://www.fcc.gov/ oet/fccid after searching on FCC ID: SDJKTFT-UV100.
Additional information on Specific Absorption Rates (SAR) can be found on the Cellular Telecommunications Industry Asso-ciation (CTIA)
web-site at http://www.wow-com.com
. * In the United States and Canada, the SAR limit for mobile phones used by the public is 1.6
watts/kg (W/kg) averaged over one gram of tissue. The standard incorporates a sub-stantial margin of safety to give additional protection
for the public and to account for any variations in measurements.
 Loading...