

Page 1
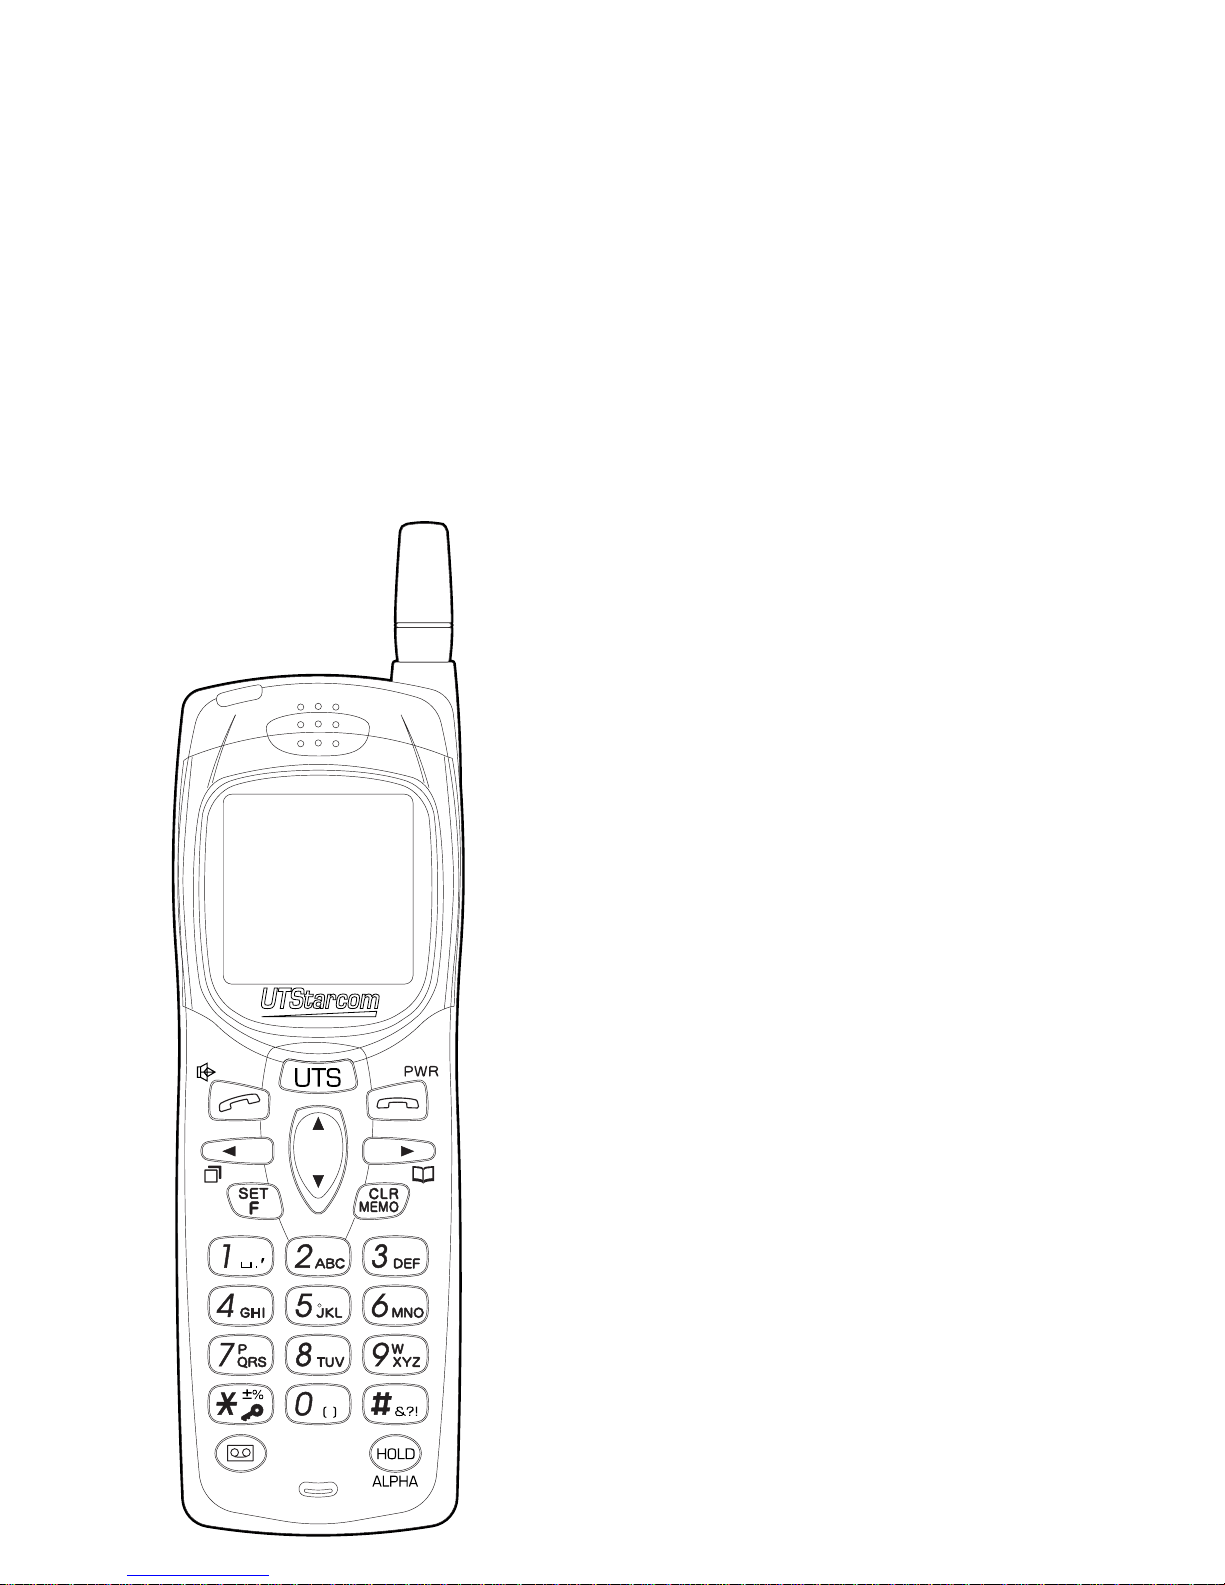
Personal Station (PS)
Model UTS-708J
INSTRUCTION MANUAL
Page 2

i
This wireless hand phone has been tested and complies with the Federal
Communications Commission (FCC) RF exposure limits for general
population/uncontrolled exposure environment. In addition, it complies
with the following standards and guidelines:
- FCC 96-326, Guidelines for Evaluating the Environmental Effets of
Radio Frequency Radiation.
- FCC OET Bulletin 65 Edition 97-01 (1997) Supplement C, Evaluating
Compliance with FCC Guidelines for Human Exposure to Radio Frequency
Electromagnetic Fields.
- ANSI/IEEE C95.1-1992, IEEE Standard for Safety Levels with Respect
to Human Exposure to Radio Frequency Electromagnetic Fields, 3 KHz
to 300 GHz.
- ANSI/IEEE C95.3-1992, IEEE Recommended Practice for the
Measurement of Potentially Hazardous Electromagnetic Fields - RF and
Microwave.
●SAFETY INFORMATION
Page 3

ii
BEFORE USING THIS
PRODUCT
EXPLANATION OF ALERT SYNBOLS
USED IN THIS MANUAL ..........2
FOR SAFE OPERATION-IT IS
IMPORTANT YOU READ THIS
....3
CAUTION OF USING ............... 10
FEATURES OF PERSONAL STATION
(PS) UTS-708J ....................11
CHECK PACKAGE CONTENTS ...12
NAMES AND FUNCTIONS OF
COMPONENTS .................... 14
DISPLAY OWN PHONE NUMBER
AND NUMBER OF EACH
OPRATION MODE (F00).......... 16
SETTING FUNCTIONS............... 16
FUNCTOIN MENU LIST............. 18
BECOMING FAMILIAR WITH YOUR
PHONE .............................. 19
Liquid crystal display (LCD) ....... 19
Attaching the hand strap ......... 21
Using the antenna................... 21
Using the Earphone/Microphone
terminal ............................... 21
CHARGING THE BATTERY PACK ...
22
Loading and removing the battery
pack.................................... 22
Preparing the battery charger .. 23
Charging ............................... 24
Turning power on.................... 24
SETTING OPERATION MODES (F51)..
25
USE AS A PHS PHONE
BEFORE USING AS A PHS PHONE...
28
PLACING A CALL....................29
Placing/ending a call ............... 29
Using dial memo ..................... 31
Using redial key to place calls ... 32
Deleting individual memorized
numbers .............................. 33
Deleting all the content of redial,
call memory or dial memo ...... 34
RECEIVING A CALL .................35
OPERATIONS DURING CALLS ...37
Placing a call on hold ............... 37
Adjusting the receiver volume ... 37
Using the conversation memo
function (communication log) ....
38
Using the hands-free/speaker
function ............................... 39
Using the Flash function........... 40
CHARACTER INPUT METHOD ...41
Switching input character types
... 41
USING PHONE BOOK ............. 43
Registering a phone book entry ....
44
Registering numbers that are
stored in radial, call memory or
dial memo ............................ 48
Placing a call by search ........... 49
Placing a call using two touch
dialing ................................. 52
Placing a call using three touch
dialing ................................. 53
Correcting phone book entries .. 53
Changing the group name (F92)
.. 54
Deleting contents of phone book
individually ............................ 54
Deleting all entries in phone book
(F32)................................... 55
● CONTENTS
Page 4

iii
USING THE ANSWER MESSAGE
FUNCTION.......................... 56
Answering message (F24)........ 56
Deleting and changing original
answering message (F24) ...... 57
Setting the answening message...
58
Canceling the answering message .....
59
Listening to and deleting messages ...
59
Deleting all the stored left
messages ............................ 60
Setting the response time from
receiving the incoming call to
answering (F25).................... 61
Taking a call when it is received in
answering message mode ...... 61
Setting answering message when
receiving an incoming call ....... 61
MORE EFFECTIVE USE
SETTING THE CLOCK AND ALARM ...
64
Setting the clock (F62) ............ 64
Setting the alarm and auto power
off (F09) .............................. 65
ADJUSTING THE SOUND .............
67
Selecting the ring-tone volume and
type .................................... 67
Selecting the incoming call
notification method (F11) ....... 67
Selecting the hold-tone (F14) .... 69
Setting and Canceling manner
mode .................................. 69
List of ring-tone melody numbers ...
70
USING THE VOICE RECORDER (VOICE
MEMO) FUNCTION ...................
72
LIST OF OPERATIONS THAT CAN BE
PERFORMED BY FUNCTION KEY ....
74
USING THE SCHEDULE
FUNCTION
USING THE SCHEDULE FUNCTION ..
76
Registering a schedule ............ 76
When the specified time arrives ..
78
Confirming or revising the registered
content of a schedule ............ 79
Deleting the registered content of
schedules individually ............. 80
Confirming or deleting old schedules
(6 or more weeks old) ..............
81
Deleting all the registered
schedules ............................ 82
OTHERS
USING THE 32KBPS HIGH SPEED
DATA TRANSFER SERVICE.........
84
Preparing for 32kbps high speed
data transfer ........................ 84
Sending data by 32kbps high speed
data transfer ........................ 85
Receiving data by 32kbps high
speed data transfer............... 86
USING MODEM FOR DATA/FAX
COMMUNICATION ....................
87
Setting modem communication
(F95)................................... 88
Performing modem communication ...
88
USING THE SHORT MESSAGE SERVICE ...
89
Making an original message
(Write Draft Text).................. 89
Insart the made message into the
original message ................... 90
Deleting the contents of original
message (Draft Text) individually..
90
Page 5

iv
Deleting the all contents of original
message (Draft Text) ............. 91
Send the message .................. 91
Receive a message ................. 92
Read the received message...... 93
Deleting the received message . 94
SETTING OTHER FUNCTIONS... 95
Dial lock ................................ 95
Key lock ................................ 96
Phone book lock (F30) ............. 96
Caller number notification (F60) ...
97
Owner Name Record (F63) ...... 98
Back light (F65) ...................... 98
LCD contrast (F66) ................. 99
Any key answer (F67) .............. 99
Registering a password number
(F71)................................. 100
Set default values (F72) ......... 101
Key touch tone (F80)............. 102
Out of service area alarm (F81)...
102
Connecting (link) sound (F82)...
103
Hand-over tone(F83) ............. 103
USING PHONE AS A TRANSCEIVER ..
104
Things to check before using ...
104
Registering a transceiver group
(F55)................................. 104
Calling the other party ........... 105
Receiving a call..................... 106
APPENDIX
BEFORE ASSUMING IT'S BROKEN ..
108
MAINTENANCE ....................110
Maintenance ........................ 110
SPECIFICATIONS.................. 111
● CONTENTS (cont.)
Page 6

1
BEFORE USING
THIS PRODUCT
●
EXPLANATION OF ALERT SYMBOLS USED IN THIS MANUAL
..P2
●
FOR SAFE OPERATION - IT IS IMPORTANT YOU READ THIS
..P3
● CAUTION OF USING ................... P10
●
FEATURES OF PERSONAL STATION (PS)
UTS-708J..P11
● CHECK PACKAGE CONTENTS ...... P12
●
NAMES AND FUNCTIONS OF COMPONENTS
..P14
●
BECOMING FAMILIAR WITH YOUR PHONE
..P19
● CHARGING THE BATTERY PACK .. P22
●
SETTING OPERATION MODES (F51)
..P25
Page 7
2
Caution
Warning
Danger
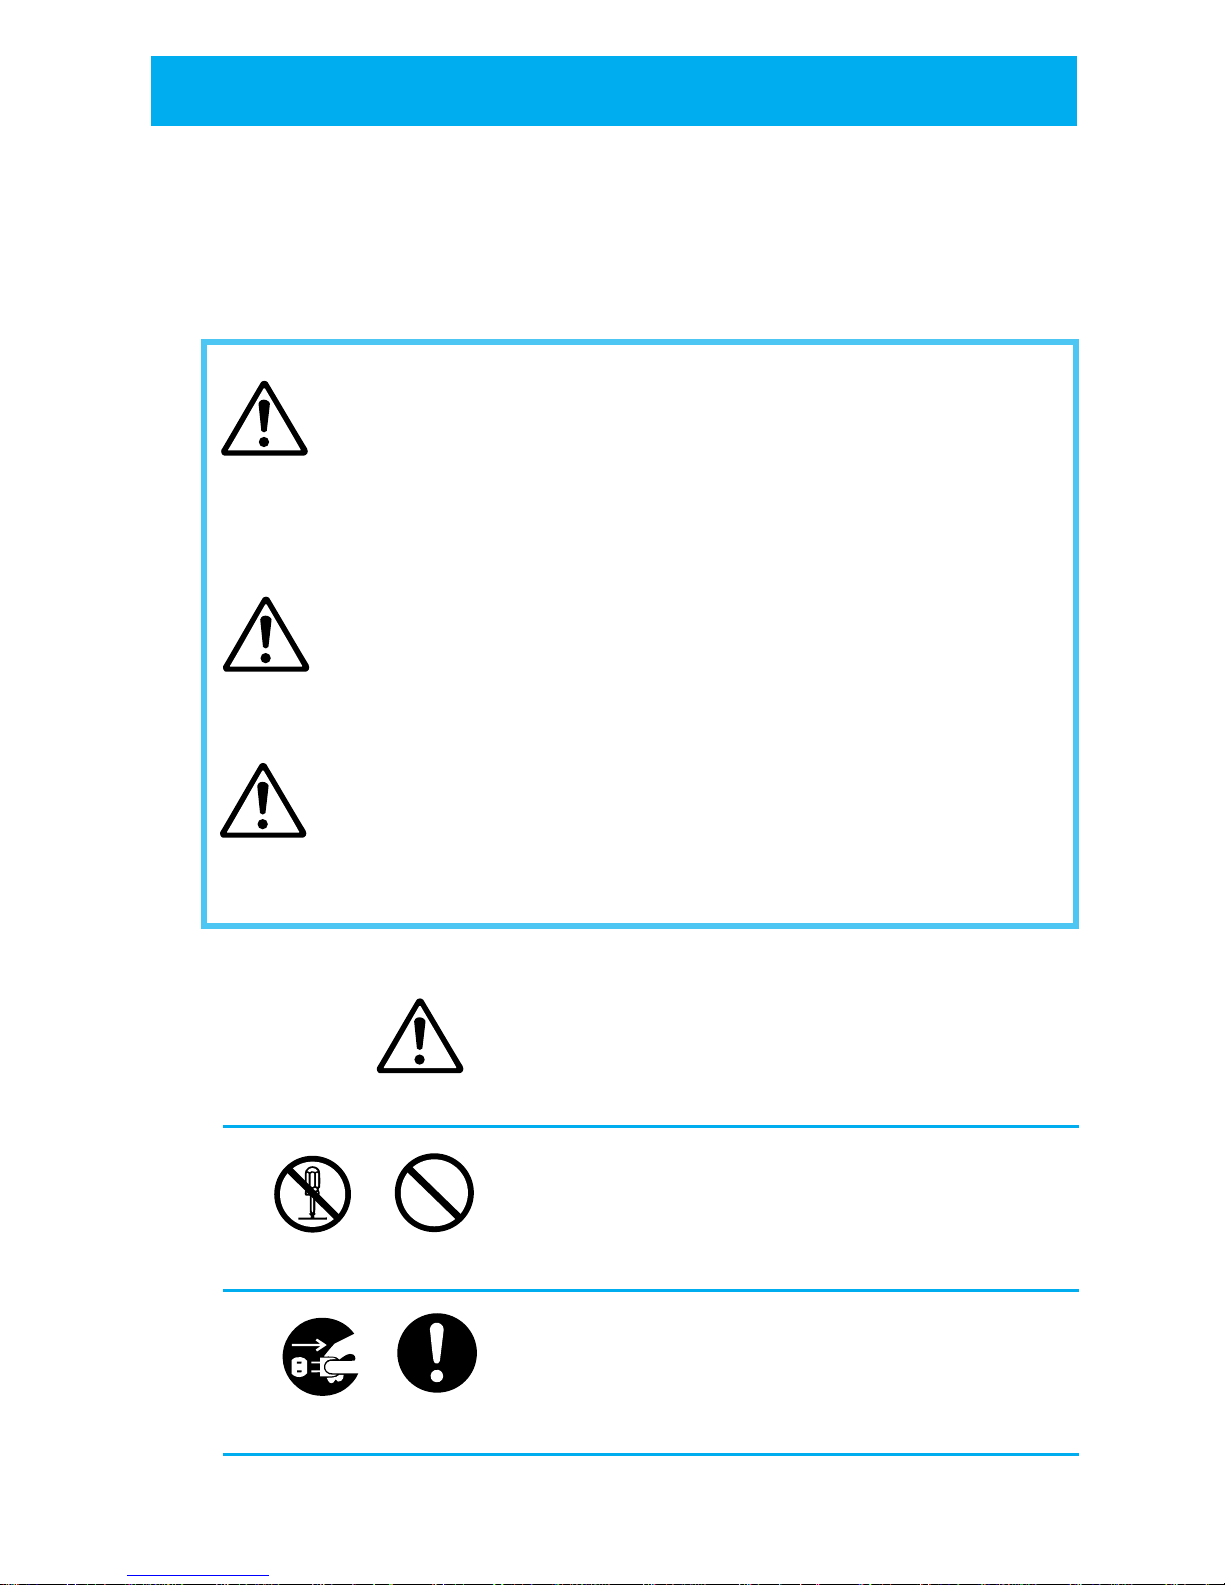
So that the user can use this product in the correct safe manner, this instruction
manual uses various alert symbols. These symbols are for the prevention of
injury to the user or others and for the prevention of property damage. The
following shows the symbols and explains their meaning. Please learn these
symbols before reading this manual.
This symbol indicates that ignorance of the symbol
and of the instruction given together with it or
erroneous operations on the product may cause an
imminent hazard which directly results in personal
serious injury or death.
This symbol implies a factor that may cause personal
serious injury or death due to ignorance of the symbol
and of the instructions given together with it or
erroneous operations of the product.
This symbol implies a factor that may cause personal
injury or property damage due to ignorance of the
symbol and of the instructions given together with it
or erroneous operations on the product.
Example of alert symbols
This symbol indicates CAUTION (includes DANGER
and WARNING), the pictures in the triangle show
caution details. (The left picture shows a general
warning.)
These symbols indicate actions that must not be
performed. Carefully read the given instructions
and DO NOT carry out these actions. (The left
picture shows DO NOT DISASSEMBLE.)
These symbols indicate instructions that must be
followed. Carefully read the given instructions and
always carry them out. (The left picture shows
REMOVE PLUG.)
●
EXPLANATION OF ALERT SYMBOLS USED IN THIS MANUAL
DO NOT
DISASSEMBLE
DO NOT
PERFORM
REMOVE
PLUG
INSTRUCTIONS
Page 8
3
●
FOR SAFE OPERATION
- IT IS IMPORTANT YOU READ THIS
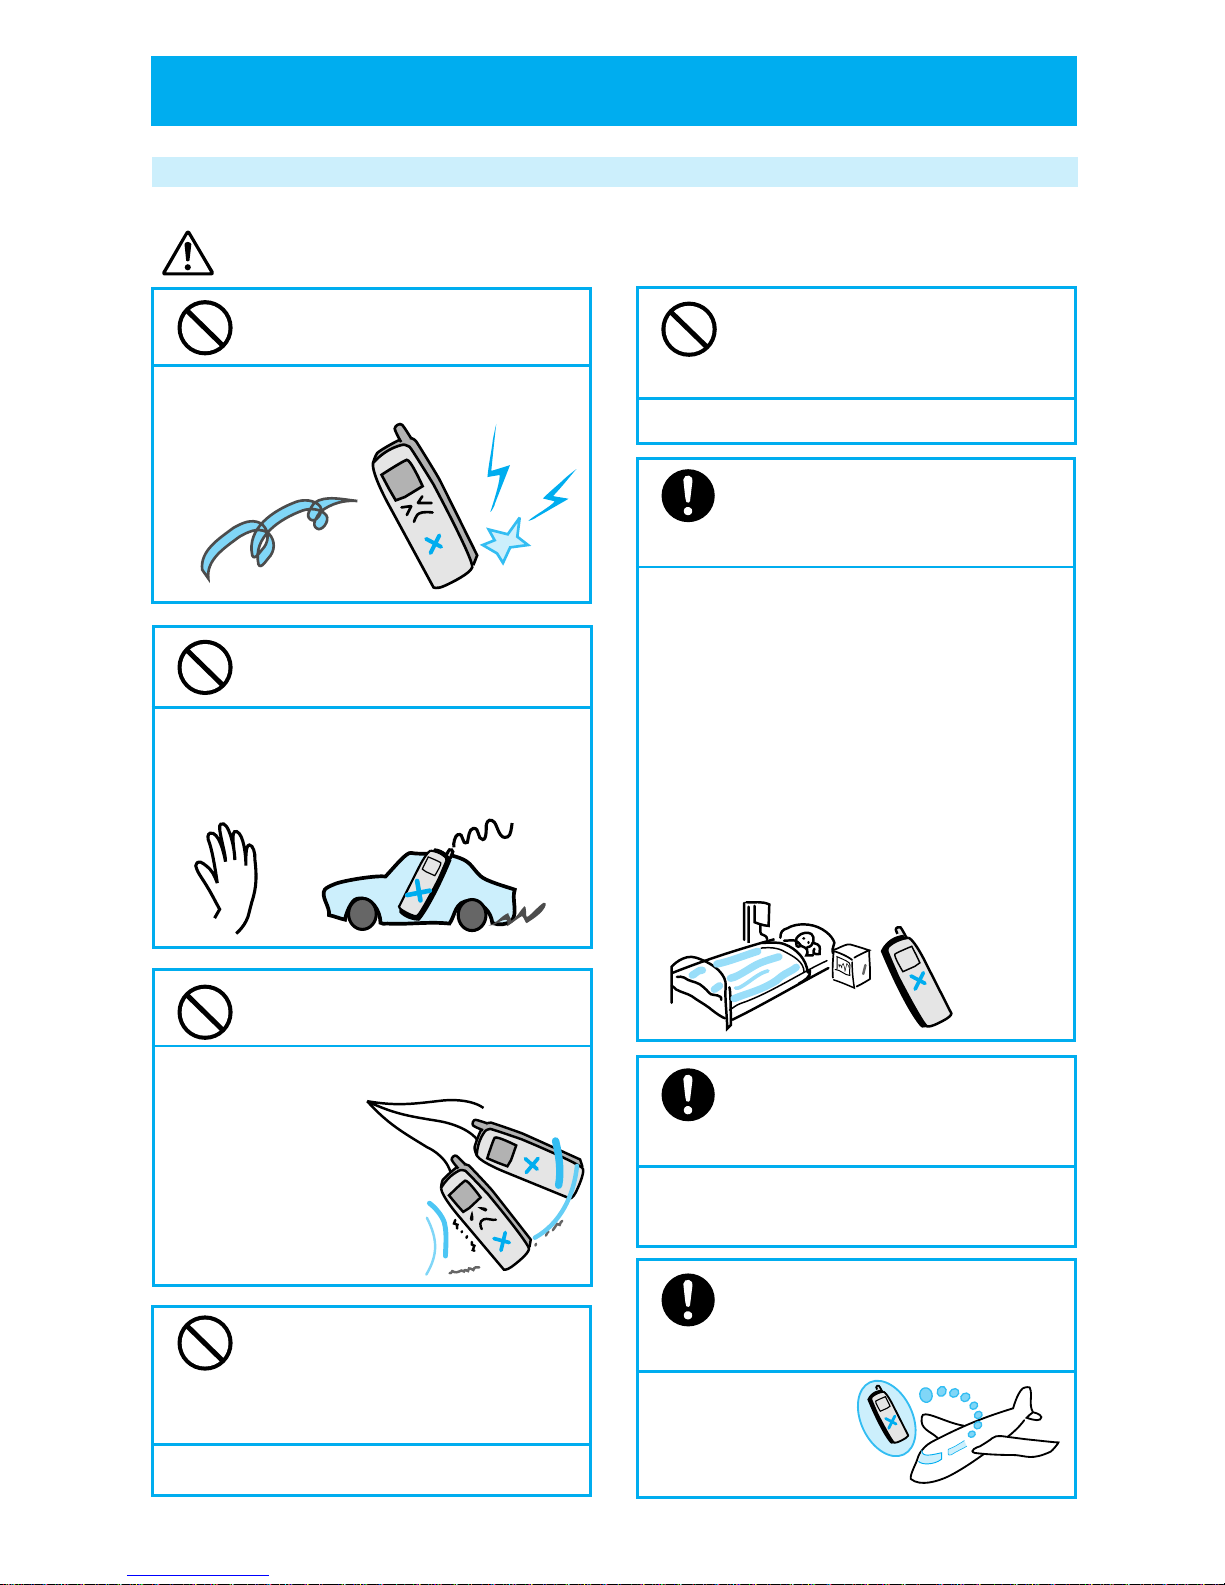
Phone handling instructions
Do not turn this phone on near
electronic equipment that uses
sensitive controls or weak signals.
Use of this phone may cause electronic equipment
to malfunction.
Examples of sensitive electronic equipment include:
Hearing aids, medical apparatus (pacemakers
included), fire alarms, automatic doors and other
automatic control equipment.
If you are using a pacemaker or some other
medical apparatus, ask medical apparatus makers
or dealers about the effect which will be caused
by the radio wave from the phone.
When using in hospitals,
always follow the directions
of that medical facility.
Otherwise, use of phone may adversely
affect medical electronic equipment.
Keep this phone turned off
while in areas prohibiting use
of phone such as in aircraft.
Otherwise, use of phone
may adversely affect
electronic equipment.
Do not give it a strong shock
or throw it.
Otherwise, it may cause battery leakage,
heat generation,
explosion, breakage
or fire.
Do not use while driving or
cycling.
Otherwise it will prevent safe driving and
may cause accidents. Stop the car or cycle
in a safe place before using this phone.
Do not swing this phone by
holding its strap or antenna.
Otherwise it may hit
you or others, or it
may cause accidents
such as injury, or
damage or defect of
the phone.
Do not turn on phone where
there is dust or flammable
substance such as propane
gas or gasoline.
Otherwise it may cause fire or explosion.
Warning
STOP !
TURN OFF!
TURN
OFF!
Do not put any metal pieces
or foreign matter into
crevices on this phone.
Otherwise it may cause electric shock or breakage.
Page 9
4
●
FOR SAFE OPERATION
- IT IS IMPORTANT YOU READ THIS (cont.)
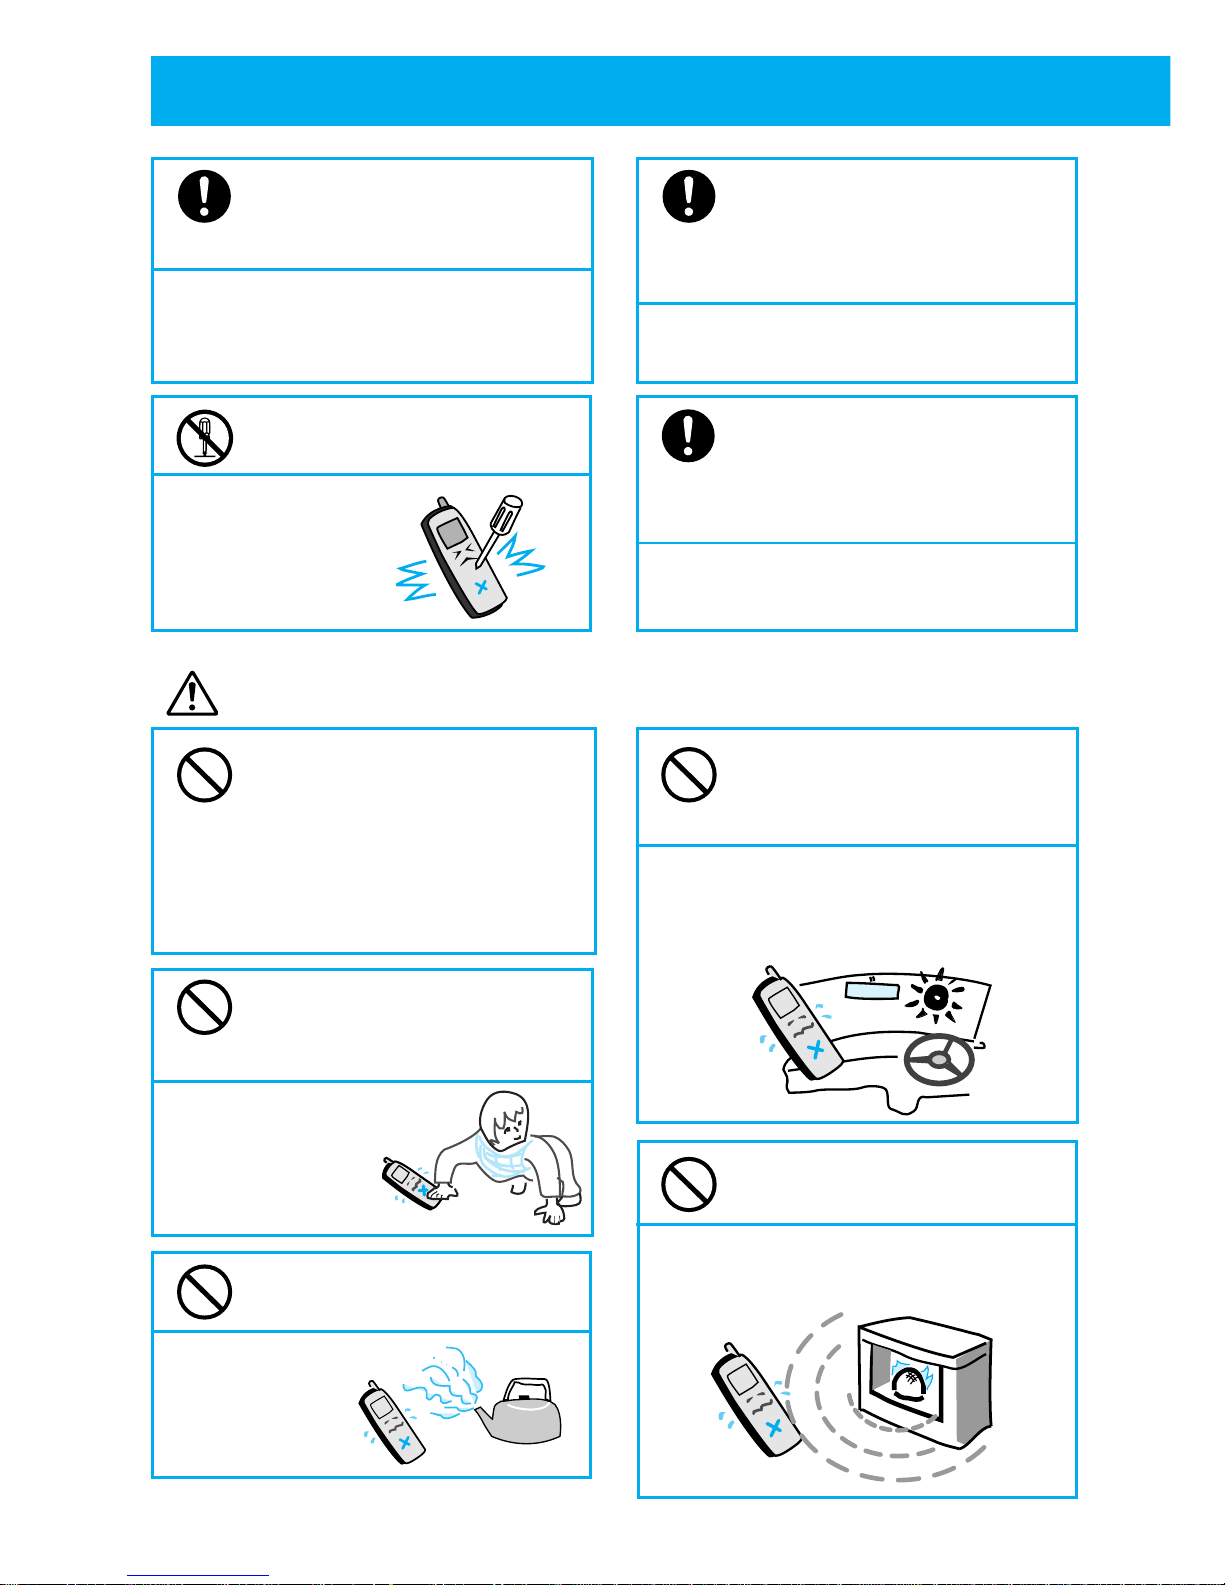
In the event that smoke (or
strange odors) comes from this
phone, immediately turn it off.
Otherwise, continued use may cause
fire. Take it to the dealer promptly.
Do not disassemble or modify
this phone.
Otherwise, it may
cause damage or
an accident such
as fire or injury.
NO !
Turn off your phone when in very
crowded situations such as a
crowded train because a nearby
person may have a pacemaker fitted.
Otherwise, the phones radio waves may
adversely affect pacemaker operation.
Caution
Never attempt to dry your phone
if it gets wet by placing it in a
microwave oven, also never place
this phone in or on microwave
ovens, high voltage containers or
electronic cooking equipment.
Do not get on this phone.
(Especially be careful with
small children.)
Otherwise, it may
cause injury by
tumbling or
breaking.
Do not leave this phone in a
dusty, humid or hot place.
Otherwise, it may
cause a fire
or a breakage.
Do not leave or use it in direct
sunshine or inside a car
exposed to the sun.
Otherwise, it may cause battery leakage,
heat generation, explosion or fire. Also
the phone may break or warp.
Do not use or leave it near
heaters or fires.
Otherwise, it may cause a breakage.
If an electrical storm occurs
while using this phone outside,
immediately turn off the phone
and move to a safe location.
Otherwise, it may cause you to get struck
by lightning or get an electric shock.
Page 10
5
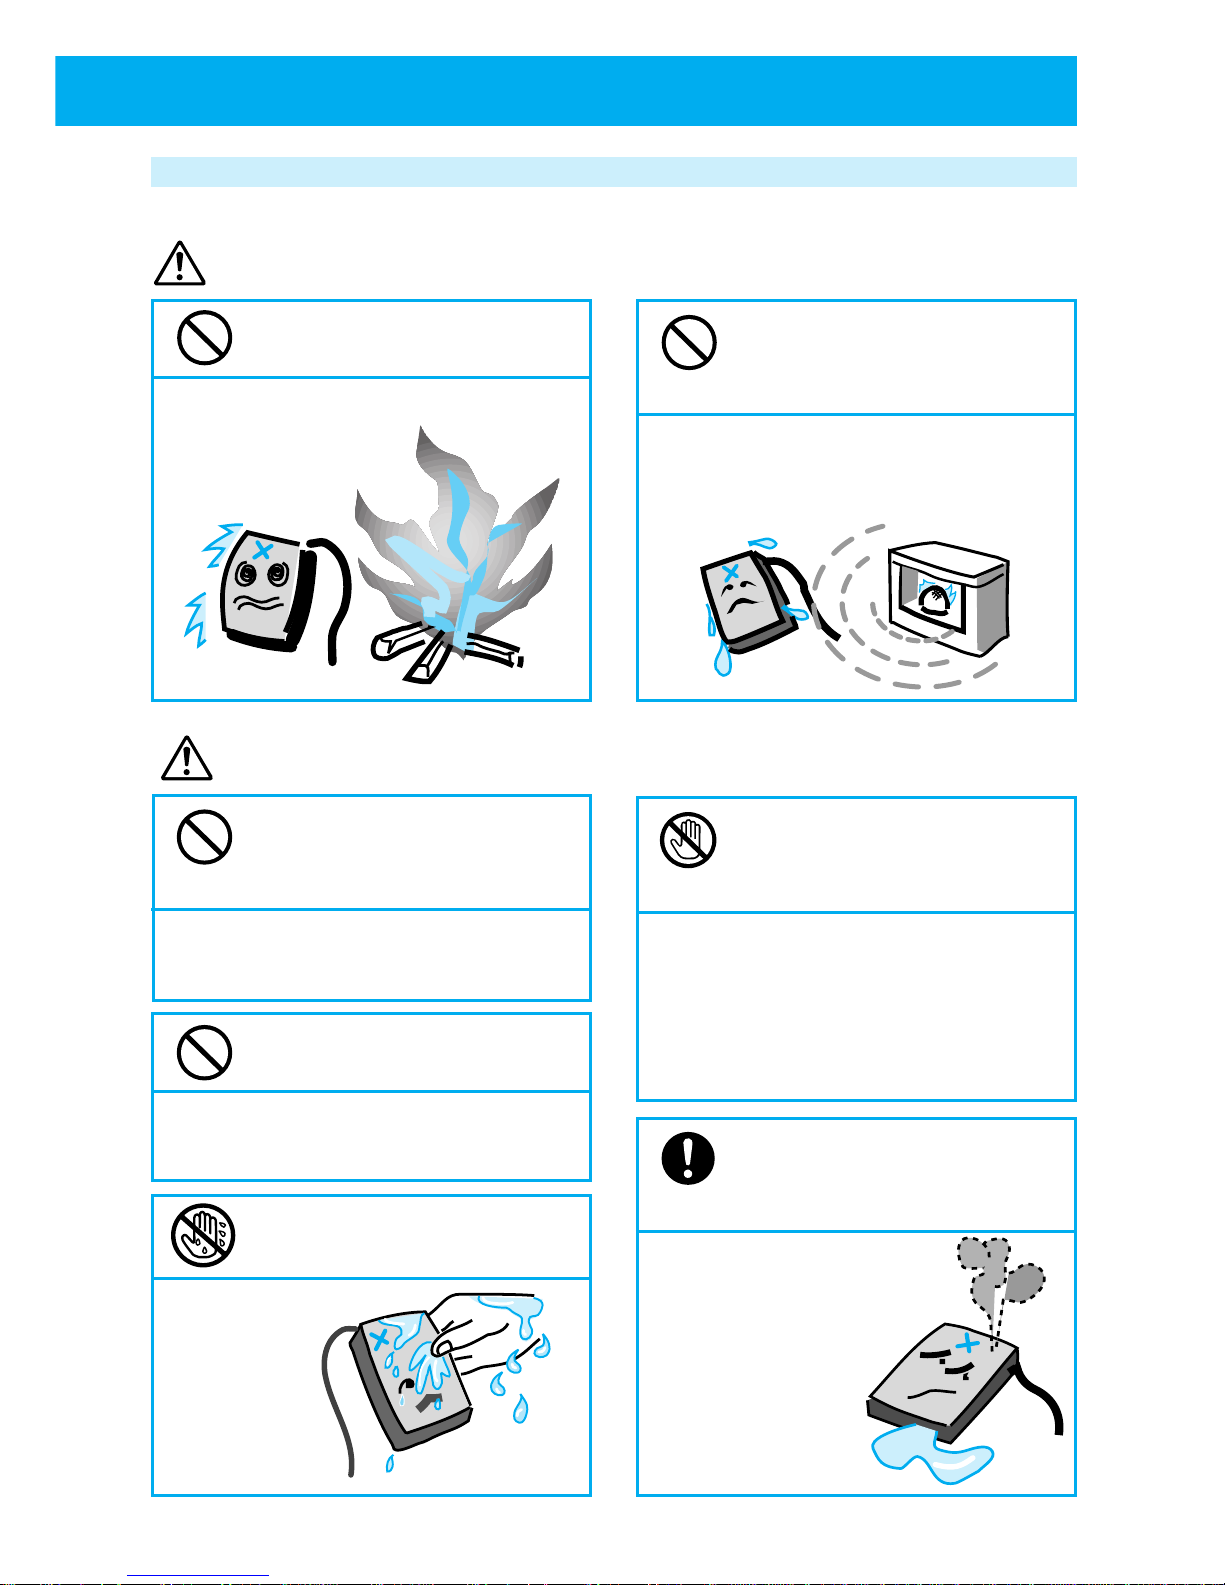
Battery pack handling instructions
Danger
Never heat battery pack or
throw it in the fire.
Otherwise, it may cause an explosion.
Do not connect a short circuit
between + and - of the
connector of the battery pack.
Otherwise, it may cause a leakage, heat
generation or explosion.
Use the designated battery
pack only.
Otherwise , it may cause an injury, fire or contamination of the
outer surface by the leakage or explosion of the battery pack.
Do not replace the battery
pack with a wet hand.
Otherwise, it may
cause ignition
or a breakage.
Do not use or leave the
battery pack in hot places
such as near heaters or fire.
Otherwise, it may cause leakage, or heat
generation, explosion or ignition.
Never touch substances
leaking from the battery
pack.
Otherwise, battery fluids can burn skin
or cause blindness. In case fluid gets in
contact with eyes, immediately flush
eyes with running water and get prompt
medical attention.
When leakage or odors come
from battery pack, immediately
move away from fire.
Otherwise, fluid may catch
fire and cause an ignition
or explosion.
Warning
Page 11
6
●
FOR SAFE OPERATION
- IT IS IMPORTANT YOU READ THIS (cont.)
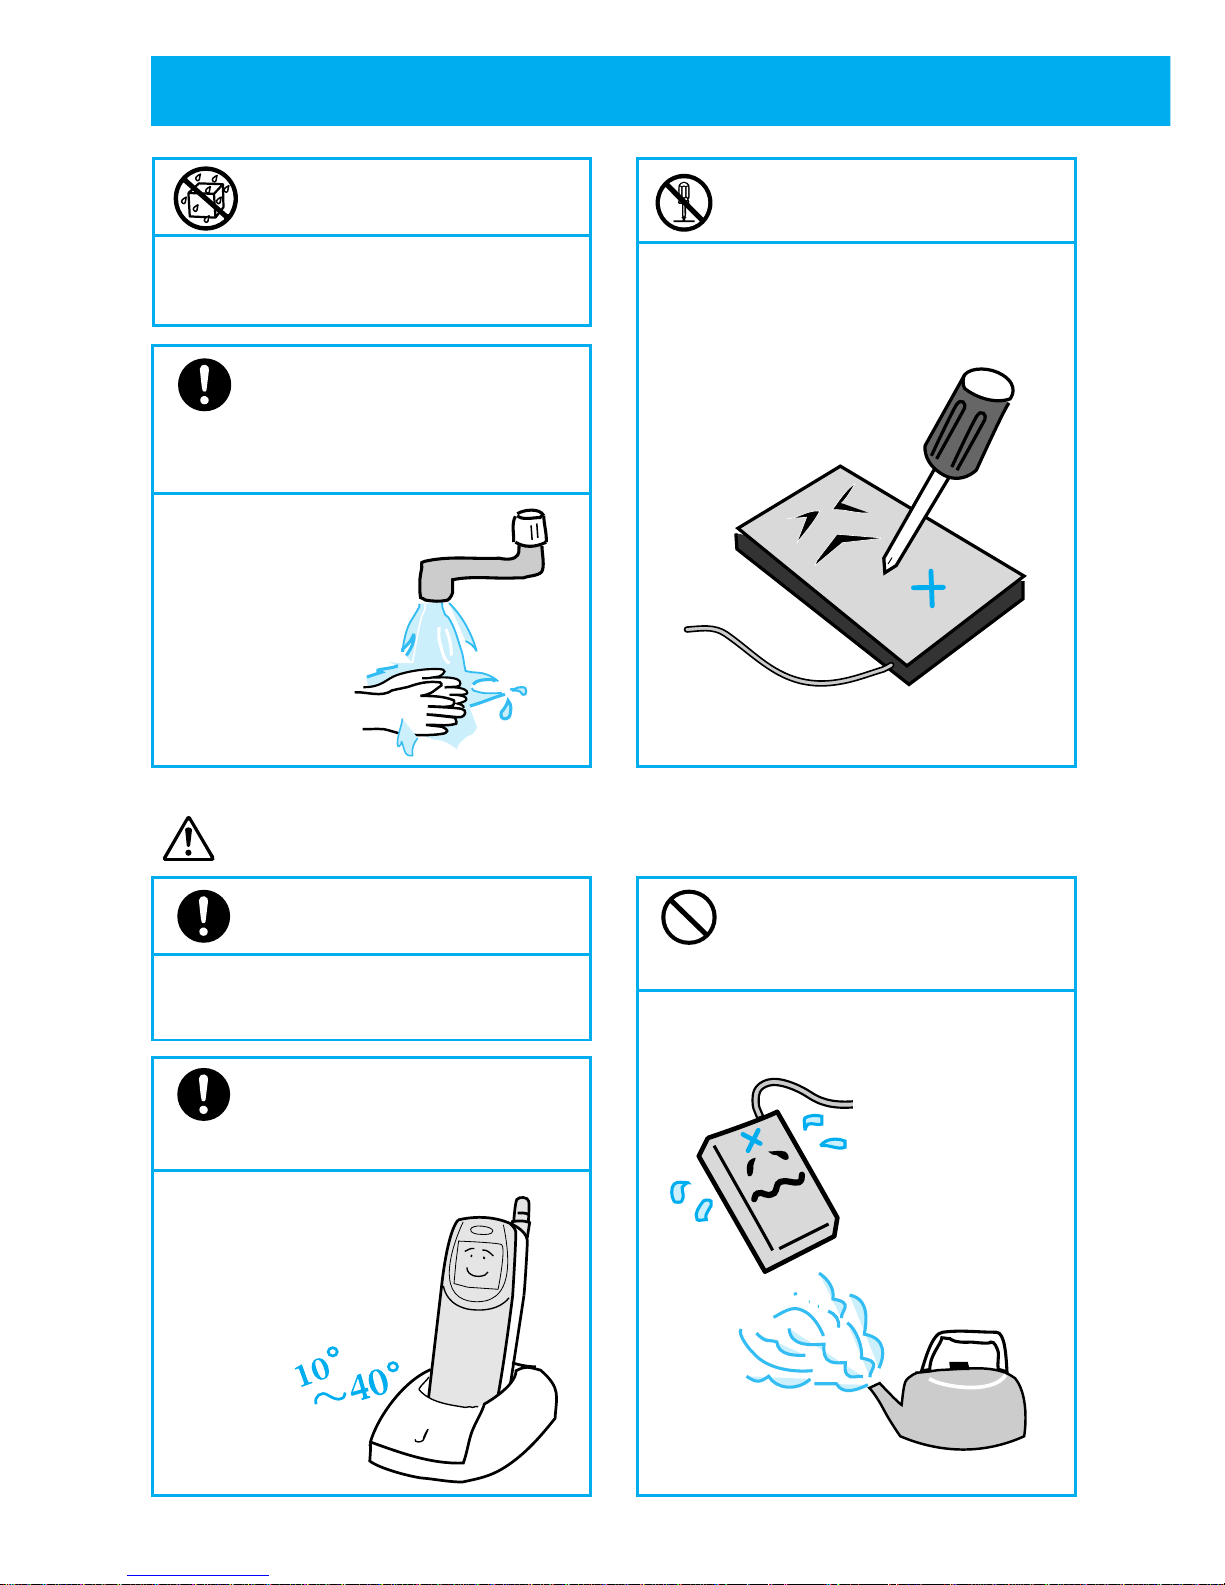
Do not let battery pack get
wet by water or urine of pets.
Otherwise, it may cause heat
generation, smoke emission or rust.
When battery fluids get on
skin or clothing, wash
immediately with running
water.
Otherwise, it will
damage skin.
Caution
Ensure battery pack is
correctly installed.
Otherwise, failure to observe cell polarity
may damage the product.
Battery pack's chargeable
temperature is between
10°C and 40°C.
Charging outside this range
may cause a leakage,
heat generation, shorter
battery pack life
or lower
power
efficiency.
NO !
Do not keep the battery pack
in a dusty, humid or hot
place.
Otherwise, it will cause a fire or
breakage.
Do not disassemble or modify
the battery pack.
Otherwise, it may cause a leakage, heat
generation, explosion or ignition.
Recharge
Page 12
7
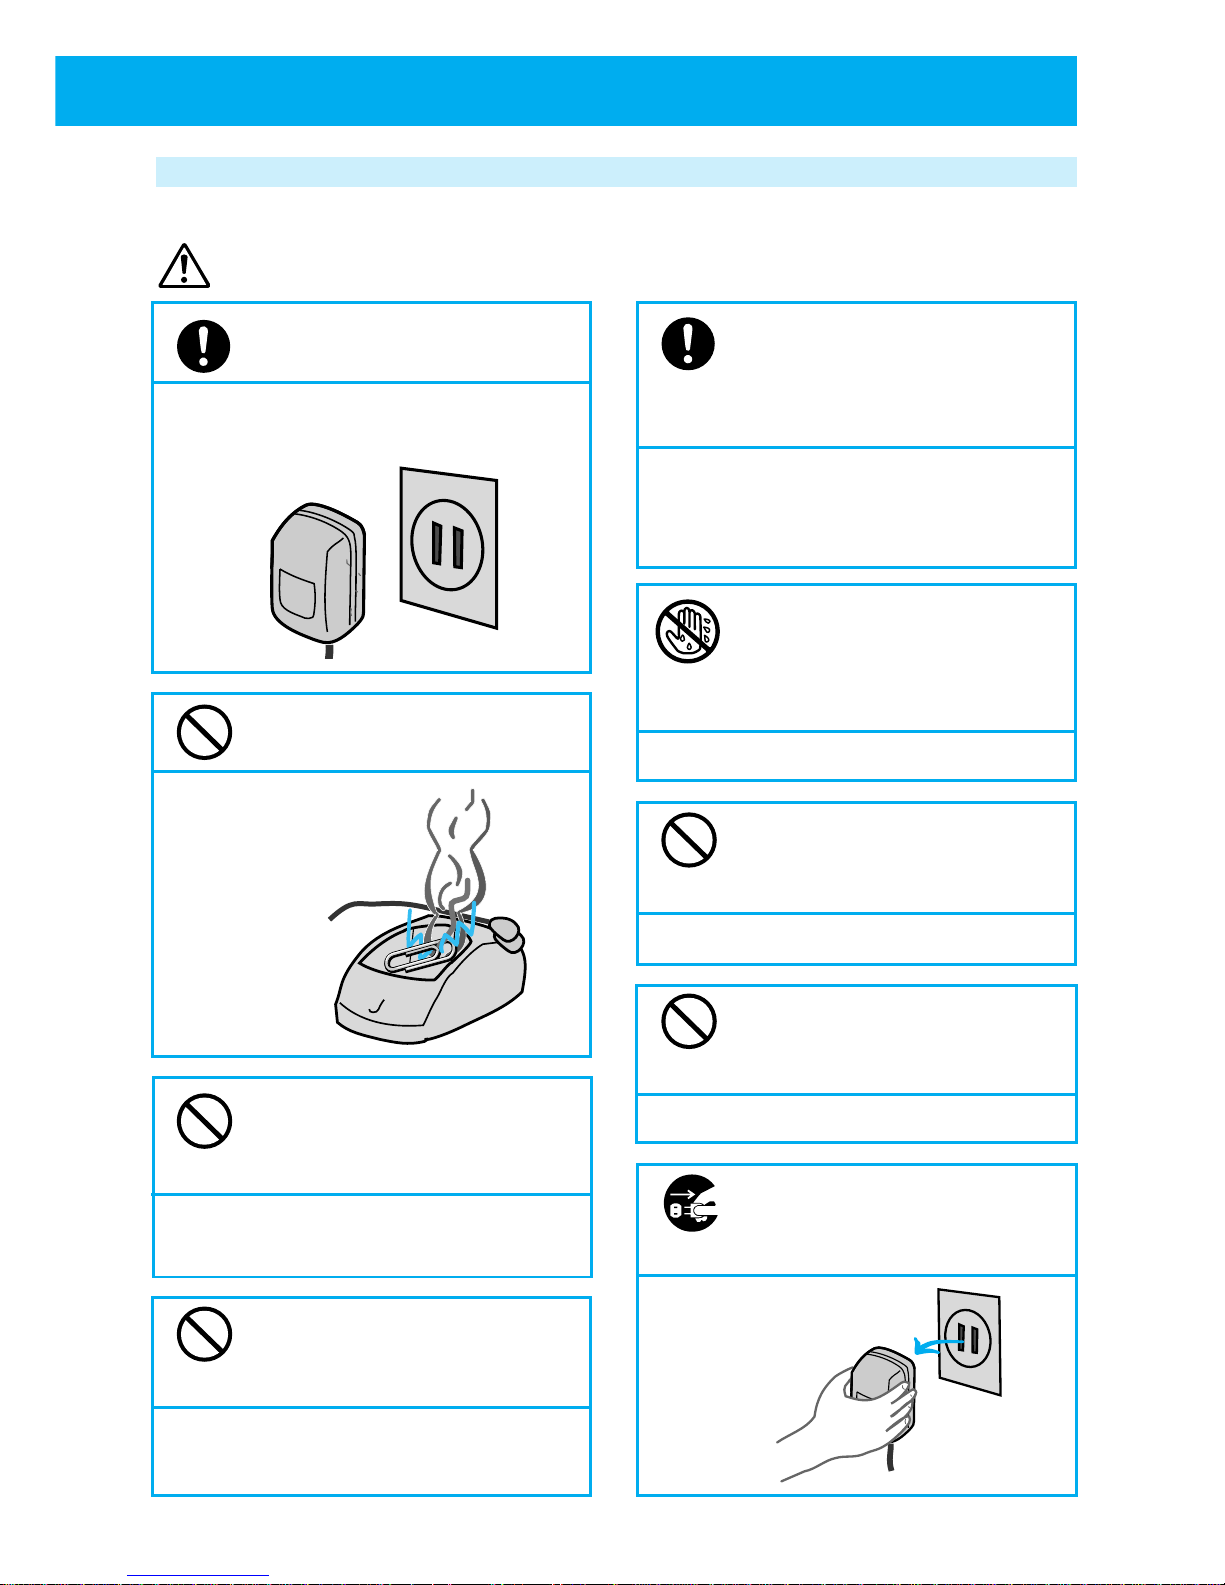
Battery charger and AC adapter handling instructions
Warning
In case of dropping or breaking
the battery charger or AC
adapter, immediately unplug the
AC adapter from the AC outlet.
Otherwise, it may cause an electric
shock or breakage. Take it to the dealer
promptly.
Do not handle the AC
adapter, battery charger or
the power plug of the AC
adapter with a wet hand.
Otherwise, it may cause an electric shock.
Do not damage the product
by forcefully bending or
bundling the AC adapter cord.
Otherwise, it may cause a breakage, electric shock or fire.
Do not place heavy items on
the AC adapter cord. Do not
modify it.
Otherwise, it may cause an electric shock or fire.
When battery charging is
finished, unplug the AC
adapter from the AC outlet.
Otherwise, it may
cause a fire
or breakage.
Always use the designated
power source.
Connecting to the wrong power source
may cause a fire or breakage.
Do not make a short circuit
between the charging terminals.
Otherwise, it may
cause a breakage,
fire or injury.
Do not insert any piece of metal
or foreign matter into a crevice on
the AC adapter or battery charger.
Otherwise, it could cause a breakage
or electric shock.
Do not swing the AC adapter
or battery charger by holding
the cord.
Otherwise, it may cause a breakage and
injury by hitting you or others.
Page 13
8
●
FOR SAFE OPERATION
- IT IS IMPORTANT YOU READ THIS (cont.)
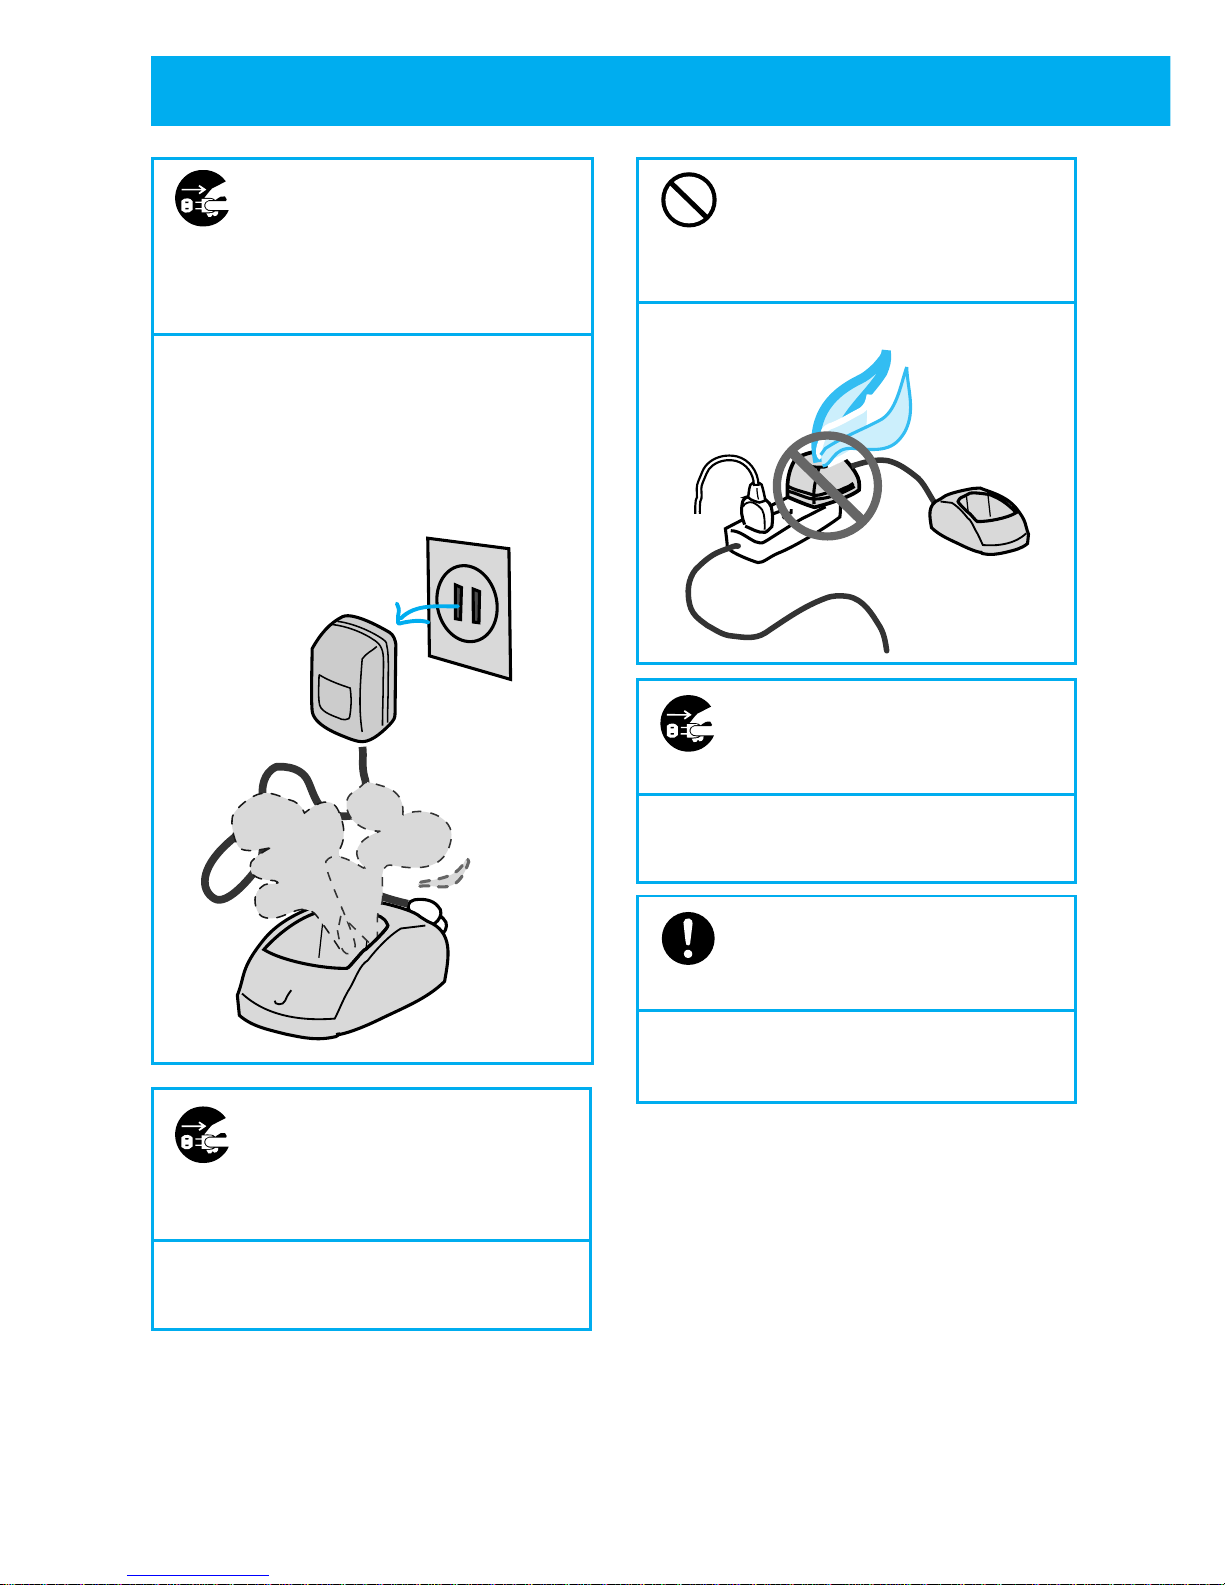
Should the battery charger or
AC adapter emit smoke or
abnormal odor, unplug the
AC adapter from the AC
outlet immediately.
Continued use of the battery charger
may cause a fire or electric shock.
Repairing by yourself is dangerous so
take it to the dealer promptly.
If the battery charger is
exposed to water, unplug the
AC adapter from the AC
outlet immediately.
Otherwise, it may cause a fire, electric
shock or smoke emission.
Do not use table tap,
divergence point or divergence
socket adapter to put many
loads on one AC outlet.
Otherwise, it may cause a fire or heat
generation.
Unplug AC adapter from AC
outlet during electrical
storms.
Otherwise, it may cause a fire, electric
shock and breakage.
Always use the designated
battery charger and AC
adapter.
Using other battery chargers or AC
adapters may cause a breakage.
Page 14
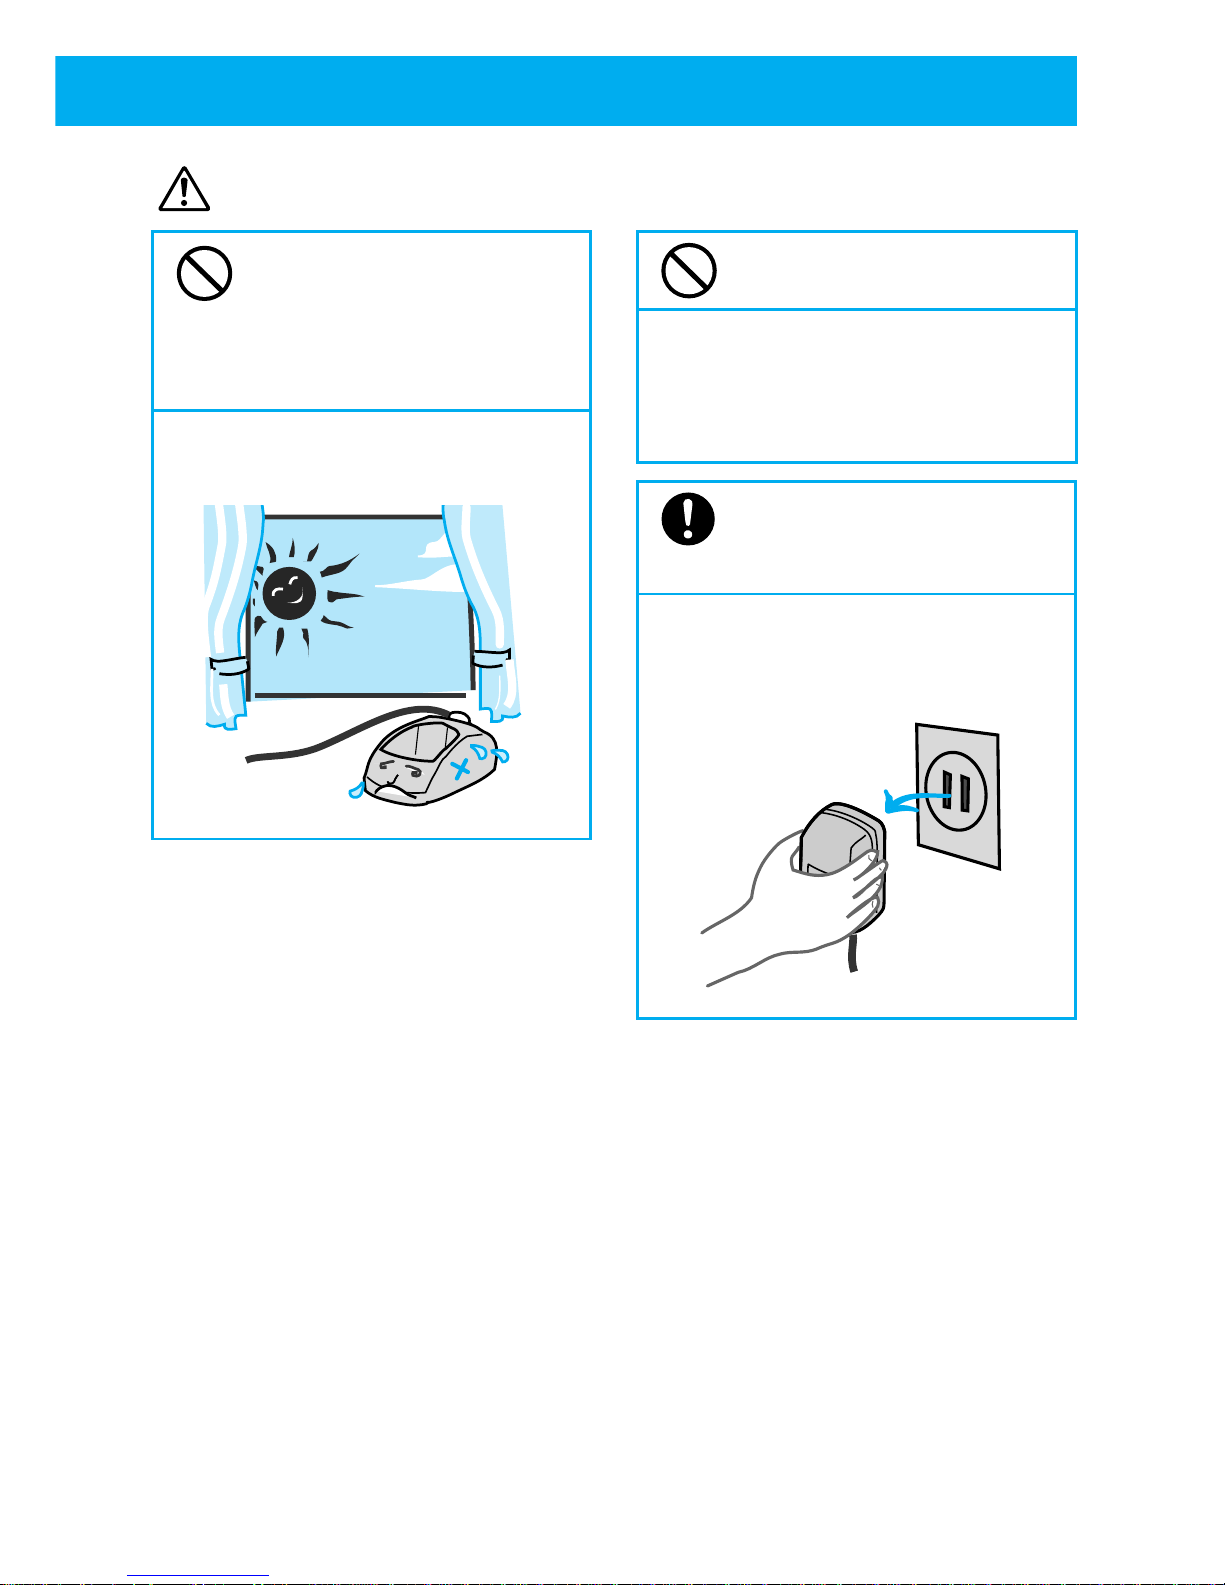
9
Caution
Do not leave or use in direct
sunshine or places with high
temperature such as near a
fire or inside a car exposed
to the sun.
Otherwise it may cause breakage or
warping.
Do not get on the battery
charger or AC adapter.
(Especially, be careful with small
children.)
Otherwise, it may cause injury by
tumbling or breaking.
Always unplug the AC
adapter by holding on to the
main adapter part.
Pulling the adapter by its cord may cause
cord damage, which may result in fire
or electric shock.
Page 15

10
● CAUTION OF USING
■ About water and rain
• Do not use it in bathroom or plunge it into water.
• Try to avoid the phone from getting wet by rain drops etc.
• If the phone gets wet, immediately wipe it with a dry cloth.
• Do not set phone on battery charger when it is wet. Always wipe it dry before
you charge it.
■ Operating environment
• You may hear some noise when cars or motor cycles pass by.
• You may hear some noise or your phone call may be cut off if you use it by OA
equipment or electrical equipment.
• You may hear some noise or your phone call may be cut off if you use it near a
microwave oven because of the electromagnetic waves.
• If you use this phone near the TV or radio, the screen may get messy or you
may hear some noise.
• Try to use this phone where it can get strongest radio wave. The usable area
can be restricted by the surrounding environment (wall, furniture etc.). See
page 25 for how to check the strength of the radio wave.
• Radio waves can be jammed by metal furniture so avoid using it near them.
■ How to use this phone
• Consider others when you use it in public places where people gather or where
it is quiet such as concert halls, restaurants and cinemas.
• This phone is using digital signal so it is unlikely to get wire-tapped. However
please be aware of this slim possibility.
Page 16

11
This Personal Station (PS) UTS-708J is a digital portable phone that uses wireless
communication.
(1) It can be used to place and receive calls while in the PHS service area.
(2) You can have direct communication as a transceiver between phones.
Please read this instruction manual carefully and treat this phone as two devices in
one.
Seamless hand-over
As a first for the PHS, the phone is fitted
with two radios. It is no longer easy to be
cut off while moving. During a call, the
base station with the best conditions is
received by reached the another radio
which means the hand-over interval is
even shorter and a stable clear
conversation can be achieved.
Dual Mode
This phone is fitted with a dual mode
communication system. The combination of
public and transceiver mode enables
simultaneous standby condition with the two
radios.
3 chord melody
With a 3 octaves range, ring-tones of up
to 3 chords are possible.
Hands-free/speaker function
When taking a call, you can talk without
needing to hold the phone and it is possible
to listen to who your talking with from a
speaker. This is useful for when you would
like to carry out your business while talking
on the phone or while answering message
is playing.
●
FEATURES OF PERSONAL STATION (PS) UTS-708J
Answering message, conversation
memo and voice recorder function
When you cannot answer the phone
because you are busy working or
somewhere like an art museum, you can
set the "answering message" function,
which answers any calls with an answering
message and saves the message. You
can easily set the function to record a
conversation (conversation memo) or
record when in standby condition (voice
recorder). You can play the recorded
memo whenever you please.
Easy electronic organizer function
Like an electronic organizer, you can input
your schedule. This can be displayed in
week units. When an appointment time
is reached, you are notified by beep tone,
melody or vibration. You can specify a
telephone number related to the
appointment to instantly pop up. You can
also store timetables for your regular train
and bus service.
Page 17
12
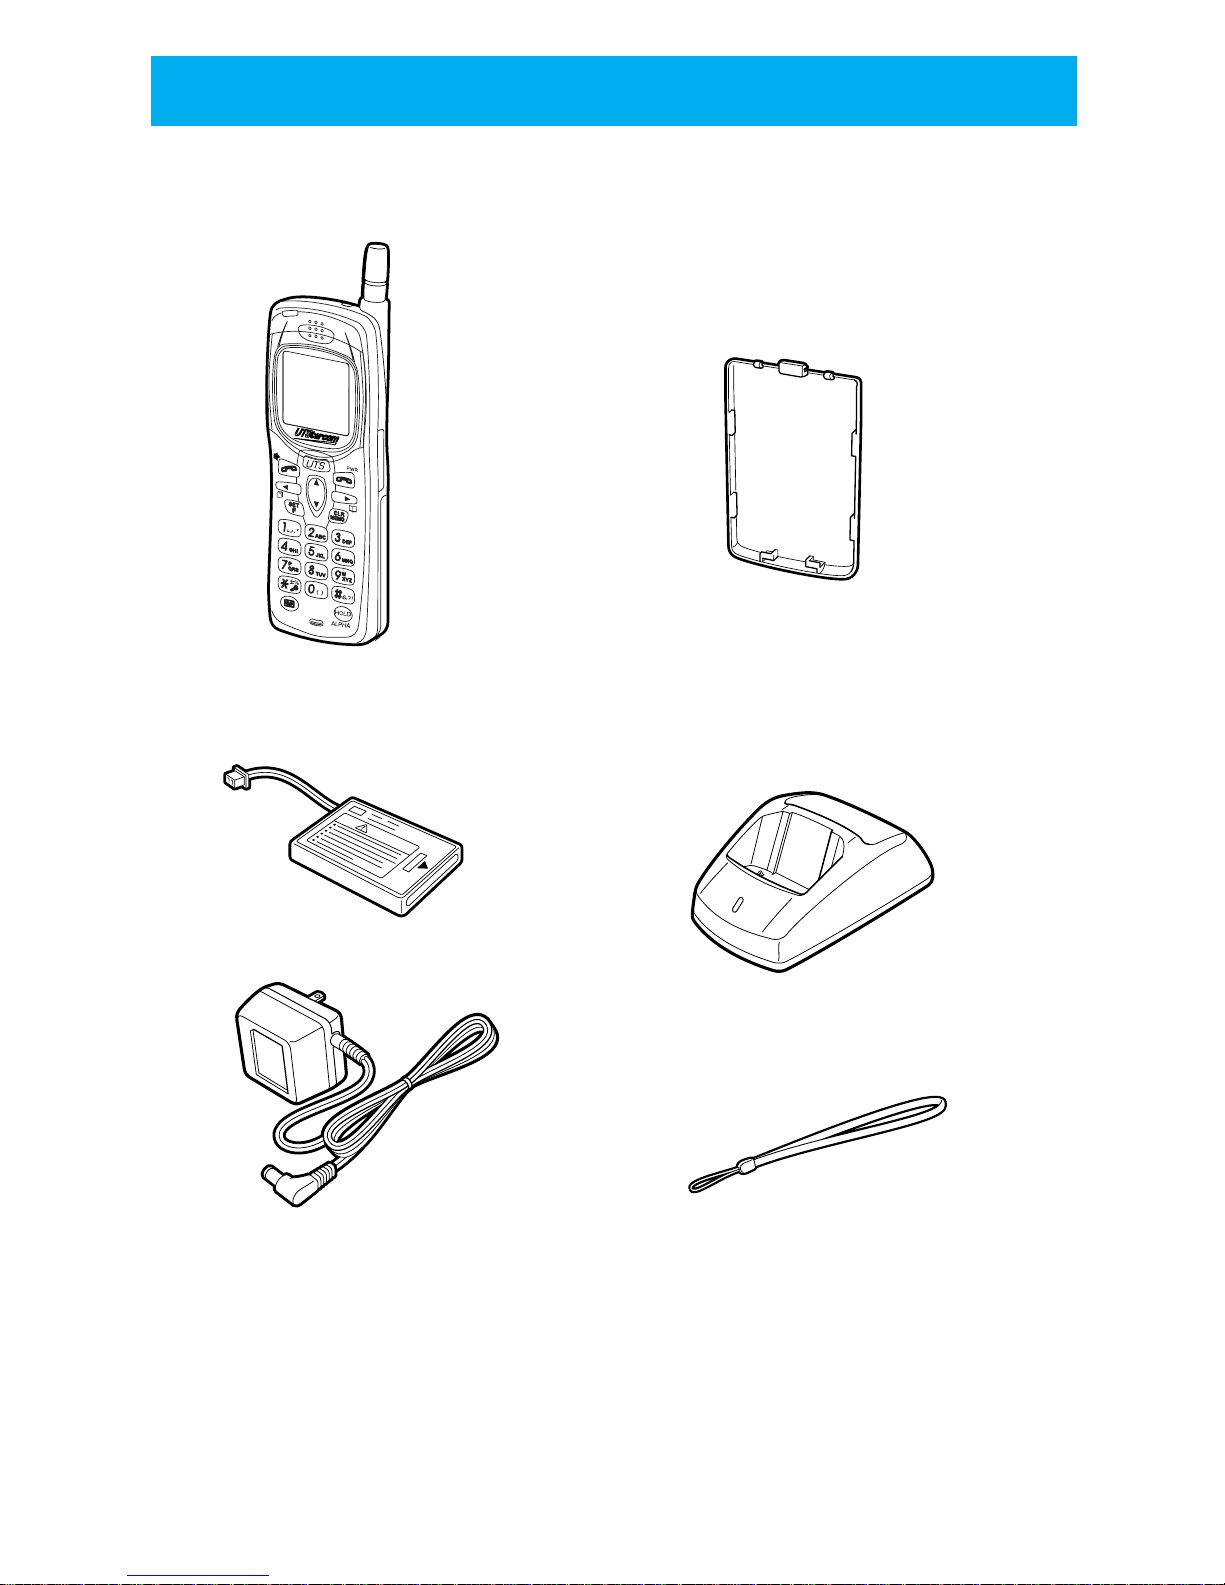
● CHECK PACKAGE CONTENTS
Check package components after opening box.
● Phone UTS-708J (1)● Battery compartment cover (1)
Accessories
● Battery pack (1) ● Battery charger (1)
● AC adapter (1)
● Hand strap (1)
● Instruction manual (1: this booklet)
C
H
A
R
G
E
Page 18

13
MEMO
Page 19
14
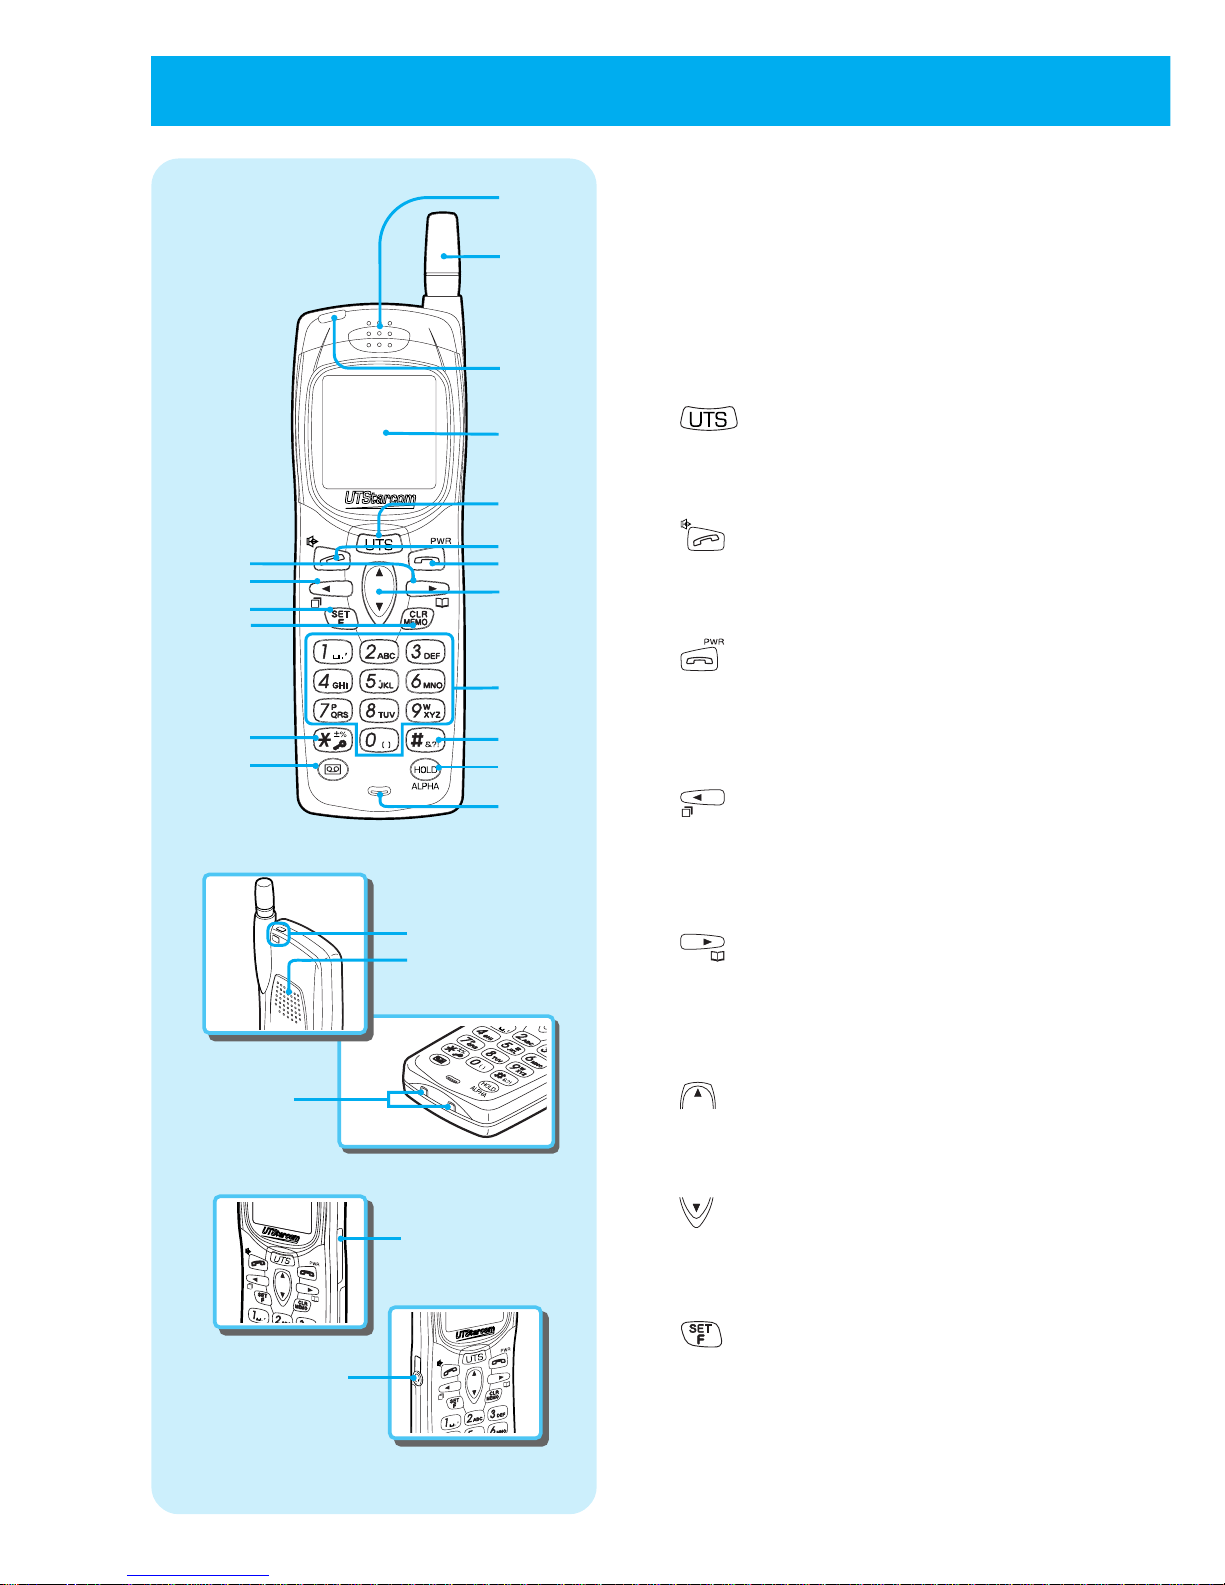
■
Front side
of phone
■
Bottom
side of
phone
■
Back side
of phone
■
Right side
of phone
■
left side
of phone
1
2
3
4
5
6
15
17
24
22
14
16
18
23
20
19
21
7
9
8
12
13
10
•
11
1 Receiver
2 Antenna
Fully extend the antenna when placing
or receiving calls. (Call may be disturbed
if antenna is not fully extended.)
3 Incoming light
4 Liquid Crystal Display (LCD)
5 key
Press this key to switch to short
message or manner mode. (See page
69 and 89.)
6 key
When placing or receiving calls, press
this key when using the hands-free
function. (See pages 29, 35 and 39.)
7 key
Press this key when ending a call and
turning the phone on and off. Also press
to stop a ring-tone. (See pages 24, 29
and 36.)
8 key
Use this key to navigate the cursor to
the left when inputting characters or
when placing a call by redial etc. (See
pages 32 and 42.)
9 key
Use this key to navigate the cursor to
the right when inputting characters or
when using the phone book function.
(See pages 42 and 44.)
10 key
Use this key to scroll up the function menu
when changing function settings. (See page
25.)
11 key
Use this key to scroll down the function menu
when changing function settings. (See page
25.)
12 key
Press this key when setting the various
functions, also press to confirm a
selected item. (See page 25.)
●
NAMES AND FUNCTIONS OF COMPONENTS
Page 20

15
13 key
Press this key when deleting characters
or using dial memo. (See pages 31 and
42.)
14 Dial key
Press this key when inputting phone
numbers or inputting characters. (See
pages 29 and 42.)
15 key
Press this key when setting key lock. (See
page 96.)
16 key
Press this key when setting dial lock.
(See pages 95.)
17 key
Press this key to record and playback.
(See pages 38, 58 and 72.)
18 key
Press when holding/releasing a call or
when changing the input character type.
(See pages 37 and 41.)
19 Microphone
20Hand strap attachment hole
21Speaker
22Battery charging terminals
2332kbps high speed data connector
24Earphone/mic. jack
* The function of keys explains only main
functions.
Page 21

16
DISPLAY OWN PHONE NUMBER AND NUMBER OF EACH OPRATION MODE (F00)
1
Press .
Display starts from the number of the current mode.
By using or the number of each mode is displayed in order. Modes that
are not registered are not displayed.
SETTING FUNCTIONS
You can call up and set various functions.
■
Setting by function menu display
1
Press .
2
Select the function you want to use by using .
You can select schedule function (page 76), function history
(page 17) and function menu (menu: each type of function can
be set)(this page). After selecting, follow the instructions for
each function.
■
Setting by function menu selection (Menu)
1
Press .
2
Press .
The function group is displayed. Find the function item of each
group from the function menu list (page 18).
3
Press or and select the function group you want to set.
Function groups for each item category are displayed in order.
This display scrolls when the keys are held down.
●
NAMES AND FUNCTIONS OF COMPONENTS (cont.)
Schedule
F
Fanc.History
History
Menu
Call Holding
Display/Clock
RecMsge&PhnBk
OperationTones
Others
Set
Select
F00
Public
TEL No. Display
07021234567
select
F00
Transceiver
TEL No. Display
No
.1000
select
Page 22
17
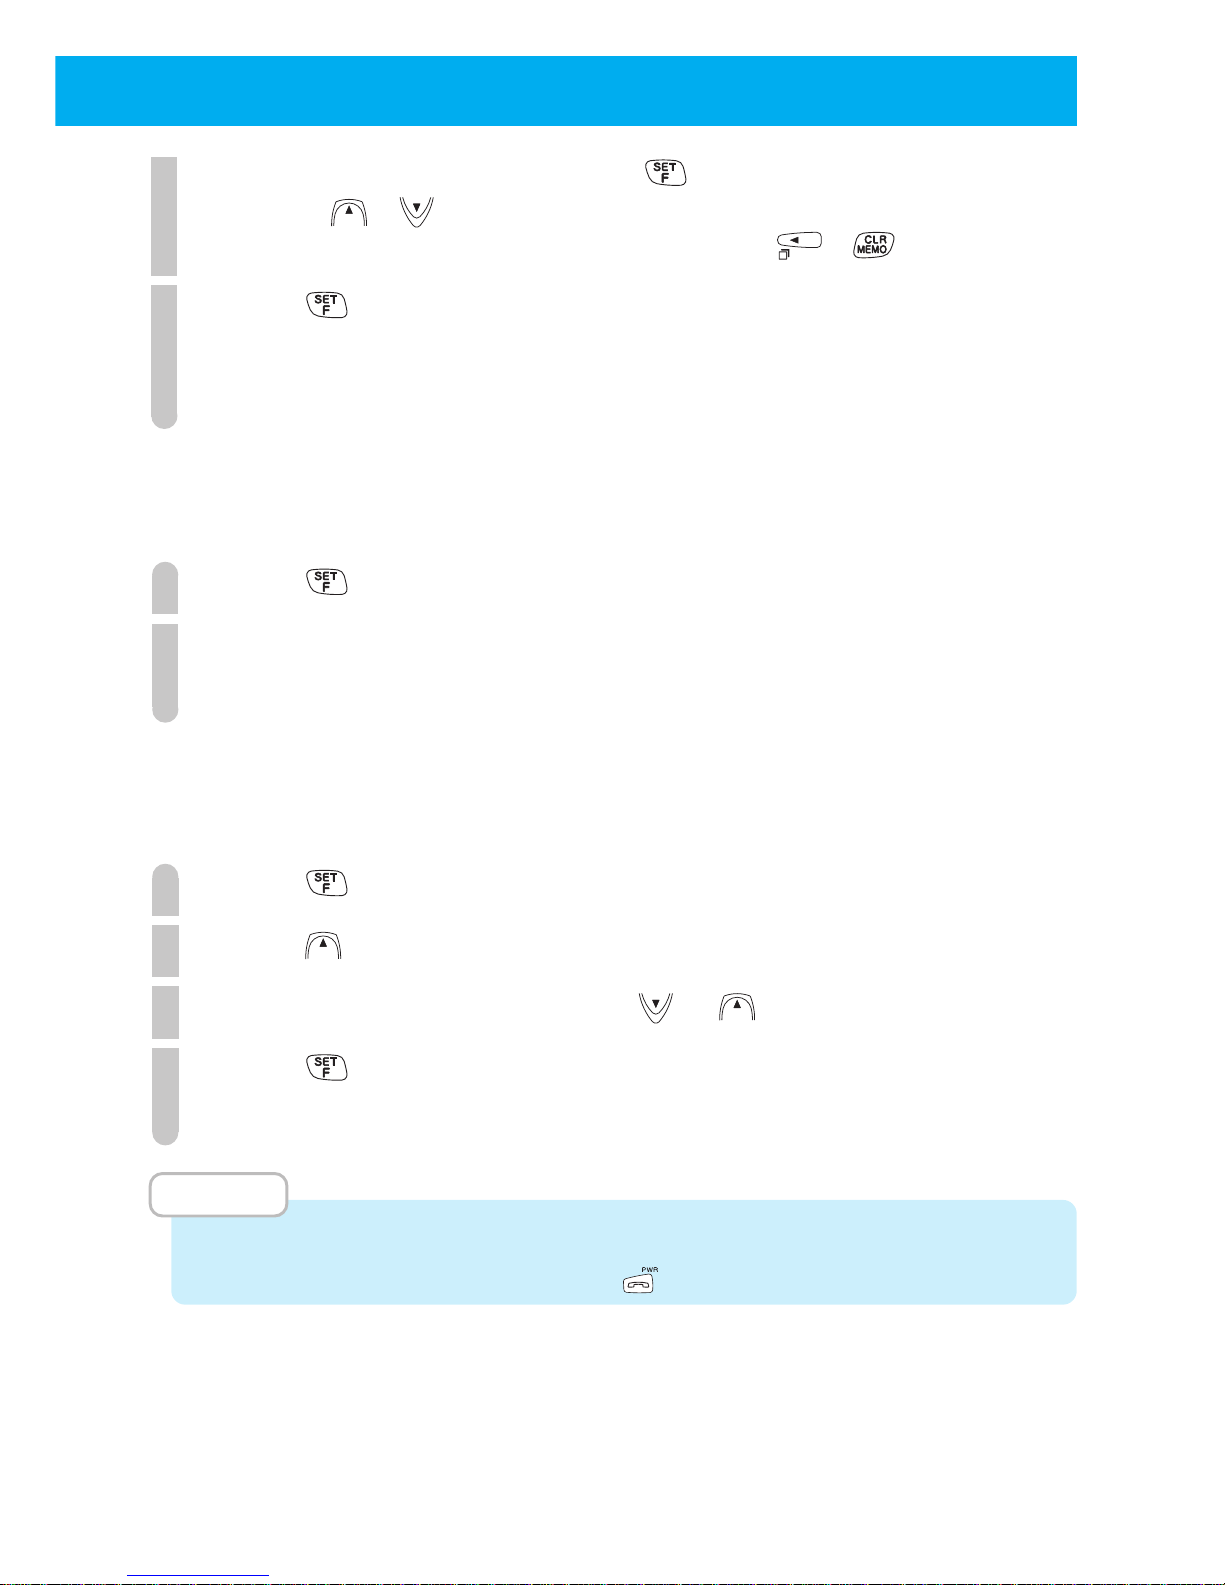
4
Select function item by pressing .
By pressing or , the list of functions can be displayed in order. If the
function you want to set is not there, return to step 3 by pressing or .
5
Press .
You can set the selected function.
For more information, see the respective sections for setting
each function.
■
Setting by function number direct input
You can call up the function setting by using the dial keys to directly input the function number (page 18 and page 74).
1
Press .
2
Input function number.
You can set the function by calling up function.
■
Setting by function history selection
You can select item from the 5 items in function history which were used previously.
You can easily select functions that you set frequently.
1
Press .
2
Press .
3
Select function icon by pressing or .
4
Press .
You can set the selected function.
MEMO
•
If you have not operated the phone for approximately 25 sec, you can exit from the
function setting screen by pressing the
key.
Page 23
18
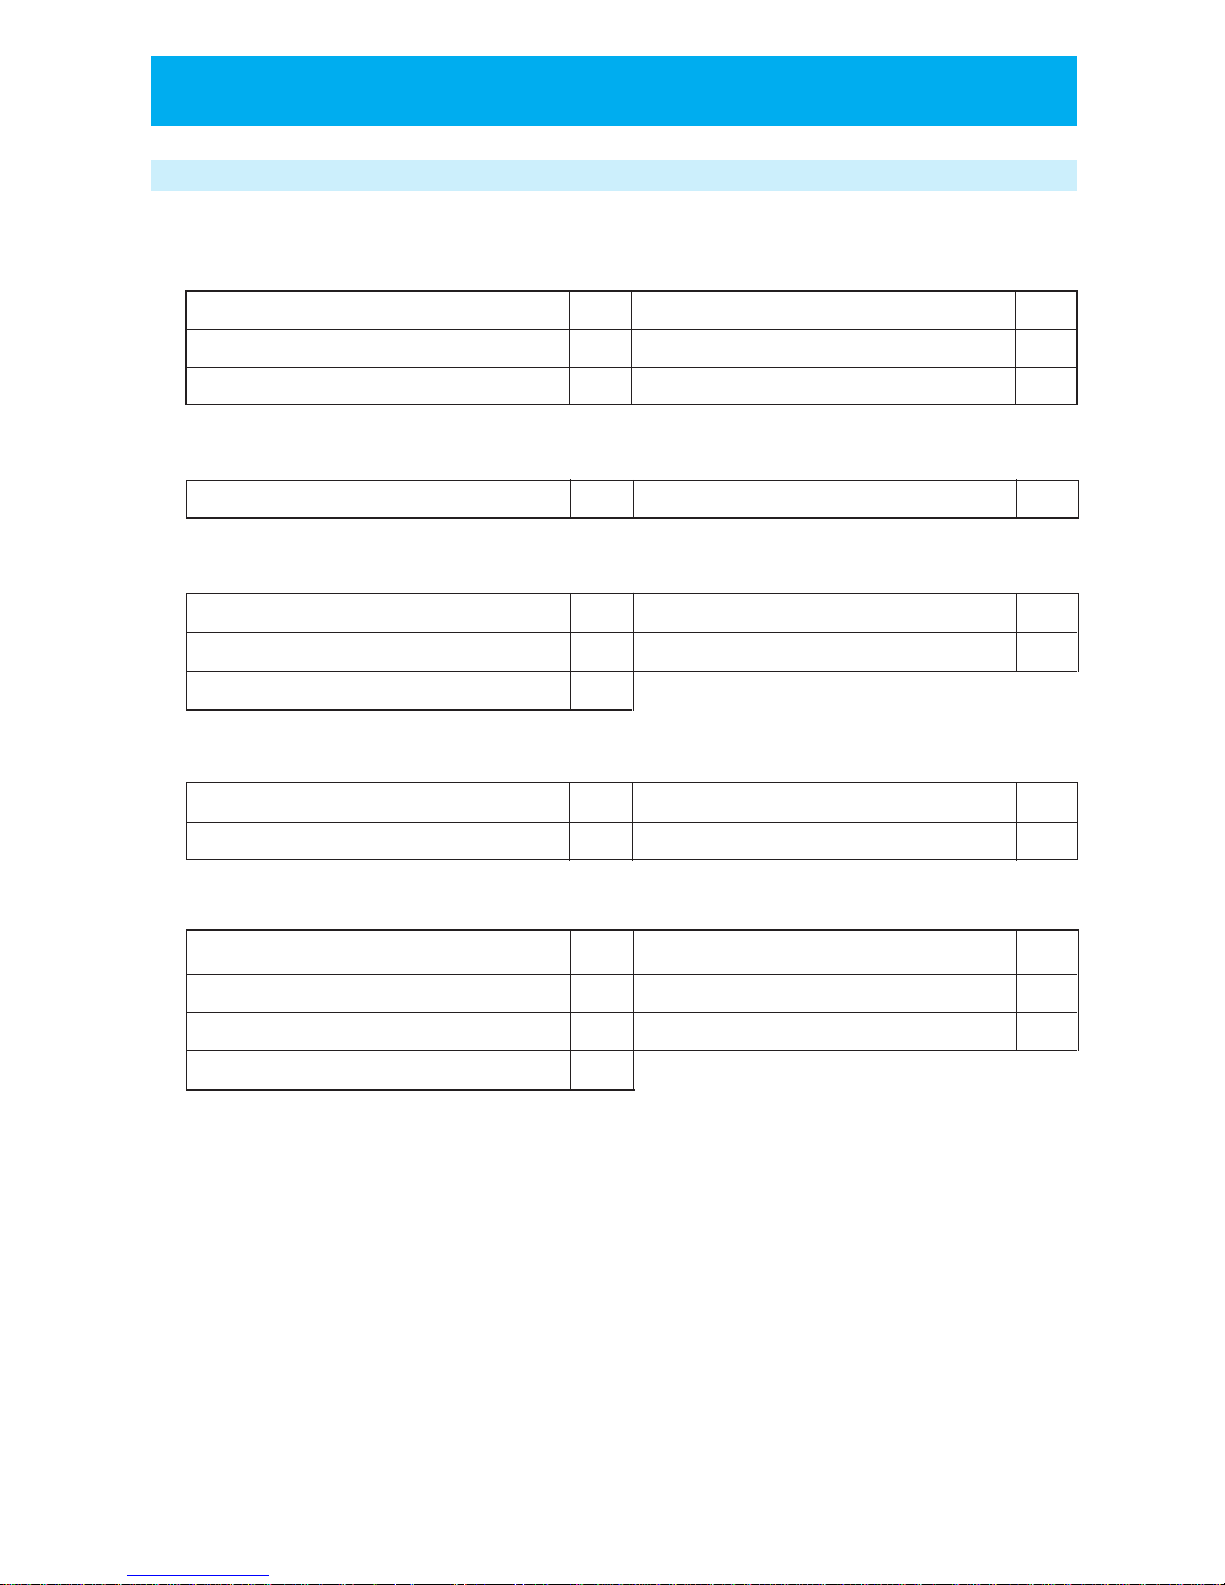
FUNCTION MENU LIST
■
DISPLAY & CLOCK FUNCTION GROUP
TEL No. Display (F00) Back Light (F65)
Set Clock (F62) LCD Contrast (F66)
Alarm & Auto OFF (F09) Rec Owner Name (F63)
■
CALL & HOLD FUNCTION GROUP
Set Ring-Tone (F11) Select Hold-Tone (F14)
■
ANSWER MESSAGE & PHONE BOOK FUNCTION GROUP
Answer Message (F24) Change Group Name (F92)
Message Response Time (F25) Clear All Phone Book (F32)
Phone Book Lock (F30)
■
OPERATION BEEP FUNCTION GROUP
Key Touch Tone (F80) Connecting (link) Tone (F82)
Out of Service Area Alarm (F81)
Hand-over Tone (F83)
■
OTHER FUNCTION GROUP
Change Standby Mode (F51)
Password Set (F71)
Notifying the Other Party (Caller ID Send) (F60)
Set Default Values (F72)
Any Key Answer (F67) Set Modem (F95)
Transceiver Group(F55)
P16
P64
P65
P98
P99
P98
P69P67
P54
P55
P56
P61
P96
P103
P103
P102
P102
P100
P101
P88
P25
P97
P99
P104
●
NAMES AND FUNCTIONS OF COMPONENTS (cont.)
Page 24
19
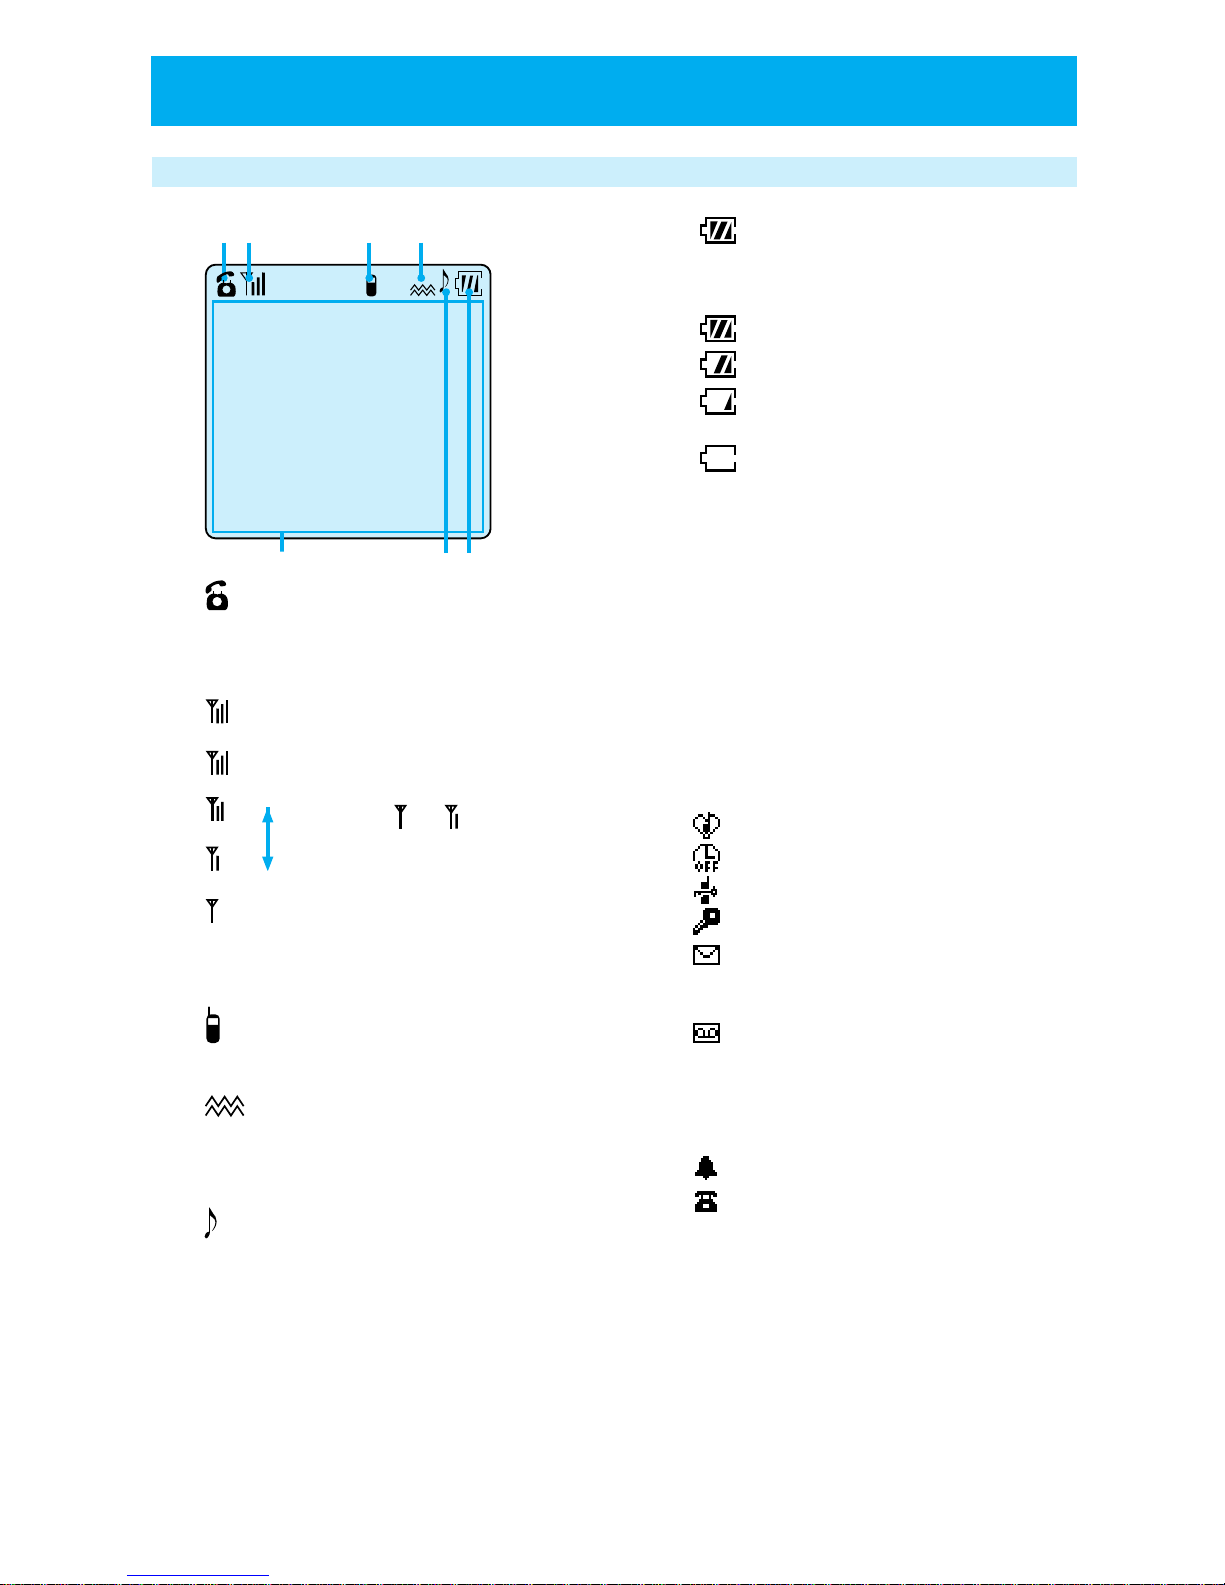
Liquid crystal display (LCD)
1
Lights up when placing a call or during
communication.
2
Lights up when you are in
service area.
When
or lights up, the
receiving signal is weak and
sometimes it is not
possible to receive or place
calls. Move to a place with
a stronger signal.
3
Lights up when in transceiver mode.
4
Lights up when PS is receiving in
vibration mode.
5
Lights up when incoming call tone is
set to melody.
6
The battery remaining power display
has four different levels.
Fully charged
Fair
Low. Not much power left.
Battery needs recharging.
No battery power. A "beep
beep beep" sounds while
communicating to indicate
approximately 1 minute of
communication time left.
7 Display area
Display content includes Alphabet and
numeric character input, dialed
numbers, and other mode states.
The following icons appear when their
corresponding functions are set.
When manner mode is set (page 69)
Auto power off (page 65)
Dial lock (page 95)
Key lock (page 96)
When received short message is
not read out.
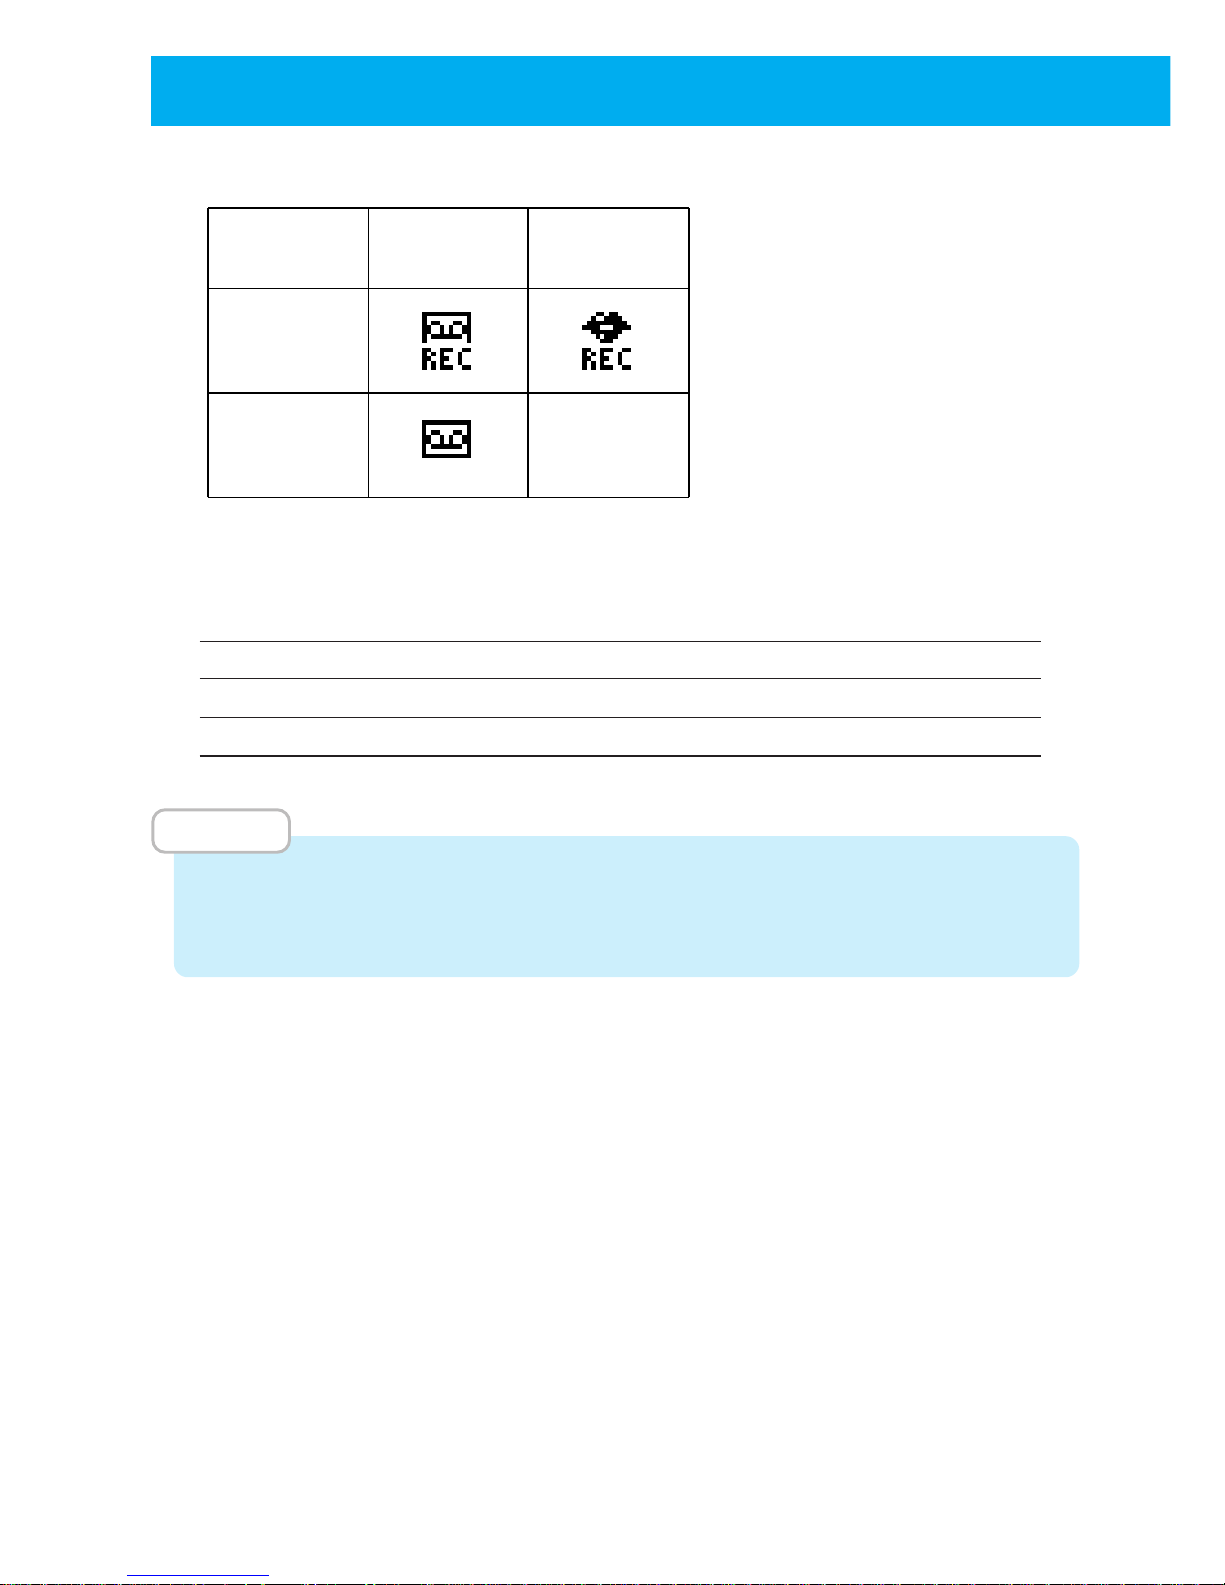
Answering Message
This display according to the status and
type of the message. See the table on
page 20.
Alarm (page 65)
Missed call (page 35)
STRONG
WEAK
●
BECOMING FAMILIAR WITH YOUR PHONE
Answer Message
11/12
15:00
1234567890
Call Memory
7
12
3
4
5
6
Page 25
20
Operation mode Continual communication time Standby time
Public Approximately 6.5 hours Approximately 550 hours
Transceiver Approximately 6.5 hours Approximately 220 hours
Guide for battery duration
The times listed below will differ depending on how the batteries are charged, the age
of the battery and the environmental conditions.
●
BECOMING FAMILIAR WITH YOUR PHONE (cont.)
new messages
exist
Ordinary
message
No display
played
messages only
Cancel
message
Message display
*This also lights up if there are unplayed
voice memos or conversation memos.
*
MEMO
• In real use, the actual phone usage time will be a combination of standby time and
communicating time. If you receive and place many calls and if you move around
frequently the battery duration will be shorter.
Page 26
21
ATTACHING THE HAND STRAP
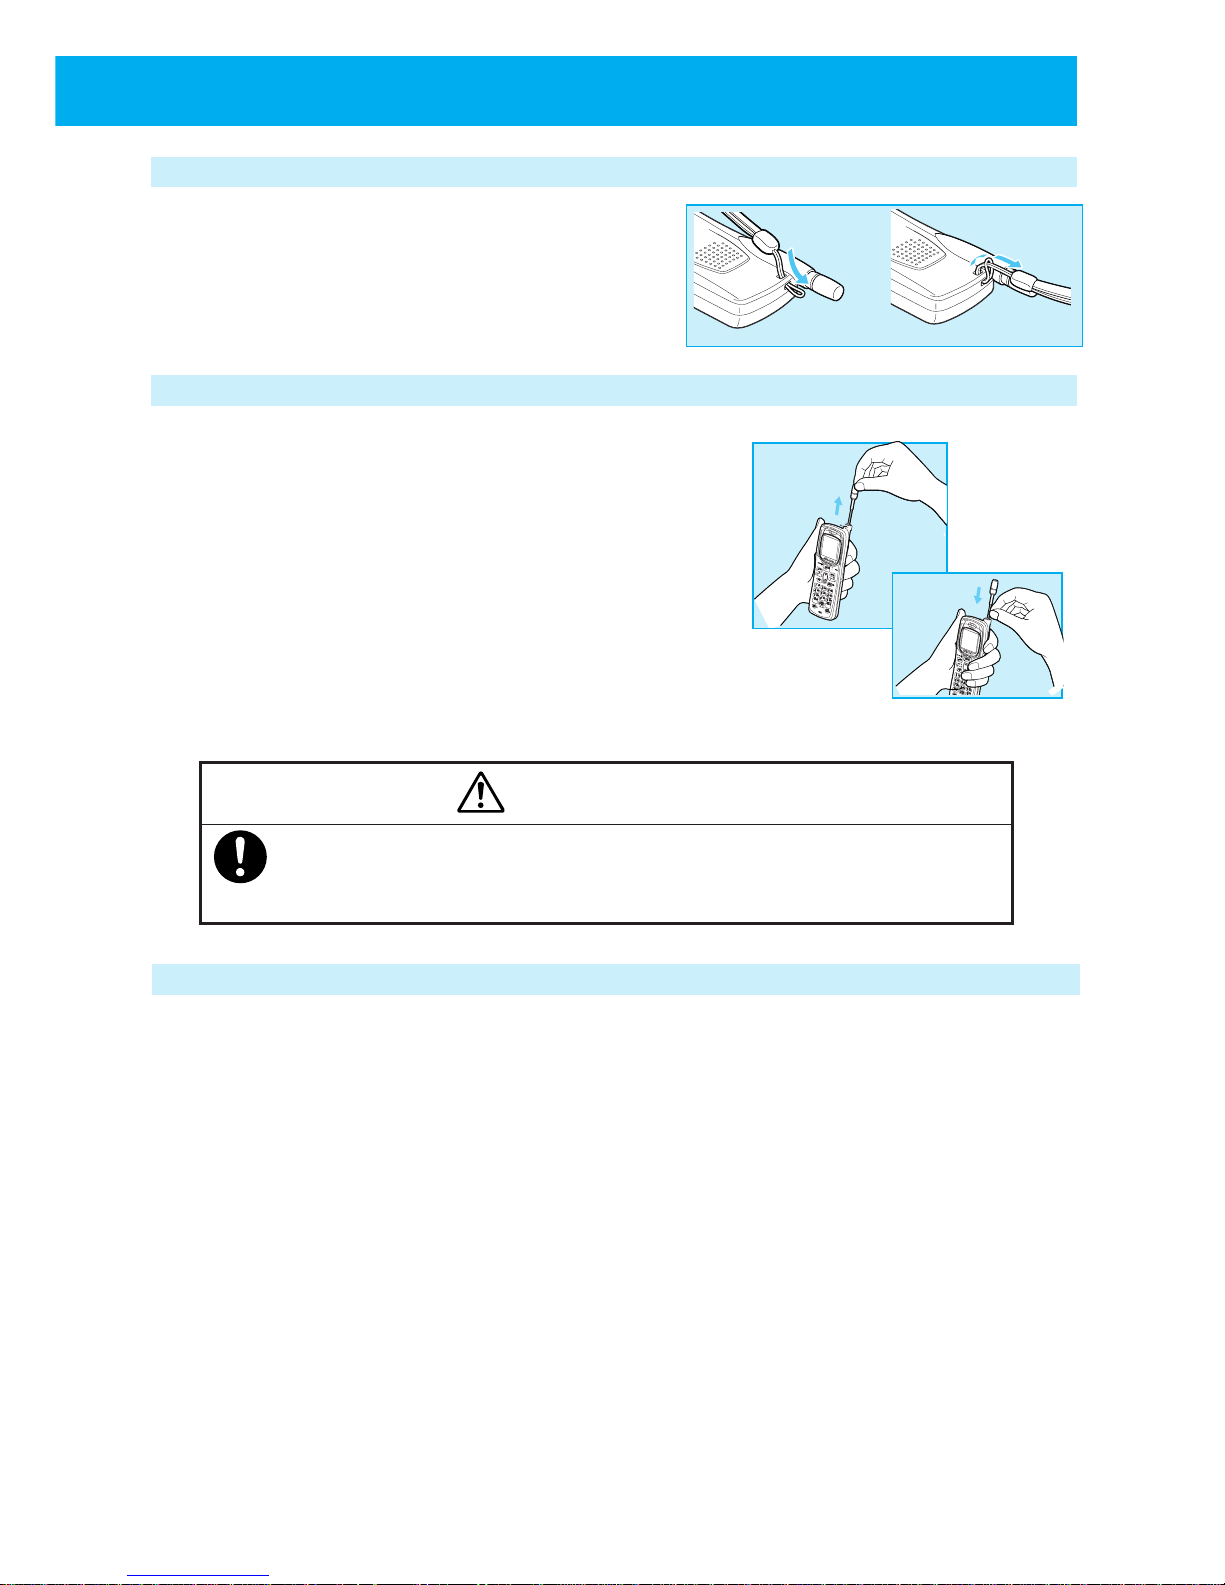
Attach the hand strap as shown in the figure
on the right. When using it, ensure that it
does not detach from the phone.
USING THE ANTENNA
The UTS-708J can place and receive calls while the
antenna is in the storage position, however for better
performance, use the phone with the antenna pulled
out.
• Pull the antenna out fully until it stops with a click.
• When returning the antenna to the storage
position, hold on to the base of the antenna and
pull it directly downward. Do not forcefully retract
antenna while it is bending. Otherwise, it may be
bent or damaged.
Caution
• When on the move, always retract the antenna to the storage position.
• Do not apply excessive force to the antenna. Otherwise, it may break
the antenna.
USING THE EARPHONE/MICROPHONE TERMINAL
The earphone/microphone terminal can be used to connect a commercially available
earphone/microphone kit or modem connection cable. Please completely furnish
the connection cable. See page 87 for how to connect a modem.
Page 27
22
● CHARGING THE BATTERY PACK
Loading and removing the battery pack
■
Loading the battery pack
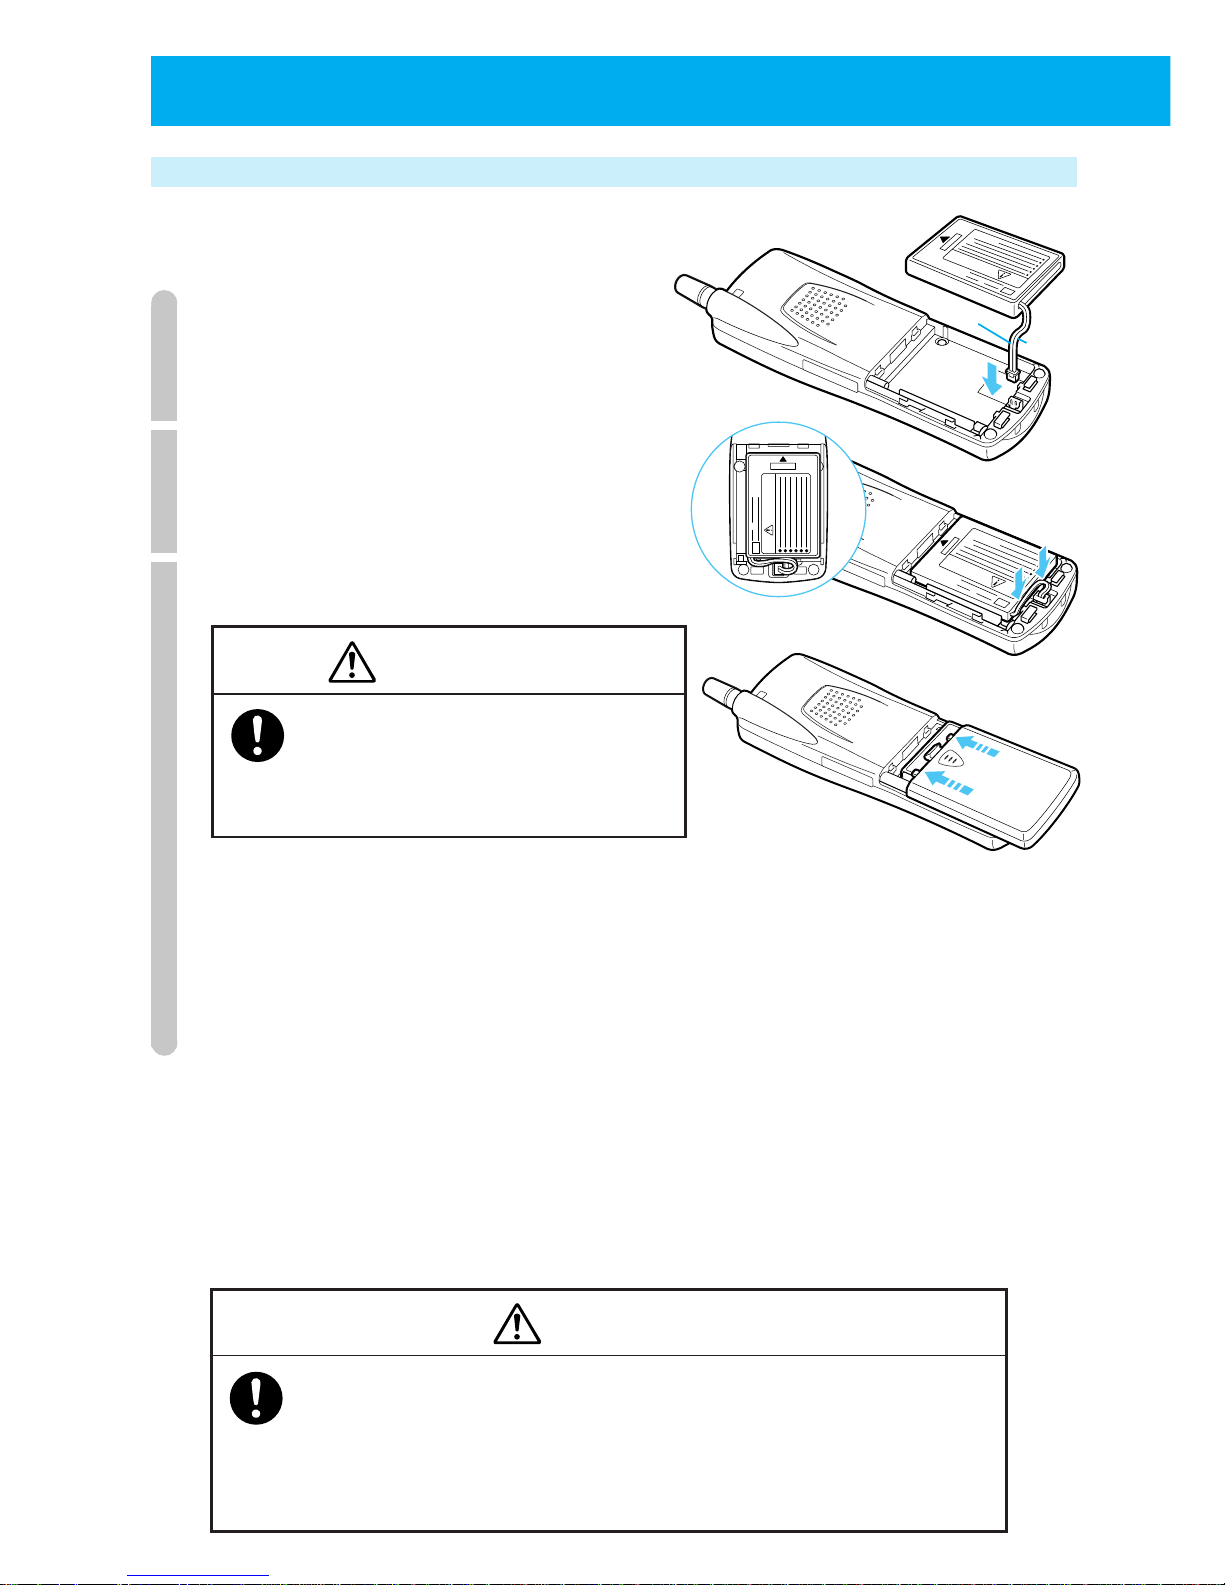
1
Connect the battery pack's connector.
Do not misconnect the connectors
direction and put it in firmly.
2
Put battery pack in.
Do not slacken the cord and put it into the
guide gap in the compartment firmly.
3
Attach the battery compartment cover.
Caution
Close the cover firmly. If the cover is
not closed completely, water can get in
or cover can open by vibration and it
may cause the battery to fall out.
(1) Place the battery compartment cover parallel to the phone in the position
shown in the right figure.
(2) While keeping a finger on the center of the cover, push the bottom part into
the phone until you hear a click.
(3) Ensure that there is no gap between the cover and the phone's body.
■
Removing the battery pack
When replacing the battery pack, you must remove the battery pack.
The battery pack is a consumable. Depending on how frequently it is used, it will last for
about one year. When charging the battery pack for more than 4 hours results in only
a few minutes of battery power, it is time to replace it with a new battery pack (sold
separately). Contact your dealer for purchasing information.
Danger
Always handle the battery pack correctly. Otherwise, it could cause leakage,
heat generation or explosion. Always follow these instructions.
• Do not short circuit the + and - terminals.
• Do not throw into fire or heat it.
• Do not disassemble or modify it.
Black
Red
Page 28
23
1
If your phone is turned on, turn it off by pressing for more than 2 seconds.
Always turn off the power.
2
Remove the battery compartment cover.
Slide the cover towards the base of the phone and remove by lifting.
3
Remove the battery pack.
When removing the connector, hold the cord in a position near the connector
and pull lightly.
4
Attach the new battery pack (page 22), prepare the battery charger
(this page) and charge (page 24).
Use the designated battery charger only.
Request for battery pack collection
Warning
When returning used lithium ion batteries, always insulate the
connector parts using tape. Otherwise, the bare connectors could
short circuit causing leakage, heat generation and ignition.
The battery pack is a lithium ion battery. For the sake of environment protection,
do not discard with other non-combustible rubbish. Please hand the old battery
over at the place you purchase the replacement battery.
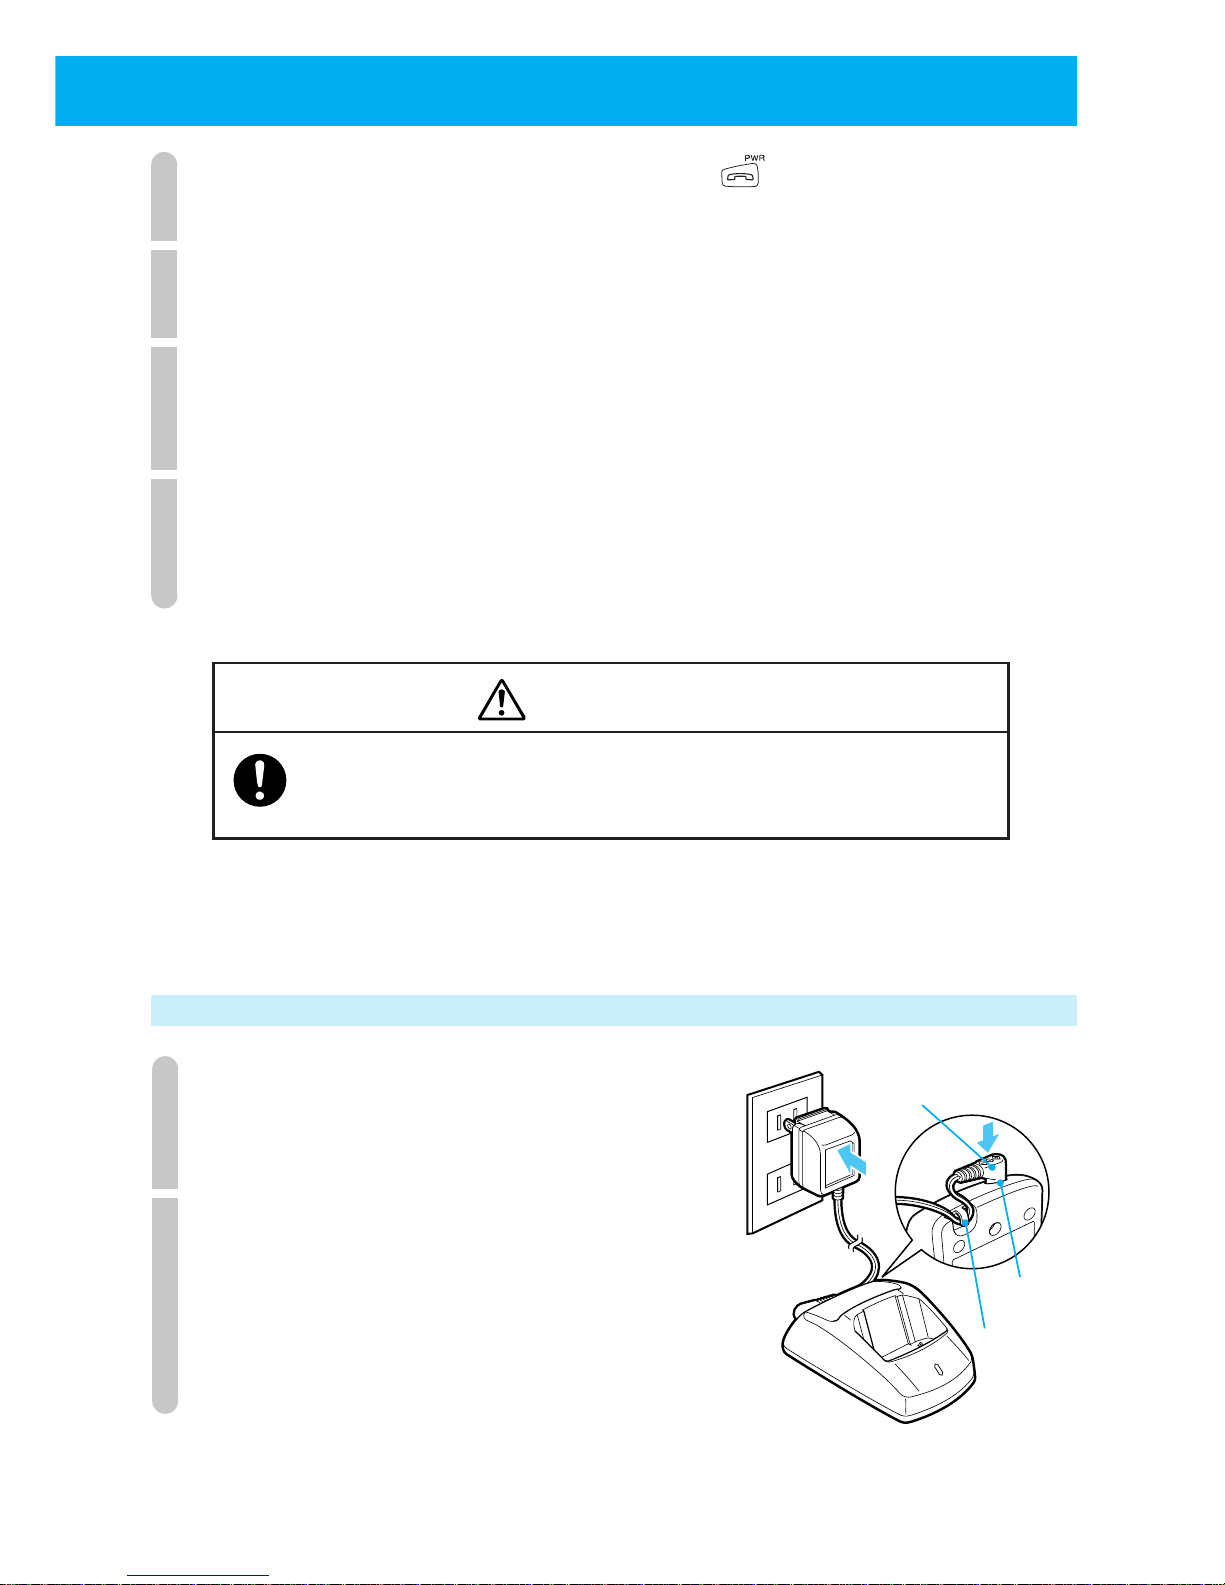
Preparing the battery charger
1
Plug the battery charger's AC adapter plug
into the battery charger's insertion port.
Fix the cord in place by passing through the hook.
2
Plug the battery charger's AC adapter
into the AC outlet.
CHARGE
AC adapter
plug
Insertion
port
Hook
Page 29
24
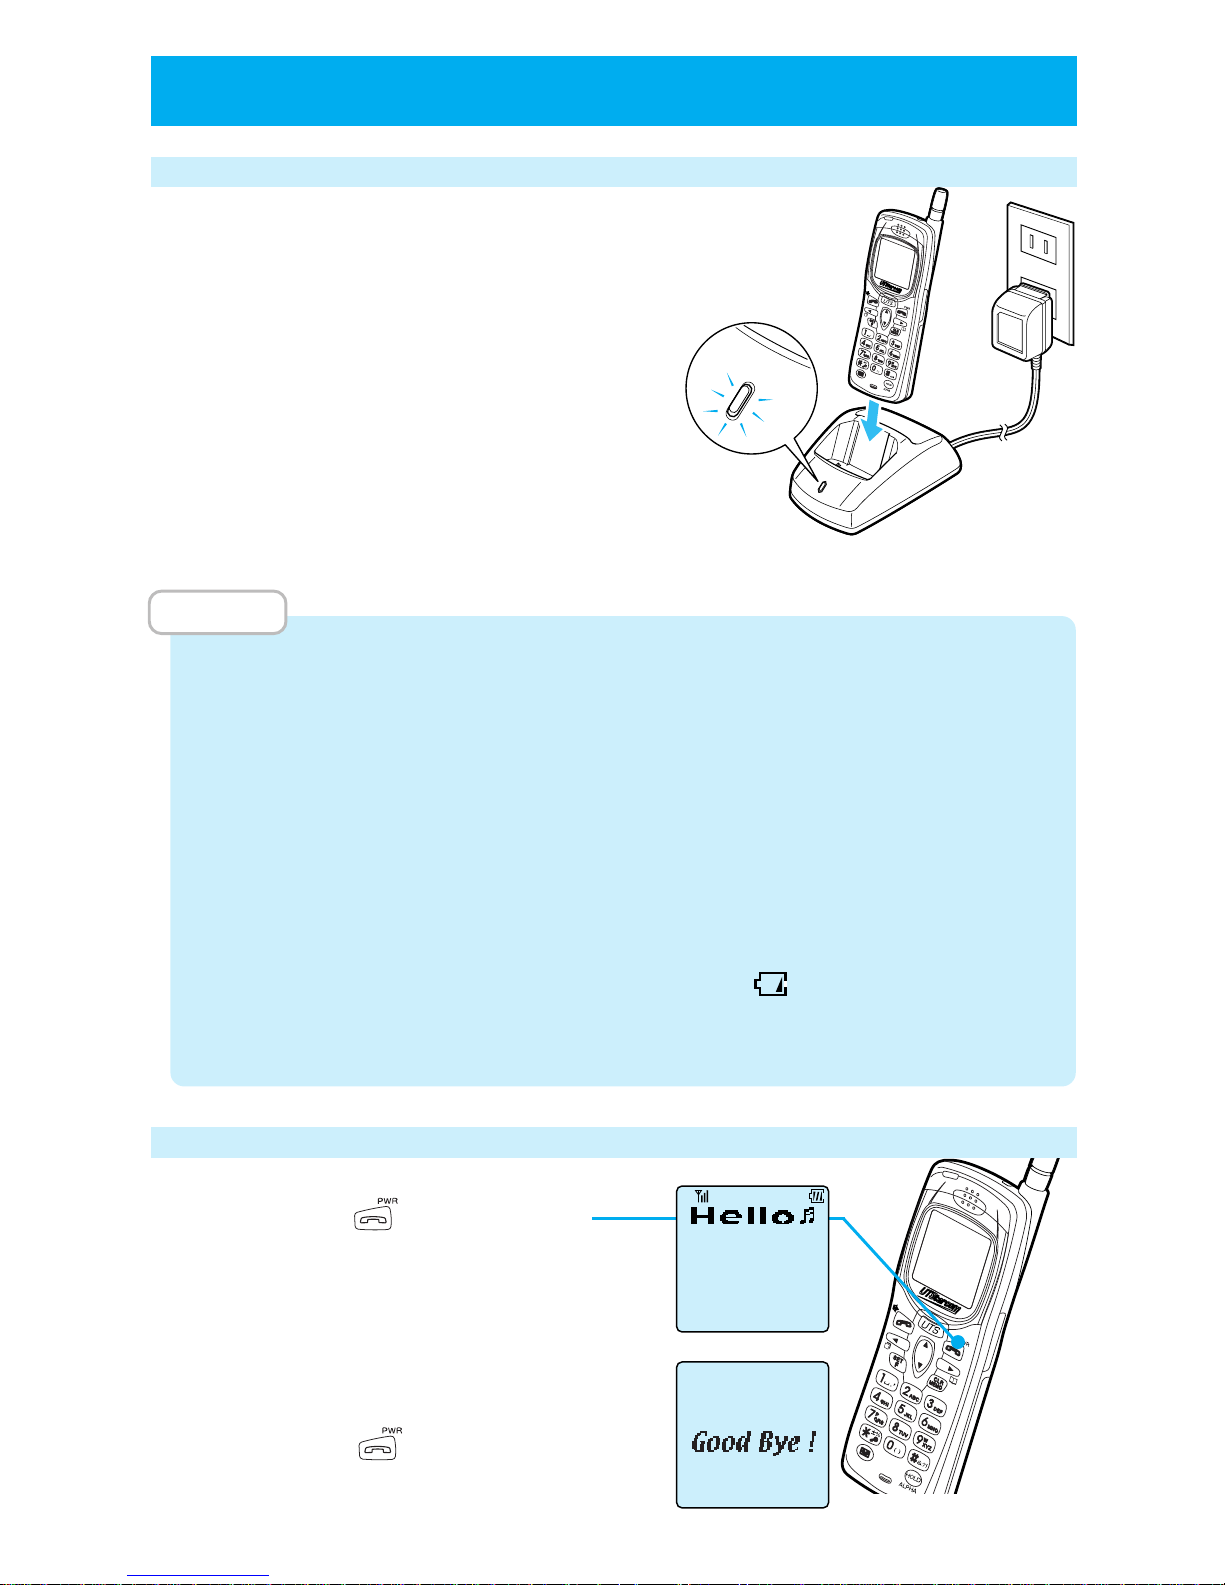
Charging
Insert the phone into the battery charger.
The charging LED will turn on.
■
Charging LED display
While charging: Charging LED is red
Charging is completed: Charging LED is green
■
Charging time
Maximum charging time approximately 4 hours
Keep charging until the charging LED changes from red to green.
MEMO
• You can charge the phone whether the power is on or off.
•
It is recommended that you always insert the phone into the battery charger when you
are not using it. Excess charging will not cause any harm. (Parts of the phone and battery
charger may get warm but this is caused by the charging and does not cause any harm.)
•
When using for the first time, and when the battery pack has been replaced, charge until the
charging LED turns green. When you purchase the battery pack, it will not be sufficiently charged.
• If after charging is completed, you remove the phone and then immediately return
the phone to the battery charger, the charging LED will be red. This is normal.
•
Do not insert the phone into the battery charger in wrong direction. Charging will not be possible.
• Phone and battery charger get warm while charging. This is normal.
•
When the battery remaining power display becomes , always charge the battery.
• If the charging terminals get dirty, the charging LED may not light up red. Clean the
terminals occasionally by wiping with a dry cloth.
Turning power on
Press and hold for more than
2 seconds.
Your phone number appears for about
5 seconds.
■
Turning power off
Press and hold for more than 2 seconds.
C
H
A
R
G
E
C
H
A
R
G
E
CHARGE
●
CHARGING THE BATTERY PACK (cont.)
07021234567
Public Mode
Page 30
25
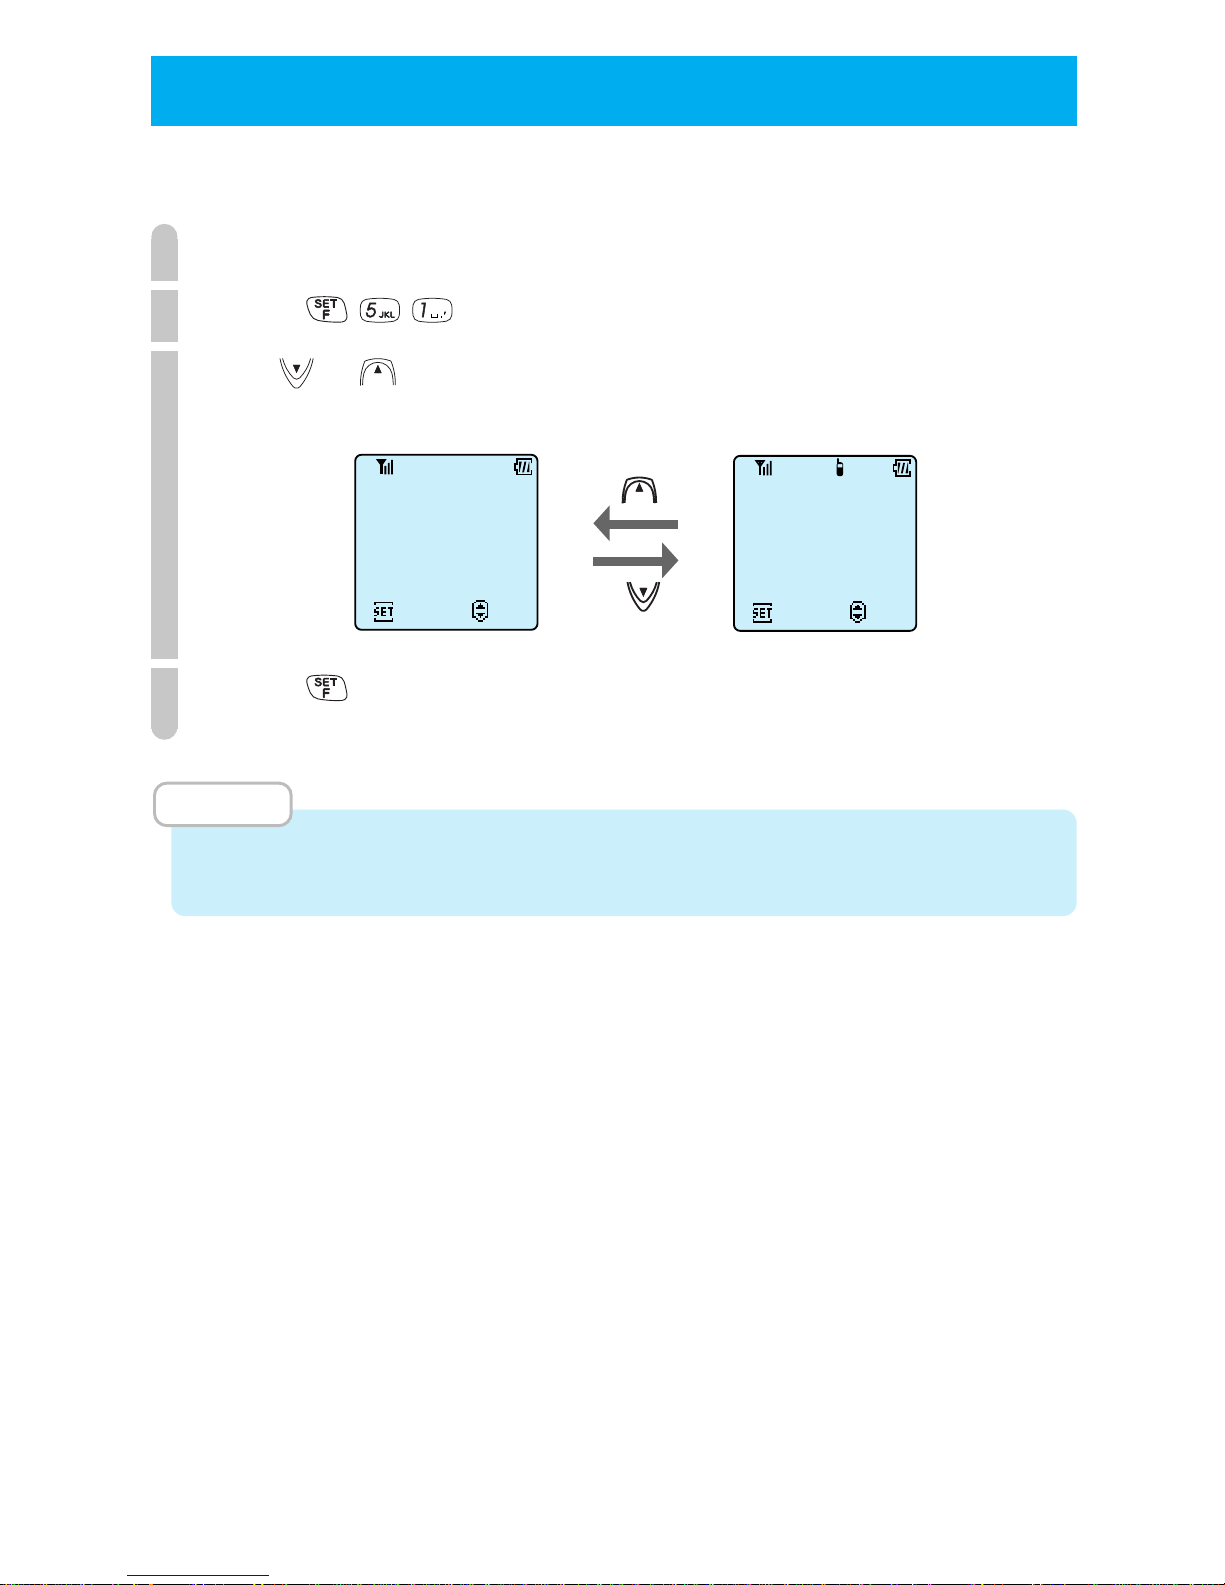
You can use your phone in public mode as a PHS or in transceiver mode as a
transceiver.
1
When you turn your phone on, the currently set mode appears.
2
Press .
3
Use or to select the mode you want.
4
Press .
Mode is switched and setting is complete.
MEMO
• When the group transceiver is not registered, the mode for that is not displayed.
• You cannot change modes while communicating.
● SETTING OPERATION MODES (F51)
Public mode Transceiver mode
F51
Public
ChngStndbyMode
07021234567
Set
Select
F51
Transceiver
ChngStndbyMode
No
.1000
Set
Select
Page 31

26
MEMO
Page 32

USE AS A PHS
PHONE
●
BEFORE USING AS A PHS PHONE
..P28
● PLACING A CALL......................P29
● RECEIVING A CALL ...................P35
● OPERATIONS DURING CALLS ....P37
● CHARACTER INPUT METHOD ....P41
● USING PHONE BOOK ................P43
●
USING THE ANSWER MESSAGE FUNCTION
..P56
Page 33

28
● BEFORE USING AS A PHS PHONE
If you have subscribed to a PHS service and you are in a PHS service area such as
outside or in various public spaces, you can place and receive calls between
general phones, and other PHS portable phones. (See page 25 for switching to
public mode.)
■
Pull the antenna when communicating.
When communicating, pull the antenna to enjoy best conditions.
■
Always check LCD for status of phone.
•
The signal status display becomes or .
When does not light up, you cannot use the phone
because the signal is not reading. Move to a place
where the signal status lights up.
• Battery power is remaining. (See page 19.)
■
When calling an ordinary phone, always start dialing from the local area code number.
■
Cautions while communicating
• Even within a PHS service area, places like inside buildings, cars, between the
buildings, underground, or in tunnels result in a weaker signal which may
result in difficulty hearing or drop outs.
• If you are communicating while moving, the communication may temporarily
drop out. This occurs when the network automatically switches (hand-over)
from the public base station that the phone was using to a base station with
a stronger signal. This does not indicate a fault. A short "per per" noise can
be set to occur during a hand-over. (See page 103.)
• If you go outside of a PHS service area while moving, communication is cut
off. Just before disconnection, the phone will beep to notify you that you are
out of service area. You can stop this beep. (See page 102.)
16:50
Thu 3/23
Page 34
29
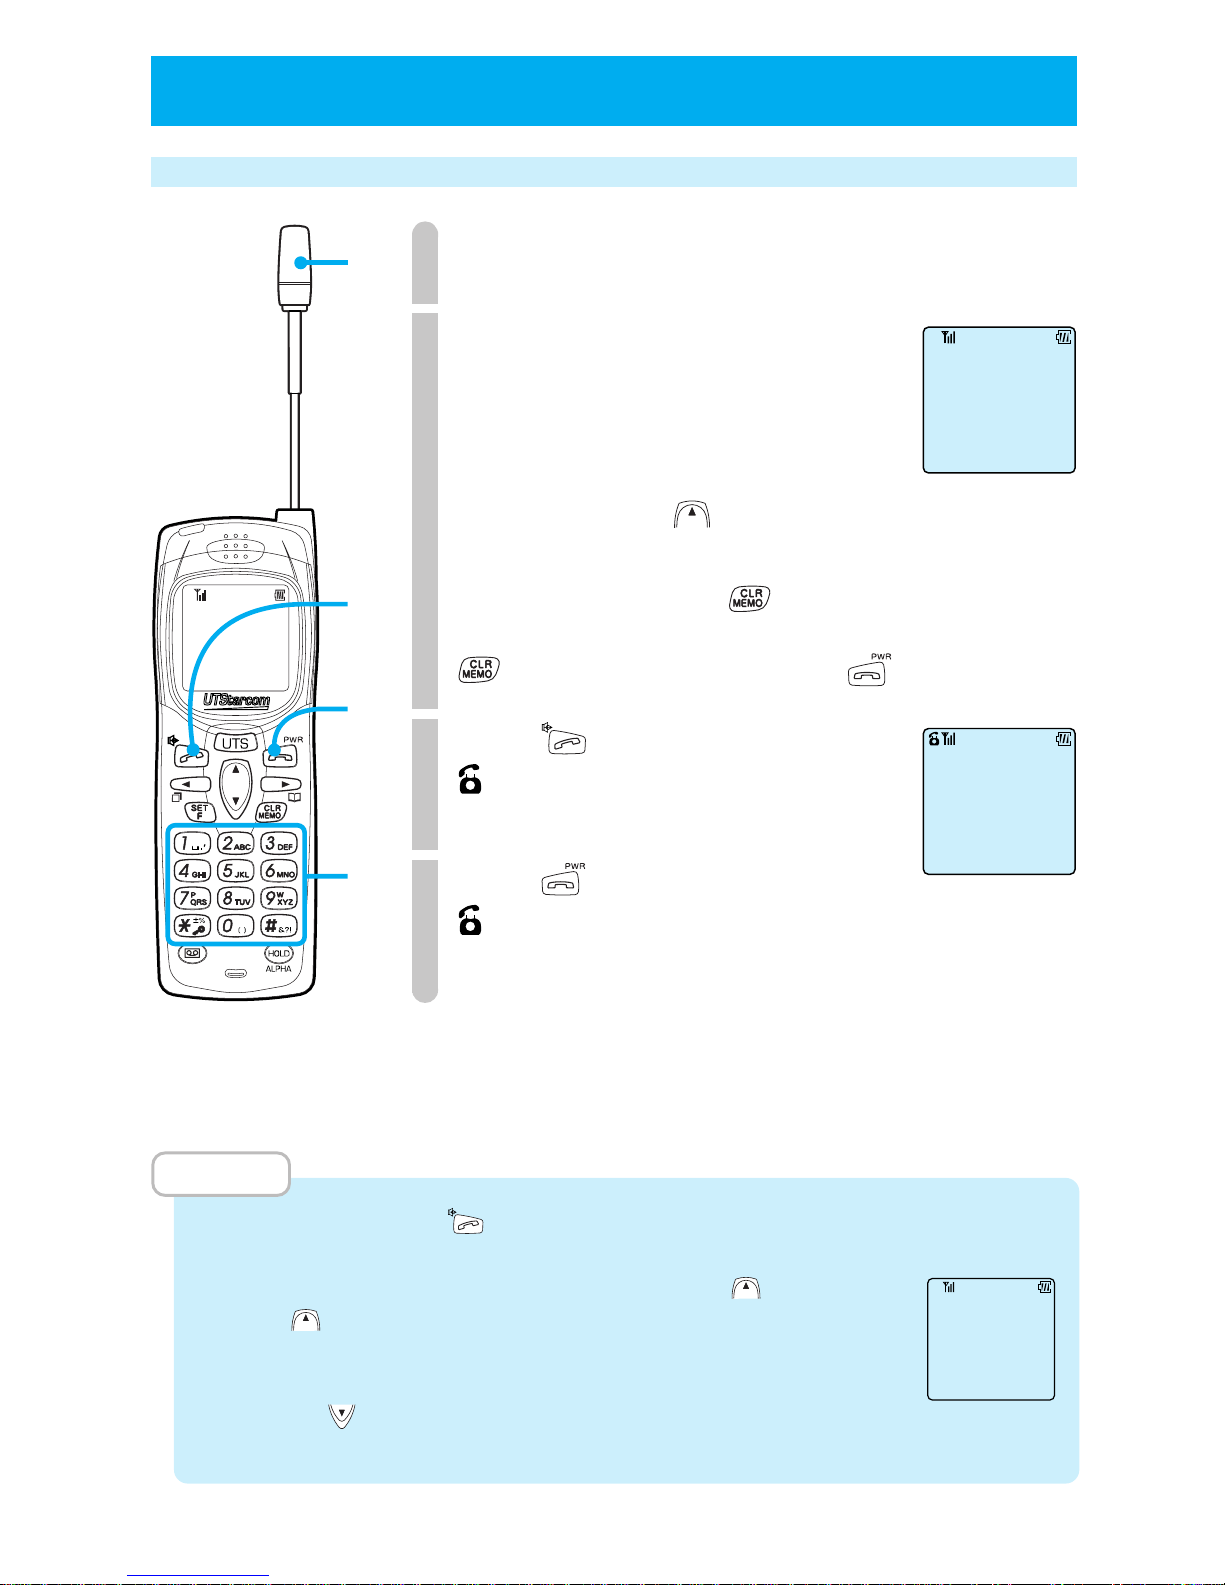
Placing/ending a call
1
Pull out the antenna.
2
Dial the phone number of the party you wish to call.
Always include the local area code when dialing.
You can enter up to 32 digits but in double-size
digit display, you can only display 12 digits at any
one time. When 13 or more digits are entered,
you can press and hold to display all digits.
Fixing mistakes
Clear the last digit : Press .
Clear all : Press and hold down
for more than a second, or press .
3
Press .
lights up and when the recipient answers, you
can communicate. The calling time is displayed.
4
Press to terminate your call.
disappears and the call duration is displayed for 3
seconds. Then the phone returns to standby screen.
■
When line is busy and you cannot get through.
You will hear the busy tone. (Sometimes a display saying the line is busy or an announce
saying something like the phone is either switched off or out of the service area.)
MEMO
•
You can dial after pressing . If you do this, there will be a 5 second delay after dialing before the call
is placed.
•
To check a number of 13 or more digits, press and hold down . When you
release
, it will go back to displaying the last 12 digits.
•
The calling time that is displayed is a guide. It may not match your phone bill.
•
The dialed phone number is kept in the redial (page 30).
•
By pressing , you can enter "■" to split up the phone number so that it is
easier to see.
00:01
● PLACING A CALL
07031234567
1
3
4
2
6789012345678901
0703123456712345
Page 35

30
●
PLACING A CALL
(cont.)
■
Calling numbers previously placed and received, and
referring to dial memo
Your phone automatically remembers the phone numbers to which you dialed or
which is from callers whose phones are set to notifying the other party. You can
confirm and display the numbers remembered, and call these numbers. You can
also register these numbers in phone book (page 44).
Contents of memory
Redial (Dial log)
Remembers the numbers of your last 10 calls (maximum of 22 digits). It will not
remember the same numbers repeatedly.
Call memory
Call back memory (Log of answer to incoming calls)
Remembers the numbers (maximum of 22 digits) which are from callers whose
phones are set to notifying the other party. It will not remember the same
numbers repeatedly. Including call memory, it can remember a maximum of
10 numbers.
Call memory (Log of incoming calls during absence)
When you could not answer the calls which is from the callers whose phones
are set to notifying the other party, it can remember the number (maximum of
22 digits) of the caller. It will not remember the same numbers repeatedly
(excluding direct mail). Including call back memory, it can remember a maximum
of 10 numbers.
Dial memo
You can take a memo for 2 phone numbers (maximum 22 digits) during a call.
See page 31 for how to take memos.
MEMO
• The redial, call memory, call back memory and dial memo data may be lost if the
battery pack is removed.
• The call memory function may not be supported in some regions.
Page 36
31
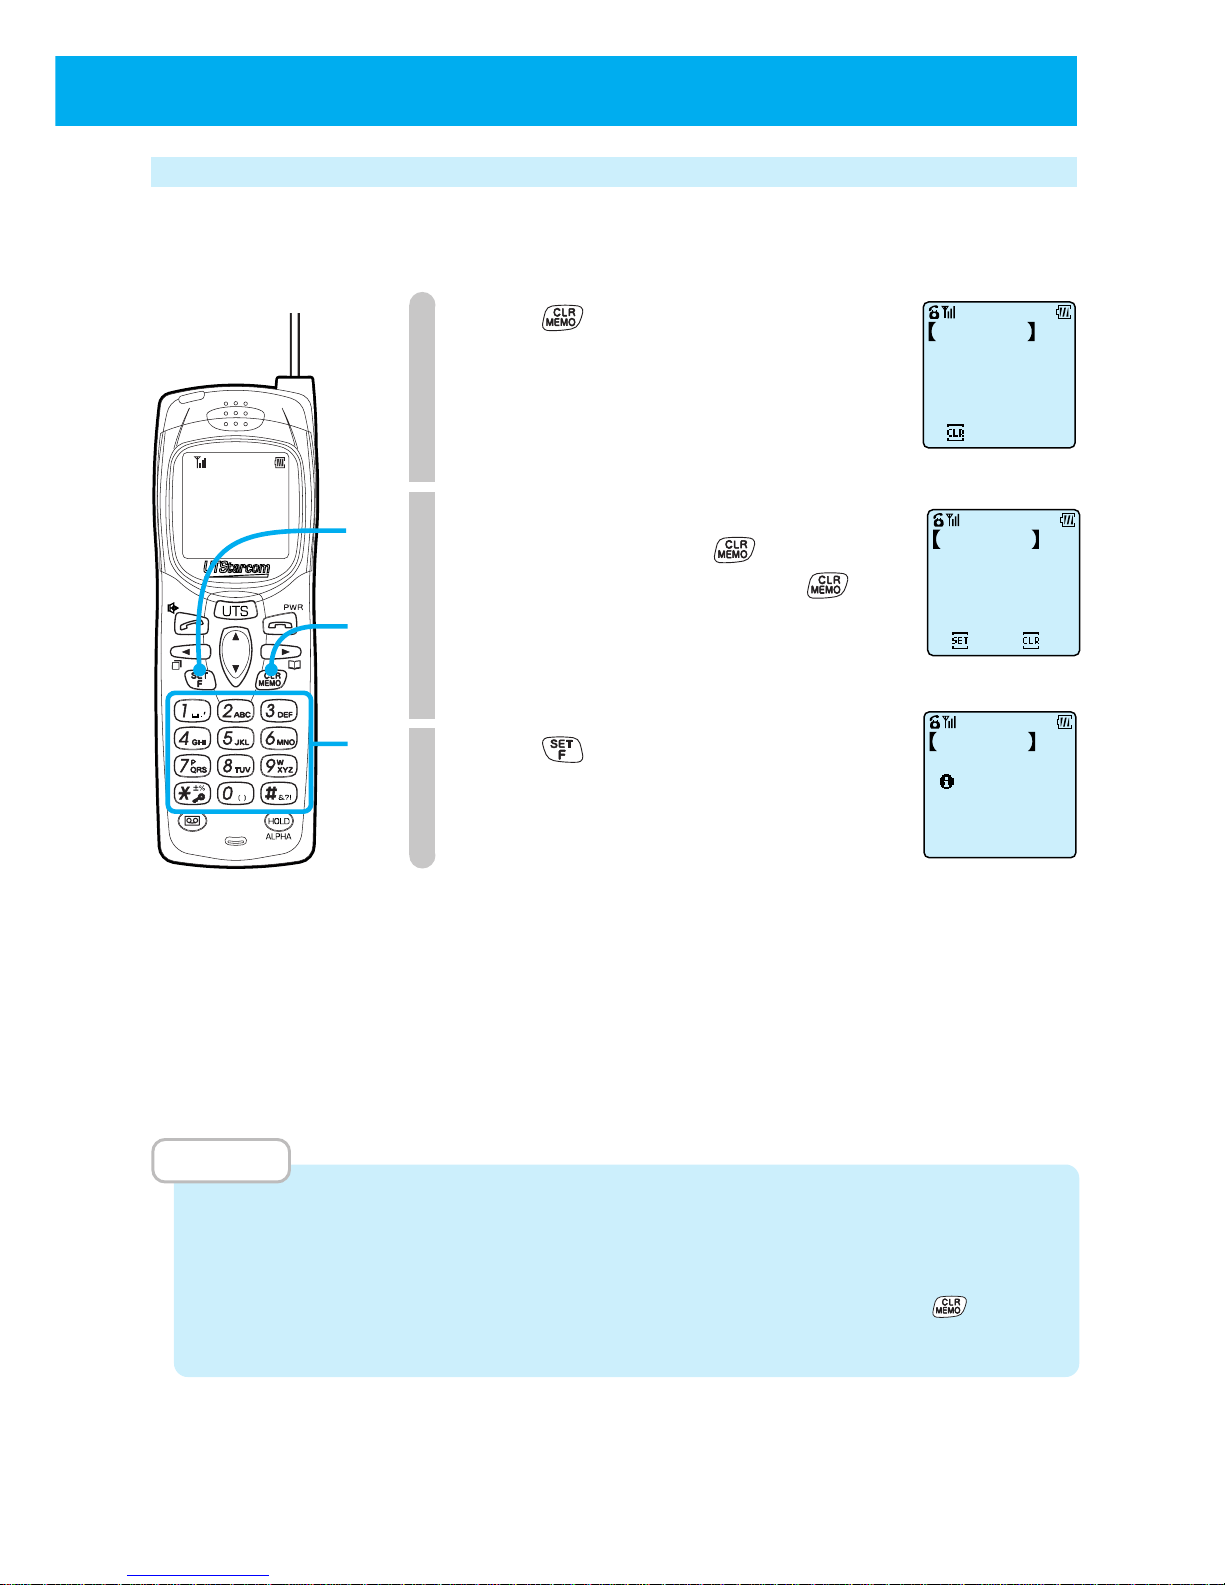
Using dial memo
Phone numbers (2 calls, maximum 22 digits) can be memorized during a call. You
can place calls by accessing these numbers from the memo.
1
Press during a call.
2
Input the number you want to memorize.
If you make errors, give one quick
press, then each time you press , the
number on the right end will be erased.
You can re-input numbers from there.
3
Press .
The phone beeps to indicate the
process is completed and the
communicating display will return.
Placing a call by accessing the dial memo
See "Using redial key to place calls" on page 32.
Deleting the dial memo
See "Deleting individual memorized numbers" on page 33.
MEMO
• When 2 numbers are already registered in the memo, the oldest memo is deleted
when the new memo is registered. If you want to keep the dial memo, you can
register it in phone book (page 44).
• When you wish to cancel the dial memo operation, press and hold
for more
than 2 seconds.
Enter the Number
HoldDwntoRtr
Dial Memo
3
1
2
Set
123456789012
Clear
Dial Memo
123456789012
Recoding Fin.
Dial Memo
Page 37
32
●
PLACING A CALL
(cont.)
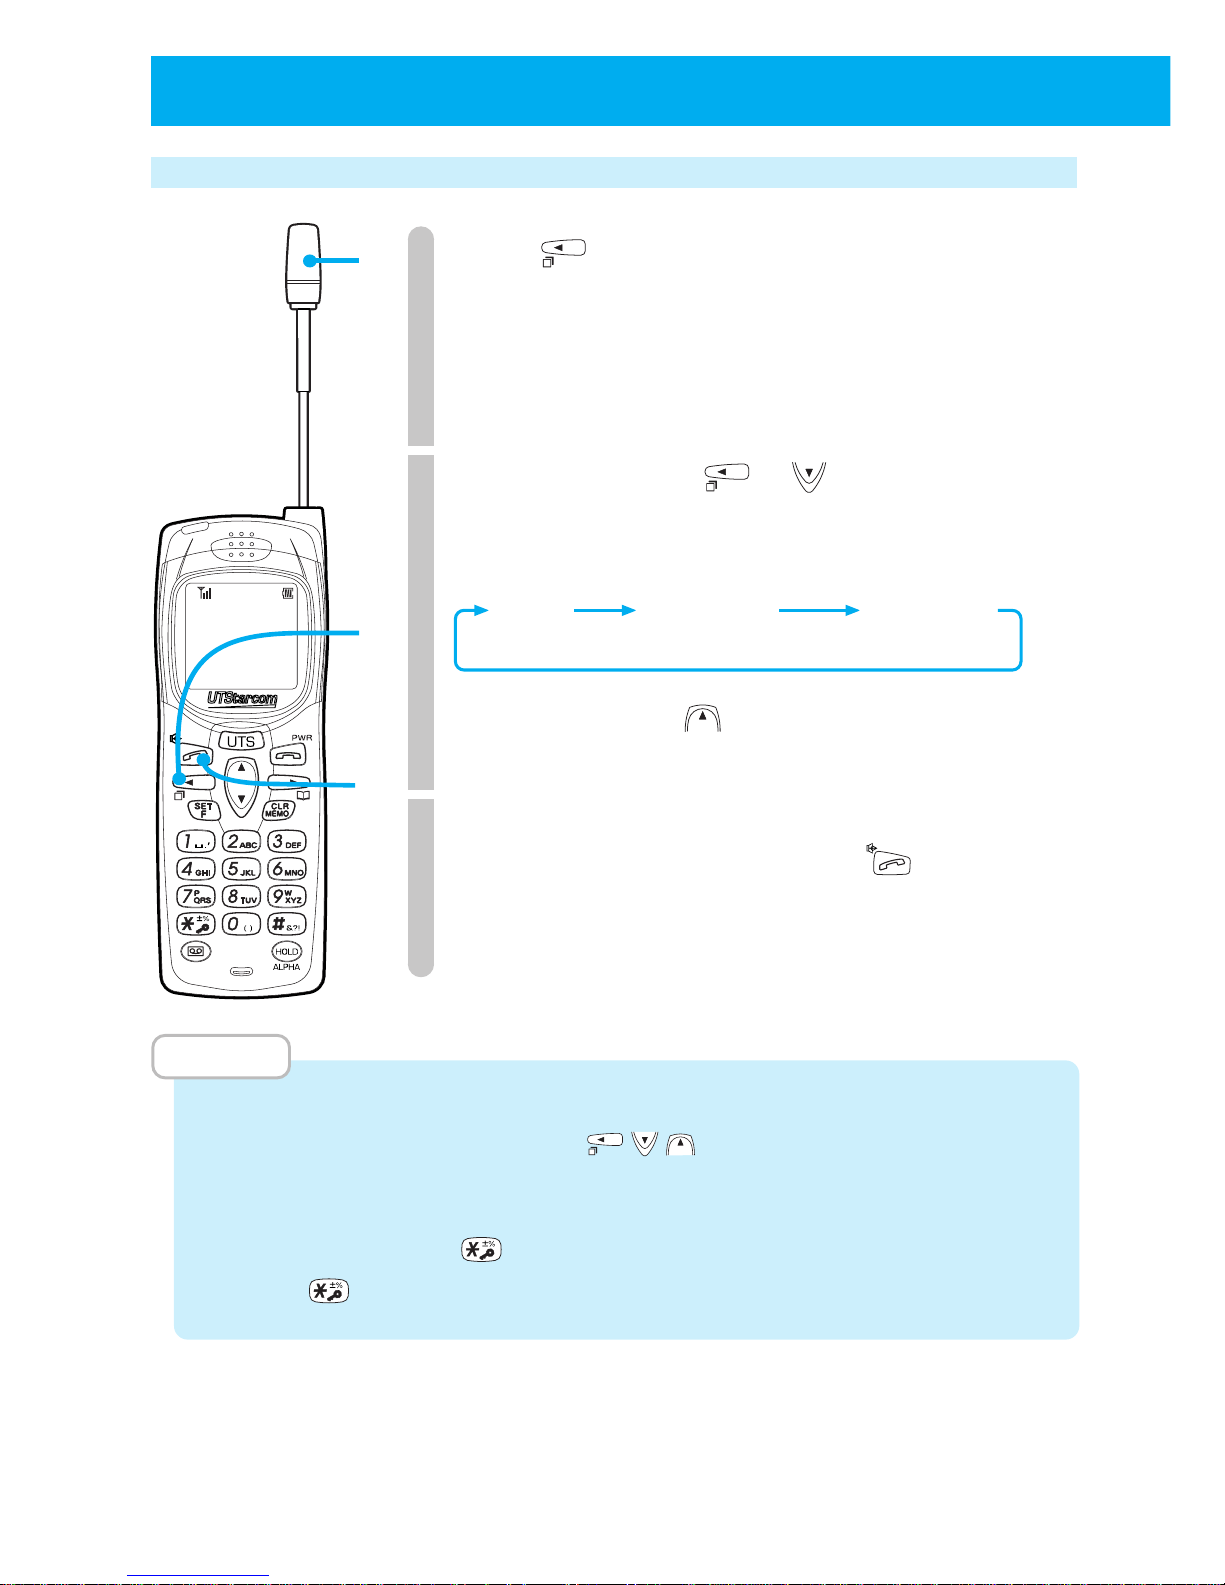
Using redial key to place calls
1
Press .
Give a quick press to display the number
of the party you last called (redial 1).
Press and hold for more than 1 second
to display call memory 1.
2
Repeatedly pressing or displays
the memory content listed in the order
of, redial, call memory, dial memo.
Repeatedly pressing displays
memory content in the reverse order.
3
When the phone number of the party
you wish to call is displayed, press
.
A call will be placed to that party.
MEMO
• After a memorized phone number has been displayed once by step 1, you can scroll
the display by pressing and holding
.
• If the phone number corresponds to a number in phone book, the name of who that
number belongs to is displayed.
• Press and hold down
to check a number of 13 or more digits. When you
release , it will return to 12 digit display.
1
1
•
2
3
Redial Dial memo
(max 10) (max 10) (max 2)
Call memory
Page 38
33
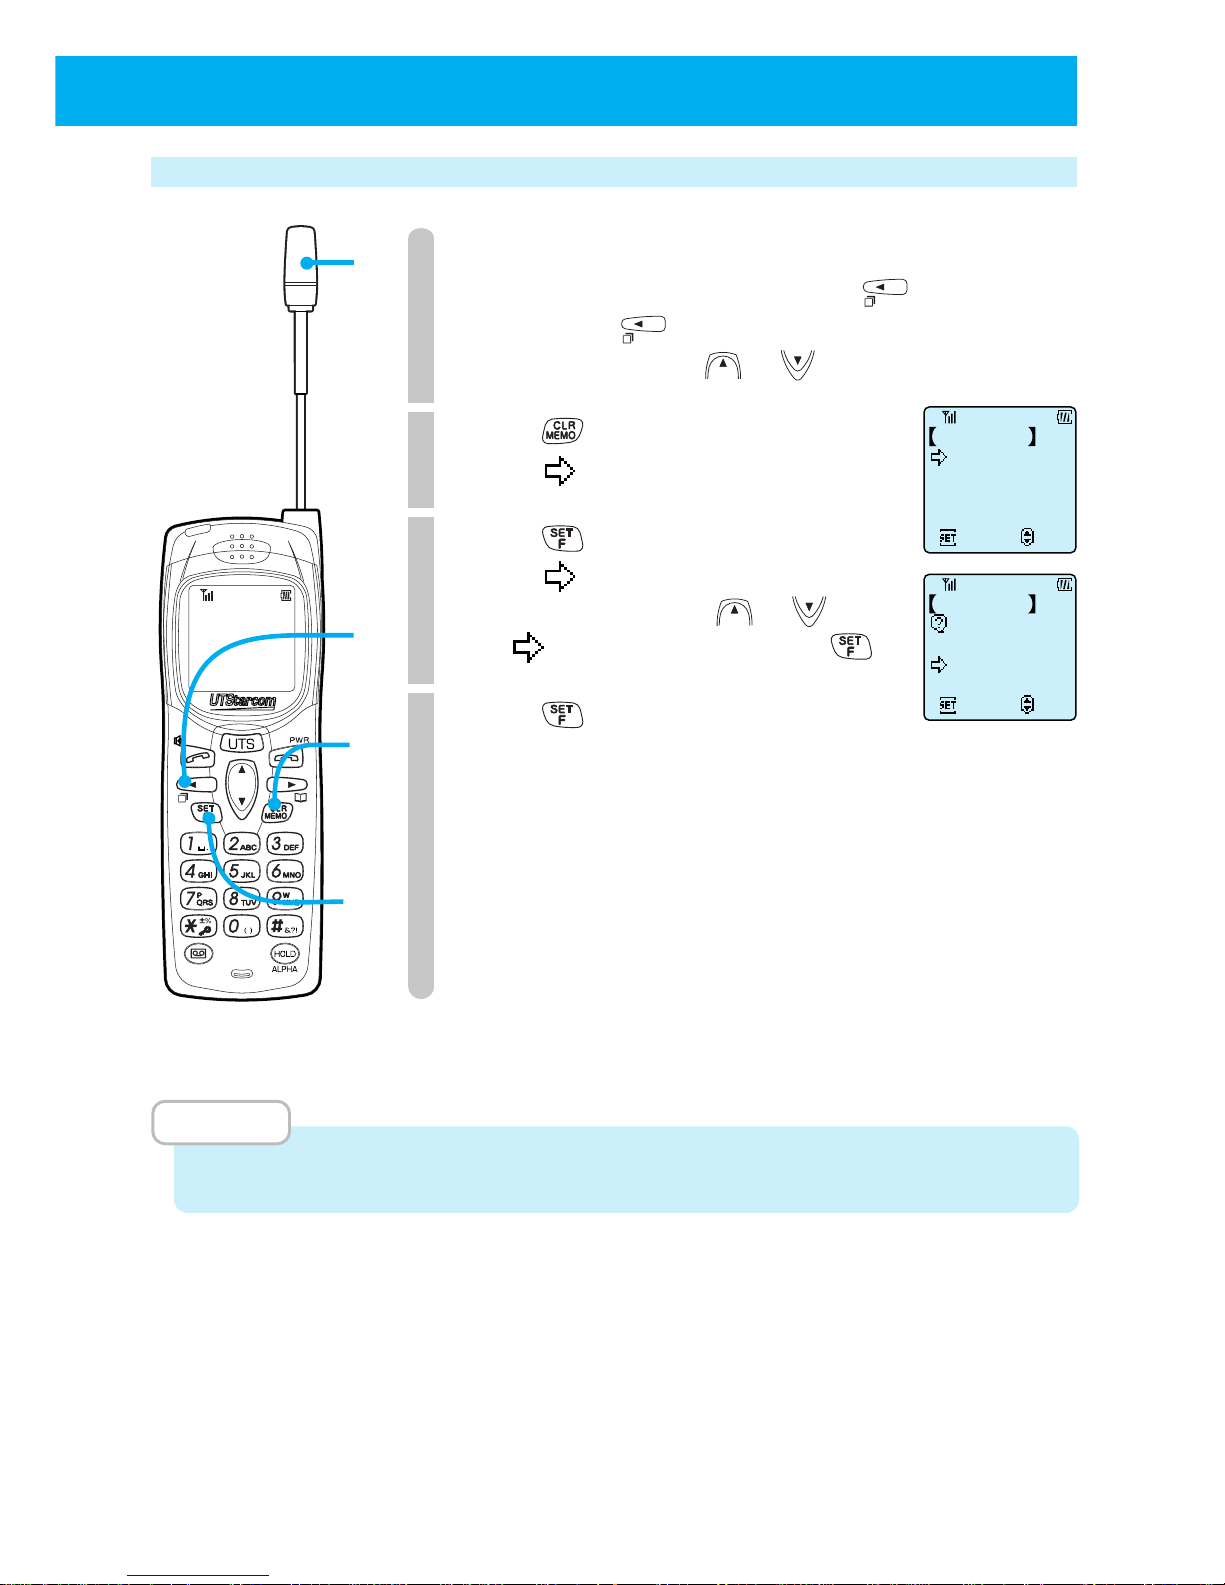
Deleting individual memorized numbers
1
Display the phone number you want
to delete by repeatedly pressing
.
After pressing , you can change the
display by using either or .
2
Press .
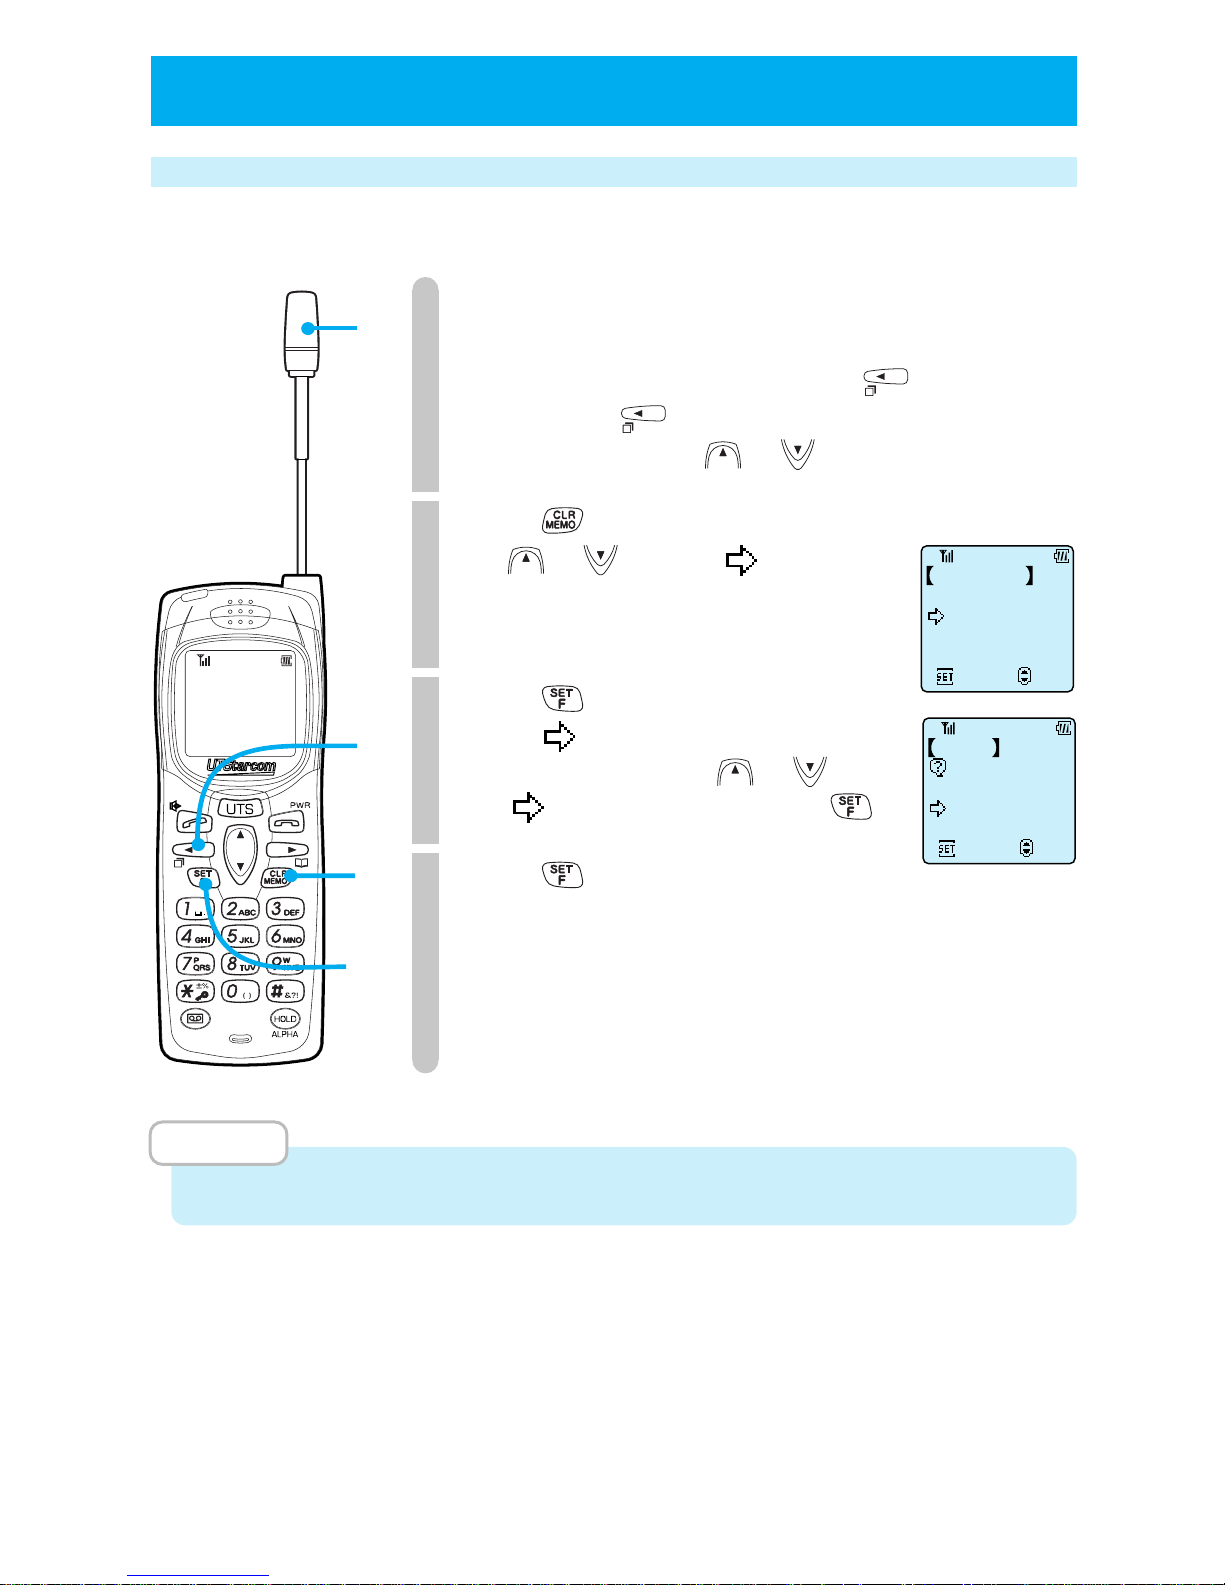
Ensure points to "Clear 1 by 1".
3
Press .
Ensure points to "Yes".
To cancel deletion, use or so
that points to "No" and press .
4
Press .
Phone beeps to confirm process and
the phone number displayed in step 1 is
deleted.
MEMO
• When the battery pack is removed, the delete operation may not perform correctly.
1
1
2
3
•
4
Clear 1 by 1
Clear All
Set
Select
Redial 1/10
Clear This
Set
Select
Yes
No
Redial 1/10
Page 39
34
● PLACING A CALL
(cont.)
Deleting all the content of redial, call memory or
dial memo
1
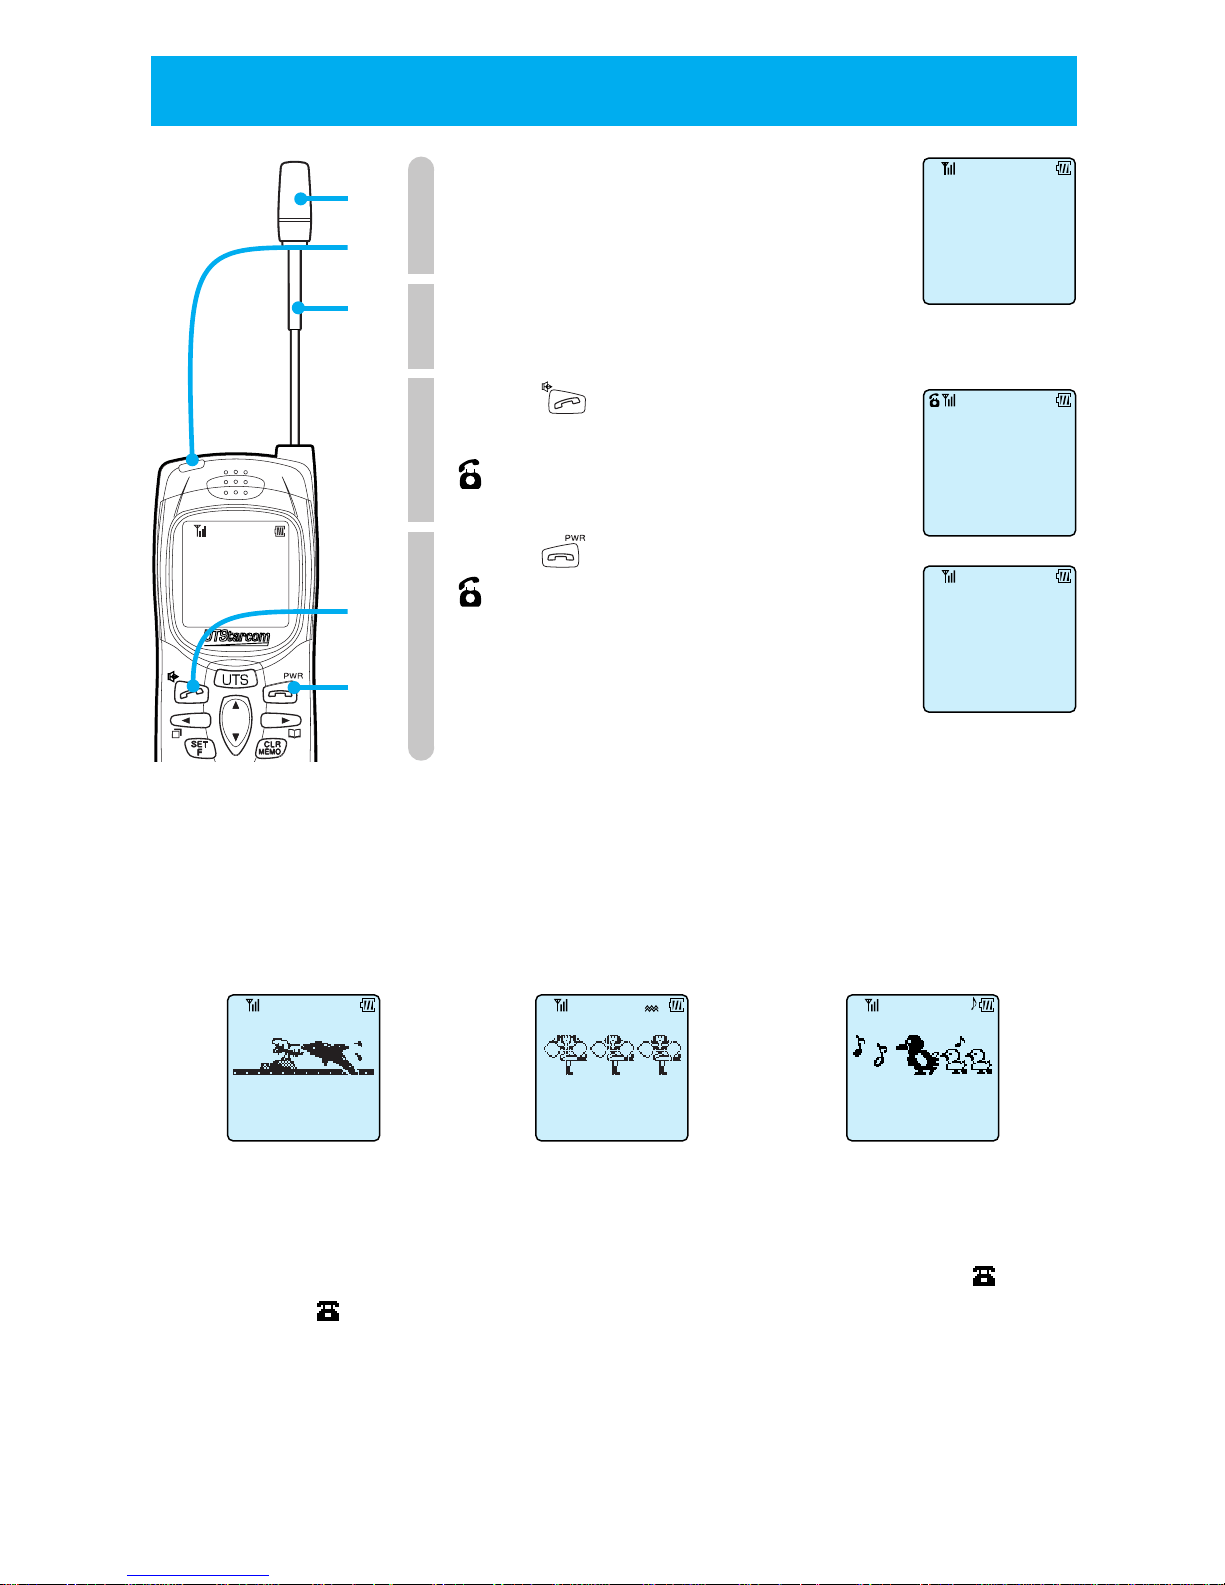
Display one of the numbers you want
to delete from redial, call memory or
dial memo by repeatedly pressing
.
After pressing , you can change the
display by using either or .
2
Press .
Use or to make point to
"Clear All".
3
Press .
Ensure points to "Yes".
To cancel clear all, use or so
that points to "No" and press .
4
Press .
Phone beeps to confirm process and the
whole contents of redial, call memory or
dial memo that contains the phone
number displayed in step 1 is deleted.
MEMO
• When the battery pack is removed, the delete operation may not perform correctly.
Clear Entry
Clear All
Set
Select
Redial 1/5
1
1
2
3
•
4
Clear All
Set
Select
Yes
No
Redial
Page 40
35
● RECEIVING A CALL
1
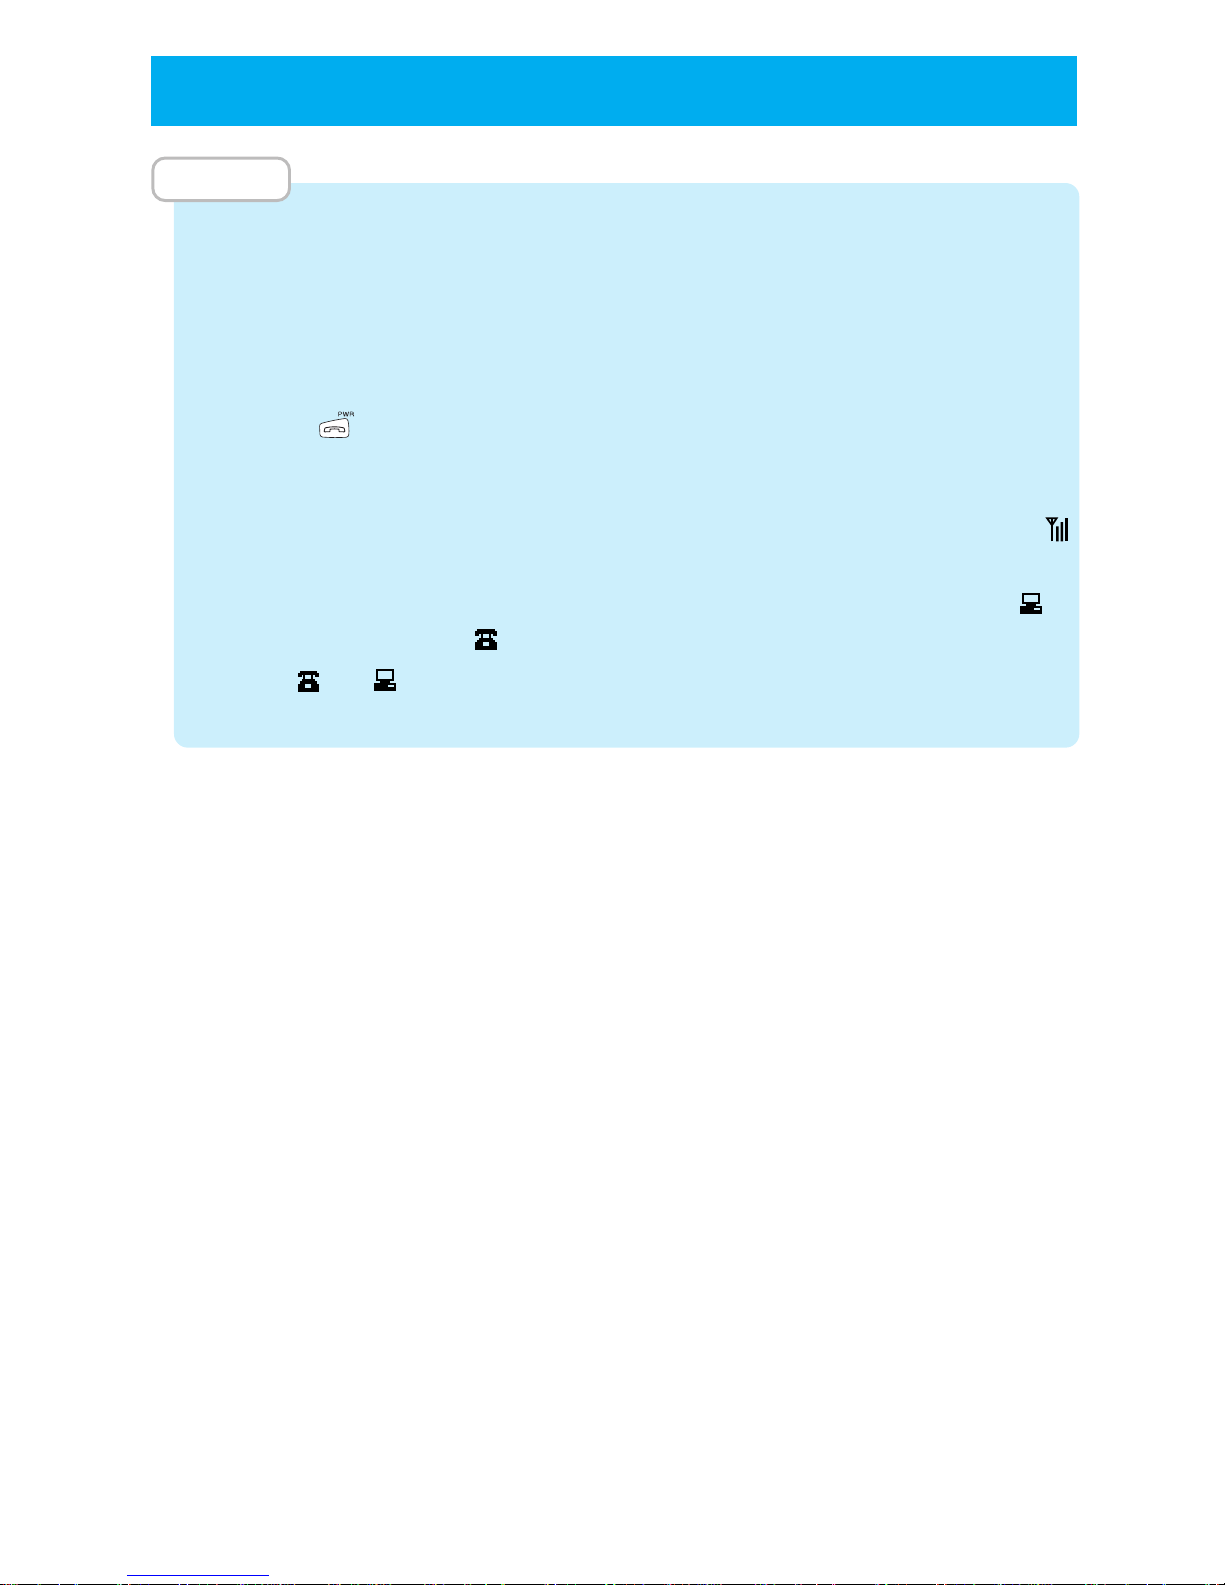
The incoming tone or vibration
activates and the incoming light blinks.
2
Pull the antenna.
3
Press .
You will now be able to talk to caller.
lights up and the calling time will be displayed.
4
Press to terminate your call.
disappears and the calling time will
be displayed for 3 seconds, then phone
will return to standby screen.
■
Incoming call display types
You can use "Selecting the ring-tone volume and type" (page 67) to change the incoming call display.
00:00
03:17
1
3
4
2
1
• When beep ringtone is set
• When melody ring-tone
is set
• When vibration
is set
INCOMING
INCOMINGINCOMING INCOMING
■
If you do not answer
If you do not answer the call, "INCOMING CALL" will be displayed in the right edge
of the bottom row. When the phone returns to standby condition, will be
displayed. disappears when call memory (page 30) is checked.
Note that when you miss a call from a caller whose phone is set to notify the other
party, that caller's number is stored in the call memory (page 30). If that caller is
registered in your phone book, the callers name is also displayed.
Press any key to remove this display.
Page 41
36
MEMO
• If the caller's phone is set to notify the other party, the caller's phone number will be
displayed. Also, if the caller is registered in your phone's phone book, the caller's
name will be displayed. Such calls are stored in call memory when they are received
(page 30).
• When incoming call is set to vibration, the phone notifies you by vibration.
• When you cannot answer the phone straight away, you can stop the ring-tone by
pressing
. Also when the phone is vibrating because of an incoming call, you can
stop it in the same way.
• When set to vibration, you can still receive calls while charging.
• When your phone is not set to public mode, you cannot receive calls even if
(antenna mark) is displayed.
• When a 32kbps high speed data transfer incoming call is not answered, the
is
displayed instead of the
.
• When
and are lit up while in standby condition, they may disappear when the
battery pack is removed.
● RECEIVING A CALL
(cont.)
Page 42
37
● OPERATIONS DURING CALLS
Placing a call on hold
Place a call on hold when you want to temporarily stop the call. While the other
party is placed on hold, they cannot hear you. You can select the hold melody from
11 preset melodies (page 70).
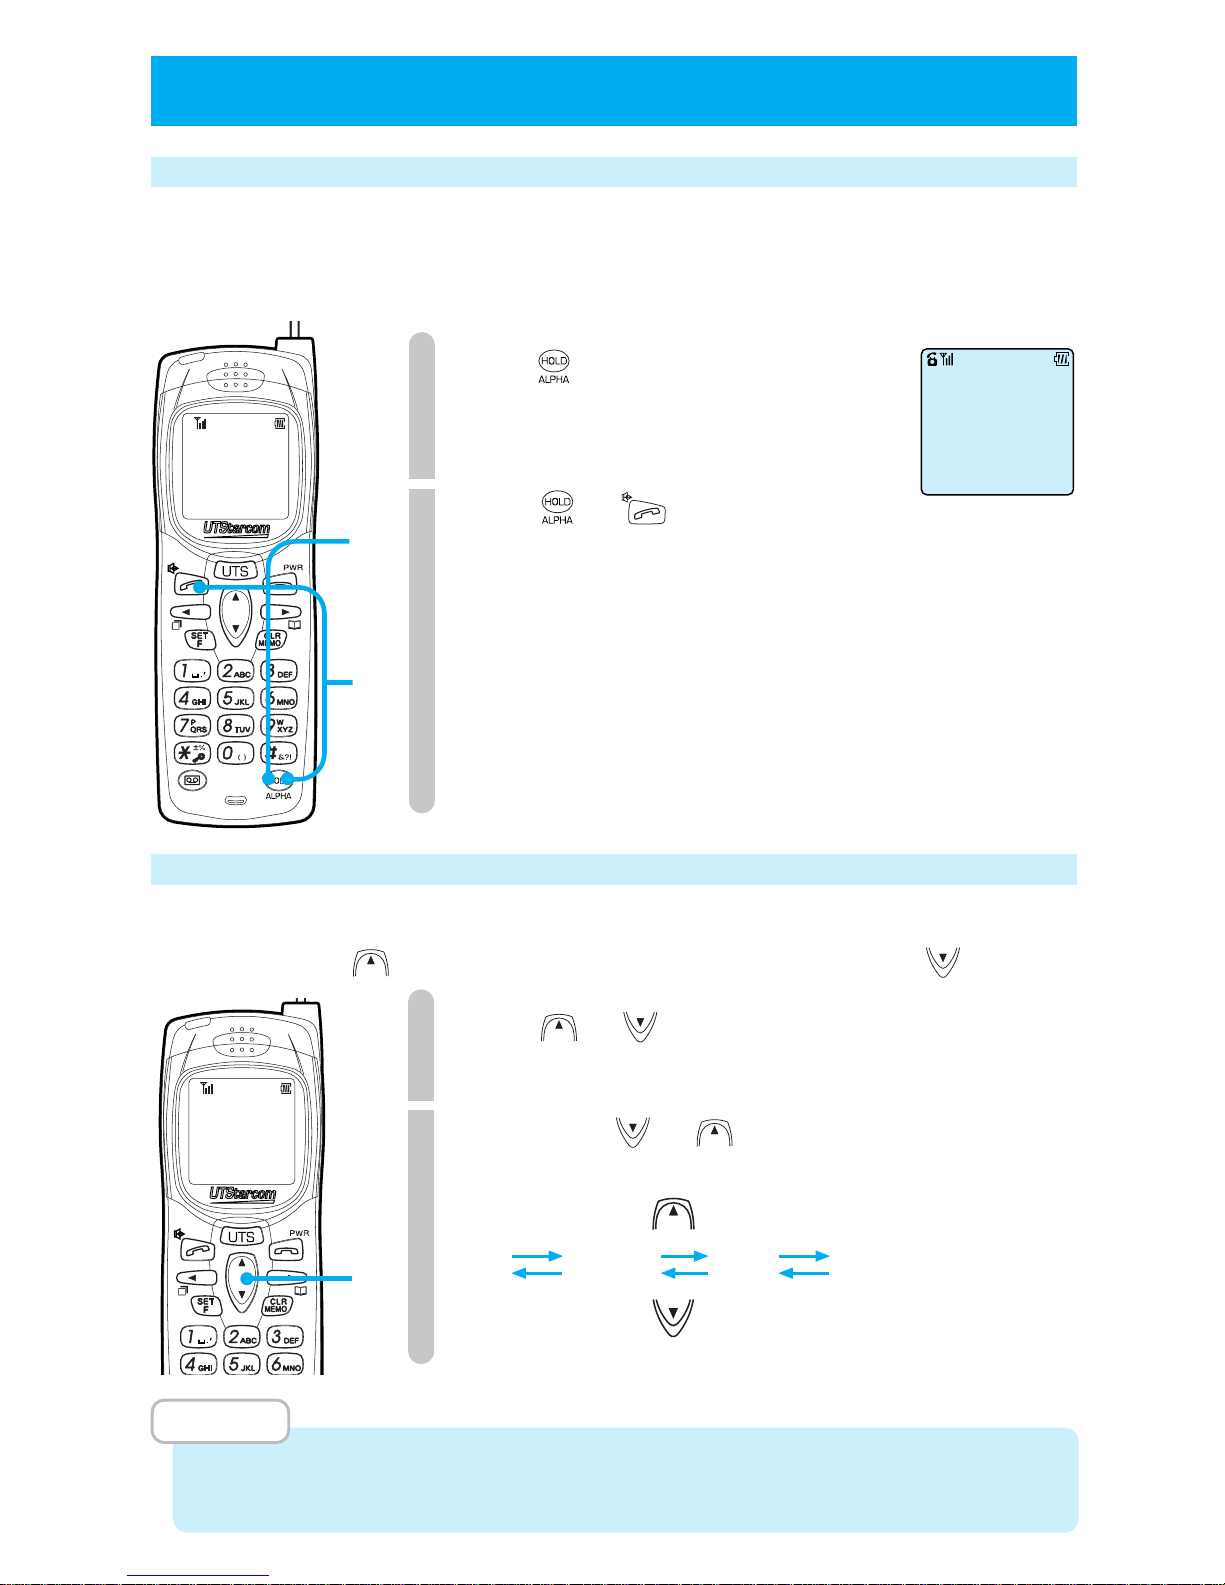
1
Press during a call.
The set hold melody is played to the
caller. [hold icon] blinks.
2
Press or to cancel the
hold.
You will now go back to the call.
Adjusting the receiver volume
You can adjust the volume of the caller's voice while talking. Volume has 4 levels. When receiver volume is "Maximum", volume
will not change when is pressed. When receiver volume is "Small", volume will not change when is pressed.
1
Press or during a call.
The current setting is displayed.
2
By pressing or , the receiver
volume level switches.
MEMO
•
At the time of purchase, the receiver volume is set to "Large".
•
Even when the call terminates, the set volume does not change until when it is changed again.
Holding...
Small Medium
Large Maximum
1
2
1
•
2
Page 43
38
● OPERATIONS DURING CALLS
(cont.)
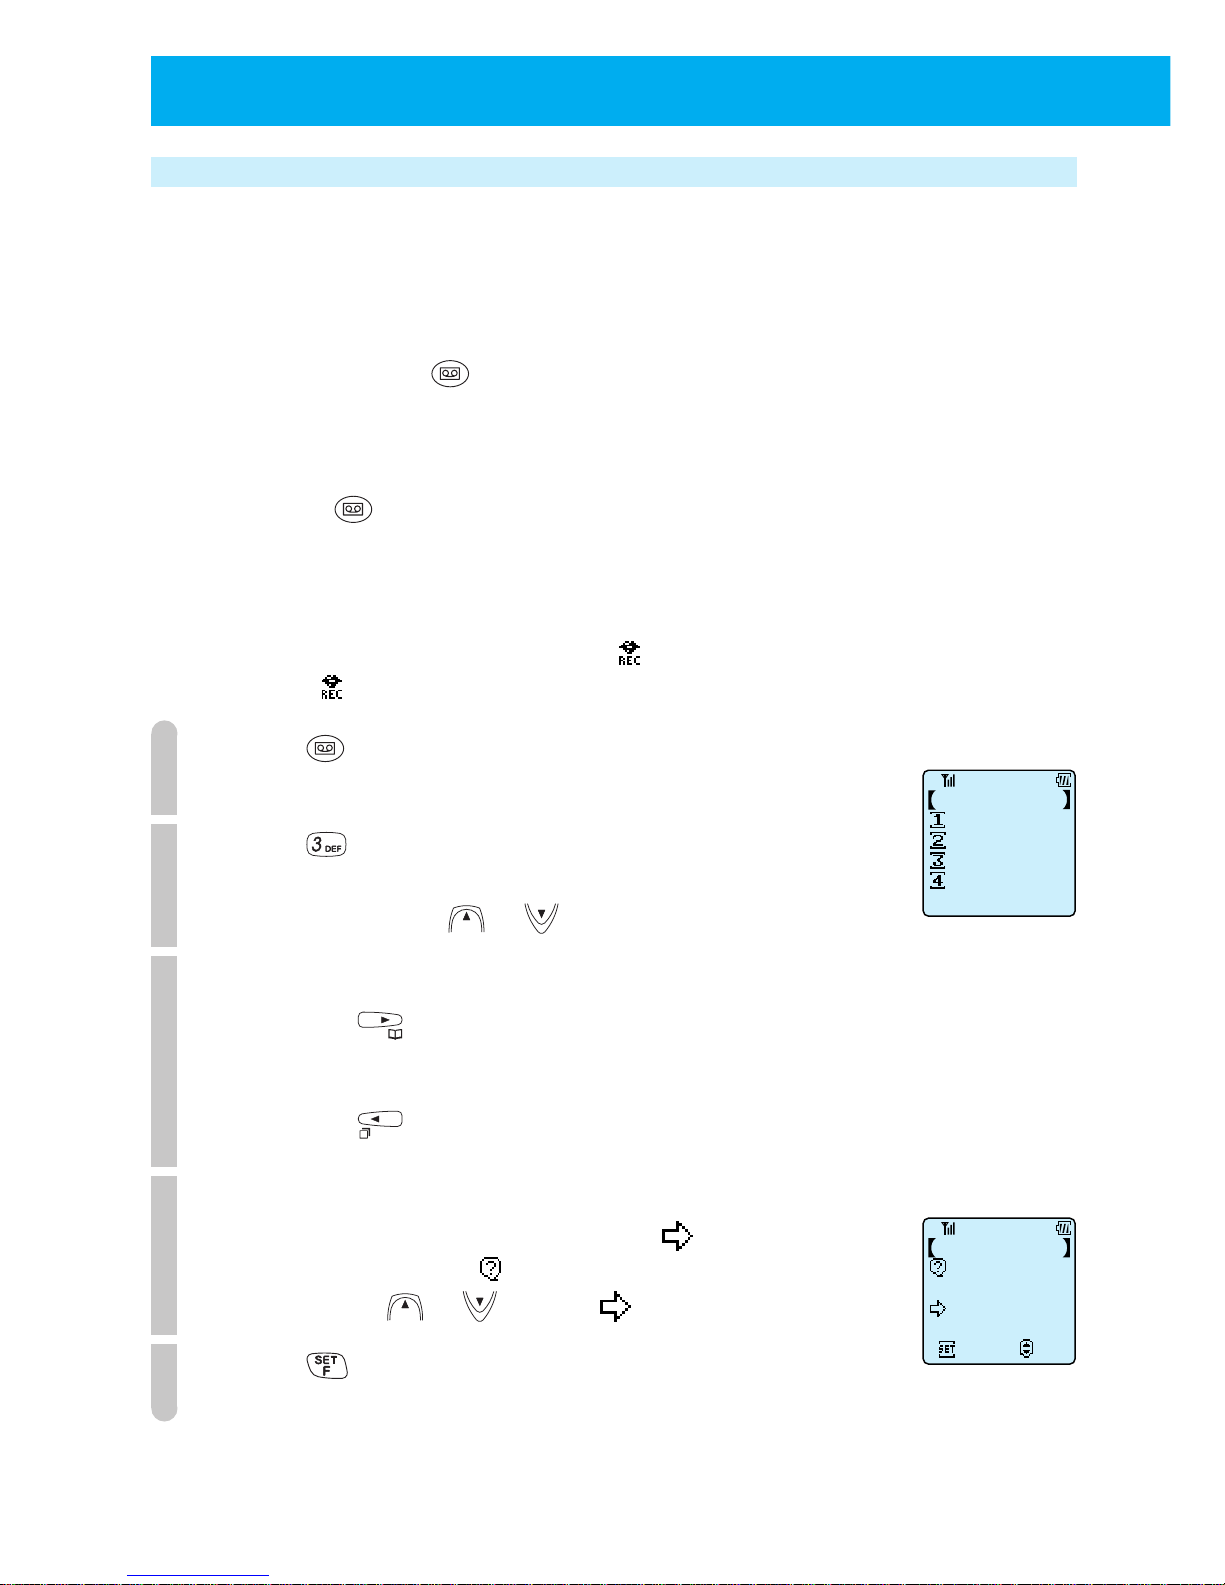
Using the conversation memo function (communication log)
You can record conversation from calls in the conversation memo. The conversation
memo can store 3 records, each of 16 seconds.
■
Recording the conversation memo
When you press the during a call the phone beeps to confirm the operation
(not heard by caller) and starts recording the conversation memo.
After 16 seconds pass, the phone beeps to confirm the operation and the recording
terminates automatically.
If you press while still recording, the recording stops at that point.
When you save the recording, "Conversation memo" is displayed.
■
Listening to and deleting conversation memos
When a conversation memo is stored, lights up to indicate there is an unplayed
recording. disappears after the conversation memo is played.
1
Press .
The Record & Playback menu is displayed.
2
Press .
Conversation memo playback starts playing in the order they
were recorded. Use or to adjust the volume.
3
● To quit midway through playback
Press
●
To listen to the current conversation memo again from the start
Press .
4
Select whether or not to delete after playback.
When you wish to delete, ensure the points to "Yes" in
answer to the question " Clear Message". To cancel the delete
operation, use or to point to "No".
5
Press .
If you selected "Yes" in step 4, the conversation memo will be deleted.
Voice Memo
AnsweringCancl
Playback Menu
Playback
Clear All
Yes
Clear Message
1st Call Memo
No
Set
Select
Page 44
39
MEMO
•
When recording your original answering message (page 56) , there can be two recordings.
•
Even when the phone is off and the battery is removed, the content of voice memo is saved.
■
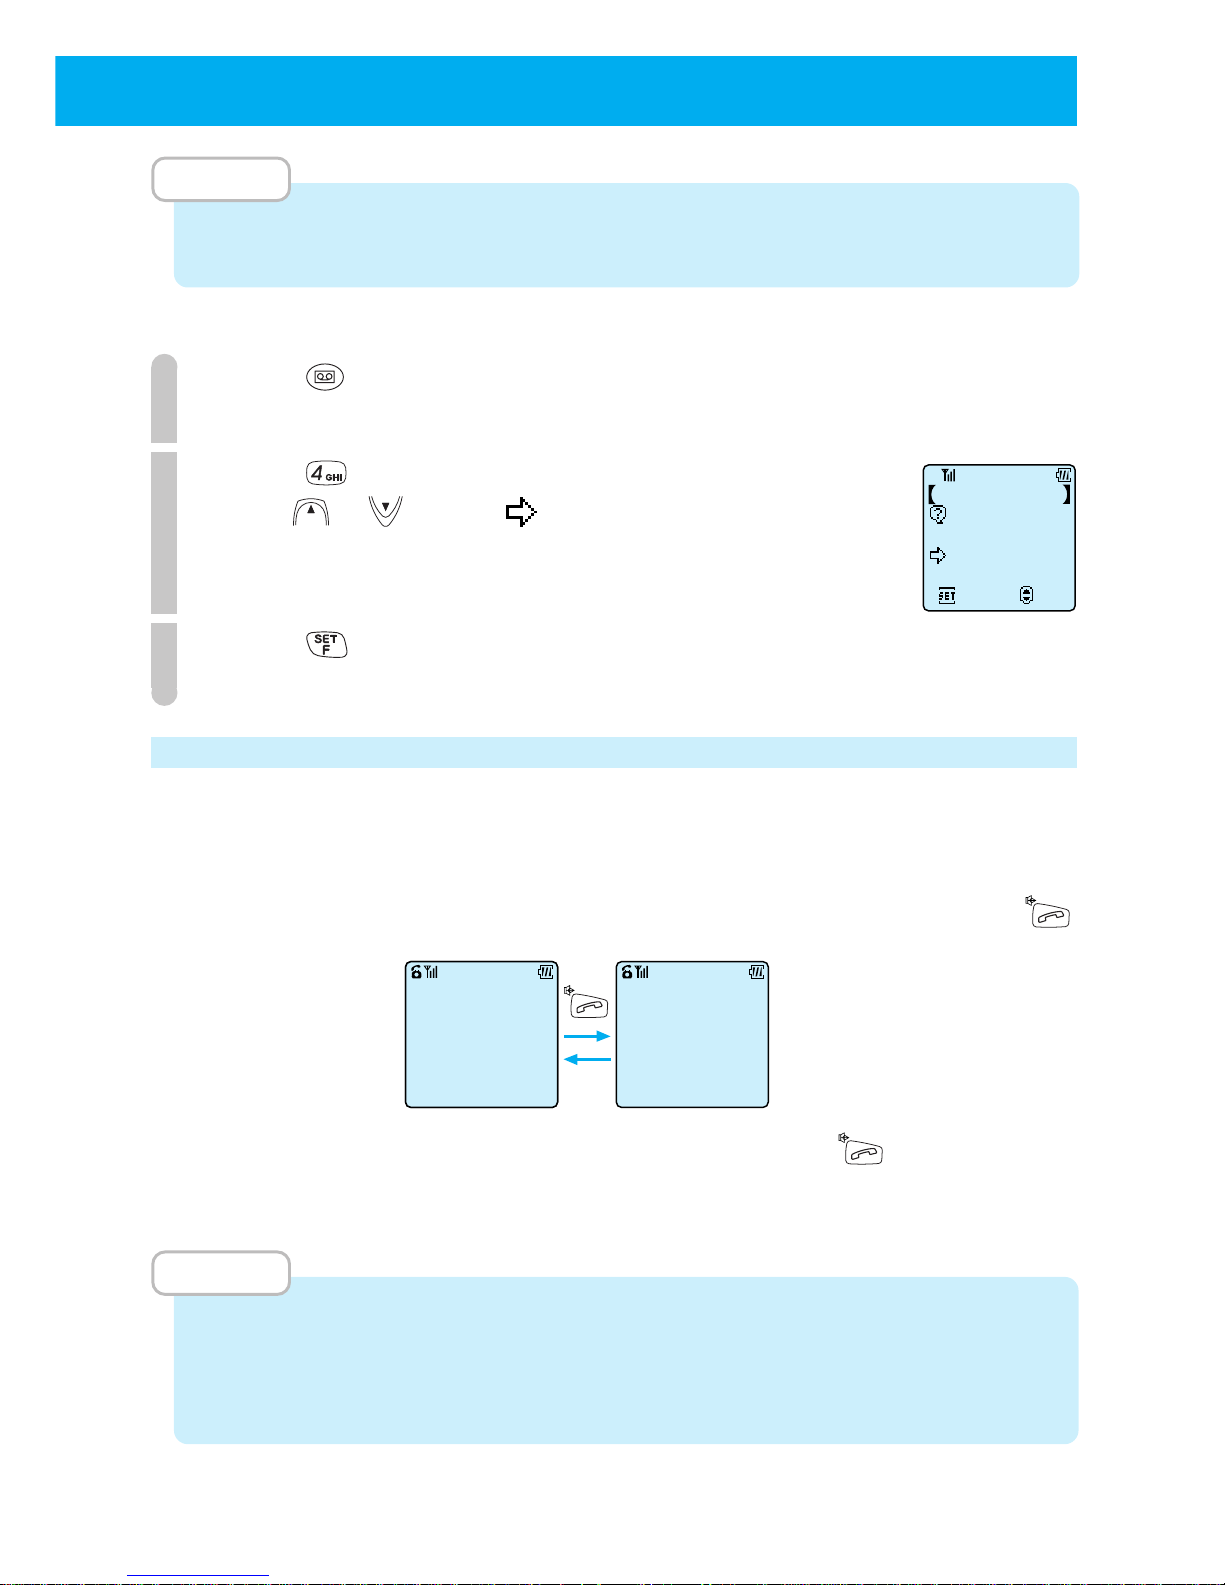
Clearing all stored conversation memos
1
Press .
The "Playback Menu" is displayed.
2
Press .
Press or to point to "Yes".
3
Press .
All stored conversation memos will be deleted.
Using the hands-free/speaker function
When you use the hands-free function, you can talk on the phone without holding it.
When you use the speaker function, you can listen to the person you are talking to from a speaker.
Press and hold down [off-hook icon] for more than 2 seconds during a call to activate hands-free mode.
After that, you can switch back and forth between hands-free mode and speaker mode by pressing .
To return to normal phone mode, press and hold down for more than 2
seconds while in hands-free or speaker mode.
MEMO
•
When you switch to hands-free/speaker function, the volume of the person you are
speaking to can suddenly increase. When setting, keep the receiver away from your ear.
•
When using the hands-free/speaker function, the battery duration for continual
communication time will be shorter than stated in "Guide for battery duration" (page 20).
Clear All
Set
Select
Yes
No
Message Memory
00:21
Hands-free
00:21
Speaker mode
Page 45

40
● OPERATIONS DURING CALLS
(cont.)
Using the Flash function
When you use the flash function, you can catch the another call during
communication.
1
Press lightly when you hear the signal sound for
the flash function during communication.
You can talk to the another call.
2
Press again if you want to talk to the former call.
Page 46
41
● CHARACTER INPUT METHOD
This phone uses character input for phone book, message input and schedule
input. Aalphabet and numerals can be input.
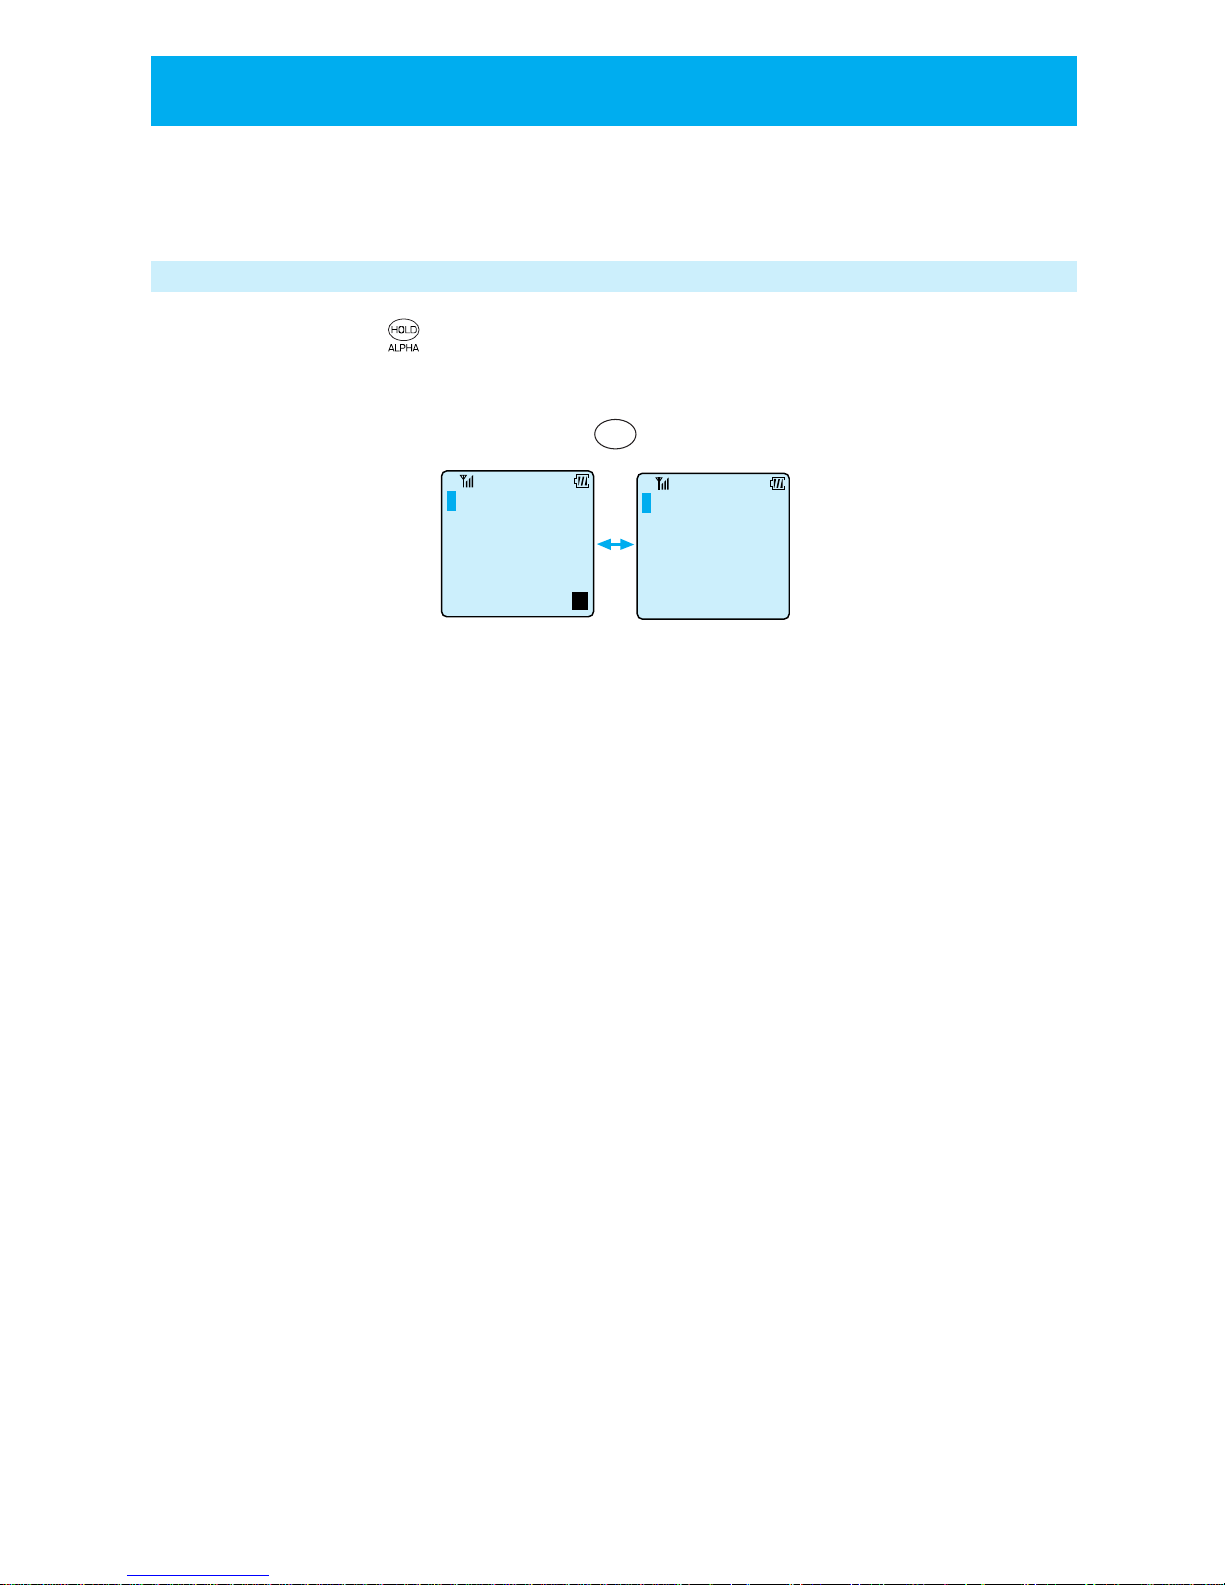
Switching input character types
When you press you can switch between alphabet and numeral.
When the character mode is not in character input display, you cannot switch
character types.
Alphabet input Numeral input
ALPHA
HOLD
E
g
Page 47
42
●
CHARACTER INPUT METHOD
(cont.)
■
Inputting characters
• Each time you press a key, the displayed character switches.
(A is displayed) -> (B is displayed) -> (C is displayed)
• Display the letter you want to input, then press the key that has the next letter
you want. If the letter you want to input next is assigned on the same key, press
to move the cursor, then input the letter.
Correcting mistakes
Press :Only the letter on the cursor is deleted.
If there are no letters behind the cursor, the letter in front of the
cursor is erased.
Press and hold for more than 1 second : All characters on that line are
erased.
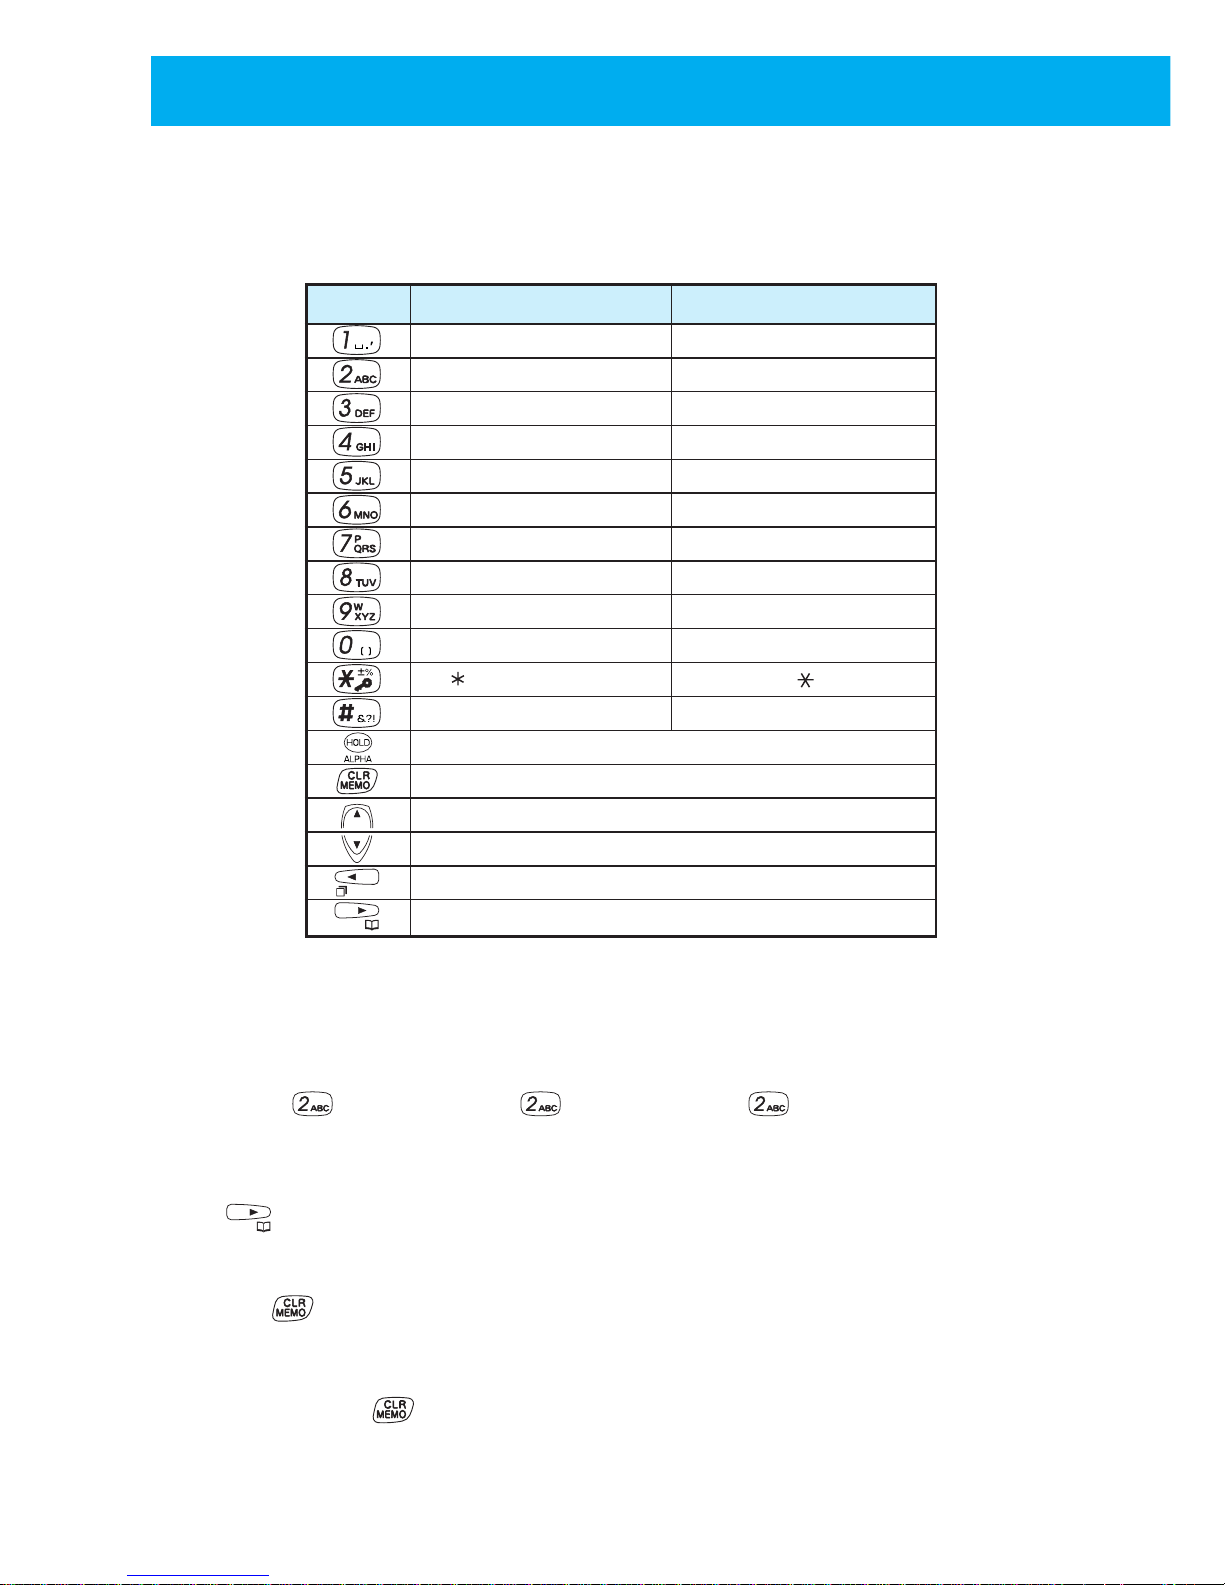
Character table
You input characters by using the dial keys. As shown in the following table,
multiple characters are assigned to 1 button.
Key Alphabet Numeral
, . _ sp ' " ^ `
~
1
ABC abc 2
DEF def 3
GHI ghi 4
JKL jkl 5
MNO mno 6
PQRS pqrs 7
TUV tuv 8
WXYZ wxyz 9
( ) < > [ ] { } 0
- + / = % | @
? ! # $ ¥ & : ; #
Switch between alphabet and numeral
Delete character
Move cursor up
Move cursor down
Move cursor left
Move cursor right
Page 48
43
The phone book is very useful for storing phone numbers that you call frequently.
You can enter 14 letters for the name and you can store phone numbers with a
maximum length of 22 digits. You can register a first phone number and a second
phone number in a single phone book memory entry. There are 300 memory
entries which are numbered 000 ~ 299 and a total of 600 telephone numbers
can be stored.
Grouping entries
You can separate business from friends by categorizing entries into 5 groups.
You can change the group name (page 54).
Using marks to categorize phone numbers
You can categorize the entry's phone number so that you know whether it is a
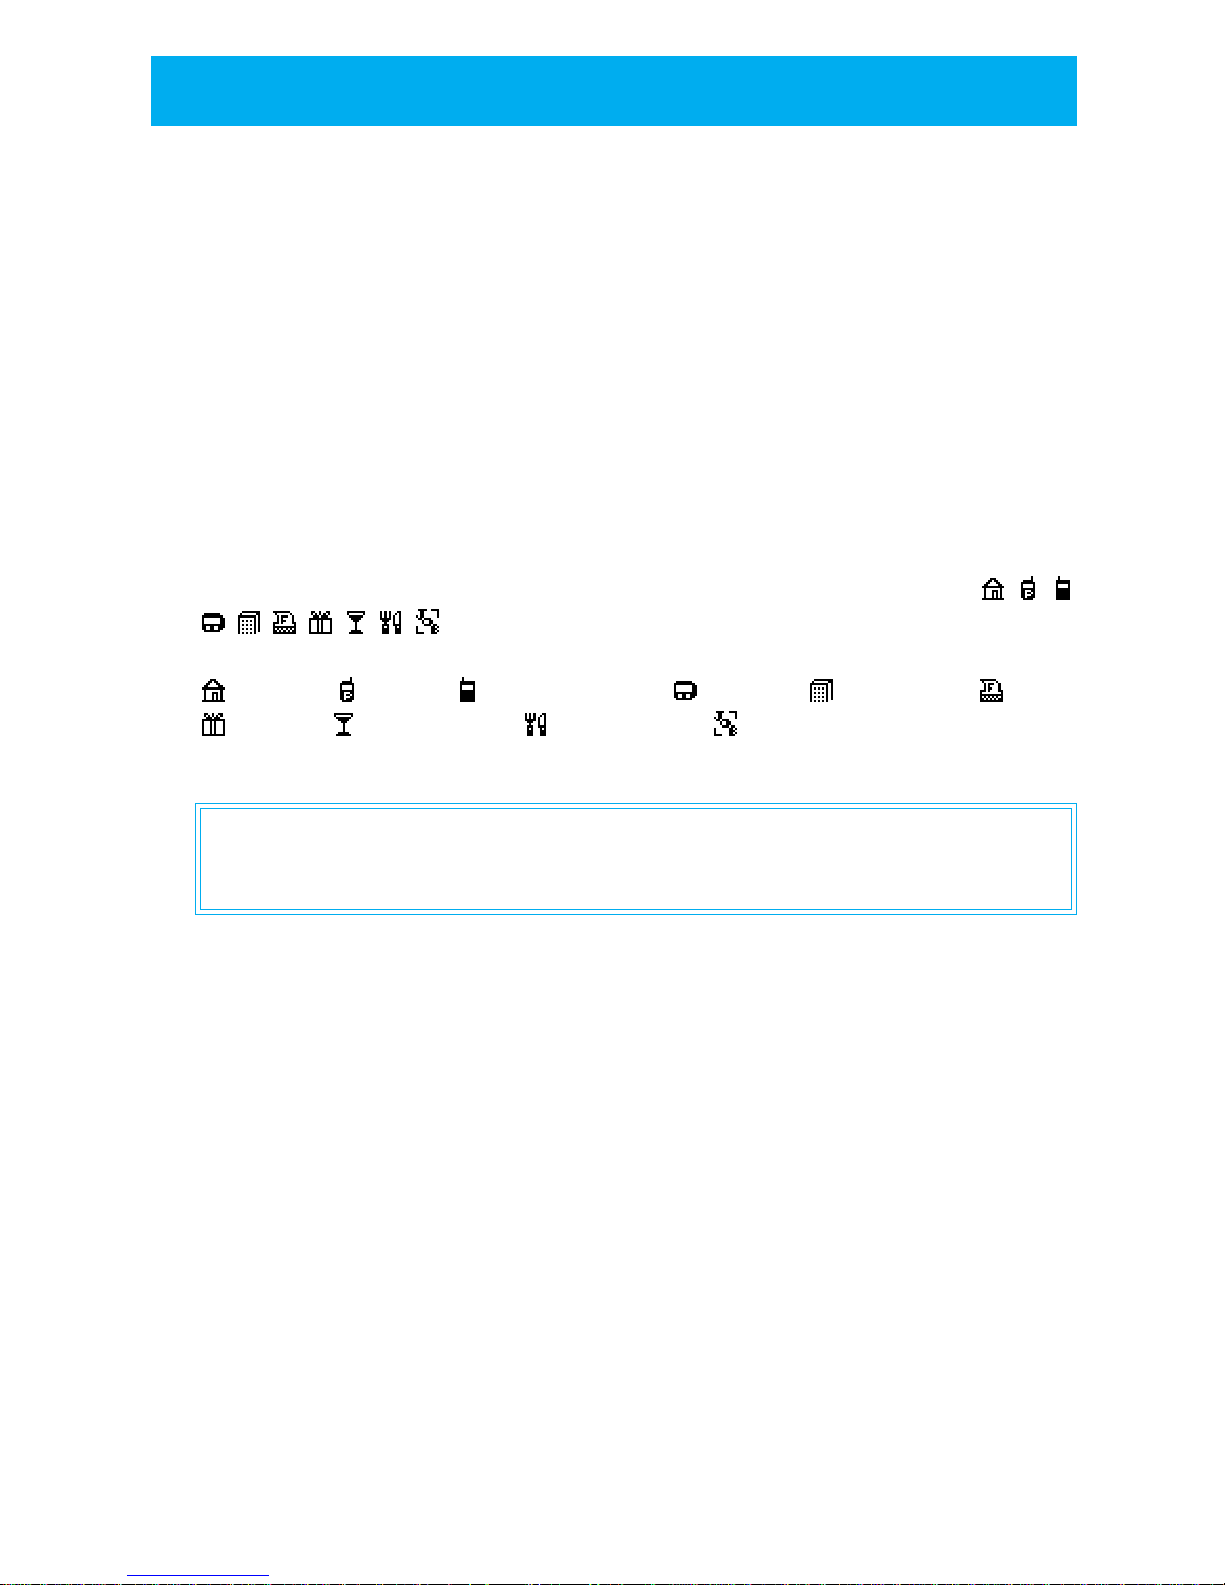
home number, PHS, company number, or fax (there are 10 categories,
) You can also categorize shops/places with marks.
These categories mean:
= home, = PHS, = mobile phone, = pager, = company, = fax,
= store, = club or bar, = restaurant, = casual workplace
Special instructions for keeping stored data
Sometimes the data stored on your phone can be erased because of mistaken
operation, static electricity, electromagnetic noise or due to faults or repairs.
Always ensure that you keep separate records of all important information.
■
Incoming call name display function
When a call is received from someone who has their phone set to notifying the
other party and that number is stored in your phone's phone book, the stored
name and number will appear in the display.
In some regions, it may not be possible to use the incoming call name display
function.
■
Specific incoming call function
When a call is received from someone who has their phone set to notifying the
other party, you can identify the caller by selecting the type of ring-tone when the
call is received by registering a melody or vibration. See "Selecting the ring-tone
volume and type" on page 67 for information on how to set this function. You can
use this function while your phone is not set to vibration 1 ~ 3, drive function or
manner mode.
● USING PHONE BOOK
Page 49
44
● USING PHONE BOOK
(cont.)
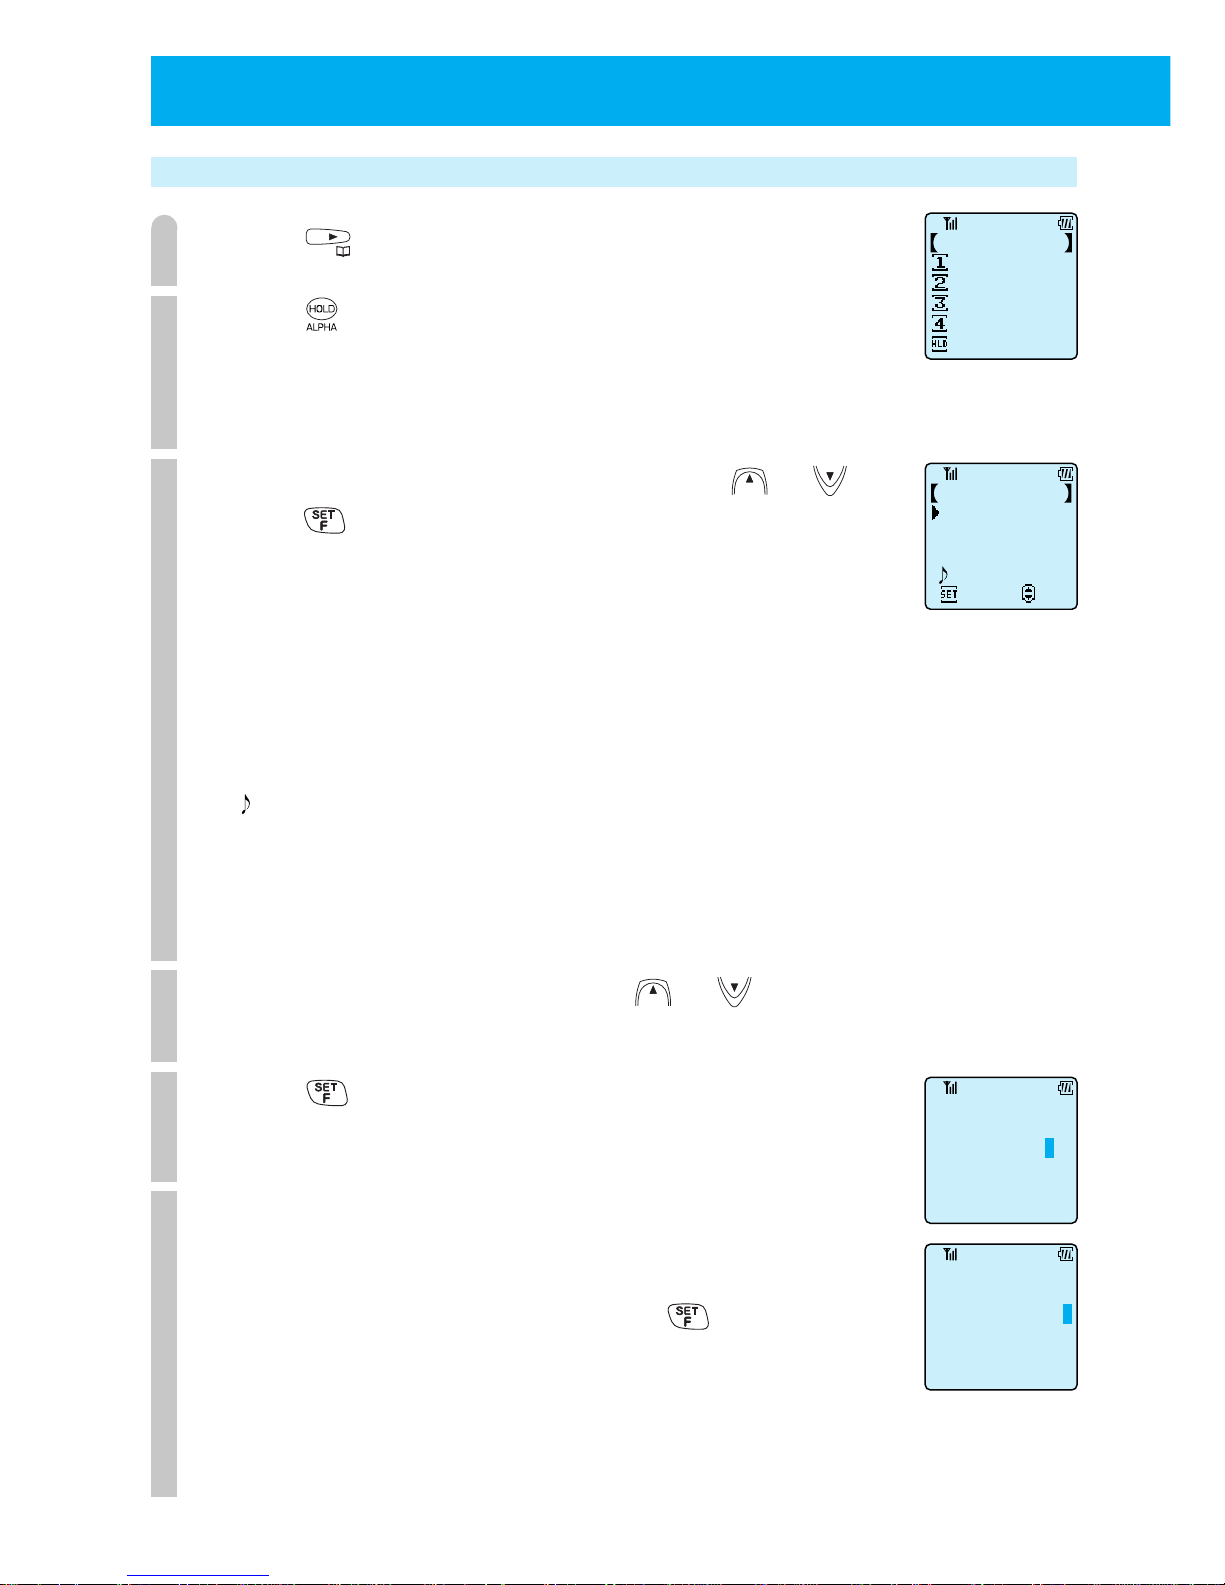
Registering a phone book entry
1
Press .
2
Press .
The number of registered entries is displayed and after that, phone book registration
mode is activated and the screen displays the select input item screen.
3
Select the item you want to input using or and
press
.
Enter the content of any of the following items. You can register an entry from
any of these items. Only input the items you require and leave others blank.
The input selected item screen appears. Input by following the registration method
of each item. After the input of each item is complete, repeat this step 3.
The following shows the items that can be registered and how to register them.
• Name?: Name & group (page 45)
• TEL1?, TEL2?: TEL No. & mark (page 46)
• ?: Specific incoming ring-tone (page 47)
After you have input all the items you require, go to step 4.
Note that if you have not input TEL1 item, you cannot perform
the step 4 operation.
4
Select "Registry End" using the or .
5
Press .
A memory No. input prompt appears.
6
Enter the memory number (000 ~ 299).
If you wish to register to the smallest vacant memory number,
do not enter a number and go to step 7.
If you do not enter a number and press , the entry will be
registered in the smallest vacant memory number after No.010.
If you store numbers that you call frequently in No. 000 ~ 009,
you can call them using two touch dialing (page 52) or three
touch dialing (page 53).
Name & group?
Name?
TEL 1?
TEL 2?
?
Edit
Select
Phone book
NameSearch
Register PhnBk
Group
Search
Mark
Search
MmryNo.
Search
Memory No.?
No.122
Memory No.?
No.D9 _ _
Page 50
45
7
Press .
The number of registered entries is displayed and after that the
display of step 2 returns and you can continue registering.
8
When you have finished registering, press .
MEMO
•
If you enter a entry in phone book that does not contain a name, it becomes group q.
•
When in step 3, you can delete an entry by selecting the item you want deleted and
pressing
.
• If you do not make any key operation for 60 seconds while in register mode, the phone
returns to standby condition.
•
When you try to register to a memory number that already contains an entry, "
Already Registered" appears. Specify another memory number.
• When you do not want others to view your phone book, set phone book lock (page 96).
When this is set, you cannot use the phone book function even when you press
unless you enter your password number.
• When key lock or dial lock is set, you cannot do this operation.
■
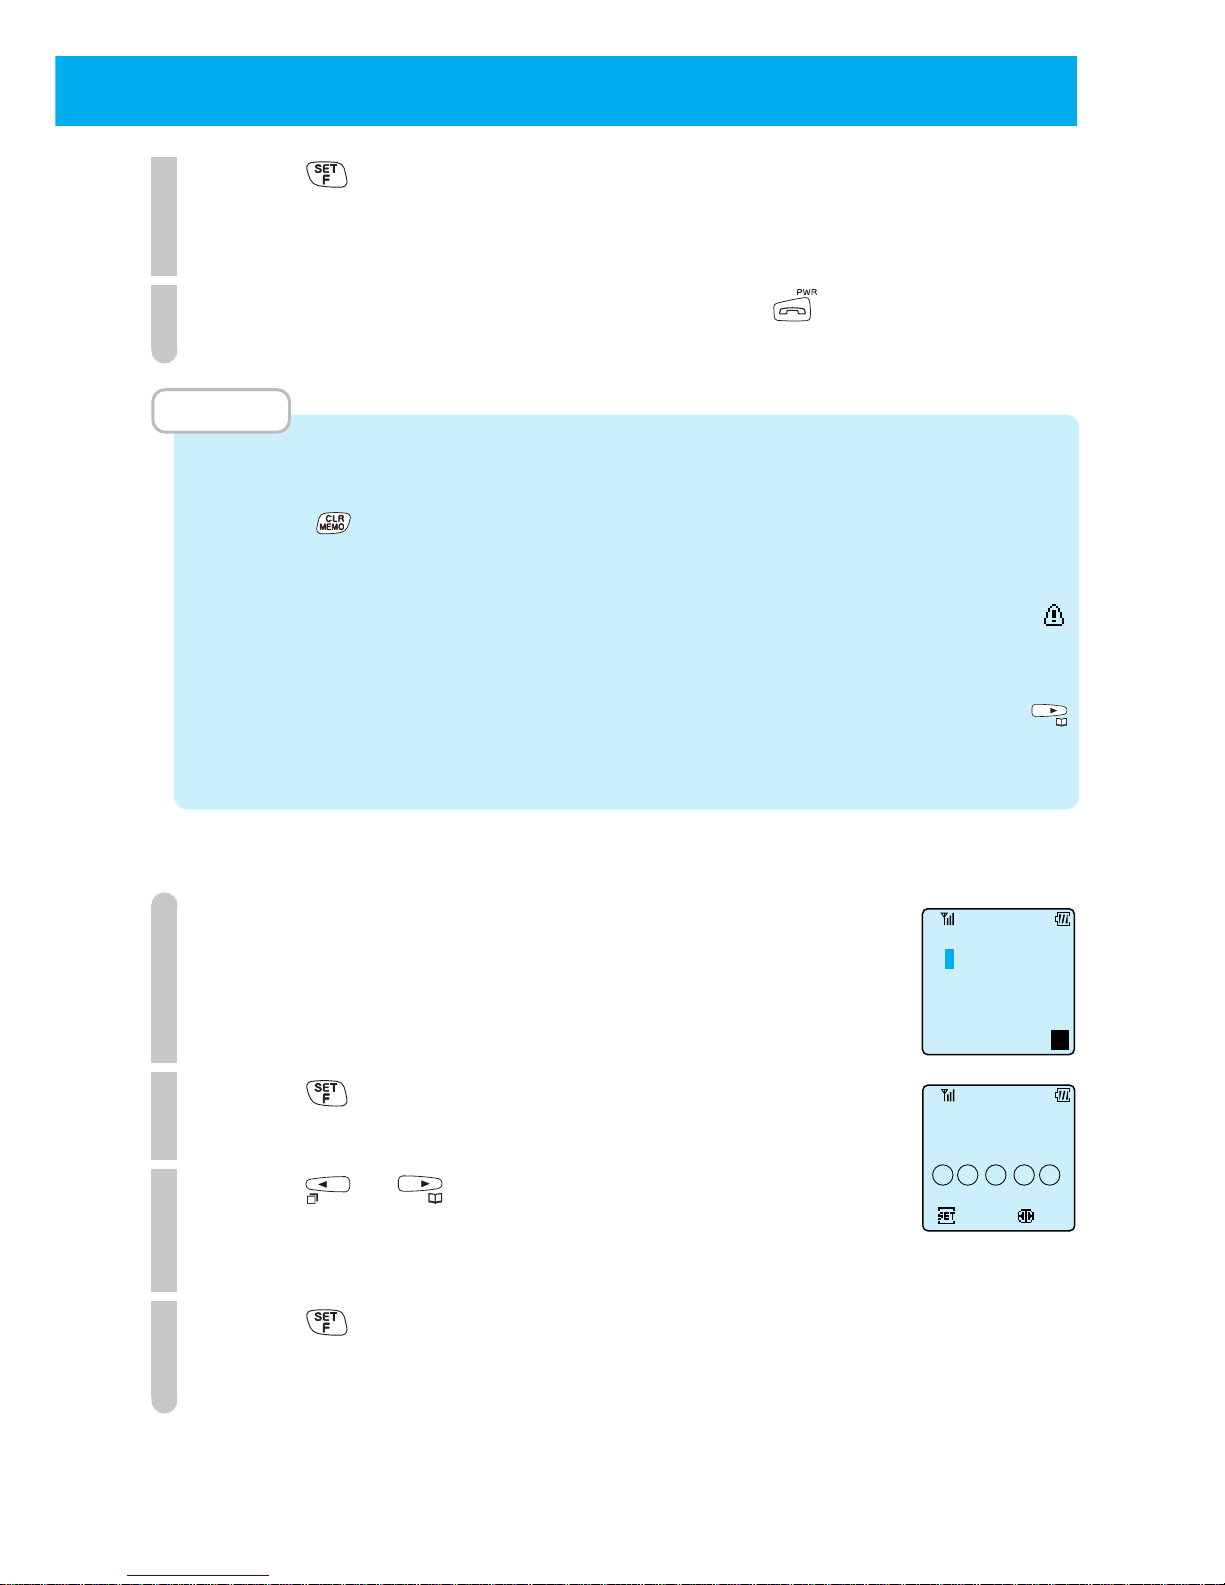
"Name & group" input method
1
Inputting name
You can input a name with a maximum length of 14 characters.
See page 41 for the character input mode switching and
character input method.
2
Press .
Select group prompt appears.
3
Press or to display the group you want.
Select from 5 groups, 1 ~ 5.
The selected group name will appear.
4
Press .
Return to step 3 of "Registering a phone book entry" (page 44).
Name?
=
E
g
Set
Select
TOM BROWN
Group Select
Group 1
1 2 3 4 5
Page 51
46
● USING PHONE BOOK
(cont.)
■
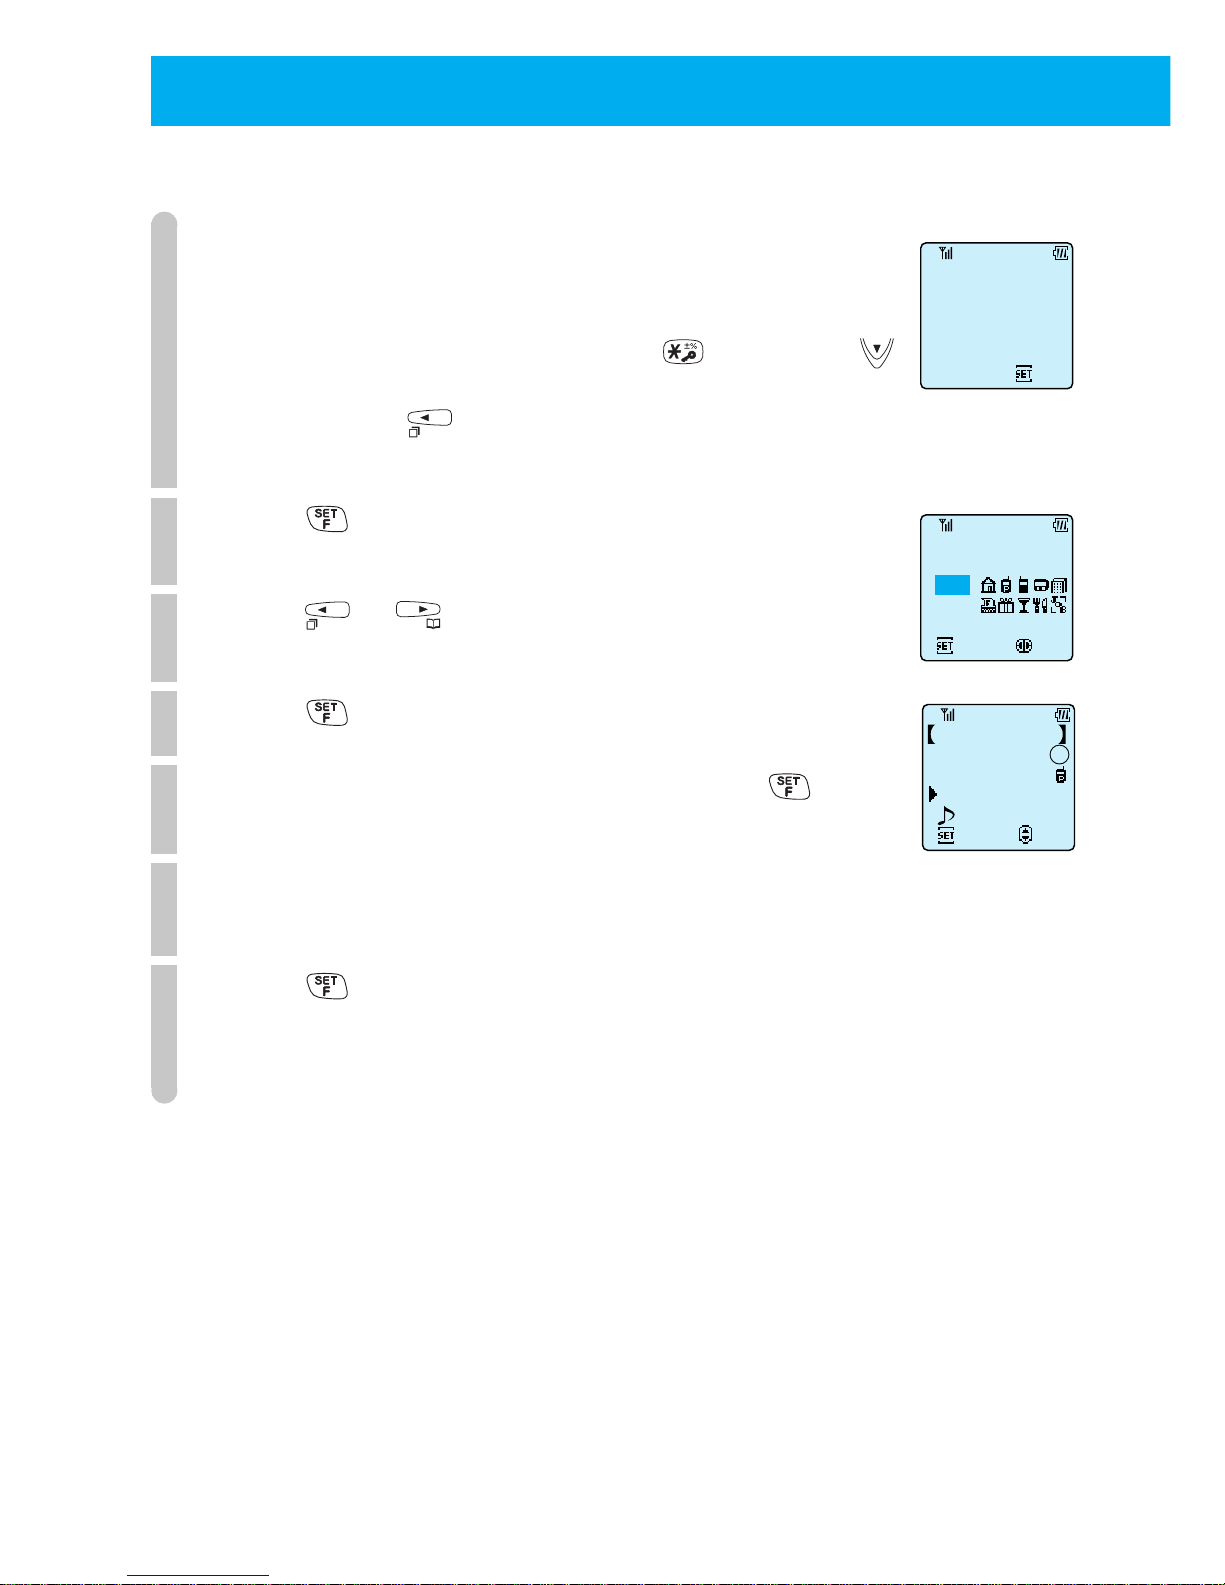
Inputting "TEL No. & mark"
1
Input the phone number.
Phone numbers up to 22 digits can be input.
If you wish to confirm phone numbers of more than 13 digits
while you are inputting, press and hold . By pressing ,
you can input hyphens.
When you press , the cursor appears and you can correct
numbers you have already entered.
2
Press .
Mark selection prompt appears.
3
Press or to select the mark you wish to use.
When you do not wish a mark, select [none].
4
Press .
5
Ensure that "TEL2? is selected and press .
6
Perform steps 1 ~ 3 again and set the second phone
number and mark.
7
Press .
Phone returns to Step 3 of "Registering a phone book entry"
(page 44).
Set
1st TelephoneNo.?
Set
Selec
07031234567
Select Mark
NONE
Edit
Select
2ndTEL & Mark?
Jack Black 1
070-3123-4567
TEL?
?
Page 52
47
■
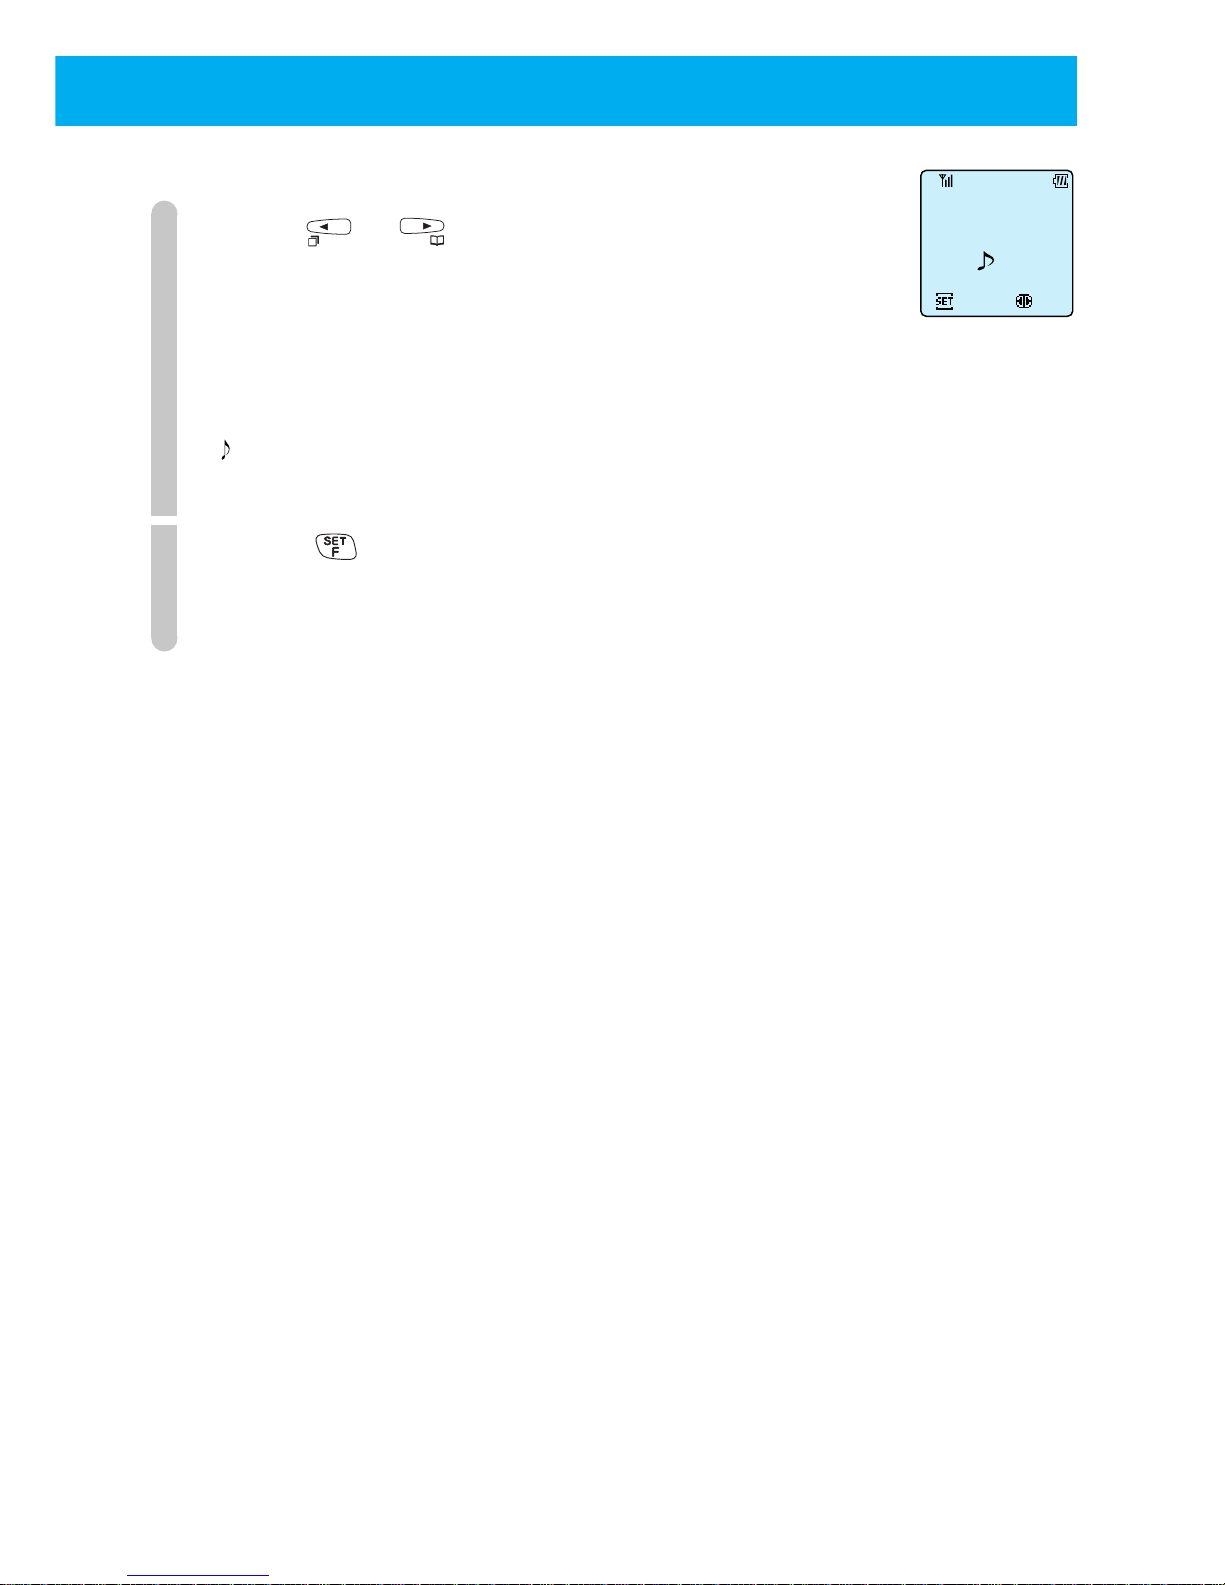
Inputting a "Specific incoming ring-tone"
1
Press or and select the melody you want to
use.
When a call is received from a caller whose phone is set to
notify other party, the ring-tone (or vibration) set here is activated
(page 43).
When you do not wish to register such a ring-tone, select [none].
1 ~ 11: Melody 1 ~ 11
VIB 1 ~ 3: Vibration 1 ~ 3
2
Press .
The registration complete screen appears.
Set Ring?
ToySoldierMrch
None 1 VB1
Set
Select
Page 53
48
● USING PHONE BOOK
(cont.)
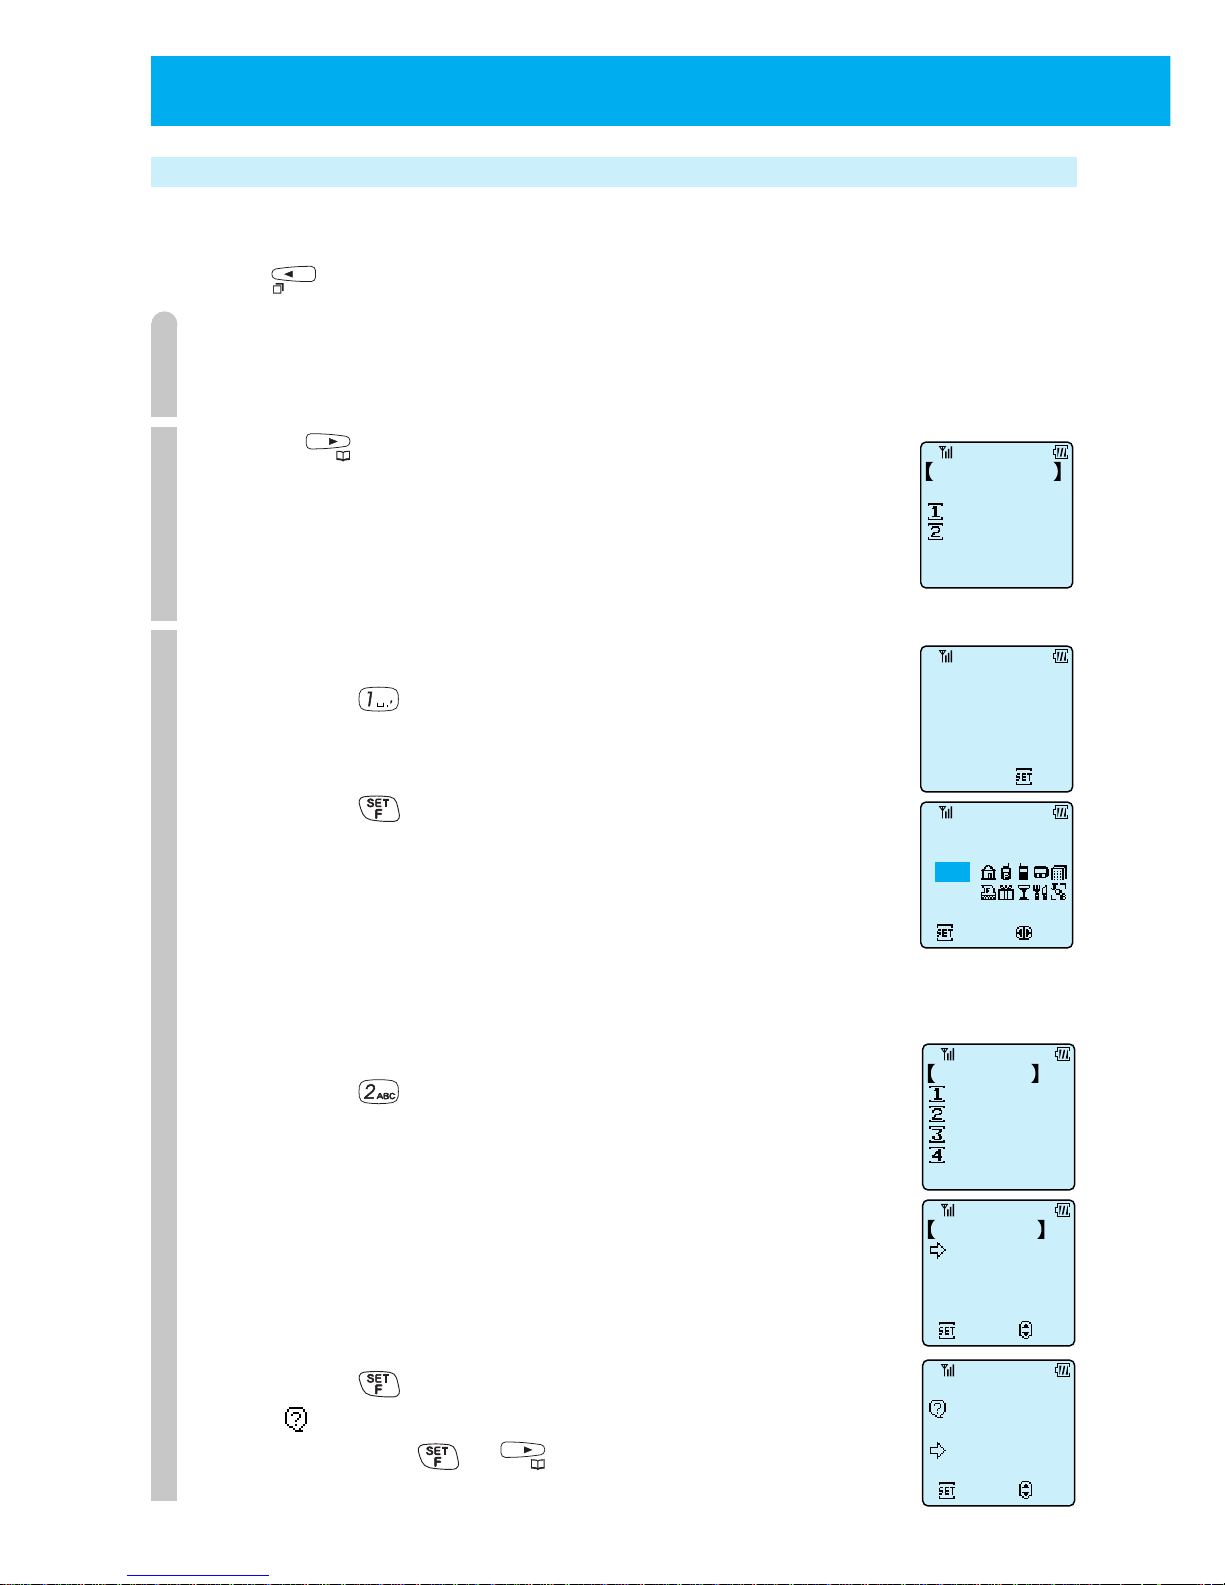
Registering numbers that are stored in redial,
call memory or dial memo
Press to store a displayed phone number in the phone book.
1
Display the phone number you want to register.
See page 32 for how to display the number.
2
Press .
A screen asking if you want to register the number appears.
From this screen, you can select to register the number in a
new entry (New registration -> 1), or add the number to an
existing entry (Add to entry -> 2).
3
● To make a new registration
q Press
.
The telephone number is displayed.
w Press .
The select mark screen appears.
e Follow the instructions from Step 3 of "Inputting
the TEL No. and mark" (page 46).
● To add to a registration
q Press
.
The Phone Book (search) screen appears.
w
Follow operations described in "Placing a call by search" (page 49)
and display the name of the entry you wish to register the number in.
Entries with first and second phone numbers are not displayed.
e Press .
" Record Here" is displayed.
Press either or .
Register PhnBk
NewRegistry
AddRegistry
NameSearch
Jack Black
Set
Select
Jane Green
Tom Brown
Susie Glay
Set
Selec
07031234567
Select Mark
NONE
1stTelephoneNo.?
Set
07031234567
Jack Black
Record Here?
Set
Select
Yes
No
PhoneBook
NameSearch
GroupSearch
MarkSearch
MmryNo.Search
Page 54
49
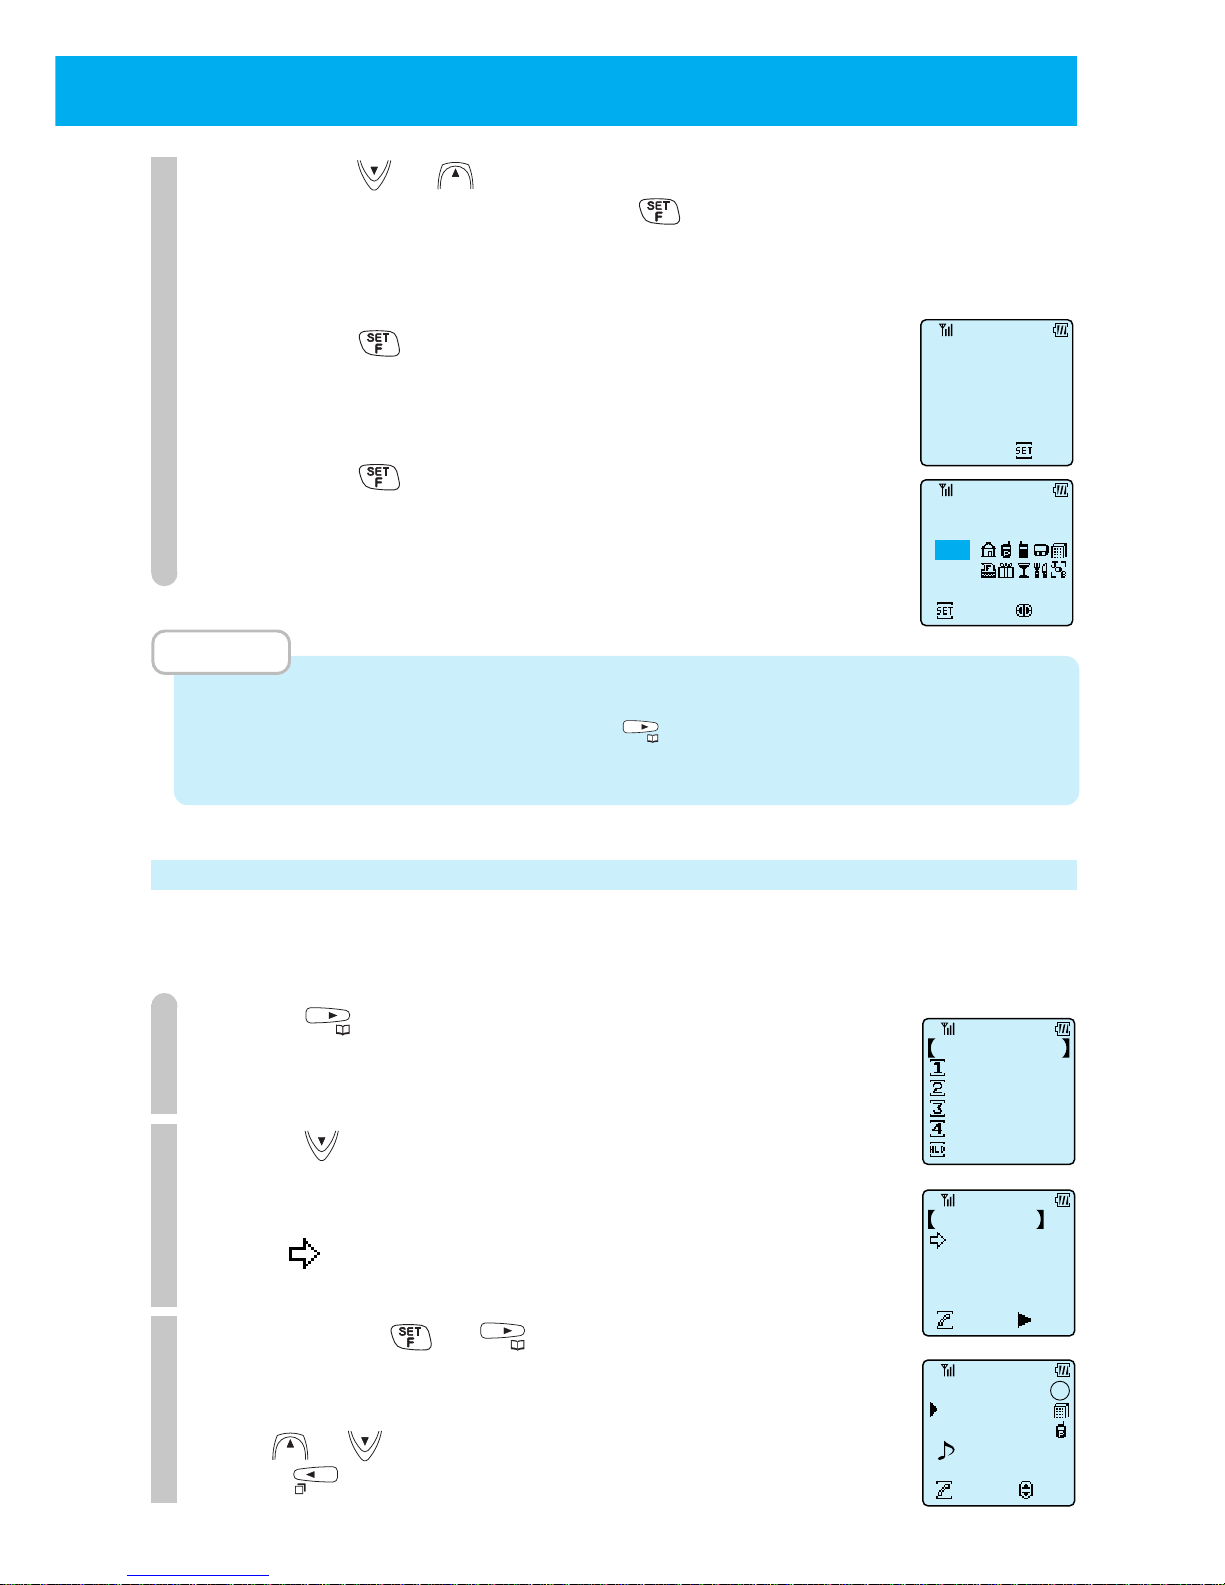
r Press or to select "Yes".
To cancel, select "No" and press . The search screen
will return.
t Press .
The phone number displayed in Step 1 is displayed.
y Press .
Follow instructions from Step 3 of "Inputting TEL No. and
mark" (page 46).
MEMO
• When in call standby condition, you can register a number in phone book after you
input the number. In this case, press
after you have input the number. Then
follow the instructions from Step 2.
Placing a call by search
■
Searching by name order
1
Press .
2
Press .
Once pressed, the names (first 12 letters) are displayed in
alphabetical order. Continue pressing and the list will scroll.
Point to the name you want to display.
3
Press either or .
The details of entry data such as the phone numbers are
displayed.
Use or to select the first or second phone number.
Press to return to the search screen.
Set
Selec
07032234567
Select Mark
NONE
2nd TelephoneNo.?
Set
07032234567
NameSearch
Jack Black
Cnctng
Dtls
Jane Green
Tom Brown
Susie Glay
Phonebook
NameSearch
Register PhnBk
Group
Search
Mark
Search
MmryNo.
Search
Jack Black
03-0323-4567
Cnctng
Slct
070-3123-4567
No.112
1
1
Page 55
50
● USING PHONE BOOK
(cont.)
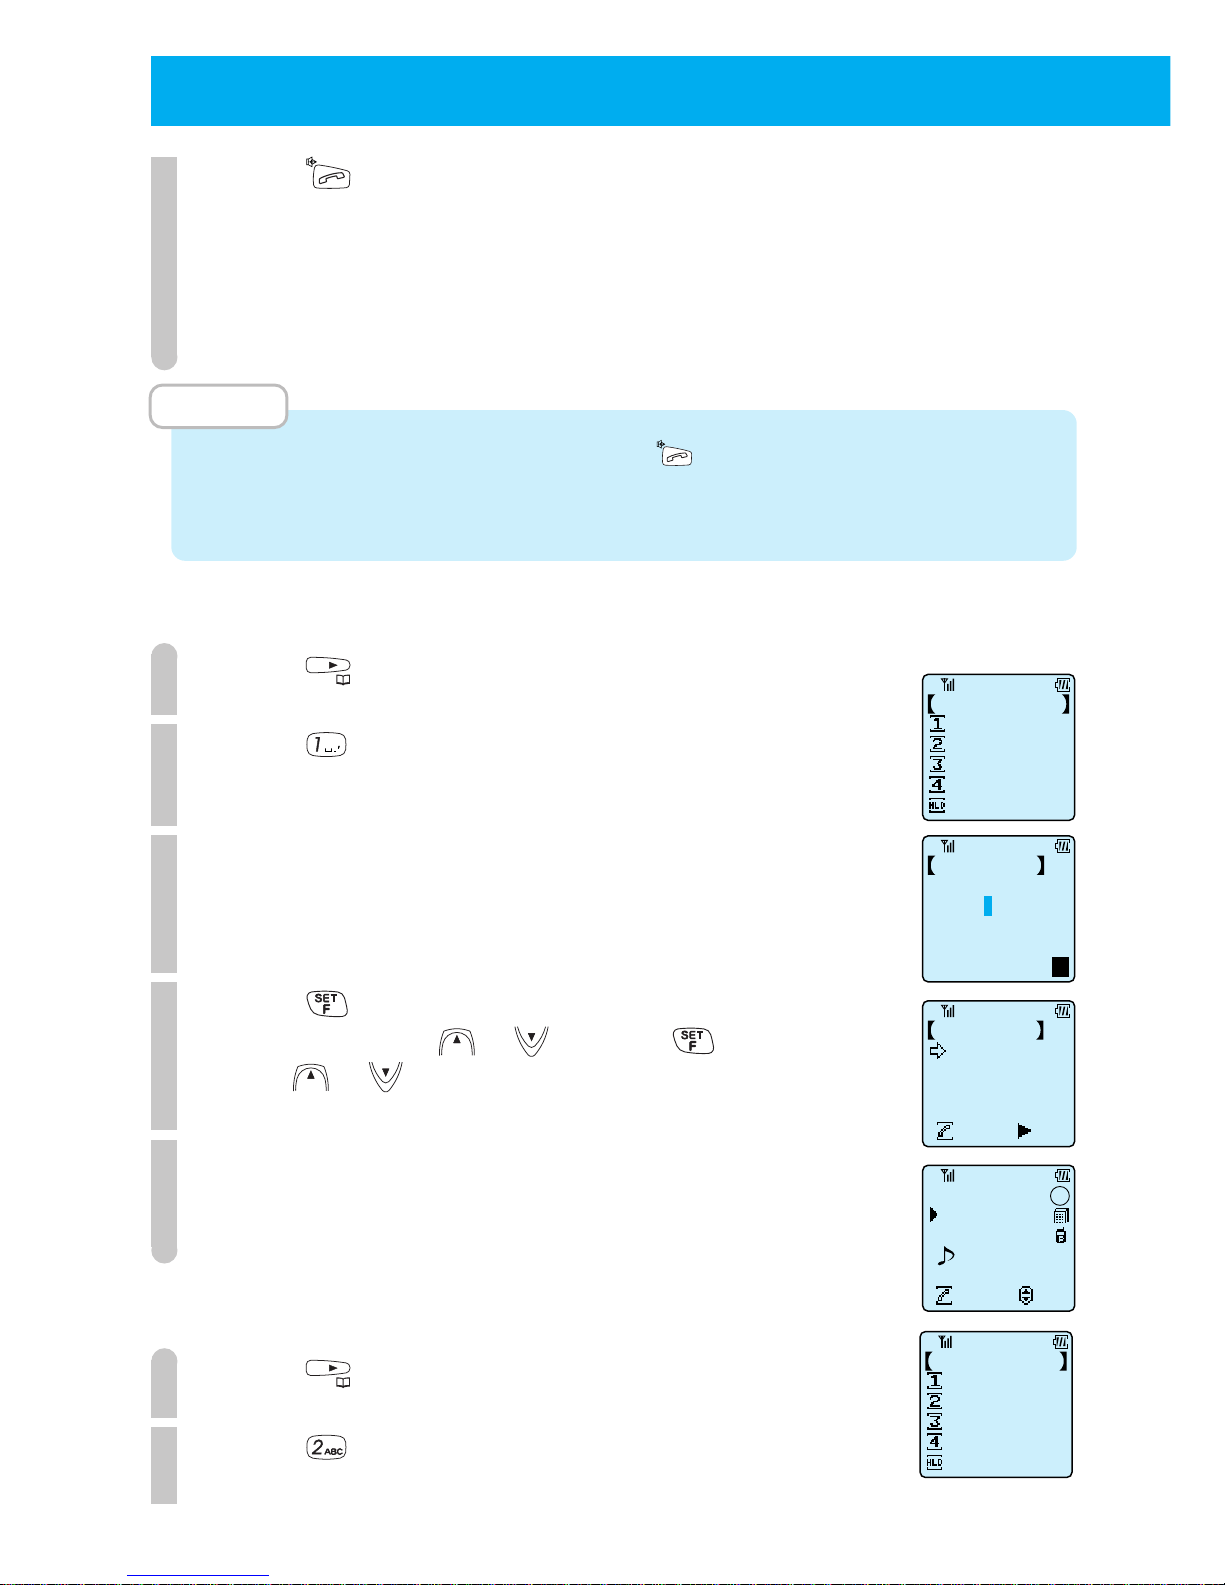
4
Press .
A call is placed to the specified phone number.
MEMO
• In step 2, you can place a call by pressing rather than displaying the entry data
such as phone numbers.When both the first and second phone numbers are
registered, the first number is dialed.
■
Searching directly by name
1
Press .
2
Press .
3
Enter the first letter of the name you wish to find.
4
Press .
You can also press or instead of .
Press or to browse the previous or next name.
5
Follow the instructions from Step 3 of "Searching by
name order" (page 49).
■
Searching by group
1
Press .
2
Press .
Phonebook
NameSearch
Register PhnBk
Group
Search
Mark
Search
MmryNo.
Search
Phonebook
NameSearch
Register PhnBk
Group
Search
Mark
Search
MmryNo.
Search
NameSearch
Jack Black
Cnctng
Dtls
Jane Green
Tom Brown
Susie Glay
NameSearch
TargetName?
=
E
g
Jack Black
03-0323-4567
Cnctng
Slct
070-3123-4567
No.112
1
1
Page 56
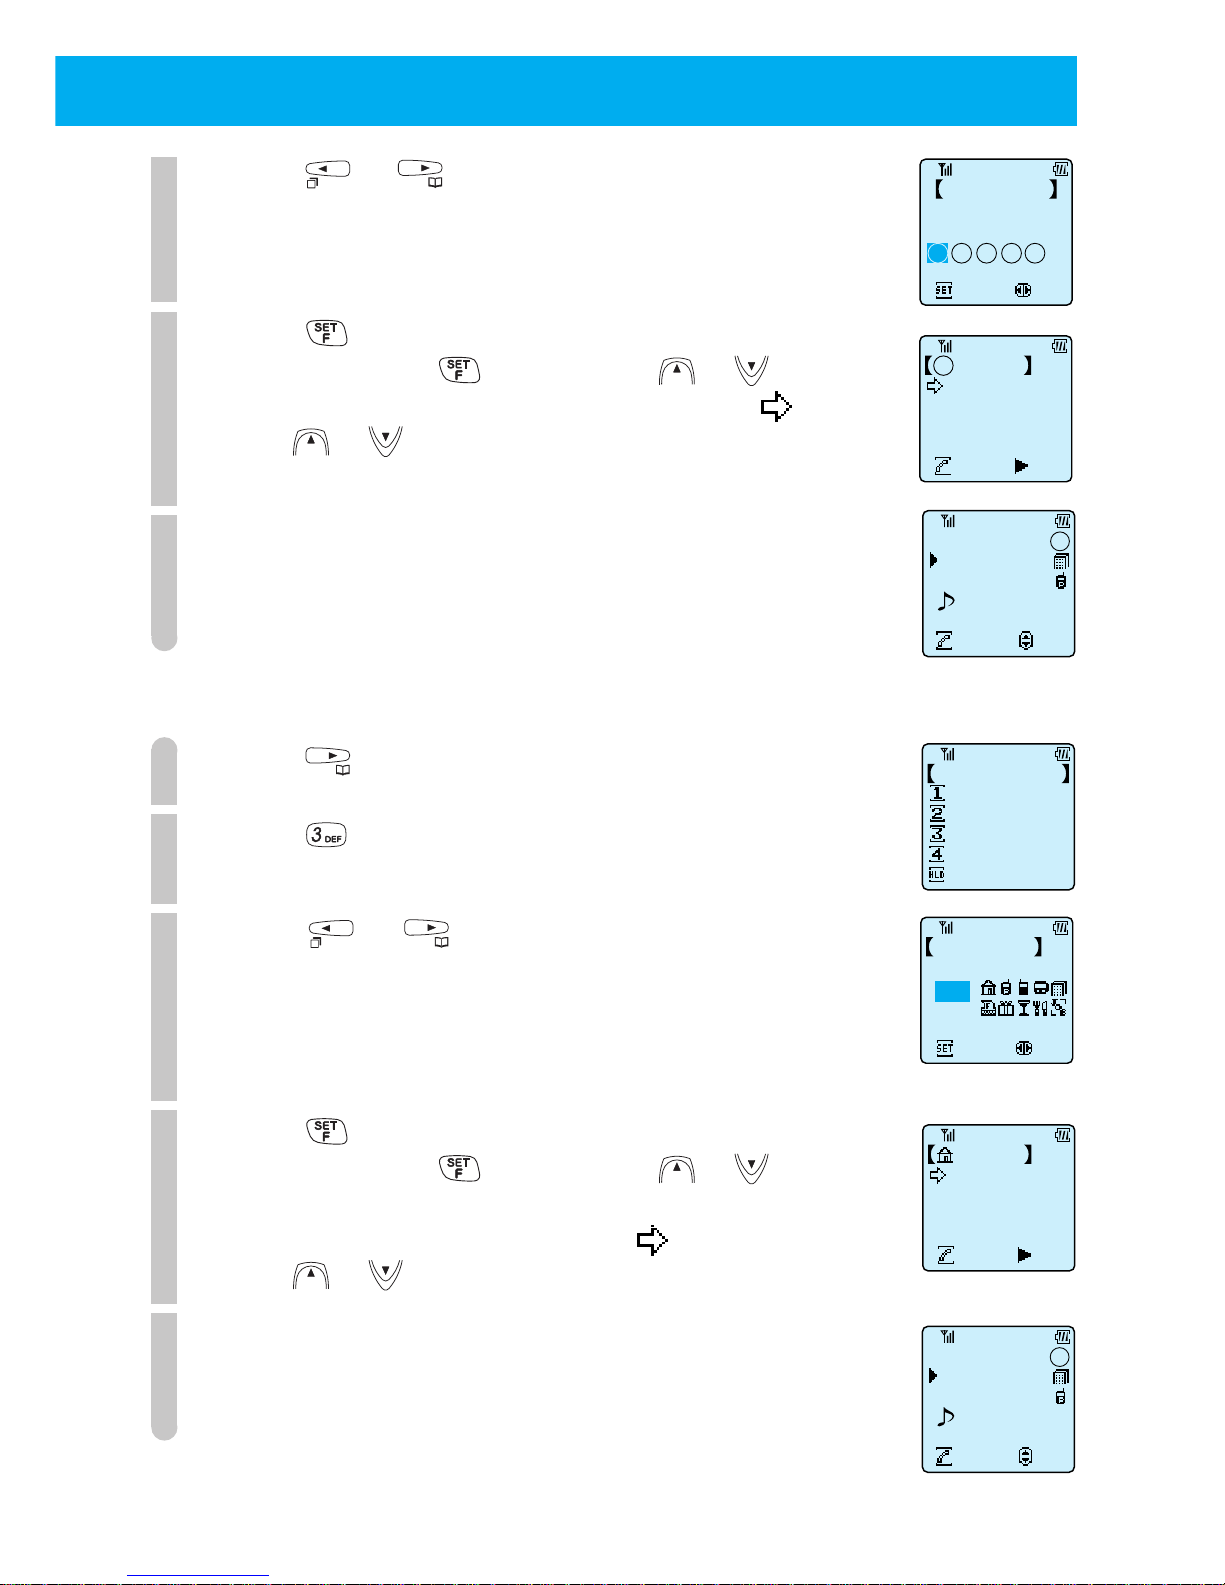
51
3
Press or to select the group to search.
4
Press .
Instead of pressing , you can press or .
The names registered in the selected group and light up.
Press or to browse the previous or next names.
5
Follow the instructions from Step 3 of "Searching by
name order" (page 49).
■
Searching by mark
1
Press .
2
Press .
3
Press or to select which category mark to
search.
Select "none", when you want to search the names of entries
whose phone numbers were stored without a category mark.
4
Press .
Instead of pressing , you can press or .
The names of entries whose phone numbers were registered
with the specified category mark and light up.
Press or to browse the previous or next names.
5
Follow the instructions from Step 3 of "Searching by
name order" (page 49).
1 Group1
Jack Black
Cnctng
Dtls
Jane Green
Tom Brown
Susie Glay
Phonebook
NameSearch
Register PhnBk
Group
Search
Mark
Search
MmryNo.
Search
Set
Select
MarkSearch
TargetMark?
NONE
MarkSearch
Jack Black
Cnctng
Dtls
Jane Green
Tom Brown
Susie Glay
Jack Black
03-0323-4567
Cnctng
Slct
070-3123-4567
No.112
1
1
Jack Black
03-0323-4567
Cnctng
Slct
070-3123-4567
No.112
1
1
Set
Select
TargetGroup?
Group1
1 2 3 4 5
Group Search
Page 57
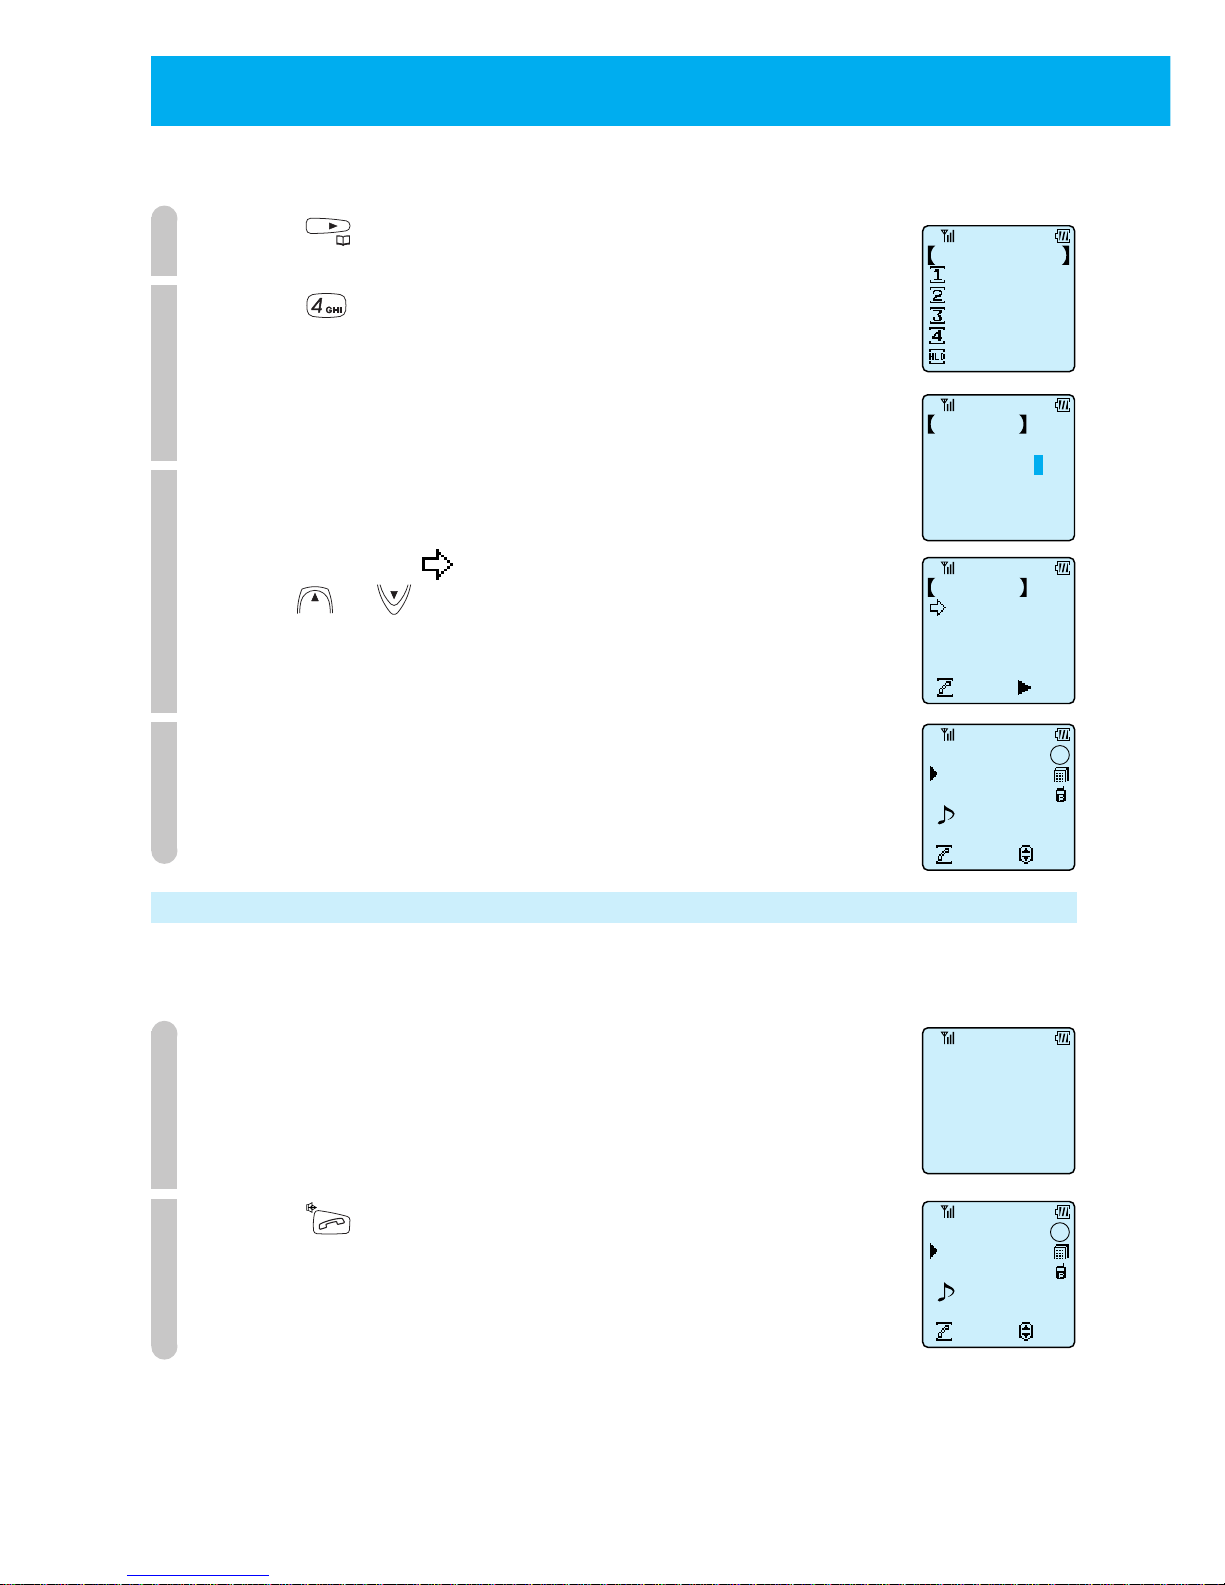
52
● USING PHONE BOOK
(cont.)
■
Searching by memory number
1
Press .
2
Press .
3
Input the memory number (3 digits) that you want to search.
The name of the entry that is assigned to the memory number
you input and the light up.
Press or to browse the previous or next registered
numbers.
4
Follow the instructions from Step 3 of "Searching by
name order" (page 49).
Placing a call using two touch dialing
There is an easy way of placing calls to the first phone numbers assigned to
memory numbers 000 ~ 009.
1
Use the dial keys to input the last digit of the memory
number (0 ~ 9).
2
Press .
After the details of the entry are displayed, a call is placed to
the first phone number.
Phonebook
NameSearch
Register PhnBk
Group
Search
Mark
Search
MmryNo.
Search
MmryNo.Search
ando
Memory No.? No. __ __
Jack Black
03-0323-4567
Cnctng
Slct
070-3123-4567
No.112
1
1
MmryNo.Search
126 Jack Black
Cnctng Dtls
127 Jane Green
128 Tom Brown
129 Susie Glay
Jack Black
03-0323-4567
Cnctng
Slct
070-3123-4567
No.112
1
1
1
Page 58
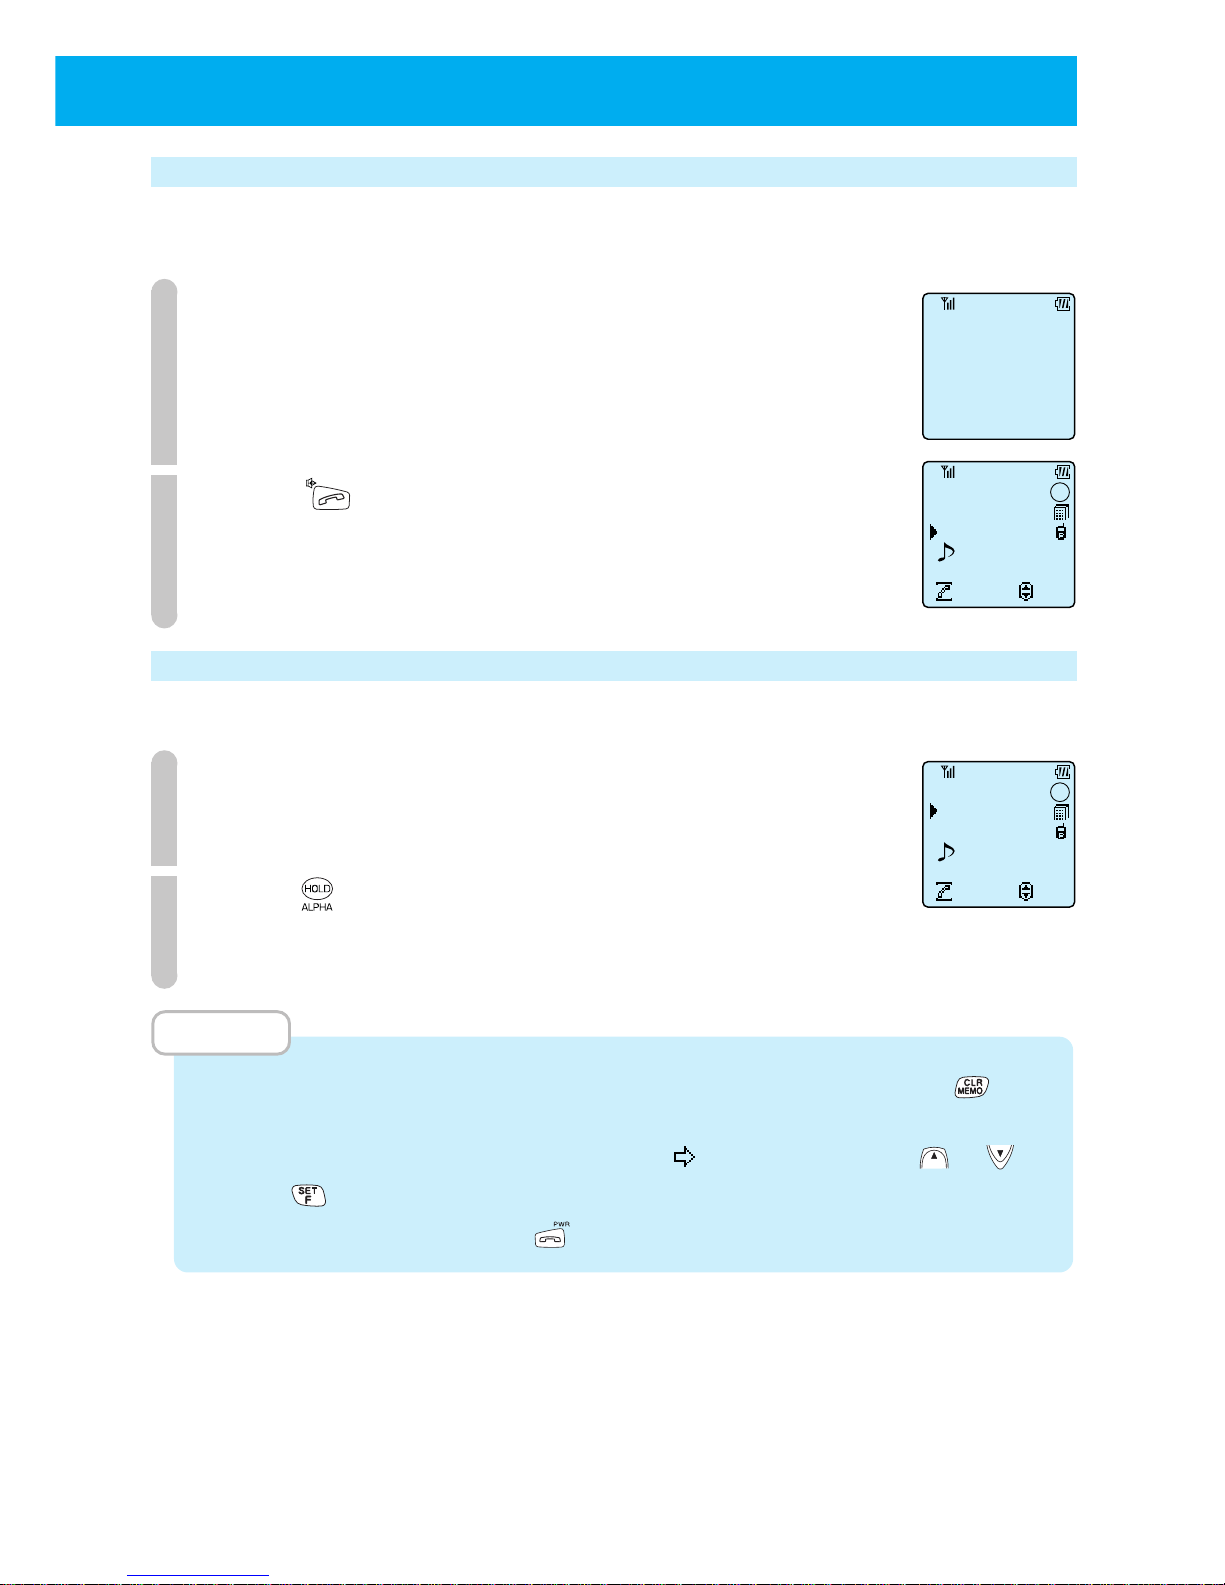
53
Placing a call using three touch dialing
You can easily place a call using three touch dialing for second phone numbers
assigned to the memory numbers 000 ~ 009.
1
Use the dial keys to input the last digit of the memory
number (0 ~ 9) twice.
2
Press .
After the entry details are displayed, a call is placed to the second phone number.
Correcting phone book entries
You can correct each item in order.
1
Search according to "Place a call by searching" (page 49)
and display the entry details of the name you want to correct.
2
Press to activate the screen to correct registration.
Then follow the instructions from Step 3 of "Registering a phone
book entry" (page 44).
MEMO
• When you select the entry whose contents you want to delete and press during
Step 3 of "Registering a phone book entry" (page 44), you are asked to confirm the
deletion of that entry's contents. Point the
to "Yes" by pressing or and
press
to delete the registered contents.
• To cancel a correction, press
.
11
Jack Black
03-0323-4567
Cnctng
Slct
070-3123-4567
No.112
1
1
Jack Black
03-0323-4567
Cnctng
Slct
070-3123-4567
No.112
1
1
Page 59
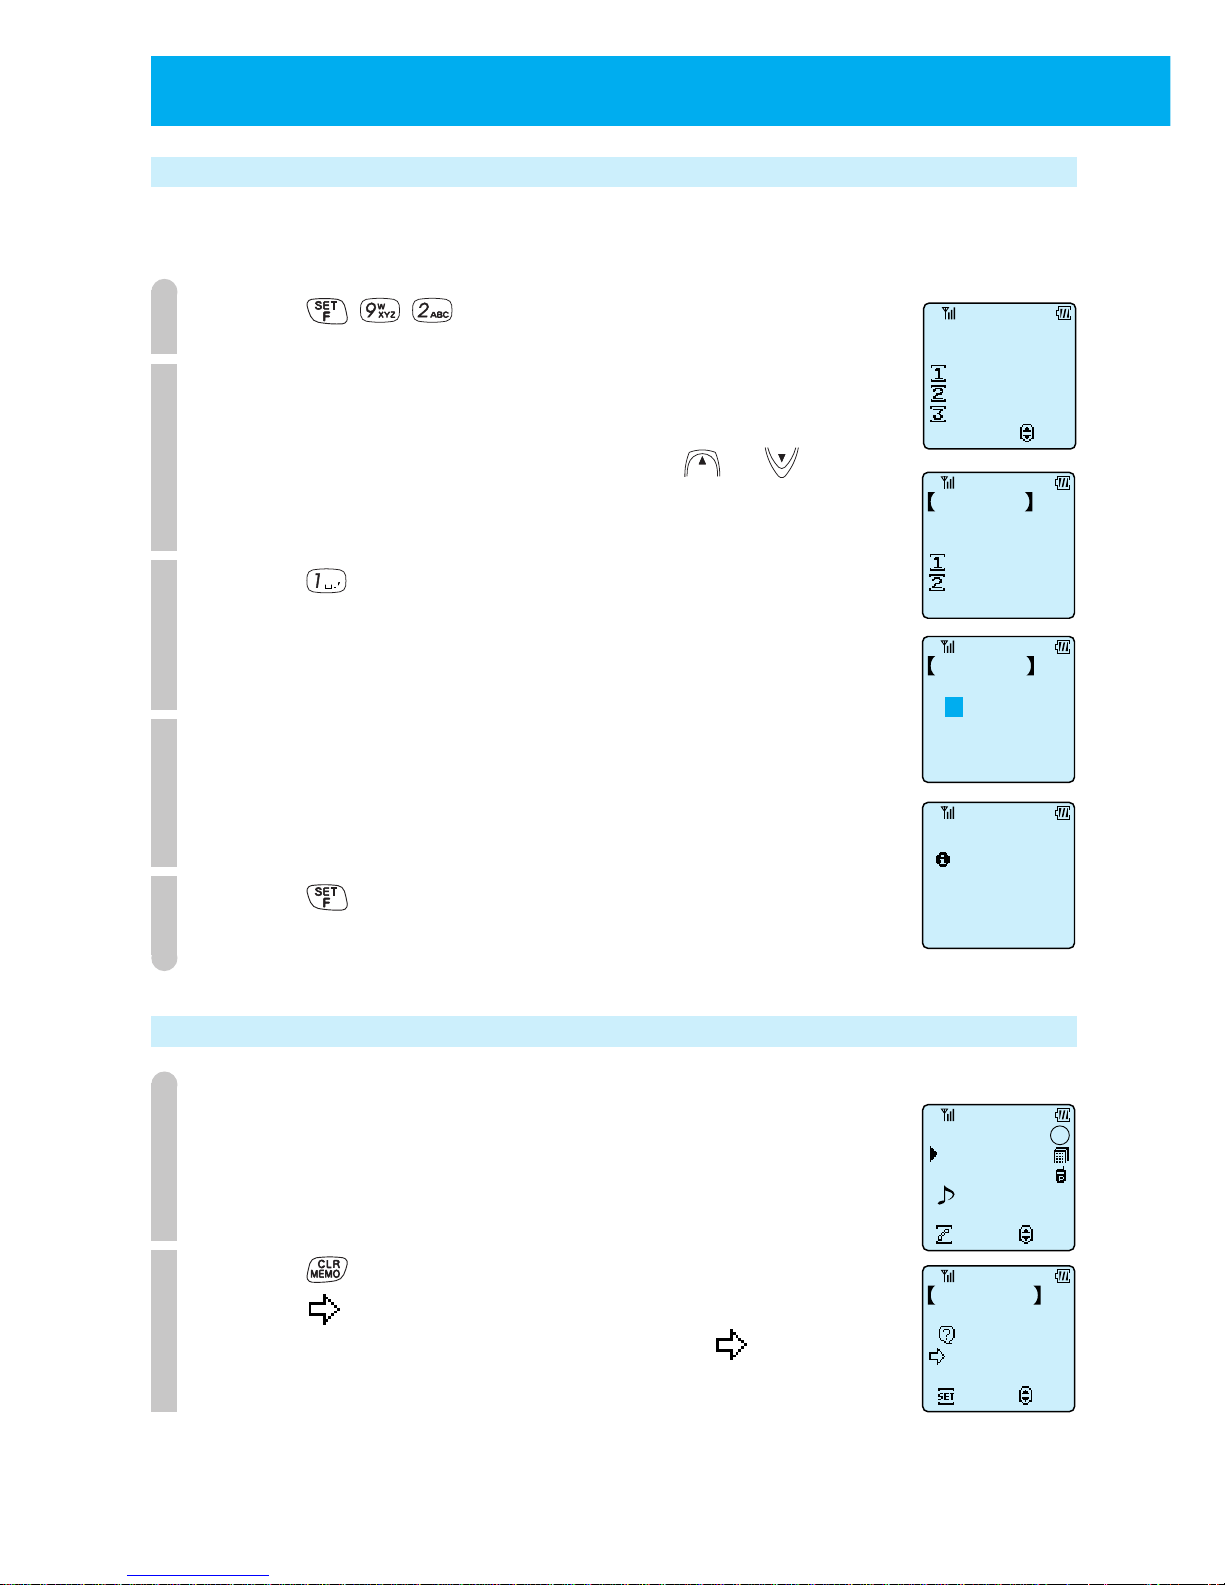
54
● USING PHONE BOOK
(cont.)
Changing the group name (F92)
You can change the group names in your phone book.
When you purchase your phone, the group names will be "group 1" ~ "group 5"
1
Press .
2
Press the number (1~ 5) of the group name that you
want to change.
To check the group name, you can use or to scroll
through the groups.
3
Press .
4
Enter the new group name.
See page 41 for how to input numerals and letters and how to
change the character size.
5
Press .
The phone will beep to confirm the process and the standby screen returns.
Deleting contents of phone book individually
1
Do a search according to "Placing a call by search"
(page 49) and display the name that you want to delete.
2
Press .
Ensure points to "Yes".
When you want to cancel the deletion, point to "No".
ChangeGrpName
Group 1
Group Name
has been
recoreded
F92
ChangeGrpName
Select
Group 1
Group 2
Group 3
ChangeGrpName
Group 1
Change
Return to
Initial Setting
Set
Select
Clear
YES
NO
Jack Brown
Jack Black
03-0323-4567
Cnctng
Slct
070-3123-4567
No.112
1
1
Page 60
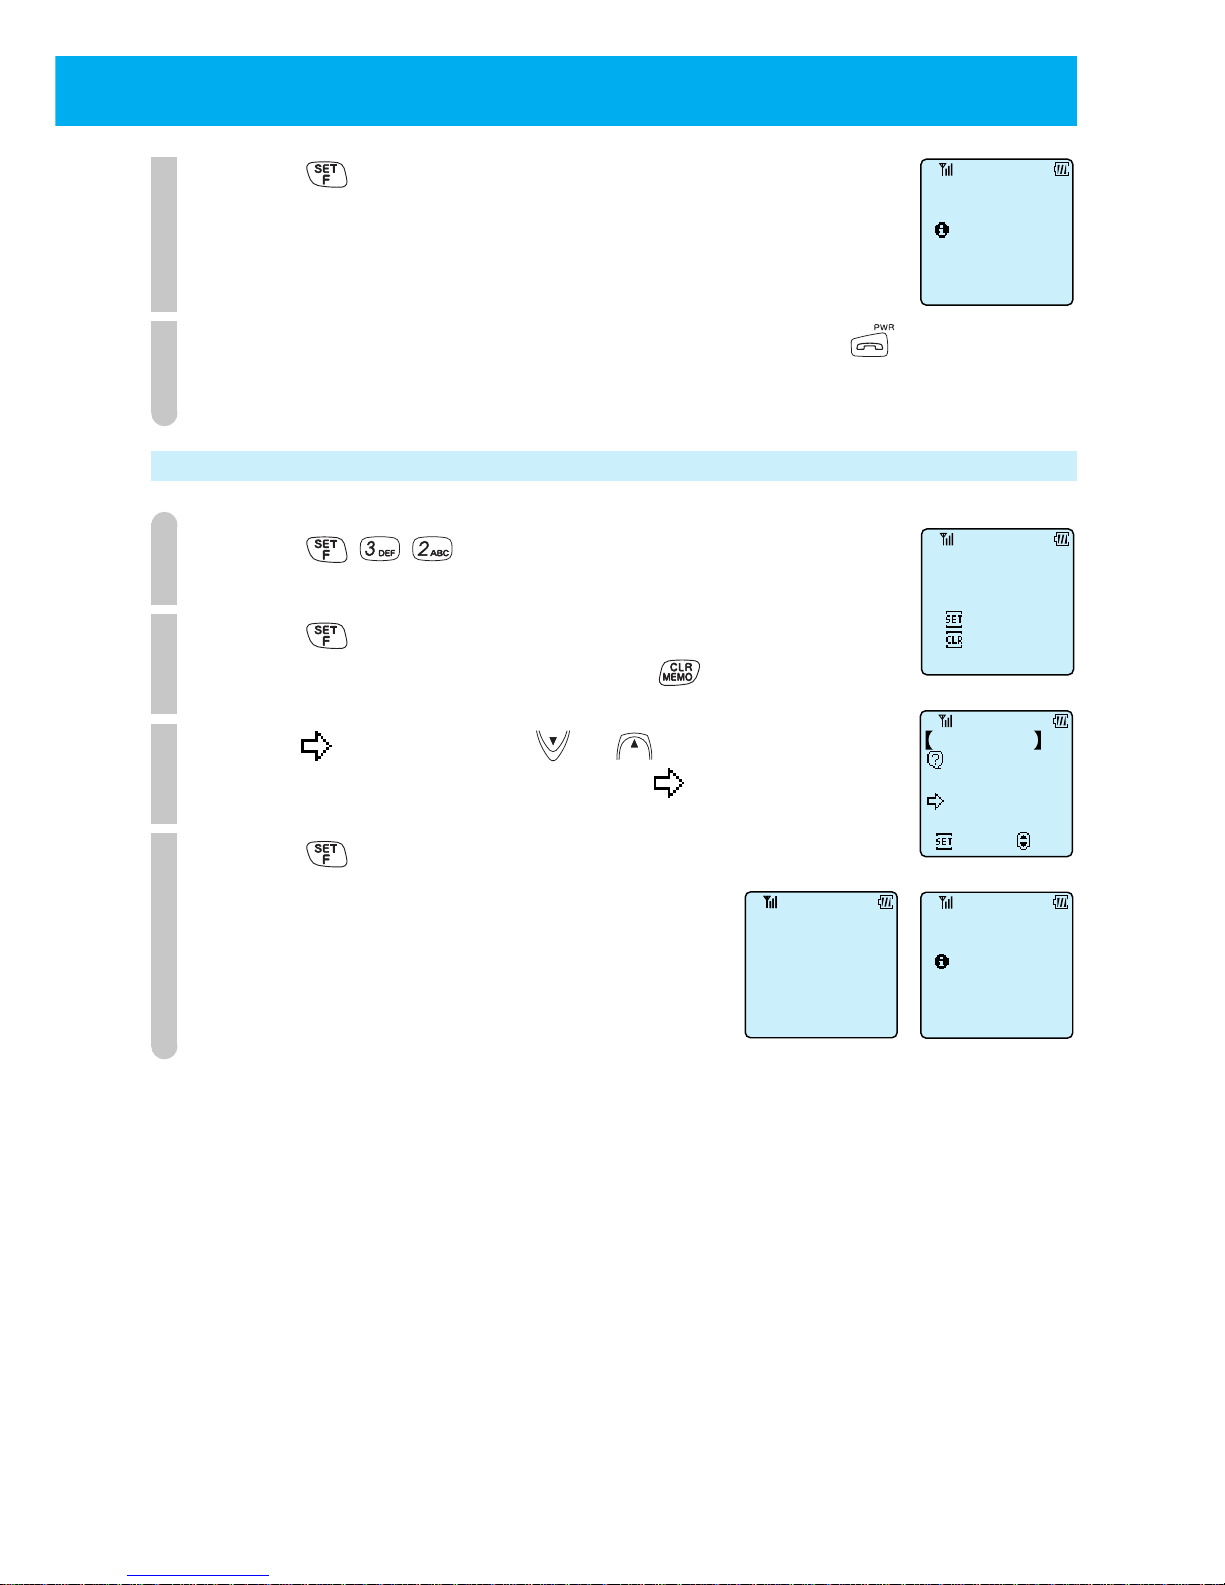
55
3
Press .
The phone book entry displayed by step 1 is deleted.
The display returns to the Phone Book (search) screen and you
can select another entry to delete.
4
When you have finished deleting individual entries, press .
Deleting all entries in phone book (F32)
1
Press .
2
Press .
To cancel the clear all operation, press .
3
Point to "Yes" using or .
To cancel the clear all operation, point to "No"
4
Press .
All phone book entries are deleted.
F32
ClearAllPhnBk
YES
NO
ClearAllPhnBk
SureYouWantTo
YES
NO
Set
Select
ClearAllPhnBk?
The Phn Bk
has been cleared
Clearing...
ClearFinished
Page 61
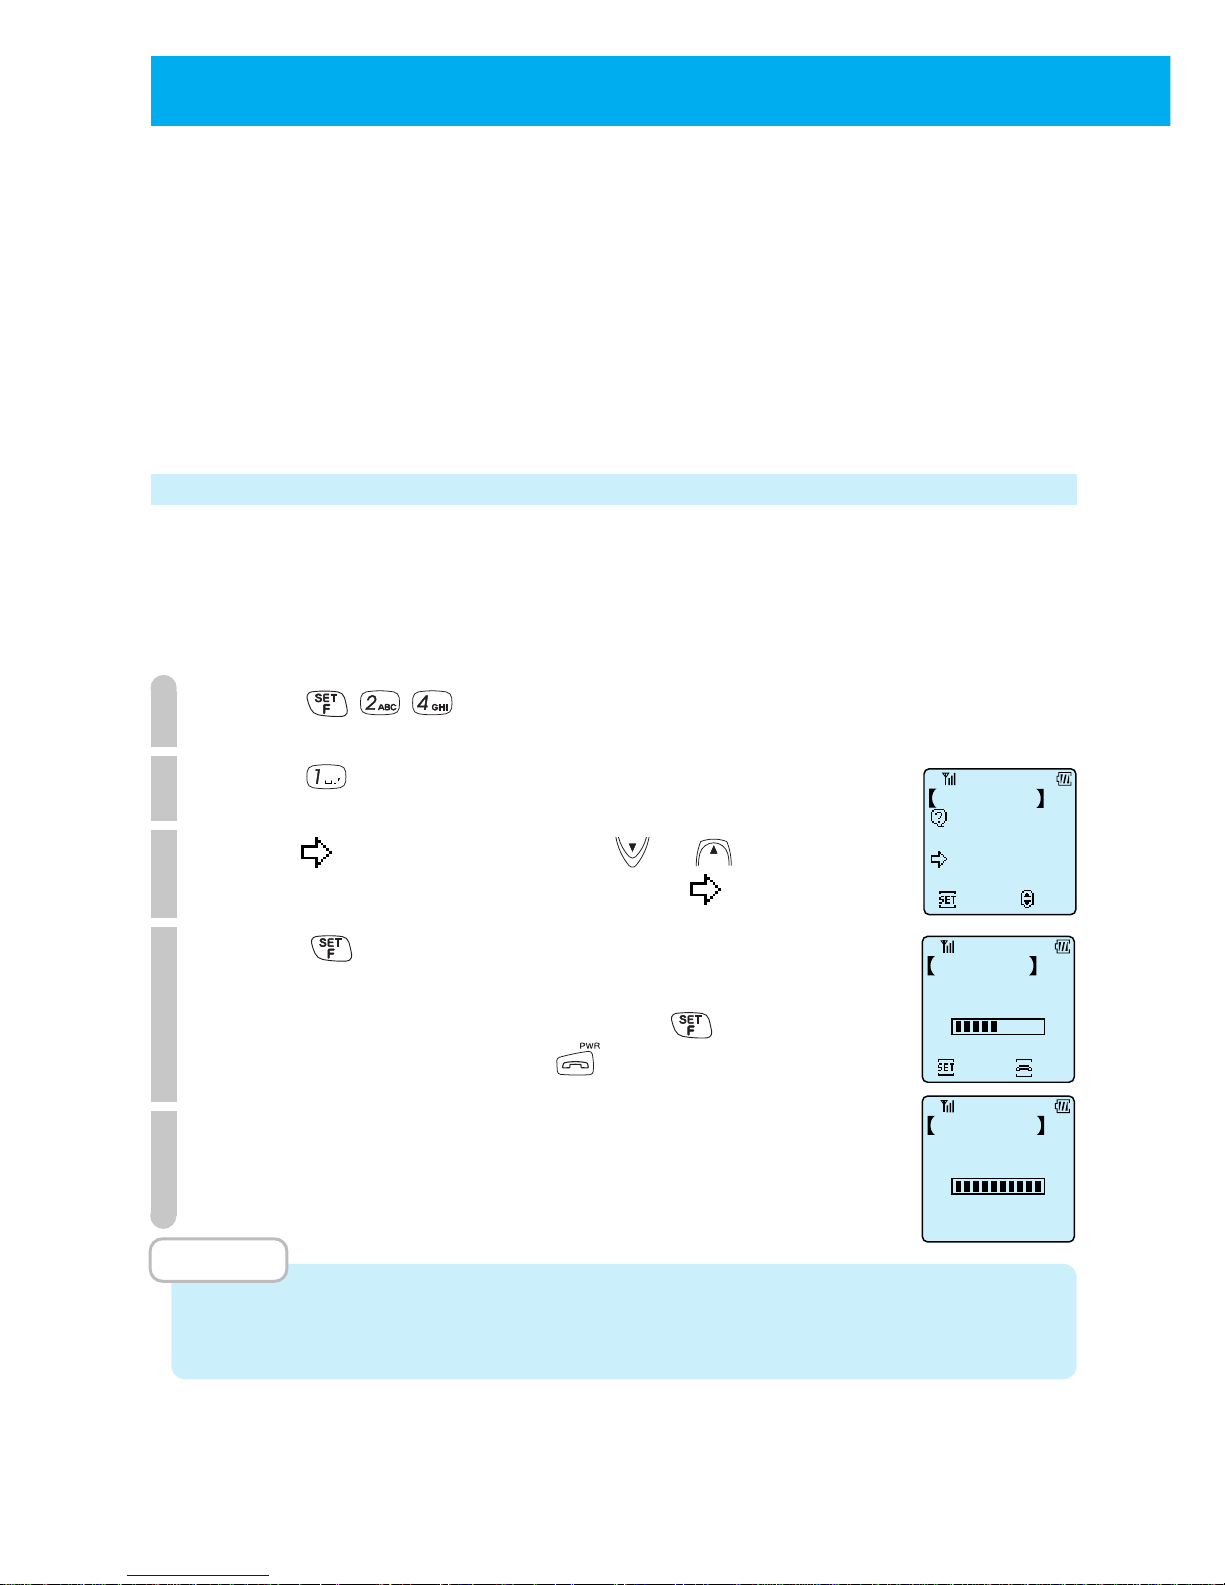
56
When you cannot answer your phone because you are busy at work or at the
cinema, it is convenient to use the answer message function.
When an incoming call is received an answering message is played and you can
receive up to 2 messages (each maximum of 16 seconds) from callers.
When the phone receives the three incoming call, the phone will return to normal
call answering mode and it cannot record a message.
You use a create your original message for the answering message.
When an incoming call is received while message mode is set, after the answering
message plays, the phone vibrates and starts recording.
Answering message (F24)
Your original answering message have to be recorded by yourself beforehand.
■
Recording an original answering message
1
Press .
2
Press .
3
Point to "Yes" by pressing or .
If you want to cancel the recording, press to "No".
4
Press and after the phone beeps, record your
answering message (maximum of 16 seconds).
When you finish before 16 seconds, press and go to Step 5.
To cancel the recording, press .
5
The phone beeps and the recording is finished.
Your original answering message has been recorded.
MEMO
• You cannot record your original answering message when in transceiver mode.
• If an incoming call is received while recording a message, please restart the operation.
●
USING THE ANSWER MESSAGE FUNCTION
Record Message
YES
NO
Set
Select
Answer Message
Answer Message
3 Seconds
Recording
Set
STOP
Answer Message
Recording Finish
Page 62
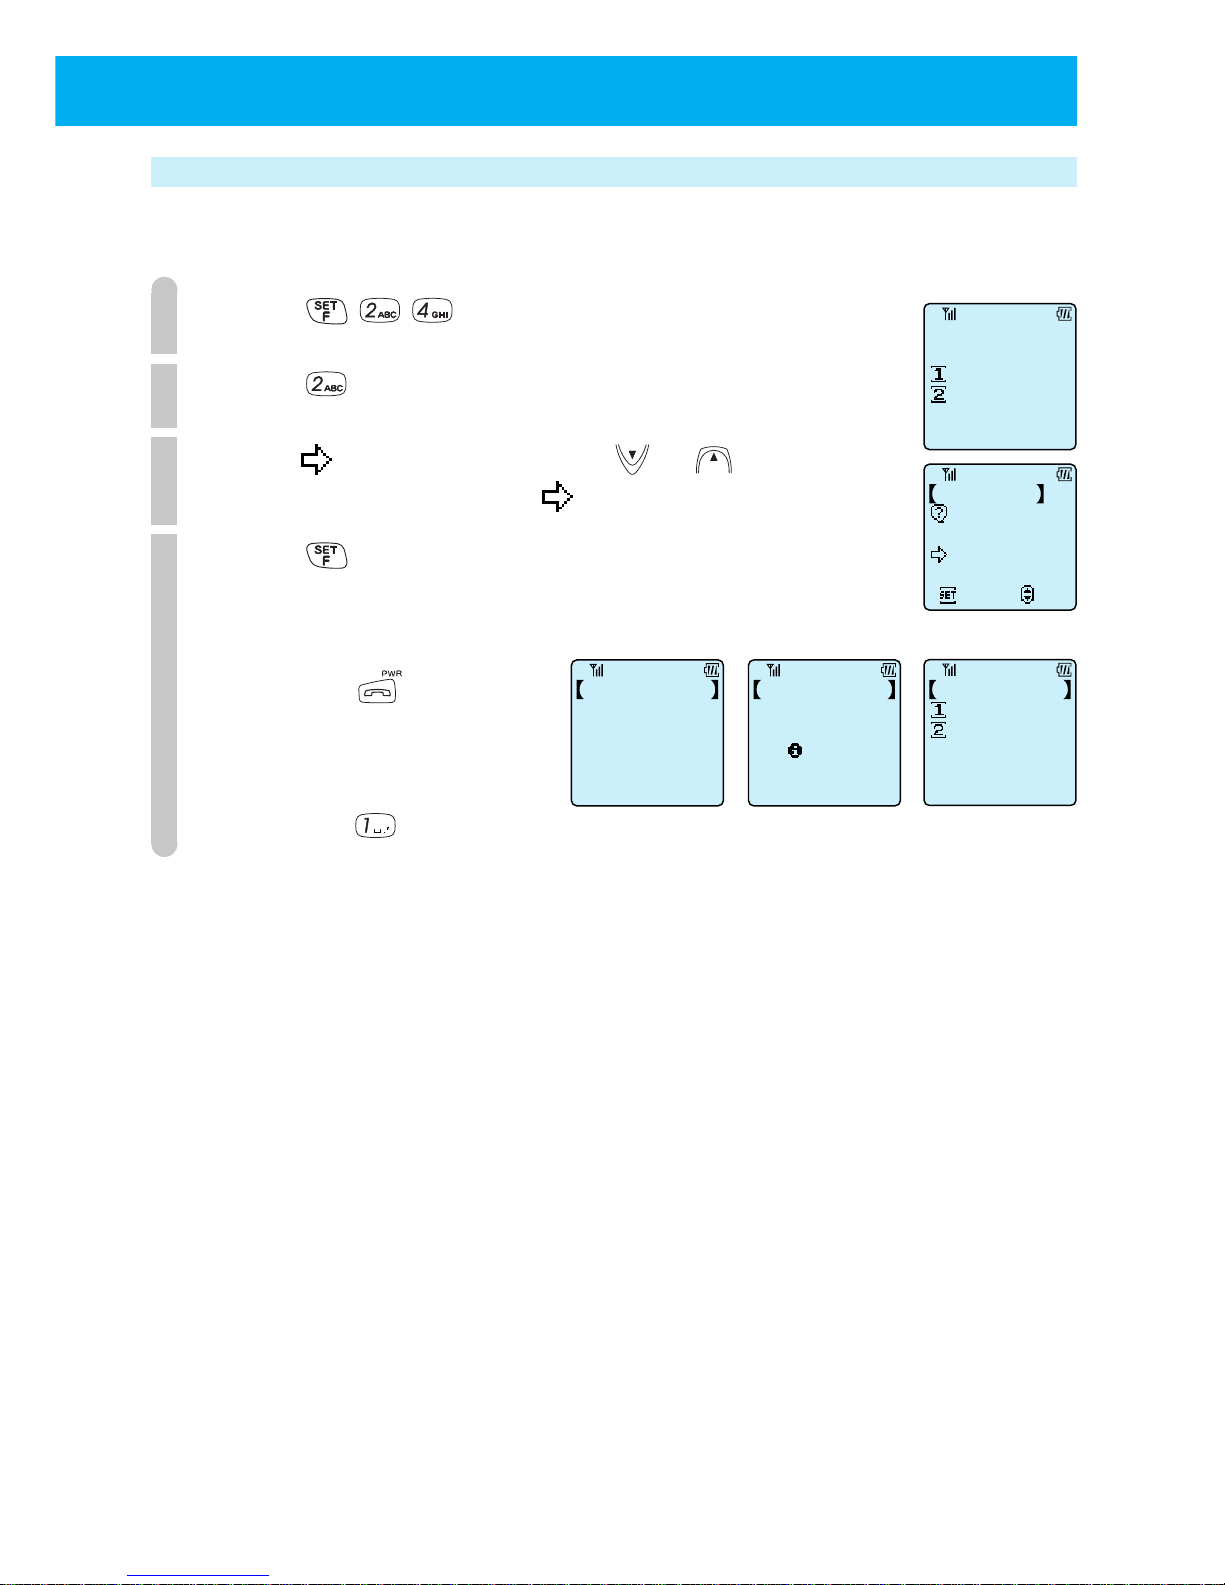
57
Deleting and changing original answering message (F24)
To change an original answering message, first delete the existing message and
then record a new original answering message.
1
Press .
2
Press .
3
Point to "Yes" by pressing or .
To cancel the deletion, point to "No".
4
Press .
The answering message is deleted and display returns to the first screen.
● When exiting after message is deleted
Press
.
● When recording a new
answering message
Press
and follow the instructions from Step 3 of "Recording
an original answering message" (page 56).
Answer Message
F24
Record
Clear
Clear Message
YES
NO
Set
Select
Answer Message
Record
Clear
Answer Message
Answer Message
Cleared
Answer Message
Clearing
Page 63
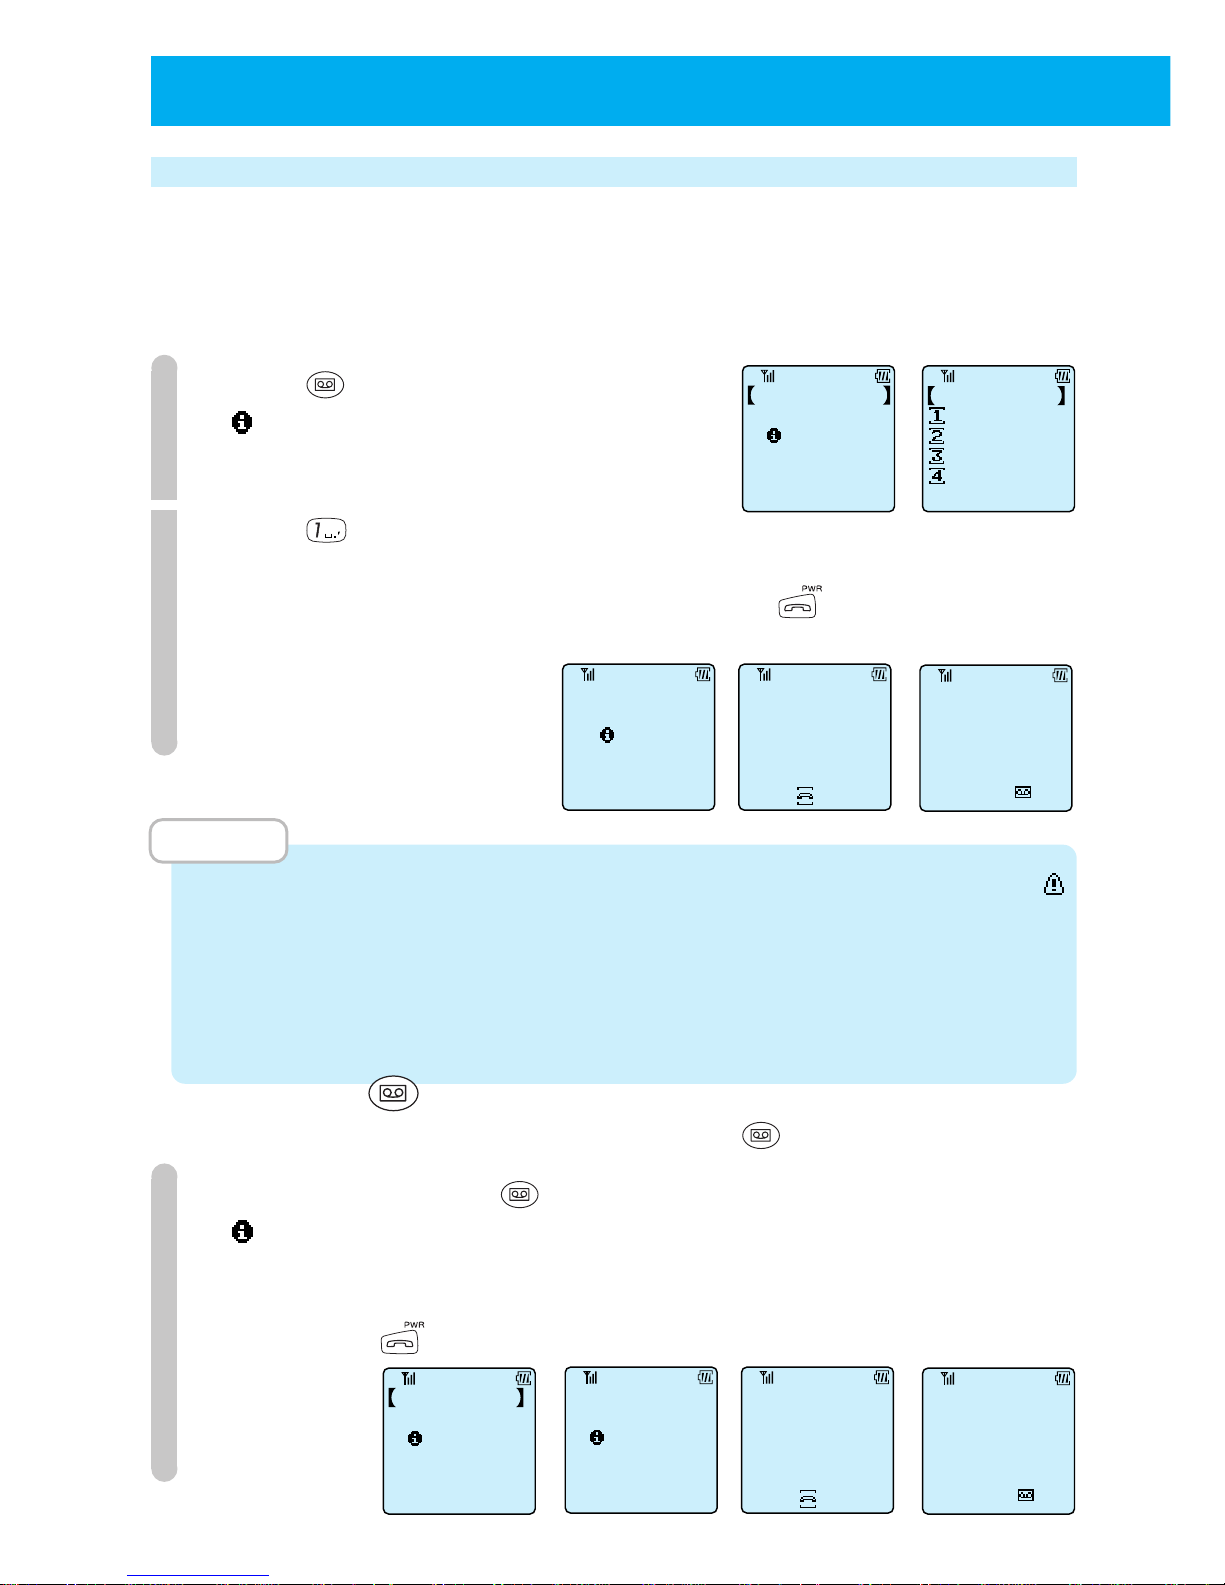
58
●
USING THE ANSWER MESSAGE FUNCTION
(cont.)
Setting the answering message
You must record an original answering message before you set the message. See
page 56 for how to record it.
■
Setting by menu
1
Press .
" * Recorded Items Remain" is displayed and
the "Playback Menu" is displayed.
2
Press .
After the original answering message plays, the message mark lights up. While
the message is playing you can stop it by pressing .
By doing this, answering message function has been set.
MEMO
•
After 2 answering messages are saved and no more messages can be recorded, "
Message Memory is full" is displayed and the display returns to the "Playback menu."
• The message settings are kept even when the phone is turned off.
• Even if the battery is removed, the answering message and the contents of the
message settings are not deleted.
■
Setting by
You can set an answering message by just using .
1
Press and hold down for more than 2 seconds.
" * Recorded Items Remain" is displayed and after the answering message
plays, the message mark lights up.
By doing this, the message function is set. To stop messages while they are
playing, press .
14:38
2/20(
SUN
)
Message
Setting Finished
Playing Back
AnsweringMessage
PlaybackStop
14:38
2/20(
SUN
)
Message
Setting Finished
Playing Back
Answering Message
PlaybackStop
Playback Menu
2 recorded
Items Remain
Answering Set
Clear All
Voice Memo
Playback
Playback Menu
Playback Menu
2 Recorded
Items Remain
Page 64
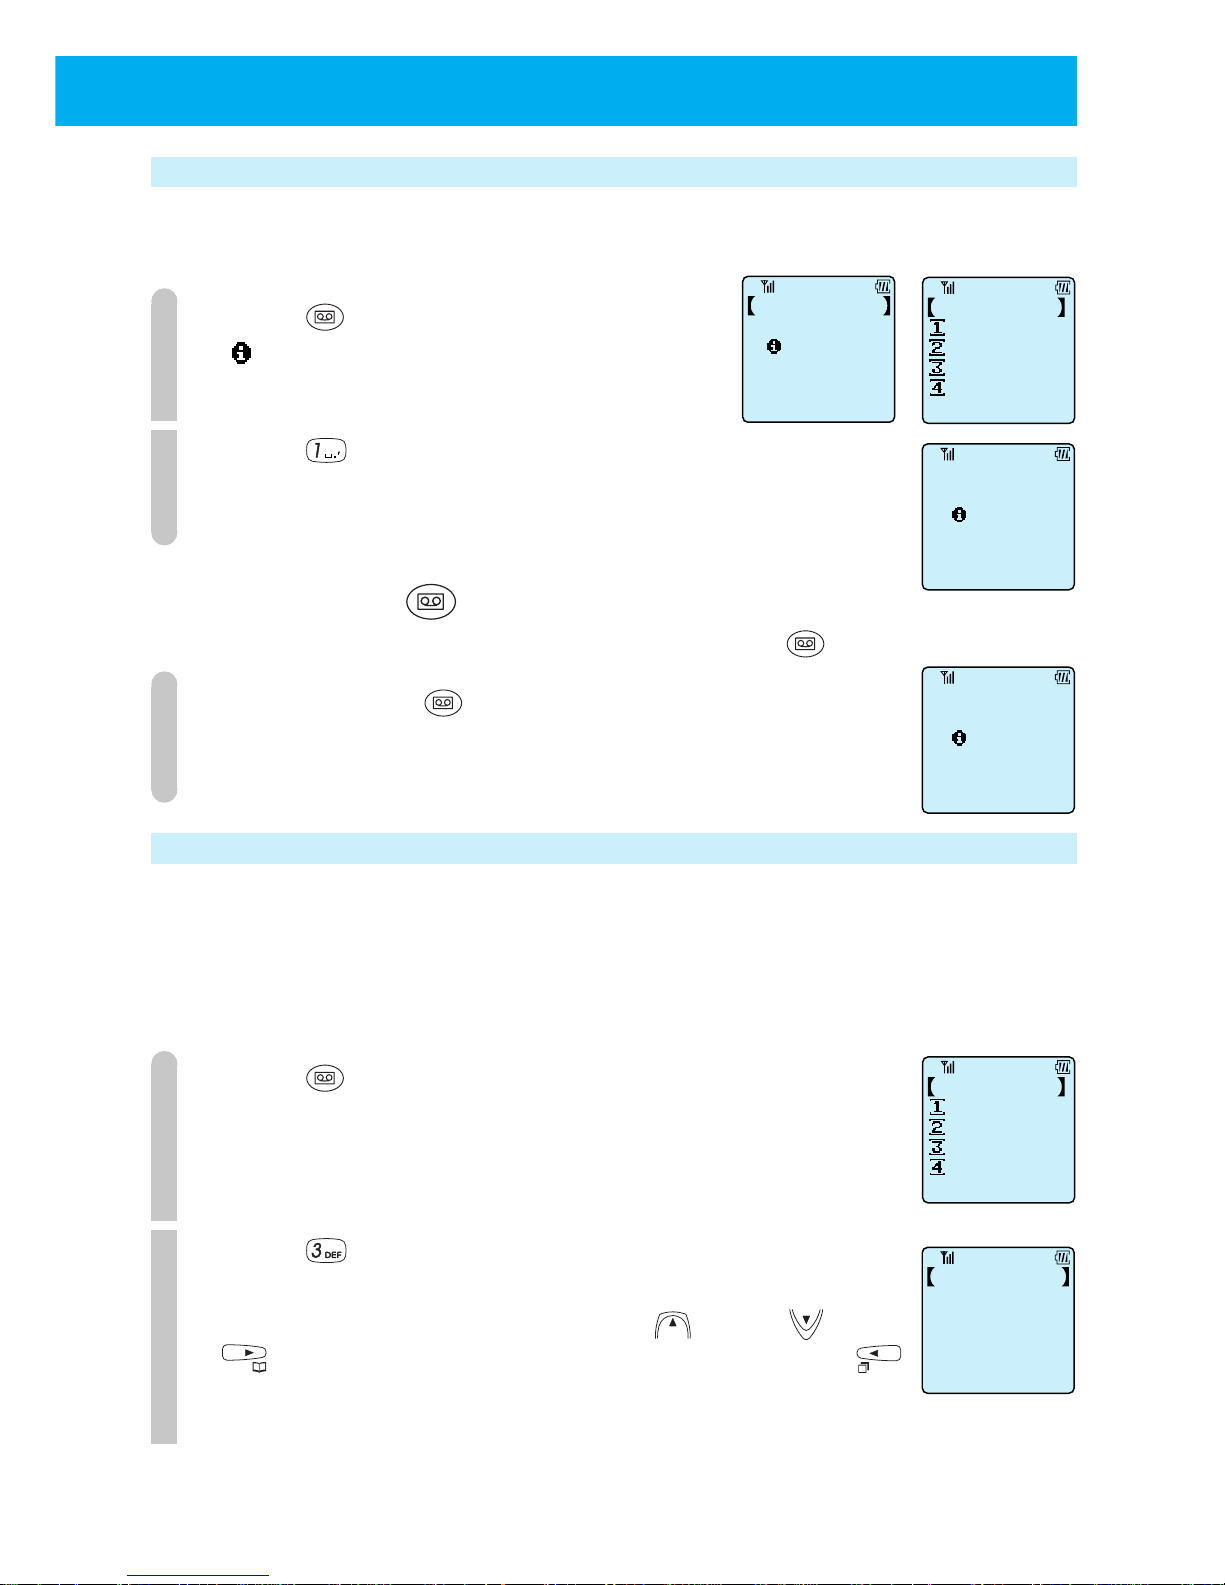
59
Canceling the answering message
■
Canceling by menu
1
Press .
" * Recorded Items Remain" is displayed and
the "Record & Playback" menu is displayed.
2
Press .
The message mark disappears.
By doing this, the answering message function is cancelled.
■
Canceling by
You can cancel the answering message just by using .
1
Press and hold for more than 2 seconds.
The message mark disappears.
By doing this, the answering message function is cancelled.
Listening to and deleting messages
When messages are stored, a display notices you about this. Even if this display disappears
because a key is pressed or an incoming call is received, an icon is displayed while there
is an unplayed message. Depending on the existence of a message and answering
message setting, the icon that is displayed will differ. See page 20 for details.
1
Press .
2
Press .
The recorded messages start playing in order.
You can adjust the volume by using the and the . Press
to stop playing the message and go to Step 3. Press
to replay the message from the start.
Message
Canceled.
Message
Canceled.
Answering Cancel
Clear All
Voice Memo
Playback
Playback Menu
Answering Cancel
Clear All
Voice Memo
Playback
Playback Menu
Playback Menu
2 Recorded
Items Remain
Playing Back
Jack Black
1st AnsMessage
Wed 12/23 17:30
07031234567
Page 65
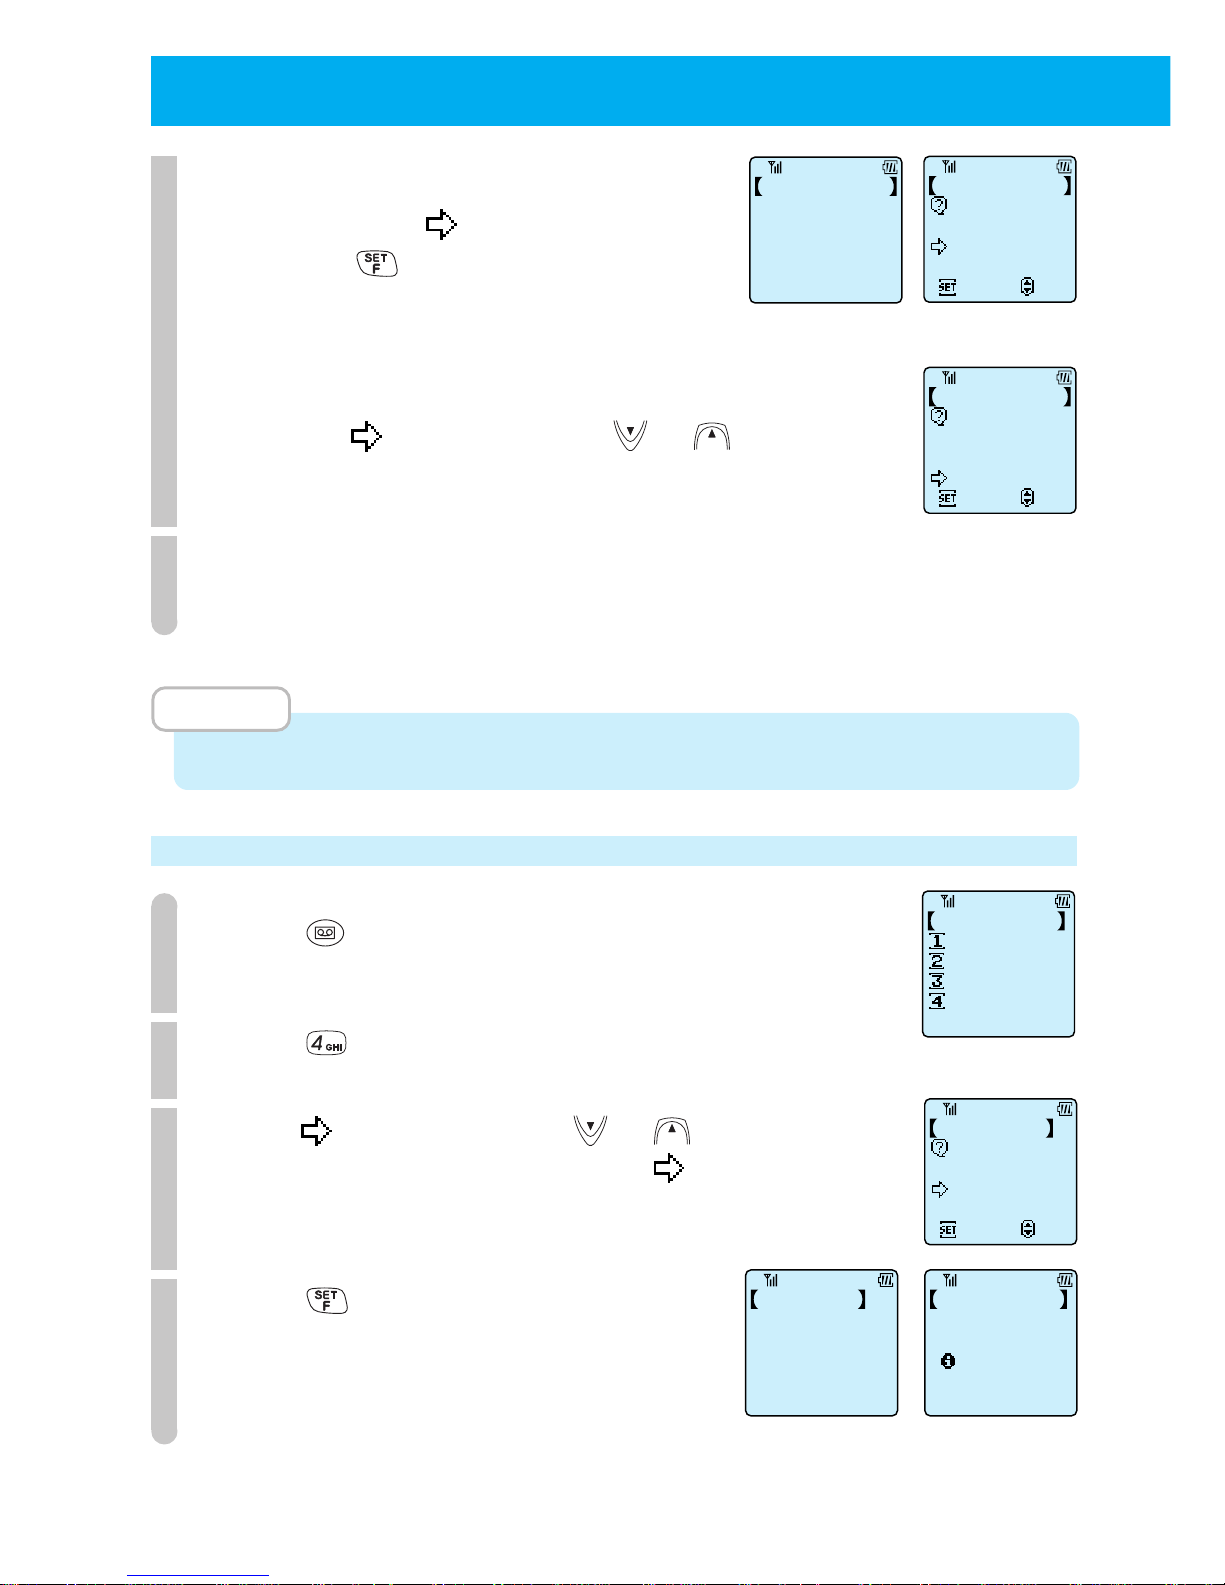
60
●
USING THE ANSWER MESSAGE FUNCTION
(cont.)
3
● To delete a message after playing it,
ensure the
points to "Yes" and
press
.
● To keep a message after playing it,
point
to "No" by using or .
To delete the message at a later date, repeat the instructions from Step 1.
4
When there are more messages, they will be played automatically.
For these messages, repeat Step 3.
When all messages are played the display returns to standby display.
MEMO
•
Even when the phone is turned off or when the batteries are removed, the stored messages are kept.
Deleting all the stored left messages
1
Press .
The "Playback Menu" is displayed.
2
Press .
3
Point to "Yes" by using or .
To cancel the clear all operation, point to "No".
4
Press .
All the stored left-messages are deleted.
Clear Message?
YES
NO
Set
Select
1st AnsMessage
Clear Message?
YES
NO
Set
Select
1st AnsMessage
PlayBack
Finished
1st AnsMessage
Answering Cancel
Clear All
Voice Memo
Playback
Playback Menu
Clear All
YES
NO
Set
Select
Message Memory
Cleared
Message Memory
Clearing
Message Memory
Page 66
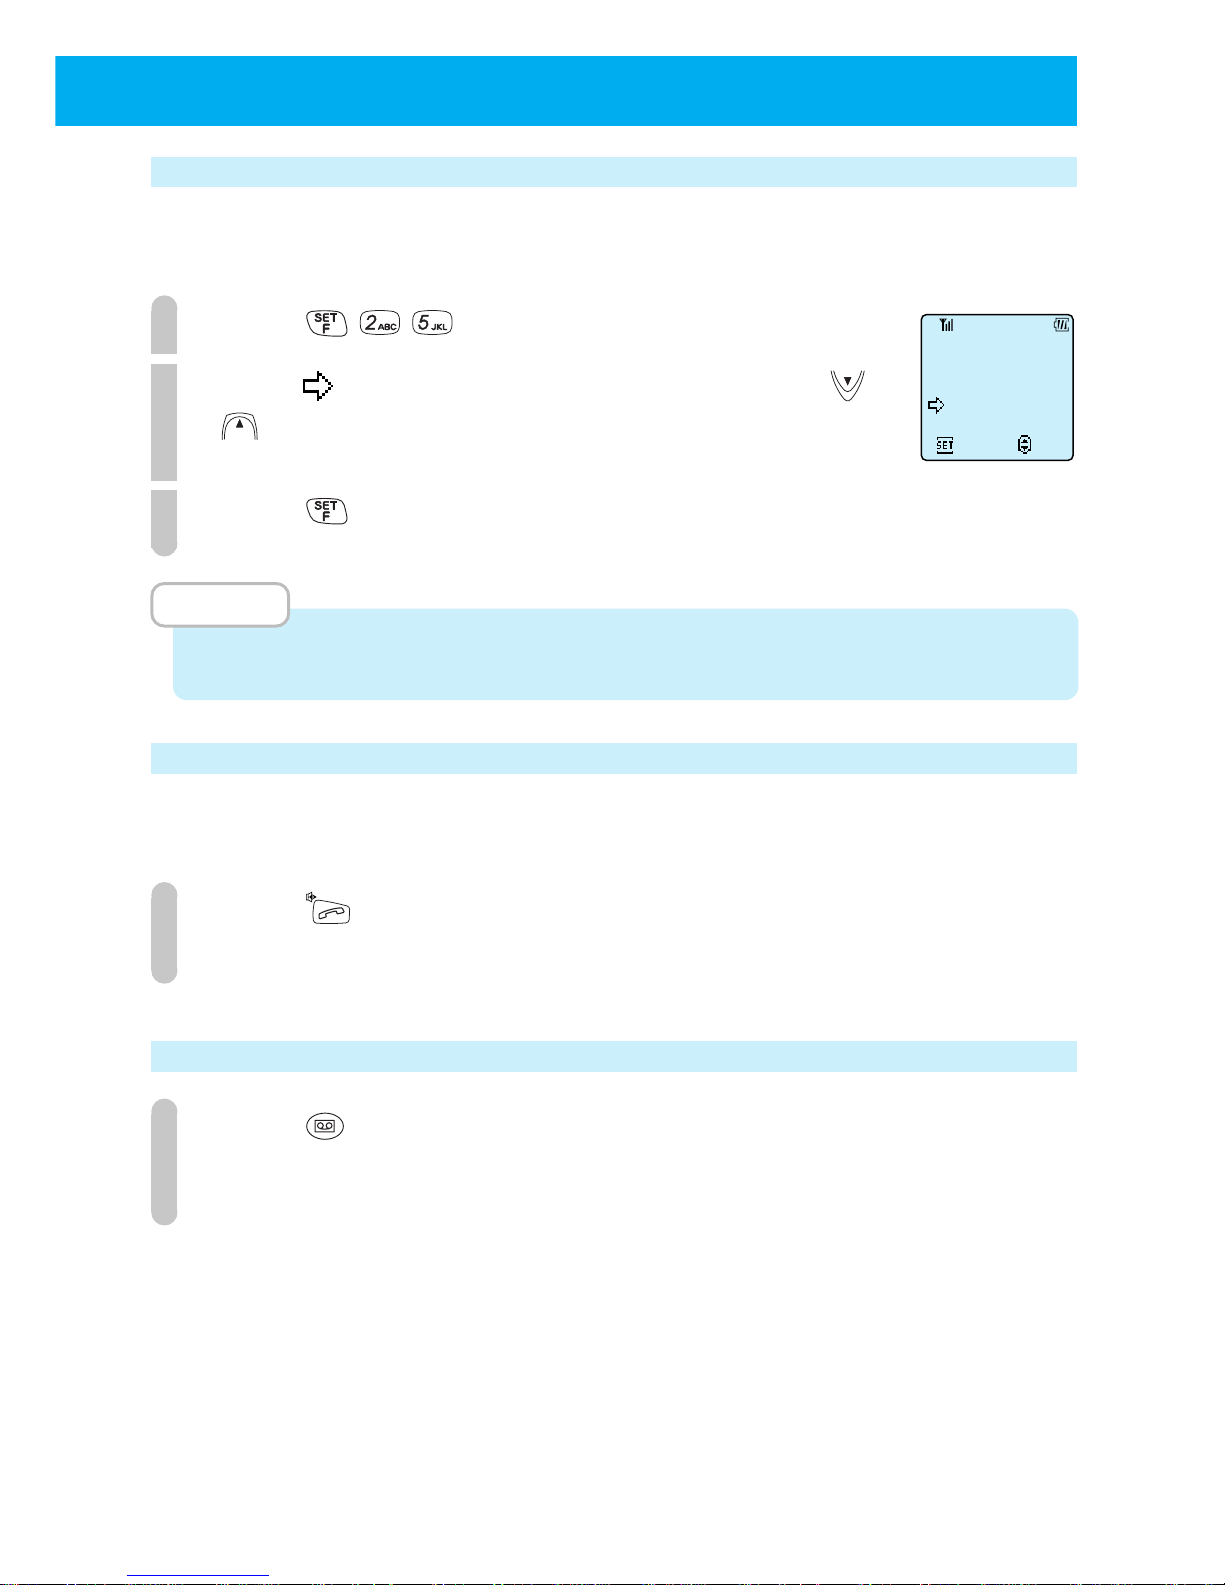
61
Setting the response time from receiving the incoming call to answering (F25)
You can select the response time from receiving the incoming call to playing the
answering message from 3 options, 0 sec, 6 sec or 12 sec.
1
Press .
2
Point to the time you want to set by using or
.
3
Press .
MEMO
• When you purchase the phone, it will be set to 6 seconds.
Taking a call when it is received in answering message mode
You can take the call at any time during the interval from when the incoming call
ring-tone activates until when the answering message operation finishes.
1
Press .
You can take the call.
Setting answering message when receiving an incoming call
1
Press when receiving the incoming call.
The answering message function becomes valid.
An answering message is played to the caller.
Set
6
Seconds
0
Seconds
12
Seconds
Select
F25
Set Respond Time
Page 67

MEMO
62
Page 68

MORE EFFECTIVE
USE
●
SETTING THE CLOCK AND ALARM
..P64
● ADJUSTING THE SOUND...........P67
●
USING THE VOICE RECORDER (VOICE
MEMO) FUNCTION
......................P72
●
LIST OF OPERATIONS THAT CAN BE
PERFORMED BY FUNCTION KEY
....P74
Page 69
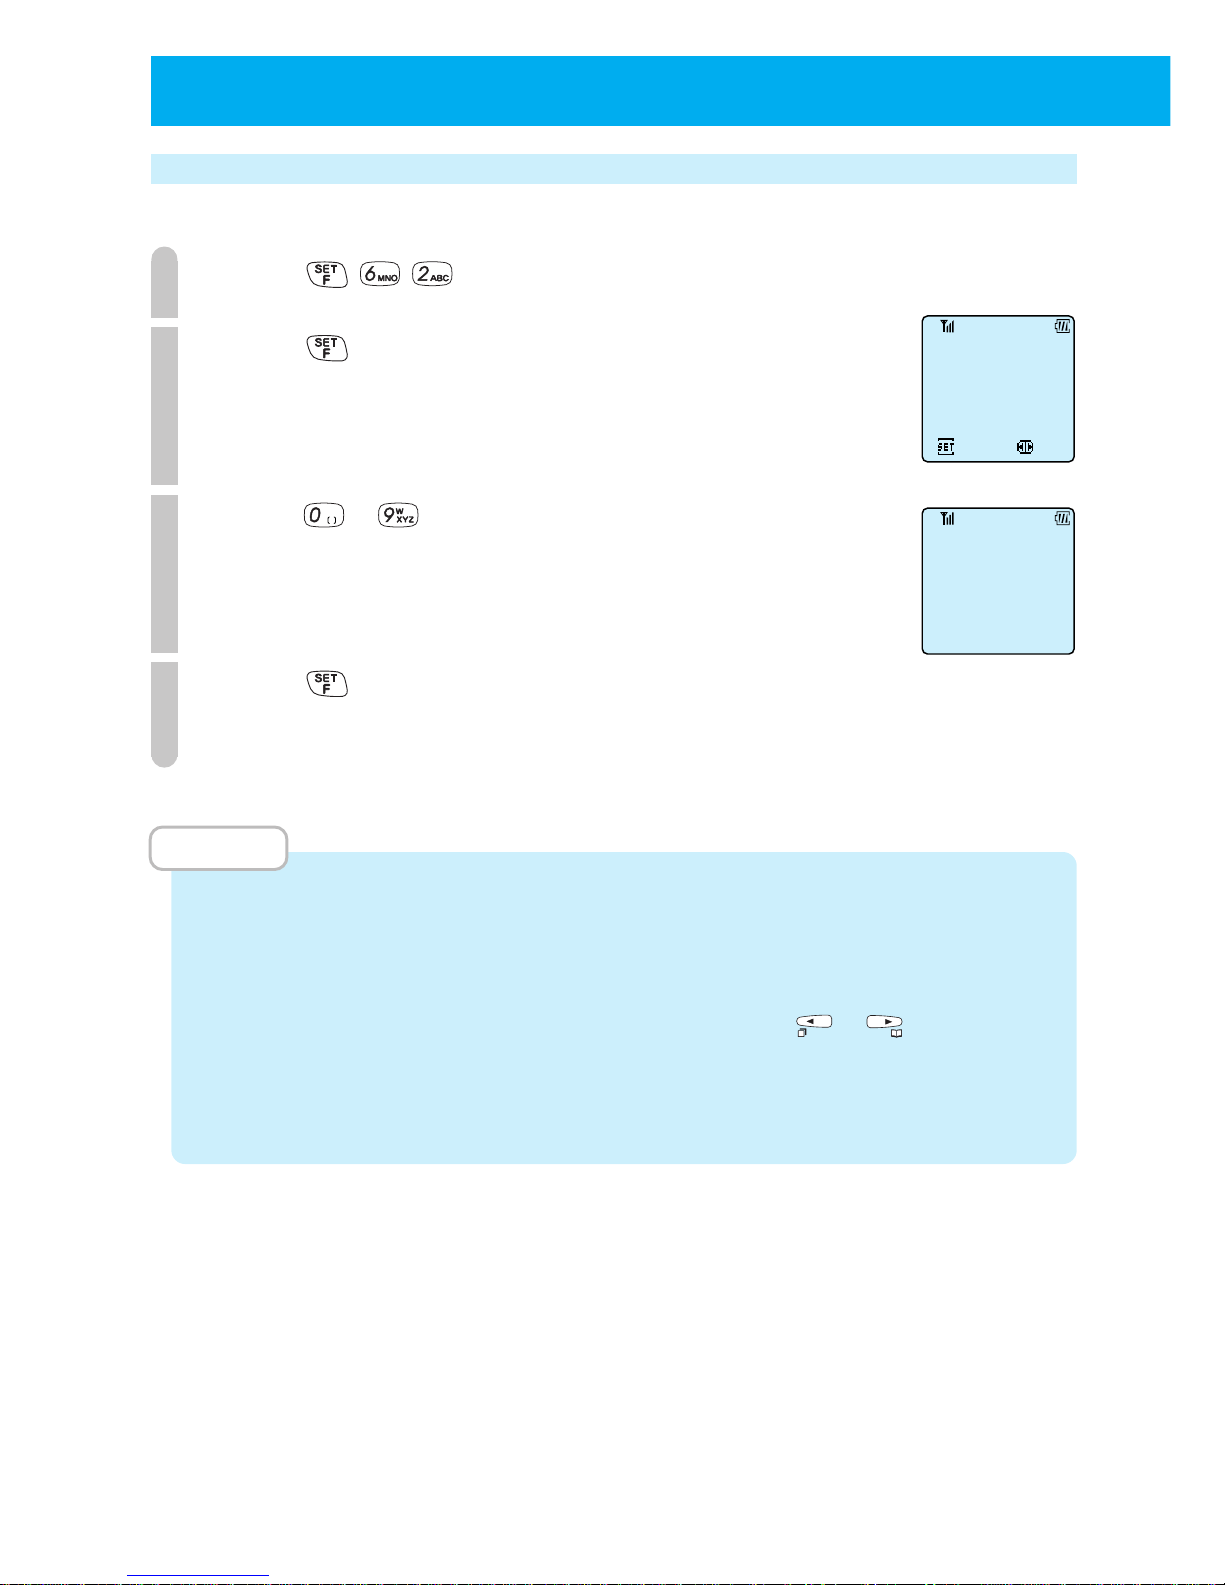
64
Setting the clock (F62)
Set the date and time that appears in the display.
1
Press .
2
Press .
3
Press ~ to input the year month day and time.
Input the last 2 digits of the western calendar. The day of the
week is set automatically from the date.
Enter the time in 24 hour time (00:00 ~ 23:59).
4
Press .
The phone beeps to confirm the operation and the screen returns
to the standby display showing the date and time.
MEMO
•
When you purchase this phone, the date and time is not set.
•
You must set the correct time in order for call memory to display the correct time.
•
When the battery runs out and when it is replaced, the clock returns to the condition at
time of purchase.
•
When you correct the time because of mistakes etc., press or to make the part
you want to change blink and input the correct time or date.
•
You are able to enter the year, month, day, and time up till 23:59, 31st December 2098.
•
The precision of the clock is about ±60 seconds every 1 month (at 25°C).
Set clock
Set
Select
14:38
F62
2/20/2000
● SETTING THE CLOCK AND ALARM
14:38
Sun 2/7
Page 70
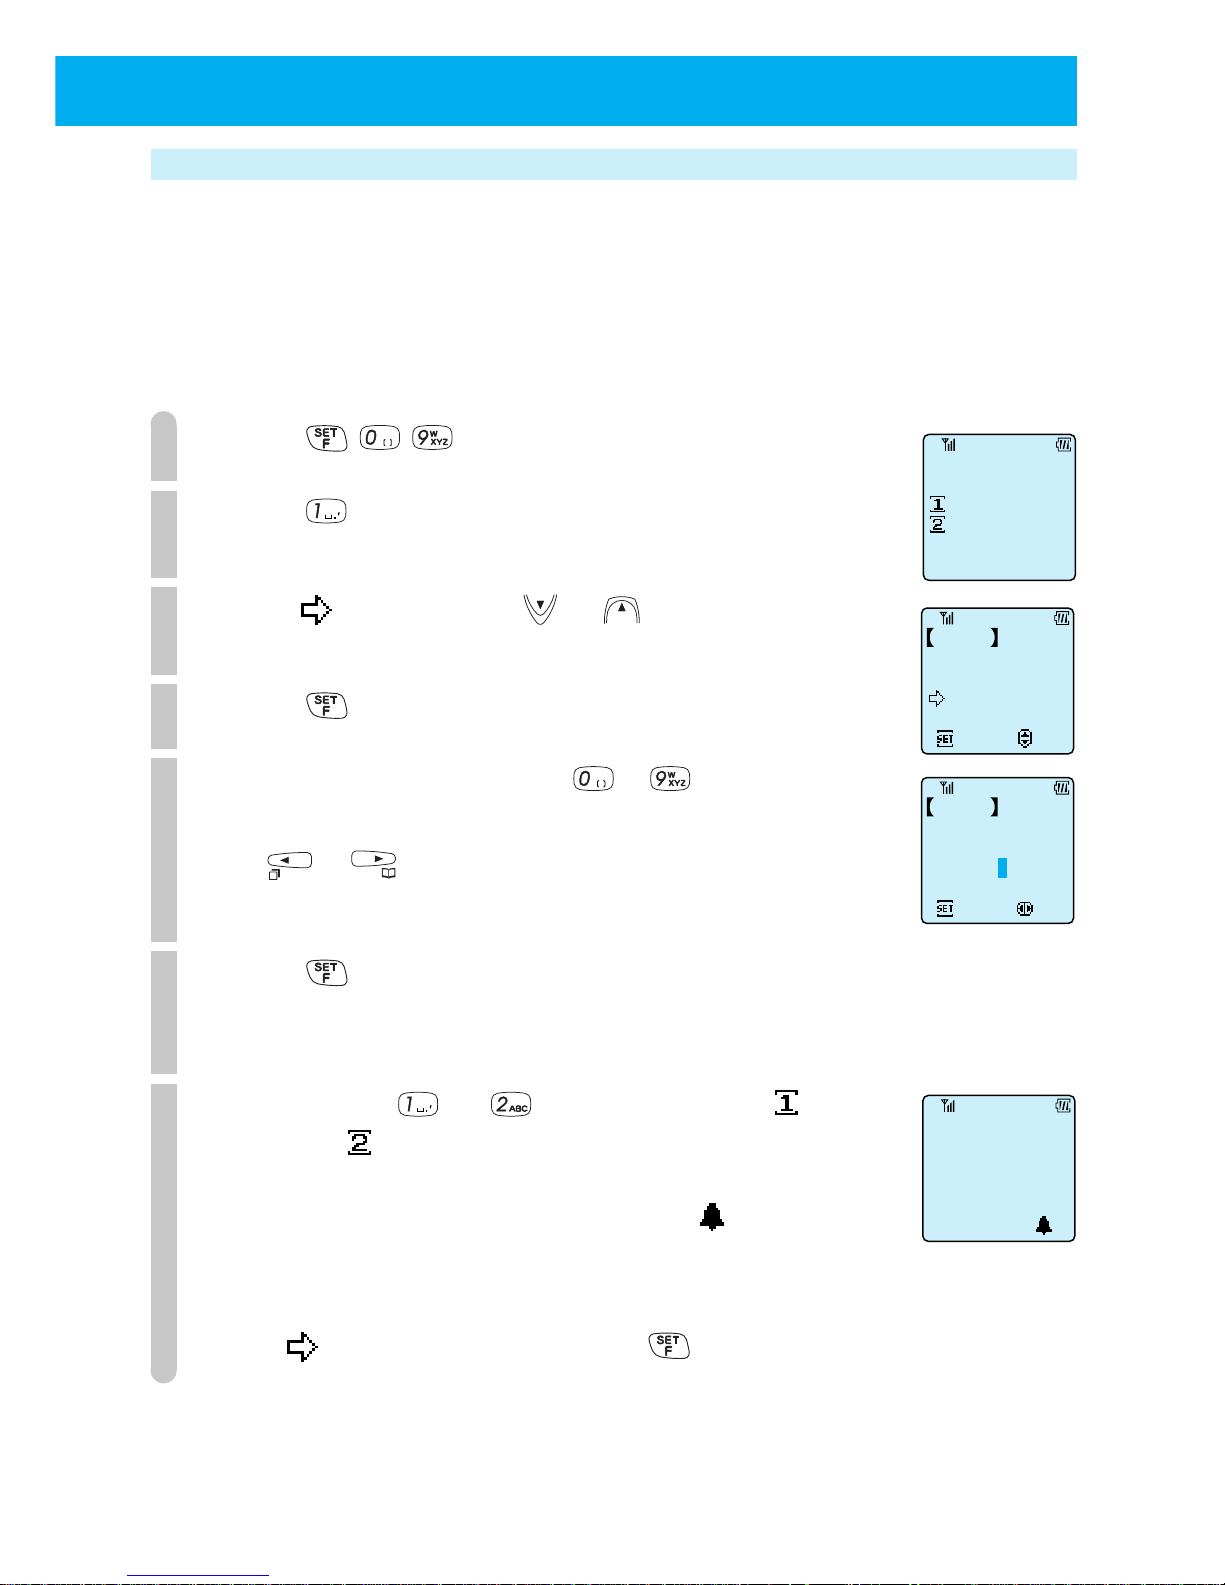
65
Setting the alarm and auto power off (F09)
■
Setting the alarm
You can set the phone to ring a one minute alarm at a specified time.
When the clock is not set, you cannot set the alarm.
If the set time arrives during a call, the phone rings an alarm sound from the receiver.
1
Press .
2
Press .
3
Point to "On" using or .
4
Press .
5
Input the alarm time using ~ .
If you make a mistake,
use or to move the cursor to the number you want to
change and input the correct number.
6
Press .
A screen appears for you to select whether to have the alarm
ring only once or at that time every day.
7
Press either or to select either " 1 Time
Only" or "
Every day".
The phone will beep to confirm the operation.
The display returns to the standby display. appears on the
display (page 19).
To cancel the alarm,
point to "OFF" in Step 3 and press .
Set
ON
OFF
Select
Alarm
Alarm
Set time table
Set
Select
14:38
14:38
Sun 2/20
F09
Alarm&AutoOFF
Alarm
AutoPowerOFF
Page 71
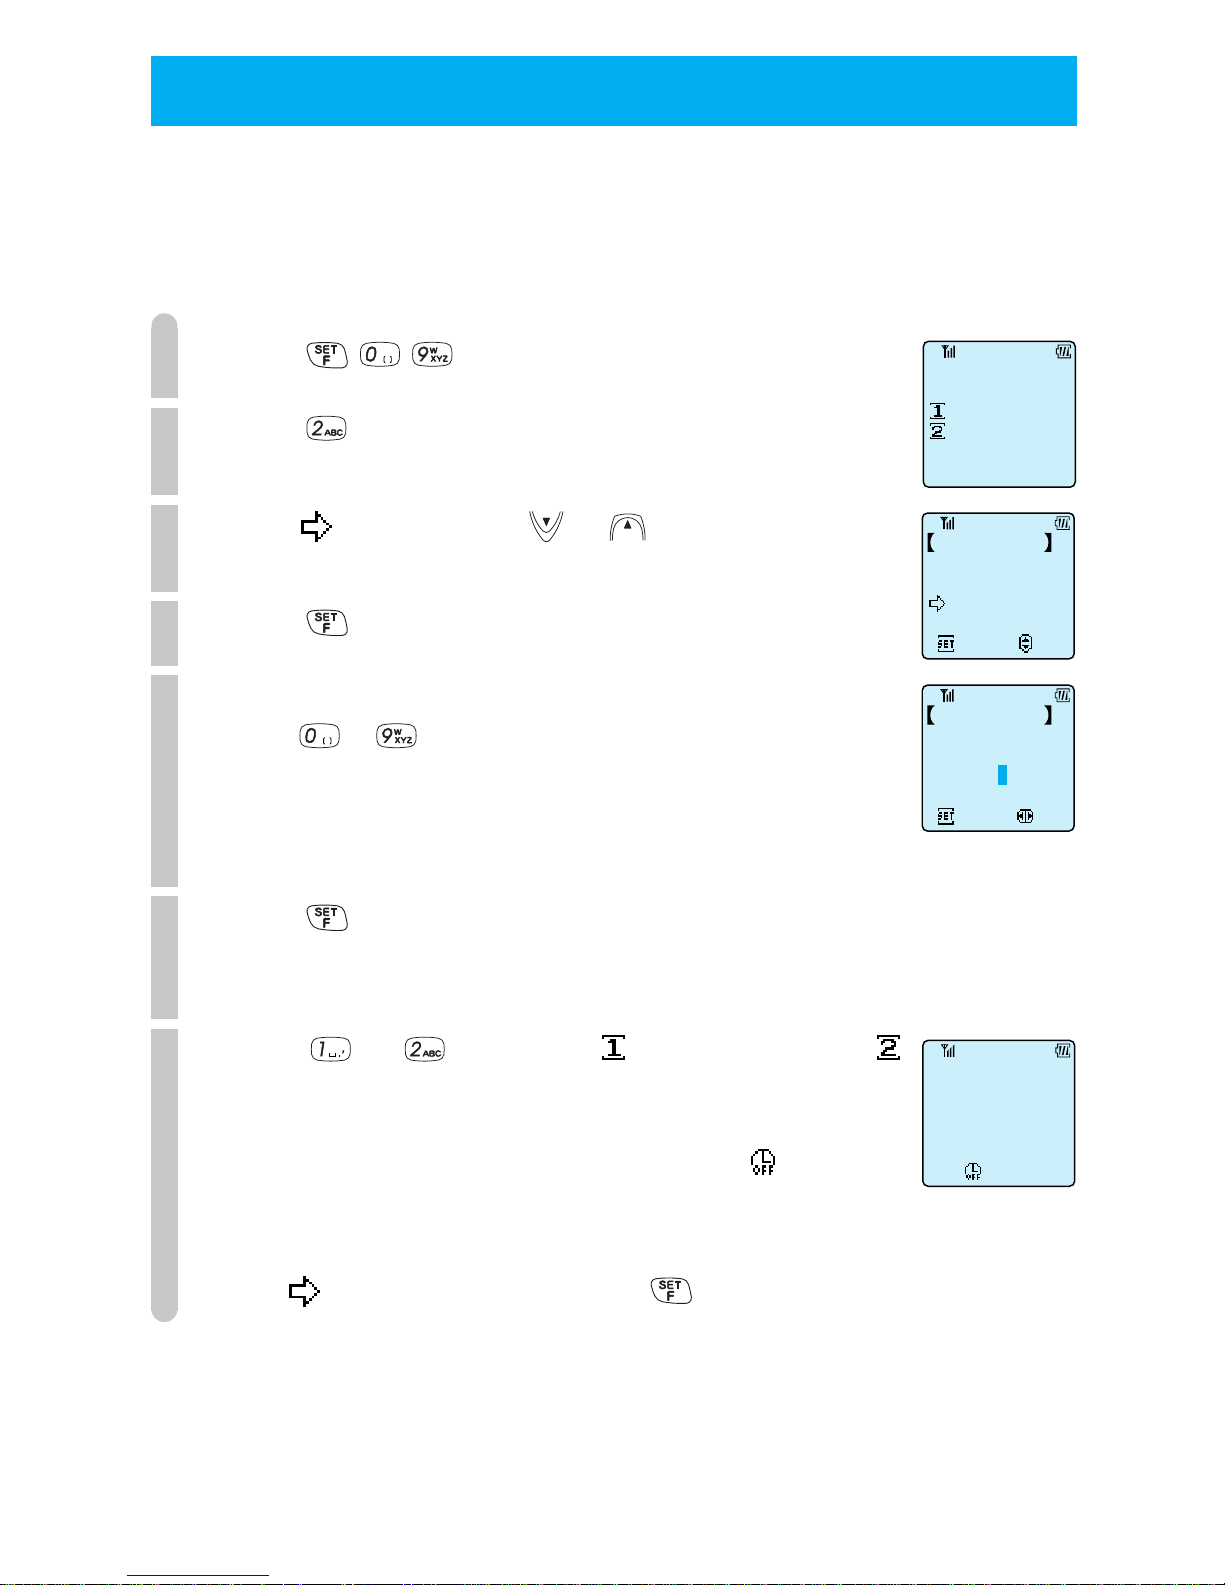
66
■
Setting the auto power off
You can set the phone to turn itself off automatically at a specified time.
When the clock has not been set, you cannot set this function. If the set time
arrives while you are taking a call, the phone will turn itself off when you end the call.
1
Press .
2
Press .
3
Point to "ON" using or .
4
Press .
5
Input the time that you want the phone to turn off by
using
~ .
If you make a mistake,
move the cursor to the number that you want to change and
input the correct number.
6
Press .
A screen appears to ask whether you want the phone to turn
itself off once only or at that time every day.
7
Press or to select " 1 Time Only" or "
Every day".
The phone beeps to confirm the operation.
The display returns to the standby screen and appears in
the display (page 19).
To cancel auto power off
Point to "OFF" in Step 3 and press .
●
SETTING THE CLOCK AND ALARM
(cont.)
F09
Alarm&AutoOFF
Alarm
AutoPowerOFF
14:38
Sun 2/20
Set
ON
OFF
Select
Auto Power OFF
Set
Select
Auto Power OFF
Set time table
14:38
Page 72
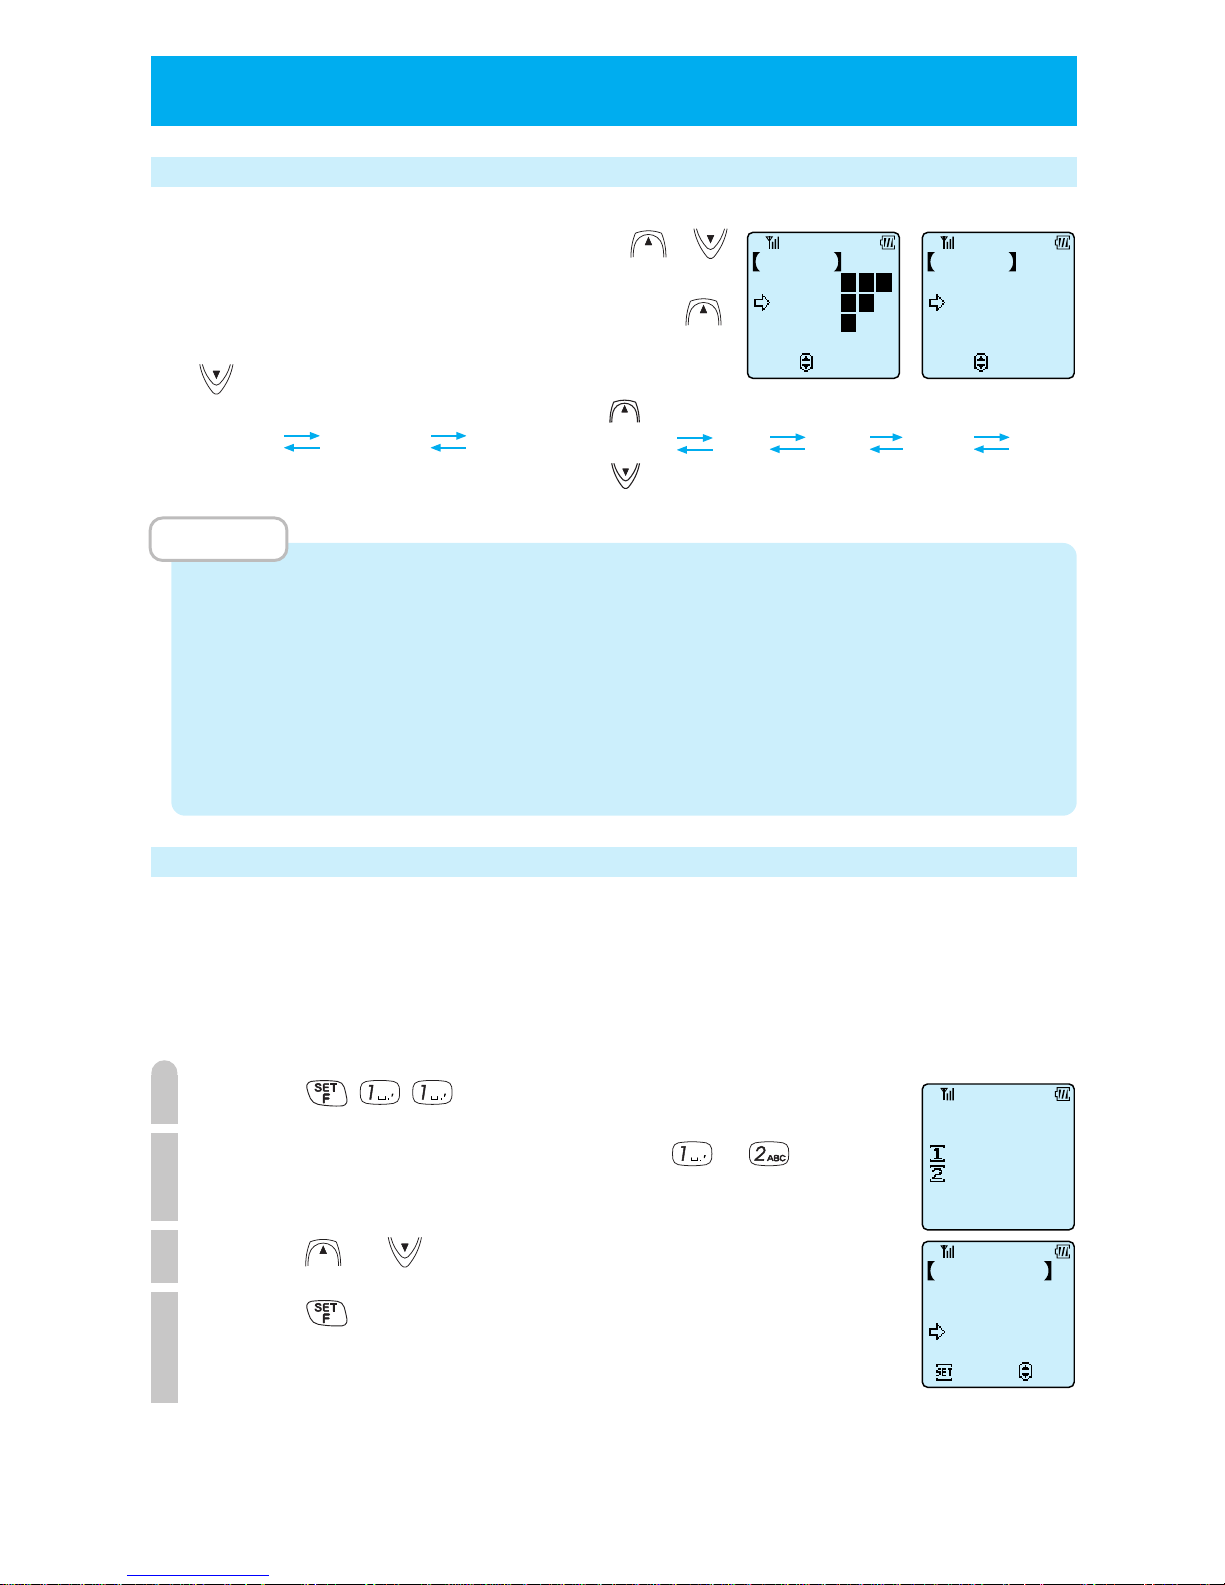
67
Selecting the ring-tone volume and type
To adjust the ring-tone volume and type, press and hold or
for more than 1 second while in standby condition.
While call volume is set to "Loud" you cannot scroll by pressing .
Also, when volume is set to "Step-down", you cannot scroll by pressing
.
MEMO
• Only one vibration selection set by "Selecting the incoming call notification method
F11" is displayed. The vibration selections are as follows.
"Vibration 1": Vibration only
"Vibration 2": Vibration - short sound
"Vibration 3": Vibration - ring-tone sound
• When in transceiver mode, you can only use "Vibration 1".
• You cannot use "Step-up" or "Step-down" while in transceiver mode.
Selecting the incoming call notification method (F11)
For each mode, you can select the incoming call notification method from 10
types of ring-tone, 11 melodies or 3 types of vibration notification. The volume and
type are selected from 6 options (including OFF).
■
Selecting the ring-tone or vibration
1
Press .
2
Select which mode to set by using ~ .
You cannot set modes that are not assigned to a number.
3
Press or to select "Tone" or "Vibration".
4
Press .
The screen to select the ring-tone or vibration appears.
● ADJUSTING THE SOUND
Step-down step up vibration (1 ~ 3) OFF Soft Med Loud
Ring-Tone
Med
Soft
OFF
Loud
Select/Set
Ring-Tone
Vibration 1
Step-up
Step-down
OFF
Select/Set
Only one vibration selection is displayed (see MEMO).
Set Ring-tone
F11
Public
Transceiver
Set Ring-tone
Tone
Vibration
Select
Set
Page 73
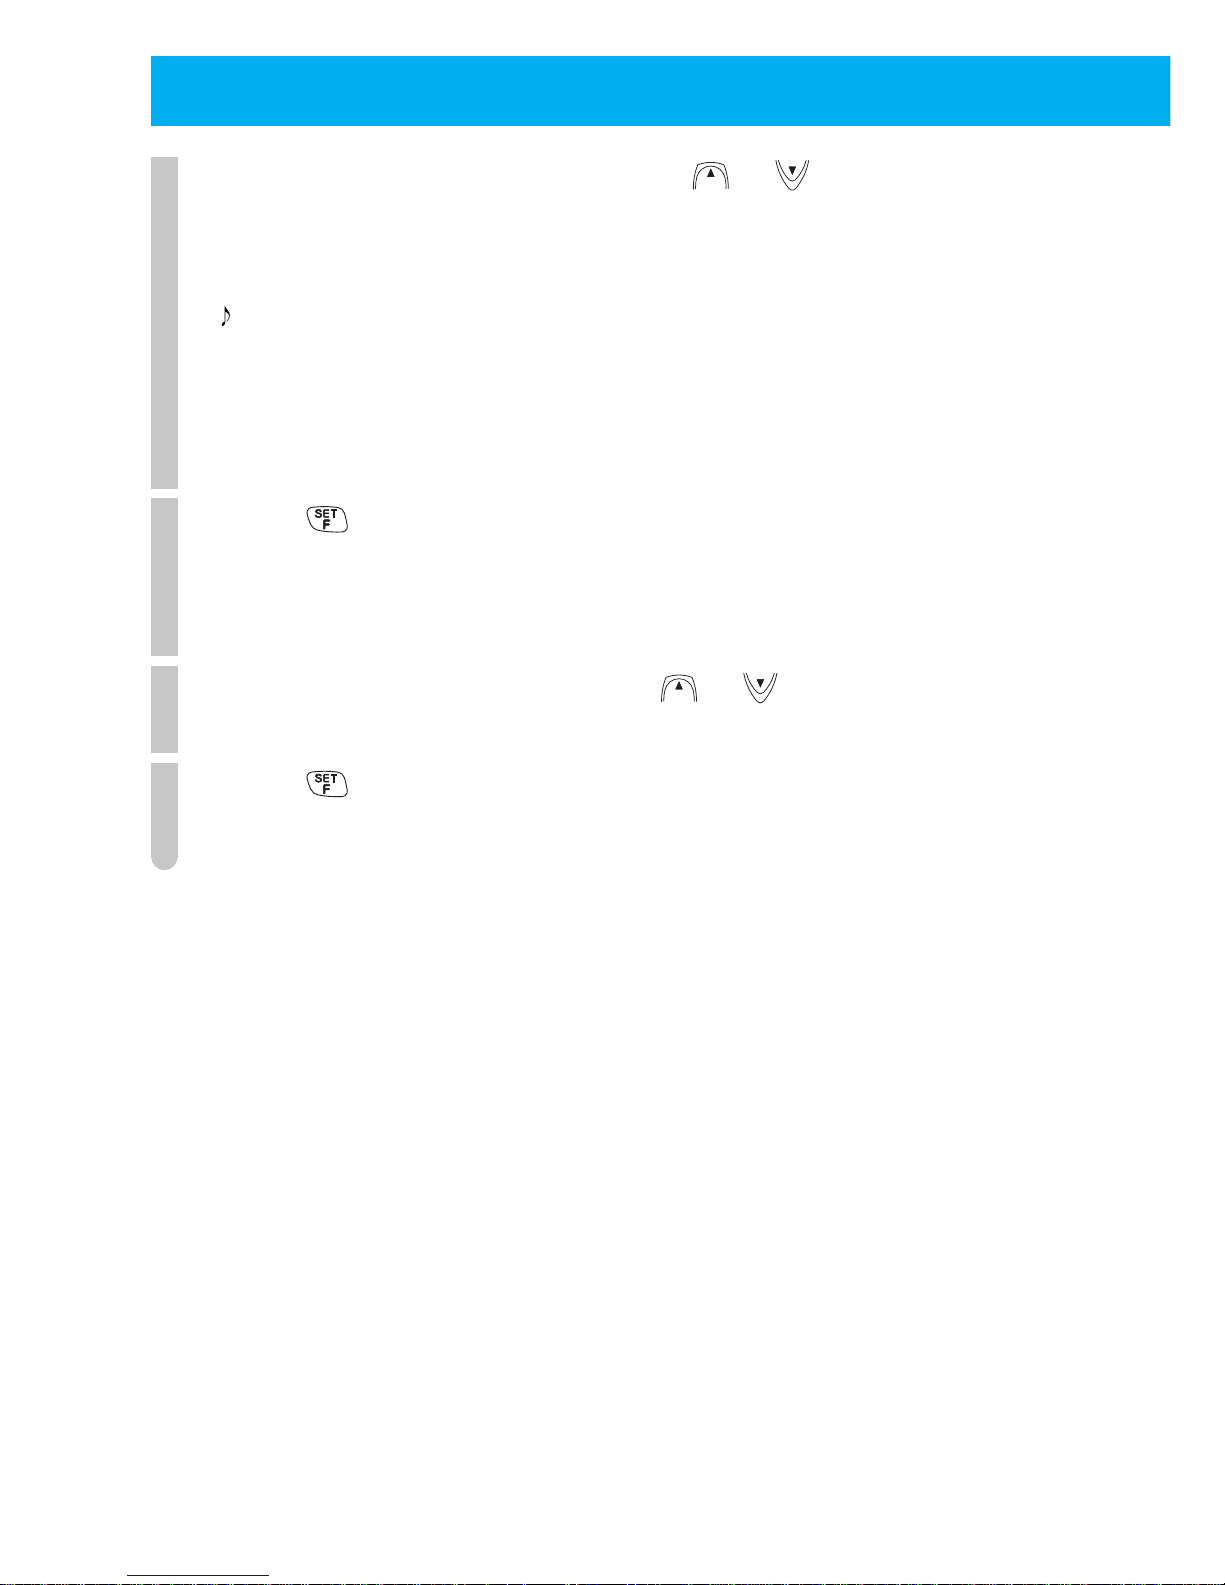
68
● ADJUSTING THE SOUND
(cont.)
5
Switch between options by pressing or .
As you switch between options, the phone rings the ring-tone or melody. If you
selected "Vibration" in Step 3, the phone vibrates as you switch between options.
Beep 1 ~ 10 : Ring-tone
Melody 1 ~ 11 : Melody numbers are shown in the table on page 70.
Vibration only : Phone vibrates only
Vibration - beep : After 20 seconds of vibration, the phone makes a "beep
beep beep" sound once.
Vibration - ring-tone
: After 10 seconds of vibration, the set ring-tone rings.
6
Press .
The display changes to the screen to set the ring-tone setting. If you selected
"Vibration only" or "Vibration - beep" then the setting is complete and the display
changes to the standby screen.
7
Set the ring-tone volume by using or .
If you selected "Vibration - ring-tone", you cannot select "Step-up" or "Step-down".
8
Press .
The phone beeps to confirm the operation.
Page 74
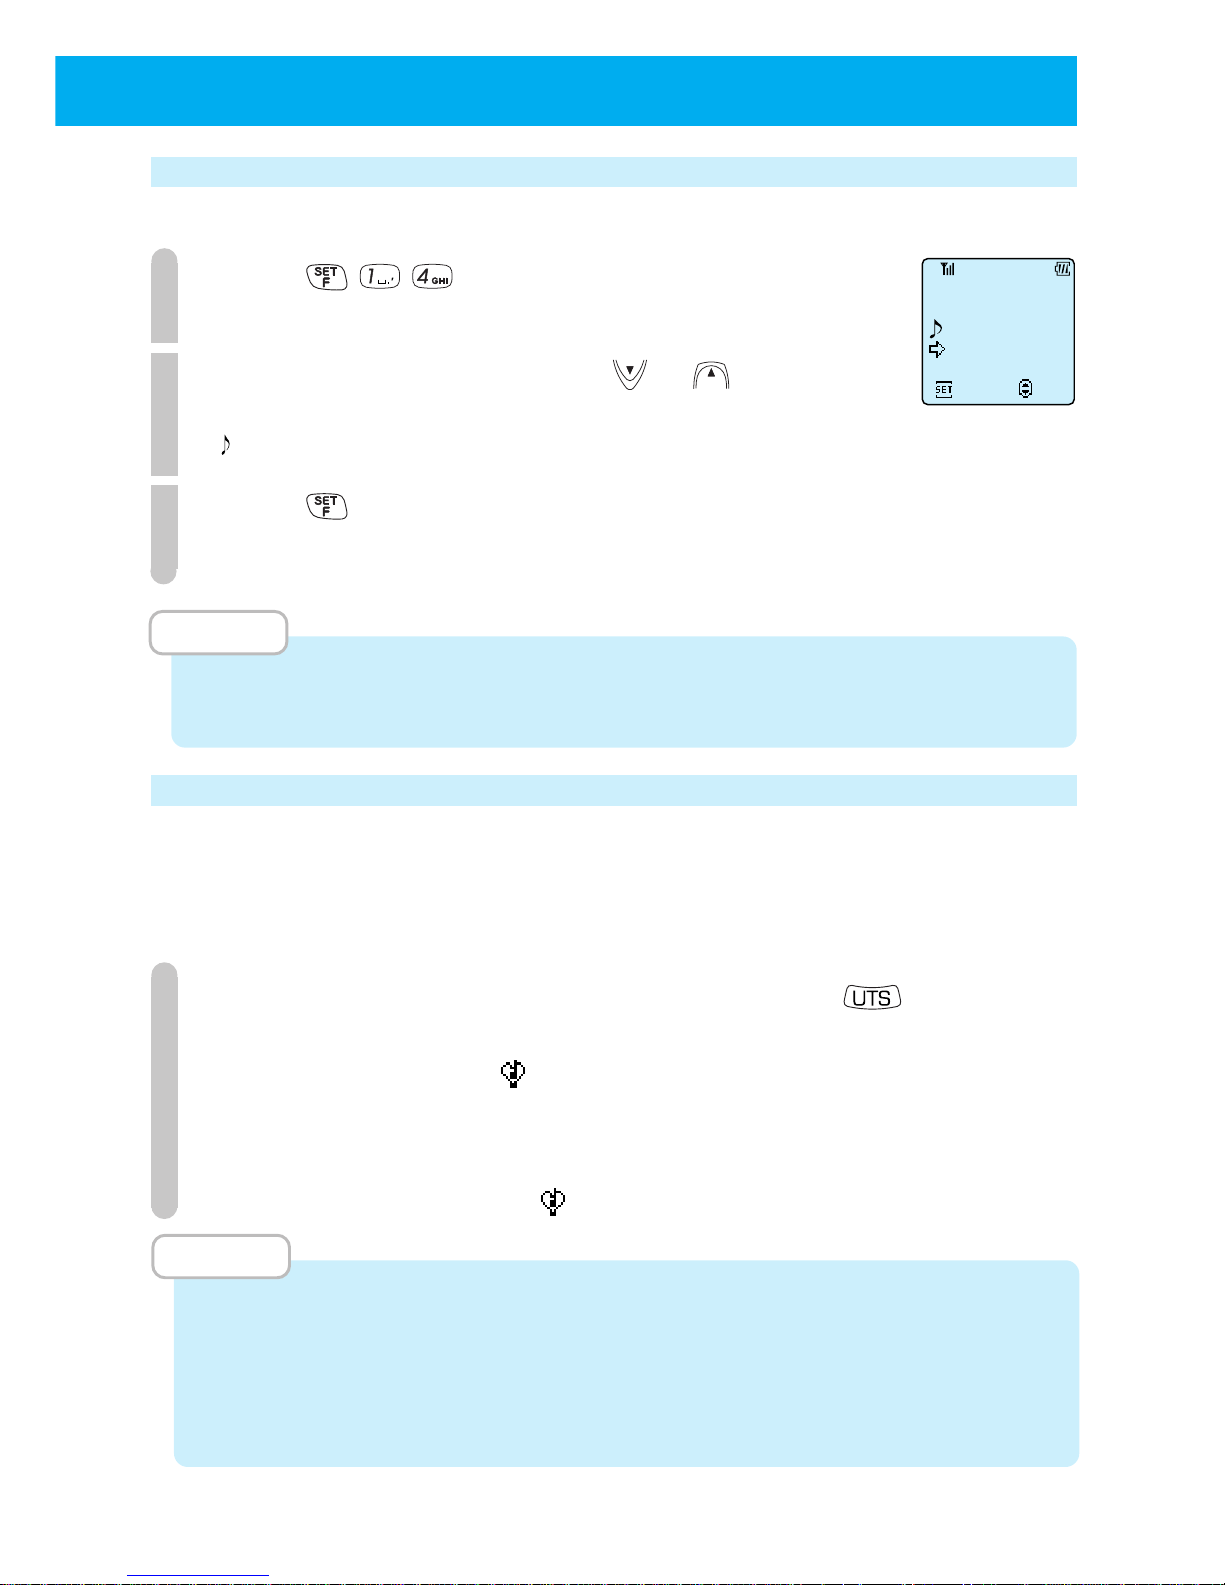
69
Selecting the hold-tone (F14)
You can select one of the 11 preset melodies.
1
Press .
The current settings are displayed.
2
Switch between options using or .
When you switch between options, the selected melody rings.
Melody 1 ~ 11 : Melody numbers are the table on page 70.
3
Press .
The phone beeps to confirm the operation.
MEMO
• In transceiver mode, you cannot set a hold-tone.
• When you purchase the phone, Melody 1 is set.
Setting and canceling manner mode
If you press manner mode, the ring-tone is set to vibration, key touch tones etc.
are disabled and all sounds are disabled. This is a convenient function as it allows
you to quickly switch to manner mode when you do not want your phone to make
a noise because you are in an art museum etc.
1
When in the standby condition, press and hold
for more than 2 seconds.
Manner mode is set and appears in the display.
To cancel,
Perform the same operation as in Step 1 while in the standby condition.
Manner mode is cancelled and disappears.
MEMO
• The setting of "Selecting ring-tone type" is not changed by setting/canceling manner
mode.
• If you try selecting the ring-tone volume or type or selecting the ring-tone notification
method etc. when manner mode is set, "Manner Mode set" will be displayed and you
will not be able to make settings.
Select Hold-tone
F14
Melody
ToySoldierMrch
Walzer
Set
Select
Page 75
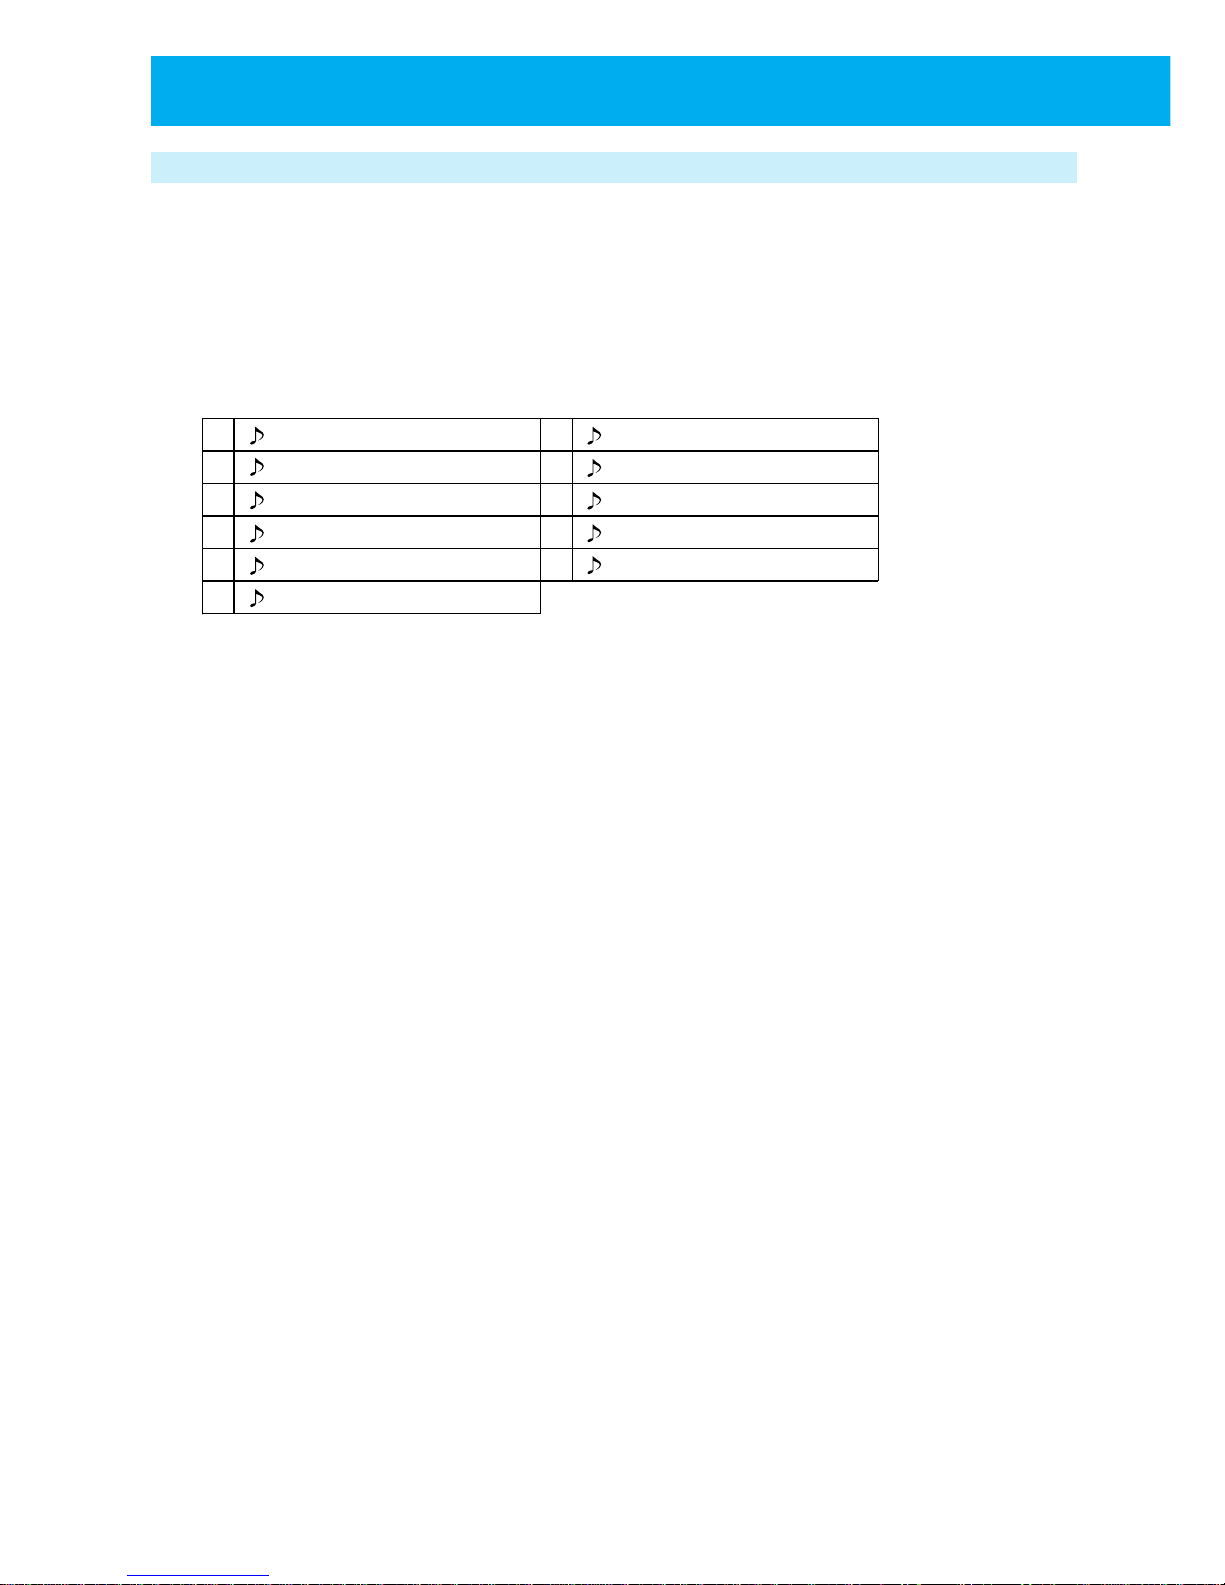
70
● ADJUSTING THE SOUND
(cont.)
List of ring-tone melody numbers
You can set the phone to notify you of incoming calls by playing a melody. The
phone can ring melodies with 3 chords.
■
Melody table
When you purchase this phone, the following 11 melodies are registered.
Walzer
Turkish March
The New World
Carmen
E.K Nacht musik
Hallelujah
Spring(The From Seasons)
The Entertainer
Radetzky March
Toy Soldier Mrch
Hungarian Dance
1
2
3
4
5
6
7
8
9
11
10
Page 76

71
MEMO
Page 77
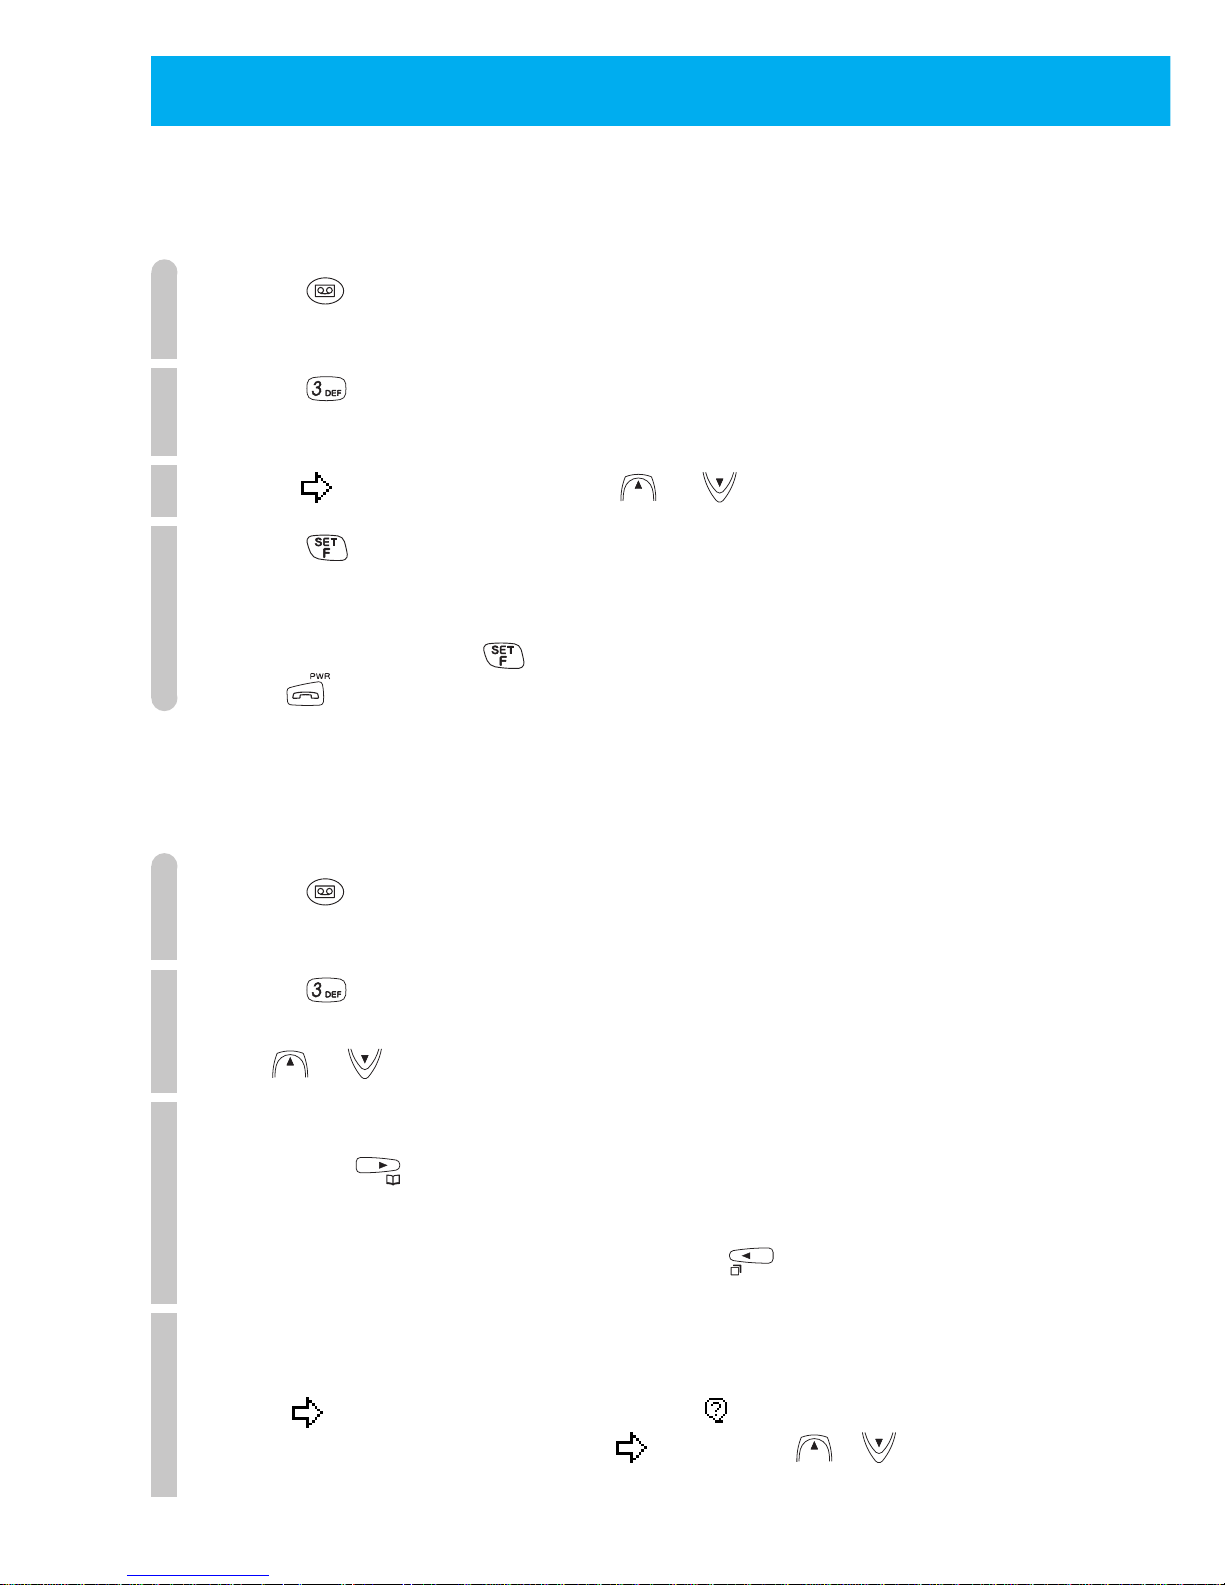
72
When the phone is in standby condition, you can record 3 voice memos (each a maximum of 16 sec).
■
Recording a voice memo
1
Press .
The "Playback Menu" appears.
2
Press .
The screen to confirm the "Voice Memo" recording appears.
3
Point to "YES" by pressing or .
4
Press .
The phone beeps and the voice recorder starts recording a voice memo.
When 16 seconds pass, the recorder stops automatically.
To quit at any time, press .
Press to stop the recorder.
■
Listening to and deleting a voice memo
When along with a voice memo, a conversation memo or a left message is recorded,
they can be played one after the other.
1
Press .
The "Playback Menu" appears.
2
Press .
The voice memos start to play in the order they were recorded.
Use or to adjust the volume.
3
● To stop playback at any time,
press
.
● While listening to voice memos, you can listen to
it again from the start by pressing
.
4
After the message has finished playing, select whether
or not to delete the recording.
Ensure points to "YES" in answer to the question " Clear Message".
If you want to stop the delete operation, point to "NO" by using or .
●
USING THE VOICE RECORDER (VOICE MEMO) FUNCTION
Page 78
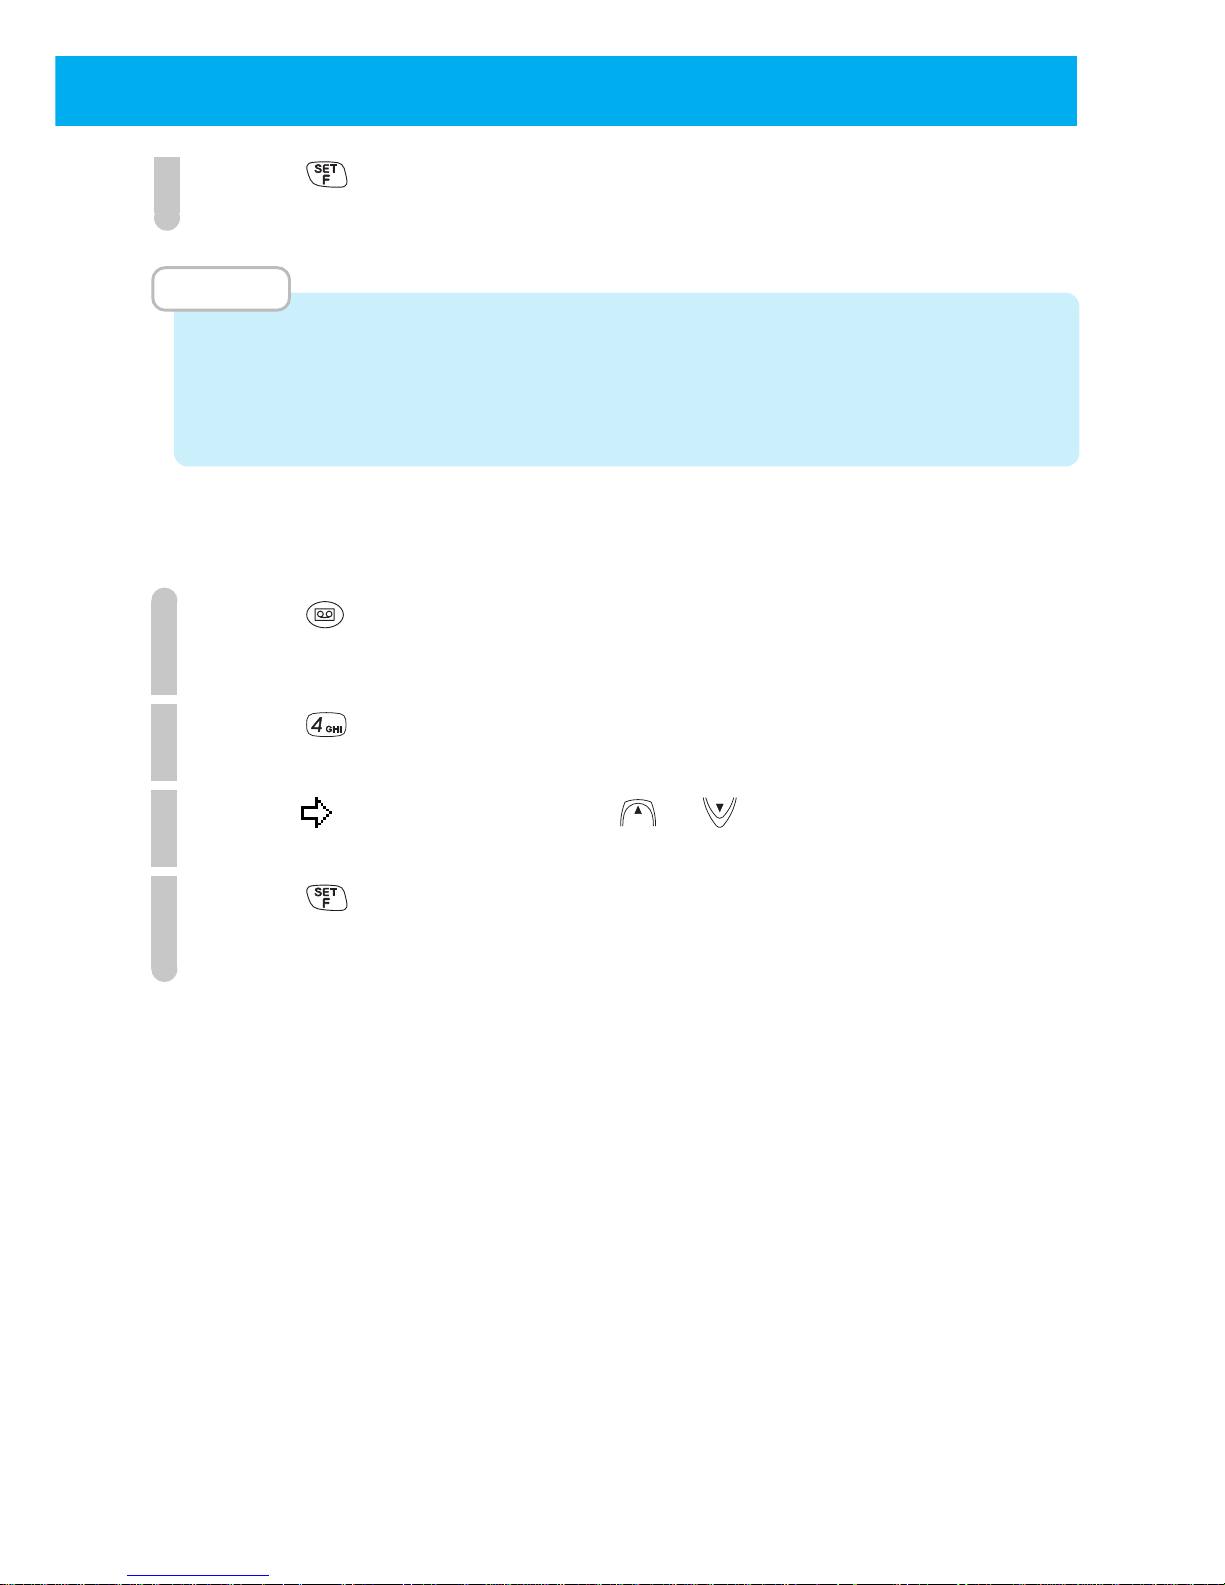
73
5
Press .
The voice memo is deleted.
MEMO
• When you record an original answering message (page 56), this uses up 2 recording
spaces.
• Even when the phone is turned off or when the battery is removed, the content of
voice memos are saved.
■
Clearing all saved voice memos/conversation memos
1
Press .
The "Playback Menu" is displayed.
2
Press .
3
Point to "YES" by pressing or .
4
Press .
All the saved voice memos are deleted.
Page 79
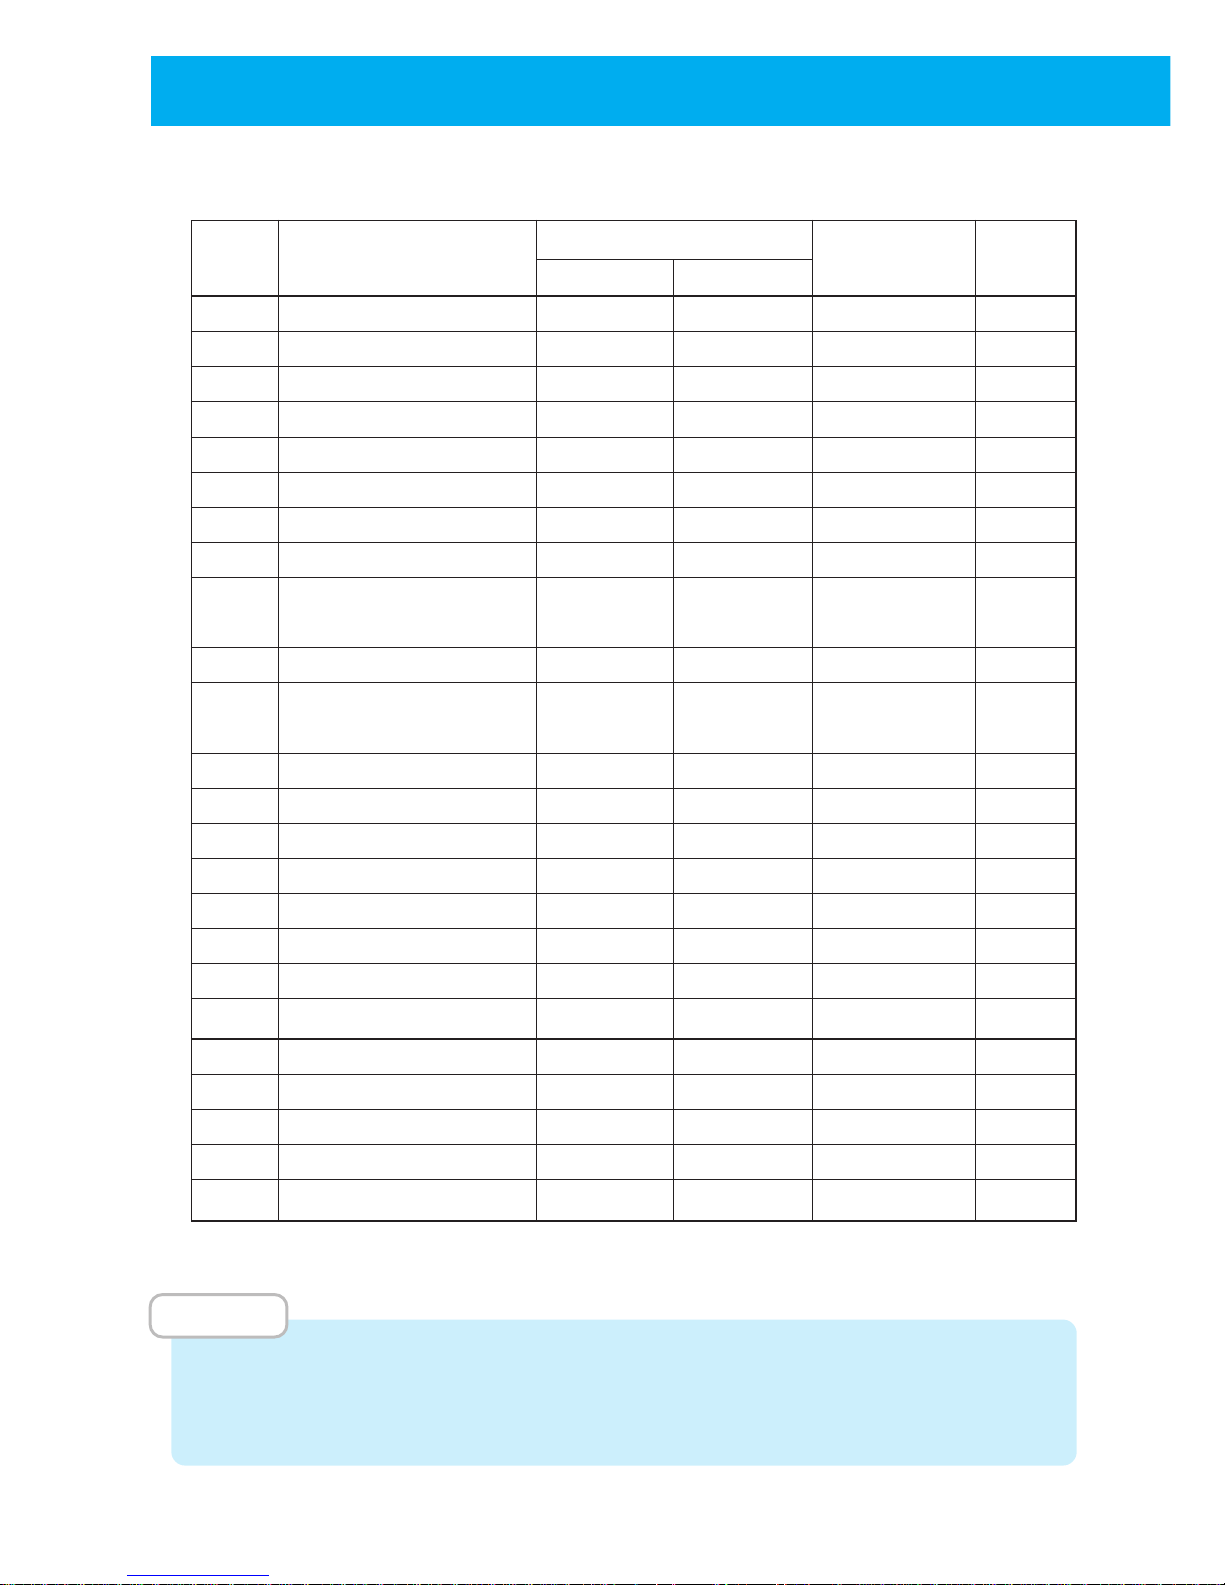
74
Yes: You can set. No: You cannot set.
MEMO
• If you do not press a key during an operation for more than 25 seconds, the
registration will become invalid. In that case, start the operation again from the
beginning.
■
List of various functions
●
LIST OF OPERATIONS THAT CAN BE PERFORMED BY FUNCTION KEY
Function
Modes that support setting
Default
Page
number
Function
Public
Transceiver
settings
F00 TEL No. Display Yes Yes – 16
F09 Alarm & Auto OFF Yes Yes Off 65
F11 Set Ring-Tone Yes Yes
BEEP1, volume = medium
67
F14 Select Hold-Tone Yes No
Toy Soldier Mrch
69
F24 Answer Message Yes No – 56
F25
Message Response Time
Yes No 6 seconds 61
F30 Phone Book Lock Yes Yes – 96
F32 Clear All Phone Book Yes Yes – 55
F51 Set Standby Mode Yes Yes – 25
(change standby mode)
F55 Transceiver Group Yes Yes – 104
F60
Notifying the other party
Yes No On 97
(caller ID Send)
F62 Set Clock Yes Yes
00:00 on 00/00, 2000
64
F63 Rec Owner Name Yes Yes – 98
F65 Back light Yes Yes
On, 15 seconds
98
F66 LCD contrast Yes Yes – 99
F67 Any key answer Yes Yes Off 99
F71 Set Password Yes Yes – 100
F72 Set Default Values Yes Yes – 101
F80 Key Touch Tone Yes Yes On 102
F81
Out of Service Area Alarm
Yes Yes On 102
F82
Connecting (link) Tone
Yes Yes Off 103
F83 Hand-over Tone Yes No Off 103
F92
Change Group Name
Yes Yes – 54
F95 Set Modem Yes No Off 88
Page 80

USING THE
SCHEDULE FUNCTION
●
USING THE SCHEDULE FUNCTION
.......P76
Page 81
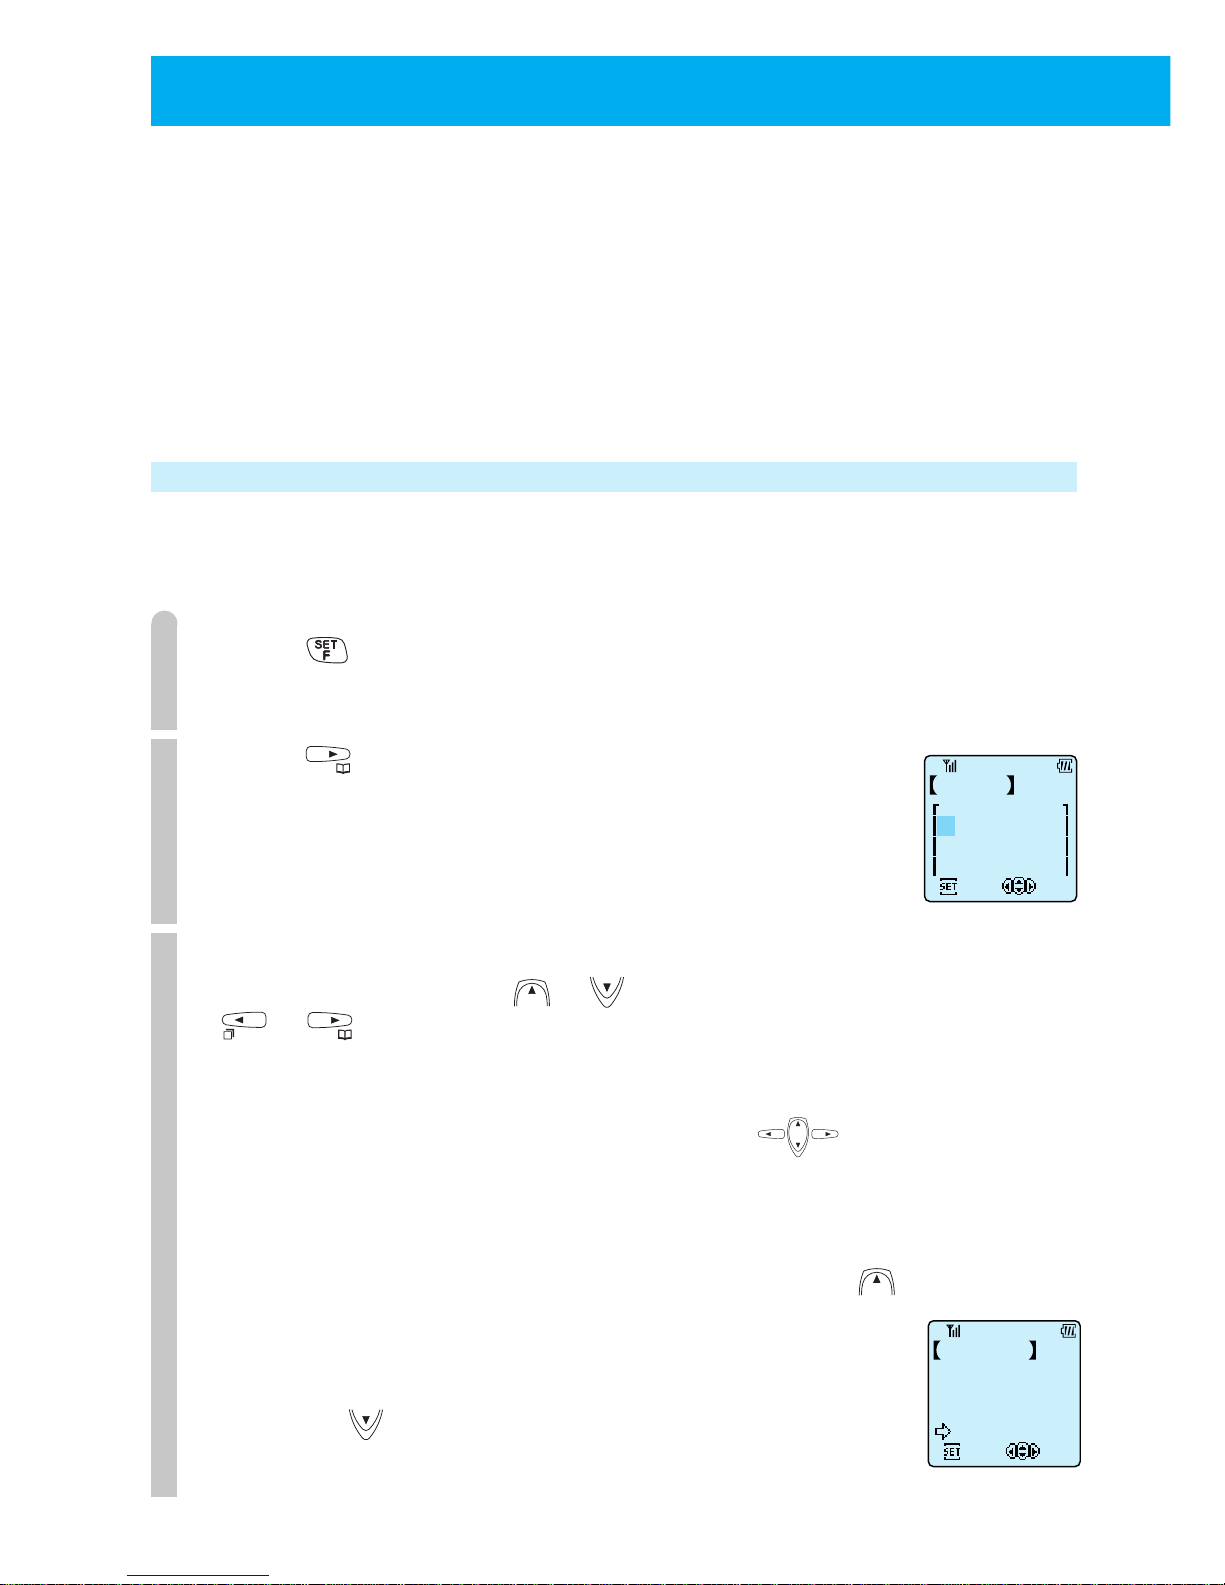
76
You can use the phone's "Schedule" function to register your already decided
appointments such as dates and meetings. By registering your appointments in a
schedule, these appointments will appear in the display at a time you specify and
you will be notified by an alarm-tone (ring-tone, melody or vibration). Moreover,
the schedule function allows you to associate phone book data to scheduled
appointments so that phone numbers can also be displayed.
A single scheduled appointment can be a maximum of 48 characters. The schedule
can hold a maximum of 100 appointments.
Registering a schedule
You can display a calendar and register a schedule on a day and time of your choice. You can also
register routine weekly appointments by specifying a day of the week rather than a specific date.
Before schedule registration, ensure that "Set Clock" (F62) is set.
1
Press .
2
Press .
A three-week calendar showing the current week, next week
and the week after that is displayed.
3
Select a date or weekday to input the schedule
Select a weekday by using or or select a date by using
or .
● Inputting by date specification
Select the date you want to input by pressing .
You can select from the range 6 weeks prior to current ~ 12/31, 2098.
● Inputting by weekday specification
Select the weekday or schedule you want to input by pressing 7 or more times.
A weekday pattern is displayed to enable you to select the weekday. You can select from the
following 11 patterns.
"Every Monday" ~ "Every Sunday", "Mon to Sat", "Mon to Fri", "Sat and Sun" and "Past Schedule"
When you press in the "Every Monday" condition, the screen will change to a calendar
display.
● USING THE SCHEDULE FUNCTION
Schedule 2/00
5 6 7 8 9 10 11
Edit
Select
Su Mo Tu We Th Fr Sa
20 21 22 23 24 25 26
[
]
27 28 29
1 2 3
4
Schedule
Edit
Every Thursday
Every Wednesday
Every Tuesday
Every Monday
Select
Page 82
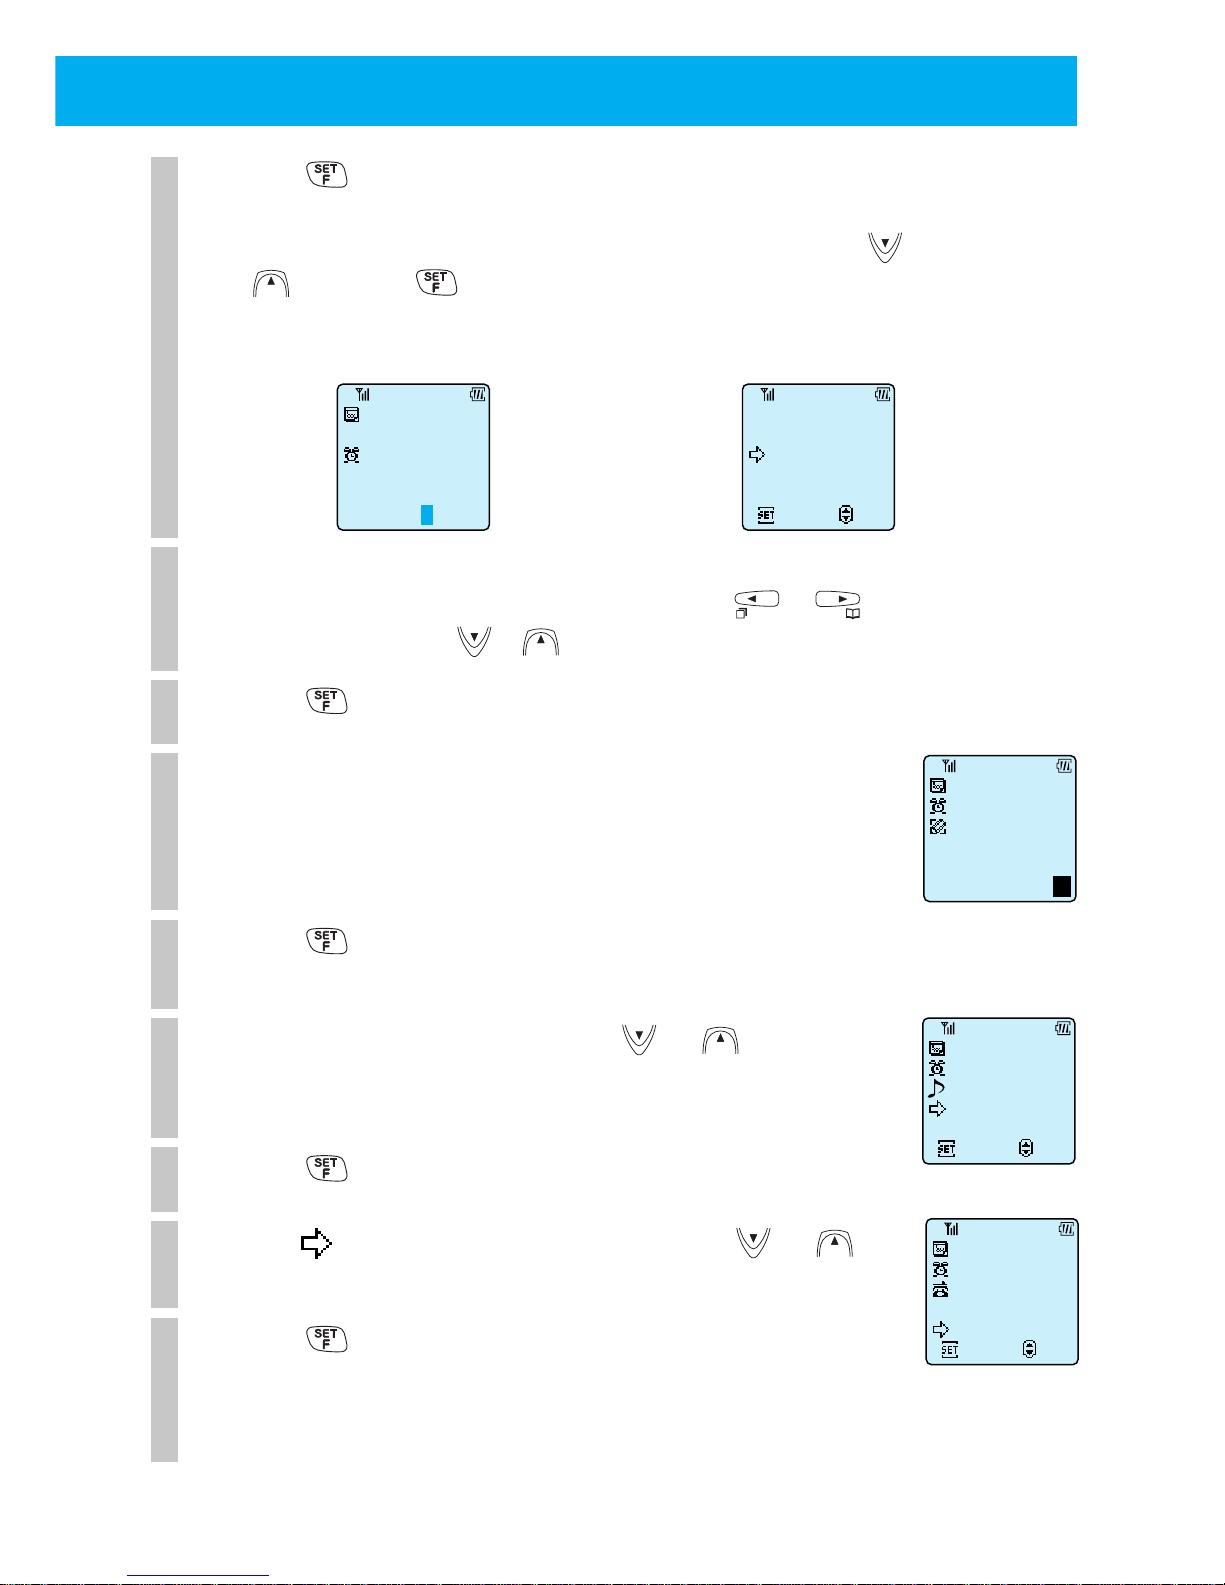
77
4
Press .
If you are adding a new schedule on a date registered for an
existing schedule, select "New Item Edit or Check" by using
or and press .
5
Input the schedule time.
Move the cursor to the numerals of the time by using or and
change the value by using or . You can also input by using dial keys.
6
Press .
7
Input the appointment.
See page 40 for instructions on inputting characters and
switching between input modes.
8
Press .
9
Select the alarm-tone by using or .
If you select "None", the appointment will not be displayed and
an alarm will not ring. The schedule will be set only.
10
Press .
11
Point to "Set" or "Skip" by pressing or .
12
Press .
If "YES" is selected, follow the instructions of "Placing a call by
search" (page 49) and select the phone book entry that you
want to associate with this schedule.
When inputting the first schedule
for this date
When a schedule has already been
input on this date
SUN 2/20
Enter the time
18:00
Choose Alarm
None
ToySoldierMrch
Set
Select
From 18:00
Sun 2/20
Set PhoneBook
YES
NO
Set
Select
From 18:00
SUN 2/20
SUN 2/20
New Item
Edit or Check
Schedule
Set
Select
Drinks with
Jack
Meet at Bar
From 18:00
SUN 2/20
E
g
Page 83
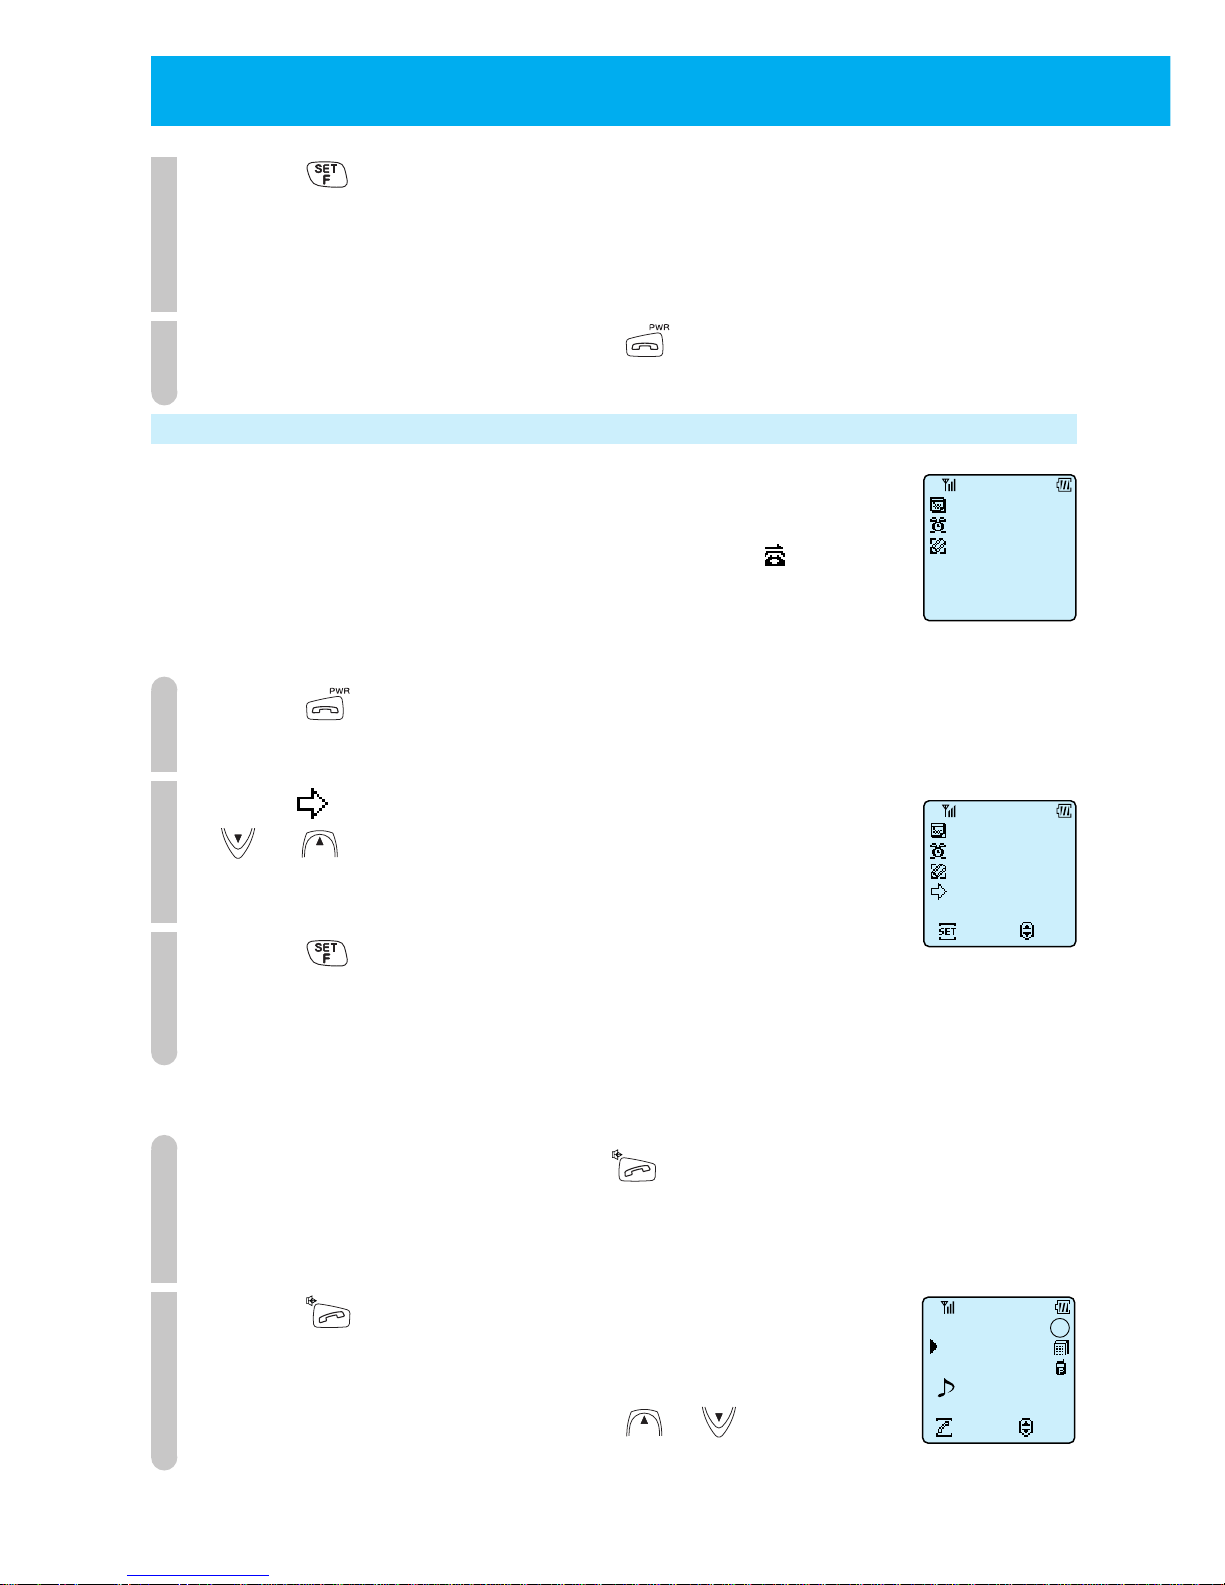
78
13
Press .
The phone will beep to confirm the operation, the schedule will be registered and the
display will return to the screen of Step 2 enabling you to continue registering your schedule.
Date and weekdays that have registered schedules will have an inverted appearance.
14
To exit from registering, press .
When the specified time arrives
When the specified time arrives, the alarm-tone set when the schedule was registered will ring
and the appointment will appear in the display. If the schedule was associated with a phone
book entry, the name registered in the phone book entry will appear after " ". You can stop
the alarm-tone by pressing any key. If you leave it, the alarm will stop ringing after one minute.
To return to the standby display
1
Press .
The display switches to the screen to save/clear the appointment.
2
Point to either "Clear" or "Do not clear" by pressing
or .
3
Press .
Display returns to the standby screen. If you deleted the appointment, "Schedule
Clear Finished" will be displayed and then the display will return to the standby screen.
When the schedule was associated with a phone book entry
1
When the alarm stops, press .
The associated phone number is displayed.
2
Press once again.
A call is placed to the displayed phone number.
If 2 numbers are registered in the phone book entry, you can
select which number to call by using or .
Jack Black
03-0323-4567
Cnctng
Slct
070-3123-4567
No.112
1
1
●
USING THE SCHEDULE FUNCTION (cont.)
Drinks with Jack
Clear
Do Not Clear
Set
Select
From 18:00
SUN 2/20
Drinks with
Jack
Meet at bar
Al also coming
From 18:00
SUN 2/20
Page 84
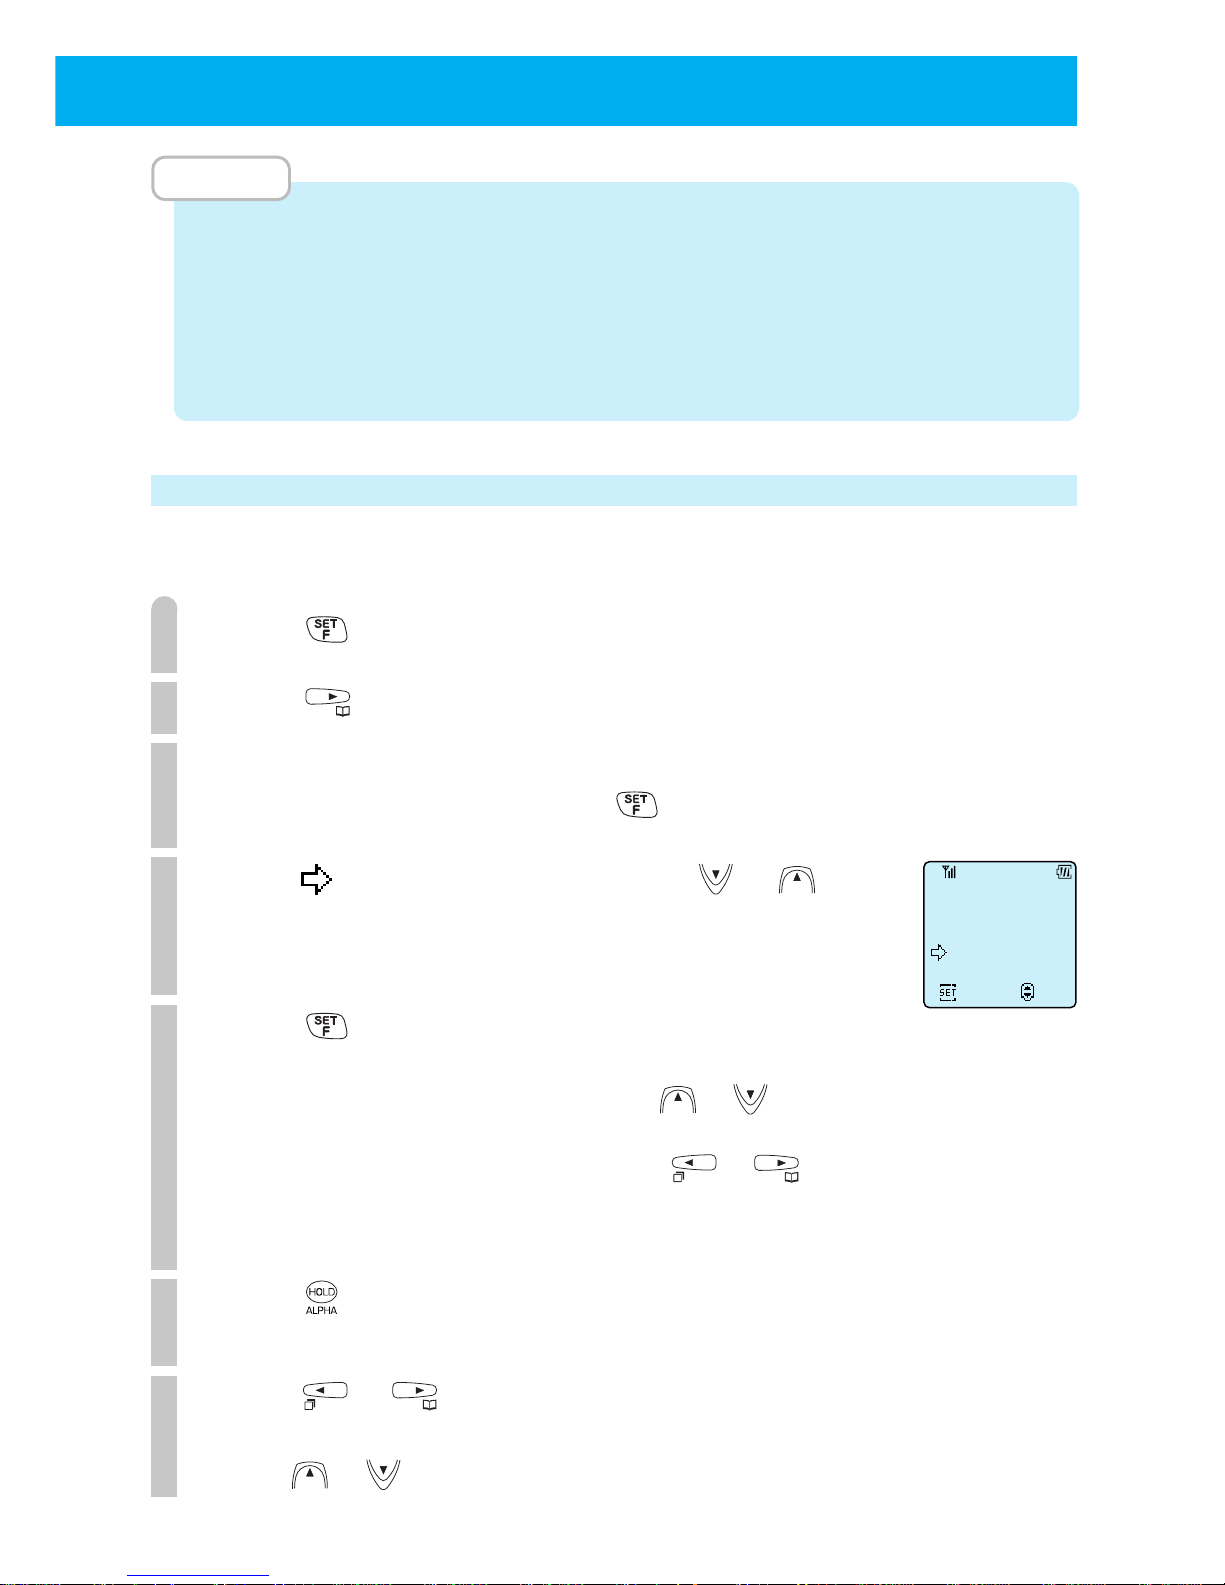
79
MEMO
•
If vibration 1 or manner mode is set, the display only will appear and the alarm will not ring.
•
If the volume setting for incoming calls is set to OFF in "Ring-Tone" of "Selecting the incoming call
notification method (F11)", the display only will appear and the alarm will not ring.
•
If the schedule time arrives while taking a call or while the phone is switched off, notification will be displayed after the time that was
set when the appointment was registered. (Sometimes appointments that have weekday specification are not displayed.) Display
may also be delayed when multiple schedules and alarms are registered for the same time or for times just before or after.
Confirming or revising the registered content of a schedule
You can confirm the content of a registered schedule and you can immediately revise it if necessary.
You can revise in the order of date, time, appointment, alarm-tone, and phone book association.
1
Press .
2
Press .
3
Select the date on which the schedule you want to
revise is registered and press
.
4
Point to "Edit or Check" by using or .
5
Press .
The selected schedule appears. If the appointment details continues
off the screen, display the details by using or to scroll.
If there are multiple schedules on the same day or if you are searching
for a schedule before or after that day, use or to select.
If you only want to confirm the registration and do not want to
revise the content, go to Step 11.
6
Press .
The western calendar will blink.
7
Press or to make the year, month or day that
you want to change blink and revise the date.
Press or to increase or decrease the numeric value. If there is no need
for revision, go to Step 11.
SUN 2/20
New Item
Edit or Check
Schedule
Set
Select
Page 85
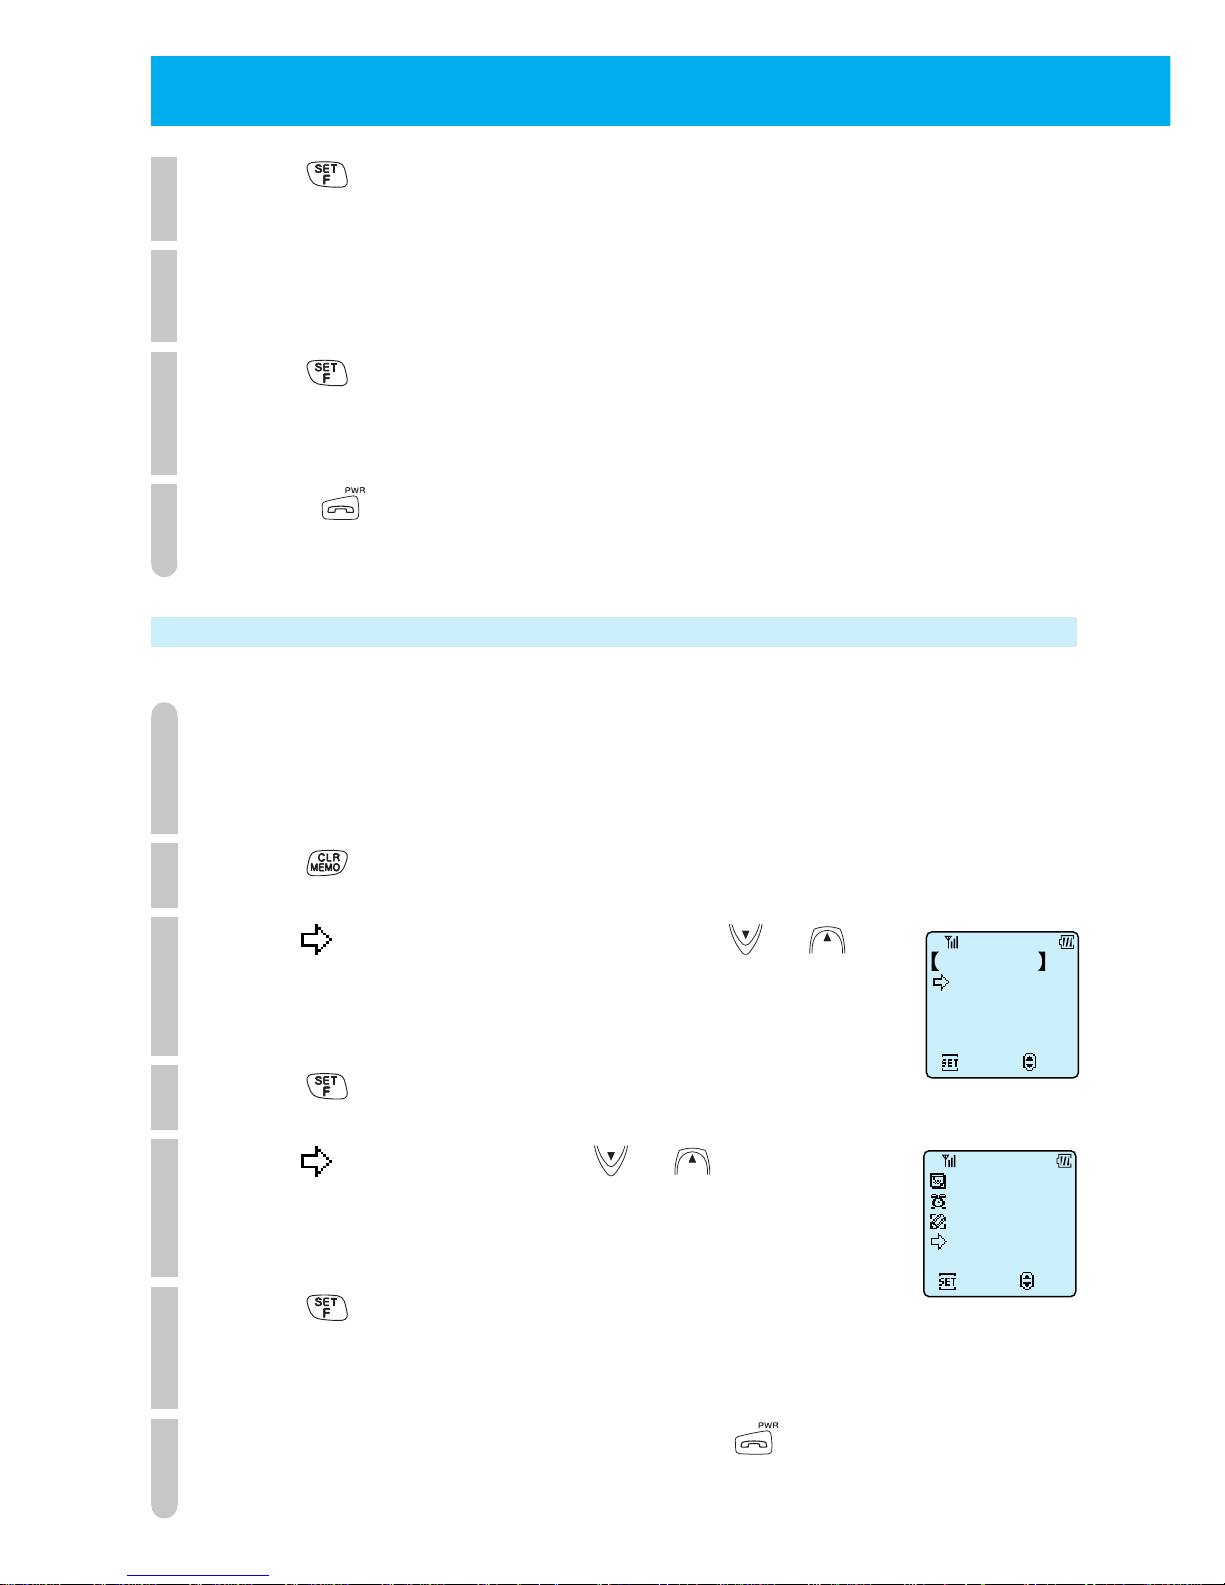
80
8
Press .
You are now able to revise the time.
9
Revise by following the instructions from Step 5 ~ 11
of "Registering a schedule".
10
Press .
The calendar appears and the revision is complete. If you need to confirm
or revise a separate schedule, repeat these instructions from Step 3.
11
Press when you have completely finished
confirming or revising schedules.
Deleting the registered content of schedules individually
1
Follow the instructions from Step 1 ~ 5 of "Confirming or
revising the registered content of a schedule" (Page 79).
Display the schedule you want to delete.
2
Press .
3
Point to "Clear 1 by 1" by pressing or .
4
Press .
5
Point to "Clear" by using or .
6
Press .
The schedule that you displayed in Step 1 is deleted. The display will return
to the calendar display screen and you can continue deleting schedules.
7
When you have finished deleting, press .
Clear Schedule
Clear 1 by 1
ClrPastSchdl
ClearAll
Set
Select
Drinks with Jack
Clear
Do Not Clear
Set
Select
From 18:00
SUN 2/20
●
USING THE SCHEDULE FUNCTION (cont.)
Page 86
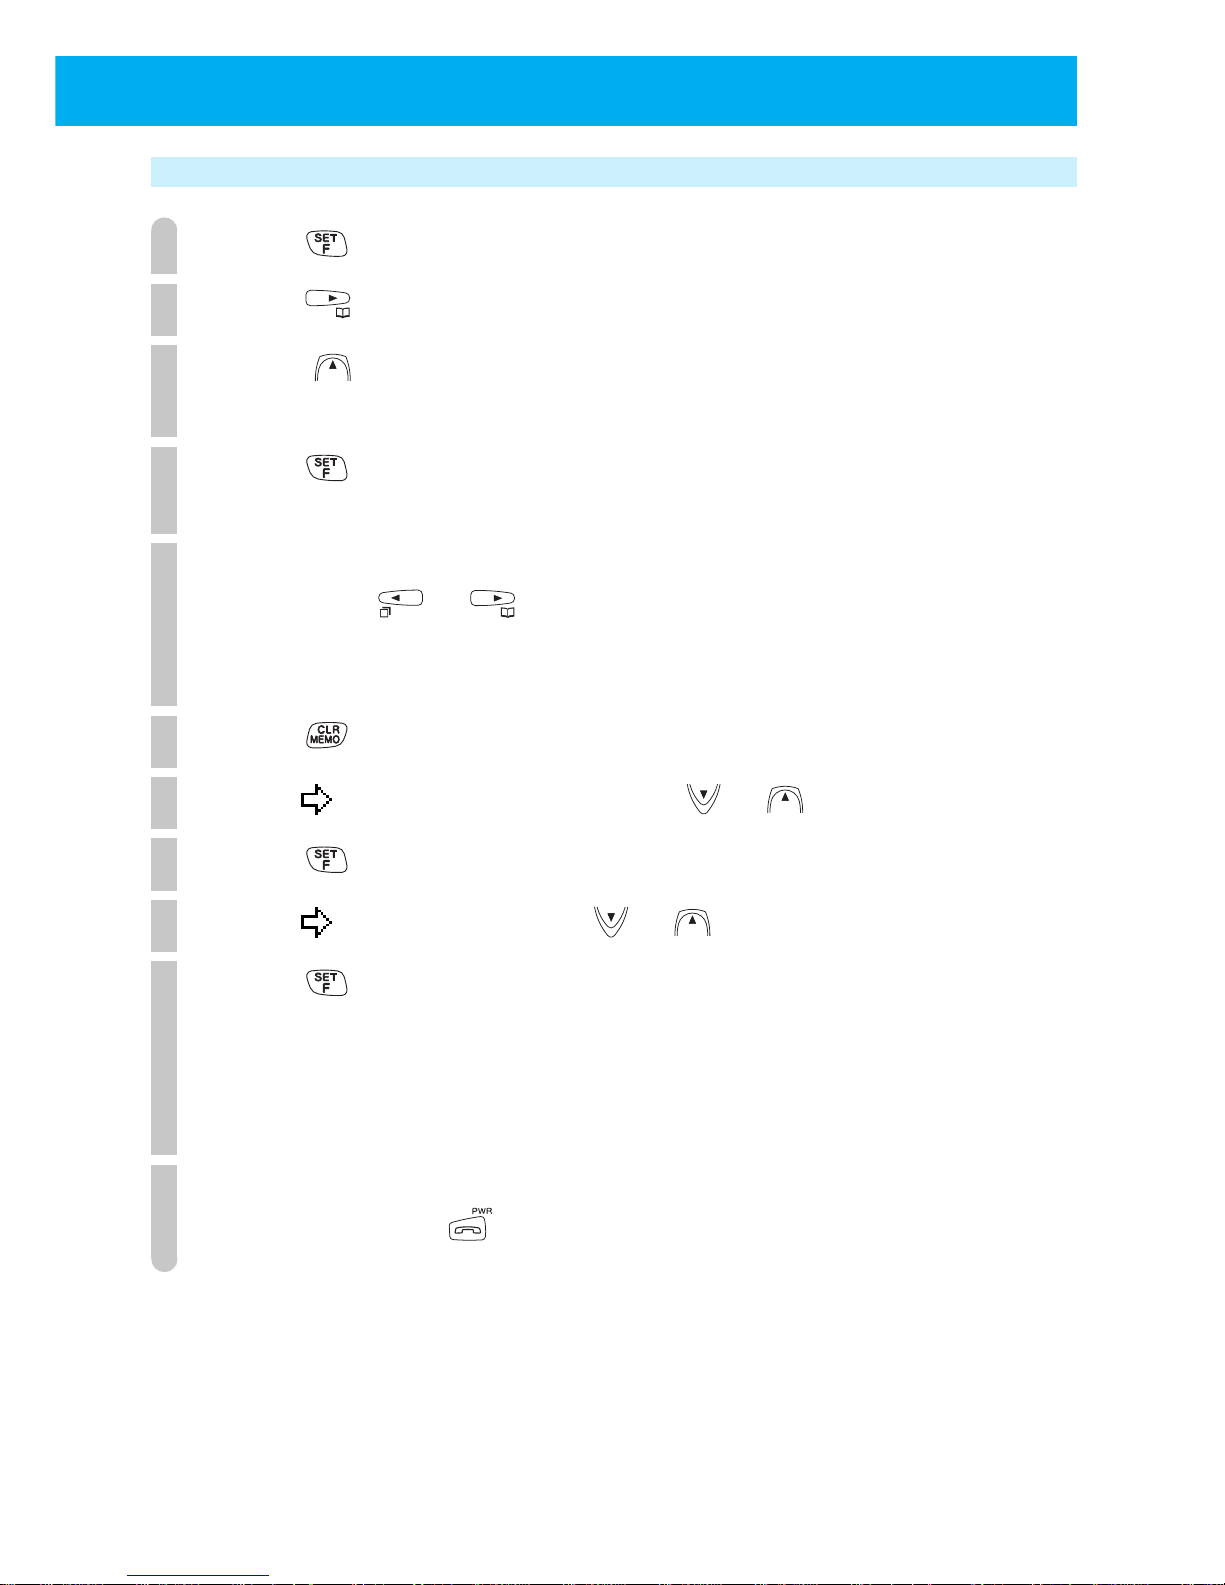
81
Confirming or deleting old schedules (6 or more weeks old)
1
Press .
2
Press .
3
Press several times until "Past schedule" is
displayed.
4
Press .
The past schedules will be displayed in the order of most recent.
5
Select the schedule that you want to confirm or delete
by pressing
or .
The schedule that you selected is displayed. If you only want to
confirm and do not need to delete the schedule, go to Step 11.
6
Press .
7
Point to "Clear 1 by 1" by using or .
8
Press .
9
Point to "Clear" by using or .
10
Press .
The schedule that you selected in Step 5 is deleted. (The schedule
will not be deleted if you just confirm the schedule.)
The display will return to the calendar display screen and you
can continue to delete other schedules.
11
When you want to exit confirming or deleting
schedules, press
.
Page 87
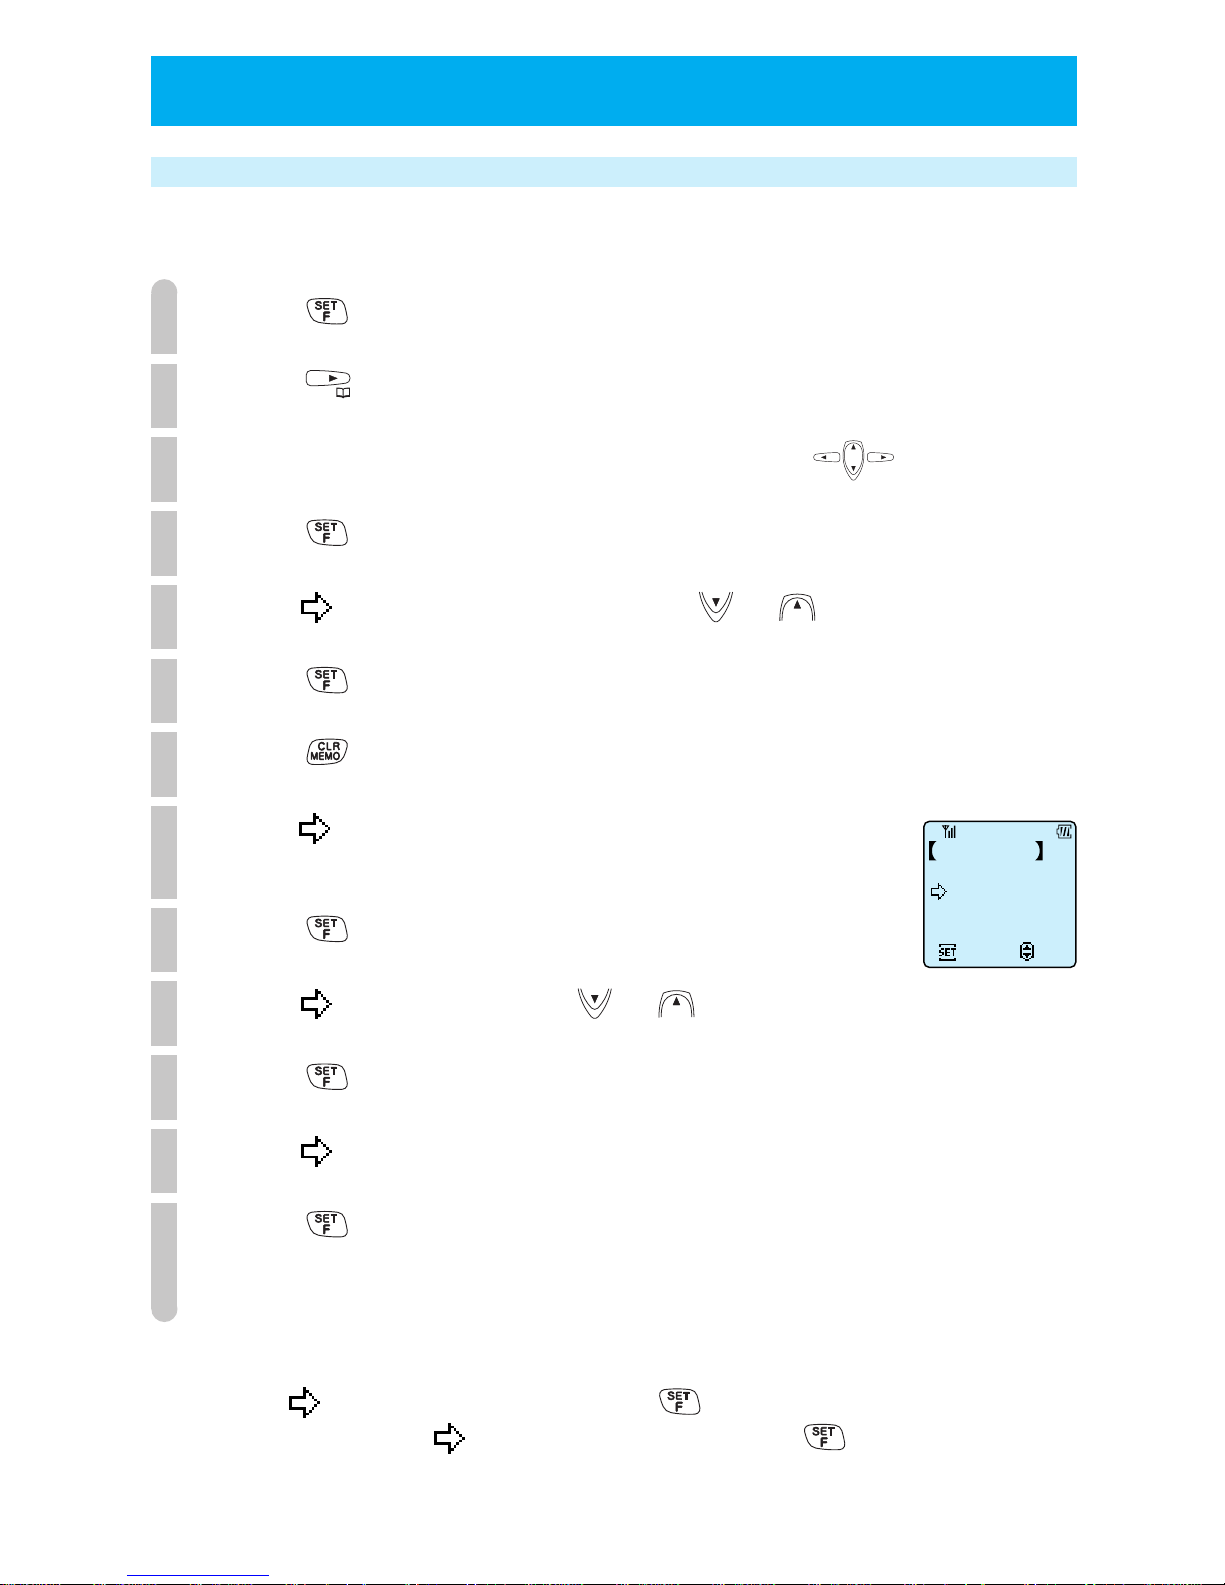
82
Deleting all the registered schedules
You can delete all past schedules and upcoming schedules together in one operation.
1
Press .
2
Press .
3
Move the cursor to the date of the schedule by using .
4
Press .
5
Point to "Edit or Check" by using or .
6
Press .
7
Press .
8
Point to "ClrPastSchdl" (delete schedules that are
more than 6 weeks old) or "Clear All".
9
Press .
10
Point to "YES" by using or .
11
Press .
12
Point to "YES".
13
Press .
The phone beeps to confirm the operation and all the past schedules or all the
registered schedules are deleted.
To cancel
Point to "NO" in Step 10 and press in Step 11.
Alternatively, point to "NO" in Step 12 and press in Step 13.
●
USING THE SCHEDULE FUNCTION (cont.)
Clear Schedule
Clear 1 by 1
ClrPastSchdl
ClearAll
Set
Select
Page 88

OTHERS
●
USING THE 32KBPS HIGH SPEED DATA TRANSFER SERVICE
..P84
●
USING MODEM FOR DATA/FAX COMMUNICATION
..P87
●
USING THE SHORT MESSAGE SERVICE
..P89
● SETTING OTHER FUNCTIONS.....P95
●
USING PHONE AS A TRANSCEIVER
..P104
Page 89
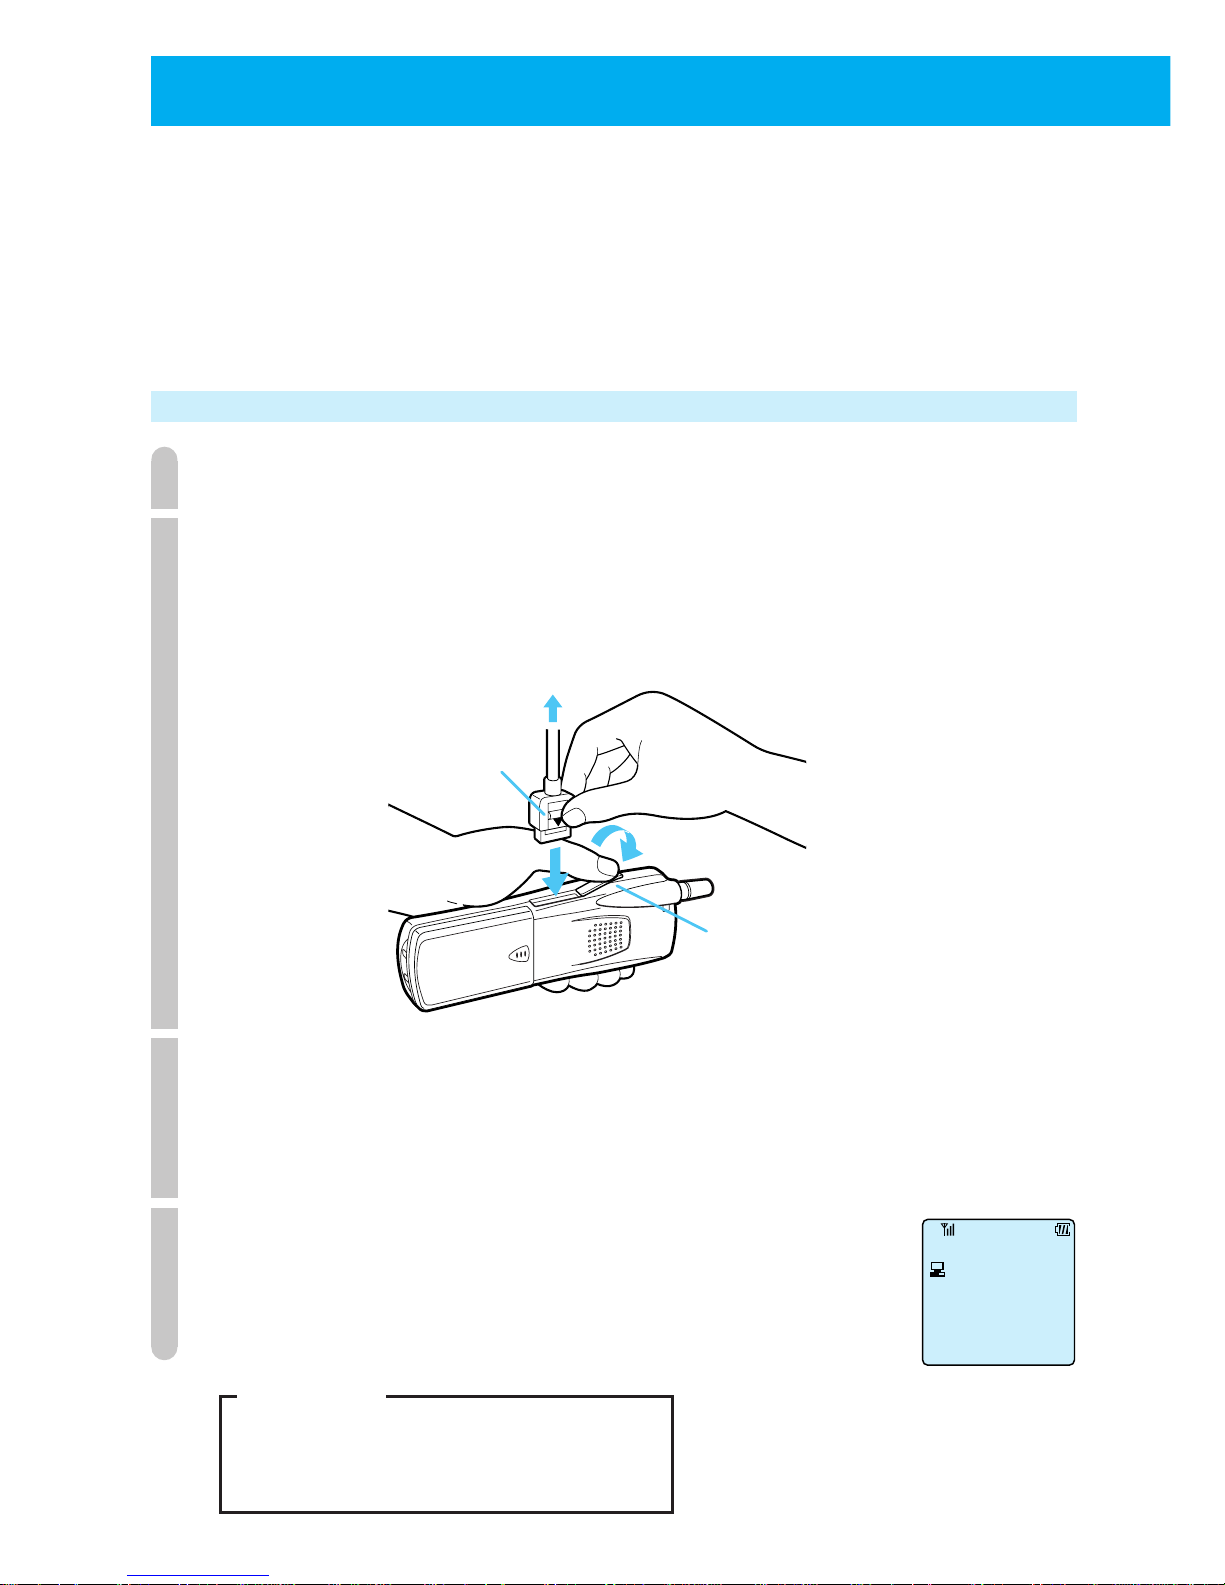
84
●
USING THE 32KBPS HIGH SPEED DATA TRANSFER SERVICE
Use a finger to open the
terminal cap and hold it.
Press and hold the
connector knob to
connect.
Use a 32kbps data card to connect
to a PC etc.
CAUTION
Do not forcefully pull the terminal cap.
If you connect this phone to various kinds of PC, PDA (mobile data terminal), using a
device such as a "32kbps data card" (sold separately), you can use the 32kbps high speed
data transfer service. For setting details, see the instruction booklet for the 32kbps data
card.
This 32kbps high speed data transfer service uses the standard transfer method PIAFS
(PHS Internet Access Forum Standard) and the actual maximum data speed is 29.2 kbps.
Preparing for 32kbps high speed data transfer
1
Connect your 32kbps data card to a PC etc.
2
Open the terminal cap and connect the 32kbps data card
cable to the 32kbps high speed data transfer terminal.
3
Carry out the setting for the 32kbps data card by
using the PC etc.
For setting details, see the instruction booklet for the 32kbps
data card etc.
4
The 32kbps high speed data transfer setting for this
phone is carried out automatically.
To cancel the 32kbps high speed data transfer setting, remove
the connection cable.
Data OK
Page 90
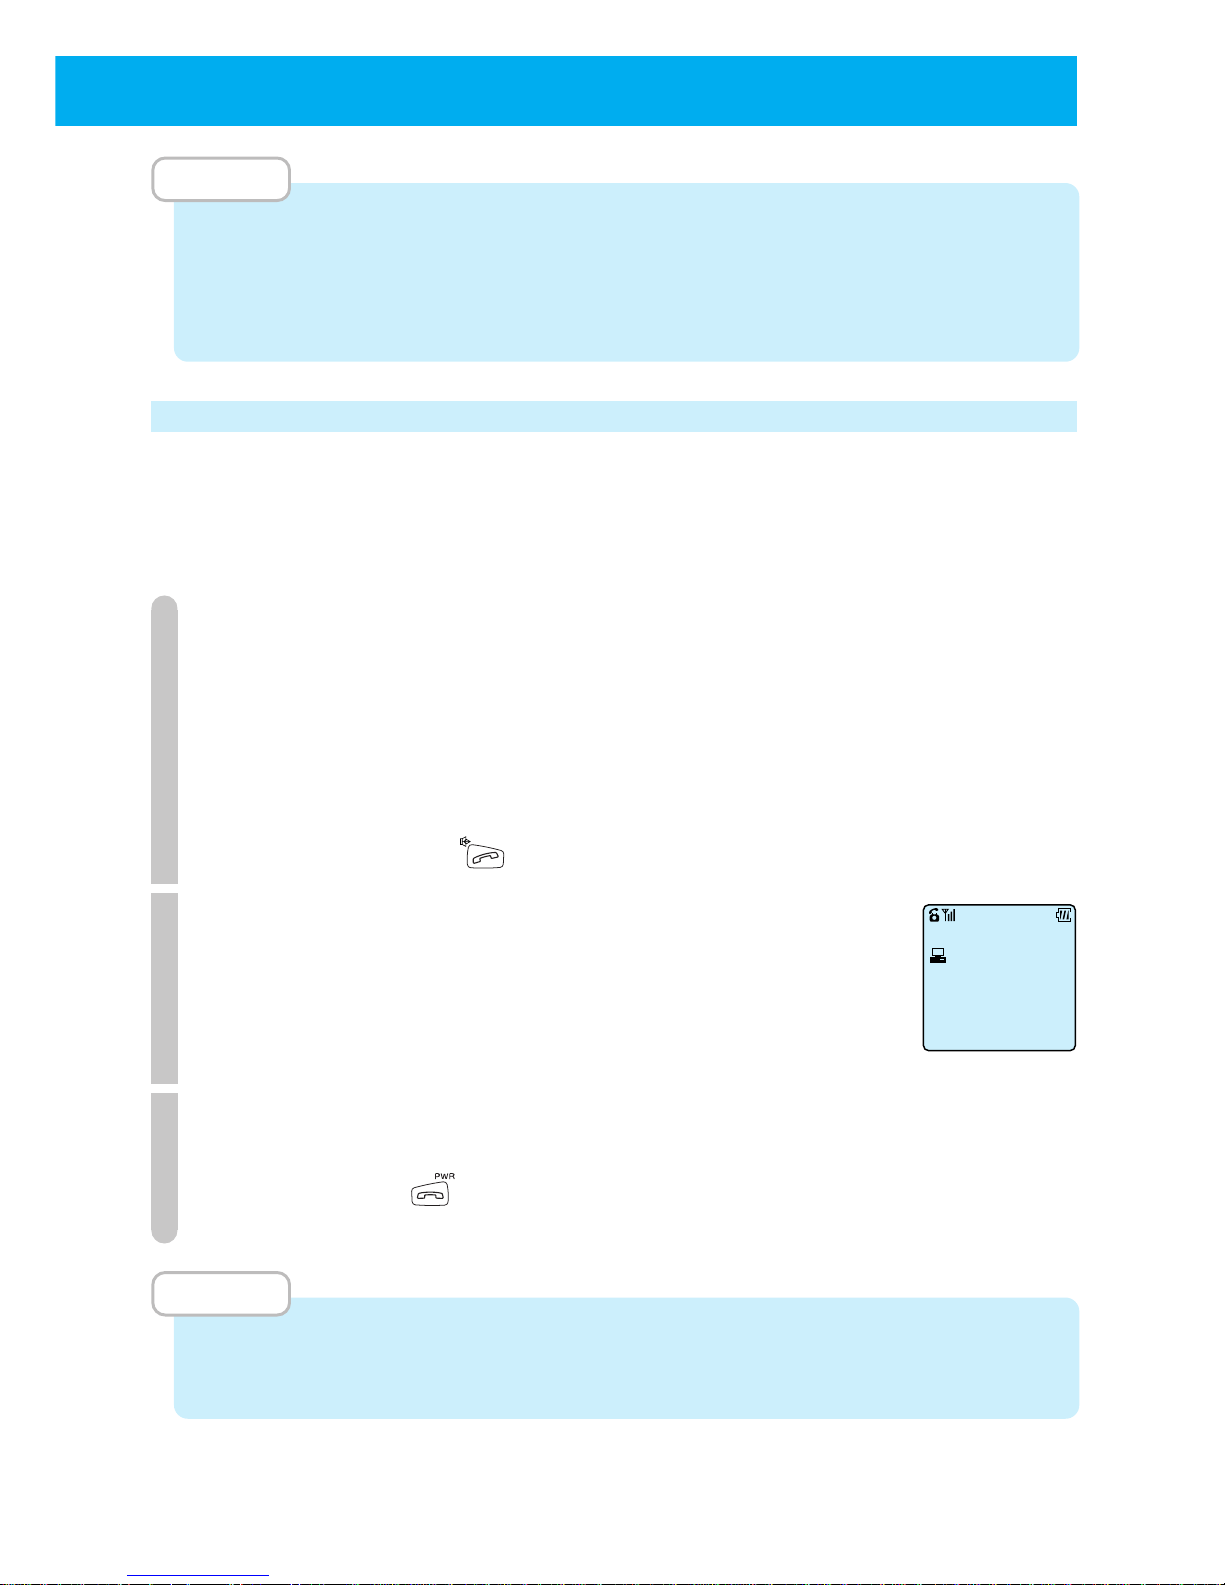
85
MEMO
• You can use 32kbps high speed data transfer in public mode and transceiver mode.
• After using data transfer, push in the terminal cap so that it locks in the storage
position.
• Even when a cable is connected, the phone can be used as a normal voice phone.
Sending data by 32kbps high speed data transfer
You can perform the 32kbps high speed data transfer from this phone or from a PC etc.
For instructions on 32kbps high speed data transfer, read the instruction booklet for the 32kbps
data card (sold separately).
Before using, follow the instructions of "Preparing for 32kbps high speed data transfer" (page 84).
1
Send 32kbps high speed data transfer from this phone
or a PC etc.
If you send automatically, sending is performed by operation
from the connected PC etc.
If you send manually, you can send by dialing, redialing, or displaying
a number such as a call memory number or phone book number.
When sending, press .
2
After connecting, carry out the 32kbps high speed
data transfer by using your PC etc.
3
When you want to terminate the 32kbps high speed data transfer,
perform the operation to terminate the data transfer from the PC etc.
Also, if you press of this phone, you can terminate the data
transfer.
MEMO
•
You may not be able to send correctly if you are moving or if the signal is weak or the
signal status is bad. Perform this operation in places where the signal condition is good.
Data
00:05
Page 91
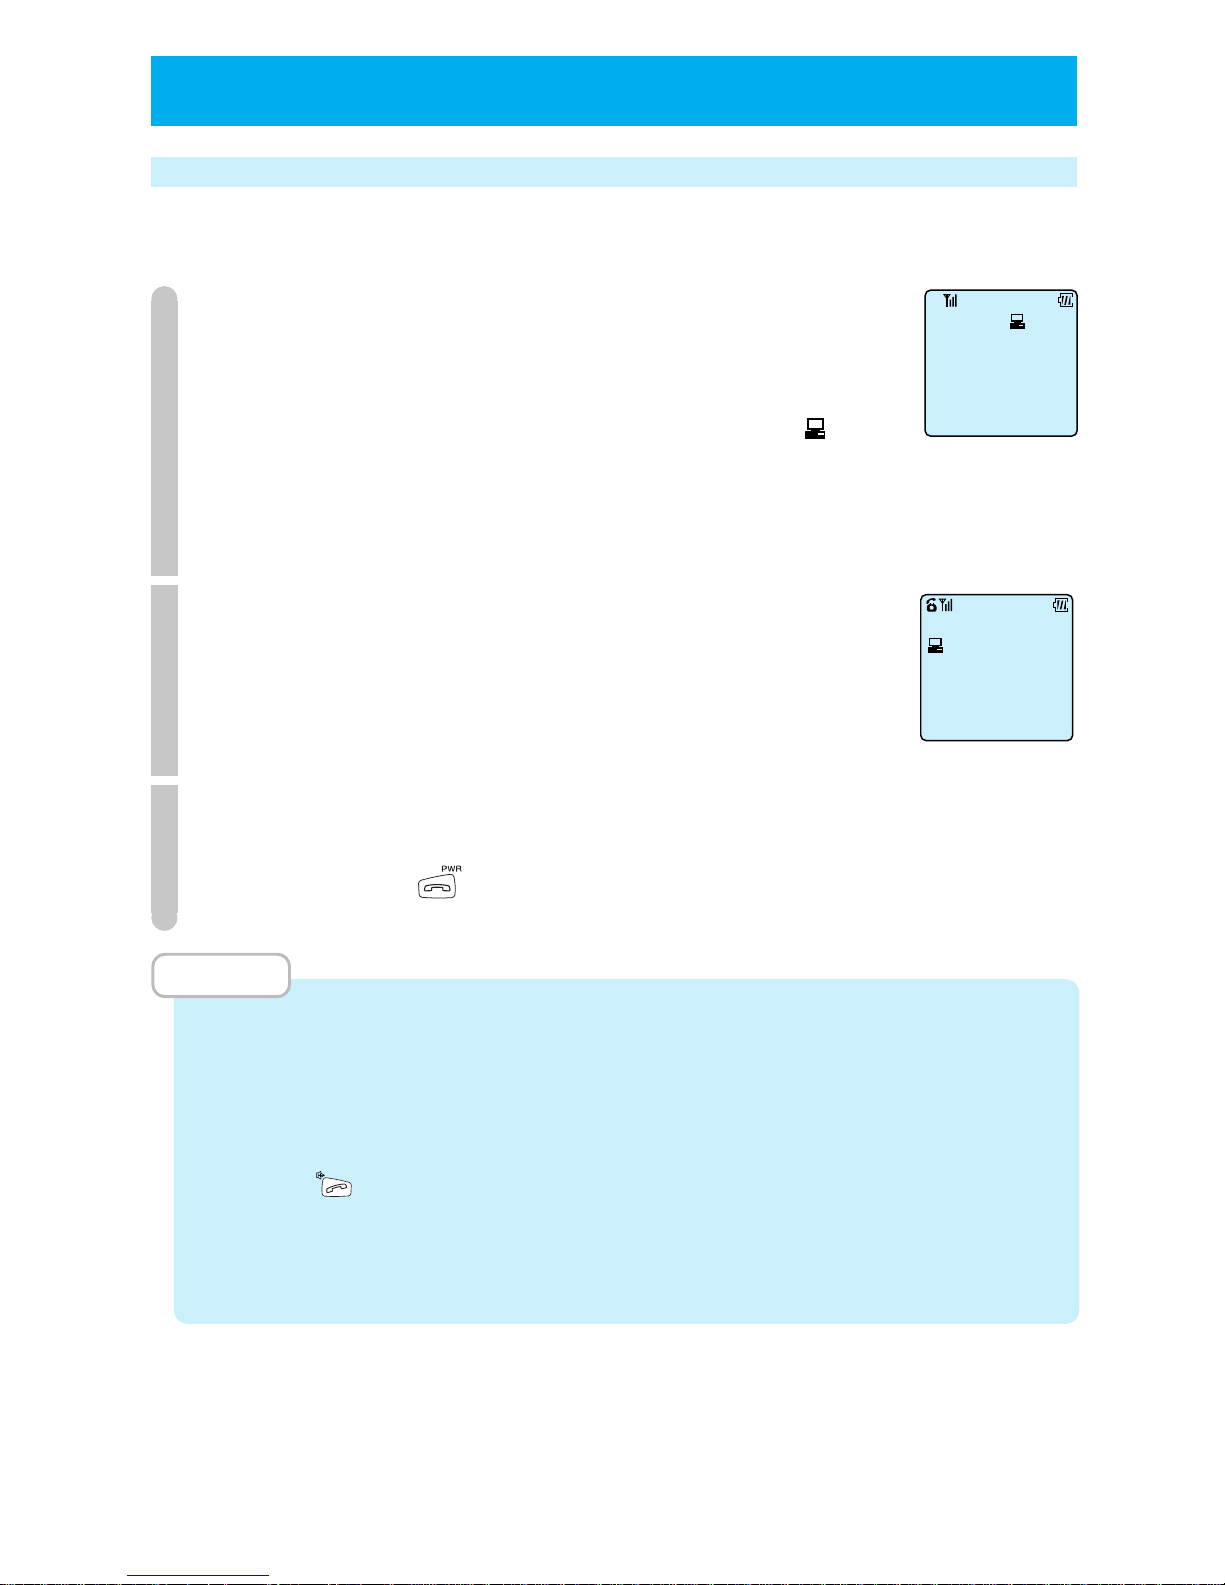
86
Receiving data by 32kbps high speed data transfer
When receiving 32kbps high speed data transfer calls, follow the instructions of
"Preparing for 32kbps high speed data transfer" (page 84) beforehand.
1
When a 32kbps high speed data transfer call is
received, the ring-tone rings, the incoming light blinks
and the display changes to incoming call condition.
The call is differentiated from a normal voice call by " " being
displayed.
When 32kbps high speed data transfer is sent from PHS or
ISDN etc, the caller's phone number may be displayed.
2
32kbps high speed data transfer connection is
performed by PC etc.
3
When terminating the 32kbps high speed data transfer, use the PC
etc. to perform the operations to terminate the data transfer.
Also, if you press on this phone, you can terminate the data transfer.
MEMO
• When a 32kbps data card is not connected and a 32kbps high speed data transfer
call is received, the call cannot be received and 32kbps high speed data transfer
cannot be performed. In such cases, the ring-tone does not ring and the incoming
light does not blink.
• When receiving a 32kbps high speed data transfer call, you cannot receive the call
by using
.
• Sometimes transfer cannot operate correctly while moving or while in places of
weak signal or places where the signal condition is bad. Use in places with a good
signal condition.
●
USING THE 32KBPS HIGH SPEED DATA TRANSFER SERVICE (cont)
Incoming
07031234567
Data communication
00:05
Page 92
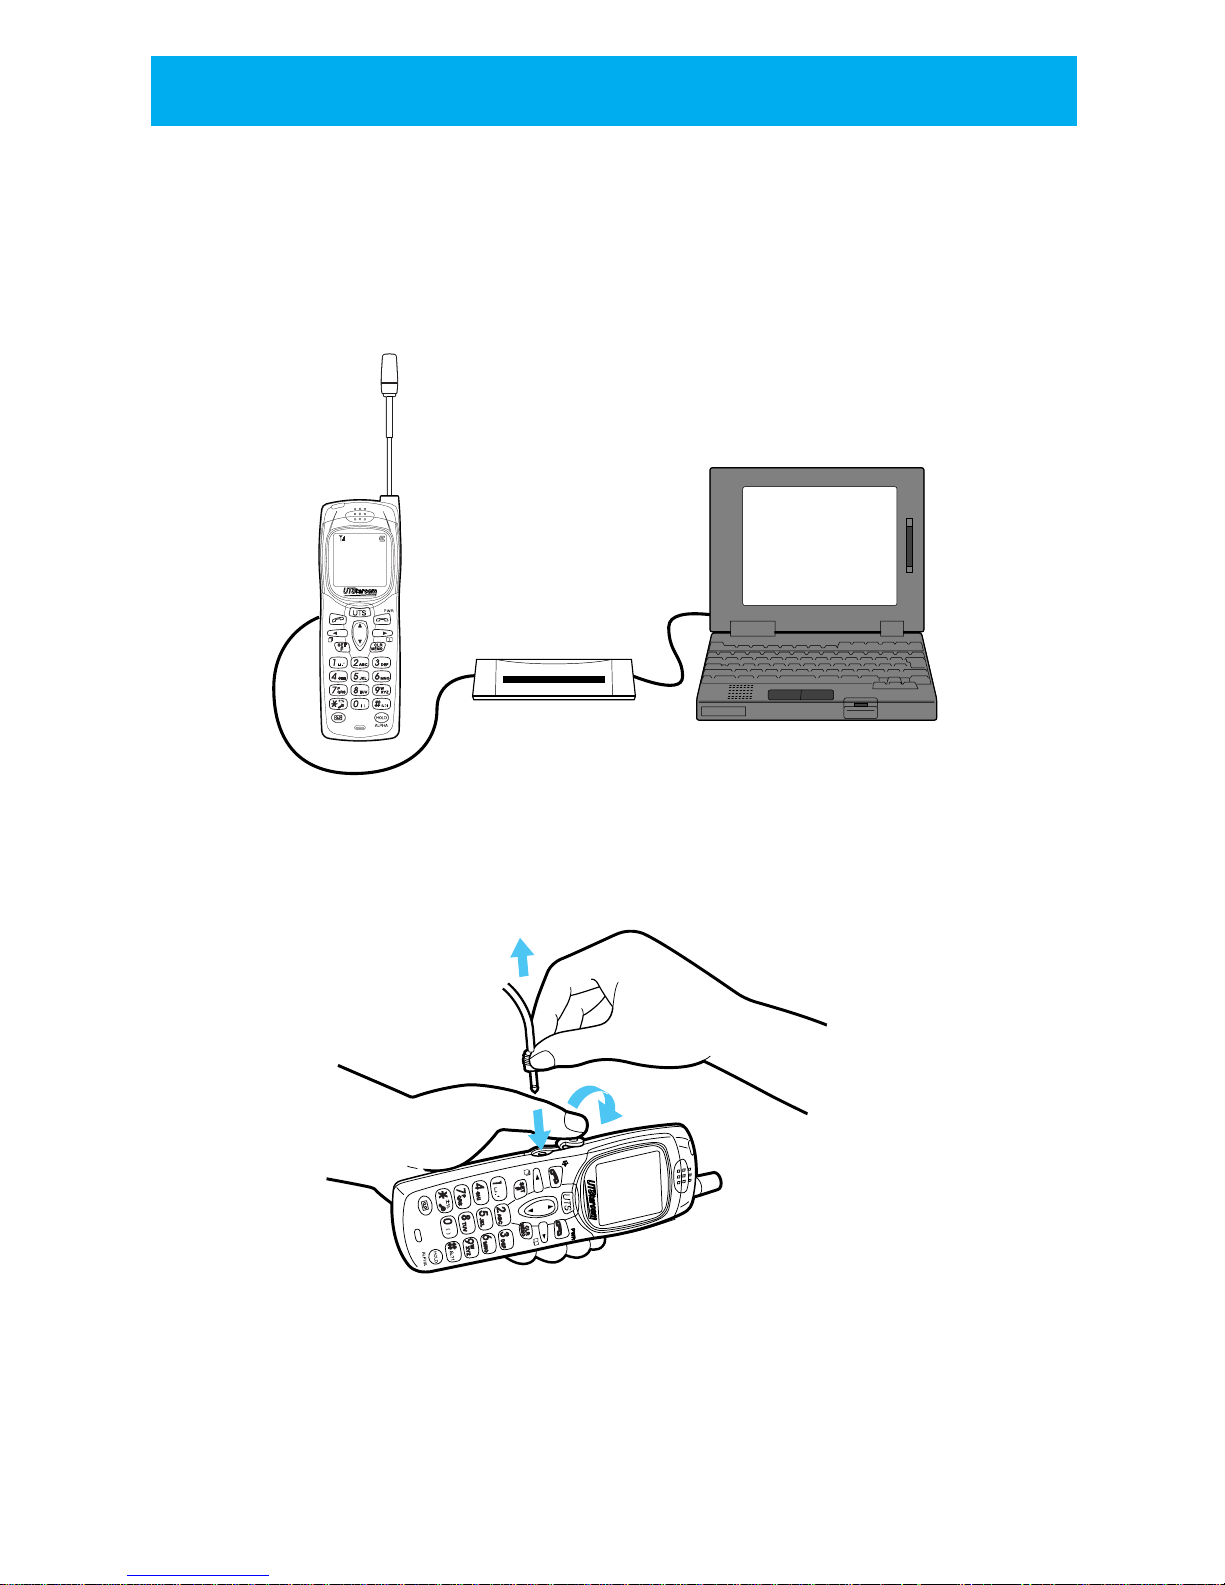
87
●
USING MODEM FOR DATA/FAX COMMUNICATION
By using a standard communication cable (modular/2.5mm dia. microplug) to
connect a modem to the phone's earphone/microphone terminal, you can carry
out data/fax communication.
During modem communication, the communication speed will be slower than the
32kbps high speed data communication.
Modem PC etc.
■
Connecting a modem
Please connect as shown by this picture.
Use finger to open terminal
cap and press down.
Connect to
modem
Page 93
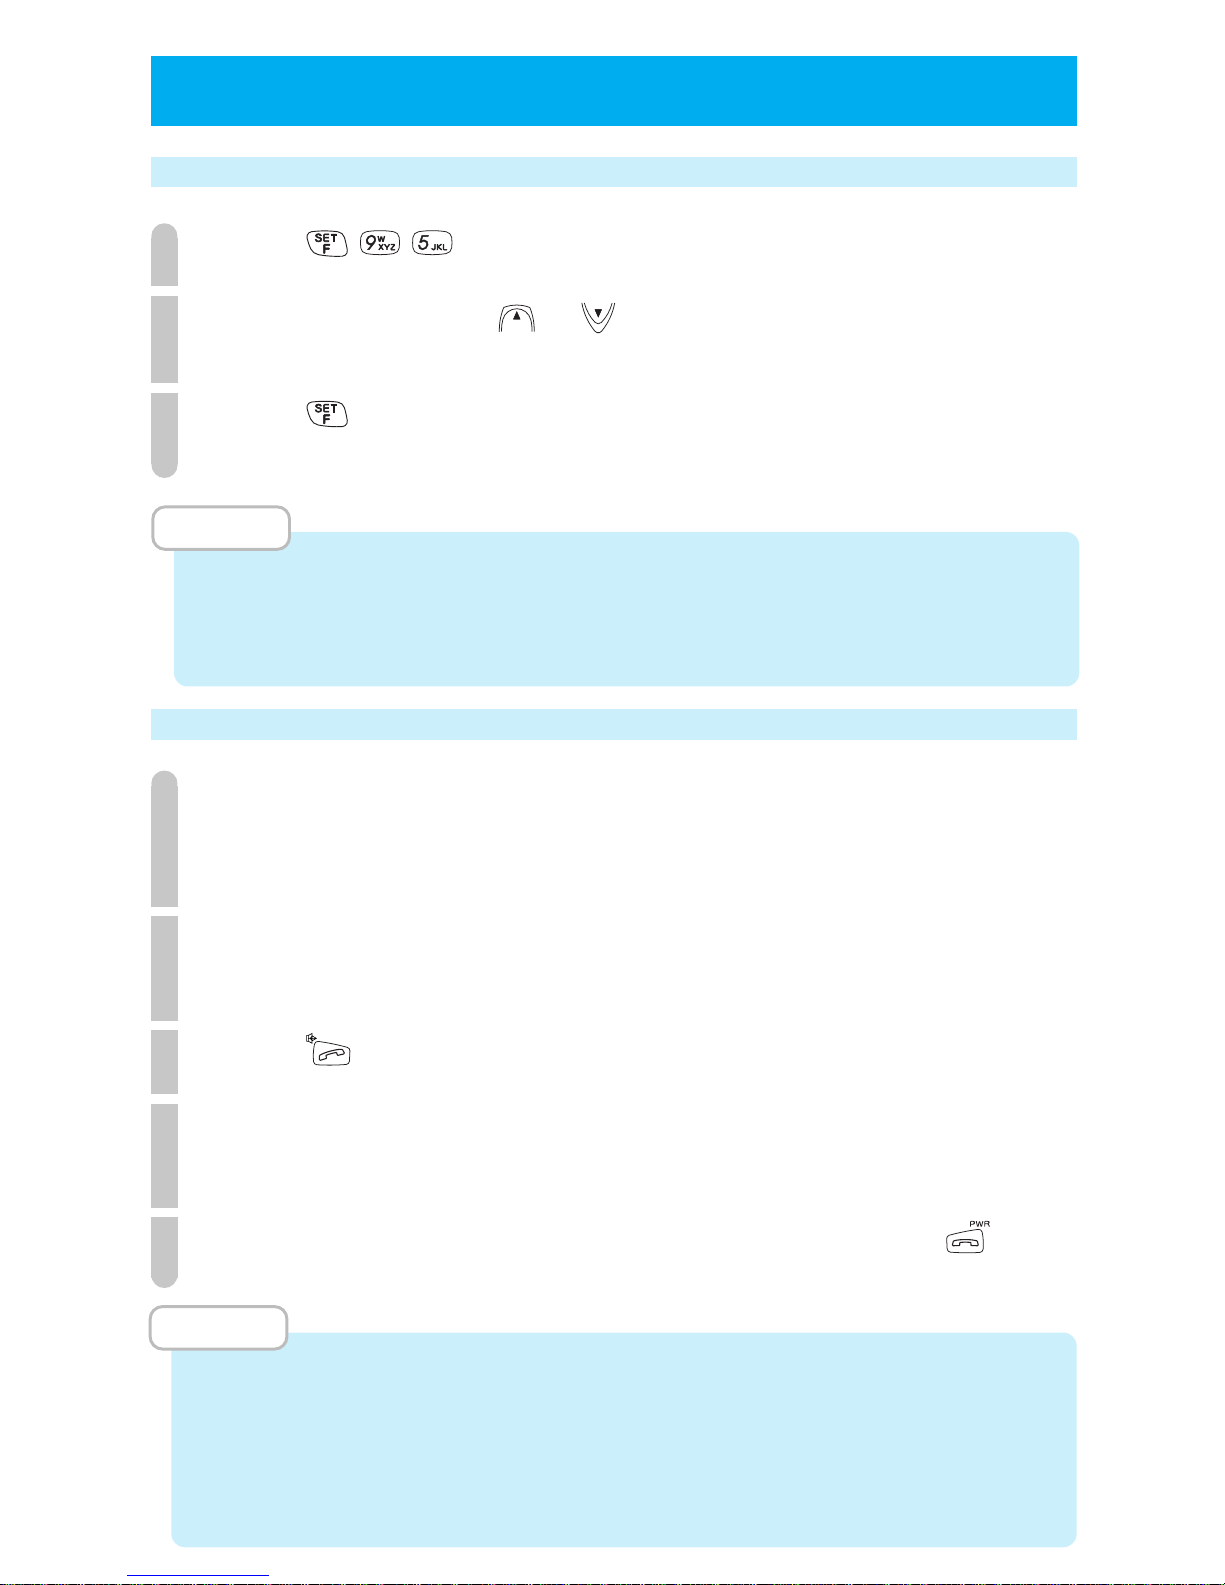
88
Setting modem communication (F95)
1
Press .
2
Set to "ON" by using or .
When canceling, set to "OFF".
3
Press .
Modem communication is now possible.
MEMO
• When not performing modem communication, always set modem communication
to "OFF".
• When you purchase this phone, modem communication is set to "OFF".
Performing modem communication
1
Ensure that the modem and PC etc. are connected,
remove the phone's earphone/microphone terminal
cap and connect the communication cable.
2
Dial the phone number of the communication partner for this data
communication.
3
Press .
4
After the communication partner responds, the PC etc. carries out
the data transfer.
5
When you want to terminate the communication, press .
MEMO
• You may not be able to communicate correctly if the signal is weak or the signal
status is bad. Use modem in places where the signal condition is good.
• When using, keep the phone and the modem 30cm or more away from the house
telephone.
• You cannot place the call from the modem.
●
USING MODEM FOR DATA/FAX COMMUNICATION (cont.)
Page 94
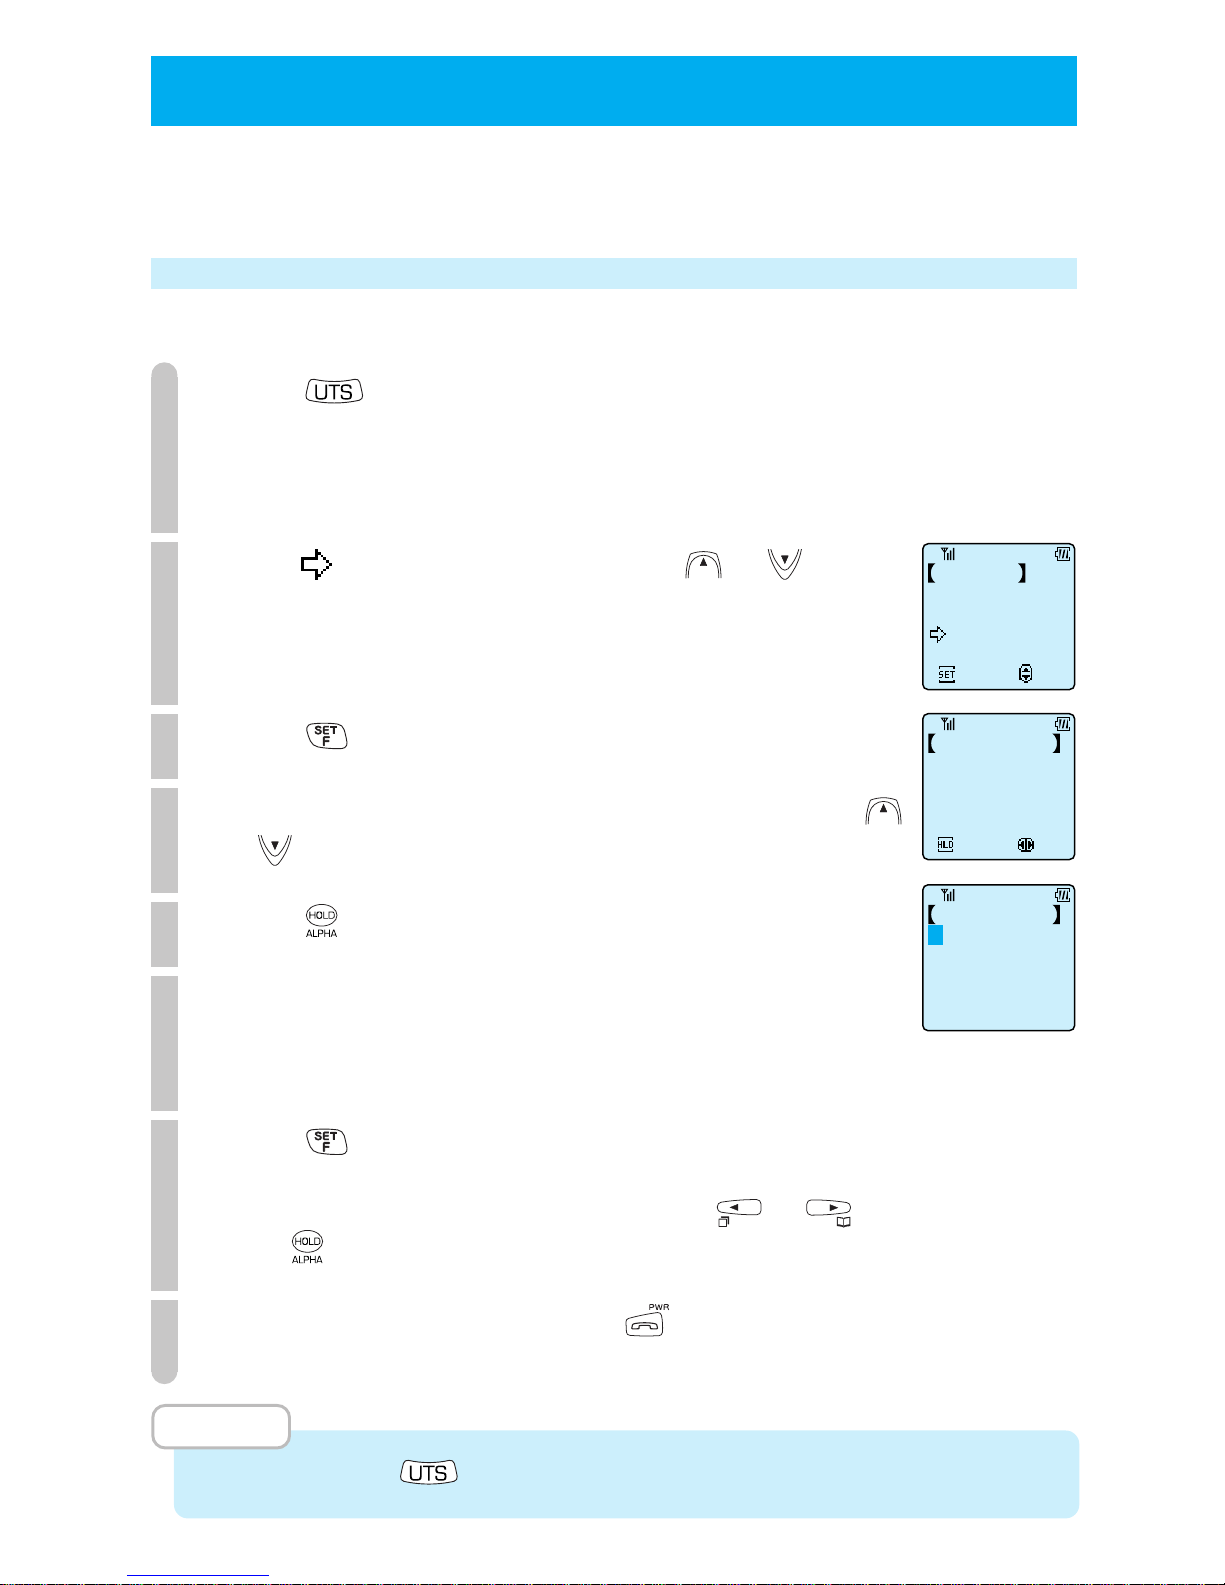
89
● USING THE SHORT MESSAGE SERVICE
You can communicate with other UTS-708J by the Short Message Service.
Maximum 20 alphanumerical letters can be sent or received.
Making an original message (Write Draft Text)
Maximum 5 original messages by maximum 20 alphanumerical can be written.
1
Press .
2
Point to "WriteDraftText" using or
.
3
Press .
4
Select the display you want to input/modify using
or
.
5
Press
.
6
Inputting message.
See page 40 for the character input mode switching and
character input method.
7
Press .
When you want to continue making an original message, select
the display you want to input/modify using
or
and
press
. And then, follow step 2 ~ 3.
8
To exit from registering, press
.
MEMO
• When you press " " during step 6, the text which should be inserted, is displayed.
Message
Send
Set
Select
Recvd Message
WriteDraftText
Dlvrd Message
Edit
Select
DraftText1/5
Will you meet us
tomorrow?
DraftText5/5
Hello
Page 95
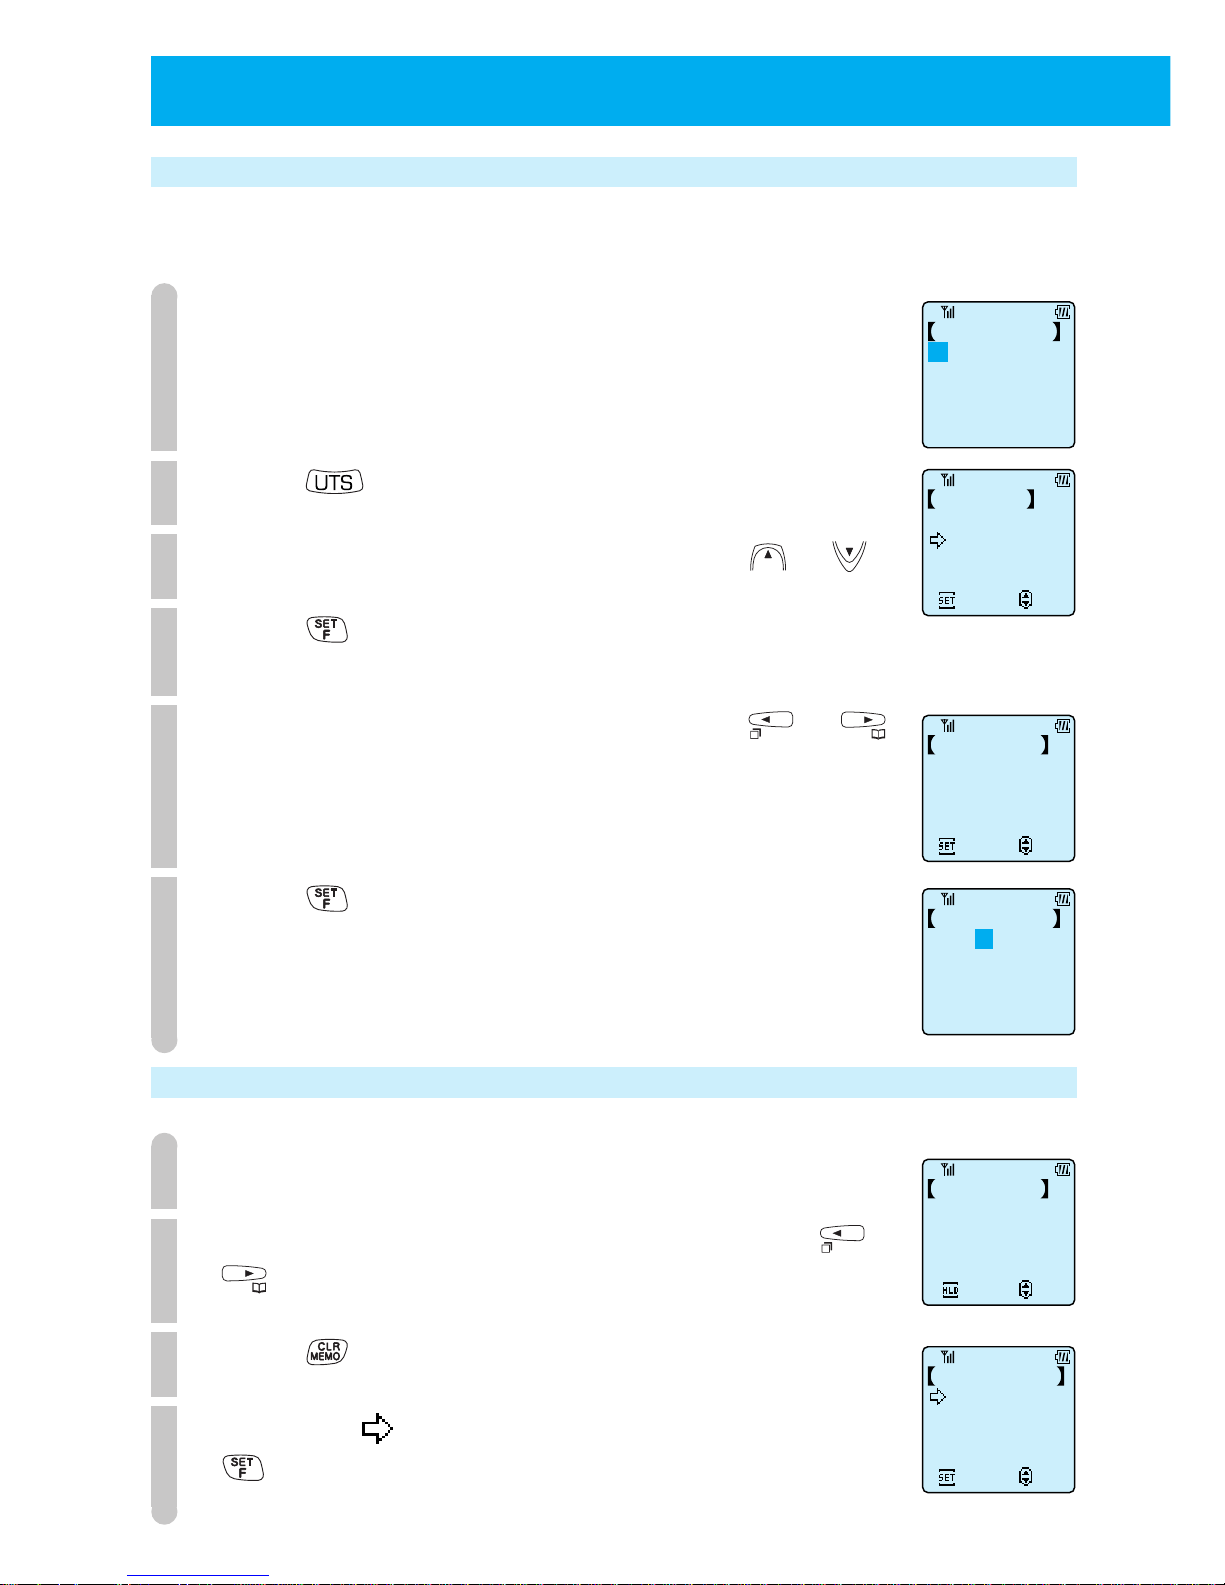
90
●
USING THE SHORT MESSAGE SERVICE (cont.)
Insert the made message into the original message
You can not only make a message but also insert the message from "Last sent
message", "Draft Text" and "Recv Message".
1
Follow Step 1 to 5 in the "Making an original message".
"Draft Text" is displayed.
2
Press .
3
Select the item you want to select using or .
4
Press .
When you select "Last sent message", follow the Step 6.
5
Select the item you want to insert using or .
6
Press .
You can make a message continuously.
Deleting the contents of original message (Draft Text) individually
1
Follow Step 1 to 5 in the "Making an original message".
2
Select the draft text you want to delete using or
.
3
Press .
4
Confirm if is pointed to "Clear 1 by 1" and press
.
The selected text is deleted.
DraftText2/5
Mr. Brown
Insert Text
Dlvrd Message
Set
Select
Draft Text
Recvd Message
DraftText5/5
Hello
Set
Select
DraftText2/5
Hello,Mr. Brown
DraftText1/5
Will you meet us
Edit
Select
tomorrow?
ClearDraftText
Clear 1 by 1
Set
Select
Clear All
Page 96
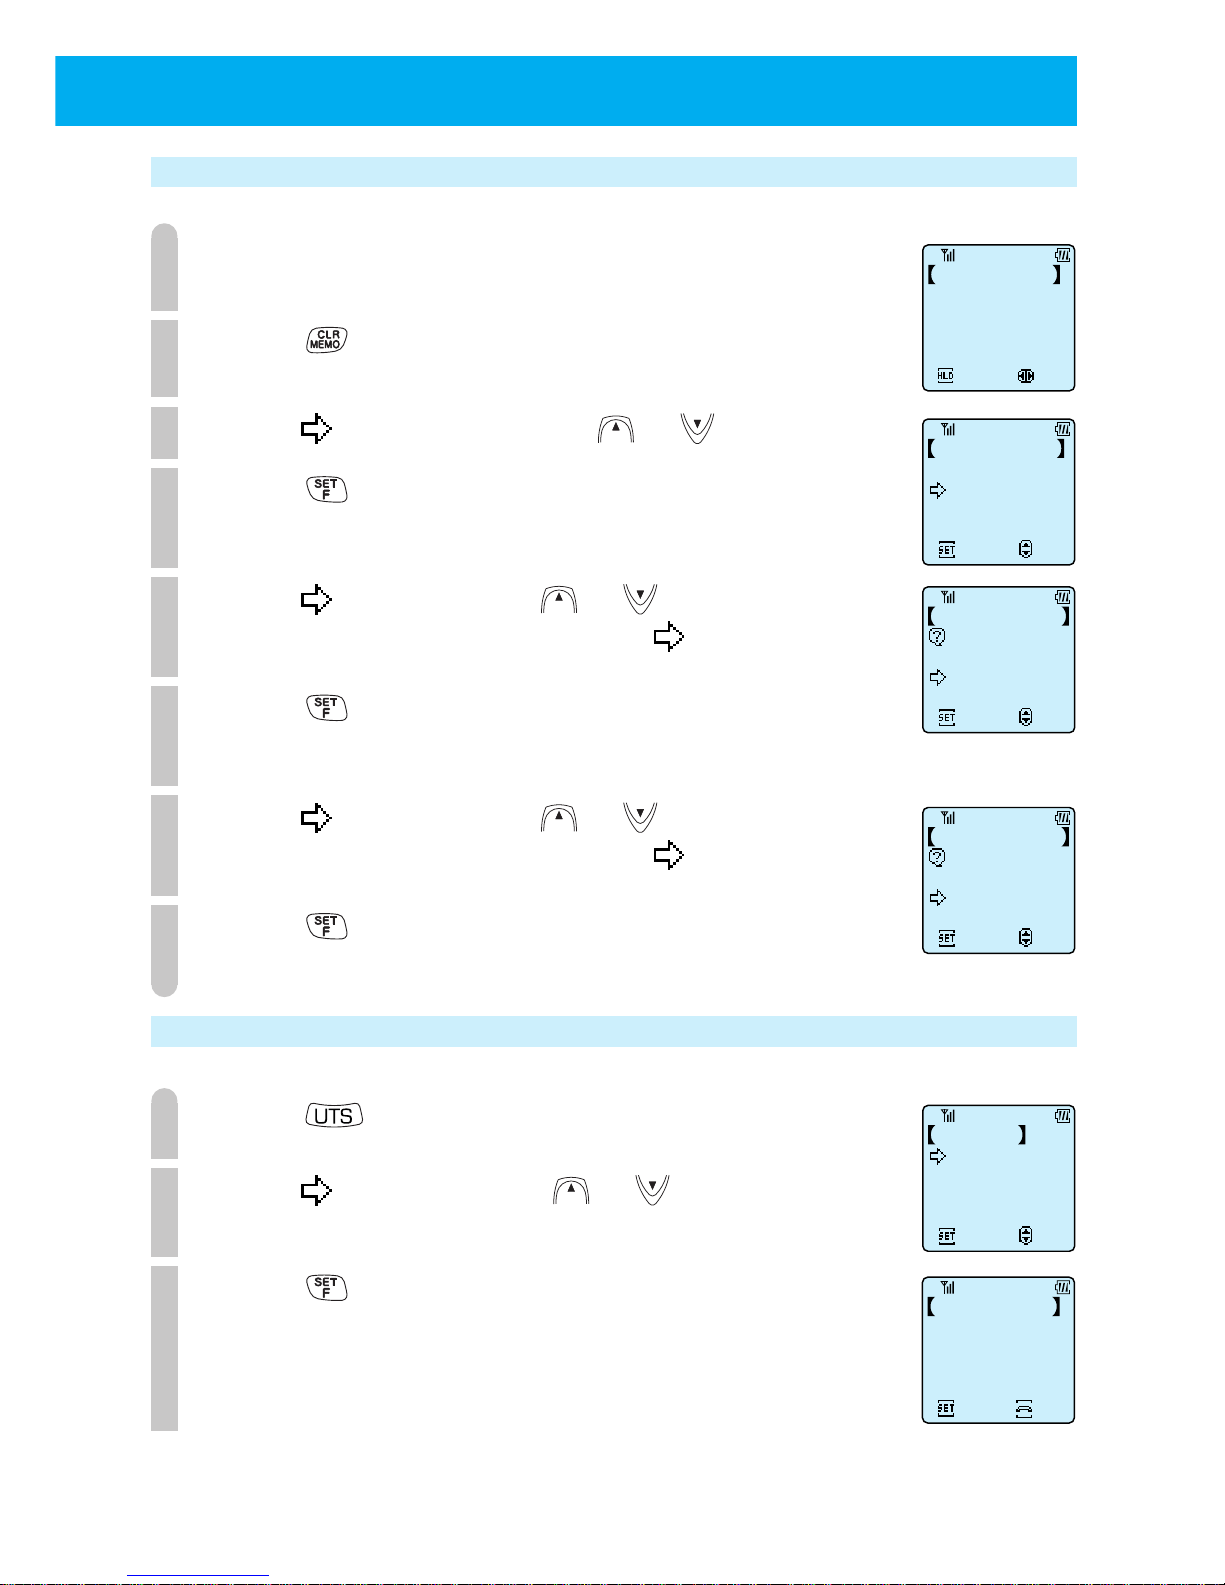
91
Deleting the all contents of original message (Draft Text)
1
Follow Step 1 to 5 in the "Making an original message".
2
Press .
3
Point to "Clear All" using or .
4
Press .
The display to confirm "Clear all" appears.
5
Point to "YES" using or .
To cancel the clear all operation, point to "NO".
6
Press .
The display to confirm "Clear all" appears again.
7
Point to "YES" using or .
To cancel the clear all operation, point to "NO".
8
Press .
All texts are deleted.
Edit
Select
DraftText1/5
Will you meet us
tomorrow?
ClearDraftText
Clear 1 by 1
Set
Select
Clear All
ClearDraftText
Clear All
Set
Select
Draft Text
YES
NO
ClearDraftText
SureYouWantTo
Set
Select
ClrAllDraftText
YES
NO
Send the message
1
Press at the public mode.
2
Point to "Send" using or .
3
Press .
Message
Send
Set
Select
Recvd Message
WriteDraftText
Dlvrd Message
Send Message
Enter
Phone Number
Set
Stop
Page 97
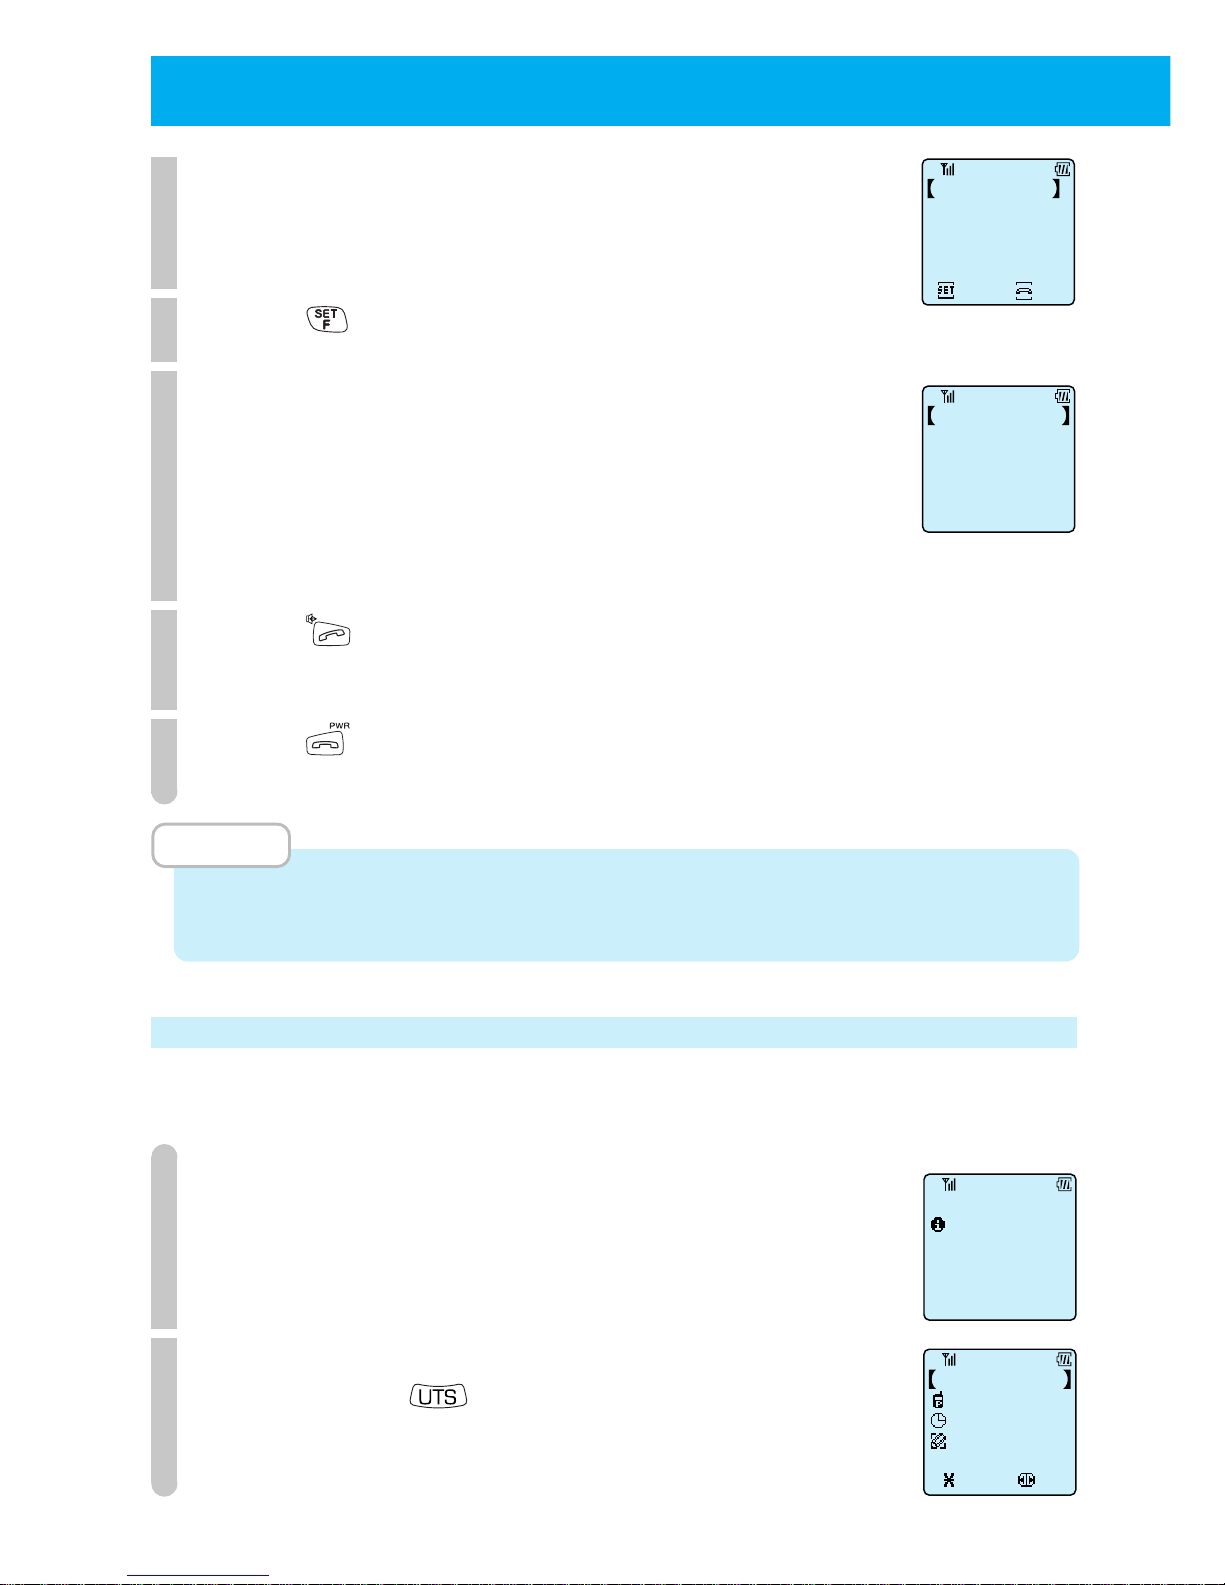
92
●
USING THE SHORT MESSAGE SERVICE (cont.)
4
Input the phone number.
The number can be also input by Redial function and telephone
book function.
5
Press .
6
Input the message.
See page 40 for the character input mode switching and
character input method.
When you send or insert "Last sent message", "Text draft" and
"Recvd Message", follow Step 2 to 6 in the "Insert the made
message into the original message".
7
Press .
When the message is sent, you can hear a sound for confirmation.
8
Press after sending.
MEMO
• When the party PS is out of service area or not powered on, you can not send or
receive a message.
Receive a message
When the message is sent, you can receive it automatically. Also, you can not
receive a message at the transceiver mode.
1
The incoming tone or vibration activates and the
incoming light blinks.
2
The message which receiving has finished is displayed.
When you press , the content of message is displayed.
Send Message
Enter
Phone Number
Set
Stop
07031234567
Send Message
Enter Message
Message Recvd
Tom Brown
Wed 10/20 14:10
07031234567
Will you meet
us tomorrow?
Save
1/19 20:45
Yamamoto PHS
Recvd Message
Select
Page 98
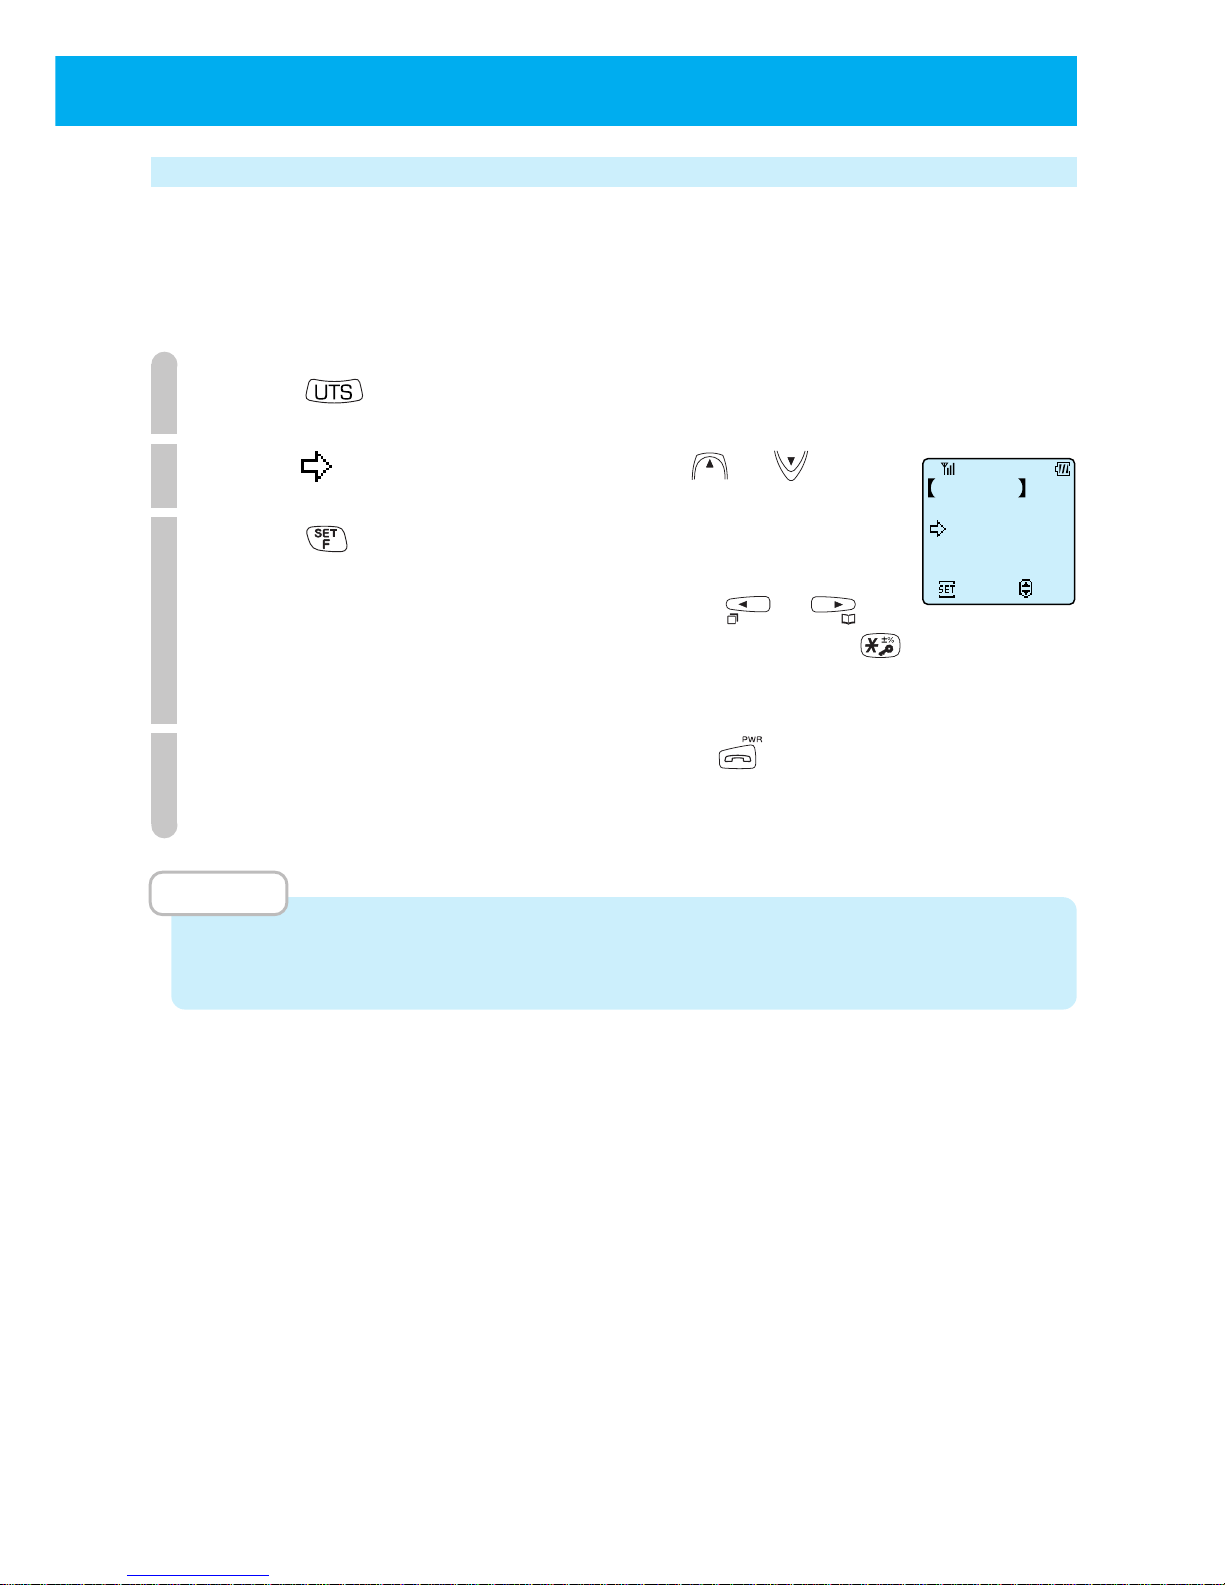
93
Read the received message
Maximum 20 messages by maximum 20 alphanumerical can be stored. When
more than 20 messages are received, the oldest message is deleted. However,
in case the message is protected, it is not deleted even if it is the oldest message
in 20 messages. Maximum 10 messages can be protected.
1
Press at the public mode.
2
Point to "Recvd Message" using or .
3
Press .
In the message, the name or phone number of sender displays.
Select the message you want to display using or .
When you want to protect the message, press and hold
for more than 2 seconds.
4
To exit from read the message, press .
The LCD for standby appears.
MEMO
• When the clock function is set, the Month/Date/Hour/Minute are displayed in the
message.
Message
Send
Set
Select
Recvd Message
WriteDraftText
Dlvrd Message
Page 99
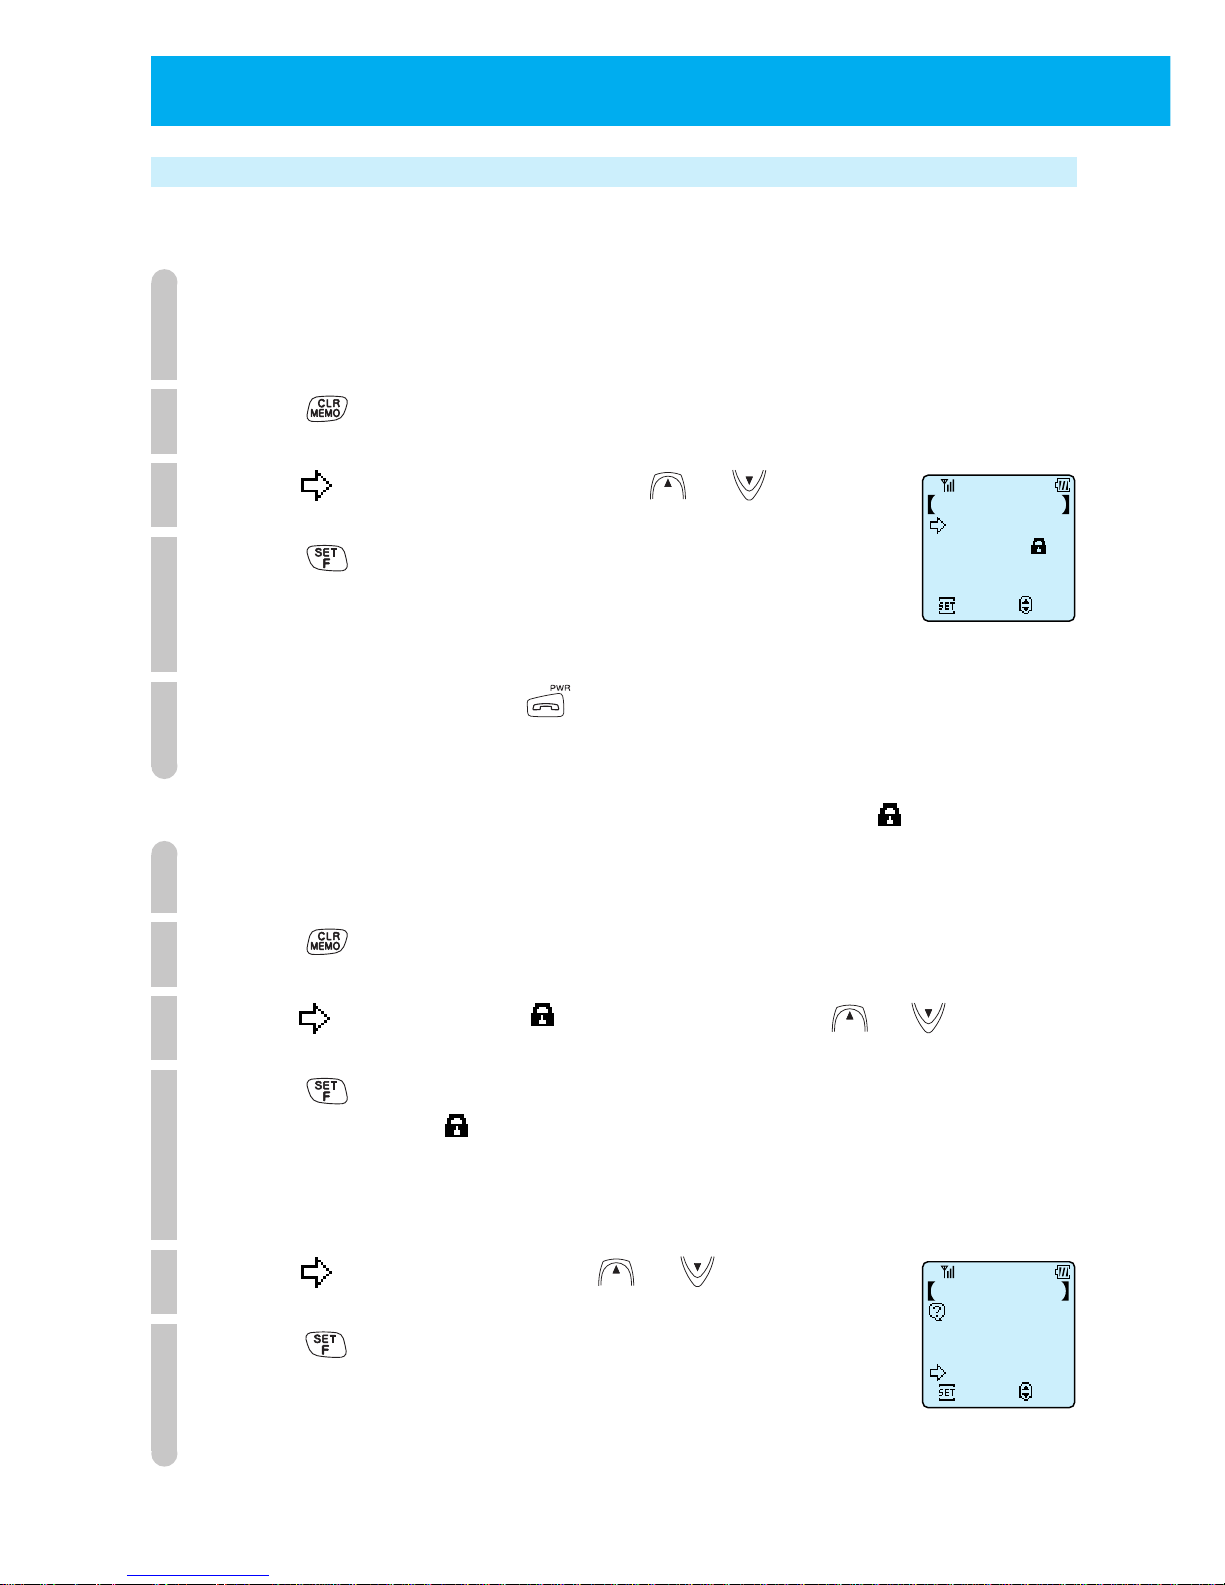
94
Deleting the received message
■
Deleting the contents of received message individually
1
Follow Step 1 to 4 in the "Read the received message".
Display the message you want to delete.
2
Press .
3
Point to "Clear 1 by 1" using or .
4
Press .
The message that is displayed in Step 1, is deleted. And, then, the
next received message is displayed and you can delete it if you want.
5
When you finish, press .
The LCD for standby appears.
■
Deleting the contents of received message except for or all
1
Follow Step 1 to 4 in the "Read the received message".
2
Press .
3
Point to "Except for
" or "Clear All" using or .
4
Press .
In case of "Except for
", the unprotected messages are deleted
and the display of Step 1 appears.
In case of "Clear All", follow Step 5.
5
Point to "Clear All" using or .
6
Press
.
The LCD for standby appears automatically after all messages
are deleted.
ClrRecvdMessge
Clear 1 by 1
Set
Select
Except for
Clear All
ClrRecvdMessge
ClearAllMessgs
Set
Select
YES
NO
●
USING THE SHORT MESSAGE SERVICE (cont.)
Page 100
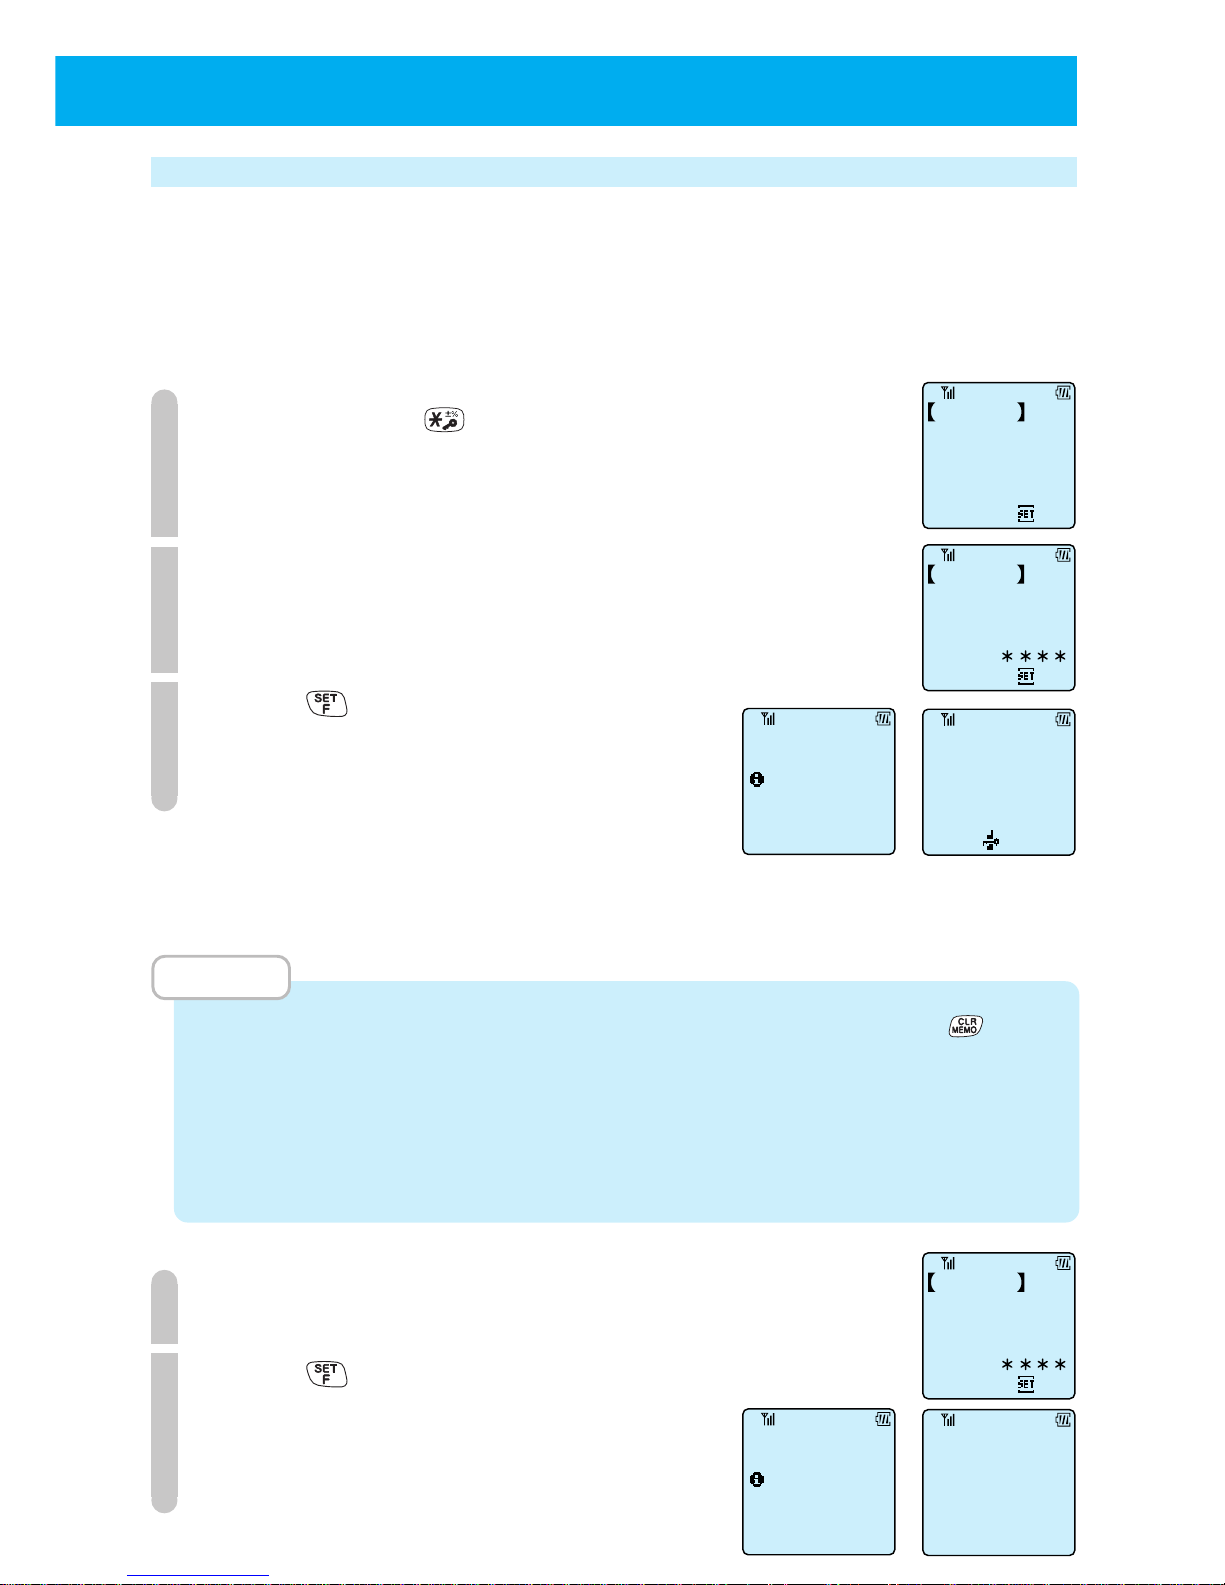
95
Dial lock
To prevent other people using your phone, you can lock the dialing so that calls
cannot be placed.
•
If password number has not been registered, you cannot set dial lock (page 100).
■
Setting dial lock
1
Press and hold for more than 2 seconds.
2
Input the 4 digit password number.
3
Press .
The phone beeps to confirm operation and
the dial keys are locked.
While dial lock is set
• You can receive incoming calls.
• You can place call to telephone No. 110 or 119 for emergency.
MEMO
• When you make a mistake while inputting the password number, press to clear
and then input the correct password number.
• If the password number does not match then the phone will beep the error-tone.
Input the password number again from the start.
• If you forget your password number and dial lock is set, you will need to contact your
service provider.
■
Canceling dial lock
1
Input the 4 digit password number.
2
Press .
When the password number matches, the
phone beeps to confirm the operation and
dial lock is cancelled.
● SETTING OTHER FUNCTIONS
Enter
the Password
Dial Lock
Set
Enter
the Password
Dial Lock
Set
14:38
Sun 2/20
Dial Lock Set
Enter
the Password
Dial Lock
Set
14:38
Sun 2/20
Cancelled
Dial Lock
 Loading...