

Page 1

USER MANUAL
© 2006 Verizon Wireless. All Rights Reserved.
PN-820
WELCOME TO VERIZON WIRELESS
WIRELESS SYNC
Page 2

WELCOME
Thank you for choosing the Verizon Wireless PN-820 by UTStarcom.
The PN-820 uses the Microsoft Windows Mobile
System Smartphone Edition in a compact flip phone design to give you
the convenience of Windows and the comfort of a familiar shape. Using
ActiveSync
times.
designed to enhance your mobile experience.
Key Features of the PN-820
Microsoft Windows Mobile™ 5.0 for Smartphone OS
Full graphic – Main LCD: TFT 65K Color LCD (240x320 pixel)
Sub LCD: TFT 65K Color LCD (96x96 pixel)
CMOS Camera (1.3 mega-pixels)
Built-in Bluetooth Technology
Advanced Voice Command Technology
2-Way Text Messaging
Multimedia Messaging Service
E-mail Messaging Service
MiniSD Card for External Memory (SDIO Support)
Voice Memo
Easy text entry using the T9 text input mode
Internet Access
®
, you can keep your PC and PN-820 synchronized at all
The PN-820 offers the multiple features listed below which are
IMPORTANT INFORMATION
This PN-820 user guide contains very important information about how to
handle and use the product.
Please read this manual thoroughly, pay attention to the warranty on the
back page and be alert to the exclusions and limitations of your warranty,
which are related to the use of unauthorized accessories or components.
™ 5.0 Operating
Page 3

CONTENTS
CHAPTER 1. BEFORE USING YOUR PHONE ............................................ 9
ACTIVATING YOUR PHONE .......................................................................... 10
SETTING UP YOUR VOICEMAIL ...................................................................
SET UP VOICEMAIL ..............................................................................................11
CHECK VOICEMAIL ...............................................................................................
INSIDE THE PACKAGE .................................................................................. 12
HANDSET DESCRIPTION .............................................................................
HOME SCREEN .................................................................................................... 14
HOME SCREEN CUSTOMIZATION .....................................................................
Chapter 1
HOME SCREEN ICONS .......................................................................................
BATTERY USAGE ......................................................................................... 17
BATTERY INSTALLATION .................................................................................... 17
BATTERY REMOVAL ............................................................................................
BATTERY CHARGING ..........................................................................................
BATTERY HANDLING INFORMATION ...............................................................
CHAPTER 2. BASIC OPERATION .............................................................23
TURNING THE PHONE ON/OFF ................................................................... 24
TURNING THE PHONE ON ................................................................................ 24
TURNING THE PHONE OFF ................................................................................
USING THE QUICK LIST ............................................................................... 25
BASIC FUNCTIONS .......................................................................................
MAKE A CALL BY ENTERING A CONTACT NAME ......................................... 26
MAKE A CALL BY ENTERING A PHONE NUMBER .........................................
MAKE A CALL FROM AN OPEN CONTACT .....................................................
MAKE A CALL FROM A HYPERLINK PHONE NUMBER .................................
MAKE A CALL FROM THE CONTACT LIST .......................................................
ANSWER A CALL BY PRESSING ANY KEY .....................................................
ANSWER OR IGNORE A CALL ..........................................................................
ANSWER OR POSTPONE A SECOND CALL ....................................................
INSERT A MANUAL PAUSE IN A DIALING SEQUENCE .................................
INSERT A THREE-SECOND PAUSE IN A DIALING SEQUENCE .....................
LOCK THE KEYPAD ..............................................................................................
Chapter 2
UNLOCK THE KEYPAD .........................................................................................
TURN VOICE PRIVACY ON OR OFF ..................................................................
SET THE DATE AND TIME ...................................................................................
SET THE IDLE TIMER ...........................................................................................
CHANGE THE HOME SCREEN APPEARANCE ..................................................
VIEW OPERATING SYSTEM INFORMATION ....................................................
ENTER OWNER INFORMATION .........................................................................
EXPLORE FILES AND FOLDERS .........................................................................
QUICKLY LOCK YOUR PHONE ............................................................................
UNLOCK YOUR PHONE .......................................................................................
SET THE ALARM ..................................................................................................
SILENCE THE RING TONE OF AN INCOMING CALL .......................................
MAKING AN EMERGENCY CALL ................................................................ 38
LOCATION ON/E911ONLY .................................................................................... 38
11
11
13
14
15
18
19
21
24
26
26
27
27
28
28
29
29
29
30
31
31
32
32
33
34
34
35
35
36
36
37
37
1
Page 4

CONTENTS
CHAPTER 3. MEMORY FUNCTION ......................................................... 39
MAKE A CALL ............................................................................................... 40
MAKE A CALL FROM THE CALL HISTORY LIST .............................................. 40
MAKE A CALL USING A RECENTLY DIALED PHONE NUMBER ...................
ENTERING TEXT AND NUMBERS ............................................................... 41
ENTERING TEXT AND NUMBERS ...................................................................... 41
CHANGE BETWEEN UPPERCASE, LOWERCASE, AND CAPS LOCK .............
CHANGE THE MULTIPRESS TIMEOUT ..............................................................
DELETE CHARACTERS ........................................................................................
ENTER A SPACE ...................................................................................................
ENTER A SYMBOL ...............................................................................................
Chapter 3
ENTER NUMBERS IN TEXT BOXES ..................................................................
ENTER PUNCTUATION IN MULTIPRESS MODE ..............................................
ENTER PUNCTUATION IN T9 MODE .................................................................
ENTER TEXT IN T9 MODE ..................................................................................
START A NEW LINE ............................................................................................
TURN ON CAPS LOCK ........................................................................................
ENTER THE PLUS SIGN FOR INTERNATIONAL CALLS ..................................
CHANGE THE INPUT MODE ...............................................................................
CREATING A CONTACT CARD FOR A CALLER ......................................... 47
CHAPTER 4. MENU FUNCTION ............................................................... 49
CONTACTS ..................................................................................................... 50
CREATE A NEW CONTACT ................................................................................. 50
BEAM A CONTACT ..............................................................................................
CALL A CONTACT FROM CONTACT INFORMATION ......................................
CALL A CONTACT FROM THE CONTACT LIST ................................................
CHANGE THE DEFAULT NUMBER FOR A CONTACT ......................................
DELETE A CONTACT ...........................................................................................
FILTER THE CONTACT LIST ................................................................................
FIND A CONTACT ................................................................................................
SEND AN E-MAIL TO A CONTACT ....................................................................
SEND A TEXT MESSAGE TO A CONTACT ........................................................
VIEW AND EDIT CONTACT INFORMATION ......................................................
ADD A PICTURE TO A CONTACT .......................................................................
REMOVE A PICTURE FROM A CONTACT .........................................................
ASSIGN A CATEGORY TO A CONTACT ............................................................
Chapter 4
ASSIGN A RING TONE TO A CONTACT ............................................................
CREATE A SPEED DIAL .....................................................................................
USING SPEED DIALS ..........................................................................................
VIEW AND EDIT A SPEED DIAL ........................................................................
DELETE A SPEED DIAL .......................................................................................
CALL HISTORY .............................................................................................. 63
VIEW CALL TIMERS ............................................................................................. 63
RESET CALL TIMERS ...........................................................................................
VIEW DETAILS ABOUT A CALL .........................................................................
CREATE A CONTACT FROM CALL HISTORY ...................................................
DELETE AN ITEM FROM CALL HISTORY .........................................................
DIAL THE LAST NUMBER CALLED ....................................................................
FIND A CONTACT FROM CALL HISTORY .........................................................
40
41
41
42
42
42
43
43
43
44
45
45
45
46
51
52
52
53
53
54
54
55
55
56
57
58
59
60
60
61
62
62
64
64
65
66
66
67
2
Page 5

CONTENTS
INSERT AN INTERNATIONAL COUNTRY CODE .............................................. 67
SEND AN E-MAIL MESSAGE FROM CALL HISTORY ......................................
SETTINGS ...................................................................................................... 69
ACCESSIBILITY SETTINGS .................................................................................69
POWER MANAGEMENT ......................................................................................
REGIONAL SETTINGS .........................................................................................
SELECT DEFAULT BAND ....................................................................................
DISPLAY YOUR PHONE NUMBER ......................................................................
DISPLAY YOUR ESN ............................................................................................
DISPLAY YOUR SOFTWARE VERSION ...............................................................
DISPLAY YOUR HARDWARE VERSION ..............................................................
DISPLAY YOUR PRL VERSION ............................................................................
DISPLAY YOUR ERI VERSION .............................................................................
TURN ERI ALERT ON / OFF ...............................................................................
TURN ERI BANNER ON / OFF ...........................................................................
REMOVE A PROGRAM ........................................................................................
SELECT NAM .......................................................................................................
SELECT TTY MODE ..............................................................................................
ERROR REPORTING ...................................................................................... 79
TURN ERROR REPORTING ON / OFF ...............................................................79
PROFILES ....................................................................................................... 80
Chapter 4
VIEW THE LIST OF PROFILES ............................................................................ 80
EDIT A PROFILE ...................................................................................................
CHANGE THE CURRENT PROFILE .....................................................................
SECURITY ...................................................................................................... 82
ENABLE THE DEVICE LOCK ................................................................................ 82
DISABLE THE DEVICE LOCK ...............................................................................
VIEW A CERTIFICATE ..........................................................................................
DELETE A CERTIFICATE ......................................................................................
RESET DEFAULT ..................................................................................................
SOUNDS ........................................................................................................ 87
CHANGE OR TURN SOUNDS ON OR OFF ....................................................... 87
DELETE A SOUND ...............................................................................................
COPY A SOUND FROM YOUR PC TO YOUR PHONE ......................................
TOOLS ............................................................................................................ 90
CALENDAR ............................................................................................................ 90
TASKS ...................................................................................................................
CALCULATOR ..................................................................................................... 10
VOICE NOTES ..................................................................................................... 10
68
70
71
72
72
73
73
74
74
75
75
76
76
77
78
80
81
83
84
85
86
88
89
98
2
3
CHAPTER 5. VOICE MAIL & MESSAGING .......................................... 107
VOICEMAIL ................................................................................................... 108
CALL YOUR VOICE MAILBOX ........................................................................... 108
TEXT MESSAGING ..................................................................................... 109
CREATE A TEXT MESSAGE .............................................................................. 109
DELETE ALL TEXT MESSAGES ......................................................................... 11
Chapter 5
BE NOTIFIED WHEN A TEXT MESSAGE IS DELIVERED ................................11
MMS MESSAGING ......................................................................................112
CREATE AN MMS ...............................................................................................112
MMS MENU OPTIONS ...................................................................................... 11
3
0
1
4
Page 6

CONTENTS
VIEW MMS MESSAGES ....................................................................................116
SELECT MMS IN THE LIST OF MESSAGE TYPE ............................................11
MMS SETTINGS .................................................................................................11
USE MMS CLIENT ..............................................................................................11
START MMS CLIENT ..........................................................................................11
MESSAGING SETTINGS ............................................................................. 120
CHANGE MESSAGING ACCOUNT OPTIONS ................................................. 120
CHANGE HOW THE MESSAGE LIST DISPLAYS ............................................12
CREATE A MESSAGE FROM A CONTACT CARD .......................................... 12
E-MAIL .......................................................................................................... 122
CREATE AN E-MAIL MESSAGE ....................................................................... 122
OVERVIEW OF E-MAIL SECURITY ................................................................... 12
DIGITALLY SIGN A MESSAGE ......................................................................... 12
DOWNLOAD A COMPLETE E-MAIL MESSAGE .............................................. 12
DOWNLOAD AN ATTACHMENT ....................................................................... 12
ENCRYPT A MESSAGE ..................................................................................... 12
MARK A FOLDER FOR SYNCHRONIZATION ..................................................12
ADD A PICTURE TO AN E-MAIL MESSAGE ...................................................12
VERIFY THE DIGITAL SIGNATURE ON A SIGNED MESSAGE YOU RECEIVE ..
SEND AND RECEIVE INTERNET E-MAIL MESSAGES ................................... 12
ADD A VOICE RECORDING TO AN E-MAIL MESSAGE ................................. 12
SET UP AN INTERNET E-MAIL ACCOUNT AUTOMATICALLY ..................... 12
SET UP AN INTERNET E-MAIL ACCOUNT MANUALLY ...............................13
SETTINGS .................................................................................................... 133
CREATE AND ADD A SIGNATURE TO MESSAGES .......................................133
DELETE A MESSAGE ........................................................................................ 13
Chapter 5
DELETE AN ACCOUNT ...................................................................................... 13
EDIT PREDEFINED TEXT ................................................................................... 13
EMPTY THE DELETED ITEMS FOLDER ........................................................... 13
FORWARD A MESSAGE .................................................................................... 13
INSERT PREDEFINED TEXT INTO A MESSAGE ............................................. 13
MARK A MESSAGE AS READ OR UNREAD .................................................. 13
MOVE A MESSAGE TO A DIFFERENT FOLDER ............................................. 13
OPEN A MESSAGE ............................................................................................ 13
QUICKLY MOVE BETWEEN ACCOUNTS ......................................................... 13
SEND A MESSAGE DRAFT ............................................................................... 14
REPLY TO A MESSAGE ..................................................................................... 14
RESPOND TO A MEETING REQUEST .............................................................. 14
SAVE A DRAFT OF A MESSAGE ..................................................................... 14
SPECIFY THE LANGUAGE FOR READING A MESSAGE ............................... 14
STOP ADDING A SIGNATURE TO MESSAGES .............................................. 14
VIEW AN ATTACHMENT ................................................................................... 14
VIEW MESSAGE FOLDER CONTENTS ............................................................ 14
VIEW THE INBOX MESSAGE LIST ................................................................... 14
VIEW THE LIST OF ACCOUNTS ....................................................................... 14
WHAT IS SSL? ................................................................................................... 14
MODEM ........................................................................................................ 146
ACTIVATE THE USB MODEM .......................................................................... 146
DEACTIVATE THE USB MODEM ..................................................................... 14
127
6
8
9
9
0
1
3
4
4
5
5
6
6
8
8
9
0
4
4
5
6
6
7
7
8
9
9
0
0
1
2
2
3
3
4
4
5
5
7
4
Page 7

CONTENTS
CHAPTER 6.
PICTURES & VIDEOS .................................................................................. 150
CAMERA CONTROLS ................................................................................. 162
GAMES ......................................................................................................... 169
CHAPTER 7. MOBILE INTERNET EXPLORER ....................................... 173
MOBILE INTERNET EXPLORER ................................................................. 174
PICTURES & VIDEOS, CAMERA, FUN & GAMES
SELECT VIDEO QUALITY .................................................................................. 150
COPY AN IMAGE TO YOUR PHONE ................................................................ 15
TAKE PICTURES USING A TIMER .................................................................... 15
ADJUST PICTURES AND VIDEO FOR LIGHTING CONDITIONS .................. 15
SELECT WHERE PICTURES ARE SAVED ......................................................... 15
CREATE A PICTURES FOLDER ......................................................................... 15
EDIT A PICTURE ................................................................................................ 15
VIEW PICTURES AS A SLIDE SHOW .............................................................. 15
SET A PICTURE AS THE HOME SCREEN ....................................................... 15
SEND A PICTURE .............................................................................................. 15
SAVE A COPY OF A PICTURE .......................................................................... 15
VIEW PICTURES ON YOUR PHONE ................................................................ 15
CAMERA ............................................................................................................. 159
VIDEO .................................................................................................................. 159
RECORD A VIDEO .............................................................................................. 15
Chapter 6
PLAY RECORDED FILE ......................................................................................16
TAKE A PICTURE ............................................................................................... 16
TAKE A PICTURE (MULTISHOT) ....................................................................... 16
SNAPSHOT ......................................................................................................... 16
VIEWING SAVED FILE ....................................................................................... 16
GENERAL OPTION ............................................................................................. 162
CAMERA OPTIONS ............................................................................................ 16
CAMCORDER OPTIONS .................................................................................... 16
OVERVIEW OF THE DEFAULT HARDWARE BUTTON ASSIGNMENTS ........ 16
SOLITAIRE ........................................................................................................... 169
BUBBLE BREAKER ............................................................................................. 17
ADD A WEB PAGE TO THE FAVORITES LIST .................................................. 174
CHANGE CONNECTION OPTIONS .................................................................. 17
CHANGE WEB PAGE DISPLAY OPTIONS ....................................................... 17
CLEAR HISTORY, COOKIES, OR TEMPORARY FILES ..................................... 17
CREATE A NEW FOLDER IN FAVORITES ........................................................ 17
DELETE A FAVORITE ......................................................................................... 17
DISCONNECT FROM THE INTERNET .............................................................. 17
EDIT A FAVORITE ............................................................................................... 17
GO TO A LINK .................................................................................................... 17
Chapter 7
GO TO A WEB PAGE .......................................................................................... 18
GO TO A WEB PAGE IN THE HISTORY LIST ................................................... 18
OPEN INTERNET EXPLORER ............................................................................ 18
REFRESH A WEB PAGE ..................................................................................... 18
RETURN TO A WEB PAGE YOU VISITED IN THE SAME SESSION ..............18
VIEW A FAVORITE ............................................................................................. 18
VIEW A LIST OF RECENTLY-VISITED WEB PAGES ........................................18
MOVE A FAVORITE TO A FOLDER ................................................................... 18
....149
1
2
3
3
4
4
5
6
7
8
8
9
0
0
0
1
1
4
6
8
0
5
6
7
7
8
8
9
9
0
0
1
1
1
2
2
3
5
Page 8

CONTENTS
CHANGE THE SIZE OF TEXT ON WEB PAGES .............................................. 183
SHOW OR HIDE PICTURES ON WEB PAGES ................................................18
VIEW A PAGE IN FULL SCREEN MODE ......................................................... 18
SEND A LINK VIA E-MAIL ................................................................................ 18
Chapter 7
ADJUST THE SCROLLING SPEED .................................................................... 18
CHAPTER 8. PC CONNECTIVITY, BLUETOOTH AND ACTIVESYNC ..187
ACTIVESYNC ................................................................................................ 188
INSTALL AND SET UP ACTIVESYNC .............................................................. 188
SET UP AN EXCHANGE SERVER CONNECTION .......................................... 18
CHANGE ACTIVESYNC SETTINGS .................................................................. 19
SCHEDULE SYNCHRONIZATION AS ITEMS ARRIVE .................................... 19
CHANGE THE SYNCHRONIZATION SCHEDULE ............................................. 19
START AND STOP SYNCHRONIZATION ......................................................... 19
VIEW INFORMATION ABOUT SYNC STATUS ................................................ 19
CHANGE SETTINGS FOR AN INFORMATION TYPE ...................................... 19
CONNECT THE PHONE ...................................................................................... 19
CONNECT TO A PC USING CHARGEABLE USB CABLE ............................... 19
CONNECT TO A PC USING BLUETOOTH ....................................................... 19
CHANGE E-MAIL SECURITY OPTIONS ........................................................... 19
EXCLUDE AN E-MAIL ADDRESS FROM REPLY ALL ..................................... 19
ACTIVESYNC TROUBLESHOOTING ........................................................... 199
ACTIVESYNC SUPPORT CODE TROUBLESHOOTER ...................................... 199
BLUETOOTH ..................................................................................................211
ACCEPT A BLUETOOTH PARTNERSHIP ...........................................................211
CREATE A BLUETOOTH PARTNERSHIP ..........................................................
END A BLUETOOTH PARTNERSHIP ................................................................
MAKE YOUR DEVICE DISCOVERABLE ............................................................
RENAME A BLUETOOTH PARTNERSHIP ........................................................
TURN BLUETOOTH ON AND OFF ...................................................................
Chapter 8
RECEIVE BEAMED INFORMATION ..................................................................
RECEIVE INCOMING BEAMS ...........................................................................
BEAM AN ITEM .................................................................................................
SET UP A BLUETOOTH-ENABLED HEADSET ................................................
SET UP A STEREO HEADSET ..........................................................................
TURN WIRELESS POWER ON OR OFF ...........................................................
CONNECT TO INTRANET URLS .......................................................................
USE A SPECIFIC CONNECTION TO CONNECT TO THE INTERNET .............
EDIT A VPN CONNECTION ...............................................................................
CONNECTING TO YOUR PC ....................................................................... 226
OVERVIEW OF BLUETOOTH VIRTUAL COM PORTS ..................................... 226
OUTGOING COM PORT ....................................................................................
INCOMING COM PORT .....................................................................................
SET UP AN INCOMING BLUETOOTH COM PORT ........................................
SET UP AN OUTGOING BLUETOOTH COM PORT .......................................
CREATE A DIAL-UP CONNECTION ..................................................................
CREATE A PROXY CONNECTION ....................................................................
CREATE A VPN CONNECTION .........................................................................
DELETE A DIAL-UP CONNECTION ...................................................................
DELETE A PROXY CONNECTION ....................................................................
DELETE AN INTRANET URL .............................................................................
212
213
214
215
216
217
218
219
220
221
222
223
224
225
226
226
227
228
229
230
231
232
232
233
4
4
5
6
9
0
1
2
3
3
4
5
5
6
7
8
6
Page 9

CONTENTSCONTENTS
DELETE A VPN CONNECTION .......................................................................... 234
EDIT A DIAL-UP CONNECTION ........................................................................
EDIT A PROXY CONNECTION ..........................................................................
Chapter 8
EDIT AN INTRANET URL ..................................................................................
CHAPTER 9. VOICE COMMAND ............................................................237
VOICE COMMAND ...................................................................................... 238
1 - ADJUST THE MICROPHONE ....................................................................... 238
2 - SET THE VOICE COMMAND BUTTON ......................................................
3 - TRY OUT VOICE COMMAND ......................................................................
TRY OUT MORE COMMANDS .........................................................................
TO LEARN MORE .............................................................................................
USING THE VOICE COMMAND BUTTON ........................................................
MAKING PHONE CALLS ...................................................................................
SHOWING CONTACTS ......................................................................................
READING APPOINTMENTS ...............................................................................
PLAYING MUSIC ................................................................................................
STARTING PROGRAMS .....................................................................................
GETTING PHONE STATUS ................................................................................
Chapter 9
GETTING VOICE COMMAND HELP .................................................................
PERSONALIZATION ...........................................................................................
GENERAL OPTIONS .........................................................................................
PHONE OPTIONS .............................................................................................
CALENDAR OPTIONS ......................................................................................
MEDIA OPTIONS ..............................................................................................
GENERAL TIPS ..................................................................................................
PHONE AND CONTACT TIPS ............................................................................
READING APPOINTMENTS TIPS ......................................................................
PLAYING MUSIC TIPS ........................................................................................
STARTING PROGRAMS TIPS ............................................................................
TROUBLESHOOTING .........................................................................................
CHAPTER 10. SAFETY AND WARRANTY ............................................ 259
SAFETY INFORMATION FOR WIRELESS HANDHELD PHONES ............ 260
DRIVING SAFETY ............................................................................................... 261
ELECTRONIC DEVICES ......................................................................................
PRECAUTIONS ...................................................................................................
SAFETY INFORMATION FOR FCC RF EXPOSURE .................................. 265
BODY-WORN OPERATION ................................................................................. 265
SAR INFORMATION .................................................................................... 266
Chapter 10
FCC HEARING-AID COMPATIBILITY (HAC) REGULATIONS
FOR WIRELESS DEVICES ...........................................................................
FDA CONSUMER UPDATE .........................................................................
PROTECT YOUR WARRANTY ..................................................................... 274
MANUFACTURER’S WARRANTY ...............................................................
12 MONTH LIMITED WARRANTY .................................................................... 275
234
235
236
238
238
239
239
240
241
243
244
245
246
247
247
248
248
249
249
249
250
251
252
252
253
254
262
264
268
270
275
7
Page 10

MEMO
8
Page 11

Chapter 1
BEFORE USING
YOUR PHONE
ACTIVATING YOUR PHONE
SETTING UP YOUR VOICEMAIL
INSIDE THE PACKAGE
HANDSET DESCRIPTION
BATTERY USAGE
C
H
1
9
Page 12

ACTIVATING YOUR PHONE
C
H
If you purchased your phone at a Verizon Wireless Store, it is probably
activated and ready to use. If you have upgraded your phone or
1
received a new phone by mail, it probably needs to be activated before
you can use it.
To activate your phone, follow these steps:
1. Visit a Verizon Wireless Store and have your phone activated, or
visit www.verizonwireless.com and place your cursor on the MY
ACCOUNT tab available on the home page.
2. When the drop-down menu “HOW To” Wireless Guide displays,
select ACTIVATE YOUR NEW PHONE and click GO, to display
instructions needed to activate your phone online.
3. After gathering the required materials, select the Activated
New Phone link and follow the online directions to complete the
activation process.
10
Page 13

SETTING UP YOUR VOICEMAIL
SET UP VOICEMAIL
All unanswered calls to your Verizon Wireless PN-820 by UTStarcom
are sent to voicemail, even if your phone is turned off.
up your voicemail and personal greeting as soon as you activate your
PN-820. Your service provider has assigned your voicemail number to
the 1 key.
1
Press and hold 1 or press *, 8, 6, S.
2
Follow the voice tutorial to set up your account.
CHECK VOICEMAIL
When checking your voice mail, all unanswered calls will be played
back in the order they were received. After you have entered your voice
mail, you will hear options for skipping, deleting, fast forwarding, or
saving messages.
1
Press and hold 1 key to call your voice
mailbox.
2
Follow the instructions to retrieve it.
You’ll want to set
C
H
1
11
Page 14

INSIDE THE PACKAGE
C
H
This package should include all items pictured below.
If any are missing or different, you should immediately contact the
1
retailer where you purchased the phone.
AC Travel ChargerHandset
Standard Battery
USB Data Cable
Getting Started Disc
12
Stereo Ear-mic
User Guide CD
Page 15
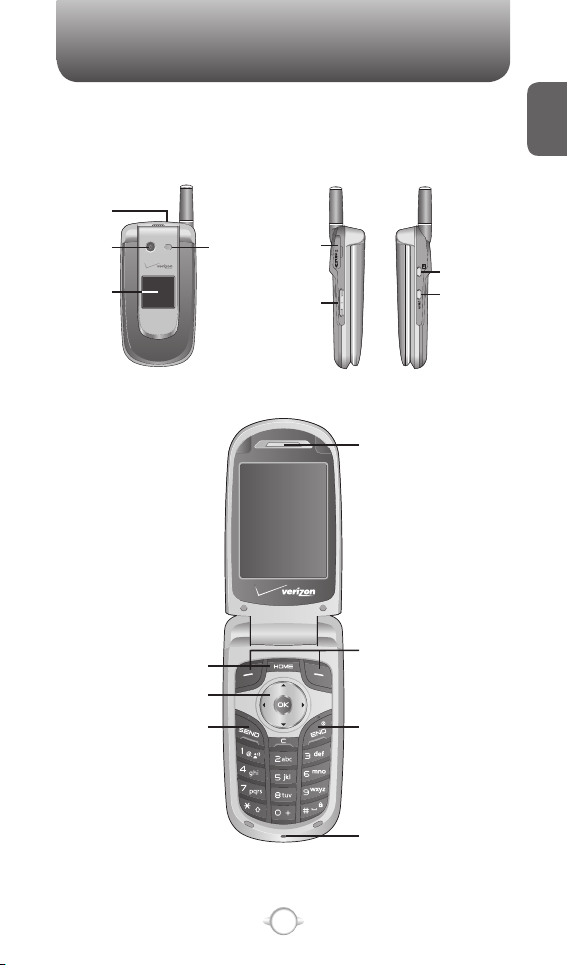
HANDSET DESCRIPTION
The PN-820 weighs 3.92oz. The dimensions are 2.05" x 3.85" x 0.78".
2.5mm
Headset
Jack
Camera
Sub LCD
Camera
Flash
Mini
SD Card
I/O Slot
Volume
Key
Earpiece
Camera Key
Quick List/
Recording
Key
C
H
1
Home Key
Navigation Key
SEND Key
Left and Right
Functional Soft Keys
END/Power Key
Microphone
13
Page 16
C
H
1
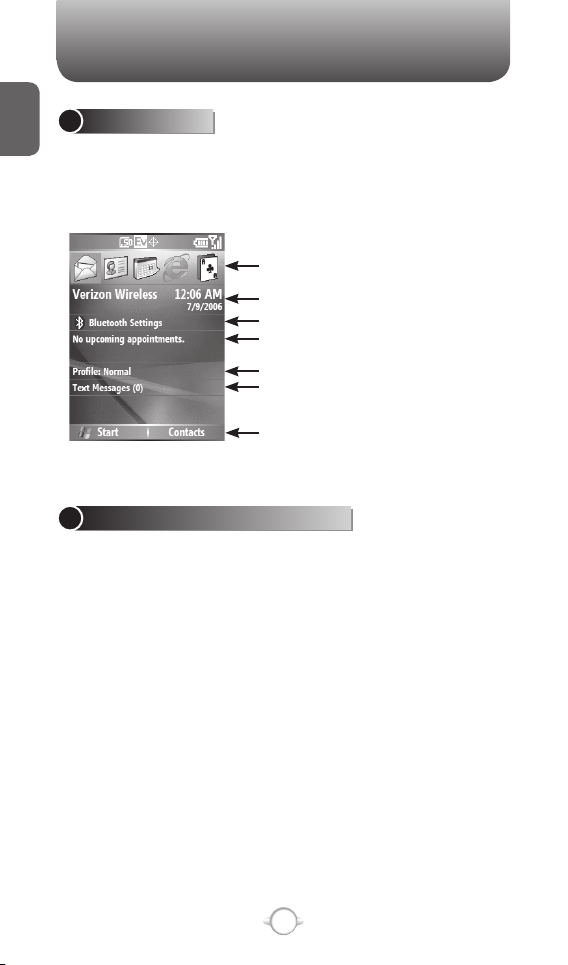
HOME SCREEN
The Home Screen plays an integral part in the navigational model of
your Smartphone. It is the first screen displayed every time the phone
is turned on. You can easily return to the Home screen by pressing the
Home key.
Select and press the O key to access
your most recently used programs
Verizon Wireless Banner and date and time
Bluetooth Settings
Appointment List
Your current profile in use.
Number of unread messages
Soft key commands
HOME SCREEN CUSTOMIZATION
The Home Screen allows you to customize your start page. For their
Smartphone, it can be used to display a variety of information, such
as phone-specific status, information from over-the-air services, and
information from personal information manager (PIM) applications. You
can fully customize the Home Screen by installing new plug-ins and
schemes.
14
Page 17
HANDSET DESCRIPTION
/
/
/
/
/
/
/
/
/
/
/
/
/
/
/
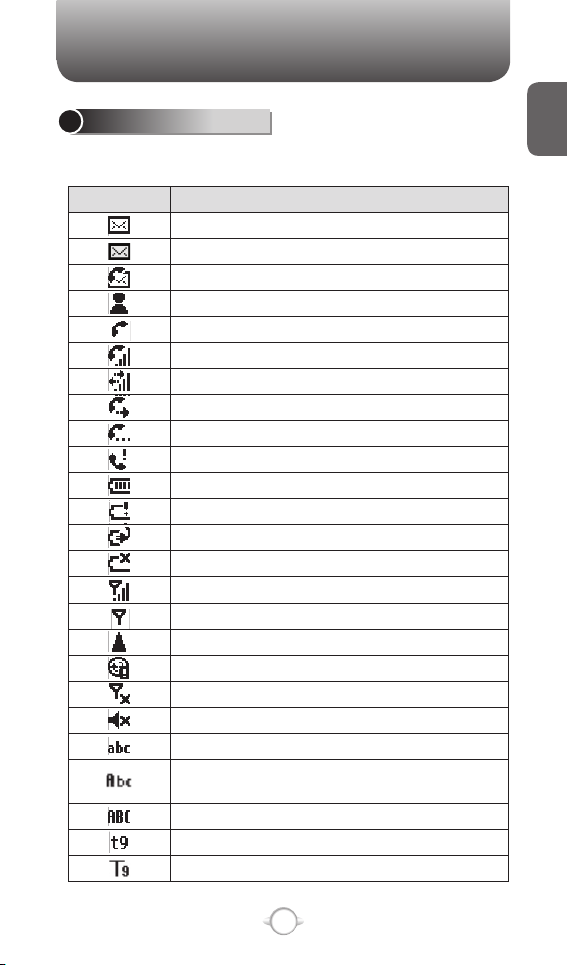
HOME SCREEN ICONS
Status icons appear at the top of the screen and In the Home screen.
The following table lists common status icons and their meanings.
Indicator Meaning
New e-mail or text message (SMS)
Multimedia message (MMS)
New voice mail
New instant message
Voice call
Voice call in progress
Data call in progress
Calls are forwarded
Call on hold
Missed call
Battery level
Low battery
Battery charging
No battery
Signal strength
No signal
Roaming
Sync error
Radio off
Ringer off
Multipress text input mode, lowercase
Multipress text input mode, uppercase first
character only
Multipress text input mode, uppercase
T9 text input mode, lowercase
T9 text input mode, uppercase first character only
15
C
H
1
Page 18
/
/
/
HANDSET DESCRIPTION
/
C
H
1
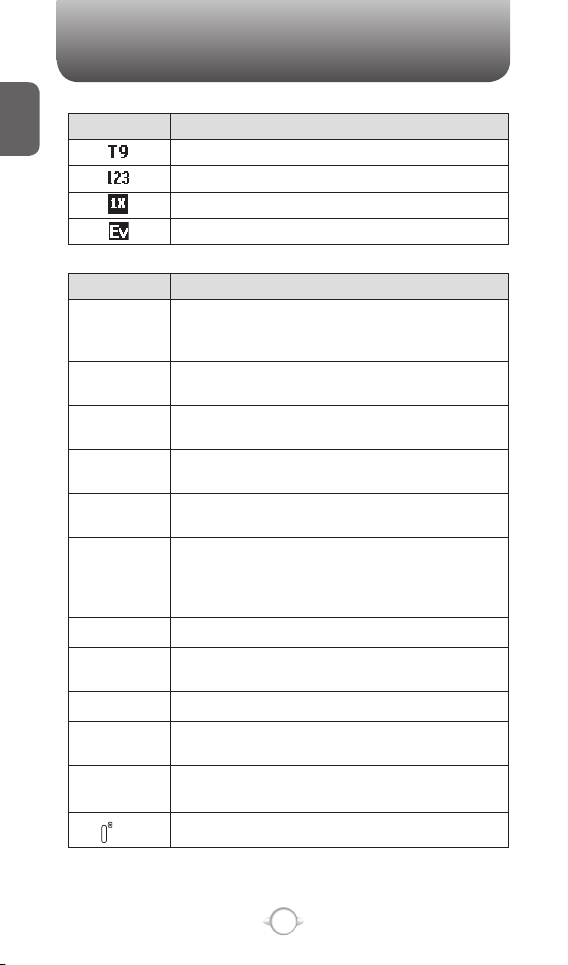
Indicator Meaning
T9 text input mode, uppercase
Numeric input mode
1XRTT connection available
EV-DO connection available
Keys Functions
Press to make or receive a call.
S key
E key
< key
> key
C key
* key
0 key
# key
H key
V / v key
Q [Q/REC]
key
key
Short press: View Recent Calls.
Long press: Make a call to the last number
Press to turn the phone on/off, to terminate a call or
to return to the Home Screen.
(Left Soft Key) Press to access
the Menu function displayed on the bottom line.
(Right Soft Key) Press to access
Menu function
(Clear) Press to clear a digit from the display or to
return to the previous page.
A long press changes to capital letters or symbols
during text entry mode. Turn vibrate mode on or
off with a long press in from the Home screen or in
“Dialing” mode.
A long press inserts a ‘+’ for international call.
Press and hold to enter lock mode or
a space during text entry mode.
Press to return to the Home screen.
Press to adjust voice volume during a call, and
adjust audio volume in standby mode.
A short press launches the Quick List and
press activates Voice Command or Voice Notes.
Press to launch the camera application.
s displayed on the bottom line.
called.
the main menu or
the Contacts or
press to insert
a long
16
Page 19
BATTERY USAGE
2
1
The battery is not charged when the phone is first purchased – fully
charge the battery before first use. Battery operating time gradually
decreases over time. If the battery fails to perform normally, you may
need to replace it.
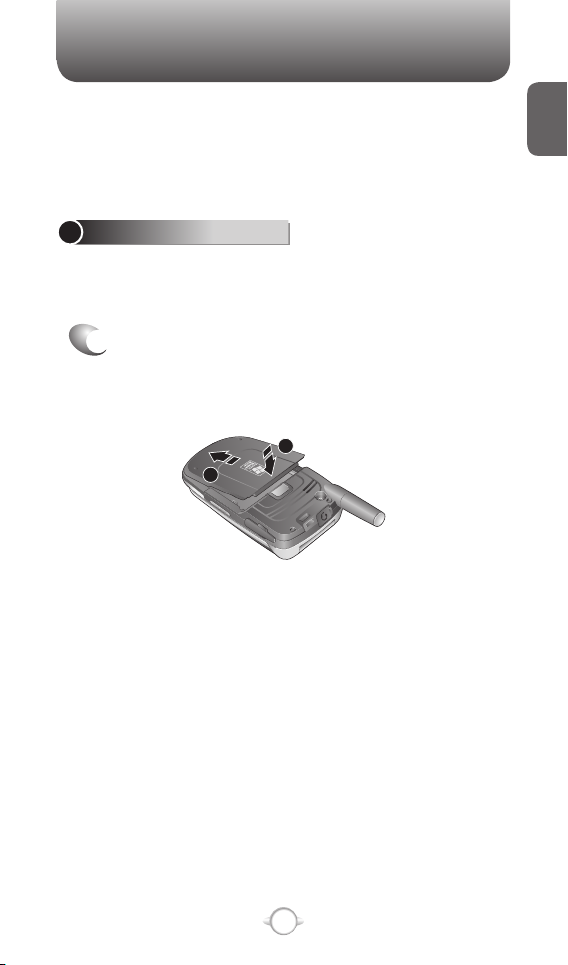
BATTERY INSTALLATION
Be sure to use only the batteries that have been provided with the
phone. Installation is easier if you have placed the phone on a flat
surface.
1
❶ Place the battery on the back of the handset
and slide into place.
❷ Push the battery down until it locks into place.
C
H
1
17
Page 20
BATTERY USAGE
2
2
1
C
H
1
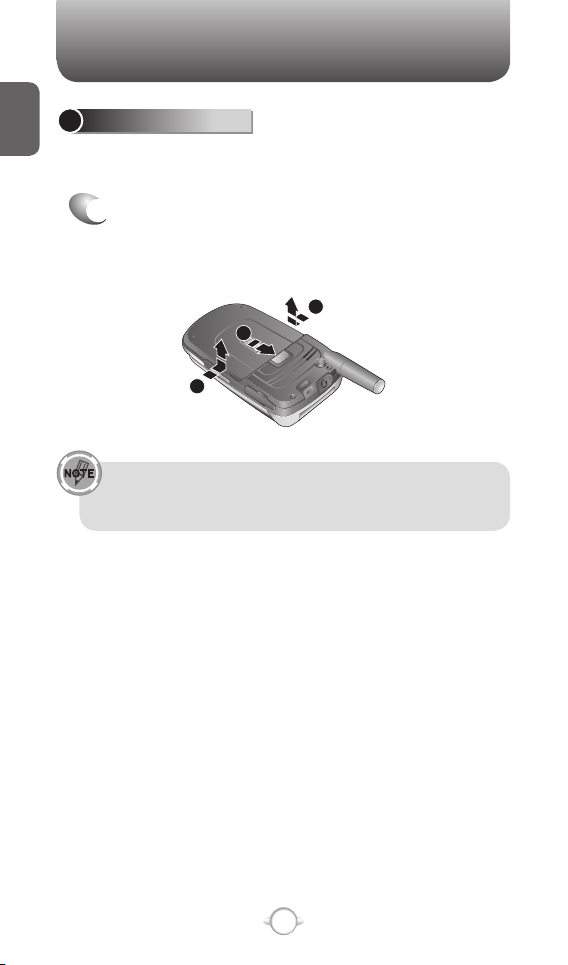
BATTERY REMOVAL
Again, place the battery on a flat surface and use an even, steady
pressure when removing the battery.
1
❶ Pull the release latch upwards, lift up the
battery.
❷ Remove the battery from the handset.
BATTERY USAGE
If the battery is not correctly placed in the compartment, the
handset will not turn on and/or the battery may detach during
use.
18
Page 21
BATTERY USAGE
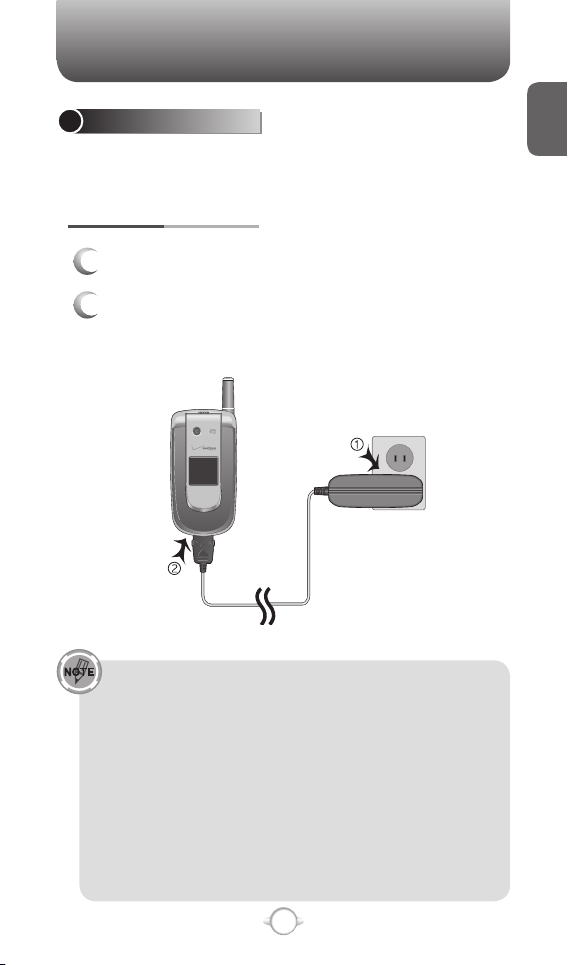
BATTERY CHARGING
Make sure the battery is properly installed in the handset. Use all
normal cautions when working with a standard wall outlet.
POWER CONNECTION
1
Plug the AC Charger into a standard outlet.
2
Plug the other end of the AC Charger into the
bottom of your phone. The battery must be
installed on the phone.
C
H
1
• When you charge the battery with the phone power off, the
device will power on.
• The battery is not charged at the time of purchase.
• Fully charge the battery before use.
• It is more efficient to charge the battery with the handset
powered off.
• The battery must be connected to the phone in order to
charge it.
• Battery operating time gradually decreases over time.
• If the battery fails to perform normally, you may need to
replace the battery.
19
Page 22
BATTERY USAGE
C
H
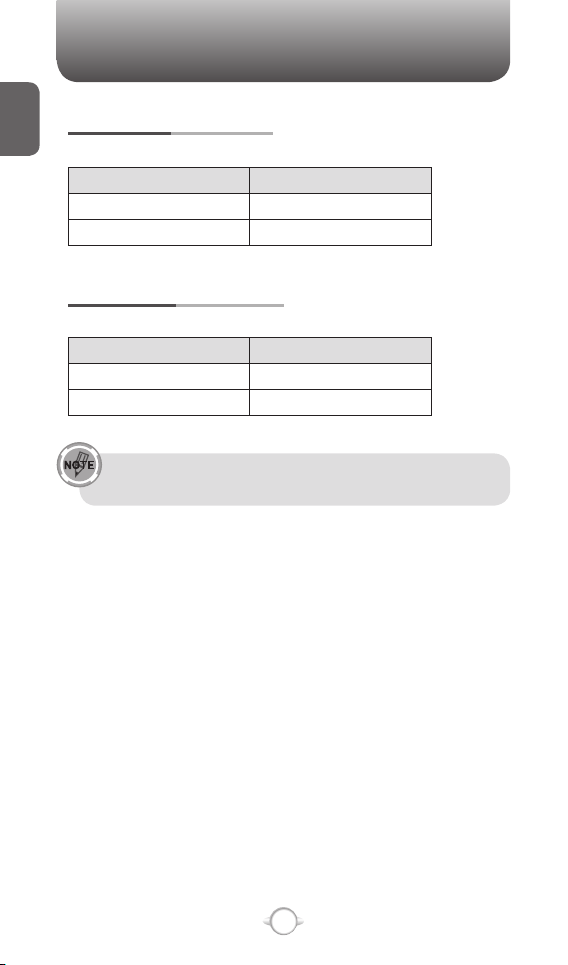
BATTERY USAGE TIMES
1
The operating time is subject to your handset usage and configuration.
Battery Capacity Talk Time
STD 950 mAh Up to 200 minutes
EXT 1600 mAh Up to 380 minutes
BATTERY STANDBY TIME
The operating time is subject to your handset usage and configuration.
Battery Capacity Standby Time
STD 950 mAh Up to 145 hours
EXT 1600 mAh Up to 245 hours
These times are for a new battery. Usage and Standby times
may decrease over time.
20
Page 23

BATTERY USAGE
BATTERY HANDLING INFORMATION
The correct usage and handling of batteries can preserve the lifetime of
your phone and ensure proper operation. Operating times are subject
to the usage and configuration of your handset; please see the label
on your battery for your battery’s capacity. Follow these suggestions
carefully.
DOs
• Only use the battery and charger approved by the manufacturer.
• Only use the battery for its original purpose.
• Try to keep the battery in a temperature range of 41ºF (5ºC) to 95ºF
(35ºC). Otherwise, it could significantly reduce the capacity and
lifetime of the battery.
• If the battery is stored in temperatures above or below the
recommended range, give it time to warm up or cool down before
using it.
• Completely drain the battery before recharging. It may take one to
four days to completely drain.
• Store the discharged battery in a cool, dark, and dry place.
• Purchase a new battery when its operating time gradually decreases
after fully charging.
• Dispose of and recycle used batteries in accordance with local
regulations.
DON’Ts
• Don’t use a damaged battery or charger.
• Don’t attempt to disassemble the battery – it is a sealed unit with no
serviceable parts.
Don’t accidentally short circuit the battery by carrying it in your pocket
•
or purse with other metallic objects such as coins, clips and pens.
This may critically damage the battery.
• To prevent injury or burns, ensure that no metal objects come into
contact with the + and – terminals of the battery.
• Don’t dispose of batteries by burning; they may explode.
C
H
1
21
Page 24

MEMO
C
H
1
22
Page 25

Chapter 2
BASIC OPERATION
This chapter addresses and explains the basic features of
your phone including:
C
H
2
TURNING THE PHONE ON/OFF
USING THE QUICK LIST
BASIC FUNCTIONS
MAKING AN EMERGENCY CALL
23
Page 26

TIP
TURNING THE PHONE ON/OFF
TURNING THE PHONE ON
Press and hold the END key E until your “Power On” logo appears.
• If “Password” appears on the display enter your 4-digit password to
C
unlock your phone.
H
• If the battery does not have enough charge to turn on the phone, the
2
keypad will not light up. You should charge your phone before turning
it on.
TURNING THE PHONE OFF
Press and hold the END key E until the “Power Off ” logo appears.
• Immediately change or recharge the battery when “LOW BATTERY!!
PHONE IS TURNING OFF!” appears on the display. The phone’s
memory may possibly be damaged if the phone turns off due to the
battery completely draining.
If the phone turns off, unsaved data may be lost.
24
Page 27
TIP
USING THE QUICK LIST
The Quick List provides a list of commands that you can use to quickly
perform common actions.
1
Press the lower button
side of your phone.
2
Use the Navigation Key to select the Quick List
command you want.
To Select this command
Turn off the phone. Power off
Turn on or off any wireless
connection, such as a Bluetooth,
Cellular phone. (You will not be
able to make or receive phone
calls.)
Lock the keypad so that you cannot
make accidental key presses. To
unlock the keypad, press Unlock
and then press the * key.
Enable the phone lock. Device lock
Make one of these profiles the
active profile.
Q [Q/REC] on the right
Wireless Manager
Key lock
,
Normal
Silent
Meeting
Outdoor
Automatic
Headset
Car
Speakerphone
C
H
2
You can turn off wireless connections to preserve battery
life when you don’t want to make or receive calls, or in
environments where cell phones must be turned off. When
wireless connections are off you can still use other phone
features.
25
Page 28

BASIC FUNCTIONS
Your Verizon Wireless PN-820 phone has many options. This section
will show you how to use basic functions such as making and receiving
calls, locking and unlocking your phone, and managing the appearance
and settings on your phone.
C
H
2
MAKE A CALL BY ENTERING A CONTACT NAME
Your phone allows you to call someone from your contact list or
address book. The screen will autofill the contact name as you begin
to enter it.
1
In the Home screen, begin entering the contact
name.
2
When you see the contact name you want to call
select it and press O [OK].
MAKE A CALL BY ENTERING A PHONE NUMBER
In the Home screen, begin entering the phone number.
Do one of the following
1
If you see the number or contact name to call,
select it and press O [OK].
2
If you do not see the number or contact name,
finish entering the number and press
26
O [OK].
,
Page 29

BASIC FUNCTIONSBASIC FUNCTIONS
MAKE A CALL FROM AN OPEN CONTACT
You can open contacts from the main screen and make a call from that
contact.
1
In the Home screen, press the right soft key
[Contacts].
2
Select the contact to call and press O [OK].
>
C
H
2
3
Select the phone number to call and press
[OK].
O
MAKE A CALL FROM A HYPERLINK PHONE NUMBER
You can quickly dial a phone number from an e-mail or text message
that contains a hyperlink phone number. A hyperlink phone number is
underlined in the same manner as a Web site address.
1
From a message containing a hyperlink phone
number, select the phone number and press
O
[OK].
27
Page 30

TIP
BASIC FUNCTIONS
MAKE A CALL FROM THE CONTACT LIST
Your contact list is always readily available from the Home screen.
C
H
2
1
In the Home screen, press the right function key
[Contacts].
2
Select the contact you want to call, and press O
[OK].
If you have a long list of contacts, you can use a shortcut
to find the contact you want. Enter the first few letters of the
contact’s name. When you do this, the phone searches through
the contact list and displays the name. To call the contact,
press O.
ANSWER A CALL BY PRESSING ANY KEY
You can set your phone to answer by pressing any key.
1
In the Home screen, press [Start] [Settings]
[Call Options].
2
Select “Receive”, use the Navigation key to
select “Any Key” and press [Done].
28
Page 31

BASIC FUNCTIONS
ANSWER OR IGNORE A CALL
To answer the call, press SEND or press Answer.
To reject the call, press
Selecting Ignore will connect the caller to your voice mail if you
subscribe to this service.
ANSWER OR POSTPONE A SECOND CALL
To put the first call on hold and answer the second call, press SEND or
press Answer. To switch between calls, press SEND.
To postpone answering the call, press
ringing until one of the following occurs:
You answer the call by pressing O; the call is placed in voice mail after
the requisite number of rings; The caller disconnects.
INSERT A MANUAL PAUSE IN A DIALING SEQUENCE
In the Home screen, press the right function key > [Contacts].
Press the contact in whose phone number you want to insert a pause.
Select the phone number and press [Menu] [Edit].
Place the cursor where you want to insert the pause.
Press [Menu] Insert Wait. The letter
pause will occur in the dialing sequence.
Press [Done].
E or press Ignore.
Ignore. The call will continue
w appears where the manual
C
H
2
To resume dialing after reaching a manual pause, press O.
29
Page 32

TIP
BASIC FUNCTIONS
INSERT A THREE-SECOND PAUSE IN A DIALING SEQUENCE
There may be occasions when you wish to pause dialing after you’ve
selected a contact to call. You can insert a three second pause between
C
selecting a contact to call and when the phone actually dials.
H
2
1
In the Home screen, press the right function key
> [Contacts].
2
Press the contact in whose phone number you
want to insert a pause.
3
Select the phone number and Press [Menu]
[Edit].
4
Place the cursor where you want to insert the
pause.
5
Press [Menu] Insert Pause.
The letter p appears where the three-second pause will occur in the
dialing sequence. Press [Done].
30
Page 33

TIP
BASIC FUNCTIONSBASIC FUNCTIONS
LOCK THE KEYPAD
Locking the keypad turns off keypad functionality. This is a helpful
feature if, for example, the phone is turned on and in your pocket, and
you want to prevent accidental key presses.
1
Display the Quick List by pressing the lower
button
Q [Q/REC] on the right side of your phone.
C
H
2
2
Select Key lock and press
3
Once the keypad is locked, the left soft key label
changes to Unlock.
You can still receive calls and make emergency calls when the
keypad is locked.
Press the RECORD key on the right side of the phone briefly to
display the Quick List and press Key lock.
O [OK].
UNLOCK THE KEYPAD
In the Home screen, press Unlock and press the * key.
31
Page 34

BASIC FUNCTIONS
TURN VOICE PRIVACY ON OR OFF
Through encryption and scrambling, the PN-820 provides privacy for
your cell phone calls.
C
H
2
1
In the Home screen, press [Start], select
Settings, then Call Options.
2
Select or clear voice privacy and press [Done].
This option is available only if your network supports voice
privacy.
SET THE DATE AND TIME
Your phone is not preset with current date and time. You will need to
select the time zone and the date and time.
1
In the Home screen, press [Start], select Settings
with the Navigation Key, or select Settings from
the menu bar on top of the Home screen.
2
Select Clock & Alarm, press
and Time.
3
In Time Zone, select your time zone using
and right Navigation Keys.
4
In Date, edit the month, day, or year.
5
In Time, edit the hour, minute, and second.
6
Press [Done].
32
O [OK], then Date
the left
Page 35

BASIC FUNCTIONS
SET THE IDLE TIMER
Your PN-820 will automatically return to the Home screen after a period of inactivity.
You can adjust the amount of time before the PN-820 defaults to the Home screen.
1
In the Home screen, press [Start], select Settings
with the Navigation Key, or select Settings from
the menu bar on top of the Home screen and
press O [OK].
2
Select Home Screen.
3
Select Time out, use left and right Navigation
Keys to set the amount of time for the phone to
be idle before the Home screen automatically
appears.
4
Press [Done].
C
H
2
33
Page 36

BASIC FUNCTIONS
CHANGE THE HOME SCREEN APPEARANCE
The PN-820 allows you to choose from many color schemes and
layouts and allows you to use a background image for the main screen.
C
H
2
1
In the Home screen, press [Start], select Settings
with the Navigation Key, or select Settings from
the menu bar on top of the Home screen and
press O [OK].
2
Select Home Screen.
3
Under the Home Screen Layout, select a
scheme, and Background image
4
Press [Done].
.
Color
VIEW OPERATING SYSTEM INFORMATION
There may be instances when you wish to see the basic information
about your phone’s operating system. This option allows you to see
summaries of all the settings on your phone.
1
In the Home screen, press [Start], select Settings
with the Navigation Key, or select Settings from
the menu bar on top of the Home screen and
press O [OK].
2
Press More, then select About.
To see About and more settings, press More.
34
Page 37

BASIC FUNCTIONS
ENTER OWNER INFORMATION
Entering and displaying owner information allow someone to return the
phone to you in case it is lost.
1
In the Home screen, press [Start] Settings
Owner Information.
2
Complete the following:
• In Name, enter your name.
• In Telephone number, enter a number where you can be
• In E-mail address, enter your e-mail address.
• In Notes, enter any other information you want to include.
File Explorer lets you browse the contents of folders on your phone.
The root folder on the phone is named My Device. My Device is similar
to My Computer on a PC and contains the My Documents, Program
Files, Temp, Storage Card, and Windows folders among others.
reached.
3
Press [Done].
To see Owner Information and more settings, press More.
EXPLORE FILES AND FOLDERS
C
H
2
1
In the Home screen, press [Start], then select
File Explorer. The My Documents folder and its
subfolders are listed.
2
To find the folder you want, do the following.
35
Page 38

BASIC FUNCTIONS
3
Select one of the folders listed in the main
window.
C
H
2
4
Press [Menu], and navigate through the folders
listed there.
5
Select the item you want to open.
QUICKLY LOCK YOUR PHONE
You can use a shortcut to quickly lock your phone by using one simple
button.
1
Display the Quick List by pressing the lower
button
Q [Q/REC] on the right side of your phone.
2
Select Device lock and press
O [OK].
UNLOCK YOUR PHONE
The option for unlocking the phone is right on the Home screen and
simple to use.
1
In the Home screen, press Unlock.
2
Enter your password, and press [Done].
36
Page 39

BASIC FUNCTIONSBASIC FUNCTIONS
SET THE ALARM
You have several options for managing the alarm feature. Be sure
you have properly set the date, time, and time zone before using this
feature.
1
In the Home screen, press [Start], select Settings
with the Navigation Key, or select Settings from
the menu bar on top of the Home screen and
press O [OK].
C
H
2
2
Select Clock & Alarm, then Alarm and press
[OK].
3
To set the alarm select Alarm time and enter the
time you want the alarm to go off.
4
To turn
use the left and right Navigation Keys to turn the
the alarm off or on, select Alarm and
O
alarm off/on.
5
Press [Done].
SILENCE THE RING TONE OF AN INCOMING CALL
Press Volume until the ring is silenced. You may still answer the call if
you want to.
37
Page 40

MAKING AN EMERGENCY CALL
Emergency calls do not depend on the availability of the 911 network
in your area. The emergency number will work independently of the
network area you are in
Dial 911 and press O [OK].
C
H
2
You can make calls to emergency service numbers under any
circumstances, even if you have locked the phone.
LOCATION ON/E911ONLY
The PN-820 allows you to share position information over the network.
1
In the Home screen, press [Start], select Settings
with the Navigation Key, or select Settings from
the menu bar on top of the Home screen and
press O [OK].
.
2
Select Call Options, press
3
To select Location option, select
use the left and right Navigation Keys to select
O [OK].
Location and
On or E911 Only.
• Select Location On to make position information
• Select E911 Only to make this information available for
For calls to emergency numbers, location information may be used
by the emergency operator to determine the position of the phone.
The functionality and accuracy of this feature are dependent on the
network, satellite systems, and the agency receiving the information.
This feature may not function in all areas or at all times.
continually available.
emergency services only.
4
Press [Done].
38
Page 41

Chapter 3
Chapter 3
MEMORY FUNCTION
MEMORY
FUNCTION
This chapter addresses memory functions including:
C
H
3
MAKE A CALL
ENTERING TEXT AND NUMBERS
CREATING A CONTACT CARD FOR A CALLER
39
39
Page 42

TIP
MAKE A CALL
MAKE A CALL FROM THE CALL HISTORY LIST
Call History displays calls you have made, received, and missed.
1
In the Home screen, press [Start] and select Call
History using the Navigation Key.
2
Select the name or phone number to call.
C
H
3
3
Press S.
MAKE A CALL USING A RECENTLY DIALED PHONE NUMBER
Your phone will maintain a list of recent calls you have made. These
calls are always easily accessible for redialing.
1
In the Home screen, press S to display a list of
recent calls.
2
Select a name or phone number to make a call.
3
Press S.
40
Page 43

TIP
ENTERING TEXT AND NUMBERS
ENTERING TEXT AND NUMBERS
You can enter text, numbers and symbols by using the keypad. The
phone supports four input modes for entering text, numbers and
symbols: Multipress, T9, Numeric and symbols. Multipress and T9
modes are used for entering text, Numeric mode is used for entering
numbers, and Symbols mode is used for entering symbols like “@”, “/”,
“$” and punctuation marks.
When you select a field that requires text or numbers, the phone
automatically selects the appropriate input mode. The status indicator
on the top right side of the display screen shows the input mode that
you are currently using.
CHANGE BETWEEN UPPERCASE, LOWERCASE, AND CAPS LOCK
Press the * key to change between uppercase, lowercase, and caps
lock within a text input mode.
In both Multipress and T9 modes, the first letter of a sentence
is automatically capitalized.
CHANGE THE MULTIPRESS TIMEOUT
The Multipress Timeout setting controls the amount of time you have
to press a single key to get to the next letter on that key. If the time
expires, the phone moves the cursor to the next letter in a word or
sentence.
C
H
3
1
In the Home screen, press [Start].
2
Select Settings, then press More to select
Accessibility.
3
In Multipress time out, select the length of the
pause between key presses using left and right
Navigation Keys.
41
Page 44

TIP
ENTERING TEXT AND NUMBERS
DELETE CHARACTERS
You can only delete characters when you are in input mode, either
for numbers, names, or text. The Clear key operates similarly to a
“backspace” key on a computer.
1
To backspace and delete a single character in
C
H
3
2
To backspace and delete an entire text or
numeric field in any input mode, press and hold
the Clear key C.
ENTER A SPACE
any input mode, press Clear key
In Multipress or T9 mode, press the # key.
ENTER A SYMBOL
There may be times when you need to use a symbol that is not
displayed on the keypad. Additional symbols are available by accessing
a separate page.
1
Press and hold the * key.
C.
2
In the menu that appears, press Symbols to
display the Symbols page.
3
Select the symbol you want.
4
Press O [OK].
42
Page 45

TIP
ENTERING TEXT AND NUMBERS
ENTER NUMBERS IN TEXT BOXES
To enter numbers, use Numeric mode. If you need to enter a number
within a line of text, change to Numeric mode to enter the number, and
then change back to Multipress or T9 mode to finish entering the text.
1
Change to Numeric mode by pressing and
holding the * key.
2
Enter the number or numbers using the keypad.
3
Change back to Multipress or T9 input mode by
briefly pressing the
your text.
If a field permits a numeric entry only, such as a phone
number, the input mode automatically defaults to Numeric
mode.
ENTER PUNCTUATION IN MULTIPRESS MODE
Press 1 repeatedly until you see the punctuation mark that you want.
To see all of the available symbols, press and hold the # key.
* key, then finish entering
C
H
3
ENTER PUNCTUATION IN T9 MODE
In a text box when in T9 text entry mode, do the following:
1
Press 1, and select from a list of common
punctuation.
43
Page 46

ENTERING TEXT AND NUMBERS
ENTER TEXT IN T9 MODE
To form a word in T9 mode, press the number keys that contain the
letters you want. As you enter letters, T9 analyzes your key presses
and attempts to complete the word. For example, to enter the word
C
H
3
shoe, press
7, 4, 6, 3.
1
Press and hold the * key.
2
On the popup menu, select T9 and press
[OK].
3
The T9 indicator appears at the top of the
screen.
4
Enter letters by pressing the keys on which the
letters appear. Press a key only once for each
letter. If there is more than one choice in the T9
dictionary for your entry, a list of available words
is displayed.
5
Press the # key to enter a space after the word
is entered, or press one of the available words
and the space is added automatically.
6
If you do not see the desired word, press Add
Word? from the list, and then enter the word
using Multipress.
O
44
Page 47

ENTERING TEXT AND NUMBERS
START A NEW LINE
When you are entering information in a text box, if you want to add a
line break, use the OK key.
1
In a multi-line text box such as the Notes area
of a contact or a calendar appointment, do the
following:
2
In any input mode, press
TURN ON CAPS LOCK
You can toggle back and forth between having the cap lock on and off,
the status indicator will tell you which mode you are in.
O [OK].
C
H
3
1
In Multipress or T9 mode, press the
until the status indicator for the text input mode
* key
appears in all capitals.
2
Press the * key to cycle back to lowercase.
ENTER THE PLUS SIGN FOR INTERNATIONAL CALLS
Before dialing an international call you must insert the plus sign in the
number. The “0” functions as the plus sign.
1
In a numeric entry field, press and hold
45
0.
Page 48

ENTERING TEXT AND NUMBERS
CHANGE THE INPUT MODE
There are several input modes available on your phone depending on
whether you are entering contact information, phone numbers, symbols
or text. Be sure you are in the input mode you desire.
1
In text input mode, press and hold the
C
H
3
2
A popup menu appears; select
you want and press
3
The status indicator for the selected input mode
appears at the top right of the screen.
O [OK].
* key.
the input mode
46
Page 49

CREATING A CONTACT CARD FOR A CALLER
Creating a contact card for a caller makes their information easier to
retrieve when the call is done. The card can be added to the Contact
list during the call.
1
During a call, press the right soft key Menu.
2
Select Save to Contacts and press
3
Select <New Item>.
4
Scroll to a phone number box and press Insert to
insert the phone number.
5
Enter information about the contact.
6
Press [Done]. The contact is added to your
Contact list.
O [OK].
C
H
3
47
Page 50

MEMO
C
H
3
48
Page 51

Chapter 4
MENU FUNCTION
This chapter discusses accessing the menu and using its
functions and features to customize your phone.
C
H
4
CONTACTS
CALL HISTORY
SETTINGS
ERROR REPORTING
PROFILES
SECURITY
SOUNDS
TOOLS
49
Page 52

TIP
CONTACTS
Using the Contacts feature of your PN-820, you can manage all the
phone information you need. There are many options for adding
contacts, retrieving contacts, and managing the information for each
contact.
CREATE A NEW CONTACT
To enter a new contact manually, without having the caller on the
phone, you will use the Contacts selection from the home screen.
1
In the Home screen, press [Start].
C
H
4
2
Select Contacts using the Navigation Key and
press O [OK].
3
Press the left soft key <[New].
4
Enter information for the new contact.
5
Press [Done].
If someone who isn’t in your list of contacts calls you or sends
you a message, you can create a contact from Call History or
from the message by pressing Menu
➞ Save to Contacts.
50
Page 53

CONTACTS
BEAM A CONTACT
It is possible to use your phone to send a contact to another device
such as Bluetooth radio. This is called “beaming” your contact. A list of
devices will appear when you’ve selected Beam.
1
In the Home screen, press the left soft key <
[Start].
2
Select Contacts.
3
Select the contact to beam.
4
Press the right soft key > [Menu].
5
Select Beam Contact and press O [OK].
6
On the list that appears, scroll to the name of the
device you want to beam the contact.
7
To beam using Bluetooth, ensure that both
Bluetooth radios are turned on and that
Bluetooth is discoverable on the receiving
device.
8
Press Beam.
C
H
4
9
Status information displays, indicating the name
of the device to which the phone is beaming,
and whether the beaming process is pending,
finished, or was unsuccessful.
51
Page 54

TIP
CONTACTS
CALL A CONTACT FROM CONTACT INFORMATION
You can call a contact directly by selecting them from the Contacts
page of the Home screen.
1
In the Home screen, press left soft key
2
Select Contacts and press O [OK].
3
Select the contact to call and press O [OK].
4
Scroll to the phone number to dial.
C
H
4
5
Press O [OK] or S.
CALL A CONTACT FROM THE CONTACT LIST
If you do not select one of the contacts phone numbers, but you press
Send, your phone will dial the default number for that contact.
1
In the Home screen, press the left soft key <
[Start].
2
Select Contacts and press O [OK].
3
Select the contact to call.
4
Press S. The contact’s default phone number is
dialed.
To call a phone number other than the default, press the
contact, press O and scroll to the number you want to dial,
then press S.
< [Start].
52
Page 55

CONTACTS
CHANGE THE DEFAULT NUMBER FOR A CONTACT
The default number for the contact will be the first number displayed. If
you need to change the default number, you will use the Navigation key
to set the default.
1
In the Home screen, press left soft key
2
Select Contacts and press O [OK].
3
Select the contact whose default number you
want to change and press
4
Press the Navigation Key up or down to select
the number or other contact method that you
O [OK].
< [Start].
want to set as the default. For example, mobile,
home or work.
DELETE A CONTACT
Deleting a contact is very simple, just use the Menu key once you have
selected the contact.
1
In the Home screen, press the left soft key <
[Start].
2
Select Contacts and press O [OK].
3
Scroll to the contact to delete.
4
Press the right soft key > [Menu].
5
Select Delete Contact from the popup menu and
press O [OK].
C
H
4
53
Page 56

CONTACTS
FILTER THE CONTACT LIST
Contacts that have categories assigned are displayed in a list when
filtered by category.
1
In the Home screen, press the left soft key <
[Start].
2
Select Contacts and press O [OK].
3
Press the right soft key > [Menu].
C
H
4
4
Select Filter from the popup menu and press
[OK].
5
Select a category to filter.
FIND A CONTACT
The contact section of your phone has an autofill feature that will allow
you to find contacts more quickly. While entering the number or name
of the contact the phone will autofill the rest of the information as you
press the keys, until you find the right contact.
1
In the Home screen, press the left soft key <
[Start].
O
2
Select Contacts and press O [OK].
3
Begin entering the name or phone number of
the contact you want to find until the contact is
displayed. For example, to find “Sandra,” enter 7,
2, 6, 3, 7, 2 because these numbers correspond
to the letters for that name.
54
Page 57

CONTACTS
SEND AN E-MAIL TO A CONTACT
If a contact’s email address is entered into their information, you can
send an email from within the contact list after selecting the contact.
1
In the Home screen, press the left soft key <
[Start].
2
Select Contacts and press O [OK].
3
Select a contact and press O [OK].
4
Scroll to the e-mail address and press O [OK].
5
Select the e-mail account to use.
6
Enter a subject, compose your message, and
then press Send.
SEND A TEXT MESSAGE TO A CONTACT
You can send text message from within the contact list after selecting
the contact and pressing the Menu key.
C
H
4
1
2
3
4
5
the Home screen, press the left soft key <
From
[Start].
Select Contacts and press O [OK].
Select a contact, and press O [OK].
Press the right soft key > [Menu] and select
Send Text Message.
Compose your message, and press
< [Send].
key
55
the left soft
Page 58

CONTACTS
VIEW AND EDIT CONTACT INFORMATION
You may want to change or update contact information once it has
already been entered. Do this from the Contacts menu of the Home
screen.
1
In the Home screen, press the left soft key <
[Start].
2
Select Contacts and press O [OK].
3
Select a contact, and press O [OK].
C
H
4
4
Press the right soft key > [Menu] select [Edit]
and press O [OK].
5
When finished making changes, press [Done].
56
Page 59

CONTACTSCONTACTS
ADD A PICTURE TO A CONTACT
You may wish to add a picture to a contact record. You can add an
existing picture, or you can put the phone in Camera mode to take the
picture and add it to the contact.
1
In the Home screen, press the left soft key <
[Start].
2
Select Contacts and press O [OK].
3
Select a contact, and press O [OK].
4
Press the right soft key > [Menu] select [Edit]
and press O [OK].
5
Using the Navigation Key, scroll down to Picture.
Do one of the following:
• Select the picture you want to add.
•
Press Camera and take a picture.
C
H
4
57
Page 60

CONTACTS
REMOVE A PICTURE FROM A CONTACT
Once a picture is attached to a contact, it can easily be removed or
changed from the Contacts menu by using the soft-key and editing the
field.
1
In the Home screen, press the left soft key <
[Start].
2
Select Contacts and press O [OK].
3
Select a contact, and press O [OK].
C
H
4
4
Press the right soft key > [Menu] select [Edit]
and press O [OK].
5
Press Remove Picture.
58
Page 61

CONTACTS
ASSIGN A CATEGORY TO A CONTACT
It may be helpful to group your contacts in categories you define for
easier reference. If you know the contact’s category you can easily
retrieve the contact.
1
You can use categories to help you organize and
group your contacts.
2
In the Home screen, press the left soft key <
[Start].
3
Select Contacts and press O [OK].
4
Select a contact, and press O [OK].
5
Press the right soft key > [Menu] select [Edit]
and press O [OK].
6
Using the Navigation Key
Categories.
7
Use the left and right Navigation Keys to select
the category you want.
8
Press [Done].
Categories are shared between your appointments,
contacts, and tasks. A category will remain in the list of
shared categories as long as it is assigned to at least one
appointment, contact, or task.
N, scroll down to
59
C
H
4
Page 62

CONTACTS
ASSIGN A RING TONE TO A CONTACT
To easily identify who is calling you by the ring tone, you can assign a
custom ring tone to each contact.
1
In the Home screen, press the left soft key <
[Start].
2
Select Contacts and press O [OK].
3
Select a contact, and press O [OK].
C
H
4
4
Press the right soft key > [Menu] select [Edit]
and press O [OK].
5
Using the Navigation Key
Custom ring tone.
6
Select the ring tone you want.
7
Press [Done].
N, scroll down to
CREATE A SPEED DIAL
You can create a speed dial for a phone number, e-mail address, or
Web page address that is stored in Contacts.
1
In the Home screen, press the left soft key <
[Start].
2
Select Contacts and press O [OK].
3
Select the contact for whom to create a speed
dial and press O [OK].
60
Page 63

CONTACTS
4
Select the phone number, e-mail address, or
Web page address for which to create a speed
dial.
5
Press [Menu] and select Add to Speed Dial, then
press O [OK].
6
In Keypad assignment, select the speed dial
number to use.
7
Press [Done].
The number 1 is reserved for calling your voice mailbox.
USING SPEED DIALS
Set up speed dial codes to allow you to call contacts by pressing only
one (or two) buttons from the Home screen.
1
In the Home screen, press and hold the number
on the keypad that you have assigned as a
speed dial for the phone number, e-mail address,
or Web page.
2
If the speed dial is two digits, press the first digit,
and press and hold the second digit.
3
The phone dials the phone number, opens a new
e-mail message, or goes to the Web page.
61
C
H
4
Page 64

TIP
CONTACTS
VIEW AND EDIT A SPEED DIAL
You can view or edit all the contacts you’ve assigned to speed dial by
entering the Speed Dial menu from the Start soft key.
1
In the Home screen, press the left soft key <
[Start].
2
Select Speed Dial and press O [OK].
3
Press the left soft key < [Edit].
C
H
4
4
Make any changes and press [Done].
DELETE A SPEED DIAL
Deleting a Speed Dial can be done at any time by following these
instructions.
1
In the Home screen, press the left soft key <
[Start].
2
Select Speed Dial and press O [OK].
3
Select the speed dial to delete.
4
Press [Menu] and select Delete from the popup
menu.
62
Page 65

TIP
CALL HISTORY
Call history provides details of all calls received, missed and dialed.
1
From the Home screen, press
[Start].
2
Select Call History and press
To view only missed calls, incoming calls, or outgoing calls,
Press [Menu] select Filter, and then press the type of calls to
view.
Once you have accessed Call History from the main menu,
the icon appears on the top of the Home screen Shortcut bar.
Select the icon and press O to go directly to Call History.
the left soft key <
O [OK].
VIEW CALL TIMERS
You can time each call that is received or made, and the time and
length of each call can be reviewed.
1
From the Home screen, press
[Start].
2
Select Call History and press
3
Press [Menu] and select View Timers from the
popup menu.
the left soft key <
O [OK].
C
H
4
63
Page 66

CALL HISTORY
RESET CALL TIMERS
When call information is no longer required, the call timers can be set
to zero.
1
From the Home screen, press
[Start].
2
Select Call History and press
3
Press [Menu] select View Timers from the popup
C
H
4
menu and press
4
Press [Menu] select Reset Timers and press
[OK].
5
Press Yes. All of the call timers are set to zero
(0), except for the Lifetime calls timer.
O [OK].
the left soft key <
O [OK].
VIEW DETAILS ABOUT A CALL
To review all the stored information on a call you will access the Call
History function.
1
From the Home screen, press
[Start].
2
Select Call History and press
3
Select the call you want to view details for and
press O [OK].
the left soft key <
O [OK].
O
64
Page 67

CALL HISTORY
CREATE A CONTACT FROM CALL HISTORY
While you are in the Call History function, you can select any of the
calls and automatically add that caller to your contact list.
1
From the Home screen, press
[Start].
2
Select Call History and press
3
Select the phone number for which to create a
contact and Press [Menu] and scroll to Save to
the left soft key <
O [OK].
Contacts in the popup menu and press
4
Select New Item and press
5
In a phone number box, press
Insert to insert the phone number.
6
Enter the remainder of the contact information
and press [Done]. The new contact appears in
O [OK].
the left soft key
your contact list.
O [OK].
C
H
4
65
Page 68

TIP
CALL HISTORY
DELETE AN ITEM FROM CALL HISTORY
Any of the calls that are shown in the Call History can be deleted by
selecting the call and then accessing the menu.
1
From the Home screen, press
[Start].
2
Select Call History and press
3
Select the item to delete.
C
H
4
4
Press the right soft key > [Menu], then select
Delete from the popup menu.
To delete all items in Call Histor y, press [Start] ➞ Call History
➞ Menu ➞ Delete List.
the left soft key <
O [OK].
DIAL THE LAST NUMBER CALLED
If you need to quickly call the last number you have called, this shortcut
allows you to do so without using menus.
1
In the Home screen, press O [OK] twice.
66
Page 69

CALL HISTORY
FIND A CONTACT FROM CALL HISTORY
There is an option in the Call History for finding contacts from your
contact list. The autofill feature will help.
1
From the Home screen, press
[Start].
2
Select Call History and press
3
Press [Menu], then select Find Contact from the
popup menu.
the left soft key <
O [OK].
INSERT AN INTERNATIONAL COUNTRY CODE
To make an international call you must include a country code at the
beginning of the dialing sequence for the phone number.
1
Enter the country code, press and hold 0 until a
plus (+) sign appears, and then enter the rest of
the phone number.
You can insert a plus (+) sign into a contact’s phone number or
dial it directly from the keypad.
C
H
4
67
Page 70

TIP
CALL HISTORY
SEND AN E-MAIL MESSAGE FROM CALL HISTORY
To use this function, the e-mail address of the person you are sending
an e-mail to must be included in their contact information card.
1
From the Home screen, press
[Start].
2
Select Call History and press
3
Select the contact you want to send an E-mail
C
H
4
message to and press [Menu].
4
Scroll to Send e-mail and press O [OK].
5
Select an e-mail account.
6
Compose the message and press Send.
the left soft key <
O [OK].
68
Page 71

SETTINGS
TIP
Choosing the Settings option from the Home screen allows you to view
and in some cases change the status of your phone, the hardware and
software version, the phone number and other important reference
information about your phone.
ACCESSIBILITY SETTINGS
The accessibility settings will determine the size of the text and
characters, time outs, call alerts, and volumes on the phone.
1
From the Home screen, press
[Start].
2
Select Settings and press O [OK].
3
Scroll down to Accessibility in the popup menu
and press O [OK].
4
Using the left and right Navigation Keys, select
your preferences for the following:
• System font size: set the size of the font that is displayed
• Multipress time out: set the length of time between key
• Confirmation time out: set the delay before an unconfirmed
• In-call alert volume: set the volume of sounds that play
on the screen.
presses when entering text in Multipress mode.
action times out.
during a call.
5
Press [Done].
You need to press More… in the Settings popup menu to
access Accessibility.
the left soft key <
C
H
4
69
Page 72

TIP
TIP
SETTINGS
POWER MANAGEMENT
You can use Power Management to check the battery and configure
settings that prolong battery life.
1
From the Home screen, press
[Start].
2
Select Settings and press O [OK].
3
Scroll to Power Management and press
C
H
4
4
Adjust the following:
5
Backlight time out on battery: select the amount
of time for the phone to be idle before the
the left soft key <
O [OK].
backlight turns off.
6
Backlight time out on AC: select the amount of
time for the phone to be idle before the backlight
turns off when
the phone is plugged into a
charger.
7
Display time out: select the number of minutes
for the phone to be idle before the Home screen
turns off.
8
Press [Done].
Main battery indicates the amount of battery life remaining.
70
Page 73

SETTINGS
TIP
REGIONAL SETTINGS
You can specify the language, locale, date and time style, as well as
number and currency formatting options.
1
From the Home screen, press
[Start].
2
Select Settings and press O [OK].
3
Scroll to Regional Settings and press O [OK].
4
Adjust the following:
5
Language: select your preferred language.
6
Locale: select the locale for the language
you selected. The locale option automatically
the left soft key <
changes the format of the remaining options
(such as date, time, and currency) according to
the locale you specify.
7
Press [Done].
You must turn your phone off and on again for the changes to
take effect.
You need to press More… in the Settings popup menu to
access Regional Settings.
C
H
4
71
Page 74

SETTINGS
SELECT DEFAULT BAND
Your phone has three possible bands in which to operate. Choose one
band as the default.
1
From the Home screen, press
[Start].
2
Select Settings and press O [OK].
3
Scroll to Connections and press O [OK].
C
H
4
4
Select Wireless Manager.
5
Press right soft key
Settings, then System Select.
6
Select Default Band (Automatic A, Automatic B,
Home Only), and press [Done].
> [Menu], select Phone
the left soft key <
DISPLAY YOUR PHONE NUMBER
For a quick display of your phone number, the “Phone Information”
selection from the settings page will display the number.
1
From the Home screen, press
[Start].
2
Select Settings and press O [OK].
3
Scroll to Phone Information and press
the left soft key <
O [OK].
72
Page 75

SETTINGS
DISPLAY YOUR ESN
Your phone has a unique identification number known as the Electronic
Serial Number, or ESN. To see the ESN follow these instructions.
1
From the Home screen, press
[Start].
2
Select Settings and press O [OK].
3
Scroll to Phone Information and press
the left soft key <
O [OK].
DISPLAY YOUR SOFTWARE VERSION
Each phone has a software version number. Check the software
version of your phone to make sure it matches the documentation
accompanying it.
1
From the Home screen, press
[Start].
2
Select Settings and press O [OK].
3
Scroll to Phone Information and press
the left soft key <
O [OK].
C
H
4
73
Page 76

DISPLAY YOUR HARDWARE VERSION
The phone itself also has a version number. Should you need tech
support or for upgrades, you will need to check the hardware version.
1
From the Home screen, press
[Start].
2
Select Settings and press O [OK].
3
Scroll to Phone Information and press
C
H
4
DISPLAY YOUR PRL VERSION
The PRL (Preferred Roaming List) is a list of information that resides in
the memory of a digital phone. It lists the frequency bands the phone
can use in various parts of the country. (The smaller bands within
Cellular or PCS.)
1
From the Home screen, press
[Start].
2
Select Settings and press O [OK].
3
Scroll to Phone Information and press
the left soft key <
the left soft key <
O [OK].
O [OK].
74
Page 77

SETTINGS
DISPLAY YOUR ERI VERSION
ERI is the Enhanced Roaming Indicator and provides more information
regarding the roaming status of your phone.
1
From the Home screen, press
[Start].
2
Select Settings and press O [OK].
3
Scroll to Phone Information and press
the left soft key <
O [OK].
TURN ERI ALERT ON / OFF
You can set your phone to alert you when the phone is in Enhanced
Roaming status.
1
From the Home screen, press
[Start].
2
Select Settings and press O [OK].
3
Select Call Options and press O [OK].
4
Check or clear ERI Alert, and press [Done].
the left soft key <
C
H
4
75
Page 78

SETTINGS
TURN ERI BANNER ON / OFF
If you do not desire to see the ERI notification, you have the option of
toggling the banner displaying the ERI messages on and off.
1
From the Home screen, press
[Start].
2
Select Settings and press O [OK].
3
Select Call Options and press O [OK].
C
H
4
4
Check or clear ERI Banner and press [Done].
the left soft key <
REMOVE A PROGRAM
You can remove programs that have been added to the phone at any
time. Be sure that you select the right program before removing it.
1
From the Home screen, press
[Start].
2
Select Settings and press O [OK].
3
Scroll to Remove Programs.
4
Select the program to remove.
5
Press the right soft key > [Menu].
6
Select Remove.
Programs that come pre-installed in the phone cannot be
deleted.
the left soft key <
76
Page 79

SETTINGS
SELECT NAM
The NAM or Number Assignment Module, is a part of the phone that
stores a wireless device’s phone number, lock code, timer reset code
and other user information. The NAM is programmed by the service
provider when a device is activated. The NAM also associates the
Mobile Identification Number (MIN) with the Electronic Serial Number
(ESN).
1
From the Home screen, press
[Start].
2
Select Settings and press O [OK].
3
Scroll to Connections and press O [OK].
4
Select Wireless Manager and click
5
Scroll to Phone and press the right soft key >
[Menu].
6
Select Phone Settings and press O [OK].
7
Select NAM Selection and press O [OK].
8
Use the left and right Navigation Keys to select
NAM 1 or NAM 2.
9
Press [Done].
the left soft key <
O [OK].
C
H
4
77
Page 80

SETTINGS
SELECT TTY MODE
Your phone is able to operate with TTY (Teletypewriter) digital modes.
This feature is system dependent and may not be available in all areas.
1
From the Home screen, press
[Start].
2
Select Settings and press O [OK].
3
Scroll to Call Options and press O [OK].
C
H
4
4
Select TTY mode (Full, Talk, Hear, Off)
5
Press [Done].
the left soft key <
78
Page 81

ERROR REPORTING
Error Reporting sends information needed by technical support groups
to diagnose a program error for a device running Windows Mobile
software. A text file is created whenever an error is detected, and can
be delivered to support personnel if you choose to send it. If a program
error occurs, Error Reporting [Start]s automatically. The information
Microsoft receives is used by programming groups at Microsoft.
The data is used for quality control and will not be used for tracking
individual users or installations for any marketing purpose.
With Error Reporting, the only data that is initially collected is technical
data about the state of the program and your device when the
error occurred. No documents (or any data contained in them) are
intentionally sent with the report information. To ensure further security,
the data that is collected is transmitted via a secure connection and is
kept confidential and anonymous in a limited-access database. This
approach is in keeping with the privacy regulations of the European
Union (EU) as well as the Fair Information Practice Principles of the
Federal Trade Commission. To view the Fair Information Practice
Principles, visit the Federal Trade Commission Web site at
www.ftc.gov/reports/privacy3/fairinfo.htm
.
TURN ERROR REPORTING ON / OFF
You can turn the error reporting on and off as you need it without
affecting the error data collected by the phone.
C
H
4
1
From the Home screen, press
[Start].
2
Select Settings and press O [OK].
3
Scroll to Error Reporting and press
4
Use the left and right Navigation Keys to Enable
or Disable Error Reporting.
5
Press [Done].
79
the left soft key <
O [OK].
Page 82

TIP
TIP
PROFILES
VIEW THE LIST OF PROFILES
You can store a set of parameters and options for your phone in what
is known as a “profile”. By developing and selecting a profile you will be
establishing the baseline features of operation for the phone.
1
From the Home screen, press
[Start].
2
Select Settings and press O [OK].
3
Scroll to Profiles and press O [OK].
C
H
4
EDIT A PROFILE
To edit a profile you’ve already created, you will open that profile,
change its settings, and save it again with the same name.
1
In the Home screen, use the up and down
Navigation Keys
N to select Profile and press
the left soft key <
O [OK].
2
Select the profile to edit.
3
Press the right soft key > [Menu] and select
[Edit] from popup menu.
4
Modify the settings and press [Done].
5
To cancel without saving changes, press Cancel.
To revert to the default profile settings, Select a profile and
press [Menu]
➞ Reset to default.
80
Page 83

TIP
PROFILES
CHANGE THE CURRENT PROFILE
If you have more than one profile on your phone, there are two simple
methods of changing to another profile.
1
In the Home screen, use the up and down
Navigation Keys
O [OK].
2
Select a different profile from the list.
3
Press [Done].
You can also change the profile by using the Quick List. Press
the Q/REC button on the right side of the phone briefly to
access the Quick List.
N to select Profile and press
C
H
4
81
Page 84

TIP
SECURITY
Your UTStarcom PN-820 has several easy-to-use security features. You
can enable the device lock, or you can enable security certificates such
as SSL.
ENABLE THE DEVICE LOCK
1
From the Home screen, press
[Start].
2
Select Settings and press O [OK].
C
H
4
3
Scroll to Security and press
4
Select Device Lock and press
5
Use the Navigation Keys to set the amount of
time for the phone to be inactive before the lock
the left soft key <
O [OK].
O [OK].
is automatically activated.
6
Enter and confirm your password.
7
Press [Done].
To ensure you can always make emergency calls at any
time, do not begin your password with the digits of your local
emergency number.
To quickly lock the phone, Press the Q/REC button on the right
side of the phone briefly to access the Quick List, select Device
lock, and press [Done].
82
Page 85

SECURITY
DISABLE THE DEVICE LOCK
When you disable a device lock, remember to disable the automatic
feature that locks the device if it is unused for a specified amount of
time.
1
From the Home screen, press the left soft key
[Start].
2
Select Settings and press O [OK].
3
Scroll to Security and press
4
Select Device Lock and press
5
Enter the password, and press [Done].
6
Use the Navigation Keys to disable “Prompt
if device unused for” before the lock is
O [OK].
O [OK].
automatically activated.
7
Press [Done].
<
C
H
4
83
Page 86

SECURITY
VIEW A CERTIFICATE
Your phone is able to use personal security certificates that you add to
the phone and it also has root certificates that come pre-installed.
1
From the Home screen, press
[Start].
2
Select Settings and press O [OK].
3
Scroll to Security and press
C
H
4
4
Select Certificates and press
5
Choose one of the following:
6
Personal to view the list of personal certificates.
7
Root to view the list of root certificates.
8
Select the certificate you want to view and press
O [OK].
the left soft key <
O [OK].
O [OK].
84
Page 87

SECURITY
DELETE A CERTIFICATE
Be careful when deleting certificates: select only the certificate you
intend to delete. Root certificates should only be deleted when you are
certain you do not need that security on the phone.
1
From the Home screen, press
[Start].
2
Select Settings and press O [OK].
3
Scroll to Security and press
4
Select Certificates and press
5
Choose one of the following:
6
Personal to view the list of personal certificates.
7
Root to view the list of root certificates.
8
Select a certificate.
9
Press [Menu], then Delete.
Deleting a root certificate can make it impossible to use
Secure Sockets Layer (SSL) protocols, which help you to send
personal information more securely.
the left soft key <
O [OK].
O [OK].
C
H
4
85
Page 88

TIP
SECURITY
RESET DEFAULT
When you first purchase your phone, all the settings are pre-configured
and installed. At any time you can return your phone to the factor y
default settings.
1
From the Home screen, Press
[Start].
2
Select Settings and press O [OK].
3
Scroll to Security and press
C
H
4
4
Select Reset Default and press
5
Press # to continue and Select “Revert” to
reset default.
Reset Default erases all user data and initializes all settings to
the factory default mode.
the left soft key <
O [OK].
O [OK].
86
Page 89

SOUNDS
TIP
The UTStarcom PN-820 comes with a large standard set of ringtones
and sounds. You can also add your own as long as they are in the
correct format
CHANGE OR TURN SOUNDS ON OR OFF
Any sound can be toggled on or off at any time, or you can turn the
phone’s sound off altogether.
.
1
From the Home screen, press
[Start].
2
Select Settings and press O [OK].
3
Scroll to Sounds and press O [OK].
4
Select the sound setting for a ring tone or an
event you wish to change and use
the left soft key <
the left and
right Navigation Keys to alter settings. Press
None if you don’t want to hear a sound.
5
Repeat for each event, and press [Done].
For ring tones, you can use sounds in .wav, .mid, mp3, or .wma
file format
When you select a sound, it plays. To hear it again, select
Menu
s.
➞ Play.
C
H
4
87
Page 90

SOUNDS
DELETE A SOUND
You can only delete sounds that you have added. You cannot delete
sounds pre-installed in the phone.
1
From the Home screen, press
[Start].
2
Select Settings and press O [OK].
3
Scroll to Sounds and press O [OK].
C
H
4
4
Press [Menu], Delete Sounds and press
5
Select the sound to delete.
6
Press Yes.
You can only delete sounds that you have added. You cannot
delete sounds pre-installed in the phone.
the left soft key <
O [OK].
88
Page 91

SOUNDS
COPY A SOUND FROM YOUR PC TO YOUR PHONE
After a sound file is located on your phone, you can use it for a ring
tone. Sound files in .wav, .mid, mp3 or .wma formats can be used.
1
Connect the phone to your PC using a USB
connection.
2
On your PC, copy the sound file you want.
3
In ActiveSync on your PC, click Explorer and
double-click My Windows Mobile-Based Device.
Do one of the following:
• To save the sound file on your phone, double-click
• To save the sound file on your storage card, double-click
See also
Specify the sound for an event.
Application Data, double-click Sounds, and paste the file
into Sounds folder.
Storage Card, and paste the file into the folder you want.
C
H
4
89
Page 92

TIP
TOOLS
CALENDAR
SCHEDULE AN APPOINTMENT
Your calendar allows you to schedule appointments and reminders by
day, by time, or by event.
1
From the Home screen, press the left soft key <
[Start].
2
Select Calendar and press O [OK].
C
H
3
Press [Menu] and select New Appointment.
4
4
Enter information about the appointment.
5
To schedule an all-day event, under End time,
select All day event.
6
Press [Done].
All-day events do not occupy blocks of time in the Calendar;
instead, they appear in banners at the top of the calendar.
See also
Change the reminder time.
90
Page 93

TOOLS
TIP
DELETE AN APPOINTMENT
To delete an existing appointment, you will have the option of deleting
just one appointment or the entire series if it is a recurring appointment.
1
From the Home screen, press the left soft key <
[Start].
2
Select Calendar and press O [OK].
3
In Agenda view, select the appointment to delete.
4
Press [Menu], then Delete Appointment.
5
If the appointment is recurring, press Yes to
delete the series.
6
Press No to delete only the current appointment.
When you delete an appointment in Calendar on your phone, it
is also deleted on your PC the next time you synchronize. If the
appointment has not been synchronized with a PC, it will be
deleted only from the phone.
Calendar items can be deleted only from Agenda view or from
an open calendar appointment. To delete from other views,
open the appointment, and Press [Menu]
To cancel a deletion, press
➞ Delete.
C.
91
C
H
4
Page 94

TIP
TOOLS
UPDATE AN APPOINTMENT
When your schedule or appointment information changes, you can
easily edit the appointment with new information.
1
From the Home screen, press the left soft key <
[Start].
2
Select Calendar and press O [OK].
3
Select the appointment and press soft key [Edit].
C
H
4
4
If the appointment is recurring, press Yes to edit
only the current occurrence.
5
Press No to edit the series.
6
Make your changes and press [Done].
VIEW AN APPOINTMENT
Your appointments should be easily viewable from the main calendar
menu. The Calendar menu is accessible with the Start soft key from the
Home screen.
1
From the Home screen, press the left soft key <
[Start].
2
Select Calendar and press O [OK].
3
Select the appointment to view and press O
[OK].
92
Page 95

TOOLS
TIP
VIEW APPOINTMENTS FOR THE WEEK
Each week’s appointments are clearly displayed in the calendar, when
you’ve selected Week
1
From the Home screen, press the left soft key <
[Start].
2
Select Calendar and press O [OK].
3
Press [Menu] and select Week View.
See also
Change the display of the work week.
VIEW TODAY’S AGENDA
For a single day’s schedule, select that day from one of the views in the
calendar and select Agenda view.
1
From the Home screen, press the left soft key <
[Start].
2
Select Calendar and press O [OK].
3
Press [Menu] select Go to Today and press O
[OK].
View.
C
H
4
4
From Week or Month view in Calendar, press
soft key [Menu] and select Agenda View.
To view previous or approaching dates, scroll left or right, or
Press [Menu]
To quickly view today’s agenda, In the Home screen, press an
upcoming appointment (if one is present).
➞ Go to Date.
93
Page 96

VIEW YOUR AGENDA FOR A SPECIFIC DATE
You can also select a specific date to check that day’s schedule.
1
From the Home screen, press the left soft key <
[Start].
2
Select Calendar and press O [OK].
3
Press [Menu] select Go to Date and press O
[OK].
C
H
4
Enter the date to view, and press [Done].
4
VIEW YOUR SCHEDULE FOR THE MONTH
The calendar function has week views and month views, for a higher
level view of a schedule.
1
From the Home screen, press the left soft key <
[Start].
2
Select Calendar and press O [OK].
3
Press [Menu] select Month View and press O
[OK].
94
Page 97

TOOLS
MAKE AN APPOINTMENT RECURRING
If you’ve already entered a single appointment in your calendar and
would like to change it to a recurring appointment, use the Occurs
selection after selecting the appointment.
1
From the Home screen, press the left soft key <
[Start].
2
Select Calendar and press O [OK].
3
Select an appointment and press soft key [Edit].
4
Scroll to Occurs and press one of the recurrence
options.
5
Press [Done].
C
H
4
95
Page 98

TOOLS
ASSIGN A CATEGORY TO AN APPOINTMENT
You can use categories to help you organize and group your
appointments.
1
From the Home screen, press the left soft key <
[Start].
2
Select Calendar and press O [OK].
3
Select an appointment and press soft key [Edit].
C
H
4
Select Categories and check the category you
4
want.
5
Press [Done].
Categories are shared between your appointments,
contacts, and tasks. A category will remain in the list of
shared categories as long as it is assigned to at least one
appointment, contact, or task.
SHOW WEEK NUMBERS
In many cases the weeks of the year are referred to by number – the
calendar function allows you the option of displaying the number of the
week, between 1 and 52.
1
From the Home screen, press the left soft key <
[Start].
2
Select Calendar and press O [OK].
3
Press the right soft key > [Menu] and select
[Options].
96
Page 99

TOOLS
4
Scroll to Month view and click O [OK].
5
Select Show week numbers.
6
Press [Done].
In Week view, the week number appears at the top of the
screen. In Month view, the week numbers appear along the left
side of the screen.
CHANGE THE WORK WEEK DISPLAY
Depending on your schedule, you may want to change the default work
week displayed. You can choose any day of the week to start and/or
finish.
1
From the Home screen, press the left soft key <
[Start].
2
Select Calendar and press O [OK].
3
Press the right soft key > [Menu] and select
[Options].
Do one of the following:
• To specify the first day of the week, in First day of week,
• To specify the number of days you want to appear in a
press Sunday or Monday.
week, in Week view, press 5-day week, 6-day week, or
7-day week.
4
Press [Done].
97
C
H
4
Page 100

TOOLS
CHANGE THE REMINDER TIME
By default, the reminder time is set 15 minutes prior to an appointment.
1
In Calendar, press the right soft key > [Menu]
and select [Options]
2
Scroll to Set reminders and press O [OK].
3
Change the time.
4
C
H
4
Press [Done].
TASKS
CREATE A TASK
The PN-820 allows you to create a new task with reminders for your
task list from your phone or from your PC.
1
From the Home screen, press the left soft key <
[Start].
2
Select Tasks and press O [OK].
3
In the Enter new task here box, enter the task
name and press O [OK].
You can synchronize information on your phone with your PC
to keep your task list up to date in both locations.
If you create a new task with a reminder on your PC and then
synchronize tasks with your phone, the reminder will play at the
time it was set on your PC.
98
 Loading...