

Page 1
Page 2

WELCOME
TABLE OF CONTENTS
Thank you for choosing the CDM180 camera phone.
This new mobile handset features dual LCD screen displays
with a unique landscape-oriented main screen. There is a 262K
color 1.8” TFT display on the inside, and a smaller 65K 1.0”
sub-display on the outside. The landscape view on the main
screen will provide users with a customary format in which to
view text messaging and menu options, but also allows for a
better gaming and browsing experience. The outer display
allows users to quickly view incoming calls, message alerts and
date/time functions. Utilizing the CDMA2000 1x networks with
a QUALCOMM®MSM6050 chipset that is GPSOneTMcapable,
this phone allows for high-speed communication services such
as wireless Internet access, messaging and image
transmissions. The phone’s built-in CCD 330K pixel camera
also includes auto flash.
Equipped with today’s latest features, this phone is Mobile
Web 2.0 enabled and features Get It NowSM, which allows users
to download ringtones, wallpapers, screensavers, games and
more to their phone. In addition, it has CMX 32 polyphonic
ringers and supports two-way short, enhanced and multimedia
messaging services. This phone also contains user-friendly
features such as a built-in speakerphone and voice activated
dialing for hands-free operation, T9 predictive text input for
easy text entries, is TTY compatible and supports English and
Spanish languages.
IMPORTANT INFORMATION
This CDM180 user guide contains very important information
about how to handle and use the product.
Please read this manual thoroughly, pay attention to the
warranty on the back page and be alert to the exclusions and
limitations of your warranty, which are related with the
unauthorized use of components.
CHAPTER 1. BEFORE USING YOUR PHONE .................................5
INSIDE THE PACKAGE .....................................................................................6
HANDSET DESCRIPTION.................................................................................7
SYSTEM STATUS BAR INDICATOR DISPLAY AREA ...........................................9
BATTERY USAGE...........................................................................................11
BATTERY INSTALLATION ....................................................................................11
BATTERY REMOVAL.............................................................................................11
BATTERY CHARGING ...........................................................................................12
POWER CONNECTION ......................................................................................12
Chapter 1
PCS AND 1X BATTERY TIMES ...........................................................................13
BATTERY LIFE (FOR NEW BATTERY) ................................................................13
BATTERY HANDLING INFORMATION..........................................................14
DOs.........................................................................................................................14
DON’Ts...................................................................................................................14
CHAPTER 2. BASIC OPERATION ..................................................15
TURNING THE PHONE ON / OFF ..................................................................16
TURNING THE PHONE ON...................................................................................16
TURNING THE PHONE OFF..................................................................................16
ACCESSING THE MENU................................................................................17
MENU SUMMARY .........................................................................................18
BASIC FUNCTIONS ........................................................................................20
MAKING A CALL ...................................................................................................20
ANSWERING CALLS.............................................................................................21
SPEAKER PHONE..................................................................................................21
WAIT/PAUSE FEATURE........................................................................................22
ANSWERING A CALL............................................................................................22
3-WAY CALLING ...................................................................................................23
CALLER ID FUNCTION..........................................................................................23
CALL WAITING FUNCTION ..................................................................................24
ADJUSTING VOLUME ..........................................................................................24
ENTER LOCK MODE .............................................................................................25
Chapter 2
DURING A CALL .............................................................................................26
MUTE (UNMUTE)..................................................................................................26
SEND TXT MSG ....................................................................................................26
SEND PIX MSG .....................................................................................................26
CONTACTS ............................................................................................................26
RECENT CALLS .....................................................................................................26
SEND DTMF...........................................................................................................27
VOICE PRIVACY.....................................................................................................27
LOCATION .............................................................................................................27
MAKING AN EMERGENCY CALL..................................................................28
911 IN LOCK MODE ..............................................................................................28
911 USING ANY AVAILABLE SYSTEM ...............................................................28
CHAPTER 3. MEMORY FUNCTION...............................................29
STORING A PHONE NUMBER ......................................................................30
ENTERING LETTERS, NUMBERS & SYMBOLS ...........................................31
STANDARD INPUT MODE....................................................................................32
T9 INPUT MODE....................................................................................................33
NUMERIC MODE...................................................................................................34
SYMBOL MODE ....................................................................................................34
MAKING A CALL THROUGH THE PHONE BOOK ........................................35
Chapter 3
ONE-TOUCH/TWO-TOUCH DIALING...................................................................35
ONE-TOUCH DIALING:.......................................................................................35
TWO-TOUCH DIALING: ......................................................................................35
CHAPTER 4. MENU FUNCTION ....................................................37
CONTACTS .....................................................................................................38
NEW CONTACT.....................................................................................................38
CONTACT LIST......................................................................................................39
GROUPS ................................................................................................................40
Chapter 4
ADD NEW GROUP .............................................................................................40
1
Page 3

TABLE OF CONTENTS TABLE OF CONTENTS
ASSIGN A PHONE NUMBER TO A GROUP.......................................................40
CHANGE GROUP NAME ....................................................................................41
SEND TXT MSG. GROUP ...................................................................................41
SEND PIX MSG. GROUP ....................................................................................42
ERASE GROUP ...................................................................................................42
SPEED DIALS.........................................................................................................43
RECENT CALLS ..............................................................................................44
MISSED..................................................................................................................44
RECEIVED ..............................................................................................................45
DIALED...................................................................................................................46
ALL .........................................................................................................................47
VIEW TIMERS ........................................................................................................48
SETTINGS .......................................................................................................49
SOUNDS ................................................................................................................49
MASTER VOLUME .............................................................................................49
CALL SOUNDS ...................................................................................................50
ALERT SOUNDS .................................................................................................51
KEYPAD VOUME ................................................................................................53
EARPIECE VOUME.............................................................................................53
SERVICE ALERTS ...............................................................................................54
POWER ON/OFF SOUNDS.................................................................................55
ALARM SOUNDS ...............................................................................................56
DISPLAY.................................................................................................................57
BANNER .............................................................................................................57
BACKLIGHT ........................................................................................................58
CONTRAST .........................................................................................................59
WALLPAPER.......................................................................................................59
SCREENSAVER...................................................................................................60
DISPLAY THEMES..............................................................................................60
FONTS ................................................................................................................60
POWER ON/OFF ANIMATIONS .........................................................................61
SYSTEM.................................................................................................................62
Chapter 4
SYSTEM SELECT................................................................................................62
NAM SELECTION ...............................................................................................63
DEVICE INFO ......................................................................................................64
LOCATION ..........................................................................................................65
SECURITY ...........................................................................................................66
LANGUAGE.........................................................................................................69
SHORT CUT KEY ................................................................................................70
CALL SETTINGS....................................................................................................71
ANSWER OPTIONS ............................................................................................71
AUTO RETRY ......................................................................................................72
TTY MODE..........................................................................................................72
ONE TOUCH DIAL ..............................................................................................73
VOICE PRIVACY..................................................................................................73
DATA SETTING ...................................................................................................73
VOICE SERVICES................................................................................................74
DTMF TONES .....................................................................................................77
CLOCK FORMAT ...................................................................................................78
MAIN CLOCK......................................................................................................78
FRONT CLOCK ...................................................................................................78
RINGER ID..............................................................................................................79
PICTURE ID ............................................................................................................79
TOOLS.............................................................................................................80
CALENDAR ............................................................................................................80
ADD NEW ...........................................................................................................80
ALARM CLOCK......................................................................................................82
WORLD CLOCK .....................................................................................................83
NOTEPAD ..............................................................................................................84
ADD MEMO........................................................................................................84
VIEW MEMO ......................................................................................................84
CALCULATOR........................................................................................................85
STOP WATCH........................................................................................................86
CHAPTER 5. GET IT NOW..............................................................87
GET IT NOW ...................................................................................................88
GET TUNES & TONES ..........................................................................................88
DOWNLOADING NEW TUNES & TONES ..........................................................88
TO RECORDING NEW TONES ...........................................................................88
USING DOWNLOADED TUNES & TONES.........................................................89
GET PIX & FLIX .....................................................................................................90
TO TAKE PIX .......................................................................................................90
PIX GALLERY......................................................................................................92
PIX PLACE ..........................................................................................................93
PIX SERVICE .......................................................................................................93
Chapter 5
GET FUN & GAMES..............................................................................................94
DOWNLOADING NEW FUN & GAMES .............................................................94
PLAYING DOWNLOADED FUN & GAMES ........................................................94
GET NEWS & INFO ...............................................................................................95
CONNECTING NEWS & INFO ............................................................................95
GET GOING ...........................................................................................................96
CONNECTING GET GOING ................................................................................96
CHAPTER 6. VOICE MAIL, TXT, PIX MESSAGING ......................97
WHEN A NEW MESSAGE ARRIVES .............................................................98
NEW TXT MSG .........................................................................................................99
NEW PIX MSG.........................................................................................................100
INBOX ......................................................................................................................102
PLAY AGAIN .....................................................................................................102
REPLY WITH COPY ..........................................................................................102
FORWARD........................................................................................................103
SAVE PICTURE .................................................................................................103
SAVE SOUND ...................................................................................................103
SAVE QUICK TEXT............................................................................................103
ADD TO CONTACTS.........................................................................................103
LOCK/UNLOCK .................................................................................................104
MESSAGE INFO ...............................................................................................104
SENT ........................................................................................................................105
FORWARD........................................................................................................105
PLAY AGAIN .....................................................................................................105
RESEND............................................................................................................106
ERASE...............................................................................................................106
ADD TO CONTACTS.........................................................................................106
LOCK/UNLOCK .................................................................................................106
SAVE QUICK TEXT............................................................................................106
MESSAGE INFO ...............................................................................................106
Chapter 6
DRAFTS ...................................................................................................................107
SEND ................................................................................................................107
ADD TO CONTACTS.........................................................................................107
LOCK/UNLOCK .................................................................................................107
SAVE QUICK TEXT............................................................................................107
VOICEMAIL ...................................................................................................108
E- MAIL ....................................................................................................................109
MOBILE IM ..............................................................................................................110
CHAT........................................................................................................................111
ERASE ALL ..............................................................................................................112
SETTINGS................................................................................................................113
AUTO SAVE.........................................................................................................113
AUTO ERASE.......................................................................................................113
AUTO VIEW TXT .................................................................................................114
AUTO RECEIVE....................................................................................................114
SIGNATURE.........................................................................................................115
CALLBACK# .........................................................................................................115
VOICE MAIL# .......................................................................................................116
BLOCK/UNBLOCK ...............................................................................................116
ENTRY MODE......................................................................................................117
QUICK TEXT ........................................................................................................117
FONT SIZE ...........................................................................................................118
2
3
Page 4

TABLE OF CONTENT
CHAPTER 7. MOBILE WEB 2.0 ....................................................119
STARTING INTERNET BROWSER...............................................................120
LAUNCHING MOBILE WEB 2.0 ..........................................................................120
BROWSER MENU.........................................................................................120
VZW HOME..........................................................................................................120
BACK ....................................................................................................................120
FORWARD ...........................................................................................................120
REFRESH..............................................................................................................121
HISTORY ..............................................................................................................121
Chapter 7
ADDRESS.............................................................................................................121
CLEAR MEMORY.................................................................................................121
SETTINGS............................................................................................................122
ADVANCED..........................................................................................................123
EXIT......................................................................................................................123
CHAPTER 8. SAFETY AND WARRANTY ....................................125
SAFETY INFORMATION FOR WIRELESS HANDHELD PHONES ..............126
DRIVING SAFETY ................................................................................................127
ELECTRONIC DEVICES .......................................................................................128
OTHER SAFETY GUIDELINES ............................................................................129
PRECAUTIONS ....................................................................................................130
SAFETY INFORMATION FOR FCC RF EXPOSURE ....................................131
CAUTIONS...........................................................................................................131
Chapter 8
SAR INFORMATION.....................................................................................132
HEARING AID COMPATIBILITY WITH MOBILE PHONES .........................134
FDA CONSUMER UPDATE ..........................................................................135
PROTECT YOUR WARRANTY .....................................................................139
12 MONTH LIMITED WARRANTY...............................................................140
Chapter 1
BEFORE USING
YOUR PHONE
This chapter provides important information about using the
CDM180 including:
INSIDE THE PACKAGE
HANDSET DESCRIPTION
BATTERY USAGE
BATTERY HANDLING INFORMATION
C
H
.
1
“Licensed by QUALCOMM Incorporated under one or more of the following Patents : U.S.Patent No.
4,901,307 U.S.Patent No. 5,056,109 U.S.Patent No. 5,099,204 U.S. Patent No. 5,101,501 U.S. Patent No.
5,103,459 U.S. Patent No. 5,107,225 U.S.Patent No. 5,109,390.”
4
5
Page 5
INSIDE THE PACKAGE
HANDSET DESCRIPTION
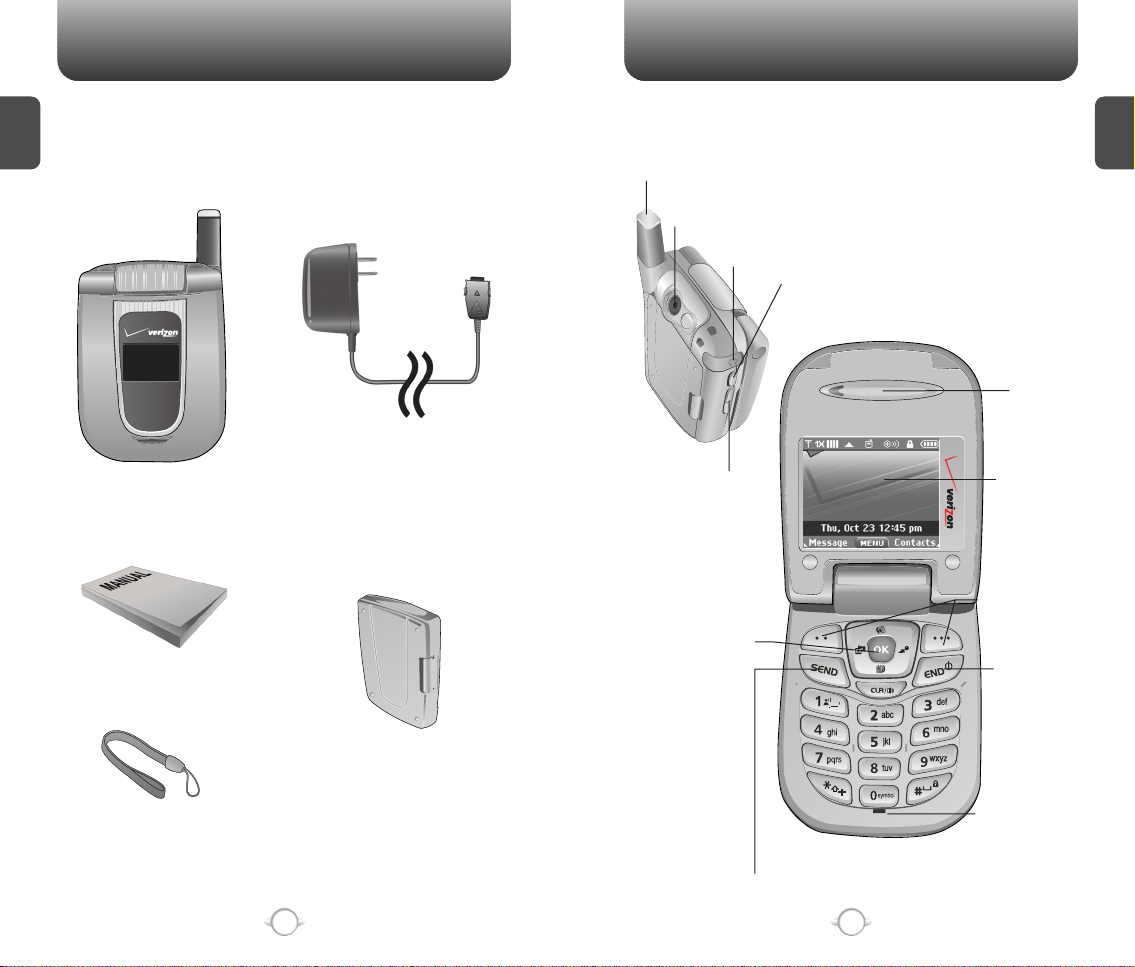
This package should include all items pictured below.
C
If any are missing or different, immediately contact the retailer
H
where you purchased the phone.
1
AC Travel Charger
Handset
User Manual
The CDM180 weighs 3.5oz. The dimensions are 2.99" x 2.14" x .95".
Antenna
Camera Lens
Earjack
Camera Button
Earpiece
Volume Key
Navigation Key
LCD Screen
Function Keys
END/
Power Key
C
H
1
Handstrap
6
Standard Battery
Microphone
Send Key
7
Page 6
HANDSET DESCRIPTION HANDSET DESCRIPTION
C
H
1
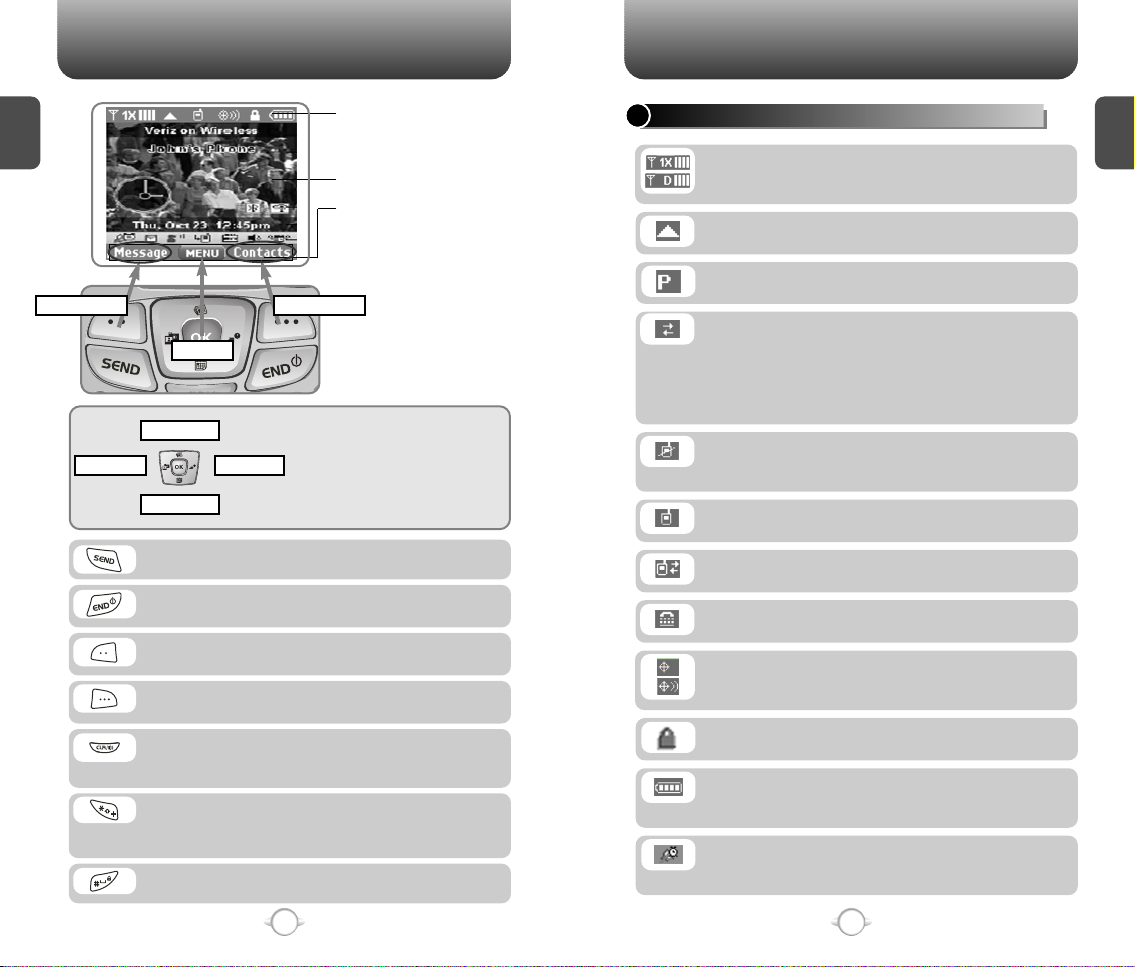
Message
Get Pix & Flix
System Status Bar
Indicator Display Area
See page 9 for a list of icons.
Text & Graphic area
Soft Key Display Area
Shows the functions currently
assigned to each soft key and
displays some icons.
Contacts
Menu
Web Browser
Get It Now
Short Cut Key
In Idle Mode
-
Press Up to access the Web Browser,
Down to access the Short Cut Key, Right
for Get It Now and Left for Get Pix &Flix.
Inside the menu
- Within a menu, use to scroll through
menu options, or to select a function
displayed on the screen.
Press to make or receive a call.
Press to turn the phone on/off, to terminate a call
or to return to the initial page.
(Left Soft Key) Press to access the message
menu or function displayed on bottom line.
(Right Soft Key) Press to access contacts menu
or function displayed on bottom line.
Press to clear a digit from the display or to return
to the previous page.
Press and hold to enable speaker phone mode.
A long press shall display a plus “+”.
A “+” is reserved for international dialing code.
In entry mode, toggle between text mode.
Press and hold to enter lock mode.
SYSTEM STATUS BAR INDICATOR DISPLAY AREA
Signal Strength - Current signal strength: the
C
H
1
more lines, the stronger the signal (1X Mode/
Digital Mode).
Roaming
Phone is out of home area.
Voice Privacy
Indicates “Voice Privacy” mode.
Dormant
Indicates your phone is in a dormant state during a
data call. Your phone goes to Dormant mode when
you have not had any activity on a page for some
time - your connection is still active and you can
make and receive calls.
No Service
Indicates the phone cannot receive a signal from
the system.
Voice
Data Active
TTY
Indicates your phone is active in TTY mode.
GPS Icon
Indicates the Location Service of your phone is
disabled/enabled.
Locked
Indicates your phone is locked.
Battery
Battery charging level – the more blocks, the
stronger the charge.
Alarm Only
Phone will alert you with an alarm tone when call
is received.
8
9
Page 7
HANDSET DESCRIPTION BATTERY USAGE
C
H
1
Alarm
Appears when either a calendar or an alarm is set.
Vibrate Only
Phone will vibrate when call is received.
All Off
Indicates the ringer volume is set to off.
Missed Calls
Voicemail
indicates you have voicemail messages.
New Messages
New TXT or voice message.
Calendar Appointment
Indicates Event Alarm is active.
Data Only
Receives an async. call as a voice call.
Speakerphone
Phone is in speakerphone mode.
Auto Answer
Phone is in answering machine mode.
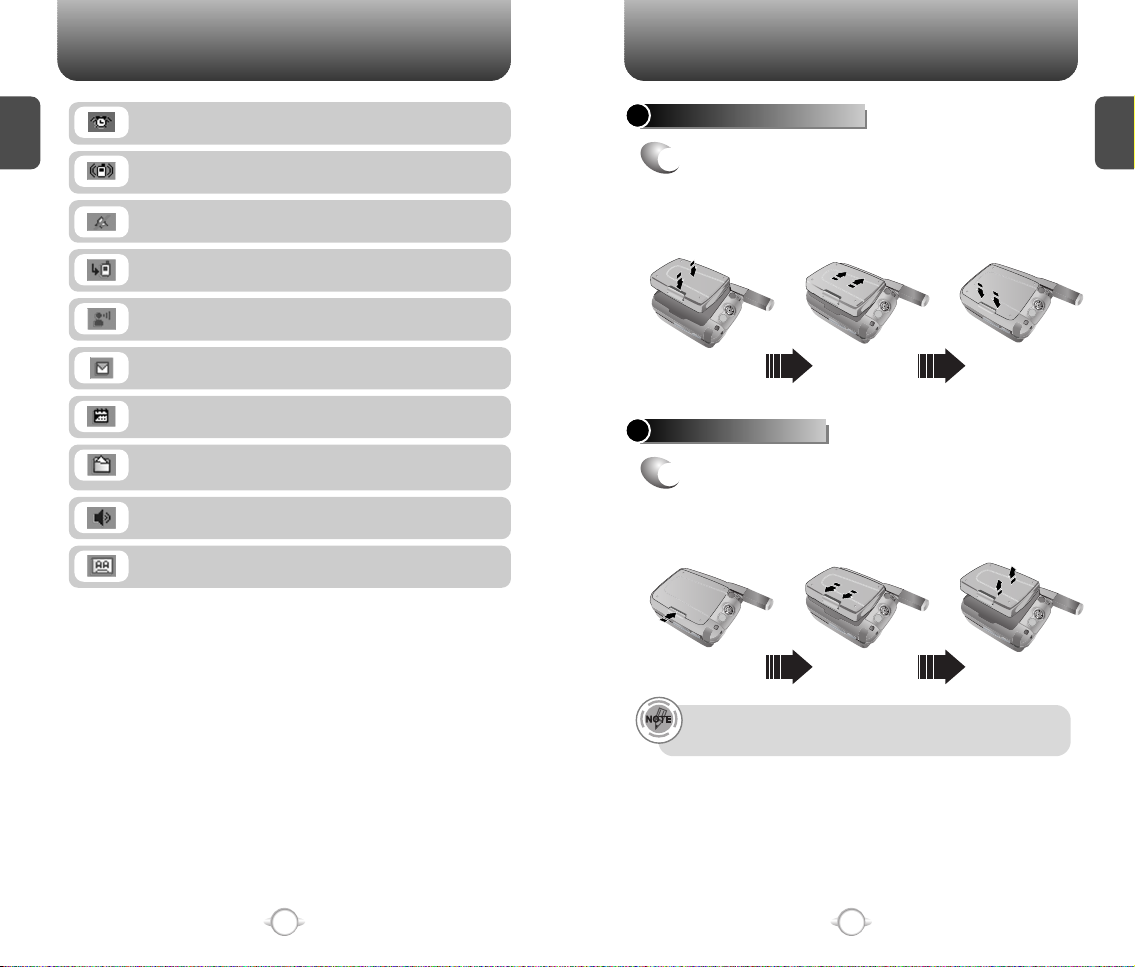
BATTERY INSTALLATION
1
Place the battery on the back of the handset
u
and slide into place.
v
until it locks into place.
BATTERY REMOVAL
1
Pull down the release latch, lift up the
u
battery and
remove the battery from the
v
handset.
Push the battery down
C
H
1
10
If the battery is not correctly placed in the compartment, the
handset will not turn on and/or the battery may detach during use.
11
Page 8
BATTERY USAGE BATTERY USAGE
C
H
1
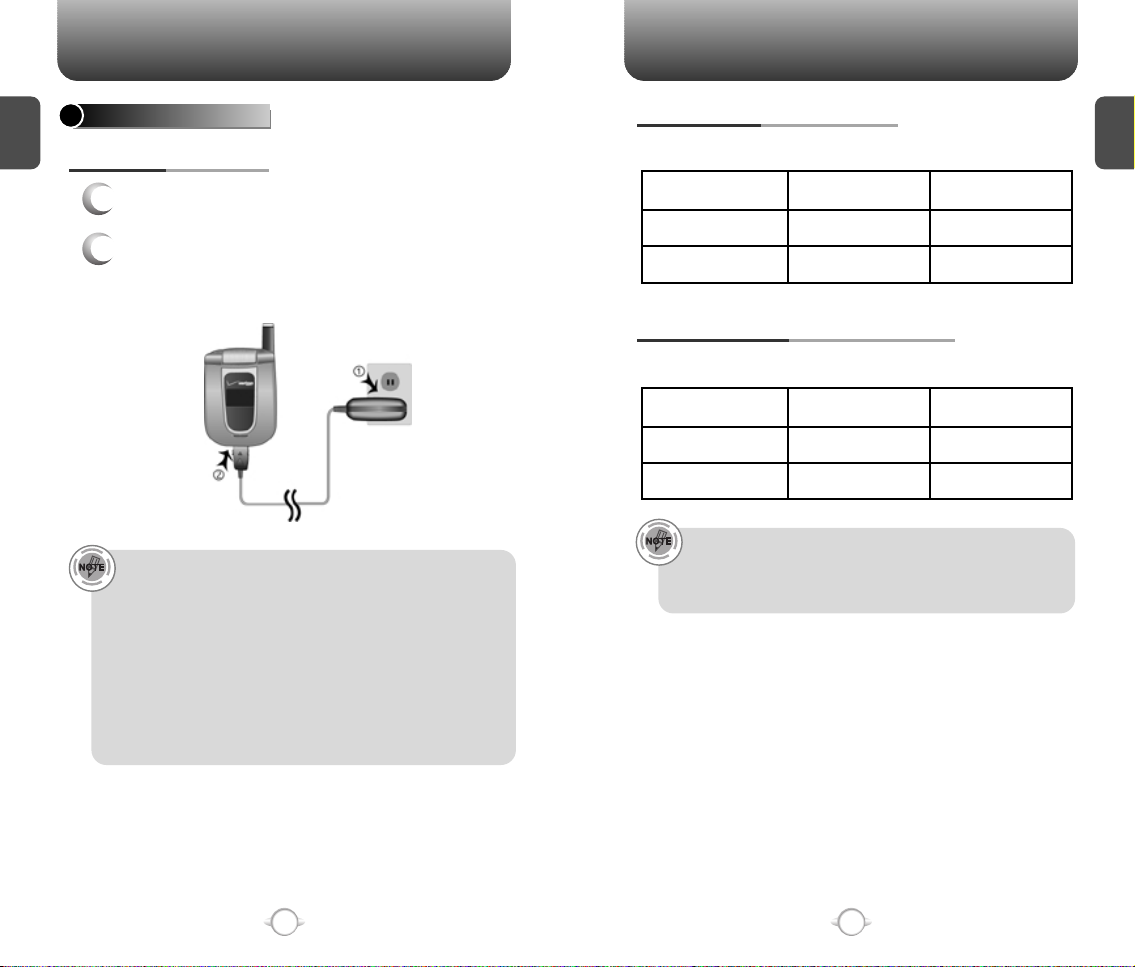
BATTERY CHARGING
POWER CONNECTION
Plug the AC Charger into a standard outlet.
1
Plug the other end of the AC Charger into the
2
bottom of your phone. The battery must be
installed onto the phone.
• When you charge the battery with the phone power off, you
will see a charging status screen. You cannot operate the
phone until it is powered on.
• The battery is not charged at the time of purchase.
• Fully charge the battery before use.
• It is more efficient to charge the battery with the handset
powered off.
• The battery must be connected to the phone in order to charge it.
• Battery operating time gradually decreases over time.
• If the battery fails to perform normally, you may need to replace
the battery.
PCS AND 1X BATTERY TIMES
The operating time is subject to your handset usage and configuration.
Battery Capacity
STD 1000 mAh
EXT 1700 mAh
DCS
Up to 207 minutes
Up to 282 minutes
PCS
Up to 160 minutes
Up to 270 minutes
BATTERY LIFE (FOR NEW BATTERY)
The operating time is subject to your handset usage and configuration.
Battery Capacity
STD 1000 mAh
EXT 1700 mAh
• These times are for a new battery. Usage and Standby time
may decrease over time.
• Talk time for the standard battery: about 207 minutes.
Standby time for the standard battery: about 190 hours.
DCS
Up to 190 Hours
Up to 326 Hours
PCS
Up to 172 Hours
Up to 293 Hours
C
H
1
12
13
Page 9

BATTERY HANDLING INFORMATION
C
H
1
DOs
l Only use the battery and charger approved by the
manufacturer.
l Only use the battery for its original purpose.
l Try to keep batteries in a temperature between
41ºF (5ºC ) and 95ºF (35ºC).
l If the battery is stored in temperatures above or
below the recommended range, give it time to warm
up or cool down before using.
l Completely drain the battery before recharging.
It may take one to four days to completely drain.
l Store the discharged battery in a cool, dark, and dry
place.
l Purchase a new battery when its operating time
gradually decreases after fully charging.
l Properly dispose of the battery according to local
laws.
DON’Ts
l Don’t attempt to disassemble the battery –
it is a sealed unit with no serviceable parts.
l Don’t accidentally short circuit the battery by
carrying it in your pocket or purse with other
metallic objects such as coins, clips and pens.
This may critically damage the battery.
l Don’t leave the battery in hot or cold temps.
Otherwise, it could significantly reduce the capacity
and lifetime of the battery.
l Don’t dispose of the battery into a fire.
Chapter 2
BASIC OPERATION
This chapter addresses and explains the basic features of your phone
including:
TURNING THE PHONE ON / OFF
ACCESSING THE MENU
MENU SUMMARY
BASIC FUNCTIONS
DURING A CALL
MAKING AN EMERGENCY CALL
C
H
2
14
15
Page 10
TURNING THE PHONE ON / OFF
ACCESSING THE MENU
TURNING THE PHONE ON
Press and hold until your “Power On” logo
1
appears and the tone sounds.
C
H
2
• To select a logo, refer to page 61 for more details.
(Settings>Display>Power on/off Animations) for more detail.
• If “Password” appears on the display enter your 4 digit
password to unlock your phone.
• The default password is the last 4 digits of your phone
number.
TURNING THE PHONE OFF
Press and hold until your “Power Off” logo
1
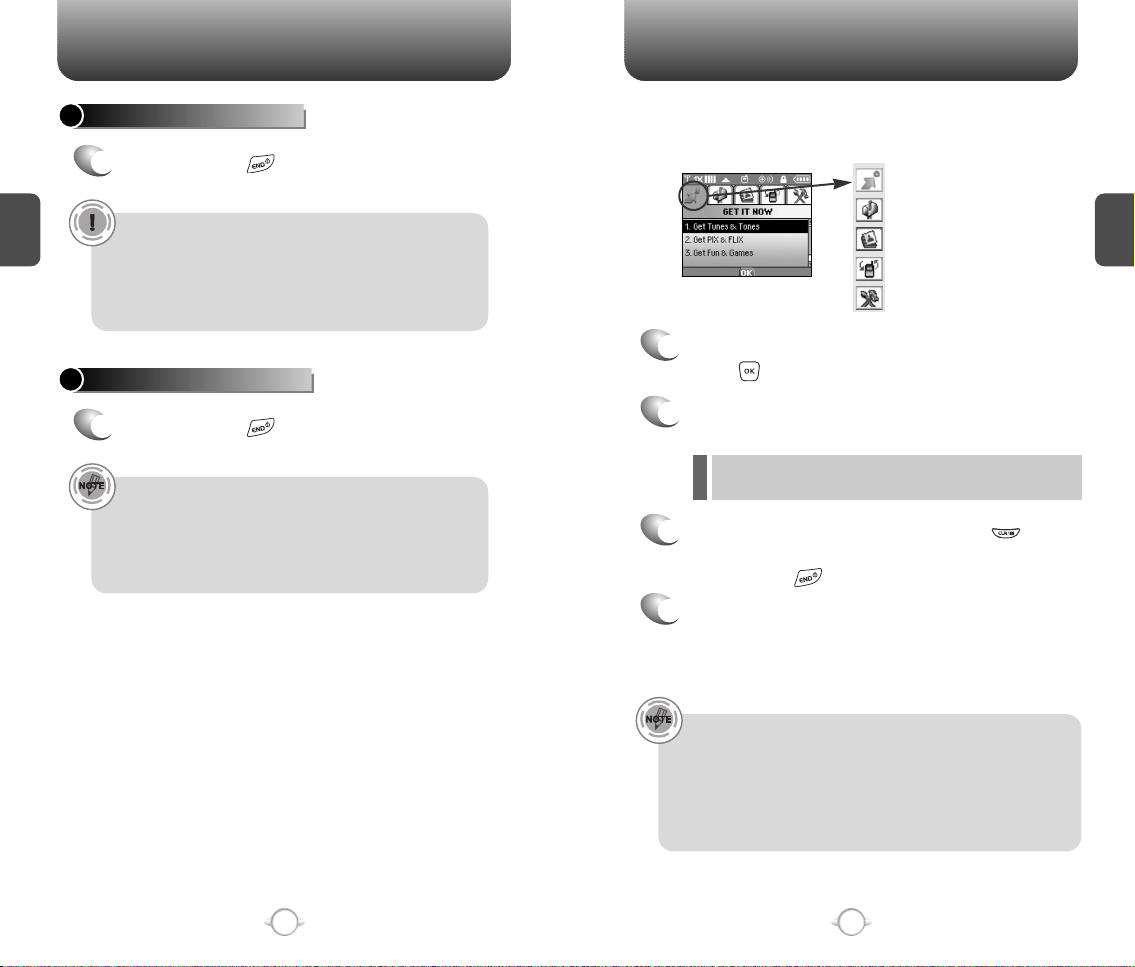
Your phone can be customized via the menu. Each function can be
accessed by scrolling with the Navigation Key or by pressing the
number that corresponds with the menu item.
Get It Now
Messaging
Contacts
Recent Calls
Settings & Tools
To access the menu in the idle mode,
1
press [MENU].
Use the Navigation Key to scroll through the
2
menu.
C
H
2
appears.
l To search through the menu in numerical order, press the
• Immediately change or recharge the battery when
“LOW BATTERY!! PHONE IS TURNING OFF!” appears on
the display. Memory may possibly be damaged if the phone
turns off due to the battery completely draining.
• Turn the phone off before removing or replacing the battery.
If the phone is on, unsaved data may be lost.
Navigation Key.
To return to the previous page, press .
3
To exit the current menu and return to the idle
mode, press .
Press the Navigation Key to enter a function
4
when its main page is displayed or press its
assigned number to have direct access to
the function.
16
Hotkey
In idle mode, move the Navigation Key as follows to access
these functions:
• Upward movement : Web Browser
• Downward movement : Short Cut Key
• Rightward movement : Get It Now
• Leftward movement : Get Pix & Flix
17
Page 11

MENU SUMMARY MENU SUMMARY
Get It Now
C
H
2
Messaging
Contacts
Recent Calls
Settings & Tools
1. Get Tunes &
Tones
2. Get Pix & Flix
3. Get Fun &
Games
4. Get News & Info
5. Get Going
1. New Txt Msg
2. New Pix Msg
3. Inbox
4. Sent
5. Drafts
6. Voicemail
7. E-mail
8. Mobile IM
9. Chat
1. New Contact
2. Contact List
3. Groups
4. Speed Dials
1. Missed
2. Received
3. Dialed
4. All
5. View Timers
1. Tools
2. Sounds
1. Get New
2. Record New
1. Take Pix
2. Pix Gallery
3. Pix Place
4. Pix Service
1. Calendar
2. Alarm Clock
3. World Clock
4. Notepad
5. Calculator
6. Stop Watch
1. Master Volume
2. Call Sounds
3. Alert Sounds
4. Keypad Volume
5. Earpiece Volume
6. Service Alerts
7. Power On/Off
Sounds
8. Alarm Sounds
1. Alarm 1
2. Alarm 2
3. Alarm 3
1. Call Ringtone
2. Call Vibrate
1. ERI Tones
2. Txt Message
3. Pix Message
4. Voicemail Msg
1. Service Change
2. Minute Beep
3. Call Connect
1. Power On Sound
2. Power Off Sound
1. Alarm Tone
2. Alarm Vibrate
3. Display
4. System
5. Call Settings
6. Clock Format
7. Ringer ID
8. Picture ID
1. Banner
2. Backlight
3. Contrast
4. Wallpaper
5. Screensaver
6. Display Themes
7. Fonts
8. Power On/Off
Animations
1. System Select
2. NAM Selection
3. Device Info
4. Location
5. Security
6. Language
7. Short Cut Key
1. Answer Options
2. Auto Retry
3. TTY Mode
4. One Touch Dial
5. Voice Privacy
6. Data Setting
7. Voice Services
8. DTMF Tones
1. Main Clock
2. Front Clock
1. Personal
2. ERI Banner
1. LCD
2. Keypad
1. Main LCD
2. Sub LCD
1. Power On
Animations
2. Power Off
Animations
1. Auto NAM
2. Change NAM
1. My Number
2. SW Version
3. Icon Glossary
1. Common Code
2. Lock Mode
3. Edit Code
4. Special #’s
5. Erase All
6. Reset Phone
1. Voice Dial
2. Voice Setting
3. Voice Memo
4. Train Word
C
H
2
18
19
Page 12
BASIC FUNCTIONS
BASIC FUNCTIONS
MAKING A CALL
Enter a phone number.
1
ANSWERING CALLS
When your phone rings or vibrates, press
1
to answer the incoming call.
C
H
2
To modify the phone number you have entered :
• To erase one digit at a time press .
• To erase the entire number, press and hold .
To find the phone number with your contact list :
• Enter a part of the phone number, then press
[Options], select “Search”.
Phone number display in contact list
If name field of the contact list entry is empty, the highest
priority phone number will be displayed. When name and
phone number fields are empty, e-mail address will be
displayed. Reference “Contact display order”.
All matching entries will be displayed. To call the selected
number, press .
To send a txt or pix message with phone number :
• Enter a part of the phone number, then press
[Options], select “Send TXT Msg or Send Pix Msg”.
Please refer to page 99 or page 100 for more details on
“Send TXT Msg or Send Pix Msg”.
Press .
2
(Depending on your phone’s settings, you may
also answer incoming calls by flip open or by
pressing any digit key.)
To ignore incoming calls, press [Ignore].
To end a call, press .
2
SPEAKER PHONE
The speaker phone feature lets you hear audio through the speaker and
talk without holding the phone.
To activate the speaker phone in idle, answering
1
or calling modes, press and hold .
C
H
2
The indicator, , appears on the display.
The phone returns to normal (Speaker Phone Off)
• If “CALL FAILED” appears on the display or the line is busy,
press or .
• If you activate the “AUTO RETRY” function, the phone will
automatically retry for the number of times you have
selected. (refer to page 72).
• When you place or receive a call from stored phone
numbers, both the name or phone number will be displayed.
• There is another way to make a call through the VR mode,
which is called “VAD (Voice Activated Dialing)”.
Please refer to page 74 (Voice Service) for more details.
• If “Enter Lock Code” appears on the display enter your
4 digit password to unlock your phone.
2
after ending a call or when the phone is turned off
and back on.
To end a call, press .
3
20
21
Page 13
BASIC FUNCTIONS BASIC FUNCTIONS
WAIT/PAUSE FEATURE
Pauses are used for automated systems (i.e., voice mail, calling cards).
Insert a pause after a phone number then enter another group of
numbers. The second set of numbers is dialed automatically after the
pause. This feature is useful for dialing into systems that require a code.
C
H
2
To insert a wait/pause, enter a phone number
1
then press [OPTIONS]. Select either a Wait
(“W” appears) or a Pause (“P” appears).
l
Wait : Inserting a “Wait” means that the caller has to press
the “Send” key to send the DTMF tone before the
dialing continues.
l
Pause : Inserting a “Pause” shall suspend the dialing for
2 seconds when it reaches the “Pause”.
Press to dial or to save.
2
Please refer to page 30 for more details about
storing a phone number.
ANSWERING A CALL
To answer a call, press any key except , ,
1
, , or .
l After pressing [MENU], select “Settings & Tools” followed
by . Select among “Flip Open”, “Any Key”, and
“Send Only” answering a call options. lf “Send Only” is
selected, the phone can only be answered by pressing .
See page 71 for more information.
3-WAY CALLING
With 3-Way Calling, you can talk to two people at the same time. When
using this feature, the normal airtime rates will be applied for each of the
two calls.
Enter a number you wish to call then press .
1
Once you have established the connection,
2
enter the second number you wish to call then
press .
When you’re connected to the second party,
3
press again to begin your 3-Way call.
If one of the people you called hangs up during your call, you
and the remaining caller stay connected. If you initiated the call
and are the first to hang up, all three callers are disconnected.
CALLER ID FUNCTION
Identifies caller by displaying their phone number. If the caller’s name
and number are already stored in your phone book, name or number
will appear. The caller ID is stored in the call history.
C
H
2
To end the call, press .
2
In Auto Answer Mode, a call is automatically answered after a
preset number of ring tones. See page 71 for more details.
22
23
Page 14

BASIC FUNCTIONS BASIC FUNCTIONS
CALL WAITING FUNCTION
Notifies you of an incoming call when you are already on a call by
sounding a beep tone and displaying the caller’s phone number.
To answer another call while on the phone,
C
H
2
1
press . This places the first call on hold.
To switch back to the first caller, press
again.
Call Waiting is a system dependent feature. Please contact your
service provider for details.
ADJUSTING VOLUME
Adjusts the volume of the ringer, key beep and speaker.
Press [MENU], then select “Settings & Tools”
1
menu, press then select one of the following.
l
Master Volume : Controls the ringer volume.
l
Keypad Volume : Controls the keypad volume.
l
Earpiece Volume : Controls the earpiece volume.
Adjust volume then press [OK] to save it.
2
• When you are on a voice call, the side up/down volume key
shall raise/lower the earpiece or headset volume respectively.
• To adjust master volume, press the side up/down key when
phone is in idle mode.
ENTER LOCK MODE
To lock the phone, press and hold .
1
To unlock the phone, press or [UNLOCK],
2
then input your password, then press [OK].
C
H
2
24
25
Page 15

DURING A CALL DURING A CALL
To display menu options during a call, press [
MUTE (UNMUTE)
With mute activated, the caller cannot hear you or any sounds from
your side but you can still hear them.
C
H
2
Press [MUTE].
1
l
To deactivate, press [UNMUTE].
l
The phone will automatically un-mute in Emergency
Call or Callback mode.
SEND TXT MSG
Enables you to send a TXT message (SMS) during a call.
Press [OPTIONS] .
1
SEND PIX MSG
Enables you to send a Pix message (MMS) during a call.
Press [OPTIONS] .
1
CONTACTS
To select the phone number in your internal Contact List.
OPTIONS
].
SEND DTMF
Automatically transmits your phone number to a pager during a call.
(Dependent on pager service)
Press [OPTIONS] .
1
VOICE PRIVACY
Increases security during a call.
Press [OPTIONS] .
1
C
H
2
LOCATION
Enables the network to locate your current location through Global
Positioning System (GPS). (Refer to page 65 for more details.)
Press [OPTIONS] .
1
Press [OPTIONS] .
1
RECENT CALLS
To select the phone number in your recent calls List.
Press [OPTIONS] .
1
26
27
Page 16

MAKING AN EMERGENCY CALL
The 911 feature puts the phone in the Emergency Call Mode
when you dial the preprogrammed emergency number, 911.
It also operates in the lock mode and out of the service area.
911 IN LOCK MODE
The 911 call service is available even in the lock mode.
C
H
Enter “911” then press .
2
1
The call connects.
2
The phone maintains the emergency mode
3
for 5 minutes.
When the call ends, the phone returns to the Lock Mode.
l
911 USING ANY AVAILABLE SYSTEM
Enter “911” then press .
1
The call connects.
2
The phone maintains the Emergency Mode
3
for 5 minutes.
l
The phone returns to the Lock Mode.
l
While the phone is in the emergency mode for 5 minutes,
the phone can receive an incoming call from any available
system. However, it can’t make a call.
Chapter 3
MEMORY FUNCTION
This chapter addresses memory functions including:
STORING A PHONE NUMBER
ENTERING LETTERS, NUMBERS & SYMBOLS
MAKING A CALL THROUGH THE PHONE BOOK
C
H
3
The 911 call is not recorded in the recent call list.
28
29
Page 17
STORING A PHONE NUMBER
ENTERING LETTERS, NUMBERS & SYMBOLS
The phone book stores up to 500 entries.
Enter phone number, press [SAVE] then
1
choose “Create New” or “Update Existing”.
Press [OK] to select.
If “Create New” is selected, the phone number
2
will appear above a list. Press the Navigation
Key up or down to choose the type of number
C
H
.
3
you’re adding, as indicated by the icon.
Press [OK] to select. If “Update Existing” is
selected, your contact list is displayed. Choose
the entry to add the phone number to, then
press [OK]. You will then see the phone
number listed with the entry.
Press [OK] to select.
Enter a name.
3
Please refer to page 31 for more details on
entering letters, numbers & symbols.
To change the input mode, press [Abc].
Press the Navigation Key down to select other
options (Mobile1.2, E-mail1.2, etc...).
If entered phone number, press [OPTIONS]
to select one of the following options:
l Set Speed Dial
l Set Voice Dial
l Set As Default
l Add Pause
To store the entry, press [SAVE].
4
“CONTACT SAVED” will be displayed.
The input mode (Alpha editor) will automatically be activated when
necessary to enter letters and numbers. As shown below, there are 4
available modes ; Standard input mode (Abc), T9 input mode
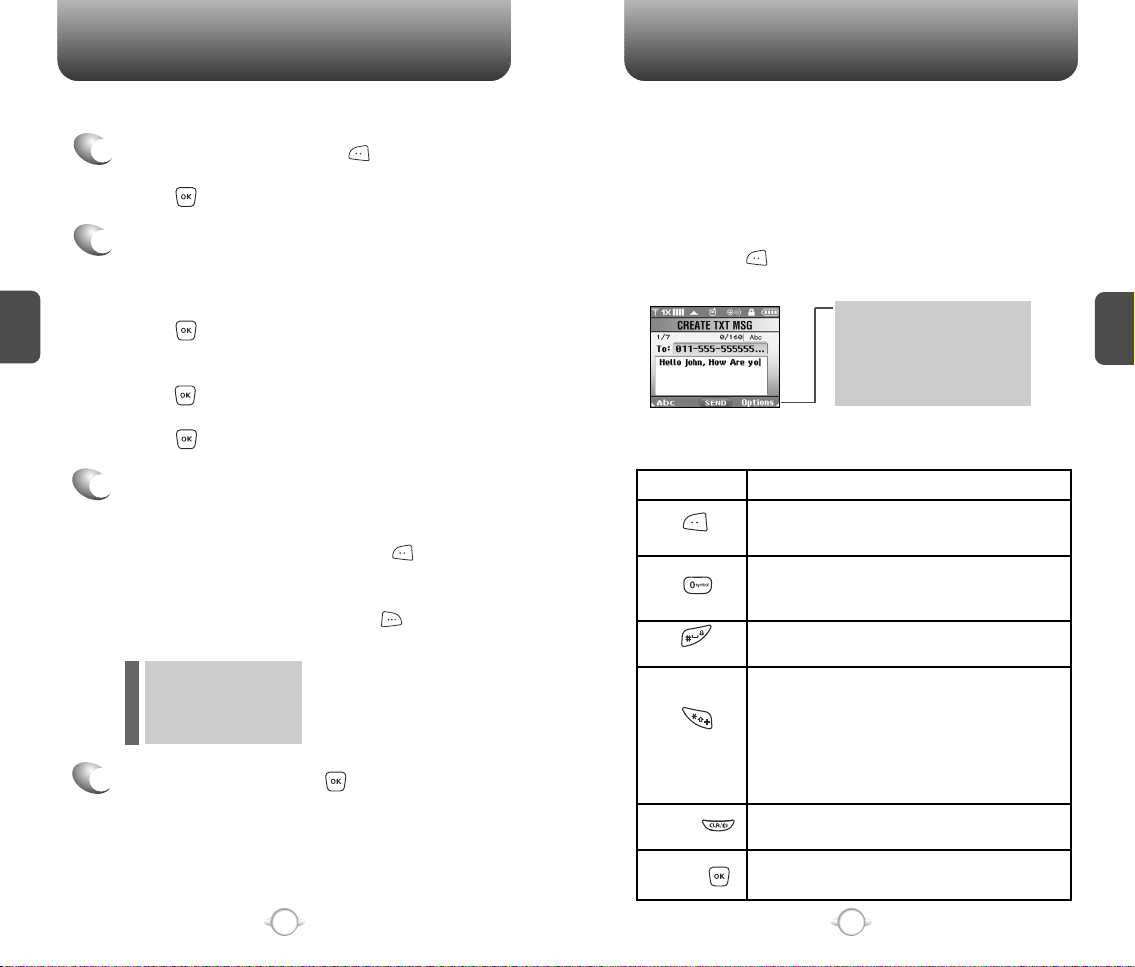
(T9Word), Numeric mode (123), and Symbol mode (Symbols).
The input mode indicator appears on the upper right
of the display when letters and numbers are entered.
To select the desired input mode among the 5 modes
below, press [MODE], then enter letters and
numbers.
Input mode indicator
T9Word : T9 mode
Abc : Abc mode
ABC : ABC mode
123 : Number mode
Symbols : Symbol mode
The following illustrates the function assigned to each key in the
Alpha Editor.
KEY FUNCTION
Press to change mode.
Abc
Next
Space
Caps Lock
Clear
[T9Word][Abc][ABC][123][Symbols]
Press to view the next matching word if
the highlighted word is not the word you
intended.
Press to accept a word and add a space.
Press to select a letter case of the
standard text input or T9 text input mode.
[Abc], [ABC] and [abc] indicate the
standard text input.
[T9Word], [T9WORD] and [T9word]
indicate the predictive text input.
Press and hold to change mode.
Press to delete a character to the left of
the cursor.
C
H
3
30
Send
Send the letters and numbers you enter.
31
Page 18
ENTERING LETTERS, NUMBERS & SYMBOLS
ENTERING LETTERS, NUMBERS & SYMBOLS
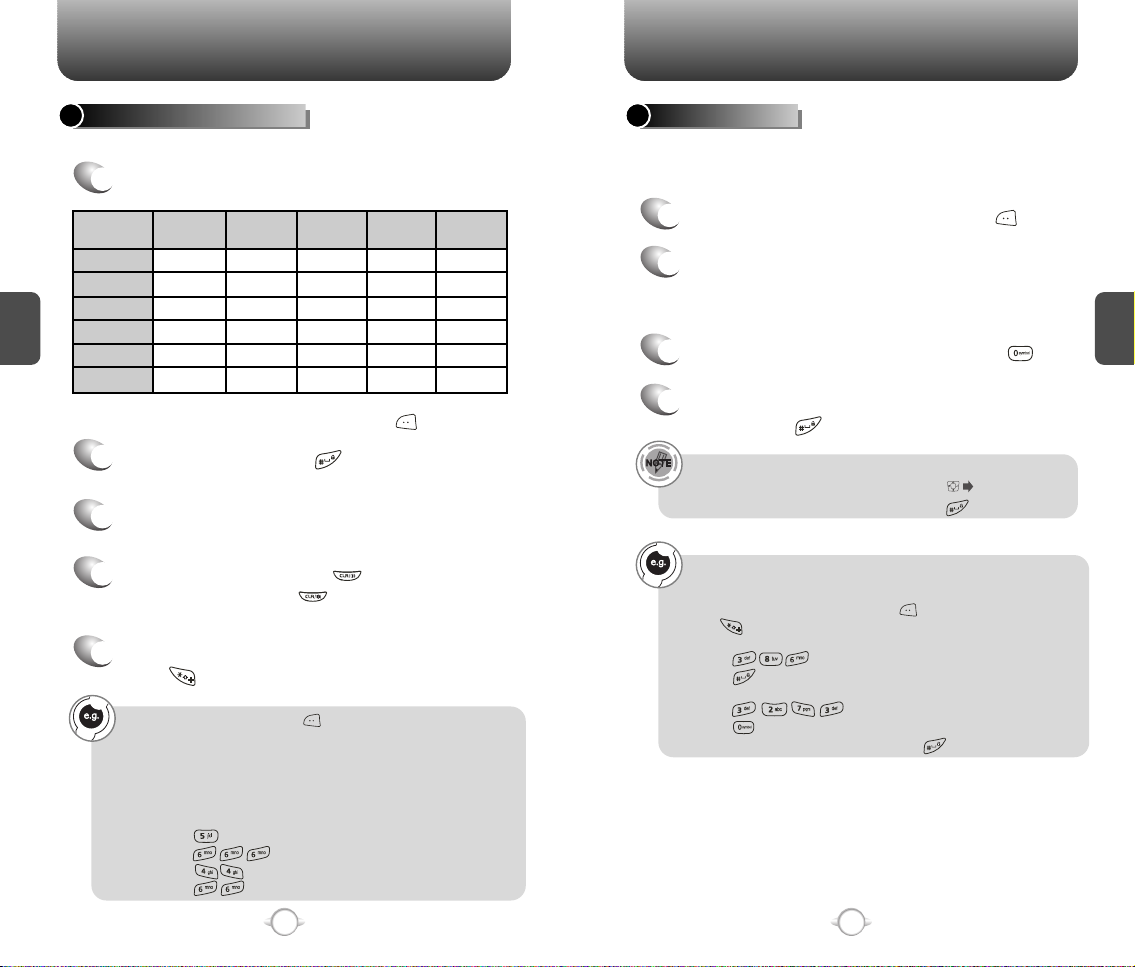
STANDARD INPUT MODE
Use the digit keys to enter letters, numbers and characters.
Enter letters using the key pad as follows:
1
1
Key Pad
1
2ABC
C
H
3
3DEF
4GHI
:
9WXYZ
Time
A
D
G
W
Repetitions
.
:
2 times
@
B
E
H
:
X
Repetitions
3 times
?
C
F
I
:
Y
To change the input mode, press [Abc].
To enter a space, press . The cursor will
2
automatically move to the next column.
Repeat until letters are entered.
3
There is a 16-letter limit.
To delete one digit, press .
4
If you press and hold , it will delete letters
word by word, and numbers in whole.
To change from lowercase to uppercase,
5
press .
Select Abc mode by pressing [Abc].
When you select this mode, the Abc icon appears as a visual
confirmation.
- Find the key that corresponds to the letter you want to enter.
- Press it as many times as needed for the letter to appear on the
screen.
- To enter the name “John”:
Press [ ] J
Press [ ] o
Press [ ] h
Press [ ] n
Repetitions
4 times
!
2
3
4
:
Z
Repetitions
5 times
-
A
D
G
:
9
T9 INPUT MODE
The T9 input mode incorporates a built-in-dictionary to determine a
word based on the entered characters. A word can be entered more
quickly by pressing a key once per character.
Select the T9Word mode by pressing [Abc].
1
Press a digit key once to enter the character
2
you want then enter all the characters to input
the word you want.
To view the next matching word, press .
3
To accept the matching word and enter a
4
space, press .
To enter a compound word:
• Enter the first part of the word then press to accept it.
• Enter the last part of the word then press to enter the word.
To enter “Fun fare” in the T9 input mode.
- After you enter the 1stletter, press [Abc] to select T9 mode
and to choose the lower case (T9Word).
- Press and you will see “Fun” highlighted.
Press to select it.
- Press and you will see “ease” highlighted.
Press to select the next matching word; press until you see
"fare". To accept and add a space, press .
C
H
3
32
33
Page 19
ENTERING LETTERS, NUMBERS & SYMBOLS MAKING A CALL THROUGH THE PHONE BOOK
NUMERIC MODE
Allows you to enter numbers.
Press [Abc] and scroll to the input mode to
1
change to “123 (Numeric mode)”.
To enter a number, press a digit key.
2
C
H
3
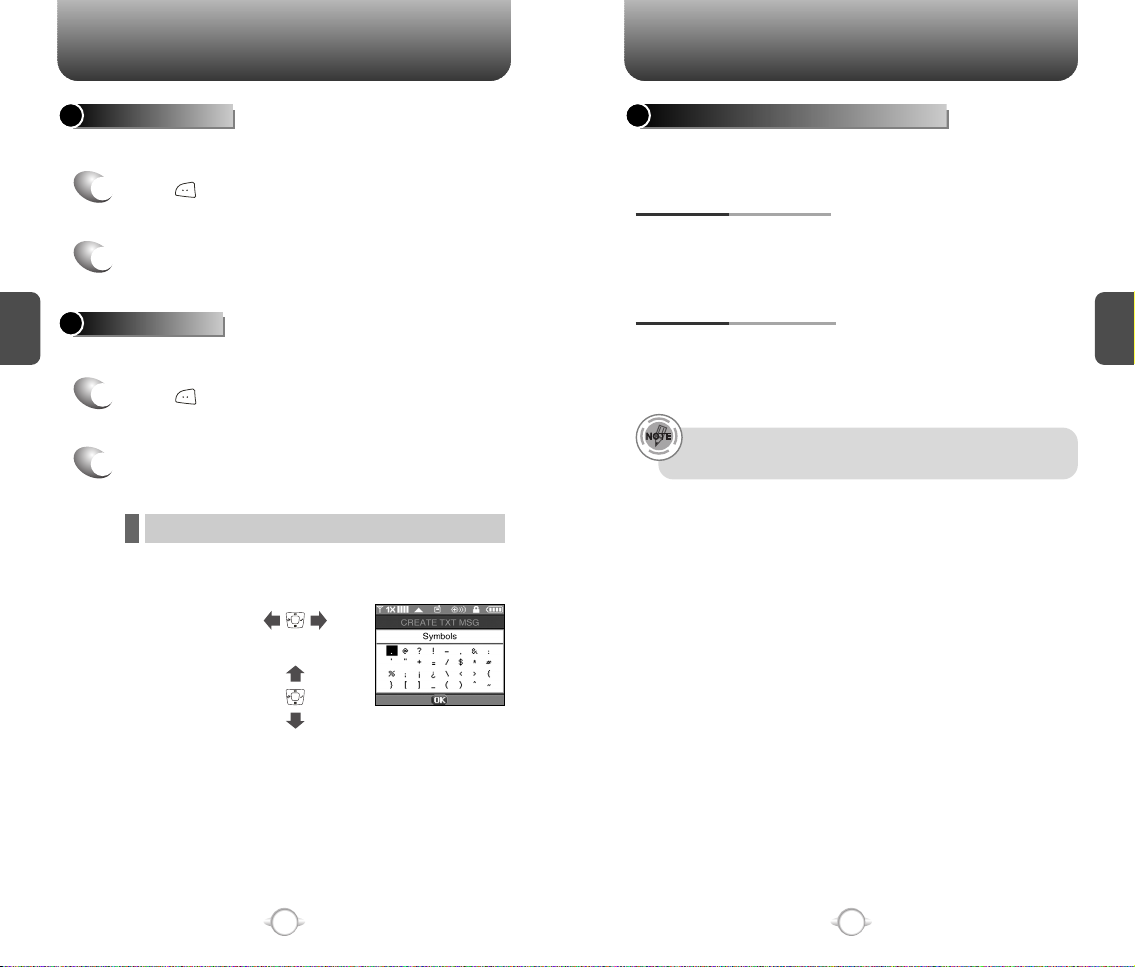
SYMBOL MODE
Allows you to enter symbols.
Press [Abc] and scroll to the input mode to
1
change to “Symbols (Symbol mode)”.
Select symbol you want to enter with the
2
Navigation Key.
l Use the Navigation Key to view a different line of symbols.
Press [ ],
or
Press [ ].
ONE-TOUCH/TWO-TOUCH DIALING
Ideal for frequently dialed numbers, this feature allows phone book
entries to be dialed via the keypad with only one or two key presses.
ONE-TOUCH DIALING:
1-9 : Press and hold the corresponding memory
number for more than 1 second.
TWO-TOUCH DIALING:
10-22/97-99 : Press the first digit and second digits
of the memory number short and long
respectively.
• If no phone number is stored in the location entered,
“UNASSIGNED LOCATION” will appear on the screen.
C
H
3
34
35
Page 20

MEMO
Chapter 4
C
H
3
This chapter addresses accessing the menu and using its functions
and features to customize your phone.
MENU FUNCTION
CONTACTS
RECENT CALLS
SETTINGS
TOOLS
C
H
4
36
37
Page 21

CONTACTS CONTACTS
Stores up to 500 entries, each of which can be assigned to a group.
Entries can be retrieved by name or group.
NEW CONTACT
Adds a new entry.
Press [MENU], then select “Contacts” menu,
1
then press “New Contact”.
To enter a name or number, use the Navigation
2
Key to select the phone book field.
PHONE BOOK FIELDS :
l
Name/Mobile1/Home/Work/E-mail1/Group/Picture/
C
H
4
Ringtone/Mobile2/Fax/E-mail2.
l
Under “Mobile 1”, “Mobile 2”, “Home”, “Work” or “Fax”
input the phone number, then press [OPTIONS], you
can choose from the following:
1. Set Speed Dial
2. Set Voice Dial
3. Set As Default
4. Add Pause
l
Under “Picture”, select image, then press [SET].
(Please refer to page 92 “Pix Gallery” for more details.)
Under “Ringtone”, select tone, then press [SET].
l
(Please refer to page 50 “Call Sounds” for more details.)
Please refer to page 31 for more details on entering
letters, numbers & symbols.
CONTACT LIST
Retrieves an entry by name and calls by simply pressing .
You can review all the entries stored in your phone book list or
quickly find an entry by entering a name or its character string.
Press [MENU], then select “Contacts” menu,
1
then press “Contact List” or
press [CONTACTS].
2
The list of names in your phone book is
displayed alphabetically.
Enter a name or its character string or scroll
3
through the list with the Navigation Key.
Please refer to page 31 for more details on
entering letters, numbers & symbols.
To edit the entry, press [EDIT].
4
To show detail the entry, press [VIEW].
Press [OPTIONS] to 1. New Contact, 2. Erase,
3. Send Txt Msg, 4. Send Pix Msg, 5. Call.
To call the selected number, press [OPTIONS]
5
then select “Call” or press .
C
H
4
3.1 To save the entry, press [SAVE].
3
3.2 To return to the previous page, press .
• For each new contact, at least 1 phone number or email
address needs to be saved with the contact. “Please insert at
least one phone number or email”will be displayed if neither
have been added.
• Even though entry name is left empty while the phone number
is provided, the entry will be saved and displayed with phone
number.
38
39
Page 22

CONTACTS CONTACTS
GROUPS
User can classify contact entries into groups. With predefined group
categories, FAMILY and WORK, you can define up to 28 additional
categories. Each group category can contain up to 10 contact entries
and you can erase, add, and edit group categories with exception of
predefined categories.
ADD NEW GROUP
Press [MENU], then select “Contacts” menu,
1
then press “Groups”.
To select “New”, press [NEW].
2
C
H
4
Input a new group name.
3
To save it, press [SAVE].
4
ASSIGN A PHONE NUMBER TO A GROUP
To assign phone numbers to a Group,
1
select “Add”, press [OPTION].
“Unassigned” locations appear.
2
Select a location and press [OK].
Your phone book entries will be displayed in
alphabetical order.
Select the contact for the group then
3
press [DONE]. “CONTACT ADDED TO
(GROUP NAME)” will be displayed.
Repeat for each location for the Group.
CHANGE GROUP NAME
Press [MENU], then select “Contacts” menu,
1
then press “Groups”.
Select an existing group name that you have
2
added with the Navigation Key.
To select “Rename”, press [OPTIONS].
3
Input a new group name.
4
To save it, press [SAVE].
5
SEND TXT MSG. GROUP
Press [MENU], then select “Contacts” menu,
1
then press “Groups”.
Select an existing group name with the
2
Navigation Key.
To select “Send Txt Msg.”, press [OPTIONS].
3
Input a “Message”, press [OPTIONS] to
4
select “Add”, “Save As Drafts”, “Priority
Level” and “Call Back #”.
5.1. To send the text message, press [SEND].
5
5.2. To save the text message, press [OPTIONS]
then select “Save As Draft”, then
press [OK].
C
H
4
40
41
Page 23

CONTACTS CONTACTS
SEND PIX MSG. GROUP
Press [MENU], then select “Contacts” menu,
1
then press “Groups”.
Select an existing group name with the
2
Navigation Key.
To select “Send Pix Msg”, press [OPTIONS].
3
Input “Text”, “Picture”, “Sound”, “Subject”,
4
then press [OPTIONS] to select “Preview”,
“Add Quick Text”, “Save As Drafts”, “Priority
C
H
4
Level”, “Remove Picture”, “Remove Sound”,
“Add Slide”.
5.1. To send the pix message, press [SEND].
5
5.2. To save the pix message, press [OPTIONS]
then select “Save as Drafts”, then
press [OK].
ERASE GROUP
Press [MENU], then select “Contacts” menu,
1
then press “Groups”.
SPEED DIALS
In idle mode, calls can be placed to numbers stored in speed dial by
pressing & holding the location number on the key pad. For a 2-digit
location number, press the first number, then press and hold the
second number.
1
Press [MENU], then select “Contacts” menu,
then press “Speed Dials”.
To assign a phone number to a location, select
2
the location then press [SET].
Select the contact with the Navigation Key then
3
press [OK]. To confirm, press [OK].
• “Unassigned” appears if the location is available.
• To call an assigned number, press & hold the last digit of the
speed dial #.
To select “Yes” or “No”, press [OK].
4
“SPEED DIAL SET” will be displayed.
5
C
H
4
Select an existing group name with the
2
Navigation Key.
To select “Erase”, press [OPTIONS].
3
Select “Yes” to erase it, press [OK].
4
42
43
Page 24

RECENT CALLS RECENT CALLS
MISSED
Displays information about the 20 most recently missed calls.
To see a list of the 20 most recently missed
1
calls, press [MENU], then select “Recent
Calls” menu, press “Missed”. If the
number is already stored in your phone book,
only the name appears. If the number is not
stored, only the phone number appears.
To view missed call details, press [OPEN].
2
C
H
4
Call details include date, time and phone number.
Press [OPTIONS] and select “Save” to save
3
it or select “Erase” to delete it.
Save : To store the phone number in your phone book.
l
Erase : To erase a missed calls list.
l
Lock/Unlock : To lock or unlock missed calls list.
l
Erase All : To erase all missed calls list (except locked one).
l
View Timers : To display usage time.
l
• After 20 missed calls, the oldest call will automatically
be erased from the history.
• Press [MESSAGE], to send the Txt or Pix message.
RECEIVED
Displays information about the 20 most recently answered calls.
To see a list of the 20 most recently answered
1
calls, press [MENU], then select “Recent
Calls” menu, press “Received”. If the
number is already stored in your phone book,
only the name appears. If the number is not
stored, only the phone number appears.
To view received call details, press [OPEN].
2
Call details include date, time and phone number.
Press [OPTIONS] and select “Save” to save
3
it or select “Erase” to delete it.
Save : To store the phone number in your phone book.
l
Erase : To erase a received calls list.
l
Lock/Unlock : To lock or unlock received calls list.
l
Erase All : To erase all received calls list (except locked one).
l
View Timers : To display usage time.
l
• After 20 received calls, the oldest call will automatically
be erased from the history.
• Press [MESSAGE], to send the Txt or Pix message.
C
H
4
44
45
Page 25

RECENT CALLS RECENT CALLS
DIALED
Displays information about the 20 most recently dialed numbers.
To see a list of the 20 most recently dialed
1
numbers, press [MENU], then select
“Recent Calls” menu, press “Dialed”.
If the number is already stored in your phone
book, only the name appears. If the number is
not stored, only the phone number appears.
To view dialed call details, press [OPEN].
2
C
H
4
Call details include type of call, date, time and phone number.
Press [OPTIONS] and select “Save” to save
3
it or select “Erase” to delete it.
Save : To store the phone number in your phone book.
l
Erase : To erase a dialed calls list.
l
Lock/Unlock : To lock or unlock dialed calls list.
l
Erase All : To erase all dialed calls list (except locked one).
l
View Timers : To display usage time.
l
• After 20 dialed calls, the oldest call will automatically
be erased from the history.
• Press [MESSAGE], to send the Txt or Pix message.
ALL
Displays information about the most recent incoming, outgoing and
missed calls. Place a call to a dialed call by simply pressing .
To see a list of the 60 most recent incoming,
1
outgoing and missed calls, press [MENU],
then select “Recent Calls” menu, press “All”.
If the number is already stored in your phone book,
only the name appears. If the number is not stored,
only the phone number appears.
2
To view details, press [OPEN].
Call details include type of call, date, time and phone number.
Press [OPTIONS] and select “Save” to save
3
it or select “Erase” to delete it.
Save : To store the phone number in your phone book.
l
Erase : To erase a recent calls list.
l
Lock/Unlock : To lock or unlock recent calls list.
l
Erase All : To erase all recent calls list (except locked one).
l
View Timers : To display usage time.
l
• After the 20 received, dialed or missed calls, the oldest call
will automatically be erased from the history.
• Press [MESSAGE], to send the Txt or Pix message.
C
H
4
46
47
Page 26

RECENT CALLS
SETTINGS
VIEW TIMERS
Displays the usage time. The 11 timers include (Last Call, All Calls,
Received Calls, Dialed Calls, Roaming, Transmit Kilobytes, Received
Kilobytes, Total Kilobytes, Last Reset, Lifetime Calls, Lifetime Data
Counter):
Press [MENU], then select “Recent Calls”
1
menu, press “View Timers”.
2
To reset the timers except Lifetime calls and
lifetime data counter, press [RESET],
then select “Yes”, press .
To return to the previous page, press [OK].
C
H
4
Customizes your phone and optimizes performance through a variety
of settings.
SOUNDS
MASTER VOLUME
Controls the Ringer volume and alerts you to incoming calls in the
modes listed in the gray box below.
Press [MENU], then select “Settings & Tools”
1
menu, then press “Sounds” then select
“Master Volume”.
Select one of the following options by pressing
2
the Navigation Key to the right.
All Off
Alarm Only
Vibrate Only
Low, Med Low, Med, Med High, High.
Press to play sound.
Select one of the available ring types.
3
To confirm, press [OK].
C
H
4
4948
Page 27

SETTINGSSETTINGS
CALL SOUNDS
To select a ringer type for incoming calls:
CALL RINGTONE
Press [MENU], then select “Settings & Tools”
1
menu, then press “Sounds” then select
“Call Sounds”, then press “Call Ringtone”.
Select your desired ringer type.
2
Up or Down key : Select “Ringer”.
Press Play/Pause to Play/Pause the ringer.
Select one of the available ring types.
C
H
4
3
To confirm, press [OK].
CALL VIBRATE
Press [MENU], then select “Settings & Tools”
1
menu, then press “Sounds” then select
“Call Sounds”, then press “Call Vibrate”.
Select “On” or “Off”, then press [OK] to save it.
2
ALERT SOUNDS
When selected, this setting alerts you to the following handset changes:
ERI TONES
Press [MENU], then select “Settings & Tools”
1
menu, then press “Sounds” then select
“Alert Sounds”, then press “ERI Tones”.
Select “Beep”, “Voice” or “Off”, then
2
press [OK] to save it.
TXT MESSAGE
Press [MENU], then select “Settings & Tools”
1
menu, then press “Sounds” then select
“Alert Sounds”, then press “TXT Message”.
Select “Tone”, “Vibrate” or “Reminder”, then
2
select one of the following options.
Tone : Select your desired ringer type.
Vibrate : Select “On” or “Off”.
Reminder : Select “Once”, “Every 2 Minutes”,
To save, press [OK].
3
“Every 15 Minutes” or “Off”.
C
H
4
5150
Page 28

SETTINGS
SETTINGS
PIX MESSAGE
1
2
3
C
H
VOICEMAIL MSG
4
1
2
Press [MENU], then select “Settings & Tools”
menu, then press “Sounds” then select
“Alert Sounds”, then press “Pix Message”.
Select “Tone”, “Vibrate”, or “Reminder”, then
select one of the following:
Tone : Select your desired ringer type.
Vibrate : Select “On” or “Off”.
Reminder : Select “Once”, “Every 2 Minutes”,
“Every 15 Minutes” or “Off”.
To save, press [OK].
Press [MENU], then select “Settings & Tools”
menu, then press “Sounds” then select
“Alert Sounds”, then press “Voicemail Msg”.
Select “Tone”, “Vibrate”, or “Reminder”, then
select one of the following:
Tone : Select your desired ringer type.
Vibrate : Select “On” or “Off”.
Reminder : Select “Once”, “Every 2 Minutes”,
“Every 15 Minutes” or “Off”.
KEYPAD VOLUME
To adjust key pad tone:
Press [MENU], then select “Settings & Tools”
1
menu, then press “Sounds” then select
“Keypad Volume”.
Select one of the following options by pressing
2
the Navigation Key to the right.
Off
Low, Med Low, Med, Med High, High
Select one of the available ring types.
3
To confirm, press [OK].
EARPIECE VOLUME
To adjust earpiece volume:
Press [MENU], then select “Settings & Tools”
1
menu, then press “Sounds” then select
“Earpiece Volume”.
Select one of the following options by pressing
2
the Navigation Key to the right.
Low, Med Low, Med, Med High, High
C
H
4
To save, press [OK].
3
52
52
Select one of the available ring types.
3
To confirm, press [OK].
53
Page 29

SETTINGS
SETTINGS
SERVICE ALERTS
SERVICE CHANGE
Sounds an alert when leaving a service area and entering a roaming
service area.
Press [MENU], then select “Settings & Tools”
1
menu, then press “Sounds” then select
“Service Alerts”, then press “Service Change”.
Select “On” or “Off”, then press [OK] to save it.
2
MINUTE BEEP
Sounds an alert every minute during a call.
C
H
4
Press [MENU], then select “Settings & Tools”
1
menu, then press “Sounds” then select
“Service Alerts”, then press “Minute Beep”.
Select “On” or “Off”, then press [OK] to save it.
2
CALL CONNECT
Notifies you that a call has been successfully placed.
Press [MENU], then select “Settings & Tools”
1
menu, then press “Sounds” then select
“Service Alerts”, then press “Call Connect”.
POWER ON/OFF SOUNDS
POWER ON SOUND
Allows you to activate/deactivate the power on tones.
Press [MENU], then select “Settings & Tools”
1
menu, then press “Sounds” then select
“Power On/Off Sounds”, then press
“Power On Sound”.
2
Select “On” or “Off”, then press [OK] to save it.
POWER OFF SOUND
Allows you to activate/deactivate the power off tones.
Press [MENU], then select “Settings & Tools”
1
menu, then press “Sounds” then select
“Power On/Off Sounds”, then press
“Power Off Sound”.
Select “On” or “Off”, then press [OK] to save it.
2
C
H
4
Select “On” or “Off”, then press [OK] to save it.
2
54
54
55
Page 30

SETTINGS SETTINGS
ALARM SOUNDS
To select a ringer type for alarm sound:
ALARM TONE
Press [MENU], then select “Settings & Tools”
1
menu, then press “Sounds” then select
“Alarm Sounds”, then press “Alarm Tone”.
2
Select your desired ringer type.
Up or Down key : Select “Ringer”.
Press Play/Pause to Play/Pause the ringer.
Select one of the available ring types.
C
H
4
3
To confirm, press [OK].
ALARM VIBRATE
Press [MENU], then select “Settings & Tools”
1
menu, then press “Sounds” then select
“Alarm Sounds”, then press “Alarm Vibrate”.
Select “On” or “Off”, then press [OK] to save it.
2
DISPLAY
Allows you to customize the display.
BANNER
To input a personal/ERI banner greeting:
PERSONAL
The text greeting can be up to 16 characters and is displayed on
your phone’s screen in standby mode.
Press [MENU], then select “Settings & Tools”
1
menu, then press “Display” then select
“Banner”, then press “Personal”.
Enter a new personal greeting.
2
To change the input mode, press [Abc].
To return to the previous page, press
[CANCEL].
Press [OK] to save it.
3
ERI BANNER
Press [MENU], then select “Settings & Tools”
1
menu, then press “Display” then select
“Banner”, then press “ERI Banner”.
C
H
4
56
2
Select “On” or “Off”, then press [OK] to save it.
57
Page 31

SETTINGS SETTINGS
BACKLIGHT
Backlights the display and key pad and activates dimming for easy
viewing in dark places.
LCD
Press [MENU], then select “Settings & Tools”
1
menu, then press “Display” then select
“Backlight”, then press “LCD”.
Select one of the following options:
2
Always On, Always Off, 5 Seconds, 15 Seconds, 30 Seconds.
Press [OK] to save it.
C
H
4
3
KEYPAD
Press [MENU], then select “Settings & Tools”
1
menu, then press “Display” then select
“Backlight”, then press “Keypad”.
Select one of the following options:
2
Always On, Always Off, 5 Seconds, 15 Seconds, 30 Seconds.
Press [OK] to save it.
3
CONTRAST
To adjust the display contrast:
MAIN LCD
Press [MENU], then select “Settings & Tools”
1
menu, then press “Display” then select
“Contrast”, then press “Main LCD”.
Select one of the following options,
2
then press [OK] to save it.
Leve 1 ~ Leve 5
SUB LCD
Press [MENU], then select “Settings & Tools”
1
menu, then press “Display” then select
“Contrast”, then press “Sub LCD”.
Select one of the following options,
2
then press [OK] to save it.
Leve 1 ~ Leve 5
WALLPAPER
Press [MENU], then select “Settings & Tools”
1
menu, then press “Display” then select
“Wallpaper”.
Select Default to choose a pre-installed display,
2
Downloads or Pix # to choose a display you
have downloaded to your phone. To launch “Get
it Now Pix Services”, press [GET NEW].
To expand selected image, press [VIEW].
C
H
4
58
3
Select a display from the Animation and the
Graphic list and press [OK] to save it.
59
Page 32

SETTINGS SETTINGS
SCREENSAVER
1
2
C
H
4
3
DISPLAY THEMES
1
2
3
Press [MENU], then select “Settings & Tools”
menu, then press “Display” then select
“Screensaver”.
Select Default to choose a pre-installed display,
Downloads or Pix # to choose a display you
have downloaded to your phone.
To launch “Get It Now Pix Services”, press
[GET NEW].
To expand selected image, press [VIEW].
Select a display from the Animation and the
Graphic list and press [OK] to save it.
Press [MENU], then select “Settings & Tools”
menu, then press “Display” then select
“Display Themes”.
Select one of the following options:
Theme 1 ~ Theme 4
Press [OK] to save it.
POWER ON/OFF ANIMATIONS
POWER ON ANIMATIONS
Allows you to set an animation to play during power on.
Press [MENU], then select “Settings & Tools”
1
menu, then press “Display” then select
“Power On/Off Animations”, then press
“Power On Animations”.
Select one of the following options:
2
Animation 1
Animation 2
Press [OK] to save it.
3
POWER OFF ANIMATIONS
Allows you to set an animation to play during power off.
Press [MENU], then select “Settings & Tools”
1
menu, then press “Display” then select
“Power On/Off Animations”, then press
“Power Off Animations”.
Select one of the following options:
2
Animation 1
Animation 2
C
H
4
FONTS
Press [MENU], then select “Settings & Tools”
1
menu, then press “Display” then select
“Fonts”.
Select “Normal” or “Large”, then press [OK]
2
to save it.
60
Press [OK] to save it.
3
61
Page 33

SETTINGS SETTINGS
SYSTEM
SYSTEM SELECT
Selects the Preferred System.
Press [MENU], then select “Settings & Tools”
1
menu, then press “System” then select
“System Select”.
2
Select one of the following options:
C
H
Press [OK] to save it.
3
4
Automatic B
Automatic A
Home Only
NAM SELECTION
Enables Auto NAM (Number Assignment Modules) or manually
selects a NAM.
AUTO NAM
Automatically switches phone to proper NAM when you have multiple
NAM registrations.
Press [MENU], then select “Settings & Tools”
1
menu, then press “System” then select
“NAM Selection”, then press “Auto NAM”.
Select “On” or “Off”, then press [OK] to save it.
2
CHANGE NAM
Changes the NAM used by the phone when you have multiple
registrations.
Press [MENU], then select “Settings & Tools”
1
menu, then press “System” then select
“NAM Selection”, then press “Change NAM”.
Select one of the following options:
2
NAM 1 - VERIZON
NAM 2 - VERIZON
C
H
4
62
Press [OK] to save it.
3
63
Page 34

SETTINGS SETTINGS
DEVICE INFO
Displays the information of your phone:
MY NUMBER
Displays phone number of the device (MDN/MIN number and carrier) :
Press [MENU], then select “Settings & Tools”
1
menu, then press “System” then select
“Device Info”, then press “My Number”.
MDN/MIN number and carrier name are
2
displayed.
To return to the previous page, press [OK].
3
C
H
SW VERSION
4
Displays the (Software/PRL/ERI/Browser/Get It Now) version.
Press [MENU], then select “Settings & Tools”
1
menu, then press “System” then select
“Device Info”, then press “SW Version”.
Software version and other device information
2
are displayed.
To return to the previous page, press [OK].
3
ICON GLOSSARY
Displays the Indicator Icons of your cellular telephone.
LOCATION
To determine whether or not the network system can detect your
position:
Press [MENU], then select “Settings & Tools”
1
menu, then press “System” then select
“Location”.
Select one of the following options:
2
Location On
E911 Only
Press [OK] to save it.
3
C
H
4
Press [MENU], then select “Settings & Tools”
1
menu, then press “System” then select
“Device Info”, then press “Icon Glossary”.
Indicator Icons of your device are displayed.
2
To return to the previous page, press [OK].
3
64
65
Page 35

SETTINGS SETTINGS
SECURITY
Prevents unauthorized use of your phone. The following settings can
be restricted:
COMMON CODE
Press [MENU], then select “Settings & Tools”
1
menu, then press “System” then select
“Security”, then enter your password,
press [OK].
The default password is the last 4 digits of your phone number.
Select “Common Code”.
2
C
H
4
Select “On” or “Off”, then press [OK] to save it.
3
LOCK MODE
Prevents the phone from being used without entering the password first.
Press [MENU], then select “Settings & Tools”
1
menu, then press “System” then select
“Security”, then enter your password,
press [OK].
The default password is the last 4 digits of your phone number.
EDIT CODE
Changes your Device/Location 4-digit password.
Press [MENU], then select “Settings & Tools”
1
menu, then press “System” then select
“Security”, then enter your password,
press [OK].
The default password is the last 4 digits of your phone number.
Select “Edit Code”.
2
Select “Device” or “Location” then select one
3
of the following options:
Enter “New Lock Code” then press [OK].
4
Enter “Confirm Lock Code” then press [OK] to
5
save it.
C
H
4
Select “Lock Mode”.
2
Select “Device” or “Location” then select one of
3
the following options:
Device : Lock, Unlock, On Power Up
Location : Lock, Unlock
Press [OK] to save it.
4
66
67
Page 36

SETTINGS SETTINGS
SPECIAL #’s
Stores 3 phone numbers that can be called even in the lock mode.
Press [MENU], then select “Settings & Tools”
1
menu, then press “System” then select
“Security”, then enter your password,
press [OK].
The default password is the last 4 digits of your phone number.
Select “Special #’s”.
2
Select a location (1~3).
C
H
4
3
Press [SET] and input a phone number,
4
press [OK] again to save.
ERASE ALL
Erases all entries in the “Contacts”, “Downloads”, and “Pix Gallery”.
Press [MENU], then select “Settings & Tools”
1
menu, then press “System” then select
“Security”, then enter your password,
press [OK].
The default password is the last 4 digits of your phone number.
Select “Erase All”.
2
Press [OK] to check “Contacts”, “Downloads”
3
or “Pix Gallery” then press [DONE] to erase all
the items in those categories. Select “Yes” and
press [OK].
RESET PHONE
Resets phone to default settings.
Press [MENU], then select “Settings & Tools”
1
menu, then press “System” then select
“Security”, then enter your password,
press [OK].
The default password is the last 4 digits of your phone number.
Select “Reset Phone”.
2
Select “Yes” or “No”.
3
Press [OK].
When you select “Yes” and [OK], you will see “This will
be reset to default settings. Reset Phone ?” on the display.
To reset the phone, press [OK].
4
LANGUAGE
Selects the language in which letters are displayed on the screen.
Press [MENU], then select “Settings & Tools”
1
menu, then press “System” then select
“Language”.
Select “English” or “Spanish”.
2
Press [OK] to save it.
3
C
H
4
68
69
Page 37

SETTINGS
SETTINGS
SHORT CUT KEY
Your phone offers you the option of assigning a short-cut key
(Down Navigation Key) to a favorite or often-used function.
To assign a shortcut to the key:
Press [MENU], then select “Settings & Tools”
1
menu, press “System” then select
“Short Cut Key”.
Select your desired menu option then press
2
[OK].
Calendar/Tunes & Tones/Gallery/Fun & Games/News & Info/
Inbox/Sent/Email/Chat/IM/Settings & Tools/Alarm Clock/
Calculator (Default-Calendar)
C
H
4
The Shortcut can now be accessed by pressing
3
the “Down Navigation Key”.
The default shortcut is set to “Calendar”.
CALL SETTINGS
ANSWER OPTIONS
To select an answer mode:
Press [MENU], then select “Settings & Tools”
1
menu, then press “Call Settings” then select
“Answer Options”.
2
Select one of the following:
Flip Open
Any Key
Send Only
Autoanswer – Handsfree
Autoanswer – Headset
Autoanswer – Handset
To save, press [OK].
3
C
H
4
70
71
Page 38

SETTINGS
SETTINGS
AUTO RETRY
Automatically redials a call up to 5 times after a set time interval.
Press [MENU], then select “Settings & Tools”
1
menu, then press “Call Settings” then select
“Auto Retry”.
Retry time to field is shown. Press the Navigation
2
Key left or right to choose the amount of time.
(Off, 3 Seconds, 5 Seconds, 7 Seconds or
10 Seconds)
When a time is chosen for retry time, the repeat
3
C
H
4
field is shown. Press the Navigation Key down to
highlight the repeat field. Press the Navigation
Key left or right to choose the number of
repeats. (1 time, 3 times or 5 times).
To save, press [OK].
4
TTY MODE
Your phone is able to operate with a TTY (Teletypewriter) device in
both analog and digital modes. This feature is system dependent and
may not be available in all areas.
Press [MENU], then select “Settings & Tools”
1
menu, then press “Call Settings” then select
“TTY Mode”.
ONE TOUCH DIAL
Press [MENU], then select “Settings & Tools”
1
menu, then press “Call Settings” then select
“One Touch Dial”.
Select “On” or “Off”, then press [OK] to save it.
2
VOICE PRIVACY
Enhances voice privacy and avoids tapping during a call.
Press [MENU], then select “Settings & Tools”
1
menu, then press “Call Settings” then select
“Voice Privacy”.
Select “Standard” or “Enhanced”,
2
then press [OK] to save it.
Enhanced : Makes it more difficult to wire tap.
l
DATA SETTING
Choose the connection mode for the usage of your phone.
Press [MENU], then select “Settings & Tools”
1
menu, then press “Call Settings” then select
“Data Setting”.
C
H
4
Select one of the following:
2
TTY Off/TTY+ TALK/TTY + HEAR/TTY Full
l
To save, press [OK].
3
72
Select one of the following connection modes:
2
Voice Call : To receive a voice call.
l
Data Only : To receive data when connected to PC.
l
To save, press [OK].
3
73
Page 39

SETTINGS
SETTINGS
VOICE SERVICES
VOICE DIAL
Voice Dial allows you to call a person by simply saying their name.
To access Voice Dial:
Press [MENU], then select “Settings & Tools”
1
menu, then press “Call Settings” then select
“Voice Services”, then press “Voice Dial”.
2.1. Press [NEW]. The phone book list will be
2
displayed alphabetically. Select a name then
press [OK]. Choose the phone number
and press [OK], will be displayed then
C
H
4
press [OK].
You will hear “Name Please”.
2.2. Say the name for the voice tag and repeat the
name when prompted. You will hear “Added”.
3
To play a voice dial: Highlight the voice tag you
want to play then press [PLAY].
To detail a voice dial: Highlight the voice tag you
4
want to view details for, press [OPTIONS]
then select “Detail”.
To re-record a voice dial: Highlight the voice tag
5
you want to re-record, press [OPTIONS] then
select “Re-record”.
VOICE SETTING
When “Active Flip” or “Send Key” is selected, opening the flip or
pressing will put the device into VR mode. When “HFK Mode” is
on, saying “Wake up” through Hands-Free Kit will activate VR mode.
Press [MENU], then select “Settings & Tools”
1
menu, then press “Call Settings” then select
“Voice Services”, then press “Voice
Setting”.
Under “Set Active”, select a option “Off”,
2
“Active Flip” or “Send Key”.
Under “HFK Mode”, select a option “On” or “Off”.
3
To save, press [OK].
4
VOICE MEMO
Voice Memo allows you to record a reminder message that can be up
to 60 seconds. To record a memo:
Press [MENU], then select “Settings & Tools”
1
menu, then press “Call Settings” then select
“Voice Services”, then press “Voice
Memo”.
To record a voice memo, select “Record New”,
2
press [OK].
C
H
4
To play back a voice dial entry through the
6
speaker of your device: Highlight the voice tag
you want to play, press [OPTIONS] then select
“Play Speaker”.
To erase an entry or entire voice dial list: Highlight
7
the voice tag you want to erase, press
[OPTIONS] then select “Erase” or “Erase All” to
erase all voice tags.
74
To start recording a voice memo, press [OK].
3
To stop recording a voice memo, press [STOP].
4
Stopping recording will automatically save the
entry into voice memo list. The list is sorted in
order of dates with the most recent file on the top
of the list.
75
Page 40

SETTINGS
SETTINGS
To play voice memo, select the message you want
5
to play then press [PLAY].
To send voice memo, select the message you want
to send then press [SEND] to access the “New
Pix Msg” see “New Pix Msg” on page 100.
If saved voice memo, press [OPTIONS] to select
one of the following options:
l Set As Ringtone
l Set As Ringer ID
l Rename
l Erase
l Erase All
C
TRAIN WORD
H
Train allows you to use Control words to make a call without using
4
the keypad. Use to train or untrain the Voice Recognition with the
control word, “Yes”, “No” or “Wake-Up”.
Press [MENU], then select “Settings & Tools”
1
menu, then press “Call Settings” then select
“Voice Services”, then press “Train
Word”.
Under “Yes”, “No”, “Wake-Up”.
2
“Please listen closely to hear instructions” will be
displayed and you will hear “Now training control
words. Please say the word”. Say word. You will
hear “Again”. Say word again. You will hear
“Training word successful”.
To undo voice recognition, select a word you want
to undo then press [UNDO].
DTMF TONES
To adjust tone length:
Press [MENU], then select “Settings & Tools”
1
menu, then press “Call Settings” then select
“DTMF Tones”.
Select one of the following with the Navigation Key.
2
Normal
l
Short
l
Off
l
To save, press [OK].
3
C
H
4
Under “Undo Train All”.
3
“Undo voice recognition for all procedures?”
will be displayed. Press [OK] to undo all
trained words.
76
77
Page 41

SETTINGS
SETTINGS
CLOCK FORMAT
MAIN CLOCK
To change the main clock’s appearance on the standby screen:
Press [MENU], then select “Settings & Tools”
1
menu, then press “Clock Format” then select
“Main Clock”.
Select one of the following:
2
Digital
l
Analog
l
Off
l
C
H
4
To save, press [OK].
3
FRONT CLOCK
To change the front clock’s appearance on the standby screen:
Press [MENU], then select “Settings & Tools”
1
menu, then press “Clock Format” then select
“Front Clock”.
Select one of the following:
2
Digital
l
Analog
l
Off
l
RINGER ID
1
Press [MENU], then select “Settings & Tools”
menu, then press “Ringer ID”.
Select “On” or “Off”,
2
then press [OK] to save it.
PICTURE ID
1
Press [MENU], then select “Settings & Tools”
menu, then press “Picture ID”.
Select “On” or “Off”,
2
then press [OK] to save it.
C
H
4
To save, press [OK].
3
78
79
Page 42

TOOLS
TOOLS
CALENDAR
Sets an event and reminds you of that event.
ADD NEW
Press [MENU], then select “Settings & Tools”
1
menu, then press “Tools” then select
“Calendar”.
Move the Navigation Key left, right, up or down to
2
choose a date in the calendar then press [OK].
Press [OPTIONS] to 1. Monthly View, 2. Weekly
View, 3. New, 4. Go To Date, 5. Erase, 6. Erase
Today or 7. Erase Passed.
C
H
4
The date field is highlighted. Press the Navigation
3
Key down to set the alarm options.
APPOINTMENT
Use the keypad to enter a scheduled appointment.
START TIME
Use the keypad to set a start time and to
select “AM” or “PM”.
END TIME
Use the keypad to set an end time and to
select “AM” or “PM”.
END DATE
Use the keypad to change or enter the end date.
TIME ZONE
Use the Navigation Key to select a time zone.
(OFF, EST, EDT, CST, CDT, MST, PST, PDT,
AKST, AKDT, HAST, HADT or GMT/UTC).
ALERT
Use the keypad to select the alert tone you wish
to set.
VIBRATE
Use the Navigation Key to select vibrate on/off.
REMINDER
Use the Navigation Key to select an alert time
interval option (0, 5 Minutes, 10 Minutes,
15 Minutes before the appointment time).
Press [SAVE] to save it or [CLR] to
4
return to the calendar.
The date of the event will be marked on your
5
calendar.
C
H
4
START DATE
Use the keypad to change or enter the start date.
RECURRENCY
Use the Navigation Key to select the recurrance
of the event (Daily, Weekly, Monthly or Yearly).
80
81
Page 43

TOOLS
TOOLS
ALARM CLOCK
1
Press [MENU], then select “Settings & Tools”
menu, then press “Tools” then select
“Alarm Clock”.
Select one of the entries using the Navigation Key.
2
To set a new alarm, choose alarm 1, 2 or 3.
To edit an existing alarm, select that alarm.
Press [OK].
Press [OPTIONS] to 1. Off, 2. Reset,
3. Reset All.
The setting field will be highlighted. Press the
C
H
4
3
Navigation Key down to select alarm options.
ALARM
Use the Navigation Key to select alarm on/off.
TIME
Use the keypad to set a time for the alarm and
to select “AM” or “PM”.
FREQUENCY
Use the Navigation Key to select a setting for the
alarm (Once, Daily, Monday through Friday,
Weekends).
WORLD CLOCK
To display the time and date in pre-programmed cities:
1
Press [MENU], then select “Settings & Tools”
menu, then press “Tools” then select
“World Clock”.
Select a city with the [CITIES].
2
The world map appears with the city, its date
3
and time.
• If you press [DST], you can turn Daylight Savings Time
On/Off.
To return to the previous page, press [OK].
4
C
H
4
RINGER
Use the keypad to select the alert tone you wish
to set.
To save an alarm setting press [SAVE].
4
82
83
Page 44

TOOLS
TOOLS
NOTEPAD
Your phone includes an internal notepad that can be used to
compose and store reminders and notes.
ADD MEMO
To compose a memo (there is an 80-letter limit):
Press [MENU], then select “Settings & Tools”
1
menu, then press “Tools” then select
“Notepad”.
To add a new memo, press [NEW].
2
Input a new text memo.
(Please refer to page 31 for more details on entering
C
H
letters, numbers & symbols.)
To save memo, press [SAVE].
3
4
VIEW MEMO
To view a saved memo:
Press [MENU], then select “Settings & Tools”
1
menu, then press “Tools” then select
“Notepad”.
The list of all memos, in saved order, is displayed.
2
Select a memo then press [VIEW].
2.1. To add a new memo, press [NEW].
2.2. To erase a memos, press [OPTIONS]
“Erase”.
CALCULATOR
To access the calculator:
1
Press [MENU], then select “Settings & Tools”
menu, then press “Tools” then select
“Calculator”.
Follow the instructions below to calculate
2
8*6
4-2.5= 9.5
Input 8.
Move the Navigation Key rightward.
Input 6 then press the Navigation Key.
Move it leftward.
Input 4 then press the Navigation Key.
Move it downward.
Input 2 then press the to input (.).
Press 5.
Then press and you will see the answer.
: X, : -, : /, : +, : ., : Clear, : =.
To reset, press [CLEAR].
3
• To change the displayed number from positive (+) to negative (-)
and vice versa, press [].
• If you press [OPERATOR], you can insert (, ), or power [^]
function into your equation.
C
H
4
2.3. To erase all memos, press [OPTIONS]
“Erase All”.
The selected memo will appear.
3
To edit it, press [EDIT] and input a new text
memo, then press [SAVE] to save it.
84
85
Page 45

TOOLS
STOP WATCH
Simultaneously times up to six different events. To operate the
stop watch:
Press [MENU], then select “Settings & Tools”
1
menu, then press “Tools” then select
“Stop Watch”.
To measure a time period.
2
1. To start the stop watch, press [START].
2. To pause it, press [STOP].
3. To resume it, press [START].
To reset it, press [RESET].
Chapter 5
GET IT NOW
C
H
4
To time up to six events at once:
3
1. To start, press [START].
2. To stop a time period and continue
measuring another one, press [CONT].
3. To stop the second and continue measuring
a third one, press [CONT].
4. To measure up to six time periods, repeat the
above steps.
5. To stop the stop watch, press [STOP].
6. To review the results, press [VIEW].
7. To return to the stop watch, press [OK].
8. To reset it, press [RESET].
86
Your phone provides a unique feature -Get It Now- that enables you
to download ringtones, wallpapers, games and more from your
network to your phone. Please contact your service provider for the
availability of these services.
GET IT NOW
87
87
C
H
5
Page 46

GET IT NOW
GET IT NOW
GET TUNES & TONES
DOWNLOADING NEW TUNES & TONES
Press [MENU], then select “Get It now” menu
1
or press , then press “Get Tunes &
Tones” then select “Get New” the select “New
Provider”, press . (Get It Now will launch and
take you to the download menu.)
Use the Navigation Key to select a provider’s
2
browser, press [OK].
Use the Navigation Key to select “Tunes or
3
Tones” you wish to download, press [OK].
RECORDING NEW TONES
C
H
5
Press [MENU], then select “Get It now” menu
1
or press , then press “Get Tunes &
Tones” then select “Record New”.
To record a voice memo, press [OK]
2
Instructions will be displayed and you will hear
“Beep Sound”.
3
To stop recording a memo, press [OK].
USING DOWNLOADED TUNES & TONES
Press [MENU], then select “Get It now” menu
1
or press , then press “Get Tunes & Tones”.
To play downloaded tunes, select the tunes.
2
Select the tunes or tones you want to play,
then press [PLAY].
To erase downloaded tunes or tones, select the
3
tunes or tones you want to erase, then
press [EARSE], then select “Yes”, press .
To assign downloaded tunes or tones, select
4
the tunes or tones you want to assign,
then press [OPTIONS].
Select “Set As Ringtone” or “Set As Ringer ID”,
then select “Yes”, press .
By pressing [OPTIONS], you can choose from the following:
l
1. Set As Ringtone
2. Set As Ringer ID
3. Rename (This function applies only to downloaded and
recorded contents.)
C
H
5
88
89
Page 47

GET IT NOW
GET IT NOW
C
H
5
GET PIX & FLIX
TO TAKE PIX
Press [MENU], then select “Get It now” menu,
1
then press “Get Pix & Flix” or press or
press and hold side camera key, then select
“Take Pix”.
Press side camerakey or press and hold to take a picture when
the flip cover of your phone is opended. Press and hole side camera
key to take a picture when the flip cover of your phone is closed.
Point the camera lens at your subject. You can
2
check the picture framing through the main
display screen.
Press side camera key or press to take the
3
picture.
Press [GALLERY], you can view the captured pictures.
By pressing [OPTIONS], you can choose from the following:
1. Resolution: To select a resolution for a picture.
2. Self Timer: To activate the timer function.
3. Flash: To activate the flash function. (Off/On this shot/
4. White Balance: To select white balance. (Auto/Sunny/
5. File Quality: To select a picture quality.
6. Shutter Sound: To select a shutter sound.
7. Color Effects: To select a color effects. (Normal/Antique/
8. Display Icon: To select an icon “On” or “Off”.
9. Sub LCD: To taking picture with Sub LCD.
User can control brightness and zoom directly by pressing up
and down navigation key.
Navigation Up / Down: Zoom up.
Navigation Left / Right: Brightness up ( -2, -1, 0, +1, +2).
(High640x480/Medium320x240/Low160x120)
(Off/5 Seconds/10 Seconds)
Always On/Auto Flash)
Cloudy/Tungsten/Fluorescent/Darkness)
(High/Normal/Economy)
(Off/Default/Say “Cheese”/Ready 123)
Black & White/Negative)
By pressing [OPTIONS], you can choose
Sub LCD options: 1. Main LCD/2. Flash/
3. Self Timer/4. Shutter Sound
90
Once the picture is successfully taken, it will be
4
displayed.
To save the picture, press [SAVE].
To go back to idle mode without saving the
picture, press .
To take another picture without saving the picture
you just took, press [REJECT].
To send the picture to someone, press [SEND].
Please refer to page 100 for more details on
“New Pix MSG”.
91
C
H
5
Page 48

GET IT NOW
GET IT NOW
PIX GALLERY
In Review Mode you can view all the pictures you have taken, store
selected images in your phone, send pictures to the Online Album,
delete images and access additional picture options.
Press [MENU], then select “Get It now” menu,
1
then press “Get Pix & Flix”, then select
“Pix Gallery”.
Hotkey
Press then "Pix Gallery". You can also press and hold
the side camera key then press "Pix Gallery".
In Review Mode, you can view all the pictures
2
you have stored in your phone.
Select picture with the Navigation Key, then
3
press [VIEW] to view the picture in full display.
C
H
5
In detail view, user can view previous or next picture by
pressing left or right navigation key.
By pressing [OPTIONS], you can choose from the following:
1. Send: To send a picture message.
2. To Pix Place: To upload the selected picture to a pix server.
3. Set As: Assigns the selected pix to display for specific tasks.
(Wallpaper/Screensaver/Picture ID/
Power On/Power Off.).
4. Rename: To edit the picture’s title.
5. Lock/Unlock: To select “Lock” or “Unlock”.
6. Erase: Erase the current picture from your phone.
7. Erase All: To erase all the pictures in your phone.
8. Pix Info: Displays information on the selected picture,
such as name, date, time, resolution and file size.
(“Send”, “To Pix Place”, “Rename”, Lock/Unlock”, Erase”
functions applies only to downloaded or user generated
contents.)
Press [CAMERA] to return to Camera mode to take
another picture.
PIX PLACE
Press [MENU], then select “Get It now” menu,
1
then press “Get Pix & Flix”, then select
“Pix Place”.
Hotkey
Press then "Pix Place". You can also press and hold the
side camera key then press "Pix Place".
Connect “WAP Browser”.
2
PIX SERVICE
Press [MENU], then select “Get It now” menu,
1
then press “Get Pix & Flix”, then select
“Pix Service”.
Hotkey
Press then "Pix Service". You can also press and hold
the side camera key then press "Pix Service".
“Get It Now Pix Services” will launch.
2
C
H
5
92
93
Page 49

GET IT NOW
GET IT NOW
GET FUN & GAMES
DOWNLOADING NEW FUN & GAMES
Press [MENU], then select “Get It now” menu,
1
then press “Get Fun & Games” then
select “Get New”. (Get It Now - Get Fun &
Games service will launch.)
Hotkey
Press then "Get Fun & Games".
Use your navigation key to select a provider’s
2
browser, press [OK].
Use your navigation key to select “Fun or
3
Games” you wish to download, press [OK].
C
H
PLAYING DOWNLOADED FUN & GAMES
5
Press [MENU], then select “Get It now” menu,
1
then press “Get Fun & Games”.
Hotkey
Press then "Get Fun & Games".
GET NEWS & INFO
CONNECTING NEWS & INFO
Press [MENU], then select “Get It now” menu,
1
then press “Get News & Info”, then select
“Connect Web”.
Hotkey
Press then "Get News & Info".
Connect “WAP Browser”.
2
C
H
5
To play downloaded fun or games.
2
Select the fun or games you want to play, then
press [PLAY].
94
95
Page 50

GET GOING
CONNECTING GET GOING
Press [MENU], then select “Get It now” menu,
1
then press “Get Going”, then select
“Get New”.
Hotkey
Press then "Get Going".
The Get It Now - Get Going service will launch.
2
C
H
5
GET IT NOW
Chapter 6
VOICE MAIL, TXT, PIX
MESSAGING
This chapter addresses Voice Mail, TXT, Pix Messaging functions
including:
WHEN A NEW MESSAGE ARRIVES
NEW TXT MSG
NEW PIX MSG
INBOX
SENT
DRAFTS
VOICEMAIL
E- MAIL
MOBILE IM
CHAT
ERASE ALL
SETTINGS
C
H
6
96
97
97
Page 51

WHEN A NEW MESSAGE ARRIVES NEW TXT MSG
The following display appears
1
when a new message arrives.
To send a new TXT message:
Press [MENU], then select “Messaging”
1
menu, press “New TXT Msg” or press
[MESSAGE], press “New TXT Msg”.
Under “To”, input the phone number and
2
press .
To display the message, select “View Now”,
2
then press [OK].
C
H
6
By pressing [ADD], you can choose from the following:
1. Contacts : Search the phone number which is stored in
2. Recent Calls : Search the phone number which is stored in
To field support max 10 contacts.
Under “Message”, input a new TXT message.
3
(Please refer to page 31 for more details on entering letters,
numbers and symbols.)
By pressing [OPTIONS], then select “ADD”.
You can choose from the following:
1. Graphics : Inserts simple graphic image in TXT Msg.
2. Sounds : Inserts EMS sound in TXT Msg.
3. Quick Text : Inserts already written sentences in TXT Msg.
Once one of the field is inserted in the text message field, the
message is saved in draft box.
the contacts list.
the recent calls list.
C
H
6
98
To save the TXT message, press [OPTIONS],
4
then select “Save As Drafts”.
Press [OPTIONS], then select “Priority Level”,
select “High” or “Normal”, then press [OK].
Press [OPTIONS], then select “Call Back #”,
select “On” or “Off”, then press [OK].
To send the TXT message, press [SEND].
5
99
Page 52

NEW PIX MSG NEW PIX MSG
To send a new pix message:
Press [MENU], then select “Messaging”
1
menu, press “New Pix Msg” or press
[MESSAGE], press “New Pix Msg”.
Under “To”, input the phone number and
2
press .
Under “Text”, input a new TXT message then
3
press .
(Please refer to page 31 for more details on entering letters,
numbers and symbols. Max 1000 characters support.)
Under “Picture”, user can insert only one picture
C
H
6
4
and be able to remove inserted picture.
Press [GALLERY], then select the picture
you’d like to send and press .
By pressing [ADD], you can choose from the following:
1. Contacts : Search the phone number which is stored in
the contacts list.
2. Recent Calls : Search the phone number which is stored in
the recent calls list.
3. To Pix Place : To send pictures by using online Address.
By pressing [OPTIONS].
Add Quick Text : Inserts already written sentences in TXT
Msg.
Under “Subject”, input a subject then press .
6
(Please refer to page 31 for more details on entering letters,
numbers and symbols. Max 100 characters support.)
By pressing [OPTIONS].
Add Quick Text : Inserts already written sentences in TXT
To preview a written picture message, press
7
Msg.
[OPTIONS], then select “Preview”.
To save the Pix message, press [OPTIONS],
then select “Save As Drafts”.
Press [OPTIONS], then select “Priority Level”,
select “High” or “Normal”, then press [OK].
To remove picture, press [OPTIONS], then
select “Remove Picture”.
To remove sound, press [OPTIONS], then
select “Remove Sound”.
To add slide, press [OPTIONS], then
select “Add Slide”.
To send the Pix message, press [SEND].
8
C
H
6
Under “Sound”, user can insert only one sound
5
and be able to remove inserted sound.
Press [SOUND], then select the sound
you’d like to send and press .
100
101
Page 53

INBOX INBOX
The Inbox manages received TXT/PIX/Web Alert messages. To access:
Press [MENU], then select “Messaging”
1
menu, press “Inbox” or press
[MESSAGE], press “Inbox”.
Select a message, then press [OPEN].
2
The message is displayed. To delete a message,
press [ERASE], press [OK].
If you select WAP Push message, press [GET],
to Browser launching.
Press [OPTIONS].
3
PLAY AGAIN
To play a sound from a received pix message.
1
C
H
REPLY WITH COPY
6
To reply to a received message and include the
1
received message into the message.
: Lock
: Priority
: Read
: Unread
: EMS Unread
: Pix Unread
: Pix Read
: MMS Push
: WAP Push
: EMS Read
FORWARD
To forward the TXT or PIX message.
1
Input the phone number of the person you are
2
sending the message, then press [OK].
Input any text message to go along with the
3
forwarded message, then press [OK].
SAVE PICTURE
To save a picture to the “Save Picture” folder.
1
SAVE SOUND
To save a sound to the “Save Sound” folder.
1
SAVE QUICK TEXT
Select to save received text msg to “Save Quick
1
Text”.
ADD TO CONTACTS
Select to save number to contacts.
1
C
H
6
The default call back number is automatically
2
included into the Default CB# field.
You can scroll to the number and edit it.
To send the TXT or PIX message, press [OK].
3
“Play Again”, “Reply with Copy” menu appears only when you
receive a pix message or SMS/EMS message.
102
103
Page 54

INBOX SENT
LOCK/UNLOCK
MESSAGE INFO
C
H
6
To lock or unlock the TXT or PIX message.
1
Select “Lock” to lock the message or “Unlock”
2
to unlock the message, then press .
To show received pix message information.
1
Manages sent TXT/PIX messages or messages waiting to be sent.
Press [MENU], then select “Messaging”
1
menu, press “Sent” or press [MESSAGE],
press “Sent”.
: Lock
: Priority
: Sent
Select a message then press [OPEN].
2
The message is displayed. To delete a message,
press [ERASE], press [OK].
Press [OPTIONS].
3
FORWARD
To forward the TXT or PIX message.
1
Input the phone number of the person you are
2
sending the message, then press [OK].
Input any text message to go along with the
3
forwarded message, then press [OK].
: Incomplete Delivery
: Deliverd
: Sent but Delievery Failed
C
H
6
104
PLAY AGAIN
To play a sound from a received pix message.
1
“Play Again” menu appears only when you receive a pix message.
105
Page 55

SENT DRAFTS
RESEND
To resend a TXT or PIX message.
1
ERASE
To erase this message, select “Erase”.
1
Select “Yes” or “No”, then press .
2
ADD TO CONTACTS
Select to save number to contacts.
1
LOCK/UNLOCK
To lock or unlock the TXT or PIX message.
1
Select “Lock” to lock the message or “Unlock”
2
to unlock the message, then press .
SAVE QUICK TEXT
C
H
Select to save received text msg to “Save Quick
6
1
Text”.
Draft Folder contains any draft messages or saved messages.
If message composition is interrupted by a voice call or other
interrupting event, the text of the current composition is automatically
saved in the drafts folder.
Press [MENU], then select “Messaging”
1
menu, press “Drafts” or press
[MESSAGE], press “Drafts”.
: Lock
: PIX Drafts
Select a message then press [EDIT].
2
The message is displayed. To delete a message,
press [ERASE], press [OK].
Press [OPTIONS].
3
SEND
To send a selected message.
1
ADD TO CONTACTS
Select to save number to contacts.
1
LOCK/UNLOCK
: SMS/EMS Drafts
C
H
6
MESSAGE INFO
To show sent pix message information.
1
106
To lock or unlock the TXT or PIX message.
1
Select “Lock” to lock the message or “Unlock”
2
to unlock the message, then press .
SAVE QUICK TEXT
Select to save received text msg to “Save Quick
1
Text”.
107
Page 56

E- MAILVOICEMAIL
Displays the number of voice mails and accesses them by pressing .
Press [MENU], then select “Messaging”
1
menu, press “Voicemail” or press
[MESSAGES], press “Voicemail”.
FIRST TIME USER
Dial *86 then press [SEND].
1
At the recording, press .
2
To set up your account follow the voice tutorial.
3
EXISTING USER
Dial *86 then press [SEND].
1
At the recording, enter your 4 digit password,
2
then press .
To listen to new messages, press .
C
H
6
3
You don’t need to be at your computer to send an e-mail.
Send a quick e-mail message from your phone.
Press [MENU], then select “Messaging”
1
menu, press “E-mail” or press
[MESSAGE], press “E-mail”.
Browser launching.
2
C
H
6
108
109
Page 57

CHATMOBILE IM
Get the instant scoop with instant messaging (IM). Choose from a
variety of popular IM programs such as AOL Instant Messenger, MSN
Messenger and Yahoo! Messenger. Some things just can’t wait to be
said. So say it without speaking it. Instant message it. Instantly,
cool.
Press [MENU], then select “Messaging”
1
menu, press “Mobile IM” or press
[MESSAGE], press “Mobile IM”.
Brew launching.
2
C
H
6
Give your mouth a rest and let your thumbs do the chatting.
Get It Now gives you three EZ ways to talk without talking.
Get TXT, Get E-Mail and Get IM.
Press [MENU], then select “Messaging”
1
menu, press “Chat” or press [MESSAGE],
press “Chat”.
Browser launching.
2
C
H
6
110
111
Page 58

SETTINGSERASE ALL
Press [MENU], then select “Messaging”
1
menu, press [OPTIONS] or press
[MESSAGE], press [OPTIONS].
2.1. To erase all the inbox messages,
2
3
press [ERASE INBOX].
2.2. To erase all the drafts messages,
press [ERASE DRAFTS].
2.3. To erase the sent messages,
press [ERASE SENT].
2.4. To erase the all message,
press [ERASE ALL].
Select “Yes”, then press .
Manages messaging features through various features.
AUTO SAVE
Press [MENU], then select “Messaging”
1
menu, press [SETTINGS] or press
[MESSAGE], press [SETTINGS].
Press [AUTO SAVE].
2
Select “On”, “Off” or “Prompt” with the
Navigation Key.
On : All sent messages saved in the Sent box.
Off : All sent messages not saved in the Sent box.
Prompt : “Yes”, “No” dialogue box displayed after sent message.
Press [OK].
3
AUTO ERASE
Automatically erases inbox messages when new messages arrive.
Press [MENU], then select “Messaging”
1
menu, press [SETTINGS] or press
C
H
6
[MESSAGE], press [SETTINGS].
Press [AUTO ERASE].
2
Select “On” or “Off” with the Navigation Key.
On : Oldest message erased from inbox automatically when
message is full.
Off : Oldest message not erased from inbox automatically when
message is full.
C
H
6
112
Press [OK].
3
113
Page 59

SETTINGSSETTINGS
AUTO VIEW TXT
If the “Auto View Txt” is set to on, the user will be able to view the
message. If the “Auto View Txt” is set to off, the user can view the
message by entering SMS Menu-> Inbox.
Press [MENU], then select “Messaging”
1
menu, press [SETTINGS] or press
[MESSAGE], press [SETTINGS].
Press [AUTO VIEW TXT].
2
Select “On” or “Off” with the Navigation Key.
On : Text message will be displayed automatically.
Off : User able to retrieve the message from the inbox or based
on user input from interactive notification.
Press [OK].
3
AUTO RECEIVE
Press [MENU], then select “Messaging”
1
menu, press [SETTINGS] or press
C
H
6
[MESSAGE], press [SETTINGS].
Press [AUTO RECEIVE].
2
Select “On” or “Off” with the Navigation Key.
On : Pix msg downloaded automatically.
Off : User able to retrieve the message from the inbox or based
on user input from interactive notification.
SIGNATURE
Create a signature that can automatically be inserted at the end of a
message.
Press [MENU], then select “Messaging”
1
menu, press [SETTINGS] or press
[MESSAGE], press [SETTINGS].
Press [SIGNATURE].
2
To activate Signature function, put the cursor
on Insert Signature then select “Custom” by
using up or down direction keys. To deactivate
Signature function, select “None”.
To input “Signature”, put the cursor on Edit
3
Signature then enter Signature Edit window by
using up or down direction keys.
Press [OK].
4
CALLBACK#
Edits a default callback number so that the recipient can callback or
reply.
Press [MENU], then select “Messaging”
1
menu, press [SETTINGS] or press
[MESSAGE], press [SETTINGS].
Press [CALLBACK#].
2
Select “On” or “Off” with the Navigation Key.
C
H
6
Press [OK].
3
114
Select “On”, then input a callback number,
3
press [OK].
115
Page 60

SETTINGSSETTINGS
VOICE MAIL#
Press [MENU], then select “Messaging”
1
menu, press [SETTINGS] or press
[MESSAGE], press [SETTINGS].
Press [VOICE MAIL#].
2
Input a new voice call back number or edit
voice call back number.
To press [OPTIONS]. Select either a Wait (“W” appears)
or a Pause (“P” appears).
Press [OK].
3
BLOCK/UNBLOCK
Press [MENU], then select “Messaging”
1
menu, press [SETTINGS] or press
[MESSAGE], press [SETTINGS].
Press [BLOCK/UNBLOCK].
C
H
6
2
Select “Block”, “Unblock” or “View List of
Blocked Addresses” with the Navigation Key.
BLOCK : Enter the address to block.
UNBLOCK : Enter the address to remove from block.
VIEW LIST OF BLOCKED ADDRESSES : Display the blocked
list on LCD.
Press [OK].
3
ENTRY MODE
Sets an Entry Mode as a default. For example, if T9 Mode is the
default, its icon will appear.
Press [MENU], then select “Messaging”
1
menu, press [SETTINGS] or press
[MESSAGE], press [SETTINGS].
Press [ENTRY MODE].
2
Select “T9Word”, “Abc”, “ABC” or “123” with
the Navigation Key.
Press [OK].
3
QUICK TEXT
To edit the Quick Text message you have saved:
Press [MENU], then select “Messaging”
1
menu, press [SETTINGS] or press
[MESSAGE], press [SETTINGS].
Press [QUICK TEXT].
2
2.1. Select a message from the list.
Press [OK].
2.2. To add a new Quick Text message,
press [OPTIONS] to select “Add New”.
To edit the Quick Text message you have
selected, press [OPTIONS] to select
“Edit”, then enter text, press [SAVE].
To erase the saved Quick Text message,
3
press [ERASE].
Pre-defined quick text as below.
1. What’s up?/2. Let's meet./3. Check this out!/4. Whacha
doing?/5. Thanks/6. What do you think?/7. You’ve gotta be here
to enjoy this./8. Would you like to join me for a date tonight?/
9. On my way./10. Yes/11. You’re the best!/12. Call me.
C
H
6
116
117
Page 61

SETTINGS
FONT SIZE
Press [MENU], then select “Messaging”
1
menu, press [SETTINGS] or press
[MESSAGES], press [SETTINGS].
Press [FONT SIZE].
2
Select “Small”, “Large” or “Normal” with the
Navigation Key.
Chapter 7
MOBILE WEB 2.0
Press [OK].
3
This chapter addresses Internet services and web browsing.
For more detailed information contact your service provider.
STARTING INTERNET BROWSER
BROWSER MENU
C
H
6
118
119
C
H
7
Page 62

STARTING INTERNET BROWSER BROWSER MENU
LAUNCHING MOBILE WEB 2.0
Now you can access news, sports, weather, and e-mail from your
phone. Mobile Web 2.0 keeps you updated by providing access to
up-to-date information such as news, sports, weather and stock
quotes when you subscribe to Internet service with your service
provider. Please contact your service provider for a list of available
websites and service details.
To start your Internet browser and access
1
websites through your wireless handset press .
BROWSER MENU
The browser menu lists the actions necessary to operate the browser.
press , then press [MENU].
VZW HOME
When the “VZW Home” item is selected from the Browser Menu,
the phone displays the homepage.
To display the homepage.
1
Press , then press [MENU] .
BACK
When the “Back” item is selected from the Browser Menu, the phone
displays the previous page in the history.
To return to the previous page.
1
C
H
7
Press , then press [MENU] .
FORWARD
When the “Forward” item is selected from the Browser Menu, the phone
displays the next page in the history. This is only available if the user has
navigated backward in the history.
REFRESH
Selecting the “Refresh” item from the Browser Menu refreshes the
current page.
To select “Refresh”.
1
Press , then press [MENU] .
HISTORY
The history list is available from the Browser Menu and the user may
delete all items from the history.
To select “History”.
1
Press , then press [MENU] .
ADDRESS
Selecting the “Address” item from the Browser Menu displays the
URL of the current page.
To select “Address”.
1
Press , then press [MENU] .
CLEAR MEMORY
The user may clear cache, history, cookies and auto fill from the
memory.
To clear browser memory.
1
Press , then press [MENU] .
C
H
7
To forward to the next page.
1
Press , then press [MENU] .
120
121
Page 63

BROWSER MENU
BROWSER MENU
SETTINGS
To select “Settings”.
1
Press , then press [MENU] .
Downloads : Selecting the “Downloads” item allows the user to
Restart Browser : Selecting “Restart Browser” causes the
Scroll Mode : Selecting the “Scroll Mode” item is selected from
Send Referrer : When the “Send Referrer” item is selected
Key Press Timeout : When the “Key Press Timeout” item is
C
H
7
Connection Timeout : When the Connection Timeout item is
enable/disable downloading images, background
sounds, and object downloads when a URL is
accessed.
history and cache to be cleared and returns
the user to the homepage.
the Settings menu allows the user to select
between time-square scrolling (referred to as
block scrolling) and smooth scrolling and to
select the speed of the smooth scrolling.
Scrolling speed choices are medium, fast, and
slow.
from the Settings menu, the browser allows
the user to turn on or off sending the referrer
URL.
selected from the Settings menu, the
browser allows the user to set the key
press timeout as fast, medium or slow.
Medium is 1.5 seconds, slow 2 seconds
and fast is 1 second. The key press
timeout is the period of time after which
the cursor auto-advances to the next
entry position. In most cases, a single key
can be used to enter more than one
character. Each time the key is pressed
the last character of the line is replaced
by the next choice for that key. As long
as the same key is re-pressed within key
press timeout, the last character cycles
between all the choices for the key.
selected from the Settings menu, the
browser allows the user to set the
connection timeout. The connection
timeout determines how long the
browser will wait for a response from
the network for a network request.
ADVANCED
Selecting the “Advanced” item in the Browser Menu displays the
advanced menu items.
To select “Advanced”.
1
Press , then press [MENU] .
About... : When the “About” item is selected information about
the browser version, copyright information and
certificate information is displayed.
Encryption : Selecting the “Encryption” item from the Advanced
Menu enable the user access to Encryption
features of the browser.
1. Authentication : The “Authentication” item in the
Encryption menu allows the
user to toggle authentication
caching.
2. Root Certificate : The “Root Certificate” item in
the Encryption menu allows
the user to view the list of
certificates.
3. Current Certificate : The “Current Certificate”
item in the Encryption
menu allows the user to
view the current certificate.
This is only available if a
secure connection is
established.
EXIT
When the “Exit” item is selected from the Browser Menu, the user exits
out of the browser and is returned to the phone idle mode.
To exit browser.
1
Press , then press [MENU] .
C
H
7
122
123
 Loading...