

Page 1

Not first, but best !!!
Not first, but best !!!
UDC-2400MAP Setting
Manual
UTSOL
co., LTD.
UTSOL co., LTD.
UTSOL co., LTD.
Page 2
Not first, but best !!!
UTSOL
co., LTD.
UTSOL co., LTD.
Page 3

Not first, but best !!!
UDC-2400MAP Specification
No. Items Specifications
2-1 CASE- ABS
2-2
2-3 Connector-Wafer 15001WR-08 1.5mm Pitch - 8Pin
2-4 Connector-Wafer 15001WR-06 1.5mm Pitch - 6Pin
2-5 Antenna PCB Pattern Antenna
2-6 Operating Temperature -20℃ ~ +50℃
2-7 Operating Humidity < 50℃ 95%RH
2-8 Operating Indicator Light Blue, Red LED 3216(Back fire Type)
2-9
2-10
PCB FR4 T=1.2mm
UTSOL
Connector-Wafer 20037WR-02 2.0mm Pitch – 2Pin
co., LTD.
Weight Under 130g ( the stand exclusion )
Dimension Under 74 x 114 x 27.5mm(W x H x D)
UTSOL co., LTD.
Page 4
Not first, but best !!!
UDC-2400MAP Function
No. Items Specifications
3-1 Communication Frequency RF RX 2.4GHz
3-2 Sensor X-Band Doppler Sensor
UTSOL
3-3 Power Consumption Under 2W (DC 24V -> Under70mA )
3-4
3-5
3-6
3-7
Input Motion Detect Signal
Output RF TX, RS232C TX, PWM Signal(For LED Control)
RF Sensitivity 15 ~ 30m (360°)
Input Operating Voltage The normal voltage : DC 12~48V
co., LTD.
Adapter available( 12, 48V )
UTSOL co., LTD.
Page 5

Not first, but best !!!
1. What is Setting
Contents
2. Compositions
3. How to connect Setting Header
4. Command of Setting
UTSOL
co., LTD.
5. Setting procedure at site
6. Important points
UTSOL co., LTD.
Page 6

Not first, but best !!!
1
What is Setting
What is Setting:
You can set the dimmer factors by the communication
-Install the basic application
-Pc operation system: Window xp
-Hyper Terminal: UART communication utility
-Usb2Uart driver: uart to usb communication utility
UTSOL
co., LTD.
UTSOL co., LTD.
Page 7
Not first, but best !!!
2
Compositions
UTSOL
co., LTD.
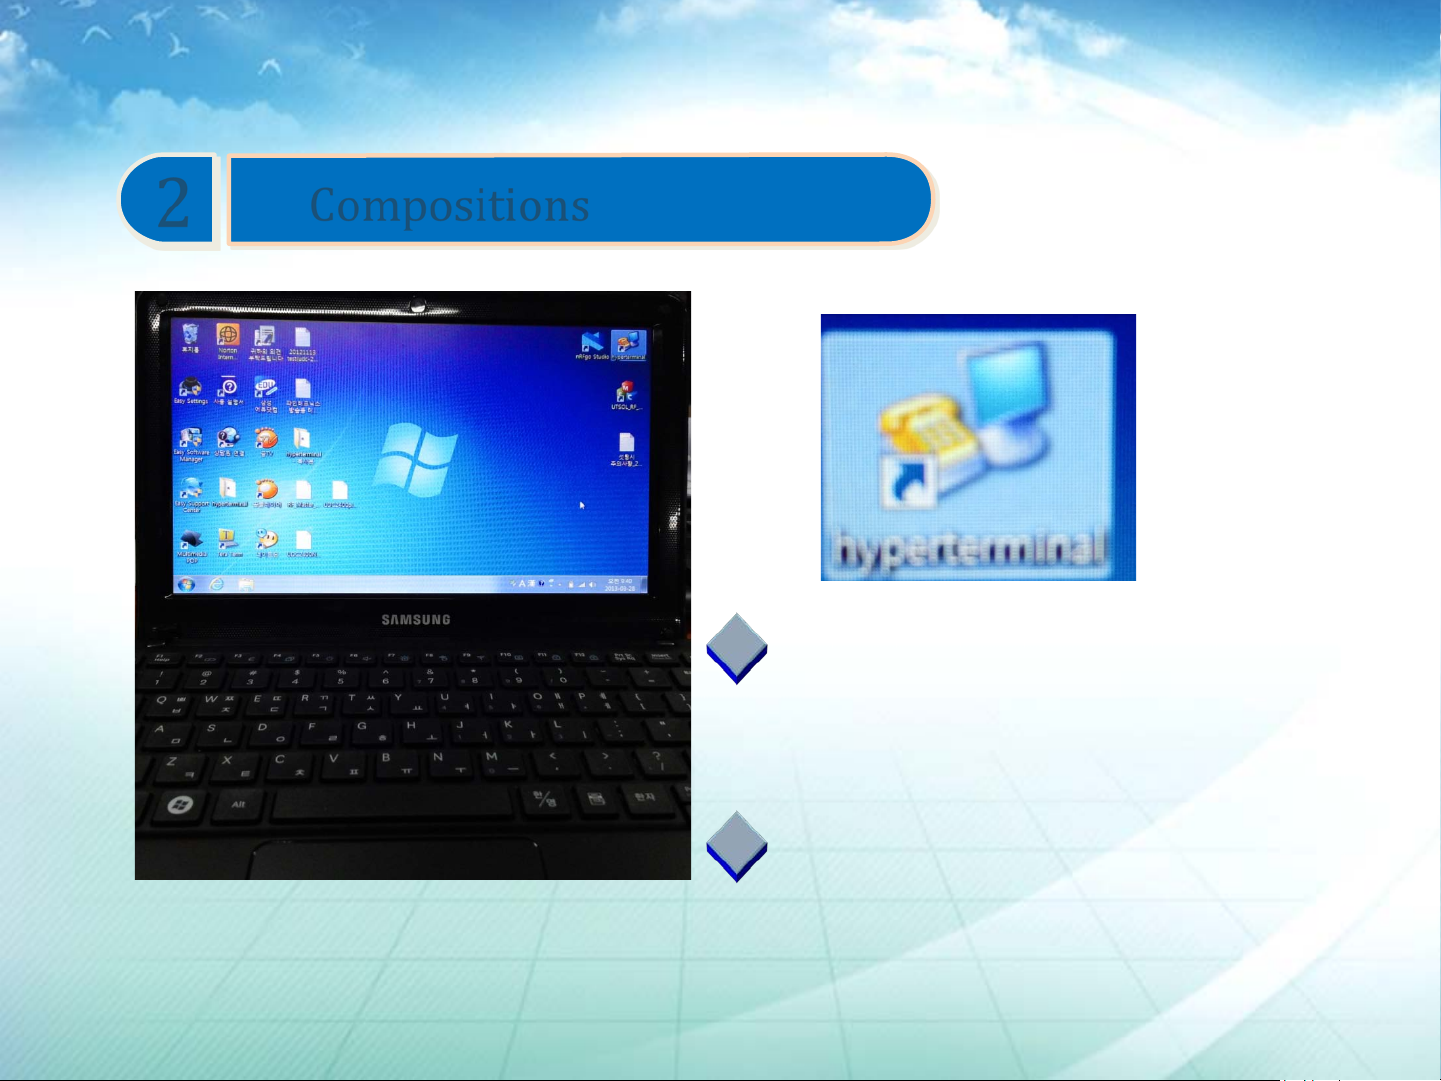
UART Communication utility
(Hyper terminal)
Install the cp2104 driver to pc
Connect usb cable to pc
UTSOL co., LTD.
Page 8
Not first, but best !!!
3
How to connect Setting Header
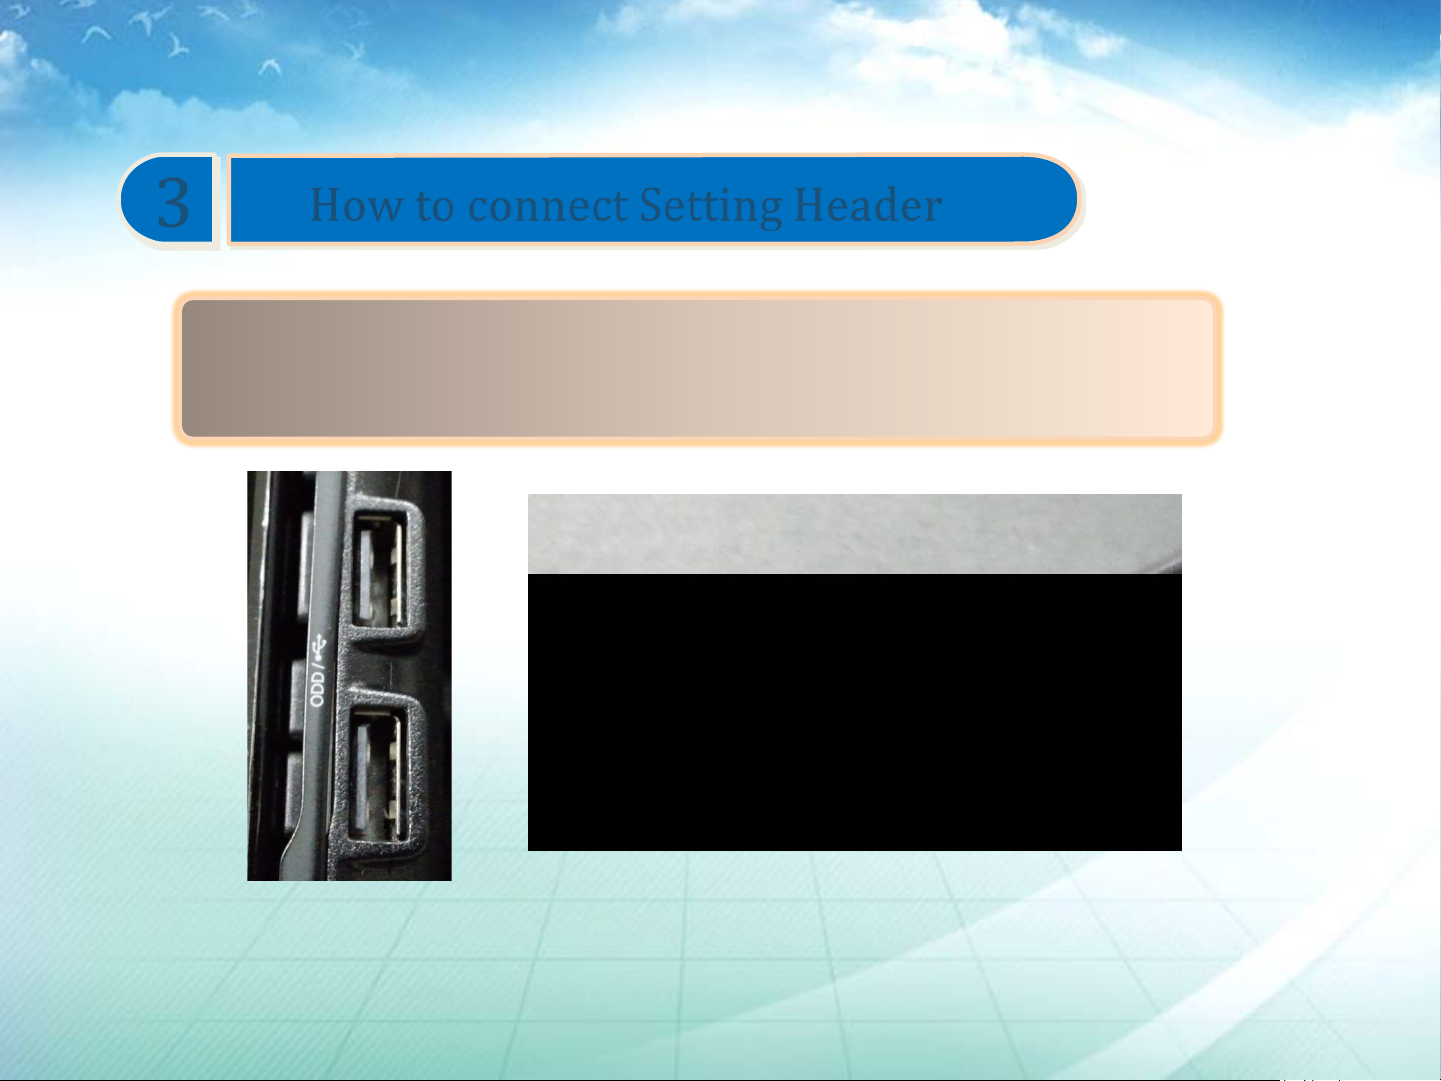
.Connect usb cable to pc usb port
UTSOL
co., LTD.
UTSOL co., LTD.
Page 9
Not first, but best !!!
3
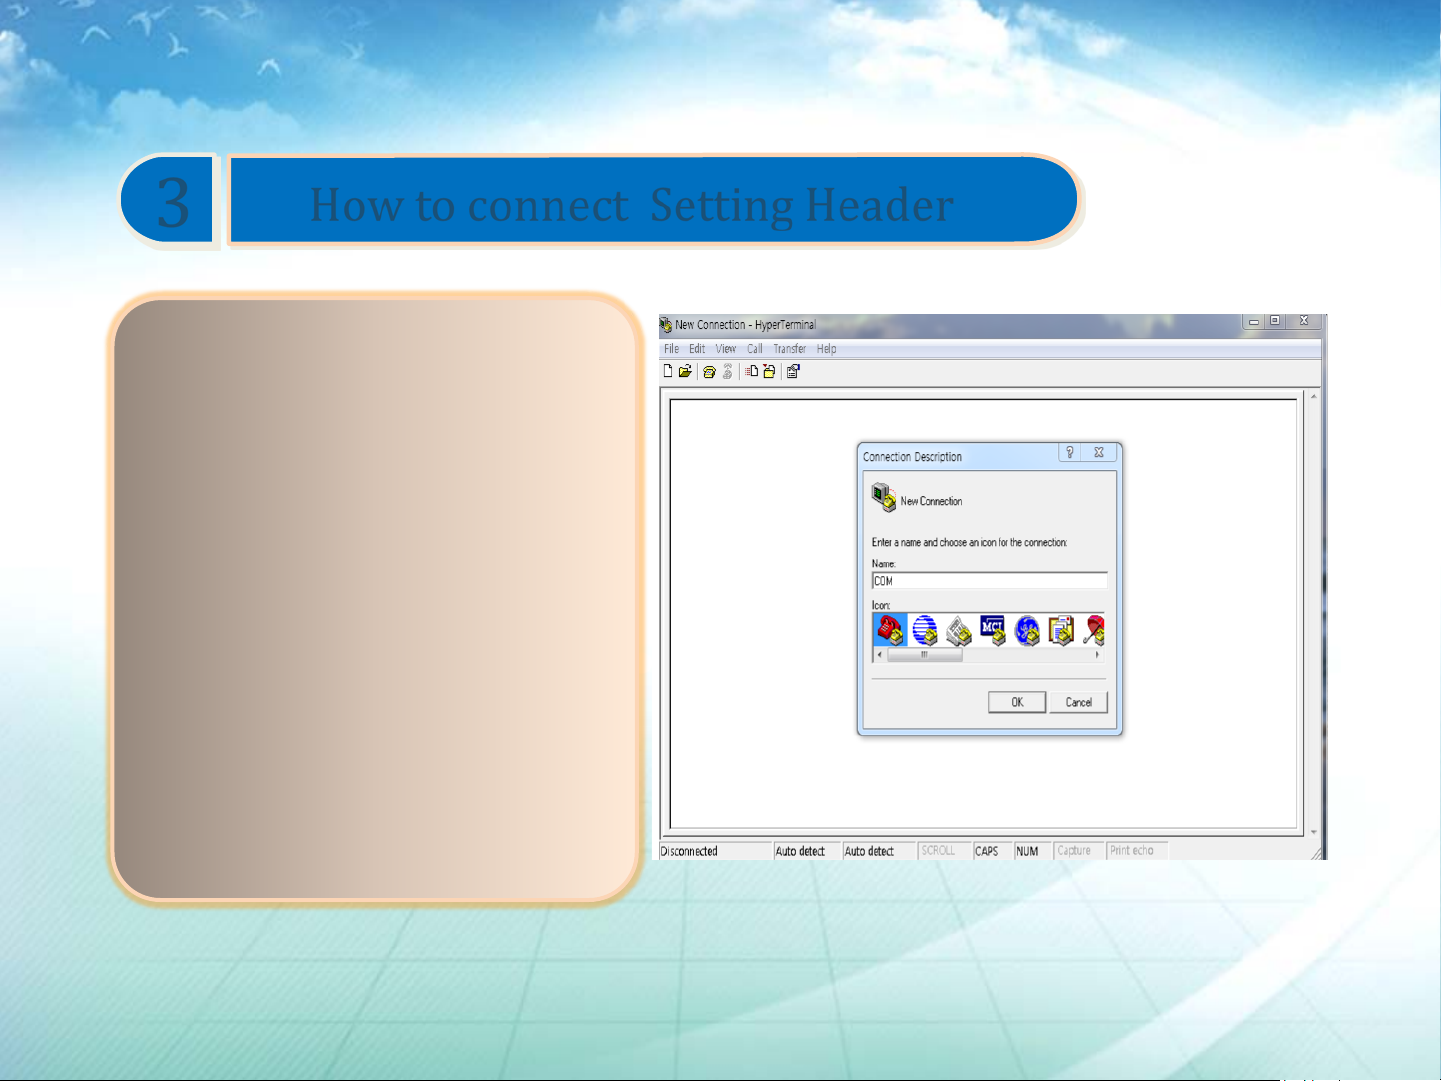
.After connect setting header
to pc, run the hyper terminal .
.See hyper terminal display
.Input your temporary name
for port
.Press Ok
How to connect Setting Header
UTSOL
co., LTD.
UTSOL co., LTD.
Page 10
Not first, but best !!!
3
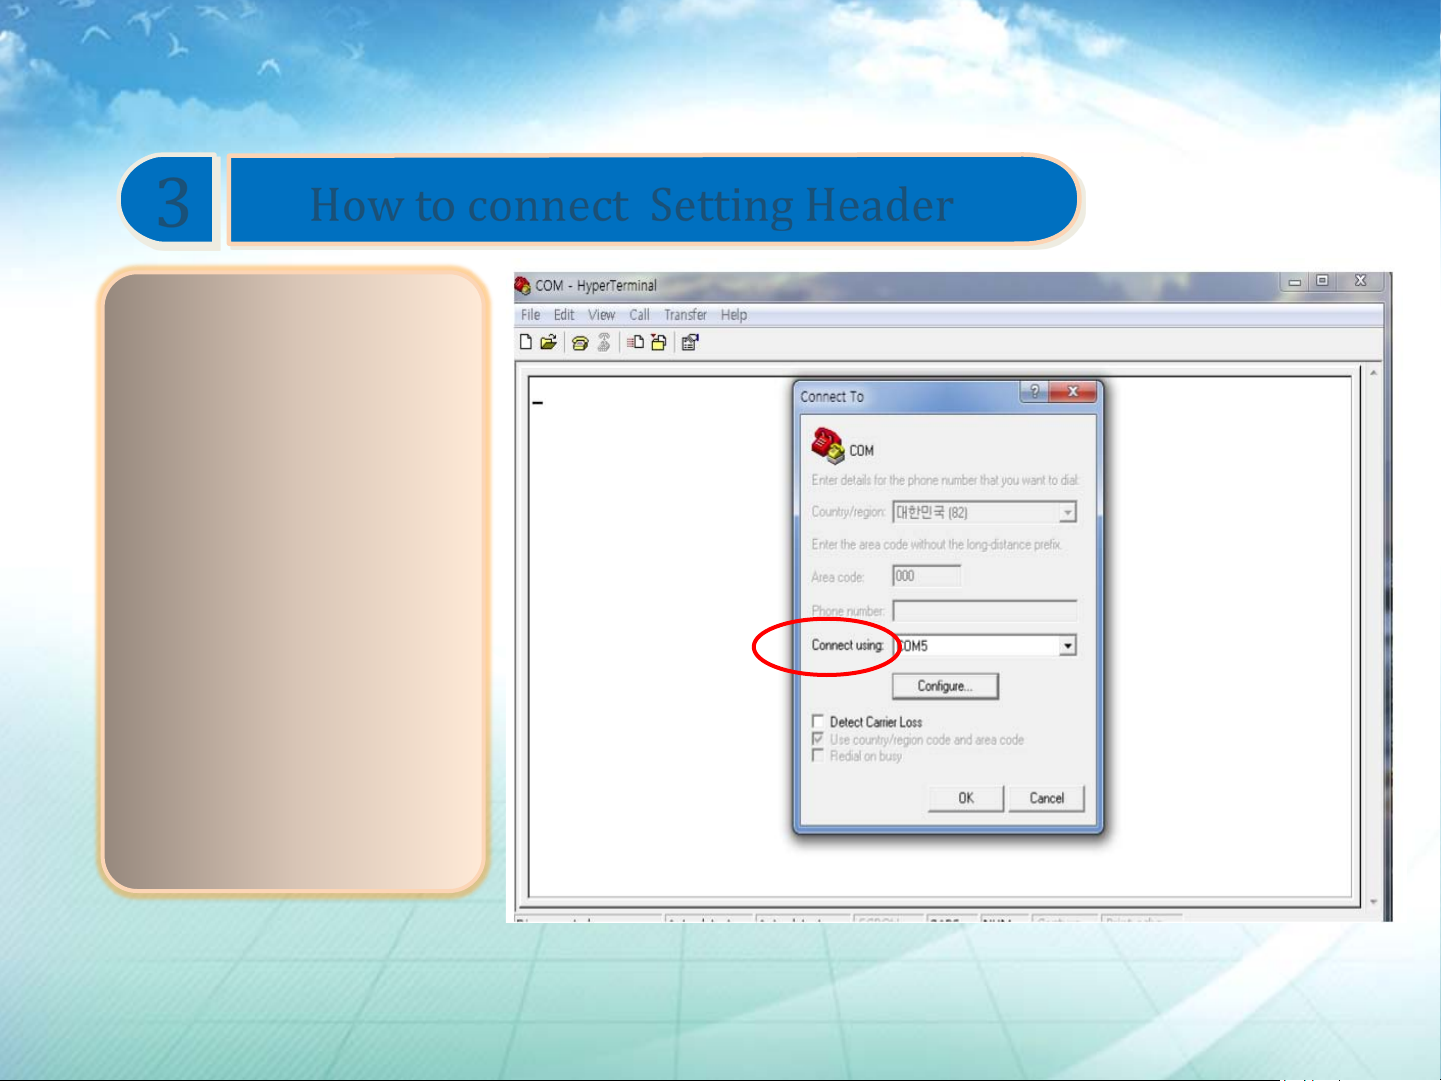
. Find the connecting
port in connect
using category
. In configure, next
page continue
How to connect Setting Header
UTSOL
co., LTD.
UTSOL co., LTD.
Page 11
Not first, but best !!!
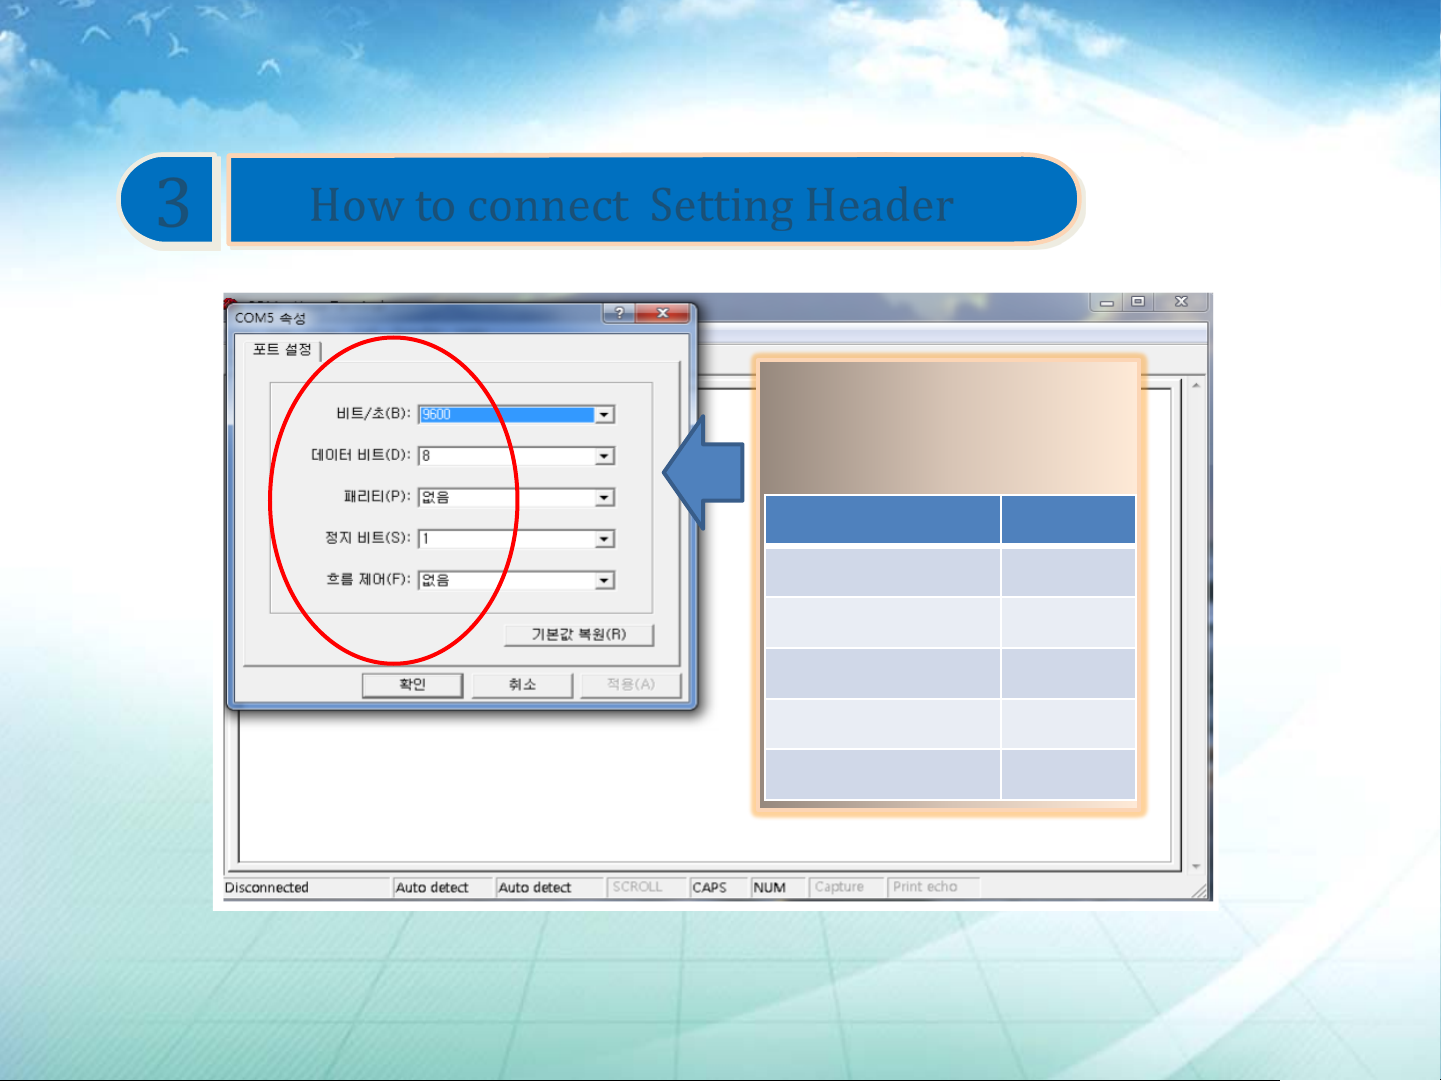
9600
bits
8
Parity
No
Stop bit
1
No
How to connect Setting Header
3 3
RF Setting 기의 연결방법
Set as like below
UTSOL
Parameter Value
Buad Rate
co., LTD.
Flow control
UTSOL co., LTD.
Page 12
Not first, but best !!!
How to connect Setting Header
3 3
RF Setting 기의 연결방법
UTSOL
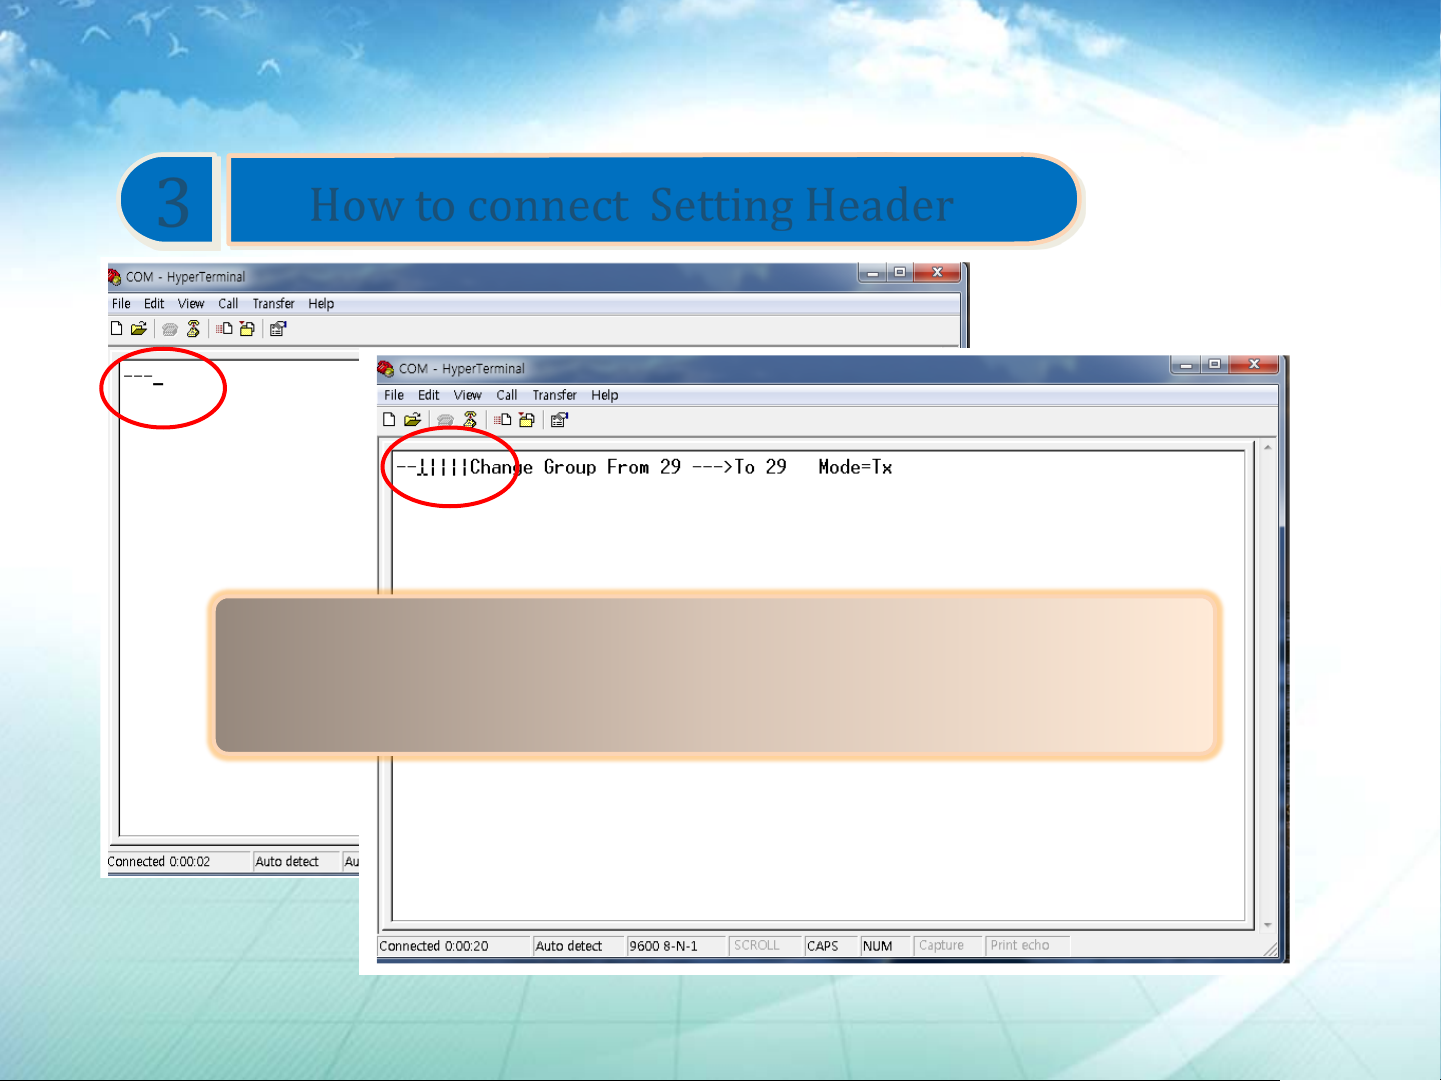
• When connection is successfully finished, you can see display
•This display is standby state, you can input new command
co., LTD.
UTSOL co., LTD.
Page 13
Not first, but best !!!
4
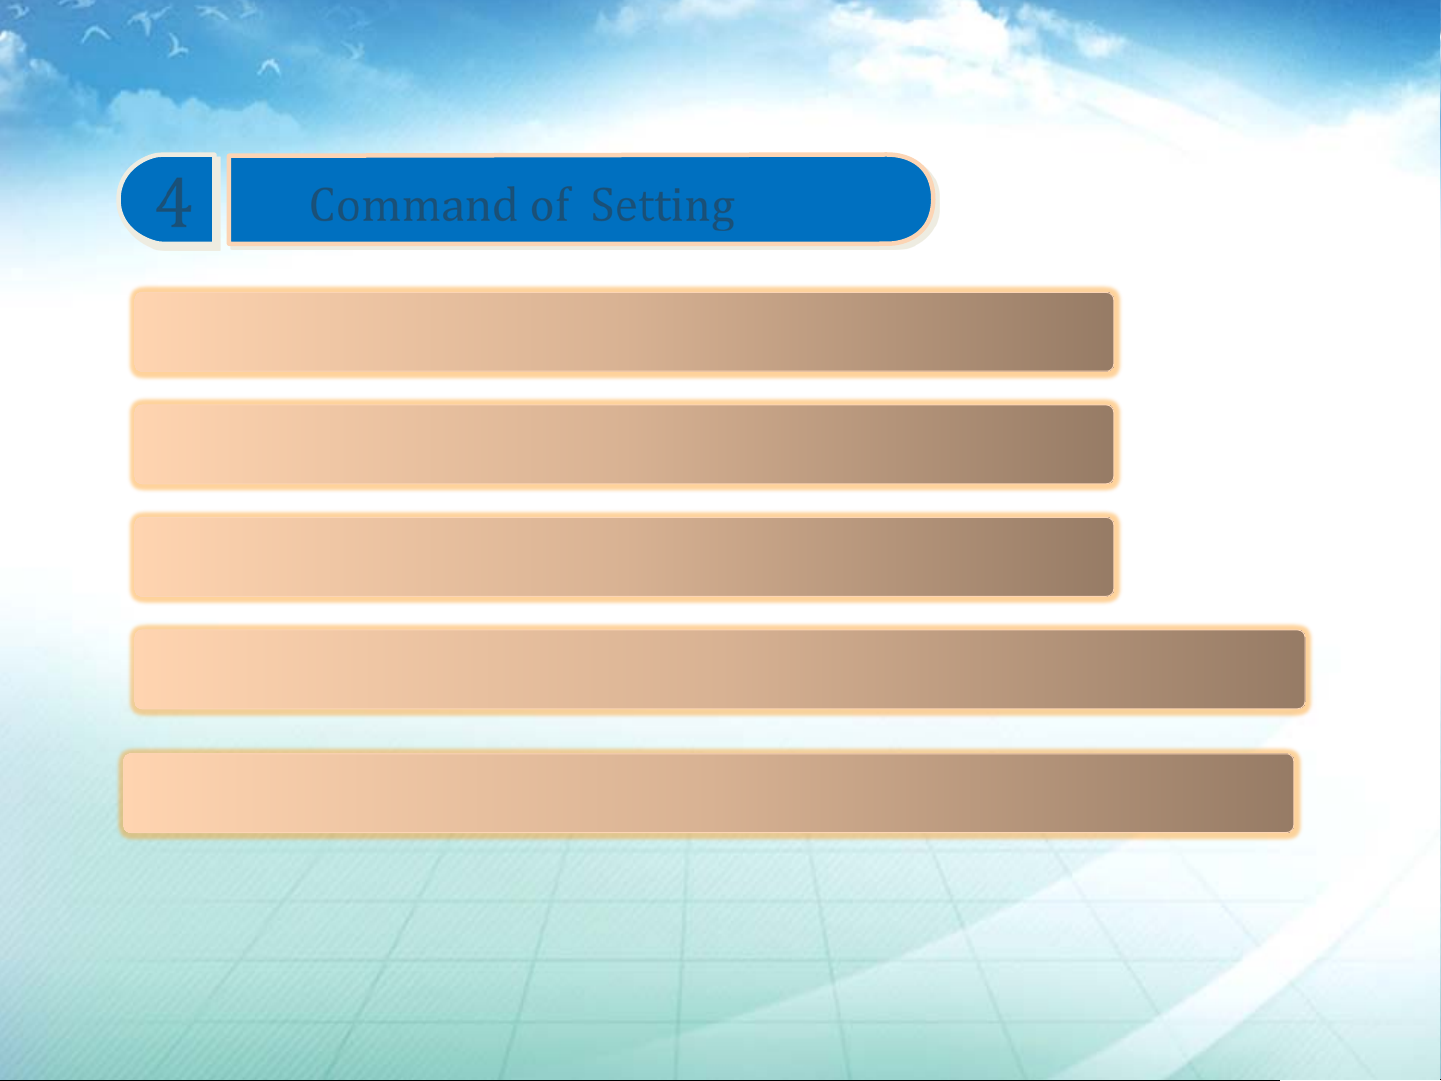
‘o’ or ‘O’:(Oigin) Meaning may be all same value in the site.
‘f’ or ‘F’:(Find) Meaning find the group id.
Command of Setting
UTSOL
‘g’ or ‘G’:(Group) Meaning set what group to go change.
‘i’ or ‘I’:(input) Meaning input new role to dimmer and set new factors.
co., LTD.
‘t’ or ‘T’:(Test) Meaning test the setting status in site after all dimmer set.
UTSOL co., LTD.
Page 14
Not first, but best !!!
99
5
10
1
4
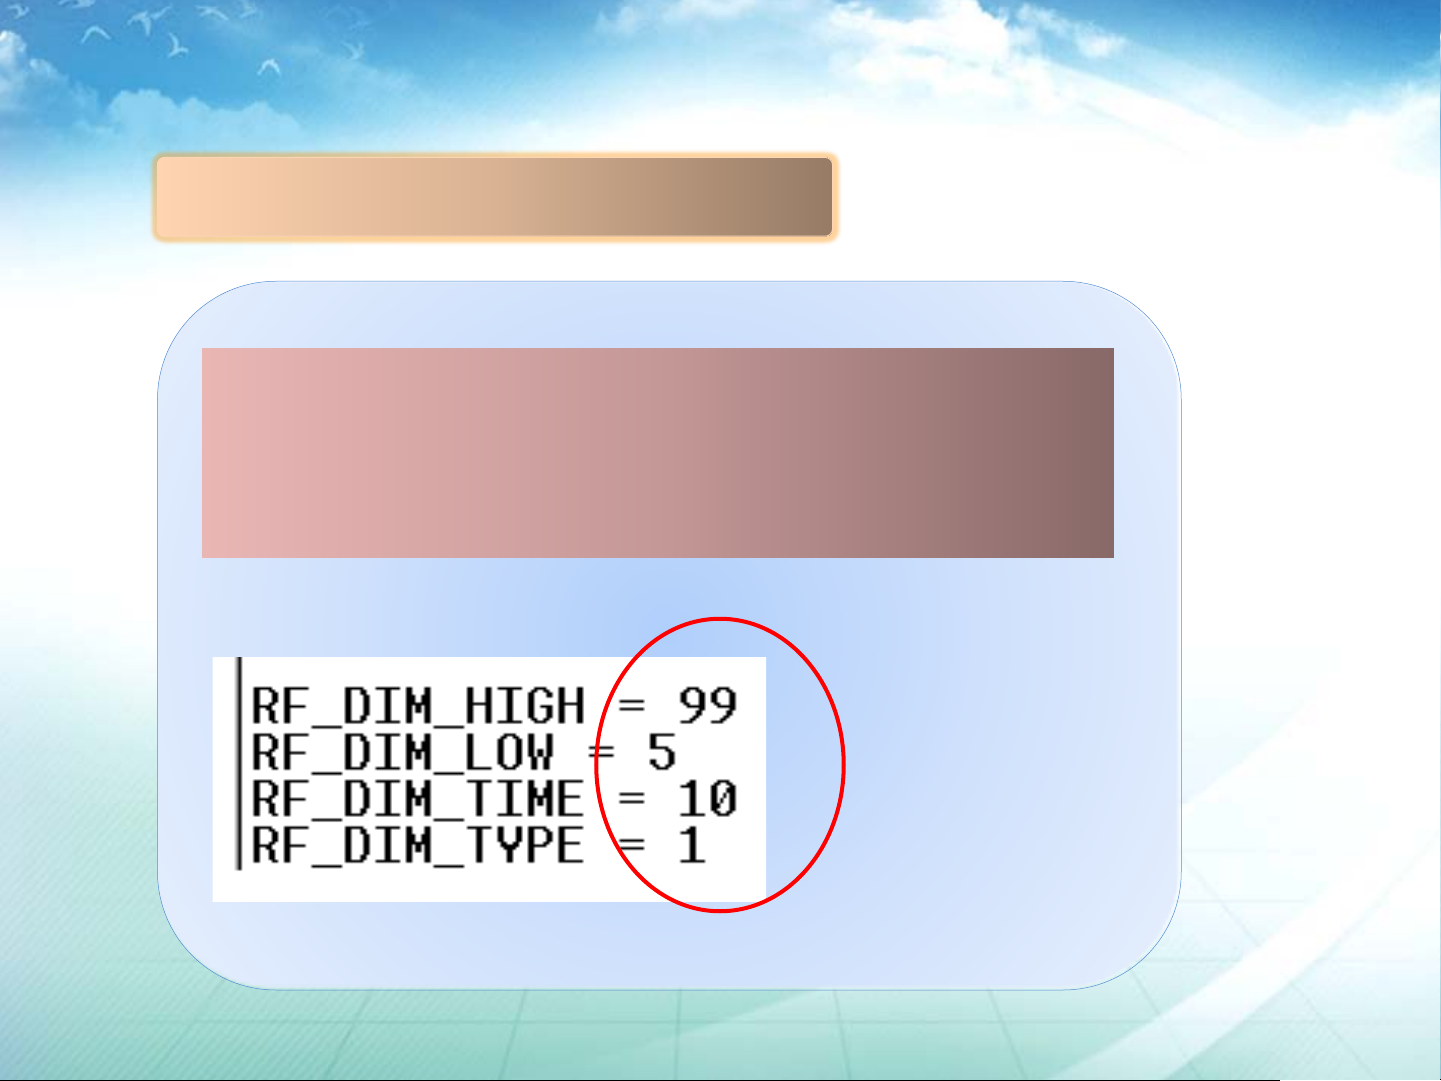
1.1 Command ‘O’
RF_DIM_HIGH
RF_DIM_LOW
RF_DIM_TIME
RF_DIM_TYPE
Command of Setting
Item Value explain
UTSOL
co., LTD.
High (0~99)
Low(0~99)
Dim time(sec)
Type: 0, 1
. High: There is moving, Lamp is max brightness value,
. Low: There is no moving, Lamp is min brightness value after Dim time
. Type : 0 immediately go from max to min,
1 slow go from max to min.
UTSOL co., LTD.
Page 15
Not first, but best !!!
1. 2 How to input ‘O’ command
1)If you press ‘o’ or ‘O’ in standby state.
2)you can input parameters, step by step.
3) when you finished to input one parameter, then press space
bar, you can go to next parameter.
4) All finished to input, go to standby state automatically/
UTSOL
co., LTD.
UTSOL co., LTD.
Page 16
Not first, but best !!!
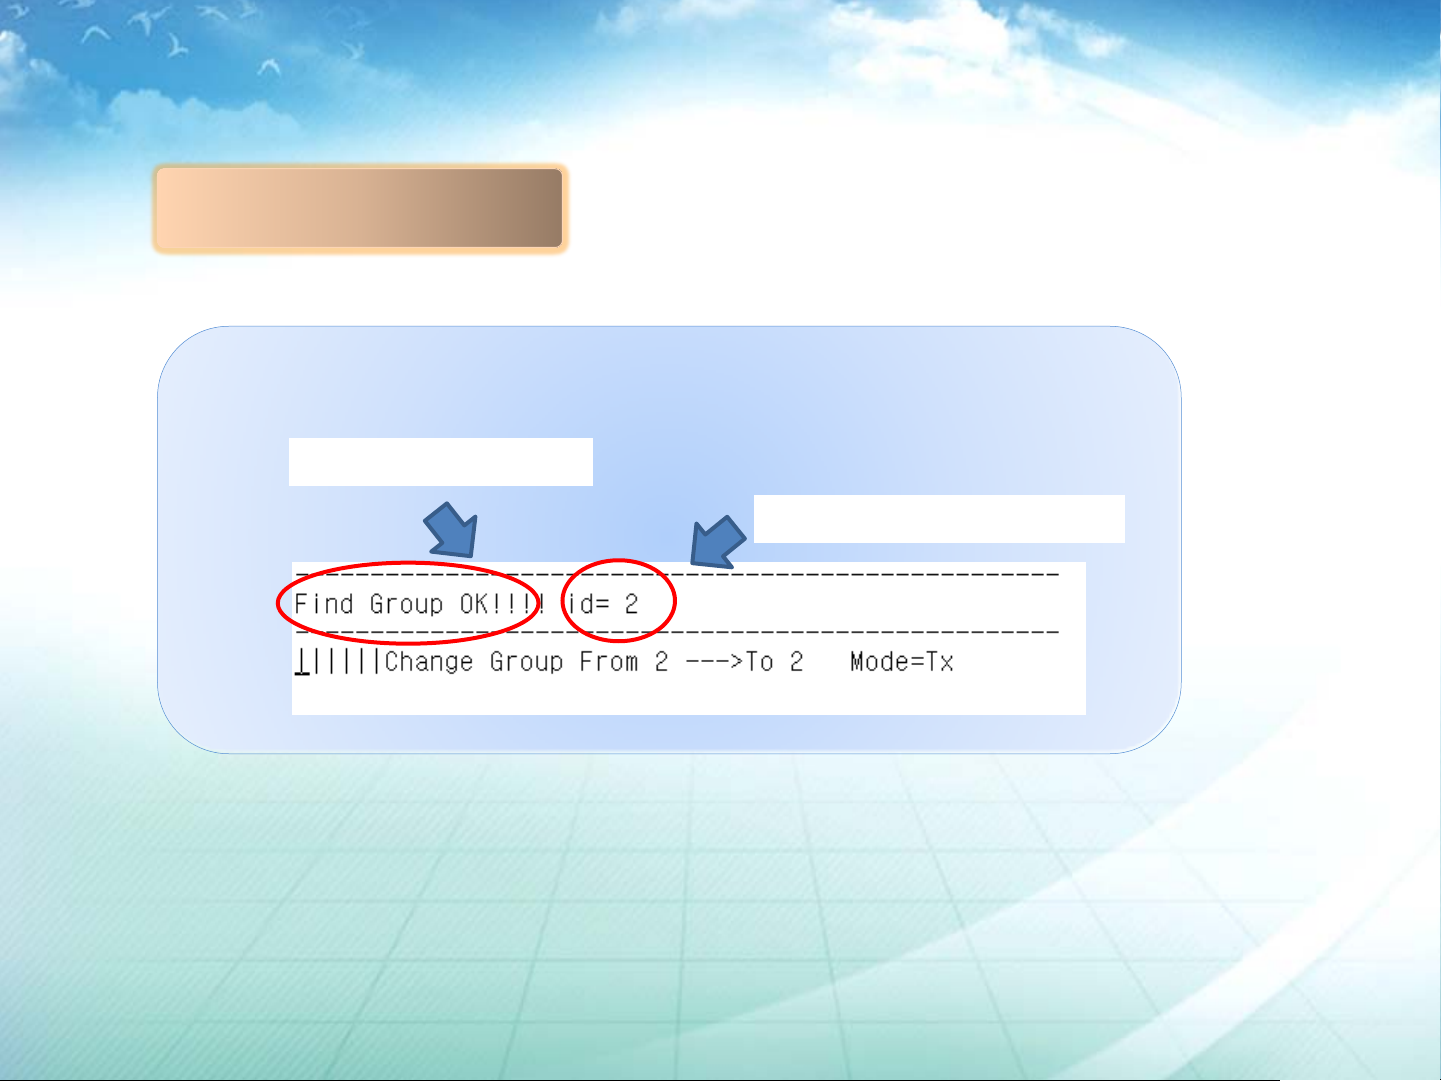
2.1 Command ‘F
Use to find what group id is set to target Dimmer.
Find success
UTSOL
Current Dimmer Group id
co., LTD.
UTSOL co., LTD.
Page 17
Not first, but best !!!
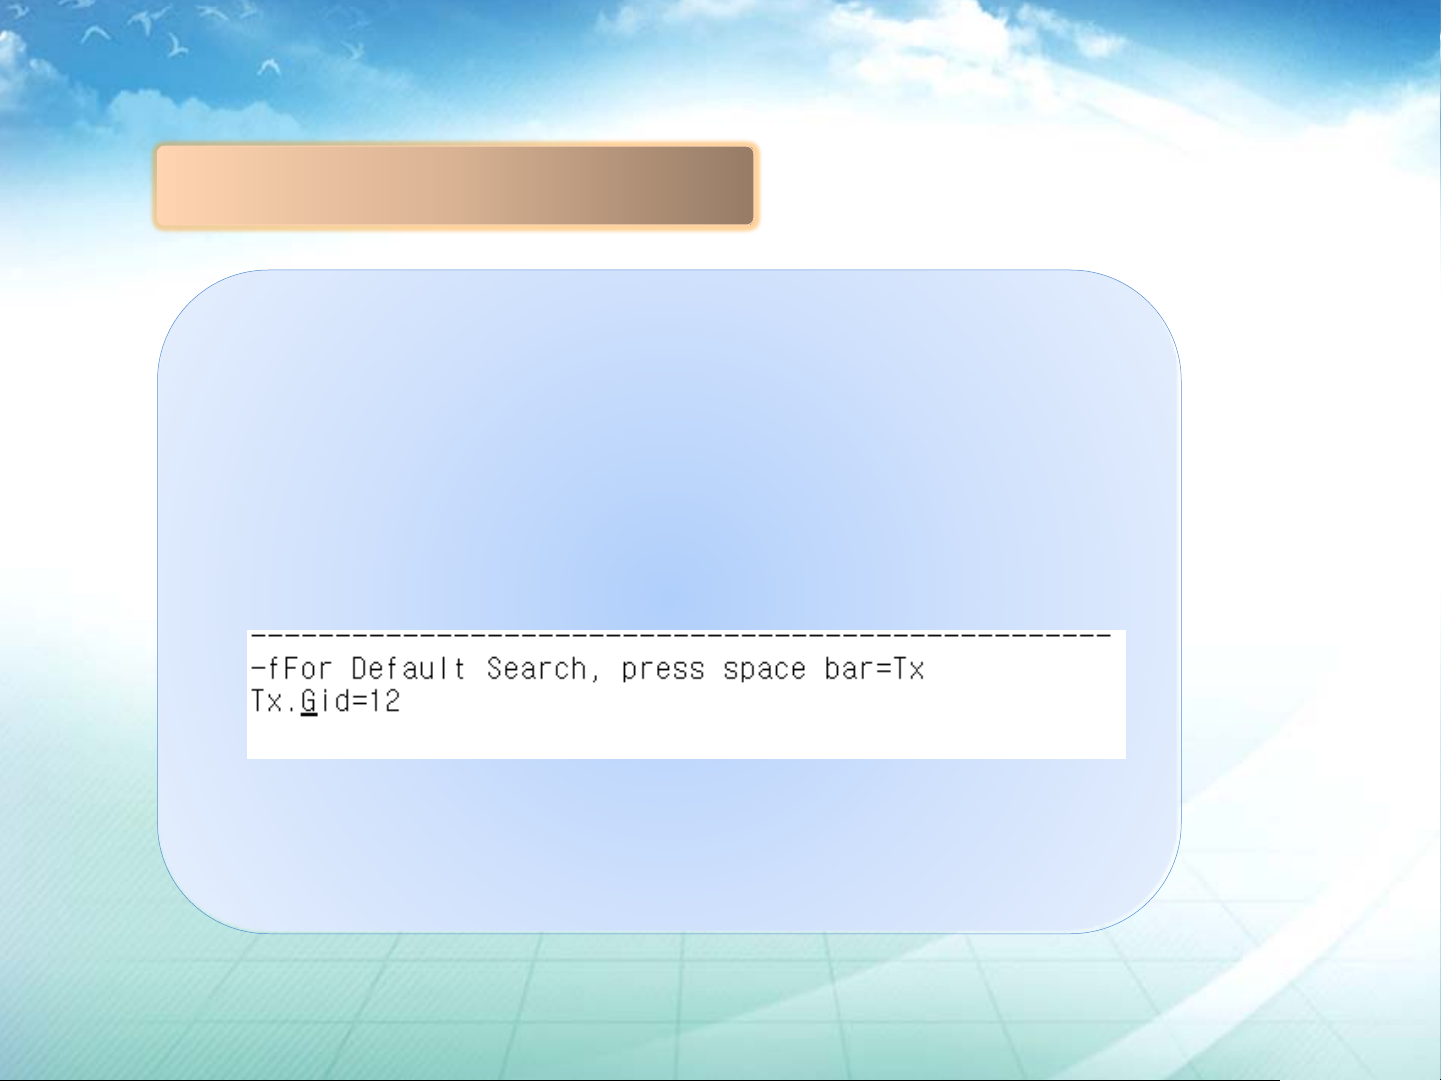
2. 2 How to input ‘F’ command
. Attach the setting header to Dimmer as possible as near.
. In standby state, press ‘f’ or ‘F’, Finally rf setting header issue
the result
UTSOL
co., LTD.
UTSOL co., LTD.
Page 18
Not first, but best !!!
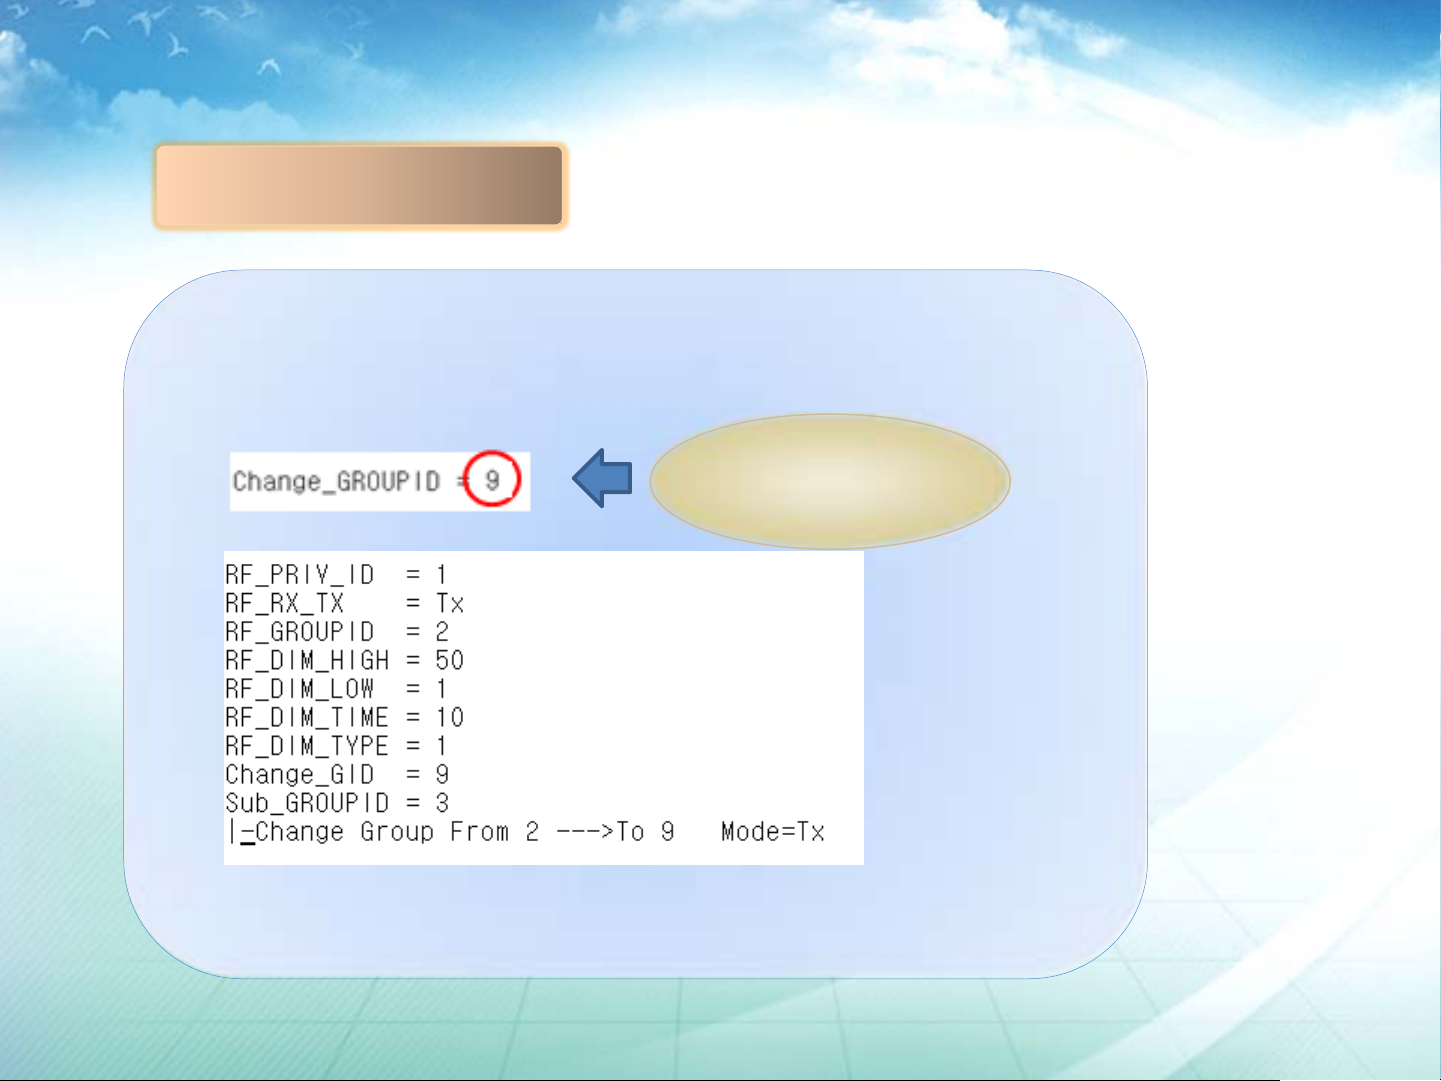
3.1 Command ‘G’
. Set the new group id to be changed
UTSOL
.New group id to be
changed
co., LTD.
UTSOL co., LTD.
Page 19
Not first, but best !!!
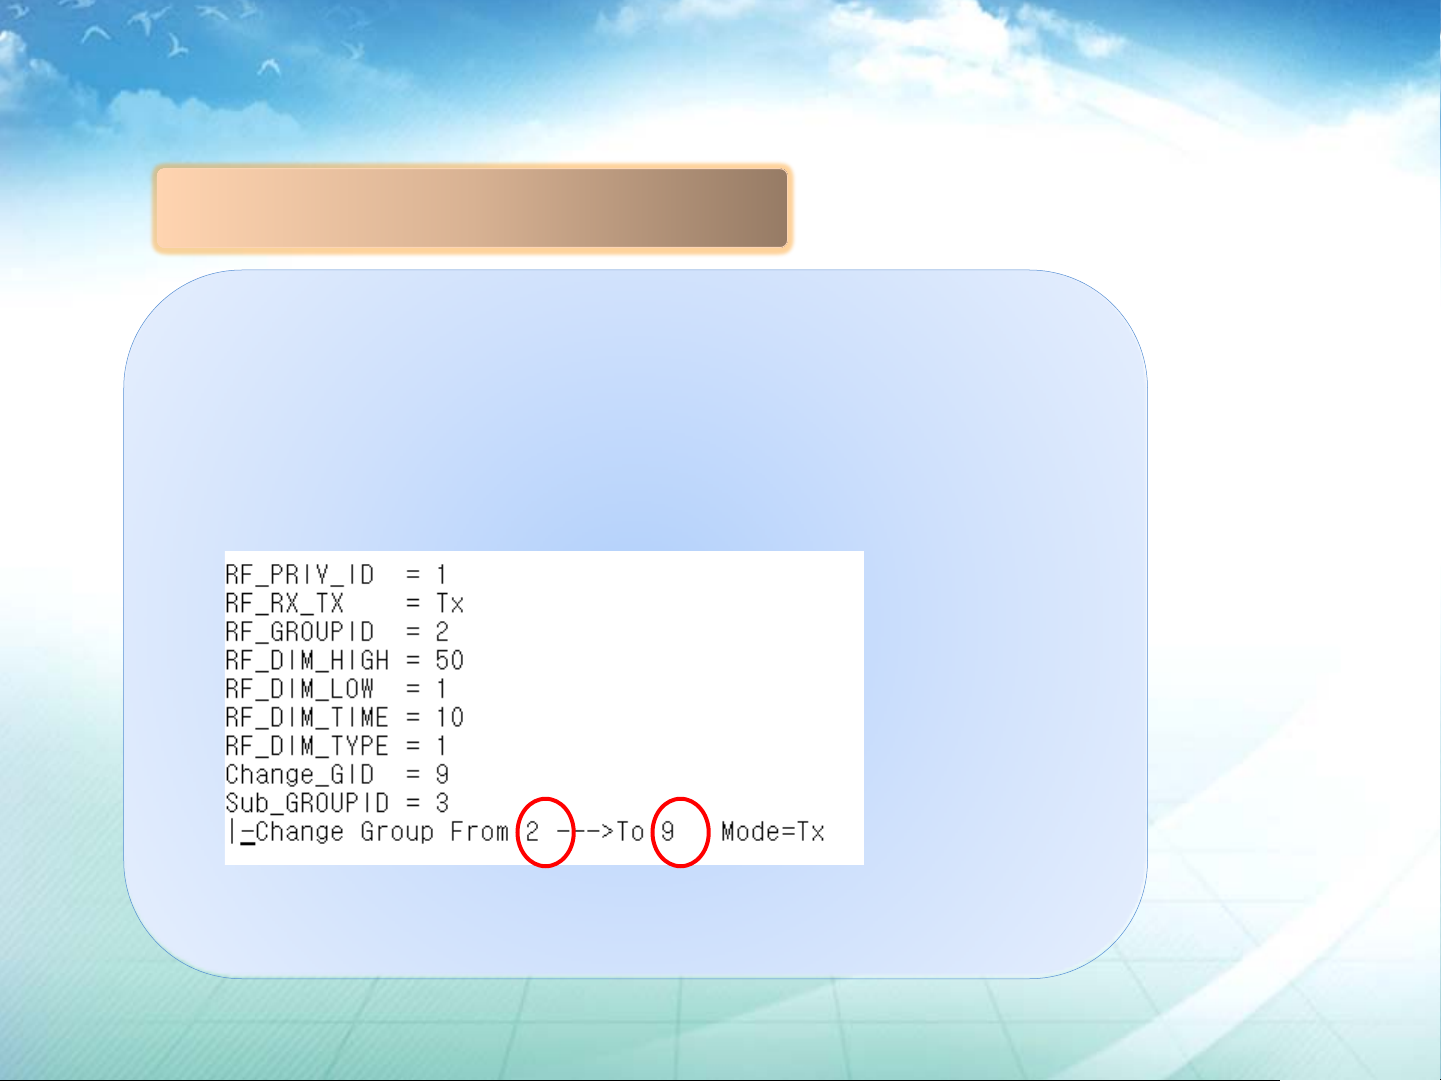
3. 2 How to input ‘G’ Command
.Press ‘g’ or ‘G’ , group number and space bar in standby state.
. Setting header display as like below that is now ready to
change the group id 2 to 9.
UTSOL
co., LTD.
UTSOL co., LTD.
Page 20
Not first, but best !!!
rx
0
Rx Only
tx
1
srx
2
msrx
3
t.b.d
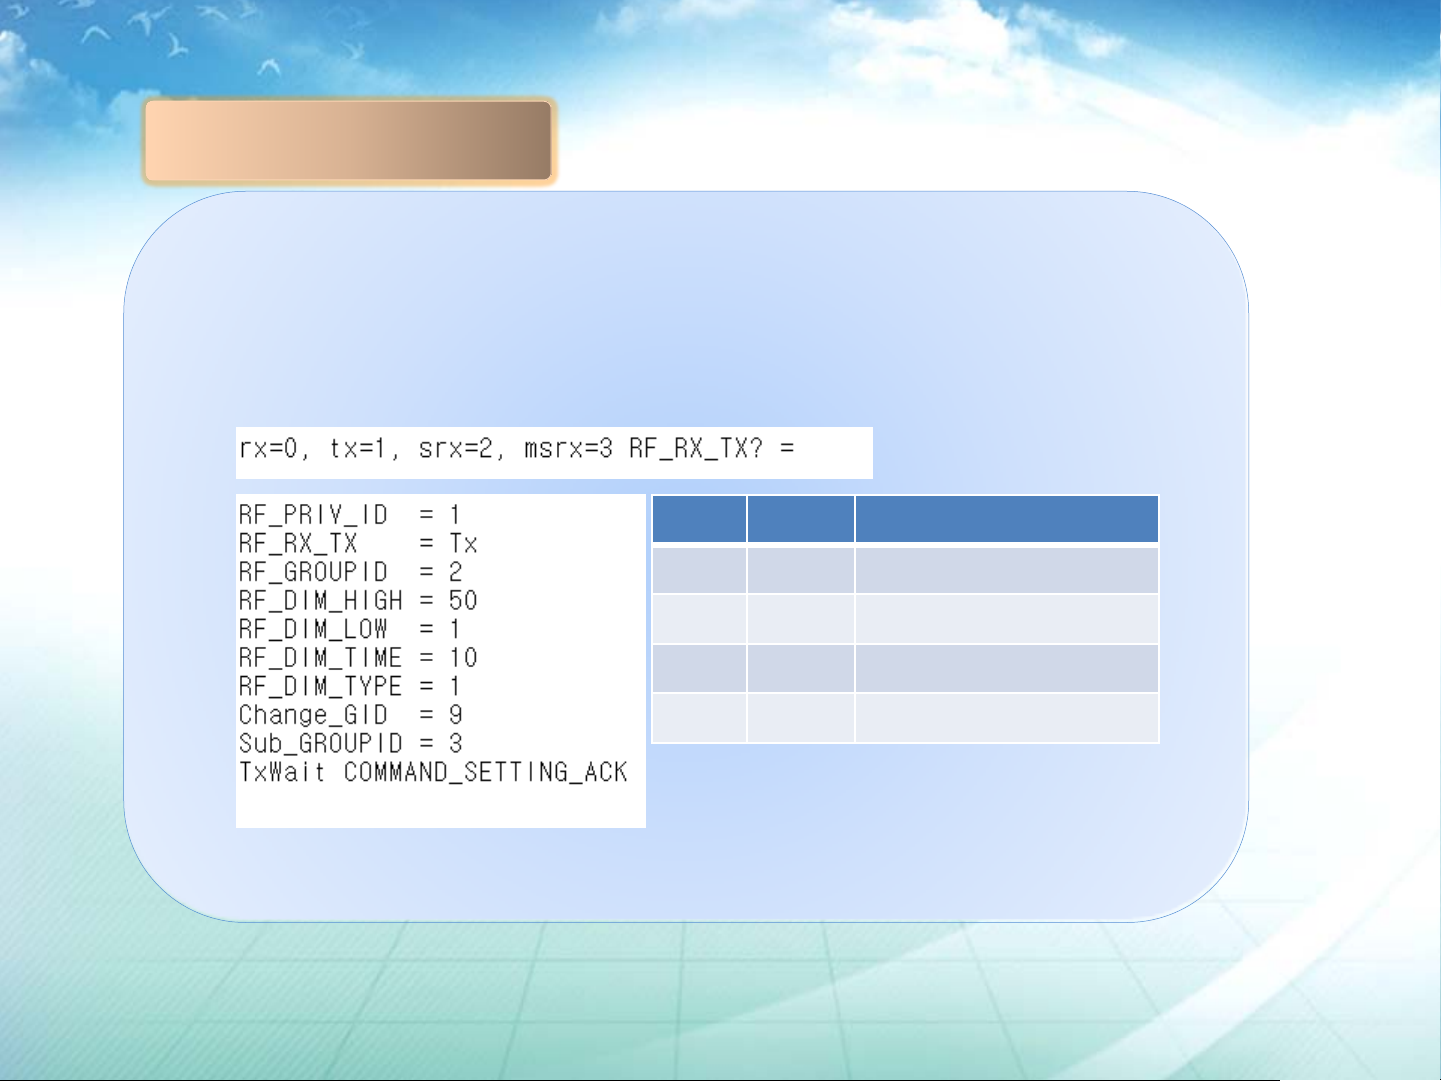
4. Command ‘I’
. Press ‘i’ in the standby state, then display as like below.
. Select one role to dimmer and input the number
. Press space bar, then all parameters set to target dimmer
now(all before commands set to setting header temporary)
UTSOL
role value Descrioption
Tx(in Group, Master)
co., LTD.
Report sensor signal to Tx
UTSOL co., LTD.
Page 21
Not first, but best !!!
4. 2 How to input ‘I’ Command
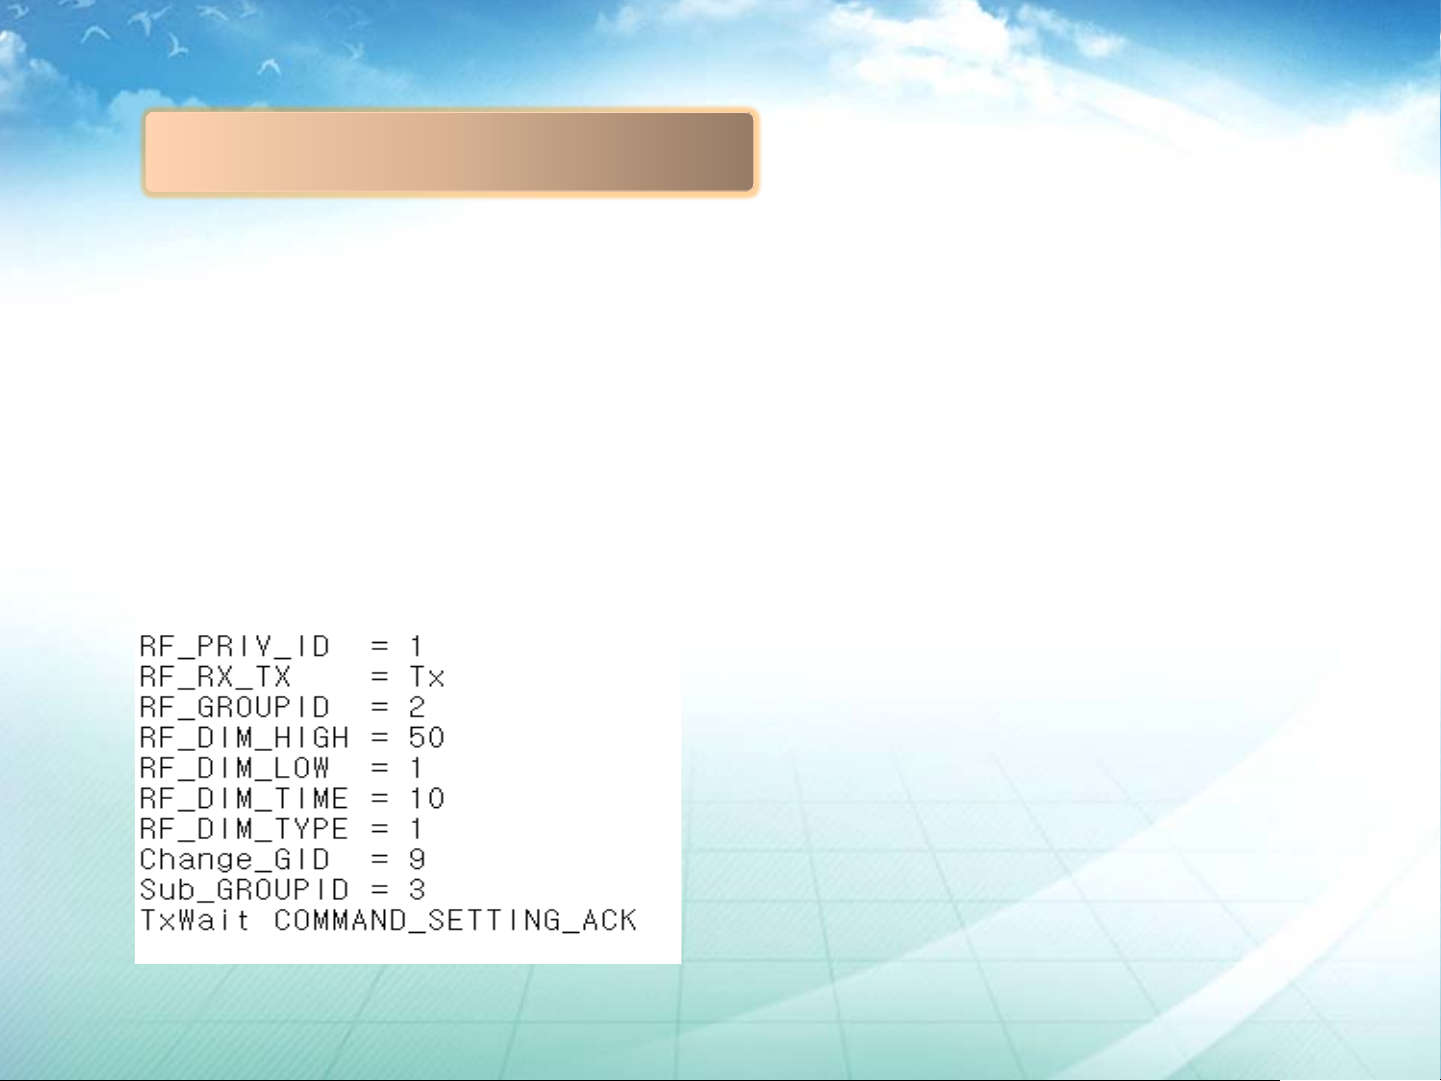
• in standby state, press ‘I’, then setting header display the screen to select
dimmer role.
• then select the one role number, input the number and press space bar.
• Finally the target dimmer is changed the new parameters.
•This is mean that all before commands set the parameters to setting header
temporary and ready to send the parameters to target dimmers.
•Finally the ‘I’ command can send the parameters from setting header to target
dimmers.
UTSOL
co., LTD.
UTSOL co., LTD.
Page 22
Not first, but best !!!
4
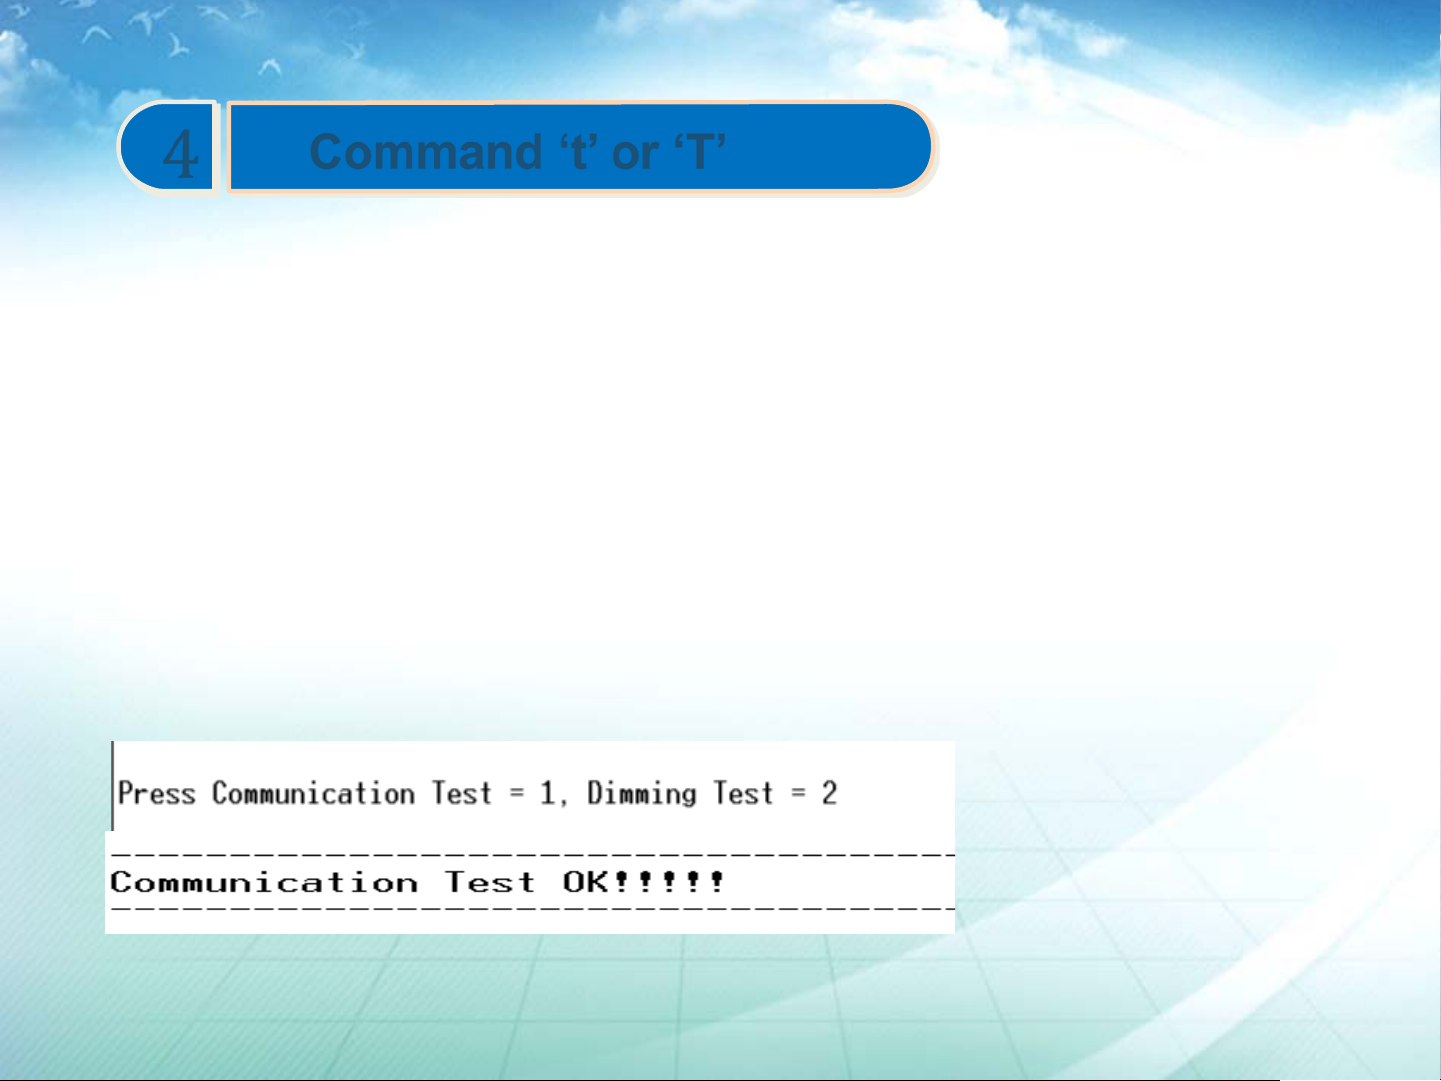
. How to test group
•This is useful to test group when all dimmers are set to one site.
•This command transfer the default parameters to Tx of the to be tested group area
•In standby state, press ‘t’, then display communication test mode, dimming test
mode.
•If press 1, all same group id dimmers go to low level, so you can identify the
dimmers position and can check the region.
•If you like to change some dimmer position, you have to change the dimmer group
id
•If you finish the group test, press ‘I’ and role to tx(1), all parameters can be return
to original.
Command ‘t’ or ‘T’
UTSOL
co., LTD.
UTSOL co., LTD.
Page 23
Not first, but best !!!
4
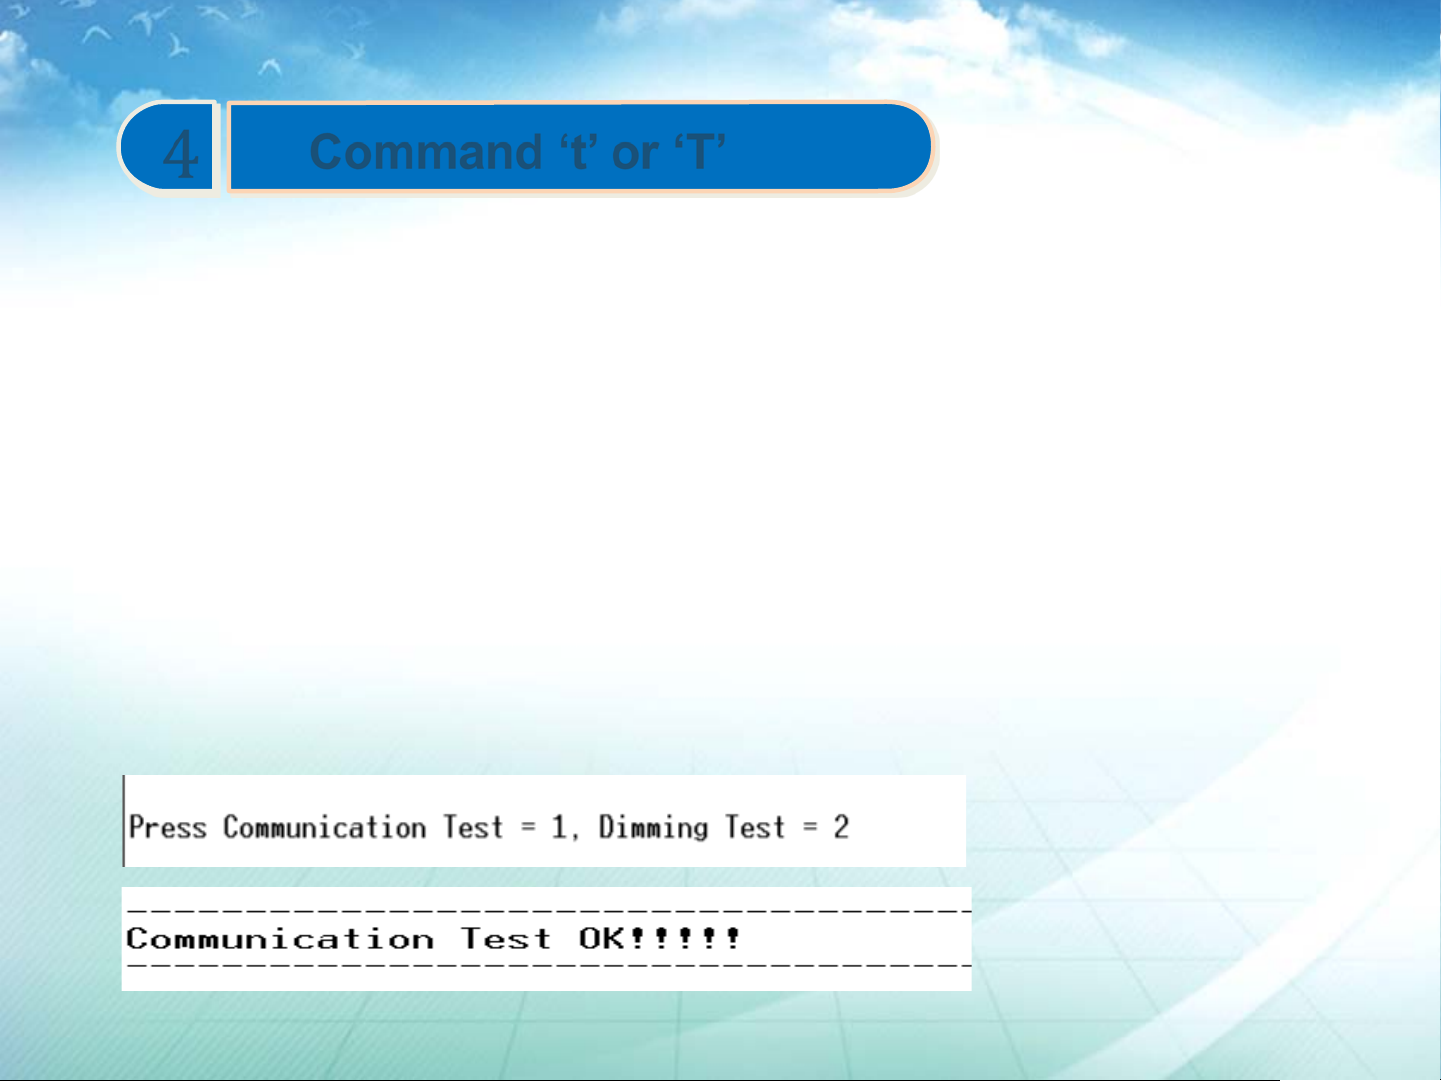
. How to test Dimming
•This is useful to test dimming operation when all dimmers are set to one site.
•This command transfer the default parameters to Tx of the to be tested dimming
operation
•In standby state, press ‘t’, then display communication test mode, dimming test
mode.
•If press 2, dim time is set 3sec that is easily see the sensor operation when there is
no moving in 3sec
•Even though there is no moving after 3sec, dimming operation is not started, you
have to check the sensor operation or setting status of dimmers.
•If you finish the group test, press ‘I’ and role to tx(1), all parameters can be return
Command ‘t’ or ‘T’
UTSOL
co., LTD.
to original.
UTSOL co., LTD.
Page 24
Not first, but best !!!
5
1. Execute ‘o’ command to set the setting header for the group parameter.
2. Execute ‘g’ command to set the setting header for the group.
3. Execute ‘f’ command to fine the dimmer group id.
4. First Execute ‘I ‘ for all Rx dimmers in same group.
5. Second Execute ‘I’ for all SRx dimmers in same group.
6. Finally Execute ‘I’ for Tx and check blink led of Rxs and SRxs.
7. Execute the group test, if you like change group for some dimmers, change
Setting procedure at site
UTSOL
co., LTD.
the group id for the dimmers.
8. Execute the dimming test, if there are some problems, you check the
dimmers setting parameters.
UTSOL co., LTD.
Page 25

Not first, but best !!!
6
1. When attach the setting header to dimmer to be set, the other dimmer that is
not set should be away from dimmer more than 3m or should be power off.
And attach the setting header to target dimmer to be set as possible as closer.
2. When command ‘f’, ‘I’ or ‘t’ is correctly finished, the target dimmer re-start
from power on that mean the lamp off and go to on again. If when ‘f’, ‘I’ or ‘t’
commands are transferred to target dimmer, the other lamp that is attached
the other dimmer seems like to re-start, maybe the other dimmer received ‘f’, ‘I’,
or ‘t’ command from setting header also. Please watch carefully the other
lamps behavior
Important points
UTSOL
co., LTD.
UTSOL co., LTD.
Page 26

Not first, but best !!!
UTSOL
• www.utsol.co.kr
co., LTD.
UTSOL co., LTD.
 Loading...