

Page 1
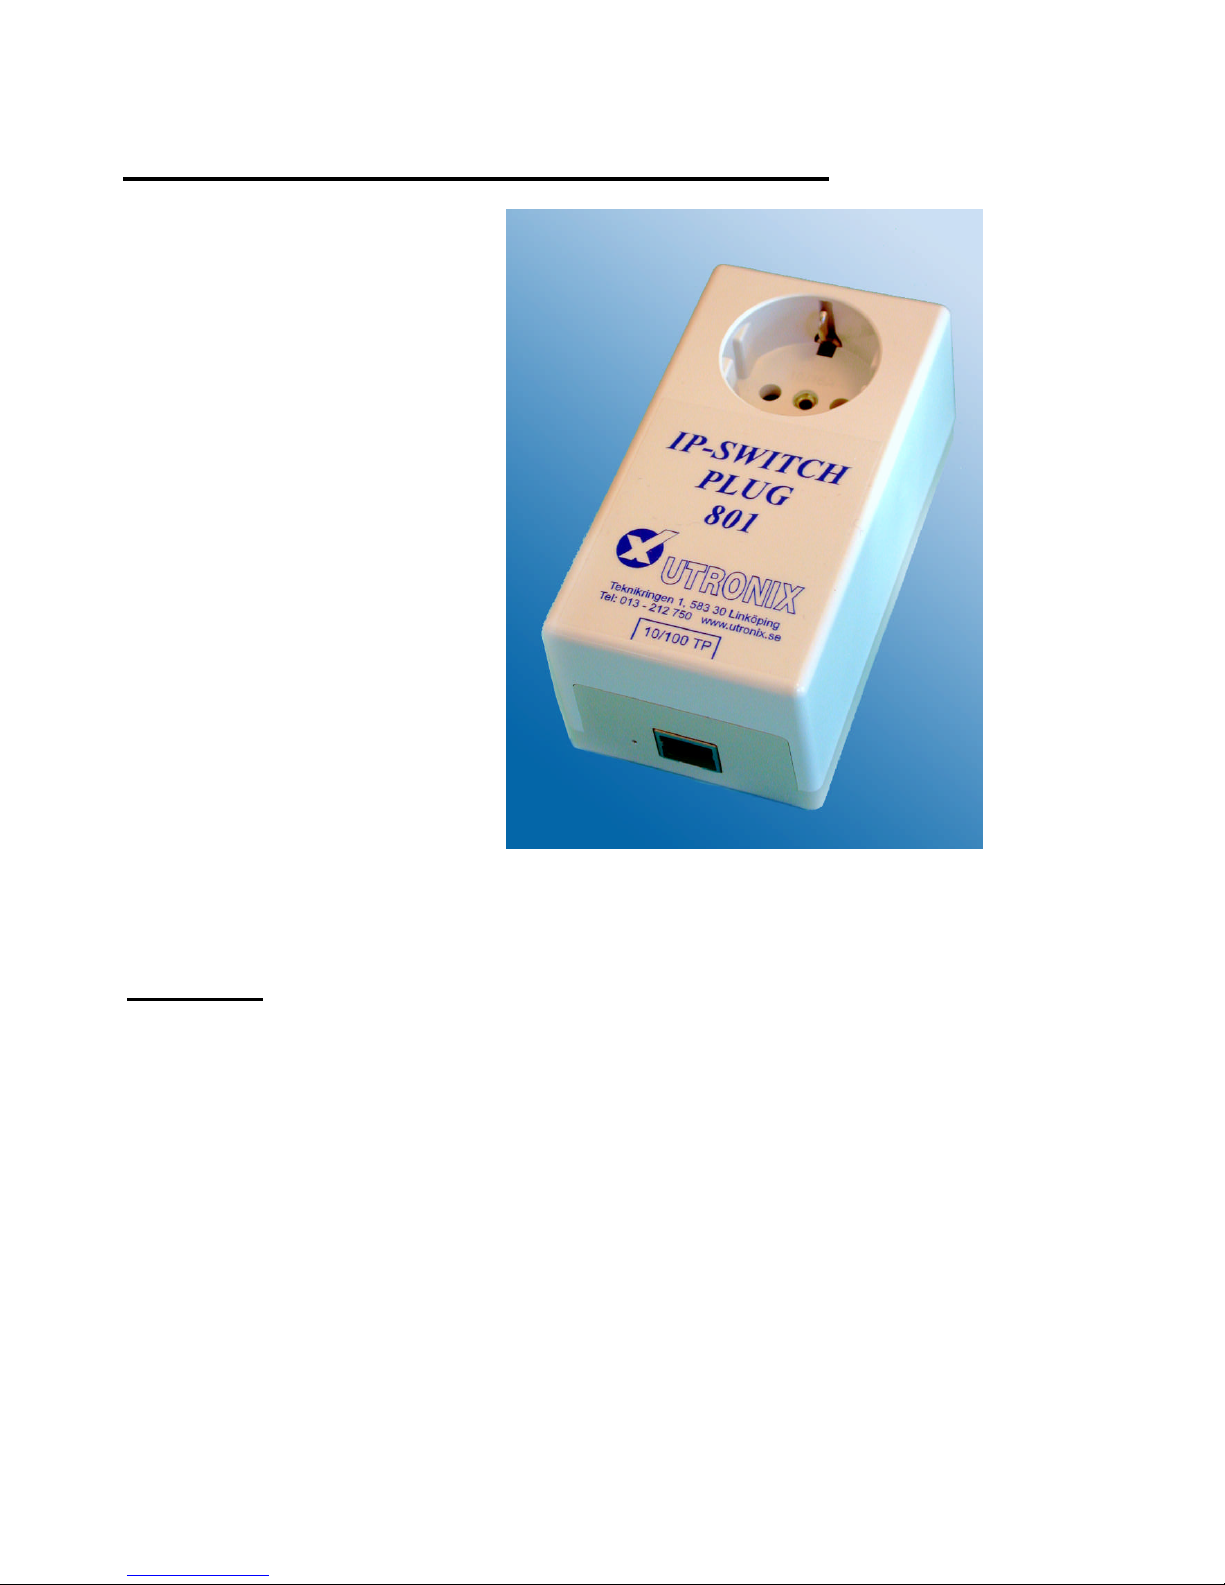
Users guide for IP-SwitchPlug801
1. Overview.
2. Main page.
3. Reset page.
4. Configuration page
5. Setting of IP-address.
6. Security aspects.
7. Controlling from PC software.
8. Default settings.
9. Technical specifications.
10. Getting started!
1. Overview
IP-SwitchPlug801 can switch the power on or off
in one 230V outlet.
Control is made with a web interface via ethernet
or from user software.
On the main page (index.htm) there are buttons for
switching on/off the outlet.
On the reset page (reset.htm) there are in addition
a button to make a temporary switching off for a
specified time
This time can be configured on the configuration
page. There it is also possible to configure the
delay to switch on after a power on.
The box can have usernames/passwords for user
and admin.
Admin always have full rights. It is also
possible to set rights for read/write for users
without password.
Chose between Basic Authorization (RFC2617)
or Digest Authorization (RFC2617).
You can add names above the button on the
web pages.
There are totally 3 different web pages.
Two are for the users, index.htm, reset.htm and
one for admin, config.htm.
Page 2
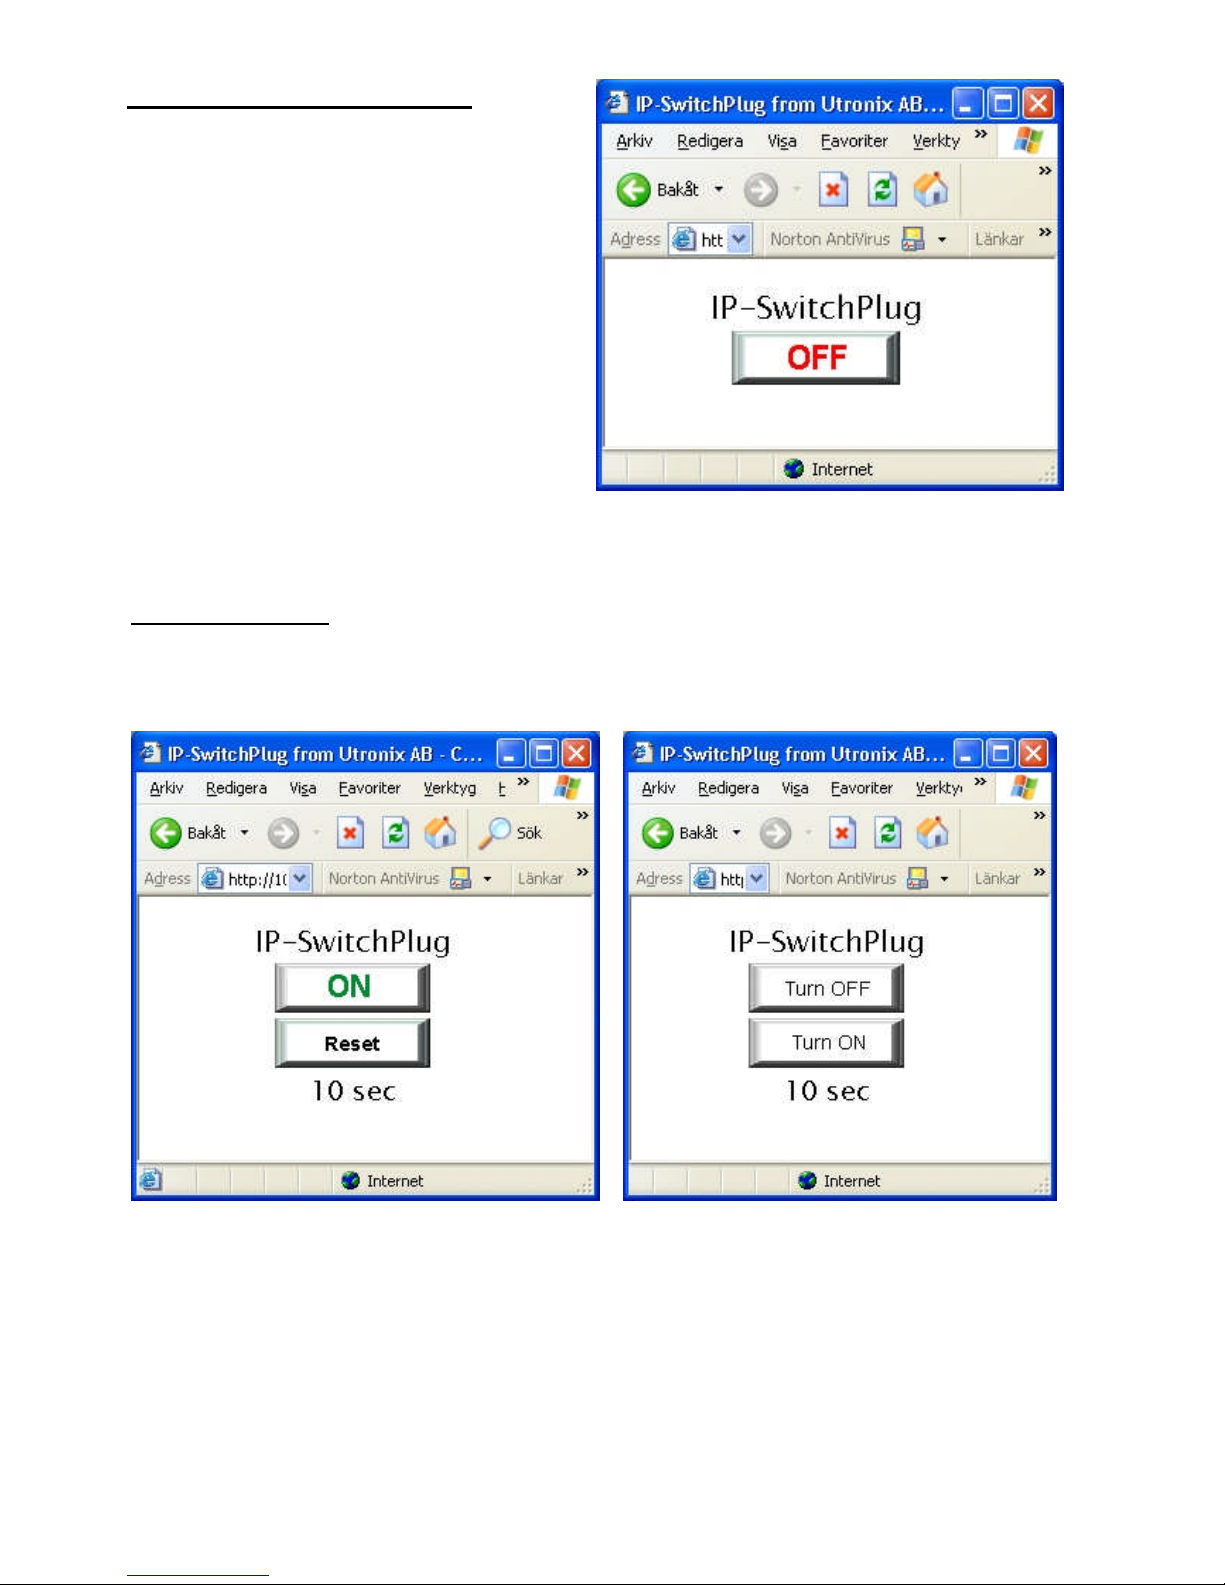
2. The main page, (index.htm).
The main page (index.htm) is used to switch
the outlet ON/OFF..
When you click at the ON or OFF button a
request for this is sent to the box. Then the button
turns gray until the box has confirmed the
change. When the confirmation arrives the button
indicates current setting again. In this way you
can be sure that the change request actuallyhas
reached the box and been serviced.
The text “IP-SwitchPlug” above the
ON/OFF button may be replace by your
own text. This is done at the configuration
page switches.htm
3. The reset page.
The reset page (reset.htm) has in addition to the ON/OFF button also a reset button for the outlet in
position ON.
When the output is in position “ON” there are a
button for reset present. When you click it the
output is switched off for the preconfigured time.
Here the reset is active.
It can be interrupted by clicking "Turn ON"
or "Turn OFF".
By clicking a reset button the outlet is switched OFF during a configured time (up to 600s). After that
time it is automatically switched ON again.
The switch off time is controlled by IP-SwitchBox800 and is hence not dependent of any delays on the
internet. The time is configured at the configuration page config.htm.
These changes can only be done after you have logged in as admin, as described in the configuration
part below.
Page 3
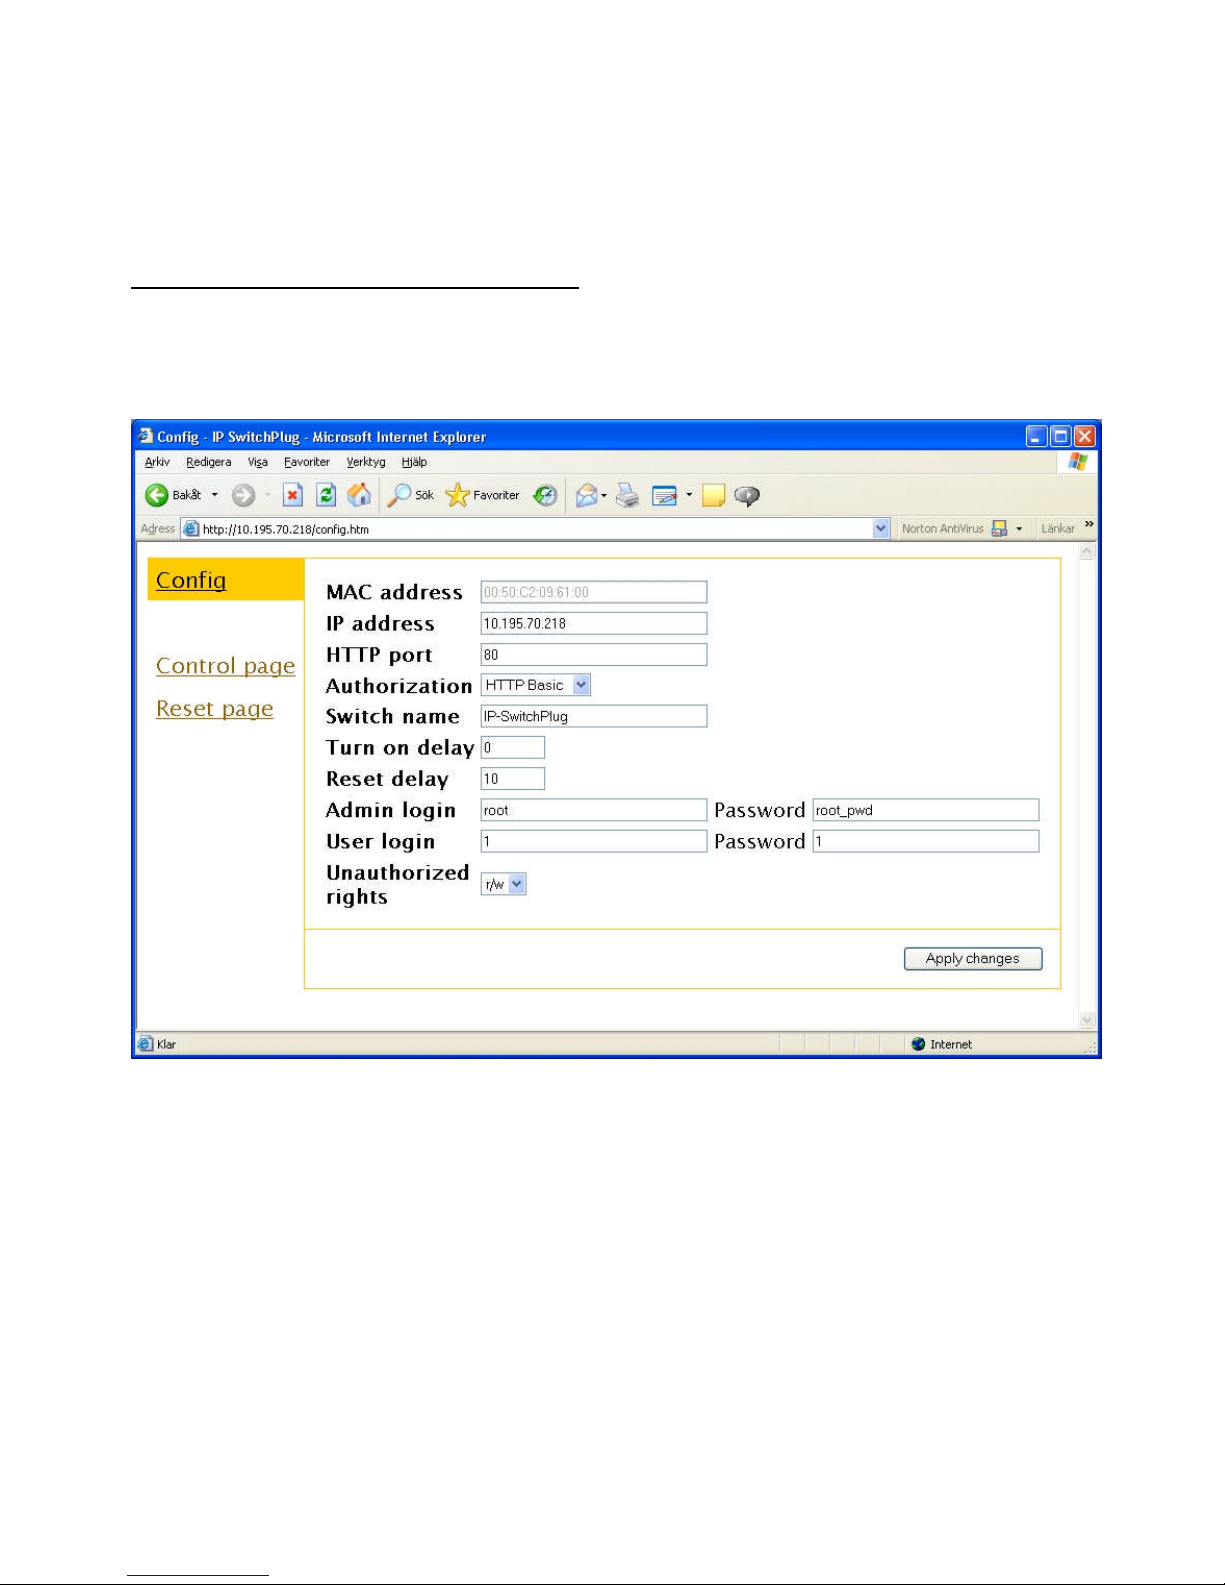
During the reset time the "ON" and "Reset" buttons is replaced by two buttons that can cancel the reset,
"Turn ON" and "Turn OFF".
During the rest time the browser contacts the IP-Switchbox800 with some seconds interval and updates
the buttons. So after the reset time the web page is updated and the "ON" and "Reset" buttons are
restored.
4. The configuration page, (config.htm).
Here you do the configuration.
The IP-address, http port, basic/digest authorization, titel over the button, delay at power-on, reset
time, user name, password and rights for not logged in user. The MAC address is also showed.
IP address and port number.
The IP address is written in common way with dots between.
You can also change port number if you want other port number than 80 for http.
After changing IP address/port you have of course to contact the box at the new IP address/port.
Switch name
I the box ”Switch name” you can write a name to be placed above the button.
Turn on delay
"Turn on delay" is used to delay switch on of the outlet for up to 10 minutes after power failure. This may be
used for two purposes.
First to start up equipment in sequence. For example first the printer and then the computer.
Secondly it may be used with delays of just a few tenth of a second delay to reduce the load on the mains
fuse.
Page 4

Reset delay
"Reset delay" is used to specify the time that the outlet shall be switched of at the reset sequence, when
clicking at the reset buttons at the web page "reset.htm".
Usually the computer shall have a small delay before being switched on again. A reasonable time may be
10secons.
Admin and User login
Here you specify user names for admin and users. The passwords is also specified.
By leaving the password empty no password is required for the user.
If you leave the username empty it is not possible to log in as user. But if rights are configured for not logged
in users the box can be controlled anyway. That is the default configuration.
NOTE! If the name for “admin” is left empty you can not do any more changes of the configuration unless
you restore the default configuration. Read more about it in “Restoring default configuration” in paragraph 8.
The letters A-Z, a-z and 0-9 may be used.
Unauthorized rights
The rights for users not logged in can be set to:
no – no read or write rights. The button is all white.
r/o - read only. Present status is displayed with a grayed ON/OFF button. It is not possible to switch the
output.
r/w - read/write. Present status is displayed with normal white ON/OFF button. The output can be switched.
RARP / BOOTP.
By setting the IP address to 0.0.0.0 the IP-address is allocated by RARP. With 0.0.0.1 BOOTP are used. With
0.0.0.2 both RARP and BOOT is tried.
By setting the IP address to 0.0.0.3 the IP-address is set to the IP address of the first message to the MAC
address of the box. This is known as “the arp-ping method” or “IP gleaning”.
This can be used for setting the IP-address with ping. This is the default setting
Security methods.
You can chose between Basic and Digest authorization. Both according to RFC2617.
Basic authorization works with "all" browsers.
Digest authorization works with newer Microsoft Explorer. In digest mode you have to log in again after 10
minutes.
Both basic and digest gives a good protection against someone operation IP-SwitchPlug by mistake.
Basic gives not much protection against a hacker with access to the network and with evil in mind.
Digest gives a very good protection, note though some safety risks mentioned in the security section.
After you have made your choices click “apply changes” to save them.
Page 5

5. Configuring of IP-address.
To be able to get contact with the box via ether/internet it has be configured with an IP-address.
You get the IP-address from your network administrator.
At delivery the IP-address is 0.0.0.3 that is the address is supplied with the “arp-ping method”.
That means the box configures itself to the IP-address of the first Ethernet message to the MAC
address of the box (= Ethernet address = serial number).
a)
First tell your PC the MAC-address of the box and what IP-address it shall correspond to.
The PC saves the information in it’s arp-table. When the PC later sends data to the box it is
automatically sends it to the MAC-address of the box.
Write ”arp –s 10.195.70.218 00-50-c2-09-65-01” in a command shell window, ”DOS-window”.
The IP-address (10.195.70.218 ) is to be substituted to the desired address and
The MAC address (00-50-c2-09-65-01) is to be substituted to the serial number on the back of
the box.
b)
Then send something , for example a ping, to the IP-address of the box. The box receives the new IP-address,
stores it and used it from now on.
This means that it is not possible to change the IP-address a second time by this method unless the box has
been rest to default values. See paragraph 8.
Write ”ping 10.195.70.218 ”
This IP-address (10.195.70.218) is to be substituted to the desired address.
The box now replies and the IP-address is configured.
6. Security aspects.
Basic authorization usually gives adequate security. It also works with “all” web browsers.
Digest authorization gives higher security. However there are two safety issues with it.
The first issue is that some old web browsers, for example. Netscape4, ignores the request for digest mode
And sends the password with only basic authorization. We will not get the high security as intended.
The IP-Switchplug does not accept this so you will notice it immediately and learn to use another browser
with digest authorization.
The security in digest mode relies on a “checksum” sent with every transmission. This checksum is extremely
difficult to forge so no hacker can control the box
The messages themselves are sent uncoded. The second issue is that when you configure the passwords over
inter/intranet the passwords are transferred uncoded. A hacker then might eavesdrop the line ang get the
passwords. Though he has to be listen at the moment the passwords are configured.
To get full security passwords may only be configured over a trusted network
Page 6

7. Controlling from PC software.
You can control the box from tour own PC-programs via http.
For this there are two “commands”, k0 and k1.
To read status.
Send a http request for k0 to get current status.
The reply is 4 bytes:
Byte 1 Status of the output. “0” (0x30) means the output is off and “1” (0x31) that it is on.
If you have no rights to read then it is reported as off.
Byte 2 Tells if the output is currently doing a reset sequence. “1” for active reset and “0” else.
Byte 3 Tells if you have rights to read. “1” if you have rights and “0” for no rights.
Byte 4 Tells rights to write in the same way.
Example:
By sending “GET/k0” via http we get the reply “1011” that means the output is on, reset is not active, we
have rights to read and we have rights to write.
Control.
To change the box you send a http request for “k1abcd”. Where a,b,c,d are the parameters.
a Byte for switch on. One byte with “1” or “0”. ”1” means the output is switched on.
b Byte for switch off. One byte with “1” or “0”. ”1” means the output is switched off
Switch on has higher priority than switch off.
If both switch on and switch off is set the output will be on.
c Byte for reset. One byte with “1” or “0”. ”1” means the output shall do a reset sequence.
d Byte to cancel One byte with “1” or “0”. ”1” means the reset sequence shall be cancelled.
active reset. Cancel have higher priority than reset.
Example: By sending "GET /k11001” via http:
The output is switched on.
The output id not switched off.
No reset is started.
Any running reset is cancelled.
An example in Perl on how to use these function is on the demo CD Unix\switchbox801.pl.
The output there is switched only to show how to do it.
The code is only meant as an example.
The same thing may of course also be done in other program languages.
You have to change to the IP-address of your box to make the example work.
It is also possible to run the script on Windows with, for example, ActivePerl.
Page 7
8. Default settings.
IP address: 0.0.0.3, reserved for setting by ”arp-ping method” as described in section 10..
Port, http: 80
Authorization: Basic
Name on the button: IP-SwitchPlug
Turn on delay: 0s
Reset delay: 10s
Username/Password.
admin: root/root_pwd Changes this to prevent other to control it..
user: 1 / 1
Acessrights
unauthorized: Read and write.
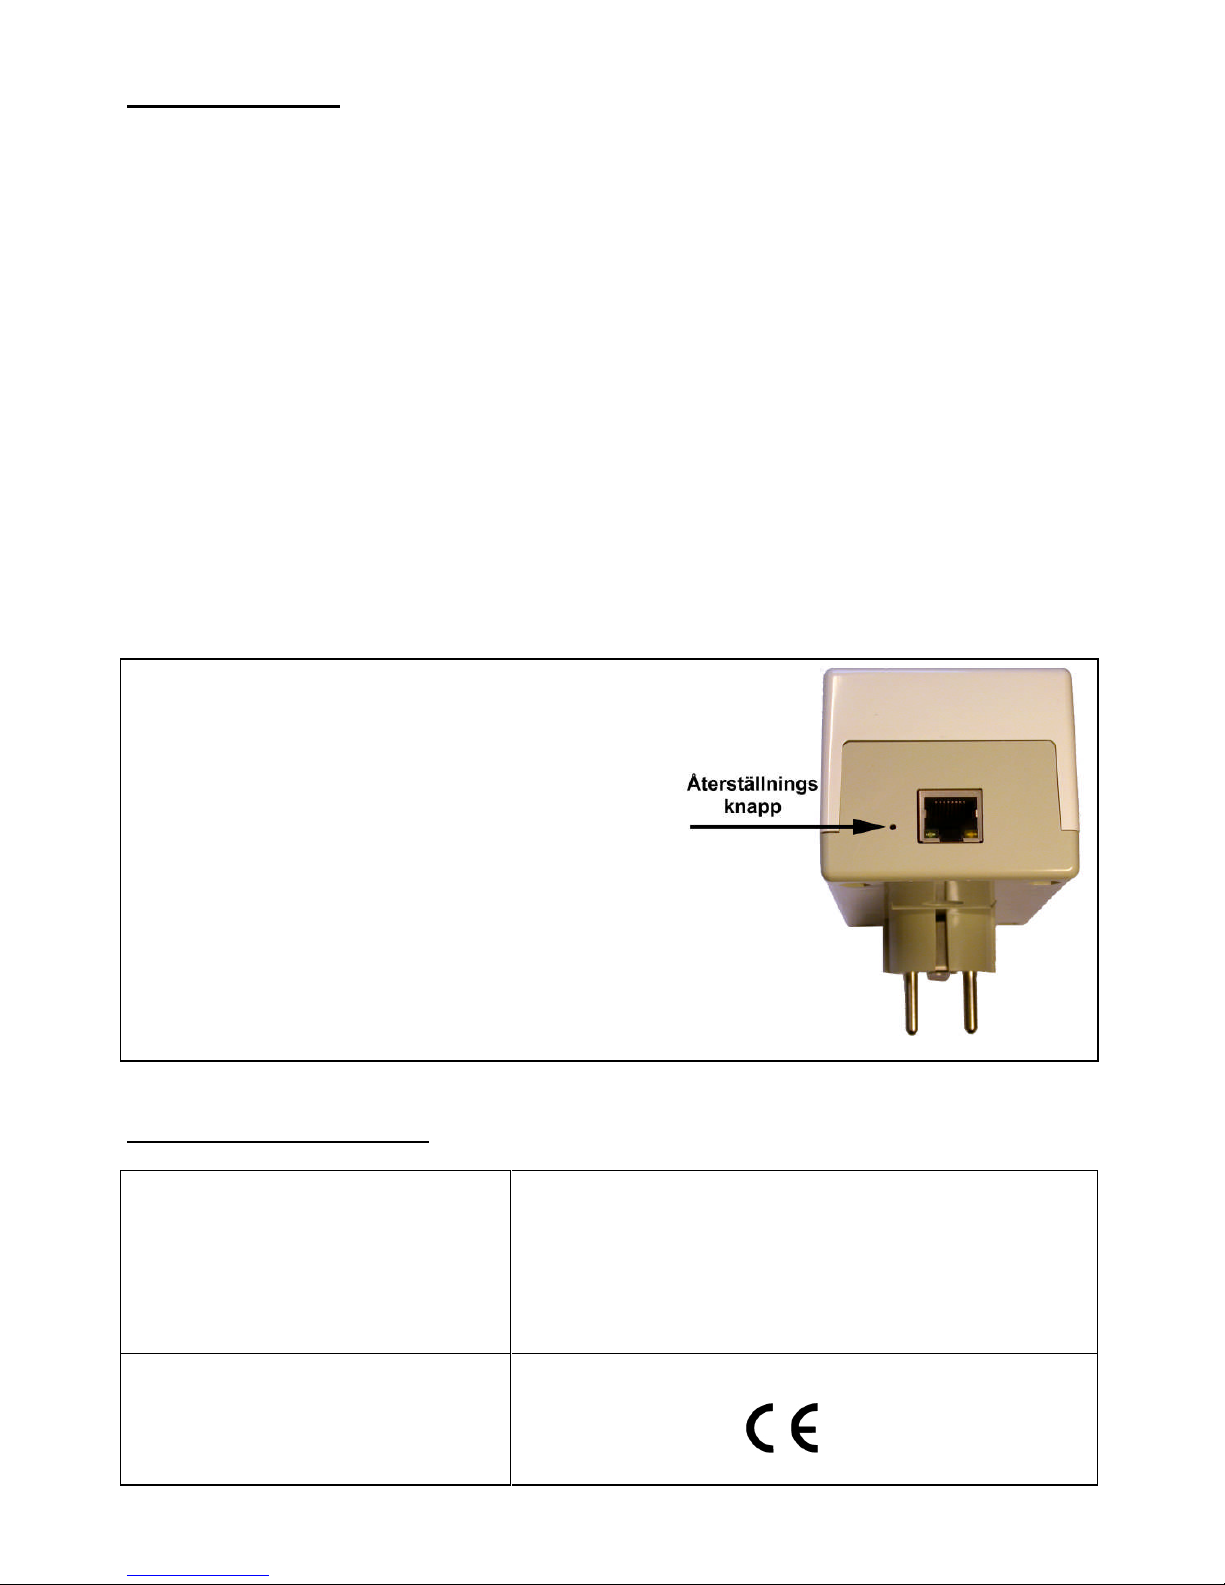
To restore defaults.
The settings can be restored to factory defaults.
This is done by pushing a small button located behind a
small hole just left of the RJ45 connector.
A thin item musts to be used, for example a paper clip.
a) Restore only the IP-address (0 0.0.0.3):
Switch off the power to the box.
Push and keep in the button.
Switch on the power to the box..
Release the button after a few seconds.
b)Restore all settings:
Do as above, a), two times after each other.
.
9. Technical specifications.
Mains connection.
Mains voltage in: 230V
Max current: 16A
Power consumption: approx 2W
Signal connection.
Ethernet 100/10M TP
Straight cable for connection to switch.
Crossed cable for direct connrction to PC
Green LED: Lit when connected to network
Temporary unlit at communicatio (100ms)
Yellow LED: Lit at full duplex.
Dimensions:
Width: 65mm
Length: 120mm
Height: 55mm exclusive contact
Weight: 380g
Page 8

10 Getting started. Quick start for the web interface!
a) Connect IP-SwitchPlug801 to the computer network and the mains outlet .
The enclosed blue cable is a straight cable used for connection to a switch, that is the most common.
If you want to co connect directly to the PC’s network card you might need a twisted cable. They often
have red connectors
b) Configure the IP-address.
To get contact with the box you have to configure the box with a suitable IP-address.
The IP-address you get from your ether/internet administrator.
Configure the address with the ”arp-ping method”.
1) Open a command shell window, ”DOS-window”.
2) Write ”arp –s 10.195.70.218 00-50-c2-09-65-01”
The IP-address (10.195.70.218 ) is to be substituted to the desired address and
The MAC address (00-50-c2-09-65-01) is to be substituted to the serial number on the back of
the box.
3) Write ”ping 10.195.70.218 ”
This IP-address (10.195.70.218) is to be substituted to the desired address.
Now the box shall respond to a ping.
c) Start the web browser.
Type in the address: for example http://10.195.70.218 , change the digits to the configured
IP-address.
Now the main page of IP-SwitchPlug801 opens and you can control it with the button.
Control of the box is done at /index.htm.
Control with the reset function is done at /reset.htm
Configuration is done at /config.htm Login as admin is required.
Default admin name is “root” and the password is “root_pwd”.
This password should be changed to a user specific name.
UTRONIX Elektronikutveckling AB Telephone: +46 13 212 750
Teknikringen 1, 583 30 Linköping Telefax: +46 13 212 725
www.utronix.se e-mail: [email protected]
1.00 20071008
 Loading...