

Page 1

0
MANUAL UTILIZARE
UTOK 700 D 3G Lite
Page 2

1
CUPR I NS
TOATE DREPTURILE REZERVATE ...................................... 2
1. Masuri de siguranta .............................................. 3
2. Aspectul tabletei ................................................... 4
3. Sugestii de utilizare ............................................... 4
4. Functii de baza ....................................................... 5
5. Ecranul de start ..................................................... 7
6. Conectarea la retele ............................................... 9
7. Conectarea USB.................................................... 10
8. Aplicatii ................................................................ 11
9. Redarea fisierelor video ....................................... 12
10. Redarea fisierelor audio ...................................... 12
11. Camera ................................................................. 12
12. Setarile sistemului ............................................... 14
13. Intrebari frecvente ............................................... 16
14. Despre firmware .................................................. 18
15. Specificatii tehnice ............................................... 18
16. Declaratie de conformitate .................................. 19
Page 3

2
T OA T E D RE P T U R I L E R E Z ER V AT E
©2013. Toate drepturile sunt rezervate. Nicio parte a acestui document nu poate fi
reprodusa fara permisiune. Toate marcile inregistrate si numele de brand mentionate
in acest document apartin proprietarilor acestora. Desi au fost depuse toate eforturile
pentru a asigura acuratetea continutului acestui manual, nu ne asumam
responsabilitatea pentru erori, omiteri sau afirmatii de orice fel, daca acestea rezulta
din neglijenta, accidente sau orice alta cauza. Desfasuram o politica a dezvoltarii
continue si ne rezervam dreptul de a aduce modificari si imbunatatiri pentru dispozitiv,
functiile, specificatiile sau a oricarei parti a acestuia, fara notificare prealabila.
Dispozitivul poate contine marcaje, link-uri catre terte site-uri Internet si va poate
permite sa accesati website-uri terte. Acestea nu sunt afiliate cu noi, iar noi nu le
sprijinim si nu ne asumam raspunderea pentru acestea. Daca accesati astfel de site-uri,
luati masuri de precautie pentru siguranta si continut. Garantia cu raspundere limitata
nu acopera manuale de utilizare sau alt software tert, setari, continut, date sau
link-uri, fie incluse/descarcate in produs, fie incluse in timpul instalarii, asamblarii,
livrarii sau in alt moment al lantului de livrare sau in alt mod si in orice fel achizitionat
de dumneavoastra. In masura permisa de legislatia aplicabila, nu garantam ca oricare
din software-urile noastre va va satisface certintele, va functiona cu orice hardware
sau aplicatii software puse la dispozitie de terte parti, ca operatiunile soft-ului vor fi
neintrerupte, fara erori sau ca orice defect din software este corectabil.
Manualul de utilizare este pus la dispozitie pentru a ghida utilizatorul cu privire
la functionalitatea dispozitivului. Acesta nu este un certificat al tehnologiei. Unele
functii pot varia datorita modificarilor, software-ului sau datorita greselilor de
printare.
Page 4

3
1. Ma s u r i de s igu r a n ta
Pentru utilizarea corecta a tabletei, inainte de a o folosi, va rugam sa cititi
cu atentie instructiunile de utilizare.
Folositi doar bateria si incarcatorul livrate de compania noastra. In
cazul in care folositi alte produse neconforme, puteti intampina diverse
probleme cum ar fi supraincalzirea produsului.
Pentru a beneficia de folosire indelungata si la capacitate maxima
a bateriei, va rugam ca inainte de prima pornire sa incarcati bateria
pentru 8 – 12 ore.
Nu aruncati produsul sau bateria in foc, exista risc de explozie.
Timpul de folosire al produsului se afla in legatura directa cu
conditiile de mediu. La temperaturi extreme timpul de functionare al
produsului va fi mai scurt, bateria descarcandu-se mai repede.
Temperatura recomandata pentru utilizarea dispozitivului este
5-35°C.
Nu folositi produsul in conditii de temperaturi foarte scazute sau
foarte ridicate sau in medii umede sau cu mult praf. De asemenea, nu
lasati produsul sub lumina directa a soarelui.
Nu loviti produsul si evitati socurile puternice.
In cazul in care ati varsat apa sau orice alt lichid pe suprafata
produsului, va trebui sa il opriti imediat si sa il stergeti cu o carpa moale.
Nu atingeti incarcatorul, cablul de alimentare sau priza cu mainile
ude. Acest lucru poate conduce la soc electric.
Nu demontati produsul sau accesoriile si nu incercati sa reparati
produsul. Demontarea produsului conduce la pierderea garantiei.
Daca produsul dumneavoastra sau orice alt accesoriu nu
functioneaza normal, va rugam sa vizitati cea mai apropiata unitate de
service autorizat.
Page 5
4
2. As p e c t ul t a b l e t e i
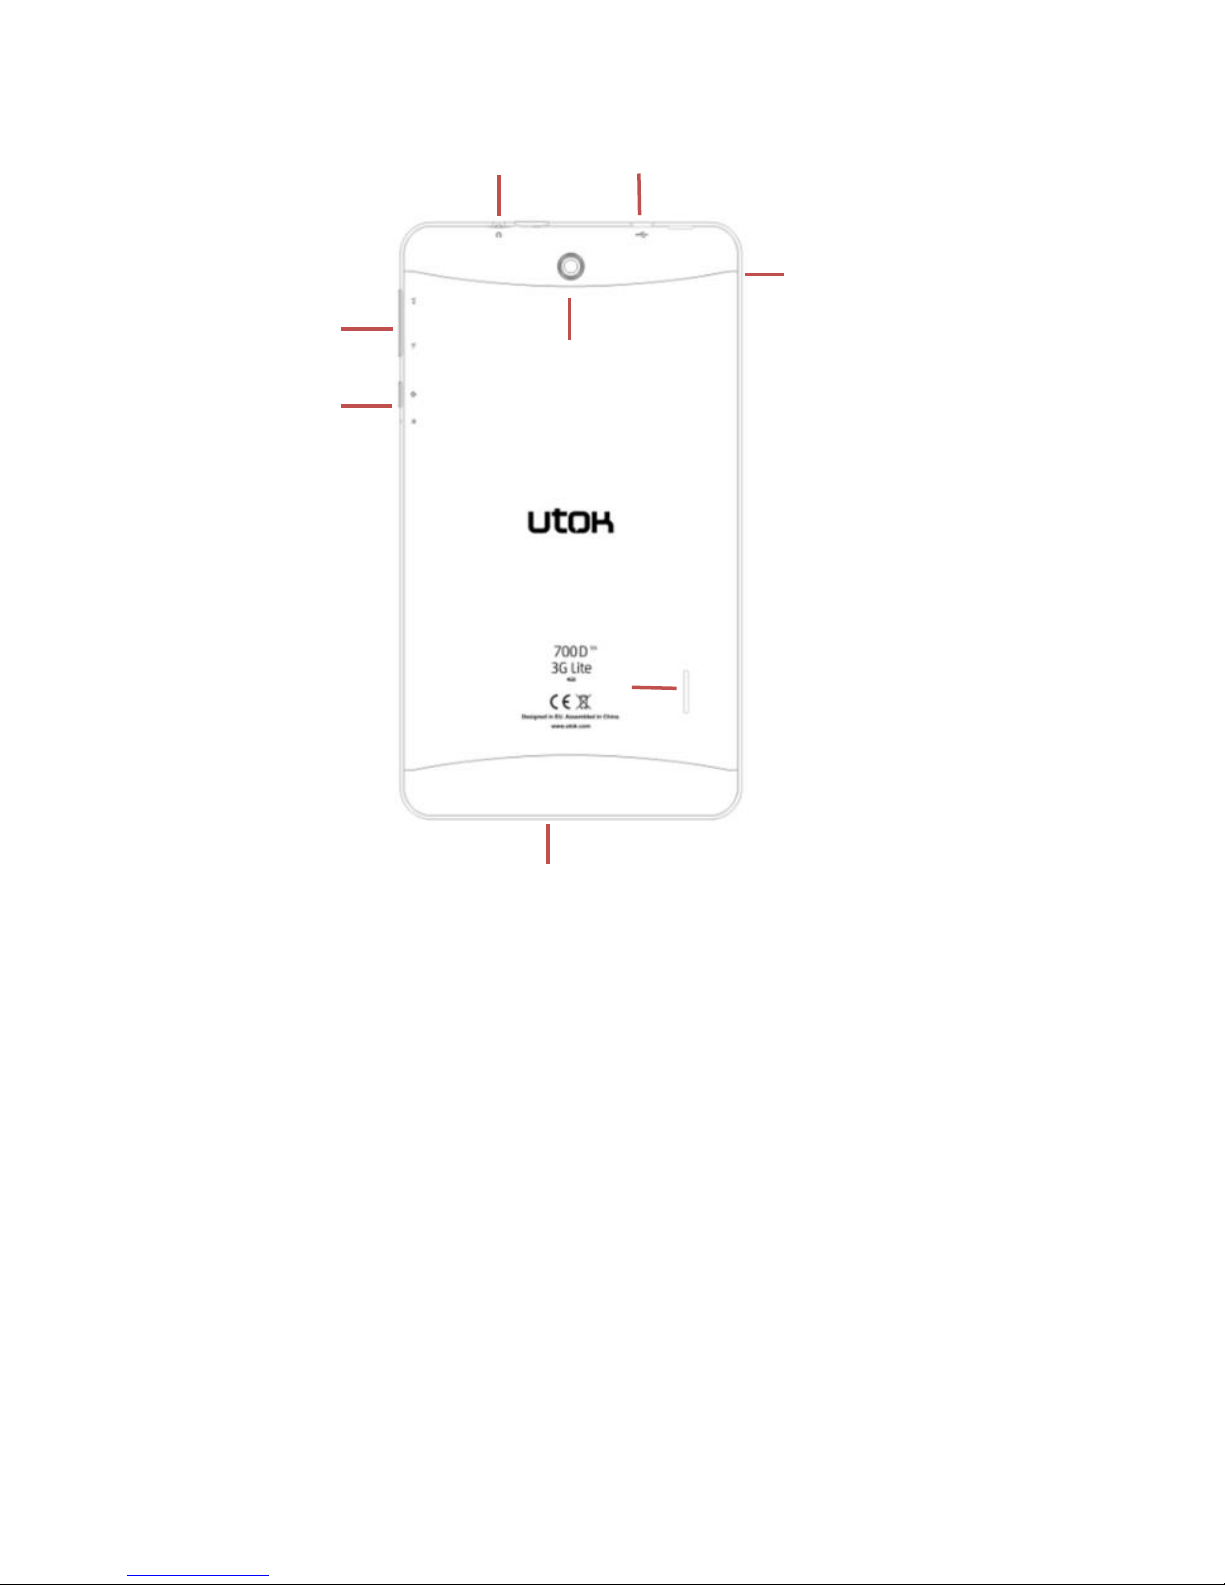
1. Mufa casti
2. Port microUSB
3. Crestere, scadere volum audio
4. Buton power
5. Microfon
6. Difuzor
7. Camera
8. Slot cartela SIM si card micro SD
3. SUGESTII DE UTILIZARE
• Bucurati-va de libraria multimedia oriunde si oricand. Acest
produs portabil poate reda fisiere de muzica, video sau fotografii.
• Produsul este dotat cu un slot pentru card de memorie microSD.
Puteti spori capacitatea de stocare cu ajutorul unui card de pana la 32 GB.
• Camere foto / video integrate. Cu ajutorul lor puteti imortaliza
11
22
33 66 44 77 55
88
Page 6
5
momentele preferate.
• Conectati-va la Internet cu ajutorul modulului 3G preinstalat. Aveti
nevoie de o cartela microSIM cu voce si date, de la oricare dintre
operatori si aveti acces la Internet si in acelasi timp puteti efectua apeluri
de voce.
• Conectati-va la Internet prin reteaua wireless Wi-Fi 802.11 b/g/n.
• Puteti naviga pe Internet si vizita website-urile favorite.
• Verificare e-mail. Puteti tine astfel legatura cu prietenii sau familia.
• Retele sociale. Prin instalarea acestui tip de aplicatii puteti fi in
contact permanent cu toti prietenii.
• Vizionare videoclipuri YouTube™. Navigati prin cea mai populara
comunitate de video-sharing si vizionati filme sau videoclipuri.
• Cititi cartile preferate. Puteti descarca o multime de carti din orice
domeniu.
• Descoperiti mii de aplicatii pentru Android ™. Jocuri, utilitare si
altele, toate disponibile prin Google Play.
• Detectarea automata a orientarii. Cititi sau lucrati oricum doriti, in
mod landscape sau portrait, ecranul se va adapta automat!
4. F u n c t i i d e b a z a
4.1 Pornirea
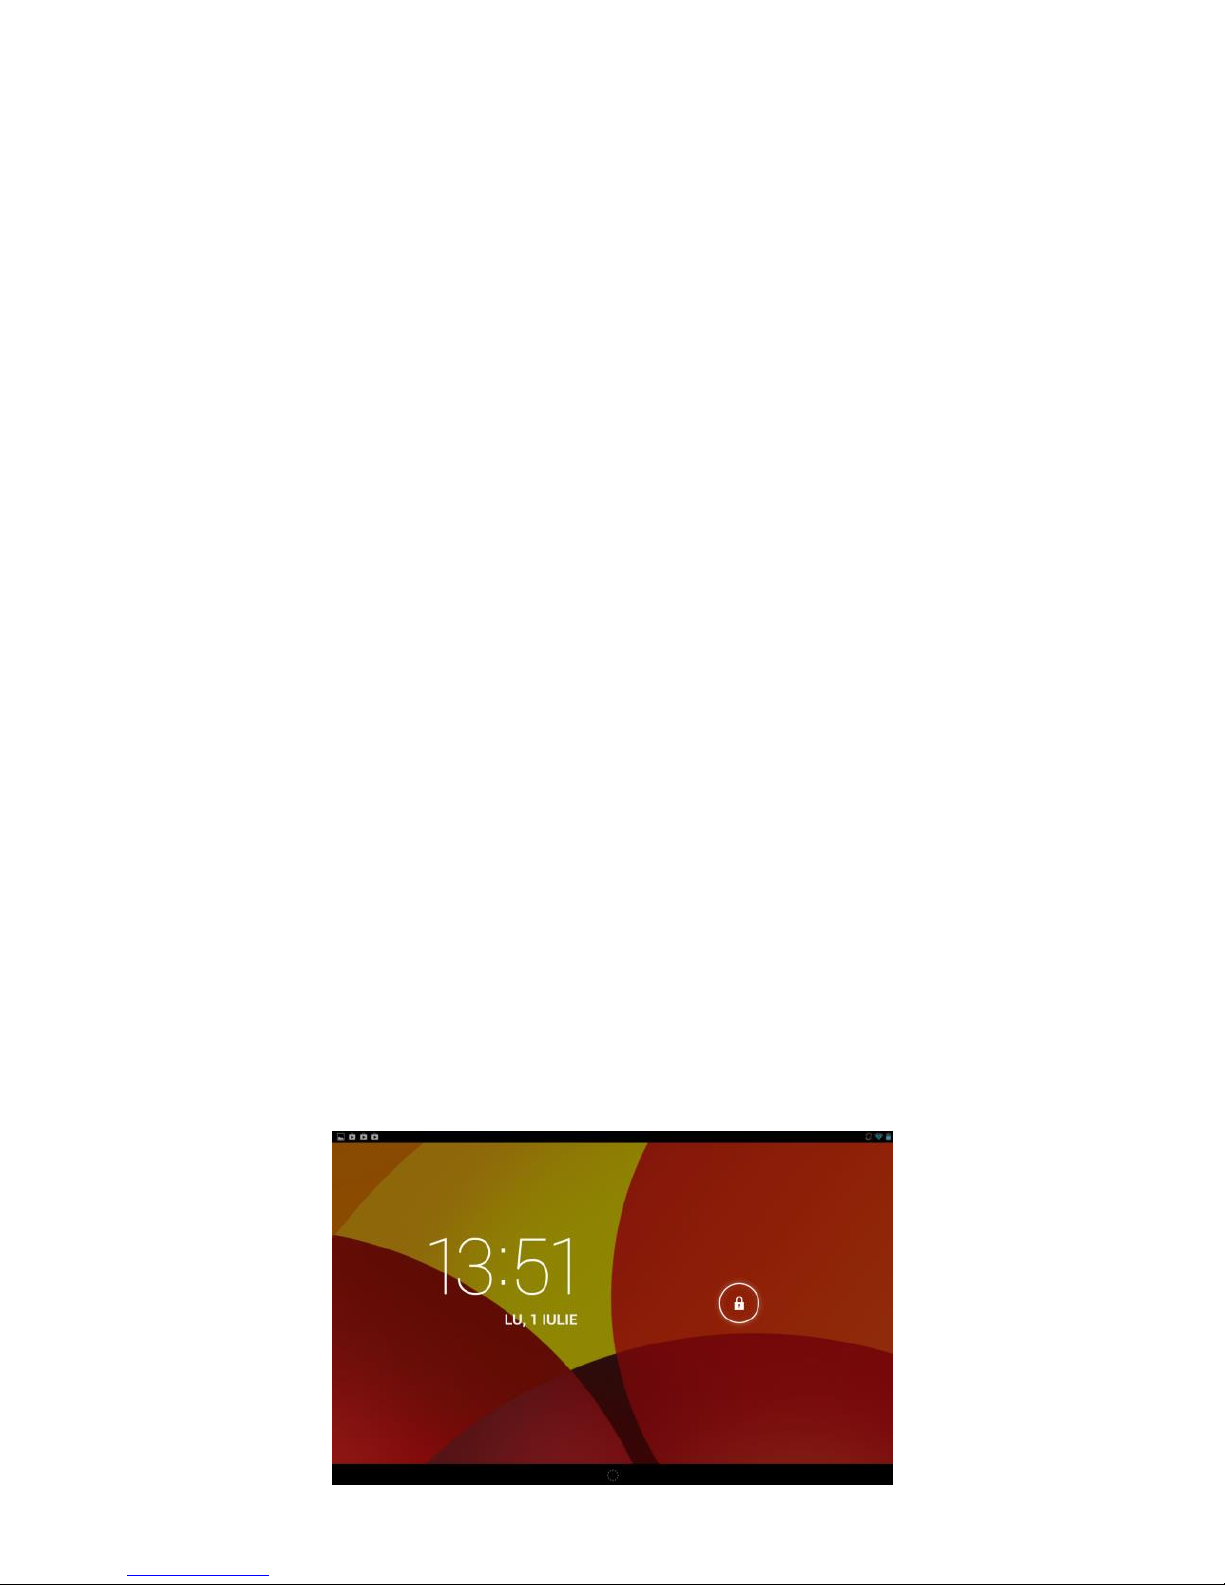
Apasati butonul POWER pentru aproximativ doua secunde. Produsul va
porni si va afisa ecanul de start. Atingeti ecranul, apasati si glisati catre
dreapta pentru a debloca ecranul si a ajunge la meniul principal.
Page 7

6
4.2 Mod asteptare
In timp ce produsul functioneaza, apasati scurt butonul POWER pentru a
inchide ecranul si a intra in modul asteptare. Apasati din nou butonul
POWER pentru a reporni produsul. Glisati pentru deblocarea ecranului.
4.3 Inchiderea
Apasati butonul POWER pentru doua secunde si confirmati oprirea
tabletei in meniul ce apare pe ecran.
4.4 Resetarea
Daca produsul este blocat, nu mai porneste sau nu mai poate fi inchis prin
butonul POWER, va rugam sa folositi functia RESET.
4.5 Reincarcarea
Cand produsul nu mai poate fi pornit sau se stinge automat, trebuie sa fie
reincarcat. Va rugam sa folositi doar incarcatorul corespunzator, furnizat
odata cu produsul, in pachet.
4.6 Ecranul de start
In cadrul oricarei aplicatii, apasati pictograma pentru a ajunge in
ecranul de start.
4.7 Butonul Inapoi
Apasati pictograma pentru a ajunge la pagina anterioara.
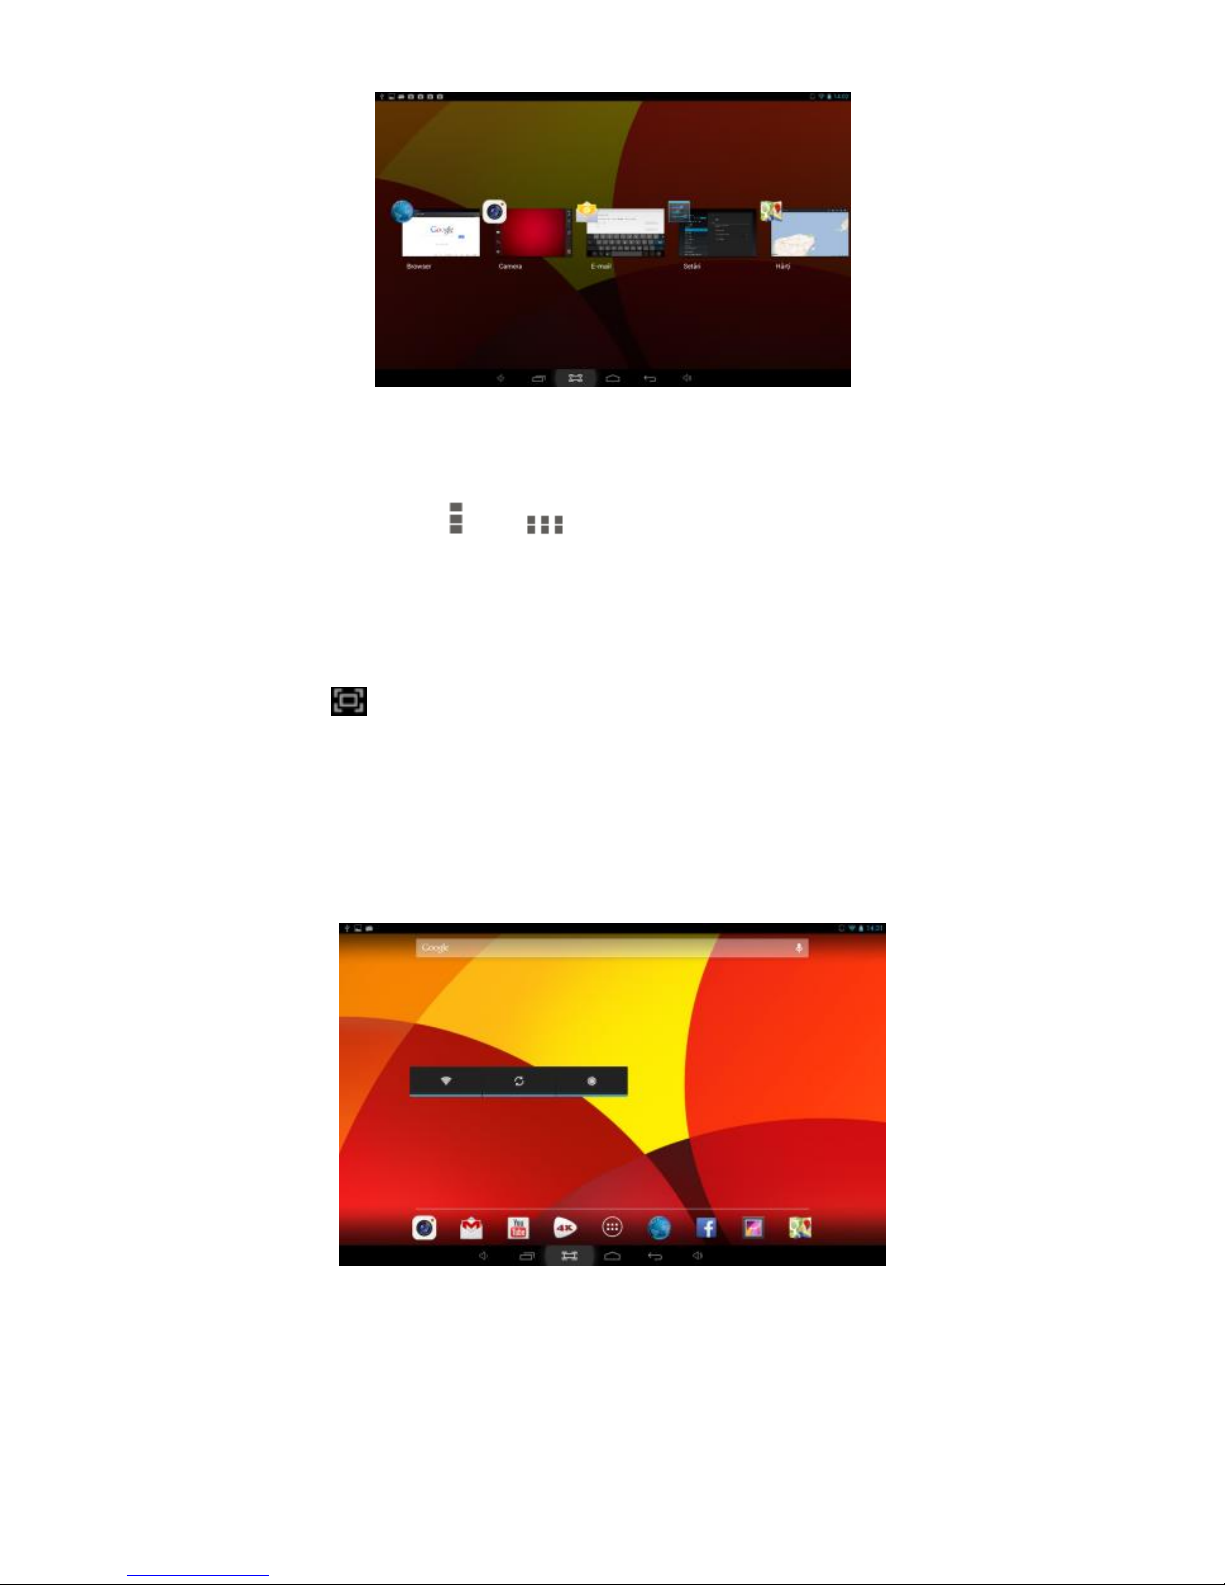
4.8 Aplicatii recent deschise
Apasati pentru a vedea aplicatiile recent deschise. Apasati pe
fereastra programului pentru a-l deschide, sau glisati in sus sau in lateral
pentru a-l inchide. In cazul in care produsul functioneaza lent, trebuie sa
apelati la aceasta functie pentru a inchide aplicatiile active nefolosite.
Acestea ocupa memoria produsului si impiedica functionarea produsului
la capacitate maxima.
Page 8
7
4.9 Meniul
Apasati pictograma sau pentru a intra in meniul principal si a
accesa toate optiunile.
4.10 Captura de ecran
Apasati pentru a realiza o captura a ecranului.
5. E cr a n u l d e s ta r t
Exista mai multe ecrane principale, glisati catre stanga si dreapta pentru a
naviga prin toate aceste ecrane.
5.1 Adaugarea aplicatiilor si widgeturilor pe ecran
Deschideti lista aplicatiilor, apasati o iconita si mutati-o pe ecranul
principal. Pe ecranul principal apasati iconita si miscati-o stanga/dreapta
pentru a o muta in cadrul altei pagini. Pentru a sterge o iconita, apasati
Page 9
8
lung pe aceasta si plasati-o peste pictograma de stergere in partea
superioara a ecranului.
5.2 Imaginea de fundal
Apasati lung pe o zona libera in cadrul ecranului si alegeti una dintre
optiunile de afisare ce apar.
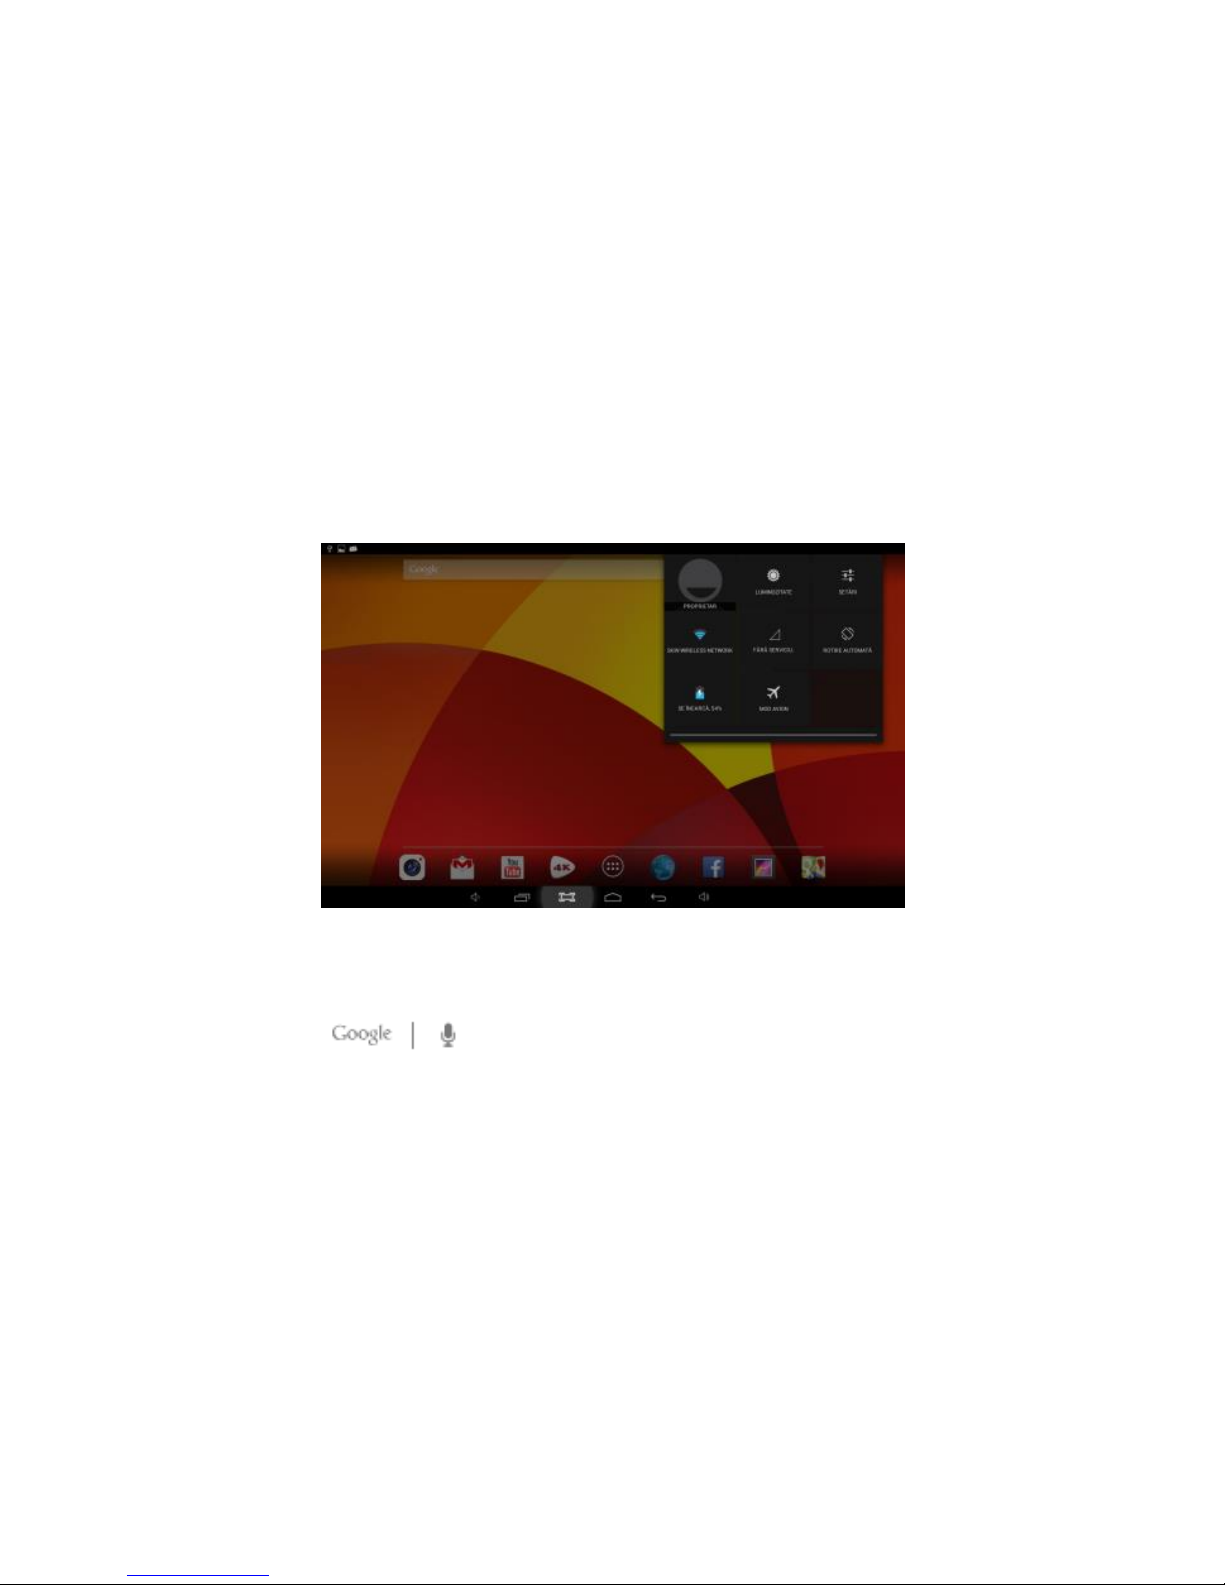
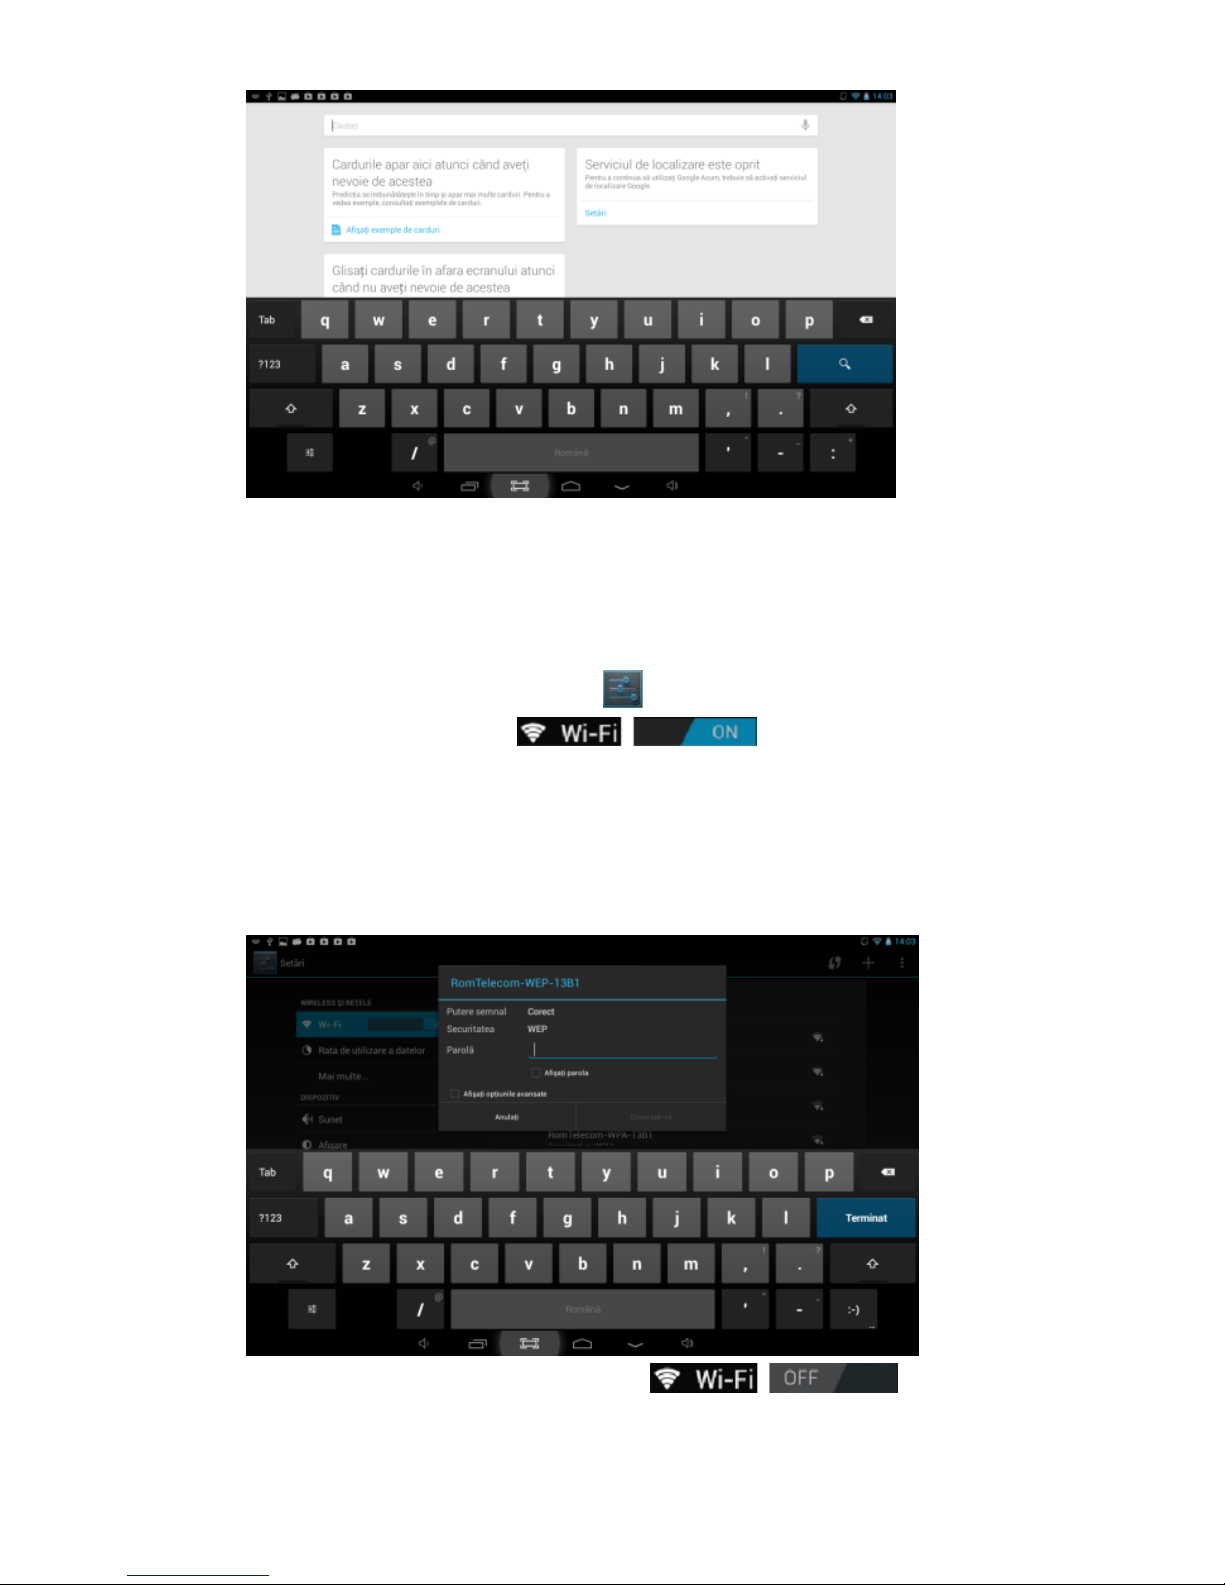
5.3 Bara de notificari
Apasati in coltul din dreapta-sus a ecranului pentru a accesa bara de
notificari. Aceasta va ofera informatii referitoare la statusul WiFi, bateriei,
actualizari si descarcari.
5.4 Cautarea
Apasati pentru a cauta informatii pe discul local sau pe
Internet. Cautarea vocala este de asemenea suportata.
Page 10
9
6. C o n e c t a r e a l a r e t e le
6.1 Conectarea la Wi-Fi
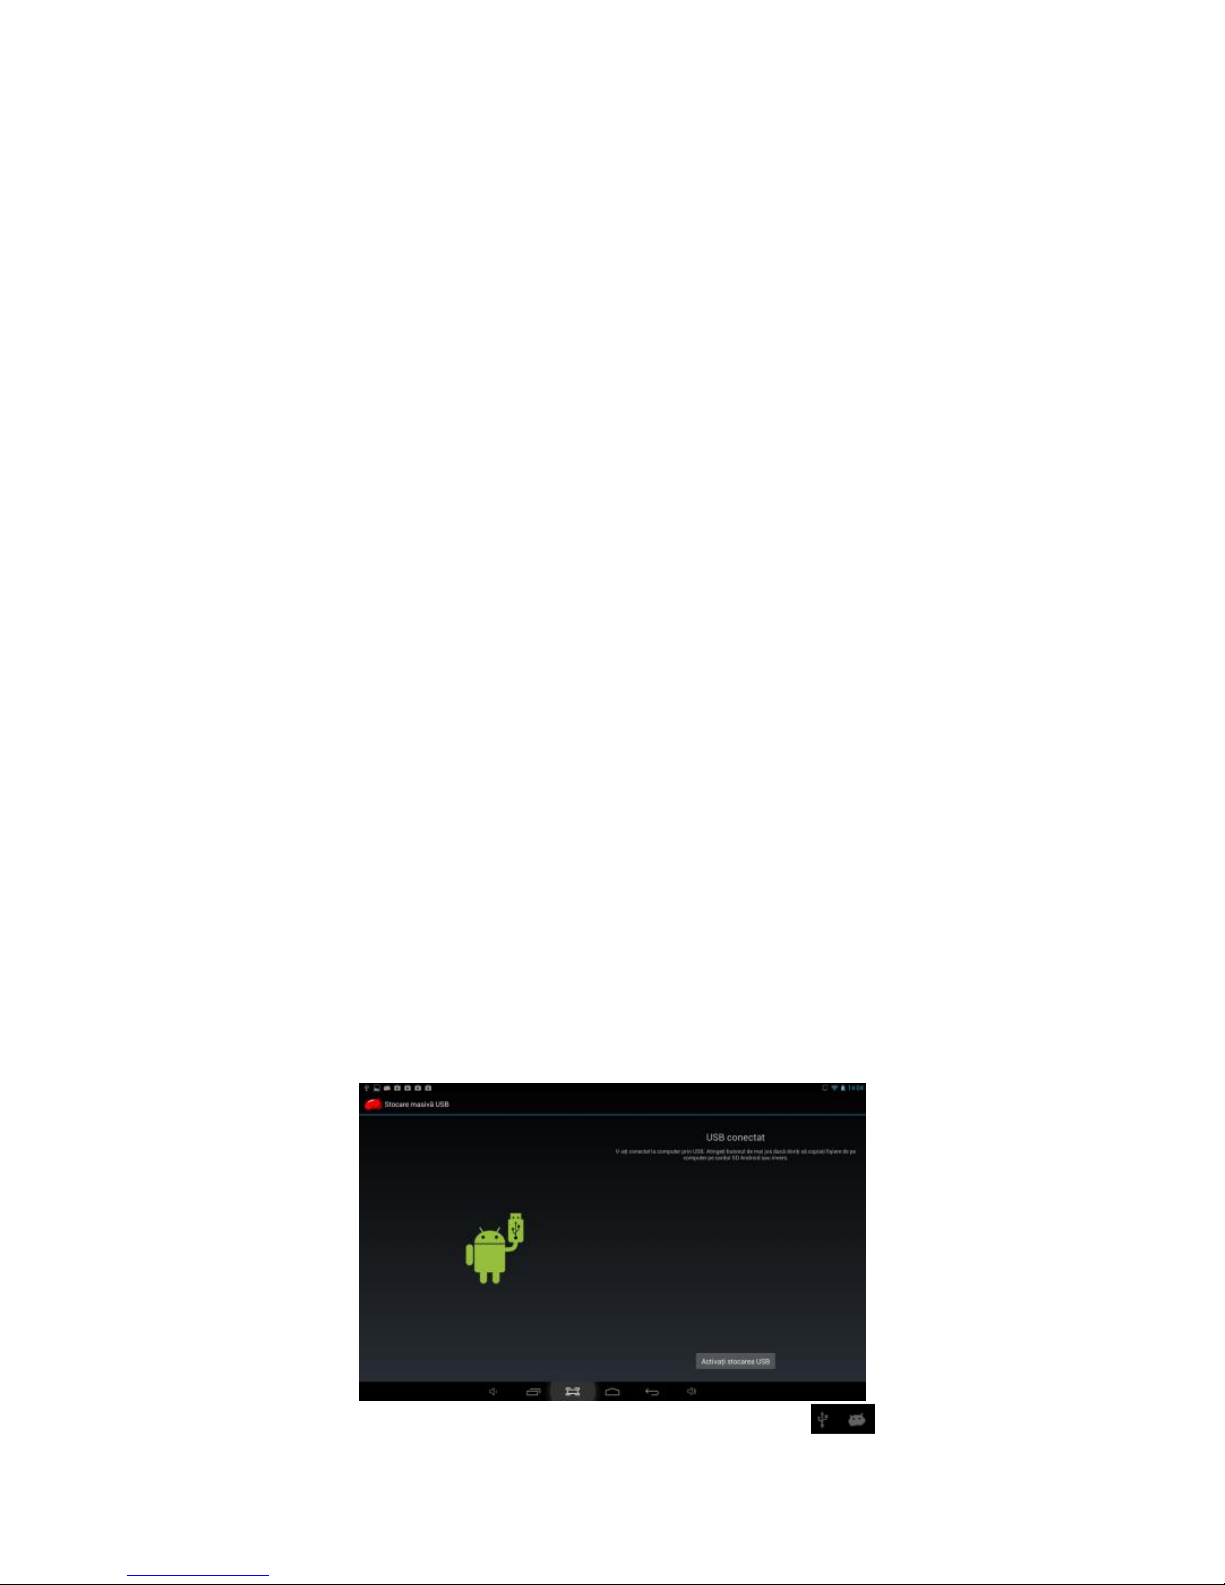
● Apasati pictograma pentru setari
●Glisati pictograma Wi-Fi catre dreapta pentru
a activa Wi-Fi. Dispozitivul va cauta si va afisa o lista cu retelele Wi-Fi
disponibile. Apasati pe numele unei retele pentru a va conecta.
● Daca reteaua Wi-Fi nu are o parola, tableta se va conecta automat.
Daca reteaua Wi-Fi are o parola, va trebui sa o introduceti, apoi selectati
“Connect” (ro. Conectare).
● Glisati pictograma Wi-Fi catre stanga pentru
a dezactiva optiunea Wi-Fi.
Page 11
10
6.2 Acces la retea prin intermediul 3G
Pentru activare 3G va rugam sa urmati pasii de mai jos:
● Asigurati-va ca produsul este inchis.
● Introduceti cartela microSIM in slotul dedicat.
● Porniti tableta.
● Din ecranul principal deschideti bara de stare prin slide din partea
dreapta sus a ecranului.
● Aici apasati pe pictograma Data connection.
● Dupa activarea SIM-ului, aveti conexiune la Internet.
6.3 Alte retele
● Ethernet
● VPN
● Important: Disponibilitatea si viteza retelelor depind de reteaua
utilizatorului. In cazul retelei 3G pot interveni costuri suplimentare.
7. C o n e c t a r e a U S B
Produsul poate fi conectat la un computer cu sistem de operare Windows
prin intermediul unui cablu USB. Cu ajutorul acestuia puteti transfera
muzica, videoclipuri, poze si alte fisiere, in ambele directii. Instructiuni de
utilizare:
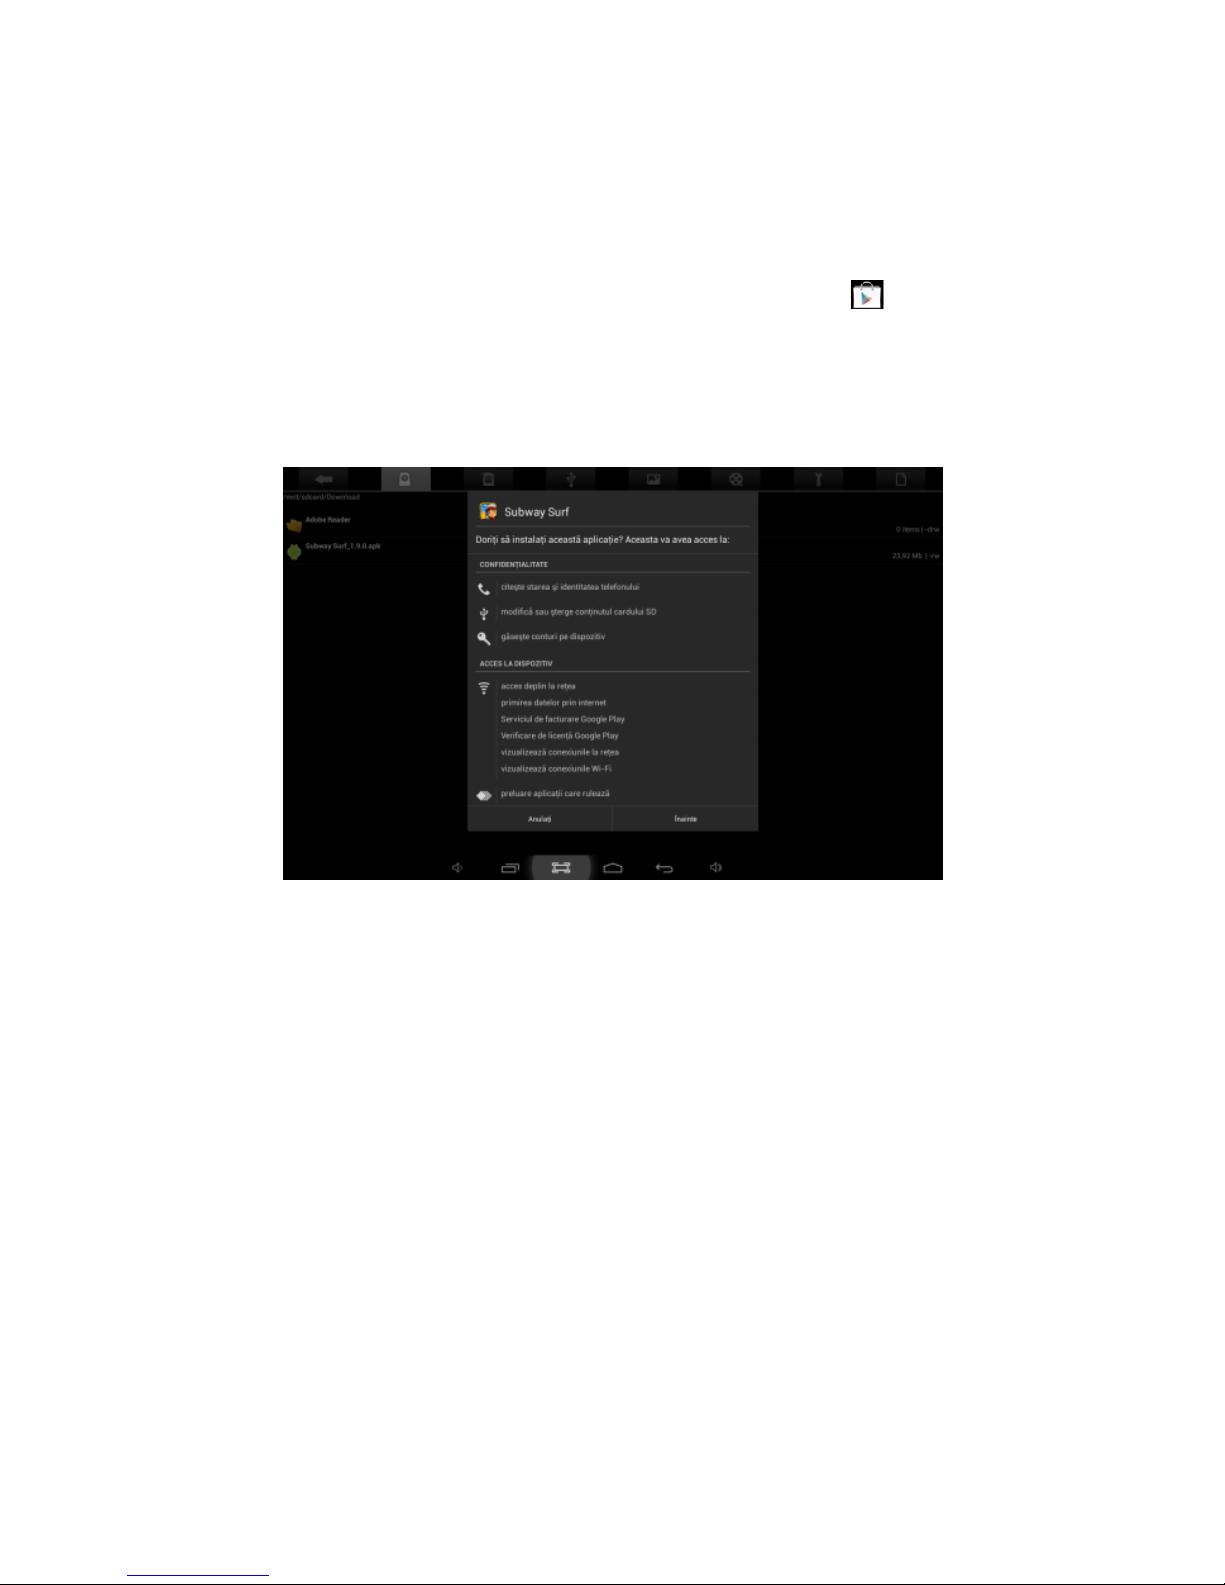
● Folositi un cablu USB pentru a conecta tableta la PC.
● Apasati Activati stocarea USB pentru a citi pe computer informatiile de
pe tableta. Acum puteti copia fisiere in ambele directii.
● Apasati Dezactivati stocarea USB pentru a deconecta tableta de la PC si
apoi indepartati cablul USB.
Daca interfata de mai sus nu apare, apasati pictograma din coltul
din stanga sus al ecranului, apoi selectati Activati stocarea USB din
Page 12
11
fereastra.
8. A p l ica t ii
8.1 Instalarea de noi aplicatii
8.1.1 Pentru a descarca si instala aplicatii din Magazin Play , urmati
instructiunile sistemului.
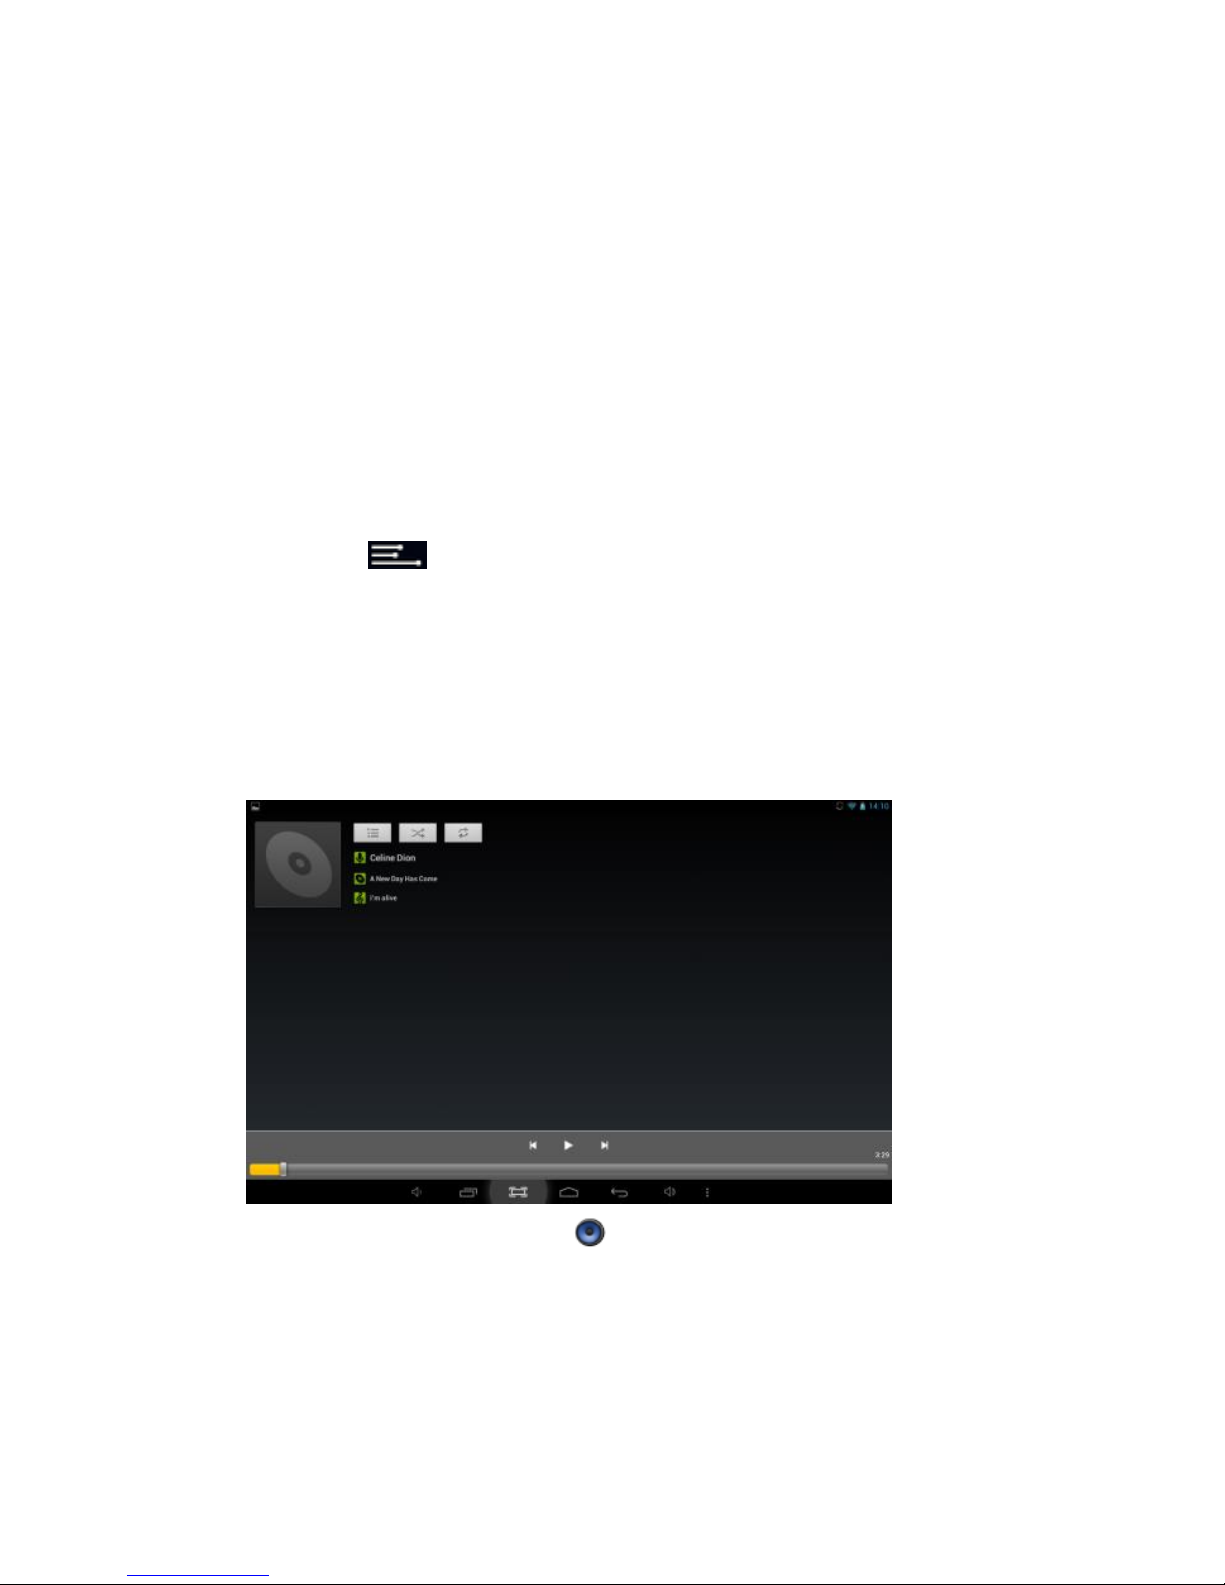
8.1.2 Pentru a instala pachetele APK ale aplicatiilor in memoria tabletei,
deschideti File Manager (ro. Manager fisiere), gasiti locatia pachetelor
aplicatiei si apasati pe numele lor pentru a instala.
Sfaturi
● Pentru a instala aplicatii care nu provin din Magazin Play, asigurati-va
ca optiunea “Surse necunoscute” este ON. (Setari – Securitate –
Administrarea Dispozitivelor).
● Daca aplicatia exista deja in tableta, selectati OK pentru a o inlocui cu
cea mai noua versiune a pachetului.
8.2 Dezinstalarea aplicatiilor
8.2.1 Accesati Setari – Aplicatii – Toate.
8.2.2 Apasati pe aplicatia pe care doriti sa o dezinstalati.
8.2.3 Apasati Dezinstalati.
8.3 Managementul aplicatiilor
8.3.1 Accesati Setari – Aplicatii – Toate.
Page 13
12
6.3.2 Apasati pe aplicatie si Opriti fortat, Dezinstalati, Stergeti Datele sau
Mutati pe SD.
9. R e d ar e a f i s i e r e l o r v i d e o
Puteti folosi aplicatia video preinstalata in tableta pentru a va bucura de
filme si videoclipuri sau puteti instala alte aplicatii video.
9.1 Apasati pictograma pentru a intra in interfata video sau deschideti
fisierele video direct din File Manager
9.2 Tableta suporta mai multe formate video, printre care: 1080P AVI,
DIVX, DIVX, XVID, RM, RMVB, WMV, MOV, MP4, MPEG, DAT, VOB, MPG,
FLV, ASF, TS, TP, 3GP.
9.3 Apasati bara de evolutie pentru a derula inainte sau inapoi.
9.4 Apasati pentru a accesa setarile aplicatiei video.
10 . R e dar e a f i s i e re l o r a u d io
Puteti folosi aplicatia Muzica, preinstalata, pentru a asculta muzica sau
puteti instala alte aplicatii audio.
8.1 Apasati pictograma Muzica pentru a accesa aplicatia de fisiere
audio, sau deschideti direct File Manager (ro. Manager fisiere)
8.2 Dispozitivul suporta urmatoarele formate audio: MP3, WMA, MP2,
OGG, AAC, FLAC, APE, 3GP, WAV, si altele.
8.3 Apasati bara de evolutie pentru a derula inainte sau inapoi.
8.4 Daca nu sunt fisiere audio in lista, sistemul va incarca automat
fisierele audio din memoria tabletei.
Page 14
13
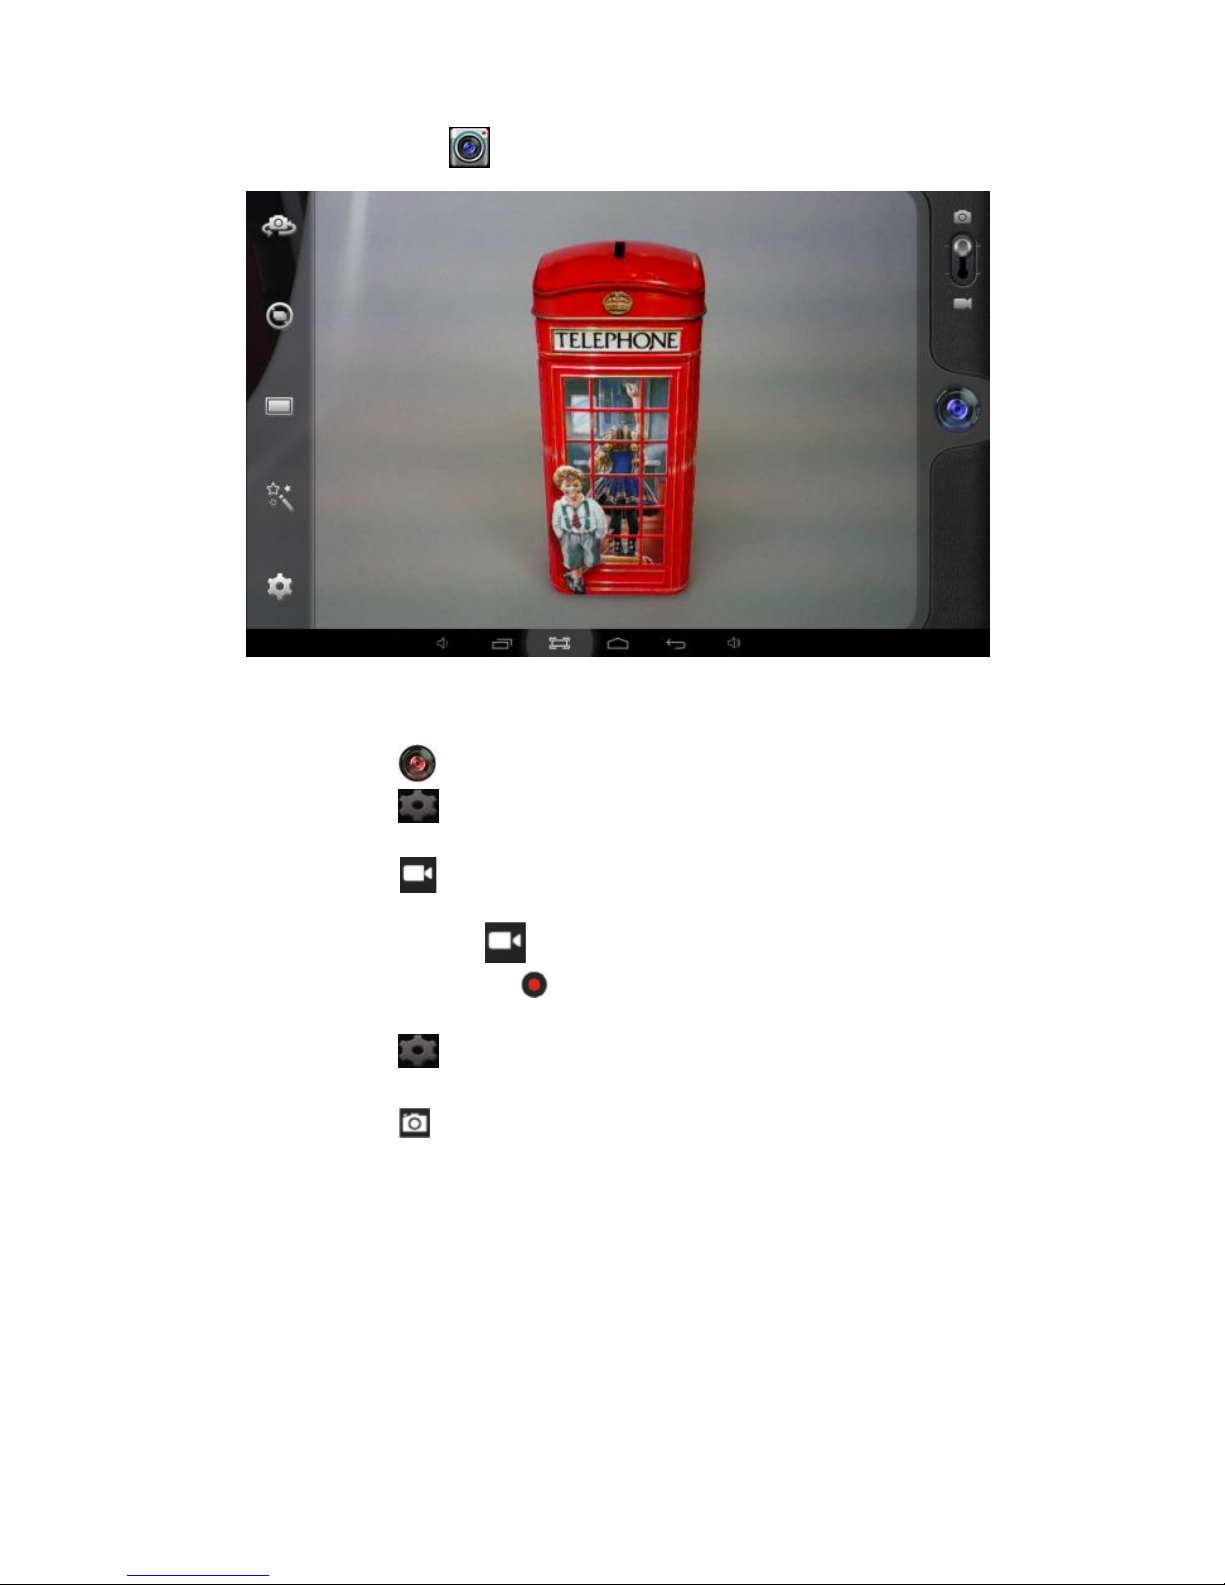
11 . C a m e r a
Apasati pictograma pentru a accesa functiile camerei.
11.1 Modul fotografie
11.1.1 Apasati pentru a face poze
11.1.2 Apasati pentru a accesa optiunile de fotografiere.
11.1.3 Apasati pe poza mica pentru a accesa pozele salvate.
11.1.4 Apasati pentru a comuta pe modul de filmare.
11.2 Modul de filmare
11.2.1 Apasati pictograma pentru a incepe filmarea. Apasati din nou
pentru a opri si a salva videoclipul.
11.2.2 Apasati pentru a accesa optiunile
11.2.3 Apasati pe poza mica pentru a accesa videoclipurile salvate.
11.2.4 Apasati pentru a comuta pe modul fotografie.
Page 15
14
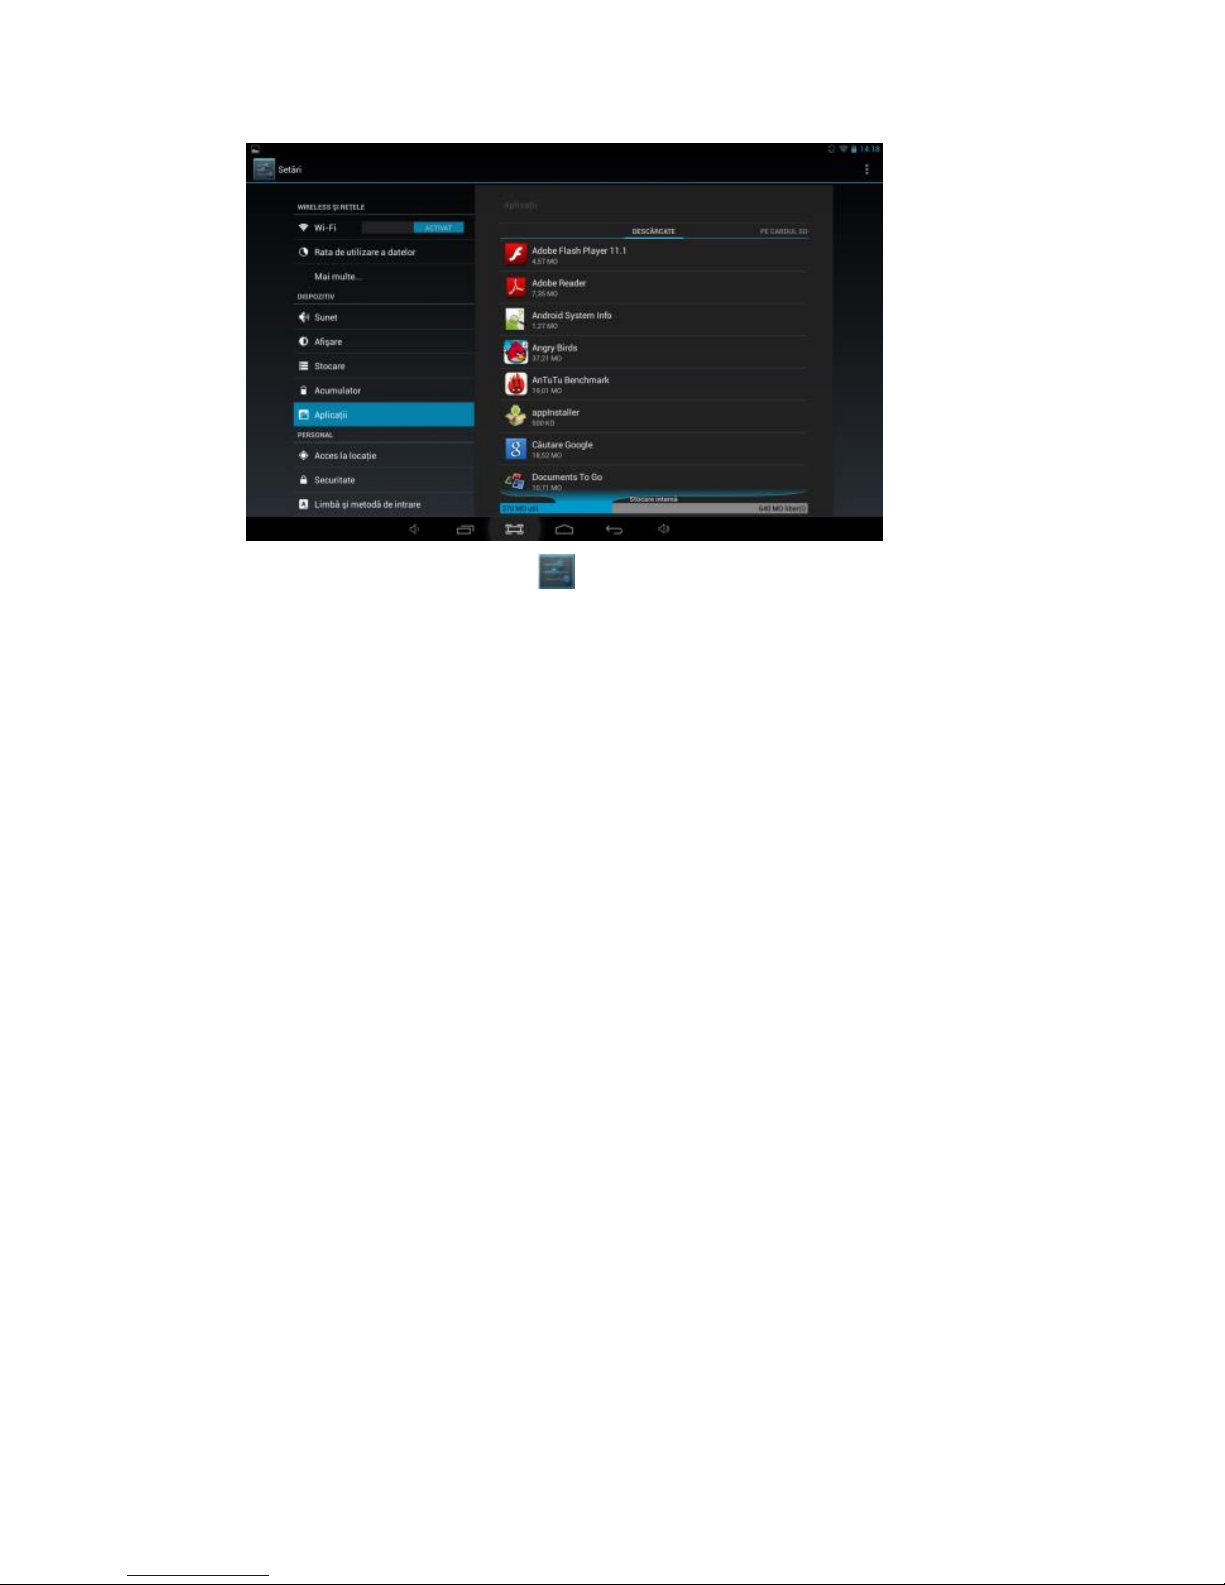
12 . S e t a r il e s i s t e m u l u i
Apasati pictograma Setari pentru a accesa setarile sistemului,
inclusiv W i-Fi si retele, Sunet, Afisare, Stocare, Baterie, Aplicatii, Servicii
de localizare, Limba si metoda de intrare, Copie de rezerva si resetare,
Conturi si sincronizare, Data/Ora, Accesibilitate, Optiuni dezvoltator si
Despre tableta.
12.1 Wireless si Retele
Din meniul setari, selectati “Internet connects manager”, apasati “Wi-Fi
settings”, intrati in meniul setare W i-Fi si selectati “Wi-Fi” pentru a
deschide conexiunea. Dupa ce Wi-Fi-ul este deschis, o cautare automata a
retelelor va fi initiata. Apoi va aparea o lista a tuturor retelelor disponibile.
Apasati pe numele retelei la care doriti sa va conectati, introduceti parola
iar peste cateva secunde veti fi conectat la Internet.
Pentru conectarea la Internet prin Dongle USB extern, conectati dongle-ul
USB 3G la produs prin intermediul cablului OTG-USB. Sistemul va detecta
dongle-ul si il va activa. Intrati apoi in meniul Setari / WiFi si alte Retele,
selectati “Retele Mobile” iar sistemul se va conecta la Internet automat.
12.2 Sunet
Din meniul principal puteti seta volumul, sunete, notificari si tonuri de
sistem.
12.3 Afisare
Optiuni: Luminozitate, Imagine de fundal, Auto-rotirea ecranului,
Page 16

15
Inactivitate, Dimensiune font, Coordonatele accelerometrului, Culori
inteligente, Iluminare de fundal inteligenta.
12.4 Stocare
In acest meniu puteti gasi o imagine generala asupra stocarii interne si a
cardului SD extern.
12.5 Acumulator
In acest meniu puteti gasi o imagine generala asupra informatiilor despre
acumulator.
12.6 Aplicatii
Vezi punctul 8. Aplicatii
12.7 Servicii de localizare
Se pot activa serviciile de localizare pentru a permite diferitelor aplicatii
sa afiseze informatii referitoare la locatia actuala si distantele pana la cele
mai apropiate puncte de interes pentru Dumneavoastra.
12.8 Securitate
Optiuni: Siguranta ecranului, Parole, Administrarea dispozitivelor si
Stocarea acreditarilor.
Sfat: Daca doriti sa instalati aplicatii din afara Magazinului Play, bifati
Surse necunoscute.
12.9 Limba si metoda de intrare
Puteti schimba limba sistemului si alege tastatura si metode de
introducere prestabilite.
Sfat: Daca ati instalat o metoda de introducere, bifati-o din Setari.
12.10 Copie de rezerva si resetare
Optiuni: Copie de rezerva si restaure, Resetarea configurarii din fabrica si
Modul de recuperare. Pentru a va asigura ca nu pierdeti informatiile
stocate pe tableta, va sfatuim ca periodic sa creati o copie de rezerva.
12.11 Conturi si sincronizare
Puteti gestiona toate conturile inregistrate pe tableta.
12.12 Data si ora
Optiuni: Setare data si ora, fus orar si setarea formatului de afisare.
Page 17

16
12.13 Accesibilitate
Optiuni: Text mare, Rotirea automata a ecranului, parole vocale, durata
atingere si mentinere apasare, cresterea accesibilitatii web. Puteti
personaliza toate aceste optiuni dupa cum doriti pentru a obtine cea mai
buna experienta de utilizare.
12.14 Optiuni dezvoltator
Optiuni: Parola copie rezerva desktop, Activ permanent, Verificare HDCP,
Protejarea cardului SD, Depanare USB, Acces locatii fictive, Intrare si
desen.
12.15 Despre tableta
In acest meniul puteti gasi o imagine generala asupra informatiilor despre
tableta (model, sistem, versiune firmware, etc).
12.16 Bluetooth
Acest produs este dotat cu Bluetooth. Prin intermediul acesteti optiuni va
puteti conecta la diverse echipamente periferice cum ar fi de exemplu un
set de casti fara fir sau o imprimanta.
13. I n t r e b a r i f r e c v e n t e
1. Dispozitivul nu se poate conecta la Wi-Fi
• Asigurati-va ca reteaua wireless functioneaza testand cu alt
dispozitiv wireless.
• Asigurati-va ca produsul este in raza retelei wireless la care doriti
sa va conectati. Peretii sau alte obstacole pot reduce raza de functionare
dintre dispozitivele wireless.
• Asigurati-va ca parola de securitate folosita este corecta.
2. Dispozitivul nu porneste
• Nu puteti porni dispozitivul atunci cand nivelul bateriei este sub
nivelul critic. Va rugam incarcati bateria.
• Apasati butonul RESET si verificati daca resetarea se produce in
mod normal.
• Verificati daca alimentatorul este conectat corect.
3. Probleme de incalzire
• Atunci cand rulati aplicatii multiple setand ecranul la o
Page 18

17
luminozitate maxima, sau cand se incarca, dispozitivul se poate incalzi.
Acest lucru este normal si nu ar trebui sa cauzeze probleme in timpul
utilizarii.
4. Sistemul prezinta anomalii si nu functioneaza corect
• Instalarea unor terte aplicatii poate provoca probleme de
functionare ale sistemului. Apasati butonul RESET si efectuati o resetare a
sistemului pentru a rezolva problema.
5. Nu pot seta e-mail-ul
• Asigurati-va ca tableta este conectata la o retea Wi-Fi si ca aceasta
se poate conecta la Internet.
• Asigurati-va ca setarile email-ului au fost introduse corect pentru
contul pe care doriti sa il accesati.
• Asigurati-va ca data sistemului este setata corect.
6. Nu pot inregistra
• Apasati butonul RESET, apoi verificati daca functia de inregistrare
functioneaza corect.
7. Timpul de utilizare a dispozitivului este prea scurt
• Timpul de utilizare pentru bateria cu lithium variaza in functie de
schimbarea temperaturii din mediul inconjurator. Daca temperatura din
mediul inconjurator este prea ridicata sau prea scazuta, durata de utilizare
a bateriei va fi afectata. Este recomandat sa folositi dispozitivul la o
temperatura normala.
• Durata de viata a bateriei depinde de utilizare. Volumul ridicat,
Wi-Fi si utilizarea frecventa pot face ca bateria sa se descarce intr-un timp
mai scurt.
• Pentru a obtine o utilizare indelungata in conditii de performanta
maxima a bateriei, inainte de a deschide produsul pentru prima data, va
rugam sa incarcati bateria pentru 8-12 ore.
8. Fara sunet in casti
• Va rugam sa verificati daca fisierul audio este stricat si incercati sa
ascultati un alt fisier audio pentru a confirma. Daca fisierul audio este
stricat, acest lucru poate cauza un zgomot sever.
• Verificati faptul ca mufa castilor este conectata corect la produs.
9. Distorsiunea culorilor pentru afisarea videoclipurilor sau a
Page 19
18
pozelor
• Apasati butonul RESET pentru a rezolva aceasta problema.
10. Nu pot copia fisiere
• Va rugam sa verificati daca spatiul de memorie este plin.
• Va rugam verificati daca cablul USB este defect.
11. Alte probleme
Apasati butonul RESET si apoi verificati daca problema s-a rezolvat. In caz
contrar, apelati la cea mai apropiata unitate de service autorizat.
14. De s p r e f i r m w a r e
Firmware-ul instalat pe tableta reprezinta programul de control pentru
dispozitiv, fiind oferit de producator. Restaurarea firmware-ului (rescrierea
firmware-ului in dispozitiv) este solutia finala pentru problemele serioase
de sistem. Pentru problemele uzuale puteti reseta dispozitivul sau folosi
optiunea resetarea configurarii din fabrica. Daca sistemul se blocheaza
chiar si cand ati resetat configurarea din fabrica, puteti restaura
firmware-ul sub indrumare de specialitate. Firmware-ul preinstalat in
dispozitiv este o versiune stabila pentru tableta, va rugam sa nu il
restaurati cu alte versiuni decat daca este absolut necesar. NU
recomandam restaurarea firmware-ului fara indrumarea producatorului,
care nu este responsabil pentru posibile erori cauzate de restaurarea
firmware-ului de catre utilizator, fara indrumare de specialitate.
15. S p e c i f ica t ii t e h n i c e
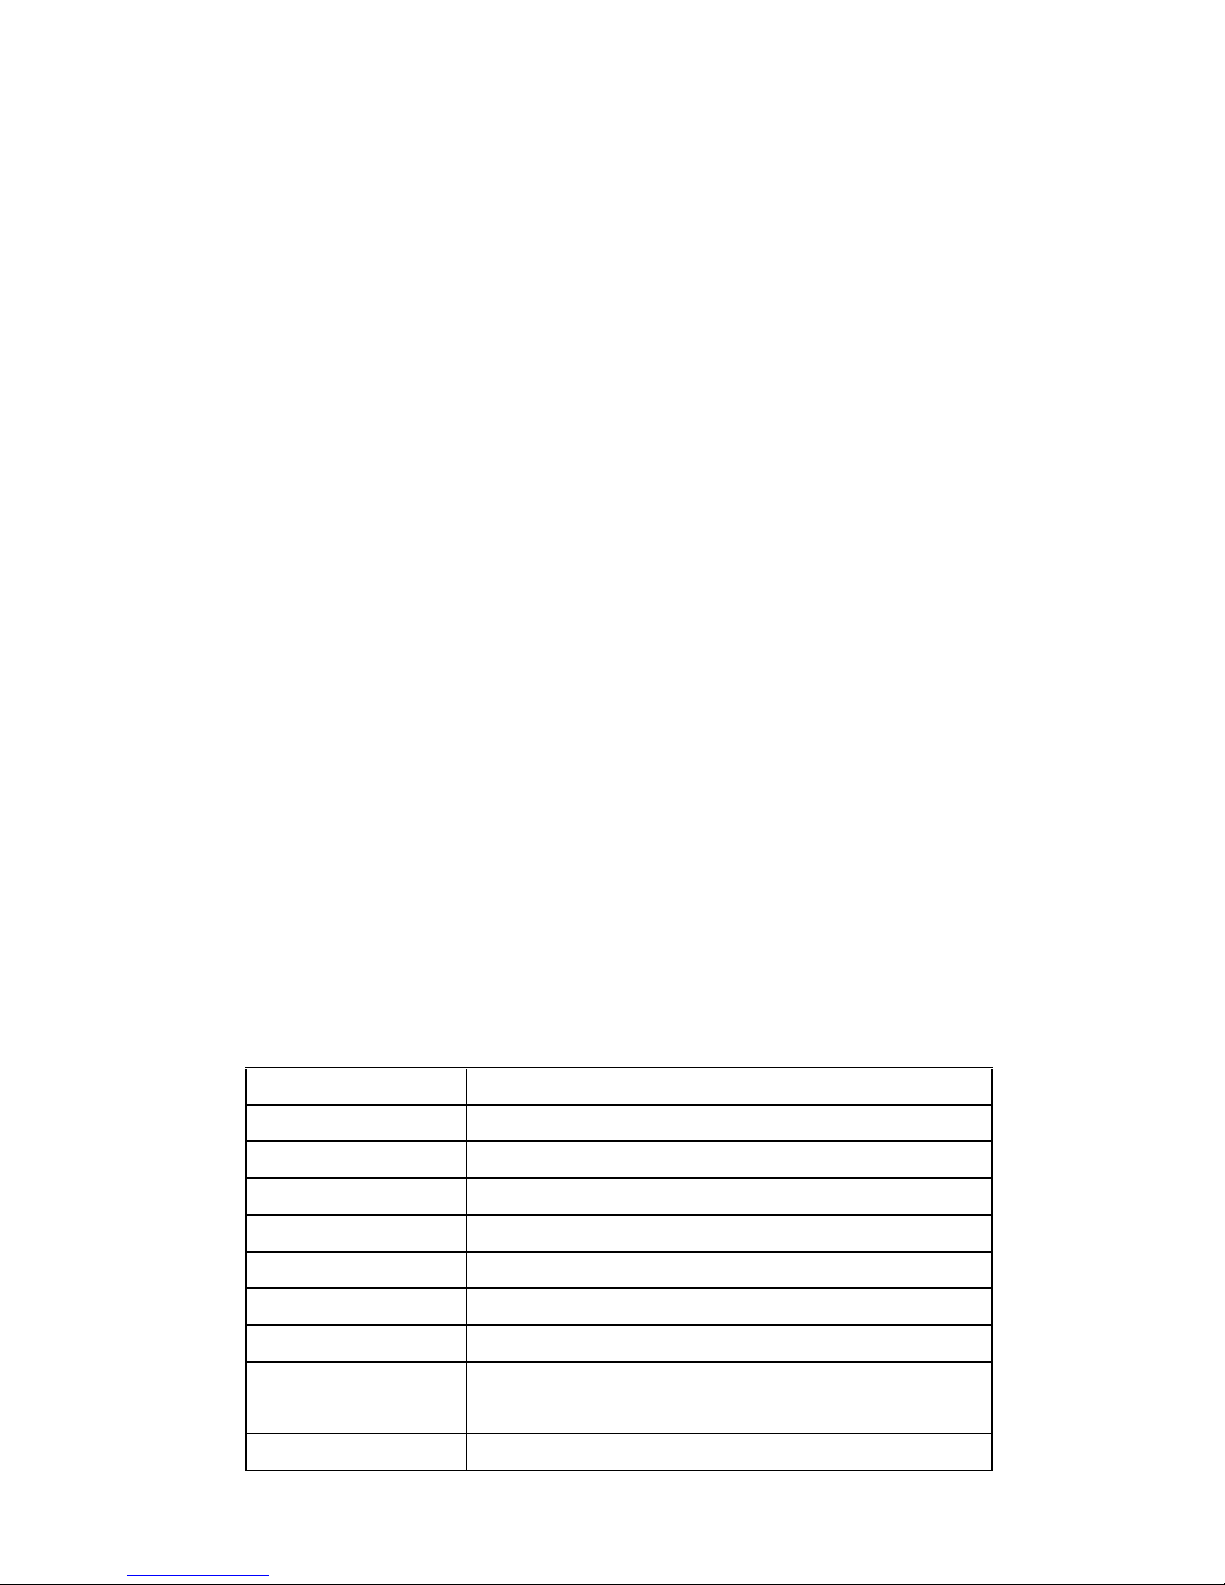
SO
Android 4.2.2 Jelly Bean
Procesor
Dual-Core MTK8312, 1,3GHz
Ecran
7" 800x480, Capacitiv multitouch, 5 puncte
Memorie RAM
512 MB DDR3
Memorie Flash
4 GB
Placa video
Dual Core Mali400
Difuzor
1 W
Camera Web
Fata: 0.3 MP; Spate: 0.3 MP
Porturi
Micro USB, Micro SD (pana la 32 GB), Intrare
pentru casti, Slot microSIM
Dimensiune
188 x 108 x 11 mm
Page 20
19
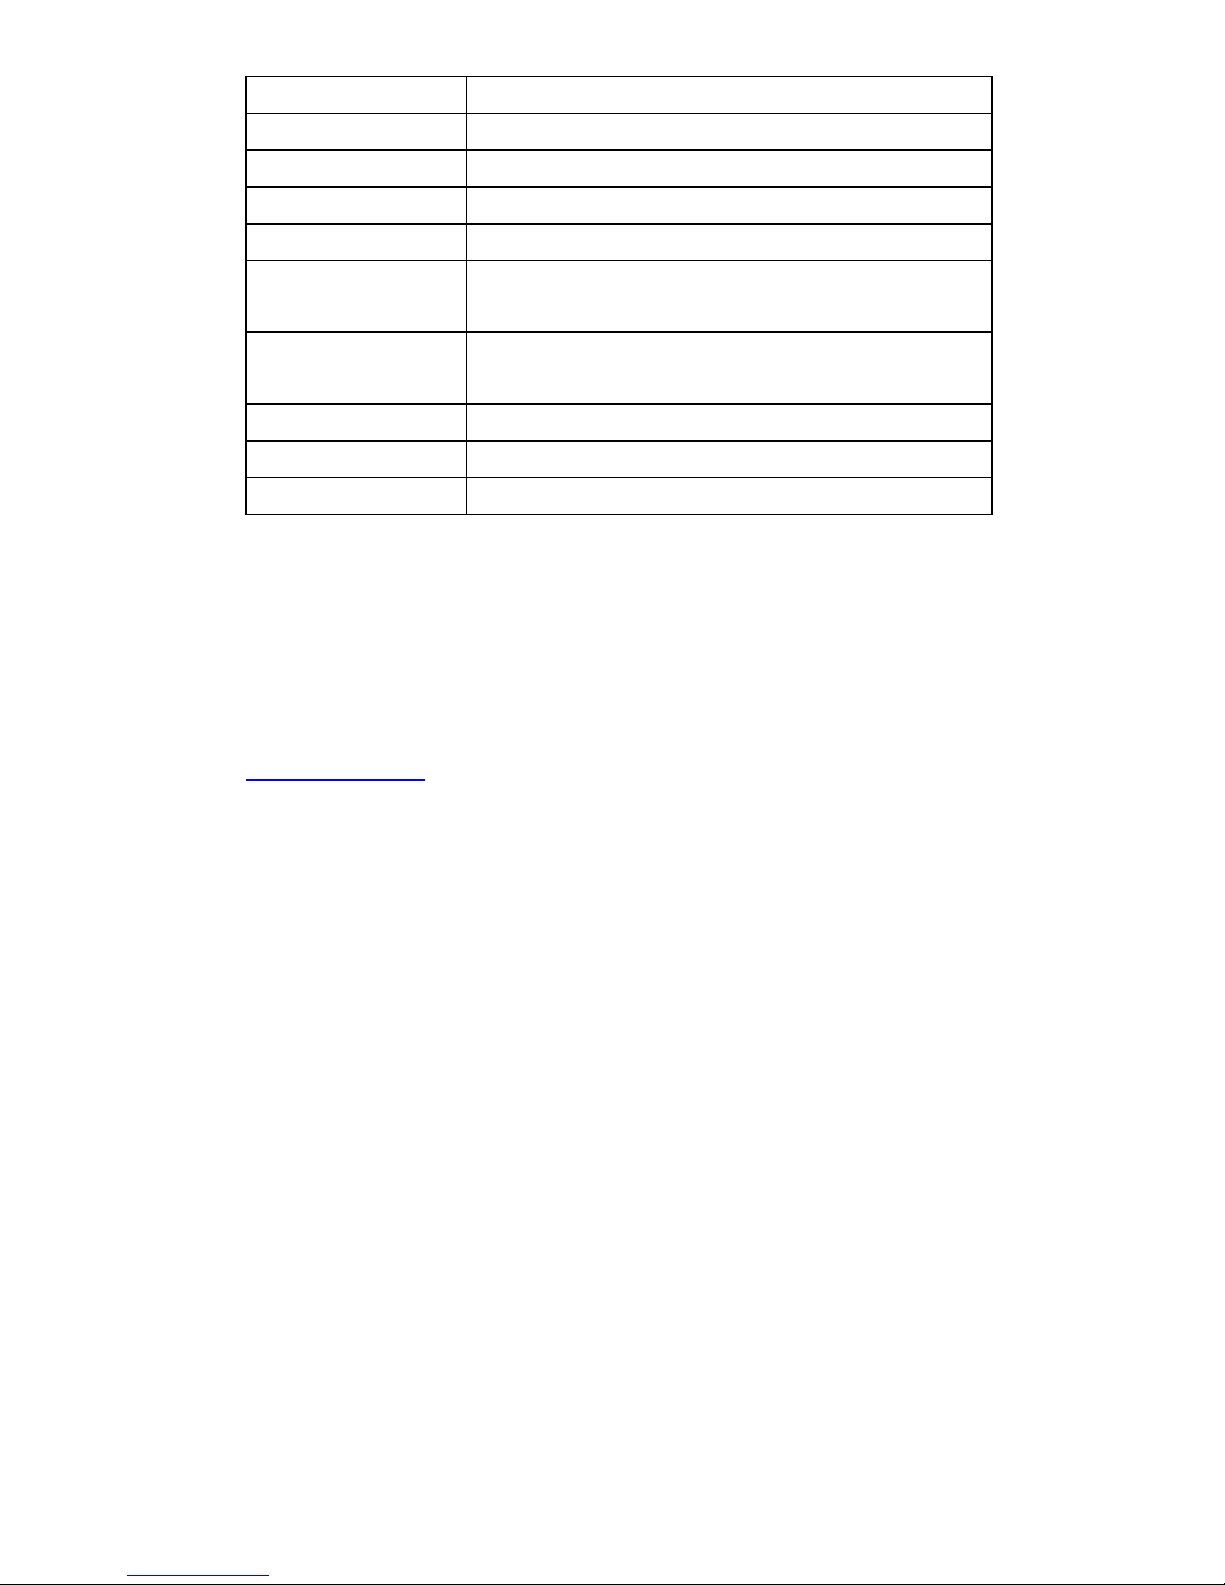
Greutate
300 g
Wi-Fi
802.11 b/g/n
3G
Inclus, 900 / 2100 Mhz
Bluetooth
Bluetooth 4.0
Baterie
Li-Polymer 2800mAh, 5-6h autonomie
Formate video
AVI, DIVX, XVID, RM, RMVB, MKV, WMV, MOV,
MP4, MPEG, MPG, FLV
Formate audio
MP3, WMA, MP2, OGG, AAC, M4A, MA4, FLAC,
APE, 3GP, WAV
Formate foto
JPG, BMP, PNG, GIF
Formate eBook
EPUB, PDF
Altele
Accelerometru, Microfon, GPS
16. De c l a r at i e d e c on f o r m i t a t e
Declaratia de conformitate pentru produsul 700 D 3G Lite,
marca UTOK poate fi accesata online la adresa web
www.utok.com
Page 21

20
USER MANUAL
UTOK 700 D 3G Lite
Page 22

21
Table of Contents
ALL RIGHTS RESERVED .................................................. 22
1. Cautions .................................................................... 23
2. Device Overview ....................................................... 24
3. Main Functions ......................................................... 24
4. Basic operation ......................................................... 25
5. Home screen ............................................................. 27
6. Connecting to networks ............................................ 29
7. USB Connection ........................................................ 30
8. Applications .............................................................. 31
9. Video Play ................................................................. 32
10. Music play ............................................................... 32
11. Camera .................................................................... 32
12. System settings ....................................................... 34
13. FAQ .......................................................................... 37
14. About firmware ....................................................... 38
15. Technical specifications .......................................... 39
16. Declaration of conformity ....................................... 39
Page 23

22
A L L R I GH T S RE S E RV E D
©2013. All rights are reserved. No part of this document can be reproduced without
permission. All trademarks and brand names mentioned in this publication are
property of their respective owners. While all the efforts have been made to ensure
the accuracy of contents in this manual, we presume no responsibility for errors or
omissions or statements of any kind, whether such errors are omissions or statements
resulting from negligence, accidents, or any other cause. We operate a policy of
continuous development and reserve the right to make changes and improvements to
the device, device features/specifications or any of its parts without prior notice. Your
device may have preinstalled bookmarks and links for third party internet sites and
may allow you to access third party sites. These are not affiliated with us, and we do
not endorse or assume liability for them. If you access such sites, take precautions for
security or content. The warranty does not cover any third party software, settings,
content, data or links, whether included/ downloaded in the product, whether
included during installment, assembly, shipping or any other time in the delivery chain
or otherwise and in any way acquired by you. To the extent permitted by applicable
law(s), we do not warrant that any of our software will meet your requirements, will
work in combination with any hardware or software applications provided by a third
party, that the operations of the software will be uninterrupted or error free or that
any defects in the software are correctable or will be corrected.
User’s Manual is provided just to guide the user about the functionality
of the device. The user manual is not a certificate of technology. Some
functions may vary due to modifications and upgrades of software or due to
printing mistake.
Page 24

23
1. Cau t i o n s
Read these notes carefully before using tablet, to ensure use
tablet safely & correctly:
● Use only the battery and charger delivered by our company.
Using other products may lead to different problems,such as
overheating the product.
● In order to have a long lasting life for the battery, please
charge it for 8 to 12 hours before the first use.
● Don’t throw battery into the fire, it could cause explosion.
● Operating time is based on the ideal working environment.
Working in extreme temperatures, the battery working time will
be shorter.
● The reccomended tempearture of use for this device is
5-35°C.
● Do no use the product in areas with very low or very high
temperatures or in wet or dusty areas. Do not leacve the
product under the direct sunlight.
● Prevent the machine fell to the ground or other strong
shocks.
● If water and other liquids spilled on the unit, immediately
turn off it and clean it with a dry and soft cloth.
● Do not touch the charger, the cable or the power supply
with wet hands. This can lead to eletrical shock.
● Do not disassemble the unit or it’s accessories and do not
try to repair the product. This will lead to waranty loss.
● If your product is not running well, please send it to the
nearest authorised service center.
Page 25
24
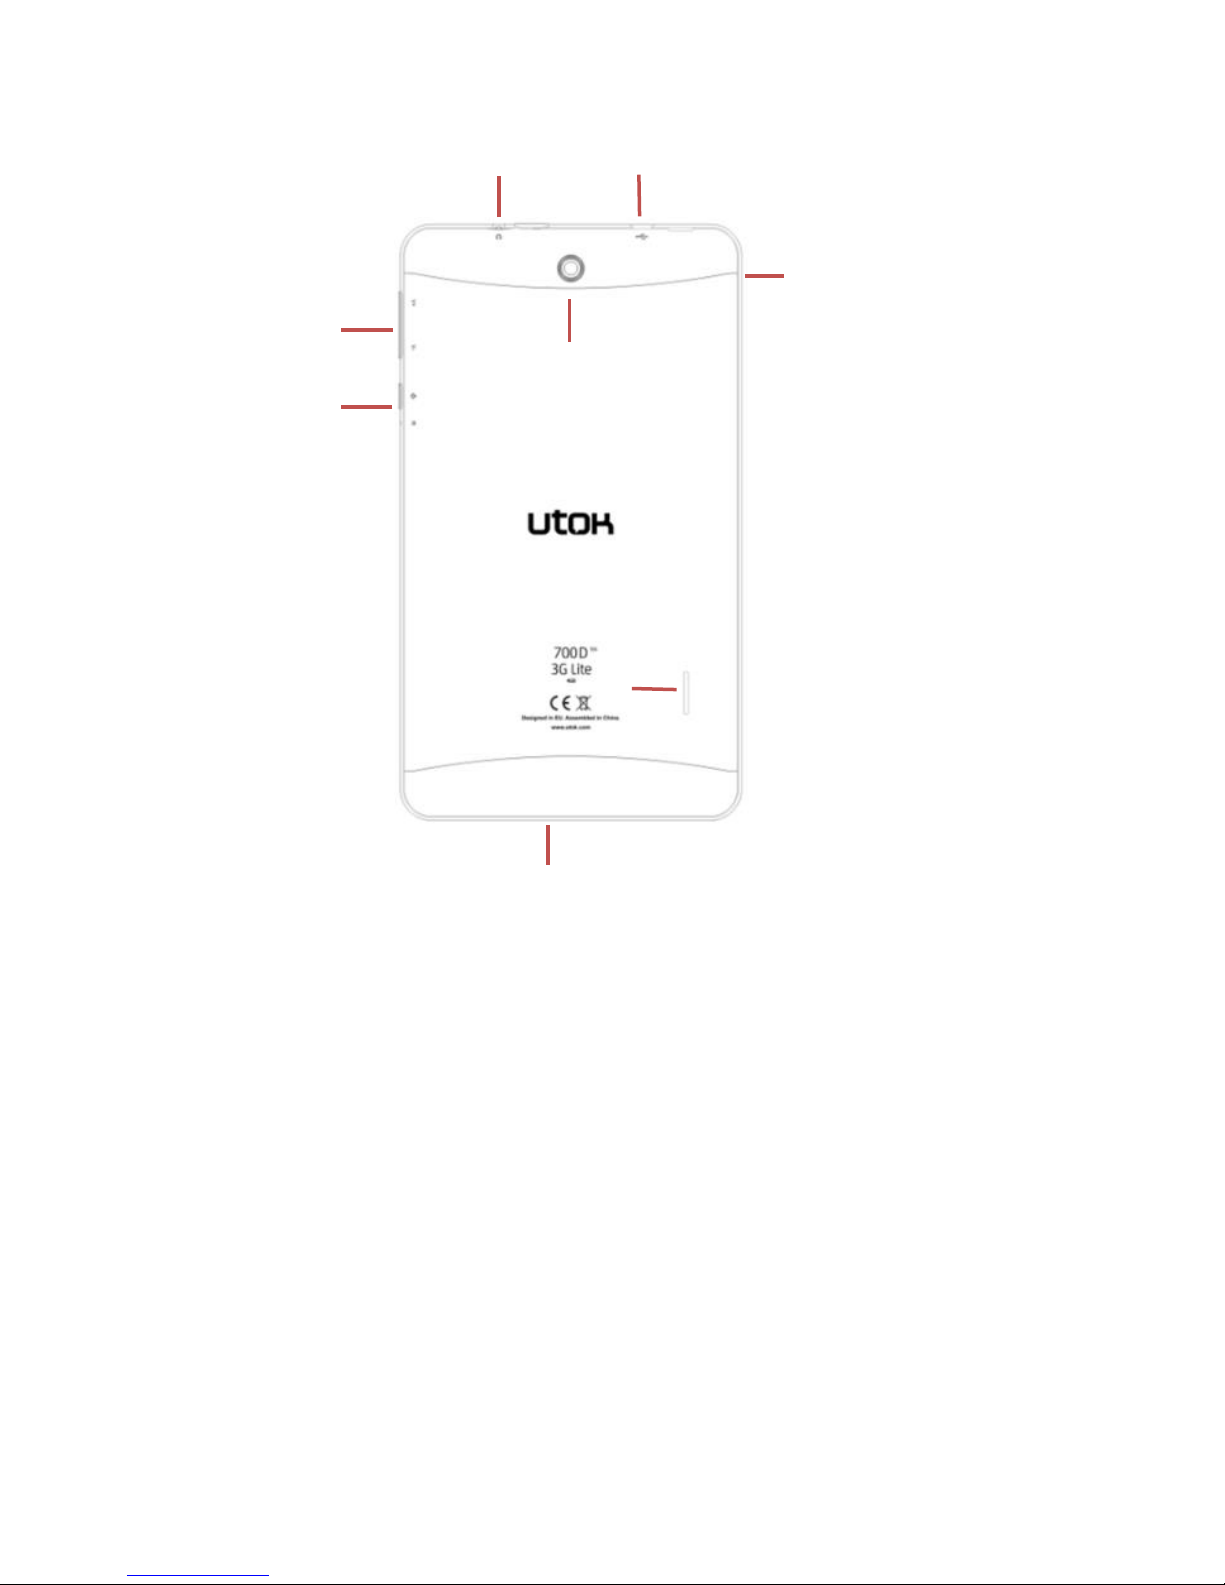
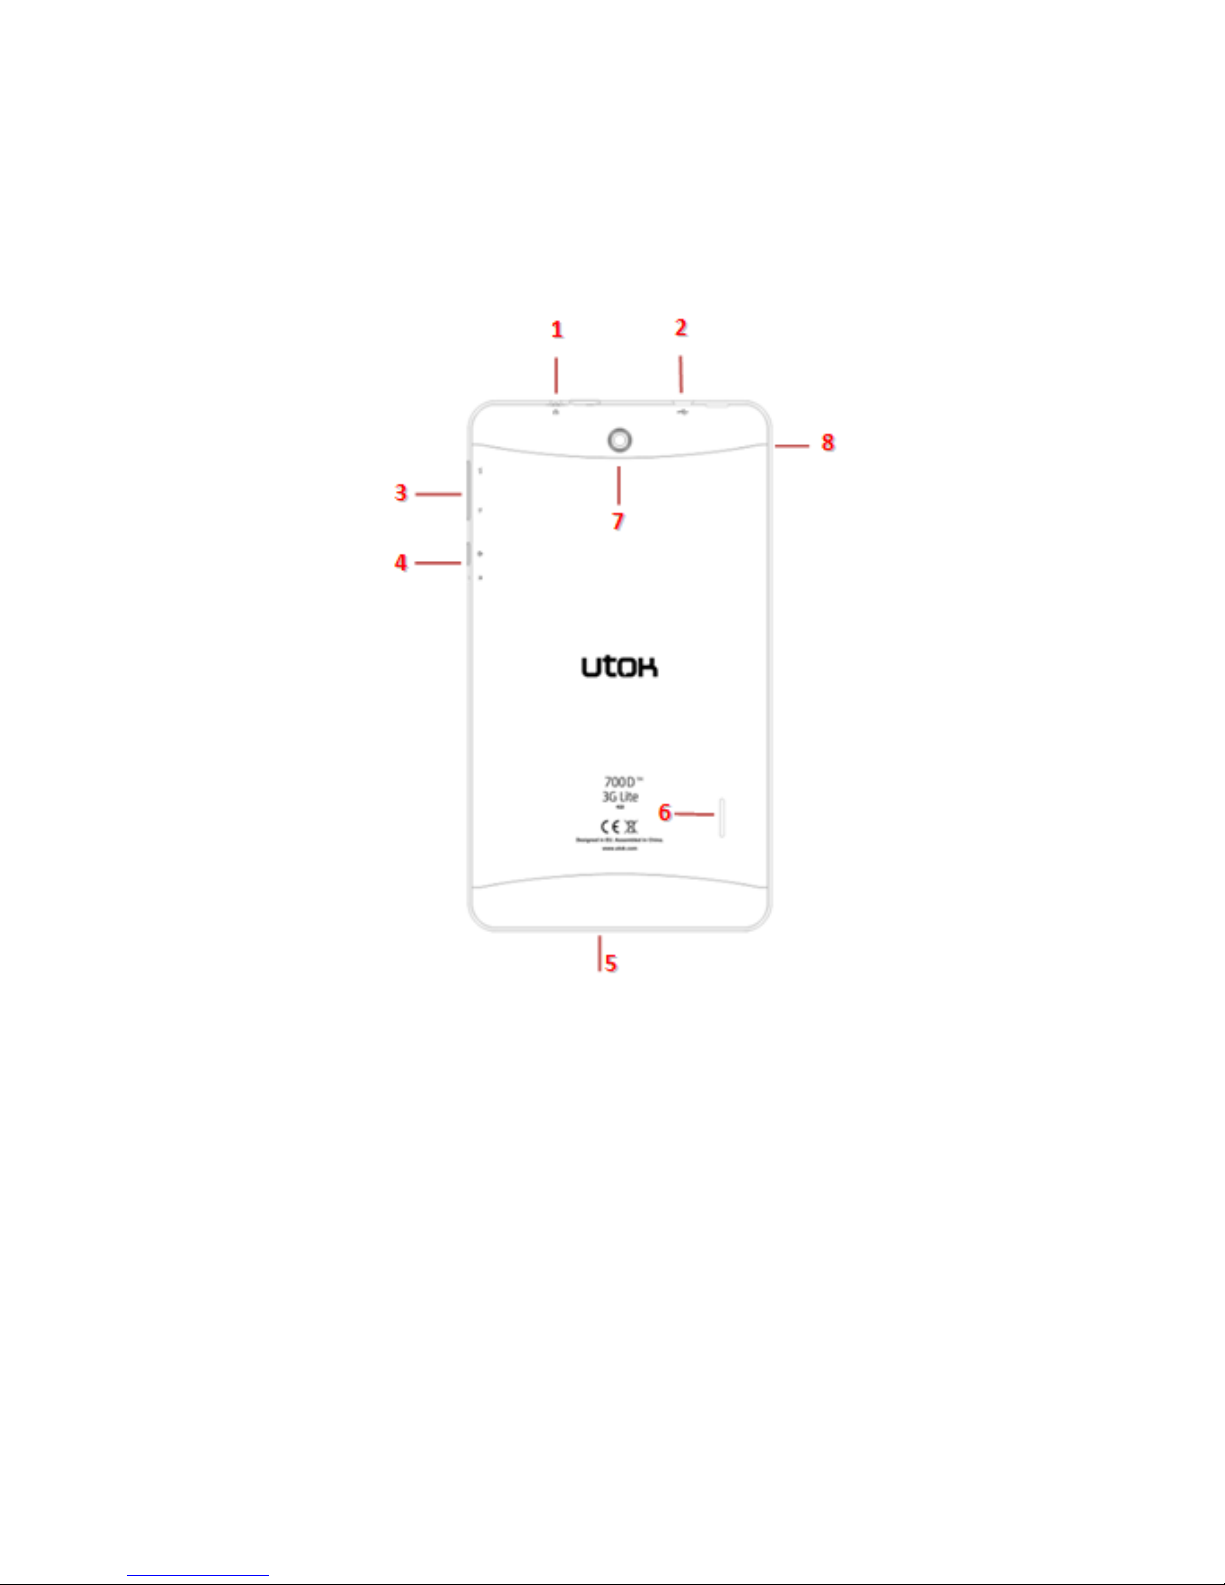
2. Device overview
1. Headphone jack
2. Micro USB port
3. Volume up, wolume down
4. Power/restart/lock key
5. Microphone
6. Speaker
7. Camera
8. SIM card slot and microSD card slot
3. Main Functions
● Enjoy the multimedia library anywhere and anytime. This
portable device can play music, video, or photo-album files.
● The device comes with an integrated microSD card slot. You
11
22 33
66 44 77 55
88
Page 26

25
can increase the memory storage upto 32GB by installing this
card.
● Photo and video cameras. With the preinstalled photo and
video cameras you can take pictures and make videos anytime.
● Connect to the Internet using the 3G module integrated.
You need a micro SIM card with voice and data support from
any of the local operators and you will have instant access to
Internet and in the same time you can make voice calls with all
your friends.
● Connect to the Internet wirelessly with the built-in WiFi.
● You can surf the Internet and visit your favorite websites.
● You can access your e-mail account and stay in contact.
● Social networks. By installing this type of aplication, you can
be in contact all the time with all your friends.
● Youtube. Surf Youtube to have access to the most popular
and biggest online video sharing comunity.
● Discover thousands of applications for Android. Games,
utility aplications and others, all available trough Google Play.
4. B a s i c o p e ra t ion
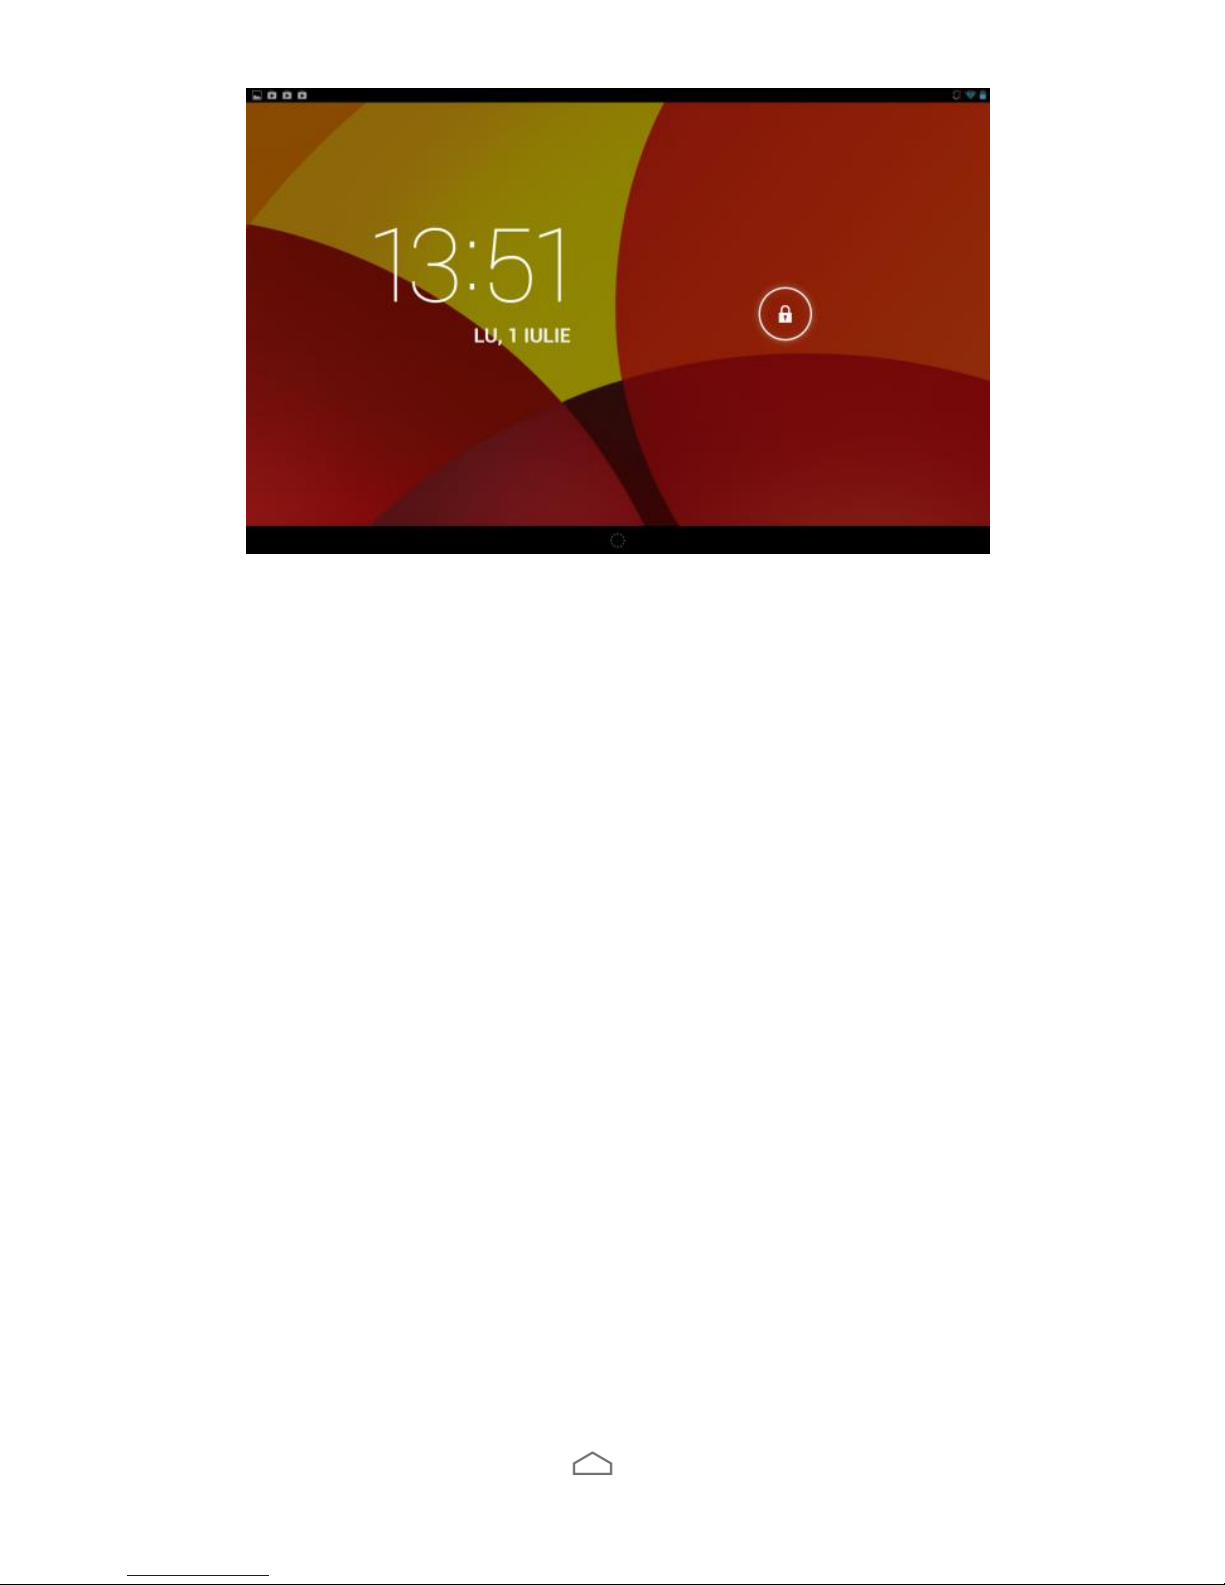
4.1 Power On
Press POWER button for around 2 seconds and the device will
start up and display the lock screen. Slide the lock to the right to
unlock. This will lead you to the Home Screen.
Page 27
26
4.2 Standby
When the device is working, press POWER button shortly to
shut the display and it goes into standby mode. Press POWER
button again to awake the device, and slide the lock to continue.
4.3 Power Off
Press POWER button for around 2 second and choose OK in the
popup.
4.4 Reset
If the device is blocked or cannot start or and can not be turned
off by POWER button, users can use RESET function.
4.5 Recharging
When the device can not be turned on normally or it is shuting
down automatically, it may need to be recharged.
Please use the correct charger as the manufacturer guides.
4.6 Home Screen
From any applications, press to go to Home Screen.
Page 28
27
4.7 Back Button
Press to go to the previous page.
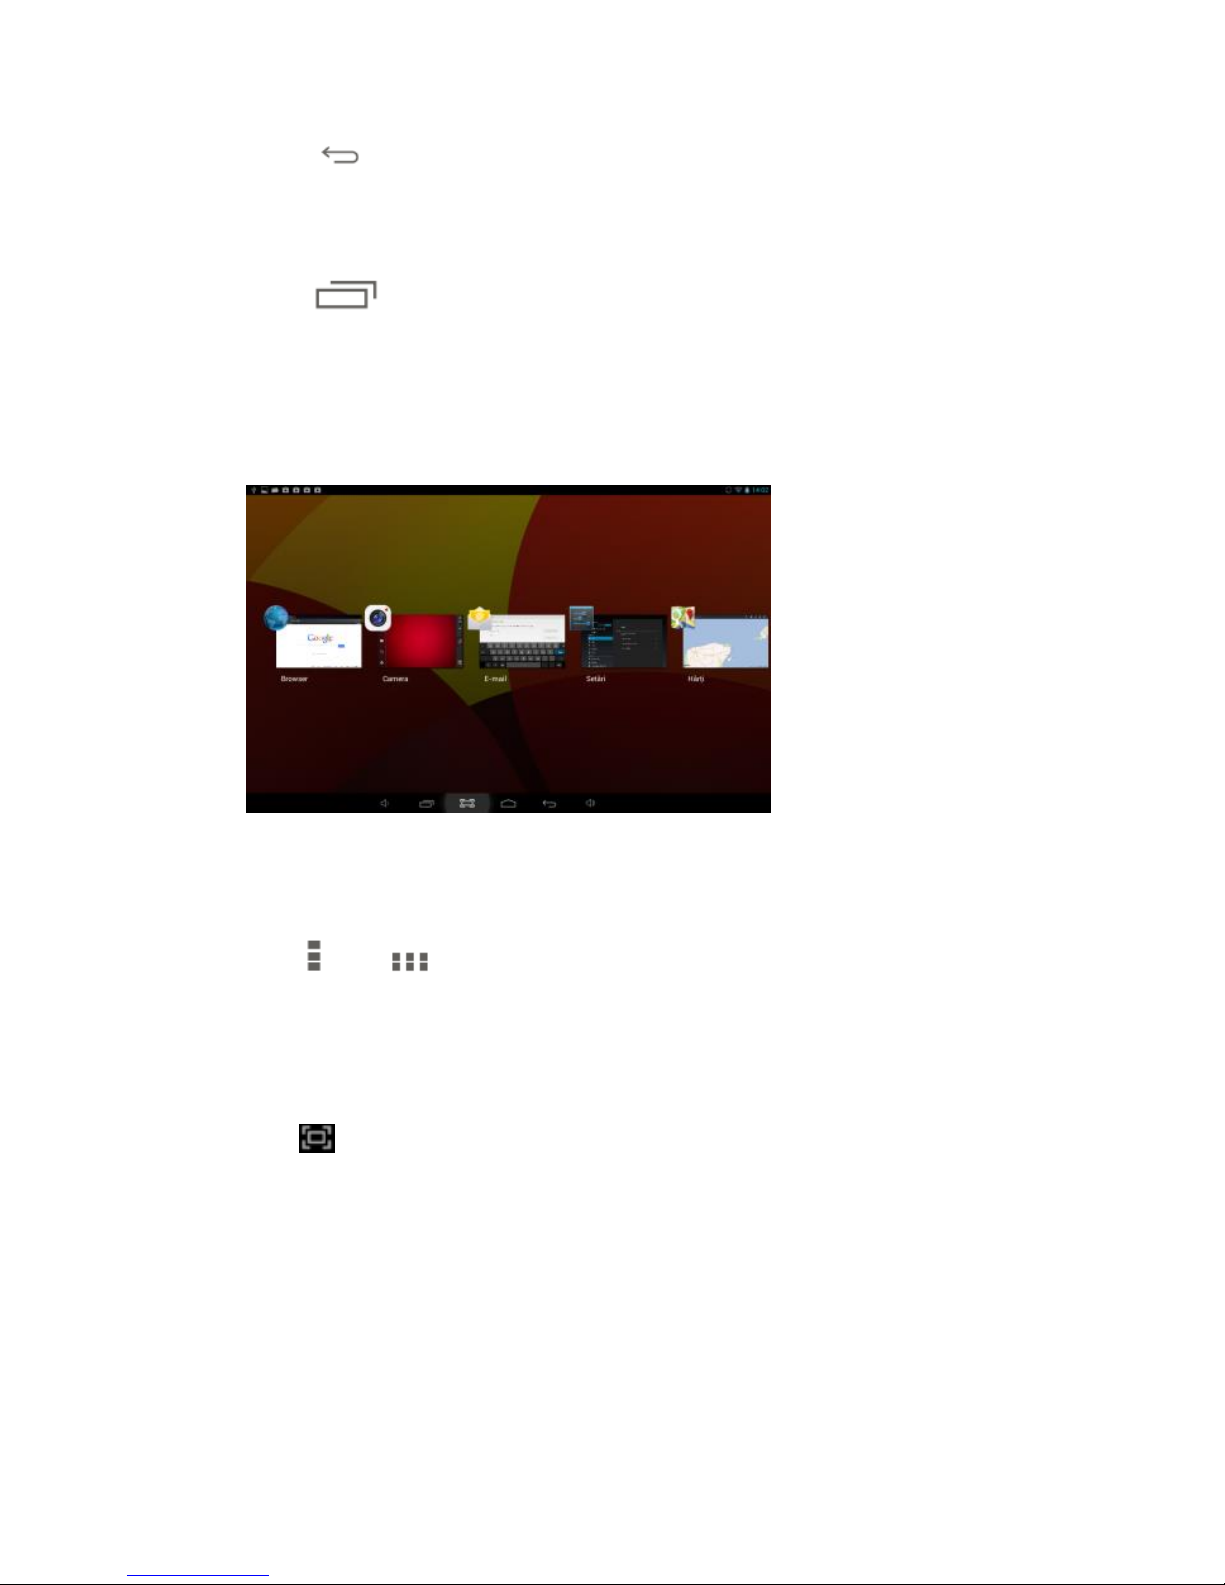
4.8 Recent Task
Press to view recent tasks. Tap the task frame to open it,
or slide to close it. If the product is functioning slowly, you have
to access this function in order to close the programs that are
running and you do not use, as these are actually slowing down
your system performance.
4.9 Menu
Tab or to access the main menu and to view all the
options.
4.10 Screen Capture
Tab to capture screenshot.
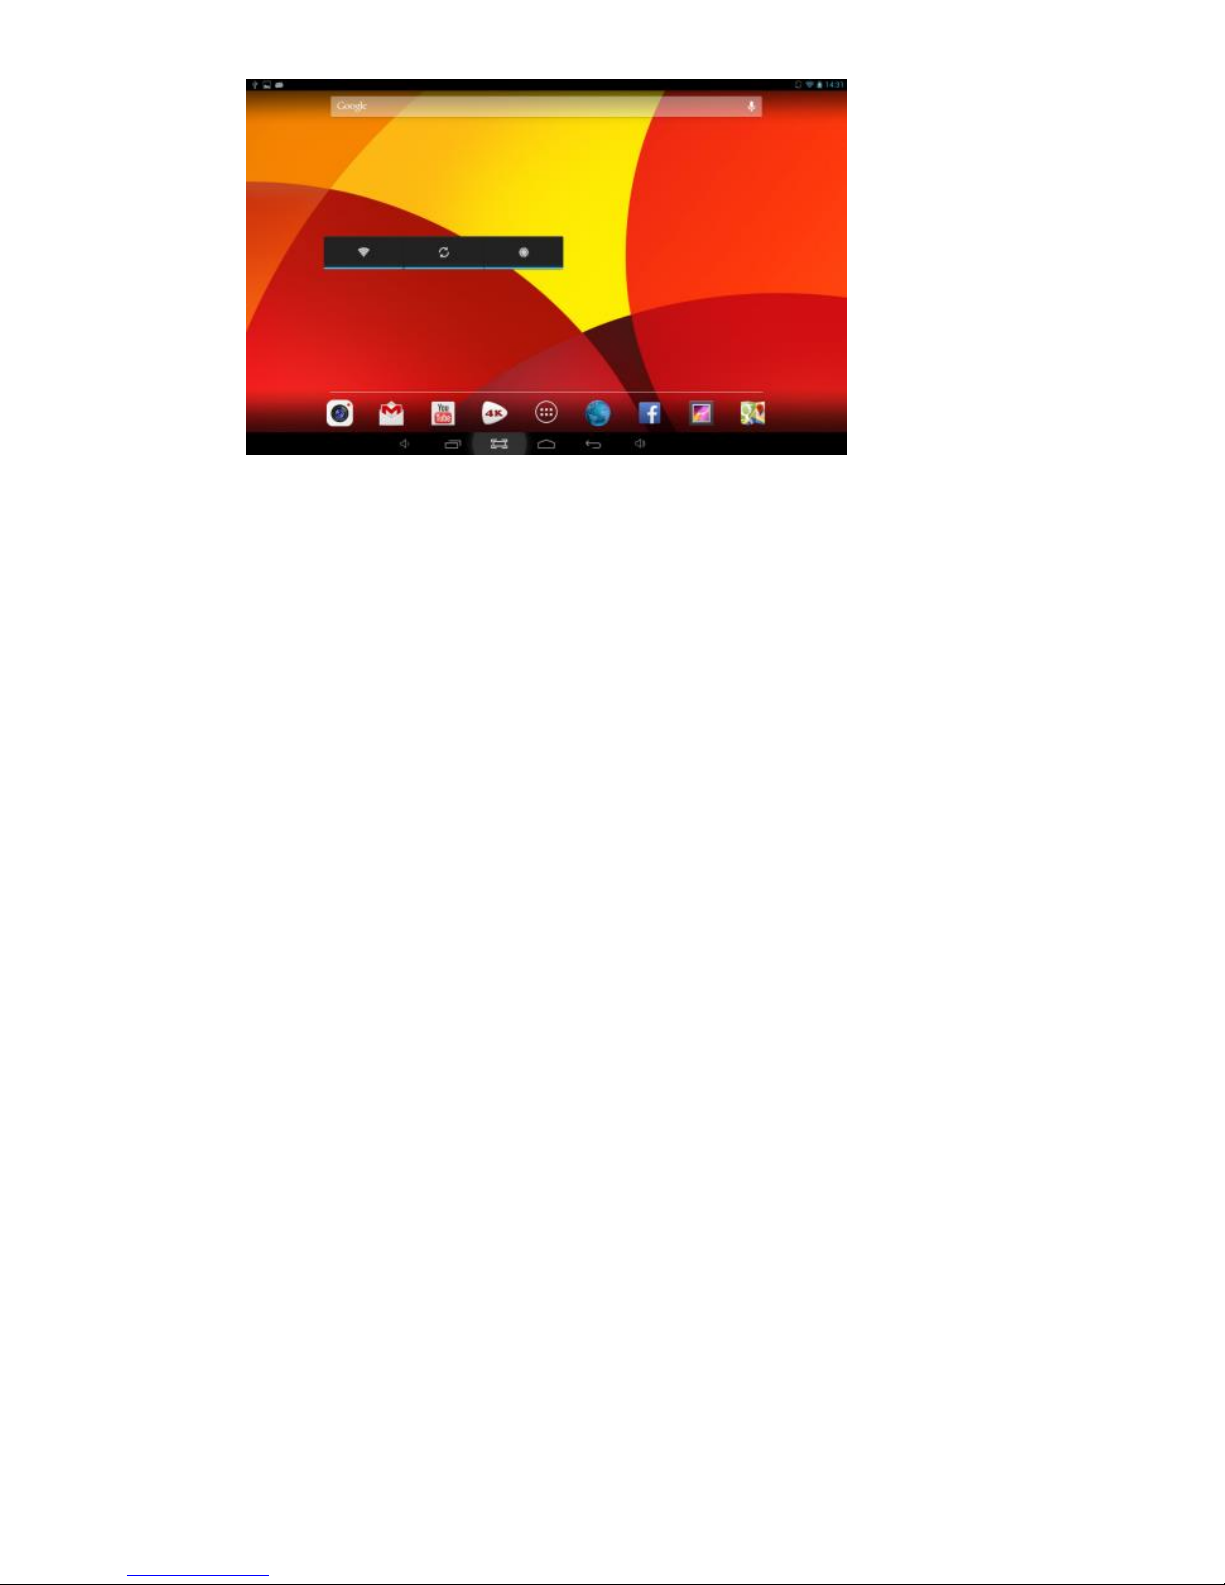
5. H o m e s c r e e n
There are several pages, slide to the left and to the right in order
to view all these main screens.
Page 29
28
5.1 Add apps & widgets to Home Screen
Launch apps list, press the icon and drag it to Home Screen if
you want to add it on this main screen. At Home Screen, press
icons to drag leftward or rightward to move it to other pages.
Drag upwards and place it over the remove icon if you want to
erase it from Home Screen.
5.2 Wallpaper
If you want to change the picture on the homescreen, long press
blank space of the Home Screen, and choose different
wallpapers in the popup.
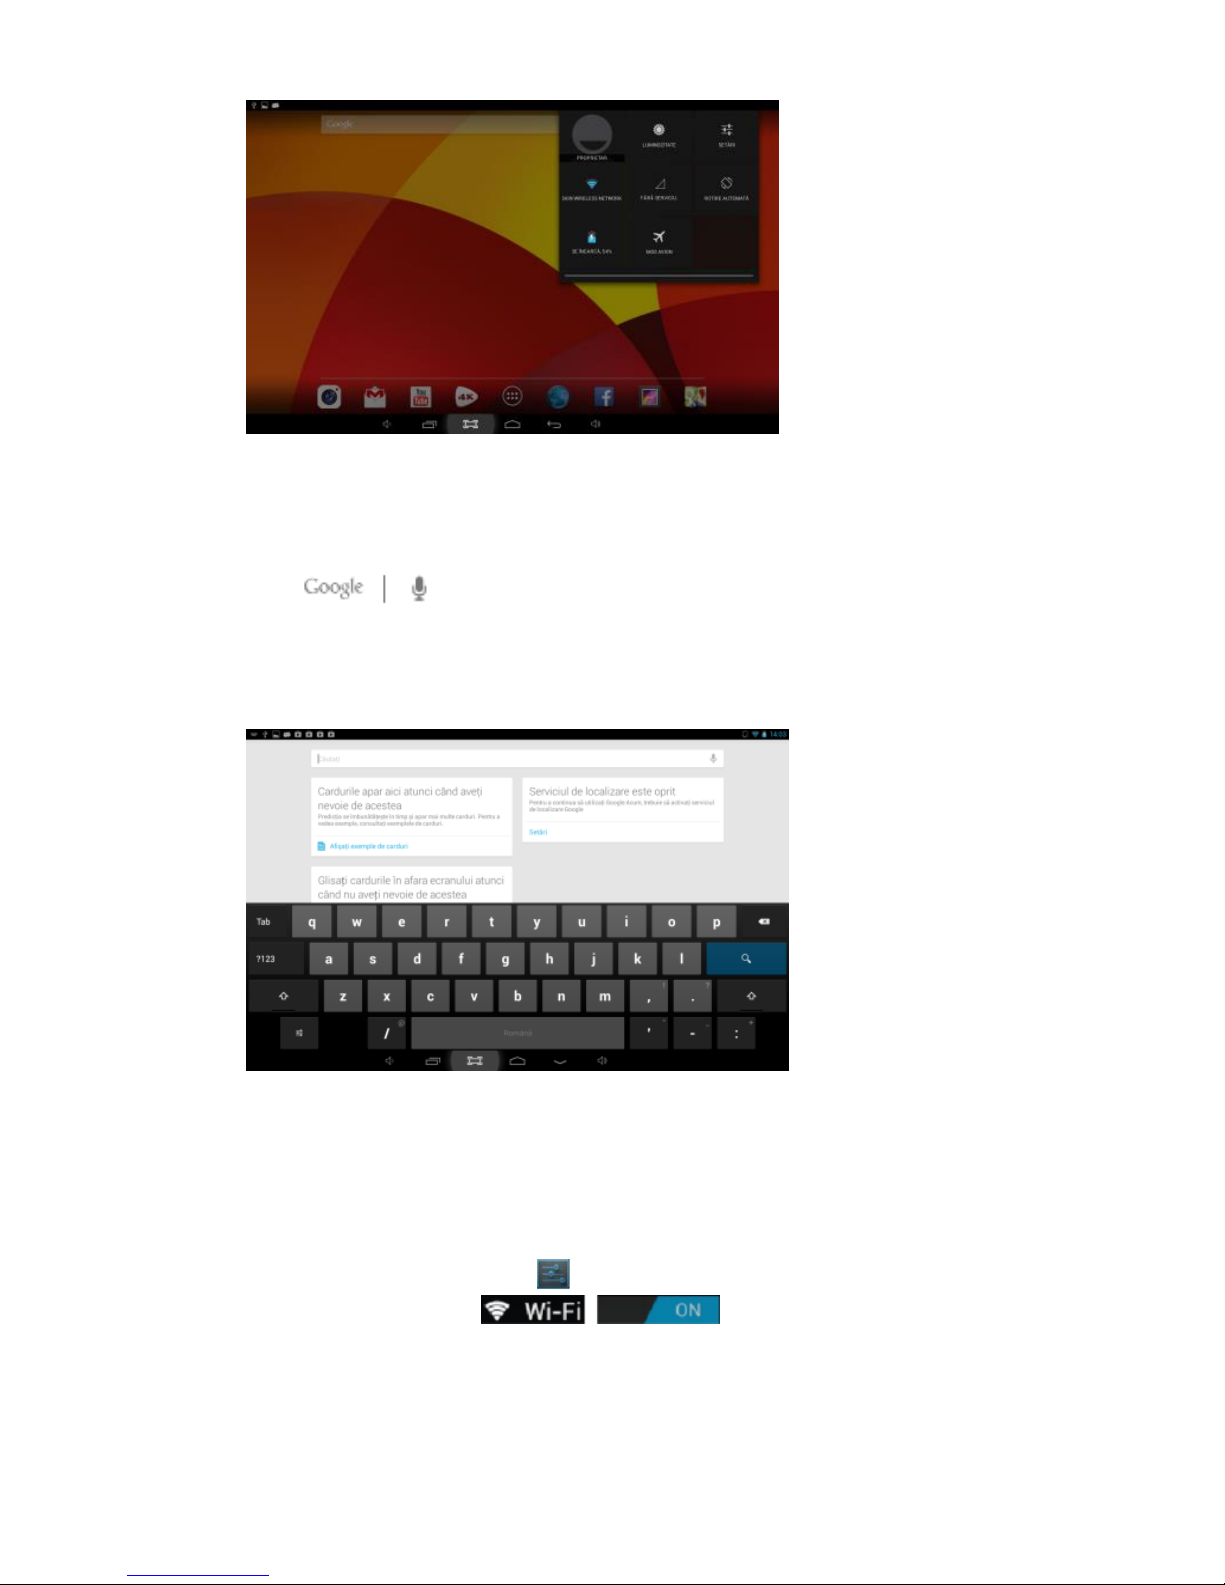
5.3 Notification Bar
Tab and slide down from the upper right corner of your screen
to view the notification bar, informing you about the WIFI status,
battery, updates, downloads and others.
Page 30
29
5.4 Search
Tab to search information at local or on the
Internet. Voice Search is supported.
6. C o n n e c t i n g t o n e t w o r ks
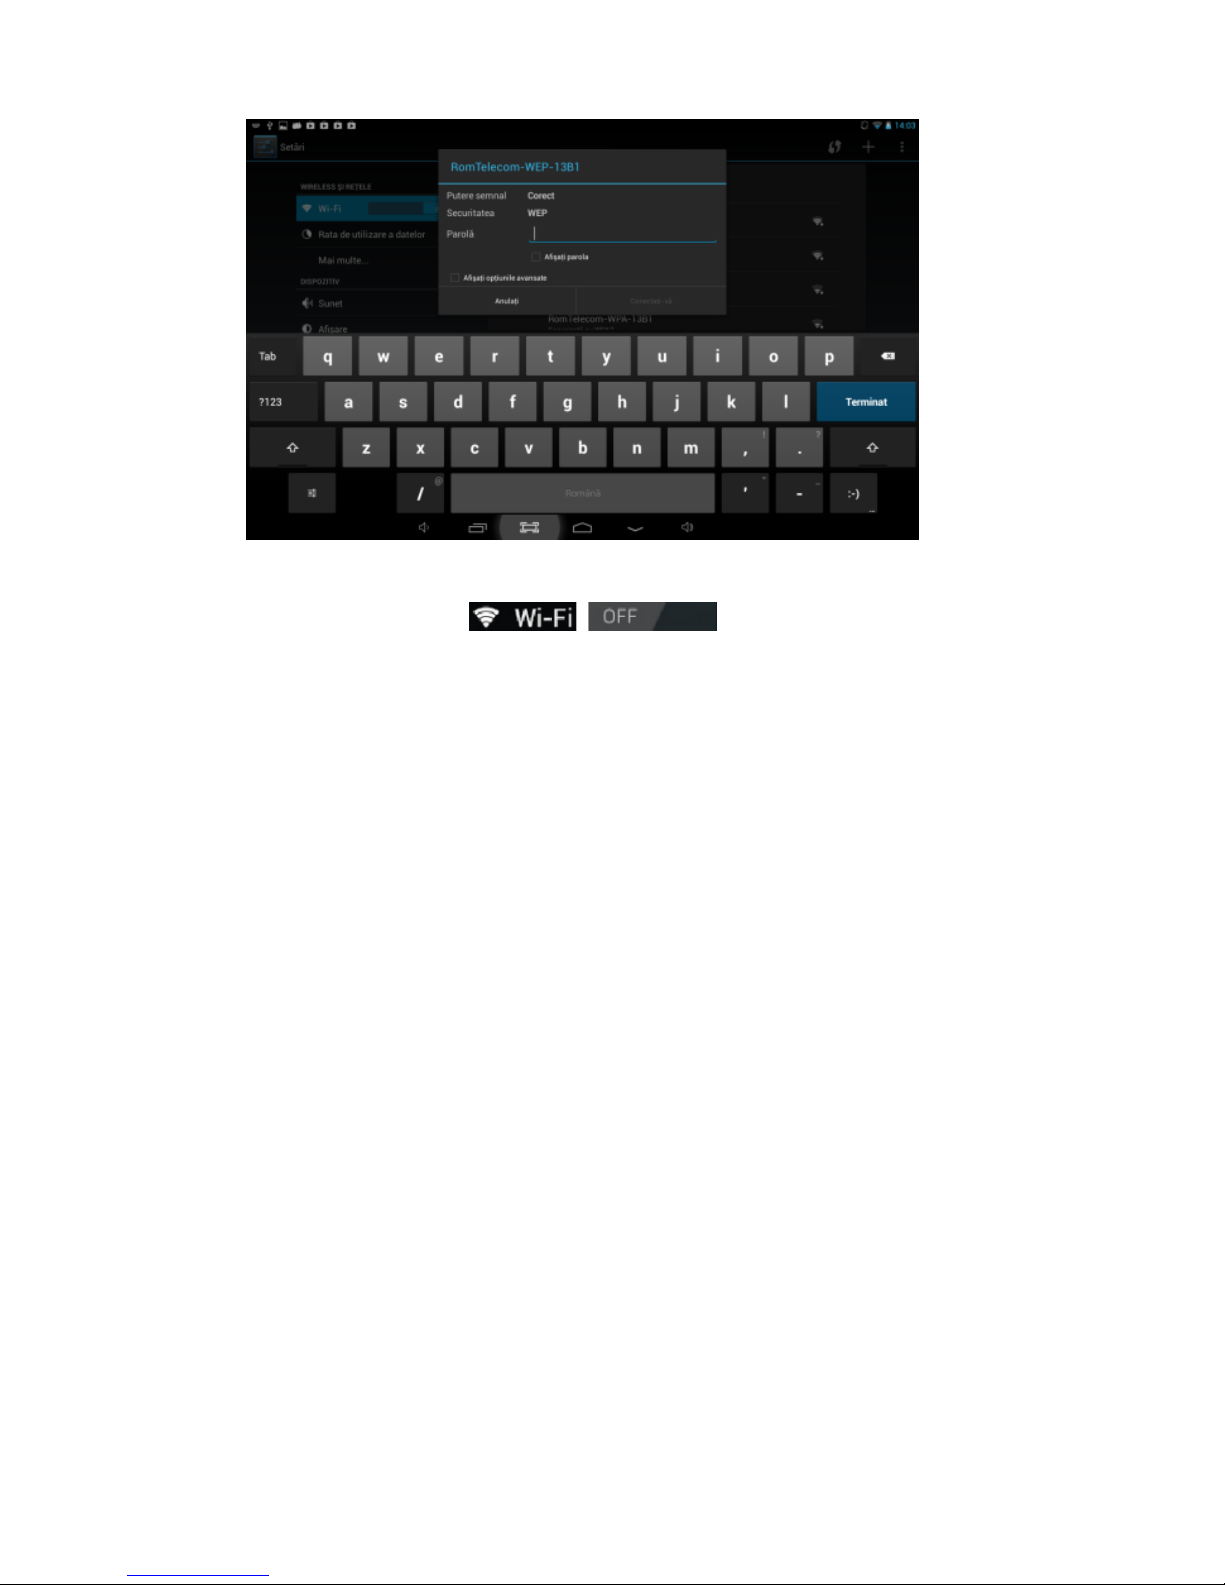
6.1 Connecting to Wi-Fi
● Press the Settings Icon
● Slide Wi-Fi icon to the right (ON) to
turn on Wi-Fi, the tablet will scan and offer a list of available
Wi-Fi net-works around. Tab the name of Wi-Fi to connect to it.
● If the Wi-Fi network doesn't have a password, the tablet will
connect to it automatically. If the Wi-Fi network has a password,
Page 31
30
input it and tap connect.
● Slide Wi-Fi icon to the left to turn on
Wi-Fi.
Pentru activare 3G va rugam sa urmati pasii de mai jos:
● Asigurati-va ca produsul este inchis.
● Introduceti cartela microSIM in slotul dedicat.
● Porniti tableta.
● Din ecranul principal deschideti bara de stare prin slide din partea
dreapta sus a ecranului.
● Aici apasati pe pictograma Data connection.
● Dupa activarea SIM-ului, aveti conexiune la Internet.
6.2 Network access via 3G
For enabling the 3G function, please follow the next steps:
● Make sure the device is off.
● Insert the 3G microSIM card into dedicated slot.
● Turn on the tablet.
● From the start-up screen, enter the status bar by sliding down
from the upper right corner of the screen.
● Here just press the Data connection tab.
● After the SIM card activation, you will have access to Internet.
Page 32
31
6.3 Other Networks
● Ethernet
● VPN
● Please notice: Availability and network speed depend on the
User's network, and 3G network fees apply.
7. U S B Co n n e c t i o n
The tablet can be connected to a Window computer via a USB
cable and then you can transfer music, videos, pictures and
other file in both directions. Operations are as follows:
● Use a USB cable to connect the tablet with the PC.
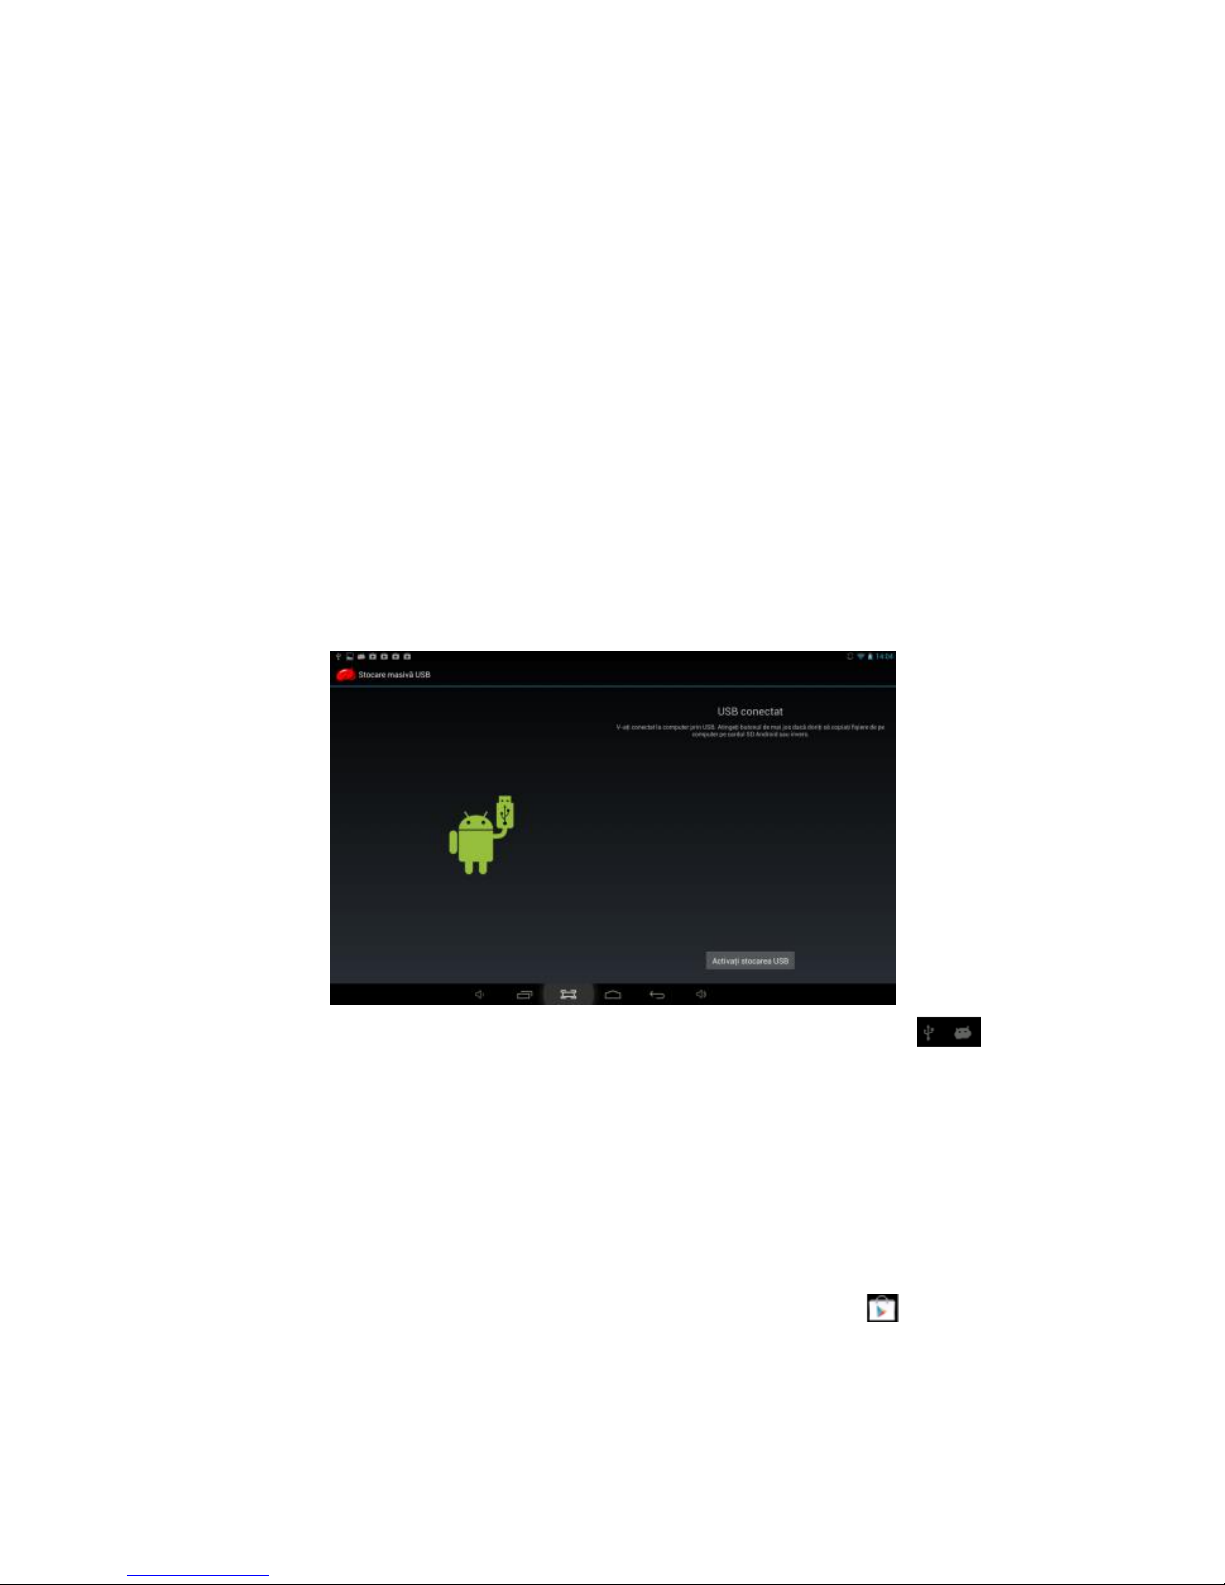
● Tab Turn on USB storage to read storage of the tablet from PC.
Now you can copy files back and forth.
● Tab Turn off USB storage to disconnect from PC, and remove
the USB cable.
If above interface does not pop up, tab the icon
at upper left corner of screen and choose USB connected in the
popup.
8. A p p l ic a t ion s
8.1 Install New Apps
8.1.1 To download & install apps from Playstore , just
follow the system instructions.
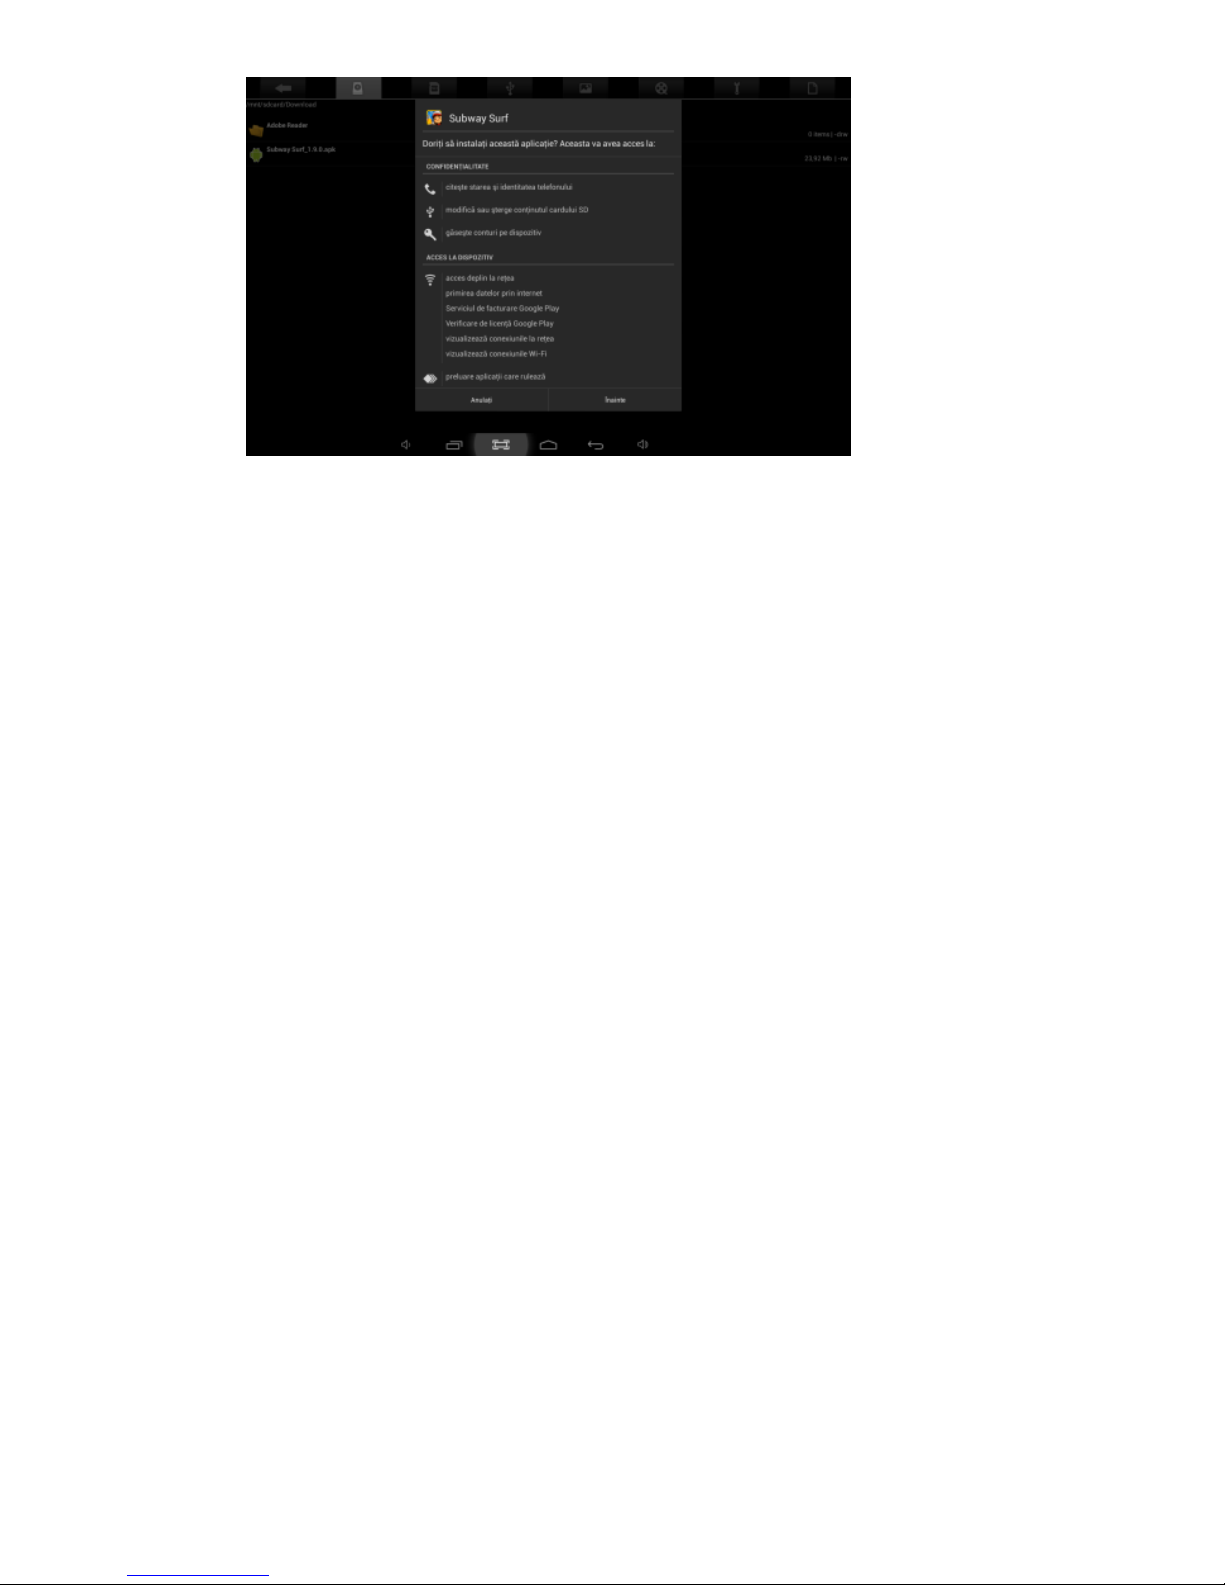
8.1.2 To install apps APK packages in tablet's storage, run File
Manager, find the location of apps' packages, and press its
name to install.
Page 33
32
Tips
● To install applications which are not from Playstore, make sure
Unknown source is ON. (you can find it in Setting – Security –
DEVICE ADMINISTRATION)
● If the application already exists in the tablet, choose OK to
replace it by latest version of package.
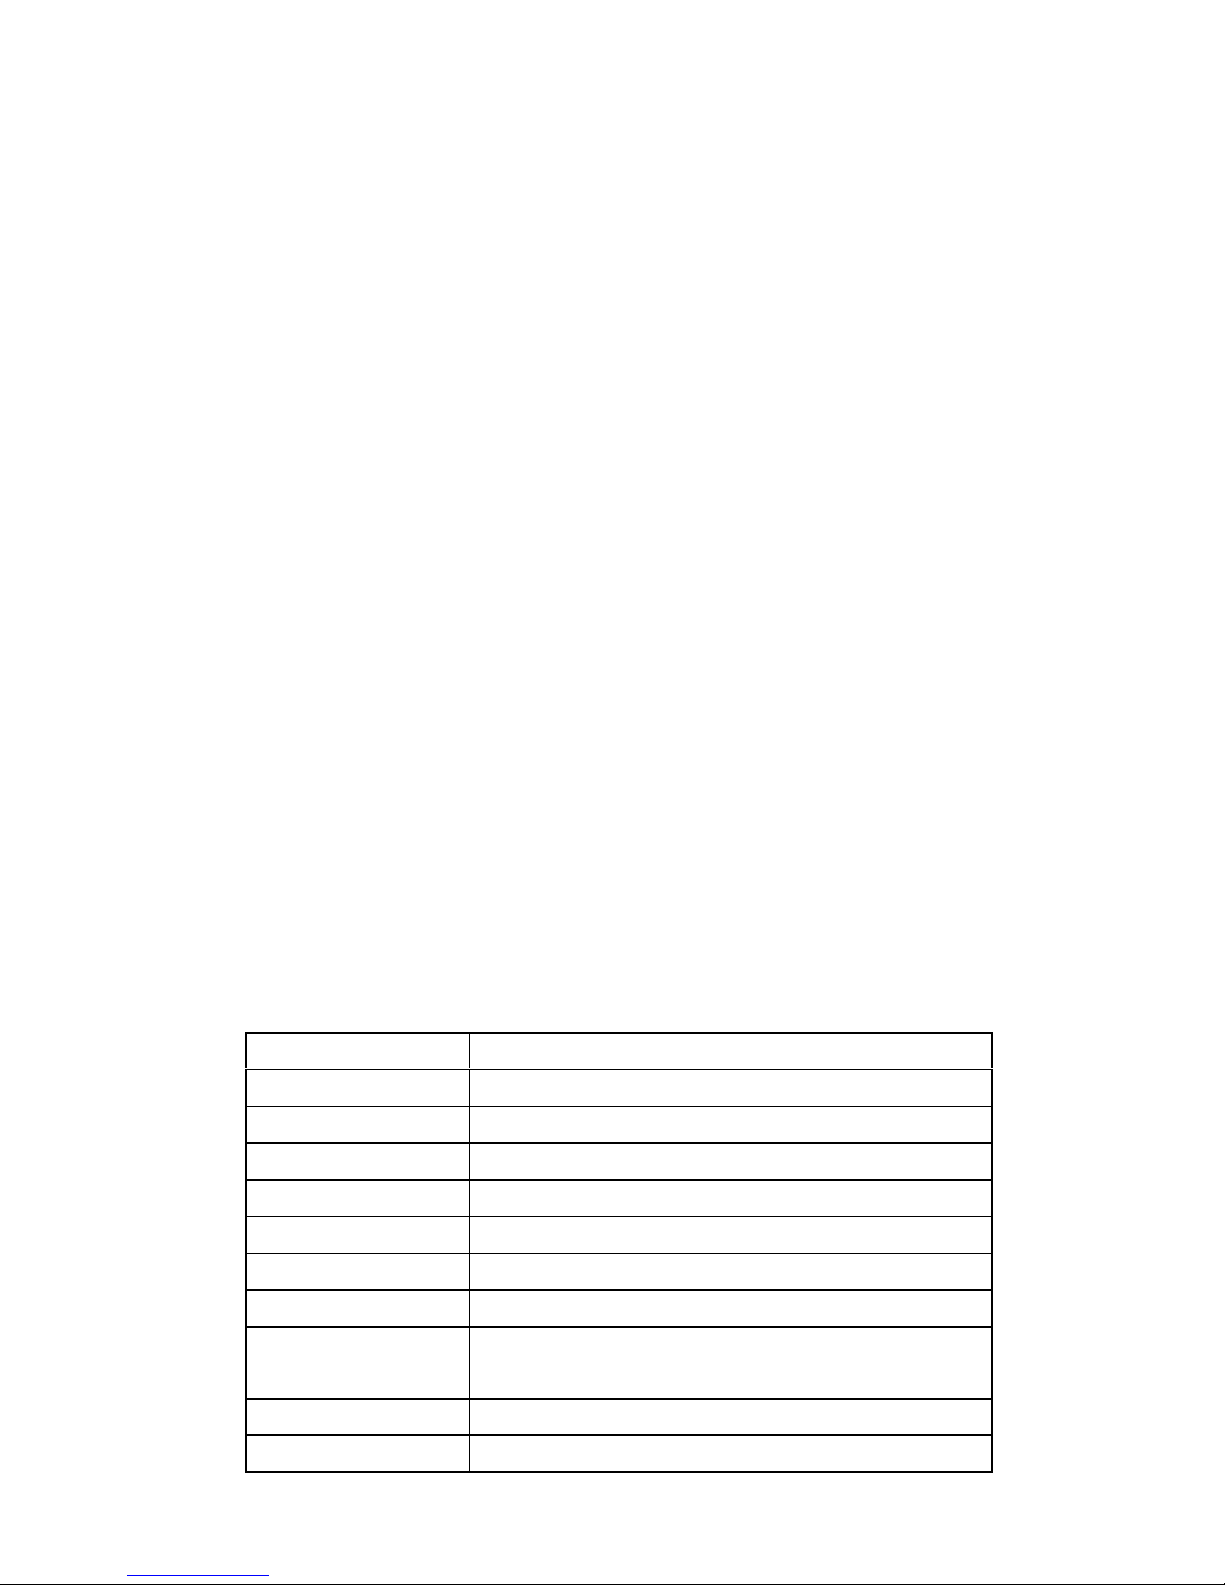
8.2 Applications uninstall
8.2.1 Press Setting – Apps – All.
8.2.2 Press the application you want to remove.
8.2.3 Press Uninstall.
8.3 Applications management.
8.3.1 Press Setting – Apps – All.
8.3.2 Press application and choose Force stop, Uninstall, Clear
data or Move to SD.
9. V i d e o P l a y
You can use the tablet's pre-installed video application to enjoy
movies & videos, or install other video apps to enrich your video
play.
9.1 Press the icon to enter the video player interface, or open
the video files from File Manager directly.
9.2 The tablet supports many formats of video files including
Page 34
33
1080P AVI, DIVX, DIVX, XVID, rm, rmvb, WMV, MOV, MP4,
MPEG, DAT, VOB, MPG, FLV, ASF, TS, TP, 3GP.
9.3 Tab progress bar to go fast-forward or fast-rewind.
9.4 Tab to access video player settings.
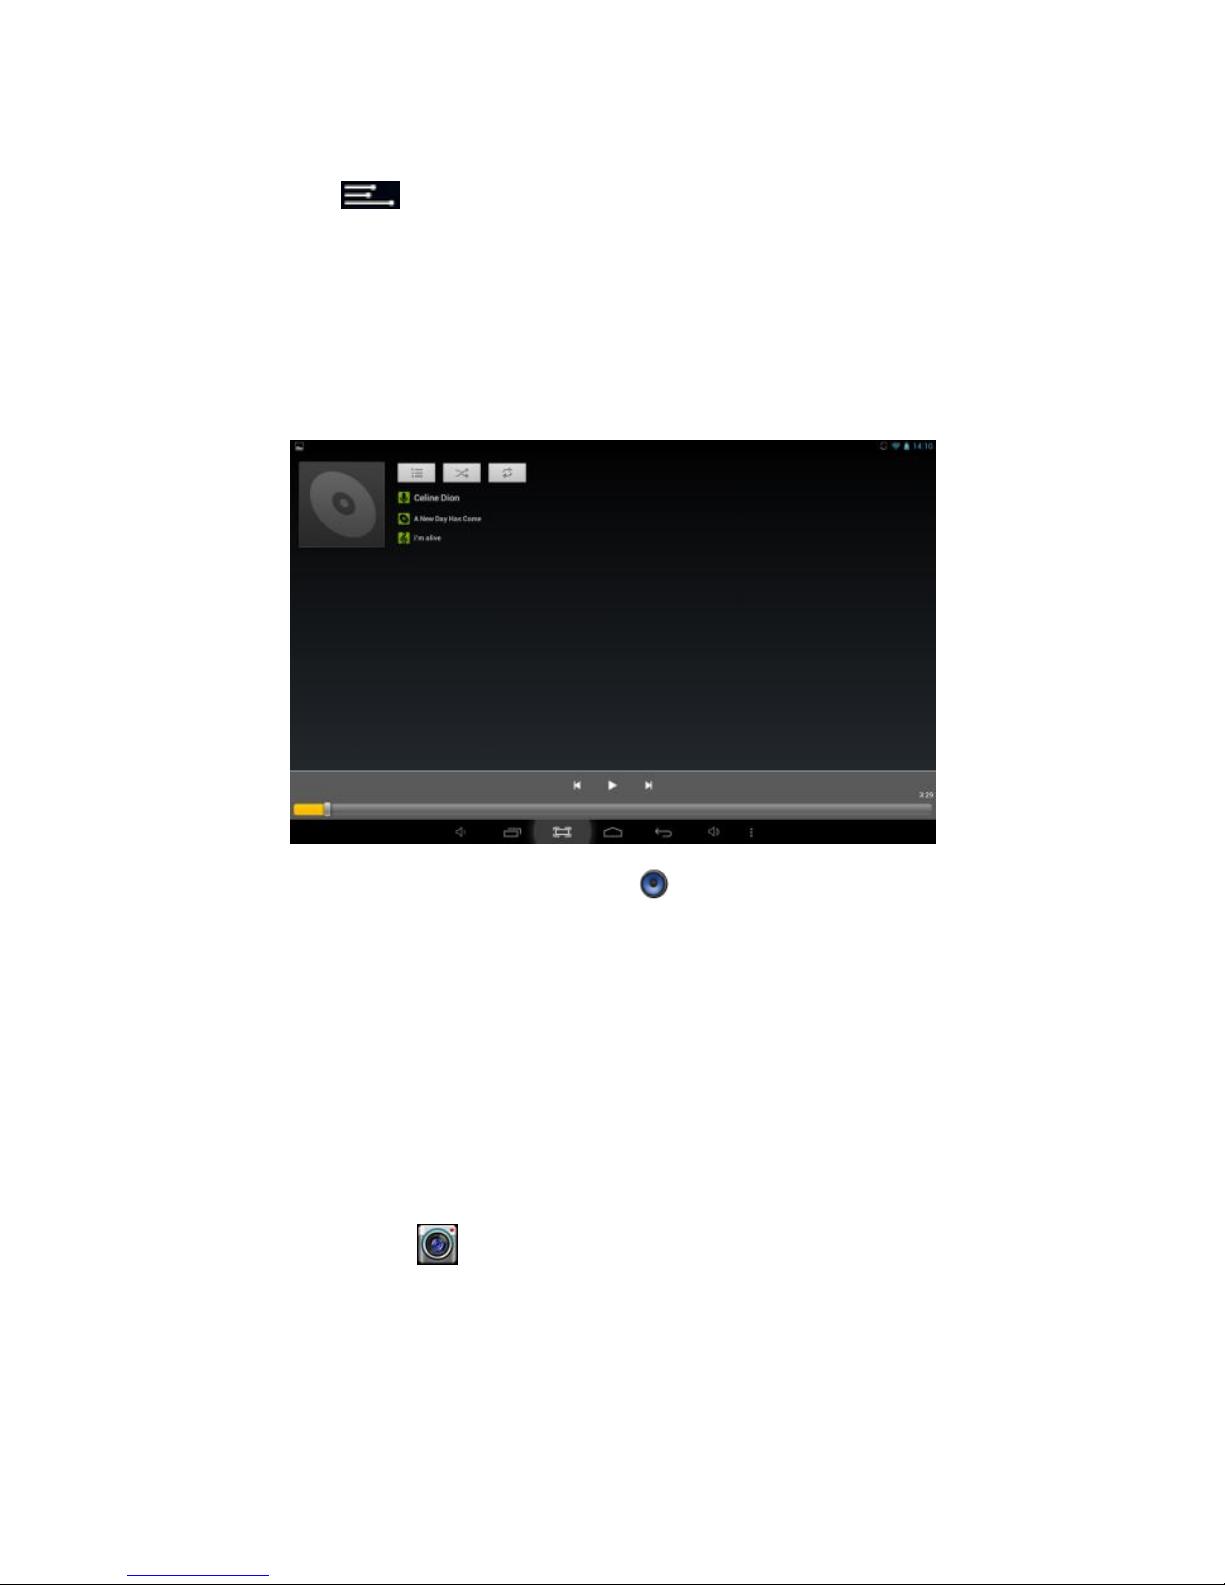
10 . M u s ic p lay
You can use the tablet's pre-installed Music Player to enjoy
music, or install other audio apps.
10.1 Press the Music player icon to enter the music player
interface, or open from File Manager directly.
10.2 The device supports the following formats of audio files:
MP3, WMA, MP2, OGG, AAC, FLAC, APE, 3GP, WAV, and more.
10.3 Tab the progress bar to go fast-forward, fast-rewind.
10.4 If there is no audio in the play list, system will automatically
load the audio files from the storage of tablet.
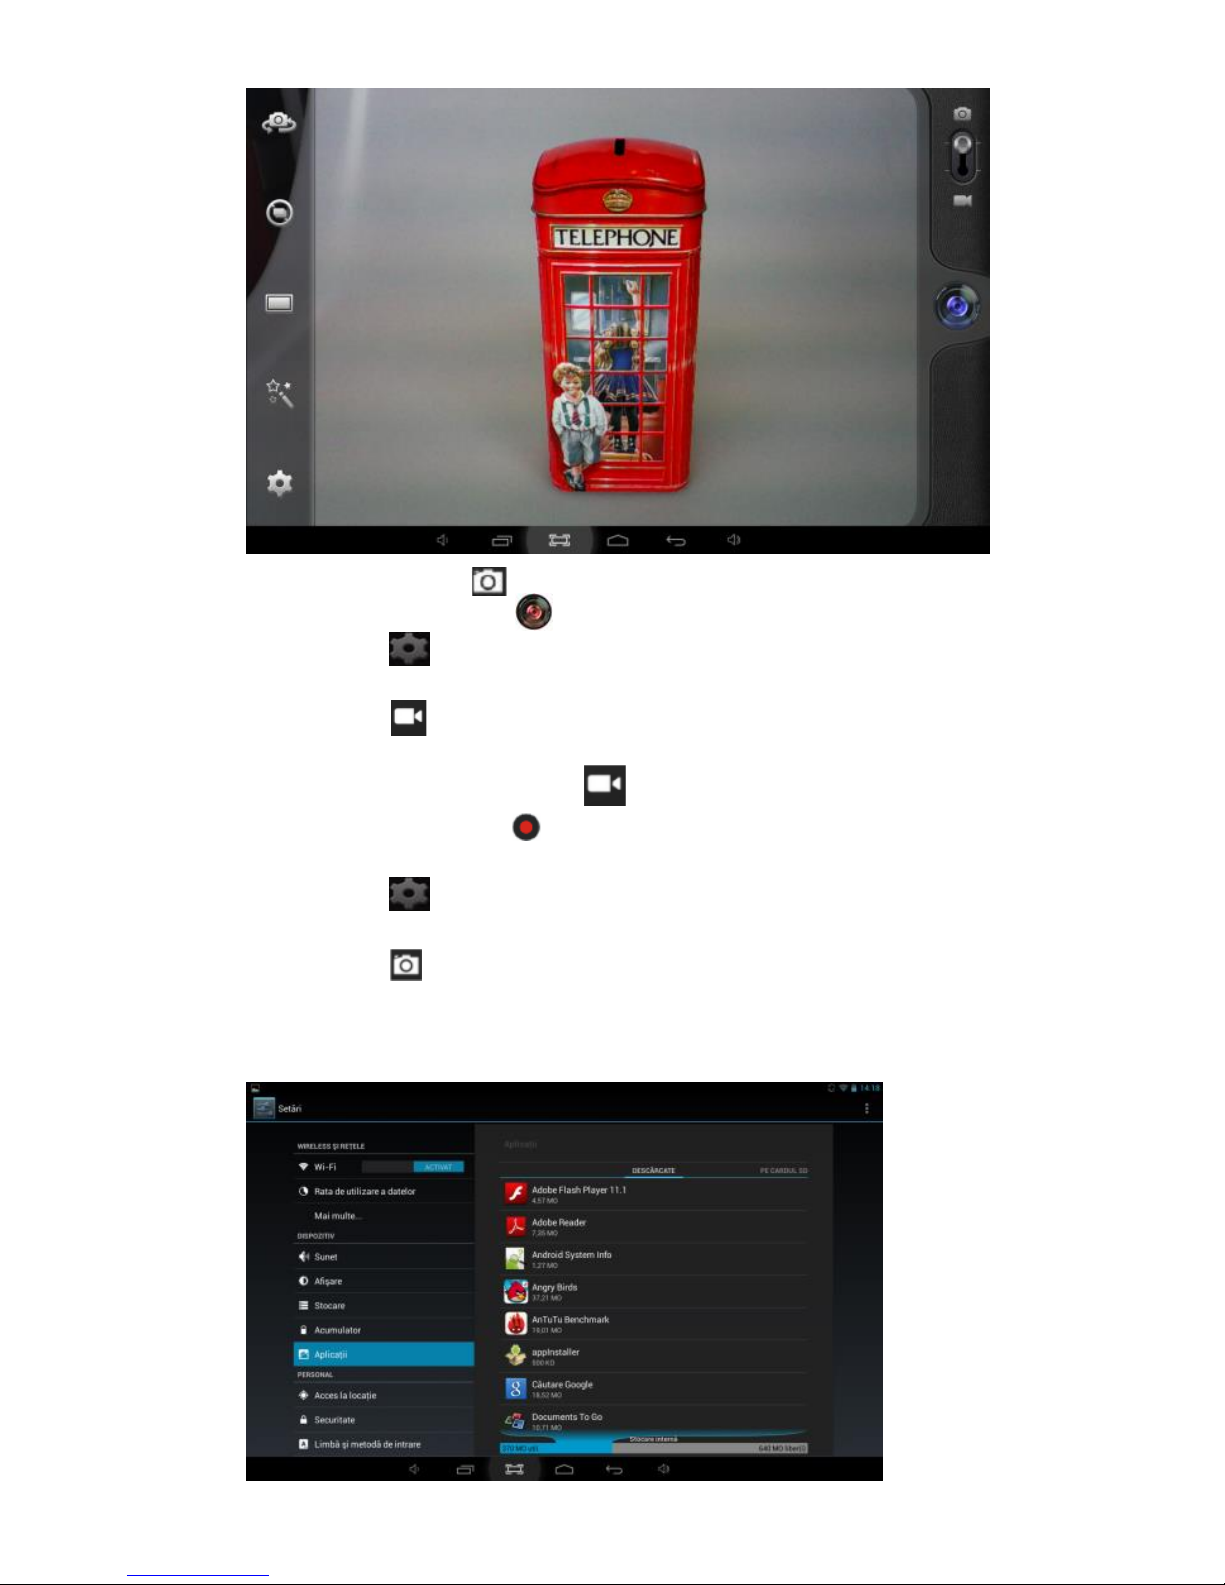
11 . C a m e r a
Press the icon to access camera function.
Page 35
34
11.1 Photos Mode
11.1.1 Click Blue Circle to take pictures.
11.1.2 Click to access photographing options.
11.1.3 Click the thumbnail picture to view saved pictures.
11.1.4 Click to switch to video recording mode.
11.2 Video Recording Mode
11.2.1 Click Red Circle to start video recording, click it again
to stop and save the video.
11.2.2 Click to access photographing options.
11.2.3 Click the thumbnail picture to view saved videos.
11.2.4 Click to switch to photos mode.
12 . S y s te m s e t t i n g s
Page 36

35
Tab Setting icon to enter system settings, including
Wireless & networks, Sound, Display, Storage, Battery, Apps,
Location services, Security, Language/input, Backup/reset,
Accounts & sync, Date/time, Accessibility, Developer options
and About tablet.
12.1 Wireless & Networks
From Settings menu, select “Internet connects manager”, press
“Wi-Fi settings”, enter in the Wi-Fi manu and select “Wi-Fi” to
open the connectio. After the WiFi is active, an automatic
search will be initiated. A list of all available networks will be
displayed. Press on the name of the network that you want to
connect to, enter the password and in a few seconds you will be
connected to the Internet.
In order to connect to the Internet with the 3G Dongle, connect
the dingle to the USB port with the OTG cable supplied. The
system will detect the dongle and will activate it. Enter the
menu Settings / WiFi and other networks, select “Mobile
Networks” and the system will automatically connect to the
Internet.
12.2 Sound
You can set volumes, ringtone & notification and system sounds.
12.3 Display
Options: Brightness, Wallpaper, Auto-rotate screen, Auto sleep
time, Font size, Accelerometer coordinate system, Smart color,
and Intelligent backlight.
12.4 Storage
A general view of internal storage and external SD card.
12.5 Battery
A general view of battery information
Page 37

36
12.6 Apps
See item 8. Applications
12.7 Location services
In this menu you can activate the location services in order to
give access to diferent applications to display diffrerent
informations regarding your location or the distances to the
nearest points of interest.
12.8 Security
Options: Screen security, Passwords, Device administration and
Credential storage.
Tips: If you want to install applications beyond Playstore, please
turn on Unknown sources.
12.9 Language & input
You can change the language of system, and choose keyboard
in-puts by default.
Tips: If you have installed an input, remember to turn on it in
this setting.
12.10 Backup & reset
Options: Backup & Restore, Factory data reset and Recovery
Mode. In order to ensure that you will not lose your private
informations, we suggest that you periodically create a back-up
copy of the data.
12.11 Accounts & sync
You can manage all accounts recorded in the tablet.
12.12 Date & time
Options: Time & Date settings, time zone and format settings.
Page 38

37
12.13 Accessibility
Options: Large text, Auto-rotate screen, Speak passwords, Touch
& hold delay and Install web scripts. You can personalise all
these options in order to serve your needs and to have a best
experience with your device.
12.14 Developer options
Options: Desktop backup password, Stay awake, HDCP checking,
Protect SD card, USB debugging, Allow mock locations, Input
and Drawing.
12.15 About Tablet
A view of tablet information (model, system, firmware version,
etc)
12.16 Bluetooth
This product has integrated Bluetooth. With this option you can connect
to different peripheral products like for example a headphone or a
printer.
13 . F A Q
1. The device cannot connect to WiFi
• Check if the wireless network is working ok with another
device.
• Make sure the device is inside the connection area of the
WiFi. The walls or other obstacles can decrease the signal range.
• Make sure the password used is the correct one.
2. The device does not start
• The device will not start if the battery power is below the
critical level. In this case, please recharge the battery.
• Press the RESET button and check if the product is starting.
• Check if the charger si correctly connected.
3. Heating problem
• If you are simultaneously working in more applications or
Page 39

38
when you use the display with the highest level of brightness or
while charging, the device can get warm. This is normal and will
not lead to other problems of functionality.
4. The system is not working correctly
• Installing third party applications can lead to system
malfunctioning. Uninstall these third party applications or have a
factory reset in order to have the device functioning in normal
parameters again.
5. Problems with e-mail setup
• Make sure the device is connected to a WiFi network and
that this network can connect to the Internet.
• Make sure all the data for the e-mail account were correctly
inserted in the application.
• Make sure the date of the system is correct.
6. Recording problems
• Press the RESET button and after restart check if the
recording works well.
7. Usage time too short
• Battery usage time can be influenced by the temperatures in
the working environment. If the temperature is too high or too
low, the working time will be affected. It is recommended to use
the device in a normal temperature environment.
• Battery usage time depends on the way you use the device.
High audio volume or WiFi make the battery life shorter.
• In order to have a long lasting life for the battery, please
charge it for 8 to 12 hours before the first use.
8. Headphones without sound
• Make sure the audio file you are trying to listen to is not
broken. Try listening to another audio file to confirm.
• Make sure you have a good wire connection between the
headphones and the device.
9. Display color problems for photos or videos
• Press the RESET button to check this issue.
Page 40
39
10. Erors while copying files
• Please check if the storage space is full.
• Please check if the USB cable is in good condition.
11. Other problems
• Most of the problems can be solved with restarting of the
device, with the reset to factory settings from the main menu or
by pressing the RESET button on the side of the case.
14. A b o u t f i r m w a r e
Firmware contained in the tablets provides the control program
for the device, and it is offered by the original manufacturer.
Flashing firmware (refer to rebuilding firmware into the device)
is the final solution to serious system problems. For common
breakdown you can just restart the device, or run factory reset.
If system crashes appear continuously even after you have run
factory reset, you can flash firmware under professional
guidance. The firmware preloaded in the device is a stable
version for the tablet, please do not flash it with other versions
of firmware unless absolute necessity. We DO NOT suggest any
private firmware flashing without guidance of the original
manufacturer, who is not responsible for any possible
breakdown of the tablet caused by user's private firmware
flashing.
15. T e c h n i c a l s p e c if i c a ti o n s
OS
Android 4.2.2 Jelly Bean
CPU
Dual-Core MTK8312, Cortex A7 1,3GHz
Display
7" 800x480, Capacitive 5 points touch
RAM Memory
512 MB DDR3
Flash Memory
4 GB
Video Chipset
Dual Core Mali400
Speaker
1 W
Web Camera
Front: 0.3 MP, Rear: 0.3 MP
Ports
Micro USB, Micro SD (up to 32 GB),
Headphone Jack, MicroSIM card slot
Dimensions
188 x 108 x 11 mm
Weight
300 g
Page 41

40
Wi-Fi
802.11 b/g/n
3G
On board, 900 / 2100 Mhz
Bluetooth
Bluetooth 4.0
Battery
Li-Polymer 2800mAh, 5-6h autonomy
Video Formats
AVI, DIVX, XVID, RM, RMVB, MKV, WMV,
MOV, MP4, MPEG, MPG, FLV
Audio Formats
MP3, WMA, MP2, OGG, AAC, M4A, MA4,
FLAC, APE, 3GP, WAV
Photo formats
JPG, JPEG, GIF, BMP, PNG
Formate eBook
EPUB, PDF
Others
Acceletrometer, Microphone, GPS
16. De c l a r at i o n o f c on f o r m i t y
Declaration of conformity for UTOK product, model 700 D 3G
Lite is available online at www.utok.com
Page 42

41
HASZNÁLATI ÚTMUTATÓ
UTOK 700D 3G Lite
Page 43

42
TARTALOMJEGYZÉK
1. Biztonsági intézkedések
2. Táblagép megjelenése
3. Használati javaslatok
4. Alapfunkciók
5. Kezdőképernyő(homescreen)
6. Kapcsolat a Hálózatokhoz
7. USB kapcsolat
8. Alkalmazások
9. Video fájlok lejátszása (listening)
10. Audio fájlok lejátszása
11. Kamera
12. Rendszer beállítások
13. Gyakori kérdések
14. A firmware
15. Műszaki adatok
16. Megfelelőségi nyilatkozat
Page 44

43
MINDEN JOG FENNTARTVA
Minden jog fenntartva. A jelen kiadvány egy részét sem lehet sokszorosítani
engedély nélkül. A védjegyek és márkanevek a dokumentumba említett
tulajdonosokhoz tartoznak. Bár erőfeszítéseket tettek a kézikönyv tartalmának
pontosságáert, nem vállalunk felelősséget az esetleges hibákért,
hiányosságokért vagy bármilyen, nyilatkozatért, akár hanyagság, baleset vagy
egyéb ok miatt. Folyamatos fejlesztés a politikánk, és fenntartjuk a jogot, hogy
bármely változtatás és fejlesztés, a jelen eszköz, funkcióit, leírásait vagy annak
bármely részét, előzetes figyelmeztetés nélkül változtatjuk. A készülék
tartalmazhat linkeket, fél internetes webhelyére, és lehetővé teszi a hozzáférést
a más felek részére is vagy fél weboldalakra. Ezek nem kapcsolódnak velünk,
és nem támogatjuk, és nem vállalunk értük semmilyen felelősséget. Ha
felkeressük ezeket a webhelyeket, tegyunk óvintézkedéseket a biztonság és a
tartalomért. Korlátozott garancia nem terjed ki felhasználói kézikönyvben, vagy
más, féltől származó szoftvert, a beállításokat , a tartalom, az adatok vagy a
linkek, hogy benne / letölthető a termék, hogy tartalmazza a telepítés során,
összeszerelés, a hajózás, vagy az ellátási lánc egyik pontján, vagy mas módon
szerzett meg. A vonatkozó jogszabályok által megengedett mértékben, nem
garantáljuk, hogy a szoftver eleget fog tenni minden kérést, vagy úgy fog
működni, mint minden más hardver vagy szoftver egy más fél által készített,
és a műveletek a szoftver megszakítás nélküli lesz, hibamentes, vagy, hogy a
szoftver hiba kijavítása mindeg lehtséges. Használati utasítás biztosítja, a
felhasználót, hogy ismerje a készülék funkcióit. Ez nem egy igazolás a
technológiárol. Egyes funkciók változhatnak a szoftver módosítások után, vagy
a nyomdai hibák miatt.
Page 45

44
1. Biztonsági óvintézkedések
A táblagép helyes használatáért, kérjük, olvassa el az utasításokat, a
használata megkezdése előtt.
- Csak a cégünk által szállított akkumulátor és töltőt használjuk. Ha más
nem megfelelő, terméket használunk akkor lehetnek különböző
problémák, mint a túlmelegedés.
- Ahhoz, hogy széles körű alkalmazása legyen és az akkumulátor nagy
kapacitású, kérjük hogy az első indítás előtt, az akkumulátort 8 - 12 órai
töltésre kell biztosítani.
- Ne dobja tűzbe a terméket vagy az akkumulátort, fennáll a tűz és
robbanásveszély.
- A termék használati ideje közvetlenül kapcsolódik az optimális
környezeti körülmények biztosításátol. A szélsőséges hőmérséklet esetén,
a termék rövidebb ideig lesz használható, és gyorsabban lemerül az
akkumulátor.
- A készülék ajánlott használati hőmérséklete 5-35 ° C.
- A terméket ne használja szélsőséges körülmények között, túl hideg, túl
meleg vagy párás , poros környezetben. Továbbá, ne hagyja, a terméket a
közvetlen napfényben.
- A terméket tartsa távol az erős fizikai behatásoktól
- Ha víz vagy más folyadék kiömlött a termék felszínere, akkor azonnal
kapcsolja ki, és törölje le egy puha textiliával.
- Ne érintse meg a töltőt, hálózati kábelt vagy a csatlakozót nedves kézzel.
Ez áramütést okozhat.
- Ne szerelje szét a készüléket és tartozékait, és soha ne próbálja
megjavítani a terméket. Ez a garancia elvesztésével jár.
Page 46
45
- Ha a termék vagy valamelyik tartozék nem működik megfelelően, kérjük,
látogasson el a legközelebbi meghatározott szervizbe.
2. Táblagép megjelenése
1. Fejhallgató-csatlakozó
2. Micro USB port
3. Hangerő fel, Hangerő le
4. Teljesítmény / restart / lock billentyű
5. Mikrofon
6. Hangszóró
7. Fotó / video kamera
8. SIM kártya slot és micro SD kártya slot
Page 47

46
3.HASZNÁLATI JAVASLATOK
- Élvezze a multimédia-könyvtár bárhol és bármikor. Ez a hordozható
termék reprodukálni tudja a zenei fájlokat, videót vagy fényképeket.
- A készülék fel van szerelve egy microSD memóriakártya-olvasóval.
Növelheti a tárolási kapacitást egy kártyával, maximum 32 GB-ig.
- Foto kamerák / video integráció. Segítségükkel rögzítheti kedvenc
pillanatait.
- Csatlakozzon az internethez vezeték nélküli hálózat W i-Fi 802.11 b/g/n
segítségével.
- Lehet online az interneten, és látogasson el a kedvenc weboldalakra.
- Ellenőrizze az e-mailjeit. Tarthatja a kapcsolatot barátaival vagy
családjával .
- Szociális hálózatok. Az ilyen alkalmazások telepítésével tud állandó
kapcsolatot tartani barátaival.
- Nézhet YouTube ™ videóklipet. Böngésszen a legnépszerűbb
video-megosztón (video-sharing) és nézhet filmeket vagy video klipeket.
- Olvassa el a kedvenc könyveit. Letölthet rengeteg könyvet bármely
területen.
- Fedezzen fel a több ezer alkalmazást Android ™-ra. Játékok, hasznos
tudnivalók, minden elérhető a Google Play-el.
- Tájolás automatikus felismerése anak. Olvasson vagy dolgozzon , álló
vagy fekvő módban, a képernyő automatikusan alkalmazkodik!
4. Alapvető funkciók
4.1 Bekapcsolás ( START )
Page 48
47
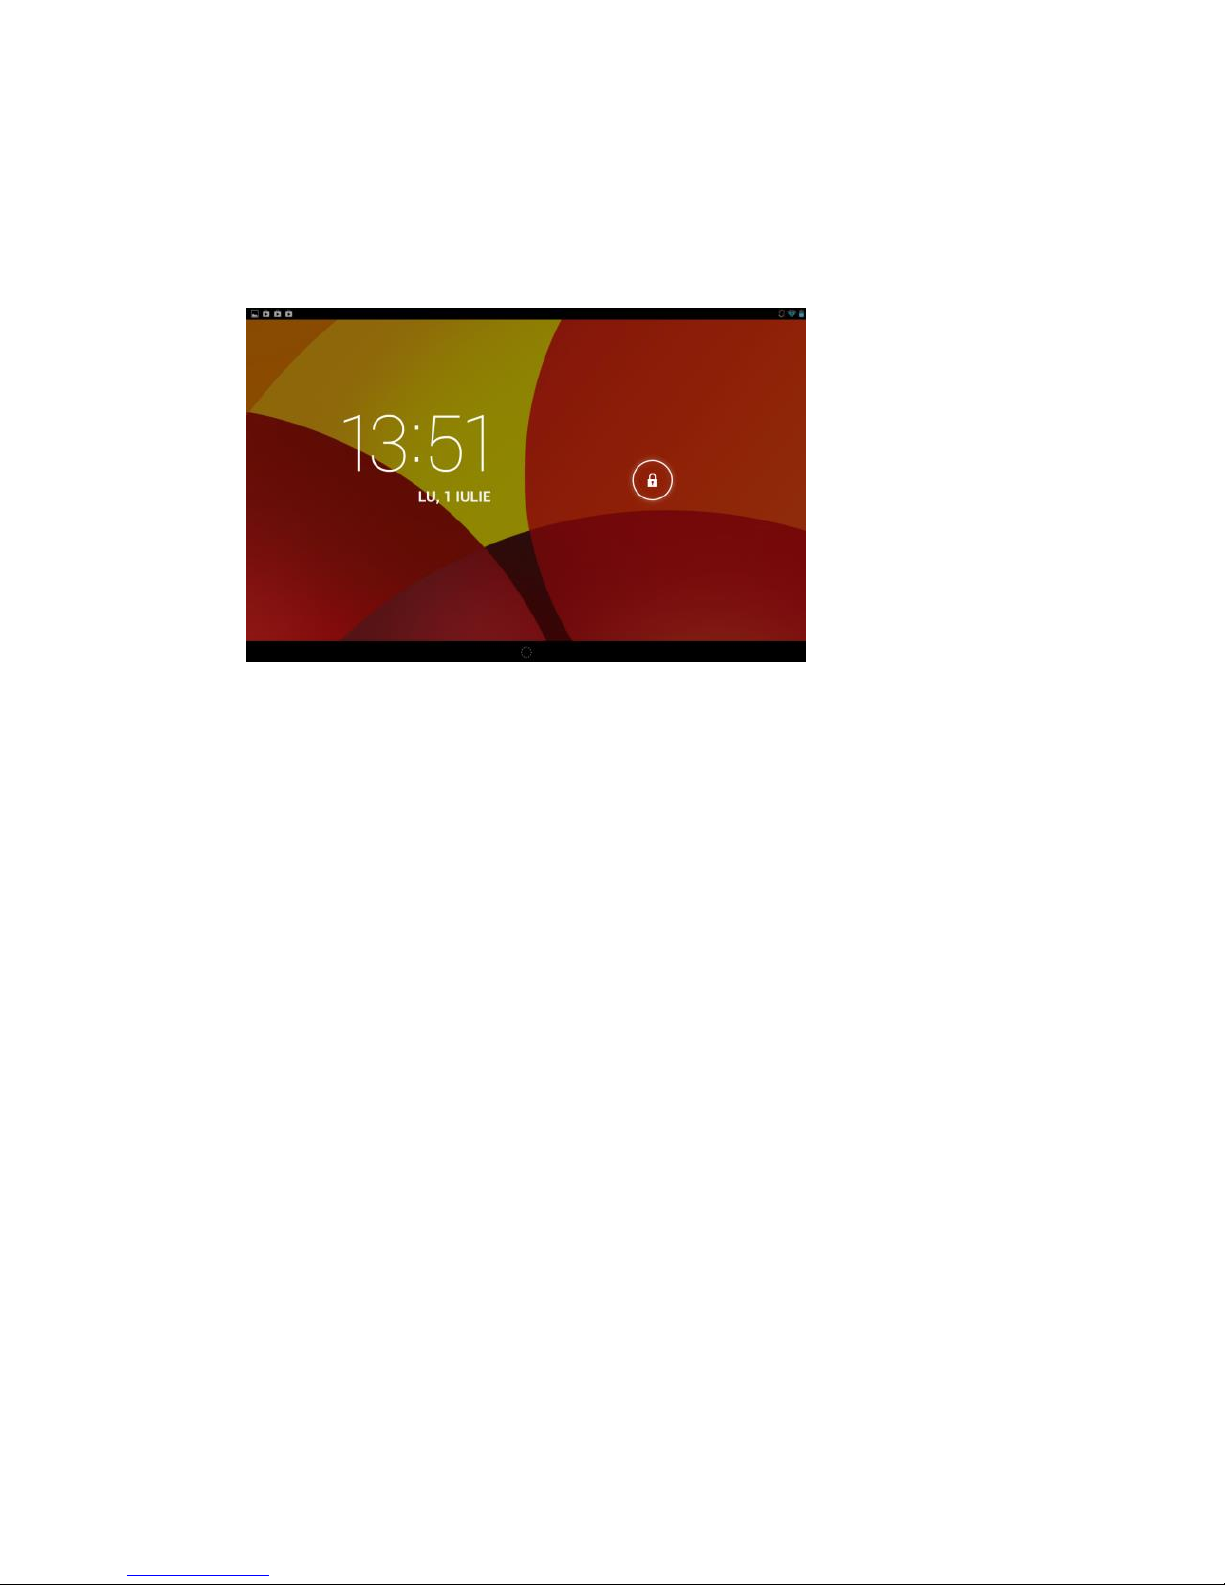
Nyomja meg a POWER gombot körülbelül két másodpercig. A termék
elindul, és megjeleníti a kezdőképernyőt. Érintse meg a képernyőt,
kattintson, és húzza jobbra, hogy kioldja a képernyőt, és belépjen a
főmenübe.
4.2 Készenléti módban
Míg a termék működik, röviden nyomja meg a POWER gombot, hogy zárja
le a képernyőt, és készenléti módba helyezze a készüléket. Nyomja meg a
POWER gombot, ha újra használni szeretné. Csúsztassa a képernyő
megjelenésére.
4.3 Kikapcsolás
Nyomja meg a POWER gombot két másodpercig, és erősítse meg a
táblagép kikapcsolását a képernyőn megjelenő menüben.
4.4 Visszaállítása
Ha a készülék le van zárva, nem indul el, vagy nem lehet lezárni a
bekapcsoló gombbal POWER, kérjük, használja a RESET funkciót.
4.5 Újratöltés
Page 49
48
Ha a készülék nem kapcsolható be vagy kikapcsolja automatikusan, akkor
fel kell tölteni. Kérjük, hogy csak a csomagban, a készülékhez mellékelt
töltőt használja .
4.6 Kezdőképernyő
Bármely alkalmazásban érintse meg ezt az ikont hogy a kezdőképernyőt
elérje.
4.7 Vissza gomb
Érintse meg ezt az ikont, rá kattintva válthat az előző oldalra.
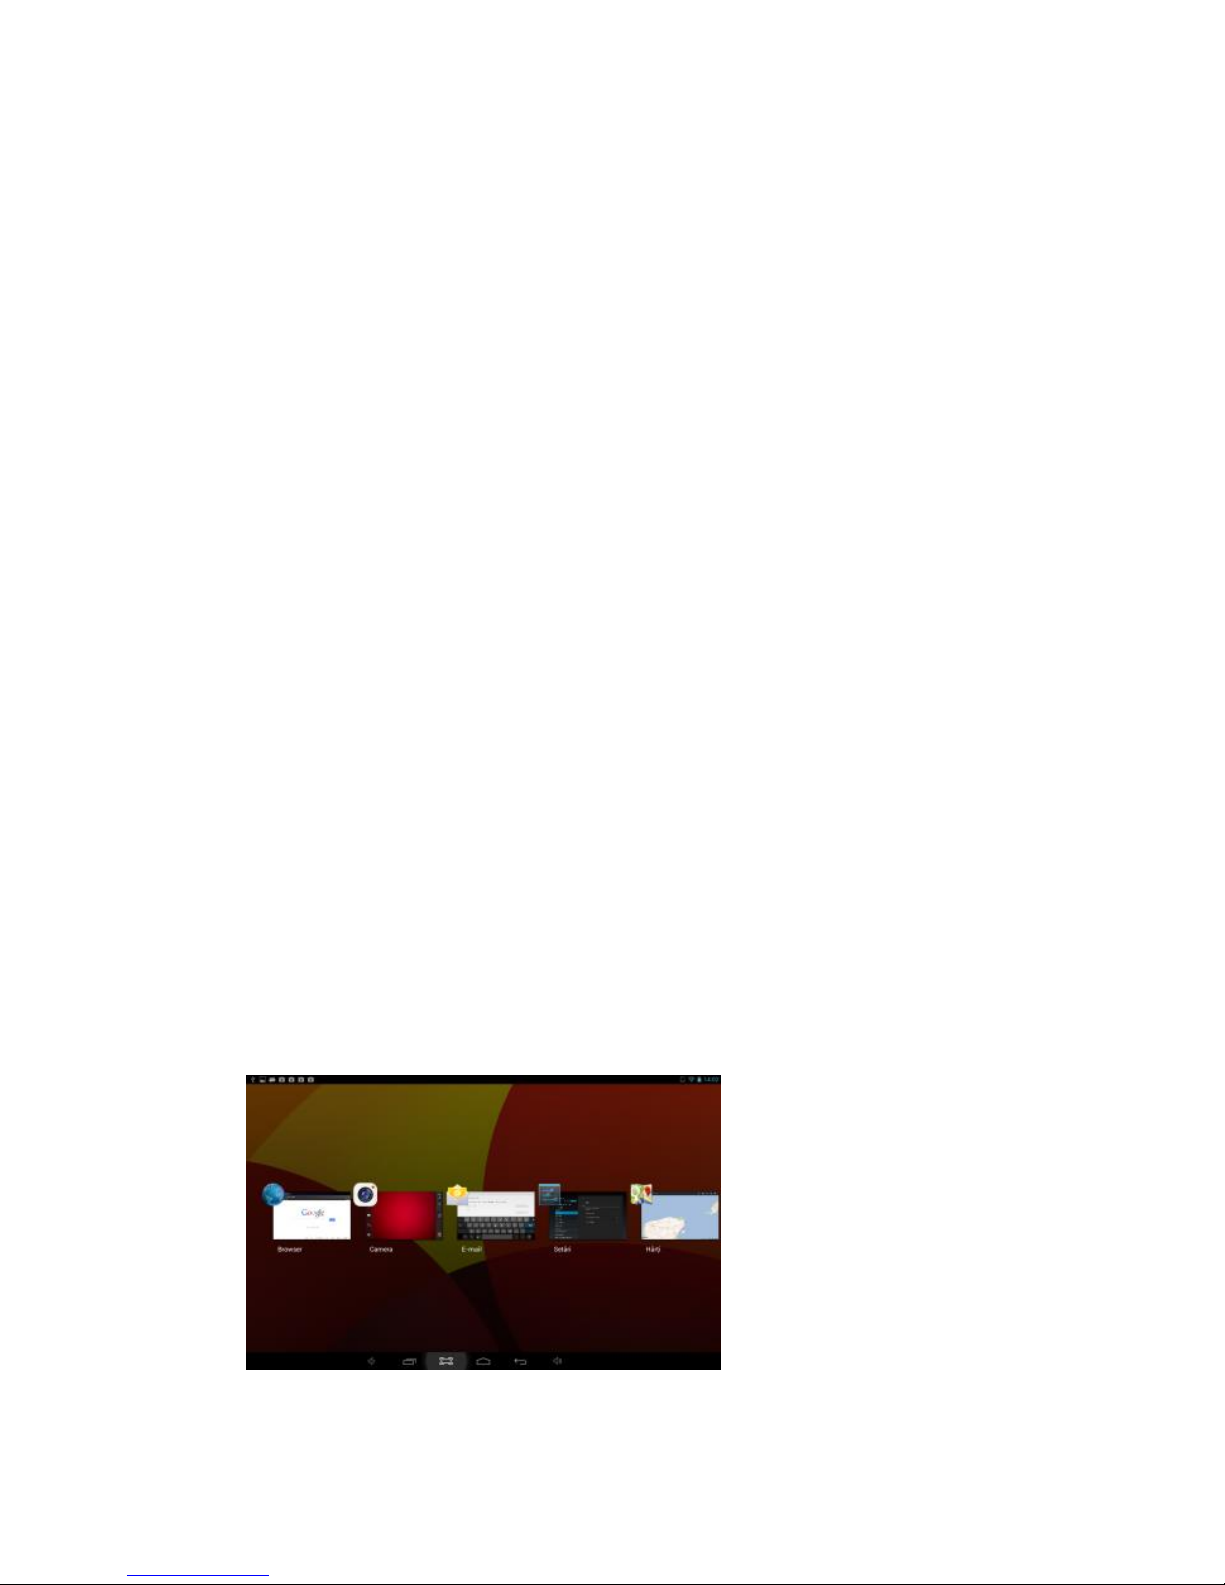
4.8 Legutóbbi megnyitott alkalmazások
Érintse meg ezt az ikont, rá kattintva fogja látni a nemrég megnyitott
alkalmazásokat. Kattintson a program ablakra hogy ki nyiljon, vagy húzza
felfelé vagy oldalra, hogy lezárja. Ha a készülék lassú és nehezen
működik, ezt a funkciót kell használni, hogy lezárja a nem aktiv, használt
alkalmazásokat. Ők elfoglaljak a készülék memóriáját, és meg
akadályozzák a termék teljes kapacitási működését.
4.9 Menü
Page 50
49
Érintse meg ezt az ikont vagy ezt ikont, rá kattintva be fog
lépni a főmenübe, és el tudja érni az összes lehetőséget.
4.10 Pillanatkép
Érintse meg ezt az ikont, rá kattintva el fog érni a képernyőfelvételhez
( screen capture ).
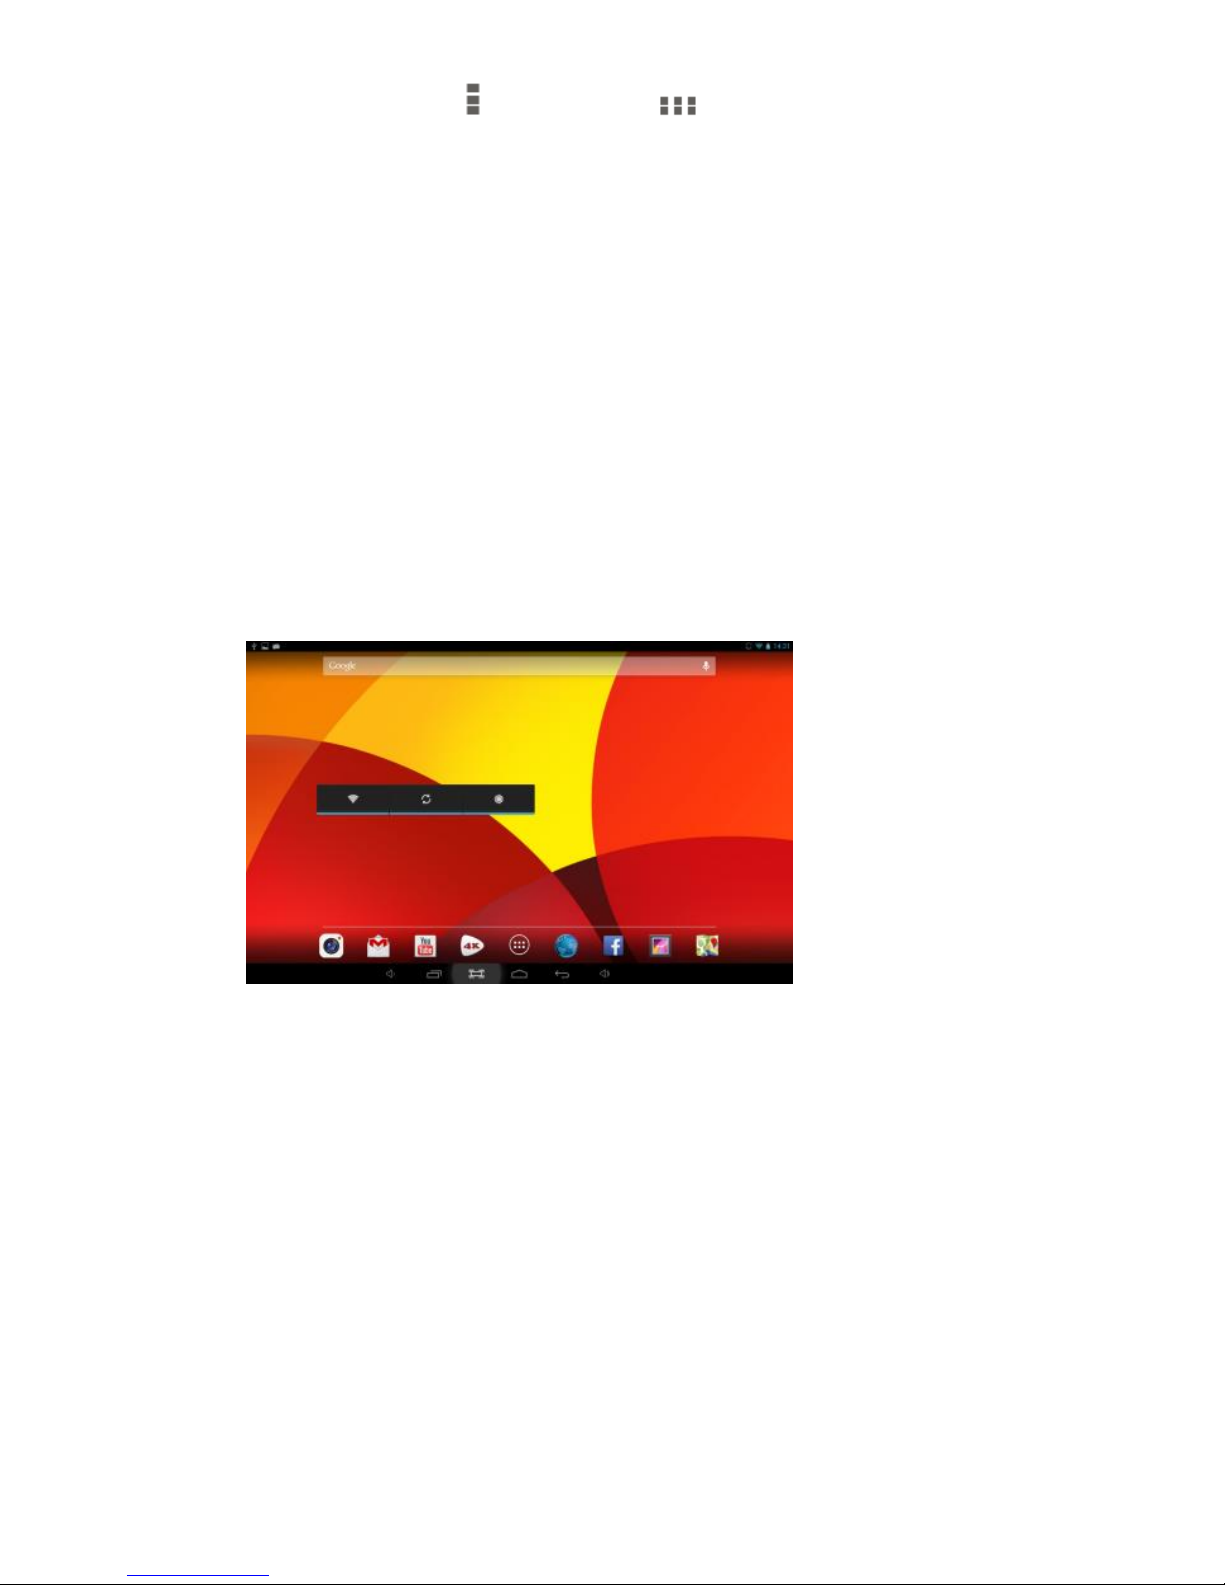
5. Kezdőképernyő
Több fő képernyő van, csúsztassa az ujját bal és jobb oldalra igy végig
lapozhat mindezeken a képernyőkön.
5.1 Alkalmazások és widget hozzáadása a képernyőre
Nyissa ki az alkalmazáslistát, kattintson egy ikonra, és mozgassa a fő
képernyőre. A főképernyőn nyomjuk meg az ikont, és mozgassa
jobbra/balra hogy a másik oldalra helyezze. Ha egy ikont el akarunk
távolítani, hosszan nyomja meg ezt az ikont, és helyezze át a Törlés ikonra
a képernyő felső részén.
5.2 Háttérkép
Page 51
50
Nyomjon meg hosszan egy üres területet a képernyőn, és válasszon ki
egyet a kijelző opciókból amíg meg jelenik
5.3. Értesítési sáv (bar)
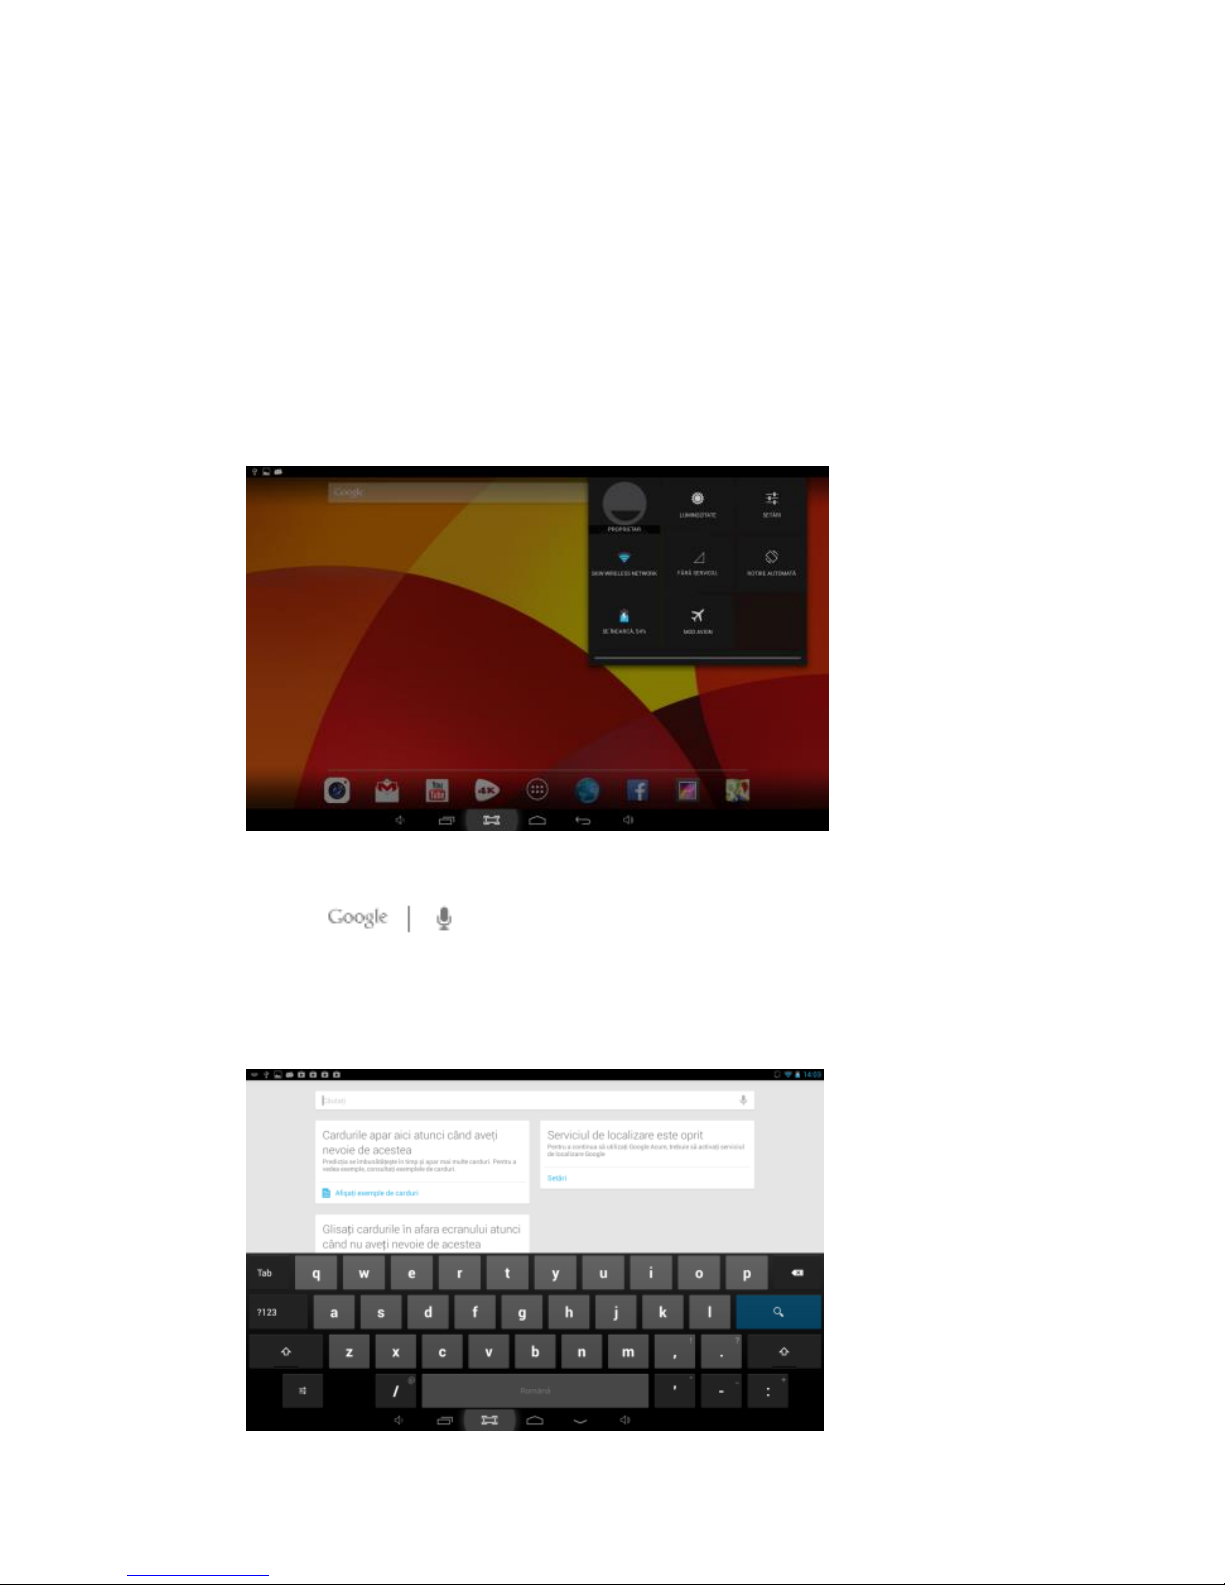
Nyomja meg a képernyőt a jobb felső sarokban hogy elérhesse az
értesítési sávot. Ez ad tájékoztatást a WiFi állapotáról, az akkumulátorról,
frissítésekről és a letöltésekről
5.4 Keresés
Érintse meg ezt az ikont, rá kattintva információkat fog
keresni a helyi lemezen vagy az interneten. A hangalapú keresés is
támogatott.
6. Csatlakozás hálózatokhoz
Page 52
51
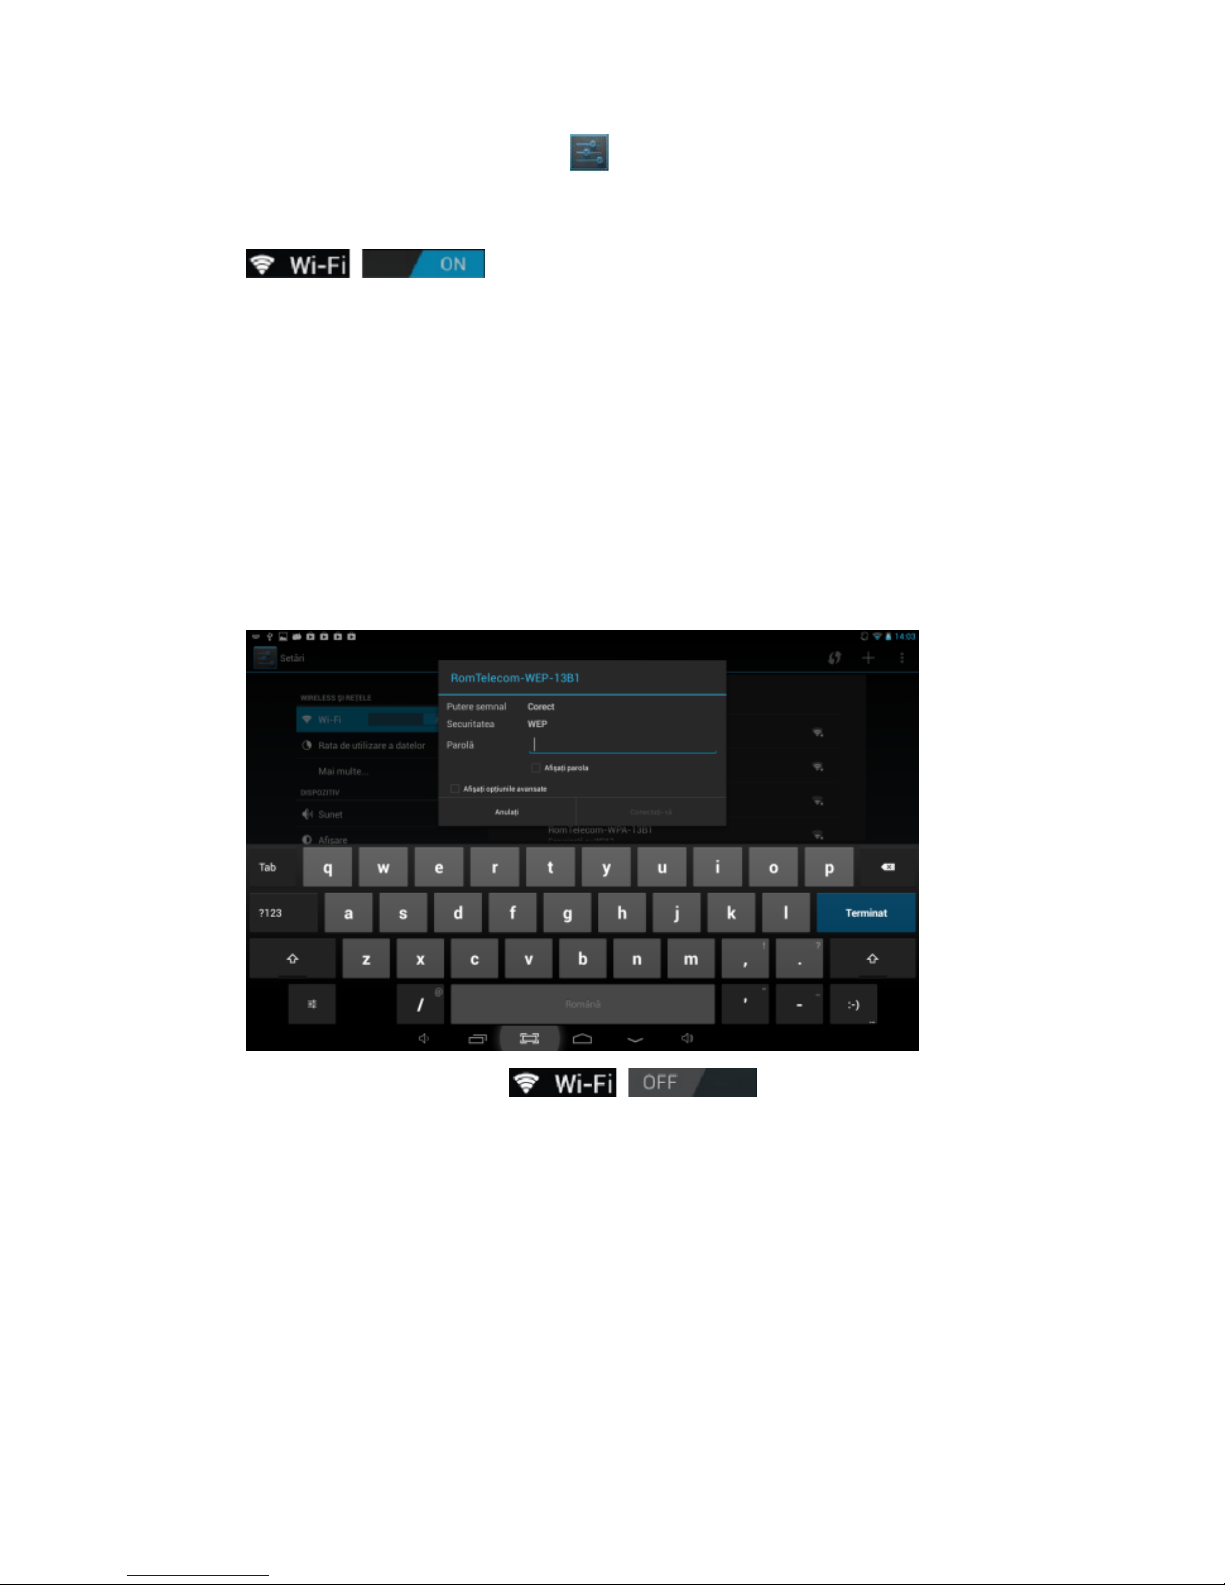
6.1 Csatlakozás a Wi-Fi-hez
- Kattintson a Beállítások ikonra
- Csúsztassa ezt az ikont jobbra, hogy aktiválja a Wi-Fi-t
. A készülék keresni fogja, és megjeleníti az
elérhető Wi-Fi hálózatokat. Kattintson a nevére a hálózatnak és a
csatlakozás lehetövé válik.
- Ha a Wi-Fi hálózat nincs jelszóval védve, a táblagép automatikusan
felveszi a kapcsolatot. Ha a Wi-Fi hálózat eléréséhez jelszó szükséges,
akkor meg kell adnia a jelszavatt, majd válassza a "Connect"
(Csatlakozás) gombot.
- Csúsztassa ezt az ikont balra, hogy becsukja
a Wi-Fi lehetőségeket.
6.2 Hálózati hozzáférés a 3G segítségével
- csukja be a Wi-Fi-t és lépjen be a - több - Mobile Networks-ba.
- győződjön meg arról, hogy az Adatforgalom engedélyezve van, be van
kapcsolva „ON”
- kapcsolya be a 3G modemet.
Page 53

52
- Kattintson a Hálózat üzemeltetőn és keresse meg az elérhető
hálózatokat.
- Választhat automatikusan mobilhálózatokat .
6.3 Más hálózatok
- Ethernet
- VPN
- Fontos: A hálózati képesség és az elérhető sebesség függ a
felhasználói hálózattól. Ha a 3G hálózat van használva,
előfordulhatnak többletköltségek.
7. USB csatlakozás
A terméket lehet csatlakoztatni Windows operációs rendszerel felszerelt
számítógéphez, egy USB-kábellel. Segítségével átmásolhatók zenék,
videók, képek és egyéb fájlok, mindkét irányban. Használati utasitás:
- Használjon egy USB-kábelt, amely segítségével csatlakoztatja a
táblagépet a számítógéphez.
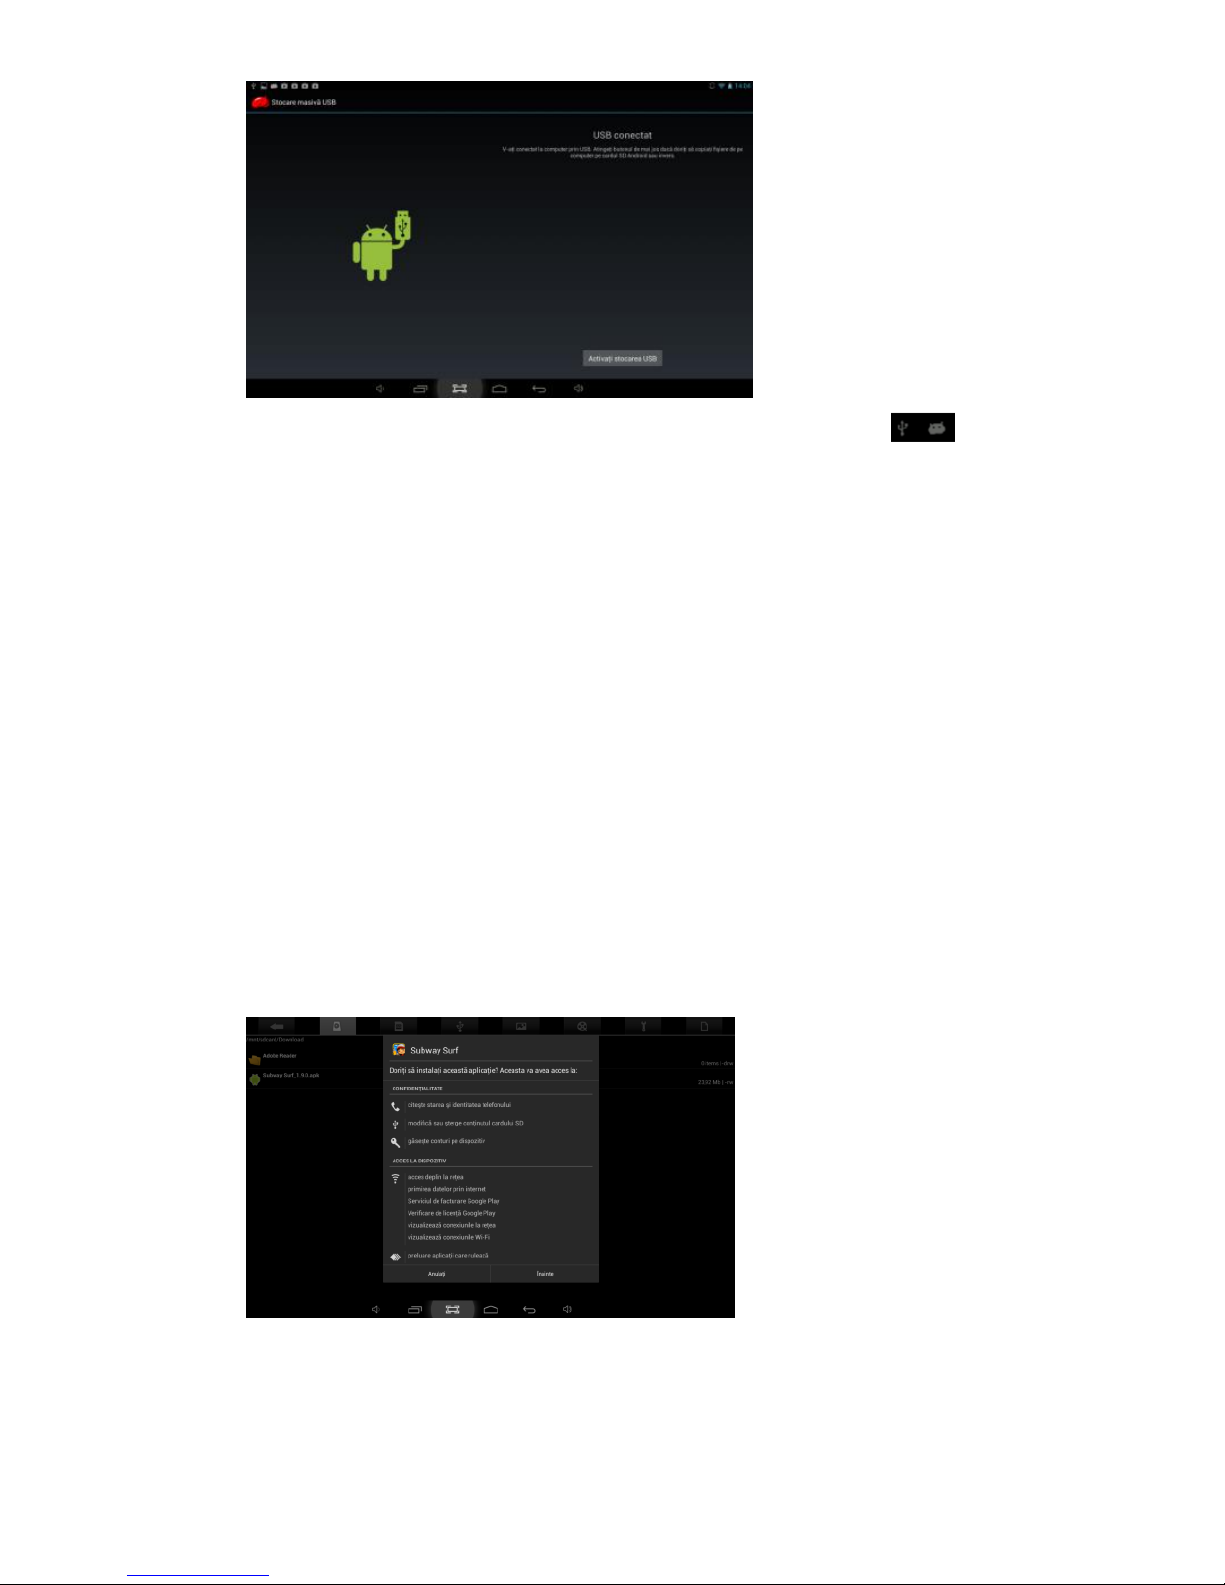
- Kattintson az - aktiválja be az USB tárolót – gombra, hogy tudja le olvasni
az információkat a táblagépről a számítógépen. Most már tudod másolni
a fájlokat mindkét irányban.
- Kattintson a – csukja be az USB tárolót- gombra, hogy tudja
lecsatlakoztatni a táblagépet a számítógépről, majd távolítsa el az USB
kábelt.
Page 54
53
Ha a fenti interfész nem jelenik meg, kattintson az ikonra a
képernyő bal felső sarkában, majd válassza a következö ablakot - aktiválja
be az USB tárolót .
8 . Alkalmazások
8.1 Új alkalmazások telepítésére
8.1.1 Play Store alkalmazások letöltése és telepítese kövesse a rendszer
utasításokat.
8.1.2 APK csomagok telepítése, az alkalmazásokat a táblagép
memóriában érjük el ha ki nyitjuk Fájlkezelőt, keresse meg a kivánt
csomagokat és kattintson a nevükre hogy a telepítés létre jöjön.
Tanácsok
Page 55

54
- Alkalmazások Letöltése és telepítese amelyek nincsenek a Play Store
- Ban, győződjön meg róla, az "Ismeretlen források" be van kapcsolva ON .
(Beállítások - Biztonság - Kezelése Devices).
- Ha az alkalmazás már létezik a tablettan, érintse meg az OK, hogy
kicserélje a csomag legújabb verzióval .
8.2 Alkalmazások eltávolítása
8.2.1 Menjen a Beállítások - Alkalmazások - All.
8.2.2 Kattintson arra az alkalmazásra amit eltávolítani kiván
8.2.3 Kattintson az Uninstall gombra.
8.3 Alkalmazás-menedzsment
8.3.1 Menj a Beállítások - Alkalmazások - All.
8.3.2 Kattintson arra az alkalmazásra amelyet kényszerből kell leállítania
uninstall, törölje az adatokat vagy vigye SD – re.
9. Videó fájlok lejátszása
Használhatja az előre telepített videolejátszó alkalmazást ami a
táblagépen van , hogy élvezze a filmeket és videókat, vagy telepíthet más
videolejátszó alkalmazásokat.
9.1 Kattintson az ikonra, hogy belépjen a video interfészbe vagy
nyisson meg videó fájlokat közvetlenül a Fájlkezelő–ből .
9.2 A táblagép sokféle videó formátumot támogat, beleértve a: 1080P
AVI, DIVX, DIVX, XVID, RM, RMVB, WMV, MOV, MP4, MPEG, DAT, VOB,
MPG, FLV, ASF, TS, TP, 3GP.
9.3 Kattintson állapotjelző sávra , hogy előre vagy hátra lépjen .
Page 56
55
9.4 Kattintson erre az ikonra , hogy hozzáférhessen a videó
alkalmazási beállításaihoz .
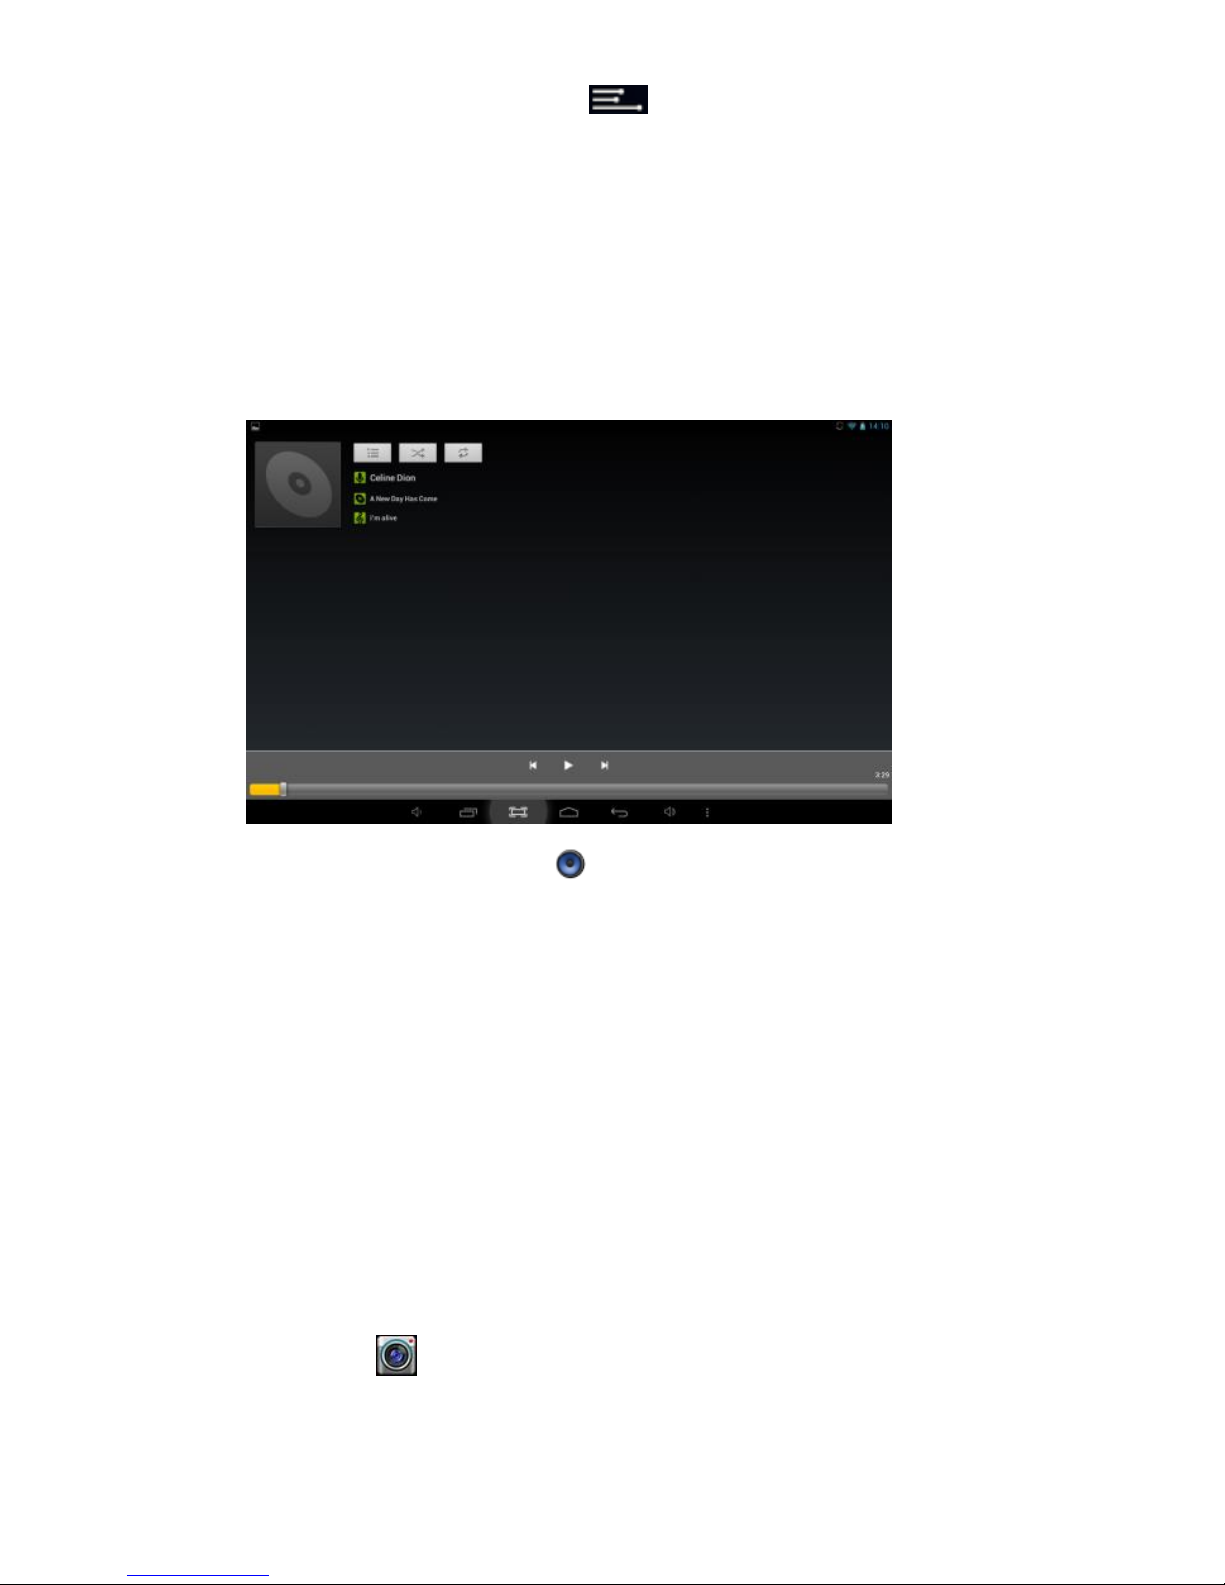
10. Audió fájlok lejátszása
Ha zenét akar hallgatni használhatja az előtelepített zenelejátszó
alkalmazást Zene, vagy telepíthet más audio alkalmazásokat.
10.1 Kattintson a Zene ikonra a hang-alkalmazásra, vagy közvetlenül
nyissa meg a Fájlkezelőből.
10.2 A készülék támogatja a következő audió formátumokat: MP3, WMA,
MP2, OGG, AAC, FLAC, APE, 3GP, WAV, etc.
10.3 Kattintson az állapotjelző sávra, hogy előre vagy hátra lépjen .
10.4 Ha nincsenek audió fájlok a listában, a rendszer automatikusan
betölti az audió fájlokat a táblagép memóriájából.
11.Kamera
Kattintson a ikonra ,a kamera funkció eléréséhez.
Page 57
56
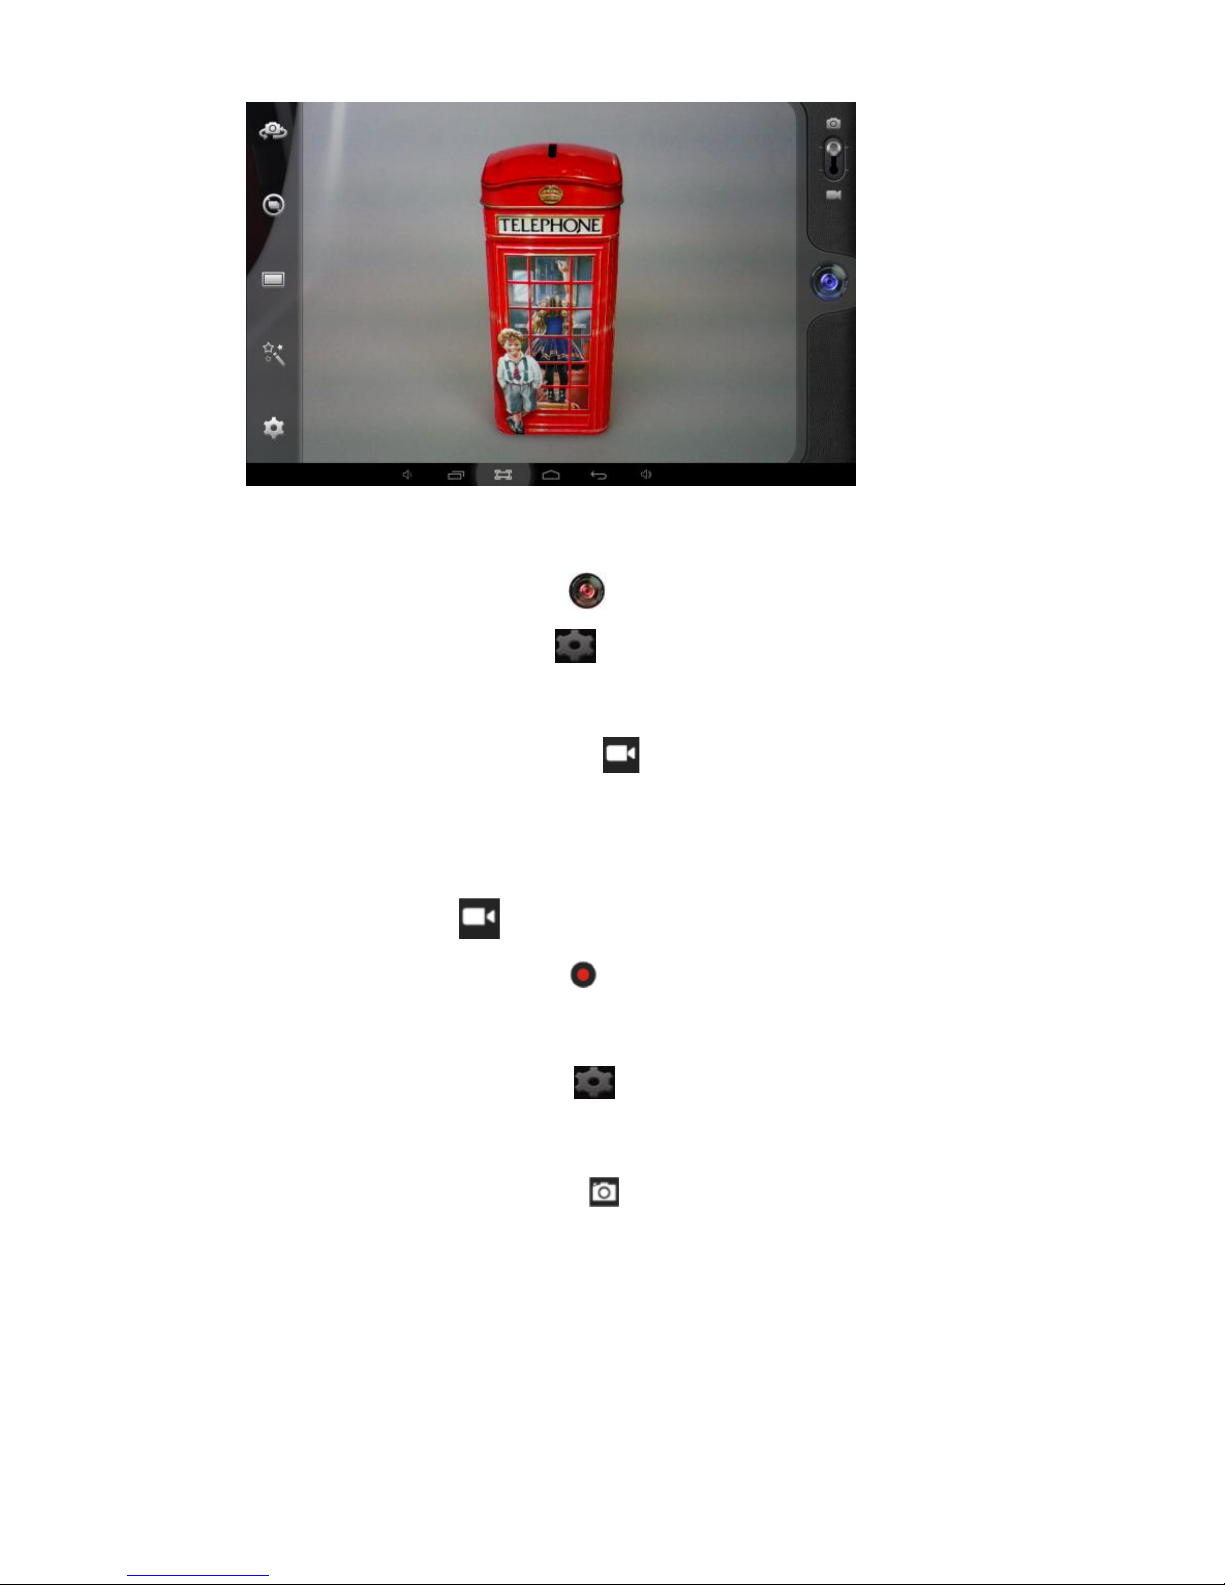
11.1 Fényképezés modul
11.1.1 Kattintson erre az ikonra Fényképezés
11.1.2 Kattintson erre az ikonra fényképezési lehetőségek eléréséhez.
11.1.3 Kattintson a kis képre hogy elérje a képvezérlőt.
11.1.4 Kattintson erre az ikonra , hogy váltani tudjon a felvétel
modulra.
11.2 Felvétel modul
11.2.1 Kattintson erre az ikonra hogy a felvétel megkezdődjőn.
Nyomja meg ismét, hogy leállítsa, és mentse a filmet.
11.2.2. Kattintson erre az ikonra a lehetőségek eléréséhez.
11.2.3. Kattintson a kis képre hogy elérje a felvétel vezérlőt
11.2.4. Kattintson erre az ikonra hogy váltani tudjon a fényképezés
modulra.
12. Rendszerbeállítások
Page 58
57
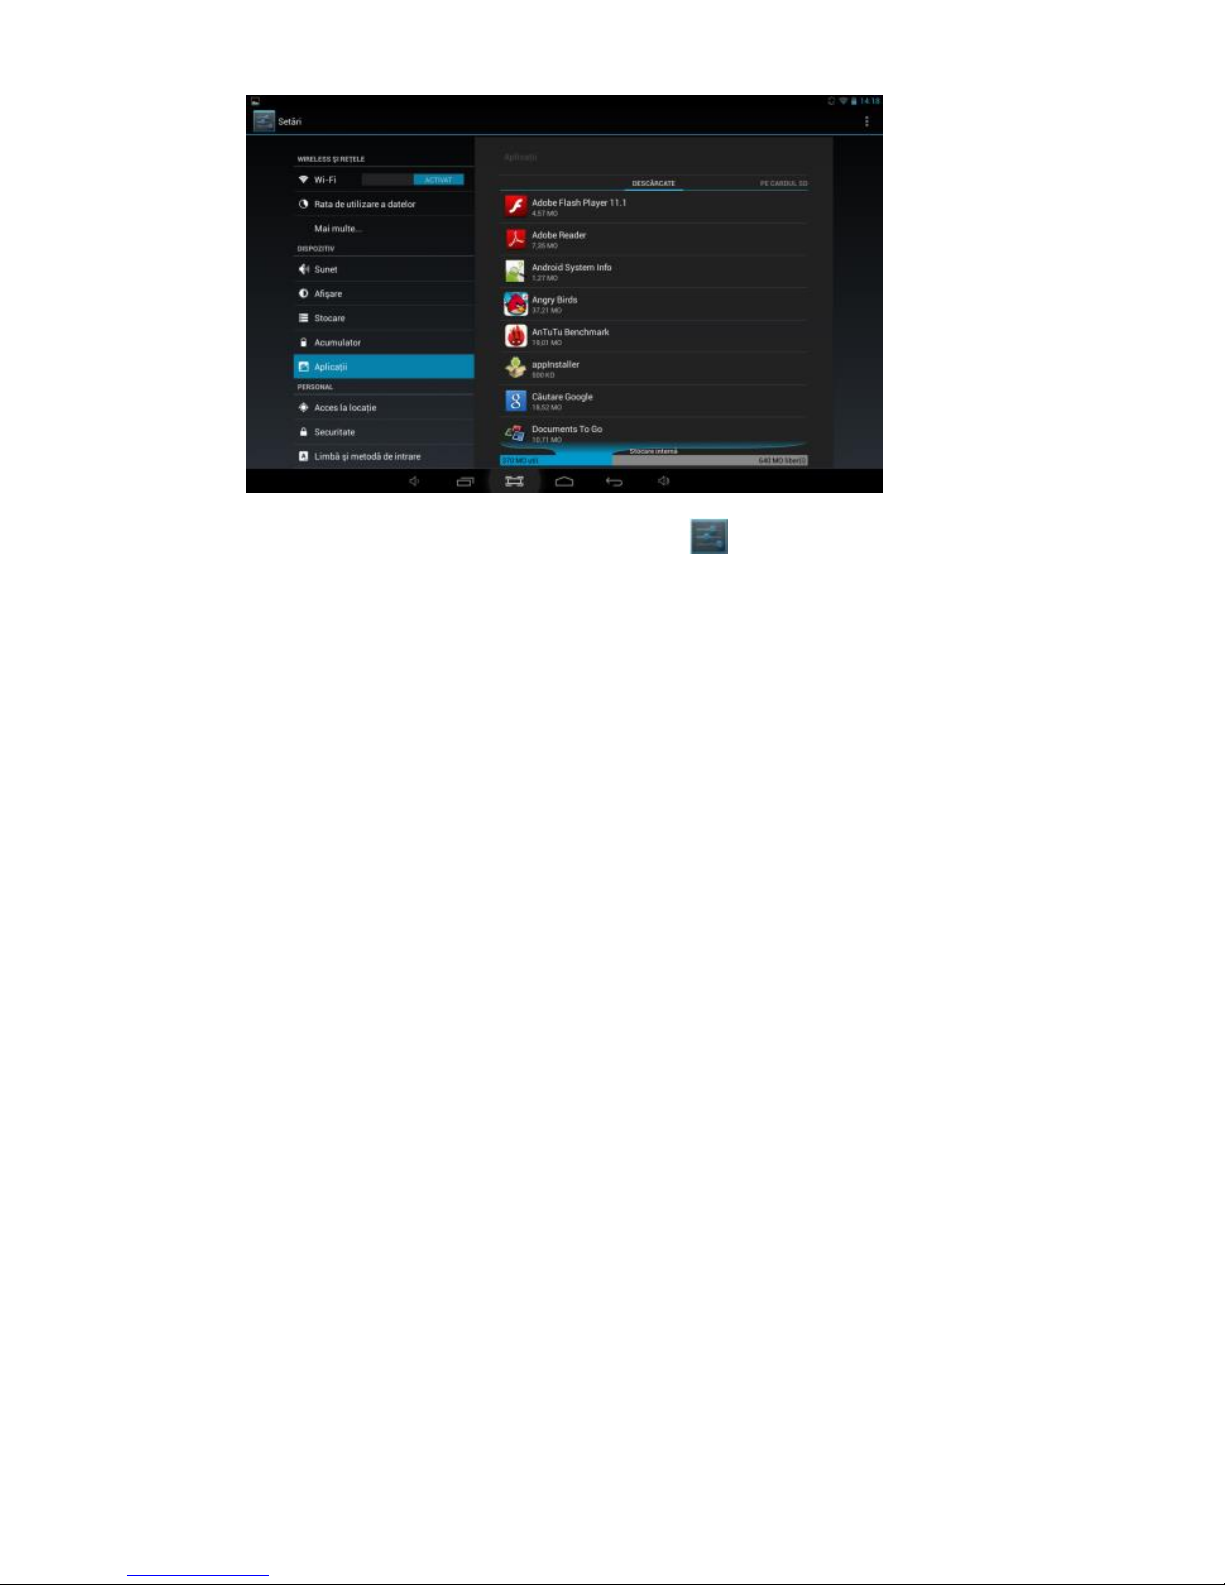
Kattintson erre az ikonra Beállítások a rendszer beállításai
eléréséhez, beleértve a Wi-Fi és más hálózatokat, hang, kijelző, tároló,
akkumulátor, alkalmazások, szolgáltatások, elhelyezkedés, a nyelvi és
beviteli mód, biztonsági mentés és visszaállítás, fiókok és szinkronizálás,
dátum / idő, fejlesztői opciók, a táblagépről.
12.1 Vezetékes és vezeték nélküli hálózatok
A Beállítások menüben válassza az "Internet connects manager"-t,
kattintson a "Wi-Fi-settings"-re, írja be a Wi-Fi beállítási menüt és
válassza a "Wi-Fi"-t, hogy megnyissa a kapcsolatot. Miután a Wi-Fi-t
kinyitotta, egy automatikus keresést kezdeményezünk a hálózatokról.
Akkor megjelenik egy lista az összes rendelkezésre álló hálózatokkal.
Kattintson annak a hálózatnak a nevére ahová csatlakozni szeretne, írja be
a jelszót, és egy pár másodperc múlva csatlakozik az internethez.
Csatlakozás az internetre USB modemmel, csatlakozik a készülékhez USB
3G kábellel OTG-USB. A rendszer érzékeli a hárdverkulcsot, és aktiválja.
Jöjjön majd a Settings / WiFi és más hálózatok, válassza a "Mobile
Networks", és a rendszer automatikusan csatlakozik az internethez.
Page 59

58
12.2 Hang
A főmenüből lehet beállítani a hangerőt, a rendszer értesítések és
csengőhangok.
12.3 Képernyő
Opciók:Beállítások: fényerő, Háttérkép, Képernyő automatikus elforgatása
inaktivitás, a betűméret, koordinálja a gyorsulásmérőt, intelligens színek
háttérvilágítás intelligencia.
12.4 Tárolás
Ebben a menüben megtalálható egy áttekintés a belső tároló és külső SD
kártyaról.
12.5 Akkumulátor
Ebben a menüben áttekintést, információkat nyújtunk az akkumulátoról.
12.6 Alkalmazások
Lásd a 8. pontot. Alkalmazások.
12.7 Szolgáltatások a tartózkodási helyről
Be lehet kapcsolni a helymeghatározó szolgáltatásokat , hogy a különböző
alkalmazások fel mutassanak információkat az aktuális helyről és
meg mutatja a távolságot a legközelebbi nevezetességekig az Ön számára.
12.8 Biztonság
Page 60

59
Opciók: Biztonság a képernyőn, jelszavak, eszközök és tárolás az
adminisztrációs adatoknak.
Tipp: Ha azt szeretné, hogy alkalmazásokat telepítsen a Play Store-n kívül,
ellenőrizze hogy legyen engedélyezve az „Ismeretlen források”.
12.9 Nyelvi és beviteli mód
Meg lehet változtatni a rendszer alapértelmezett, nyelvét és a
billentyűzetét, és a beviteli módot. Tipp: Ha telepítve van egy beviteli
mód, jelölje ki azt a beállításokban .
12.10 Biztonsági mentés és visszaállítása
Opciók: Biztonsági mentés és visszaállítása, gyári beállítások visszaállítása
és a helyreállítási modul. Annak érdekében, hogy ne veszítse el a tárolt
információkat a táblagépről, azt javasoljuk, hogy rendszeresen készítsen
Biztonsági mentést.
12.11 Fiókok és szinkronizálás
Itt kezelheti az összes felhasználói fiókját, ami a táblagépen van.
12.12 Idő
Opciók: Állítsa be a dátumot és az időt, az időzónát, és a kijelző
formátumot.
12.13 Megközelíthetőség
Opciók: Nagyméretű szöveg, automatikus képernyő forgatás, hang
jelszavak, érintesi és tartási időtartamát, növeli internetes hozzáférést.
Page 61

60
Személyre szabhatja ezeket a lehetőségeket, ahogy tetszik, hogy a legjobb
felhasználói élményt érje el.
12.14 Fejlesztői beállítások
Lehetőségek: Jelszó, Aktív állandó ellenőrzés HDCP, SD kártya, USB
hibakeresés, hozzáférési helyek fiktív bemenet és a rajz.
12.15 A táblagépről
Ez a menü áttekintést és információt nyújt a táblagépről (modell, a
rendszer, a firmware verzió, stb.)
13. Gyakori kérdések
1. A készülék nem tud csatlakozni a Wi-Fi-hez .
- Ellenőrizze, hogy a vezeték nélküli hálózat megfelelően működik-e egy
másik vezeték nélküli eszközzel.
- Győződjön meg arról, hogy a készülék hatótávolságán belül van amelyik
vezeték nélküli hálózathoz szeretne csatlakozni. Falak vagy egyéb
akadályok csökkenthetik a működést a vezeték nélküli eszközöknél.
- Figyeljen, hogy a biztonsági jelszó helyesen legyen használva.
2. A készülék nem indul be
- Nem tudja bekapcsolni a készüléket, ha az akkumulátor töltöttségi
szintje a kritikus szint alat van . Kérjük, töltse fel az akkumulátort.
- Nyomja meg a RESET gombot, és ellenőrizze, hogy a visszaállítás
rendesen történik.
- Ellenőrizze, hogy a tápegység megfelelően csatlakozik
Page 62

61
3.Melegedési problémák
- Akkor amikor több alkalmazást futtatni akarunk , a maximális fényerő
beállításal a képernyőn, vagy amikor feltölti a készüléket. Ez normális
jelenség, és nem okoz problémát a használat során.
4. Rendszer rendellenességek és nem megfelelő működés
- Idegen alkalmazások telepítése problémát okozhatnak a rendszer
működésében. Nyomja meg a RESET gombot, és végezze el a rendszer
visszaállításat a probléma megoldásához.
5.Nem tudom beállítani az e-mail-t
- Ellenőrizze, hogy a táblagép csatlakozik egy Wi-Fi hálózathoz, és képes
kapcsolódni az internethez.
- Figyeljen arra, hogy az e-mail beállítások helyesek a kívánt fiókra.
- Ellenőrizze, hogy a rendszer dátum helyesen van beállítva.
6. Nem tudok rögzíteni
Nyomja meg a RESET gombot, majd ellenőrizze hogy a felvétel funkció
megfelelően működik.
7. A készülék felhasználási ideje túl rövid
- Lítium akkumulátor felhasználás ideje függ a hőmérséklet-változástol a
környezetben. Ha a környezeti hőmérséklet túl magas vagy túl alacsony, az
akkumulátor élettartamát fogja érinteni. Javasoljuk, hogy használja a
készüléket normál hőmérsékleten.
- Az akkumulátor élettartama a használattól függ. Nagy mértékű és a
gyakori Wi-Fi használata okozhatja az akkumulátor lemerülését
rövidebb idő alatt.
Page 63

62
- Ahhoz, hogy hosszabb legyen a használat és a maximális
teljesítmény szempontjából,első alkalommal, kérjük, töltse fel az
akkumulátort, 8-12 órán át.
8. Nincs hang a fejhallgatóban
- Kérjük, ellenőrizze, hogy az audiofájl sérült-e, és meg kell hallgatni más
audiofájlt a megerősítéshez. Ha az audiofájl sérült, ez okozhat súlyos zajt.
- Ellenőrizze, hogy a fejhallgató-csatlakozó megfelelően csatlakozik-e a
termékkel.
9. Színek torzítása a videó felveteleken vagy a képek megjelenítésénél
- Nyomja meg a RESET gombot, hogy megoldja ezt a problémát
10.Nem tudok fájlokat másolni
- Ellenőrizze, hogy a memória megtelt.
- Kérjük, ellenőrizze, hogy az USB-kábel nem hibás-e.
11. Egyéb problémák
- Nyomja meg a RESET gombot, majd ellenőrizze, hogy a probléma
megoldódott. Ellenkező esetben, hívja a legközelebbimeghatározott
szervízt.
14 .A firmware bemutatása
A Firmware amely telepítve van a táblagépben, egy eszköz a program
ellenőrzésére, megadott a gyártó által. A Firmware helyreállítása , a végső
megoldás a rendszerben levő komoly problémákra. A problémákat
orvoslni lehet a gyári beállítások visszaállítása opció használatával. Ha a
Page 64
63
rendszer összeomlik, akkor is, ha visszaállítja a gyári beállításokat, akkor
visszaállíthatja a firmware-t szakértői útmutatás szerint. Firmware előre
telepítve a készülékbe egy stabil verzió a táblagéphez, kérjük nem
visszaállítani más változatot, csak ha feltétlenül szükséges. NEM
javasoljuk helyreállítását a firmware-t a gyártó útmutatása nélkül, A
gyártó nem felel az esetleges hibákért, ha a firmware helyreállítását a
felhasználó eszközölte, szakértői útmutatás nélkül.
15. Műszaki adatok
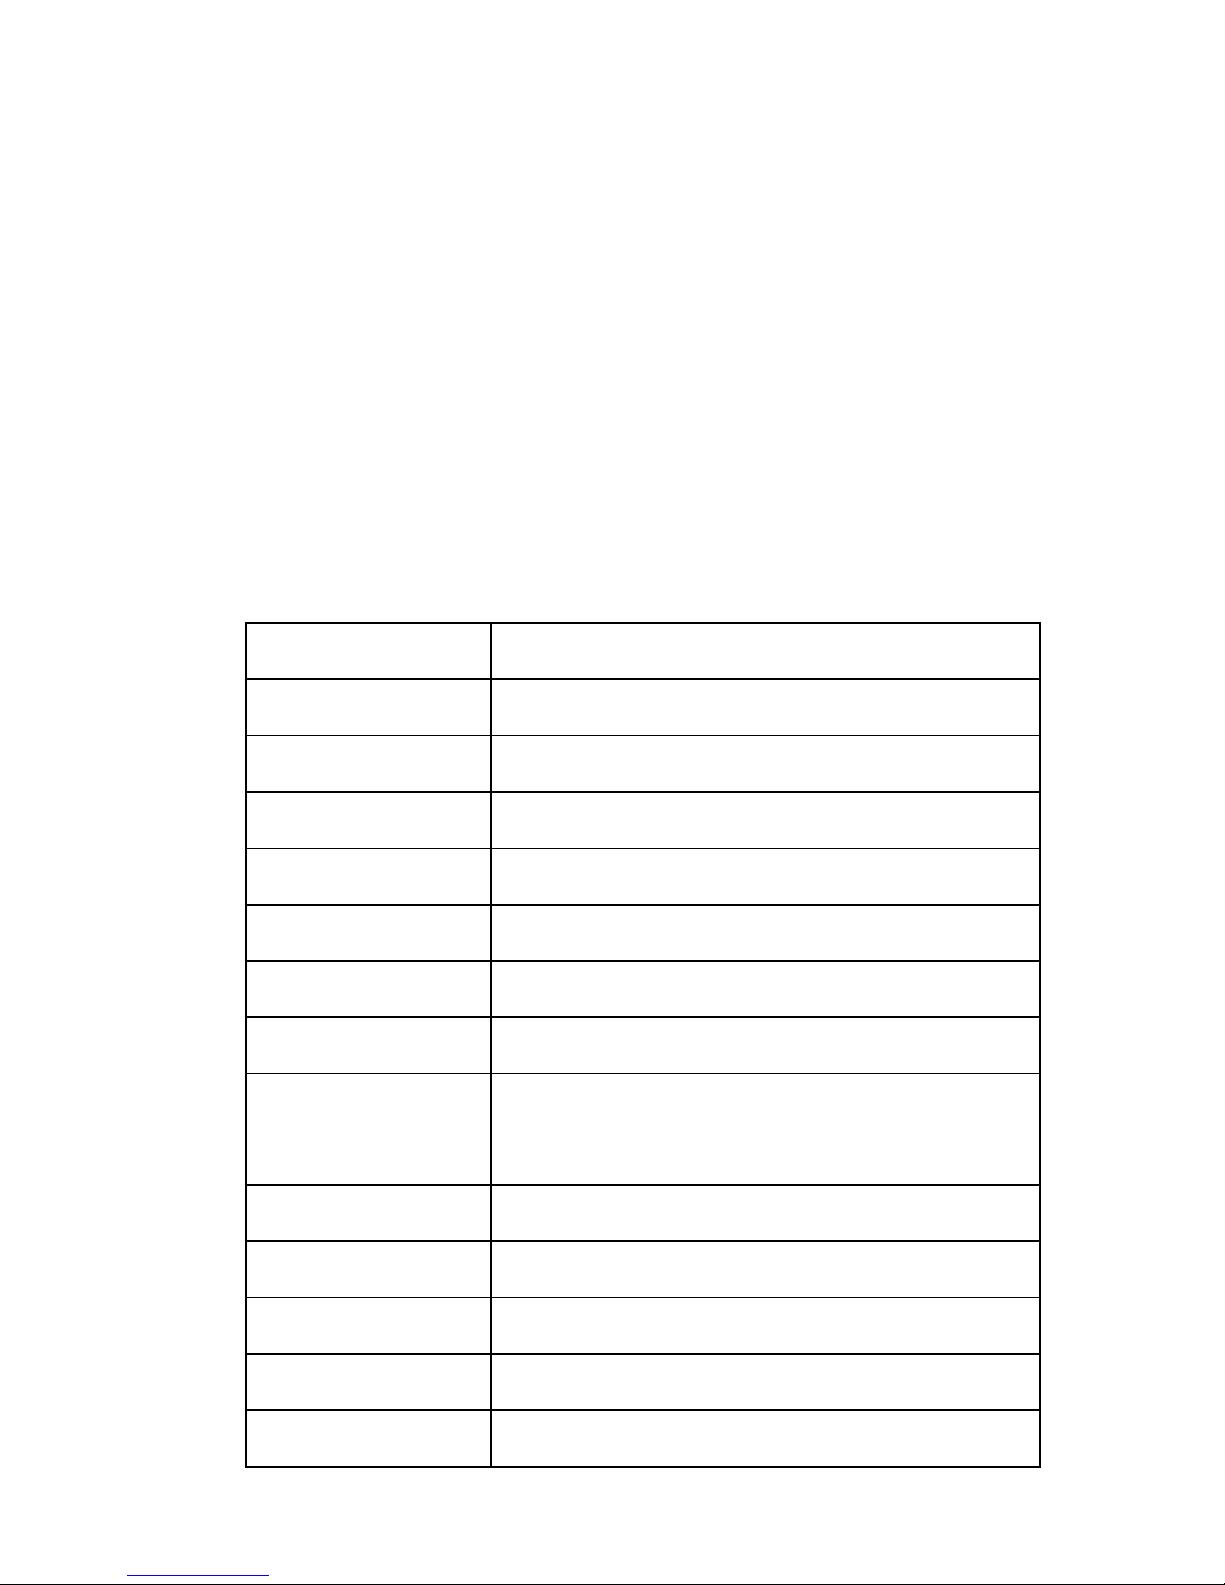
OS
Android 4.2 Jelly Bean
Processzor
Dual Core MTK 8312 1.3GHz
Képernyő
RAM memória
512 MB DDR 3
Tárolás
4 GB
Videokártya
Dual Core Mali400
Hangszóró
1 W
Web kamera
Elülső: 0.3 MP, Hátulsó: 0.3 MP
Kikötők
Micro USB, Micro SD (32 GB-ig),
Fejhallgató csatlakozó, SIM card port.
Méret
188 x 108 x 11 mm
Súly
300 g
Wi-Fi
802.11 b/g/n
3G
On board, 900 / 2100 Mhz
Akkumulátor
Li-Polymer 2800mAh, 5-6h autonómia
Page 65
64
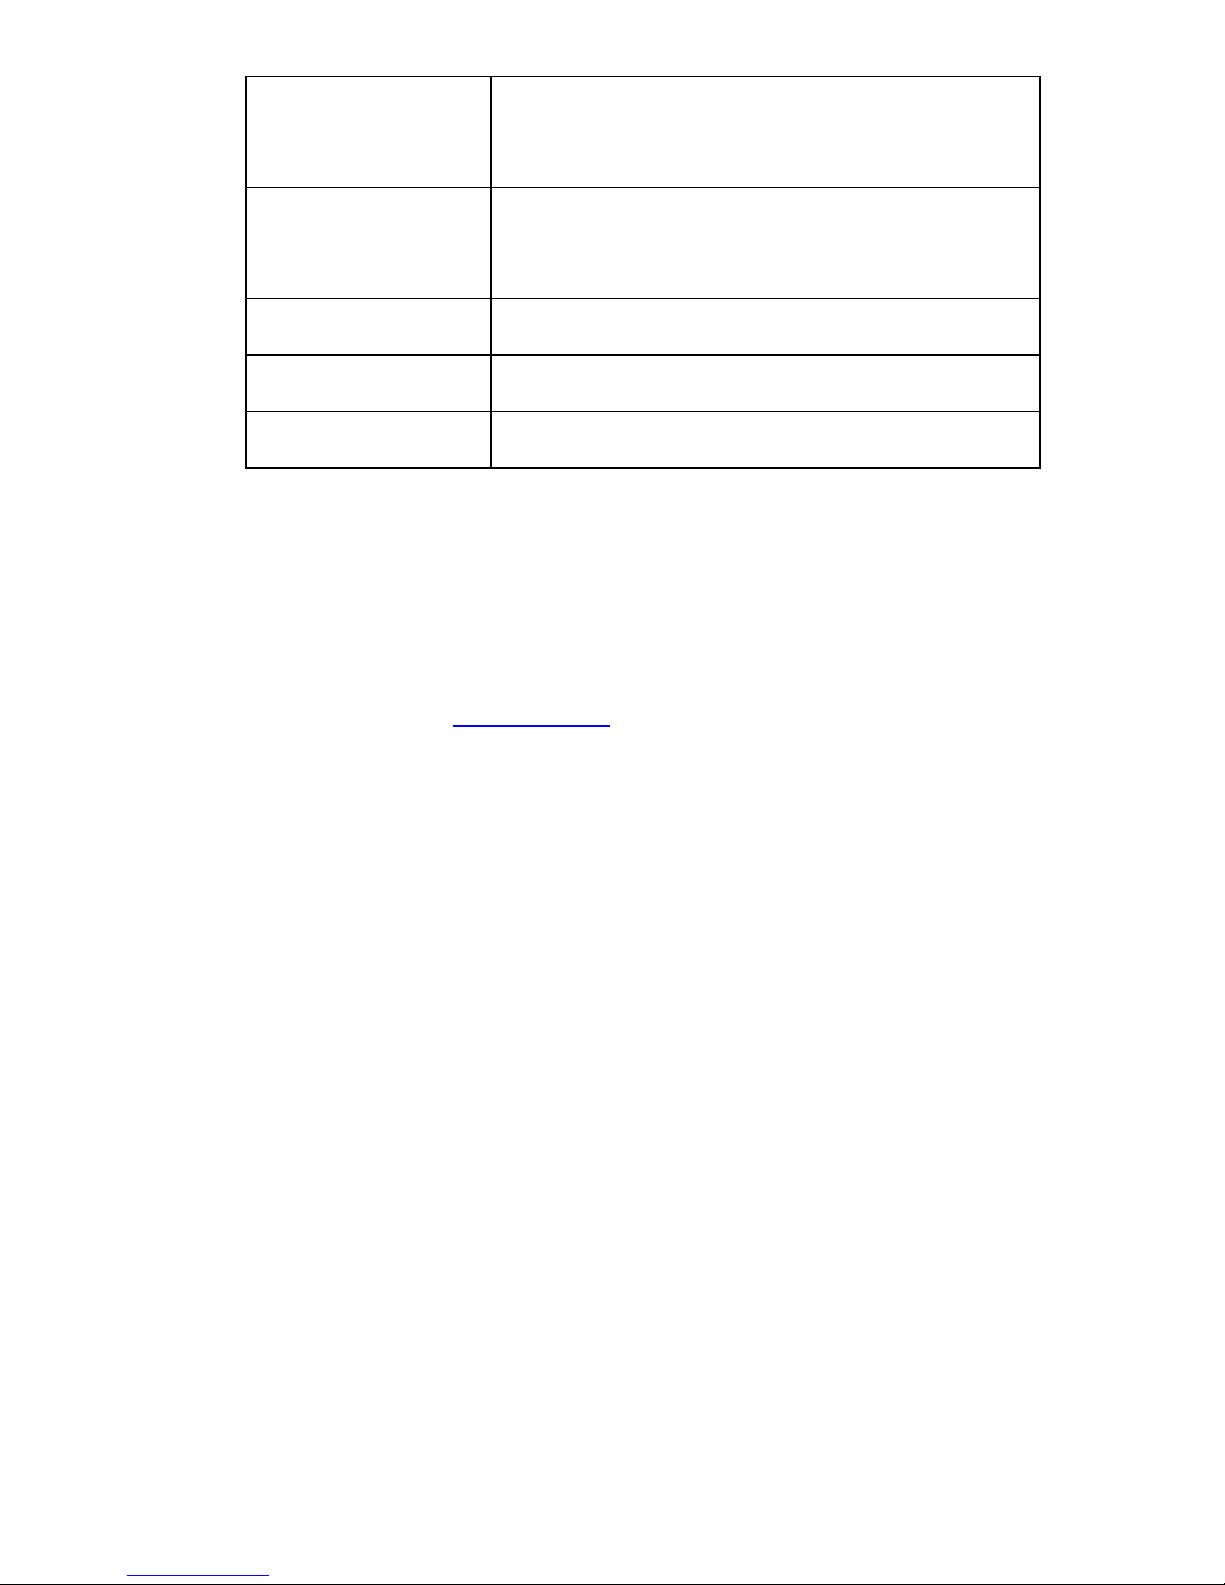
Videó formátumok
AVI, DIVX, XVID, RM, RMVB, MKV, WMV, MOV,
MP4, MPEG, MPG, FLV
Audió formátumok
MP3, WMA, MP2, OGG, AAC, M4A, MA4, FLAC,
APE, 3GP, WAV
Fotó formátumok
JPG, JPEG, GIF, BMP, PNG
eBook formátumok
Mások
3G, Bluetooth, GPS, Gyorsulásmérő, Mikrofon
16. Megfelelőségi nyilatkozat
Megfelelőségi nyilatkozat a 700D 3G Lite termék, UTOK márka, elérhető
az online webcímen www.utok.com
 Loading...