

Page 1

1
MANUAL DE UTILIZARE
UTOK 700 D
Page 2

2
CUPRINS
1. Interfata ................................................................................ 4
2. Pornire / oprire ..................................................................... 5
3. Ecran tactil ............................................................................ 5
4. Folosirea cardului SD ............................................................ 5
5. Utilizarea produsului ............................................................. 6
6. Ecranul principal ................................................................... 7
7. Blocarea ecranului ................................................................ 8
8. Aplicatii preinstalate ............................................................. 8
9. Meniul principal .................................................................... 9
10. Administrare aplicatii ........................................................ 10
11. Ceas ................................................................................... 11
12. Instalare aplicatii ............................................................... 12
13. Navigare pe Internet ......................................................... 12
14. Calendar ............................................................................ 13
15. Camera .............................................................................. 13
16. Calculator .......................................................................... 14
17. Inregistrare sunet ............................................................. 15
18. Email ................................................................................. 15
Page 3

3
19. Administrare fisiere .......................................................... 16
20. Muzica ............................................................................... 18
21. Video Player HD ................................................................ 18
22. Setari ................................................................................. 19
23. Intrebari frecvente ............................................................ 22
SPECIFICATII ............................................................................ 25
DECLARATIE DE CONFORMITATE ............................................ 26
Page 4
4
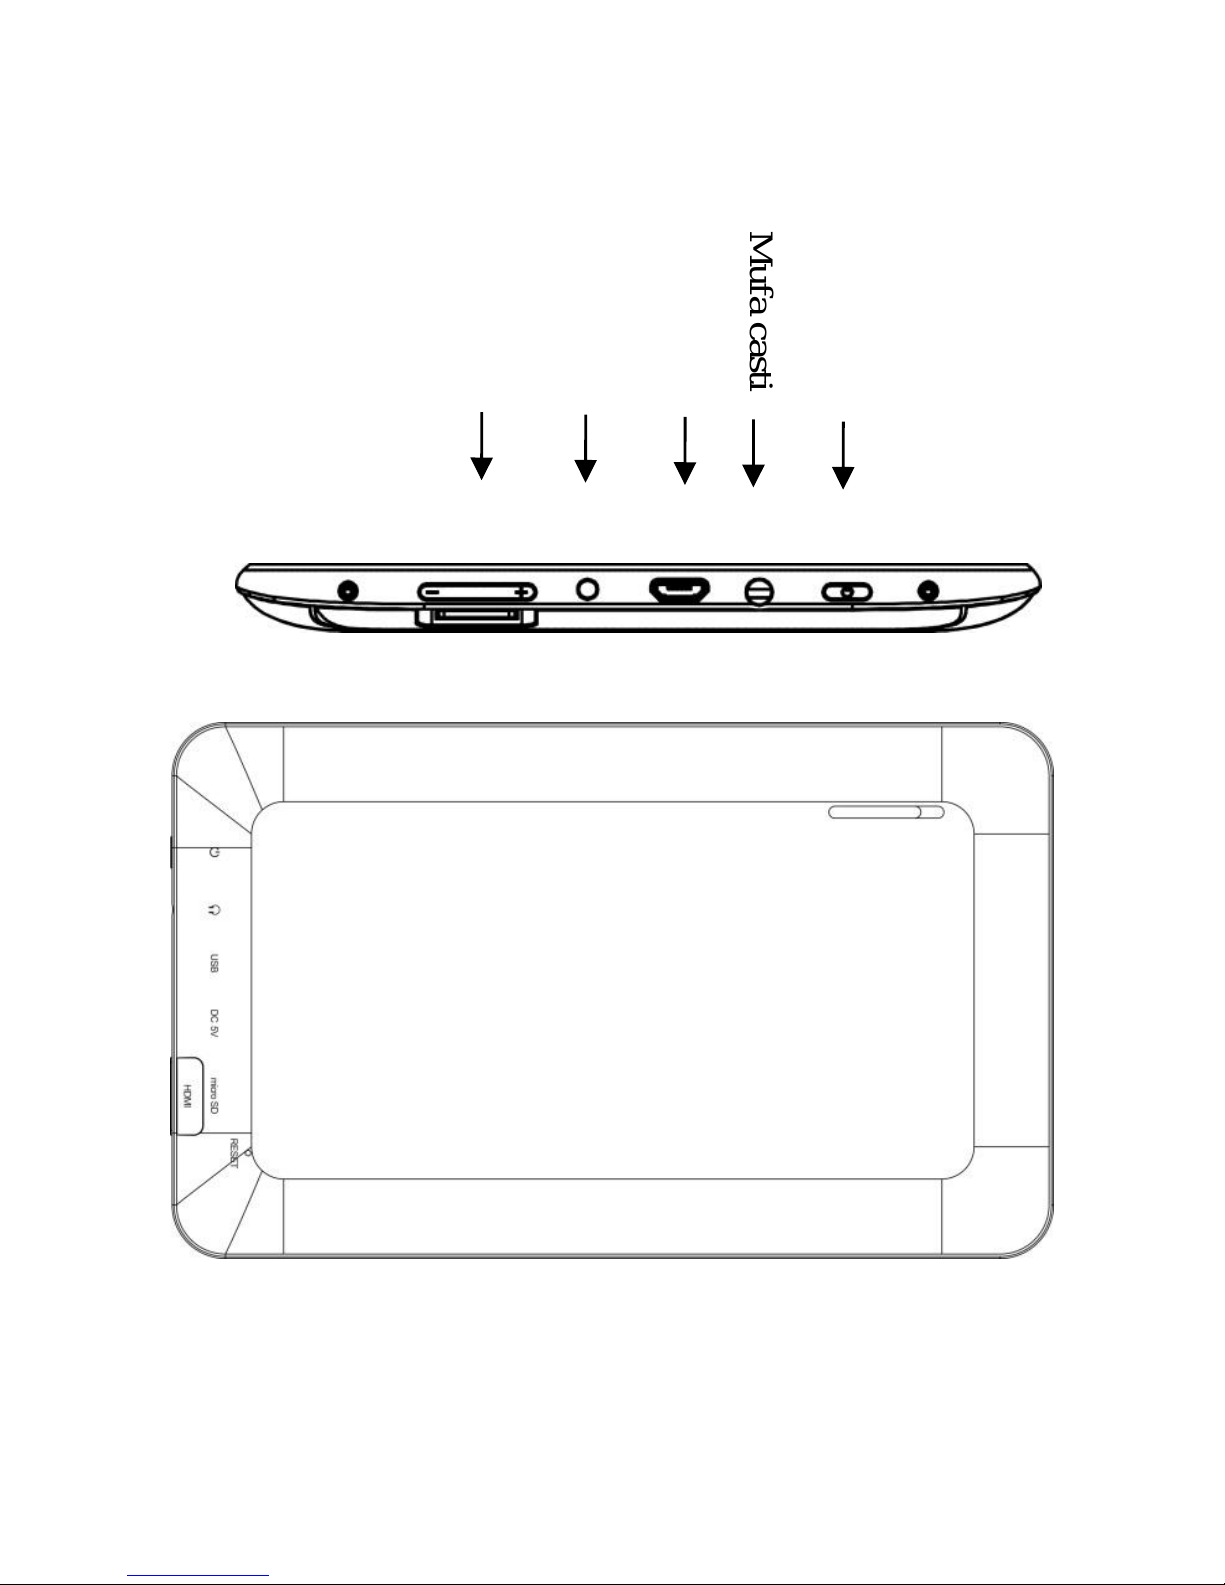
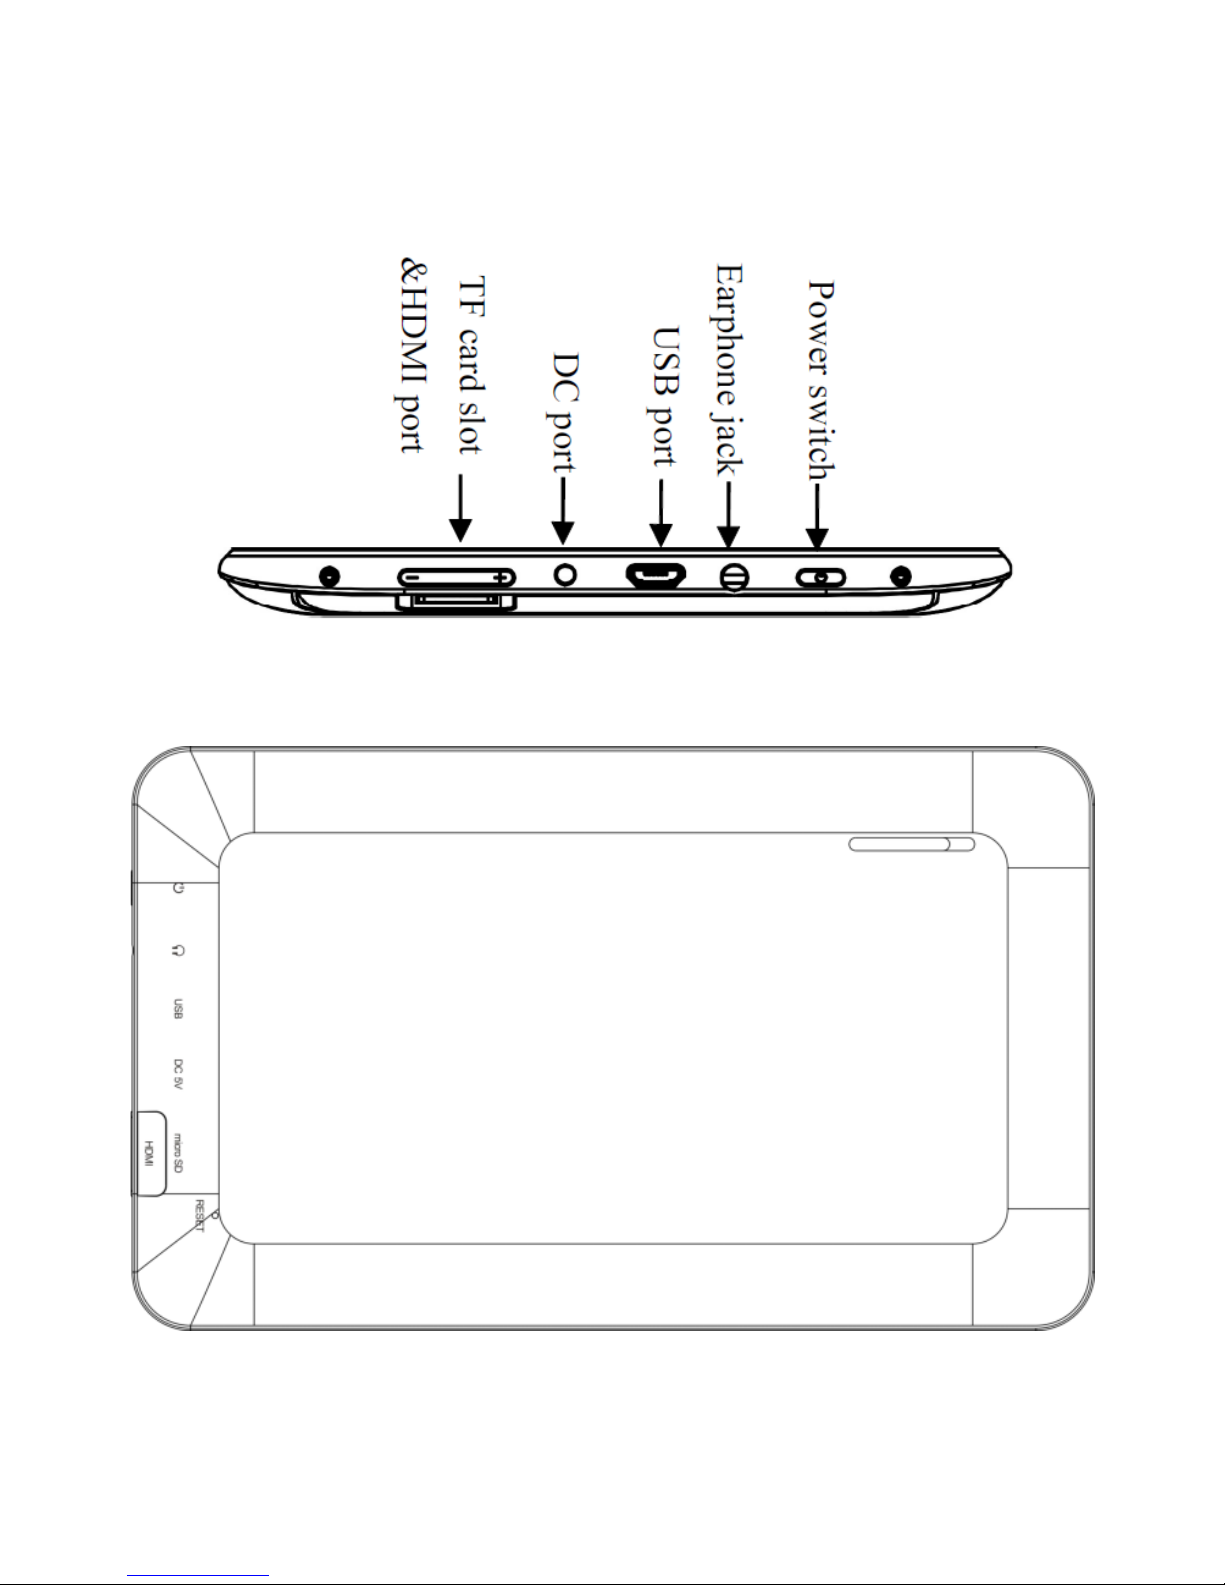
1. Interfata
Slot card SD
si port HDMI
Mufa casti
Buton pornire
/ oprire
Port USB
Alimentare
Page 5

5
2. Pornire / oprire
Pornire: apasati si mentineti pentru 3 secunde butonul de pornire / oprire
pentru a activa produsul.
Oprire: apasati si mentineti pentru 3 secunde butonul de pornire / oprire apoi
selectati OK si tableta se va inchide automat.
Oprire fortata: in cazul in care produsul se blocheaza, apasati si mentineti
pentru 7 secunde butonul de oprire / pornire pentru a inchide fortat tableta.
Apasati apoi din nou pentru 3 secunde pentru a reporni si a relua activitatea.
Atentionare: oprirea fortata poate cauza erori neasteptate ale sistemului de
operare.
Blocare / deblocare ecran: apasati scurt butonul de pornire / oprire pentru a
bloca / debloca ecranul.
3. Ecran tactil
Pentru a folosi ecranul tactil cu usurinta, va rugam sa folositi metodele de mai
jos. Pentru activarea unei aplicatii apasati o singura data scurt pe pictograma
acesteia. Pentru activarea optiunilor suplimentare, apasati pe pictograma si
mentineti pentru aproximativ 2 secunde. Pentru mutarea unei pictograme
apasati, mentineti pentru 2 secunde, apoi mutati pictograma in locatia dorita.
☆ Pentru a preveni distrugerea ecranului, va sfatuim sa nu puneti niciun
obiect pe suprafata acestuia.
4. Folosirea cardului SD
☆ Produsul suporta carduri SD cu o capacitate de pana la 32 GB.
☆ Introduceti cardul in slotul dedicat, apoi impingeti pana cand se aude
“click”. Acum cardul este functional.
Inlaturarea card-ului SD
Page 6

6
In primul rand va rugam sa inchideti toate programele sau fisierele de pe card.
Apoi apasati Setari -> Stocare -> Scoateti card SD -> OK. Apoi apasati cardul
pentru a fi eliberat din slot.
☆ Nu introduceti si scoateti cardul in mod repetat la intervale scurte de timp.
Acest tratament poate duce la defectarea cardului SD.
☆ Va sugeram sa folositi un card produs de un brand cunoscut pentru a va
asigura cu privire la compatibilitatea acestuia.
5. Utilizarea produsului
Incarcarea tabletei
☆ Nu este recomandat sa incarcati tableta cu ajutorul cablului USB.
☆Puteti folosi produsul in timp ce acesta se incarca, insa acest mod de
utilizare va prelungi durata de incarcare a bateriei.
Conectati cablul de incarcare la priza si introduceti celalalt capat in mufa
speciala din tableta pentru a incarca bateria produsului. Poate dura pana la 5
ore pentru a incarca complet bateria.
In timpul conectarii la sursa de curent, pictograma bateriei va afisa procesul
de incarcare, iar atunci cand este incarcata la maxim, va afisa pictograma
corespunzatoare. In acest moment puteti intrerupe alimentarea.
Pornirea produsului
Apasati si mentineti pentru 3 secunde butonul de start pentru pornirea
produsului.
Setari Wi-Fi
Va sfatuim sa configurati setarile conexiunii WiFi cand incepeti utilizarea.
1. Apasati Setari -> Wireless si Retele
2. Comutati conexiunea Wi-Fi pe optiunea Activat.
Produsul va cauta si va lista toate retelele WiFi disponibile.
Page 7
7
In cazul in care este afisata pictograma va trebui sa introduceti parola
pentru a va putea conecta la retea.
3. Apasati pe reteaua WiFi dorita, apoi introduceti parola (daca este cazul),
apoi apasati “Conectare”.
4. Apasati “Intoarcere” pentru a reveni la ecranul principal.
☆ In cazul in care reteaua WiFi este ascunsa, ea nu va putea fi accesata in
mod automat. In acest caz va trebui sa apasati “Adauga reteaua WiFi” si sa
introduceti toate informatiile necesare.
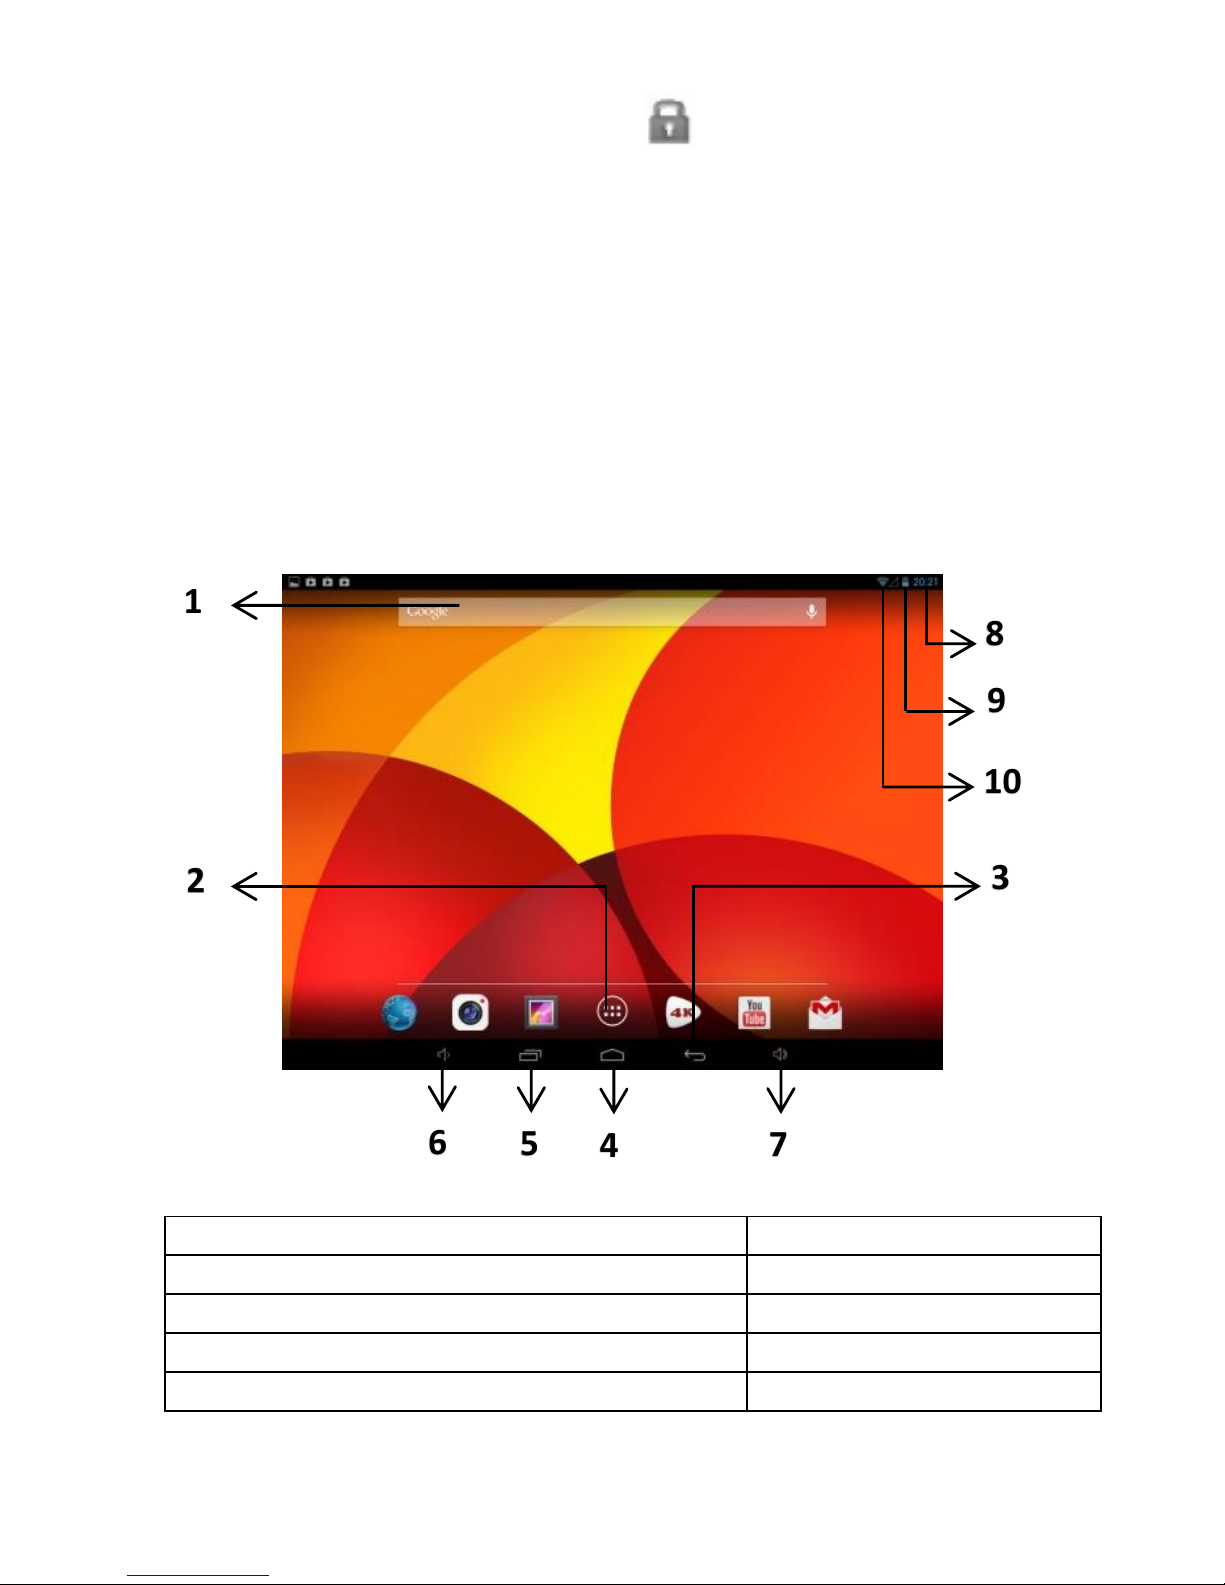
6. Ecranul principal
1 – Cautare
6 – Scadere nivel volum
2 – Acces meniu
7 – Crestere nivel volum
3 – Intoarcere la meniul anterior
8 – Ora
4 – Intoarcere directa la ecranul principal
9 – Status baterie
5 – Vizualizate toate aplicatiile active
10 – Semnal Wi-Fi
1
2
3
4
5 6 7
8
9
10
Page 8
8
☆ Apasati pe oricare dintre pictograme pentru a activa aplicatia
☆ Apasati, mentineti si apoi mutati pictograma in cazul in care doriti sa o
mutati intr-o alta pozitie pe ecran.
☆Apasati, mentineti si mutati pictograma pe simbolul pentru a sterge
pictograma de pe ecran.
7. Blocarea ecranului
Puteti seta blocarea automata a ecranului sau il puteti bloca manual prin
apasarea butonului de start. Dupa activarea ecranului, catre dreapta pentru
deblocarea acestuia.
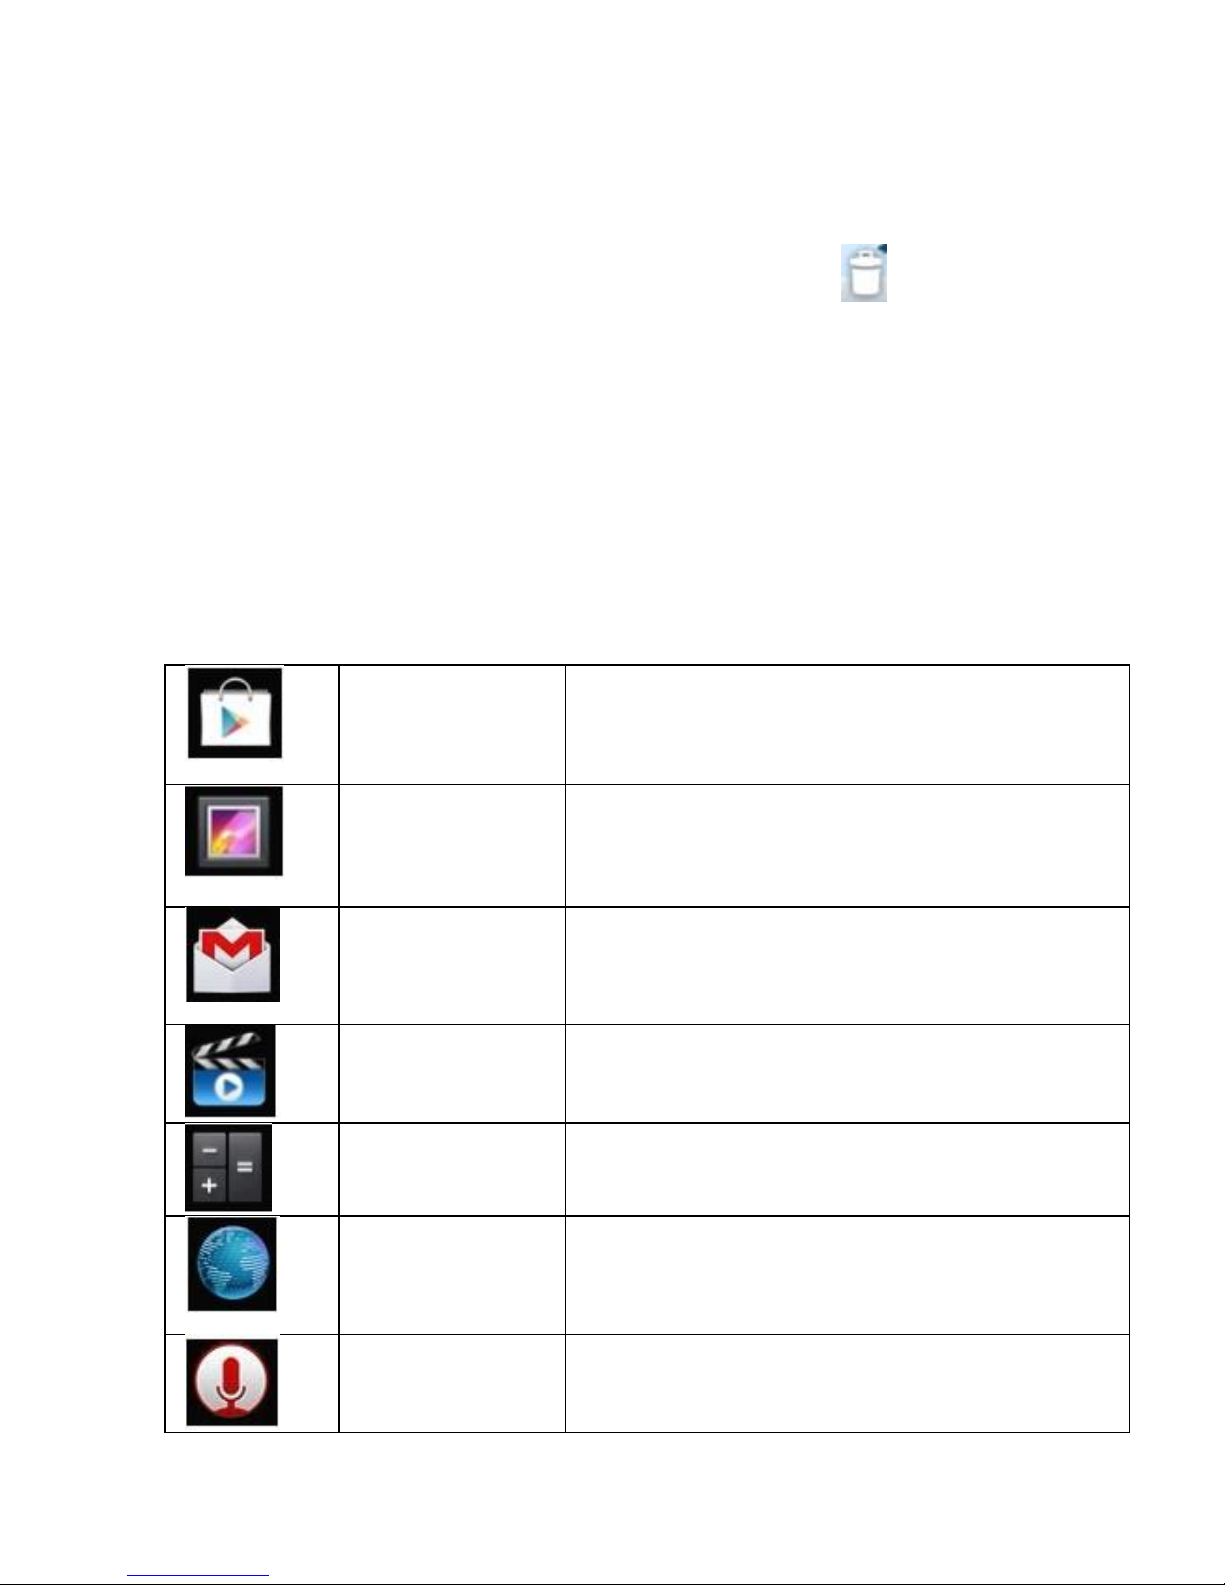
8. Aplicatii preinstalate
Magazin Play
Alegeti dintr-o multitudine de aplicatii,
descarcati si instalati.
Galerie
Vizualizare fotografii.
Gmail
Trimiteti si primiti e-mail-uri pe adresa
personala.
HD video
player
Administrati si rulati fisiere video.
Calculator
Efectuati operatiuni matematice.
Browser
Navigare pe Internet
Inregistrare
sunet
Inregistrati, apoi redati sunetul
Page 9
9
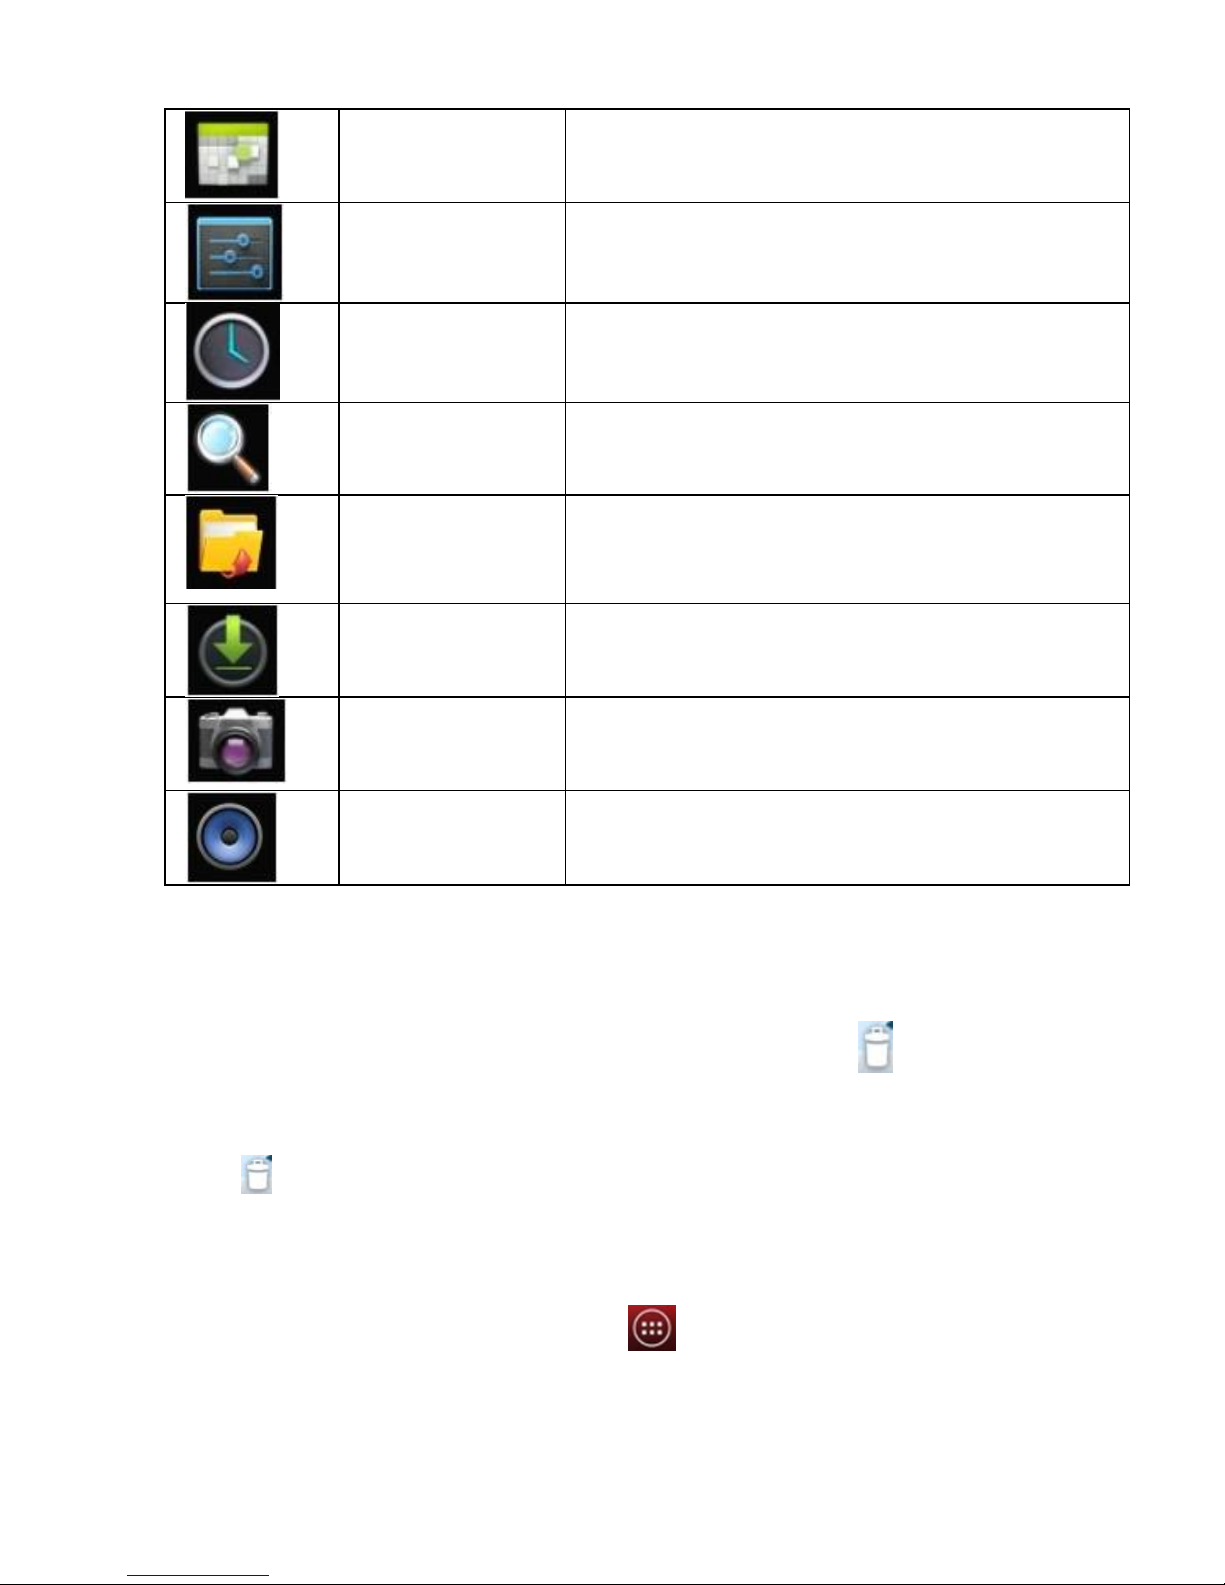
Calendar
Cu ajutorul calendarului puteti tine in
ordine agenda personala
Setari
Efectuati setari personalizate
Ceas
Setati ora curenta, precum si alarma
Scanare
Optiuni de cautare Google
Manager de
fisiere
Aplicatie pentru administrarea fisierelor
Descarcari
Meniu pentru fisierele descarcate de pe
Internet
Camera
Camera foto
Muzica
Rulati si administrati fisierele de sunet
☆ Apasati, mentineti si mutati pictograma in cazul in care doriti sa o
repozitionati in cadrul ecranului.
☆ Apasati, mentineti si mutati picatograma pe simbolul in cazul in care
doriti sa o stergeti de pe ecranul principal. In cazul in care doriti sa dezinstalati
o aplicatie, in meniul aplicatiilor, apasati, mentineti si mutati pictograma pe
simbolul .
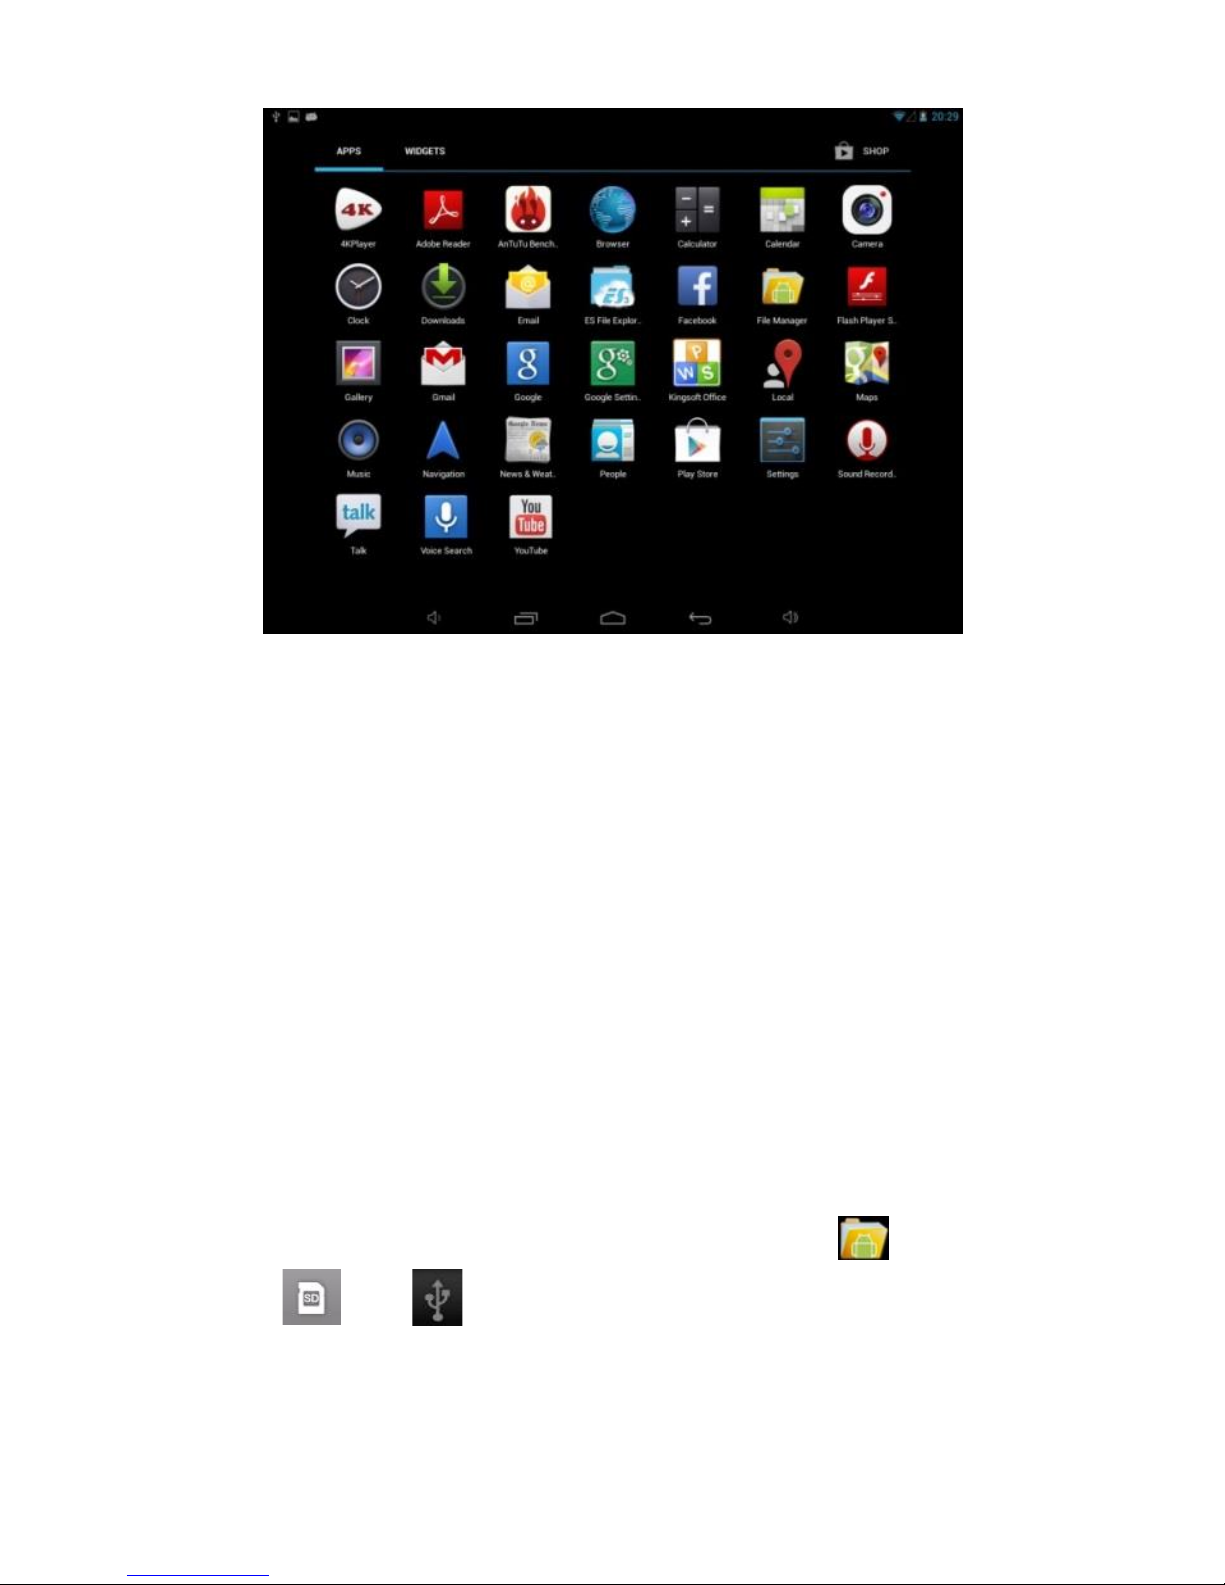
9. Meniul principal
Pe ecranul principal, apasati pictograma pentru a accesa meniul principal.
Page 10
10
10. Administrare aplicatii
Instalare
☆ Puteti gasi o multitudine de aplicatii gratuite in Google Play sau pe Internet.
In cazul in care doriti sa descarcati aplicatii de pe Internet, pur si simplu
cautati “Aplicatii pentru Android” cu ajutorul aplicatiei de navigare.
Aplicatiile cumparate sau descarcate pot fi foarte usor instalate din aplicatia de
administrare fisiere.
Administrare fisiere
1. Copiati fisierul .apk pe care vreti sa il instalati pe cardul SD sau pe disc-ul
extern, apoi introduceti cardul sau conectati discul USB.
2. Apasati pictograma aplicatiei pentru administrare fisiere
3. Apasati sau si cautati directoarele ce contin fisierele .apk.
4. Selectati fisierul .apk si apoi apasati → Instalare.
Page 11
11
Acum aplicatia este instalata si pictograma ei va aparea in meniul aplicatiilor.
Apasati pe pictograma pentru a rula aplicatia.
Descarcarea aplicatiilor de pe Internet
Puteti descarca direct de pe Internet aplicatii si le puteti instala pe tableta.
1. Apasati pictograma de navigare pentru a va conecta la Internet.
2. Introduceti adresa de Internet dorita si apasati pe link-ul aplicatiei pe care doriti
sa o instalati.
3. Dupa ce aplicatia este descarcata, in interfata aplicatiilor, apasati si mentineti pe
numele acesteia, apoi Deschideti si Instalare.
Dezinstalare aplicatii
1. Apasati pictograma → Setari → Aplicatii → Administrare aplicatii.
2. Apasati pe aplicatia pe care doriti sa o dezinstalati.
3. Apasati ok pentru a dezinstala aplicatia.
11. Ceas
Apasati pictograma pentru a avea acces la setarile orei.
Alarma ceas
Tableta poate seta in acelasi timp mai multe alarme.
☆ Cand pictograma apare in bara de status, in partea de sus a ecranului,
inseamna ca este activata cel putin o alarma.
Adaugati o alarma
1. Apasati pictograma
2. Apasati pentru a seta alarma , apoi apasati “Adauga”.
3. Setati alarma la ora dorita.
Page 12
12
4. Apasati Activare.
5. Apasati Finalizare.
Oprire alarma
In momentul in care se ajunge la ora setata, o fereastra va aparea pe ecranul
principal. Apasati pictograma pentru a intrerupe alarma si a reveni la ecranul
principal.
12. Instalare aplicatii
Descarcarea aplicatiei
1. Apasati pictograma pentru instalarea aplicatiilor online.
☆ In cazul in care folositi aceasta functie pentru prima oara, sistemul va va
solicita sa va inregistrati. Daca nu aveti un cont, va trebui sa va creati unul. Daca
deja aveti un cont Google, introduceti datele si veti avea acces imediat in aplicatie.
2. Puteti selecta aplicatii din lista de recomandari sau din lista clasificarii in functie
de numarul de descarcari. Puteti de asemenea sa cautati anumite aplicatii
introducand numele acestora.
3. Apasati pe una din aplicatii si apoi Descarcare.
4. Dupa ce aplicatia este descarcata, apasati Instalare.
5. Apasati apoi Deschide pentru a activa si rula aplicatia.
13. Navigare pe Internet
Va puteti conecta la Internet cu ajutorul aplicatiei de navigare.
Apasati pictograma pentru a deschide aplicatia de navigare.
Page 13
13
14. Calendar
Apasati pictograma pentru a accesa calendarul.
Pentru a avea acces la aplicatia calendar, va trebui sa deschideti un cont Exchange.
Introduceti adresa Dumneavoastra de e-mail si parola, apasati “Next” si completati
corespunzator campurile urmatoare. Apoi puteti folosi calendarul.
Activitate noua
1. In interfata calendarului, apasati pe data pentru a adauga o activitate.
2. Selectati ora pentru aceasta activitate si introduceti detaliile.
3. Apoi apasati Finalizare.
4. Apasati pictograma pentru a selecta interfata dorita.
☆ Data in agenda va fi afisata in culoarea gri.
15. Camera
Apasati pictograma pentru a accesa meniul de fotografie.
Functiile meniului
1. Apasati pictograma pentru a face trecerea intre camera frontala si
cea de pe partea din spate a tabletei.
2. Apasati pictograma pentru a face trecerea intre meniul foto si cel
video.
Fotografiati
1. In interfata camerei, apasati pentru a face o poza.
2. Poza va fi salvata automat.
Page 14
14
3. Glisati catre stanga pentru a vedea fotografiile.
4. Apasati pentru a va reintoarce in modul fotografie.
5. Apasati pentru a iesi din modul fotografie catre ecranul principal.
Inregistrare video
1. Apasati pentru a trece in modul video.
2. Apasati pentru a incepe sa inregistrati si pentru a opri
inregistrarea.
3. Filmul va fi salvat automat.
4. Apasati pentru a reveni la meniul de filmare.
5. Apasati pentru a iesi din modul de filmare si a reveni la ecranul
principal.
16. Calculator
1. Apasati pentru a intra in aplicatie.
2. Tastati pentru a efectua calculele dorite.
3. Apasati Clear pentru a sterge rezultatele cifra dupa cifra sau mentineti
apasat pentru a sterge in intregime.
Page 15
15
17. Inregistrare sunet
1. Apasati pe pictograma pentru a intra in meniul de inregistrare.
2. Apasati pentru a porni inregistrarea.
3. Pentru a opri inregistrarea, apasati pictograma
4. Apasati pentru a gasi inregistrarea.
18. Email
☆ Tableta suporta e-mail si conturi POP3 si SMTP.
Crearea unui nou cont de e-mail
Puteti introduce unul sau mai multe conturi pe care le puteti folosi cu ajutorul
tabletei.
1. Apasati pictograma pentru e-mail
2. In interfata contului Dumneavoastra, apasati “Urmator”
3. Apasati optiunea pentru adresa de e-mail si introduceti adresa Dumneavoastra
4. La optiunea pentru parola introduceti parola Dumneavoastra
5. Apasati finalizare
6. Apasati Urmator
7. Optional: introduceti numele contului
8. Introduceti semnatura, apoi apasati Finalizat.
Casuta mesaje
1. Apasati pictograma pentru e-mail
2. Daca aveti setat doar un cont, acesta va fi deschis automat. Daca aveti setate mai
multe conturi, va fi afisata lista cu toate aceste conturi
3. Apasati contul pe care doriti sa il deschideti si apoi tastati casuta de mesaje.
Deschiderea unui e-mail
Page 16
16
1. In casuta de mesaje, apasati pe un mesaj pentru a-l deschide
2. Daca aveti un fisier atasat, apasati Deschidere pentru a activa aplicatia
corespunzatoare, apoi aveti optiunea de a deschide mesajul sau de a-l salva pe
cardul SD.
3. Daca doriti sa raspundeti, apasati Raspunde
a. Introduceti mesajul pe care doriti sa-l transmiteti
b. Apoi apasat trimitere. Daca alegeti sa il salvati ca si draft, mesajul va fi
salvat dar nu va fi trimis; daca nu il salvati si nici nu il trimiteti, mesajul nu va putea
fi recuperat
4. Apasati Anulare pentru a inchide automat un mesaj pe care nu doriti sa il
pastrati.
Compuneti un mesaj
1. In casuta de mesaje, apasati pentru a compune un mesaj nou
2. Daca doriti sa adaugati participanti la discutie, le puteti completa adresele la To,
cc sau bcc
3. Adaugati un subiect mesajului Dumneavoastra
4. Daca este necesar, apasati pentru a atasa un fisier mesajului
5. Dupa ce ati compus mesajul, apasati pentru a-l trimite.
19. Administrare fisiere
Apasati pentru a intra in aplicatia de administrare fisiere pentru a vedea
toate fisierele cotinute de toate mediile de stocare. Din acest meniu puteti cu
usurinta sa instalati diverse aplicatii pe tableta dumneavoastra.
Optiunile din acest meniu sunt urmatoarele:
Directorul anterior
Page 17
17
Apasati pentru a lista fisierele locale
Apasati pentru a lista fisierele de pe cardul SD
Apasati pentru a lista fisierele de pe echipamentul conectat le USB
Apasati pentru a lista toate fotografiile
Apasati pentru a lista toate fisierele video
Apasati pentru a edita fisierele
Copierea fisierelor intre PC si tableta
Puteti folosi aceasta aplicatie pentru a copia fisiere de pe tableta pe alte medii
de stocare externe. Pentru a transfera fisierele va trebui mai intai sa le copiati
pe cardul SD sau pe un disc USB.
☆ Numele directorului pentru stocarea interna este “Local”, cel pentru
cardul SD este “sdcard”, iar pentru disc-ul USB este “udisk”.
☆ In urmatorul exemplu va vom arata pasii ce trebuie urmati pentru
copierea unor fisiere de pe tableta pe cardul SD sau pe disc-ul USB. Apoi
conectati echipamentul de stocare la PC pentru a copia fisierele in directorul
dorit.
1. Deschideti directorul sau fisierul pe care doriti sa il copiati.
2. Alegeti fisierul sau directorul si apasati Copiere.
3.Apasati pentru a va intoarce la mediul de stocare si apasati pe
directorul catre care doriti sa faceti copierea.
Page 18
18
Stergerea unui fisier
Selectati directorul sau fisierul pe care doriti sa il stergeti, apoi apasati
Stergere si apoi Confirmare.
20. Muzica
☆ Formate suportate MP1, MP2, MP3, WMA, OGG, APE, FLAC, WAV, AC3,
AAC, AMR, DTS, RA, M4A.
Redarea fisierelor audio
1. Apasati pictograma
2. Selectati fisierul / melodia pe care doriti sa o ascultati
3. Apasati pe fisier pentru a porni redarea acestuia.
4. Pentru a va intoarce la interfata anterioara, apasati
21. Video Player HD
☆ Formate suportate RM, RMVB, MKV (H.264), MPEG (AVI), MOV, FLV,
MPG, VOB, MPE, DAT , MPE,DAT formats. Suport 2160P, 3840×2160.
☆ Formate fotografie suportate: JPG, JPEG, BMP and PNG.
1. Apasati pictograma pentru a intra in aplicatie.
2. Selectati fisierul video pe care doriti sa-l vizionati.
3. Apasati pe ecran pentru a ajusta optiunile: volum, pauza / redare,
luminozitate, etc.
4. Apasati pentru intoarcere la lista.
Page 19
19
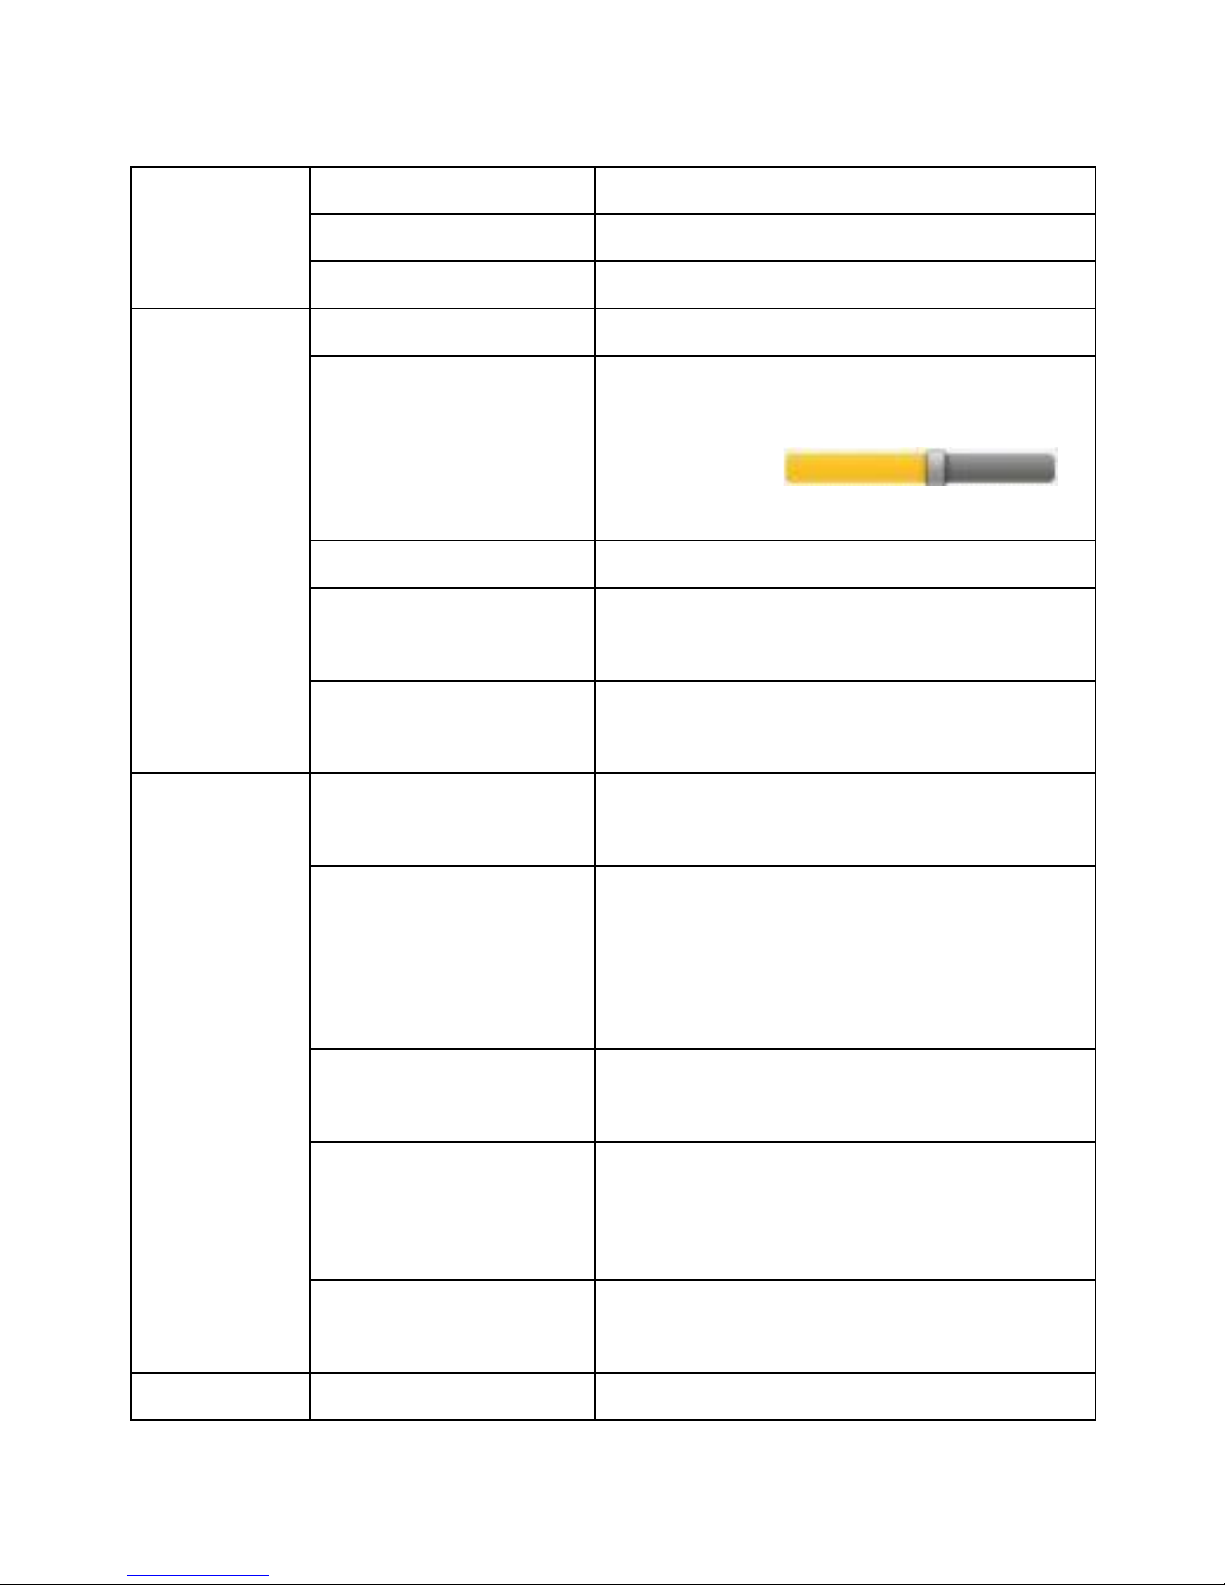
22. Setari
Wireless si
retele
Wi-Fi
Activati Wi-Fi.
Wi-Fi
Setari
Retele mobile
Setati roaming, retea
Sunet
Mute mode
Mod silentios
Volum
Ajustati volumul pentru fisiere audio,
alarma si notificari. Apasati pentru a
face ajustarea,
apoi apasati ok.
Sonerie notificari
Selectati melodia preferata
Tonuri operare
Selectati sunetul redat atunci cand faceti
operatiuni pe ecran.
Blocare ecran
Selectati tonul redat atunci cand
blocati / deblocati ecranul.
Ecran
Iluminare ecran
Apasati si ajustati pentru a ajunge la
setarea dorita dupa care apasati OK.
Rotire automata a
ecranului
Cand optiunea este bifata, ecranul va
comuta automat intre modurile portret si
landscape, corespunzator pozitionarii
tabletei.
G-sensor
Folositi sistemele de coordonate
necesare anumitei aplicatii rulate.
Animatie
Aveti optiunea de a activa sau nu
redarea animata a operatiunilor din
meniu.
Inchidere ecran
Ajustati timpul de inactivitate dupa care
ecranul se stinge automat.
Folosirea retelelor
Folositi retelele wireless pentru a vedea
Page 20
20
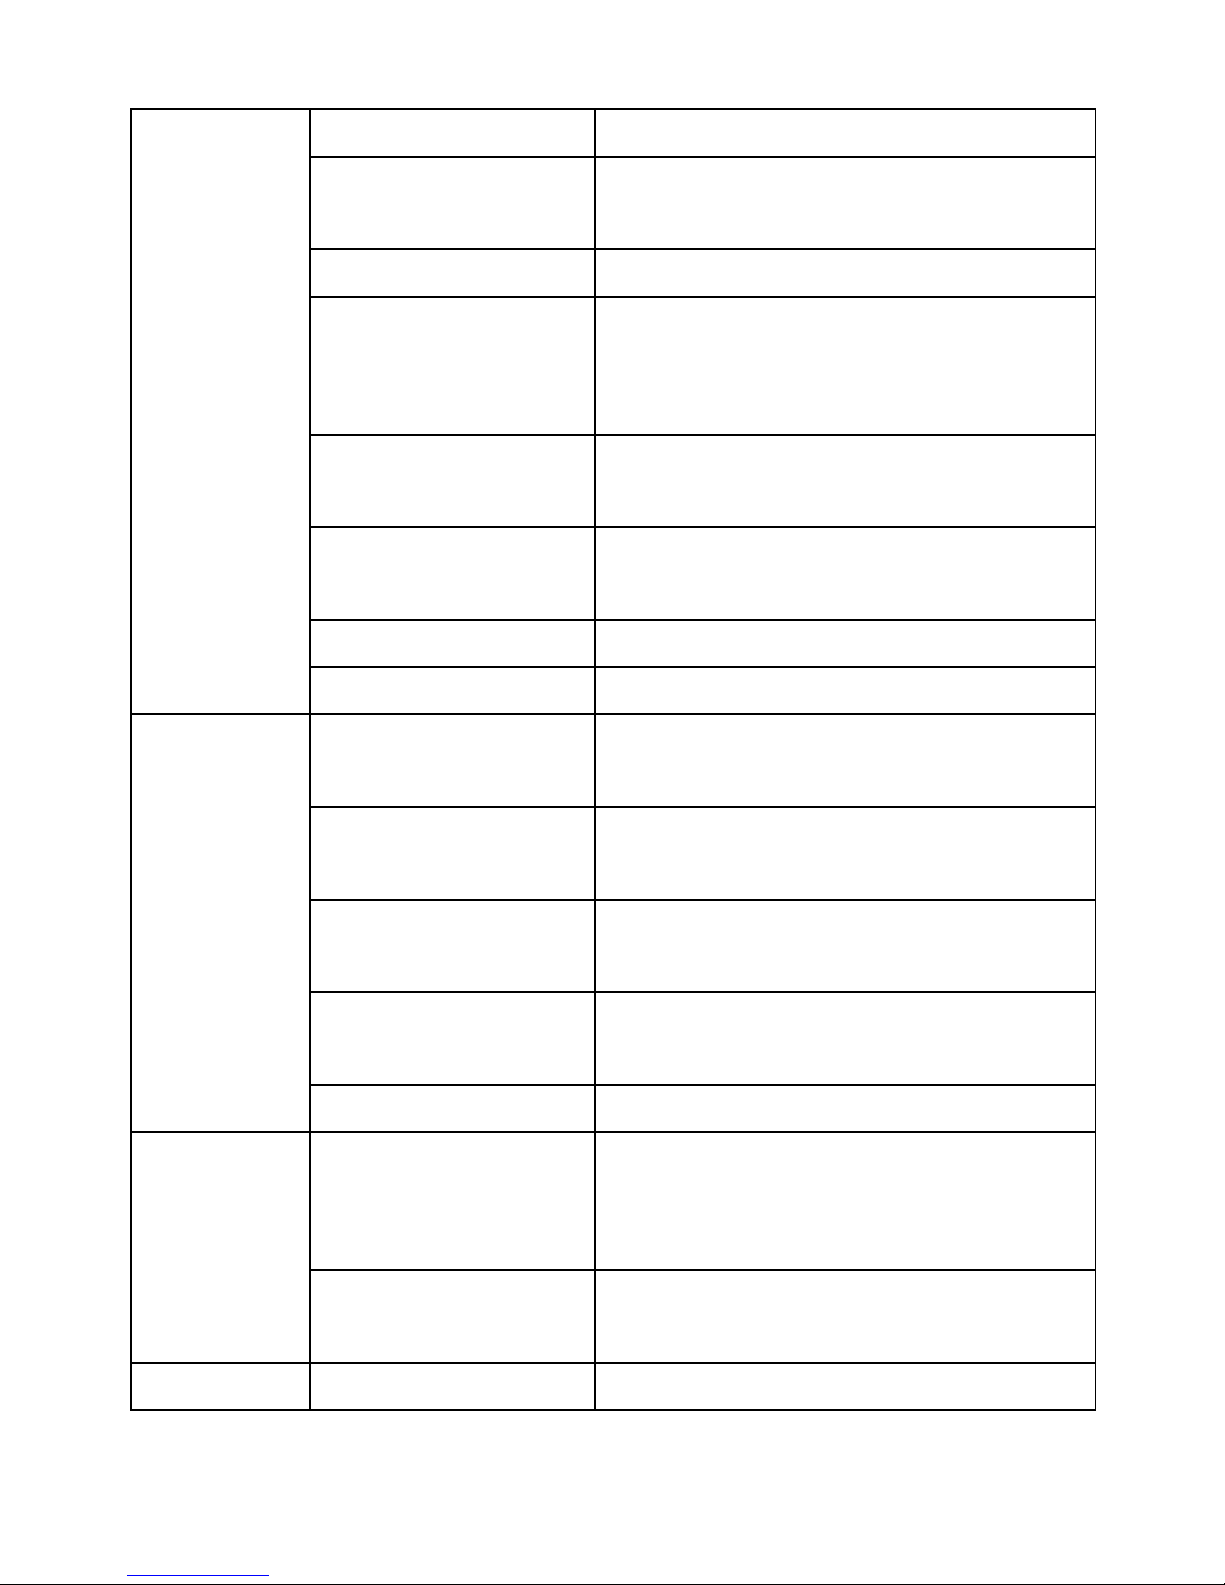
Locatie si
elemente
de
securitate
wireless
locatia in aplicatii precum Google map.
Setati blocarea
ecranului
Folositi poza, cod PIN sau parola pentru
deblocarea ecranului.
Parola vizibila
Introducerea parolei este vizibila.
Selectati
administrarea
produsului
Adaugati sau stergeti elementele de
administrare pentru produs.
Elemente de
securitate
Permiteti aplicatiilor sa aibe acces la
informatiile de securitate.
Instalare de pe
cardul SD
Instalati elemente de securitate criptate
de pe cardul SD
Setare parola
Setati sau schimbati parola
Steregere stocare
Stergeti toate informatiile salvate
Aplicatii
Sursa necunoscuta
Permite instalarea aplicatiilor din afara
Android Market
Administrare
aplicatii
Administrare si stergere aplicatii
instalate
In desfasurare
Vizualizati si controlati aplicatiile care
ruleaza
Status elemente
stocare
Vizualizati spatiul ocupat de aplicatiile
instalate
Dezvoltare
Setati optiunile pentru diverse aplicatii
Cont si
sincronizar
e
Date care ruleaza
Setati daca aplicaiile se vor sincroniza
automat pentru a trimite si primi seturi
de informatii.
Sincronizare
automata
Sincronizare automata pentru aplicatii.
Salvare date
Salvati datele, parola pentru WiFi si alte
Page 21
21
Confidenti
alitate
setari pe serverul Google.
Recuperare
automata
Cand aplicatiile sunt reinstalate,
sistemul va recupera setarile salvate
anterior sau orice alte date necesare.
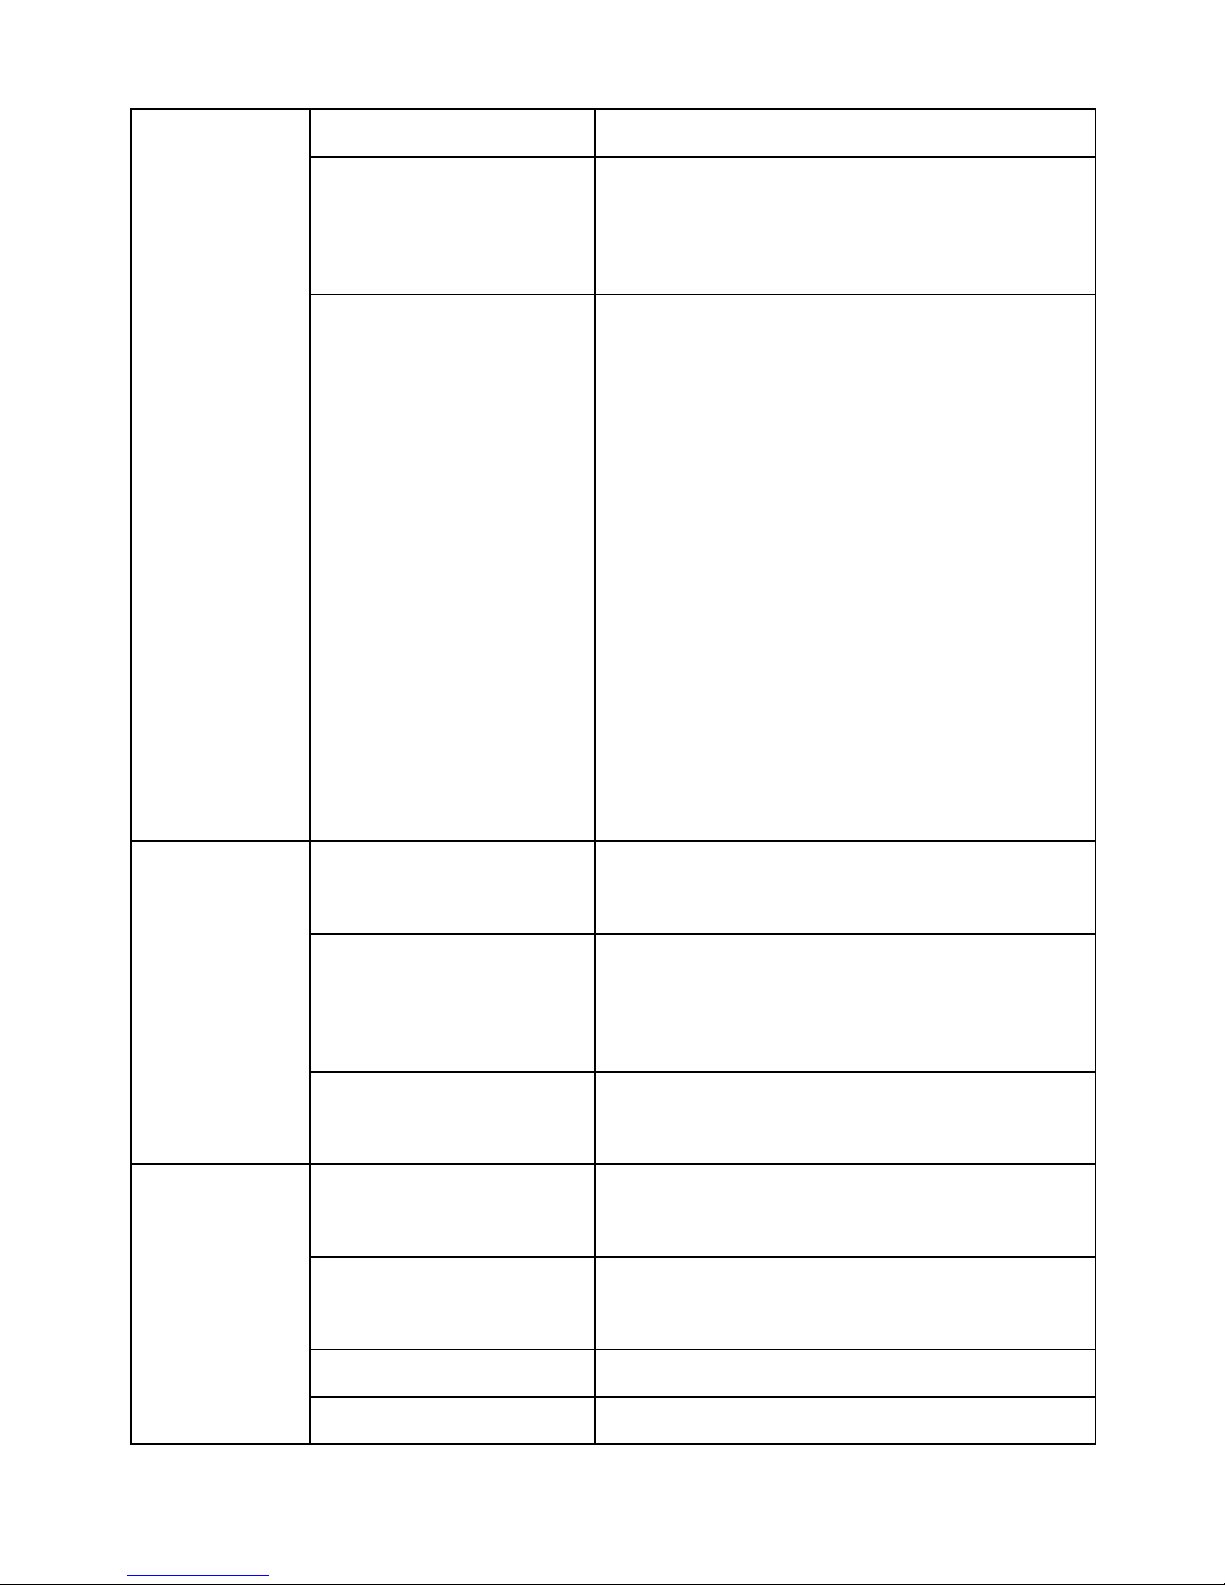
Restaurare la
setarile din fabrica
Apasati pentru a sterge toate datele de
pe tableta. Apasati Reset pentru a reseta
produsul sau apasati Anulare pentru a
reveni la ecranul anterior. Atentionare:
urmatoarele informatii vor fi sterse:
contul Google, datele si setarile
aplicatiilor, toate aplicatiile descarcate.
Urmatoarele date nu vor fi sterse:
sistemul de operare si aplicatiile
preinstalate, fisierele stocate pe cardul
SD cum ar fi fotografii, filme sau
muzica.
Stocare
Capacitate totala,
spatiu liber
Este afisat atunci cand un card SD sau
un disc extern sunt conectate
Inlaturare card SD
sau disc USB
Cand un card SD sau un disc extern sunt
conectate, apasati pentru a le deconecta
in deplina siguranta
Formatare card SD
sau disc extern
Formatare / stergere card SD sau disc
extern
Setari
Selectare limba
Selectarea limbii in functie de locatia
Dumneavoastra
Dictionar personal
Adaugare cuvinte in dictionarul
personal
Tastatura Android
Setari pentru tastatura de pe ecran
Exemplu Audio
Rularea de scurte exemple audio
Page 22
22
singvistice
si metode
de
introducer
e date
Motor preferat
Seteaza solutia de conversie intre text si
voce
Viteza voce
Viteza de redare a fisierului audio dupa
ce textul este convertit in format audio
Pico TTS
Setari Pico TTS
Data si ora
Auto
Foloseste informatia de pe Internet
Setare data
Setare data
Setare ora
Setare ora
Selectare fus orar
Selectare fus orar
Afisare ora in
format 24 ore
Selectati afisarea in sistem 12ore sau 24
ore
Selectare format
data
Selectare format data
Despre
produs
Vizualizari statusul produsului, al
bateriei, informatii legale, model,
versiune Android si numarul versiunii
23. Intrebari frecvente
Android
I: Care este versiunea Android?
R: 4.2
Functii de baza
I: Trebuie sa incarc bateria produsului inainte de punerea in functiune?
R: Trebuie sa incarcati bateria produsului pentru cel putin 4 ore, dar puteti opera
produsul in timpul incarcarii. Incarcati tot timpul prin conectarea la priza.
Email
Page 23

23
I: Pot sa folosesc adresa de e-mail personala pentru a trimite si primi e-mail-uri?
R: Produsul suporta conturi POP3 si SMTP. Este posibil ca anumite conturi gratuite
de e-mail sa nu fie suportate. Va rugam sa consultati providerul de mail pentru
detalii.
Stocare
I: Ce tip de card de stocare este compatibil?
R: Card mini SD .
Muzica
I: Ce formate de fisiere audio sunt suportate?
R: MP2, MP3, WAV, AAC, WMA
I: Cum pot sa adaug muzica pe tableta?
R: Puteti copia fisiere audio de pe PC pe card SD sau pe disc USB si apoi sa le
transferati in tableta prin intermediul aplicatiei de administrare fisiere.
Foto
I: Ce formate de fotografii sunt suportate?
R: JPG, JPEG, BMP and PNG.
I: Cum pot adauga fotografii pe tableta?
R: Puteti copia fisiere de pe PC pe card SD sau pe disc USB si apoi sa le transferati in
tableta prin intermediul aplicatiei de adminitrare fisiere.
Video
I: Ce formate video sunt suportate?
R: MPEG1/2/4, MJPG, H263, H264. H264 cu suport 720×480, alte formate cu
suport 1280×720.
I: Tableta poate reda videoclipuri de pe Youtube?
R: Da. Puteti accesa aplicatia Youtube pentru a reda videoclipuri de pe Youtube.
I: Cum pot sa adaug filme pe tableta?
R: Puteti copia fisiere de pe PC pe card SD sau pe disc USB si apoi sa le transferati
in tableta prin intermediul aplicatiei de administrare fisiere.
Wi-Fi
I: Am nevoie de un device WiFi pentru a ma conecta la Internet?
R: Nu. Acest produs are functie WiFi preinstalata.
Administrare baterie
Page 24

24
Bateria nu este incarcata la maxim cand produsul pleaca din fabrica, asa ca va
sfatuim sa incarcati bateria cel putin 4 ore inainte de a folosi produsul.
Timpul de viata al bateriei se masoara de obicei dupa numarul de incarcari. Gasiti
mai jos cateva sfaturi pentru a prelungi durata de viata a acesteia:
● Folositi tableta cel putin o data pe saptamana.
● Incarcati bateria la maxim de fiecare data.
● Nu tineti bateria complet descarcata pentru o lunga perioada de timp.
● Pastrati produsul si bateria departe de surse de caldura.
Incarcarea bateriei
Conectati adaptorul AC la priza si capatul celalalt al cablului la tableta in conectorul
dedicat. Dureaza aproximativ 5 ore pentru o incarcare completa.
Cand bateria este incarcata complet, pictograma corespunzatoare va fi afisata.
Masuri de precautie
Va rugam urmati masurile de precautie de mai jos in momentul in care folositi acest
produs, pentru a evita riscul de electrocutare sau ranire de orice fel:
● Tineti produsul departe de ploaie sau de mediu umed.
● Tineti produsul departe de razele directe ale soarelui sau de medii cu
temperaturi ridicate.
● Folositi cu atentie cablul de alimentare. Cand este conectat, nu puneti
niciun alt produs peste el. Protejati cu mare atentie conectorii cablului
de alimentare.
● Va rugam folositi pentru incarcare doar adaptoarele aprobate de
producator. Folosirea altor echipamente poate conduce la defectiuni
ale produsului.
● Sub nicio forma nu dezasamblati produsul sau nu incercati sa il reparati
fara indrumarea producatorului.
Curatarea produsului
Curatati produsul cu atentie. Pentru curatarea de amprente sau praf in zona
ecranului, va sfatuim sa folositi o carpa moale, precum cea folosita pentru
curatarea lentilelor unei camera foto. In niciun caz nu folositi o carpa aspra, aceasta
putand produce zgarieturi pe suprafata ecranului.
Page 25
25
SPECIFICATII
Sistem de operare
Android 4.2 JellyBean
CPU
Dual Core 1,2 Ghz, Allwinner A20
Ecran
7" 800x480 Capacitiv, multitouch, 5 puncte
Memoria RAM
512 MB DDR 3
Memoria
8 GB memorie flash
Chipset video
Dual Core Mali 400
Difuzor
1 W
Camera Web
Fata: 0.3 MP; Spate: 2 MP
Ports
HDMI, Micro USB, Micro SD (pana la 32 GB), Iesire
audio
Dimensiuni
192 x 117 x 10,7 mm
Greutate
250 g
Wi-Fi
802.11 b/g/n
3G
external 3G USB Dongle
Baterie
Li-Polymer 2400mAh, 5-6h autonomy
Formate video
VC-1, MPEG-2, MPEG4, XviD/DivX, AVI, RM, RMVB,
PMP, FLV, MP4, M4V, VOB, WMV, 3GP, MKV
Formate audio
MP3, WMA, APE, FLAC, OGG, WAV
Formate eBook
ePub, PDF
Formate foto
JPEG, GIF, PNG, BMP
Page 26
26
Altele
3D Games support, G-Sensor, Microphone
Pachetul contine
1 x Tableta UTOK 700 D;
1 x Incarcator;
1 x Cablu USB;
1 x Cablu OTG;
1 x Manual de utilizare.
DECLARATIE DE CONFORMITATE
Nr. 377E/ 07.08.2013
Produs marca UTOK, Model 700 D
Noi, S.C. SKIN MEDIA S.R.L., cu sediul in Str. Ocna Sibiului 46-48, Bucuresti 1,
avand Certificatul de Inregistrare nr. 1049291 din 03.07.2007, J40/8241/2000,
CIF RO13348504, in calitate de importator, asiguram, garantam si declaram
pe propria raspundere, ca echipamentele electrice si electronice la care se
refera aceasta declaratie respecta cerintele H.G. 1022/2002, conform
prevederilor art. 5, privind regimul produselor si serviciilor care pot pune in
pericol viata, sanatatea, securitatea muncii si protectia mediului si nu produc
un impact negativ asupra mediului.
Echipamentele electrice si electronice puse pe piata de compania noastra
respecta prevederile urmatoarelor acte normative: Hotararea nr. 1022/2002,
H.G. 497/2003 (privind compatibilitatea electromagnetica), H.G. 457/2003,
modificata prin Hotararea 1514/2003 (privind asigurarea securitatii
utilizatorului de echipamente electrice de joasa tensiune) precum si toate
actele normative incidente, H.G. 992/2005 (privind limitarea utilizarii
substantelor periculoase), H.G. 448/2005 (privind prevenirea producerii de
Page 27

27
deseuri de echipamente electrice si electronice) si Directivele UE 2002/95/CE,
1999/5/EC.
Produsul a fost evaluat conform urmatoarelor standarde, mentionate in anexa
II a H.G. 88/2003: EN 62479, EN 60950-1, EN 301 489-1, EN 301 489-17, EN
300 328. Toate documentele justificative ale evaluarilor primite de la
producator, sunt depozitate la sediul companiei noastre.
Produsul are aplicat marcajul CE.
Garantia produselor se asigura in conformitate cu O.G. 21/1992, Legea
449/2003, Legea 296/2004 si O.U.G 174/2008, privind protectia
consumatorului.
Acesta declaratie este valabila pentru produsul marca UTOK, model 700 D.
Declaratia este disponibila si la adresa web www.utok.com.
07.08.2013 Director,
Camil Perian
Page 28

28
USER MANUAL
UTOK 700 D
Page 29

29
CONTENTS
1. Appereance .................................................................... 31
2. Power Switch ................................................................. 32
3. Touch Screen .................................................................. 32
4. Using SD Card ................................................................. 32
5. Getting Started ............................................................... 32
6. Desktop .......................................................................... 34
7. Lock Screen .................................................................... 34
8. Preinstalled applications ................................................ 35
9. Desktop Menu ................................................................ 37
10. Managing Applications .............................................. 37
11. Clock .......................................................................... 38
12. Installing Software Online ......................................... 39
13. Browser ...................................................................... 40
14. Calendar ..................................................................... 40
15. Camera....................................................................... 41
16. Calculator ................................................................... 42
17. Sound recorder .......................................................... 42
18. Email .......................................................................... 42
19. File Manager .............................................................. 44
Page 30

30
20. Music ......................................................................... 45
21. HD Video Player ......................................................... 46
22. Settings ...................................................................... 46
23. FAQ ............................................................................ 50
SPECIFICATIONS ...................................................................... 52
DECLARATION OF CONFORMITY ............................................. 54
Page 31
31
1. Appereance
Page 32

32
2. Power Switch
Switch on: press and hold the power switch for 3 seconds and wait for startup.
Switch off: press and hold the power switch for 3 seconds → click Power off →
click OK.
Lock/unlock screen: briefly press the power switch to lock/unlock the screen.
Forced shout down: if the device has no response, press and hold the power
switch for 7 seconds to switch off the device by force.
Warning: forced shut down may cause unexpected errors of the system!
3. Touch Screen
The touch screen is easy and convenient to use.
You can use the touch screen in the following methods:
Single click: briefly touch the screen and then move away.
Click and hold: click the screen with the finger and hold for about 2 seconds.
Drag: click a certain icon in the screen and hold, then move the finger, the
icon will move accordingly.
☆ To avoid damage the screen, never put anything on it.
4. Using SD Card
☆ The device supports up to 32GB storage card.
Insert the card into the card slot, and push it in until a “click” is heard. Now
the card is ready for use.
Removing SD card
Close all programs or files on the card first. Click Settings → Storage →
Remove SD card → OK. Then press the card with your finger, and simply
remove it when it is ejected.
☆ Do not insert and remove the card repeatedly in a short time, as this may
cause damage to the card.
☆ We suggest you use the card of well-known brand, to ensure compatibility.
5. Getting Started
Charging the device
Page 33

33
☆It is not recommended to charge the device via USB cable.
☆You may operate the device while charging it, but this may prolong the
charging time. Connect one end of the AC adaptor to the mains supply and
the other end to the power jack on the device to charge it (it may take about 5
hours to fully charge the device). The battery icon will roll during charging.
When it is full please disconnect the AC adaptor.
Starting the device
Press and hold the power switch for 3 seconds and wait for system startup.
Wi-Fi setting
We suggest you configure the Wi-Fi network before using, as many functions
require it in order to work normally.
1. Click Settings → Wireless and Network
2. Switch the Wi-Fi on.
The device will search and list all available Wi-Fi networks. If an locked icon is
displayed, you need to enter a password to connect to such Wi-Fi network.
3. Click the desired Wi-Fi network → Enter the password (if any) → Click
Connect.
4. Click Return to return to desktop.
☆ The Wi-Fi set as hidden will not be searched automatically. In this case you
need to click Add Wi-Fi Network and enter necessary information to add your
Wi-Fi.
Page 34
34
6. Desktop
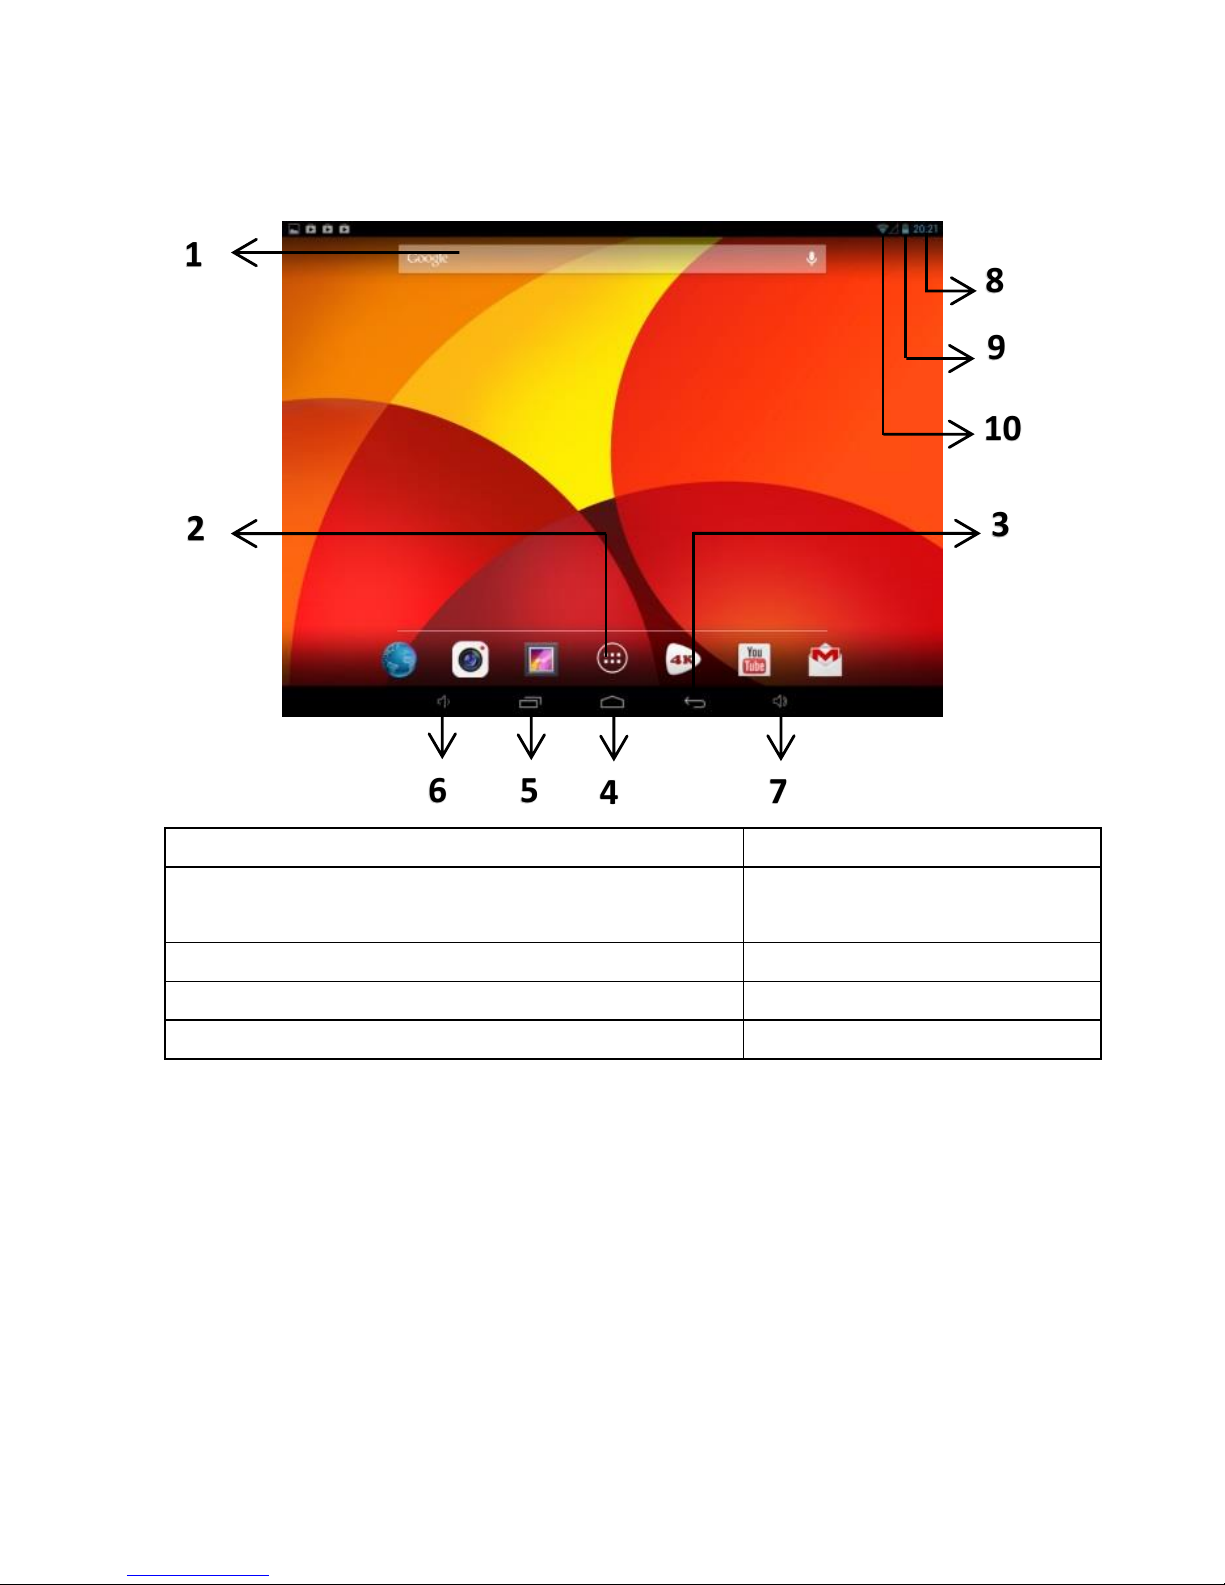
1 – Search
6 – Volume -
2 – Click to go to main menu and view all
applications
7 – Volume +
3 – Return
8 – Current time
4 – Return to desktop directly
9 – Battery status
5 – See all active tasks
10 – WiFi signal level
☆Click any icon to run it.
☆Click and drag the icon to move it to another place on the screen.
☆Click and drag the icon to to delete it from the desktop.
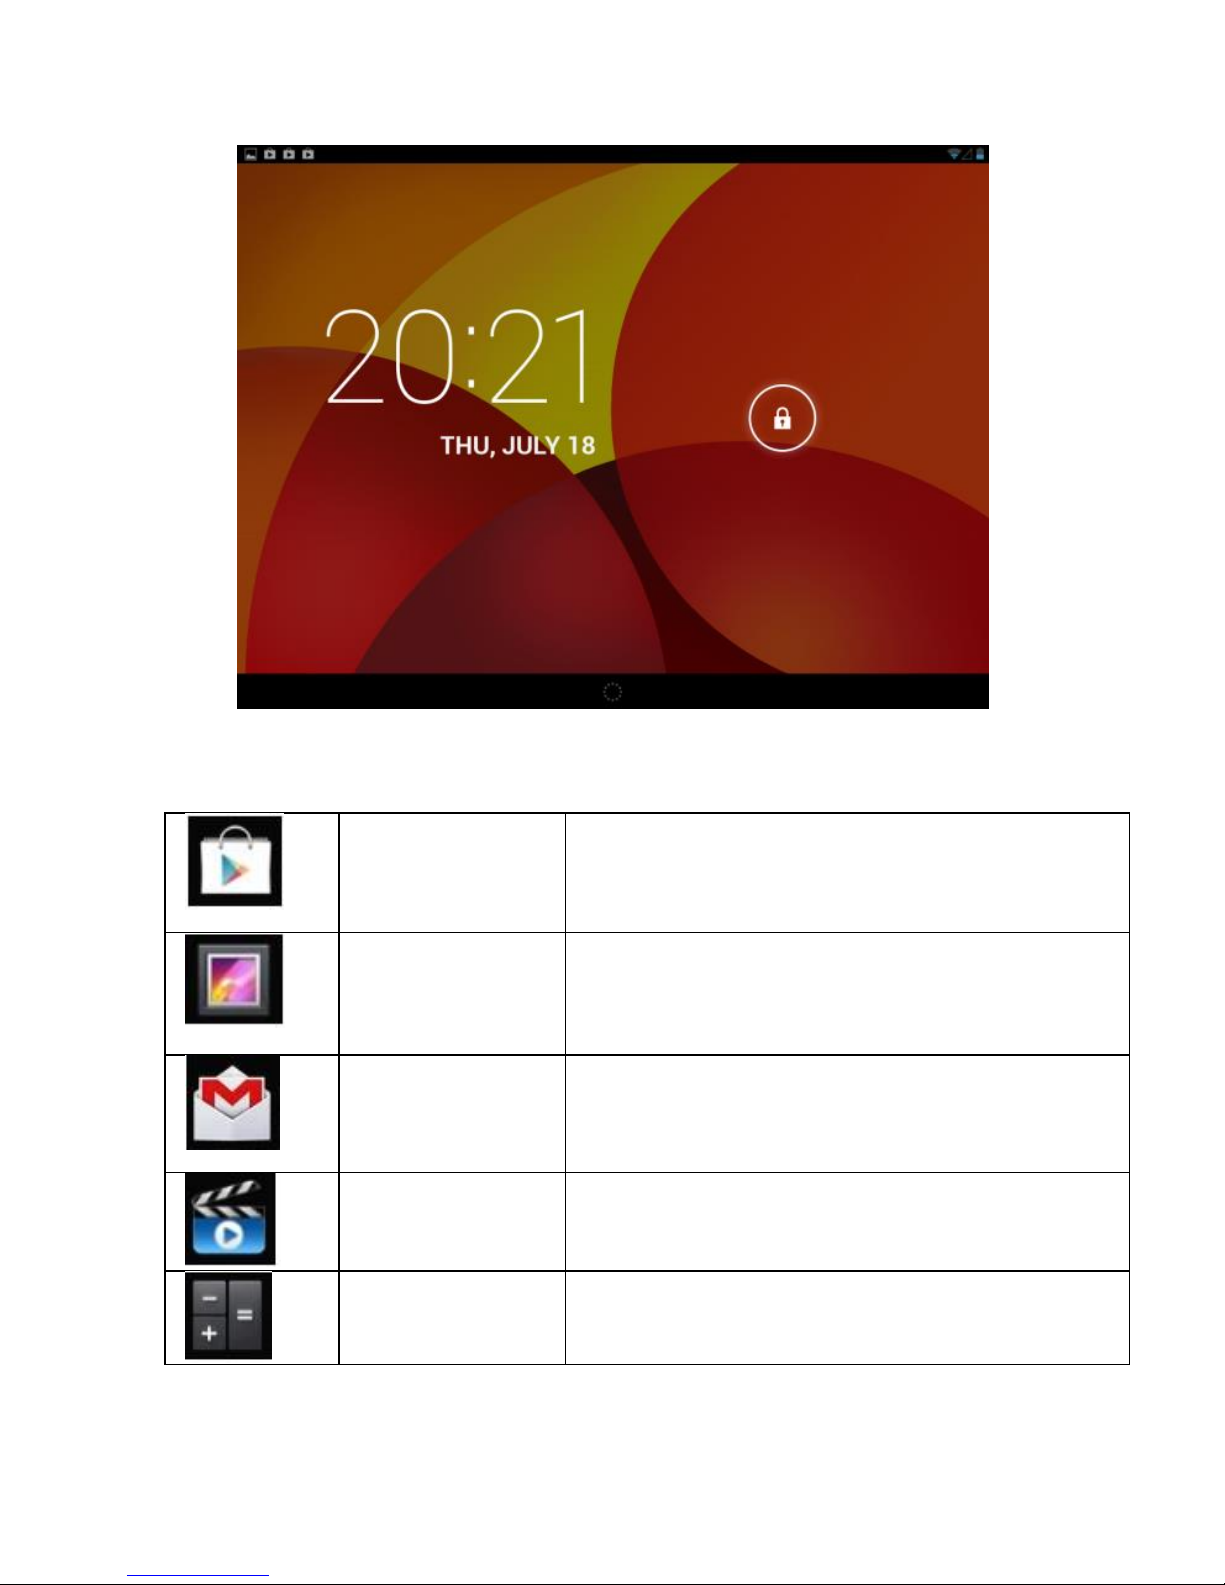
7. Lock Screen
You can set auto lock screen or lock screen manually by pressing the power
switch. You can see the lock screen interface below. Slide to the right if you
want to unlock the screen.
2
3
4 5 6
7
8
9
10
1
Page 35
35
8. Preinstalled applications
Play Store
View and download applications
Gallery
Browse photos
Gmail
Send and receive emails.
HD video
player
Manage and play video files.
Calculator
Perform simple mathematical operations
Page 36
36
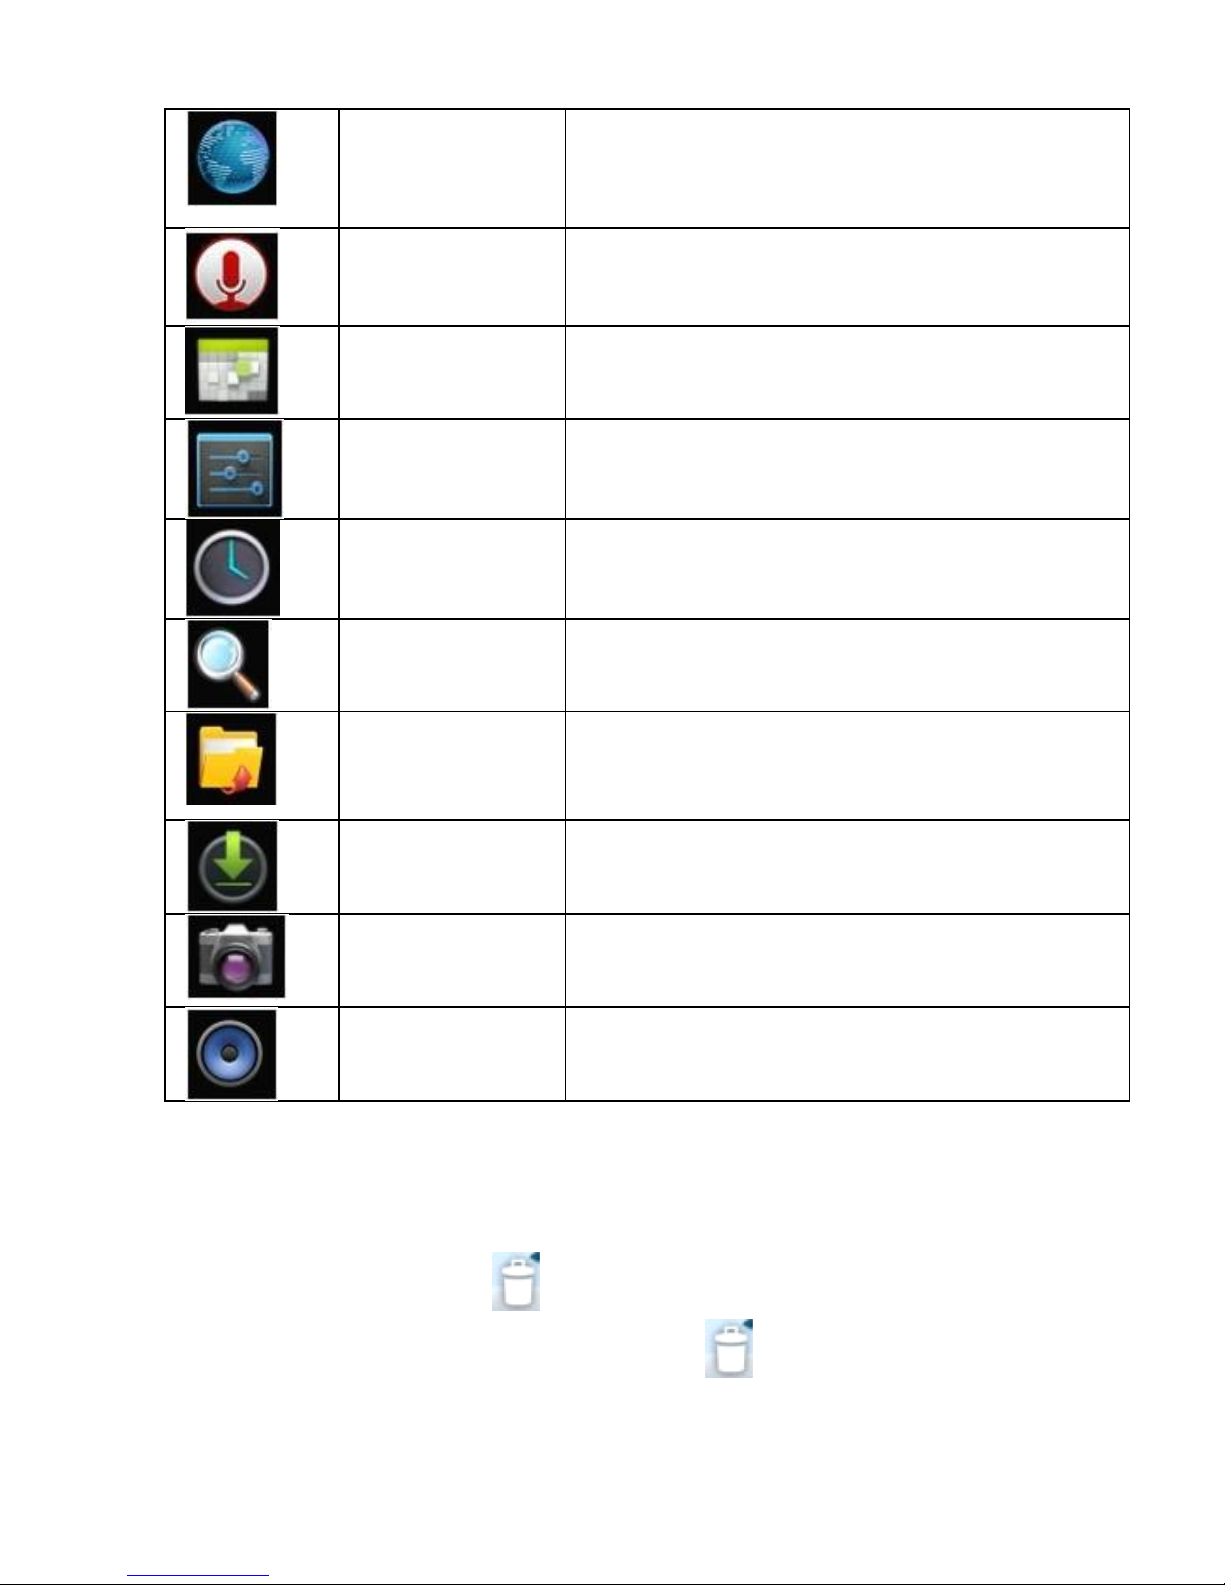
Browser
Browse the Web
Sound
Recorder
Record and play sounds
Calendar
Manager your personal agenda.
Settings
Acces the Settings menu to adjust the
tablet’s options
Clock
Set the current time and alarm.
Search
Google Search options
File Manager
Manage files
Downloads
View downloaded file
Camera
Photo camera
Music
Play music
☆ Click and drag the icon to move it to another place on the screen.
☆ Click and drag the icon to if you want to delete it from the desktop. In
the application list, click and drag the icon to to uninstall the application
from the device.
Page 37
37
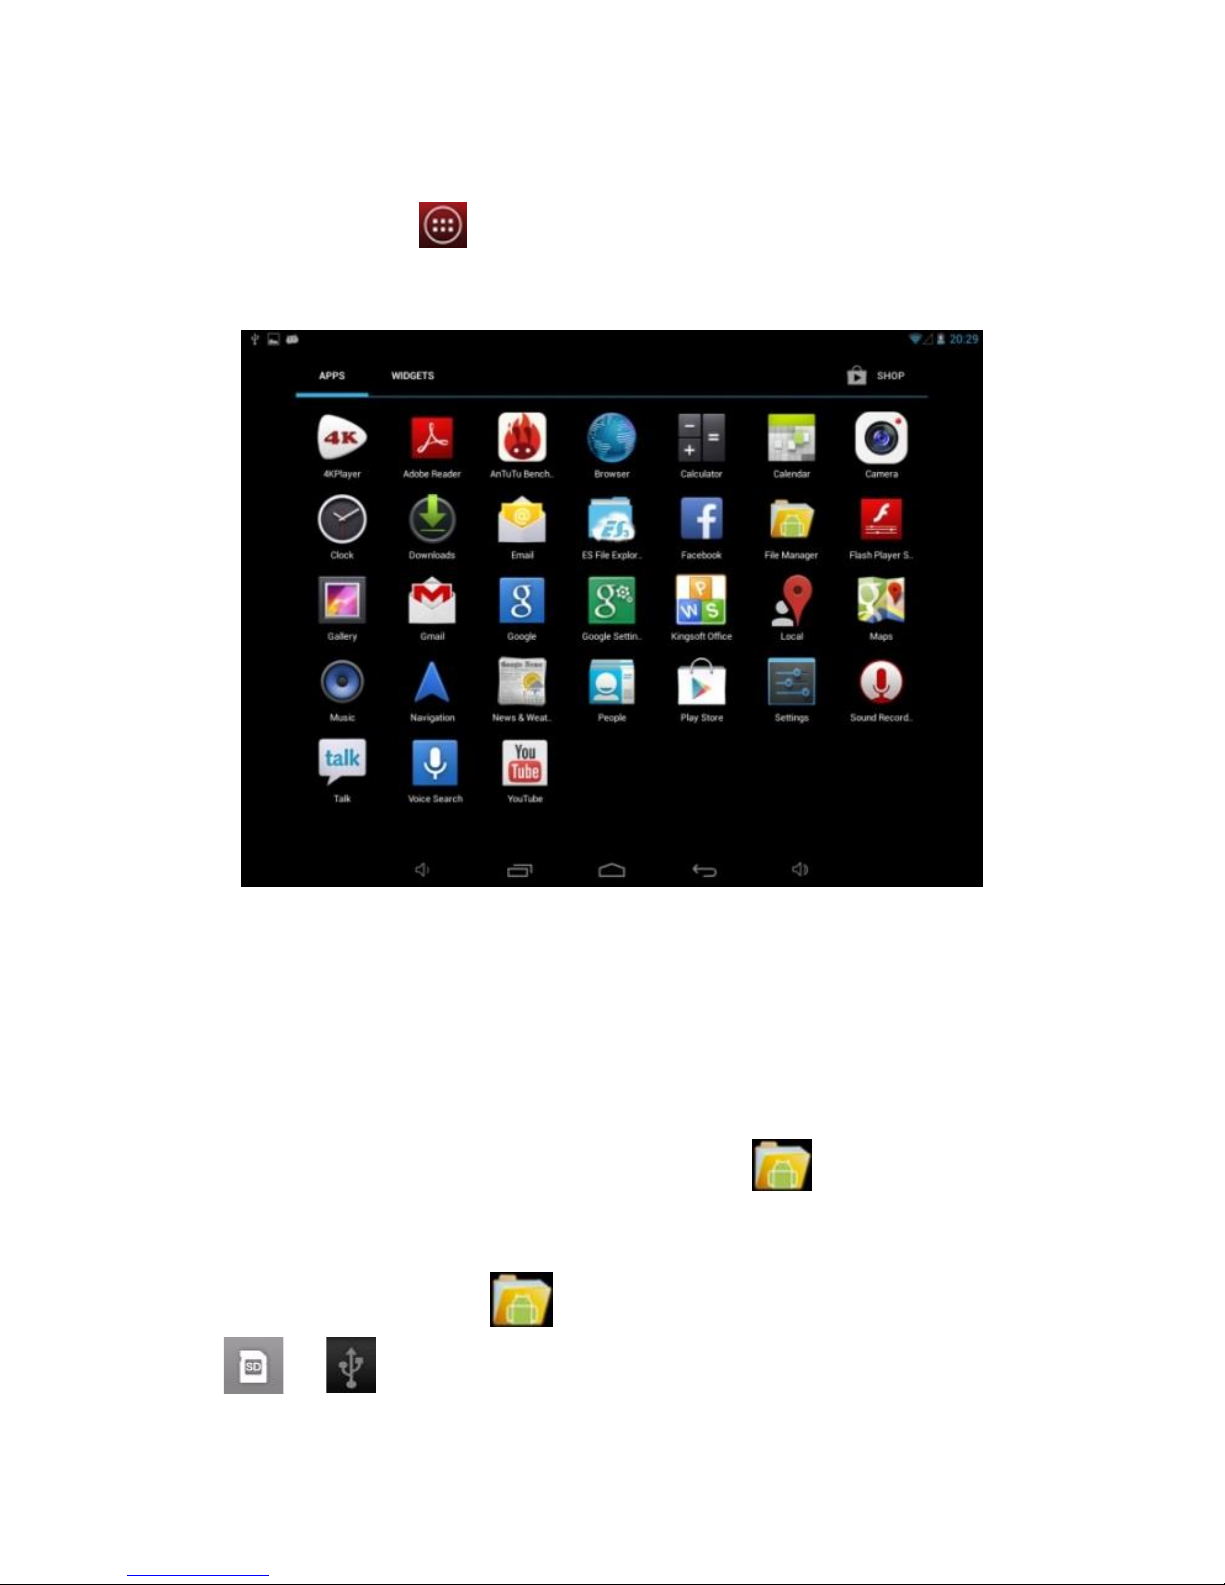
9. Desktop Menu
On the desktop, click icon to display the main menu and the list of
applications.
10. Managing Applications
Installing
☆ You can find many interesting and free Android applications through the
internet. Simply open the browser and search for “Android Applications”.
The purchased or downloaded Android applications can be quickly and
simply installed from the File Manager application
1. Copy the .apk file you want to install to the SD card or USB disk → insert the
card or connect the USB disk to the device.
2. Click the File Manager icon
3. Click or and find the folders containing .apk files.
4. Select a .apk file → Install.
Page 38
38
Now the application is installed and it’s icon will be displayed in the
applications interface.
5. Click Open to run the application, or click Complete to return to File
Browser interface.
Downloading applications from Internet
You can directly download Android applications from the Internet and install it
into the device conveniently.
1. Click Browser icon to connect to Internet.
2. Enter the URL and click the link of the application you want to install.
3. After the application is downloaded, press and hold the downloaded file (in
Downloaded Files interface) → Click to open → Install.
Uninstalling the application
You can conveniently uninstall the Android applications.
1. Click → Settings → Applications → Manage Applications.
2. Click the application you want to uninstall → Uninstall.
3. Click OK to uninstall the application.
11. Clock
Click Clock icon to view the current date and time.
Alarm clock
The device supports more than one clock at the same time.
☆ When the icon appears in the status bar on the top of the screen,
it means at least one alarm is activated.
Add alarm clock
1. Click Clock icon .
2. Double click Set alarm clock → + Add alarm clock.
Page 39
39
3. Set your desired alarm time.
4. Click Activate the alarm.
5. Click Complete.
Stop the alarm clock
When the set time is reached, a window will pop up showing the name of the
alarm. If you want the alarm to activate again 10 minutes later, you can click
Pause and repeat. Click Cancel to stop the alarm clock.
Edit the alarm clock
1. Click Clock icon → Click
2. Click the alarm clock you want to edit → Edit the alarm clock.
Delete the alarm clock
1. Click Clock icon → Click
2. Click the alarm clock you want to delete.
3. Click to delete the alarm clock.
Click to return to desktop.
12. Installing Software Online
There are many applications available in the Installing Software Online
interface. You can easily and quickly download them into your device.
Download the application
1. Click the Installing Software Online icon, or Google Play icon
☆ If this is the first time you use this function, the system will ask to register
and login. If you don’t have a registered account, you need to click Register to
establish a Google account. If you already have a Google account, simply click
Login and enter your account information.
Page 40
40
2. You can select application from the recommendation list, or the list of
classification or ranking. You can also search for the application you want by
entering a specific name.
3. Click an application → Download.
4. When downloading completes, click Install.
5. Click Open to run the application, or click Complete to return to Installing
Software Online interface.
Record
When downloading completes, click Record to manage the installed
application. You can submit your comments to the application or view other
users’ comments. You can also uninstall the applications.
Menu function
Click to display the menu function of the Installing Software Online.
Personal folder Click to view personal information. You can change your
password, change email address and save your password here. Click the
Logout at the top right corner of the personal folder to logout your account.
13. Browser
The user can connect to the internet through the browser.
Click the Browser icon on the desktop to open the browser.
14. Calendar
Click the Calendar icon
If this is the first time you use this function, you need to open an Exchange
account first. Enter your email address and password, click Next, and
complete the configuration of the account following the instructions. Now you
can use the Calendar.
New activity
1. In calendar interface, click the date you want to add an activity.
2. Select time of the activity → enter the details of the activity in the field.
Page 41
41
3. Click Complete.
4. Click icon to select your desired calendar interface.
☆ The date with agenda is displayed in grey.
15. Camera
Click Camera icon
Menu function
1. Press the Menu button to pop up the menu list, which includes: Switch to
video / Switch to camera and My album/My video.
2. In camera interface, click My album to enter the album to view the taken
photos.
3. In video recording interface, click My video to enter the video list.
Take a photo
1. In camera interface, click to take a photo.
2. The photo will be saved automatically.
3. Click the thumbnail to enter My album to view full size photos.
4. Click Return to return to camera.
5. Click to exit camera and return to the desktop.
Record a video
1. Click to switch to video, and you can record videos.
2. Click to start recording, click to stop.
3. The recorded video will be saved automatically.
4. Click the thumbnail to play the video.
5. Click Return to return to camera.
6. Click to switch back to camera interface.
7. Click to exit camera and return to the desktop.
Page 42
42
16. Calculator
1. Click the Calculator icon
2. Click the numbers and operators to make operations.
3. Click Clear to clear the entry one by one, or click and hold Clear to clear all
entries.
17. Sound recorder
1. Click the Sound Recorder icon
2. Click the icon to start recording.
3. When recording completes, click the icon to stop recording.
4. Click the Play icon to play the recorded sound.
18. Email
☆Support POP3 and SMTP accounts.
New email account
You enter one or more email accounts that you want to use on the device.
1. Click the Email icon
2. In Your account interface, click Next
3. Click Email address option → Enter your email address
4. In the Password option → Enter the password of your email
5. Click complete
6. Manual setting (optional): the server will select email provider (such as
gmail.com) according to the email address you have entered automatically.
However, if you need to change the server setting, you can click Manual
setting and make necessary changes.
7. Click Next.
8. Optional: enter account name.
Page 43
43
9. Enter the signature→ Click Complete.
☆ When setting completes, if you cannot connect to a free email account,
please confirm with your email provider whether there sever supports (POP)
and (SMTP) protocols or not.
Inbox
1. Click the Email icon
2. If only one email account is set, such account will be opened directly. If
more than one is set, all email accounts will be listed.
3. Click the email account that you want to open → Click Inbox.
Open an email
1. In Inbox interface, click an email to open it.
2. If there is attachment, click Open to activate the corresponding application
to open it, or click Save to save it to SD card.
3. If you want to reply, click Reply or Reply all.
a. Enter the message you want to reply.
b. Click Send to send the email. If you save it as draft, the message
will be saved but not sent; if you don’t save it or sent it, it will be
discarded.
4. Click Cancel to cancel an email immediately.
Compose an email
1. In Inbox interface, click → Compose your email.
2. Click Send to option, then enter the address of the Receiver.
3. Or, if you want cc or bcc to others, click the icon → Add cc and bcc,
then enter the email address of the receiver.
4. In the title bar of the email, enter the subject of your email.
5. Click Compose email option to enter your message.
6. If necessary, click →Add attachment to add attachment.
7. When composition completes, click →Send.
Page 44
44
Edit email account
1. Click the Email icon
2. In Inbox interface, click → Account setting
3. Choose the email account settings according to your needs.
4. Click to return to Inbox interface.
19. File Manager
Click File Browser icon to view the files in all storage mediums (internal
storage of the device, SD card, USB disk), and you can quickly and easily install
Android applications into the device. Functions of the icons in the screen are
as follows:
Previous folder
View
Multi select
Send email
Previous folder
Copy files between PC and device
You can use the File Browser to copy files between PC and the
external/internal storage mediums. To copy files into the device, you can
firstly copy them to SD card or USB disk.
☆ The folder name of the internal storage medium is “Local”, the name of the
storage card is “sdcard”, and the name of the USB disk is “udisk”.
☆ The following example is that you copy file into the device from SD card or
USB disk. You can use the same way to copy the file from the device to the SD
Page 45
45
card or USB disk. Then connect your storage medium to your PC and copy the
files into the desired folder.
1. Click or to display the files in the storage medium.
2. Click and hold the file or folder you want to copy → click Copy.
3. Click icon to return to internal storage medium → click the folder you
want to copy to → click Paste.
Delete a file
Select the file or folder you want to delete → click Delete → click OK to delete.
20. Music
☆ Support MP1, MP2, MP3, WMA, OGG, APE, FLAC, WAV, AC3, AAC, AMR,
DTS, RA, M4A formats.
Play music
1. Click My music icon
2. Select the track you want to play from All/Album/Artist/Album/Track/Play
list/Now playing
3. Click the track to play
4. To return to previous interface while playing a track, click to return to
Desktop.
Operate the track and play list
New play list
1. Click setting, and click Add to play list
2. Enter the name of the play list.
3. Click OK.
Rename or delete the play list
Click and hold the play lists → click Rename or Delete.
Page 46
46
New track
Click and hold the track you want to add to play list, → click “Add to play list”
Delete track
Click and hold the track you want to delete → click Delete.
21. HD Video Player
☆ Support RM, RMVB, MKV (H.264), MPEG (AVI), MOV, FLV, MPG, VOB,
MPE, DAT formats. Support 2160P, 3840×2160.
☆ Supported picture format: JPG, JPEG, BMP and PNG.
1. Click the HD Video Player icon
2. Select the video or picture you want to play from All/Content/My
favorite/Personal list
3. Click on the screen to adjust the video (including volume, pause/play,
brightness, etc.).
4. Click the picture to preview or play in slide.
5. Click to return to list.
22. Settings
Wireless
and
network
Wi-Fi
Enable Wi-Fi
Wi-Fi
Settings
Mobile network
Set roaming, network, APN option
Sound
Mute mode
Mute except media and alarm clock
Volume
Adjust volume of media, alarm clock
and notification. Click and move the
slider ,
then click OK
Notification
Select desired notification ringtone
Page 47
47
ringtone
Operation tone
Tone played when selecting on screen
Screen lock
promote tone
Tone played when
locking/unlocking screen
Display
Brightness
Click and move slider to adjust
brightness of the screen and click OK to
confirm
Auto rotate screen
When it is selected, the screen will
switch between Portrait and Landscape
according to the direction of the device
G-sensor
coordinate system
Use the different coordinate system
mode, which is necessary under certain
conditions
Animation
Choose whether to display or not the
operations in animation
Screen timeout
Adjust the time before screen lock
Location
and
security
Use wireless
network
Use wireless network to view location
in applications (such as Google map)
Set screen lock
Use picture, PIN or password to lock
screen
Visible password
The entered password is visible
Select device
manager
Add or delete device manager
Use security
credential
Allow application to access to security
credentials and other credentials
Install from TF
card
Install encrypted certificate from SD
card
Page 48
48
Set password
Set or change credential password
Clear storage
Clear all credentials
Applicatio
ns
Unknown source
Allow installing applications supplied
by electronic market
Manage application
Manage and delete installed
applications
Service in process
View and control the services in process
Storage status
View the space occupation of the
application.
Development
Set application development options
Account
and
synchroniz
ation
Background data
Set whether or not the applications will
synchronize, send and receiver data
from time to time
Auto
synchronization
Auto data synchronization of the
application
Privacy
Back up my data
Back up the application data, wifi
password and other settings to Google
server
Auto recovery
When an application is reinstalled, the
system will recover the back up setting
or other data
Restore factory
setting
Click to clear all data on the device.
Click Reset the device will be reset, or
click to cancel and return to
previous screen.
Warning: the following data will be
deleted from the device:
~ Google account.
Page 49
49
~ Data and settings of the system and
applications.
~ All downloaded applications.
The following data will not be deleted:
~ System software and preinstalled
applications.
~ Files in SD card, such as music and
photos.
Storage
Total capacity, free
space
Display when a TF card or USB disk is
inserted
Remove SD
card/USB disk
When a TF card or USB disk is
inserted, click Remove SD card/USB
disk to remove them
Format SD
card/USB disk
Format (clear) TF card/USB disk
Language
and
input/outp
ut
Select language
Select language according to your
location.
Personal dictionary
Add words to the user dictionary
Android keypad
Screen keypad setting
Listening example
Play short voice examples
Preferred engine
Set the voice combination engine for
switching between text and voice
Voice speed
Play speed after the texts are converted
into voice
Pico TTS
Pico TTS setting
Auto
Use the network value, i.e. to
synchronize with the network time
Page 50
50
Date and
time
Set date
Set date
Set time
Set time
Select time zone
Select time zone
Use 24-hour time
system
Select 24-hour time system or 12-hour
time system
Select date format
Select date format.
About the
device
View status, battery status, legal
information, model, Android version,
kernel version and version number
23. FAQ
Android
Q: What is the Android version?
A: 4.2
Basic function of the device
Q: Do I need to charge the device before use?
A: You need to charge the battery for at least 4 hours, but you can operate
the device while charging. When charging, always use a AC adaptor.
Email
Q: May I use my own email address to send and receive emails?
A: The device support POP3and SMTP accounts. The device may not support
some free email accounts. Please consult the email provider for details.
Storage card
Q: What storage card does the device support?
A: mini SD card.
Music
Page 51

51
Q: What audio formats does the device support?
A: MP2, MP3, WAV, AAC, WMA
Q: How can I add music into the device?
A: You can copy the audio files from PC to SD card or USB disk, then copy
them into the device through File Browser.
Picture
Q: What picture formats does the device support?
A: JPG, JPEG, BMP and PNG.
Q: How can I add pictures into the device?
A: You can copy the picture files from PC to SD card or USB disk, then copy
them into the device through File Browser.
Video
Q: What video formats does the device support?
A: MPEG1/2/4, MJPG, H263, H264. H264 supports 720×480, other formats
support 1280×720.
Q: Are videos in YouTube playable by the device?
A: Yes. You can click YouTube icon to play videos.
Q: How can I add videos into the device?
A: You can copy the video files from PC to SD card or USB disk, then copy
them into the device through File Browser.
Wi-Fi
Q: Do I need an external Wi-Fi device to connect to internet?
A: No. The device has built in Wi-Fi function.
Battery management
The battery is not fully charged when leaving the factory, so we suggest you
charge the battery for at least 4 hours before using.
The useful life of the battery is usually counted by charging times. However,
you can try the following dos to prolong its useful life:
● Use the device at least once every week.
Page 52

52
● Regularly fully charge the battery.
● Never keep the battery empty for a long time.
● Keep the device and the battery away from heat.
Charging the battery
Connect one end of the AC adaptor to the mains supply and the other end to
the power jack on the device (it takes about 5 hours to fully charge).
When the battery is full, the battery icon will display
It takes about 5 hours to fully charge an empty battery. You can operate the
device while charging.
Important safety instruction
Please follow the following safety instructions while using the device to avoid
risk of fire, electric shock or injury:
● Keep the product away from rain and humidity.
● Keep the product away from direct sunlight and heat.
● Protect the power core. When connecting the power core, do not trample
on it or place anything on it. Use care to protect the connectors of the power
core.
● Please only use the approved AC adaptor for charging. Using other adaptors
may cause damage.
● Never dissemble or try to repair the device.
Clean the device
Clean the screen softly. To clean the fingerprints or dust on the screen, we
suggest you use the soft cloth used for camera lens. Do not use any rough
cloth, as the screen may get not pleasant scratches.
SPECIFICATIONS
Page 53
53
Operating System
Android 4.2 JellyBean
CPU
Dual Core 1,2 Ghz, Allwinner A20
Display
7" 800x480 Capacitive, multitouch, 5 points
RAM Memory
512 MB DDR 3
Memory
8 GB flash memory
Video Chipset
Dual Core Mali 400
Speaker
1 W
Web Camera
Front: 0.3 MP; Back: 2 MP
Ports
HDMI, Micro USB, Micro SD (up to 32 GB),
Headphone Jack
Dimensions
192 x 117 x 10,7 mm
Weight
250 g
Wi-Fi
802.11 b/g/n
3G
external 3G USB Dongle
Battery
Li-Polymer 2400mAh, 5-6h autonomy
Video Formats
VC-1, MPEG-2, MPEG4, XviD/DivX, AVI, RM, RMVB,
PMP, FLV, MP4, M4V, VOB, WMV, 3GP, MKV
Audio Formats
MP3, WMA, APE, FLAC, OGG, WAV
eBook Formats
ePub, PDF
Photo Formats
JPEG, GIF, PNG, BMP
Others
3D Games support, G-Sensor, Microphone
Package contains
1 x UTOK 700 D Tablet;
Page 54

54
1 x Charger;
1 x USB Cable;
1 x OTG Cable;
1 x User Manual
DECLARATION OF CONFORMITY
Nr. 377E / 07.08.2013
UTOK Product, Model 700 D
We, S.C. SKIN MEDIA S.R.L., based in Ocna Sibiului street 46-48, Bucharest 1,
with certificate no. 1049291 from 03.07.2007, J40/8241/2000, CIF
RO13348504, as importer and distributor, make, guarantee and declare on his
own responsability that electrical and electronic equipment to which this
declaration relates complies with the requirements of HG 1022/2002,
according to Art. 5, regarding the products and services that may endanger
the life, health, work safety and environmental protection and do not have a
negative impact on the environment.
Electrical and electronic equipment imported and distributed on the market
by our company comply with the following regulations: Decision no.
1022/2002, H.G. 497/2003 (Electromagnetic Compatibility), H.G. 457/2003,
amended by Decision 1514/2003 (regarding the safety of users of electrical,
low voltage) and all incidental acts, H.G. 992/2005 (the Restriction of
Hazardous Substances), H.G. 448/2005 (the prevention of waste electrical and
electronic equipment) and EU Directives 2002/95/EC, 1999/5/EC.
The product has been assessed according to the following standards listed in
Annex II to HG 88/2003: EN 62479, EN 60950-1, EN 301 489-1, EN 301 489-17,
Page 55

55
EN 300 328. All documents received from the producer regarding the
evaluations are stored at our headquarter.
The product has CE marking.
Product warranty is provided in accordance with O.G. 21/1992, Law
449/2003, Law 296/2004 and O.U.G. 174/2008 regarding the consumer
protection.
This statement is valid for the product UTOK, model 700 D. The declaration of
conformity is also available on web address www.utok.com.
07.08.2013 Director,
Camil Perian
 Loading...