

Page 1

1
MANUAL UTILIZARE
UTOK 450 D
Page 2

2
CUPRINS
1. Familiarizarea cu produsul 6
2. Notiuni de baza 8
3. Operatiuni de baza 11
4. Ecranul principal 12
5. Multimedia 14
6. Retea 16
7. Setari 18
8. Aplicatii 23
9. Specificatii tehnice 25
Page 3

3
T O A T E DREPTURILE REZER VATE
©2013. Toate drepturile sunt rezervate. Nicio parte a acestui document
nu poate fi reprodusa fara permisiune. Toate marcile inregistrate si
numele de brand mentionate in acest document apartin proprietarilor
acestora. Desi au fost depuse toate eforturile pentru a asigura acuratetea
continutului acestui manual, nu ne asumam responsabilitatea pentru
erori, omiteri sau afirmatii de orice fel, daca acestea rezulta din
neglijenta, accidente sau orice alta cauza. Desfasuram o politica a
dezvoltarii continue si ne rezervam dreptul de a aduce modificari si
imbunatatiri pentru dispozitiv, functiile, specificatiile sau a oricarei parti a
acestuia, fara notificare prealabila. Dispozitivul poate contine marcaje
preinstalate, link-uri catre terte site-uri Internet si va poate permite sa
accesati website-uri terte. Acestea nu sunt afiliate cu noi, iar noi nu le
sprijinim si nu ne asumam raspunderea pentru acestea. Daca accesati
astfel de site-uri, luati masuri de precautie pentru siguranta si continut.
Garantia cu raspundere limitata nu acopera manuale de utilizare sau alt
software tert, setari, continut, date sau link-uri, fie incluse/descarcate in
produs, fie incluse in timpul instalarii, asamblarii, livrarii sau in alt
moment al lantului de livrare sau in alt mod si in orice fel achizitionat de
dumneavoastra. In masura permisa de legislatia aplicabila, nu garantam
ca oricare din software-urile noastre va va satisface certintele, va
functiona cu orice hardware sau aplicatii software puse la dispozitie de
terte parti.
Manualul de utilizare este pus la dispozitie pentru a ghida
utilizatorul cu privire la functionalitatea dispozitivului. Acesta nu este un
certificat al tehnologiei. Unele functii pot varia datorita modificarilor
software-ului sau datorita greselilor de printare.
Page 4

4
MASURI DE SIGURANTA
Va rugam sa cititi urmatoarele instructiuni de siguranta
inainte de a utiliza aparatul.
• Nu utilizati telefonul in timp ce conduceti
• Nu puneti medii de stocare magnetice in apropierea
telefonului. Radiatiile telefonului pot sterge
informatiile stocate pe acestea.
• Nu lasati telefonul si accesoriile acestuia la indemana
copiilor.
• Telefoanele mobile pot interfera cu dispozitive
medicale functionale precum aparate auditive sau
stimulatoare cardiace. Persoanele care au implanturi
medicale active ar trebui sa tina telefonul mobil la cel
putin 15 cm distanta fata de implant.
• Utilizarea castilor la volum ridicat poate duce la
pierderea definitiva a auzului.
• Folositi un sistem hands-free wireless (headphone /
headset) cu un emitator Bluetooth cu putere redusa.
• Asigurati-va ca telefonul mobil are o valoare SAR
scazuta.
• Mentineti durata apelului scurta sau trimiteti un
mesaj text in schimb (SMS). Acest sfat se aplica in
special copiilor adolescenti sau femeilor insarcinate.
• Utilizati telefonul mobil atunci cand calitatea
semnalului este buna.
Page 5

5
Atentionare:
- Nu demontati dispozitivul sau accesoriile. In caz
contrar, producatorul nu este responsabil de
plata daunelor provocate dispozitivului si
accesoriilor, daune pe care garantia nu le
acopera. Folositi doar baterii si dispozitive de
incarcare originale. Va rugam sa efectuati
periodic copii de rezerva pentru datele
importante si sa le pastrati corespunzator.
Compania nu este responsabila pentru
imposibilitatea apelarii sau pierderea datelor
cauzata de utilizarea incorecta, semnal slab,
intreruperi de curent, etc.
- Nu puneti si nu utilizati telefonul intr-un loc cu gaze
inflamabile, cum ar fi pompele de benzina.
- Temperatura recomandata pentru utilizarea
dispozitivului este 5-35°C.
- Nu atingeti incarcatorul, cablul de alimentare sau
priza cu mainile ude. Acest lucru poate duce la
socul electric.
- Toate ecranele din acest manual sunt prezentate cu
scop ilustrativ iar continutul afisat poate
depinde de presetarile furnizorului de servicii,
de operatorul de retea sau de cartela SIM. Daca
anumite functii la care se face referire in acest
manual sunt diferite de cele ale dispozitivului
dumneavoastra, va rugam sa va raportati la
dispozitiv.
Page 6

6
Daca telefonul dumneavoastra sau orice alt accesoriu
nu functioneaza normal, va rugam sa vizitati cea mai
apropiata unitate de service autorizat. Personalul calificat va
va asista, si daca va fi necesar, va organiza service-ul.
1. FAMILIARIZAREA CU PRODUSUL
1. 1 I N F O R M A T I I GENERA LE
UTOK 450 D este un telefon multi SIM care cuprinde functii
precum Android versiune 4.2, Wi-Fi, Procesor Dual-Core 1
GHz, Camera 5.0 MP. Acest telefon este dotat cu doua sloturi
SIM pentru doua cartele SIM diferite. Cartela SIM inserata in
slot1 se numeste cartela SIM 1, iar cea in slot2 este cunoscuta
ca SIM 2. Puteti alege sa utilizati SIM-urile in functie de
nevoile personale si profesionale.
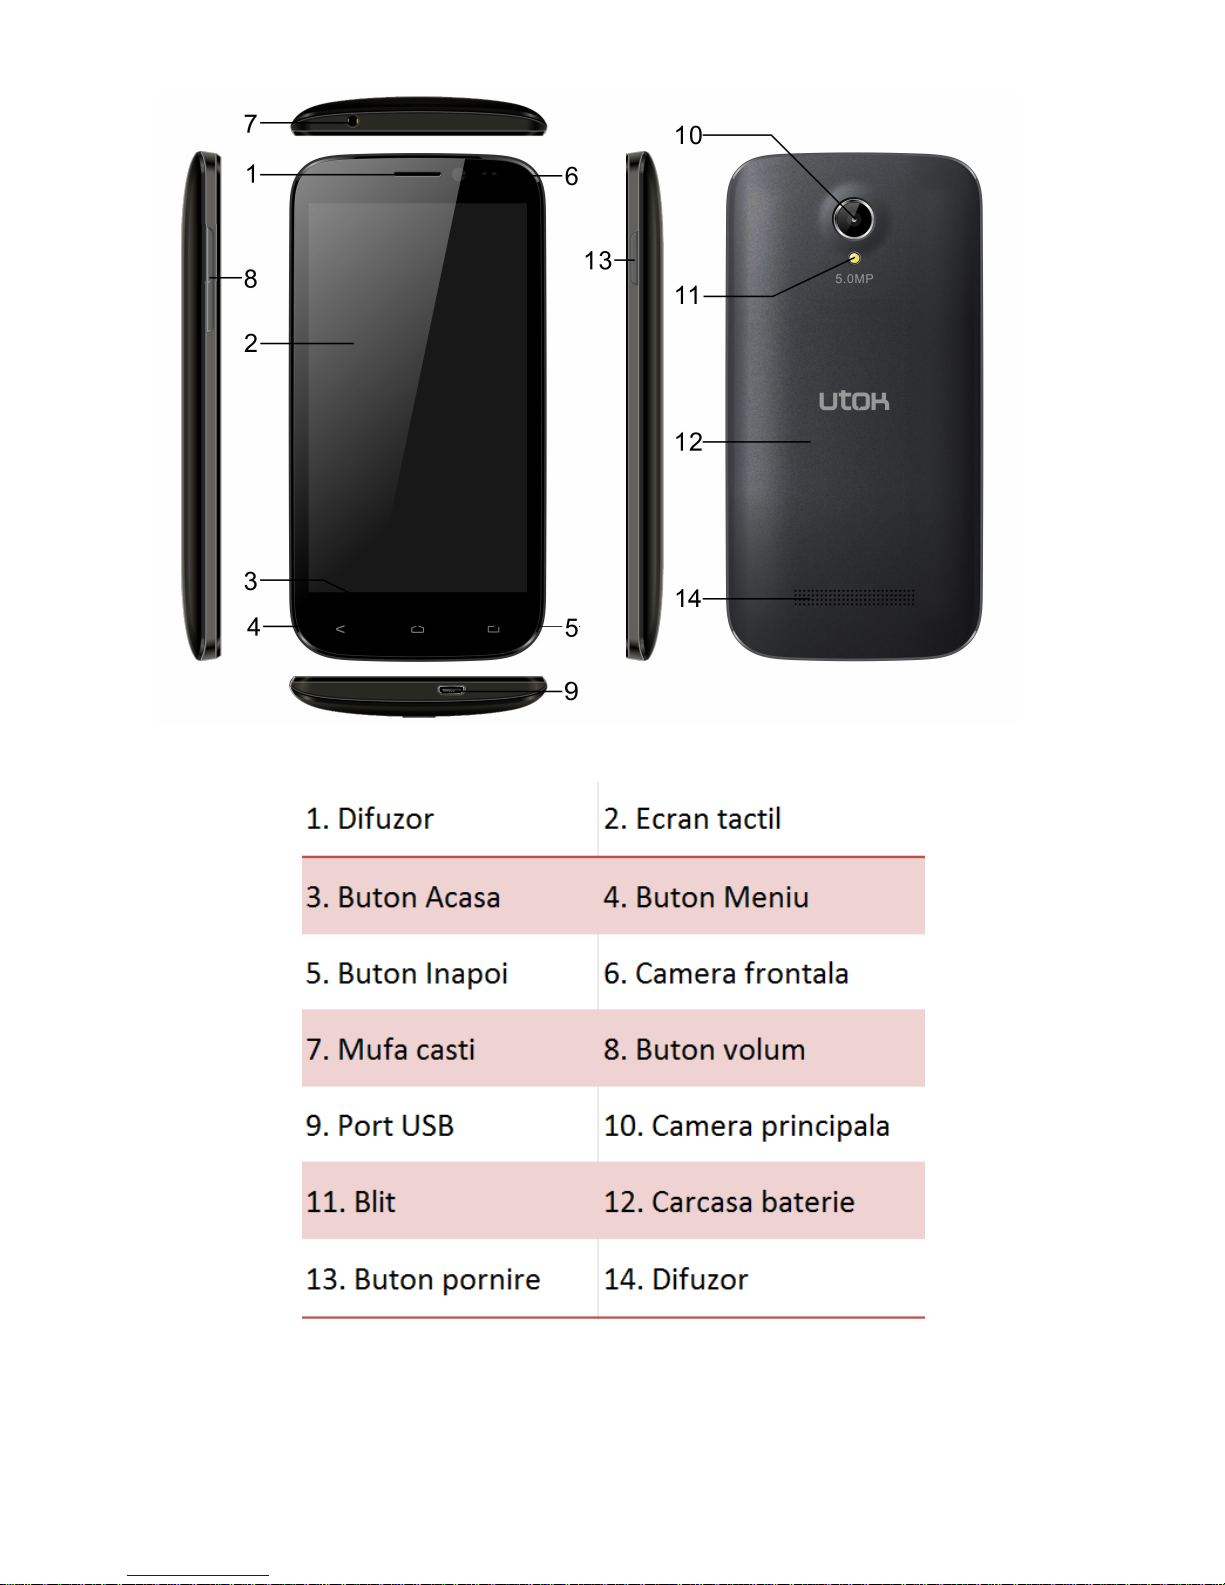
1. 2 A S P E C T U L D ISPOZI T I V U L U I
Page 7
7
Page 8
8
2. NOTIUNI DE BAZA
2. 1 I N S T A L A R EA CA R T E L E I / B A T ERIEI
Va rugam sa opriti dispozitivul inainte de a insera sau inlatura
bateria / cartela SIM sau cardul de memorie.
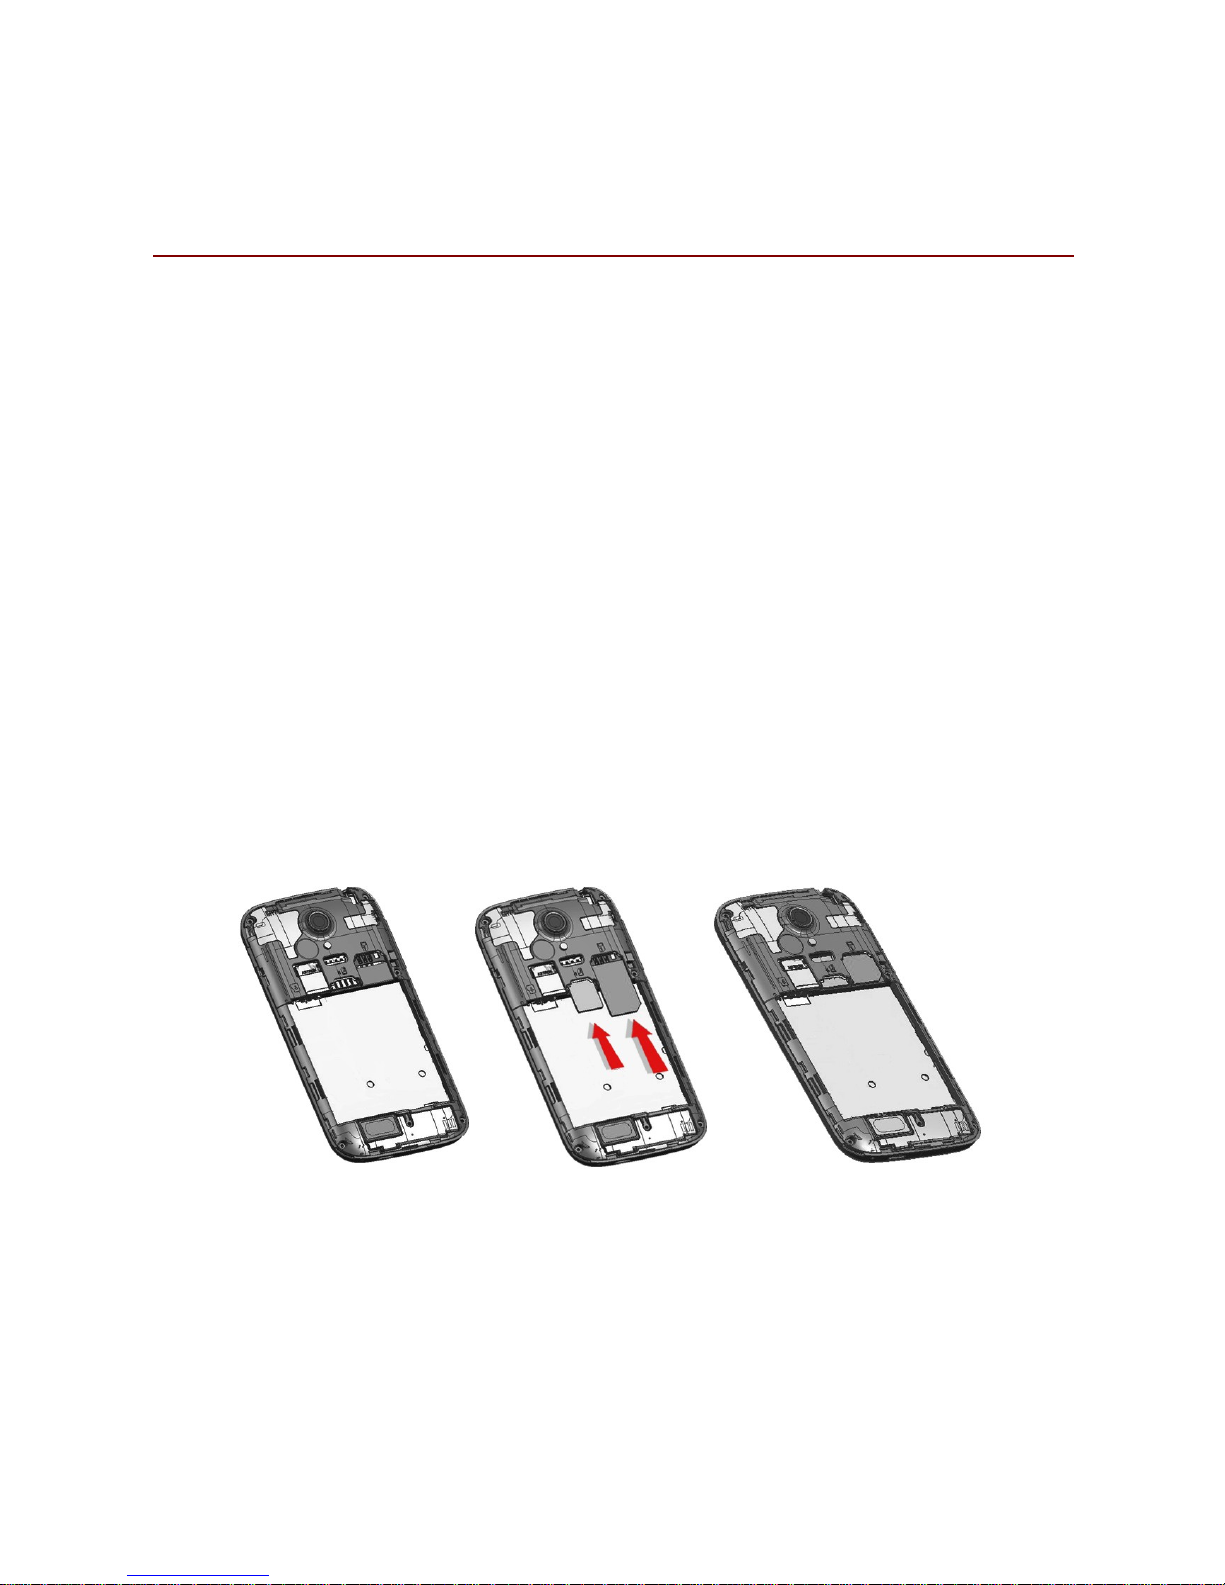
Instalarea cartelei SIM si a Bateriei
Dispozitivul este dotat cu doua slot-uri SIM pentru doua
cartele SIM diferite. Pentru a instala bateria si cartela SIM in
dispozitiv, va rugam sa urmati pasii de mai jos:
Inlaturati capacul din spate al dispozitivului
Tineti aparatul cu fata in jos si trageti capacul bateriei
Introduceti cartela SIM in dispozitiv
Atasati bateria
Apasati capacul bateriei pana se fixeaza in pozitie
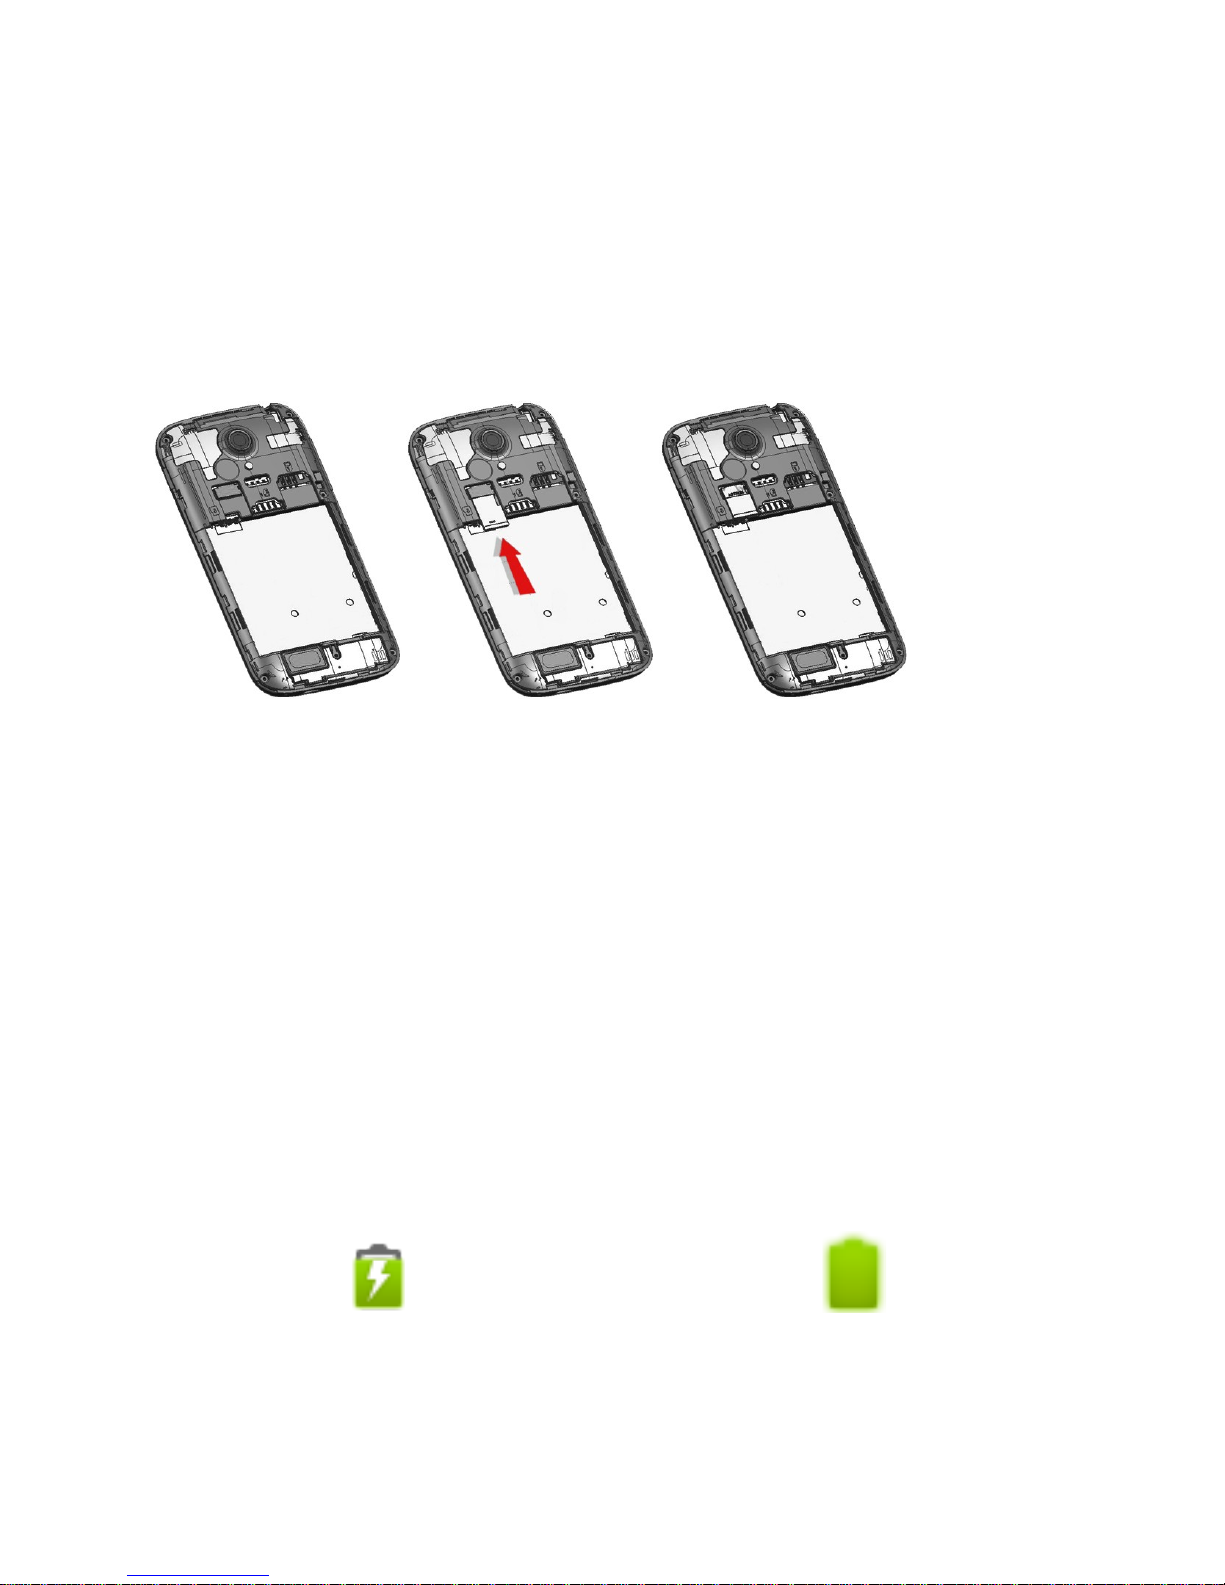
Instalarea cardului de memorie
Dispozitivul suporta card microSD, card multimedia folosit
pentru a multiplica memoria dispozitivului. Cardul microSD
este mic si ar trebui sa fie scos si instalat cu grija pentru a
evita orice fel de daune. Va rugam sa urmati pasii de mai jos
Page 9
9
pentru a instala cardul de memorie in dispozitiv:
Opriti dispozitivul
Inlaturati capacul bateriei
Atasati cardul de memorie T-Flash in slot
Atasati bateria
Incarcarea bateriei
Atunci cand bateria este descarcata, dispozitivul atentioneaza
printr-un sunet de avertizare si un mesaj ce semnalizeaza
insuficienta bateriei. Va rugam sa urmati instructiunile de mai
jos pentru a incarca dispozitivul:
Introduceti conectorul incarcatorului in mufa din
dispozitiv.
Conectati incarcatorul la o priza de perete standard
de curent alternativ.
Incarcare……. Incarcat complet…….
Va recomandam ca inainte de prima utilizare a dispozitivului
Page 10

10
sa incarcati complet bateria. Este recomandat sa incarcati
bateria pentru trei ore inainte de prima utilizare a
dispozitivului.
2. 2 P OR N I R E A SI OPRI R E A
Pornirea dispozitivului
Dupa instalarea cartelei SIM si incarcarea bateriei, sunteti
pregatit pentru a porni dispozitivul.
Apasati lung si mentineti apasata tasta Pornire /
Oprire pentru a porni dispozitivul.
Primul ecran ce apare este cunoscut ca si ecran
acasa.
Trageti in lateral pictograma de blocare pentru a
debloca ecranul.
Daca ecranul se stinge apasati scurt tasta Pornire /
Oprire pentru a porni dispozitivul.
Oprirea dispozitivului
Apasati si tineti apasata tasta Pornire/Oprire timp de
3 secunde.
O fereastra pop-up apare, selectati Oprire.
Selectati OK pentru a confirma.
3. OPERATIUNI DE BAZA
Page 11
11
3. 1 A P E L A R E A
Pentru a efectua apeluri
Daca pictograma apare pe ecran, puteti efectua sau primi
apeluri.
Apasati pentru a sterge un numar gresit.
Apasati si tineti apasat pentru a sterge intregul numar.
Preluarea/Respingerea unui apel receptionat
Cand primiti un apel, un mesaj de notificare apare pe ecran.
Pentru a accepta apelul, glisati catre dreapta. Daca doriti
sa respingeti apelul, glisati catre stanga.
3. 2 M E SA J E
Caracteristicile aparatului includ trimiterea si primirea SMSurilor si a MMS-urilor.
3. 3 C ON TA C T E
“Contacte” se refera la agenda telefonica ce permite stocarea
numelor, numerelor de telefon, adreselor de email si a altor
informatii. Puteti salva informatii precum nume, poza, numar
de telefon, adrese de email, etc, pentru fiecare contact listat
in meniul Contacte.
Page 12

12
3. 4 E M A I L
Dispozitivul va permite sa compuneti, cititi si trimiteti
emailuri.
4. ECRANUL PRINCIPAL
Din ecranul principal puteti accesa rapid functii comune,
vizualiza notificari, apeluri pierdute, mesaje primite sau puteti
sa verificati statusul conexiunii.
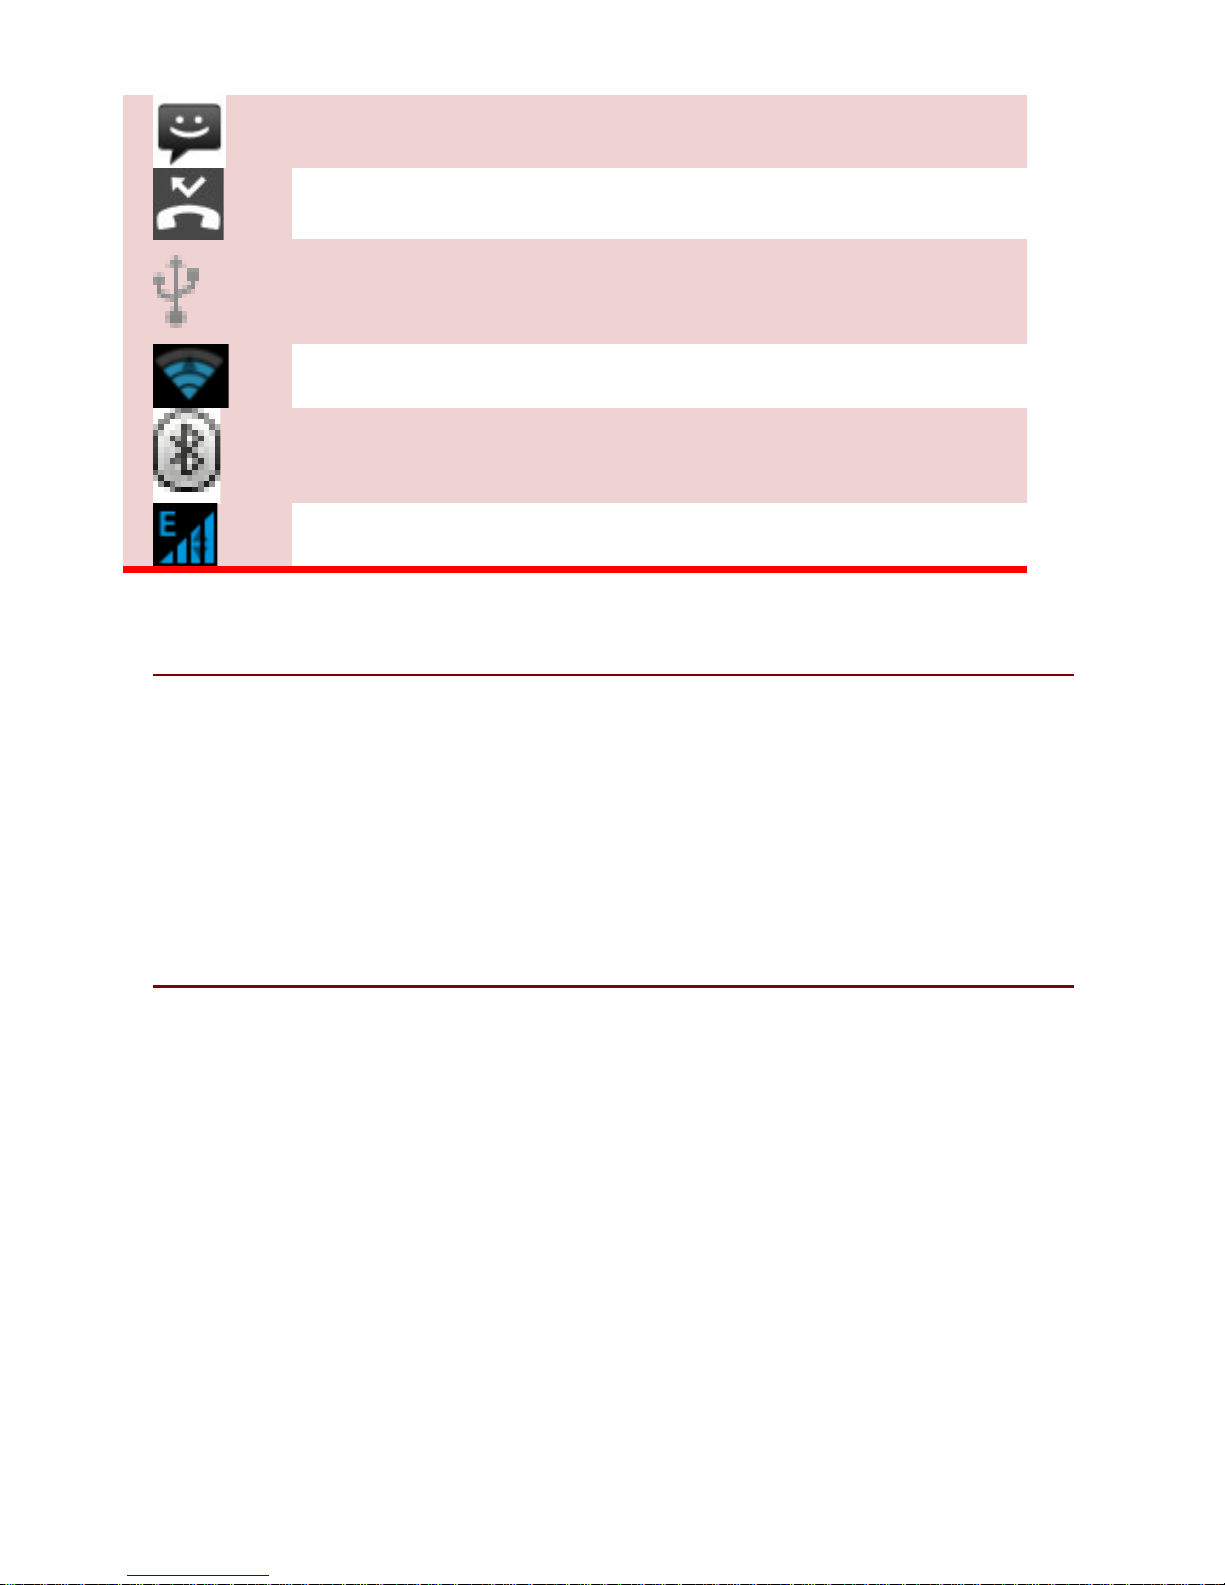
4. 1 BA R A D E N OT IFIC A R I
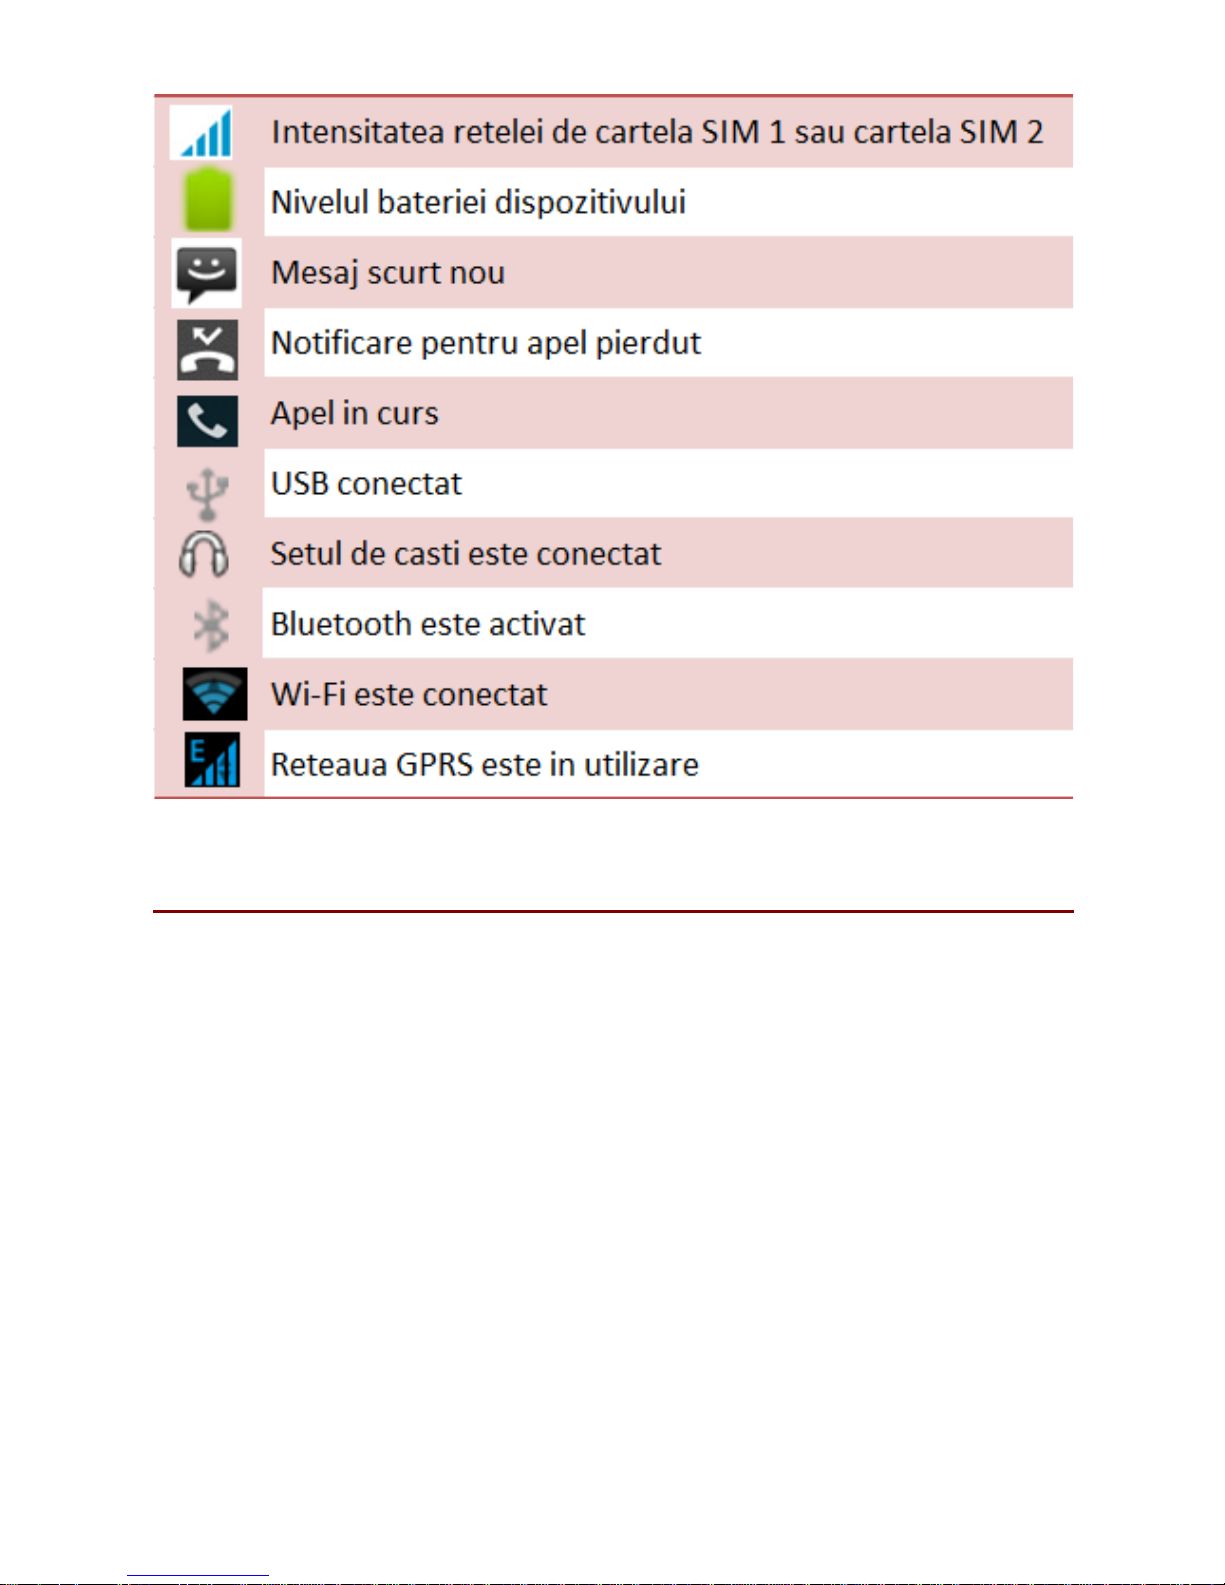
Bara de notificari afiseaza diferite informatii. Tabelul de mai
jos listeaza diverse pictograme ce pot aparea pe bara de
notificari a dispozitivului.
Page 13
13
4. 2 C U S T O M I Z A R EA ECRA N U L U I
Dispozitivul este dotat cu un ecran tactil cu display activ si
acces la utilitati cu o singura atingere. Asa ca puteti glisa catre
dreapta sau stanga pentru a naviga prin diferite ecrane ce pot
accesa functiile preferate.
Setarea imaginii de fundal
Puteti customiza imaginea de fundal a ecranului principal cu
imagini de fundal predefinite sau cu fotografii facute cu
dispozitivul.
Apasati tasta meniu si selectati Imagine de fundal.
Page 14

14
Selectati imaginea de fundal dorita din optiunile
urmatoare:
ES File explorer
Galerie
Imagini de fundal live
Tapet video
Imagini de fundal
Rotirea ecranului telefonului mobil
Orientarea majoritatea ecranelor se va schimba in
modul de vizualizare landscape sau portrait atunci
cand rotiti telefonul.
Accesati Setari > Afisare > Rotirea automata a ecranului
pentru a dezactiva aceasta functie.
5. MULTIMEDIA
Dispozitivul are mai multe optiuni multimedia, precum
redarea fisierelor audio, camera, radio FM.
5. 1 MA N A G E R D E FI SI E R E
Puteti rasfoi, deschide si gestiona datele salvate in dispozitiv
si in cardul de memorie accesand Manager fisiere. Dispozitivul
pune la dispozitie un anumit spatiu pentru ca utilizatorii sa
poata gestiona fisiere si suporta card microSD. Puteti folosi
Managerul de fisiere pentru a gestiona convenabil diverse
Page 15

15
directoare si fisiere de pe cardul microSD.
5. 2 M U Z I C A
Folositi aplicatia Muzica pentru a reda fisiere de muzica.
Melodiile salvate pe cardul microSD pot fi redate folosind
aplicatia Muzica aflata in dispozitiv. Melodiile sunt clasificate
in functie de Artisti, Albume si Cantece. Puteti defini liste
preferate de redare apasand lung pe o melodie si selectand
Adauga in lista de redare.
5. 3 C A M E R A
Dispozitivul este echipat cu camera foto si camera video ce va
permit sa capturati fotografii si video.
Camera din spate are 8 megapixeli, cand alegeti dimensiunea
de vizualizare pentru standard (4:3).
5. 4 GA LE R I E
Puteti vizualiza imaginile capturate, clipurile video inregistrate
si imaginile descarcate in Galerie. Dosarul cu imagini si cel
video vor fi afisate. Selectati pentru a vizualiza fotografii sau
clipuri video realizate cu camera. Imaginile sau video-urile vor
fi afisate in miniaturi.
5. 5 I N R E G I S T R A RE S UN ET
Puteti utiliza aplicatia Inregistrare sunet pentru a inregistra
Page 16
16
sunete si a salva inregistrarile in telefonul dumneavoastra.
Cand va aflati in interfata pentru inregistrarea sunetelor
apasati tasta meniu pentru a selecta modul de inregistrare.
5. 6 RA D I O F M
Puteti utiliza telefonul pentru a asculta posturi de radio FM
atunci cand castile originale sunt conectate in port. Va rugam
sa apasati tastele laterale pentru a ajusta volumul.
Apasati pentru a iesi din functia FM radio. Apasati (
) pentru a cauta canale.
6. RETEA
6. 1 W I - F I
Conectati-va la o retea wireless pentru a naviga pe Internet.
Accesati Setari.
Apasati ‘ON’ (ro. Activat) pentru a activa Wi-Fi.
Apasati Wi-Fi > Notificari de retea pentru a
incepe detectarea retelelor. Retelele disponibile vor
fi listate.
Apasati Adauga retea pentru a adauga o conexiune..
Page 17

17
NOTA:
In cazul in care o retea la care v-ati conectat cu
success este salvata, informatiile de retea vor fi
salvate intr-o fereastra pop-up pentru respectiva
conexiune. Pentru a sterge informatiile din dispozitiv,
selectati Eliminati.
In cazul in care conexiunea selectata nu este criptata,
pur si simplu apasati fereastra pop-up pentru a va
conecta.
Daca dispozitivul este criptat, va aparea o fereastra
pop-up, unde trebuie sa introduceti parola.
Daca s-a realizat cu success conexiunea, pe bara de
notificari va aparea conexiunea Wi-Fi.
6. 2 3 G
Dispozitivul suporta protocol WCDMA. Inainte sa introduceti /
inlaturati cartela SIM va rugam sa va asigurati ca dispozitivul
este oprit.
6. 3 B LU E T OO TH
Cautati dispozitivul si acceptati / transferati date. Datele
primite sunt salvate automat in director.
Accesati Setari.
Bifati Bluetooth pentru a porni Bluetooth.
Pentru a face dispozitivul dumneavoastra vizibil, selectati
setarile blueetooth-ului si bifati “vizibil”.
Page 18

18
7. SETARI
Accesati Setari pentru a vizualiza si ajusta setarile
dispozitivului. Meniul Setari este clasificat in: Wireless &
Retele, Profiluri audio, Afisare, Stocare, Acumulator, Aplicatii,
Acces la locatie, Securitate, Limba si metoda de intrare, Creati
o copie de rezerva si resetati si Sistem.
7. 1 G E S T I U N E SI M
Dispozitivul suporta doua cartele SIM care pot fi gestionate
accesand submeniul Gestiune SIM. Puteti vizualiza/modifica
setarile roaming ale cartelei utilizand meniul.
7. 2 W I R E L E S S & R ET ELE
Accesati submeniul pentru a modifica/vizualiza Wi-Fi,
Bluetooth, Retele mobile, setari VPN. Pentru detalii legate de
Wi-Fi si Bluetooth va rugam sa consultati sectiunile dedicate.
7. 3 P R O F I L U R I A UDI O
Dispozitivul pune la dispozitie patru profiluri predefinite ce
permit operatiuni ale dispozitivului care se potrivesc cel mai
bine in mediul in care va aflati. Profilurile sunt General,
Silentios, Intalnire si Exterior. Atingand pictograma
puteti adauga un nou profil; Apasati pentru a reveni la
Page 19

19
setarile initiale.
7. 4 A F I S A R E
Cu aceasta functie puteti configura caracteristicile de afisare
ale dispozitivului, inclusiv luminozitate, rotire automata, etc.
7. 5 S T O CA R E
Vizualizati si gestionati spatiul de stocare al dispozitivului.
Spatiul total si spatiul disponibil: Listeaza capacitatea spatiului
de stocare din cardul microSD instalat in dispozitiv si
cantitatea pe care ati utilizat-o pentru stocarea fotografiilor,
fisierelor video, audio si a altor fisiere. Demontati cardul
microSD: Demontati cardul microSD din dispozitiv astfel incat
sa formatati cardul sau sa il inlaturati in conditii de siguranta
cand dispozitivul este pornit.
Spatiul disponibil: Capacitatea de stocare interna a
telefonului, folosita de sistemul de operare, componentele
sale, aplicatiile (inclusive cele descarcate) si datele
permanente sau temporare.
7. 6 A C U M U L A T OR
Puteti verifica statusul acumulatorului accesand acest
submeniu.
7. 7 A P LI C A T I I
Page 20

20
Acest submeniu va permite sa gestionati toate aplicatiile
instalate, care ruleaza sau pe cele salvate in memoria
dispozitivului si pe cardul SD. Puteti inlatura sau gestiona
aplicatiile instalate, vizualiza si controla aplicatiile care
ruleaza, permite instalari ale aplicatiilor din afara magazinului
Play.
7. 11 A C C E S LA LOCA TI E
Aparatul suporta Global Positioning System (GPS).
7. 12 S E C U R I T A TE
Puteti proteja dispozitivul de utilizatorii neautorizati setand
codul PIN sau introducand o parola.
Activati sau dezactivati PIN-ul cartelei SIM
Atunci cand codul PIN este activat, vi se va solicita
introducerea acestuia inaintea efectuarii unui apel.
Accesati Aplicatii > Setari > Securitate
Din meniul Blocare card SIM selectati Activati
blocarea cardului SIM
Selectati un card SIM.
Atingeti Blocare SIM pentru a folosi PIN. Bifati pentru
a activa, debifati pentru a dezactiva.
Introduceti codul PIN curent.
Pentru a schimba codul PIN, selectati Schimba PIN.
Introduceti codul PIN vechi.
Introduceti noul cod PIN pentru a confirma.
Page 21

21
Setarea blocarii ecranului
Puteti seta o metoda de blocare a ecranului in functie de
Model, Cod PIN sau parola.
Accesati Setari > Securitate
Selectati Blocarea ecranului
Selectati forma dorita (Fara, Glisare, Deblocare
vocala, Model, PIN sau parola)
7. 13 L I M B A SI ME TODA D E I N TRA RE
Folositi setarile din Limba si metoda de intrare pentru a
selecta varianta lingvistica a textului din dispozitiv si pentru a
configura tastatura de pe ecran, incluzand cuvinte pe care leati adaugat in dictionar.
7. 14 C OP I E D E REZ ER V A & R E S E T A RE
Puteti face setari de confidentialitate pentru a gestiona
informatii personale precum stabilirea unei copii de rezerva,
restabilirea automata sau resetarea configurarii din fabrica.
7. 15 C ON TU R I
Folositi sectiunea Conturi pentru a adauga, inlatura sau
gestiona contul dumneavoastra Google sau alte conturi
suportate. Puteti, de asemenea, sa utilizati aceste setari
pentru a controla cum si daca aplicatiile trimit, primesc si
sincronizeaza date in functie de propriul program, si daca
Page 22

22
toate aplicatiile pot sincroniza automat datele utilizatorului.
7. 16 DA T A S I OR A
Puteti opta pentru setarea datei, orei si a fusului orar utilizand
submeniul. Utilizati modul Automat daca doriti alte setari
decat cele ale retelei. Utilizati formatul de 24 de ore: Puteti
activa sau dezactiva. Alegeti formatul de data: selectati din
multitudinea de formate.
7. 17 P L A N I F I CARE PORN I R E / O P R I R E
Puteti seta timpul pentru pornire/oprire automata. Activati
functia inainte de a seta timpul.
7. 18 A C C E S I B I LITA TE
Puteti utiliza setarile din Accesibilitate pentru a configura
plug-in-uri de accesibilitate pe care le-ati instalat pe
dispozitiv.
7. 19 D E S P R E T EL EFON
Puteti vizualiza informatii de sistem precum Stare, Informatii
legale, Numar model, Versiune Android si asa mai departe.
Pont: In versiunea JellyBean, optiunile pentru dezvoltator
sunt ascunse. Pentru a le afisa mergeti la “Despre telefon” si
apasati de 4 ori pe “Numarul versiunii”. Apoi sectiunea
“Optiuni dezvoltator” va fi disponibila.
Page 23

23
8. APLICATII
In scop de divertisment, dispozitivul dumneavoastra este
prevazut cu mai multe aplicatii interesante si utilitare. Va
rugam sa va asigurati ca ati efectuat setarile GPRS din
dispozitiv, pentru a accesa aplicatiile. Contactati operatorul
pentru setarile GPRS.
8. 1 C A L C U L A T O R
Calculatorul va ajuta sa efectuati functii aritmetice de baza,
cum a ar fi adunarea, scaderea, inmultirea si impartirea.
8. 2 C EA S
Functia Ceas ofera acces catre setarea alarmei.
8. 3 G M A I L
Gmail este serviciul de email web-based Google. Google Mail
este configurat atunci cand setati pentru prima data
dispozitivul. In functie de setarile de sincronizare, Google Mail
instalat pe dispozitiv este sincronizat automat cu contul de
Google Mail de pe web.
Accesati Gmail; Selectati Creati un cont nou sau Autentificare
in contul Google.
Urmati instructiunile de pe ecran pentru a va loga sau pentru
a crea un utilizator si o parola Gmail.
Page 24

24
Atunci cand veti fi logat veti putea sa cititi si sa trimiteti
emailuri din contul Gmail.
8. 4 L OCA L
Local va ajuta sa descoperiti punctele de interes din
apropiere. Cautati rapid restaurant, cafenele, baruri si alte
locuri, in timp ce sunteti pe drum.
Cu Local e simplu sa evaluati locurile pe care le vizitati.
Evaluand locuri veti primi recomandari de locatii bazate pe
locatiile care va plac si recomandari din partea prietenilor.
8. 5 MA G A Z I N PLAY
Magazinul Play va ajuta sa gasiti si sa descarcati aplicatii si
jocuri distractive pentru dispozitivul dumneavoastra.
Accesati Magazin Play si setati un cont Google.
Selectati Creati un cont pentru un cont nou sau
Conectati-va pentru a va conecta cu contul existent.
Conectandu-va puteti incepe sa cautati si sa descarcati
aplicatii din magazinul Play. Accesati Aplicatii pentru a
vizualiza lista aplicatiilor disponibile si accesati Jocuri pentru a
vizualiza lista jocurilor disponibile.
9. SPECIFICATII
Sistem de operare
Android 4.2
Culoare fata/spate
Black/Black
Page 25

25
Procesor
Dual Core 1,2 GHz
Demensiune ecran
4,5" IPS
Rezolutie
854 × 480
Tip ecran
Multitouch, 5 points
Dual Sim
Yes
Tip SIM
1 Normal SIM + 1 Micro SIM
2G Network
850/900/1800/1900
3G Network
900/2100
Camera frontala
0,3 MP
Camera principala
5MP, Flash
Memorie RAM
512 MB
Memorie flash
4 GB
Wi-Fi
Yes
Bluetooth
Yes
GPS
Yes
EDGE
Yes, Class 10
GPRS
Yes, Class 12
Difuzor
0,5 W
Porturi
audio jack, microUSB
Dimensiuni
132 x 66.8 x 9.5 mm
Greutate
140 g
Baterie
1750 mAh
Format video AVI, MP4, 3GP, RMVB
Format audio MP3, MIDI, WAV, AAC, AMR
Page 26

26
Format foto
JPG, BMP, PNG
Altele
FM Radio, Proximity sensor,
Accelerometer
Pachetul contine
1 x UTOK 450D Smartphone;
1 x Battery;
1 x USB Cable;
1 x Charger;
1 x Earphones;
1 x User Manual.
SAR VALUE 0,327 W/Kg
Valoare SAR
maxim admisa
2,0 W/Kg
Declaratia de conformitate pentru produsul 450 D, marca
UTOK poate fi accesata online la adresa web www.utok.com
Page 27

27
USER MANUAL
UTOK 450 D
TABLE OF CONTENTS
Page 28

28
1. Understanding your device 32
2. Getting started 34
3. Basic operations 37
4. Home screen 42
5. Multimedia 44
6. Network 46
7. Settings 48
8. Aplications and utilities 52
9. Technical specifications 54
Page 29

29
ALL R I G H T S R E SER VED
©2013. All rights are reserved. No part of this document can be
reproduced without permission. All trademarks and brand names
mentioned in this publication are property of their respective owners.
While all the efforts have been made to ensure the accuracy of contents
in this manual, we presume no responsibility for errors or omissions or
statements of any kind, whether such errors are omissions or statements
resulting from negligence, accidents, or any other cause. We operate a
policy of continuous development and reserve the right to make
changes, modifications and improvements to the device, device features/
specifications or any of its parts without prior notice. Your device may
have preinstalled bookmarks and links for third party internet sites and
may allow you to access third party sites. These are no affiliated with us,
and we do not endorse or assume liability for them. If you access such
sites, take precautions for security or content. The limited warranty does
not cover user manuals or any third party software, settings, content,
data or links, whether included/downloaded in the product, whether
included during installment, assembly, shipping or any other time in the
delivery chain or otherwise and in any way acquired by you. To the
extent permitted by applicable law(s), we do not warrant that any our
software will meet your requirements, will work in combination with any
hardware or software applications provided by a third party, that the
operations of the software will be uninterrupted.
User’s Manual is provided just to guide the user about the
functionality of the device. It is not a certificate of technology. Some
functions may vary due to modifications and up-gradations of software
or due to printing mistake.
Page 30

30
SA F E T Y PR E C A U T I O N S
Please read the following safety guidelines before using the
device.
• Do not use the phone while you are driving.
• Do not place magnetic storage media near your
phone. Radiation from the phone may erase the
information stored on them.
• Keep your phone and its accessories away from
children.
• Mobile phones can interfere with the
functioning of medical devices such as hearing
aids or pacemakers. People having active
medical implants should keep their cell phone at
least 15 cm away from the implant.
• Permanent hearing loss may occur if you use
earphones or headphones at high volume.
• Use a wireless hands-free system (headphone/
headset) with a low power Bluetooth emitter.
• Make sure the cell phone has a low SAR.
• Keep your calls short or send a text message
(SMS) instead. This advice applies specially to
children adolescents and pregnant women.
• Use cell phone when the signal quality is good.
Page 31

31
Notice:
Do not dismantle the device or accessories,
otherwise the manufacturer will not be liable to pay
for damages as the device and accessories are not
covered by warranty.
Use only original batteries and charging devices.
Please back up your important data timely and keep
them properly. The company is not liable for any
failure to call or loss of data due to mis-operation,
poor signal or power cut, etc.
Do not put use it in a place with flammable gas such
as a petrol pumps. The temperature recommended
for using the device is 5-35℃. Do not touch the
charger, power cable or socket with wet hands. This
may cause an electric shock.
All the screens in this manual are for reference only,
and some contents actually displayed may depend
upon the presetting of the service provider or the
network operator, or the SIM card. If any functions
referred to in this manual are different from those of
your device, please follow your device.
If your phone or any of its accessories do not
function normally, then please visit your nearest
Page 32

32
authorized service facility. The qualified personnel will
assist you, and if necessary, will arrange for the service.
1. UNDERSTANDING YOUR DEVICE
1.1 GENERAL I N FO
UTOK 450D is a multi SIM phone that encloses features, such
as Andriod version 4.2, Wi-Fi, 1.2 GHz Dual Core Processor, 5
MP digital Camera, etc. This phone is provided with two SIM
slots for two different SIM cards. The SIM card inserted in the
slot1 is called SIM1, and the second one in the slot2 is known
as SIM2. You can select to operate SIMs as per your personal
and professional needs.
Page 33
33
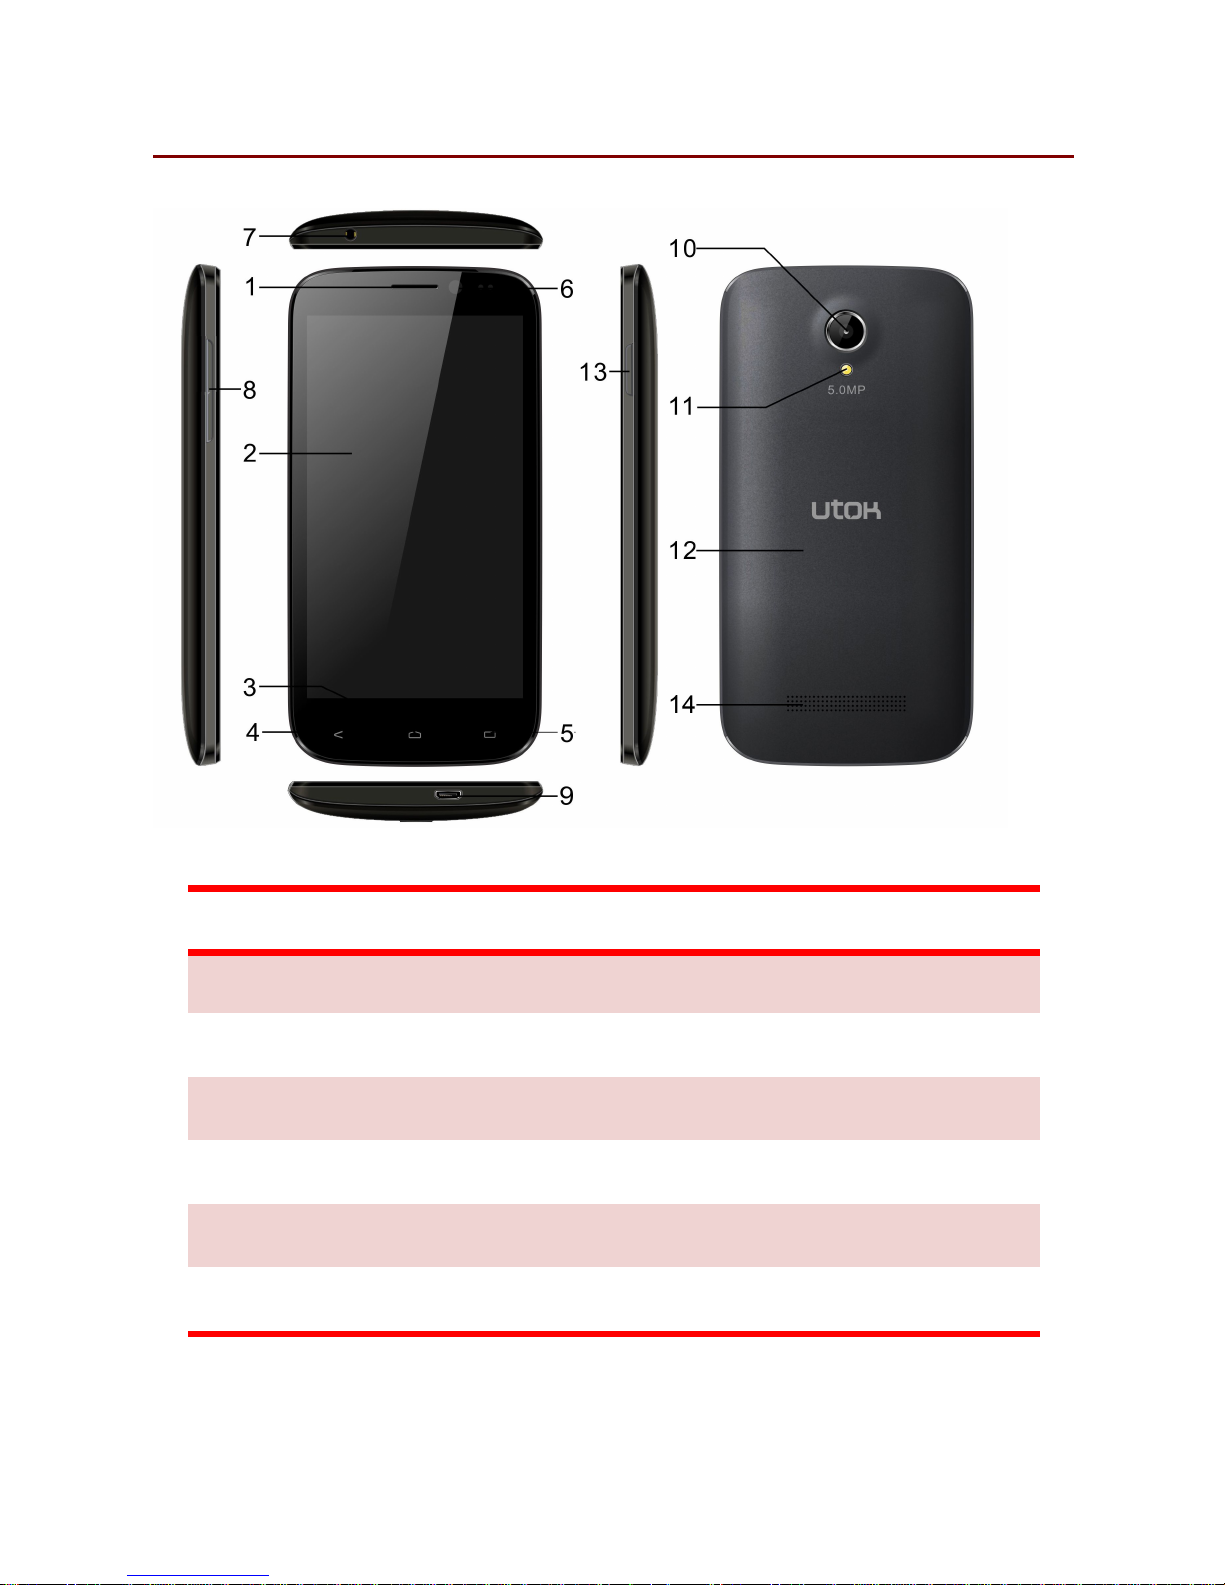
1.2 DEVICE O VE RV I EW
1. Earpiece 2. Touch Screen
3. Home Key 4. Menu Key
5. Back Key 6. Front camera lens
7. Earphone Jack 8. Volume control key
9. USB port 10. Camera lens
11. Torch 12. Battery cover
13. Power Key 14. Speaker
Page 34
34
2. GETTING STARTED
2.1 INST ALL I N G CARDS & B AT TERY
Please switch off your device before inserting or removing the
battery / SIM card or memory card.
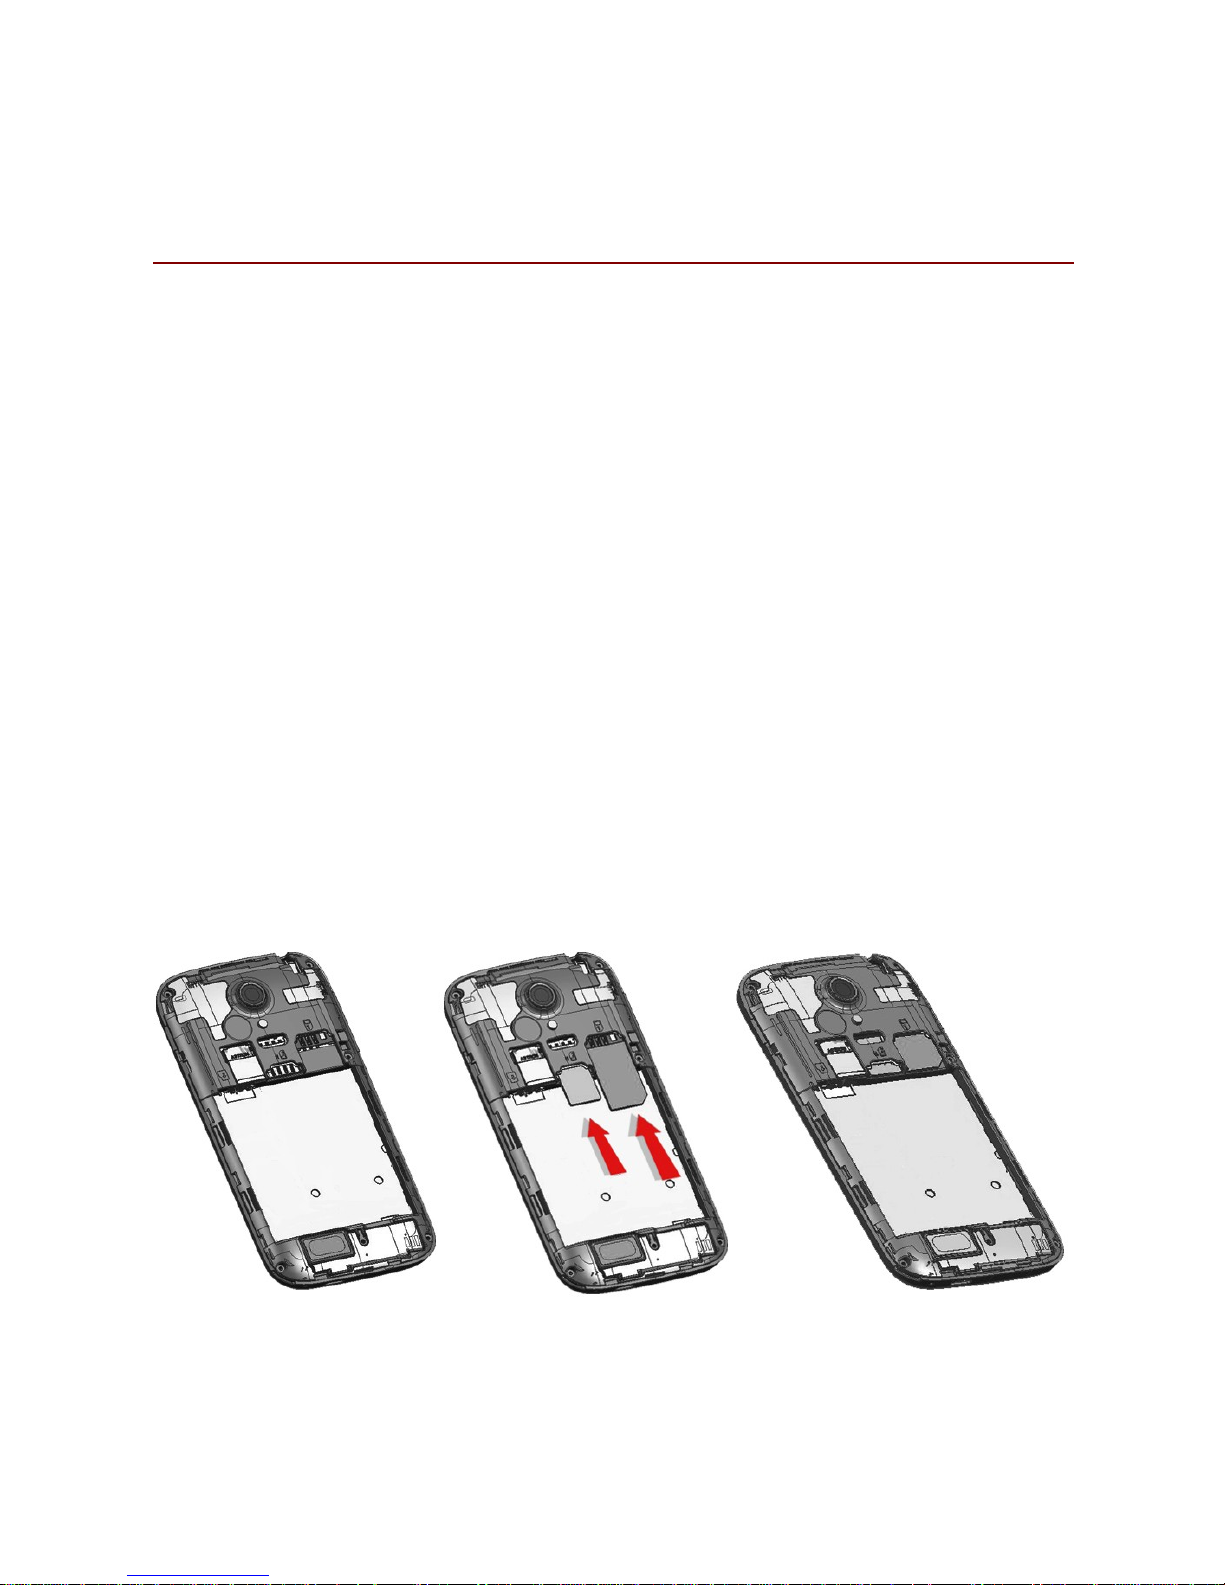
Installing SIM Card and Battery
Your device is provided with two SIM slots for two different
SIM cards. In order to install battery and SIM card in the
device, please follow the steps mentioned below:
Remove the back cover of the device.
Hold the device with the front facing downwards and
pull the battery cover.
Insert the SIM cards in the device.
Attach the battery.
Push the battery cover until it clicks into place.
Page 35
35
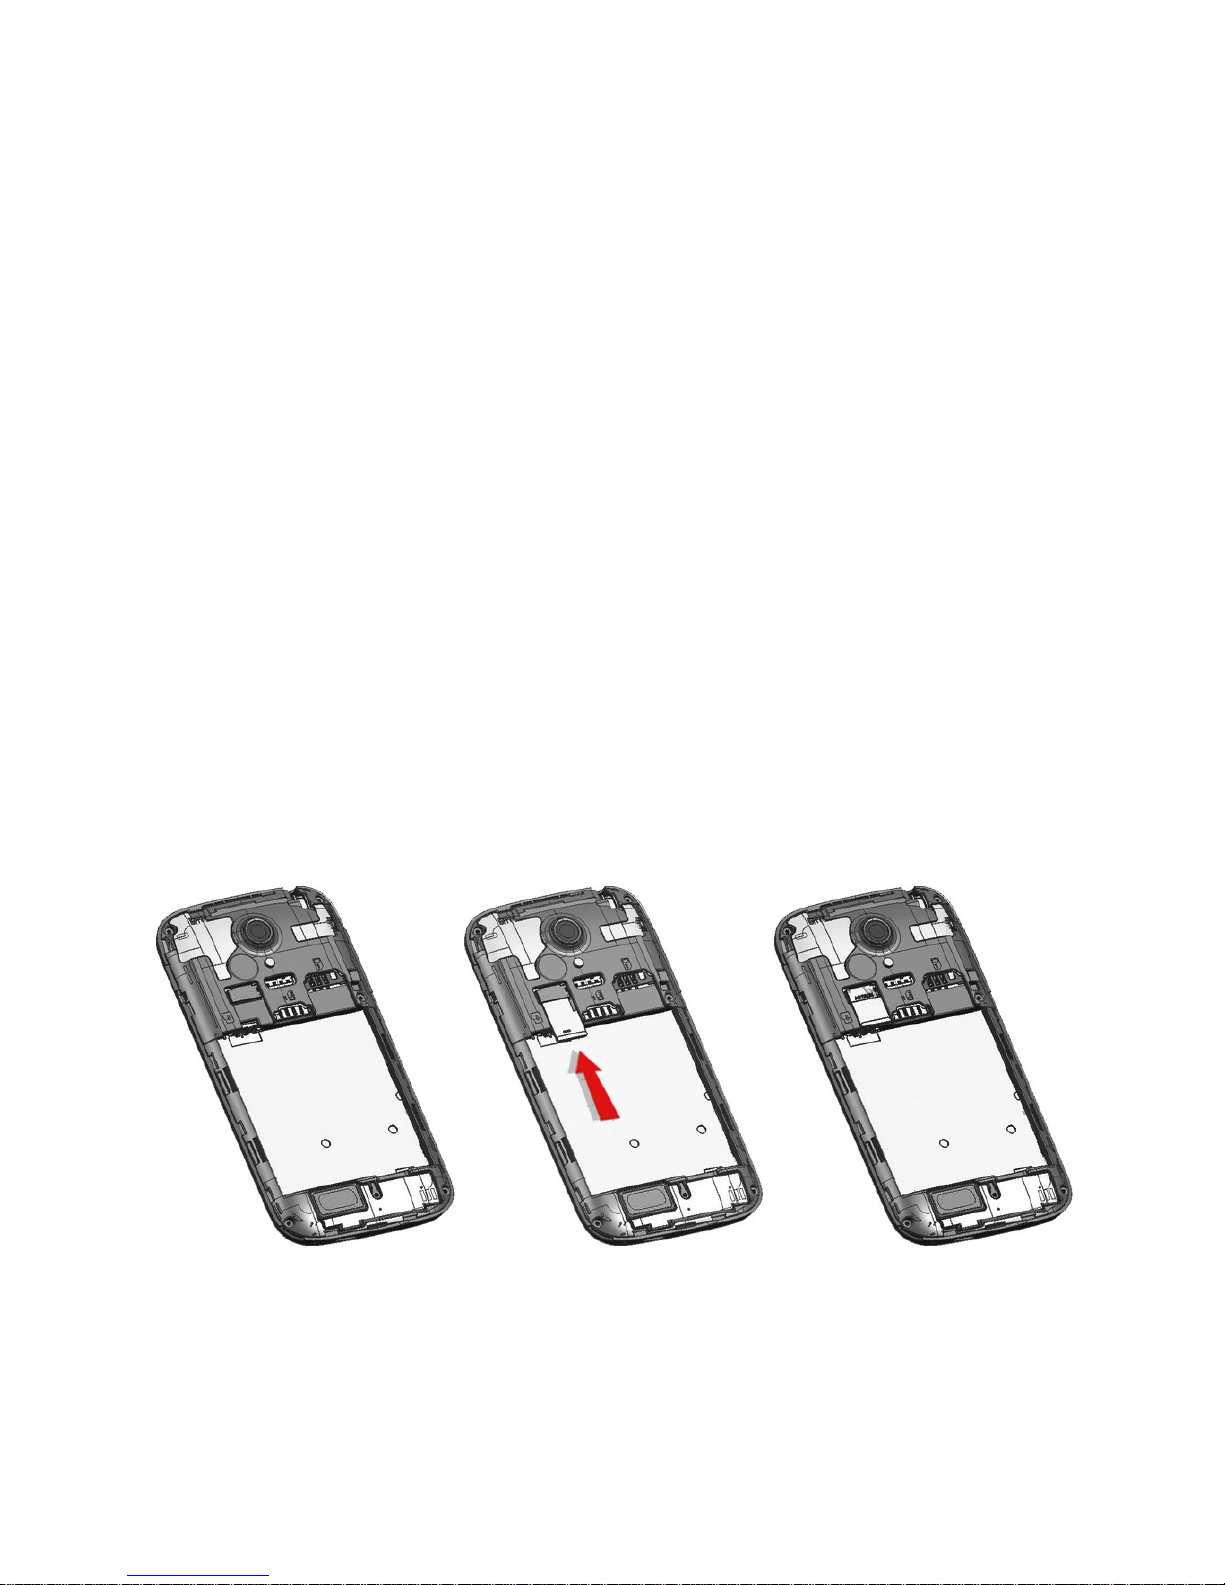
Installing Memory Card
Your device supports T-Flash card, which is a multimedia
memory card used to multiply the memory of the device. The
T-flash card is small and should be pulled out and installed
carefully and prudently in order to avoid any kind of damage.
Please follow the steps mentioned below to install the
memory card in the device:
Switch off your device.
Remove the battery cover.
Slot the T-Flash memory card into the slot.
Attach the battery.
Fix the battery cover until it mount properly into
place.
Page 36
36
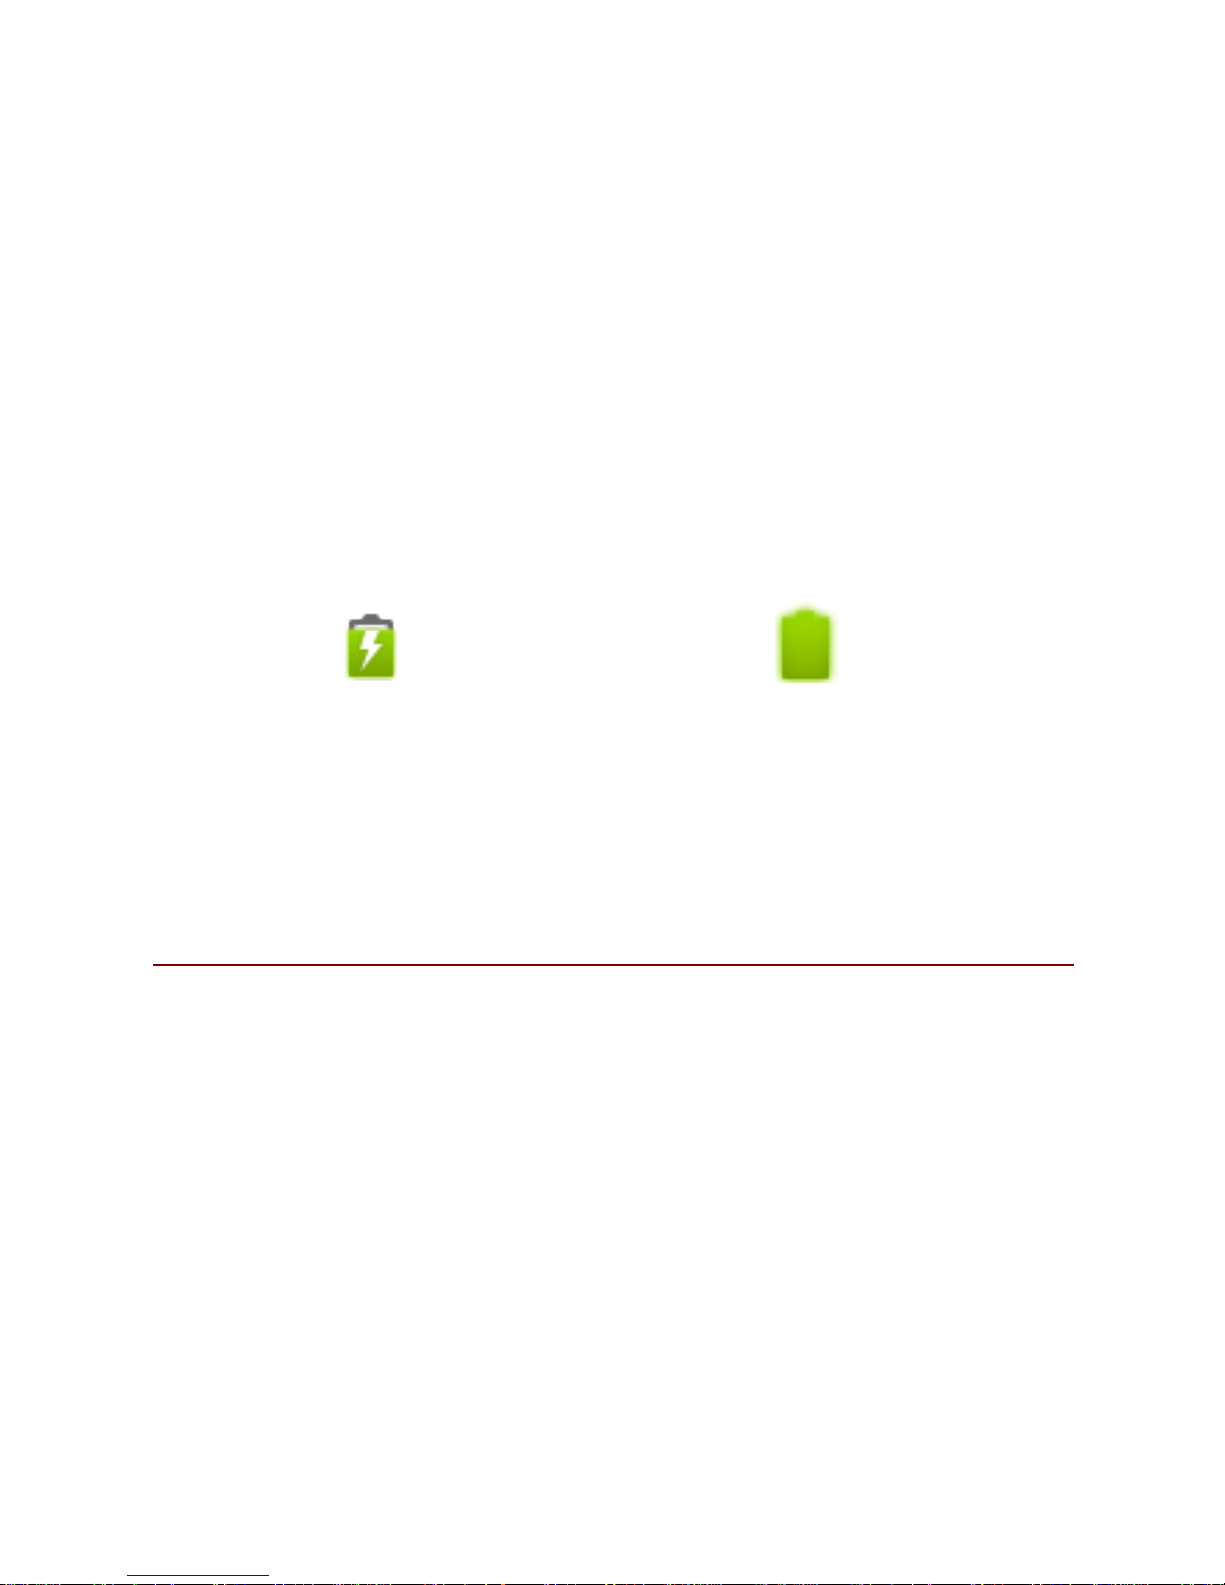
Charging the Battery
The device prompts a warning tone and message stating
insufficient battery when the battery power is low.
Please follow the instructions mentioned below to charge
your device:
Plug the connector of the charger into the jack of the
device.
Plug the charger into a standard AC wall outlet.
Charging……. Fully Charged…….
You should fully charge the battery before using the device
for the first time. It is recommended to charge the battery for
three hours before using the device for the first time.
2.2 POWERING ON/OFF THE DE VICE
Turning On the Device
After installing the SIM cards and charging the battery, you
are now ready to turn on your device.
Long press and hold the Power Key to turn on the
device.
The first screen that appears is known as the home
Screen.
Drag the lock icon sidewards to unlock the screen.
If the screen turns off, then short press the Power
Page 37
37
Key to turn on the display.
Turning Off the Device
Press and hold the Power Key for 3 seconds.
A pop-up window appears, select Power off.
Select OK to confirm.
3. BASIC OPERATIONS
3.1 CALLING
To Make Calls
If the icon appears on the screen, then you can make or
receive calls.
To make a call, please follow the steps mentioned below:
Enter the Main Menu, select Phone.
Enter the phone number using the on-screen
keyboard.
Tap to delete a wrong number. Tap and hold
it to erase the entire number.
After entering phone number, tap .
To end the call, tap
Answer/Reject an Incoming Call
Page 38

38
When you receive an incoming call, a notification message
appears on the screen. In order to accept the call, drag
towards right. If you wish to reject the call, drag towards
left.
Other Options during the call
To put a call on hold
If you are having a call conversation and there is another
incoming call, select hold to put the first call on hold. To
unhold the call, select unhold.
To set up conference calls
If you are already having a call conversation, select
Hold to put the call on hold.
Select Add Call to make another call.
After connecting to the second call, select merge
calls to set up the conference call.
3. 2 M E S S A G I N G
Your device features sending and receiving of SMS (Short
Message Service) and MMS (Multimedia Message Service). Go
to Main Menu and then select Messaging.
Creating a Message
Page 39
39
Tap Compose new message.
In To field; enter the recipient’s phone number.
Type message in the Type to compose field.
Tap to Send.
Receiving and Managing Messages
When you send and receive messages to or from a contact,
these messages are grouped as a message thread. A message
thread looks like an exchanged conversation.
To reply to a text message
Enter the Main Menu, select Messaging.
Select a message thread to open it.
Select Type to compose to enter your message.
Tap to Send.
To forward a text message
Enter the Main Menu, select Messaging.
Tap to view a message thread.
Press and hold a message to view the message
options.
Select Forward.
In the To field, enter the recipient’s phone number.
Tap to Send.
To delete all text messages
Enter the Main Menu, select Messaging.
Tap Menu > Delete all threads.
Page 40

40
All the messages will be deleted.
To copy message text
You can use this function to copy the text from a message to a
new message you are composing.
Enter the Main Menu, select Messaging.
Select a message thread to open it.
Press and hold the message to view the submenu
options.
Select ‘Copy’.
Go to Compose new message.
Press and hold Type to compose.
Select ‘Paste’ to paste the copied text to your new
message.
MULTIMEDIA MESSAGE
A Multimedia message or MMS can contain letters, an image,
an audio or video file. To create and send a MMS, please
follow the steps mentioned below:
Enter the Main Menu, select Messaging.
Tap Compose new message.
Select Menu > Add subject.
In the To field, enter the recipient’s phone number or
email address and enter the Subject.
To insert a picture or video file, etc, tap .
To insert text, tap Type to Compose, and then enter
your message.
Page 41

41
3. 3 C ON TA C T S
Contacts refer to the phonebook that lets you store names,
phone numbers, e-mail addresses and other information. You
can save information such as name, picture, phone numbers,
e-mail addresses, etc for each contact listed in your Contacts
menu.
To add a Contact
Enter the Main Menu select Phone.
Enter number > Tap Menu key > Add to contacts >
Create New contact.
Select the storage
You can enter contact information such as name,
phone number, email address etc, if you select
storage as “Phone”.
Tap Done to save the contact.
Tip: Or enter the Main Menu and select People, tap
create New contact.
To import contacts
Enter the Main Menu select People.
Tap Menu key > Import/Export.
Select to import contacts from Phone contact/ Phone
storage/ SIM Card/ SD Card.
Select a particular source to import the contacts
from.
Select Next.
Select the destination, such as Phone to copy
Page 42

42
contacts to.
Select Next.
Select “Select All” to import all contacts or mark the
required contacts.
Select OK.
3. 4 E M A I L
Your device allows you to compose, read and send emails.
3. 5 B R O W S E R
Browser is a tool which enables you to access the Internet.
4. HOME SCREEN
From Home screen, you can quickly access common features,
view notifications of missed calls, received messages and
check connection status.
4. 1 S T A T U S BAR
The Status bar icons indicate different types of information.
The table below lists various icons that might appear on the
status bar of the device.
Network intensity of SIM card 1 or SIM card 2
Battery level of the device
Page 43
43
New short message
Missed call notification
USB connected
Wi-Fi is connected.
Bluetooth is activated
GPRS network is in use.
4. 2 A P P L I C A T I O N TA B
Tap Application Drawer to access applications and settings of
the device. The Application tab enables you to access the
Main Menu and choose among the various utilities / features
available in the device.
4. 3 C U S T O M I Z I NG SCREEN
The device features a touch screen with active displays and
access to utilities at just one-touch. So swipe right or left to
navigate through various screens accessing your favorite
features without entering the main menu. Each screen can be
customized by adding various widgets, shortcuts and folders.
Shortcuts
In order to add a shortcut on the screen: Long press on the
desired application to add on the screen.
Page 44

44
Widgets
Save time with live updates right on Home screen and get all
of your personalized updates at one place.
Setting the wallpaper
You can customize the wallpaper of your Home screen with
default wallpaper or with pictures taken from your device.
In the idle mode, tap Menu Key > Wallpaper.
Select your desired wallpaper from the various
options: ES File Explorer, Gallery, Live Wallpapers,
Video Wallpaper, Wallpaper.
Rotating Your Mobile Phone Screen
The orientation of most screens will change to landscape or
portrait view when you rotate your phone sideways.
On the Home screen, tap > Settings > Display >
Auto-rotate screen to disable this function.
5. MULTIMEDIA
Your device features various multimedia options, such as
Music Player, Camera and Video Player.
5. 1 F I L E MA N A G E R
You can browse, open and manage the data saved in the
Device and Memory card by accessing the File Manager submenu. The device provides a certain space for users to
Page 45
45
manage files and supports the T-Flash card. You can use the
file browser to conveniently manage various directories and
files on the T-Flash card.
5.2 MUSIC
Use the Music player to play music files. The songs saved in
your SD Card can be played using the Music Player of the
device.
Tap select Application tab
Select Music
The songs are categorized by Artists, Albums and Songs. You
can make your favorite playlist by long pressing on a song and
selecting Add to Playlist.
5.3 CAMERA
Your device is equipped with camera and camcorder, which
enables you to capture photos and videos.
5. 4 S OU N D R E C O R D E R
You can use the sound recorder to record sounds and also
select to save the recordings in your phone.
Tap > Sound Recorder. When in the sound recorder
interface, press menu key to select recording mode.
Page 46
46
5. 5 GA LL ER Y
You can view the captured images, recorded video clips, and
downloaded images in the Gallery.
The picture folder and video folder will be displayed.
Select to view the camera pictures or camera videos. The
images or videos will be displayed in thumbnails.
5. 6 F M r a d i o
You can use your phone to listen to FM radio stations once the
original Headset is plugged into the connector. Please press
the side key to adjust music volume.
Tap to exit FM radio function. Tap the ( ) to search
the channels.
6. NETWORK
6.1 WI- F I
Connect to a wireless network to browse Internet.
Enter Main Menu and tap Settings.
Tap ‘ON’ to activate Wi-Fi.
Tap Wi-Fi > Network notification to start
detecting networks. The available networks will then
be listed.
Tap Add Wi-Fi network to add a connection.
Page 47

47
Note:
If the device before the connection is successful, the
equipment information will be saved in the pop-up
window selected connection, select forget to remove
device information.
If the device does not encrypt selected connection in
the pop-up window to connect.
If the device is encrypted, the pop-up window will
appear, enter the password.
Network connection is successful; the status bar icon
appears Wi-Fi connection.
6. 2 3 G
The device supports WCDMA protocol. Please make sure that
you device is turned off, then insert or remove the SIM card.
6. 3 B LU E T OO TH
You can transfer data, such as music to other device using
Bluetooth. Search the device and accept/transfer data. The
received data is automatically stored in the directory.
Access Settings by entering the main menu
Check Bluetooth to turn on Bluetooth
To make your device discoverable, select bluetooth
settings and check discoverable.
7. SETTINGS
Select Settings to view and adjust the settings of your device.
Page 48
48
The Settings menu is categorized into: Wireless & networks,
Audio profiles, Display, Storage, Battery, Apps, Location
services, Security, Language & input, Backup & reset,
Accounts and System.
7.1 S IM MANAGEMENT
Your device supports two SIM cards, which can be managed
by accessing the SIM Management sub-menu. You can
view/change the roaming settings of the cards using this
menu.
7.2 WIRELES S & NETWOKS
Access this sub-menu to change/view the Wi-Fi, Bluetooth,
Mobile Networks, VPN settings, etc. Please refer to network
section for detailed information on Wi-Fi and bluetooth.
7.3 AUDIO P RO F I LES
Your device provides four pre-defined user profiles that allow
the operations of the device to best suit the environment you
are in. The profiles are General, Silent, Meeting and Outdoor.
The Touch icon adds a new profile; tap the icon to
select Reset to restore the default settings.
7.4 DISPL AY
Page 49

49
With this function you can configure the display
characteristics of the device including brightness, Auto-rotate
screen, etc.
7.5 STO RAGE
View and manage the data storage of your device:
Total Space and Available Space: Lists the amount of space on
the microSD card installed in your device and the amount you
have used to store photos, videos, music, and other files.
Un-mount SD Card: Un-mounts the microSD card from your
device so that you can format the card or safely remove it
when the device is on.
Available Space: The amount of internal phone storage used
by the operating system, its components, applications
(including those you downloaded), and their permanent and
temporary data.
7.6 BATTERY
You can check the battery status of the device by accessing
this sub-menu.
7.7 APPLICA TI ON S
This sub-menu enables you to manage all the installed,
running and applications saved in the device memory and SD
card. You can remove and manage installed applications, view
Page 50

50
and control running applications, allow installation of non we
build in market applications.
7.8 LOCA TI ON ACCE S S
Your device supports Global Positioning System (GPS).
7.9 SECURITY
You can protect your device from unauthorized users by
setting the PIN code or entering a password.
Enable or Disable SIM card PIN
When PIN code is enabled, you are required to enter the PIN
code before making a call.
Go to Application Drawer > Settings > Security.
On the SIM card lock tab, select Set up SIM card lock.
Select a SIM card.
Tap Lock SIM card to use PIN. Check to enable,
uncheck to disable.
Enter the current PIN code.
To change the PIN code, select Change PIN.
Enter the old PIN code.
Enter the new PIN code and confirm.
Setup Screen Lock
You can set up a lock for your screen in form of Pattern, PIN
code or password.
Go to Settings > Security
Set up screen lock
Page 51

51
Select a desired form (None, Slide, Pattern, PIN or
password)
7.10 L ANGUAGE AND INPUT
Use the Language & Keyboard settings to select the language
for the text on your device and for configuring the onscreen
keyboard, including words that you’ve added to its dictionary.
7.11 B ACKU P & RESET
You can use the Privacy settings to manage your personal
information, such as back up my data, automatic restore and
factory date reset.
7.12 ACCO UN T S
Use the Accounts to add, remove, and manage your Google
and other supported accounts. You also use these settings to
control how and whether all applications send, receive, and
sync data on their own schedules, and whether all
applications can synchronize user data automatically.
7.13 DATE AN D TIME
You can select to set date, time and time zone using this submenu.
Use Automatic unless you need to override the network
values.
Page 52

52
Use 24-hour format: Select to set 24-hour formats on or off.
Choose Date format: Select from a variety of formats.
7.14 SC HE DU L E POWER ON/ O F F
You can set the time for auto power on /off. Do turn the
status on before using that function, and then the time.
7.15 ACCE S S IBILITY
You can use the Accessibility settings to configure any
accessibility plug-ins you have installed on your device.
7.16 ABO UT P H O NE
You can view system information Including Status, Legal
information, Model number,Android version and so on.
8. APPLICATIONS & UTILITIES
For your entertainment purpose, your device is provided with
several interesting games, applications and utilities. Please
ensure that you have GPRS setting in your device to access
the applications. Contact your operator for GPRS settings.
8.1 C ALCULATOR
Calculator helps you perform basic arithmetic functions, such
as addition, subtraction, multiplication and division.
Page 53

53
8.2 CL OCK
This function gives you an access to the alarm clock.
Go to Clock
Tap > tap to add alarm.
8.3 G MAIL
Gmail is Google's web-based email service. Google Mail is
configured when you first set up your device. Depending on
your synchronization settings, Google Mail on your device is
automatically synchronized with your Google Mail account on
the web.
Go to Main Menu > Gmail.
Select Create or Sign in your Google account.
Follow the on screen instructions to login or create your
Gmail username and password.
Once logged in, you can begin reading and sending emails
from your Gmail account.
8.4 L O CAL
Places helps you discover nearby places you'll love. Quickly
search for Restaurants, Cafes, Bars and other places, while on
the go. Places also makes it easy to quickly rate the places you
visit. By rating places you'll get place recommendations based
on the places you like and recommendations from your
Page 54
54
friends.
8.5 PLAY ST O R E
Play store allows you to find and download applications and
fun games for your device.
Go to Main Menu > Play Store and setup your Google
account.
Select Create to create a new account or Sign in to
sign in your existing account.
Once you are signed in you can begin searching and
downloading programs from the market. Tap Apps to view
the list of applications available and tap Games to view the
list of games available.
9. SPECIFICATIONS
OS
Android 4.2
Color front/back
Black/Black
CPU
Dual Core 1,2 GHz
Display
4,5" IPS
Resolution
854 × 480
Display type
Multitouch, 5 points
Dual Sim
Yes
Sim Type
1 Normal SIM + 1 Micro SIM
Page 55

55
2G Network
850/900/1800/1900
3G Network
900/2100
Front camera
0,3 MP
Back camera
5MP, Flash
RAM
512 MB
Flash memory
4 GB
Wi-Fi
Yes
Bluetooth
Yes
GPS
Yes
EDGE
Yes, Class 10
GPRS
Yes, Class 12
Speaker
0,5 W
Ports
audio jack, microUSB
Dimensions
132 x 66.8 x 9.5 mm
Weight
140 g
Battery
1750 mAh
Video Formats AVI, MP4, 3GP, RMVB
Audio Formats MP3, MIDI, WAV, AAC, AMR
Photo Formats
JPG, BMP, PNG
Others
FM Radio, Proximity sensor,
Accelerometer
Page 56

56
Package contains
1 x UTOK 450D Smartphone;
1 x Battery;
1 x USB Cable;
1 x Charger;
1 x Earphones;
1 x User Manual.
SAR VALUE 0,327 W/Kg
Maximum value for
SAR
2,0 W/Kg
* The standby time and maximum talk time depend upon the
network signals and settings.
Declaration of conformity for UTOK product, model 450 D is
available online at www.utok.com
 Loading...