

Page 1
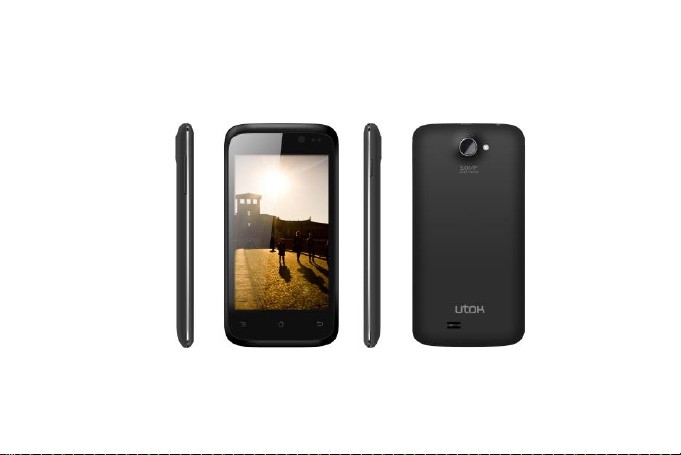
UTOK 400 D
Manual de utilizare
1
Page 2

CUPRINS
Folosirea telefonului .................................................................................................................................. 3
Apelare ........................................................................................................................................................... 10
Administrare contacte ............................................................................................................................... 11
Trimitere / primire mesaje....................................................................................................................... 11
Setarea conturilor de e-mail .................................................................................................................... 13
Folosirea Internet-ului .............................................................................................................................. 15
Aplicatii principale ...................................................................................................................................... 16
Folosirea camerei ........................................................................................................................................ 17
Galerie ............................................................................................................................................................ 18
Muzica ............................................................................................................................................................. 19
Harti si localizare......................................................................................................................................... 20
Comunicatii fara fir ..................................................................................................................................... 21
Setari telefon ................................................................................................................................................ 23
SPECIFICATII TEHNICE ............................................................................................................................ 25
2
Page 3
Folosirea telefonului
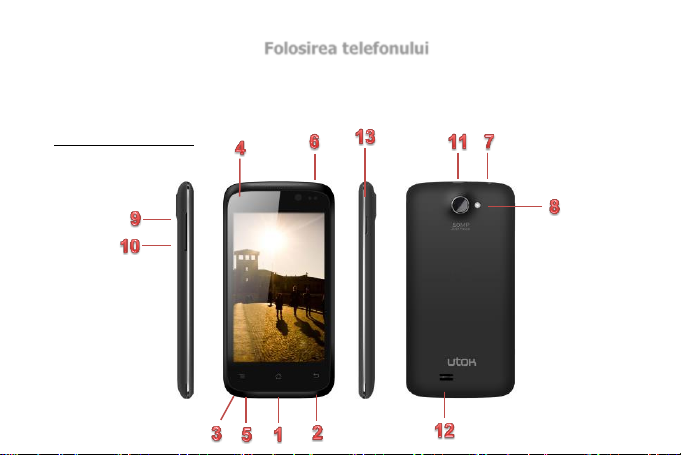
In cadrul acestei sectiuni va prezentam functiile generale ale telefonului, inclusiv pozitionarea
butoanelor, functiile acestora, precum si specificatiile telefonului.
Macheta telefonului
3
Page 4
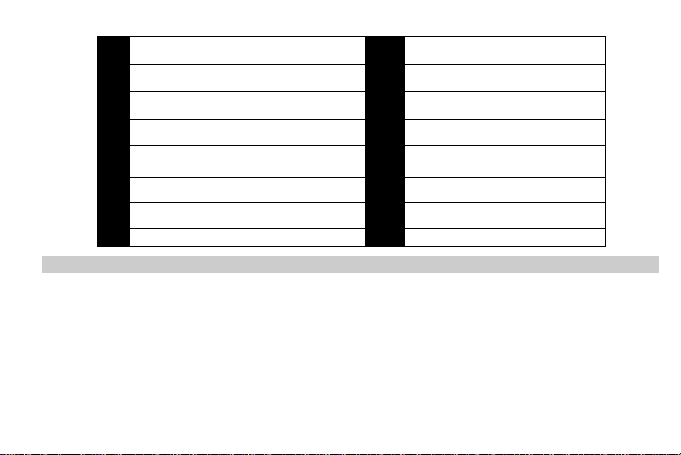
1
Acasa
8
Camera
2
Inapoi
9
Crestere volum
3
Microfon
10
Scadere volum
4
Ecran multi-touch
11
Port Micro-USB
5
Meniu
12
Difuzor
6
Microreceptor
13
Buton pornit/oprit
7
Conector casti 3.5mm
Instalarea cartelelor SIM
Cardul Dumneavoastra SIM va identifica si va face legatura cu reteaua de telefonie. Telefonul
Dumneavoastra nu poate functiona fara cardul SIM.
Pentru a instala cardul SIM, parcurgeti urmatorii pasi:
1. Pregatiti cardul SIM.
2. Deschideti capacul din spate al carcasei.
3. Scoateti bateria din telefon.
4
Page 5
4. Montati cardul SIM astfel incat conectorii metalici ai acestuia sa fie aliniati cu cei ai
telefonului.
5. Montati la loc capacul carcasei apasandu-l usor in pozitia initiala.
Montarea bateriei
1. Deschideti capacul din spate al carcasei.
2. Aliniati punctele de contact ale bateriei cu cele ale telefonului si apoi apasati usor bateria in
locul marcat.
3. Montati la loc capacul carcasei apasandu-l usor in pozitia initiala.
Incarcarea bateriei
1. Conectati incarcatorul la telefon si introduceti-l in priza.
2. Indicatorul bateriei din coltul ecranului va afisa pictograma animata care confirma faptul ca
telefonul se incarca.
3. Cand telefonul este incarcat la maxim, o noua pictograma va afisa nivelul maxim.
4. Deconectati incarcatorul si scoateti-l din priza.
Introducerea cardului SD
1. Deschideti capacul din spate al carcasei
2. Introduceti cardul Micro-SD in locul destinat cu contactele aurii orientate in jos.
5
Page 6

Deschiderea telefonului
Dupa ce ati instalat bateria, puteti porni telefonul si il puteti folosi. Pentru a-l porni, apasati
butonul de pornire/oprire.
Inchiderea telefonului
Deblocati ecranul daca aceasta optiune este activa.
Apasati si mentineti pentru cateva secunde butonul de pornire/oprire.
Cand apare meniul de optiuni, apasati “Opriti alimentarea” si apoi confirmati.
Acasa
Ecran principal
Ecranul principal afiseaza statusul telefonului si face posibil accesul la aplicatii. Ecranul principal
este afisat cand porniti telefonul sau cand apasati butonul “Acasa”.
Ecan principal extins
Exista cinci ecrane principale. Din ecranul principal glisati in stanga sau dreapta pentru a vedea si
celelalte ecrane.
Puteti customiza cele cinci ecrane principale dupa dorinta Dumneavoastra. Ca exemplu, puteti
adauga sau elimina aplicatii, puteti schimba imaginea de fundal si asa mai departe.
6
Page 7
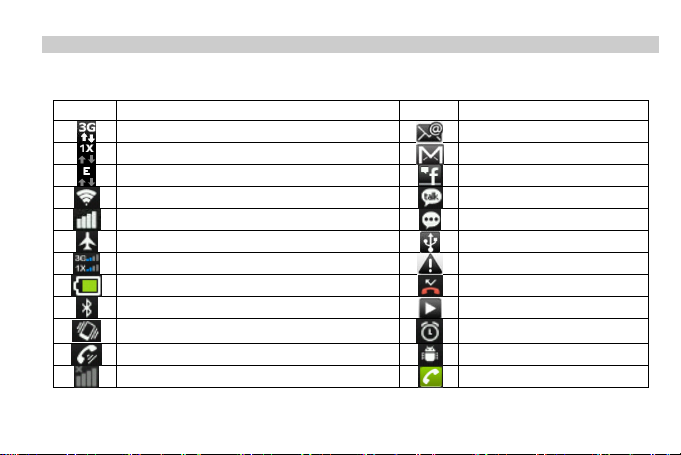
Statusul telefonului si notificari
Pictogra
ma
Descriere
Pictogra
ma
Descriere
Conexiunea 3G pentru date este activa
Mesaj nou E-mail
Conexiune de date activa si in asteptare
Mesaj nou G-Mail
Serviciul de date GSM EDGE activ
Mesaj nou Facebook
Conexiune fara fir Wi-Fi activa
Mesaj nou Gtalk
Puterea semnalului GSM
SMS nou
Mod zbor activat
Mod USB activ
Putere semnal pentru conexiunea 3G
Notificari generale
Nivelul de incarcare al bateriei
Apel ratat
Optiunea Bluetooth este activa
Se ruleaza fisiere de sunet
Modul vibratii este activat
Alarma activa
Optiunea difuzor este activa
Mod depanare USB activ
Fara semnal
Convorbire in desfasurare
Pictograme pentru status telefon si pentru notificari
Acestea sunt pictogramele care pot aparea pe ecranul telefonului si pe bara de notificari:
7
Page 8
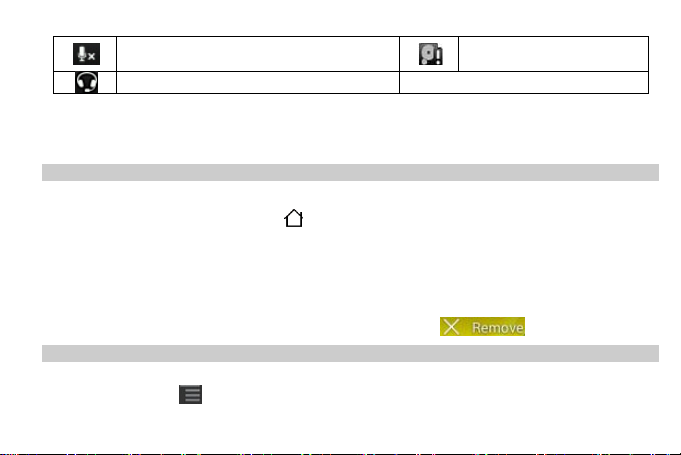
Microfon inactiv
Capacitate maxima de
stocare atinsa
Casti conectate
Deschidere meniu notificari
In momentul in care o pictograma este afisata in bara de notificari, apasati si glisati in jos pentru
a deschide meniul de notificari.
Personalizarea telefonului
Adaugarea de pictograme pe ecranul principal
1. Apasati pictograma “Acasa” pentru a ajunge la ecranul principal.
2. Apasati si mentineti pictograma dorita, apoi mutati-o in locatia aleasa pe oricare dintre
ecrane.
Stergerea pictogramelor de pe ecranul principal.
1. Apasati lung pictograma pana aceasta se activeaza.
2. Mutati pictograma in partea de sus a ecranului peste pentru a o sterge.
Imaginea de fundal
Puteti schimba imaginea de fundal urmand urmatorii pasi:
1. Apasati meniu , apoi “Imagine de fundal”.
8
Page 9

2. Sau puteti apasa lung pe ecranul principal pentru a deschide meniul special pentru
schimbarea imaginii de fundal.
Puteti alege imaginea de fundal preferata din:
Galerie
Imagini de fundal live
Imagini de fundal
Imagini de fundal video
Apoi selectati poza preferata si apasati “Setati imaginea de fundal”.
Copiere fisiere catre si de pe SD card
1. Conectati telefonul la computer cu ajutorul cablului USB livrat.
2. Cand apare pictograma de conectare la PC, apasati “USB Storage” sau “Dispozitiv media”.
3. Pe calculatorul Dumneavoastra, telefonul apare ca un disc extern. Navigati pe acest disc si
puteti copia fisierele.
9
Page 10
Apelare
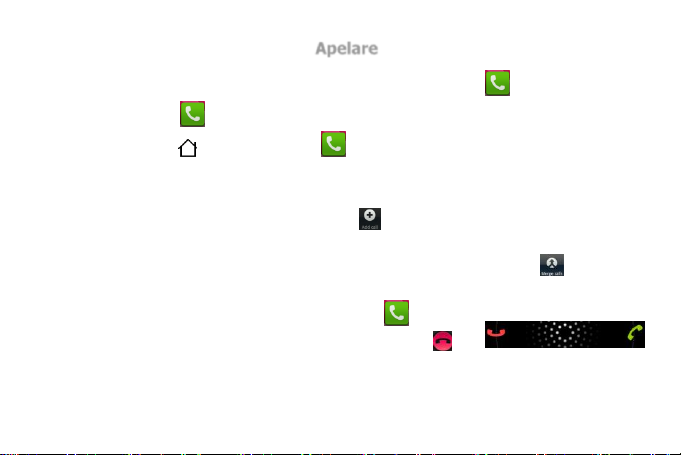
Puteti efectua apeluri prin reteaua WCDMA sau GSM. Puteti apasa pentru a suna folosind
SIM-ul WCDMA sau pentru a folosi SIM-ul GSM.
1. Apasati ACASA , si apoi pictograma .
2. Alegeti numarul dorit apoi apasati pictograma pentru apelare prin SIM1 sau SIM2.
In cazul in care functia este suportata de operator, puteti efectua apeluri de tip conferinta:
In timpul convorbirii, apasati pictograma , apoi introduceti persoana pe care doriti sa
o adaugati in cadrul conferintei si apasati pictograma de apelare.
In momentul in care persoana apelata raspunde, apasati “Merge calls” .
Acum puteti vorbi in conferinta cu toate persoanele implicate.
Pentru a raspunde la un apel, apasati pictograma si glisati
catre dreapta. Pentru a respinge un apel, apasati tasta si
glisati catre stanga. Pentru a opri soneria fara a respinge apelul, apasati butonul de volum.
10
Page 11
Administrare contacte
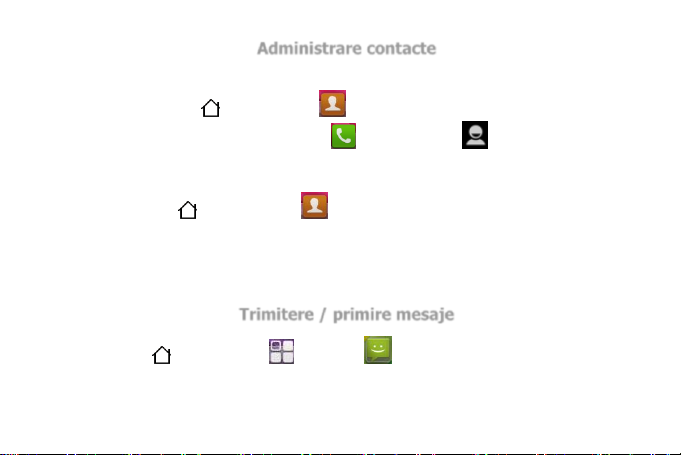
Pentru a vizualiza contactele pe telefonul Dumneavoastra, procedati dupa cum urmeaza:
Apasati ACASA , apoi Contacte .
Apasati ACASA, apoi pictograma , apoi alegeti din partea superioara a
ecranului.
Adaugare contacte noi
1. Apasati ACASA , apoi Contacte .
2. In meniul pentru contacte, apasati “Contact nou”.
3. Alegeti unde sa salvati contactul.
4. Introduceti informatiile pentru acest contact in campurile existente si apoi apasati Finalizat.
Trimitere / primire mesaje
Apasati ACASA , apoi Aplicatii > Mesaje .
Punctul rosu indica mesajele necitite din lista.
Apasati pe un mesaj pentru a putea sa il deschideti si sa cititi continutul.
11
Page 12
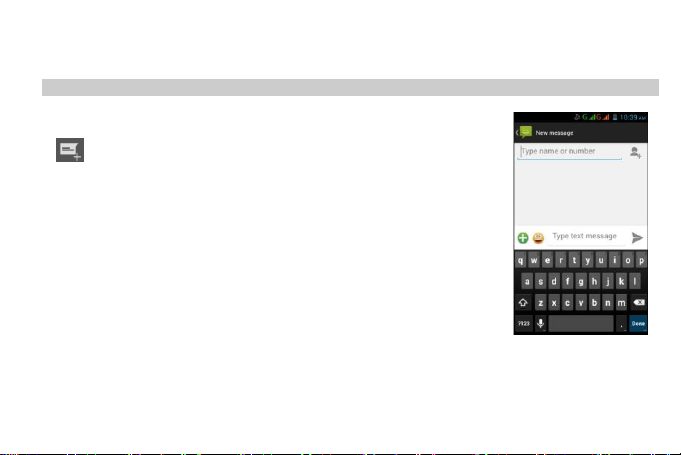
Mesajele sunt afisate in intregime, puteti deci gasi in fiecare mesaj intreaga istorie a
conversatiei.
Trimitere mesaje text si multimedia
Trimitere mesaje text
In meniul pentru mesaje, in partea superioara a ecranului, apasati
. Sau apasati meniu, apoi “Mesaj nou”, pentru a scrie un nou
mesaj.
Adaugati apoi unul sau mai multi destinatari si expediati mesajul.
Pentru a primi rapoarte de trimitere si pentru a fi anuntati atunci cand
mesajul a ajuns la destinatie, in meniul mesajelor apasati Meniu si apoi
Setari. In sectiunea setari SMS, selectati optiunea rapoarte de
expediere.
Pentru a trimite mesaje multimedia, puteti adauga un subiect
apasand Meniu si apoi optiunea Adauga subiect.
Pentru a atasa un fisier, apasati Meniu si apoi Atasament. Apoi Trimitere. Va rugam sa va
asigurati referitor la tipul conexiunii de date ce va fi folosita in momentul trimitetii mesajelor
multimedia, optiune ce poate fi selectata in meniul Setari -> Wireless si retele -> Retele mobile.
12
Page 13
Setarea conturilor de e-mail
1. Apasati ACASA , apoi apasati pictograma aplicatiilor .
2. Apasati pictograma pentru e-mail-uri . Va aparea apoi meniul pentru setarea adresei de
e-mail, meniu ce va va ghida in procesul de instalare. In cazul in care E-mail-ul
Dumneavoastra are deja un cont, dupa deschiderea aplicatiei de e-mail, apasati Optiuni, apoi
Conturi si apoi Adaugare Cont. Apoi apasati Pasul urmator.
3. Activati tastatura.
4. Introduceti adresa de e-mail si parola pentru contul Dumneavoastra, apoi Next pentru a
finaliza si pentru a fi redirectat catre casuta de mesaje. Pentru setari manuale, va rugam sa
alegeti optiunea manual si sa urmati instructiunile.
Trimitere mesaje e-mail
In timp ce aplicatia Dumneavoastra de e-mail este deschisa, apasati tasta Meniu.
Apasati Compunere mesaj si tastatura va fi activata. Introduceti un nume sau o adresa de e-mail
in campul “Catre”.
Daca doriti sa adaugati persoane in Cc sau Bcc, apasati +Cc/Bcc.
Introduceti subiectul mesajului. Putei atasa un fisier din meniu. Apoi apasati Trimitere.
13
Page 14

Setare Gmail
Telefonul Dumneavoastra poate primi mesajele din contul Gmail. Prin conectarea si inregistrarea
in contul Gmail, veti avea acces automat la mai multe servicii Google, cum ar fi sincronizare cont
si contacte, acces la Google Play, Gtalk, si altele. In acelasi timp, veti putea primi mesaje e-mail
fara a mai fi necesare si alte setari.
14
Page 15
Folosirea Internet-ului
Telefonul Dumnevoastra va permite sa accesati Internetul, pentru a avea acces la o mare varietate
de aplicatii si servicii. Urmatoarele exemple reprezinta aplicatii folosite pentru conectarea la
Internet. Veti gasi aceste aplicatii listate in meniul special. Pentru a accesa acest meniu, apasati
ACASA , apoi aplicatii :
1. Navigare Internet : in meniu veti gasi aplicatia pentru navigare Internet.
2. Android Market (Play Store) : Descarcati mii de aplicatii, jocuri, si fisiere media.
3. Retele sociale:
a. Facebook
b. YouTube
c. Google Talk
15
Page 16
Aplicatii principale
Ceas si alarma
Pentru a adauga o alarma, apasati >Ceas>Adauga alarma, apoi
introduceti detaliile necesare.
Pentru a activa alarma, bifati optiunea din dreptul ei.
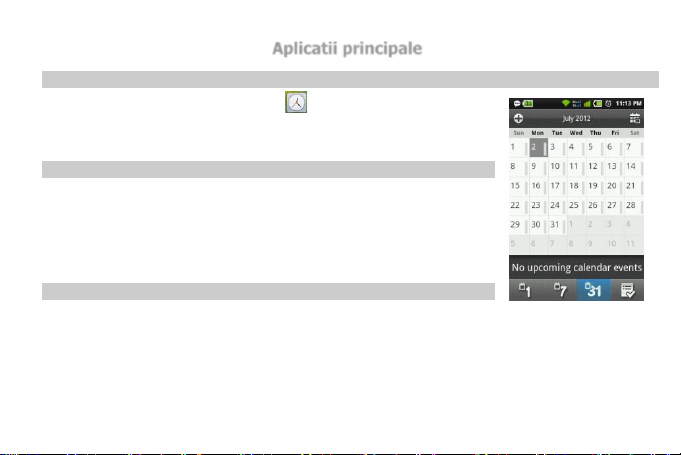
Calendar
Evenimentele din calendarul Dumneavoastra pot fi vizualizate in
diferite moduri:
Apasati > Agenda, Zi , Saptamana, sau Luna.
Cand activati un eveniment, apar mai multe detalii.
Apasati + pentru a introduce detaliile pentru un nou eveniment.
Calculator
Calculatorul are optiuni de vizualizare operatiuni de baza si operatiuni avansate. Pentru a comuta
intre aceste moduri, apasati Meniu > Meniu Avansat / Meniu de baza. Pentru a sterge rezultatele,
apasati butonul de stergere.
16
Page 17
Vizualizare documente
Puteti vizualiza si edita diferitele documente cum ar fi fisiere Word, Excel, PDF sau PowerPoint
folosind diferitele aplicatii disponibile pentru sistemul de operare Android.
Folosirea camerei
Elemente de baza
Asigurati-va ca ati introdus cardul microSD inainte de a folosi camera telefonului.
Pentru a porni aparatul si a face poze, apasati ACASA , Aplicatii apoi apasati
pictograma camerei .
Modul fotografie
Pe ecran, puteti alege intre optiunile urmatoare:
Expunere: Cresteti sau descresteti timpul de deschidere a diafragmei.
Zoom: Inainte de a face fotografia puteti sa incadrati si sa apropiati subiectul fotografiat.
17
Page 18
Modul inregistrare video
Pe ecran, apasati pictograma pentru a inregistra un film.
Galerie
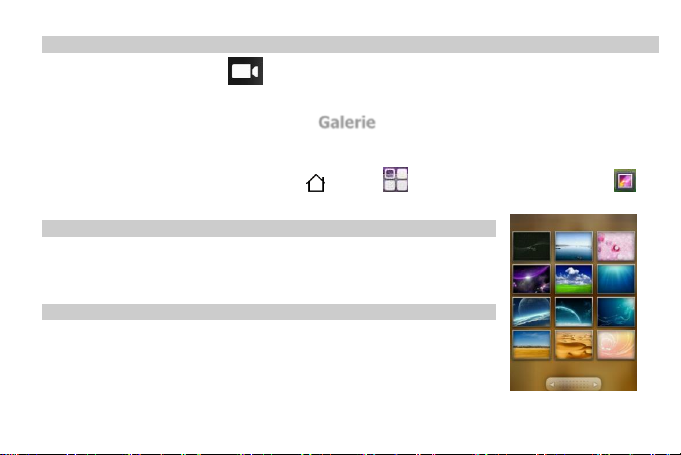
Pentru a deschide galeria, apasati ACASA , Aplicatii , apoi pictograma pentru Galerie .
Apasati apoi unul dintre albume pentru a vedea fotografiile sau filmele salvate.
Vizualizare fotografii
Dupa selectarea albumului, puteti naviga printre fisierele de imagini
sau filme si le puteti vizualiza sub forma de lista sau grila. Apasati pe
poza dorita pentru a o vedea pe tot ecranul.
Vizualizare film
Ecranul comuta in mod automat in formatul ecran lat cand rulati un
fisier video. Folositi butoanele pentru a rula, opri sau pentru a pune
pauza unui film. Toate filmele sunt redate in mod automat pe tot
ecranul.
18
Page 19
Muzica
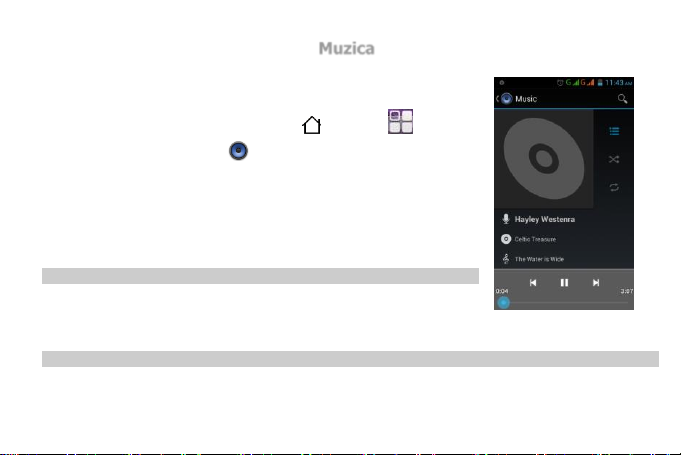
Va trebui sa copiati fisiere audio pe cardul Dumneavoastra pentru a
putea folosi aplicatia pentru muzica si pentru a reda fisierele audio.
Pentru a activa aplicatia, apasati ACASA , Aplicatii apoi
apasati pictograma Muzica .
Melodiile sunt organizate in patru categorii: Artisti, Albume,
Melodii si Liste redare.
Telefonul poate reda urmatoarele fisiere audio:
• MP3, M4A ,WAV, AMR, MIDI, OGG Vorbis
Accesare si redare fisiere audio
In cadrul meniului Muzica, apasati Melodii. Puteti de asemenea
selecta Artisti sau Albume. Apoi apasati pe unul dintre fisiere pentru
a fi redat.
Adaugare fisiere audio in lista
1. In aplicatia Muzica, apasati Melodii.
19
Page 20
2. Apasati si mentineti melodia pe care doriti sa o adaugati in lista, apoi apasati Adaugare in
lista.
3. Apasati Nou iar tastatura va fi activata.
4. Introduceti numele listei de melodii.
5. Apasati salvare.
Harti si localizare
Folosirea hartilor Google
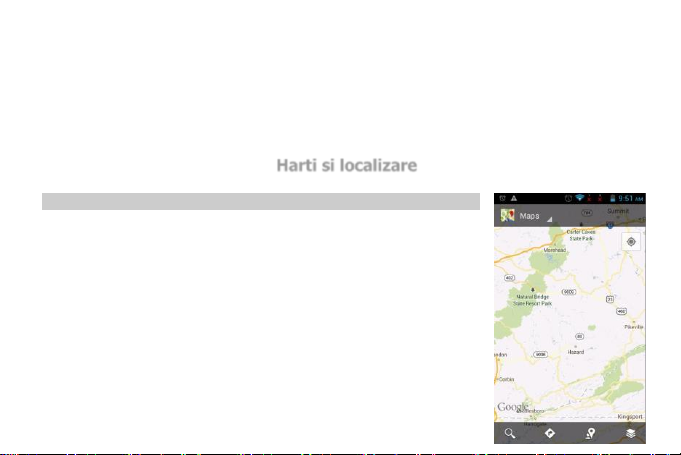
Google Maps va permite accesul si informatii referitoare la locatia
Dumneavoastra, precum si informatii in timp real referitoare la
deplasare.
In acelasi timp puteti primi informatii detaliate referitoare la rutele
catre o destinatie aleasa.
Pentru aceasta optiune veti avea nevoie de un serviciu de
date activ sau de o conexiune Wi-Fi pentru a accesa Google
Maps.
Vizualizarea locatiilor
20
Page 21
Activati serviciile de localizare.
Inainte de a deschide aplicatia Harti si a gasi locatia Dumneavoastra sau a cauta locurile de
interes, trebuie sa activati optiunea de localizare.
1- Apasati ACASA , Aplicatii apoi Setari > Acces la locatie.
2- Selectati Localizare din WiFi si mobil sau Sateliti GPS sau ambele optiuni.
Identificarea locatiei Dumneavoastra
Apasati ACASA , Aplicatii apoi apasati Harti .
In aplicatia Harti apasati Meniu.
Apasati Locatia mea si aceasta va fi afisata pe ecran sub forma unui punct albastru.
Comunicatii fara fir
Conexiune Wi-Fi
Telefonul Dumneavoastra se poate conecta la retele Wi-Fi. Pentru conectare:
1. Apasati ACASA , Aplicatii .
2. Apasati Setari.
21
Page 22
3. Apasati Wi-Fi pentru a activa optiunea.
4. Apasati setari WiFi. Telefonul va cauta retelele WiFi disponibile.
5. Apasati reteaua WiFi la care doriti sa va conectati.
6. Apasati “Conectati-va”. In cazul in care reteaua este securizata, va trebui sa introduceti
parola.
Bluetooth®
Telefonul Dumneavoastra este dotat cu tehnologie Bluetooth, tehnologie fara fir care permite
conexiune intre telefonul Dumneavoastra si alte aparate cu Bluetooth, cum ar fi telefoane,
computere, casti si altele. Pentru a pregatiti o casca Bluetooth pentru conectare, asigurati-va ca
este incarcata si ca ati realizat conexiunea intre telefon si casca. Cititi manualul castii Bluetooth
pentru mai multe informatii referitoare la conectare.
Activare Bluetooth si conectare casca wireless
Apasati pe bara de notificari din partea superioara a ecranului si glisati in jos pentru a activa
meniul. Apasati pe pictograma Bluetooth pentru a activa optiunea.
1. Apasati ACASA , apoi Aplicatii .
22
Page 23
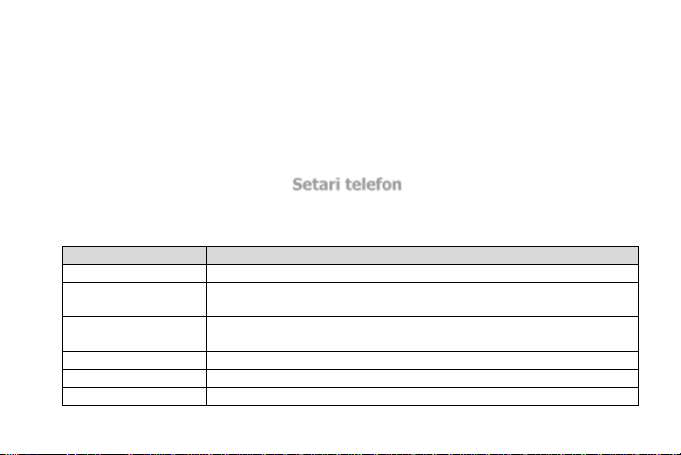
2. Apasati Setari.
Element
Descriere
Setari Dual SIM
Setare conexiune pentru cardurile SIM.
Wireless si retele
Configurare si administrare pentru retele prin WiFi, Bluetooth si
retele mobile.
Setari apel
Configurati setarile pentru apel in ambele retele, WCDMA si GSM,
cum ar fi: casuta vocala, apel in asteptare, redirectionare si altele.
Sunet
Configurati volumul, tonurile de apel si alarmele.
Afisare
Configurati luminozitatea si alte setari ale ecranului.
Locatie si securitate
Configurati modul in care doriti ca telefonul sa determine locatia
3. Apasati Bluetooth pentru a activa optiunea.
5. Apasati setari Bluetooth. Telefonul Dumneavoastra cauta acum aparatele disponibile din
apropiere.
6. Dupa ce casca este gasita si afisata in meniu, apasati pentru a o activa.
7. Activati tastatura si introduceti codul PIN in cazul in care este cerut.
8. Apasati OK.
Setari telefon
Multitudinea de setari disponibile va ajuta sa personalizati si optimizati telefonul Dumneavoastra.
In sectiunea urmatoare aveti informatii referitoare la aplicatiile principale.
23
Page 24
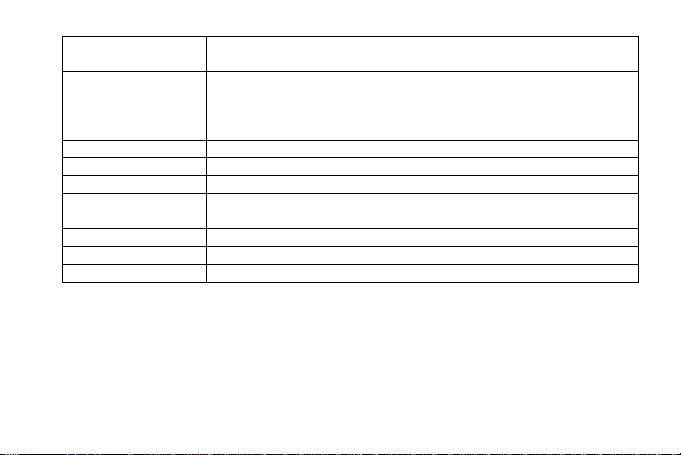
Dumneavoastra si cum doriti sa comunicati locatia cu Google si cu
alti prieteni.
Aplicatii
Vedeti detaliile aplicatiilor instalate pe telefonul Dumneavoastra,
puteti administra aplicatiile, le puteti inchide, precum si seta
pentru a permite instalarea aplicatiilor pe care le primiti prin
intermediul site-urilor web sau a mesajelor e-mail.
Conturi
Adaugati, eliminati si administrati conturile Google.
Reset
Salvati datele sau resetati telefonul.
Stocare
Monitorizati spatiul folosit si cel disponibil.
Limba si metoda de
intrare
Selectati limba si metoda de introducere text.
Accesibilitate
Activati sau dezactivati tehnologiile de accesibilitate.
Data si ora
Setati data si ora.
Despre telefon
Afisati informatii referitoare la telefonul Dumneavoastra.
Pentru a accesa oricare din elementele de mai sus:
1. Din ecranul principal, apasati Aplicatii si apoi meniul de setari.
2. Apasati una dintre pictograme pentru a o activa. Meniul secundar va fi activat pentru a va
permite sa faceti selectiile dorite.
24
Page 25
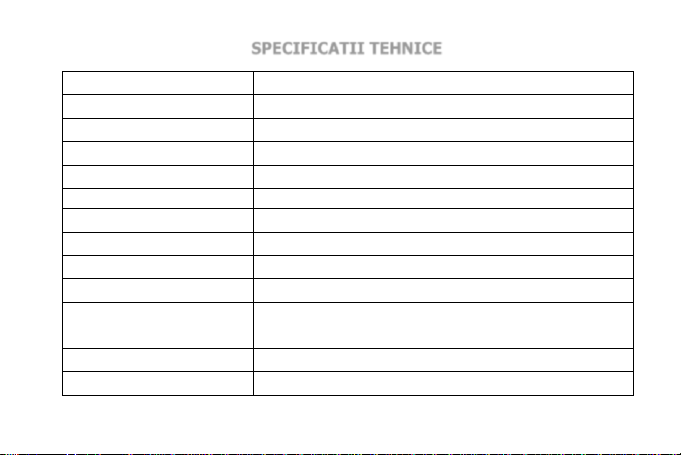
SPECIFICATII TEHNICE
Sistem de operare
Android 4.2.2 Jelly Bean
Dual SIM
Da
Retea 2G
850/900/1800/1900 MHz
Retea 3G
900/2100MHz
CPU
Dual Core 1,3 GHz
Ecran
4", Capacitiv multitouch
Rezolutie
480 x 800 (WVGA)
Memorie RAM
512 MB
Memorie
4 GB
Difuzor
1W
Camera Web
Fata: 0.3 MP; Spate: 5 MP
Porturi
Micro USB, Micro SD (pana la 32 GB), Audio Jack
Dimensiuni
125.2 x 64.5 x 10 mm
Greutate
118 g
25
Page 26
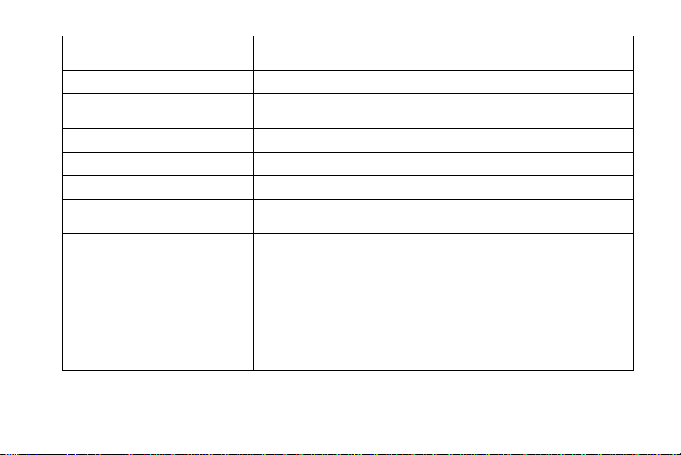
Conectivitate
Wi-Fi IEEE 802.11b/g/n; 3G, GPS, A-GPS, Bluetooth 4.0,
FM Radio, Microfon
Senzori
G-Sensor, Senzor de proximitate, Senzor de lumina
Baterie
Lithium Ion 1500 mAh. Standby: 135h; Convorbire: pana
la 5h
Formate video
MP4, 3GP, AVI
Formate audio
MP3, M4A ,WAV, AMR, MIDI, OGG
Formate foto
JPG, BMP, GIF
Valoare SAR
Valoare maxima permisa in UE: 2,0 W/Kg;
Valoare maxima UTOK 400D: 1,168 W/Kg.
Pachetul contine
1 Telefon mobil UTOK 400 D;
1 Baterie;
1 Cablu USB;
1 Incarcator;
1 Casti;
1 Manual de utilizare.
Declaratia de conformitate pentru produsul 400 D, marca UTOK, poate fi accesata
online la adresa web www.utok.com
26
Page 27
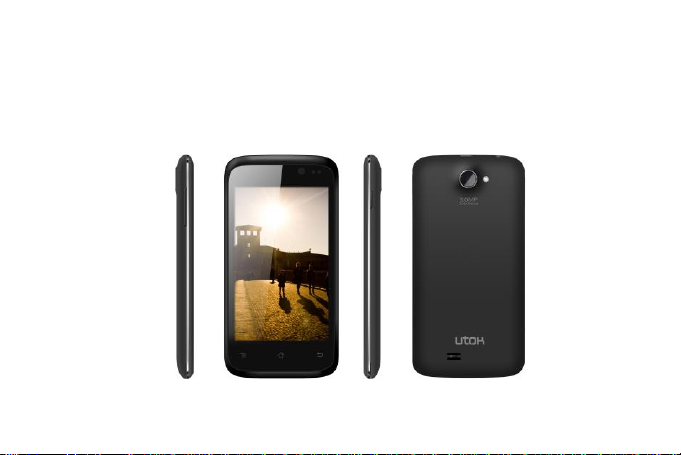
UTOK 400 D
User Manual
27
Page 28

CONTENTS
Start using your phone .............................................................................................................................. 29
To Make a call ............................................................................................................................................... 36
Manage your Contacts ............................................................................................................................... 37
To Send/Receive Messages ..................................................................................................................... 37
Set-up your Email Accounts ..................................................................................................................... 39
Using the Internet ...................................................................................................................................... 41
The Common Tools ..................................................................................................................................... 42
Using the Camera ........................................................................................................................................ 43
The Gallery .................................................................................................................................................... 44
The Music ....................................................................................................................................................... 45
Maps and location ....................................................................................................................................... 46
Wireless communication ........................................................................................................................... 47
Setting your phone ..................................................................................................................................... 49
SPECIFICATIONS ........................................................................................................................................ 51
28
Page 29
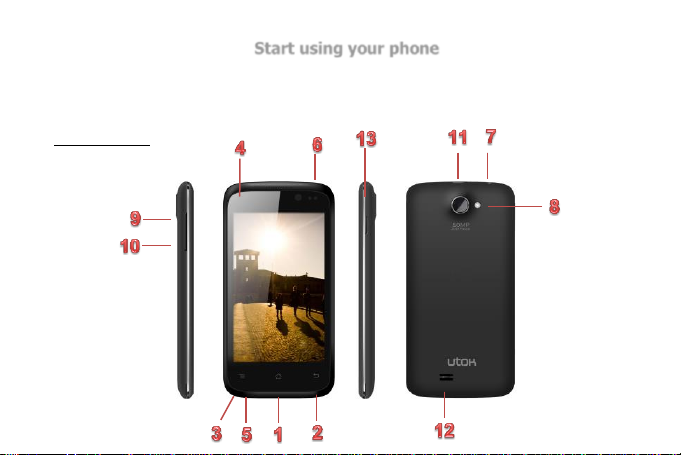
Start using your phone
This section provides an overview of the smart phone, including the locations of the connectors
and controls and phone specifications.
Phone Layout
29
Page 30
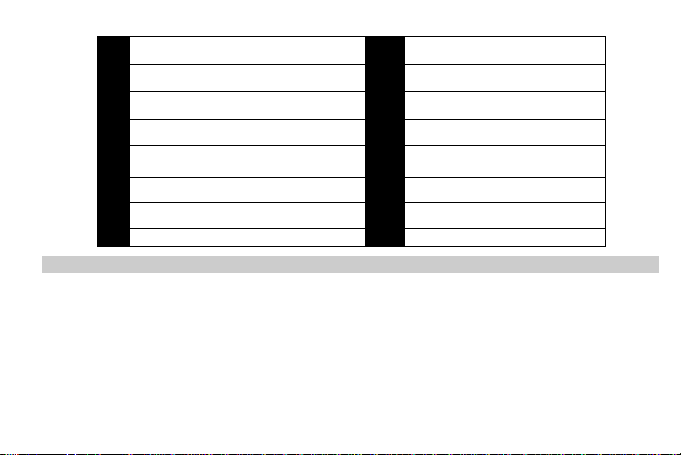
1
HOME
8
Camera
2
BACK (Return)
9
Volume up
3
Microphone
10
Volume down
4
Multi-touch screen
11
Micro-USB port
5
MENU
12
Speaker
6
Receiver
13
Power button
7
3.5mm headset jack
Installing the SIM cards
Your Subscriber/Universal Identity Module (SIM) card identifies you to the wireless network. Your
phone will not work without the SIM card.
To install a SIM card, do the following:
6. Detach your SIM card.
7. Open the battery cover on the back of your phone.
8. Lift the battery up and out of your phone.
30
Page 31
9. Align the SIM Cards metal contactors with those of the phone.
Inserting the battery
4. Open the battery cover on the back of your phone.
5. Align the battery's contact points with those of the phone and gently press the battery
down into place.
6. Replace the battery cover clicking it back into position.
Charging the battery
5. Connect the charger to your phone, and plug it into a socket.
6. The battery indicator in the corner of the screen will scroll to show you it’s charging.
7. When fully charged, the battery indicator will stop scrolling.
8. Disconnect the charger from your mobile, and unplug it.
Inserting the Storage card
3. Remove the back cover.
4. Insert the Micro-SD card into the slot with its gold contacts facing down and push it into
its place.
31
Page 32

Turning on your phone
Once you’ve installed your battery, you can turn on your phone and start using it. To turn on
your phone Press the POWER button.
Turning off your phone
Unlock your phone if the Lock screen is displayed.
Press and hold the POWER button for a few seconds.
When the Phone options menu appears, tap Power off.
Home
Home screens
Home screens display the status of your phone and provide you with access to applications. By
default, the main Home screen is displayed whenever you turn on your phone or press the Home
button.
Extended Home screen
There are five Home screens. Tap a blank area on the screen and slide your finger left or right
horizontally to view the other Home screens.
32
Page 33
You can customize the five Home screens to meet your personal preferences. For example, you
Phone
Description
Notify
Description
3G data is connected and active
New Email message
1x data is connected in idle status
New Gmail message
GSM EDGE data service is connected
New Facebook message
Wireless connection Wi-Fi is on
New Gtalk message
GSM Signal strength
New SMS
Flight mode
USB mode is connected
WCDMA-1X/3G signal strength
General warning notification
Battery level
Missed call
Bluetooth is on
Music is playing
Vibration mode is activated
Alarm is set to on
can add or remove widgets or applications shortcuts, change the wallpaper and so on.
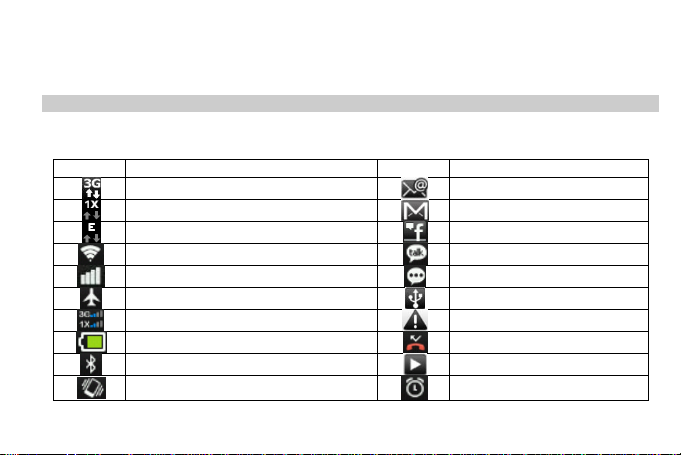
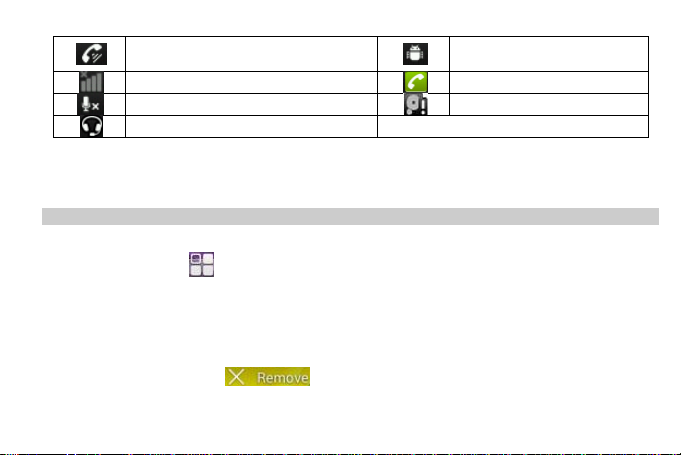
Phone status and notifications
Phone status icons and notification icons
These are the icons that may appear on the phone and notification area of the status bar:
33
Page 34
Speaker is on
USB debugging mode
connected
No signal
Call in progress
Microphone is muted
Memory is full
Cord headset is connected
Opening the Notifications panel
When a new notification icon displays in the status bar, press and hold the status bar, then slide
your finger downward to open the Notifications panel.
Personalize your phone
Adding icons on your Home screen
3. Press HOME .
4. Long press the icon on the main interface until it’s enlarged and the mobile phone
vibrates.
Delete icons from the main interface
3. Long press the icon on the main interface until it’s removable.
4. Drag the icon into to delete it.
34
Page 35
Wallpaper
You can change the wallpaper by one of the following:
3. Press MENU , and then tap Wallpapers.
4. Or Long press “Home screen” to open the menu “Add to Home Screen”, then choose
Wallpapers
You can choose the wallpaper you want from:
Gallery
Live wallpapers
Wallpapers
Video Wallpapers
and Select the wallpaper and press “Set wallpaper” to complete.
Copying files to and from the Storage card
4. Connect the phone to your computer using the supplied USB cable.
5. When the Connect to PC dialog box appears, tap strorage, and then tap Done.
6. On your computer, the connected phone is recognized as a removable disk. Navigate to this
removable disk and copy the files.
35
Page 36
To Make a call
You can dial either through the WCDMA or GSM network. You can tap to make call using
WCDMA SIM card or tap to make call using the GSM SIM card.
3. Press HOME , and then tap the phone icon .
4. Choose the required number then tap Call icon of SIM1 or SIM2.
You can make a conference call based on network support for this service by:
Tap add call fom in-call options, then enter the second party number you want to
add to conference, then press dial icon,
When the second party answer tap “Merge calls” .
Now you can speak a conference call with all parties.
To answer a call, tap the green answer icon and slide your
finger horizontally to the right to answer the incoming call. To reject a
call, tap the red reject icon and slide your finger horizontally to
36
Page 37
the left to reject the incoming call. To mute the ringing sound without rejecting the call, Press any
VOLUME button.
Manage your Contacts
To view the contacts on your phone do one of the following:
Press the HOME , and tap Contacts .
Press the Home key and tap first key , then choose in the top of the screen.
Add a new contacts
5. Press HOME , and then tap Contacts .
6. On the contact screen, tap menu then select New contact.
7. Select where to save the Contact.
8. Enter the contact information in the fields provided. then tap Done
To Send/Receive Messages
Press HOME , and then tap Applications > Messages .
37
Page 38
Red point indicates unread messages in the list.
Tap to open the message and read the content.
Messages are listed as threads, each thread shows the messages history of each
sender/receiver.
Sending text and multimedia messages
Sending a text message
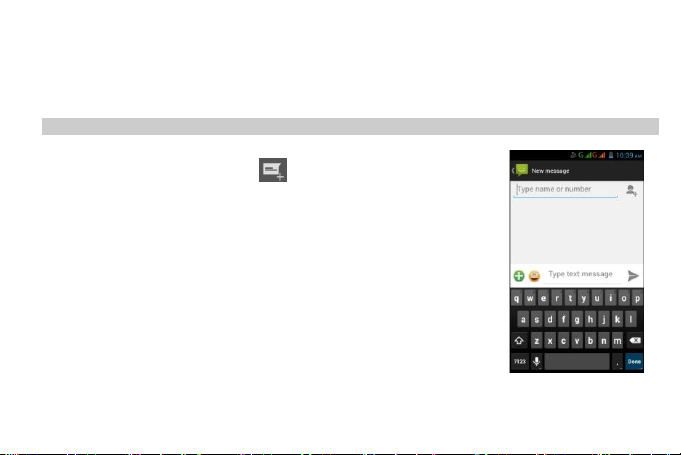
On the All messages screen, tap on the top of the screen. Or
press menu,
then select compose to write a new message.
Fill in one or more recipients then send the message by W or G.
To receive delivery reports and know when a text message is
received, in the All messages screen, press MENU and then tap
Settings. In the SMS settings section, select the Delivery reports
check box.
For sending Multimedia message, you can add a subject line to
the new message by pressing MENU and then tapping Add subject.
To attach file, Press MENU and then tap Attach. Tap Send. Please
38
Page 39
make sure of the data connection type that will be used for sending the MMS from the Settings-
>Wireless & Networks – Mobile Networks.
Set-up your Email Accounts
5. Press HOME , then tap the applications button.
6. Tap Email icon . The Email setup screen appears guiding you through the setup process.
If your Email has already an account, then after opening the email application press options
then accounts then add account. Tap Next.
7. Slide open the display to reveal the keyboard.
8. Type your e-mail address and password to your e-mail account, tap Next to finish setup
automatically and go to your Inbox. For maually setting, please select manual and follow the
instructions.
Send Email messages
While your email application is opened showing your inbox, press the Menu key.
Tap Compose, the keyboard will be displayed. Type a name or e-mail address in the To field.
If you want to add Cc or Bcc addresses, tap +Cc/Bcc.
Type the subject and message. You can attach picture, from the Menu. then tap Send.
39
Page 40

Gmail Setup
Your phone can receive messages from your Gmail account by signing in to your phone, you are
automatically set up by signing to your Gmail account to get the different services by Google,
such as syncing your account and contacts, Go ogle play, Gtalk, ..etc. You will be able also to
receive your e-mail messages, and there are no additional steps needed to set up Gmail on your
phone.
40
Page 41
Using the Internet
Your SMART PHONE phone provides you interent connectivity for the variety of applications and
service. The following are some of the important applications that are used to connect to the
internet, you will find those applications listed on your Applications menu, Press HOME , then
tap the applications button to open it:
2- Web Browsing : You will find the Web Browser in your applications menu for browsing
Internet web pages.
3- Android Market (Play Store) : Download thousands of applications, games, and media
files from Google play store.
4- Social Networks:
a. Facebook
b. YouTube
c. Google Talk
41
Page 42
The Common Tools
Alarm clock
To add an alarm, press >CLOCK >Add alarm, then enter alarm
details.
To turn on an alarm, tap the check box.
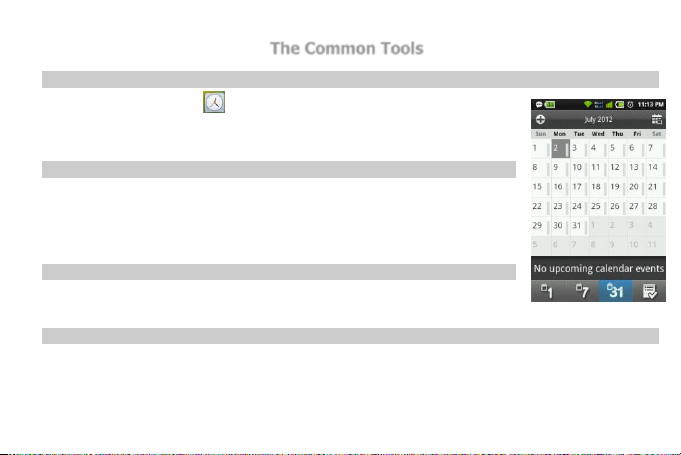
Calendar
Your calendar events can be viewed in different ways:
Tap > Agenda, Day, Week, or Month.
When you tap an event, more details appear.
tap + to enter a new event details.
Calculator
Your calculator has basic and advanced views. To change views, press
Menu > Advance panel/Basic panel. To clear results, press clear button.
Viewing documents
You can browse and edit your different documents such as word file, Excel, PDF, and power
point by using the different available applications for the Android operating system.
42
Page 43
Using the Camera
Camera Basics
Be sure to plug in your microSD card before you use your phone’s camera.
To open the camera in photo mode and take photos, press HOME , applications and
then tap Camera icon .
Taking a photo
On the Viewfinder screen, tap the options as follow:
Exposure: Increase or decrease the amount of aperture time.
Zoom: Before taking the photo, you can zoom in first on your subject.
Capturing a video
On the Viewfinder screen, tap the to make a video.
43
Page 44
The Gallery
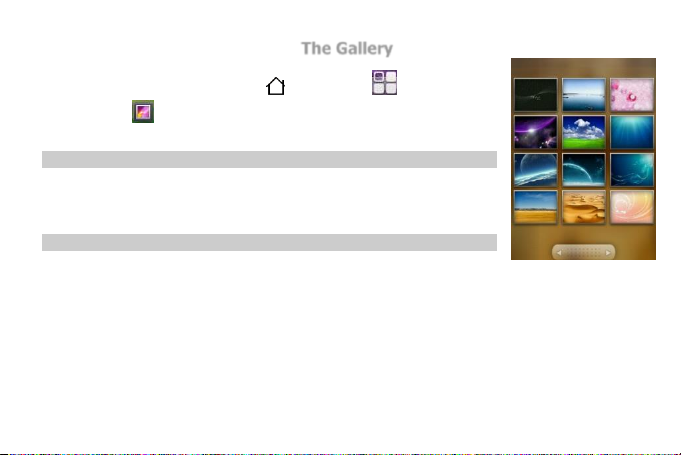
To open the Gallery, press HOME , applications and then tap
Gallery icon .
Simply tap an album to view the photos and/or videos in that album.
Viewing photos and videos
After selecting an album, you can browse the photos and videos of
that album either in filmstrip or grid view. Tap a photo to view in full
screen.
Watching video
The screen automatically switches to landscape mode when you play a
video. Use the onscreen controls to play, pause, or stop the video. The video is displayed in full
screen size.
44
Page 45
The Music
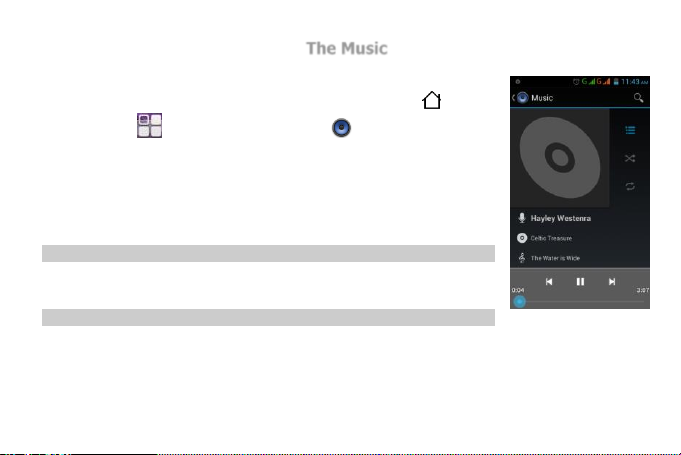
You need to copy music files to your storage card first to use the Music
application to play music. To open the Music, press HOME ,
applications and then tap Music icon .
Your music is organized into four categories: Artists, Albums, Songs,
and Playlists.
The phone will play the following music file formats:
• MP3, M4A ,WAV, AMR, MIDI, OGG Vorbis
Access and play music
In the music application screen,Tap Songs. You can also tap Artists,
Albums, or Playlists.Tap the song to play.
Add songs to new play list
6. In the Music application screen, Tap Songs.
7. Tap and hold the song that you want to add to the play list, tap Add to playlist.
8. Tap New, the keyboard will open.
9. Type the name for the play list.
45
Page 46
10. Tap Save.
Maps and location
Using Google Maps
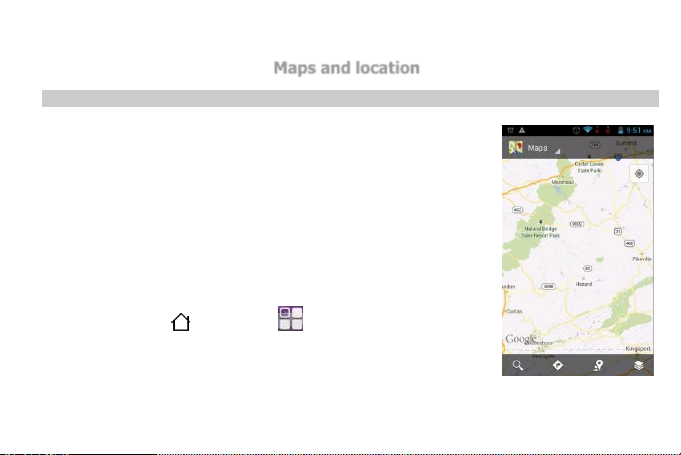
Google Maps lets you track your current location, view real-time traffic
situations (depends on the serviec availability), and receive detailed
directions to your destination.
You need an active mobile data or Wi-Fi connection to use
Google Maps.
Viewing locations
Turning on location services
Before you open Google Maps and find your location or search for
places of interest, you must enable location sources.
3- Press HOME , applications and then tap Settings >
Location access.
4- Select Use wireless networks, Use GPS satellites, or both.
Finding your location
46
Page 47
Press HOME , applications and then tap Maps .
On the Google Maps screen, press MENU
tap My Location, then Your location will be shown on the map as a blinking blue dot
according to the results coming from the .
Wireless communication
Wi-Fi Connection
Your phone can connect to Wi-Fi ntworks. To connect:
7. Press HOME , applications .
8. Tap Settings.
9. Tap Wi-Fi to turn it on.
10. Tap Wi-Fi settings. Your phone scans for the available Wi-Fi networks.
11. Tap the Wi-Fi network that you want to connect to.
12. Tap Connect. If the network is secured, then you will be required
to enter the network lock key.
47
Page 48
Bluetooth®
Your phone comes with Bluetooth technology, which is a wireless technology that enables a data
connection between your phone and other Bluetooth wireless devices such as phones, computers
and headsets. Prepare a Bluetooth wireless headset to pair your phone with a Bluetooth headset,
make sure that your headset is fully charged and that you put the headset into pairing mode. See
your Bluetooth headset’s manual for more information.
Turn on the Bluetooth feature and pair with a headset
Tap the status bar at the top of the home screen and drag it down. Tap the Bluetooth icon to turn
on the bluetooth function.
3. Press HOME , applications .
4. Tap Settings.
3. Tap Bluetooth to turn it on.
5. Tap Bluetooth settings. Your phone scans for available Bluetooth devices.
6. Tap the headset to select it.
7. Slide open the display to reveal the keyboard and type the PIN if required.
8. Tap oK.
48
Page 49
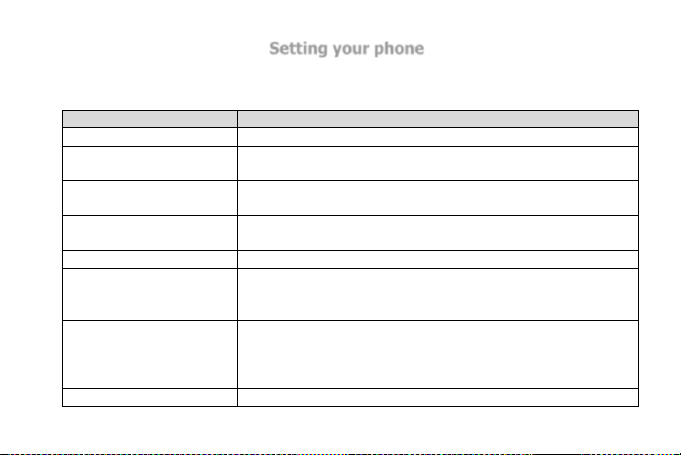
Setting your phone
item
Description
Dual SIM Settings
Close the connection with the SIM Cards.
Wireless & networks
Configure and manage connections to networks and devices
through Wi-Fi, Bluetooth, and mobile networks.
Call Settings
Configure the call settings in both WCDMA and GSM network
such as voicemail, call forwarding and so on.
Sound
Configure the volume level and type; configure ringtones and
alarms.
Display
Configure brightness and other screen settings.
Location & security
Configure how you want the phone to determine your
location and how you want to share your location with
Google and others.
Applications
View details about the applications installed on your phone,
manage application data, close applications, and set whether
you want to permit the installation of applications that you
obtain from Web sites and e-mail.
Accounts
Add, remove, and manage your Google Accounts and other
The various settings available help you to personalize and optimize your phone.
The following table lists the main menu items on the Android Settings screen.
49
Page 50
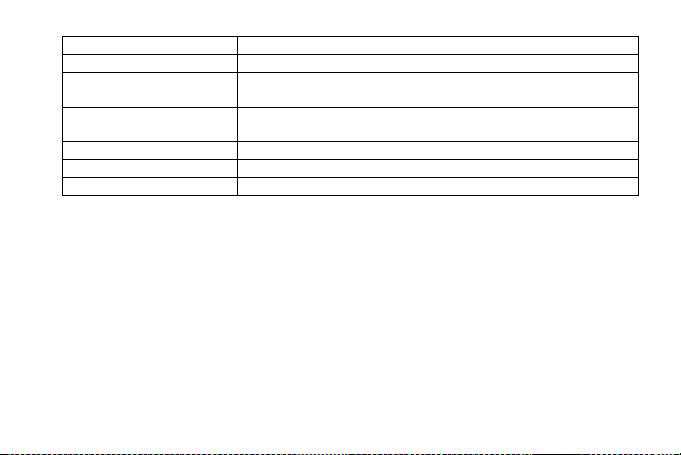
accounts.
Reset
Back up data or reset your phone.
Storage
Monitor the used and available space on your phone internal
storage.
Language & input
Select the language that you want to work with on your
phone and configure the input method.
Accessibility
Enable or disable accessibility technologies.
Date & time
Set date and time.
About phone
View information about your phone.
To access any item, do the following:
3. From the main Home screen, tap the Android Settings icon, or tap the applications icon and
then tap Settings . The Android Settings screen opens.
4. Tap an item from the main menu. The submenu for the item is displayed.
50
Page 51
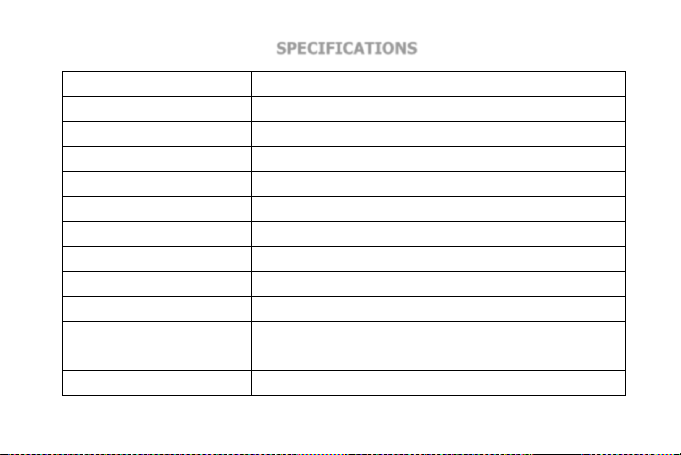
SPECIFICATIONS
Operating System
Android 4.2.2 Jelly Bean
Dual SIM
YES
2G Network
850/900/1800/1900 MHz
3G Network
900/2100MHz
CPU
Dual Core 1,3 GHz
Display
4", Capacitive multitouch
Resolution
480 x 800 (WVGA)
RAM Memory
512 MB
Memory
4 GB
Speaker
1W
Web Camera
Front: 0.3 MP; Back: 5 MP
Ports
Micro USB, Micro SD (up to 32 GB), Audio Jack
Dimensions
125.2 x 64.5 x 10 mm
51
Page 52
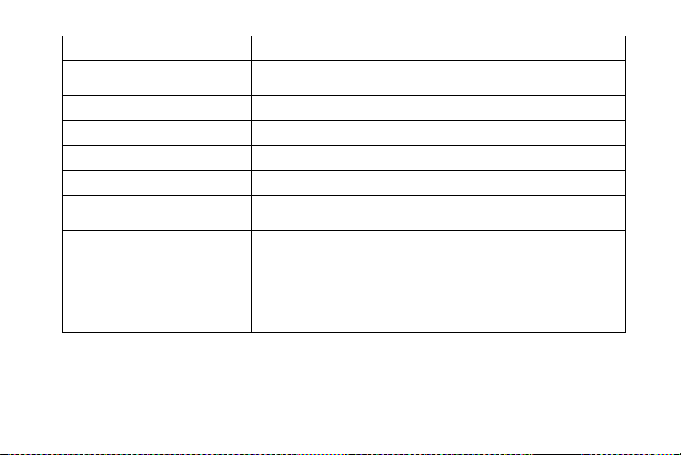
Weight
118 g
Connectivity
Wi-Fi IEEE 802.11b/g/n; 3G, GPS, A-GPS, Bluetooth 4.0,
FM Radio, Microphone
Sensors
G-Sensor, Proximity Sensor, Light Sensor
Battery
Lithium Ion 1500 mAh. Standby: 135h; Talk time: 5h
Video & Foto Formats
MP4, 3GP, AVI / JPG, BMP, GIF
Audio Formats
MP3, M4A ,WAV, AMR, MIDI, OGG
SAR Values
Highest SAR limit in EU: 2,0 W/Kg;
Highest SAR value for UTOK 400D: 1,168 W/KG
Package contains
1 x UTOK 400D Smartphone;
1 x Battery;
1 x USB Cable;
1 x Charger;
1 x Earphones;
1 x User Manual.
Declaration of conformity for UTOK product, model 400 D, is available online at
www.utok.com
52
 Loading...