

Page 1
INSTALLATION INSTRUCTIONS
HELPFUL TIPS
• This unit is weather-resistant and rate d for outdoor use.
• This timer operates using a light-sensitive photocell that sense s
when the environment is getting dark (dusk) or light (dawn). The
photocell is located to the upper right on the fac e of the unit.
• Once programm ing activates at dusk in the 2hr, 4hr, 6hr or 8hr
mode, the progr am cycle will co mplete before the timer resets.
Headlights, po rch lights, street lamps and other external lighting
sources will not interfere with the active timer program.
• When set to ON, the unit will provide continual power to
attached devices until the timer is switched to OFF, or to any of
the other operating modes.
• The POWER indicator will glow red when the timer
programming is activated and power is being provided to
attached devices.
OUTDOOR TIMER
ITEM #0154182
MODEL #UTTNOCD2
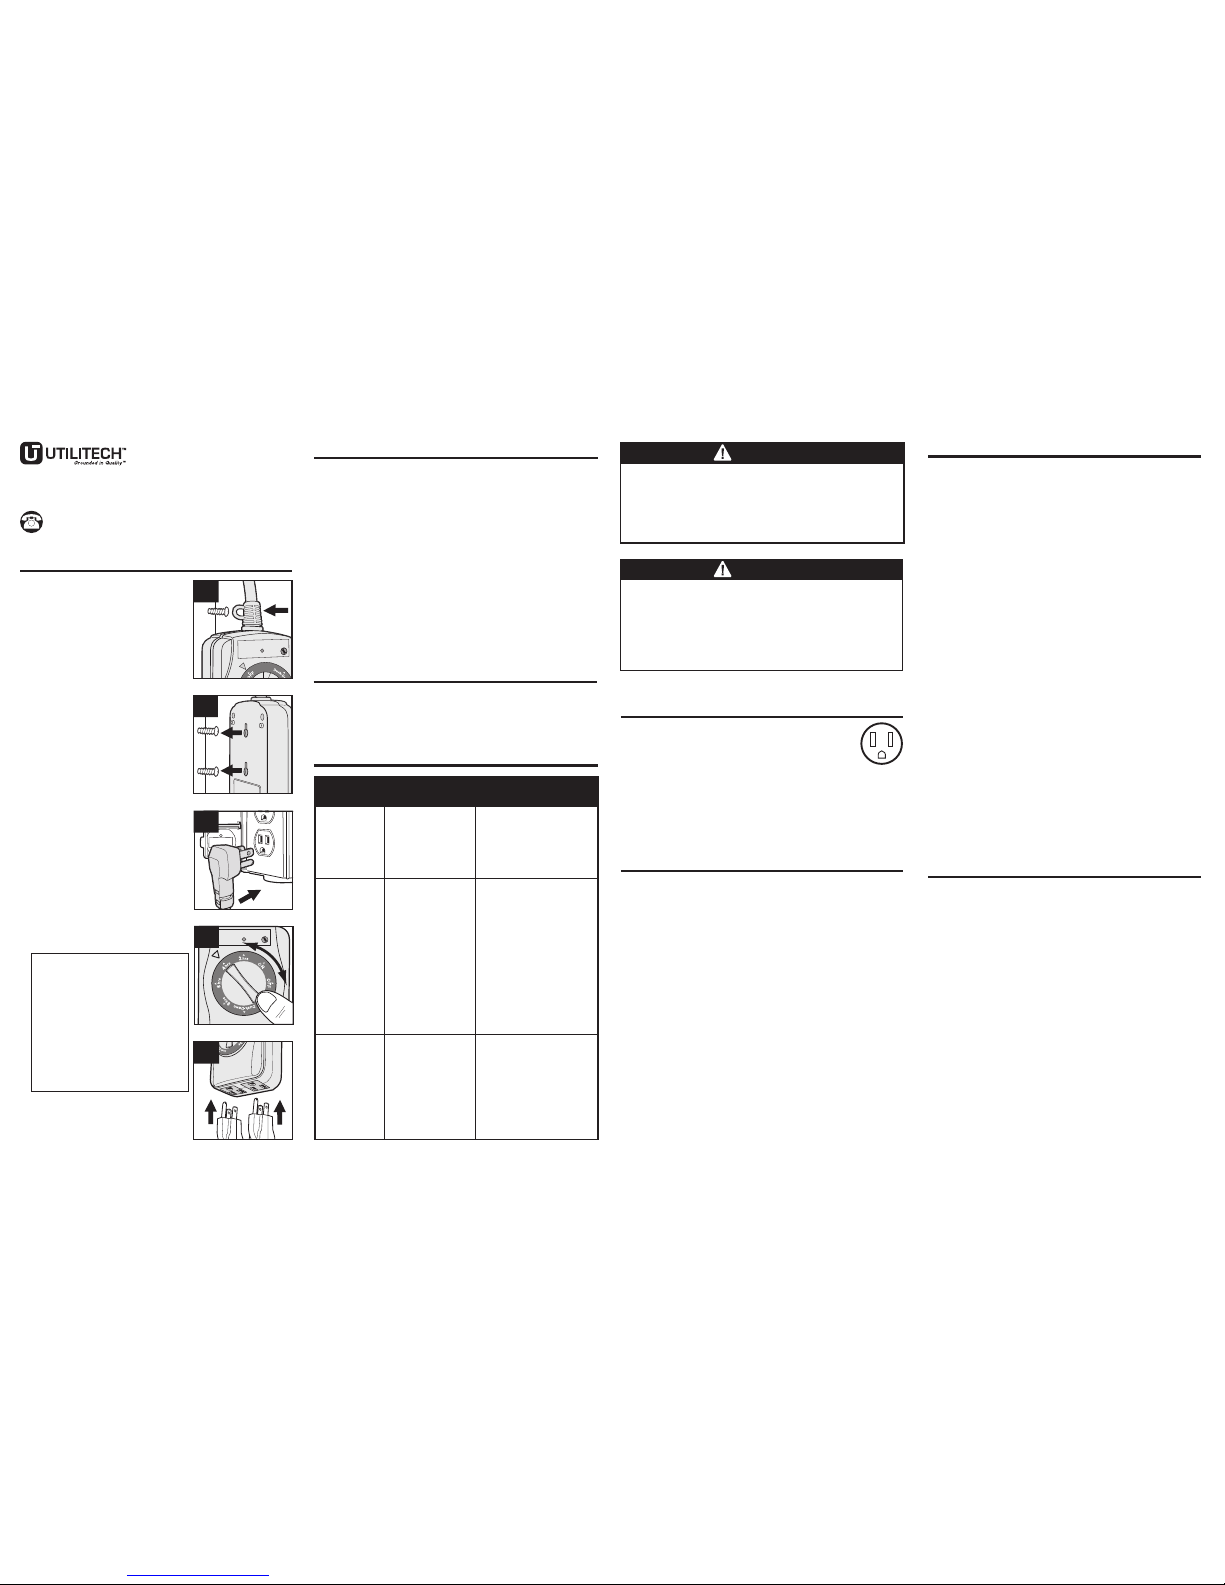
1. Install unit to a flat surface.
a. Using a screw or hook (not included),
secure the MOUNTING TAB at the top
of the timer to a wall or post.
b. For a more secure mounting, use the
two MOUNTING HOLES on the back
of the timer.
• Create a mounting template by
placing a sheet of paper over the
back of the timer and punching holes
through the paper where the mounting
holes are located on the timer.
• Temporarily secure the mounting
template to the flat surface where
the timer is to be mounted.
• Drill two 3/32 inch pilot holes where
indicated on the mounting template.
• Insert two #6 sheet metal screws
(not included), leaving screw heads
protruding 1/8 inch from the surface.
• Place the timer over the screw heads
and push down to lock into place.
2. Plug unit into an electrical outlet.
Use an outdoor-rated three-pronged
grounded electrical outlet. Do not use
extension cords to connect the timer to
the power source.
3. Set the desired OPERATING MODE.
Rotate the black turn-dial either clockwise
or counter-clockwise to align the mode
with the arrow.
4. Attach up to two devices to unit.
Plug the devices into the outlets on the
bottom of the timer.
WARNING
R
isk of Electric Shock
Keep children away. Unplug timer befo re cleaning. Fully
insert plug. Do not use in wet locations.
Risk of Fire
Do not use to control appliances that contain heating
elements (cooking app liances, heaters, irons, etc.). Do not
exceed electric al ratings.
IN CASE OF POWER FAILURE
The timer will stop operating if the power goes out. Once
power is restored, the timer will restar t programming based
on the current mode selected.
3
4
OFF - Power is off to attached devices
ON - Power is on to attached devices
2 Hrs - Power will turn on at dusk and
remain on for 2 hours
4 Hrs - Power will turn on at dusk and
remain on for 4 hours
6 Hrs - Power will turn on at dusk and
remain on for 6 hours
8 Hrs - Power will turn on at dusk and
remain on for 8 hours
Dusk-Dawn - Power will turn on at
dusk and remain on until dawn
SAFETY INFORMATION
This timer is a “GROU NDED” device. The male plug
contains a ground pin and is only intended for use
with a three-pronged grounded outlet.
Do not attach a devic e that exceeds the unit ratings:
125 V AC / 60 Hz
15 A / 1,875 W Resistive (General Purpose)
8 A / 1,000 W Tungsten (Incandescent)
1/3 HP (Horsepower Motor)
LIMITED 1-YEAR WARRANTY
Prime warrants this product to be free from manufacturing
defects for a period of one year from the original date of purchase
(“warrant y period” ). This warranty is limited to the repair or
replacement of this product only and Prime is not liable for any
consequentia l or incidental damage to other products that may
be used with this unit. This warranty is effective only if suc h unit
is returned to Prime not later than thir ty (30) days after the
expiration of the warranty period. War ranty is void if damage is
due to ne glect, misuse, alteration, modif ication, imp roper
installation, or repair by anyone other than Prime. This warranty
is in lieu of all other warranties expressed or implied. Some
states do not allow limitatio ns on how long an implied war ranty
lasts or per mit the exclusi on or limitation of incidental or
consequentia l damages, so the above limitations may not apply
to you. This warranty gives you specif ic rights, and you may also
have other rights which vary from state to state. If unit should
prove defective within the warr anty perio d, return within the time
period set for th above prepaid with dated proof of purchase to:
Prime Wire & Cable, Inc.
ATTN: Timer Warranty
280 Machlin Co urt
City of Industr y, CA 91789
Printed in China
AVERTISSEMENT
Risque de cho c électrique
Gardez les enfant s à l’écart. Débranchez la minuter ie avant de
procéder au net toyage. Insérez complètement la fic he.
N’utilisez pas l’art icle dans des endroits humides.
Risque d’incendie
N’utilisez pas cet article pour command er des appareil s qui
contiennent d es éléments chauffants (appareils de cuisson,
radiateurs, fers, etc.). Ne dépassez pas l es capacités électriques.
Call customer service at 1-866-994-4148,
8 a.m. - 6 p.m., EST, Monday - Thursday,
8 a.m. - 5 p.m., EST, Friday.
AB141042
Lights do not
turn on at
dusk.
Lights do not
turn on even
when timer is
in ON
position.
Lights are
flashing
(turning ON
and OFF).
There is too muc h
ambient light fo r
the photocel l light
sensor to detect
darkness.
Connected li ghts
are not in ON
position, are n ot
functionin g, or
timer is not
receiving p ower.
The timer is in
Dusk-to- Dawn
mode and the lig ht
from the conn ected
lights or other light
source is af fecting
the photocel l light
sensor.
Move the connec ted lights
away from the time r or
reposition t he timer so it
does not face any ot her
outside light .
Be sure connec ted lights
are function al by plugging
them directl y into the
outlet. Conn ected lights
should be in ON po sition if
they have their own
switch. Make sure t he
timer is rece iving power the red POWER ON l ight
should come o n when
plugged into an ou tlet and
placed in the O N position.
Move the connec ted lights
away from the time r or
reposition t he timer so it
does not face any ot her
outside light .
TROUBLESHOOTING
PROBLEM POSSIBLE
CAUSE
CORRECTIVE
ACTION
P
o
w
e
r
1a
1b
2
FCC REGULATORY STATEMENT
This device c omplies with part 15 of the FCC rules. O peration
is subject to the following two conditions:
1. This device may not cause harmful inter ference, and
2. This device must accept any interference received,
including inter ference that may cause undesired operation.
Notes: T his equipment has been tested and found to comply
with the limits for a Class B digital device, pursuant to Part 15
of the FCC Rule s. The se limi ts are designed to p rovide
reasonable p rotec tion ag ainst h armful inter ference in a
residential installation. This equipment generates, uses and
can radiate radio frequency energy and, if not installed and
used in accordance w ith the instr uctions, may cause har mful
interferenc e to radio communications. However, there is no
guaran tee that inter ference wi ll not occur in a par ticular
installation. If this equipment does cause harmful interference
to radio or television reception, which can be determined by
turning the equipment of f and on, the user is encouraged to
try to correct the interference by o ne or more of the following
measures:
1. Reorient or relocate the receiving antenna.
2. Increase the separat ion between th e equipment and
receiver.
3. Connect the equipment into an outlet on a circuit different
from that to whic h the receiver is c onnected.
4. Consult the dealer or an experienced radio/T V technician
for help.
IC REGULATORY STATEMENT
Under Industr y Canada regulations, this radio transmit ter may
only operate using an antenna of a type and maximum (or
lesser) gain approved for the transmitter by Industry Canada.
To reduce potential radio interference to other users, the
antenna type an d its gai n should be so cho sen that t he
equivalent isotropically radiated power (e.i.r.p.) is not more
than that neces sary for suc cessful communication.
This device complies with Industry Canada licence-exempt
RSS standard(s). Operation is subject to the following two
conditions: (1) this device may not cause inter ference, and (2)
this devi ce must acc ept any inte rfer ence, i ncluding
inter ference that may cause un desired o peration of the
device.
Page 2
INSTRUCCIONES DE INSTALACIÓN
CONSEJOS PRÁCTICOS
• Esta unidad es resi stente a la intemperie y está cer tificada para
uso en exter iores.
• Este temporizad or funciona con una fotocé lula ultrasensible que
detecta cu ando el ambiente se oscurece (ano checer) o se ilumi na
(amanecer). La fot océlula se encuentra en la par te superior
derecha de l frente de la unidad.
• Un a vez que la programación se acti va al anochecer en el modo
de 2 horas, 4 horas, 6 horas u 8 hora s, el tiempo del programa se
complet ará antes de que el temporizado r se reinicie. Los focos,
las luces pa ra porches, la s luces de la cal le y otras fuentes
externas de i luminación no interfer irán con el programa activo d el
temporiz ador.
• Cu ando se estable ce en ON, la unidad proporc ionará
alimentac ión continua a los disposit ivos conect ados hasta que el
temporiz ador se cambie a OFF, o a cualquiera de los otros modos
de funcionamiento.
• El in dicador de alimentación s e ence nderá de color rojo cuando
se active la pr ogramación del temporiz ador y se entregue
alimentac ión a los dispositivos cone ctados.
INFORMACIÓN DE SEGURIDAD
Este temporiza dor es un disposit ivo con PUESTA A
TIERRA . El enchufe macho contiene una clav ija de
puesta a tierr a y está destinada solo para su uso co n
un tomacorri ente de puesta a tierra de tres clavijas.
Este temporiza dor es para uso con u na fuente de alimentación
de 125 V CA.
125VAC / 60Hz
No conecte un di spositivo que supere la clasif icación de la unidad:
15 A / 1875 W resistivo (de uso general)
8 A / 1000 W tungsteno (Incandesc ente)
1/3 HP (motor de caballos d e fuerza)
1 AÑO DE GARANTÍA LIMITADA
Prime garantiza que este producto no pr esentará defectos de
fabricaci ón por un período de u n año a partir de l a fecha de
compra ori ginal ("período de garantía"). Esta garantía se lim ita a
la repa ración o reemplazo de este produ cto solamente y Prime
no es responsable de ningún daño resultante o accidental a otros
productos que se puedan usar con esta unidad. Esta garantía
tiene validez solo si la unidad se devuelve a Prime antes de
treinta (30) días de spués de la fecha de venci miento del período
de garantía. La garantía es nula si el daño se debe a negligencia,
uso ind ebido, alteraciones, modif icaciones, instalación
inadecuada o reparaciones hecha s por terceros que no
pertenec en a Prime. Esta garantía reemplaza a todas las demás
garantías, expresas o implícitas. Algunos estados no permiten
limitacione s en cua nto a la duración de una garantía implíc ita ni
permiten la exclusión o limitació n de daños accidental es o
resultantes, de modo que las limitaciones anteriores pueden no
aplicarse a usted. Esta gara ntía le otorga derec hos específicos,
pero podría tener también otros derec hos que varían según el
estado. Si se demuestra que la unida d tiene defectos durante del
período de garantía, devué lvala dentro del plazo establecido co n
anteriorida d, con franqueo prepagad o y el c omprobante de
compra con fe cha a:
Prime Wire & Cabl e, Inc.
ATTN: Timer Warranty
280 Machlin Co urt
City of Industr y, CA 91789
TEMPORIZADOR
PARA EXTERIORES
ARTÍCULO #0154182
MODELO #UTTNOCD2
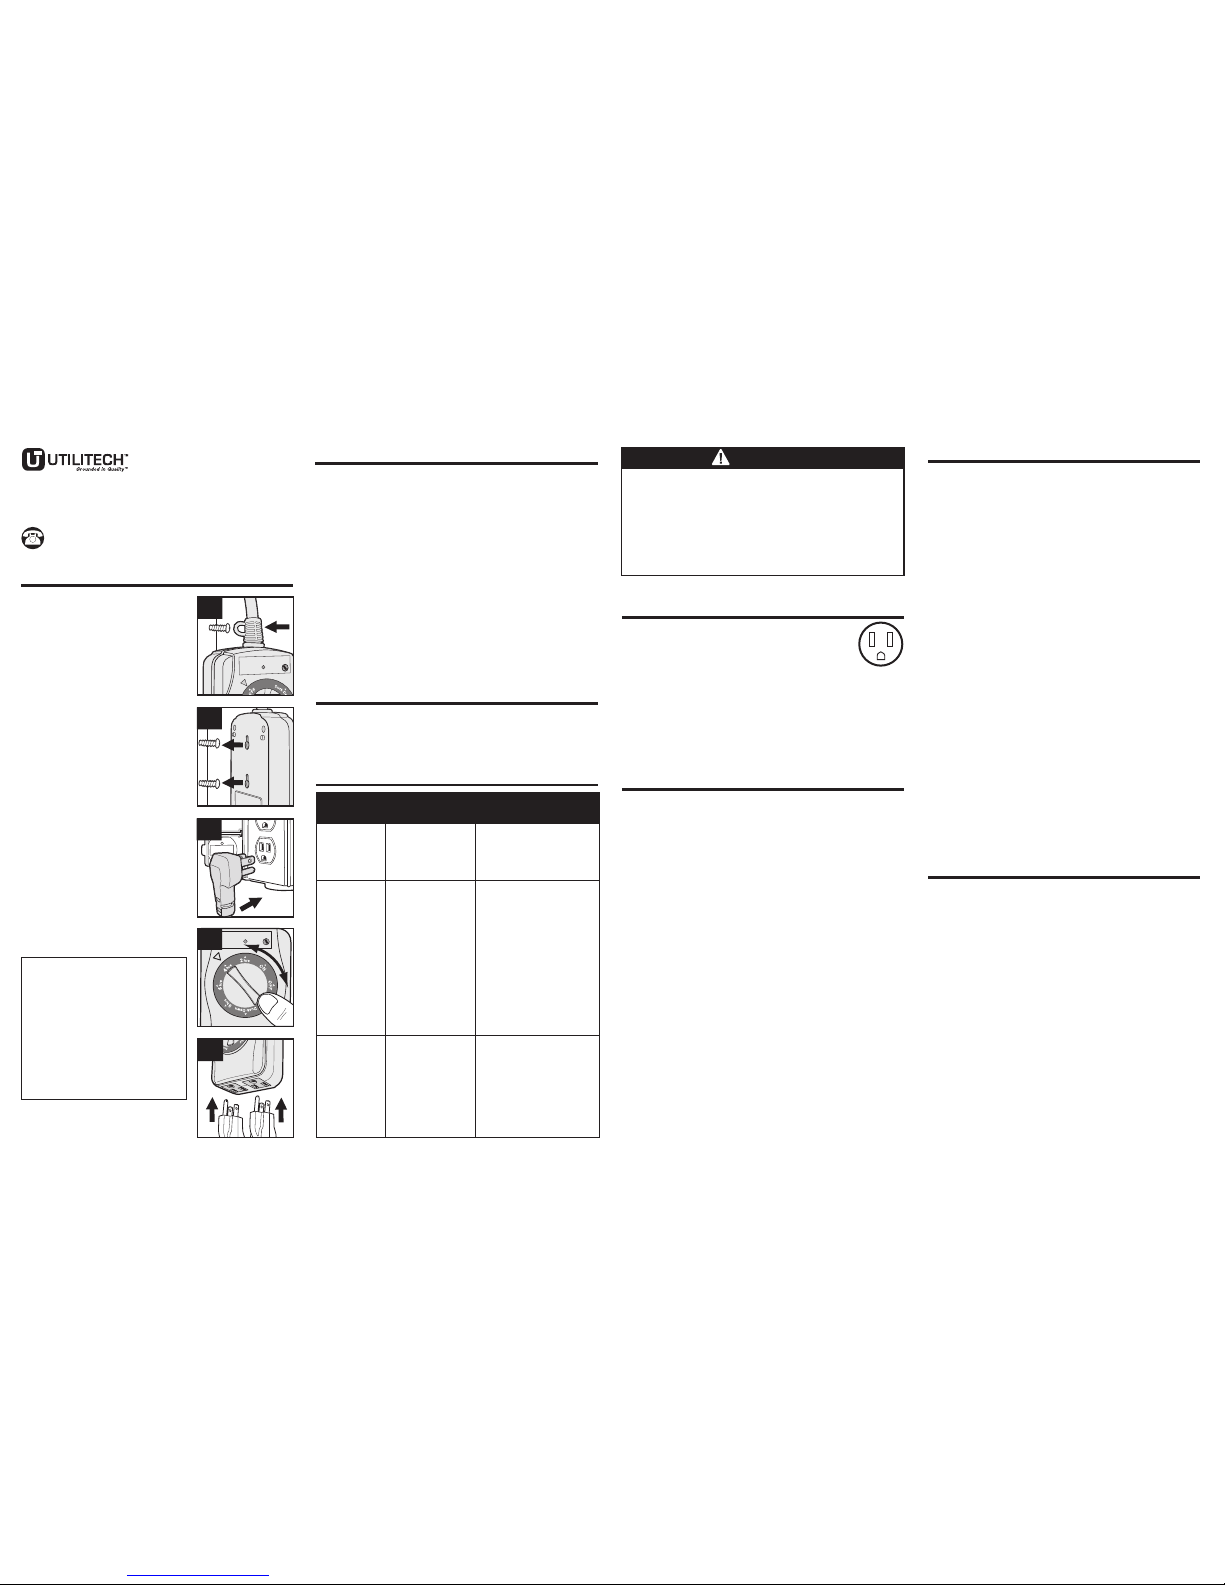
1. Instale la unidad sobre una superficie plana.
a. Con un tornillo o gancho (no se incluyen) fije
la LENGÜETA DE MONTAJE en la parte
superior del temporizador a una pared o poste.
b. Para un montaje más seguro, use los dos
ORIFICIOS DE MONTAJE ubicados en la
parte posterior del temporizador.
• Cree una plantilla de montaje colocando
una hoja de papel sobre la parte posterior
del temporizador y perforando agujeros a
través del papel, donde se encuentran los
orificios de montaje en el temporizador.
• Fije temporalmente la plantilla de montaje
a la superficie plana, donde se montará el
temporizador.
• Taladre dos orificios piloto de 3/32 pulgadas
en el lugar indicado en la plantilla de montaje.
• Inserte dos tornillos para láminas de metal
#6 (no se incluyen) y deje que las cabezas
de los tornillos sobresalgan 3,18 mm de la
superficie.
• Coloque el temporizador sobre las cabezas
de los tornillos y presione para fijar en su
lugar.
2. Enchufe la unidad a un tomacorriente.
Use un tomacorriente con puesta a tierra de
tres clavijas y certificado para uso en exteriores.
No use extensiones eléctricas para conectar el
temporizador a la fuente de alimentación.
3. Establezca el MODO DE OPERACIÓN
deseado.
Gire el selector negro en dirección de las
manecillas del reloj o en dirección contraria
para alinear el modo con la flecha.
4. Conecte hasta dos dispositivos a la unidad.
Enchufe los dispositivos en el tomacorriente de
la parte inferior del temporizador.
Las luces no s e
encienden a l
anochec er.
Las luces no s e
encienden , aun
cuando el
temporiz ador
está en la
posición d e
encendid o.
Las luces
destellan (se
encienden y s e
apagan).
Hay demasiad a luz
ambiente par a que el
sensor de luz d e la
fotocélul a detecte la
oscurida d.
Las luces c onectadas
no están en la
posición d e
encendid o, las luces
no funcion an o el
temporiz ador no
recibe alim entación.
El temporiz ador está
en el modo
Dusk-to- Dawn y la luz
proveniente de l as
luces con ectadas u
otras fuente s de
iluminaci ón están
afectando e l sensor
de luz de la fotoc élula.
Aleje las luc es conectadas
del tempor izador o
reposici one el temporizador
para que no rec iba ninguna
otra luz del ex terior.
Asegúrese de que las luces
conecta das funcionan
enchufánd olas directamente
al tomacor riente. Las luces
conecta das deben estar en la
posición d e encendido si
tienen su pro pio interruptor.
Asegúrese de que el
temporiz ador recibe
alimentac ión: La luz roja
POWER ON (alime ntación
activada) debe e ncenderse
cuando se co necta a un
tomacorr iente y se coloca en
la posició n de encendido.
Aleje las luc es conectadas
del tempor izador o
reposici one el temporizador
para que no rec iba ninguna
otra luz del ex terior.
SOLUCIÓN DE PROBLEMAS
PROBLEMA
CAUSA
POSIBLE
ACCIÓN
CORRECTIVA
EN CASO DE UN APAGÓN
El temporizado r dejará de funcionar si se interr umpe la
alimentación. U na vez que se restablezca, se reinici ará la
programació n según el modo actual seleccio nado.
OFF (apagado): No hay alimentación a los
dispositivos conectados
ON (encendido): Hay alimentación a los dispositivos
conectados
2 Hrs: La alimentación se activará al anochecer y
permanecerá encendida por 2 horas
4 Hrs: La alimentación se activará al anochecer y
permanecerá encendida por 4 horas
6 Hrs: La alimentación se activará al anochecer y
permanecerá encendida por 6 horas
8 Hrs: La alimentación se activará al anochecer y
permanecerá encendida por 8 horas
Dusk-Dawn (anochecer-amanecer): La alimentación
se activará al anochecer y permanecerá encendida
hasta el amanecer
Impreso en China
P
ADVERTENCIA
Riesgo de de scarga eléctrica
Mantenga alejado d e los niños. Desenchufe el tempor izador
a
ntes de limpiarlo. I nserte comp letamente el enchufe. No lo
utilice en lugar es con agua.
Riesgo de in cendio
No utilice el pr oducto para cont rolar electrodoméstico s que
contengan elem entos para calentar (electrodom ésticos de
cocina, cal entadores, plan chas, etc.). No supere la capacidad
eléctric a nominal.
AV
Llame al Servicio al Cliente al 1-866-994-4148,
de lunes a jueves de 8 a.m. a 6 p.m.,
y los viernes de 8 a.m. a 5 p.m., hora estándar del Este.
3
4
P
o
w
e
r
1a
1b
2
DECLARACIÓN DE NORMAS DE LA FCC
E
ste equipo cumple con la sección 15 de las reglas de la
FCC. El f uncionamie nto está suj eto a las sigu ientes dos
condicione s:
1. Este dispositivo no deb e causar interferencia per judicial y
2. Este dispositivo debe rá aceptar cualquier interferencia
recibida, incluye ndo la interfer encia que pudiese causar la
operación no dese ada.
Notas: Este equipo ha sido probado y se ha verificado que
cumpl e los límites p ara un disp ositivo dig ital clase B,
conforme a la secc ión 15 de las reglas de la FCC. Estos
límites se han di señado para proporc ionar una pro tección
razonable c ontra la inter ferencia perjudicial en una instalac ión
reside ncial. E ste equip o genera, uti liza y puede irr adiar
energía de r adiofrecue ncia y, si no se instal a y usa d e
acuerdo c on las instruccio nes, puede causar int erferencia
perjudicial a las comunicaciones de radio. Sin embargo, no se
garant iza que no se produc irán inte rferenci as en un a
insta lación en especi al. Si este equipo genera una
inter ferencia perj udici al para la recep ción de r adio o
televisión, que se pu ede determinar apagan do y encendiendo
el equipo, se recomienda al usuario que intente c orregir la
interferenc ia con una o más de las siguientes medid as:
1. Reoriente o reubique l a antena de recepción.
2. Aumente la separació n entre el equipo y el receptor.
3. Conecte el equipo a un to macorriente de un circuito dis tinto
al que usa el receptor.
4. Solicite ayuda al concesionari o o a un técnico con
experiencia en rad io/TV.
DECLARACIÓN DE NORMAS DEL IC
De acuerdo con las regulacione s del Ministerio de Industria
de Ca nadá, este transmi sor de ra dio puede funcio nar
únicam ente utiliza ndo un tipo d e antena y una gananc ia
máxim a (o i nferior) aprob ada para el tr ansmisor por el
Minis terio de Indu stria de Canadá. Para dis minuir la
interferenc ia potencial de radio c on otros u suarios, el tipo de
antena y su gananc ia deben elegir se de tal forma que la
potencia isótropa radiada equivalente (eir p, por sus s iglas en
inglés) no sea mayor de lo necesario par a una comunic ación
eficaz.
Este d ispositivo cumpl e con l as normas RSS sin licencia del
Ministerio d e Industria de Canadá. El funcionamiento est á
sujeto a las s iguientes dos condicio nes: (1) este dispositivo no
debe causar interfe rencia y (2) este dispositivo debe ac eptar
cualquier interferenc ia recibid a, incluso aquella que pudiese
causar un funci onamiento no deseado del disposit ivo.
 Loading...