

Page 1
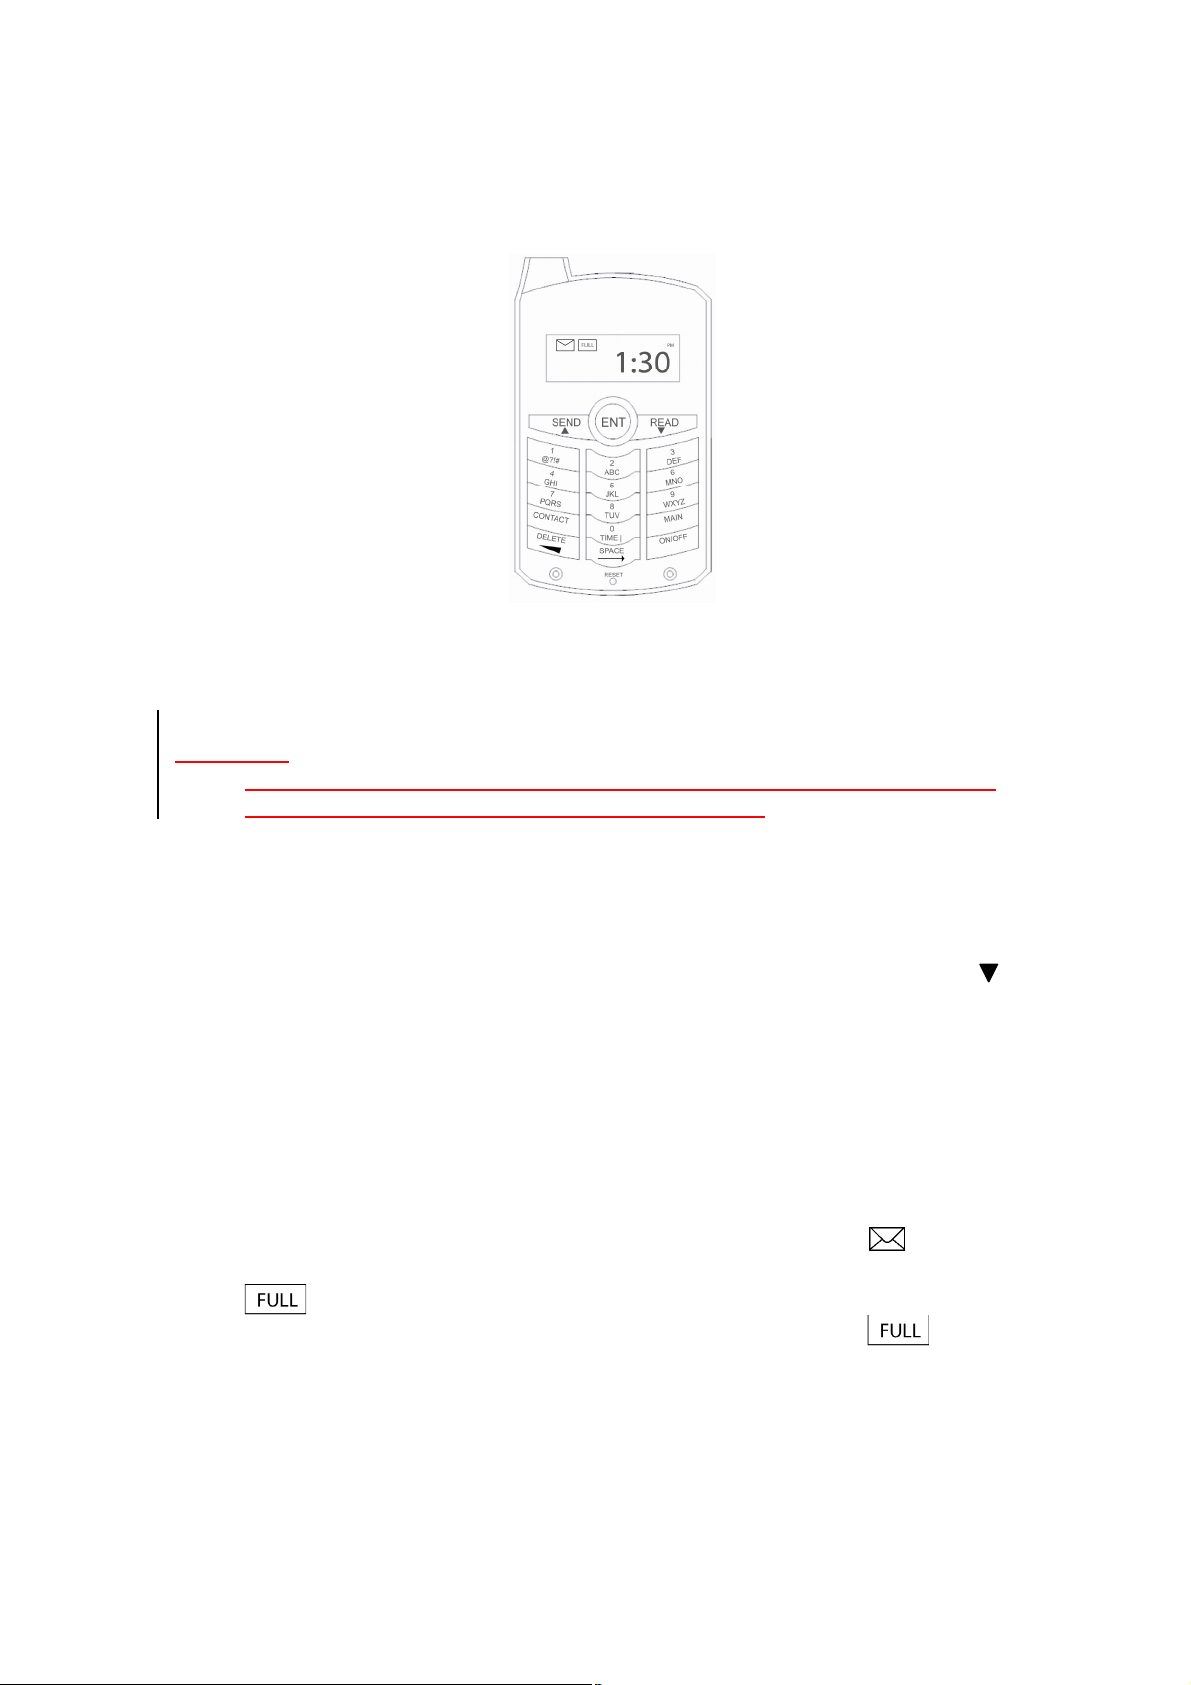
Electronic Text Messenger User Manual
To activate, pull out the plastic tabs on the back of the device.
When the device is first turned on you must first set the time before using
other functions. See setting time instructions below.
GENERAL
• You can only receive a message when your device is on. Messages sent
to you when your device is off cannot be retrieved.
YOUR UNIQUE ID
• Each device is pre-set with a Unique ID Number. In order to send a
message to another device you must know that person’s Unique ID
Number.
• To find your own Unique Id Number select CONTACT, keep selecting
until you reach the last entry, USER ID, select ENTER. Your Unique ID
Number will be shown.
• Before you can send a message to a friend’s device you must either enter
their Unique ID Number and name into your contact list, enter their Unique
ID Number every time you send them a message, or store their Unique ID
Number in your Contacts from a message they have sent to you.
INBOX FUNCTIONS
• The INBOX can store a total of 14 messages.
• If there are unread messages the envelope icon will display,
• If there are between 11-13 messages in your inbox the full icon will blink,
• When your inbox has 14 messages the full icon will stay on,
• If your Inbox is full then you must delete some old messages before you
can receive any new ones.
ADDING A NEW CONTACT
The device can save a maximum of 24 contacts.
Page 2

• Select CONTACT
• Screen displays “ADD?”
• If Contact memory is full then screen displays “FULL”
• Select ENTER
• Input UNIQUE ID NUMBER (For example “1432”)
• Select ENTER
• Screen displays “NAME?”
• Using keypad input contact name (Max. 7 letters)
• Select ENTER
• Screen displays “OK!”
DELETING A CONTACT
• Select CONTACT
• Screen displays “ADD?”
• Select until screen displays contact you want to delete
• Select DELETE
• Screen displays “DELETE?”
• Select DELETE again
• Screen displays “OK!”
SENDING A MESSAGE
A message can only be sent to a device whose Unique ID Number is stored in
Contacts or whose Unique ID Number you know.
• Select SEND
• Screen displays “TO?”
• Select▲▼ keys to scroll through CONTACTS or use keypad to input
receiver’s Unique ID Number directly.
• Select ENTER when desired contact is displayed or Unique ID Number
has been typed.
• Screen displays “MSG?”
• Select keypad buttons to type message. Messages can be 40 characters
maximum.
• Select ENTER to send message.
• Screen displays SENT if message is received successfully.
• Screen displays FAIL if message is not received successfully. Your
message will be displayed again. Select ENTER to try sending the
message again.
READING A MESSAGE
1. If the email icon is displayed then the user has unread messages.
2. Messages are displayed in order received, newest messages at the top of
list.
3. The name associated with the message will be displayed if it is in device’s
Contacts.
4. If message is from a new Unique ID Number that is not entered in
Contacts then it will be shown as NEW ID.
Page 3

• Select READ
• Screen displays a list of who messages are from
• Use▲▼ keys to scroll through messages
• Select ENTER to read message
When reading a message you can take the following three actions:
Save ID in Contacts
• If message was from NEW ID, select CONTACT
• Screen displays “NAME?”
• Using keypad input contact name (Max. 7 letters)
• Select ENTER
• Screen displays “OK!”
Reply to Message
• Select SEND to reply to message.
• Screen displays “MSG?”
• Select keypad buttons to type message. Messages can be 40 characters
maximum.
• Select ENTER to send message.
• Screen displays SENT if message is received successfully.
• Screen displays FAIL if message is not received successfully. Your message
will be displayed again. Select ENTER to try sending the message again.
Delete Message
• Select DELETE
• Screen displays “DELETE?”
• Select DELETE again
• Screen displays “OK!”
Note: Once deleted a message cannot be restored.
REVIEWING AND SENDING A MESSAGE FROM CONTACT LIST
• Select CONTACT
• Screen displays “ADD?”
• If Contact memory is full then screen display “FULL”
• Use▲▼ keys to scroll CONTACT NAMES
• Select ENTER to send a message to that contact.
SETTING TIME/AUDIO
• Select TIME | AUDIO
• Hours in time blink
• Select number from keypad to input current hour
• Select ENTER
• Minutes in time blink
• Select number from keypad to input current minutes
Page 4

• Select ENTER
• AM blinks
• Select ▲▼ to switch between AM and PM
• Select ENTER
• On Screen display “AUDIO ON”
• Select ▲▼ to switch between AUDIO ON and AUDIO OFF
• Select ENTER
Replacing Batteries
To change the batteries, unscrew the battery panel and lift it off. Remove the old
batteries and replace with three new AA batteries. Replace the panel and screw it
back on. Replace one battery at a time.
Note: After changing batteries time will have to be reset.
FCC WARNING: This device complies with part 15 of the FCC Rules. Operation is
subject to the following two conditions: (1) This device may not cause harmful interference,
and (2) this device must accept any interference received, including interference that
may cause undesired operation.
Important Battery Information
· Battery installation and removal should be performed by an adult.
· Use only batteries recommended in this instruction manual.
· Be careful to install the batteries with the correct polarity, as indicated.
· Do not use old and new batteries.
· Remove all batteries when replacing.
· Do not use alkaline, standard, rechargeable, or different types of batteries.
· Different types of batteries or new and used batteries are not to be mixed.
· Non-rechargeable batteries are not to be recharged.
· Only batteries of the same or equivalent type as recommended are to be
used.
· The supply terminals are not to be short-circuited.
· Remove exhausted batteries.
FCC Notes: The manufacture is not responsible for any radio or TV interference caused
by unauthorized modifications to this equipment.Such modifications could void the user's
authority to operate the equipment.
 Loading...