

Page 1
AdvisorOne Z-Wave® Module Installation Sheet
EN
CNF
ES
PR
1. Z-Wave Module
2. Tabs and Battery Connector
3. Without Covers
English: Installation Sheet
Description
The Advisor™One self-contained lifestyle management and security system detects situations and provides control and information
to home and small business owners (P/N AVO-1037).
This document provides instructions on installing and programming the Z-Wave module (P/N AVO-ZW) for use with the AdvisorOne
panel.
The AdvisorOne Z-Wave module enables control of Z-Wave devices that have been configured to the AdvisorOne system.
Controlling lights, thermostats, door locks and other appliances is possible from the AdvisorOne panel and from the auxiliary
Advisor TouchScreens. Some Z-Wave devices may also be controlled via Advisor Mobile or from Bluetooth® devices when the
system has been configured with the AdvisorOne Bluetooth module.
Preparation and Installation
Preparing to Install the Z-Wave Module
WARNING: Use caution when installing or removing the power supply to an outlet with a metal cover.
1. Depending on the situation, it may be necessary to contact the central monitoring station before starting the installation.
2. If a power supply is present, remove the screw from the securement tab and unplug the power supply.
3. Remove the screw securing the panel chassis. Open the panel by pressing down on the tabs and carefully swing the panel
chassis open.
CAUTION: Use static electricity precautions when handling electronic components.
P/N 466-4410 • REV C • 23APR15 1 / 5
Page 2

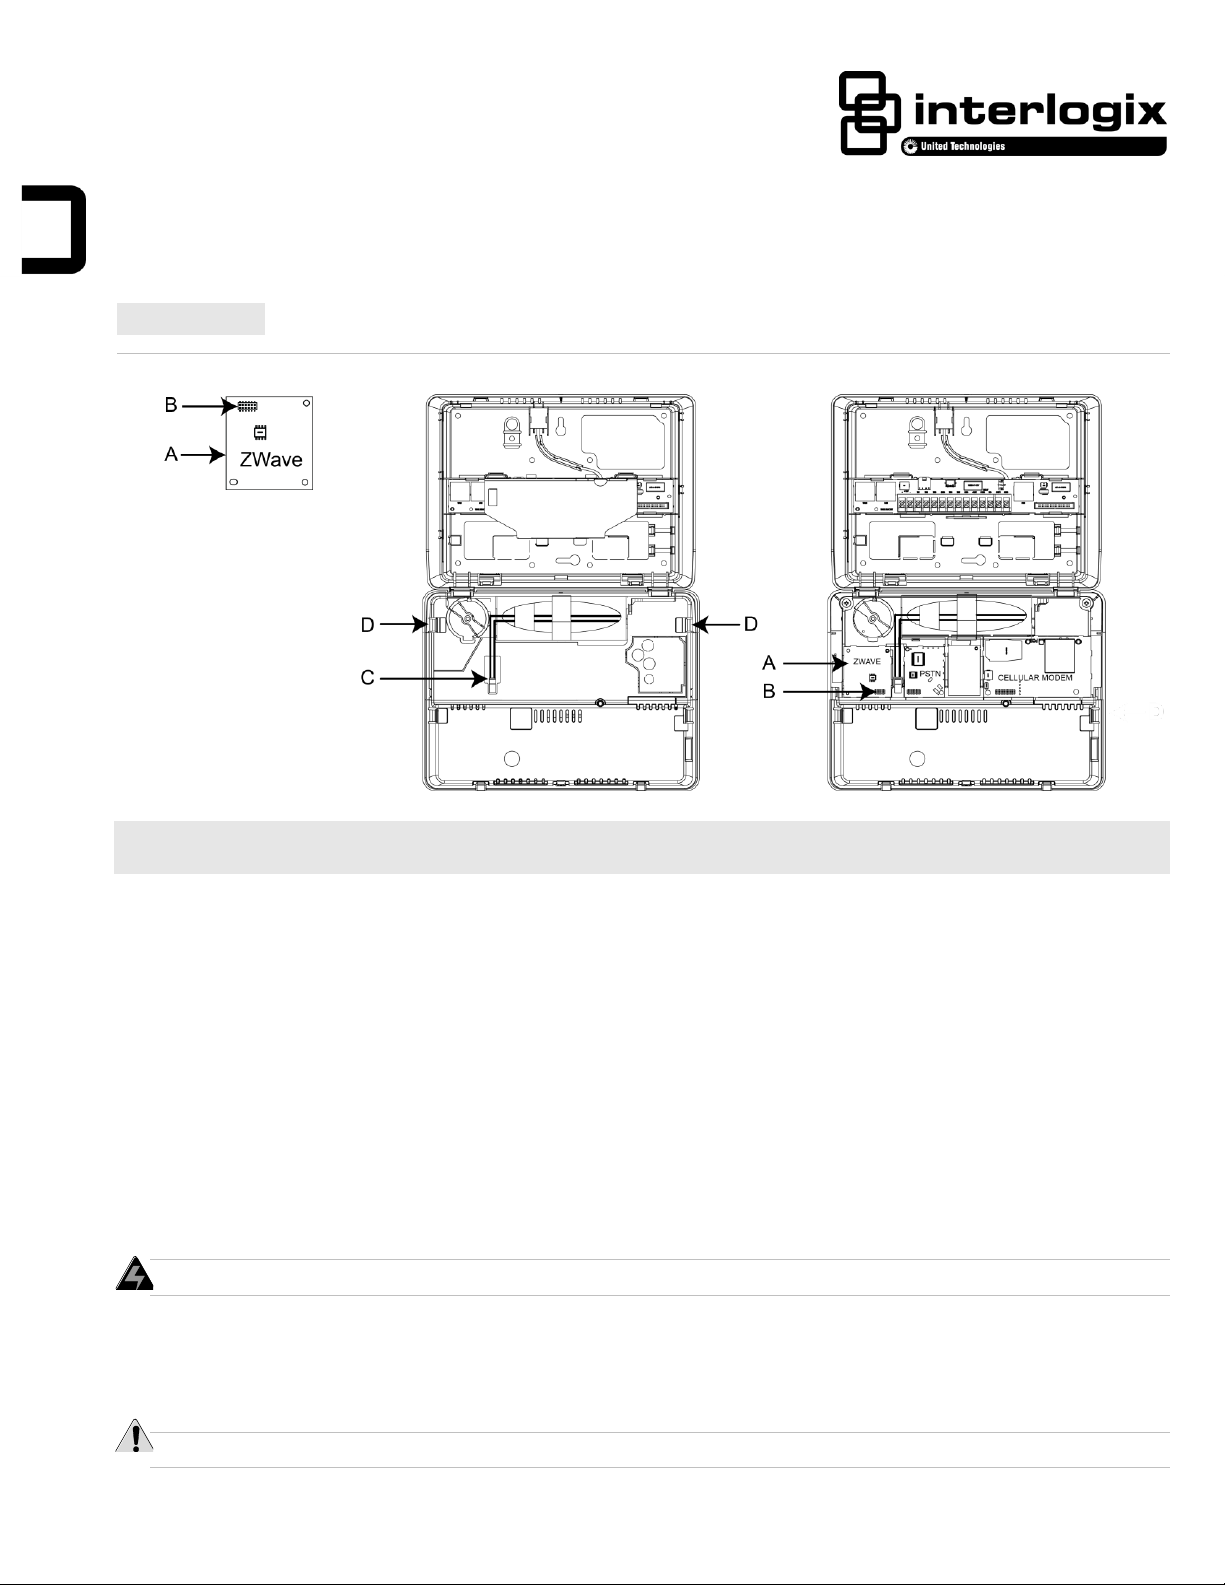
4. Disconnect the battery from the battery connector (C in Figure 2) by pressing down on the wire end of the battery clip.
5. To access the location of the Z-Wave module, remove the Communication Modules Cover by pulling outward on the tabs (D in
Figure 2) and then lifting upward when tabs release.
Installing the Z-Wave Module
1. Install the Z-Wave module (A in Figures 1 and 3) into the Z-Wave module location (with the bar code label side up). Carefully
align the header (B in Figures 1 and 3) with the pins on the circuit board. Press into place.
The Z-Wave module must be installed in the Z-Wave designated slot (marked ZWAVE in the plastic). DO NOT force the
module into place.
2. Reinstall the Communication Modules Cover by pressing the cover down until the tabs (D in Figure 2) snap into place.
The Communication Modules Cover must be secured for proper operation.
3. Plug the power supply into the outlet. Optionally, secure the power supply to the outlet with the supplied screw.
Connect the battery within 15 seconds of providing AC power to reduce the potential for a low battery indication.
4. Connect the battery to the battery connector on the panel (C in Figure 2).
The cable connector locks in place.
5 Close the panel, making sure all tabs are engaged. Replace the screw securing the panel chassis.
6. If the central monitoring station was notified, inform them this operation is complete.
Module Configuration and Programming
Module Configuration
The Z-Wave module will automatically configure to the AdvisorOne panel. For details regarding optional Z-Wave module
configuration settings, refer to the AdvisorOne Panel Install & Programming Manual (P/N 466-4405) for more information.
Note: The default configuration for the Z-Wave module will work for a majority of configurations. If the module doesn’t configure
automatically, see “Troubleshooting” on page 3.
Programming
The Z-Wave module can be programmed to support “known categories/preferred devices” which manage light, lock, and thermostat
control and other forms of automation. Refer to the AdvisorOne Panel Install & Programming Manual. To support this capability, ZWave devices must be added to the module.
Known category device is preferred
To Add Z-Wave Device(s)
Note: Only “known” category devices can be added. Unknown category devices will not install. Refer to the Z-Wave section of the
AdvisorOne Panel Install & Programming Manual for more information.
1. Press the Settings icon then press CONFIGURATION and enter the access code.
2. From the Configuration & Programming screen, press DEVICES.
3. From the Devices screen press Z-Wave devices and then press EDIT.
4. Press LEARN.
5. Select the Installation method:
• Select Direct Device Install if you are adding the Z-Wave device directly to the AdvisorOne panel. This is the typical
mode when the device is physically close to the panel.
• Select Inclusion Device Install if you are adding the device through an inclusion controller. Refer to the specific Z-Wave
device manual for more information. This is used when the devices are farther away from the panel and devices will be
learned in at one time. This mode is less typical.
6. Press CONTINUE to start learning. A countdown timer will be displayed. The panel is ready to add Z-Wave devices.
A. On the Z-Wave device to be installed, press the Include/Bind/Mate button on the Z-Wave device. Upon successful
detection of the device, the screen will navigate to the Z-Wave Details screen.
2 / 5 AdvisorOne Z-Wave Module Installation Sheet
Page 3

B. Press the field next to Enter Device Name and enter the name of the Z-Wave Device via the keyboard. Press SAVE.
C. For a single partition system, press CONTINUE and proceed to step D. For a multiple partition system, press SELECT
PARTITIONS FOR THIS DEVICE to select the partitions to which this device is assigned. Press SAVE, then press
CONTINUE.
D. If the device has been added successfully (and all devices have been added), press CLOSE. Verify all devices are
present.
Note: If the add process failed, a red screen will appear. Press RESET to reset the device to its factory defaults; this is
useful if the device is not responding or if the device has been previously installed to a different controller. Press RETRY to
attempt to add again.
To Edit Z-Wave Device(s)
1. From the Z-Wave devices screen, press EDIT to edit the name or partition details of a Z-Wave device.
2. When finished editing, press SAVE to return to the Z-Wave device menu.
To Delete Z-Wave Device(s)
1. From the Z-Wave devices screen, press DELETE next to the name of the device to delete. Note: The device will be removed
from the list.
Troubleshooting
The Module Doesn’t Auto Configure or Appear Operational
• Verify the module is installed in the panel correctly and that the pins on the circuit board are aligned properly with the header
on the Z-Wave module.
• Verify the Z-Wave devices appear in the Z-Wave device list and a green dot appears. Re-install devices if necessary. If these
steps fail, try replacing the module devices or contact Interlogix Technical Support.
• If a device does not seem to work with an application, verify that it works at a low level and is a known category device, press
CONFIGURATION/TESTING/Z-WAVE. Select the device in question and select ON. If the device turns on, it is a known
category device, but it is not a preferred device. Only known/preferred devices work with the Advisor applications. If the device
did not turn on, then it is a hardware issue and repeat the steps above or the category device is unknown.
Unable to Add a Z-Wave Device
• Verify the device has factory defaults and/or has not been learned into another Z-Wave controller. To correct, utilize the reset
option in step 5D in the section “To Add Z-Wave Device(s)”.
• Verify that the Z-Wave device is a known category device and is on the supported devices list. For more information, contact
Interlogix Technical Support.
• Replace the device.
Unable to See Devices in the Application When Launched
• Verify that the user has permission to access the Z-Wave devices.
• Some applications may require permission from the Z-Wave devices to operate properly. In this instance, log in with an access
code and attempt to access the Z-Wave device application.
• If the system has multiple partitions, ensure the TouchScreen and user permissions/access match (or are at least a superset)
the devices’ permission/access. For example, if a secondary Advisor TouchScreen is assigned to partitions one and two, but a
Z-Wave module is assigned to partition three, then the application will be unable to access or display information.
• If a device does not seem to work with an application, verify that it works at a low level and is a known category device, press
CONFIGURATION/TESTING/Z-WAVE. Select the device in question and select ON. If the device turns on, it is a known
category device, but it is not a preferred device. Only known/preferred devices work with the Advisor applications. If the device
did not turn on, then it is a hardware issue and repeat the steps above or the category device is unknown.
AdvisorOne Z-Wave Module Installation Sheet 3 / 5
Page 4

If Devices are Grayed Out in the Applications When Launched (for example, lights)
Compatibility
Advisor Panel
Storage temperature
-29 to 140ºF (-34 to 60ºC)
Operating temperature
32 to 120ºF (0 to 49ºC)
Maximum humidity
85% relative humidity, noncondensing
Module compatibility
Contact an Interlogix representative and/or Interlogix.com for the latest list of compatible devices.
• Verify the Z-Wave device has power and/or fully charged batteries (if necessary).
• If possible, move the device closer to the AdvisorOne panel.
• Check to see if the AdvisorOne panel has AC power. On battery only, the Z-Wave subsystem may be powered down.
Specifications
Regulatory Information
This equipment has been tested and found to comply with the limits for a Class B digital device, pursuant to Part 15 of the FCC
Rules. These limits are designed to provide reasonable protection against harmful interference in a residential installation.
This equipment generates, uses and can radiate radio frequency energy and, if not installed and used in accordance with the
instructions, may cause harmful interference to radio communications. However, there is no guarantee that interference will not
occur in a particular installation.
If this equipment does cause harmful interference to radio or television reception, which can be determined by turning the
equipment off and on, the user is encouraged to try to correct the interference by one or more of the following measures:
• Reorient or relocate the receiving antenna.
• Increase the separation between the equipment and receiver.
• Connect the equipment into an outlet on a circuit different from that to which the receiver is connected.
• Consult the dealer or an experienced radio/TV technician for help.
Changes or modifications not expressly approved by UTC Fire and Security could void the user’s authority to operate the
equipment.
In accordance with FCC requirements of human exposure to radiofrequency fields, the radiating element shall be installed such that
a minimum separation distance of 20 cm is maintained from the general population.
FCC: B4Z-959-ZW
IC: 1175C-959BZW
This Class B digital apparatus complies with Canadian ICES-003.
Cet appareil numérique de la classe B est conforme à la norme NMB-003 du Canada.
This device complies with Industry Canada licence-exempt RSS standard(s). Operation is subject to the following two conditions:
(1) this device may not cause interference,and (2) this device must accept any interference, including interference that may cause
undesired operation of the device.
Cet appareil est conforme avec Industrie Canada exempts de licence standard RSS (s). Son fonctionnement est soumis aux deux
conditions suivantes: (1) cet appareil ne doit pas provoquer d'interférences et (2) cet appareil doit accepter toute interférence, y
compris celles pouvant causer un mauvais fonctionnement de l'appareil.
Manufacturer Information
UTC Fire & Security Americas Corporation, Inc.
1275 Red Fox Road, Arden Hills, MN
55112-6943, USA
4 / 5 AdvisorOne Z-Wave Module Installation Sheet
Page 5

Contact Information
For general information, see www.interlogix.com. For customer/technical support, see www.interlogix.com/customer-support or call
+1 855 286 8889.
© 2015 United Technologies Corporation. Interlogix is part of UTC Building and Industrial Systems, a unit of United Technologies
Corporation. All rights reserved. The Z-Wave trademark and the Bluetooth trademark are the property of their respective owners.
Limitation of Liability
To the maximum extent permitted by applicable law, in no event will Interlogix be liable for any lost profits or business opportunities,
loss of use, business interruption, loss of data, or any other indirect, special, incidental, or consequential damages under any theory
of liability, whether based in contract, tort, negligence, product liability, or otherwise. Because some jurisdictions do not allow the
exclusion or limitation of liability for consequential or incidental damages the preceding limitation may not apply to you. In any event
the total liability of Interlogix shall not exceed the purchase price of the product. The foregoing limitation will apply to the maximum
extent permitted by applicable law, regardless of whether Interlogix has been advised of the possibility of such damages and
regardless of whether any remedy fails of its essential purpose.
Installation in accordance with this manual, applicable codes, and the instructions of the authority having jurisdiction is mandatory.
While every precaution has been taken during the preparation of this manual to ensure the accuracy of its contents, Interlogix
assumes no responsibility for errors or omissions.
Canadian French: Installation Sheet
Translation of the manual into Canadian French.
Spanish: Installation Sheet
Translation of the manual into Spanish.
Portuguese: Installation Sheet
Translation of the manual into Portuguese.
AdvisorOne Z-Wave Module Installation Sheet 5 / 5
 Loading...