

Page 1

UltraView IP XP3 Box
Day/Night Range Camera
Quick Start Guide
P/N 1070300-EN • REV B • ISS 17NOV10
Page 2

EN 2 UltraView IP XP3 box day/night range camera
Copyright © 2010 UTC Fire & Security. All rights reserved.
Trademarks and
patents
The UltraView name and logo are trademarks of
UTC Fire & Security.
GE and the GE monogram are trademarks of the
General Electric Company and are under license
to UTC Fire & Security, 9 Farm Springs Road,
Farmington, CT 06034-4065, USA
Other trade names used in this document may
be trademarks or registered trademarks of the
manufacturers or vendors of the respective
products.
Contact
information
For contact information, see
www.utcfireandsecurity.com.
Page 3

UltraView IP XP3 box day/night range camera 3 EN
Introduction
The UltraView IP XP3 box day/night range camera uses a digital
signal processor (DSP) to process video signals. The video camera
includes a microcontroller to provide high-quality images with highcolor reproduction and sharp pictures.
Product codes:
• UVC-IP-XP3DN-HR
• UVC-IP-XP3DN-HR-P
Package contents
The camera is shipped with the following items:
• The camera assembly
• 1 channel passive video transceiver
• AC power wiring harness
• 150 mm DC jack to terminal adapter
Installation environment
Refer to the user manual for detailed information, but observe these
important requirements:
• Place the camera in a secure location.
• Ensure that the camera is in a well-ventilated area.
• Do not expose the camera to rain or moisture.
Cable requirements
Cable type Requirements
Video 75 ohm RS-59 coaxial cable with BNC ends
Power 24 VAC cable
Page 4
EN 4 UltraView IP XP3 box day/night range camera
Camera description
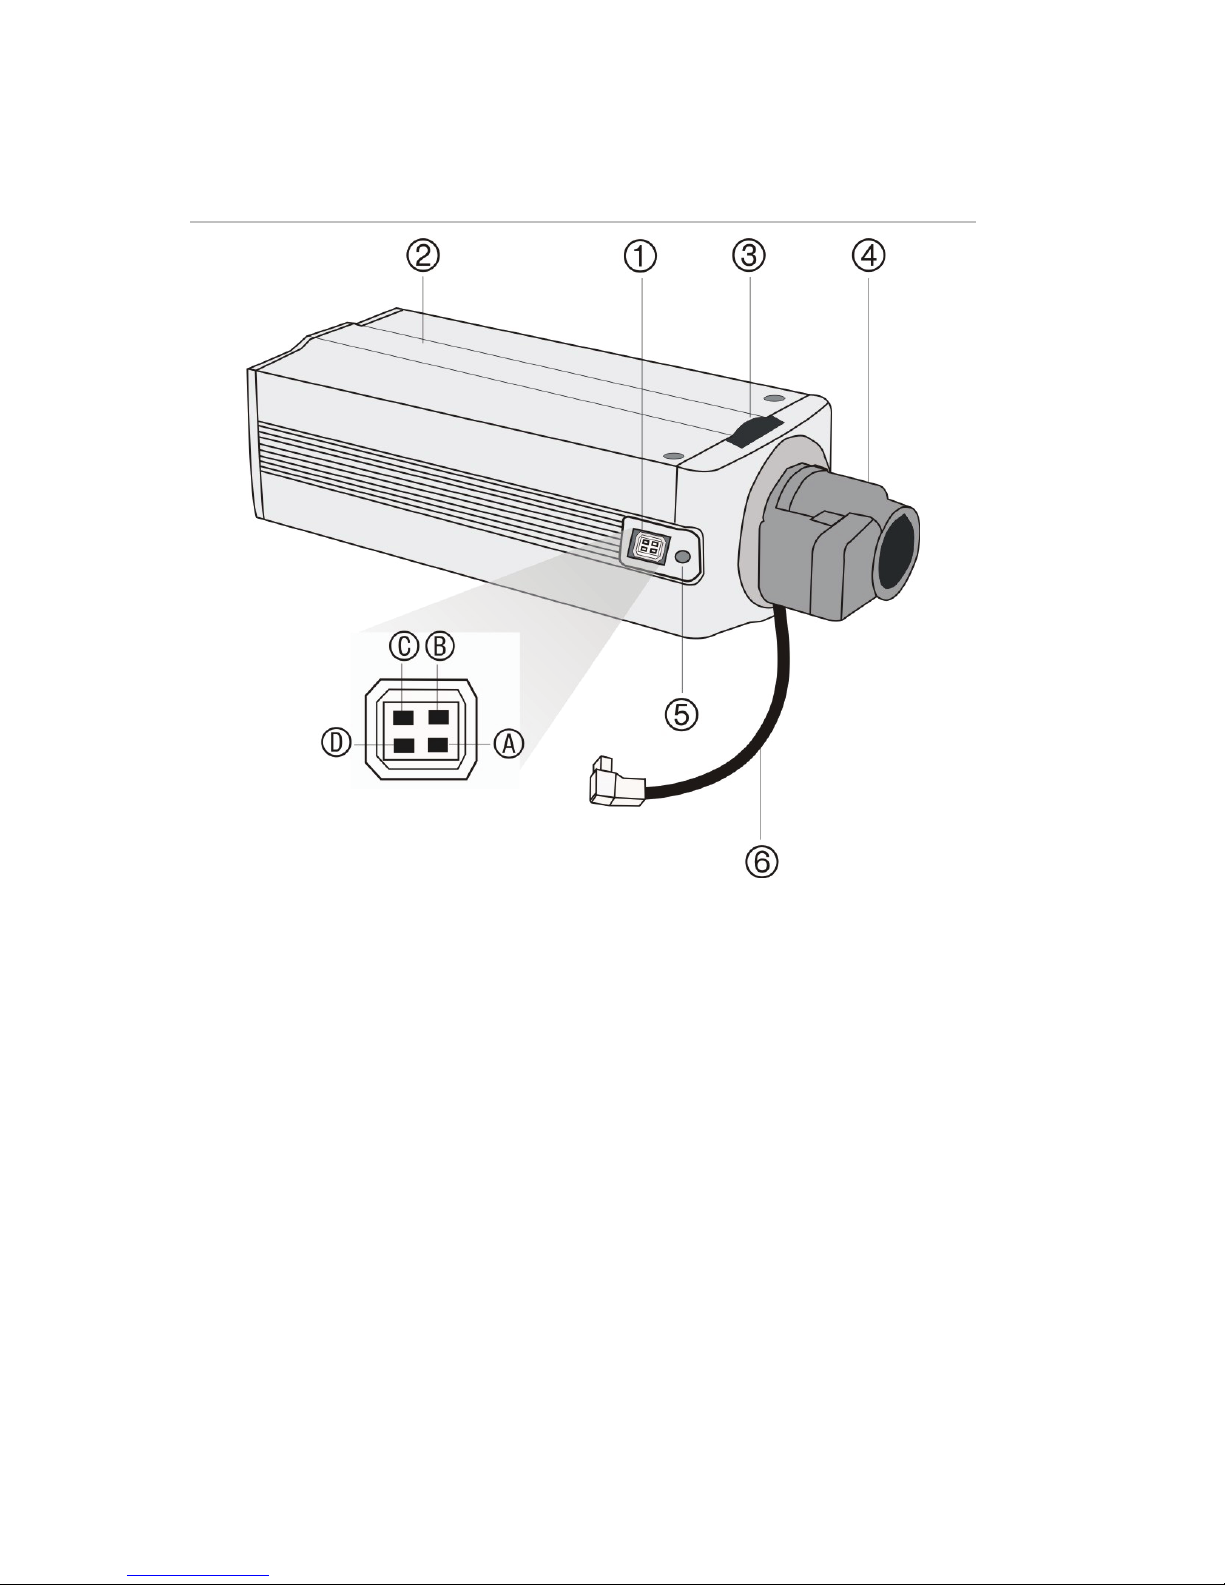
Figure 1: Side view of box camera
1. Auto iris lens connector
Video-type auto iris lens
connection:
A. Video (white); B. Power;
C. NC; D. GND (black)
DC-type auto iris lens
connection:
A. Driving coil (+);B. Damping
coil (+); C. Damping coil (-);
D. Driving coil (-)
2. Camera
3. Back focus adjustment
4. Lens (auto iris lens shown.
Manual lens has no cable.)
Not included
5. Back focus lock screw
6. Auto iris lens cable. Not
included
Page 5
UltraView IP XP3 box day/night range camera 5 EN
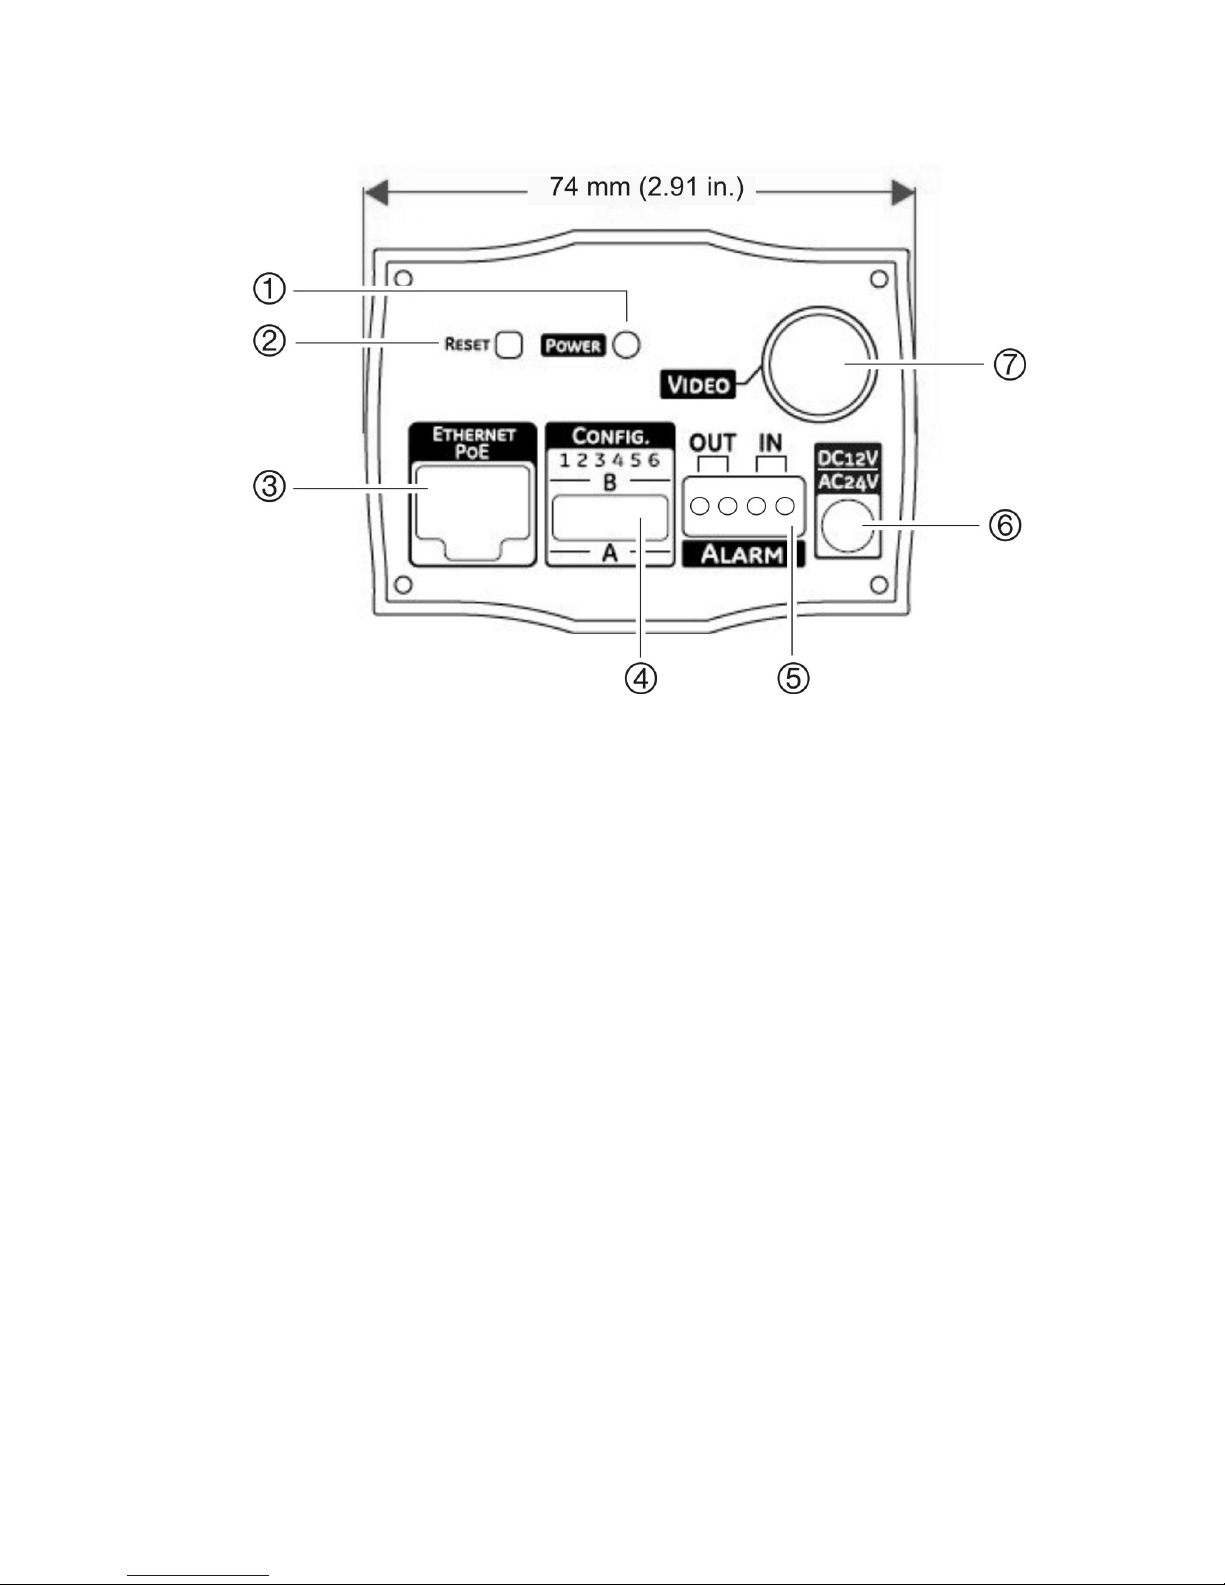
Connecting the devices
1. Power LED.
2. Reset button.
Press to reset camera to
factory default settings.
3. Ethernet RJ45 port.
Connect to network devices.
4. DIP switches.
Configure camera settings.
5. Alarm input and output.
Connect to be able to trigger
an alarm at the network
device.
6. Power supply.
Connect 12 VDC or 24 VDC
power supply.
7. Video output.
Connect to a CCTV monitor
Setting the DIP switches
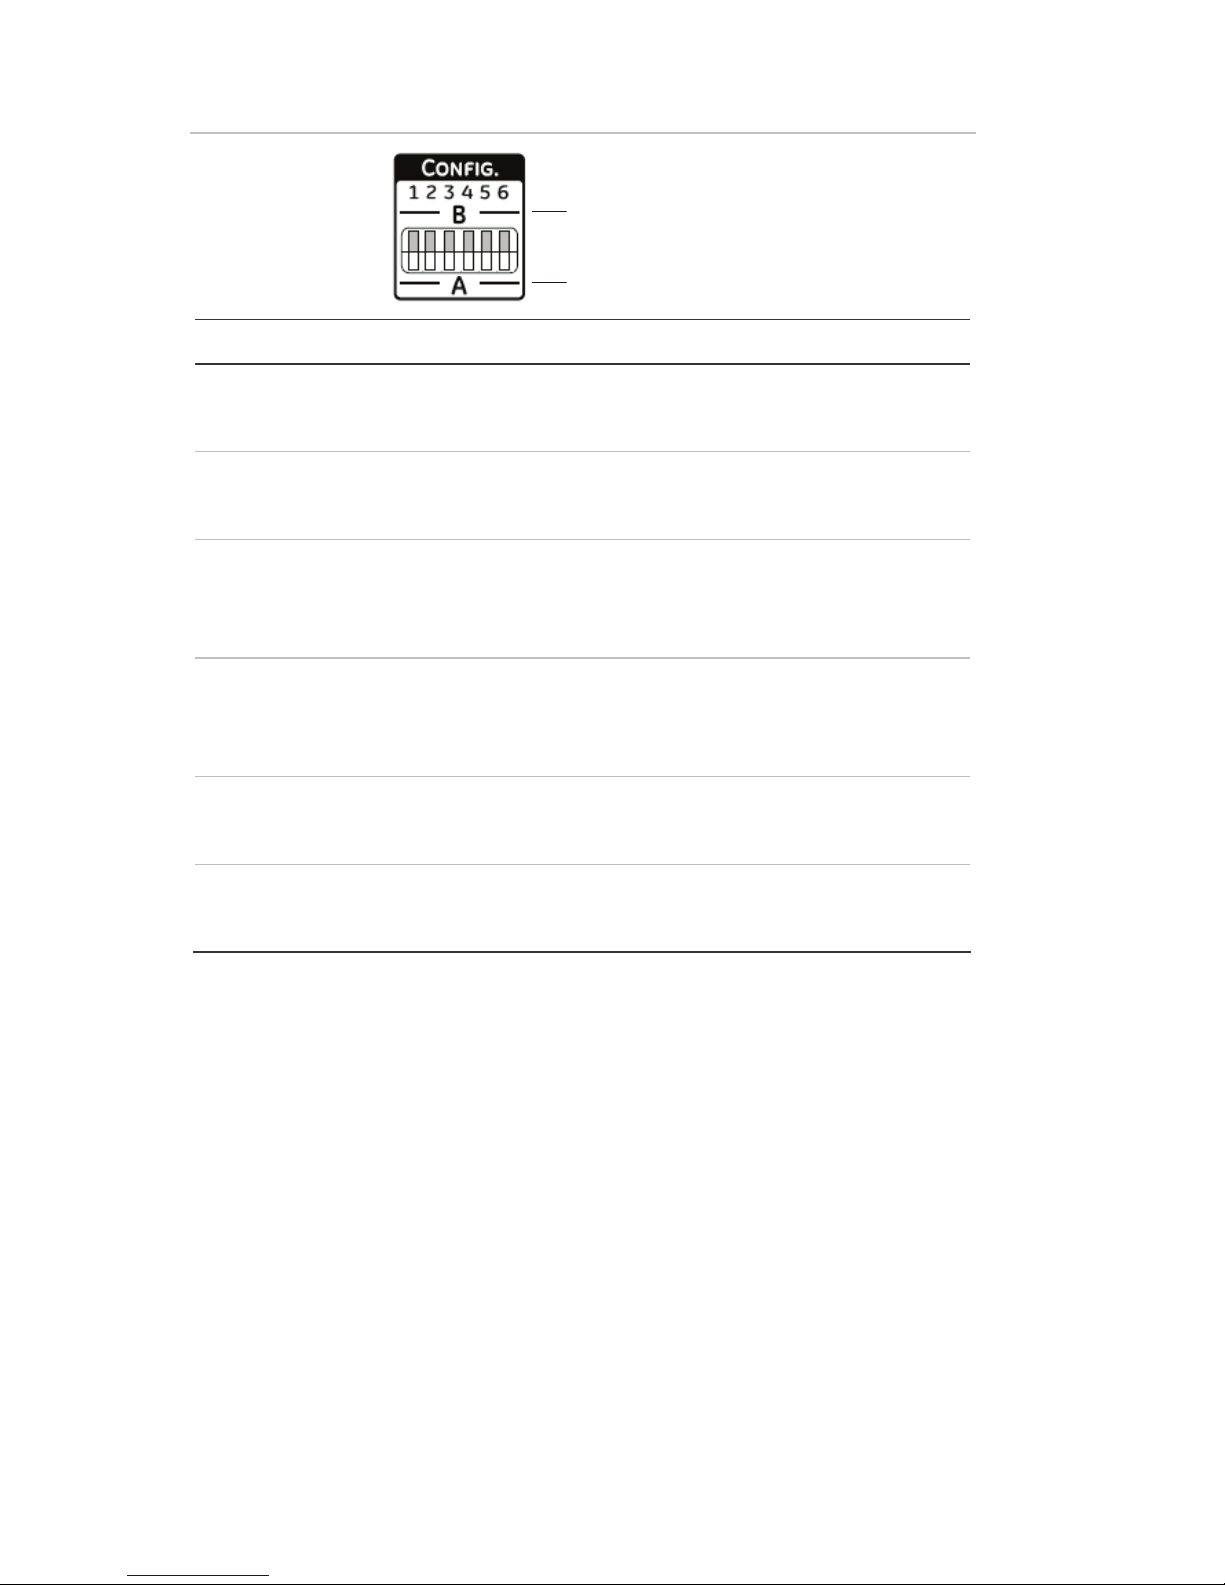
You can set up six camera functions using the DIP switch bank on the
rear of the camera. Figure 2 on page 6 shows the DIP switch layout.
For detailed descriptions on the functions of the DIP switch settings,
please refer to the user manual.
Page 6
EN 6 UltraView IP XP3 box day/night range camera
Figure 2: DIP switch layout (rear of camera)
OFF
ON
Switch Description
1. White balance
ON: ATW mode; OFF: PTL mode
2. Backlight compensation
ON: BLC on; OFF: BLC off
3. AI/AE exposure
ON: Auto exposure (AE) mode; OFF: Auto iris (AI)
mode
4. Day/Night setting
ON: Black and white mode; OFF: Auto Day/Night
mode
5. High/Normal Resolution
ON: High resolution; OFF: Normal resolution
6. Flickerless control
ON: Flickerless enabled; OFF: Normal
Accessing the camera over the internet
The camera can be configured using an internet browser such as
Microsoft Internet Explorer (IE).
For detailed descriptions on the functions of the DIP switch settings,
please refer to the user manual.
To access the camera online:
1. Configure your host PC/laptop within the same subnet as the
camera’s default IP address, for example: 10.1.2.10.
Page 7

UltraView IP XP3 box day/night range camera 7 EN
2. In the Web browser enter the camera’s default fixed IP address
10.1.2.11. The login dialog box appears.
3. Enter the username and password:
Login: admin
Password: admin
4. Click OK. The UltraView box camera’s home page appears.
Overview of the Web browser window
Use the menu toolbar on the top of every screen to access the various
screens for monitoring and configuring the camera. There are five
options:
• Home: Return to the home page.
• Live view: View images in live mode.
• Monitoring: Display information on the health of the device,
system configuration, video ports and network interfaces.
• Administration: Define the network parameters, access rights and
video formats.
• Restart: Restart the device. This is required, for example, to
reboot the system for changes to be implemented. However, if the
network connection is lost as a result of the configuration changes
made, you must reconfigure the camera by pressing the Reset
button on the rear of the camera. The settings return to factory
default.
For detailed descriptions on the functions, please refer to the user
manual.
Page 8

EN 8 UltraView IP XP3 box day/night range camera
Specifications
Operating temperature -30 to +50 °C (-22 to +122 °F)
Dimensions
(W × H × D)
75 × 53 × 168 mm (2.93 × 2.1 × 6.6 inches)
Weight 690 g (21.5 oz.)
Power consumption 6 W (12 VDC); 5.5 W (12 VDC); 5.5 W
(PoE)
Power supply 24 VAC ±10% / 12 VDC ±10%, PoE
 Loading...