

Page 1

User Guide
WZB 35
TELECOMMANDE TACTILE PORTATIVE
Page 2

© 2008 VITY Technology
VITY Technology IS NOT RESPONSIBLE FOR TECHNICAL OR EDITING ERRORS IN THE CONTENTS
OF THIS GUIDE. VITY Technology IS NOT RESPONSIBLE FOR ANY SPECIAL, INDIRECT OR
CONSEQUENTIAL DAMAGES OR ANY DAMAGES WHATSOEVER RESULTING FROM ARISING OUT
OF OR IN CONNECTION WITH THE USE OR PERFORMANCE OF DOCUMENTS, OR LOSS OF USE.
The contents of this guide has NOT been filtered, may contain unconfirmed, unproved or indirect
information regarding product warranty, product quality and advertisement, and are subject to change
without notice if deemed necessary. VITY Technology product warranty is included in the product kit, and
this user guide is NOT included with any extra product warranty.
THE CONTENTS AND INFORMATION INCLUDED IN THIS GUIDE ARE COPYRIGHT PROTECTED.
THUS, THEY CANNOT BE COPIED, REPRODUCED, OR TRANSLATED WITHOUT VITY Technology’s
WRITTEN CONSENT.
User Guide
TELECOMMANDE TACTILE PORTATIVE
Model No. WZB 35
Website: www.vity.com
Page 3

CONTENTS
5
Product Introduction
20
Registration
20 Basic Device
Registration
6
Product Kit
6 Product Kit Details
7 Body Structure
Chargeable Cradle
8 RF Receiver
9 Hard Buttons and
Functions
11 Touch Screen and
Functions
24
Edit Home
25 Add Device
Home Page
Delete Device
Home Page
26 Hide Device
Home Page
Add Device Button
28 Copy Device Button
Delete Device Button
29 Move Device Button
30 Change Type & Text
13
Getting Started
13 Power On
14 Battery Charging
31
Edit Remote Control
32 Add Remote
Control Page
Delete Remote
Control Page
33 Add Remote
Control Button
34 Copy Remote
Control Button
35 Delete Remote
Control Button
Move Remote
Control Button
36 Change Type & Text
37 Set Remote
Control Button IR
39 Import Control Code
15
System Setup
15 LCD & LED
17 Volume
Date & Time
18 Macro Display
Calibrate
19 Factory Default
System Inform
41
Macro
41 How To Use Macro
Create Macro
43 Edit Macro Action
Page 4

45
Timer
45 How To Use Timer
46 Edit Timer
62
Setup Protection Mode
53
IR Learn
63
Troubleshooting
55
IR / RF
66
General Information
58
myDB Management
58 How to add
User Device to myDB
60 How to add
Device from myDB
68
System Specifications
Page 5

5
Product Introduction
WZB 35 Intelligent Digital Controller
WZB 35 is a revolutionary customizable intelligent digital controller introduced to the world market for the very
first time. It outdoes previous models of total or individual remote controllers in performance, and provides
excellent quality macro actions, remote control registration, timer option and various other services. WZB 35
is also equipped with high quality touch screen which enables users to edit screen and set up various remote
control scenarios at their convenience.
WZB 35 is capable of remote controlling high quality audio, video, lighting systems as well as various other
appliances, and is also compatible with audio, video, lighting systems used in conference, home, auditoriums
and lecture rooms in corporations, educational institutes, and public organizations.
WZB 35’s featured characteristics are as follows;
▪ Customizing UI setup - able to customize UI (user interface) scenarios, the graphic image of buttons.
▪ User mode and protect mode - able to protect the setup data if you set User mode.
▪ Various control method - able to support the IR signal for audio, video devices and RS232/RS485 (only TX)
for lighting devices, matrix, AV switchers etc. Also able to support the relay contact control for electric
motorized screen, curtain and elevation.
▪ Addressable channel and ID setup for multi-zone and same model’s devices - provide to support 16
channel address for the multi-zone and 16 ID address for same model’s devices.
▪ 2.4GHz RF operation distance – able to control to about 100meter in open space.
▪ myDB register and management – able to save and open the user setup device’s control data to transfer
from/to myDB.
▪ Powerful IR learning function - able to learn wide frequency (no carrier and below 1MHz) IR signal and
toggle property’s button.
▪ Dedicated macro function - able to execute multiple trigger actions using macro functions with delay
(by 0.2 sec) and page jumper.
▪ 16 Timer function - provides a convenient timer option to set active time for a selected macro.
▪ Convenient touch screen and external hard buttons - provide a 3.5 inch touch screen with 65,000 colors
to enhance your visual perception and 19 external hard button included with 13 remote control buttons.
▪ IR code library – support to be Installed with a wide selection of codesets for domestic and foreign brands
of IR devices, and provides a convenient codeset autoscan function to help you find codesets and register
devices with ease.
▪ Convenient touch keyboard - able to select and modify font size and colors of English, Arabic Numbers,
ASCII Codes and symbols that are used for device, remote control, and macro buttons.
▪ Online software upgrade - provides a frequent online software update service and convenient after-services
and able to transfer data between WZB 35 and a computer by using USB port.
Page 6
6
Product Kit
Product Kit Details
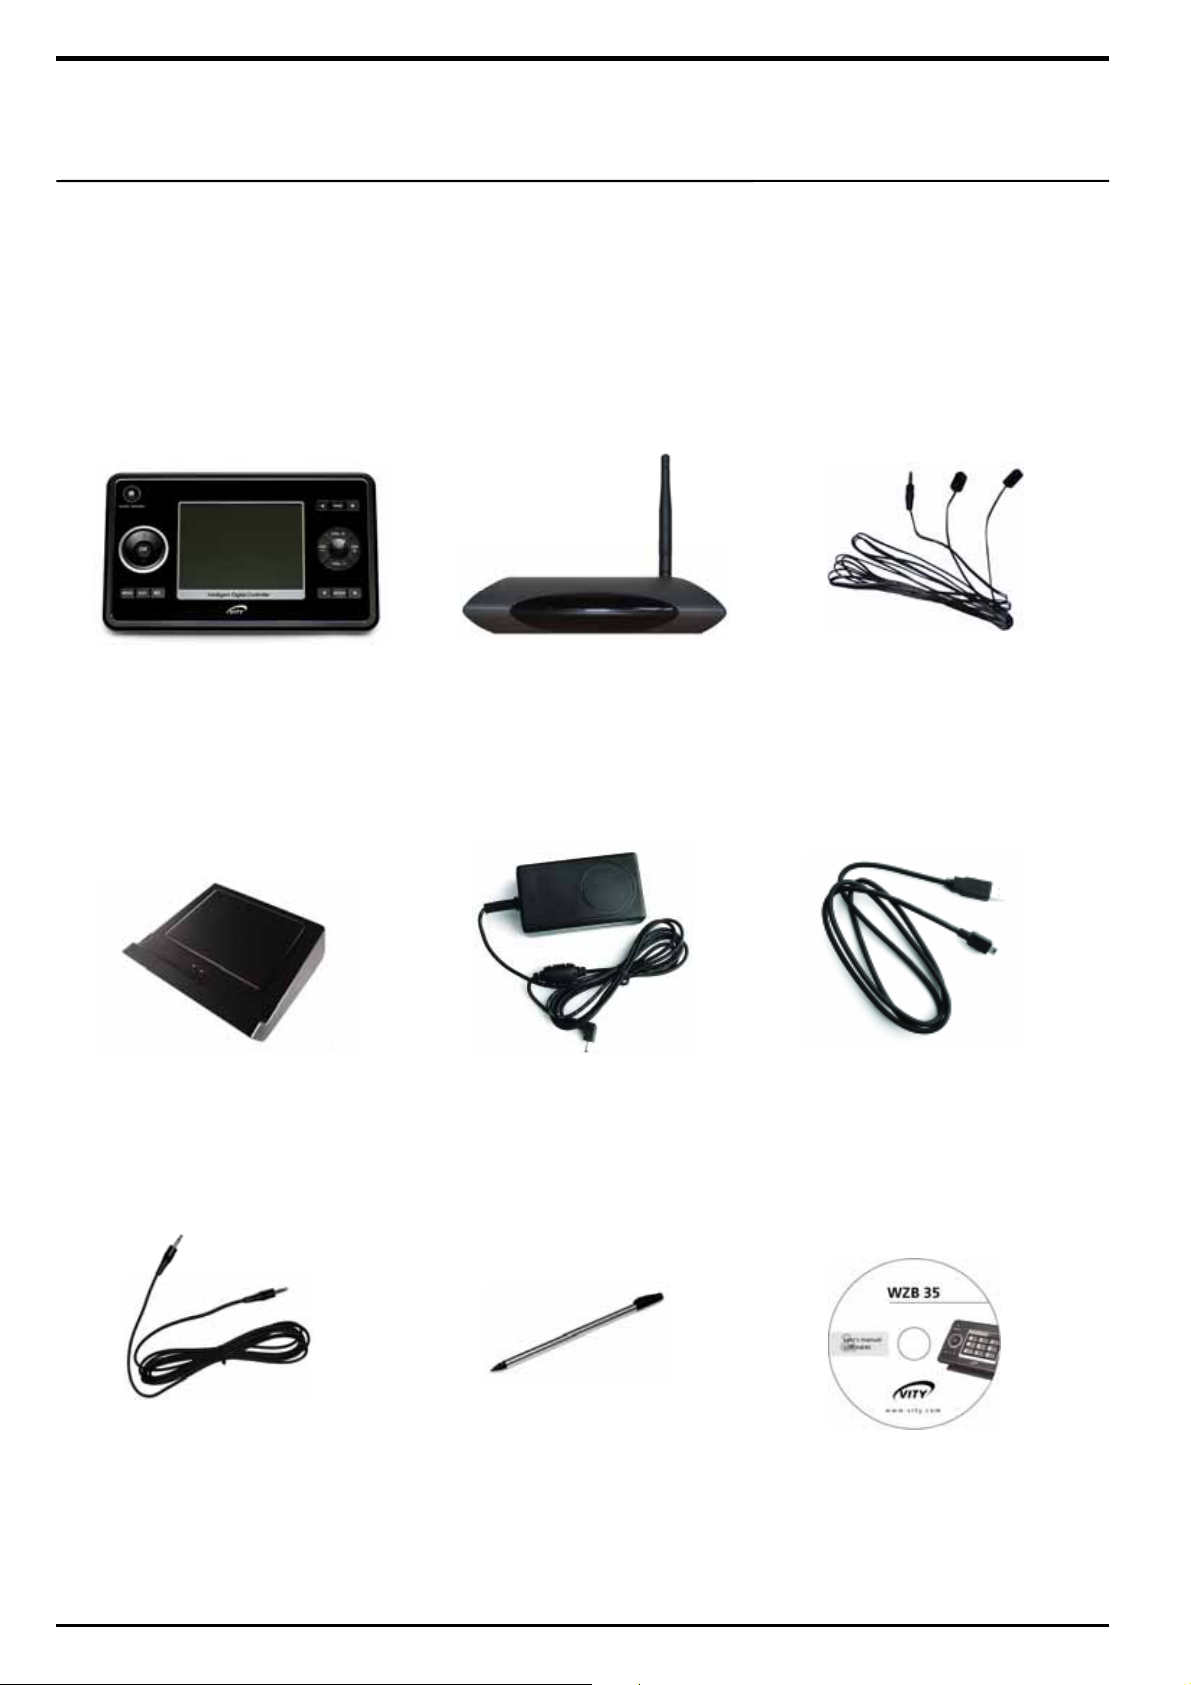
WZB 35 product kit includes items as follows.
■ WZB 35
■ Battery Charger
■ RF Receiver
■ DC Adapter ⅹ2
■ Dual IR Emitter
■ USB Cable
■ IR Link Cable
■ Stylus
■ CD
( Included with User Guide
& other software )
Page 7
7
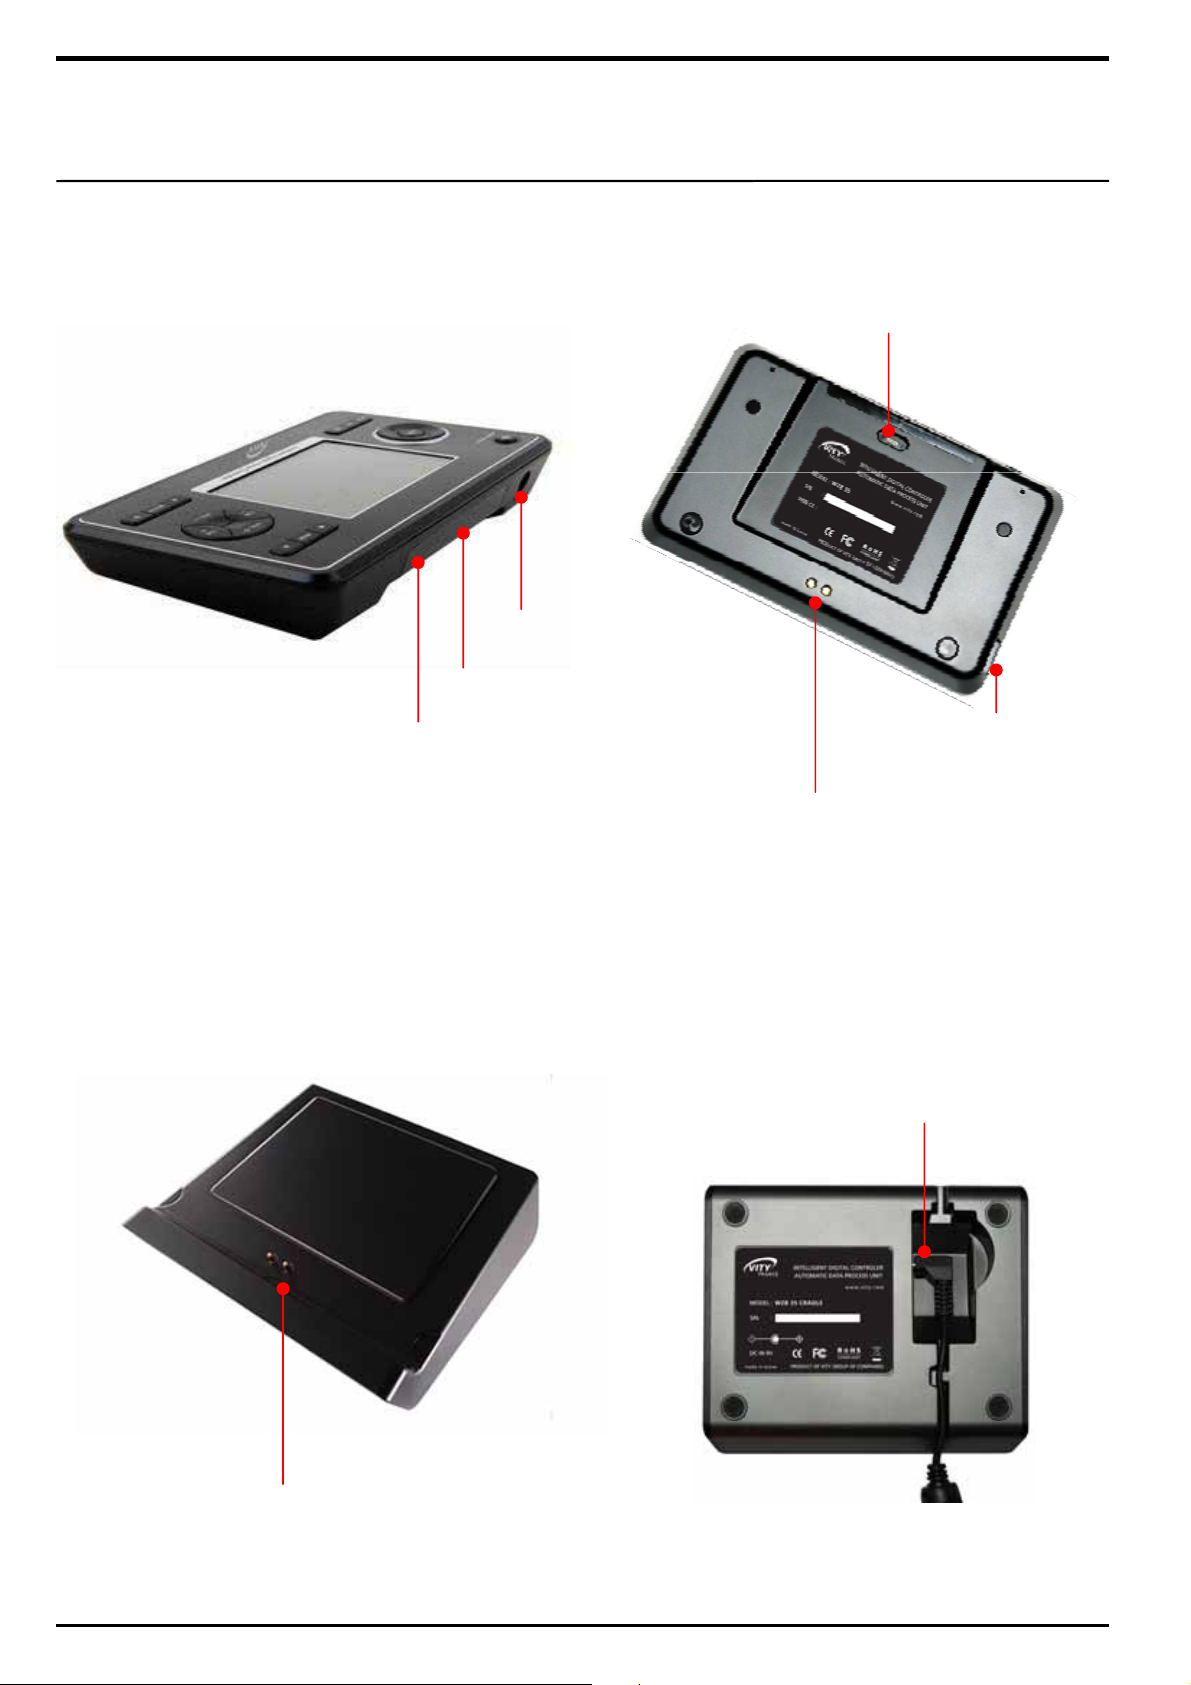
WZB 35 Body Structure
Power Switch
DC Adapter Port
Chargeable Cradle
IR Receiver
IR Transmitter
USB Port
Charger Terminal
DC Adapter Port
WZB 35 Charger Terminal
Page 8
8
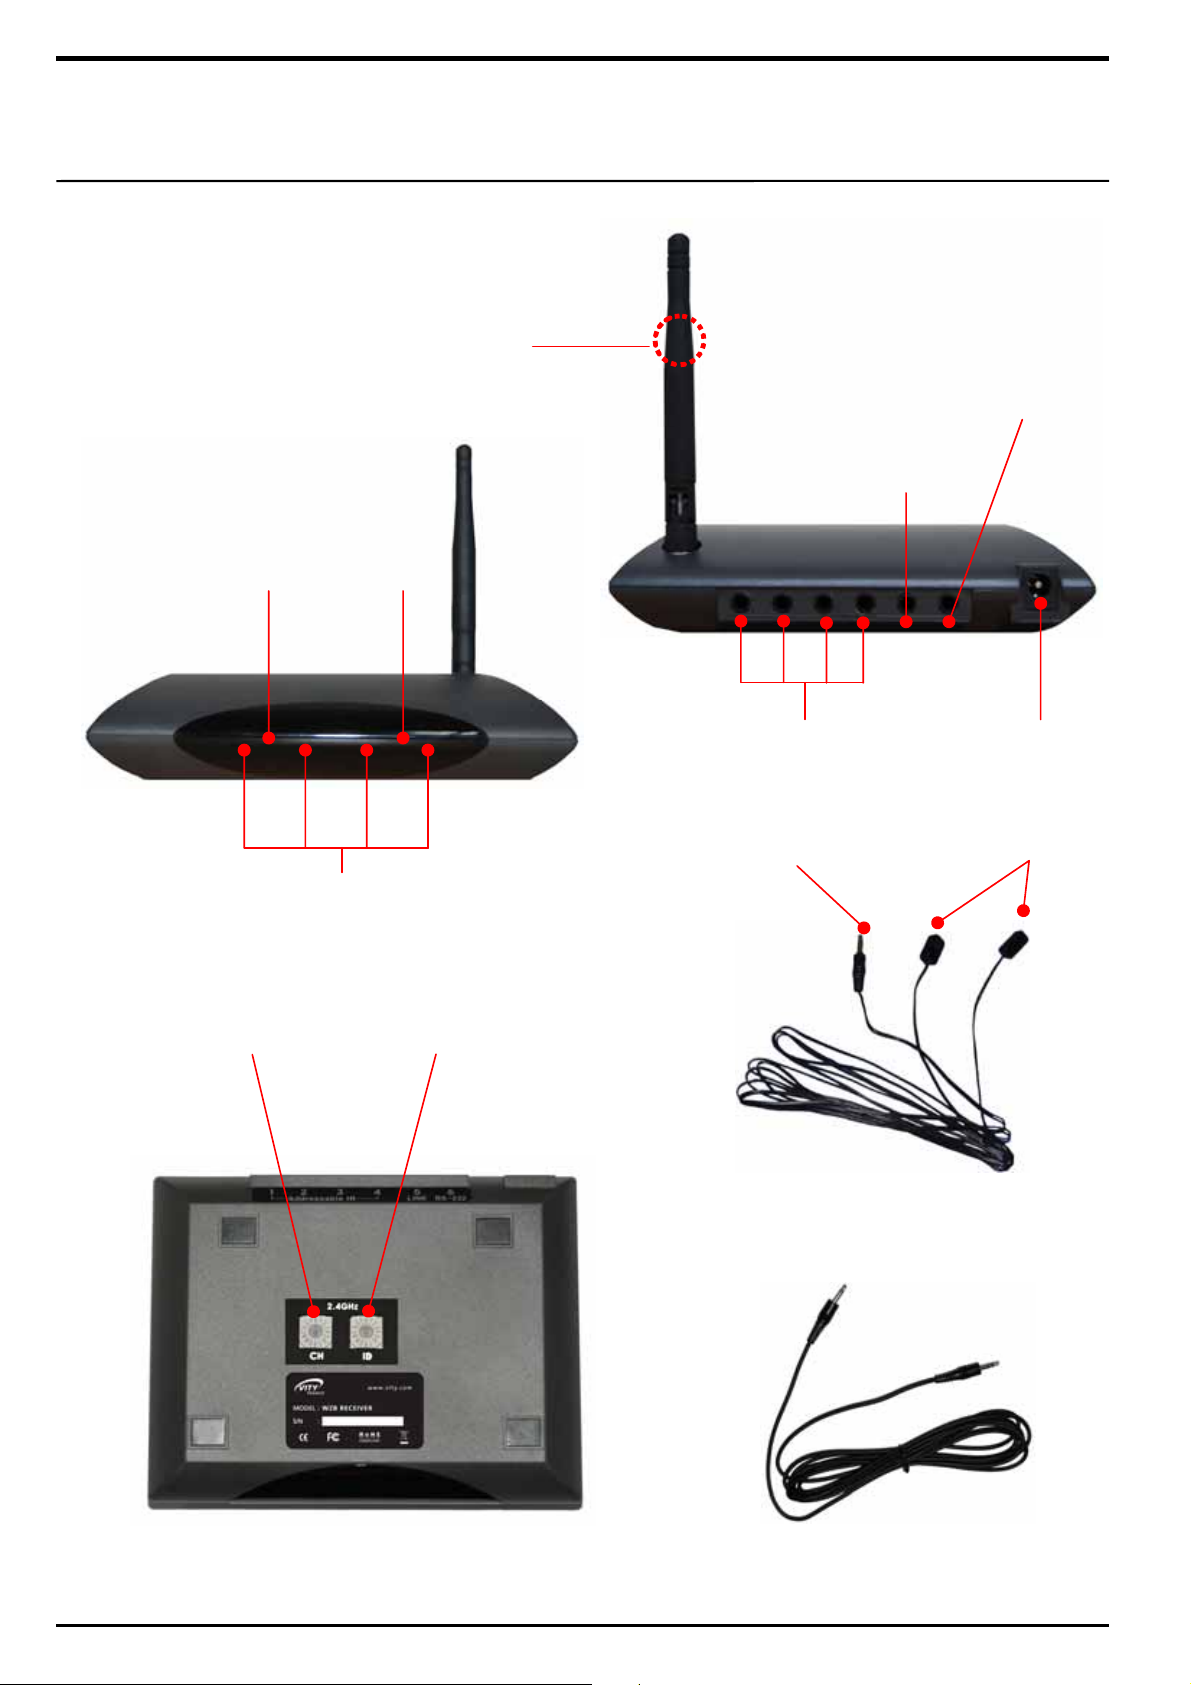
RF Receiver
Power LED Indicator
RF Antenna
(Insert)
RS-232 Port
IR Link Port
LED
IR Transmitter
RF Channel Switch
RF ID Switch
Addressable IR Port DC Adapter Port
Mini-jack Connector
Dual IR Emitter
IR Emitter
IR Link Cable
Page 9
9
Hard Buttons and Functions
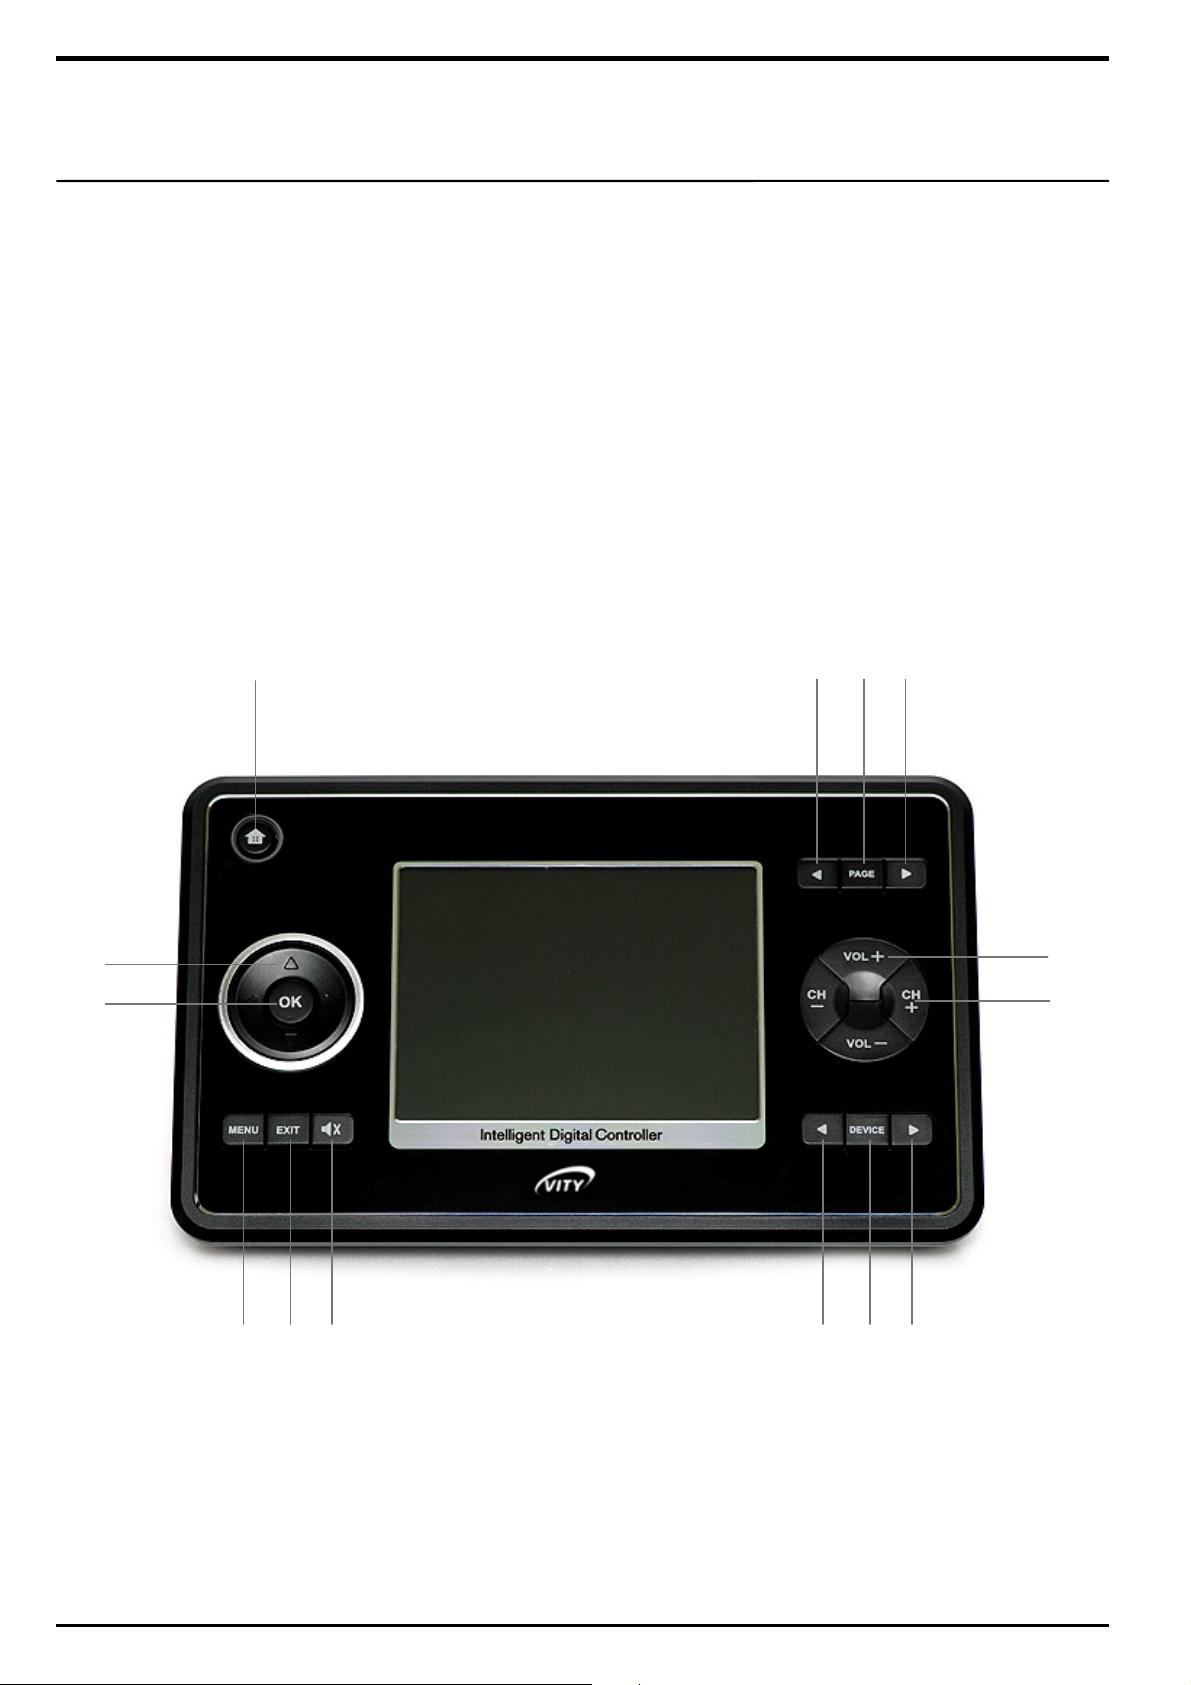
Hard buttons located on the WZB 35 body are classified into two different types depending on their functions.
There are “Move Buttons” to move between modes and pages in WZB 35, and “Remote Control Buttons” to
control devices in connection with the remote controller displayed on the touch screen.
2
7
1 3
10
11
8
9
5 4 6 12 13 14
Page 10
10
Move Buttons
1 [Page] Button
When more than one device home pages, remote
control or macro pages are saved, press this to go
to the very 1
2 [◀ Page] Button
Enables you to move between pages to backward.
i.e.) Page 4 > Page 3 > Page2 …
3 [Page ▶] Button
Enables you to move between pages to forward.
i.e.) Page 1 > Page 2 > Page 3…
4 [Device] Button
Directs you to the 1
page registered on Device Home regardless of the
mode you are in (Device Home or other Remote
Control Page).
5 [◀ Device] Button
Press this in "Device Home" to go to the Remote
Control link page for the first device registered in
the list. If pressed while in "Remote Control", you
will be directed to the list of devices, ordered from
the most recently registered to the first registered
device.
6 [Device ▶] Button
Press this in "Device Home“ to go to the Remote
Control link page for the first device registered in
the list. If pressed while in "Remote Control", you
will be directed to the list of devices, ordered from
the first to the most recently registered device.
st
page of each page automatically.
st
device’s initial remote control
Remote Control Buttons
7 [Home] Button
Enables you to attribute the remote control code
and macro.
Note 1. Use this to go to ‘user mode’ and ‘protect mode
2. This button is equipped with an LED. It will be
displayed in blue when in use, white while
being charged, and green when the battery is
fully charged.
8 [Volume +/-] Buttons
Enables you to adjust a selected device’s sound
volume using the [VOL +] and [VOL -] buttons.
9 [Channel +/-] Buttons
Enables you to change a selected device’s
channels using the [CH +] and [CH -] buttons.
10 [Cursor Control] buttons
Enables you to execute various finding functions
such as device menu search function using the
[▲], [▼], [◀] and [▶] buttons.
11 [OK] Button
Enables you to confirm commands such as menu
opening function searched by a Cursor Control
button.
12 [Menu] Button
Enables you to open menus such as device’s
menu list.
13 [Exit] Button
Enables you to close and exit menus such as
device’s menu list.
14 [Mute] Button
Enables you to mute sound.
Page 11
11
Touch Screen and Functions
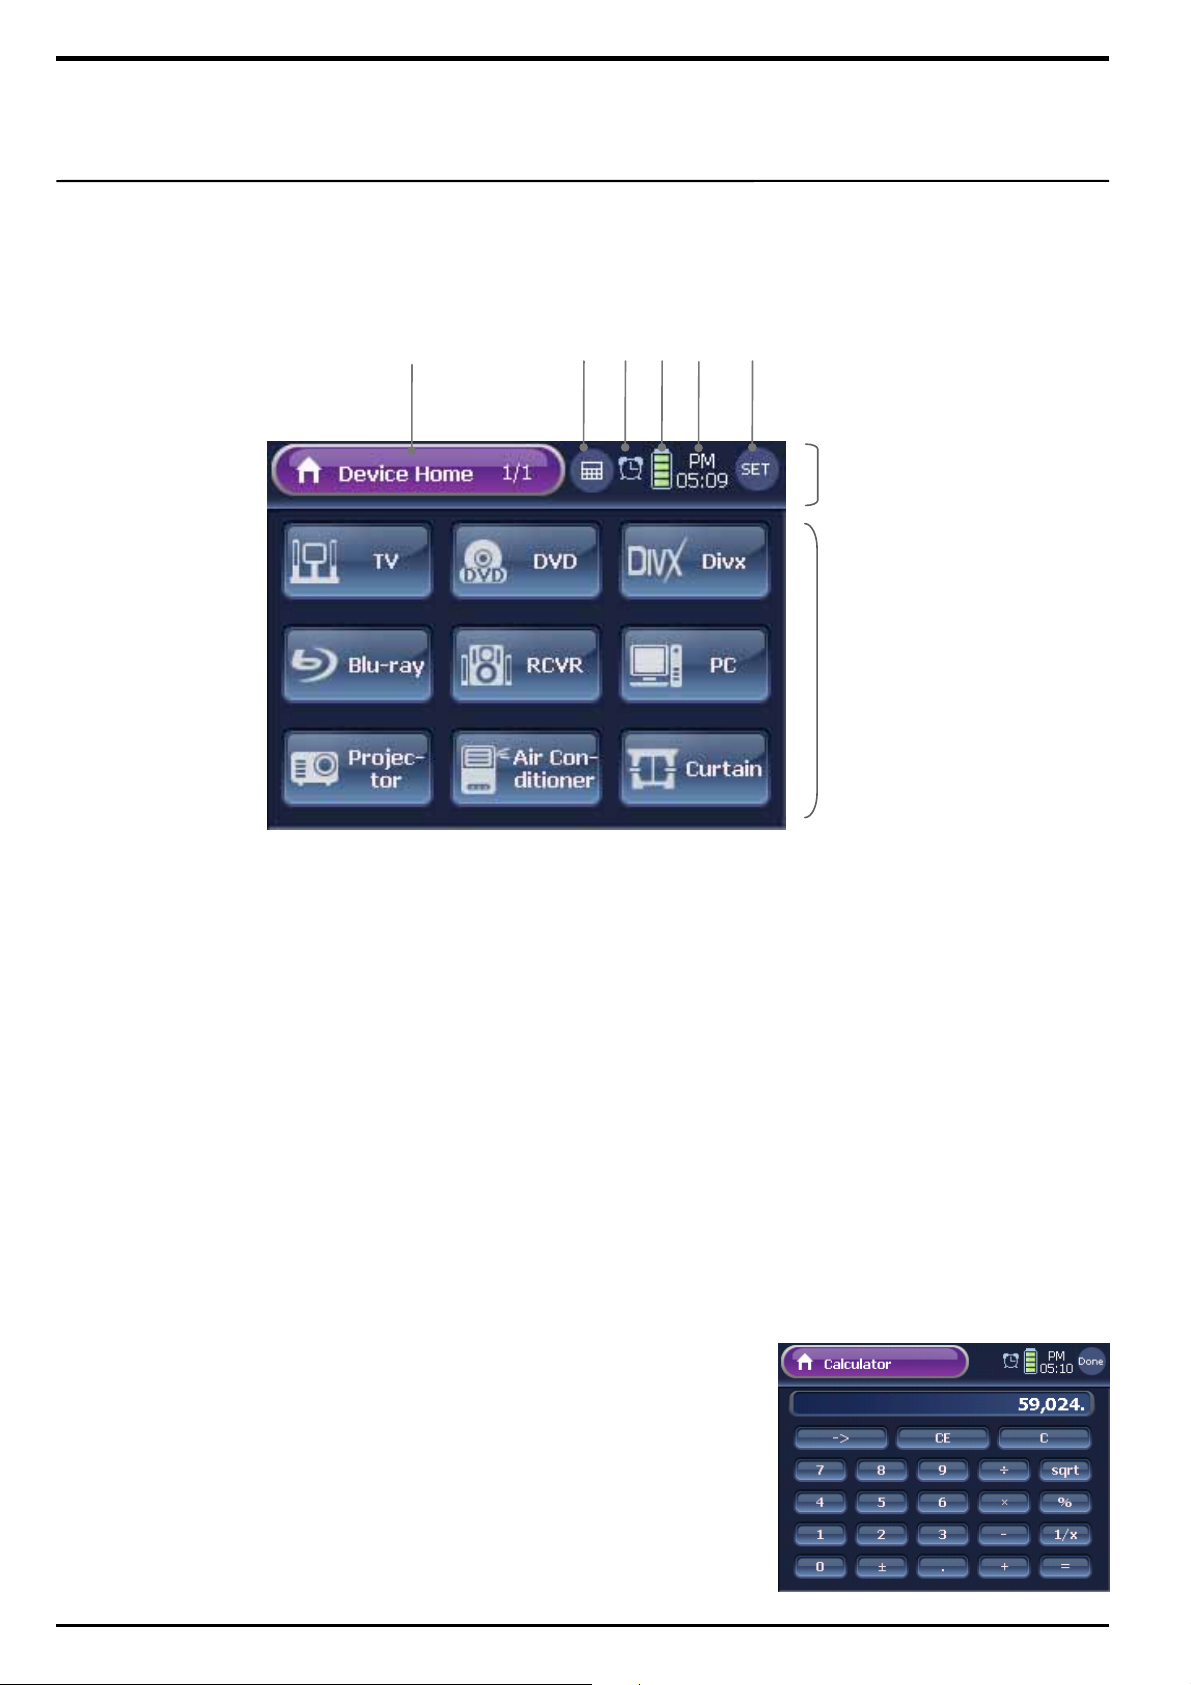
System Display Area
1 2 3
4 5 6
System Display Area
On-Touch Buttons
1 Current Directory Information Button
Displays the current directory and page on the touch screen.
Note 1. “Directory Information” displays a mode (“Device Home” ),
a selected device type (“TV”, “DVD”), and a setup mode ( “Device Setup”
or “Registration”).
2. “Page Information” displays total numbers of the screen’s page and the
current page as “Current Page/Total Page Number”.
Enables you to move between modes: “Device Home” and “Remote
Control Page”.
2 Calculator
This Calculator button is only displayed when in “Device Home”
mode, and directs you to “Calculator” mode when selected.
Note 1. This button is not displayed when in “Remote Control” modes, and
replaced with IR Indicator instead.
2. Calculator mode performs exactly same as the calculator function
provided in PCs.
3. To finish using Calculator mode, press the [Done] button. You will be
redirected to “Device Home”.
Page 12
12
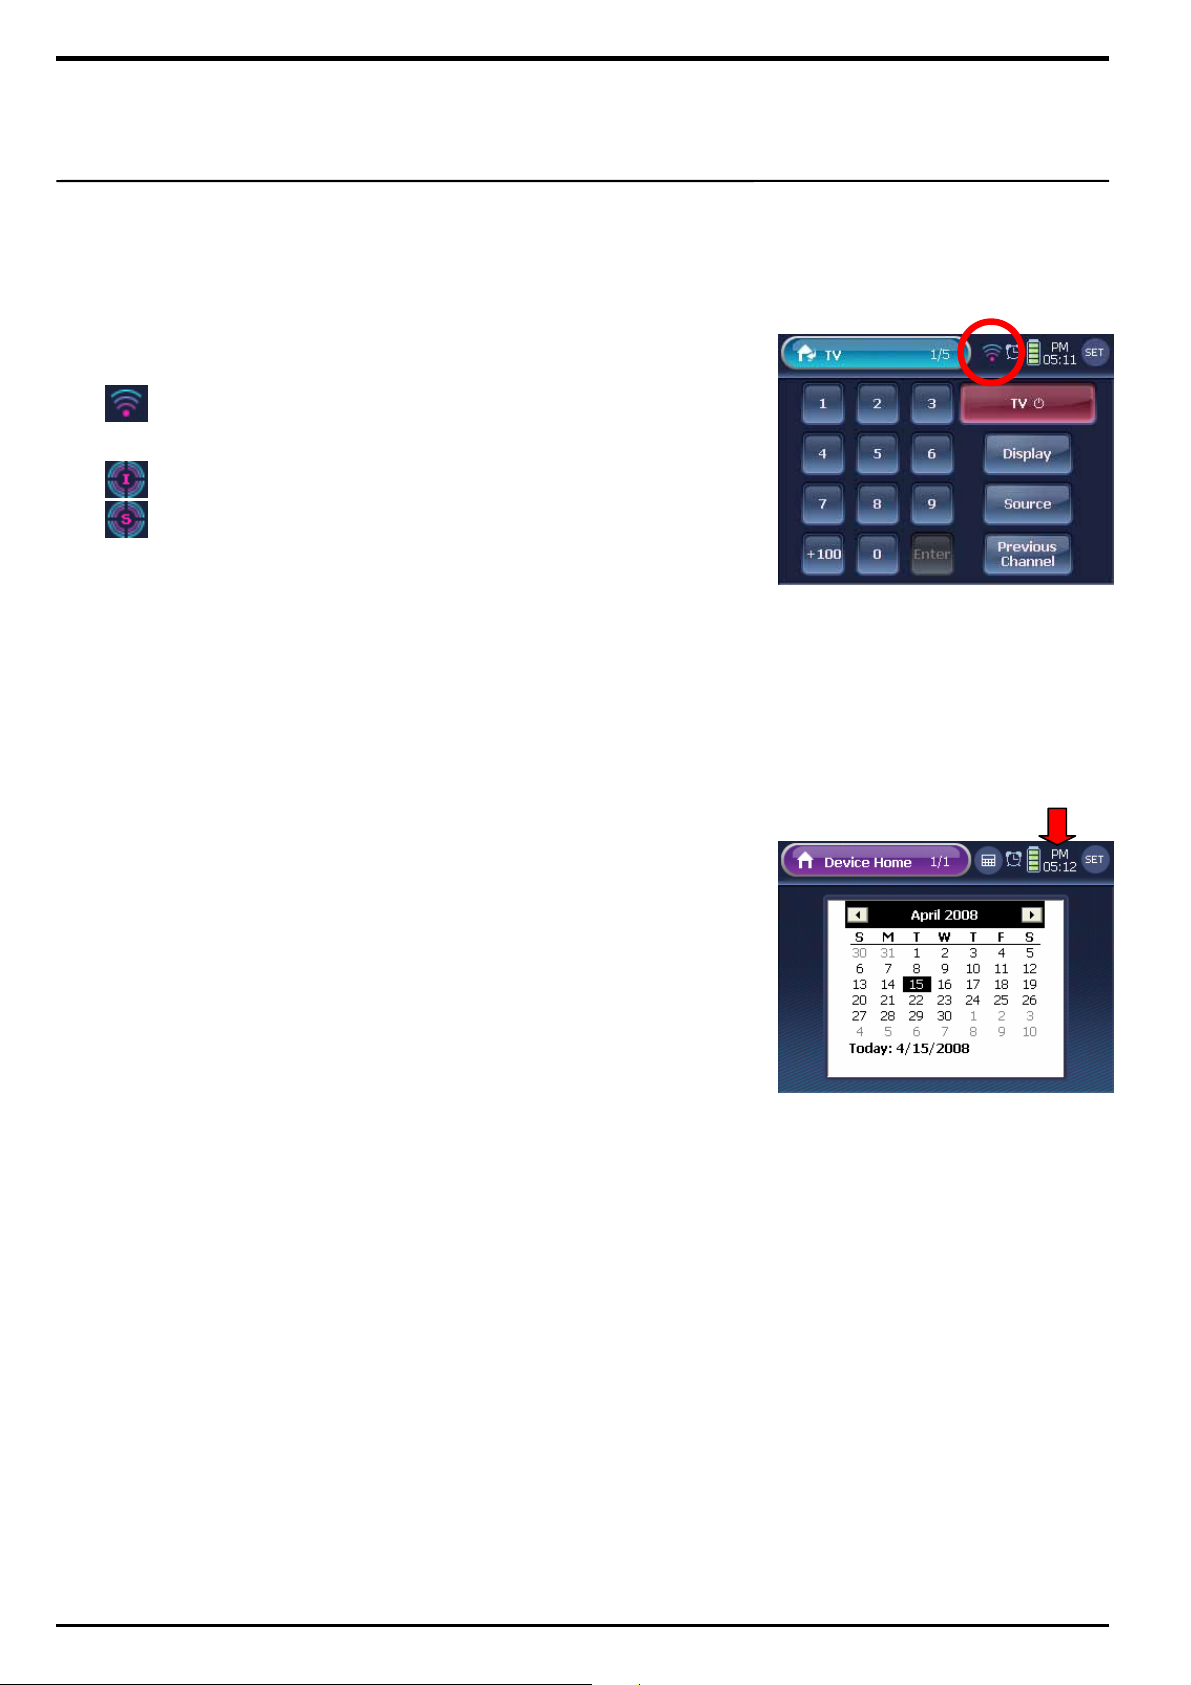
Signal Indicator
When WZB 35 is transmitting signals to a device through a remote
control or macro button, signal indicator appears and informs the
signal status.
[ IR control mode ]
Status to transmit IR signal from front body of WZB 35
[ RF control mode ]
Status to transmit IR signal from IR port of RF receiver
Status to transmit RS232 from RS-232 port of RF receiver
Note. In Remote Control modes, this Signal Indicator will be displayed on the
location where the Calculator button is placed.
3 Timer Indicator
When a Timer is set, Timer Indicator will be displayed.
4 Battery Indicator
Informs remaining battery capacity with 5 different stages, and will
start blinking when the battery needs to be charged.
5 Clock
Informs your current local time.
Note 1. You can adjust time with the “Date & Time” menu under the “System
Setup” menu.
2. Press the Clock to bring up Calendar as a pop up window. Calendar
automatically disappears in 6 seconds from the time that it was open,
but you can also manually close by pressing an edge of the window.
6 Function Buttons
Perform various functions in modes and pages. Press the [SET]
button about 0.5sec shortly on any screen to go to "Device Setup"
menu mode.
On-Touch Buttons
When in the “Device Home” mode, on-touch buttons become device
buttons, and in the “Remote Control” mode, they become remote control
buttons. In the “Setup” mode, they become menu and function buttons to
perform the corresponding functions.
Page 13
13
Getting Started
Power On
1 Turn on the power to start using WZB 35.
Move the power switch at the backside of WZB 35 to the “I”.
Note 1. The power switch is located and caved in at the backside of WZB 35,
please use stylus to turn on or off power.
(Refer to the page 7, “Body Structure”.)
2. “I” on the power switch means “Power On”, while “O” means “Power
Off”.
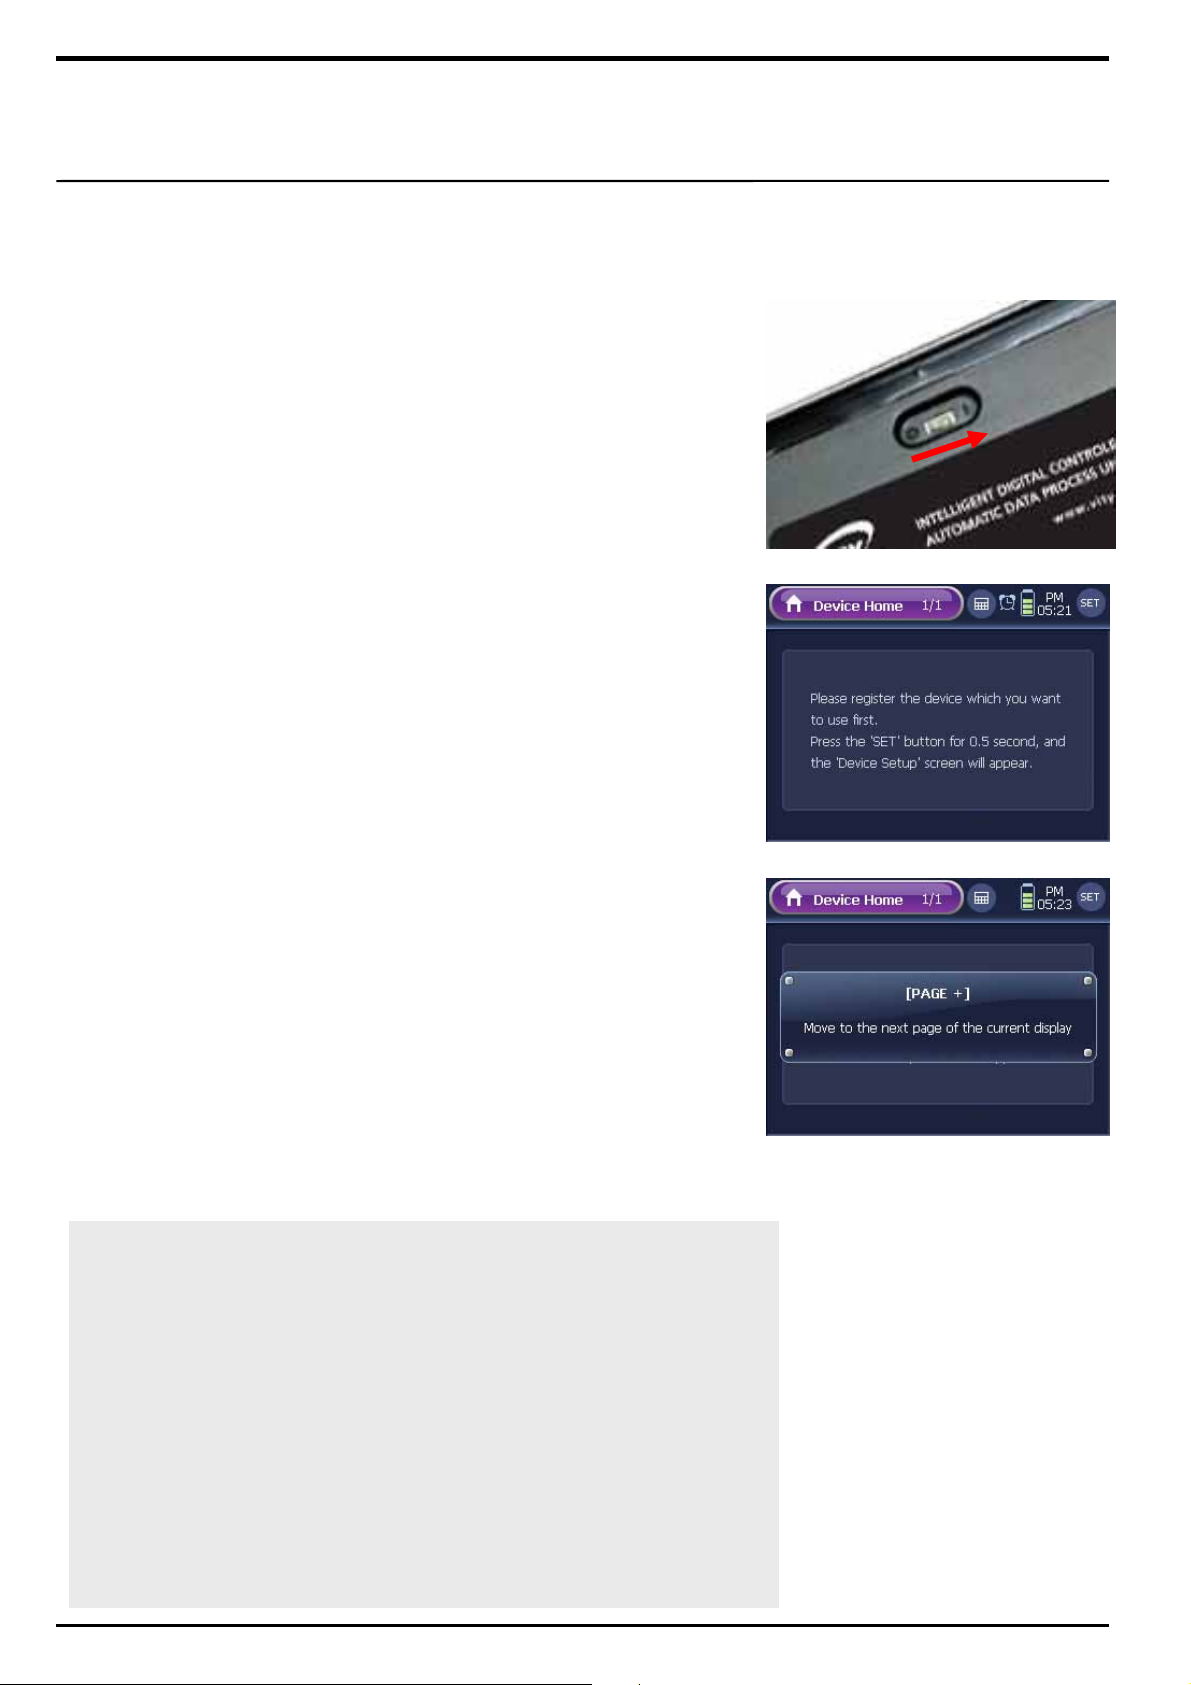
2 When you turn on WZB 35 for the very first time, you will be
directed to “Device Home”.
The “Device Home” screen will appear followed by a loading screen
which will be displayed and stay for approximately 45 seconds as
immediately as after the LCD screen is turned on. Since there is no
available device registered in “Device Home”, you must register
devices before starting to use the mode.
Note 1. When you open “Device Home” for the first time, you will be
informed with the mode unavailability messages. This message will
no longer appear once a device button is registered.
2. You cannot use exterior buttons at first. When you press an exterior
button, you will be informed with the button’s function through a
message. However, this message will be no longer displayed once
you register a device and use the exterior button for the device.
3. Press the [SET] button shortly at the upper right side of the “Device
Home” screen. You will be directed to “Device Setup” menu.
Tip. Restarting from the Sleep Mode
The LCD screen will be automatically switched to the Sleep mode, and
turned off at the time that was set up by the user. (Refer to the page 16,
“LCD Timeout”.)
If you wish to wakeup the Sleep mode and display the LCD screen;
1. Gently press the touch screen with a finger.
2. Press any hard button on the WZB 35’s body.
3. Gently lift WZB 35 with your hand.
( WZB 35 is equipped with a pick-up sensor.)
Page 14
14
Battery Charging
Battery Capacity Check
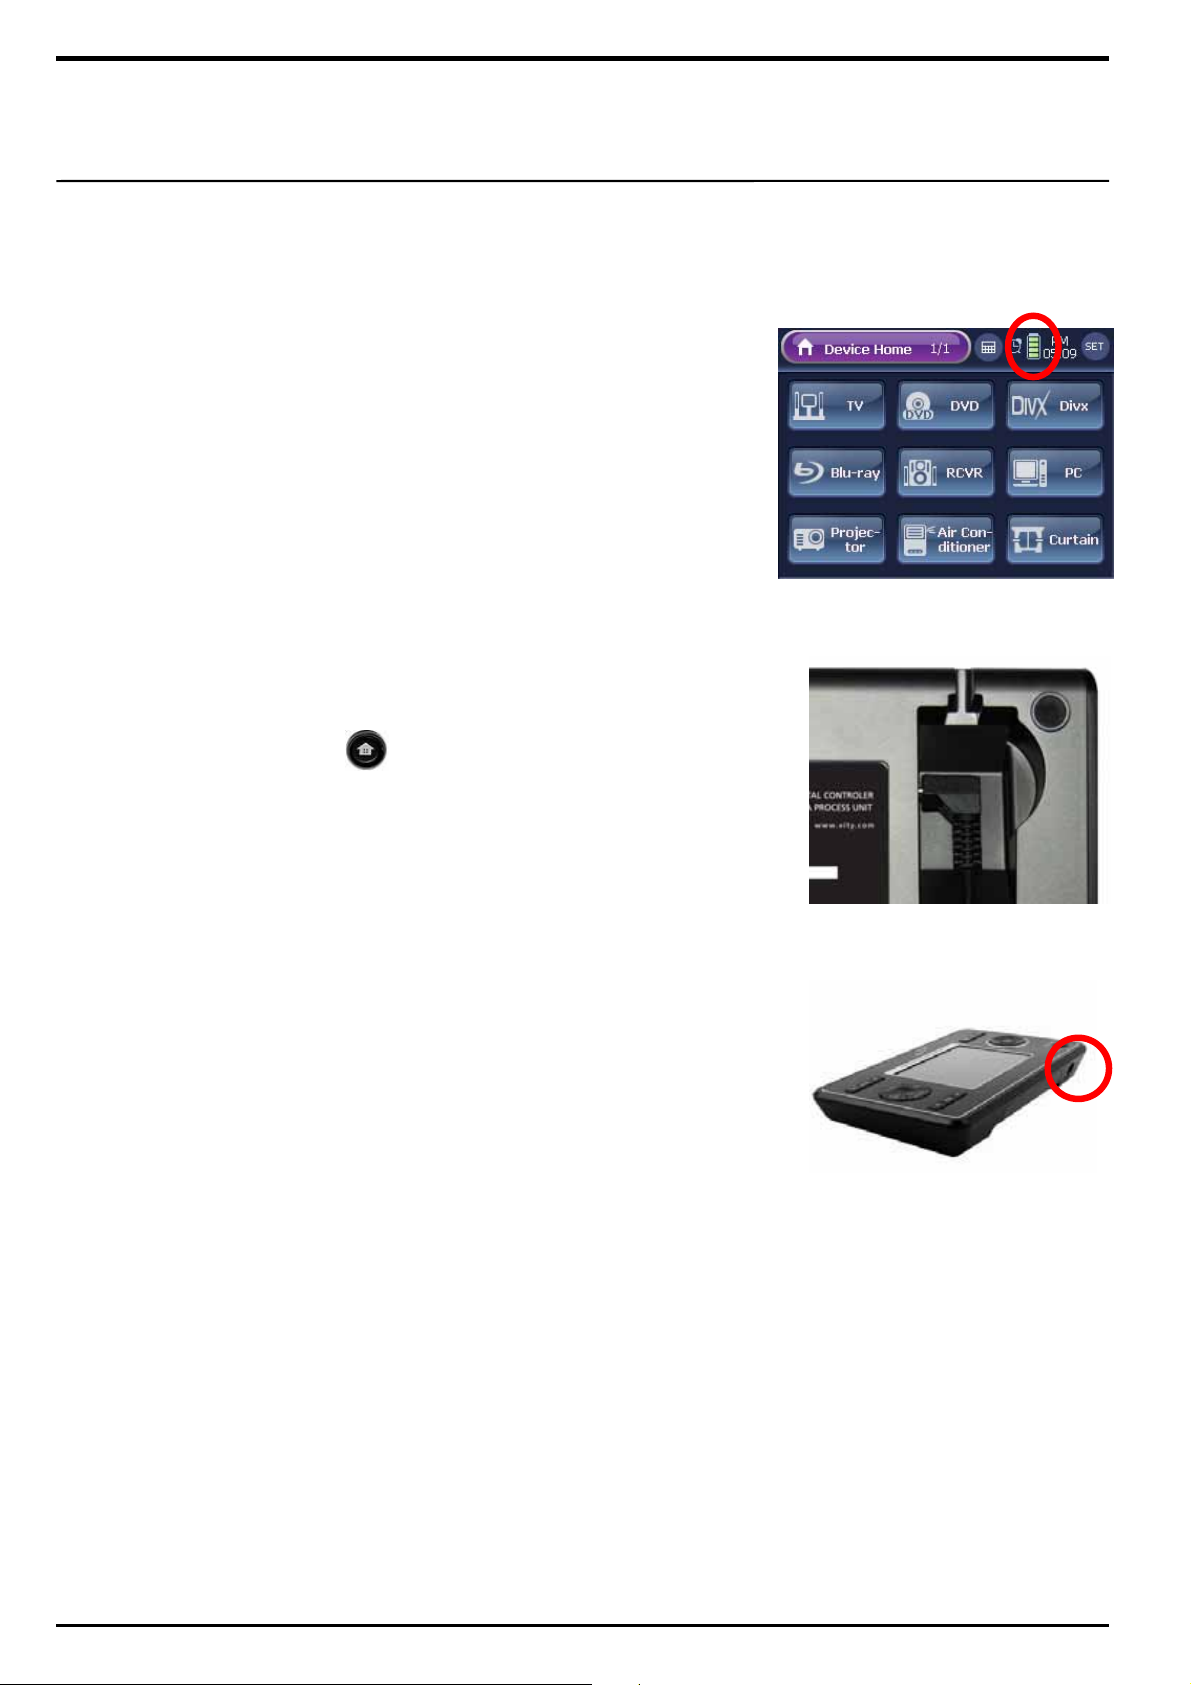
“Battery Indicator” displayed within the System Display Area informs
you with WZB 35’s remaining battery capacity. The remaining battery
capacity will be shown in 5 different stages, and the indicator will start
blinking when the battery needs to be charged.
How to Charge Battery
1 By Using the Battery Charger
Connect the DC adapter to the battery charger, and place WZB 35
on the charger. It will immediately initiate battery charging.
Note 1. When WZB 35 is connected to the charger’s charging terminal,
the LED on the exterior button will turn into “white”,
which means the battery is being charged. When the battery is fully
charged, the LED will become “green” color.
2. It takes approximately 4 hours to fully charge a completely discharged
battery.
2 By Using DC Adapter
Connect DC adapter directly to WZB 35’s DC adapter port. It will
automatically initiate battery charging. In this case, you can still use
WZB 35 even when the battery is being charged.
Note 1. The exterior [Home] button’s LED displays the same colored
lights as well as using the battery charger to indicate the battery
charging status.
2. You can still use WZB 35 even when the battery is being charged.
3. Even if the battery is fully discharged, and the LCD screen was turned
off, the LCD screen will be again turned on as immediately as the
battery starts being charged by the charger or the DC adapter.
4. Fully discharged battery will not cause any data loss or damage.
However, if you leave the battery without charging it for longer than
15 days, the clock may stop working; make sure to readjust the time
when you restart using WZB 35.
☞ Caution !
1 WZB 35’s battery is chargeable only when the power is on.
When the battery is fully discharged, and WZB 35’s power is off, please
turn on the power to start charging.
2 WZB 35 is equipped with free voltage standard system; therefore, it is
compatible with wide voltage range between 100V and 250V.
Page 15
15
This page describes WZB 35’s basic system setup such as the
adjustment of LCD screen brightness, sound volume, and graphic
type. WZB 35 has been already configured with its default system
prior to its release.
Therefore, you may not need to change its system setup.
Note 1. We encourage you to set up time as WZB 35 is not configured with
correct time upon its release.
2. System configuration will be safely kept even if WZB 35’s battery
becomes fully discharged, or the power is incidentally off.
3. If you use the “Factory Default” option, it will be resulted in deleting
the current system configuration, and restoring the default one.
System Setup
How To Go To the “System Setup” Page
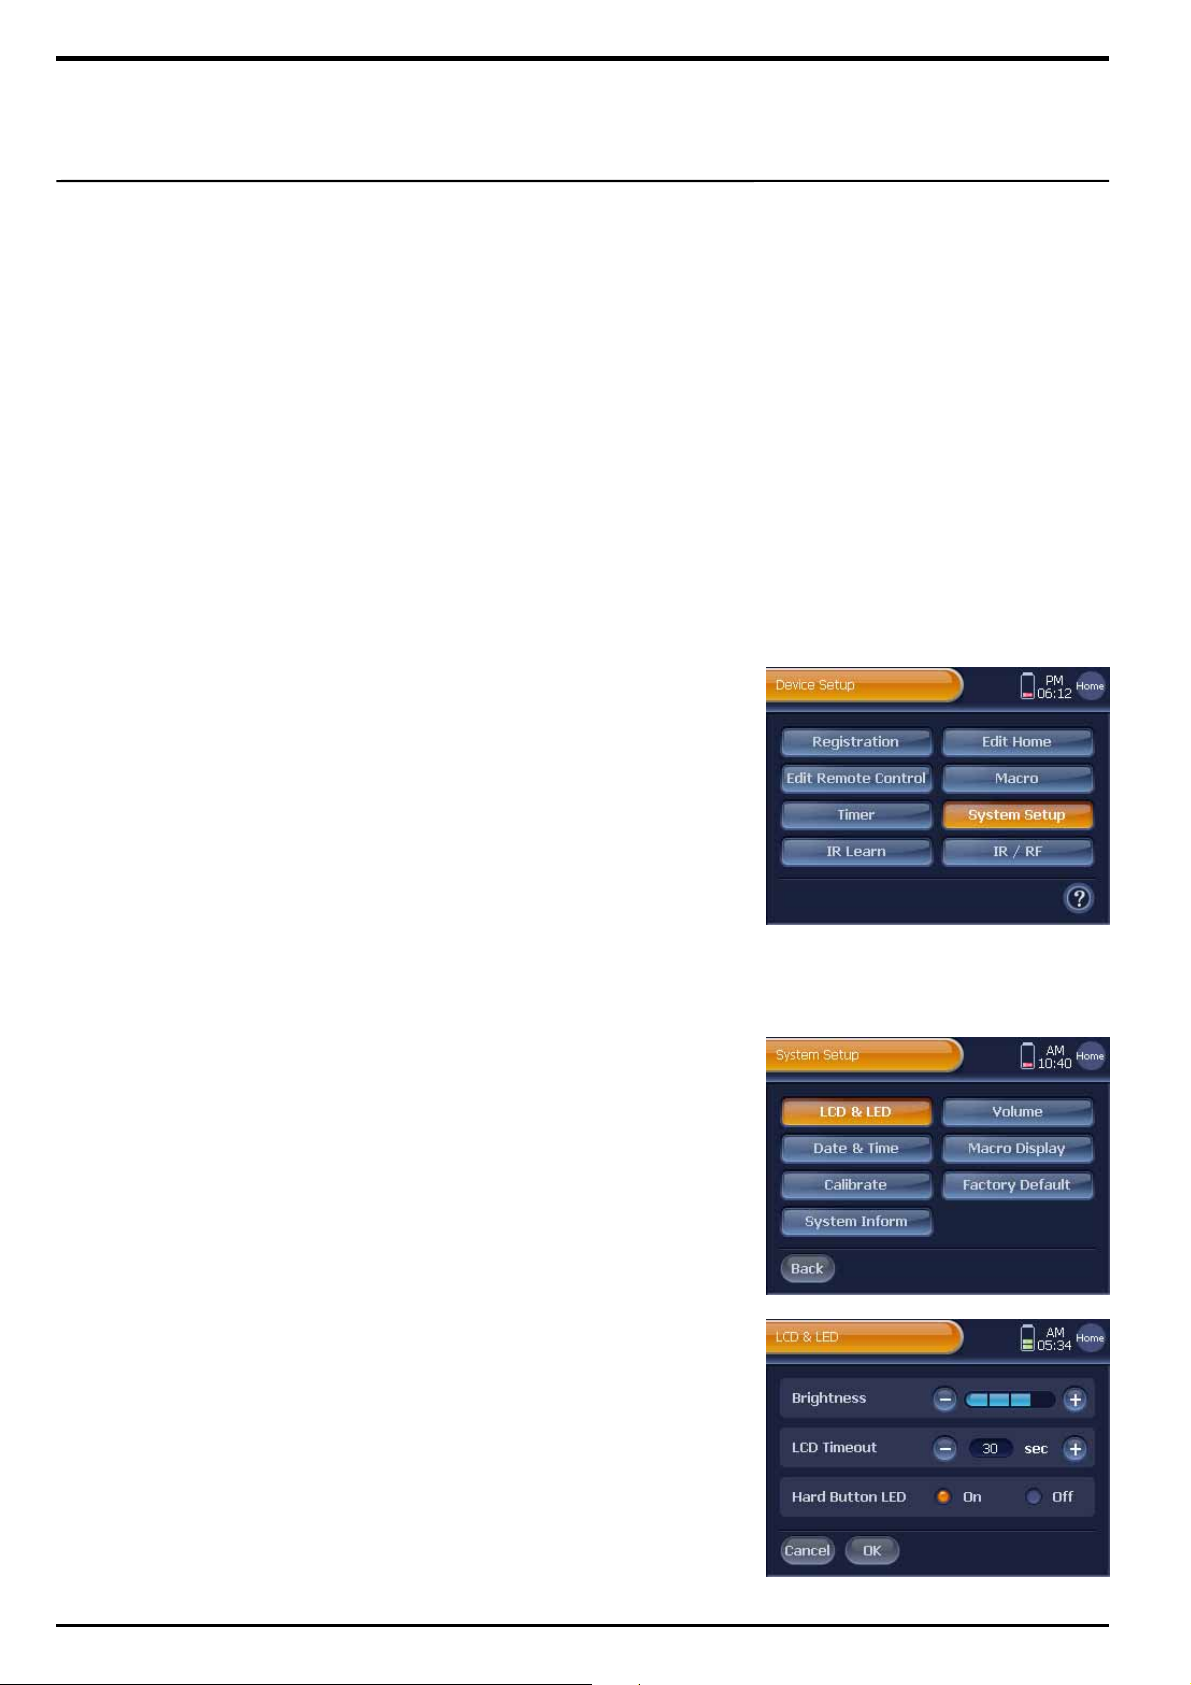
1 Press [SET] shortly on “Device Home”.
You will be directed to the "Device Setup" menu screen.
Note. To go back to “Device Home” from the "Device Setup" menu, press
[Home] shortly.
2 Press [System Setup] on the "Device Setup" menu screen.
You will be directed to the “System Setup” menu screen.
3 Press a setup menu button on the “System Setup” menu screen.
It will direct you to the setup page.
LCD & LED
“Brightness” Adjustment
WZB 35 provides 5 brightness levels of the LCD screen.
1 For brighter screen, press [+] on the Brightness Adjustment section.
For less bright screen, [-] on the Brightness Adjustment section.
2 Press [OK]. You will be redirected to the “System Setup” menu
screen as the change is saved.
☞ Caution !
In order to complete any changes made on system configuration, you must
press [OK] button at the end. Using the [Cancel] or [Home] button will
automatically cancel the configuration change process, and keep the
previous status instead.
Page 16
16
3 Press [Home] shortly. You will be redirected to “Device Home”.
“LCD Timeout” Settings
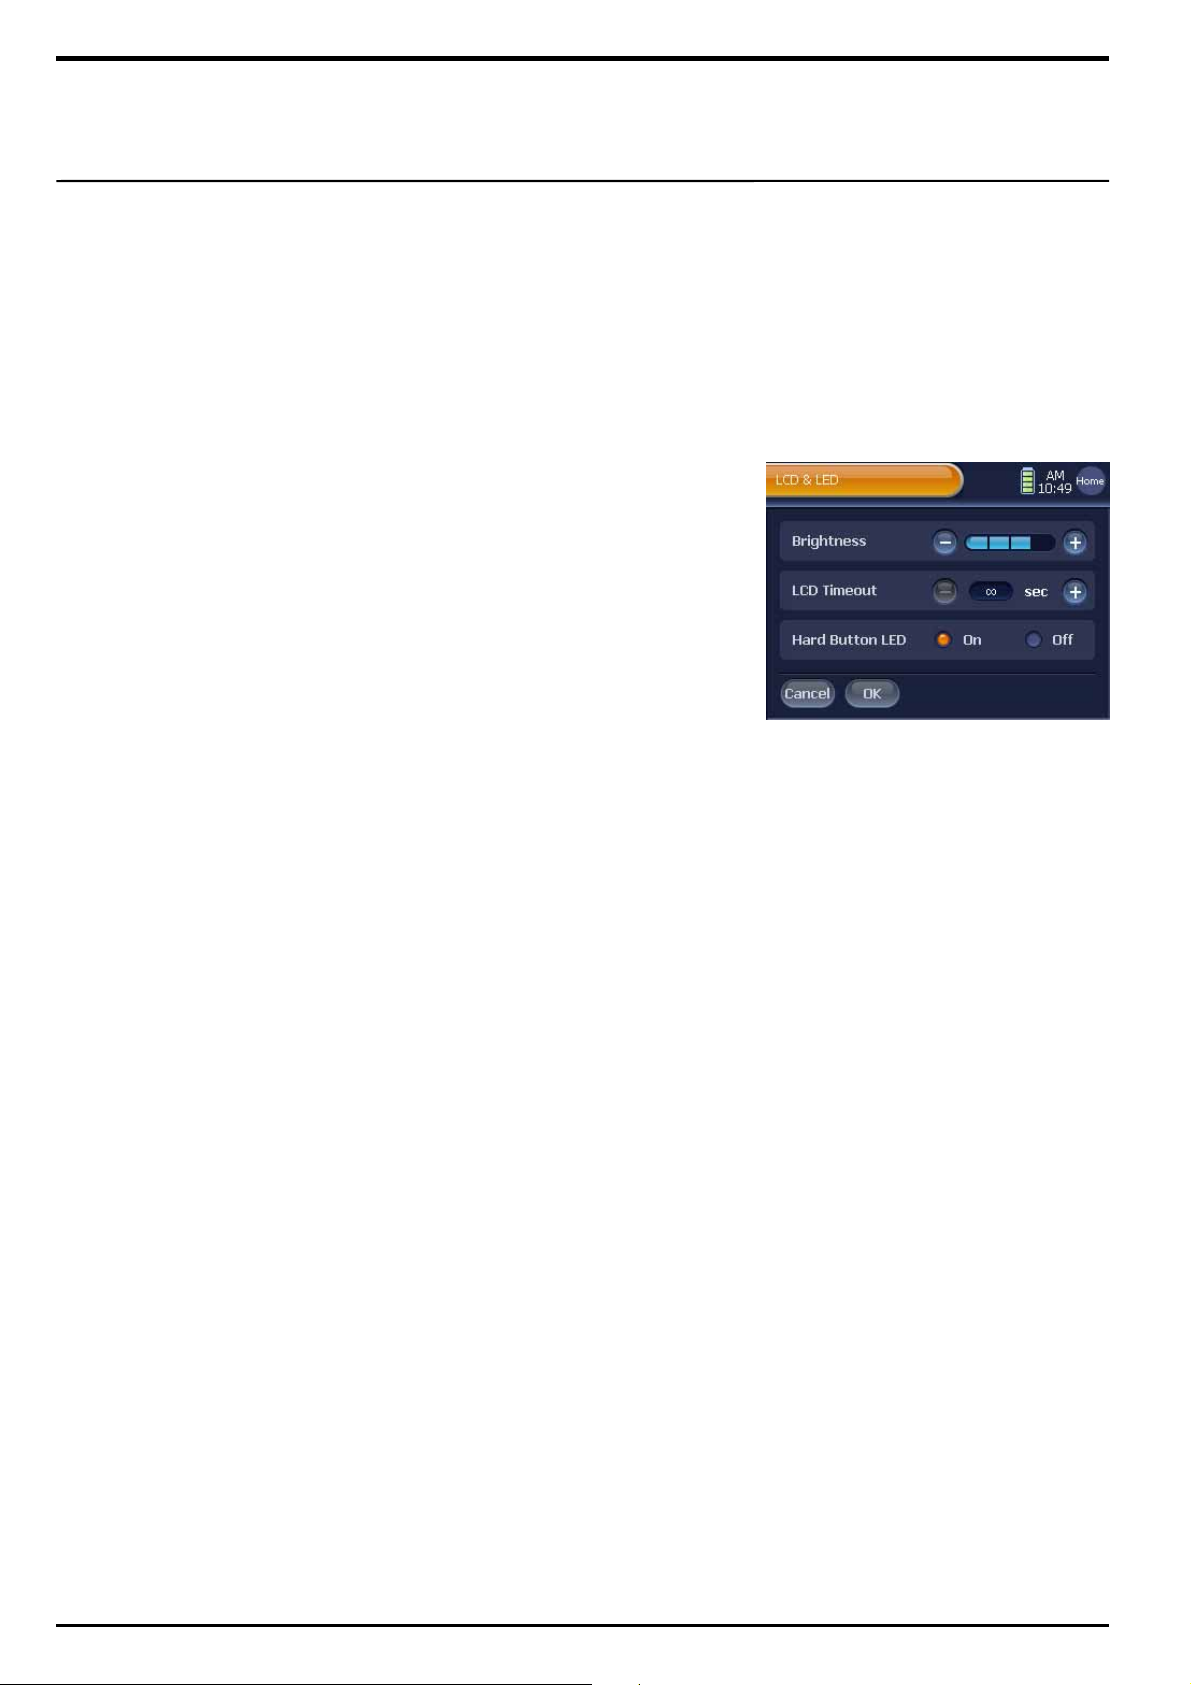
You can set up to automatically turn off the LCD screen when WZB 35
Is not being used for a while. This option helps you minimize the
battery power consumption by a u t om a tically switchi n g t h e system
mode to the Sleep Mode.
1 To increase the LCD screen auto-off hours, press [+].
To decrease the LCD screen auto-off hours, press [-].
Note 1. [+] and [-] buttons increase or decrease the time setting by
10 seconds each time they are pressed.
2. You can configure the auto-off time from minimum 10 seconds to
maximum 180 seconds and the default setting is configured to 30
seconds.
3.
2 Press [OK].
You will be redirected to the “System Setup” menu screen as the
change is saved.
You can configure the on time infinitely .
3 Press [Home] shortly . You will be redirected to “Device Home”.
“Hard Button LED” Setup
Configure hard button’s LED status for your convenience.
1 To always leave the lights on, press [On].
To always leave the lights off, press [Off].
Note 1. LEDs are equipped with the [Home], [VOL +/-] and [CH +/-] buttons.
2. Even if the LEDs are set as “On”, they will be automatically turned off
as the LCD screen mode becomes the “Sleep” mode, and when the
mode is canceled, the lights will be back on.
2 Press [OK].
You will be redirected to the “System Setup” menu screen as the
change is saved.
3 Press [Home] shortly. You will be redirected to “Device Home”.
Page 17
17
Volume
“LCD Button’s Sound Volume” Setup
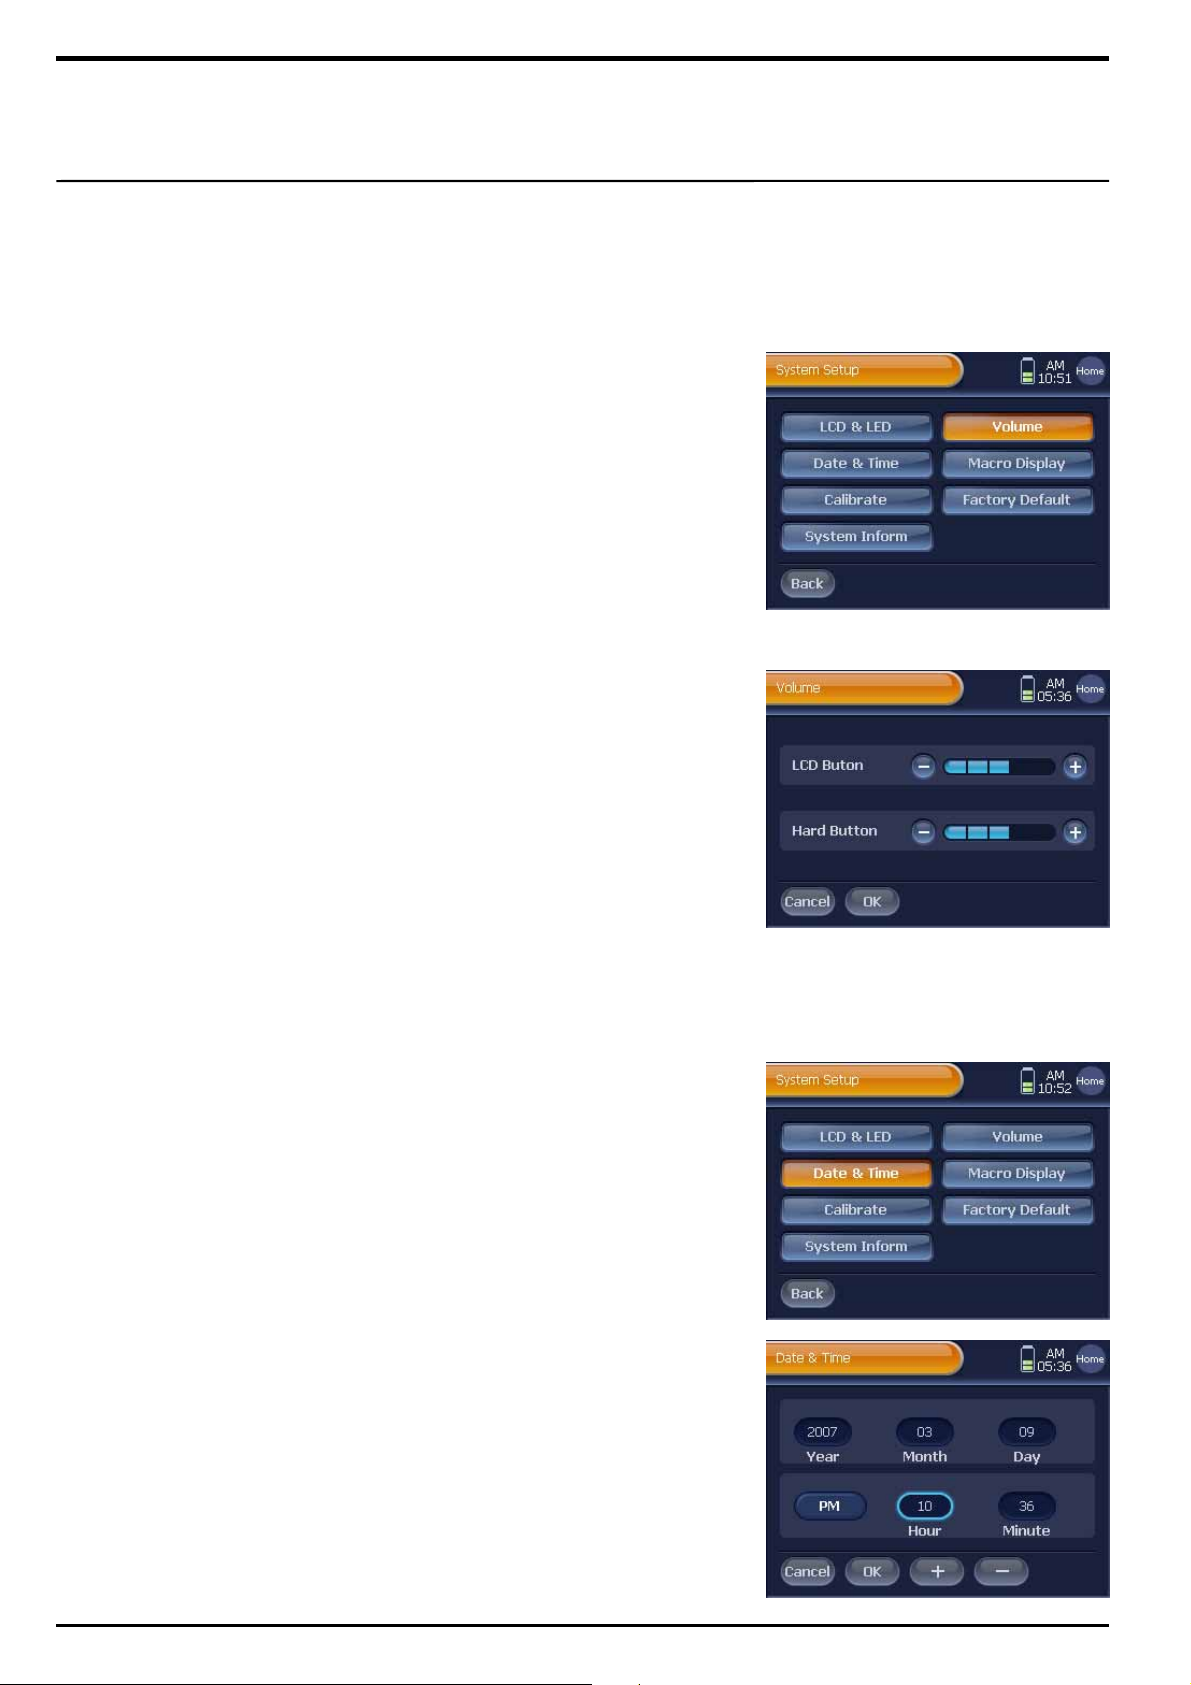
You can change on-touch button’s beep sound from level 1 to 6, and
at the 1
1 To increase the LCD button’s sound volume, press [+] on the LCD
Button section. Or to reduce the LCD button’s sound volume, press
[-] on the LCD Button section.
2 Press [OK]. You will be redirected to the “System Setup” menu
screen as the change is saved.
3 Press [Home] shortly. You will be redirected to “Device Home”.
“Hard Button’s Sound Volume” Setup
st
level, the beep sound is muted.
You can change hard button’s beep sound from level 1 to 6, and at the
1st level, the beep sound is muted.
1 To increase the hard button’s sound volume, press [+] on the Hard
Button section. Or to reduce the hard button’s sound volume, press
[-] on the Hard Button section.
2 Press [OK]. You will be redirected to the “System Setup” menu
screen as the change is saved.
3 Press [Home] shortly. You will be redirected to “Device Home”.
Date & Time
Configure the clock time displayed on the LCD screen’s System
Display Area.
1 Select and press a button among [Year], [Month], [Day], [Hour],
and [Minute]. The selected button will be highlighted, and enables
you to use the [+] and [-] buttons at the bottom of your screen.
2 Adjust time by pressing the [+] and [-] buttons.
Note. AM/PM will be automatically adjusted followed by the time that is being
set up.
3 Press [OK]. You will be redirected to the “System Setup” menu
screen as the change is saved.
4 Press [Home] shortly. You will be redirected to “Device Home”.
Page 18
18
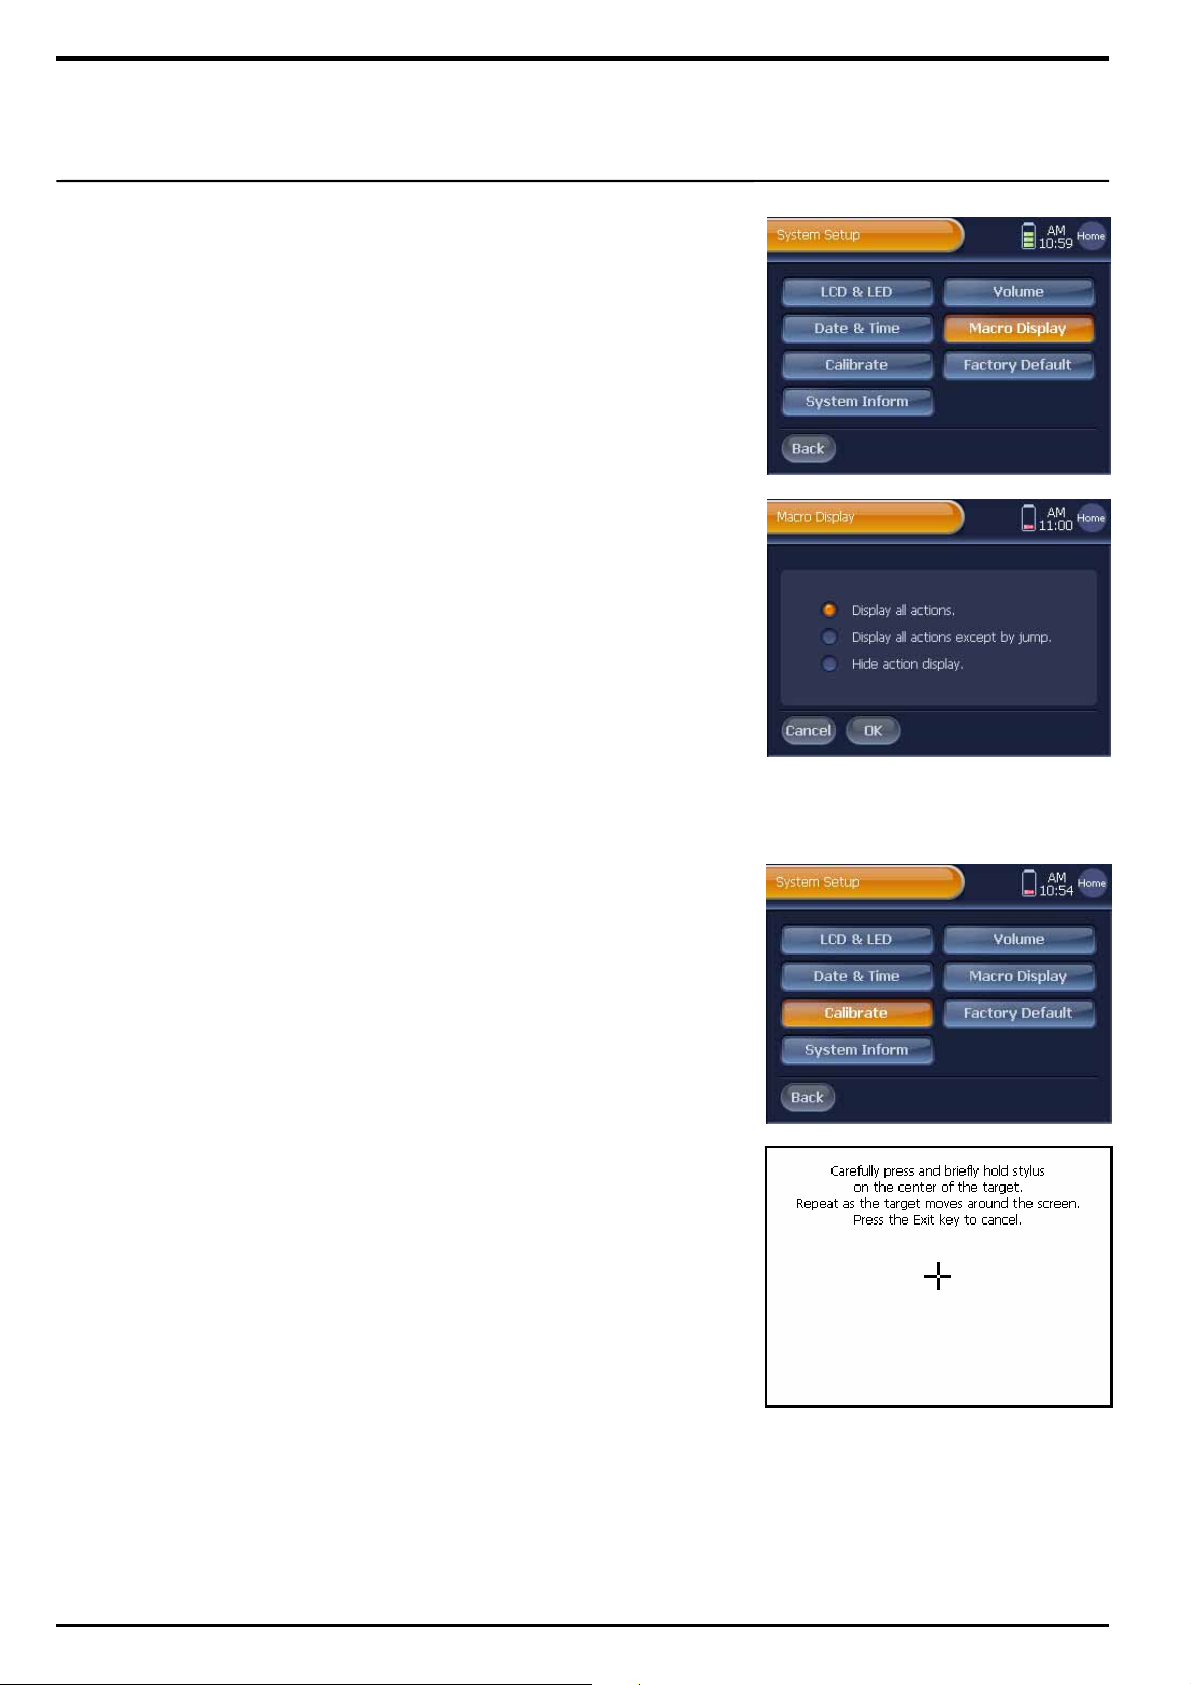
Macro Display
Configure Macro Display status for your convenience.
1 For always display all actions, check [Displa y a ll a ctions].
2 To always display all actions except by jump,
check [Display all actions except by jump].
3 To always hide macro actions, check [Hide action display].
Note. Refer to the page 41, “Macro”.
Calibrate
WZB 35 already has been configured with its default touchpoint system
prior to its release. Therefore, you may not need to change the system
setup. However, if you encounter an on-touch function disorder, we
advise you to reset the touchpoint.
1 Press the center of the cross displayed on the Touchpoint setup
screen. When you correctly press the cross, it will move and
reappear on a different spot.
2 Continuously press the cross as it reappears several times on the
Touchpoint Setup screen.
When the setup is successfully complete, you will be redirected to
the “System Setup” menu screen.
Note 1. The cross will appear on total 5 different spots.
2. Press the cross shortly, and then it will move and reappear on
a different spot.
3. If you incorrectly press the cross, the cross will continuously
appear on the same spot.
4. To cancel Touchpoint Setup, press the exterior [EXIT] button.
5. Please avoid using sharp objects such as a ball point pen; they
may cause damage onto the touch screen. Please use Stylus
instead.
3 Press [Home] shortly. You will be redirected to “Device Home”.
Page 19
19
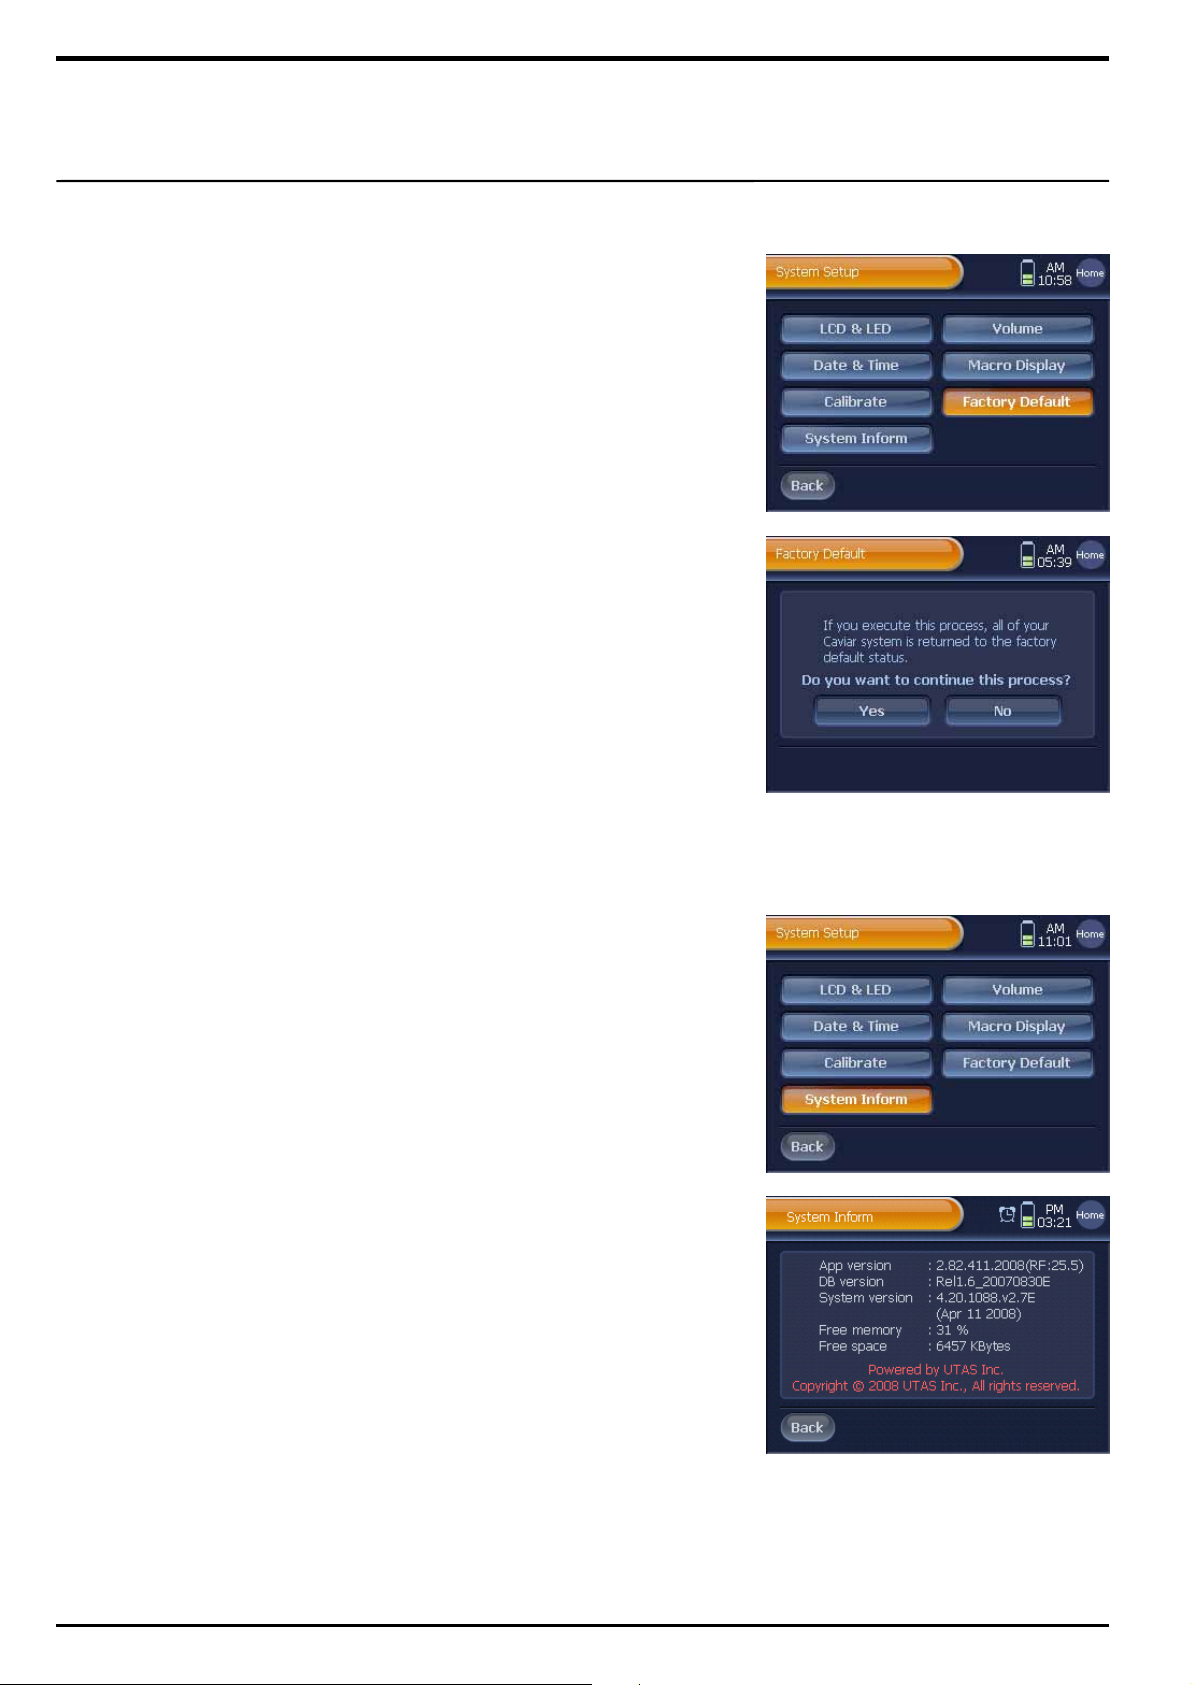
Factory Default
You can delete the entire data saved and registered in WZB 35, and
reset the system.
☞ Caution !
When executing the Factory Default, it will be resulted in deleting and losing
the entire data saved in WZB 35; please use only when it is necessary.
1 Press [Yes] on the “Factory Default” screen.
Then, you will be directed to the Setup Confirmation screen.
2 Press [OK]. WZB 35 will be automatically turned off, and rebooted.
System Inform
System Information Review option allows you to check WZB 35 system
properties as well as remaining memory capacity.
Press [Back] button after reviewing the system properties. You will be
redirected to the “System Setup” screen.
Page 20
20
Registration
Basic Device Registration
Register remote control options on “Device Home”, and enjoy controlling
various devices like TV, DVD, and home theater with one set controller.
☞ The Definition Of Device Registration, And How It Works
Many manufacturers are introducing many devices in many different models
that have unique IR Codes (Infrared Remote Control Code). WZB 35
provides you a wide selection of the codesets, so that you can find codesets
compatible with your devices, and control them with WZB 35.
You can find a codeset compatible with your device by;
▪ Using the codeset “Autoscan” function which automatically searches
for a codeset from the entire codeset list of the device brand.
▪ Using the codeset “Manual Selection” function which enables you to
view the entire codeset list of the device brand without autoscan.
Note. “Manual Selection” is same as codeset “Autoscan” except the “Autoscan”
part. This function only can be effective when there are a small number
of codesets provided by the device manufacturer. Thus, we encourage
you to use codeset “Autoscan” function more often than the other
function; please read the autoscan instructions listed below.
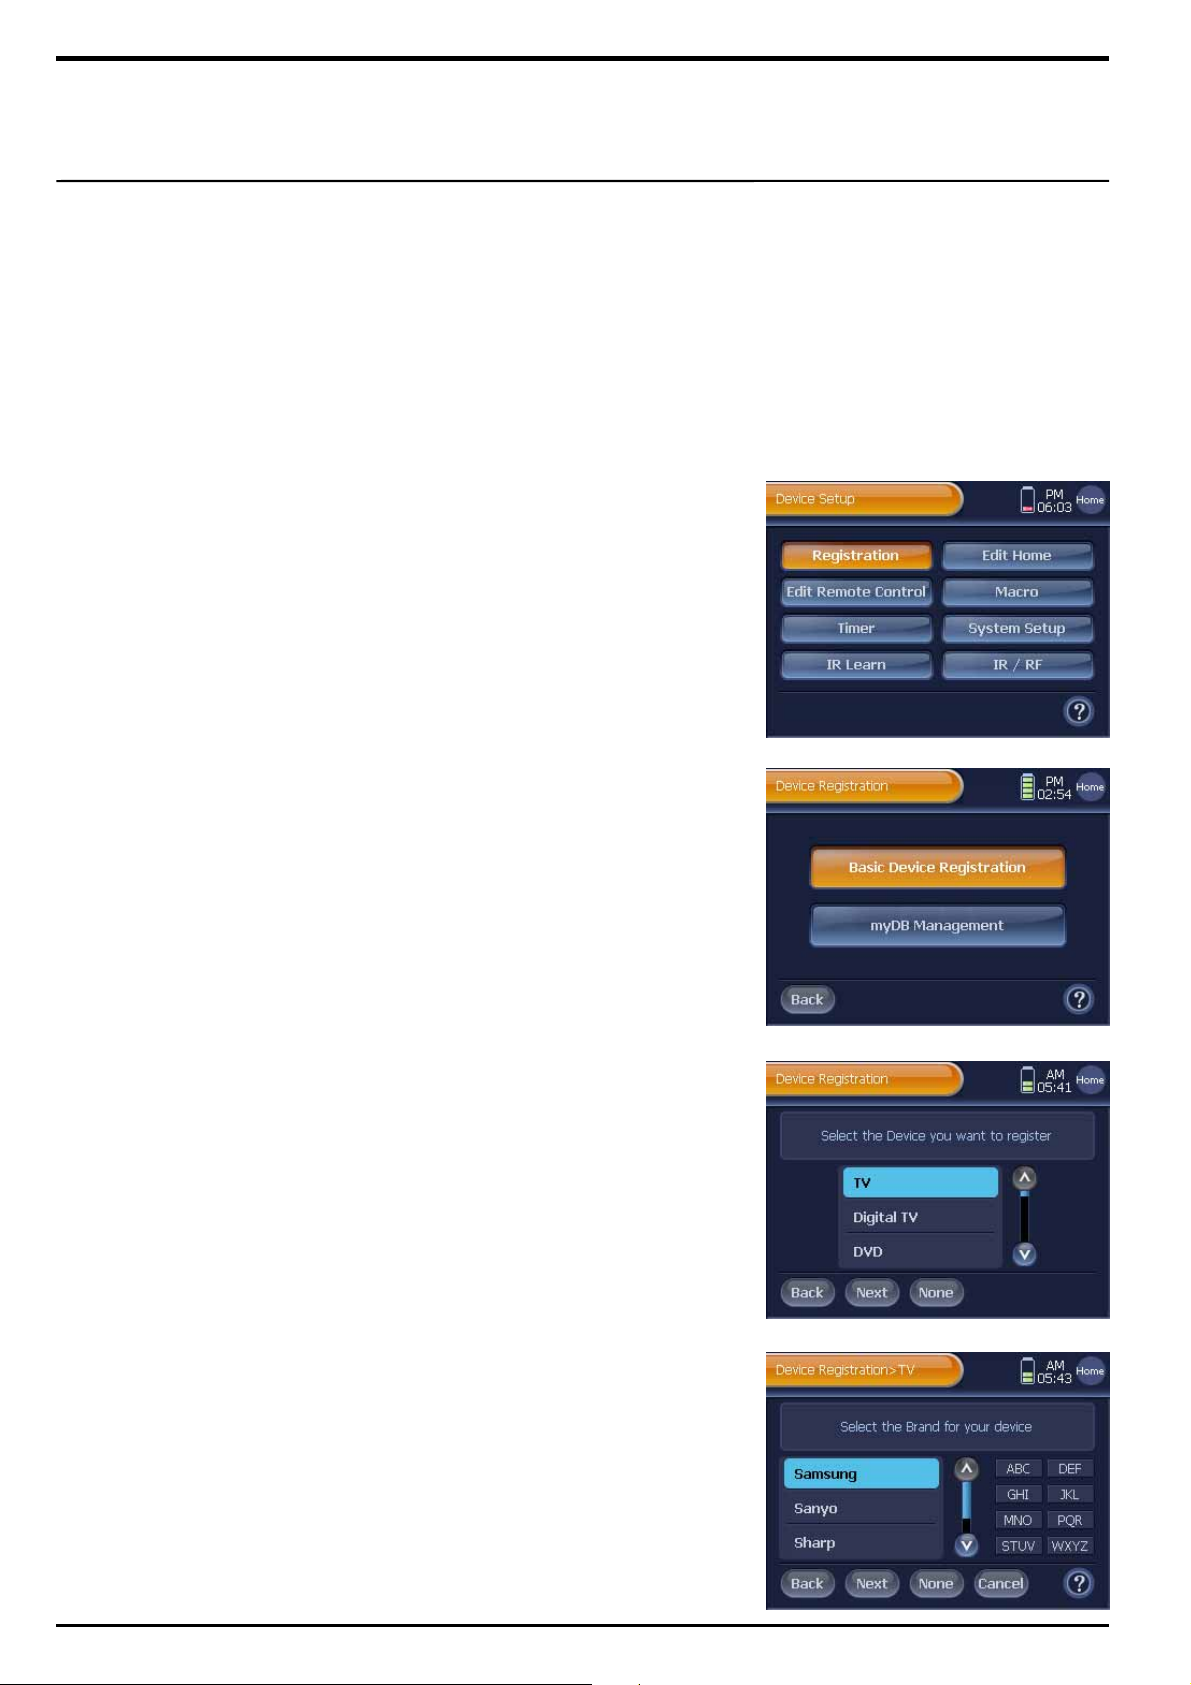
1 Press [SET] shortly on “Device Home".
You will be directed to the "Device Setup" menu screen.
Note. To move back to “Device Home” from the "Device Setup" menu screen,
press [Home] shortly.
2 Press [Registration] on the “Device Setup” menu screen, and select
[Basic Device Registration] on the "Device Registration" menu
screen. You will be directed to the Device Selection page.
Note. About “myDB Management”, refer to the page 57, “myDB Management”.
3 Select a “Device” from the device list, and press [Next].
You will be directed to the Brand Selection page.
Note. If the device does not exist in the device list, press the [None] button, and
refer to the page 23, “Exceptional Situation 1”.
4 Select a “Brand” from the brand list, and press [Next].
Note. If the brand does not exist in the brand list, press the [None] button, and
refer to the page 23, “Exceptional Situation 2”.
Page 21
21
☞ Brand Search
Press an alphabet button at the right side of the brand selection screen.
It will bring up a list of brands whose names start with the corresponding
alphabets.
i.e.) If you wish to find “YAMAHA”, press the [WXYZ] button 3 times.
It will bring up every brand name starting with ‘Y’.
Select “YAMAHA” among the brand names.
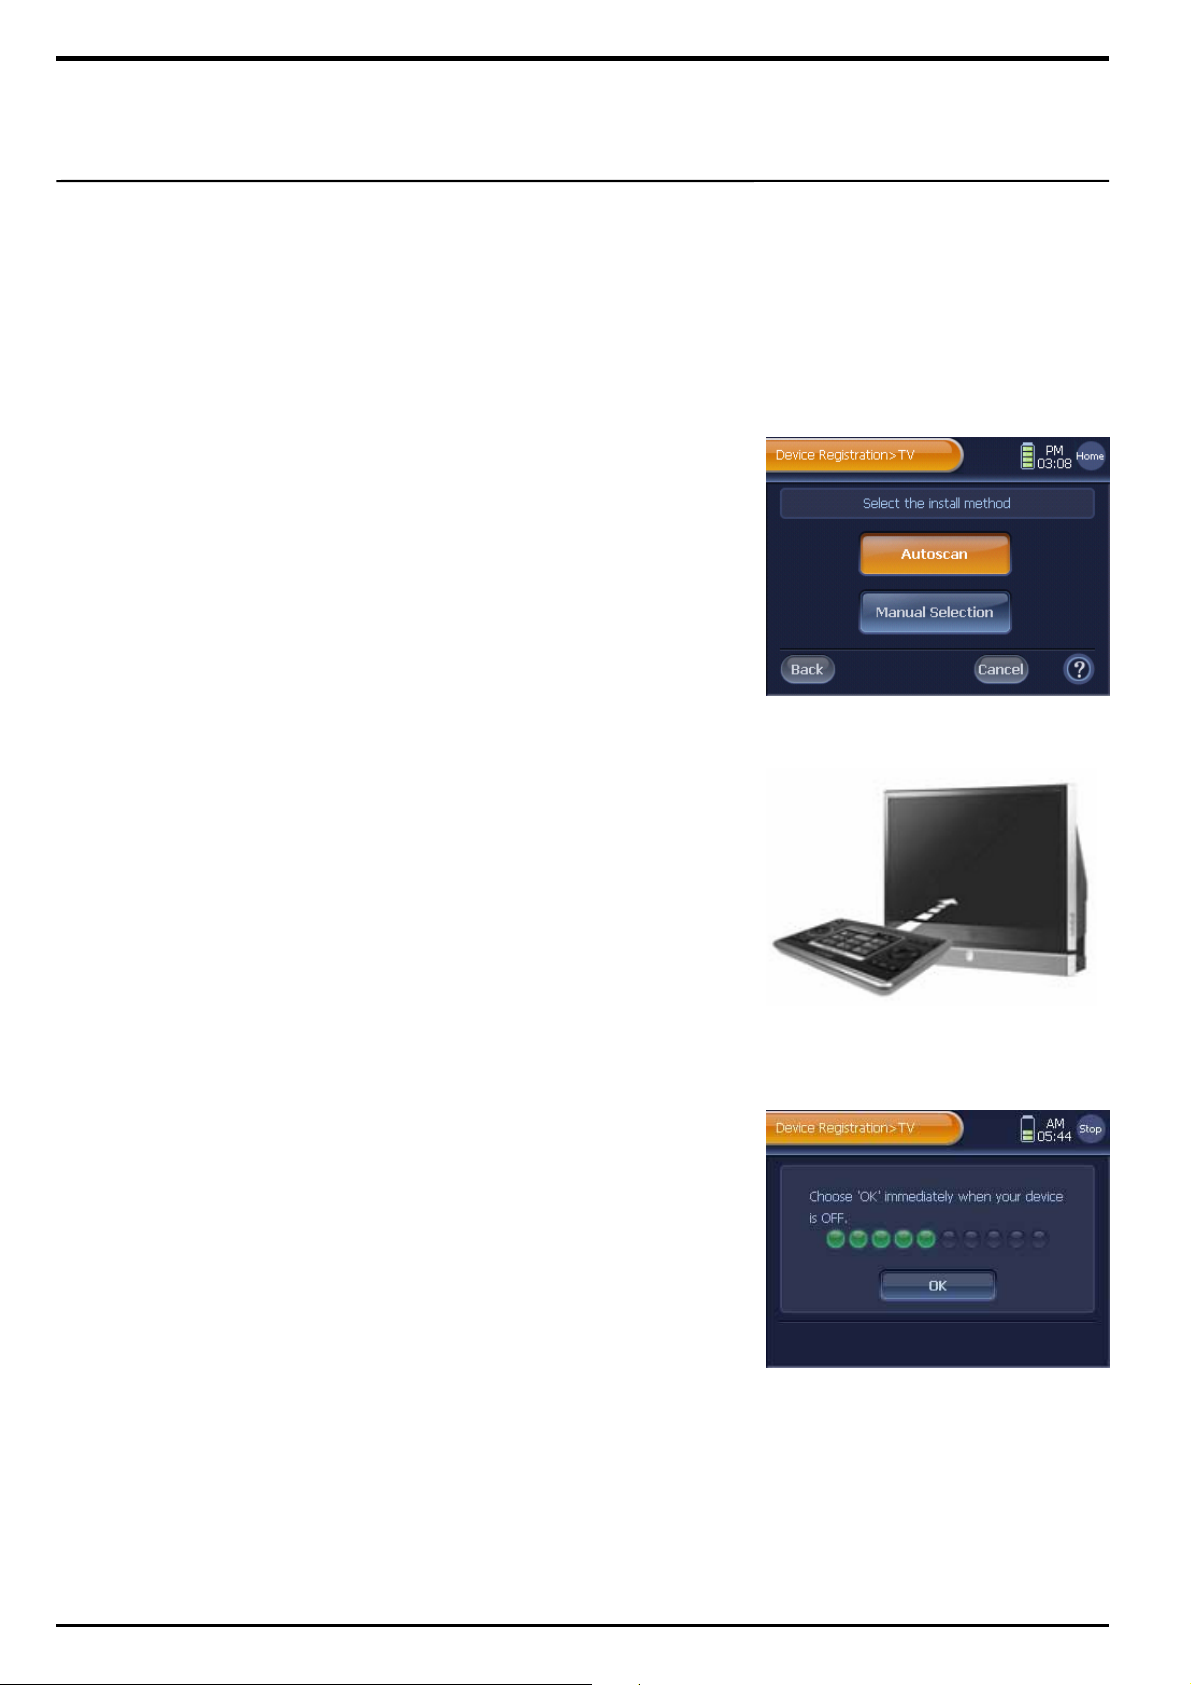
5 Select the [Autoscan] option.
☞ Autoscan
“Autoscan” is to automatically select a codeset that is compatible with the
selected device, and WZB 35 uses “Power Off” signal as the codeset
search standard.
6 To proceed with the Autoscan, turn on the device power, and then
place WZB 35 facing toward the device.
Note. Please place WZB 35’s IR Transmitter facing toward the device, and
make sure to keep less than 10 meter distance between the device and
WZB 35.
7 Press [Next] on the autoscan information screen.
It will automatically search codesets as immediately as the codeset
autoscan preparation process is complete.
8 When the device is automatically turned off during autoscan
process, press [OK] immediately.
WZB 35 will display an autoscanned codeset list.
Note 1. Make sure to press the [OK] button at least within 4 seconds after the
device is turned off.
2. “Progress Bar” on the autoscan screen displays the scanning progress.
3. It may take a while depending on the numbers of codeset provided by
the manufacturer.
4. Pressing the [Stop] button temporarily stops the autoscan progress.
Pressing the [Yes] button will reinitiate the progress from the stopped
point.
5. If the device is not turned off until the autoscan is complete, you will be
informed with a failure message. If this happens, please refer to the
page 23, “Exceptional Situation 3”.
Page 22
22
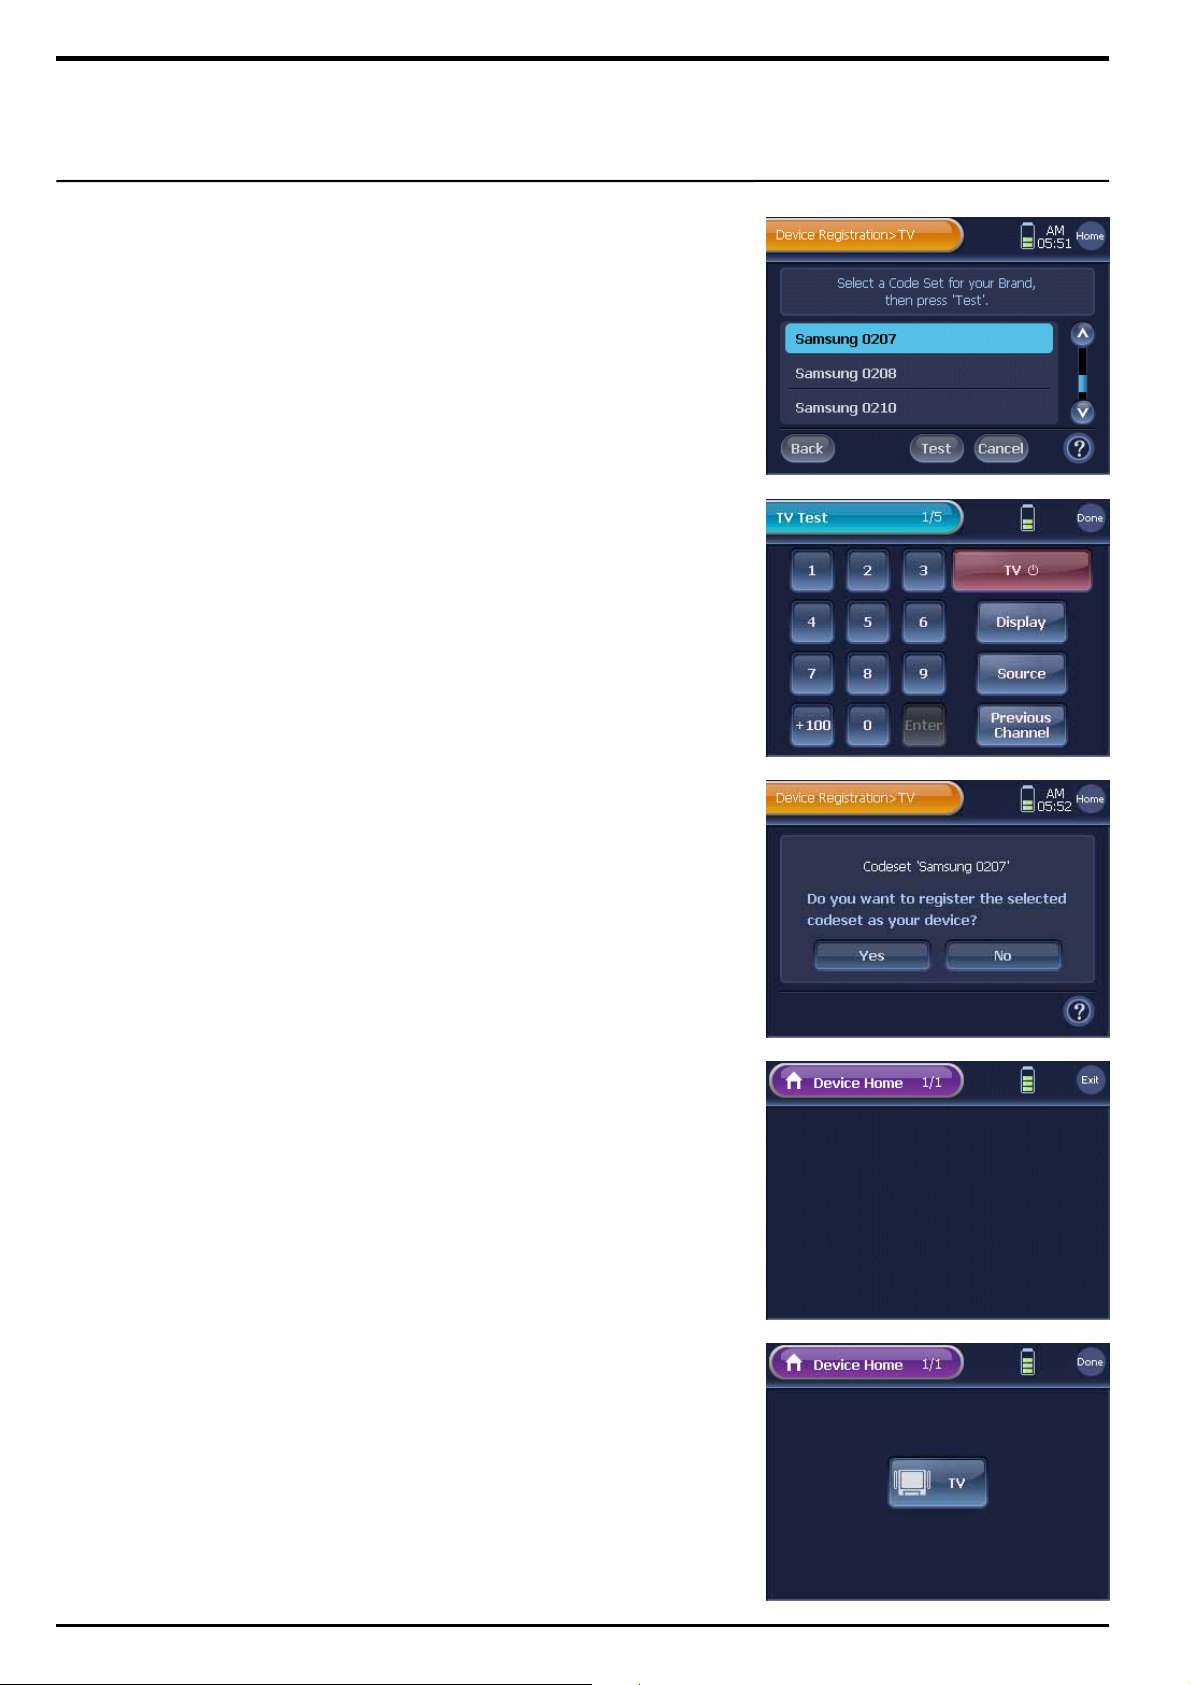
9 Select a Codeset from the codeset list, and press [Test].
You will be directed to the Remote Control page of the selected
device.
Note. Pressing [Back] or [Cancel] will automatically cancel the auto scan result.
☞ Codeset
Codesets listed on the code set list as the autoscan result have the same
“Power Off” signal. Thus, you can find a codeset that is most suitable for your
device through testing various codesets before registration.
10 Press a Remote Control Button to test the codeset compatibility.
To finish testing, press [Done].
You will be directed to the Device Registration Confirmation screen.
Note 1. To make sure that you have the most suitable codeset for your device,
we encourage you to test with Remote Control buttons as many as you
can.
2. Please place WZB 35 facing toward the device, and keep less than 10
meter distance between the device and WZB 35 while testing.
3. To move between remote control pages, please use the exterior
[◀ , PAGE ,▶] buttons.
11 If the test result is satisfactory, please press [Yes].
Note. If you press the [No], you will be redirected to the autoscanned codeset
list, so that you can select a different code, and proceed with testing until
you find the most suitable codeset.
12 In the next screen, press [Next].
You will be directed to the “Device Home” page.
13 In the “Device Home” page, select and press a location to add the
device button.
A new device button will be registered on the selected location.
Note 1. When you select an incorrect or unavailable location, you will hear a
beep sound alerting that the location unavailability.
2. You can register maximum 128 device buttons on the Device Home
page.
14 To finish, press [Done].
☞
Page 23
23
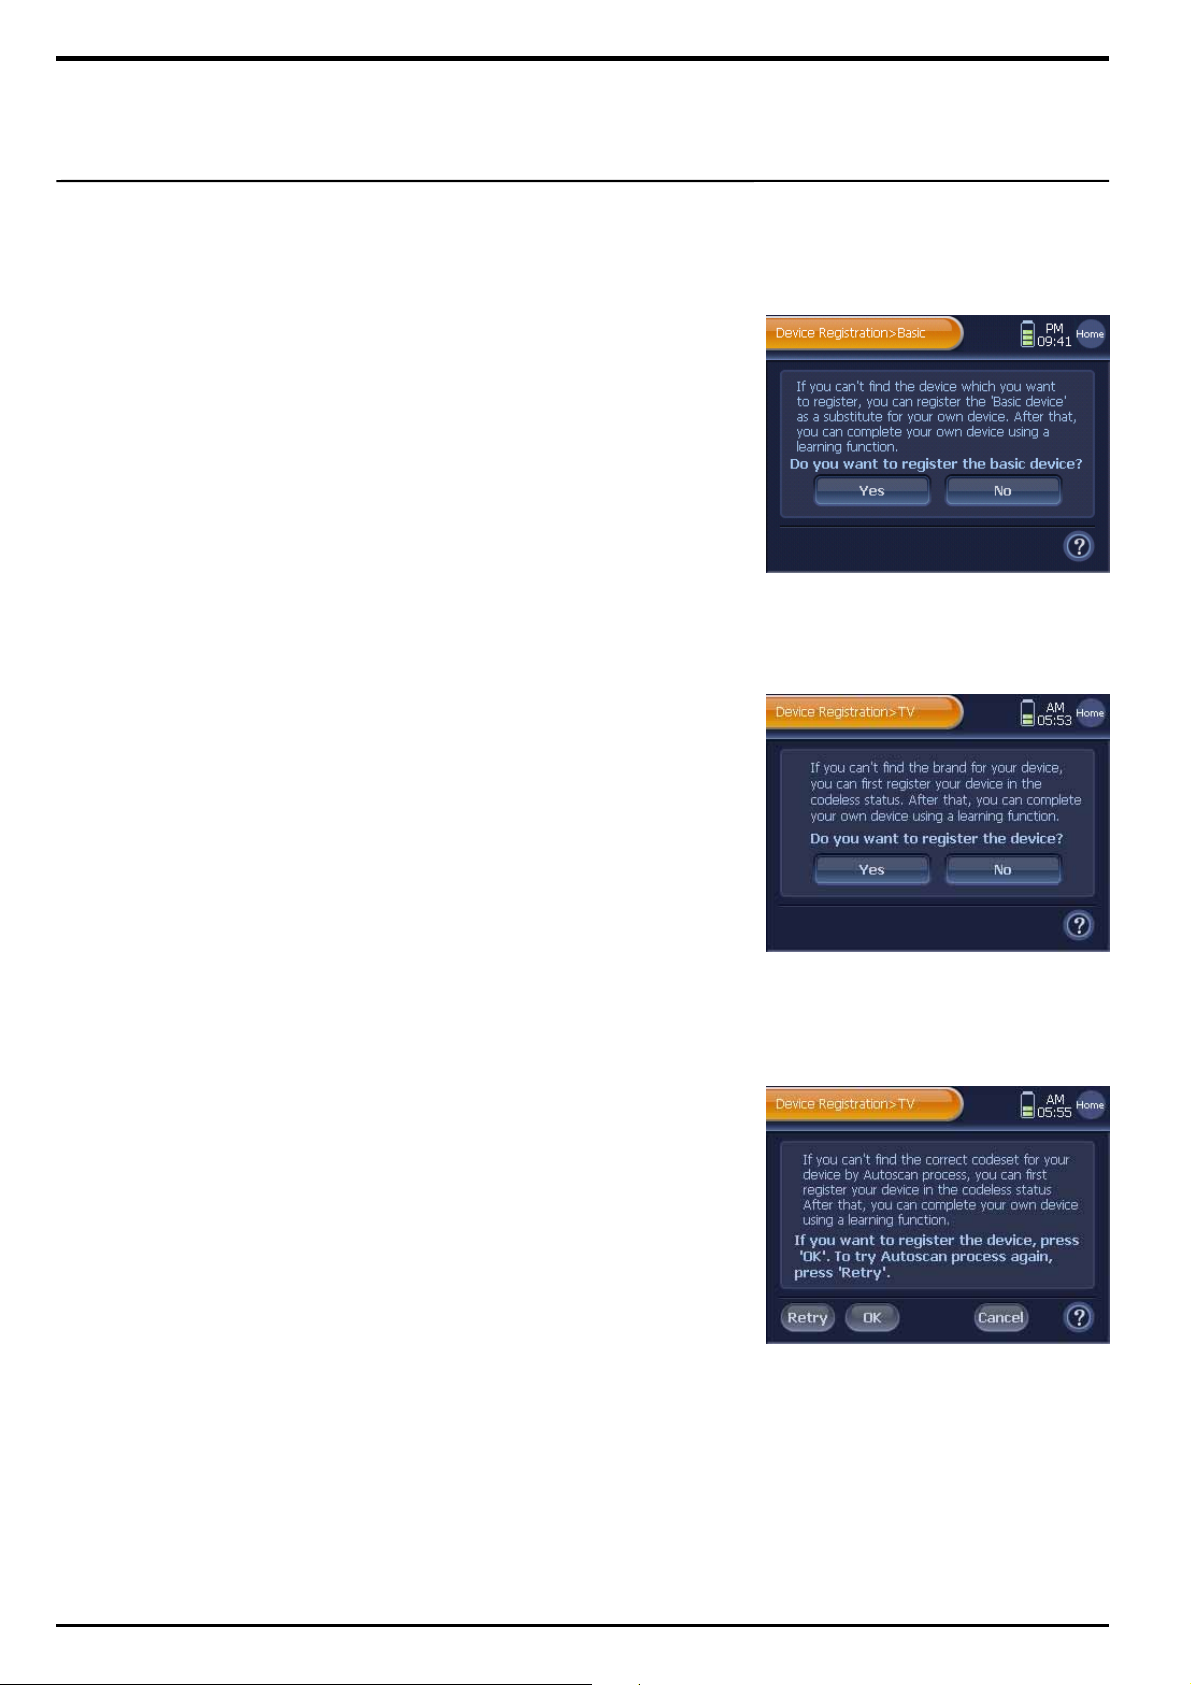
Device Registration instructions under Exceptional Situations
Situation 1. When a device does not exist in the Device List
1 Press [None] on the Device Selection screen.
2 Press [Yes] on the next screen, and then a Basic Device button will
be created on “Device Home”.
Note. Any Basic Device’s Remote Control button cannot be used at this point
because it is not registered with a codeset, and thus IR signals are not
available.
3 Use the “IR Learn” function to copy the device’s original remote
controller function to the basic device’s remote control button.
(Refer to the page 53, “IR Learn”.)
Situation 2. When a selected device’s manufacturer does not exist in the
1 Press [None] on the Brand Selection screen.
2 Press [Yes] on the next screen, and then a Selected Device button
will be created on “Device Home”.
Note. This newly created Device’s Remote Control button cannot be used at
this point because it is not registered with a codeset, and thus IR signals
are not available.
3 Use the “IR Learn” function to copy the device’s original remote
controller function to the newly created device’s remote control button.
(Refer to the page 53, “IR Learn”.)
Brand List
Situation 3. When the Autoscan option fails to find a codeset compatible with the target device
1 WZB 35 will display a failure message and automatically move to the
next screen.
2 Press [OK], and then a Selected Device button will be created on
“Device Home”.
Note. This newly created Device’s Remote Control button cannot be used at this
point because it is not registered with a codeset, and thus IR signals are
not available.
3 Use the “IR Learn” function to copy the device’s original remote
controller function to the newly created device’s remote control button.
(Refer to the page 53, “IR Learn”.)
☞ Extra Information
1 If the Autoscan option fails to find a compatible codeset, you may use the other scan method, codeset “Manual
Selection” before trying the “Exceptional Situation 3” instructions. In this way, you can test the entire codeset of
the device brand, and it is more effective to find a compatible code, although it takes more time.
2 Even if you have correctly registered a device, sometimes you may not be able to find certain buttons of the
original remote controller on the WZB 35’s Remote Control page. In this case, we encourage you to use the
“IR Learn” function.
Page 24
24
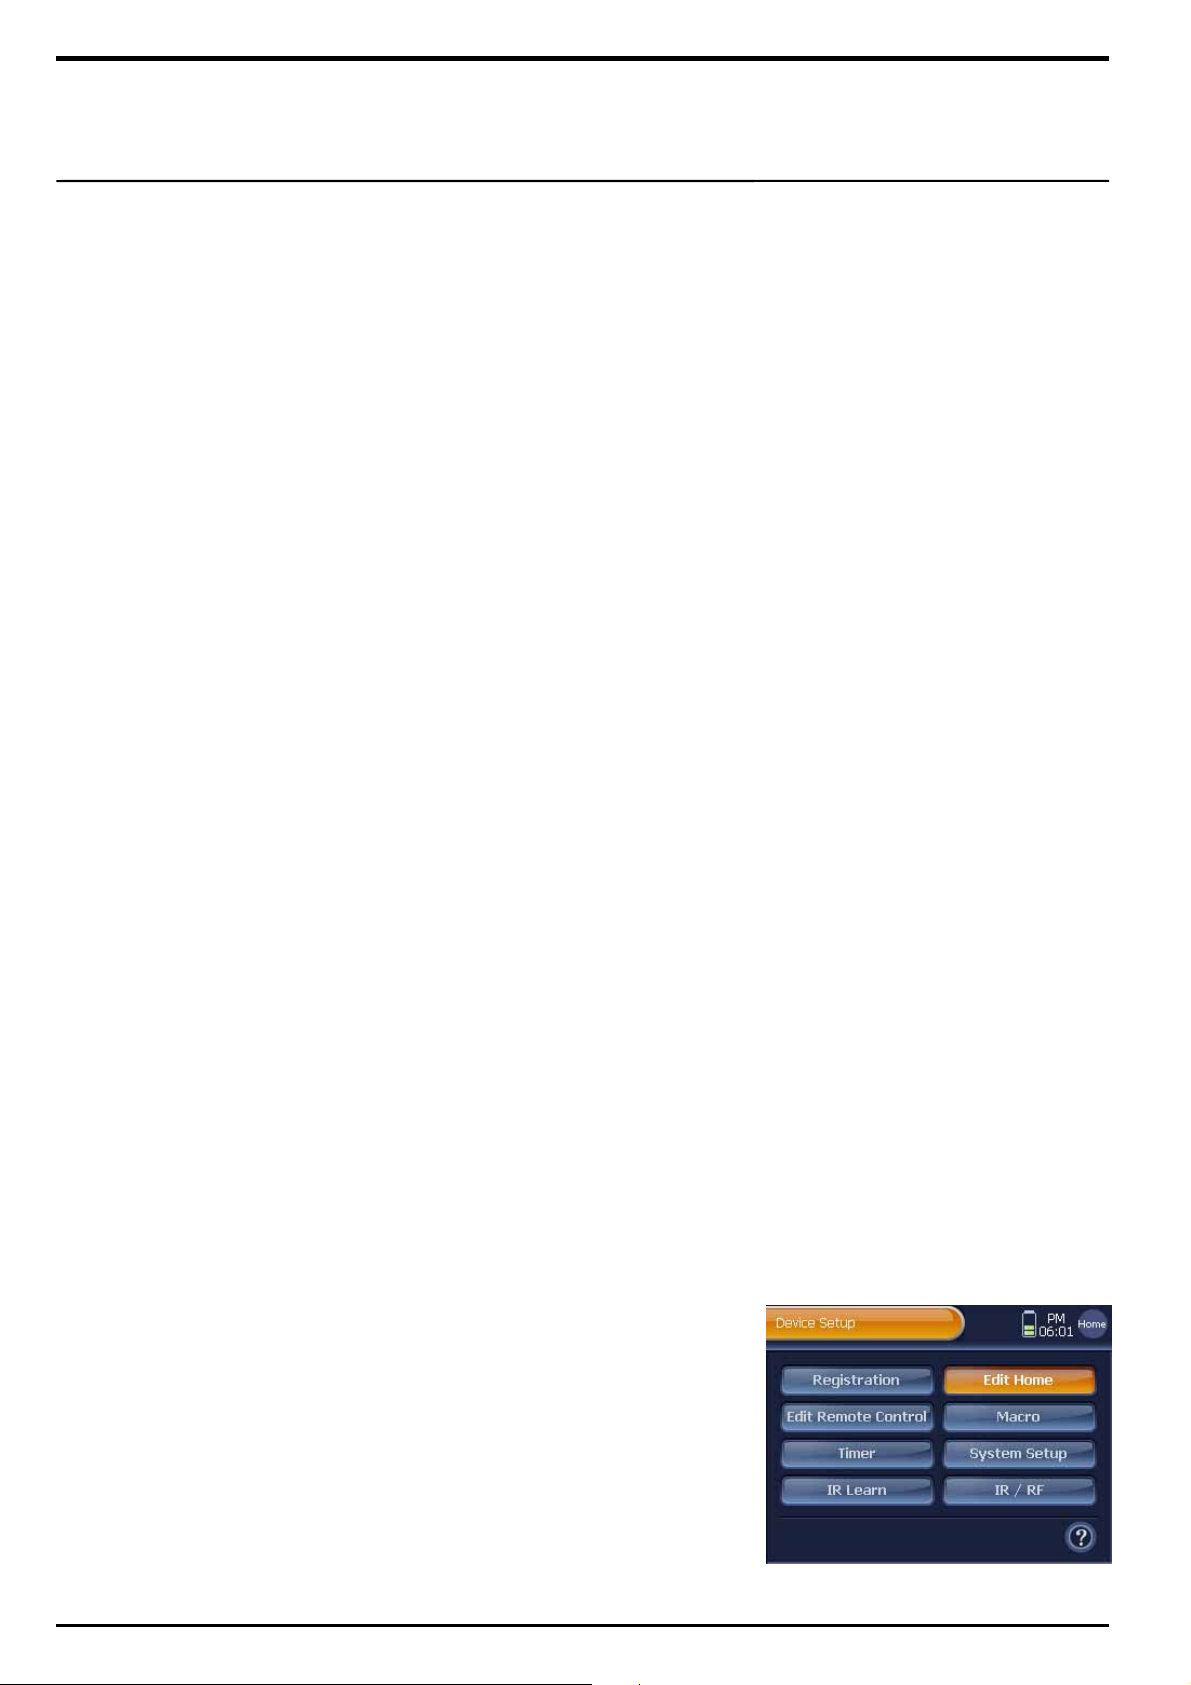
Once you complete registering a device on WZB 35, the device will
exist as a “Device Button” on “Device Home”. You can edit the Device
Home Page and the Device Button by using various functions provided
with the “Edit Home” menu.
1) Add Device Home Page
Add new device home pages on Device Home. It is convenient to
have a new device’s home page prior to changing the device’s
button locations.
2) Delete Device Home Page
Delete device home pages that are no longer needed.
3) Hide Device Home Page
Hide device home pages that are no longer displayed.
4) Add Device Button
Add a new device button on the “Device Home” page. Unlike device
registration, this function adds a device button which does not have
remote control option; you can create and customize a new device
button by using the “Edit Remote Control” options.
5) Copy Device Button
You can copy and paste your device buttons for your needs.
6) Delete Device Button
Delete device buttons that are no longer needed.
7) Move Device Button
Move device buttons to new locations.
8) Change Type & Text
You can change types or names of your device button.
Edit Home
To use the “Edit Device Home” options, please follow the next
instructions.
1 Press [SET] shortly on “Device Home”.
You will be directed to the "Device Setup" menu screen.
Note. To go back to “Device Home” from the "Device Setup" menu, press
[Home] shortly.
2 Press [Edit Home] on the "Device Setup" menu.
You will be directed to the “Edit Device Home” screen.
3 Proceed with device home editing options by pressing menu
buttons on the “Edit Device Home” screen.
Page 25

25
Add Device Home Page
1 Press [Page] on the “Edit Device Home” screen.
2 Press [Add] on the “Edit Device Home Page” screen.
3 Press [Yes] on the “Add Device Home Page” screen, and then a
new page will be added to Device Home.
Note 1. The newly created home page will be added to the last page of
Device Home as a blank page.
2. You can add maximum 32 device home pages.
4 To continue adding pages, press [Yes], or [No] to finish on the next
screen.
Delete Device Home Page
1 Press [Page] on the “Edit Device Home” screen.
2 Press [Delete] on the “Edit Device Home Page” screen.
3 Press [Next] on the next screen, and then you will be directed to
“Device Home”.
4 Select a page to delete, and press [Delete]. The home page will be
deleted.
Note. You cannot delete a home page which has device buttons.
5 To continue deleting home pages, press [Yes], or [No] to finish on
the next screen.
Page 26
26
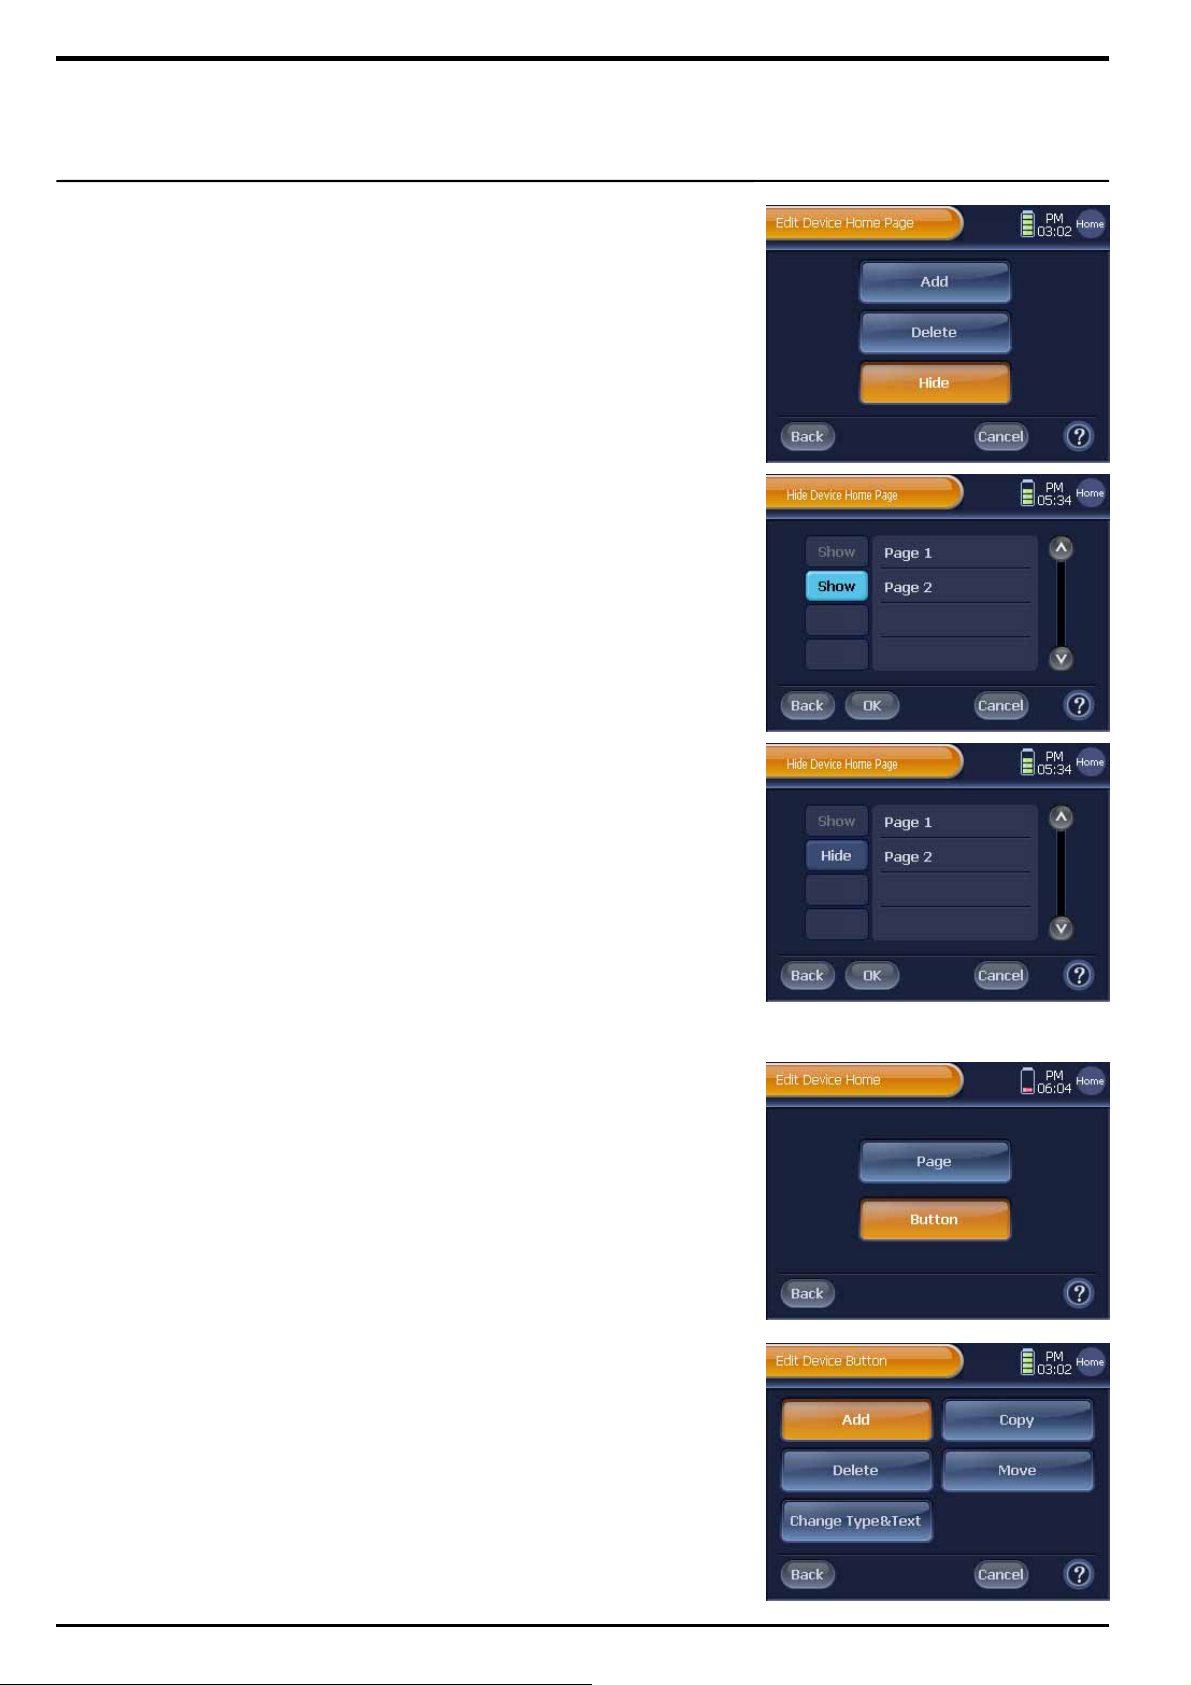
Hide Device Home Page
1 Press [Page] on the “Edit Device Home” screen.
2 Press [Hide] on the “Edit Device Home Page” screen.
3 Press [Show] or [Hide] on the “Hide Device Home Page” screen.
And If you want to save, press [OK].
Note 1. You cannot hide the 1st Device Home page.
2. ‘Hide’ page does not appear on Device Home screen but only on setup
mode.
3. When jumping or moving to a page with ‘Hide’ setup, it is always
moved to ‘Page 1’ of the Device Home page.
Add Device Button
1 Press [Button] on the “Edit Device Home” screen.
2 Press [Add] on the “Edit Device Button” screen.
You will be directed to the “Keyboard” screen.
3 Use the keyboard, select a type and enter a name for the new device
button.
Note. To use the keyboard, refer to the page 27 “Tip. Keyboard Functions”.
4 After entering a new name, press [OK] on the “Keyboard” screen.
And press [Next], you will be directed to “Device Home”
5 In the “Device Home” page, select and press a location to add the
new device button. “Device Home” will display a new d evic e b ut t o n .
Note 1. When you select an incorrect or unavailable location, you will hear a
beep sound alerting that the location unavailability.
2. Unlike device buttons that are registered through the Basic Device
Registration option, this newly created device button does not have
Remote Control option because its codeset has not been determined.
6 To exit “Device Home” page, press [Done].
You will be directed to “Keyboard” screen.
You can repeat adding device button, or press [Cancel] to finish.
Page 27
27
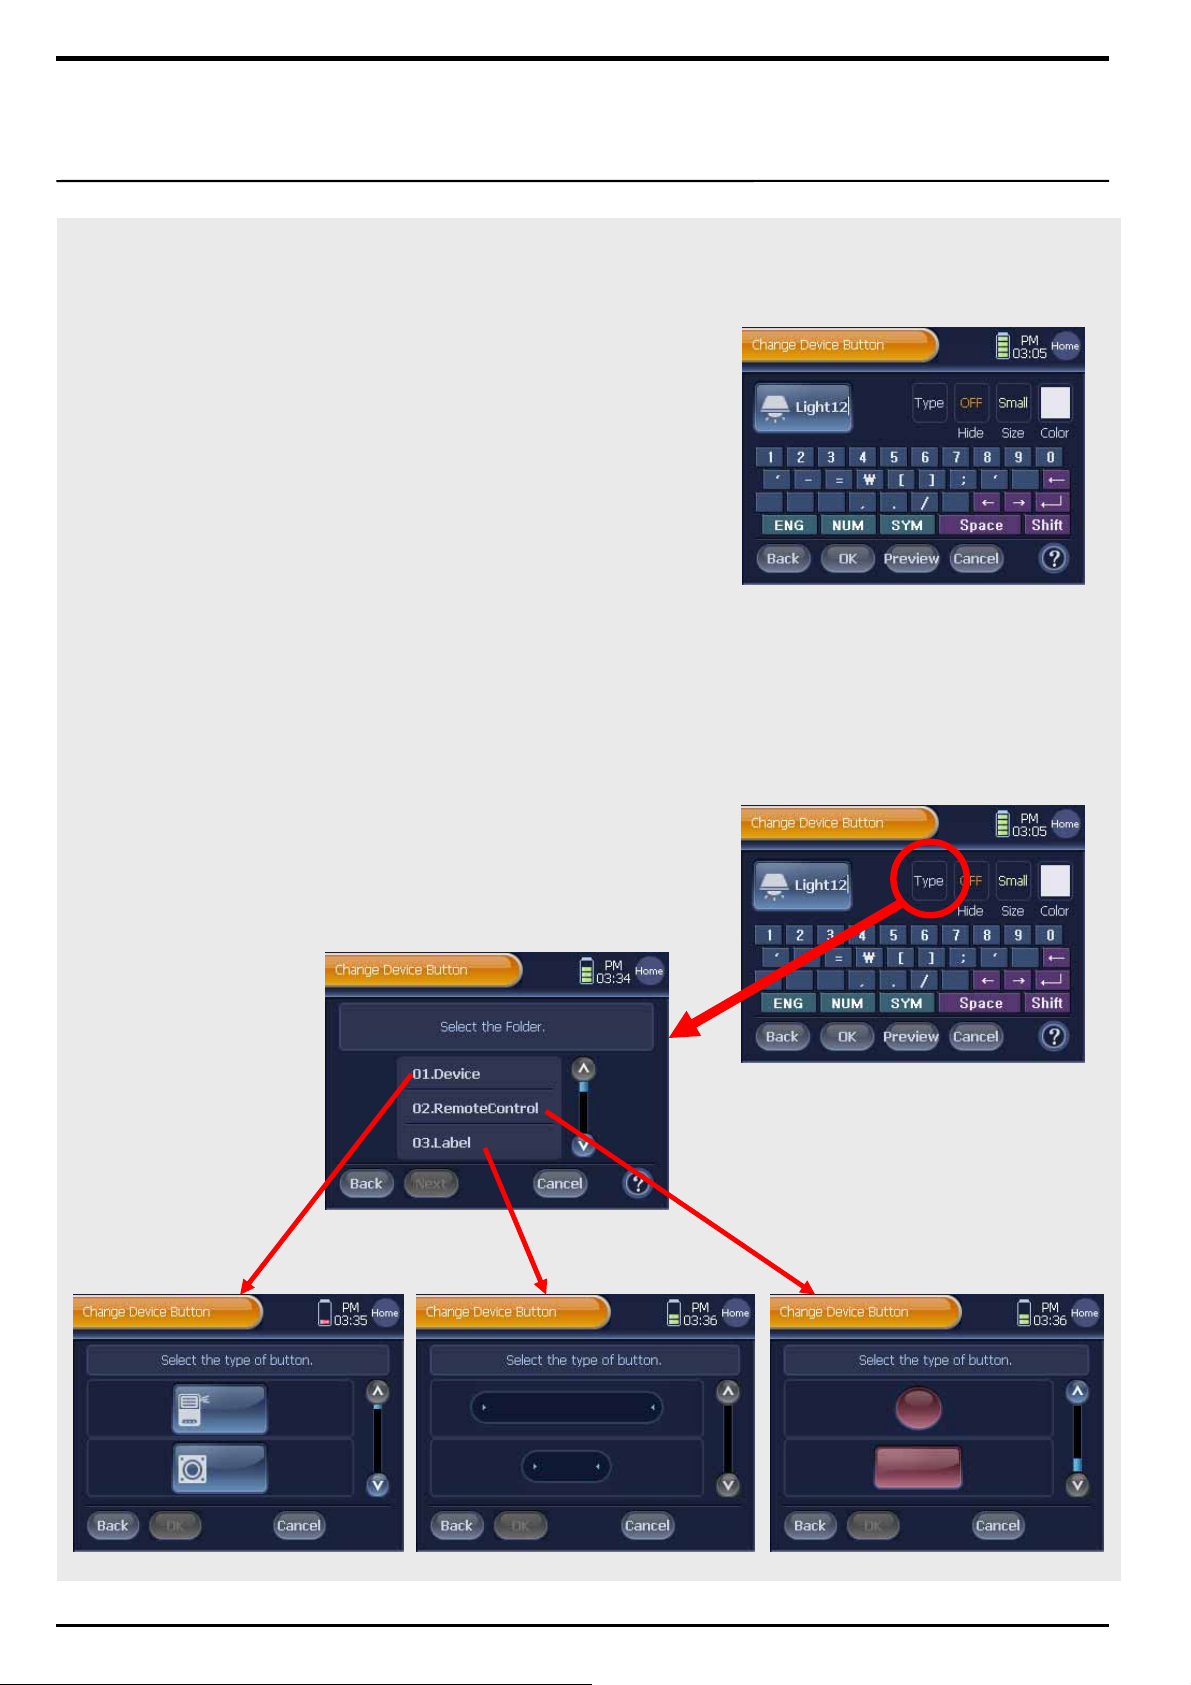
Tip. Keyboard Functions
1. Displays the default device button and enables you to directly enter a
new name on the button; helps you to check the name change easily.
2. The keyboard supports total 6 pages of the following characters and
ASCII codes.
[Alphabet], [Alphabet + Caps], [Number], [Number + Shift],
[ASCII Code], [ASCII Code + Shift] , [ AV, Lighting Graphic Symbol]
3. You can enter maximum 2 lines of characters.
4. You can select the button type with [Type] button. If you press [Type],
will be directed to “Button Folder” page, 3 types of button presented.
You can choose a hidden font for pure graphic buttons.
5.
To display the text font, press the “Hide” button for [OFF] status
. To hide, press the “Hide” button for [ON] status.
6. Two font sizes are provided: Large and Small. To change the font size,
press the [Size] button.
7. You can choose a font color from total 12 different colors. To change
the font color, press the [Color] button.
8. If you press [Preview], you can see the completed button image in
advance.
Page 28
28
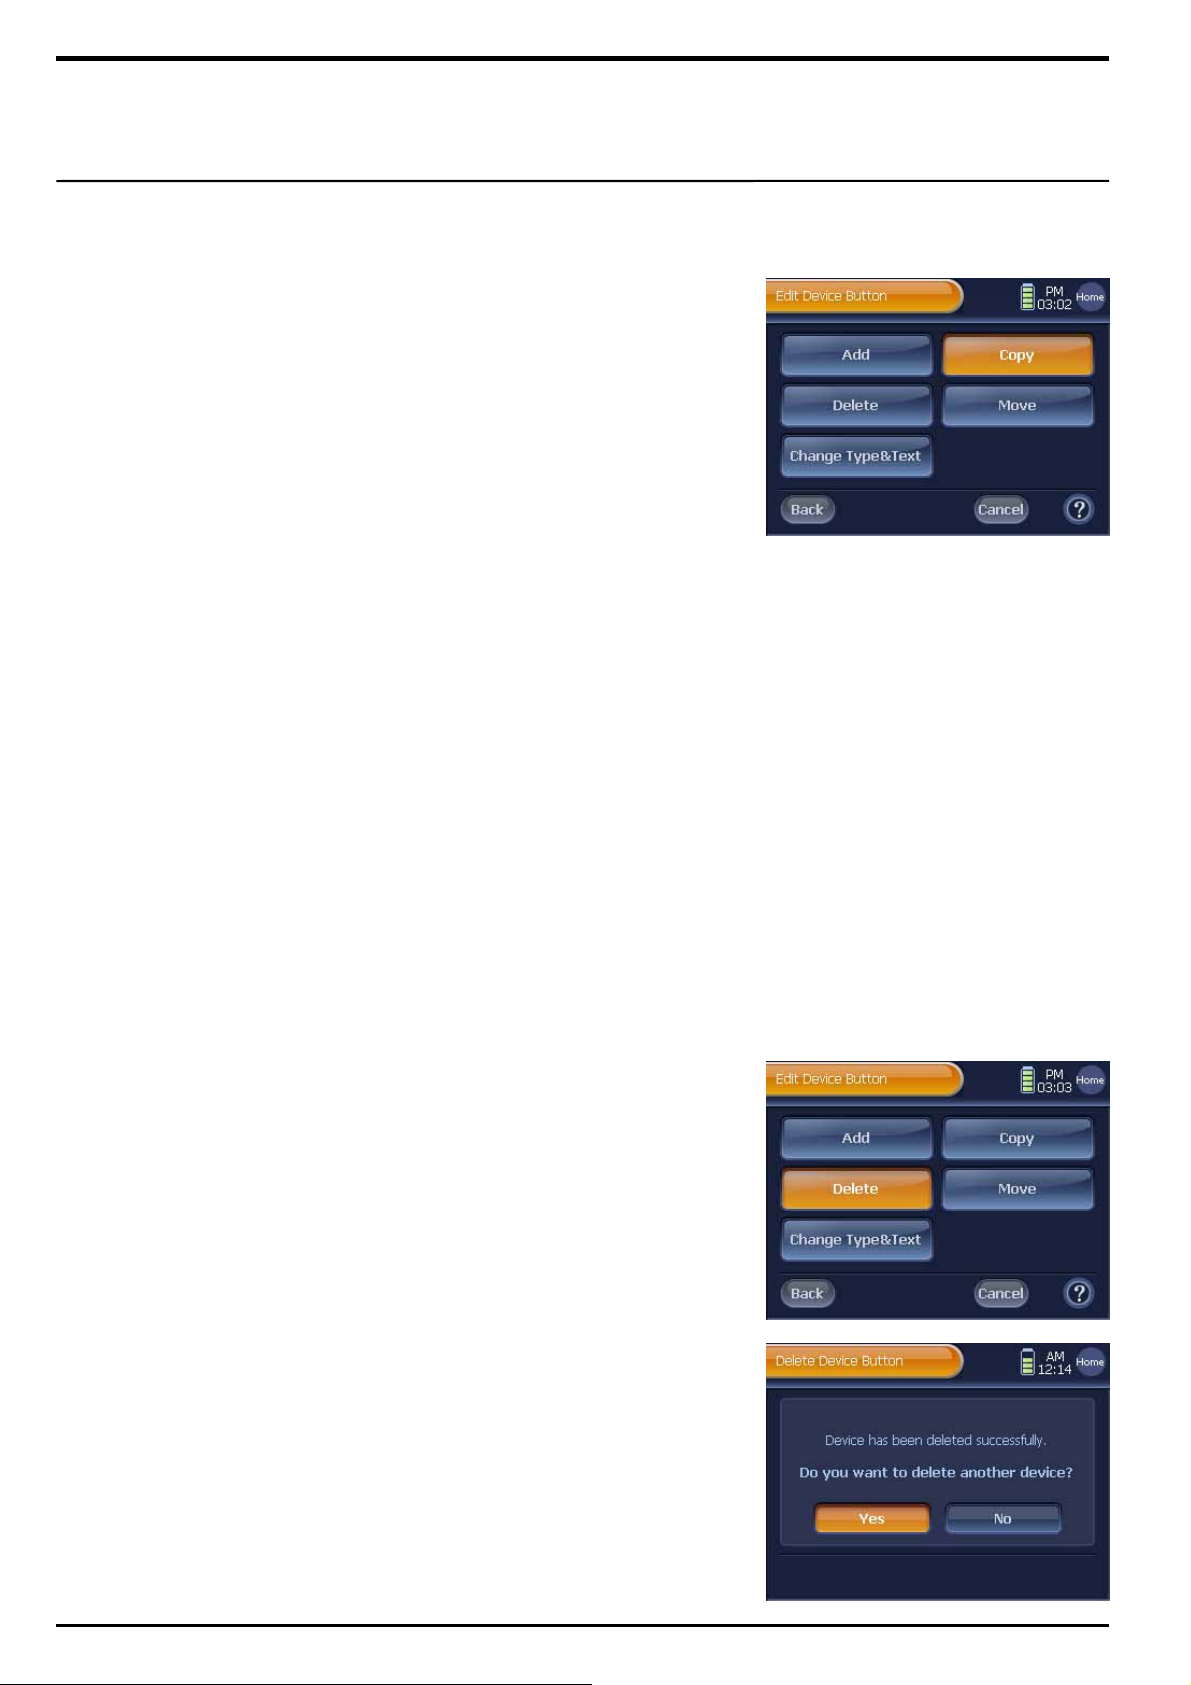
Copy Device Button
1 Press [Button] on the “Edit Device Home” screen.
2 Press [Copy] on the “Edit Device Button” screen.
3 Press [Next] on the next screen, and then you will be directed to
“Device Home”.
4 Select and press a Device button to copy.
Note 1. To move between pages, and find a device button, use the exterior
[◀ , Page , ▶] button.
2. To exit from the “Device Home” screen, press [Exit].
5 Press [Next] on the next screen, and then you will be redirected to
“Device Home”.
6 Select and press a location on the device home page to paste the
copied device button.
The device button will be registered on the selected location.
Note 1. When you select an incorrect or unavailable location, you will hear a
beep sound alerting that the location unavailability.
2. After the new device button is registered on the selected location, you
can continue changing the button’s location to different spots.
7 Press [Done]. You can continue copying device buttons or finish the
process by moving back to step 3.
Delete Device Button
1 Press [Button] on the “Edit Device Home” screen.
2 Press [Delete] on the “Edit Device Button” screen.
3 Press [Next] on the next screen, and then you will be directed to
“Device Home”.
4 Select and press a Device button to delete.
5 Press [Yes] on the Button Deletion Confirmation screen. The button
will be deleted.
6 To continue deleting buttons, press [Yes], or [No] to finish.
Page 29
29
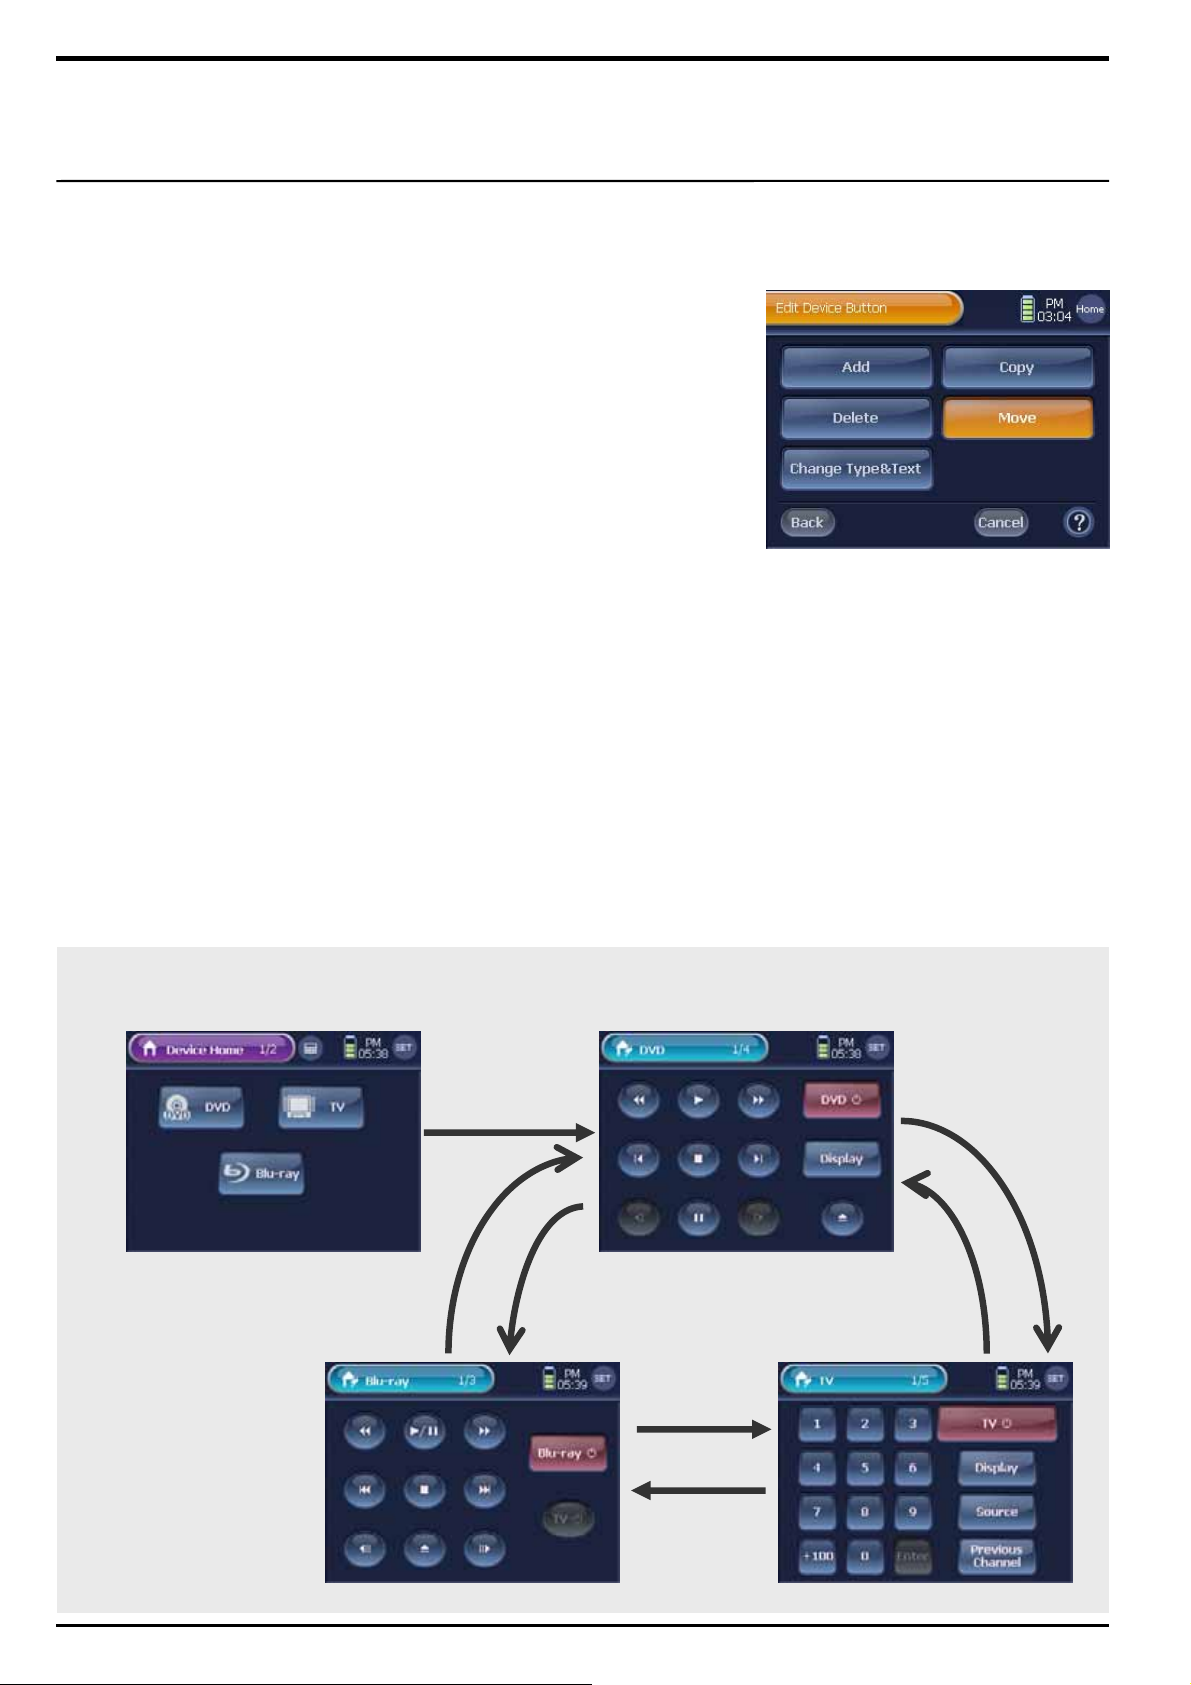
Move Device Button
1 Press [Button] on the “Edit Device Home” screen.
2 Press [Move] on the “Edit Device Button” screen.
3 Press [Next] on the next screen, and then you will be directed to
“Device Home”.
4 Select and press a Device button to move.
The button will be highlighted, and waiting to be moved.
5 Select and press a new location to move the device button.
The button will be moved to the location.
Note. When you select an incorrect or unavailable location, you will hear a
beep sound alerting that the location unavailability.
6 To finish moving button, press [Done].
You can continue moving device buttons or finish the process by
moving back to step 3.
Note. When you move a device button, it will affects the order of Remote
Control pages turned by the [◀ Device] and [Device ▶] buttons.
Tip.
Remote Control page order turned by the exterior [◀ Device] and [Device ▶] buttons
[Device ▶] [◀ Device] [◀ Device]
[◀ Device]
or [Device ▶]
[◀ Device]
[Device ▶]
[Device ▶]
Page 30
30
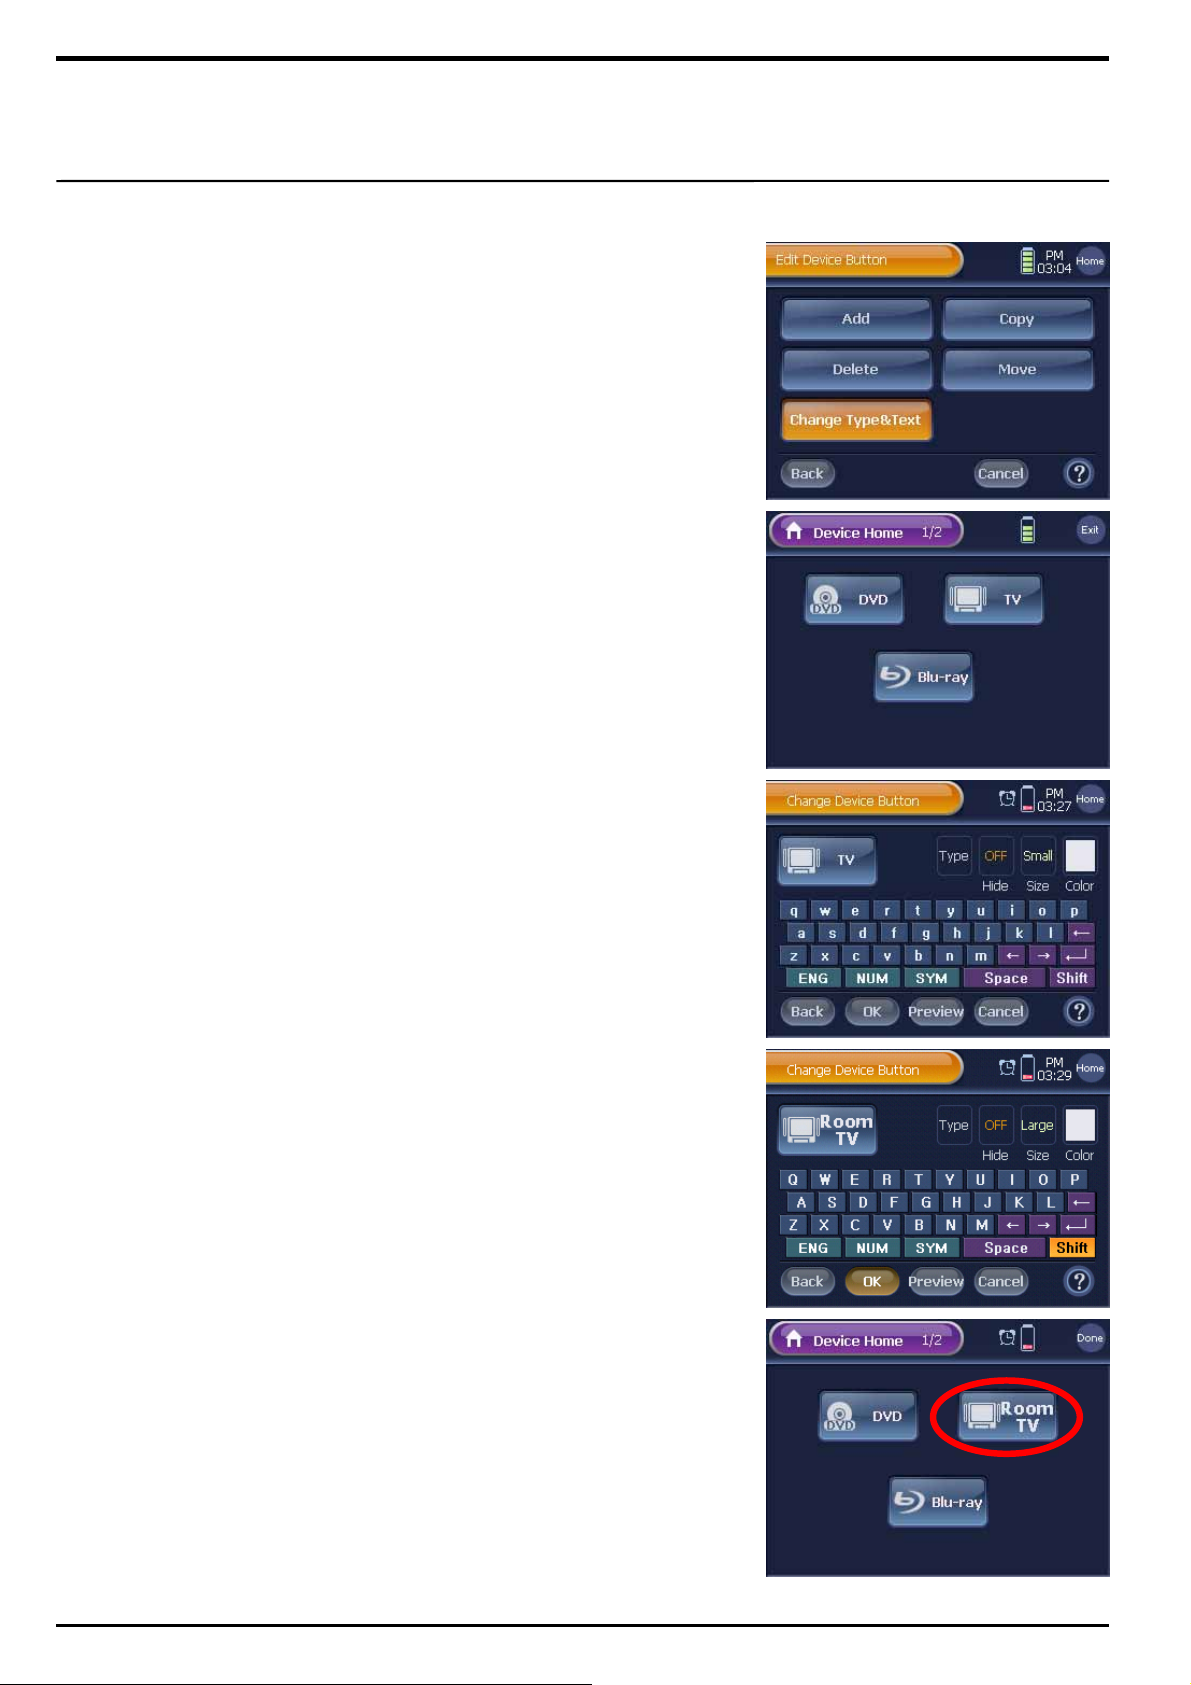
Change Type & Text
1 Press [Button] on the “Edit Device Home” screen.
2 Press [Change Type & Text ] on the “Edit Device Button” screen.
3 Press [Next] on the next screen, and then you will be directed to
“Device Home”.
4 Select and press a Device b u t t o n t o ren am e. Y o u will be direct e d t o
the “Keyboard” screen which enables you to enter a new name.
5 Use the keyboard to enter a new name for the device button.
Note. To use the keyboard, refer to the page 27 “Tip. Keyboard Functions”.
6 After entering a new name, press [OK] on the “Keyboard” screen.
You will be directed to “Device Home” that has the device button with
the new name.
☞
7 To finish changing button name, press [Done].
To continue changing button names, repeat step 4, 5 and 6.
☞
Page 31
31
Registered devices have their own “Remote Control” pages. “Remote
Control” page is composed of various “Remote Control” buttons. You
can edit these “Remote Control” pages and buttons by using various
options provided with the “Edit Remote Control” menu.
1) Add Remote Control Page
Add new devices’ remote control pages. It is convenient to have a
remote control page prior to changing remote control button locations.
2) Delete Remote Control Page
Delete remote control pages that are no longer needed.
3) Add Remote Control Button
Add new remote control buttons on remote control pages. Use the
“IR Learn” option to customize the newly created remote control
buttons.
4) Copy Remote Control Button
Copy and paste your favorite remote control buttons for individual
devices to a remote control page.
5) Delete Remote Control Button
Delete remote control buttons that are no longer needed.
6) Move Remote Control Button
Move remote control buttons to new locations.
7) Change Type & Text of Remote Control Button
You can change types or names of remote control button.
8) Set Remote Control Button IR
Customize the IR signal output mode and the default IR output
quantity of a specific remote control button.
9) Import Control Code
You can import and retrieve the control code of the remote control
button.
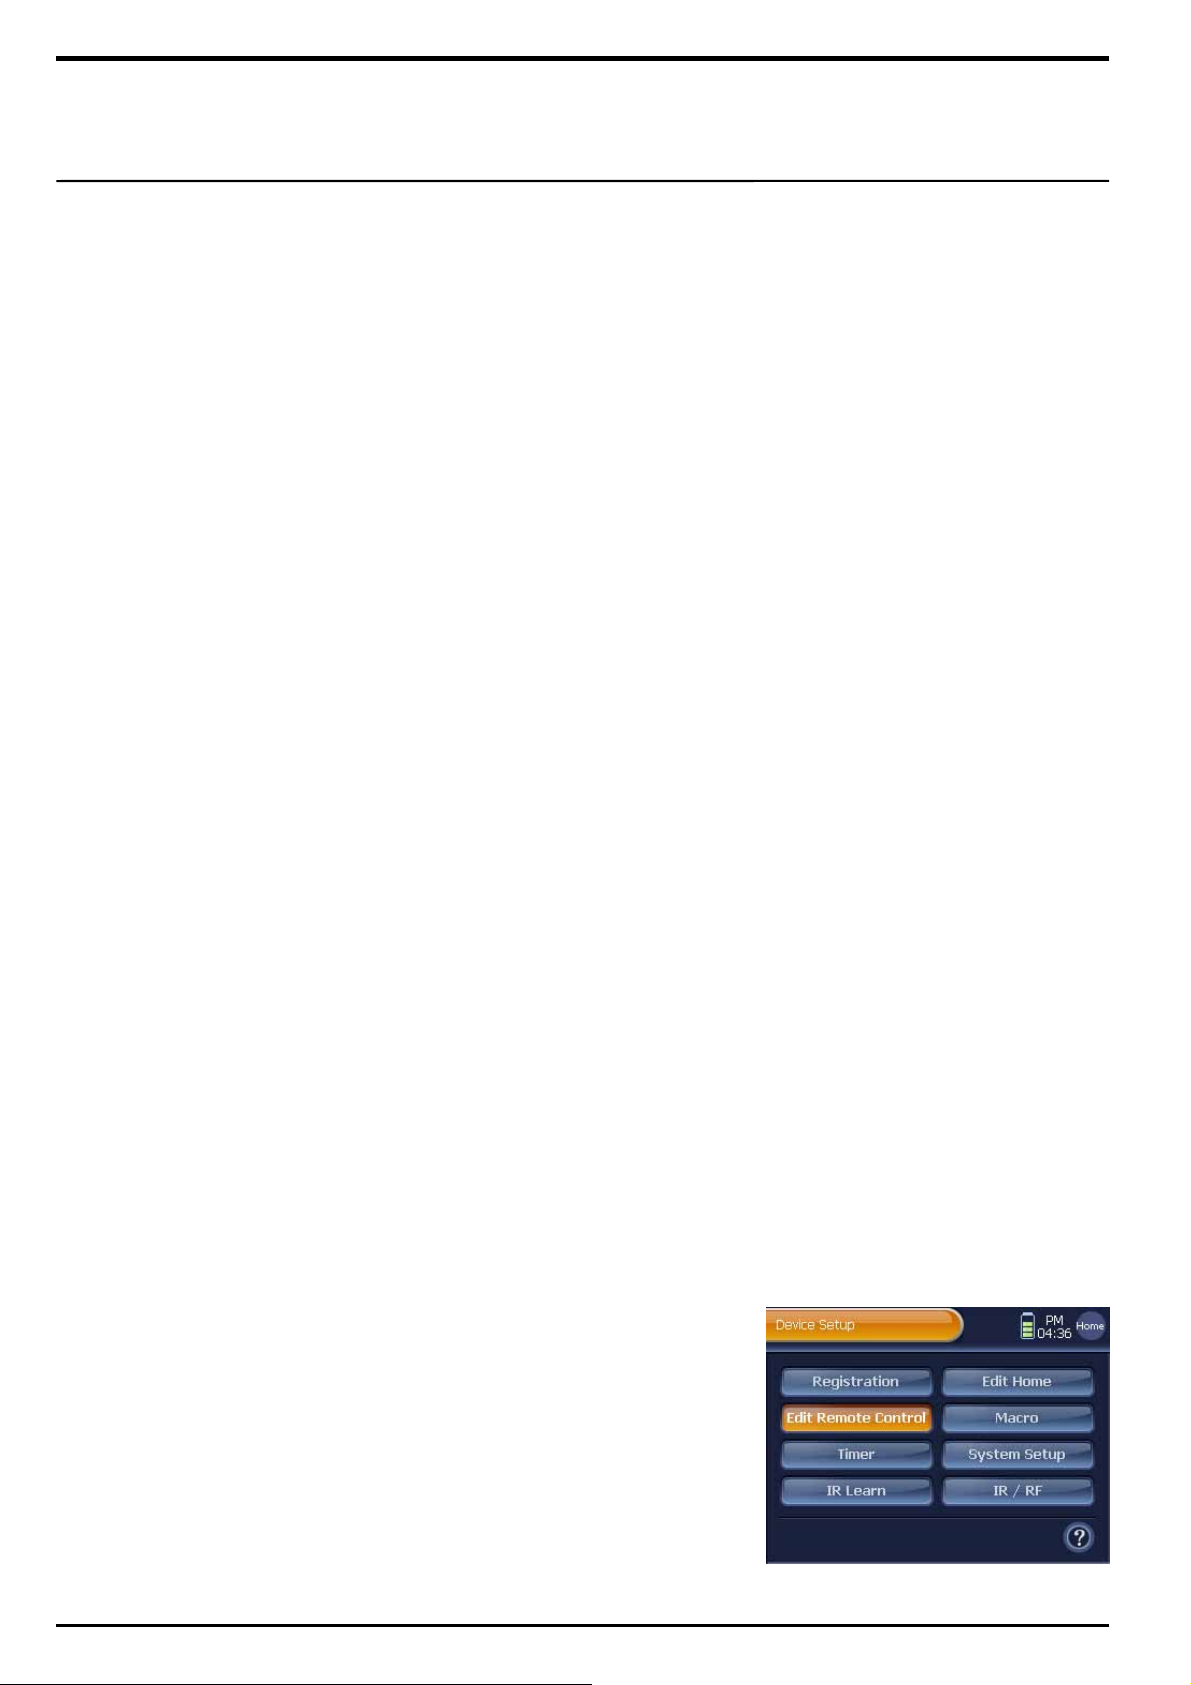
Edit Remote Control
To use the “Edit Remote Control” options, please follow the next
instructions.
1 Press [SET] shortly on “Device Home”.
You will be directed to the "Device Setup" menu screen.
Note. To go back to “Device Home” from the “Device Setup” menu, press
[Home] shortly.
2 Press [Edit Remote Control] on the "Device Setup" menu screen.
You will be directed to the “Edit Remote Control” screen.
3 Proceed with editing options by pressing menu buttons on the “Edit
Remote Control” screen.
Page 32
32
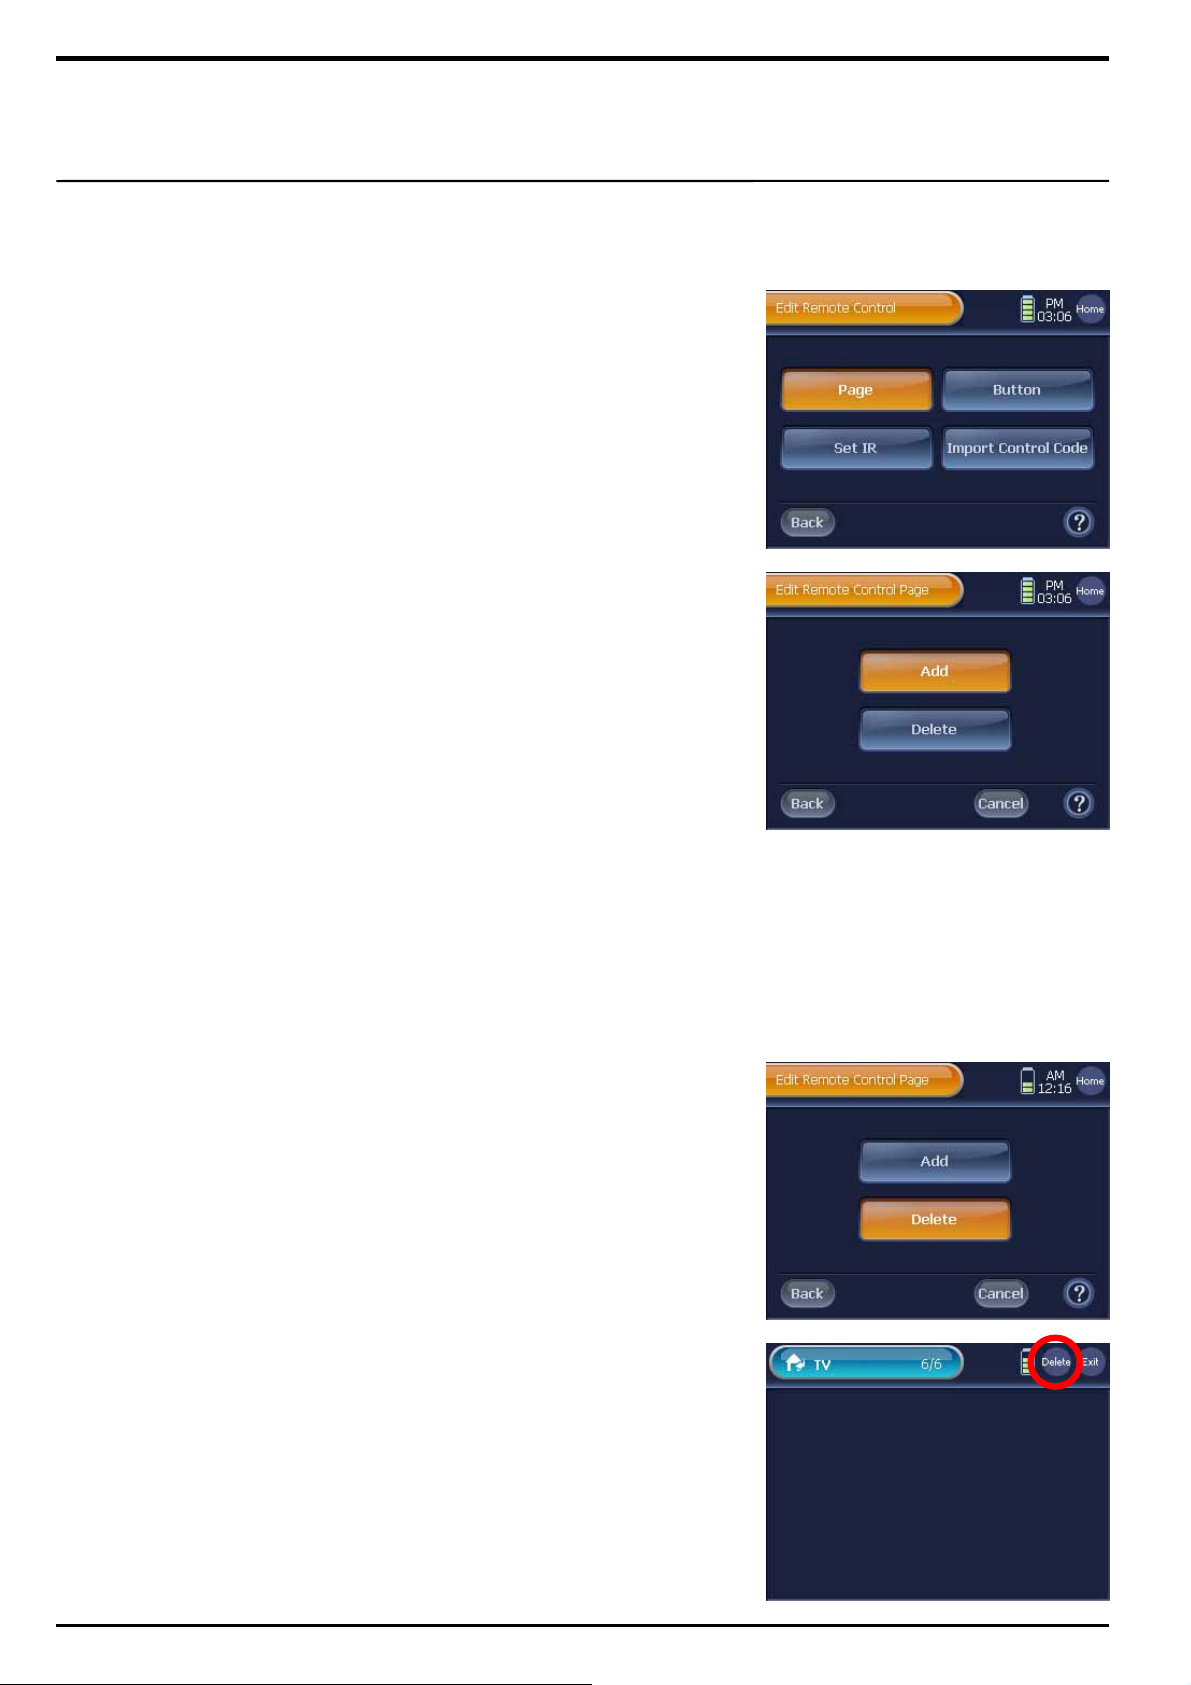
Add Remote Control Page
1 Press [Page] on the “Edit Remote Control” screen.
2 Press [Add] on the “Edit Remote Control Page” screen.
3 Press [Next] on the next screen, and then you will be directed to
“Device Home”.
4 Select and press a Device button on “Device Home” to add a new
Remote Control page.
Note 1. To move between pages, and find a device button, use the exterior
[◀ , Page, ▶] button.
2. To exit from the “Device Home” screen, press [Exit].
5 Press [Yes] on the “Add Remote Control Page” screen, and then a
new Remote Control page will be added to the device.
Note 1. The new Remote Control page will be added on the last page of the
selected device’s Remote Control page.
2. You can add maximum 32 Remote Control pages.
6 To continue adding pages, press [Yes], or [No] to finish on the next
screen.
Delete Remote Control Page
1 Press [Page] on the “Edit Remote Control” screen.
2 Press [Delete] on the “Edit Remote Control Page” screen.
3 Press [Next] on the next screen, and then you will be directed to
“Device Home”.
4 Select and press a Device button on “Device Home” to delete its
Remote Control page. You will be directed to the selected device’s
st
1
Remote Control page.
5 Select a page to delete, and press [Delete]. Then, the page will be
deleted.
Note. You cannot delete a remote control page that has remote control button.
6 To continue deleting pages, press [Yes], or [No] to finish on the
next screen.
Page 33
33
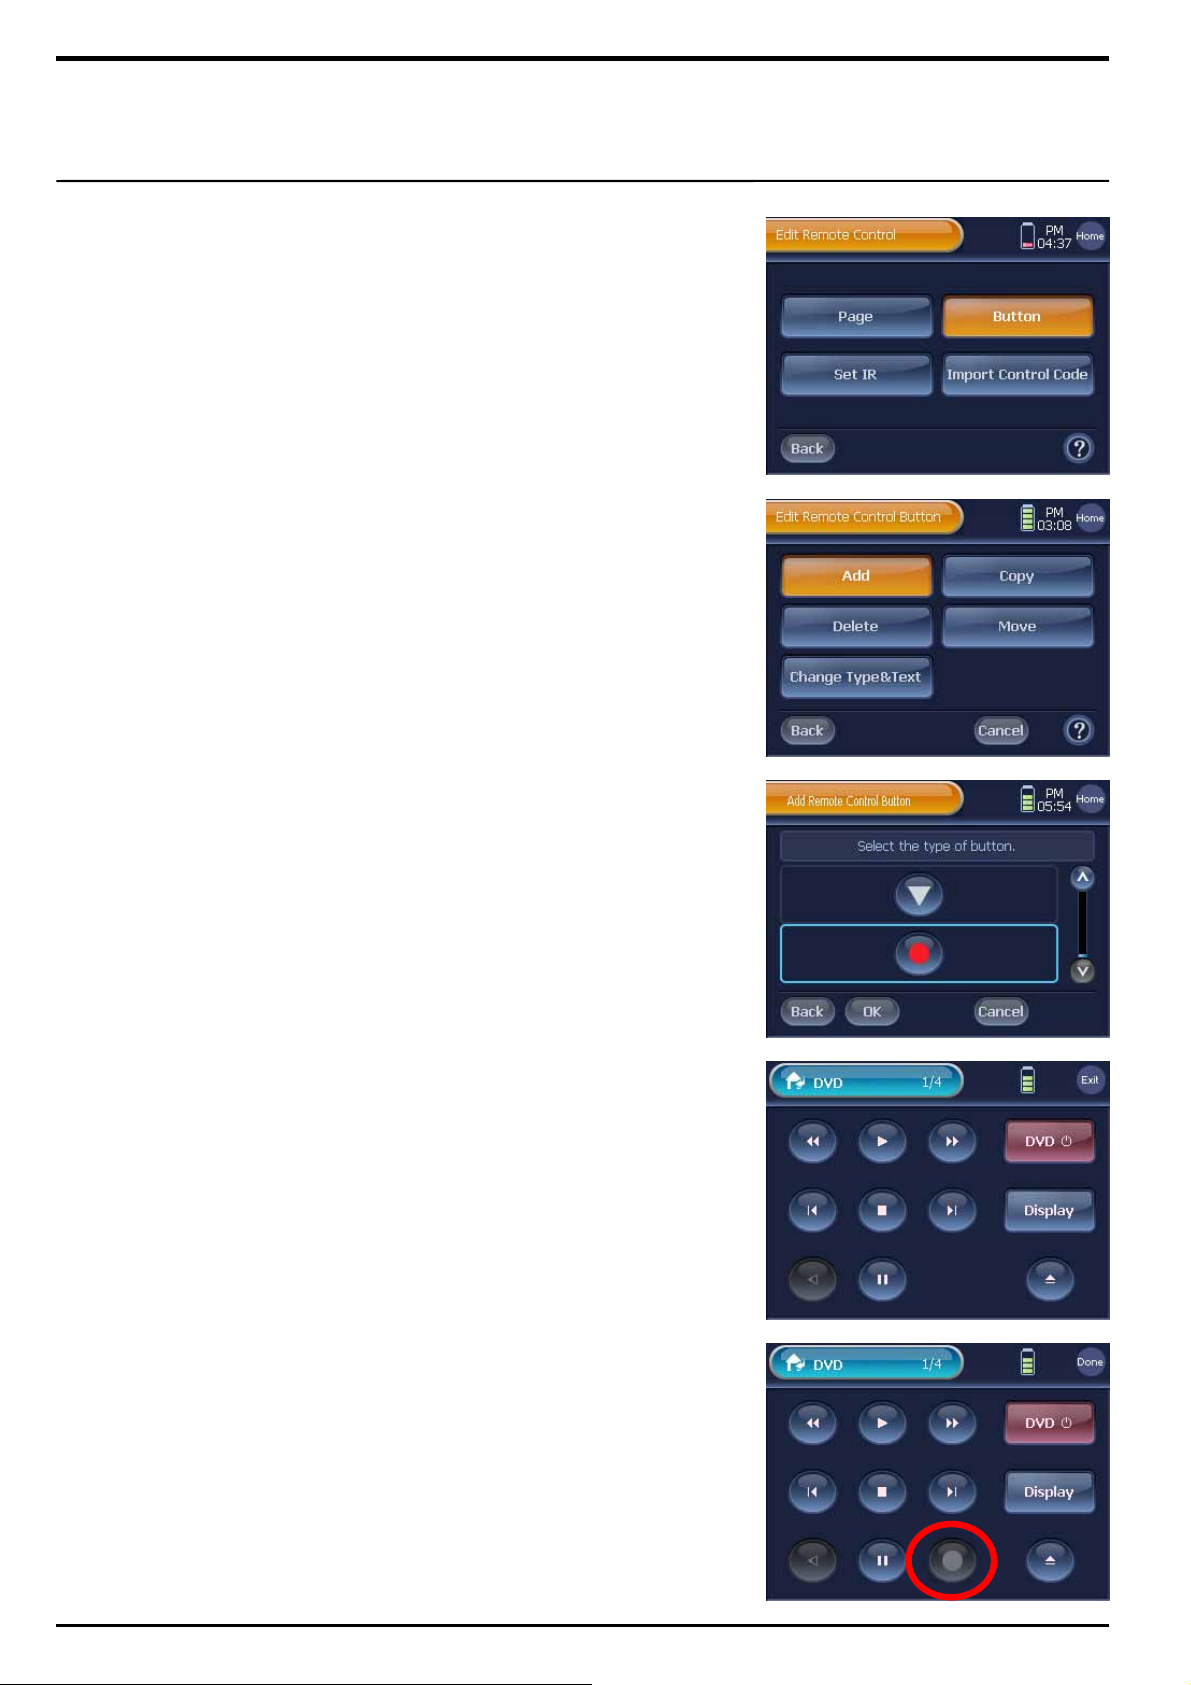
Add Remote Control Button
1 Press [Button] on the “Edit Remote Control” screen.
2 Press [Add] on the “Edit Remote Control Button” screen.
You will be directed to the “Keyboard” screen.
3 Use the keyboard, select a type and enter a name for the new device
button.
Note. To use the keyboard, refer to the page 27 “Tip. Keyboard Functions”.
4 After entering a new name, press [OK] on the “Keyboard” screen.
And press [Next], you will be directed to “Device Home”
5 Select a Device button on “Device Home” to add the newly added
Remote Control button. You will be directed to the selected device’s
st
1
Remote Control page.
Note 1. To move between pages, and find a device button, use the exterior
[◀ , Page, ▶] button..
2. To exit from the “Device Home” screen, press [Exit].
6 Select and press the new Remote Control button location to save
the button on the Remote Control page. The button will be saved on
the selected location.
Note. The button location becomes varied depending on the selected
Remote Control type. When you select an incorrect or unavailable
location, you will hear a beep sound alerting that the location
unavailability.
8 After the new Remote Control button is registered on the selected
location, you can continue changing the button’s location to different
spots.
Note. Repeat the button and location selection processes to change the
button’s location.
9 To exit Remote Control page, press [Done].
You will be directed to “Keyboard” screen.
You can repeat adding Remote Control button, or press [Cancel] to
finish.
☞
Page 34
34
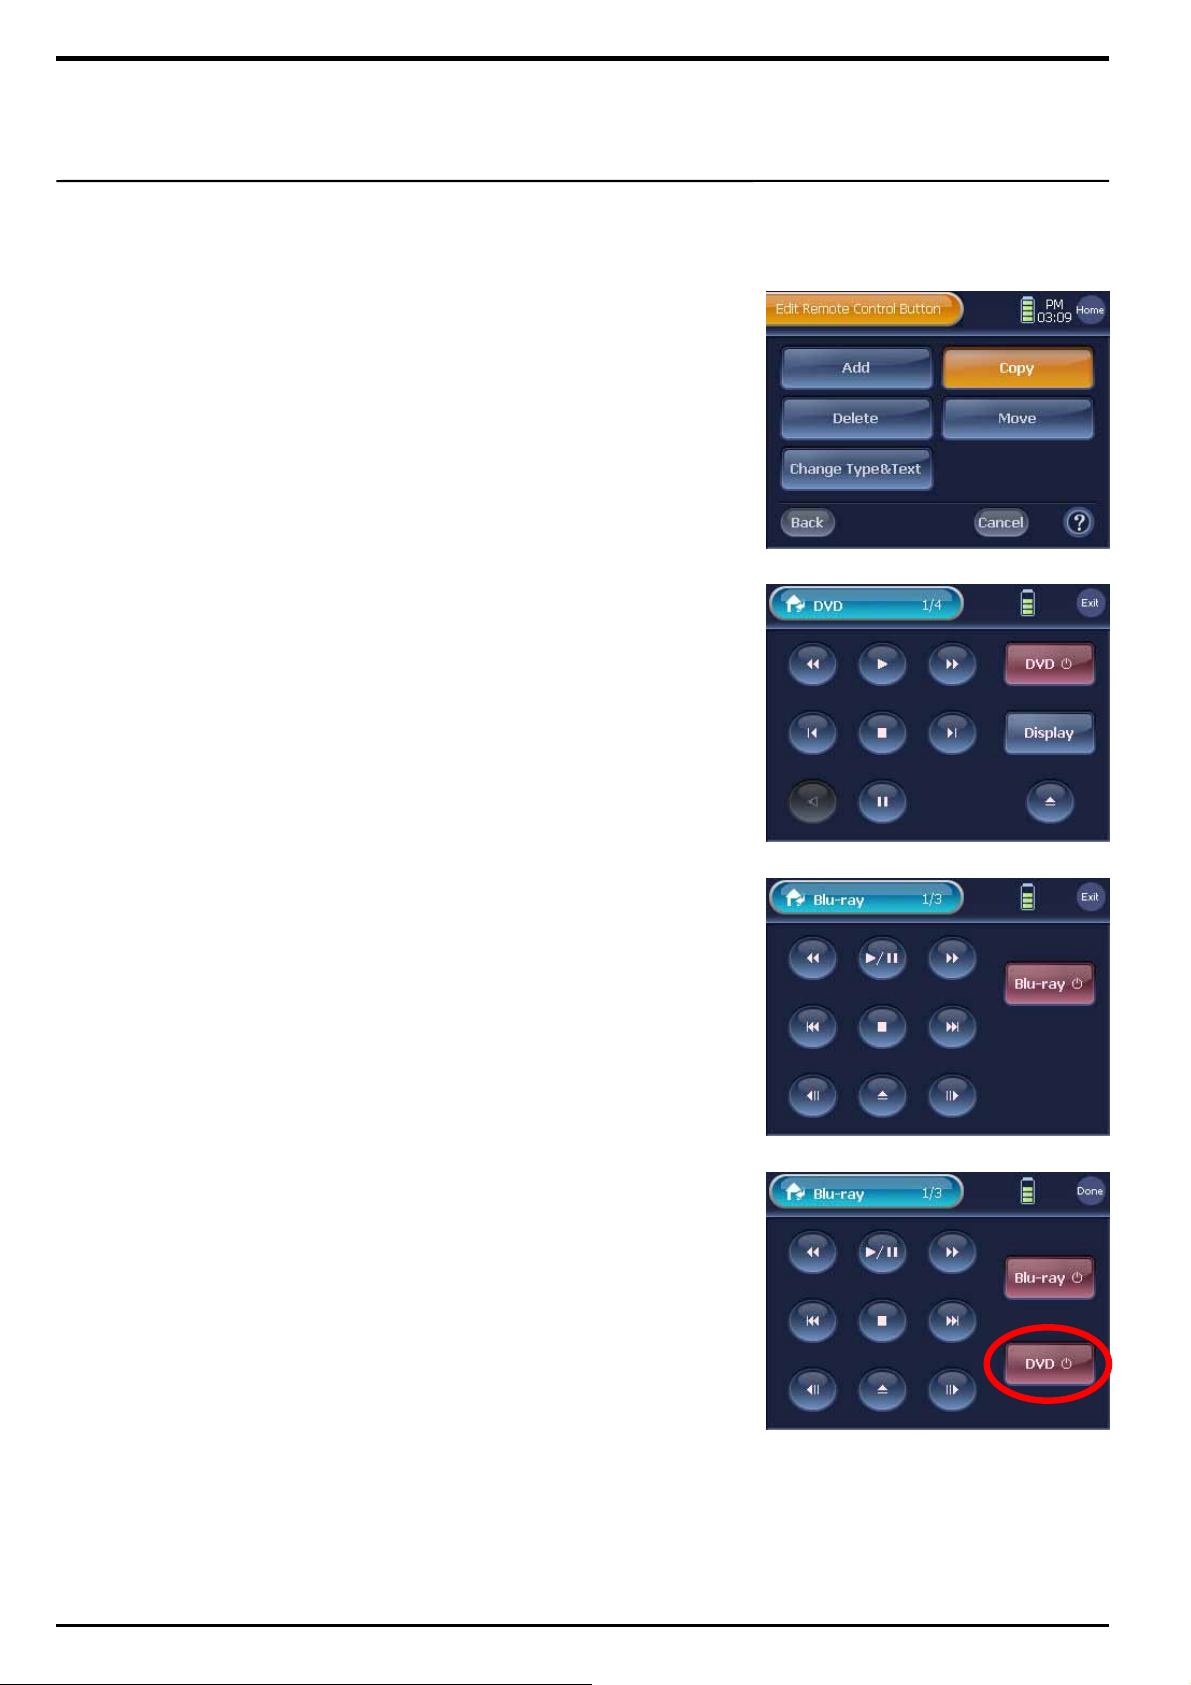
Copy Remote Control Button
1 Press [Button] on the “Edit Remote Control” screen.
2 Press [Copy] on the “Edit Remote Control Button” screen.
3 Press [Next] on the next screen, and then you will be directed to
“Device Home”.
4 Select and press a Device button on “Device Home” to copy its
Remote Control button. You will be directed to the selected device’s
st
1
Remote Control page.
Note 1. To move between pages, and find a device button, use the exterior
[◀ , Page, ▶] button.
2. To exit from the “Device Home” screen, press [Exit].
5 Select and press a Remote Control button to copy.
6 Press [Next] on the next screen, and then you will be redirected to
“Device Home”.
☞
7 Select and press a Device button on “Device Home” to paste the
copied Remote Control button on its Remote Control page. You will
be directed to the selected device’s 1
8 Select and press a location on the Remote Control page to paste
the copied Remote Control button.
The Remote Control button will be registered on the selected location.
Note . The button location becomes varied depending on the selected remote
control button type. When you select an incorrect or unavailable location,
you will hear a beep sound alerting that the location unavailability.
9 After the new Remote Control button is registered on the selected
location, you can continue changing the button’s location to different
spots.
Note. Repeat the button and location selection processes to change the
button’s location.
10 Press [Done]. You can continue copying remote control buttons or
finish the process by moving back to step 3.
st
Remote Control page.
☞
Page 35
35
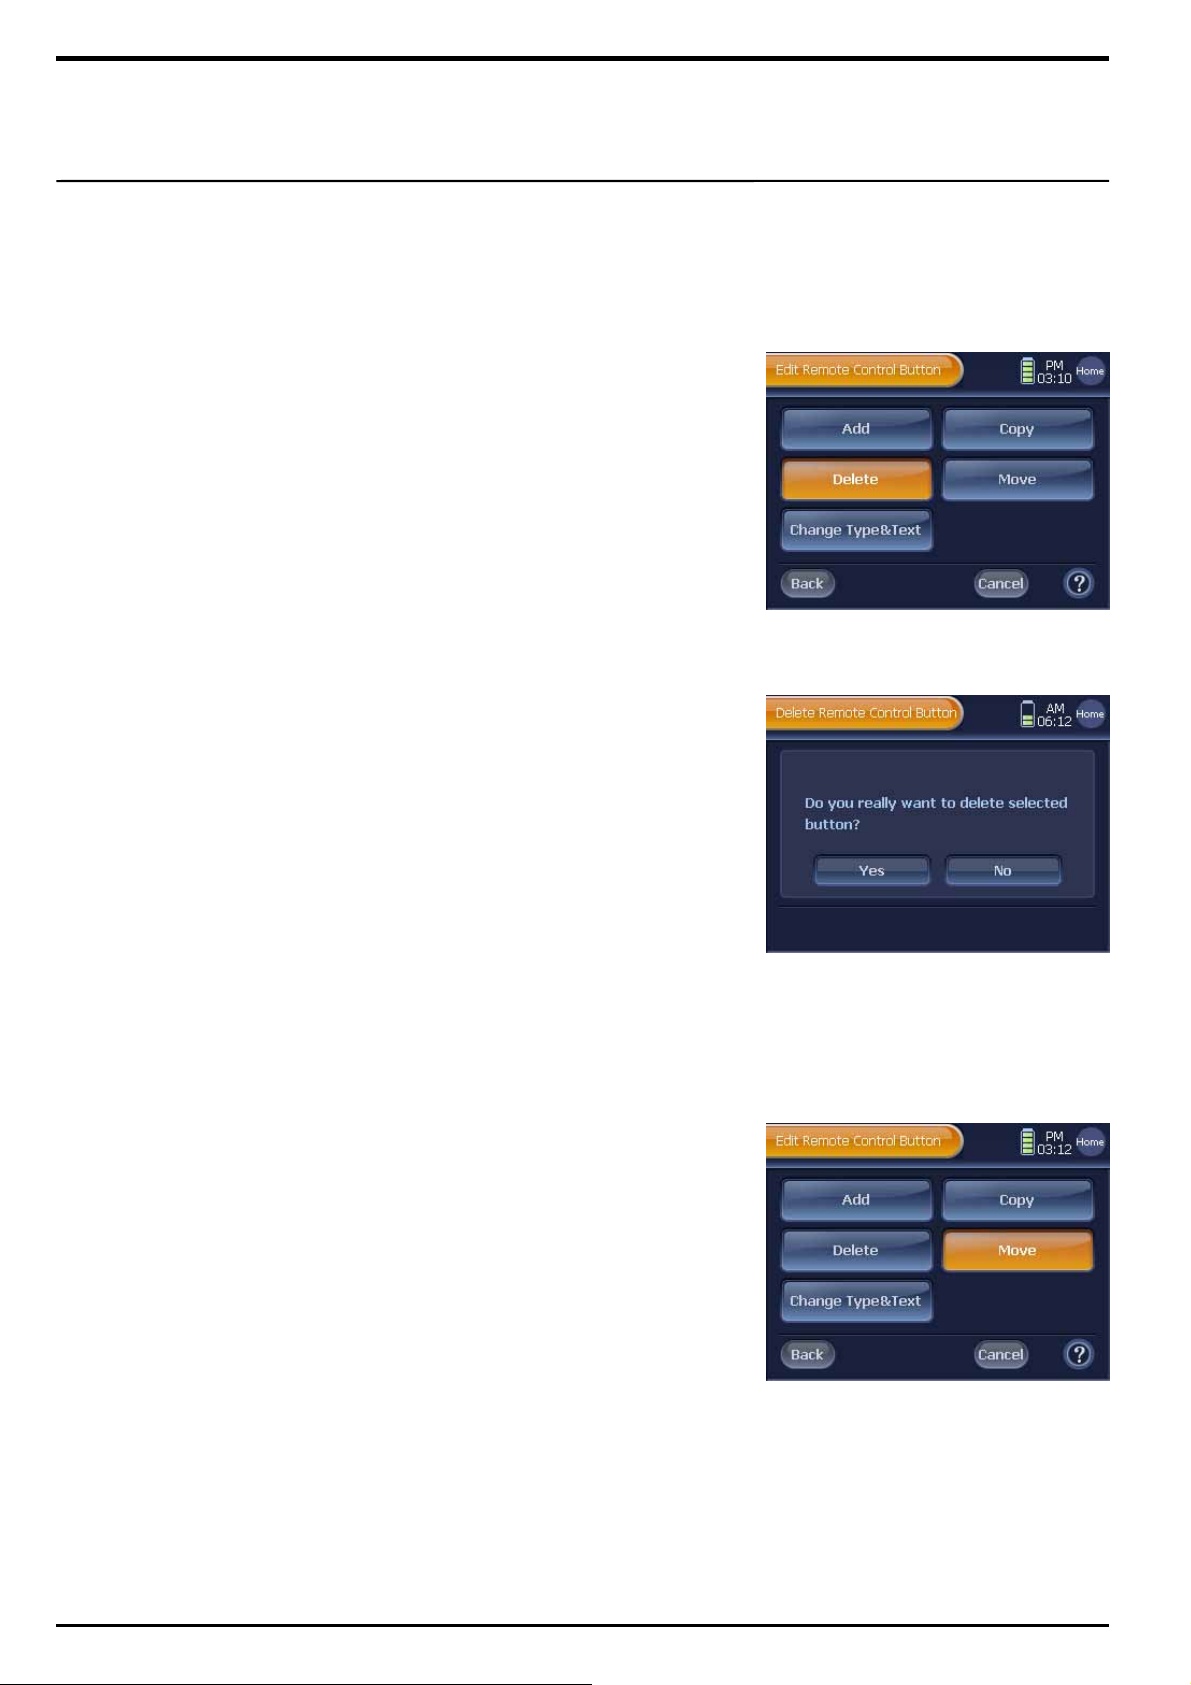
Delete Remote Control Button
1 Press [Button] on the “Edit Remote Control” screen.
2 Press [Delete] on the “Edit Remote Control Button” screen.
3 Press [Next] on the next screen, and then you will be directed to
“Device Home”.
4 Select and press a Device button on “Device Home” to delete its
Remote Control button. You will be directed to the selected device’s
st
1
Remote Control page.
Note 1. To move between pages, and find a device button, use the exterior
[◀ , Page, ▶] button.
2. To exit from the “Device Home” screen, press [Exit].
5 Select and press a Remote Control button on the Remote Control
page to delete.
6 Press [Yes] on the Button Deletion Confirmation screen.
The selected Remote Control button will be deleted.
7 To finish deleting button, press [Done].
To continue deleting buttons, repeat step 5 and 6.
Move Remote Control Button
1 Press [Button] on the “Edit Remote Control” screen.
2 Press [Move] on the “Edit Remote Control Button” screen.
3 Press [Next] on the next screen, and then you will be directed to
“Device Home”.
4 Select and press a Device button on “Device Home” to move its
Remote Control button. You will be directed to the selected device’s
st
1
Remote Control page.
5 Select and press a Remote Control button to move its location.
The selected button will be highlighted, and waiting to be relocated.
6 Select and press a new location that the selected Remote Control
button will be moved to. The button will be move to the location.
Page 36
36
Note 1. The button location becomes varied depending on the selected remote
control button type. When you select an incorrect or unavailable
location, you will hear a beep sound alerting that the location
unavailability.
2. You cannot switch locations between remote control buttons; you
cannot select another remote control button as a selected button’s new
location.
7 To finish moving buttons, press [Done].
To continue moving buttons, repeat step 4, 5 and 6.
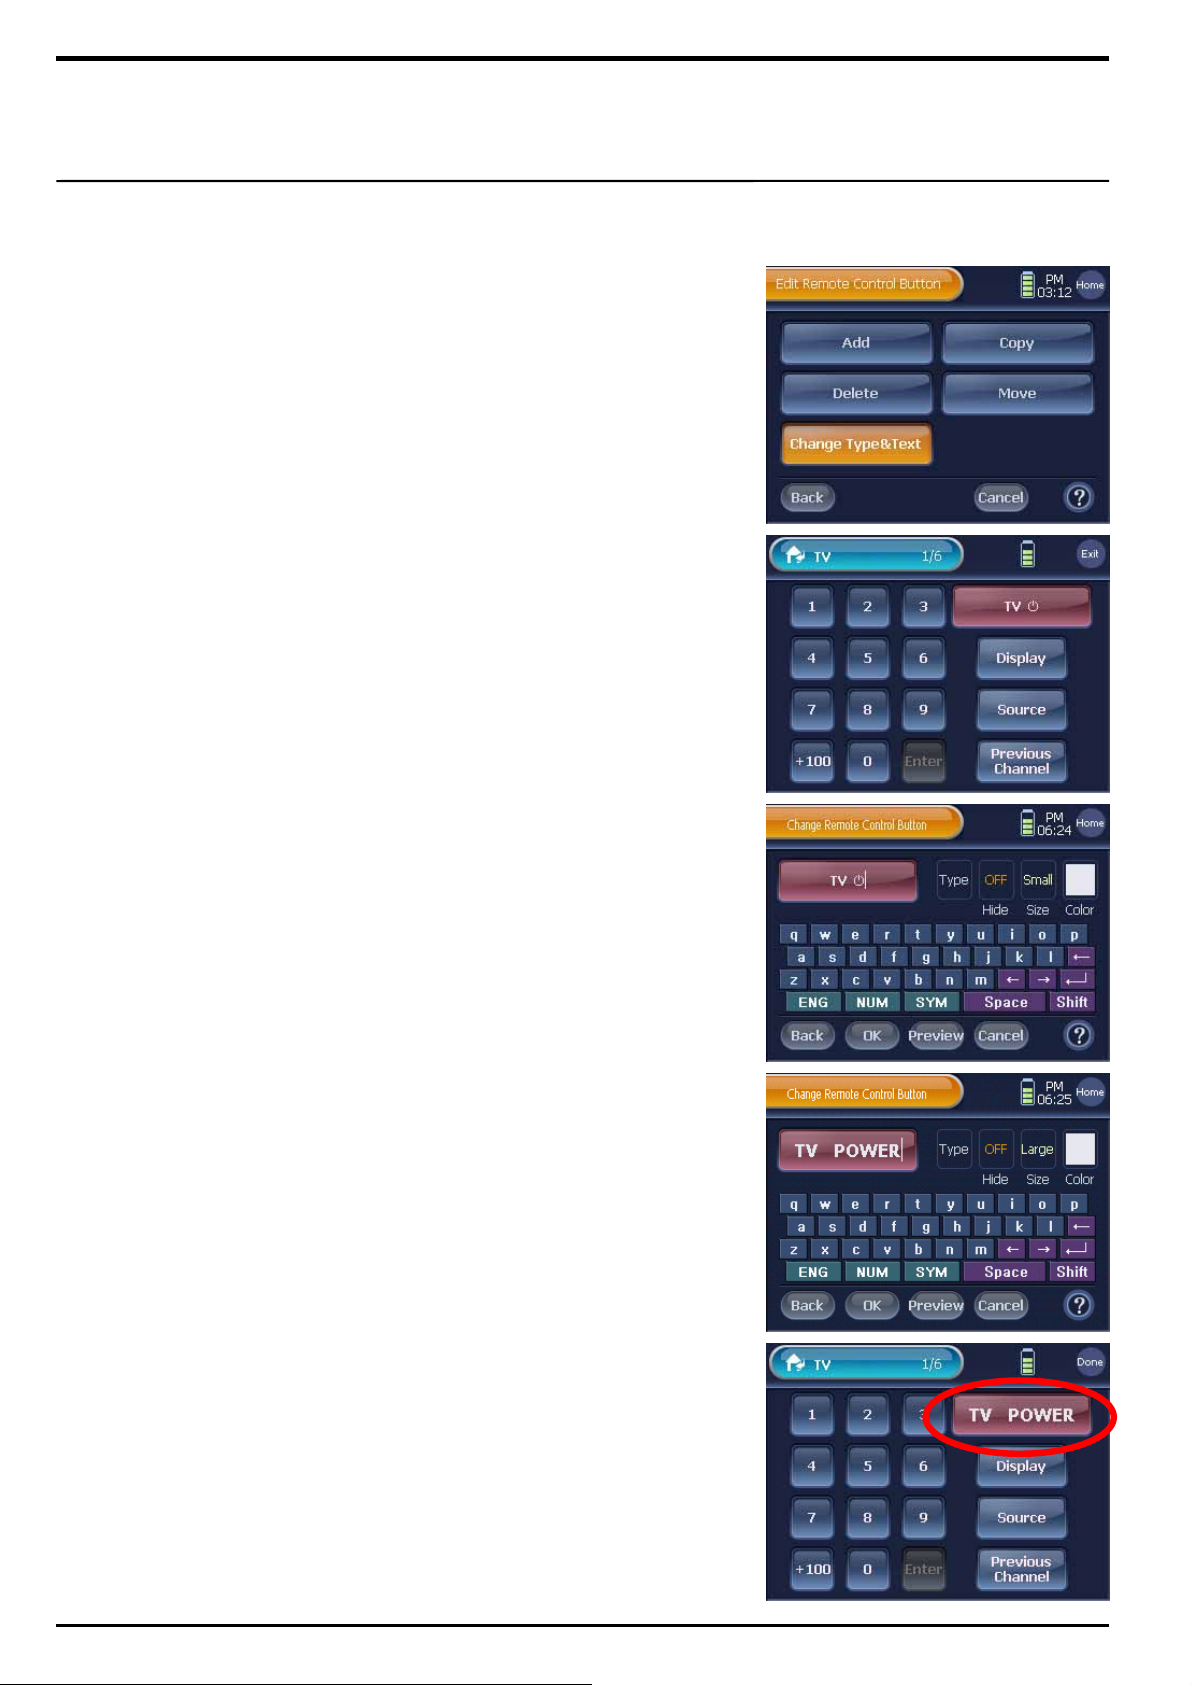
Change Type & Text Remote Control Button
1 Press [Button] on the “Edit Remote Control” screen.
2 Press [Change Type& Text] on the “Edit Remote Control Button”
screen.
3 Press [Next] on the next screen, and then you will be directed to
“Device Home”.
4 Select and press a Device button on “Device Home” to rename its
Remote Control button. You will be directed to the selected device’s
st
1
Remote Control page.
Note 1. To move between pages, and find a device button, use the exterior
[◀ , Page, ▶] button.
2. To exit from the “Device Home” screen, press [Exit].
5 Select and press a Remote Control button to change its name.
You will be directed to the “Keyboard” screen which enables you to
enter a new name.
6 Enter a new name by using the keyboard.
Note. Refer to the page 27, “Tip. Keyboard Functions”.
7 When you finish entering a new name, press [OK] on the “Keyboard”
screen. You will be directed to the Remote Control page which has
the Remote Control button with the new name.
Note. When a button’s name is successfully changed, the [Exit] button will be
changed to the [Done] button.
8 To finish renaming buttons, press [Done].
To continue renaming buttons, repeat step 5, 6, and 7.
☞
Page 37
37
Set Remote Control Button IR
This setting method is used to customize the IR signal output mode and
the default IR output quantity of a specific remote control button to suit
the properties of the corresponding device.
☞ ‘Set Remote Control Button IR’ Application Examples
① To achieve desired operation results on a device via the IR signal output
with just one touch of a remote control button, you can set the default IR
signal output to the desired IR signal quantity.
For example, to raise or lower an electrically-powered screen, you don’t need
to press and hold down the corresponding button continuously. If the default
IR signal output quantity is set appropriately, such operations can be
performed with just one touch of the button.
② When performing any of the macro actions registered to the macro button,
one touch of the button results in IR signals, namely the set ‘Default IR
Output’, to be sent to the device to be operated. It is possible that the IR
signal output quantity of the special remote control button may be insufficient,
resulting in failure to operate the special device. In such cases, the errors
should be fixed by adjusting the ‘Default IR Output’ of the corresponding
remote control button to the appropriate level.
For example, given that a macro action is registered to a remote control
button with the ‘Default IR Output’ setting of one time, if performance of the
macro action results in an error, the error may be addressed and proper
operation of the device achieved by modifying the ‘Default IR Output’ to three
times.
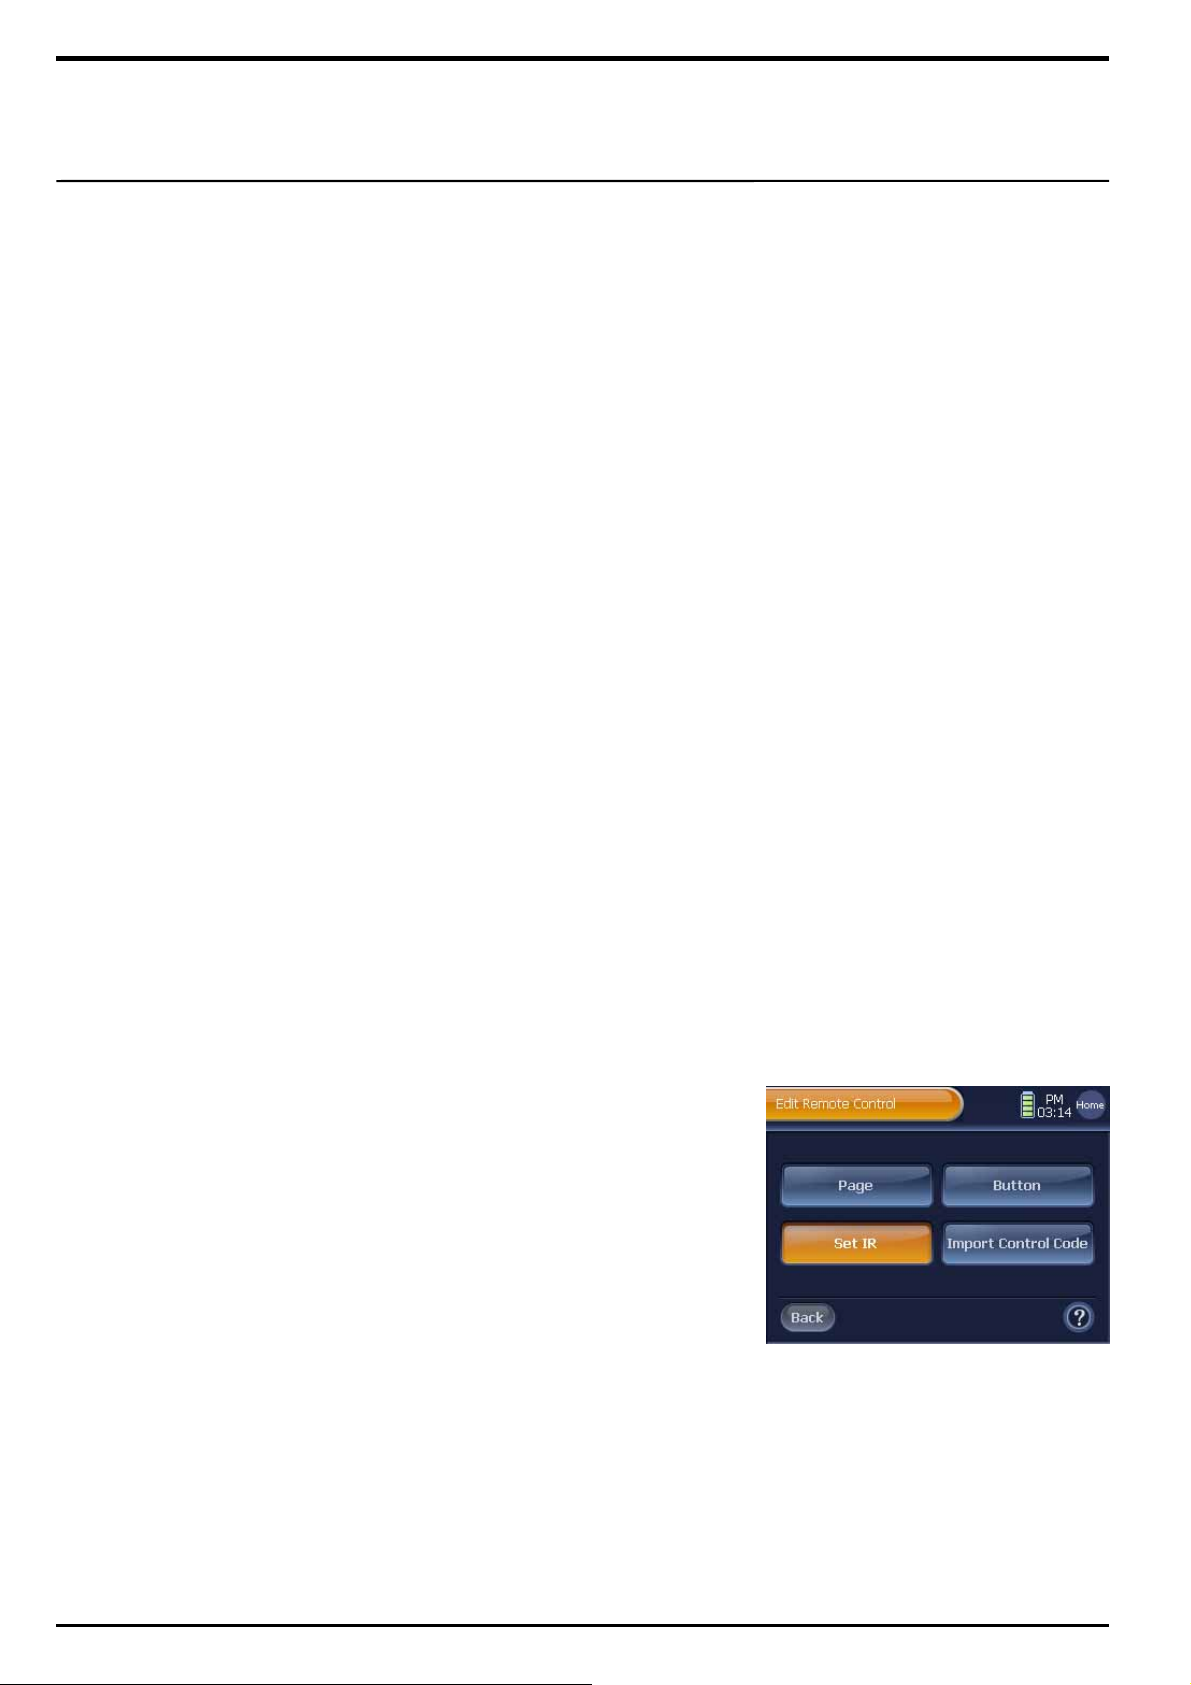
1 Press [Set IR] on the “Edit Remote Control” screen.
2 Press [Next] on the next screen, and then you will be directed to
“Device Home”.
3 Select and press a Device button on “Device Home” for setting the
Remote Control button IR. You will be directe d to the selected
device’s 1
Note 1. To move between pages, and find a device button, use the exterior
[◀ , Page , ▶] button.
2. To exit from the “Device Home” screen, press [Exit].
4 Select and press a Remote Control button to set the IR output mode.
You will be directed to the “IR Setting” screen.
st
Remote Control page.
Page 38
38
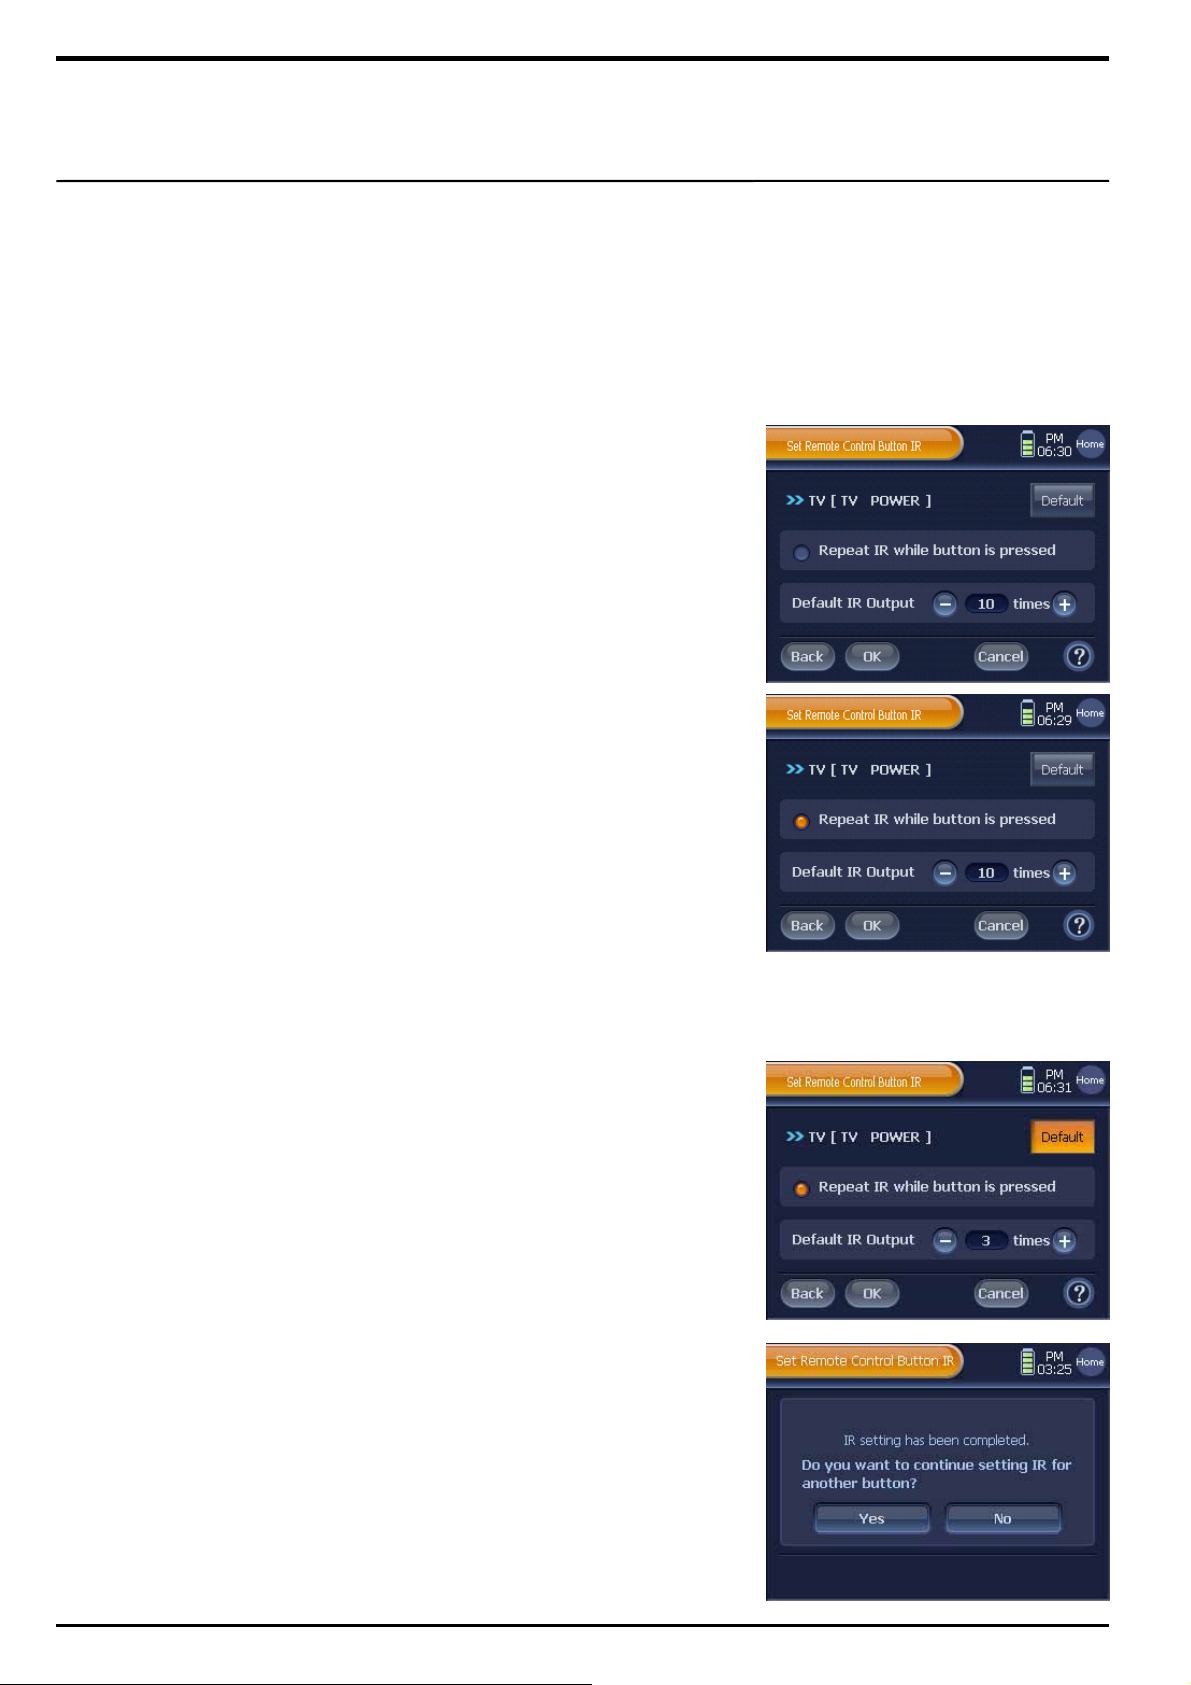
5 Configure IR output mode of selected remote control button through
the “IR Setting” screen.
■ Remote Control Button IR Setting Instructions
① ‘IR Output Mode’ Setting
1. ‘Enable’ Setting (Checked status)
This applies when the [Repeat IR while button is pressed] button
is activated. The IR signals will be output continuously as long as
the corresponding remote control button is pressed.
2. ‘Disable’ Setting (Unchecked status)
This applies when the [Repeat IR while button is pressed] button
is not activated. The IR signals will not be output continuously. Even
if the corresponding button is pressed and held, only the ‘Default IR
Output’ will be is transmitted.
Note. The default status of all registered remote control buttons is that of
‘Enable’, meaning they are set to ‘Repeat IR while button is pressed’.
② ‘Default IR Output’ Setting
1. This setting dictates the number of IR signals to be transmitted,
according to the number set in the box, when the corresponding
remote control button is pressed once.
2. The [+], [-] button is used to set the number of times from a
minimum of 1 to a maximum of 255.
Note. The default status of all registered remote control buttons is equivalent
to the current IR output quantity saved in the IR data of each individual
remote control button.
③ ‘Default’ Settings
1. Pressing the [Default] button automatically sets the ‘IR Output
mode’ and ‘Default IR Output’ of the corresponding remote control
button to ‘IR Default settings’ status.
2. ‘IR Default Settings’ Status
‘IR Output Mode’ : Continuous IR Transmission enabled ‘Default IR
Output’ : IR Transmission 3 Times
6 To finish ‘Set Remote Control Button IR’, press [OK] button.
7 To continue setting IR, press [Yes], or [No] to finish on the next
screen.
Page 39
39
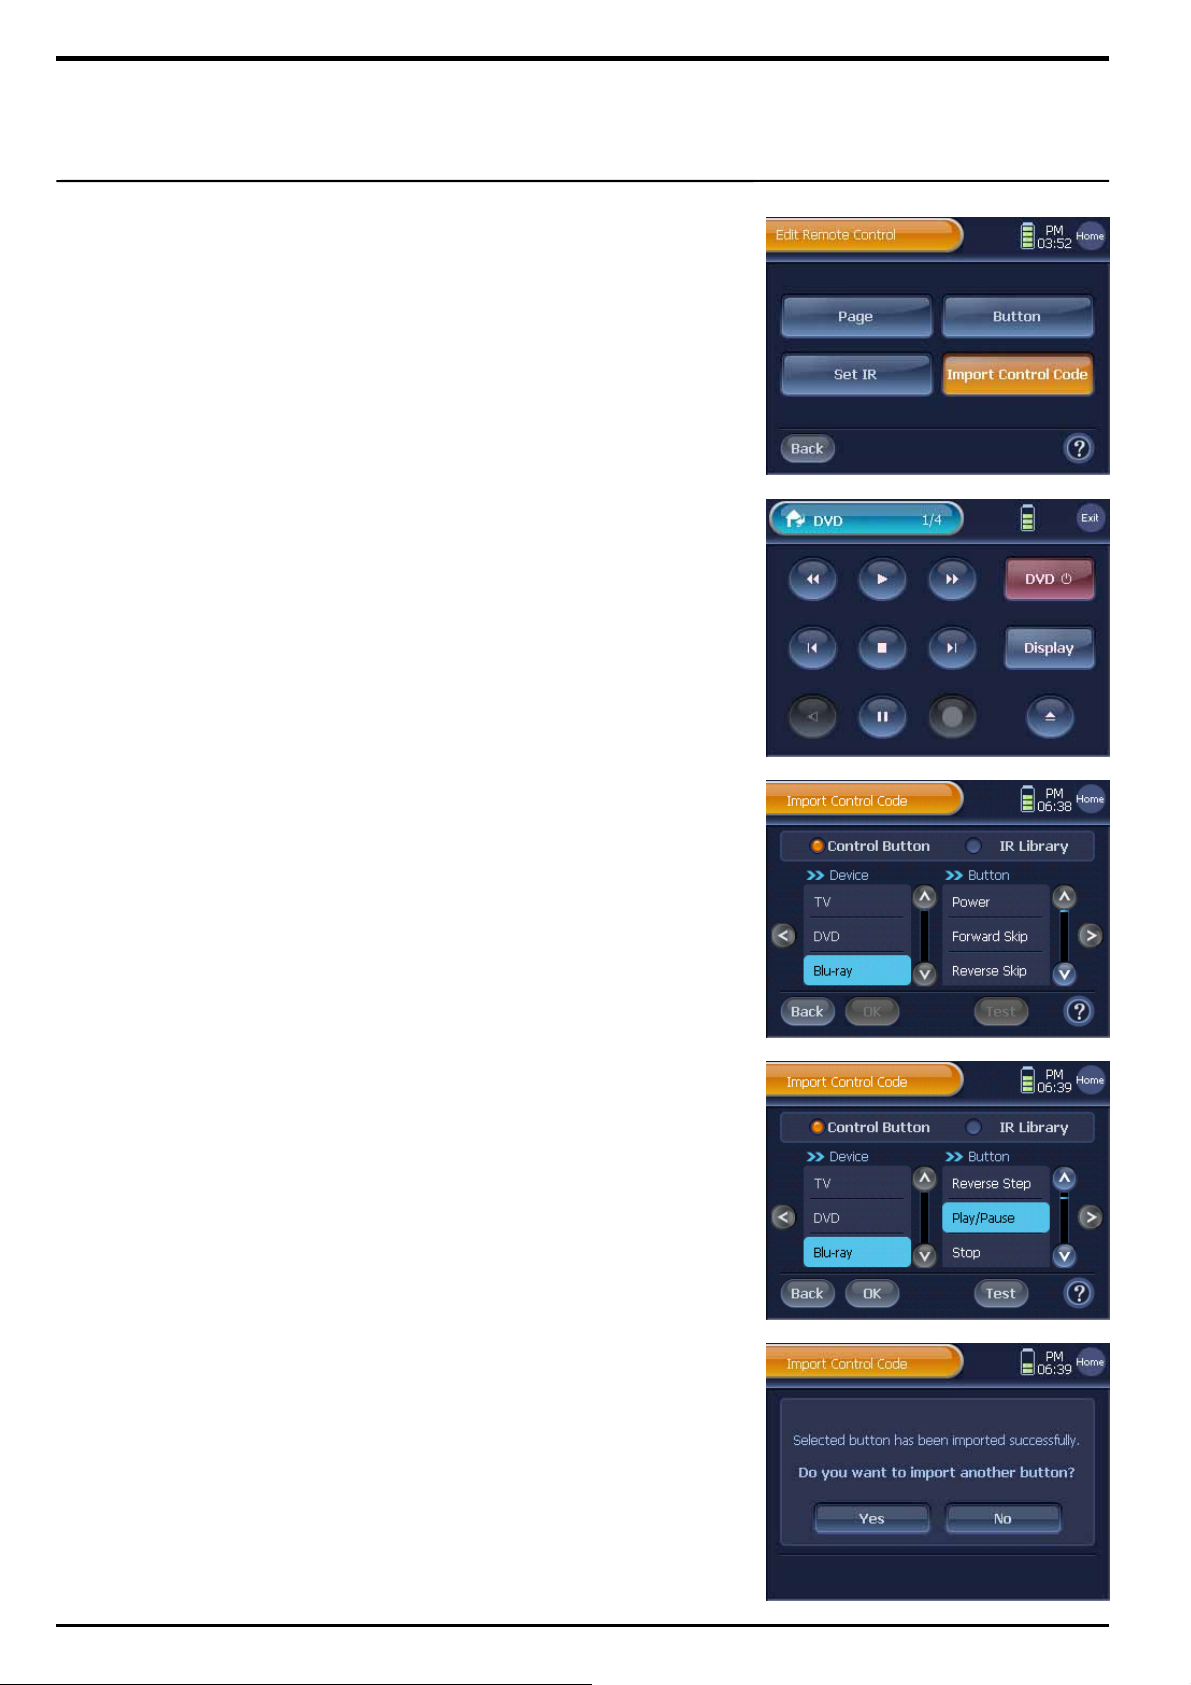
Import Control Code
You can retrieve the control code of the remote control button that is
being used after being registered on the Device Home or the built-in
control code database inside WZB 35, and put the code in a button you
want to use.
1 Press [Import Control Code] on the “Edit Remote Control” screen.
2 Press [Next] on the next screen, and then you will be directed to
“Device Home”.
3 Select and press a Device button on “Device Home” to import the
control code its Remote Control button. You will be directed to the
selected device’s 1
Note 1. To move between pages, and find a device button, use the exterior
[◀ , Page , ▶] button.
2. To exit from the “Device Home” screen, press [Exit].
4 Select a Remote Control button you would like to retrieve and use.
Note. You can put the control code in the touch button as well as the external
hard button.
5 Press [Next] on the next screen, and then you will be directed to
the “Import Control Code” screen.
st
Remote Control page.
☞
6 You can find a control code for import and paste to your remote
control button from “Control button” or “IR Library”.
To select the control code, follow the instructions described below.
Import Control Code from “Control button”
① Press [Control button], then all kinds of user defined devices are
displayed on device list.
② Select a “Device” and “Button” in the order, then press [OK] to
complete.
Note. To make sure that you have the most suitable control code for your
button, you can use [Test] button.
Page 40
40
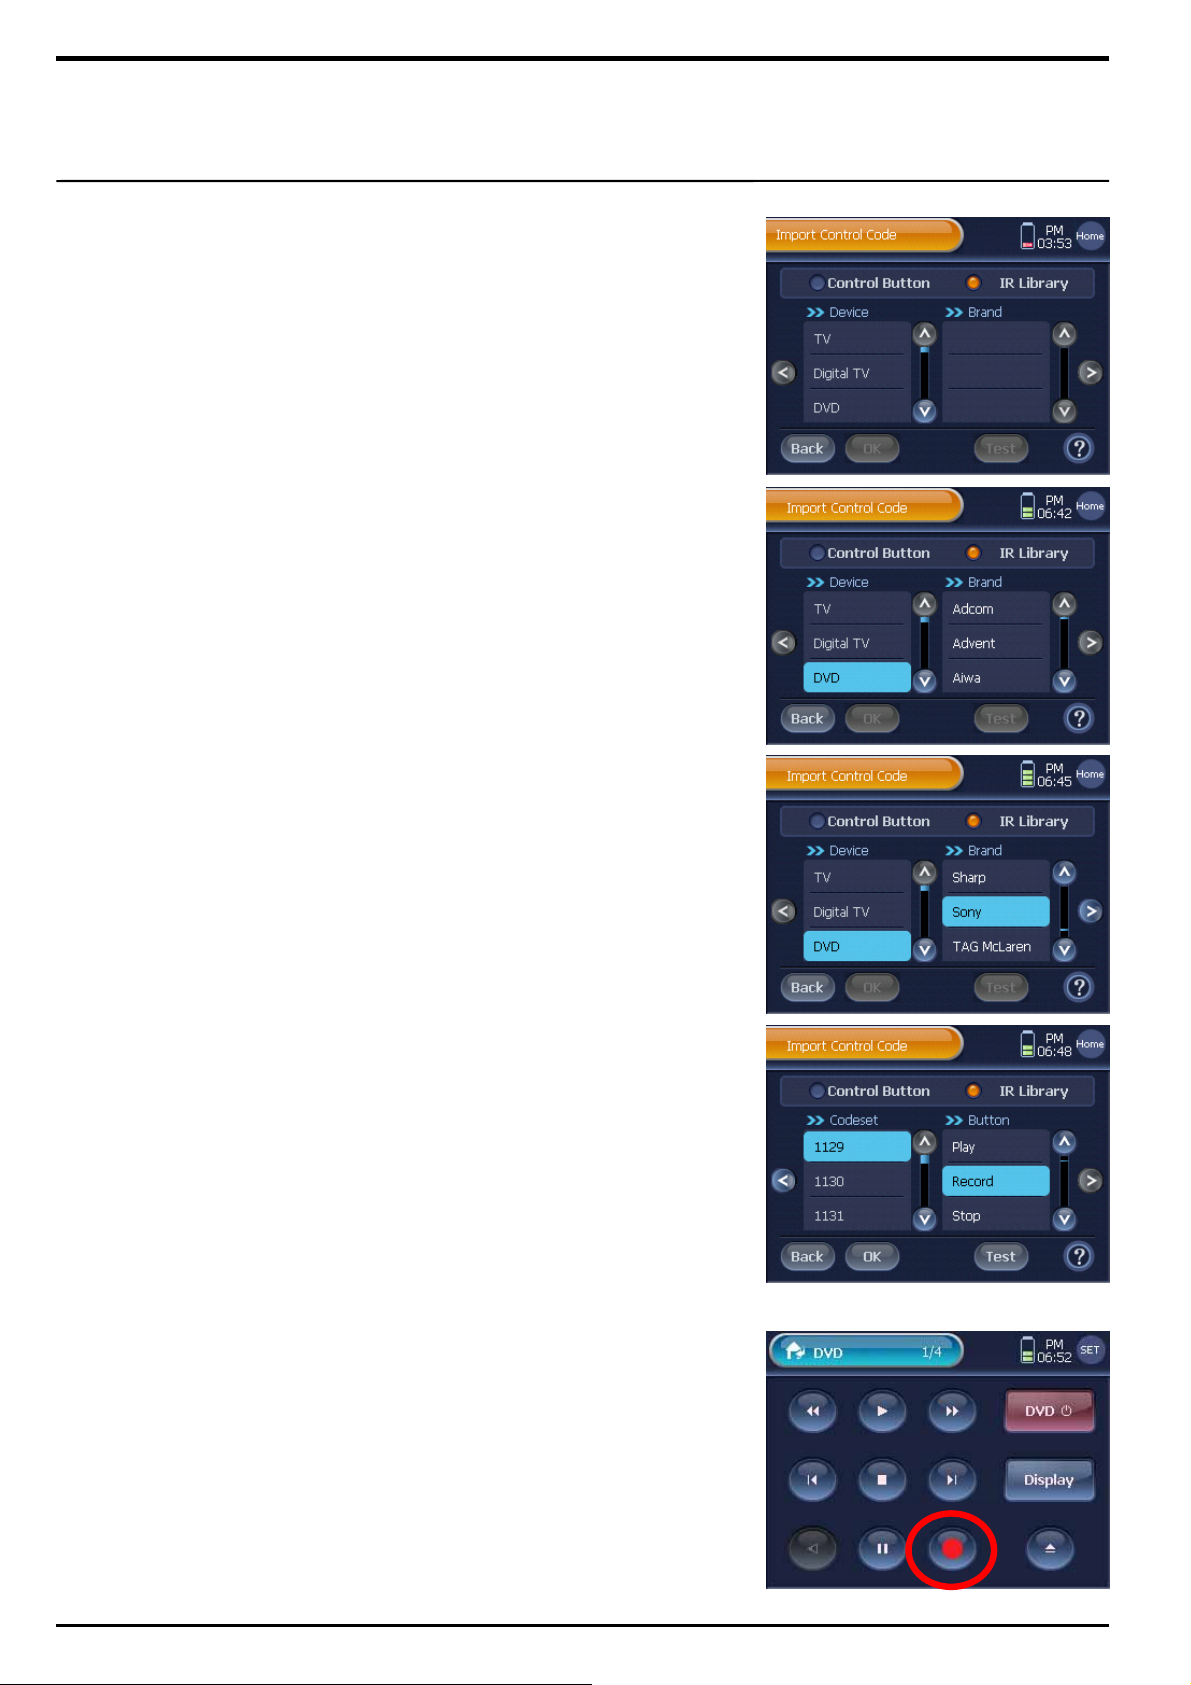
Import Control Code from “IR Library”
① Press [IR Library], then control code database for all devices
possessed by WZB 35 itself is indicated in the Device list.
Note. “IR Library” provides you a distinguished control code data bases for
each device that are controlled by remote control.
② Select a “Device” and “Brand” in the order, then press the right
arrow button to see the control code.
③ Select a “Codeset” and “Button” in the order, then press [OK] to
complete.
Note. To make sure that you have the most suitable control code for your
button, you can use [Test] button.
7 To continue setting IR, press [Yes], or press [No] to finish on the
next screen.
Page 41
41
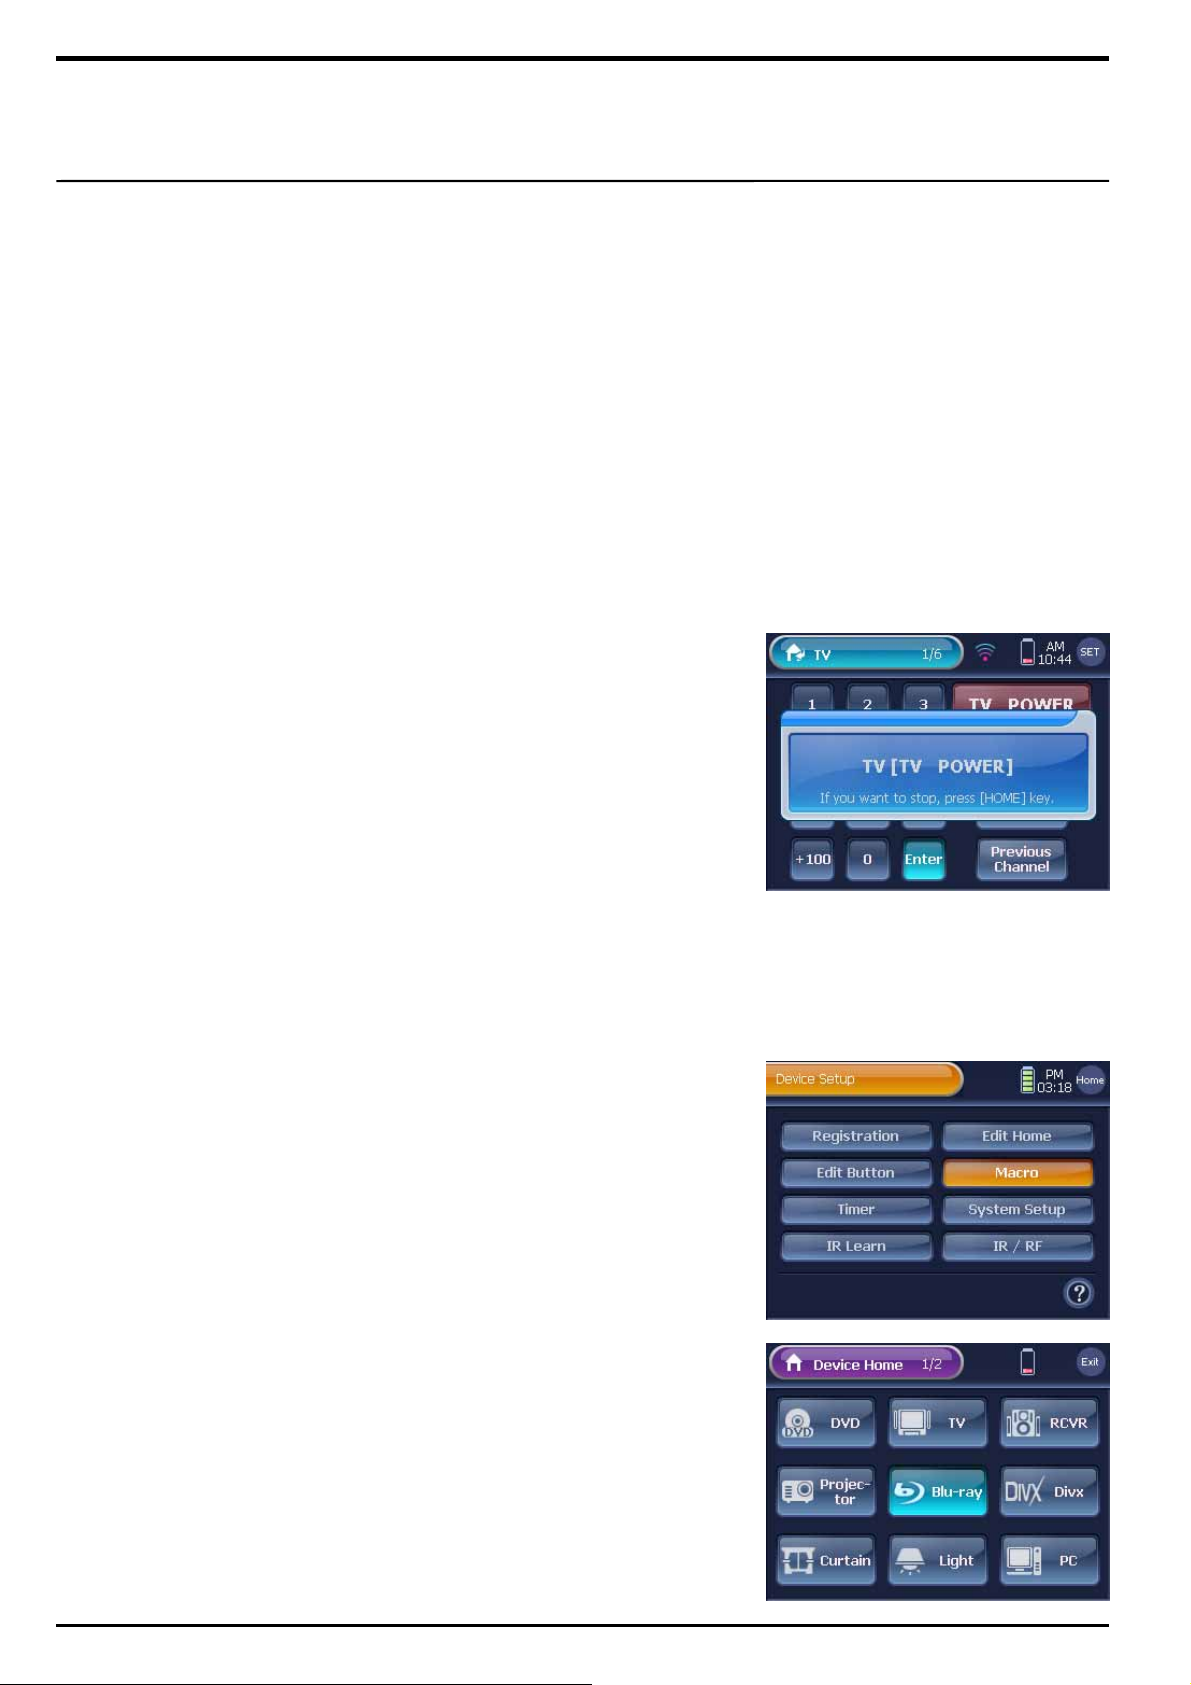
WZB 35 enables you to trigger multiple actions of various devices just
by one touch. For instance, if you want to watch a DVD, you need to turn
on the TV, set up the output as DVD, and press the DVD player’s play
button. This also applies to music manias who enjoy listening to music
through Hi-Fi audio system. You can eliminate such hassles by using
WZB 35’s macro options, and just enjoy your videos and music.
Macro
How To Use Macro
1 Press a Remote Control button which contains Macro Action on the
remote control page.
2 The Remote Control button will activate the series of Macro Actions
that have been memorized with it.
Note. When Macro Actions are activated;
1) IR Indicator displays the actions in the order that they have been
registered as the corresponding devices are being activated.
2) The Macro action names will be displayed on the remote control screen.
( It is possible to hide the display of macro action names optionally .
Refer to the page 18, “Macro Display”.)
3) Exterior hard key such as [Home], [CH+/-], [VOL +/-], [Mute], [Menu],
[Left, Right, Up, Down], [Exit] and [Mute] can be used in Macro.
4) If you want to stop activating the Macro Action, press the exterior hard
key [HOME].
Create Macro
1 Press [SET] on the “Device Home ” screen shortly.
You will be directed to the “Device Setup" menu screen.
2 Press [Macro] on the “Device Setup" menu screen.
3 Press [Next] on the next screen, and then you will be directed to
“Device Home”.
4 On the “Device Home” screen, select and press the Device button
having Remote Control button that will be used as Macro. You will be
directed to the selected device’s 1
Note 1. To move between pages, and find a device button, use the exterior
[◀ , Page , ▶] button.
2. To exit from the “Device Home” screen, press [Exit].
st
Remote Control page.
☞
Page 42

42
5 Select and press a Remote Control button to set the Macro Action.
You will be directed to “Macro action List” screen.
Note. You can select the exterior hard key as a macro button also.
6 You will view the properties of selected remote control button in
“Macro Action List”.
Note. This new Macro will be named same as the selected remote control
button.
7 Press [Add] button on the “Macro Action List” screen. You will be
directed to the “Device Home” screen.
8 Select and press a Device button having Remote Control button that
will be used as Macro Action. You will be directed to the selected
device’s 1
.
9 Select a Remote Control butto n that will be used for a Macro Action,
and then press [OK] button.
You will be directed to the “Macro Action List” screen, and the
selected Remote Control button will be displayed on the list in the
order that they have been registered as a Macro Action.
10 To finish Macro Action Setup, press [OK] on “Macro Action List”.
The Macro Action will be registered on the Remote Control button.
Note 1. The [Test] option allows you to test macro actions before the button
registration. Make sure that WZB 35 is placed and facing toward the
target device before pressing the [Test].
2. When pressing the [Exit] button, you will be automatically sent back to
Step 3 as the configuration process is canceled.
3. Make a distinction from normal remote control button, this icon( )
will be displayed at the Remote Control button which contains Macro
Action in setup mode.
You can also use the following options on the “Macro Action List”.
① Press [Add] to continue setting up macro actions.
② Press [Delete] to delete macro actions that are not needed.
③ Press [Move] to switch the order of macro actions registered on
the Macro Action List.
④ Press [Delay] to delay executing the macro actions.
⑤ Press [Jump] to move to a desired page while a macro action is in
progress or upon its completion.
※ For more details, refer to the page 43, “Edit Macro Action”.
11 Press the [OK] button on the Macro registration Confirmation
screen. You will be redirected to the “Device Setup” menu screen.
st
Remote Control page.
☞
☞
Page 43
43
Edit Macro Action
Edit Macro Actions for your convenience.
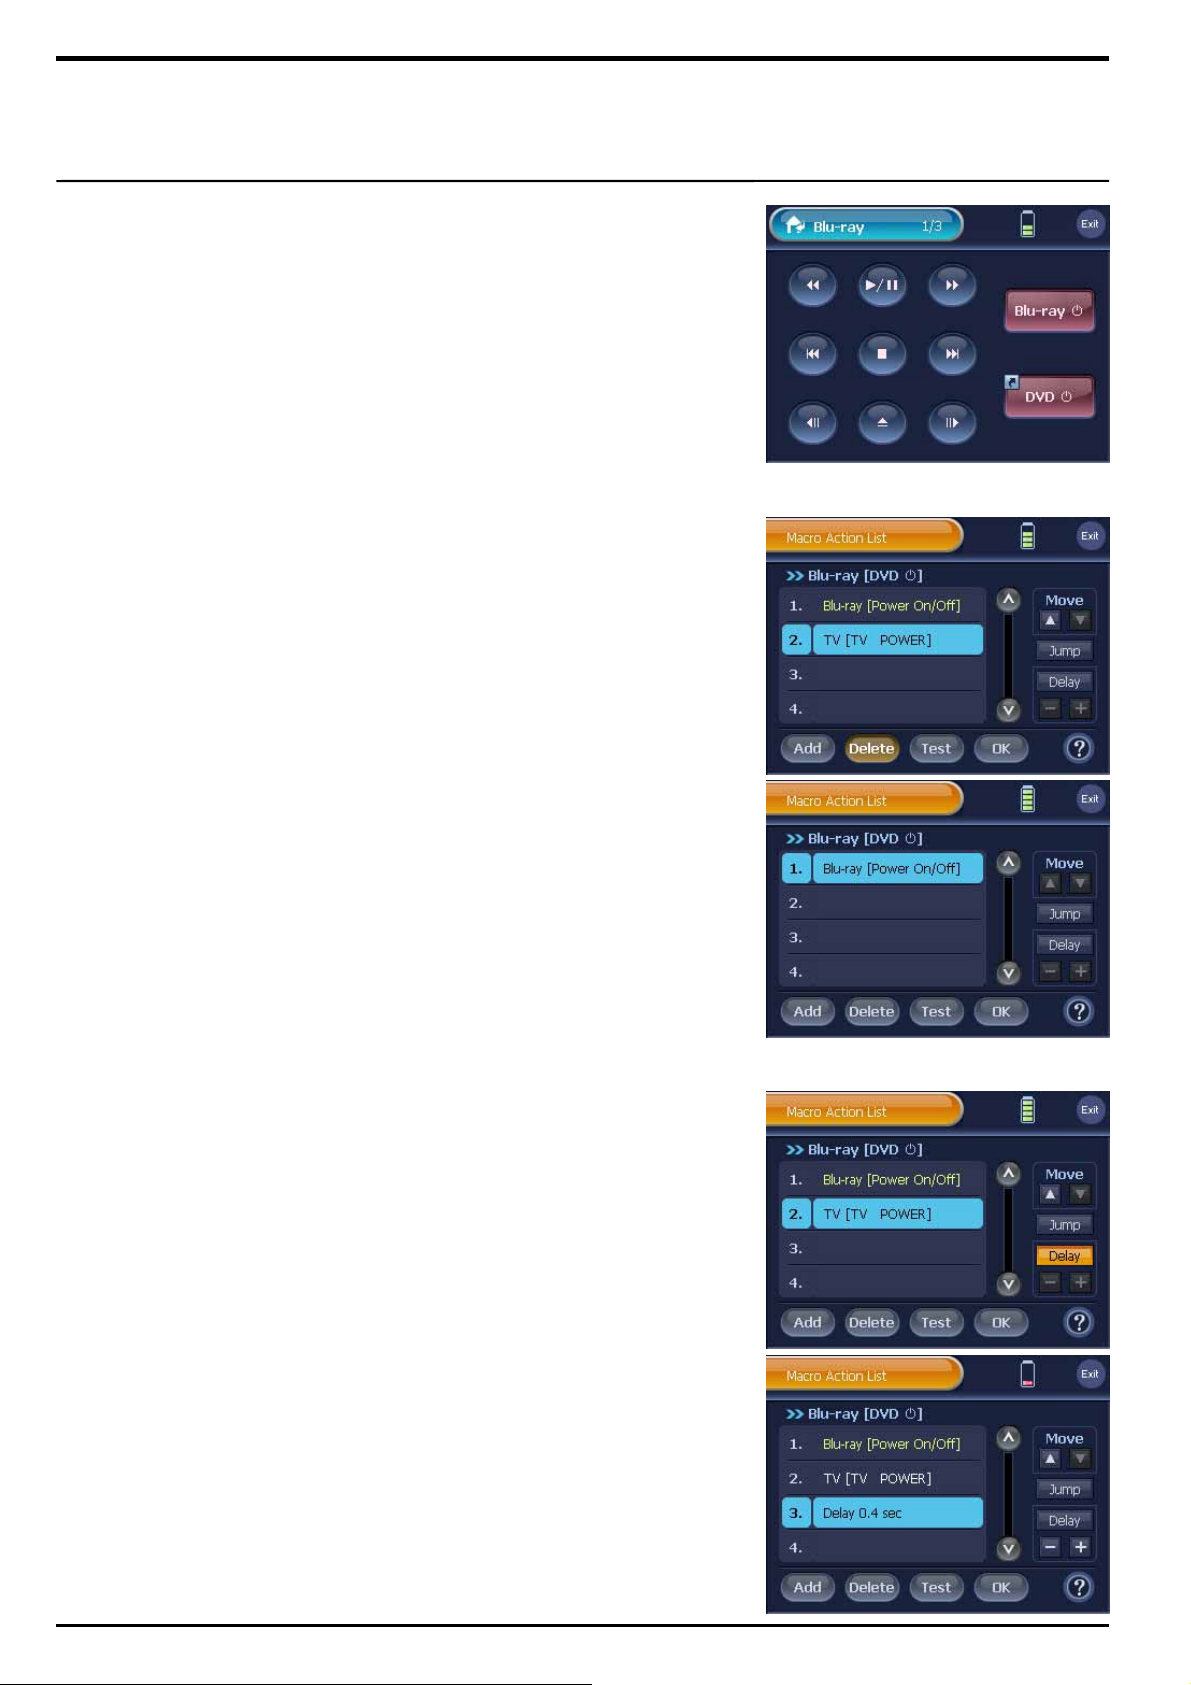
1 Select and press a Remote Control button to edit its registered
Macro Actions. You will be directed to the selected Macro button’s
“Macro Action List”.
2 Edit Macro Actions on the “Macro Action List” screen as follows.
■ How To Delete Macro Action
① On the “Macro Action List” screen,
select and press a macro action to delete from the list.
② Press [Delete] on the “Macro Action List” screen.
③ The selected macro action will be deleted.
☞
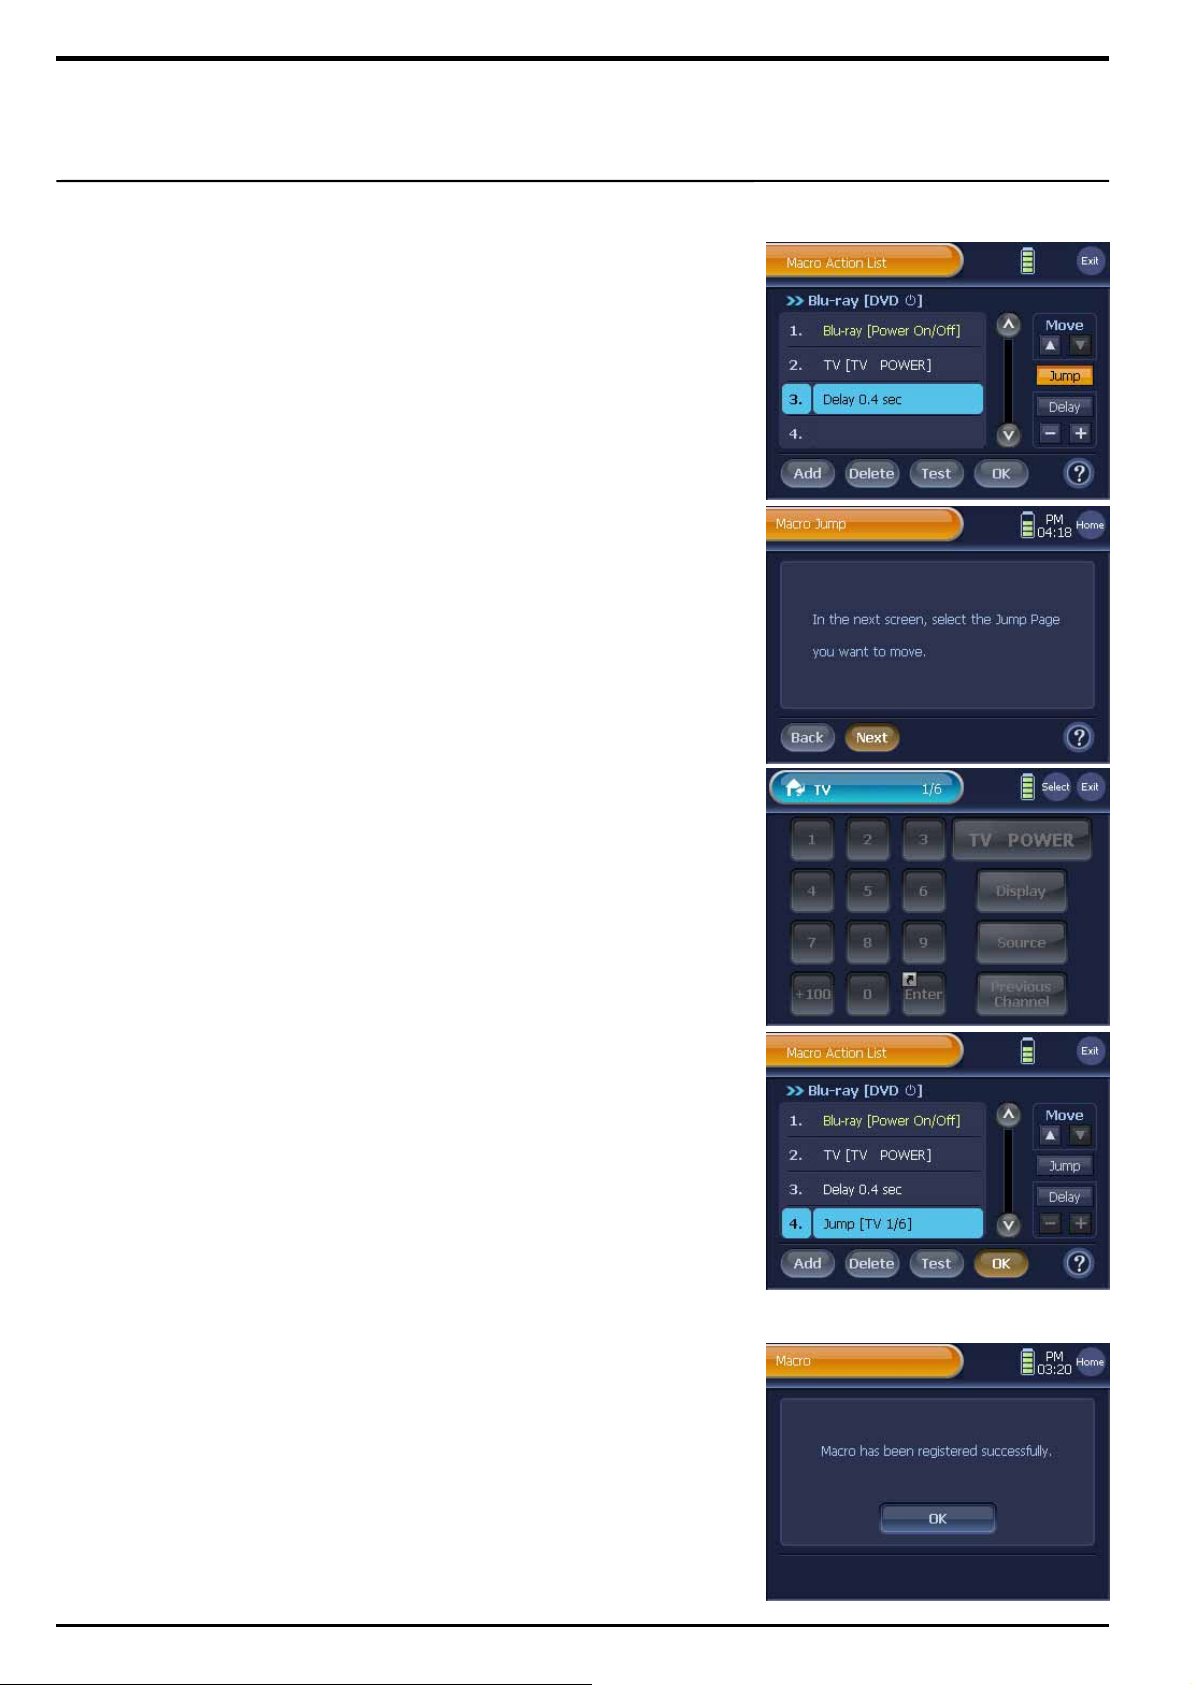
Example 1. Delete Action: “TV Power”
■ How To Set Up Macro Action Delay
① Press [Delay] on the “Macro Action List” screen.
② The Delay command will be set up, and displayed as
“Delay 0.4 sec” at the bottom of the Macro Action List.
Note 1. The default delay time is 0.4 second.
2. To set up “Delay Command” between actions,
select a macro action, and press the [Delay] button. The delay
command will be added right under the selected macro action.
■ To Change Registered “Delay” Time
① Press a registered “Delay Command” on the “Macro Action List”
screen.
② Use the [+] and [–] buttons at the right side of your screen to
modify the delay time.
Note. You can increase or decrease the delay time by 0.1 second each
time you press [+] or [–] button. You can set up delay time from
minimum 0.2 second to maximum 50 seconds.
☞ What is “Macro Action Delay” ?
When you think about TV, you cannot change the channel as immediately as
a TV is turned on. This is because most of TV models require minimum 3
seconds to maximum 10 seconds of time to actually have its power on even
after it is physically turned on. And during this time, TVs do not accept any in coming signals from the remote controllers. In other words, any macro actions
registered within the time will be skipped and not work. WZB 35’s delay
setup option enables you to pause a next macro action after a macro action is
activated, so that you can avoid situations as explained above.
Example 2. Set Up Delay
Page 44
44
■ How To Change The Order of Macro Action
① On the “Macro Action List”,
select and press a macro action to move its location.
② Use the Move buttons,
[▲] and [▼] to move the macro action to a new location.
■ How To Use Macro Jump
The macro ‘Jump’ function jumps to a desired page while a macro
action is in progress or upon its completion. This convenient function
allows for movement to the desired page and progress to the next
stage upon execution of a macro without requiring any separate
operation.
① Press [Jump] on the “Macro Action List” screen.
② Press [Next] on the next screen, and then you will be directed to
the “Device Home” page.
③ Press [Select] on the desired page to register ‘Jump Page’ in the
Macro Action List.
Note 1. All pages are open to selection, including Device Home, Macro,
Remote Control pages.
2. Use the Device button and hard buttons to move to selection.
④ The ‘Page Jump’ command will be set up, and displayed at the
bottom of the Macro Action List.
☞ Caution !
1. If the Macro Jump is performed in the middle of a macro action, movement
to the desired page is executed followed by continuation of the next action.
2. If the page designated by the macro jump has been deleted, the macro
jump is automatically cancelled.
3. If the pages preceding the page designated by the macro jump have been
deleted, the jump page is automatically readjusted forward by the number
of previous pages deleted.
4. If performing [Test], any macro jump is not conducted.
3 After editing macro actions, press [OK] on the “Macro Action List”
screen. The edited Macro button will be saved to the remote control
page.
Note 1. Make sure to press the [OK] button, otherwise the changes made on
the Macro button will not be saved.
2. When pressing the [Exit] button, all the changes made on the Macro
button will be canceled, and you will be redirected to step 3.
3. The [Test] button enables you to test macro action changes before
saving them. Make sure to place WZB 35 facing toward the target
device before pressing the [Test] button.
4 Press the [OK] button on the Macro registration Confirmation
screen. You will be redirected to the “Device Setup” menu screen.
Example 3. Use Macro Jump
☞
Page 45
45
Use the Timer options to set up device activation time and the actions.
When using the options, you can set up your TV to be turned on, and
play a set channel at 7 am in the morning as well as your VCR to
automatically start recording a TV drama on set time.
Timer
How To Use Timer
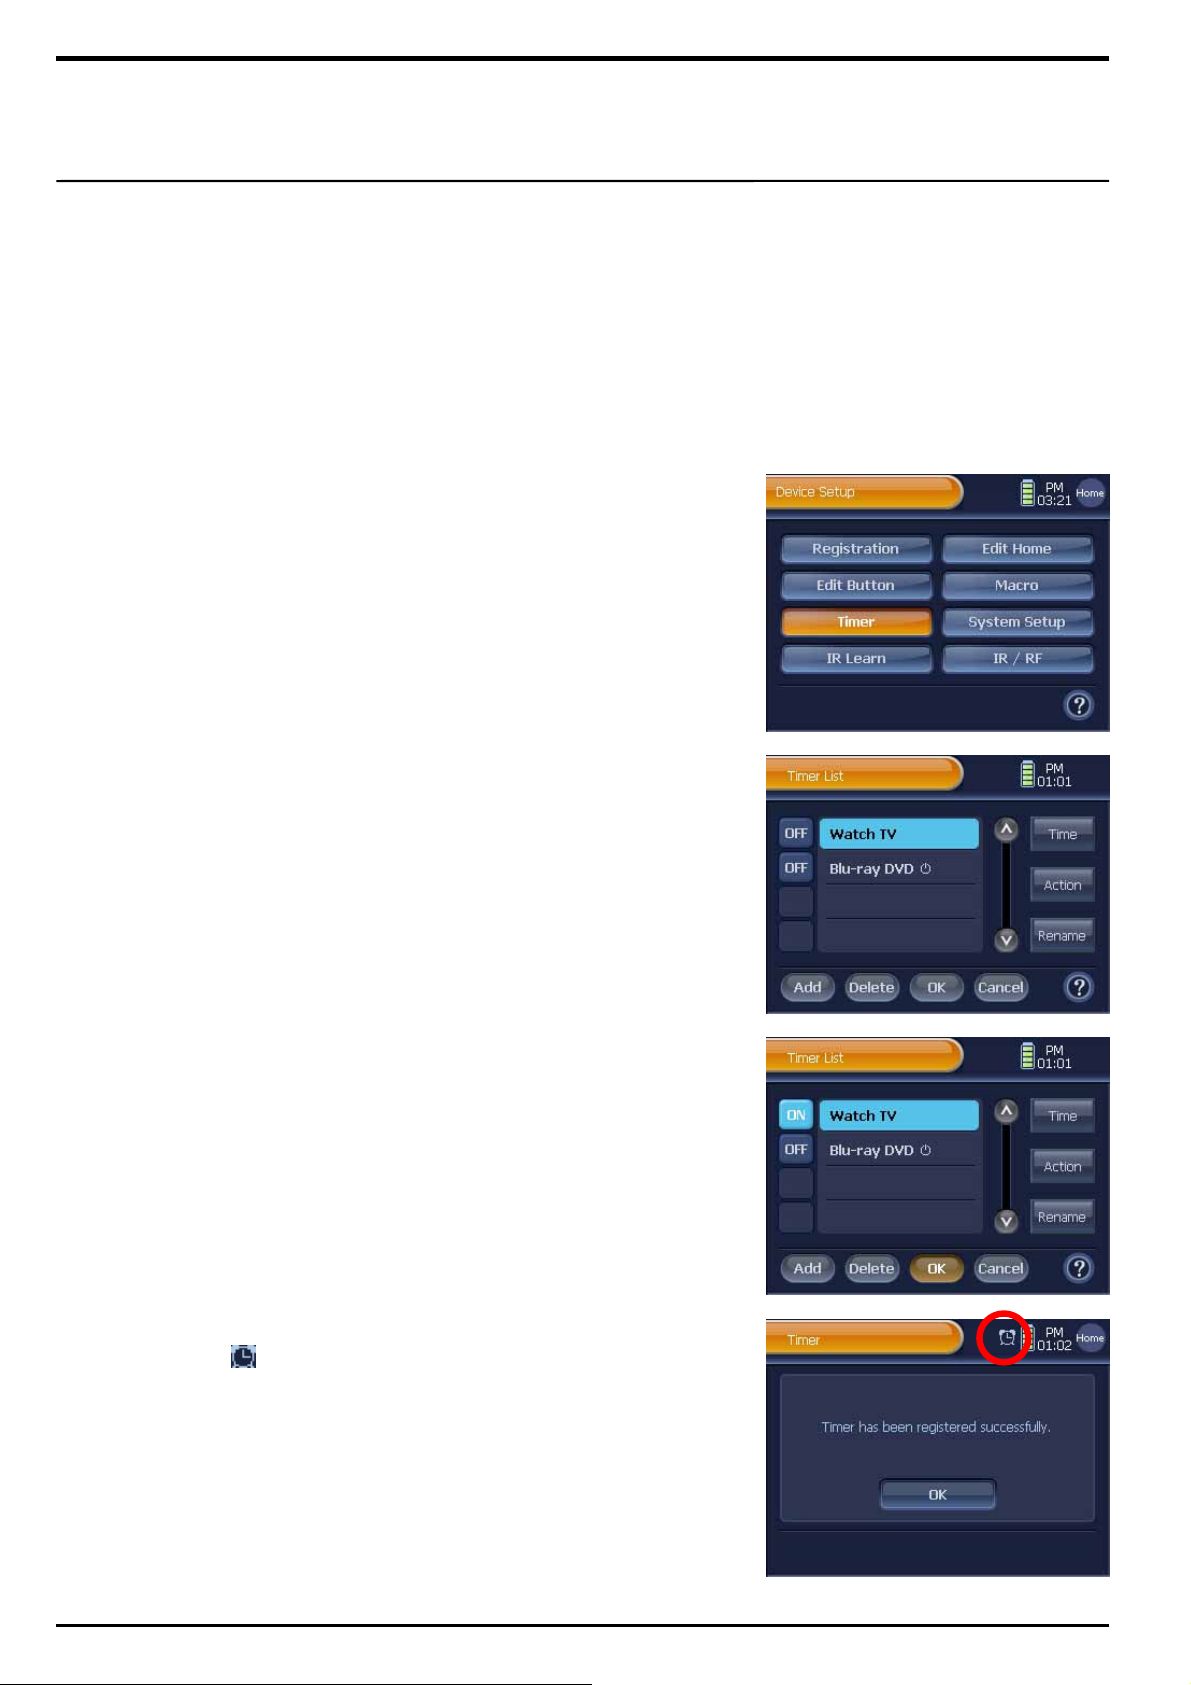
To activate a timer registered on “Timer List”, follow the instructions
described below.
1 Press [SET] on the “Device Home ” screen shortly.
You will be directed to the “Device Setup" menu screen.
2 Press [Timer] on the “Device Setup" menu screen.
You will be directed to the “Timer List” screen.
3 Select a Timer from the “Timer List”, and press its “Timer Activation
Setup” button to switch the button status to [ON].
Note 1. “Timer Activation Setup” buttons are located next to the timer list at the
far left side of your screen, and displayed as [OFF] or [ON].
2. When a timer is set up with the [OFF] button, the timer has been
inactivated. To activate the timer, press the button, and change the
status to [ON].
3. To inactivate a timer, press the button, and change the status to [OFF].
4. When a timer has not been configured with the Activation Time and
Timer Actions, you cannot turn it on. Make sure to set up “Time” and
“Action” prior to the Timer Activation.
4 When pressing the [OK] button on the “Timer List” screen, the timer
will be activated.
To move back to the “Device Setup" menu screen, press the [OK]
button.
Note. When you set up a Timer Activation, every screen will start displaying the
Timer icon ( ) within System Display Area, and the timer will be
activated on the set time, and execute the registered actions.
When pressing the [Cancel] button on the “Timer List”, you will be
directed to the Cancellation Confirmation screen.
Press [Yes] to move back to the “Device Setup” menu screen, and
cancel the current timer setup.
Page 46
46
☞ You will hear a beep for 5 times in 5 seconds right before a timer is activated.
You will also have a message window on the current screen alerting that a
timer has been activated. When pressing the [Cancel] button on the message
window, the timer will be immediately canceled, and the window will be
closed. When you are using a different function (i.e.: pressing TV Remote
Control buttons, or using macro functions) when a timer is about to be
activated, the timer will be activated in 5 seconds after you finish the current
function.
Edit Timer
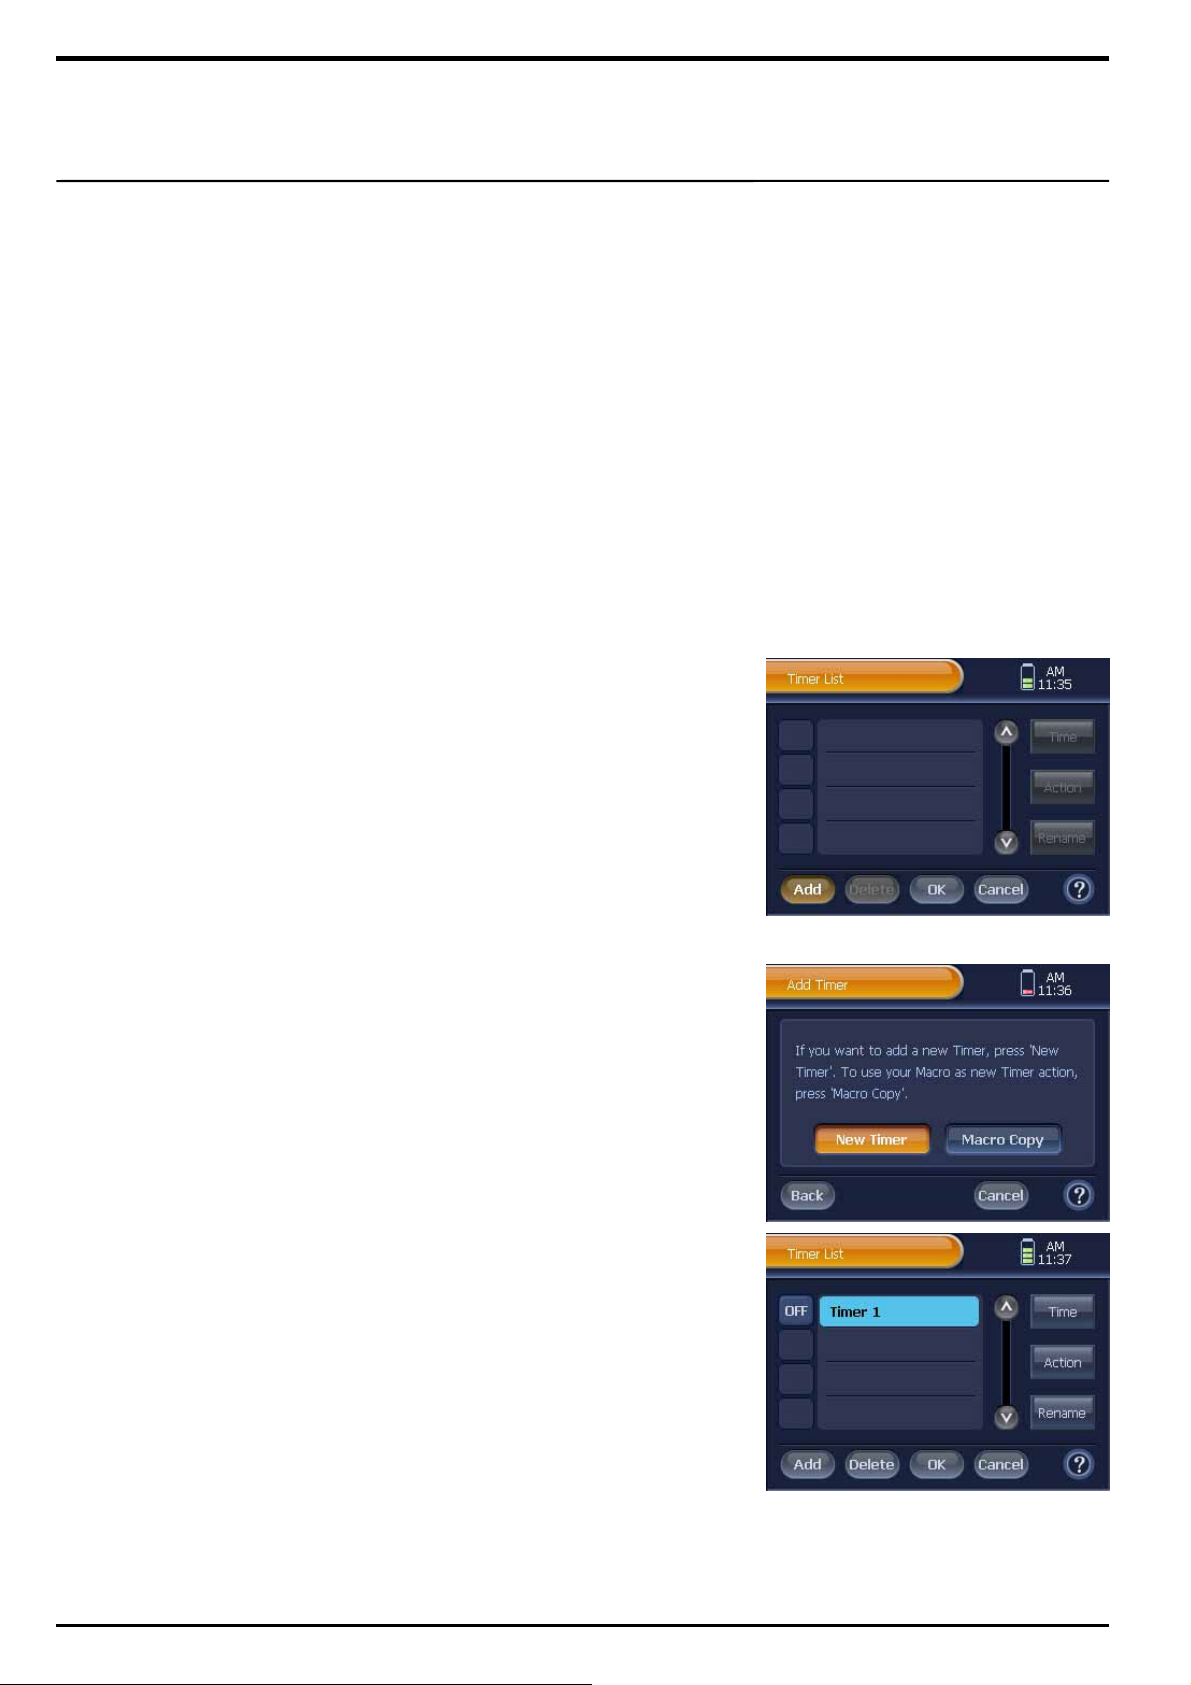
Add Timer
1 Press [SET] on the “Device Home” screen shortly.
You will be directed to the “Device Setup " menu screen.
2 Press [Timer] on the “Device Setup" menu screen.
You will be directed to the “Timer List” screen.
3 Press [Add] on the “Timer List” screen.
You will be directed to the “Add Timer” screen.
4 On the “Add Timer” screen,
select the [New Timer] or [Macro Copy] button.
When selecting the [New Timer] button;
You will be directed to the “Timer List” screen as a new timer is
registered on the list.
Note 1.The new timer’s name will be displayed as “Timer + Number”.
2. When a timer is registered by using the [New Timer] button, it was
not set up with the “Time” and “Actions”. Thus, you must set up
those first in order to activate the timer.
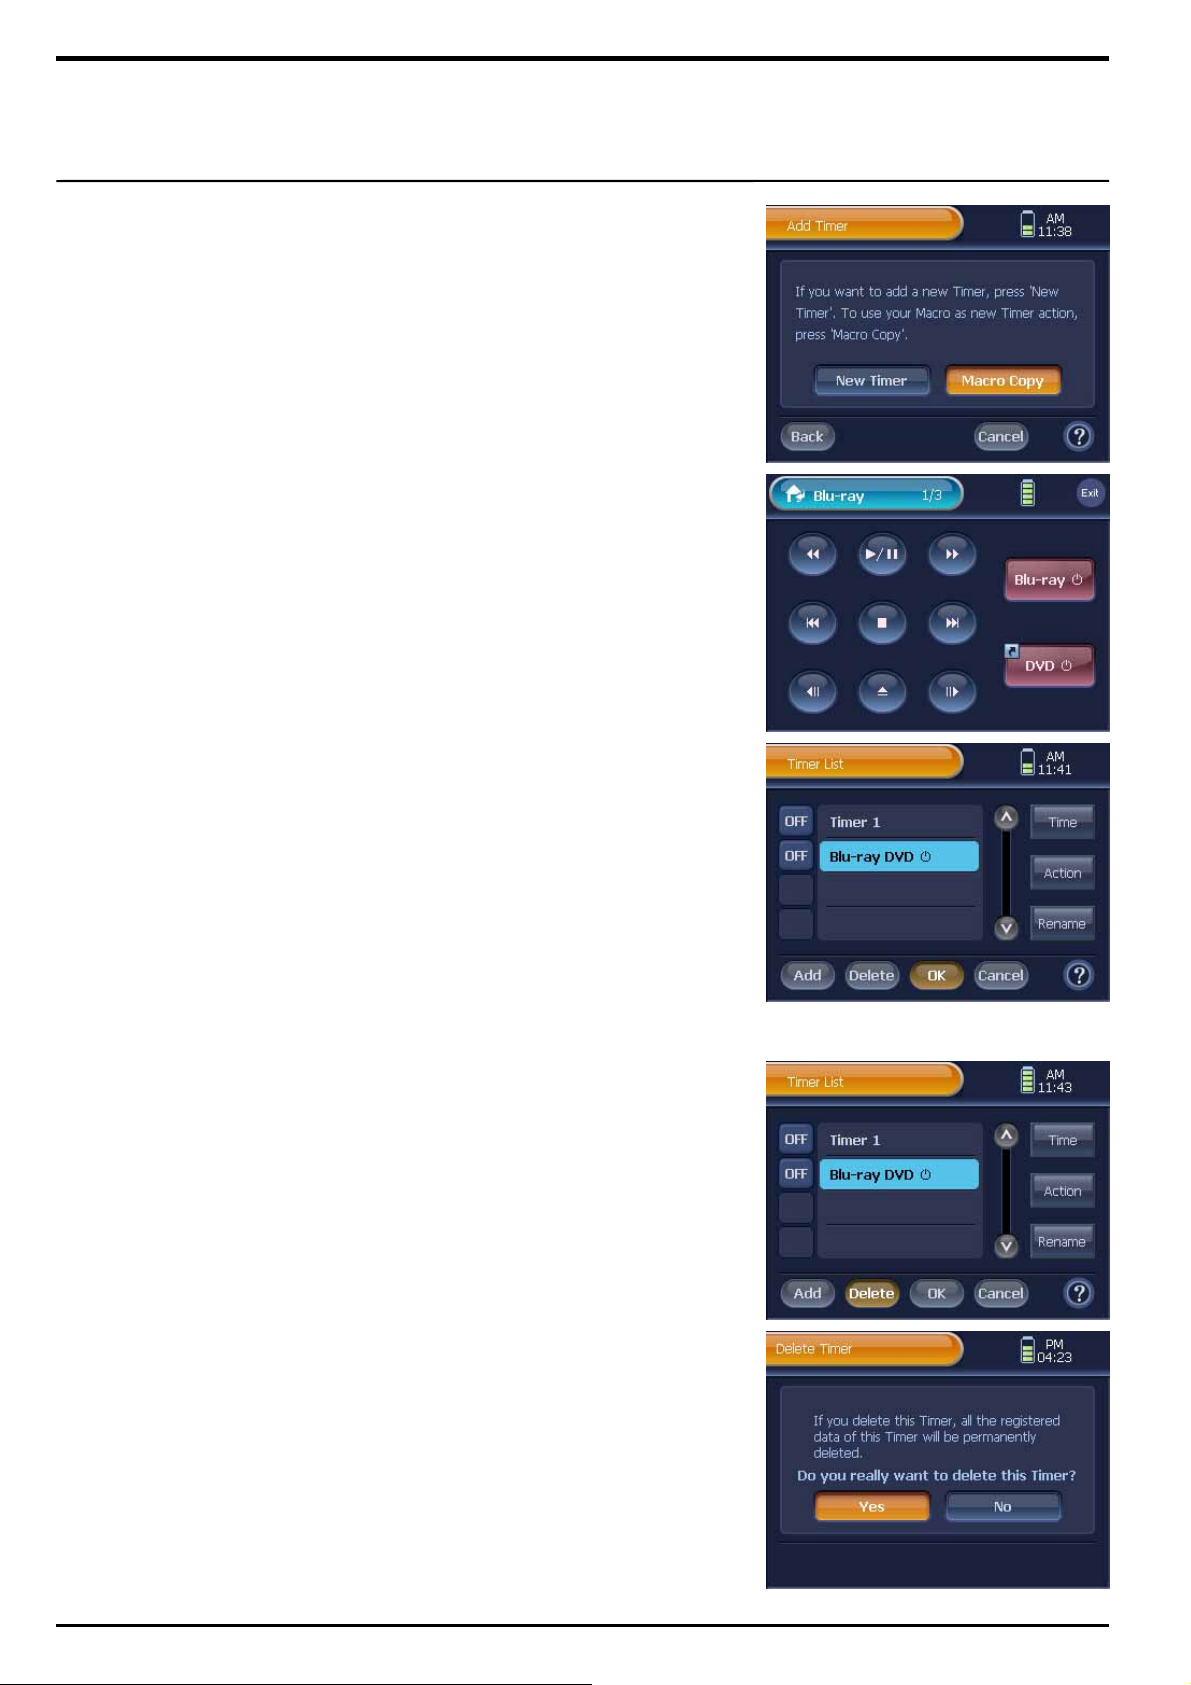
When selecting the [Macro Copy] button;
① Press [Next] on the next screen, and then you will be directed to
“Device Home” screen.
② On the “Device Home” screen, select and press the Device button
having macro button that will be used as a Timer.
③ On the “Remote Control” page, select and press the Macro button
that will be used as a Timer.
You will be directed to the “Timer List” screen as the new Timer is
registered on the list.
Note. This new timer will be named same as the selected Macro button.
Page 47
47
5 Press the [OK] button on the “Timer List” screen to save the Timer.
You will be directed to the Registration Information screen.
Then pressing the [OK] button, you will be redirected to the “Device
Setup" menu screen.
Note. When pressing the [Cancel] button on the “Timer List”, you will be
directed to the Cancellation Confirmation screen. Press the [Yes] button
to cancel the timer setup, and move back to the “Device Setup" menu
screen.
☞ Caution !
Every Timer setup option requires you to press the [OK] button on the
“Timer List” screen. Otherwise, changes will not be saved. And when
pressing the [Cancel] button, changes will be canceled, and will not be
saved.
☞ You can register maximum 64 Timers on the Timer list.
☞
Delete Timer
1 Press [SET] on the “Device Home” screen shortly.
You will be directed to the “Device Setup" menu screen.
2 Press [Timer] on the “Device Setup" menu screen, and then you will
be directed to the “Timer List” screen.
3 Select a timer from the timer list. The selected timer will be
highlighted.
4 Press [Delete] on the “Timer List” screen. You will be directed to the
Timer Deletion Confirmation screen.
5 Press [Yes] on the confirmation screen, and then you will be
redirected to the “Timer List” screen as the timer is deleted.
6 Press the [OK] button on the “Timer List” screen to save the change.
You will be directed to the Registration Information screen.
When pressing the [OK] button, you will be redirected to the “Device
Setup" menu screen.
Note. When pressing the [Cancel] button on the “Timer List”, you will be
directed to the Cancellation Confirmation screen. Press the [Yes] button
to cancel the timer setup, and move back to the “Device Setup" menu
screen.
Page 48
48
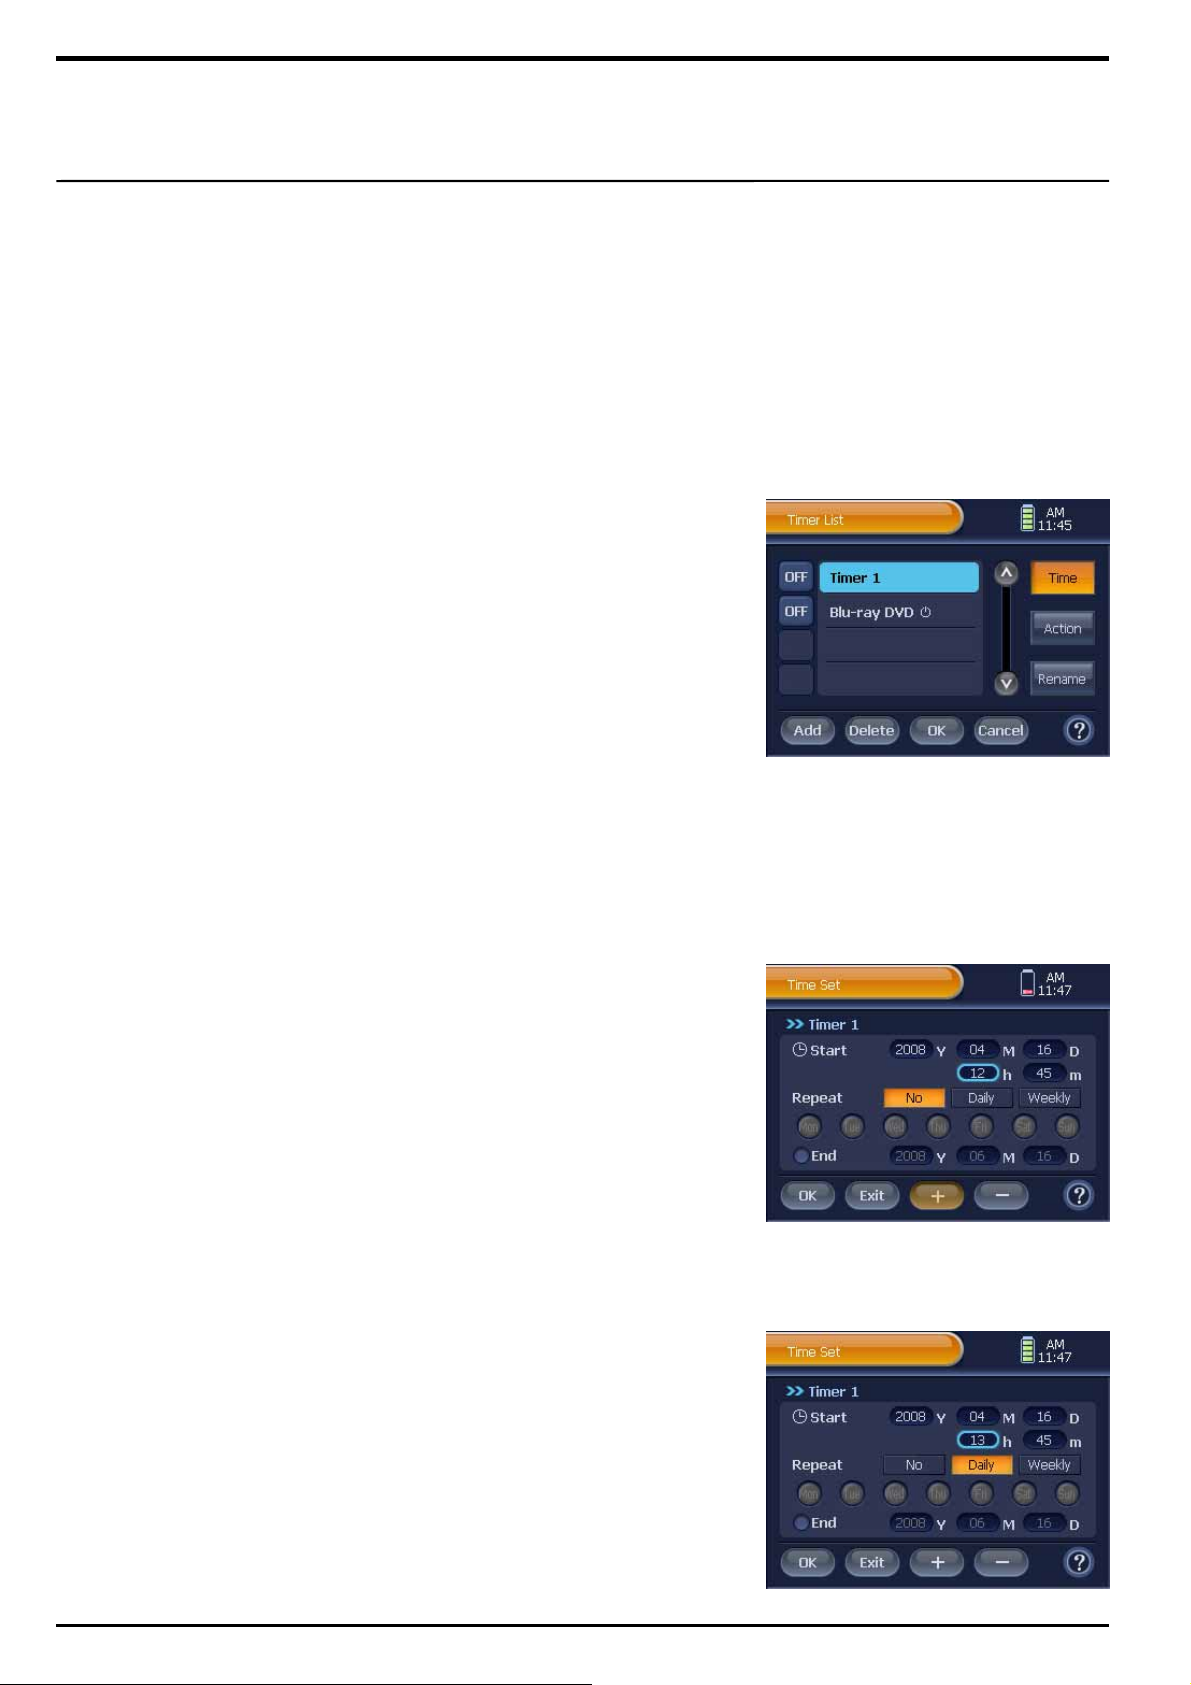
Set Up Activation Time
1 Press [SET] on the “Device Home” screen shortly.
You will be directed to the “Device Setup" menu screen.
2 Press [Timer] on the “Device Setup" menu screen.
You will be directed to the “Timer List” screen.
3 Select a Timer on the timer list. The selected timer will become
highlighted.
4 Press [Time] at the right side of the “Timer List” screen.
You will be directed to the “Time Set” screen.
5 To set up the timer’s activation time, follow the instructions listed
below.
Activation Time Setup
Set up a Timer to your desired time.
Note. When a timer is newly created, its time will be configured to your current
local time.
■ To Set up Timer’s Activation Time
① Select a button from [Year], [Month], [Day], [Hour], and [Minute].
The button will become highlighted, and the [+] and [-] buttons will
be activated.
② Use the [+] and [-] buttons to set up the timer.
Repeating Timer Setup
You can set up a repeating timer that repeats itself everyday on set
days.
The default timer setup is “Non-Repeating”.
■ Daily Repeating Timer Setup
① Press [Daily] on the “Repeat” section.
The timer will repeat itself everyday on the set time.
Page 49
49
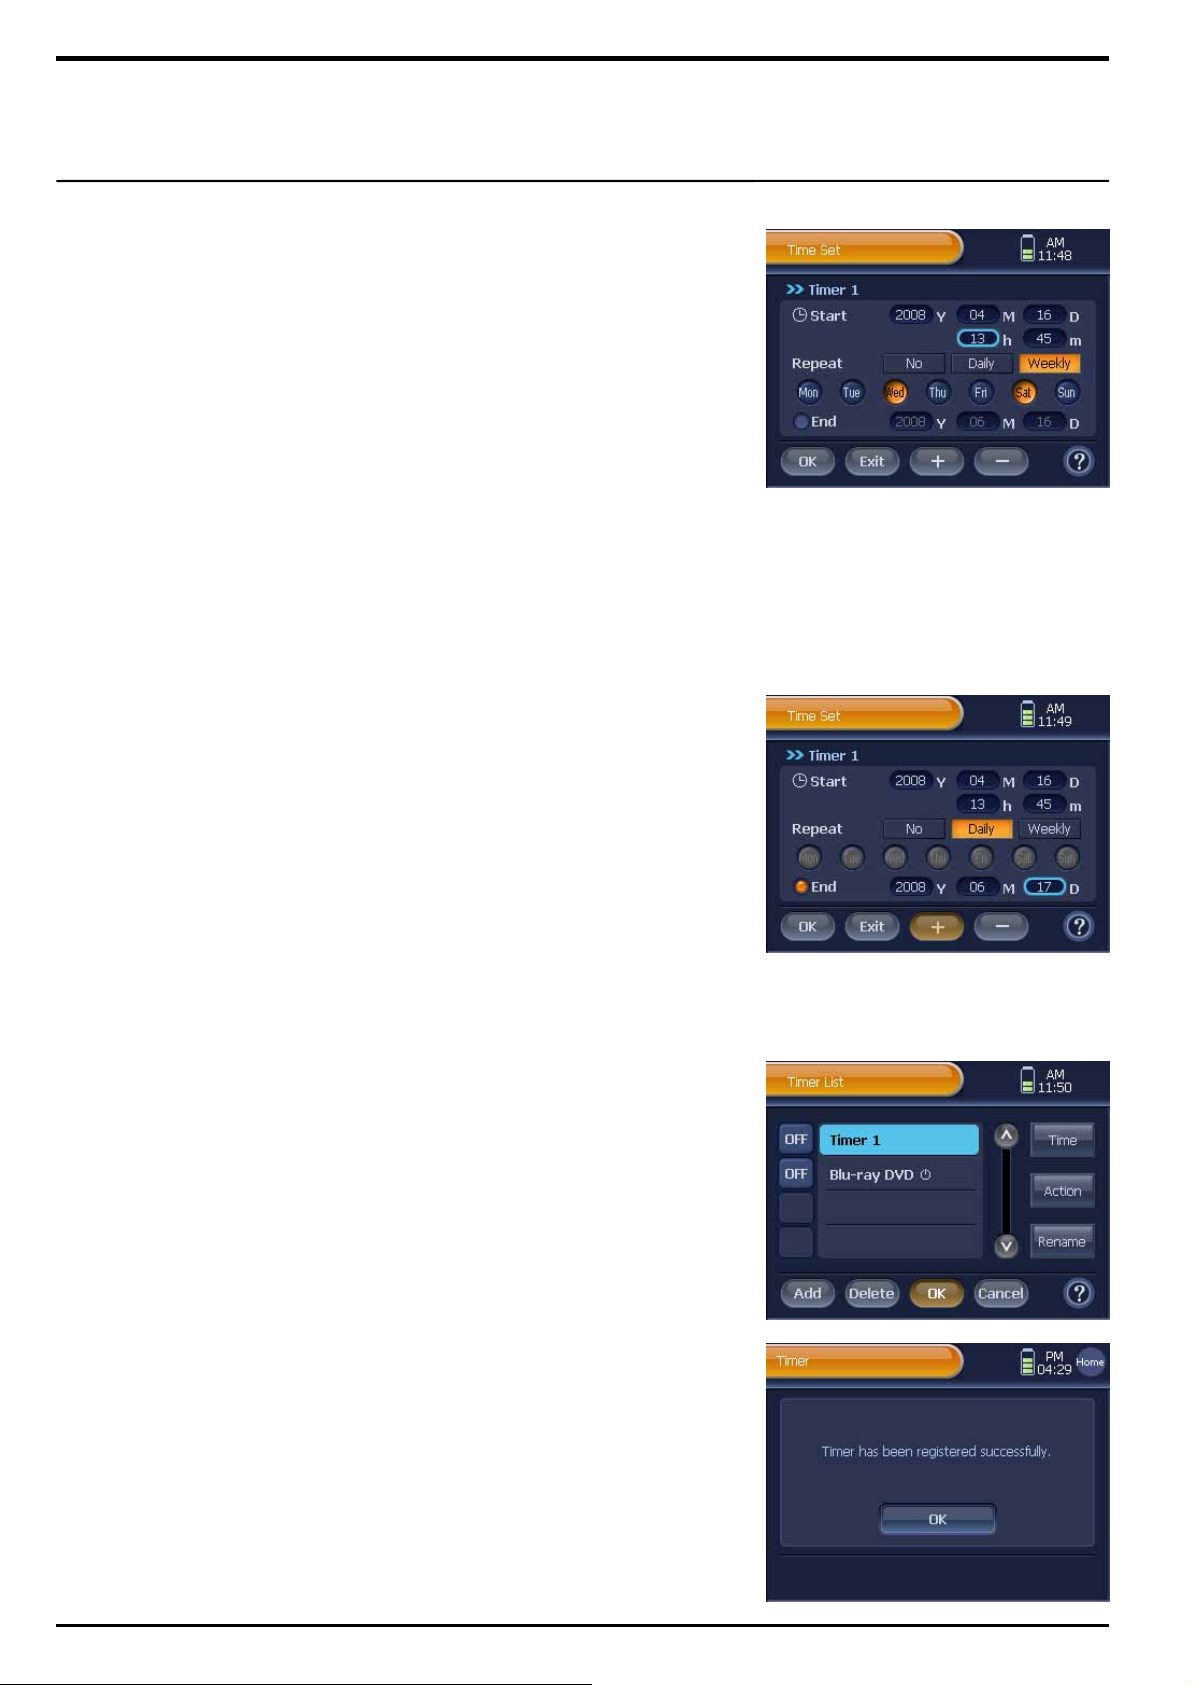
■ Set Day Repeating Timer Setup
① Press the [Weekly] button on the “Repeat” section.
Then, you can select the [Day] buttons.
Note. Your current day will be selected and highlighted as default.
② Select and press [Day] buttons.
A timer will be activated at the set time on the set days.
Note 1. To cancel a day, press the [Day] button one more time.
2. You can select multiple [Day] buttons at a time.
3. If you do not select any day, and register the timer, the timer
will be automatically set as “Non-Repeating”.
Repeating Timer Inactivation Time Setup
You can set up a repeating timer to be inactivated on a certain day.
■ Inactivation Date & Time
① Press the “End” label on the far left bottom of your screen.
The circle located at the left side of the label will turn into red color,
and allow you to select the date buttons on the right bottom side.
Note 1. The default inactivation time is the same day as the timer’s
activation time.
2. If the timer is set up as “Non-Repeating”, you cannot use this
option.
② Press a button from [Year], [Month] and [Day]. The selected
button will become highlighted, and the [+] and [-] buttons will be
activated.
③ Adjust inactivation time by pressing the [+] and [-] buttons.
Note. You cannot set up a timer’s inactivation time earlier than the
activation time.
6 Press [OK] on the “Time Set” screen.
You will be redirected to the “Timer List” screen as the activation time
is saved.
Note. When pressing the [Exit] button, the timer setup will be canceled, and
you will be directed to the “Timer List” screen. In case you cancel while
making changes on an existing timer, the timer will be kept with the
previous configuration, and you will be directed to the “Timer List” screen.
7 Press [OK] on the “Timer List” screen, and then the Registration
Confirmation screen will be displayed as the timer configuration is
registered.
Then press [OK], and move back to the “Device Setup" menu screen.
Note. When pressing the [Cancel] button on the “Timer List”, you will be
directed to the Cancellation Confirmation screen. Press the [Yes] button
to cancel the timer setup, and move back to the “Device Setup" menu
screen.
Page 50
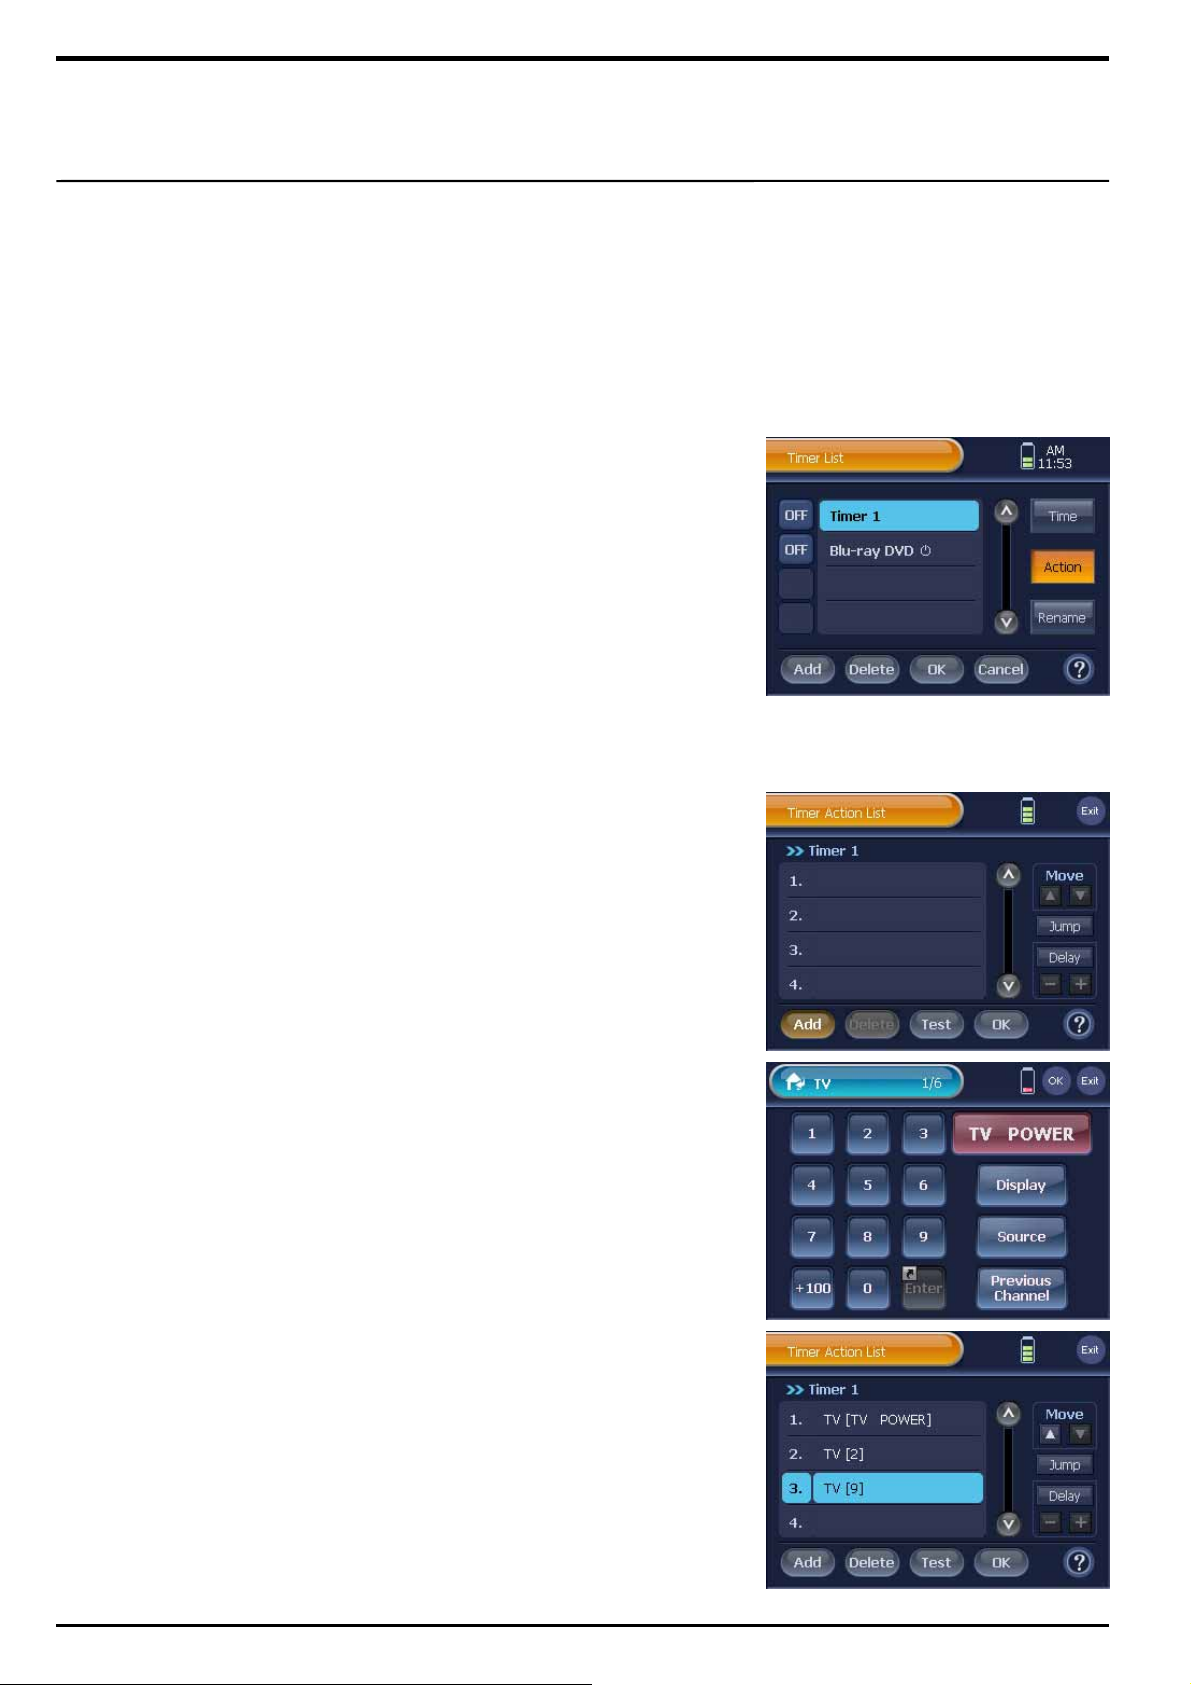
50
Timer Action Setup
1 Press [SET] on the “Device Home” screen shortly.
You will be directed to the “Device Setup" menu screen.
2 Press [Timer] on the “Device Setup" menu screen, and then you will
be directed to the “Timer List” screen.
3 On the “Timer List” screen,
select a Timer to set up its “Timer Actions”.
Then, the selected timer will be highlighted.
4 Press the [Action] button on the “Timer List” screen.
You will be directed to the timer’s “Timer Action List” screen.
5 Configure Timer Actions on the “Timer Action List”.
To set up Timer Actions, follow the instructions described below.
■ Add Timer Action
① Press [Add] on the “Timer Action List”. You will be directed to the
“Device Home” screen.
② Select a device from the “Device Home” screen. You will be
directed to the “Remote Control page” screen.
③ Select a Remote Control buttons in the “Remote Control” page.
④ Press [OK] on the “ Remote Control page ” screen.
⑤ You will be redirected to the “Timer Action List” screen, and the
new timer action will be displayed at the botto m of th e list.
②
☞
①
☞ You can set up maximum 128 actions for one timer.
■ Delete Timer Action
① Select a timer action from the “Timer Action List”.
② Press the [Delete] button on the “Timer Action List” screen.
③ The selected timer will be deleted from the list.
■ Change Timer Action Order
① On the “Timer Action List”, select a timer action to move its location.
② Use the move buttons, [▲] and [▼] to move the actions to a new
location.
③
Page 51
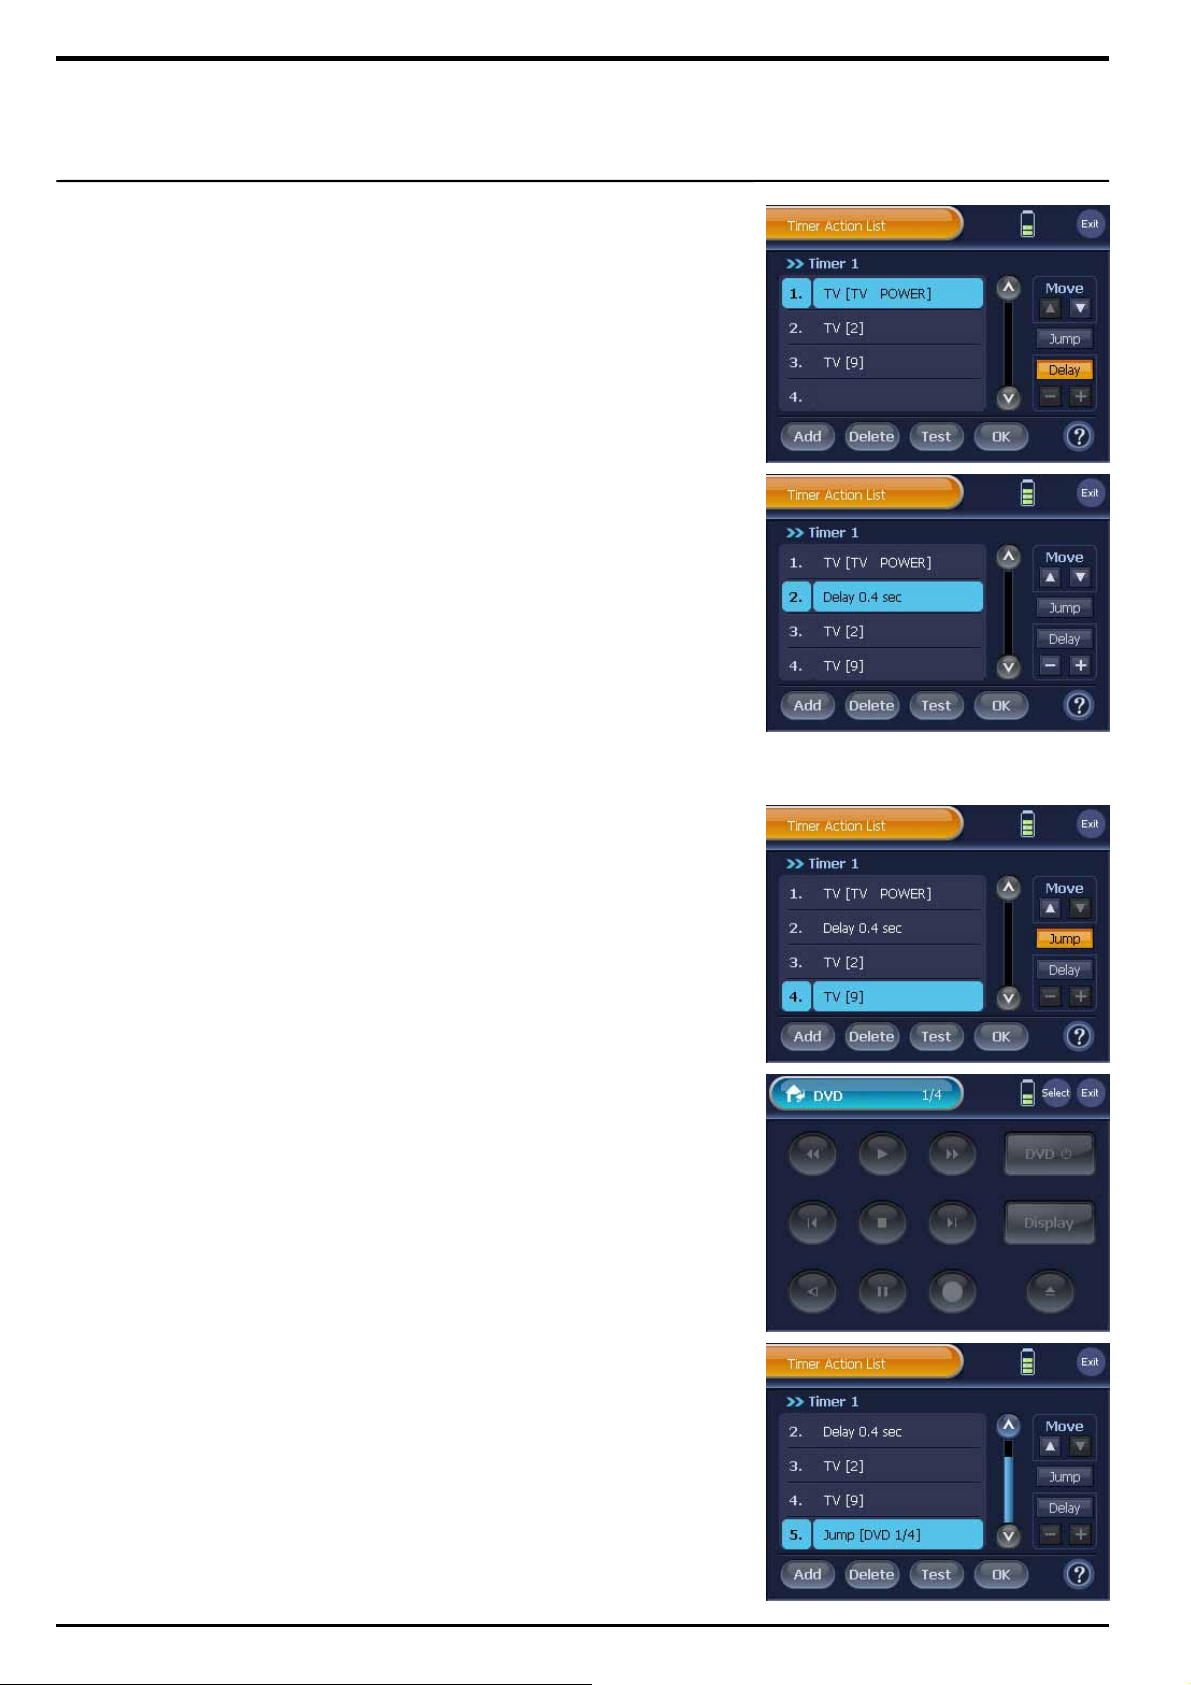
51
■ Add Timer Action Delay
① Press [Delay] on the “Timer Action List” screen.
② A delay command will be added at the bottom of the list, and
displayed as “Delay 0.4 second”.
Note 1. The default delay time is 0.4 second.
2. To set up a “Delay” command between actions, press a target
action, and press the “Delay” button. A delay command will be
added right under the selected action.
■ Edit Existing Delay
① Select a “Delay” command on the “Timer Action List”.
② Press the [+] and [-] buttons to adjust the delay time.
Note. You can increase or decrease delay time by 0.1 second each time
you press either one of the [+] or [-] button. And you can set up
minimum 0.2 second to maximum 50.0 seconds of delay time.
■ Use Timer Jump
① Press [Jump] on the “Timer Action List” screen.
② Press [Next] on the next screen, and then you will be directed to
the “Device Home” page.
③ Press [Select] on the desired page to register ‘Jump Page’ in the
Timer Action List.
④ The ‘Page Jump’ command will be set up, and displayed at the
bottom of the Timer Action List.
☞
Refer to the Macro Action Setup instructions to configure Timer Action
Setup as the instructions apply the same. For more information, refer to
the “Macro” and “Edit Macro Action” instructions.
6 After setting up the Timer Action, press the [OK] button on the
“Timer Action List”. You will be directed to the “Timer List” screen as
the action change is registered.
Note 1. When pressing the [Exit] button, the timer action setup will be
canceled, and you will be directed to the “Timer List” screen. If you
cancel while making changes on an existing timer action, the timer
action will be kept with the previous configuration, and you will be
directed to the “Timer List” screen.
2. The [Test] button enables you to test the new timer action before its
registration. Make sure to place WZB 35 facing toward the target
device before pressing the [Test] button.
☞
Page 52
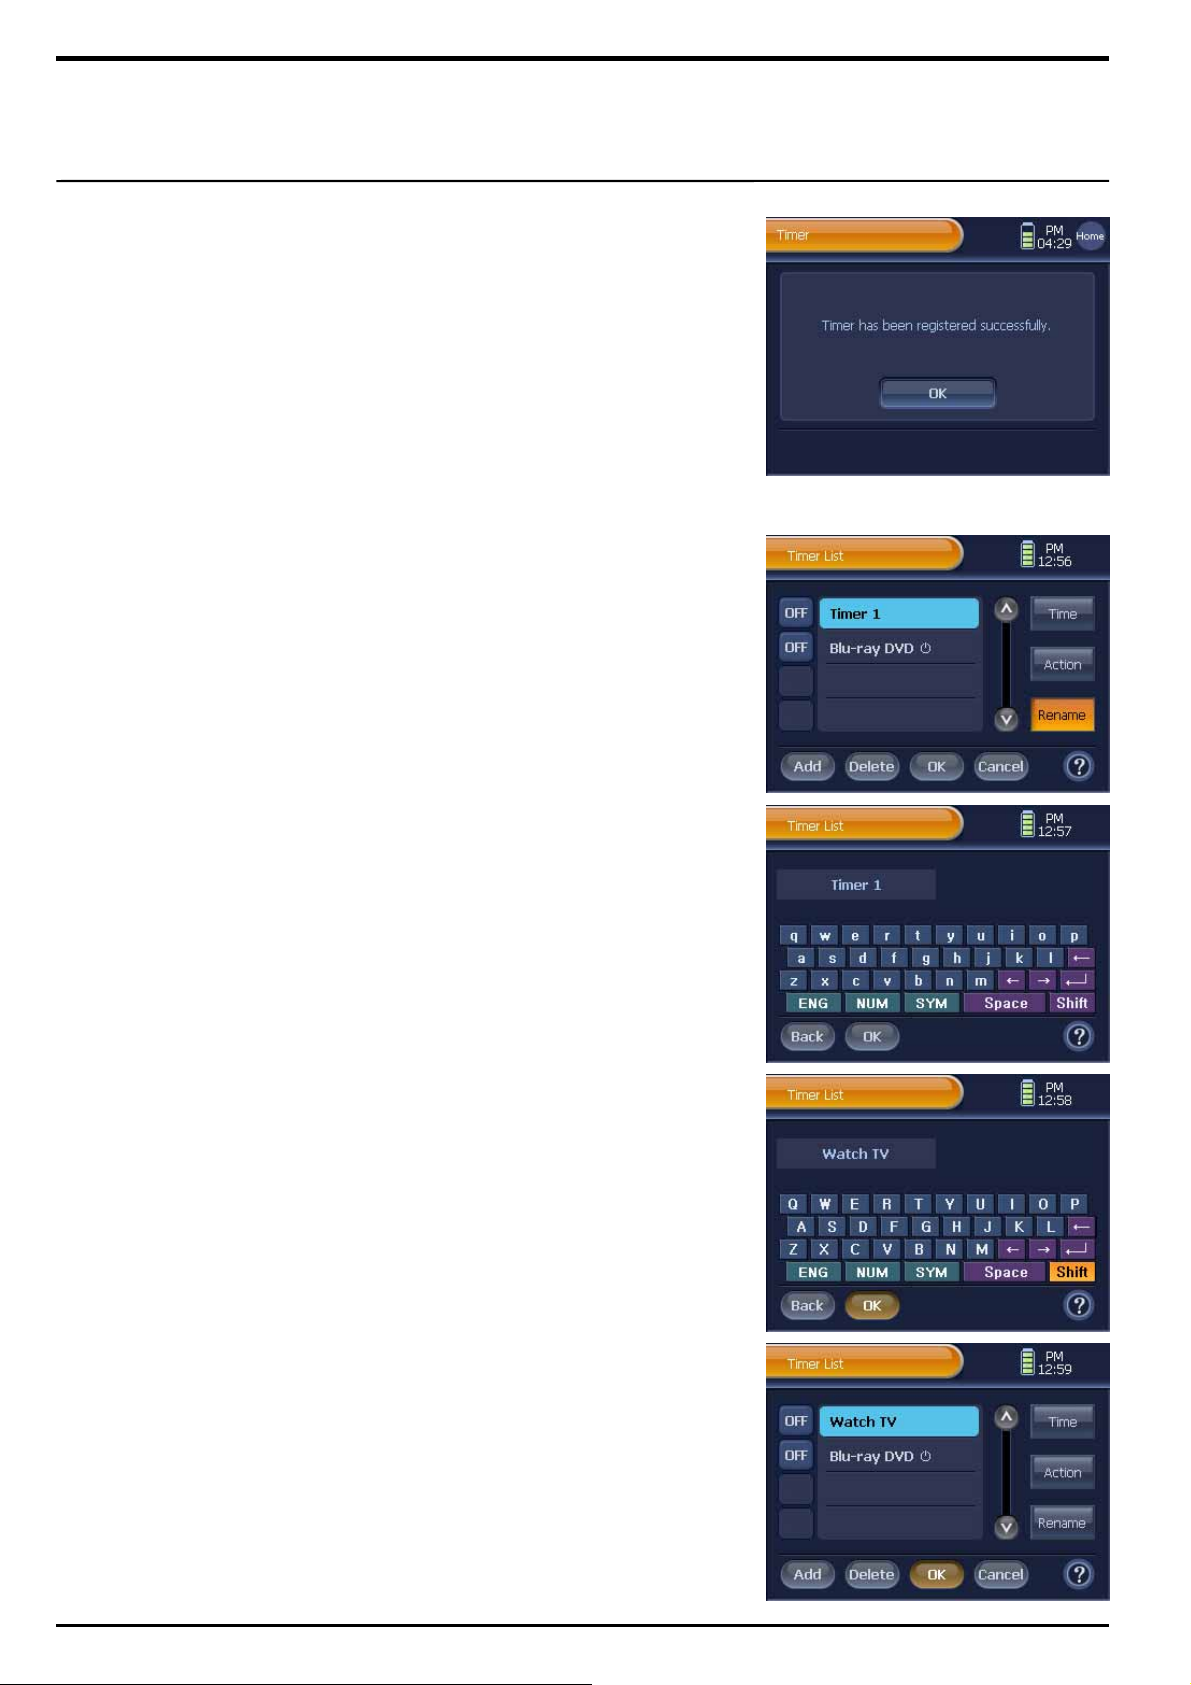
52
7 Press [OK] on the “Timer List” screen, and then the Registration
Confirmation screen will be displayed as the timer action
configuration is registered.
Press [OK] on the screen, and move back to the “Device Setup"
menu screen.
Note. When pressing the [Cancel] button on the “Timer List”, you will be
directed to the Cancellation Confirmation screen. Press the [Yes] button
to cancel the timer setup, and move back to the “Device Setup" menu
screen.
Rename Timer
1 Press [SET] on the “Device Home” screen shortly.
You will be directed to the “Device Setup" menu screen.
2 Press [Timer] on the “Device Setup" menu screen.
You will be directed to the “Timer List” screen.
3 On the “Timer List”, select and press a timer to change its name.
The selected timer will become highlighted.
4 Press [Rename] on the “Timer List” screen.
You will be directed to the keyboard screen.
5 Use the keyboard to enter the timer’s new name.
6 After entering a new name, press [OK] on the “Keyboard” screen.
You will be redirected to the “Timer List” screen that has the timer
list with the new name.
Note. If you press the [Back] button on the “Keyboard” screen after entering
a name, the name change process will be canceled, and you will be
redirected to the “Timer List” screen.
7 Press [OK] on the “Timer List” screen, and then the Registration
Confirmation screen will be displayed as the timer name
configuration is registered.
Press [OK] on the screen, and move back to the “Device Setup"
menu screen.
Note. When pressing the [Cancel] button on the “Timer List”, you will be
directed to the Cancellation Confirmation screen. Press the [Yes] button
to cancel the timer setup, and move back to the “Device Setup" menu
screen.
Page 53
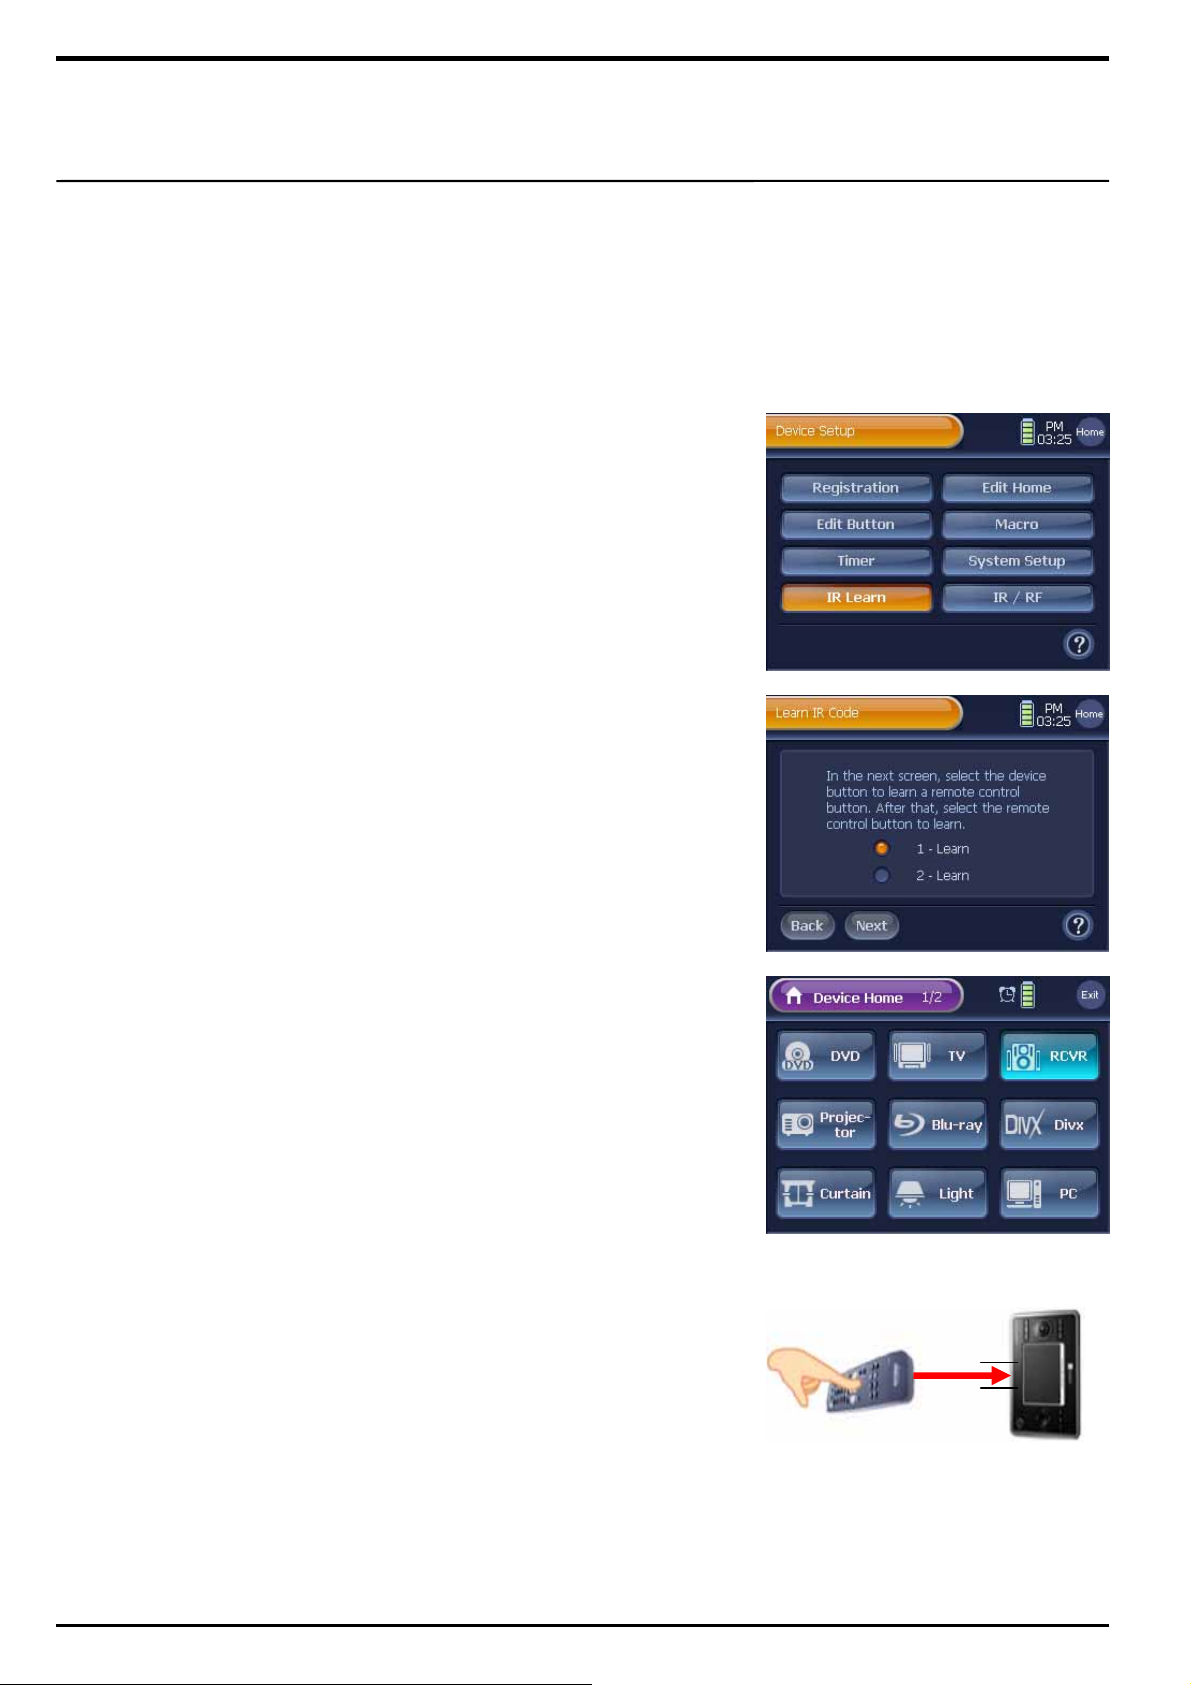
53
IR Learn
“IR Learn” is a convenient option when:
1) WZB 35’s Remote Control page does not provide a certain remote
control button on the device’s original remote controller.
2) A certain Remote Control button does not work properly even
though the device has been successfully registered.
3) A target device does not exist in WZB 35’s device list.
4) A target device’s brand does not exist in WZB 35’s brand list.
5) You cannot find a codeset from WZB 35’s codeset list that is
compatible with a selected device.
6) You want to customize Remote Control button options.
1 Press [IR Learn] on the “Device Setup” menu screen.
2 Press [1- Learn] on the “Learn IR code” screen if original remote
controller’s button have one IR code.
Note. Press [2- Learn] if original remote controller’s button have toggle IR code
( for example, “Play/Stop” button ).
3 Select and press a Device button on “Device Home” to learn its
Remote Control button. You will be directed to the selected device’s
st
1
Remote Control page.
Note 1. To move between pages, and find a device button, use the exterior
[◀ , Page , ▶] button.
2. To exit from the “Device Home” screen, press the [Exit] button.
4 Place WZB 35 and the original remote controller to face each other
within 5cm distance.
☞
☞ Caution !
1) Aim the original remote controller’s IR transmitter part exactly toward
WZB 35’s center IR receiver part.
2) If the original remote controller is running out of battery, the button study
may result in failure. Thus, make sure to check the controller’s battery
capacity before you try.
5cm
Page 54
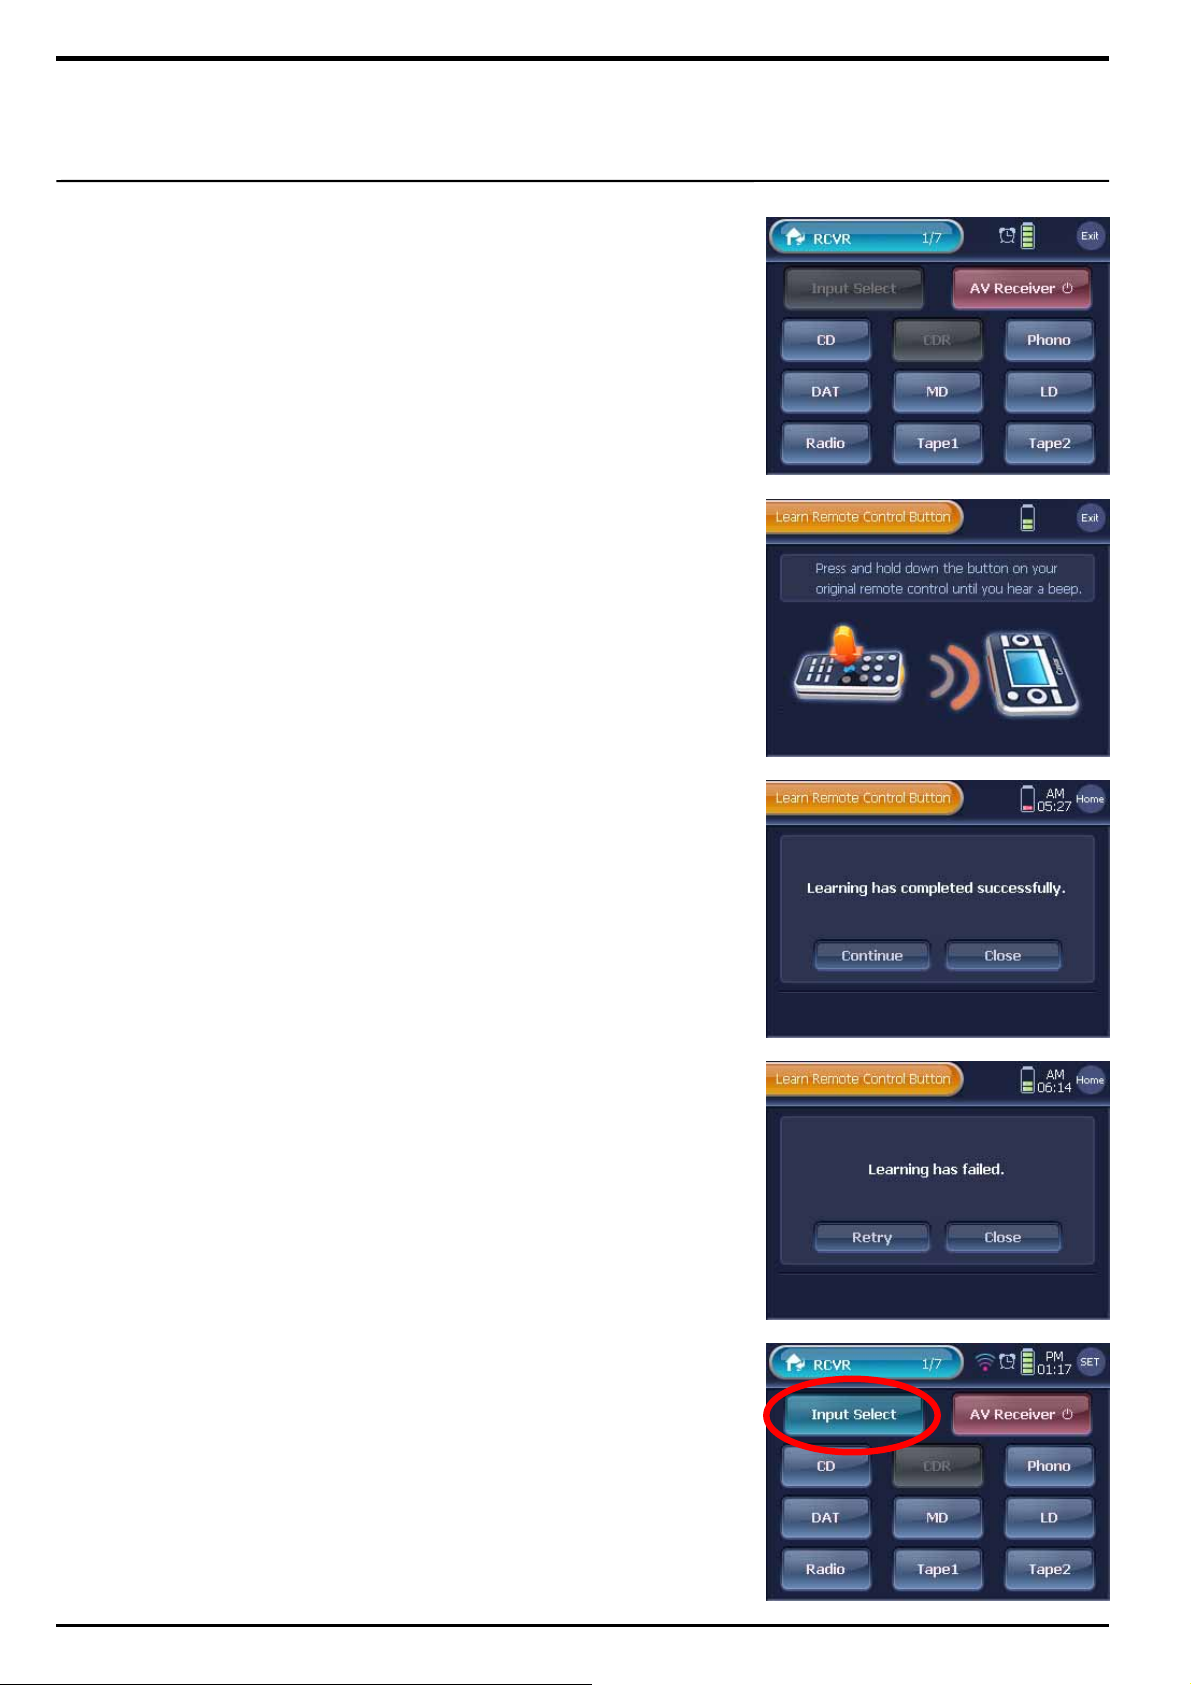
54
5 On the Remote Control screen, press a remote control button which
will learn the original remote controller’s button option.
It will load Learn Remote Control Button processing screen.
Note. You can use the exterior hard key for learning IR also.
6 Press the desired original remote controller’s button.
☞ Caution !
1) You must press the original remote controller’s button at least within 5
seconds as immediately as the screen moves to the learning screen.
2) Make sure to press the button until a beep sound indicates the process
completion.
3) Press the button a little bit hard, so that the button will be pressured with
enough strength.
7 When the learning process is successful, a beep sound and a
success message will be activated.
To continue learning other remote control buttons, press [Continue].
To finish learning buttons, press [Close].
Note. If you press the [Continue] button, you will be redirected to step 6, so
that you can repeat the Button Learning process.
If the button study is failed, a failure message will be activated.
To try to learn the button again, press [Retry].
To finish learning the button, press [Close].
Note 1. When failed, press the [Retry] button to go back to step 6, and restart
the learning process.
2. Main reasons of button learning failure are highly related to the
cautions listed on step 5 and 7. Refer to the cautions, and try again.
3. If you learn the IR by [2-Learn] method, press the desired original
remote controller’s 2
button immediately.
nd
button after completion of IR learning for 1st
☜
Page 55
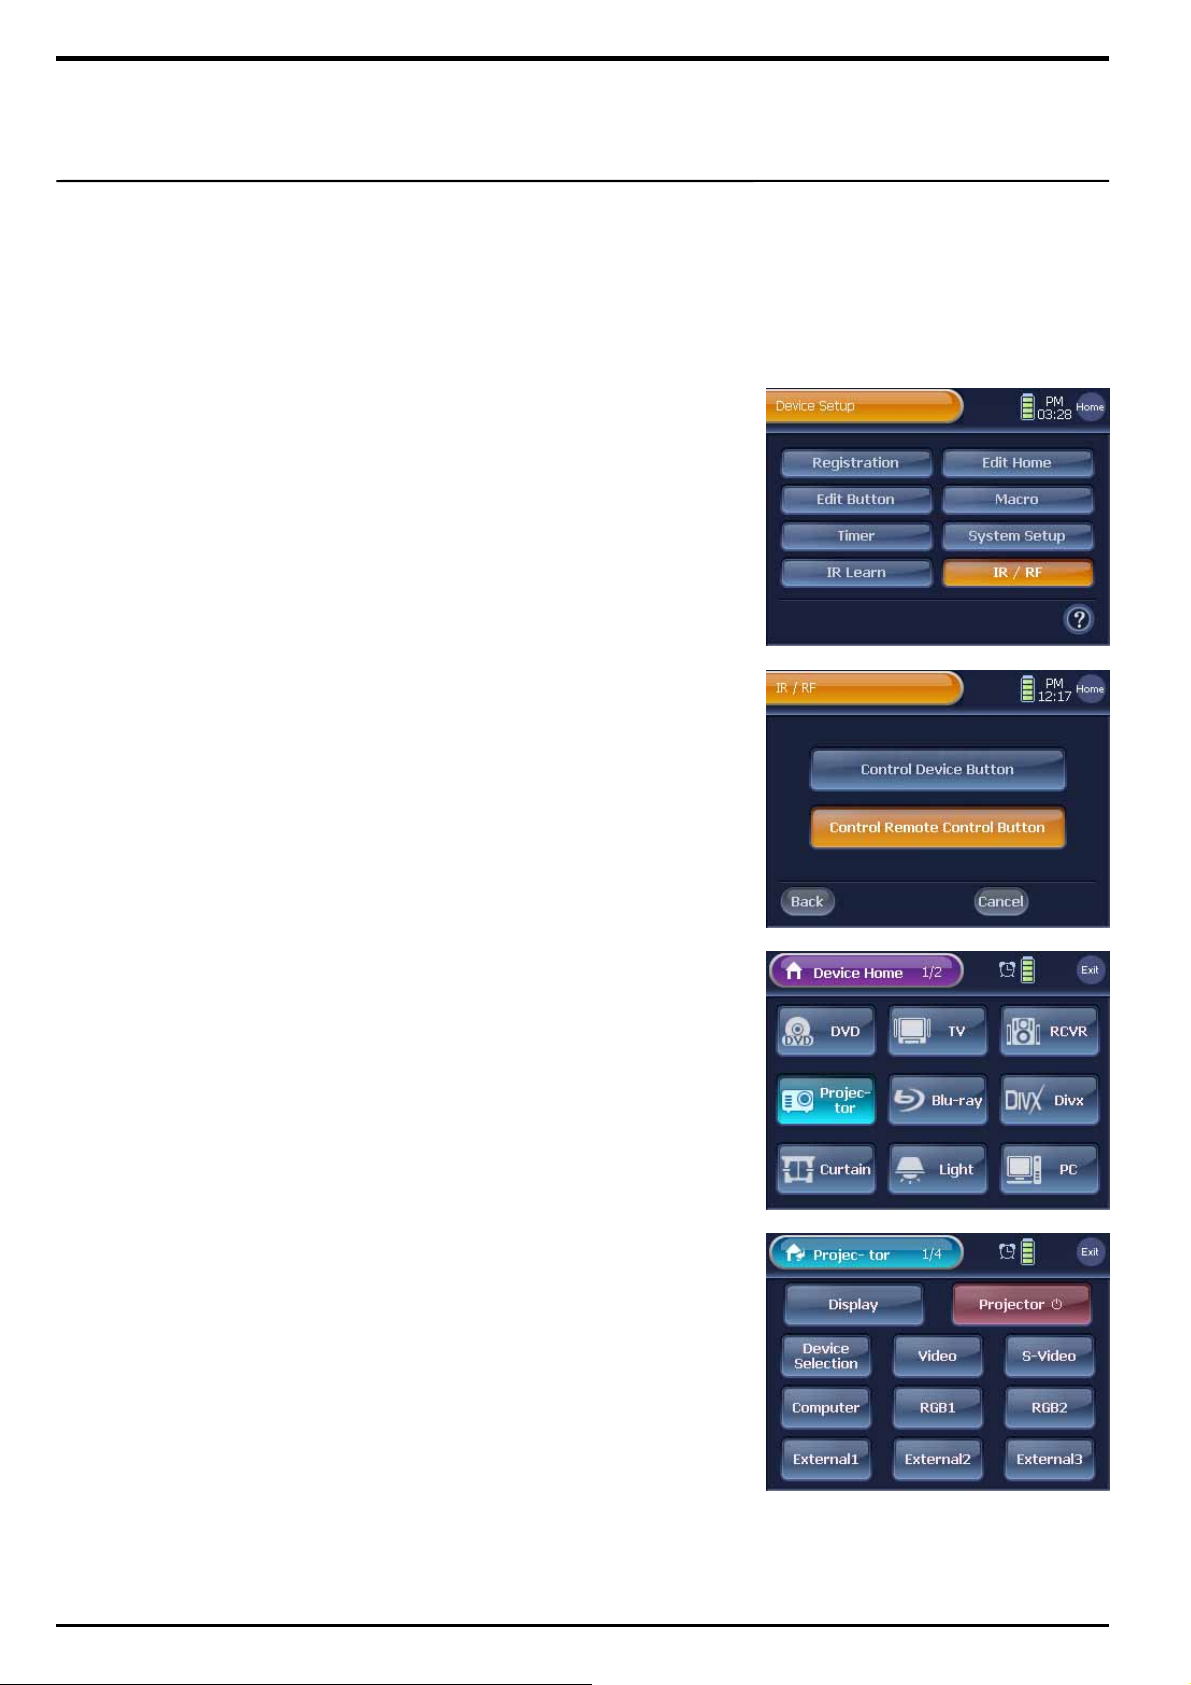
55
WZB 35 can be used to control devices using two control modes,
comprising the IR (Infrared) and the RF (Radio Frequency) control
mode. WZB 35 is designed to choose between IR and RF control modes
according to the situation to allow control of various devices.
All devices are set up by default to work with IR signals. To be able to
operate one or more devices with RF signals, you have to change the
WZB 35’s IR/RF settings for those devices.
IR / RF
1 Press [IR/RF] button on the “Device Setup” menu screen.
☞ Caution !
2 If you would like to setting control mode with each Device button,
press [Control Device Button].
If you would like to setting control mode with each Remote Control
button, press [Control Remote Control Button].
Note . This explains ‘Control Remote Control Button’ method. ‘Control Device
Button’ method is similar to the ‘Control Remote Control Button’ method,
except that Relay and Serial setup are not available.
3 Select and press a Device button on “Device Home” for setting IR/RF
its Remote Control button. You will be directed to the selected
device’s 1
Note 1. To move between pages, and find a device button, use the exterior
[◀ , Page , ▶] button.
2. To exit from the “Device Home” screen, press the [Exit] button.
4 Select and press a Remote Control button for setting IR/RF.
You will be directed to “Remote Control Button IR/RF” setting screen.
[IR / RF] menu is not in a diffusion model.
st
Remote Control page.
☜
5 On the “Remote Control Button IR/RF” setting screen, select a
control method button.
Selected button will become highlighted, and the [+] and [-] buttons
will be activated.
Use the [+] and [-] buttons to set up the control method.
After setting up the control method, press the [Next] button.
☞
Page 56
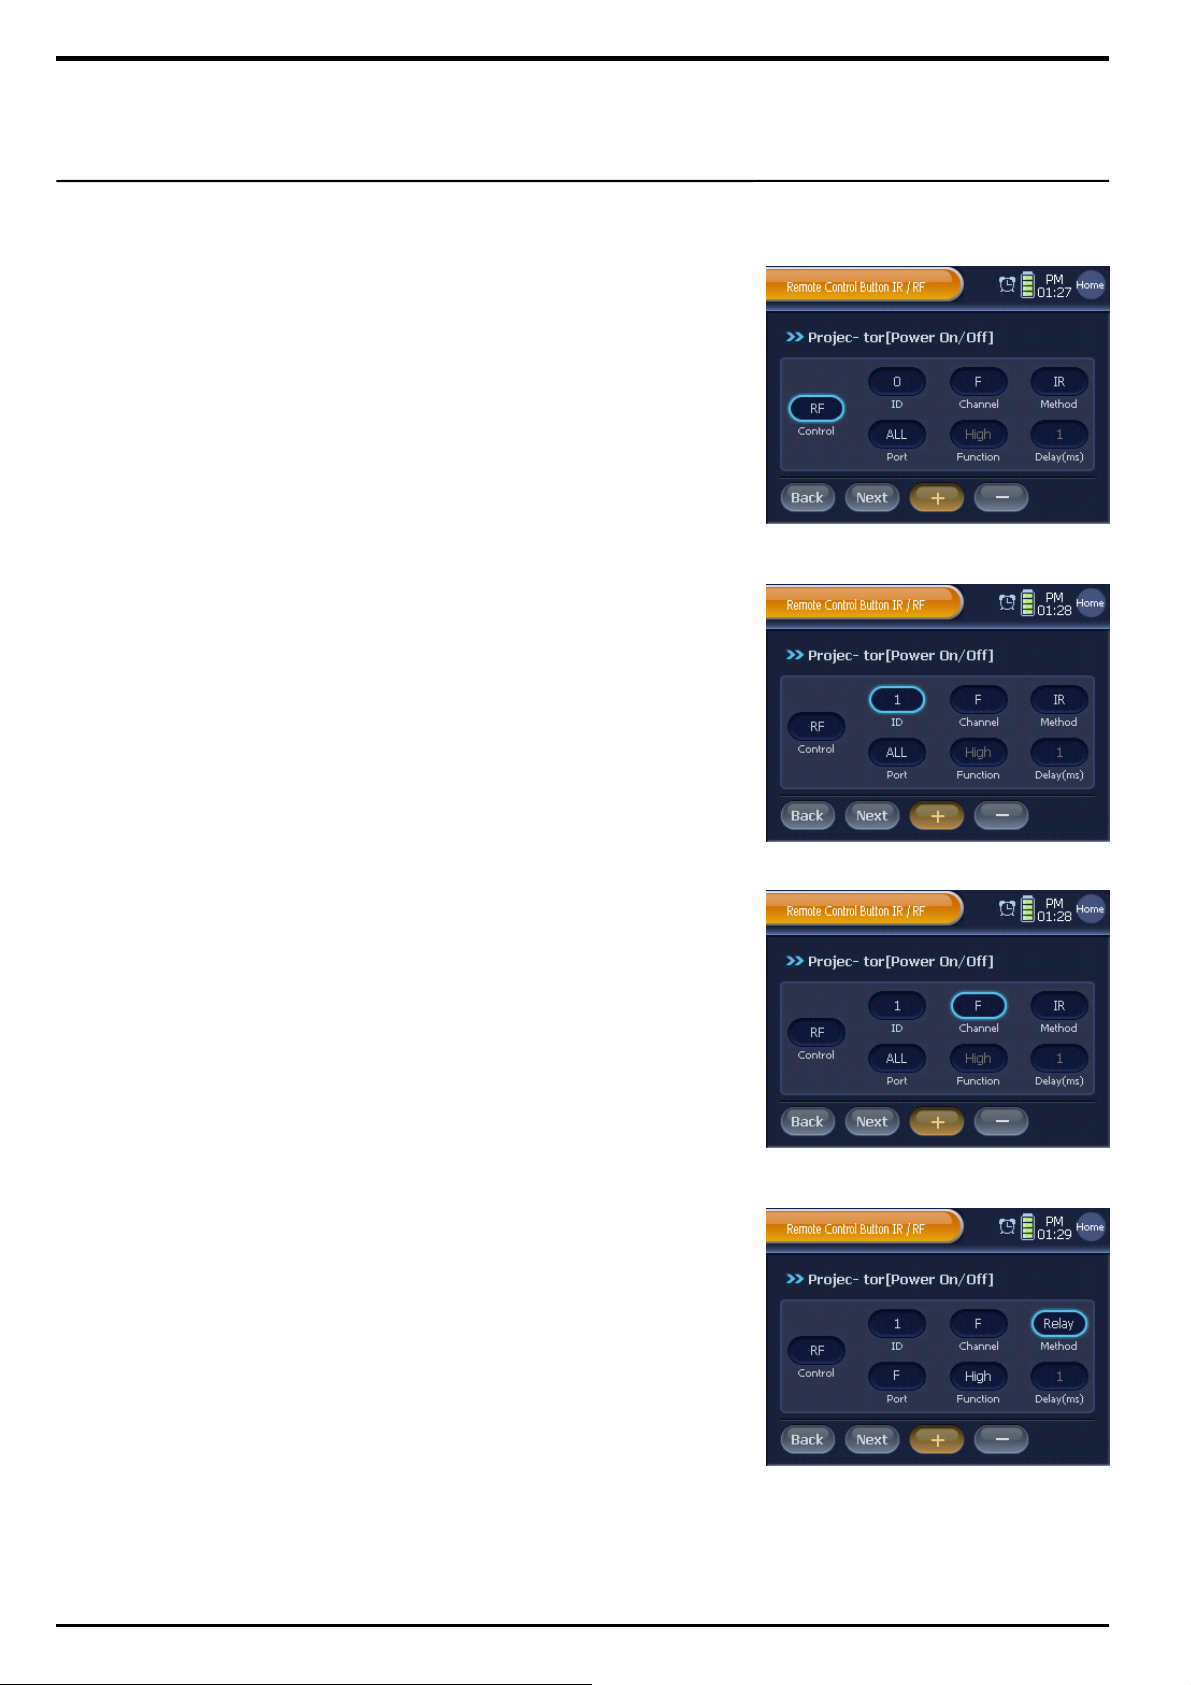
56
■ Instructions of Control Method Button
① Control : Select a control signal output method between IR and RF
methods. Only RF method allows setup for the remaining
setups.
② ID : Individual ID is granted for each Device or each Remote Control
button in order to prevent unwanted devices to operate if there
are several identical devices. There are total 16 RF IDs whose
names are composed of numbers from 0 to 9, and alphabets
from A to F.
③ Channel : Setup a proper channel in order to prevent frequency
interception if using a product with RF control method
nearby. There are total 16 RF IDs whose names are
composed of numbers from 0 to 9, and alphabets from A
to F. We recommend using E or F channel.
④ Method : RF receiver outputs signals in three methods: [IR], [Relay],
and [Serial].
Note 1. RELAY and SERIAL methods control a certain device using a port of
RF receiver itself through wire.
2. [IR], [Relay], and [Serial] setups need support from RF receiver for use.
Page 57
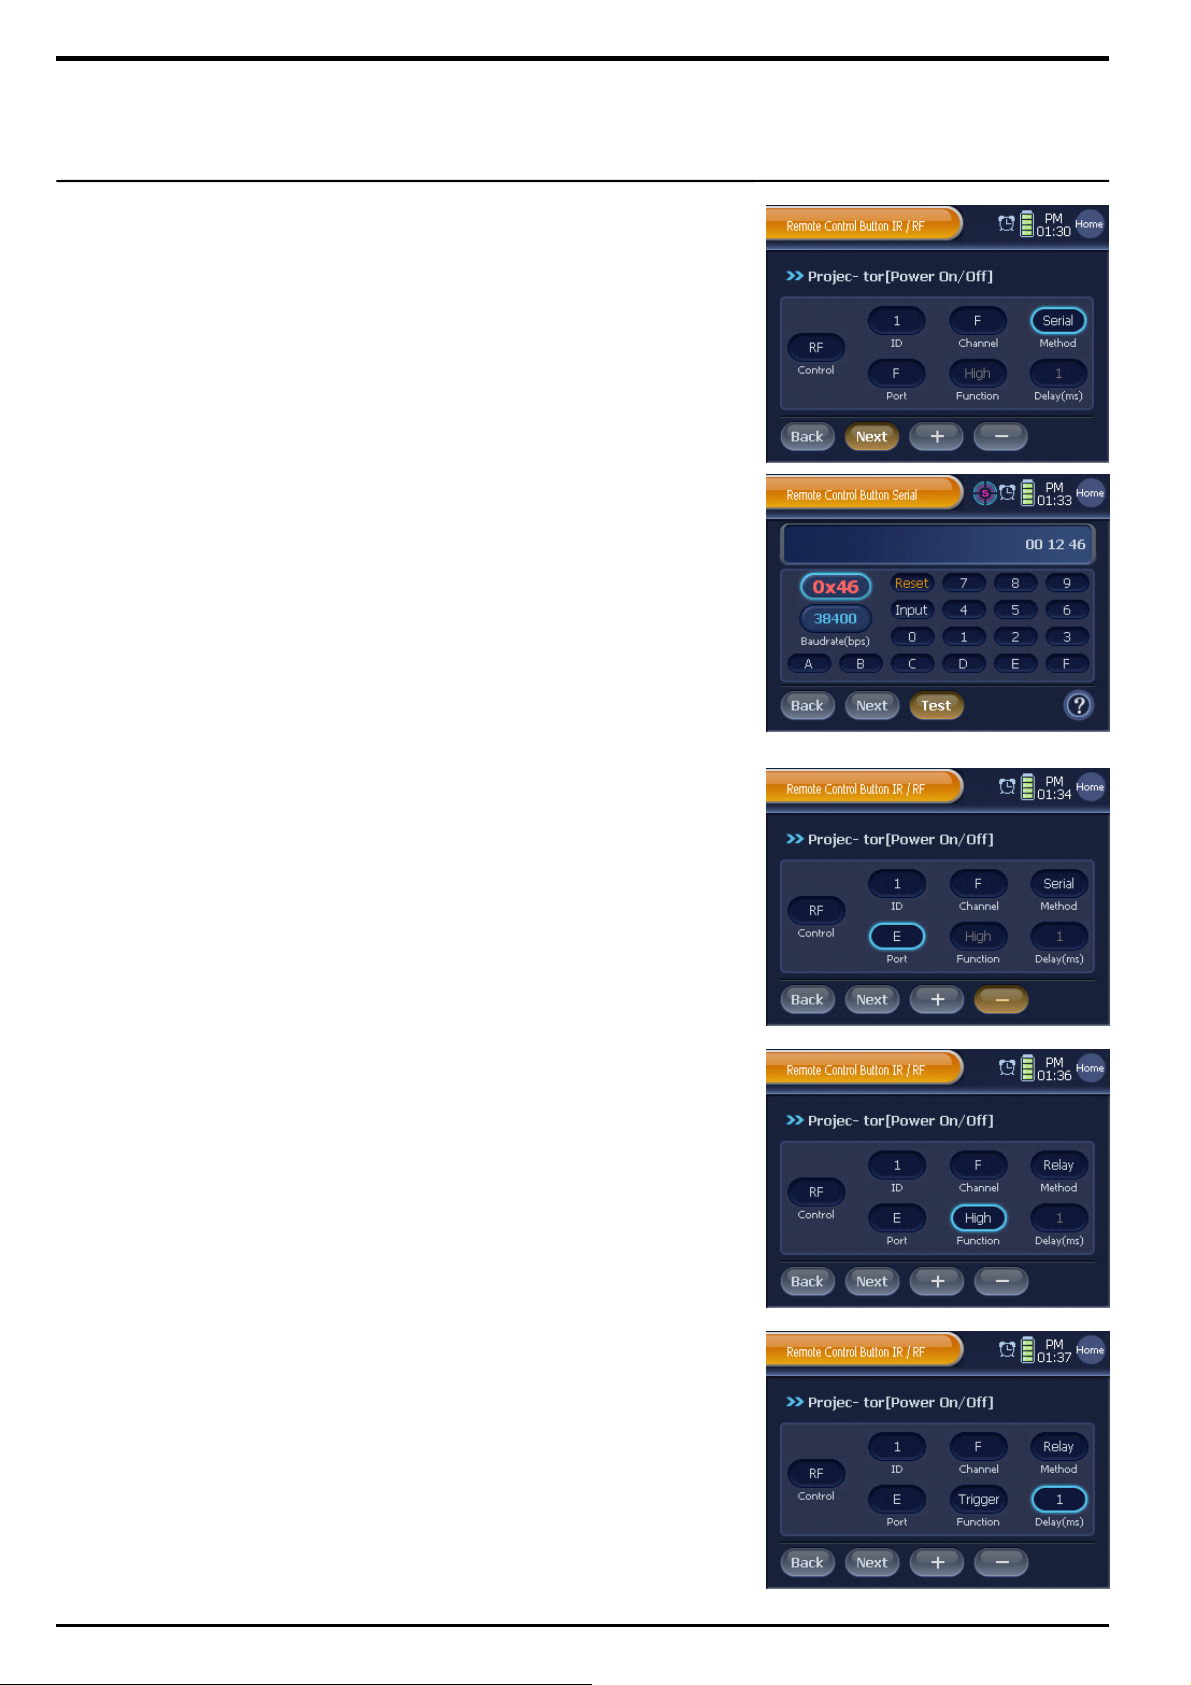
57
☞ If the Method is setup as Serial, a separate Serial setup is needed.
- If the Method is setup as Serial, press [Next] button then Serial setup
screen for remote control button comes out.
- Serial data can be input as byte(16 digit) unit and it is available up to 32 byte.
Select a button from 0 to 9 and from A to F and the data value is indicated in
red text. Press [Input] button to save the data in a result window.
- Press [Baudrate] button to setup Baudrate in the Remote Control / Device
button you wish to use.
- Basic Serial communication setup is as follows.
Stop bit : 1bit / Data bit : 8bits / No parity / No flow control
⑤ Port : Setup an individual number for each Port of RF receiver to
control the device you wish to operate.
⑥ Function : Select a method of signal output from [Trigger], [High],
and [Low] only when the [Method] button is setup as [Relay].
⑦ Delay : You can setup Trigger time only when the [Function] button
is setup as [Trigger].
You can setup the time range from 1ms to 1s (1000ms).
6 IR/RF setting is completed.
To continue setting IR/RF, press [Yes], or press [No] to finish.
Note. Once setup, you don’t need to change any functions unless a problem
occurs.
Page 58
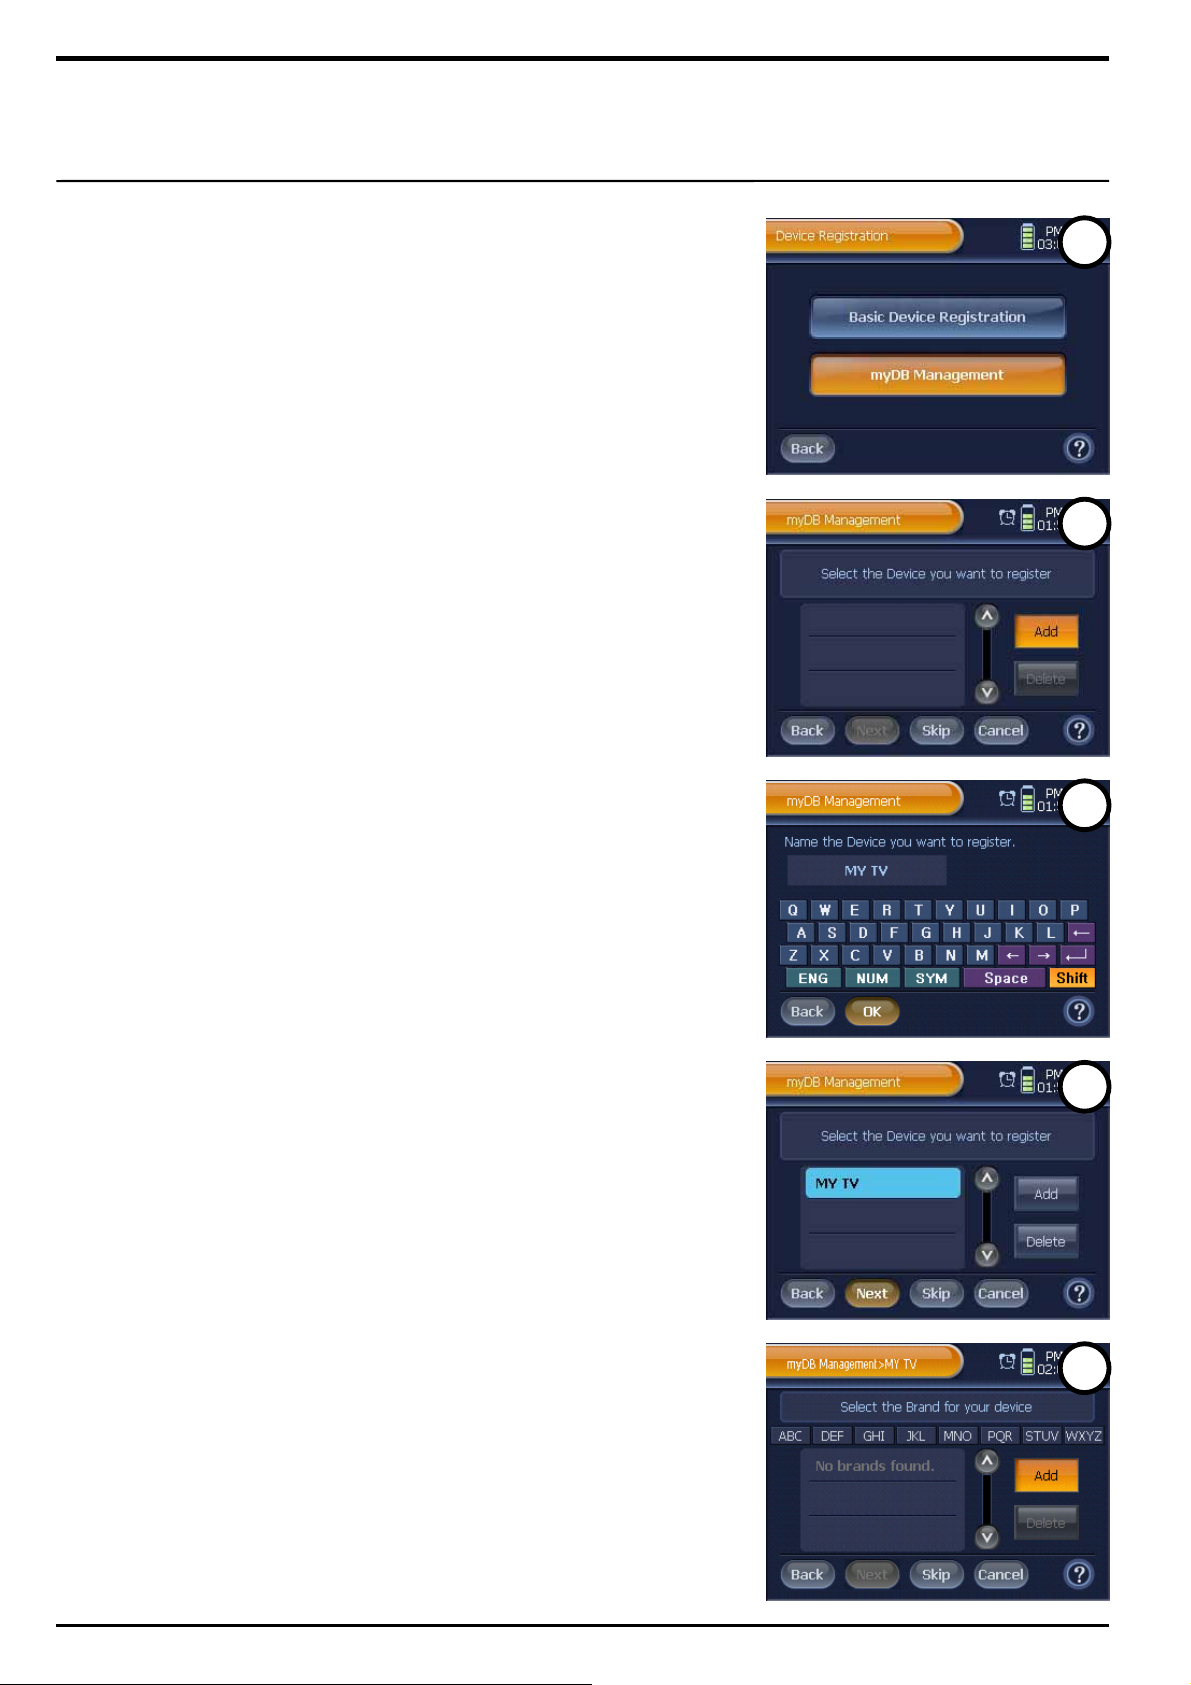
58
myDB Management
How to add User Device to myDB
It is possible to backup the data of user-defined devices to myDB.
1 Press [SET] shortly on “Device Home".
2 Press [Registration] on the "Device Setup" menu screen.
3 Press [myDB Management] on the "Device Registration" menu
screen.
4 Press [Add] on the “Device Selection” screen.
3
4
5
5 Use the key-board to enter a new name for the user device and
press [OK].
You will be redirected to the “Device Selection” screen.
Note. You can register maximum 100 device data on myDB.
6 Select the New Device from the device list, and press [Next].
7 Press [Add] on the “Brand Selection” screen.
6
7
Page 59
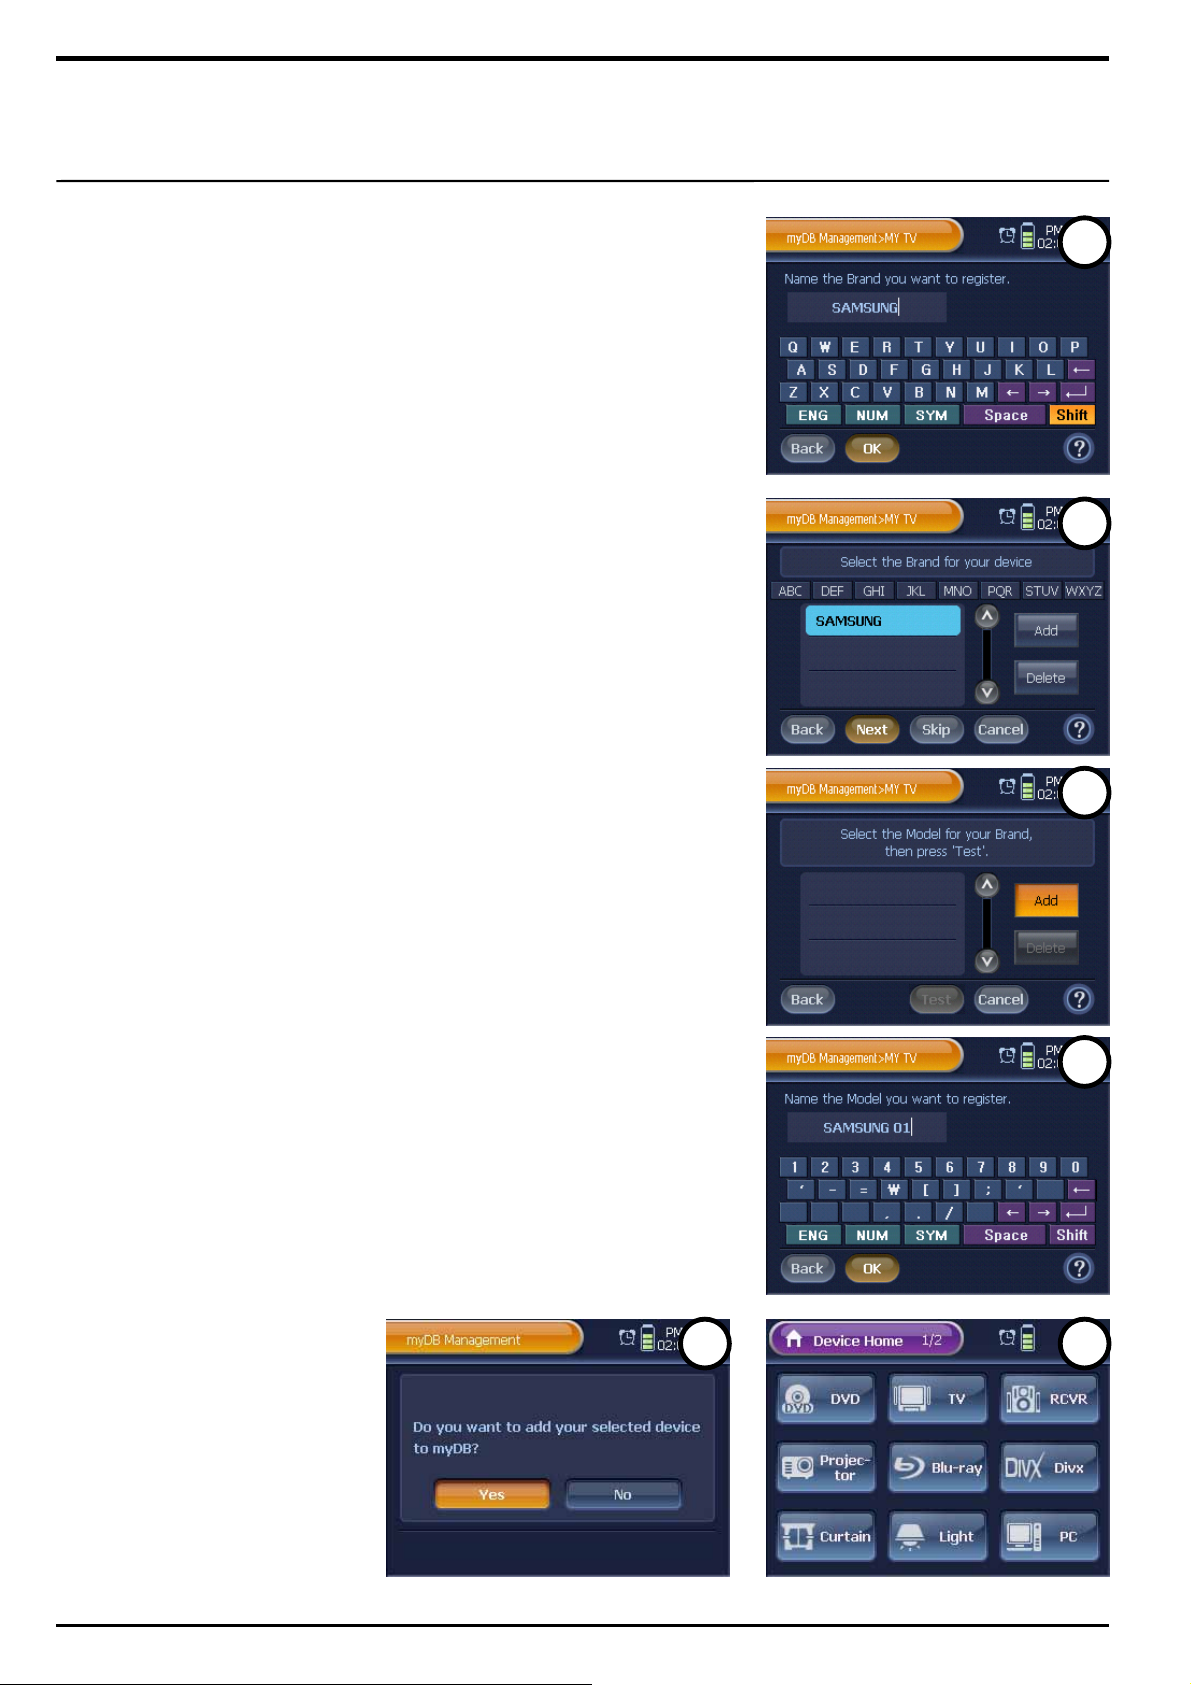
59
8 Use the key-board to enter a new brand name and press [OK].
You will be redirected to the “Brand Selection” screen.
9 Select the New Brand from the brand list, and press [Next].
10 Press [Add] on the “Model Selection” screen.
11 Use the key-board to enter a new model name and press [OK].
12 Press [Next] on the next screen, and then you will be directed to
“Device Home”.
8
9
10
13 Select and press a Device button to register on myDB with new
name. You will be directed to the confirmation page.
14 Press [Yes], and then a new user device will be added to myDB.
Note. If you press the [No] button, you will be redirected to the “Device Home”,
so that you can select a device button again.
11
13 14
Page 60
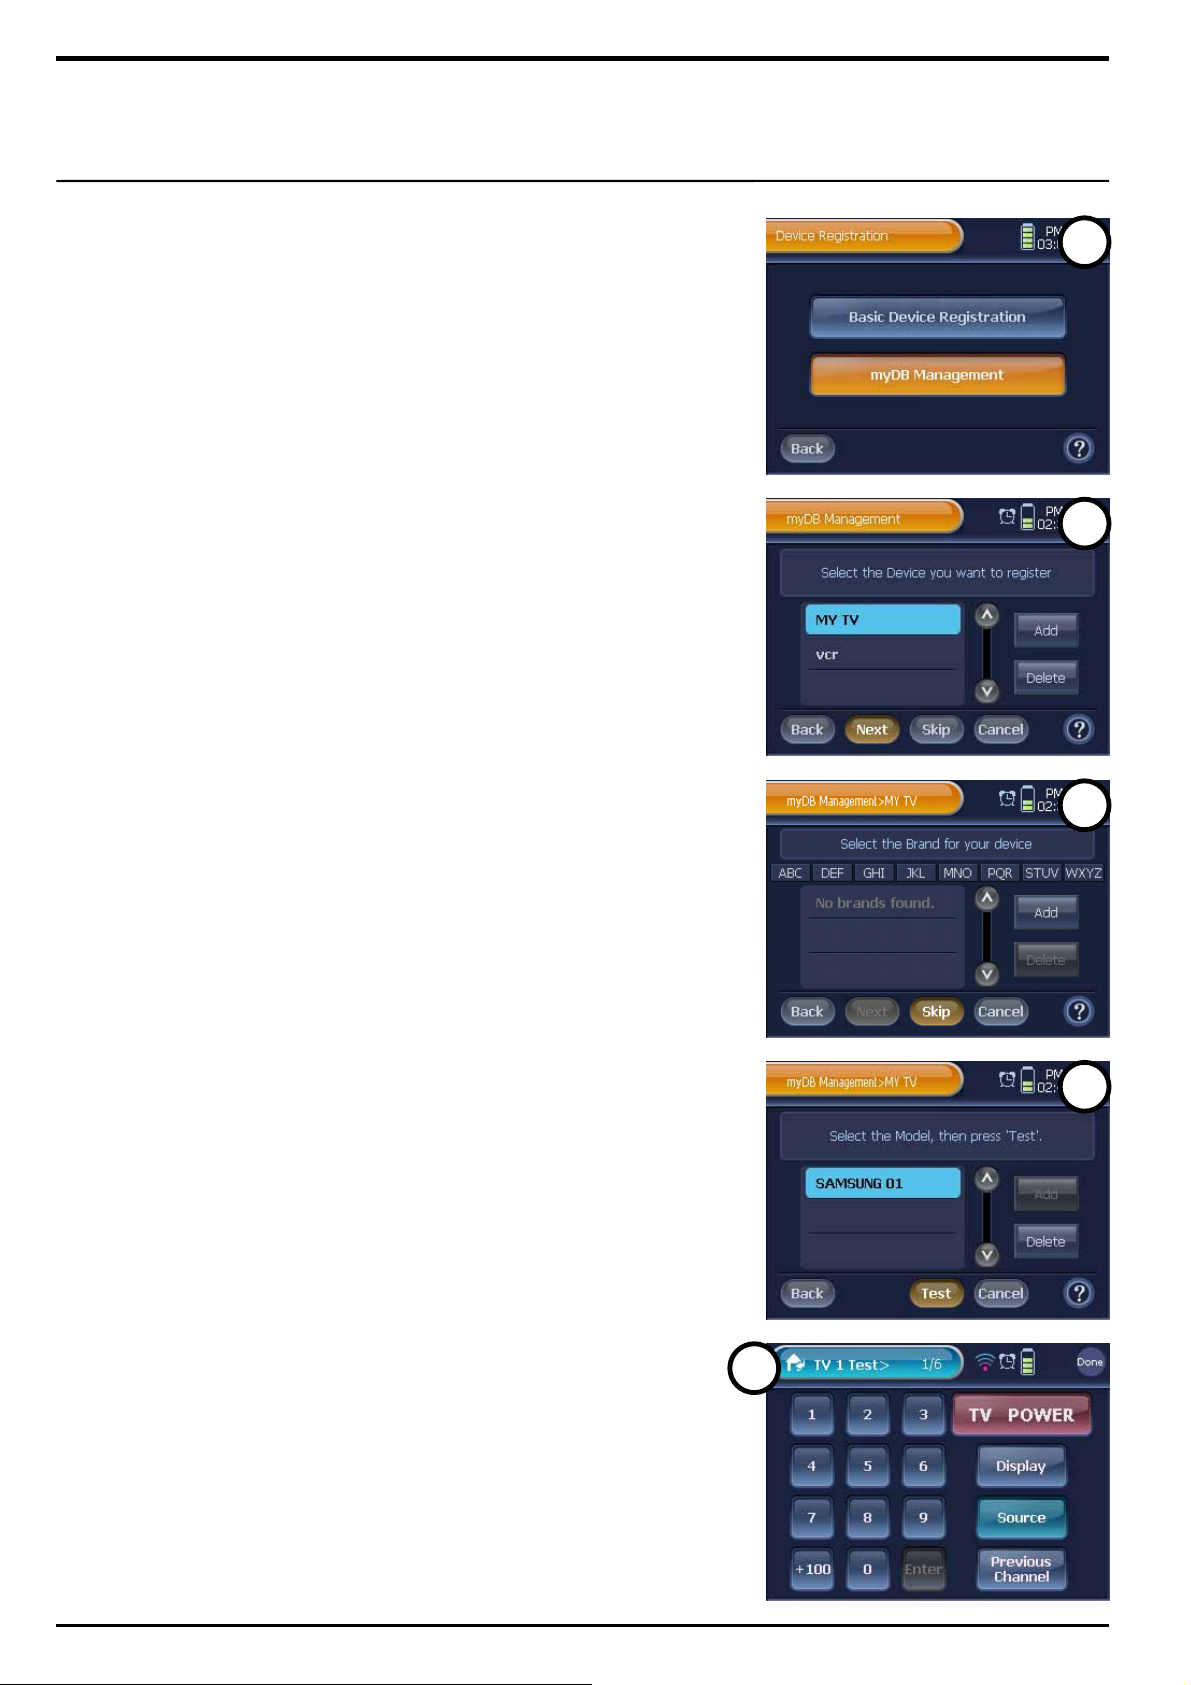
60
How to add Device from myDB
You can register remote control options on “Device Home” using data
of user-defined devices from myDB.
1 Press [Registration] on the "Device Setup" menu screen.
2 Press [myDB Management] on the "Device Registration" menu
screen.
3 Select a “Device” from the device list, and press [Next].
Note 1. If you press [Skip], you can jump to the ‘model list’ screen, then will
see all the model registered in myDB.
2. If you press [Delete], selected device will be removed from myDB.
4 Select a “Brand” from the brand list, and press [Next].
Note 1. When you want to find a brand, please press alphabet button. Then
you will see all the brand beginning with the selected character.
2. If you press [Skip], you can jump to the ‘model list’ screen, then will
see all the model registered in myDB.
3. If you press [Delete], selected brand will be removed from myDB.
5 Select a “Model” from the model list, and press [Test].
You will be directed to the remote control page of the selected device.
Note. If you press [Delete], selected model will be removed from myDB.
6 Press a remote control button to test.
To finish testing, press [Done].
You will be directed to the Device Registration Confirmation screen .
6
2
3
4
5
☞
Page 61
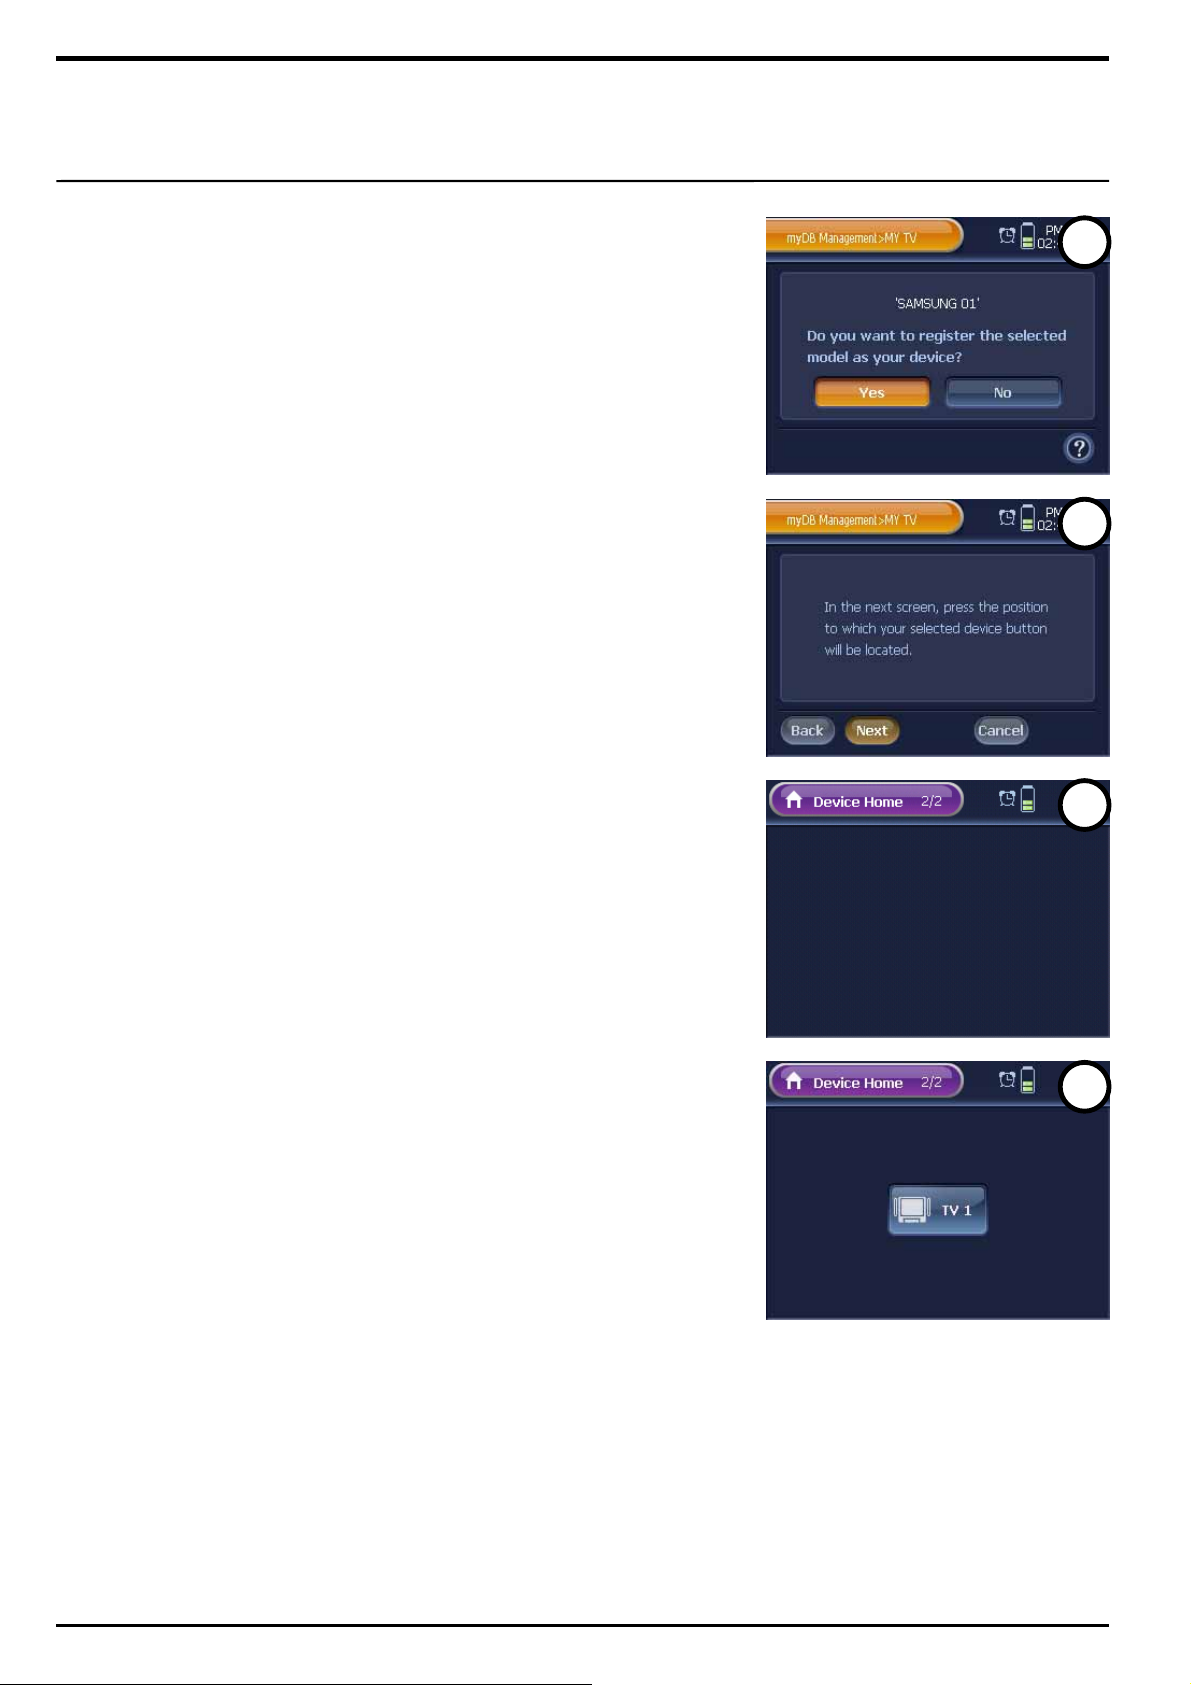
61
7 On the Device Registration Confirmation screen, press [Yes].
8 Press [Next] on the next screen, and then you will be directed to
“Device Home”.
9 Select and press a new location to add the device button.
Note. When you select an incorrect or unavailable location, you will hear a
beep sound alerting that the location unavailability.
10 The device button will be registered.
☞ You can share the data saved in MyDB with a PC or other WZB 35
using USB port of the PC.
Refer to ‘PC Management Guide’ for more detailed information.
7
8
9
☞
10
Page 62

62
User can setup the device in ‘General mode’. ‘Protection mode’ locks the setup function in order to
prevent re-setup by another user.
Setup Protection Mode
How To Setup Protection Mode
① Reboot power. (Switch the power button located in the back side of terminal off and on again).
② Press exterior hard button and at the same time after you switch on the power.
☞ Caution ! You must press the button before LCD screen is turned on.
③ Release the pressed button when you hear a beep sound.
④ ‘General mode’ is converted to ‘Protection mode’ as system loading is completed or vice versa.
[HOME] + [PAGE]
In ‘Setup Protection Mode’, [Set] button is not indicated in order to prevent setting up by a user.
Beep ×2
‘Setup Protection Mode’ ‘General mode’
Page 63

63
Troubleshooting
Basic System
Cannot turn on WZB 35.
① See if you have turned on WZB 35’s power switch.
The switch must be at the “I” side to be on.
② When the battery is fully discharged, you cannot turn
on WZB 35. Please charge WZB 35’s battery.
③ When you still cannot turn on WZB 35 even if you
charge the battery, turn off WZB 35’s power switch,
and leave it off for approximately 5 minutes. Then,
connect the DC adapter directly to WZB 35, and try to
turn on the power again.
WZB 35 automatically turns off.
WZB 35 is configured with automatic energy saving
mode, so it automatically turns off itself when it is not
being used for a while. To reactivate WZB 35, press the
touch screen or an exterior button, or gently lift it up.
Then, it will be turned on again. You can also configure
the energy saving mode setup for your convenience.
LCD screen is too dark to see anything.
WZB 35’s LCD touch screen’s brightness can be
adjusted to 5 different levels. Use the “Brightness
Adjustment” option in WZB 35’s System Setup menu to
adjust the brightness for your convenience.
Clock shows incorrect time.
WZB 35’s clock can be easily configured by using the
“Date & Time” option. Especially the timer options are
based on the clock time, so please make sure to set up
the clock with your correct local time.
I can’t use the on-touch buttons on the touch
screen.
When pressing an on-touch button, it will display an
animation of the button being pressed. If you cannot see
any change on the button even when pressing it, it is
highly possible that the button function has been disabled.
Disabled buttons are shown in a different image from the
normal buttons, and they cannot be pressed. Another
possibility is that the coordinates setup for the touch
screen and the button may have been incorrectly
configured. If this is the case, we encourage you to
reconfigure the touchpoint setup.
How can I delete all the data saved in WZB 35,
and initialize the system?
You can use the “Factory Default” option in the System
Setup menu to initialize WZB 35 system. Please
remember, when the system is initialized, the previous
data saved in the system cannot be restored. Thus, we
encourage you to use this option only when it is
necessary.
The [SET] button doesn’t open the “Setup”
screen.
When pressing the [SET] button on “Device Home”, you
will be directed to "Device Setup" menu. At this point,
the [SET] button can only be activated when it is pressed
at least 0.5 second, and this is to prevent the button from
unnecessarily opening the setup mode whenever it is
touched.
The [Home] button doesn’t allow me to exit
from the setup screen.
Just like the [SET] button function explained above, the
[Home] button also must be pressed at least for 0.5
second to be activated.
I can’t find a button to open the Calculator.
You can open the Calculator screen by pressing the
“Calculator” icon button within System Display Area on
“Device Home”. Remember, the “Calculator” button only
appears on “Device Home”. Thus, you cannot use the
Calculator in any other mode such as Remote Control
mode.
Will I be losing all the data saved in WZB 35 if I
let the battery completely discharged?
Page 64

64
No, even if the battery is completely discharged, your data
in WZB 35 will be safely kept. However, if you leave the
battery without charging it for longer than 15 days, the
clock may stop working; make sure to readjust the time
when you restart using WZB 35.
Can I charge the battery any time I want?
You can charge the battery any time, and it will not affect
the battery’s durability. However, charting the battery when
it is about to run out may cause you inconvenience in
remote controlling devices; therefore, we encourage you to
frequently charge the battery regardless of its remaining
capacity.
Can I use WZB 35 even while charging the
battery?
You will not experience any problem to use WZB 35 even
when the battery is being charged. For your convenience,
we suggest you to use the DC adapter by directly
connecting it to WZB 35, and charging the battery.
Device Registration
I can’t find my device from the device list.
Although WZB 35 enables you to register total 22 different
kinds of device, you may not find a target device from the
device list. In this case, you can select a similar kind
instead. For instance, you can select “AV Receiver”
instead of “Audio”, or “TV” instead of “Web TV”. If you
cannot even find a similar kind of your target device, we
encourage you to use the “Basic Device Registration”
menu.
I can’t find my device’s brand from the brand list.
Although WZB 35 is equipped with a wide selection of
codeset data, and we are continuously updating the
I have successfully registered a device on
WZB 35, but the device’s Remote Control page
doesn’t show a Remote Control button which
exists on the device’s original remote controller.
Even if you have successfully registered a device on
WZB 35, the device’s Remote Control page may not
seem to provide you every option included with the
original remote controller. It is because WZB 35’s device
remote control page is composed of various Remote
Control buttons that are highly optimized, to almost
every brand’s remote controller functions; thus, the
Remote Control buttons may look different from your
original remote controller. If you have a missing Remote
Control button, you can use the “IR Learn” option which
enables you to copy the original remote controller’s
function to a Remote Control button.
The “IR Learn” option doesn’t work.
When you fail to copy a remote controller’s function to
WZB 35’s Remote Control button, please check the
possible causes listed below.
① If a device’s original remote controller is running out of
battery, the “IR Learn” option may not work properly;
Make sure to check the original remote controller’s
battery capacity.
② Before you activate the “IR Learn” option, make sure
to keep less than 5cm distance between the original
remote controller and WZB 35.
③ Aim the original remote controller’s IR transmitter part
exactly toward WZB 35’s center IR receiver part.
④ Press the original controller’s button until you hear a
beep alerting that the Button Learning has been
successfully complete.
⑤ Press the button a little bit hard, so that the button will
be pressured with enough strength. Otherwise, you
may fail to copy the button option to WZB 35.
codeset data, you
the
brand list. If this happens, please refer to the page 23,
“Exceptional Situation 2”.
may not find your device brand from
Page 65

65
Functions
I can’t control my devices with WZB 35’s
Remote Control buttons.
If you experience a problem in remotely controlling a
device by using WZB 35, please check the followings;
① See if you have correctly selected a target device on
“Device Home”.
② Make sure to aim WZB 35’s IR transmitter toward the
target device.
③ Check the battery’s remaining capacity. If the battery
is ran out, WZB 35 may not be able to transmit IR
signals to the device.
④ Test the device with different Remote Control buttons.
If some or even the entire buttons do not respond, we
encourage you to delete the device registration, and
reregister the device.
⑤ When reregistering the device, please test its
codesets and buttons as many as you can before the
actual registration.
I don’t have Channel and Volume buttons on my
device’s Remote Control page.
Some Remote Control options use WZB 35’s exterior
buttons such as “CH +/-”, “VOL +/-”, “Mute”, “Cursor
Control”, “Menu”, and “Exit”. These buttons perform
exactly the same as on-touch Remote Control buttons in
Remote Control mode.
Macro options don’t work.
If you experience a problem in using macro options,
please check the followings;
① Make sure to aim WZB 35’s IR transmitter toward the
selected device. Considering that you are using
macro options to control multiple devices at the same
time, all the target devices should be placed within
WZB 35’s IR signal area which is quite wide: 100˚
from left to right, and 80˚ from top to bottom.
② Check the battery’s remaining capacity. If the battery
is ran out, WZB 35 may not be able to transmit IR
signals to the device.
③ Check the target device’s status. For instance, if WZB 35
is about to turn on the device, but the device already has
been turned on, it may cause a malfunction of WZB 35,
and WZB 35 might turn off the device as the result.
④ When you command macro actions to one device, check
“Delay” of the actions.
⑤ Open the “Edit Macro Action” menu, test the macro button,
and reconfigure the macro action that does not work
properly.
A timer doesn’t work.
If you experience a problem in activating a timer, please
check the followings;
① Aim WZB 35’s IR transmitter toward a device which will
be activated by the timer. If the timer is configured to
control multiple devices at the same time, all the all the
target devices should be placed within WZB 35’s IR
signal area which is quite wide: 100˚ from left to right, and
80˚ from top to bottom. Since the timer is going to control
the devices instead of you hand-holding WZB 35 and
controlling them, you have to place WZB 35 in a place
where it can control the devices without causing a
malfunction.
② Check the battery’s remaining capacity. If the battery is
ran out, WZB 35 may not be able to transmit IR signals to
the device.
③ Check the target device’s status. For instance, if WZB 35
is about to turn on the device, but the device already has
been turned on, it may cause a malfunction of WZB 35,
and WZB 35 might turn off the device as the result.
④ If the timer is configured to command multiple actions to
one device, check “Delay” of the actions.
⑤ If the timer was not activated at the set time, check
WZB 35’s clock, and see if the clock indicates the correct
time. Make sure that the timer’s activation time is affected
by the clock. For next, please check the timer’s registered
activation time.
⑥ If the timer’s action does not work properly, test the action
on the “Timer Action List”, and reconfigure the action.
Page 66
66
General Information
Safety Precautions
▪ Do NOT use WZB 35 with a Non- WZB 35 branded DC adapter.
▪ Keep WZB 35 stably positioned at all times, or the unit, especially the LCD screen, may be
seriously damaged..
▪ Always keep WZB 35 away from heavy moisture.
▪ Always keep WZB 35 from being exposed to magnetic fields.
▪ Always keep WZB 35 from all kinds of heat sources.
▪ Do NOT attempt to repair the product yourself or remove the casting.
Any hardware modified product is subject to exclusion from free repair services.
▪ Keep WZB 35 and the battery charger’s charging terminal away from dust and other substances
at all time.
▪ Use Stylus or finger to touch WZB 35's LCD screen.
Other objects may cause scratches or damage to the LCD screen..
▪ Never use liquid or aerosol detergent to clean WZB 35, or its LCD screen.
▪ Use a soft cloth to wipe WZB 35.
Certification and Verification – CE R&TTE FCC FCCID RoHS
WZB 35 Software Update
Vity Technology frequently provides you all kinds of WZB 35 related software, so that you can enjoy
more options with your WZB 35. To download and update WZB 35 software, you must install the Active
Sync program, and have a USB driver. For your convenience, WZB 35 product kit is included with a USB
driver and the Active Sync program inside the product CD. You can also download the Active Sync
program from the “Update” section on our official website. For more information regarding the software
update, please visit our website at www. vity.com and check the “Online Update” menu.
Page 67
67
FCC Information
This device complies with Part 15 of the FCC Results. Operation is subject to the following
two conditions :
(1) This Device may not cause harmful interface, and
(2) This Device must accept any interference received, including interference that
may cause undesired operation.
Note : This equipment has been tested and found to comply with the limits
for CLASS B digital device, purs u a nt t o Part 1 5 FCC Rules. Th es e limits
are designed to provide reasonable protection against harmful interference
when the equipment is operated in a commercial environment. This equipment
generates, uses and can radiate radio frequency energy and, if not installed
and used in accordance with the instructions, may cause harmful interference
to radio communications. However, there is no guarantee that interference will
not occur in a particular installation. If this equipment does cause harmful
interference to radio or television reception, which can be determined by
turning the equipment off and on, the user is encouraged to try correct the
interference by one or more of the following measures ;
1.1. Reorient or relocate the receiving antenna.
1.2. Increase the separation between the equipment and receiver.
1.3. Connect the equipment into an outlet on a circuit different from that to
which receiver is connected.
1.4. Consult the dealer or experienced radio/TV technician for help.
WARNING
Changes or modifications not expressly approved by the manufacturer could void the user’s
authority to operate the equipment.
“CAUTION : Exposure to Radio Frequency Radiation.
Antenna shall be mounted in such a manner to minimize the potential for human contact during
normal operation. The antenna should not be contacted during operation to avoid the possibility
of exceeding the FCC radio frequency exposure limit. The minimum separation distance of 20cm
from the antenna to the body of user required.”
Page 68

68
System Specifications
Display
. Touch screen
. 3.5 inches Color TFT LCD
. 65,000 colors
. 320 X 240 pixels
. High Brightness Backlight
CPU
. 32bit RISC
. 206MHz ARM9 Processor
Memory
. 64MB NAND Flash
. 64MB SDRAM
OS
. Windows CE.NET 4.2
IR Capabilities
USB
. USB 1.1 Interface
Status LED
. Operating and Battery Status
. High Brightness
. Color : Blue, Red, Green
Sound
. Magnetic Buzzer
Pick up Sensor
. Screen wake up
. Operating Angle : Up/Down 15˚
Dimensions
. WxDxH(mm) : 160 x 99 x 17.0/22.8
. Weight(g) : 240
Convenience
. Operating Distance : 45M(max)
. Horizontal Range: ±50 degrees
. Vertical Range: ±40 degrees
. IR Transmitter and Receiver
. Learning IR codes
. Universal IR code Database
Radio Frequency (RF)
. Frequency : 2.4GHz
. Operating Distance: Max120M
( 2dB external antenna)
. Addressable 16 Extender ID
. Addressable 16 Channel
Battery
. 4.2V/1,600mA Thin Lithium-polymer
DC Power
. 12V/1.5A SMPS DC Adaptor
. System Macro Function
. Macro Link Function
. Timer Function
. Clock/Date Display
. RTC Back up Battery built in
. Hard Button : 19 ea
. Automatic Power Off
. Online Update
Accessories
. Chargeable Cradle
. RF Receiver ( Options)
- External Antenna 2dB
- Addressable 4 IR port
- 1 IR link Port
- 1 RS232 (Tx)
. Dual Blink IR Emitter Cable
. DC Adaptor
. USB Cable
. Stylus Pen
 Loading...