

Page 1
1
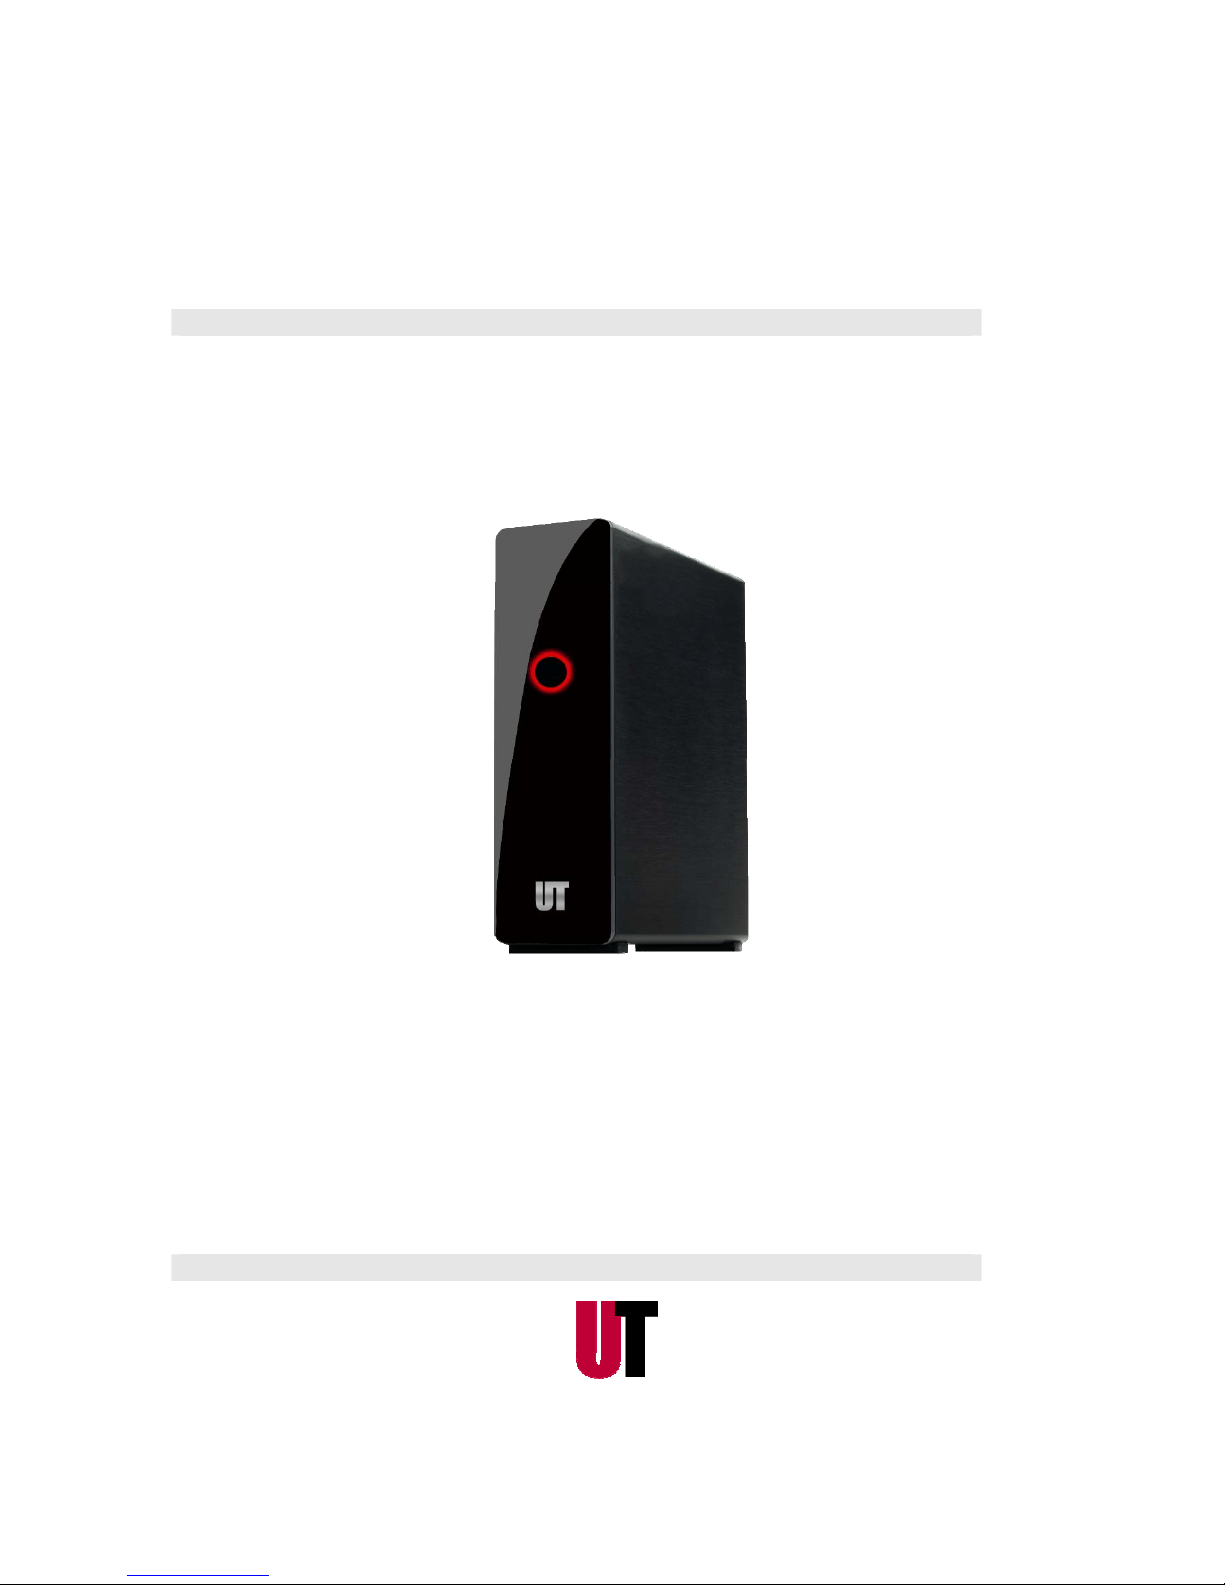
MV3600 MyMovee
User’s Guide
Page 2

2
Table of Content
Introduction .................................................................................................................. ............. 3
Features Highlight ................................................................................................................... ... 3
Product Specifications .............................. ................................................ ................................... 3
Contents of box ............................................................... ................................................ ........... 4
Chapter 1: Getting Started .......................................................................................... .. ........... 5
The Remote Control ................................................................................................ 5
The Guide Menu .................................................. .. ... .............................................. 10
Selecting file copy ................................................................................................. 10
Selecting Browser ................................................................................................. 10
Selecting Setup ............ ........................ ........................... ........................... ........... 10
Chapter 2: Setup Menu ........................................................................................................ .. 11
Changing Audio Settings ...................... ................................................................ . 11
Changing Video Settings ........................................................................................ 12
Changing Network Settings ................................................................................... 15
Changing System Settings ..................................................................................... 20
Changing MISC Settings ........................................................................................ 25
Chapter 3: Browser Menu ........................................................................... .. ... ...................... 28
Browsing All ......................................................................................................... 28
Browsing Music .................. .......................... ........................ ........................... ...... 29
Browsing Photos ................................................................................................... 29
Browsing Movies .................................................................................................... 30
Browsing Network ............................................................................................... 30
File Edit Menu ............ .......................... ........................ ........................... .............. 34
Playlist ................................................................................................................. 36
Chapter 4: File Copy Menu ..................................................................................................... 37
Chapter 5: Install BT_SAMBA ........................................................... ... ................................... 40
Ready for installation ............................................................................................ 40
The First install ....................... ... .................................................................. ......... 40
Boot Up System to install ...................................................................................... 43
Chapter 6: Transcode Server in PC ......................................................................................... 44
Chapter 7: Neithbor Web Interface ................................................ ... ...................................... 49
BitTorrent Download ............................................................................................. 49
Add new torrent ................................................................................................... 50
Delete torrent file ................................................................................................. 52
Stop torrent File ... ........................... ........................... .......................... ................. 53
Visit Neighbor ....................................................................................................... 54
Account Management ........................................................................................... 54
Limited Warranty Statement .......................... .................................................................. ......... 55
Page 3

3
Introduction
The MV3600 HD Media Players are designed to enhance the consumer experience with breathtaking movie
quality of High-Definition (HD) video and crystal sound clarity of DTS and Digital Dolby digital audio.
Featuring full support of major media formats, MV3600 offers users a simple way to play their HD 1080p
digital content on any TV.
Instead of keeping shelves full of music CDs, DVDs and Blue Ray Discs movies, more and more people prefer
to build large personal collections of digital content on their desktop or laptop computers. The drawback is
they must use the computer to play these files. Their movie watching or music listening experience is
confined to small screen and small speakers of their computer system. With MV3600, users can simply play
the digital content directly from the pre-assembled internal HDD up to 2TB or from USB external storage
device in the comfort of their living room or bedroom. They are free from struggling with burning media files
onto DVDs or connecting the computer to the TV.
Features Highlight
High definition 1080p movie
Crystal clear high def i nition audio
More video format supported
Build-in HDD
Media Streaming with UPNP
USB 2.0 Host ports
Internet Radio
Download Station
NAS
Multi language support
Product Specifications
Chipset Realtek 1073DD C+
A
C Adapter Input: 100-240V Output: 12V/3AVideo: HDMI 1.3,CVBS, Ypbpr
A
/V Output Audio:Digital 5.1(optical+coaxial) Audio,Stereo L/R
USB
Interface
2* USB 2.0 HOST,1* mini USB 2.0 device
HDD Capacity 3.5 (SATA)HDD built-in , up to 2TB
Language English,Spanish,French,Germany,Italian,Dutch,Russian,Polish,Portuguese,Swedish,
Turkish
File System FAT32/NTFS
NTSC/PAL
Video Format MKV, TS, M2TS, MTS, TP, WMV, IFO, ISO, VOB, DAT, AVI, MPG, MP4, MOV, RM,
Page 4

4
RMVB, DIVX, XVID, FLV
Subtitle SUB, SRT, SSA, SMI, IDX+SUB
A
udio
FormatCodec
MP3, WMA, WAV, OGG, AAC, LPCM, FLAC, AC3;MPEG1,HD MPEG2(up to MP@HL
1080i)
HD MPEG4 SP/ASP(720p/1080i/1080p)Xvid,WMV9(up to 1080p)
H.264 BP@L3,[email protected],[email protected] (up to 1080p)
RM/RMVB8/9/10(up to 1280x720@30P)
A
udio Out Stereo
Dolby Digital AC3 5.1 (passthrough & downmix to stereo)
Dolby Digital Plus (passthrough)
DTS (passthrough & downmix to stereo)
DTS-HD Master Audio (passthrough core stream & downmix to stereo)
FLAC 7.1 (passthrough & downmix to stereo)
Photo JPG/JPEG/BMP/GIF/TIFF,Music Slideshow, Zoom and Transition
Web Service Youtube ,Youku,Picasa, Flickr ,Rss news,Weather, iRadio, Internet TV
Others
Function
NAS,UPNP,SAMBA,BT,FTP,WIFI
Optional
A
ccessories
HDMI cable, Wireless N Dongle
Note: The specifications and design of this product are su bject to change without prior notice.
Contents of box
MV3600 HD Media Player
Remote Control with Batteries
Quick Installation Guide
Component AV Cables
Composite AV Cables
Power Adapter
HDMI Cable (optional)
Wireless N dongle (optional)
Page 5
5
Chapter 1
Getting Started
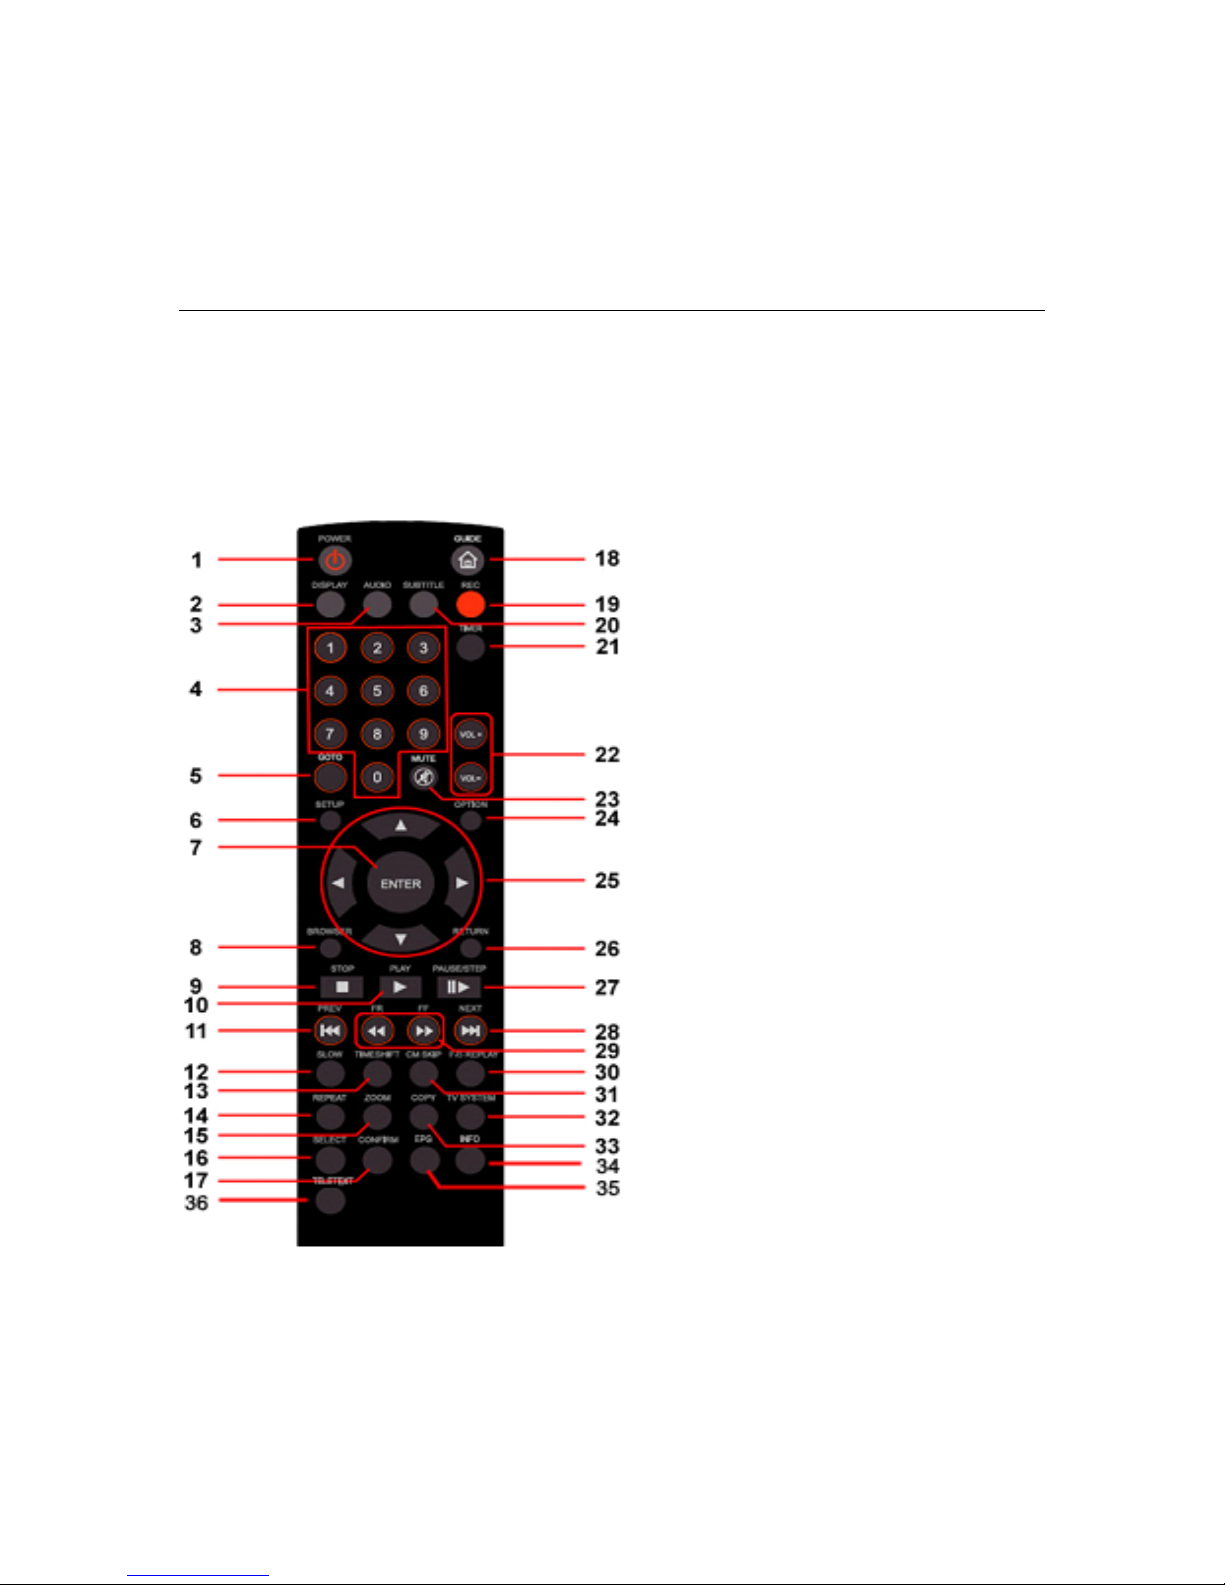
The Remote Control
All procedures in this manual can be carried out using th e remote control butt o ns. Certain functions
can also be carried out using the front pane l at the front of the DVD recorder.
See the following for details on each button and its function:
1. POWER 2. DISPLAY
3. AUDIO 4. Number
buttons
5. GOTO 6. SETUP
7. ENTER 8. BROWSER
9. STOP 10. PLAY
11. PREV 12. SLOW
13. TIMESHIFT 14. REPEAT
15. ZOOM 16. SELECT
17. CONFIRM 18. GUIDE
19. REC 20. SUBTITLE
21. TIMER 22. VOL+/-
23. MUTE 24. OPTION
25. Navigation
buttons
26. RETURN
27. PAUSE/STEP 28. NEXT
29. FR/FF 30. INS REPLAY
31. CM SKIP 32.
T
V SYSTEM
33. COPY
35. EPG
34. INFO
36. TELETEXT
Page 6
6
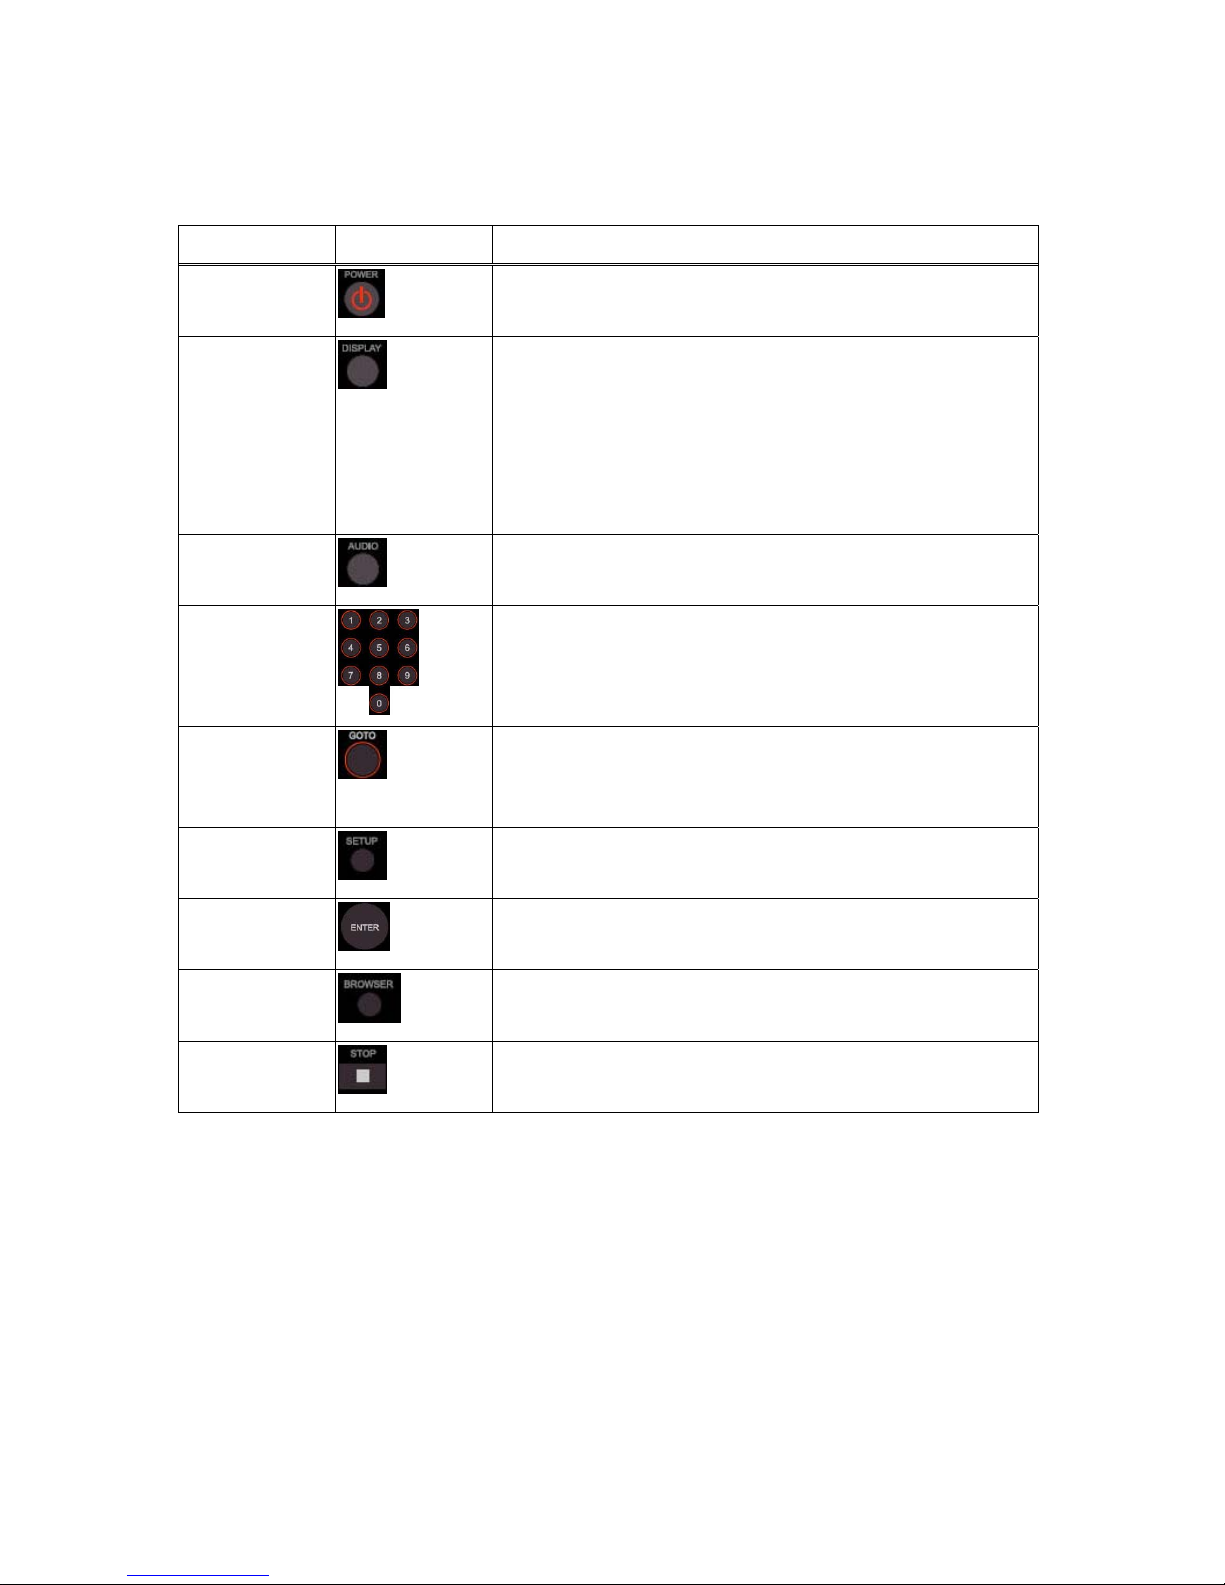
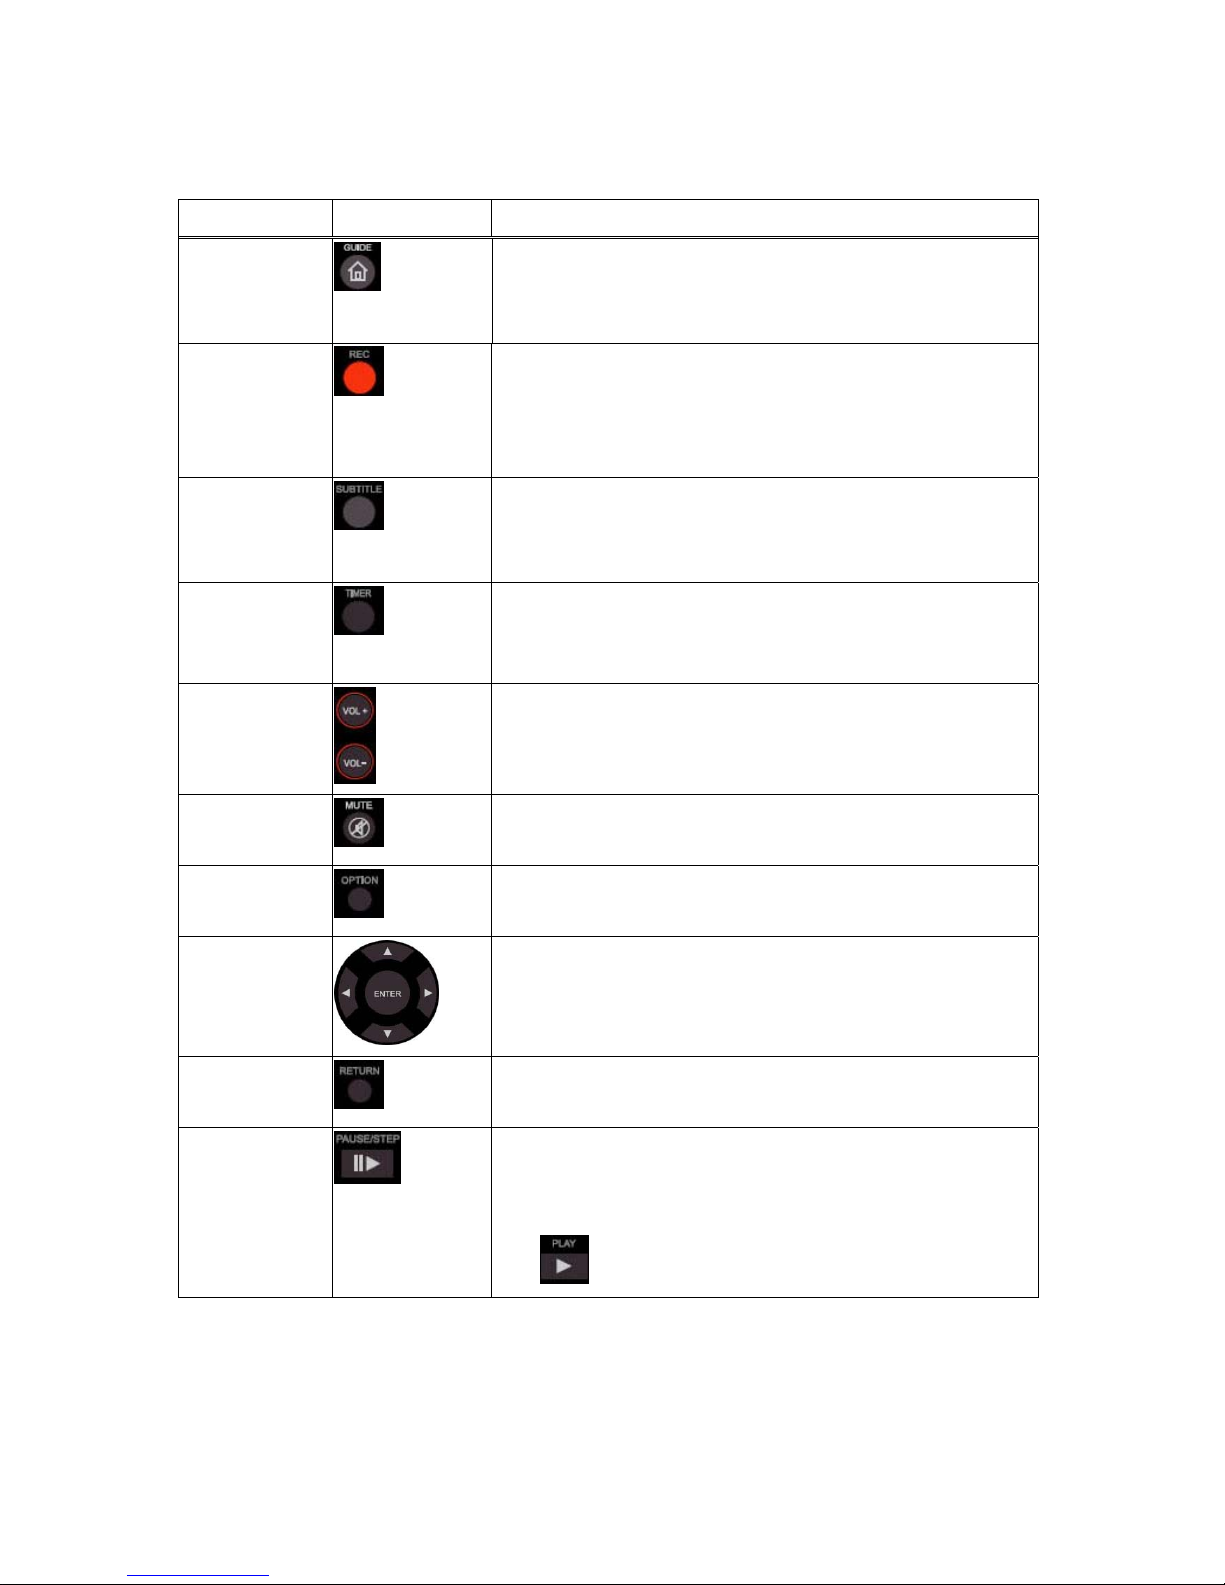
No. Button Function
1
POWER
button:
Press to POWER on or off the AVHDD recorder.
2
DISPLAY
button:
Press to display current status.
Press durin
g
playback and an onscreen display appears, showing
track number and time elapsed/remaining.
Press during recordin
g
and an onscreen display appears, showing
the recording quality setting and time elapsed.
3
AUDIO
button:
Press to select an audio track on a HDD or USB file.
4
Numeric
buttons:
Press to enter channel numbers or numeric input when changing settings.
5
GOTO
button:
Press to
j
ump to a specific point on the disc or title. Specify the point using
Title, Chapter and Time.
6
SETUP
button:
Press to access the Setup Menu directly to change system settings.
7
ENTER
button:
Press to select confirm in menus.
8
BROWSER
button:
Press to browse the music , photo, movie, all files on USB,HDD.
9
STOP
button:
Press to stop playback.
Page 7
7
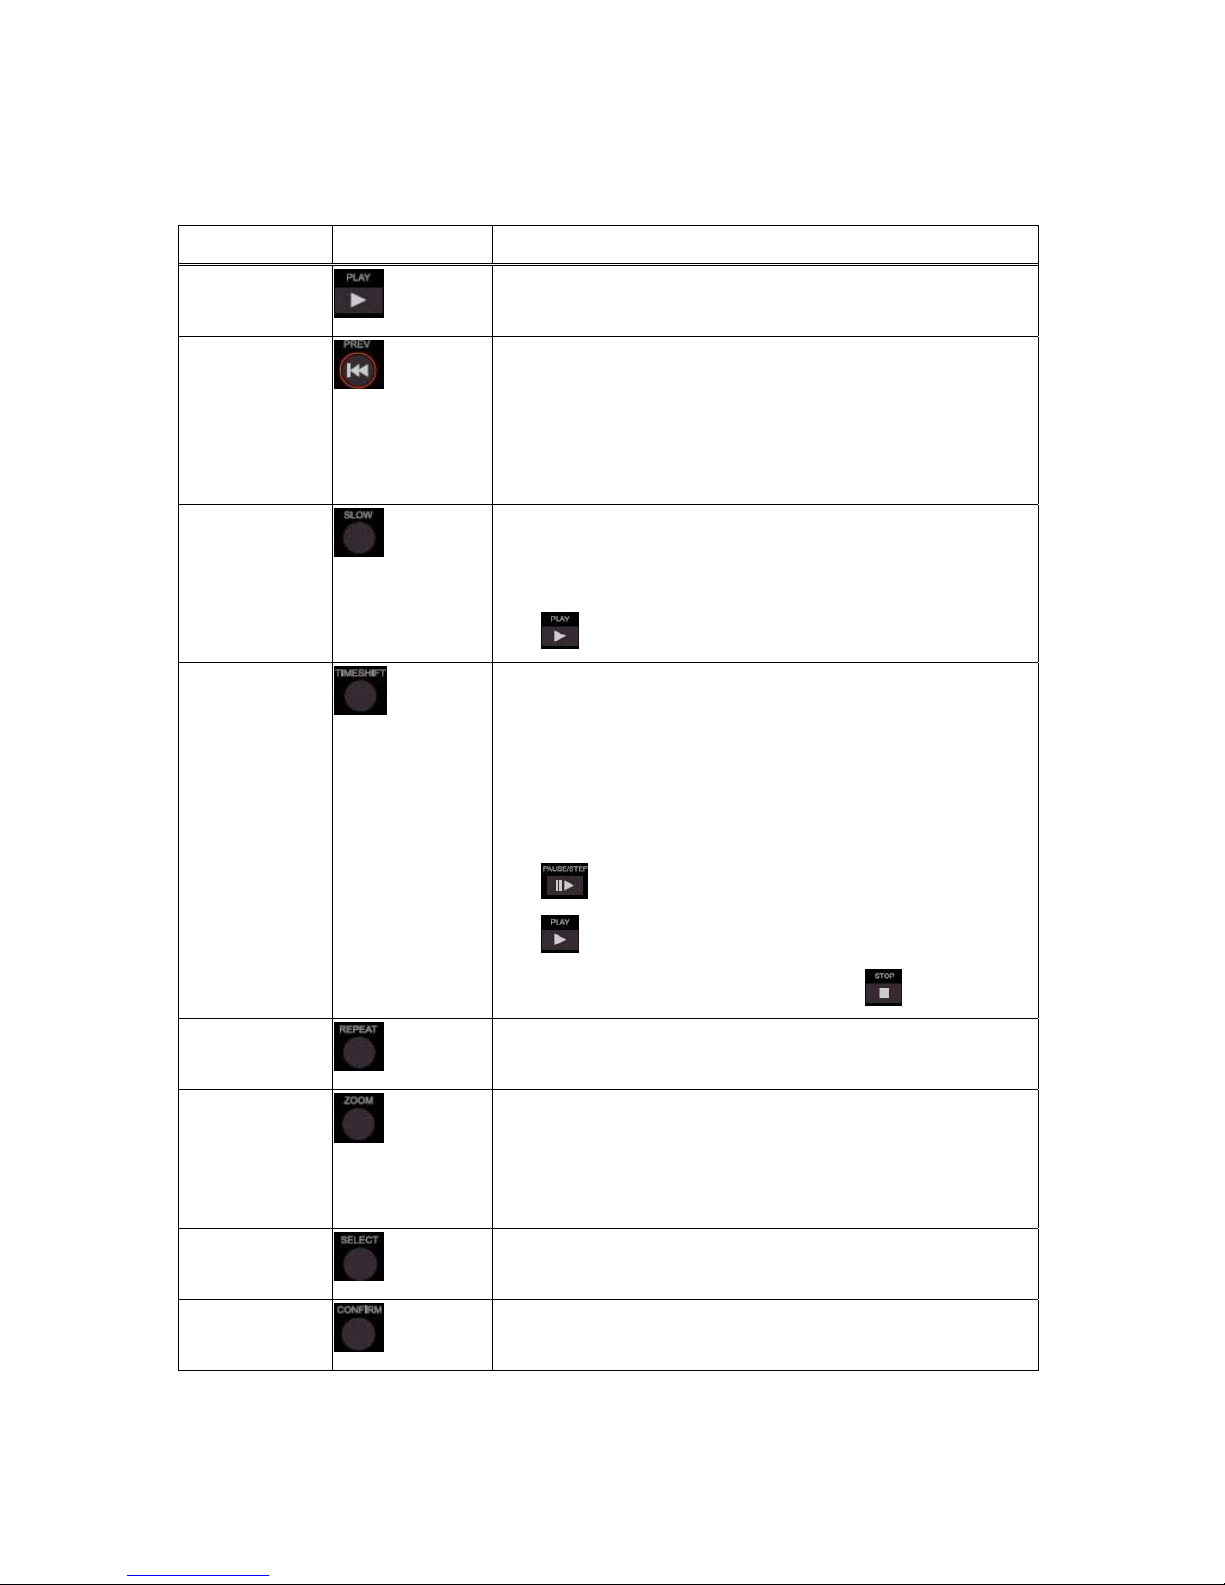
No. Button Function
10
PLAY
button:
Press to begin playback of a DVD or HDD title.
11
PREVIOUS
buttons:
Press to go the prev. on a HDD or USB file when playing music.
Press to page up the file list at Browser.
When play photo ,the button is enable; pl ay Movie and Mp3 f ile,
the button is disable.
12
SLOW MOTION
button:
Press to play back in slow motion. Three motion settings are available.
Five slow motion levels(3/4,1/2,1/4,1/8,1/16x) are available.
Press
to resume regular playback.
13
TIME SHIFT
button:
Press to activate the timeshift function, which allows you to pause live TV
and resume the program from the point you left it. While paused, the
program is recorded to the HDD, as long as space is available.
Press to activate TIME SHIFT function and wait for the
PLAY arrow to appear on the screen.
Press
and the program is paused.
Press
to resume viewing the program.
Timeshift mode remains active until you press the
button.
14
REPEAT
buttons:
Press REPEAT 1 / ALL to set repeat option - Chapter, Title or Off.
15
ZOOM
button:
Press to zoom in/out when playing back photos or Video programs.
Photo zoom levels:2X,4X,8X,16X;
Video zoom levels:2X,3X,4X,8X.
16
SELECT
buttons:
Press to select file or folder to rename or delete.
17
CONFIRM
button:
Press to select confirm.
Page 8
8
No. Button Function
18
GUIDE
button:
Press to view the Guide menu. See
“The Guide Menu” on page 6
for
more details.
19
RECORD
button:
Press to begin recording or to resume when recording has been paused.
Press repeatedly to set OTR len
g
th (30 mins / 60 mins / 90 mins / 120 mins
/ 180 mins /240 mins/Off).
20
SUBTITLE
button:
Press to activate available subtitles when play the DIVX file.
DivX subtitle supported: SRT,SMI,SUB,SSA format file.
21
TIMER
button:
Press to enter the Timer Menu directly to add, edit and delete recording
schedules.
22
VOL + / -
buttons:
Press to increase or decrease the volume.
23
MUTE
button:
Press to mute audio output, and press again to resume.
24
OPTION
button:
Press to select option bar.
25
Navigational
buttons:
Press the arrow buttons to navigate the menus.
26
RETURN
button:
Press to return to the previous screen when navigating the menus.
27
PAUSE / STEP
button:
Press to pause current playback.
Press again to step to the next frame.
Press to resume playback.
Page 9
9
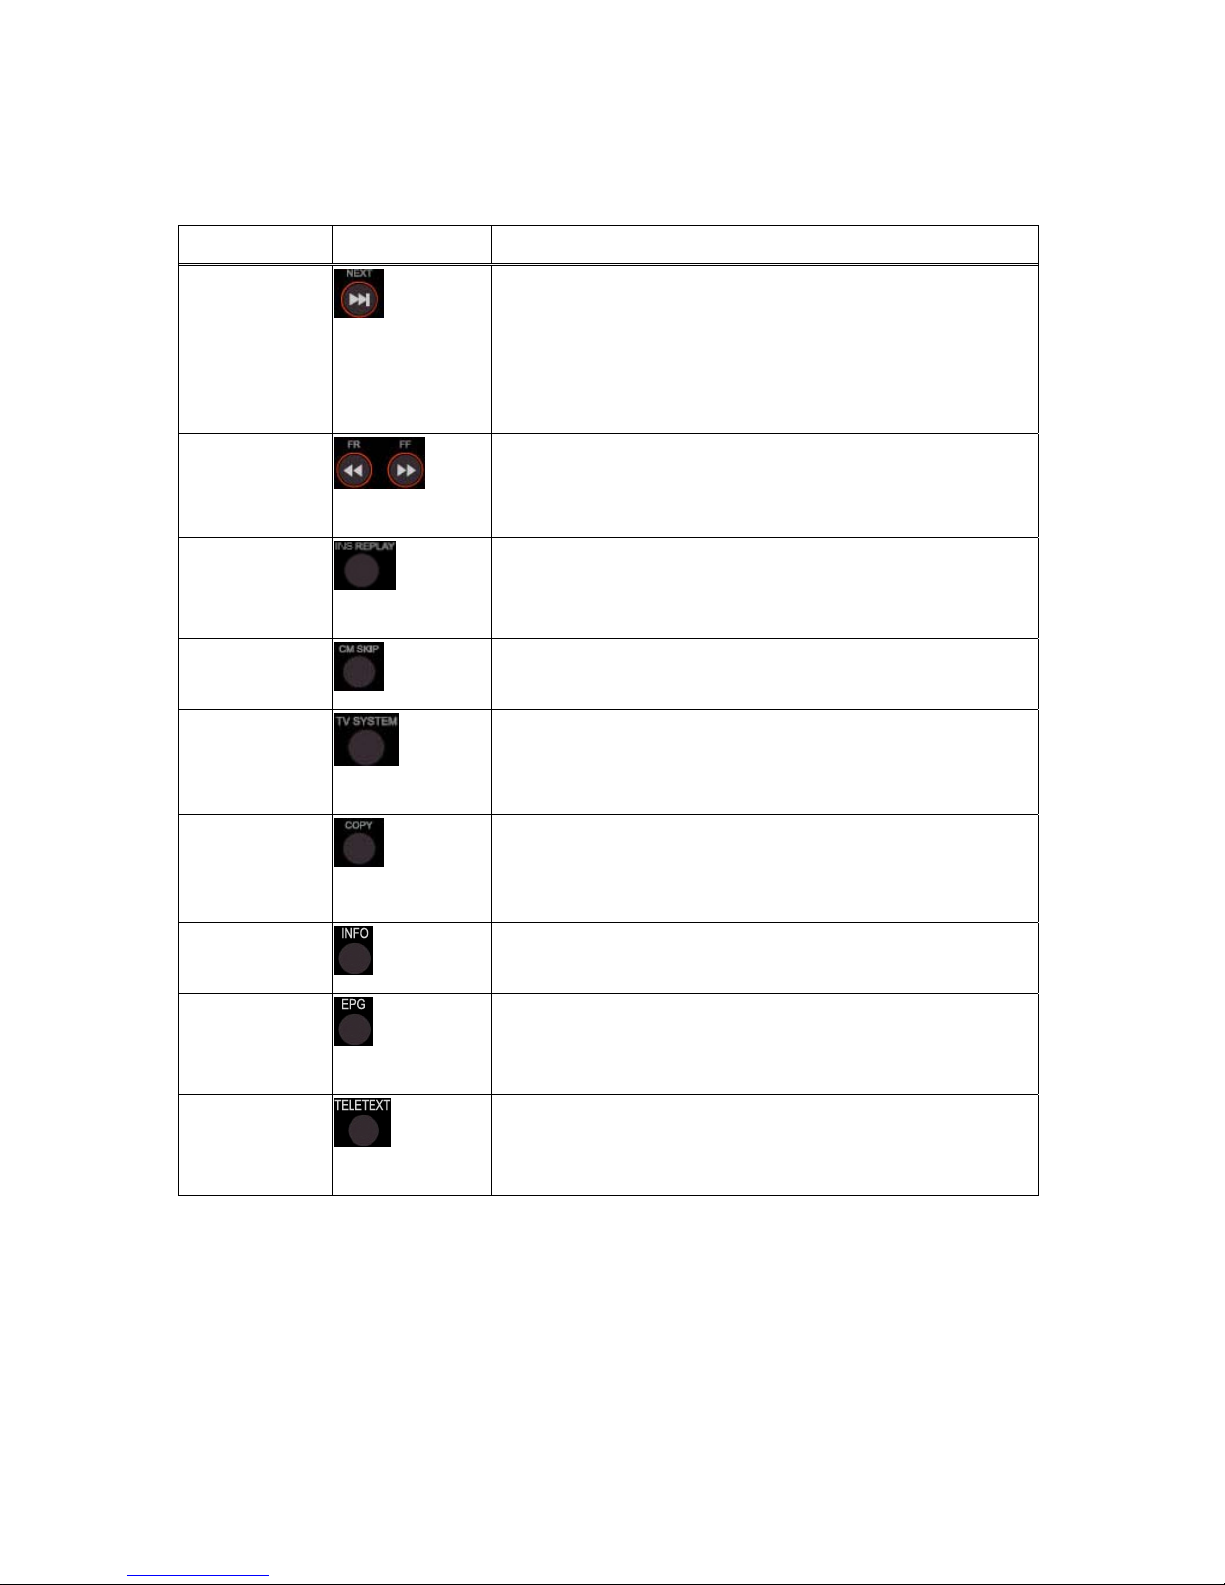
No. Button Function
28
NEXT
buttons:
Press to go the next on a HDD or USB file when playing music.
Press to page down the file list at Browser.
When play photo ,the button is enable; play Movie and M p3 file,
the button is disable.
29
FAST REWIND / FAST FORWARD
buttons:
Press to fast rewind or fast forward the current playback.
Press repeatedly to select faster rewind or fast forward speeds.
30
INS REPLAY
button.
Press to backward 10 seconds of the current playback, which suitable for
sport program.
31
CM SKIP
button:
Press to advance 30 seconds when in playback or record mode.
32
TV SYSTEM button:
Press to switch between NTSC Interlaced, NTSC Progressive,
PAL Interlaced, and PAL Progressive.
33
COPY
button:
Press to copy file from one device to ot her.
See
“FILE COPY MENU” on page 32
for more details.
34
INFO
button:
Press to view the current channel information.
35
EPG
button:
Press to enter the Electronic Program Guide which displays an on-screen
list of programs for the coming week when watching Digital Terrestrial TV.
36
TELETEXT
button:
Press to open Teletext OSD if i t is available in the broadcasted stream of
Digital Terrestrial TV.
Page 10
10
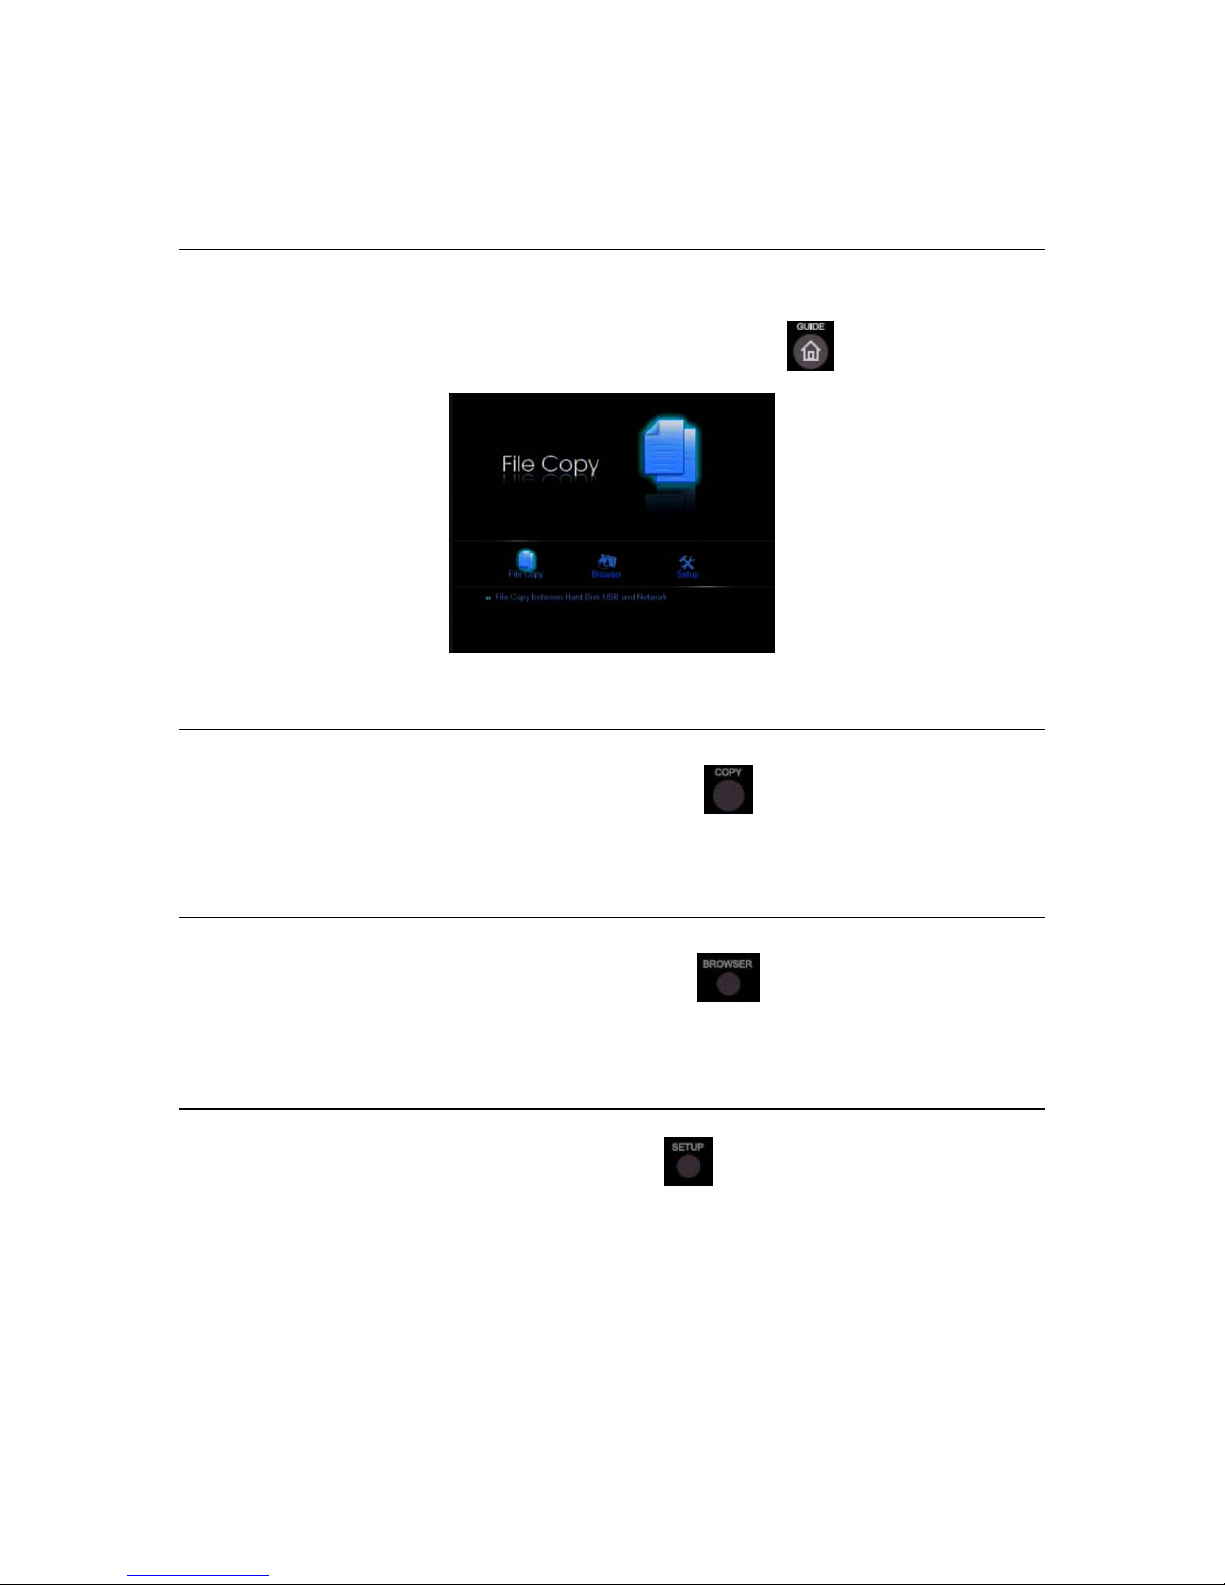
The Guide Menu
Power on the MV3600 MyMovee system, you can see the star up page.
After a few second, the system will enter a guide menu. To enter this menu, press
on the remote control too.
Selecting file Copy
Select File Copy button on the guide menu page or select on the remote control to copy files
between HDD, USB, Card Reader and NET.
Selecting Browser
Select Browser button on the guide menu page or select on the remote control to browser
movie, photo, music files stored either on a HDD, USB, Card Reader, NET or a USB device.
Selecting Setup
Select Setup button on the guide menu page or select
on the remote control to enter the setup
menu.
Page 11
11
Chapter 2
Setup Menu
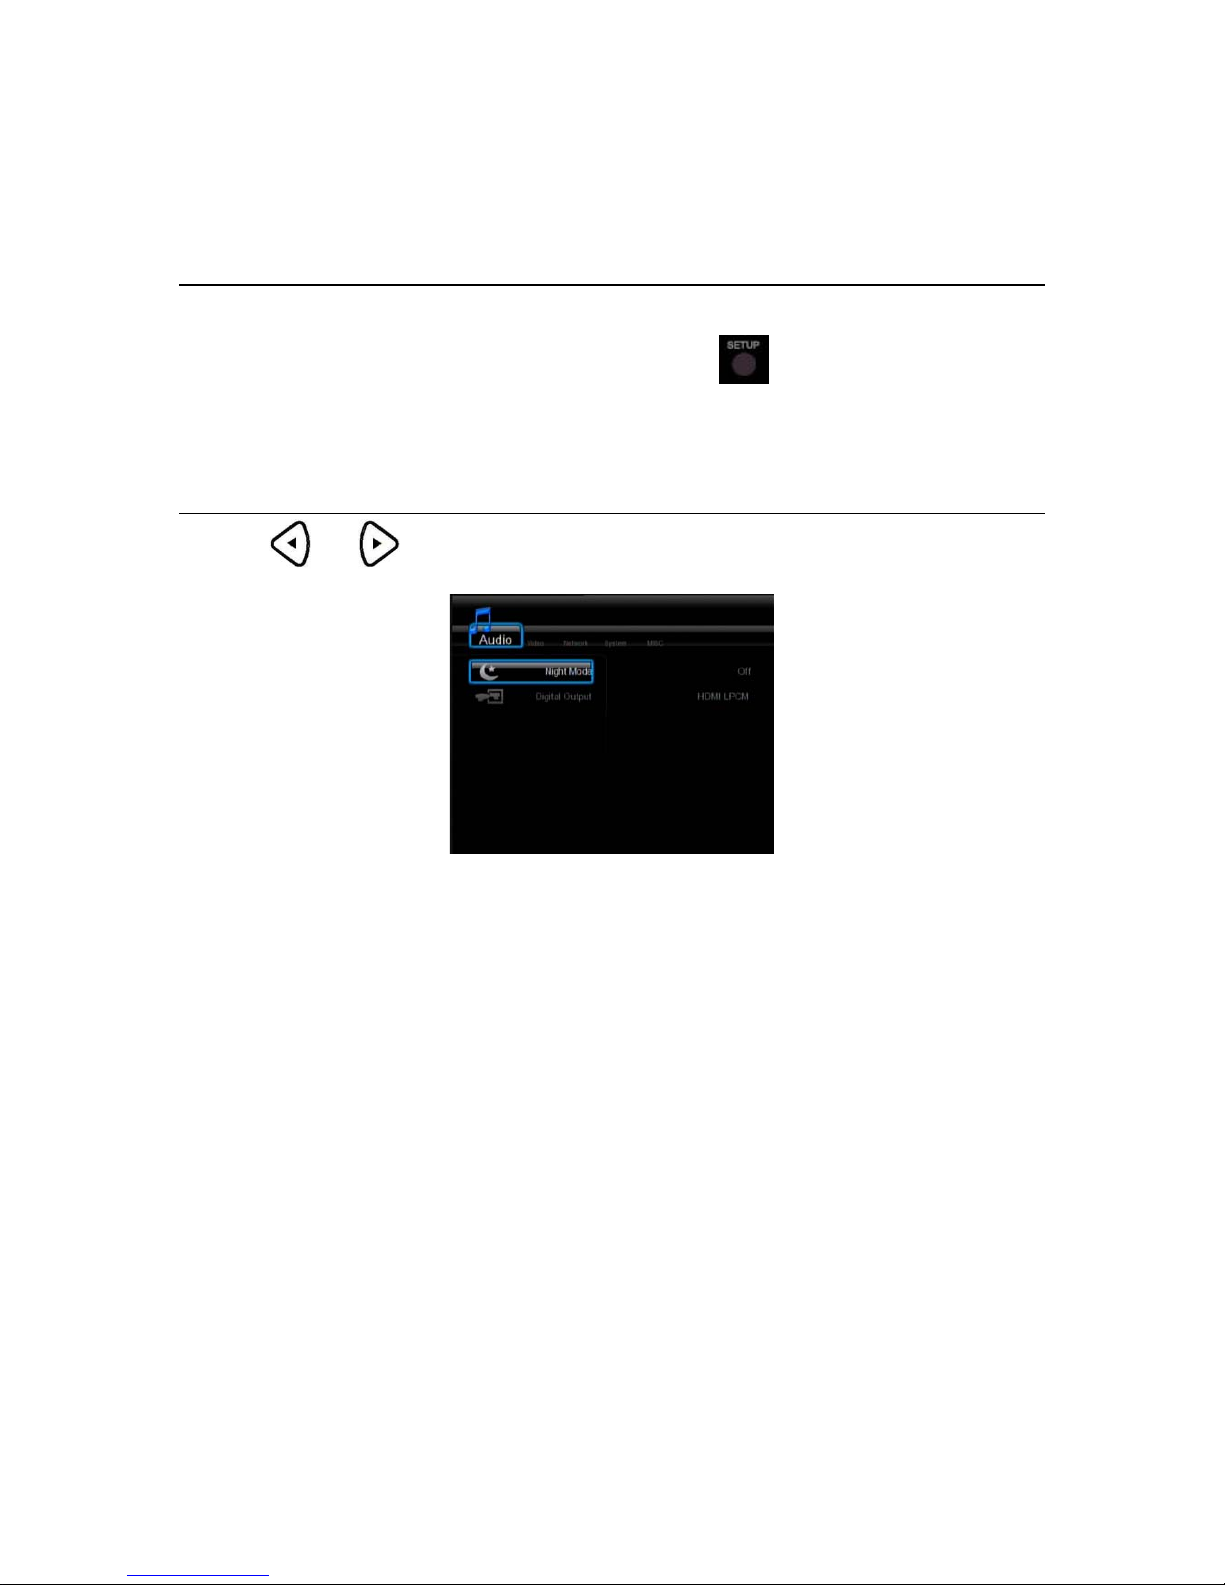
The Setup Menu allows you to configure audio, video, network,photo and system settings.
To enter the menu, select Setup from the Guide menu or
on the remote control
Changing Audio Settings
Press and on the remote control to se le ct the Audio tab from the menu bar.
Page 12
12
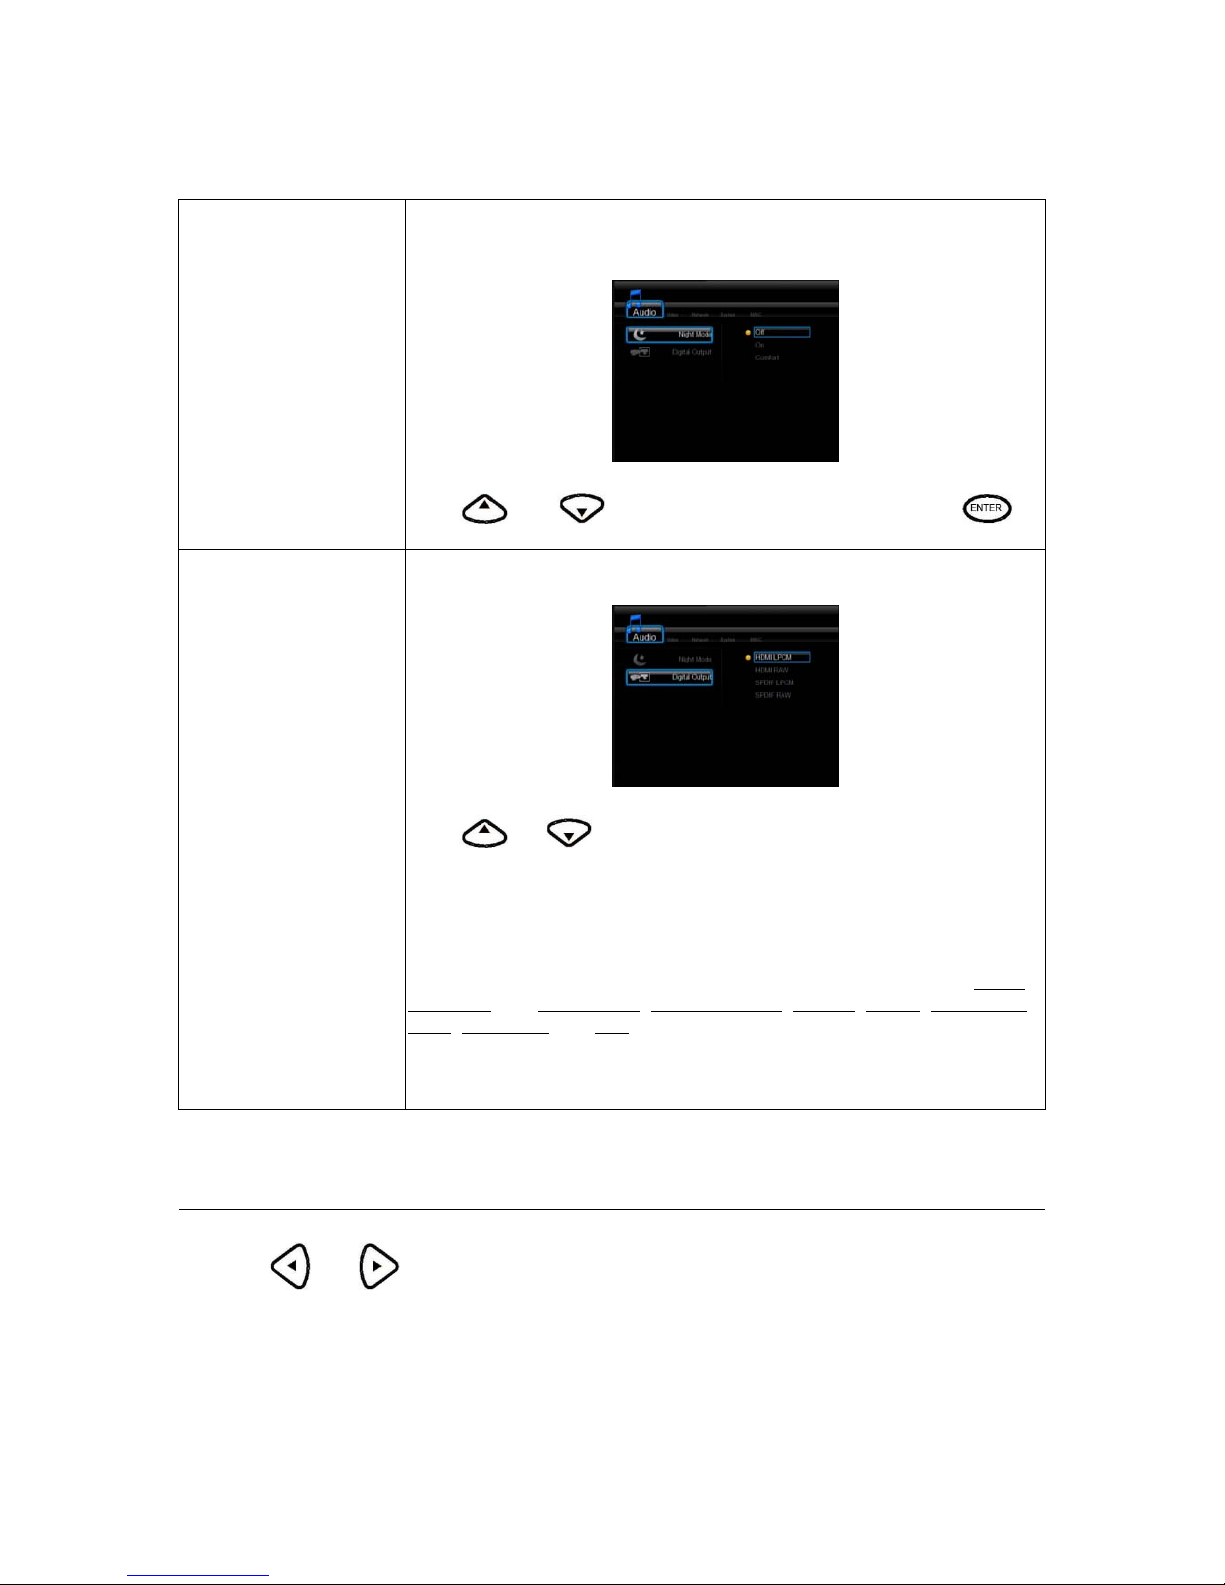
Night Mode Select to toggle Night Mode on and off.
This function reduces the maximum dynamic audio range.
Press
and to to enable or disable the function. Press to
confirm.
Digital Output Select to set Digital output type.
Press
or to select from HDMI and SPDIF RAW or LPCM.
S/PDIF (Sony/Phillips Digital Interface Format) carries digital audio signals
between the DVD recorder and other component devices, such as a home
theater setup with surround sound.
The HDMI(High Definition Multimedia Interface) is a compact audio/video
connector interface for transmitting uncompressed digital streams. It
represents a digital alternative to consumer analog standards such as Radio
Frequency (RF) coaxial cable, composite vid e o, S-Video, SCART, component
video, D- Terminal, and VGA.
RAW data is the original bit stream and will provide a better audio output
quality.
LPCM is the default setting, and provides 2 channels audio output.
Changing Video Settings
Press and on the remote control to select the Video tab from the menu bar.
Page 13
13
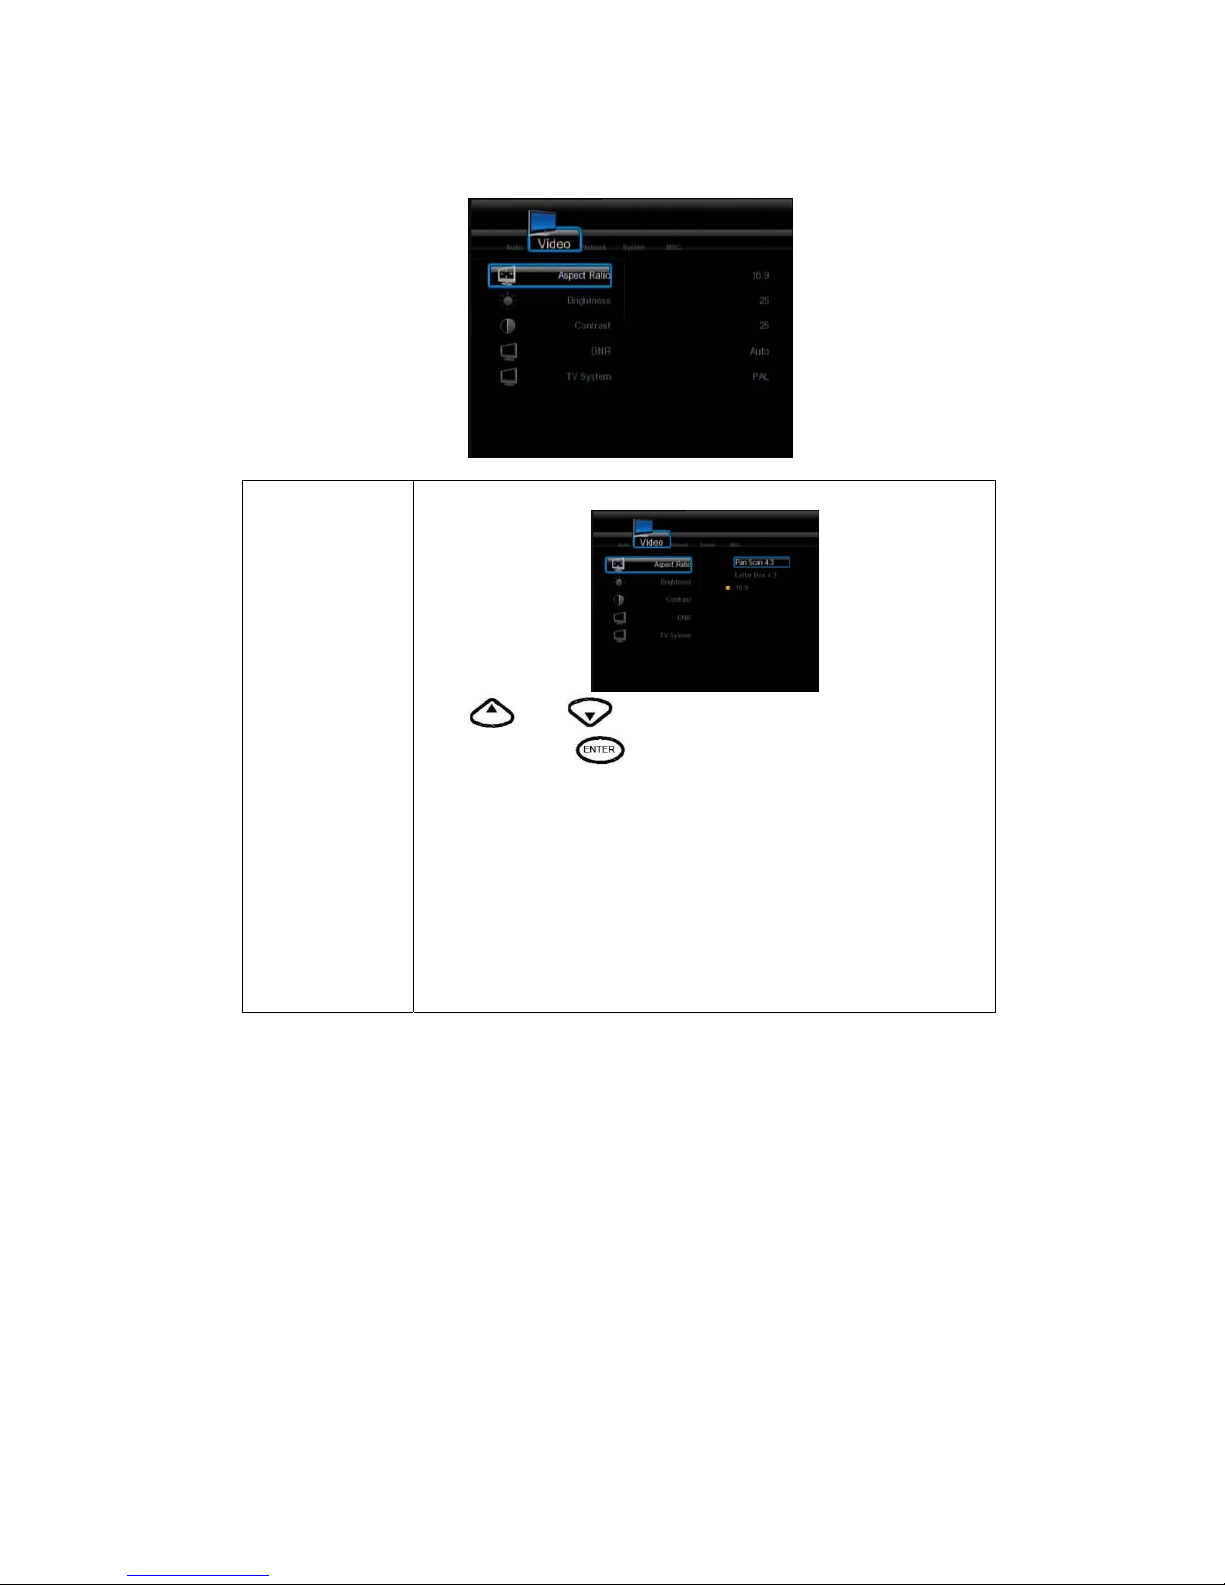
Aspect Ratio Select to set aspe ct ratio.
Press
and to select from Pan Scan 4:3, Letter Box
4:3, or 16:9. Press
to confirm.
Pan Scan 4:3: Display a wide picture on the entire screen and cuts off
the redundant portions. Select when a standard 4:3 TV is connected.
Letter Box 4:3: Display a wide picture with two black borders on the
top and bottom of 4:3 screen Select when a standard 4:3 TV is
connected.
16:9: Compress the image to convert the whole image. Select when a
16:9 TV is connected.
Page 14
14
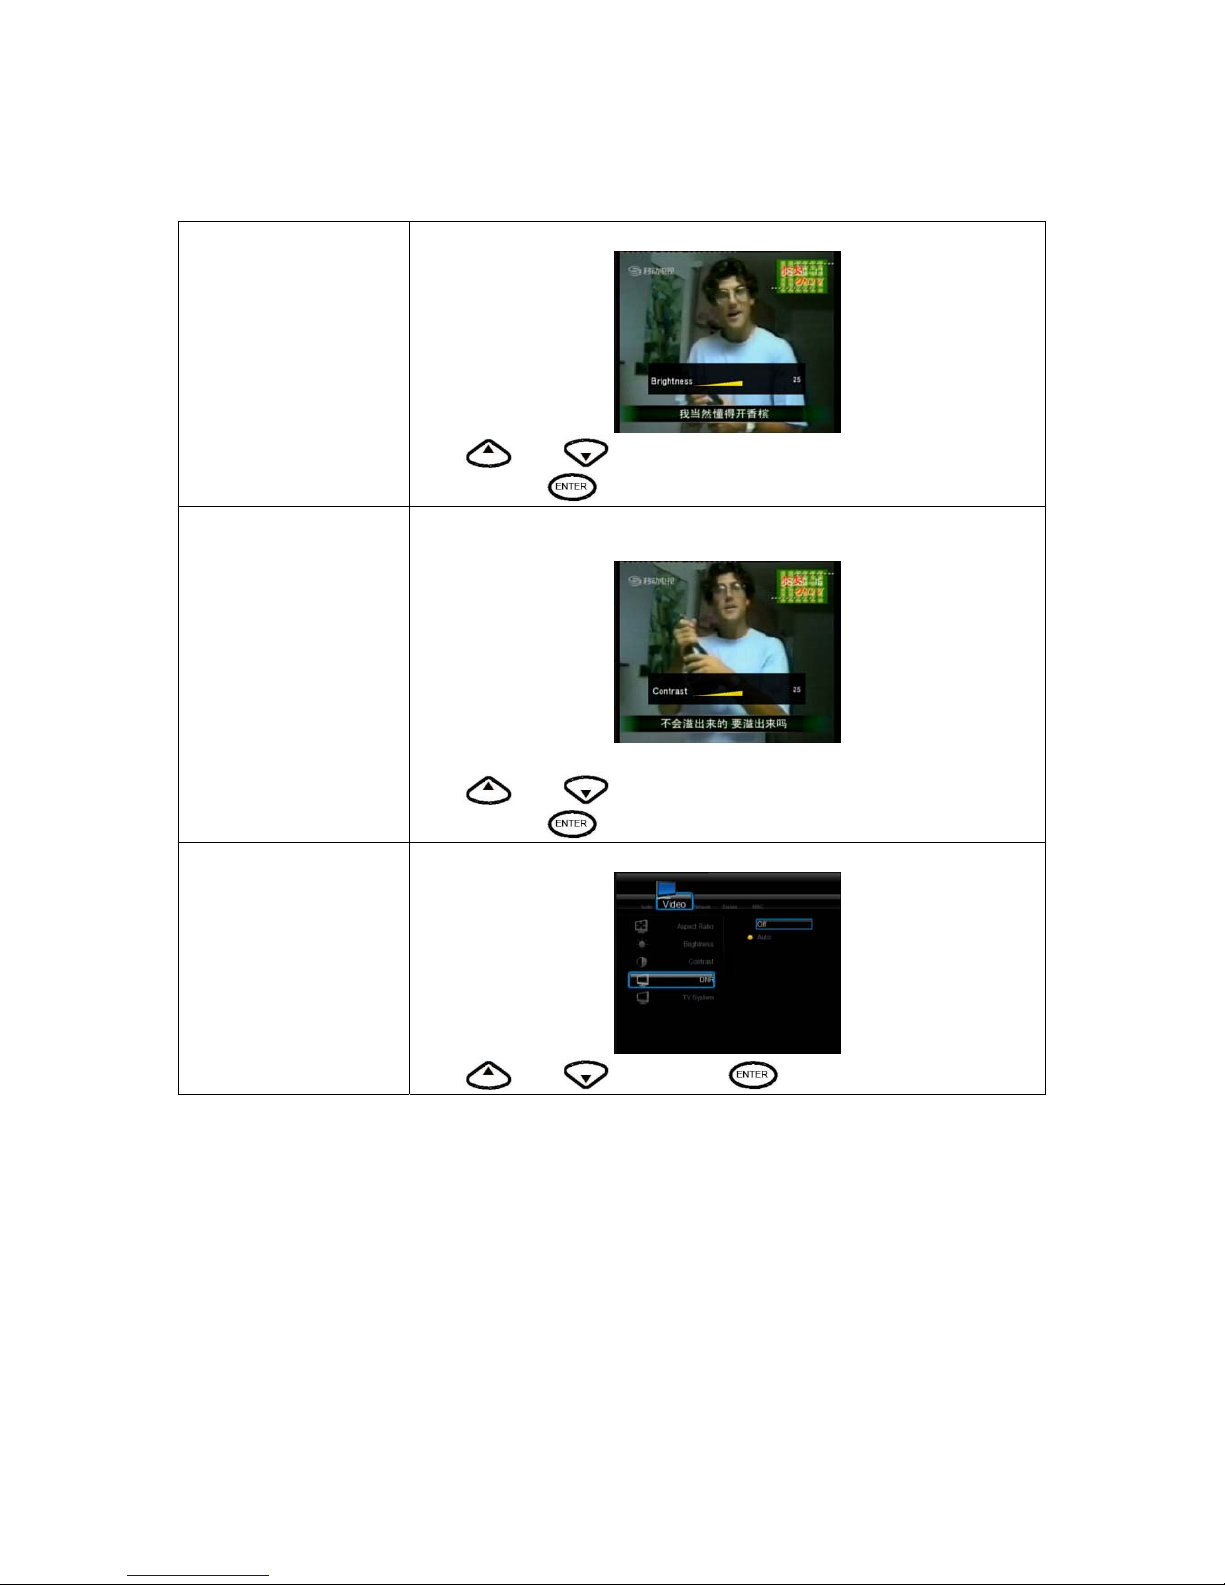
Brightness Select to set brightness levels.
Press
and to adjust brightness. The new setting is previewed
onscreen. Press
to confirm.
Contrast Select to set contrast levels.
Press
and to adjust contrast. The new setting is previewed
onscreen. Press
to confirm.
DNR Select to adjust DNR.
Press
and to set. Press to confirm.
Page 15
15
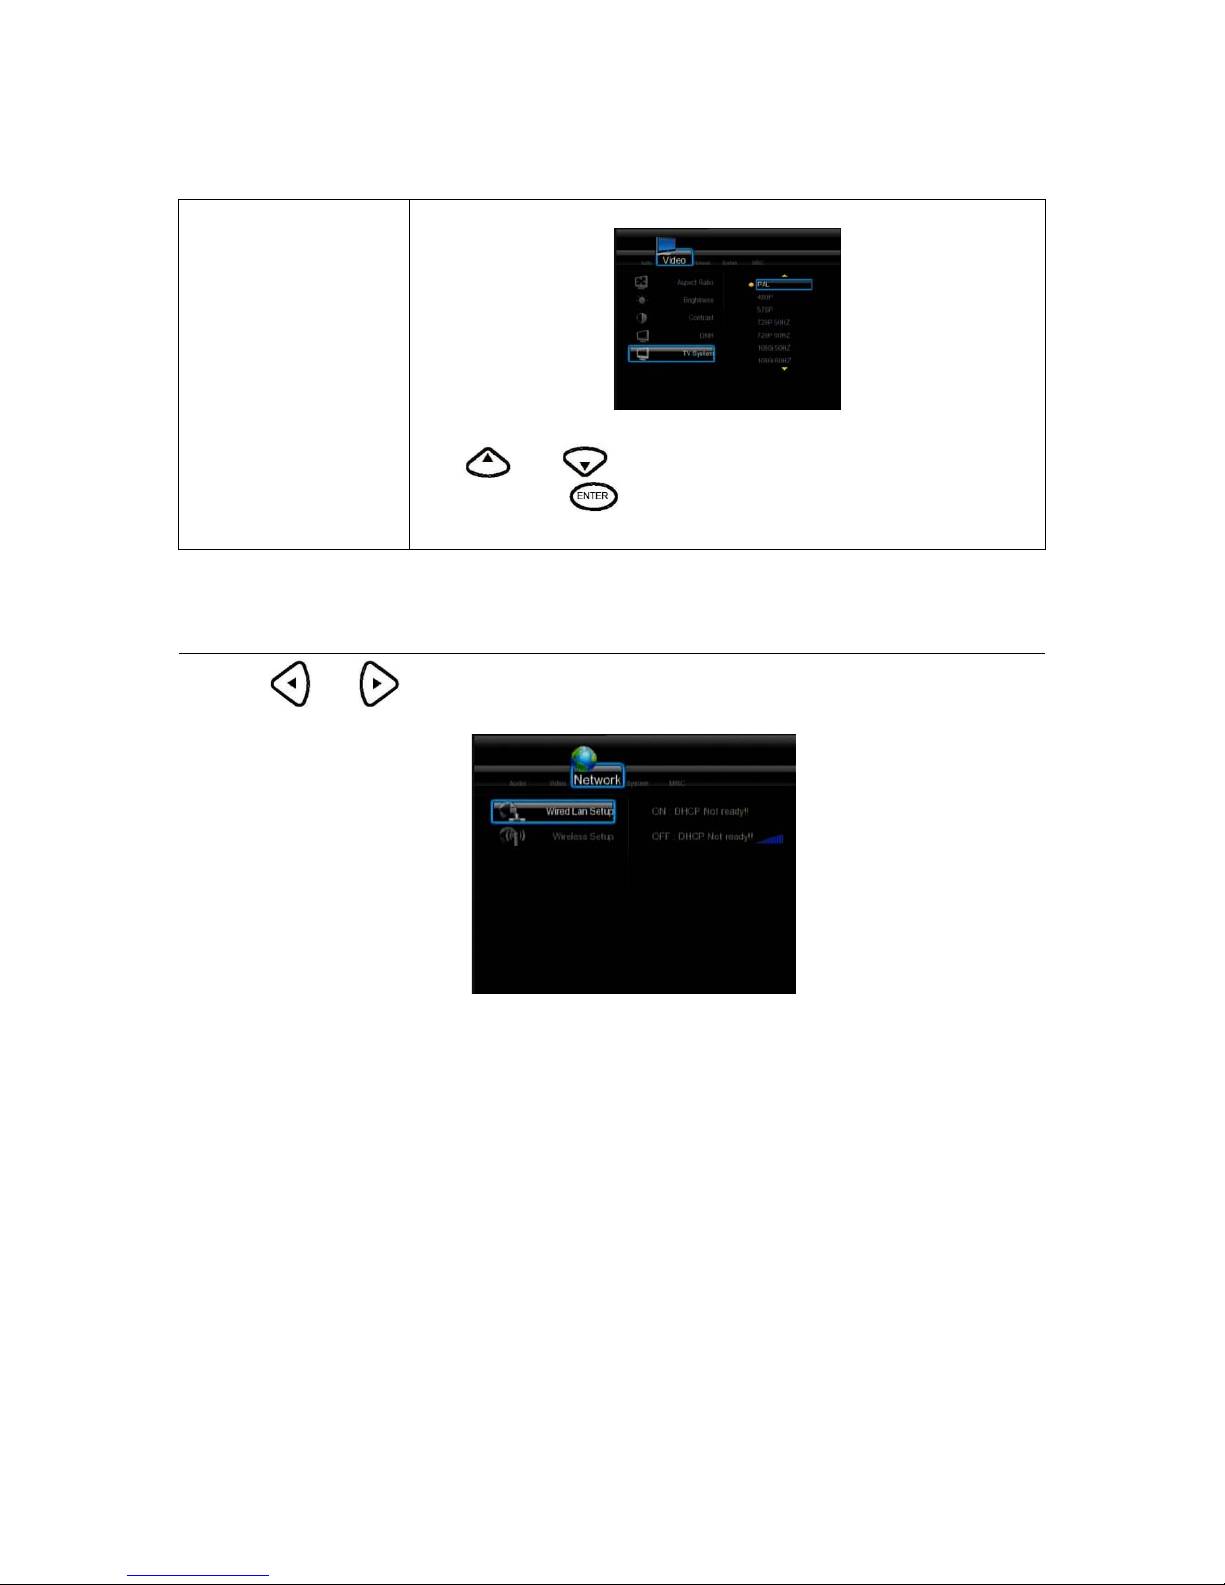
TV System Select to adjust TV system.
Press and to set the TV system, depending on your viewing
preferenc es. Press
to confirm.
HDMI Auto: According TV resolution to set TV system automatically.
Changing Network Settings
Press and on the remote control to se le ct the Network tab from the menu.
Page 16
16
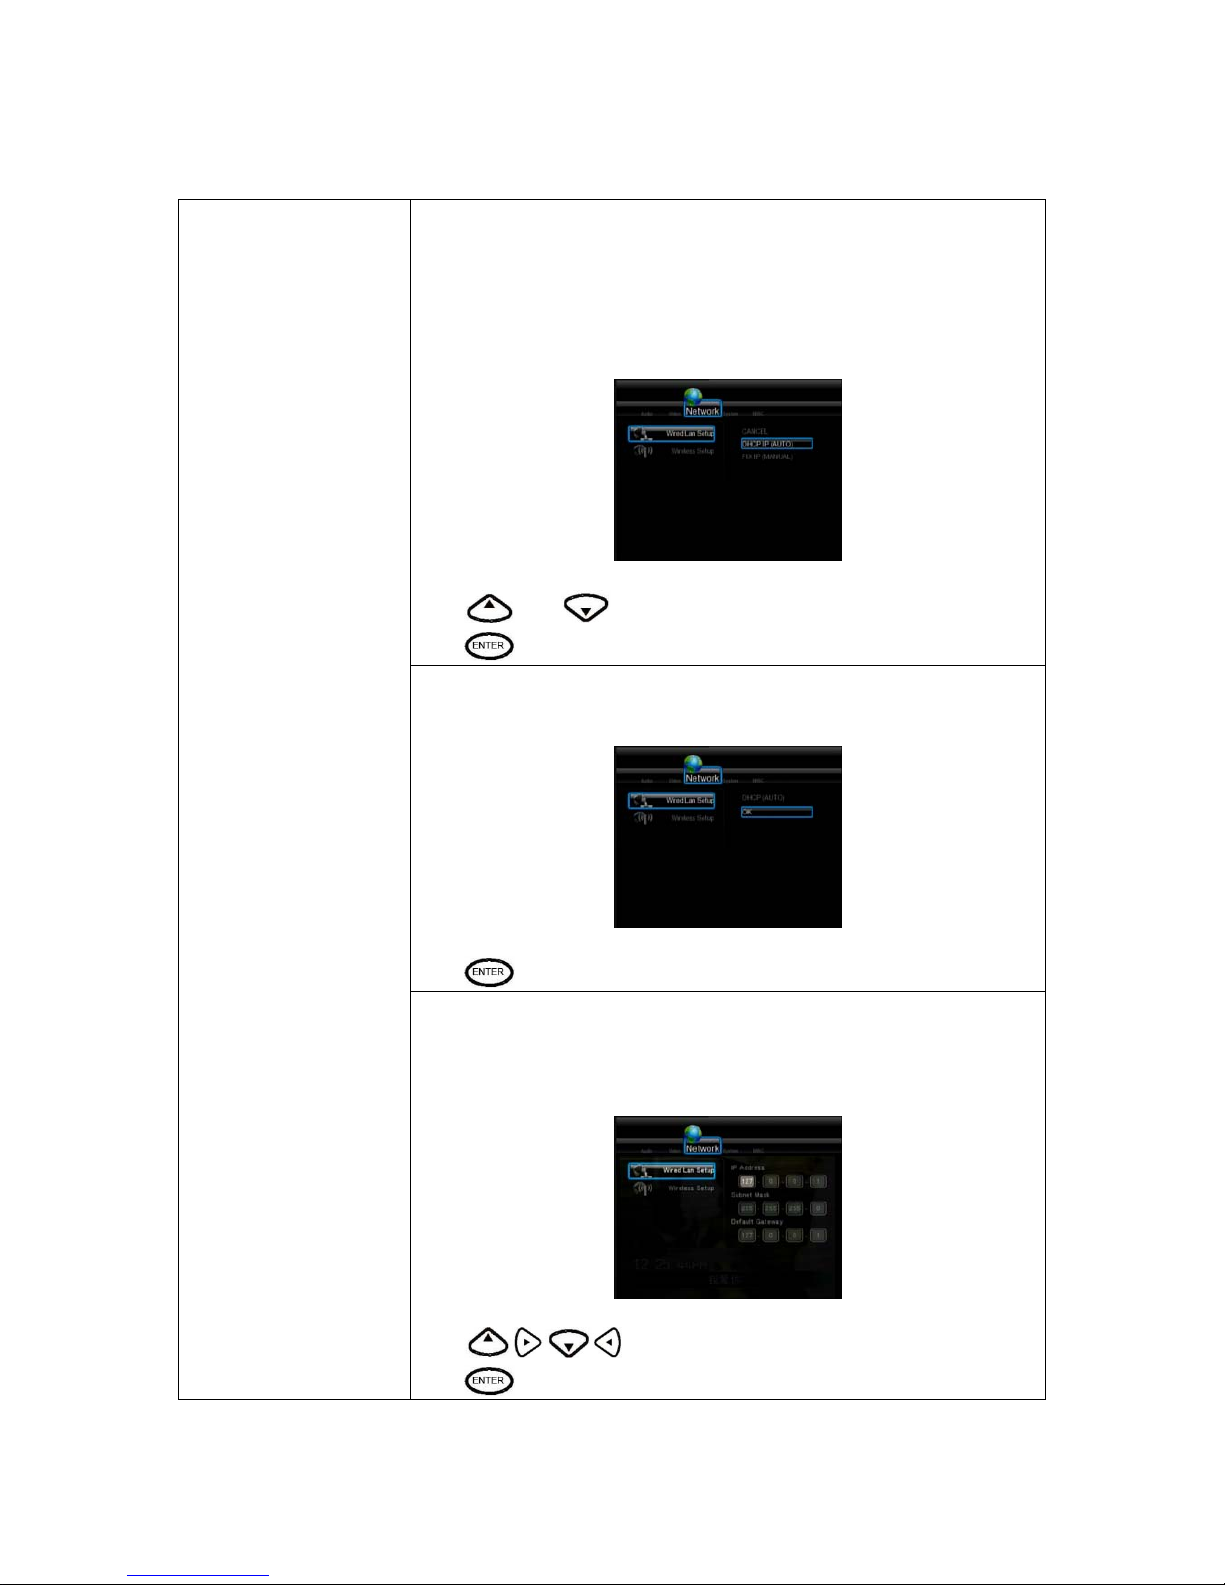
Wired Lan Setup Select to set the Network Setting. Before use the Network functions, ple a s e
check following items:
1) Connect the MKAVHDD to Network first.
2) Please enable NetBIOS of TCP/IP on computer.
3) Please turn off your PC’s firewall.
4) Please share the folders which you wish to browse in your PC.
Press
and to select DHCP(AUTO) or FIXED IP(MANUAL).
Press
to confirm.
DHCP DNS(AUTO)
Set the DNS server IP address by auto.
Press
to confirm.
FIX IP (MANUAL)
Using Fixed IP, it is required to enter followings. IP address, Subnet Mask,
Default Gateway. For f urthe r as sista nt to abov e se ttings , ple ase co ntac t to th e
network administrator.
Press
to enter the IP address.
Press
to confirm.
Page 17
17
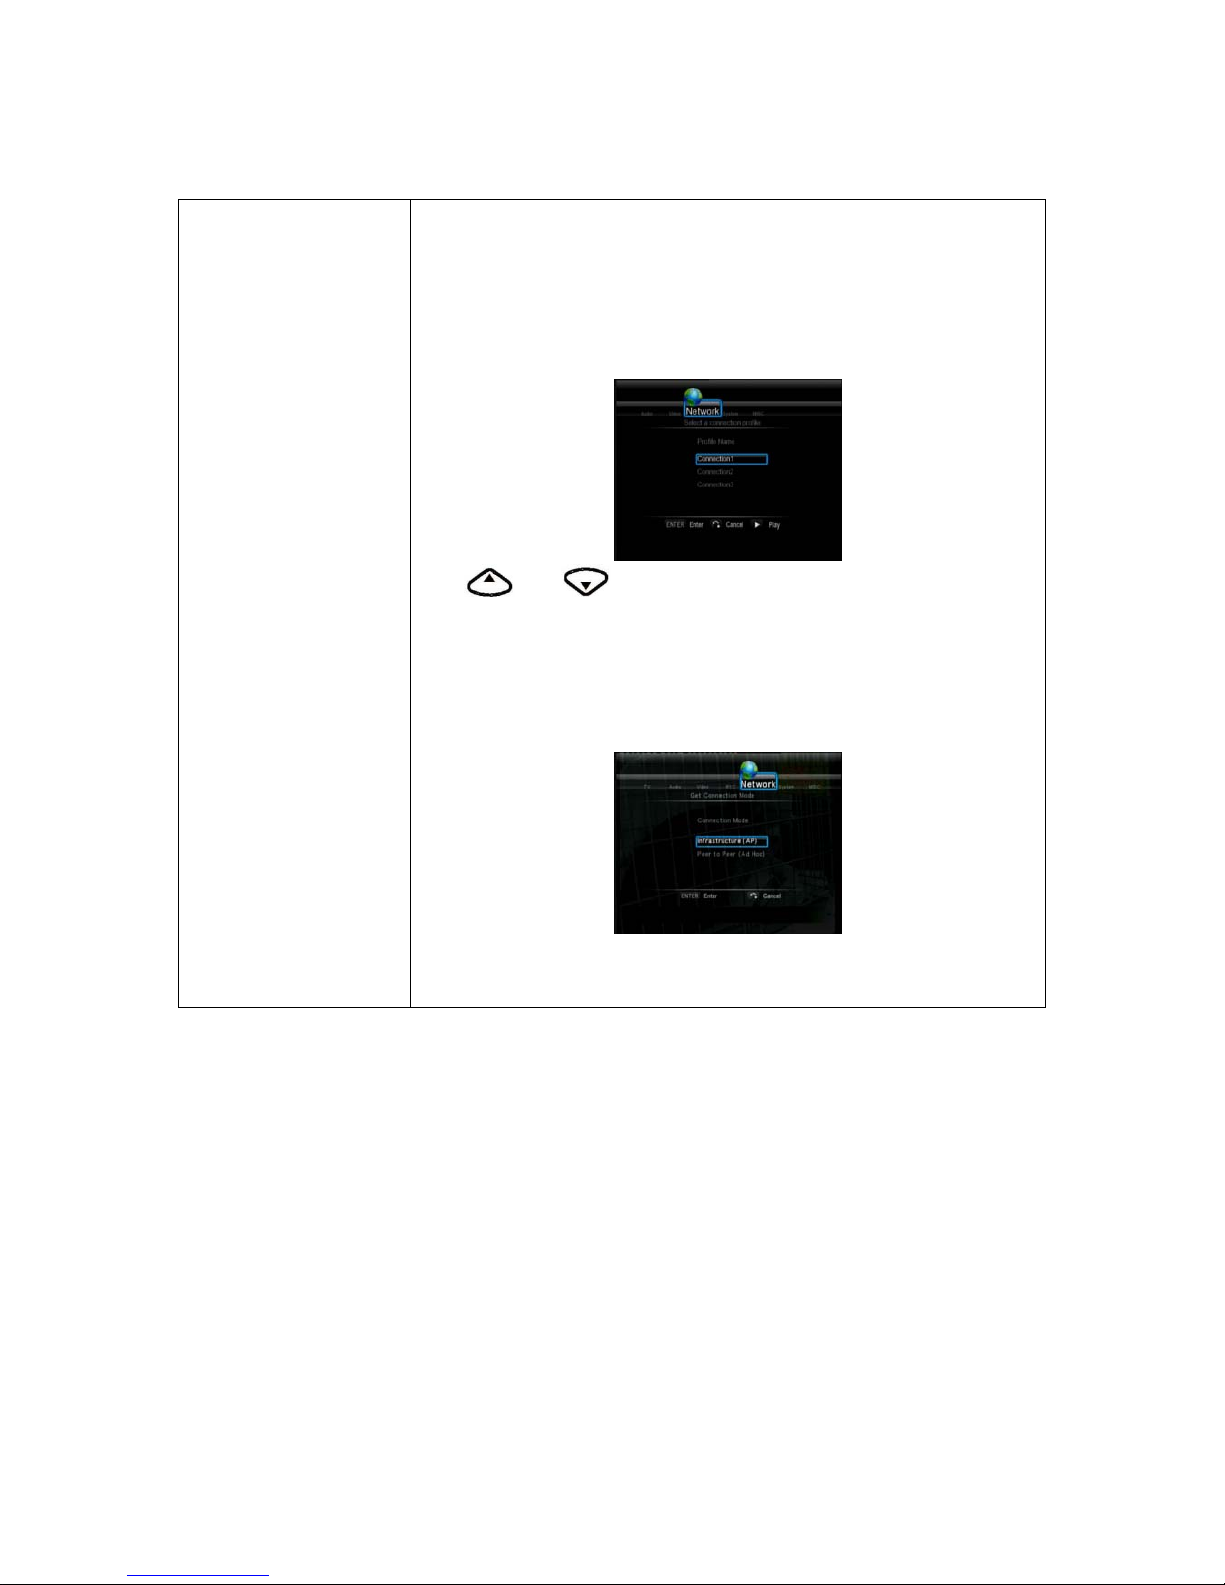
Wireless Setup Before configuring the WLAN settings, please check the following:
1) Make sure the WLAN USB Adapter is connected to the USB HOST port;
2) Make sure there is a wireless router or an AP (Access Point) on the
network, or your PC is equipped with a wireless network adapter/card;
3) Make sure your player is in the effective range of the WLAN.
Select a Profile Name
Press
and to select.Press the ENTER button to the next
step.Press Play button to direct connect. Press the RETURN button to return.
Get Connection Mode
There appear two connection modes: Infrastructure (AP) mode and Peer
to Peer (Ad Hoc) mode.
Press the RETURN button to return, and the ENTER button for next step.
Press the UP / DOWN button to select items.
Page 18
18
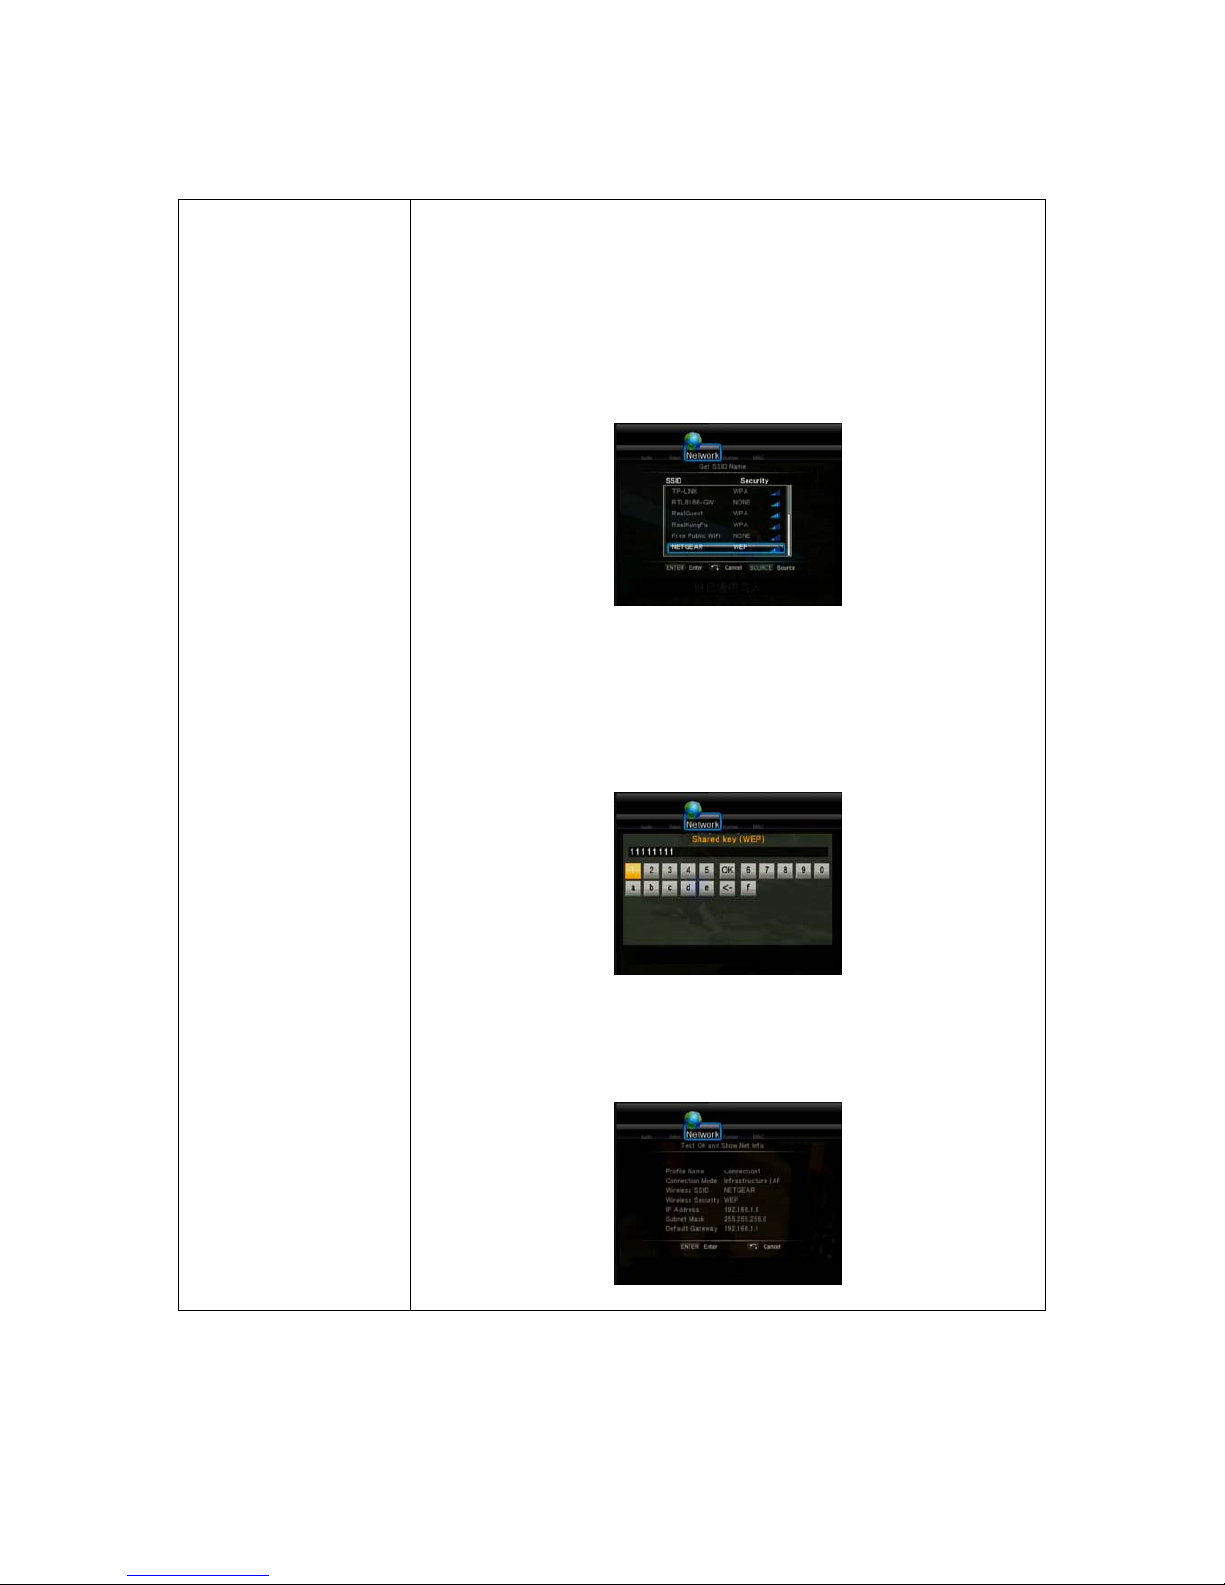
1.Infrastructure (AP)
Infrastructure mode is used to connect computers with wireless network
adapters, also known as wireless clients, to an existing wired network with the
help from wireless router or access point.
Get SSID Name
System will search for an existing SSID (Service Set Identifier) auto. And select
the access point you wish to access from the SSID list.
Note: In the Security list, WEP (Wired Equivalent Privacy) and WPA (Wi-Fi
Protected Access) means the network is encrypted, i.e. an encryption key is
needed to access the network. NONE means it is an open system network.
Select Open System if the network is not encrypted. Otherwise, select
Shared Key (WEP) or WPA Key to enter the encryption key.
Select SSID the system will get the IP address automatically. The test will take
for a while, please be patient to wait.
If the test is ok, the network information will be displayed.
Page 19
19
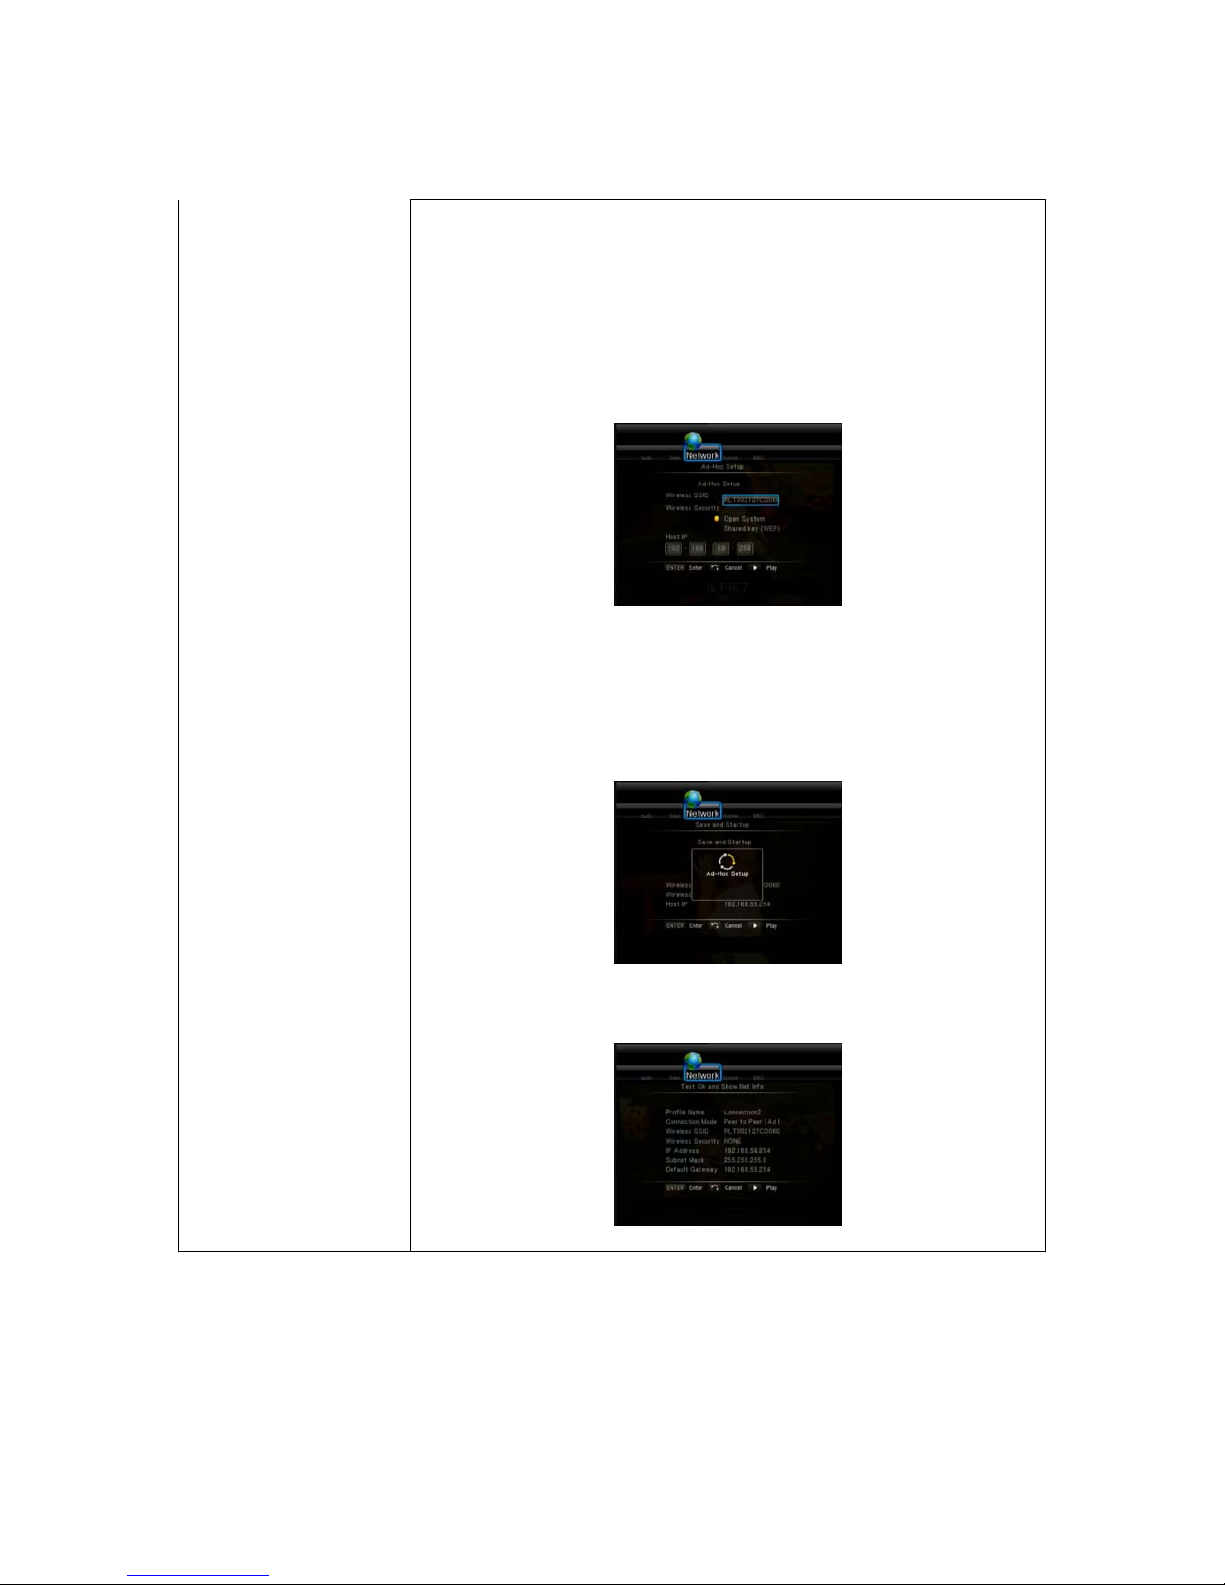
2.Peer to Peer (Ad Hoc)
Peer to Peer mode, which is also called Ad Hoc mode or computer-to-computer
mode, is used to connect wireless clients directly together , without the need for
a wireless router or access point.
Ad Hoc Setup
Set the Wireless SSID, Wireless Security, and Host IP for the Ad Hoc
connection.
Press ENTER button to enter.Press RETURN to return.
Note: Both the player and your PC need to use the Ad Hoc mode, share a
common SSID, and be put into the same IP range.
Select PLAY button to confirm and the next s te p.
If the test is ok, the network information will be displayed.
Page 20
20
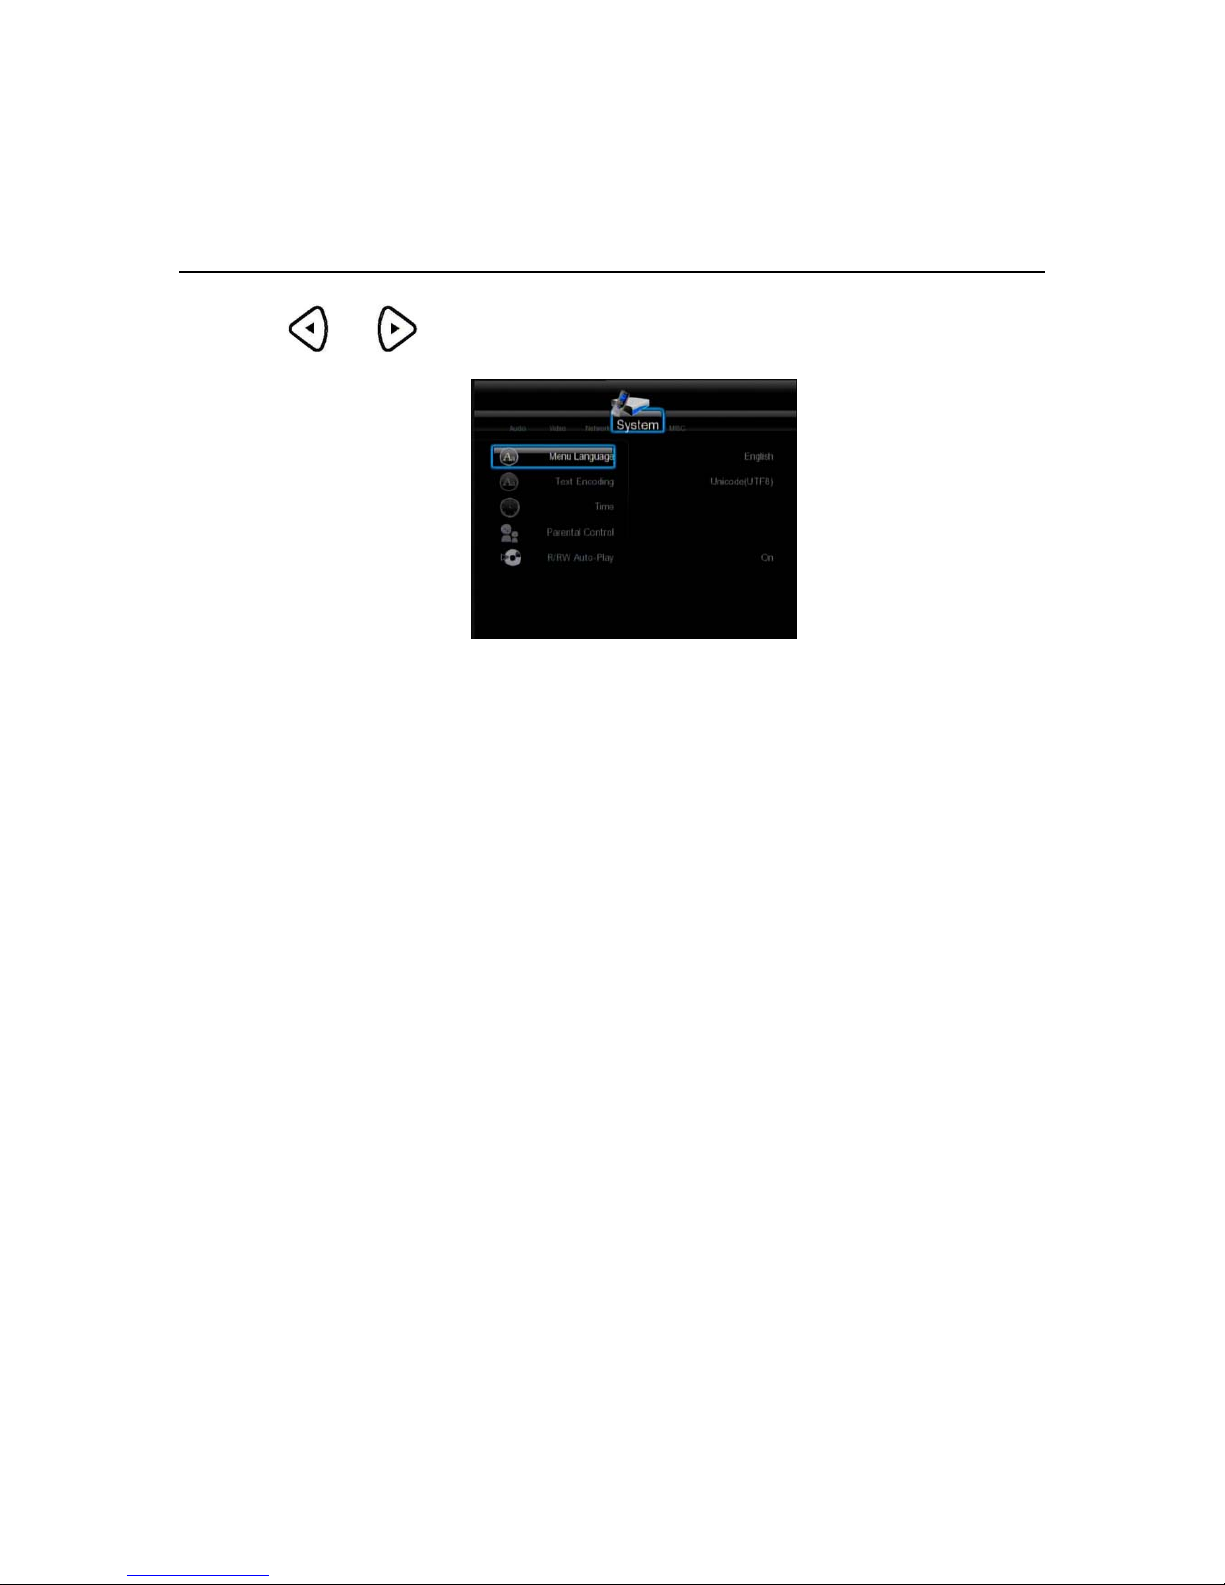
Changing System Settings
Press and on the remote control to select the System tab from the menu.
Page 21
21
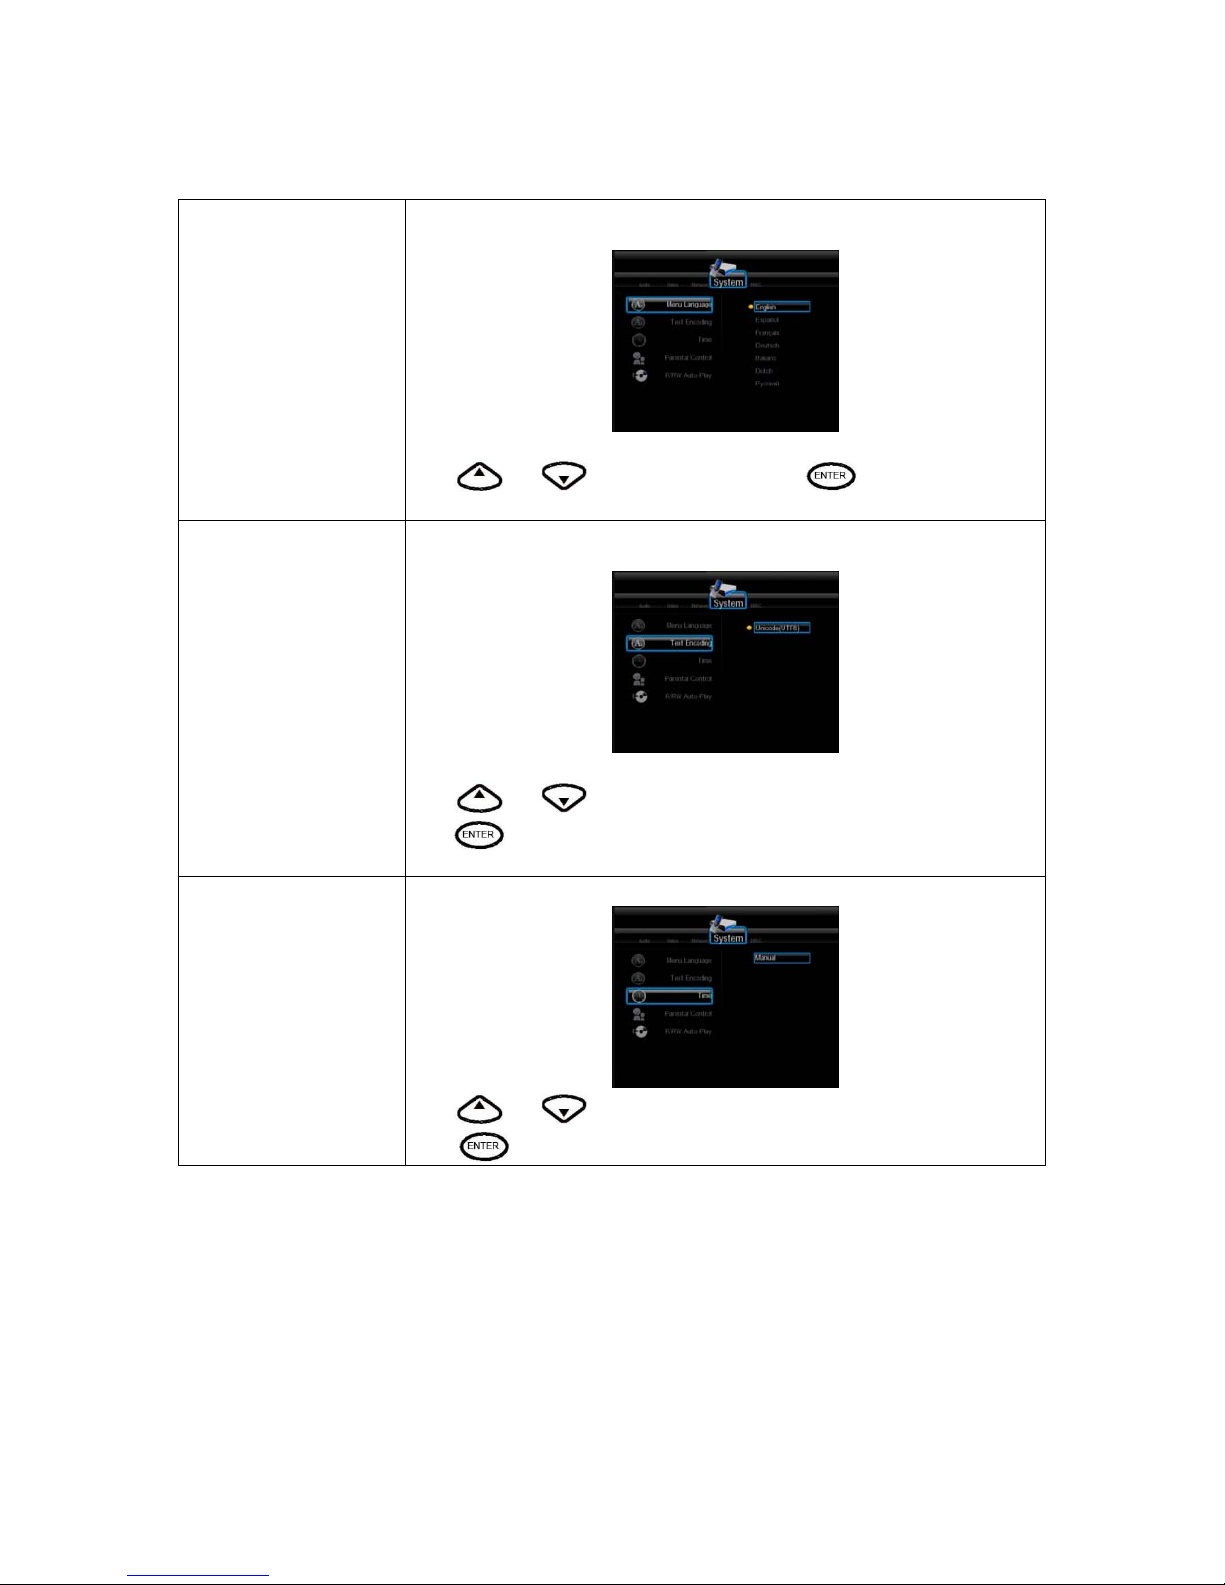
Menu Language
Select to choose the OSD (On Screen Display) language.
Press
and to select the language. Press to confirm.
Text Encoding
Select to choose the text encoding language.
Press
and to select the text encoding language.
Press
to confirm.
Time Select to set the system time.
Press and to select from Manual and Auto(via TV).
Press
to confirm.
Page 22
22
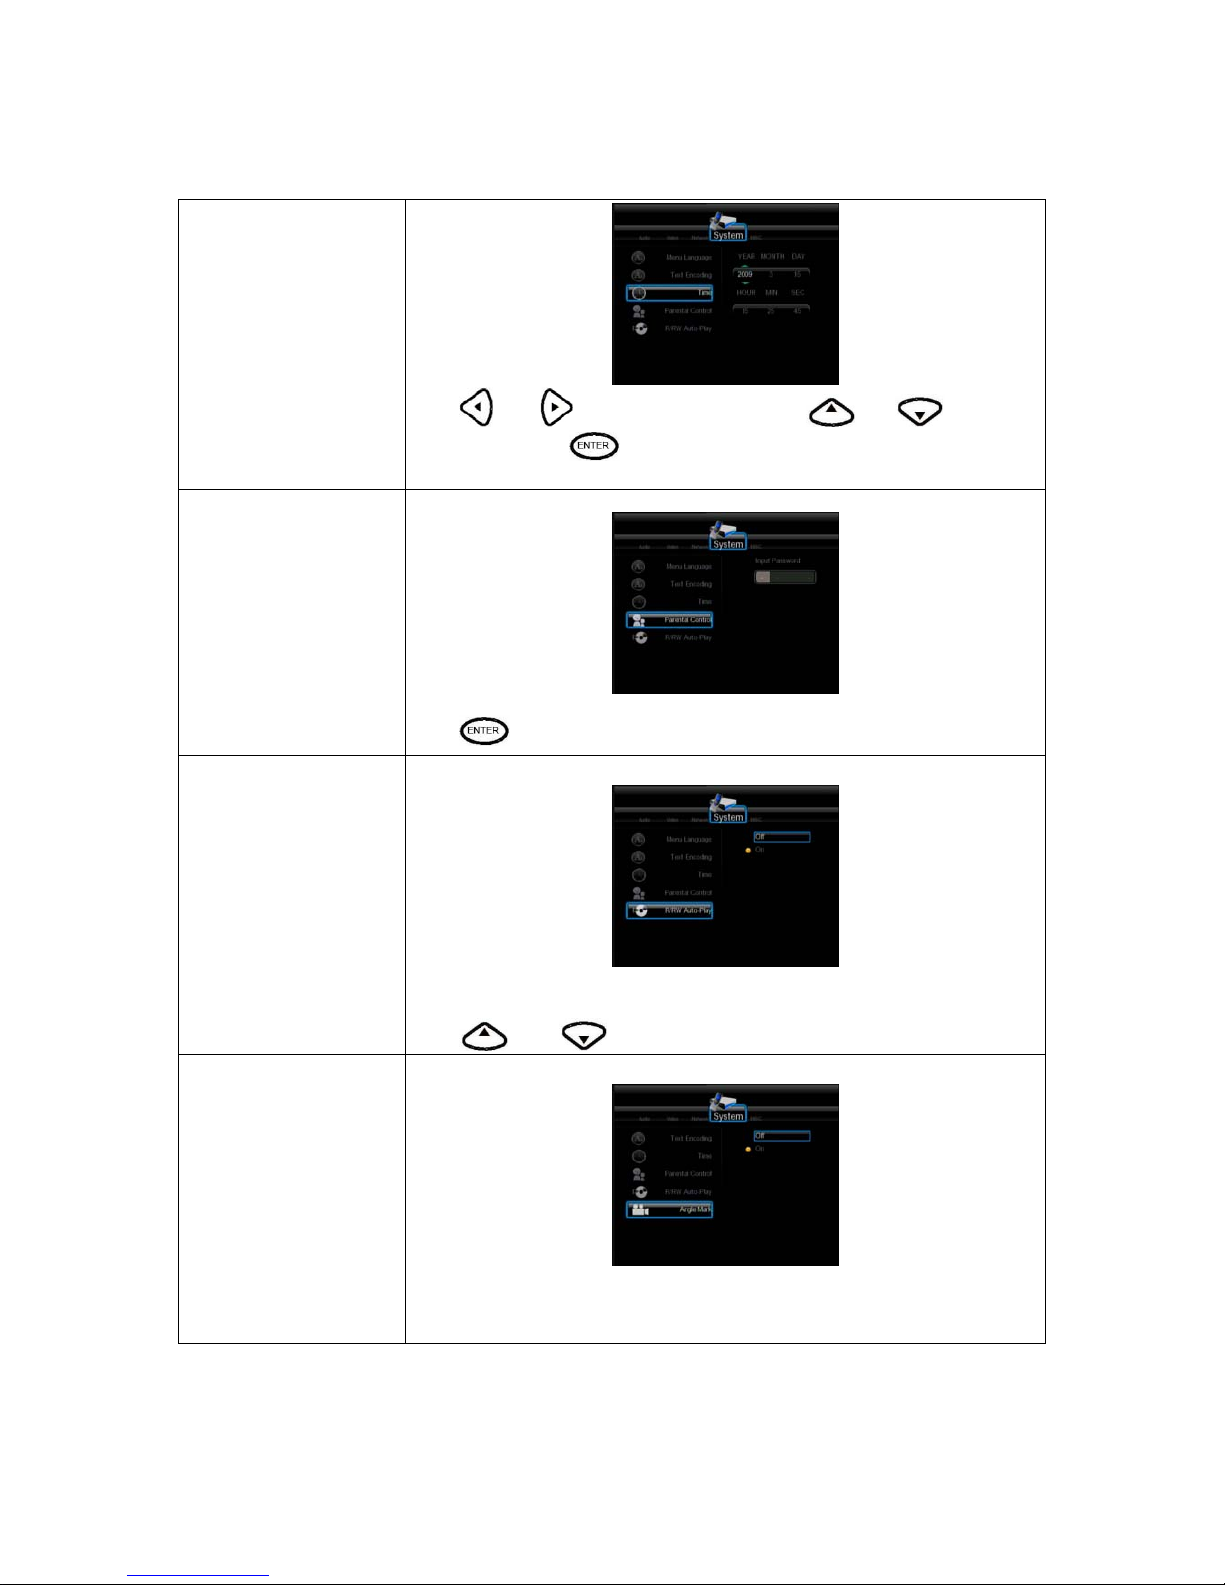
Press
and to select each field and the and to to adjust
each setting. Press
to confirm.
Parental Control
Select to set the TV parental control options.
Input the original password “0000” to enter.
Press
to confirm.
R/RW Auto-Play Select to toggle the Auto Play function on or off.
Auto Play begins playing a DVD immediately when you insert it in the DVD
drive.
Press
and to enable or disable this function.
Angle Mark Select to toggle the Angle Mark function on and off.
A mark will be shown when playing back a DVD disc with multiviewing angle.
Press the Angle button to switch through different view aspect.
Page 23
23
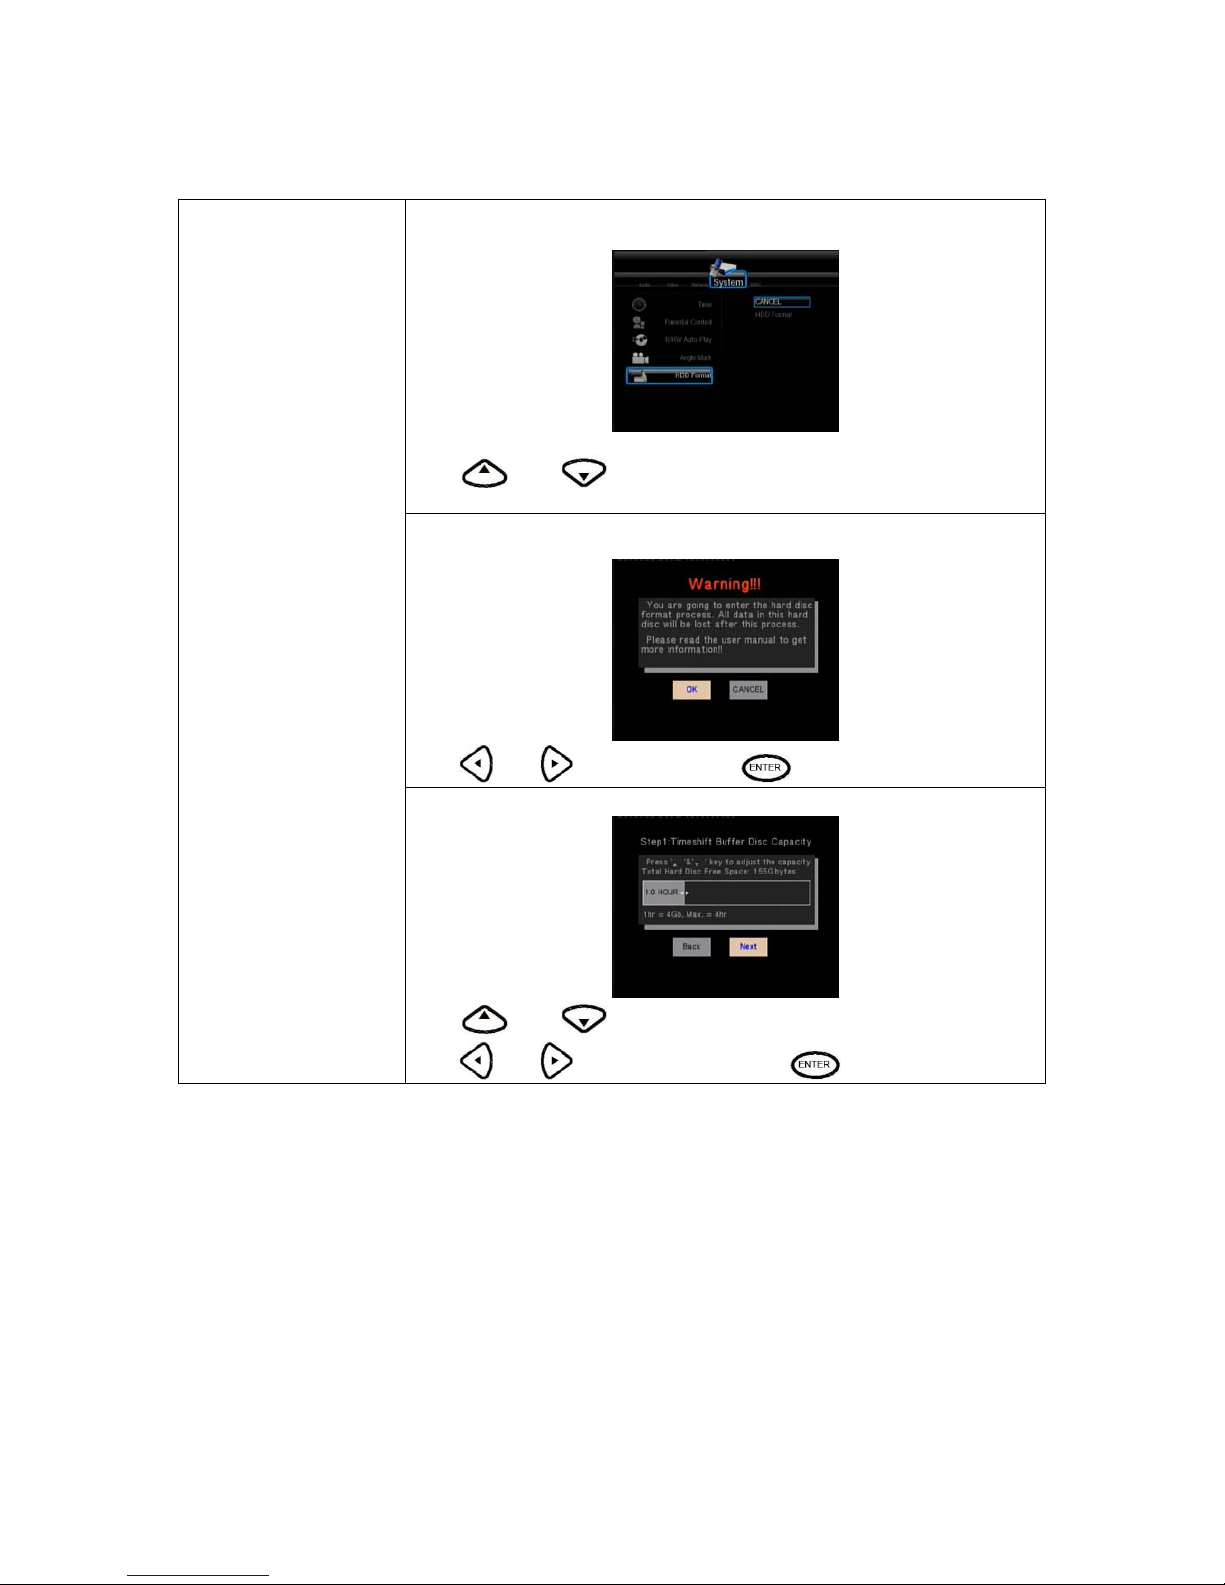
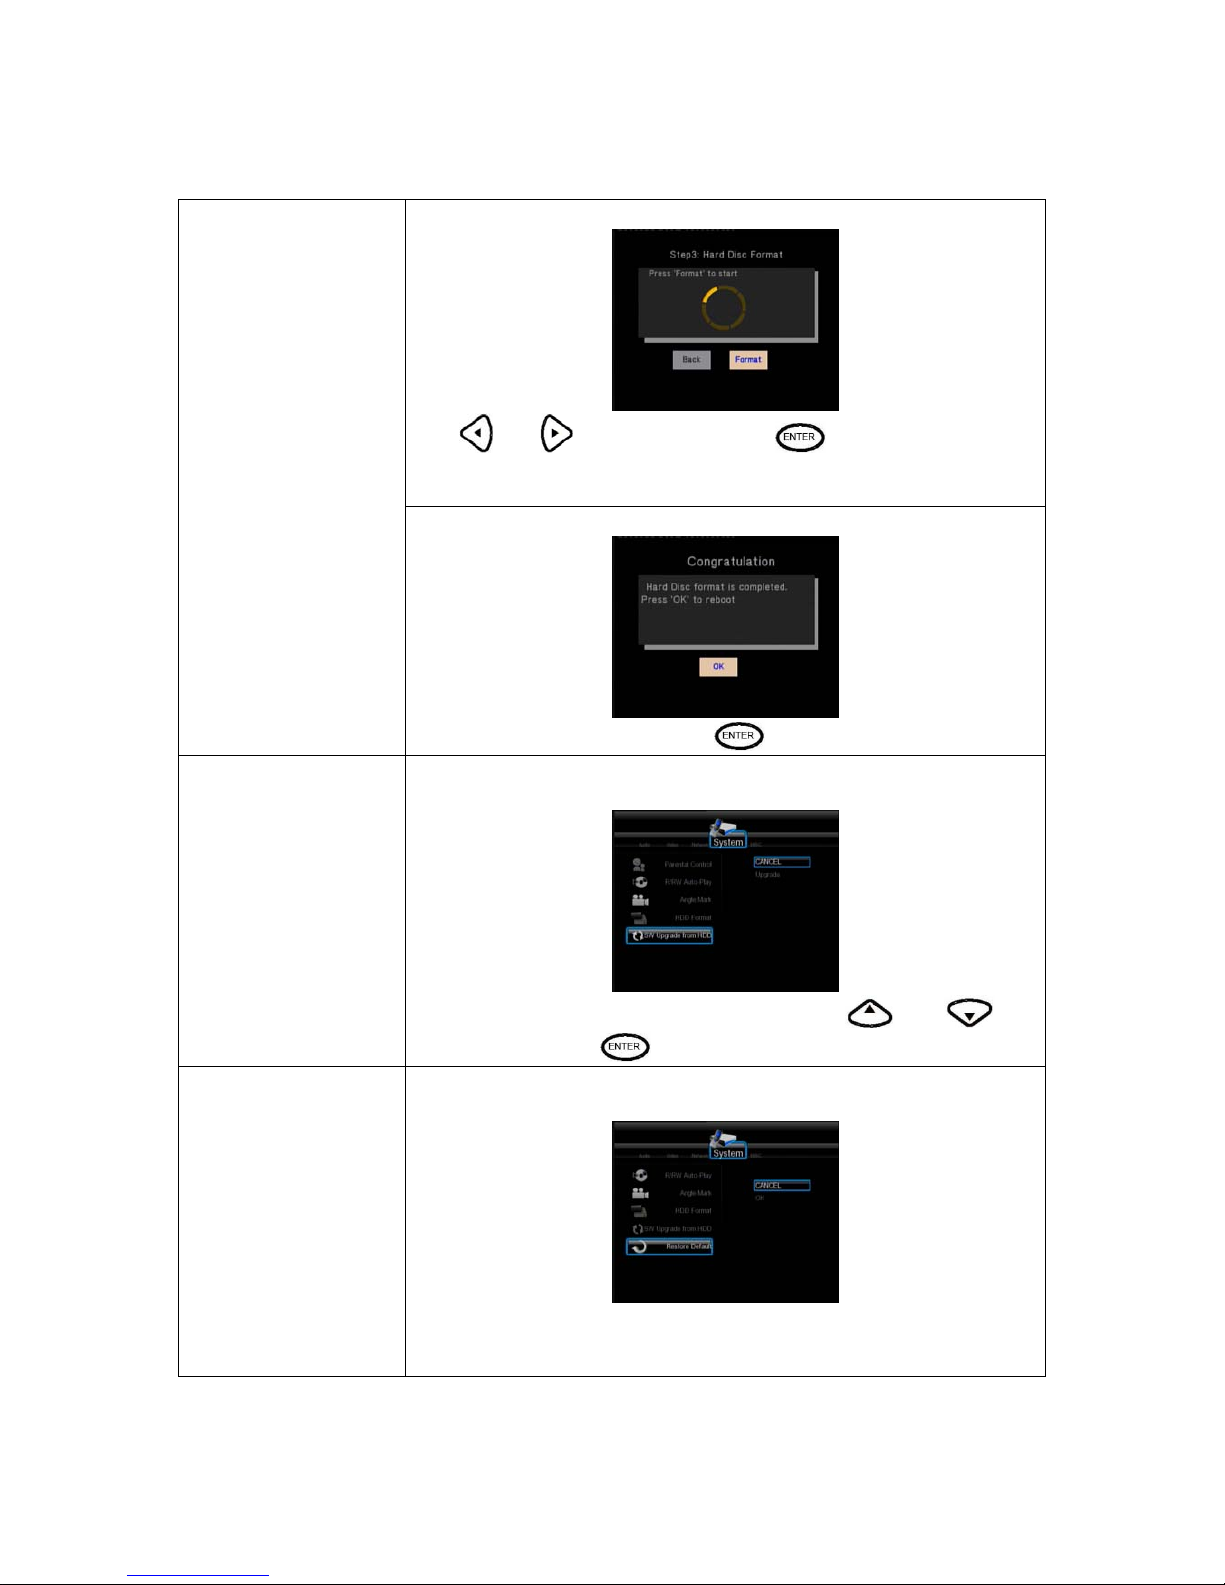
HDD Format
Select to HDD Format.
Press and button on the remote control to select Cancel or
CONFIRM from the menu.
When select HDD format, please according the following steps:
1.Warring
Press
and to select OK. Press to confirm.
2.Step1:Timeshift Butter Disc Capacoty
Press
and to adjust the capacity of time shift buffer.
Press
and to select Next, and Press to confirm.
Page 24
24
3.Step3:Hard Disc Format
Press
and to select Format. Press to confirm.
And the formatting will start, which will take for several minute, please be
patient to wait.
4.Congratulation
When formatting is completed, press
to reboot.
SW Upgrade from HDD Select to Upgrade SW from HDD.
Please copy the Upgrade SW to HDD first.Then,Press
and to
select Upgrade. Press
to confirm. Otherwise, Select Cancel to return.
Restore Default Select to restore factory defaults.
A confirmation message appears. Select CONFIRM and press RETURN to
restore all settings to defaults.
Page 25
25
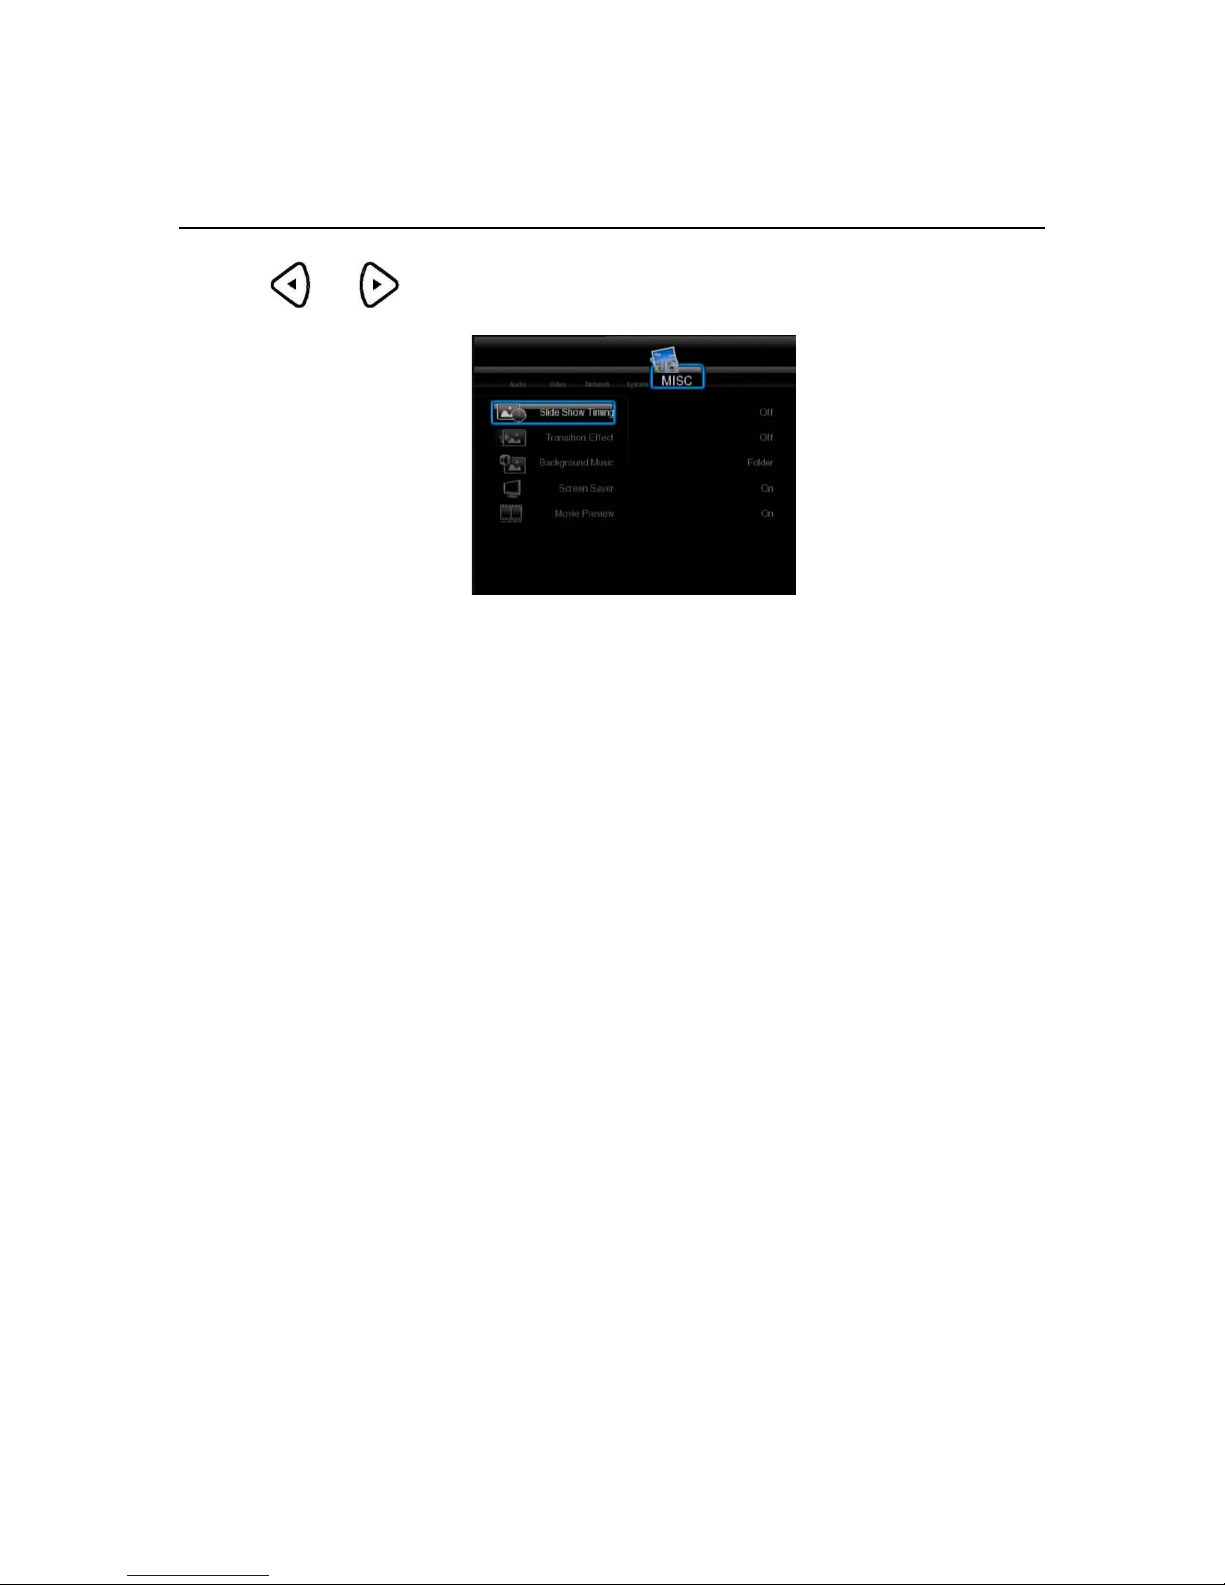
Changing MISC Settings
Press and on the remote control to se le ct the MISC tab from the menu.
Page 26
26
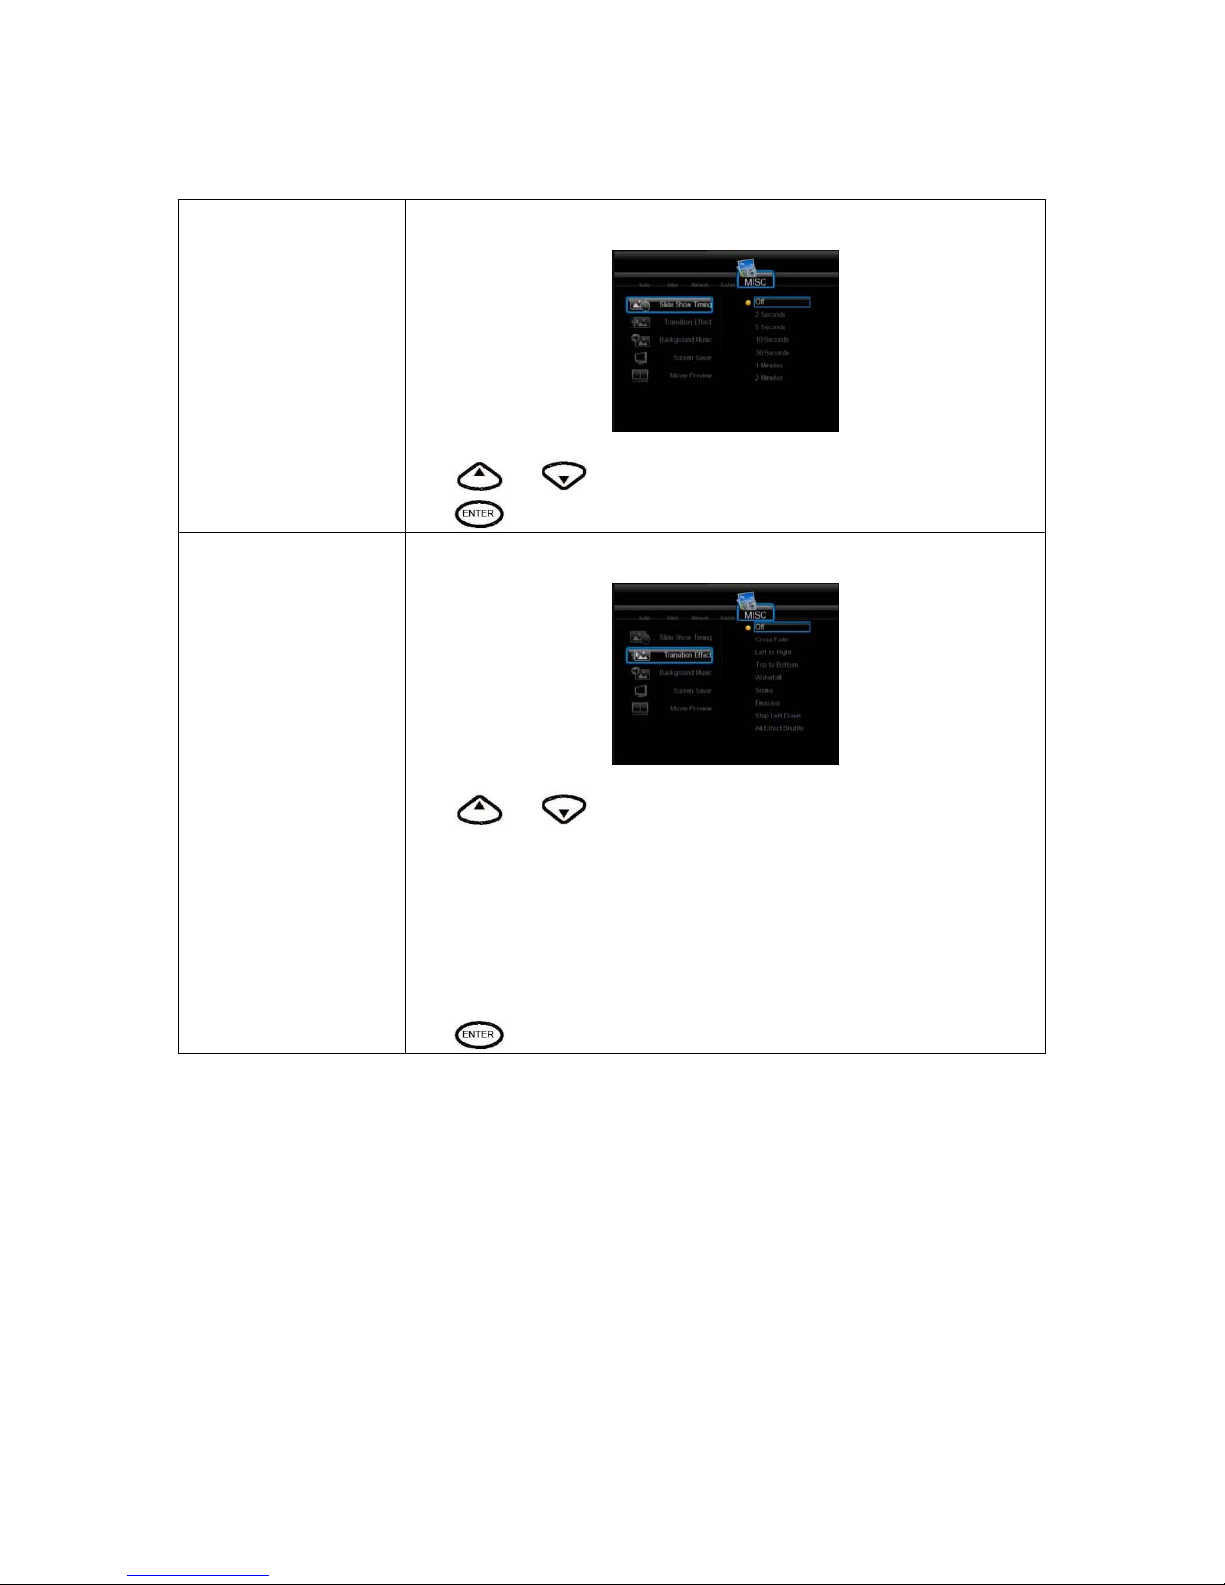
Slide Show Time
Select to set slide show time.
Press
and to select the interval you require.
Press
to confirm.
Transition Effect
Select to set the transition effect of photos.
Press
and to select the transform of photo you require:
1) Cross Fade – fade in and fade out
2) Left to Right- from left to right
3) Top to Bottom- from top to bottom
4) Waterfal l- like a steep descent of water from a height
5) Snake – like snake motion
6) Dissolve – like water dissolve
7) Strip Left Down – like strip cover from top of left to bottom of right
8) All Effect Shuffle – shuffle in and out
Press
to confirm.
Page 27
27
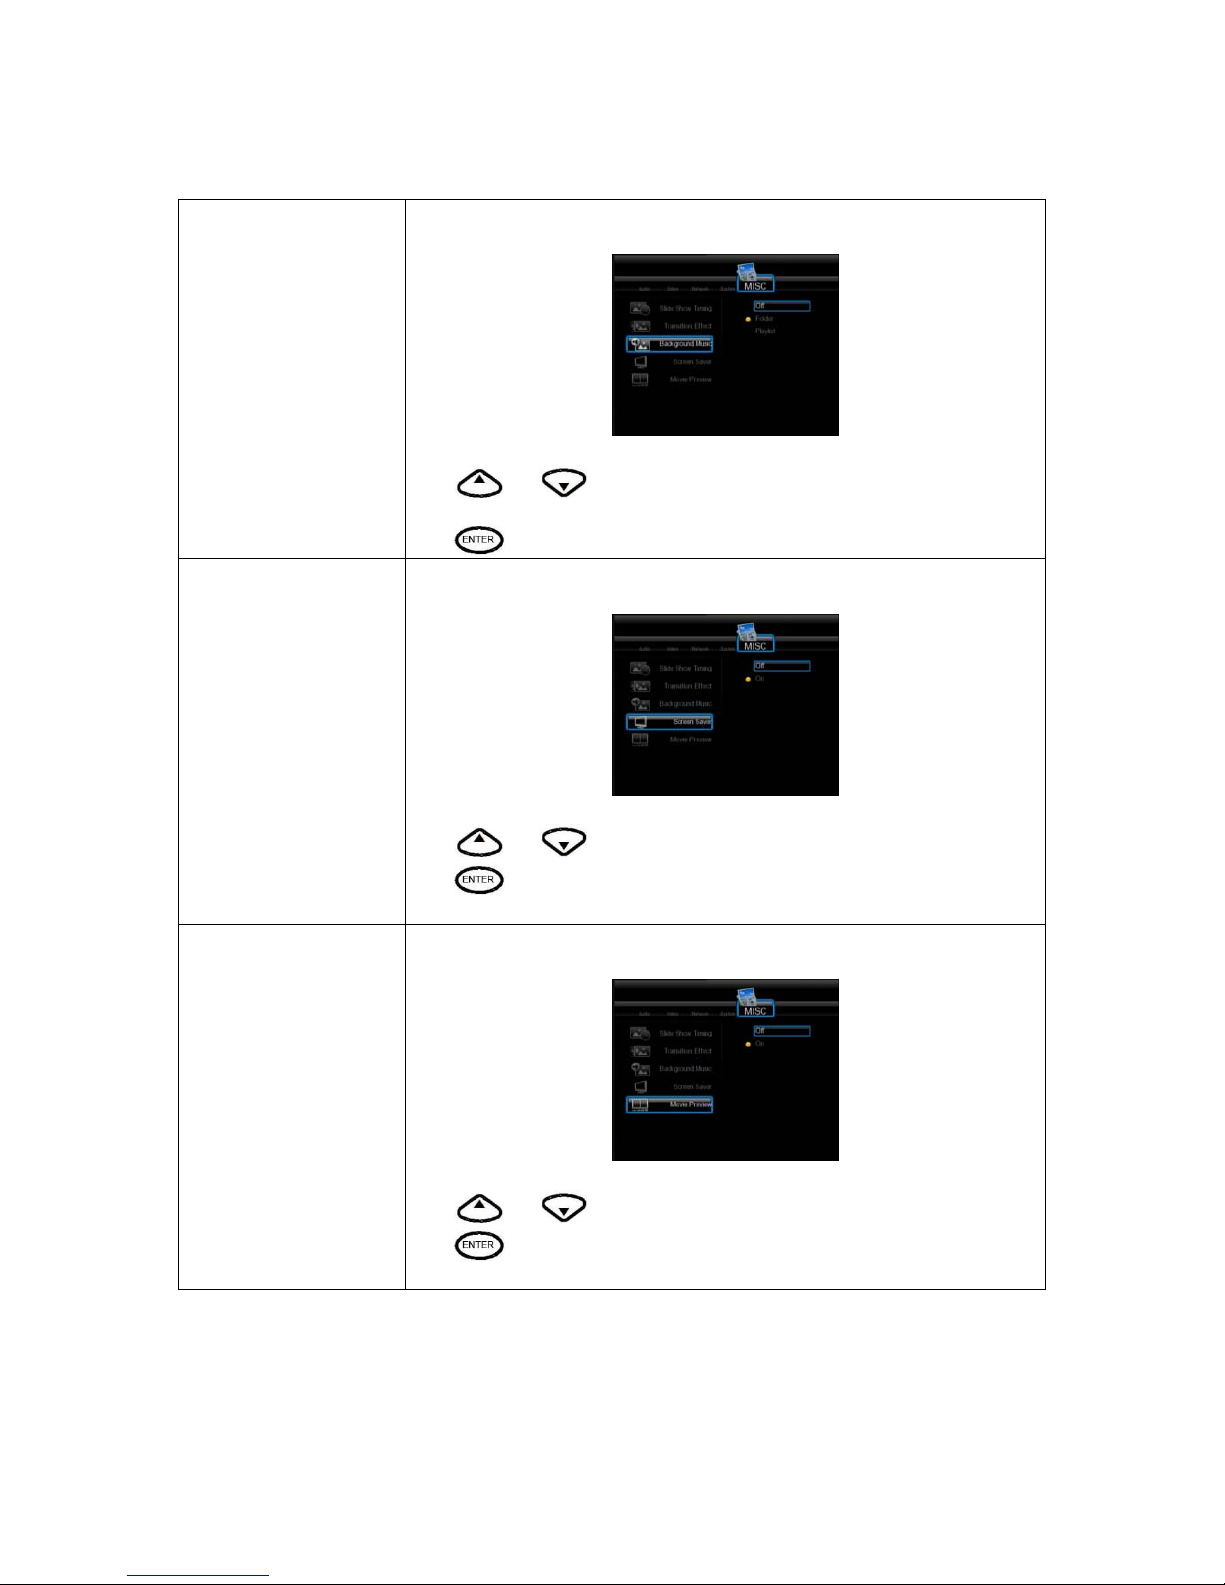
Background Music Select to play the music file under the same folder.
Press and to select the position of the background music. Select “off” to
close the function.
Press
to confirm.
Screen Saver Select to turn on/off the Screen Saver function.
Press and to select.
Press
to confirm.
Movie Preview Select to turn on/off the Movie Preview function.
Press and to select.
Press
to confirm.
Page 28
28
Chapter 3
Browser Menu
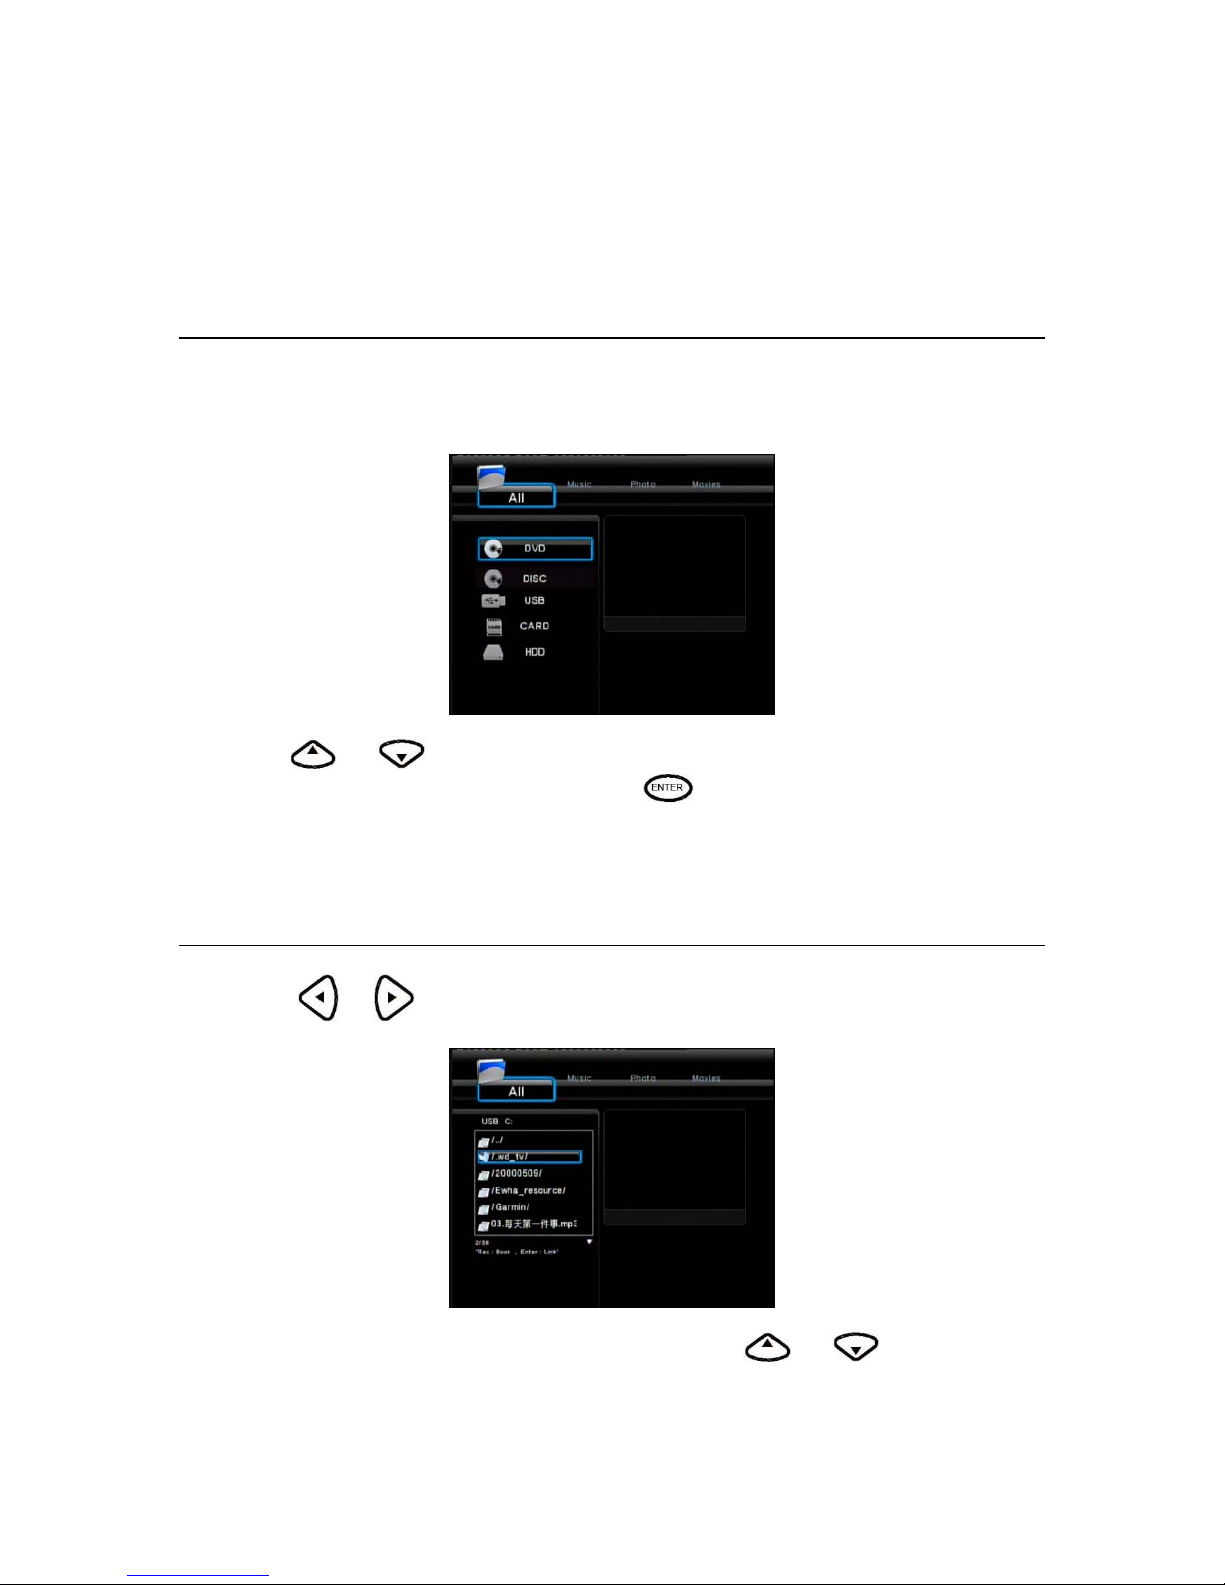
The Browser menu allows you browse and play music, photo and movie files stored on a HDD or an
external USB device and Card reader, Network, UPNP,DVD disc, etc. To enter the menu, select
Browser from the Guide menu.
Press
and to select the device on which the media is stored. Choose from USB, Card,
HDD, NET, UPNP,DVD disc,Playlist, and press the
to confirm.
When data on HDD,USB device or Card reader is connected the system to Network, you can also
browse photos, listen to MP3 files, and watc h videos.
Browsing All
Use the
or to select the All tab.
All directories and supported contents will be displayed. Press
and to select the
Page 29
29
directory or file you wish to browse, and press
to confirm.
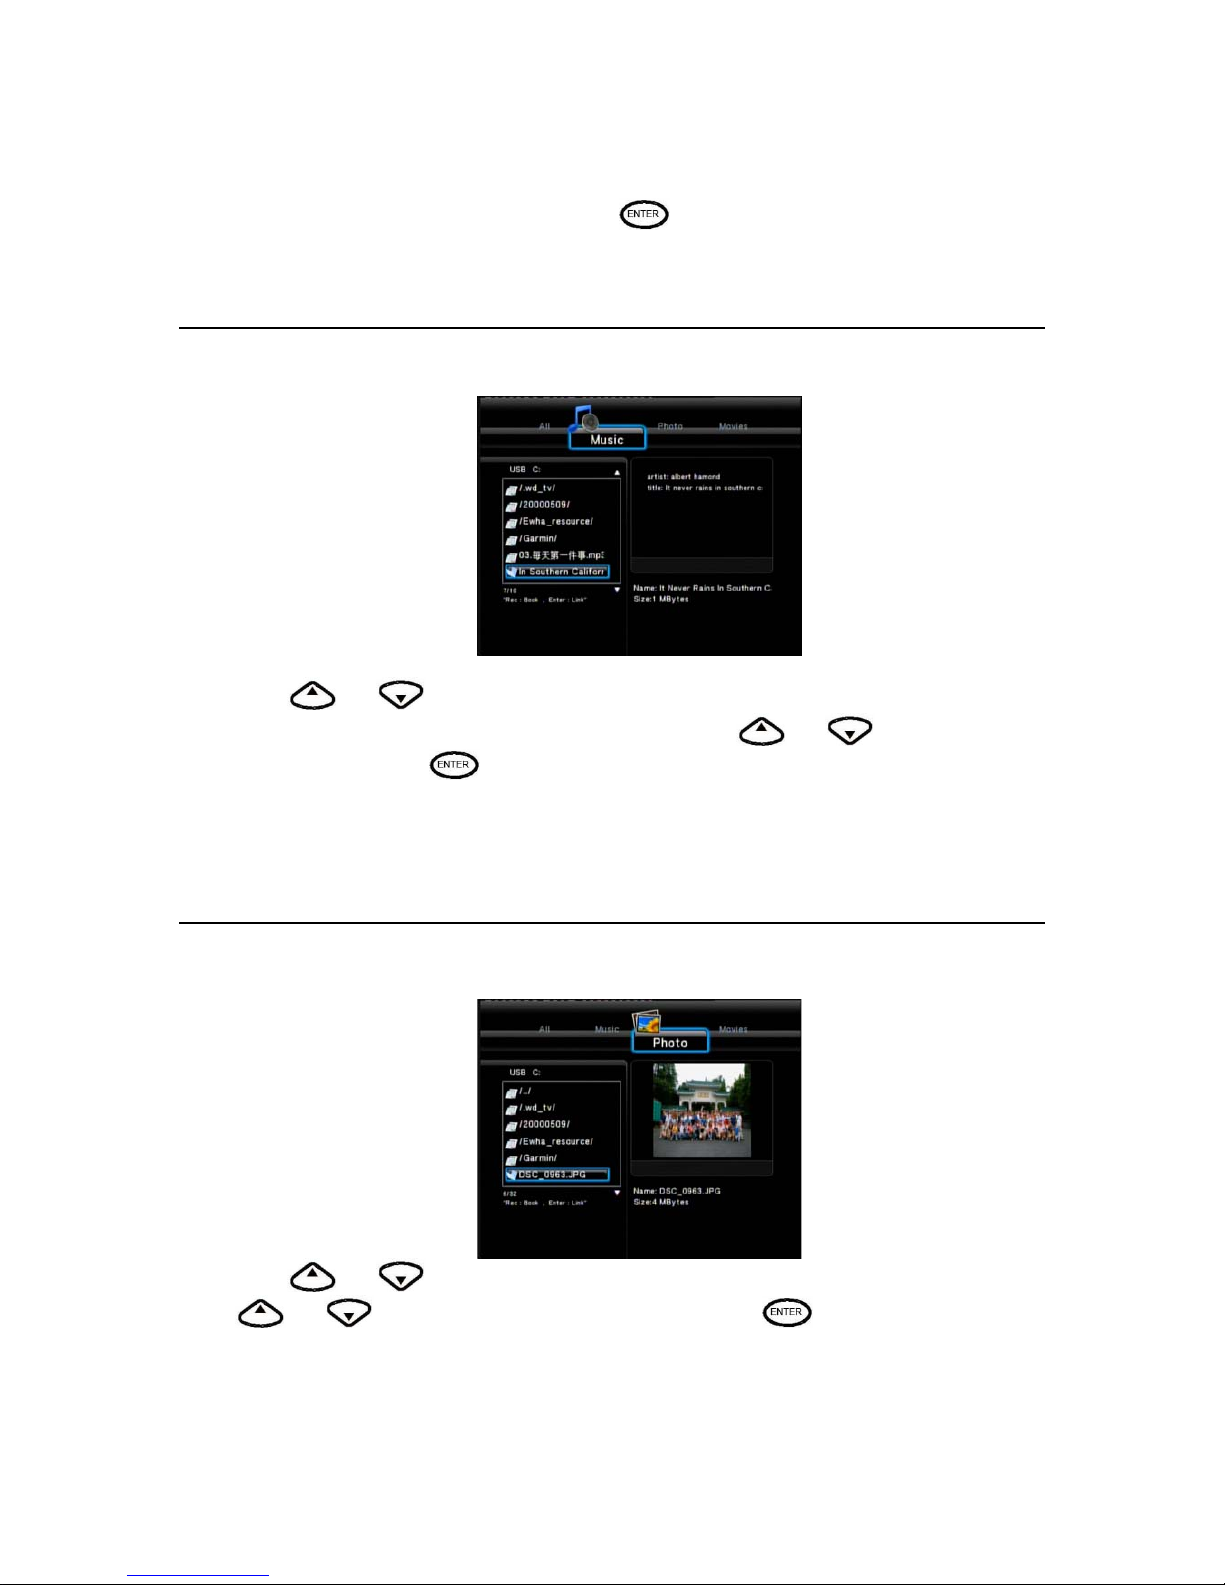
Browsing Music
Use the left and right nav i gation arrows to select the Music tab.
Press
and to select the folder containing your audio files. A thumbnail strip appears at
the bottom of the screen, along with song information. Press
and to select the file you
want to play and press
.
This browsing music function supports Mp3,WMA,AAC,OGG format Playback.
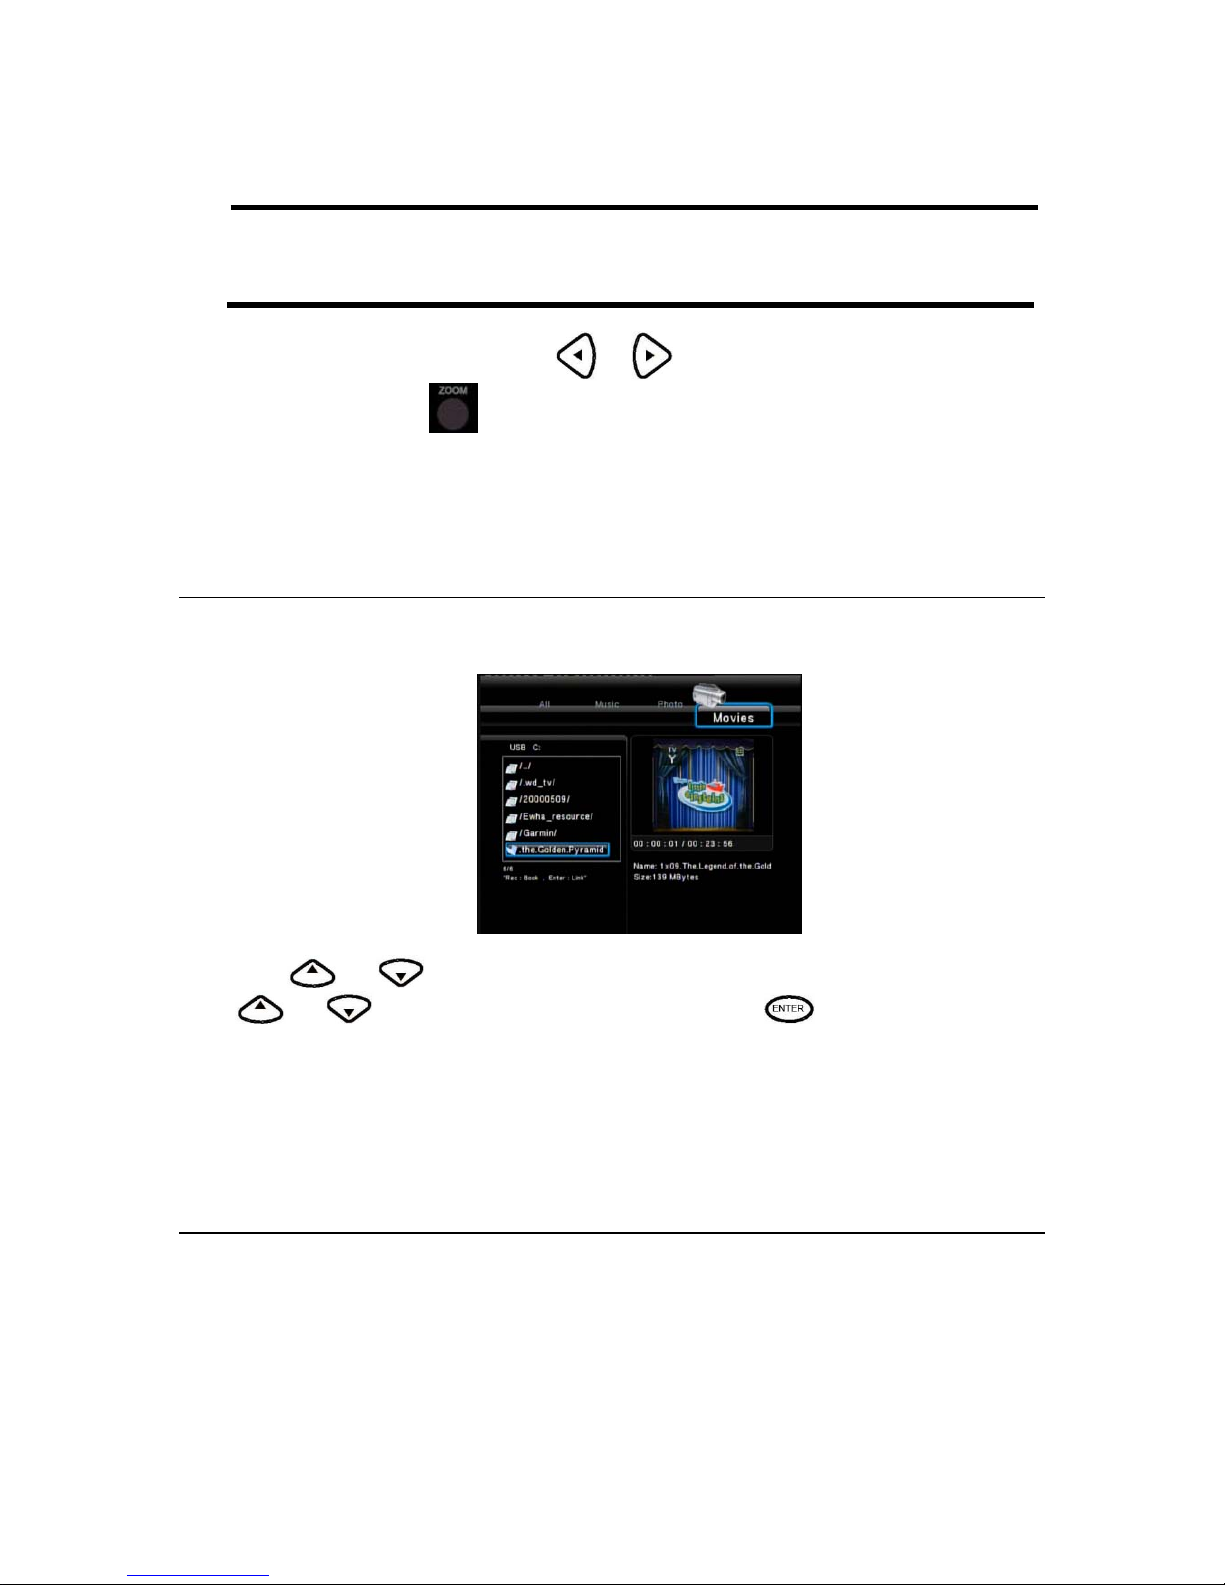
Browsing Photos
Use the left and right nav i gation arrows to select the Photos tab.
Press
and to select the folder containing your photo files. Enter the folder press
and to select the photo you want to view and press The photo is displayed full
screen.
Page 30
30
Note:
1. When the photo is displayed in full screen mode, the slide show starts automatically.
2. While listening to MP3 files, you can browse the photos at the same time.
While brows ing a ph oto, yo u can pre ss
or to rotate a photo in any angle. Beside rotating
a photo, you can press
to zoom in/out that photo, three zoom levels are available.
This browsing photos function supports High Definition Photo (JPG,JPEG,BMP)Playback.
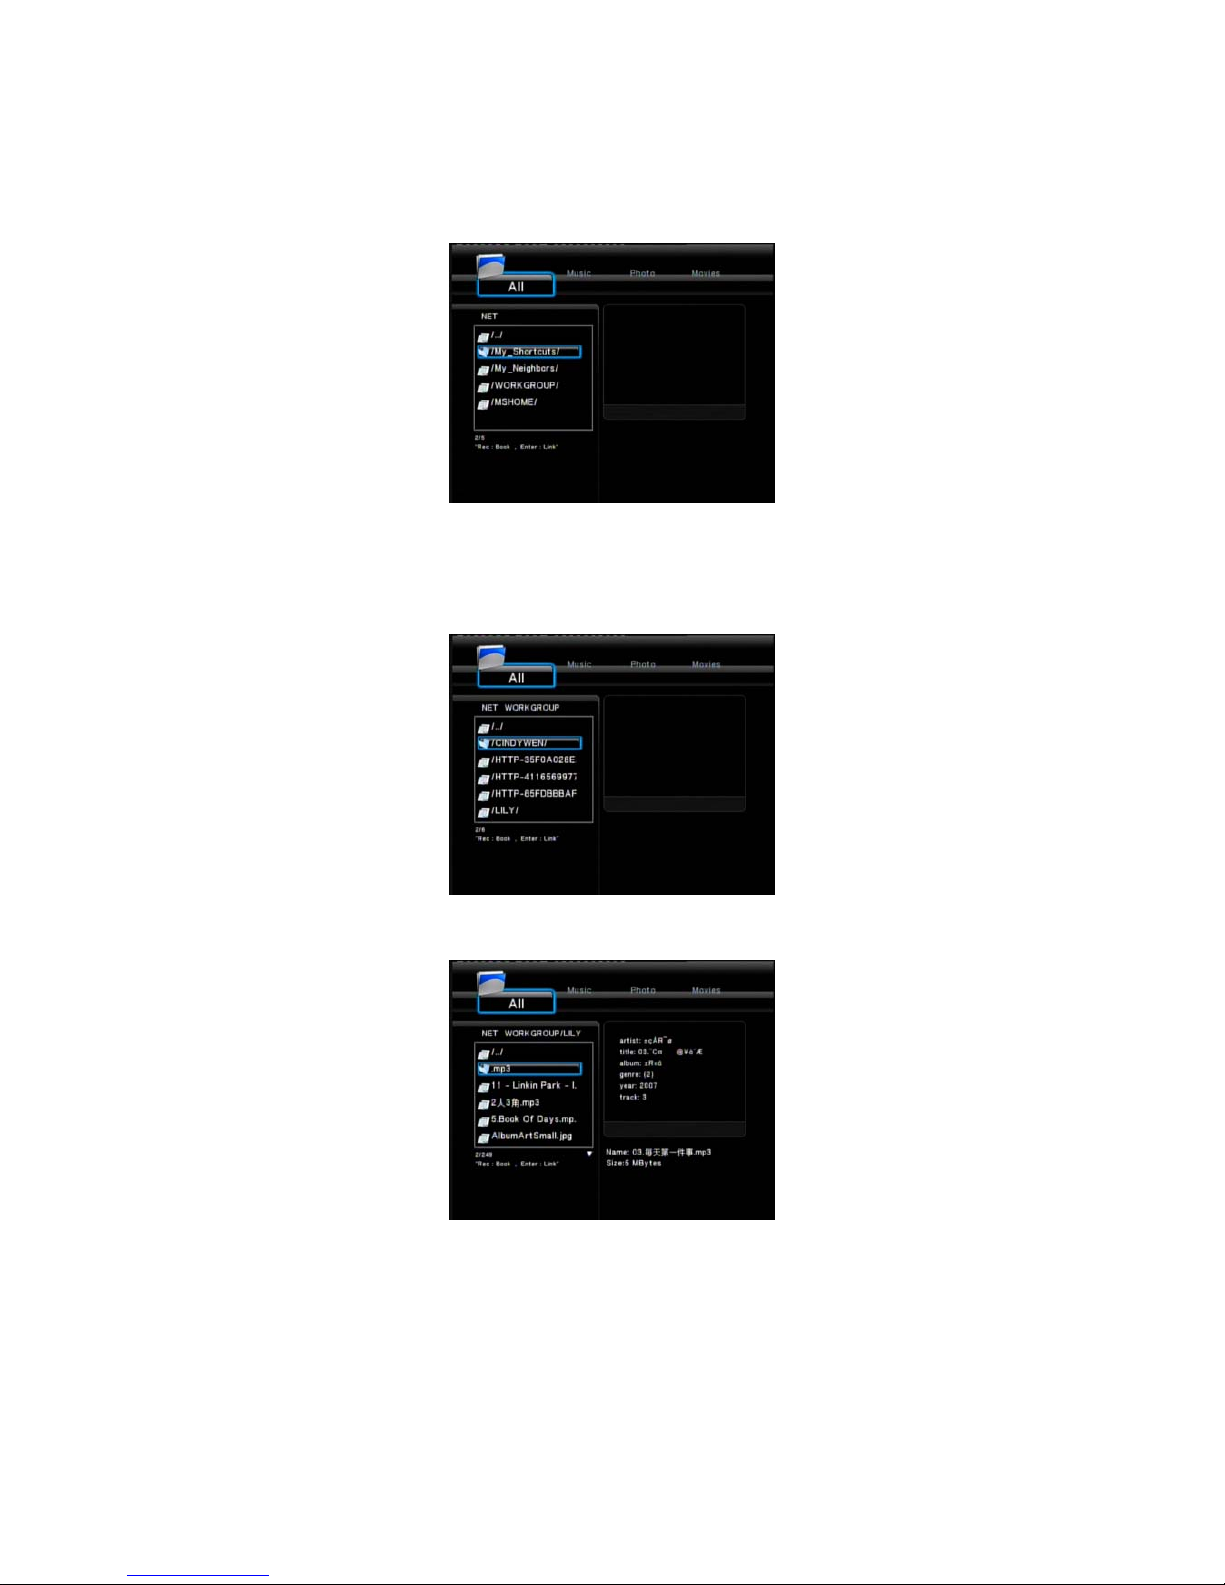
Browsing Movies
Use the left and right nav i gation arrows to select the Movies tab.
Press
and to select the folder(s) containing your movie files. Enter the folder press
and to select the movie you want to view and press . The movie is played full
screen.
This browsing movies function supports DAT, VOB, IFO, MPG, AVI, and TS file formats.
While browsing a movie in full screen mode, you can press the ZOOM button to zoom in/out the
image. Four zoom levels are available.
Browsing Network
You can streaming playback the multimedia files shared on the local area network (Ethernet or
WLAN).
Before viewing the following, please make sure that you have read
“Changing Network Settings”
on page 11
and made the right settings.
When selecting NET in the Browser menu, there are two ways to locate the multimedia files shared
Page 31
31
on your local network. One way is to browse through workgroup; the other w ay is to browse through
‘My_Shortcuts’ .
1. Browsing through Workgroup
You can choose the workgr oup which your PC be longs to from the w orkgroup list, find your PC name,
and press the ENTER button to confirm.
Then select the shared multimedia fi le that you want to browse.
Note:
1. While browsing high definition video files (resolution up to 720p / 1080i / 1080p) via Ethernet or
WLAN, the video might be buffering. It is normal due to the limit of network speed or signal strength.
2. Due to different network conditions, sometimes the workgroup might not be accessed or shown in
the list. And then you need to use ‘My_Shortcuts’ to browse shared files.
Page 32
32
2 . Browsing through ‘My_Shortcuts’
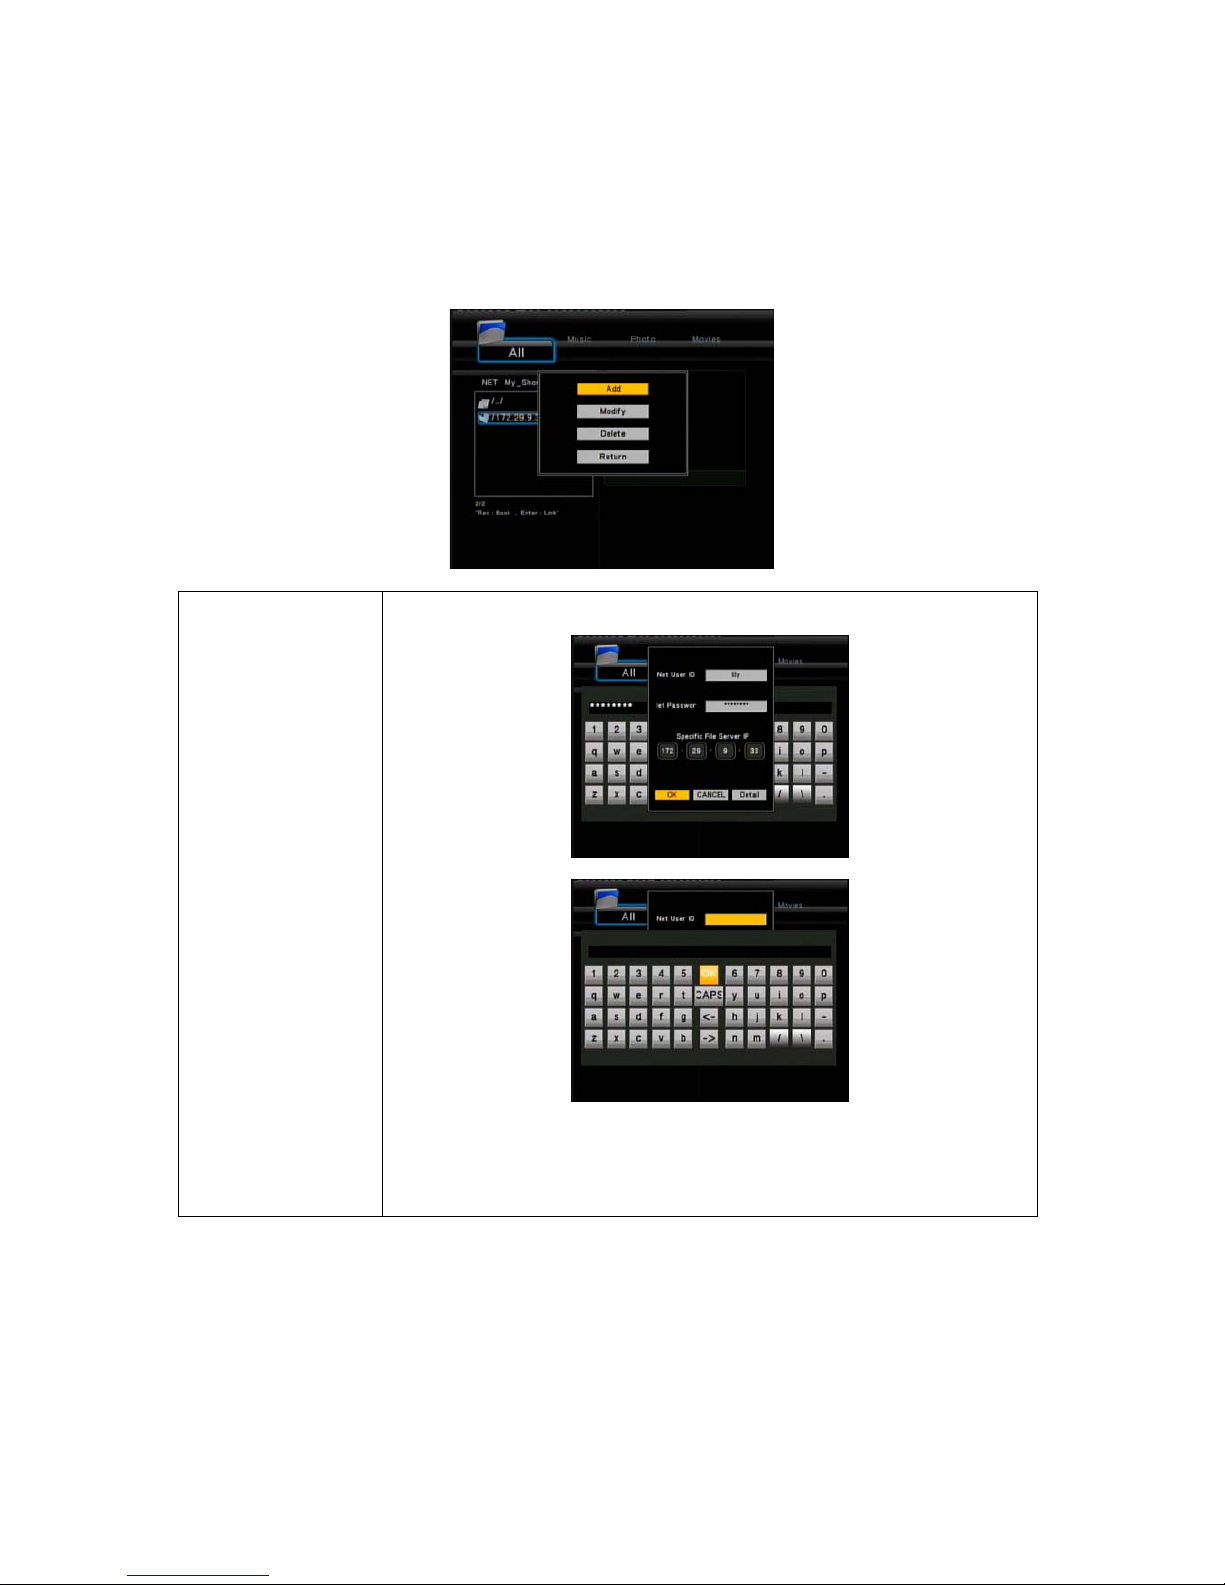
You can also set ‘Specific File Server IP’ and access it from ‘My_Shortcuts’ in the menu.
Press the EDIT button and a tools menu appears.
Network Browser Select to set Net User ID, Net Password, and Specific File Server IP, which
enables to browse files on NET through ‘My_Shortcuts’.
Select Net User ID and the entry screen will appear.
Press the Navigation buttons to select letters and numbers. Select CAPS to
toggle between uppercase and lowercase letters. Press <- to delete a letter.
Press -> to insert a space. Press the ENTER button to input each letter or
number. Select OK and press the ENTER button to confirm all changes.
Page 33
33
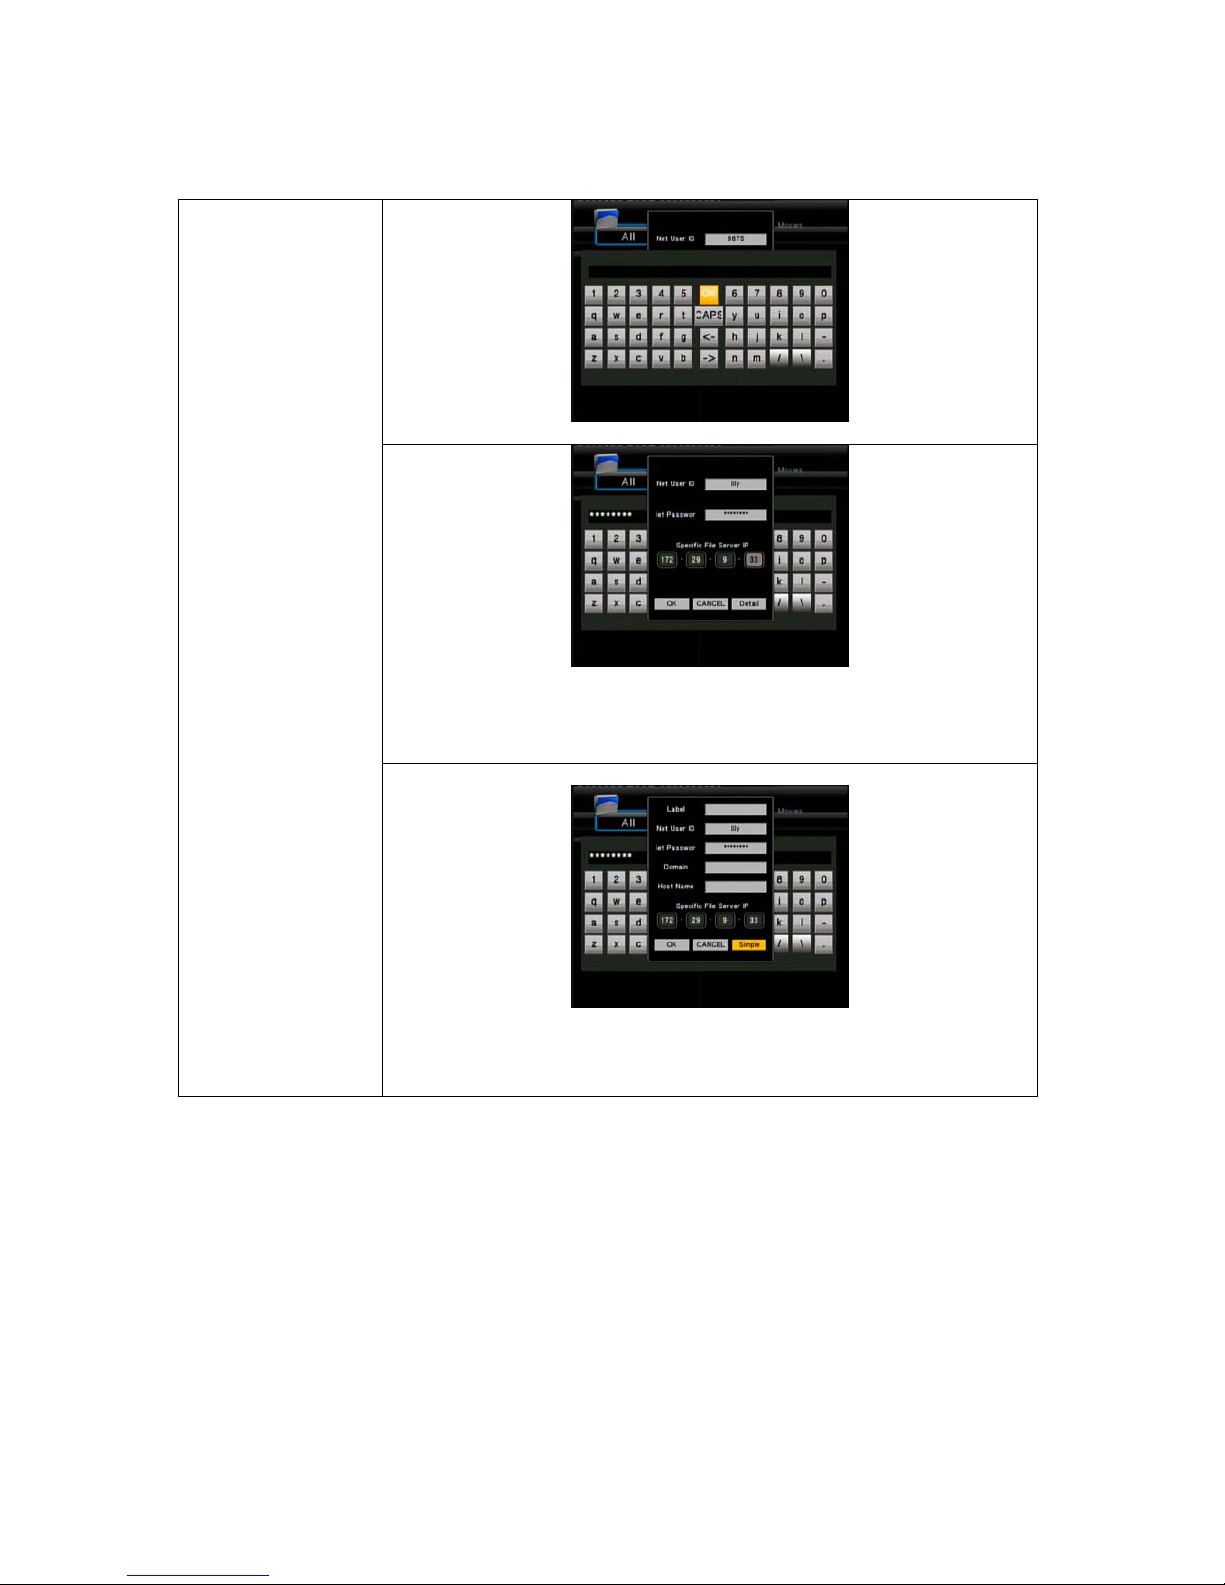
Select Net Password and the entry screen will appear. See above.
Select Specific File Server IP, and use Navigational and Numeric buttons to
enter IP address.
You can also select Detail to set the Label, Domain, and Host Name of the
shortcut. Then select OK and press the ENTER button to confirm.
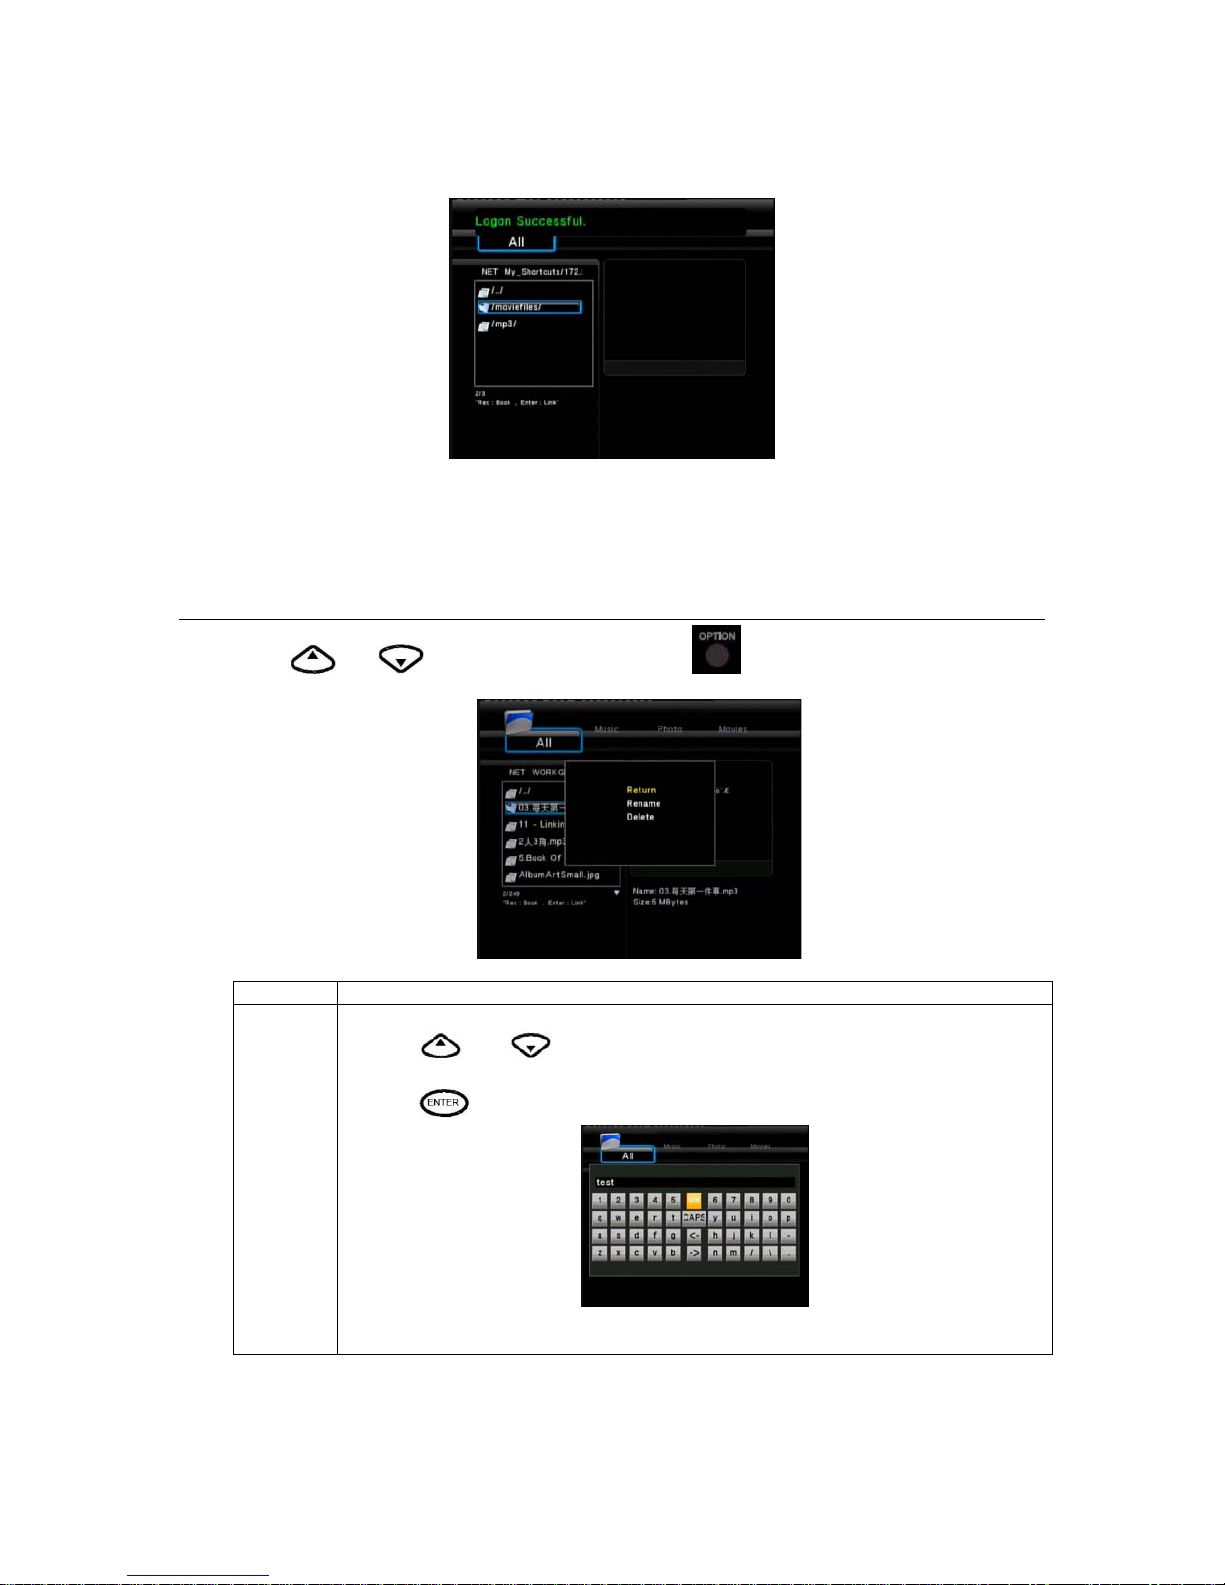
Select the shortcut you added and press the ENTER button to confirm.
Page 34
34
Then select the shared multimedia file that you want to browse.
File Edit Menu
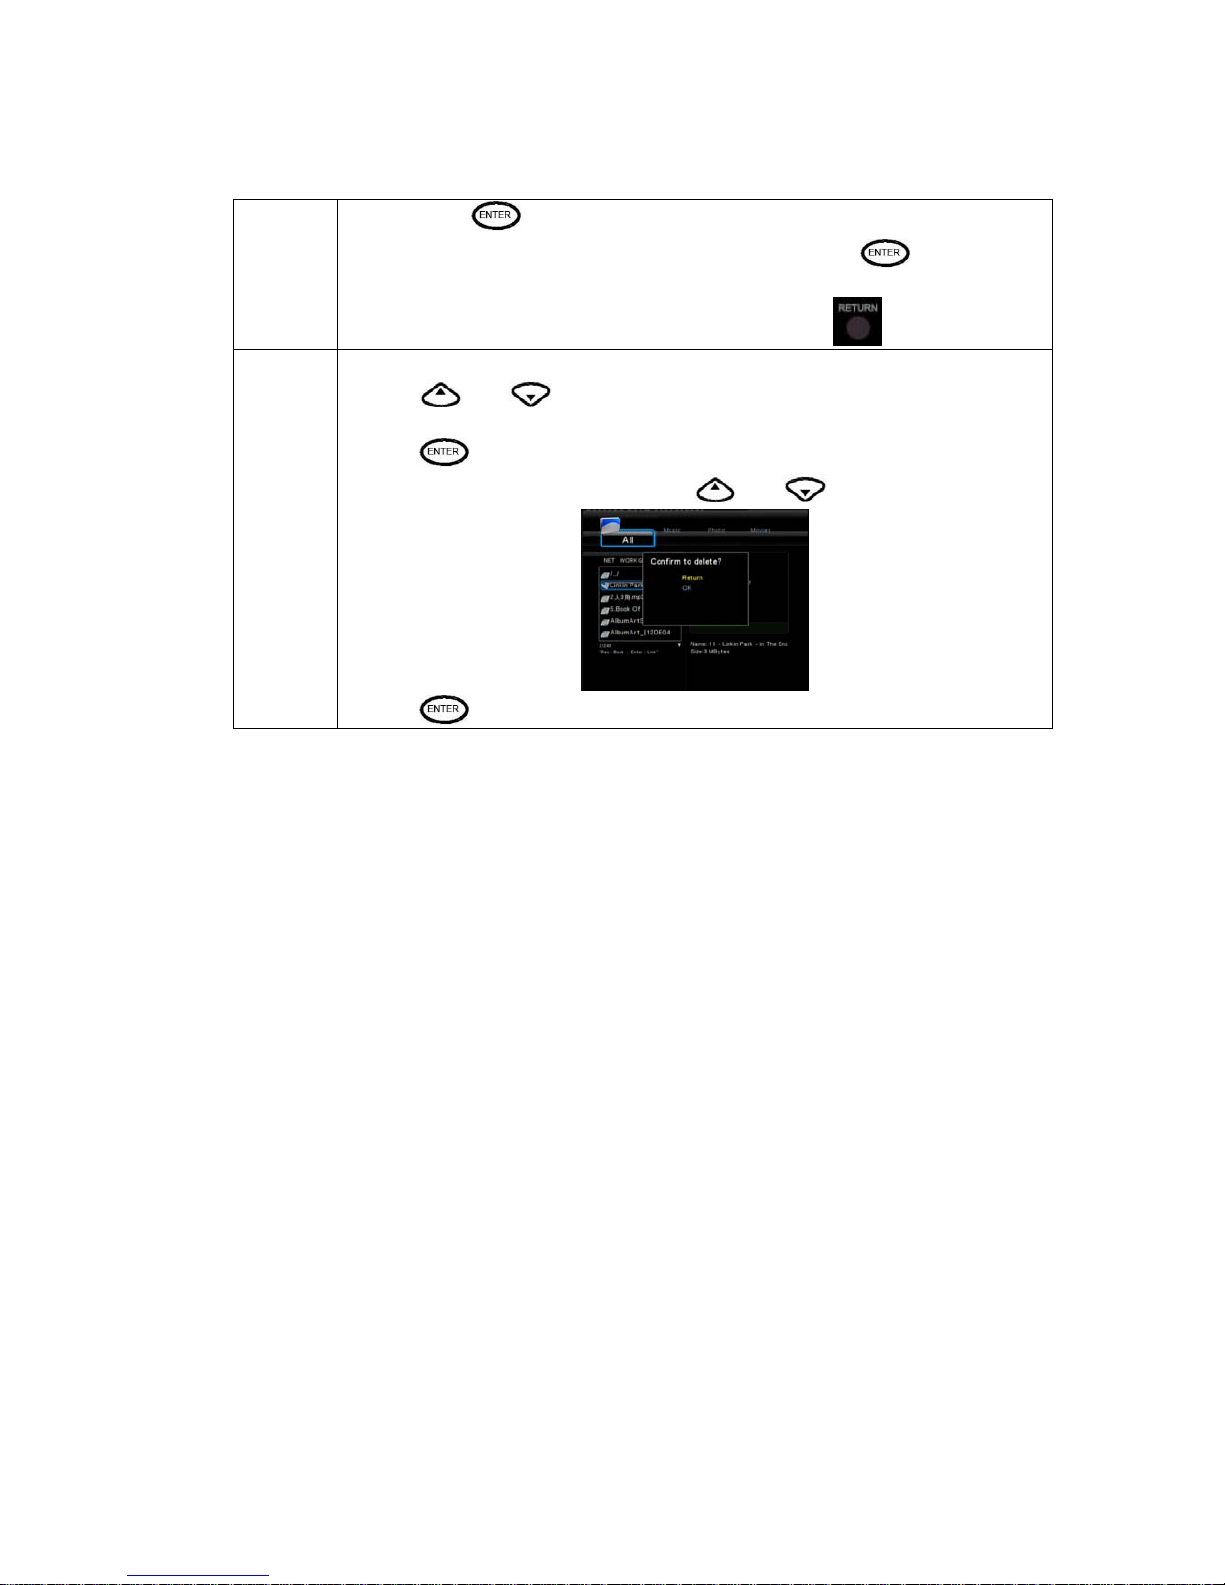
Press and to select the file or folder, press to display the Edit tab.
Return Select to return to the main screen.
Rename To rename a file, do the following:
1. Press
and on the remote control to select the Rename tab from the
menu bar.
2. Press
on the remote control. The name entry screen appears.
3. Use the navigation arrows to select letters and numbers. Select CAPS to toggle
between uppercase a nd lowercase letters. Press <- to delet e a letter. Pres s -> to insert
Page 35
35
a space. Press
to input each letter or number.
4. Once you have entered the new name, select OK and press
to confirm all
changes.
If you want to cancel the naming during the process, press
Delete
To delete a title, do the following:
1. Press
and on the remote control to select the Delete tab from the
menu bar.
2. Press
to confirm and delete the file.
3. A confirmation message appears. Press
and and select OK.
4. Press
to delete the selected file. To cancel delete, select Return.
Page 36
36
Playlist
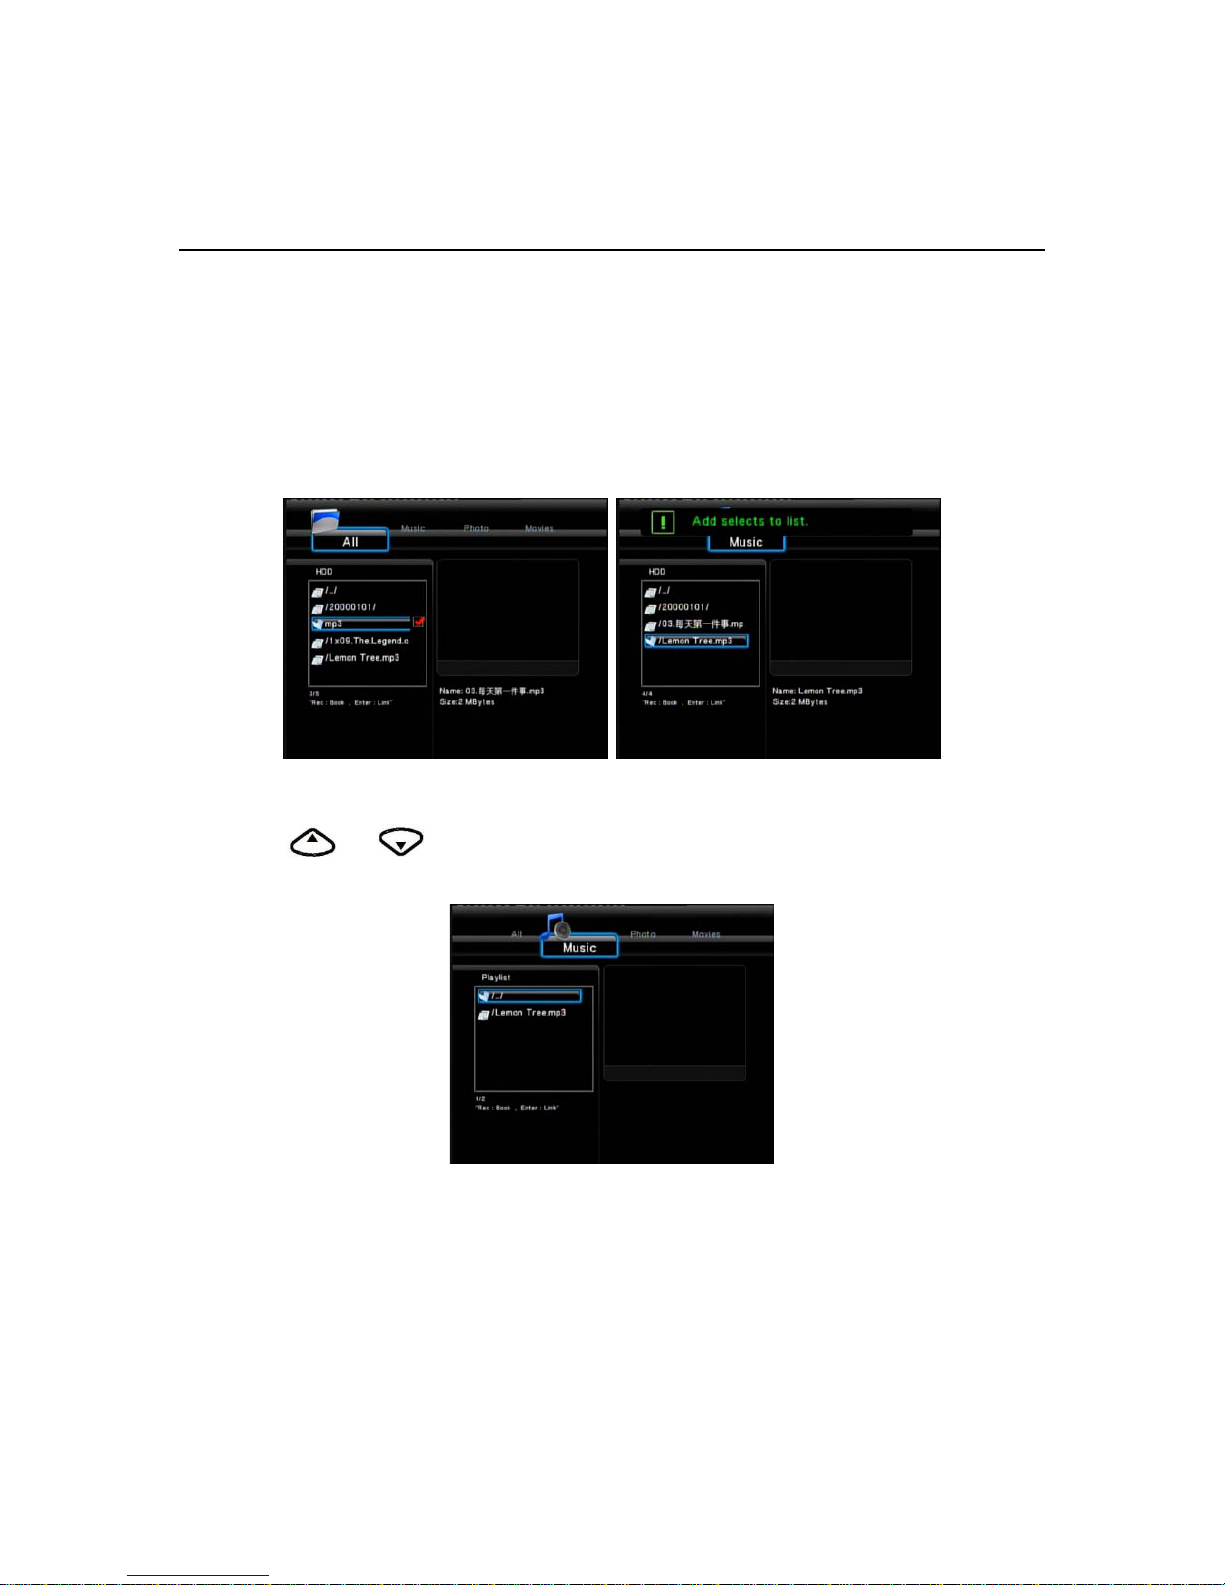
This player supports the playlist function, which allows you to add your f avorite content to the playlist,
and enjoy them at any time.
1. Adding files to the playlist
Select the favorite file you wish to add, press the SELECT button on the bottom of the remote control,
and the file will be ticked. Press the ENTER button on the bottom of the remote control to confirm,
and then an on-screen message ‘Add selects to list’ will be shown. Multiple selections are allowed.
See photo below.
2. Browsing the playlist
Press
and to select Play List in the browser menu. And press the ENTER button to
confirm. Then you will enter the playlist.
Page 37
37
Chapter 4
File Copy Menu
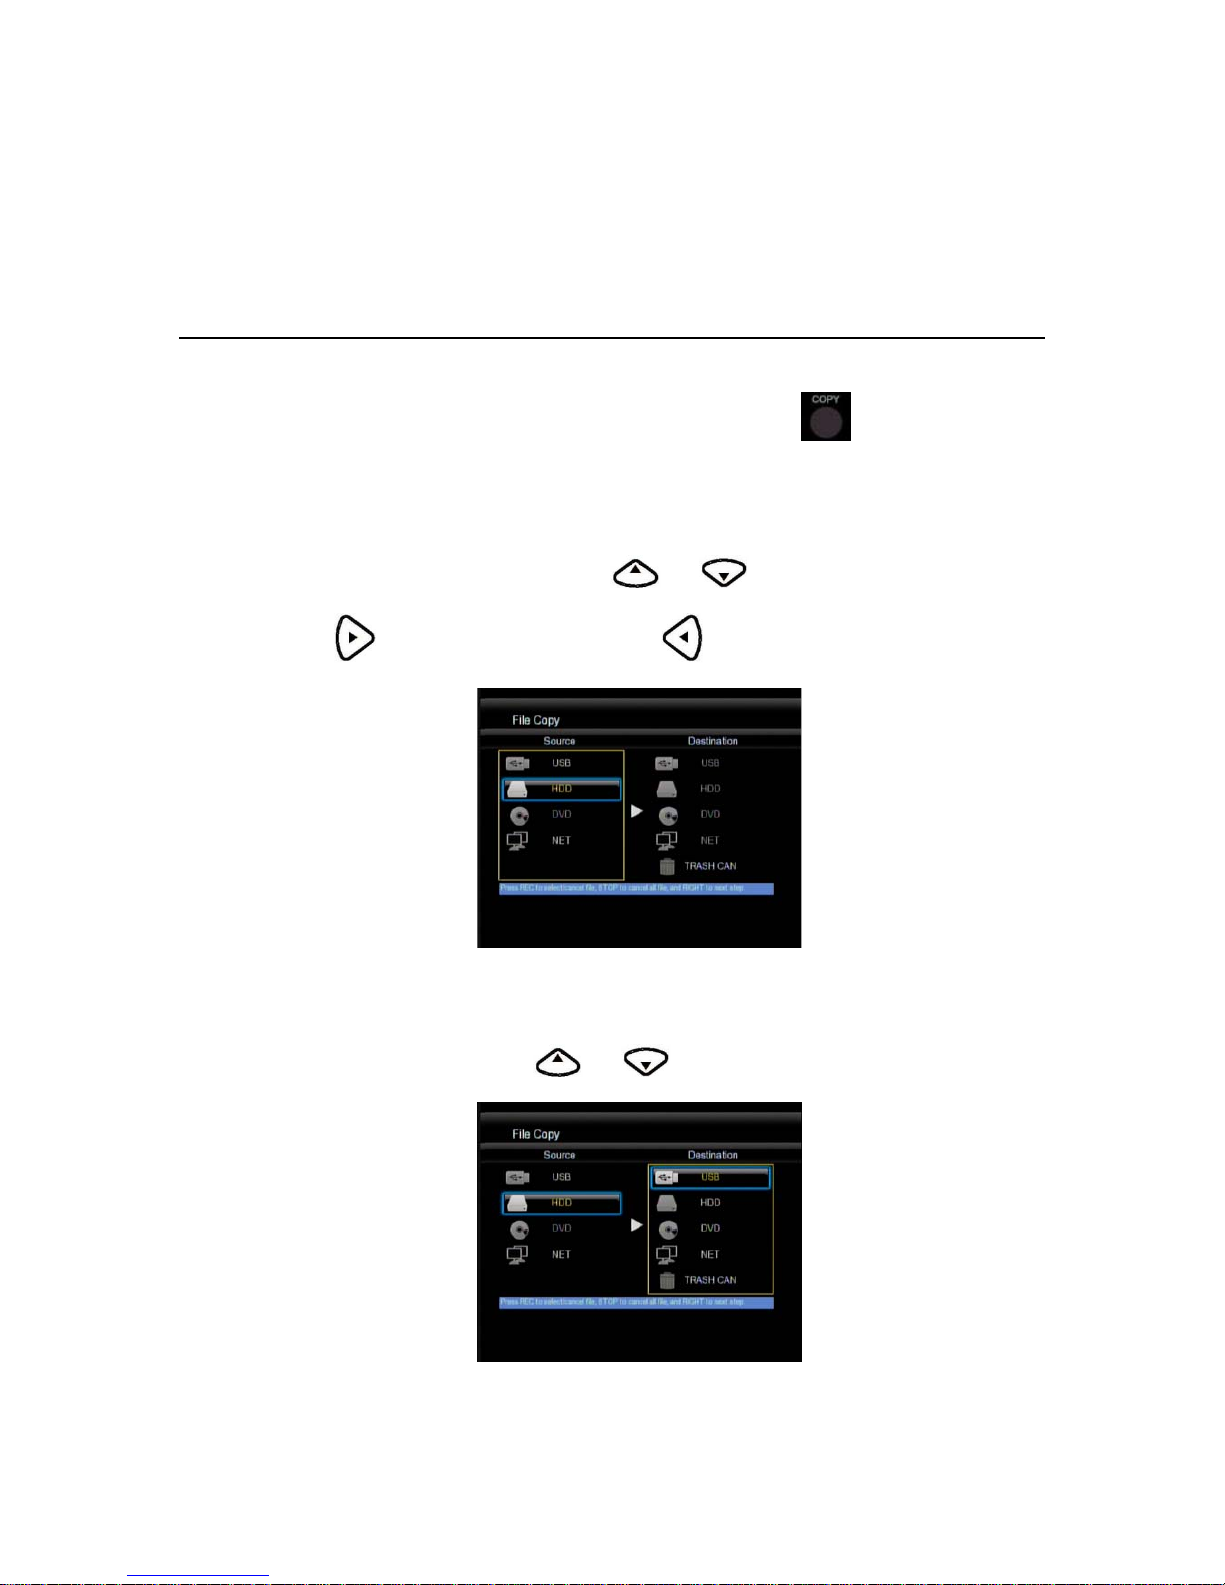
The Setup Menu allows you to copy files at NET,USB,HDD each other.
To enter the menu, select File Copy from the Guide menu or select
on the remote control.
Step 1. Select Sour c e Dev ice
When you enter the File copy interface, press and to select the device which your want
to copy first.
Then press
to select Destination Device, press to return.
Step 2. Select Destin at i on Device
When into Destination sector, press and to select the device of the Destination.
Page 38
38
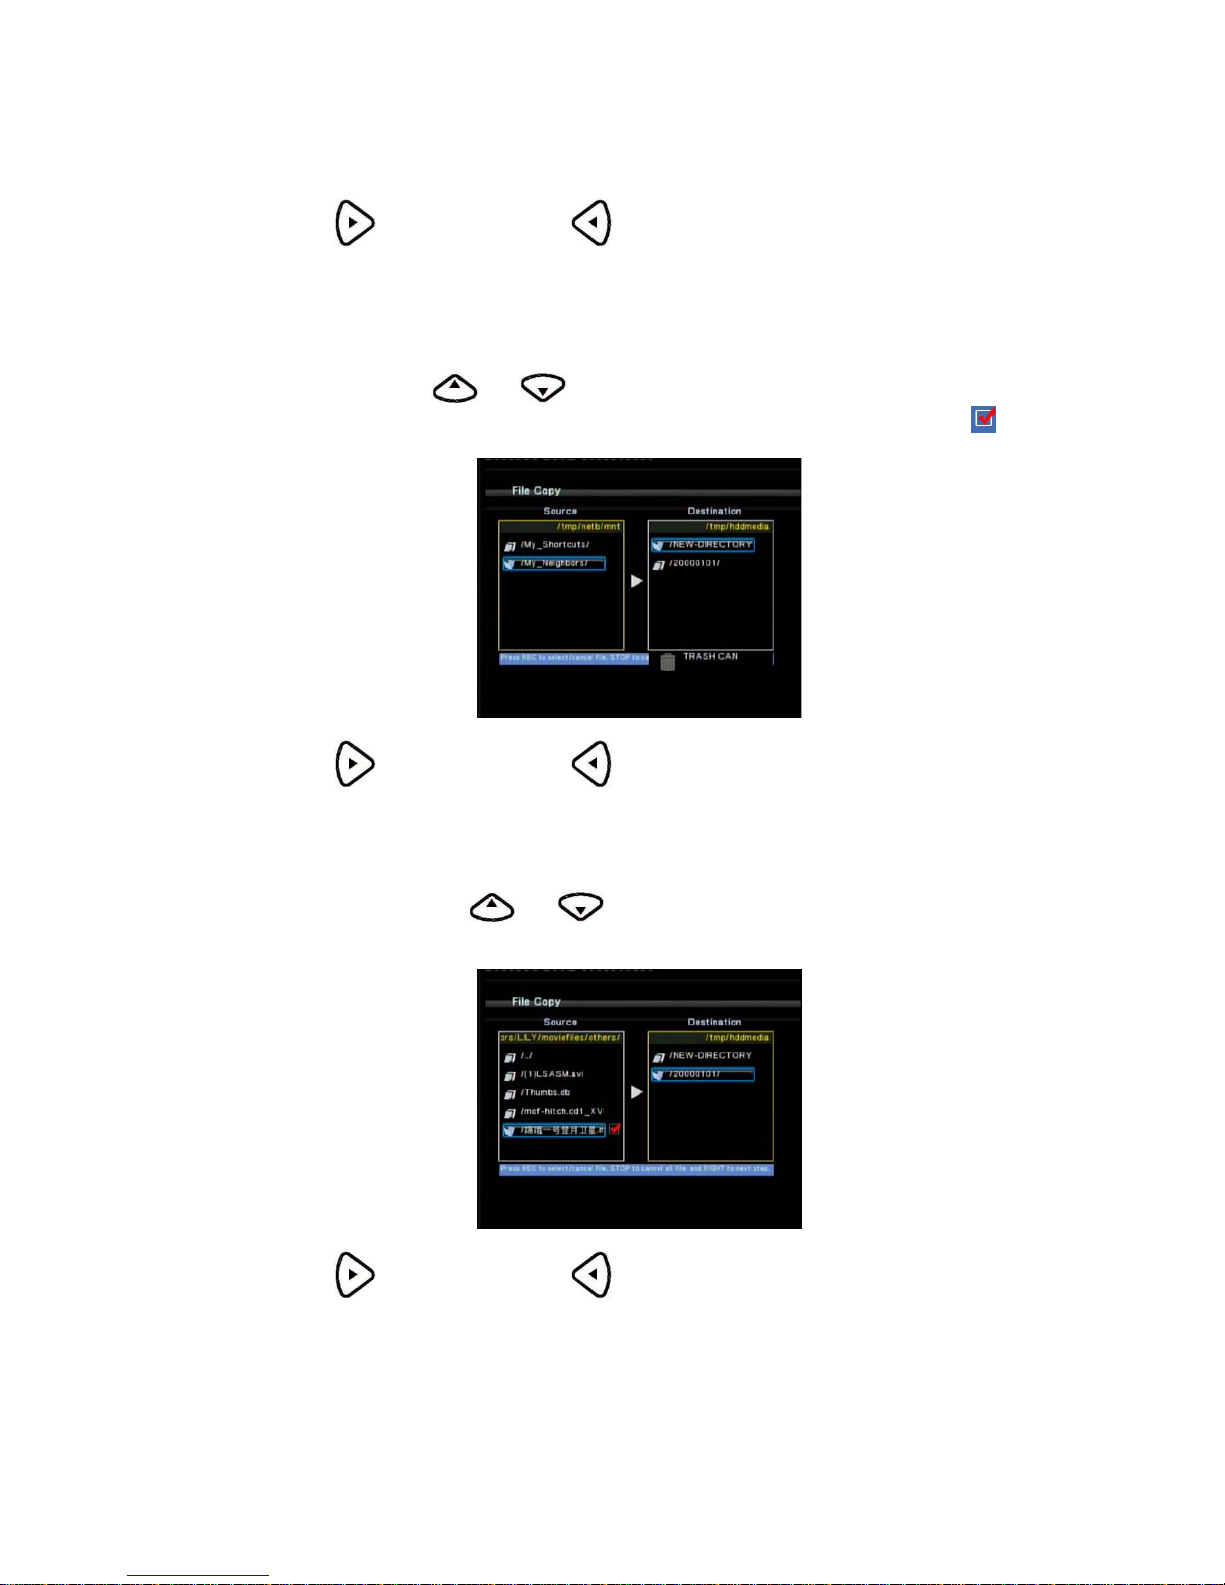
Then press
to next step, and press to return.
Step 3. Select copy f il e s or folders
At Source sector, press and to select and press Enter to select file or folders which yo u
want to copy. When you succeed to select, at the file or folder name right side will display
.
Then press
to next step, and press to return.
Step 4. Select the folders of Destination
At Destination sector, press and to select the folders of destination.
Then press
to next step, and press to return.
Page 39
39
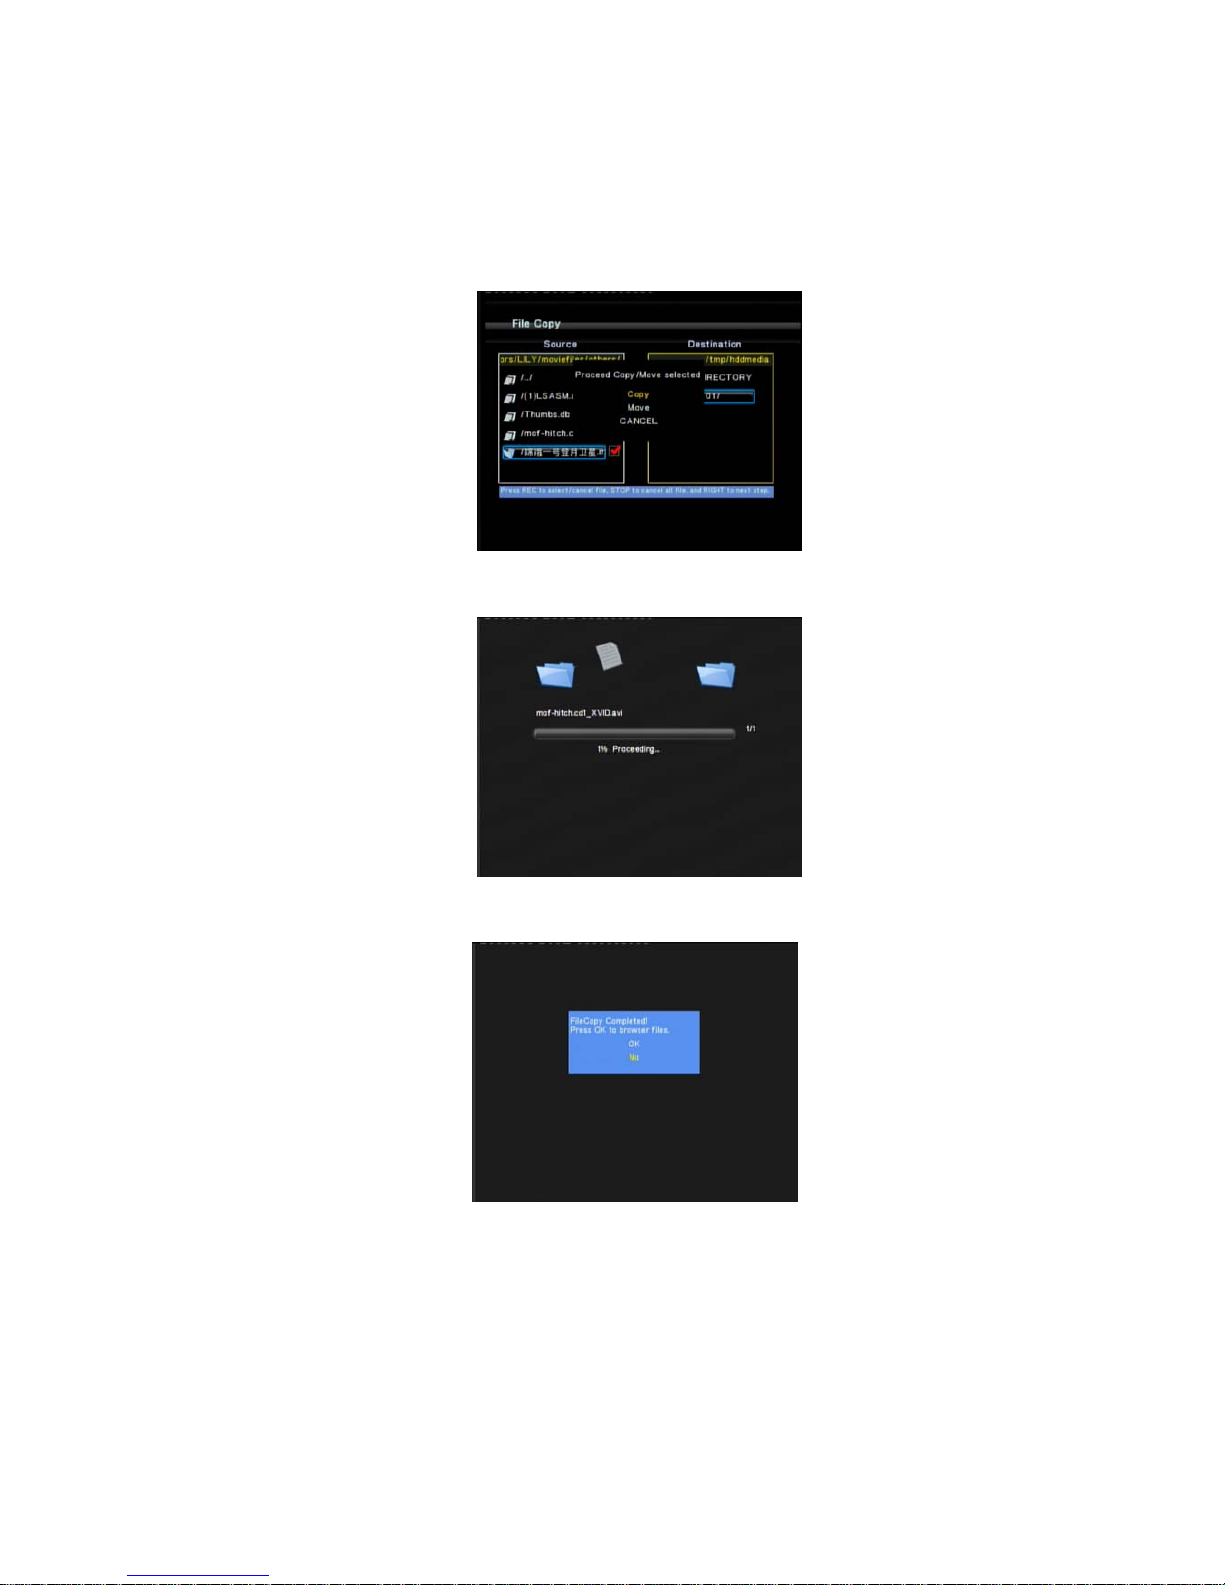
Step 5. Copy Status
At Pop menu, select Copy to copy, select Move to move ,select CANCEL to cancel,.
Press OK into copy status. You will see the copy proceeding.
When copy succeed, the system will display “File Copy Completed!”; if failed, the system will display
“File Copy failed!”
When the File Copy completed! You can select “OK” to browser files, or select “No” return.
Page 40
40
Chapter 5
Install BT_SAMBA
HD Recorder Player is a system, it consist of operating system (Linux+AP) and application software
(BT_SAMBA).
The operating system install in the 8M flash; and application software will install on HDD of Net Media
Player.
Ready for installation
Please save the relatively of BT_SAMBA files in USB Device, and insert the USB device in the Net Media Player first.
The first install
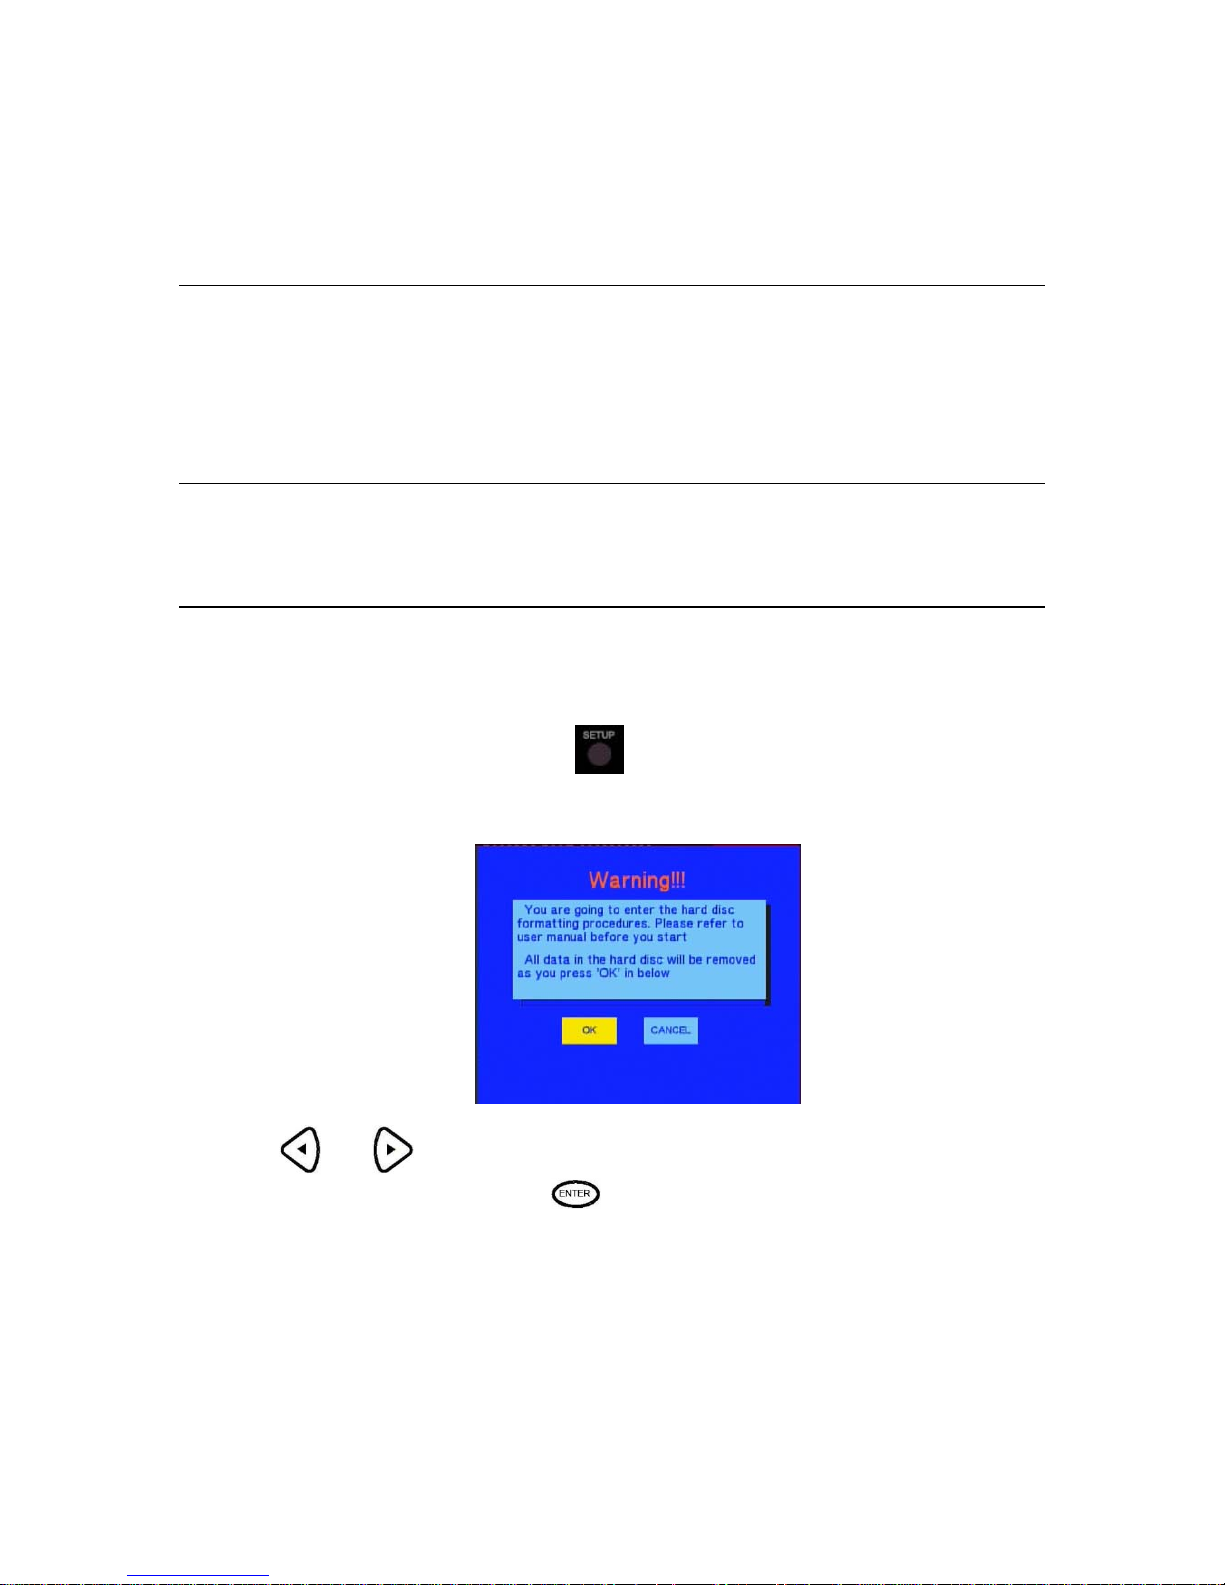
When you insert a Hard disc on the system at the first time, System will remain you to enter the Hard
disc format interface.
Warning!!!
About format the HDD, you can also press
into Setup menu and select HDD Format to Format
HDD.
Press and on the remote control to select you wish.
When highlight move the OK button, Press to enter the next step. Otherwise, select cancel to return.
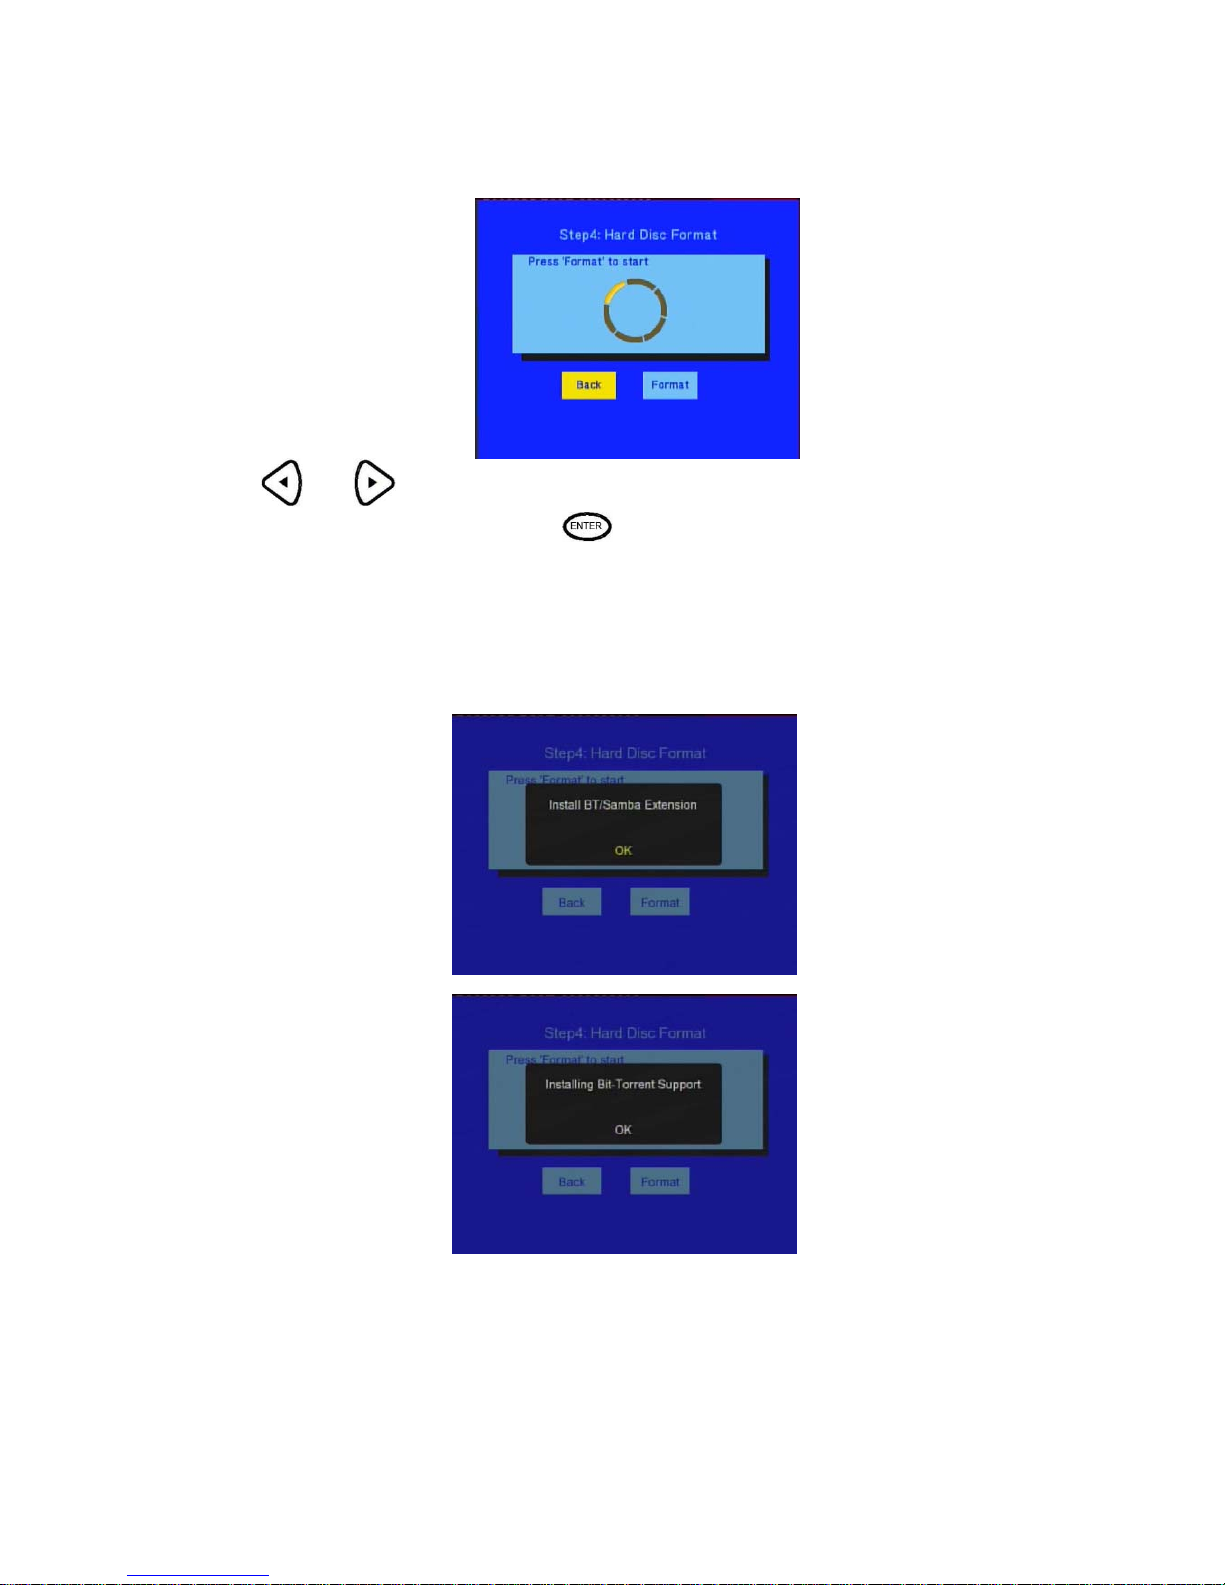
Step 2: Hard disk format
Page 41
41
Press and on the remote control to select back or format.
When highlight move the Format button, Press
to start. Otherwise, select back button to back.
Step 3: Install BT/Samba Extension
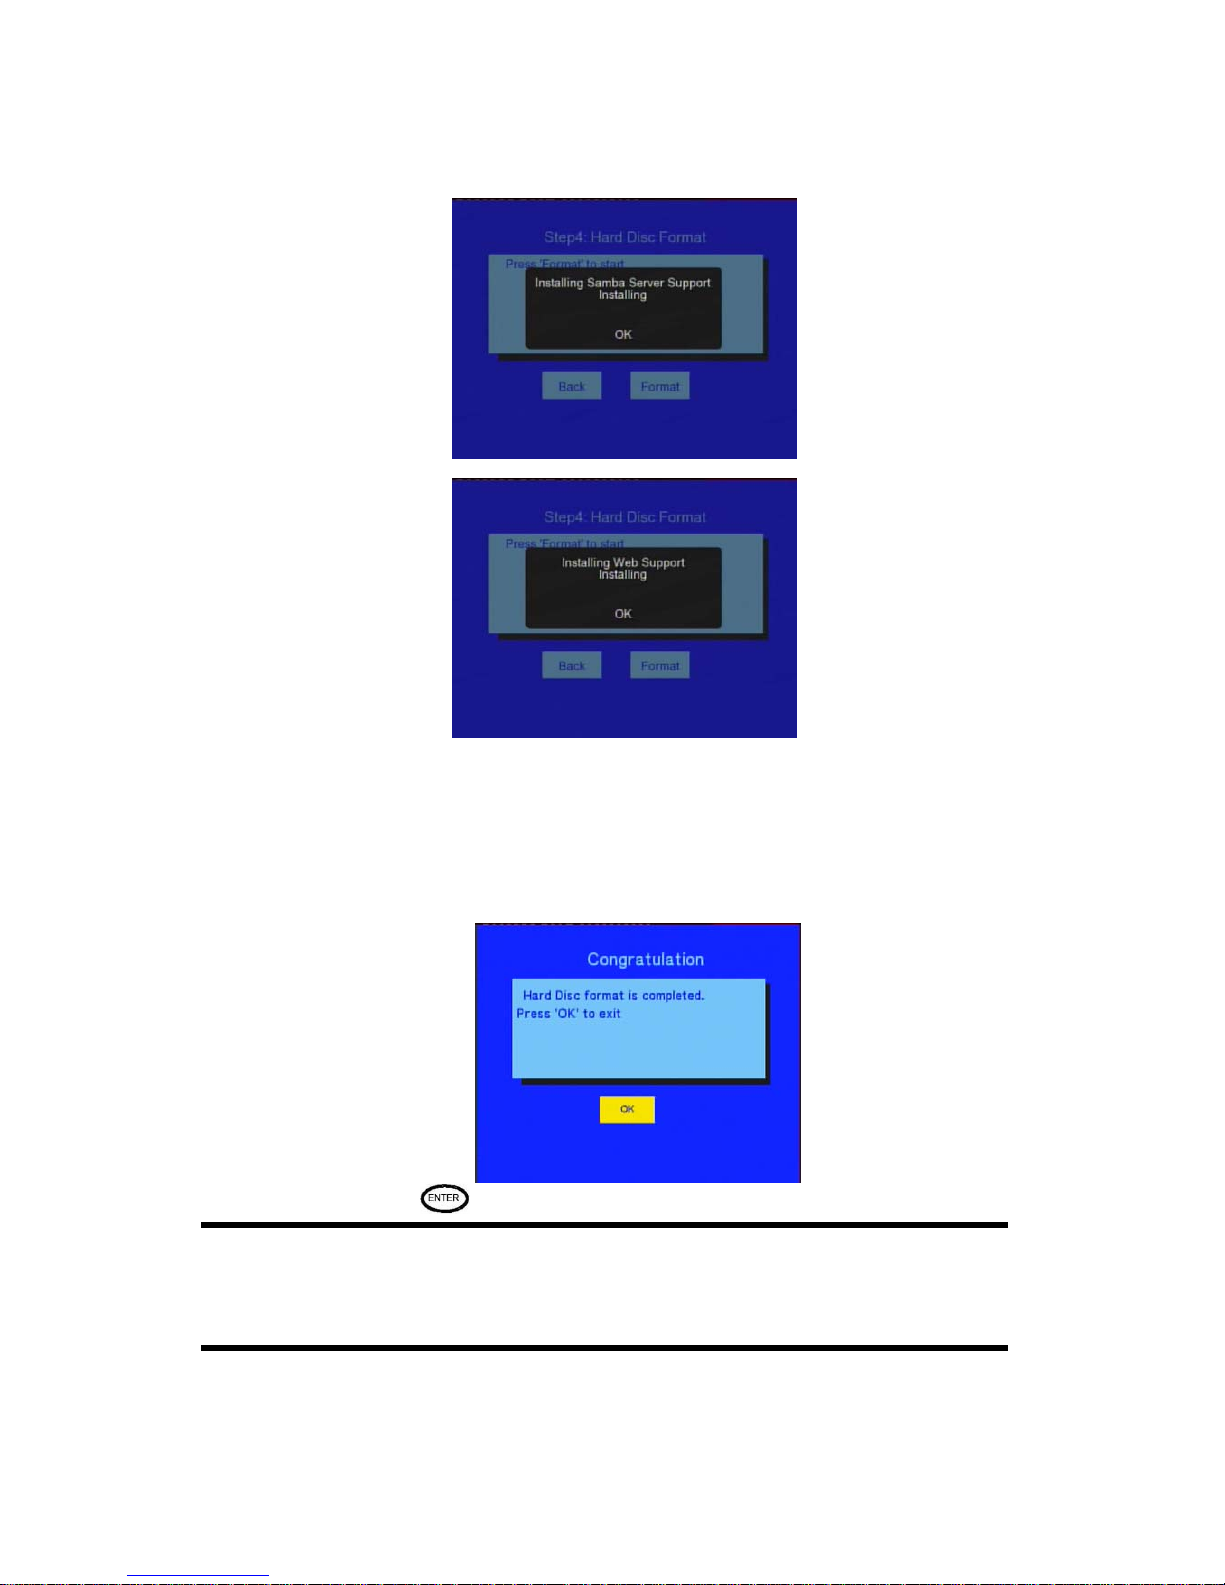
After format complete, the system will install BT/Samba automatically. Please select OK to the next step.
The system will auto install according the following steps.
1) Install BT/Samba Extension
2) Install Bit-Torrent Support
3)Install Samba Server Support Installing
Page 42
42
4)Install Web Support Inst alling
When the install complete, the system will display succeed at the end of even steps.
Step 4:Congratulation page
When complete the format, the system will display the congratulation page.
Select OK button and Press to exit. And the system will boot up automatically.
Note:
If you find the install is fail, the system will in sta ll again at next time. please check :
i)If USB device insert the HD Recorder Player and if the install file is correct in the USB device.
ii) If the Transcode server is insta ll in your PC .
iii) When installing , the network or HD Recorder Player is break.
Page 43

43
Boot Up system to install
When insert the HDD which is not format by BT Player, the system will install automatically. Please see the “
The
first install
”
on page 36
for more detail.
When insert the HDD Which is format by BT Player, the system will install begin from “
Step3.
BT/Samba
Extension
”
on page 37
for more detail.
Page 44
44
Chapter 6
Transcode Server in PC
Transcode server is a medial transition software. It need install in PC. And it is a communicate bridge to connect Net
Media Player and PC.
Double click the T ranscode Server .msi
and finish the installation.
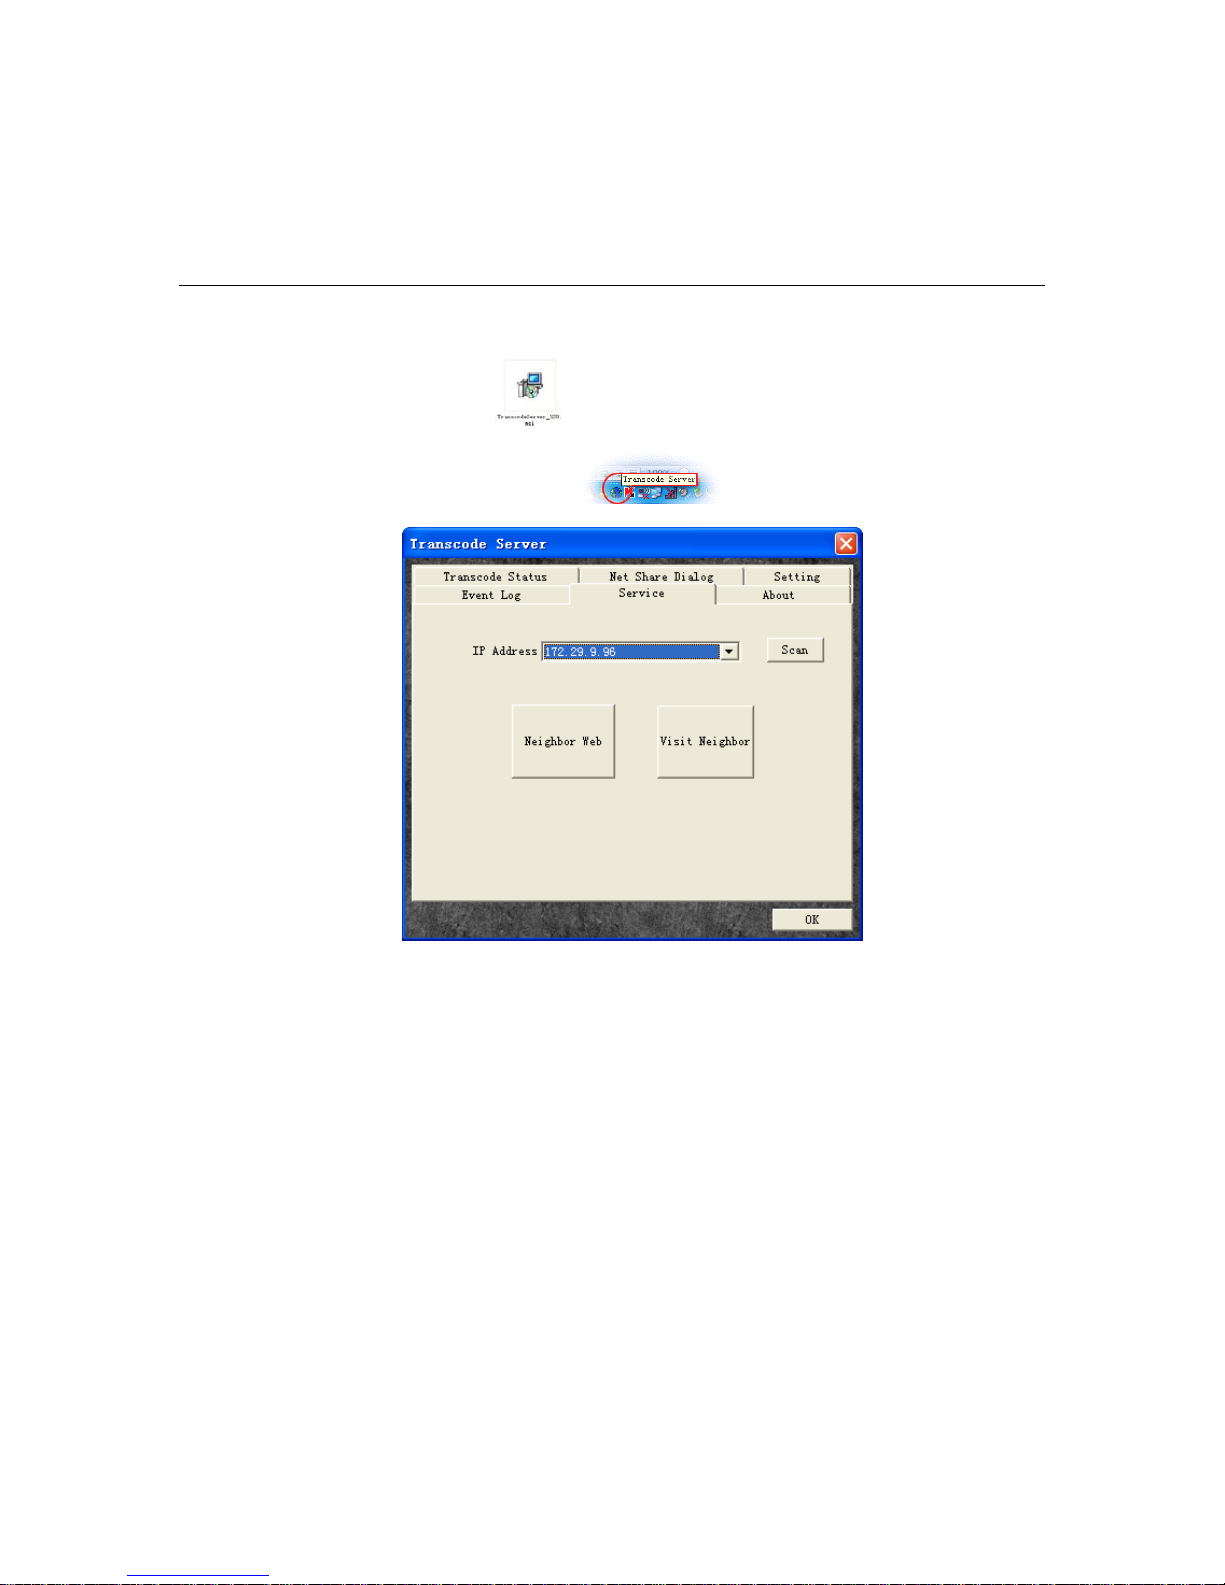
Please execute the Transcode server as installation completed. The Transcode Server icon will appear on button
right of the screen. Click the transcode server icon
to enter the Transcode server interface.
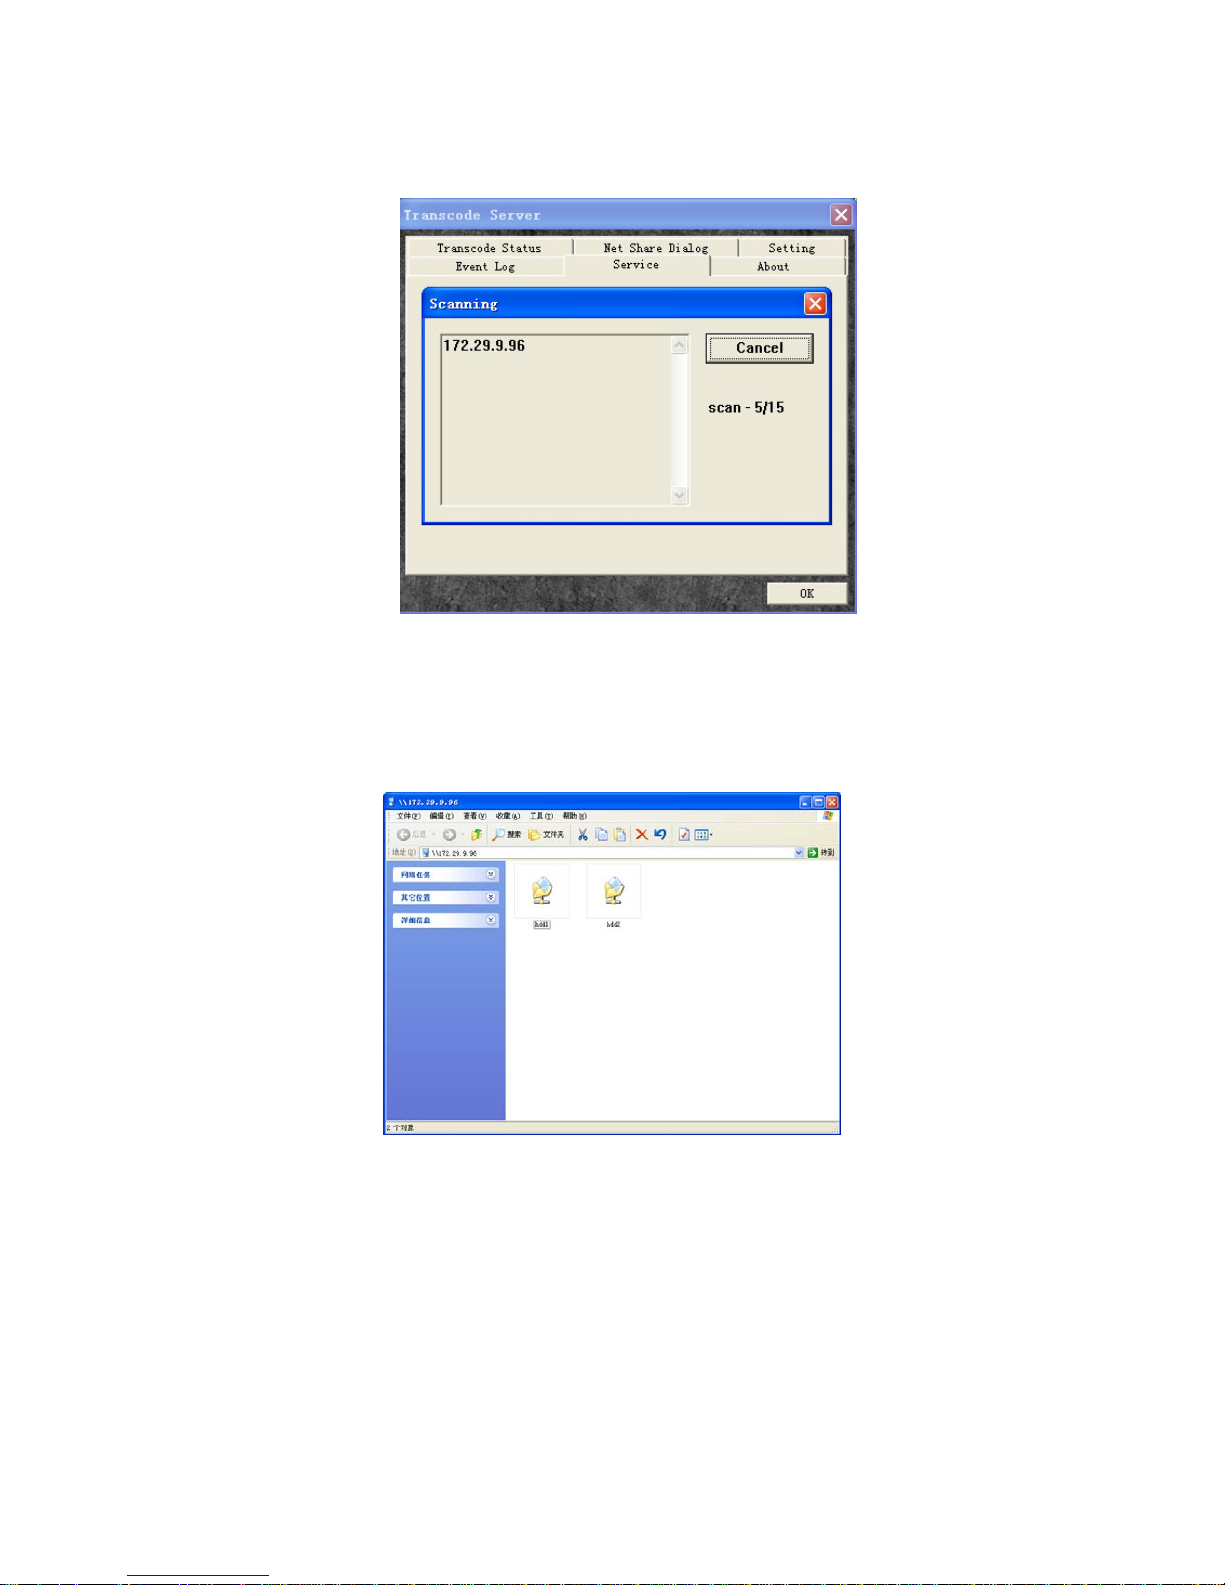
1) Service
Press the “Service ” tab.
Press “Scan” button and Transcode will scan your Net Media Player’s IP.
Page 45
45
If found, the IP will be shown. If no found IP, Please check the Network setting on your Net Media Player.
You can press the “Neighbo r Web” butto n to enter the “Neighbor web” interface by your internet browser(Such as IE,
Fire Fox…). Please see the “
Neighbor Web” on page 45
for more detail.
Press “Visit Neighbor” to visit the shared disks of Net Media Player. You can add new directory, copy or delete files
from it.
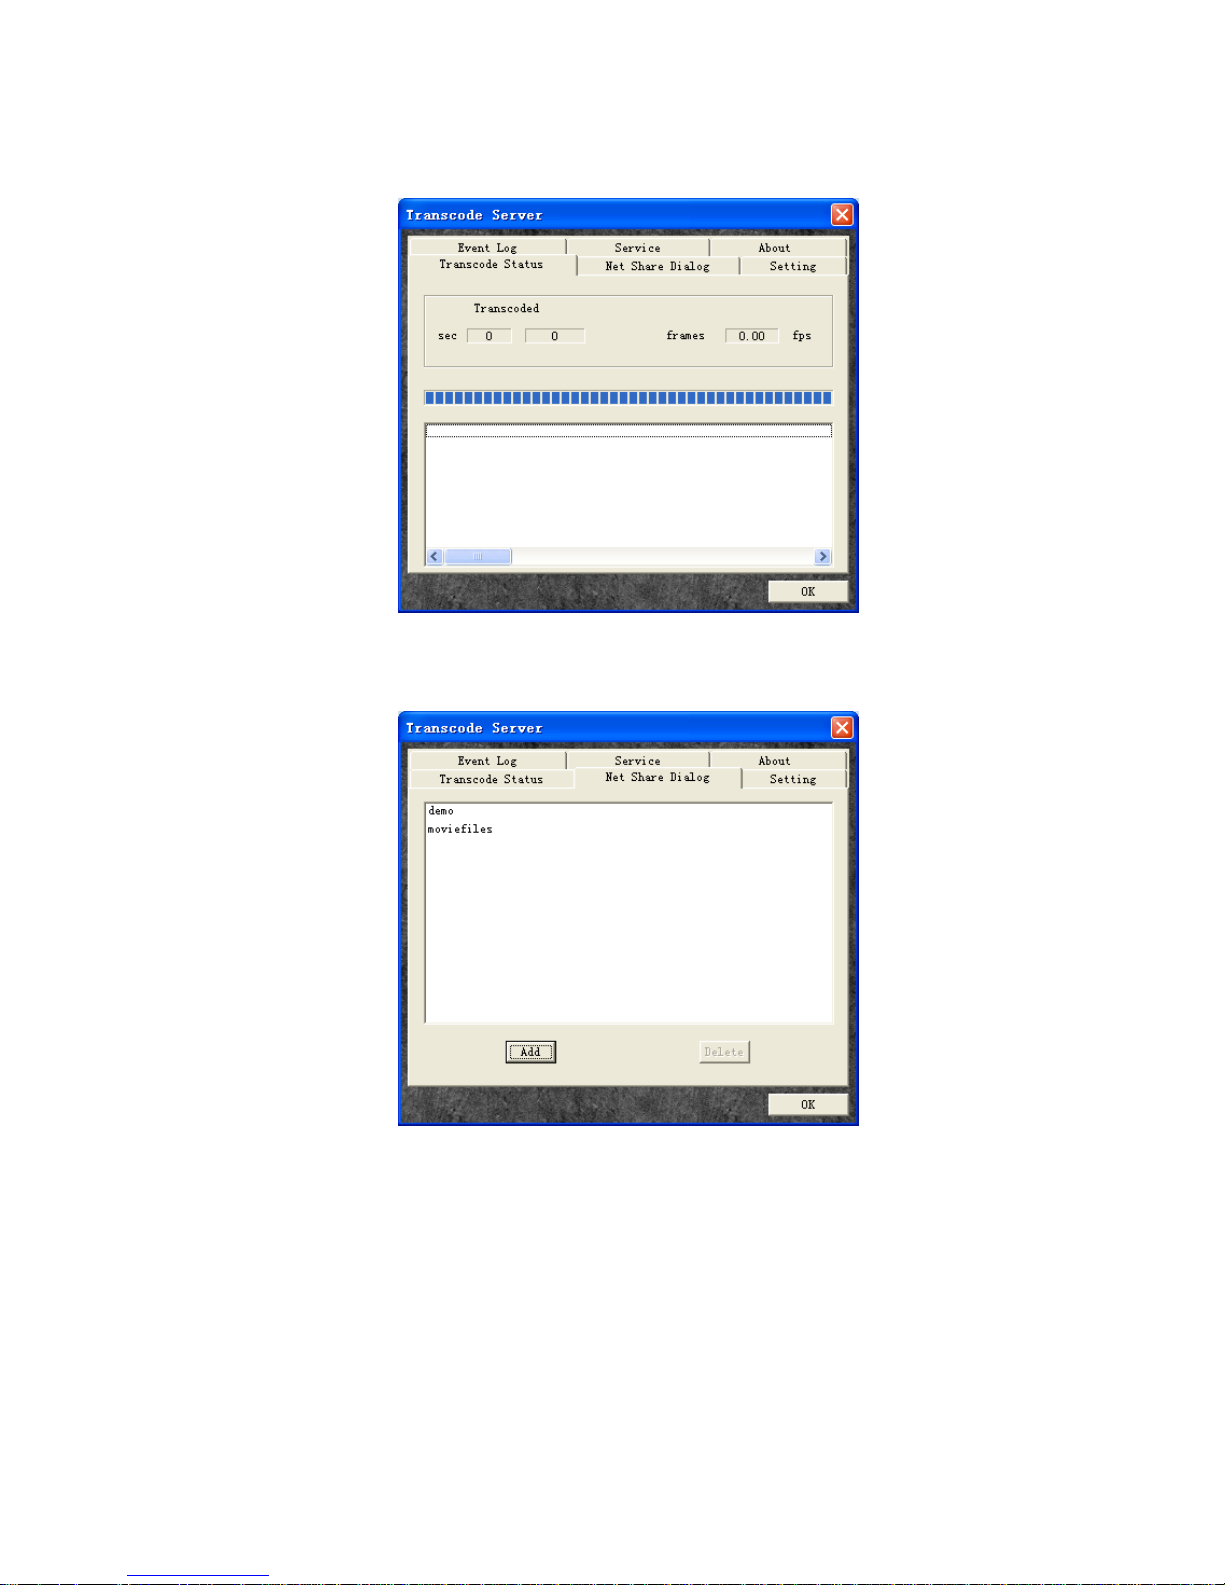
2) Transcode Status
Press “Transcode Status” tab to display the files information. When through the transcode sever to play an y movie
files, the movies information will display here.
Page 46
46
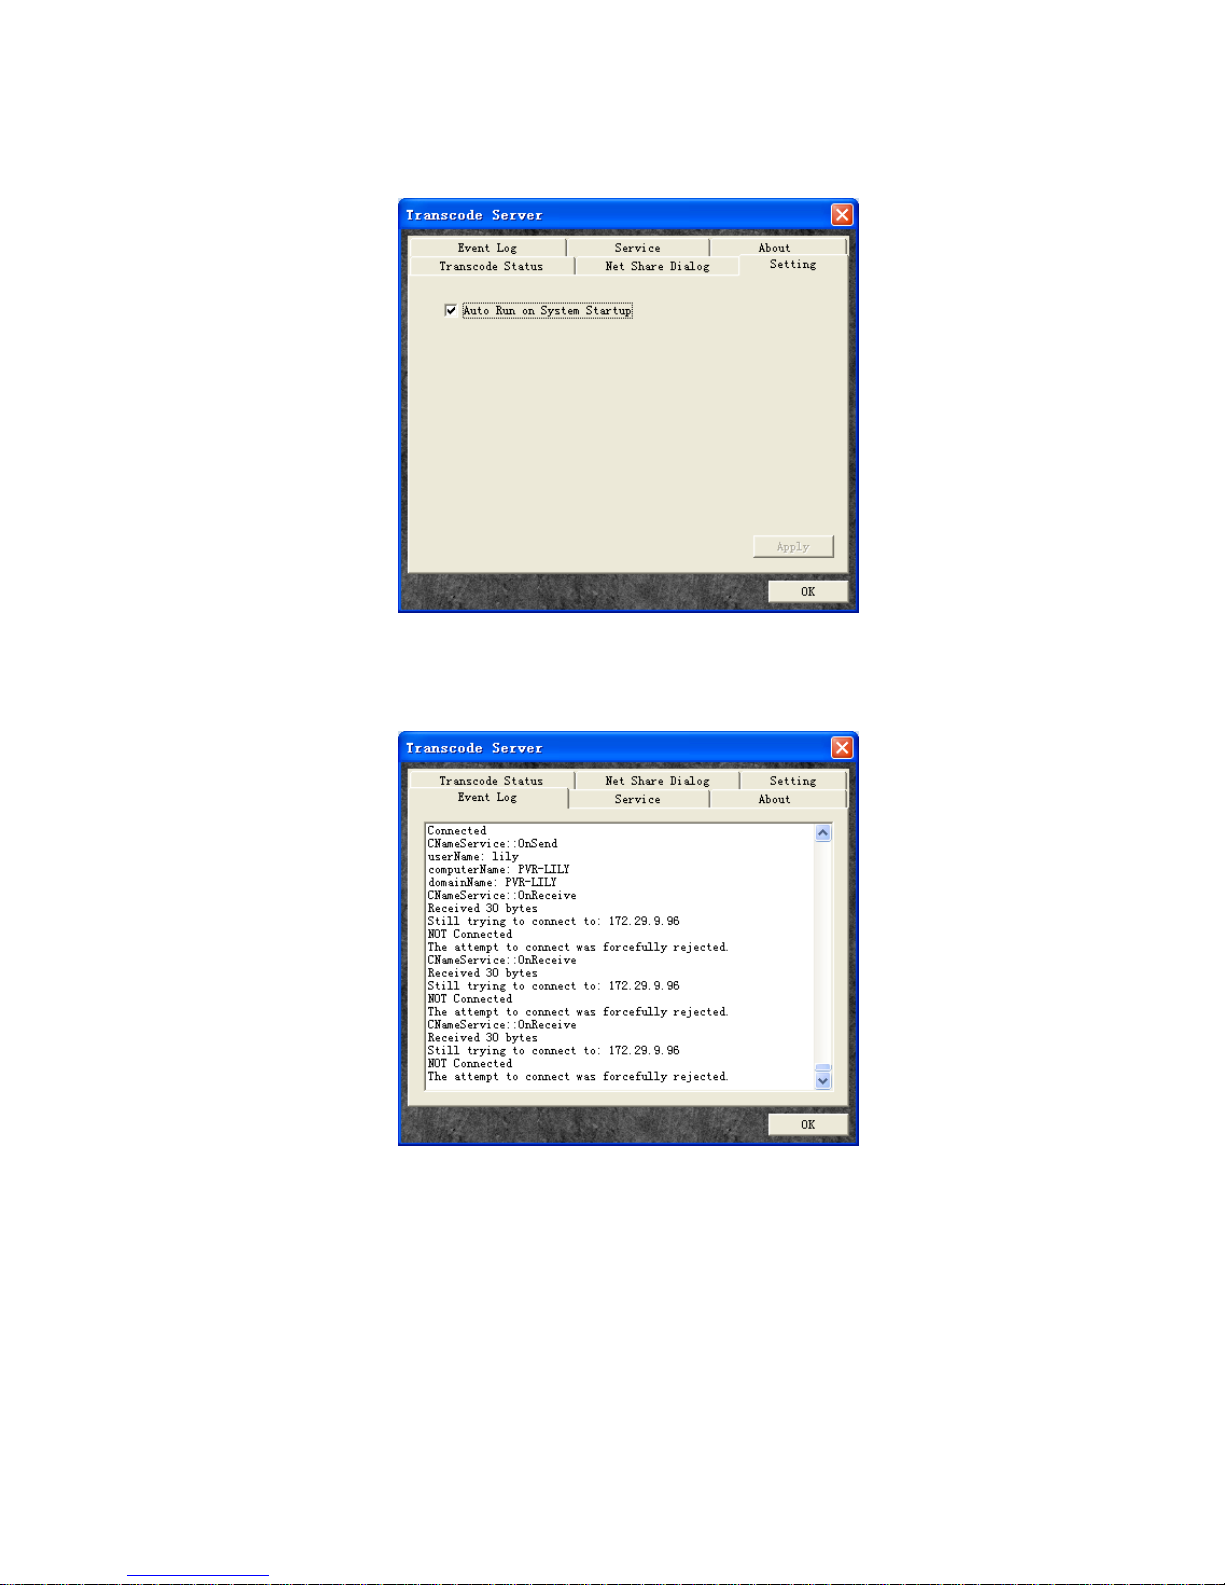
3) Net Share Dialog
Press “Transcode status” tab to display share folders at local PC.
Press “Add” to add shared folder; Press “Delete” to delete the selected folder.
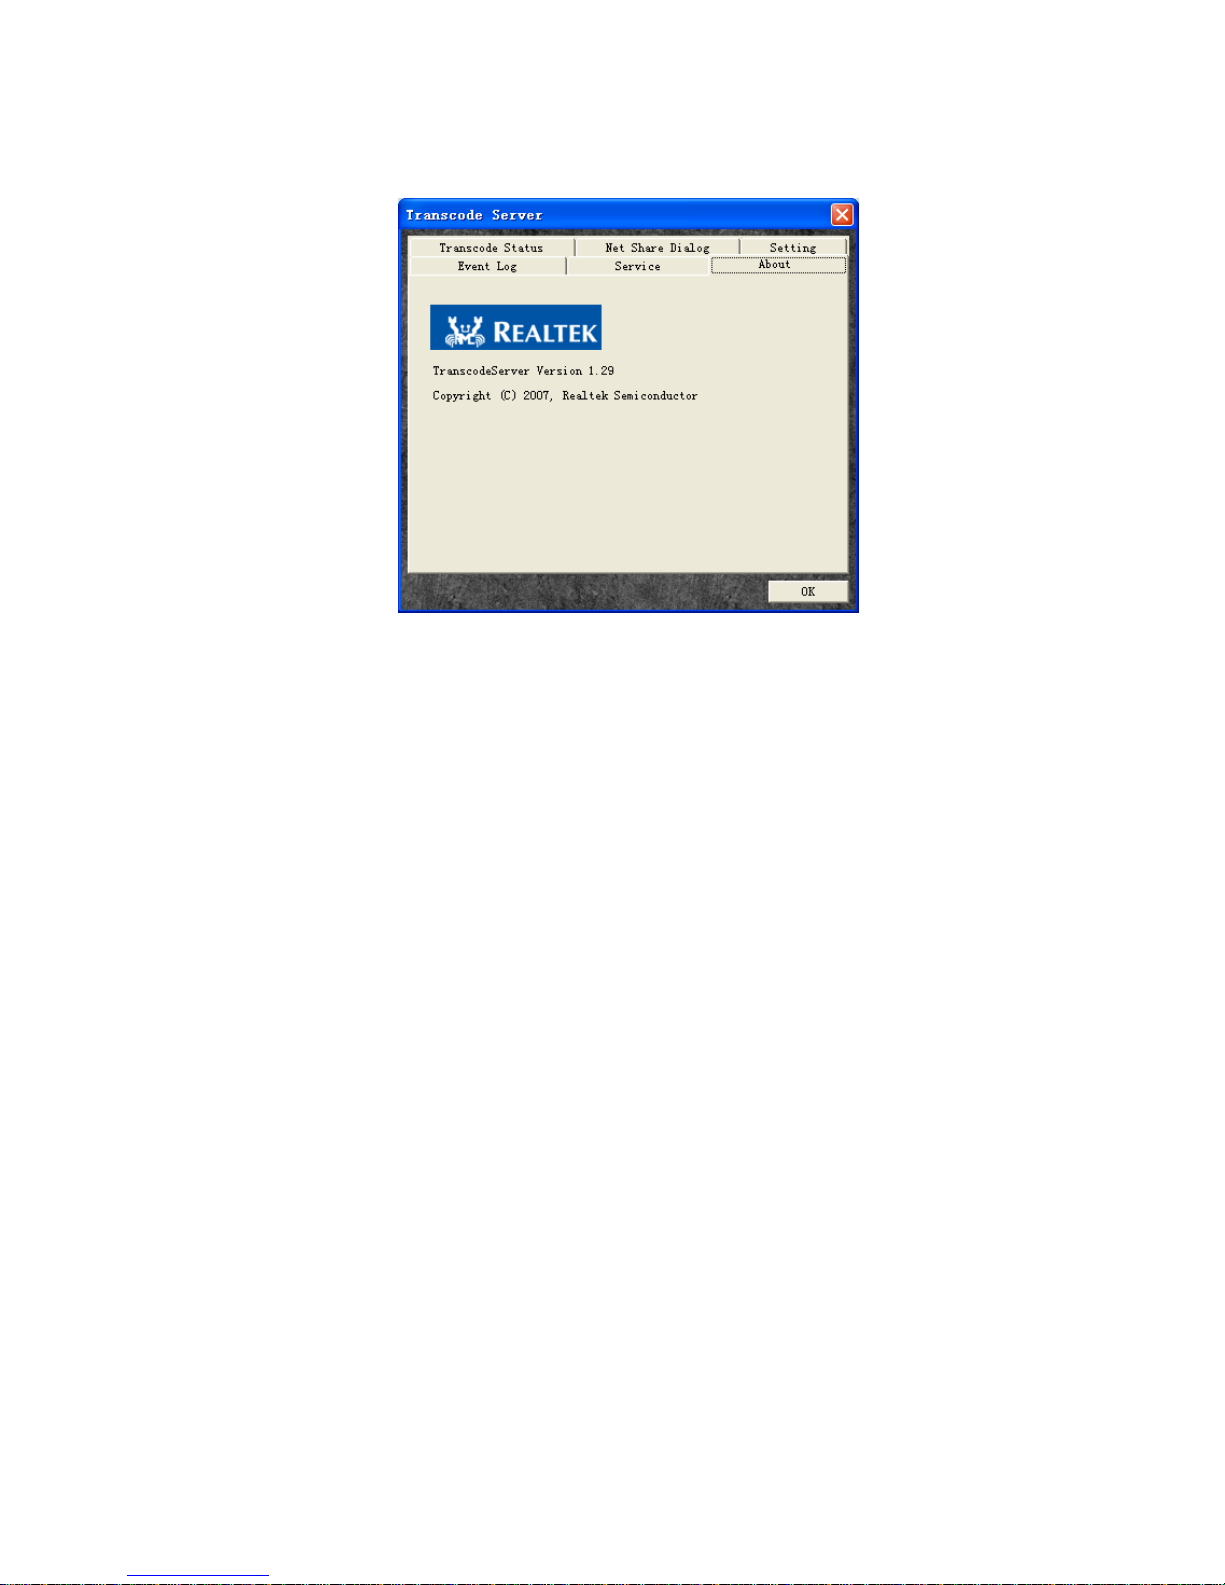
4) Setting
Press “Setting” tab to select if run the transcode Serv er on your PC Startup”.
Page 47
47
5) Event Log
Press “Event Log” tab to display PC and Media player communication information.
6) About
Press “About” tab to display Transcode server version .
Page 48
48
Page 49
49
Chapter 7
Neighbor Web Interface
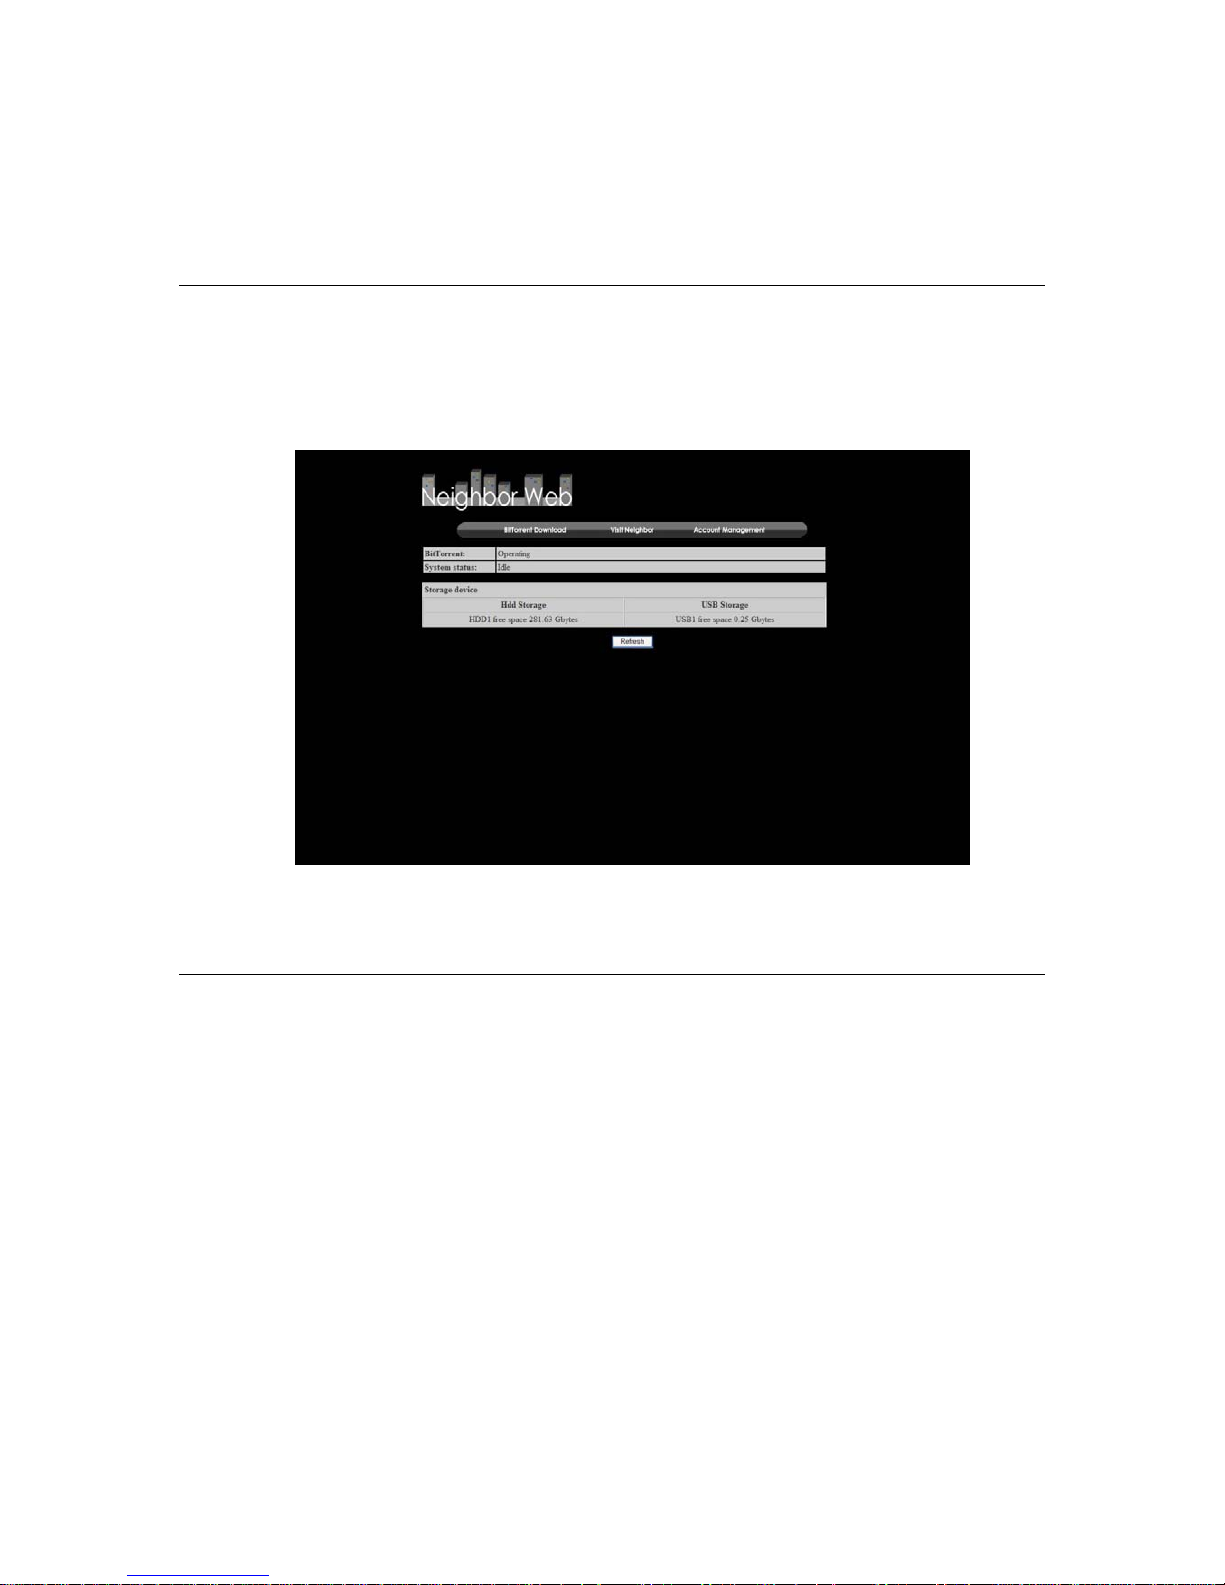
When use the transcode sever to get HD R ecorder Playe r’s IP addr ess, you can select ”Service”->”Neighbor web”
into Neighbor web interface. And also, input the IP address into Neighbor web interface by IE browser. How to
use the Transcode Server to open Neighbor Web, please reference “
Transcode Server in PC” page on 40
for
more detail.
At Home page, the “Neighbor web” will display HD Recorder Player’s status and storage device.
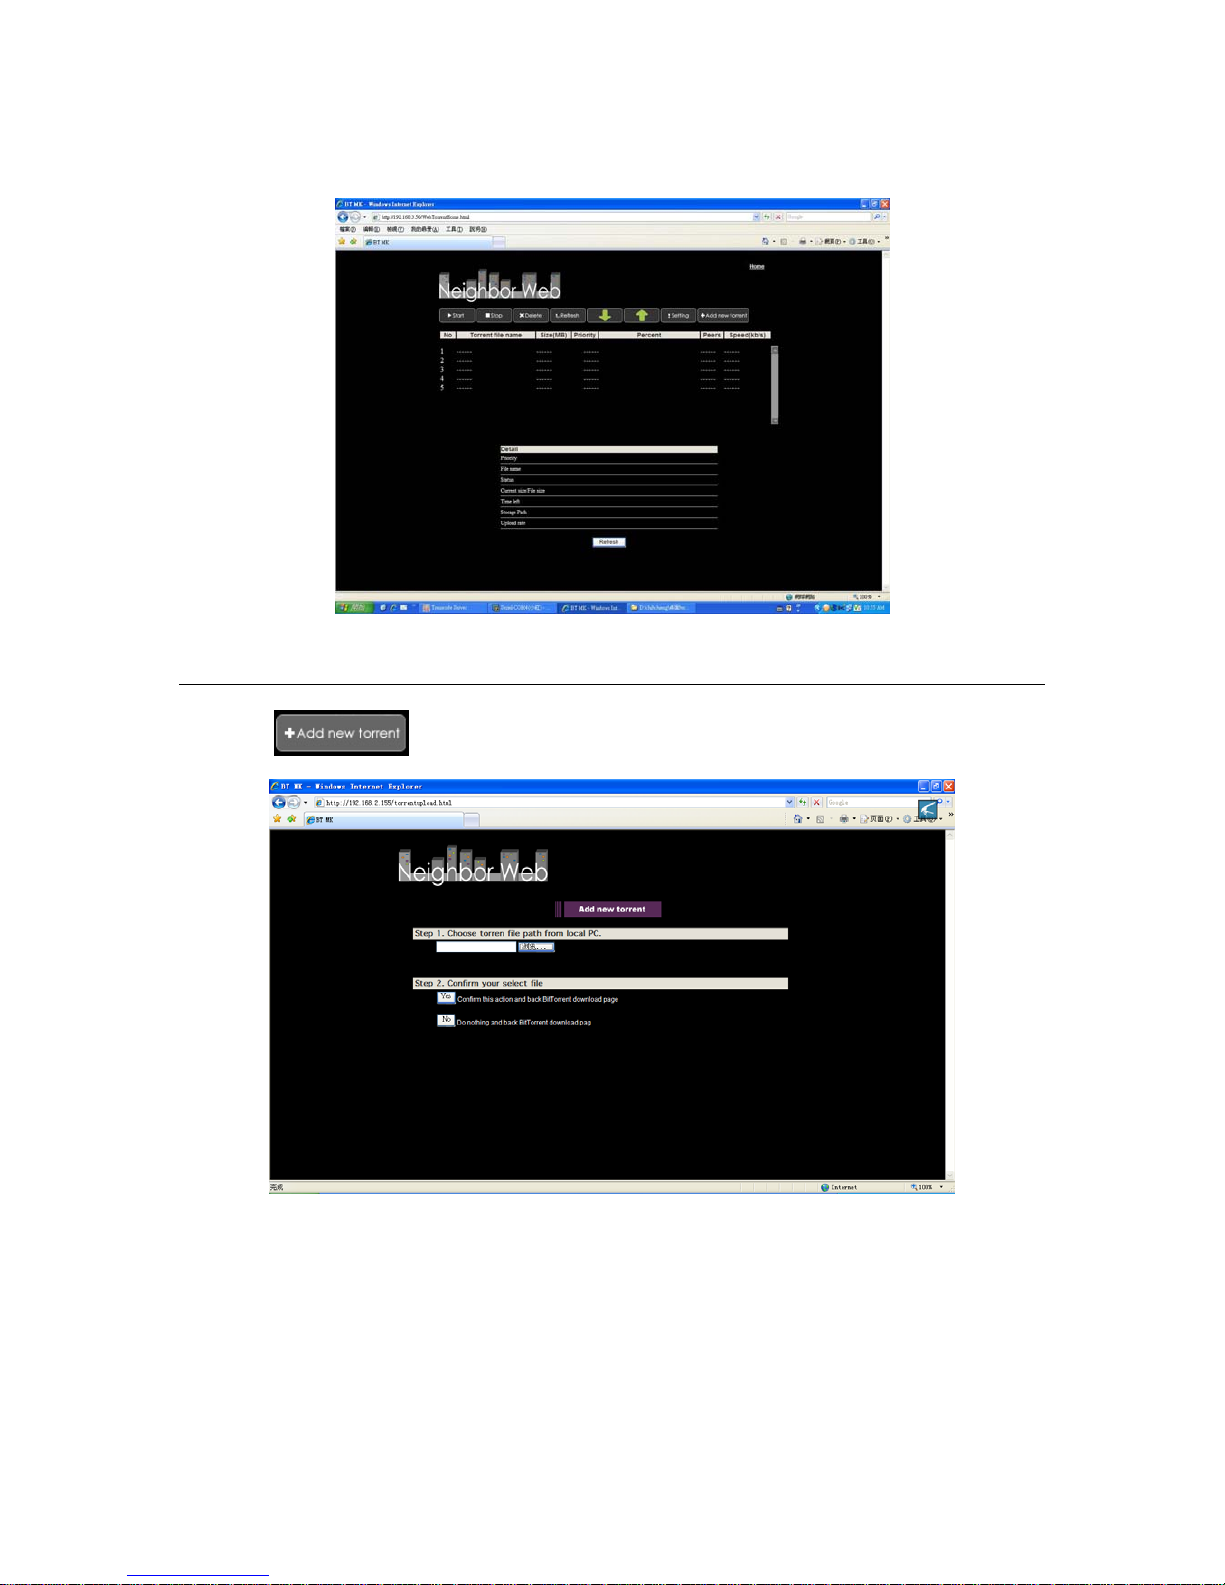
BitTorrent Download
At Home page, Select “BitTorrent Download” into downloa d i nterface.
Page 50
50
Add new torrent
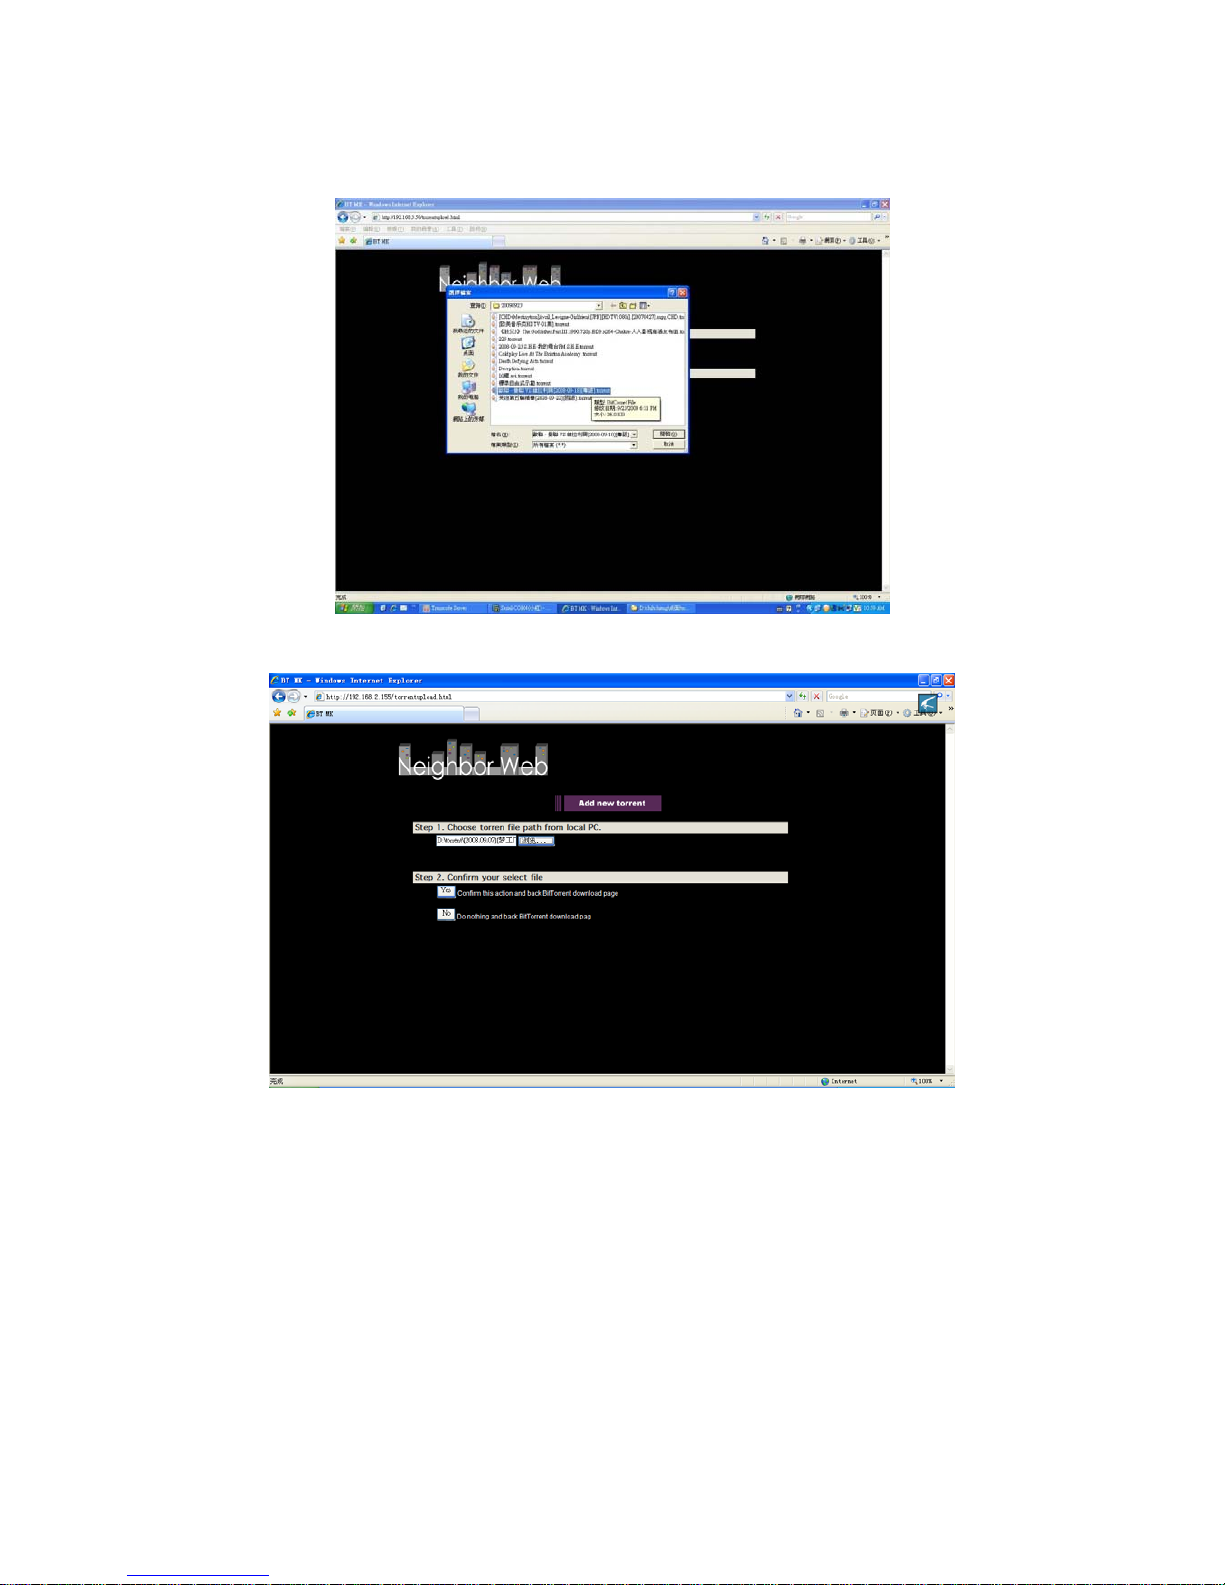
Select
into add new torrent file page.
At “add new torrent” page, click “浏览”button to choose torren t file path from local PC.
Page 51
51
When you select a torrent file, press “Open” button to add.
Next , click “Yes” to confirm your select file
When select “Yes”, the page will display “Loading” before back download page.
Page 52
52
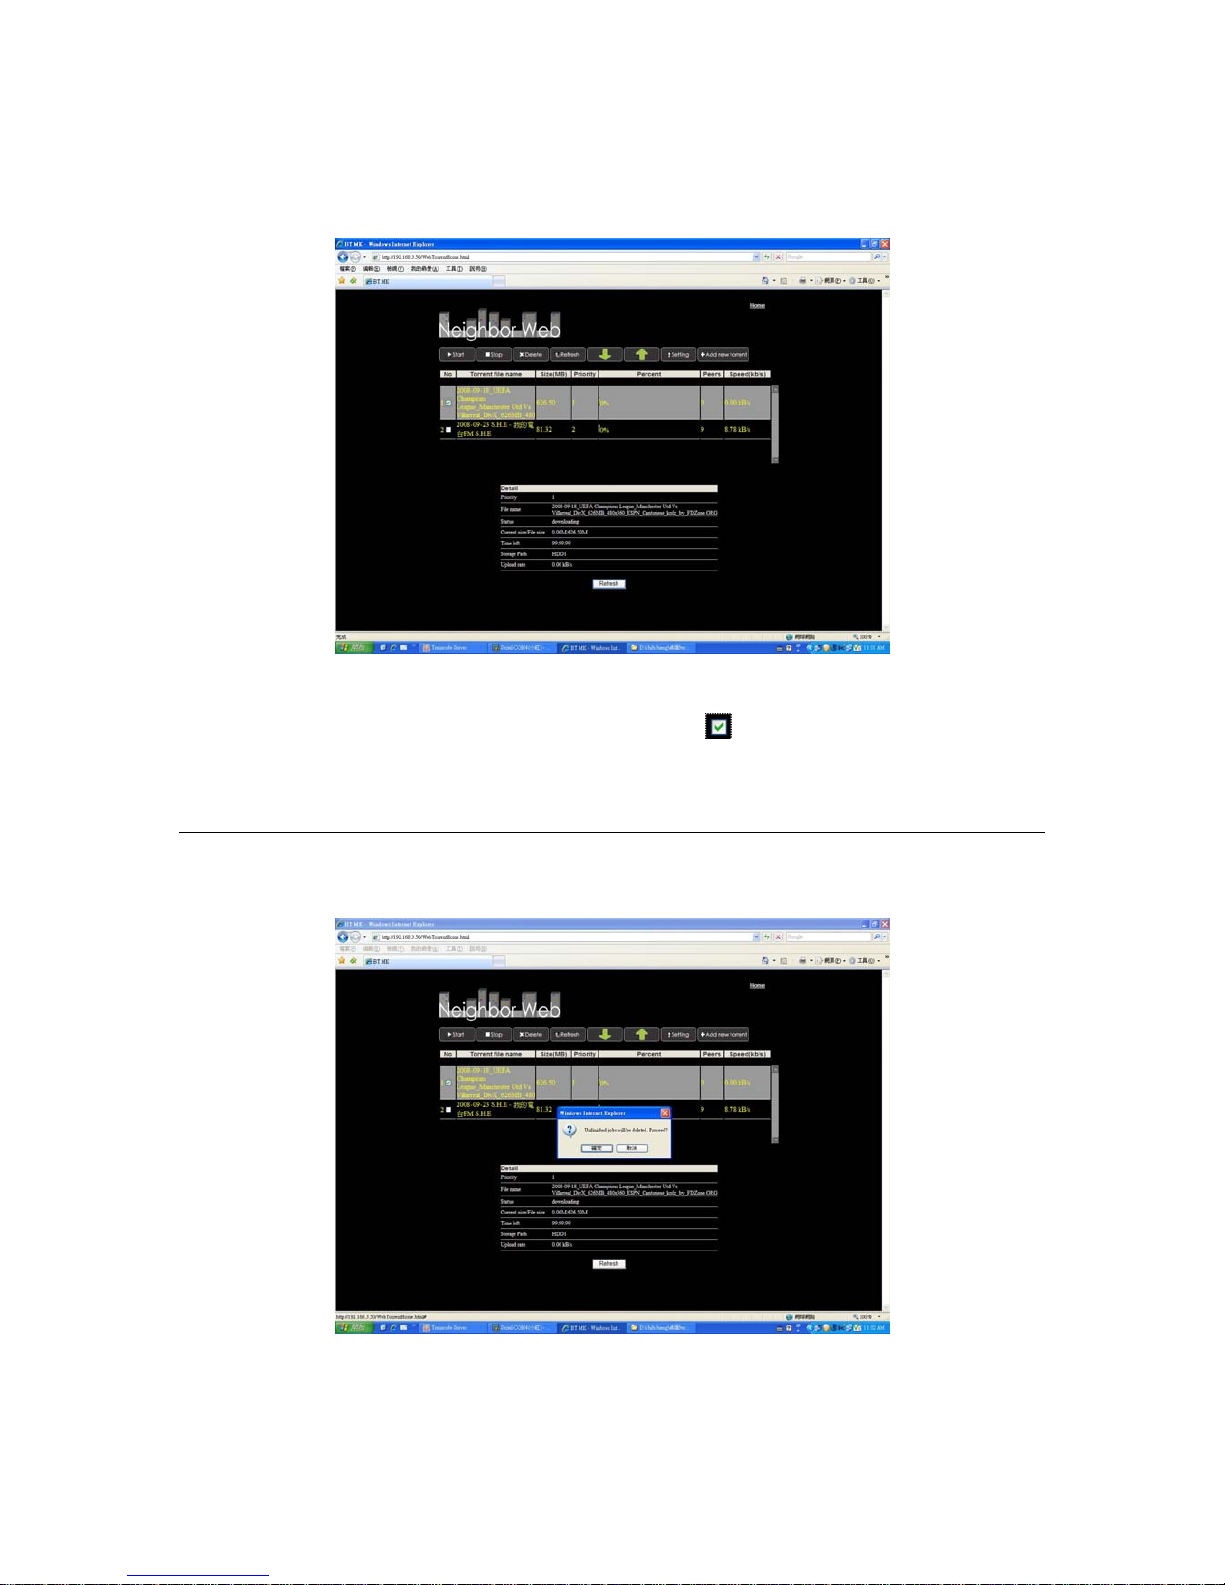
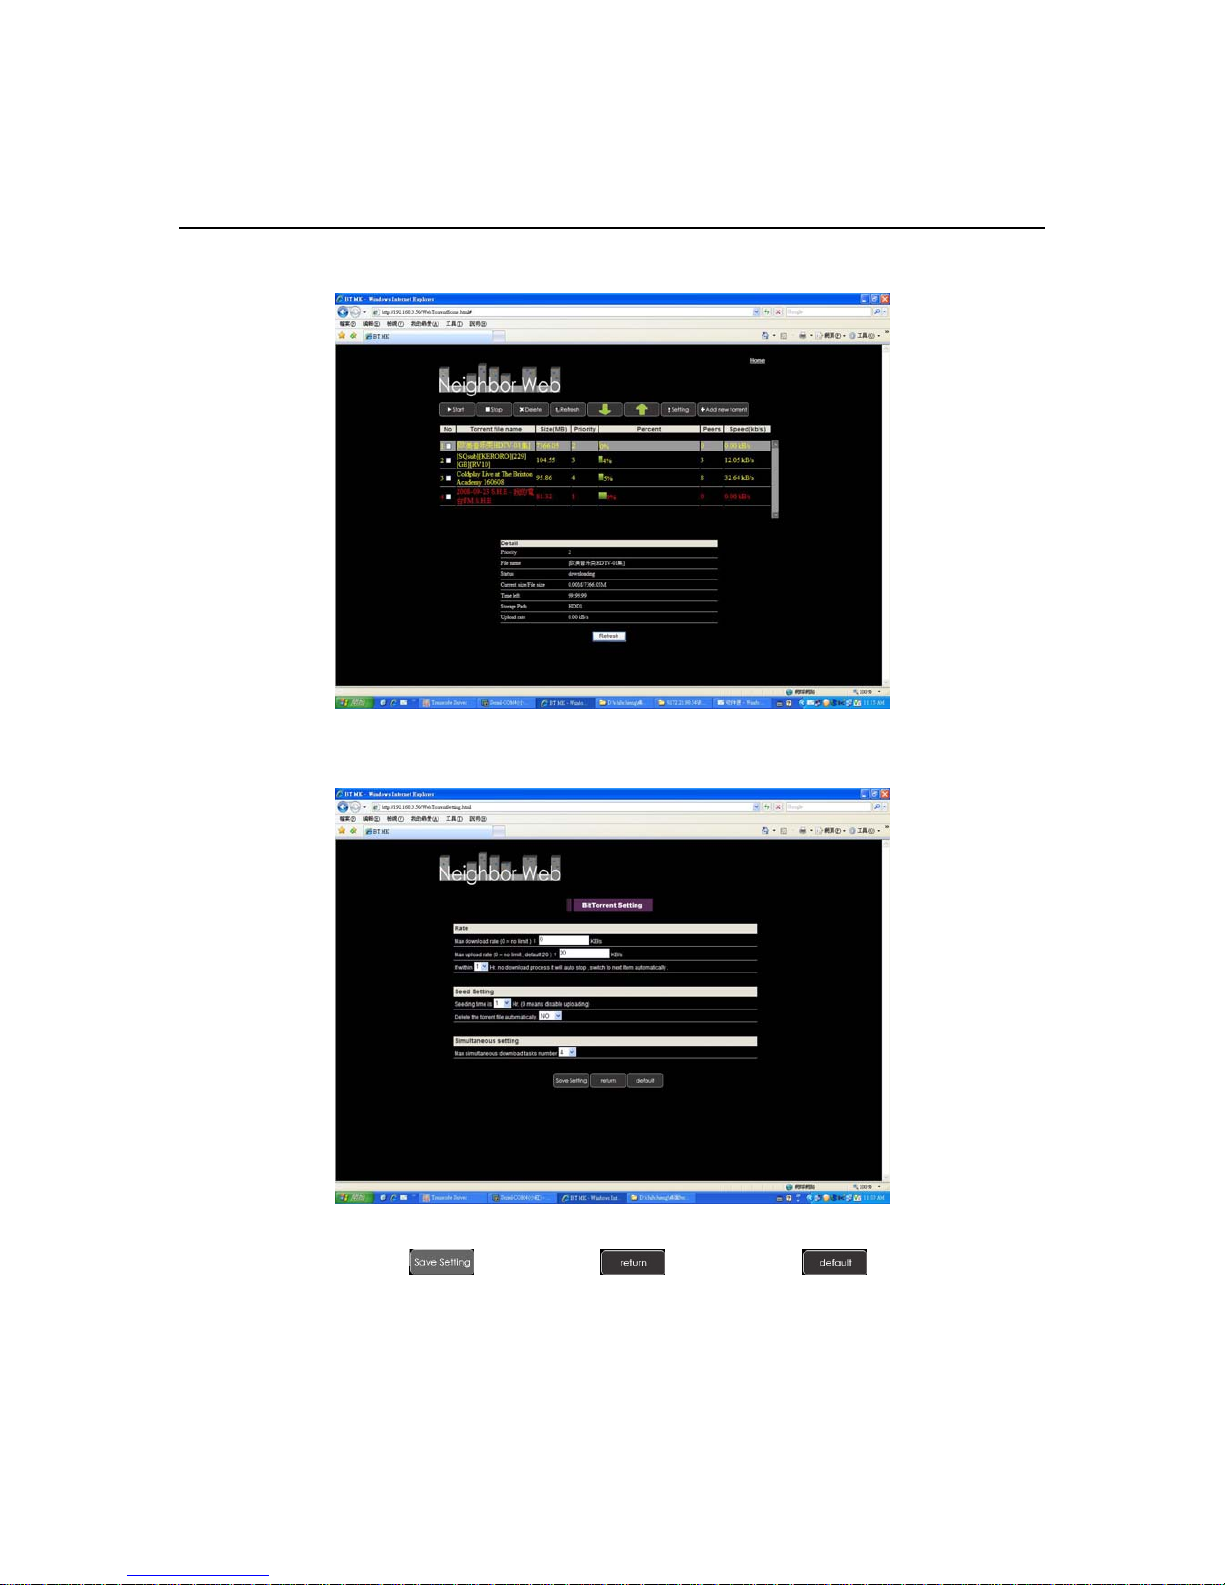
1) Click “start” to begin download
Click every torrent file name, at the bottom of pa ge will display the torrent file information.
And you can double click every file, when the left of little frame display
,it means the files be choose.
Then you can operate to select “start” ,”stop” ,”delete” ,”Refresh” and sort order “up” and “down”.
Delete torrent file
When you need delete the torrent file, please choose the file first.
Then select “Delete” button on the page. The system will ask “Unfinished jobs will be deleted. Proceed?”Press “Confirm”
to confirm, press “Cancel” to cancel.
Page 53
53
Stop the torrent fil e
When you need delete the torrent file, please choose the file first.
Then select “STOP” button on the page. The file which stopped will turn red.
2) BitTorrent Setting
Press “Setting” into BitTorrent setting page.
Set Max download rate, Max upload rate and seeding setting in this setting page.
When setting completed, Click
to save or Click to return or Click to come back default
setting.
Page 54
54
Visit neighbor
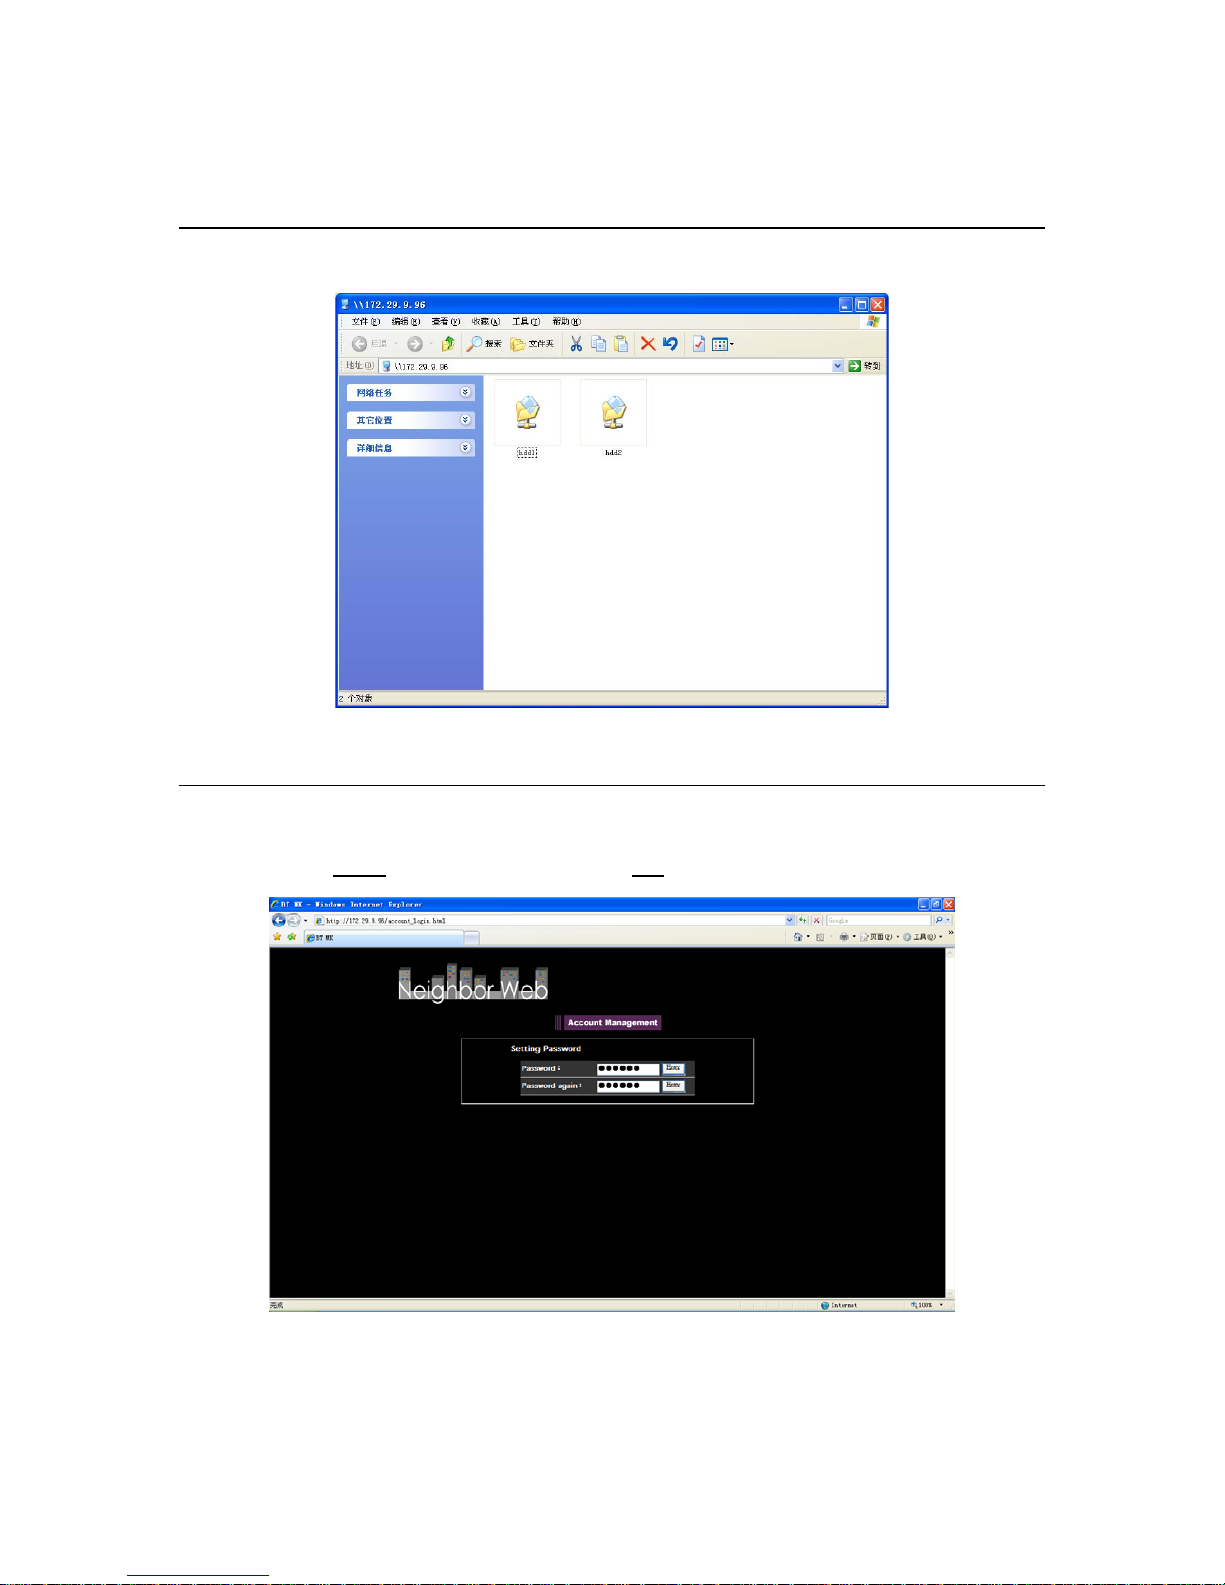
At Home page, Select “Visit neighbor” to browser the HDD files.
And through the Transcode server -> Service ->Visit neighbor can browser HDD files too.
Account Management
At Home page, Select “Account Management” into Account Management page.
If click “Account Management” is not into this page, please confirm Login control is set to ON.
The Username is
Admin
and the initialization password is
123
. Please setting password according your favorite .
login password can be modify at here. Pl ease input password twice and click “Enter” to confirm. When modify is succeed,
press “Conf irm” at the pop menu and return. Plea se note the User name cannot be change.
Page 55

55
Limited Warranty Statement
MV3600 MyMovee HD Media Player
War ranty Duration
Hardware: 3 years Limited Warranty
Hardware Limited Warranty
Universal Tech warrants that the product that you have purchased from Universal Tech is free from defects
in materials or workmanship under normal use during the Limited Warranty Period. The Limited Warranty
Period starts on the date of purchase. Your dated sales or delivery receipt showing the date of purchase is
your proof of purchase date.
Limitation of Liability
If your UT hardware product fails to work as warranted above, UT’s maximum liability under this limited
warranty is expressly limited to the lesser of the price you have paid for the product or the cost of repair or
replacement of any hardware components that malfunction in conditions of normal use.
Exclusions
Universal Tech does not warrant that the operation of the product will be uninterrupted or error-free. UT is
not responsible for damage that occurs as a result of your failure to follow the instructions intended for the
product. This Limited Warranty does not apply to product under the following circumstances:
serial number has been removed
product enclosure has been opened
product has been damaged or defective due to
a) transportation,
b) accident, misuse, abuse, water, fire, lightning or other acts of nature,
c) improper or inadequate site maintenance,
d) normal wear and tear,
e) software not supplied by UT.
ENSURE THAT YOUR DATA IS BACKED UP PERIODICALLY . UT IS NOT RESPONSIBLE FOR DAMAGE OR LOSS
OF DATA, AND IS NOT RESPONSIBLE FOR RECOVERY OF PROGRAMS OR DATA OTHER THAN THE
SOFTWARE SUPPLIED BY UT WHEN THE PRODUCT IS MANUFACTURED.
 Loading...