

Page 1
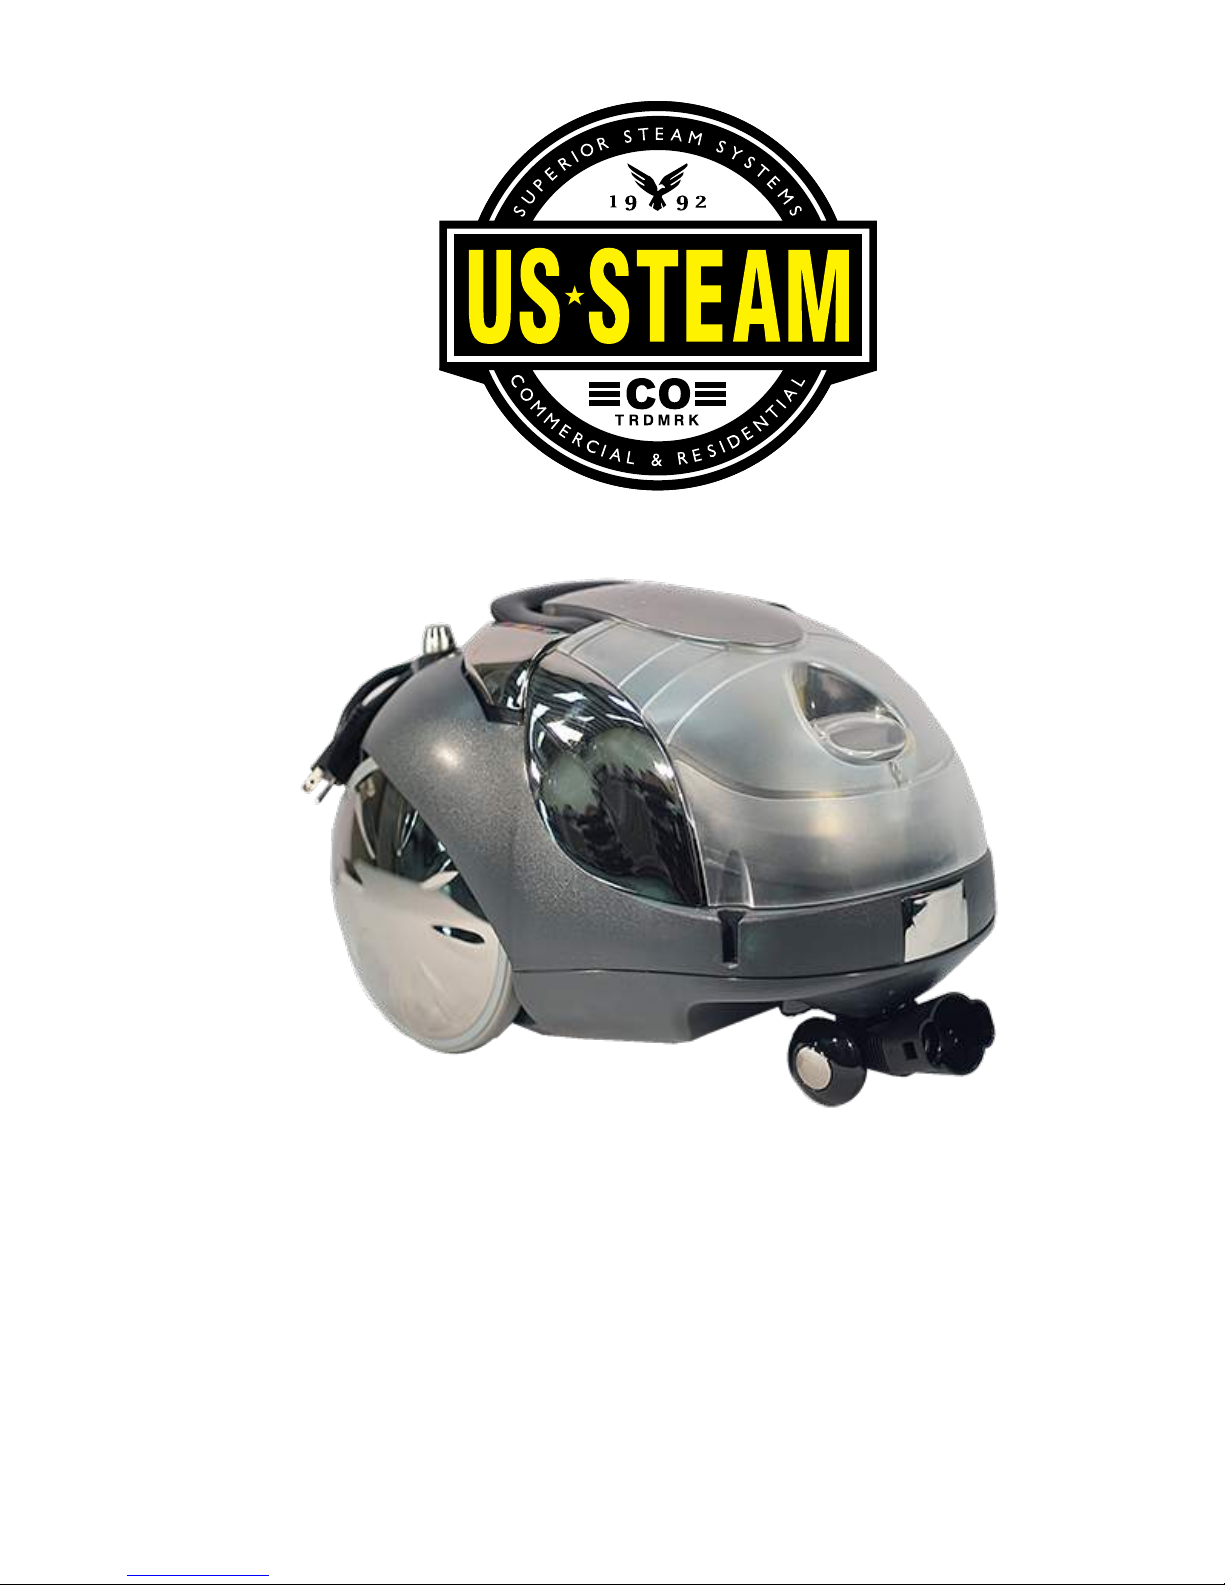
User Manual
Sea Hawk / SteamVac
Residential Steam Cleaner
US Steam Corporate Office
7920 Rodeo Trail, Ste 240
Mansfield, TX 76063
(817) 297-7745
www.ussteam.net
Page 2

2
!
Page 3

3
Congratulations on your purchase of the US Steam Sea Hawk system. The Sea Hawk
not only combines a steam and vacuum cleaner into one system, but it included our
patented RAIN SYSTEM™.
The RAIN SYSTEM™ is a sophisticated air filtration system using a highly efficient
nebulization filter and trap large dust particles in water. Air is then passed through a 2nd
H.E.P.A paper filter system trapping even the smallest of particles. THE AIR RELEASED
FROM THE SEA HAWK IS THEREFORE PURIFIED FROM ALL DIRT PARTICLES.
Table!of!Contents!
!"#$%&'()*(&+"#,-&..................................................................................................................................&/01&
'(-)2&345(*46&'-((#578&............................................................................................................................&1&
9*4":6-&';44(#57&......................................................................................................................................&<&
36-)5#57&)5,&=)#5(-5)5$-&&...............................................................................................................&>0?&
9446&)5,&@AA6#$)(#45&+"#,-&................................................................................................................&BC&
D4*%&9-$;5#E"-8&..................................................................................................................................&BB&
&
F4G&(4&"8-&(;-&)$$-884*H&(4468&...................................................................................................................&BB&
Floors&.....................................................................................................................................................................................&11&
Kitchen&..................................................................................................................................................................................&12&
Bathroom&.............................................................................................................................................................................&13&
Bed&Bugs&/&Dust&Mites&....................................................................................................................................................&14&
Living&and&Bedrooms&......................................................................................................................................................&14&
Windows&...............................................................................................................................................................................&15&
Autos&......................................................................................................................................................................................&15&
Miscellaneous&.....................................................................................................................................................................&16&
I4(#$-8&)5,&D)*5#578&..........................................................................................................................&B>&
'-*J#$-8&)5,&'"AA4*(&............................................................................................................................&B?&
K-("*58&.................................................................................................................................................&B?&
D)**)5(H&K-7#8(*)(#45&.........................................................................................................................&LB& &
Page 4
4
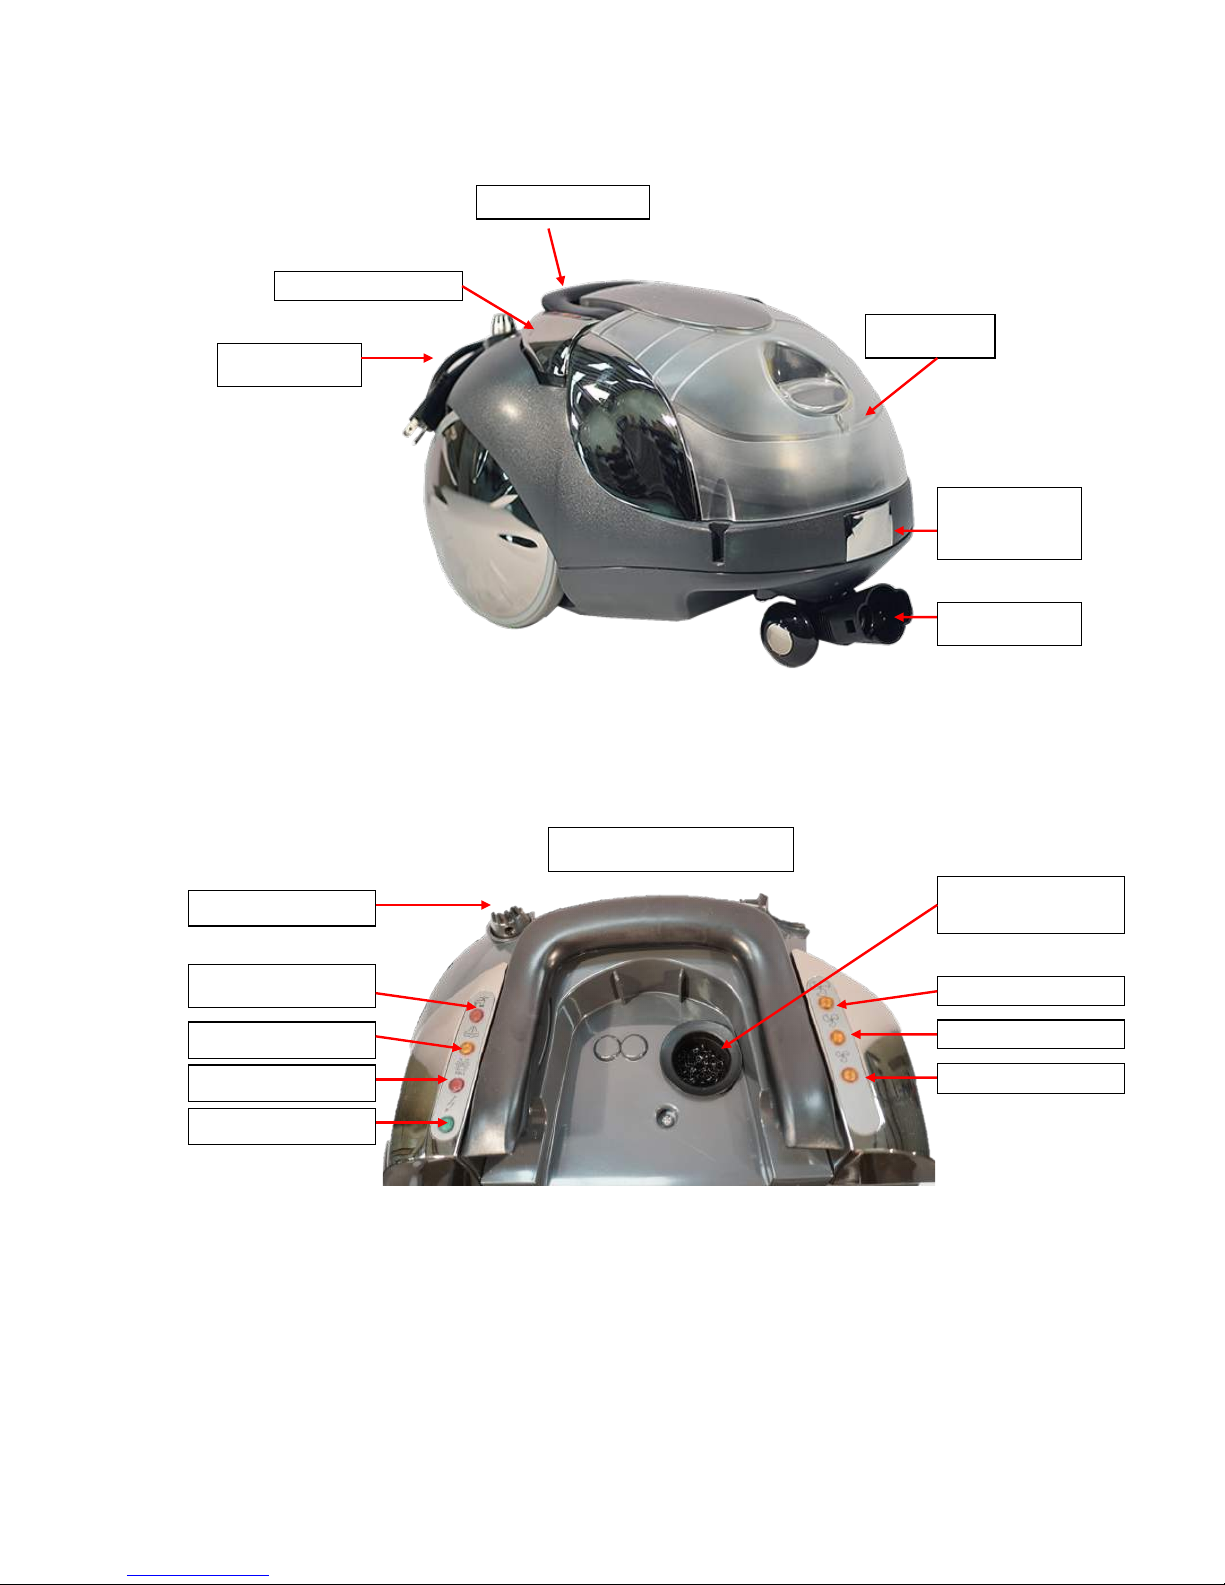
STEAM CONTROL
Control Panel
Carrying Handle
Low Water Indicator
Power Cord
Tank Lid
Steam Indicator
Steam Power Button
Vacuum MAX Power
Connection Indicator
Power Light
Vacuum MED Power
Vacuum LOW Power
Motor Aspirating
Filter
Hose Port
Hose Power
Command
Connector
Page 5
5
QUICK START GUIDE
DO NOT PLUG IN STEAM CLEANER UNTIL INSTRUCTED
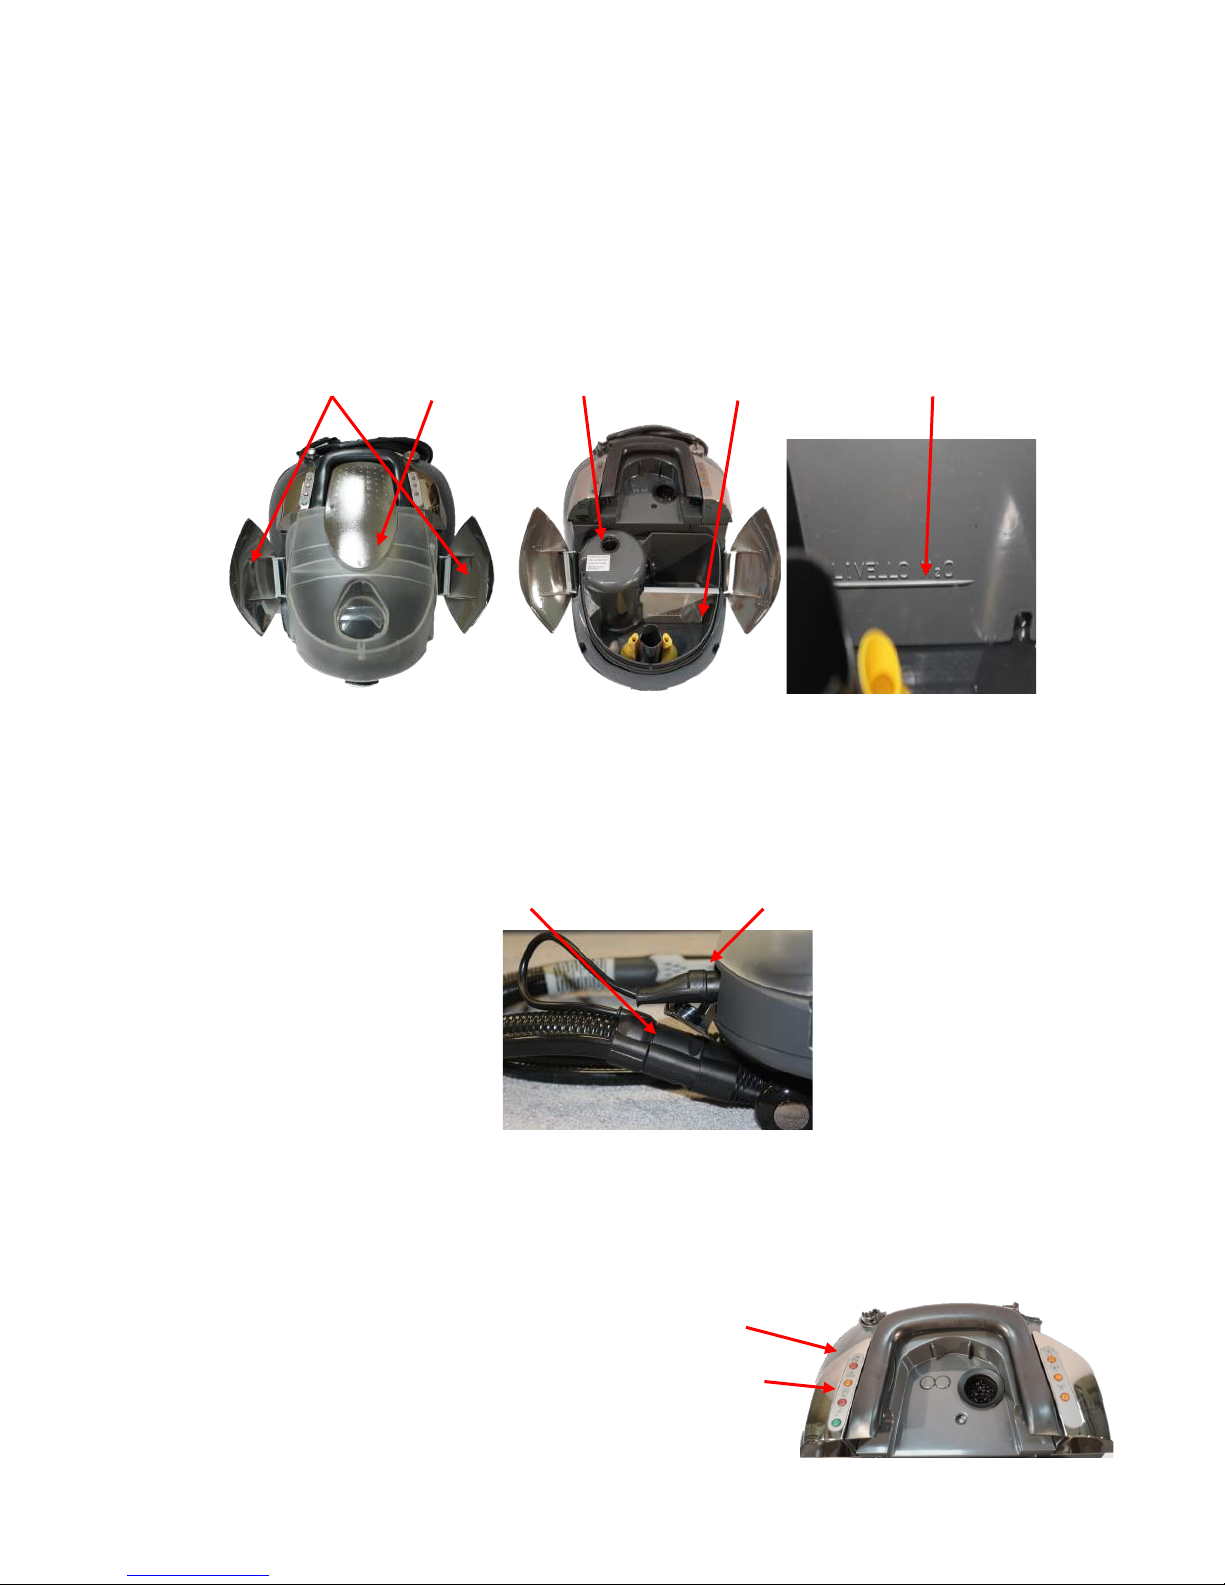
1. OPEN TANK LID AND ADD WATER TO THE STEAM AND VACUUM RESERVOIRS: Lift
both fasteners and remove the tank lid (figure 1). R e move the cap on the steam reservoir (figure 2) and
pour .9 Liters of w ater; replace the lid. Fill the vacuum reservoir ( figure 2) with .7 liters of water. Fill
only to m ark on the tank separators (figure 3). PURIFICATION TANK CAN BE REMOVED FOR
FILLING. Do NOT put cleaning fluids into the machine.
Tank Fastener Tank Lid Fill Cap Vacuum Reservoir Water Fill Line
Figure 1 Figure 2 Figure 3
2. REPLACE TANK LID AND TIGHTEN BOTH FASTENERS
3. CONNECT HOSE AND POWER COMMAND TO THE SEA HAWK: Insert the vacuum hose with
the release button on th e left side and the power comm and plug on top. Lift the silver hinge cover on
the front of the Sea Hawk and insert the power command connector.
Vacuum Hose Power Command
4. PLUG IN THE Sea Hawk: Plug the power cord and you will hear a beep and the green connection
indicator light will start blinking. The Sea Hawk should be the only appliance plugged into the pow er
outlet. Use only a 15AMP rated or higher extension cord.
5. POWER: Push down on the power button and the orange steam indicator light will start flashing
signaling the boiler is building pressure. When the indicator light becomes solid then the Sea Hawk is
ready for steaming.
Power Button
Steam Ready
(solid orange when ready )
!
Page 6
6
6. USING THE Sea Hawk: Once the boiler reaches pressure, the orange light indicator will go
solid. Pull the trigger on the hose handle for 10-15 seconds to BLEED excess water from the system.
When only steam is released from the hose, your system is ready to use.
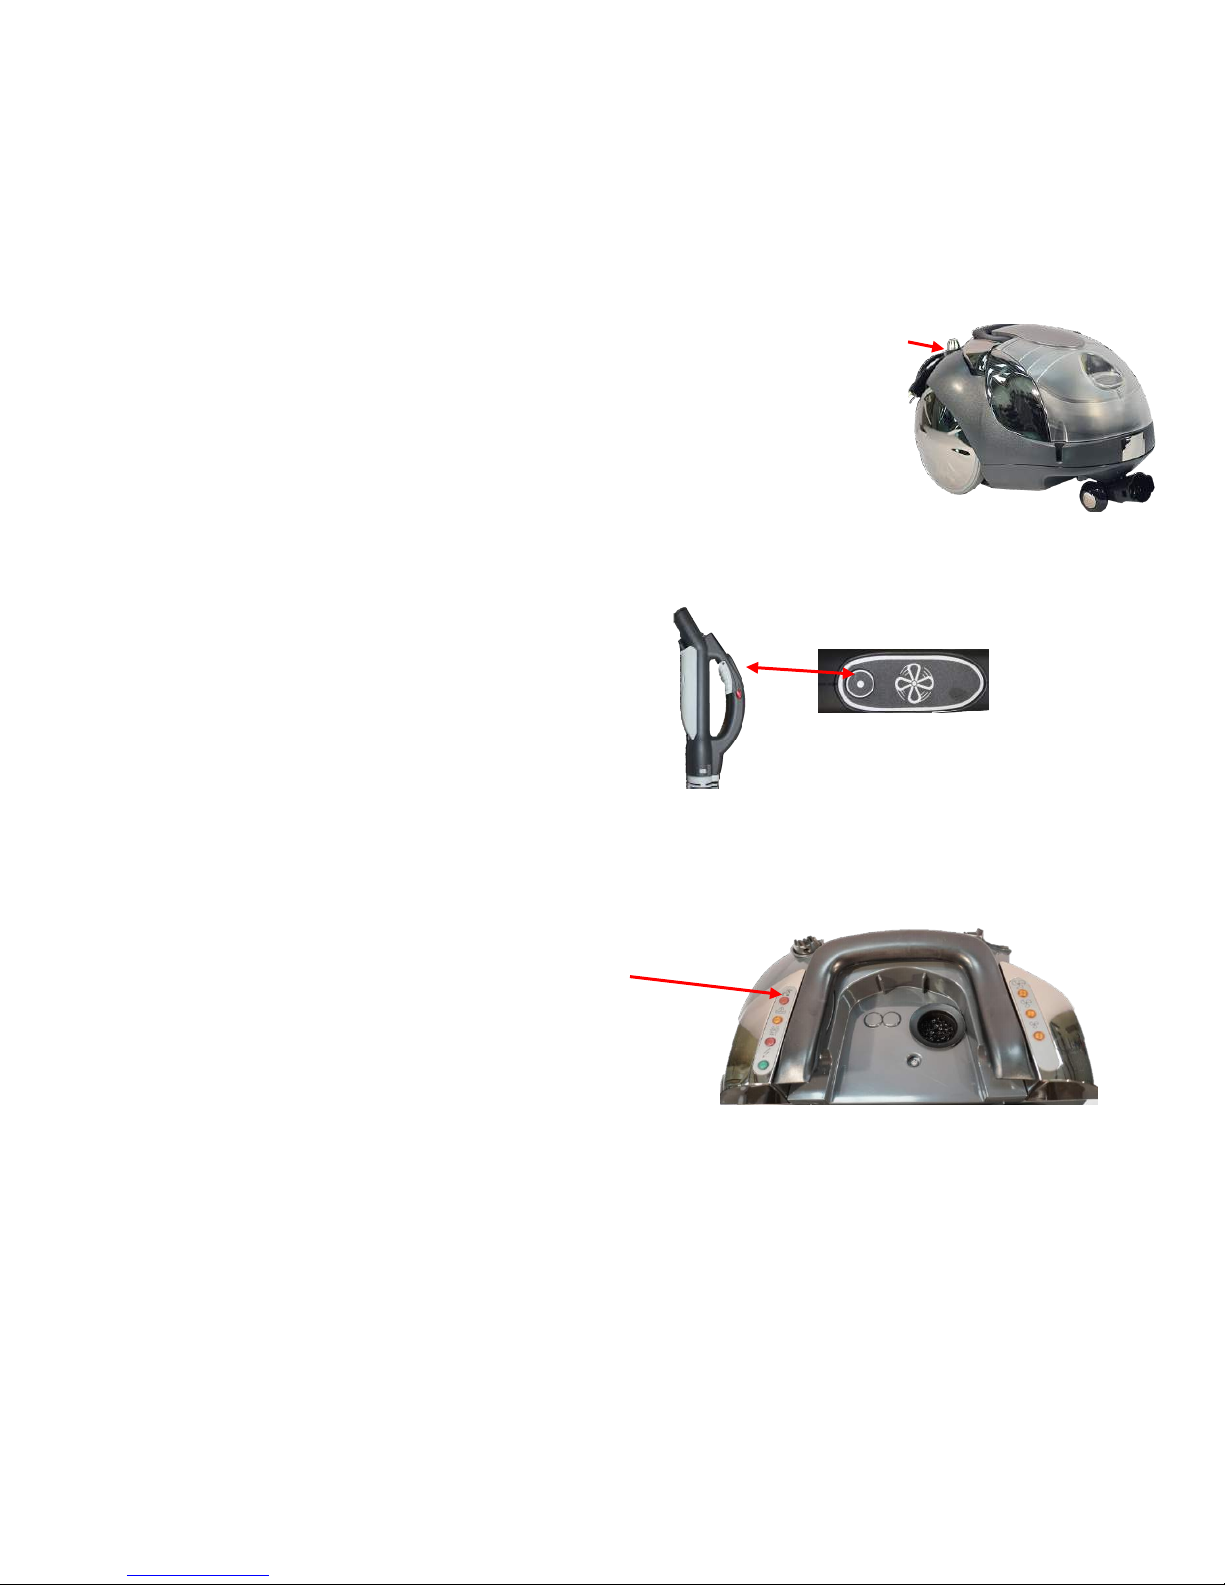
7. STEAM CONTROL DIAL controls the amount of steam released. By turning the dial counter-
clockwise (toward the “+” sign on the dial), the steam w ill increase. To reduce amount of steam, turn
dial clockwise (toward the “–“ sign on the dial). Turning the dial all the way clockwise is the lowest
possible setting and no steam will come out when you press the steam
trigger.
8. SELECT AND ATTACH TOOL TO HOSE: Securely attach whichever
tool is needed to accomplish the task at hand, by using your
TOOL/APPLICATION GUIDE (Page 9).
9. USING THE VACUUM : Press and release the vacuum power button on the handle to turn on the
vacuum. The va cuum will start on the “LOW” setting. To turn the vacuum “off” push the same button
again. To increase the motor speed, push and HOLD” the vacuum power button on the handle. Push
the same button to de c re a s e the motor speed.
NOTE: For maximum vacuum power, the steam function must be turned off.
10. REFILLING THE Sea Hawk: Your Sea Hawk needs refilling when the orange low wate r indicator
light turns on or the amount of s tea m b e co mes very light.
Low Water
Indicator Light
11. VACUUM LIQUIDS: To vacuum liquids, do not fill the purification tank with clean water. Use the
vacuum on low to m edium power. The Sea Hawk can aspirate up to 1.4 liters of liquid before needing
to empty the tank.
12. AROMATHERAPY AND BALSAMTHERAPY: It is possible to add essential or balsamic oils
to the water in the purification tank.
!
Page 7
7
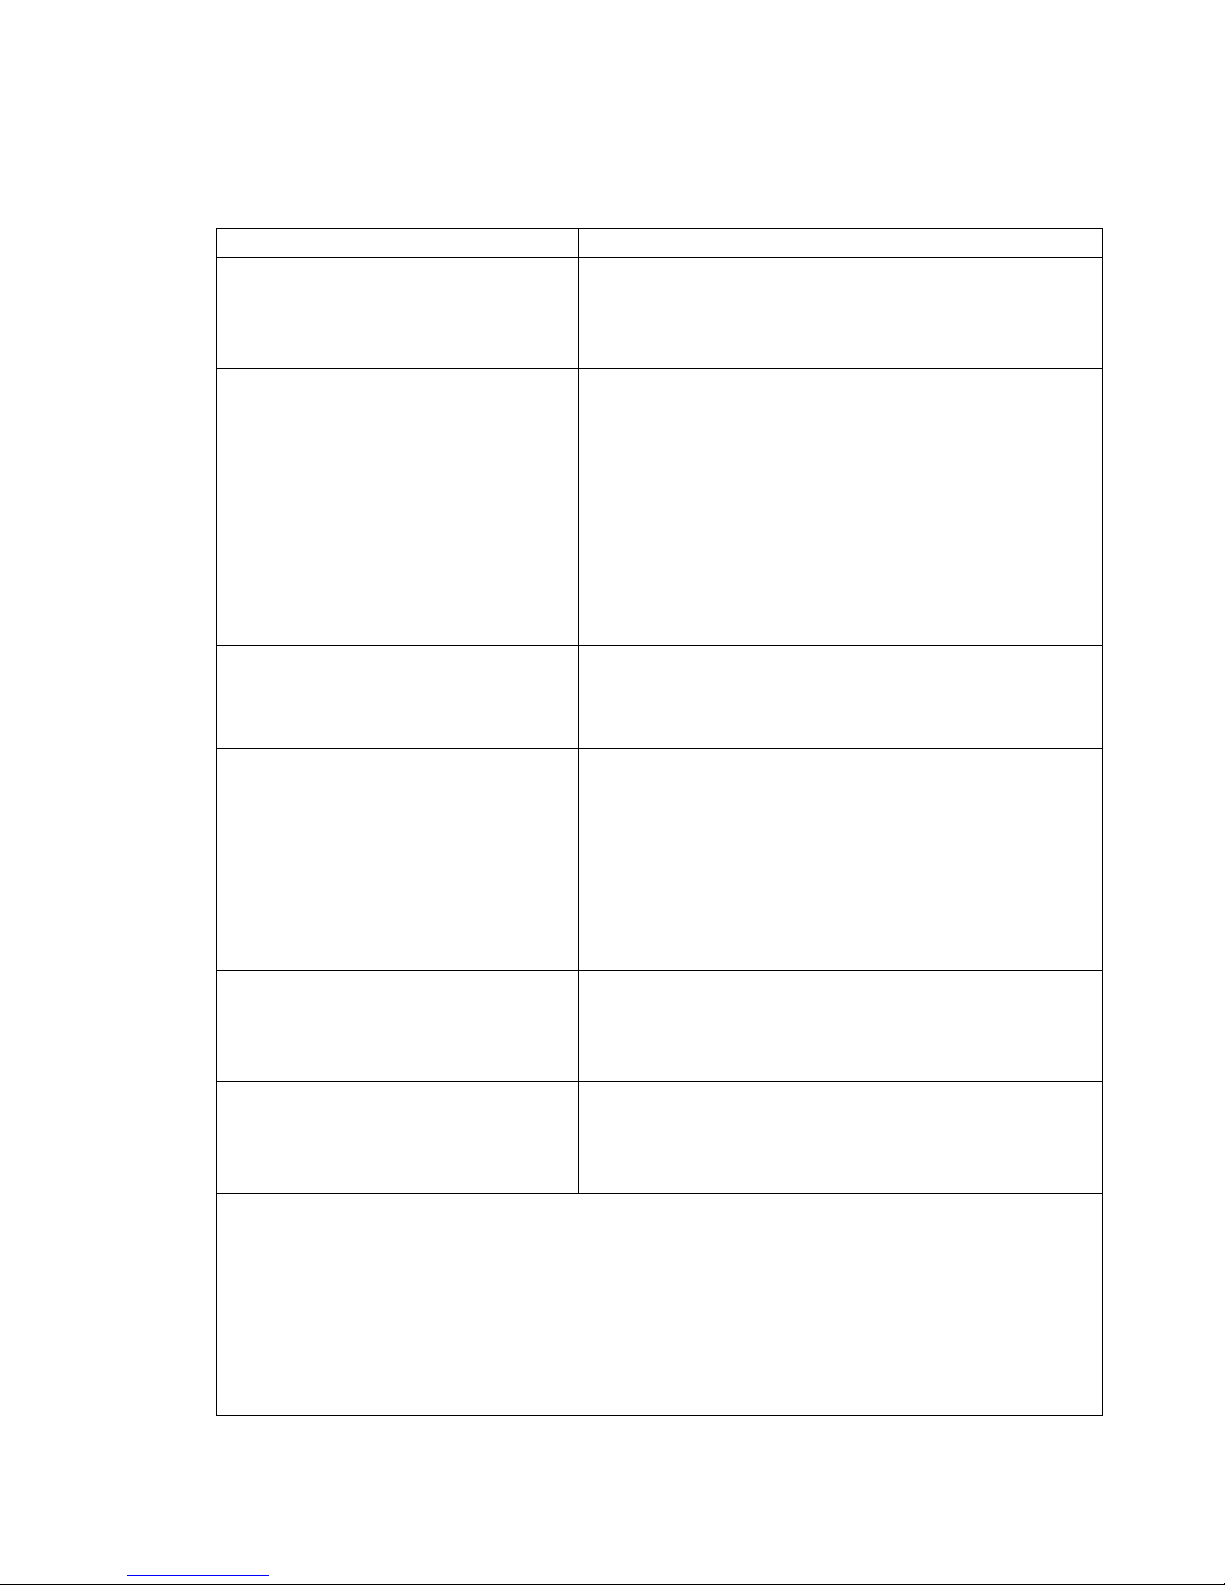
Troubleshooting & Technical Data
Problem
Possible Solution
No Power to Unit
Check the circuit breaker / circuit panel for
tripped breaker.
No steam coming out of hose
1) Is the green attachment indictor light on?
2) Recheck the hose and power command
connection to make sure it is correctly
connected to the Sea Hawk.
3) Is the water in the boiler heated and the
orange indicator light gone solid?
4) Is the steam control adjustment knob turned
to the closed position?
Water coming out of hose while
the unit is heating up.
Make sure the Steam Button and hose handle
buttons are in the OFF position.
Vacuum Power is insufficient
1) Check the filter and clean if necessary.
2) Recheck the hose and accessory connections
3) The seal around the water tank is not
positioned correctly.
4) Check the hose and accessories for particle
blockage.
5)
No response from buttons on
hose handle
Check hose connections.
Try disconnecting the hose and reconnecting.
The hose or accessories have an
unpleasant odor.
Dirt has accumulated in the hose or filter.
Clean both and reinsert.
TECHNICAL DATA:
Steam Pressure: 4.5 Bars
Air flow: 22 liters/second
Boiler Volume: .81 Liters
Boiler Capacity: .4 Liters
Recovery Tank Volume: 1.2 Liters
Page 8
8
EASY CLEAN SYSTEM™
AFTER EACH USE
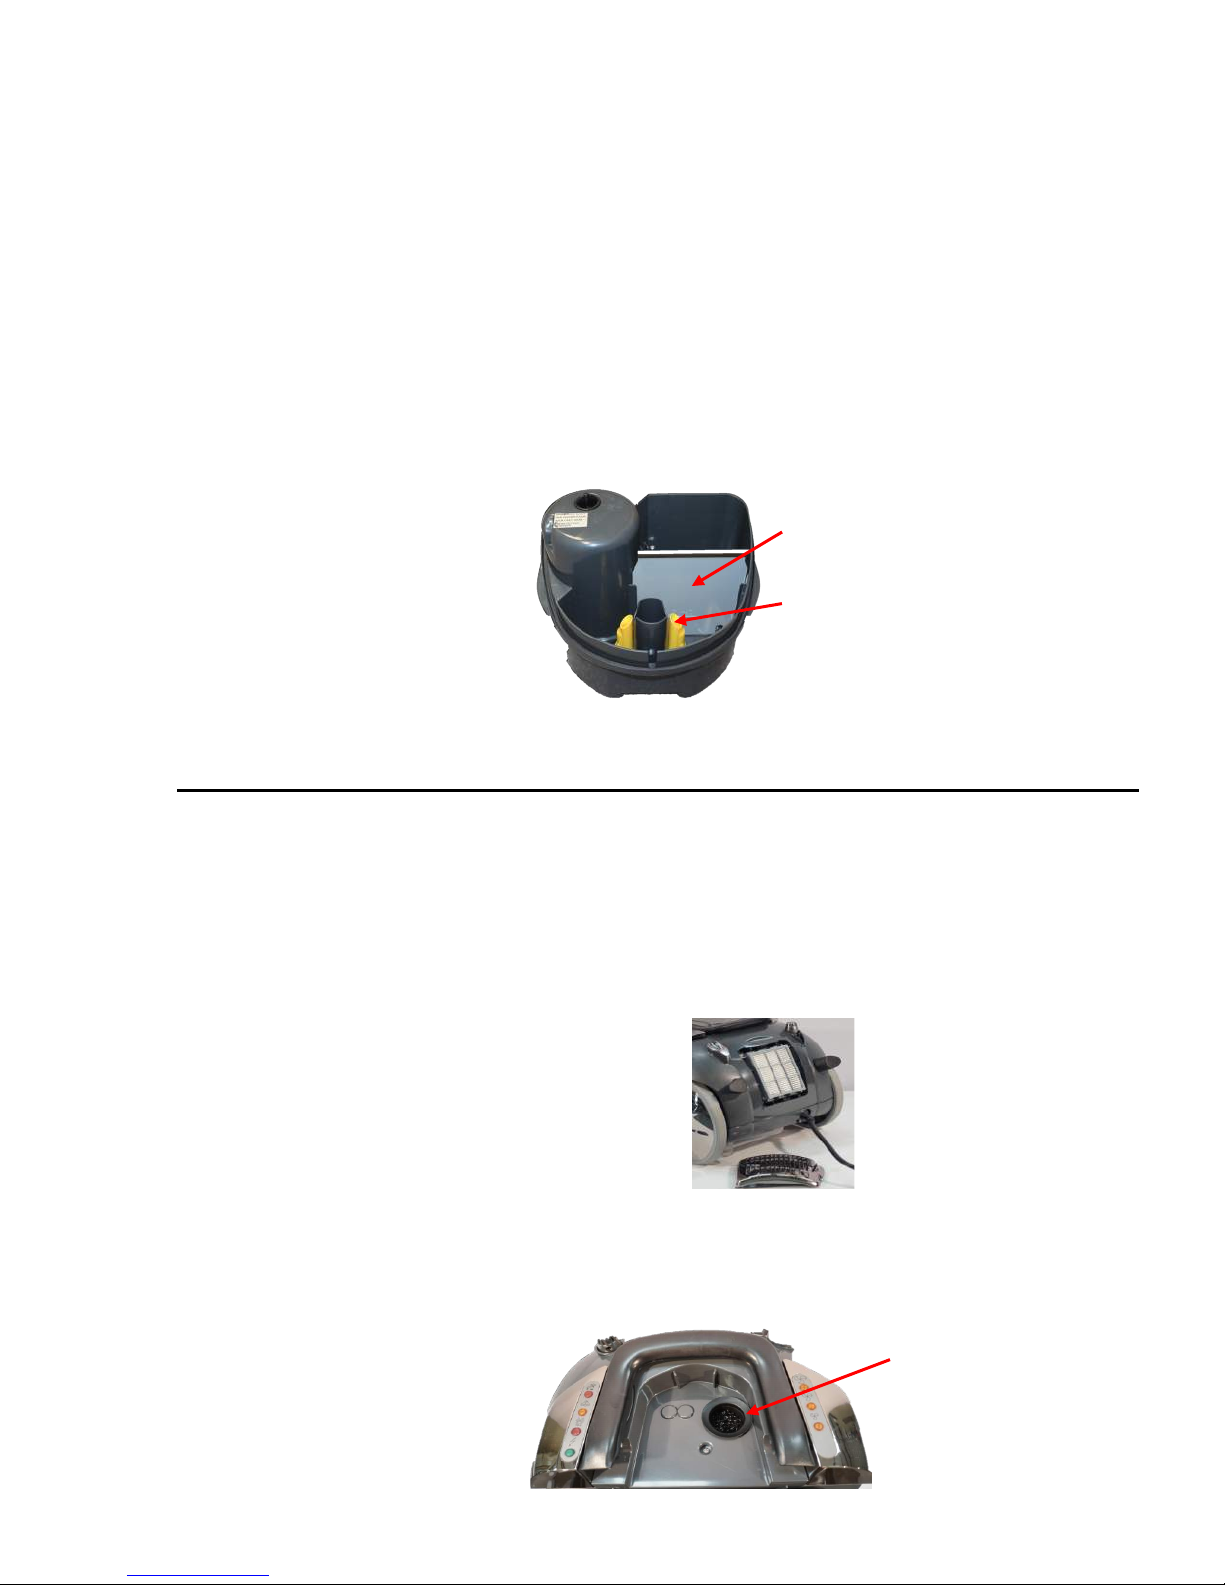
1. PURIFICATION TANK: Remove the tank lid by lifting the fasteners. Remove the purification tank and
drain contents from the vacuum reservoir and boiler tank. Clean the tank and remove the yellow nebulizers
for additional cleaning. R ise with hot water until all residue and stains on the tank wall have been removed.
WARNING: The gray tank divider and nebulizer may be removed for cleaning but must be reassembled
correctly before using. Using the SteamVac w ithout the divider or nebulizer filters could lead the serious
damage. The curved top of the divider should be facing forward and upwards with bottom securely
touching the tank.
Tank Divider
Yellow Nebulization Filters
2. EXTERIOR: Clean the exterior of the SteamVac with wet cloth. Do not use solvents or detergents that
could damage the plastic surface.
CLEAN EVERY MONTH
3. CHECK AND CLEANING THE H.E.P.A FILTER: Filter care and maintenance are essential to
maintain the quality of air released from the Sea Hawk. We recommend checking the state of the filter at
least once per mon th if the appliance is used daily.
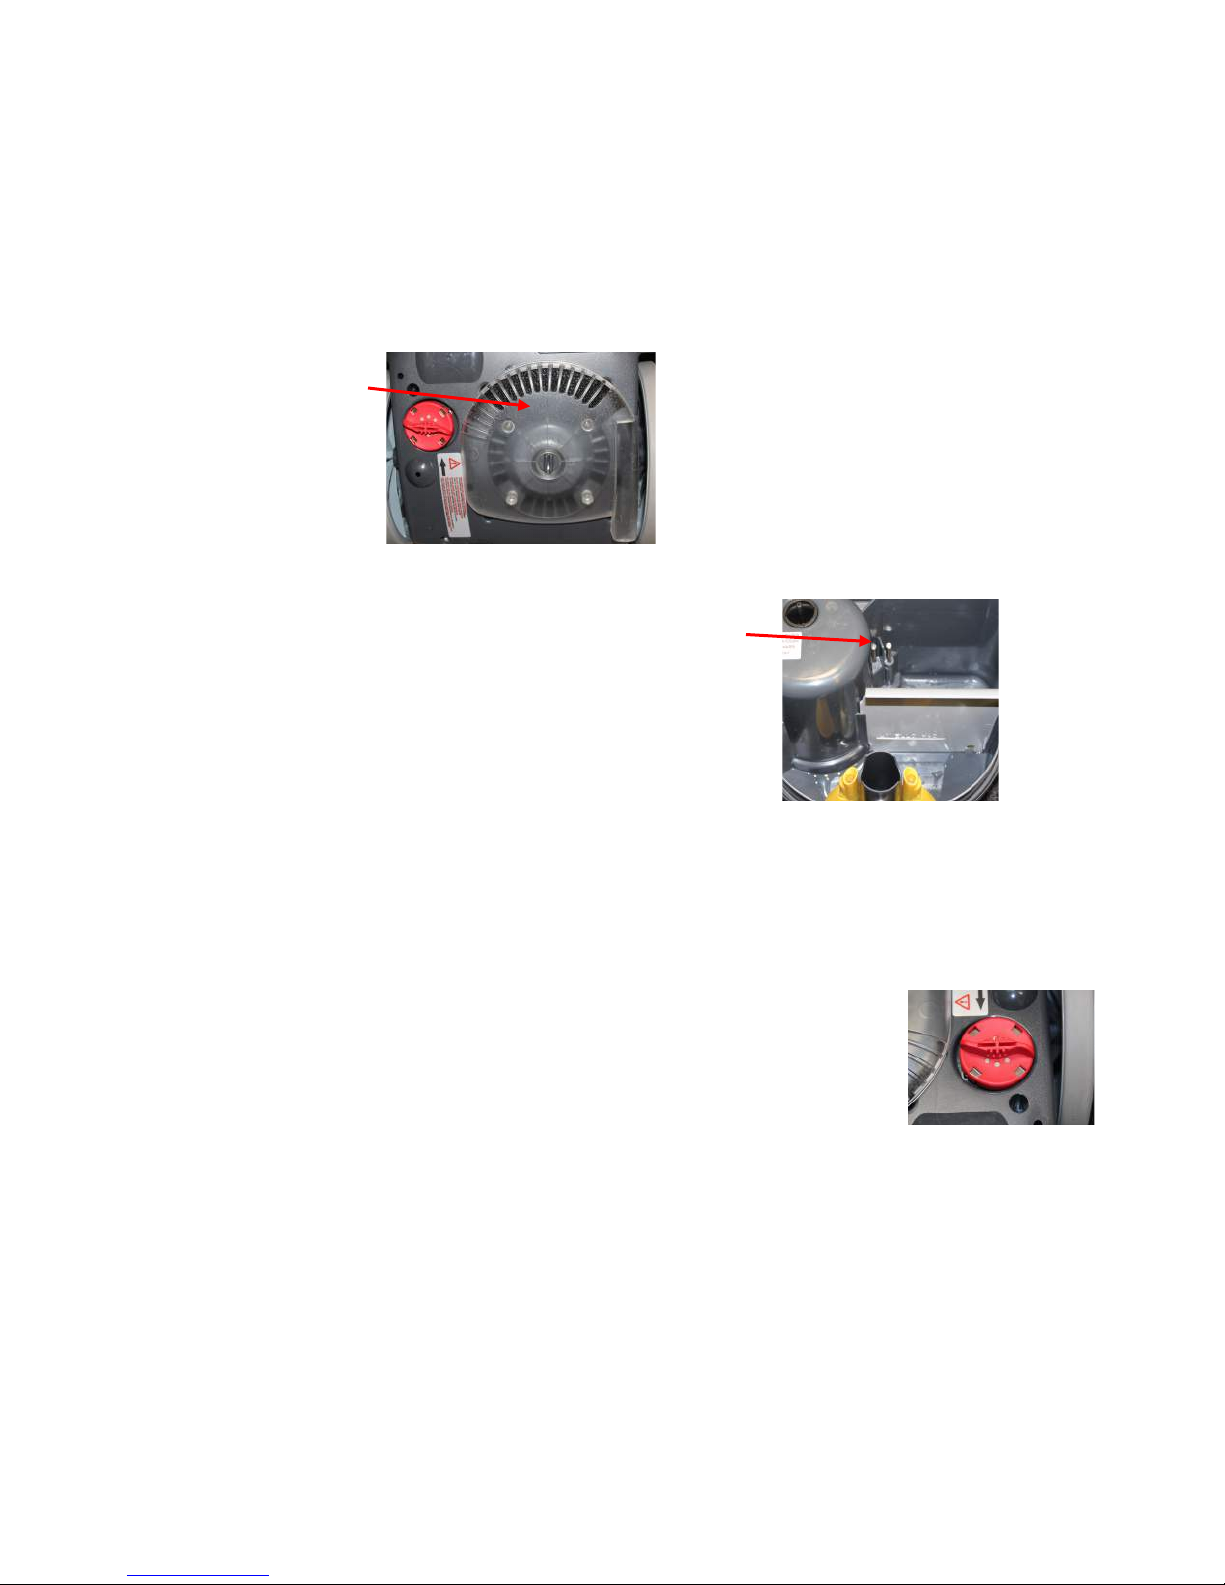
TO CLEAN: Remove the grill from the back of the Sea Hawk and remove the H.E.P.A. filter. Inspect the
filter for dirt and traces of dust. If there are traces of dust, shake and brush it gently to remove all visible
particles. Replace the filter and reassemble the cover.
WARNING: The H.E.P.A. filter must NOT be washed with water or detergent. If the filter shows traces of
mold or spores, replace the filter. If the filter should become wet, wait until it is completely dry before using.
4. ASPIRATING FILTER: The motor filter is designed to prevent dust and dirt particles from reaching the
vacuum motor. Use small pliers or tweezers to rem o ve . W a s h w ith co ld w a ter a n d d e terg e nt. Le t it
completely dry before replacing.
Motor Filter
!
Page 9
9
CLEAN ONLY WHEN NEEDED
5. MOTOR ASPIRATING FILTER: The motor aspirating filter is a secondary filter used to prevent dust
and particles from reaching the motor.
TO CLEAN: Remove the tank, turn over the Sea Hawk, and find the lower cover. Unsc re w and remove the
black filter. Wash with warm wate r and detergent. Make sure it is completely dry b efore replacing.
Filter Cover
6. SENSORS: The overflow sensors can become encrusted with dirt and stop working correctly. Use a cue
tip with detergent or alcoh o l removing dirt particles.
Overflow Sensors
DESCALING THE BOILER AND ELECTRONIC SENSOR (ONCE PER YEAR)
To extend the life of your Sea Hawk, we recommend descaling the boiler and the electronic
sensor. After prolong periods of activity, lime scale deposits make the boilers of most steam
appliances unusable. Your Sea Hawk comes with an exclusive technology allows you to clean
and inspect the electronic sensors that monitor the boiler water levels.
1. Make sure the Sea Hawk is unplugged and has cooled down
completely.
2. Remove the purification tank and empty completely.
3. Turn the steamer upside down, identifying the RED sensor knob.
4. Slowly unscrew the sensor by turning the knob counter-clockwise and remove.
5. Pour approximately ½ glass of vinegar into the boiler and replace the sensor by turning
clockwise until tight.
6. Return the tank to original position, replace the tank, close the lid and refasten.
7. Turn on the Sea Hawk for approximately 1 minute then turn off.
8. Leave vinegar in the boiler for 12 hours,
9. After 12 hours, remove the senor knob and empty the vinegar solution from the boiler.
10. Clean the encrusted sensor with a scourer pad removing any encrusted deposits.
IMPORTANT: The first time the Sea Hawk is used following the descaling, remember to
discharge steam into a cloth to catch the descaling product. Once the discharged steam is clear,
the Sea Hawk is ready for use
Page 10
10
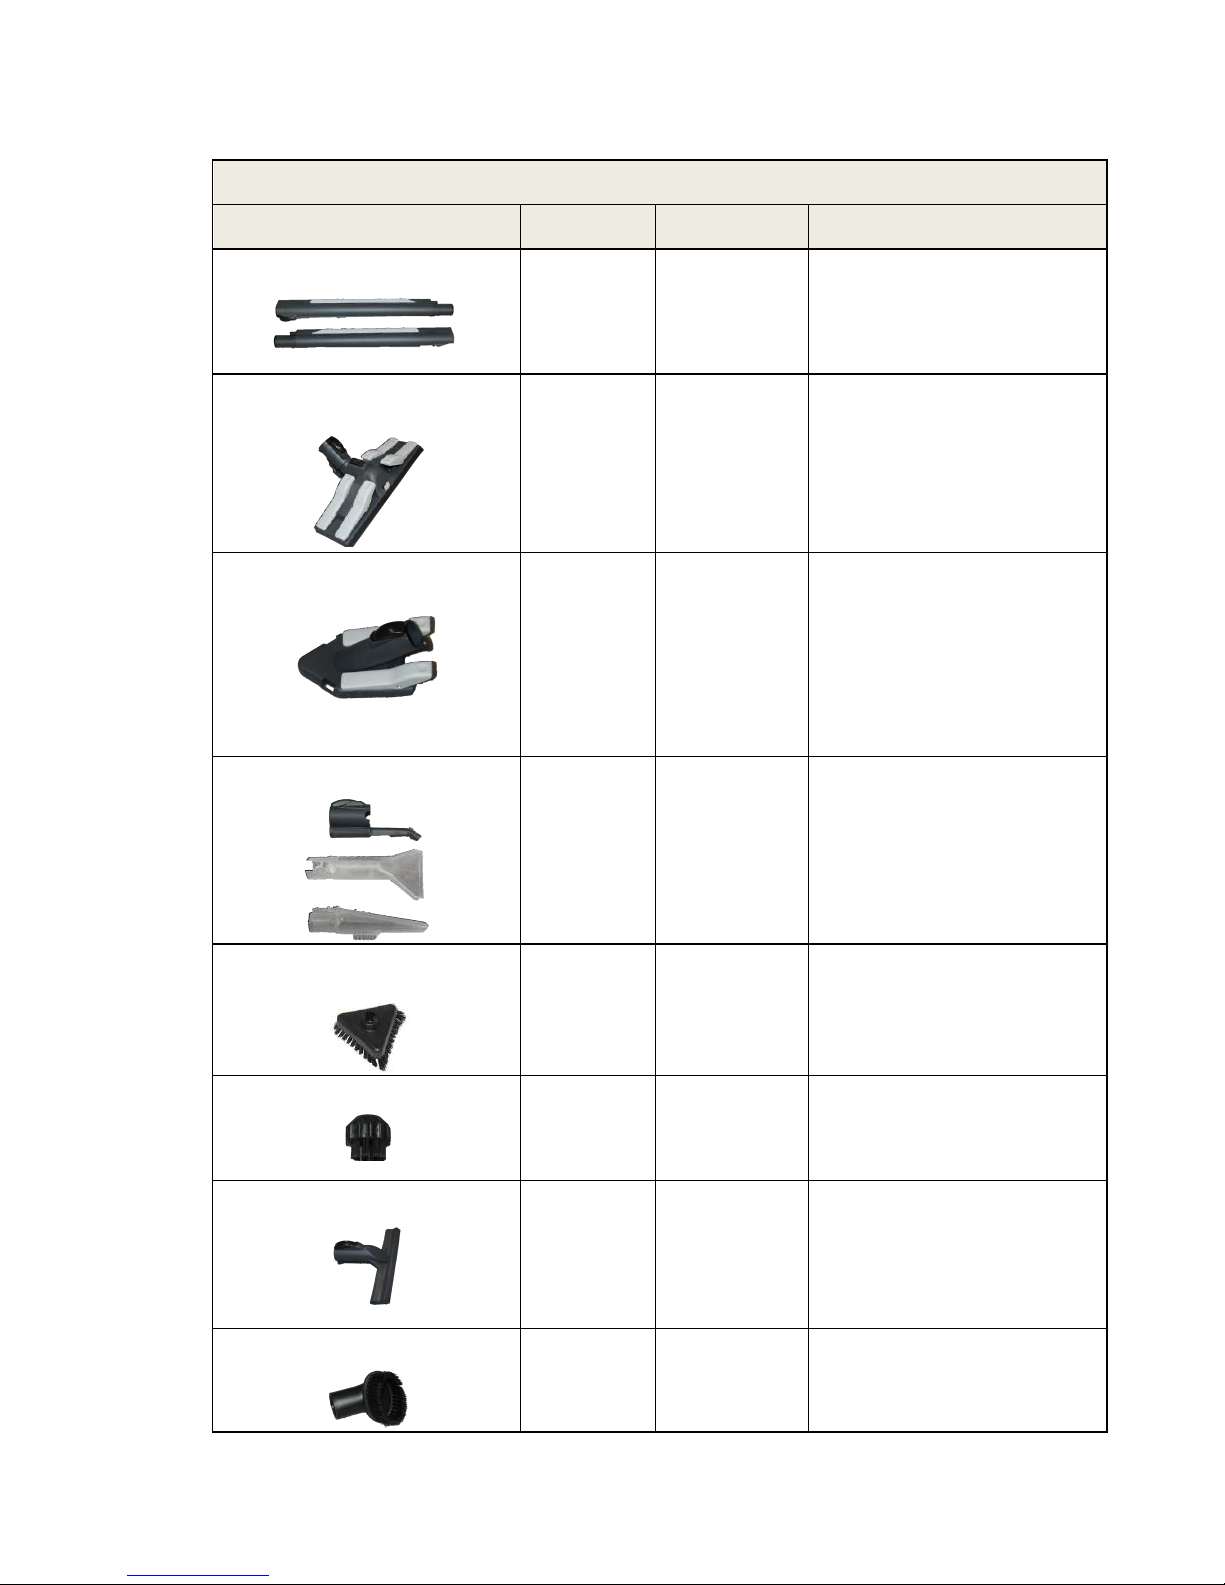
TOOL AND APPLICATION GUIDE
TOOL
USE
STEAM SETTING
INSTRUCTIONS
EXTENSION WANDS
Use with any nozzle or brush
combination to extend reach for floors,
walls and ceilings.
LARGE FLOOR BRUSH
Hard Floors
Decks
Low Steam
Low or Medium
Vacuum
Used to clean hard floors on
low steam and low to medium
vacuum.
Please test an small
surface area first.
LARGE TRIANGULAR BRUSH
Base Boards
Wall Tile
Clothes
Dust Mites
Low or Medium
Steam
Spot cleaning for
upholstery and carpets,
bathtubs, refrigerator, countertops,
cabinets, bathrooms, blinds.
DUST MITES
Use on low to medium steam to
sanitize and kill dust mites in
mattresses and other upholstered
items.
1-HOLE NOZZLE
Tile & Grout
Refrigerator
Dishwater
Corners
Low or Medium
Steam
Use with any brush.
Small or large nozzle to vacuum
excess water.
SMALL TRIANGULAR BRUSH
Surface
Cleaner
Medium
Steam
Attach to the 1-hole nozzle.
1-INCH ROUND NYLON BRUSH
Any Surface
Low or Medium
Steam
Attach the 1-hole nozzle.
WINDOW SQUEEGEE
Windows
Low Steam Only
Clean windows on low steam.
Wipe excess water with microfiber
towel or lint free cloth.
ROUND VACUUM BRUSH
Vacuum Any
Surface
!
!
! !
! !
!
!
Page 11

11
Work Techniques
The temperature of the steam at the tip of the nozzle is between 312ºF - 285ºF, since
the vapor is dry, it cools to 245ºF 4” from the tip less than 185ºF 8” inches from the
tip. Most bacteria begins to die when exposed to temperatures of 245ºF so keeping
the tip of the handle close to the work area is key to successful cleaning.
Floors
Floors –Use the large floor brush at low or medium steam volumes and a low or medium vacuum
setting. Use the extension wands by inserting one wand into the other making sure the lengthwise lines
on them are all lined up with each other on each piece.
a. Tile – Use the large floor brush or triangle brush at low or medium steam setting and medium
vacuum setting. Pre-treat stains or especia lly dirty areas with heat activated Vapormate®.
b. Vinyl or Wood – Use the large floor brush at a low steam setting. If the floor is especially dirty,
pre-treat area lightly with clean e r s u c h as Murphy’s Oil Soap or Vapormate®.
NOTE: WHEN STEAMING A WOOD FLOOR, NEVER LET BRUSH STAND IN ONE PLACE
WHILE STEAM TRIGGER IS ON. ALWAYS KEEP BRUSH MOVING. GO OVER AREA TWO
OR THREE TIMES AS NEEDED AND ALWAYS USE A CLEAN TOWEL.
c. Waxed Vinyl Floors - Use large floor brush and if necessary, use the small triangle brush in
corners and tight areas. Apply steam, cleaning a small area quickly as you go. This should melt a
top layer of wax holding th e d irt in th e pores of the floor. If the floor is greasy or very dirty, yo u may
need to repeat this procedure. It may be necess a ry to reapply floor sealer when finished.
d. Unwaxed Vinyl Floors - Use the large floor brush on low steam . Use a back and forth motion.
NOTE: DO NOT OVERHEAT ANY KIND OF VINYL, SINCE THIS COULD SOFTEN THE
SURFACE AND AFFECT THE TEXTURE. THIS ALSO APPLIES WHEN USING SMALL
BRUSHES TO REMOVE TOUGH SPOTS.
PRE-STEAM
Get into the habit of pre-steaming a surface if it is heavily soiled. At a
5-inch distance, sp r a y s t e a m on surface from all directions for 10 seconds.
PRE-TREAT
Use heat activated Vapormate® to pre-treat surface areas be fo re
steaming.
SPEED
Let the heat do the work for you! Do not move too quickly, unless surface
is sensitive to heat like wood, paint, wallpaper, colored fabrics or plastic.
WIPE
Always remember to wipe the area you just cleaned with a cotton towel.
All surfaces have pores. Steam cleaners use steam vapor to open and
deep clean into the surface pores. Wipe off dirt immediately before the
surface cools down.
Page 12

12
e. Wood Parquet Floors - Use the large floor brush at low steam. Use heat activated Vapormate®
for dirty floors.
f. Marble Floors - Use the same techniques as used for wood floors, keeping heat and moisture off
the surface as much a s possible. Always use Marble conditioner afte r c le a n in g .
NOTE: SOME MARBLE SURFACES CAN DISCOLOR.
STEAM CLEANING CARPETS
We do not recommend your Sea Hawk for steam cleaning large carpeted a reas but rather for spot
cleaning. Man made carpet fibers melt at temperatures 300ºF and above. The heat from the vapor
system does not melt the fibers, but it can change their shape or color at temperatures 185ºF-250ºF.
Tips for Treating Carpet Stains
a. Protein Stain: Dab with towel dampened with a solution of 1 teaspoon white vinegar and 1 quart of cold water.
b. Food Dye Stain: Wet stain with a solution of water and lemon juice or white vinegar.
c. Water Stain: First wet the stain with carbonated water, and then use triangular brush.
d. Reoccurring Stain: If a stain comes up again and a g a in , it h a s a “ re s e rv o ir ” u n d e r th e p a d d ing. Before
removing the stain you have to dry it out first. Press a drying agent such as talcum powder, a mixture of
cornstarch and cornmeal, or clean unscented, uncolored cat litter into the fibers do not rub. Let sit for 20
minutes, and then vacuum it out.
e. Surface Stain: If the stain is only on the surface of the carp e t, it c a n b e r e moved by shooting the steam against
the spot from the side, 1-2 inches above surface. Hold a towel on the other side to catch the residue. This
prevents driving the particles deeper into the fibers.
f. Gum: Same technique as SURFACE STAIN, except use paper towel instead of cotton towel. If the gum melts
too much, let it cool off before trying a g a in . Once major part of gum is removed mist with a non-toxic c le a n in g
formula and re-clean
Kitchen
Sink – Use the 1-inch nylon round brush or small triangular brush with the 1-hole nozzle with low or
medium steam. For tough stains, you can pre-spray surface with heat activated Vapormate®.
Stovetop – Make sure stovetop and burners are cool to the touch. Use the 1-inch round brush or small
triangular brush with the 1-hole nozzle at low or medium steam.
Oven Interior – Make sure oven is cool to the touch. Use the 1-inch nylon round b rus h w ith the 1-hole
nozzle. Pre-treat with heat activated Vapormate®. DO NOT SCRUB SURFACE. THIS MAY DAMAGE
THE ENAMEL.
Countertops
a. Method 1 - Use 1-inch round brush with 1-hole nozzle in a slow, back and forth movements to
cover area being cleaned at low or medium steam. Wipe with clean cotton towel.
b. Method 2 - Use the large triangular brush attached to the hose handle. Clean surface using
back and forth movements.
Cabinet or Drawer Facings – Use the large triangular brush at low or medium steam. Attach to the
hose handle. Use extension wands as needed to extend your reach.
Optional: For extra shine, you can spray your favorite citrus cleaner or Vapormate® on the cabinet face
first. For wood facings, s p ra y with cleaner such as Murphy’s Oil soap.
Page 13

13
Corners/Crevices – Use the 1-hole nozzle attached to the hose handle at low or medium steam to
blow out dirt.
Refrigerator – Please remove food, bins and shelves from the refrigerator before cleaning the interior.
a. Exterior Surfaces – Use the large triangular brush on low or medium steam.
b. Interior Surfaces – Use the 1-inch round brush or sm a ll t ria ngular brush with the 1-hole nozzle
on low or medium steam. Use separate towel to wipe up loosened dirt.
c. Door Moldings – Use the 1-inch nylon bristle round b rush with the 1-hole nozzle. Use separate
towel to mop up loose n e d dirt.
d. Defrosting Freezer – Use the 1-inch nylon b ris t le r o u nd brush with the 1-hole nozzle on low or
medium steam.
Dishwasher – Use the 1-hole nozzle on low or medium steam to clean out corners and edges.
BATHROOM
Mirrors/Glass/Windows – Use the large triangular brush or the window squeegee tool on the low
steam setting. Follow up if necessary by turning off steam and re-squeegee window, wipe with lint free
microfiber cloth.
CAUTION: DO NOT USE THE BRUSH IN A CONCENTRATED AREA FOR MORE THAN TWO
OR THREE SECONDS, GLASS COULD BREAK.
CAUTION! ALWAYS PREHEAT GLASS WITH THE SQUEEGEE 2-3 INCHES FROM SURFACE
BEFORE CLEANING! DO NOT CLEAN GLASS WHEN TEMPERATURES ARE BELOW
FREEZING POINT! NEVER CLEAN A GLASS THAT HAS A CRACK!
Toilet
Exterior cleaning uses the small triangular brush with the 1-hole nozzle on low or medium steam.
Interior cleaning use the 1” nylon round brush with the 1-hole nozzle for cleaning on low or medium
steam. Start from the top of the toilet and work down to the base.
Be sure to clean the floor up to 2 feet around the toilet to kill odor-causing bacteria.
DO NOT PUT THE BRUSH OR HOSE HANDLE UNDER WATER.
Faucets – Use the 1-inch nylon ro und brush or small triangular brush with the 1-hole nozzle on low
steam. Wipe dry with a microfiber towel as you go.
Bathtub/Shower
a. Fiberglass – Pre-spray the area with heat activated Vapormate®. Use the large triangular brush
on low steam setting to avoid scratching surface
b. Ceramic – Use the large triangular brush on low steam setting to avoid scratching surface.
c. Shower door – Use the large triangle brush on low steam setting . Wipe surface dry with a spare
cotton or microfiber towel as you go. Lightly applying Vapormate® assists in naturally removing
mineral deposits or soap scum.
CAUTION: DO NOT USE THE BRUSH IN A CONCENTRATED AREA FOR MORE THAN
TWO OR THREE SECONDS, GLASS COULD BREAK.
d. Tile Grout – Use the 1-inch nylon round br u s h with the 1-hole nozzle on low or medium steam.
Pre-spraying the grout crevices with heat activated Vaporma t e ® to help loosen dirt before applying
steam. Wipe with a spare cotton towel as you go.
e. Silicone Sealant – Use the 1-hole nozzle on low or medium steam, no closer than one-inch, use
back and forth movement blowing out debris.
Page 14

14
BED BUGS / DUST MITES
To eliminate bed bugs or dust mites, use the large floor brush or triangle brush on the
medium to high steam setting. Move quickly over the mattress and go over each area
more than once to ensure complete and thorough elimination of dust mites. Bed bugs
and dust mites will die on contact from the steam. Empty the vacuum reservoir often
and clean when finished.
Make sure to treat both sides of the mattress and all areas around the bed including
baseboards.
Mattress should be slightly damp to the touch but not wet so let it air-dry before putting
bed linens back on the mattress.
Living & Bed Rooms
Walls, painted trim or molding – Use the large triangular brush on the low steam setting. Pretest an
inconspicuous area to be cleaned for paint thickness since it is e asy to take paint off walls.
Wallpaper
a. Washable - Steam 2 inches off surfac e o n lo w or medium steam settings. Wipe with a towel
after treating. Do not stay on one spot too long.
b. Deep Cleaning - If surface is heav ily s oiled, pre-steam surface or spray a towel with
Vapormate®. If wallpaper is textured, pre-steam 2 inches off surface on low/medium steam
settings. Wipe with towel. Do not stay on one spot too long.
a. Non-Washable - Use large triangle brush and move quickly with smooth strokes. Do not stay
on one spot too long.
b. Removing - Use the large triangle brush and start in one corner hold in one spot for 5 to 10
seconds. Pull corner out start peeling back while moving wallpaper remover or triangle brush
slowly back and forth.
Painted walls and ceilings CAUTION: THE STEAM MAY REMOVE SOME PAINT IF IT IS THIN.
a. Oil Paint - Use large triangle brush with the steam on low settings. Do not stay on one spot too
long. Use extension tu bes to reach ceilings.
b. Latex Paint - Use large triangle brush on a low steam setting. Pre h eat the towel and wipe with
no steam. Do not apply pressure. Move quickly with smooth strokes or use nozzle about 5inch off surface to pre -steam spot. Do not get surface too wet. Wipe gently with towel.
Tracks, Moldings
a. Tracks - Use 1-hole nozzle with detail brush on low or medium steam setting. Wipe cleansed
area with towel.
b. Moldings - Use one-hole nozzle on low or medium setting. Hold the nozzle in one hand and a
towel in the other hand to absorb excess water.
Page 15

15
Blinds
Close blinds. Use a low steam setting with the 1-hole nozzle or the large triangular brush and
work gently in a horizontal direction.
NOTE: USE ONLY ON METAL BLINDS. NOT FOR USE ON VINYL BLINDS
Slats
a. Dusting - Open blinds and use 1-hole nozzle to blow dust onto window on a medium steam
setting.
b. Deep Cleaning - Close blinds with top of slats facing you. Use large triangle brush and wipe
side-to-side from the top down. If needed, pre-spray the blinds with Vapormate.
Strings
Pull the blind all the way up. Wipe the string with a towel wet with cleaning formula. Pull the string
slowly through a detail brush.
Upholstery – Use the large brush or large triangle brush for 3 to 5 seconds at low steam setting.
Pretest an inconspicuous area and work quickly and lightly especially if fabric has Scotch Guard. Clean
furniture using back and forth movement. If material seems to be gettin g to o wet, cut steam off.
NOTE: ALWAYS CHECK AREA FOR SCOTCH GUARDING.
a. Leather – DO NOT CLEAN INTERIOR LEATHER FURNITURE WITH STEAM.
b. Vinyl - Using 1-hole nozzle, blow out cracks and crevasses. Use appropriate brush.
Windows
Window Sills and Thresholds – Use the small nylon nozzle brush with 1-hole nozzle. Use on medium
steam setting. Attach to the hose handle. Use the extension wands if you need to extend your reach.
Window Frame -
a. Painted wood and plastic - Use 1-hole nozzle with 1” nylon brush.
b. Aluminum - Use 1” inch nylon brush directly on the surface to remove dirt and to polish. Wipe
with towel.
Window Screens – Use the window squeegee tool on a low steam setting and low vacuum setting.
Use the extension wands if you need to extend your reach.
AUTO
Open the car windows or doors to let the steam escape while you are cleaning.
Wheels – Use 1-hole nozzle or large triangular brush on medium s te am volume and vigorously brush
dirt away. Use smaller tools for crevices if needed to finish job.
Carpets and Upholstery
Pretest an inconspicuous area and work quickly and lightly especially if fabric has Scotch Guard.
Use the large brush or large triangle brush on low steam setting.
NOTE: ALWAYS CHECK AREA FOR SCOTCH GUARDING.
Page 16

16
Leather – DO NOT CLEAN INTERIOR LEATHER FURNITURE WITH STEAM.
Vinyl - Using 1-hole nozzle on the low steam setting, blow out cracks and crevasses in the vinyl
Windows – See “mirrors/glass/windows” in Bathroom section above.
Air Conditioning or Heating Vents – Turn OFF air conditioning or heating. Put down a large towel
under the vents on the floor and cover the seats. Use the 1-hole nozzle (no brush) attached to the hose
handle and insert nozzle tip into the vent. Using the low steam setting, spray into each vent to clean out
the passageways. Wipe up the residue with a spare cotton or mic ro fib e r to wel. To finish job, turn on air
conditioning to dry out vents.
Dashboard – Use the small triangular brush with the 1-hole nozzle. Wipe immediately with a microfiber
cloth.
MISCELLANEOUS ITEMS
Clothing – Use the large triangular brush (no towel) on the low steam setting. Apply steam 12 inches
from clothes. Before co n tin u in g , test an inconspicuous area of the clothing for co lo rfa s tn e s s firs t.
Clothing should be slightly damp to the touch but not wet. Air-dry the clothing.
Cleaning and Sanitizing Bird or Pet Cages –Use the 1-inch round nylon brush with 1-hole nozzle
attached to the hose handle. When done steam cleaning. Rinse the cage and towel it dry.
Deck – Use the large floor brush on low steam setting. Increase volume on tough areas. Rinse with a
garden hose.
Golf Clubs – Use the 1-inch nylon brush with 1-hole nozzle. Scrub lightly and wipe with cotton
microfiber towel immediately.
Page 17
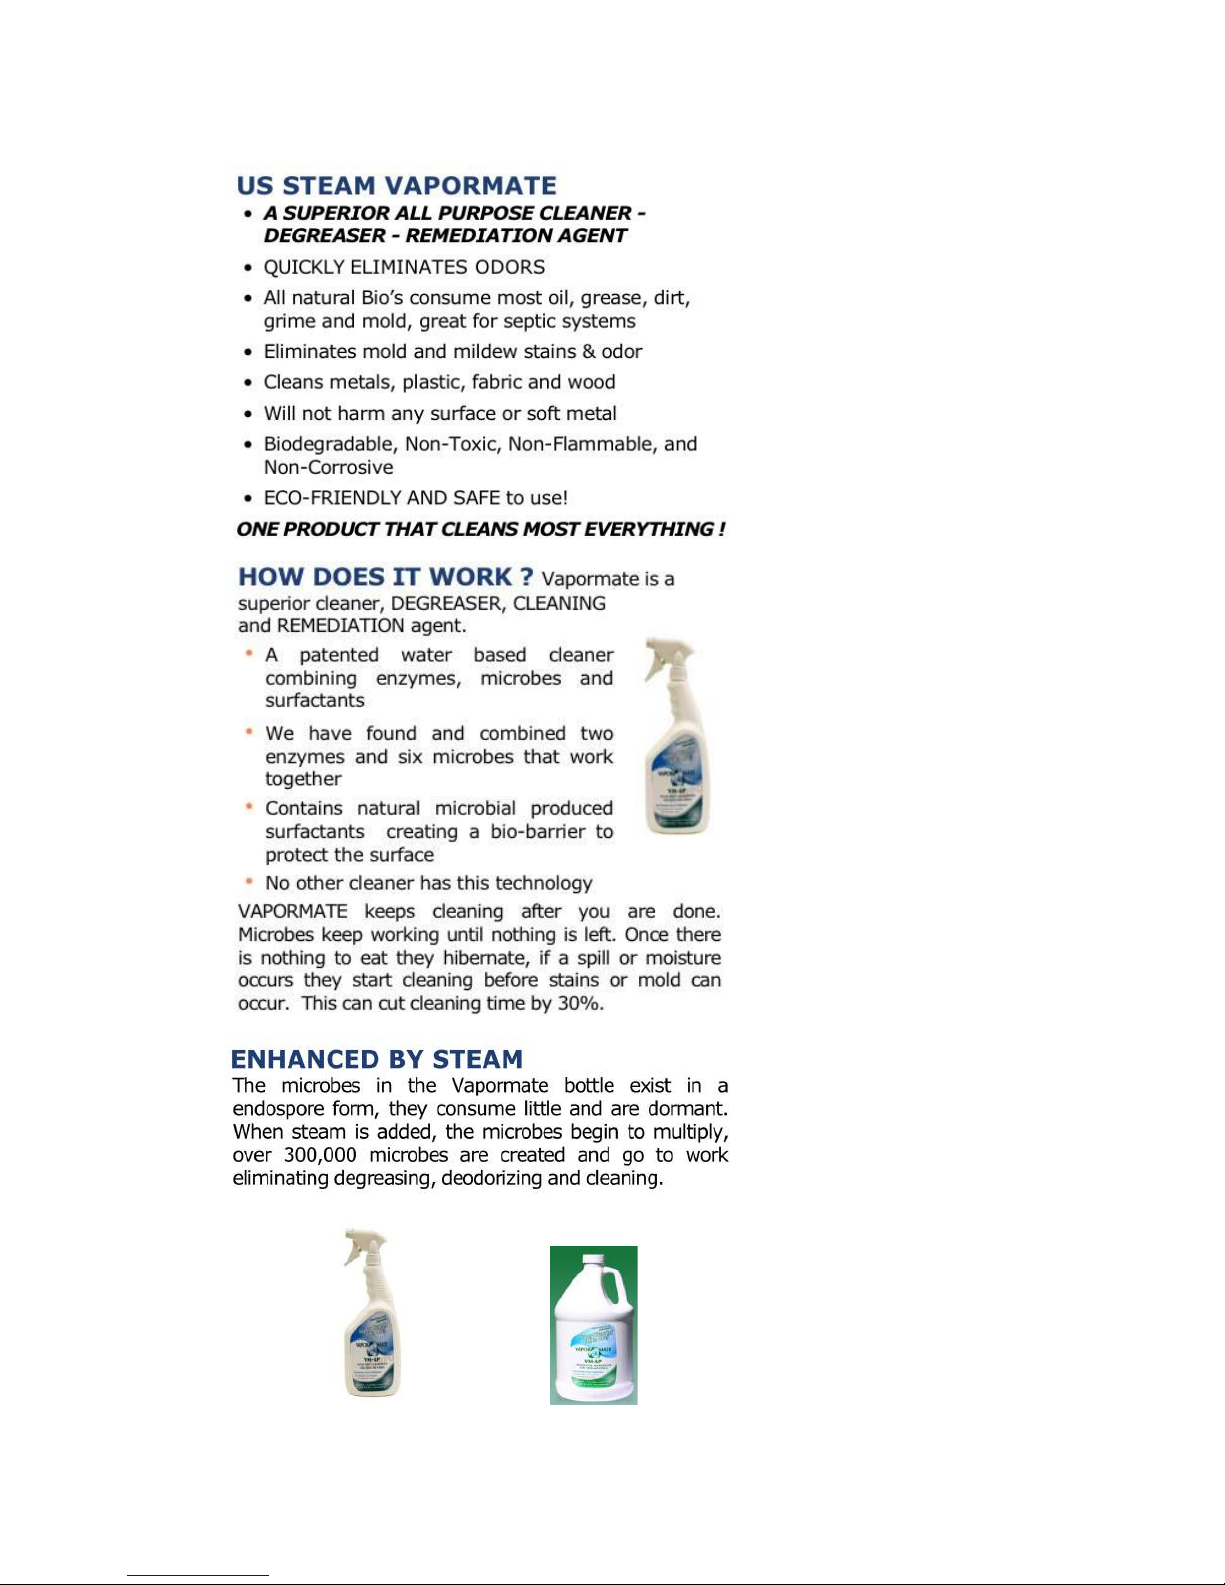
17
!
!
!
!!!!!!!!!!!!!!!!!!!! !! ! !!!!!!! !!!!!
!!!!!!!!!!!!!!!!!!!!!$7.95! !!!!!!!!!!!!!!!!!!!!!!$21.50!
Page 18

18
NOTICES
1. Read all instructions before using this steam cleaner. Save these instructions for future
reference.
2. Use of any replacement parts other than authorized US Steam parts voids all warranties and can
cause bodily injury to the operator and damage equipment. Service performed by anyone other
than factory authorized p e rs o n nel will void warranty.
WARNINGS
1. DO NOT leave the steam cleaner unattended while plugged in. Turn off all controls and unplug the
electrical cord when not in use, when moving to another location and before servicing.
2. DO NOT use with a damaged cord or plug. If the steam cleaner is not working as it should, has
been dropped, damaged, left outdoors or dropped into water, call for service before using.
3. NEVER attempt to disassemble this product in a way not instructed in this manual.
4. DO NOT handle the plug with wet hands.
5. DO NOT pull or carry by cord. Keep cord away from heated surfaces.
6. DO NOT use extension cords greater than 25 ft. or cords or outlets with inadequate current carrying
capacity (15 AMP capacity, and must have ground wire capabilities).
7. DO NOT add anything other than clean, distilled water to the boiler tank.
8. Keep body, hands, and feet away from nozzle or brush steam. Steam can cause burns.
9. ALWAYS set safety switch on hose handle into the locked position when not in use.
Not setting safety switch to locked position could result in an injury.
10. ALWAYS test a small area before cleaning a large area on any type of surface to make sure no
damage will occur
11. DO NOT expose machine to freezing temperatures while not in use.
ELECTRICAL CONNECTIONS
The steam cleaner uses 110 Volts and will pull 12.9 Amps when starting. It should be the
only appliance plugged into an outlet.
1. Any alteration of electrical cord supply on this steam cleaner will void all warranties.
2. Once electrical hook-up meets requirements, make sure all switches on front of unit are in the off
position before plugging unit into electrical outlet.
3. For circuit breaker protection, if possible plug the unit into an outlet isolated from other equipment,
or turn the other equipment off while using the steam cleaner — the combined ele ctr ical amperage
of other equipment and the steam cleaner together may cause a circuit breaker to trip.
4. Always press the power button ( ) to OFF before you unplug the unit.
5. Removing the ground prongs from the power cord will void any and all warranties and can cause
risk of shock or injury.
6. Only use extension cords with a minimum of 15AMP rating and no longer than 25 ft. in length.
KEEP FOR YOUR RECORDS. THIS MANUAL MUST BE RETAINED FOR FUTURE REFERENCE.
PLEASE READ, UNDERSTAND AND FOLLOW THE INSTRUCTIONS AND WARNINGS CONTAINED IN
THIS MANUAL BEFORE USING THIS VAPOR STEAM CLEANER.
In order to reduce the risk o f fire , electric shock, personal injury or damage to pro p erty, follow these
instructions carefully. When using electrical appliances, basic s a f e ty precautions should be followed
Page 19

19
STANDARD TERMS AND CONDITIONS
ONE YEAR LIMITED WARRANTY
US Steam warrants that your steam cleaner will be free from defects in material and workmanship for a period of one
(1) year.
TERMS OF LIMITED WARRANTY
The limited warranty becomes effective on the date of shipment from US Steam and is granted to th e in itial c u s tomer
end user only and is nontransferable. Any claims under this warranty must be made before the end of the applicable
warranty period. During such period if US Steam determines that a part or system is defective in material or
workmanship, US Steam, at its option, will provide you with a repaired part or replace any part that is covered by the
limited warranty. US Steam re s er v es th e r igh t to s u b stitu te fu n c tio n ally e q u iv ale n t n e w or serviceable reconditioned
parts or systems. US Steam’s responsibility is limited to repair, replacement, credit or refund, any of which may be
selected by US Steam at its sole discretion.
The limited warranty covers only defects arising from normal use and does not include malfunctions or failures arising
from: misuse, abuse, neglect, alteration, usage not in accordance with user manual and instructions, depletion of
consumables, acts of nature or damage caused by repairs where such repairs were made without US Steam’s express
approval.
The Warranty does not cover defects or damage arising from the disassembly or attempted disassembly of your
steamer.
SERVICE AND SUPPORT
If you need support for your steam cleaner call 1-888-788-1234 (M-F 9am-5pm CST) to sp ea k with a Customer
Service Representative, or contact us through the web at www.ussteam.net. A representative will troubleshoot the
problem and determine if the steamer should be returned for further diagnosis. The customer service representative
will advise you if you should ship your m a c h in e to o u r Service Center.
Before you ship your steam cleaner for service, you must call 1-888-788-1234 (M-F 9am-5pmCEST) or contact us
through the web at www.ussteam.net our customer service representative will explain how you must package and ship
your Steamer to prevent further damage. The Customer Service Representative will also provide you with a return
authorization (RMA), if required.
RETURN PROCEDURES
Prior to returning the product(s) you must obtain a Return Merchandise Authorization (RMA) by
calling 1-888-788-1234. No returns will be accepted without RMA #. When packing the
Steamer, you must use the original packing material to prevent damage in shipping. Make sure you
include all items and accessories. You will be responsible for all shipping cost. Send returns to
US Steam
7920 Rodeo Trail, Ste 240
Mansfield, TX 76063
Page 20

20
LIMITATIONS
EXCEPT AS SET FORTH HEREIN, US STEAM MAKES NO WARRANTIES, EXPRESSED OR IMPLIED, AND
DISCLAIM AND NEGATE ALL OTHER WARRANTIES, INCLUDING WITHOUT LIMITATIONS, IMPLIED
WARRANTIES OF MERCHANTABILITY, FITNESS FOR THE PARTICULAR PURPOSE AND CONFORMITY
TO MODELS OR SAMPLES. SOME JURISDICTIONS DO NOT ALLOW LIMITATIONS ON IMPLIED
WARRANTIES, SO THESE LIMITATIONS MAY NOT APPLY TO YOU.
THE WARRANTY SET FORTH HEREIN GIVES YOU SPECIFIC LEGAL RIGHTS, AND YOU MAY HAVE
OTHER RIGHTS, WHICH VARY FROM STATE TO STATE. IN NO EVENT SHALL AKI BE LIABLE FOR
ANY INDIRECT, SPECIAL, INCIDENTAL, OR CONSEQUENTIAL DAMAGES, SO THE ABOVE EXCLUSION
OR LIMITATION MAY NOT APPLY TO YOU. NO VARIATION OR EXCEPTIONS IN THE TERMS STATED
HEREIN CAN BE MADE.
GOVERNING LAW, JURISDICTION AND COSTS
THESE LIMITED WARRANTIES ARE INCORPORATED INTO AND ARE ESSENTIAL AND MATERIAL
PROVISIONS OF THE TERMS AND CONDITIONS OF SALE OR SELLER PRODUCTS TO YOU. ALL
DISPUTES ARISING OUT OF OR RELATED TO THE LIMITED WARRANTY SET FORTH HEREIN
(CUSTOMER DISPUTE S ) SH A L L B E G O VERNED BY THE LAWS OF THE STATE OF TE X A S . TH E
CUSTOMER HEREBY CONSENTS TO THE JURISDICTION AND VENUE OF THE STATE COURTS OF
TEXAS TO RESOLVE ANY AND ALL CUSTOMERS DISPUTES WITH BOSTON GREEN GOODS, INC., AND
THE CUSTOMER WAIVES ALL DEFENSES TO SUCH JURISDICITON AND VENUE INCLUDING, BUT NOT
LIMITED TO, ANY DEFENSE BASED ON INCONVENIENT FORUM. IN THE EVENT THE CUSTOMER AND
BOSTON GREEN GOODS, INC. ARE UNABLE TO RESOLVE ANY CUSTOMER DISPUTE, AND ANY
COLLECTION ACTION, SUIT OR OTHER JUDICIAL PROCEEDING IS COMMENCED; THE PREVAILING
PARTY IN ANY SUCH ACTION, SUIT OR PROCEEDING SHALL BE ENTITLED TO RECOVER ITS COSTS
AND REASONABLE ATTORNEY’S FEES INCURRED.
Page 21

21
-
WARRANTY REGISTRATION
To help us serve you better and to activate your warranty:
Complete the information below and mail to manufacturer’s service center:
US Steam
7920 Rodeo Trail
Ste 240
Mansfield, TX 76063
Name: ____________________________________________________
Address: __________________________________________________
__________________________________________________________
State: _______ Zip Code: _____________
Phone #: ______ - ______ - _____________
E-Mail: __________________________________
Serial #: ______________ Date Purchased: __________
Purchased from: _____________________________________________
How did you hear about the US Steam?
TV___WEB ___ Friend ___
Other_______________________________________
If you have any questions or comments,
Please contact our Customer Service Department:
Email [email protected] or
call toll-free 1-888-788-1234 (Monday-Friday 9am-5pm CST)
 Loading...