

Page 1
R24.0796.00
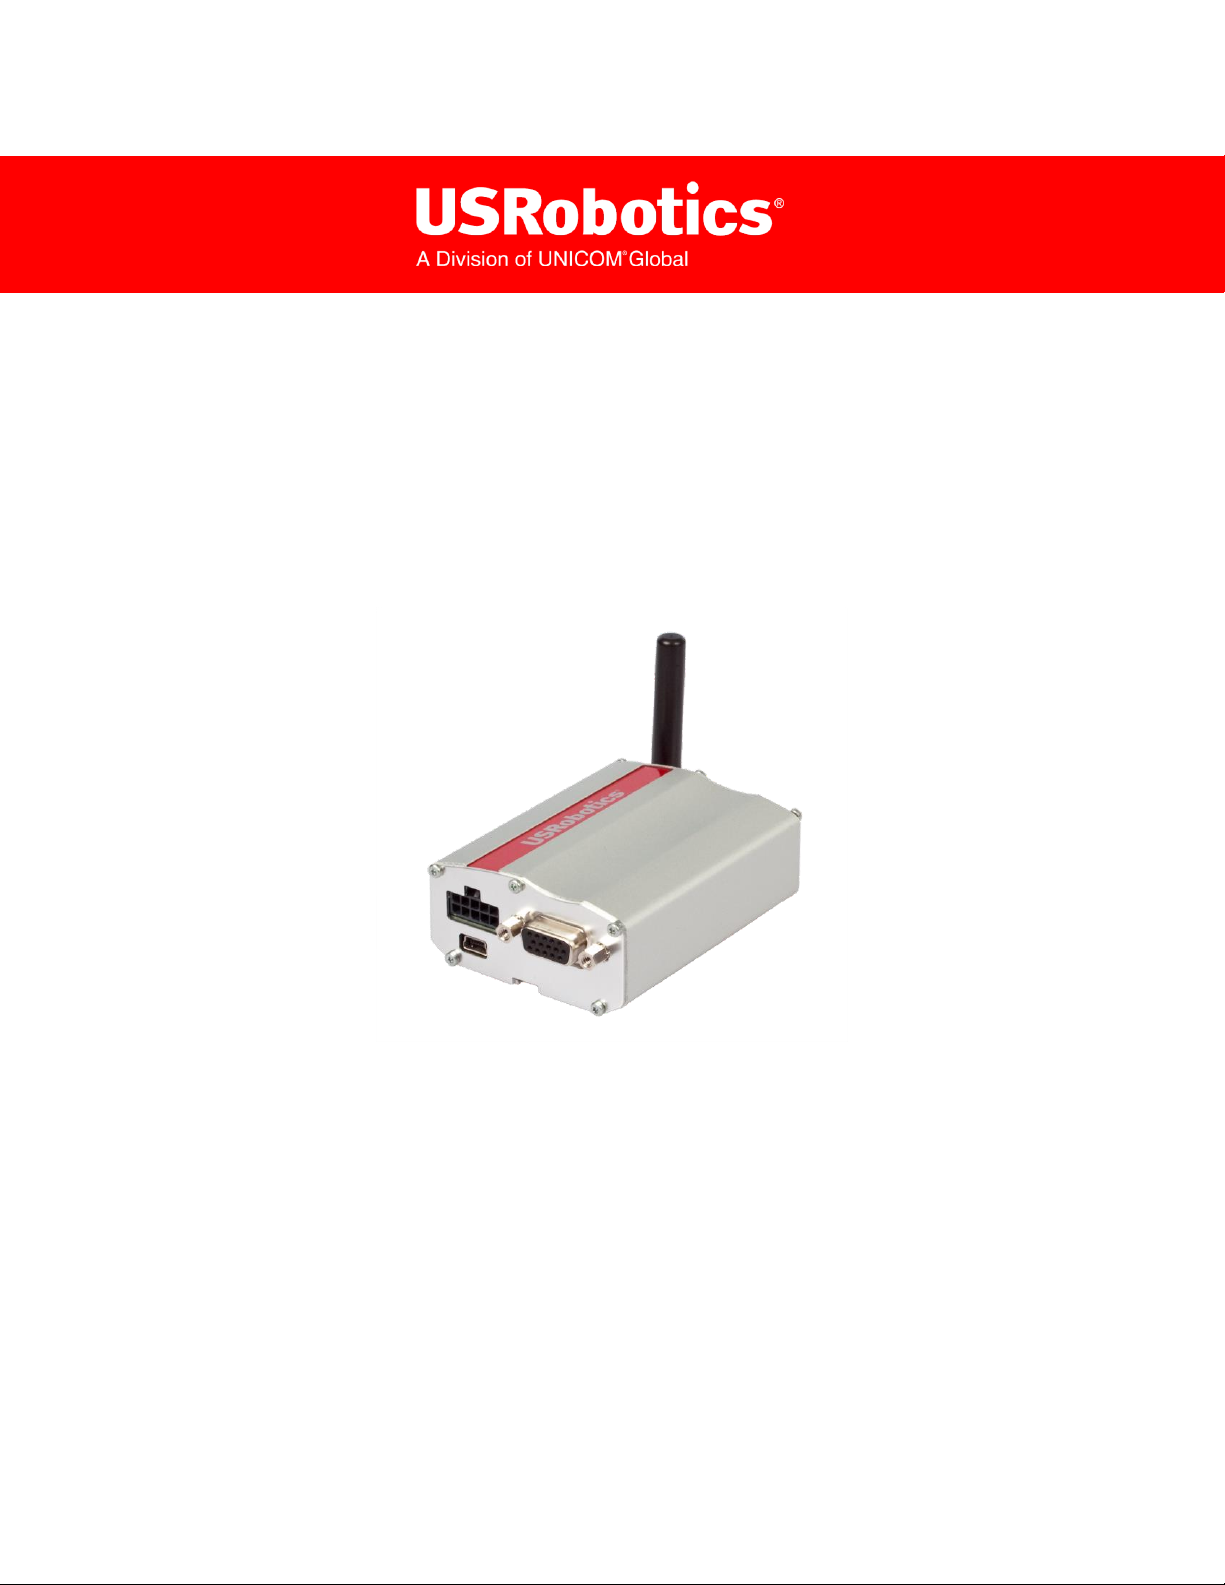
Courier M2M 3G Cellular Modem
USR3500
Getting Started
Page 2

Important Notice
Due to the nature of wireless communications, transmission and reception of data can
never be guaranteed. Data may be delayed, corrupted (i.e., have errors) or be totally
lost. Although significant delays or losses of data are rare when wireless devices are
used in a normal manner with a well-constructed network, the modem should not be
used in situations where failure to transmit or receive data could result in damage of any
kind to the user or any other party, including but not limited to personal injury, death, or
loss of property. Neither Sierra Wireless nor USRobotics accepts any responsibility for
damages of any kind resulting from delays or errors in data transmitted or received
using the modem, or for failure of the modem to transmit or receive such data.
Safety and Hazards
Do not operate the modem in areas where cellular modems are not advised without
proper device certifications. These areas include environments where cellular radio can
interfere such as explosive atmospheres, medical equipment, or any other equipment
which may be susceptible to any form of radio interference. The modem can transmit
signals that could interfere with this equipment. Do not operate the modem in any
aircraft, whether the aircraft is on the ground or in flight. In aircraft, the modem MUST
BE POWERED OFF. When operating, the modem can transmit signals that could
interfere with various onboard systems.
Note: Some airlines may permit the use of cellular phones while the aircraft is on the ground and the door is
open. Modems may be used at this time.
The driver or operator of any vehicle should not operate the modem while in control of a
vehicle. Doing so will detract from the driver or operator’s control and operation of that
vehicle. In some states and provinces, operating such communications devices while in
control of a vehicle may be an offence.
Limitations of Liability
This manual is provided “as is”. Neither Sierra Wireless nor USRobotics makes any
warranties of any kind, either expressed or implied, including any implied warranties of
merchantability, fitness for a particular purpose, or noninfringement. The recipient of the
manual shall endorse all risks arising from its use.
The information in this manual is subject to change without notice and does not
represent a commitment on the part of Sierra Wireless or USRobotics. EACH OF
SIERRA WIRELESS AND USROBOTICS AND THEIR RESPECTIVE AFFILIATES
SPECIFICALLY DISCLAIM LIABILITY FOR ANY AND ALL DIRECT, INDIRECT,
SPECIAL, GENERAL, INCIDENTAL, CONSEQUENTIAL, PUNITIVE OR EXEMPLARY
DAMAGES INCLUDING, BUT NOT LIMITED TO, LOSS OF PROFITS OR REVENUE
OR ANTICIPATED PROFITS OR REVENUE ARISING OUT OF THE USE OR
Page 3

Getting Started
INABILITY TO USE ANY SIERRA WIRELESS PRODUCT, EVEN IF SIERRA
WIRELESS AND/OR USROBOTICS AND/OR THEIR RESPECTIVE AFFILIATES
HAVE BEEN ADVISED OF THE POSSIBILITY OF SUCH DAMAGES OR THEY ARE
FORESEEABLE OR FOR CLAIMS BY ANY THIRD PARTY.
Notwithstanding the foregoing, in no event shall Sierra Wireless or USRobotics and/or
their respective affiliates aggregate liability arising under or in connection with the Sierra
Wireless/ USRobotic product, regardless of the number of events, occurrences, or
claims giving rise to liability, be in excess of the price paid by the purchaser for the
Sierra Wireless /USRobotics product.
Customer understands that neither Sierra Wireless nor USRobotics is providing cellular
or GPS (including A-GPS) services. These services are provided by a third party and
should be purchased directly by the Customer.
Rev 1.1 9/22/14 3
Page 4

Getting Started
Web:
http://www.usr.com/contact
SPECIFIC DISCLAIMERS OF LIABILITY: CUSTOMER RECOGNIZES AND
ACKNOWLEDGES SIERRA WIRELESS IS NOT RESPONSIBLE FOR AND SHALL
NOT BE HELD LIABLE FOR ANY DEFECT OR DEFICIENCY OF ANY KIND OF
CELLULAR OR GPS (INCLUDING A-GPS) SERVICES.
Patents
This product may contain technology developed by or for Sierra Wireless, Inc.
This product includes technology licensed from QUALCOMM®.
This product is manufactured or sold by Sierra Wireless, Inc. or its affiliates under one
or more patents licensed from InterDigital Group and MMP Portfolio Licensing.
Copyright
© 2014 USRobotics. All rights reserved.
Trademarks
USRobotics®, CourierTM and the USRobotics logo are registered trademarks of
USRobotics.
Sierra Wireless®, AirPrime®, AirLink®, AirVantage® and the Sierra Wireless logo are
registered trademarks of Sierra Wireless.
Windows® is a registered trademark of Microsoft Corporation.
QUALCOMM® is a registered trademark of QUALCOMM Incorporated. Used under
license.
Other trademarks are the property of their respective owners.
Contact Information
Consult our website for up-to-date product descriptions, documentation, application
notes, firmware upgrades, and troubleshooting tips: http://www.usr.com/support/3500
Rev 1.1 9/22/14 4
Page 5

Getting Started
Version
Date
Updates
1.0
9/25/13
Creation
1.1
11/1/2013
First review edits
Document History
Rev 1.1 9/22/14 5
Page 6

Getting Started
Contents
CONTENTS ............................................................................................................... 6
LIST OF FIGURES..................................................................................................... 9
LIST OF TABLES .................................................................................................... 10
1. OVERVIEW ........................................................................................................ 11
2. PACKAGING ...................................................................................................... 12
2.1. Contents .................................................................................................... 12
2.2. Accessories ............................................................................................... 12
2.2.1. Antenna ............................................................................................. 12
2.2.2. Serial Data Cable .............................................................................. 13
2.2.3. Two Mounting Brackets ..................................................................... 13
2.2.4. Power Supply .................................................................................... 14
3. HARDWARE....................................................................................................... 16
3.1. Overall Dimensions ................................................................................... 16
3.2. Connections .............................................................................................. 17
3.3. Interfaces................................................................................................... 17
3.3.1. External Interfaces ............................................................................ 17
3.3.2. Internal Expansion Interface ............................................................. 17
3.4. Environmental Compliance........................................................................ 18
3.4.1. RoHS Directive Compliant ................................................................ 18
3.4.2. Disposing of the Product ................................................................... 18
4. FEATURES ........................................................................................................ 19
4.1. Features .................................................................................................... 19
4.2. Supported Bands ....................................................................................... 20
4.3. Expansion Interface ................................................................................... 20
4.4. Over-Voltage and Over-Current Protection ............................................... 21
4.4.1. Power Supply Input ........................................................................... 21
4.4.2. Electrostatic Discharge ..................................................................... 21
4.4.3. Main Serial Port ................................................................................ 21
5. USING THE USR3500 ........................................................................................ 22
Rev 1.1 9/22/14 6
5.1. Mounting the USR3500 ............................................................................. 22
Page 7

Getting Started
5.2. Setup ......................................................................................................... 23
5.2.1. Inserting the SIM Card ...................................................................... 24
5.2.2. Extracting the SIM Card .................................................................... 25
5.3. Operational Status ..................................................................................... 26
6. COMMUNICATING WITH THE USR3500 .......................................................... 28
6.1. Communications Testing ........................................................................... 28
6.2. Verifying the Received Signal Strength ..................................................... 29
6.3. Verifying the Network Registration ............................................................ 29
6.4. Checking the Band Selection .................................................................... 30
6.5. Switching Bands ........................................................................................ 31
6.6. Checking the PIN Code Status .................................................................. 33
6.7. Echo Function ........................................................................................... 33
6.8. Enabling/Disabling the Flash LED ............................................................. 33
6.9. Firmware Upgrade Procedure ................................................................... 34
6.10. Main AT Commands for the USR3500 .................................................... 34
6.11. IP Data Connection ................................................................................. 35
7. TROUBLESHOOTING THE USR3500 ............................................................... 36
7.1. No Communications with the USR3500 through the Serial Port................ 36
7.2. Receiving “ERROR” .................................................................................. 37
7.3. Receiving “NO CARRIER” ......................................................................... 37
8. USR3500 ACCESSORIES ................................................................................. 40
8.1. Optional Accessories ................................................................................. 40
8.1.1. 6-wire Cable Accessory .................................................................... 40
8.1.2. GPS Antenna ................................ .................................................... 41
9. SAFETY RECOMMENDATIONS ....................................................................... 42
9.1. General Safety .......................................................................................... 42
9.2. RF Safety .................................................................................................. 44
9.2.1. General ............................................................................................. 44
9.2.2. Exposure to RF Energy ................................ ................................ ..... 44
9.2.3. Efficient Modem Operation ................................................................ 44
Rev 1.1 9/22/14 7
9.3. Vehicle Safety ........................................................................................... 44
9.4. Care and Maintenance .............................................................................. 45
9.5. Your Responsibility .................................................................................... 45
Page 8

Getting Started
10. REFERENCE DOCUMENTS .............................................................................. 46
10.1. Firmware Documentation ........................................................................ 46
10.2. Ethernet Card Documentation ................................................................. 46
10.3. Firmware Upgrade Documentation .......................................................... 46
11. LIST OF ABBREVIATIONS ............................................................................... 47
12. PRODUCT LABELING ....................................................................................... 50
Rev 1.1 9/22/14 8
Page 9

Getting Started
List of Figures
Figure 1. Mounting Bracket Dimensions ................................................................ 13
Figure 2. USR3500 ................................................................................................ 16
Figure 3. Mounting Brackets .................................................................................. 22
Figure 4. Mounting the Modem .............................................................................. 22
Rev 1.1 9/22/14 9
Page 10

Getting Started
Overview
List of Tables
Table 1. Included contents with the USR3500 ....................................................... 12
Table 2. Antenna Description ................................................................................ 12
Table 3. Serial Data Cable Description .................................................................. 13
Table 4. Power Supply Description ........................................................................ 14
Table 5. USR3500 Physical Dimensions ............................................................... 16
Table 6. USR3500 Basic Features ........................................................................ 19
Table 7. Basic AT Commands to Use with the USR3500 ...................................... 29
Table 8. <rssi> Value Description .......................................................................... 29
Table 9. AT+CREG? Main Reponses .................................................................... 29
Table 10. AT+WMBS? Main Reponses .................................................................. 30
Table 11. AT+WUBS? Main Reponses .................................................................. 30
Table 12. AT+WWSM? Main Reponses ................................................................. 31
Table 13. AT+WMBS Band Selection .................................................................... 31
Table 14. AT+WUBS Band Selection ..................................................................... 32
Table 15. AT+WWSM Cellular Network Setting ..................................................... 32
Table 16. AT+CPIN Main Responses .................................................................... 33
Table 17. Main AT Commands used for the USR3500 .......................................... 34
Table 18. No Communications with the USR3500 Through the Serial Port ........... 36
Table 19. Receiving a “No Carrier” Message ......................................................... 38
Table 20. Extended Error Codes ............................................................................ 38
Table 21. 6-wire Cable Accessory Description ....................................................... 40
Table 22. 6-Wire Cable Accessory Color Coding ................................................... 40
Table 23. GPS Antenna Description ....................................................................... 41
Rev 1.1 9/22/14 10
Page 11

Getting Started
Overview
1. Overview
The USR3500 is a programmable modem bundled with our USRobotics Courier M2M
Open AT application. The USR3500 industrial grade USB and serial modem supports
penta-band 3G HSPA+ with dual antenna receive diversity and quad band 2G
GSM/GPRS/EDGE. It offers audio capabilities, GPS, digital I/O, and an expansion card
interface that accepts an Ethernet adaptor card (available separately).
The Courier M2M Open AT application is a robust software platform that enables the
modem to communicate with remote servers and hosts without the need of an intelligent
host controlling the modem. Key features include cellular module control, bearer
management, device management, GPS device control, and asset tracking
functionality.
The USR3500 is capable of integrating with many leading cloud application and
management services. Refer to http://www.usr.com/support/3500 for details.
For information regarding programming capabilities available through the Courier M2M
application, refer to the Courier M2M Application Guide at
http://www.usr.com/support/3500.
Rev 1.1 9/22/14 11
Page 12
Getting Started
Packaging
2. Packaging
Standard Package
Penta Band Antenna
Universal Power Supply
Serial Data Cable
Mounting Brackets
Quick Installation Guide
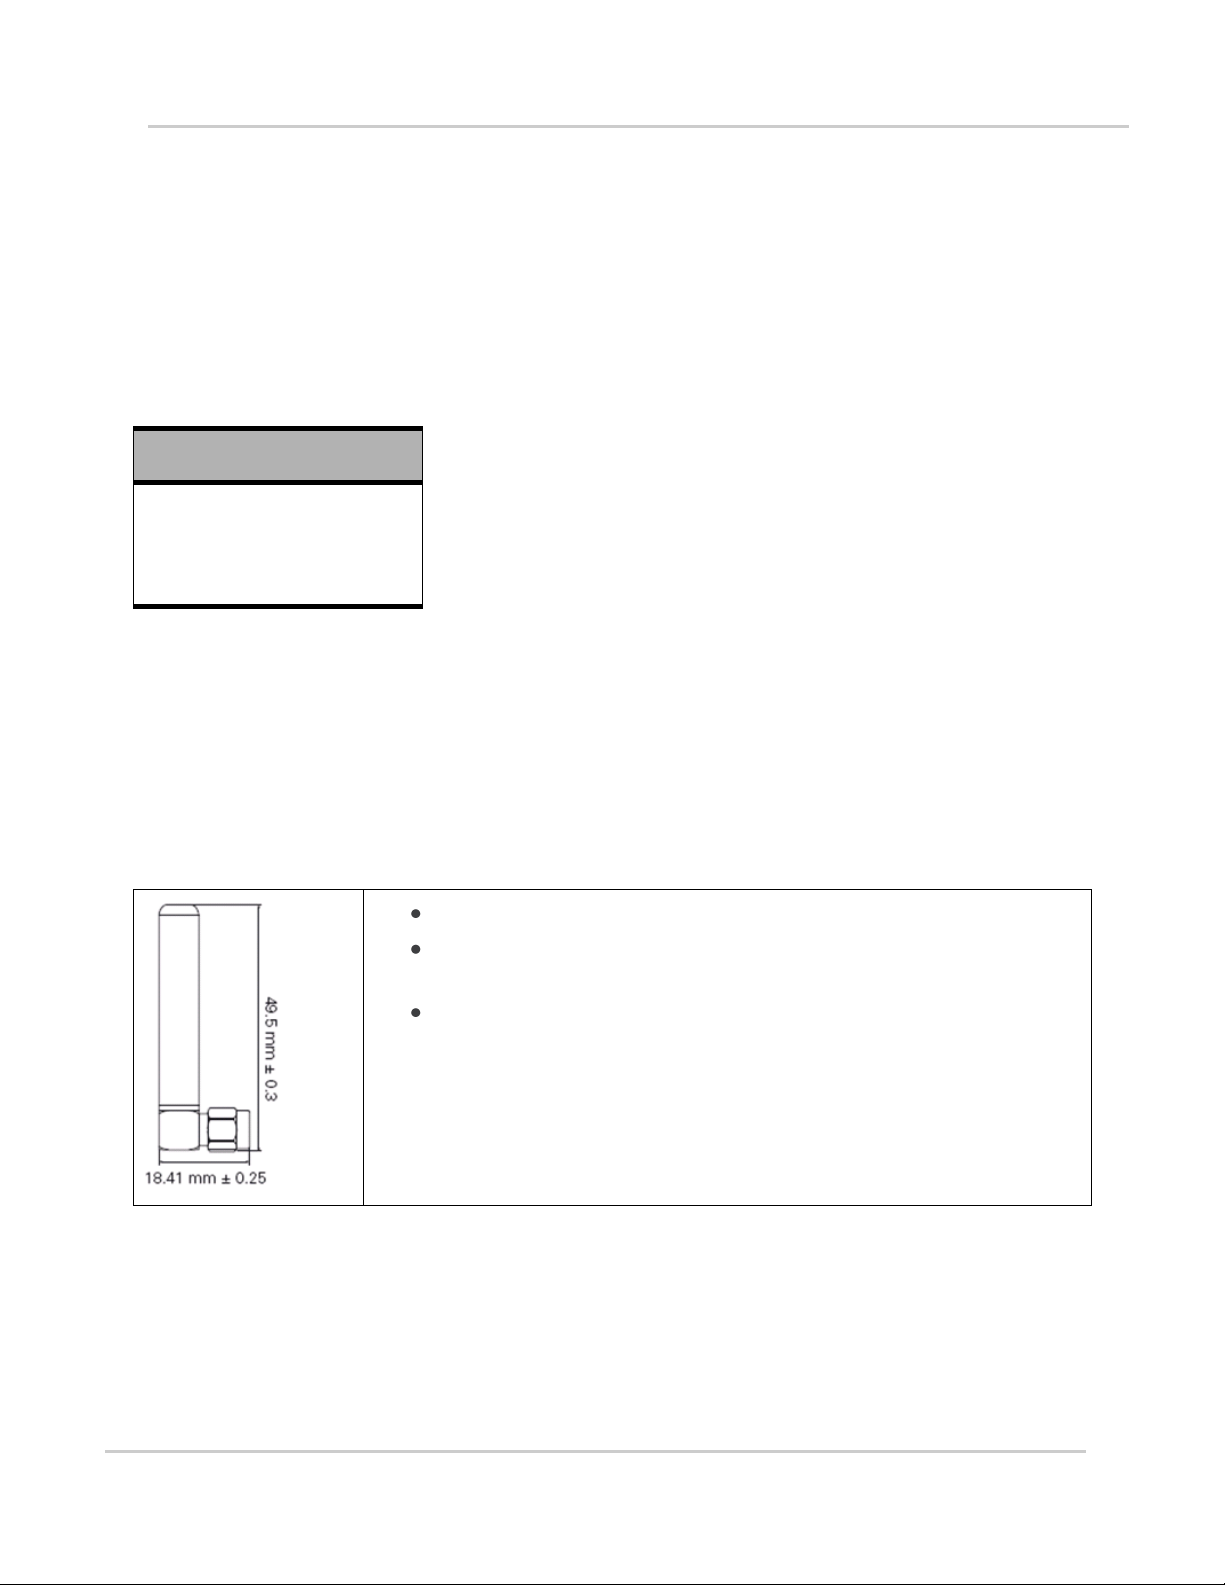
Antenna Size W x L x H (18.4 x 8.0 x 49.5mm)
Frequency Range supported: 850 / 900 / 1800 / 1900 /
2100 MHz
Connector SMA (Male)
2.1. Contents
The table below summarizes the list of items delivered with the USR3500.
Table 1. Included contents with the USR3500
2.2. Accessories
This section describes the standard accessories included with the USR3500.
2.2.1. Antenna
Table 2. Antenna Description
Refer to Chapter 8 USR3500 Accessories for more information.
Rev 1.1 9/22/14 12
Page 13
Getting Started
Packaging
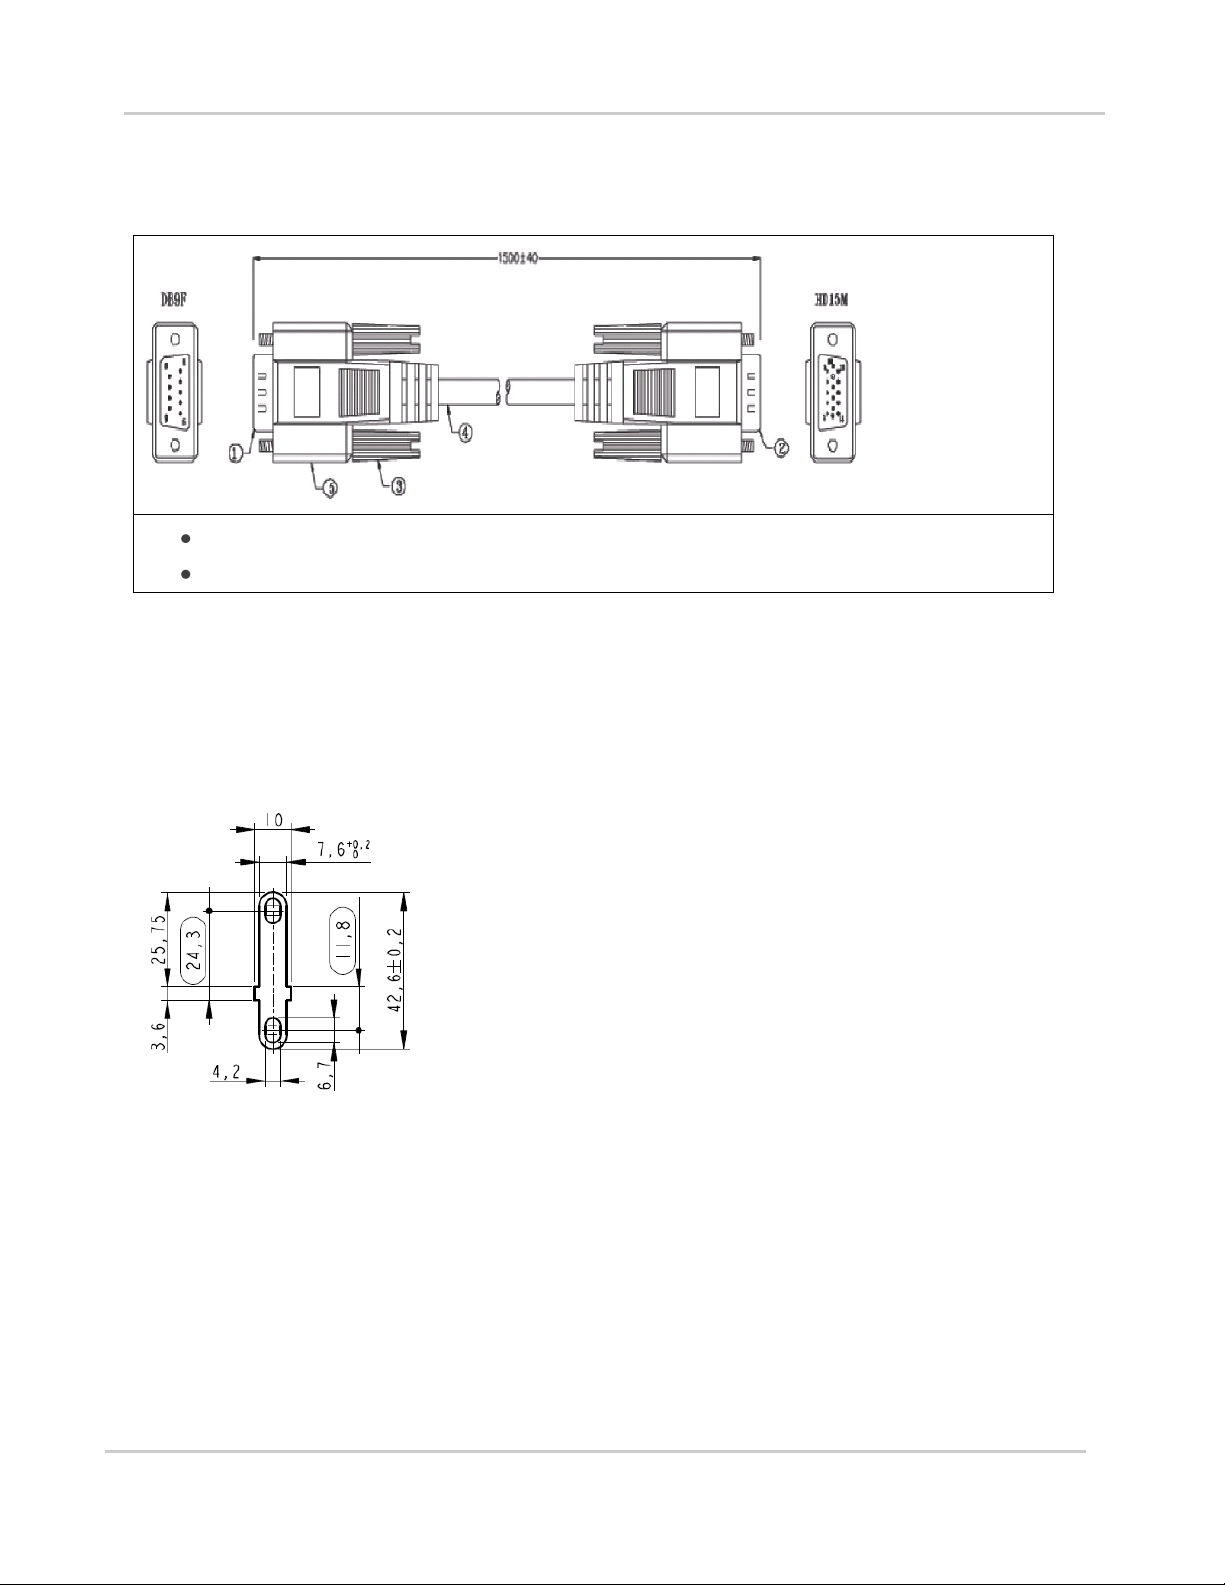
Length: 1.5M
Connection: DB9F (PC) to HD15M
2.2.2. Serial Data Cable
Table 3. Serial Data Cable Description
2.2.3. Two Mounting Brackets
Please refer to section 5.1 Mounting the USR3500 for more information regarding the
mounting brackets.
Figure 1. Mounting Bracket Dimensions
Rev 1.1 9/22/14 13
Page 14
Getting Started
Packaging
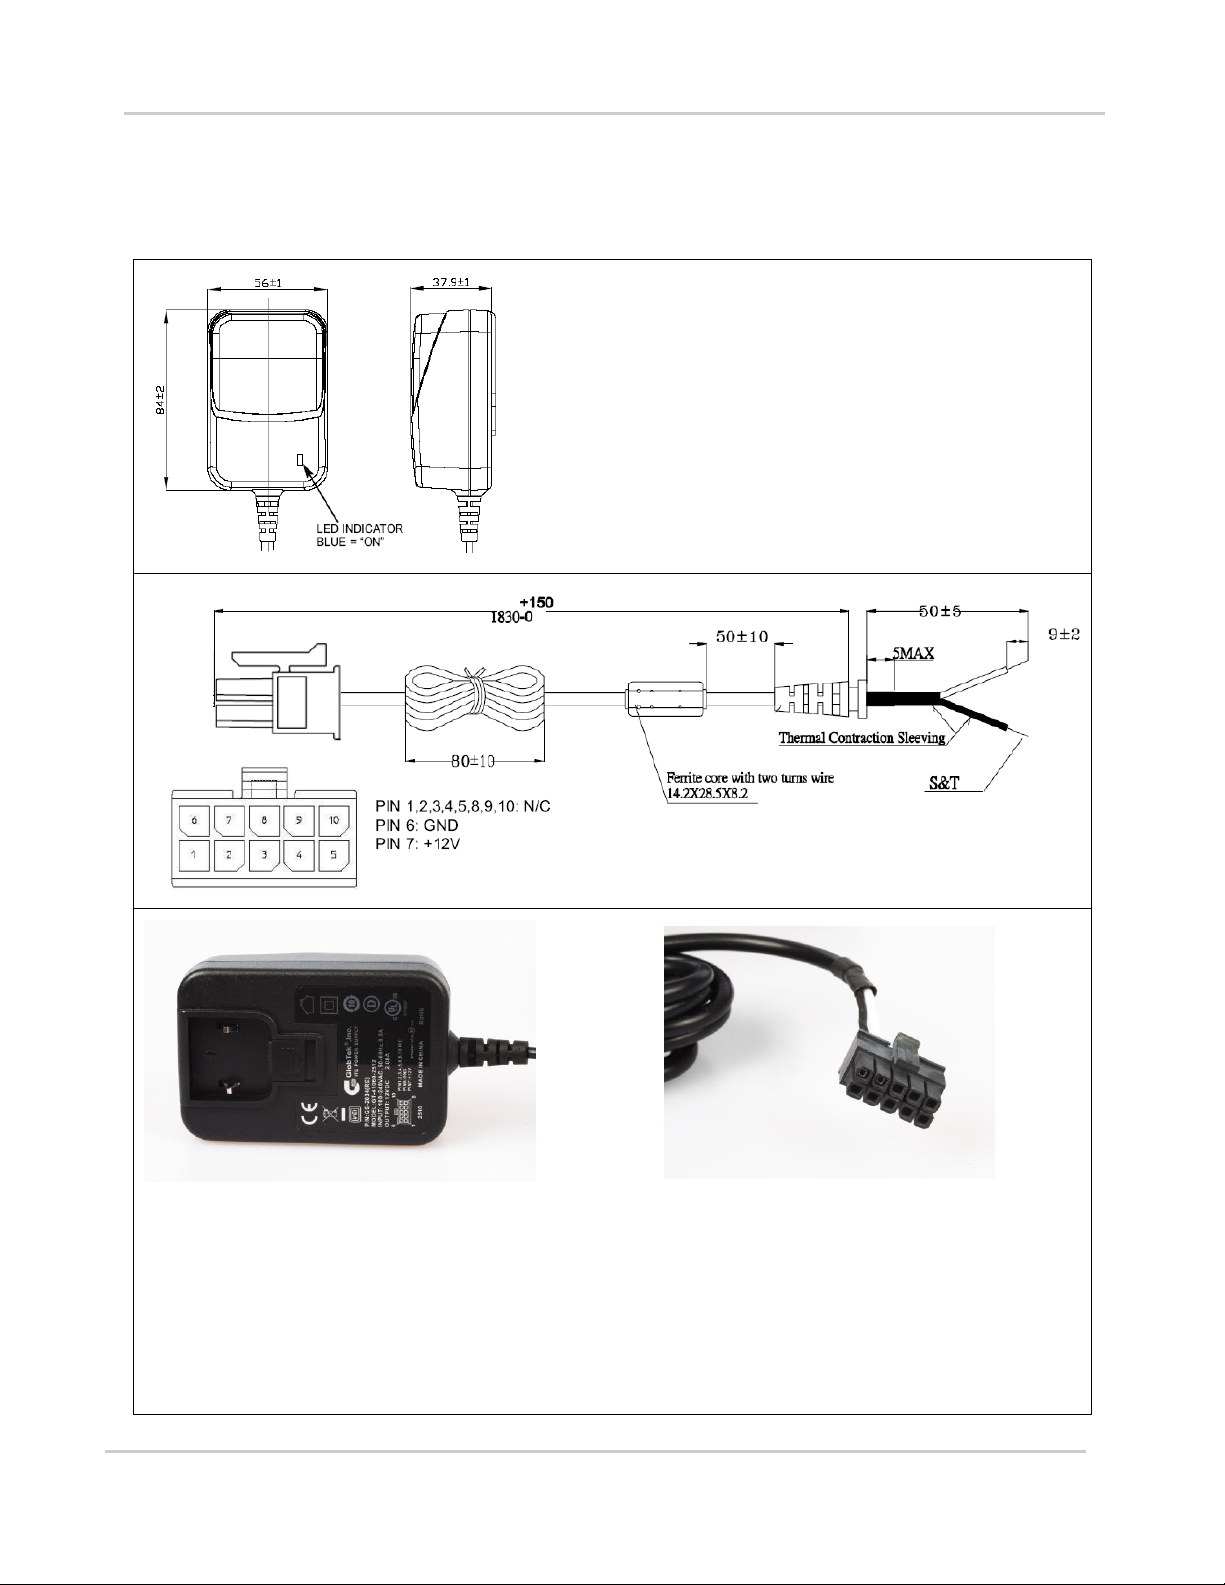
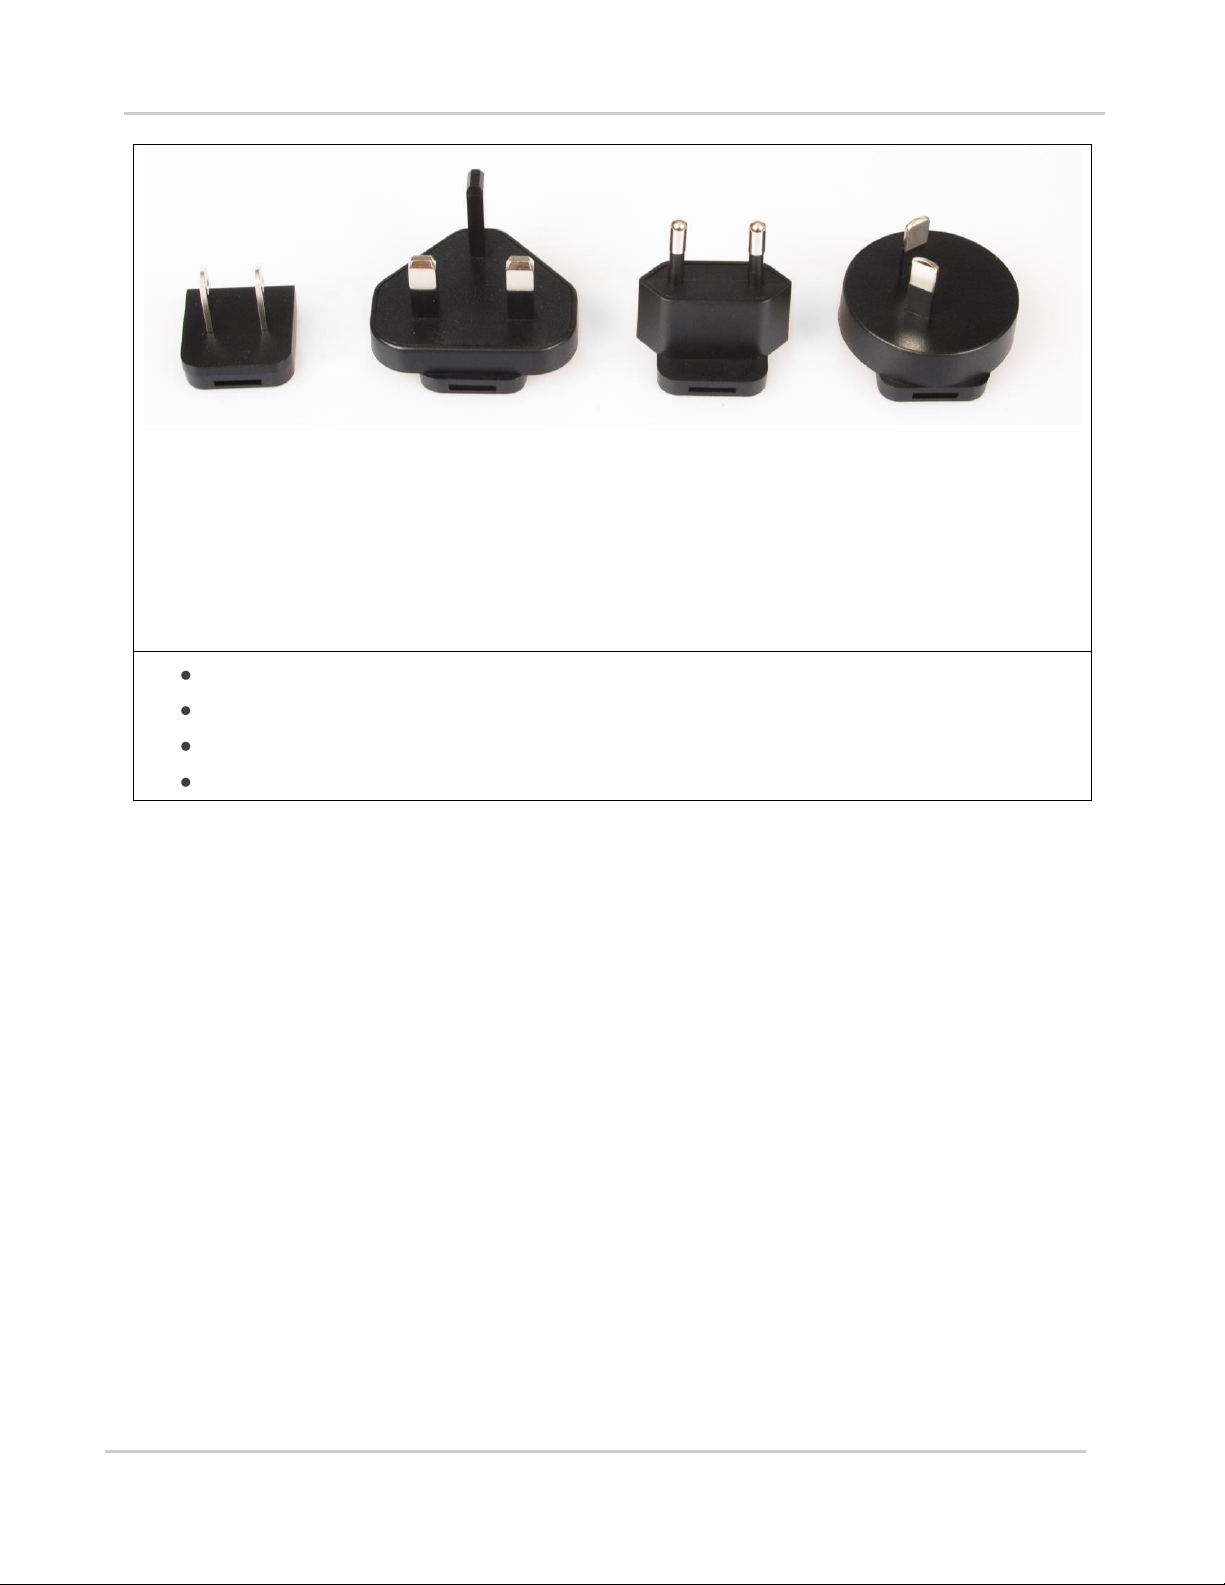
2.2.4. Power Supply
Table 4. Power Supply Description
Rev 1.1 9/22/14 14
Page 15
Getting Started
Packaging
Input Voltage 100-240VAC
Output Voltage 12VDC
Output Current 2.08A, No Minimum Load required
Output Power (Rated) 25W MAX
Rev 1.1 9/22/14 15
Page 16
Getting Started
Hardware
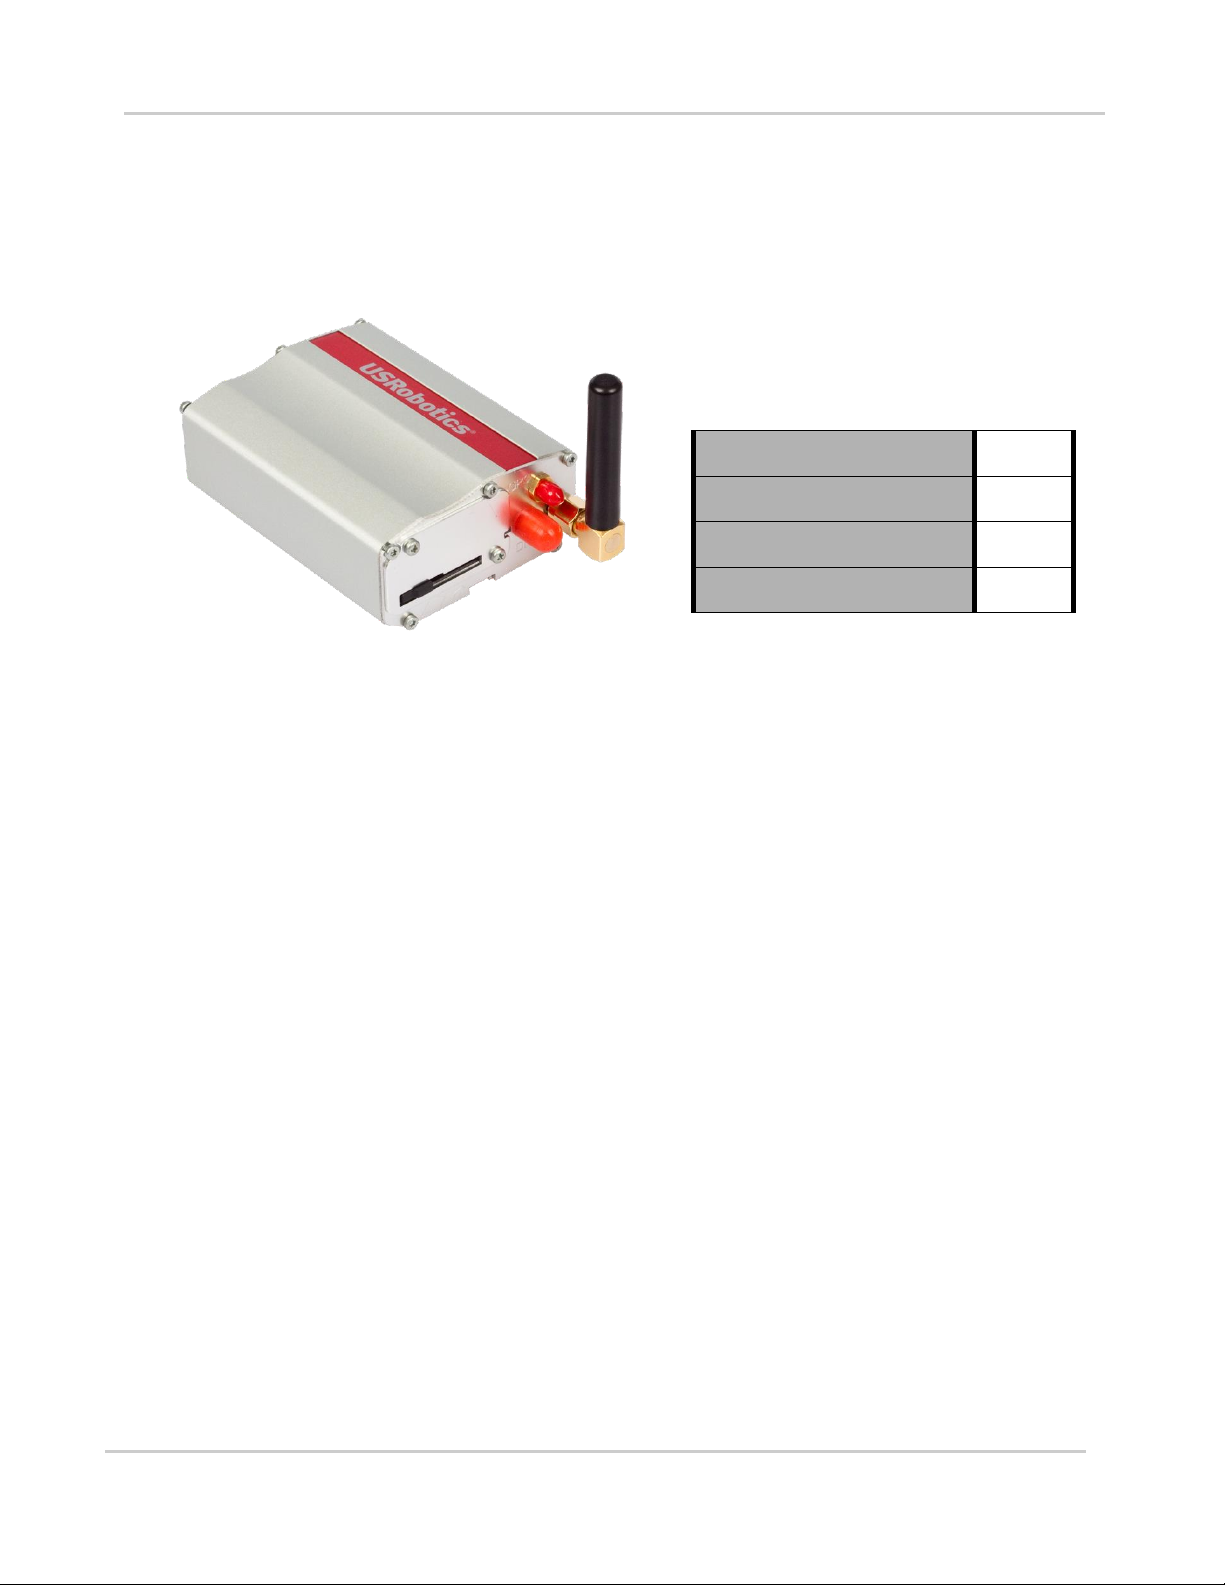
Length
89 mm
Width
60 mm
Thickness
30 mm
Weight
125g
3. Hardware
3.1. Overall Dimensions
Figure 2. USR3500
Table 5. USR3500 Physical Dimensions
Rev 1.1 9/22/14 16
Page 17

Getting Started
Hardware
3.2. Connections
10-pin Micro-Fit Power Supply Connector
USB Interface
15-pin Sub-D Serial Interface
SIM Interface
Antenna Interface
SMA Main
SMA Diversity
GPS
3.3. Interfaces
3.3.1. External Interfaces
Power Supply
3V/1V8 SIM Interface
USB Device Interface
Serial Port (UART1)
ON/OFF
1 Interrupt (multiplexed in the Microfit connector)
Reset
Audio Interface
2 GPIOs
LED Status Indicator
3.3.2. Internal Expansion Interface
1 Secondary Serial Port (UART2)
6 GPIOs
2 SPI Bus
1 ADC
Rev 1.1 9/22/14 17
1 PCM
1 Interrupt
Reset access to the embedded module
2.8V supply from the USR3500
Page 18

Getting Started
Hardware
This electronic product is subject to the EU Directive 2002/96/EC for
Waste Electrical and Electronic Equipment (WEEE). As such, this
product must not be disposed of at a municipal waste collection point.
Please refer to local regulations for directions on how to dispose of this
product in an environmental friendly manner.
4V supply from the USR3500
2.8V Digital supply from the embedded module
1.8V Digital supply from the embedded module
Access to 4.75 to 32V DC-IN
3.4. Environmental Compliance
3.4.1. RoHS Directive Compliant
The USR3500 is compliant with RoHS Directive 2011/65/EC which
sets limits for the use of certain restricted hazardous substances.
This directive states that “from 1st July 2006, new electrical and
electronic equipment put on the market does not contain lead,
mercury, cadmium, hexavalent chromium, polybrominated
biphenyls (PBB) or polybrominated diphenyl ethers (PBDE)”.
3.4.2. Disposing of the Product
Rev 1.1 9/22/14 18
Page 19

4. Features
Features
Description
Courier M2M Open
AT Application
AT command programmable
Allows standalone operation
Platform for embedded applications
HTTP
SMS
Email
GPS
Standard
850MHz / 900 MHz
E-GSM compliant
Output power: class 4 (2W)
Fully compliant with ETSI GSM
phase 2 + normal MS
1800 MHz / 1900MHz
Output power: class 1 (1W)
Fully compliant with ETSI GSM
phase 2 + normal MS
GPRS
Class 10
Class 12
PBCCH support
Coding schemes: CS1 to CS4
Compliant with SMG31bis
Embedded TCP/IP stack
EGPRS
Class 10
Class 12
PBCCH support
Coding schemes: MCS1 to MCS9
Compliant with SMG31bis
Embedded TCP/IP stack
Interface
RS232 (V.24/V.28) Serial interface supporting:
Baud rate (bits/s): 300, 600, 1200, 2400, 4800, 9600, 19200, 38400, 57600,
115200, 230400, 460800 and 921600
Autobauding (bits/s): from 1200 to 921600
2 General Purpose Input/Output gates (GPIOs) available
1.8 V / 3 V SIM interface
AT command set based on V.25ter and GSM 07.05 & 07.07
This section details the features available on the USR3500.
4.1. Features
Refer to the table below for the list of basic features available on the USR3500.
Table 6. USR3500 Basic Features
Rev 1.1 9/22/14 19
Page 20

Getting Started
Features
Features
Description
SMS
Text & PDU
POINT TO POINT (MT/MO)
Cell broadcast
Data
Data circuit asynchronous
Transparent and Non Transparent modes
Up to 14,400 bits/s
MNP Class 2 error correction
V42.bis data compression
UMTS Data
Transfer
BAND I, II, V, VI, VIII (2100/1900/850/800/900) up to 384kbits/s
HSXPA
BAND I, II, V, VI, VIII (2100/1900/850/800/900)
HSDPA Cat 10 up to 14.4Mbits/s
HSUPA Cat 6 up to 5.76Mbits/s
Audio
Echo cancellation
Noise reduction
Full Rate, Enhanced Full Rate, Half Rate operation and Adaptive Multi-Rate
(FR/EFR/HR/AMR)
Dual Tone Multi Frequency function (DTMF).
4.2. Supported Bands
The USR3500 is a quad band EGSM900/DCS1800/GSM850/PCS1900 that also
supports penta band UMTS/HSPA (WCDMA-FDD) 2100/1900/850/800/900 (Band I, II,
V, VI and VIII). Band selection is done automatically without having to switch manually
using AT commands.
Refer to sections 6.4 Checking the Band Selection and 6.5 Switching Bands for more
information regarding switching bands.
4.3. Expansion Interface
The USR3500 offers a 50-pin expansion interface. It is an additional interface for
customers who wish to expand their application features by simply plugging in a card
through the mating connector of the interface.
Refer to the Reference Guide at http://www.usr.com/support/3500 for more information
about the expansion card supported by the USR3500.
Rev 1.1 9/22/14 20
Page 21

Getting Started
Features
4.4. Over-Voltage and Over-Current Protection
4.4.1. Power Supply Input
The USR3500 power supply input is protected against transient voltage peaks over
+32V. When the input voltage exceeds 32V, the supply voltage is automatically
disconnected in order to protect the internal electronic components from over-voltage.
The optional 6-wire cable accessory protects the USR3500 from continuous overcurrent by a 2A/250V slow break fuse directly bonded into the cable.
4.4.2. Electrostatic Discharge
The USR3500 withstands ESD according to IEC 1000-4-2 requirements for all
accessible parts, except for the RF connector which withstands ESD as follows:
+/- 8kV of air discharge
+/- 4kV of contact discharge
4.4.3. Main Serial Port
The USR3500’s RS232 serial port connection is internally protected against
electrostatic surges on its lines by ESD protection and it also has the following filtering
guarantees:
EMI/RFI protection on both input and output
Signal smoothing
Rev 1.1 9/22/14 21
Page 22

5. Using the USR3500
Mounting brackets
5.1. Mounting the USR3500
The mounting brackets help hold and secure the USR3500 on a support.
Figure 3. Mounting Brackets
To mount the USR3500 on its support, fasten it using the mounting brackets as shown
in the figure below.
Figure 4. Mounting the Modem
Rev 1.1 9/22/14 22
Page 23

Getting Started
Using the USR3500
1. Insert the SIM card into the SIM card
socket. (Refer to Inserting the SIM Card
and Extracting the SIM Card for more
details on how to insert and extract the
SIM card from the USR3500.)
2. Slide the SIM lock switch to lock the SIM
card in the USR3500.
3. Connect the main antenna to the main RF
connector.
5.2. Setup
To set up the Modem, follow the procedures below.
Rev 1.1 9/22/14 23
Page 24

Getting Started
Using the USR3500
4. Connect the serial cable to the USR3500.
5. Plug the external power supply into the
USR3500 and connect to an AC power
source.
1. Prepare the SIM card in the correct
position as shown in the figure.
Refer to section 6.10 Main AT Commands for the list of commands used to configure
the USR3500.
Note: For automotive applications, it is recommended to connect the DC-IN line of the USR3500 directly to
the positive terminal of the battery.
5.2.1. Inserting the SIM Card
In order to insert the SIM card into the USR3500, follow the procedures below:
Rev 1.1 9/22/14 24
Page 25

Getting Started
Using the USR3500
2. Slide the SIM card into the SIM holder.
3. Use a tool to help push the SIM card into
the SIM holder. Push the SIM card all the
way in until you hear a clicking sound.
4. Slide the SIM lock switch to lock the SIM
card in the USR3500.
1. Open the SIM lock switch by sliding it
to the left.
5.2.2. Extracting the SIM Card
In order to extract the SIM card from the USR3500, follow the procedures below:
Rev 1.1 9/22/14 25
Page 26

Getting Started
Using the USR3500
2. Use a tool to further push the SIM card
into the SIM holder. Push until you hear
a clicking sound.
3. The SIM card should spring out a little
bit after the clicking sound.
4. Extract the SIM card from the
USR3500.
5.3. Operational Status
The USR3500’s operational status is defined by a red LED, which is located between
the back plate and the secondary RF interface.
Rev 1.1 9/22/14 26
Page 27

Getting Started
Using the USR3500
Status LED
If the LED of the USR3500 is flashing slowly, the modem is switched ON and is
registered in a network (Idle mode). Refer to the Reference Guide at
http://www.usr.com/support/3500 for more information about the LED status indicator.
Rev 1.1 9/22/14 27
Page 28

6. Communicating with the USR3500
After setting up the USR3500, communications can be established by directly sending
AT commands to the device using terminal software such as HyperTerminal for MS
Windows. The following subsections describe how this is done.
For more information about the AT commands described in the following sub-sections,
refer to the AT Commands Interface Guide at http://www.usr.com/support/3500.
6.1. Communications Testing
To perform a communications test after the USR3500 has been setup using the RS232
serial port connection, do the following:
Connect the RS232 port between the external application COM port (DTE) and
the USR3500 (DCE).
Configure the RS232 port of the DTE as follows:
COM port: 1 (commonly used port for PC serial)
Bits per second: 115200 bps
Data bits: 8
Parity: None
Stop bits: 1
Flow control: Hardware
Using a communication software such as HyperTerminal, enter:
AT
When communications have been established, the USR3500 will respond with an
“OK”, which is displayed in the HyperTerminal window.
If communications cannot be established with the USR3500, do the following:
Check the RS232 connection between the application (DTE) and the USR3500
(DCE).
Check the configuration of the COM port used on the DTE.
Refer to the table below for other AT commands that can be used after getting the
USR3500 started.
Rev 1.1 9/22/14 28
Page 29

Getting Started
Communicating with the
USR3500
AT Command
Description
AT+CGMI
To check if the serial port is OK
The USR3500 will respond with "Sierra Wireless" when it is OK.
AT+CPIN=xxxx
To enter a PIN code, xxxx (if activated)
AT+CSQ
To verify the received signal strength
AT+CREG?
To verify the registration of the USR3500 on the network
<rssi> Value
Description
0 – 10
Received signal strength is insufficient
11 – 31
Received signal strength is sufficient
32 – 98
Not defined
99
No measure available
AT+CREG? Response
Description
AT+CREG: 0, 0
Not registered
AT+CREG: 0, 1
Registered on the home network
AT+CREG: 0, 5
Registered on a roaming network
Table 7. Basic AT Commands to Use with the USR3500
6.2. Verifying the Received Signal Strength
The USR3500 only establishes a call if the received signal strength is strong enough.
Using a communication software such as HyperTerminal, enter AT+CSQ to check the
received signal strength. The response returned will follow the format +CSQ: <rssi>,
<ber>
where: <rssi> = received signal strength indication, and <ber> = channel bit
error rate.
Refer to the table below for the description of the <rssi> values returned.
Table 8. <rssi> Value Description
6.3. Verifying the Network Registration
Using a communication software such as HyperTerminal, enter AT+CREG? to verify the
network registration of the USR3500. Refer to the table below for the list of main
responses returned.
Table 9. AT+CREG? Main Reponses
If the USR3500 is not registered on the network, do the following:
Rev 1.1 9/22/14 29
Page 30

Getting Started
Communicating with the
USR3500
AT+WMBS? Response
Description
AT+WMBS: 0, x
Mono band mode 850MHz is selected
AT+WMBS: 1, x
Mono band mode extended 900MHz is selected
AT+WMBS: 2, x
Mono band mode 1800MHz is selected
AT+WMBS: 3, x
Mono band mode 1900MHz is selected
AT+WMBS: 4, x
Dual band mode 850/1900MHz is selected
AT+WMBS: 5, x
Dual band mode extended 900/1800MHz is selected
AT+WMBS: 6, x
Dual band mode extended 900/1900MHz is selected
AT+WMBS: 7, x
Quad-band mode 850/900E (extended)/1800/1900MHz is selected
AT+WUBS? Response
Description
AT+WUBS: y, x
Where:
y = Band frequency configuration (bit field) in HEX format. Refer to the AT
Commands Interface Guide at http://www.usr.com/support/3500.
x = Reset flag (0 means the band(s) have not been modified since the last
boot of the USR3500, and 1 means the band(s) have been modified since
the last boot and that the USR3500 will have to be reset in order to take
any previous modification(s) into account.
Check the connection between the USR3500 and the antenna.
Verify the signal strength to determine the received signal strength (Refer to
section 6.2 Verifying the Received Signal Strength).
6.4. Checking the Band Selection
Using a communication software such as HyperTerminal, enter AT+WMBS? to check
the band selection of the USR3500. Refer to the table below for the list of main
responses returned.
Table 10. AT+WMBS? Main Reponses
Where:
When x = 0, the band has not been modified since the last boot of the USR3500;
When x = 1, the band has been modified since the last boot of the USR3500, and
will have to be reset in order to take any previous modification(s) into account.
Enter AT+WUBS? to check the UMTS-FDD band selection.
Table 11. AT+WUBS? Main Reponses
Enter AT+WWSM? to check the existing cellular network status of the USR3500. Refer
to the table below for the list of main responses returned.
Rev 1.1 9/22/14 30
Page 31

Getting Started
Communicating with the
USR3500
AT+WWSM? Response
Description
AT+WWSM: 0
GSM digital cellular system (GERAN)
AT+WWSM: 1
Universal Terrestrial Radio Access Network (UTRAN) only
AT+WWSM: 2, x
3GPP systems (both GERAN and UTRAN)
Where if x is:
0 = automatic
1 = GERAN preferred
2 = UTRAN preferred
AT+WMBS Command
Description
AT+WMBS=0,x
Switch to mono band mode 850MHz
AT+WMBS=1,x
Switch to mono band mode extended 900MHz
AT+WMBS=2,x
Switch to mono band mode 1800MHz
AT+WMBS=3,x
Switch to mono band mode 1900MHz
AT+WMBS=4,x
Switch to dual band mode 850/1900MHz
AT+WMBS=5,x
Switch to dual band mode extended 900/1800MHz
AT+WMBS=6,x
Switch to dual band mode extended 900/1900MHz
AT+WMBS=7,x
Switch to quad band mode 850/900E (extended)/1800/1900MHz
Table 12. AT+WWSM? Main Reponses
6.5. Switching Bands
Use the AT+WMBS AT Command to change the band setting of the USR3500 and
switch between EU and US bands and vice versa. Refer to the following table for the list
of AT+WMBS parameters that can be used and their corresponding description.
Table 13. AT+WMBS Band Selection
Where:
When x = 0, the USR3500 will have to be reset to start on the specified band(s);
When x = 1, the band switch is effective immediately. However, this mode is
forbidden while in Communication mode and during the USR3500’s initialization.
Use AT+WUBS to change the UMTS-FDD band setting of the USR3500.
Rev 1.1 9/22/14 31
Page 32

Getting Started
Communicating with the
USR3500
AT+WUBS Command
Description
AT+WUBS=y, x
Where:
y = Band frequency configuration (bit field) in HEX format.
x = Optional reset parameter (0 means the USR3500 will have to be reset
to start on the specified band(s), and 1 means the band switch is effective
immediately. Note that x=1 is forbidden while in Communication mode and
during the USR3500’s initialization.
Refer to the document AT Commands Interface Guide at
http://www.usr.com/support/3500.
AT+WWSM Command
Description
AT+WWSM=0
GSM Digital Cellular System (GERAN)
AT+WWSM=1
Universal Terrestrial Radio Access Network (UTRAN) only
AT+WWSM=2,0
3GPP systems (both GERAN and UTRAN); automatic network
AT+WWSM=2,1
3GPP systems (both GERAN and UTRAN); GERAN preferred
AT+WWSM=2,2
3GPP systems (both GERAN and UTRAN); UTRAN preferred
Table 14. AT+WUBS Band Selection
Use AT+WWSM to change the cellular network setting of the USR3500. Refer to the
table below for the list of main responses returned.
Table 15. AT+WWSM Cellular Network Setting
Rev 1.1 9/22/14 32
Page 33

Getting Started
Communicating with the
USR3500
AT+CPIN Response
Description
+CPIN: READY
The PIN code has been entered.
+CPIN: SIM PIN
The PIN code has not been entered.
6.6. Checking the PIN Code Status
Using a communication software such as HyperTerminal, enter AT+CPIN? to check the
PIN code status. Refer to the table below for the list of main responses returned.
Table 16. AT+CPIN Main Responses
6.7. Echo Function
If no echo is displayed when entering an AT Command, it could mean either of the
following:
The “local echo” parameter of your communication software (HyperTerminal) is
disabled.
The USR3500 echo function is disabled.
To enable the USR3500’s echo function, enter the AT Command ATE1.
When sending AT Commands to the USR3500 using a communication software such
as HyperTerminal, it is recommended to:
Disable the “local echo” parameter of your communication software.
Enable the USR3500’s echo function (use the ATE1 command).
In a machine-to-machine communication with the USR3500, it is recommended to
disable the USR3500’s echo function (using the ATE0 AT command) in order to avoid
useless embedded module processing.
6.8. Enabling/Disabling the Flash LED
The USR3500 has a red LED indicator that shows the status of the GSM network. It is
possible to disable this LED during Sleep mode in order to reduce power consumption.
Using a communication software such as HyperTerminal, enter:
AT+WHCNF=1,0 to deactivate Flash LED
AT+WHCNF=1,1 to activate Flash LED
Note: You will need to restart the USR3500 for the new setting to take effect.
Rev 1.1 9/22/14 33
Page 34

Getting Started
Communicating with the
USR3500
Feature/Function
AT Command
Response
Description
Check network
registration
AT+CREG?
+CREG: 0,1
The USR3500 is registered on
the network.
+CREG: 0,2
The USR3500 is not registered
on the network; registration attempt
is ongoing.
+CREG: 0,0
The USR3500 is not registered
on the network; no registration
attempt has been made.
Enter PIN code
AT+CPIN=xxxx
(xxxx = PIN code)
OK
PIN code accepted.
+CME ERROR: 16
Incorrect PIN code (with +CMEE =
1 mode*).
+CME ERROR: 3
PIN code already entered (with
+CMEE = 1 mode*).
Check the selected
band
AT+WMBS?
+WMBS:
<Band>,<ResetFlag>
OK
The currently selected band mode is
returned.
Switch bands
AT+WMBS=<Band>
OK
Band switch is accepted; the
USR3500 has to be reset for the
change to be effective.
AT+WMBS=<Band>,0
OK
Band switch is accepted; the
USR3500 has to be reset for the
change to be effective.
AT+WMBS=<Band>,1
OK
Band switch is accepted and the
GSMS stack has been restarted.
AT+WMBS=<Band>
+CME ERROR: 3
Band selected is not allowed.
Receive a call
ATA
OK
Answer the call.
6.9. Firmware Upgrade Procedure
The firmware upgrade procedure is used to update the firmware embedded in the
USR3500. This procedure consists of downloading the firmware into internal memories
through the RS232 serial port available on the 15-pin SUB-D serial connector. Refer to
the Courier M2M Application Guide at http://www.usr.com/support/3500 for more
information regarding this procedure.
6.10. Main AT Commands for the USR3500
The table below lists the main AT Commands required for starting the USR3500. For
other available AT Commands, refer to the AT Commands Interface Guide at
http://www.usr.com/support/3500.
Table 17. Main AT Commands used for the USR3500
Rev 1.1 9/22/14 34
Page 35

Getting Started
Communicating with the
USR3500
Feature/Function
AT Command
Response
Description
Initiate a call
ATD<phone
number>;
(Do not forget the « ;
» at the end for
« voice » call)
OK
Communication established.
+CME ERROR: 11
PIN code not entered (with +CMEE =
1 mode*).
+CME ERROR: 3
AOC credit exceeded or
communications is already
established.
Hang up
ATH
OK
Communication has
been lost
NO CARRIER
Store the parameters
in EEPROM
AT&W
OK
The configuration settings are stored
in EEPROM (non-volatile memory).
Start Courier M2M
application
AT+WOPEN=1
OK
* The command AT+CMEE=1 switches to a mode that enables a more complete error diagnostic.
6.11. IP Data Connection
Enter AT+WOPEN=1 to start the Courier M2M application. A startup banner will display.
Use AT+WOPEN=0 to stop the application.
Lib Version 1.9.1
Courier M2M Wireless Device
Application Started
To use IP data services, you need to configure an APN. Your cellular account needs to
have data services, and the cellular provider must provide you with an APN string.
Example: Enter AT$CGDCONT=1,”m2m.apn.com” to set the APN.
Note: The APN string: “m2m.apn.com” is a sample. Do not use.
Use AT+CGREG? to verify GPRS registration.
AT+CGREG?
+CGREG: 0,1
OK
A response with 0,1 indicates that your device is registered on the GPRS network. A
response of 0,0 would indicate not registered. Once you are registered, Courier M2M
will automatically activate a PDP context. Enter AT$IP to verify the device’s IP address.
AT$IP
$IP: "<deviceID>",0,"203.0.113.1"
OK
Refer to the Courier M2M Application Guide at http://www.usr.com/support/3500 for
more information regarding data connections.
Rev 1.1 9/22/14 35
Page 36

7. Troubleshooting the USR3500
If the USR3500
returns
Then ask
Action
Nothing
Is the USR3500 powered correctly?
Make sure that the external power
supply is connected to the USR3500
and provides a voltage within the range
of 4.75V to 32V.
Is the serial cable connected at both sides?
Check the serial cable connection.
Does the serial cable correctly follow the pin
assignments? Refer to the Reference Guide
at http://www.usr.com/support/3500 for more
information about the serial cable pin
assignments.
Connect the cable by following the pin
assignments as given in the Reference
Guide.
Nothing or nonsignificant characters
Is the communication program properly
configured on the PC?
Ensure that the settings of the
communication program are compatible
with the settings of the USR3500.
The USR3500 factory settings are:
Data bits = 8
Parity = none
Stop bits = 1
Baud = 115200 bps
Flow control = hardware
Is there another program interfering with the
communication program (i.e. conflict on
communication port access)?
Close the interfering program.
This section of the document describes possible problems that might be encountered
when using the USR3500 and the corresponding solutions.
For additional troubleshooting information, refer to the support page at
http://www.usr.com/support/3500
7.1. No Communications with the USR3500 through
the Serial Port
If the USR3500 does not respond to AT commands through the serial port, refer to the
table below for possible causes and the corresponding solutions.
Table 18. No Communications with the USR3500 Through the Serial Port
Rev 1.1 9/22/14 36
Page 37

Getting Started
Troubleshooting the USR3500
7.2. Receiving “ERROR”
The USR3500 returns an “ERROR” message (in reply to an AT command) in the
following cases:
The AT command syntax is incorrect. In this case, check the command syntax
(refer to the AT Commands Interface Guide at http://www.usr.com/support/3500).
The AT command syntax is correct, but was transmitted using the wrong
parameters
Enable the verbose error report method to see the error codes associated with the
command syntax.
Enter the AT+CMEE=1 command in order to change the error report method to
the verbose method, which includes the error codes.
Re-enter the AT command which previously caused the reception of an “ERROR”
message in order to get the Mobile Equipment error code.
When the verbose error report method is enabled, the response of the USR3500 in
case of error is either:
+CME ERROR: <error result code>
or
+CMS ERROR: <error result code>
Refer to the AT Commands Interface Guide at http://www.usr.com/support/3500 for
more information on the error result code description and further details on the
AT+CMEE command.
Caution: It is strongly recommended to always enable the verbose error report method to get the Mobile
Equipment error code (enter the AT +CMEE=1 command).
7.3. Receiving “NO CARRIER”
If the USR3500 returns a “NO CARRIER” message upon an attempted call (voice or
data), refer to the following table for possible causes and their corresponding solutions.
Rev 1.1 9/22/14 37
Page 38

Getting Started
Troubleshooting the USR3500
If the USR3500
returns
Then ask
Action
“NO CARRIER”
Is the received signal strong enough?
Refer to section 6.2 Verifying the
Received Signal Strength to verify the
strength of the received signal.
Is the USR3500 registered on the network?
Refer to section 6.3 Verifying the
Network Registration to verify the
network registration.
Is the antenna properly connected?
Refer to the Reference Guide at
http://www.usr.com/support/3500 for
more information about the USR3500’s
antenna requirements.
Is the band selection correct?
Refer to section 6.5 Switching Bands for
more information about switching
between bands.
"NO CARRIER"
(when trying to issue
a voice
communication)
Is the semicolon (;) entered immediately
after the phone number in the AT
command?
Ensure that the semicolon (;) is entered
immediately after the phone number in
the AT command.
e.g. ATD######;
"NO CARRIER"
(when trying to issue
a data
communication)
Is the SIM card configured for data calls?
Configure the SIM card for data calls.
(Ask your network provider if
necessary).
Is the selected bearer type supported by the
called party?
Ensure that the selected bearer type is
supported by the called party.
Is the selected bearer type supported by the
network?
Ensure that the selected bearer type is
supported by the network.
If still unsuccessful, try selecting the
bearer type using the AT command:
AT+CBST=0,0,3
Error Code
Diagnosis
Hint
1
Unallocated phone number
16
Normal call clearing
17
User busy
18
No user responding
19
User alerting, no answer
21
Call rejected
22
Number changed
31
Normal, unspecified
Table 19. Receiving a “No Carrier” Message
If the USR3500 returns a “NO CARRIER” message, you may retrieve the extended
error code by using the AT Command AT+CEER. Refer to the following table for the
interpretation of extended error codes.
Table 20. Extended Error Codes
Rev 1.1 9/22/14 38
Page 39

Getting Started
Troubleshooting the USR3500
Error Code
Diagnosis
Hint
50
Requested facility not subscribed
Check your subscription. (Is data subscription
available?)
68
ACM equal or greater than ACMmax
The credit of your pre-paid SIM card has expired.
252
Call barring on outgoing calls
253
Call barring on incoming calls
3, 6, 8, 29, 34, 38,
41, 42, 43, 44, 47,
49, 57, 58, 63, 65,
69, 70, 79, 254
Network causes
Refer to the AT Commands Interface Guide at
http://www.usr.com/support/3500 for further details
or call your network provider.
For all other codes and/or details, refer to the documents listed in section 10.1 Firmware
Documentation.
Rev 1.1 9/22/14 39
Page 40

8. USR3500 Accessories
Length 1.5M
Connection 10-pin Microfit female connector to 6-wire open ends
Fuse 2A/250V slow break fuse
IO
Cable Accessory Color
DC-IN
RED
GND
BLACK
VREF
GREEN
GPIO35
ORANGE
ON/OFF
YELLOW
GPIO25/INT1
BROWN
8.1. Optional Accessories
The following optional accessories are available for use with the USR3500:
6-wire cable accessory with IO (DC IN, GND, Vref, GPIO25/INT1, GPIO35,
ON/OFF) Refer to the following table for the color-coding of the 6-wire cable
accessory.
Diversity and GPS antennas
Ethernet expansion card (Refer to the Reference Guide at
http://www.usr.com/support/3500 for more information about the card.)
8.1.1. 6-wire Cable Accessory
Table 21. 6-wire Cable Accessory Description
Table 22. 6-Wire Cable Accessory Color Coding
Note: The above items are ONLY considered as optional accessories of the USR3500. They are NOT
considered as part of the USR3500.
Rev 1.1 9/22/14 40
Page 41

8.1.2. GPS Antenna
Mechanical
Weight
< 110 grams
Size
49x39x14mm
Cable
RG174/U 3meters
Connector
MMCx m. right angle
Mounting
Magnetic base
Housing
Black
Dielectric Antenna
Center Frequency
1575.42MHz ± 3 MHz
V.S.W.R
1.5 : 1
Band Width
±5 MHz
Impedance
50Ω
Peak Gain
> 3dBic Based on 7x7cm ground plane
Gain Coverage
> -4dBic at –90°< 0 < +90°(over 75% Volume)
Polarization
RHCP
LNA / Filter
LNA Gain (without cable)
28dB (typical)
Noise Figure
1.5dB
Filter Out Band Attenuation
(f0=1575.42 MHZ)
7dB Min f0+/-20MHZ
20dB Min f0+/-50MHZ
30dB Min f0+/-100MHZ
V.S.W.R
< 2.0
DC Voltage
3.0V to 5.0V
DC Current
10mA Max
Table 23. GPS Antenna Description
Rev 1.1 9/22/14 41
Page 42

Getting Started
Safety Recommendations
9. Safety Recommendations
9.1. General Safety
For the efficient and safe operation of your programmable modem, please read the
following information carefully.
It is important to follow any special regulations regarding the use of radio equipment due
in particular to the possibility of radio frequency (RF) interference. Carefully follow the
safety advice given.
Switch OFF your programmable modem:
When in an aircraft. The use of cellular telephones in an aircraft may endanger
the operation of the aircraft, disrupt the cellular network and is illegal. Failure to
observe this instruction may lead to suspension or denial of cellular telephone
services to the offender, or legal action or both,
When at a refueling point,
When in any area with a potentially explosive atmosphere which could cause an
explosion or fire,
In hospitals and any other place where medical equipment may be in use.
Respect restrictions on the use of radio equipment in:
Fuel depots,
Chemical plants,
Places where blasting operations are in progress,
Any area where the use of a cellular telephone is forbidden or dangerous.
Any other area where you would normally be advised to turn off your vehicle
engine.
Turn your modem OFF when in any area with a potentially explosive atmosphere. It is
rare, but your modem or its accessories could generate sparks. Sparks in such areas
could cause an explosion or fire resulting in bodily injuries or even death.
Areas with a potentially explosive atmosphere are often, but not always, clearly marked.
They include below decks on boats and areas where the air contains chemicals or
particles, such as grain, dust, or metal powders.
Do not transport or store flammable gas, liquid, or explosives, in the compartment of
your vehicle which contains your modem or accessories.
Rev 1.1 9/22/14 42
Page 43

Getting Started
Safety Recommendations
Before using your modem in a vehicle powered by liquefied petroleum gas (such as
propane or butane) ensure that the vehicle complies with the relevant fire and safety
regulations of the country in which the vehicle is to be used.
There may be a hazard associated with the operation of your USR3500 close to
inadequately protected personal medical devices such as hearing aids and pacemakers.
Consult the manufacturers of the medical device to determine if it is adequately
protected.
Operation of your USR3500 close to other electronic equipment may also cause
interference if the equipment is inadequately protected. Observe any warning signs and
manufacturers’ recommendations.
The USR3500 is designed for and intended to be used in "fixed" and "mobile"
applications:
"Fixed" means that the device is physically secured at one location and is not able to
be easily moved to another location.
"Mobile" means that the device is designed to be used in other than fixed locations and
generally in such a way that a separation distance of at least 20 cm (8 inches) is
normally maintained between the transmitter’s antenna and the body of the user or
nearby persons.
The USR3500 is not designed for nor intended to be used in portable applications
(within 20 cm or 8 inches of the body of the user) and such uses are strictly prohibited.
Rev 1.1 9/22/14 43
Page 44

Getting Started
Safety Recommendations
9.2. RF Safety
9.2.1. General
Your GSM modem is based on the GSM standard for cellular technology. The GSM
standard is spread all over the world. It covers Europe, Asia and some parts of America
and Africa. This is the most used telecommunication standard.
Your GSM modem is actually a low power radio transmitter and receiver. It sends out
and receives radio frequency energy. When you use your GSM application, the cellular
system which handles your calls controls both the radio frequency and the power level
of your cellular modem.
9.2.2. Exposure to RF Energy
There has been some public concern about possible health effects of using GSM
modems. Although research on health effects from RF energy has focused on the
current RF technology for many years, scientists have begun research regarding newer
radio technologies, such as GSM. After existing research had been reviewed, and after
compliance to all applicable safety standards had been tested, it has been concluded
that the product was acceptable for use.
If you are concerned about exposure to RF energy there are things you can do to
minimize exposure. Obviously, limiting the duration of your calls will reduce your
exposure to RF energy. In addition, you can reduce RF exposure by operating your
cellular modem efficiently by following the below guidelines.
9.2.3. Efficient Modem Operation
For your GSM modem to operate at the lowest power level, consistent with satisfactory
connection quality:
Do not hold the antenna when the modem is « IN USE ». Holding the antenna affects
connection quality and may cause the modem to operate at a higher power level than
needed.
9.3. Vehicle Safety
Do not use your USR3500 while driving, unless equipped with a correctly installed
vehicle kit allowing ‘Hands-Free’ Operation.
Respect national regulations on the use of cellular telephones in vehicles. Road safety
always comes first.
Rev 1.1 9/22/14 44
Page 45

Getting Started
Safety Recommendations
If incorrectly installed in a vehicle, the operation of the USR3500 could interfere with the
correct functioning of vehicle electronics. To avoid such problems, make sure that the
installation has been performed by qualified personnel. Verification of the protection of
vehicle electronics should form part of the installation.
The use of an alert device to operate a vehicle’s lights or horn on public roads is not
permitted.
9.4. Care and Maintenance
Your USR3500 is the product of advanced engineering, design and craftsmanship and
should be treated with care. The suggestion below will help you to enjoy this product for
many years.
Do not expose the USR3500 to any extreme environment where the temperature or
humidity is high.
Do not use or store the USR3500 in dusty or dirty areas. Its moving parts can be
damaged.
Do not attempt to disassemble the modem. There are no user serviceable parts inside.
Do not expose the USR3500 to water, rain or beverages. It is not waterproof.
Do not abuse your USR3500 by dropping, knocking, or violently shaking it. Rough
handling can damage it.
Do not place the USR3500 alongside computer discs, credit or travel cards or other
magnetic media. The information contained on discs or cards may be affected by the
embedded module.
The use of third party equipment or accessories not authorized by USRobotics may
invalidate the warranty of the modem.
Contact USRobotics in the unlikely event of a modem failure.
9.5. Your Responsibility
This USR3500 is under your responsibility. Please treat it with care, respecting all local
regulations. It is not a toy. Therefore, keep it in a safe place at all times and out of the
reach of children.
Remember your Unlock and PIN codes. Become familiar with and use the security
features to block unauthorized use and theft.
Rev 1.1 9/22/14 45
Page 46

10. Reference Documents
The documents referenced herein are provided by USRobotics. Visit the USRobotics
website at http://www.usr.com/support/3500 for the latest documentation available.
10.1. Firmware Documentation
[1] AT Commands Interface Guide
[2] Customer Release Notes for Firmware 7.52 A1
10.2. Ethernet Card Documentation
[3] Ethernet Card User Guide
10.3. Firmware Upgrade Documentation
[4] Courier M2M Application Guide
Rev 1.1 9/22/14 46
Page 47

11. List of Abbreviations
Abbreviation
Definition
AC
Alternating Current
ACM
Accumulated Call Meter
AMR
Adaptive Multi-Rate
AT
ATtention (prefix for Wireless CPU® commands)
CLK
Clock
CMOS
Complementary Metal Oxide Semiconductor
CS
Coding Scheme
CTS
Clear To Send
dB
Decibel
dBc
Decibel relative to the Carrier power
dBi
Decibel relative to an Isotropic radiator
dBm
Decibel relative to one milliwatt
DC
Direct Current
DCD
Data Carrier Detect
DCE
Data Communication Equipment
DCS
Digital Cellular System
DSR
Data Set Ready
DTE
Data Terminal Equipment
DTMF
Dual Tone Multi-Frequency
DTR
Data Terminal Ready
EEPROM
Electrically Erasable Programmable Read-Only Memory
EFR
Enhanced Full Rate
E-GSM
Extended GSM
EMC
ElectroMagnetic Compatibility
EMI
ElectroMagnetic Interference
ESD
ElectroStatic Discharges
ETSI
European Telecommunications Standards Institute
FIT
Series of connectors (micro-FIT)
FR
Full Rate
FTA
Full Type Approval
GCF
Global Certification Forum
GND
Ground
GPIO
General Purpose Input Output
GPRS
General Packet Radio Service
GSM
Global System for Mobile communications
HR
Half Rate
HSDPA
High Speed Downlink Packet Access
Rev 1.1 9/22/14 47
Page 48

Getting Started
List of Abbreviations
Abbreviation
Definition
HSPA
High Speed Packet Access
HSUPA
High Speed Uplink Packet Access
I
Input
IEC
International Electrotechnical Commission
IES
Internal Expansion Socket
IESM
Internal Expansion Socket Module
IMEI
International Mobile Equipment Identification
I/O
Input / Output
LED
Light Emitting Diode
MAX
MAXimum
ME
Mobile Equipment
MIC
MICrophone
Micro-Fit
Family of connectors from Molex
MIN
MINimum
MNP
Microcom Networking Protocol
MO
Mobile Originated
MS
Mobile Station
MT
Mobile Terminated
NOM
NOMinal
O
Output
Pa
Pascal (for speaker sound pressure measurements)
PBCCH
Packet Broadcast Control Channel
PC
Personal Computer
PCL
Power Control Level
PDP
Packet Data Protocol
PIN
Personal Identity Number
PLMN
Public Land Mobile Network
PUK
Personal Unblocking Key
RF
Radio Frequency
RFI
Radio Frequency Interference
RI
Ring Indicator
RMS
Root Mean Square
RTS
Request To Send
RX
Receive
SIM
Subscriber Identification Module
SMA
SubMiniature version A RF connector
SMS
Short Message Service
SNR
Signal-to-Noise Ratio
SPL
Sound Pressure Level
SPK
SpeaKer
Rev 1.1 9/22/14 48
Page 49

Getting Started
List of Abbreviations
Abbreviation
Definition
SRAM
Static RAM
TCP/IP
Transmission Control Protocol / Internet Protocol
TDMA
Time Division Multiple Access
TU
Typical Urban fading profile
TUHigh
Typical Urban, High speed fading profile
TX
Transmit
TYP
TYPical
UMTS
Universal Mobile Telecommunications System
VSWR
Voltage Stationary Wave Ratio
Rev 1.1 9/22/14 49
Page 50

12. Product Labeling
A product label is located at the back of the USR3500 and provides additional
information about the modem.
The labels provide the following information:
Serial number and barcode
Product Name
Model number
WEEE logo
Qualcomm CDMA logo
CE marking
Product Name
FCC ID
IC number
A-Tick logo, N24480
Open AT logo
IMEI number and barcode
Rev 1.1 9/22/14 50
Page 51

Rev 1.1 9/22/14 51
 Loading...