

Page 1

uShare™ Mini NAS Adapter
Guide de l’utilisateur
Bedienungsanleitung
Guía del usuario
guida per l'utente
USR8710
User Guide
rev 1.0 12/10
Page 2

Contents
English . . . . . . . . . . . . . . . . . . . . . . . . . . . . . . . . . . . . . . . . . . . . . . . . . . . . . . . . . .1
Overview ........................................................................................................... 1
Hardware Installation ..........................................................................................2
NAS Manager ..................................................................................................... 2
NAS Web User Interface ....................................................................................... 3
SAMBA File Server (SMB) ..................................................................................... 9
Map to Shared Folders on Your uShare™ Mini NAS Adapter
(Windows 7, Windows Vista and XP) .....................................................................13
WebDAV Server..................................................................................................14
UPnP Media Server (Xbox 360, PS3, iTunes) ..........................................................21
Printer Server (Windows 7, Windows Vista and XP)................................................ 23
P2P Server ....................................................................................................... 27
Mac Installation (Mac 10.5.4 and above) .............................................................. 29
Troubleshooting ............................................................................................... 32
Warranty ......................................................................................................... 35
Regulatory ....................................................................................................... 35
Français . . . . . . . . . . . . . . . . . . . . . . . . . . . . . . . . . . . . . . . . . . . . . . . . . . . . . . . . .36
Présentation .................................................................................................... 36
Installation du matériel ..................................................................................... 37
NAS Manager ................................................................................................... 37
Interface utilisateur Web NAS ............................................................................ 38
Serveur de fichiers SAMBA (SMB) ....................................................................... 44
Mappage de dossiers partagés sur votre uShare™ Mini NAS Adapter
(Windows 7, Windows Vista et XP) ...................................................................... 48
Serveur WebDAV ............................................................................................... 49
Serveur multimédia UPnP (Xbox 360, PS3, iTunes) ................................................ 56
Serveur d'impression (Windows 7, Windows Vista et XP)........................................ 58
Serveur P2P ..................................................................................................... 62
Installation sous Mac (Mac 10.5.4 et version ultérieure) ........................................ 64
Dépannage....................................................................................................... 67
Garantie .......................................................................................................... 70
Réglementation ................................................................................................ 70
Deutsch . . . . . . . . . . . . . . . . . . . . . . . . . . . . . . . . . . . . . . . . . . . . . . . . . . . . . . . . . 71
Übersicht ..........................................................................................................71
Hardware-Installation ....................................................................................... 72
NAS Manager ................................................................................................... 72
NAS-Web-Benutzeroberfläche ............................................................................. 73
SAMBA File Server (SMB) (SAMBA-Dateiserver) ..................................................... 79
Herstellen einer Verbindung zu freigegebenen Ordnern in Ihrem uShare™ Mini NAS
Adapter (Windows 7, Windows Vista und XP) ........................................................ 83
WebDAV-Server ................................................................................................ 84
UPnP-Medienserver (Xbox 360, PS3, iTunes) .........................................................91
Druckerserver (Windows 7, Windows Vista und XP) ............................................... 93
P2P-Server ....................................................................................................... 97
Installation unter Mac OS X (Mac OS X 10.5.4 oder höher) ...................................... 99
Fehlerbehebung............................................................................................... 102
Garantie .........................................................................................................105
Vorschriften .................................................................................................... 105
Page 3

Español . . . . . . . . . . . . . . . . . . . . . . . . . . . . . . . . . . . . . . . . . . . . . . . . . . . . . . . . 106
Información general ......................................................................................... 106
Instalación del hardware .................................................................................. 107
NAS Manager .................................................................................................. 107
Interfaz de usuario Web de NAS .........................................................................108
Servidor de archivos SAMBA (SMB) .................................................................... 114
Asignación de carpetas compartidas en el uShare™ Mini NAS Adapter
(Windows 7, Windows Vista y XP) ....................................................................... 118
Servidor WebDAV ............................................................................................. 119
Servidor de medios UPnP (Xbox 360, PS3, iTunes) ...............................................126
Servidor de impresora (Windows 7, Windows Vista y XP) ....................................... 128
Servidor P2P ...................................................................................................132
Instalación de Mac (Mac 10.5.4 y posterior) ........................................................ 134
Solución de problemas .....................................................................................137
Garantía .........................................................................................................140
Información normativa .....................................................................................140
Italiano . . . . . . . . . . . . . . . . . . . . . . . . . . . . . . . . . . . . . . . . . . . . . . . . . . . . . . . . 141
Introduzione ................................................................................................... 141
Installazione dell'hardware ...............................................................................142
NAS Manager .................................................................................................. 142
Interfaccia utente Web di NAS ...........................................................................143
File Server SAMBA (SMB) .................................................................................. 149
Mappatura di cartelle condivise su uShare™ Mini NAS Adapter
(Windows 7, Windows Vista e XP).......................................................................153
Server WebDAV................................................................................................154
Server multimediale UPnP (Xbox 360, PS3, iTunes) .............................................. 161
Server per stampante (Windows 7, Windows Vista e XP) ....................................... 163
Server P2P ......................................................................................................167
Installazione su Mac (Mac 10.5.4 e versioni successive) ....................................... 169
Risoluzione di problemi .................................................................................... 172
Garanzia ......................................................................................................... 175
Conformità ...................................................................................................... 175
Page 4

English
Overview
The uShare™ Mini NAS Adapter lets you turn an external USB storage drive into a network attached storage (NAS)
device, or let you connect a USB printer to the uShare™ Mini NAS Adapter to share the printer over your network.
Supported Operating Systems
• Windows 7, Windows Vista, Windows XP SP3
• Mac OSX 10.5.4 and above
Key Features
• Supports USB mass storage device (Capacity: Minimum 4GB, Maximum 2TB)
• Supports Auto IP (DHCP server or DHCP Client)/Fixed IP
• Supports 10/100/1000Mb Ethernet port
• Password management provides secure access to HDD and web management
• Supports SAMBA (SMB)
• Supports WebDAV server
• Supports Bit Torrent download
English
• Supports UPnP AV media Server & Apple iTunes music server
• Supports USB Printer server
Network environment
You can set your device one of three ways:
• Setup the uShare™ Mini NAS Adapter as DHCP Client: If your uShare™ Mini NAS Adapter operates under
a built-in DHCP server router (ex. Internet Sharing Hub), it will obtain an IP from DHCP Server automatically.
• Setup the uShare™ Mini NAS Adapter as DHCP Server: If your operating environment does not support
DHCP server, the uShare™ Mini NAS Adapter will immediately act as DHCP server and assign an IP address for
installation.
• In Static IP environment: First, you need to configure the IP for the uShare™ Mini NAS Adapter to operate in
the static IP environment. For configuration details, please refer to “LAN Configuration” on page 6.
1
Page 5

English
Hardware Installation
1. Connect your USB storage drive to the adapter (a).
And/Or
Connect your USB printer to the adapter (b).
2. Connect an Ethernet cable to the adapter (c) and to your
router or gateway.
3. Connect the power adapter (d) and plug it in.
•(e) Power LED
• (f) Operating System LED
• (g) LAN LED
*. The uShare™ Mini NAS Adapter supports FAT32/NTFS/FAT64
file systems. Make sure your USB storage drive has been pre-formatted to one of these system files. Then simply plug your USB
storage into the USB storage port and the system will automatically recognize and initialize the drive.
*
NAS Manager
The SyncQuick™ NAS Manager is a NAS device search and backup software that has been specifically developed for
NAS Client users to provide simple, fast and reliable backups for personal information including photos, MP3 files, and
other documents.
Search for your uShare™ Mini NAS Adapter with SyncQuick™ NAS Manager
1. Insert the USRobotics Installation CD-ROM. Click Install SyncQuick™ NAS Manager.
2
Page 6

English
2. Select Auto Search, then click the green arrow. When the NAS is found, right-click and select Open NAS Control
Page.
3. The default user name and password is admin. Click OK to open the configuration page to set up your NAS device.
To manually search for your uShare™ Mini NAS Adapter using a web browser
1. To search for the IP address of your uShare™ Mini NAS Adapter, open a web browser and enter storage in the
address bar to locate your uShare™ Mini NAS Adapter and see the IP address.
2. The default user name and password is admin. Click OK to open the configuration page.
NAS Web User Interface
To open NAS Web user interface, launch the SyncQuick NAS Manager to locate the device.
The uShare™ Mini NAS Adapter supports a localized user interface. Click on a flag to select your language.
3
Page 7
English
Hard Disk Format Support
The uShare™ Mini NAS Adapter supports FAT32/NTFS/FAT64 file systems. Make sure your USB storage drive has
been pre-formatted to one of these system files. Then, simply plug your USB storage into the USB storage port and the
system will automatically recognize and initialize the drive.
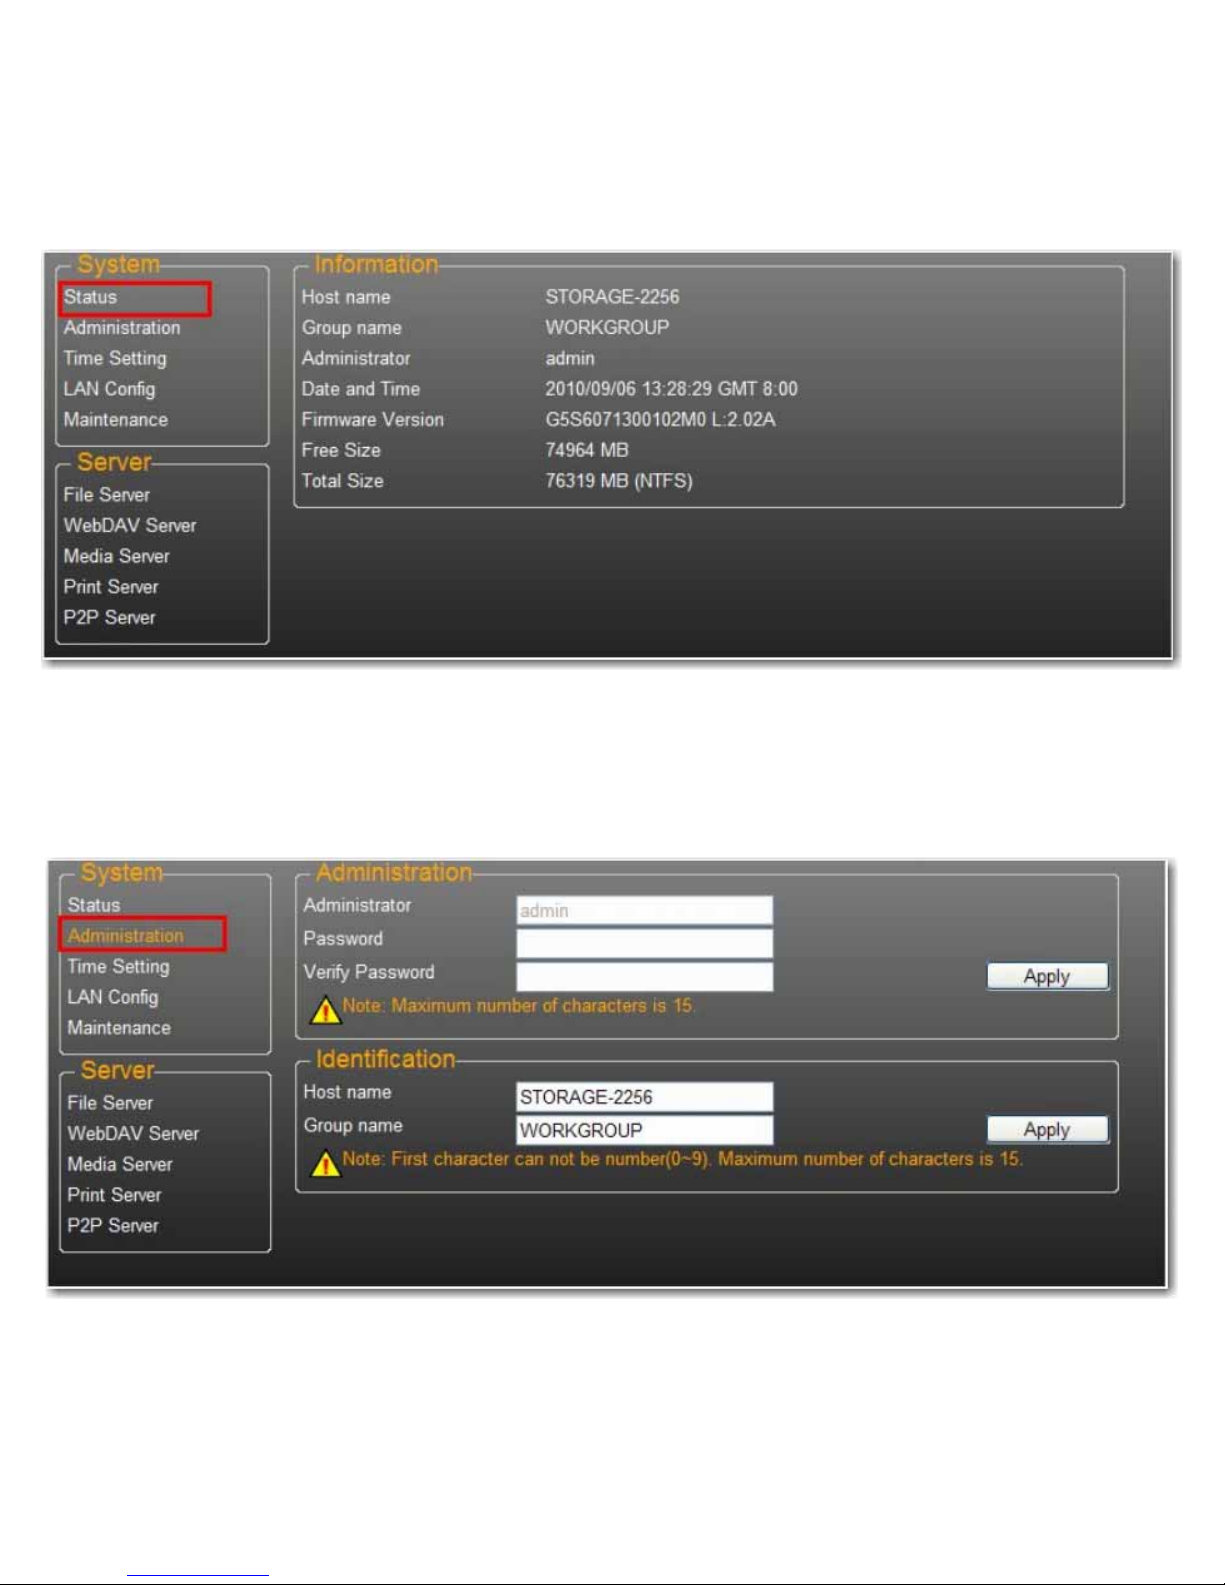
Status
This page provides basic information for the uShare™ Mini NAS Adapter. You can check your firmware version and
available HDD capacity from this page.
Administration
You can change and modify your host name, group name, and password from this page. Click Apply to save your
settings.
• Host name: This is used to identify your device on the network. If you prefer a different name, type in the new
name and click Apply.
4
Page 8

• Group name: This should be same as your workgroup. Unless you have manually configured workgroups on your
network, the default is “WORKGROUP”. If your workstation belongs to different workgroup, enter the correct
group name to modify.
In Windows, right-click My Computer, select Properties, and go to the computer name tab to see your current
workgroup.
Date/ Time Setting
English
You can change date/time settings from this page. Click Select Enable and click Apply to enable the Time Server. By
default, SNTP is set to the Network time service clock.isc.org. You can also select Synchronize to PC from the dropdown list. If Internet access is available, we recommended setting SNTP to Network time service.
To disable the time server, select Disable and click Apply. You may need to manually update your Date and Time
information.
5
Page 9
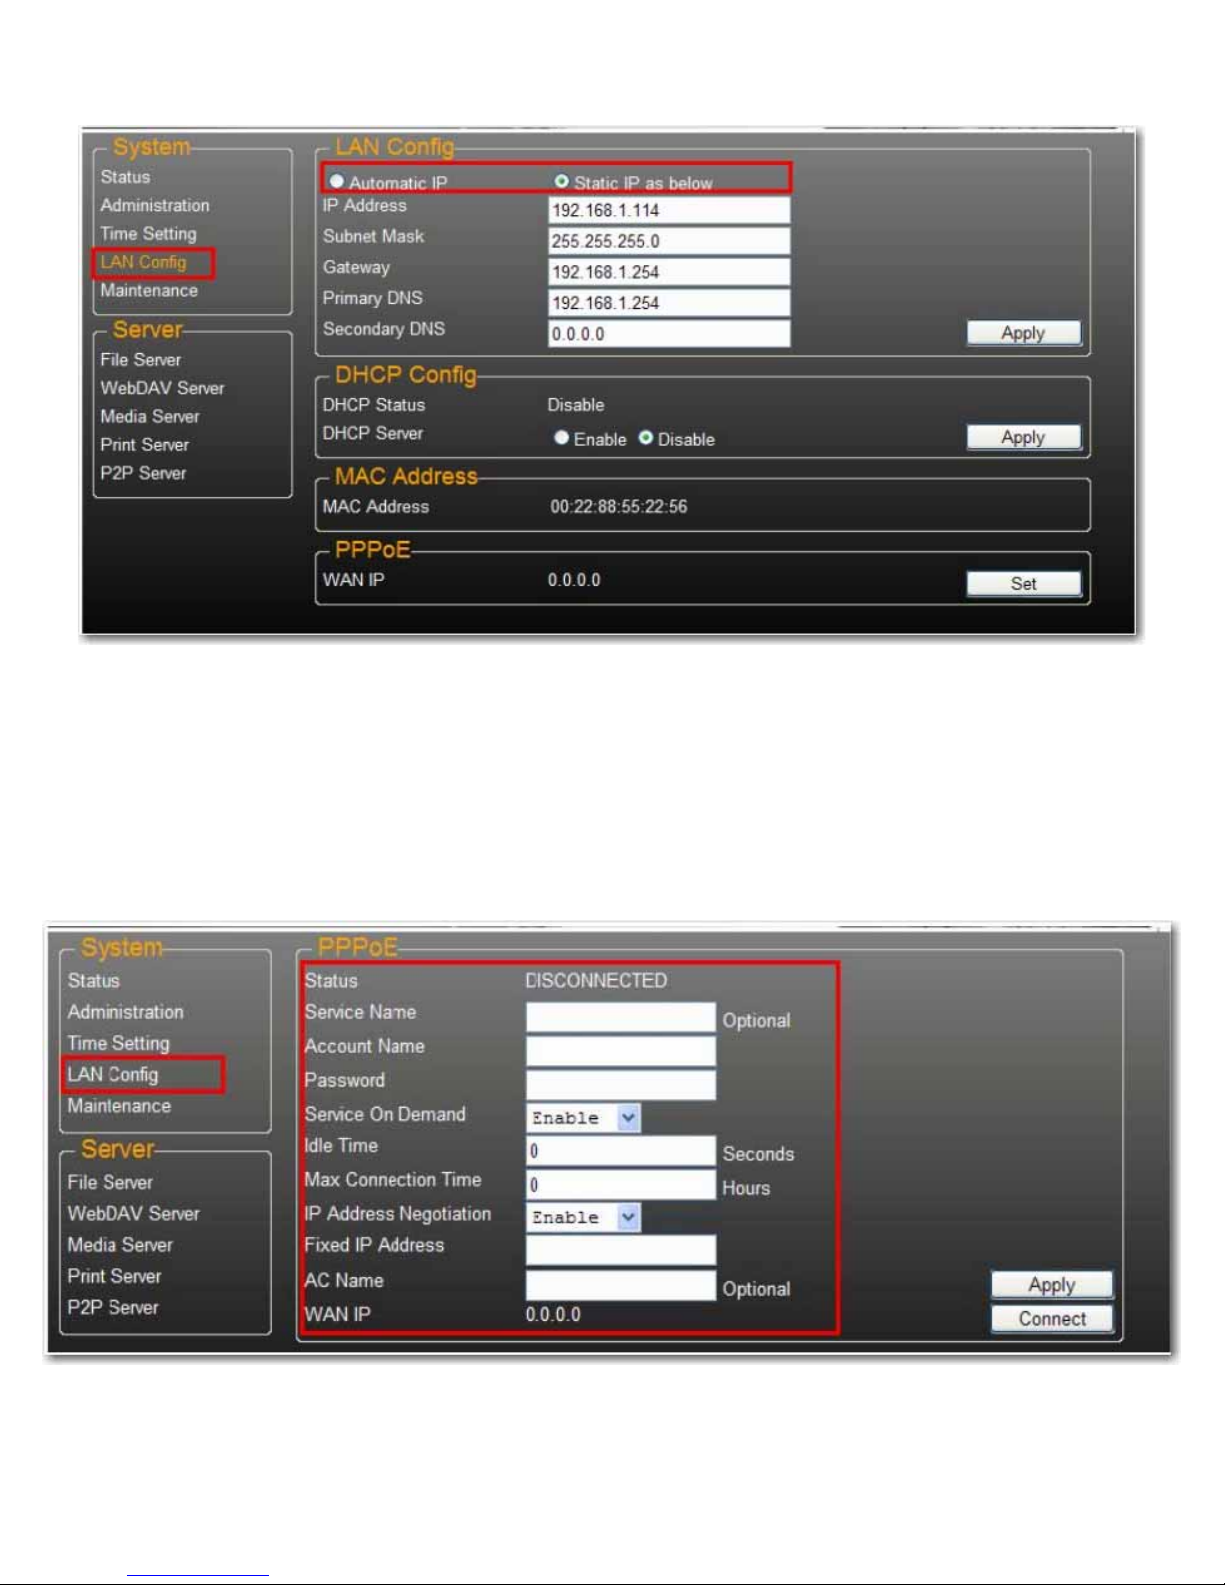
LAN Configuration
English
By default, the IP Setting is set to Automatic IP. This is the recommended setting and will allow the uShare™ Mini
NAS Adapter to obtain its IP address automatically.
If you prefer, select Static IP and enter your IP address, Subnet Mask, Gateway and Primary DNS server
information, then click Apply. Static IP addresses are useful when mounting network drives or using with port
forwarding.
PPPoE Settings
PPPoE (Point-to-Point Protocol over Ethernet) is an Internet connection protocol that lets users to connect to the
Internet without a router. All local users can share one PPPoE connection to access the Internet.
If you want to configure the setting of PPPoE for your NAS, click the Set button and enter the information for your
connection to you ISP.
• Status: Display PPPoE connection status.
6
Page 10

English
• Service Name: Optional field.
• Account Name: Enter your user name provided by your ISP.
• Password: Enter your password provided by your ISP.
• Service on Demand: The router will ONLY connect itself to your ISP when there is an Internet request
demanded by any LAN user and disconnect itself when the transaction is done.
• Idle Time (Seconds): Idle time means the adapter will disconnect itself from the ISP after being idle for a specific
time. If the time is set to 0, the adapter will not disconnect itself.
• Max Connection Time (Hours): A specific time that indicate how long the storage can stay connection with ISP.
• IP Address Negotiation: IP Address and Subnet Mask should be assigned within the same network as the
PPPoE-enabled DSL modem.
• Fixed IP Address: Use to assign an IP address manually.
• AC Name: Optional field. Used to configure an access concentrator (AC) name on the PPPoE interface.
• WAN IP: This is the current IP address for the storage device.
DDNS Settings
DNS service (Domain Name System) is used for the translation of IP addresses from domain names to the numeric IP
address format. Translation of the domain name into the set of numbers is performed by the appropriate DNS server.
The uShare™ Mini NAS Adapter supports dynamic DNS from the following free providers:
• http://www.dyndns.com (DYDNS)
• http://www.2mydns.com (2MYDNS)
To enable the dynamic DNS service for the uShare™ Mini NAS Adapter, select a dynamic DNS service and enter the
appropriate Host name, User name and Password and click Apply. To exit, press Return.
7
Page 11

English
Maintenance
This page allows you to update your uShare™ Mini NAS Adapter firmware, reboot the system, or restore the uShare™
Mini NAS Adapter to its factory default settings.
Firmware Upload
1. Download the latest firmware from USRobotics:
www.usr.com/support
2. Save the firmware file to your computer, and unzip the file (if needed).
3. From the Maintenance page, click Browse and navigate to the folder where you have the unzipped firmware update
file.
4. Click the Update button.
8
Page 12
English
5. Confirm the pop-up message to start the update.
The firmware update begins. It may take several minutes to complete.
Caution: Do not power off or unplug the uShare™ Mini NAS Adapter during firmware update.
6. Once the update is done, your uShare™ Mini NAS Adapter will reboot.
Factory Defaults
Click the Reset button to restore factory default settings. SAMBA/WebDAV account setting will still remain in the
uShare™ Mini NAS Adapter. All other system settings will go back to factory default.
System Reboot
This can be used to manually restart the network drive after a firmware update, or if you having problems with your
uShare™ Mini NAS Adapter. Click Reboot to restart the uShare™ Mini NAS Adapter.
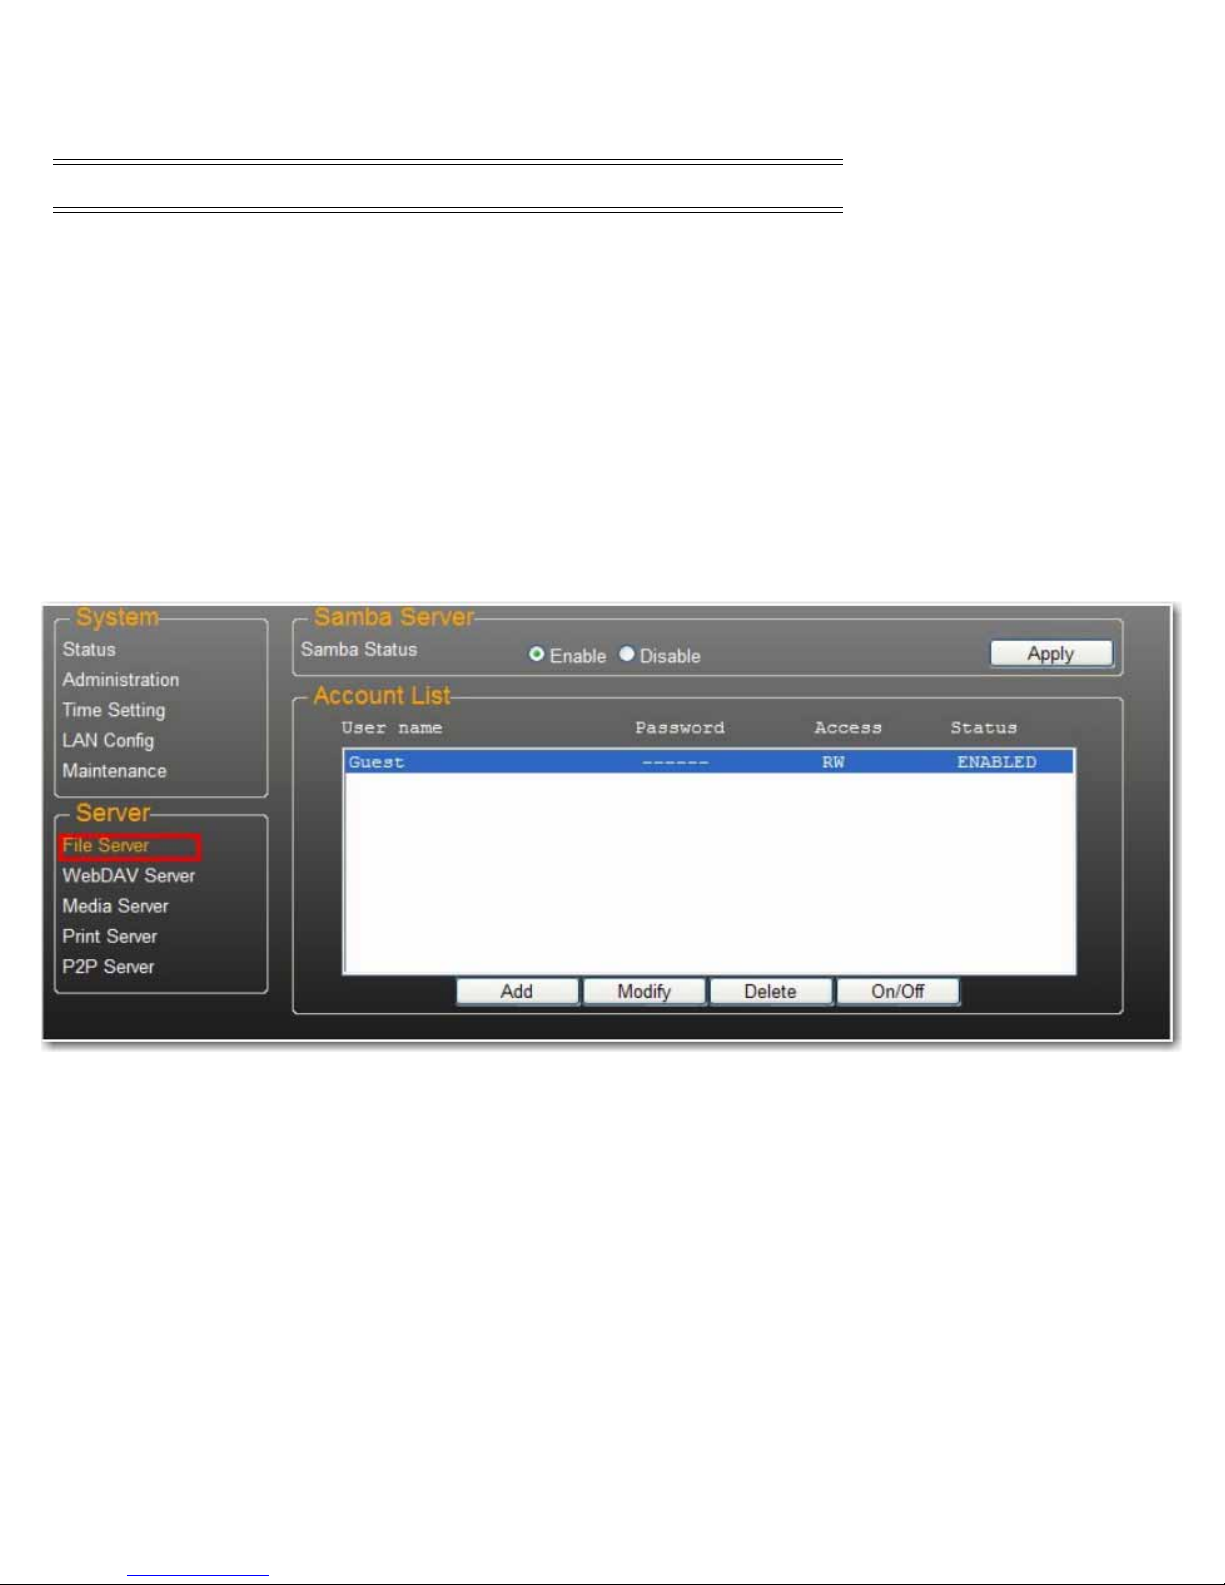
SAMBA File Server (SMB)
SMB server allows you to share data or files through LAN environment. A default “Guest” account is created and the
“Public” folder is accessible to the guest account by default.
Note:To avoid language support issues, use only standard English characters to create/share folders.
9
Page 13
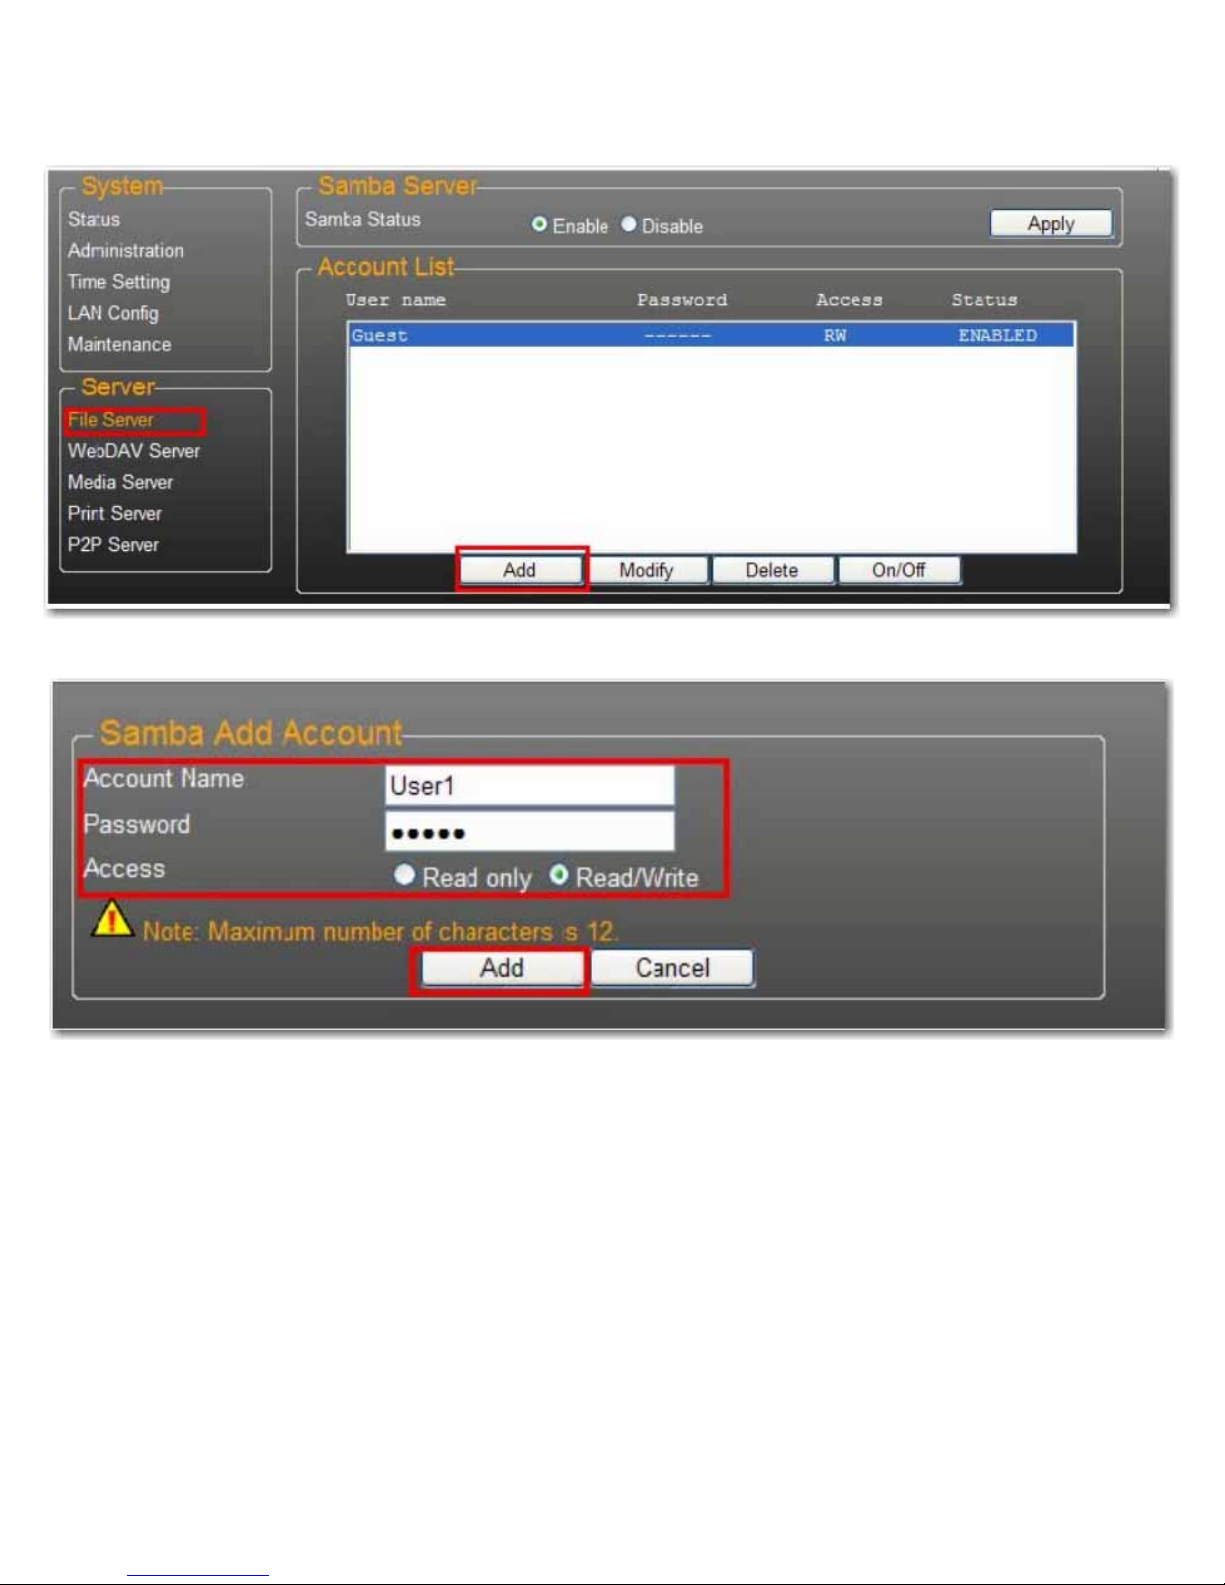
Create Additional User Accounts for the uShare™ Mini NAS Adapter
1. Click the Add button.
2. Enter a new Account Name and Password, set the Access level (Read only or Read/Write), then click Add.
English
3. The uShare™ Mini NAS Adapter will create a SAMBA folder with the same name as the Account Name.
10
Page 14
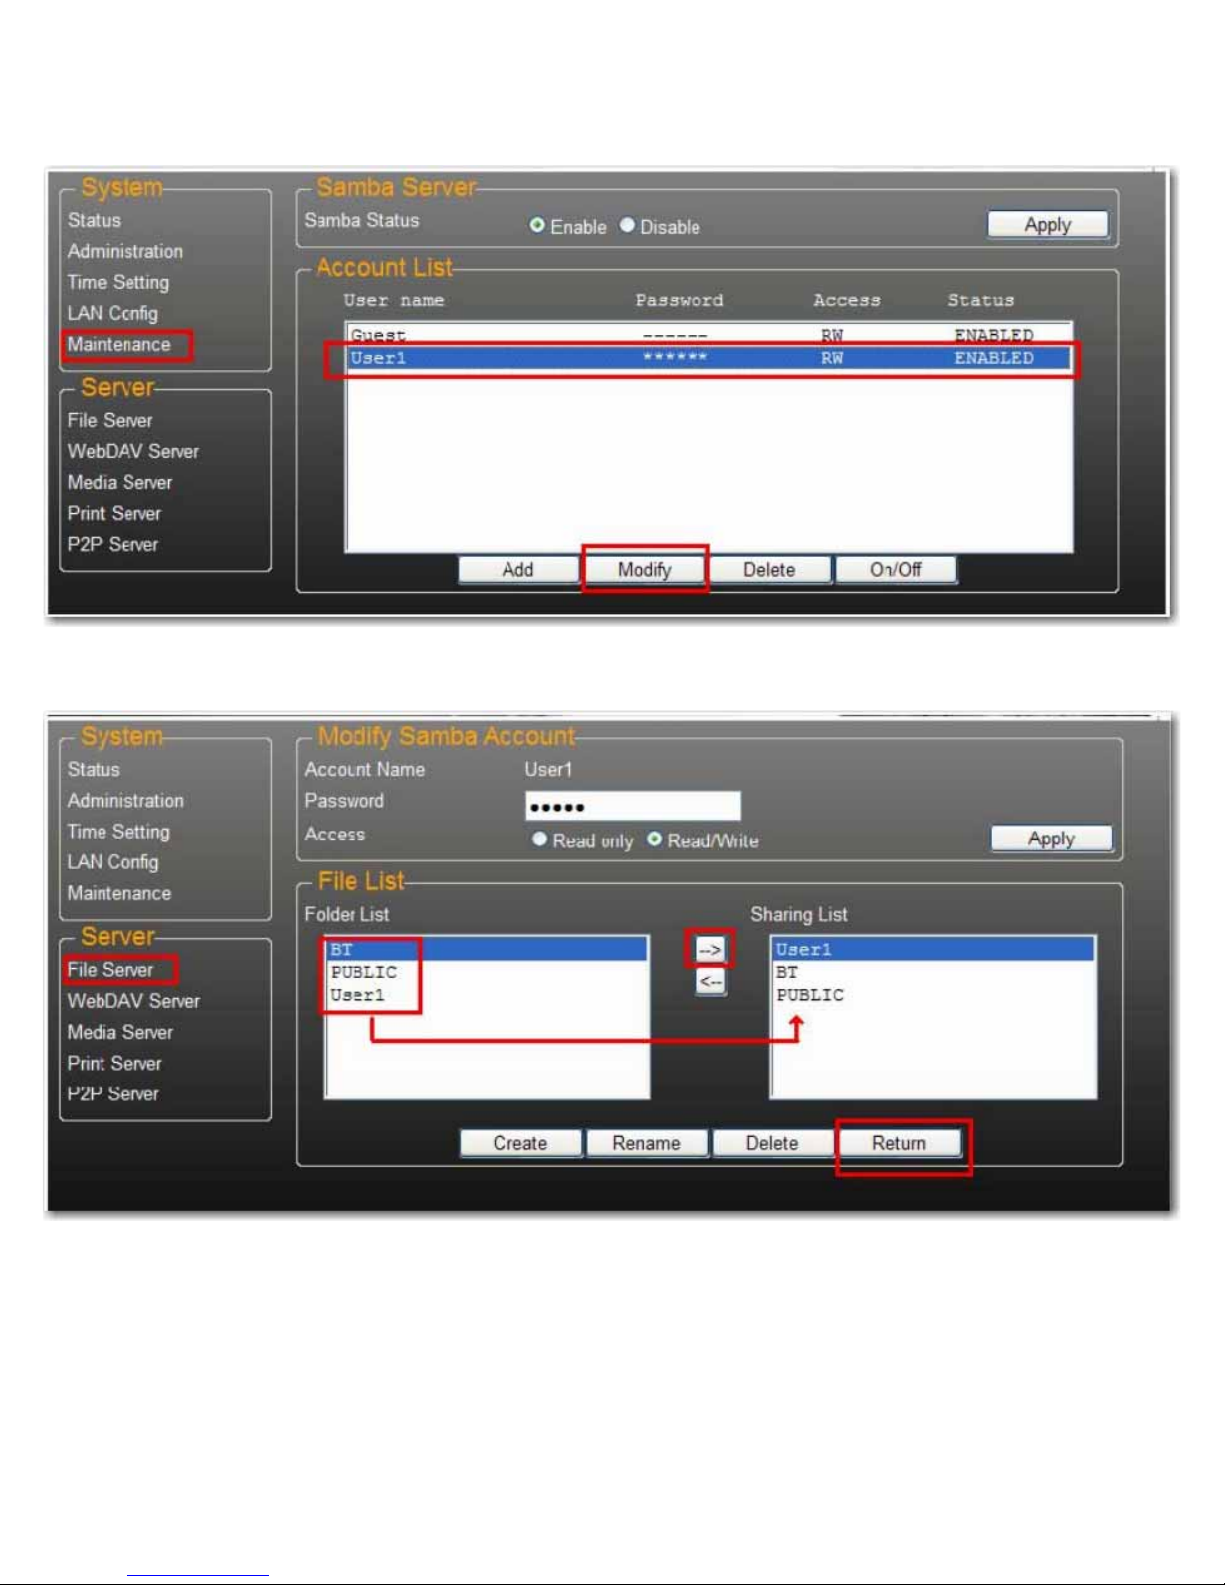
Modify User Accounts
1. Highlight the account name, then click Modify.
English
2. From this page, you can either add a folder share list for the selected user, or create a new folder. Click Return to save
your settings.
11
Page 15

Modify a User Account Password
1. Select the account name and click Modify.
English
2. Enter the new Password and click Apply to save your settings.
12
Page 16

Delete a User Account
Note:All the data inside the account name folder will be lost after the account is deleted.
Select the account you wish to delete, then click Delete to proceed.
English
Map to Shared Folders on Your uShare™ Mini NAS Adapter
(Windows 7, Windows Vista and XP)
You can map to shared folders on your uShare™ Mini NAS Adapter as Network Drives on your computer system
(Showing NAS disk drive in network). For faster connection and usability, it is recommend that you map folders that you
use constantly as network drives. This creates direct access to the shared folders on your uShare™ Mini NAS Adapter
from My Computer.
Note:You need to know the IP address of your uShare™ Mini NAS Adapter to map drives. To search for the IP address
of your uShare™ Mini NAS Adapter, open a web browser and enter storage in the address bar to locate your uShare™ Mini NAS Adapter and see the IP address.
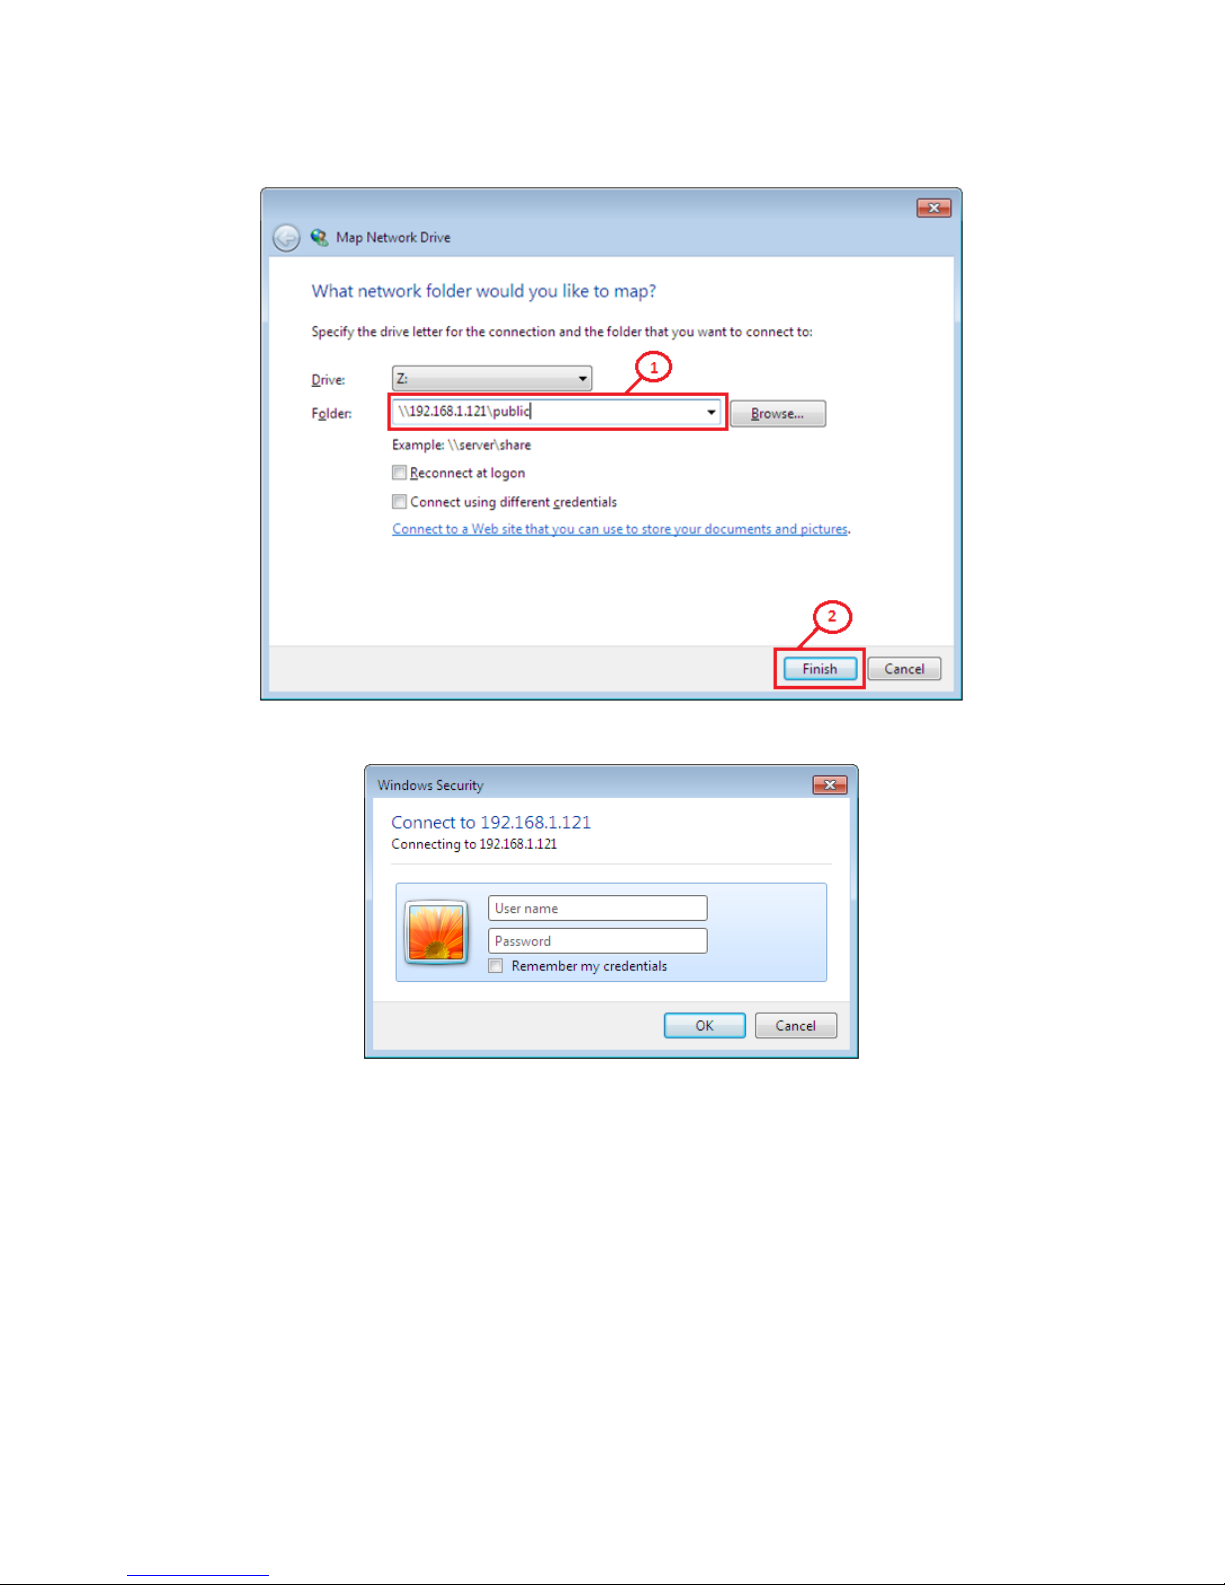
1. Click Windows Start, then right-click Computer and select Map Network Drive.
13
Page 17
English
2. Enter the host name or IP address of the uShare™ Mini NAS Adapter followed by the shared folder name, and click
Finish.
Example: Enter storage\public (host name) or \\192.168.1.121\public (IP address)\
3. Enter a user name and password to access this shared folder, and click OK.
WebDAV Server
WebDAV is a set of extensions to the HTTP protocol that allows a web server to appear as a standard network drive.
With WebDAV support, users will be able to access the share folders via the HTTP protocol remotely.
14
Page 18

Create WebDAV Account
1. A default Guest account is created. The Public folder is accessible to the guest account by default.
4. Next, you need to create a WebDav share account. Click the Add button.
5. Enter a new Account Name and Password, set the Access level (Read only or Read/Write), then click Add
English
15
Page 19

English
6. After the WebDav Share account is created, click Modify to set up the WebDAV access right for each share folder.
Here we add “Public” folder into account. Click Return to save your settings.
Map a Network Drive to WebDAV in Windows 7
The step-by-step guide below demonstrates how to connect to your NAS via WebDAV on Windows 7.
1. Click Windows Start, the right-click Computer and select Map Network Drive.
16
Page 20
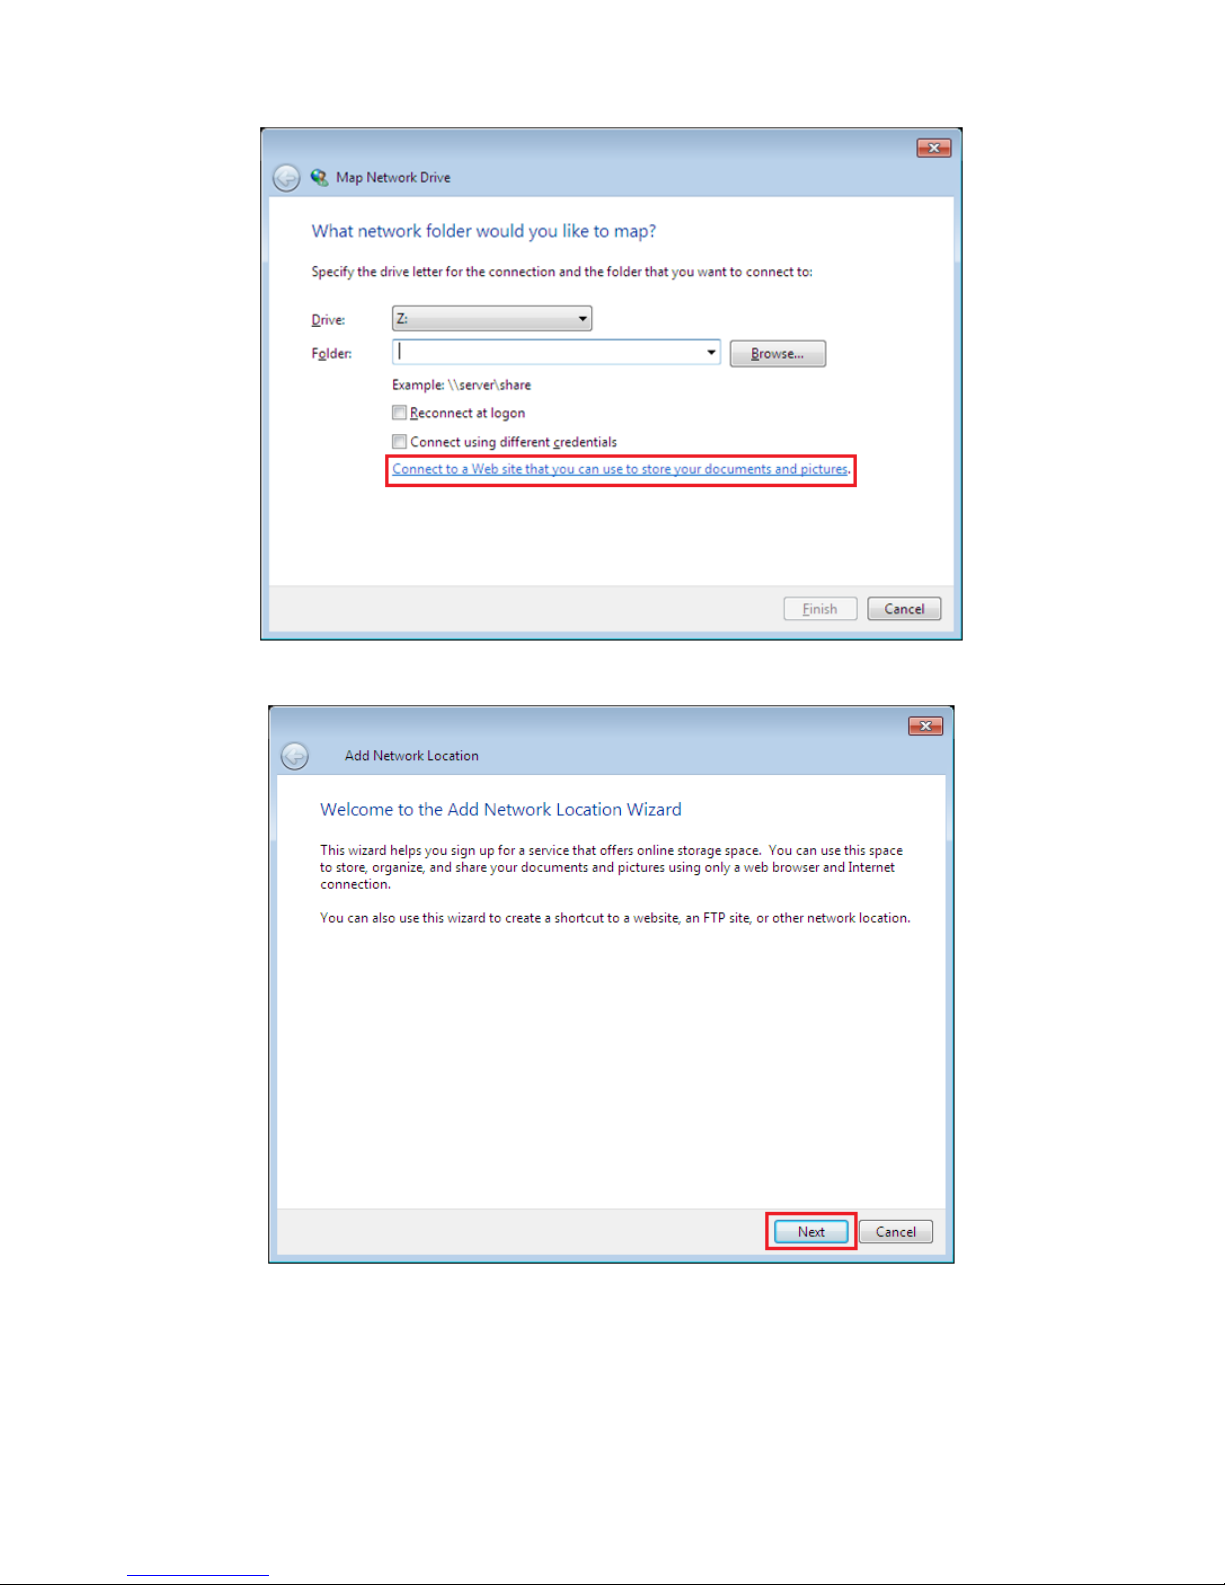
2. Click Connect to a Web site that you can use to store your documents and pictures.
English
3. Click Next.
17
Page 21

4. Click Next to choose a custom network location.
English
5. Enter the URL of your uShare™ Mini NAS Adapter with the share folder name and click Next.
Example: http://192.168.1.121/webdav/public
18
Page 22

6. Enter a user name and password that has WebDAV privilege to access this shared folder, and click OK.
7. Enter a name for this network location. Click Next.
English
19
Page 23

8. Click Finish. The network place has been created and is ready to use.
English
Note:Current Windows default capacity for WebDAV is 500MB only. In order to change this limitation, please run the
USRobotics Installation CD-ROM and click WebDAV Registry Editor to run the program. This will allow users
to access data more than 500MB in windows O/S.
Remotely Accessing WebDav Shared Folder
You will need to forward port 80 in your router or firewall to the IP address of the NAS Adapter to be able to access
WebDav shares remotely. Forwarding port 80 allows access to the WebDAV enabled share. Review your router or firewall
documentation for instructions on port forwarding.
Port forwarding in some routers or firewalls may also be referred to as “Local Servers” or “Virtual Servers.”
20
Page 24

English
Once port forwarding is configured in your firewall or router, you will need to determine your external IP address
assigned by your ISP. This information can be obtained in your router's or firewall's user interface. You can also use third
party websites that can provide this information. Use the search term “what is my IP address” as an example to locate
these websites.
Write down your external address. Example: 12.34.56.78
Accessing a WebDav folder remotely, uses the same procedure as accessing a WebDav folder locally. The only change is
the external IP address.
Using the IP address above, the WebDav URL will be http://12.34.56.78/webdav/(folder name)
UPnP Media Server (Xbox 360, PS3, iTunes)
The Media server on the uShare™ Mini NAS Adapter can be used to share your mutlimedia content (photographs,
music and video) with an Xbox 360 video game console that is connected to the same local network.
Note:Before you start, make sure both devices are connected to the same local network and powered on.
1. Go to the Media Server page and select the folder where you have the multimedia content and click Share.
21
Page 25

English
2. After the uShare™ Mini NAS Adapter media server is enabled, go to the Xbox 360 media page, select either Music
or Pictures, and press A to continue on your Xbox 360.
3. Press X to change the source and select your network drive. It should display as storage-xxx and display the folder
your enabled for sharing from your uShare™ Mini NAS Adapter.
22
Page 26

Inside the shared folder, you can access your shared multimedia files.
Connect USB Printer
English
Printer Server (Windows 7, Windows Vista and XP)
Note:You need to know the IP address of your uShare™ Mini NAS Adapter to use the adapter as a printer server. To
search for the IP address of your uShare™ Mini NAS Adapter, open a web browser and enter storage in the
address bar to locate your uShare™ Mini NAS Adapter and see the IP address.
1. Connect your USB printer to USB printer port on the uShare™ Mini NAS Adapter.
2. Install the printer driver on your computer(s). To use a printer attached to the uShare™ Mini NAS Adapter, the
printer drivers need to be installed locally on computer(s).
23
Page 27
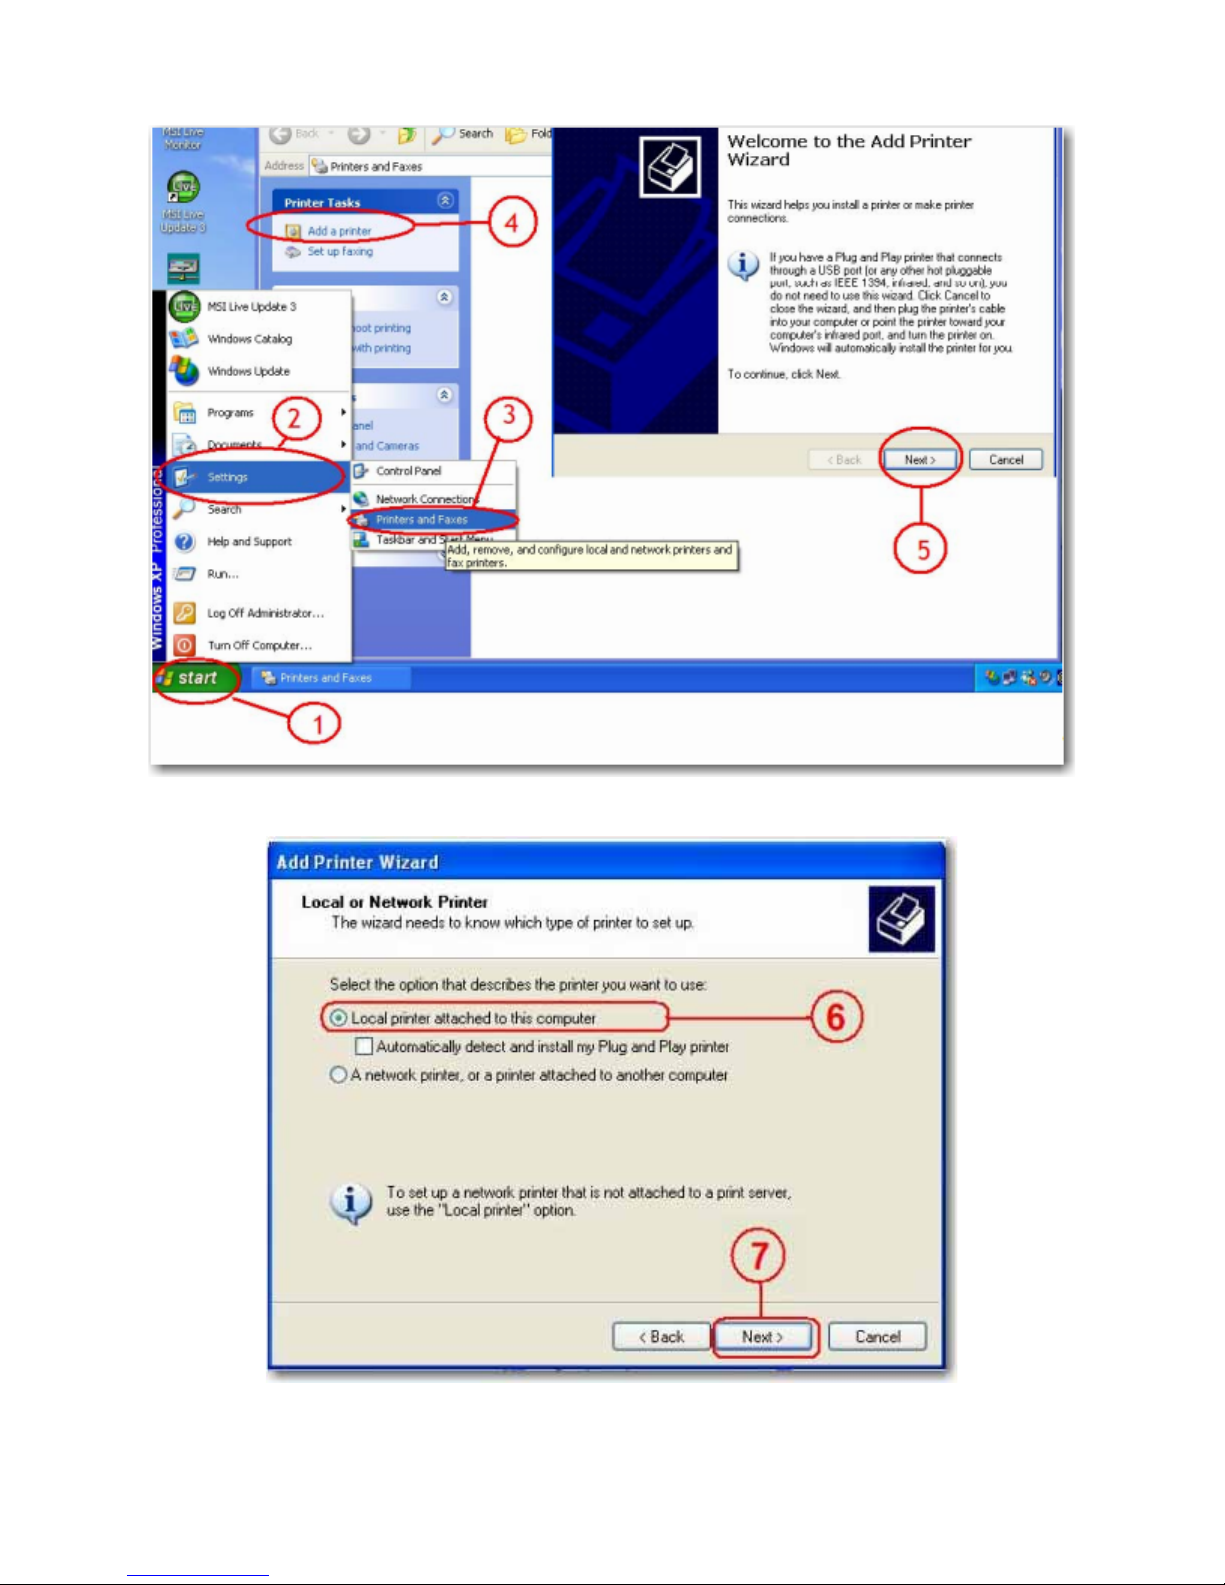
3. After printer driver installation, click Windows Start > Setting > Printer and Faxes > Add a printer > Next.
English
4. In the Add Printer Wizard, select Local printer and click Next.
24
Page 28

5. Select Create a new port type of port:, then select Standard TCP/IP Port, and click Next.
English
6. Enter IP address of your uShare™ Mini NAS Adapter and click Next.
25
Page 29
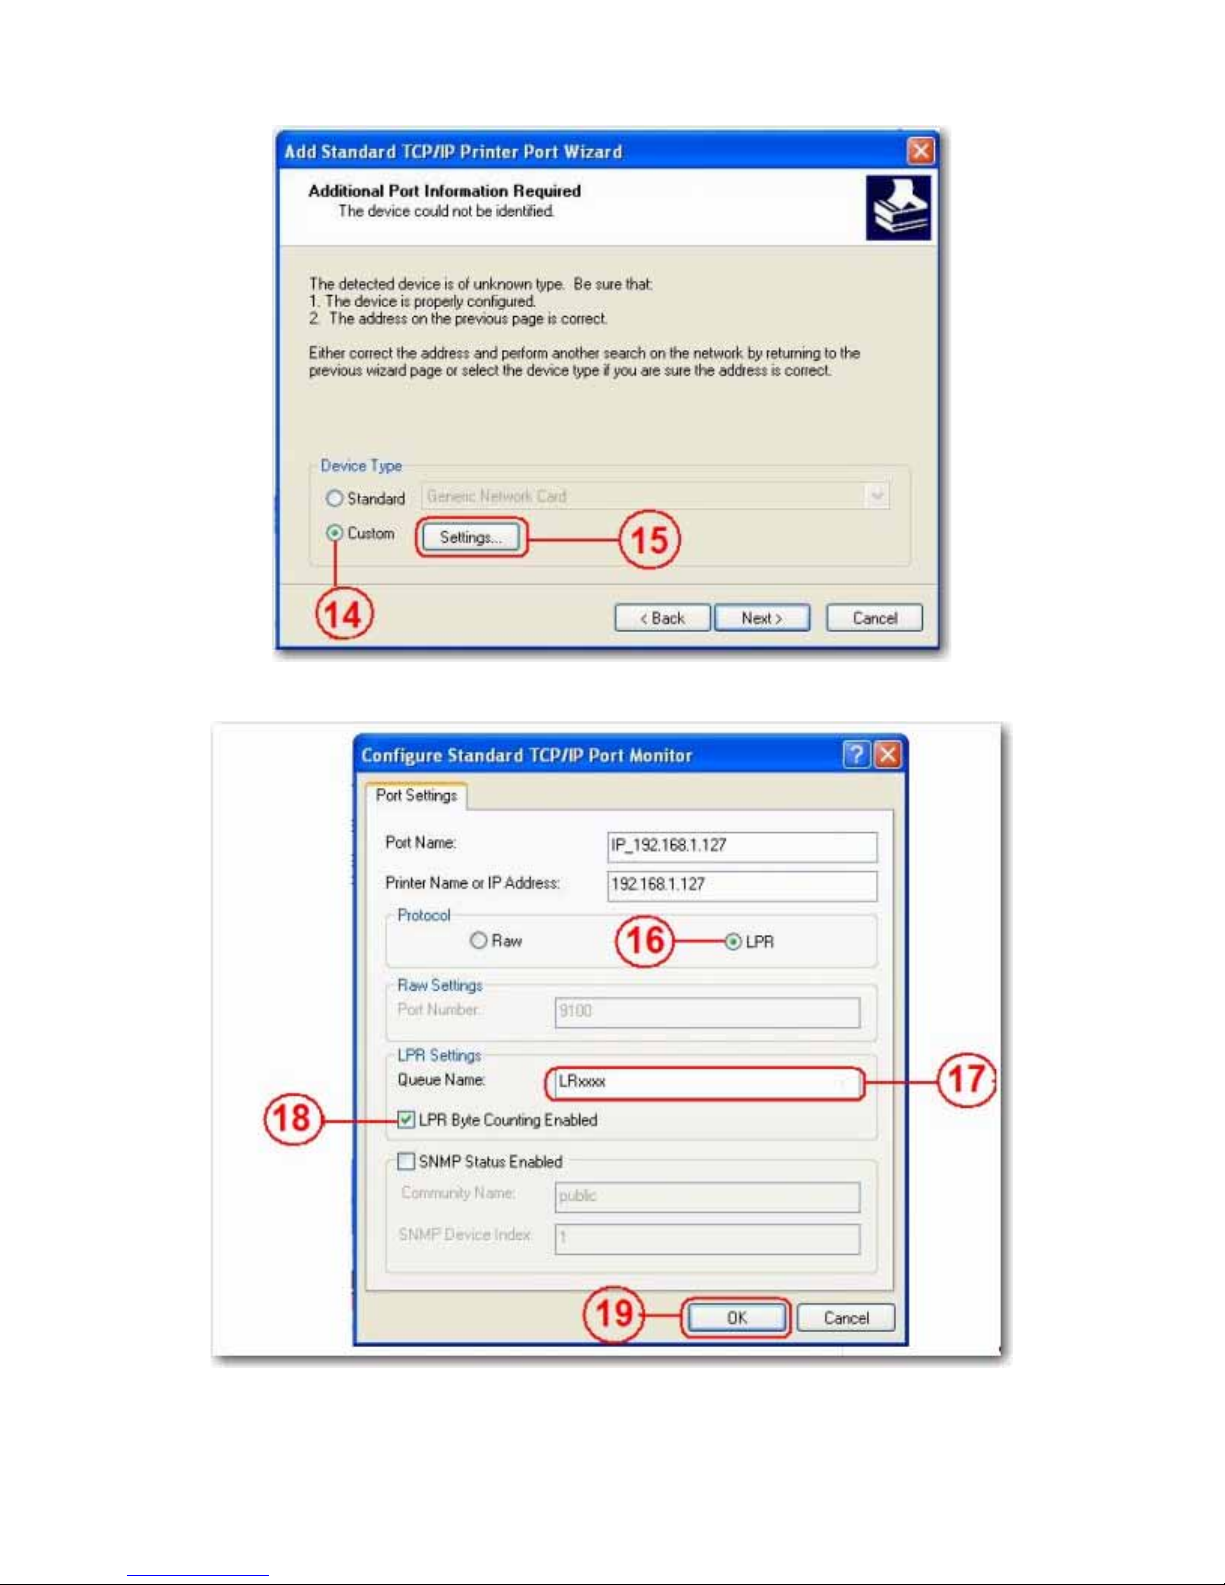
7. Select Custom and go to Setting. Click Next.
English
8. Select LPR for the protocol, and enter a queue name (example: LRxxx) and select LPR byte enable.
9. Click OK to save the port setting.
10.Click Finish.
26
Page 30

English
11.Go to the Print Server page and check the printer status. If status shows ok, the printer has been successfully set up.
Note:The print server in the uShare™ Mini NAS Adapter does not support GDI/Host-based printers. For some Multi
Function Printers (MFP), scanning functions may not work. Please contact the printer manufacturer for detailed
specifications.
P2P Server
The uShare™ Mini NAS Adapter supports Bit Torrent download independently without using PC resources. A
maximum of 4 bit torrent downloads can be running at the same time.
1. Select P2P Server. Select the Download Path you wish to use. Click Apply to save your settings.
Note:Do not change the path setting while any Bit torrent downloads are active. If you change the path setting while
downloads are in progress, the downloads will fail.
27
Page 31

English
2. Set the Server port range. The Server port range can be chosen from 6881 to 65535 (default is 6881).
3. Create an upload speed limit: 0=unlimited upload speed (4 KBps is the minimum speed), and click Set to save your
setting.
4. Click Browse, select the .torrent file, and click Upload to place the torrent in the download queue.
Note:Any jobs listed in the Download Queue will be removed when the uShare™ Mini NAS Adapter is turned off or
the USB drive connected to the uShare™ Mini NAS Adapter is removed.
5. To delete Bit Torrent jobs after the download is complete, click Remove to delete the download jobs from the queue.
E-mail Notifications
The uShare™ Mini NAS Adapter can send an e-mail notification to a designated e-mail address after each successful
download.
1. Go to Mail Notification and click the Set button.
28
Page 32

2. Select Enable.
3. Enter your SMTP Server, Recipient e-mail address, SMTP User name and Password.
English
4. Click Apply to save your settings.
Mac Installation (Mac 10.5.4 and above)
1. Open your browser and enter the host name or IP address of the uShare™ Mini NAS Adapter.
Example: Enter http://storage-1d5e (host name) or http://192.168.1.121 (IP address)
2. The Default user name and password is admin. Click Login to open the configuration page to set up your uShare™
Mini NAS Adapter.
29
Page 33

Access SAMBA Share in Mac OS X
1. Click Go on the toolbar, and select Connect to Server.
English
2. Enter the host name or IP address of the uShare™ Mini NAS Adapter and click Connect.
Example: Enter smb://storage-1d5e (host name) or smb://192.168.1.121 (IP address)
3. Connect as a Guest or Registered User, then click Connect.
30
Page 34

4. Select the shared volumes to mount, and then click OK.
Access WebDAV Share in Mac OS X
1. Click Go on the toolbar, and select Connect to Server.
English
2. Enter the host name or IP address of the uShare™ Mini NAS Adapter and click Connect.
31
Page 35

Example: Enter http://storage-1d5e/webdav (host name) or http://192.168.1.121/webdav (IP address)
3. Enter the WebDAV username and password, and then click OK.
English
Troubleshooting
What is the default IP address of the uShare™ Mini NAS Adapter?
Solution:
The default IP address for the uShare™ Mini NAS Adapter is 169.254.0.1. To search for the IP address of your uShare™
Mini NAS Adapter, open a web browser and enter storage in the address bar to locate your uShare™ Mini NAS Adapter
and see the IP address.
What is the default user/login name and password?
Solution:
The default user name and password is admin.
I forgot my login and/or password, what should I do?
Solution:
If you forgot your login and/or password, you will need to reset the uShare™ Mini NAS Adapter to its factory default
settings.
32
Page 36

English
Only the SAMBA/WebDAV account settings will remain in the uShare™ Mini NAS Adapter hard disk. All other
Note:
settings will return to factory default.
1. Press and hold down the reset button.
2. Disconnect and the reconnect the power to the uShare™ Mini NAS Adapter.
3. Continue to hold down the reset button for 30 seconds, and then release the reset button.
The uShare™ Mini NAS Adapter will return to its factory default settings.
4. Repeat the steps in the installation procedure(s) to set up you uShare™ Mini NAS Adapter again.
Why can’t I create Accounts in SAMBA or WebDAV?
Solution:
You may be using unsupported characters. To avoid language support issues, use only standard English characters to
create/share folders.
Why can’t I upload files via LAN connection?
Solution:
Make sure you have a proper network connection and privileges read & write access) to the folders.
My uShare™ Mini NAS Adapter did not adjust for Daylight Savings time.
The uShare™ Mini NAS Adapter does not support Daylight Savings time settings. You will need to manually adjust the
time for Daylight Savings.
I can not enter a SMB folder with a password via the uShare™ Mini NAS Adapter in Windows XP.
Solution:
SAMBA is supported in XP SP2 or higher. This adapter requires Windows XP SP3 or higher. Please update Windows XP
to SP3 or above. After the update, if you have installed Norton Internet Security, check with Norton service center.
What Operating Systems does the uShare™ Mini NAS Adapter support?
Solution:
The uShare™ Mini NAS Adapter supports Windows 7, Windows Vista, XP SP3 and Mac OS 10.5.4 and above.
What are the limitations user logins with the Samba server?
Solution:
• Samba Server: User Level Access (maximum create 16 user accounts, 16 folders shared by one account)
• Maximum User Login: Samba 8 User (Total 64 TCP connection at the same time)
What are the limitations for uShare™ Mini NAS Adapter file name lengths?
Solution:
The limitation of file name length is 12 bytes.
Can I use the uShare™ Mini NAS Adapteras DHCP server?
Solution:
You can setup the uShare™ Mini NAS Adapter as a DHCP server if there is no other DHCP server in your local
network. Otherwise, the uShare™ Mini NAS Adapter will automatically turn off its DHCP server function and become
a DHCP client.
33
Page 37

English
Does WebDAV support Win XP SP1?
Solution:
Microsoft started WebDAV support with Windows XP SP2. If you still using SP1, please download and install file the XP
Service Pack 3 from Microsoft.
Why Can't I create new a WebDAV link in my windows computer? It always connects to the link that I deleted
previously.
Solution:
Please go to the recycle bin in your computer and clean the WebDAV link that you have deleted previously.
Does the Bit Torrent client seed (upload) the file during an active download?
Solution:
Yes. When the download has completed, Bit Torrent seeding (upload) completes.
34
Page 38

English
Warranty
This product is subject to the U.S. Robotics Corporation Limited Warranty.
To view a copy of the Limited Warranty and for information on how to contact USRobotics Technical Support, please
see the USRobotics corporate web site at:
www.usr.com/support
Regulatory
FCC Conditions
This equipment has been tested and found to comply with Part 15 of the FCC Rules. Operation is subject to the
following two conditions:
1. This device may not cause harmful interference.
2. This device must accept any interference received, including interference that may cause undesired operation.
CE
This equipment is in compliance with the requirements of the following regulations: EN55022: CLASS B
WEEE Information
For EU (European Union) member users: According to the WEEE(Waste electrical and electronic equipment) Directive,
do not dispose of this product as household waste or commercial waste. Waste electrical and electronic equipment should
be appropriately collected and recycled as required by practices established for your country. For information on
recycling of this product, please contact your local authorities, your household waste disposal service or the shop where
you purchased the product.
35
Page 39

Français
Présentation
uShare™ Mini NAS Adapter permet de transformer un disque de stockage USB en périphérique de stockage réseau
(Network Attached Storage, NAS). Vous pouvez aussi connecter une imprimante USB à votre uShare™ Mini NAS
Adapter afin de partager l'imprimante sur votre réseau.
Systèmes d'exploitation pris en charge
• Windows 7, Windows Vista, Windows XP SP3
• Mac OSX 10.5.4 ou ultérieur
Principales fonctions
• Prend en charge le périphérique de stockage de masse USB (capacité : 4 Go minimum, 2 To maximum)
• Prend en charge la fonction Auto-IP (serveur DHCP ou client DHCP)/IP fixe
• Prend en charge le port Ethernet 10/100/1 000 Mbits/s
• Offre un accès sécurisé au disque dur et à la gestion Web avec la gestion des mots de passe
• Prend en charge SAMBA (SMB)
• Prend en charge le serveur WebDAV
Français
• Prend en charge le téléchargement Bit Torrent
• Prend en charge le serveur multimédia UPnP AV et le serveur de musique Apple iTunes
• Prend en charge le serveur d'impression USB
Environnement réseau
Vous pouvez configurer votre périphérique de trois façons :
• Configurer uShare™ Mini NAS Adapter en tant que client DHCP : si votre uShare™ Mini NAS Adapter
fonctionne sous un routeur de serveur DHCP intégré (par exemple, un concentrateur de partage Internet), il
obtiendra automatiquement une adresse IP du serveur DHCP.
• Configurer uShare™ Mini NAS Adapter en tant que serveur DHCP : si votre environnement d'exploitation ne
prend pas en charge le serveur DHCP, votre uShare™ Mini NAS Adapter fonctionnera immédiatement en tant
que serveur DHCP et attribuera une adresse IP pour l'installation.
• Dans un environnement IP statique : vous devez d'abord configurer l'adresse IP pour que votre uShare™ Mini
NAS Adapter fonctionne dans un tel environnement. Pour obtenir le détail de la configuration, reportez-vous à la
section « Configuration LAN », page 41.
36
Page 40

Installation du matériel
1. Connectez votre disque de stockage USB à l'adaptateur (a).
et/ou
Connectez votre imprimante USB à l'adaptateur (b).
2. Connectez un câble Ethernet à l'adaptateur (c) et à votre
routeur ou votre passerelle.
3. Connectez l'adaptateur secteur (d) et branchez-le.
• (e) Voyant DEL d'alimentation
• (f) Voyant DEL du système d'exploitation
• (g) Voyant DEL LAN
*. Votre uShare™ Mini NAS Adapter prend en charge les systèmes
de fichiers FAT32/NTFS/FAT64. Assurez-vous que votre disque
de stockage USB a été préformaté pour l'un de ces fichiers
système. Connectez alors simplement votre disque de
stockage USB au port de stockage USB. Le système
reconnaîtra et initialisera automatiquement le disque.
NAS Manager
Français
*
SyncQuick™ NAS Manager est un logiciel de recherche et de sauvegarde de périphérique NAS spécialement développé
pour les utilisateurs du client NAS. Il permet de sauvegarder de façon simple, rapide et fiable des informations
personnelles comme des photos, des fichiers MP3 et bien d'autres documents.
Recherche de votre uShare™ Mini NAS Adapter avec SyncQuick™ NAS Manager
1. Insérez le CD-ROM d'installation USRobotics. Cliquez sur Install SyncQuick™ NAS Manager (Installer
SyncQuick™ NAS Manager).
37
Page 41

Français
2. Sélectionnez Auto Search (Recherche automatique), puis cliquez sur la flèche verte. Une fois le NAS détecté,
effectuez un clic droit et sélectionnez Open NAS Control Page (Ouvrir la page de contrôle NAS).
3. Par défaut, le nom d'utilisateur et le mot de passe sont tous deux admin. Cliquez sur OK pour ouvrir la page de
configuration de votre périphérique NAS.
Recherche manuelle de votre uShare™ Mini NAS Adapter à l'aide d'un navigateur Web
1. Pour rechercher l'adresse IP de votre uShare™ Mini NAS Adapter, ouvrez un navigateur Web et saisissez storage
dans la barre d'adresse afin de trouver votre uShare™ Mini NAS Adapter et d'afficher l'adresse IP.
2. Par défaut, le nom d'utilisateur et le mot de passe sont tous deux admin. Cliquez sur OK pour ouvrir la page de
configuration.
Interface utilisateur Web NAS
Pour ouvrir l'interface utilisateur Web NAS, lancez SyncQuick™ NAS Manager afin de trouver le périphérique.
uShare™ Mini NAS Adapter permet d'afficher l'interface utilisateur dans différentes langues. Pour sélectionner la langue
souhaitée, cliquez sur le drapeau correspondant.
38
Page 42

Français
Prise en charge du format de disque dur
Votre uShare™ Mini NAS Adapter prend en charge les systèmes de fichiers FAT32/NTFS/FAT64. Assurez-vous que
votre disque de stockage USB a été préformaté pour l'un de ces fichiers système. Connectez alors simplement votre
disque de stockage USB au port de stockage USB. Le système reconnaîtra et initialisera automatiquement le disque.
Statut
Cette page fournit des informations de base sur votre uShare™ Mini NAS Adapter. Elle vous permet d'afficher la
version du microcode et la capacité disponible sur le disque dur.
Administration
Sur cette page, vous pouvez modifier votre nom d'hôte, votre nom de groupe et votre mot de passe. Cliquez sur Apply
(Appliquer) pour enregistrer vos paramètres.
• Host Name (Nom d'hôte) : permet d'identifier votre périphérique sur le réseau. Si vous préférez lui attribuer un
autre nom, saisissez le nouveau nom et cliquez sur Apply (Appliquer).
39
Page 43

• Group name (Nom de groupe) : doit être identique au nom du groupe de travail. Sauf si vous avez configuré
manuellement des groupes de travail sur votre réseau, le nom par défaut est « WORKGROUP ». Si votre poste
de travail fait partie d'un autre groupe de travail, entrez le nom de groupe correct pour le modifier.
Sous Windows, effectuez un clic droit sur Ordinateur (ou Poste de travail selon la version utilisée), sélectionnez
Propriétés, puis ouvrez l'onglet correspondant au nom de l'ordinateur pour afficher votre groupe de travail actuel.
Paramètres de date/heure
Français
Vous pouvez modifier les paramètres de date et d'heure à partir de cette page. Sélectionnez Enable (Activer), puis
cliquez sur Apply (appliquer) pour activer le Time Server (Serveur horaire). Par défaut, le protocole SNTP est défini sur
l'horloge réseau clock.isc.org. Vous pouvez aussi sélectionner Synchronize to PC (Synchroniser avec le PC) dans la
liste déroulante. Si l'accès à Internet est disponible, nous vous conseillons de définir le SNTP sur l'horloge réseau.
Pour désactiver le serveur horaire, sélectionnez Disable (Désactiver) et cliquez sur Apply (Appliquer). Vous devrez
peut-être mettre à jour manuellement vos informations de date et d'heure.
40
Page 44

Configuration LAN
Français
Par défaut, le paramètre IP est défini sur Automatic IP (IP automatique). Il s'agit de la configuration recommandée.
Elle permet à votre uShare™ Mini NAS Adapter d'obtenir son adresse IP automatiquement.
Si vous préférez, sélectionnez Static IP (IP statique) et renseignez les champs IP address (Adresse IP), Subnet Mask
(Masque de sous-réseau), Gateway (Passerelle) et Primary DNS (DNS primaire), puis cliquez sur Apply (Appliquer).
Les adresses IP statiques sont utiles lorsque vous montez des lecteurs réseau ou lorsque vous avez recours à la redirection
de port.
Paramètres PPPoE
PPPoE (Point-to-Point Protocol over Ethernet) est un protocole de connexion Internet qui permet aux utilisateurs de se
connecter à Internet sans utiliser de routeur. Tous les utilisateurs locaux peuvent partager une connexion PPPoE pour
accéder à Internet.
Si vous souhaitez définir le paramètre PPPoE pour votre NAS, cliquez sur le bouton Set (Définir) et saisissez les
informations de connexion à votre FAI.
41
Page 45

• Status (Statut) : affiche le statut de connexion PPPoE.
• Service Name (Nom du service) : champ facultatif.
• Account Name (Nom du compte) : entrez le nom d'utilisateur fourni par votre FAI.
• Password (Mot de passe) : entrez le mot de passe fourni par votre FAI.
• Service on Demand (Service à la demande) : le routeur se connectera UNIQUEMENT à votre FAI si une
demande Internet est effectuée par un utilisateur réseau local et se déconnectera une fois la transaction réalisée.
• Idle Time (Seconds) (Délai d'inactivité, en secondes) : durée d'inactivité à l'issue de laquelle l'adaptateur se
déconnectera du FAI. Si le délai est défini sur 0, l'adaptateur ne se déconnectera pas.
• Max Connection Time (Hours) (Temps de connexion maximal en heures) : durée pendant laquelle le
périphérique stockage peut rester connecté au FAI.
• IP Address Negotiation (Négociation d'adresse IP) : l'adresse IP et le masque de sous-réseau doivent être
attribués au même réseau que le modem DSL sur lequel le protocole PPPoE est activé.
• Fixed IP Address (Adresse IP fixe) : permet d'attribuer une adresse IP manuellement.
• AC Name (Nom du concentrateur d'accès) : champ facultatif. Permet de configurer un concentrateur
d'accès (Access Concentrator, AC) sur l'interface PPPoE.
• WAN IP (IP WAN) : adresse IP actuelle du périphérique de stockage.
Français
Paramètres DDNS
Le service DNS (Domain Name System) est utilisé pour la traduction des adresses IP, c'est-à-dire la transposition des
noms de domaine au format d'adresse IP numérique. La traduction du nom de domaine en une série de chiffres est
effectuée par le serveur DNS approprié.
Votre uShare™ Mini NAS Adapter prend en charge la fonction DNS dynamique pour les fournisseurs gratuits suivants :
• http://www.dyndns.com (DYDNS)
• http://www.2mydns.com (2MYDNS)
Afin d'activer le service DNS dynamique pour votre uShare™ Mini NAS Adapter, sélectionnez un service
DNS dynamique, puis renseignez les champs Host name (Nom d'hôte), User name (Nom d'utilisateur)
et Password (Mot de passe). Cliquez ensuite sur Apply (Appliquer). Pour quitter, cliquez sur Return (Retour).
42
Page 46

Français
Maintenance
Cette page vous permet de mettre à jour le microcode de votre uShare™ Mini NAS Adapter, de redémarrer le système
ou de rétablir les paramètres d'usine de votre uShare™ Mini NAS Adapter.
Firmware Upload (Téléchargement du microcode)
1. Téléchargez la dernière version du microcode sur USRobotics :
www.usr.com/support
2. Enregistrez le fichier de microcode sur votre ordinateur, puis décompressez-le (le cas échéant).
3. Sur la page Maintenance, cliquez sur Browse (Parcourir) et accédez au dossier dans lequel vous avez décompressé le
fichier de mise à jour du microcode.
4. Cliquez sur le bouton Update (Mettre à jour).
43
Page 47

Français
5. Confirmez le message qui s'affiche pour démarrer la mise à jour.
La mise à jour du microcode commence et peut prendre plusieurs minutes.
Attention :n'éteignez pas ou ne déconnectez pas votre uShare™ Mini NAS Adapter pendant la mise à jour du microcode.
6. Une fois la mise à jour terminée, votre uShare™ Mini NAS Adapter redémarre.
Factory Defaults (Paramètres d'usine)
Cliquez sur le bouton Reset (Réinitialiser) pour rétablir les paramètres d'usine. Les paramètres de compte SAMBA/
WebDAV sont conservés dans votre uShare™ Mini NAS Adapter. Tous les autres paramètres système sont remplacés
par les paramètres d'usine correspondants.
System Reboot (Redémarrage du système)
Cette fonction permet de redémarrer manuellement le lecteur réseau après une mise à jour du microcode ou si vous
rencontrez des problèmes avec votre uShare™ Mini NAS Adapter. Cliquez sur Reboot (Redémarrer) pour redémarrer
votre uShare™ Mini NAS Adapter.
Serveur de fichiers SAMBA (SMB)
Le serveur SMB vous permet de partager des données ou des fichiers dans un environnement LAN. Un compte « client »
par défaut est créé et le dossier « public » est accessible au compte client par défaut.
Remarque : pour éviter les problèmes de prise en charge de la langue, utilisez uniquement des caractères anglais
standard pour créer/partager des dossiers.
44
Page 48

Français
Création de comptes d'utilisateur pour votre uShare™ Mini NAS Adapter
1. Cliquez sur le bouton Add (Ajouter).
2. Renseignez les champs Account Name (Nom du compte) et Password (Mot de passe), définissez le niveau Access
(Accès), à savoir Read only (Lecture seule) ou Read/Write (Lecture/Ecriture), puis cliquez sur Add (Ajouter).
3. uShare™ Mini NAS Adapter crée alors un dossier SAMBA dont le nom est identique au nom du compte.
45
Page 49

Modification de comptes d'utilisateur
1. Sélectionnez le nom du compte, puis cliquez sur Modify (Modifier).
Français
2. Sur cette page, vous pouvez soit ajouter une liste de partage de dossier pour l'utilisateur sélectionné, soit créer un
nouveau dossier. Cliquez sur Return (Retour) pour enregistrer vos paramètres.
46
Page 50

Modification d'un mot de passe de compte d'utilisateur
1. Sélectionnez le nom du compte, puis cliquez sur Modify (Modifier).
Français
2. Saisissez le nouveau mot de passe dans le champ Password (Mot de passe), puis cliquez sur Apply (Appliquer) pour
enregistrer vos paramètres.
47
Page 51

Français
Suppression d'un compte d'utilisateur
Remarque : une fois ce compte supprimé, toutes les données stockées dans le dossier du nom de compte seront perdues.
Sélectionnez le compte que vous souhaitez supprimer, puis cliquez sur Delete (Supprimer).
Mappage de dossiers partagés sur votre uShare™ Mini NAS Adapter
(Windows 7, Windows Vista et XP)
Vous pouvez mapper des dossiers partagés sur votre uShare™ Mini NAS Adapter en tant que lecteurs réseau de votre
système informatique (affichant le lecteur NAS dans le réseau). Pour plus de commodité et une connexion plus rapide,
nous vous conseillons de mapper les dossiers que vous utilisez constamment comme lecteurs réseau. Vous créez ainsi un
accès direct aux dossiers partagés sur votre uShare™ Mini NAS Adapter à partir de l'option de menu Ordinateur/Poste
de travail.
Remarque : vous devez connaître l'adresse IP de votre uShare™ Mini NAS Adapter pour mapper les lecteurs. Pour
rechercher l'adresse IP de votre uShare™ Mini NAS Adapter, ouvrez un navigateur Web et saisissez
storage dans la barre d'adresse afin de trouver votre uShare™ Mini NAS Adapter et d'afficher l'adresse IP.
1. Cliquez sur Démarrer, effectuez un clic droit sur Ordinateur ou Poste de travail, puis sélectionnez Connecter un
lecteur réseau.
48
Page 52

Français
2. Entrez le nom d'hôte ou l'adresse IP de votre uShare™ Mini NAS Adapter suivis du nom de dossier partagé, puis
cliquez sur Ter mi ne r.
Exemple : saisissez storage\public (nom d'hôte) ou \\192.168.1.121\public (adresse IP)\
3. Saisissez un nom d'utilisateur et un mot de passe pour accéder à ce dossier partagé, puis cliquez sur OK.
Serveur WebDAV
WebDAV est un ensemble d'extensions du protocole HTTP qui permet à un serveur Web d'apparaître en tant que lecteur
réseau standard. Avec la prise en charge WebDAV, les utilisateurs pourront accéder à distance aux dossiers partagés via le
protocole HTTP.
49
Page 53

Français
Création d'un compte WebDAV
1. Un compte Guest (Client) par défaut est créé. Par défaut, le dossier Public est accessible au compte client.
2. Vous devez ensuite créer un compte de partage WebDav. Cliquez sur le bouton Add (Ajouter).
3. Renseignez les champs Account Name (Nom du compte) et Password (Mot de passe), définissez le niveau Access
(Accès), à savoir Read only (Lecture seule) ou Read/Write (Lecture/Ecriture), puis cliquez sur Add (Ajouter).
50
Page 54

4. Une fois le compte de partage WebDav créé, cliquez sur Modify (Modifier) pour configurer les droits
d'accès WebDAV de chaque dossier de partage. Nous ajoutons ici le dossier « Public » au compte. Cliquez
sur Return (Retour) pour enregistrer vos paramètres.
Mappage d'un lecteur réseau à WebDAV sous Windows 7
Français
Les instructions détaillées ci-dessous vous indiquent comment vous connecter à votre NAS via WebDAV sous
Windows 7.
1. Cliquez sur Démarrer, effectuez un clic droit sur Ordinateur, puis sélectionnez Connecter un lecteur réseau.
51
Page 55

2. Cliquez sur Se connecter à un site Web permettant de stocker des documents et des images.
Français
3. Cliquez sur Suivant.
52
Page 56

4. Cliquez sur Suivant pour choisir un emplacement réseau personnalisé.
Français
5. Entrez l'URL de votre uShare™ Mini NAS Adapter avec le nom du dossier de partage, puis cliquez sur Suivant.
Exemple : http://192.168.1.121/webdav/public
53
Page 57

Français
6. Saisissez un nom d'utilisateur et un mot de passe ayant les droits WebDAV nécessaires pour accéder à ce dossier
partagé, puis cliquez sur OK.
7. Entrez un nom pour cet emplacement réseau. Cliquez sur Suivant.
54
Page 58

8. Cliquez sur Te rmi ne r. L'emplacement réseau a été créé et est prêt à être utilisé.
Français
Remarque : la capacité par défaut actuelle de Windows pour WebDAV est seulement de 500 Mo. Afin de modifier cette
limite, exécutez le CD-ROM d'installation USRobotics, puis cliquez sur WebDAV Registr y Editor
(Editeur de registre WebDAV) pour exécuter le programme. Les utilisateurs pourront ainsi accéder à un
contenu supérieur à 500 Mo sur le système d'exploitation Windows.
Accès distant au dossier partagé WebDav
Pour pouvoir accéder à distance aux partages WebDav, vous devez rediriger le port 80 de votre routeur ou pare-feu vers
l'adresse IP de l'adaptateur NAS. La redirection du port 80 permet d'accéder au partage WebDAV. Consultez la
documentation de votre routeur ou pare-feu pour obtenir des instructions sur la redirection de port.
Sur certains routeurs ou pare-feux, la redirection de port peut apparaître sous le nom de « Serveurs locaux » ou
« Serveurs virtuels ».
55
Page 59

Français
Une fois que la redirection de port est configurée dans votre pare-feu ou routeur, vous devez déterminer votre adresse IP
externe attribuée par votre FAI. Ces informations sont disponibles dans l'interface utilisateur de votre pare-feu ou
routeur. Vous pouvez également utiliser des sites tiers qui fournissent ces informations. Recherchez par exemple
l'expression « quelle est mon adresse IP » pour trouver ces sites Web.
Notez votre adresse externe. Exemple : 12.34.56.78
L'accès distant à un dossier WebDav s'effectue de la même manière que l'accès local à un dossier WebDav. La seule
différence est l'adresse IP externe.
Avec l'adresse IP ci-dessus, l'URL WebDav sera http://12.34.56.78/webdav/(nom du dossier).
Serveur multimédia UPnP (Xbox 360, PS3, iTunes)
Le serveur multimédia de votre uShare™ Mini NAS Adapter permet de partager vos contenus multimédia (photos,
musique et vidéos) avec une console de jeux vidéo Xbox 360 connectée au même réseau local.
Remarque : avant de commencer, assurez-vous que les deux périphériques sont connectés au même réseau local et qu'ils
sont sous tension.
1. Ouvrez la page Media Server (Serveur multimédia), sélectionnez le dossier dans lequel se trouve le contenu
multimédia, puis cliquez sur Share (Partager).
56
Page 60

Français
2. Une fois le serveur multimédia de votre uShare™ Mini NAS Adapter activé, ouvrez la page du média Xbox 360,
sélectionnez Music (Musique) ou Pictures (Images), puis appuyez sur A pour poursuivre sur votre Xbox 360.
3. Appuyez sur X pour changer la source, puis sélectionnez votre lecteur réseau. Il doit apparaître en tant que storage-
xxx et afficher le dossier que vous avez activé pour le partage à partir de votre uShare™ Mini NAS Adapter.
57
Page 61

Dans le dossier partagé, vous pouvez accéder à vos fichiers multimédia partagés.
Connectez l'imprimante USB
Français
Serveur d'impression (Windows 7, Windows Vista et XP)
Remarque : vous devez connaître l'adresse IP de votre uShare™ Mini NAS Adapter pour utiliser l'adaptateur comme
serveur d'impression. Pour rechercher l'adresse IP de votre uShare™ Mini NAS Adapter, ouvrez un
navigateur Web et saisissez storage dans la barre d'adresse afin de trouver votre uShare™ Mini NAS
Adapter et d'afficher l'adresse IP.
1. Connectez votre imprimante USB au port d'imprimante USB de votre uShare™ Mini NAS Adapter.
2. Installez le pilote d'imprimante sur un ou plusieurs de vos ordinateurs. Pour utiliser une imprimante associée à votre
uShare™ Mini NAS Adapter, les pilotes d'imprimante doivent être installés localement sur les ordinateurs.
58
Page 62

Français
3. Après l'installation du pilote d'imprimante, cliquez sur Démarrer > Paramètres > Imprimantes et télécopieurs >
Ajouter une imprimante > Suivant.
4. Dans l'assistant Ajout d'imprimante, sélectionnez Imprimante locale, puis cliquez sur Suivant.
59
Page 63

5. Sélectionnez Créer un type de port, choisissez le type Port TCP/IP standard et cliquez sur Suivant.
Français
6. Saisissez l'adresse IP de votre uShare™ Mini NAS Adapter et cliquez sur Suivant.
60
Page 64

7. Sélectionnez Personnalisé et accédez à Paramètres. Cliquez sur Suivant.
Français
8. Sélectionnez LPR pour le protocole, puis entrez un nom de file d'attente (exemple : LRxxx) et sélectionnez LPR byte
enable (Compteur Byte LPR activé).
9. Cliquez sur OK pour enregistrer les paramètres de port.
10.Cliquez sur Ter miner.
61
Page 65

Français
11.Ouvrez la page Print Server (Serveur d'impression) et vérifiez le statut de l'imprimante. Si le statut est correct, cela
signifie que l'imprimante a été correctement configurée.
Remarque : le serveur d'impression de votre uShare™ Mini NAS Adapter ne prend pas en charge les imprimantes
GDI/Hôte. Sur certaines imprimantes multifonctions (Multi Function Printer, MFP), les fonctions de
numérisation sont susceptibles de ne pas fonctionner. Veuillez contacter le fabricant de l'imprimante pour
obtenir les spécifications détaillées.
Serveur P2P
uShare™ Mini NAS Adapter prend en charge le téléchargement Bit Torrent indépendamment, sans utiliser les ressources
de l'ordinateur. Il est possible d'exécuter au maximum 4 téléchargements Bit Torrent simultanément.
1. Sélectionnez P2P Server (Serveur P2P). Dans Download Path (Chemin de téléchargement), sélectionnez le chemin
de téléchargement que vous souhaitez utiliser. Cliquez sur Apply (Appliquer) pour enregistrer vos paramètres.
Remarque : ne modifiez pas le chemin si des téléchargements Bit Torrent sont actifs. Si vous modifiez le chemin alors
que des téléchargements sont en cours, ces derniers échoueront.
62
Page 66

Français
2. Définissez la plage de ports du serveur, qui peut être comprise entre 6881 (par défaut) et 65535.
3. Dans Upload Limit (Limite de téléchargement), définissez la vitesse de téléchargement maximum : 0 = vitesse de
téléchargement illimitée (4 kbits/s étant la vitesse minimale), puis cliquez sur Set (Définir) pour sauvegarder votre
configuration.
4. Cliquez sur Browse (Parcourir), sélectionnez le fichier .torrent, puis cliquez sur Upload (Télécharger) pour le placer
dans la file d'attente de téléchargement.
Remarque : toutes les tâches affichées dans la liste Download Queue (File d'attente de téléchargement) sont supprimées
lorsque uShare™ Mini NAS Adapter est mis hors tension ou si le lecteur USB connecté à votre uShare™
Mini NAS Adapter est déconnecté.
5. Pour supprimer les tâches Bit Torrent une fois le téléchargement terminé, cliquez sur Remove (Supprimer) pour
supprimer les retirer de la file d'attente.
Notifications par e-mail
Pour chaque téléchargement terminé, uShare™ Mini NAS Adapter peut envoyer une notification à une adresse e-mail
donnée.
1. Accédez à Mail Notification (Notification par e-mail) et cliquez sur le bouton Set (Définir).
63
Page 67

Français
2. Sélectionnez Enable (Activer).
3. Renseignez les champs SMTP Server (Serveur SMTP), Recipient (Destinataire), c'est-à-dire l'adresse e-mail du
destinataire, ainsi que User name (Nom d'utilisateur) et Password (Mot de passe).
4. Cliquez sur Apply (Appliquer) pour enregistrer vos paramètres.
Installation sous Mac (Mac 10.5.4 et version ultérieure)
1. Ouvrez votre navigateur, puis saisissez le nom d'hôte ou l'adresse IP de votre uShare™ Mini NAS Adapter.
Exemple : saisissez http://storage-1d5e (nom d'hôte) ou http://192.168.1.121 (adresse IP).
2. Par défaut, le nom d'utilisateur et le mot de passe sont tous deux admin. Cliquez sur Ouverture de session pour
ouvrir la page de configuration de votre uShare™ Mini NAS Adapter.
64
Page 68

Accès au partage SAMBA sous Mac OS X
1. Cliquez sur Aller dans la barre d'outils, puis sélectionnez Se connecter au serveur.
Français
2. Entrez le nom d'hôte ou l'adresse IP de votre uShare™ Mini NAS Adapter et cliquez sur Se connecter.
Exemple : saisissez smb://storage-1d5e (nom d'hôte) ou smb://192.168.1.121 (adresse IP).
3. Connectez-vous comme Invité ou Utilisateur référencé, puis cliquez sur Se connecter.
65
Page 69

4. Sélectionnez les volumes partagés à monter, puis cliquez sur OK.
Accès au partage WebDAV sous Mac OS X
1. Cliquez sur Aller dans la barre d'outils, puis sélectionnez Se connecter au serveur.
Français
2. Entrez le nom d'hôte ou l'adresse IP de votre uShare™ Mini NAS Adapter et cliquez sur Se connecter.
66
Page 70

Exemple : saisissez http://storage-1d5e/webdav (nom d'hôte) ou http://192.168.1.121/webdav (adresse IP).
3. Entrez le nom d'utilisateur et le mot de passe WebDAV, puis cliquez sur OK.
Français
Dépannage
Quelle est l'adresse IP par défaut de mon uShare™ Mini NAS Adapter ?
Solution :
L'adresse IP par défaut de votre uShare™ Mini NAS Adapter est 169.254.0.1. Pour rechercher l'adresse IP de votre
uShare™ Mini NAS Adapter, ouvrez un navigateur Web et saisissez storage dans la barre d'adresse afin de trouver votre
uShare™ Mini NAS Adapter et d'afficher l'adresse IP.
Quels sont le nom de connexion/utilisateur et le mot de passe par défaut ?
Solution :
Par défaut, le nom d'utilisateur et le mot de passe sont tous deux admin.
J'ai oublié mon nom d'utilisateur et/ou mon mot de passe, que dois-je faire ?
Solution :
Si vous avez oublié votre nom d'utilisateur et/ou votre mot de passe, vous devez rétablir les paramètres d'usine de votre
uShare™ Mini NAS Adapter.
67
Page 71

Français
Remarque :
seuls les paramètres de compte SAMBA/WebDAV seront conservés sur le disque dur de votre uShare™
Mini NAS Adapter. Tous les autres paramètres reprennent leur configuration par défaut.
1. Appuyez sur le bouton de réinitialisation et maintenez-le enfoncé.
2. Débranchez l'adaptateur secteur puis rebranchez-le à votre uShare™ Mini NAS Adapter.
3. Maintenez le bouton de réinitialisation enfoncé pendant 30 secondes, puis relâchez-le.
Votre uShare™ Mini NAS Adapter revient à ses paramètres d'usine.
4. Effectuez de nouveau les étapes de la procédure d'installation pour reconfigurer votre uShare™ Mini NAS Adapter.
Pourquoi ne puis-je pas créer de comptes dans SAMBA ou WebDAV ?
Solution :
Vous utilisez peut-être des caractères qui ne sont pas pris en charge. Pour éviter les problèmes de prise en charge de la
langue, utilisez uniquement des caractères anglais standard pour créer/partager des dossiers.
Pourquoi ne puis-je pas télécharger des fichiers via une connexion LAN ?
Solution :
Assurez-vous que vous disposez d'une connexion réseau correcte mais aussi des droits d'accès en lecture et en écriture
sur les dossiers.
Mon uShare™ Mini NAS Adapter n'est pas passé à l'heure d'été.
Solution :
Votre uShare™ Mini NAS Adapter ne prend pas en charge les paramètres de passage à l'heure d'été. Vous devez régler
l'heure d'été manuellement.
Je ne peux pas accéder à un dossier SMB avec un mot de passe via mon uShare™ Mini NAS Adapter sous
Windows XP.
Solution :
SAMBA est pris en charge par XP SP2 ou toute version ultérieure. Cet adaptateur requiert Windows XP SP3 ou version
ultérieure. Veuillez mettre à jour Windows XP vers le SP3 ou une version ultérieure. Une fois la mise à jour effectuée, si
vous avez installé Norton Internet Security, contactez le centre d'assistance Norton.
Quels sont les systèmes d'exploitation pris en charge par uShare™ Mini NAS Adapter ?
Solution :
uShare™ Mini NAS Adapter prend en charge Windows 7, Windows Vista, XP SP3, Mac OS 10.5.4 et versions
ultérieures.
Quelles sont les limites relatives aux connexions utilisateur avec le serveur Samba ?
Solution :
• Serveur Samba : accès de niveau utilisateur (vous pouvez créer au maximum 16 comptes d'utilisateur, avec
16 dossiers partagés par compte)
• Connexion utilisateur maximale : 8 utilisateurs Samba (64 connexions TCP simultanées au total)
Quelles sont les limites de longueur des noms de fichier de uShare™ Mini NAS Adapter ?
Solution :
La limite de longueur de nom de fichier est de 12 octets.
68
Page 72

Français
Puis-je utiliser mon uShare™ Mini NAS Adapter en tant que serveur DHCP ?
Solution :
Vous pouvez configurer votre uShare™ Mini NAS Adapter en tant que serveur DHCP si aucun autre serveur DHCP
n'est présent sur votre réseau local. Sinon, uShare™ Mini NAS Adapter désactivera automatiquement sa fonction de
serveur DHCP et deviendra un client DHCP.
WebDAV prend-il en charge Windows XP SP1 ?
Solution :
Microsoft permet la prise en charge de WebDAV à partir de Windows XP SP2. Si vous utilisez encore la version SP1,
téléchargez et installez le fichier XP Service Pack 3 depuis le site Web de Microsoft.
Pourquoi ne puis-je pas créer un nouveau lien WebDAV sur mon ordinateur Windows ? Le système se connecte
toujours au lien que j'ai précédemment supprimé.
Solution :
Ouvrez la Corbeille de votre ordinateur et supprimez définitivement le lien WebDAV dont vous ne voulez plus.
Le client Bit Torrent amorce-t-il (charge-t-il) le fichier au cours d'un téléchargement actif ?
Solution :
Oui. Une fois le téléchargement terminé, l'amorçage (chargement) de Bit Torrent s'effectue.
69
Page 73

Français
Garantie
Ce produit est soumis à la garantie limitée d'U.S. Robotics Corporation.
Pour afficher une copie de la garantie limitée et pour savoir comment contacter le service d'assistance technique de
USRobotics, consultez le site Web USRobotics à l'adresse suivante :
www.usr.com/support
Réglementation
Conditions FCC
Cet équipement a été testé et déclaré conforme à la Section 15 des règles de la FCC. Son fonctionnement est soumis aux
deux conditions suivantes :
1. Ce produit ne risque pas de causer d'interférences nuisibles.
2. Ce produit doit accepter toutes les interférences reçues, y compris celles qui risquent d'entraîner un fonctionnement
indésirable.
CE
Cet équipement est conforme aux normes suivantes : EN55022 : CLASS B
Informations DEEE
Pour les utilisateurs des pays membres de l'UE (Union européenne) : conformément à la directive DEEE (Déchets
d'équipements électriques et électroniques), ne mettez pas ce produit au rebut avec les déchets ménagers ou
commerciaux. Les équipements électriques et électroniques doivent être récupérés et recyclés selon les pratiques
définies pour votre pays. Pour plus d'informations sur le recyclage de ce produit, veuillez contacter les autorités
locales, le service de ramassage des déchets ménagers ou le magasin où vous l'avez acheté.
70
Page 74

Deutsch
Übersicht
Mit dem uShare™ Mini NAS Adapter können Sie eine externe USB-Festplatte in ein NAS-Gerät (Network Attached
Storage) verwandeln oder einen USB-Drucker zum Netzwerkdrucker machen.
Unterstützte Betriebssysteme
• Windows 7, Windows Vista, Windows XP SP3
• Mac OS X 10.5.4 oder höher
Hauptfunktionen
• Unterstützt USB-Massenspeichergeräte (Kapazität: Minimum 4 GB, Maximum 2 TB)
• Unterstützt Auto-IP (DHCP-Server oder DHCP-Client) / Fixed-IP
• Unterstützt 10/100/1000 Mbps Ethernet-Anschlüsse
• Passwortverwaltung für sicheren Zugriff auf Festplatte und Webmanagement
• Unterstützt SAMBA (SMB)
• Unterstützt WebDAV-Server
• Unterstützt BitTorrent-Download
Deutsch
• Unterstützt UPnP-AV-Medienserver und Apple iTunes Musik-Server
• Unterstützt USB-Druckerserver
Netzwerkumgebung
Für die Einrichtung Ihres Geräts gibt es drei Möglichkeiten:
• Einrichtung des uShare™ Mini NAS Adapters als DHCP-Client: Wenn Ihr uShare™ Mini NAS Adapter unter
einem integrierten DHCP-Server-Router (z. B. Internet-Sharing-Hub) betrieben wird, erhält er vom DHCPServer automatisch eine IP-Adresse.
• Einrichtung des uShare™ Mini NAS Adapters als DHCP-Server: Wenn Ihre Betriebsumgebung nicht über
einen DHCP-Server verfügt, übernimmt der uShare™ Mini NAS Adapter automatisch die Funktion eines DHCPServers und vergibt für die Installation eine IP-Adresse.
• In einer statischen IP-Umgebung: Wenn der uShare™ Mini NAS Adapter in einer statischen IP-Umgebung
betrieben werden soll, müssen Sie zunächst die IP-Adresse für ihn konfigurieren. Weitere Informationen zur
Konfiguration finden Sie unter "LAN-Konfiguration" auf Seite 76.
71
Page 75

Hardware-Installation
1. Verbinden Sie Ihre USB-Festplatte mit dem Adapter (a).
Und/Oder
Verbinden Sie Ihren USB-Drucker mit dem Adapter (b).
2. Verbinden Sie Ihren Router oder Ihr Gateway über ein
Ethernet-Kabel mit dem Adapter (c).
3. Schließen Sie das Netzteil an (d) und stecken Sie es in die
Steckdose.
• (e) Netzanzeige
• (f) Betriebssystemanzeige
• (g) LAN-Anzeige
*. Der uShare™ Mini NAS Adapter unterstützt die Dateisysteme
FAT32, NTFS und FAT64. Stellen Sie sicher, dass Ihre USBFestplatte in einem dieser Dateisysteme vorformatiert ist.
Verbinden Sie die USB-Festplatte danach einfach mit dem
USB-Anschluss. Sie wird vom System automatisch erkannt
und initialisiert.
NAS Manager
Deutsch
*
Der SyncQuick™ NAS Manager ist eine NAS-Software zur Gerätesuche und -sicherung. Die Software wurde speziell für
NAS-Client-Benutzer entwickelt und ermöglicht die einfache, schnelle und zuverlässige Sicherung persönlicher Daten
wie Fotos, MP3-Dateien und anderer Dokumente.
Suche nach dem uShare™ Mini NAS Adapter mit dem SyncQuick™ NAS Manager
1. Legen Sie die USRobotics Installations-CD-ROM ein. Klicken Sie auf Install SyncQuick™ NAS Manager
(SyncQuick™ NAS Manager installieren).
72
Page 76

Deutsch
2. Wählen Sie Auto Search (Automatische Suche) und klicken Sie anschließend auf den grünen Pfeil. Klicken Sie nach
der Erkennung des NAS-Geräts mit der rechten Maustaste darauf und wählen Sie Open NAS Control Page (NAS-
Steuerungsseite öffnen).
3. Der Standardbenutzername und das Standardpasswort lauten beide admin. Klicken Sie auf OK, um die
Konfigurationsseite zu öffnen und Ihr NAS-Gerät einzurichten.
So suchen Sie Ihren uShare™ Mini NAS Adapter manuell über einen Webbrowser
1. Öffnen Sie ein Browserfenster und geben Sie storage in die Adressleiste ein, um Ihren uShare™ Mini NAS Adapter
zu suchen und sich seine IP-Adresse anzeigen zu lassen.
2. Der Standardbenutzername und das Standardpasswort lauten beide admin. Klicken Sie auf OK, um die
Konfigurationsseite zu öffnen.
NAS-Web-Benutzeroberfläche
Starten Sie den SyncQuick NAS Manager, um das Gerät zu suchen und die NAS-Web-Benutzeroberfläche zu öffnen.
Der uShare™ Mini NAS Adapter verfügt über lokalisierte Benutzeroberflächen. Klicken Sie auf eine Länderflagge, um
Ihre Sprache auszuwählen.
73
Page 77

Deutsch
Unterstützte Festplattenformate
Der uShare™ Mini NAS Adapter unterstützt die Dateisysteme FAT32, NTFS und FAT64. Stellen Sie sicher, dass Ihre
USB-Festplatte in einem dieser Dateisysteme vorformatiert ist. Verbinden Sie die USB-Festplatte danach einfach mit dem
USB-Anschluss. Sie wird vom System automatisch erkannt und initialisiert.
Status
Auf dieser Seite erhalten Sie grundlegende Informationen zum uShare™ Mini NAS Adapter. Hier werden Ihnen auch
Ihre Firmware-Version und die verfügbare Festplattenkapazität angezeigt.
Administration
Auf der Seite "Administration" können Sie Hostnamen, Gruppennamen und Passwort ändern. Klicken Sie auf Apply
(Übernehmen), um Ihre Einstellungen zu speichern.
• Host name (Hostname): Wird verwendet, um Ihr Gerät im Netzwerk zu lokalisieren. Wenn Sie einen anderen
Namen verwenden wollen, geben Sie den neuen Namen ein und klicken Sie auf Apply.
74
Page 78

• Group Name (Gruppenname): Sollte mit dem Namen der Arbeitsgruppe übereinstimmen. Wenn Sie nicht
manuell Arbeitsgruppen für Ihr Netzwerk konfiguriert haben, lautet der Standardname "WORKGROUP".
Ändern Sie den Gruppennamen, wenn Ihre Workstation zu einer anderen Arbeitsgruppe gehört.
Klicken Sie in Windows mit der rechten Maustaste auf Computer und wählen Sie Eigenschaften, um sich Ihre
aktuelle Arbeitsgruppe anzeigen zu lassen.
Datums- und Zeiteinstellungen
Deutsch
Auf der Seite "Time Setting" können Sie die Datums- und Zeiteinstellungen ändern. Wählen Sie Enable (Aktivieren) und
klicken Sie auf Apply (Übernehmen), um den Time Server zu aktivieren. Standardmäßig ist für das SNTP der NetzwerkZeitserver clock.isc.org eingestellt. Sie können aus der Dropdown-Liste auch Synchronize to PC (Mit dem Computer
synchronisieren) auswählen. Wenn Sie über Internetzugang verfügen, empfehlen wir Ihnen den Netzwerk-Zeitserver als
SNTP-Einstellung.
Wählen Sie Disable (Deaktivieren) und klicken Sie auf Apply (Übernehmen), um den Zeitserver zu deaktivieren.
Möglicherweise müssen Sie dann Datum und Uhrzeit manuell aktualisieren.
75
Page 79

LAN-Konfiguration
Deutsch
Die standardmäßige IP-Einstellung ist Automatic IP (Automatische IP-Adresse). Dies ist die empfohlene Einstellung,
da dem uShare™ Mini NAS Adapter in diesem Modus seine IP-Adresse automatisch zugewiesen wird.
Sie können aber auch die Einstellung Static IP (Statische IP-Adresse) auswählen. Bei dieser Option müssen Sie die
Felder IP address (IP-Adresse), Subnet Mask (Subnetzmaske), Gateway und Primary DNS (Primärer DNS-Server)
ausfüllen und auf Apply (Übernehmen) klicken. Statische IP-Adressen empfehlen sich für das Mounten von
Netzlaufwerken oder bei Port Forwarding (Anschlussweiterleitung).
PPPoE-Einstellungen
PPPoE (Point-to-Point Protocol over Ethernet) ist ein Netzwerkprotokoll, das eine Verbindung mit dem Internet ohne
Router ermöglicht. Alle lokalen Benutzer können über dieselbe PPPoE-Verbindung auf das Internet zugreifen.
Zum Konfigurieren der PPPoE-Einstellung Ihres NAS-Systems klicken Sie im Feld "PPPoE" auf die Schaltfläche Set
(Einstellen) und geben Ihre Verbindungsdaten für den ISP ein.
• Status: PPPoE-Verbindungsstatus anzeigen.
76
Page 80

Deutsch
• Service Name (Dienstname): Optional.
• Account Name (Kontoname): Geben Sie den von Ihrem ISP zugeteilten Benutzernamen ein.
• Password (Passwort): Geben Sie das von Ihrem ISP zugeteilte Passwort ein.
• Service on Demand: Der Router stellt nur dann eine Verbindung zum ISP her, wenn eine LAN-Benutzer eine
Anfrage an das Internet sendet, und trennt die Verbindung, wenn kein Datenverkehr mehr stattfindet.
• Idle Time (Leerlaufzeit in Sekunden): Die Leerlaufzeit gibt an, wie lange es dauert, bis sich der Adapter vom ISP
trennt, wenn kein Datenverkehr stattfindet. Wenn die Zeit auf 0 gestellt wird, bleibt der Adapter dauerhaft
verbunden.
• Max Connection Time (Maximale Verbindungsdauer in Stunden): Gibt an, wie lange die USB-Festplatte mit dem
ISP verbunden bleiben kann.
• IP Address Negotiation (Abstimmung der IP-Adresse): Die IP-Adresse und die Subnetzmaske sollten
demselben Netzwerk zugewiesen sein wie das DSL-Modem mit aktiviertem PPPoE.
• Fixed IP Address (Feste IP-Adresse): Zur manuellen Zuweisung einer IP-Adresse.
• AC Name (Zugangsrechner-Name): Optional. Zur Konfiguration eines Zugangsrechner-Namens in der PPPoE-
Schnittstelle.
• WAN IP: Bezeichnet die aktuelle IP-Adresse der USB-Festplatte.
DDNS-Einstellungen
Der DNS-Dienst (Domain Name System) übersetzt IP-Adressen von Domänennamen in das numerische IP-AdressenFormat. Die Übersetzung vom Domänennamen in eine Abfolge von Zahlen wird vom entsprechenden DNS-Server
durchgeführt.
Der uShare™ Mini NAS Adapter unterstützt Dynamic DNS der folgenden kostenlosen Anbieter:
• http://www.dyndns.com (DYDNS)
• http://www.2mydns.com (2MYDNS)
Wählen Sie einen DNS-Dienst, füllen Sie die Felder Host name (Hostname), User name (Benutzername) und
Password (Passwort) aus und klicken Sie auf Apply (Übernehmen), um den dynamischen DNS-Dienst für den
uShare™ Mini NAS Adapter zu aktivieren. Klicken Sie auf Return (Eingabe), um die Konfiguration zu beenden.
77
Page 81

Deutsch
Maintenance (Wartung)
Auf dieser Seite können Sie die Firmware Ihres uShare™ Mini NAS Adapters aktualisieren, das System neu starten oder
die werkseitigen Voreinstellungen des Geräts wiederherstellen.
Firmware Upload
1. Laden Sie die aktuelle USRobotics Firmware unter
www.usr.com/support
herunter.
2. Speichern Sie die Firmware-Datei auf Ihrem Computer und entpacken Sie sie (gegebenenfalls).
3. Klicken Sie auf der Wartungsseite auf Browse (Durchsuchen) und navigieren Sie zu dem Ordner, in dem sich die
entpackte Firmware-Update-Datei befindet.
4. Klicken Sie auf die Schaltfläche Update (Aktualisieren).
78
Page 82

Deutsch
5. Bestätigen Sie die Popup-Meldung, um das Update zu starten.
Das Firmware-Update beginnt. Dieser Vorgang kann einige Minuten dauern.
Vorsicht: Während des Updates darf der uShare™ Mini NAS Adapter weder ausgeschaltet noch
von der Stromversorgung getrennt werden.
6. Nach Beendigung des Updates wird Ihr uShare™ Mini NAS Adapter neu gestartet.
Factory Defaults (Werkseitige Voreinstellungen)
Klicken Sie auf die Schaltfläche Reset (Zurücksetzen), um die werkseitigen Voreinstellungen wiederherzustellen. Die
SAMBA/WebDAV-Kontoeinstellungen Ihres uShare™ Mini NAS Adapters bleiben dabei erhalten. Alle anderen
Systemeinstellungen werden auf die Werkseinstellungen zurückgesetzt.
System Reboot (Systemneustart)
Mit dieser Funktion kann das Netzlaufwerk nach einem Firmware-Update oder bei Problemen mit Ihrem uShare™ Mini
NAS Adapter manuell neu gestartet werden. Klicken Sie auf Reboot (Neustart), um den uShare™ Mini NAS Adapter
neu zu starten.
SAMBA File Server (SMB) (SAMBA-Dateiserver)
Über den SMB-Server können Sie Daten oder Dateien in der LAN-Umgebung freigeben. Dafür wird ein StandardGastkonto "Guest" erstellt, welches standardmäßig Zugriff auf den öffentlichen Ordner "Public" hat.
Hinweis: Verwenden Sie bei der Erstellung/Freigabe von Ordnern nur englische Standardzeichen, um
Sprachunterstützungsprobleme zu vermeiden.
79
Page 83

Erstellen zusätzlicher Benutzerkonten für den uShare™ Mini NAS Adapter
1. Klicken Sie auf Add (Hinzufügen).
2. Füllen Sie die Felder Account Name (Kontoname) und Password (Passwort) aus, legen Sie im Feld Access
(Zugang) die Art der Zugriffsberechtigung (Read only (nur Leseberechtigung) oder Read/Write (Lese- und
Schreibberechtigung)) fest und klicken Sie anschließend auf Add (Hinzufügen).
Deutsch
3. Der uShare™ Mini NAS Adapter legt daraufhin einen SAMBA-Ordner an, dessen Name mit dem des Kontonamens
übereinstimmt.
80
Page 84

Bearbeiten von Benutzerkonten
1. Markieren Sie den Kontonamen und klicken Sie auf Modify (Ändern).
Deutsch
2. Auf dieser Seite können Sie für den ausgewählten Benutzer entweder eine Ordnerfreigabeliste hinzufügen oder einen
neuen Ordner erstellen. Klicken Sie auf Return (Eingabe), um Ihre Einstellungen zu speichern.
81
Page 85

Ändern des Passworts für das Benutzerkonto
1. Wählen Sie den Kontonamen und klicken Sie auf Modify (Ändern).
Deutsch
2. Geben Sie im Feld Password (Passwort) das neue Passwort ein und klicken Sie auf Apply (Übernehmen), um Ihre
Einstellungen zu speichern.
82
Page 86

Deutsch
Löschen eines Benutzerkontos
Hinweis:Das Löschen des Kontos hat den Verlust sämtlicher Daten innerhalb des Kontonamen-Ordners zur Folge.
Wählen Sie das zu löschende Konto und klicken Sie auf Delete (Löschen), um fortzufahren.
Herstellen einer Verbindung zu freigegebenen Ordnern in Ihrem uShare™
Mini NAS Adapter (Windows 7, Windows Vista und XP)
Sie können in Ihrem Computersystem eine Netzlaufwerkverbindung zu freigegebenen Ordnern (im Netzwerk als NASFestplatten angezeigt) in Ihrem uShare™ Mini NAS Adapter herstellen. Um eine schnellere Verbindung und Nutzbarkeit
zu ermöglichen, wird empfohlen, häufig verwendete Ordner als Netzlaufwerke zu verbinden. Auf diese Weise haben Sie
vom Windows-Hauptordner "Computer" aus direkten Zugriff auf freigegebene Ordner in Ihrem uShare™ Mini NAS
Adapter.
Hinweis: Um Laufwerke verbinden zu können, benötigen Sie die IP-Adresse Ihres uShare™ Mini NAS Adapters.
Öffnen Sie ein Browserfenster und geben Sie storage in die Adressleiste ein, um Ihren uShare™ Mini NAS
Adapter zu suchen und sich seine IP-Adresse anzeigen zu lassen.
1. Klicken Sie unter Windows auf Start, klicken Sie anschließend mit der rechten Maustaste auf Computer und wählen
Sie Netzlaufwerk verbinden.
83
Page 87

2. Geben Sie den Hostnamen oder die IP-Adresse des uShare™ Mini NAS Adapters, gefolgt vom Namen des
freigegebenen Ordners ein und klicken Sie auf Fertig stellen.
Beispiel: Geben Sie storage\public (Hostname) oder \\192.168.1.121\public (IP-Adresse)\ ein.
Deutsch
3. Geben Sie einen Benutzernamen und ein Passwort ein, um auf diesen freigegebenen Ordner zugreifen zu können,
und klicken Sie auf OK.
WebDAV-Server
WebDAV ist eine Erweiterung des HTTP-Protokolls, mit dem Sie auf einen Webserver wie auf ein StandardNetzlaufwerk zugreifen können. Mit WebDAV-Unterstützung haben Benutzer über das HTTP-Protokoll
Fernzugriff auf die freigegebenen Ordner.
84
Page 88

Erstellen eines WebDAV-Kontos
1. Es wird ein standardmäßiges Gastkonto Guest erstellt. Das Gastkonto hat standardmäßig Zugang auf den
öffentlichen Ordner Public.
4. Als Nächstes müssen Sie ein WebDAV-Freigabekonto erstellen. Klicken Sie auf Add (Hinzufügen).
Deutsch
5. Füllen Sie die Felder Account Name (Kontoname) und Password (Passwort) aus und legen Sie im Feld
Access die Art der Zugriffsberechtigung fest (Read only (nur Leseberechtigung) oder Read/Write
(Lese- und Schreibberechtigung)). Klicken Sie anschließend auf Add.
85
Page 89

6. Nachdem das WebDAV-Freigabekonto erstellt ist, klicken Sie auf Modify (Ändern), um die WebDAV-
Zugriffsberechtigung für jeden freigegebenen Ordner einzustellen. Fügen Sie an dieser Stelle den öffentlichen
Ordner "Public" zu den Konten hinzu. Klicken Sie auf Return (Eingabe), um Ihre Einstellungen zu speichern.
Verbinden eines Netzlaufwerks mit WebDAV unter Windows 7
Deutsch
In der untenstehenden Schritt-für-Schritt-Anleitung wird erklärt, wie Sie Ihr NAS-System über WebDAV mit Windows 7
verbinden können.
1. Klicken Sie unter Windows auf Start, klicken Sie anschließend mit der rechten Maustaste auf Computer und wählen
Sie Netzlaufwerk verbinden.
86
Page 90

2. Klicken Sie auf Verbindung mit einer Website herstellen, auf der Sie Dokumente und Bilder speichern
können.
Deutsch
3. Klicken Sie auf Weiter.
87
Page 91

4. Klicken Sie auf Weiter, um eine benutzerdefinierte Netzwerkadresse auszuwählen.
Deutsch
5. Geben Sie die URL Ihres uShare™ Mini NAS Adapters zusammen mit dem Namen des freigegebenen Ordners ein
und klicken Sie auf Weiter.
Beispiel: http://192.168.1.121/webdav/public
88
Page 92

Deutsch
6. Geben Sie einen Benutzernamen und ein Passwort mit WebDAV-Zugriffsberechtigung auf diesen freigegebenen
Ordner ein und klicken Sie auf OK.
7. Geben Sie einen Namen für diese Netzwerkadresse ein. Klicken Sie auf Weiter.
89
Page 93

8. Klicken Sie auf Fertig stellen. Die Netzwerkressource wurde erstellt und kann nun verwendet werden.
Deutsch
Hinweis: Die aktuelle Standardkapazität für WebDAV unter Windows beträgt nur 500 MB. Um diese Beschränkung
ändern zu können, starten Sie bitte die USRobotics Installations-CD-ROM und klicken Sie auf WebDAV
Registry Editor, um das Programm auszuführen. Danach haben Benutzer unter Windows-Betriebssystemen
auch Zugriff auf Daten, die 500 MB übersteigen.
Fernzugriff auf freigegebene WebDAV-Ordner
Um Fernzugriff auf freigegebene WebDAV-Ordner zu erhalten, müssen Sie Anschluss 80 Ihres Routers oder Ihrer
Firewall an die IP-Adresse des NAS-Adapters weiterleiten. Die Weiterleitung von Anschluss 80 ermöglicht den Zugriff
auf die WebDAV-fähigen freigegebenen Ordner. Die Vorgehensweise zur Anschlussweiterleitung finden Sie in der
Bedienungsanleitung Ihres Routers oder Ihrer Firewall.
Bei manchen Routern oder Firewalls kann die Anschlussweiterleitung auch als "lokale Server" oder "virtuelle Server"
bezeichnet sein.
90
Page 94

Deutsch
Sobald die Anschlussweiterleitung in Ihrem Router oder Ihrer Firewall konfiguriert ist, müssen Sie die externe IPAdresse, die von Ihrem ISP zugewiesen wurde, festlegen. Diese Information erhalten Sie auf der Benutzeroberfläche
Ihres Routers oder Ihrer Firewall. Alternativ erhalten Sie diese Information auch auf Websites von Drittanbietern.
Geben Sie bei der Suche nach diesen Websites als Suchbegriff "welche IP-Adresse habe ich" ein.
Schreiben Sie sich Ihre externe Adresse auf. Beispiel: 12.34.56.78
Der Fernzugriff auf einen WebDAV-Ordner funktioniert nach dem gleichen Prinzip wie der lokale Zugriff auf einen
WebDAV-Ordner. Den einzigen Unterschied stellt die externe IP-Adresse dar.
Im Fall der obigen Beispiel-IP-Adresse würde die URL http://12.34.56.78/webdav/(Ordnername) lauten.
UPnP-Medienserver (Xbox 360, PS3, iTunes)
Der Medienserver im uShare™ Mini NAS Adapter kann u. a. zur Freigabe Ihrer Multimediainhalte (Fotos, Musik und
Videos) an eine Xbox 360 Spielkonsole verwendet werden, die mit demselben Netzwerk verbunden ist.
Hinweis: Bevor Sie beginnen, sollten Sie sich vergewissern, dass beide Geräte eingeschaltet und mit demselben lokalen
Netzwerk verbunden sind.
1. Öffnen Sie die Seite Media Server (Medienserver), wählen Sie den Ordner, in dem sich Ihre Multimediainhalte
befinden, und klicken Sie auf Share (Freigeben).
91
Page 95

Deutsch
2. Nachdem der Medienserver des uShare™ Mini NAS Adapters aktiviert ist, öffnen Sie die Registerkarte "Medien" in
Ihrer Xbox 360, wählen Sie Musik oder Bilder und drücken Sie die A-Taste, um auf Ihrer Xbox 360 fortzufahren.
3. Drücken Sie die X-Taste, um Ihre Quelle zu ändern, und wählen Sie Ihr Netzlaufwerk. Es sollte als storage-xxx
angezeigt werden und den Ordner anzeigen, den Sie auf Ihrem uShare™ Mini NAS Adapter freigegeben haben.
92
Page 96

Über den freigegebenen Ordner haben Sie Zugriff auf Ihre freigegebenen Multimediadateien.
USB-Drucker anschließen
Deutsch
Druckerserver (Windows 7, Windows Vista und XP)
Hinweis: Um Ihren uShare™ Mini NAS Adapter als Druckerserver verwenden zu können, müssen Sie die IP-Adresse
des Adapters kennen. Öffnen Sie ein Browserfenster und geben Sie storage in die Adressleiste ein, um Ihren
uShare™ Mini NAS Adapter zu suchen und sich seine IP-Adresse anzeigen zu lassen.
1. Verbinden Sie Ihren USB-Drucker mit dem USB-Druckeranschluss Ihres uShare™ Mini NAS Adapters.
2. Installieren Sie auf Ihrem/Ihren Computer/n den Druckertreiber. Um einen Drucker über den uShare™ Mini NAS
Adapter zu betreiben, muss der entsprechende Druckertreiber lokal auf dem/den Computer/n installiert sein.
93
Page 97

Deutsch
3. Klicken Sie nach der Installation des Druckertreibers unter Windows auf Start > Einstellungen > Drucker und
Faxgeräte > Drucker hinzufügen > Weiter.
4. Wählen Sie im Druckerinstallations-Assistenten die Option Lokaler Drucker und klicken Sie auf Weiter.
94
Page 98

5. Wählen Sie Neuen Anschluss erstellen: und danach Standard-TCP/IP-Port und klicken Sie auf Weiter.
Deutsch
6. Geben Sie die IP-Adresse Ihres uShare™ Mini NAS Adapters an und klicken Sie auf Weiter.
95
Page 99

7. Wählen Sie Benutzerdefiniert und gehen Sie zu Einstellungen. Klicken Sie auf Weiter.
Deutsch
8. Wählen Sie LPR für das Protokoll, geben Sie einen Warteschlangennamen ein (Bsp.: LRxxx) und wählen Sie LPRBytezählung aktiviert.
9. Klicken Sie auf OK, um die Anschlusseinstellungen zu speichern.
10.Klicken Sie auf Fertig stellen.
96
Page 100

Deutsch
11.Öffnen Sie die Seite Print Server (Druckerserver) und überprüfen Sie den Druckerstatus. Wenn der Status auf
"Online" steht, war die Einrichtung des Druckers erfolgreich.
Hinweis: Der Druckerserver des uShare™ Mini NAS Adapters unterstützt keine GDI/Host-basierten Drucker. Bei
einigen Multifunktionsdruckern funktioniert unter Umständen die Scanfunktion nicht. Detaillierte
Informationen erhalten Sie beim Hersteller Ihres Druckers.
P2P-Server
Der uShare™ Mini NAS Adapter unterstützt BitTorrent-Download, ohne dabei auf Computer-Ressourcen
zurückgreifen zu müssen. Es können bis zu vier BitTorrent-Downloads gleichzeitig durchgeführt werden.
1. Öffnen Sie die Seite P2P Server. Wählen Sie im Feld Download Path den Downloadpfad aus, den Sie verwenden
möchten. Klicken Sie auf Apply (Übernehmen), um Ihre Einstellungen zu speichern.
Hinweis: Ändern Sie die Pfadeinstellungen nicht, solange es aktive BitTorrent-Downloads gibt. Wenn Sie die
Pfadeinstellungen ändern, während Downloads durchgeführt werden, schlagen diese Downloads fehl.
97
 Loading...