

U.S. Products maxg Quick Installation Manual
Wireless MAXg Router and
Wireless MAXg USB Adapter
Quick Installation Guide
Guide d'installation rapide
Installationsanleitung
Guida all'installazione rapida
Guía breve de instalación
Beknopte installatiegids
R24.0555.00
rev 1.1 10/05

Installing the Router and Wireless USB Adapter ..................... 1
Installation du routeur et du Wireless USB Adapter .............. 13
Installieren des Routers und des Wireless USB Adapters ..... 25
Installazione di Router e USB Adapter ................................... 37
Instalación del Wireless USB Adapter y del Router ...............49
De Router en de Wireless USB Adapter installeren ............... 61

1
Installing the Router and Wireless USB Adapter
Package Contents:
Prepare for installation
You must have administrator rights on your computer in order to install this product.
You will need to install this Installation CD-ROM on all the PCs on which you plan to install
Wireless MAXg USB Adapters.
To use the Wireless MAXg Adapter, you must be using Windows XP (Service Pack 1 or higher) or
2000 (Service Pack 4 or higher).
For the most updated information, visit: http://www.usr.com/support
You can also refer to the User Guides on the U.S. Robotics Installation CD-ROM for more detailed
information.
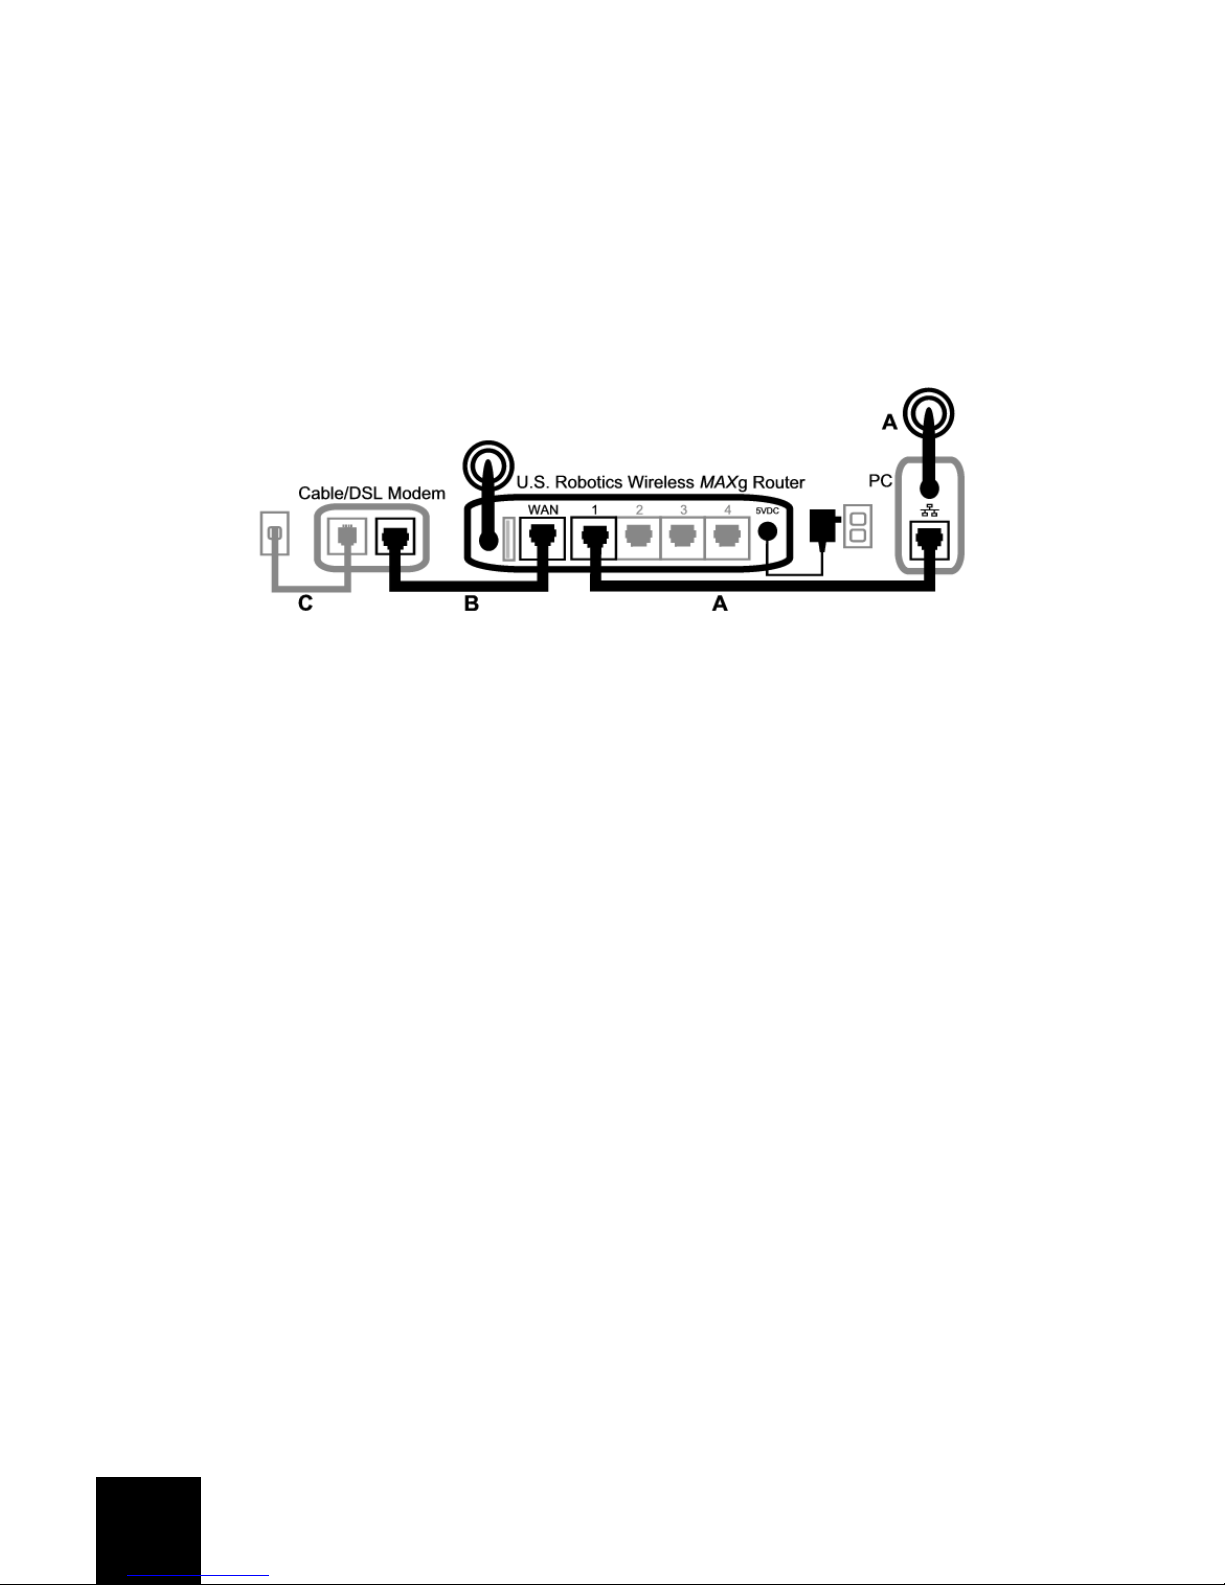
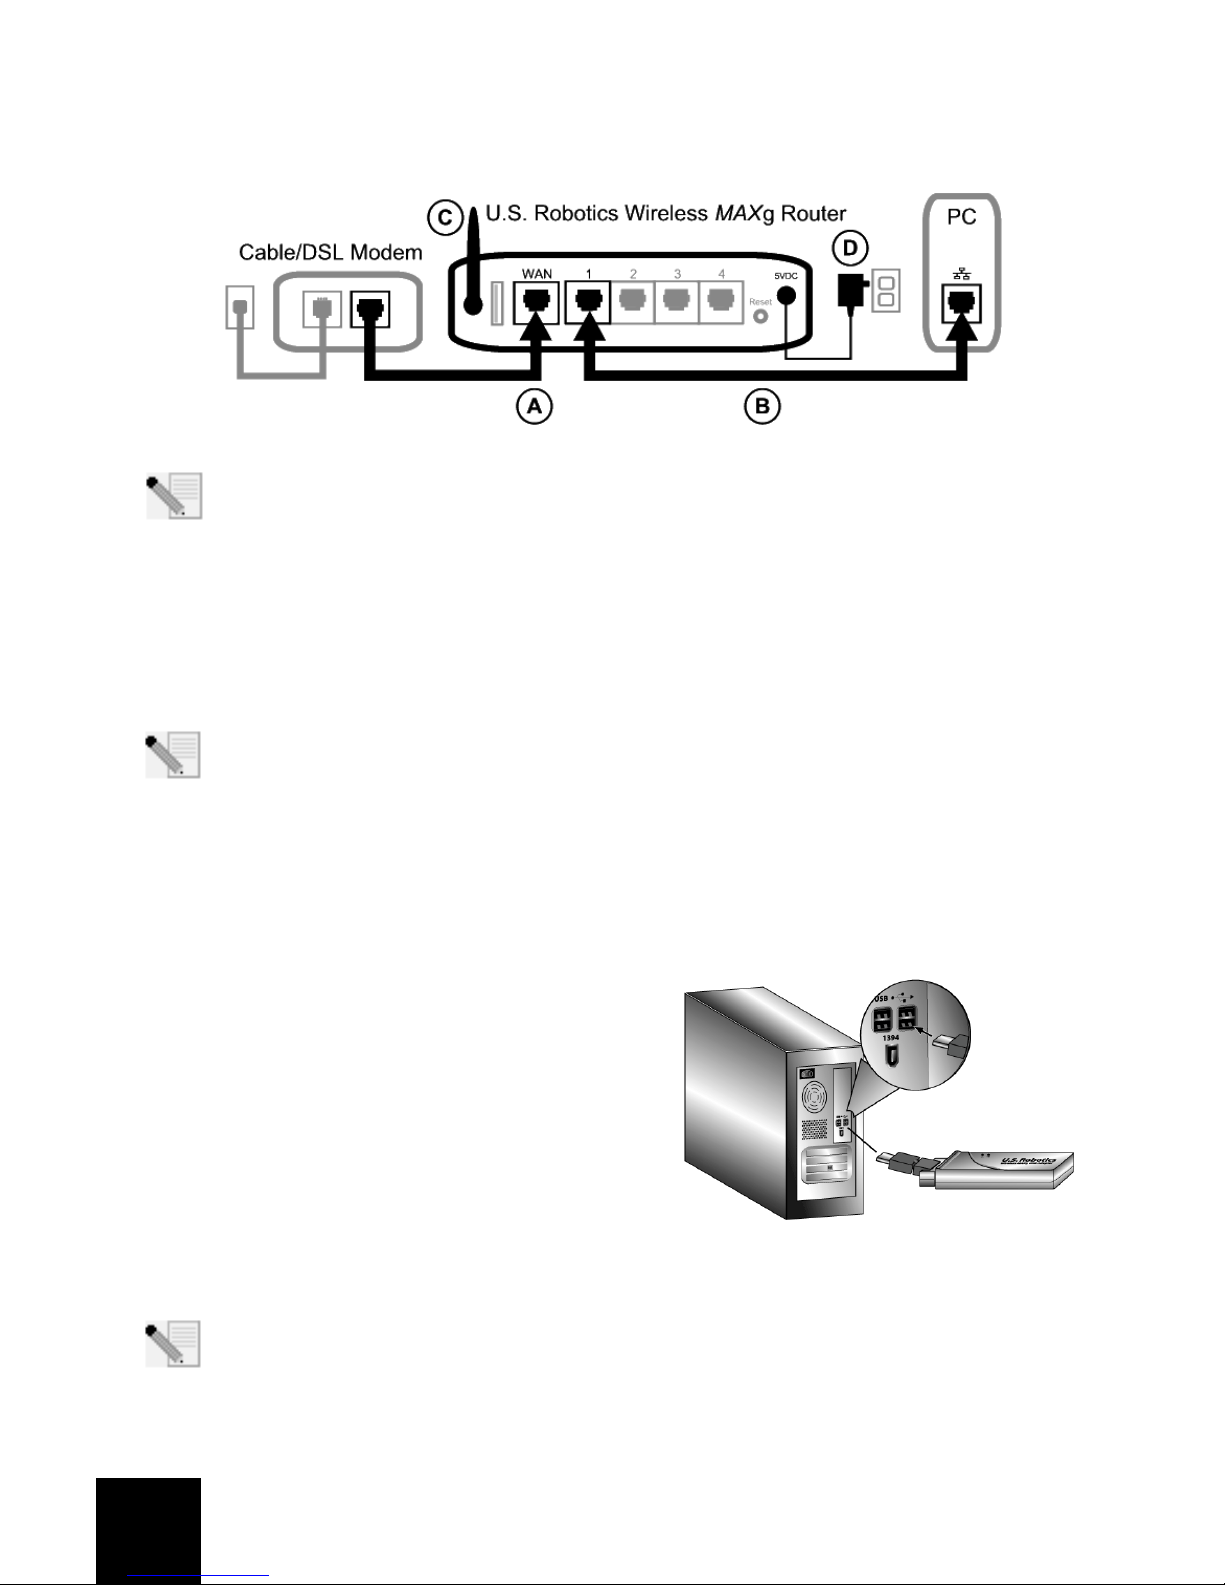
Step One: Connect the Wireless MAXg Router
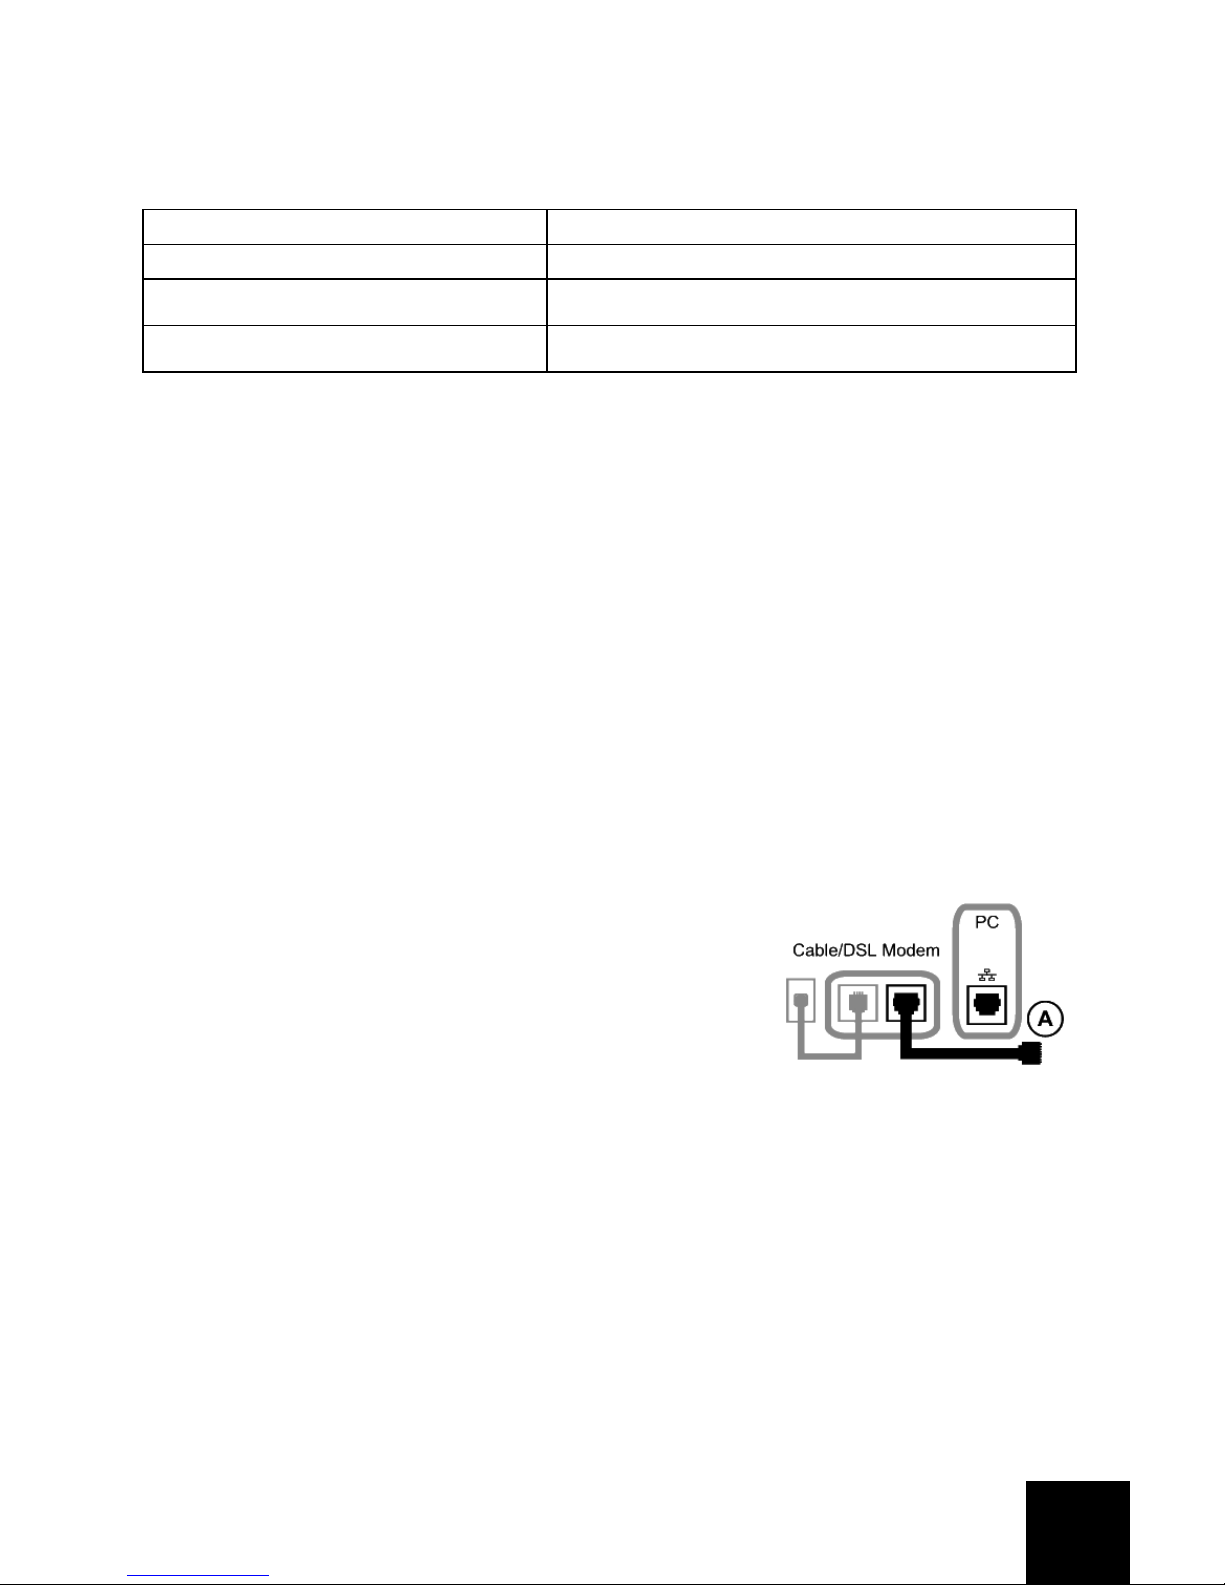
A. Turn off your computer and your cable or DSL modem.
Disconnect the modem’s Ethernet cable from your
computer and connect it to the WAN port of the Wireless
MAXg Router.
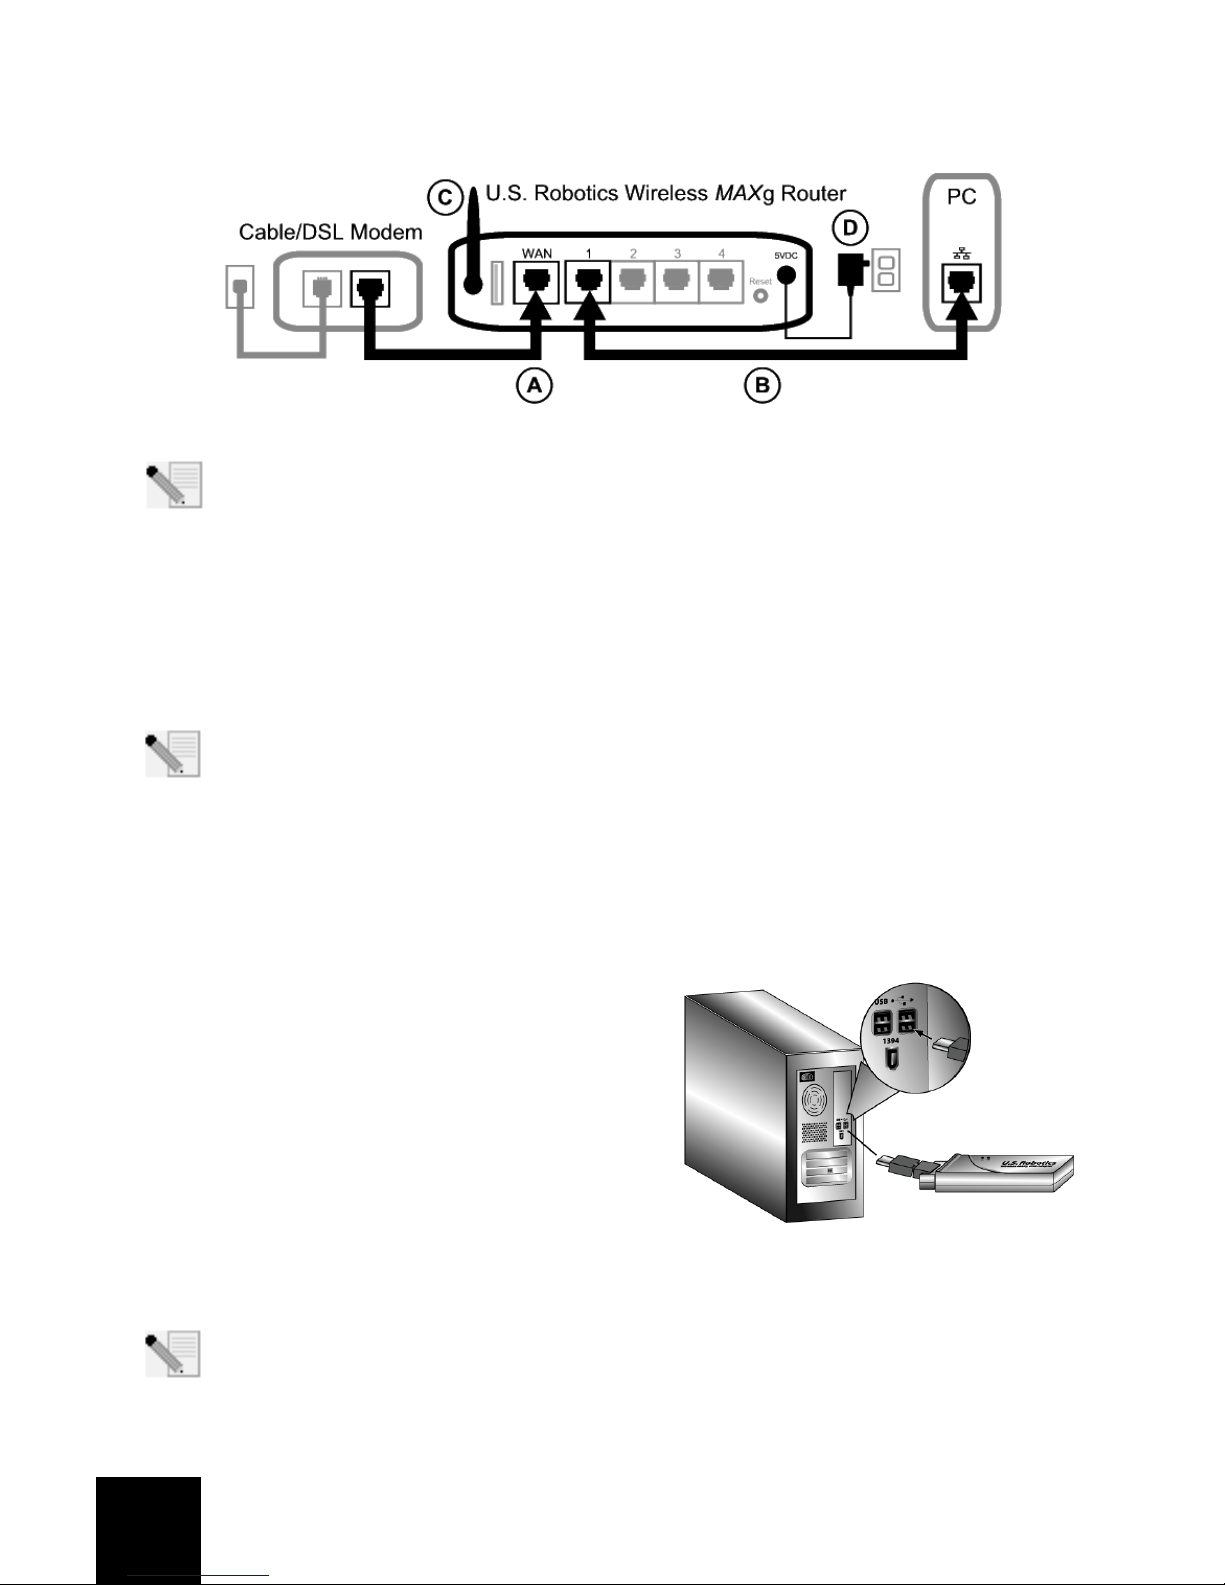
B. Connect the supplied Ethernet cable to the Network Interface Card of your computer and to
one of the LAN ports of the Wireless MAXg Router.
C. Connect the antenna to the Wireless MAXg Router.
D. Connect the power adapter to the Wireless MAXg Router and to a standard wall power
outlet. Turn on your computer.
USR5461 Wireless MAXg Router Installation CD-ROM which includes User Guides
USR5421 Wireless MAXg USB Adapter 5VDC power supply
Quick Installation Guide Detachable antenna
One (1) Ethernet cable
2
E. Turn on your cable or DSL modem.
Note to UK Users: Attach the correct power plug to the power adapter.
Note: You have finished connecting the Wireless MAXg Router and will now need to install
the Wireless MAXg USB Adapter.
Step Two: Install the Wireless MAXg USB Adapter
A. Insert the USB Adapter Installation CD-ROM into the CD-ROM drive of the computer you are
installing the USB Adapter in. The Installation CD Graphical User Interface (GUI) will appear
on your screen. If prompted, select your preferred language.
Note: If your CD-ROM does not automatically launch, click Windows Start, Run, type
D:\setup (if your CD-ROM drive uses a different letter, type that letter in place of “D”), and
click OK.
B. Click Installation.
C. Follow the on-screen instructions.
D. When prompted, locate an available USB port and
fully insert the Wireless MAXg USB Adapter.
Windows XP users should follow any on-screen
instructions.
E. When prompted, click Restart to restart your computer.
Note: You may see a screen which says “Digital Signature Not Found” or “Windows Logo
testing”. Click Yes or Continue Anyway. U.S. Robotics has thoroughly tested this product’s
driver in conjunction with the supported hardware and has verified compatibility with
Windows XP and 2000. Because U.S. Robotics wants its customers to take full advantage
of the network card’s functionality, it has made the drivers available.
3
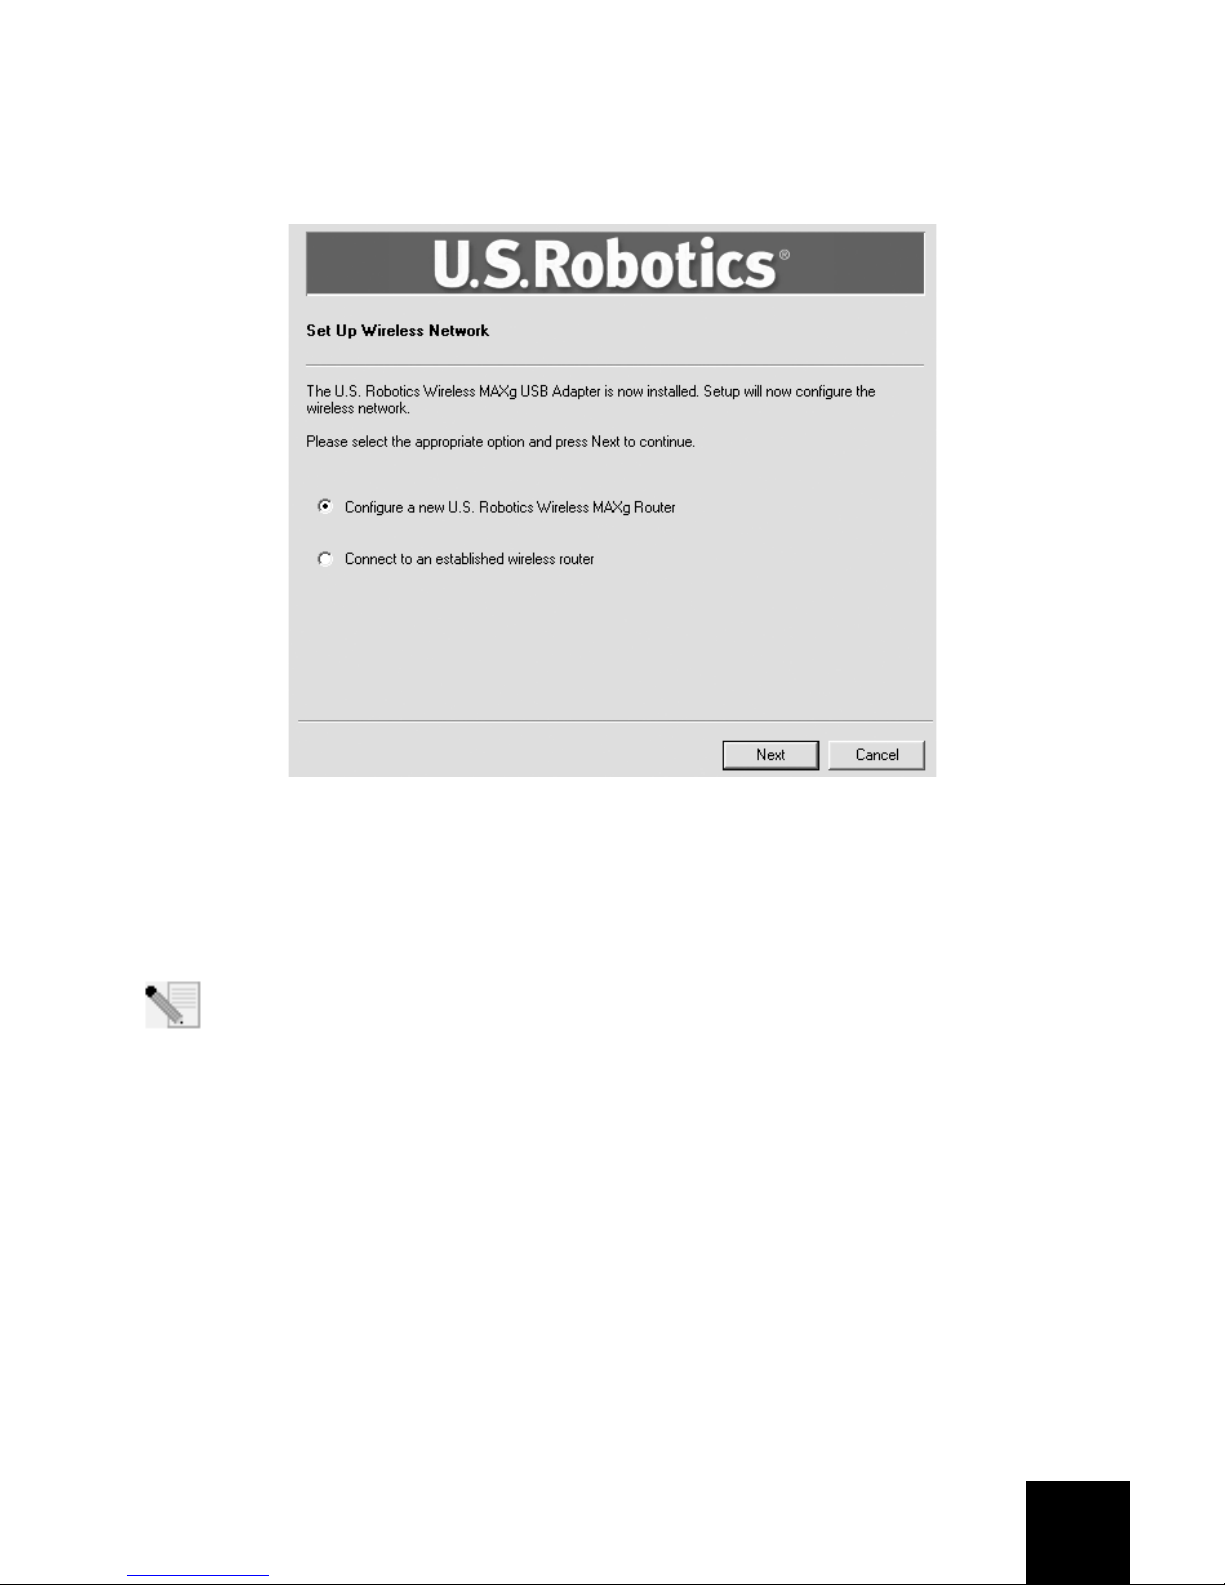
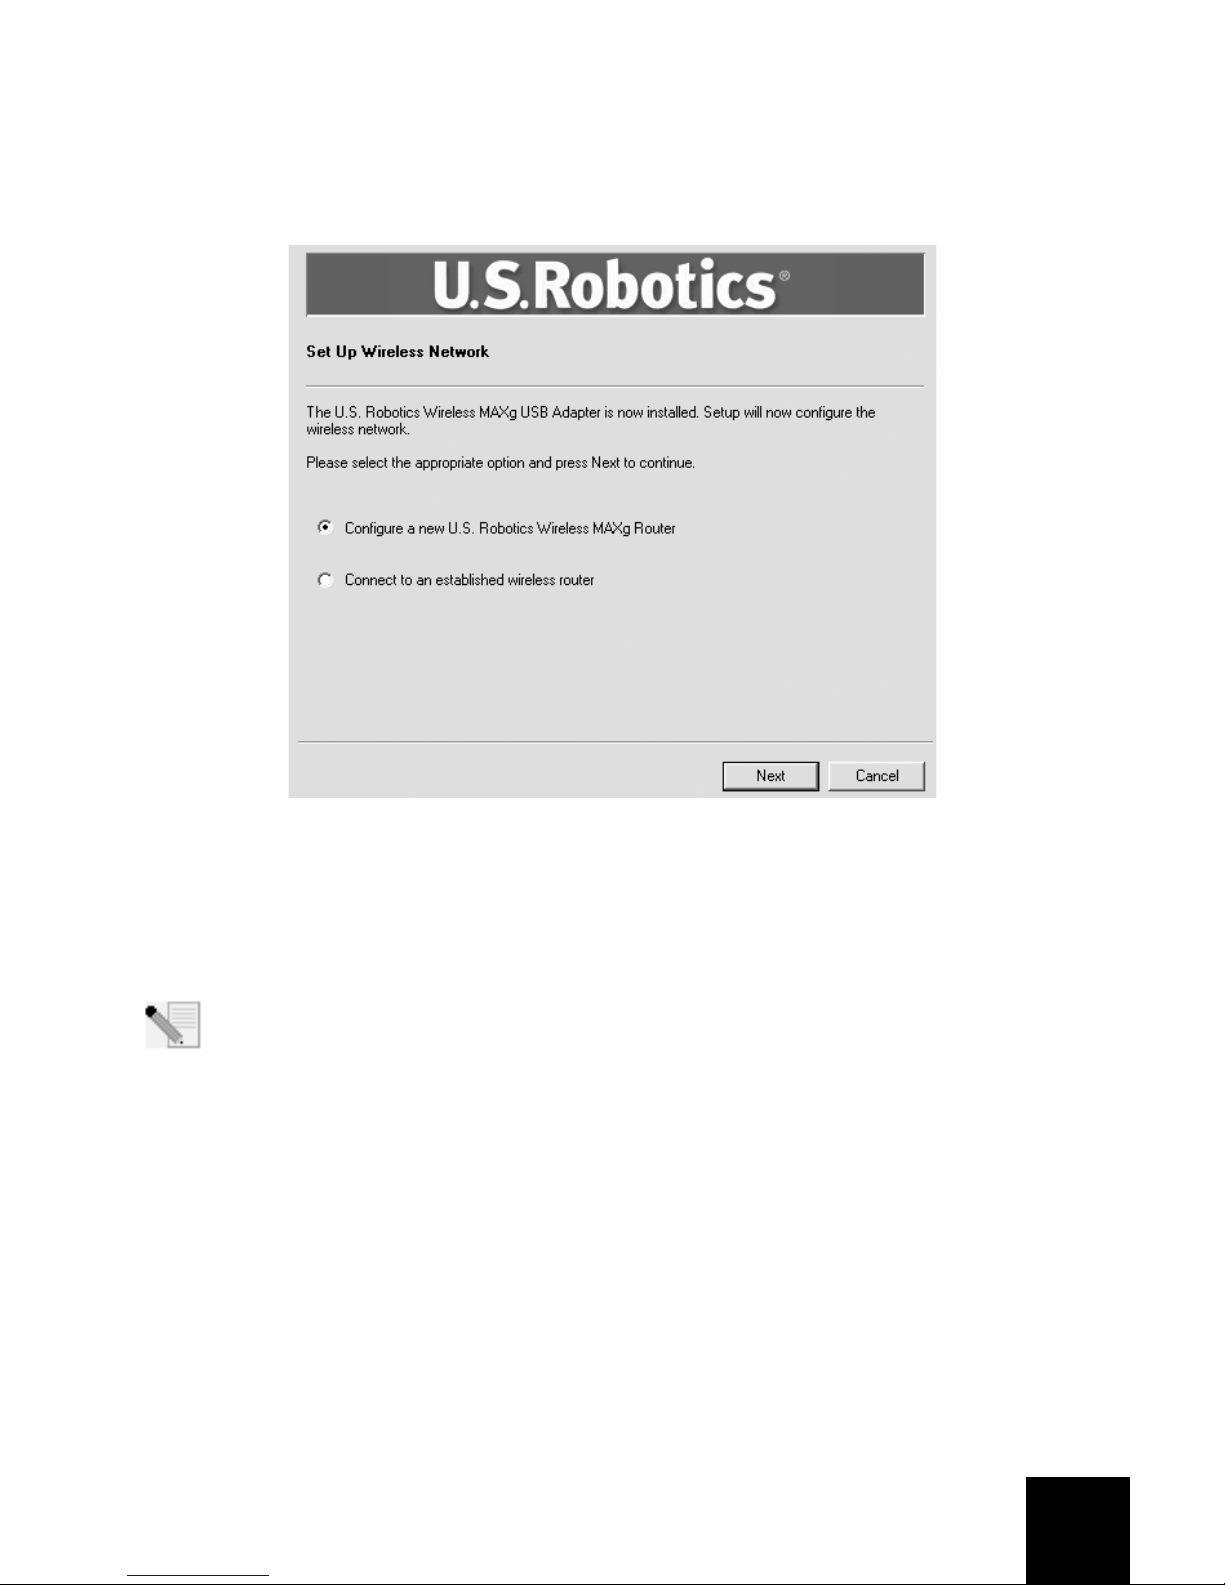
Step Three: Set up a Wireless Network
A. When your computer restarts and you are prompted, select Configure a new U.S. Robotics
Wireless MAXg Router and click Next. You will need to wait while the Wireless MAXg USB
Adapter communicates with the router.
B. If prompted, select your Internet Connection type and click Next. Depending on the type of
Internet Connection that you choose, you may need to enter some additional information.
C. Enter a Network name and a Pass phrase (also known as network key) for your wireless
encryption and click Next. You will need to wait while the router and the USB Adapter are
configured.
Note: U.S. Robotics recommends that you enable WPA security so that your wireless
network is secure. Make sure you assign the same secret WPA key to all your wireless
devices to ensure network connectivity. For more information about this and additional
wireless parameters, refer to the User Guides on the U.S. Robotics Installation CD-ROM.
D. When prompted, enter a User name and Password for the router login and then click Next.
Wait while the configuration continues.
E. You will then see a screen that shows you the settings for your Wireless MAXg Router. These
settings will be saved to a text file on your computer desktop and you have the option to
print them out if your computer is connected to a printer. When you are done reviewing this
information, click Finish. Your Wireless MAXg Router and USB Adapter should all be
configured and ready for use.
Congratulations! You have finished installing your product. The Wireless MAXg USB Adapter
should now be connected to the network that you set up.
If you experience any problems connecting to a wireless networking device, refer to the
Troubleshooting section in this guide or to the Configuration section of the Wireless MAXg
Adapter User Guide on the U.S. Robotics Installation CD-ROM for more information.
4
Opening the Configuration Utility
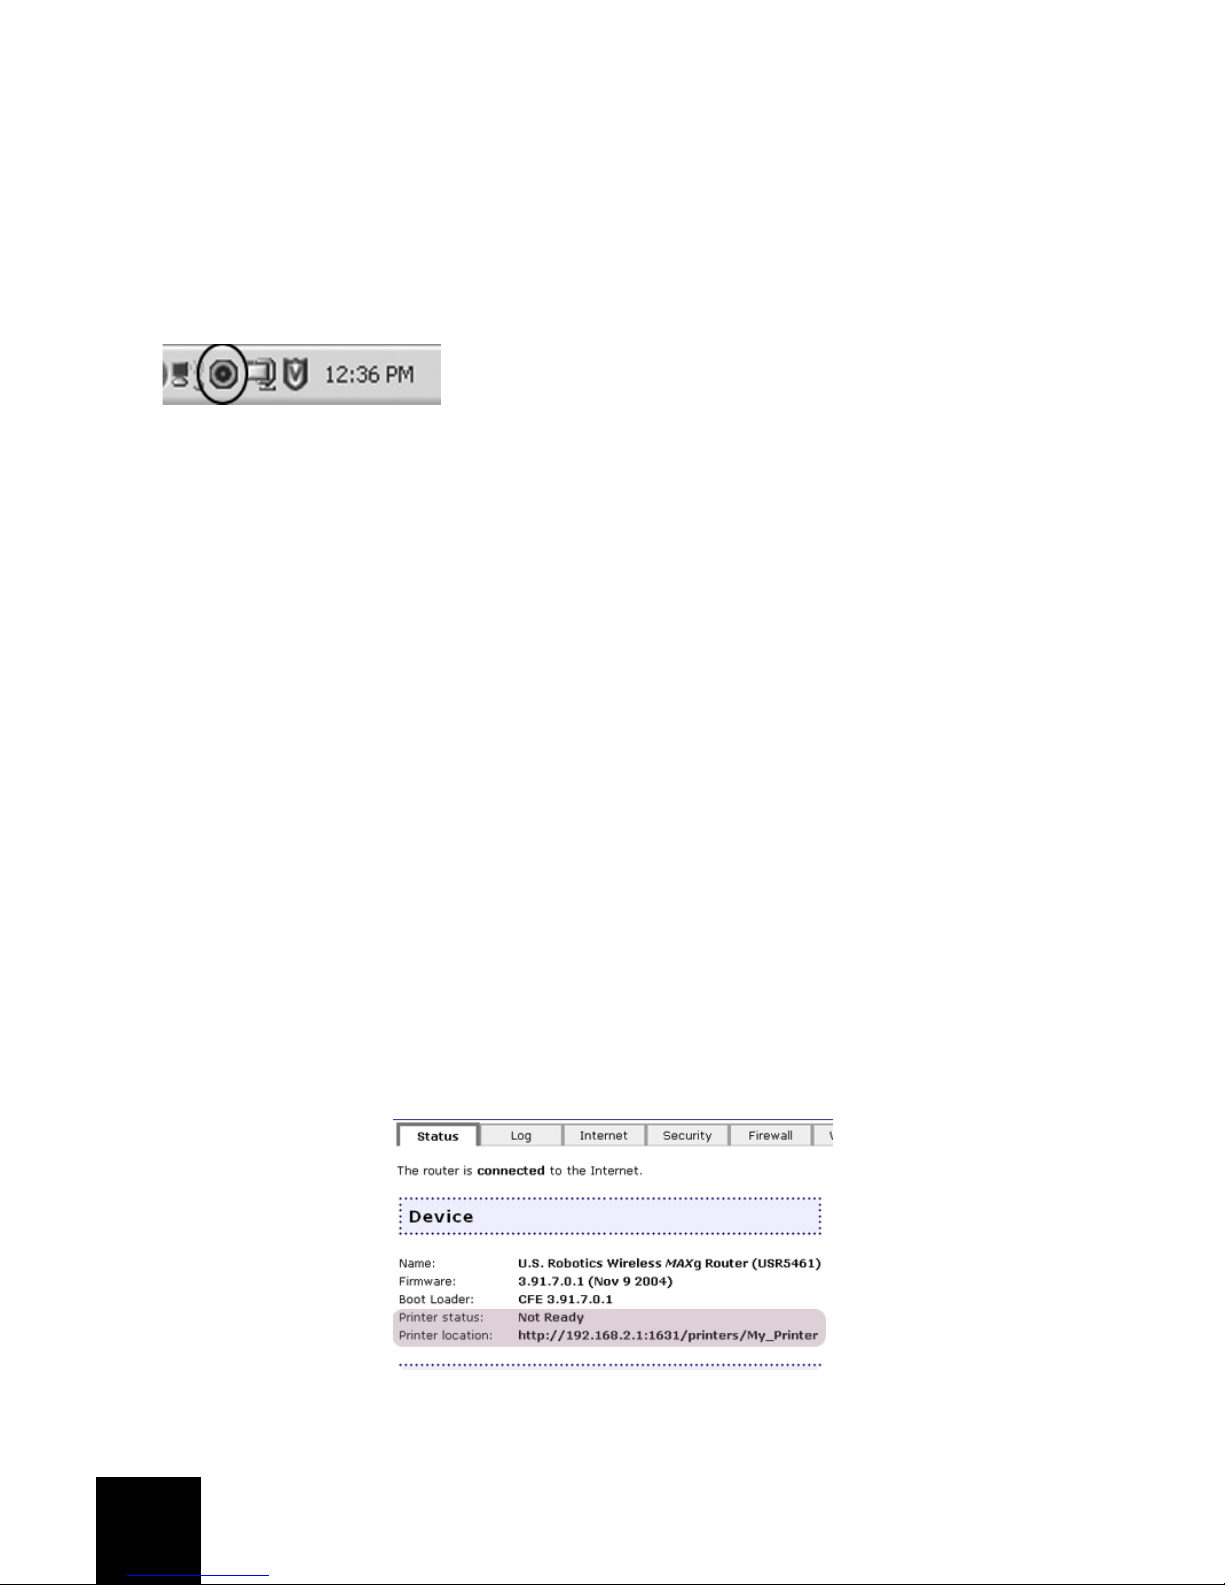
You should now see a small icon for the Configuration Utility in the system tray by your clock on
your computer desktop. You can open the Configuration Utility in two ways:
• Right-click the icon and click Open Utility.
• Left-click once on the Utility icon to open the quick connect screen. In the quick connect
screen, you can select an available network and enter the Network key, if applicable. Click
Connect to establish a wireless connection. You can also click Advanced to open the full
Configuration Utility.
The Configuration Utility is used to change or verify the configuration information that relates to
your Wireless MAXg USB Adapter. The Configuration Utility icon will be colored to indicate the
status of your wireless network: red for disconnected and green for connected with good quality.
USB Printer Installation
A USB printer can be connected to the Wireless MAXg Router and used as a network printer if you
are using an operating system that supports printing to an Internet Printing Protocol (IPP)-based
printer. Windows XP and 2000 have built-in support for this function, but other Windows users
will need to download either a Microsoft patch for their version of Windows or a third party
application. Refer to the documentation for your version of Windows for more information. Other
operating systems will need to either already support IPP-based printing or download a third
party application for their operating system.
Perform the following steps to install and set up the printer.
Step One: Connect the printer to the Wireless MAXg Router
Plug the square end of a USB cable into the USB port on your printer. Plug the thin rectangular
end of the USB cable into the USB port on the Wireless MAXg Router. Connect the power supply
to your printer and turn your printer on.
Step Two: Set up your printer
Launch a Web browser. In the browser’s location or address line, type http://192.168.2.1 to
access the Web User Interface.
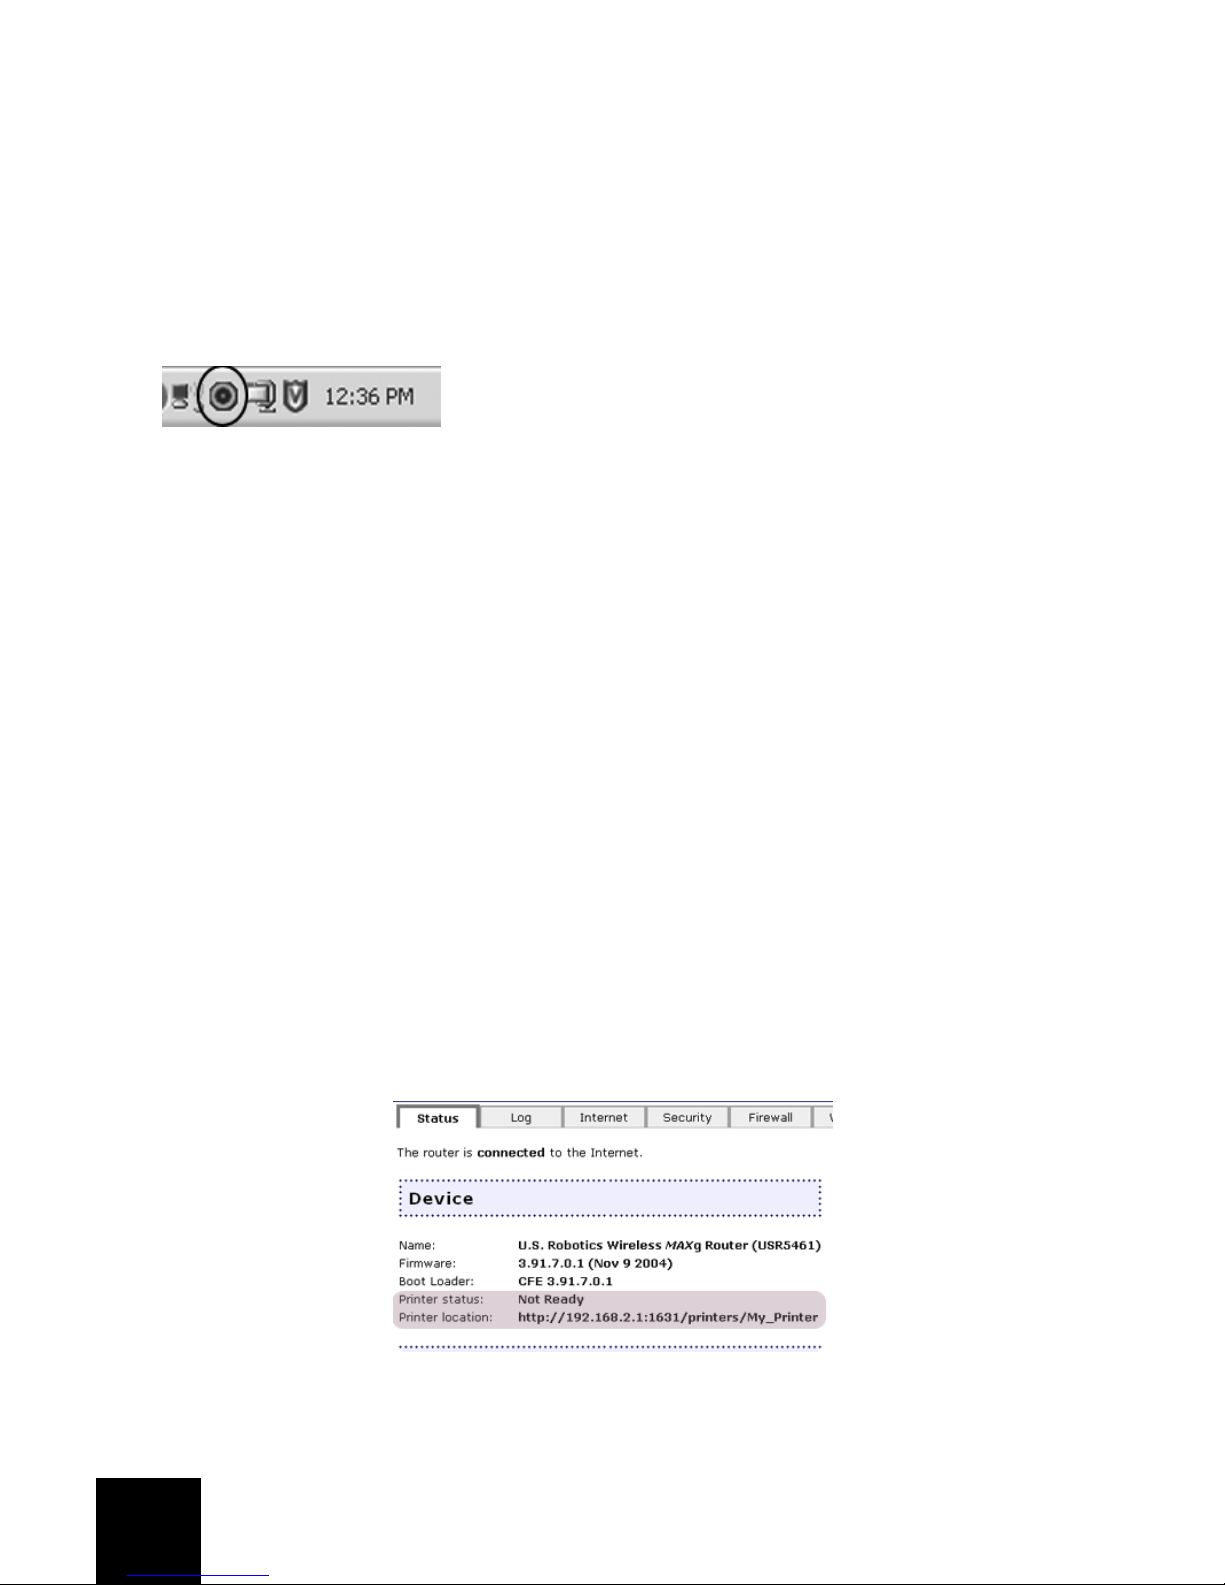
Look on the Status page for the Printer Status and Printer location information in the Device
section. Write down the Printer location information since this is the network address of the
printer and you will need this to set up the printer.

5
Perform the following steps to set up your printer. You will need to do this on every computer that
is connected to your network and wants to be able to access the printer.
1. Windows XP Users: Click Windows Start and then Printers and Faxes.
Windows 2000, Me, and 98 Users: Click Windows Start, Settings, and then Printers.
2. Click Add Printer and the Add Printer Wizard will launch. Click Next.
3. Select Network printer and click Next.
4. Select Connect to a printer on the Internet... and enter the network address listed in Printer
location. Click Next.
Note: The network address that is listed in Printer location must be entered exactly
as it is seen on-screen. The address field is case-sensitive. If the network address is
not entered correctly, the printer will not be located.
5. You will be prompted to choose the brand and model of your printer. You can either select
them from the list or click Have Disk, insert the CD-ROM that came with your printer, and
navigate to your CD-ROM drive to locate the drivers. When you are finished, click Next.
6. When prompted, select Ye s or No to set this printer as your default printer. If prompted, you
can choose to print a test page.
7. You will be shown the information regarding your printer. Click Finish to complete the setup
process.
Step Three: Verify the printer connection
If you look on the Status page of the Web User Interface, your printer status should now be listed
as "Ready". You can verify the printer is working correctly by clicking the Print this page link in
the Help area on the right side of the screen. If this prints correctly, your printer setup is
complete.
If the printer status is listed as "Not Ready", make sure the printer is turned on and that the USB
cable is firmly connected to both the printer and to the Wireless MAXg Router.
If the printer status is still listed as "Not Ready" or if the page did not print correctly, repeat the
setup procedure and make sure you enter all the correct information.
Register your Wireless MAXg Router and Wireless
MAXg USB Adapter
Register your products online at http://www.usr.com/productreg
6
Troubleshooting
I am no longer able to access the Internet.
When your computer connects to the Internet, a number of devices have to work together.
A. Your computer connects to your Wireless MAXg Router via a wireless or wired connection.
B. Your Wireless MAXg Router connects to your broadband cable/DSL modem via an Ethernet
cable.
C. Your cable/DSL modem connects to your Internet Service Provider (ISP) via your cable/
phone network.
The first step in solving this problem is to diagnose the cause. There are a number of places
where the connection from your computer to the Internet might fail.
First, check the indicator lights of your various devices. If one or more of these devices indicate a
problem, it’s a good indication of where you should focus your troubleshooting efforts.
1. If your computer uses a wireless connection to your router, does the wireless utility indicate
there is a good connection to your router?
If your computer cannot communicate with the router, it cannot access the Internet.
2. Are your Wireless MAXg Router’s power, wireless, and Internet LEDs lighted?
If the router is turned off, or the wireless radio isn’t operating, or it has no connection to the
Internet (via your cable/DSL modem), your computer won’t be able to access the Internet
either.
3. Do your cable/DSL modem’s power and status LEDs indicate a connection? (Please refer to
your modem’s documentation for information on its status indicators.)
If your modem is turned off or cannot communicate with your ISP, your router will be unable
to access the Internet.
Now, let’s step through the various devices and determine which one isn’t connecting properly.
Step 1: Can your computer connect to your Wireless MAXg Router?
If you use a wired connection:
If you use a wired connection between your computer and your Wireless MAXg Router, ensure the
Ethernet cable is connected to your computer’s LAN port and to a LAN port on the router, and also
that the corresponding LEDs are lighted.
If you use a wireless connection:
If you have a wireless connection to your Wireless MAXg Router, does your wireless utility report
a successful connection to your router?
If your wireless utility reports a successful wireless connection, it’s possible that your computer
has connected to a neighbor’s router instead of yours. You can use your wireless utility to check
the network name (SSID) of the router you’re connected to. If it’s connected to the wrong router,
you can use the utility to force your computer to try to connect to your router.

7
If you do not have a connection to your Wireless MAXg Router, you can try the following solutions:
1 Ensure that your computer is close enough to your router to receive a signal and that there
is nothing interfering with the signal, such as a microwave oven or a concrete wall. If your
router broadcasts its network name, you can use your computer’s wireless utility to scan for
it. (This is typically called a “site survey.”) If your utility can’t detect your router, it may be a
signal problem.
2. Ensure that the wireless utility is using the correct network name and security settings for
your router. Settings such as network name, security method (WPA, WEP, etc.), and security
keys must all match. If your router is using WPA encryption, each wireless card or adapter
must support WPA encryption. Please refer to the Configuration section of the Wireless
MAXg Router User Guide for information on changing the security settings.
3. If you have enabled MAC filtering, is this computer permitted to connect to your router?
Please note that MAC filtering refers to specific wireless adapters. If you use MAC filtering
and you’ve changed wireless adapters, you will have to add the MAC address of the new
wireless adapter to the router.
You’ve probably noticed that you need to access your Wireless MAXg Router in order to check
some of these things. We’ll do that in the next step.
If none of these work, you can try a wired connection between your computer and your router by
connecting an Ethernet cable between your computer’s LAN port and a LAN port on the router.
(Ensure that the corresponding LAN port LEDs are lighted.) If a wired connection works, the
problem is almost certainly with your computer’s wireless connection to the router. You should
then try the previous steps again.
Step 2: Is your Wireless MAXg Router responding?
If you have a wireless or wired connection to your Wireless MAXg Router, open your Web browser
to the router’s address: 192.168.2.1 (Please note that if you’ve modified the router’s LAN IP
address, you should use the new one.)
If the Wireless MAXg Router’s Web interface doesn’t appear, your computer may need to reestablish a connection to your router:
Release and renew your computer’s network connection.
Windows XP, 2000, and NT users:
Press Start and select Run.
Typ e cmd and press ENTER.
Typ e ipconfig /release and press ENTER.
Typ e ipconfig /renew and press ENTER.
Typ e exit and press ENTER.
Windows Me, 98, and 95 users:
Press Start and select Run.
Enter winipcfg and press ENTER.
Click Release.
Click Renew.
Close the application.
Your computer should acquire an IP address (such as 192.168.2.5) from the router.
Try to access the router’s Web address at http://192.168.2.1
If the Wireless MAXg Router’s Web interface doesn’t appear, the router may need to be restarted:
1. With a thin tool, such as a paper clip, briefly press the RESET button on the back of the
router. Hold it in for 1 to 2 seconds to reset the Router. If you press the RESET button for
more than five seconds, the router will return to its factory default settings.

8
2. Wait about 30 seconds.
3. Release and renew your computer’s network connection. (See above for details.)
4. Try to access the router’s Web address at http://192.168.2.1
If you still cannot access the Wireless MAXg Router, the router may need to be restored to the
default factory settings. (Please note that you will lose all of your router’s custom settings and
will need to set it up again as if you were installing it for the first time. Alternatively, if you’ve
made a backup of the settings, you will be able to restore them. See the Wireless MAXg Router’s
User’s Guide on the installation CD-ROM for more information on backups.)
1. With a thin tool, such as a paper clip, press the RESET button on the back of the router for at
least five seconds.
2. Wait about 30 seconds.
3. Try to access the router’s Web address at http://192.168.2.1
If the Wireless MAXg Router’s Web interface still doesn’t appear, it’s possible that the router has
failed. Please contact U.S. Robotics Customer Support.
If the Wireless MAXg Router’s Web interface appears, the problem may be with its connection to
your cable/DSL modem.
Step 3: Can your Wireless MAXg Router connect to your cable/DSL modem?
Now that you have accessed your Wireless MAXg Router’s Web interface, go to the Status page.
There should be a statement at the top of the page (below the Status tab) indicating whether the
router is connected to the Internet.
Sample screenshot of a router connected to the Internet:
Sample screenshot of a router not connected to the Internet:
You can confirm that statement by checking the Status page’s WAN section to see if the router
has a WAN IP address (such as 235.42.181.5). This IP address indicates whether the router is
connected to the cable/DSL modem.

9
If the router doesn’t have a WAN IP address, select the router’s Internet page and use it to
configure the router’s Internet connection. (If you have a DSL modem, you may be required to
enter the login information your ISP provided.)
If the Wireless MAXg Router still cannot obtain a WAN IP address, it is likely there is a problem
with the cable/DSL modem or your ISP.
Step 4: Can your cable/DSL modem connect to your ISP?
If your computer has a connection to your Wireless MAXg Router and the router’s Internet
connection is configured correctly, but the router cannot connect to the Internet, it’s possible that
the cable/DSL modem has lost its connection or isn’t functioning properly, or there’s a problem
with your ISP.
1. Ensure that an Ethernet cable is connected between your router’s WAN port and the cable/
DSL modem’s Ethernet port and that the corresponding LEDs are lighted.
2. Ensure that your cable/DSL modem is connected to your wall jack. (A cable modem uses a
coax cable, and a DSL modem uses an RJ-11 cable.)
3. Restart the cable/DSL modem. (There may be a power switch or reset button on the modem,
or you may have to unplug/re-plug the modem’s power adapter. Consult your modem’s
documentation.)
4. After the cable/DSL modem has restarted and connected to your ISP, click the Reboot
button on your router’s Device page.
5. After the router has finished rebooting, click Continue to return to the Status page.
If your Wireless MAXg Router now says it’s connected to the Internet and has a WAN IP address,
try to access the Internet. If you still cannot access the Internet, please start at the beginning of
this troubleshooting procedure to determine the new point of failure. (It’s possible that your
wireless connection needs to be re-established.)
If the Wireless MAXg Router still does not have a WAN IP address, the problem may be with the
cable/DSL modem or your ISP. Please contact your ISP’s Customer Support.

10
I accidentally clicked Cancel during the software installation procedure for the
Wireless MAXg USB Adapter.
Possible Solution:
Remove and reinsert the Installation CD-ROM into your CD-ROM drive. Follow the instructions in
this guide for installing the software.
The U.S Robotics interface did not begin when I inserted the Installation CD-ROM.
Possible Solution:
Some programs may disable the autorun feature of Windows. Close any open applications and
reinsert the Installation CD-ROM. If the Installation CD-ROM interface does not run automatically,
click Windows Start and then click Run. In the “Run” dialog box, type D:\setup.exe. If your CDROM drive uses a different letter, type that letter in place of “D.”
I inserted the Wireless MAXg USB Adapter before the Installation CD-ROM.
Possible Solution:
If you inserted the Wireless MAXg USB Adapter before the Installation CD-ROM, cancel the
installation procedure that is currently running. Insert the Installation CD-ROM, select your
language, click Installation, and then follow the on-screen instructions.
For more troubleshooting information or for advanced wireless configuration options, refer to the
Wireless MAXG USB Adapter User Guide on the Installation CD-ROM or go to www.usr.com/
support
The Setup Wizard was unable to detect my Internet connection.
Possible Solution:
You will need to manually configure your Internet connection. There are two methods of
instructions you can follow to setup your Internet connection: If you are still in the Setup Wizard
or If you have already closed the Setup Wizard.
If you are still in the Setup Wizard:
Select your Internet connection type: either Cable, DSL Router, satellite, ISN, LAN, or other or
DSL modem (also known as PPPoE). Depending on your selection, you will need to enter some
information that was provided by your ISP. After entering all of your necessary information,
click Next. Continue to follow the on-screen instructions to complete the Setup Wizard. For
more information about the settings, refer to the Web User Interface section of the Wireless
MAXg Router User Guide on the Installation CD-ROM.
If you have already closed the Setup Wizard:
Launch a Web browser. In the location or address line of your Web browser, type
http://192.168.2.1 to access the Web User Interface. Click the Internet tab. Select your
Internet connection type: either Cable, DSL Router, satellite, ISN, LAN, or other or DSL
modem (also known as PPPoE). Depending on your selection, you will need to enter some
information that was provided by your ISP. When you are finished, click Save. You should now
be able to access the Internet. For more information about the settings, refer to the Web User
Interface section of the Wireless MAXg Router User Guide on the Installation CD-ROM.

11
My Wireless MAXg Router’s Web User Interface is not responding, but I can still
access the Internet.
Possible Solution:
If your Web User Interface stops responding, unplug and then plug back in the power supply of
the Wireless MAXg Router. This will reboot the Wireless MAXg Router. If you are still unable to
use the Web User Interface, press in and hold the RESET button for five to ten seconds. This will
reset the Wireless MAXg Router to the factory default settings. If you made any personal
configuration settings, you will need to make the changes again or restore your settings if you
created a backup file. (See the Wireless MAXg Router’s User Guide on the installation CD-ROM for
more information.)
My computer does not recognise the Wireless MAXg USB Adapter.
Possible Solution:
The Wireless MAXg USB Adapter may not be fully inserted into the USB port. You can also try
installing the Wireless MAXg USB Adapter into a different USB port.
I am unable to communicate with the Wireless MAXg Router.
Possible Solution:
Be sure that each Wireless MAXg USB Adapter that you want to connect to the wireless network is
set to Infrastructure mode within the Configuration Utility. If your Wireless MAXg USB Adapters
are not set to Infrastructure mode, they will not be able to communicate with an Access Point or
Wireless Router.
Possible Solution:
Determine the MAC address of the router. Using the U.S. Robotics Configuration utility, check the
MAC address and verify that you are connecting to the correct Wireless MAXg Router.
Possible Solution:
Ensure that the Configuration Utility is installed for your Wireless MAXg USB Adapter and that the
Configuration Utility detects your Wireless MAXg USB Adapter.
Possible Solution:
Ensure that the correct Authentication Mode and encryption key are being used. If you changed
the settings in the configuration of your Wireless MAXg Router, you must also change the settings
of every Wireless MAXg USB Adapter attached to this network to match. If you are still
experiencing difficulties, reset all of your Wireless Routers or Access Points and wireless network
adapters to the default settings and try again.
I am experiencing poor wireless link quality.
Possible Solution:
Low link quality or range can be caused by environmental interference, such as lead-based paint
and concrete walls. Try to move the antenna of the Wireless MAXg Router or to reposition the
wireless clients to improve the link quality.
12
Possible Solution:
Some electronic items, such as 2.4Ghz phones, may interfere with the wireless signal and affect
your wireless range and link quality. Try creating a wireless connection on a different channel.
Refer to the Configuration section of the Wireless MAXg Router User Guide on the Installation
CD-ROM for more information on changing your wireless settings.
Additional Support
Note: Your model numbers are 5461 (for the MAXg Wireless Router) and 5421 (for the MAXg Wireless
USB Adapter). You can find your serial number on the label of the product and on the side of the
package. Write your serial numbers down. If you ever need to call our Technical Support department,
you will need them to receive assistance.
1. Go to the User Guides on the Installation CD-ROM.
More configuration and advanced troubleshooting information is available in the Wireless MAXg Router and
USB Adapter User Guides on the Installation CD-ROM.
2. Go to the Support section of the U.S Robotics Web site at www.usr.com
Many of the most common difficulties users experience have been addressed in the FAQ and
Troubleshooting Web pages for your specific product.
3. Submit your technical support question using an online form at http://www.usr.com/emailsupport
4. Call the U.S. Robotics Technical Support department.
Country Voice Online Support Hours
United States & Canada (888) 216-2850 http://www.usr.com/emailsupport 9:00 A.M. - 5:00 P.M., M-F CST
Austria 07 110 900 116 http://www.usr.com/emailsupport/de 9:00 –17:00, M-F
Belgium (Flemish) +32 (0)70 233 545 http://www.usr.com/emailsupport/ea 9:00 –17:00, M-F
Belgium (French) +32 (0)70 233 546 http://www.usr.com/emailsupport/ea 9:00 –17:00, M-F
Denmark +45 7010 4030 http://www.usr.com/emailsupport/uk 9:00 –17:00, M-F
Finland +358 98 171 0015 http://www.usr.com/emailsupport/ea 9:00 –17:00, M-F
France 082 507 0693 http://www.usr.com/emailsupport/fr 9:00 –17:00, M-F
Germany 01805671548 http://www.usr.com/emailsupport/de 9:00 –17:00, M-F
Hungary 01805671548 http://www.usr.com/emailsupport/hu 9:00 –17:00, M-F
Ireland +44 870 844 4546 http://www.usr.com/emailsupport/uk 9:00 –17:00, M-F
Italy 848 80 9903 http://www.usr.com/emailsupport/it 9:00 –17:00, M-F
Luxembourg +352 342 080 8318 http://www.usr.com/emailsupport/bn 9:00 –17:00, M-F
Middle East/Africa +44 870 844 4546 http://www.usr.com/emailsupport/me 9:00 –17:00, M-F
Netherlands 0900 20 25 857 http://www.usr.com/emailsupport/ea 9:00 –17:00, M-F
Norway +47 23 50 0097 http://www.usr.com/emailsupport/ea 9:00 –17:00, M-F
Poland http://www.usr.com/emailsupport/pl
Portugal +351 (0)21 415 4034 http://www.usr.com/emailsupport/pt 9:00 –17:00, M-F
Spain 902 117 964 http://www.usr.com/emailsupport/es 9:00 –17:00, M-F
Sweden +46 (0) 77 128 1020 http://www.usr.com/emailsupport/ea 9:00 –17:00, M-F
Switzerland +0848 840 200 http://www.usr.com/emailsupport/de 9:00 –17:00, M-F
UK 0870 844 4546 http://www.usr.com/emailsupport/uk 9:00 –17:00, M-F
For current support contact information, go to the following Web site: http://www.usr.com/support
Regulatory and warranty information are located in the User Guides on the Installation CD-ROM.
Model Number Serial Number
USR5461
USR5421

13
Installation du routeur et du Wireless USB Adapter
Contenu de la boîte :
Préparation à l'installation
Vous devez disposer de droits d'administrateur sur votre ordinateur afin d'installer ce produit.
Vous devrez installer le CD-ROM d'installation sur tous les ordinateurs où vous avez prévu
d'installer des adaptateurs Wireless MAXg USB Adapter
.
Pour utiliser le Wireless MAXg Adapter, votre ordinateur doit être équipé de Windows XP (Service
Pack 1 ou supérieur) ou 2000 (Service Pack 4 ou supérieur).
Pour obtenir les informations les plus récentes, rendez-vous sur le site
http://www.usr.com/support.
Pour obtenir des informations plus détaillées, vous pouvez également consulter les guides de
l'utilisateur sur le CD-ROM d'installation U.S. Robotics.
Etape 1 : connexion du Wireless MAXg Router
A. Eteignez votre ordinateur et votre modem câble ou DSL.
Déconnectez le câble Ethernet du modem de votre
ordinateur et connectez-le au port WAN du Wireless
MAXg Router.
B. Connectez le câble Ethernet à la carte d'interface réseau de votre ordinateur et à un des
ports LAN du Wireless MAXg Router.
C. Connectez l'antenne au Wireless MAXg Router.
D. Connectez l'adaptateur secteur au Wireless MAXg Router, ainsi qu'à une prise murale
standard. Allumez votre ordinateur.
USR5461 Wireless MAXg Router CD-ROM d'installation avec guides de l'utilisateur
USR5421 Wireless MAXg USB Adapter Adaptateur secteur 5 V CC
Guide d'installation rapide Antenne amovible
Un (1) câble Ethernet
14
E. Allumez votre modem câble ou DSL.
Remarque pour les utilisateurs du Royaume-Uni : connectez la prise d'alimentation
adéquate à l'adaptateur secteur.
Remarque : vous avez connecté le Wireless MAXg Router et vous devez maintenant
installer le Wireless MAXg USB Adapter.
Etape 2 : installation du Wireless MAXg USB Adapter
A. Insérez le CD-ROM d'installation de l'adaptateur USB dans le lecteur CD-ROM de l'ordinateur
où vous installez l'adaptateur. L'interface graphique utilisateur (GUI) du CD d'installation
apparaîtra à l'écran. Si le programme vous le demande, sélectionnez votre langue.
Remarque : si votre CD-ROM ne se lance pas automatiquement, cliquez sur Démarrer,
Exécuter, tapez D:\setup (ou la lettre correspondante de votre lecteur CD-ROM) puis
cliquez sur OK.
B. Cliquez sur Installation.
C. Suivez les instructions à l'écran.
D.
Lorsque vous y êtes invité, trouvez un port USB
disponible et insérez le Wireless
MAXg
USB Adapter.
Remarque à l'attention des utilisateurs de
Windows XP : suivez les instructions à l'écran.
E. Lorsque vous y êtes invité, cliquez sur Redémarrer pour redémarrer votre ordinateur.
Remarque : il se peut que le message « Impossible de trouver la signature numérique » ou
l'écran de test affichant le logo Windows apparaisse. Cliquez sur Oui ou sur Continuer.
U.S. Robotics a procédé à des tests complets sur ce pilote associé au matériel pris en
charge et s'est assuré de la compatibilité avec Windows XP et 2000. Les pilotes sont
disponibles pour que les clients d'U.S. Robotics puissent tirer pleinement parti des
fonctionnalités de la carte réseau.
15
Etape 3 : configuration d'un réseau sans fil
A. Une fois que l'ordinateur a redémarré, sélectionnez Configure a new U.S. Robotics Wireless
MAXg Router (Configurer un nouveau U.S. Robotics Wireless
MAX
g Router) lorsque vous y
êtes invité et cliquez sur Next (Suivant). Patientez pendant que la communication s'établit
entre le Wireless MAXg USB Adapter et le routeur.
B. Si vous y êtes invité, sélectionnez votre type de connexion Internet et cliquez sur Next
(Suivant). Selon le type de connexion que vous choisissez, vous devrez peut-être fournir
d'autres informations.
C. Saisissez un nom de réseau (
Network name
) ainsi qu'une clé réseau, également connue sous le
nom de phrase d'authentification (
Pass phrase
), pour votre mode de cryptage sans fil. Cliquez
ensuite sur
Next
(Suivant). Patientez pendant la configuration du routeur et de l'USB Adapter.
Remarque : nous vous recommandons d'activer le cryptage WPA pour garantir la sécurité
de votre réseau sans fil. Assurez-vous de bien affecter la même clé WPA secrète à vos
différents périphériques afin d'éviter tout problème de connectivité par la suite. Pour plus
d'informations et pour connaître tous les paramètres du mode sans fil, reportez-vous aux
guides de l'utilisateur du CD-ROM d'installation U.S. Robotics.
D. Lorsque vous y êtes invité, saisissez un nom d'utilisateur (User name) ainsi qu'un mot de
passe (Password) pour la connexion du routeur puis cliquez sur Next (Suivant). La
configuration se poursuit. Patientez.
E. Un écran des paramètres de votre Wireless MAXg Router s'affichera. Ces paramètres seront
sauvegardés dans un fichier texte sur le bureau de votre ordinateur et vous pourrez les
imprimer si ce dernier est connecté à une imprimante. Lorsque vous aurez pris
connaissance de ces informations, cliquez sur Finish (Terminer). Votre Wireless MAXg
Router et Wireless
MAX
g USB Adapter devraient être configurés et prêts à l'emploi.
Félicitations ! Vous avez terminé l'installation du produit ! Le Wireless MAXg USB Adapter est
désormais connecté au réseau que vous avez configuré.
En cas de problème de connexion à un dispositif sans fil, reportez-vous à la section Dépannage
de ce guide ou au chapitre Configuration du guide de l'utilisateur pour le Wireless MAXg Adapter
sur le CD-ROM d'installation U.S. Robotics.
16
Lancement de l'utilitaire de configuration
La petite icône de l'utilitaire de configuration doit maintenant apparaître dans la barre système,
près de l'horloge. Vous pouvez ouvrir l'utilitaire de configuration de deux façons :
• Cliquez avec le bouton droit de la souris sur l’icône puis sur Open Utility (Ouvrir l'utilitaire).
• Cliquez une fois avec le bouton gauche de la souris sur l'icône de l'utilitaire pour ouvrir
l'écran de connexion rapide. A partir de cet écran, sélectionnez un réseau disponible puis
saisissez la clé réseau, le cas échéant. Cliquez sur Connect (Se connecter) pour établir une
connexion sans fil. Vous pouvez également cliquer sur Advanced (Paramètres avancés) pour
ouvrir tout l'utilitaire de configuration.
L'utilitaire de configuration sert à modifier ou à vérifier les informations relatives à la
configuration de votre Wireless MAXg USB Adapter. La couleur de l'icône de l'utilitaire de
configuration indique l'état de votre réseau sans fil : rouge pour déconnecté et vert pour une
connexion de qualité.
Installation de l'imprimante USB
Une imprimante USB peut être connectée au Wireless MAXg Router et servir d'imprimante réseau
si vous utilisez un système d'exploitation prenant en charge l'impression vers une imprimante
IPP (Internet Printing Protocol). Les versions Windows XP et 2000 prennent en charge cette
fonction. Pour les autres versions de Windows, les utilisateurs doivent télécharger un correctif
Microsoft ou une application tierce. Reportez-vous à la documentation de votre version de
Windows pour en savoir plus. Pour les autres systèmes d'exploitation, l'impression IPP doit être
prise en charge ou une application tierce doit être téléchargée.
Pour installer et configurer l'imprimante, procédez comme suit :
Etape 1 : connexion de l'imprimante au Wireless MAXg Router
Branchez l'extrémité carrée du câble USB au port USB de votre imprimante. Branchez l'extrémité
rectangulaire du câble USB dans le port USB du Wireless MAXg Router. Branchez votre
imprimante sur le secteur, puis mettez-la sous tension.
Etape 2 : configuration de votre imprimante
Lancez un navigateur Web. Dans le champ d'adresse de votre navigateur Web, tapez
http://192.168.2.1 pour accéder à l’interface utilisateur Web.
A la section Device (Périphérique) de la page Status (Statut), recherchez les informations
relatives au statut de l'imprimante (Printer Status) et à son emplacement (Printer location).
Notez les informations spécifiées dans le champ Printer location car il s'agit de l'adresse réseau
de l'imprimante et vous en aurez besoin pour configurer cette dernière.

17
Pour configurer votre imprimante, procédez comme suit. Vous devrez effectuer cette procédure
pour chaque ordinateur du réseau que vous souhaitez voir accéder à l'imprimante.
1. Utilisateurs de Windows XP : cliquez sur Démarrer/Panneau de configuration puis sur
Imprimantes et télécopieurs.
Utilisateurs de Windows 2000, Me et 98 : cliquez sur Démarrer, Paramètres puis sur
Imprimantes.
2. Cliquez sur Ajouter une imprimante pour lancer l'Assistant Ajout d'imprimante. Cliquez sur
Suivant.
3. Sélectionnez Imprimante réseau et cliquez sur Suivant.
4. Sélectionnez Se connecter à une imprimante sur Internet… et entrez l'adresse réseau de
l'imprimante. Cliquez sur Suivant.
Remarque : l'adresse réseau figurant dans Printer location doit être identique à
celle qui s'affiche à l'écran. Le champ d'adresse est sensible à la casse. Si vous ne
saisissez pas correctement l'adresse réseau, l'imprimante ne sera pas détectée.
5. Le système vous invite à choisir la marque et le modèle de votre imprimante. Vous pouvez
soit le sélectionner dans la liste, soit cliquer sur Disque fourni. Insérez alors le CD-ROM livré
avec votre imprimante, puis accédez à votre lecteur de CD-ROM afin de trouver les pilotes.
Quand vous avez terminé, cliquez sur Next (Suivant).
6. A l'invite du système, vous pouvez si vous le souhaitez définir cette imprimante comme
imprimante par défaut (en sélectionnant Oui ou Non). Si le système vous y invite, vous
pouvez imprimer une page de test.
7. Les informations relatives à votre imprimante y sont spécifiées. Pour terminer le processus
de configuration, cliquez sur Finish (Terminer).
Etape 3 : vérification de la connexion de l'imprimante
Sur la page Status (Statut) de l'interface utilisateur Web, vous pouvez désormais vérifier que le statut
de l'imprimante est Ready (Prêt). Pour vous assurer que l'imprimante fonctionne correctement, cliquez
sur le lien
Print this page
(Imprimer cette page) dans la zone Help (Aide) à droite de l'écran. Si
l'impression est satisfaisante, la configuration de votre imprimante est terminée.
Si le statut de l'imprimante affiche Not Ready (Pas prêt), assurez-vous que l'imprimante est allumée et
que le câble USB est correctement raccordé à l'imprimante, ainsi qu'au Wireless
MAX
g Router.
Si le statut de l'imprimante affiche encore Not Ready (Pas prêt) ou si la page ne s'imprime pas
correctement, recommencez la procédure de configuration et vérifiez la validité de toutes les
informations entrées.
Enregistrement du Wireless MAXg Router et du
Wireless MAXg USB Adapter
Enregistrez vos produits en ligne à l'adresse http://www.usr.com/productreg.

18
Dépannage
Je n'arrive plus à me connecter à Internet.
Lorsque votre ordinateur se connecte à Internet, plusieurs périphériques doivent fonctionner ensemble.
A. Votre ordinateur se connecte au Wireless MAXg Router via une connexion sans fil ou câblée.
B. Votre Wireless
MAX
g Router se connecte à votre modem haut débit/DSL via un câble Ethernet.
C. Votre modem haut débit/DSL se connecte à votre fournisseur d'accès Internet (FAI) par
l'intermédiaire de votre réseau téléphonique/câblé.
La première étape de résolution du problème est d'en diagnostiquer la cause. Plusieurs éléments
peuvent faire échouer la connexion entre Internet et votre ordinateur.
Contrôlez tout d'abord les voyants des différents périphériques. Si un ou plusieurs voyants
indiquent un problème, vous pourrez cibler vos opérations de dépannage.
1. Si votre ordinateur utilise une connexion sans fil vers votre routeur, vérifiez que l'utilitaire
sans fil indique une connexion correcte vers votre routeur.
Si votre ordinateur ne parvient pas à communiquer avec le routeur, il ne pourra pas accéder
à Internet.
2. Les voyants de contrôle de l'alimentation, de la connexion sans fil et d'Internet du Wireless
MAXg Router sont-ils allumés ?
Si le routeur est éteint, si la radio sans fil ne fonctionne pas ou si la connexion Internet (via
votre modem câble/DSL) ne fonctionne pas, votre ordinateur ne pourra pas non plus
accéder à Internet.
3. Les voyants d'alimentation et de statut du modem câble/DSL indiquent-ils une connexion ?
(Pour plus d'informations sur les indicateurs de statut du modem, reportez-vous à la
documentation de ce dernier.)
Si votre modem est éteint ou s'il ne peut pas communiquer avec votre FAI, il ne pourra pas
accéder à Internet.
Parcourons désormais les divers périphériques afin de repérer celui qui ne se connecte pas
correctement.
Etape 1 : votre ordinateur se connecte-t-il à votre Wireless MAXg Router ?
Si vous utilisez une connexion câblée :
Si vous utilisez une connexion câblée entre votre ordinateur et votre Wireless MAXg Router,
assurez-vous que le câble Ethernet est connecté au port LAN de votre ordinateur et à un port LAN
du routeur, et que les voyants correspondants sont allumés.
Si vous utilisez une connexion sans fil :
Si vous disposez d'une connexion sans fil vers le Wireless MAXg Router, votre utilitaire sans fil
indique-t-il que la connexion à votre routeur a été établie avec succès ?
Si votre utilitaire sans fil indique que la connexion sans fil fonctionne correctement, il est possible
que votre ordinateur soit connecté à un routeur voisin, et non au vôtre. Vous pouvez utiliser votre
utilitaire sans fil pour connaître le nom réseau (SSID) du routeur auquel vous êtes connecté. Si
votre ordinateur est connecté au mauvais routeur, vous pouvez utiliser l'utilitaire pour amener
votre ordinateur à se connecter à votre routeur.

19
Si aucune connexion n'est établie avec votre Wireless MAXg Router, essayez les solutions
suivantes :
1 Assurez-vous que votre ordinateur est positionné assez près de votre routeur pour recevoir
un signal et que rien (par exemple, un four micro-ondes ou un mur en béton) n'interfère
avec le signal. Si votre routeur diffuse son nom de réseau, vous pouvez utiliser l'utilitaire
sans fil de votre ordinateur pour le rechercher. Cette opération est généralement appelée
« Représentation du site ». Si votre utilitaire ne parvient pas à détecter votre routeur, le
problème peut être lié au signal.
2. Assurez-vous que l'utilitaire sans fil possède le nom réseau correct et applique les
paramètres de sécurité de votre routeur. Les paramètres tels que le nom de réseau, la
méthode de sécurité (WPA, WEP, etc.) et les clés de sécurité doivent tous correspondre. Si
votre routeur utilise le cryptage WPA, chaque adaptateur ou carte sans fil doit prendre en
charge le cryptage WPA. Pour plus d'informations sur le changement des paramètres de
sécurité, reportez-vous à la section Configuration du guide de l'utilisateur du Wireless
MAXg Router.
3. Si vous avez activé l'option Mac Filtering (Filtrage MAC), cet ordinateur est-il autorisé à se
connecter à votre routeur ? Cette option s'adresse à des adaptateurs sans fil spécifiques. Si
vous utilisez le filtrage MAC et si vous avez remplacé les adaptateurs sans fil, vous devez
intégrer l'adresse MAC des nouveaux adaptateurs sans fil au routeur.
Vous avez probablement remarqué que vous devez accéder à votre Wireless MAXg Router pour
contrôler certains de ces éléments. Nous effectuerons cette tâche à la prochaine étape.
Si aucune de ces solutions ne fonctionne, tentez d'établir une connexion câblée entre votre
ordinateur et votre routeur, en connectant un câble Ethernet entre le port LAN de votre ordinateur
et un port LAN du routeur. Assurez-vous que les voyants des ports LAN correspondants sont
allumés. Si la connexion câblée fonctionne, le problème vient probablement de la connexion sans
fil entre votre ordinateur et le routeur. Essayez alors d'effectuer de nouveau les étapes
précédentes.
Etape 2 : votre Wireless MAXg Router répond-il ?
Si vous disposez d'une connexion sans fil ou câblée vers votre Wireless MAXg Router, ouvrez
votre navigateur Web et saisissez l'adresse suivante : 192.168.2.1. Remarque : si vous avez
modifié l'adresse IP du LAN du routeur, vous devez utiliser la nouvelle adresse.
Si l'interface Web du Wireless MAXg Router n'apparaît pas, votre ordinateur devra peut-être
établir de nouveau une connexion vers votre routeur :
Libérez et renouvelez la connexion réseau de votre ordinateur.
Utilisateurs de Windows XP, 2000 et NT :
Cliquez sur Démarrer et sélectionnez Exécuter.
Ta pe z cmd et appuyez sur Entrée.
Ta pe z ipconfig /release et appuyez sur Entrée.
Ta pe z ipconfig /renew et appuyez sur Entrée.
Ta pe z exit et appuyez sur Entrée.
Utilisateurs de Windows Me, 98 et 95 :
Cliquez sur Démarrer et sélectionnez Exécuter.
Ta pe z winipcfg et appuyez sur Entrée.
Cliquez sur Libérer.
Cliquez sur Renouveler.
Fermez l'application.
Votre ordinateur recevra alors une adresse IP (telle que 192.168.2.5) envoyée par le routeur.
Essayez d'accéder à l'adresse Web du routeur : http://192.168.2.1.
Si l'interface Web du Wireless MAXg Router n'apparaît pas, vous devez probablement réinitialiser
votre routeur.
1. A l'aide d'un outil assez fin, tel qu'un trombone, appuyez brièvement sur le bouton de
réinitialisation (RESET) situé à l'arrière du routeur. Maintenez le bouton enfoncé pendant
une à deux secondes pour réinitialiser le routeur. Si vous appuyez sur le bouton RESET
pendant plus de cinq secondes, le routeur rétablira ses paramètres d'usine.

20
2. Attendez environ 30 secondes.
3. Libérez et renouvelez la connexion réseau de votre ordinateur. (Pour plus de détails, voir
ci-dessus.)
4. Essayez d'accéder à l'adresse Web du routeur : http://192.168.2.1.
Si vous ne parvenez toujours pas à accéder au Wireless MAXg Router, vous devrez probablement
rétablir ses paramètres d'usine. Vous perdrez alors tous les paramètres personnalisés et vous
devrez les définir de nouveau comme si vous installiez le routeur pour la première fois.
Néanmoins, si vous avez effectué une sauvegarde de vos paramètres, vous pourrez les rétablir
ultérieurement. Pour en savoir plus, reportez-vous au guide de l'utilisateur du Wireless MAXg
Router sur le CD-ROM d'installation.
1. A l'aide d'un outil assez fin, tel qu'un trombone, appuyez pendant au moins cinq secondes
sur le bouton de réinitialisation (RESET) situé à l'arrière du routeur.
2. Attendez environ 30 secondes.
3. Essayez d'accéder à l'adresse Web du routeur : http://192.168.2.1.
Si l'interface Web du Wireless MAXg Router n'apparaît toujours pas, il est possible que votre
routeur soit défectueux. Contactez le service d'assistance clientèle d'U.S. Robotics.
Si l'interface Web du Wireless MAXg Router apparaît, le problème vient peut-être de sa connexion
à votre modem câble/DSL.
Etape 3 : votre Wireless MAXg Router parvient-il à se connecter à votre modem câble/DSL ?
Maintenant que vous avez réussi à accéder à l'interface Web du Wireless MAXg Router, accédez à
la page Status (Statut).
Le système doit normalement indiquer en haut de la page (sous l'onglet Status) si le routeur est
connecté à Internet.
Copie d'écran d'un routeur connecté à Internet :
Copie d'écran d'un routeur non connecté à Internet :
Vous pouvez contrôler cette indication en accédant à la section WAN de la page Status (Statut),
afin de vérifier si le routeur dispose d'une adresse IP WAN (telle que 235.42.181.5). Cette
adresse IP indique si le routeur est connecté au modem câble/DSL.
 Loading...