

U.S. Products HYDRAPORT 1200 Operating Instructions Manual
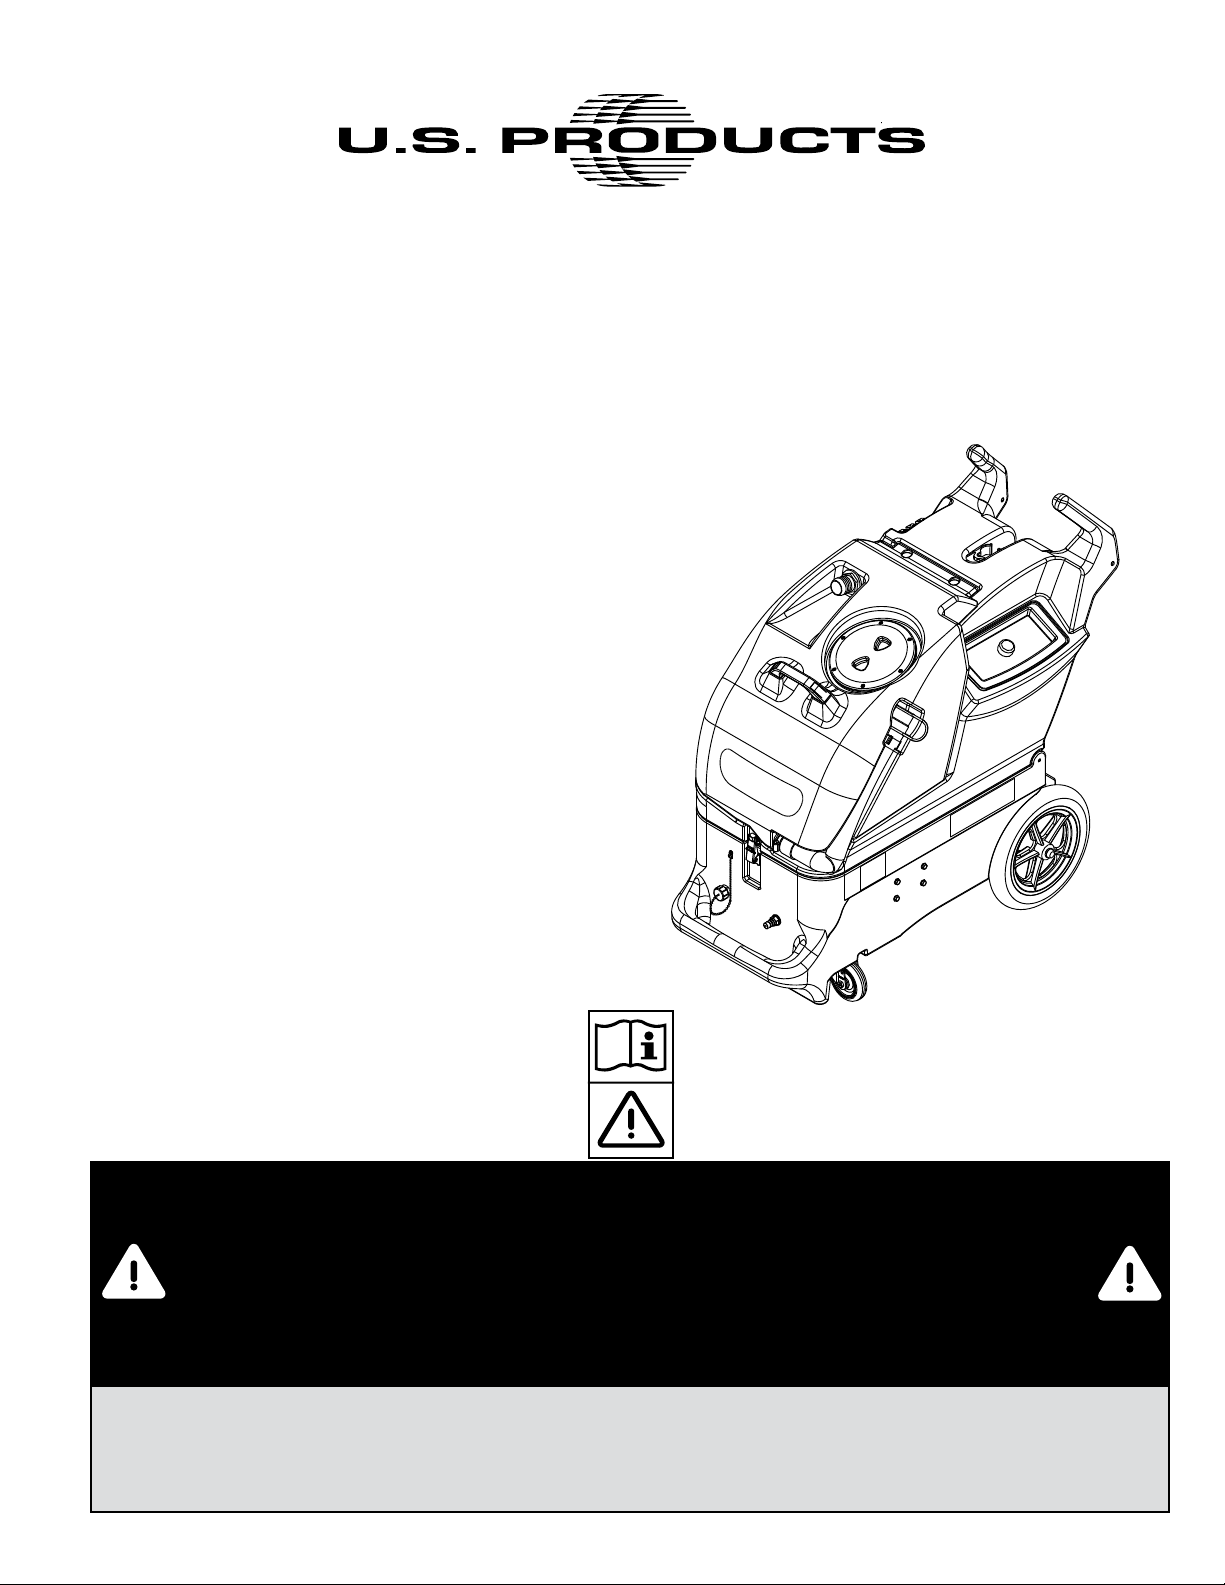
HYDRAPORT 1200
INFORMATION AND
OPERATING
INSTRUCTIONS
INFORMACIÓN E
INSTRUCCIONES DE
USO
INFORMATION ET
D’UTILISATION
MODELS: 5
A-English
B-Español
C-Français
DIRECTIVES
6105306
CAUTION: DO NOT OPERATE MACHINE UNTIL YOU HAVE READ
ALL SECTIONS OF THIS INSTRUCTION MANUAL
PRECAUCIÓN: NO UTILICE LA MÁQUINA HASTA HABER LEÍDO
TODAS LAS SECCIONES DE ESTE MANUAL DE INSTRUCCIONES
ATTENTION : N’UTILISEZ PAS LA MACHINE AVANT D’AVOIR LU
TOUTES LES SECTIONS DU PRÉSENT MANUEL
IMPROPER USE OF THE MACHINE WILL VOID THE WARRANTY
EL USO INCORRECTO DE LA MÁQUINA ANULARÁ LA GARANTÍA
UNE UTILISATION INCORRECTE DE LA MACHINE ANNULERA LA GARANTIE
11/11 revised 2/12 FORM NO. 56091030

ENGLISH
INSTRUCTIONS FOR USE
TABLE OF CONTENTS
Page
Introduction ................................................................................... A-3
Parts and Service ........................................................................... A-3
Modifi cations ................................................................................... A-3
Nameplate ...................................................................................... A-3
Uncrating the Machine .................................................................... A-3
Cautions and Warnings .................................................................. A-4
Grounding Instructions ................................................................... A-5
Know Your Machine.............................................................A-6 – A-7
Know Your Switch Plate .................................................................. A-8
Preparing the Machine for Use .................................................... A-9
Auto-Fill Operation .......................................................................... A-9
Auto-Dump Operation ..................................................................... A-9
Operating the Machine .................................................... A-10 – A-11
After Use
After Using the Machine ............................................................... A-12
REVISED DATE
Maintenance
Maintenance Schedule ................................................................. A-12
Power Cord Maintenance ............................................................. A-12
Troubleshooting ............................................................................ A-13
Technical Specifi cations ............................................................... A-13
Material Composition and Recyclability ........................................ A-13
SECTION II – Parts List
General View .................................................................................. D-2
Decal System .................................................................................D-3
Base System 1200 ............................................................... D-4 – D-5
Recovery System ................................................................. D-6 – D-7
Solution System .................................................................... D-8 – D-9
Wiring Diagram ............................................................................. D-10
Options & Accessories ...................................................................D-11
Water Flow Diagram ..................................................................... D-12
A - 2 HydraPort 1200 - 56091030 11/11

REVISED DATE
12/2
ENGLISHINSTRUCTIONS FOR USE
INTRODUCTION
This manual will help you get the most from your US Products™ dual-surface extractor. Read it thoroughly before operating the machine.
This product is intended for commercial use only.
PARTS AND SERVICE
Repairs, when required, should be performed by your Authorized US Products Service Center, who employs factory trained service personnel, and
maintains an inventory of US Products original replacement parts and accessories.
Call the US PRODUCTS DEALER named below for repairs or service. Please specify the Model and Serial Number when discussing your
machine.
MODIFICATIONS
Modifi cations and additions to the cleaning machine which affect capacity and safe operation shall not be performed by the customer
or user without prior written approval from Nilfi sk-Advance Inc. Unapproved modifi cations will void the machine warranty and make
the customer liable for any resulting accidents.
NAMEPLATE
The Model Number and Serial Number of your machine are shown on the Nameplate, located at the rear of the machine on the base. This information
is needed when ordering repair parts for the machine. Use the space below to note the Model Number and Serial Number of your machine for future
reference. Be sure to register your warranty online at www.usproducts.com/warranty
MODEL ________________________________________________
SERIAL NUMBER ________________________________________
UNCRATING THE MACHINE
When the machine is delivered, carefully inspect the shipping carton and the machine for damage. If damage is evident, save the shipping carton
so that it can be inspected. Contact the US Products Customer Care Department immediately to fi le a freight damage claim at 800.257.7982 then
press option #2.
This machine shipped with a replacement impeller kit attached to the dump pump inside the base of the machine. Tip open the tanks to locate the
kit and remove it from the machine for future use. Keep the impeller kit along with this operator manual in a safe place.
WARNING!
The Products sold with this Manual contain or may contain chemicals that are known to certain governments (such as the State of
California, as identifi ed in its Proposition 65 Regulatory Warning Law) to cause cancer, birth defects or other reproductive harm. In
certain locations (including the State of California) purchasers of these Products that place them in service at an employment job site
or a publicly accessible space are required by regulation to make certain notices, warnings or disclosures regarding the chemicals
that are or may be contained in the Products at or about such work sites. It is the purchaser’s responsibility to know the content of,
and to comply with, any laws and regulations relating to the use of these Products in such environments. The Manufacturer disclaims
any responsibility to advise purchasers of any specifi c requirements that may be applicable to the use of the Products in such
environments.
11/11 A - 3 56091030 - HydraPort 1200

ENGLISH
IMPORTANT SAFETY INSTRUCTIONS
INSTRUCTIONS FOR USE
REVISED DATE
This machine is only suitable for commercial use, for example in hotels, schools, hospitals, factories, shops and offi ces
other than normal residential housekeeping purposes.
When using any electrical appliance, basic precautions should always be followed, including the following:
NOTE: Read all instructions before using this machine.
WARNING!
To reduce the risk of fi re, electric shock, or injury:
• Do not leave the machine unattended when it is plugged in. Unplug the unit from the outlet when: not in use, before cleaning the
machine, prior to servicing or performing any maintenance on the machine, and when replacing parts or converting the machine
to another function.
• To avoid electric shock, do not expose to rain or snow. Store and use machine indoors only, store in a heated location. Do not
let the machine or wand freeze.
• Do not allow to be used as a toy. Close attention is necessary when used near children.
• High pressure cleaners shall not be used by children or untrained personnel.
• Use only as described in this manual. Use only the manufacturer’s recommended attachments.
• Never add water over 130º F/54º C to the solution tank.
• Always use a defoamer when foaming occurs to prevent vacuum motor damage.
• Do not let the pump run dry.
• Never turn on the solution pump without fi rst connecting your solution hose to your machine and to your tool.
• Do not use with damaged cord or plug. If the machine is not working as it should, has been dropped, damaged, left outdoors or
dropped into water, return it to a service center.
• Turn off all controls before unplugging.
• Do not pull by the cord, use the cord as a handle, close a door on the cord, or pull the cord around sharp edges or corners. Do
not run the machine over the cord. Keep the cord away from heated surfaces. To unplug, grasp the plug, not the cord.
• Do not handle the plug, the cord or the machine with wet hands.
• Extension cords must be 12/3 and no longer than 50 feet. Replace the cord or unplug immediately if the ground prong becomes
damaged.
• Connect to a properly grounded outlet only.
• Do not put any object into openings. Do not use with any opening blocked; keep free of dust, lint, hair, and anything that may
reduce air fl ow.
• Keep loose clothing, hair, fi ngers, and all parts of body away from openings and moving parts.
• Do not pick up anything that is burning or smoking, such as cigarettes, matches, or hot ashes, or any health endangering dusts.
Do not use to pick up fl ammable or combustible liquids such as gasoline or use in areas where they may be present.
• Risk of explosion – Do not spray fl ammable liquids.
• Use extra care when cleaning on stairs.
• Wear gloves or use rags when removing quick disconnects to prevent burns.
• Liquid ejected at the spray nozzle could be dangerous as a result of its temperature, pressure, or chemical content.
• High pressure jets can be dangerous if subject to misuse. The jet must not be directed at persons, live electrical equipment or the
machine itself.
• Do not use the machine within range of persons unless they wear protective clothing.
• Do not direct the jet against yourself or others in order to clean clothes or foot-wear.
• High pressure hoses, fi ttings and couplings are important for the safety of the machine. Use only hoses, fi ttings and couplings
recommended by the manufacturer.
• To ensure machine safety, use only original spare parts from the manufacturer or approved by the manufacturer.
• Water that has fl owed through backfl ow preventers is considered to be non-potable.
• Do not use the machine if a supply cord or important parts of the machine are damaged, e.g. safety devices, high pressure
hoses, trigger gun.
A - 4 HydraPort 1200 - 56091030 11/11
REVISED DATE
ENGLISHINSTRUCTIONS FOR USE
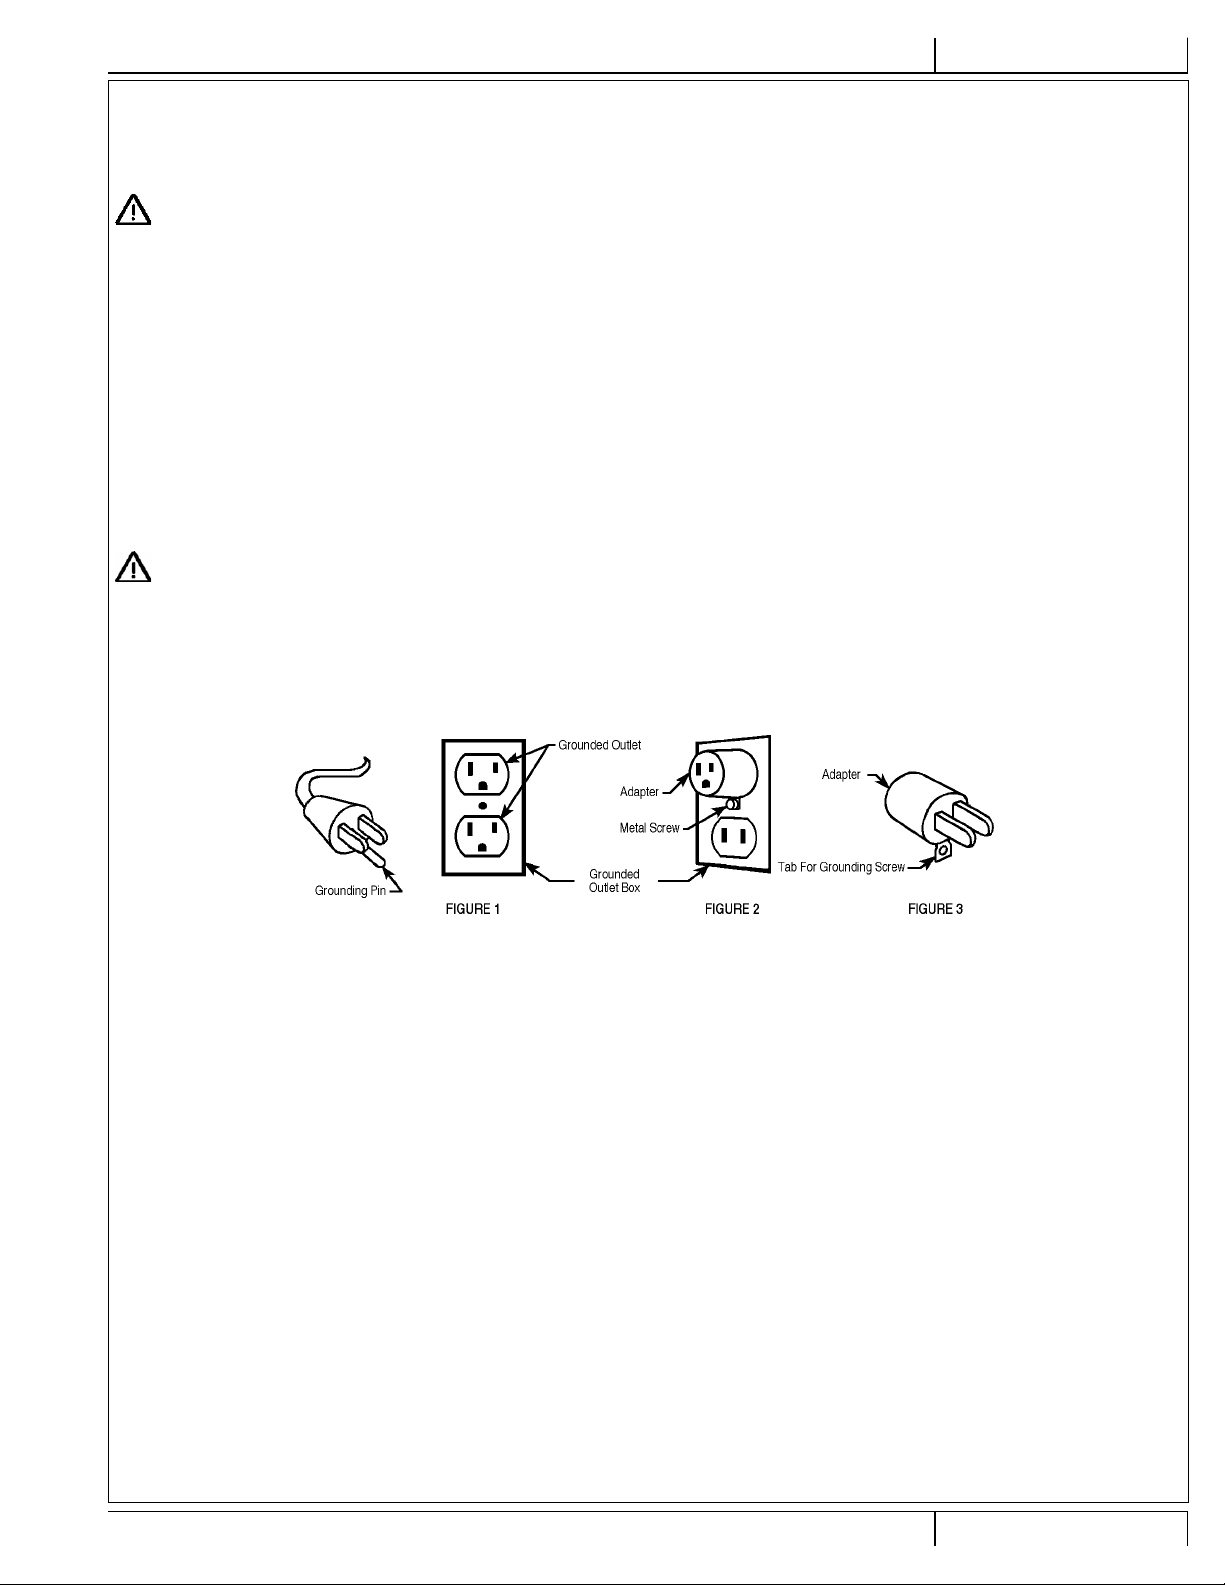
120VAC GROUNDING INSTRUCTIONS
This appliance must be grounded. If it should electrically malfunction, grounding provides a path of least resistance for electric current to reduce
the risk of electric shock. This appliance is equipped with a cord having an equipment-grounding conductor and grounding plug. The plug must be
plugged into an appropriate outlet that is properly installed and grounded in accordance with all local codes and ordinances.
DANGER!
Improper connection of the equipment-grounding conductor can result in a risk of electric shock. Check with a qualifi ed
electrician or service person if you are in doubt as to whether the outlet is properly grounded. Do not modify the plug
provided with the appliance. If it will not fi t the outlet, have a proper outlet installed by a qualifi ed electrician.
This appliance is for use on a nominal 120-volt circuit, and has a grounding plug that looks like the plug illustrated in Figure 1 below. A temporary
adapter illustrated in Figures 2 and 3 may be used to connect this plug to a 2-pole receptacle as shown in Figure 2 if a properly grounded outlet is
not available. The temporary adapter should be used only until a properly grounded outlet (Figure 1) can be installed by a qualifi ed electrician. The
green-colored rigid ear, tab, or the like extending from the adapter must be connected to a permanent ground such as a properly grounded outlet box
cover. Whenever the adapter is used, it must be held in place by a metal screw. Grounding adapters are not approved for use in Canada.
Replace the plug if the grounding pin is damaged or broken.
The Green (or Green/Yellow) wire in the cord is the grounding wire. When replacing a plug, this wire must be attached to the grounding pin only.
Extension cords connected to this machine should be 12 gauge, three-wire cords with three-prong plugs and outlets. DO NOT use extension cords
more than 50 feet (15 m) long.
WARNING!
• If an extension cord is used, the plug and socket must be of watertight construction.
• Inadequate extension cords can be dangerous.
PLEASE NOTE: FOR NORTH AMERICA ONLY
11/11 A - 5 56091030 - HydraPort 1200
ENGLISH
INSTRUCTIONS FOR USE
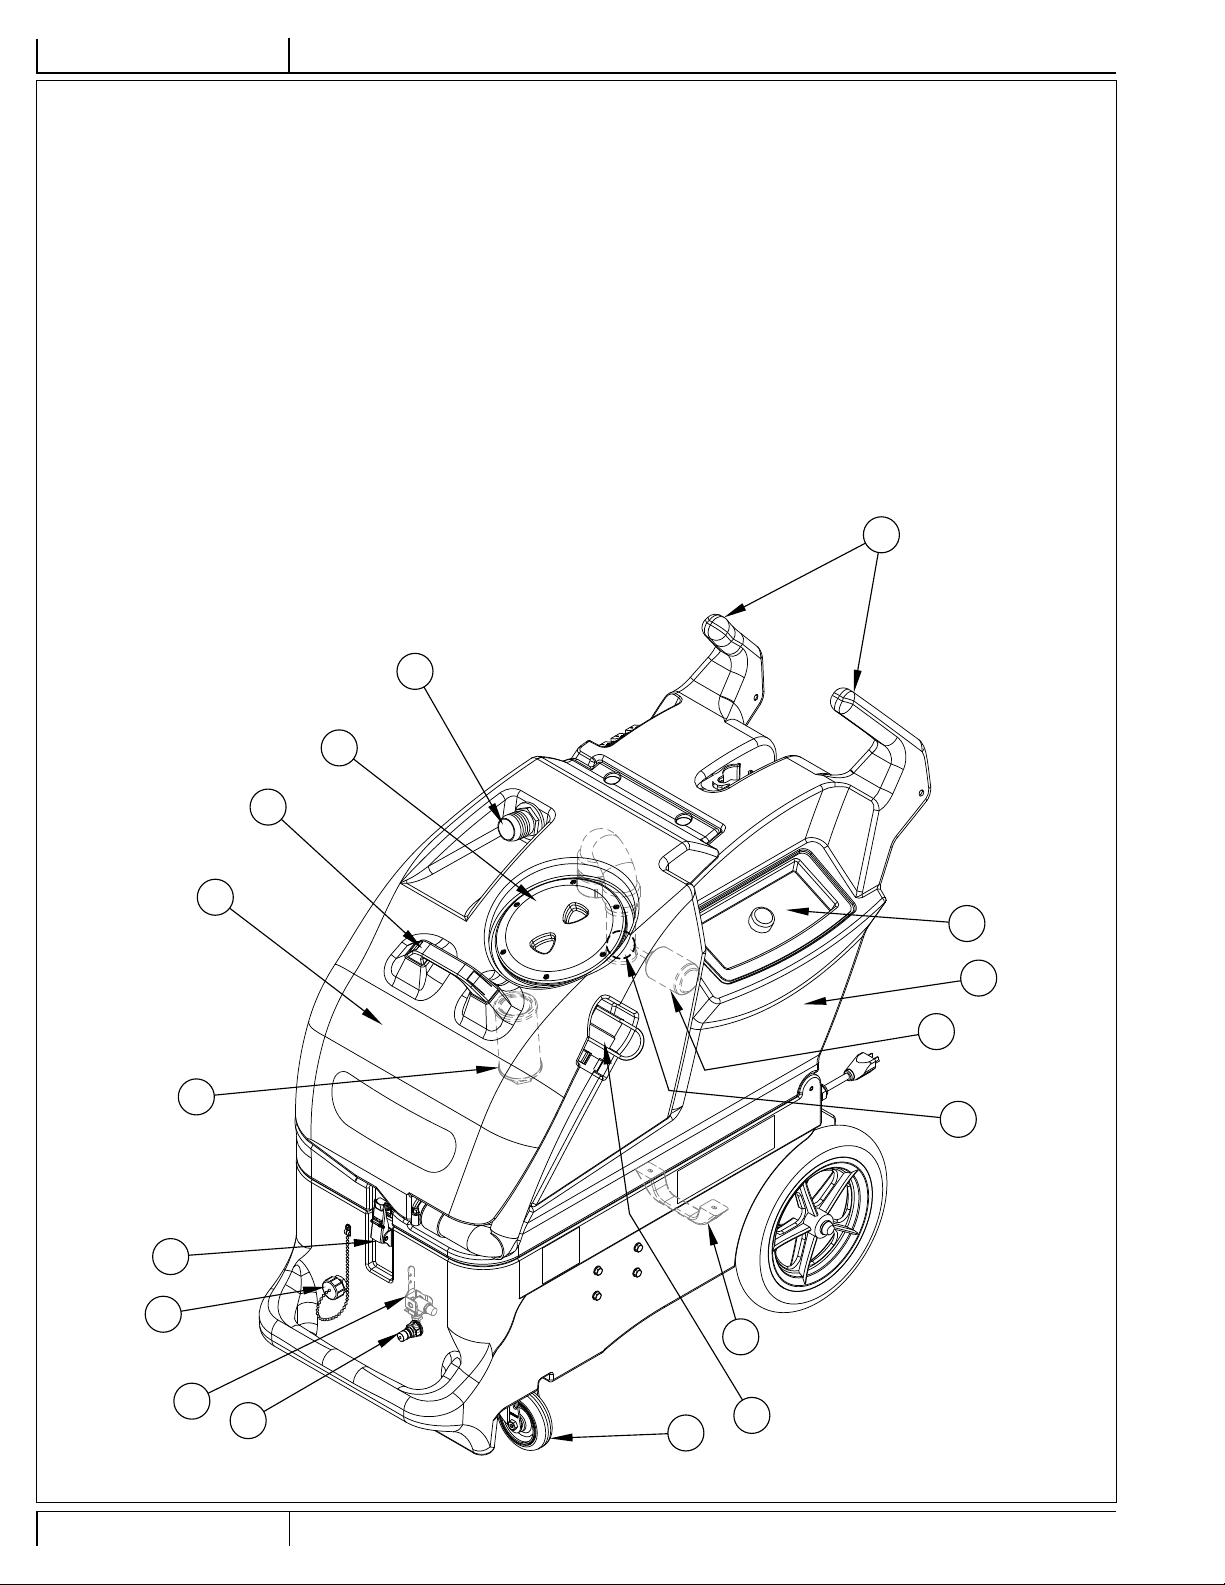
KNOW YOUR MACHINE
1 Recovery Tank Lid
2 Vacuum Hose Barb
3 Recovery Tank
4 Recovery Tank Drain Hose
5 Latch
6 Solution Hose Quick Disconnect
7 Caster
8 Recovery Tank Shutoff Float
9 Solution Tank Fill Opening
10 Solution Tank
11 Grab Handle
12 Handles
13 Auto-Dump Outlet Cap
14 Auto-Dump Float Switch (inside recovery tank)
15 Dump Pump Inlet Filter (inside recovery tank)
16 Pressure Relief Valve (inside base)
17 Loading Handle
REVISED DATE
12
15
2
1
11
3
9
10
14
8
5
13
17
16
6
A - 6 HydraPort 1200 - 56091030 11/11
7
4

REVISED DATE
KNOW YOUR MACHINE (CONTINUED)
18 Pressure Adjustment Knob
19 Auto-Fill Hose Connection
20 Solution Filter (inside solution tank)
21 Pressure Gauge
22 Cord Retainer Straps (two)
23 Hour Meter (Optional)
24 Pigtail Power Cord (two)
25 Loading Wheels
26 Tool Storage Clip
27 Auto-Fill Shutoff Float (inside solution tank)
28 Switch Plate
29 Filter Bag (fed into Vacuum Hose Barb)
30 Wheel
ENGLISHINSTRUCTIONS FOR USE
25
22
19
27
26
28
29
24
21
20
18
11/11 A - 7 56091030 - HydraPort 1200
24
30
23

ENGLISH
INSTRUCTIONS FOR USE
REVISED DATE
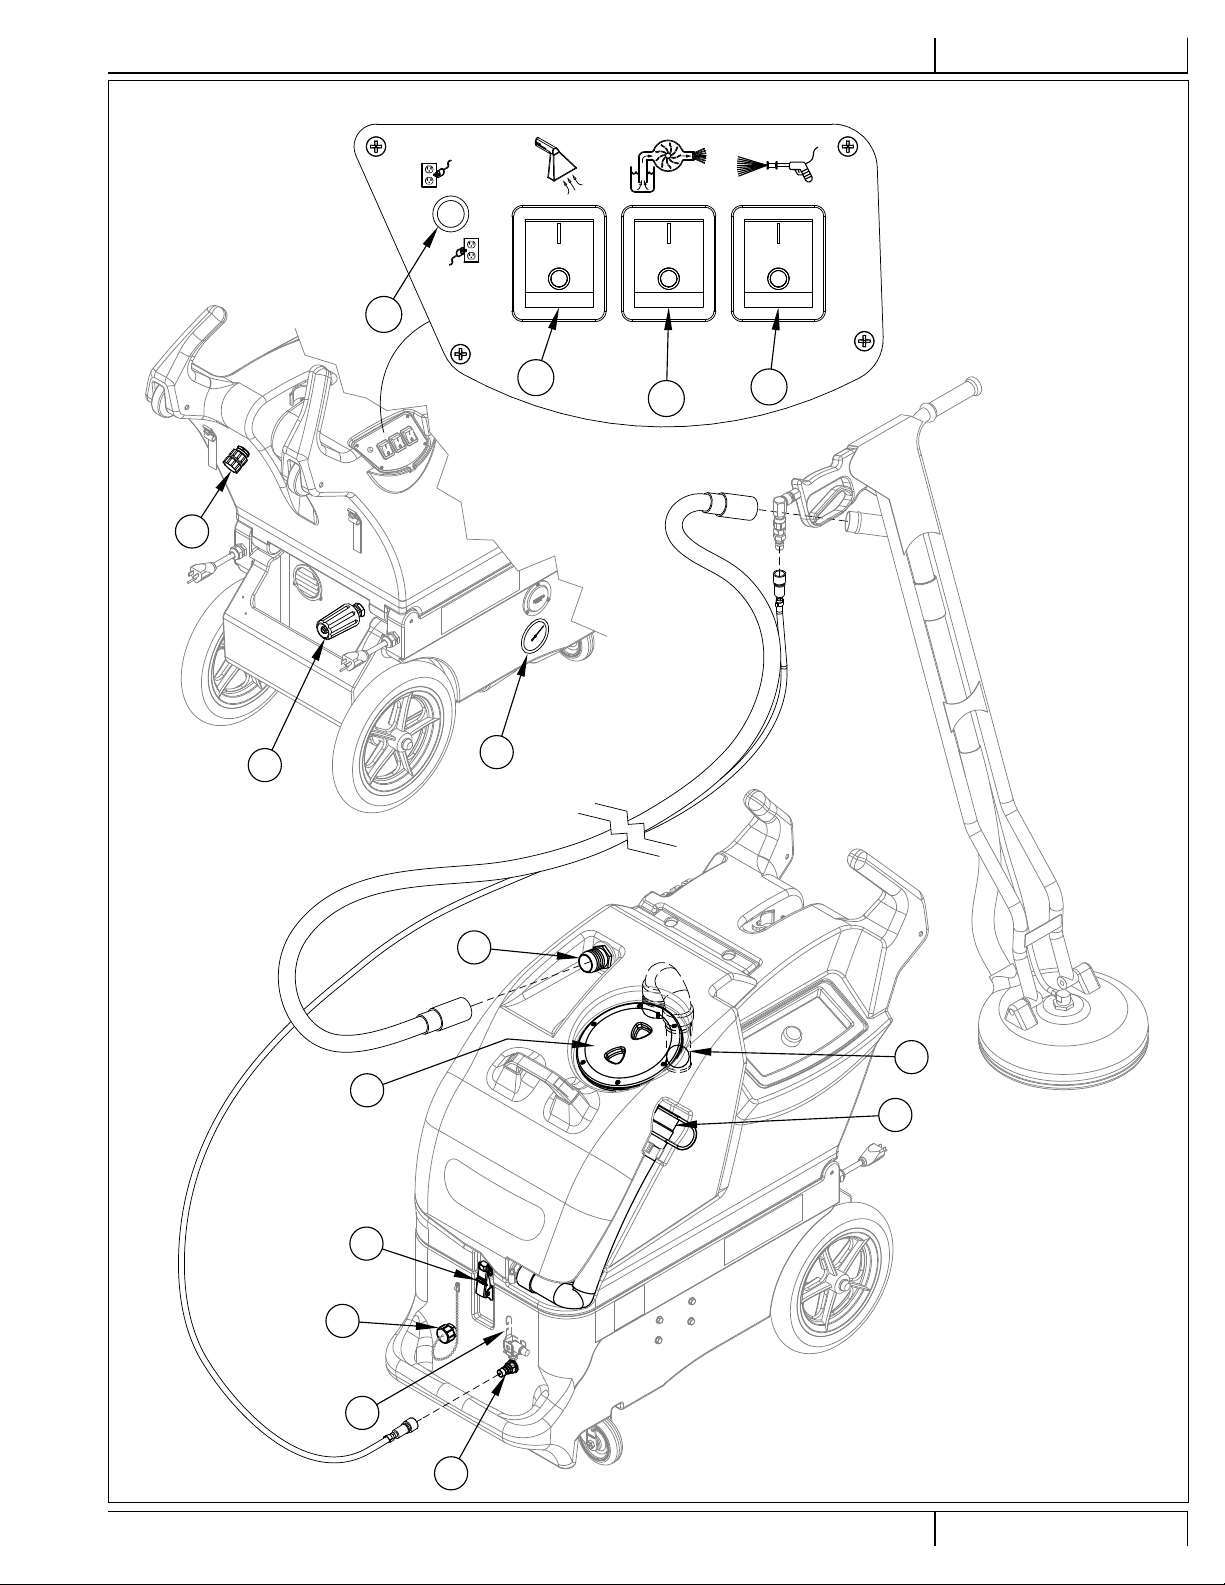
KNOW YOUR SWITCHPLATE
A Circuit Indicator (green) - When this light is on, it indicates that the two cords are plugged into separate circuits. NOTE: if this indicator
light is not turned on, you may have both power cords on the same circuit and this can trip the circuit breaker in the wall.
B Vacuum Switch - This switch turns the vacuum motor ON and OFF.
C Auto-Dump Switch – This switch enables/disables the auto-dump pump. With the pump enabled, the pump will automatically turn ON
and OFF based on the position of the fl oat in the recovery tank.
D Solution Pump Switch - This switch turns the solution pump ON and OFF. The output pressure is adjusted at the pressure adjustment
knob.
CAUTION!
The circuit breaker in the wall panel can trip if both cords are on the same circuit.
A B C
D
A - 8 HydraPort 1200 - 56091030 11/11

REVISED DATE
ENGLISHINSTRUCTIONS FOR USE
PREPARING THE MACHINE FOR USE
1 Inspect the machine, hoses, and cleaning tools for cleanliness and completeness.
2 Screw the Recovery Tank Lid (1) closed. Ensure the Recovery Tank Drain Hose Cap (4) is closed tightly.
3 Pre-spray spots and heavy traffi c areas before extracting with the detergent of your choice. Mix the pre-spray according to the detergent
manufacturer’s directions.
4 If not using the auto-fi ll feature: open Solution Tank Fill Opening (9) and fi ll the solution tank with clear water (12.5 gal. / 47 L capacity). Never
use water above 130º F/54º C in the solution tank. If desired, add a detergent or rinse of your choice. If you choose to add a detergent to
the solution tank, be sure to mix well, and always follow the use & dilution instructions on the detergent label. Only use a detergent with a pH
between 5 and 10.
AUTO-FILL OPERATION
• Attach a 3/4” garden hose to the Auto-Fill Hose Connection (19), and connect the other end of the hose to your water source (F) – HIGH
PRESSURE IS NOT NECESSARY.
• Make sure the fl oat (27) that hangs from the auto-fi ll valve into the tank is free of obstruction and can move freely.
• Turn the water supply on and allow the tank to fi ll with water. NOTE: Never use water above 130º F/54º C in the solution tank.
• The auto-fi ll fl oat will automatically shut-off the fl ow of incoming water when the solution tank is nearly full, and it will allow the valve to open
again once the water level has dropped to a predetermined level.
AUTO-DUMP OPERATION
• Before each use: If necessary, unscrew the stainless steel fi lter (15) at the bottom of the recovery tank and clean it. Also make sure the fl oat
(14) in the recovery tank is clean and moves freely.
• Remove the Auto-Dump Outlet Cap (13). Attach a 3/4” garden hose to the dump pump outlet fi tting (13A) on the base of the machine.
• Run the other end of the hose into a drain (G).
• Turn ON the Dump Pump Switch (C).
• NOTE: The dump pump is ‘self-priming.’ You should see water start to fl ow within 30 seconds of the pump turning on. If water does not
begin to fl ow, check the fi lter to see if it is plugged with debris. The fl oat will automatically shut off the dump pump once the water reaches a
predetermined level.
• After each job: Run clear water through the dump pump to wash out any chemical residue. Remove and clean the fi lter in the recovery tank.
Reinstall the fi lter once it is clean. Clean and empty the recovery tank.
AUTO-DUMP
G
AUTO-FILL
F
13A
1
15
9
14
4
27
13
19
11/11 A - 9 56091030 - HydraPort 1200

ENGLISH
OPERATING THE MACHINE
1 Follow the instructions in the Preparing the Machine for Use section of this manual.
2 Turn off all the switches. Plug the power cords into properly grounded outlets. Do not connect both cords to the same outlet; the green,
Circuit Indicator Light (A) on the switch plate should light up. If the indicator light does not come on, try different outlets until it does.
3 If you choose not to use the auto-fi ll feature, fi ll the tank with water and cleaning chemical. Follow chemical directions regarding dilution and
mixing. Do not use harsh chemicals; they may damage seals in pumps and valves, and cause the pump to wear prematurely.
If you choose to use the auto-fi ll feature, see “Auto-Fill Operation” steps on the previous page.
INSTRUCTIONS FOR USE
REVISED DATE
CAUTION!
• Do not use solvents, or any chemicals that may be fl ammable, explosive or combustible.
4 If not using the auto-dump feature, make sure the Auto-Dump Outlet Cap (13) is on the drain hose connector on the front of the base of the
machine, and keep Auto-Dump Switch (C) in the OFF (O) position.
If you choose to use the auto-dump feature, see “Auto-Dump Operation” steps on the previous page.
5 Attach the priming hose to the machine at Quick Disconnect (6) and place the open end into the solution tank.
6 Turn ON the Solution Pump (D) and let it run until the pump is fully primed (approximately 30 seconds to 1 minute). Once the pump is primed,
turn off the pump and remove the priming hose. Never remove the prinimg hose while the pump is still running.
7 Connect a solution line to the Solution Hose Quick Disconnect (6). Attach the other end of the solution line to the cleaning tool.
Never turn on the Solution Pump (D) before fi rst connecting your solution line to your machine and to your tool. If the pump builds up pressure
before you connect the hose and tool, you will not be able to connect them. If this occurs; unlatch the tanks at Latch (5) and tip open the tanks,
then press the lever on the Pressure Relief Valve (16) to relieve the solution line pressure.
8 Connect a vacuum hose to the Vacuum Hose Barb (2). Attach the other end of the vacuum hose to the cleaning tool.
9 Press the Solution Pump Switch (D) to ON (I).
CAUTION!
• Never leave the solution pump running when you are not actively using it.
10 Press the Vacuum Switch (B) to ON (I).
11 Spray through your tool a few times to fi ll the lines with solution. Begin cleaning.
12 To adjust the solution spray pressure; rotate the Pressure Adjustment Knob (18) clockwise to increase pressure and counterclockwise to
decrease pressure. The pump spraying pressure will be observable at the Pressure Gauge (21) while spraying. Make sure the cleaning tool is
spraying when adjusting the pressure, otherwise the pressure reading will be inaccurate.
13 Watch the fl uid entering the Recovery Tank Lid (1). If there is a large amount of suds in the recovery tank, add a defoamer chemical to the
recovery tank.
CAUTION!
• Empty the recovery tank before the fl uid or foam enters the vacuum motor.
• If foam or liquid escapes from the machine, switch off immediately.
CAUTION!
Always make sure the fl oat is clean and travels freely before turning on the machine. A fl oat that is stuck will cause the
vacuum motor to suck in water, resulting in vac motor damage.
14 The recovery tank has a Recovery Tank Shutoff Float (8) to block the vacuum system when the recovery tank is full (when not using the auto-
dump feature). You can tell when the fl oat closes by the sudden change in the sound of the vacuum motor. When the fl oat closes, the recovery
tank must be emptied. The machine can continue to dispense solution, but will not pick up water with the fl oat closed.
15 If not using the auto-fi ll feature; monitor the water level in the solution tank. Do not let the pump run dry. When the solution tank gets low, turn
off the solution pump and the vacuum motor, refi ll the solution tank with water and the proper ratio of cleaning detergent. Empty the recovery
tank and continue cleaning.
16 When the operator has completed the job; turn off the water source for the auto-fi ll feature. Follow the instructions in the After Using the Machine
section of this manual.
A - 10 HydraPort 1200 - 56091030 11/11
REVISED DATE
OPERATING THE MACHINE
A
ENGLISHINSTRUCTIONS FOR USE
19
18
B
C
D
21
2
8
1
4
5
13
16
6
11/11 A - 11 56091030 - HydraPort 1200

ENGLISH
INSTRUCTIONS FOR USE
REVISED DATE
AFTER USING THE MACHINE
1 To empty the solution tank, open Solution Tank Fill Opening (9) and vacuum out all unused solution into the recovery tank using the vacuum
hose. Rinse the tank with clean water.
2 Allow the dump pump to run and empty recovery tank if using auto-dump feature.
3 Turn all the Power Switches (B, C & D) to OFF (O). Unplug the Power Cords (17, 24). Coil the cords and secure them to the rear of the machine
using the two Cord Retainer Straps (22).
4 Push the machine to a designated waste water “DISPOSAL SITE”. To empty the recovery tank, pull the Recovery Tank Drain Hose (4) from
its side storage location, then remove the plug (hold the end of the hose above the water level in the tank to avoid sudden, uncontrolled fl ow of
waste water). Rinse the tank with clean water. Inspect the drain hose; replace if kinked or damaged.
5 Disconnect the solution and vacuum hoses from the machine, at the Solution Hose Quick Disconnect (6) and Vacuum Hose Barb (2). Disconnect
the hoses from the cleaning tool. Flush the vacuum hose with warm water to wash any debris out of the vacuum hose and cleaning tool. Inspect
them for damage.
6 Disconnect and store the two garden hoses used for auto-fi ll and auto-dump features. Thread the Auto-Dump Outlet Cap (13) back in place on
the base of the machine.
7 Wipe the machine with a damp cloth. Do not use abrasive chemicals or solvents.
8 Perform any required maintenance before storage.
MAINTENANCE SCHEDULE
MAINTENANCE ITEM Daily Weekly Monthly Yearly
Check / Clean Tanks & Hoses
Check / Clean Recovery Tank Shut-Off Float
Clean Extraction Wand/Tool
Check / Clean Recovery Filter Bag
Inspect & Clean Solution Filter
Inspect & Clean Dump Pump Inlet Filter (inside recovery tank)
Inspect Auto-Fill Float (inside solution tank)
Inspect Auto-Dump Float (inside recovery tank)
Use a fl ushing compound (descale machine)
* Have a US Products service technician check the vacuum motor carbon brushes once a year or after 300 operating hours. Check the pump motor
carbon brushes every 500 hours or once a year.
*Check Carbon Brushes X
X
X
X
X
X
X
X
X
X
IMPORTANT!
Motor damage resulting from failure to service the carbon brushes is not covered under warranty. See the Limited Warranty
Statement.
9 Store the machine indoors in a clean, dry place with the recovery tank lid open. Keep from freezing.
10 Lubricate the wheels, casters and quick disconnects with an all-purpose silicone spray.
11 Once a month, run a fl ushing compound (a mild acid descaler) through the machine to break up any mineral or chemical build-up that may have
formed. Rinse the descaler out of the system with a few gallons of clear water.
POWER CORD MAINTENANCE
Once a week (or more often if necessary), check the power cords for cracked or damaged insulation, exposed wires in the cord or plug, and damaged
or missing ground pin. Repair or replace damaged cord or plug immediately.
A - 12 HydraPort 1200 - 56091030 11/11

REVISED DATE
12/2
TROUBLESHOOTING:
IF THIS OCCURS CHECK THIS
Solution tank is empty, or fi lter is plugged.
Clogged spray tip(s).
NO SPRAY
SOLUTION PUMP DOES
NOT RUN
LOW SUCTION
NO SUCTION
AUTO-DUMP PUMP DOES
NOT RUN
LOW FLOW FROM AUTO-
DUMP PUMP
TECHNICAL SPECIFICATIONS (as installed and tested on the unit)
Model Hydraport 1200
Model No. 56105306
Voltage/frequency 120 V / 60 Hz
Rated Current 15 Amp
Protection Class (electrical) Class 1
Solution Tank Capacity 12.5 gal (47 L)
Recovery Tank Capacity 11.0 gal (42 L)
Total Weight 129 lbs. (58.5 kg)
Material Composition and Recyclability
Type % of machine weight % recyclable
Aluminum 5% 100%
Electrical / motors / engines - misc 40% 33%
Ferrous metals 9% 100%
Harnesses / cables 3% 75%
Liquids 0% 0%
Plastic - non-recyclable 2% 0%
Plastic - recyclable 3% 100%
Polyethylene 35% 95%
Rubber 2% 34%
Valve on tool not operating.
Solution hose not completely connected to hose or to machine.
Solution pump not running or not primed.
This pump motor runs on AC voltage, so it should start running as soon as you turn on the switch. If the
pump motor does not start running, check the wiring to the switch and to the motor. Check the switch to
see if it is “open”. Check voltage to the switch.
Debris is plugging cleaning tool or vacuum hose.
Drain hose cap is not completely closed.
Recovery tank lid is not seated or gasket is damaged.
Ball in the fl oat is blocking air fl ow. Turn off the vacuum so the ball will drop down, or the recovery tank
is full and needs to be emptied.
No power to motor.
Test the switch.
Test the vacuum motor.
Float has not activated the pump (water level in recovery tank is too low or empty).
Test the switch.
Test the fl oat switch.
Test the pump.
Impeller is worn out. Refer to the replacement impeller kit which shipped with the machine. The
impeller kit originally shipped attached to the dump pump inside the base of the machine. Follow the
directions in the kit to replace the auto-dump pump’s impeller.
ENGLISHINSTRUCTIONS FOR USE
11/11 A - 13 56091030 - HydraPort 1200

ESPAÑOL
INSTRUCCIONES DE USO
ÍNDICE
Página
Introducción .................................................................................. B-3
Componentes y servicio ................................................................. B-3
Modifi caciones ................................................................................ B-3
Placa de identifi cación .................................................................... B-3
Desembalaje de la máquina ........................................................... B-3
Precauciones y advertencias .......................................................... B-4
Instrucciones de conexión a tierra .................................................. B-5
Conozca su máquina ...........................................................B-6 – B-7
Conozca su placa de interruptores ................................................. B-8
Preparación de la máquina para el uso ...................................... B-9
Funcionamiento del llenado automático ......................................... B-9
Funcionamiento del vaciado automático ........................................ B-9
Manejo de la máquina .....................................................B-10 – B-11
Después de la utilización
Después de la utilización de la máquina ...................................... B-12
REVISED DATE
Mantenimiento
Programa de mantenimiento ........................................................ B-12
Mantenimiento del cable de alimentación .................................... B-12
Resolución de problemas ............................................................. B-13
Especifi caciones técnicas ............................................................. B-13
Composición del material y reciclaje ............................................ B-13
SECCIÓN II – Lista de piezas
Vista general ................................................................................... D-2
Sistema de calcomanías ................................................................D-3
Sistema de base 1200 .......................................................... D-4 – D-5
Sistema de recuperación ...................................................... D-6 – D-7
Sistema de solución ............................................................. D-8 – D-9
Diagrama de cableado .................................................................D-10
Opciones y accesorios ..................................................................D-11
Diagrama del fl ujo de agua ........................................................... D-12
B - 2 HydraPort 1200 - 56091030 11/11

REVISED DATE
12/2
ESPAÑOLINSTRUCCIONES DE USO
INTRODUCCIÓN
Este manual le ayudará a obtener el máximo rendimiento de su aspirador de doble superfi cie US Products™. Léalo con atención antes de utilizar la
máquina.
Este producto está destinado exclusivamente al uso comercial.
COMPONENTES Y SERVICIO
Las reparaciones, cuando sean necesarias, deben ser realizadas por su Centro Autorizado de Servicio de US Products, que utiliza personal de
servicio formado en fábrica y lleva un inventario de las piezas de repuesto y accesorios originales de US Products.
Llame al DISTRIBUIDOR US PRODUCTS que se indica a continuación para lo referente a piezas de repuesto o servicio. Por favor, especifi que el
modelo y el número de serie cuando hable de su máquina.
MODIFICACIONES
El cliente o usuario no deberá realizar modifi caciones o agregados a la máquina limpiadora que afecten la capacidad y la operación
segura sin la autorización previa por escrito de Nilfi sk-Advance Inc. Las modifi caciones sin autorización anularán la garantía de la
máquina, y el cliente será responsable de cualquier accidente que resulte.
PLACA DE IDENTIFICACIÓN
El Número de Modelo y Número de Serie de la máquina se indican en la placa de identifi cación instalada en la parte trasera de la máquina. Esta
información es necesaria a la hora de solicitar repuestos para la máquina. Utilice el espacio situado más adelante para anotar el número de modelo
y el número de serie de la máquina para futuras consultas. Asegúrese de registrar su garantía en línea en www.usproducts.com/warranty
MODELO _______________________________________________
NÚMERO DE SERIE ______________________________________
DESEMBALAJE DE LA MÁQUINA
Cuando reciba la máquina, examine con atención el cartón de embalaje y la máquina, con el fi n de comprobar si existe algún daño. Si observa algún
daño, guarde la caja de embalaje para que se pueda inspeccionar. Póngase en contacto inmediatamente con el Departamento de Servicio al Cliente
de US Products para presentar una reclamación por daños en transporte al número 800.257.7982 y elija la opción 2.
Esta máquina viene equipada de fábrica con un kit de impulsor de repuesto adosado a la bomba de vaciado dentro de la base de la máquina. Abra
los tanques inclinándolos para localizar el kit y extraerlo de la máquina para uso futuro. Guarde el kit de impulsor junto con este manual de uso en
un lugar seguro.
¡ADVERTENCIA!
Los Productos a la venta con este Manual contienen, o pueden contener, productos químicos reconocidos por algunos gobiernos
(como el Estado de California, según lo indica en su Proposición 65, Ley de Advertencia Regulatoria) como causantes de cáncer,
defectos de nacimiento u otros daños reproductivos. En algunas jurisdicciones (incluido el Estado de California), los compradores de
estos Productos que los coloquen en servicio en un emplazamiento laboral o en un espacio de acceso público tienen la obligación
regulatoria de realizar determinados avisos, advertencias o divulgaciones respecto de los productos químicos contenidos o
posiblemente contenidos en los Productos utilizados en tal lugar. Es la responsabilidad del comprador conocer y cumplir con todas
las leyes y reglamentaciones relacionadas con el uso de estos Productos en tales entornos. El Fabricante niega toda responsabilidad
de informar a los compradores sobre requisitos específi cos que pueden regir el uso de los Productos en tales entornos.
11/11 B - 3 56091030 - HydraPort 1200

ESPAÑOL
INSTRUCCIONES IMPORTANTES DE SEGURIDAD
INSTRUCCIONES DE USO
REVISED DATE
Esta máquina es apta únicamente para su uso comercial, por ejemplo, en hoteles, colegios, hospitales, fábricas, tiendas y
ofi cinas, y no para la limpieza diaria del hogar.
Cuando utilice un aparato eléctrico, se deben respetar las precauciones básicas, incluidas las siguientes:
NOTA: lea todas y cada una de las instrucciones antes de utilizar la máquina.
¡ADVERTENCIA!
Para reducir el riesgo de incendios, descargas eléctricas o lesiones:
• No pierda de vista la máquina mientras esté enchufada. Desenchufe la unidad de la toma de corriente cuando: no la use, antes
de limpiarla, antes de someterla a mantenimiento o reparaciones, y cuando reemplace las piezas o modifi que la máquina para
otra función.
• Para evitar descargas eléctricas, no la deje expuesta a la lluvia ni a la nieve. Utilícela y guárdela únicamente en interiores, y
guárdela en un lugar calefaccionado. No deje que la máquina o varilla se congele.
• No permita que se utilice como juguete. Es necesario prestar mucha atención si se la usa cerca de niños.
• Los limpiadores de alta presión no deben ser utilizados por niños ni por personal no capacitado.
• Utilice sólo de la manera descrita en este manual. Utilice únicamente los accesorios recomendados por el fabricante.
• Nunca agregue agua a una temperatura superior a 130º F/54º C al depósito de solución.
• Utilice siempre un desespumante cuando se produzca espuma para evitar daños en el motor de aspiración.
• No deje que la bomba funcione en seco.
• Nunca encienda la bomba de la solución sin antes conectar el tubo de la solución a su máquina y a su herramienta.
• No utilice si observa daños en el cable o el enchufe. Si la máquina no funciona correctamente, se ha caído, ha sufrido daños, se
ha dejado a la intemperie o ha caído al agua, acuda a un centro de servicio.
• Apague todos los controles antes de desenchufar.
• No tire del cable ni lo utilice a modo de asa, evite que el cable quede atrapado al cerrar una puerta y no tire de él contra bordes
afi lados ni esquinas. No haga pasar la máquina por encima del cable. Mantenga el cable alejado de superfi cies calientes. Para
desenchufar, agarre el enchufe y no el cable.
• No manipule el enchufe, el cable ni la máquina con las manos húmedas.
• Los alargadores deben ser de 12/3 y su longitud no debe superar los 15,24 m. Sustituya el cable o desenchufe inmediatamente
si la clavija de tierra está dañada.
• Enchufe sólo a una toma de corriente debidamente conectada a tierra.
• No coloque ningún objeto en las aberturas. No utilice la máquina si las aberturas están obstruidas; manténgalas libres de polvo,
hilos, pelo o cualquier otra sustancia que pueda reducir el caudal de aire.
• Mantenga el cabello, las ropas sueltas, los dedos y todas las partes del cuerpo lejos de las aberturas y de las partes en
movimiento.
• No recoja ningún material en combustión o que eche humo, como cigarrillos o cerillas, o cualquier tipo de polvo que
representara una amenaza para la salud. No utilice para recoger líquidos infl amables o combustibles, como gasolina, ni en
lugares en los que pueda haber dichos líquidos.
• Riesgo de explosión. No pulverice líquidos infl amables.
• Tenga un cuidado especial cuando limpie en escaleras.
• Use guantes o trapos al retirar las desconexiones rápidas para evitar quemaduras.
• El líquido eyectado por la boquilla de pulverización podría ser peligroso debido a su temperatura, presión o contenido químico.
• Las boquillas de alta presión pueden ser peligrosas si se utilizan incorrectamente. La boquilla no se debe posicionar apuntando
a personas, equipos eléctricos activos o la misma máquina.
• No utilice la máquina cerca de personas sin ropa de protección.
• No posicione la boquilla apuntando a usted ni a otras personas para limpiar ropa o zapatos.
• Los tubos, accesorios y acoplamientos de alta presión son importantes para la seguridad de la máquina. Utilice únicamente
tubos, accesorios y acoplamientos recomendados por el fabricante.
• Para garantizar la seguridad de la máquina, utilice únicamente piezas de repuesto originales del fabricante o aprobadas por el
fabricante.
• El agua que pasó por dispositivos de prevención de contracorriente se considera no potable.
• No utilice la máquina si un cable de alimentación o partes importantes de la máquina están dañados, por ejemplo dispositivos de
seguridad, tubos de alta presión, pistola de accionamiento.
B - 4 HydraPort 1200 - 56091030 11/11
 Loading...