

Page 1
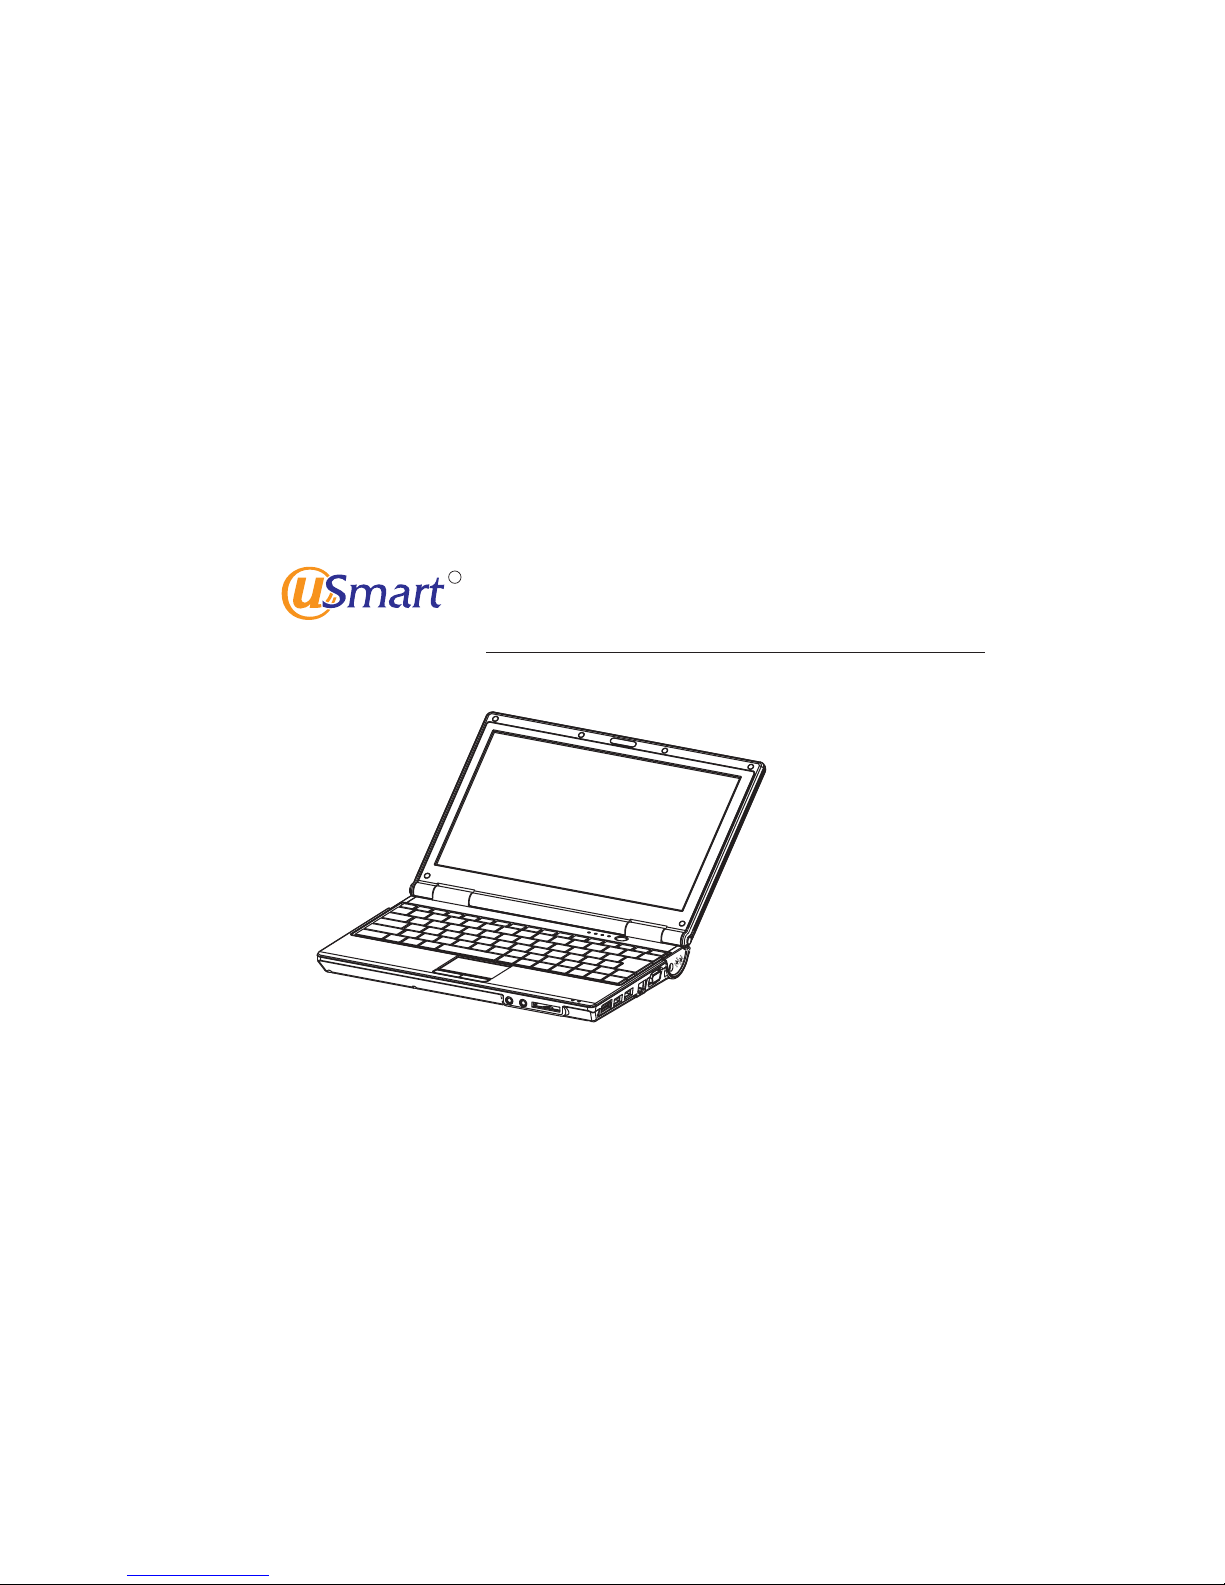
LB-1017
Mini PC User Manual
R
Page 2

Table of contents
Notes forthis Manual......................................................................................................................................
Regulations Information(if applicable).............................................................................................................
Safety Instructions.........................................................................................................................................
Quick StartGuide...........................................................................................................................................
Product Overview...........................................................................................................................................
Power Management........................................................................................................................................
Specification..................................................................................................................................................
Keyboard ......................................................................................................................................................
TouchPad .....................................................................................................................................................
HDD ........................................
eSATA Port
USB Port
LAN Port
Wireless LANCard
VGA Port
MicIn/LineOutPort
Built-in Webcam
Troubleshooting
.....................................................................................................................
....................................................................................................................................................
.......................................................................................................................................................
........................................................................................................................................................
.........................................................................................................................................
.......................................................................................................................................................
......................................................................................................................................
Memory CardSlot ..........................................................................................................................................
............................................................................................................................................
.............................................................................................................................................
01
02
03
05
09
11
13
18
19
20
21
21
21
22
22
22
23
23
23
24
Page 3
Notes for this Manual
A few notes and warnings are used throughoutthis Manual, allowingyou to completecertain tasks safelyand effectively.
These noteshave different degrees of importanceas follows:-
02
!
WARNING!
IMPORTANT!
TIP:
NOTE:
Important informationthat must befollowed for safeoperation.
Vital information that mustbe followed toprevent damage todata, components, orpersons.
Tips for completing tasks.
Information forspecial situations.
Page 4

Regulations Information (if applicable)
FCC Statement
Changes ormodifications not expresslyapproved by theparty responsible forcompliance could voidthe user's
authority tooperate the equipment.
This devicecomplies with part15 of theFCC Rules. Operationis subject tothe following twoconditions:
(1) This device maynot cause harmfulinterference, and
(2) thisdevice must acceptany interference received,includinginterference that maycause undesired operation
This equipmenthas been testedand found tocomply with thelimits for a Class B digital device, pursuant to
Part 15of the FCCRules. These limitsare designed to provide reasonable protection against harmful interference in
a residential installation. This equipment generates, uses andcan radiate radio frequency energy and, if not installed
and usedin accordance withthe instructions, may cause harmful interference to radio communications. However,
there isno guarantee thatinterference will notoccur in aparticular installation. If this equipmentdoes cause harmful
interference toradio or televisionreception,which can bedetermined by turningthe equipment off and on, the user is
encouraged totry to correctthe interference byone or moreof the following measures:
NOTE:
Reorient orrelocate the receivingantenna.
Increase theseparation between theequipment and receiver.
Connect theequipment into anoutlet on acircuit different from thatto which thereceiver is connected.
Consult thedealer or anexperienced radio/TV technicianfor help.
03
Page 5
For betterenvironmental protection, wastebatteries should becollected separately forrecycling or special
disposal.
CAUTION: Dangerof explosion ifbattery is incorrectlyreplaced. Replace onlywith the sameor equivalent type
recommended bythe equipment manufacturer. Discard used batteries according to manufacturer's instructions.
Under theEuropean Union (“EU”)Directive on Waste Electrical and Electronic Equipment, Directive 2002/96/EC,
which takeseffect on August 13, 2005, products of “electrical and electronic equipment”cannot be discarded as
municipal wasteanymore and manufacturersof covered electronicequipment will beobligated to takeback such
products atthe end oftheir useful life.
All trademarksare the propertiesof their respectiveowners.
Safety Guidelinefor using LithiumBattery
WEEE Statement
Trademarks
Regulations Information (if applicable)
04
Page 6

Safety Instructions
The followingsafety instructions willincrease the lifeof the Product.Follow all precautionsand instructions. Exceptas
described inthis Manual, referall servicing toqualified personnel. Donot use damagedpower cords, accessories,or
other peripherals.Do not usestrong solvents suchas thinners, benzene,or other chemicalson or nearthe surface.
Disconnect theAC power and remove the battery pack(s) before cleaning.Wipe the Productusing a clean
cellulose spongeor chamois clothdampened with asolution of nonabrasivedetergent and afew drops ofwarm
water andremove any extramoisture with adry cloth.
05
Keep theUser Manual thatcomes with thepackage for futurereference.
Read theSafety Instructions carefullyand thoroughly.All cautions and warnings onthe Product orUser
Manual shouldbe noted
Lay theProduct on astable surface beforesetting it up.
Keep theProduct away fromhumidity and hightemperature.
SAFE
Page 7

Safety Instructions
The openingson the enclosureare used forair convention andto prevent theProduct from overheating.
Do notcover the openings.
Make surethe power voltageis within safetyrange and hasbeen adjusted properlyto the valueof
100~240V beforeconnecting the Productto the poweroutlet.
Never pourliquid into theopening that coulddamage the Productor cause anelectrical shock.
Do notleave the Productin an unconditionedenvironment with astorage temperature above60°C (140°F)
or below0°C (32°F) , which may damagethe Product.
Place thepower cord ina way thatpeople are unlikelystepping on it.Do not placeanything on topof the
power cord.
Always unplugthe power cordbefore inserting anyadd-on card ormodule.
06
Page 8
Safety Instructions
If anyof the followingsituations arises, getthe Product checkedby a servicepersonnel:
● Thepower cord orplug is damaged.
● Liquidhas penetrated intothe Product.
● TheProduct has beenexposed to moisture.
● TheProduct has notworked well oryou cannot getit work accordingto User Manual.
● TheProduct was droppedand damaged.
● TheProduct has obvioussigns of breakage.
07
Toprevent explosion causedby improper batteryreplacement, use thesame or equivalenttype of battery
recommended bythe manufacturer only.
Always keepthe battery ina safe place.
Always keepthe strong magneticor electrical objectsaway from theProduct.
Page 9
Safety Instructions
Transportation Precautions
Charging yourbattery pack
Airplane Precautions
Toprepare the Productfor transport, youshould close thetop cover toprotect the keyboardand display panel.
The Productsurface is easilydulled if notproperly cared for. Be careful not to rub or scrape surfaces when transporting
your Product.You canput your Productin a carrybag for protectionfrom dirt, water, shock and scratches.
If youintend to usebattery power, be sure to fully charge your batterypack and anyoptional battery packsbefore
going onlong trips. Rememberthat the poweradapter charges thebattery pack aslong as itis plugged intothe Product
and anAC power source is connecting. Be aware that ittakes much longerto charge thebattery pack whenthe Product
is inuse.
Contact yourairline if youwant to usethe Product onthe airplane. Mostairlines have restrictionsfor using electronic
devices. Mostairlines allow electronicuse only betweenand NOT during takeoffs and landings.
There arethree main typesof airport securitydevices: X-ray machines(used on itemsplaced on conveyorbelts),
magnetic detectors(used on peoplewalking through securitychecks), and magneticwands (hand-held devicesused
on peopleor individual items).You cansend your Productthrough airport X-raymachines. However, it is recommended
that youdo not sendyour Product throughairport magnetic detectorsor expose itto magnetic wands
08
Page 10

Quick Start Guide
These areonly quick instructionsfor using yourProduct. Read thefollowing chapters fordetailed information.
Unpack theshipping carton andcheck all itemscarefully. If any item contained is damaged or missing, please contact
your localdealer immediately. The package should contain the following items:
● UserManual
● Warranty Card
● ACpower adapter andpower cord
● Carrybag
● MiniPC
● High-capacityLi-ion battery pack
* These accessories listedabove may changewithout notice.
Unpacking
09
Page 11

Quick Start Guide
10
Setup
1.Install the battery pack.
2.Connect the AC power adapter and power cord.
The walloutlet differs in type bycountry. Your Product ships with an adapter compliant with your national standard.
Refer tothe chapter “PowerManagenent” for moredetails.
3.Open the top cover.
4.Turn on the power.
When youopen the topcover, do not force it down to the tableor else thehinges may break!Never lift theProduct
by thetop cover!
Page 12
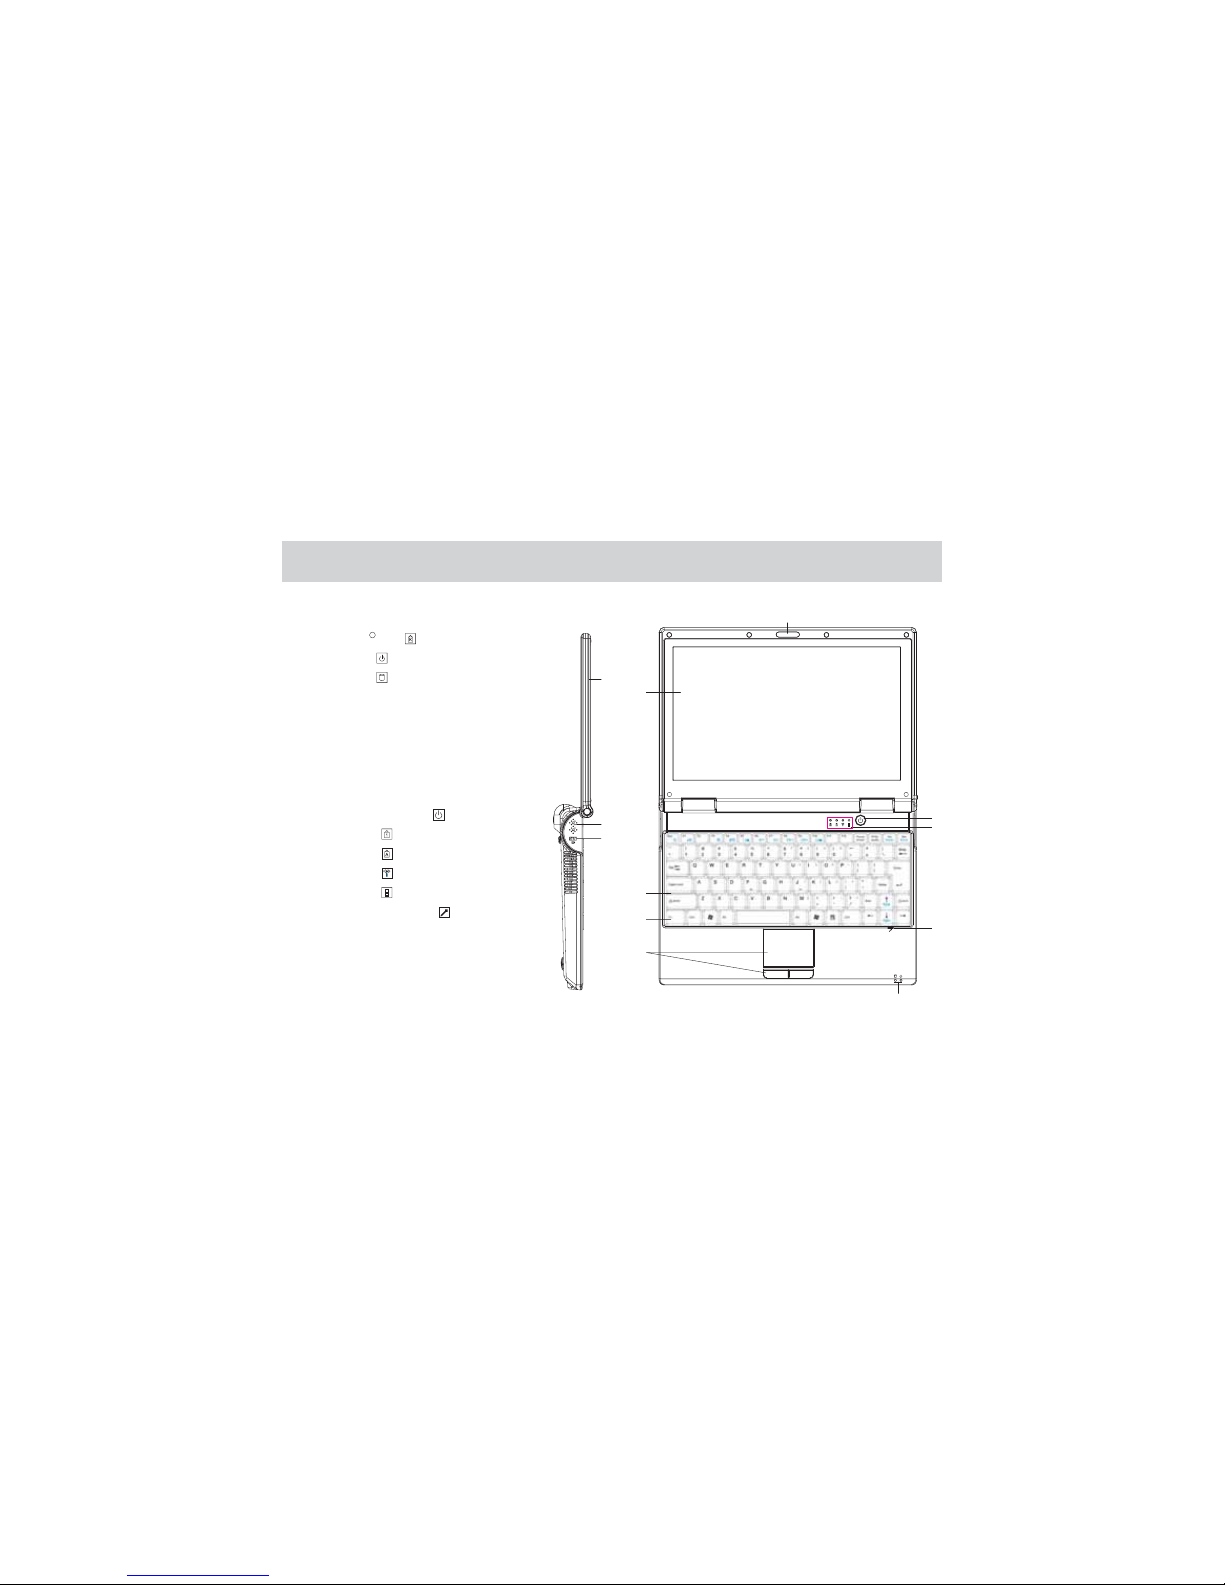
Product Overview
1. Speakers
2. Kensington lock
3. Indicators: Power
HDD activity
4. Touch Pad and Buttons
5. Keyboard
6. WirelessLAN card (underKeyboard)
7. Displaypanel
8. Webcam(Built-in)
9. Top cover
10. PowerOn/Off switch
11. Indicators : Number Lock
Caps Lock
Wireless activity
Charger &Battery status
12. Microphone(built-in)
11
10
12
11
4
5
1
9
2
6
7
3
8
R
Page 13
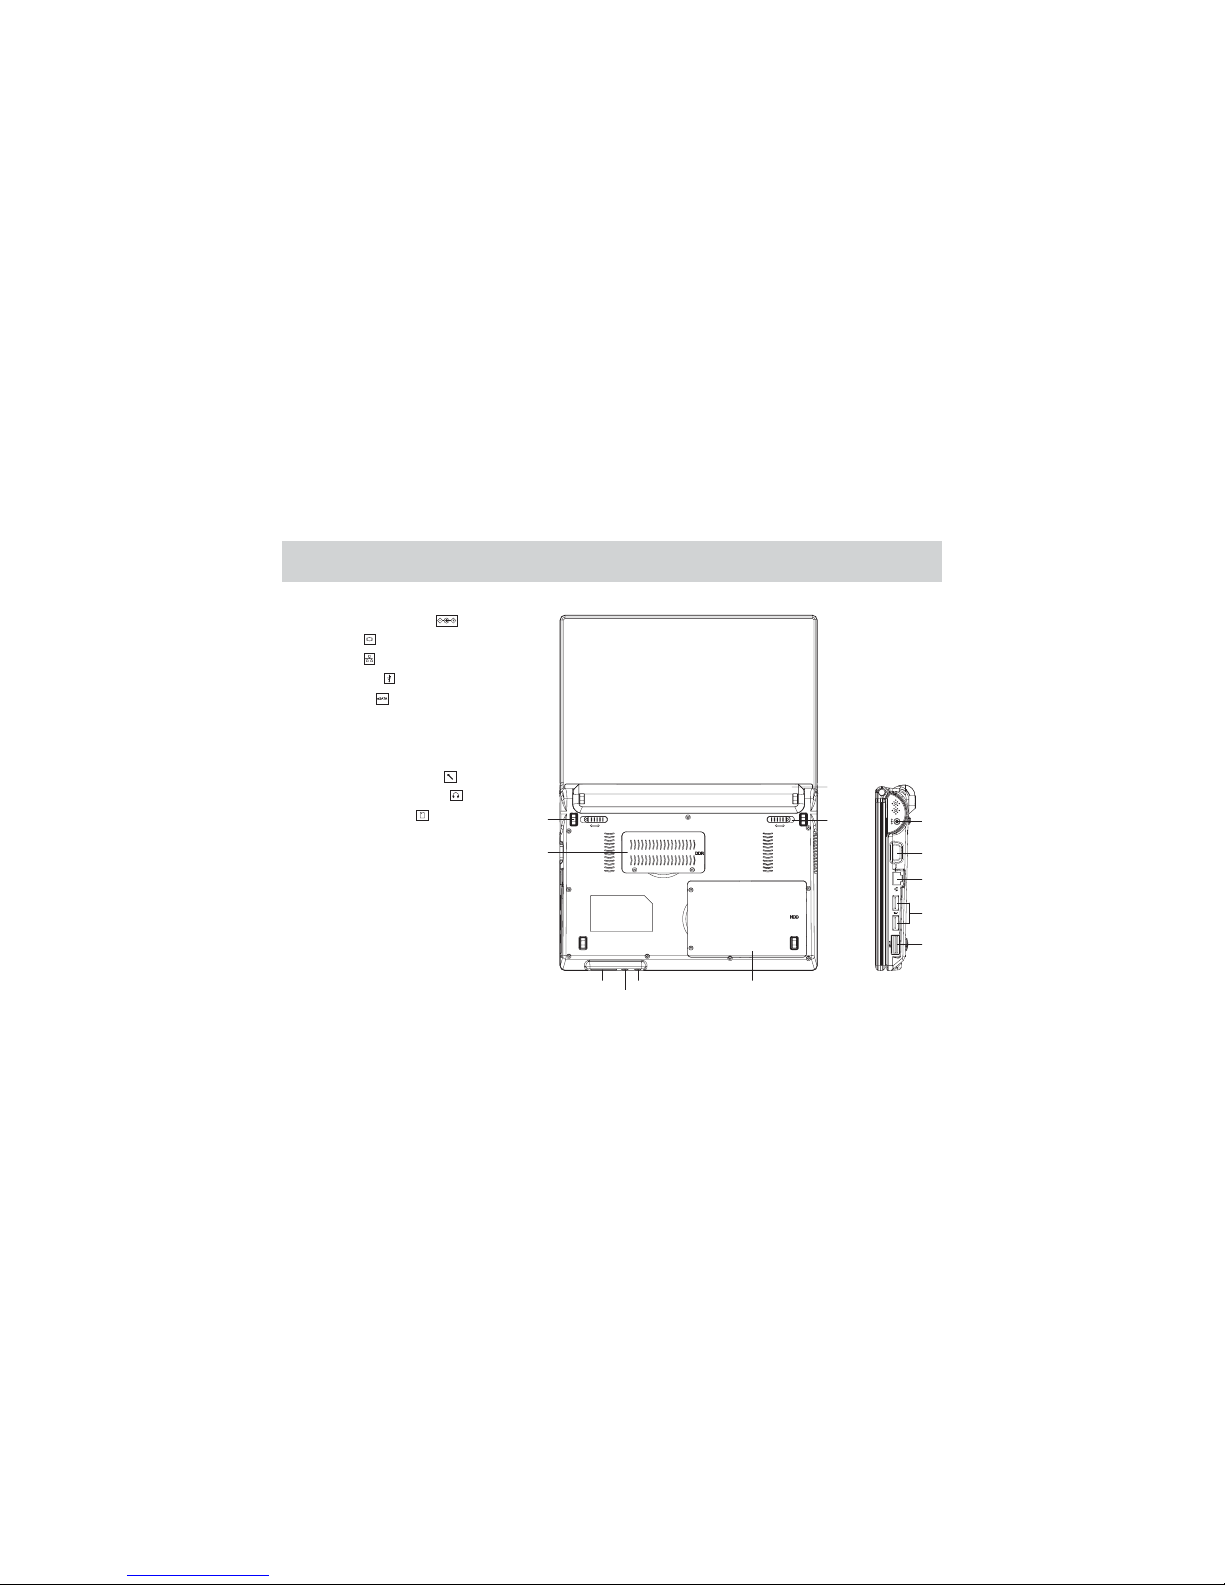
Product Overview
13. Power(DC) input jack
14. VGAport
15. LANport
16. USB2.0 port
17. eSATAport
18. Batterypack
19. Batterylock (spring)
20. HDD(2.5’’)
21. Microphonejack(pink)
22. Headphonejack(green)
23. MemoryCard slot
24. Memory(DDR)
25. Batterylock (manual)
12
UNLOCK
LOCK
UNLOCK
LOCK
24
25
19
18
14
13
15
16
17
23
22
20
21
Page 14
Power Management
AC poweradapter
It isstrongly recommended toconnect the AC power adapter and use the AC power while using this Productfor the
FIRST TIME. When the power adapteris connected, thebattery pack isbeing charged immediately.
It isstrongly recommended touse the sameor equivalent AC power adapter as suggested. Using otherpower adapter
model maydamage either theProduct or otherdevices attached toit.
13
Page 15

Power Management
14
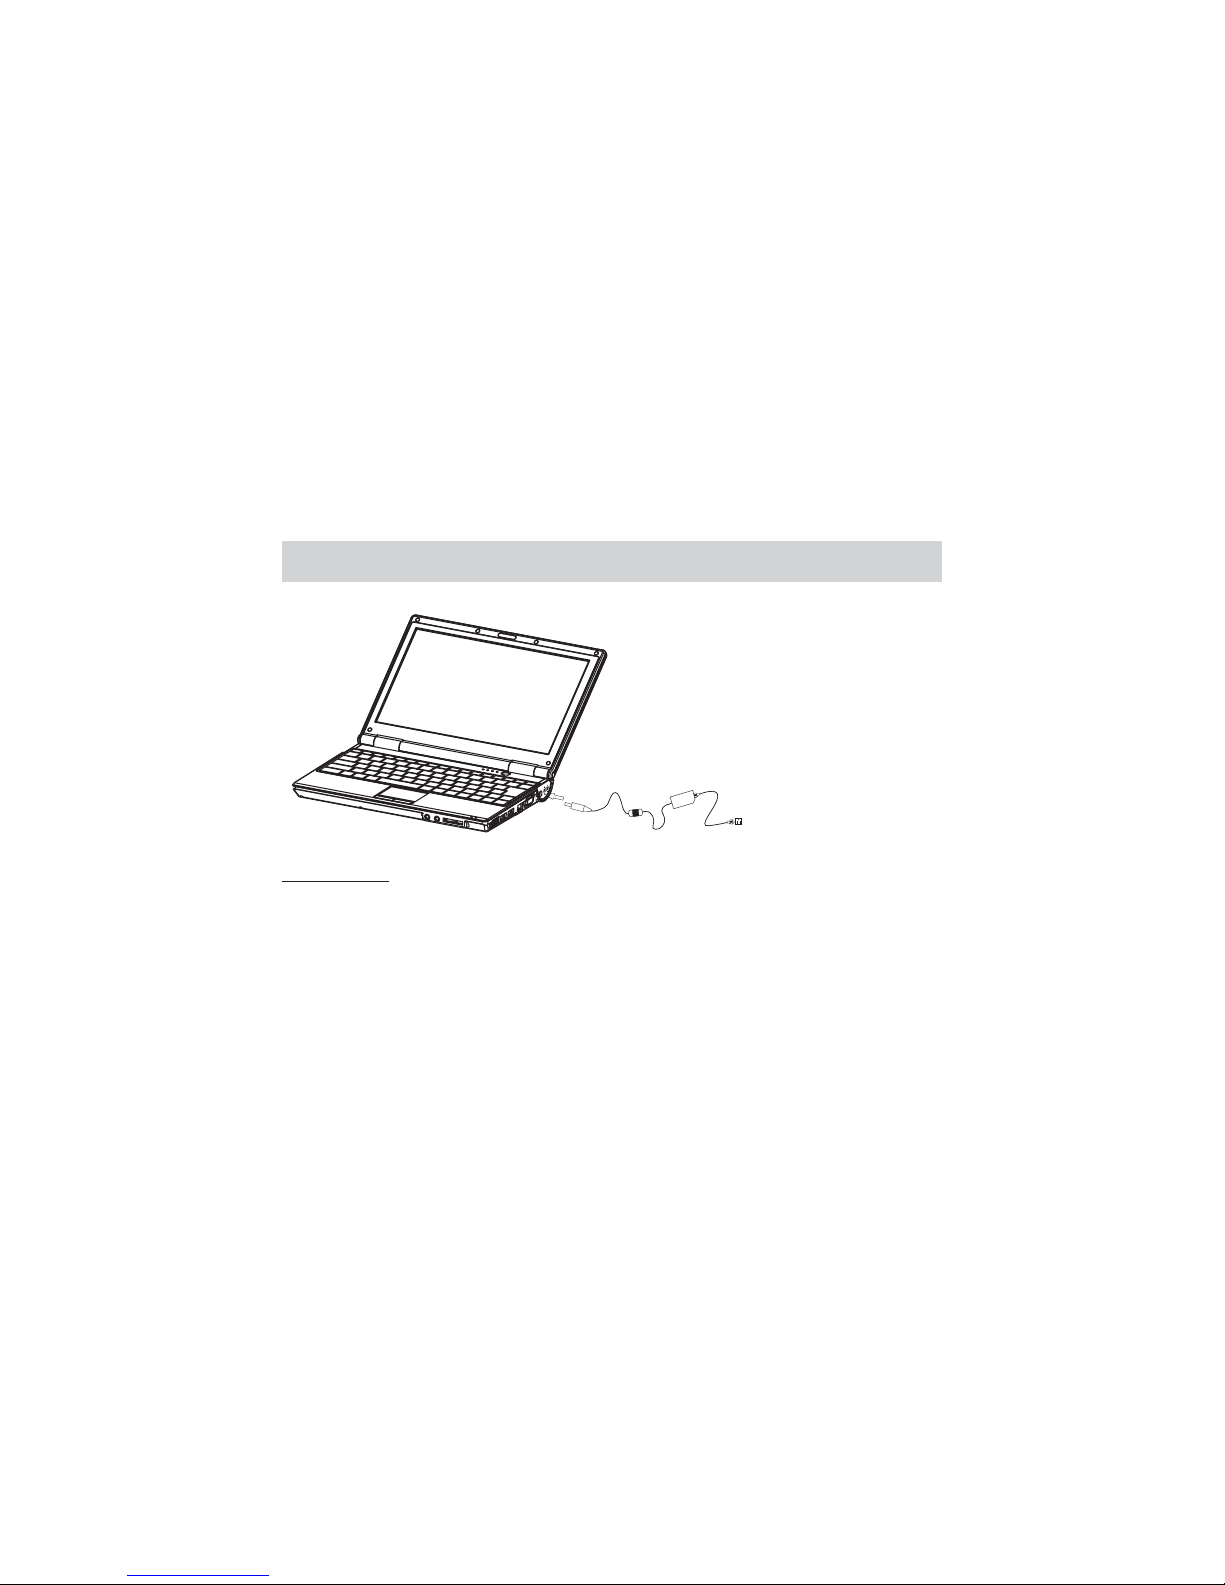
Connecting theAC power adapter
Battery pack
1) Connect the DCoutput cable tothe Power (DC)input jack atthe right handside of yourProduct.
2) Connect the AC power adapter with the power cord.
3) Plug the powercord into anAC electrical outlet. When the Product is turned on,the Power Indicatorturns on. When
the batterypack is beingcharged, the BatteryIndicator lights red.
The Li-ionbattery pack isnot charged uponpurchase. Initial chargingtime can beup to 8hours. We recommend
the batterypack be fullycharged before use.When the batterypack is fullycharged, the BatteryIndicator lights
green
This Productis equipped witha high-capacity Li-ionbattery pack. The rechargeable Li-ionbattery pack isan internal
power sourceof the Product.
DO NOTattempt disassembling the battery packon your own.
Please followyour local lawsand regulations torecycle the unusedbattery pack.
Page 16
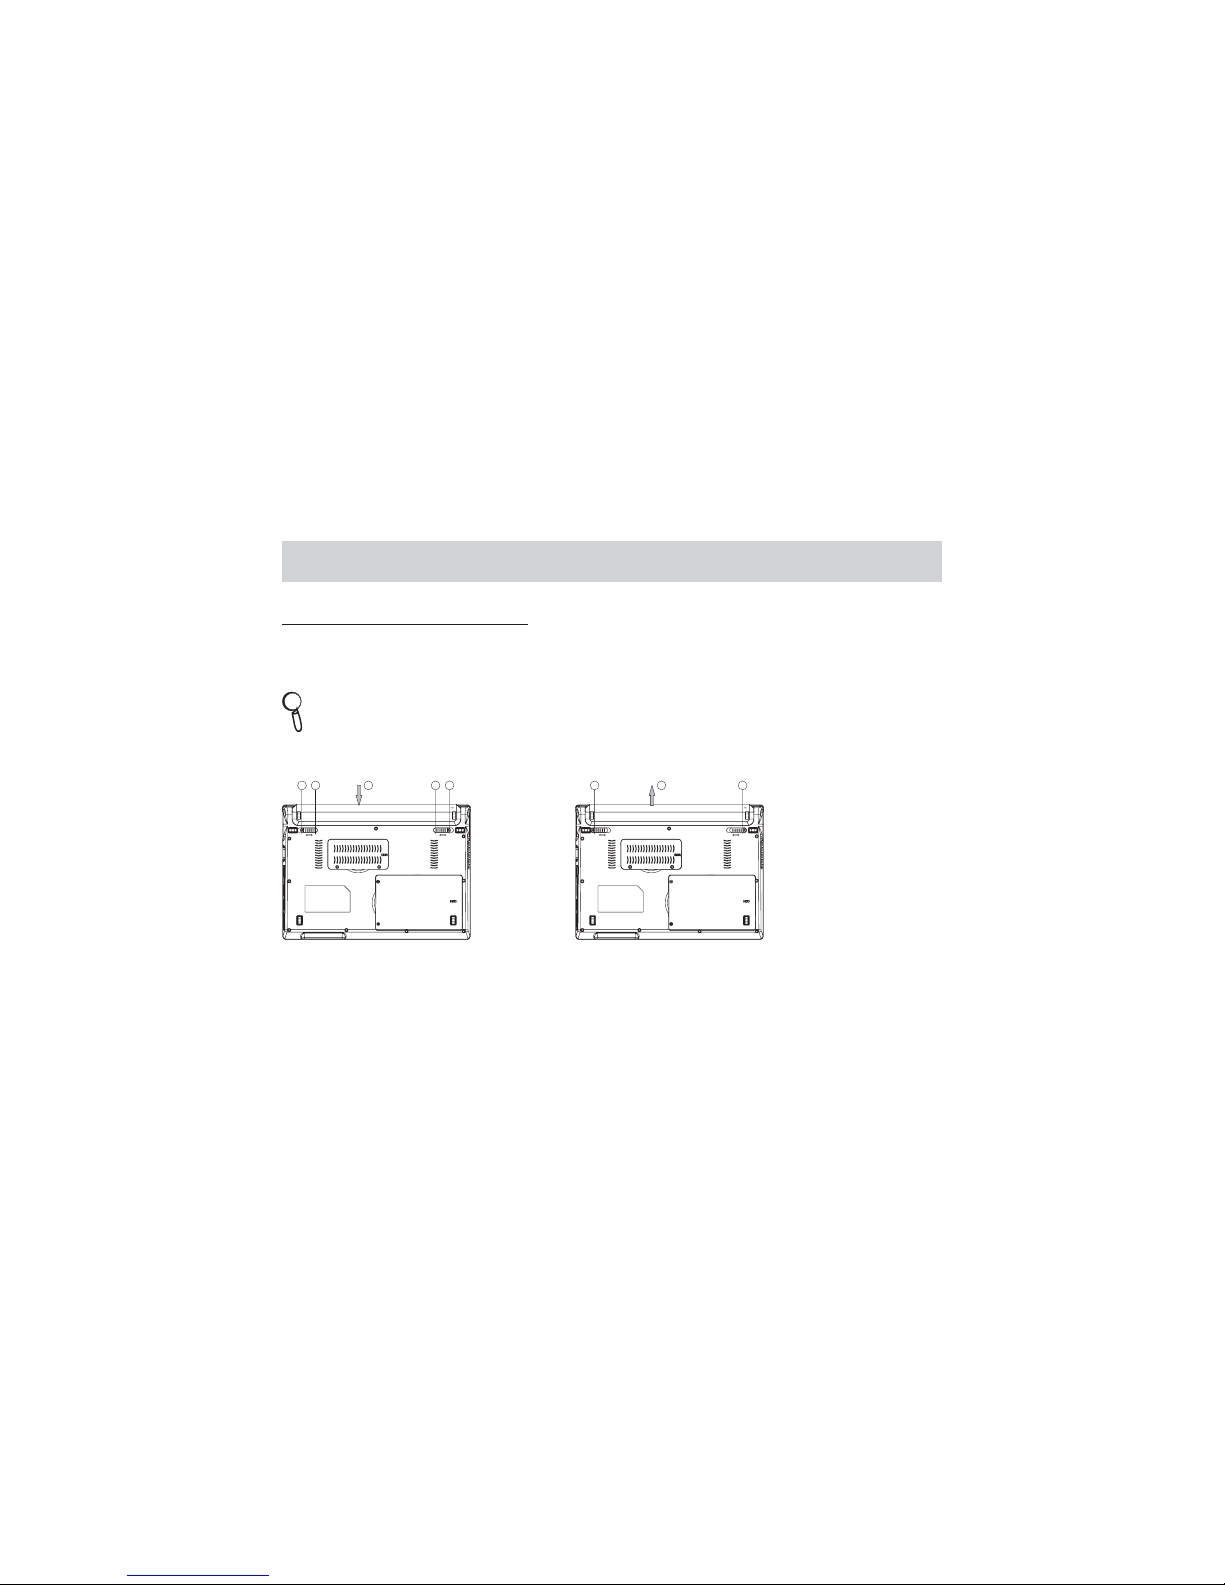
Power Management
15
Toinstall the batterypack:
Toremove the batterypack
UNLOCKLOCKLOCKUNLOCK
3
1
2
UNLOCKLOCKLOCKUNLOCK
3 2
5
1
4
Installing andRemoving the batterypack
Your Product may not have its battery pack installed initially. If not, use the following procedures to install thebattery
pack.
Never attemptto remove thebattery pack whilethe Product isturned ON, asthis may resultin the lossof working
data.
Page 17

Power Management
16
Battery packsafety tips
Conserving batterypack power
Replacing orhandling the batterypack incorrectly maypresent a riskof fire orexplosion, which couldcause serious
injury.
● Onlyreplace the mainbattery pack withthe same orequivalent type ofbattery pack.
● DONOT disassemble, short-circuit battery packor store themto temperatures above 60°C(140°F).
● DONOT throw the battery packin fire.
● DONOT temper with the batterypack. Keep awayfrom the reachof children.
● DONOT use rusty or damagedbattery pack.
● Disposeof battery packaccording to localregulations. Check withyour local solidwaste officials for details about
recycling optionsor for properdisposal in yourarea.
Battery packpower is criticalto maintain anormal operation withoutAC power available. If the battery pack power is
not managedwell, the saveddata and customizedsettings may belost.To optimizebattery pack powerlife and avoid
a suddenpower loss, followthe tips below:
● Suspendsystem operation ifthe system willbe idle fora while orshorten the suspendtimer's time period.
● Turn off the system if you do not useit for a period of time.
● Disableunnecessary settings orremove idle peripherals.
● Connectan AC power adapter to the system whenever possible.
!
Page 18

17
Charging thebattery pack
The batterypack can berecharged while itis installed inthe Product. Pleasenote the followingtips before recharging
the batterypack:
● Saveyour work andclose all runningprograms and shutdown the system.
● Plugin the AC power adapter with AC power connected.
● You can use the system, suspend system operation or shut down andturn off the system withoutinterrupting the
charging process.
● The battery packuses Li-ion batterycells that haveno “memory effect”. It is unnecessary to discharge the battery
pack beforerecharging. However, to optimize the battery pack life, wesuggest that consumingthe battery pack
power completelyonce a month.
● Ifyou don notuse the Productfor a longtime, it issuggested to removethe battery packfrom your Product.This may
be helpfulto extend yourbattery pack life.
● The actual chargingtime will bedetermined by theapplications in use.
The bottomof the Productcan get veryhot. Be carefulwhen handling theProduct while itis in operationor
recently beenin operation. Hightemperatures are normalduring charging oroperation.
DO NOTuse on soft surface suchas beds orsofas which mayblock the vents.
DO NOTPUT the Product ON YOUR LAP OR OTHER PARTS OFTHE BODYTO AVOID INJURYFROM THE HEAT.
CAUTION: The power adaptermay become warmto hot whenin use. Besure NOT TO COVER the power
adapter andkeep it awayfrom your body.
!
!
Power Management
Page 19
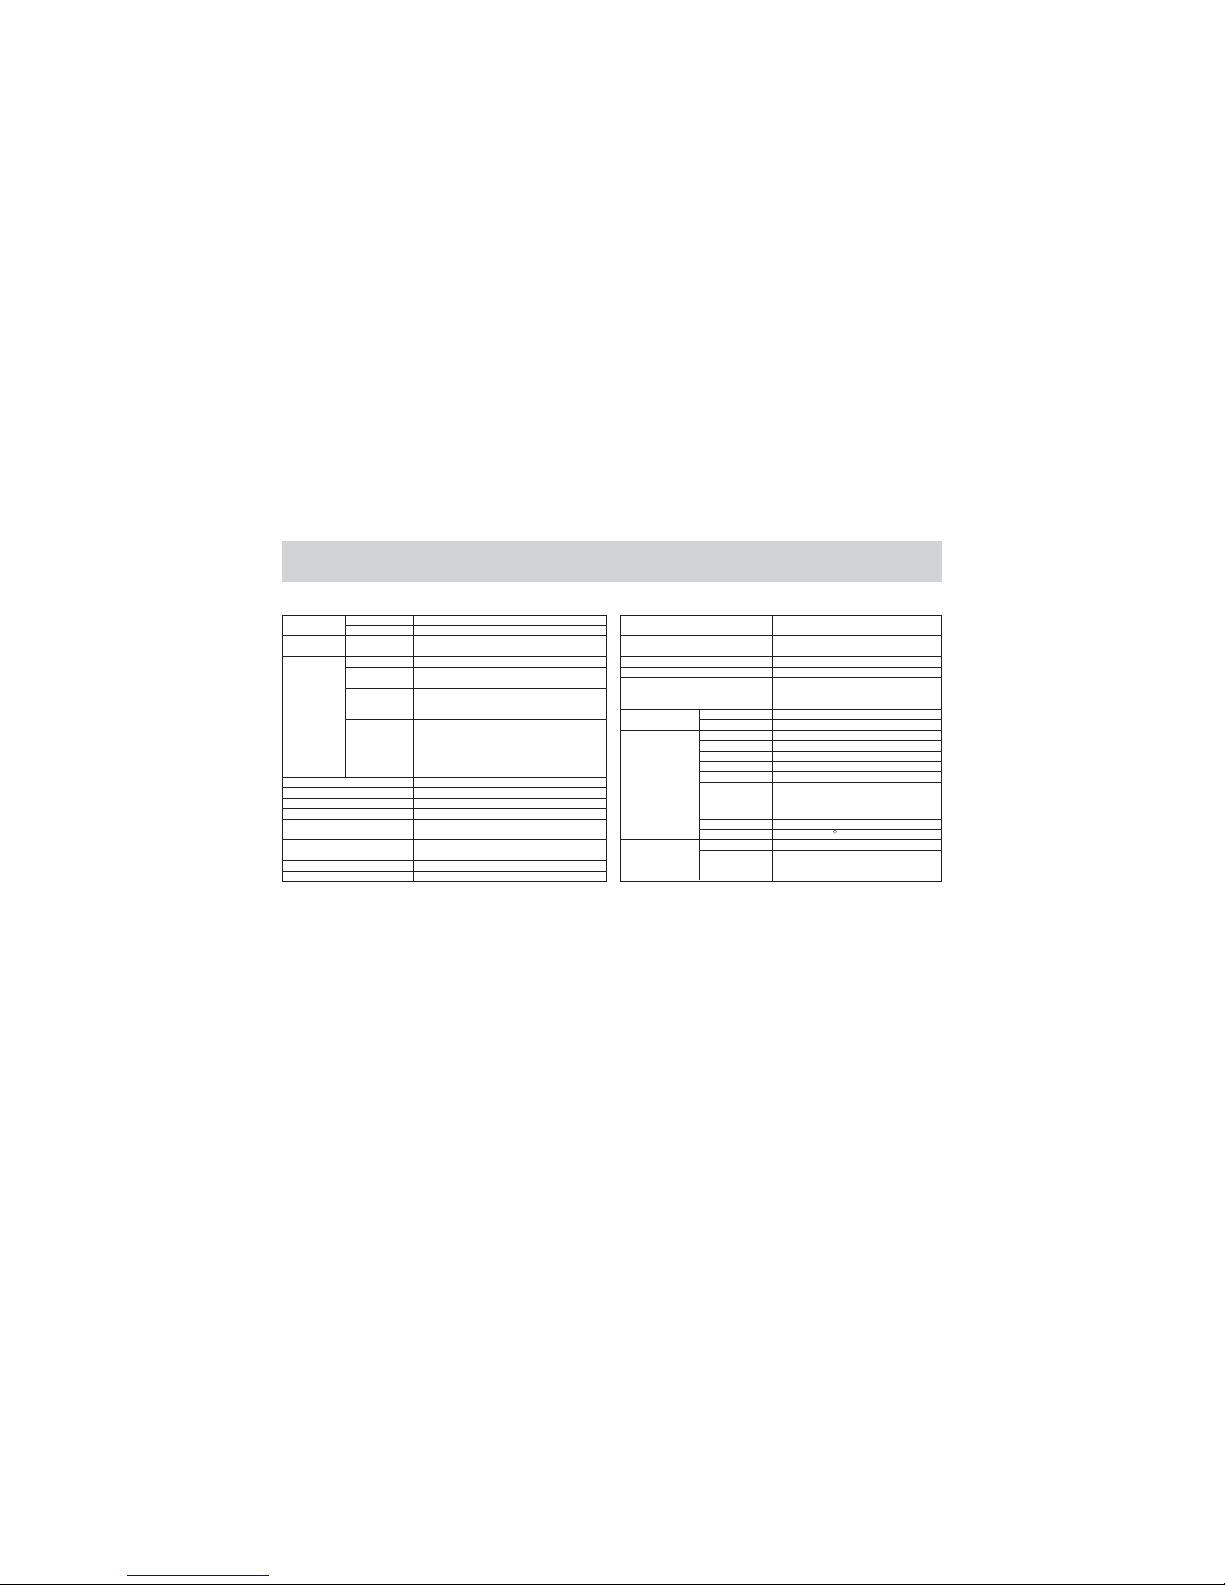
Specification
18
Integrated UniChromePro
VGA
10” LCD1024*600 17:10LCD screen
Support one2.5” 9.5 mmSATA(or SATAII)
HDD (120GBor optional)
HDD
Built-in MicrophoneMicrophone
85 keywith 16 mmkey pitch and2.25 mm keystroke;
Standard English.Multi-nationallanguage support
Keyboard
Graphic
Mass Storage
User Interface
Integrated Touch Pad;
Left key;
Right key
Pointing Device
Power (green);
Charger &Battery status (greenand red);
HDD activity(green);
Wireless activity(green);
Number Lock(green);
Caps Lock(green)
LED Indicators
One MiniPCI-E slot, support802.11 b/g
Wireless LAN
10/100 Mbps
Ethernet LAN
Built-in Webcam0.3 M pixel(oroptional)
Digital Camera
Mobile VIAC7-M 1.6Ghz;
FSB 800Mhz
Processor
DDR2 1GB533 Mhz;
one So-DIMMDDR2 memory slotsupport up to1GB
HDAudio. Built-in stereoSpeakers
Memory
Audio
ACPI V2.0;
S1, S3support
Power Management
Around 1.25Kg (including Li-ionbattery pack)
Weight
Dimension
250x182x28.8~39mm
Power On/Offswitch;
Topcover magnetic switch(power off
back-light whentop cover isclosed)
Switch control
One Power(DC) input jack
Power jack
One Kensington Lock
Security port
AMI CODE8
System software
BIOS
Support WindowsXP SP3
Support WindowsXPe
Support Linux(similarto Linpus)
OS
One 15-pinVGA port
I/O Ports
Video port
Twojacks, MIC in(pink) / Lineout (green)
Audio port
OneRJ-45port
LAN port
Two4-pinUSB2.0portsUSB port
One eSATA portfor HDD
eSATAport
One memorycard slot supportingSD, SDHC,
Mini SD,Micro SD, MMC,RS-MMC,
Mobile MMC,MMC-Micro, MS, MSPro,
MS Duo,MS-Pro Duo, Micro-MS(M2)
Memory cardslot
AC 100~240V, DC19 V,3000m A
Power system
R
VIAVX700
Core Logic
Working temp.:5ºC(41ºF) ~ 45ºC(113ºF);
Storage temp.:0ºC(32ºF) ~ 60ºC(140ºF)
Working andStorage temperature
Working time:≥1.5hours
Battery life
Battery
AC poweradapter
3 cellsLi-ion battery pack,10.8V,2200mAH
Page 20
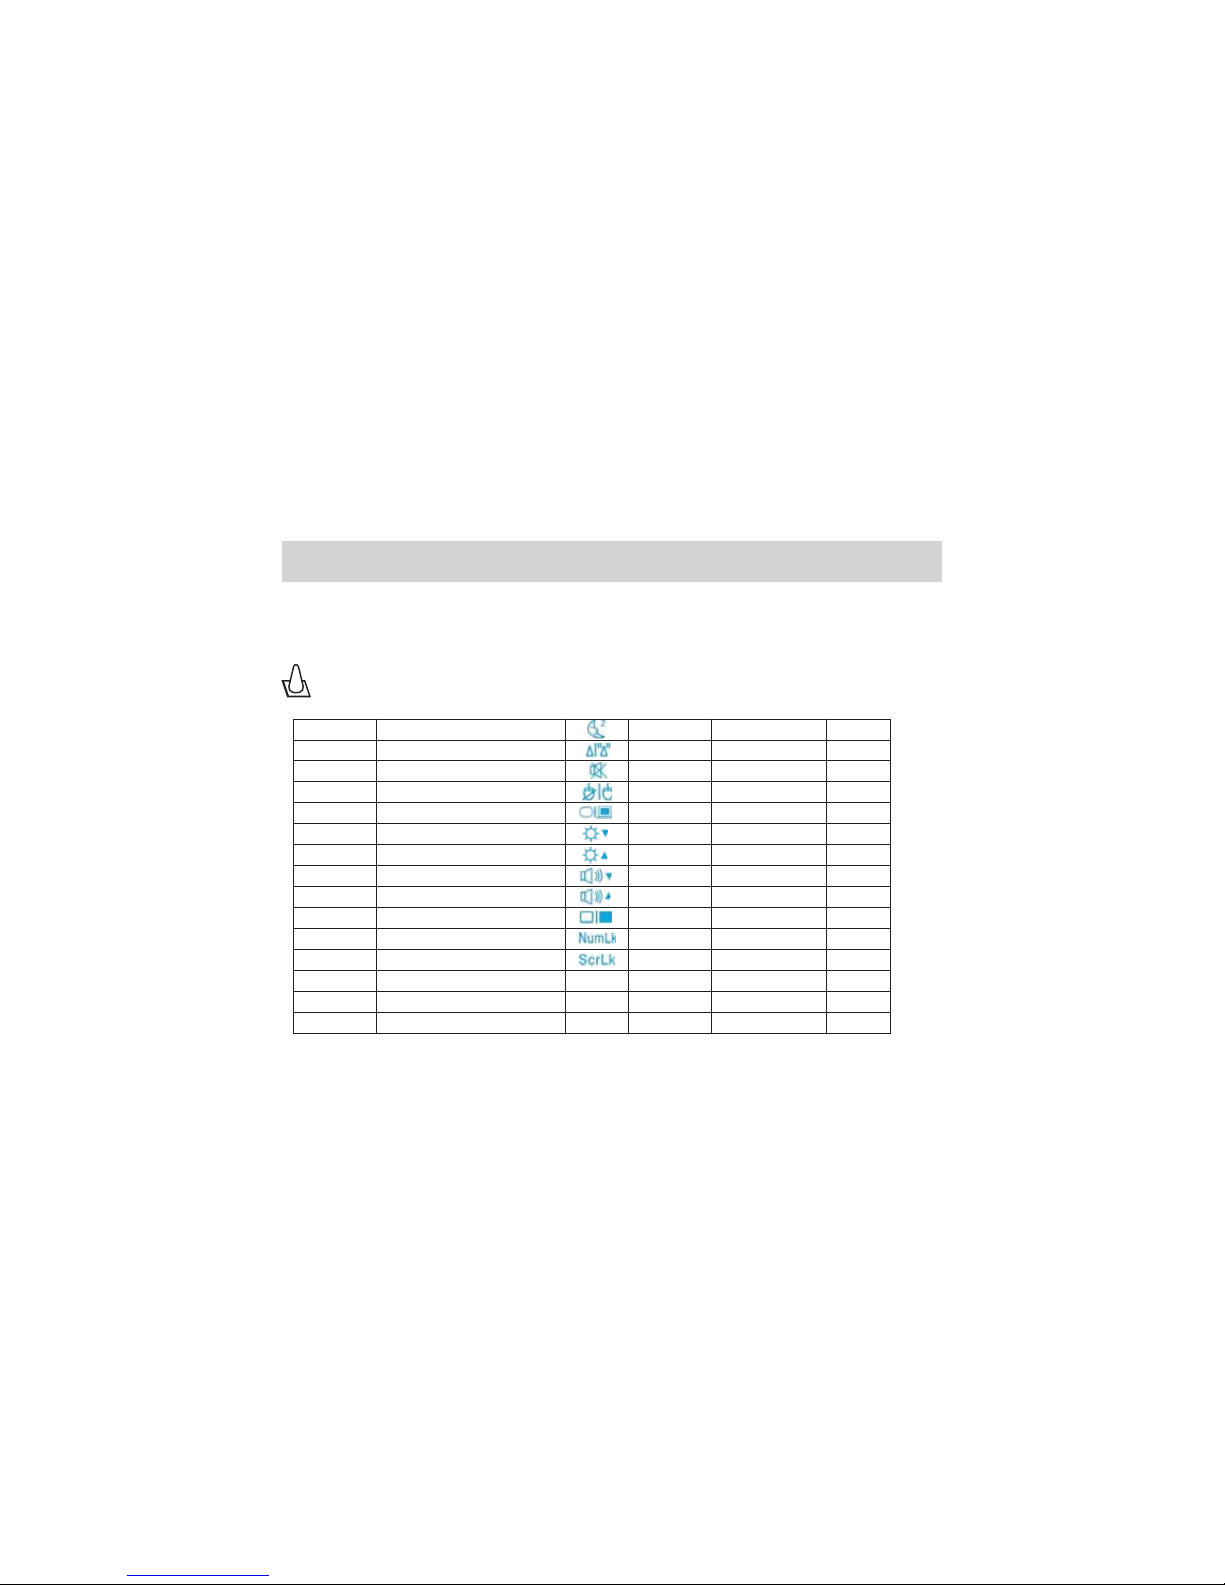
Keyboard
The followingdefines the coloredHot keys onthe Product keyboard.The colored commands can onlybe accessed by
first pressingand holding theFunction Fn keywhile pressing akey with acolored command.
The Hotkey locations onthe Function keysmay vary dependingon model butthe functions shouldremain the
same. Followthe icons wheneveryour Hot keylocations do notmatch with theManual.
19
NumLk(9)
Fn+F1
Fn+F3
Fn+F4
Fn+F5
Fn+F6
Fn+F7
Fn+F8
Fn+F9
Fn+F10
Fn+Ins
Fn+Del
Fn+↑
Fn+↓
Fn+Esc
NumLk(0)
NumLk(/)
NumLk( );
NumLk(P)
Wireless On/Off
Mute key
TouchPad On/Off
LCD /CRT display switch
LCD Brightnessdecrease
LCD Brightnessincrease
Volume decrease key
Volume increase key
LCD DisplayOn/Off
Number Lock
Scroll Lock
Page Up
Page Down
9
Enter Suspendstate
7
6
5
4
3
2
1
0
. (Decimal)
* (multiply)
/ (divide)
+ (plus)
8
- (minus)
!
7
6
5
4
3
2
1
0
.
*
/
+
8
-
PgUp
PgDn
NumLk(8)
NumLk(7)
NumLk(O)
NumLk(I)
NumLk(U)
NumLk(L)
NumLk(K)
NumLk(J)
NumLk(M)
NumLk(.)
9
Page 21

Touch Pad
The Touch Pad is a pointing device thatis compatible witha standard Mouse,allowing you tolocate the Cursoron the
screen andmake selection withits Left andRight Buttons. This Touch Pad function can be enabled / disabledby Hot Key.
Place yourfinger on theTouch Pad. When youmove your fingertipacross the Pad,the Cursor onthe screen willmove
simultaneously tothe same direction.When yor fingerreaches the edgeof the Pad,lift your fingerand place iton a
proper locationof the Padto continue themovement.
With theCursor over anitem, a menuitem or acommand, simply tapslightly on thePad or pressthe Left Buttonto
select. Eachtap on thePad can actas pressing theLeft Button. Tapping twice more rapidly on the Padis to executea
double-click.
Drag andDrop means pickingup an itemand placing itanywhere on thescreen you wish.To do so, placethe Cursor
on thedesired item andtap slightly. Now you can drag the selected item to thedesired location bymoving your finger
on thePad, and thenlift your fingerfrom the Padto drop theitem into place.Alternatively you can press and hold the
Left Buttonwhen you selectan item, andthen move yourfinger on thePad to thedesired location, finallyrelease the
Left Buttonto finish theDrag and Dropoperation.
Position andMove
Point andClick
Drag andDrop
20
Page 22

HDD/eSATAPort/USBPort
HDD
eSATA Port
USB Port
Your Product is equipped with a 2.5” HDD (Hard Disk Drive). Itis used to install the Operating System (OS),
software applicationsand store yourdata.
Toavoid unexpected dataloss in yoursystem, please backupyour critical filesregularly.
Do notturn off the Product whenthe HDD activityLED Indicator ison.
Do notremove or installthe HDD whenthe Product isturned on. The replacement ofHDD should bedone by
authorized personnel.
The eSATA(External Serial Advanced Technology Attachment) port is used toconnect external HDD for program / data
storage andtransfer. This Product is capable to auto detect the eSATA devices installed.If there is no detection of the
devices, pleasemanually enable theeSATA devices by going to Start Menu / Control Panel / Add Hardware to add the
new devices.
There aretwo USB (UniversalSerial Bus) 2.0ports on thisProduct. The USB port isused to connectvarious USB
devices likeMouse, Keyboard, DigitalCamera, Webcam, Printer, External Optical Storage Device etc. for data storage
and transfer. This Product is capable to auto detect the USB devices installed. If thereis no detection of the devices,
please manuallyenable the USBdevices by goingto Start Menu/ Control Panel /Add Hardware to add the new devices.
21
Page 23

LAN Port / Wireless LAN Card / VGA Port
LAN Port
Wireless LAN Card
VGA Port
The RJ-45LAN (Local Area Network) port is used to connectyour Product to the LAN devices like Hub, Switch and
Gateway etc,and build anetwork connection. Itworks with 10/100Mbps. Please referyour network staff for more
instructions andsteps on connectingyour Product tothe LAN devices.
There isa built-in WirelessLAN card whichsupports standards 802.11 b/g.A WirelessActivity Indicator shows the
Wireless LANstatus of idleor active. This Wireless LANfunction can beenabled / disabledby Hot Key. Please refer
your networkstaff for more instructions andsteps on connectingyour Product tothe Wireless LANdevices.
This Productprovides a VGA(Video GraphicsArray) port for connecting anexternal Monitor orother standard
VGA-compatible device(like Projector etc)for a largerview of yourProduct display. This VGAport function can be
enabled /disabled by HotKey.
In addition,there are Hotkeys controlling theLCD Display On/Off, LCD Brightness Increase and Decrease.
22
Page 24

Mic In / Line Out Port / Memory Card Slot / Built-in Webcam
Mic In/ Line OutPort
Memory CardSlot
Built-in Webcam
The MicrophoneJack (Mic inport) and HeadphoneJack (Line outport) are locatedtogether for theconnection of
Headset bywhich you canenjoy Internet chat/ telephony, video conferencing, music and game.
There arealso built-in Microphoneand Speakers. The Speaker soundfeature can beMuted, Volume increased and
Volume decreased by Hot keys.
The MemoryCard Slot isthe normal CardReader which canaccess SD /MMC / MS/ MS Promemory cards. Insertor
remove thememory card toand from theslot will autodetect / disablethem.
There isa built-in 0.3Mpixel PC Cameraon top ofthe LCD screen.It can beenabled or disabledby device driver.
CAUTION: Donot remove cover;there are nouser-serviceable parts inside.
Do notattempt to servicethe Product beyondthose means describedin these operatinginstructions. All other
servicing shouldbe referred toqualified service personnel.
23
!
Page 25

Troubleshooting
Symptoms &Actions
● Check firm connectionbetween wall outlet,power plug, powercord, power adapter andpower (DC) input jack.
● Check good conditionof power plug,power cord andpower adapter. Replace them if worn.
● Battery pack powermay be toolow. ConnectAC power adapterfor charging.
● If the batterypack is toohot or toocold, it maynot be rechargednormally. Put the battery pack in room temperature
for sometime. When itstemperature is closeto that ofroom temperature, thentry recharging itagain.
● If the batterypack is fullydischarged, it cannotbe recharged immediately. Wait for a few minutes and try recharging
it again.
● In order toextend the batterypack life, itwill not berecharged until itspower level dropsto below 95%of full capacity.
● If the Charger& Battery statusLED Indicator isalways off, your battery packmay be inend-of-life stage. Replacethe
old batterypack with anew one.
● Different Operating Systems and PowerManagement device settingsmay affect the battery packpower consumption,
and thenthe battery packcontinuous working time.Try decreasing LCD Brightness or similar power saving methods
to extendbattery pack workingtime.
1. Nopower output fromAC power adapter
2. Nopower output frombattery pack
3. Batterypack does notrecharge even AC power adapter is connected
4. Thecontinuous working timeof the batterypack is lessthan expected
24
Page 26

Troubleshooting
● If the batterypack is frequentlyin use withoutbeing fully recharged,it may notdeliver its designedpower. Tryto
calibrate thebattery pack by repeating fullyrecharge and thenfully discharge process3 times.
● Check if anyapplication software orprogram has notbeen closed.
● Check if NumberLock LED Indicatoris turned off.
● Check if newlyinstalled software orprogram has different keyboard setting.
● It may becaused by incorrectsystem operation orvirus damage. Try to clean virus first and thenfollow operation
system settingproperly.
● The program or data filesmay have toomany fragmentations. Runany disk-keeping programto improve thefiles
conditions.
5. Thesystem cannot enterinto Suspend state
6. Presscharacter keys butoutput numbers
7. Pressany key butoutput different key
8. Systemcannot be bootedup from HDD
9. HDDruns slowly
25
Page 27

Troubleshooting
10. Blackescren
11. No sound
12. USBdevice not working
13. NoLAN connection
● Check Hot Keyfor LCD DisplayOn/Off.
● Check Hot Keyfor LCD /CRT display switch.
● Check if systemin Suspend state.
● Check Hot keyfor Volume increase.
● Check the volumesetting in applicationsoftware or program.
● Check if Headphoneor Headset isfirmly connected.
● Check Windows devicesetting for propersound card installed,sound output enabled,and no anydevice conflict.
● Checkfirm connection ofUSB cable.
● Checkif USB devicedriver is properlyinstalled.
● Check firm connectionof LAN cable.
* Specificationsare subject tochange without notice.
26
 Loading...