

Page 1

®
®
MINI GREASE GUN
With 3 Oz. Lithium Grease Cartridge
Model 95575
OPERATING INSTRUCTIONS
3491 Mission Oaks Blvd., Camarillo, CA 93011
Visit our Web site at: http://www.harborfreight.com
TO PREVENT SERIOUS INJURY,
READ AND UNDERSTAND ALL WARNINGS
AND INSTRUCTIONS BEFORE USE.
Copyright© 2006 by Harbor Freight Tools®. All rights reserved. No portion of this
manual or any artwork contained herein may be reproduced in any shape or form
without the express written consent of Harbor Freight Tools.
For technical questions, or replacement parts, please call 1-800-444-3353.
Page 2

PRODUCT SPECIFICATIONS
Item Description
Capacity 3 ounce multi-purpose Lithium grease cartridge (suction loaded)
Extension Pipe 5-1/2” Long
Delivery Rate 1/2 oz. grease per 40 strokes
Pipe, Coupler and
Head Cap
Weight 1.7 Pounds (Empty)
1/8” NPT Threads
UNPACKING
When unpacking, check to make sure that the item is intact and undamaged. If any parts
are missing or broken, please call Harbor Freight Tools at the number shown on the cover
of this manual as soon as possible.
SAVE THIS MANUAL
You will need this manual for the safety warnings and precautions, assembly, operating, inspection, maintenance and cleaning procedures, parts list and assembly diagram.
Keep your invoice with this manual. Write the invoice number on the inside of the front
cover. Keep this manual and invoice in a safe and dry place for future reference.
GENERAL SAFETY RULES
IMPORTANT SAFETY INSTRUCTIONS
WARNING!
READ AND UNDERSTAND ALL INSTRUCTIONS
Failure to follow all instructions listed below may
result in serious injury.
SAVE THESE INSTRUCTIONS
WORK AREA
1. Keep your work area clean and well lit. Cluttered benches and dark areas invite
accidents.
2. Keep bystanders, children, and visitors away while operating this product.
Distractions can cause you to lose control. Never allow children in the work area.
For technical questions, please call 1-800-444-3353.
Page 2SKU 95575
Page 3

PERSONAL SAFETY
1. Stay alert. Watch what you are doing, and use common sense when operating
tools. Do not use this product while tired or under the influence of drugs,
alcohol, or medication. A moment of inattention while operating this product may
result in serious personal injury.
2. Dress properly. Do not wear loose clothing or jewelry. Contain long hair.
Keep your hair, clothing, and gloves away from moving parts. Loose clothes,
jewelry, or long hair can be caught in moving parts.
3. Do not overreach. Keep proper footing and balance at all times. Proper footing
and balance enables better control of the power tool in unexpected situations.
4. Use safety equipment. Always wear ANSI-approved safety glasses underneath
a full face safety shield. Nonskid safety shoes, heavy duty work gloves, and a hard
hat should be worn under appropriate conditions.
TOOL USE AND CARE
1. Do not force the tool. Use the correct tool for your application. The correct
tool will do the job better and safer at the rate for which it is designed.
2. Store idle tools out of reach of children and other untrained persons. Tools
are dangerous in the hands of untrained users.
3. Maintain tools with care. Properly maintained tools are less likely to malfunction
and are easier to control. Do not use a damaged tool. Tag damaged tools “Do not
use” until repaired.
4. Check for misalignment or binding of moving parts, breakage of parts, and
other conditions that may affect tool’s operation. If damaged, have the tool
serviced before using. Many accidents are caused by poorly maintained tools.
5. Use only accessories that are recommended by the manufacturer for your
model. Accessories that may be suitable for one tool may become hazardous when
used on another tool.
6. Store this tool and grease in a secure area out of the reach of children.
SERVICE
1. Tool service must be performed only by qualified repair personnel. Service
or maintenance performed by unqualified personnel could result in a risk of injury.
2. When servicing a tool, use only identical replacement parts. Follow instructions
in the “Inspection, Maintenance, And Cleaning” section of this manual. Use
of unauthorized parts or failure to follow maintenance instructions may create a risk
of personal injury.
For technical questions, please call 1-800-444-3353.
Page 3SKU 95575
Page 4
SPECIFIC SAFETY RULES
1. Maintain labels and nameplates on this product. These carry important information.
If unreadable or missing, contact Harbor Freight Tools® for a replacement.
2. Always maintain a firm grip on the tool with both hands.
3. Keep the outer body of Grease Gun dry, clean, and free from oil and grease.
4. Industrial applications must follow OSHA requirements.
5. Make sure to read and understand all instructions and safety precautions
as outlined in the manufacturer’s manual for the vehicle (or object) you are
lubricating.
6. This Grease Gun is designed only to hold and dispense grease. Never use
the Grease Gun to hold and dispense any other material.
7. WARNING! The warnings, precautions, and instructions discussed in this manual
cannot cover all possible conditions and situations that may occur. The operator
must understand that common sense and caution are factors which cannot be built
into this product, but must be supplied by the operator.
SAVE THESE INSTRUCTIONS
INSTALLING AND REPLACING THE GREASE CARTRIDGE
REPLACING THE GREASE CARTRIDGE
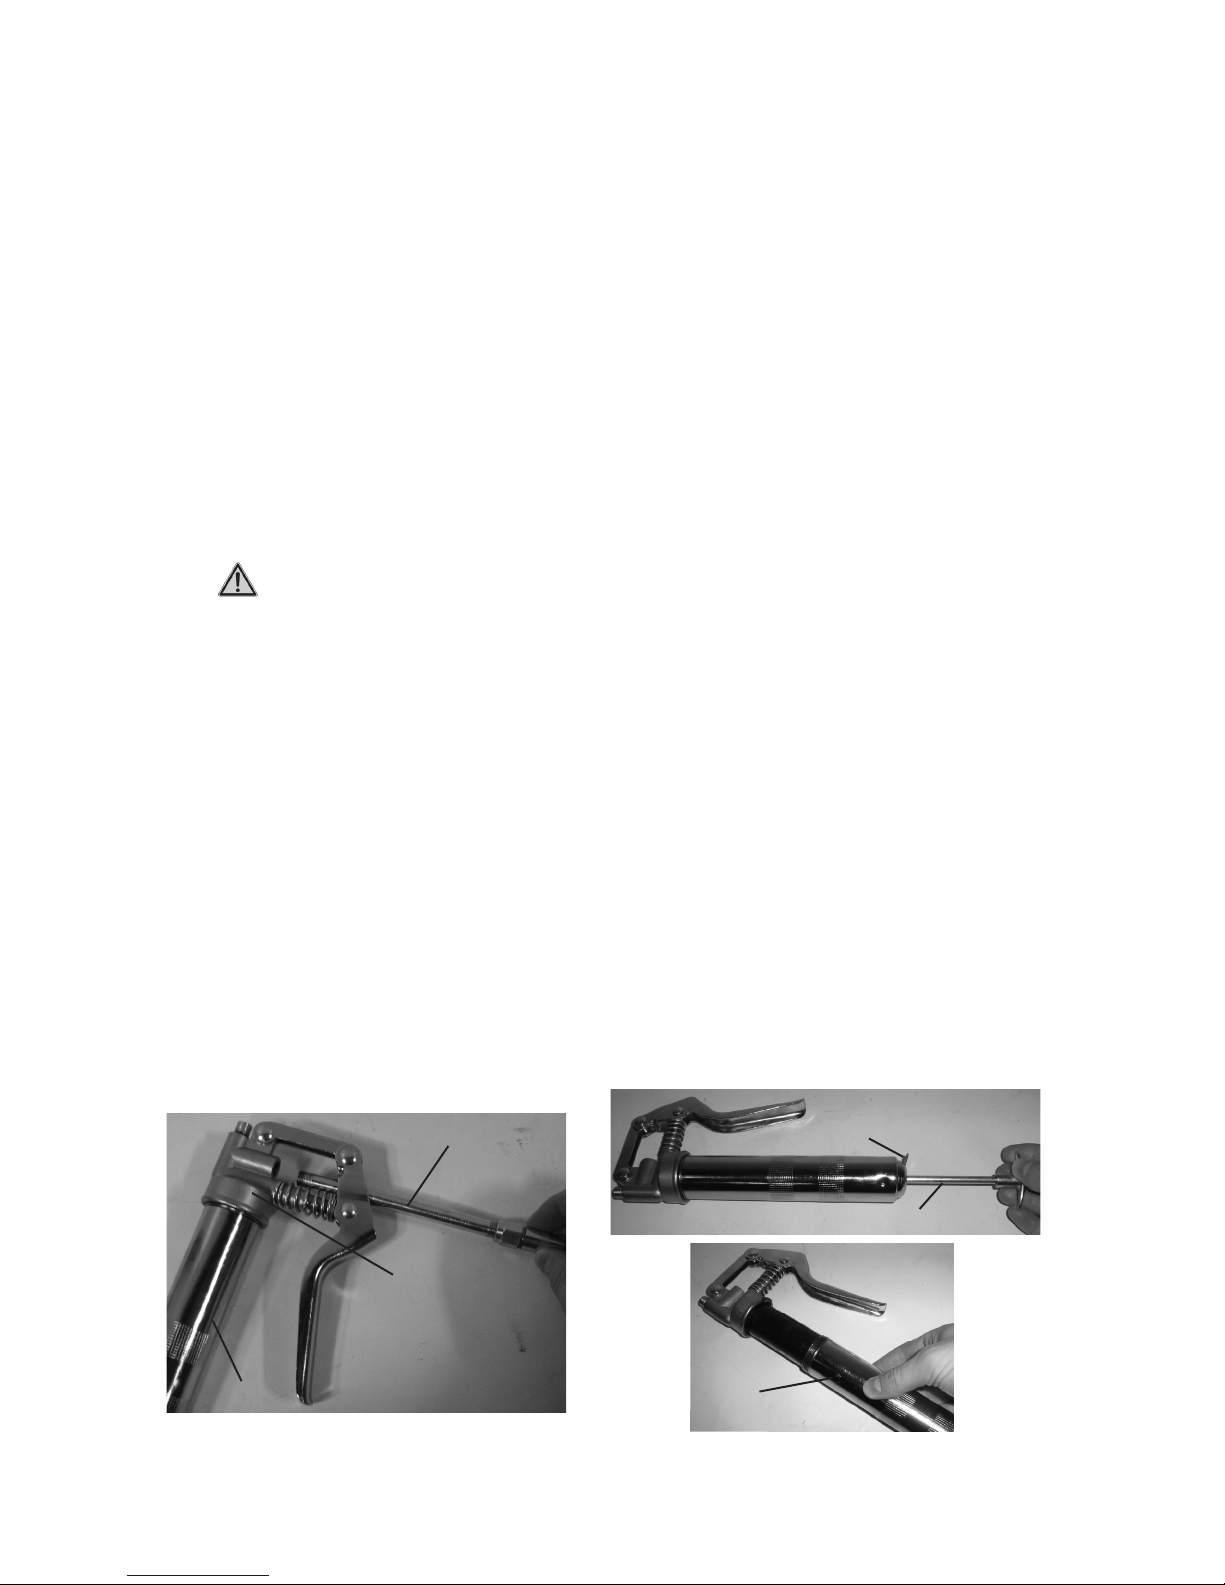
1. Unscrew and remove the Extended Pipe (14) from the Head (11). (See Fig. 1)
2. Pull the T-Grip Handle (1) all the way back and lock it in place. (See Fig. 2)
3. Unscrew the Barrel (3) from the Head (11). Remove the cap from both ends of the 3
ounce grease cartridge. Note: Open and prepare cartridge per the manufacturer’s
instructions. Insert the cartridge into the Head (11).
4. Slide the Barrel over the cartridge and back into the Head. (See Fig. 3)
5. Depress the Clamp (2) and push T-Grip Handle (1) forward as far as it will go.
Figure 2
Extended Pipe (14)
Clamp (2)
T-Grip Handle (1)
Figure 3
Head (11)
Figure 1
Barrel (3)
For technical questions, please call 1-800-444-3353.
Barrel (3)
Page 4SKU 95575
Page 5

SUCTION FILLING FROM BULK GREASE CONTAINER
1. Unscrew and remove the Head (11) from the Barrel (3).
2. Insert the open end of the Barrel (3) into the lubricant. Slowly pull the T-Grip Handle
(1) back while pushing the Barrel (3) deeper into the lubricant to prevent air pockets
from being pulled into the Barrel (3).
3. When the Handle (1) is fully extended, remove the Barrel (3) from the lubricant.
Wipe the exterior of the Barrel (3) clean of lubricant. Screw the Head (11) back
onto the Barrel (3).
4. Depress the Clamp (2) and push the Handle (1) back into the Barrel.
TO EXPEL AIR POCKETS IN THE BARREL
TO EXPEL AIR POCKETS IN THE BARREL
If the grease gun does not work properly, there may be air pockets in the barrel.
1. Unscrew the Head (1) 1-11/2 turns.
2. Depress the Clamp (2) and slowly push the Handle (1) forward to the Barrel (3).
3. After all excess air is expelled from the Barrel (3), retighten the Head (1).
TO OPERATE THE GREASE GUN
TO OPERATE THE GREASE GUN
1. NOTE: ALWAYS clean the Grease Gun carefully and completely with a clean cloth
prior to use.
2. With one hand, hold the Barrel (3) securely. With the other hand, pump the Grip
(13) several times or until a small amount of grease flows out of the Coupler (15).
3. When finished, store in a clean, dry, safe location out of reach of children.
INSPECTION, MAINTENANCE AND CLEANING
INSPECTION, MAINTENANCE, AND CLEANING
1. Before each use, inspect the general condition of the Grease Gun. Check
for misalignment or binding of moving parts, cracked or broken parts, leaking
connections, and any other condition that may affect its safe operation. If a problem
occurs, have the problem corrected before further use.
Do not use damaged equipment.
2. Daily, with a soft, dry cloth, remove all dirt, grease, and debris from the exterior of
the Grease Gun. Do not use solvents to clean the Grease Gun. Do not immerse
the Grease Gun in any liquids.
3. When storing, always keep the Grease Gun in a clean, dry, safe location out of
reach of children.
For technical questions, please call 1-800-444-3353.
Page 5SKU 95575
Page 6
3491 Mission Oaks Blvd. • PO Box 6009 • Camarillo, CA 93011 • (800) 444-3353
Harbor Freight Tools Co. makes every effort to assure that its products meet high quality and durability standards,
and warrants to the or iginal purchaser that this product is free from defects in materials and workmanship for
the period of ninety days from the date of purchase. This warranty does not apply to damage due directly or
indirectly, to misuse, abuse, negligence or accidents, repairs or alterations outside our facilities, or to lack of
maintenance. We shall in no event be liable for death, injuries to persons or property, or for incidental, contingent,
special or consequential damages arising from the use of our product. Some states do not allow the exclusion or
limitation of incidental or consequential damages, so the above limitation of exclusion may not apply to you. THIS
WARRANTY IS EXPRESSLY IN LIEU OF ALL OTHER WARRANTIES, EXPRESS OR IMPLIED, INCLUDING
THE WARRANTIES OF MERCHANTABILITY AND FITNESS.
To take advantage of this warranty, the product or part must be returned to us with transportation charges prepaid.
Proof of purchase date and an explanation of the complaint must accompany the merchandise. If our inspection
verifies the defect, we will either repair or replace the product at our election or we may elect to refund the purchase
price if we cannot readily and quickly provide you with a replacement. We will return repaired products at our
expense, but if we determine there is no defect, or that the defect resulted from causes not within the scope of
our warranty, then you must bear the cost of returning the product.
This warranty gives you specific legal rights and you may also have other rights which vary from state to state.
Limited 90 day
warranty
®
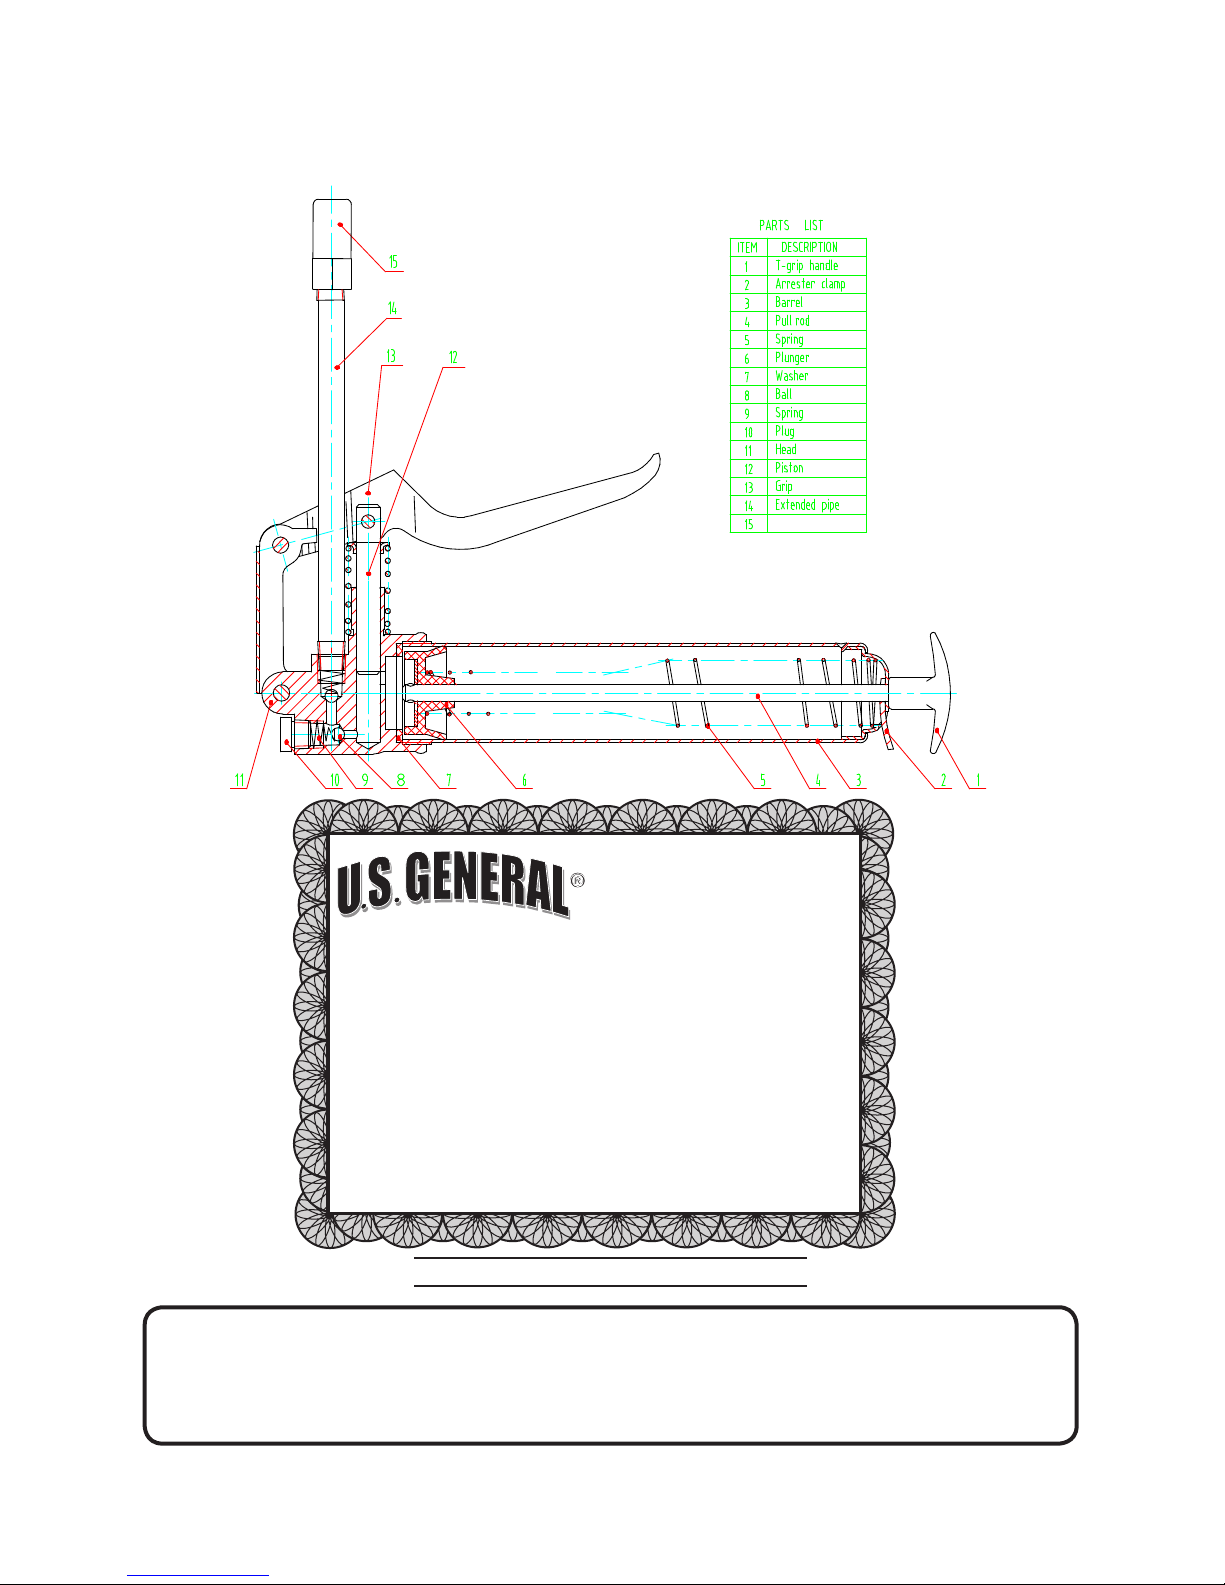
PARTS LIST, ASSEMBLY DIAGRAM AND WARRANTY
PARTS LIST AND DIAGRAM
coupler
The manufacTurer and/or disTribuTor has provided The parTs lisT and assembly diagram in This manual as a reference Tool only. neiTher The manufacTurer or disTribuTor makes any represenTaTion or warranTy of any kind To
The buyer ThaT he or she is qualified To make any repairs To The producT, or ThaT he or she is qualified To replace
any parTs of The producT. in facT, The manufacTurer and/or disTribuTor expressly sTaTes ThaT all repairs and parTs
replacemenTs should be underTaken by cerTified and licensed Technicians, and noT by The buyer. The buyer assumes
all risk and liabiliTy arising ouT of his or her repairs To The original producT or replacemenT parTs ThereTo, or arising ouT of his or her insTallaTion of replacemenT parTs ThereTo.
For technical questions, please call 1-800-444-3353.
PLEASE READ THE FOLLOWING CAREFULLY
Page 6SKU 95575
 Loading...