

Page 1

®
Fiberock
Underlayment and
Tile Backerboard
Installation
Guide
Interior Floors, Walls and
Countertops.
Page 2

Fiberock® Underlayment and
Tile Backerboard
Fiberock® underlayment and tile backerboard are
all purpose substrates engineered to meet floor
underlayment and wall tile-backing needs
throughout a home. Under resilient flooring,
Fiberock underlayment provides a hard surface
that’s smooth and flat with no bumps or ridges to
show through or affect finished floor covering.
Behind and under tile or natural stone, Fiberock
tile backerboard provides the resistance to water
and mold that is required in bathrooms, kitchens
and entryways. With Fiberock panels, you can rely
on a single family of products to back all types of
tile and resilient flooring in the home.
Integral Water Resistance
This remarkable family of
products is completely different
from other substrates.
Manufactured with a unique,
proprietary technology,
panels feature a durable, waterresistant composition that
eliminates the swelling and
warping often experienced
with fiber cement, plywood,
oriented strand board (OSB),
lauan and other wood-based
underlayments.
Easy to Install
Fiberock panels score easily
and snap with minimal effort.
In fact, the International Certified
Floorcovering Installer Association
awarded
Fiberock underlayment
the “Installer Friendly Seal.”
Fiberock
Proven Performance
Fiberock panels are warranted
for 20 years. They have been
tested by the Tile Council of
North America (TCNA), using the
Robinson Floor Method, and are
approved for residential and light
commercial use (as defined by
TCNA).
Environmentally Friendly
Fiberock panels are made from
95 percent recycled material.
In recognition of the
environmentally sound alternative
these panels provide, United
States Gypsum Company earned
the Green Cross certificate from
Scientific Certification Systems,
a leading testing company that
evaluates environmental claims.
2
Page 3

Introduction
Installing Fiberock panels is quick
and easy. Just follow the simple
installation steps in this booklet
to create a perfect base for tile or
floor coverings.
Note: Do not use Fiberock panels
over concrete subfloors or over
cushion-backed vinyl.
Tools
Common tools like those shown
below are typically all that are
needed to install
Fiberock panels,
though additional, specialized
tools may be required with some
finish materials, such as tile and
natural stone.
Materials
Fiberock Panels
– Sizes and Packaging
Size
(thick x width x length) Units (pcs.)
1/4" x 4' x 4' 60
1/4" x 3' x 5' 60
3/8"
x 4' x 4' 60
3/8"
x 4' x 8' 40
3/8"
x 3' x 5' 60
1/2" x 3' x 5' 50
1/2" x 4' x 8' 30
5/8"
x 3' x 5' 40
5/8" x 4' x 8' 24
– Joint Reinforcement
Behind ceramic tile, use
Durock™ tile backer tape and
latex-based Type I mastic or
latex-modified thin-set mortar.
For sections that will be
painted, use paper tape and
setting-type joint compound.
–
Fasteners
Wall Application: For steel
stud applications (20 ga. or
equivalent), use 1-1/4" or
1-5/8"
Durock™ screws for
steel framing (or equivalent).
For wood stud applications,
use 1/4", 1-5/8" or 2-1/4"
Durock screws for wood
framing (or equivalent) or
1-1/2" hot-dipped galvanized
ring shank roofing nails.
Floor Application: Use 1-1/4"
Durock™ tile backer screws for
wood framing (or equivalent)
or 1-1/2" hot-dipped
galvanized ring shank roofing
nails. For resilient flooring, use
minimum 1/4" crown chisel
point staples, hot-dipped
galvanized ring shank nails or
corrosion-resistant screws.
Fastener length should
be approximately equal
to combined thickness of
underlayment and subfloor.
Fasteners should not
penetrate through subfloor.
–
Floor and Wall Framing
Floor Tile Applications:
Maximum joist spacing
24" o.c. The subfloor system
should be designed with a
minimum deflection limit
of L/360 for the span. Some
finish materials may require a
more rigid subassembly
(such as large format tile
and natural stone products
L/720). In these cases, follow
the manufacturer’s minimum
requirements. The subfloor
should be APA Span-Rated
Plywood or OSB with an
Exposure 1 classification
or better with tongue and
groove or back blocked at
the unsupported edges.
3
Page 4
Handling
Wall Applications: Maximum
stud spacing: 16" o.c.
Framing shall be designed
(based on stud properties
alone) not to exceed L/360
deflection for tile, L/240 for
surfaces that will be painted.
Maximum fastener spacing:
8" o.c. for wood and steel
framing; 6" o.c. for ceiling
applications.
–
Patching Compound
Use a high-quality patching
compound such as D
urock
Floor Patch or equivalent
approved by the resilient-
flooring manufacturer.
–
Adhesive/Mortar
Meeting ANSI A136.1: Type I
ceramic tile adhesive.
Meeting ANSI A118.1: dry-set
mortar.
Meeting ANSI A118.4: latex
portland cement mortar.
–
Grout meeting ANSI A118.7.
–
Ceramic tile meeting ANSI
A137.1.
–
Waterproof Membrane
If waterproofing is desired,
use
Durock™ tile membrane
installed with
Durock™ tile
membrane adhesive. See USG
literature piece CB492 for
Durock tile membrane product
information.
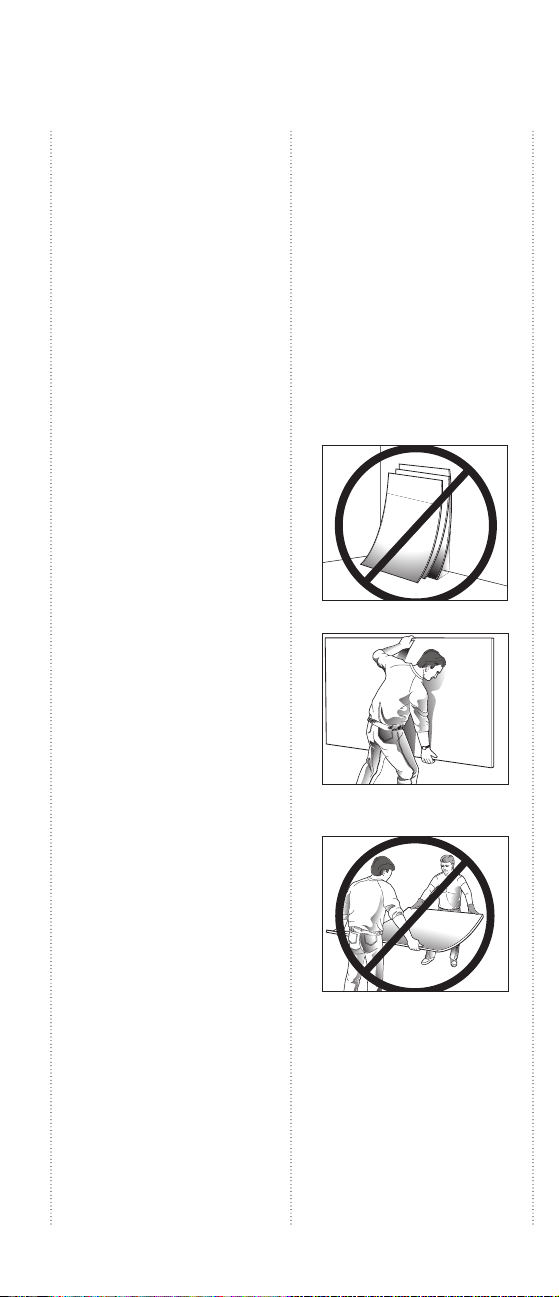
– Protect panels from the
elements with adequate
covering during delivery and
storage.
– Store panels flat on an even,
dry surface. Allow panels to
acclimate to temperature and
humidity at job site prior to
installation.
– Handle panels in an upright
position to prevent breakage.
Incorrect
Correct
Incorrect
4
Page 5

Preparation
sand uneven
joints
fill and
sand gaps
flush with or slightly
below surface
Crawl-Space Requirements
Crawl-space requirements may
vary based on geographic location.
Consult local building codes for
more specific information regarding
vapor barriers and their uses.
Subfloor Requirements
The subfloor system should
be designed for a deflection
limit of L/360 for the span. The
subfloor should be APA SpanRated Plywood or OSB with
an Exposure 1 classification
or better with tongue and
groove or back-blocked at the
unsupported edges.
Resilient Flooring
Joist Minimum
Spacing Subfloor
Thickness
16", 19.2" 23/32"
and 24" o.c.
Ceramic Tile
Joist Minimum
Spacing Subfloor
Thickness
16" o.c. 19/32"
19.2" o.c. 23/32"
24" o.c. 23/32"
Wood Subfloor
Ensure that subfloor and
structure are within tolerances
specified by floor covering
manufacturer. Inspect subfloor
for even, flat surface before
installing underlayment.
Uneven end edge joints and
variations in subfloor panel
thickness may telegraph
through underlayment in vinyl
applications. Sand uneven
joints, if necessary.
Ensure that subfloor is
flat between framing elements.
If subfloor panels appear to
buckle, correct by adding
blocking or cleats under floor.
Fasten cleats to subfloor to
flatten panels. Repair voids, large
gaps and penetrations through
subfloor using a manufacturerapproved floor leveler prior to
installing
Over Existing Vinyl Floor
Fiberock underlayment.
CAUTION: Do not install Fiberock
underlayment over heavily
cushioned, thick foam-backed
floor coverings.
– Ensure that existing floor is
level and meets appropriate
design requirements.
– Repair any missing or broken
vinyl tiles, curling seams,
severe gouges, or protrusions
by filling with floor leveler.
Clean subfloor and leave free
of dust, dirt and debris. Ensure
that subfloor is completely dry
(no more than 12% moisture
in subfloor prior to installation).
Verify that fasteners are flush
with, or slightly below, subfloor
surface.
If floor will be finished with
ceramic tile, make sure that the
existing vinyl covering is fully
adhered and bonded to the floor.
5
Page 6

Cutting and
16" 16"
1/4" gap
cut
edge
factory edges
underlayment
subfloor
Laying Out Panels
Cutting Panels
Maintain temperature and
humidity in space approximate to
that of normal occupancy prior to,
during and after installation.
Install underlayment, with
fastener marks up. Panels may
be cut by scoring and snapping
with a utility knife and straight
edge, or by sawing, working from
the face side. With score-andsnap method, score panel twice
and snap away from cut face,
then snap panel in reverse
direction to break the back.
Where necessary, use a rasp or
surform to smooth the cut edges.
Cutouts
For difficult cuts, combine the
score-and-snap method with use
of a handsaw or low-RPM power
saw. Cut holes for plumbing
with a hole saw, keyhole saw or
variable-speed jigsaw. A power
saw should be used only if
equipped with a dust-collection
device. Always wear an OSHAapproved dust mask when
cutting
Fiberock panels with a
power saw.
For more cutting techniques,
consult your USG
Fiberock
representative.
Panel Layout
Lay cut edges against the wall—
only factory edges should be
joined. Begin laying panels
at one corner. Maintain 1/4"
space between panels and
perimeter walls. Stagger joints
a minimum of 16" so that four
panel corners never meet, and
offset end and edge joints of
panels a minimum of 12"–16"
from subfloor panel joints. Butt
panel edges and ends lightly
together. A maximum 1/32"
gap is allowed.
Preparation for resilient
flooring: Consider critical lighting
when determining panel layout.
Run continuous panel joints in
the direction of the dominant
source of natural light, when
possible.
Prior to installation of final
floor covering, avoid heavy traffic
and moving heavy items across
panels. If necessary, items
such as refrigerators or other
appliances with wheels (or on
wheeled dollies) may be rolled
over underlayment surface; using
strips of hard wood or scrap
underlayment to bear the wheel
traffic is recommended. Allow
a minimum of 24 hours after
floor covering installation before
placing heavy appliances or
furniture on floor.
6
Page 7

Floor Application
Ceramic Tile
Underlayment or Tile Backerboard
Panel Application
Apply Type 1 organic adhesive
with 5/32" v-notched trowel,
latex-fortified mortar with
1/4" square-notched trowel.
Comb out adhesive or mortar in
straight, parallel rows (as shown
below) and immediately cover
with panel. Adhere panels to
subfloor, one panel at a time.
Fastening
Fasten to subfloor with 1-1/4"
D
urock tile backer screws for
wood framing (or equivalent) or
1-1/2" hot-dipped galvanized
ring shank roofing nails spaced
8" o.c. in both directions with
perimeter fasteners at least 3/8"
and less than 5/8" from ends and
edges. Drive nails and screws so
that bottoms of heads are flush
with panel surface to ensure firm
panel contact with subfloor. Do
not overdrive fasteners.
Finishing Joints
Fill joints with latex-fortified
mortar or Type 1 organic
adhesive and immediately
embed D
urock tilebacker tape
or equivalent alkali-resistant,
fiberglass mesh joint tape.
Ceramic Tile Installation
Sweep all debris from
underlayment, and vacuum
carefully to eliminate dust
and dirt.
To set tile, apply latex-fortified
mortar or Type 1 organic
adhesive with a notched trowel.
Key in mortar or adhesive with flat
side of trowel to prime F
iberock
surface, then comb out adhesive
or mortar in straight parallel rows.
When combing out adhesive or
mortar, hold trowel at an angle to
maintain uniform thickness.
7
Page 8

Floor Application
Working a small area at a
time, set tile with a slight
twisting motion and press into
place. Avoid adhesive buildup
on tile edge and in grout space.
Keep tiles aligned so joints are
straight and uniform. Use tile
spacers if desired.
Note: Refer to ANSI A108.4
or A108.5 for complete tile
installation instructions. Refer
to setting material manufacturer
for specific information related
to trowel type and size, proper
tile type and size, mixing
instructions, and set and cure
times.
Resilient Flooring
Underlayment
Selecting Fasteners
Fasten Fiberock underlayment to
subfloor with 1/4" crown chisel
point staples. Do not use screws
or nails.
Fastener length should be
approximately equal to combined
thickness of underlayment and
subfloor. Do not allow fasteners
to penetrate through subfloor.
Fastening Panels
Lay panels flat and press tightly
onto subfloor while fastening.
Begin fastening where three
panels intersect. Affix staples
along joints in a zipper
pattern at 1" o.c., 1/4" from
panel edge. Install staples at 4"
o.c. in the field of panels.
1/4”
Consult your USG
Fiberock
representative for additional
fastening techniques.
When using pneumatic tools,
apply sufficient pressure on gun
to prevent the tool from bouncing.
Set pneumatic tool pressure to
drive fasteners flush or slightly
below underlayment surface.
To prevent fastener heads from
telegraphing through resilient floor
covering, do not countersink more
than 1/16" below surface.
Fasten one panel at a time.
Begin at one end and fan out
across the floor.
Installing Fiberock Panels over
Existing Vinyl Floor Coverings
Do not install underlayment over
heavily cushioned, thick foambacked vinyl. Ensure that existing
floor is level, is fully adhered and
well bonded, and meets
appropriate design requirements.
Repair missing or broken tiles,
curling seams, severe gouges,
protrusions of surface and any
other damage with a high-quality
floor leveler. Follow floorcovering manufacturer's
recommendations for
installations over existing floors.
8
Page 9

Correcting Joint Imperfections
Use Durock patching compound
or equivalent sparingly to fill wide
joints, repair any surface voids
and correct joint lippage (panel
edge sitting above or below
the floor plane). Carefully fill
joints wider than 1/32" and any
surface imperfections with only
enough material to infill void – do
not feather. Correct joint lippage
by applying patching compound
to low side only and feathering
to level. Allow compound to dry
completely (90 min. minimum),
then lightly sand or scrape, taking
care not to scuff panel surface;
use a flat blade to scrape away
any excess material.
Remove all debris from panel
surfaces; vacuum carefully to
eliminate excess dust and dirt.
Applying Floor Covering
Refer to floor-covering
manufacturer's
recommendations for proper
procedures. For proper trowel
selection, refer to adhesive
manufacturer's recommendation
for nonporous substrates. Follow
floor-covering and/or adhesive
manufacturer's guidelines for
setting times before allowing
traffic on the finished floor. Follow
floor-covering manufacturer's
recommendations for preventive
maintenance, cautions and
procedures.
Perimeter-Bonded, Felt-Backed
Resilient Floor Covering
Joint patching is not required
with this type of floor covering
in new construction unless
joint spaces or lippage exceed
1/32". Carefully fill joints wider
than 1/32" with only enough
material to infill void – do not
feather. Correct joint lippage by
applying patching compound
to low side only and feathering
to level. Allow compound to dry
completely (90 min. minimum),
then lightly sand or scrape,
taking care not to scuff panel
surface. Remove dust, dirt
and debris from underlayment
surface before application of
floor covering.
Wood Flooring
Underlayment
Mechanically Fastened
Wood Flooring
Fasteners must be long enough
to penetrate through
underlayment and into subfloor.
To determine proper fastener
length, add thickness of
underlayment to length of
fastener recommended by the
flooring manufacturer. Follow
recommendations on pages
6 and 8 for underlayment
installation.
9
Fiberock
Page 10

Wall and Ceiling
Application
Glued-Down Wood Flooring
Installation of engineered or
solid hardwood glued-down
flooring must strictly follow
manufacturer's instructions.
Follow recommendations above
for underlayment installation.
Ceramic Tile
Tile Backerboard
Framing Requirements
Steel or wood wall framing
shall be structurally sound and
in compliance with local building
code requirements. Damaged
and excessively bowed studs
shall be replaced before installation
of tile backerboard panels.
Space wood or steel framing
24" o.c., maximum. Framing
shall be designed to meet L/360
deflection for tile and L/240
deflection for flexible finishes
such as paint.
Fastening
Space fasteners 8" o.c. for walls,
6" o.c. for ceilings. Fit ends and
edges of panels closely, but not
forced together.
– Wood framing: 1-1/2"
hot-dipped galvanized ring
shank roofing nails or
1-1/4" D
wood framing or
equivalent.
– Steel framing: 1-1/4"
– Joining: Fill joints with
urock screws for
D
urock screws for steel
framing or equivalent.
latex-fortified mortar or
Type 1 organic adhesive
and immediately embed
D
urock tape or equivalent
alkali-resistant, fiberglass
mesh joint tape.
Shim
Place a 1/4" spacer strip or shim
around lip of bathtub or shower
pan to hold bottom edge of panel
off the fixture.
Joint Finishing
In areas that will be tiled, finish
joints with D
urock tile backer
tape and latex-fortified mortar
or Type I mastic. In areas that
will be painted: For taping, use
S
with S
heetrock
heetrock
®
brand joint tape
®
DurabonD®
setting-type joint compound.
For finishing, use
all purpose joint compound.
Do not use P
all purpose or M
compounds on F
Planning Your Tile Installation
sheetrock®
®
lus 3
lightweight
iDweight
iberock panels.
™
joint
Where tile will not cover entire
wall surface, such as above
the tub and shower surrounds,
determine where you want the
tile to end and draw a level line at
this height. Be sure to allow for
height of tile cap, if applicable.
10
Page 11

Countertop Application
Determine whether floor is level
by measuring distance
to desired tile height on both
sides of area to be tiled. If there
is a difference (i.e., the floor
is lower on one side), lay one
vertical row of tile from desired
tile height to low point of floor.
Affix tiles with tile-setting
materials. Use this first row as
a guide to keep tiles and grout
lines level and even throughout
installation.
If new flooring will be installed,
allow for thickness of new
flooring where the wall meets
the floor.
Installing Ceramic Tile
Always follow current ANSI
specifications and TCNA
guidelines for installing tile.
Apply tile-setting material to
tile backerboard with notched
trowel; key in mortar or adhesive
with smooth side of trowel to
prime F
iberock surface first,
then comb out mortar or
adhesive in straight parallel
rows, hold trowel at min. 45º
angle to maintain uniform
thickness.
Working a small area at a time,
set tile with a slight twisting
motion and press into place. Keep
tiles aligned so joints are straight
and uniform. Use tile spacers if
desired. If excess adhesive
squeezes from under tile, remove
before it dries.
Cover plywood base with D
tile membrane, 15 lb. felt or 4 mil
polyethylene and attach with 1/4"
galvanized staple.
Position
Fit ends and edges of panels closely,
but not forced together. Stagger
panel joints from plywood base
joints.
Fasten
Space fasteners 8" o.c. around the
perimeter and in the field of the
board.
Joining
Fill joints with latex-fortified mortar
or Type 1 organic adhesive and
immediately embed alkali-resistant,
fiberglass mesh joint tape.
Finish
Install tile.
Note:
Because cement board fasteners may
protrude through the plywood base when
1/4" cement board is used, 1/2" or 5/8"
cement board is preferred in this
application.
11
urock
Page 12

Trademarks
The following trademarks used herein
are owned by United States Gypsum
Company or a related company:
DurabonD, Durock, Fiberock,
MiDweight, Plus 3, sheetrock,
USG, USG in stylized letters.
Note
Products described here may not be
available in all geographic markets.
Consult your United States Gypsum
Company sales office or representative
for information.
Notice
We shall not be liable for incidental
and consequential damages, directly
or indirectly sustained, nor for any
loss caused by application of these
goods not in accordance with current
printed instructions or for other
than the intended use. Our liability
is expressly limited to replacement
of defective goods. Any claim shall be
deemed waived unless made in writing
to us within thirty (30) days from date
it was or reasonably should have been
discovered.
Product Information
See usg.com for the most
up-to-date product information.
Safety First!
Follow good safety and industrial hygiene
practices during handling and installation
of all products and systems. Take
necessary precautions and wear the
appropriate personal protective equipment
as needed. Read material safety data
sheets and related literature on products
before specification and/or installation.
For warranty or product information
and literature:
800 USG.4YOU (874-4968)
usg.com
Manufactured by
United States Gypsum Company
550 West Adams Street
Chicago, IL 60661
F119/rev. 1-12
© 2012 United States Gypsum Company
Printed in U.S.A.
 Loading...