

Page 1

Durock™
Tile Membrane
System
installation
guide
Durock™ Tile Membrane
Membrane for ceramic
Durock™ Tile Membrane Adhesive
floor tile installation
Page 2

An easy-to-install tile backer on a roll
with superior tile bond.
Durock™ brand tile membrane is a thin,
water-proof, vapor-permeable membrane
used under tile in residential and lightcommercial floor, wall and countertop
applications. Easy to install, with outstanding
tile bond, this membrane provides a highperformance crack-isolation solution when
used with Durock™ tile membrane adhesive.
Back side (light)Cementitious side (dark)
2
Page 3

Products
ToolsStart with Quality
Durock™ Tile Membrane
Ideal for floor, wall and countertop
applications.
Durock™
Membrane Adhesive
A superior adhesive with proprietary acrylic polymer and an
additive for mold and mildew
resistance, used with
tile membrane to provide crack
isolation.
Durock tile membrane may also
be installed with the following
products, which do not provide
crack isolation: Type 1 organic
adhesive and latex-modified
thin-set mortar.
Durock
In general, common tools like
scissors, a straightedge, and a
notched trowel or 3/89-nap paint
roller (for applying
membrane adhesive) are used for
tile membrane installation. Other
tools you may need for installation
include: tape measure, utility knife,
caulk and caulking gun.
Durock tile
3
Page 4

Preparation Installation of
Tile Membrane
1. Ensure that substrate is clean,
even, flat, designed to support
ceramic tile, and properly
installed according to manufacturers’ specifications.
2. Substrate must be free
of sealers, waxes, bond
breakers, dust and dirt.
3. If
Durock tile membrane is
installed directly over a woodbased subfloor, ensure that
all fasteners are seated correctly and there are no uneven
joints. Sand or fill if necessary.
1. Precut the full width of mem-
brane to provide a tight fit to
the perimeter of the room.
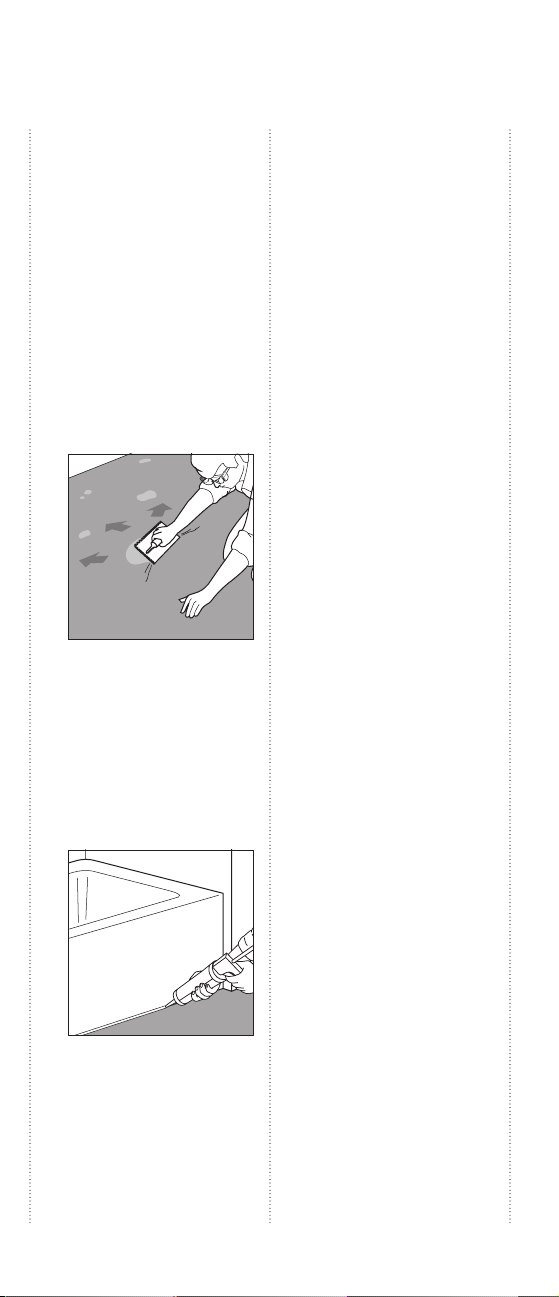
2. Spread adhesive over an area
the full width of the sheet and
as far as can be comfortably
reached.
– For
Durock tile membrane
adhesive, use a 3/89-nap
paint roller or a 1/169 U-notch
trowel.
– For Type 1 organic adhesive,
use a 1/169 U-notch trowel.
– For latex-modified thin-set
mortar, use a 1/89 U-notch
trowel. Roll or trowel adhesive
in parallel rows across the
width or length to avoid trapping air under the membrane.
For installations over non-
porous surfaces, such as
vinyl, laminate and existing
tile—allow adhesive to air-dry,
becoming translucent and
developing tack, before
installing D
urock tile
membrane. Time will vary
depending on temperature,
humidity and substrate type;
however, a minimum of 15
minutes should be allowed.
3. Install membrane with
cementitious side out. Embed
into adhesive, using the flat
edge of the trowel or with a
non-segmented hand roller.
Start in the center of the
4
Page 5
sheet and work out towards
the edges, removing all air
bubbles. Overlap each row
29, making sure that a
sufficient amount of
adhesive is applied to the
joint area.
For wall applications, begin
from the lowest point and work
toward the highest point of
coverage so that all horizontal
membrane seams are lapped
in a shingle-like manner.
4. Areas unable to receive verti-
cal flashing, such as pipe penetrations and bathroom tubs,
should be sealed using a good
quality silicone sealant. Run a
continuous bead and tool the
material to provide continuity
to the membrane.
6. Install tiles on cementitious
(dark) side of membrane with
ANSI A118.4 latex-modified
Portland cement mortar or ANSI
A136.1 Type 1 organic adhesive. Determine correct
trowel size based on tile material and size to achieve at least
95% coverage of the average
tile contact area.
7. After tile installation, do not
walk on floor for at least 48
hours unless walking boards
or plywood sheets are used, as
per current TCNA Handbook for
Ceramic Tile Installation.
8. Select, prepare and install ANSI
A118.7 latex-modified or ANSI
A118.8 modified epoxy emulsion grout per grout manufacturer recommendations.
5. Allow membrane adhesive to
cure sufficiently (minimum
2 hours for
Durock tile membrane adhesive, minimum
4 hours for Type 1 organic
adhesive or 8 hours for latexmodified thin-set mortar).
5
Page 6

Installation of
Flashing
If flashing is required:
1. Cut 39-49 strip from end of
Durock tile membrane roll.
Pre-crease the material in
half lengthwise, with half to
be adhered to the floor and
half to the vertical surface.
Install all corner pieces first,
then fill in between corners
around the perimeter as
necessary.
2. Apply Durock tile membrane
adhesive with a 3/89-nap paint
roller or a 1/169 U-notch
trowel; apply Type 1 organic
adhesive or latex-modified
thin-set mortar with a 1/169
U-notch trowel.
Use the trowel’s smooth edge
to fully embed the material.
4. For inside corners, provide a
relief cut, but place adhesive
where the membrane folds
over itself to ensure a waterdurable connection. Overlap
butt joints by 1-1/29 and
use the mastic to ensure a
water-durable connection.
Apply adhesive to the vertical
and horizontal legs of the butt
joint. Work the material carefully into position and smooth
out, using the flat edge of
the trowel.
3. Install membrane with the
cementitious side out. For
outside corners, make a relief
cut and press into adhesive.
5. Allow membrane to cure
adequately before setting tile.
6
Page 7

Product Information
See usg.com for the most
up-to-date product information.
Trademarks
The following trademark used
herein is owned by United
States Gypsum Company:
Durock, uSG, uSG in stylized letters.
Notice
We shall not be liable for
incidental and consequential
damages, directly or indirectly
sustained, nor for any loss
caused by application of these
goods not in accordance with
current printed instructions
or for other than the intended
use. Our liability is expressly
limited to replacement of
defective goods. Any claim
shall be deemed waived unless
made in writing to us within
thirty (30) days from date it
was or reasonably should have
been discovered.
Safety First!
Follow good safety and industrial hygiene practices during
handling and installation of all
products and systems. Take
necessary precautions and
wear the appropriate personal
protective equipment as
needed. Read material safety
data sheets and related literature on products before specification and/or installation.
For warranty or product
information and literature:
800 USG.4YOU (874.4968)
usg.com
durocktilemembrane.com
United States
Gypsum Company
550 West Adams Street
Chicago, IL 60661
CB493/rev. 10-11
© 2011, United States Gypsum Company
Printed in U.S.A.
 Loading...