

Page 1
Planning and
Installation
Guide
Tools and Materials Needed
Crosscut hand saw
or finishing saw
Coping saw
Straightedge
Carpenter’s square
Tape measure
Chalk line
Utility knife
Staple gun—trigger
type
Staple—9/16 leg
Ceiling tile adhesive
Putty knife
Paint brush
Hammer and 8d
coated box nails
USG
Ceilings
™
Choose the Right USG CEILINGS tiles are easy to install. The 12 x 12 tiles feature exclusive, self-aligning tongue-and-groove edges, giving the installed
Installation Method
ceiling a finished appearance. For most applications, tiles are stapled to 1 x 3 furring strips that are attached to the ceiling or
to joists.
If you have: Painted ceilings—If paint and ceiling are in good condition, USG CEILINGS tiles can be adhered to the paint after roughening the surface with
sandpaper. Use any good-quality ceiling tile adhesive and follow manufacturer’s recommendations. If paint is peeling, furring strips
should be installed before tile application.
Cracked ceiling surface—If cracks are minor, follow directions for painted ceilings. If cracks are bad, nail furring strips to joists, then staple
or nail ceiling tile to strips.
Open joists—Attach furring strips to exposed joists, then staple or nail ceiling tile to strips.
Old wallpaper—Remove paper carefully and adhere tile to old ceiling. If paper and ceiling are not sound, nail furring strips through ceiling
surface into the joists, then apply tiles.
New ceilings—Clean surface carefully to remove dirt and dust, then apply USG CEILINGS tiles with adhesive.
Planning a
1 Draw the room to scale
—Use the graph sheet printed below. Choose a convenient scale, like one square equals one foot. For large spaces,
staple-up ceiling
use one square for every four feet. Measure around all walls at ceiling level, including any irregular areas like bays, alcoves, columns,
installation
beams and stairwells. Note each dimension on the drawing.
2 Locate room centerlines on the ceiling plan
—Draw centerlines and determine distance from each centerline to the wall.
3 Adjust centerlines as necessary to eliminate narrow borders
—The wider the border tiles, the better the ceiling appearance. For example,
for a 126 x 186 ceiling, counting tiles from the exact center of the room in both directions would result in 12 rows of tile in one direction
and 18 in the other, with narrow, 3 borders. By moving both centerlines 6, you can create wider, more attractive borders. There are now 11
tile rows in one direction and 17 in the other, with 9 wide borders.
Estimating
1 Ceiling tile
—Count the full-size tiles in the layout. Also determine how many extra whole tiles will be needed to meet partial or perimeter
Materials
needs
.
2 1x3 furring strips
—Furring strips should run perpendicular to ceiling joists. The first strip should be flush against the wall. The second
strip should be at a distance equal to the border tile plus 3/8. Furring strips then continue across the ceiling at 12 o.c. Draw the furring
strips on the graph and count how many you need.
Important:
Use only seasoned kiln-dried softwood to avoid warping. Store in installation area for 24 hours before nailing.
Estimating
Ceiling
System
Staple-up
System
Page 2
L
C
L
C
1/2"
1/2"
1/2"
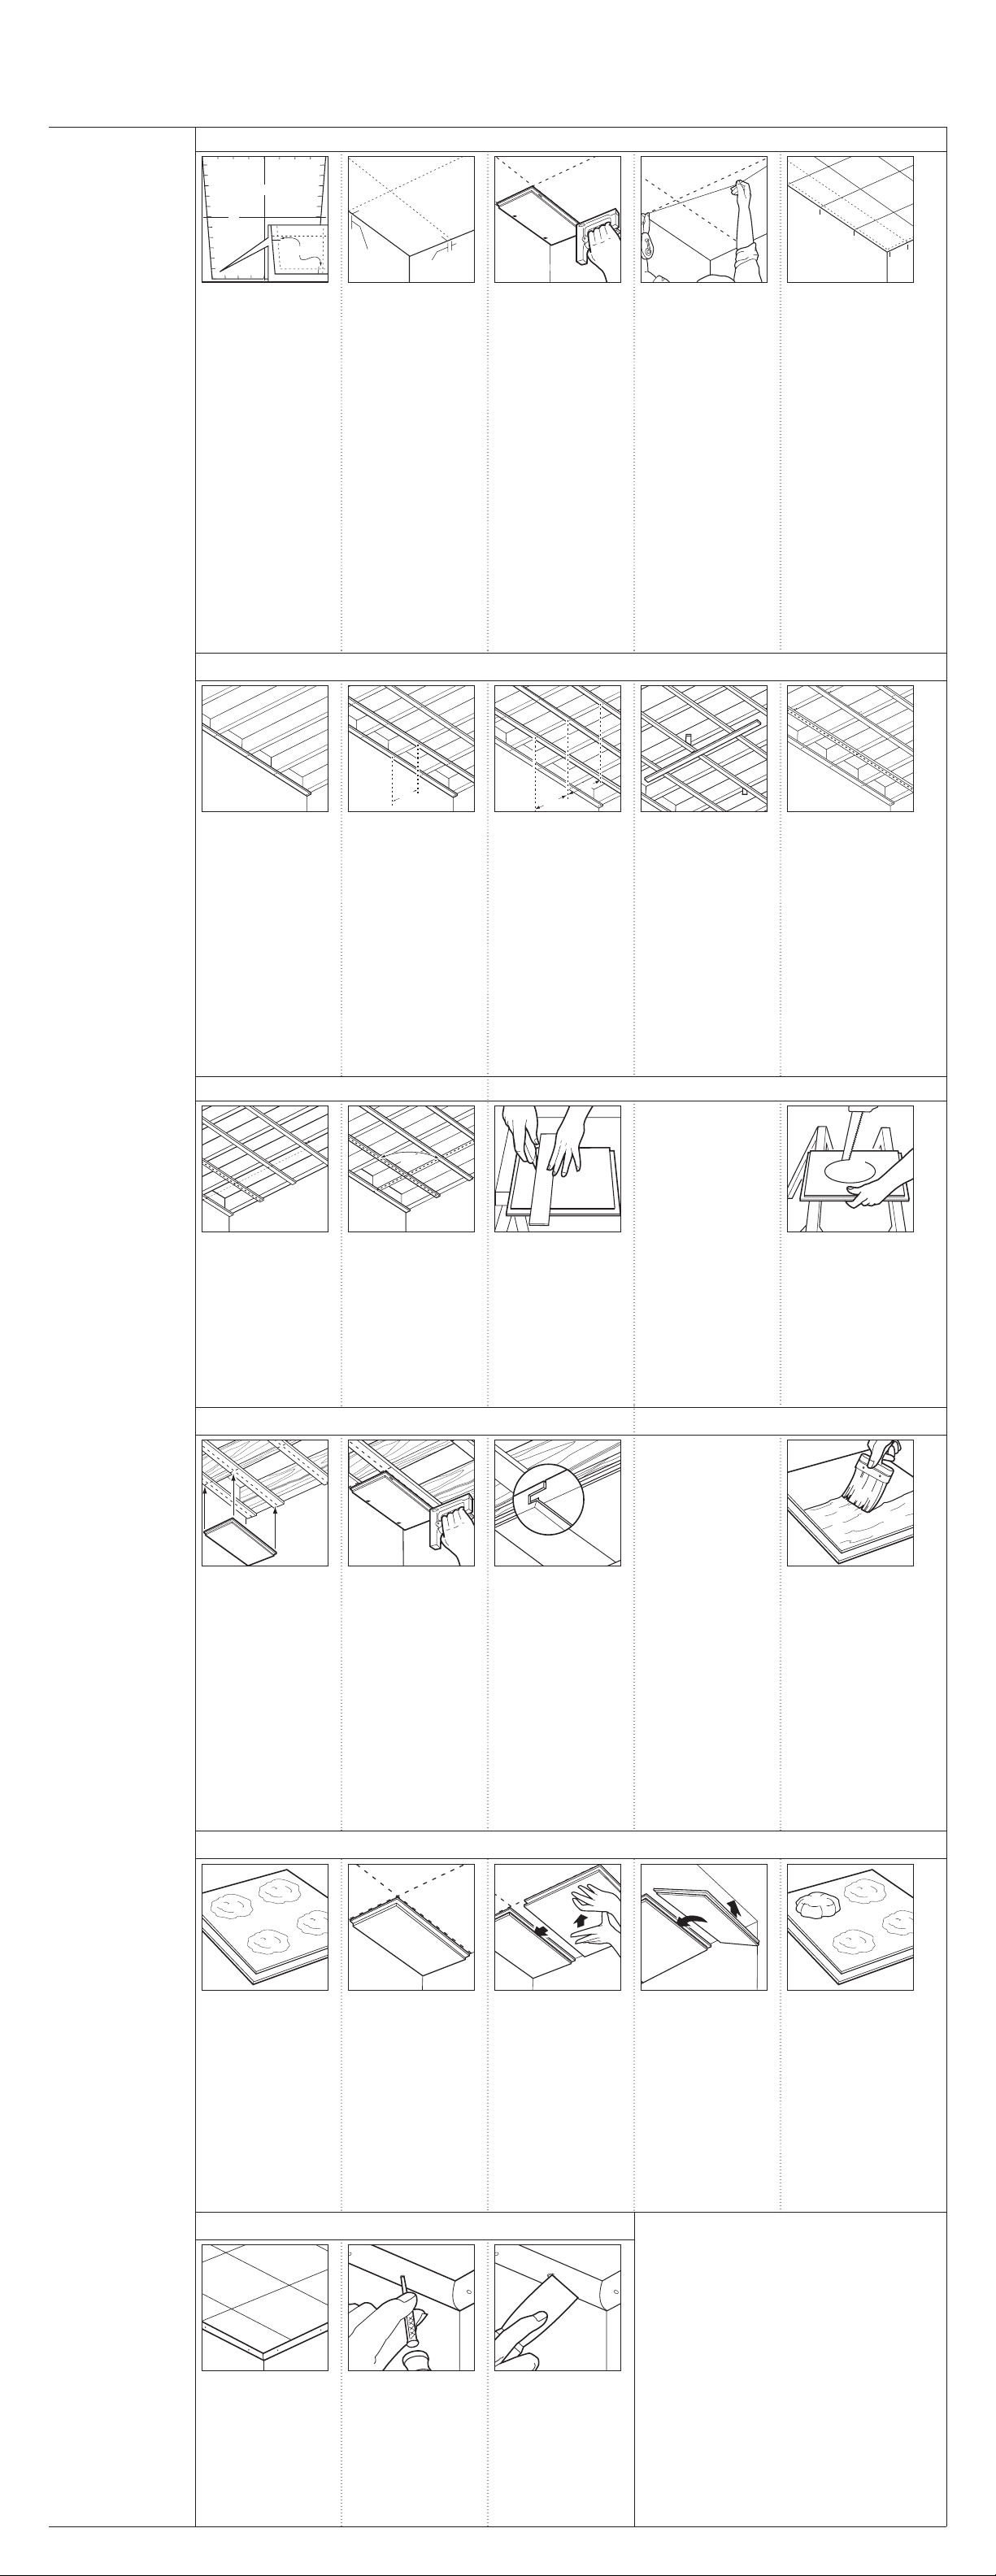
Locate and Mark Guidelines
9 3/8"
12"
12"
Attach Furring Strips
Cut Tile
1 Mark centerlines. Mark
ends of actual or adjusted centerlines on ceiling
perimeter.
Important:
Because you need to
compensate for the width
of the stapling flange, do
not snap chalk lines at
the centerlines. Instead,
determine the starting
corner for your installation. Then, to compensate for the width of stapling flange, re-mark the
centerlines an additional
1/2 away from the starting corner. Snap chalk
lines at these adjusted
positions.
2 Locate guidelines for
the starting corner. To
locate the position of the
guidelines for the two
border rows that meet at
the starting corner, add
1/2 to the width of the
border tiles, as determined by the layout.
Then mark the total distance along the starting
edges of the ceiling.
Stapling flanges will align
on chalk lines, and the
face of tile will be correctly positioned when
work reaches the center
of the room.
6 Mark border tile.
Measure out from the
adjacent wall the length
of the border tile plus
3/8. Mark this point on
the second furring strip.
Snap a chalk line at this
point across the faces of
the furring strips.
7 Check chalk lines.
Make sure that the chalk
lines at the starting corner intersect at exactly
90 degrees.
3 Make sure guidelines
are parallel to centerline.
Snap a chalk line to
make these starting
guidelines.
4 Locate center and border guidelines. If you are
installing furring strips,
mark the position of the
center and border guidelines on the wall, about
1 below the ceiling.
After the furring strips
are installed, snap chalk
lines across the faces of
the strips.
1 Nail the first strip.
Always install furring
strips perpendicular to
ceiling joists. Nail the
first furring strip flush
against the wall. Use two
8d nails at each joist
crossing.
2 Nail the second strip.
Position the second furring strip so that the center of the strip is at a
distance from the wall
equal to the width of the
border tile plus 3/8. For
example, if the border tile
width is 9”, the center of
the furring strip should
be 9-3/8 from the wall.
3 Continue to install
strips across the ceiling,
12 on center. On center,
or o.c., is distance
between the center of
one strip to the center of
the next. Stagger strips
where possible so that
ends do not line up on
the same joist. Furring
strips should always butt
together in the center of
a joist, and never in the
space between joists.
90
0
USG Corporation
Manufactured by USG Interiors, Inc.
125 South Franklin Street
Chicago, Illinois 60606
(800) USG-4YOU (874-4968)
http://www.usg.com
WL1004/8-02
©2002, USG Interiors, Inc.
Printed in U.S.A.
Install Your Tile
Ceiling, Step by
Step
4 Make sure strips are
level. Use a long straight
edge to make sure furring strips are level. Use
wood shims, where necessary, to level.
5 Mark starting corner.
Select your starting corner by snapping a chalk
line down the middle of
the furring strip (width of
the border tile plus 3/8).
1 For border rows. Use a
saw to cut tiles as work
progresses. Always measure dimensions of border tiles on the face side
of the tiles. Cut excess
material from tongue
edge of tile for the two
starting border tiles. Cut
excess material from the
flange edge for the two
finishing rows.
Important: Walls are
rarely perfectly square,
so border tiles may have
to vary slightly in size to
accommodate imperfections. Measure for each
border tile before cutting.
2 For openings in ceiling.
Use a coping saw for
cuts at light fixtures,
pipes, columns, etc.
Cut excess material at
tongue edge of tile. Cut
tile to accommodate light
fixtures, pipes, etc.
Attach Tile with Staples
1 Position the first tiles.
Place first border tile in
starting corner with stapling flanges toward center of room. Align it and
succeeding border tiles
on chalk line that has
been snapped on face of
furring strips. Do not
align on wall/ceiling
angle, since wall may not
be straight.
2 Staple the tiles. Hold
tile in place and fasten
with trigger-type automatic stapler. Drive four
staples through the
flanges of each tile as
shown here. Face-nail
wall edges of border tiles
with 1-1/8 13-ga. blue
plasterboard nails with
5/16 heads, driven
close to the wall so that
molding will cover nailheads.
When applying tiles, be
certain the tongue-andgroove edges are snugly
fitted, but not forced
together.
Before beginning work,
check painted surfaces
for compatibility with
adhesive. Use a goodquality ceiling tile adhesive and follow the
manufacturer’s directions.
1 Prime tile. Priming
ensures good bond
between back of tile and
adhesive. Use a brush to
wipe a thin coat of primer
over the back of the tile.
Attach Tile with Adhesives
2 Apply adhesive. Keep
adhesive 2-2-1/2 from
edge of tile. Then apply
golfball-sized daubs of
adhesive to the spots on
the tile. Never apply
adhesive to the ceiling.
3 Attach the first tile.
Place first border tile in
starting corner with
flanges toward center of
room. Press firmly
upward, compressing
adhesive until tile back is
1/4-1/8 from ceiling.
Adjust until tile face is
level and edges are
aligned on guidelines.
4 Attach the second tile.
Put adhesive on tile.
Place tile gently against
ceiling, about 1/2 from
first tile. Press firmly
upward and slide toward
the first tile until edges
are fully engaged and tile
is level. Repeat until ceiling is covered, except for
tiles in finishing rows.
5 Install finishing rows.
Apply adhesive to back of
cut tile, then lightly
engage tongue-andgroove edges and press
tile upwards in a hinging
motion. Do not slide tile
horizontally between preceding row and the wall.
Important: On uneven
surfaces increase the
thickness of the adhesive
to compensate for the low
areas, so that the joints
and surfaces of tile will
be level. Also, if a tile is in
final position and is
noticeably below the level
of the adjoining one,
remove it and add more
adhesive. Never pull tile
away from the base to
create a level joint or surface.
Attach Tile with Adhesive
Finish the Ceiling
Finish ceiling with molding to conceal the border
nailheads and give a finished appearance.
Attach molding with finishing nails driven into
studs, not into furring
strips.
Countersink nails and
finish with a putty stick.
Trademarks
The following trademarks used
herein are owned by USG corporation or its subsidiaries: USG C
EILINGS
Safety First!
Follow good safety and industrial
hygiene practices during handling
and installing of all products and
systems. Take necessary precautions and wear the appropriate
personal protective equipment as
needed. Read material safety data
sheets and related literature on
products before specification and/or
installation.
 Loading...